

Page 1
GENERAL SAFETY RULES - FOR ALL BATTERY OPERATED TOOLS
WA R N I N G ! READ AN D UN DER STAND ALL INS TRUCTIO NS. Fai lure to follow all
instructions listed below, may result in electric shock, fire and/or serious personal injury
S A VE THESE INSTRUCTIONS
Work Are a
• K eep yo ur wor k area cl ean and well li t. Clutt ered b enches an d d ark areas invite
a c c i d e n t s .
• Do not operate po wer tools in explosive atmospheres, such as in the presen ce of
flammable liquids, gases, or dust. Power tools create sparks which may ignite the dust or
f u m e s .
• Keep bystanders, children, and visitors away while operating a power tool. D i s t r a c t i o n s
can cause you to lose control.
Electrical Safety
• Do not abuse the cord. Never use the cord to carry the tool. Keep cord away fro m
hea t, oil , shar p edges or mov ing pa rts. R epl ace da maged co rds immed iately.
Damaged cords may create a fire.
• A battery operated t ool with integral batteries or a separate battery pack must be
recharged only with the specified charger for the battery. Acharger that may be suitable
for one type of battery may create a risk of fire when used with another battery.
• Use battery operated tool only with specifically designated battery pack. Use of any
other batteries may create a risk of fire.
Personal Safety
• Stay alert, watch what you are doing and use common sense when operating a power
tool. Do n ot us e tool while tired or un der t he in fluenc e o f dru gs, alcoh ol, o r
m e d i c a t i o n . A moment of inattention while o perating power tools may r esult in serious
personal injury,
• D ress pro p e r l y. Do not wear loose clothing or jewelry. Contain long hair. Keep your
h a i r, clothing , and gloves away from moving parts. Loose clothes, jewelry, or long hair
can be caught in moving parts. Air vents cover moving parts and should be avoided.
• Avoid accidental star ting . Be sure switch is in the locke d or off position before
inserting battery pack. Carrying tools with your finger on the switch or inserting the battery
pack into a tool with the switch on invites accidents.
• Remove adjusting keys or wrenches before turning the tool on. Awrench or a key that is
left attached to a rotating part of the tool may result in personal injury.
• Do not overre a c h . Keep proper footing and balance at all times. Proper footing and
balance enable better control of the tool in unexpected situations.
• Use safety equipment. Always wear eye pro t e c t i o n . Dust mask, non-skid safety shoes,
hard hat, or hearing protection must be used for appropriate conditions.
Tool Use and Care
• Use clamps or other practical way to secure and support the workpiece to a stable
p l a t f o r m . Holding the work by hand or against your body is unstable and may lead to loss of
c o n t r o l .
• Do not force tool. Use the correct tool for your application. The correct tool will do the
job better and safer at the rate for which it is designed.
• Do not use tool if switch does not turn it on or off .A tool that cannot be controlled with the
switch is dangerous and must be repaired.
• Disconnect battery pack from tool or place the switch in the locked or off position
b e f o r e making any adjustme nts, changing accesso ries, or storing the tool. S u c h
preventative safety measures reduce the risk of starting the tool accidentally.
• S t o r e idle tools out of reac h of child ren and other untra ine d pe rsons. Tools a re
dangerous in the hands of untrained users.
• When battery pack is not in use, keep it away from other metal objects like: paper
cli ps, co ins , keys , nail s, scr ews or other small me tal objec ts that can mak e a
connection from one termin al to another. Shorting the battery terminals together may
cause sparks, burns, or a fire.
• Maintain tools with care. Keep cutting tools sharp and clean. Properly maintained tools,
with sharp cutting edge are less likely to bind and are easier to control.
• Check for misalignment or binding of moving parts, breakage of parts, and any other
condition that may affect the tool’s operation. If damaged, have the tool serviced
b e f o re using.Many accidents are caused by poorly maintained tools.
• Use only accessories that are recommend ed by the manufacturer for your model.
Accessories that may be suitable for one tool may create a risk of injury w hen used on
another tool.
S e r v i c e
• Too l serv ice mu st be performe d only by qual ified rep air personn el. Service or
maintenance performed by unqualified personnel may result in a risk of injury.
• When servicing a tool, use only identical replacement parts. Follow instructions in the
Maintenance sec tion of this manual. Use of unau thorized parts or failu re to fo llow
Maintenance Instructions may create a risk of shock or injury.
Specific Safety Rules
• Hold tool by insulat ed gripping surfaces when performing an operation where the
cutting tool may contact hidden wiring or its own cord . Contact with a "live" wire will also
make exposed metal parts of the tool "live" and shock the operator.
• When working on a ladder or on scaffolding be sure to lay the tool down on its side
when not in use. Some tools with large battery packs will stand upright but may be easily
knocked over.
WA R N I N G : Some dust created by power sanding, sawing, grinding, drilling, and
other construction activities contains chemicals known to cause cancer, birth
defects or other re p roductive harm. Some examples of these chemicals are :
• lead from lead-based paints,
• crystalline silica from bricks and cement and other masonry products, and
• arsenic and chromium from chemically-treated lumber (CCA).
Your risk from these exposures varies, depending on how often you do this type of work. To
reduce you r exposure to these chemical s: work in a well ventilated area, and work with
approved safety equipment, such as those dust masks that are specially designed to filter
out microscopic particles.
• Avoid prolonged contact with dust from power sanding, sawing, grinding, drilling, and
other construction activities. Wear protective clothing and wash exposed areas with
soap and water. Allowing dust to get into your mouth, eyes, or lay on the skin may promote
absorption of harmful chemicals.
WARNING: Use of this tool can generate and/or disperse dust, which may cause serious
and permanent respiratory or other injury. Always use NIOSH/OSHA approved respiratory
protection appropriate for the dust exposure. Direct particles away from face and body.
The label on your tool may include the following symbols.
V ..........................volts A..........................amperes
Hz ........................hertz W ........................watts
min ........................minutes ......................alternating current
......................direct current
n
o........................no load speed
..........................
Class II Construction
........................earthing terminal
........................safety alert symbol .../min ..................revolutions or
reciprocations per minute
BATTERY CAP INFORMATION
Battery storage and carrying caps are provided for use whenever the battery is out of the
tool or charger. Remove cap before placing battery in charger or tool.
WARNING: Do not store or carry battery so that metal objects can contact exposed
battery terminals. For example, do not place battery in aprons, pockets, tool boxes,
product kit boxes, drawers, etc. with loose nails, screws, keys, etc. without battery cap.
Transporting batteries can possibly cause fires if the battery terminals inadvertently come
in contact with conductive materials such as keys, coins, hand tools and the like. The US
Department of Transportation Hazardous Material Regulations (HMR) actually prohibit
transporting batteries in commerce or on airplanes (i.e. packed in suitcases and carryon
luggage) UNLESS they are properly protected from short circuits. So when transporting
individual batteries, make sure that the battery terminals are protected and well insulated
from materials that could contact them and cause a short circuit.
Safety Warnings and Instructions: Charging the Battery
1. This manual contains important safety and operating instructions.
2. Before using battery charger, read all instructions and cautionary markings on (1) battery
charger, (2) battery, and (3) product using battery.
3. CAUTION: To reduce the risk of injury, charge only Black & Decker Power Packs.
Other types of batteries may burst causing personal injury and damage.
4. Do not expose charger to rain or snow.
5. Use of an attachment not recommended or sold by Black & Decker may result in a risk of
fire, electric shock, or injury to persons.
6. To reduce risk of damage to electric plug and cord, pull by plug rather than cord when
disconnecting charger.
7. Make sure cord is located so that it will not be stepped on, tripped over, or otherwise
subjected to damage or stress.
8. An extension cord should not be used unless absolutely necessary. Use of improper
extension cord could result in a risk of fire, electric shock or electrocution.
a. Two-wire cords can be used with 2-wire or 3-wire extension cords. Only round jacketed
extension cords should be used, and we recommend that they be listed by Underwriters
Laboratories (U.L.). If the extension is to be used outside, the cord must be suitable for
outdoor use. Any cord marked for outdoor use can also be used for indoor work. The
letters "W" or "WA" on the cord jacket indicate that the cord is suitable for outdoor use.
b. An extension cord must have adequate wire size (AWG or American Wire Gauge) for
safety, and to prevent loss of power and overheating. The smaller the gauge number of
the wire, the greater the capacity of the cable; that is, 16 gauge has more capacity than
18 gauge. When using more than one extension to make up the total length, be sure each
extension contains at least the minimum wire size.
C H A RT FOR MINIMUM WIRE SIZE (AWG)OF EXTENSION CORDS
N A M E P L ATE RATING AMPS – 0 – 10.0
Total Extension Cord Length (ft) 2 5 5 0 7 5 1 0 0 125 150
Wire Gauge 1 8 1 8 1 6 1 6 14 14
9. Use only the supplied charger when charging your drill. The use of any other charger
could damage the drill or create a hazardous condition.
VEA EL ESPAÑOL EN LA CONTRAPORTADA.
S AVE THIS MANUAL FOR FUTURE REFERENCE.
INSTRUCTIVO D E OPERACIÓN, CENTROS DE SERVICIO Y
P Ó L I Z A DE GA RANT ÍA. A D V E RT ENCIA : LÉ ASE EST E
INSTRUCTIVO ANTES DE USAR EL P R O D U C TO.
A
Depress for reverse (this side)
Enfoncer pour la marche arrière (du
côté gauche)
Oprima para reversa (desde el lado
izquierdo)
Cat. Nos. CD1200S, CD1800SB, CD9600SB Form No. 90504127 (APR.-06)
Copyright©2006 Black & Decker Printed in China
Torque Adjust Collar
collier de réglage du couple
collarÍn de ajuste de par (torque)
Depress for forward (other side)
Enfoncer pour la marche avant (du côté droit)
Oprima para marcha hacia adelante (desde el
lado derecho)
Center “OFF”
position
Position
«ARRÊT»
centrale
Posición central
“APAGADO”
INSTRUCTION MANUAL
Catalog Nos. CD1200S, CD1800SB, CD9600SB
• Cha rge ba ttery f or 9 hours bef ore first use . Fo r mo re inf or mati on s ee
“ C H A R G I N G T H E P O W E R PA C K ” .
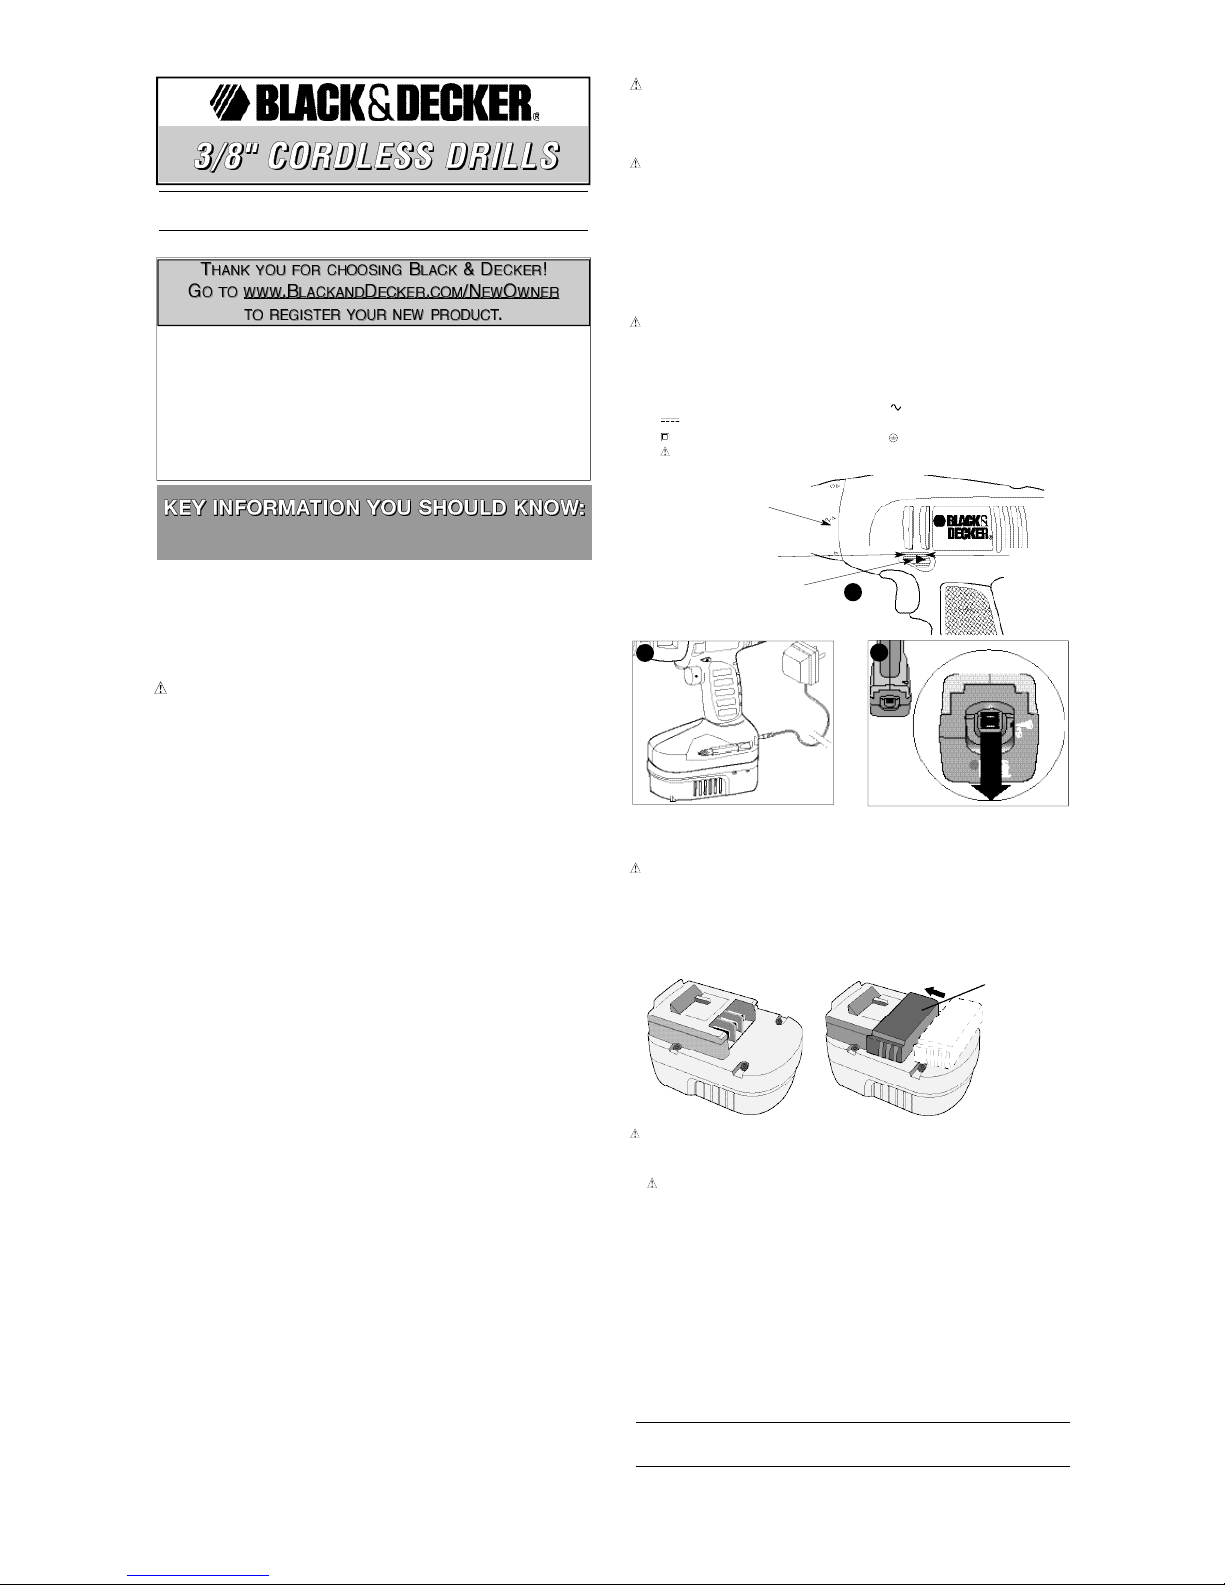
Battery Cap
BEFORE RETURNING THIS PRODUCT
FOR ANY REASON PLEASE CALL
1-800-544-6986
BEFORE YOU CALL, HAVE THE CATALOG No. AND DATE CODE AVA I L A B L E. IN MOST CASES, A
BLACK & DECKER R E P R E S E N TATIVE CAN RESOLVE THE PROBLEM OVER THE PHONE. IF
YOU HAVE A SUGGESTION OR COMMENT, GIVE US A CALL. YOUR FEEDBACK IS VITA L TO
BLACK & DECKER.
1
2
Page 2

10. Use only one charger when charging.
11. Do not attempt to open the charger or the drill. There are no customer serviceable parts
inside. Return to any authorized Black & Decker service center.
12. DO NOT incinerate the drill or battery packs even if they are severely damaged or
completely worn out. The batteries can explode in a fire.
13. Do not incinerate the batteries. They can explode in a fire. Asmall leakage of liquid from
the battery cells may occur under extreme usage, charging or temperature conditions.
This does not indicate a failure. However, if the outer seal is broken and this leakage gets
on your skin:
a. Wash quickly with soap and water.
b. Neutralize with a mild acid such as lemon juice or vinegar.
c. If the battery liquid gets in your eyes, flush them with clean water for a minimum of 10
minutes and seek immediate medical attention. MEDICAL NOTE: The liquid is a 25-35%
solution of potassium hydroxide.
Charging the Power Pack
THE BATTERIES IN YOUR POWER PACK ARE NOTF U L L Y CHARGED ATT H E
FA C TO R Y. BEFORE ATTEMPTING TO CHARGE THEM, T H O R O U G H LY READ A L L O F
THE SAFETY I N S T R U C T I O N S .
The charger is designed to use standard household 120 volt 60 Hz power.
1. Make sure the battery is fitted properly into the drill. Insert the charger plug into the
connector as shown in Figure 1.
2. Plug the charger into any standard 120 Volt 60 Hz electrical outlet and let the battery
charge initially for 9 hours. After the initial charge, under normal usage, your power
pack should be fully charged in 3 to 6 hours.
3. Disconnect the charger from the outlet, then disconnect the charger from the tool.
WARNING: Do not use the tool while it is connected to the charger.
NOTE: To remove the battery from the drill, press down on the release button on the back
of the battery (Figure 2) and slide out.
I M P O RTANT CHARGING NOTES
1. After normal usage, your power pack should be fully charged in 3 to 6 hours. If the power
pack is run-down completely, it may take up to 6 hours to become fully charged. Your
power pack was sent from the factory in an uncharged condition. Before attempting to
use it, it must be charged for at least 9 hours.
2. DO NOT charge the power pack in an air temperature below 40°F or above 105°F. This
is important and will prevent serious damage to the power pack. Longest life and best
performance can be obtained if power pack is charged when air temperature is about
75°F.
3. While charging, the charger may hum and become warm to touch. This is a normal
condition and does not indicate a problem.
4. If the power pack does not charge properly—(1) Check current at receptacle by plugging
in a lamp or other appliance. (2) Check to see if receptacle is connected to a light switch
which turns power off when you turn out the lights. (3) Move charger and power pack to
a surrounding air temperature of 40°F to 105°F. (4) If the receptacle and temperature are
OK, and you do not get proper charging, take or send the power pack and charger to your
local Black & Decker service center. See Tools Electric in yellow pages.
5. The power pack should be recharged when it fails to produce sufficient power on jobs
which were easily done previously. DO NOT CONTINUE using product with its power
pack in a depleted condition.
6. To prolong power pack life, avoid leaving the power pack on charge for extended periods
of time (over 30 days without use). Although overcharging is not a safety concern, it can
significantly reduce overall power pack life.
7. When the battery is inserted into the charger, the red “Charging Indicator” light will come
on indicating that there is contact between the battery and charger. The light will stay on
as long as the battery is in the charger and the charger is plugged into a working outlet. It
W I L L N O T flas h, go out or ch ange t o a differ ent color wh en the charging cycle is
complete.
8. The power pack will reach optimum performance after being cycled 5 times during normal
usage. There is no need to run the batteries down completely before recharging. Normal
usage is the best method of discharging and recharging the batteries.
Safety Warnings and Instructions: Drills
1. Do not lock the tool ON when drilling by hand. Refer to Operating Instructions-Switch.
2. Hold drill firmly to control the twisting action of the drill.
3. When attaching accessories in the drill chuck, hand tighten the keyless chuck firmly
WARNING: D rill may stall (if overloaded or improperly used) causing a twist. A l w a y s
expect the stall.Grip the drill firmly to control the twisting action and prevent loss of control
which could cause personal injury. If a stall does occur, release the trigger immediately and
determine the reason for the stall before re-starting.
S AVE THIS MANUAL FOR FUTURE REFERENCE.
OPERATING INSTRUCTIONS
Switch and Control Button
A forward/reverse control button determines the direction of the tool and also serves as a
lock off button (Fig. A). To select forward rotation, release the trigger switch and depress the
forw ard/rev erse co ntrol b utton as shown in Fig ure A. To se lec t re verse, depress th e
forward/ reverse control button the opposite direc tion. Th e center position of the control
button locks the tool in the off position. When changing the position of the control button, be
sure the trigger is released. NOTE: The first time tool is run after changing direction of
rotation, you may hear a click on start up. This is normal and does not indicate a problem.
Torque Control
This tool is fitted with a collar to select the operating mode and to set the torque for tightening
screws. Large screws and hard workpiece materials requ ire a higher torque setting than
small screws and soft workpiece materials.
• For drilling in wood, metal and plastics, set the collar to the drilling position symbol .
• For screwdriving, set the collar to the desired setting. If you do not yet know the
appropriate setting, proceed as follows:
• Set the collar to the lowest torque setting.
• Tighten the first screw.
• If the clutch ratchets before the desired result is achieved, increase the collar setting and
continue tightening the screw. Repeat until you reach the correct setting. Use this setting
for the remaining screws.
Keyless Chuck Operation
To attach accessories, grasp the rear half of the chuck with one hand and use your other
hand to rot ate the fr ont hal f in the count erclockwis e d irection. Insert the bit or other
accessory fully into the chuck, and tighten securely by holding the rear half of the chuck and
rotating the front portion in the clockwise direction as viewed from the chuck end.
Drilling
• Use sharp drill bits only.
• Support and secure work properly, as instructed in the Safety Instructions.
• Use appropriate and required safety equipment, as instructed in the safety instructions.
• Secure and maintain work area, as instructed in the safety instructions.
• Run the drill very slowly, using light pressure, until the hole is started enough to keep the
drill bit from slipping out of it.
• Apply pressure in a straight line with the bit. Use enough pressure to keep the bit biting
but not so much as to stall the motor or deflect the bit.
• Hold the drill firmly to control its twisting action.
• DO NOT CLICK THE TRIGGER OF A STALLED DRILL OFF AND ON IN AN ATTEMPT
TO START IT. DAMAGE TO THE DRILL CAN RESULT.
• Minimize stalling on breakthrough by reducing pressure and slowly drilling through last
part of hole.
• Keep the motor running while pulling the bit out of a drilled hole This will help reduce
jamming.
• Use a cutting lubricant when drilling metals. The exceptions are cast iron and brass which
should be drilled dry. Lubricants that work best are sulphurized cutting oil or lard oil.
• When using twist drill bits to drill holes in wood, it will be necessary to pull the bits out
frequently to clear chips from the flutes.
• Make sure switch turns drill on and off.
WA R N I N G : It is important to support work properly and to hold the drill firmly to prevent
loss of control which could cause personal injury If you have questions on how to operate
tool, call: 1-800-54-HOW-TO (544-6986).
DRILLING IN WOOD
Holes in wood can be made with the same twist drill bits used for metal or with spade bits.
These bits should be sharp and should be pulled out frequently when drilling to clear chips
from the flutes.
DRILLING IN META L
Use a cutting lubricant when drilling metals. The exceptions are cast iron and brass which
should be drilled dry. The cutting lubricants that work best are sulfurized cutting oil or lard oil.
DRILLING IN MASONRY
Use carbide tipped masonry bits. Refer to Drilling section. Keep even force on the drill but
not so much that you crack the brittle material. A smooth, even flow of dust indicates the
proper drilling rate.
TROUBLESHOOTING
P r o b l e m Possible Cause Possible Solution
• Unit will not start. • Battery not charged. • Check battery charging
r e q u i r e m e n t s .
• Battery will not charge. • Charger not plugged in. • Plug charger into a working
outlet. Refer to “Important
Charging Notes” for more
d e t a i l s .
• Check current at receptacle
by plugging in a lamp or
other appliance.
• Check to see if receptacle
is connected to a light
switch which turns power off
when you turn out the lights.
• Surrounding air temperature • Move charger and tool to a
too hot or too cold. surrounding air temperature
of above 40 degree F(4 , 5°C )
or below 105 degree F
(+ 4 0 , 5°C ).
For assistance with your product, visit our website www.blackanddecker.com for the
location of the service center nearest you or call the BLACK & DECKER help line at
1-800-544-6986.
MAINTENANCE
Use only mild soap and damp cloth to clean the tool. Never let any liquid get inside the tool;
never immerse any part of the tool into a liquid. I M P O R TA N T: To assure product SAFETY
and RELIABILITY, repairs, maintenance and adjustment should be performed by authorized
service centers or other qualified service organizations, always using identical replacement
p a r t s .
THE RBRC™ SEAL
The RBRC™ (Rechargeable Battery Recycling Corporation) Seal on the nickelcadmium battery (or battery pack) indicates that the costs to recycle the battery (or battery
pack) at the end of its useful life have already been paid by Black & Decker. In some areas, it
is illegal to place spent nickel-cadmium batteries in the trash or municipal solid waste stream
and the RBRC program provides an environmentally conscious alternative.
RBRC in cooperation with Black & Decker and other battery users, has established
programs in the United States and Canada to facilitate the collection of spent nickelcadmium batteries. Help protect our environment and conserve natural resources by
returning the spent nickel-cadmium battery to an authorized Black & Decker service center
or to your local retailer for recycling. You may also contact your local recycling center for
information on where to drop off the spent battery, or call 1 - 8 0 0 - 8 - B AT T E R Y.
Accessories
Recommended accessories for use with your tool are available from your local dealer or
authoriz ed service cent er. If you need assistance r egarding accessorie s, pleas e c all:
1-800-54-HOW-TO (544-6986). The following accessories should be used only in the sizes
specified below: BITS, META L DRILLING – Up to 3/8" (9.5mm); BITS, MASONRYD R I L L I N G
– Up to 3/8" (9.5mm); WOOD DRILLING – Up to 1/2" (12.7mm).
WA R N I N G : The use of any accessory not recommended for use with this tool could be
h a z a r d o u s .
S E RVICE INFORMAT I O N
All Black & Decker Service Centers are staffed with trained personnel to provide customers
with efficient and reliable power tool service. Whether you need technical advice, repair, or
genuine factory replacement parts, contact the Black & Decker location nearest you. To find
your local service location, refer to the yellow page directory under "Tools—Electric" or call:
1-800-544-6986 or visit www. b l a c k a n d d e c k e r . c o m
FULL TWO-YEAR HOME USE WARRANTY
Black & Decker (U.S.) Inc. warrants this product for two years against any defects in material
or workmanship. The defective product will be replaced or repaired at no charge in either of
two ways.
The first, which will result in exchanges only, is to return the product to the retailer from
whom it was purchased (provided that the store is a participating retailer). Returns should be
made within the time period of the retailer’s policy for exchanges (usually 30 to 90 days after
the sale). Proof of purchase may be required. Please check with the retailer for their specific
return policy regarding returns that are beyond the time set for exchanges.
The second option is to take or send the product (prepaid) to a Black & Decker owned or
authorized Service Center for repair or replacement at our option. Proof of purchase may be
required.Black & Decker owned and authorized Service Centers are listed under
" Tools-Electric" in the yellow pages of the phone directory.
This warranty does not apply to accessories. This warranty gives you specific legal rights
and you may have other rights which vary from state to state or province to province. Should
you have any questions, contact the manager of your nearest Black & Decker Service
C e n t e r. This product is not intended for commercial use.
FREE WARNING LABEL REPLACEMENT: If your warning labels become illegible or are
missing, call 1-800-544-6986 for a free replacement.
See ‘Tools-Electric’
– Yellow Pages –
for Service & Sales
Imported by
Black & Decker (U.S.) Inc.,
701 E. Joppa Rd.
Towson, MD 21286 U.S.A.
Page 3
IMPORTANTES MESURES DE SÉCURITÉ - POUR TOUS LES OUTILS
ALIMENTÉS PAR PILES
AV E RT I S S E M E N T ! LIRE ET COMPRENDRE TOUTES LES DIRECTIVES. L e
non-respect de toutes les directives suivantes présente des risques de secousses
électriques, d’incendie ou de blessures graves.
CONSERVER CES MESURES.
Zone de travail
• S ’ a s s u r er que la zone de travail est pro p re et bien éclairée. Des établis encombrés et
des endroits sombres présentent des risques d’accidents.
• Ne pas utiliser des outils électriques en présence de vapeurs explosives (comme
celles dégagées par des liquides, des gaz ou des poussières inflammables ). Les
étincelles générées par le moteur des outils électriques peuvent enflammer les poussières
ou les vapeurs.
• Éloigner les curieux, les enfants et les visiteurs de la zone de travail lorsqu’on utilise
un outil électrique. Une distraction peut entraîner la perte de maîtrise de l’outil.
Mesures de sécurité relatives à l’électricité
• Manipuler le cordon avec soin. Ne jamais se servir du cordon afin de transporter
l’outil . Éloigner le cordon des sources de chaleur, des flaques d’huile, des arêtes
tra nch antes et des p ièc es mob iles. Remp lac er imméd iateme nt les cord o n s
e n d o m m a g é s . Les cordons e ndommagés au gmentent les ri sques de secousses
é l e c t r i q u e s .
• Il faut charger un outil à piles intégrées ou un ensemble de piles seulement dans le
chargeur conçu à cet eff e t . Un chargeur convenant pour un type de piles peut présenter
un risque d’incendie lorsqu’on s’en sert avec un autre type de piles.
• Utiliser un outil alimenté par piles seulement avec la pile appro p r i é e . L’utilisation de
toute autre pile présente des risques d’incendie.
Sécurité personnelle
• D e m e u rer vigilant, pre n d re soin et faire preuve de jugement lorsqu’on utilise un outil
électrique. Ne pas s’en servir lorsqu’on est fatigué ou affaibli par des drogues, de
l’alcool o u de s méd icaments. De graves blessures pe uvent résulter d’un moment
d’inattention lors de l’utilisation d’un outil électrique.
• Porter des vêtemen ts appropriés. Éviter de porter des vêtements amples ou des
bij oux. Re couvr ir la cheve lure si elle est l ongue . Élo igner les cheve ux, l es
vêtements et les gants des pièces en mouvement qui peuvent les happer.
• Éviter les démarrages accidentels. S’assurer que l’interrupteur est en position hors
tension ou verrouilleé avant d’insérer la pile. Afin d’éviter les risques de blessures, ne
pas transporter l’outil avec le do igt sur l’interrupteur ni insérer la pile dans un out il dont
l’interrupteur est en position sous tension.
• Enlever les clés de réglage avant de me ttre l’outil sous tens ion. Une clé qui est
laissée sur une pièce rotative de l’outil présente des risques de blessures.
• Ne pas dépasser sa portée. Garder son équilibre en tout temps. On s’assure d’une
meilleure maîtrise de l’outil dans des situations imprévues grâce à une position stable et un
bon équilibre.
• Porter de l’équipement de sécurité. Toujours porter des lunettes de sécurité. Dans
cert aine s cond it io ns , il fa ut p orte r des m as ques res pira toir es , des c haus sure s
antidérapantes, un casque de sécurité ou des protège-tympans.
Utilisation et entretien de l’outil
• Utilis er des pin ces de serrage ou de tout autre moyen pratique afin de fixer et de
soutenir la pièce à ouvrer sur une plate-forme stable. La pièce est instable lorsqu’elle
est retenue par la main ou le corps de l’utilisateur. Cela présente des risques de perte de
maîtrise de l’outil.
• Ne pas forcer l’outil. Utiliser l’outil approprié à la tâche. L’outil approprié fonctionne
mieux et sûrement lorsqu’on s’en sert à son rendement nominal.
• Ne pas se servir de l’outil lorsque l’interrupteur est défectueux. Le cas échéant, l’outil
est dangereux et il faut le réparer.
• Enlev er la pile de l’outil ou placer celui-ci en position hors tension ou verro u i l l é e
avant de le régler, d’en remplacer les accessoires ou de le ranger. On minimise de la
sorte le risque de démarrage accidentel de l’outil.
• Ranger l’outil hors de portée des enfants et de toute autre personne qui n’en connaît
pas le fonctionnement. L’outil est dangereux entre les mains de ces personnes.
Charger la pile pendant 9 heures avant d’utiliser le produit pour la pre m i è r e fois.
Pour obtenir plus de renseignements, consulter la section « CHARGEMENT DU
BLOC-PILE » du présent guide.
MODE D’EMPLOI
AVANT DE RETOURNER CE PRODUIT POUR
QUELQUE RAISON QUE CE SOIT, COMPOSER LE
1-800-544-6986
AVA N T D’APPELER, AYEZ EN MAIN LE N° DE CATALOGUE ETLE CODE DE DATE. DANS LA P L U PA RT
DES CAS, UN REPRÉSENTA N T DE BLACK & DECKER PEUT RÉSOUDRE LE PROBLÈME PAR
TÉLÉPHONE. SI VOUS AVEZ UNE SUGGESTION OU UN COMMENTAIRE, APPELEZ-NOUS. VOS
IMPRESSIONS SONTCRUCIALES POUR BLACK & DECKER.
N° de catalogue CD1200S, CD1800SB, CD9600SB
• Lorsque la pile ne sert pas, l’éloigner de tout objet métallique (comme des tro m b o n e s ,
des pièces de monna ie, d es clé s, de s clous, des v is ou tout au tre pe tit o bje t
métallique qui peut créer une connexion d’une borne à l’autre ) . Lorsque les bornes sont
court-circuitées, cela peut générer des étincelles, des brûlures ou un incendie.
• P re n d r e soin des outils. S’assurer que les outils de coupe sont tranchants et pro p re s.
Des outils bien entretenus à arêtes tranchantes ont moins tendance à se coincer et ils se
maîtrisent mieux.
• Vérifier l’alignement et les attaches des pièces mobiles, le degré d’usure des pièces
ainsi que tout autre facteur susceptible de nuire au bon fonctionnement de l’outil.
F a i re réparer un outil endommagé avant de s’en servir. Des outils mal entretenus sont la
cause de nombreux accidents.
• Utiliser seulement les accessoires recommandés par le fabricant. Des accessoires qui
conviennent à un outil peuvent présenter des risques avec un autre outil.
Entretien
• Confier l’entretien de l’outil seulement à du personnel qualifié. Le non-respect de la
présente directive présente des risques de blessures.
• Lors de l’entretien de l’outil, utiliser seulement des pièces de rechange identiques.
Respecter les consignes relatives à l’entretien du présent guide d’utilisat ion. Il y a
risque de secousses électriques ou de blessures lorsqu’on utilise des pièces non autorisées
ou lorsqu’on ne respecte pas les consignes relatives à l’entretien.
Règles de sécurité spécifiques
• Saisir l’outil par ses surfaces de prises isolées lorsque l’outil peut entrer en contact
avec des fils cachés ou son cordon. En cas de contact avec un fil sous tension, les pièces
métalliques de l’outil seront sous tension et l’utilisateur subira des secousses électriques.
• Lo rsqu’ on est installé sur une éc helle ou un échafauda ge pour travailler, on doit
déposer l’outil sur le côté lorsqu’on ne s’en sert plus.Bien que certains outils munis d’un
gros bloc-piles puissent être placés à la verticale, dans cette position, ils peuvent facilement
être renversés.
AV E RTISSEMENT : certains outils électriques, tels que les sableuses, les scies, les
meules, les perceuses ou certains autres outils de construction, peuvent pro d u i re
de la poussière contenant des produits chimiques susceptibles d’entraîner le
c a n c e r, des malformations congénitales ou pouvant être nocifs pour le système
re p roductif. Parmi ces produits chimiques, on re t r ouve :
· le plomb dans les peintures à base de plomb,
· la silice cristalline dans les briques et le ciment et autres produits de maçonnerie,
· l’arsenic et le chrome dans le bois de sciage ayant subi un traitement chimique
(comme l’arséniate de cuivre et de chrome).
Le risque associé à de telles expositions varie selon la fréquence avec laquelle on eff e c t u e
ces travaux. Pour réduire l’exposition à de tels produits, il faut travailler dans un endroit bien
aéré et utiliser le matériel de sécurité approprié, tel un masque anti-poussières spécialement
conçu pour filtrer les particules microscopiques.
• Éviter tout contact prolongé avec la poussière soulevée par cet outil ou autres outils
électriques. Porter des vêtements de protection et nettoyer les parties exposées du
corps avec de l’eau savonneuse.S’assurer de bien se protéger afin d’éviter d’absorber par
la bouche, les yeux ou la peau des produits chimiques nocifs.
AV E RTISSEMENT : Cet outil peut produire et répandre de la poussière susceptible de
causer des dommages sérieux et permanents au système respiratoire. Toujours utiliser un
appareil respiratoire anti-poussières approuvé par le NIOSH ou l’OSHA. Diriger les
particules dans le sens opposé du visage et du corps.
L’étiquette de l’outil peut comporter les symboles suivants.
V ....................................volts A..........................ampères
Hz ..................................hertz W ........................watts
min..................................minutes ......................courant alternatif
................................courant continu
n
o........................sous vide
....................................
construction de classe II
........................borne de terre
..................................symbole d´avertissement .../min ..................tours ou courses
à la minute
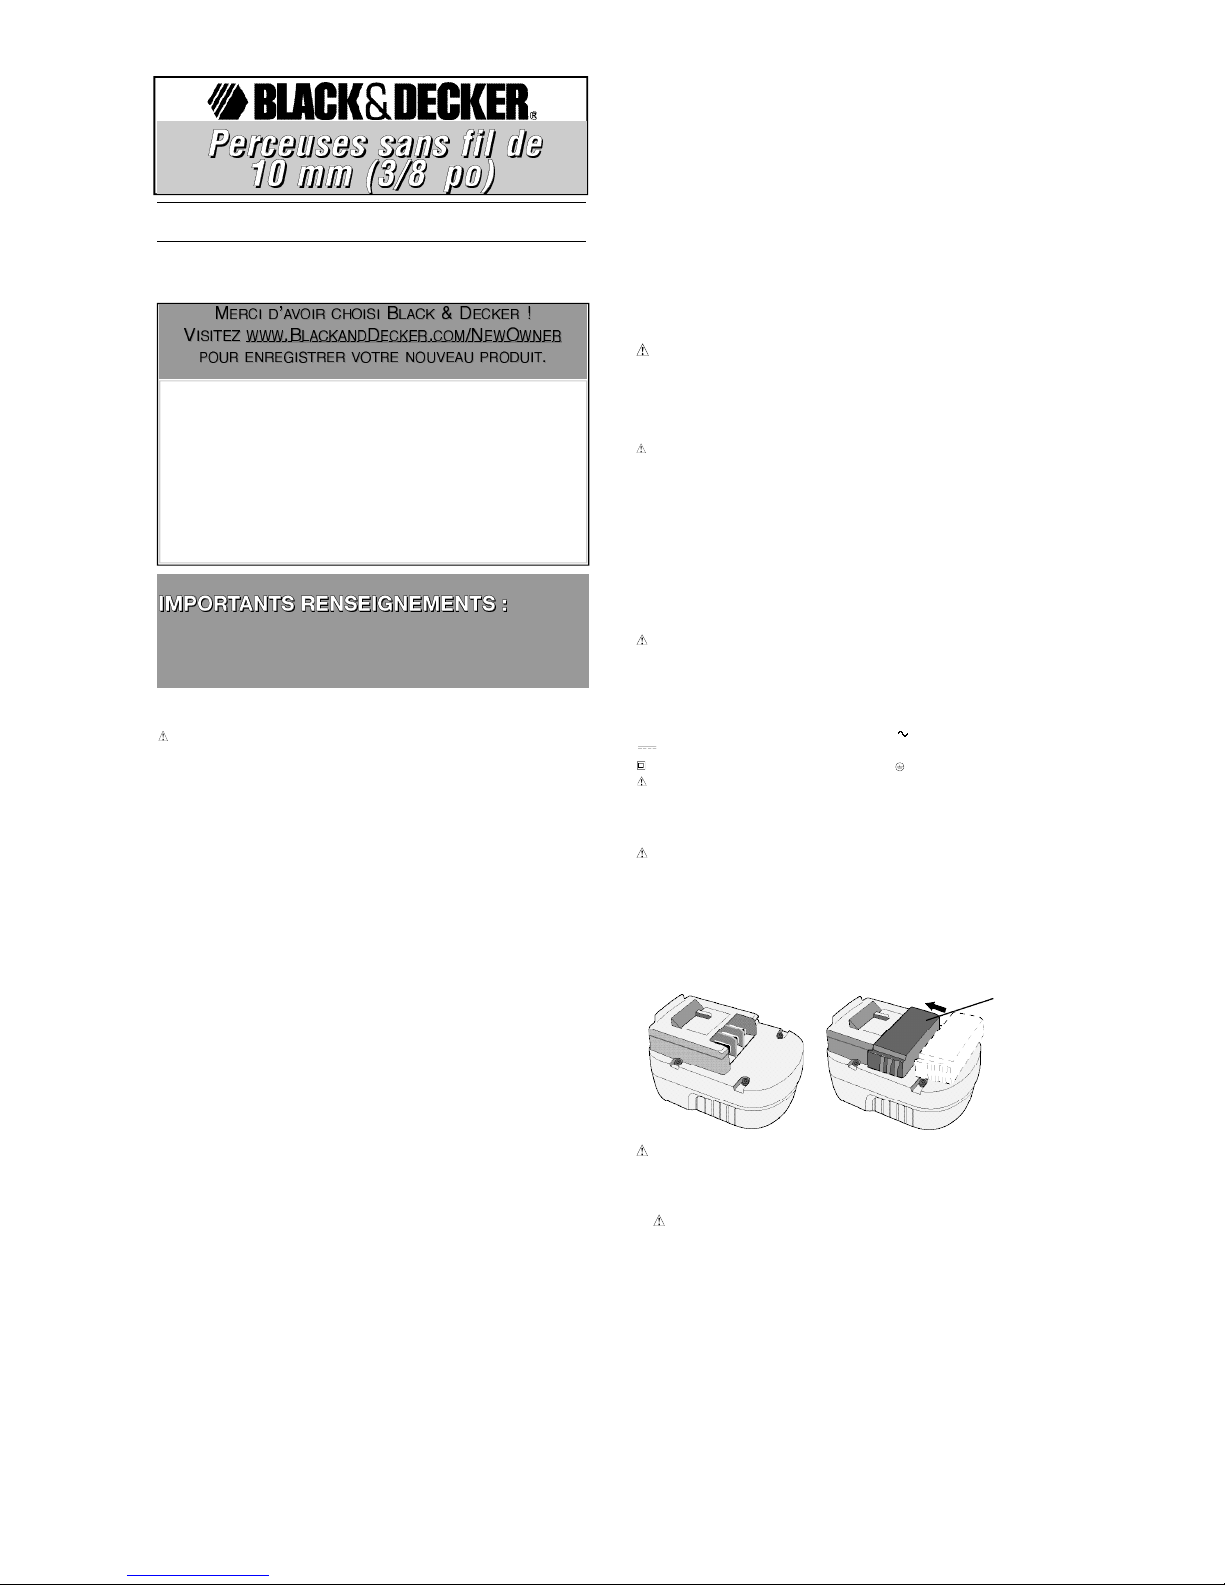
I N F O R M ATION CONCERNANT LE CAPUCHON DU BLOC-PILE
Un capuchon est fourni avec le bloc-pile en vue d’être utilisé chaque fois qu’on retire ce
dernier de l’outil ou du chargeur en vue de le ranger ou de le transporter; enlever le
capuchon avant de remettre le bloc-pile dans le chargeur ou dans l’outil.
AV E RT I S S E M E N T : S’assurer, au moment de ranger ou de transporter un bloc-pile ou une
pile, qu’aucun objet métallique n’entre en contact avec leurs bornes à découvert de celui-ci.
Par exemple, il faut éviter de placer un bloc-pile ou une pile sans capuchon dans un tablier,
une poche, une boîte à outils ou un tiroir (etc.) contenant des objets tels que des clous, des
vis ou des clés, car tout contact entre les bornes à découvert et un objet métallique comme
une clé, une pièce de monnaie, un outil à main. etc. pourrait causer un incendie. En eff e t ,
les règlements américains Hazardous Material Regulations (HMR) du US Department of
Transportation interdisent le transport d’un bloc-pile ou d’une pile dans tout moyen de
transport commercial ou aéronef (que ce soit dans une valise ou le bagage de cabine)
SAUF s’ils sont bien protégés contre les courts-circuits. On doit donc s’assurer, lorsqu’on
transporte un bloc-pile ou une pile séparément, de bien protéger et isoler les bornes contre
tout matériau qui risque d’entrer en contact avec eux et de causer un court-circuit.
MESURES DE SÉCURITÉ : CHARGEMENT DE L’OUTIL
1. Le présent guide renferme d’importantes directives relatives à la sécurité et au
fonctionnement.
2. Avant d’utiliser le chargeur de piles, bien lire toutes les directives et les mises en garde
qui se trouvent sur (1) le chargeur de piles, (2) l’ensemble de piles et (3) le produit
utilisant l’ensemble de piles.
3. MISE EN GARDE : Afin de minimiser les risques de blessures, charger seulement des
ensembles de piles Black & Decker. D’autres types de piles pourraient exploser et causer
des blessures et des dommages.
4. Protéger le chargeur de la pluie et de la neige.
5. L’utilisation d’accessoires non recommandés ni vendus par Black & Decker présente des
risques d’incendie, de secousses électriques ou de blessures.
6. Il vaut mieux tirer sur la fiche que sur le cordon pour débrancher le chargeur afin de
minimiser les risques de dommages à la fiche et au cordon.
7. S’assurer que le cordon est situé de sorte qu’on ne puisse marcher dessus, y trébucher,
l’endommager ou le soumettre à toute autre contrainte.
8. Utiliser un cordon de rallonge seulement en cas d’absolue nécessité. L’utilisation d’un
cordon de rallonge inapproprié présente des risques d’incendie ou de secousses
électriques.
a. Les cordons bifilaires peuvent être utilisés avec un cordon de rallonge muni de 2 ou de 3
fils. Il faut seulement utiliser des cordons de rallonge à gaine ronde homologués par
l’organisme américain Underwriters Laboratories (U.L.). Lorsque le cordon de rallonge
est utilisé à l’extérieur, il doit être prévu à cet effet. Tout cordon extérieur peut servir à
l’intérieur. Les lettres «W» ou «WA» sur la gaine du cordon indiquent que celui-ci
convient pour une utilisation à l’extérieur.
b. Les cordons de rallonge doivent être faits de conducteurs de calibre approprié (AWG ou
jauge américaine des fils) par mesure de sécurité et afin de prévenir les pertes de
puissance et les surchauffes. Le numéro de calibre du fil est inversement proportionnel à
la capacité du cordon. Ainsi, un cordon de calibre 16 a une capacité supérieure à un
cordon de calibre 18. Lorsqu’il est nécessaire d’utiliser plus d’un cordon de rallonge,
veiller à ce que chaque cordon ait au moins le calibre minimal.
Capuchon du
bloc-pile
Page 4

TABLEAU POUR LE CALIBRE MINIMAL (AWG) DES CORDONS DE RALLONGE
INTENSITÉ (A) - PLAQUE SIGNALÉTIQUE – 0 – 10,0
Longueur totale du cordon de rallonge (pi) 2 5 5 0 7 5 100 125 150
Calibre de fil 1 8 1 8 1 6 16 14 14
9. Utiliser seulement le chargeur fourni pour charger la perceuse. L’utilisation de tout autre
chargeur peut endommager la perceuse et être dangereuse.
10. Utiliser un seul chargeur à la fois.
11. Ne pas tenter de démonter le chargeur ni la perceuse. L’utilisateur ne peut les réparer.
En confier les réparations à un centre de service autorisé Black & Docker.
12. NE PAS incinérer la perceuse ni les ensembles de piles même si ceux-ci sont très
endommagés ou complètement usés. La chaleur des flammes risque de les faire
exploser.
13. Ne pas incinérer les piles. La chaleur des flammes risque de les faire exploser. Il peut se
produire une légère fuite du liquide excitateur des piles dans des conditions d’utilisation
et de chargement difficiles ou en cas de température extrême, fuite qui ne serait pas
nécessairement un signe de panne. Toutefois, si ce liquide s’échappe par une rupture du
joint étanche du boîtier et atteint la peau, il faut :
a. laver immédiatement à l’eau et au savon;
b. neutraliser à l’aide d’un acide doux (jus de citron ou vinaigre, p. ex.);
c. si le liquide excitateur atteint les yeux, il faut rincer à l’eau claire pendant au moins dix
minutes et consulter immédiatement un médecin. AVIS AU MÉDECIN : Le liquide excitateur est une solution d’hydrogène de potassium à 25-35 p. 100.
CHARGEMENT DU BLOC-PILE
LES PILES NE SONT PAS COMPLÈTEMENTCHARGÉES EN USINE. ILI M P O R T E
DONC DE LIRE AT T E N T I V E M E N T TOUTES LES CONSIGNES DE SÉCURITÉ AVA N T D E
LE CHARGER.
Le chargeur est conçu pour être branché dans une prise résidentielle standard de 120 volts
et de 60 Hz.
1. S’assurer que la pile est bien enclenchée dans l’outil.. Insérer la fiche du chargeur dans
le connecteur (fig.1).
2. Brancher le chargeur dans une prise murale appropriée et charger les piles pendant 9
h e u r e s . Après la charge initiale et à la suite d’une utilisation normale, le bloc-pile devrait
se charger complètement en 3 à 6 heures.
3. Débrancher le chargeur de la prise murale, puis débrancher le chargeur de l’outil.
AV E RTISSEMENT : Ne pas utiliser l’outil lorsqu’il est raccordé au chargeur.
REMARQUE : pour retirer le bloc-pile de l’outil, appuyer sur le bouton de dégagement
situé à l’arrière du bloc-pile (figure 2) et tirer sur ce dernier pour le dégager.
CONSEILS IMPORTANTS CONCERNANT LE CHARGEMENT
1. À la suite d’une utilisation normale, le bloc-pile devrait prendre de 3 à 6 heure s pour se
charger complètement, et jusqu’à 6 heure s s’il est complètement déchargé. Le bloc-pile
n’est pas chargé au moment de quitter l’usine; on doit donc le charger pendant au moins
9 heures avant de l’utiliser.
2. Afin d’éviter d’endommager le bloc-pile, il est important de NE PAS le charger à des
températures inférieures à +4,5 °C (+40 °F) ou supérieures à +40,5 °C (+105 °F). Pour
augmenter la durée de vie du bloc-pile et optimiser son rendement, le charger à une
température d’environ 24°C (75 °F).
3. Le chargeur peut émettre un bourdonnement ou devenir chaud au toucher durant le
chargement. Cela est normal et n’indique pas la présence d’un problème.
4. Si le bloc-pile ne se charge pas normalement, il faut : (1) vérifier l’alimentation de la prise
en y enfichant une lampe ou un appareil, (2) s’assurer que la prise n’est pas raccordée à
un interrupteur qui coupe le courant lorsqu’on éteint les lumières, (3) placer le chargeur et
le bloc-pile dans un endroit où la température ambiante est environ +4,5 °C (+40 °F) à
+40,5 °C (+105 °F) ou, si le problème persiste, (4) retourner le bloc-pile et le chargeur au
centre de service Black & Decker le plus près (les centres de service autorisés sont
répertoriés dans les pages jaunes sous la rubrique «Outils - électriques»).
5. Le bloc-pile doit être rechargé lorsqu’il ne produit pas suffisamment de courant pour
permettre à l’utilisateur de travailler normalement. On doit C E S S E R d’utiliser la scie dans
de telles conditions.
6. On peut prolonger la durée de vie du bloc-pile en évitant de le laisser dans le chargeur
pendant de longues périodes (plus de 30 jours lorsqu’on ne l’utilise pas). Bien que la
surcharge du bloc-pile ne soit pas un problème au niveau de la sécurité, cette pratique
peut réduire de façon appréciable sa durée de vie.
7. Lorsqu’on insère le bloc-pile dans le chargeur, le témoin rouge s’allume pour indiquer que
le contact entre le bloc-pile et le chargeur s’est établi; celui-ci reste allumé tant que le
bloc-pile est dans le chargeur et que ce dernier est enfiché dans une prise sous tension.
Le témoin NE CLIGNOTERA PA S , ne s’éteindra pas et ne changera pas de couleur une
fois la période de charge terminée.
8. Le bloc-pile atteindra son rendement optimal après avoir terminé cinq cycles de charge et
de décharge au cours d’une utilisation normale. Il n’est pas nécessaire de décharger
complètement le bloc-pile avant de le recharger. Le meilleur moyen de charger et de
décharger le bloc-pile est de l’utiliser normalement.
MESURES DE SÉCURITÉ : PERCEUSES
1. Ne pas verrouiller la perceuse en mode de fonctionnement continu lorsqu’on perce à la
main. Consulter la rubrique «Fonctionnement - Interrupteur».
2. Bien saisir la perceuse afin d’en maîtriser l’effet de torsion.
3. Lorsqu’on installe un accessoire dans le mandrin de la perceuse, il faut bien le serrer le
mandrin sans clé, à la main.
AVERTISSEMENT : La perceuse peut caler (en raison d’une surcharge ou d’une
mauvaise utilisation) et provoquer un effet de torsion. Toujours en prévenir le blocage. La
saisir fermement pour en empêcher l’effet de torsion et pour prévenir la perte de maîtrise
de l’outil qui pourrait occasionner des blessures. Lorsque la perceuse cale, relâcher
immédiatement la détente et déterminer la cause du blocage avant de se servir de
nouveau de l’outil.
C O N S E RVE R CES MESURES À TITRE DE RÉFÉRENCE.
FONCTIONNEMENT
Inverseur de marche
L’invers eur de ma rche perm et de choisir le mode de fo nctio nnement de l’ outil et de le
verr ouil ler en posi tion d’ arrêt (f ig.A). Pour ac tionner la marche avant, il faut relâcher
l’interrupteur à détente, puis enfoncer l’inverseur vers la droite de l’outil. Pour actionner la
marche a rrière, il faut relâcher l’interrupteur à détente, puis enfoncer l’inve rseur vers la
gauche de l’outil. L’outil est verrouillé en position hors circuit lorsque l’inverseur se trouve au
centre. Il faut relâcher l’interrupteur à détente avant de modifier la position de l’inverseur de
marche. N O T E : Lorsqu’on démarre l’outil après en avoir changé le mode de fonctionnement,
un d éclic p eut se fai re ente ndr e. Il s’agit d’une s itu ation normale qu i ne po se aucu n
p r o b l è m e .
R É G U L ATEUR DE COUPLE
L’outil est doté d’un collier qui permet de choisir le mode de fonctionnement et de serrer les
vis selon le couple voulu. Le réglage des grosses vis et des matériaux durs doit être plus
élevé que celui des petites vis et des matériaux mous.
• Pour percer un trou dans le bois, le métal ou le plastique, régler le collier à la position de
perçage indiquée par le symbole .
• Pour utiliser l’outil comme tournevis, régler le collier à la position voulue. Si on ne connaît
pas encore la position correcte, procéder comme suit :
• Régler le collier à la plus basse position.
• Serrer la première vis.
• Si l’embrayage de l’outil se met à encliqueter avant que la vis ne soit bien ancrée, tourner le
collier vers une position plus élevée et enfoncer complètement la vis. Continuer de tourner le
collier jusqu’à la position voulue. Conserver ce réglage pour serrer les autres vis.
Fonctionnement du mandrin sans clé
Pour fixer l'accessoire, saisir la moitié arrière du mandrin d'une main et, de l'autre, faire
tourner dans le sens antihoraire la moitié avant. Insérer le foret ou tout autre accessoire à
fond dans le mandrin, puis serrer fermement en retenant la moitié arrière au mandrin et en
faisant tourn er dans le sens horaire la moitié avant, lo rsqu'on se place à l'e xtrémi té du
m a n d r i n .
Perçage
• N’utiliser que des forets bien affûtés.
• Veiller à ce que la pièce à percer soit solidement retenue ou fixée en place, selon les
mesures de sécurité.
• Porter l’équipement de sécurité approprié et requis, selon les mesures de sécurité.
• Rendre la zone de travail sûre et en assurer l’entretien, selon les mesures de sécurité.
• Actionner la perceuse à basses vitesses en exerçant une pression minimale jusqu’à ce
que le trou soit suffisamment percé afin d’empêcher le glissement du foret hors du trou.
• Toujours exercer la pression en ligne directe avec le foret. N’user que de la force
nécessaire pour que le foret continue de percer; éviter de trop forcer, ce qui pourrait faire
étouffer le moteur ou dévier le foret.
• Bien saisir la perceuse afin de maîtrise son effet de torsion.
• NE PAS ACTIONNER À PLUSIEURS REPRISES LA DÉTENTE D’UNE PERCEUSE
BLOQUÉE DANS LE BUT DE LA DÉCOINCER AU RISQUE DE L’ENDOMMAGER.
• Réduire la pression exercée sur l’outil et le foret vers la fin de la course afin d’éviter que
le moteur ne cale en traversant le matériau.
• Laisser le moteur en marche lorsqu’on retire le foret du trou afin d’en prévenir le
coincement.
• Utiliser de l’huile de coupe pour percer dans les métaux, sauf la fonte et le laiton qui se
percent à sec. Les huiles de coupe les plus efficaces sont l’huile sulfurisée ou l’huile de
lard; la graisse de bacon est parfois suffisante.
• Les forets hélicoïdaux à métal peuvent servir à percer le bois, mais il faut les retirer
souvent du trou pour chasser les copeaux et rognures des goujures.
• S’assurer que l’interrupteur met l’outil en marche et qu’il l’arrête.
AVERTISSEMENT : Il est essentiel de bien soutenir la pièce à ouvrer et de saisir
fermement la perceuse afin de prévenir la perte de maîtrise de l’outil qui pourrait
occasionner de graves blessures. Pour obtenir de plus amples renseignements relatifs au
bon fonctionnement de l’outil, composer le : 1 800 544-6986.
PERÇAGE DANS LE BOIS
Les forets hélicoïdaux à métal peuvent servir à percer le bois, mais il faut s’assurer qu’ils sont
a f fûtés et il faut les retirer souvent du trou pour chasser les copeaux et rognures des
g o u j u r e s .
PERÇAGE DANS LE MÉTA L
Utiliser de l’huile de coupe pour percer les métaux, sauf la fonte et le laiton qui se percent à
sec. Les huiles de coupe les plus efficaces sont l’huile sulfurisée ou l’huile de lard; la graisse
de bacon est parfois suff i s a n t e .
PERÇAGE DANS LA MAÇONNERIE
Utiliser des forets au carbure à basses vitesses. Consulter la rubrique «Perçage». Exercer
une pression con stante , sans forcer afin d’éviter de casser les maté riaux friables. Une
production uniforme de poussière à débit moyen indique un perçage convenable.
ENTRETIEN
Nettoyer l’outil seulement à l’aide d’un savon doux et d’un linge humide. Ne laisser aucun
liquide s’infiltrer dans l’outil et ne jamais immerger l’outil.
I M P O RTA N T : Pour assurer la SÉCURITÉ D’EMPLOI et la FIABILITÉ de l’outil, n’en confier
la réparatio n, l ’entreti en et les rajust ements qu’à un centre de service ou à un atelier
d’entretien autorisé n’utilisant que des pièces de rechange identiques.
Sceau RBRC
M C
Le sceau RBRC
M C
de la Rechargeable Battery Recycling Corporation apposé sur
la pile au nickel-cadmium (ou le bloc-pile) indique que les coûts de recyclage de
ce dernier à la fin de sa vie utile ont déjà été payés par Black & Decker. En
certains endroits, la mise au rebut ou aux ordures municipales des piles au nickel-cadmium
est illégale; le programme de «RBRC» constitue donc une solution des plus pratiques et
é c o l o g i q u e s .
La «RBRC», en collaboration avec Black & Decker et d’autres utilisateurs de piles, a mis sur
pied des programmes aux États-Unis et au Canada dans le but de faciliter la collecte des
piles déchargées. Black & Decker encourage ses utilisateurs à participer à son programme
de protection de l'environnement et de conservation des ressources naturelles en retournant
les piles usagées à un centre de service Black & Decker ou chez un dépositaire local afin
qu’elles puissent être recyclées. On peut en outre se renseigner auprès d’un centre de
recyclage local pour connaître d'autres sites les acceptant, ou composer le
1 800 8-228-8379 pour obtenir de l'information sur le recyclage de ces piles dans sa région.
Accessoires
Les détaillants et le centre de service de la région vendent les accessoires recommandés
pour l’outil. Pour trouver un accessoire, composer le 1 8 0 0 544-6986.
Il faut utiliser les accessoires suivants seulement en fonction des dimensions spécifiées.
FORETS À MÉTA L – 9,5 mm (3/8 po) max.; FORETS À MAÇONNERIE – 9,5 mm (3/8 p o )
max.; FORETS À BOIS – 12,7 mm (1/2 po) max.
AV E RT I S S E M E N T : L’utilisation de tout accessoire non recommandé pour l’outil peut être
d a n g e r e u s e .
Information sur les réparations
Tous les centres de réparation Black & Decker sont dotés de personnel qualifié en matière
d’outillage électrique; ils sont donc en mesure d’offrir à leur clientèle un service efficace et
fiable. Que ce soit pour un avis technique, une réparation ou des pièces de rechange
authentiques installées en usine, communiquer avec l’établissement Black & Decker le plus
près de chez vous. Pour trouver l’établissement de réparation de votre région, consulter le
répertoire des Pages jaunes à la rubrique « Outils électriques » ou composer le numéro
suivant : 1-800-544-6986 ou consulter le site www.blackanddecker.com
Garantie complète de deux ans pour une utilisation domestique
Black & Decker (É.-U.) Inc. garantit ce produit pour une durée de deux ans contre tout
défaut de matériau ou de fabrication. Le produit défectueux sera remplacé ou réparé sans
frais de l’une des deux façons suivantes :
La première façon consiste en un simple échange chez le détaillant qui l’a vendu (pourvu
qu’il s’agisse d’un détaillant participant). Tout retour doit se faire durant la période
correspondant à la politique d’échange du détaillant (habituellement, de 30 à 90 jours après
l’achat). Une preuve d’achat peut être requise. Vérifier auprès du détaillant pour connaître
sa politique concernant les retours hors de la période définie pour les échanges.
La deuxième option est d’apporter ou d’envoyer le produit (transport payé d’avance) à un
centre de réparation autorisé ou à un centre de réparation de Black & Decker pour faire
réparer ou échanger le produit, à notre discrétion. Une preuve d’achat peut être requise. Les
centres Black & Decker et les centres de service autorisés sont répertoriés dans les pages
jaunes, sous la rubrique « Outils électriques ».
Cette garantie ne s’applique pas aux accessoires. Cette garantie vous accorde des droits
légaux spécifiques et vous pourriez avoir d’autres droits qui varient d’un État ou d’une
province à l’autre. Pour toute question, communiquer avec le directeur du centre de
réparation Black & Decker le plus près de chez vous. Ce produit n’est pas destiné à un
usage commercial.
DÉPANNAGE
Problème Cause possible Solution possible
• L’appareil refuse de • Pile non chargée. • Vérifier les exigences de
d é m a r r e r. charge pour la pile.
• La pile ne se charge pas.• Chargeur non branché. •Brancher le chargeur dans
une prise qui fonctionne. Se
reporter à la rubrique
« Remarques importantes de
chargement » pour plus de
r e n s e i g n e m e n t s .
•Vérifier le courant à la prise en
branchant une lampe ou un
autre appareil électrique.
•Vérifier si la prise est reliée à
un interrupteur qui coupe le
courant au moment d’éteindre
la lumière
• Température ambiante • Déplacer le chargeur
trop chaude ou froide. et l’outil à une température
ambiante de plus de 4,5 °C
(40 °F) ou sous les 40,5 °C
(105 °F) 105 degree F
(+ 4 0 , 5°C ).
Pour de l’aide avec l’outil, consulter notre site Web www.blackanddecker.com pour
l’emplacement du centre de réparation le plus près ou communiquer avec l’assistance
BLACK & DECKER au 1-800-544-6986.
Page 5

REGLAS GENERALES DE SEGURIDAD - PARA TODAS LAS
HERRAMIENTAS OPERADAS CON BATERÍAS
¡ A D V E RTENCIA! LEA Y COMPRENDA TODAS LAS INSTRUCCIONES. No hacerlo
puede originar riesgos de choque eléctrico, incendio y lesiones personales de gravedad.
CONSERVE ESTAS INSTRUCCIONES
Á rea de trabajo
• Conserve su área de trabajo limpia y bien iluminada. Las bancas amontonadas y las
zonas oscuras propician los accidentes.
• No opere herramientas eléctricas en atmósferas explosivas, como en presencia de
líquidos, gases o polvos inflamables. Las herramientas eléctricas producen chispas
que pueden originar la ignición de los polvos o los vapores.
• C onserve a ob serva dores , niños y vi sitan tes a lejados mien tras op era una
herramienta eléctrica. Las distracciones pueden ocasionar que pierda el control.
Seguridad eléctrica
• No maltrate el cable. Nunc a utilice el cabl e para transpo rtar la herramienta.
Conserve el cable al ejad o de calor, aceite, bordes afi lado s o pie zas móviles.
Reemplace inmediatamente los cables dañados.Los cables dañados pueden originar
i n c e n d i o .
• U na herramie nta de b ate rías c on ba ter ías i nte grada s o po r sepa rado deb e
recargarse ú nicamen te con el cargador es peci ficado para esas b aterías . U n
cargador que pueda adec uarse a un tipo de batería puede c rear riesgos de incendi o
cuando se emplea con otra batería.
• Utili ce su h erramienta de bate rías únicamen te c on la bate ría esp ecialmente
diseñada para ella. El empleo de otras baterías puede crear riesgos de incendio.
Seguridad personal
• E sté aler ta, concéntrese en lo que est á haciendo. Rec urra al sentid o común
cuando op ere una herra mienta eléct rica. No op ere ningu na herram ien ta si se
encuentra fatigado o bajo la influencia de drogas, alco hol o medicamen tos. Un
momento de desatención mientras se operan herramientas eléctricas puede ocasionar
lesiones graves.
• Vístase de manera adecuada. No tenga puestas ropas o artículos de joyería flojos.
Cubra su cabello si lo tiene largo. Conserve su cabello, sus ropas y guantes alejados
de las p iezas móv iles. Las piezas de vestir flojas, las joyas y el cabello largo pueden
resultar atrapados por las piezas móviles.
• Ev ite el encendido a ccidental. Asegúrese que el interruptor esté en posici ón de
apagado antes de instalar la batería. Sostener una batería con el dedo en el interruptor o
cone ctarl a si n fija rse si el interruptor es tá en posici ón de encend ido pr opicia los
a c c i d e n t e s .
• R e t i r e las llaves de ajuste antes de encender la herramienta. Una llave que se deja en
una pieza giratoria puede ocasionar lesiones personales.
• No se sob reextien da. Conserve siempre los pies bien apoyados, al igual q ue el
e q u i l i b r i o . La posició n correcta de los pies y el equilibrio permiten controlar mejor la
herramienta en situaciones inesperadas.
• Utilice equipo de seguridad. Siempre utilice protección en los ojos. Se deben utilizar
mascarillas con tra polvo, zapatos antiderrapantes, casco o protectores para los oídos
para tener las condiciones apropiadas.
Uso y cuidados de la herramienta
• Utilice prensas u otros medios prácticos para asegurar y apoyar la pieza de trabajo
en un a plataforma establ e. Sujetar las pie zas con la ma no o contra su cuerpo es
inestable y puede originar la pérdida de control.
• No fuerce la herramient a. utilice la herramienta adecuada para su aplicación. L a
he rram ienta ade cuad a ha rá m ejor el tr abaj o y de man er a má s segu ra b aj o la s
especificaciones para las que se diseñó.
• No utilice la herramienta si el interruptor no enciende y apaga. Cualquier herramienta
que no pueda controlarse por medio del interruptor es peligrosa y debe repararse.
• Desconec te la batería de la herramienta o coloque el interruptor en posición de
apagado antes de hacer cualquier ajuste, cambio de accesorios o de guarda r la
h e r r a m i e n t a . Tales medidas de seguridad prev enti vas reducirán el riesgo d e que la
herramienta se encienda accidentalmente.
• G u a rde las herrami entas fuera del alc ance de los niños y de otras pe rsonas no
c a p a c i t a d a s . Las herramientas son peligrosas en manos de personas no capacitadas.
• Cuando no utilice la batería consérvela alej ada de objetos met álicos com o: clips,
monedas, llaves, clavos, tornillos y otras piezas de metal que puedan establecer una
conexión entre una terminal y otra. Hacer corto en las terminales de la batería puede
ocasionar chispas, quemaduras o incendios.
• Cuide sus herramientas. Conserve las herramientas de corte afiladas y limpias. L a s
herram ientas que reciben un manteni miento adecuado, con piezas d e corte afiladas,
difícilmente se atascan y son más fáciles de controlar.
• Verifique la alineación de las piezas móvi les, busque fr acturas en las pie zas y
cu ales qui er a o tra s con dic io nes qu e p uedan af ect ar la ope raci ón de las
h e r r a m i e n t a s . Si está dañada, lleve su herramienta a servicio antes de usarla de nuevo.
Muchos accidentes se deben a herramientas con mantenimiento pobre.
• S olame nte u se ac ces orios q ue el fa bri cante re comie nde p ara s u m odelo de
h e r r a m i e n t a . Los accesorios que estén diseñados para una herramienta, pueden volverse
peligrosos cuando se emplean con otra.
S e r v i c i o
• El servicio a las herramientas lo debe efectuar únicamente personal calificado. E l
servicio o mantenimiento realizado por personal no calificado puede originar riesgos de
l e s i o n e s .
• Cuando efectúe servicio a una herramienta, utilice únicamente refacciones idénticas.
Siga las instrucciones de la sección de Mantenimiento de este manual. El empleo de
piezas no autorizadas o no seguir las instrucciones de mantenimiento puede origina r
riesgos de choque eléctrico o lesiones.
Normas de seguridad específicas
• Sujete la herramienta por las superficies aislantes cuando realice una operación en
que la herramienta pueda hacer contacto con cableados ocultos. Al hacer contacto
con un ca ble “vivo”, las partes metálicas de la herramienta se vuelven “vivas” y pueden
originar un choque al operador.
• Cuando trabaje en una escalera o una plataforma asegúrese de dejar la herramienta
de lado cuando no la use. Algunas herramientas con baterías grandes se paran sobre su
base, pero se pueden volcar fácilmente.
AV E RTISSEMENT : El polvo creado al lijar, aserrar, pulir, taladrar o realizar otras
actividades de la construcción, contiene substancias químicas que se sabe
p roducen cáncer, defectos de nacimiento u otros defectos del sistema
re p ro d u c t o r . Algunos ejemplos de esos productos químicos son:
• El plomo de las pinturas a base de plomo,
• La sílice cristalina de los ladrillos, del cemento y de otros productos de albañilería, y
• El arsénico y el cromo de la madera tratada químicamente (CCA).
El riesgo que se corre a causa del contacto con esos productos varía según la frecuencia
con que usted realice este tipo de trabajos. Con el fin de reducir su exposición a esas
substancias químicas, trabaje en un área bien ventilada y utilice un equipo de seguridad
reglamentario, tal como una máscara contra el polvo especialmente diseñada para filtrar
partículas microscópicas.
• Evite el contacto prolongado con el polvo proveniente del lijado, aserrado, amolado y
taladrado eléctrico y otras actividades de construcción. Use vestimenta protectora y
lave todas las áreas expuestas con agua y jabón. De entrar polvo en sus ojos, boca, o
que este permanezca sobre su piel puede promover la absorción de químicos dañinos.
AV E RTISSEMENT :El uso de esta herramienta puede generar y/o dispersar el polvo, el
cual puede ocasionar lesión respiratoria u otro tipo de lesión grave y permanente. Utilice
siempre protección respiratoria NIOSH/OSHAapropiada para la exposición al polvo. Dirija
las partículas lejos de su cara o su cuerpo.
La etiqueta de su herramienta puede incluir los siguientes símbolos.
V . . . . . . . . . . . . . . . . . . . . . . . . . . . . . . . . . .v o l t s S P M . . . . . . . . . . . . . . . . . . . . . . . . . . Golpes por minuto
A . . . . . . . . . . . . . . . . . . . . . . . . . . . . . . . . . .a m p e r e s H z . . . . . . . . . . . . . . . . . . . . . . . . . . . . . .h e r t z
W . . . . . . . . . . . . . . . . . . . . . . . . . . . . . . . . w a t t s m i n . . . . . . . . . . . . . . . . . . . . . . . . . . . .m i n u t o s
. . . . . . . . . . . . . . . . . . . . . . . . . . . . . . . .corriente alterna . . . . . . . . . . . . . . . . . . . . . . . . . .corriente directa
n
o . . . . . . . . . . . . . . . . . . . . . . . . . . . . . . . .velocidad sin carga
. . . . . . . . . . . . . . . . . . . . . . . . . . . . . .construcción clase II
. . . . . . . . . . . . . . . . . . . . . . . . . . . . . . . . . .erminales de conexión a tierre
. . . . . . . . . . . . . . . . . . . . . . . . . . . . . . . .símbolo de alerta seguridad . . . / m i n . . . . . . . . . . . . . . . . . . . . . . . . revoluciones o
reciprocaciones
INFORMACIÓN ACERCA DEL PROTECTOR DE LA BATERÍA
Se han incluido protectores para el almacenaje y transporte de la batería. Estos deben ser
usados cuando la batería no esté conectada a la herramienta ni en el cargador. Recuerde
quitar el protector antes de poner la batería en el cargador o conectarla a la herramienta.
ADVERTENCIA: No guarde ni lleve baterías, unidades de alimentación o pilas en un
lugar donde sus terminales pudieran entrar en contacto con algún objeto metálico. Por
ejemplo, no ponga baterías, unidades de alimentación o pilas dentro de un delantal o
bolsillo, una caja de herramientas o de almacenamiento del producto, un cajón, etc., junto
con clavos sueltos, tornillos, llaves, etc. si no están debidamente protegidas. El transporte
de baterías, unidades de alimentación o pilas puede causar un incendio si sus terminales
entran en contacto sin querer con materiales conductores como llaves, monedas,
herramientas de mano y otros por el estilo. De hecho, el reglamento sobre materiales
peligrosos (HMR) del Ministerio de Transporte de los Estados Unidos prohibe el
transporte de baterías, unidades de alimentación o pilas en cualquier tipo de transporte
terrestre o aéreo (es decir, embaladas en maletas y maletines de mano) ANO SER que
estén debidamente protegidas de hacer cortocircuito. Por lo tanto, cuando transporte
baterías, unidades de alimentación o pilas individuales, asegúrese que sus terminales
estén protegidos y debidamente aislados de materiales que pudieran entrar en contacto
con ellos y causar un cortocircuito.
•
Cargue la b atería durant e 9 horas antes de utilizar el producto por primera vez.
Para mayor información consulte las instrucciones “PARA CARGAR EL APA R AT O
DE RECARGA DE BAT E R I A ” .
MANUAL DE INSTRUCCIONES
Catalog Nos. CD1200S, CD1800SB, CD9600SB
Protector de la batería
REMPLACEMENT GRATUIT DES ÉTIQUETTES D’AV E RTISSEMENT : si les étiquettes
d’avertissement deviennent illisibles ou sont manquantes, composer le 1 - 8 0 0 - 5 4 4 - 6 9 8 6
pour en obtenir le remplacement gratuit.
Imported by / Importé par
Black & Decker Canada Inc.
100 Central Ave.
Brockville (Ontario) K6V 5W6
Voir la rubrique “Outils électriques”
des Pages Jaunes
pour le service et les ventes.
ANTES DE DEVOLVER ESTE PRODUCTO POR
CUALQUIER MOTIVO, LLAME AL
(55)5326-7100
ANTES DE LLAMAR, T E N G A E L NÚMERO DE CATÁLOGO YE L CÓDIGO DE FECHAP R E P ARADOS. EN
L A M AY O R Í A DE LOS CASOS, UN REPRESENTANTE DE BLACK & DECKER PUEDE RESOLVER EL
P R O B L E M A POR TELÉFONO. SI DESEAREALIZAR UNAS U G E R E N C I A O COMENTARIO, LLÁMENOS.
SU OPINIÓN ES FUNDAMENTA L PA R A BLACK & DECKER.
Page 6

ADVERTENCIAS E INSTRUCCIONES DE SEGURIDAD: CARGA DEL
TALADRO
1. Este manual contiene instrucciones de seguridad y de operación importantes.
2. Antes de utilizar el cargador de baterías, lea todas las instrucciones y las marcas
precautorias en (1) el cargador de baterías, (2) la batería y (3) el producto que emplea
la batería.
3. PRECAUCION: A fin de reducir el riesgo de lesiones, solamente recargue baterías
Black & Decker. Otros tipos de baterías pueden estallar ocasionando lesiones
personales y daños.
4. No exponga el cargador a lluvia o nieve.
5. El uso de dispositivos no recomendados o vendidos por Black & Decker puede originar
riesgos de incendios, descargas eléctricas o lesiones a personas.
6. Para reducir el riesgo de daños a la clavija o al cable, tire de la clavija en vez de tirar del
cable cuando desconecte el cargador.
7. Asegúrese que el cable se ubique de manera que no se pise, se enrolle, o se sujete a
otro tipo de tensiones o daños.
8. No deben emplearse cables de extensión a menos que sea absolutamente
indispensable. El empleo de una extensión incorrecta puede resultar en riesgos de
incendio, choque eléctrico o electrocución.
a. Los cables de 2 hilos se pueden emplear con extensiones de 2 o de 3 hilos. Solamente
deberán emplearse extensiones con cubierta cilíndrica, y le recomendamos que estén
aprobados por la Norma Oficial Mexicana (NOM). Si se piensa utilizar la extensión a la
intemperie, ésta deberá ser adecuada para dicho uso. Cualquier extensión marcada
para utilizarse a la intemperie se puede emplear bajo techo. las siglas “W” o “WA” en la
cubierta de la extensión indican que es adecuada para utilizarse a la intemperie.
b. Una extensión debe tener el calibre de cable adecuado (AWG o American Wire Gauge)
por seguridad, y a fin de evitar pérdida de potencia y sobrecalentamiento. Mientras más
pequeño sea el número del calibre del alambre, mayor será su capacidad; esto significa
que un cable de calibre 16 tiene mayor capacidad que otro de calibre 18. Cuando emplee
más de una extensión para alcanzar la longitud total, asegúrese que cada extensión
tenga por lo menos el calibre mínimo requerido.
TABLA PARA EL CALIBRE MINIMO DEL ALAMBRE (AWG) EN CABLES DE
EXTENSION
AMPERAJE EN LA PLACA DE IDENTIFICACION – 0 – 10,0
Longitud total del cable de extensión (m) 7,6 15,2 22,8 30,4 38,1 45,7
Calibre del alambre 18 18 16 16 14 14
9. Solamente utilice el cargador suministrado para recargar su taladro. El empleo de
cualquier otro cargador puede dañar el taladro o crear condiciones peligrosas.
10. Solamente utilice un cargador cuando cargue.
11. Nunca intente abrir el cargador ni el taladro. No contienen partes susceptibles de ser
reparadas por el usuario en su interior. Envíelos a cualquier centro de servicio
Black & Decker.
12. NO incinere el taladro o la batería aún cuando estén muy dañados o la batería esté
completamente desgastada. Pueden explotar con el fuego. Puede ocurrir una pequeña
fuga de líquido de las celdas de la batería bajo condiciones extremas de uso, carga o
temperatura. Esto no indica fallas, sin embargo, si el sello externo está roto y el líquido
hace contacto con su piel:
a . Lave inmediatamente con agua y jabón.
b . Neutralice con un ácido débil como jugo de limón o vinagre.
c . Si el líquido de la batería toca sus ojos, enjuáguelos con agua limpia por un mínimo de
10 minutos y busque inmediatamente atención médica. N O TA MEDICA: el líquido es una
solución de potasa cáustica en concentración de 25 a 35%.
CÓMO CARGAR LA UNIDAD DE ALIMENTA C I Ó N
LAS BATERÍAS DE SU UNIDAD DE A L I M E N T ACIÓN NO VIENEN COMPLETA M E N T E
CARGADAS DE LAFÁBRICA. ANTES DE INTENTAR CARGARLAS, LEA
CONCIENZUDAMENTE TODAS LAS INSTRUCCIONES DE SEGURIDAD.
El cargador está diseñado para utilizar la corriente doméstica estándar de 120 voltios 60 Hz.
1. Asegúrese que la batería esté bien conectada al taladro. Conecte el cargador al
c o n e c t o r, como lo muestra la Figura 1.
2. Enchufe el cargador en cualquier toma de corriente estándar de 120 voltios 60 Hz y
deje que la batería se cargue inicialmente por 9 horas. Luego de la carga inicial, su
unidad de alimentación debería cargarse completamente en 3 a 6 horas, si tiene una
frecuencia de uso normal.
3. Desconecte el cargador de la toma de corriente, luego desconecte el cargador de la
h e r r a m i e n t a .
A D V E R T E N C I A : No use la herramienta mientras se encuentra conectada al cargador.
N O TA : Para quitar la batería del taladro, presione el pulsador de liberación que se
encuentra en la parte posterior de la batería (Figura 2) y deslícela hacia afuera.
N O TAS IMPORTANTES RESPECTO EL CARGADO
1. Luego de uso normal su batería debería recargarse totalmente en un plazo de 3 a 6
horas. En el caso de que se encuentre totalmente descargado puede demorar hasta 6
horas en recargarse. Su batería fue enviada desde la fabrica sin estar cargada. Antes de
intentar usarlo debe cargarse durante 9 horas.
2. NO CARGUE la batería a una temperatura inferior a 40°F ni mayor a 105°F. Esto es muy
importante y asistirá en prevenir daños serios a la batería. Una vida útil duradera y el
máximo rendimiento pueden obtenerse a una temperatura de 75°F.
3. Mientras este cargando la batería, el cargador puede en algunos casos emitir un zumbido
y su temperatura puede aumentar ligeramente. Esta es una condición normal que no
implica ningún problema.
4. En caso de que el cargador no cargue adecuadamente - (1) Verifique la corriente en el
receptáculo enchufando una lámpara o accesorio similar a la toma de corriente. (2)
Verifique si el receptáculo esta conectado a una toma de luz que apaga la corriente al
apagar las luces. (3) Mueva la batería y el cargador a una temperatura ambiente de 40°F
a 105°F. (4) Si el receptáculo esta en buen estado y la temperatura es la correcta y no
logra cargar la batería, lleve o envié su batería y cargador a un centro Black & Decker
cercano a su domicilio. Ver bajo Herramientas Eléctricas en las paginas amarillas de su
Anuario telefónico.
5. El cargador debe recargarse cuando ya no produce suficiente energía para labores que
se realizaban fácilmente con anterioridad. NO CONTINUE A UTILIZAR SU SIERRRA
con la batería si éstas se encuentran sin energía.
6. Para prolongar la vida útil de la batería, evite que esté cargándose durante periodos de
tiempo largos (Mas de 30 días sin uso). Aun cuando una sobrecarga no es un factor de
seguridad, puede afectar considerablemente su vida útil.
7. Cuando la batería se encuentra insertado en el cargador, el “Indicador de Carga” rojo se
encenderá indicando que existe contacto entre la batería y el cargador. La luz
permanecerá encendida mientras la batería se encuentre en el cargador y el mismo se
encuentra enchufado a la toma de corriente. En caso de que NO SE ENCIENDA, retire o
cambie a un color diferente cuando el ciclo este completo.
8. El cargador alcanzara su rendimiento óptimo luego de haber completado 5 ciclos bajo
uso normal. No hay necesidad de dejar que se descarguen totalmente las baterías antes
de recargarlas. El uso normal es el mejor método para descargar y recargar las baterías.
ADVERTENCIAS E INSTRUCCIONES DE SEGURIDAD: TALADROS
1. No asegure el taladro en posición de ENCENDIDO permanente cuando taladre a mano.
Refiérase a Instrucciones de operación-Interruptor.
2. Sujete el taladro con firmeza para controlar la acción de torsión.
3. Cuando instale accesorios en el portabrocas, apriételo a mano con firmeza.
A D V E RT E N C I A : El taladro se puede atascar (si se sobrecarga o se utiliza de manera
inadecuada) ocasionando un giro. Siempre espere el atascamiento. Sujete el taladro con
firmeza para controlar la acción de torsión y evitar la pérdida de control que pudiera causar
lesiones personales. Si el taladro se atasca, suelte inmediatamente el gatillo y determine la
razón del atascamiento antes de reiniciar la operación.
C O N S E RVE ESTAS INSTRUCCIONES PARA REFERENCIAS FUTURAS
INSTRUCCIONES DE OPERACION
Interruptor y palanca de control
Un botón de control de marcha determina la dirección de la herramienta y funciona también
como botón de trabado (Figura A. Para seleccionar la rotación hacia adelante, suel te el
gatillo interruptor y oprima el botón de control del lado derecho de la herramienta.
Para seleccionar reversa, oprima el botón de control del lado izquierdo de la herramienta. La
posición central del botón de control asegura la herramienta en la posición de A PA G A D O .
Cuando cambie la posición del botón de control, asegúrese que el gatillo interruptor se
encuentra liberado.
N O TA: La primera vez que encienda la herramienta después de cambiar la dirección de
rotación, puede escuchar un “clic” al arrancar. Esto es normal y no indica ningún problema.
CONTROL DEL PAR TORSOR
Esta herramienta viene con una rueda para seleccionar el modo de funcionamiento y fijar el
par torsor para ajust ar tornillos. Los tornillos grandes y piezas fabricadas con materiales
duros requier en un mayor par torsor que los t ornill os pequeños y piezas de materiales
b l a n d o s .
• Para taladrar en madera, metal y plásticos, fije la rueda en la posición del taladro con el
símbolo .
• Para atornillar, fije la rueda en la posición deseada. Si no conoce la posición apropiada,
haga lo siguiente:
• Fije la rueda en la posición de menor par torsor.
• Ajuste el primer tornillo.
• Si el portabrocas emite un ruido de chicharra y se tranca (ratchets) antes de lograr el resultado deseado, aumente el par torsor y siga ajustando el tornillo. Repita hasta que alcance
la posición correcta. Use esta configuración para los demás tornillos.
Operación del portabrocas sin llave
Portabrocas con doble camisa – Para instalar los acces orios, sujete la mitad trasera del
portab rocas con una mano y utili ce la otra mano para gi rar la mitad frontal en sentido
opuesto a las manecillas del reloj. Inserte la broca u otro accesorio completamente dentro
del portabrocas, y apriete con firmeza sujetando la mitad trasera del portabrocas y girando la
mitad frontal en el sentido de las manecillas del reloj, visto desde el extremo del portabrocas.
Taladrado
• Solamente utilice brocas afiladas.
• Apoye y asegure apropiadamente la pieza de trabajo, como se recomienda en las
Instrucciones de seguridad.
• Utilice el equipo de seguridad apropiado y requerido, como se señala en las instrucciones
de seguridad.
• Cuide el área de trabajo, como se menciona en las instrucciones de seguridad.
• Haga funcionar el taladro muy lentamente, utilizando poca presión, h asta haber
perforado lo suficiente para evitar que la broca se deslice hacia afuera del barreno.
• Aplique presión en línea recto con la broca. Haga presión suficiente para conservar a la
broca cortando, pero no tanta como para que el motor se atasque o la broca se desvíe.
• Sujete firmemente el taladro para controlar su acción de torsión.
• NO OPRIMA E L G A TILLO DE UN TALADRO ATASCADO PA R A I N T E N TAR
ENCENDERLO Y A PAGARLO. PUEDE DAÑARLO.
• Minimice el atascamiento al iniciar el barreno reduciendo la presión y perforando
lentamente a través de la última parte del barreno.
• Conserve el motor en funcionamiento mientras saca la broca de un barreno. Esto ayudará
a evitar atascaduras.
• Emplee un lubricante para corte cuando perfore metales. Las excepciones son el hierro
colado y el latón, que deben taladrarse en seco. Los lubricantes que tienen mejor
funcionamiento son el aceite sulfúrico para corte y la manteca de cerdo. La grasa de
tocino funciona también.
• Cuando emplee brocas helicoidales para perforar en madera, será necesario sacarlas del
barreno con frecuencia para limpiar las virutas de los canales.
• A s e g ú r ese que el interruptor enciende y apaga el taladro .
A D V E R T E N C I A : Es importante apoyar la pieza de trabajo adecuadamente y sujetar al
tala dro con firm eza para evitar la pérdida de control que pud iese ocasio nar lesiones
personales. Si tiene preguntas sobr e la operación correcta de la herramienta, ll ame:
( 5 5 ) 5 3 2 6 - 7 1 0 0
TALADRADO EN MADERA
Se puede utilizar el mismo tipo de brocas helicoidales que se emplean para metal
cuando haga barrenos en madera. Estas brocas deben estar afiladas y deben sacarse con
frecuencia del barreno para quitar las virutas acumuladas en las estrías.
TALADRADO EN META L
Utilice un lubricante para corte cuando perfore metales, excepto en los casos de hierro
fundido o latón en los que se deberá taladrar en seco. Los lubricantes para corte que mejor
funcionan son el aceite sulfúrico y la manteca de cerdo; la grasa de tocino también funciona
para este propósito.
TALADRADO EN MAMPOSTERIA
Utilice brocas para mampostería con punta de carburo. Consulte la sección Ta l a d r a d o .
Aplique fuerza uniforme al taladro, pero no tanta como para estrellar el material. El flujo
uniforme de polvo indica la velocidad de perforación adecuada.
MANTENIMIENTO
Utilice únicamente jabón suave y un trapo húmedo para limpiar la herramienta. No
permita nunca que lleguen líquidos al interior de la herramienta, ni sumerja ninguna parte en
ningún líquido.
I M P O RTA N T E : Para garantizar la SEGURIDAD y la CONFIABILIDAD del producto, las
reparaciones, el mantenimiento y los ajustes deben ser realizados por centros de servicio
autorizados u otras organizaciones de servicio calificadas, que siempre utilicen partes de
repuesto idénticas.
El sello RBRC™
El sello RBRC™ (Rechargeable Battery Recycling Corporation o Corporación de
Reciclaje de Baterías Recargables) en la batería (o unidad de alimentación) de níquelcadmio indica que los costos de reciclaje de la batería (o unidad de alimentación), una vez
que llegue al final de su vida útil, ya han sido pagados por Black & Decker. En algunas áreas
es ilegal botar baterías de níquel- cadmio gastadas en la basura o corriente de residuos
sólidos urbanos, y el programa RBRC ofrece una alternativa ecológica. RBRC, en
colaboración con Black & Decker y otros usuarios de baterías, ha establecido programas e n
los EE.UU. y Canadá para facilitar la colección de baterías de níquel- cadmio gastadas.
Ayude a proteger nuestro medio ambiente y a conservar los recursos naturales devolviendo
la batería de níquel-cadmio gastada a un centro de servicio Black & Decker autorizado o a
su distribuidor local para que sea reciclada. También puede contactar a su centro local de
reciclaje para mayor información sobre dónde ir a dejar la batería gastada, o llame al
(55)5326-7100.
DETECCIÓN DE PROBLEMAS
P r o b l e m a Causa posible Solución posible
• La unidad no enciende. • La batería no carga. • Verifique los requisitos de
carga de la batería.
• La batería no carga. • El cargador no está enchufado. • Enchufe el cargador en un
tomacorriente que funcione.
Para conocer más detalles,
consulte "Notas importantes
sobre la carga".
• Controle la corriente del
tomacorriente enchufando
una lámpara u otro artefacto.
• Verifique si el tomacorriente
está conectado a un
interruptor que corta la
energía cuando usted apaga
la luz.
• Temperatura ambiental • Mueva el cargador y la
demasiado caliente o demasiado herramienta a un ambiente
f r í a . con una temperatura superior
a 4,5 °C (40 °F) o inferior a
40,5 °C (105 °F).
Para conocer la ubicación del centro de mantenimiento más cercano a fin de recibir ayuda con
su producto, visite nuestro sitio Web w w w. b l a c k a n d d e c k e r.com o llame a la línea de ayuda
BLACK & DECKER al ( 5 5 ) 5 3 2 6 - 7 1 0 0 .
Page 7

Accesorios
Los accesorios recomendados para emplearse con su herramienta se encuentran a su
disposición con su distribuidor local o en los centros de servicio autorizado. Si necesita
ayuda en relación con los accesorios, por favor llame: (55) 5326-7100
Los siguientes accesorios deben utilizarse únicamente en las medidas especificadas para
mayor seguridad: BROCAS PA R A M E TAL–Hasta 9,5 mm (3/8"); BROCAS PA R A
MAMPOSTERIA–Hasta 9,5 mm (3/8"); BROCAS PA R A MADERA–Hasta 12,7 mm (1/2").
A D V E RT E N C I A : El uso de cualquier accesorio no recomendado para emplearse con
esta herramienta puede ser peligroso.
INFORMACIÓN DE MANTENIMIENTO
Todos los Centros de mantenimiento de Black & Decker cuentan con personal altamente
capacitado dispuesto a brindar a todos los clientes un servicio eficiente y confiable en la
reparación de herramientas eléctricas. Si necesita consejo técnico, reparaciones o piezas
de repuesto originales de fábrica, póngase en contacto con el centro de mantenimiento de
Black & Decker más cercano a su domicilio. Para ubicar su centro de servicio local,
consulte la sección “Herramientas eléctricas” (Tools-Electric) de las páginas amarillas,
llame al
( 5 5 ) 5 3 2 6 - 7 1 0 0 o visite nuestro sitio w w w . b l a c k a n d d e c k e r. c o m .
GARANTÍA COMPLETA DE DOS AÑOS PARA USO EN EL HOGAR
Black & Decker (Estados Unidos) Inc. ofrece una garantía de dos años por cualquier
defecto del material o de fabricación de este producto. El producto defectuoso se reparará
o reemplazará sin costo alguno de dos maneras.
La primera opción, el reemplazo, es devolver el producto al comercio donde se lo adquirió
(siempre y cuando se trate de un comercio participante). Las devoluciones deben
realizarse conforme a la política de devolución del comercio (generalmente, entre 30 y 90
días posteriores a la venta). Le pueden solicitar comprobante de compra. Consulte en el
comercio acerca de la política especial sobre devoluciones una vez excedido el plazo
e s t a b l e c i d o .
La segunda opción es llevar o enviar el producto (con flete pago) a un Centro de
mantenimiento propio o autorizado de Black & Decker para su reparación o reemplazo
según nuestro criterio. Le pueden solicitar el comprobante de compra. Los Centros de
mantenimiento autorizados y de propiedad de Black & Decker se detallan en la sección
“Herramientas eléctricas” (Tools-Electric) de las páginas amarillas de la guía telefónica.
Esta garantía no se extiende a los accesorios. Esta garantía le concede derechos legales
específicos; usted puede tener otros derechos que pueden variar según el estado o la
provincia. Si tiene alguna pregunta, comuníquese con el gerente del Centro de
mantenimiento de Black & Decker de su zona. Este producto no está diseñado para uso
c o m e r c i a l .
REEMPLAZO GRATUITO DE LAS ETIQUETAS DE ADVERT E N C I A S : si sus etiquetas
de advertencia se tornan ilegibles o faltan, llame al (55)5326-7100 para que se le
reemplacen gratuitamente.
ESPECIFICACIONES
CD1200S
Cargador: 120 V AC ~ 60HZ 12W
Salida: 14,5V dc 200MA
CD1800SB
Cargador: 120V AC ~ 60HZ 9W
Salida:
21,75V dc 210MA
CD9600SB
Cargador: 120V AC ~ 60HZ 8W
Salida: 11V dc 130mA
BLACK & DECKER S.A. DE C.V.
BOSQUES DE CIDROS ACCESO RADIATAS NO. 42
COL. BOSQUES DE LAS LOMAS.
05120 MÉXICO, D.F
TEL. 55-5326-7100
Vea “Herramientas
eléctricas (Tools-Electric)”
– Páginas amarillas –
para Servicio y ventas
CULIACAN, SIN
Av. Nicolás Bravo #1063 Sur
(667) 7 12 42 11
Col. Industrial Bravo
GUADALAJARA, JAL
Av. La Paz #1779
(33) 3825 6978
Col. Americana Sector Juarez
MEXICO, D.F.
Eje Central Lázaro Cardenas
No. 18
(55) 5588 9377
Local D, Col. Obrera
MERIDA, YUC
Calle 63 #459-A
(999) 928 5038
Col. Centro
MONTERREY, N.L.
Av. Francisco I. Madero
No.831
(81) 8375 2313
Col. Centro
PUEBLA, PUE
17 Norte #205
(222) 246 3714
Col. Centro
QUERETARO, QRO
Av. Madero 139 Pte.
(442) 214 1660
Col. Centro
SAN LUIS POTOSI, SLP
Av. Universidad 1525
(444) 814 2383
Col. San Luis
TORREON, COAH
Blvd. Independencia, 96 Pte.
(871) 716 5265
Col. Centro
VERACRUZ, VER
Prolongación Díaz Mirón #4280
(229)921 7016
Col. Remes
VILLAHERMOSA, TAB
Constitución 516-A
(993) 312 5111
Col. Centro
PARA OTRAS LOCALIDADES LLAME AL: (55) 5326 7100
Para reparación y servicio de sus herramientas eléctricas, favor de dirigirse
al Centro de Servicio más cercano:
 Loading...