

Page 1

Please read before returning this product for any reason.
àLIRE avant de retourner ce produit pour quelque raison que
ce soit.
LEA EL MANUAL antes de devolver este producto por
cualquier motivo.
INSTRUCTION MANUAL
MODE D’EMPLOI
MANUAL DE INSTRUCCIONES
BLOWER VAC
ASPIRATEURS-SOUFFLEUR
BARREDORA / ASPIRADORA
BV2900
Page 2

FRANÇAIS
English 1
Français 11
Español 22
To register your new product, visit
www.BlackandDecker.com/NewOwner
Consulter le site Web www.BlackandDecker.com/NewOwner
pour enregistrer votre nouveau produit.
Visite www.BlackandDecker.com/NewOwner para registrar su
nuevo producto.
Thank you for choosing BLACK+DECKER!
If you have a question or experience a problem with your
BLACK+DECKER purchase, go to:
http://www.blackanddecker.com/instantanswers
If you can’t find the answer or do not have access to the Internet, call
1-800-544-6986 from 8 a.m. to 5 p.m. EST Mon. - Fri. to speak with
an agent.
Please have the CATALOG NUMBER available when you call.
Page 3
ENGLISH
1
WARNING! Read all safety
warnings and all instructions. Failure to follow the
warnings and instructions may result in electric shock,
fire and/or seriousinjury.
WARNING: To reduce the risk of injury, read the
instructionmanual.
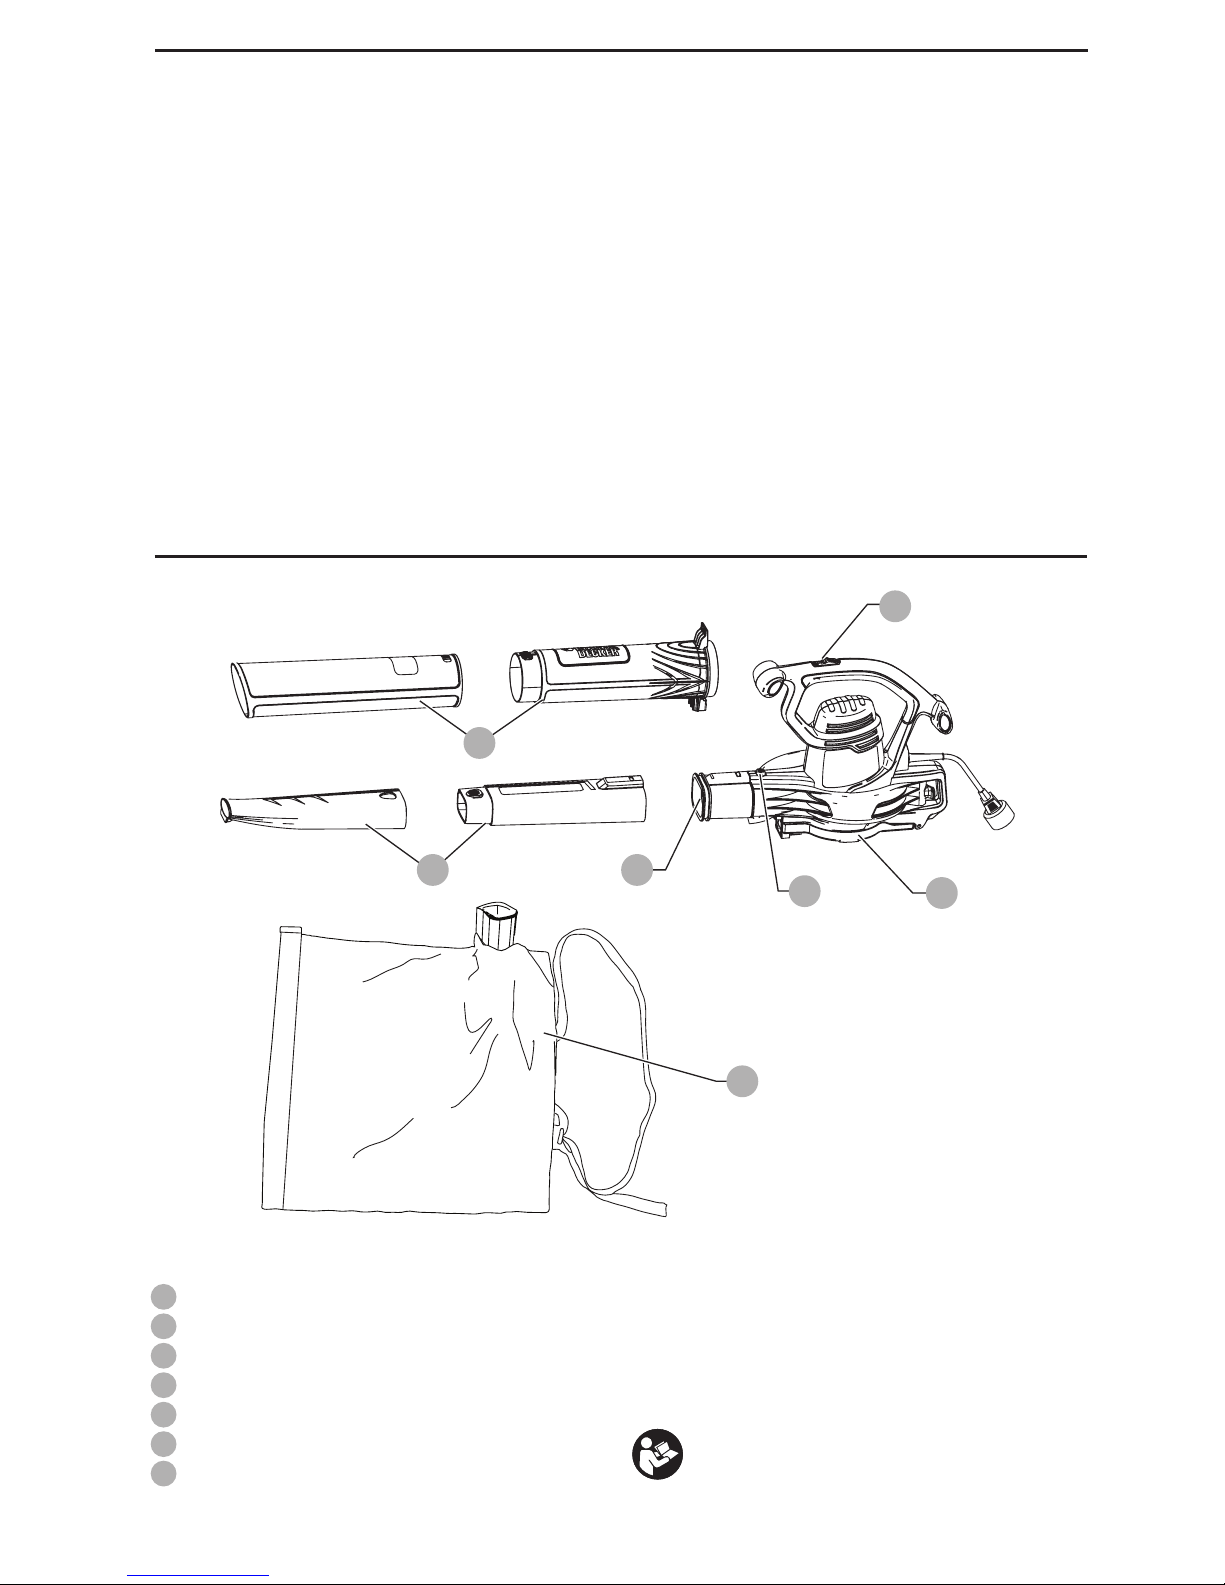
1
Blower Tube Release Button
2
On / Off Switch
3
Blower Opening
4
Fan Cover
5
Blower Tube (2 pieces)
6
Vacuum Tube (2 pieces)
7
Collection Bag
Definitions: Safety Alert Symbols and Words
This instruction manual uses the following safety alert symbols and words to alert you to hazardous situations and your risk
of personal injury or property damage.
DANGER: Indicates an imminently hazardous situation which, if not avoided, will result in death or
seriousinjury.
WARNING: Indicates a potentially hazardous situation which, if not avoided, could result in death or
seriousinjury.
CAUTION: Indicates a potentially hazardous situation which, if not avoided, may result in minor or
moderateinjury.
(Used without word) Indicates a safety related message.
NOTICE: Indicates a practice not related to personal injury which, if not avoided, may result in
propertydamage.
Fig. A
7
5
6
4
3
2
1
Page 4

ENGLISH
2
IMPORTANT SAFETY
WARNINGS & INSTRUCTIONS
WARNING: To reduce risk of injury:
• Before any use, be sure everyone using this unit reads and
understands all safety instructions and other information
contained in this manual.
• Save these instructions and review frequently prior to use
and in instructing others.
• Do not point unit discharge at self or bystanders.
• Keep long hair and loose clothing away from openings
and moving parts.
W
ARNING: When using an
electric tool, basic safety precautions should always
be followed to reduce risk of fire, electric shock, and
personal injury, including the following.
WARNING: Some dust created by
this product contains chemicals known to the State
of California to cause cancer, birth defects or other
reproductive harm. Some examples of these chemicals are:
ʵ compounds in fertilizers
ʵ compounds in insecticides, herbicides and pesticides
ʵ arsenic and chromium from chemically treated lumber
To reduce your exposure to these chemicals, wear approved
safety equipment such as dust masks that are specially
designed to filter out microscopic particles.
READ ALL AND UNDERSTAND ALL
INSTRUCTION BEFORE USING BLOWER VAC
GENERAL SAFETY WARNINGS AND
INSTRUCTIONS FOR ALL TOOLS
WARNING: Read all safety warnings and
all instructions. Failure to follow the warnings and
instructions may result in electric shock, fire and/or
serious injury.
• ALWAYS WEAR EYE PROTECTION – Wear safety glasses or
goggles at all times when this unit is in use. Also use face
or dust mask. Safety glasses are available at extra cost at
your local BLACK+DECKER Service Center or authorized
service facility.
• READ and follow all instructions.
• DO NOT place inlet or outlet of vacuum near eyes or ears
when operating.
• THIS APPLIANCE IS PROVIDED WITH DOUBLE INSULATION.
Use only identical replacement parts. See instructions for
servicing of double insulated appliances.
• STORE IDLE TOOLS. When not in use, the unit should be stored
in a dry, high or locked-up place - out of reach of children.
• DON’T OVERREACH. Keep proper footing and balance at
all times.
• DO NOT pick up anything that is burning or smoking, such
as cigarettes, matches or hot ashes.
• MAINTAIN TOOL WITH CARE. Keep fan area clean for best and
safest performance. Follow instructions for proper maintenance.
• DO NOT attempt to repair the blower/vac. To assure
product safety and reliability, repairs, maintenance, and
adjustments should be performed by BLACK+DECKER
service centers or authorized service stations, always using
BLACK+DECKER replacement parts.
• DO NOT operate blower/vac in a gaseous or explosive
atmosphere. Motors in these tools normally spark, and the
sparks might ignite fumes.
• DO NOT use to pick up flammable or combustible liquids
such as gasoline or use in areas where they may be present.
• USE EXTRA CARE when cleaning on stairs.
• DO NOT leave appliance when plugged in. Unplug from
outlet when not in use and before servicing.
• DO NOT allow to be used as a toy. Close attention
is necessary when used by or near children. Not
recommended for use by children.
• DO NOT attempt to clear clogs from tool without first
unplugging it.
• USE ONLY as described in this manual. Use only
manufacturer’s recommended attachments.
• DO NOT use with damaged cord or plug. If appliance is
not working as it should, has been dropped, damaged, left
outdoors, or dropped into water, return it to a service center.
• DO NOT pull or carry by cord, use cord as a handle, or pull
cord around sharp edges or corners. Keep cord away from
heated surfaces.
• DO NOT unplug by pulling on cord. To unplug, grasp the
plug, not the cord.
• DO NOT put any objects into openings. Do not use with
any opening blocked; keep free of dust, lint, hair and
everything that may reduce air flow.
• KEEP hair, loose clothing, fingers, and all parts of body
away from openings and moving parts.
• TURN OFF all controls before unplugging.
• DO NOT vacuum water, other liquids, or wet objects. Never
immerse any part of the tool in liquid.
• DO NOT handle plug or appliance with wet hands.
• DO NOT use in vacuum mode without the vacuum tubes
and collection bag in place.
• KEEP CHILDREN, BYSTANDERS AND ANIMALS AWAY from the
work area a minimum of 30 feet (10 meters) when starting or
operating the tool. Do not blow debris in directions of bystanders.
• INSPECT THE AREA before using the tool. Remove all debris
and hard objects such as rocks, glass, wire, etc. that can
ricochet, be thrown, or otherwise cause injury or damage
during operation. As a vacuum, the tool is designed to pick
up dry material such as leaves, grass, small twigs, and bits of
paper. Do not vacuum stones, gravel, metal, broken glass, etc.
• TO REDUCE THE RISK
of electric shock, use only with an
extension cord intended for outdoor use, such as SJW or SJTW.
Page 5
ENGLISH
3
WARNING: Shock Hazard. To
reduce the risk of electrical shock; do not expose to
rain, do not use on wet surfaces. Store indoors.
WARNING: Cut Hazard. Turn off and
unplug unit, then wait until fan stops or at least 10 seconds
before removing the blower or vacuum tube assemblies.
Servicing of Double Insulated Appliances
Your Blower/Vac is double-insulated to give you added safety.
In a double insulated appliance, two systems of insulation
are provided instead of grounding. No grounding means is
provided on a double insulated appliance, nor should a means
for grounding be added to the appliance. Servicing a double
insulated appliance requires extreme care and knowledge
of the system and should be done only by qualified service
personnel. Replacement parts for a double insulated appliance
must be identical to the parts they replace. A double insulated
appliance is marked with the words double insulated or
“double insulation”. The symbol (square within a square) may
also be marked on the appliance.
Safety Rules and Instructions:
Extension Cords
WARNING: To reduce the risk of personal
injury due to a loose electrical connection between the
appliance’s plug and extension cord, firmly and fully attach
the appliance plug to the extension cord. Periodically check
the connection while operating to ensure it is fully attached.
Do not use an extension cord that provides a loose
connection. A loose connection may result in overheating,
fire, and increases the risk of a burning.
Double insulated tools have 2-wire cords and can be used with
2-wire or 3-wire extension cords. Only round jacketed extension
cords should be used, and we recommend that they be listed by
Underwriters Laboratories (U.L.) (C.S.A. in Canada). If the extension
will be used outside, the cord must be suitable for outdoor
use. Any cord marked as outdoor can also be used for indoor
work. An extension cord must have adequate wire size (AWG or
American Wire Gauge) for safety, and to prevent loss of power and
overheating. The smaller the gauge number of the wire, the greater
the capacity of the cable, that is 16 gauge has more capacity than
18 gauge. When using more than one extension to make up the
total length, be sure each individual extension contains at least the
minimum wire size. Before using an extension cord, inspect it for
loose or exposed wires, damaged insulation, and defective fittings.
Make any needed repairs or replace the cord if necessary.
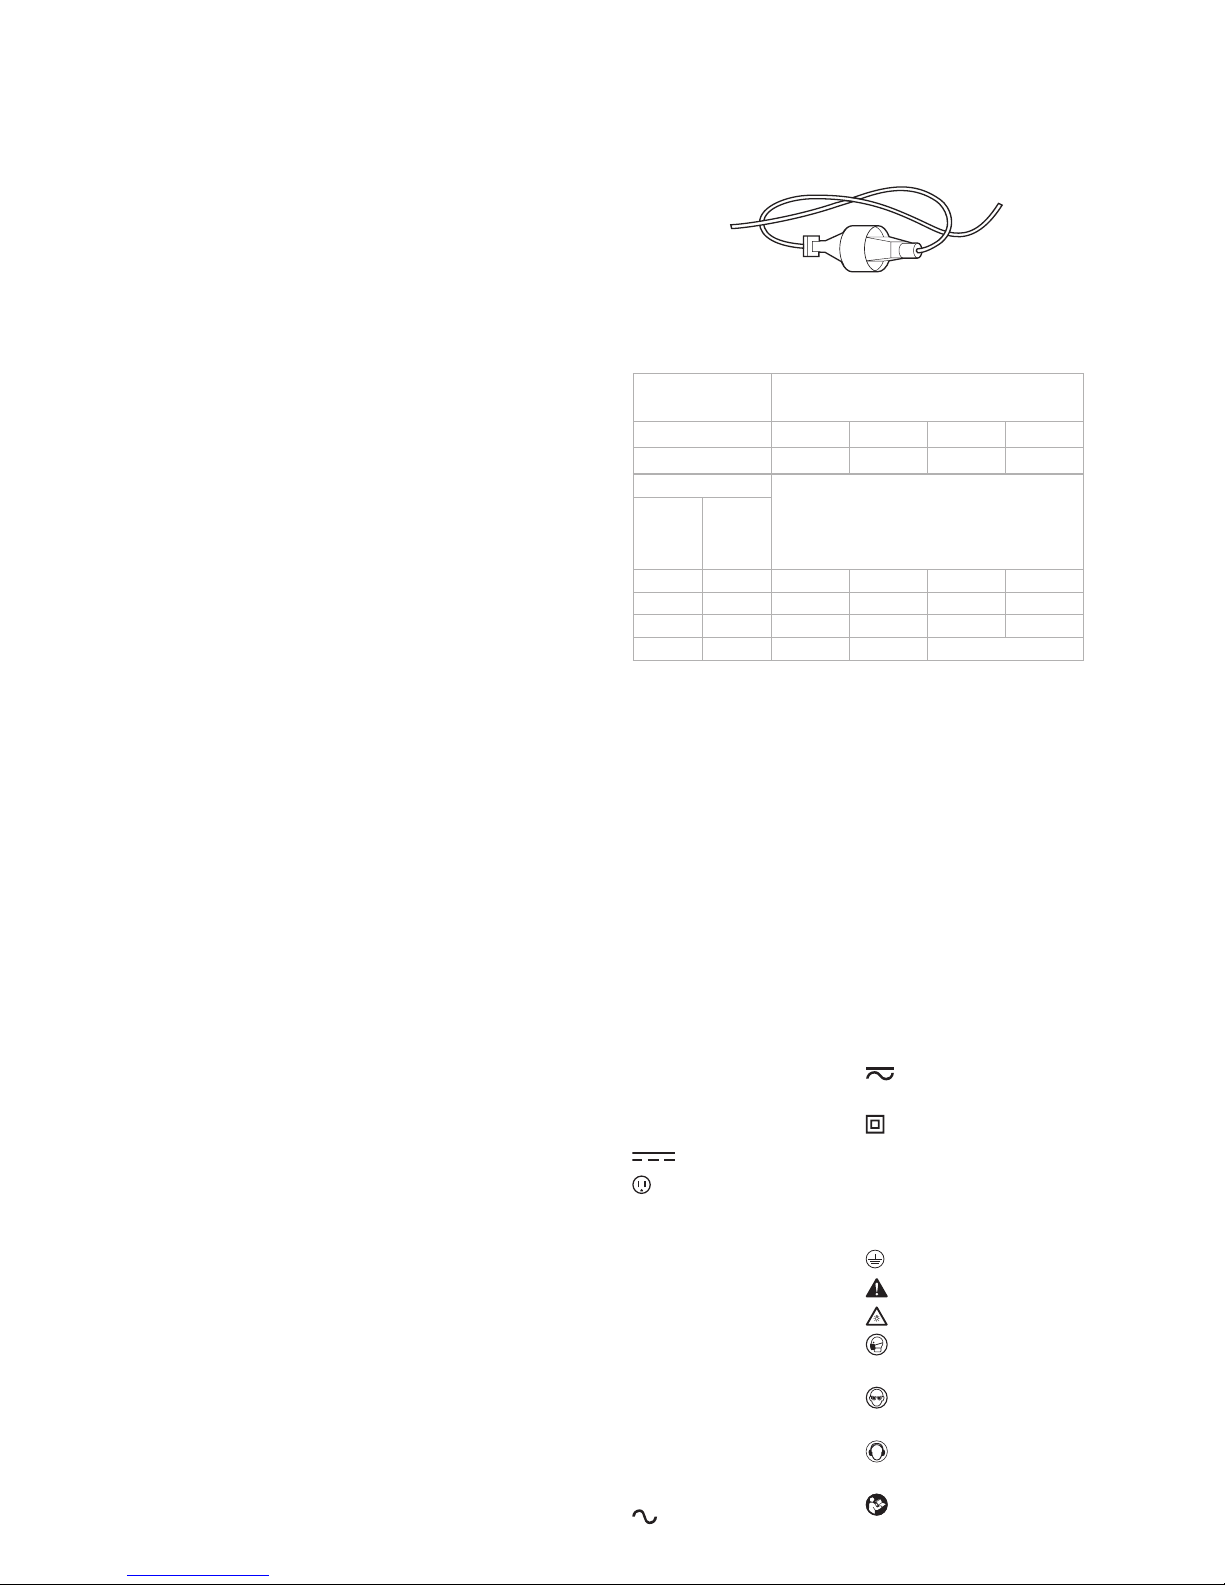
• To reduce the risk of disconnection of the appliance cord
from the extension cord during operating:
i) Make a knot as shown in figure B, or
ii) Use one of the plug-receptacle retaining straps or
connectors described in this manual. (The manual
shall also include a statement indicating that devices
for retaining extension cords are available. The name
and address of the manufacturer or brand-name
distributor shall be included.); or
iii) Secure the extension cord to the appliance plug as
shown or described in the Operating Instructions.
• Maintain Appliance With Care – Inspect extension cords
periodically and replace if damaged.
Figure B
To determine the minimum wire size required, refer to
the chart:
Minimum Gauge for Cord Sets
Volts
Total Length of Cord in Feet
(meters)
120 V 25 (7.6) 50 (15.2) 100 (30.5) 150 (45.7)
240 V 50 (15.2) 100 (30.5) 200 (61.0) 300 (91.4)
Ampere Rating
American Wire Gauge
More
Than
Not
More
Than
0 6 18 16 16 14
6 10 18 16 14 12
10 12 16 16 14 12
12 16 14 12 Not Recommended
Safety Rules and Instructions:
Polarized Plug
To reduce the risk of electric shock, this equipment has a polarized
plug (one blade is wider than the other). This equipment must
be used with a suitable polarized 2 wire or 3 wire extension cord.
Polarized connections will fit together only one way. Make sure
that the receptacle end of the extension cord has large and small
blade slot widths. If the plug does not fit fully into the extension
cord, reverse the plug. If it still does not fit, obtain a suitable
extension cord. If the extension cord does not fit fully into the
outlet, contact a qualified electrician to install the proper outlet.
Do not change the tool plug or extension cord in any way.
The label on your tool may include the following symbols. The
symbols and their definitions are asfollows:
V ......................... volts
Hz ....................... hertz
min ..................... minutes
or DC ......direct current
...................... Class I Construction
(grounded)
…/min ..............per minute
BPM .................... beats per minute
IPM ..................... impacts per minute
RPM .................... revolutions per
minute
sfpm ................... surface feet per
minute
SPM .................... strokes per minute
A ......................... amperes
W ........................ watts
or AC ...........alternating current
or AC/DC .... alternating or
direct current
...................... Class II
Construction
(double insulated)
no ....................... no load speed
n ......................... rated speed
...................... earthing terminal
.....................safety alert symbol
.....................visible radiation
..................... wear respiratory
protection
..................... wear eye
protection
..................... wear hearing
protection
..................... read all
documentation
Page 6
ENGLISH
4
SAVE THESE INSTRUCTIONS
COMPONENTS (FIG. A)
WARNING: Never modify the power
tool or any part of it. Damage or personal injury
couldresult.
Refer to Figure A at the beginning of this manual for a
complete list ofcomponents.
INTENDED USE
This blower vac is designed for residential applications.
DO NOT use under wet conditions or in presence of
flammable liquids orgases.
This blower vac is a residential power tool. DO NOT let
children come into contact with the tool. Supervision is
required when inexperienced operators use thistool.
BLOWER MODE ASSEMBLY
WARNING: Ensure the blower is switched
off and disconnected from the power supply before
attaching or removing the blower tubes. The tube
assembly must be assembled to the housing before use.
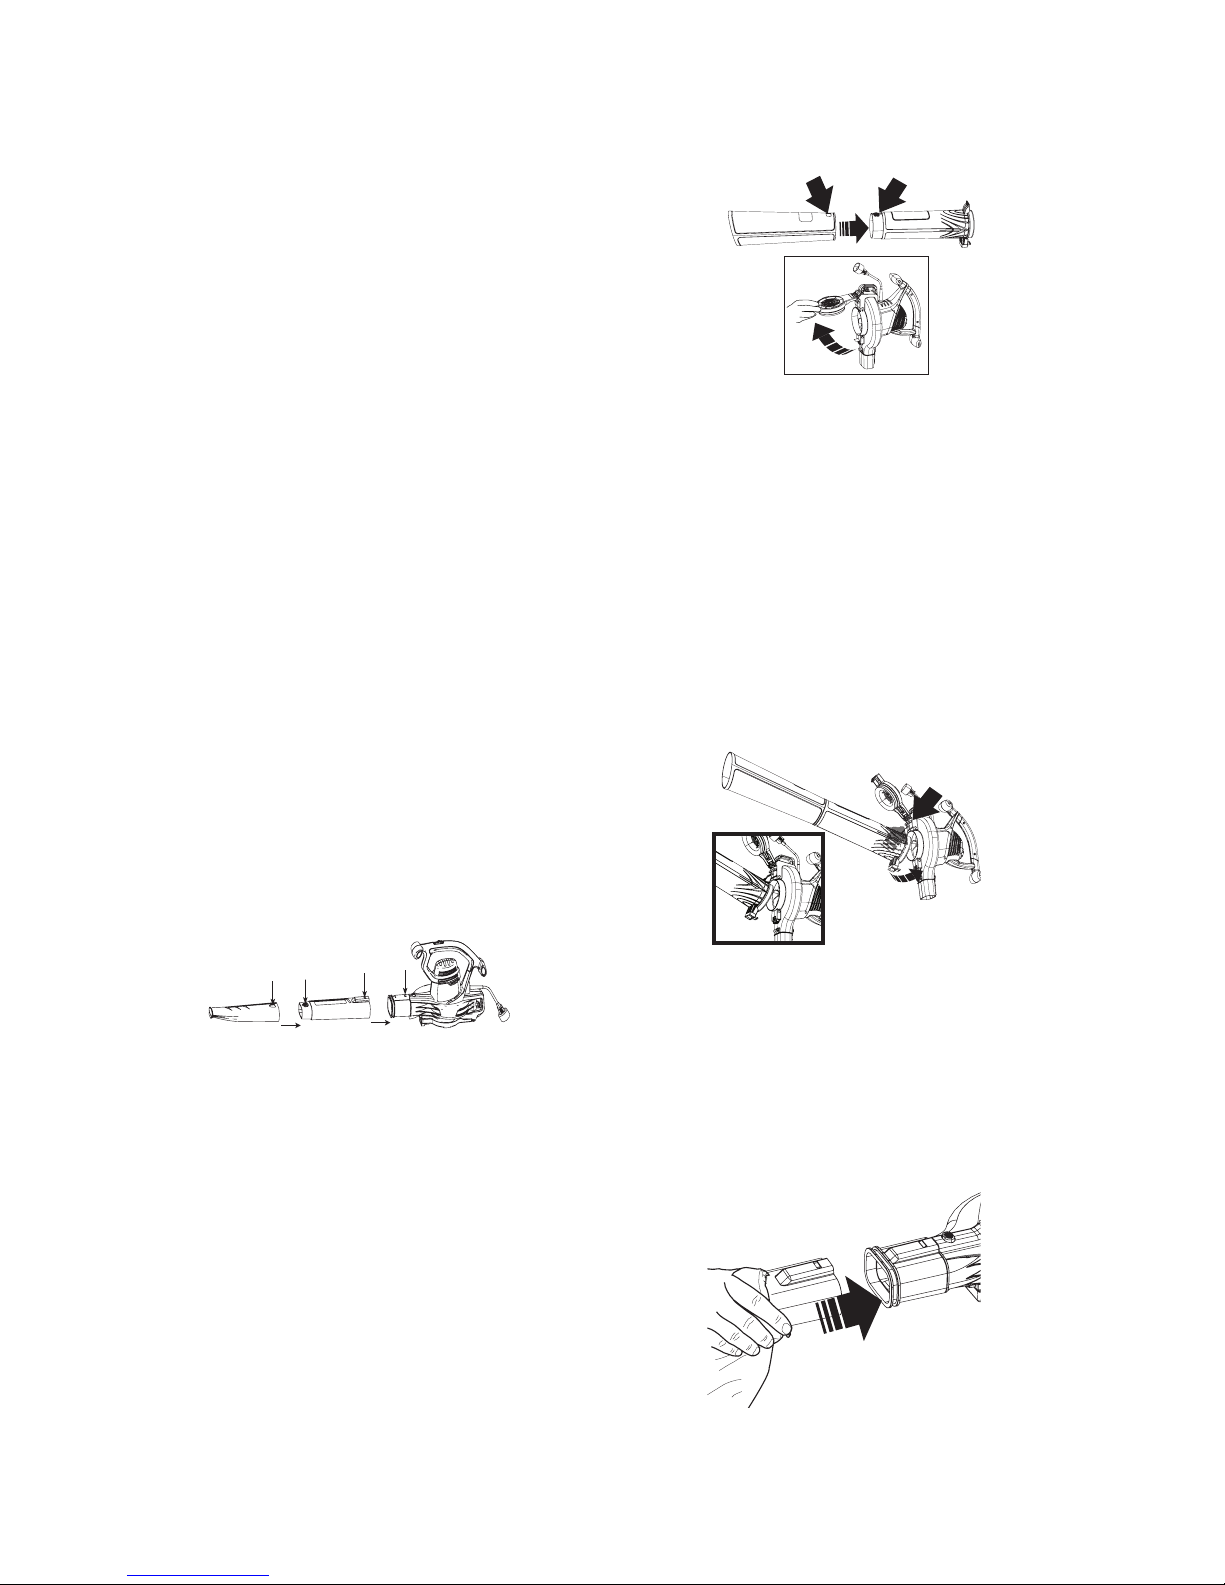
Tube assembly
• To attach the two piece blower tubes to the blower, line
up the tube with the blower housing as shown in figure
C. Push the tube into the blower housing until the lock
lever engages the lock hole in the tube.
• To remove the tube depress the lock button and slide
the tube off the housing neck.
Figure C
VACUUM MODE ASSEMBLY
Vacuum Tube Assembly
WARNING: Ensure the vacuum is
switched off and disconnected from the power supply
before attaching or removing the vacuum tube. The
vacuum tube and collection bag must be assembled
to the housing before use. The vacuum tubes must be
assembled together before use.
• Align the notches and the tabs on the two tube pieces.
(figure D)
• Push the lower tube firmly into the upper tube, until the
tabs click into place. (Never operate apart).
CAUTION: CUT HAZARD. Ensure the tube
assembly is securely seated and latched into position.
• Unlatch the fan cover from the bottom of the vacuum
housing by pressing the release tab (located near the
front of the vacuum housing) and pulling the cover
open like a lid (figure D).
Figure D
NOTE: This interlock will disconnect the electric circuit
automatically and the unit will not operate.
• Attach the vacuum tube assembly to the fan inlet on
the vacuum housing (figure E), insert the vacuum tube
support tab into the assembly slot (figure E) on the
blower housing.
• Push the lock button to lock the vacuum tube in place.
CAUTION: CUT HAZARD. `Ensure the
vacuum tube assembly is securely seated and latched
into position.
NOTE: This interlock will connect the electric circuit
automatically and the unit will operate.
Figure E
Collection Bag Assembly
CAUTION: Ensure the vacuum is switched
off and disconnected from the power supply before
attaching or removing the collection bag.
• Remove blower tube if attached.
• Push the collection bag on to the blower housing until
the lock lever engages the lock hole as shown in figure F.
Figure F
Page 7
ENGLISH
5
OPERATION
ALWAYS WEAR SAFETY GLASSES. WEAR A FILTER MASK
IF THE OPERATION IS DUSTY. USE OF RUBBER GLOVES
AND SUBSTANTIAL FOOTWEAR IS RECOMMENDED WHEN
WORKING OUTDOORS. FOR HOUSEHOLD USE ONLY.
WARNING: Cut Hazard. When turning the
tool off for tube installation or any other reason, wait 10
seconds for the fan to stop rotating before disassembly.
CAUTION: Always switch off and remove
the plug from the electrical supply when:
• Changing from blower to vacuum.
• The power supply cord has become damaged or entangled.
• You leave blower/vac unattended.
• Clearing a blockage.
• Checking, adjusting, cleaning or working on blower/vac.
Use blower/vac only in daylight or good
artificial light.
Switching on and off (Figure G)
WARNING: Use both hands to grip the
product firmly when switching on.
WARNING: The tool will continue to run
for approximately 5 seconds after it has been switched
off. Use both hands to grip the tool and let the motor
come to a complete stop before setting the tool down.
Your blower vac is fitted with a two speed switch located on
the top of the handle.
• To use in low speed, slide the switch
2
foward to
Position 1. To use in high speed, fully slide the switch
forward to Position 2.
• To turn the tool off, slide the switch all the way back to
Position 0.
Figure G
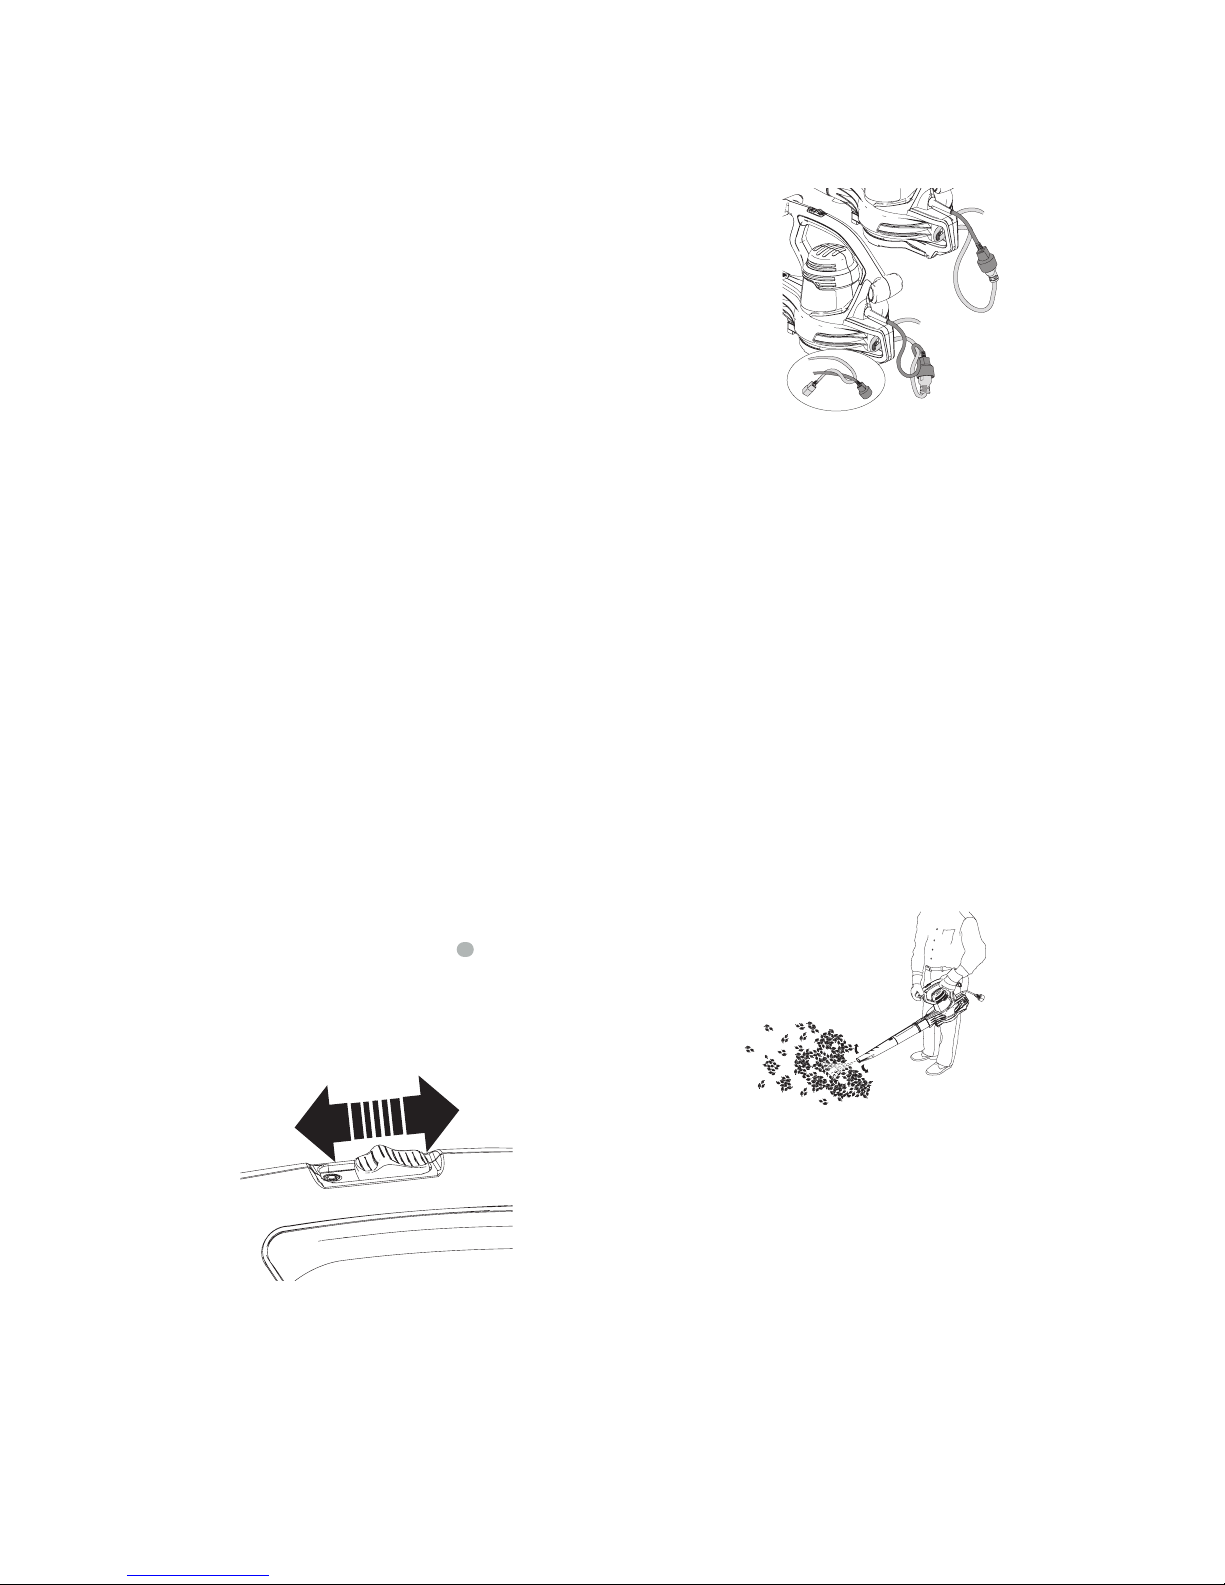
Extension cord retainer
A cord retainer is incorporated into the rear of the power
head. It can be used in two different ways:
• To use the cord retainer as shown in figure H1, insert the
extension cord into the cord retainer housing from the
side. Loop the extension cord around the retainer so it
rests in the cord retainer. Then plug the cord from the
power head into the extension cord.
• To use the cord retainer as shown in figure H2, loop the
extension cord over the power head cord and plug the two
ends into each other. Next, insert the extension cord into
the cord retainer housing from the side. Loop the extension
cord around the retainer so it rests in the cord retainer.
Figure H
H1
H2
Blower operation
CAUTION: Always wear safety glasses.
Wear a filter mask if the operation is dusty. Use
of gloves, long pants and substantial footwear is
recommended. Keep long hair and loose clothing
away from openings and moving parts. THIS BLOWER
IS FOR HOUSEHOLD USE ONLY.
CAUTION: Ensure the blower is switched
off and disconnected from the power supply before
attaching or removing the blower tubes. The blower
tube must be assembled to the housing before use.
• Hold the blower with both hands as shown in figure
I and sweep from side to side with the nozzle several
inches above the surface. Slowly advance keeping the
accumulated pile of debris in front of you.
Figure I
Vacuum operation
CAUTION: Ensure the vacuum is switched
off and disconnected from the power supply before
attaching or removing the vacuum tube. The vacuum
tube and collection bag must be assembled to the
housing before use in vacuum mode.
• Position the vacuum tube slightly above the debris/
leaves. Turn the unit on, then using a side to side
sweeping motion the debris/leaves will be sucked up
the tube, mulched and deposited into the collection
bag (figure J) .
Page 8
ENGLISH
6
CAUTION: NEVER REMOVE THE
COLLECTION BAG WITHOUT FIRST TURNING OFF AND
UNPLUGGING THE VACUUM.
As the bag fills the power of the suction will decrease. To
empty collection bag, switch off the vacuum and disconnect
tool from the power supply. Remove the collection bag
from the power head, unzip the collection bag to empty.
Re-assemble before continuing to operate.
Figure J
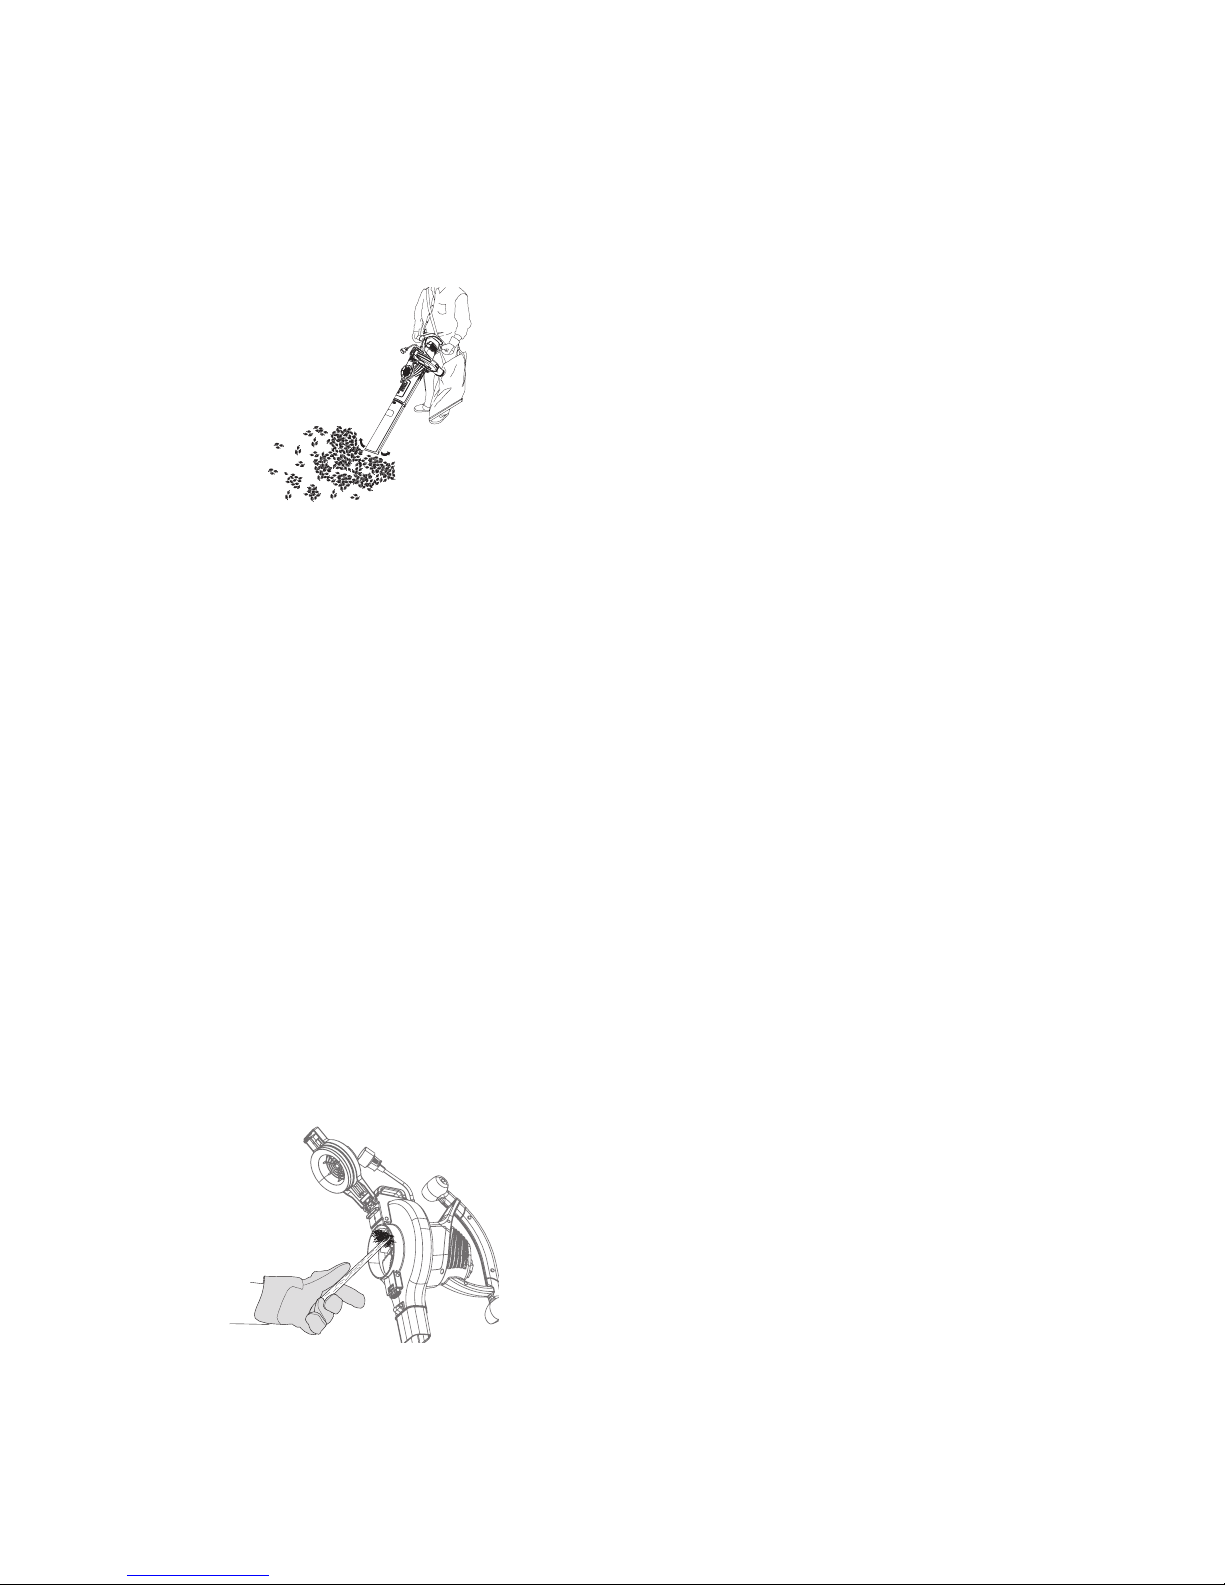
What to do if the unit jams: (Figure K)
CAUTION: TURN OFF UNIT AND
DISCONNECT TOOL FROM POWER SUPPLY.
If the unit motor stops, the fan has become jammed. If this
happens, turn the unit off and disconnect from power supply.
Remove the bag and vacuum tube. Remove the jamming
material using a small wooden stick. Do not use a metal
implement or anything, which may damage the fan or
scratch the plastic. Ensure the fan will turn by hand before
reassembling the unit.
If the unit stops picking up debris or the performance
substantially reduces it may have become clogged. Switch
the unit off and disconnect from power supply. Remove the
vacuum tube and look down the tube to ensure no debris is
blocking it. If necessary remove debris with a small wooden
stick. Do not use a metal implement or anything, which may
scratch or damage the tube. Remove the bag. If the bag is full,
empty the bag. If necessary remove any debris from around
the fan or unit outlet using a small wooden stick. Do not use
a metal implement or anything which may damage the fan
or scratch the plastic. Ensure the fan will turn by hand before
reassembling the unit.
Figure K
MAINTENANCE
Cleaning and Storage
WARNING: SHOCK HAZARD. DO NOT
POUR OR SPRAY WATER ON THE TOOL IN AN ATTEMPT
TO CLEAN.
CAUTION: TURN OFF UNIT AND
DISCONNECT TOOL FROM POWER SUPPLY.
Use only mild soap and a damp cloth to clean the tool. Never
let any liquid get inside the tool; never immerse any part of
the tool into a liquid. Clean out any clippings which may have
accumulated in the Blower/Vac. When used properly with dry
leaves the fan chamber of your Blower/Vac should remain
clean. If damp earth and debris are ingested some of the
particles may build up on the inside of the fan chamber. If this
happens the performance of the unit will decrease. This area
can be cleaned out using a wooden stick as shown in figure K
after disconnecting from the power source. Your Blower/Vac
should be stored in a dry place.
Do not store the tool on or adjacent to fertilizers or chemicals.
Such storage can cause rapid corrosion of the metal parts.
ACCESSORIES
WARNING: DO NOT use this product
with any type of accessory or attachment. Such usage
might be hazardous.
SERVICE INFORMATION
All BLACK+DECKER Service Centers are staffed with trained
personnel to provide customers with efficient and reliable power
tool service. Whether you need technical advice, repair, or
genuine factory replacement parts, contact the BLACK+DECKER
location nearest you. To find your local service location, call:
1-800-544-6986 or visit www.blackanddecker.com.
Page 9

ENGLISH
7
FULL TWO-YEAR HOME USE WARRANTY
Black & Decker (U.S.) Inc. warrants this product for two years against
any defects in material or workmanship. The defective product will
be replaced or repaired at no charge in either of two ways.
The first is to return the product to the retailer from whom
it was purchased (provided that the store is a participating
retailer). Returns should be made within the time period of the
retailer’s policy for exchanges (usually 30 to 90 days after the
sale). Proof of purchase may be required. Please check with the
retailer for their specific return policy regarding returns that
are beyond the time set for exchanges.
The second option is to take or send the product (prepaid)
to a BLACK+DECKER owned or authorized Service Center for
repair or replacement at our option. Proof of purchase may
be required. This warranty does not apply to accessories.
This warranty gives you specific legal rights and you may
have other rights which vary from state to state or province
to province. Should you have any questions, contact the
manager of your nearest BLACK+DECKER Service Center. This
product is not intended for commercial use.
LATIN AMERICA: This warranty does not apply to products
sold in Latin America. For products sold in Latin America,
check country specific warranty information contained in
the packaging, call the local company or see the website for
warranty information.
FREE WARNING LABEL REPLACEMENT: If your warning
labels become illegible or are missing, call 1-800-544-6986 for
a free replacement.
TROUBLESHOOTING
Problem Possible Cause Possible Solution
• Unit will not start. • Fan cover or vac tube • Install fan cover for blower mode or vac tube
not installed properly for vac mode.
• Cord not plugged in. • Plug tool into a working outlet.
• Circuit fuse is blown. • Replace circuit fuse. (If the product repeatedly
causes the circuit fuse to blow, discontinue use
immediately and have it serviced at a
BLACK+DECKER
service center or authorized servicer.)
• Circuit breaker is tripped. •
Replace circuit breaker.
(If the product repeatedly
causes the circuit fuse to blow, discontinue use
immediately and have it serviced at a
BLACK+DECKER
service center or authorized servicer.)
• Cord or switch is damaged. • Have cord or switch replaced at a BLACK+DECKER
service center or authorized servicer.
• Unit jammed • Debris blocking fan. •
Remove vac tube and inspect inlet/outlet for clogs.
Refer to “Cleaning and Storage Section - Maintenance”
For assistance with your product, visit our website www.blackanddecker.com for the location of the service center nearest you or call
the BLACK+DECKER help line at 1-800-544-6986.
Imported by Black & Decker (U.S.) Inc.,
701 E. Joppa Rd.
Towson, MD 21286
BlackandDecker.com
1-800-544-6986
Page 10

FRANÇAIS
8
Définitions : symboles et termes d'alarmes sécurité
Ces guides d'utilisation utilisent les symboles et termes d'alarmes sécurité suivants pour vous prévenir de situations
dangereuses et de risques de dommages corporels ou matériels.
DANGER: indique une situation dangereuse imminente qui, si elle n’est pas évitée, entraînera la mort ou des
blessuresgraves.
AVERTISSEMENT: indique une situation potentiellement dangereuse qui, si elle n’est pas évitée, pourrait entraîner la
mort ou des blessuresgraves.
ATTENTION: indique une situation potentiellement dangereuse qui, si elle n’est pas évitée, pourrait entraîner des
blessures légères oumodérées.
(Si utilisé sans aucun terme) Indique un message propre à la sécurité.
AVIS : indique une pratique ne posant aucun risque de dommages corporels mais qui par contre, si rien n’est fait
pour l’éviter, pourrait poser des risques de dommages matériels.
AVERTISSEMENT! lire
tous les avertissements de sécurité et toutes les
directives. Le non-respect des avertissements et des
directives pourrait se solder par un choc électrique, un
incendie et/ou une blessuregrave.
AVERTISSEMENT : afin de réduire le risque de
blessures, lire le mode d’emploi del’outil.
1
1. Bouton de dégagement du tube de soufflage
2
2. Interrupteur marche/arrêt
3
3. Ouverture du souffleur
4
4. Garde-ventilateur
5
5. Tube de soufflage (2 morceaux)
6
6. Tube d’aspiration (2 morceaux)
7
7. Sac collecteur
Fig. A
7
5
6
4
3
2
1
Page 11

FRANÇAIS
9
AVERTISSEMENTS DE
SAVERTISSEMENT :
IMPORTANTES MESURES
DE SÉCURITÉ
AVERTISSEMENT : POUR
RÉDUIRE LES RISQUES DE BLESSURES
ʵ Avant tout usage, s’assurer que tout utilisateur de cet
appareil lise et comprenne les directives de sécurité ainsi que
l’information comprise dans le présent manuel.
ʵ Conserver ces directives et les examiner fréquemment avant
d’utiliser l’appareil ou de donner des directives aux autres.
ʵ Ne pas diriger la zone d’évacuation de l’appareil vers soi ou des
personnes à proximité.
ʵ Éloigner les cheveux longs et les vêtements amples des
ouvertures et des pièces mobiles.
AVERTISSEMENT : Afin de réduire
les risques d’incendie, de secousses électriques ou de
blessures lorsqu’on utilise des outils électriques, il faut
toujours respecter les mesures de sécurité suivantes.
AVERTISSEMENT : Le produit
génère de la poussière qui peut renfermer des produits
chimiques. Selon l’état de la Californie, ces produits
chimiques peuvent causer le cancer ainsi que des
malformations congénitales, et ils présentent d’autres
dangers au système reproductif humain. Voici des
exemples de tels produits chimiques :
ʵ les composés d’engrais;
ʵ les composés d’insecticides, d’herbicides et de
pesticides;
ʵ l’arsenic et le chrome provenant de bois traité.
Afin de minimiser les risques, porter de l’équipement de
sécurité approuvé comme des masques antipoussières
spécialement conçu pour filtrer les particules microscopiques.
BIEN LIRE ET COMPRENDRE
TOUTES LES DIRECTIVES AVANT
D’UTILISER L’OUTIL.
AVERTISSEMENTS ET DIRECTIVES DE
SÉCURITÉ GÉNÉRALES POUR TOUS LES OUTILS
AVERTISSEMENT : Lire tous les
avertissements de sécurité et toutes les instructions.
Ne pas suivre les avertissements et instructions peut
entraîner un choc électrique, un incendie et / ou des
blessures graves.
• TOUJOURS PORTER DES PROTECTEURS OCULAIRES.
Porter de lunettes de sécurité en tout temps lorsque
l’outil est branché. Les lunettes de sécurité sont vendues
séparément aux centres de service BLACK+DECKER ou aux
ateliers d’entretien autorisés.
• NE PAS porter l’orifice de sortie de l’outil à proximité des
yeux ou des oreilles lorsque l’outil fonctionne.
• RANGER LES OUTILS NON UTILISÉS dans un endroit sec,
situé en hauteur ou fermé à clé, hors de portée des enfants.
• NE PAS DÉPASSER SA PORTÉE. Toujours demeurer dans
une position stable et garder son équilibre en tout temps.
• BIEN ENTRETENIR L’OUTIL. Garder l’outil propre
afin d’optimiser et de sécuriser le rendement. Suivre les
directives d’entretien.
• NE PAS tenter de réparer l’outil. Pour garantir la sécurité et
la fiabilité du produit, en confier les réparations, l’entretien
et les réglages à un centre de service BLACK+DECKER ou
à un atelier d’entretien autorisé utilisant uniquement des
pièces de rechange BLACK+DECKER.
• NE PAS utiliser l’outil dans des endroits où l’atmosphère
renferme des vapeurs combustibles ou explosives. Les
étincelles que produit habituellement le moteur en marche
pourraient enflammer ces produits.
• ÉVITER LES CONDITIONS AMBIANTES DANGEREUSES.
Ne pas se servir d’outils électriques dans des endroits
humides ou mouillés. Ne pas se servir de l’outil sous la pluie.
• DEMEURER VIGILANT. Travailler avec vigilance et faire preuve
de bon sens. Ne pas se servir de l’outil lorsqu’on est fatigué.
• UTILISER L’OUTIL APPROPRIÉ. Utiliser l’outil seulement
aux fins pour lesquelles il a été conçu.
• FAIRE TRÈS ATTENTION lorsqu’on travaille dans des
escaliers.
• IL NE S’AGIT PAS d’un jouet. Faire particulièrement
attention lorsqu’un enfant utilise l’outil ou qu’on s’en sert
près d’un enfant. Il est déconseillé de laisser un enfant se
servir de l’outil.
• NE PAS tenter de débloquer l’outil avant de le débrancher.
• UTILISER SEULEMENT L’OUTIL de la manière prescrite
dans le présent guide. Utiliser uniquement les accessoires
recommandés par le fabricant.
• NE RIEN insérer dans les ouvertures. Ne pas utiliser l’outil
lorsqu’une ouverture est bouchée; garder les ouvertures
exemptes de poussière, de charpie, de cheveux et de tout
ce qui peut réduire le débit d’air.
• ÉLOIGNER les cheveux, les vêtements amples, les doigts et
le corps des ouvertures ainsi que des pièces mobiles.
• ÊTRE TRÈS PRUDENT lors du nettoyage des escaliers.
• NE PAS manipuler le chargeur, notamment la fiche et les
bornes du chargeur, avec des mains mouillées.
• NE PAS CHARGER l’appareil à l’extérieur.
• NE PAS immerger l’outil, au complet ou en partie.
• NE PAS manipuler la fiche ni l’outil avec les mains mouillées.
• S’ASSURER QUE LES ENFANTS, LES OBSERVATEURS
ET LES ANIMAUX SE TROUVENT ÀUNE DISTANCE
minimale de 10mètres (30pieds) de la surface de travail
lorsqu’on démarre l’outil ou qu’on s’en sert.
Page 12

FRANÇAIS
10
• EXAMINER LA ZONE avant d’utiliser l’outil. Enlever tout
débris ou objet dur (comme des pierres, du verre, des fils)
qui peut ricocher, être éjecté ou provoquer des blessures ou
des dommages lors de l’utilisation de l’outil.
• POUR RÉDUIRE TOUT RISQUE de chocs électriques,
n'utiliser que des rallonges conçues pour l'extérieur,
comme les modèles SJW ou SJTW.
AVERTISSEMENT :
Afin de
minimiser les risques de secousses électriques, protéger
de la pluie, ne pas s’enservir sur des surfaces mouillées
et ranger àl’intérieur.
AVERTISSEMENT :
RISQUE DE
COUPURE. Arrêter et débrancher l’appareil. Attendre
au moins 10 secondes ou jusqu’à ce que le ventilateur
s’arrête complètement avant de retirer l’assemblage de
la souffleuse ou du tube d’aspiration.
Entretien des outils a double isolation
La souffleuse-aspirateur à double isolation procure une
protection supplémentaire. Dans ce type d’outil, les deux
systèmes d’isolant remplacent la mise à la terre. Il n’y a aucun
moyen de mettre l’outil àla terre et aucun système de mise
à la terre ne doit être ajouté à l’outil. L’entretien d’un outil à
double isolation exige beaucoup de soin et une excellente
connaissance du système; il ne devrait être confié qu’à un
technicien compétent. Les pièces de rechange de ce type
d’outil doivent être identiques aux pièces d’origine. Un outil
àdouble isolation porte l’inscription «DOUBLE INSULATED» ou
«DOUBLE INSULATION». Le symbole (un carré àl’intérieur d’un
carré) peut aussi figurer sur l’outil. m
Mesures de sécurité : cordons
de rallonge
AVERTISSEMENT :
pour
réduire tout risque de dommages corporels dû à une
connexion électrique lâche entre la fiche de l’appareil et
la rallonge, les rattacher fermement et à fond. Vérifier
périodiquement que la connexion est sécuritaire
pendant l’utilisation. Ne pas utiliser une rallonge dont
la connexion est lâche. Une connexion lâche pose des
risques de surchauffe et d’incendie, et augmente les
risques de brûlures.
Les outils à double isolation sont munis d’un cordon bifilaire et
ils peuvent être utilisés avec un cordon de rallonge muni de 2 ou
de 3 fils. Il faut seulement utiliser des cordons de rallonge à gaine
ronde et ils devraient être homologués par l’organisme américain
Underwriters Laboratories (U.L.) ou la CSA (au Canada). Lorsque
le cordon de rallonge est utilisé à l’extérieur, il doit être prévu à cet
effet. Tout cordon extérieur peut servir àl’intérieur.
Les cordons de rallonge doivent être faits de conducteurs de
calibre approprié (AWG ou calibre moyen de fil) par mesure
de sécurité et afin de prévenir les pertes de puissance et les
surchauffes. Le numéro de calibre du fil est inversement
proportionnel à la capacité du cordon. Ainsi, un cordon de
calibre16 a une capacité supérieure à un cordon de calibre18.
Lorsqu’il est nécessaire d’utiliser plus d’un cordon de rallonge,
veiller àce que chaque cordon ait au moins le calibre minimal.
Avant d’utiliser un cordon de rallonge, s’assurer qu’il n’y a pas
de fils dénudés ni détachés, et que l’isolant et les raccords ne
sont pas défectueux. Effectuer les réparations nécessaires ou
remplacer le cordon, le cas échéant.
• Pour réduire tout risque de déconnexion entre le cordon de
l'appareil et sa rallonge pendant l'utilisation:
i) Faire un nœud comme illustré en Figure B; ou
ii) Utiliser un dispositif de retenue de fiche, ou les
connecteurs décrits dans ce manuel. (Le guide
d'utilisation inclura également une remarque
indiquant que des dispositifs de retenue de rallonges
existent. Le nom et l’adresse du fabricant ou du
fournisseur de la marque devraient être inclus.); ou
iii) Arrimer fermement la rallonge à la fiche de l’appareil
comme illustré ou décrit dans les Instructions d’utilisation.
• Entretenir l'appareil avec soin – Vérifier les rallonges
périodiquement et les changer en cas de dommages.
Figure B
Le tableau ci-dessous permet de déterminer le calibre
minimal des cordons.
Calibre minimum pour les cordons d'alimentation
Volts
Longueur totale du cordon
d'alimentation en mètre (pieds)
120 V 7,6 (25) 15,2 (50) 30,5 (100) 45,7 (150)
240 V 15,2 (50) 30,5 (100) 61,0 (200) 91,4 (300)
Ampères
AWG
Plus que Pas plus
que
0 6 18 16 16 14
6 10 18 16 14 12
10 12 16 16 14 12
12 16 14 12 Non recommandé
Mesures de sécurité : fiche
polarisée
Afin de minimiser les risques de secousses électriques, le
produit comporte une fiche polarisée (une lame plus large
que l’autre). Il faut utiliser une rallonge polarisée appropriée,
bifilaire ou trifilaire, avec ce produit. Ce genre de fiche n’entre
que d’une façon dans une prise polarisée. S’assurer que la prise
de la rallonge comporte des fentes de dimensions appropriées.
Lorsqu’on ne peut insérer la fiche àfond dans la prise de la
rallonge, il faut tenter de le faire après avoir inversé les lames
de côté. Si la fiche n’entre toujours pas dans la prise, il faut se
procurer une rallonge appropriée. Lorsqu’on ne peut insérer la
fiche de la rallonge àfond dans la prise, il faut communiquer
avec un électricien certifié. Il ne faut pas neutraliser la fiche de
l’outil ni celle de la rallonge.
Page 13

FRANÇAIS
11
L’étiquette apposée sur votre outil peut inclure les symboles
suivants. Les symboles et leur définition sont indiqués ci-après:
V ......................... volts
Hz ....................... hertz
min ..................... minutes
or DC ...... courant continu
...................... fabrication classe I
(mis à la terre)
…/min .............. par minute
BPM .................... battements par
minute
IPM ..................... impacts par minute
RPM .................... revolutions per
minute
sfpm ................... pieds linéaires par
minute (plpm)
SPM (FPM) ......... fréquence par
minute
A ......................... ampères
W ........................ watts
or AC ........... courant alternatif
or AC/DC .... courant alternatif
ou continu
...................... fabrication classe II
(double isolation)
no ....................... vitesse à vide
n ......................... vitesse nominale
...................... borne de terre
...................... symbole
d’avertissement
..................... radiation visible
..................... protection
respiratoire
..................... protection oculaire
.....................protection auditive
..................... lire toute la
documentation
CONSERVER CES MESURES
DESCRIPTION (FIG. A)
AVERTISSEMENT : ne jamais
modifier l’outil électrique ni aucun de ses composants,
car il y a risques de dommages corporels oumatériels.
Reportez-vous en figureA au début de ce manuel pour
obtenir la liste complète descomposants.
USAGE PRÉVU
Cet aspirateur-souffleur a été conçu pour une utilisation
domestique.
Ne pas l’utiliser en milieu ambiant humide ou en présence de liquides ou de gaz inflammables.
Cet aspirateur-souffleur est un outil électrique pour les particuliers. NE PAS le laisser à la portée des enfants. Une
supervision est nécessaire auprès de tout utilisateur non
expérimenté.
ASSEMBLAGE POUR LE SOUFFLEUR
AVERTISSEMENT : S’assurer que
le souffleur est éteint et débranché de l’alimentation
avant de fixer ou de déposer les tubes de soufflage. Le
module de tube doit être monté sur le boîtier avant
d’utiliser l’appareil.
MODULE DE TUBE
• Pour fixer les tubes de soufflage en deux morceaux au
souffleur, aligner le tube sur le boîtier du souffleur comme
le montre la figure C. Enfoncer ensuite le tube dans le
boîtier de manière à ce que le levier de verrouillage
s’engage dans le trou de blocage dans le tube.
• Pour déposer le tube, enfoncer le bouton de
verrouillage et glisser le tube hors du col du boîtier.
Figure C
ASSEMBLAGE POUR LE MODE ASPIRATEUR
Module tube d’aspiration
AVERTISSEMENT : S’assurer que
le souffleur est éteint et débranché de l’alimentation.
Le tube d’aspiration et le sac collecteur doivent être
assemblés sur le boîtier avant d’utiliser l’appareil. Les
segments du tube d’aspiration doivent être assemblés
avant d’utiliser l’appareil.
• Aligner les coches et les saillies des tubes en deux
morceaux (figure D).
• Insérer fermement le tube inférieur dans le tube supérieur
jusqu’à ce que les deux saillies s’enclenchent. (Ne pas faire
fonctionner l’appareil si les deux tubes sont séparés.)
MISE EN GARDE : RISQUE DE
COUPURE. Assurez-vous que l’ensemble du tube est bien
en place et solidement verrouillé.
• • Enfoncer la languette de dégagement pour retirer le
couvercle de la soufflerie logé sous le boîtier du souffleur
(à l’avant du boîtier) et tirer sur le couvercle (figure D).
Figure D
REMARQUE : Cet interrupteur d’interdiction coupe le circuit
électrique automatiquement, ce qui empêche l’appareil de
fonctionner.
• Fixer le module de tube d’aspiration à la bouche de la
soufflerie sur le boîtier du souffleur (figure E) et insérer la
languette de soutien du tube d’aspiration dans la fente
d’assemblage (figure C1) sur le boîtier du souffleur.
• Appuyer sur le bouton de verrouillage pour verrouiller le
tube d’aspiration en place.
MISE EN GARDE : RISQUE DE
COUPURE. `Assurez-vous que l’ensemble du tube de
l’aspirateur est bien en place et solidement verrouillé.
REMARQUE : Cet interrupteur d’interdiction branche
le circuit électrique automatiquement, ce qui permet à
l’appareil de fonctionner.
Page 14

FRANÇAIS
12
Figure E
MODULE DE SAC COLLECTEUR
MISE EN GARDE :
S’assurer que le
souffleur est éteint et débranché de l’alimentation avant
de fixer ou de déposer le sac collecteur.
• Retirer le tube de soufflage s’il est fixé à l’appareil.
• Enfoncer le sac collecteur sur le boîtier du souffleur de
manière à ce que le levier de verrouillage s’engage dans
le trou de blocage comme le montre la figure F.
Figure F
UTILISATION
TOUJOURS PORTER DES LUNETTES DE SÉCURITÉ.
EN PRÉSENCE DE POUSSIÈRES, PORTER UN MASQUE
FILTRANT DE TYPE « A ». LORS DE TRAVAUX À
L’EXTÉRIEUR, PORTER DES GANTS DE CAOUTCHOUC
ET DES CHAUSSURES ROBUSTES. POUR UN USAGE
DOMESTIQUE SEULEMENT.
AVERTISSEMENT :
RISQUE
DE COUPURE.
Attendre 10 secondes après la mise
hors fonction de l’appareil pour que le ventilateur
s’immobilise avant de démonter, d’installer un tube ou
pour toute autre opération sur l’outil.
MISE EN GARDE :
Toujours
éteindre l’appareil et le débrancher de
l’alimentation secteur :
• Pour convertir l’appareil de souffleur à aspirateur;
• Lorsque le cordon d’alimentation s’enchevêtre ou est
endommagé;
• Lorsque l’appareil est laissé sans surveillance;
• Lors du nettoyage d’un bourrage;
• Lors de la vérification, du réglage, du nettoyage ou de
tout travail sur le souffleur-aspirateur.
UTILISER LE SOUFFLEUR-
ASPIRATEUR UNIQUEMENT SOUS
LA LUMIÈRE DU JOUR OU SOUS UN
BON ÉCLAIRAGE ARTIFICIEL.
Commutateur de marche/arrêt (figure G)
AVERTISSEMENT :
SE SERVIR DES
DEUX MAINS POUR SAISIR FERMEMENT LE PRODUIT AU
MOMENT DE LE METTRE EN MARCHE.
AVERTISSEMENT :
L’outil
continuera de fonctionner environ 5 secondes après la
mise hors tension. Tenir l’outil des deux mains et laisser le
moteur s’arrêter complètement avant de déposer l’outil.
Ce souffleur-aspirateur est muni d’un commutateur à deux vitesses
logé sur le dessus la poignée
.
• Pour l’utiliser en vitesse réduite, pousser l’interrupteur (2)
vers l’avant en position 1. Pour l’utiliser en haute vitesse,
pousser à fond l’interrupteur vers l’avant en position 2.
• Pour arrêter l'outil, repousser à fond l’interrupteur vers
l’arrière en position 0.
Figure G
DISPOSITIF DE RETENUE DE LA RALLONGE
Un dispositif de retenue est intégré à l’outil, à l’arrière du bloc
moteur. Il s’utilise de deux façons :
• Pour utiliser le dispositif de retenue du cordon comme
l’illustre la figure H1, insérer la rallonge sur le côté du
boîtier du dispositif de retenue. Enrouler la rallonge
autour du dispositif de retenue du cordon de manière à
ce qu’elle repose dans le dispositif de retenue. Brancher
ensuite le cordon d’alimentation de l’ensemble moteur
à la rallonge.
• Pour utiliser le dispositif de retenue du cordon comme
l’illustre la figure H2, enrouler la rallonge sur le cordon
de l’ensemble oteur, puis raccorder les deux extrémités.
Ensuite, insérer la rallonge sur le côté du boîtier du
dispositif de retenue du cordon. Enrouler la rallonge
autour du dispositif de retenue du cordon de manière à
ce qu’elle repose dans le dispositif de retenue.
Figure H
H1
H2
Page 15

FRANÇAIS
13
Fonctionnement de mode souffleur
MISE EN GARDE :
Toujours porter
des lunettes de sécurité. En présence de poussières, porter
un masque filtrant. Nous vous recommandons de porter
des gants, des pantalons longs et de bonnes chaussures.
Éloigner les cheveux longs et les vêtements amples des
ouvertures et des pièces mobiles. CETTE BALAYEUSE EST
PRÉVUE POUR UN USAGE DOMESTIQUE SEULEMENT.
MISE EN GARDE :
S’assurer que
le souffleur est éteint et débranché de l’alimentation
avant de fixer ou de déposer les tubes de soufflage. Le
tube de soufflage doit être monté sur le boîtier avant
d’utiliser l’appareil.
• Tenir le souffleur d’une main comme le montre la figure
I, puis balayer d’un côté à l’autre en appliquant la buse à
plusieurs pouces au-dessus de la surface dure. Avancer
lentement en maintenant la pile de débris devant vous.
Figure I
Fonctionnement de mode aspirateur
MISE EN GARDE :
S’assurer que
le souffleur est éteint et débranché de l’alimentation.
Le tube d’aspiration et le sac collecteur doivent être
assemblés sur le boîtier avant d’utiliser l’appareil.
• Placer le tube légèrement au-dessus des débris et des
feuilles. Allumer l’appareil. Exercer ensuite un mouvement
de balayage latéral pour aspirer les débris et les feuilles
dans le tube. Ils seront pulvérisés et déposés dans le sac
collecteur (figure J).
MISE EN GARDE :
NE JAMAIS
RETIRER LE SAC À BANDOULIÈRE SANS D’ABORD METTRE
L’ASPIRATEUR HORS FONCTION ET DE LE DÉBRANCHER.
Au fur et à mesure que le sac se remplit, la puissance de succion
baisse. Pour vider le sac collecteur, éteindre le produit. Déposer le
sac collecteur du bloc moteur. Vider ensuite le sac en ouvrant la
fermeture éclair. Fermer le sac avant de réutiliser l’appareil.
Figure J
QUE FAIRE SI L’APPAREIL SE COINCE :
(FIGURE K)
AVERTISSEMENT :
s’assurer
que l’appareil est éteint et débranché de sa source
d’alimentation.
Si le moteur de l’appareil s’arrête, cela signifie que le ventilateur
s’est coincé. Si cela se produit, éteindre l’appareil et le débrancher
de la prise de courant. Déposer le sac et le tube d’aspiration.
Retirer la matière coincée à l’aide d’un petit bâton de bois. Ne
pas utiliser d’outil métallique ou d’objet pouvant endommager le
ventilateur ou égratigner le plastique. S’assurer que le ventilateur
tourne manuellement avant de réassembler l’appareil.
Si l’appareil cesse de ramasser les débris ou si le rendement
baisse radicalement, il peut être bouché. Éteindre l’appareil et le
débrancher de la prise de courant. Déposer le tube d’aspiration,
puis l’examiner pour s’assurer qu’aucun débris ne le bloque.
S’il y a lieu, retirer le débris à l’aide d’un petit bâton de bois. Ne
pas utiliser d’outil métallique ou d’objet pouvant égratigner ou
endommager le tube. Déposer le sac. Si le sac est plein, le vider.
S’il y a lieu, retirer les débris entourant le ventilateur ou la sortie
de l’appareil à l’aide d’un petit bâton de bois. Ne pas utiliser
d’outil métallique ou d’objet pouvant endommager le ventilateur
ou égratigner le plastique. S’assurer que le ventilateur tourne
manuellement avant de réassembler l’appareil.
Figure K
ENTRETIEN
NETTOYAGE ET RANGEMENT
MISE EN GARDE :
RISQUE DE
CHOC ÉLECTRIQUE. NE PAS VERSER DE L’EAU SUR
L’OUTIL NI LE VAPORISER POUR LE NETTOYER.
MISE EN GARDE :
METTRE L’OUTIL
HORS TENSION ET LE DÉBRANCHER.
Utiliser seulement du savon doux et un chiffon humide pour
nettoyer l’outil. Enlever tout brin accumulé dans l’outil. Lorsqu’on
s’en sert dans des conditions normales avec des feuilles sèches, la
chambre du ventilateur de l’outil devrait rester propre. Lorsqu’on
aspire de la terre ou des débris humides, la chambre du ventilateur
peut se salir. Le cas échéant, le rendement de l’outil diminue. Une
fois l’appareil débranché de la prise électrique, il est possible de
nettoyer cette zone au moyen d’un bâton de bois comme cela est
montré à la figure 16. Il faut ranger l’outil dans un endroit sec.
Ne pas ranger l’outil sur des produits chimiques ni sur des engrais,
ou près de ceux-ci, au risque de provoquer la corrosion rapide des
pièces métalliques de l’outil.
Page 16

FRANÇAIS
14
Accessoires
AVERTISSEMENT : NE
PAS utiliser le taille-haie avec un accessoire. Une
telle utilisation peut être dangereuse.
Information sur les réparations
Tous les centres de réparation Black+Decker sont dotés de
personnel qualifié en matière d’outillage électrique; ils sont donc
en mesure d’offrir à leur clientèle un service efficace et fiable. Que
ce soit pour un avis technique, une réparation ou des pièces de
rechange authentiques installées en usine, communiquer avec
l’établissement Black+Decker le plus près de chez vous. Pour
trouver l’établissement de réparation de votre région, composer le
numéro suivant : 1-800-544-6986 ou consulter le site
www.blackanddecker.com
Garantie Limitèe De Deux Ans
Black & Decker (É.-U.) Inc. garantit que le produit est
exempt de défauts de matériau et de fabrication pendant
deux (2) ans à partir de la date d’achat, à condition que
le produit soit utilisé en milieu domestique. La présente
garantie limitée ne couvre pas les défaillances provoquées
par un abus, un dommage accidentel ou des réparations
ou tentatives de réparations effectuées par toute autre
personne que le personnel de BLACK+DECKER et de ses
centres de réparation agréés. Un produit défectueux qui
remplit les conditions stipulées par la présente garantie
sera remplacé ou réparé sans frais d’une des deux façons
suivantes : La première façon consiste en un échange chez
le détaillant où le produit a été acheté (à la condition que
le magasin soit un détaillant participant).Tout retour doit
se faire durant la période correspondant à la politique
d’échange du détaillant. Une preuve d’achat peut être
requise. Prière de vérifier la politique de retour du détaillant
au sujet des délais impartis pour les retours ou les échanges.
La deuxième option est d’apporter ou d’envoyer le produit
(en port payé) à un centre de réparation agréé ou à un
centre de réparation BLACK+DECKER pour faire réparer ou
échanger le produit, à la discrétion de BLACK+DECKER. Une
preuve d’achat peut être requise. Les centres de réparation
de BLACK+DECKER et les centres de réparation agréés en
ligne sur www.blackanddecker.com.
Cette garantie ne s’applique pas aux accessoires. Cette
garantie accorde des droits légaux propres au propriétaire de
l’outil. Ce dernier pourrait avoir d’autres droits selon l’État ou
la province qu’il habite. Pour toute question, communiquer
avec le directeur du centre de réparation BLACK+DECKER le
plus près. Ce produit n’est pas destiné à un usage commercial.
L’usage commercial de ce produit annule par conséquent
cette garantie. Toutes autres garanties, expresses ou
implicites, sont déclinées par la présente.
REMPLACEMENT GRATUIT DES ÉTIQUETTES
D’AVERTISSEMENT : si les étiquettes d’avertissement
deviennent illisibles ou sont manquantes, composer le
1-800-544-6986 pour en obtenir le remplacement gratuit.
Page 17

FRANÇAIS
15
DÉPANNAGE
Problème Cause possible Solution possible
• L’appareil refuse de • Le couvercle de la • Mettre le couvercle de la soufflerie
démarrer. soufflerie ou le tube en position ou le tube d’aspiration
d’aspiration n’est pas en mode aspiration.
installé.
• Cordon d’alimentation • Brancher l’outil dans une prise
non branché. qui fonctionne.
• Le fusible du circuit est • Remplacer le fusible du circuit.
grillé. (Si le produit fait le fusible du circuit,
arrêter immédiatement d’utiliser le
produit et le faire réparer dans un
centre de réparation BLACK+DECKER
ou un centre de réparation autorisé.)
• Le disjoncteur est • Remettre le disjoncteur à zéro . (Si
déclenché. le produit fait déclencher de façon
répétée le disjoncteur, arrêter
immédiatement d’utiliser le produit
et le faire réparer dans un centre de
réparation BLACK+DECKER ou un
centre de réparation autorisé.)
• Le cordon d’alimentation • Faire remplacer le cordon ou
ou la prise de courant est l’interrupteur au centre de
endommagé(e). réparation BLACK+DECKER ou à un
centre de réparation autorisé.
• L’appareil est coincé ou • Des débris bouchent • Débrancher le cordon
bourré. l’entrée, la sortie d’alimentation. Retirer le tube de
ou le ventilateur. l’aspirateur. Se reporter à la
rubrique « Nettoyage et rangement
- Entretien »
Pour obtenir de l’aide avec l’outil, consulter notre site Web www.blackanddecker.com
pour l’emplacement du centre de réparation le plus près ou communiquer avec l’assistance
BLACK+DECKER au 1-800-544-6986.
Importé par Black & Decker (U.S.) Inc.,
701 E. Joppa Rd.
Towson, MD 21286
BlackandDecker.com
1-800-544-6986
Page 18

ESPAÑOL
16
¡ADVERTENCIA! Lea todas las advertencias de
seguridad e instrucciones. El incumplimiento
de las advertencias e instrucciones puede provocar
descargas eléctricas, incendios o lesionesgraves.
ADVERTENCIA: Para reducir el riesgo de lesiones, lea
el manual deinstrucciones.
1
Botón de liberación del tubo soplador
2
Interruptor de encendido/apagado
3
Abertura para el soplador
4
Cubierta del ventilador
5
Tubo soplador (2 piezas)
6
Tubo aspirador (2 piezas)
7
Bolsa de recolección
Definiciones: Símbolos y palabras de alerta de seguridad
Este manual de instrucciones utiliza los siguientes símbolos y palabras de alerta de seguridad para alertarle de situaciones
peligrosas y del riesgo de lesiones corporales o daños materiales.
PELIGRO: Indica una situación de peligro inminente que, si no se evita, provocará la muerte o
lesionesgraves.
ADVERTENCIA: Indica una situación de peligro potencial que, si no se evita, podría provocar la
muerte o lesionesgraves.
ATENCIÓN: Indica una situación de peligro potencial que, si no se evita, posiblemente provocaría
lesiones leves omoderadas.
(Utilizado sin palabras) indica un mensaje de seguridad relacionado.
AVISO: Se refiere a una práctica no relacionada a lesiones corporales que de no evitarse puede resultar en daños a
la propiedad.
Fig. A
7
5
6
4
3
2
1
Page 19

ESPAÑOL
17
ADVERTENCIAS E INSTRUCCIONES
IMPORTANTES DE SEGURIDAD
ADVERTENCIA: PARA
REDUCIR EL RIESGO DE LESIONES:
• Antes de todo uso, asegúrese de que todos los que utilicen
esta unidad lean y comprendan todas las instrucciones de
seguridad y demás información contenida en este manual.
• Conserve estas instrucciones y revíselas con frecuencia
antes del uso y al instruir a otras personas.
• No apunte la descarga de la unidad hacia usted mismo o
hacia personas a su alrededor.
• Mantenga el cabello largo y la ropa holgada lejos de las
aberturas y las piezas en movimiento.
ADVERTENCIA: Al utilizar
una herramienta eléctrica, siempre deben tomarse
precauciones básicas de seguridad para reducir el
riesgo de incendios, descargas eléctricas y lesiones
personales, incluidas las siguientes:
ADVERTENCIA: Parte del
polvo creado por este producto contiene sustancias
químicas reconocidas por el Estado de California
como causantes de cáncer, defectos de nacimiento u
otros problemas reproductivos. Algunos ejemplos de
estas sustancias químicas son:
- compuestos en los fertilizantes
- compuestos en los insecticidas, herbicidas y
pesticidas
- arsénico y cromo de la madera con tratamiento
químico
Para reducir su exposición a estas sustancias químicas, use
equipos de seguridad aprobados, como máscaras contra
el polvo que estén diseñadas especialmente para filtrar
partículas microscópicas.
LEA Y COMPRENDA TODAS LAS
INSTRUCCIONES ANTES DEL USO.
NORMAS GENERALES DE SEGURIDAD
• SIEMPRE UTILICE PROTECCIÓN EN LOS OJOS – Utilice
gafas de seguridad en todo momento en el que esta
herramienta esté en uso. Las gafas de seguridad están
a su disposición con costo extra en el Centro de Servicio
BLACK+DECKER de su comunidad o en estaciones de
servicio autorizado.
• NO coloque la salida del barredor cerca de sus ojos u oídos
cuando esté en operación.
• GUARDE LAS UNIDADES QUE NO EMPLEE. Cuando no
utilice la unidad, ésta deberá guardarse en un lugar seco y
elevado o bajo llave, fuera del alcance de los niños.
• NO SE SOBREEXTIENDA. Conserve siempre bien
apoyados los pies así como el equilibrio.
• CUIDE LA UNIDAD. Conserve limpia la unidad para
que funcione mejor y de manera más segura. Siga las
instrucciones para el mantenimiento apropiado.
• NO
intente reparar el barredor. Para garantizar la seguridad
y la confiabilidad del producto, las reparaciones el
mantenimiento y los ajustes deben ser realizados por centros
de servicio BLACK+DECKER u otras organizaciones de servicio
autorizado, que utilicen siempre refacciones BLACK+DECKER.
• NO opere el barredor en atmósferas gaseosas o explosivas.
Los motores en estas unidades producen chispas en
condiciones normales, y estas chispas pueden originar la
ignición de los vapores.
• EVITE CONDICIONES AMBIENTALES PELIGROSAS – No
use herramientas eléctricas en lugares mojados o inundados.
• ESTÉ ALERTA – Concéntrese en lo que esté haciendo. Utilice
el sentido común. No opere la herramienta si está cansado.
• UTILICE LA UNIDAD ADECUADA – No emplee esta unidad
para ningún trabajo que no sea para el que está diseñada.
• TENGA MUCHO CUIDADO cuando limpie en escalones.
• NO deje el aparato cuando esté conectado. Desconéctelo
de la toma de corriente cuando no esté en uso y antes de
darle servicio.
• NO permita que se utilice como juguete. Se requiere
atención cercana cuando se utilice por niños o cerca de
ellos. No se recomienda para ser usada por niños.
• NO intente limpiar la unidad sin antes retirar la batería.
• ÚSESE SOLAMENTE como se describe en este manual.
Solamente utilice los dispositivos recomendados por el fabricante.
• NO coloque ningún objeto en las aberturas. No se use con
ninguna abertura bloqueada; consérvelas libres de polvo,
pelusas y cualquier objeto que pueda reducir el flujo de aire.
• CONSERVE cabello, ropas flojas, dedos y demás partes del
cuerpo alejados de aberturas y partes móviles.
• TENGA MUCHO CUIDADO al limpiar en escaleras.
• NO manipule el cargador, incluidos el enchufe y los
terminales del mismo, con las manos húmedas.
• NO sumerja ninguna parte de la unidad en ningún líquido.
• NO maneje la clavija ni otra parte de la unidad con las
manos húmedas.
• CONSERVE A LOS NINOS, ESPECTADORES Y
ANIMALES ALEJADOS del área de trabajo, a un mínimo
de 10 metros cuando encienda u opere la unidad.
• REVISE EL ÁREA antes de usar la unidad. Elimine todos
los objetos duros como rocas, vidrios, alambres, etc.,
que puedan salir despedidos y por consiguiente, causar
lesiones durante la operación.
• PARA REDUCIR EL RIESGO de descarga eléctrica, usar
sólo con un alargador diseñado para uso en exterior,
como por ejemplo uno del tipo SJW o SJTW.
ADVERTENCIA: Para
disminuir el riesgo de choque eléctrico, no se exponga
a la lluvia, no se use sobre superficies mojadas.
Guárdese bajo techo.
Page 20

ESPAÑOL
18
ADVERTENCIA: peligro de
corte. Apague y desconecte la unidad, después, espere
a que el ventilador se detenga o al menos 10 segundos
antes de desmontar los subensambles de aspirado o
del soplador.
Servicio a aparatos con doble
aislamiento
Su Soplador/Aspiradora cuenta con doble aislamiento para
brindarle protección añadida. En los aparatos con doble
aislamiento, se cuenta con dos sistemas de aislamiento
en lugar de conexión a tierra. No se proporciona ningún
medio de aterrizaje en un aparato con doble aislamiento,
ni se requiere añadirle ninguno. El servicio a aparatos
con doble aislamiento requiere de cuidado extremo y de
conocimiento del sistema, y debe ser efectuado solamente
por personal de servicio calificado. Las piezas de repuesto
para aparatos con doble aislamiento deben ser idénticas
a las que reemplazan. Los aparatos con doble aislamiento
están marcados con las palabras “doble aislamiento”. El
símbolo (un cuadro dentro de otro) puede estar también
marcado en el aparato.
Reglas e instrucciones de
seguridad: Cables de extension
ADVERTENCIA: Para
reducir el riesgo de lesiones corporales debidas a
una conexión eléctrica suelta entre el enchufe del
aparato y el alargador, inserte firme y totalmente
el enchufe del aparato al alargador. Compruebe
periódicamente la conexión mientras el aparato esté
en funcionamiento para asegurar que esté totalmente
conectado. No use un alargador que proporcione una
conexión suelta. Una conexión suelta puede resultar
en un sobrecalentamiento o incendio y aumenta el
riesgo de quemaduras.
Las herramientas con doble aislamiento tienen cables con dos
líneas y pueden utilizarse con extensiones de 2 o de 3 líneas.
Solamente deben usarse extensiones con cubierta cilíndrica,
y le recomendamos que estén aprobadas por Underwriters
Laboratories (U.L.) (NOM en México). Si la extensión se
empleará a la intemperie, deberá ser adecuada para ello.
Cualquier extensión destinada para uso a la intemperie se
puede utilizar para trabajar bajo techo.
Una extensión debe contar con el calibre adecuado (AWG o
American Wire Gauge) por seguridad, y para evitar pérdida
de potencia y sobrecalentamiento. Mientras menor sea el
número, mayor será la capacidad del cable, por ejemplo,
un cable de calibre 16 tiene mayor capacidad que uno
de calibre 18. Cuando emplee más de una extensión para
alcanzar la longitud total, asegúrese que cada extensión
contenga por lo menos el calibre mínimo requerido. Antes
de utilizar un cable de extensión, revíselo en busca de
alambres flojos o expuestos, aislamiento dañado y uniones
defectuosas. Haga las reparaciones necesarias o reemplace
el cable en caso necesario.
Para determinar el calibre mínimo requerido para el cable,
consulte la tabla que sigue:
• Para reducir el riesgo de desconexión del cable del
aparato del alargador durante el funcionamiento:
i) Haga un nudo como se muestra en la figura B o
ii) Use una de las correas de retención de la toma del
enchufe o uno de los conectores que se describen
en este manual. (El manual también incluirá una
declaración que indica que se dispone de dispositivos
para sujetar los alargadores. Se incluirá el nombre y la
dirección del fabricante o del distribuidor de la marca.); o
iii) Asegure el alargador al enchufe del aparato como se
muestra o se describe en las Instrucciones de operación.
• Mantenga el aparato con cuidado – Inspeccione los
alargadores periódicamente y cámbielos si están dañados.
Figure B
Para determinar el calibre mínimo requerido para
el cable, consulte la tabla que sigue:
Calibre mínimo de conjuntos de cables
Voltios
Longitud total del cable en pies
(metros)
120 V 25 (7,6) 50 (15,2) 100 (30,5) 150 (45,7)
240 V 50 (15,2) 100 (30,5) 200 (61,0) 300 (91,4)
Amperaje
nominal
AWG
Más de Más de
0 6 18 16 16 14
6 10 18 16 14 12
10 12 16 16 14 12
12 16 14 12 Not Recommended
Advertencias e instrucciones de
seguridad: Clavija polarizada
Este equipo cuenta con una clavija polarizada (con una pata
más ancha que la otra) para reducir el riesgo de choque
eléctrico. El equipo debe utilizarse con una extensión adecuada
de 2 o 3 cables. Las conexiones polarizadas solamente ajustan
de una manera. Asegúrese que la conexión hembra de la
extensión tenga una ranura grande y una más pequeña. Si la
clavija no se ajusta completamente a la extensión, inviértala.
Si aún así no ajusta, consiga una extensión adecuada. Si la
extensión no se ajusta por completo a la toma de corriente
comuníquese con un electricista calificado para que le instale
la toma de corriente adecuada. Por ningún motivo cambie la
clavija en la herramienta o en la extensión de ninguna manera.
La etiqueta de su herramienta puede incluir los siguientes
símbolos. A continuación se indican los símbolos y
susdefiniciones:
V ......................... voltios
Hz ....................... hertz
min ..................... minutos
or DC ...... direct current
...................... Construcción de
Clase I (tierra)
Page 21

ESPAÑOL
19
…/min .............. por minuto
BPM .................... golpes por minuto
IPM ..................... impactos por
minuto
RPM .................... revoluciones por
minuto
sfpm ................... pies de superficie
por minuto
SPM .................... pasadas por
minuto
A ......................... amperios
W ........................ vatios
or AC ........... corriente alterna
or AC/DC .... corriente alterna
o directa
...................... Construcción de
Clase II (doble
aislamiento)
no ....................... velocidad sin carga
n ......................... velocidad nominal
...................... terminal de
conexión a tierra
...................... símbolo de
advertencia de
seguridad
..................... radiación visible
..................... protección
respiratoria
..................... protección ocular
.....................protección auditiva
..................... lea toda la
documentación
CONSERVE ESTAS
INSTRUCCIONES
COMPONENTES (FIG. A)
ADVERTENCIA: Nunca
modifique la herramienta eléctrica, ni tampoco
ninguna de sus piezas. Podría producir lesiones
corporales odaños.
Consulte la Figura A al principio de este manual para
obtener una lista completa de loscomponentes.
USO DEBIDO
Este soplador aspirador está diseñado para aplicaciones
residenciales.
No debe usarse en condiciones húmedas ni en presencia de
líquidos o gases inflamables.
Este soplador aspirador es una herramienta eléctrica
residencial. No permita que los niños toquen la herramienta.
Si el operador no tiene experiencia utilizando esta
herramienta, deberá ser supervisado.
ENSAMBLAJE EN MODO DE SOPLADORA
ADVERTENCIA: Asegúrese
de que el soplador esté apagado y desconectado de
la fuente de alimentación antes de instalar o quitar
los tubos sopladores. El ensamblaje del tubo debe
instalarse en la carcasa antes del uso.
ENSAMBLAJE DEL TUBO
• Para instalar el tubo soplador de dos piezas en el soplador,
alinee el tubo con la carcasa del soplador como se
muestra en la figura C. Empuje el tubo dentro de la carcasa
del soplador hasta que la palanca de bloqueo encaje en el
orificio de bloqueo en el tubo.
• Para quitar el tubo oprima el botón de bloqueo y deslice el
tubo fuera del cuello de la carcasa.
Figure C
ENSAMBLAJE EN MODO DE ASPIRADORA
Ensamblaje del tubo de aspirado
ADVERTENCIA: Asegúrese
de que el aspirador esté apagado y desconectado de
la fuente de alimentación antes de instalar o quitar
los tubos aspiradores. El tubo aspirador y la bolsa de
recolección deben ensamblarse en la carcasa antes
del uso. Los tubos aspiradores deben ensamblarse
antes del uso.
• Alinee las muescas y las lengüetas de las dos piezas del
tubo (figura D).
• Empuje firmemente el tubo inferior dentro del tubo
superior, hasta que las lengüetas encajen en su lugar
produciendo un clic. (Nunca los haga funcionar separados).
PRECAUCIÓN:RIESGO DE
CORTE. Verifique que el ensamblaje del tubo esté
correctamente asentado y afirmado en su posición.
• Abra la cubierta del ventilador desde la parte inferior de la
carcasa del soplador oprimiendo la lengüeta de liberación
(ubicada cerca de la parte delantera de la carcasa del
soplador) y tirando de la cubierta para abrirla como una
tapa (figura D).
Figure D
NOTA: Este interbloqueo desconectará automáticamente el
circuito eléctrico y la unidad no funcionará.
• Instale el ensamblaje del tubo aspirador en la entrada del
ventilador de la carcasa del soplador (figura E), inserte
la lengüeta de soporte del tubo aspirador dentro de la
ranura del ensamblaje (figura E) de la carcasa del soplador.
• Oprima el botón de bloqueo para bloquear el tubo
aspirador en su lugar.
PRECAUCIÓN: RIESGO DE
CORTE. `Verifique que el ensamblaje del tubo de
vacío esté correctamente asentado y afirmado en su
posición.
NOTA: Este interbloqueo conectará automáticamente el
circuito eléctrico y la unidad funcionará.
Page 22

ESPAÑOL
20
Figure E
ENSAMBLAJE DE LA BOLSA DE
RECOLECCIÓN
PRECAUCIÓN: Asegúrese de
que el soplador esté apagado y desconectado de la
fuente de alimentación antes de instalar o quitar la
bolsa de recolección.
• Si está instalado, quite el tubo soplador.
• Empuje la bolsa de recolección sobre la carcasa del
soplador hasta que la palanca de bloqueo encaje en el
orificio de bloqueo como se muestra en la figura F.
Figure F
OPERACIÓN
UTILICE SIEMPRE ANTEOJOS DE SEGURIDAD. UTILICE
UNA MÁSCARA CON FILTRO SI LA OPERACIÓN
PRODUCE POLVILLO. SE RECOMIENDA UTILIZAR
GUANTES DE GOMA Y CALZADO CERRADO DE
MATERIAL RESISTENTE AL TRABAJAR AL AIRE LIBRE.
PARA USO DOMÉSTICO SOLAMENTE.
ADVERTENCIA: peligro
de corte. Al apagar la herramienta para instalar
los tubos o por cualquier otro motivo, espere 10
segundos hasta que el ventilador deje de girar antes
de desarmarla.
PRECAUCIÓN: Apague
siempre la herramienta y desenchúfela del
tomacorriente cuando:
• Cambie de modo sopladora a modo aspiradora.
• El cable de alimentación esté dañado o enredado.
• Deje la aspiradora/sopladora sin supervisión.
• Elimine una obstrucción.
• Verifique, ajuste, limpie o trabaje en la aspiradora/sopladora.
Utilice la aspiradora/sopladora
solamente con la luz del día o con una
buena luz artificial.
INTERRUPTOR ENCENDIDO Y APAGADO
(FIGURE G)
ADVERTENCIA: UTILICE
AMBAS MANOS PARA SOSTENER FIRMEMENTE EL
PRODUCTO AL ENCENDERLO.
ADVERTENCIA: La
herramienta continuará funcionando durante
aproximadamente 5 segundos después de haberla
apagado. Utilice ambas manos para sostener la
herramienta y espere a que el motor se detenga por
completo antes de ponerla sobre una superficie.
Su aspiradora sopladora está equipada con un interruptor de
dos velocidades ubicado en la parte superior del cabezal de
impulsión, debajo del mango.
• Para utilizarlo a velocidad baja, deslice el interruptor
2
hacia adelante hasta la Posición 1. Para utilizarlo a
velocidad alta, deslice el interruptor
2
totalmente hacia
adelante hasta la Posición 2.
• Para apagar la herramienta, deslice el interruptor
totalmente hacia atrás hasta la Posición 0.
Figure G
DISPOSITIVO DE RETENCIÓN DEL CABLE
La parte posterior de la unidad motriz tiene incorporado un
dispositivo de retención del cable. Puede utilizarse de dos
maneras diferentes:
• Para utilizar el dispositivo de retención del cable como se
muestra en la figura H1, inserte el cable prolongador en el
alojamiento del dispositivo de retención del cable desde
el lado. Forme un lazo con el cable prolongador alrededor
del dispositivo de retención de manera que se apoye en el
mismo. Luego, enchufe el cable desde la unidad motriz al
cable prolongador.
• Para utilizar el dispositivo de retención del cable como
se muestra en la figura H2, forme un lazo con el cable
prolongador y el cable de la unidad motriz, y enchufe
ambos extremos entre sí.
Luego, inserte el cable
prolongador en el alojamiento del dispositivo de retención
del cable desde el lado. Forme un lazo con el cable
prolongador alrededor del dispositivo de retención de
manera que se apoye en el mismo.
Page 23

ESPAÑOL
21
Figure H
H1
H2
FUNCIONAMIENTO COMO SOPLADORA
PRECAUCIÓN: Siempre use
anteojos de seguridad. Use una máscara con filtro si el
funcionamiento es polvoriento. Se recomienda el uso
de guantes, pantalones largos y calzado resistente.
Mantenga el cabello largo y la ropa holgada lejos
de las aberturas y las piezas en movimiento. ESTA
BARREDORA ES ÚNICAMENTE PARA USO DOMÉSTICO.
PRECAUCIÓN: Asegúrese de
que el soplador esté apagado y desconectado de la
fuente de alimentación antes de instalar o quitar los
tubos sopladores. El tubo soplador debe ensamblarse
en la carcasa antes del uso.
• Sostenga el soplador con una mano como se muestra en
la figura I y barra de un lado a otro con la boquilla a cierta
distancia por encima de la superficie. Avance lentamente
manteniendo la pila acumulada de residuos frente a usted.
Figure I
FUNCIONAMIENTO COMO ASPIRADORA
PRECAUCIÓN: Asegúrese de
que el aspirador esté apagado y desconectado de la
fuente de alimentación antes de instalar o quitar los
tubos sopladores. El tubo aspirador debe ensamblarse
en la carcasa antes del uso.
• Coloque el tubo apenas por encima de los residuos y
hojas. Encienda la aspiradora/sopladora, luego con un
movimiento de barrido, el tubo aspirará los residuos
y las hojas, los triturará y los depositará en la bolsa de
recolección (figura J).
PRECAUCIÓN: NUNCA
EXTRAIGA LA BOLSA DE RECOLECCIÓN SIN APAGAR Y
DESENCHUFAR LA ASPIRADORA PREVIAMENTE.
A medida que la bolsa se llena, el poder de succión disminuye.
Apague el producto y desenchúfelo de la fuente de alimentación.
Quite y vacíe la bolsa antes de reanudar la operación.
Figure J
QUÉ DEBE HACERSE SI LA UNIDAD SE
OBSTRUYE (FIGURA I)
ADVERTENCIA: Apague el
producto y desenchúfelo de la fuente de alimentación.
Si el motor de la unidad se detiene, significa que el
ventilador se ha obstruido. Si esto ocurre, apague la unidad y
desconéctela de la fuente de alimentación. Quite la bolsa y el
tubo aspirador. Elimine el material obstructor con una pequeña
varilla de madera. No utilice un implemento metálico ni nada
que pueda dañar el ventilador o rayar el plástico. Asegúrese de
que pueda girar el ventilador manualmente antes de volver a
ensamblar la unidad.
Si la unidad deja de recoger residuos o si el rendimiento se
reduce sustancialmente, es posible que se haya obstruido.
Apague la unidad y desconéctela de la fuente de alimentación.
Quite el tubo aspirador y mire a través de éste para asegurarse
de que no haya residuos bloqueándolo. Si es necesario, elimine
los residuos con una pequeña varilla de madera. No utilice un
implemento metálico ni nada que pueda rayar o dañar el tubo.
Quite la bolsa. Si la bolsa está llena, vacíela. Si es necesario,
elimine todo residuo alrededor del ventilador o la salida de
la unidad con una pequeña varilla de madera. No utilice un
implemento metálico ni nada que pueda dañar el ventilador
o rayar el plástico. Asegúrese de que pueda girar el ventilador
manualmente antes de volver a ensamblar la unidad.
Figure K
MANTENIMIENTO
LIMPIEZA Y GUARDADO
ADVERTENCIA: RIESGO DE
DESCARGA ELÉCTRICA. NO VACÍE O ROCÍE AGUA EN LA
HERRAMIENTA EN UN INTENTO POR LIMPIARLA.
Page 24

ESPAÑOL
22
PRECAUCIÓN: APAGUE Y
DESCONECTE LA HERRAMIENTA.
Utilice únicamente jabón suave y un trapo húmedo para
limpiar la herramienta. Limpie todos los desechos y recortes
que se hayan Acumulado en su Blower/Vac. Cuando la
unidad se utiliza apropiadamente con hojas secas, la cámara
del ventilador debe permanecer limpia. Si se trabaja con tierra
y desechos húmedos, algunas de las partículas se pueden
acumular en el interior de la cámara del ventilador.
Si esto ocurre, el rendimiento de la unidad bajará. Esta parte
puede limpiarse con una vara de madera, como se muestra
en la figura S, luego de desconectar la unidad de la fuente
de alimentación. Su soplador aspiradora Blower/Vac debe
guardarse en un lugar seco.
No guarde la herramienta sobre fertilizantes o productos
químicos ni junto a ellos. Dicho almacenaje puede ocasionarle
una rápida corrosión a las partes metálicas.
Accesorios
ADVERTENCIA: El uso de
accesorios no recomendados para utilizar con esta
herramienta puede resultar peligroso.
Información de mantenimiento
Todos los Centros de servicio de BLACK+DECKER cuentan
con personal altamente capacitado dispuesto a brindar
a todos los clientes un servicio eficiente y confiable en la
reparación de herramientas eléctricas. Si necesita consejo
técnico, reparaciones o piezas de repuesto originales de
fábrica, póngase en contacto con el centro de servicio de
BLACK+DECKER más cercano a su domicilio. Para ubicar su
centro de servicio local, llame al 1-800-544-6986 o visite
nuestro sitio www.blackanddecker.com.
Garantía limitada por dos años
Black & Decker (U.S.) Inc. garantiza que este producto está
libre de defectos de material o mano de obra durante un
período de dos (2) años desde la fecha de compra, siempre
y cuando el producto se utilice en un entorno doméstico.
Esta garantía limitada no cubre contra fallas debidas a mal
uso, daño accidental o cuando se han realizado o intentado
reparaciones por parte de cualquier otra persona ajena a
BLACK+DECKER y sus centros de mantenimiento autorizados.
Un producto defectuoso que cumple con las condiciones
de la garantía establecidas en el presente documento será
remplazado o reparado sin costo de una dos maneras:
La primera, que únicamente dará lugar a intercambios,
consiste en devolver el producto al comerciante minorista
donde fue comprado (siempre y cuando la tienda sea un
comerciante minorista participante). Las devoluciones
deben realizarse dentro del período establecido en la
política para intercambios del comerciante minorista.
Es posible que se requiera el comprobante de compra.
Consulte al comerciante minorista sobre su política
específica de devoluciones con respecto a los límites de
tiempo para devoluciones o intercambios.
La segunda opción es llevar o enviar (pagado por adelantado)
el producto a un centro de mantenimiento de propiedad o con
autorización de BLACK+DECKER para su reparación o remplazo
a discreción de BLACK+DECKER. Es posible que se requiera un
comprobante de compra. Los centros de mantenimiento de
propiedad o con autorización de BLACK+DECKER se indican en
línea en www.blackanddecker.com.
Esta garantía no se aplica a los accesorios. Esta garantía le
otorga derechos legales específicos y es posible que tenga otros
derechos que varían de un estado a otro. En caso de que tenga
alguna pregunta, comuníquese con el gerente del centro de
mantenimiento de BLACK+DECKER más cercano a usted. Este
producto no está diseñado para uso comercial y, en consecuencia,
dicho uso comercial de este producto anulará la garantía. Por
medio del presente documento, se declina la responsabilidad de
todas las demás garantías, explícitas o implícitas.
AMÉRICA LATINA: Esta garantía no se aplica a productos
vendidos en América Latina. Para los productos que se venden
en América Latina, consulte la información de garantía específica
del país contenida en el empaque, llame a la compañía local o
visite el sitio web para obtener dicha información.
Page 25

ESPAÑOL
23
DETECCIÓN DE PROBLEMAS
Problema Causa posible Solución posible
• La unidad no enciende. • La cubierta del ventilador o • Instale la cubierta del ventilador
el tubo de aspirado no está para el modo sopladora o el tubo
instalado. de aspirado para el modo aspiradora.
• Cable desenchufado. • Enchufe el cargador en un
tomacorriente que funcione.
• Fusible quemado. • Reemplace el fusible quemado.
(Si repetidamente el producto
hace que el fusible del circuito
se
queme, deje de utilizarlo
inmediatamente y haga que le
realicen mantenimiento en
un centro de mantenimiento
BLACK+DECKER o en un
centro de servicio autorizado.)
• El interruptor automático • Reinicie el interruptor automático.
está activado. (Si repetidamente el producto
hace que el fusible del circuito
se queme, deje de utilizarlo
inmediatamente y haga que le
realicen mantenimiento en un
centro de mantenimiento
BLACK+DECKER o en un
centro de servicio autorizado.)
• Interruptor o cable dañado. • Haga reparar el cable o el
interruptor en un centro de
mantenimiento BLACK+DECKER
o en un centro de mantenimiento
autorizado.
• La unidad está atascada • Los residuos bloquean los • Desenchufe el cable de
u obstruida. conductos de entrada y alimentación. Extraiga el tubo de
salida o el ventilador. aspirado.Consulte la “Sección de
limpieza y almacenamiento:
Mantenimiento”.
Para conocer la ubicación del centro de mantenimiento más cercano a fin de recibir
ayuda con su producto, visite nuestro sitio Web www.blackanddecker.com o llame a la
línea de ayuda BLACK+DECKER al 55-5326-7100
Importado por Black & Decker (U.S.) Inc.,
701 E. Joppa Rd.
Towson, MD 21286
BlackandDecker.com
1-800-544-6986
Page 26

· GARANTÍA BLACK+DECKER · BLACK+DECKER WARRANTY
. SOLAMENTE PARA PROPOSITOS DE MEXICO
Distributor Name · Sello firma del distribuidor
Date of purchase · Fecha de compra Invoice No. · No. de factura
PRODUCT INFOMATION · IDENTIFICACIÓN DEL PRODUCTO
Cat. No. · Catalogo ó Modelo Serial Number · No. de serie
Name · Nombre Last Name · Apellido
Address · Dirección
City · Ciudad State · Estado
Postal Code · Código Postal Country · País
Telephone · No. Teléfono
2 AÑOS DE GARANTIA
Este producto cuenta con dos años de garantía a partir de la fecha de compra contra
cualquier defecto de su funcionamiento, así como cualquier falla debido a materiales
empleados para su fabricación ó mano de obra defectuosa.
Nuestra garantía incluye la reparación o reposición del producto y/o componentes sin cargo
alguno para el cliente incluyendo la mano de obra, esta incluye los gastos de trasportación
erogados para lograr cumplimiento de esta garantía en los domicilios diversos señalados.
Para hacer efectiva esta garantía deberá presentar su herramienta y esta póliza sellada
por el establecimiento comercial donde se adquirió el producto.
Nos comprometemos a entregar el producto en un lapso no mayor a 30 días hábiles contados
a partir de la fecha de recepción del mismo en nuestros talleres de servicio autorizados.
ESTA GARANTIA NO APLICA CUANDO:
El producto se hubiese utilizado en condiciones distintas a las normales.
El producto no hubiese sido operado de acuerdo con el instructivo de uso que se acompaña.
El producto hubiese sido alterado o reparado por personas no autorizadas por nosotros.
Importador: Black & Decker S.A. de .C.V
Bosque de Cidros Acceso Radiatas No.42
3ra.Seccion de Bosques de las lomas
C.P.05120, Mexico, D.F. Tel: (01 55) 5326 7100
Page 27

Grupo Realsa en herramientas,
S.A. de C.V.
Súper Manzana 69 MZ.01 Lote 30
(Av. Torcasita)
Col. Puerto Juárez
Cancún, Quintana Roo
Tel. 01 998 884 72 27
Ferre Pat de Puebla, S.A. de C.V.
16 de Septiembre No. 6149
Col. El Cerrito
Puebla, Puebla
Tel. 01 222 264 12 12
Ferre Pat de Puebla, S.A. de C.V.
Ejército Mexicano No. 15
Col. Ejido 1ro. de Mayo
Boca del Rio, Veracruz
Tel. 01 229 167 89 89
Servicio de Fabrica BLACK+DECKER,
S.A. de C.V.
Lázaro Cardenas No. 18
Col. Obrera
Distrito Federal
Tel. 55 88 95 02
Representaciones Industriales Robles,
S.A. de C.V.
Tezozomoc No. 89
Col. La Preciosa
Distrito Federal
Tel. 55 61 86 82
Gpo. Comercial de Htas. y Refacciones
de Occidente, S.A. de C.V.
Av. La Paz No. 1779
Col. Americana, S. Juaréz
Guadalajara, Jalisco
Tel. 01 33 38 25 69 78
Herramientas y Equipos Profesionales
Av. Colón 2915 Ote.
Col. Francisco I. Madero
Monterrey, Nvo. León
Tel. 01 81 83 54 60 06
Htas. Portátiles de Chihuahua,
S.A. de C.V.
Av. Universidad No. 2903
Col. Fracc. Universidad
Chihuahua, Chihuahua
Tel. 01 614 413 64 04
Fernando González Armenta
Bolivia No. 605
Col. Felipe Carrillo Puerto
Cd. Madero, Tamaulipas
Tel. 01 833 221 34 50
Perfiles y Herramientas de Morelia
Gertrudis Bocanegra No. 898
Col. Ventura Puente
Morelia, Michoacán
Tel. 01 443 313 85 50
Enrique Robles
Av. de la Solidaridad No. 12713
Col. La Pradera
Irapuato, Guanajuato
Tel. 01 462 626 67 39
Hernández Martinez Jeanette
Prolongación Corregidora Nte. No. 1104
Col. Arboledas
Queretaro, Qro.
Tel. 01 442 245 25 80
SOLAMENTE PARA PROPOSITOS DE MEXICO
PARA OTRAS LOCALIDADES LLAME AL 01 800 847 2309 o 01 800 847 2312.
BLACK & DECKER S.A. DE C.V.
BOSQUES DE CIDROS ACCESO RADIATAS NO. 42
COL. BOSQUES DE LAS LOMAS.
05120 MÉXICO, D.F
TEL. (01 55) 5326 7100
01 800 847 2309/01 800 847 2312
Page 28

Black & Decker (U.S.) Inc.
701 East Joppa Road, Towson, MD 21286
Part No. 90641475
BV2900
NOV16
Copyright © 2016 BLACK+DECKER
 Loading...