

Page 1

www.blackanddecker.ae
BS600
Page 2
ENGLISH
1
2
3
4
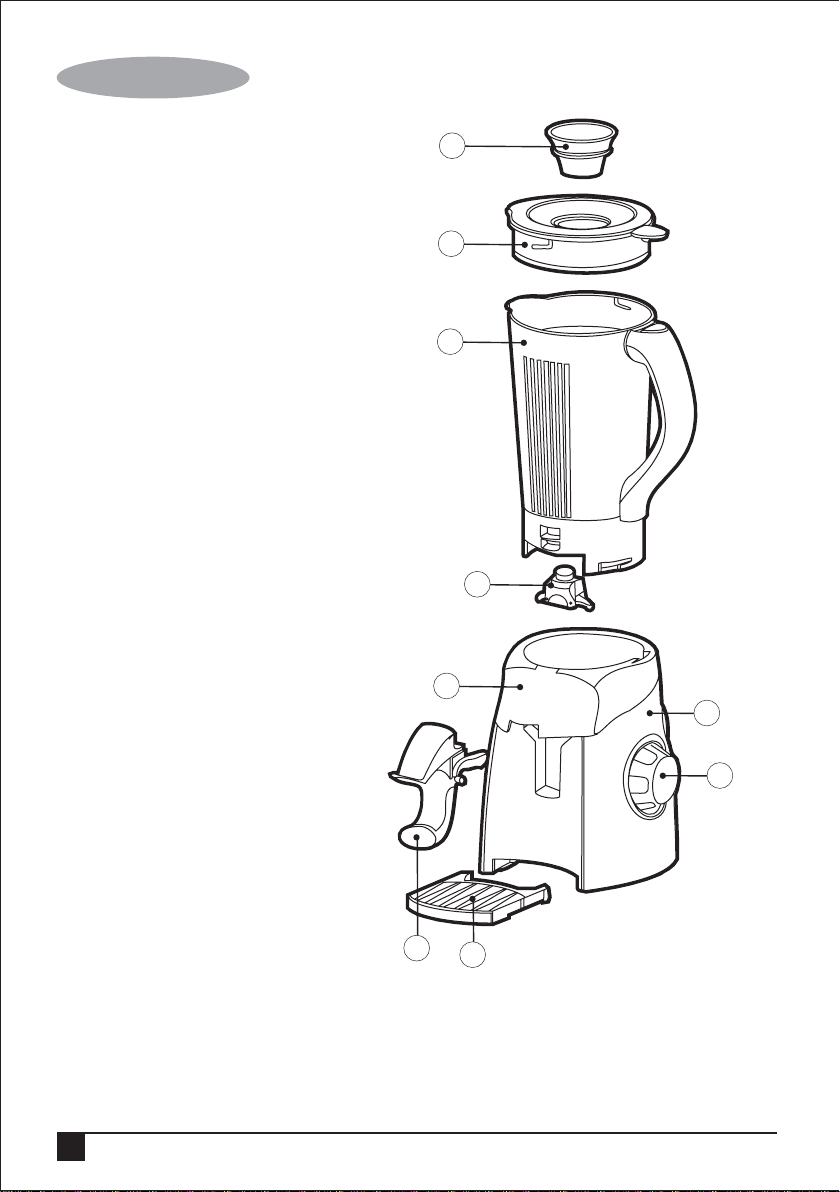
Parts Identification
1. Filler cap
2. Lid
3. Blending jar
4. Valve
5. Shield
6. Base
7. Rotary control knob
8. Dispenser
9. Drip tray
2
5
6
7
8
9
Page 3

ENGLISH
Intended use
Your Black & Decker smoothie maker has been
designed for blending fruits and vegetables and
making smoothies. This product is intended for
household use only.
Read this entire manual carefully
before using the appliance.
Safety instructions
• Warning! When using mains-powered
appliances, basic safety precautions,
including the following, should always be
followed to reduce the risk of fire, electric
shock and personal injury.
• The intended use is described in this manual.
The use of any accessory or attachment or
the performance of any operation with this
appliance other than those recommended in
this instruction manual may present a risk of
personal injury.
• Retain this manual for future reference.
Using your appliance
• Always take care when using the appliance.
• Never pull the power supply cord to
disconnect the plug from the socket. Keep
the power supply cord away from heat, oil
and sharp edges.
• Do not place the appliance on or near heat
sources or in a heated oven.
• Do not use the appliance outdoors.
• Do not leave the appliance unattended
during use.
• Always allow moving parts to come to a
complete stop before removing the lid.
• Always protect the motor unit from water or
excessive humidity.
• If the power supply cord is damaged during
use, disconnect the appliance from the power
supply immediately. Do not touch the power
supply cord before disconnecting from the
power supply.
• Disconnect the appliance from the power
supply when not in use, before fitting or
removing parts and before cleaning.
• Never let the appliance operate unattended.
• Never reach into the feeding tube with your
fingers or an object while the appliance is
running.
• Take care when handling the sharp cutting
blades, emptying the bowl and during
cleaning.
• Keep any loose clothing or long hair away
from the feeding tube and any moving parts.
• Warning! Misuse could cause personal injury.
Safety of others
• This appliance is not intended for use by
persons (including children) with reduced
physical sensory or mental capabilities, or
lack of experience and knowledge, unless
they have been given supervision or
instruction concerning use of the appliance by
a person responsible for their safety.
• Children should be supervised to ensure that
they do not play with the appliance.
After use
• Remove the plug from the socket before
leaving the appliance unattended and before
changing, cleaning or inspecting any parts of
the appliance.
• When not in use, the appliance should be
stored in a dry place. Children should not
have access to stored appliances.
3
Page 4

ENGLISH
Inspection and repairs
• Before use, check the appliance for
damaged or defective parts. Check for
breakage of parts, damage to switches and
any other conditions that may affect its
operation.
• Do not use the appliance if any part is
damaged or defective.
• Have any damaged or defective parts
repaired or replaced by an authorised repair
agent.
• Before use, check the power supply cord for
signs of damage, ageing and wear.
• Do not use the appliance if the power supply
cord or mains plug is damaged or defective.
• If the power supply cord or mains plug is
damaged or defective it must be repaired by
an authorised repair agent in order to avoid a
hazard. Do not cut the power supply cord
and do not attempt to repair it yourself.
• Never attempt to remove or replace any
parts other than those specified in this
manual.
Additional safety instructions
for Smoothie Makers
• Do not immerse the appliance, cord set or
plug in liquids
• Always leave sufficient space around the
appliance for ventilation
• Keep loose clothing, hair, jewellery, etc. away
from moving parts.
• Do not use the unit if you have wet hands
• Care is needed when handling cutting
blades, especially when removing the blades
from the bowl, emptying the bowl and during
cleaning.
• “Switch off the appliance before changing
accessories or approaching parts which move
in use”.
Electrical safety
Before use, check that the mains voltage
corresponds to the voltage on the rating plate.
This appliance is double insulated in
accordance with EN 60335-2-14;
therefore no earth wire is required.
• To avoid the risk of electric shock, do not
immerse the cord, plug or motor unit in water
or other liquid.
• Check that the supply voltage shown on the
rating plate of the appliance matches that of
your electrical system. Any connection error
will invalidate the guarantee.
Mains plug replacement
If a new mains plug needs to be fitted:
• Safely dispose of the old plug.
• Connect the brown lead to the live terminal of
the new plug.
• Connect the blue lead to the neutral terminal.
• If the product is class l (earthed), connect the
green / yellow lead to the earth terminal.
Warning! If your product is class ll double
insulated (only 2 wires in the cord set), no
connection is to be made to the earth terminal.
Follow the fitting instructions supplied with good
quality plugs
Any replacement fuse must be of the same rating
as the original fuse supplied with the product.
4
Page 5
ENGLISH
Assembly
• This appliance requires parts to be cleaned
before use. See “Maintenance and Cleaning”
for details.
Installing the jug
• Place the jug onto the motor unit, positioning
the line moulded into the base of the handle
with the unlocked padlock symbol on the
motor base.
• Turn the jug clockwise until the line is
positioned opposite the locked padlock
symbol. Ensure that the motor unit and the
jug are correctly assembled and securely
locked in position.
Installing the lid and filler cap
• Line up the circle symbol on the lid with the
unlocked padlock symbol on the jug.
• Lower the lid onto the jug, keeping the two
symbols aligned,
• Turn the lid clockwise until the circle symbol
lines up with the locked padlock symbol.
Ensure that the lid and the jug are securely
locked in position.
• To fit the filler cap, lower it onto the lid. Make
sure the lugs on the filler cap fit between the
two cut-out slots on the lid.
• Push the filler cap down to lock into position.
Installing the drip tray
• Slide the drip tray into the grooves on the
motor base.
Use
• Remove the jug lid and place the ingredients
inside the jug. For best results, ingredients
should be cut into smaller pieces. Cut dry
ingredients into smaller pieces before
processing.
• Replace the jug lid ensuring that the filler cap
is installed.
• Fit the jug onto the motor base. Ensure the
jug and the lid are fitted correctly, otherwise
the smoothie maker will not work.
Warning! Make sure that the speed
control dial is set to the off position ‘0’
before plugging the smoothie maker
into the mains supply.
• Plug the motor unit into a suitable mains
supply and switch on at the socket.
• To start, set the speed control dial to setting
‘1’. To increase the speed, turn the speed
control dial clockwise.
Note: ‘1’ is the slowest speed setting and ‘3’ is
the fastest.
• Alternatively, blend the ingredients in short
bursts by turning and holding the speed
control switch to the PULSE setting. Release
it to stop.
Caution! Do not operate the unit
continuously for more than one minute
without a rest period of two minutes.
The filler cap can be carefully removed to feed
ingredients into the jug during processing if
required.
Warning! Do not place your fingers
inside the jug when adding ingredients.
• Allow the ingredients to blend until smooth.
When processing is complete, set the speed
control dial to the off ‘0’ position. Switch off
and unplug the blender from the mains
supply.
5
Page 6
ENGLISH
Note: Always keep the filler cap secured in
position, unless ingredients are being added to
the Blender.
Warning! Wait until all moving parts
have stopped before removing the lid
or jug.
• To serve a smoothie, simply press your glass
against the dispensing lever on the motor
base.
• When the glass is full, release the lever.
Note: To help dispense the last amount of a
thick smoothie drink, add a few tablespoons of
liquid to increase the flow.
Note: Always wash immediately after use. Do
not let food dry onto the jug, valve or dispensing
assembly as this will make cleaning difficult.
Using the smoothie maker to
crush ice
Note: For best results defrost ice cubes slightly
before crushing. To crush home made (small)
ice cubes fill the jug to 750ml and add 200mls
water. To crush shop bought (large) ice cubes
add 15 ice cubes to the blender jug and add
200ml of water.
• Remove the jug lid and place recommended
ice cube and water quantity inside the jug.
• If you want to crush ice cubes, put not more
than 6 ice cubes (of approx. 25x35x25mm) in
the blender jar and turn the control knob to
pulse position a few times.
• Do not process a large quantity of solid
ingredients at the same time. To get good
results, we advise you to process these
ingredients in a series of small batches.
Caution! Do not operate the unit
continuously for more than one minute
without a rest period of two minutes.
• When blending is complete, switch off and
unplug the unit from the mains supply.
Useful advice
• The best results will be obtained if you blend
fresh food, as food that have been stored for
any length of time will be dry in nature.
• Prepare your fruit and vegetables in advance
and place the cut pieces in a dish ready for
blending. Cut your fruit and vegetables into
pieces that will fit easily through the lid hole,
but do not make them too small.
• Never attempt to force large pieces of fruit or
vegetables through the lid hole, cut them into
smaller pieces first.
• Replace the jug lid ensuring the filler cap is
in place. Make sure that the speed control
dial is set to the off position ‘0’ before
plugging the smoothie maker into the mains
supply.
• Plug in and switch the smoothie maker on at
the mains socket.
• Blend in short bursts by holding and
releasing the speed control dial to the
PULSE setting.
6
• As a general guideline, you do not need to
peel any fruits and vegetables whose skin
you would normally eat. However, we do
recommend washing all produce before it is
blended.
• Certified organic vegetables are guaranteed
not to contain chemical residues but should
still be washed, as they have been handled
prior to sale.
Page 7
ENGLISH
• Remove skin from thick skinned fruits, such
as melon and pineapple.
• Remove stones from cherries, peaches,
nectarines etc.
• Remove the core from apples and pears.
Maintenance & cleaning
• The appliance is easier to clean if you do so
immediately after use.
• Do not use abrasive cleaning agents,
scourers, acetone, alcohol etc. to clean the
appliance.
• Clean the motor unit with a damp cloth.
• Never immerse the motor unit in water nor
rinse it under the tap.
To remove the dispenser
• Pull up shield.
• Lift up the dispenser.
• Pull out as shown. Do not force the valve.
Note: To reassemble, reverse the above
procedures and make sure the valve is locked in
place before blending again.The small arrow on
the valve front will line up with the small arrow
on the jar bottom where the locked padlock
picture is shown. If the valve is not properly
locked in place, ingredients will leak from the
drain hole in the bottom of the jar.
Technical data
Voltage 220-240V ~
Supply 50/60Hz
Power consumption 450W
Product Weight 2.5 kgs
Cord Length 1.2 meter
• Move the dispenser forward and out.
To remove the valve from
the jug
• Turn the jar on an angle so you can grasp
the valve easily.
• Turn the valve to the unlock position (toward
the unlocked padlock picture).
7
Page 8

ENGLISH
Protecting the environment
Separate collection. This product must
not be disposed of with normal
household waste.
Should you find one day that your Black &
Decker product needs replacement, or if it is of
no further use to you, do not dispose of it with
other household waste. Make this product
available for separate collection.
• Black & Decker provides a facility for
recycling Black & Decker products once they
have reached the end of their working life.
This service is provided free of charge. To
take advantage of this service please return
your product to any authorised repair agent
who will collect them on our behalf.
• You can check the location of your nearest
authorised repair agent by contacting your
local Black & Decker office at the address
indicated in this manual. Alternatively, a list of
authorized Black & Decker repair agents and
full details of our after-sales service and
contact are available on the Internet at:
www.2helpU.com.
Warranty
Black & Decker is confident of the quality of its
products and offers an outstanding warranty.
This warranty statement is in addition to and in
no way prejudices your statutory rights.
The warranty is valid within the territories of the
Member States of the European Union and the
European Free Trade Area.
If a Black & Decker product becomes defective
due to faulty materials, workmanship or lack of
conformity, within 24 months from the date of
purchase, Black & Decker warranty to replace
defective parts, repair products subjected to fair
wear and tear or replace such products to ensure
minimum inconvenience to the customer unless:
The product has been used for trade,
professional or hire purposes;
The product has been subjected to misuse
or neglect;
The product has sustained damage
through foreign objects, substances or
accidents;
Repairs have been attempted by persons
other than authorised repair agents or
Black & Decker service staff.
To claim on the warranty, you will need to submit
proof of purchase to the seller or an authorised
repair agent. You can check the location of your
nearest authorised repair agent by contacting
your local Black & Decker office at the address
indicated in this manual.
Alternatively, a list of authorised Black & Decker
repair agents and full details of our after-sales
service and contacts are available on the Internet
at: www.2helpU.com.
8
Page 9

ARABIC
1
2
3
4
5
6
AGõLC’G ∞jô©J
áÄÑ©àdG áëàa AÉ£Z .1
7
AÉ£¨dG .2
•ÓÿG ≥jôHEG .3
Ωɪ°üdG .4
AÉ£Z .5
IóYÉ≤dG .6
8
9
QGhO ºµ– ¢†Ñ≤e .7
´Rƒe .8
Ò£≤àdG á«æ«°U .9
9
Page 10

ARABIC
,ΩGóîà°S’G AÉæKCG »FÉHô¡µdG QÉ«àdG ∂∏°S ∞∏J ádÉM ‘
.»FÉHô¡µdG QÉ«àdG Qó°üe øY áæ«cÉŸG QƒØdG ≈∏Y π°üaG
¬∏°üa πÑb »FÉHô¡µdG QÉ«àdG ∂∏°S ¢ùŸ ÖæŒ »¨Ñæjh
.»FÉHô¡µdG QÉ«àdG Qó°üe øY
ΩóY ádÉM ‘ »FÉHô¡µdG QÉ«àdG øY áæ«cÉŸG π°üØH ºb
É¡æY É¡àdGREG hCG É¡H AGõLCG …CG Ö«côJ πÑbh É¡eGóîà°SG
.∞«¶æàdG πÑbh
.É¡∏«¨°ûJ AÉæKCG áÑbGôe ¿hO áæ«cÉŸG ∑ÎJ ’
∂HÉ©°UCG ᣰSGƒH ájò¨àdG ܃ÑfCG ¤EG ∫ƒ°UƒdG ∫hÉ– ’ •
.áæ«cÉŸG 𫨰ûJ AÉæKCG IOÉe ájCG hCG
IOÉ◊G ™£≤dG äGôØ°T ™e πeÉ©àdG óæY Qò◊G »NƒJ
.∞«¶æàdGh AÉfE’G ≠jôØJ óæY ∂dòch
øY kGó«©H πjƒW ô©°T hCG á°VÉØ°†a ¢ùHÓe …CG AÉ≤HEÉH ºb
.ácôëàe AGõLCG ájCGh ájò¨àdG ܃ÑfCG
¢Vô©àdG ¤EG áæ«cÉŸG ΩGóîà°SG Aƒ°S …ODƒj ób !ôjò–
.á«°üî°T áHÉ°UE’
øjôNB’G áeÓ°S
hhP ¢UÉî°TC’G ¬eóîà°ù«d ºª°üe ÒZ RÉ¡÷G Gòg •
á«fóàŸG á«∏≤©dGh á«°ù◊Gh á«ægòdGh ájó°ù÷G äGQó≤dG
‘ ’EG (∫ÉØWC’G ∂dP ‘ ÉÃ) Úà∏«∏≤dG áaô©ŸGh IÈÿGh
á≤∏©àŸG äɪ«∏©àdG º¡FÉ£YEG hCG º¡«∏Y ±GöTE’G πX
øY ∫hDƒ°ùŸG ¢üî°ûdG πÑb øe RÉ¡÷G ΩGóîà°SÉH
.º¡àeÓ°S
º¡ãÑY ΩóY ¿Éª°†d ∫ÉØWC’G ≈∏Y ±GöTE’G Ωõ∏j
.RÉ¡÷ÉH
ΩGóîà°S’G ó©H
òNCÉe øe ¢ùHÉ≤dG ´õfGh RÉ¡÷G 𫨰ûJ ±É≤jEÉH ºb •
hCG Ò«¨J πÑb ∂dòch RÉ¡÷G ΩGóîà°SG ΩóY óæY AÉHô¡µdG
.¬FGõLCG øe …CG áfÉ«°U hCG ∞«¶æJ
•
ôµjO ófBG ∑ÓH »Kƒª°ùdG ÜGöT OGóYEG áæ«cÉe ⪪o°U
ÜGöT OGóYEGh äGhö†ÿGh ¬cGƒØdG êõŸ kÉ°ü«°üN
‹õæŸG ΩGóîà°SÓd ºª°üe èàæŸG Gòg ¿CÉH kɪ∏Y ;»Kƒª°ùdG
ΩGóîà°S’G ¢VôZ
•
ΩGóîà°SG πÑb ájÉæ©H π«dódG Gòg IAGôb »¨Ñæj
.áæ«cÉŸG
•
QÉ«àdG Qó°üà á∏°üàŸG Iõ¡LC’G ΩGóîà°SG óæY !ôjò– •
áeÓ°ùdG äÉWÉ«àMG IÉYGôe kɪFGO Ú©àj ,»°ù«FôdG
√ÉfOCG IQƒcòŸG äÉWÉ«àM’G ∂dP ‘ Éà ᫰SÉ°SC’G
•
áeó°üd ¢Vô©àdGh ≥jô◊G ´’ófG ôWÉfl øe óë∏d
.á«°üî°T äÉHÉ°UEGh á«FÉHô¡c
áeÓ°ùdG äɪ«∏©J
•
áæ«cÉŸG √òg ΩGóîà°SG øe ¢Vô¨dG π«dódG Gòg Oóëj
á≤aôe äGóMh hCG äÉ≤ë∏e ájCG ΩGóîà°SG ¿CG IÉYGôe ™e
∂∏J ÒZ áæ«cÉŸG √òg ΩGóîà°SÉH á«∏ªY ájCG ò«ØæJ hCG
IQƒ£N ≈∏Y …ƒ£æJ ób π«dódG Gòg ‘ É¡H ≈°UƒŸG
.á«fóH áHÉ°UE’ ¢Vô©àdG
.kÓÑ≤à°ùe ¬«dEG ´ƒLô∏d π«dódG Gò¡H ®ÉØàM’G ≈Lôj
áæ«cÉŸG ΩGóîà°SG
.áæ«cÉŸG ΩGóîà°SG óæY kɪFGO Qò◊G ñƒJ •
π°üØd »FÉHô¡µdG QÉ«àdG ∂∏°S ó°T kÉ≤∏£e ∫hÉ– ’ •
»FÉHô¡µdG QÉ«àdG ∂∏°ùH ßØàMG .¢ùÑ≤ŸG øY ¢ùHÉ≤dG
•
øNÉ°S ¿ôa hCG IQGô◊G QOÉ°üe ≈∏Y áæ«cÉŸG ™°†J ’
.IOÉ◊G ±Gƒ◊Gh âjõdGh IQGô◊G øY kGó«©H
.ɪ¡æe Üô≤dÉH hCG
.∫õæŸG êQÉN áæ«cÉŸG Ωóîà°ùJ ’
AÉæKCG ±GöTEG hCG áÑbGôe ¿hO áæ«cÉŸG ∑ÎJ ’ •
.ΩGóîà°S’G
.§≤a
•
•
•
•
¿Éµe ‘ ¬æjõîJ Öéj ,RÉ¡÷G ΩGóîà°SG ΩóY ádÉM ‘
¤EG ∫ƒ°UƒdG øe ∫ÉØWC’G Úµ“ ΩóY Öéjh .±ÉL
.áfõîŸG Iõ¡LC’G
10
πeɵdÉH ácôëàŸG AGõLC’G ∞bƒJ ≈àM kɪFGO ô¶àfG
•
.AÉ£¨dG ádGREG πÑb
áHƒWôdG hCG √É«ŸG øe ∑ôëŸG IóMh ájɪëH kɪFGO ºb
•
•
.á«dÉ©dG
Page 11

ARABIC
ÜGÎb’G hCG äÉ≤ë∏ŸG Ò«¨J πÑb áæ«cÉŸG ≥∏¨H ºb"
".𫨰ûàdG AÉæKCG ∑ôëàJ »àdG AGõLC’G øe
á«FÉHô¡µdG áeÓ°ùdG
òNCÉŸG á«£dƒa ≥aGƒJ øe áæ«cÉŸG ΩGóîà°SG πÑb ≥≤–
.∞«æ°üàdG áMƒd ≈∏Y IOóëŸG á«£dƒØdG ™e »°ù«FôdG
OGƒª∏d »ŸÉ©dG QÉ«©ŸG ™e áæ«cÉŸG √òg ≥aGƒàJ
øe É¡fCG ɪc ,60335-2-14 ºbQ á«Hô¡µdG
¢†jQCÉJ Ωõ∏j ’ ,ºK øeh ;êhOõŸG ∫õ©dG ´ƒf
.áæ«cÉŸG √òg
‘ ∑ôëŸG IóMh hCG ¢ùHÉ≤dG hCG ∂∏°ùdG ôª¨H Ωƒ≤J ’
áHÉ°UE’G ôWÉîŸ ÉkjOÉØJ ôNCG πFÉ°S …CG hCG √É«ŸG
.á«Hô¡µdG äÉeó°üdÉH
áMƒd ≈∏Y áë°VƒŸG á«£dƒØdG ≥aGƒJ øe ócCÉàdG Ωõ∏j
kɪ∏Y ;»FÉHô¡µdG ΩɶædG ™e RÉ¡÷ÉH á°UÉÿG ∞«æ°üàdG
¤EG …ODƒ«°S π«°UƒàdG á«∏ªY ‘ CÉ£N …CÉH ΩÉ«≤dG ¿CÉH
.¿Éª°†dG AɨdEG
»°ù«FôdG òNCÉŸG ¢ùHÉb ∫GóÑà°SG
Ωõ∏j ,»°ù«FôdG òNCɪ∏d ójóL ¢ùHÉb Ö«cÎd áLÉ◊G ádÉM ‘
:»∏j Ée ´ÉÑJG
.øeBG ƒëf ≈∏Y Ëó≤dG ¢ùHÉ≤dG øe ¢ü∏îàdG
‘ QÉ«àdÉH π°üàŸG ±ô£dÉH ¿ƒ∏dG »æÑdG ∂∏°ùdG π«°UƒJ •
.ójó÷G ¢ùHÉ≤dG
.ójÉëŸG ±ô£dÉH ¿ƒ∏dG ¥QRC’G ∂∏°ùdG π«°UƒJ •
òÄæ«ëa ,(¢†jQCÉJ ∂∏°S) 1 áÄØdG øe èàæŸG ¿ƒc ∫ÉM ‘ •
±ô£dÉH ¿ƒ∏dG ôØ°UC’G /ö†NC’G ∂∏°ùdG π«°UƒJ Ú©àj
.»°VQC’G
•
AGõLCG ájCG ±É°ûµà°S’ ΩGóîà°S’G πÑb áæ«cÉŸG ¢üëaG •
AGõLCG ájCG OƒLh ΩóY øe ócCÉàdGh áÑ«©e hCG áØdÉJ
ób iôNCG ±hôX ájCG hCG í«JÉØŸG ∞∏J ΩóYh IQƒ°ùµe
hCG ¬FGõLCG øe …CG ∞∏J ádÉM ‘ RÉ¡÷G Ωóîà°ùJ ’
Öéj ,áÑ«©e hCG áØdÉJ AGõLCG ájCG OƒLh ádÉM ‘
.óªà©e áfÉ«°U π«ch áaô©Ã É¡dGóÑà°SG hCG É¡MÓ°UEG
≈∏Y ±ô©à∏d AÉHô¡µdG ∂∏°S ¢üëaG ,ΩGóîà°S’G πÑb
•
hCG AÉHô¡µdG ∂∏°S ∞∏J ádÉM ‘ RÉ¡÷G Ωóîà°ùJ ’
•
Öéj ,»°ù«FôdG ¢ùHÉ≤dG hCG AÉHô¡µdG ∂∏°S ∞∏J ádÉM ‘
Öæéàd óªà©e áfÉ«°U π«ch áaô©Ã ɪ¡dGóÑà°SG
¬MÓ°UEG ∫hÉ– ’h AÉHô¡µdG ∂∏°S ™£≤J ’ .ôWÉîŸG
∂∏J ÒZ AGõLCG ájCG ∫GóÑà°SG hCG ádGREG Ék≤∏£e ∫hÉ– ’
.πcBÉàdGh ≠dÉÑdG Ωó≤dGh ∞∏àdG äÉeÓY
.ɪ¡æe …CÉH Ö«Y OƒLh hCG »°ù«FôdG ¢ùHÉ≤dG
ìÓ°UE’Gh ¢üëØdG
.É¡∏«¨°ûJ IAÉØc ≈∏Y ôKDƒJ
.¬H Ö«Y OƒLh
.π«dódG Gòg ‘ É¡«dEG QÉ°ûŸG
OGóYEG äÉæ«cÉŸ á«aÉ°VE’G áeÓ°ùdG äɪ«∏©J
»Kƒª°S ÜGöT
•
‘ ¢ùHÉ≤dG hCG ∑Ó°SC’G áYƒª› hCG áæ«cÉŸG ôª¨J ’ •
.πFGƒ°ùdG
áæ«cÉŸG ∫ƒM ‘Éc õ«M OƒLh ≈∏Y kɪFGO ßaÉM
.É¡àjƒ¡J π«¡°ùàd
äGôgƒéŸG hCG ô©°ûdG hCG á°VÉØ°†ØdG ¢ùHÓŸG AÉ≤HEÉH ºb
.ácôëàŸG AGõLC’G øY Gkó«©H
.Úà∏àÑe ∑Gójh IóMƒdG Ωóîà°ùJ ’
•
•
•
•
•
.∂°ùØæH
•
•
•
•
áLhOõe ∑Ó°SC’G 2 áÄØdG øe èàæŸG ¿ƒc ádÉM ‘ !ôjò–
,(∑Ó°SC’G áYƒª› ‘ §≤a ¿Éµ∏°S É¡H óLƒj »àdG) ∫õ©dG
.»°VQC’G ±ô£dÉH π«°UƒàdG »¨Ñæj ’ òFóæ©a
äGôØ°T ™e πeÉ©àdG AÉæKCG Qò◊Gh ᣫ◊G »NƒJ Öéj •
AÉfE’G øe äGôØ°ûdG ádGREG óæY Ék°Uƒ°üNh á©WÉb
.∞«¶æàdG á«∏ªY AGôLEG AÉæKCGh AÉfE’G ≠jôØJh
11
Page 12

ARABIC
ΩGóîà°S’G
;≥jôHE’G πNGO äÉfƒµŸG ™°Vhh ≥jôHE’G AÉ£Z ádGREÉH ºb •
äÉfƒµŸG ™«£≤J èFÉàædG π°†aCG ≈∏Y ∫ƒ°üë∏d »¨Ñæjh
™£b ¤EG áaÉ÷G äÉfƒµŸG ™«£≤àH ºb .IÒ¨°U ™£b ¤EG
.áæ«cÉŸG ‘ É¡Lõe πÑb IÒ¨°U
áëàa AÉ£Z Ö«côJ ¿Éª°†d ≥jôHE’G AÉ£Z IOÉYEÉH ºb
.áÄÑ©àdG
øe ócCÉJh ;∑ôëŸG IóYÉb ≈∏Y ≥jôHE’G Ö«cÎH ºb
ø∏a ’EGh ,í«ë°üdG πµ°ûdÉH AÉ£¨dGh ≥jôHE’G Ö«côJ
.»Kƒª°ùdG ÜGöT OGóYEG áæ«cÉe πª©J
¢UÉÿG QGhódG ¢Uô≤dG §Ñ°V øe ócCÉJ !ôjò–
ºbôdG óæY ¥ÓZE’G ™°Vh óæY áYöùdG ‘ ºµëàdÉH
ÜGöT OGóYEG áæ«cÉe ¢ùHÉb π«°UƒJ πÑb "0"
.»°ù«FôdG QÉ«àdG Qó°üà »Kƒª°ùdG
Qó°üe ¢ùÑ≤e ‘ ∑ôëŸG IóMh ¢ùHÉb π«°UƒàH ºb
.¬∏«¨°ûàH ºbh Ö°SÉæŸG »°ù«FôdG QÉ«àdG
¢UÉÿG QGhódG ¢Uô≤dG §Ñ°†H ºb ,áæ«cÉŸG 𫨰ûàd
,áYöùdG IOÉjõd ÉeCG ,"1" ºbôdG óæY áYöùdG ‘ ºµëàdÉH
ÜQÉ≤Y √ÉŒG ‘ QGhódG ¢Uô≤dG IQGOEG Ú©àj ¬fEÉa
.áYÉ°ùdG
Ò°ûj ÚM ‘ ,πbC’G áYöùdG ¤EG Ò°ûj "1" ºbôdG :áXƒë∏e
.iƒ°ü≤dG áYöùdG ¤EG "3" ºbôdG
øY IÒ°üb äGQhO ‘ äÉfƒµŸG êõe ∂dP øe k’óH øµÁ •
‘ ºµëàdG ìÉàØe ≈∏Y §¨°†dG QGôªà°SGh IQGOE’G ≥jôW
∑ôJ Ú©àj ¬fEÉa ,∞bƒà∏d ÉeCG ;¢†ÑædG ™°Vh óæY áYöùdG
.ìÉàØŸG
Gkôªà°ùe kÓ«¨°ûJ IóMƒdG 𫨰ûàH º≤J ’ !¬«ÑæJ
¥ô¨à°ùJ áMGQ IÎa ¿hO IóMGh á≤«bO øe ÌcC’
.Úà≤«bO
≥jôHE’G ójhõàd ájÉæ©H áÄÑ©àdG áëàa AÉ£Z ádGREG øµÁ
.IQhö†dG óæY á÷É©ŸG á«∏ªY AÉæKCG äÉfƒµŸÉH
óæY ≥jôHE’G πNGO ∂©HÉ°UCG ™°VƒH º≤J ’ !ôjò–
.äÉfƒµŸG áaÉ°VEG
12
¢ùHGƒ≤dG ™e á≤aôŸG π«°UƒàdGh Ö«cÎdG äɪ«∏©J ™ÑJG
.IOƒ÷G á«dÉY
áÄa ¢ùØf ™e QÉ«àdG ™WÉ≤d á∏jóH ™£b ájCG ≥aGƒàJ ¿CG Öéj
.èàæŸÉH OhõŸG »∏°UC’G QÉ«àdG ™WÉb
•
ɪc ;É¡eGóîà°SG πÑb áæ«cÉŸG AGõLCG ∞«¶æJ Ωõ∏j •
"∞«¶æàdGh áfÉ«°üdG" º°ùb ≈∏Y ´ÓWE’G ≈Lôj
•
.π«°UÉØàdG øe ójõŸG ≈∏Y ∫ƒ°üë∏d
≥jôHE’G Ö«côJ
¿ƒµj å«ëH ,∑ôëŸG IóMh ≈∏Y ≥jôHE’G ™°VƒH ºb •
õeQ ™e kÉ≤aGƒàe ¢†Ñ≤ŸG IóYÉb ‘ OƒLƒŸG §ÿG
.∑ôëŸG IóYÉb ≈∏Y OƒLƒŸG ≥∏¨ŸG ÒZ πØ≤dG
¿CG ¤EG áYÉ°ùdG ÜQÉ≤Y √ÉŒÉH ≥jôHE’G IQGOEÉH ºb
;≥∏¨ŸG πØ≤dG õeQ ™e πHÉ≤àe √ÉŒG ‘ §ÿG õcôªàj
•
πµ°ûdÉH ∑ôëŸG IóMhh ≥jôHE’G ™«ªŒ øe ócCÉàdG ™e
.ɪ¡©°Vƒe ‘ ɪ¡≤∏Z ΩɵMEGh í«ë°üdG
•
áÄÑ©àdG áëàa AÉ£Zh AÉ£¨dG Ö«côJ
õeôH AÉ£¨dG ≈∏Y OƒLƒŸG IôFGódG õeQ IGPÉëà ºb •
.≥jôHE’G ≈∏Y OƒLƒŸG ≥∏¨ŸG ÒZ πØ≤dG
≈∏Y ®ÉØ◊G ™e ,≥jôHE’G ≈∏Y AÉ£¨dG ¢†ØîH ºb
,øjõeôdG Óc IGPÉfi
¿CG ¤EG áYÉ°ùdG ÜQÉ≤Y √ÉŒÉH ≥jôHE’G IQGOEÉH ºb
πØ≤dG õeQ ™e …PÉfi √ÉŒG ‘ IôFGódG õeQ õcôªàj
AÉ£¨dGh ≥jôHE’G ≥∏Z ΩɵMEG øe ócCÉàdG ™e ;≥∏¨ŸG ÒZ
.ɪ¡©°Vƒe ‘
≈∏Y ¬°†ØN ,áÄÑ©àdG áëàa AÉ£Z Ö«côJ ᫨H ,Öéj
áÄÑ©àdG áëàa AÉ£Z ¬æ°ùdCG ≥aGƒJ øe ócCÉàdG ™e ;AÉ£¨dG
.AÉ£¨dG ≈∏Y ÚJóLGƒàŸG ™£≤dG »àëàa ÚH
.¬©°Vƒe ‘ ¬≤∏¨d πØ°SCÓd ƒ°û◊G áëàa AÉ£Z ™aóH ºb
Ò£≤àdG á«æ«°U Ö«côJ
IOƒLƒŸG äGQÉ°ùŸG ≈∏Y Ò£≤àdG á«æ«°U ™°VƒH ºb •
.∑ôëŸG IóYÉb ≈∏Y
™«ªéàdG
•
•
•
•
•
Page 13

ARABIC
‘ »Kƒª°ùdG ÜGöT OGóYEG áæ«cÉe ¢ùHÉb π«°UƒàH ºb
.É¡∏«¨°ûàH ºbh Ö°SÉæŸG »°ù«FôdG QÉ«àdG Qó°üe ¢ùÑ≤e
QGôªà°S’G ᣰSGƒH IÒ°üb äGQhO ‘ §«∏ÿG êõà ºb
™°Vh óæY áYöùdG ‘ ºµëàdG ìÉàØe ≈∏Y §¨°†dG ‘
.§¨°†dG øY ∞bƒàdGh ¢†ÑædG
»¨Ñæj ’ ¬fEÉa ,è∏ãdG äÉÑ©µe ¢TôL ‘ áÑZôdG óæY
∫OÉ©J ΩÉéMCG äGP) è∏K äÉÑ©µe 6 øY ójõj Ée ™°Vh
IQGOEGh •ÓÿG ≥jôHEG ‘ (ÉkÑjô≤J ·25×35×25
.á∏«∏b äGôŸ ¢†ÑædG ™°Vh ¤EG k’ƒ°Uh ºµëàdG ¢†Ñ≤e
‘ áÑ∏°üdG äÉfƒµŸG øe IÒÑc äÉ«ªc êõà º≤J ’
êõà í°üæf ÉæfEÉa ,Ió«L èFÉàf ≥«≤ëàdh .âbƒdG ¢ùØf
äÉYƒª› øe ∞dCÉàJ πMGôe ≈∏Y äÉfƒµŸG √òg
.IÒ¨°U
Gkôªà°ùe kÓ«¨°ûJ IóMƒdG 𫨰ûàH º≤J ’ !¬«ÑæJ
¥ô¨à°ùJ áMGQ IÎa ¿hO IóMGh á≤«bO øe ÌcC’
.Úà≤«bO
ádGREGh IóMƒdG ≥∏¨H ,êõŸG á«∏ªY ∫ɪàcG óæY ,ºb
.»°ù«FôdG QÉ«àdG Qó°üe øe ¢ùHÉ≤dG
Ió«Øe íFÉ°üf
,áLRÉ£dG ᪩WC’G êõe óæY èFÉàædG π°†aCG ≥«≤– ºàj •
IÎa ájC’ É¡æjõîJ óæY kÉ«©«ÑW ᪩WC’G ∞ØéàJ å«M
.á«æeR
™£≤dG ™°VƒH ºbh kÉ≤Ñ°ùe äGhö†ÿGh ¬cGƒØdG OGóYEÉH ºb
ºbh ;êõŸG á«∏ª©d ó©e AÉYh ‘ É¡©«£≤J ” »àdG
Ö°SÉæàJ IÒ¨°U ™£b ¤EG äGhö†ÿGh ¬cGƒØdG ™«£≤àH
™£b ¤EG É¡©«£≤J ‘ ≠dÉÑJ ’ øµdh ,AÉ£¨dG áëàa ™e
.Ò¨°üdG á«gÉæàe
;¢ù∏°S πFÉ°S ≈∏Y ∫ƒ°ü◊G ≈àM äÉfƒµŸG êõà ºb •
•
¢Uô≤dG §Ñ°V ,á÷É©ŸG á«∏ªY ∫ɪàcG óæY Öéjh
¥ÓZE’G ™°Vh óæY áYöùdG ‘ ºµëàdÉH ¢UÉÿG QGhódG
•
øe ¢ùHÉ≤dG ádGREGh •ÓÿG ≥∏¨H ºb ºK ;"0" ºbôdG óæY
.»°ù«FôdG QÉ«àdG Qó°üe
•
•
•
áëàa AÉ£Z ≥∏Z ΩɵMEG ≈∏Y kɪFGO ßaÉM :áXƒë∏e
.•ÓÿG ¤EG äÉfƒµŸG áaÉ°VEG ºàj ⁄ Ée ,áÄÑ©àdG
AGõLC’G áaÉc ∞bƒJ ≈àM ô¶àfG !ôjò–
.≥jôHE’G hCG AÉ£¨dG ádGREG πÑb ácôëàŸG
≈∏Y ≥aôH ܃µdG §¨°†H ºb ,»Kƒª°ùdG ÜGöT Ëó≤àd
.∑ôëŸG IóYÉb ≈∏Y OƒLƒŸG ™jRƒàdG ´GQP
.܃µdG AÓàeG óæY ´GQòdG ∑ÎH ºb
ÜGöT øe ᫪c ôNCG ™jRƒJ á«∏ªY π«¡°ùàd :áXƒë∏e
IÒ¨°U ≥YÓe QGó≤e áaÉ°VEG Ú©àj ¬fEÉa ,∂«ª°ùdG »Kƒª°ùdG
.ÜGöûdG ¿ÉjôL π«¡°ùàd πFGƒ°ùdG øe
∑ÎJ ’h ,ΩGóîà°S’G ó©H ≥jôHE’G π°ù¨H kɪFGO ºb :áXƒë∏e
áYƒª› hCG Ωɪ°üdG hCG ≥jôHE’G ‘ ∞Øéààd ᪩WC’G
á«∏ªY Ö«©°üJ ¤EG º¡Ø«ØŒ …ODƒj ób å«M ™jRƒàdG
»Kƒª°ùdG ÜGöT OGóYEG áæ«cÉe ΩGóîà°SG
è∏ãdG ¢Tô÷
è∏ãdG äÉÑ©µe ∑ÎH ºb ,èFÉàædG π°†aCG ≥«≤ëàd :áXƒë∏e
á«dõæe è∏K äÉÑ©µe ¢Tô÷ .É¡°TôL πÑb
•
πe750 ≈àM É¡H ≥jôHE’G CÓe Ú©àj ¬fEÉa ,(IÒ¨°U)
è∏K äÉÑ©µe ¢Tô÷ ÉeCG ;√É«ŸG øe πe 200 áaÉ°VEGh
Ö©µe 15 áaÉ°VEG Ú©àj ¬fEÉa ,ôLÉàŸG ‘ É¡©«Ñd (IÒÑc)
.√É«ŸG øe πe 200 áaÉ°VEGh •ÓÿG ≥jôHEG ‘ è∏K
Ó«∏b Ühòàd
k
•
•
.∞«¶æàdG
äGhö†ÿGh ¬cGƒØdG øe IÒÑc ™£b ∫ÉNOEG ∫hÉ– ’
IÒ¨°U ™£b ¤EG É¡©«£≤J Ú©àj å«M ,AÉ£¨dG áëàa ‘
.k’hCG
¬cGƒa …CG Ò°û≤J ¤EG ,áeÉY IóYÉ≤c ,êÉà– ’
»°Uƒf ÉæfEG ’EG ;IOÉ©dG ‘ É¡Jöûb πcDƒj äGhö†Nh
.Й¡Lхe πСb дЙйажŸG бaЙc π°щ¨H
äÉÑ©µeh √É«ŸG ᫪c ™°Vhh ≥jôHE’G AÉ£Z ádGREÉH ºb
•
.≥jôHE’G πNGO É¡H ≈°UƒŸG è∏ãdG
áëàa AÉ£Z õcô“ ¿Éª°†d ≥jôHE’G AÉ£Z IOÉYEÉH ºb
QGhódG ¢Uô≤dG §Ñ°V øe ócCÉJh ;É¡©°Vƒe ‘ áÄÑ©àdG
•
óæY ¥ÓZE’G ™°Vh óæY áYöùdG ‘ ºµëàdÉH ¢UÉÿG
ÜGöT OGóYEG áæ«cÉe ¢ùHÉb π«°UƒJ πÑb "0" ºbôdG
.»°ù«FôdG QÉ«àdG Qó°üà »Kƒª°ùdG
•
•
13
Page 14

ARABIC
,IQƒ°üdG ‘ √ÉfOCG í°Vƒe ƒg ɪc Ωɪ°üdG ÜòéH ºb •
.Iƒ≤H Ωɪ°üdG ™aóH º≤J ’h
á≤HÉ°ùdG äGƒ£ÿG ¢ùµY ,™«ªéàdG IOÉYE’ Öéj:áXƒë∏e
AGôLEG πÑb ¬©°Vƒe ‘ Ωɪ°üdG ≥∏Z ΩɵMEG øe ≥≤ëàdGh
Ò¨°üdG º¡°ùdG iPÉëàj ¿CG Öéjh ;iôNCG Iôe êõŸG á«∏ªY
OƒLƒŸG Ò¨°üdG º¡°ùdG ™e Ωɪ°üdG á¡LGh ≈∏Y OƒLƒŸG
ádÉM ‘h ;≥∏¨ŸG πØ≤dG IQƒ°U RÈJ å«M ≥jôHE’G πØ°SCG
±ƒ°S òÄæ«ëa ,Ö°SÉæŸG πµ°ûdÉH Ωɪ°üdG ≥∏Z ΩɵMEG ΩóY
πØ°SCG ‘ IOƒLƒŸG ±öüdG áëàa øe äÉfƒµŸG ÜöùàJ
.≥jôHE’G
á«æØdG äÉ«£©ŸG
~ ± 220-240 á«£dƒØdG
õJôg 50/60 »Hô¡µdG QÉ«àdG
äGh 450 ábÉ£dG ∑Ó¡à°SG
ΩGôLƒ∏«c 2.5 èàæŸG ¿Rh
Îe 1.2 ∂∏°ùdG ∫ƒW
≈∏Y Ióªà©ŸG ájƒ°†©dG äGhö†ÿG AGƒàMG ΩóY øª°†oj •
” ób å«M É¡∏°ù¨H ≈°Uƒj ¬fCG ’EG ,á«Fɪ«c äÉØ∏fl …CG
.É¡©«H πÑb ó«dÉH É¡à÷É©e
πãe Iöû≤dG ᵫª°S ¬cGƒØdG øe Qƒ°û≤dG ádGREÉH ºb
.¢SÉfÉfC’Gh Ωɪ°ûdG
.∂dP ÒZ Ée ¤EG ,¥GQódGh ñƒÿGh RôµdG IGƒf ádGREÉH ºb
.¢UÉLC’Gh ìÉØàdG øe IGƒædG ádGREÉH ºb •
áfÉ«°üdGh ∞«¶æàdG
.IöTÉÑe ΩGóîà°S’G ó©H áæ«cÉŸG ∞«¶æJ π¡°ùj •
OGƒe hCG öUÉæY …CG hCG ¿ƒà°SC’G hCG ∫ƒëµdG Ωóîà°ùJ ’ •
.áæ«cÉŸG ∞«¶æJ ‘ ᣰTÉc ∞«¶æJ
¢Tɪb á©£b ΩGóîà°SÉH ∑ôëŸG IóMh ∞«¶æàH ºb
.á∏∏Ñe
É¡Ø£°ûH Ωƒ≤J ’h √É«ŸG ‘ ∑ôëŸG IóMh ôª¨H º≤J ’
.√É«ŸG QƒÑæ°U â–
´RƒŸG ádGRE’
AÉ£¨dG Öë°ùH ºb •
´RƒŸG ™aQG •
.êQÉî∏dh ΩÉeCÓd ´RƒŸG ∂jôëàH ºb •
•
•
•
•
14
≥jôHE’G øe Ωɪ°üdG ádGRE’
Ωɪ°üdG ∑É°ùeEG øµÁ å«ëH ájhGõH ≥jôHE’G IQGOEÉH ºb •
.ádƒ¡°ùH
√ÉŒÉH) ¥ÓZE’G ÒZ ™°Vh ¤EG Ωɪ°üdG IQGOEÉH ºb
.(≥∏¨ŸG ÒZ πØ≤dG IQƒ°U
•
Page 15

ARABIC
¿Éª°†dG
É¡fEÉa ,É¡JÉéàæe IOƒéH ôµjO ófBG ∑ÓH RGõàYG øe ÉkbÓ£fG
.õ«‡ ¿Éª°V ¢Vô©J
’h á«fƒfÉ≤dG ºµbƒ≤M ¤EG áaÉ°VEG Gòg ¿Éª°†dG ¿É«H ó©j
.∫GƒMC’G øe ∫ÉM …CÉH É¡H πîj
OÉ–’G ‘ AÉ°†YC’G ∫hódG º«∏bEG πNGO ¿Éª°†dG Gòg iöùj
.á«HQhC’G Iô◊G IQÉéàdG á≤£æeh »HQhC’G
…CG OƒLh ÖÑ°ùH ÉkÑ«©e ôµjO ófBG ∑ÓH èàæe íÑ°UCG Ée GPEG
™e èàæŸG ≥aGƒJ ΩóY hCG OGƒŸG hCG áYÉæ°üdG ‘ ܃«Y
òÄæ«ëa ,AGöûdG ïjQÉJ øe
ìÓ°UEG hCG áÑ«©ŸG AGõLC’G πjóÑJ ôµjO ófBG ∑ÓH øª°†J
hCG …OЙ©dG ΩGуоа°S’ЙH ∑УgE’G бС°щжd Йk≤ah дЙйажŸG
:⁄ Йe 𫪩∏d бMGфdG ТaƒJ ¿Йª°†d дЙйажŸG √тg πjуСJ
hCG á«æ¡e hCG ájQÉŒ ¢VGôZC’ èàæŸG ΩGóîà°SG ºàj
;¬dɪgEG hCG èàæŸG ΩGóîà°SG IAÉ°SEG ºàj
hCG öUÉæY OƒLƒd áé«àf QöV …C’ èàæŸG ¢Vô©àj
;çOÉ◊ É¡°Vô©J hCG É¡H á«LQÉN OGƒe
ÒZ øe ¢UÉî°TCG πÑb øe É¡MÓ°UEG ¬dhÉfi ºàj
ácöûd ™HÉàdG áfÉ«°U ≥jôa hCG º¡d ìöüŸG AÓcƒdG
π«ch hCG ™FÉÑdG ¤EG AGöûdG á«∏ªY âÑãj Ée Ëó≤J Öéj
≈∏Y ∫ƒ°ü◊ÉH áÑdÉ£ŸG øe øµªààd ¬d ìöüŸG áfÉ«°üdG
≥≤ëàdG ºµæµÁh ;¿Éª°†dG Gòg ÖLƒÃ áMƒæªŸG ÉjGõŸG
øY ºµd áÑ°ùædÉH ¬d ìöüe áfÉ«°U π«ch ÜôbCG ¿Éµe øe
¿Gƒæ©dG ≈∏Y »∏ëŸG ôµjO ófBG ∑ÓH ÖàµÃ ∫É°üJ’G ≥jôW
Gô¡°T 24 ∫ÓN IOóëŸG ÒjÉ©ŸG
k
;ÒLCÉà∏d
.ôµjO ófBG ∑ÓH
.π«dódG Gòg ‘ ¬«dEG QÉ°ûŸG
áÄ«ÑdG ájɪM
Gòg øe ¢ü∏îàdG ΩóY Ωõ∏j .π°üØæŸG ™ª÷G
.ájOÉ©dG á«dõæŸG áeɪ≤dG ™e èàæŸG
ôµjO ófBG ∑ÓH èàæe ∫GóÑà°SG ΩÉjC’G øe Ωƒj ‘ Ωõd GPEG
™e ¬æe ¢ü∏îàJ Óa ,¬eóîà°ùJ ó©J ⁄ GPEG hCG ,∂H ¢UÉÿG
èàæŸG Gòg áMÉJEG øe ócCÉJ πH ,iôNC’G á«dõæŸG áeɪ≤dG
.π°üØæŸG ™ªé∏d
ôjhóJ IOÉYE’ ≥aôe ôµjO ófBG ∑ÓH ácöT ôaƒJ
бjЙ¡f ¤EG Й¡dƒ°Uh OфйГ фµjO уfBG ∑УH дЙйажe
√òg Ëó≤J ºàjh .πª©∏d É¡à«MÓ°U ΩóYh ÉgôªY
≈Lôj ,áeóÿG √òg øe IOÉØà°SÓd .ÉkfÉ› áeóÿG
±ƒ°S …òdGh óªà©e áfÉ«°U π«ch …CG ¤EG èàæŸG IOÉYEG
.ЙжY бHЙ«f дЙйажŸG ™ªL √QhуH ¤ƒаj
óªà©e áfÉ«°U π«ch ÜôbCG ™bƒe ≈∏Y ±ô©àdG ∂æµÁ
»∏ëŸG ôµjO ófBG ∑ÓH Öàµe ≈∏Y ∫É°üJ’G ∫ÓN øe
,∂dP øe k’óHh .π«dódG Gòg ‘ í°VƒŸG ¿Gƒæ©dG ‘
Ú©HÉàdG øjóªà©ŸG áfÉ«°üdG AÓcƒH áªFÉb óLƒJ
Ée äÉeóÿ á∏eɵdG π«°UÉØàdGh ôµjO ófBG ∑ÓH ácöûd
âfÎfE’G ≈∏Y ÉæH á°UÉÿG ∫É°üJ’G πFÉ°Shh ™«ÑdG ó©H
.www.2helpU.com :ÊhεdE’G ™bƒŸG ≈∏Y
•
•
AÓcƒH áªFÉb ≈∏Y ∫ƒ°ü◊G ∂dP øe k’óH ôaƒàj ɪc
ôµjO ófBG ∑ÓH ácöûd Ú©HÉàdG º¡d ìöüŸG áfÉ«°üdG
ó©H Ée äÉeóîH á≤∏©àŸG á∏eɵdG π«°UÉØàdG ≈∏Y ±ô©àdGh
:ÊhεdE’G ™bƒŸG ≥jôW øY ™«ÑdG
www.2helpU.com
15
Page 16

FRENCH
1
2
3
4
Identification des pièces
1. Bouchon de remplissage
2. Couvercle
3. Bol mélangeur
4. Valve
5. Protection
6. Socle
7. Bouton de commande rotatif
8. Distributeur
9. Bac de récupération
16
5
6
7
8
9
Page 17

FRENCH
Utilisation prévue
Votre machine à smoothie Black & Decker a été
conçue pour mélanger des fruits et des légumes
et faire des smoothies. Cet appareil est destiné
uniquement à un usage domestique.
Lire attentivement ce mode d’emploi
avant d’utiliser l’appareil.
Consignes de sécurité
• Avertissement! Lorsqu’on utilise un appareil
électrique, il faut toujours respecter certaines
règles de sécurité fondamentales,
notamment les suivantes, afin de prévenir
les risques d’incendie, de décharges
électriques, de blessures corporelles ou de
dégâts matériels.
• L’utilisation est décrite dans ce mode
d’emploi. L’utilisation d’un accessoire ou
d’une pièce, ou l’exécution de toute
opération avec cet appareil autres que celles
recommandées dans ce mode d’emploi peut
présenter un risque de blessures corporelles.
• Conserver ce mode d’emploi pour le
consulter ultérieurement.
Utilisation de votre appareil
• Prenez toujours des précautions pendant
l’utilisation de l’appareil.
• Ne tirez jamais sur le cordon d’alimentation
pour débrancher la fiche de la prise. Gardez
le cordon d’alimentation éloigné de la
chaleur, des graisses et des arêtes vives.
• Ne placez pas l’appareil sur ou près de
sources de chaleur ou dans un four chauffé.
• N’utilisez pas l’appareil à l’extérieur.
• Ne laissez pas l’appareil fonctionner sans
surveillance.
• Attendez toujours l’arrêt complet des pièces
en mouvement avant d’enlever le couvercle.
• Protégez toujours le bloc moteur de l’eau ou
d’une humidité excessive.
• Si le cordon d’alimentation est endommagé
pendant le fonctionnement de l’appareil,
débranchez l’appareil immédiatement. Ne
touchez pas le cordon d’alimentation avant de
l’avoir débranché de la prise électrique.
• Débranchez l’appareil de l’alimentation
électrique lorsqu’il n’est pas utilisé, avant de
monter ou de démonter des pièces et avant
de le nettoyer.
• Ne mettez jamais vos doigts ou tout autre
objet dans le tube d’alimentation lorsque
l’appareil est en cours de fonctionnement.
• Faites attention quand vous manipulez les
lames coupantes, quand vous videz le bol et
pendant le nettoyage.
• Tenez le tube d’alimentation et les parties
mouvantes à l’écart des vêtements amples ou
des cheveux longs.
• Avertissement! Une mauvaise utilisation
peut causer des blessures.
Sécurité d’autrui
• Cet appareil n’est pas destiné à être utilisé
par des personnes (y compris les enfants)
dont les capacités physiques, sensorielles ou
mentales sont réduites, ou dénuées
d’expérience ou de connaissances, sauf si
elles sont supervisées ou ont reçu des
instructions concernant l’utilisation de
l’appareil par une personne responsable de
leur sécurité.
• Les enfants doivent être surveillés pour
s’assurer qu’ils ne jouent pas avec l’appareil.
Après utilisation
• Retirer la fiche de la prise et laisser l’appareil
refroidir avant de le laisser sans surveillance
et de changer, nettoyer ou inspecter les
pièces de l’appareil.
• Lorsqu’il n’est pas utilisé, l’appareil doit être
rangé dans un endroit sec. Les enfants ne
doivent pas avoir accès aux appareils rangés.
17
Page 18

FRENCH
Inspection et réparations
• Avant d’utiliser l’appareil, vérifiez qu’aucune
pièce ne soit endommagée ou défectueuse.
Vérifiez la présence de pièces cassées,
d’interrupteurs endommagés ou toute autre
condition qui pourraient affecter son
fonctionnement.
• Ne pas utiliser l’appareil si une pièce est
endommagée ou défectueuse.
• Faites réparer ou remplacer les parties
endommagées ou défectueuses par un
réparateur agréé.
• Avant utilisation, vérifier l’état du cordon
d’alimentation pour des signes de
dommages, de vieillissement ou d’usure.
• Ne pas utiliser l’appareil si le cordon
d’alimentation ou la fiche secteur est
endommagée ou défectueuse.
• Si le cordon d’alimentation ou la prise est
endommagée ou défectueuse, il doit être
réparé par un réparateur agréé afin d’éviter
tout danger. Ne coupez pas le cordon
d’alimentation et n’essayez pas de le réparer
vous-même.
• Ne jamais essayer d’enlever ou de remplacer
des pièces autres que celles mentionnées
dans ce mode d’emploi.
Consignes de sécurité
supplémentaire pour les
machines à smoothie
• Ne plongez pas l’appareil, le cordon ou la
fiche dans un liquide
• Laissez toujours un espace suffisant autour
de l’appareil pour la ventilation
• Tenez les vêtements, les cheveux, les bijoux,
etc. à l’écart des parties mouvantes.
• N’utilisez pas l’appareil avec les mains
humides.
• Il faut être prudent lors de la manipulation
des lames coupantes, en particulier lorsque
vous retirez les lames du bol, videz le bol et
pendant le nettoyage.
• “Eteindre l’appareil avant de changer
d’accessoire ou avant d’approcher les pièces
en mouvement”.
Sécurité électrique
Avant d’utiliser l’appareil, vérifiez que la tension
électrique correspond à celle indiquée sur
l’étiquette signalétique.
Cet appareil possède une double
insolation conformément à la norme
EN 60335-2-14; de ce fait un fil de
terre n’est pas nécessaire.
• Pour éviter les risques de décharges
électriques, ne plongez pas le cordon, la
fiche ou le bloc moteur dans l’eau ou tout
autre liquide.
• Vérifiez que la tension d’alimentation
indiquée sur l’étiquette signalétique de
l’appareil correspond bien à celle de votre
installation électrique. Toute erreur de
branchement annulerait la garantie.
Remplacement d’une prise
électrique
En cas d’installation d’une nouvelle prise:
• Jetez l’ancienne prise avec prudence.
• Connectez le fil marron sur la borne sous
tension de la nouvelle prise.
• Connectez le fil bleu sur la borne neutre.
• Si l’appareil est de classe l (mis à la terre),
connectez le fil vert / jaune sur la borne.
Avertissement! Si votre appareil est de classe ll
double isolation (seulement 2 fils dans le
cordon), aucune connexion n’est à faire sur la
borne terre.
18
Page 19

FRENCH
Suivez les instructions de montage fournies
avec les prises de bonne qualité.
Tout fusible remplacé doit être du même calibre
que le fusible d’origine fourni avec l’appareil.
Assemblage
• Les pièces de l’appareil doivent être
nettoyées avant son utilisation. Voir
“Entretien et nettoyage” pour plus
d’informations.
Mise en place du bol
• Posez le bol sur le bloc moteur en alignant le
trait sculpté à la base de la poignée avec le
symbole cadenas ouvert du socle moteur.
• Faites pivoter le bol dans le sens des
aiguilles d’une montre de façon à aligner le
trait avec le symbole cadenas fermé.
Assurez-vous que le bloc moteur et le bol
sont correctement assemblés et verrouillés
en position.
Installation du couvercle et du
bouchon de remplissage
• Alignez le symbole cercle sur le couvercle
avec le symbole cadenas ouvert sur le bol.
• Abaissez le couvercle sur le bol en gardant
les deux symboles alignés.
• Faites pivoter le couvercle dans le sens des
aiguilles d’une montre jusqu’à l’alignement
du symbole cercle avec le symbole cadenas
fermé. Assurez-vous que le couvercle et le
bol sont bien verrouillés en position.
• Pour placer le bouchon de remplissage,
abaissez-le sur le couvercle. Alignez les
pattes du bouchon de remplissage avec les
deux encoches sur le couvercle.
• Appuyez sur le bouchon de remplissage pour
le verrouiller en position.
Installation du bac de
récupération
• Faites glisser le bac de récupération dans les
rainures du socle moteur.
Utilisation
• Retirez le couvercle du bol et placez les
ingrédients dans le bol. Pour de meilleurs
résultats, les ingrédients doivent être coupés
en petits morceaux. Coupez les ingrédients
secs en petits morceaux avant le mixage.
• Remettez le couvercle sur le bol avec le
bouchon de remplissage bien ajusté.
• Enclenchez le bol sur le socle moteur.
Assurez-vous que le bol et le couvercle sont
correctement ajustés, sinon la machine à
smoothie ne pourra pas fonctionner.
Avertissement! Assurez-vous que la
molette de commande de vitesse est
réglée sur la position off ‘0’ avant de
brancher la machine à smoothie au réseau
électrique.
• Branchez le bloc moteur sur une prise
adéquate et enclenchez l’interrupteur de la
prise.
• Pour commencer, réglez la molette de
contrôle de vitesse sur la position ‘1’. Pour
augmenter la vitesse, faites tourner la
molette de contrôle de vitesse dans le sens
des aiguilles d’une montre.
Remarque: La vitesse ‘1’ est la plus lente, la ‘3’
la plus rapide.
• Vous pouvez aussi mélanger les ingrédients
par de courtes impulsions en faisant tourner
et en tenant la molette de contrôle de vitesse
sur la position PULSE. Relâchez-la pour
arrêter.
Attention! Ne faites pas fonctionner
l’appareil sans interruption pendant
plus d’une minute sans une période de
repos de deux minutes.
19
Page 20

FRENCH
Le bouchon de remplissage peut être enlevé
avec précaution pour ajouter des ingrédients
dans le bol pendant le mixage.
Avertissement! Ne mettez pas vos
doigts dans le bol lorsque vous
ajoutez les ingrédients.
• Laissez les ingrédients se mélanger jusqu’à
obtenir une consistance homogène. Une fois
le mixage terminé, réglez la molette de
contrôle de vitesse sur la position off ‘0’.
Eteignez et débranchez le blender de
l’alimentation secteur.
Remarque: Gardez toujours le bouchon de
remplissage enclenché en position, sauf si vous
ajoutez des ingrédients dans le blender.
Avertissement! Attendez jusqu’à
l’arrêt complet de toutes les pièces
mouvantes avant de retirer le
couvercle ou le bol.
• Pour servir un smoothie, il suffit d’appuyer
votre verre contre le levier du distributeur sur
le socle moteur.
• Quand le verre est rempli, relâchez le levier.
Remarque: Pour vous aider à verser le reste
d’un smoothie épais, ajoutez quelques cuillerées
à soupe de liquide pour un meilleur débit.
Remarque: Lavez toujours immédiatement
après utilisation. Ne laissez pas de nourriture
sécher dans le bol, la valve ou le distributeur,
car cela rendrait le nettoyage difficile.
Utilisation de la machine à
smoothie pour broyer de la
glace
Remarque: Pour de meilleurs résultats laissez
les glaçons dégivrer légèrement avant le
broyage. Pour broyer des (petits) glaçons faits
maison remplissez le bol jusqu’à 750ml et
ajoutez 200ml d’eau. Pour broyer des (gros)
glaçons achetés en supermarché, mettez 15
glaçons dans le bol mélangeur et ajoutez 200ml
d’eau.
20
• Enlevez le couvercle du bol et mettez les
glaçons puis l’eau dans le bol.
• Remettez le couvercle du bol en s’assurant
que le bouchon de remplissage est bien en
place. Vérifiez que la molette de contrôle de
vitesse est réglée sur la position off ‘0’ avant
de brancher la machine à smoothie au
réseau d’alimentation.
• Branchez la fiche et allumez la machine à
smoothie sur la prise secteur.
• Mélangez par de courtes impulsions en
tenant et en relâchant la molette de contrôle
de vitesse sur la position PULSE.
• Si vous voulez broyer des glaçons, ne mettez
pas plus de 6 glaçons (environ
25x35x25mm) dans le bol mélangeur et
tournez la molette de contrôle de vitesse sur
la position pulse à quelques reprises.
• Ne mélanger pas une grande quantité
d’ingrédients solides à la fois. Pour obtenir
de bons résultats, nous vous conseillons de
mélanger ces ingrédients par plusieurs
petites quantités.
Attention! Ne faites pas fonctionner
l’appareil sans interruption pendant
plus d’une minute sans une période
d’arrêt de deux minutes.
• Lorsque le mélange est terminé, éteignez et
débranchez l’appareil de l’alimentation
secteur.
Conseils utiles
• Vous obtiendrez de meilleurs résultats avec
des produits frais, car les produits qui ont été
stockés pendant quelque temps seront secs
par nature.
• Préparez vos fruits et légumes à l’avance et
placez les morceaux dans un plat prêts pour
le mélange. Coupez vos fruits et légumes en
morceaux suffisamment petits pour qu’ils
passent facilement par le trou du couvercle,
mais ne les coupez pas trop petits.
Page 21

• N’essayez jamais de forcer des gros
morceaux de fruits ou de légumes par le trou
du couvercle, coupez-les en petits morceaux
dès le départ.
• En règle générale, vous n’avez pas besoin
de peler les fruits ou les légumes dont vous
consommer la peau normalement.
Cependant nous vous conseillons de laver
tous les produits avant de les mélanger.
• Les légumes certifiés biologiques sont
garantis ne pas contenir de résidus de
produits chimiques mais ils doivent toujours
être lavés, car ils ont été manipulés avant la
vente.
• Enlevez la peau des fruits à peau épaisse,
comme le melon et l’ananas.
• Enlevez les noyaux des cerises, des pêches,
des nectarines etc.
FRENCH
Pour enlever la valve du bol
• Tournez le bol sur un angle afin de pouvoir
saisir la valve facilement.
• Tournez la valve en position déverrouillée
(vers le symbole cadenas ouvert).
• Sortez-la comme indiqué. Ne forcez pas la
valve.
• Enlevez les pépins des pommes et des
poires.
Entretien et nettoyage
• Il est plus facile de nettoyer l’appareil
immédiatement après son utilisation.
• N’utilisez pas de produits abrasifs, tampons à
récurer, acétone, alcool etc. pour nettoyer
l’appareil.
• Nettoyez le bloc moteur avec un chiffon
humide.
• Ne jamais plonger le bloc moteur dans l’eau
ni le rincer sous le robinet.
Pour enlever le distributeur
• Remontez la protection.
• Soulevez le distributeur.
• Déplacez le distributeur vers l’avant et
sortez-le.
Remarque: Pour remonter l’appareil, inversez la
procédure ci-dessus et vérifiez que la valve est
bien verrouillée en place avant de recommencer
à mélanger. La petite flèche sur l’avant de la
valve sera alignée avec la petite flèche sur le
bas du bol où est affiché le symbole cadenas
fermé. Si la valve n’est pas correctement
verrouillée en place, le contenu va fuir par le trou
de vidange au fond du bol.
Données techniques
Tension 220-240V ~
Courant d’alimentation 50/60Hz
Puissance nominale 450W
Poids de l’appareil 2,5 kg
Longueur du cordon 1,2 mètre
21
Page 22

FRENCH
Protection de l'environnement
Collecte séparée. Ce produit ne doit
pas être jeté avec les déchets
domestiques normaux.
Si vous décidez de remplacer ce produit Black &
Decker, ou si vous n'en avez plus l'utilité, ne le
jetez pas avec vos déchets domestiques
Rendez-le disponible pour une collecte séparée.
• Black & Decker fournit un dispositif
permettant de collecter et de recycler les
produits Black & Decker lorsqu'ils ont atteint
la fin de leur cycle de vie. Pour pouvoir
profiter de ce service, veuillez retourner votre
produit à un réparateur agréé qui se chargera
de le collecter pour nous.
• Pour connaître l'adresse du réparateur agréé
le plus proche de chez vous, contactez le
bureau Black & Decker à l'adresse indiquée
dans ce manuel. Vous pourrez aussi trouvez
un liste des réparateurs agréés de Black &
Decker et de plus amples détails sur notre
service après-vente sur le site Internet à
l'adresse suivante : www.2helpU.com
22
Page 23

Garantie
Black & Decker est confiant dans la qualité de
ses appareils et accorde une garantie
exceptionnelle.
Ce certificat de garantie est un document
supplémentaire et ne peut en aucun cas se
substituer à vos droits légaux.
La garantie est valable sur tout le territoire des
Etats Membres de l’Union Européenne et de la
Zone de Libre Echange Européenne.
Lorsqu’un appareil Black & Decker s’avère
défectueux en raison d’un défaut matériel, d’un
défaut de fabrication ou d’un manque de
conformité dans les 24 mois à compter de la date
d’achat, Black & Decker garantit le
remplacement des pièces défectueuses, la
réparation ou le remplacement des appareils
soumis à une usure normale à la convenance du
client, sauf dans les circonstances suivantes:
Utilisation de l’appareil à des fins
commerciales, professionnelles ou en
location;
Mauvaise utilisation de l’appareil ou
appareil endommagé à cause de
négligence;
Appareil endommagé par d’autres
appareils, des substances ou par accident;
Réparations tentées par des personnes
autres qu’un réparateur agréé ou le service
technique de Black & Decker.
Pour avoir recours à la garantie, il est nécessaire
de fournir une preuve d’achat à votre revendeur
ou à un réparateur agréé. Pour connaitre
l’adresse du réparateur agréé le plus proche,
contactez le bureau Black & Decker à l’adresse
indiquée dans ce manuel.
Vous pouvez aussi trouver une liste des
réparateurs agréés Black & Decker et de plus
amples détails sur notre service après-vente en
visitant notre site: www.2helpU.com.
FRENCH
23
Page 24

Names & Addresses for Black & Decker Service Concessionaries
ALGERIA: SARL Outillage Corporation, After Sale Service Center-08, Rue Mohamed Boudiaf - Cheraga, Algiers, Algeria, Tel:
+213 21 375131, Fax: +213-0-369667. AZERBAIJAN: Kontakt - NN LLC, M.Qashqay 43, Baku, Azerbaijan Az1000. Tel:
+994 12 4082050, Fax: +994 12 4117090. BAHRAIN: Alfouz Services Co. WLL., P.O. Box 26562, Tubli, Manama, Tel: +973-17783562/
17879987, Fax: +973-17783479. Kewalram & Sons Co. WLL P.O. Box 84, Manama, Kingdom of Bahrain, Tel: +973-17213110/ 17210617/
17210619, Fax: +973-17213211/ 17210627. BANGLADESH: Ultra Corporation, 8, Kushol Centre, Uttara, Dhaka 1230. Tel:
+880-2-8922144, Fax: +880-2-8951339. EGYPT: Anasia Egypt for Trading S.A.E, P.O. Box 2443, 9, Mostafa Refaat Street,
Sheraton Heliopolis 11361, Cairo, Tel: +202-22684159, Fax: +202-22684169. ETHIOPIA: Seif Sherif Trade PLC -Arada Sub City,
Kebele 01-02, Global Insurance Bldg., 2nd Flr. Room 43, P.O.Box 2525, Addis Ababa, Ethiopia, Tel: 00-251-11-1563968/ 1563969, Fax:
00-251-11-1558009. INDIA: Gryphon Appliances Ltd., D-6/4, Okhla Industrial Area, Phase-I, New Delhi-110020, Tel: +91-11-46731111,
Fax: +91-11-46731111. JORDAN: Bashiti Hardware, 93 King Abdullah 2nd St., Opp ELBA House, P.O. Box 3005, Tel: +962-6-5349098
ext.11, Fax: +962-6-5330731. KENYA: Leading Concepts, P.O. Box: 40877-00100, Nairobi, Kenya. Tel: +254 20 690 5000, Fax:
+254 20 690 5111. KUWAIT: Al Omar Technical Co., P.O. Box 4062, Safat 13041, Kuwait, Tel: 00965-24848595/ 24840039, Fax:
00965-24845652. The Sultan Centre, P.O. Box 26567-13126 Safat, Kuwait, Tel: 00965-24343155 Etn. 432, Fax: 00965-24319071.
LEBANON: Aces Service Centre, P.O. Box 90-102, Nahr El Mot, Seaside Highway, Pharaon Building, Beirut. Tel: 00961-1-898989, Fax:
00961-1-245880. LIBYA: Homeworld Co., Building No.5, Senidal St., Amr Ibn Elaas Road, Benghazi, Libya. Tel: 00218-61-9094183.
Service Center1 - Benghazi: Tel: +218-061-3383994, Fax: +218-092-7640688, Service Center2 - Tripoli: Tel: +218-021-3606430, Fax:
+218-092-6514813. MALTA: John G Cassar Ltd. 36-Victory Street, Qormi QRM 06, Malta. Tel: +356-21493251, Fax: +356-21483231.
MAURITIUS: J.M. Goupille & Co. Ltd., Rogers Industrial Park 1, Riche Terre, Mauritius, Tel: +230 206 9450/ +230 207 1700, Fax:
+230 206 9474/ +230 248 3188. MOROCCO: UATS 26 Rue Ennarjisse, Hay Erraihan, Beausejour - Hay Hassani-Casablanca, Morocco.
Tel: +212 522945114, Fax: +212 522942442. NEPAL: Universal Electrocom, Tripureshwor, Kathmandu, Nepal. Tel:+977-1-4265191.
NIGERIA: Dana Electronics Ltd. (Lagos) 116/ 120, Apapa Oshodi Express Way, Isolo, Lagos, Nigeria. Tel: +234-17431818/
+234-8037767774/ +234-8057445477. (Abuja) 18, A.E. Ekukinam Street, Off Obsfemi Awolowo Road, Utako, Abuja, Nigeria. Tel:
+234-8032276101/ +234-8037767774. (Kano) 9A - Mai Malari Road, Bompai, Kano, Nigeria. Tel: +234-8053294947/ +234-8037767774.
OMAN: Oman Marketing & Service Co. (Omasco), P.O. Box 2734, Behind Honda Showroom, Wattayah, Oman, Tel: +968-24560232/
24560255, Fax: +968-24560993. Oman Marketing & Service Co. (Omasco), Al Ohi, Sohar, Oman, Tel: +968-26846379, Fax:
+968-26846379. Oman Marketing & Service Co. (Omasco) - Sanaya, Salalah, Oman, Tel: 00968-23212290, Fax: +968-23210936.
PAKISTAN: Ammar Service & Spares - 60-Bank Arcade, Serai Road, Karachi, Pakistan, Tel: 0092-21-32426905, Fax: 0092-21-32427214.
PHILIPPINES: 476 J. P. Rizal St., cor Kakarong St. Brgy Olympia, Makati City, Tel: +632 403-5698. QATAR: Al Muftah Service Centre -
Al Wakrah Road, P.O. Box 875, Doha, Qatar. Tel: 00974-4650880/ 4650110/ 4446868, Fax: 00974-4441415/ 4662599. SAUDI ARABIA:
(Al Khobar) Al-Suwaiket Catering & Trading Co., P.O.Box 4228, King A.Aziz Street, Al Khobar, Tel: +966-3-8591088, Fax:
+966-3-8595648. Fawaz Ebrahim Al Zayani Trading Est. P.O. Box 76026, Al Khobar #31952, Tel: +966-3-8140914, Fax: +966-3-8140824 .
(Jeddah) Banaja Trading Co. Ltd, P.O. Box 366, Jeddah-21411, Tel: +966-2-6511111, Fax: +966-2-6503668. (Riyadh) Banaja Trading Co.
Ltd, P.O. Box 566, Riyadh-11421, Tel: 00966-1-4124444, Fax: +966-1-4033378. SOUTH AFRICA: Trevco Power Tool Service 14
Steenbok Street, Koedoespoort, 0186, Pretoria, South Africa, Tel: +27-86-1873826, Fax: +27-86-5001771. SRI LANKA: Delmege
Construction Products (Pvt) Ltd., No 101 Vinayalankara Mawatha, Colombo-10, Sri Lanka, Tel: +94-11-2693361-7, Service hotline:
+94-77-2211111. TUNISIA: Société Tunisienne De Manutention - Rue de la Physique, Nouvelle Zone Industrielle de Ben Arous-2013
Tunisie, Tel: +216-71-386102/ 380620, Fax: +216-71380412 ext 216. UGANDA: Anisuma Investment and Services Ltd., J R complex,
Ware House No.5, Plot No 101, 3rd Street Industrial Area, Jinja Road, Kampala, Tel: +256-414237106. UAE: (Abu Dhabi)
Light House Electrical, P.O. Box 120, Abu Dhabi, Tel: +971-2-6726131, Fax: +971-2-6720667. (Al Ain) Zillion Equipment and Spare Parts
Trading LLC, P.O. Box 19740, Opp. Bin Sadal/Trimix Redymix Sanaiya, Al Ain. Tel: +971-3-7216690, Fax:+971-3-7216103 (Dubai)
Black & Decker (Overseas) GmbH, P.O. Box 5420, Dubai, Tel: +971-4-8127400/ 8127406, Fax: +971-4-2822765. (Musaffah) Light House
Electrical, P.O. Box 120, Abu Dhabi, Tel: +971-2-5548315, Fax: +971-2-5540461. (Sharjah) Mc Coy Middle East LLC, P.O. Box 25793,
Sharjah, Tel: +971-6-5395931, Fax: +971-6-5395932. (Ras Al Khaimah) Mc Coy Middle East LLC, P.O.Box 10584, Ras Al Khaimah, Tel:
+971-7-2277095, Fax: +971-7-2277096. YEMEN: (Aden) Muala St., Tel: +967 2 222670, Fax: +967 2 222670. (Sana'a) Middle East Trad.
Co. Ltd., P.O. Box 12363, Hayel Street, Sana'a. Tel: +967-1-204201, Fax: +967-1-204204. (Taiz) Middle East Trading Co. (METCO),
5th Flr.Hayel Saeed Anam Bldg, Al-Mugamma St. Taiz, Yemen, Tel: +967-4-213455, Fax: +967-4-219869.
Page 25

WARRANTY REGISTRATION CARD
YOUR NAME/
YOUR ADDRESS
POSTCODE
DATE OF PURCHASE
DEALER'S NAME & ADDRESS/
«ùßr
«∞FMu«Ê
«∞d±e «∞∂d¥bÍ
¢U¸¥a «∞Ad«¡
≈ßr Ë ´Mu«Ê «∞∂Uzl
PRODUCT MODEL NO.
BS600
 Loading...