

Page 1
Assembly
(STEP 1, FIG. A &B) Locate the black spray wand holder shown in
figure A and attach it to the inside of the Brush and Roller Cleaner as
shown in figure B.
(STEP 2, FIG. C) Feed orange tube down through hole in top of
cleaner and into spray wand holder.
(STEP 3) Attach the orange clip to the hose. Note: The clips acts as a
storage area for the adaptor and hose when not in use.
Catalog No. BRC300
CAT. NO. BRC300 FORM NO. 640297-00 (APR- 06) COPYRIGHT © 2006 BLACK & DECKER PRINTED IN CHINA
VEA EL ESPAÑOL EN LA CONTRAPORTADA.
INSTRUCTIVO DE OPERACIÓN, CENTROS DE SERVICIO Y
PÓLIZA DE GARANTÍA. ADVERTENCIA: LÉASE ESTE
INSTRUCTIVO ANTES DE USAR EL PRODUCTO.
INSTRUCTION MANUAL
BBBBRRRRUUUUSSSSHHHH&&&&RRRROOOOLLLLLLLLEEEERRRR CCCCLLLLEEEEAAAANNNNEEEERR
RR
SAVE THIS MANUALFOR FUTURE REFERENCE.
Important Safety Instructions
WARNING! To reduce the risk of injury, user must read and understand instruction
manual.
• Read all instructions before using the Brush and Roller Cleaner.
• Always wear proper eye protection.
• Always use proper drainage, test the drain with running water before attempting to use the
Brush and Roller Cleaner.
• Local disposal requirements vary; consult your sanitation department or state designated
environmental agency for disposal options.
• Do not use hot water. It will not decrease the cleaning process and can damage the roller
sleeve.
• Do not use with oil based paints. Brush and Roller Cleaner can only be used with latex
water based paint.
• Brush and Roller Cleaner should only be connected to a water supply with standard
household water pressure.
SAVE THESE INSTRUCTIONS
Cleaning Brushes:
(STEP 1, FIG. 1) Remove the aerator from
your faucet and replace it with the faucet
adaptor.
(STEP 2, FIG. 2) Place the Brush and Roller Cleaner
into the sink and attach the hose to the faucet.
(STEP 3, FIG. 3) Remove any excess paint from brush
by scraping bristles on side of paint container. Insert
brush handle into brush holder.
(STEP 4, FIG. 4) Remove the cap and insert brush into
canister, with paint brush icon pointing toward spray
control knob.
Place top cap into position on the canister.
(STEP 5, FIG. 5) Turn on faucet part way and check for
leaks, then turn on faucet to full.
(STEP 6, FIG. 6) Direct the spray to the center of the
brush, saturating the bristles with water.
(STEP 7, FIG. 7) Direct the spray to the edge of the
brush, spinning brush to remove paint.
• Repeat steps 6 & 7 until water runs clear.
Cleaning Rollers
(STEP 1,FIG. 8) Remove the aerator from
your faucet and replace it with the faucet
adaptor.
BEFORE RETURNING THIS PRODUCT
FOR ANY REASON PLEASE CALL
1-800-544-6986
BEFORE YOU CALL, HAVE THE CATALOG No. AND DATE CODE AVAILABLE. IN MOSTCASES, A
BLACK & DECKER REPRESENTATIVE CAN RESOLVE THE PROBLEM OVER THE PHONE. IF YOU HAVE
A SUGGESTION OR COMMENT, GIVE US ACALL. YOUR FEEDBACK IS VITAL TO BLACK & DECKER.
T
T
HANK
HANK
YOU
YOU
FOR
FOR
CHOOSING
CHOOSING
B
B
LACK
LACK
&&D
D
ECKER
ECKER
!
!
G
G
OOTTOOWWW
WWW
.B
.B
LACKAND
LACKAND
D
D
ECKER
ECKER
.
.
COM
COM
/N
/N
EW
EW
O
O
WNER
WNER
TTOOREGISTER
REGISTER
YOUR
YOUR
NEW
NEW
PRODUCT
PRODUCT
.
.
1
2
3
4
5
6
7
Operating Instructions
8
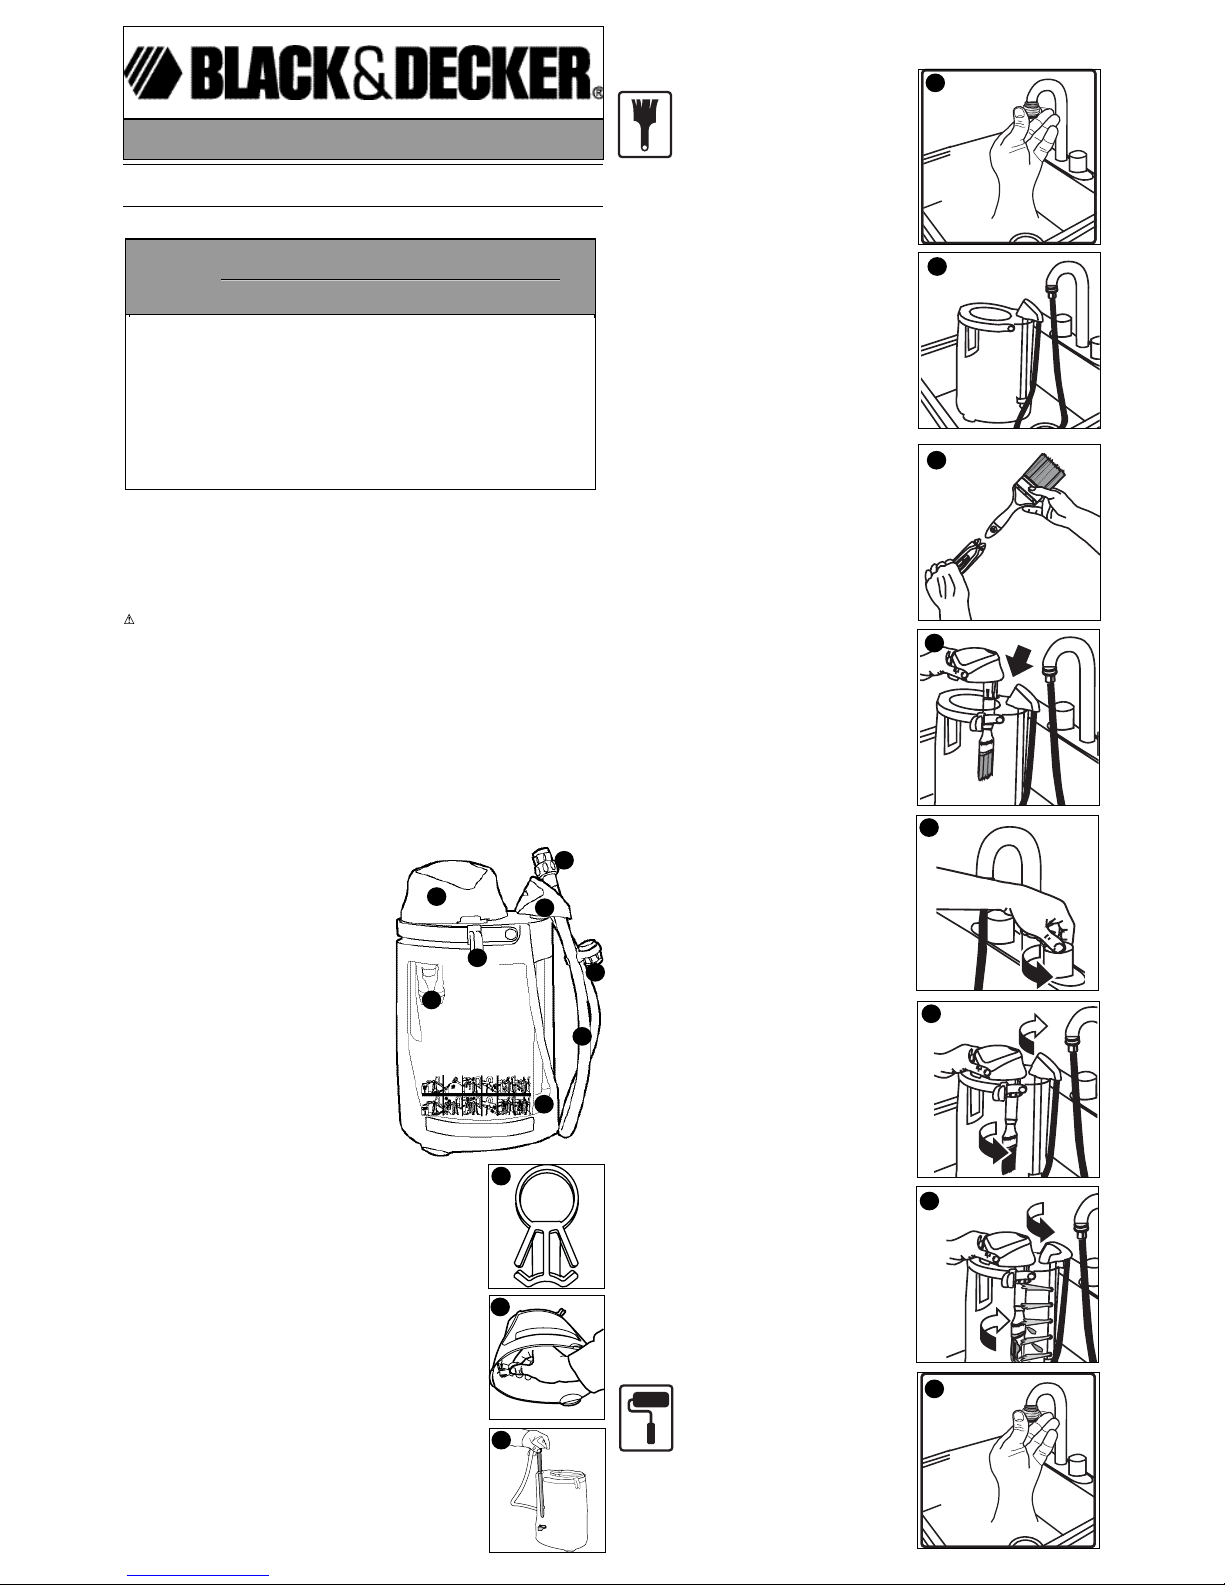
FEATURES
A. Cap
B. Spray control knob
C. Faucet adator
D. Hose
E. Roller frame holder
F. Brush holder
G. Spray wand holder
A
B
C
C
D
E
F
G
A
B
C
Page 2
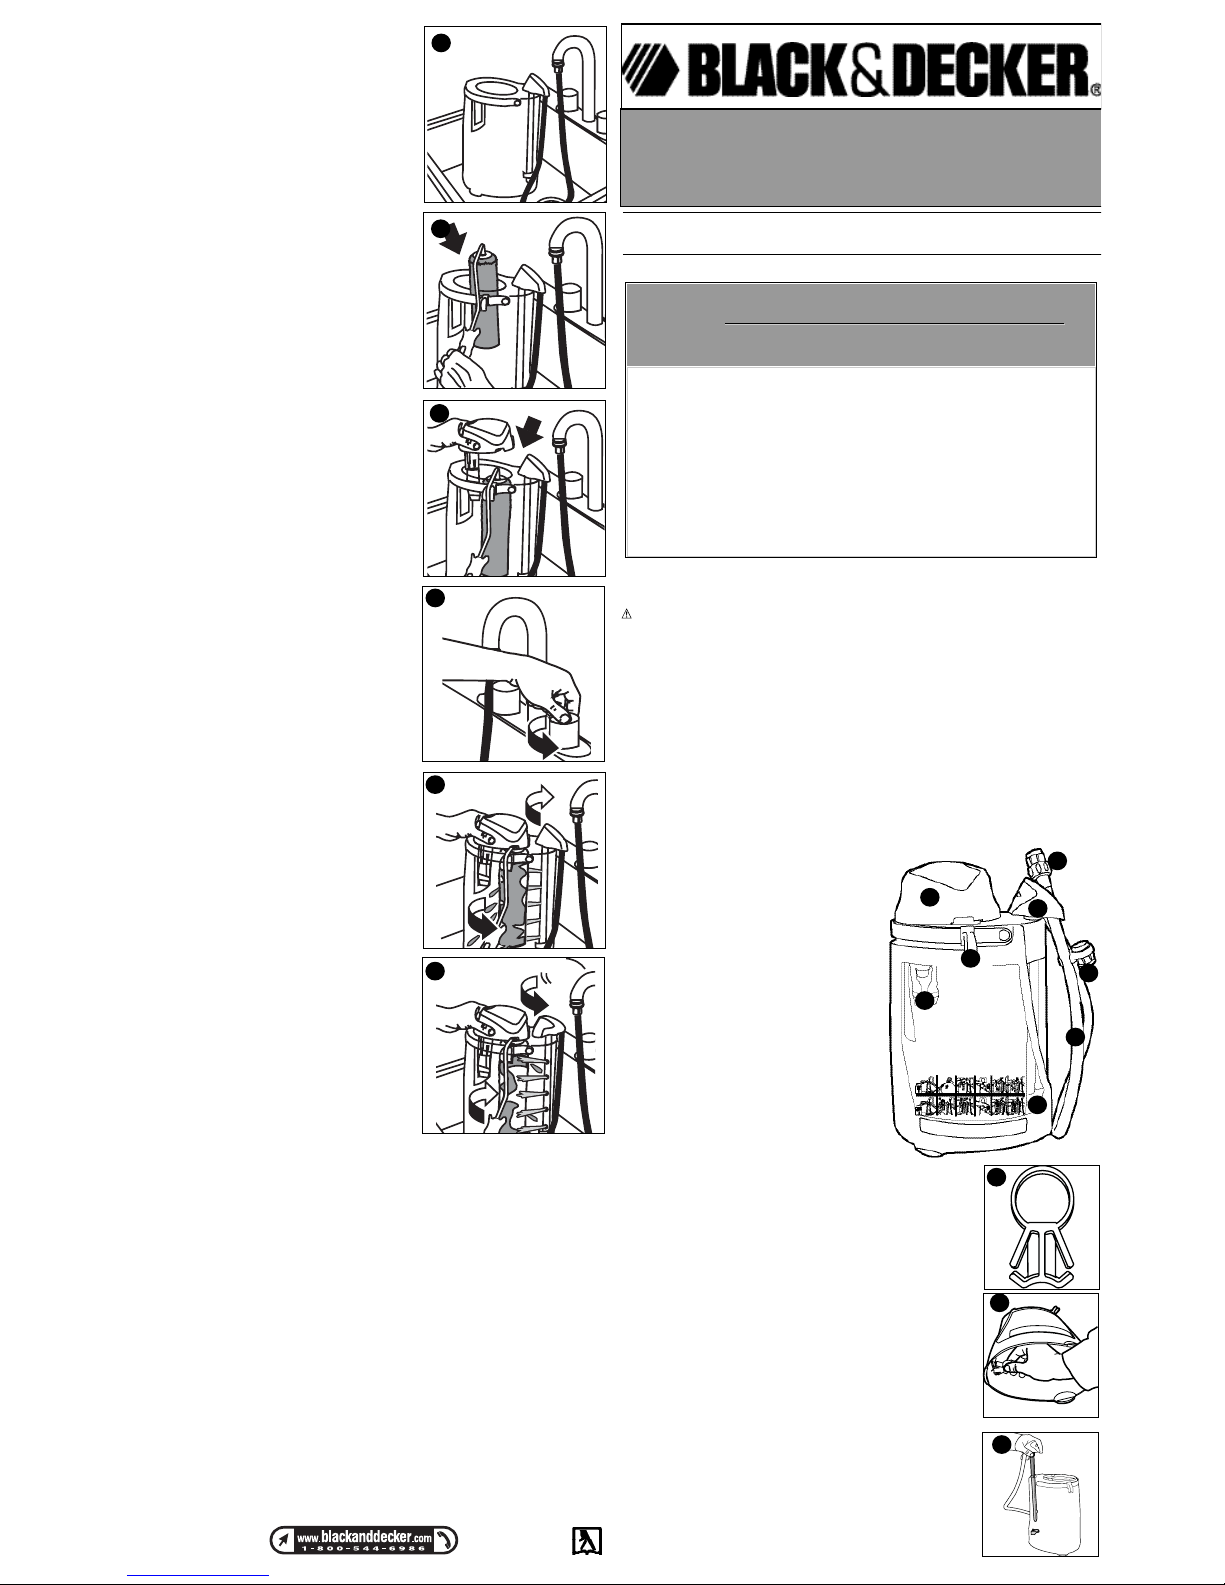
(STEP 2, FIG. 9) Place the Brush and Roller Cleaner into
the sink and attach the hose to the faucet.
• Remove excess paint from roller into paint container.
(STEP 3, FIG. 10) Remove the cap and insert roller into
canister, with roller frame resting in notch on top of
canister.
(STEP 4, FIG. 11) Align the roller frame with the notch in
the top of the canister. Place top cap into position on the
canister, with roller icon pointing toward spray control
knob.
(STEP 5, FIG. 12) Turn on faucet part way and check for
leaks, then turn on faucet to full.
(STEP 6, FIG. 13) Direct the spray to the center of the
roller sleeve, saturating the knap with water.
(STEP 7, FIG. 14) Direct the spray to the edge of the
roller sleeve, spinning sleeve to remove paint.
• Repeat steps 6 & 7 until water runs clear.
SAVE THESE INSTRUCTIONS
Service Information
Black & Decker offers a full network of company-owned and authorized service locations
throughout North America. All Black & Decker Service Centers are staffed with trained
personnel to provide customers with efficient and reliable power tool service.
Whether you need technical advice, repair, or genuine factory replacement parts, contact
the Black & Decker location nearest you.
To find your local service location, refer to the yellow page directory under "Tools–Electric"
or call: 1-800-54-HOW TO (544-6986).
Full Two-Year Home Use Warranty
Black & Decker (U.S.) Inc. warrants this product for two years against any defects in
material or workmanship. The defective product will be replaced or repaired at no charge in
either of two ways:
The first, which will result in exchanges only, is to return the product to the retailer from
whom it was purchased (provided that the store is a participating retailer). Returns should
be made within the time period of the retailer’s policy for exchanges (usually 30 to 90 days
after the sale). Proof of purchase may be required. Please check with the retailer for their
specific return policy regarding returns that are beyond the time set for exchanges.
The second option is to take or send the product (prepaid) to a Black & Decker owned or
authorized Service Center for repair or replacement at our option. Proof of purchase may be
required. Black & Decker owned and authorized service centers are listed under
"Tools–Electric" in the yellow pages of the phone directory.
This warranty does not apply to accessories. This warranty gives you specific legal rights
and you may have other rights which vary from state to state. Should you have any
questions, contact the manager of your nearest Black & Decker Service Center. This
product is not intended for commercial use
Free Warning Label Replacement: If your warning labels become illegible or are missing,
call 1-800-544-6986 for a free replacement.
11
12
13
14
See ‘Tools-Electric’
– Yellow Pages –
for Service & Sales
Black & Decker (U.S.) Inc.,
701 E. Joppa Rd.
Towson, MD 21286 U.S.A.
Directives de sécurité importantes
AVERTISSEMENT ! Afin de réduire le risque de blessures, l’utilisateur doit lire et
comprendre le mode d’emploi.
• Lire toutes les directives avant d’utiliser l’appareil de nettoyage pour pinceaux et rouleaux.
• Toujours porter une protection oculaire adéquate.
• S’assurer que l’évier s’écoule bien, tester le drain à l’eau courante avant l’utilisation de
l’appareil de nettoyage pour pinceaux et rouleaux.
• Les exigences municipales en matière d’élimination des eaux usées varient. Veuillez
consulter le service d’assainissement de votre région ou l’organisme responsable de
l’environnement de l’état, de la province ou du territoire pour obtenir les options d’élimination.
• Ne pas utiliser d’eau chaude. En effet, cette pratique ne réduira pas le temps de nettoyage et
pourrait endommager le manchon du rouleau.
• Ne pas utiliser l’appareil pour le nettoyage des pinceaux et des rouleaux lorsqu’ils sont
enduits de peintures à base d’huile. L’utiliser uniquement pour les peintures latex à base
d’eau.
• Relier l’appareil de nettoyage pour pinceaux et rouleaux uniquement à un approvisionnement
en eau à pression normale domestique.
CONSERVER CES DIRECTIVES
ASSEMBLAGE
(ÉTAPE 1, FIG A ET B) Repérer le porte-tube noir illustré à la figure
A et le fixer à l'intérieur du bidon de l'appareil de nettoyage pour
pinceaux et rouleaux comme indiqué à la figure B.
(ÉTAPE 2, FIG. C) Enfiler le tube orange par le trou du couvercle
de l'appareil et dans le porte-tube.
(ÉTAPE 3) Fixer le clip orange au tuyau. Les clips servent
d'éléments de rangement pour l'adaptateur et le tuyau lorsqu'ils ne
sont pas utilisés.
N° de catalogue BRC300
MODE D’EMPLOI
AAAAPPPPPPPPAAAARRRREEEEIIIILLLL DDDDEEEE NNNNEEEETTTTTTTTOOOOYYYYAAAAGGGGEE
EE
PPPPOOOOUUUURRRR
PPPPIIIINNNNCCCCEEEEAAAAUUUUXXXX EEEETT
TT
RRRROOOOUUUULLLLEEEEAAAAUUUUXX
XX
CARACTÉRISTIQUES
A. Couvercle
B. Bouton de commande du jet
C. Adaptateur de robinet
D. Tuyau
E. Porte-manche du rouleau
F. Porte-pinceau
G. Porte-tube
CONSERVER CE MANUEL POUR UN USAGE ULTÉRIEUR.
AVANT DE RETOURNER CE PRODUIT POUR QUELQUE
RAISON QUE CE SOIT, COMPOSER LE
1-800-544-6986
AVANT D’APPELER, AYEZ EN MAIN LE N° DE CATALOGUE ETLE CODE DE DATE. DANS LA PLUPART
DES CAS, UN REPRÉSENTANT DE BLACK & DECKER PEUT RÉSOUDRE LE PROBLÈME PAR
TÉLÉPHONE. SI VOUS AVEZ UNE SUGGESTION OU UN COMMENTAIRE, APPELEZ-NOUS. VOS
IMPRESSIONS SONT CRUCIALES POUR BLACK & DECKER.
M
M
ERCI
ERCIDD
’
’
AAVOIR
VOIR
CHOISI
CHOISI
B
B
LACK
LACK
& D
& D
ECKER
ECKER
!
!
V
V
ISITEZ
ISITEZ
WWW
WWW
.B
.B
LACKAND
LACKAND
D
D
ECKER
ECKER
.
.
COM
COM
/N
/N
EW
EW
O
O
WNER
WNER
POUR
POUR
ENREGISTRER
ENREGISTRER
VOTRE
VOTRE
NOUVEAU
NOUVEAU
PRODUIT
PRODUIT
.
.
9
10
A
B
C
C
D
E
F
G
A
B
C
Page 3

Mode d’emploi
NETTOYAGE DES PINCEAUX :
(ÉTAPE 1, FIG. 1) Retirer l’aérateur du
robinet et le remplacer par l’adaptateur.
(ÉTAPE 2, FIG. 2) Déposer l’appareil de nettoyage pour
pinceaux et rouleaux dans l’évier et brancher le tuyau à
l’adaptateur du robinet.
(ÉTAPE 3, FIG. 3) Retirer tout excès de peinture des
soies du pinceau en les essuyant sur le rebord du
contenant de peinture. Insérer la poignée du pinceau
dans le porte-pinceau.
(ÉTAPE 4, FIG. 4) Retirer le couvercle et insérer le
pinceau dans le bidon avec l’icône du pinceau pointée en
direction du bouton de commande du jet.
Remettre le couvercle supérieur sur le bidon.
(ÉTAPE 5, FIG. 5) Ouvrir partiellement le robinet pour
vérifier la présence de fuites puis l’ouvrir complètement.
(ÉTAPE 6, FIG. 6) Diriger le jet d’eau au centre du
pinceau pour saturer les soies.
(ÉTAPE 7, FIG. 7) Diriger le jet sur les bords du pinceau
tout en le faisant tourner pour éliminer l’eau et la
peinture.
•Répéter les étapes 6 et 7 jusqu’à ce que l’eau s’écoule
sans traces de peinture.
Nettoyage des rouleaux
(ÉTAPE 1, FIG. 8) Retirer l’aérateur du
robinet et le remplacer par l’adaptateur.
(ÉTAPE 2, FIG. 9) Déposer l’appareil de nettoyage pour
pinceaux et rouleaux dans l’évier et brancher le tuyau à l’adaptateur du robinet.
• Retirer l’excès de peinture du rouleau dans le contenant de peinture.
(ÉTAPE 3, FIG. 10) Retirer le couvercle et insérer le
rouleau dans le bidon. Déposer le manche du rouleau
sur l’encoche du dessus du bidon.
(ÉTAPE 4, FIG. 11) Aligner le manche du rouleau avec
l’encoche du dessus du bidon. Remettre le couvercle
supérieur en place avec l’icône du rouleau pointée vers
le bouton de commande du jet.
(ÉTAPE 5, FIG. 12) Ouvrir partiellement le robinet pour
vérifier la présence de fuites puis l’ouvrir complètement.
(ÉTAPE 6, FIG. 13) Diriger le jet d’eau au centre du
manchon du rouleau pour saturer les poils.
(ÉTAPE 7, FIG. 14) Diriger le jet sur les bords du
manchon du rouleau tout en le faisant tourner pour
éliminer l’eau et la peinture.
• Répéter les étapes 6 et 7 jusqu’à ce que l’eau s’écoule
sans traces de peinture.
CONSERVER CES DIRECTIVES
Information sur les réparations
Tous les centres de réparation Black & Decker sont dotés de personnel qualifié en matière
d’outillage électrique; ils sont donc en mesure d’offrir à leur clientèle un service efficace et
fiable. Que ce soit pour un avis technique, une réparation ou des pièces de rechange
authentiques installées en usine, communiquer avec l’établissement Black & Decker le plus
près de chez vous. Pour trouver l’établissement de réparation de votre région, consulter le
répertoire des Pages jaunes à la rubrique « Outils électriques » ou composer le numéro
suivant : 1-800-544-6986 ou consulter le site www.blackanddecker.com
Garantie complète de deux ans pour une utilisation domestique
Black & Decker (É.-U.) Inc. garantit ce produit pour une durée de deux ans contre tout défaut
de matériau ou de fabrication. Le produit défectueux sera remplacé ou réparé sans frais de
l’une des deux façons suivantes :
La première façon consiste en un simple échange chez le détaillant qui l’a vendu (pourvu qu’il
s’agisse d’un détaillant participant). Tout retour doit se faire durant la période correspondant à
la politique d’échange du détaillant (habituellement, de 30 à 90 jours après l’achat). Une
preuve d’achat peut être requise. Vérifier auprès du détaillant pour connaître sa politique
concernant les retours hors de la période définie pour les échanges.
La deuxième option est d’apporter ou d’envoyer le produit (transport payé d’avance) à un
centre de réparation autorisé ou à un centre de réparation de Black & Decker pour faire
réparer ou échanger le produit, à notre discrétion. Une preuve d’achat peut être requise. Les
centres Black & Decker et les centres de service autorisés sont répertoriés dans les pages
jaunes, sous la rubrique « Outils électriques ».
Cette garantie ne s’applique pas aux accessoires. Cette garantie vous accorde des droits
légaux spécifiques et vous pourriez avoir d’autres droits qui varient d’un État ou d’une
province à l’autre. Pour toute question, communiquer avec le directeur du centre de
réparation Black & Decker le plus près de chez vous. Ce produit n’est pas destiné à un usage
commercial.
REMPLACEMENT GRATUIT DES ÉTIQUETTES D’AVERTISSEMENT : si les étiquettes
d’avertissement deviennent illisibles ou sont manquantes, composer le 1-800-544-6986 pour
en obtenir le remplacement gratuit.
Imported by / Importé par
Black& Decker Canada Inc.
100 Central Ave.
Brockville (Ontario) K6V 5W6
Voir la rubrique “Outils électriques”
des Pages Jaunes
pour le service et les ventes.
1
2
3
4
5
6
7
8
11
12
13
14
9
10
Page 4

Instrucciones de operación
Limpieza de los cepillos:
(PASO 1, FIG. 1) Retire el aireador de la
canilla y reemplácelo con un adaptador para
canilla.
(PASO 2, FIG. 2) Coloque el limpiador con cepillo
y rodillo en el fregadero y conecte la manguera a la
canilla.
(PASO 3, FIG. 3) Retire todo exceso de pintura del
cepillo rasqueteando las cerdas del lado del recipiente de
pintura. Inserte el mango del cepillo en el sujetador de
cepillos.
(PASO 4, FIG. 4) Retire la tapa e inserte el cepillo en el
depósito, con el ícono del cepillo hacia la posición de la
perilla de control de pulverización.
Coloque la tapa superior en su lugar en el depósito.
(PASO 5, FIG. 5) Abra la canilla a la mitad y controle si
hay pérdidas, luego abra la canilla por completo.
(PASO 6, FIG. 6) Dirija el pulverizador hacia el centro del
cepillo, empapando las cerdas con agua.
(PASO 7, FIG. 7) Dirija el pulverizador hacia el borde del
cepillo, haciendo que el cepillo gire para liberarlo de
pintura y agua.
• Repita los pasos 6 y 7 hasta que el agua comience a
correr limpia.
Limpieza de los rodillos
(PASO 1, FIG. 8) Retire el aireador de la
canilla y reemplácelo con un adaptador para
canilla.
Instrucciones de seguridad importantes
¡ADVERTENCIA! ! Para reducir el riesgo de lesiones, el usuario debe leer y
comprender el manual de instrucciones.
• Lea todas las instrucciones antes de usar el limpiador con cepillo y rodillo.
• Utilice siempre protección adecuada para los ojos.
• Utilice siempre el drenaje adecuado, pruébelo con agua corriente antes de intentar utilizar
el limpiador con cepillo y rodillo.
• Los requisitos locales con respecto a los desechos varían; consulte a la división de
saneamiento o la secretaría de medio ambiente estatal designada acerca de las opciones
de eliminación de desechos.
• No use agua caliente. No acortará el proceso de limpieza y puede dañar el mango del
rodillo.
• No lo utilice en pinturas al aceite. El limpiador con cepillo y rodillo sólo se puede utilizar
en pinturas al látex con base de agua.
• El limpiador con cepillo y rodillo sólo se debe conectar a un suministro de agua que
posea una presión doméstica estándar.
CONSERVE ESTAS INSTRUCCIONES
Armado
(PASO 1, FIG. A y B) Ubique el sujetador negro de la varilla
pulverizadora como se muestra en la figura A y anéxelo al interior del
limpiador con cepillo y rodillo como se muestra en la figura B.
(PASO 2, FIG. C) Introduzca el tubo anaranjado hacia abajo y a través
del orificio en la parte superior del limpiador y luego dentro del
sujetador de la varilla pulverizadora.
(PASO 3) Anexe el soporte anaranjado a la manguera. Nota: el
soporte funciona como un área de almacenamiento para el adaptador
y la manguera cuando no se utilizan.
Catálogo N° BRC300
MANUAL DE INSTRUCCIONES
LLLLIIIIMMMMPPPPIIIIAAAADDDDOOOORRRR CCCCOOOONNNN CCCCEEEEPPPPIIIILLLLLLLLOOOO YY
YY
RRRROOOOD
DDDIIIILLLLLLLLOO
OO
CARACTERÍSTICAS
A. Tapa
B. Perilla de control pulverizadora
C. Adaptador para canilla
D. Manguera
E. Sujetador del marco del rodillo
F. Sujetador de cepillos
G. Sujetador de la varilla
pulverizadora
ANTES DE DEVOLVER ESTE PRODUCTO POR
CUALQUIER MOTIVO, LLAME AL
(55)5326-7100
ANTES DE LLAMAR, TENGA EL NÚMERO DE CATÁLOGO Y EL CÓDIGO DE FECHAPREPARADOS. EN
LA MAYORÍA DE LOS CASOS, UN REPRESENTANTE DE BLACK & DECKER PUEDE RESOLVER EL
PROBLEMA POR TELÉFONO. SI DESEAREALIZAR UNA SUGERENCIA O COMENTARIO, LLÁMENOS. SU
OPINIÓN ES FUNDAMENTAL PARA BLACK & DECKER.
¡G
¡G
RACIAS
RACIAS
POR
POR
ELEGIR
ELEGIR
B
B
LACK
LACK
& D
& D
ECKER
ECKER
!
!
V
V
AAYYAAAAWWW
WWW
.B
.B
LACKAND
LACKAND
D
D
ECKER
ECKER
.
.
COM
COM
/N
/N
EW
EW
O
O
WNER
WNER
PPARA
ARA
REGISTRAR
REGISTRARSUSU
NUEVO
NUEVO
PRODUCT
PRODUCTOO
.
.
CONSERVE ESTE MANUAL PARA FUTURAS CONSULTAS.
A
B
C
A
B
C
C
D
E
F
G
1
2
3
4
5
6
7
8
Page 5

(PASO 2, FIG. 9) Coloque el limpiador con cepillo y rodillo
en el fregadero y conecte la manguera a la canilla.
• Retire el exceso de pintura del rodillo dentro del recipiente
de pintura.
(PASO 3, FIG. 10) Retire la tapa e inserte el rodillo en el
depósito, con el marco del rodillo sobre la muesca en la
parte superior del depósito.
(PASO 4, FIG. 11) Alinee el marco del rodillo con la
muesca en la parte superior del depósito.
Coloque la tapa superior en su lugar en el depósito, con el
ícono de rodillo hacia la posición de la perilla de control de
pulverización.
(PASO 5, FIG. 12) Abra la canilla a la mitad y controle si
hay pérdidas, luego abra la canilla por completo.
(PASO 6, FIG. 13) Dirija el pulverizador hacia el centro del
cepillo, empapando las cerdas con agua.
(PASO 7, FIG. 14) Dirija el pulverizador hacia el borde del
mango del rodillo, haciendo que el mango gire para
liberarlo de pintura y agua.
• Repita los pasos 6 y 7 hasta que el agua comience a
correr limpia.
CONSERVE ESTAS INSTRUCCIONES
Información de mantenimiento
Todos los Centros de mantenimiento de Black & Decker cuentan con personal altamente
capacitado dispuesto a brindar a todos los clientes un servicio eficiente y confiable en la
reparación de herramientas eléctricas. Si necesita consejo técnico, reparaciones o piezas de
repuesto originales de fábrica, póngase en contacto con el centro de mantenimiento de Black
& Decker más cercano a su domicilio. Para ubicar su centro de servicio local, consulte la
sección “Herramientas eléctricas” (Tools-Electric) de las páginas amarillas, llame al
(55)5326-7100 o visite nuestro sitio www.blackanddecker.com.
Garantía completa de dos años para uso en el hogar
Black & Decker (Estados Unidos) Inc. ofrece una garantía de dos años por cualquier defecto
del material o de fabricación de este producto. El producto defectuoso se reparará o
reemplazará sin costo alguno de dos maneras.
La primera opción, el reemplazo, es devolver el producto al comercio donde se lo adquirió
(siempre y cuando se trate de un comercio participante). Las devoluciones deben realizarse
conforme a la política de devolución del comercio (generalmente, entre 30 y 90 días
posteriores a la venta). Le pueden solicitar comprobante de compra. Consulte en el comercio
acerca de la política especial sobre devoluciones una vez excedido el plazo establecido.
La segunda opción es llevar o enviar el producto (con flete pago) a un Centro de
mantenimiento propio o autorizado de Black & Decker para su reparación o reemplazo según
nuestro criterio. Le pueden solicitar el comprobante de compra. Los Centros de
mantenimiento autorizados y de propiedad de Black & Decker se detallan en la sección
“Herramientas eléctricas” (Tools-Electric) de las páginas amarillas de la guía telefónica.
Esta garantía no se extiende a los accesorios. Esta garantía le concede derechos legales
específicos; usted puede tener otros derechos que pueden variar según el estado o la
provincia. Si tiene alguna pregunta, comuníquese con el gerente del Centro de
mantenimiento de Black & Decker de su zona. Este producto no está diseñado para uso
comercial.
REEMPLAZO GRATUITO DE LAS ETIQUETAS DE ADVERTENCIAS: si sus etiquetas de
advertencia se tornan ilegibles o faltan, llame al (55)5326-7100 para que se le reemplacen
gratuitamente.
Para servicio y ventas consulte
“HERRAMIENTAS ELECTRICAS”
en la sección amarilla.
CULIACAN, SIN
Av. Nicolás Bravo #1063 Sur
(667) 7 12 42 11
Col. Industrial Bravo
GUADALAJARA, JAL
Av. La Paz #1779
(33) 3825 6978
Col. Americana Sector Juarez
MEXICO, D.F.
Eje Central Lázaro Cardenas
No. 18
(55) 5588 9377
Local D, Col. Obrera
MERIDA, YUC
Calle 63 #459-A
(999) 928 5038
Col. Centro
MONTERREY, N.L.
Av. Francisco I. Madero
No.831
(81) 8375 2313
Col. Centro
PUEBLA, PUE
17 Norte #205
(222) 246 3714
Col. Centro
QUERETARO, QRO
Av. Madero 139 Pte.
(442) 214 1660
Col. Centro
SAN LUIS POTOSI, SLP
Av. Universidad 1525
(444) 814 2383
Col. San Luis
TORREON, COAH
Blvd. Independencia, 96 Pte.
(871) 716 5265
Col. Centro
VERACRUZ, VER
Prolongación Díaz Mirón #4280
(229)921 7016
Col. Remes
VILLAHERMOSA, TAB
Constitución 516-A
(993) 312 5111
Col. Centro
PARA OTRAS LOCALIDADES LLAME AL: (55) 5326 7100
Para reparación y servicio de sus herramientas eléctricas, favor de dirigirse
al Centro de Servicio más cercano:
IMPORTADOR: BLACK & DECKER S.A. DE C.V.
BOSQUES DE RADIATAS NO. 42
BOSQUES DE LAS LOMAS, 05120 MEXICO, D.F.
TEL (55)5326-7100
11
12
13
14
9
10
 Loading...