

Page 1

www.blackanddecker.ae
BPHR323K
Page 2
ENGLISH
A
2
Page 3
ENGLISH
B
D
C
E
F
3
Page 4

ENGLISH
Intended use
Your Black & Decker rotary hammer drill has been designed
for drilling in wood, metal, plastics, and masonry as well as
for screwdriving and light chiselling applications. This tool is
intended for consumer use only.
Safety instructions
General power tool safety warnings
Warning! Read all safety warnings and all
instructions. Failure to follow the warnings and
instructions listed below may result in electric
shock, fire and/or serious injury.
Save all warnings and instructions for future reference.
The term "power tool" in the warnings refers to your mains
operated (corded) power tool or battery operated (cordless)
power tool.
1. Work area safety
a. Keep work area clean and well lit. Cluttered or dark
areas invite accidents.
b. Do not operate power tools in explosive
atmospheres, such as in the presence of flammable
liquids, gases or dust. Power tools create sparks
which may ignite the dust or fumes.
c. Keep children and bystanders away while operating
a power tool. Distractions can cause you to lose
control.
2. Electrical safety
a. Power tool plugs must match the outlet. Never
modify the plug in any way. Do not use any adapter
plugs with earthed (grounded) power tools.
Unmodified plugs and matching outlets will reduce risk
of electric shock.
b. Avoid body contact with earthed or grounded
surfaces such as pipes, radiators, ranges and
refrigerators. There is an increased risk of electric
shock if your body is earthed or grounded.
c. Do not expose power tools to rain or wet conditions.
Water entering a power tool will increase the risk of
electric shock.
d. Do not abuse the cord. Never use the cord for
carrying, pulling or unplugging the power tool. Keep
cord away from heat, oil, sharp edges or moving
parts. Damaged or entangled cords increase the risk of
electric shock.
e. When operating a power tool outdoors, use an
extension cord suitable for outdoor use. Use of a cord
suitable for outdoor use reduces the risk of electric
shock.
f. If operating a power tool in a damp location is
unavoidable, use a residual current device (RCD)
protected supply. Use of an RCD reduces the risk of
electric shock.
3. Personal safety
a. Stay alert, watch what you are doing and use
common sense when operating a power tool. Do not
use a power tool while you are tired or under the
influence of drugs, alcohol or medication. A moment
of inattention while operating power tools may result in
serious personal injury.
b. Use personal protective equipment. Always wear eye
protection. Protective equipment such as dust mask,
non-skid safety shoes, hard hat, or hearing protection
used for appropriate conditions will reduce personal
injuries.
c. Prevent unintentional starting. Ensure the switch is
in the off-position before connecting to power
source and/or battery pack, picking up or carrying
the tool. Carrying power tools with your finger on the
switch or energising power tools that have the switch on
invites accidents.
d. Remove any adjusting key or wrench before turning
the power tool on. A wrench or a key left attached to a
rotating part of the power tool may result in personal
injury.
e. Do not overreach. Keep proper footing and balance
at all times. This enables better control of the power tool
in unexpected situations.
f. Dress properly. Do not wear loose clothing or
jewellery. Keep your hair, clothing and gloves away
from moving parts. Loose clothes, jewellery or long hair
can be caught in moving parts.
g. If devices are provided for the connection of dust
extraction and collection facilities, ensure these are
connected and properly used. Use of dust collection
can reduce dust-related hazards.
4
Page 5

ENGLISH
4. Power tool use and care
a. Do not force the power tool. Use the correct power
tool for your application. The correct power tool will do
the job better and safer at the rate for which it was
designed.
b. Do not use the power tool if the switch does not turn
it on and off. Any power tool that cannot be controlled
with the switch is dangerous and must be repaired.
c. Disconnect the plug from the power source and/or
the battery pack from the power tool before making
any adjustments, changing accessories, or storing
power tools. Such preventive safety measures reduce
the risk of starting the power tool accidentally.
d. Store idle power tools out of the reach of children
and do not allow persons unfamiliar with the power
tool or these instructions to operate the power tool.
Power tools are dangerous in the hands of untrained
users.
e. Maintain power tools. Check for misalignment or
binding of moving parts, breakage of parts and any
other condition that may affect the power tools
operation. If damaged, have the power tool repaired
before use. Many accidents are caused by poorly
maintained power tools.
f. Keep cutting tools sharp and clean. Properly
maintained cutting tools with sharp cutting edges are
less likely to bind and are easier to control.
g. Use the power tool, accessories and tool bits etc. in
accordance with these instructions, taking into
account the working conditions and the work to be
performed. Use of the power tool for operations different
from those intended could result in a hazardous
situation.
• Use auxiliary handles supplied with the tool. Loss of
control can cause personal injury.
• Hold power tool by insulated gripping surfaces
when performing an operation where the cutting
accessory may contact hidden wiring or its own
cord. Cutting accessory contacting a "live" wire may
make exposed metal parts of the power tool "live" and
shock the operator.
• Never use a chisel accessory in rotary mode. The
accessory will bind in the material and rotate the drill.
• Use clamps or another practical way to secure and
support the workpiece to a stable platform. Holding
the work by hand or against your body leaves it unstable
and may lead to loss of control.
• Before drilling into walls, floors or ceilings, check for the
location of wiring and pipes.
• Avoid touching the tip of a drill bit just after drilling, as it
may be hot.
• This tool is not intended for use by persons (including
children) with reduced physical, sensory or mental
capabilities, or lack of experience and knowledge, unless
they have been given supervision or instruction
concerning use of the appliance by a person responsible
for their safety. Children should be supervised to ensure
that they do not play with the appliance.
• The intended use is described in this instruction manual.
The use of any accessory or attachment or performance
of any operation with this tool other than those
recommended in this instruction manual may present a
risk of personal injury and/or damage to property.
• Use a face or dust mask whenever the operations may
produce dust or flying particles.
5. Service
a. Have your power tool serviced by a qualified repair
person using only identical replacement parts. This
will ensure that the safety of the power tool is
maintained.
Additional power tool safety warnings
Warning! Additional safety warnings for rotary
and chiselling hammers
• Wear ear protectors. Exposure to noise can cause
hearing loss.
Safety of others
• This appliance is not intended for use by persons
(including children) with reduced physical, sensory or
mental capabilities, or lack of experience and
knowledge, unless they have been given supervision or
instruction concerning use of the appliance by a person
responsible for their safety.
• Children should be supervised to ensure that they do not
play with the appliance.
5
Page 6

ENGLISH
Residual risks.
Additional residual risks may arise when using the tool
which may not be included in the enclosed safety warnings.
These risks can arise from misuse, prolonged use etc. Even
with the application of the relevant safety regulations and
the implementation of safety devices, certain residual risks
can not be avoided. These include:
• Injuries caused by touching any rotating/moving parts.
• Injuries caused when changing any parts, blades or
accessories.
• Injuries caused by prolonged use of a tool. When using
any tool for prolonged periods ensure you take regular
breaks.
• Impairment of hearing.
• Health hazards caused by breathing dust developed
when using your tool (example:- working with wood,
especially oak, beech and MDF.)
Labels on tool
The following pictograms are shown on the tool:
Warning! To reduce the risk of injury, the user must
read the instruction manual.
Electrical safety
This tool is double insulated; therefore no earth wire
is required. Always check that the power supply
corresponds to the voltage on the rating plate.
• If the supply cord is damaged, it must be replaced by
the manufacturer or an authorised Black & Decker
Service Centre in order to avoid a hazard.
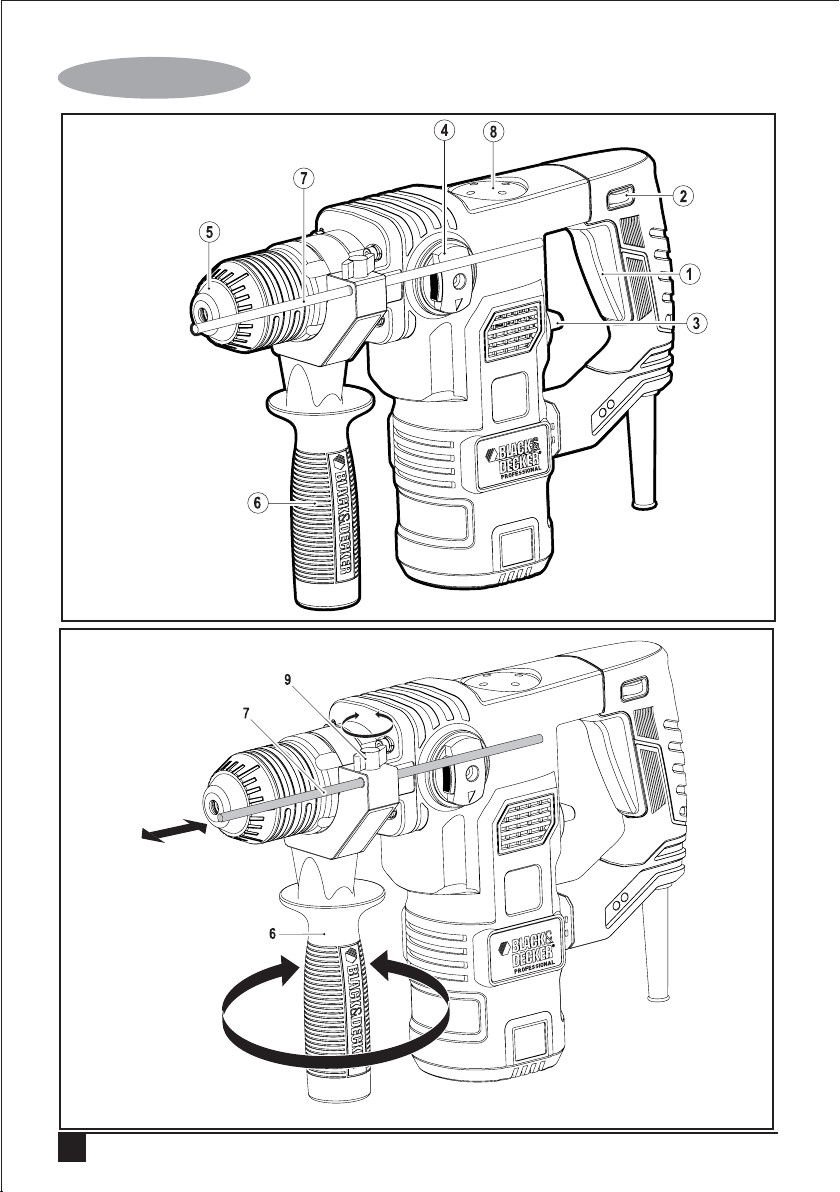
5. Tool holder
6. Side handle
7. Depth stop
8. Grease cap
Assembly
Warning! Before assembly, make sure that the tool is
switched off and unplugged.
Fitting the side handle (fig. A)
• Turn the grip counterclockwise until you can slide the
side handle (6) onto the front of the tool as shown.
• Rotate the side handle into the desired position.
• Tighten the side handle by turning the grip clockwise.
Fitting and setting the depth stop (fig. A)
• Slacken the knob (9).
• Insert the depth stop (7) into the mounting hole as
shown.
• Set the depth stop (7) to the desired position. The
maximum drilling depth is equal to the distance between
the tip of the drill bit and the front end of the depth stop.
• Tighten the knob (9).
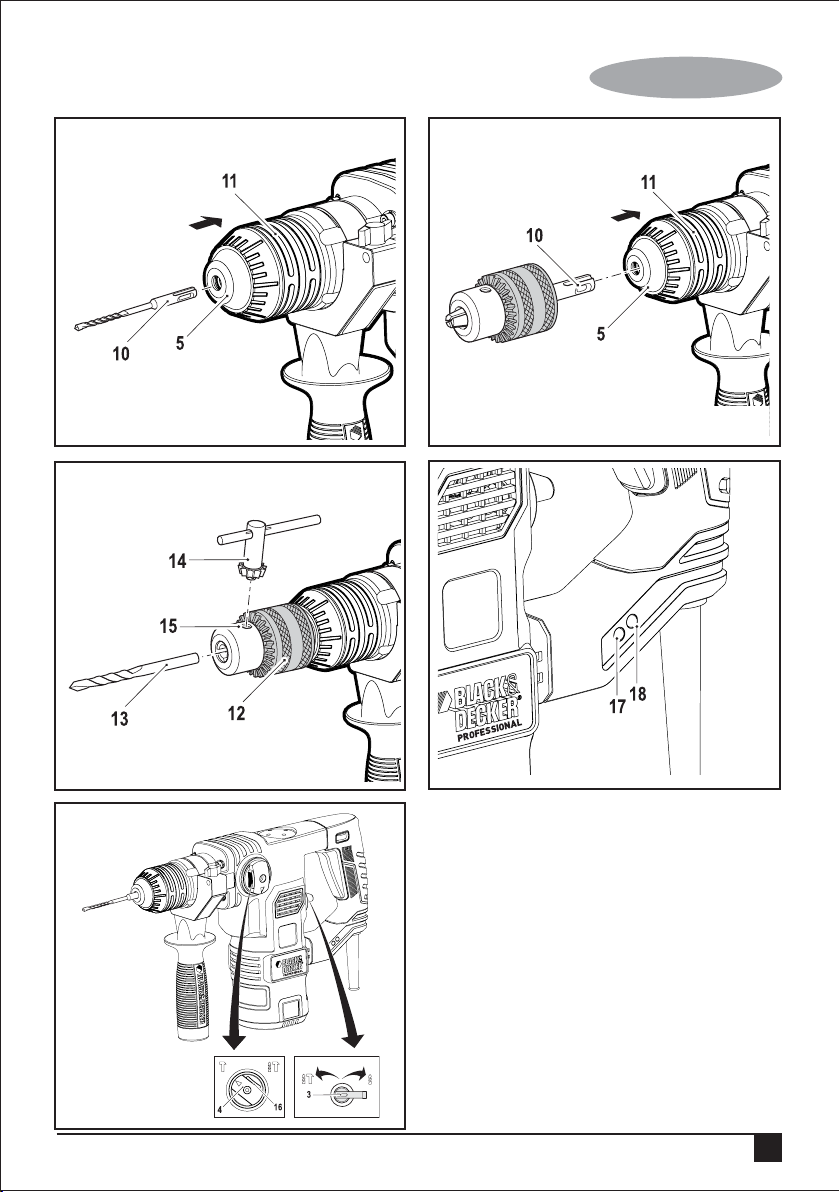
Fitting an accessory (fig. B - D)
• Clean and grease the shank (10) of the accessory.
• Pull back the sleeve (11) and insert the shank into the
tool holder (5).
Features
This tool includes some or all of the following features.
1. On/Off switch
2. Speed selector dial
3. Drilling mode selector
4. Operating mode selector
6
• Push the accessory down and turn it slightly until it fits
into the slots.
• Pull on the accessory to check if it is properly locked.
The hammering function requires the accessory to be
able to move axially several centimetres when locked in
the tool holder.
• To remove the accessory, pull back the sleeve (11) and
pull out the accessory.
Page 7

ENGLISH
Keyed chuck (fig. D)
• Open the chuck by turning the sleeve (12)
anti-clockwise.
• Insert the bit shaft (13) into the chuck.
• Insert the chuck key (14) into each hole (15) in the side
of the chuck and turn clockwise until tight.
Use
Warning! Let the tool work at its own pace. Do not overload.
Warning! Before drilling into walls, floors or ceilings, check
for the location of wiring and pipes.
Warning! Do not apply chisels when the tool is in the drilling
mode.
Selecting the operating mode (fig. F)
The tool can be used in three operating modes.
• To operate the drilling mode selector (3), rotate it
towards the required position, as indicated by the
symbols.
• To operate the operating mode selector (4), push the
unlock button (16) and rotate the selector towards the
required position, as indicated by the symbols.
position and the drilling mode selector (3) to the
position.
• When changing from hammer drilling to chiselling, turn
the chisel to the desired position. If resistance is felt
during mode change, slightly turn the chisel to engage
the spindle lock.
Switching on and off
• Select the required speed by turning the speed selector
dial (2).
• To switch the tool on, press the on/off switch (1).
• To switch the tool off, release the on/off switch.
Brush monitor (fig. E)
Your tool has a built in system that monitors the health of the
brushes.
• Green brush monitor indicator (17). The brushes are in
good condition.
• Red brush monitor indicator (18). The brushes are warn
and need replacing, return your tool to an authorised
Black & Decker Service Centre in order to to have the
brushes replaced.
Accessories
Drilling
• For drilling in steel, wood and plastics, and for
screwdriving set the operating mode selector (4) to the
position and the drilling mode selector (3) to the
position.
Hammer drilling
• For hammer drilling in masonry and concrete, set the
operating mode selector (4) to the position and the
drilling mode selector (3) to the position. When
hammering, the tool should not bounce and run
smoothly. If necessary, increase the speed.
Hammering
• For hammering with spindle lock, and for light chiselling
and chipping, set the operating mode selector (4) to the
The performance of your tool depends on the accessory
used. Black & Decker and Piranha accessories are
engineered to high quality standards and designed to
enhance the performance of your tool. By using these
accessories you will get the very best from your tool.
7
Page 8

ENGLISH
Maintenance
Your Black & Decker corded/cordless appliance/tool has
been designed to operate over a long period of time with a
minimum of maintenance. Continuous satisfactory operation
depends upon proper tool care and regular cleaning.
Warning! Before performing any maintenance on
corded/cordless power tools:
• Switch off and unplug the appliance/tool.
• Regularly clean the ventilation slots in your
appliance/tool/charger using a soft brush or dry cloth.
• Regularly clean the motor housing using a damp cloth.
Do not use any abrasive or solvent-based cleaner.
• Regularly open the chuck and tap it to remove any dust
from the interior (when fitted).
Mains plug replacement (U.K. & Ireland only)
If a new mains plug needs to be fitted:
• Safely dispose of the old plug.
• Connect the brown lead to the live terminal in the new
plug.
Technical Data
BPHR323K
Input voltage V
Power input W 1250
Rated speed /min 0-850
Impact rate /min 0-4100
Impact energy per
stroke according to
EPTA-Procedure 05/2009 j 3.2
Weight kg 5.4
Max. drilling capacity
Concrete mm 32
Steel mm 13
Wood mm 40
ac 220-240
• Connect the blue lead to the neutral terminal.
Warning! No connection is to be made to the earth terminal.
Follow the fitting instructions supplied with good quality
plugs. Recommended fuse: 5 A.
8
Page 9

Protecting the environment
Separate collection. This product must not be
disposed of with normal household waste.
Should you find one day that your Black & Decker product
needs replacement, or if it is of no further use to you, do not
dispose of it with household waste. Make this product
available for separate collection.
Separate collection of used products and packaging
allows materials to be recycled and used again.
Reuse of recycled materials helps prevent environmental
pollution and reduces the demand for raw materials.
Local regulations may provide for separate collection of
electrical products from the household, at municipal waste
sites or by the retailer when you purchase a new product.
Black & Decker provides a facility for the collection and
recycling of Black & Decker products once they have
reached the end of their working life. To take advantage of
this service please return your product to any authorised
repair agent who will collect them on our behalf.
You can check the location of your nearest authorised repair
agent by contacting your local Black & Decker office at the
address indicated in this manual. Alternatively, a list of
authorised Black & Decker repair agents and full details of
our after-sales service and contacts are available on the
Internet at: www.2helpU.com.
ENGLISH
9
Page 10

ENGLISH
Guarantee
Black & Decker is confident of the quality of its products and
offers an outstanding guarantee. This guarantee statement is
in addition to and in no way prejudices your statutory rights.
The guarantee is valid within the territories of the Member
States of the European Union and the European Free Trade
Area.
If a Black & Decker product becomes defective due to faulty
materials, workmanship or lack of conformity, within 12
months from the date of purchase, Black & Decker
guarantees to replace defective parts, repair products
subjected to fair wear and tear or replace such products to
make sure of the minimum inconvenience to the customer
unless:
♦ The product has been used for trade, professional or hire
purposes.
♦ The product has been subjected to misuse or neglect.
♦ The product has sustained damage through foreign
objects, substances or accidents.
♦ Repairs have been attempted by persons other than
authorised repair agents or Black & Decker service staff.
To claim on the guarantee, you will need to submit proof of
purchase to the seller or an authorised repair agent. You can
check the location of your nearest authorised repair agent by
contacting your local Black & Decker office at the address
indicated in this manual. Alternatively, a list of authorised
Black & Decker repair agents and full details of our aftersales
service and contacts are available on the Internet at:
www.2helpU.com
Please visit our website www.blackanddecker.co.uk to
register your new Black & Decker product and to be kept up
to date on new products and special offers. Further
information on the Black & Decker brand and our range of
products is available at www.blackanddecker.co.uk.
10
Page 11

FRANÇAIS
A
11
Page 12

FRANÇAIS
B
D
C
E
F
12
Page 13

FRANÇAIS
Utilisation
Votre perceuse à percussion rotative Black & Decker peut
percer le bois, le métal, le plastique et la pierre. Elle peut
aussi être utilisée pour les travaux de vissage et de
burinage légers. Cet outil est destiné à une utilisation
exclusivement domestique.
Consignes de sécurité
Consignes de sécurité concernant les outils
électroportatifs
Attention ! Lisez avec attention tous les
avertissements et toutes les instructions. Le
non-respect de cette consigne peut entraîner
une électrocution, un incendie et/ou de graves
blessures.
Conservez tous les avertissements et instructions pour
référence ultérieure.
La notion « d’outil électroportatif » mentionnée dans les
consignes de sécurité se rapporte à des outils électriques
raccordés au secteur (avec câble de raccordement) ou
fonctionnant sur piles ou batterie (sans fil).
1. Sécurité de la zone de travail
a. Maintenez la zone de travail propre et bien éclairée.
Un lieu de travail en désordre ou mal éclairé augmente
le risque d’accidents.
b. N'utilisez pas les outils électroportatifs dans un
environnement présentant des risques d'explosion
ni en présence de liquides, gaz ou poussières
inflammables. Les outils électroportatifs génèrent des
étincelles risquant d'enflammer les poussières ou les
vapeurs.
c. Tenez les enfants et autres personnes éloignés
durant l'utilisation de l'outil électroportatif. En cas
d'inattention, vous risquez de perdre le contrôle de
l'outil.
2. Sécurité électrique
a. La prise de l'outil électroportatif doit être compatible
avec la prise d'alimentation. Ne modifiez en aucun
cas la prise. N'utilisez pas de prises d'adaptateur avec
des appareils ayant une prise de terre. Le respect de
ces consignes réduit le risque de choc électrique.
b. Évitez le contact physique avec des surfaces mises
à la terre telles que tuyaux, radiateurs, fours et
réfrigérateurs. Il y a un risque élevé de choc électrique
si votre corps est relié à la terre.
c. N'exposez pas l'outil électroportatif à la pluie ou à
l'humidité. La pénétration d'eau dans un outil
électroportatif augmente le risque de choc électrique.
d. Préservez le câble d'alimentation. N'utilisez pas le
câble pour porter l'outil, pour l'accrocher. Ne le tirez
pas pour le débrancher. Maintenez le câble éloigné
des sources de chaleurs, des parties huilées, des
bords tranchants ou des parties de l'appareil en
rotation. Le risque de choc électrique augmente si les
câbles sont endommagés ou emmêlés.
e. Si vous utilisez l'outil électroportatif à l'extérieur,
utilisez une rallonge homologuée pour une
utilisation à l'extérieur. L'utilisation d'une rallonge
électrique homologuée pour les travaux à l’extérieur
réduit le risque de choc électrique.
f. Si l'outil doit être utilisé dans un endroit humide,
prenez les précautions nécessaires en utilisant un
dispositif à courant résiduel (RCD). L'utilisation d'un
tel dispositif réduit les risques d'électrocution.
3. Sécurité personnelle
a. Restez vigilant, surveillez ce que vous faites. Faites
preuve de bon sens quand vous utilisez un outil
électroportatif. N'utilisez pas l'outil lorsque vous êtes
fatigué ou après avoir consommé de l'alcool ainsi
que des médicaments. Un moment d'inattention lors de
l'utilisation de l'outil peut entraîner de graves blessures.
b. Portez un équipement de protection. Portez toujours
des lunettes de protection. Selon le travail à effectuer,
le port d'équipement de protection tels que masque
anti-poussières, chaussures de sécurité antidérapantes,
casque ou protection auditive, réduit le risque de
blessures.
c. Évitez un démarrage imprévu. L’outil doit être en
position OFF (arrêt) avant d'effectuer le branchement
à l'alimentation et/ou au bloc-batterie, de le ramasser
ou de le porter. Ne laissez pas votre doigt sur le bouton
de commande en le transportant. N'alimentez pas l'outil
si le bouton est activé. Ceci pourrait être à l’origine
d’accident.
d. Enlevez tout outil ou clé de réglage avant de mettre
l'appareil en marche. Une clé ou un outil se trouvant
sur une pièce en rotation peut causer des blessures.
e. Adoptez une position confortable. Adoptez une
position stable et gardez votre équilibre en
permanence. Vous contrôlerez mieux l'outil dans des
situations inattendues.
f. Portez des vêtements appropriés. Ne portez pas de
vêtements amples ou de bijoux. N’approchez pas les
cheveux, vêtements ou gants des parties des pièces
mobiles. Les vêtements amples, les bijoux ou les
cheveux longs peuvent s'accrocher dans les pièces en
mouvement.
g. En cas d'utilisation d'appareils servant à aspirer ou à
recueillir les poussières, assurez-vous qu'ils sont
correctement raccordés et utilisés. L'utilisation de tels
dispositifs réduit les dangers dus aux poussières.
13
Page 14

FRANÇAIS
4. Utilisation des outils électroportatifs et précautions
a. Respectez la capacité de l'outil. Utilisez l'outil
électroportatif correspondant au travail à effectuer.
Avec un outil approprié, vous travaillerez mieux et en
toute sécurité.
b. N'utilisez pas un outil électroportatif dont
l'interrupteur est défectueux. Un outil électroportatif
qui ne peut plus être mis en marche/arrêt présente un
danger et doit être réparé.
c. Retirez la prise de courant et/ou débranchez le
bloc-batterie avant d'effectuer des réglages, de
changer les accessoires ou de ranger l'outil. Cette
mesure de précaution empêche de mettre l’outil en
marche accidentellement.
d. Rangez les outils électroportatifs hors de portée des
enfants. Les personnes ne connaissant pas l'outil ou
n'ayant pas lu ces instructions ne doivent en aucun
cas l'utiliser. Les outils électroportatifs sont dangereux
lorsqu'ils sont utilisés par des personnes non initiées.
e. Entretenez les outils électroportatifs. Vérifiez que les
parties en mouvement fonctionnent correctement et
qu'elles ne sont pas coincées. Vérifiez qu'il n’y a pas
de pièces cassées ou endommagées susceptibles
de nuire au bon fonctionnement de l'outil. S'il est
endommagé, faites réparer l'outil avant de l'utiliser.
De nombreux accidents sont dus à des outils
électroportatifs mal entretenus.
f. Maintenez les outils de coupe aiguisés et propres.
Des outils soigneusement entretenus avec des bords
tranchants bien aiguisés se coincent moins souvent et
peuvent être guidés plus facilement.
g. Utilisez les outils électroportatifs, les accessoires,
etc. en suivant ces instructions et en tenant compte
des conditions de travail, ainsi que du travail à
effectuer. L'utilisation des outils électroportatifs à
d'autres fins que celles prévues peut vous mettre en
situation dangereuse.
5. Réparations
a. Faites réparer votre outil électroportatif uniquement
par du personnel qualifié et seulement avec des
pièces de rechange appropriées. Cela garantira le
maintien de la sécurité de votre outil.
Consignes de sécurité supplémentaires
concernant les outils électroportatifs
Attention ! Prendre encore plus de précautions
avec les marteaux à buriner et à rotation.
• Portez un serre-tête antibruit. L’exposition au bruit
peut entraîner la perte de l’ouïe.
14
• Utilisez les poignées auxiliaires livrées avec l’outil.
La perte de contrôle peut entraîner des blessures.
• Tenez l’outil au niveau des surfaces de prise isolées.
Ceci permet d’éviter les accidents en cas de contact
de l’accessoire de coupe avec des fils cachés ou
son propre câble. En touchant un fil sous tension, la
charge électrique passe dans les parties métalliques de
l'outil électroportatif et il y a risque de choc électrique.
• N’utilisez jamais un burin en mode rotatif.
L’accessoire peut se tordre à l’intérieur du matériel et
faire tourner le foret.
• Utilisez des pinces ou autres pour fixer et soutenir la
pièce de manière stable. Si vous la tenez à la main ou
contre votre corps, elle ne sera pas stable et vous
pouvez en perdre le contrôle.
• Avant de percer les murs, les planchers ou les plafonds,
vérifiez l'emplacement des câblages et des tuyaux.
• Évitez de toucher le bout d'un foret juste après avoir
percé. Il peut être chaud.
• Cet outil ne peut être utilisé par des personnes (y
compris des enfants) ayant des capacités mentales,
sensorielles ou physiques réduites, ou celles manquant
d'expérience et de connaissances, à moins qu'elles ne
soient encadrées ou qu'elles n'aient été formées à
l'utilisation de l'outil par une personne responsable de
leur sécurité. Ne laissez jamais les enfants sans
surveillance pour éviter qu'ils ne jouent avec cet outil.
• Les consignes d'utilisation sont données dans ce
manuel d'instructions. L’utilisation d’un accessoire ou
d’une fixation, ou bien l’utilisation de cet outil à d’autres
fins que celles recommandées dans ce manuel
d’instructions peut entraîner des blessures et/ou des
dommages matériels.
• Utilisez un masque anti-poussières dès que le travail est
source de poussière ou de projection de débris.
Sécurité des personnes
• Cet appareil ne doit pas être utilisé par des personnes (y
compris les enfants) ayant des déficiences physiques,
mentales ou sensorielles. Cette consigne s’applique
aussi aux personnes manquant d'expérience et de
connaissance du matériel, à moins que celles-ci n’aient
reçu les instructions appropriées ou qu’elles ne soient
encadrées par une personne responsable de leur
sécurité pour utiliser l’appareil.
• Ne laissez jamais les enfants sans surveillance pour
éviter qu'ils ne jouent avec cet outil.
Page 15

FRANÇAIS
Risques résiduels.
L'utilisation d'un outil non mentionné dans les consignes de
sécurité données peut entraîner des risques résiduels
supplémentaires. Ces risques peuvent survenir si la
machine est mal utilisée, si l'utilisation est prolongée, etc.
Malgré l'application des normes de sécurité
correspondantes et la présence de dispositifs de sécurité,
les risques résiduels suivants ne peuvent être évités. Ceci
comprend :
• Les blessures dues au contact avec une pièce
mobile/en rotation.
• Les blessures causées en changeant des pièces, lames
ou accessoires.
• Les blessures dues à l'utilisation prolongée d'un outil.
Une utilisation prolongée de l'outil nécessite des pauses
régulières.
• Déficience auditive.
• Risques pour la santé causés par l'inhalation de
poussières produites pendant l'utilisation de l'outil
(exemple : travail avec du bois, surtout le chêne, le hêtre
et les panneaux en MDF).
Caractéristiques
Cet outil comprend certains, ou tous, les éléments suivants :
1. Bouton marche/arrêt (On/Off)
2. Sélecteur de vitesse
3. Sélecteur de mode de perçage
4. Sélecteur de mode de fonctionnement
5. Support d’outil
6. Poignée latérale
7. Tige de butée de profondeur
8. Bouchon de graisse
Assemblage
Attention ! Avant l'assemblage, assurez-vous que l'outil est
éteint et débranché.
Installation de la poignée latérale (figure A)
• Tournez le manche dans le sens inverse des aiguilles
d’une montre jusqu’à ce que la poignée latérale (6)
puisse glisser sur l’avant de l’outil, comme indiqué.
Étiquettes de l’outil
Les pictogrammes ci-dessous se trouvent sur l’appareil :
Attention ! Pour réduire le risque de blessures, l’utilisateur
doit lire le manuel d’instructions.
Sécurité électrique
Cet outil est doublement isolé. Par conséquent, aucun câble
de mise à la terre n'est nécessaire. Vérifiez si l’alimentation
mentionnée sur la plaque signalétique de l'outil correspond
bien à la tension présente sur le lieu.
• Si le câble d'alimentation est endommagé, il doit être
remplacé par le fabricant ou par un Centre de réparation
Black & Decker agréé pour éviter tout danger.
• Tournez la poignée latérale dans la position désirée.
• Serrez la poignée latérale en tournant le manche dans le
sens des aiguilles d’une montre.
Installation de la poignée latérale et réglage de la butée
de profondeur (figure A)
• Desserrez le bouton (9).
• Insérez la tige de butée de profondeur (7) dans l’orifice
de montage, comme indiqué.
• Réglez la butée de profondeur (7) à la position désirée.
La profondeur de perçage maximale est égale à la
distance entre le bout du foret et l’extrémité avant de la
tige de butée de profondeur.
15
Page 16

FRANÇAIS
• Serrez le bouton (9).
Installation d’un accessoire (figures B et D)
• Nettoyez et graissez l’embout (10) de l'accessoire.
• Tirez le manchon (11) et insérez l’embout dans le
support d’outil (5).
• Poussez l’accessoire et tournez-le légèrement jusqu’à
ce qu’il soit dans les fentes.
• Tirez sur l’accessoire pour vérifier le verrouillage. La
fonction martelage a besoin de l’accessoire pour pouvoir
se déplacer sur son axe de plusieurs centimètres quand
il est verrouillé dans le support d’outil.
• Pour retirer l’accessoire, appuyez sur le manchon (11)
et sortez l'accessoire.
Mandrin à clé (figure D)
• Ouvrez le mandrin en tournant le manchon (12) dans le
sens inverse des aiguilles d’une montre.
• Insérez la tige du foret (13) dans le mandrin.
• Insérez la clé du mandrin (14) dans chaque trou (15) sur
le côté du mandrin et tournez dans le sens des aiguilles
d’une montre pour serrer.
Utilisation
Attention ! Laissez l'outil fonctionner à sa propre vitesse.
Ne le poussez pas au-delà de sa limite.
Attention ! Avant de percer les murs, les planchers ou les
plafonds, vérifiez l'emplacement des câblages et des
tuyaux.
Attention ! N'utilisez pas de burin quand l'outil est en mode
de perçage.
Sélection du mode de fonctionnement (figure F)
L’outil peut être utilisé dans les trois modes de
fonctionnement.
• Pour utiliser le sélecteur de mode de perçage (3),
tournez-le dans la position désirée, comme indiqué par
les symboles.
• Pour utiliser le sélecteur de mode de fonctionnement
(4), poussez le bouton de déverrouillage (16) et tournez
le sélecteur dans la position requise, comme indiqué par
les symboles.
Perçage
• Pour percer dans l’acier, le bois et le plastique, et pour
visser, réglez le sélecteur de mode de fonctionnement
(4) et le sélecteur de mode de perçage (3) dans
la position appropriée.
Perçage au marteau
• Pour percer dans la pierre et le béton, et pour visser,
réglez le sélecteur de mode de fonctionnement (4)
et le sélecteur de mode de perçage (3) dans la
position appropriée. Pour marteler, l’outil ne doit pas
rebondir et doit fonctionner tout en douceur. Si
nécessaire, augmentez la vitesse.
Martelage
• Pour marteler avec l'axe de verrouillage, et pour les
travaux de burinage et d'ébarbage légers, réglez le
sélecteur de mode de fonctionnement (4) et le
sélecteur de mode de perçage (3) dans la position
appropriée.
• Pour passer du perçage au burinage, tournez le burin
dans la position désirée. Si une résistance se fait
ressentir pendant le changement de mode, tournez
légèrement le burin pour enclencher l’axe de
verrouillage.
Mise en marche et arrêt
• Sélectionnez la vitesse requise en déplaçant le sélecteur
de vitesse (2).
• Pour mettre l’outil en marche, appuyez sur le bouton
marche/arrêt (1).
• Pour arrêter l’outil, relâchez le bouton marche/arrêt.
Surveillance des brosses (figure E)
Votre outil est doté d'un système intégré qui surveille l'état
des brosses.
• Témoin vert de surveillance de brosse (17). Les brosses
sont en bon état.
• Témoin rouge de surveillance de brosse (18). Les
brosses sont usées et doivent être remplacées.
Retournez l'outil dans un Centre de réparation agréé
Black & Decker pour les faire remplacer.
16
Page 17

FRANÇAIS
Accessoires
La qualité du travail réalisé par votre outil dépend des
accessoires utilisés. Les accessoires Black & Decker et
Piranha correspondent aux normes de qualité supérieure et
sont conçus pour donner le meilleur résultat possible. En
utilisant ces accessoires, votre outil vous donnera entière
satisfaction.
Entretien
Votre appareil/outil sans fil/avec fil Black & Decker a été
conçu pour fonctionner pendant longtemps avec un
minimum d'entretien. Un fonctionnement continu satisfaisant
dépend d'un nettoyage régulier et d'un entretien approprié
de l'outil.
Attention ! À ne pas oublier avant l’entretien des appareils
électriques sans fil/avec fil :
• Arrêtez l’appareil/outil, puis débranchez-le.
• Nettoyez régulièrement les orifices de ventilation de
votre appareil/outil/chargeur à l'aide d'une brosse souple
ou d'un chiffon sec.
• Nettoyez régulièrement le compartiment du moteur à
l'aide d'un chiffon humide. N'utilisez pas de produit
abrasif ou à base de solvant.
• Ouvrez régulièrement le mandrin et retirez la poussière
à l’intérieur en le tapant (si installé).
Remplacement des prises secteur (RU et
Irlande uniquement)
Protection de l'environnement
Recyclage. Cet appareil ne doit pas être jeté avec
les déchets ménagers.
Si votre appareil/outil Black & Decker doit être remplacé ou
si vous ne l'utilisez plus, ne le jetez pas avec les ordures
ménagères. Songez à la protection de l'environnement et
recyclez-le.
La collecte séparée des produits et des emballages
usagés permet de recycler et de réutiliser des
matériaux. La réutilisation de matériaux recyclés évite la
pollution de l'environnement et réduit la demande de
matières premières.
Des réglementations locales peuvent stipuler la collecte
séparée des produits électriques et des produits ménagers,
dans des déchetteries municipales ou par le revendeur
lorsque vous achetez un nouveau produit.
Black & Decker offre une solution permettant de recycler les
produits Black & Decker lorsqu'ils ont atteint la fin de leur
cycle de vie. Pour pouvoir profiter de ce service, veuillez
retourner votre produit à un réparateur agréé qui se chargera
de le collecter pour nous.
Pour connaître l'adresse du réparateur agréé le plus proche
de chez vous, contactez le bureau Black & Decker à
l'adresse indiquée dans ce manuel. Vous pourrez aussi
trouver une liste de réparateurs agréés Black & Decker et de
plus amples détails sur notre service après-vente sur le site
Internet à l'adresse suivante : www.2helpU.com
Si une nouvelle prise secteur doit être installée :
• Mettez au rebut la vieille prise.
• Branchez le fil brun dans la borne de la nouvelle prise.
• Branchez le fil bleu à la borne neutre.
Attention ! Aucune connexion ne doit être faite à la borne
de terre. Suivez les instructions de montage fournies avec
les prises de bonne qualité. Fusibles recommandés : 5 A.
17
Page 18

FRANÇAIS
Caractéristiques techniques
BPHR323K
Tension d’entrée V
Puissance W 1250
Vitesse à vide /min 0-850
Résistance au choc /min 0-4100
Impact énergétique
par course selon
la procédure EPTA 05/2009 j 3.2
Poids kg 5.4
Capacité max de perçage
Béton mm 32
Acier mm 13
Bois mm 40
ac 220 - 240
Garantie
Black & Decker vous offre une garantie très élargie ainsi que
des produits de qualité. Ce certificat de garantie est un
document supplémentaire et ne peut en aucun cas se
substituer à vos droits légaux. La garantie est valable sur
tout le territoire des États Membres de l'Union Européenne
et de la Zone de Libre Échange Européenne.
Si un produit Black & Decker s'avère défectueux en raison
de matériaux en mauvaises conditions, d'une erreur
humaine, ou d'un manque de conformité dans les 12 mois
suivant la date d'achat, Black & Decker garantit le
remplacement des pièces défectueuses, la réparation des
produits usés ou cassés ou remplace ces produits à la
convenance du client, sauf dans les circonstances suivantes
:
♦ Le produit a été utilisé dans un but commercial,
professionnel, ou a été loué;
♦ Le produit a été mal utilisé ou utilisé avec négligence;
♦ Le produit a subi des dommages à cause d'objets
étrangers, de substances ou à cause d'accidents;
♦ Des réparations ont été tentées par des techniciens ne
faisant pas partie du service technique de Black &
Decker.
18
Pour avoir recours à la garantie, il est nécessaire de fournir
une preuve d'achat au vendeur ou à un réparateur agréé.
Pour connaître l'adresse du réparateur agréé le plus proche
de chez vous, contactez le bureau Black & Decker à
l'adresse indiquée dans ce manuel. Vous pourrez aussi
trouver une liste de réparateurs agréés Black & Decker et de
plus amples détails sur notre service après-vente sur le site
Internet à l'adresse suivante : www.2helpU.com
Visitez notre site Web www.blackanddecker.fr pour
enregistrer votre nouveau produit Black & Decker et être
informé des nouveaux produits et des offres spéciales. Pour
plus d'informations concernant la marque Black & Decker et
notre gamme de produits, consultez notre site
www.blackanddecker.fr
Page 19

ARABIC
¿Éª°†dG
¿É«H ¿ƒµjh .kGõ«‡ kÉfɪ°V Ωó≤Jh É¡JÉéàæe IOƒéH ôµjO ófBG ∑ÓH ≥ãJ
¥ƒ≤◊ÉH ∫GƒMC’G øe ∫ÉM …CÉH πîj ’h áaÉ°VE’ÉH Gòg ¿Éª°†dG
OÉ–E’G ‘ AÉ°†YC’G ∫hódG º«∏bEG πNGO ¿Éª°†dG Gòg …öùjh .á«fƒfÉ≤dG
.á«HhQhC’G Iô◊G IQÉéàdG á≤£æeh »HQhC’G
áYÉæ°üdGh OGƒŸG ܃«Y ÖÑ°ùH kÉÑ«©e ôµjO ófBG ∑ÓH èàæe íÑ°UCG GPEG
ïjQÉJ øe kGô¡°T 12 ¿ƒ°†Z ‘ ôµjO ófBG ∑ÓH øª°†J ,á≤HÉ£ŸG ΩóYh
»∏СdG IЙYGфe ™e дЙйажŸG мУ°UEGh бС«©ŸG AGхLC’G ∫GуСа°SG AGцыdG
AУª©dG Й°VQ шe уcCЙа∏d дЙйажŸG √тg ∫GуСа°SG hCG …OЙ©dG ΩGуоа°S’ЙH
:⁄ Ée
.ÒLCÉà∏d hCG á«æ¡e hCG ájQÉŒ ¢VGôZC’ èàæŸG ΩGóîà°SG ” •
.èàæŸG ΩGóîà°SG IAÉ°SEG hCG ∫ɪgEG •
.çOGƒ◊G hCG á«HôZ ¢VGôZCG hCG OGƒe ÖÑ°ùH ∞∏àd èàæŸG ¢Vô©J •
øjôNB’G ¢UÉî°TC’G πÑb øe ìÓ°UE’G äÉ«∏ªY AGôLEG ádhÉfi •
™HÉàdG áeóÿG ≥jôa hCG º¡H ìöüŸG ìÓ°UE’G AÓch ±ÓîH
.ôµjO ófBG ∑ÓÑd
™«ÑdG π«ch hCG ™FÉÑ∏d AGöûdG äÉÑKEG Ëó≤J Öéj ,¿Éª°†dÉH áÑdÉ£ª∏d
Öàµe á©LGôà óªà©e ìÓ°UEG π«ch ÜôbCG ¿Éµe áaô©e ∂æµÁh .óªà©ŸG
ôaƒàJ ɪc .π«dódG ‘ ¬«dEG QÉ°ûŸG ¿Gƒæ©dG ‘ »∏ëŸG ôµjO ófBG ∑ÓH
äÉeóN äÉfÉ«Hh ôµjO ófBG ∑ÓH iód øjóªà©ŸG ìÓ°UE’G AÓcƒH áªFÉb
:ÊhεdE’G ™bƒŸG ≈∏Y ∫É°üJ’Gh ™«ÑdG ó©H Ée
.www.2helpU.com
ÊhεdE’G Éæ©bƒe á©LGôe ≈Lôj
øe ójó÷G ∂éàæe π«é°ùàd www.blackanddecker.co.uk
∫ƒ°ьл∏dh .б°UЙяG ¢Vhф©dGh дЙйажŸG зуMCG бaф©Ÿh фµjO уfBG ∑УH
≈Lôj ,ÉæJÉéàæeh ôµjO ófBG ∑ÓH áeÓY ∫ƒM äÉeƒ∏©ŸG øe ójõŸG ≈∏Y
.www.blackanddecker.co.uk IQÉjR
19
Page 20

ARABIC
á«æØdG äÉfÉ«ÑdG
BPHR323K
220 - 240 OOÎe QÉ«J âdƒa πNGódG »FÉHô¡µdG ó¡÷G
1250 •Gh IQó≤dG πNO
0-850 á≤«bódG ‘ IQhO IOóëŸG áYöùdG
0-4100 á≤«bódG ‘ IQhO ΩOÉ°üàdG áYöS
3.2 ∫ƒL 05/2009 á«HhQhC’G
5.4 ºéc ¿RƒdG
32 º∏e áfÉ°SôÿG
13 º∏e Ö∏°üdG
40 º∏e Ö°ûÿG
•ƒ°ûdG Ö°ùëH ΩOÉ°üàdG Iƒb
Iõ¡LC’G OÉ–G AGôLE’ kÉ≤ah
á«FÉHô¡µdG
Ö≤ã∏d iƒ°ü≤dG á©°ùdG
áÄ«ÑdG ájɪM
.á«dõæŸG äÉØ∏îŸG ™e èàæŸG Gòg AÉ≤dEG ΩóY Öéj .π°üØæe ™«ªŒ
∂H ¢UÉÿG ôµjO ófBG ∑ÓH RÉ¡L πjóÑJ Öéj ¬fCÉH ΩÉjC’G óMCG ‘ ∂d ÚÑJ GPEG
ºbh .á«dõæŸG äÉØ∏îŸG ™e ¬æe ¢ü∏îàJ ’ .¬eGóîà°S’ áLÉëH ó©J ⁄ hCG
.π°üØæŸG ™«ªéà∏d èàæŸG Gòg ÒaƒàH
шe бeуоа°щŸG дGƒС©dGh дЙйажª∏d π°ьШжŸG ™«ªйаdG шµБ
IOÉYEG óYÉ°ùj PEG ,iôNCG Iôe É¡eGóîà°SGh OGƒŸG ôjhóJ IOÉYEG
≈∏Y Ö∏£dG ¢†ØNh »Ä«ÑdG çƒ∏àdG ™æe ≈∏Y ÉgôjhóJ OÉ©ŸG OGƒŸG ΩGóîà°SG
ΩÉÿG OGƒŸG
шY б«FЙHф¡µdG дЙйажª∏d π°ьШжe ™«ªŒ ≈∏Y б«∏лŸG дЙ©jцыаdG ¢ьжJ уb
AGöT óæY áFõéàdG ôLÉJ hCG ájó∏ÑdG äÉØ∏fl ™bGƒe ‘ á«dõæŸG äÉØ∏îŸG
.ójóL èàæe
фµjO уfBG ∑УH дЙйажe фjhуJ IOЙYEGh ™«ªйаd ICЙ°ыжe фµjO уfBG ∑УH фaƒJ
√тg шe IOЙШа°SУdh .™aЙжdG ЙgфªY бjЙ¡жd дЙйажŸG ∂∏J ∫ƒ°Uh ужY
Ωƒ≤«°S …òdG óªà©e ìÓ°UEG π«ch …CG ¤EG èàæŸG IOÉYEG ≈Lôj ,áeóÿG
.ЙжY бHЙ«f дЙйажŸG ™«ªйаH
ôµjO ófBG ∑ÓH Öàµe á©LGôà óªà©e ìÓ°UEG π«ch ÜôbCG ¿Éµe áaô©e ∂æµÁ
ìÓ°UE’G AÓcƒH áªFÉb ôaƒàJ ɪc .π«dódG ‘ ¬«dEG QÉ°ûŸG ¿Gƒæ©dG ‘ »∏ëŸG
≈∏Y ∫É°üJ’Gh ™«ÑdG ó©H Ée äÉeóN äÉfÉ«Hh ôµjO ófBG ∑ÓH iód øjóªà©ŸG
.www.2helpU.com :ÊhεdE’G ™bƒŸG
20
Page 21

ARABIC
äÉ≤ë∏ŸG
äÉ≤ë∏e º«ª°üJ ”h .áeóîà°ùŸG äÉ≤∏ëŸG ´ƒf ≈∏Y RÉ¡÷G AGOCG óªà©j
∂eGóîà°SG Ú°ùëàd IOƒ÷G á«dÉY ÒjÉ©Ÿ kÉ≤ah É¡©«æ°üJh ôµjO ófBG ∑ÓH
øe á浇 IOÉØà°SG ÈcCG ≥≤ëà°S ,äÉ≤ë∏ŸG √òg ΩGóîà°SÉHh .RÉ¡é∏d
.RÉ¡÷G
áfÉ«°üdG
áLÉ◊G øe Qób πbCÉH á∏jƒW IÎØd Ωhó«d ºª°üe ôµjO ófBG ∑ÓH RÉ¡L
≈∏Y »°VôŸG ƒëædG ≈∏Y ¬∏ªY AGOCG ‘ RÉ¡÷G QGôªà°SG óªà©j å«M .áfÉ«°ü∏d
.º¶àæŸG ∞«¶æàdGh áÑ°SÉæŸG ájÉæ©dG
:᫵∏°ùdG ÒZh ᫵∏°ùdG á«FÉHô¡µdG Iõ¡LCÓd áfÉ«°U ájCG AGôLEG πÑb !ôjò–
»FÉHô¡µdG QÉ«àdG øY ¬∏°üah IGOC’G/RÉ¡÷G 𫨰ûJ ±É≤jEÉH ºb •
kÉjQhO øMÉ°ûdG/IGOC’G/RÉ¡÷G ‘ IOƒLƒŸG ájƒ¡àdG òaÉæe ∞¶f •
.áaÉL ¢Tɪb á©£b hCG áªYÉf IÉ°Tôa ΩGóîà°SÉH
,á∏∏Ñe ¢Tɪb á©£b ΩGóîà°SÉH kÉjQhO ∑ôëª∏d »LQÉÿG πµ«¡dG ∞¶f •
.ᣰTÉc IOÉe ájCG hCG äÉÑjòŸG ≈∏Y ºFÉb ∞¶æe …CG Ωóîà°ùJ ’h
óæY) πNGódÉH IOƒLƒe áHôJCG ájCG ádGREÉH ºbh RÉ¡÷G á∏àc íàaG •
.(Ö«cÎdG
»°ù«FôdG QÉ«àdG ¢ùHÉb ∫GóÑà°SG
(§≤a GóædôjCGh IóëàŸG áµ∏ªŸG)
:ójóL »°ù«FQ QÉ«J ¢ùHÉb Ö«cÎd áLÉ◊G óæY
.¿ÉeCÉH ójó÷G ¢ùHÉ≤dG øe ¢ü∏îJ •
¢ùHÉ≤dG øe QÉ«àdÉH …QÉ°ùdG ±ô£dG ™e »æÑdG ∂∏°ùdG π«°UƒàH ºb •
.ójó÷G
.ójÉëŸG ±ô£dG ™e ¥QRC’G ∂∏°ùdG π«°UƒàH ºb •
Ö«cÎdG äɪ«∏©J ™ÑJG .»°VQC’G ±ô£dÉH π«°UƒJ …CG AGôLEG Öéj ’ !ôjò–
.A 13 :¬H ≈°UƒŸG ô¡°üŸG .IOƒ÷G á«dÉY ¢ùHGƒ≤dG ™e áeó≤ŸG
21
Page 22

ARABIC
(16) πØ≤dG AɨdEG QR ≈∏Y §¨°VG ,(4) 𫨰ûàdG ™°Vh Oófi 𫨰ûàd •
¬«dEG Ò°ûJ …òdG ƒëædG ≈∏Y ,܃∏£ŸG ™°VƒdG √ÉŒ OóëŸG ôjhóàH ºbh
.RƒeôdG
Ö≤ãdG
Oófi §Ñ°†H ºb ,»ZGÈdG ∂Ødh ,∂à°SÓÑdGh Ö°ûÿGh Ö∏°üdG ‘ Ö≤ã∏d •
Ö≤ãdG ™°Vh Oófih ܃∏£ŸG ™°VƒdG ≈∏Y (4) 𫨰ûàdG ™°Vh
. ܃∏£ŸG ™°VƒdG ≈∏Y (3)
¥ô£dÉH Ö≤ãdG
𫨰ûàdG ™°Vh Oófi §Ñ°†H ºb ,áfÉ°SôÿGh ÊÉÑŸG ‘ ¥ô£dÉH Ö≤ã∏d •
≈∏Y (3) Ö≤ãdG ™°Vh Oófih ܃∏£ŸG ™°VƒdG ≈∏Y (4)
RÉ¡÷G 𫨰ûJ ≈∏Y ¢UôMG ,¥ô£dG óæY . ܃∏£ŸG ™°VƒdG
.áYöùdG IOÉjõH ºb ,IQhö†dG óæY .√OGóJQG ΩóYh á°SÓ°ùH
¥ô£dG
§Ñ°†H ºb ,∞«ØÿG âëædGh ᫶°ûà∏dh ,¿GQhódG OƒªY πØb ™e ¥ô£∏d •
™°Vh Oófih ܃∏£ŸG ™°VƒdG ≈∏Y (4) 𫨰ûàdG ™°Vh Oófi
. ܃∏£ŸG ™°VƒdG ≈∏Y (3) Ö≤ãdG
™°VƒdG ¤EG π«eRE’G ∞∏H ºb ,âëædG ¤EG ¥rô£dÉH Ö≤ãdG øe Ò«¨àdG óæY •
∞∏H ºb ,™°VƒdG Ò«¨J AÉæKCG áehÉ≤à Qƒ©°ûdG ádÉM ‘ .܃∏£ŸG
.¿GQhódG OƒªY πØb ‘ ¬≤«°û©àd ≥aôH π«eRE’G
𫨰ûàdG ±É≤jEGh 𫨰ûàdG
≥ªY ≈°übCG ¿ƒµj .܃∏£ŸG ™°VƒdG ≈∏Y (7) ≥ª©dG Oófi §Ñ°VG •
»eÉeC’G ±ô£dGh Ö≤ãdG áª≤d ±ôW ÚH áaÉ°ùª∏d kÉjhÉ°ùe Ö≤ã∏d
.≥ª©dG OóëŸ
.(9) Ió≤©dG §HQG •
(O – Ü πµ°ûdG) ≥ë∏e Ö«côJ
.≥ë∏ŸG (10) ¥É°S º«ë°ûJh ∞«¶æàH ºb •
.(5) RÉ¡÷G πeÉM ‘ ¥É°ùdG πNOCGh (11) ±ô£dG Öë°SG •
.дЙлаШdG ‘ πNуj ¿CG ¤EG ≥aфH √фjhуаH ºbh πШ°SC’ ≥л∏ŸG ™aOG •
áØ«Xh Ö∏£àJ .í«ë°U πµ°ûH ¬à«ÑãJ øe ≥≤ëà∏d ≥ë∏ŸG Öë°SG •
Ió©d …Qƒfi πµ°ûH ∑ôëàdG ≈∏Y kGQOÉb ≥ë∏ŸG ¿ƒµj ¿CG ¥ô£dG
.IGOC’G πeÉM ‘ ¬à«ÑãJ óæY äGΪ«àæ°S
.≥ë∏ŸG êôNCG ºK (11) ±ô£dG Öë°SG ,≥ë∏ŸG ádGRE’ •
(O πµ°ûdG) í«JÉØÃ OhõŸG ±ô¶dG
ÜQÉ≤Y √ÉŒG ¢ùµ©H (12) ±ô£dG ∞d ∫ÓN øe ±ô¶dG íàaG •
.áYÉ°ùdG
.±ô¶dG ‘ (13) áª≤∏dG ¿GQhO OƒªY πNOCG •
ºbh ±ô¶dG ÖfÉL ‘ (15) áëàa πc ‘ (14) ±ô¶dG ìÉàØe πNOCG •
.§HôdG ΩɵMEG ºàj ¿CG ¤EG áYÉ°ùdG ÜQÉ≤Y √ÉŒÉH ∞∏dÉH
.(2) áYöùdG ójó– ¢Uôb ∞d ∫ÓN øe áHƒ∏£ŸG áYöùdG OóM •
.(1) ±É≤jE’G/𫨰ûàdG ìÉàØe ≈∏Y §¨°VG ,RÉ¡÷G 𫨰ûàd •
.πØ≤dG QR QôM ,RÉ¡÷G 𫨰ûJ ±É≤jE’ •
(h πµ°ûdG) IÉ°TôØdG ÖbGôe
.»°TGôØdG áeÓ°S ÖbGôj èeóe Ωɶf ≈∏Y RÉ¡÷G πªà°ûj
ádÉëH »°TGôØdG ¿ƒµJ ,(17) ö†NCG IÉ°TôØdG ÖbGôe öTDƒe ¿Éc GPEG •
.Ió«L
á«dÉH »°TGôØdG ¿ƒµJ ,(17) ôªMCG IÉ°TôØdG ÖbGôe öTDƒe ¿Éc GPEG •
áeóN õcôe ¤EG RÉ¡÷G IOÉYEÉH ºb ,òÄæ«M .∫GóÑà°S’G ¤EG áLÉëHh
.»°TGôØdG ∫GóÑà°S’ ôµjO ófBG ∑ÓH øe óªà©e
22
ΩGóîà°S’G
.¬«∏Y π«ªëàdG ‘ •ôØJ ’h ¬d IOóëŸG áYöùdÉH RÉ¡÷G 𫨰ûàH ºb !ôjò–
äÉ«°VQC’G hCG ¿GQó÷G Ö≤K πÑb Ö«HÉfC’Gh ∑Ó°SC’G øcÉeCG øe ≥≤– !ôjò–
.∞≤°ùdG hCG
.Ö≤ãdG ™°Vh ‘ RÉ¡÷G ¿ƒµj ɪæ«M âëf ∫ɪYCÉH º≤J ’ !ôjò–
(h πµ°ûdG) 𫨰ûàdG ™°Vh ójó–
.´É°VhCG áKÓK ‘ RÉ¡÷G ΩGóîà°SG øµÁ
,܃∏£ŸG ™°VƒdG √ÉŒÉH √ôjhóàH ºb ,(3) Ö≤ãdG ™°Vh Oófi 𫨰ûàd •
.RƒeôdG ¬«dEG Ò°ûJ …òdG ƒëædG ≈∏Y
Page 23

ARABIC
á©æ°üŸG ácöûdG ᣰSGƒH ¬dGóÑà°SG Öéj ,ábÉ£dG πHÉc ∞∏J ádÉM ‘ •
.áHÉ°UE’G hCG Qö†dG Öæéàd ôµjO ófBG ∑ÓH øe óªà©e áeóN õcôe hCG
¢üFÉ°üÿG
:á«dÉàdG ¢üFÉ°üÿG ¢†©H hCG πc ≈∏Y RÉ¡÷G Gòg …ƒàëj
±É≤jEG/𫨰ûJ ìÉàØe .1
áYöùdG ójó– ¢Uôb .2
Ö≤ãdG ™°Vh Oófi .3
𫨰ûàdG ™°Vh Oófi .4
RÉ¡é∏d πeÉM .5
≥ª©dG Oófi .6
º«ë°ûJ AÉ£Z .7
™«ªéàdG
.ábÉ£dG øe ¬∏°üaGh RÉ¡÷G 𫨰ûJ ∞bhCG ,™«ªéàdG πÑb !ôjò–
øjôNB’G áeÓ°S
äGQó≤dG ÜÉë°UCG ¢UÉî°TC’G É¡eóîà°ù«d ᪪°üe ÒZ ádB’G √òg •
øÃ) á∏«∏≤dG áaô©ŸGh IÈÿG hCG IOhóëŸG á«∏≤©dG hCG á«°ù◊G ájó°ù÷G
äɪ«∏©àdG º¡FÉ£YEG hCG º¡«∏Y ±GöTE’G πX ‘ ’EG ,(∫ÉØWC’G º¡«a
.º¡àeÓ°S øY ∫hDƒ°ùŸG ¢üî°ûdG πÑb øeÉ¡eGóîà°SÉH á≤∏©àŸG
.RÉ¡÷ÉH º¡ãÑY ΩóY ¿Éª°†d ∫ÉØWC’G ≈∏Y ±GöTE’G Ωõ∏j •
iôNC’G ôWÉîŸG
ÒZ ¿ƒµJ óbh RÉ¡÷G ΩGóîà°SG óæY á«aÉ°VEG iôNCG ôWÉfl èàæJ ¿CG øµÁ
èàæJ ¿CG øµÁh .π«dódG ‘ á檰†ŸG áeÓ°ùdG äGôjò– ‘ É¡«∏Y πªà°ûe
≈àMh ïdEG... ,Ióà‡ IÎØd ΩGóîà°S’G hCG ΩGóîà°S’G Aƒ°S øY ôWÉîŸG √òg
øµÁ ’ ,áeÓ°ùdG Iõ¡LCG ΩGóîà°SGh á∏°üdG äGP áeÓ°ùdG íFGƒd ≥«Ñ£J ™e
:∂dP πª°ûjh ,iôNC’G ôWÉîŸG ¢†©H ÖæŒ
.ácôëàe /IQGhO AGõLCG …CG ¢ùŸ øY áŒÉædG äÉHÉ°UE’G •
.äÉ≤ë∏e hCG äGôØ°T hCG AGõLCG …CG Ò«¨J øY áŒÉædG äÉHÉ°UE’G •
ΩGóîà°SG óæYh .Ióà‡ IÎØd RÉ¡÷G ΩGóîà°SG øY áŒÉædG äÉHÉ°UE’G •
äGÎa ∂dP π∏îàj ¿CG øe ócCÉàdG »¨Ñæj á∏jƒW äGÎØd RÉ¡L …CG
.᪶àæe ∞bƒJ
.™ª°ùdG ∞©°V •
(CG πµ°ûdG) »ÑfÉ÷G ¢†Ñ≤ŸG Ö«côJ
â«ÑãJ ∂æµÁ ¿CG ¤EG áYÉ°ùdG ÜQÉ≤Y √ÉŒG ¢ùµ©H á°†Ñ≤dG ∞∏H ºb •
.í°Vƒe ƒg ɪc RÉ¡÷G áeó≤e ‘ (6) »ÑfÉ÷G ¢†Ñ≤ŸG
.܃∏£ŸG ™°VƒdG ¤EG »ÑfÉ÷G ¢†Ñ≤ŸG q∞d •
ÜQÉ≤Y √ÉŒG ‘ á°†Ñ≤dG ∞d ∫ÓN øe »ÑfÉ÷G ¢†Ñ≤ŸG §HQG •
.áYÉ°ùdG
(CG πµ°ûdG) ≥ª©dG Oófi §Ñ°Vh Ö«côJ
(9) Ió≤©dG q∂a •
.í°Vƒe ƒg ɪc â«ÑãàdG áëàa ‘ (7) ≥ª©dG Oófi πNOCG •
ΩGóîà°SG øY œÉædG QÉѨdG ¥É°ûæà°SG øY áŒÉædG á«ë°üdG ôWÉîŸG •
Ö°ûN á°UÉNh ,Ö°ûÿG ™e πeÉ©àdG :∫ÉãŸG π«Ñ°S ≈∏Y) RÉ¡÷G
.(áaÉãµdG ᣰSƒàe á«Ø«∏dG ìGƒdC’Gh ¿GõdG Ö°ûNh •ƒ∏ÑdG
RÉ¡÷G ≈∏Y äÉeÓ©dG
:RÉ¡÷G ≈∏Y á«dÉàdG á«ë«°VƒàdG Qƒ°üdG ô¡¶J
π«dO IAGôb Ωóîà°ùŸG ≈∏Y Ú©àj ,áHÉ°UE’G ôWÉfl π«∏≤àd !ôjò–
.äɪ«∏©àdG
á«FÉHô¡µdG áeÓ°ùdG
kÉehO ¢UôMG .»°VQCG ∂∏°ùd áLÉM ∑Éæg â°ù«d Gòd ,∫õ©dG êhOõe RÉ¡÷G Gòg
»Hô¡µdG ó¡÷G ™e ábÉ£dG π°UƒŸ »Hô¡µdG ó¡÷G á≤HÉ£e øe ≥≤ëàdG ≈∏Y
.∞«æ°üàdG áMƒd ≈∏Y OƒLƒŸG
23
Page 24

ARABIC
»Hô¡µdG RÉ¡÷G ¢Uƒ°üîH áeÓ°ù∏d á«aÉ°VEG äGôjò–
IQGhódG âëædG ¥QÉ£Ÿ á«aÉ°VEG áeÓ°S äGôjò–!ôjò–
.™ª°ùdG ¿Gó≤a ¤EG AÉ°Vƒ°†dG ¤EG ¢Vô©àdG …ODƒj ó≤a .¿PCÓd äÉ«bGh póJQG •
ÖÑ°ùàj ¿CG øµÁ .RÉ¡÷G ™e IôaƒàŸG á«aÉ°VE’G ¢†HÉ≤ŸG Ωóîà°SG •
.á«°üî°T áHÉ°UEG çhóM ‘ ºµëàdG ≈∏Y IQó≤dG ΩóY
óæY RÉ¡÷ÉH πª©dG óæY §≤a ádhõ©e í£°SCG ᣰSGƒH RÉ¡÷G ∂°ùeG •
∂∏°S hCG á«ØîŸG ∑Ó°SC’G ™e ™£≤dG ≥ë∏e ¢ùeÓJ á«dɪàMG OƒLh
…öùj »àdG" ∑Ó°SCÓd ™£≤dG ≥ë∏e á°ùeÓe ¿CÉH º∏YGh .¬°ùØf RÉ¡÷G
ób ɇ ,áaƒ°ûµŸG á«fó©ŸG AGõLC’G ¤EG QÉ«àdG π°UƒJ ób "QÉ«àdG É¡H
.á«FÉHô¡µdG äÉeó°üdÉH áHÉ°UE’G ôWÉfl ¤EG π¨°ûŸG ¢Vô©j
áHƒ©°U ¤EG ∂dP …ODƒj å«M .¿GQhódG ™°Vh ‘ âëf ≥ë∏e Ωóîà°ùJ ’ •
.ìó≤ŸG ¿GQhO ¤EG …ODƒj Ée ,IOÉŸG ‘ ≥ë∏ŸG ácôM
É¡à«ÑãJh πª©dG á©£b ™°Vƒd iôNCG á«∏ªY á≤jôW …CG hCG áeõ∏e Ωóîà°SG •
º°ù÷G πHÉ≤e ‘ hCG ó«dÉH πª©dG á©£b ∑É°ùeEG ¿EG .âHÉK í£°S ≈∏Y
.ºµëàdG ¿Gó≤a ¤EG ∂dP …ODƒj óbh Iô≤à°ùe ÒZ É¡∏©éj
™°Vƒe øe ≥≤– ,∞≤°SC’G hCG äÉ«°VQC’G hCG §FGƒ◊G ‘ ôØ◊G πÑb •
.Ö«HÉfC’Gh ∑Ó°SC’G
áæNÉ°S ¿ƒµJ ó≤a .IöTÉÑe ôØ◊G ó©H ábô£ŸG áª≤d ±ôW ¢ùª∏J ’ •
.ájɨ∏d
∂dP ‘ ÉÃ) ¢UÉî°TC’G πÑb øe ΩGóîà°SÓd ¢ü°üfl ÒZ RÉ¡÷G Gòg •
hCG ,»ægP hCG »°ùM hCG ÊóH Qƒ°üb øe ¿ƒfÉ©j øjòdG (∫ÉØWC’G
º¡¡«LƒJ hCG º¡«∏Y ±GöTE’G ºàj ⁄ Ée ,áaô©ŸGh IÈî∏d ¿hó≤àØj
øY ∫hDƒ°ùe ¢üî°T πÑb øe RÉ¡÷G ΩGóîà°SG á«Ø«µH ≥∏©àj ɪ«a
.RÉ¡÷ÉH º¡ãÑY ΩóY ¿Éª°†d ∫ÉØWC’G áÑbGôe Öéjh .º¡àeÓ°S
…CG ΩGóîà°SG ¿EG .Gòg äɪ«∏©àdG π«dO ‘ Qƒcòe ΩGóîà°S’G ¢VôZ •
≈°UƒŸG ΩGóîà°S’G ÒZ RÉ¡÷G Gòg ΩGóîà°SÉH πªY …CG AGOCG hCG ≥ë∏e
.äɵ∏ટG hCG/h ¢UÉî°TC’ÉH Qö†dG ≥ë∏j ób äɪ«∏©àdG π«dO ‘ ¬H
¬H ájÉæ©dGh »FÉHô¡µdG RÉ¡÷G ΩGóîà°SG 4
¢ü°üîŸG RÉ¡÷G ∂dɨ°TCG ò«Øæàd Ωóîà°SG .RÉ¡÷G 𫪖 ‘ •ôØJ ’ CG
OóëŸG AGOC’G ∫ó©Ÿ kÉ≤ah kÉfÉeCG ÌcCGh π°†aCG πµ°ûH πª©dG ò«Øæàd
.ΩGóîà°SÓd
πãÁ PEG ,kÉØdÉJ ¬∏«¨°ûJ ìÉàØe ¿Éc GPEG »FÉHô¡µdG RÉ¡÷G Ωóîà°ùJ ’ Ü
𫨰ûàdG ìÉàØe ᣰSGƒH ¬H ºµëàdG øµÁ ’ …òdG »FÉHô¡µdG RÉ¡÷G
.¬ë«∏°üJ Öéjh IÒÑc IQƒ£N
hCG RÉ¡÷G §Ñ°V πÑb ájQÉ£ÑdG ´õfG hCG/h ¢ùÑ≤ŸG øe ¢ùHÉ≤dG Öë°SG ê
äÉWÉ«àMG ™æ“h .á«FÉHô¡µdG Iõ¡LC’G øjõîJ hCG äÉ≤ë∏ŸG ∫GóÑà°SG
ÒZ πµ°ûH á«FÉHô¡µdG Ió©dG 𫨰ûJ øe IQƒcòŸG á«FÉbƒdG áeÓ°ùdG
.Oƒ°ü≤e
∫hÉæàe øY kGó«©H áeóîà°ùŸG ÒZ á«FÉHô¡µdG Iõ¡LC’ÉH ßØàMG O
¿hó«éj ’ øjòdG ¢UÉî°TC’G πÑb øe É¡∏«¨°ûàH íª°ùJ ’h .∫ÉØWC’G
Iõ¡LC’G ¿CG PEG ,äɪ«∏©àdG ∂∏J ≈∏Y Gƒ©∏£j ⁄ øjòdG hCG É¡eGóîà°SG
¢UÉî°TCG πÑb øe É¡∏«¨°ûJ ” GPEG IÒÑc IQƒ£N πµ°ûJ ób á«FÉHô¡µdG
.É¡«∏Y ÚHQóàe ÒZ
¿CG øe ócCÉà∏d É¡°üëaGh á«FÉHô¡µdG Iõ¡LC’G áfÉ«°U ≈∏Y ßaÉM √
É¡àcôM á∏bôY ºàj ’ ¬fCÉHh ó«L πµ°ûH πª©J IQGhódG AGõLC’G
≈∏Y ôKDƒJ ób iôNCG ádÉM …CG hCG É¡«a Qƒ°ùc ájCG OƒLh ≈∏Y ±ô©à∏dh
PEG ,ΩGóîà°S’G πÑb É¡MÓ°UEG Öéj ,É¡Ø∏J ÚÑJ GPEÉa .Iõ¡LC’G 𫨰ûJ
.á«FÉHô¡µdG Iõ¡LCÓd áÄjOôdG áfÉ«°üdG ÖÑ°ùH çOGƒ◊G øe ójó©dG ™≤J
á∏bôY á«dɪàMG π≤J PEG ,IOÉMh áØ«¶f ™£n≤dG OóoY AÉ≤HEG ≈∏Y ßaÉM h
É¡àfÉ«°U ºàj »àdGh IOÉ◊G ™£≤dG ±GƒM äGP ™£≤dG äGhOCG ácôM
.É¡«∏Y Iô£«°ùdG π¡°ùj ɪc Ö°SÉæŸG πµ°ûdÉH
kÉ≤ah ∂dP ¤EG Éeh π¨°ûdG OóoYh äÉ≤ë∏ŸGh »FÉHô¡µdG RÉ¡÷G Ωóîà°SG R
Qô≤ŸG πª©dG á©«ÑWh ±hôX ¿ÉÑ°ù◊G ‘ òNC’G ™e ,äɪ«∏©àdG √ò¡d
⁄ ∫ɪYCG ò«Øæàd »FÉHô¡µdG RÉ¡÷G ΩGóîà°SG …ODƒj óbh .√ò«ØæJ
.IÒ£N ä’É◊ ¢Vô©àdG ¤EG RÉ¡÷G É¡∏LC’ ¢ü°üîj
»FÉHô¡µdG RÉ¡÷G ìÓ°UEG 5
IôjÉ£àe äÉÄjõL hCG QÉÑZ CÉ°ûæJ ó≤a ,QÉѨdG øe ájÉbƒdG ´Éæb póJQG •
.RÉ¡÷G ΩGóîà°SG AGôL
24
ΩGóîà°SÉH πgDƒŸG áfÉ«°üdG π«ch iód ’EG »FÉHô¡µdG ∑RÉ¡L í∏°üJ ’ CG
RÉ¡÷G áeÓ°S ≈∏Y ®ÉØ◊G øª°†j Éà á≤HÉ£ŸG ∫GóÑà°S’G ™£b
.»FÉHô¡µdG
Page 25

ARABIC
RÉ¡÷G πª◊ kGóHCG ¬eóîà°ùJ Óa ,∂∏°ùdG ΩGóîà°SG IAÉ°SEÉH º≤J ’ O
∂∏°ùdÉH ßØàMGh .¢ùÑ≤ŸG øY ¢ùHÉ≤dG π°üØd hCG ¬Hò÷ hCG »FÉHô¡µdG
AGõLC’G hCG IOÉ◊G ±GôWC’G hCG âjõdG hCG IQGô◊G QOÉ°üe øY kGó«©H
¢Vô©àdG IQƒ£N øe É¡Ø∏J hCG ∑Ó°SC’G ∂HÉ°ûJ ójõjh .ácôëàŸG
.á«FÉHô¡µdG äÉeó°ü∏d
»LQÉÿG ΩGóîà°S’G óæY áÑ°SÉæŸG ójóªàdG äÓHÉc iƒ°S Ωóîà°ùJ ’ √
ôWÉfl øe ¢†Øîj áÑ°SÉæŸG ójóªàdG äÓHÉc ΩGóîà°SG ¿CG PEG ,RÉ¡é∏d
.á«FÉHô¡µdG äÉeó°ü∏d ¢Vô©àdG
Ωóîà°SG ,áÑWôdG AGƒLC’G ‘ »FÉHô¡µdG RÉ¡÷G 𫨰ûJ ÖæŒ Qò©J GPEG h
π∏≤j ìÉàØŸG ∂dP ΩGóîà°SG ¿EG PEG ,∞∏îàŸG QÉ«àdG øe ájÉbƒ∏d ìÉàØe
.á«FÉHô¡µdG äÉeó°ü∏d ¢Vô©àdG ô£N øe
á«°üî°ûdG áeÓ°ùdG 3
.»FÉHô¡µdG RÉ¡÷G 𫨰ûJ óæY kGQòM øch ,¬∏©ØJ ÉŸ ¬ÑàfGh kɶ≤j øc CG
¿ƒµJ ÉeóæY hCG Ö©àdÉH ∑Qƒ©°T óæY »FÉHô¡µdG RÉ¡÷G Ωóîà°ùJ ’h
√ÉÑàf’G ΩóY …ODƒj ób PEG .ájhOC’G hCG ∫ƒëµdG hCG äGQóîŸG ÒKCÉJ â–
áHÉ°UE’ ¢Vô©àdG ¤EG »FÉHô¡µdG RÉ¡÷G ΩGóîà°SG óæY IóMGh á¶ë∏d
.IÒ£N
´Éæb πãe á«°üî°ûdG ájɪ◊G äGó©eh ájÉbƒdG äGQɶf kɪFGO óJQG Ü
á«bGh hCG PƒÿGh ¥’õf’G øe á«bGƒdG ¿ÉeC’G ájòMCGh QÉѨdG øe ájÉbƒdG
¢Vô©àdG ô£N øe π∏≤j áÑ°SÉæŸG äGó©ŸG AGóJQG ¿CG PEG ,ÚfPC’G
.äÉHÉ°UEÓd
≥∏Z øe ócCÉàdÉH ∂dPh »FÉHô¡µdG RÉ¡é∏d ÅLÉØŸG 𫨰ûàdG QòMG ê
hCG ¬©aQ πÑbh ,ájQÉ£ÑdG hCG/h »FÉHô¡µdG QÉ«àdÉH ¬∏«°UƒJ πÑb RÉ¡÷G
RÉ¡÷G πªM AÉæKCG 𫨰ûàdG ìÉàØe ≈∏Y ∂©Ñ°UEG ™°Vh …ODƒj .¬∏ªM
ó«b ¿ƒµj ÉeóæY á«FÉHô¡µdG áµÑ°ûdÉH RÉ¡÷G π«°UƒJ hCG »FÉHô¡µdG
.çOGƒ◊G ´ƒbh ¤EG 𫨰ûàdG
ób PEG ,»FÉHô¡µdG RÉ¡÷G 𫨰ûJ πÑb §HôdG ìÉàØe hCG §Ñ°†dG IóY ´õfG O
áHÉ°UE’G ¤EG RÉ¡÷G øe QGhO AõL ‘ óLGƒàŸG ìÉàØŸG hCG Ió©dG …ODƒJ
.ìhôéH
‘ ∂fRGƒJ ≈∏Y ßaÉMh ¿ÉeCÉH ∞b .á«©«Ñ£dG ÒZ ó°ù÷G ´É°VhCG ÖæŒ √
‘ π°†aCG πµ°ûH RÉ¡÷G ≈∏Y Iô£«°ùdG øe ∂æµÁ ɇ äÉbhC’G ™«ªL
.á©bƒàŸG ÒZ ∞bGƒŸG
≈∏Y ßaÉM .»∏◊G hCG á°VÉØ°†ØdG ÜÉ«ãdG óJôJ ’h ,áÑ°SÉæe kÉHÉ«K óJQG h
ób PEG ,ácôëàŸG AGõLC’G øY äGRÉØ≤dGh á°VÉØ°†ØdG ÜÉ«ãdGh ô©°ûdG OÉ©HEG
AGõLC’ÉH πjƒ£dG ô©°ûdG hCG »∏◊G hCG á°VÉØ°†ØdG ÜÉ«ãdG ∂HÉ°ûàJ
.ácôëàŸG
É¡fCG øe ócCÉJ ,QÉѨdG ™«ªŒh §Ø°ûd äÉ≤ë∏à RÉ¡÷G õ«¡Œ ” GPEG R
ΩGóîà°SG ¿CG PEG ,º«∏°ùdG πµ°ûdÉH É¡eGóîà°SG ºàj ¬fCÉHh RÉ¡÷ÉH á∏°üàe
.QÉѨdG øY áŒÉædG ôWÉîŸG øe ¢†Øîj ób äÉ≤ë∏ŸG √òg
ΩGóîà°S’G ¢VôZ
í£°SC’G ‘ ôØë∏d ôµjO ófBG ∑ÓH øe IQGhódG ábô£ŸG ìó≤ŸG º«ª°üJ ”
∂a ä’ɪ©à°SG ¤EG áaÉ°VE’ÉH áfÉ°SôÿGh ¿OÉ©ŸGh ∂à°SÓÑdGh á«Ñ°ûÿG
.∞«ØÿG âëædGh »ZGÈdG
áeÓ°ùdG äGOÉ°TQEG
á«FÉHô¡µdG Iõ¡LC’G ΩGóîà°SGóæY áeÓ°ù∏d äGôjò–
PEG ,áeÓ°ùdG äGOÉ°TQEGh äGôjò– áaÉc IAGôb Öéj !ôjò–
áæ«ÑŸG äɪ«∏©àdGh äGOÉ°TQE’ÉH ΩGõàd’G ΩóY …ODƒj ób
äÉHÉ°UEG hCG/h á«FÉHô¡c äÉeó°üd ¢Vô©àdG ô£N ¤EG √ÉfOCG
.IÒ£N
.kÓÑ≤à°ùe É¡«dEG ´ƒLô∏d áeÓ°ùdG äGOÉ°TQEGh äGôjò– ™«ªéH ßØàMG
¤EG √ÉfOCG áæ«ÑŸG äGOÉ°TQE’G ‘ OQh ɪã«M "»FÉHô¡c RÉ¡L" í∏£°üe Ò°ûj
ájQÉ£ÑdÉH hCG (᫵∏°ùdG) AÉHô¡µdÉH πª©J »àdG á«FÉHô¡µdG Iõ¡LC’G ™«ªL
.(᫵∏°SÓdG)
πª©dG á≤£æe áeÓ°S 1
ôWÉfl ójõJ PEG ,kGó«L IAÉ°†eh áØ«¶f πª©dG á≤£æe ¿ƒµJ ¿CG Öéj CG
.᪶æŸG ÒZ hCG áª∏¶ŸG ≥WÉæŸG ‘ çOGƒë∏d ¢Vô©àdG
‘ ɪc QÉéØfÓd á∏HÉ≤dG AGƒLC’G ‘ á«FÉHô¡µdG Iõ¡LC’G π¨°ûJ ’ Ü
øY ºéæj PEG ,∫É©à°TÓd á∏HÉ≤dG äGRɨdG hCG πFGƒ°ùdG hCG QÉѨdG §«fi
hCG QÉѨdG π©°ûJ ºK ôjÉ£àJ ób Éjɶ°T »FÉHô¡µdG RÉ¡÷G ΩGóîà°SG
.áæNOC’G
RÉ¡÷G 𫨰ûJ AÉæKCG πª©dG á≤£æe øY IQÉŸGh ∫ÉØWC’G OÉ©HEG Öéj ê
ºµëàdG ¿Gó≤a ¤EG √ÉÑàf’G ±öU πeGƒY …ODƒJ ó≤a ¬ÑàfGh ,»FÉHô¡µdG
.Iõ¡LC’G ∂∏àH
á«FÉHô¡µdG áeÓ°ùdG 2
Ò«¨J ô¶ëjh .¢ùÑ≤ŸG ™e »FÉHô¡µdG RÉ¡÷G ¢ùHÉb ≥aGƒàj ¿CG Öéj CG
™e ÅjÉ¡e ¢ùHÉb ájCG ΩGóîà°SG hCG ∫GƒMC’G øe ∫ÉM …CÉH ¢ùHÉ≤dG
ΩóY ¢†Øîjh .(»°VQCG) ¢VQDƒe ±ôW É¡d »àdG á«FÉHô¡µdG Iõ¡LC’G
äÉeó°ü∏d ¢Vô©àdG IQƒ£N øe á°ùfÉéàŸG ¢ùHÉ≤ŸGh ¢ùHÉ≤dG Ò«¨J
.á«FÉHô¡µdG
áÄaóàdG äGÎjOGQh Ö«HÉfC’Éc á°VQDƒŸG 샣°ùdG á°ùeÓe ÖæŒ Ü
á«FÉHô¡µdG äÉeó°ü∏d ¢Vô©àdG Iƒ£N OGOõJ PEG ,äÉLÓãdGh ÅaGóŸGh
.¢VQCÓd kÉ°ùeÓe ∂ª°ùL ¿ƒµj ÉeóæY
ÜöùJ ¿CÉH kɪ∏Y ,áHƒWôdG hCG ô£ª∏d á«FÉHô¡µdG Iõ¡LC’G ¢Vô©J ’ ê
äÉeó°ü∏d ¢Vô©àdG IQƒ£N ójõj »FÉHô¡µdG RÉ¡÷G πNGO ¤EG √É«ŸG
.á«FÉHô¡µdG
25
Page 26

ARABIC
B
D
C
E
26
F
Page 27

Arabic
A
27
Page 28

Page 29

WARRANTY REGISTRATION CARD
YOUR NAME/
YOUR ADDRESS
POSTCODE
«ùßr
«∞FMu«Ê
«∞d±e «∞∂d¥bÍ
DATE OF PURCHASE
DEALER'S NAME & ADDRESS/
¢U¸¥a «∞Ad«¡
≈ßr Ë ´Mu«Ê «∞∂Uzl
PRODUCT MODEL NO.
BPHR323K
Page 30

N a m e s & A dd re ss es fo r B la ck & D e c k e r S e r v i c e Co n c e s s i o n a r i e s
ALGERIA: Sarl Outillage Corporation, 08 Rue Med Boudiaf - Cheraga - Algiers, Algeria. Tel: (213-21) 375130, Fax: (213-21) 369667. ANGOLA: Angoferraria,
Lda., Rua Robert Shields, No. 61, Luanda, Angola, Tel: 00244-222-395837 / 222-395034, Fax: 00244-222-394790. AZERBAIJAN: Royalton Holdings Ltd. 41
Khagani St. Apt. 47 AZ 1001, Baku. Tel: (994-12) 4935544, Fax: (994-12) 5980378. BAHRAIN: Kavalani & Sons W.L.L., P.O. Box 71, Sitra, Manama, Tel: (973)
17732888, Fax: (973) 17737379. Alfouz Services Co. WLL., P.O. Box 26562, Tubli, Manama. Tel: (973) 17783562, Fax: (973) 17783479. EGYPT: El Farab
S.A.E., 15-Nabil El Wakkad Street, Dokki, Giza, Egypt, Tel: 00202-37603946 / 002-010-2582544, Fax: 00202-33352796. ETHIOPIA: Seif Tewfik Sherif, Arada
Sub-City, Kebele 01/02, Global Insurance Building, 2nd Floor, Room 43, P.O. Box 2525, Addis Ababa, Ethiopia. Tel: (251-11) 1563968/ 1563969, Fax: (251-11)
1558009. IRAQ: Financial Links, Kazzaz Building Arasat Al-Hindia Block No: 629 Street: 31Building No: 1 Baghdad – Iraq. Tel: 00964 (0)780 195 2223/ 00964
(0)781 3763044. Al Sard Co. for General Trading Ltd. Jbara Bldg. 3Flr, Al Rasheed St. Bagdad. Tel: (964) 18184102. Sakhar Group, Arrassat al-hindya Al
Masbah, Bagdad. (964) 7400144446. JORDAN: Palestine Bldg. Matl. (Bashiti Hardware), 93 King Abdullah 2nd Street, Opp. ELBA House, P.O. Box 3005,
Amman 11953, Tel: (962-6) 5349098, Fax: (962-6) 5330731. KENYA: Dextron Tools Ltd., P.O. Box 20121-00200, Shariff House, Kimathi Street, Nairobi. Tel:
(254-20) 6905000/ 2358021, Fax: (254-20) 6905111/ 6905112. KUWAIT: Al Omar Technical Co., P.O. Box 4062, 13041 Safat, Kuwait. Tel: (965) 24848595/
24840039, Fax: (965) 24845652. Fawaz Al Zayani Establishment, P.O. Box 42426, Shop No. 18, Al Humaizi Commercial Complex, Khalifa Al Jassim,
Shuwaikh, Kuwait. Tel: (965) 24828710, Fax: (965) 24828716. Fawaz Al Zayani Establishment, P.O. Box 42426, Shop No.18, Al Humaizi Commercial
Complex, Khalifa Al Jassim, Shuwaikh, Kuwait, Tel: (965) 24828710, Fax: (965) 24828716. Fawaz Al Zayani Establishment, Fahaheel Industrial Area, Main St.,
Sanaya, Kuwait, Tel: (965) 23925830, Fax: (965) 24828716. LEBANON: Est. Shaya & Azar S.A.R.L., Boulvard Jdeideh - Mar Takla - Bouchrieh .P.O. Box
90545 Jdeideh.Beirut - Lebanon, Tel: 00961 1 872305 / 306 , Fax: 00961 1 872303. LIBYA: North Africa Trading ( El Ghoul Brothers), AlHilal Service Center
Tawergha St. Misurata, Tel: 00218-091-3221408. (Benghazi) Sniydel st., Amr Ibn EL-Aas Rd. Tel: (+218) 92 5771120. (Tripoli) Al Barniq Service Center,
Mokhazin elsukar st., ElFallah. Tel: (+218) 21 4808019. (Misrata) Al Hilal Service Center, Tawergha st. Tel: (+218) 51 2626743. MAURITIUS: Robert Le Marie
Limited, Old Moka Road, Bell Village, P.O. Box 161, Port Louis, Tel: 00230-212 1865/ 212 2847, Fax: 00230-2080843. MOROCCO: Ets Louis Guillaud & Cie,
149, Quartier Industriel, Moulay Rachid, Casablanca, Postal Code 20450, Morocco, Tel: 00212-522729233, Fax: 00212-522729096. NIGERIA: Meridian
Power Tools Ltd., Gr.Floor, #1 Alhaji Masha Rd, Next toTeslim Balogun Stadium, Near National Stadium Surulere, Lagos, Nigeria, Tel: 00234-1-7740431 /
7740410, Fax: 00234-1-7913798. OMAN: Al Jizzi Company LLC, P.O. Box 1704,PC 112 Ruwi, Oman, Tel: (968) 24832618/ 24835153, Fax: (968)
24831334/24836460. Al Hassan Technical & Construction Supplies Co. LLC, P.O. Box 1948, P.C. 112, Ruwi, Tel: (968) 24810575 / 24837054, Fax: (968)
24810287/ 24833080. Oman Hardware Co. LLC, P.O. Box 635, Ruwi Postal Code 112, Te: (968) 24815131, Fax: (968) 24816491. Khimji Ramdas, P.O. Box
19, Post Code 100, Ghala, Muscat, Oman. Tel: (968) 24595906/ 907, Fax: (968) 24852752. Oman Marketing & Service Co. (Omasco), P.O. Box 2734, Behind
Honda Showroom, Wattayah, Oman. Tel: (968) 24560232/ 24560255, Fax: (968) 24560993. Oman Marketing & Service Co. (Omasco), Al Ohi, Sohar, Oman.
Tel: (968) 26846379, Fax: (968) 26846379. Oman Marketing & Service Co. (Omasco), Sanaya, Salalah, Oman. Tel: (968) 23212290, Fax: (968) 23210936.
PAKISTAN: ZIT Co - Nasir & Bros., 2nd Floor, Qadri Center, Chowk Dalgran Railway Road, Lahore, Pakistan, Tel: 0092 42 37670839, Fax: 0092 42
37652989. Ammar Service & Spares, 60-Bank Arcade, Serai Road, Karachi, Pakistan. Tel: (92-21) 32426905, Fax: (92-21) 32427214. QATAR: Teyseer
Industrial Supplies & Services Co. WLL, 55, Al Wakalat St. (Between St. 18 & 19) Salwa Industrial Area, P.O. Box 40523 Doha,Qatar, Te: (974) 44581536, Fax:
(974) 44682024. Shaheen Electrical Works & Trading Co. WLL, Gate 34, St. 44 Industrial Area P.O. Box 9756, Doha, Tel: (974) 44600230 /44600525, Fax:
(974) 44601338. Al Muftah Service Centre, Al Wakrah Road, P.O. Box 875, Doha,Qatar, Tel: (974) 44650880/ 44650110/ 44446868, Fax: (974) 44441415 /
44662599. SAUDI ARABIA: (Al Bahr) Mohamed Ahmed Bin Afif Est., P.O. Box 530, Yanbu, Al Bahr. Tel: (966-4) 3222626/ 3228867, Fax: (966-4) 3222210.
(Al Khobar) Fawaz Ebrahim Al Zayani Trading Est., P.O. Box 76026, Al Khobar # 31952, Tel: (966-3) 8140914, Fax: (966-3) 8140824. MSS (Al-Mojil Supply &
Services) P.O. Box 450, Jubail 31951, Opp. Gulf Bridge Library & Riyadh House. Tel: (966-3) 3612850/ 3624487/ 3621729, Fax: (966-3) 3623589/ 3620783.
(Dammam) MSS (Al-Mojil Supply & Services), P.O. Box 450, Jubail 31951.Opp-Gulf Bridge Library & Riyadh House, Tel: (966-3) 3612850 / 3624487 /
3621729, Fax: (966-3) 3623589 / 3620783. Al Bawardi Tools & Hardware, P.O. Box 112, Dammam, Tel: (966-3) 8330780 Ext.24 / 8348585 Ext. 24 /
+966-3-8335555, Fax: (966-3) 8336303. (Al Hassa) Mutawa Trading & Gen. Services, Maliki road Hafuf city, Al Hassa, KSA. Tel: (966) 502846275 (Jeddah) Al
Bawardi Tools & Hardware, P.O. Box 16905, Jeddah 21474, Tel: (966-2) 6444547 / 6439035 / 6456095, Fax: (966-2) 6439024. EAC (Al Yousef Contg. & Trdg.
Est.), P.O. Box 30377, Jeddah -21477, Tel: (966-2) 6519912, Fax: (966-2) 6511153. (Madina) Garziz Trading for Bldg Mat & Decoration, P.O. Box 3364,
Madina, Tel: (966-4) 826 14 90 / 8227636, Fax: (966-4) 8265741. (Riyadh) Industrial Material Organization (IMO), P.O. Box 623, Rail Street ,Riyadh, Tel:
(966-1) 4028010 Ext 26 / 8001245757, Fax: (966-1) 4037970. Sultan Garment Factory (RSC), P.O. Box 29912, Riyadh 11467, KSA, Tel: (966-1) 4055148 /
4042889, Fax: (966-1) 4055148. Al Bawardi Tools & Hardware, P.O. Box 68, Riyadh 11411, Tel: (966-1) 4484999, Fax: (966-1) 4487877. (Yanbu) Fawaz
Ebrahim Al Zayani, Opposite to Al Fouzan, Jeddah highway or King Abdul Aziz road, Yanbu. Tel: (966-4) 3960980, Fax: (966-4) 3961980. Mohamed Ahmed
Bin Afif Est., P.O. Box 530, Yanbu, Al Bahr, Tel: (966-4) 3222626/ 3228867, Fax: (966-4) 3222210. SOUTH AFRICA: Stanley Black & Decker - RSA, 199
Winze Drive Stormill Ext 9 Roodepoort, Tel: (2711) 472 0454, Fax: (2711) 472 0482. Trevco Power Tool Service 14 Steenbok Street, Koedoespoort, 0186,
Pretoria, South Africa. Tel: (27-86) 1873826, Fax: (27-86) 5001771. TANZANIA: General Motors investment Ltd., P.O. Box 16541, 14 Nyerere Road,
Vingunguti, Dar-es-Salaam. Tel: (255 22) 2862661/ 2865022, Fax: (255 22) 2862667. TUNISIA: Societe Tunisienne De Maintenance (STM), Rue de la
Physique. Nouvelle Zone Industrielle Ben Arous., 2013 Ben Arous, Tunisia. Tel: (+216) 79 389687, Fax: (+216) 71 385154. UAE: (Abu Dhabi) Light House
Electrical, P.O. Box 120, Abu Dhabi, Tel: (971-2) 6726131, Fax: (971-2) 6720667. Galaxy Equipment Trading, Madinath Zayed (Baada Zaid), Abu Dhabi P.C.
58910, Tel: (971-2) 8844279, Fax: (971-2) 8844297 (Ajman) Al Sukoon Gen. Trdg. Co. LLC, P.O. Box 2975, Ajman. Tel: (971-6) 7435725/ 7438317, Fax:
(971-6) 7437350. Al Sukoon Gen. Trdg. Co. LLC, P.O. Box 2975, Ajman, Tel: (971-6) 7435725 / 7438317, Fax: (971-6) 7437350 (Al Ain) Zillion Equipment and
Spare Parts Trading LLC, P.O. Box 19740, Opp. Bin Sadal/ Trimix Redymix Sanaiya, Al Ain. Tel: (971-3) 7216690, Fax: (971-3) 7216103. (Dubai) Black &
Decker (Overseas) GmbH, P.O. Box 5420, Dubai, Tel: (971-4) 8127400/ 8127406, Fax: (971-4)2822765. Ideal Star Workshop Eqpt.Trading LLC, P.O. Box
37116, Al Quoz, Dubai, Tel: (971-4) 3474160, Fax: (971-4) 3474157, Fine Tools, P.O.Box 30139 , Al Quoz, Dubai, Tel: (971-4) 3385240, Fax: (971-4) 3385239,
Alebrah Engineering Service, P.O. Box 78954, Al Qusais , Dubai, Tel: (971-4) 2850044, Fax: (971-4) 2844802. (Musaffah) Light House Electrical, P.O. Box
120, Abu Dhabi, Tel: (971-2) 5548315, Fax: (971-2) 5540461. (Sharjah) Mc Coy Middle East LLC, P.O. Box 25793, Sharjah, Tel: (971-6) 5395931, Fax:
(971-6) 5395932. Burj Al Madeena, Industrial Area No.1, Opp. Pakistani Masjid, P.O. Box 37635, Sharjah. Tel: (971-6) 5337747, Fax: (971-6) 5337719. Burj Al
Madeena, , Industrial Area No 1,opp Pakistani Masjid P.O. Box 37635, Sharjah, Tel: (971-6) 5337747, Fax: (971-6) 5337719 (Ras Al Khaimah) Mc Coy Middle
East LLC, P.O. Box 10584, Ras Al Khaimah, Tel: (971-7) 2277095, Fax: (971-7) 2277096. UGANDA: The Building Center (U) Ltd., 52 Station Road, Kitgum
House, P.O. Box 7436, Kampala, Uganda. Tel: (256-41) 4234567/ 4259754, Fax: (256-41) 4236413. YEMEN: (Aden) Middle East Trad. Co. Ltd. (METCO),
Mualla Dakka, Aden, Yemen. Tel: (967-2) 222670, Fax: (967-2) 222670. (Sana'a) Middle East Trad. Co. Ltd. (METCO), Hayel St., Sana'a, Yemen. Tel: (967-1)
204201, Fax: (967-1) 204204. (Taiz) Middle East Trading Co. (METCO), P.O. Box 12363, 5th Flr, Hayel Saeed Anam Bldg, Al-Mugamma St. Taiz, Yemen. Tel:
(967-4) 213455, Fax: (967-4) 219869.
 Loading...