

Page 1

Please Read and Save this Use and Care Book
Por favor lea este instructivo antes de usar el producto
Veuillez lire et conserver ce guide d’entretien et d’utilisation
Accessories/Parts (USA/Canada)
Accesorios/Partes
(EE.UU/Canadá)
Accessoires/Pièces (É.-U./Canada)
1-800-738-0245
Crush Master
™
Blender
Licuadora
Mélangeur
Model
Modelo
Modèle
❑
BL10475BM
USA/Canada 1-800-231-9786
Mexico 01-800-714-2503
www.blackanddecker.com
Page 2

2
1
IMPORTANT SAFEGUARDS
When using electrical appliances, basic safety precautions should always
be followed, including the following:
❑
Read all instructions.
❑
To protect against risk of electrical shock, do not put blender base, cord,
or plug in water or other liquid.
❑
Close supervision is necessary when any appliance is used by or near
children.
❑
Unplug from outlet when not in use, before putting on or taking off
parts, and before cleaning.
❑
Avoid contacting moving parts.
❑
Do not operate any appliance with a damaged cord or plug or after
the appliance malfunctions or is dropped or damaged in any manner.
Return the appliance to the nearest authorized service facility for
examination, repair, or electrical or mechanical adjustment. Or, call the
appropriate toll-free number listed on the cover of this manual.
❑
The use of attachments, including canning jars, not recommended
or sold by the appliance manufacturer may cause fire, electric shock,
or injury.
❑
Do not use outdoors.
❑
Do not let the plug or cord hang over the edge of table or counter.
❑
Keep hands and utensils out of container while blending to reduce the
risk of severe injury to persons or damage to the blender. A scraper may
be used but must be used only when the blender is not running.
❑
Blades are sharp. Handle carefully.
❑
To reduce the risk of injury, never place cutter assembly blades on base
without the jar properly attached.
❑
Always operate blender with cover in place.
❑
When blending hot liquids, remove center piece of two-piece cover.
❑
Do not use appliance for other than intended use.
SAVE THESE INSTRUCTIONS.
POLARIZED PLUG (120V Models Only)
This appliance has a polarized plug (one blade is wider than the other). To reduce the
risk of electric shock, this plug is intended to fit into a polarized outlet only one way.
If the plug does not fit fully into the outlet, reverse the plug. If it still does not fit,
contact a qualified electrician. Do not attempt to modify the plug in any way.
ELECTRICAL CORD
The cord of this appliance was selected to reduce the possibility of tangling in or
tripping over a longer cord. If more length is needed, use an extension cord rated
no less than 15-amperes. (For 220 volts rated products, use an extension cord
rated no less than 6-amperes). When using an extension cord, do not let it drape
over the working area or dangle where someone could accidentally trip over it.
Handle cord carefully for longer life; avoid jerking or straining it at outlet and
appliance connections.
TAMPER-RESISTANT SCREW
Warning: This appliance is equipped with a tamper-resistant screw to prevent removal
of the outer cover. To reduce the risk of fire or electric shock, do not attempt to
remove the outer cover. There are no user-serviceable parts inside. Repair should be
done only by authorized service personnel.
Note: If the power supply cord is damaged, it should be replaced by qualified
personnel or in Latin America by an authorized service center.
Page 3
4
BLENDER JAR ASSEMBLY
1. Before first use, wash all parts except the unit base. Put the gasket on top of the
blade assembly.
2. Place the blade assembly into the jar base and turn the jar base clockwise until
tight.
3. Interlock System: Place the assembled Jar onto the unit base and turn toward
lock ( ) until secured in place. You’ve engaged the interlock system if you lift
the jar handle and the entire blender lifts together as one unit.
How to Use
This product is for household use only.
1. Be sure the unit is OFF and plug the cord into a standard electrical outlet.
2. Place the food to be blended into the jar and the lid on the jar before blending.
3. Be sure that the lid cap is in place. When crushing ice or hard foods, keep one
hand on the lid.
4. Select the desired speed setting (A). Choose the speed that
best suits your task for food or beverage blending. Press
the LOW/HI button in combination with the task button
when choosing or switching speeds. For example, to
"beat" press the LOW button and then the Beat button.
To switch to higher settings, switch the LOW/HI button
to the HI position then, press your task speed such as
Chop. Speeds on the left side (from Fast Clean to
Smoothie) work with LO; speeds on the right side
(Stir to Chop) work with HI.
5. Use the Pulse button for a few seconds, then release for quick or delicate
blending tasks. Releasing the Pulse automatically turns the blender off. Use the
Crush button to crush ice in the same manner as the Pulse. For best results, use
short “pulses.” The blender will stop when you release the Ice Crush button.
6. If you want to add ingredients while the blender is on, remove the lid cap and
drop ingredients through the lid opening.
7. When finished blending, push the Off/Pulse button.
8. To remove the jar, grasp the handle, twist toward the unlock ( ) and lift it
from the unit base. For most models, remove the lid before pouring.
BLENDING TIPS AND TECHNIQUES
• Cut food into small pieces (about 3⁄4”/2 cm) before adding to the blender.
• When ingredients stick or spatter along the sides of the jar, stop the blending
action and remove the lid. Use a rubber spatula to push food toward the
blades. Replace the lid, then continue blending.
• Some of the tasks that cannot be performed efficiently with a blender are:
beating egg whites, whipping cream, mashing potatoes, grinding meats, mixing
dough, and extracting juices from fruits and vegetables.
• The following items should never be placed in the unit as they may cause damage: dried spices and herbs (ground alone), bones, large pieces of solidly
frozen foods, tough foods such as turnips.
• To crush ice, pour liquid in the jar first, then add up to 6 ice cubes. Hold one
hand firmly on the lid; pulse, using the ice crush button. For models with a lid
3
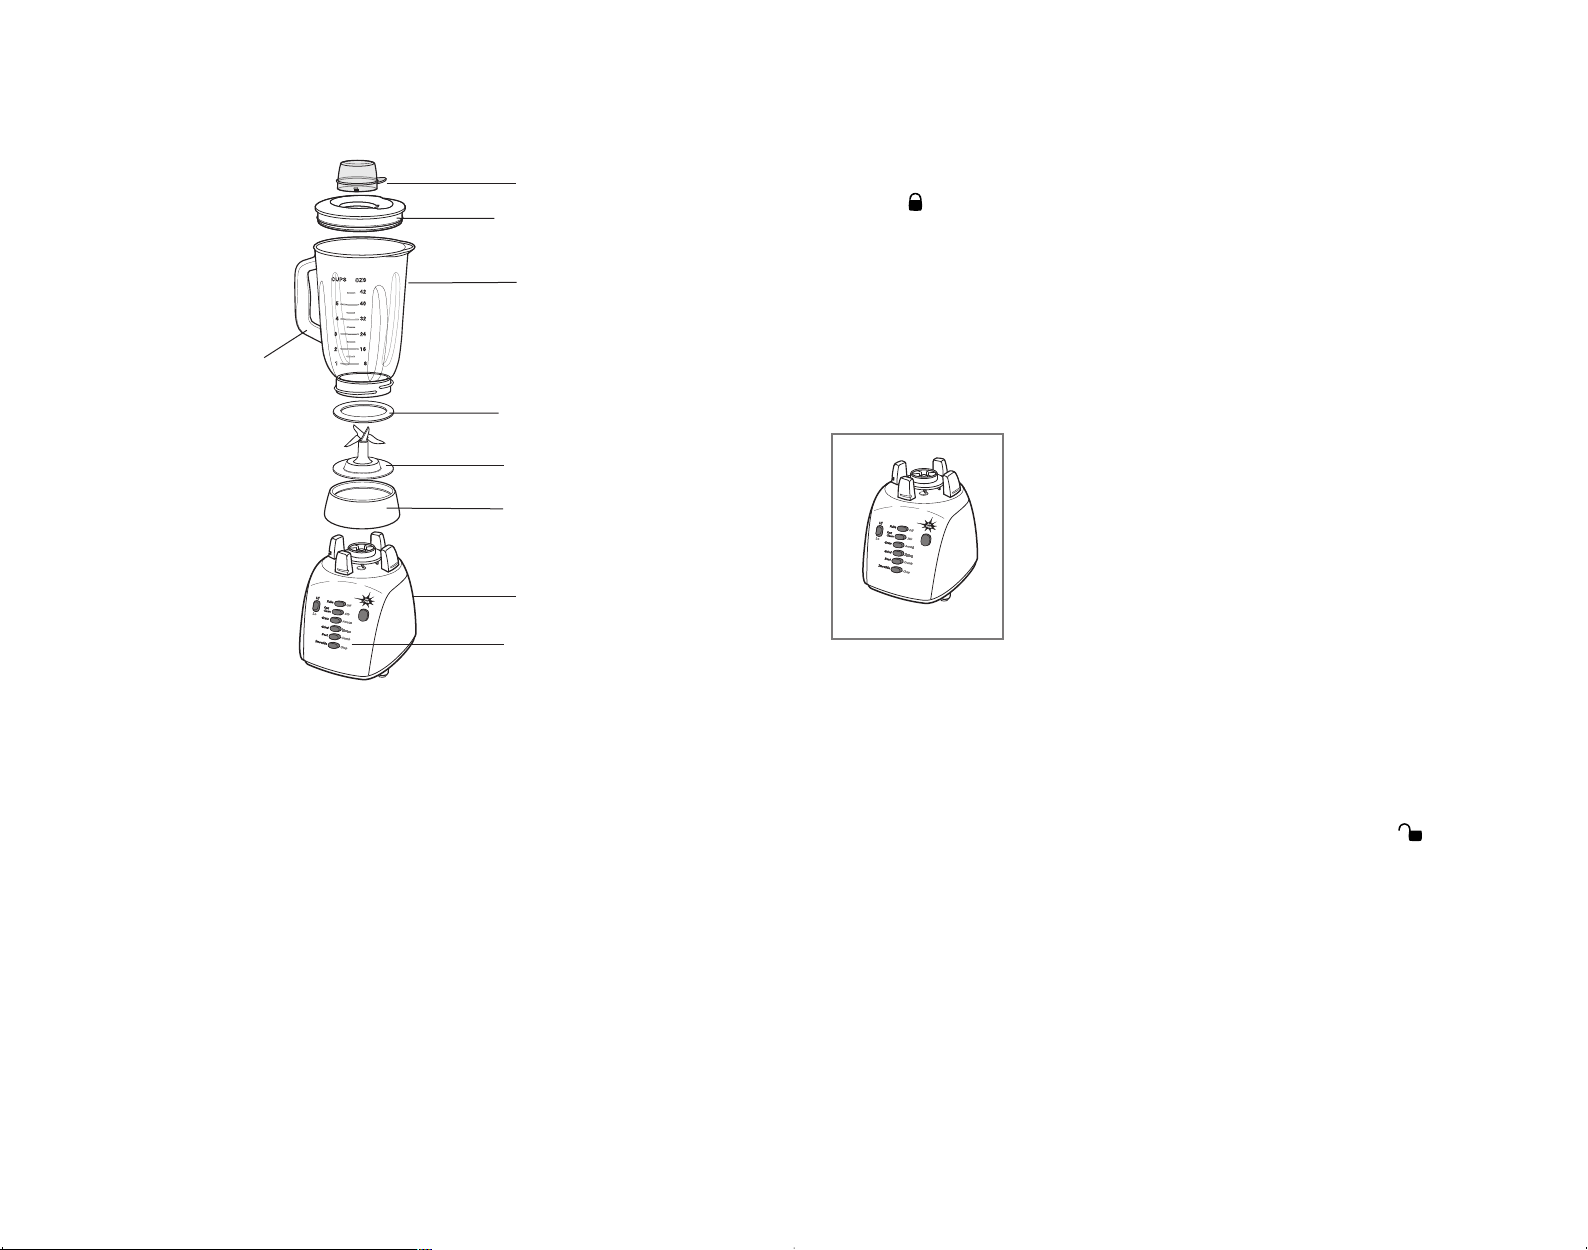
Product may vary slightly from what is illustrated.
A
†1. Lid cap (Part# 1000000715)
†2. Lid (Part# 1000000727-black)
†3. Jar (Part# 1000000718 - glass)
4. Handle
†5. Gasket (Part# 1000000720)
†6. Blade assembly (Part# 1000000721)
†7. Jar base (Part# 1000000726 - black)
8. Unit base
9. Controls (see A)
† Consumer replaceable/removable parts
Page 4

6
5
cap, use the lid cap to measure ingredients up to 60 ml/2 oz. when adding
ingredients like lemon juice, cream, or liqueurs.
Care and Cleaning
FAST CLEAN
1. The Fast Clean feature helps make it easier to clean the blender jar by
loosening food particles. You may use the Fast Clean feature by filling the jar
with lukewarm water to the 1.6-Cup mark. Add a little dish detergent for tough
cleaning jobs (such as after making salsa, shakes, or salad dressing). Hold the
lid and press the Fast Clean button. Let the unit run for about 5 seconds, then
press Off.
2. Unplug the unit, twist to unlock ( ), lift the jar off the unit base, and rinse.
3. Parts may be hand-washed. Follow the cleaning instructions below.
For hand washing parts:
1. Before cleaning, turn off and unplug the blender.
2. Rinse parts immediately after blending for easier cleanup.
3. Wipe the unit base with a damp cloth and dry thoroughly. Remove stubborn
spots by rubbing with a damp cloth and non-abrasive cleaner. Do not immerse
the base in liquid.
4. Removable parts can be washed by hand or in a dishwasher. Lid, lid cap, and
blade assembly should be placed in the top rack only. The jar is bottom rack
dishwasher-safe. Do not place jars or parts in boiling liquids.
5. If liquids spill into the Base, wipe with a damp cloth and dry thoroughly.
Do not use rough scouring pads or cleansers on parts or finish.
STORAGE
For convenient storage, wrap the cord around the feet on the
bottom of the Unit Base (B).
B
INSTRUCCIONES IMPORTANTES
DE SEGURIDAD
Cuando se utilizan aparatos eléctricos, siempre se debe respetar ciertas
medidas de seguridad, incluyendo las siguientes:
❑
Lea todas las instrucciones.
❑
A fin de protegerse contra el riesgo de un choque eléctrico, asegúrese
que la base de la licuadora, el cable y el enchufe no puedan entrar en
contacto con agua u otro líquido.
❑
Todo aparato eléctrico utilizado en la presencia de menores de edad o
por ellos mismos requiere la supervisión de un adulto.
❑
Desconecte el aparato de la toma de corriente cuando no esté en
funcionamiento, antes de instalar o retirar las piezas y antes de
limpiarlo.
❑
Evite el contacto con las piezas móviles.
❑
No se debe utilizar ningún aparato eléctrico que tenga el cable o el
enchufe averiado, que presente un problema de funcionamiento o que
esté dañado. Devuelva el aparato al centro de servicio autorizado más
cercano para que lo examinen, reparen o ajusten o llame gratis al
número que aparece en la cubierta de este manual.
❑
El uso de accesorios no recomendados o a la venta por el fabricante del
aparato, incluyendo envases para conservar alimentos, podría ocasionar
lesiones personales.
❑
Este aparato no se debe utilizar a la intemperie.
❑
No permita que el cable cuelgue del borde de la mesa ni del mostrador.
❑
No se debe introducir las manos ni los utensilios adentro de la jarra, a
fin de evitar el riesgo de serias lesiones a las personas o daños a la
licuadora. Se puede utilizar un raspador siempre que la licuadora no
esté en funcionamiento.
❑
Las cuchillas tienen filo y se deben manejar con prudencia.
❑
A fin de evitar el riesgo de lesiones, nunca coloque el montaje de las
cuchillas sobre la base sin antes ajustar bien la jarra.
❑
Siempre haga funcionar la licuadora con la tapa en su lugar.
❑
Para licuar líquidos calientes, se debe retirar el tapón del centro de la
tapa. (Si el modelo incluye una tapa de dos piezas.)
❑ Este aparato se deberá utilizar solamente con el fin previsto
CONSERVE ESTAS INSTRUCCIONES.
Page 5

8
7
ENCHUFE POLARIZADO
(Solamente en los modelos de 120V)
Este aparato cuenta con un enchufe polarizado (un contacto es más ancho que el
otro). A fin de reducir el riesgo de un choque eléctrico, este enchufe encaja en una
toma de corriente polarizada en un solo sentido. Si el enchufe no entra en la toma de
corriente, inviértalo y si aun así no encaja, consulte con un electricista. Por favor no
trate de alterar esta medida de seguridad.
CABLE ELÉCTRICO
El cable de este aparato fue escogido a fin de evitar el riesgo de enredarse o de
tropezar con un cable de mayor longitud. Cualquier cable de extensión que se
deba emplear, deberá estar calificado para nada menor de 15 amperios. (Para
aquellos productos de 220 voltios, se deberá utilizar un cable de extensión no
menor de 6 amperios). Cuando utilice un cable de extensión, asegúrese que no
interfiera con la superficie de trabajo ni que cuelgue de manera que alguien se
pueda tropezar. A fin de aumentar la vida útil del cable, no tire de él ni maltrate
las uniones del cable con el enchufe ni con el aparato.
TORNILLO DE SEGURIDAD
Advertencia: Este aparato cuenta con un tornillo de seguridad para evitar la remoción
de la cubierta exterior del mismo. A fin de reducir el riesgo de incendio o de choque
eléctrico, por favor no trate de remover la cubierta exterior. Este producto no
contiene piezas reparables por el consumidor. Toda reparación se debe llevar a cabo
únicamente por personal de servicio autorizado.
Nota: Si el cordón de alimentación es dañado, debe sustituirse por personal
calificado o en América Latina por el centro de servicio autorizado.
Este producto puede variar ligeramente del que aparece ilustrado.
†1. Tapa con medidor (No. de pieza 1000000715)
†2. Tapa (No. de pieza 1000000727-negra)
†3. Jarra (No. de pieza 1000000718 -cristal)
4. Asa
†5. Junta (No. de pieza 1000000720)
†6. Cuchillas (No. de pieza 1000000721)
†7. Base de la jarra (Part# 1000000726 - negra)
8. Base de la unidad
9. Controles (Consulte A)
† Reemplazable/removible por el consumidor
Page 6

10
9
INSTALACION DE LA JARRA
1. Antes de usar la licuadora por primera vez, lave todas sus partes con
excepción de la base. Coloque la junta sobre el montaje de las cuchillas.
2. Coloque las cuchillas dentro de la base de la jarra y gire la base hacia la
derecha hasta quedar ajustada.
3. Sistema de seguro de cierre: Una vez instaladas las cuchillas en la jarra,
coloque la jarra sobre la base de la unidad y gírela hacia el candado ( ) hasta
quedar fija. El seguro de cierre ha encajado apropiadamente si puede usted
sujetar el asa de la jarra y alzar la unidad completa de una sola vez.
Como usar
Este producto es solamente para uso doméstico.
1. Asegúrese que el control de la licuadora indique “Off” (apagada) y conecte el
cable a una toma de corriente standard.
2. Antes de licuar los alimentos, introdúzcalos en la jarra y tápela. Asegúrese que
el tapón de medir de la tapa esté bien colocado.
3. Asegúrese que el tapón esté en su lugar. Cuando triture hielo o alimentos
duros, mantenga una mano sobre la tapa.
4. Seleccione la velocidad deseada (A). Escoja la velocidad
que mejor realice la función deseada para los alimentos o
bebidas. Asegúrese de oprimir el botón de velocidad alta
o baja en combinación con el de la función deseada,
antes de seleccionar o de cambiar la velocidad. Por
ejemplo, para "batir" oprima el botón de velocidad LOW
(baja), y luego el botón Beat (batir). A fin de aumentar las
graduaciones, oprima el botón de pulso/apagado para que
el botón HI/LOW permanezca hacia arriba, luego oprima
la velocidad de una función tal como la de picar.
Las velocidades al costado izquierdo (desde limpieza rápida a batidos de frutas )
funcionan con la velocidad baja; las velocidades al costado derecho (revolver a
picar) funcionan con la velocidad alta.
5. Use el botón del control de pulso por unos cuantos segundos, luego suéltelo
para las funciones de licuado rápido y delicado. Al soltarse este botón, la
licuadora se apaga automáticamente. Use el botón para triturar hielo de la
misma manera que el botón del control de pulso. Para obtener mejores
resultados, use pulsos cortos. La licuadora se apaga cuando se suelta el botón
para triturar hielo.
6. Si desea agregar ingredientes a medio licuar, retire el medidor de la tapa e
introdúzcalos a través de la abertura.
7. Una vez que termine de licuar, oprima el botón OFF/PULSE.
8. Para retirar la jarra de la base, sujétela del asa y gírela hacia el símbolo ( )
para desengancharla. En la mayoría de los modelos, retire la tapa para verter.
CONSEJOS Y TÉCNICAS PARA LICUAR
• Parta los alimentos en pedazos pequeños de aproximadamente 2 cm (
3
⁄4”)
antes de agregarlos a la licuadora. Para picar y rallar, parta los alimentos
sólidos en pedazos de 2 cm (
3
⁄4”).
• Cuando los ingredientes se adhieran o salpiquen los costados de la jarra,
apague la licuadora y retire la tapa. Use una espátula de goma para empujar
los alimentos hacia las cuchillas. Tape la jarra y continúe licuando.
• Algunas de las funciones que no se logran con éxito en una licuadora son:
batir claras de huevo a punto de nieve, cremar, deshacer papas, moler carne,
amasar, ni extraer jugos de fruta o vegetales.
•A continuación ingredientes que nunca deben introducirse en la licuadora a
fin de no ocasionarle daño: especies secas y hierbas (licuadas solas), huesos,
pedazos grandes de alimentos congelados, alimentos duros como los nabos.
• Cuando triture hielo, primero vierta agua en la jarra y después agregue hasta
6 cubos a la vez. Sujete bien la tapa con la mano; use el control de pulso o
el botón para triturar hielo. En los modelos con tapón de medir en la tapa, use
el medidor para medir ingredientes hasta 60 ml (2 oz.) cuando añada
cantidades pequeñas de jugo de limón, crema, o licores.
Cuidado y limpieza
LIMPIEZA RÁPIDA
1. La característica “Fast Clean” (limpieza rápida) facilita lavar la jarra porque
ayuda a desprender las partículas de comida. Puede usar esta característica
llenando la jarra con agua tibia hasta la marca que indica 1,6 taza. Agregue un
poco de detergente de losa para las manchas persistentes (después de preparar
salsa, malteadas, o aderezo de ensalada). Sujete la tapa y oprima el botón
“Fast Clean.” Permita que la unidad funcione por unos 5 segundos y enseguida
oprima “Off” (apagada).
2. Desconecte la unidad, gire la jarra hacia el símbolo ( ), retire la jarra
y lávela.
3. Las partes de la licuadora pueden lavarse a mano. Siga las instrucciones de
limpieza a continuación.
Para lavar a mano las partes de la licuadora:
1. Antes de limpiar, apague y desconecte la licuadora.
2. Enjuague las partes de inmediato después de licuar para facilitar la limpieza.
3. Limpie la base de la licuadora con un paño humedecido y séquela bien.
Elimine las manchas persistentes frotándola con una esponja humedecida con
un limpiador no abrasivo. No sumerja la base en ningún líquido.
4. Las partes removibles pueden ser lavadas a mano o en una máquina
lavaplatos. La tapa, el tapón de medir, y las cuchillas deben colocarse siempre
en la bandeja superior de la máquina. La jarra puede introducirse en la
bandeja inferior de la máquina lavaplatos. No coloque las jarras ni las partes
en líquidos hirviendo.
5. Si llegara a derramarse líquido sobre la base, límpiela con un paño
humedecido y séquela bien. No use almohadillas ni limpiadores abrasivos
en ninguna de las partes ni en el acabado de la licuadora.
A
Page 7

12
11
Lorsqu’on utilise un appareil électrique, il faut toujours respecter certaines
règles de sécurité fondamentales, notamment les suivantes :
❑
Lire toutes les directives.
❑
Afin d’éviter les risques de secousses électriques, ne pas immerger le
cordon, la fiche ni le socle de l’appareil.
❑
Exercer une étroite surveillance lorsqu’on utilise l’appareil près d’un
enfant ou que ce dernier s’en sert.
❑
Débrancher l’appareil lorsqu’on ne s’en sert pas, avant d’enlever ou de
remettre des accessoires, et avant de nettoyer l’appareil.
❑
Éviter de toucher aux pièces en mouvement.
❑
Ne pas utiliser un appareil dont la fiche ou le cordon est abîmé, qui
présente un problème de fonctionnement, qui est tombé par terre ou
qui est endommagé. Confier l'examen, la réparation ou le réglage de
l'appareil au personnel du centre de service autorisé de la région. On
peut également composer le numéro sans frais inscrit sur la page
couverture du présent guide.
❑
L'utilisation d'accessoires (y compris des récipients pour la mise en
conserve) non recommandés ni vendus par le fabricant présente des
risques de blessures.
❑
Ne pas utiliser à l’extérieur.
❑
Ne pas laisser pendre la fiche ni le cordon d’une table ou d’un
comptoir.
❑
Garder les mains et les ustensiles à l'extérieur du récipient lorsque
l'appareil fonctionne afin d’éviter les risques de blessures graves ou de
dommages. On peut utiliser une spatule seulement lorsque l’appareil ne
fonctionne pas.
❑
Les lames sont tranchantes; il faut les manipuler avec soin.
❑
Ne jamais placer les lames sur le socle sans y fixer le récipient
convenablement afin de réduire les risques de blessures.
❑
Toujours se servir de l’appareil avec le couvercle en place.
❑
Retirer le bouchon du couvercle pendant le mélange de liquides chauds
(lorsque le couvercle comporte un bouchon).
❑ N’utiliser cet appareil que pour les usages prévus.
IMPORTANTES MISES EN GARDE
CONSERVER CES MESURES.
ALMACENAMIENTO
Para un práctico almacenamiento, enrolle el cable alrededor
de los soportes en el inferior de la base de la unidad (B).
B
Page 8

13
14
Le produit peut différer légèrement de celui illustré.
†1. Bouchon du couvercle (Pièce no. 1000000715)
†2. Couvercle (Pièce no. 1000000727 - noir)
†3. Récipient (Pièce no. 1000000718 - verre)
4. Poignée
†5. Joint d’étanchéité (Pièce no. 1000000720)
†6. Lames (Pièce no. 1000000721)
†7. Socle du récipient (Pièce no. 1000000726 - blanc)
8. Socle de l’appareil
9. Commandes (voir A)
† Pièce amovible e remplaçable par le consommateur
FICHE POLARISÉE (Modèles de 120 V seulement)
L'appareil est muni d'une fiche polarisée (une lame plus large que l'autre). Afin de
minimiser les risques de secousses électriques, ce genre de fiche n'entre que d'une
façon dans une prise polarisée. Lorsqu'on ne peut insérer la fiche à fond dans la
prise, il faut tenter de le faire après avoir inversé les lames de côté. Si la fiche n'entre
toujours pas dans la prise, il faut communiquer avec un électricien certifié. Il ne faut
pas tenter de modifier la fiche.
CORDON ÉLECTRIQUE
La longueur du cordon de l'appareil a été choisie afin d'éviter les risques
d’enchevêtrement et de trébuchement que présente un long cordon. Tout cordon
de d’au moins 15 ampères, (ou de 6 ampères, dans le cas des produits de 220
volts), peut servir au besoin. Lorsqu'on utilise un cordon de rallonge, s'assurer
qu'il ne traverse pas la surface de travail ni qu'il pend de façon qu'on puisse
trébucher dessus par inadvertance. Manipuler le cordon avec soin afin d’en
prolonger la durée; éviter de tirer dessus et de le soumettre à des contraintes près
des prises ou des connexions de l’appareil.
VIS INDESSERRABLE
Avertissement : L’appareil est doté d’une vis indesserrable empêchant l’enlèvement
du couvercle extérieur. Pour réduire les risques d’incendie ou de secousses
électriques, ne pas tenter de retirer le couvercle extérieur. L’utilisateur ne peut pas
remplacer les pièces de l’appareil. En confier la réparation seulement
au personnel
des centres de service autorisés
Note : Lorsque le cordon d’alimentation est endommagé, il faut le faire
remplacer par du personnel qualifié ou, en Amérique latine, par le personnel
d’un centre de sevice autorisé.
Page 9

15
16
• Lorsque des ingrédients adhèrent aux parois du récipient ou y sont éclaboussés,
arrêter l’appareil et en retirer le couvercle. Se servir d’une spatule en
caoutchouc pour repousser les aliments vers les lames. Remettre le couvercle
en place et continuer à mélanger.
• Certaines tâches ne sont pas effectuées convenablement dans un mélangeur. Il
s’agit de monter des blancs d’œufs en neige, de fouetter de la crème, de réduire
des pommes de terre en purée, de hacher finement de la viande, de pétrir de la
pâte et d’extraire du jus de fruits ou de légumes.
• Ne jamais placer les ingrédients suivants dans l’appareil car ils peuvent
l’endommager : des épices et des fines herbes séchées (pour les moudre seules),
des os, des gros morceaux d’aliments congelés et des aliments durs (comme des
navets).
• Pour concasser des glaçons, il faut d’abord verser le liquide dans le récipient et
y ajouter jusqu’à 6 gros glaçons. Tenir le couvercle fermement d’une main; se
servir du bouton à impulsion Ice Crush pour concasser les glaçons. Dans le cas
des modèles dotés d’un couvercle à bouchon, se servir du bouchon pour
mesurer les ingrédients (au plus 60 ml (2 oz)) à ajouter comme du jus de citron,
de la crème ou des liqueurs.
Entretien et nettoyage
NETTOYAGE RAPIDE (Fast Clean)
1. La fonction de nettoyage rapide (Fast Clean) facilite le nettoyage du récipient
en en décollant les particules d’aliments. On peut utiliser cette fonction en
remplissant le récipient d’eau tiède jusqu’à la marque de 1,6 tasse. Ajouter un
peu de détergent pour enlever les taches tenaces (comme après avoir préparé
de la salsa, des laits frappés ou une vinaigrette). Tenir le couvercle d’une main
et de l’autre, enfoncer le bouton Fast Clean. Laisser l’appareil fonctionner
pendant environ 5 secondes puis l’arrêter.
2. Débrancher l’appareil, faire tourner le récipient pour le déverrouiller ( ),
puis le soulever hors du socle de l’appareil et le rincer.
3. On peut également laver les pièces à la main. Respecter alors les consignes
qui suivent.
Pour lavage manuel des pièces
1. Avant de nettoyer le mélangeur, le mettre hors tension et le débrancher.
2. Rincer les pièces immédiatement après avoir mélangé afin d’en faciliter le
nettoyage.
3. Essuyer le socle de l’appareil avec un chiffon humide et bien l’assécher. Enlever
les taches tenaces en frottant à l’aide d’un chiffon humide et d’un produit
nettoyant non abrasif. Ne pas immerger le socle de l’appareil.
4. Les pièces amovibles peuvent être lavées à la main ou au lave-vaisselle. Le
couvercle, le bouchon, le couvercle à deux becs et les lames vont seulement
dans le panier supérieur du lave-vaisselle. Le récipient peut aller dans la partie
inférieure du lave-vaisselle. Ne pas plonger les récipients ni les pièces dans un
liquide bouillant.
5. Lorsqu’un liquide se renverse dans le socle de l’appareil, essuyer ce dernier
avec un chiffon humide et l’assécher complètement. Ne pas utiliser de
tampons de récurage ni de produits nettoyants abrasifs sur les pièces ou le fini
de l’appareil.
MONTAGE DU RÉCIPIENT
1. Avant la première utilisation, nettoyer toutes les pièces du mélangeur sauf le
socle de l’appareil. Placer le joint d’étanchéité sur le dessus de la lame.
2. Placer la lame dans le socle du récipient et tourner celui-ci dans le sens
horaire jusqu’à ce qu’il soit serré.
3. Système d’asservissement: Placer le récipient assemblé dans le socle de
l’appareil et le faire tourner vers le pictogramme de verrouillage ( ) jusqu’à
ce qu’il soit fixé en place. Le dispositif d’asservissement est alors engagé. Si on
soulève la poignée du récipient, tout le mélangeur est soulevé.
Utilisation
Cet appareil est pour usage domestique uniquement.
1. S’assurer que l’appareil est en position hors tension et brancher le cordon dans
une prise d’alimentation standard.
2. Placer les aliments à mélanger dans le récipient et placer le couvercle sur le
récipient avant de commencer.
3. S’assurer que le bouchon est en place. Laisser une main sur le couvercle
lorsqu’on concasse des glaçons ou des aliments durs.
4. Choisir la vitesse voulue (A). Bien enfoncer le bouton
de gamme de vitesses (LOW/HI) en même temps que
celui de la vitesse pour la tâche à effectuer lorsqu’on
choisit ou qu’on modifie la vitesse. Ainsi, pour hacher,
il faut enfoncer le bouton de gamme de vitesses et le
bouton Beat. Pour augmenter la puissance, appuyer sur
le bouton de gamme de vitesses (LOW/HI) enfoncer le
bouton de vitesse approprié (comme Chop). Les vitesses
à gauche (de Fast Clean à Smoothiea) fonctionnent à la
position Lo et celles de droite (de Stir à Chop) fonctionnent à la position Hi.
5. Utiliser le bouton à impulsion (Pulse) ou régler le cadran à la position Pulse
pendant quelques secondes, puis le relâcher pour mélanger rapidement ou
délicatement. Lorsqu’on relâche cette fonction, le mélangeur s’arrête
automatiquement. Se servir du bouton Ice Crush comme du bouton
à impulsion pour concasser des glaçons. Afin d’optimiser les résultats, s’en
servir sur de courtes périodes. Le mélangeur s’arrête lorsqu’on relâche
ce bouton.
6. Pour ajouter des ingrédients lorsque le mélangeur fonctionne, retirer le
bouchon du couvercle et insérer les aliments par l’ouverture du couvercle.
7. Une fois le mélange terminé, appuyer sur le bouton d’arrêt et à impulsion
(Off/Pulse).
8. Pour retirer le récipient, en saisir la poignée et le faire tourner vers le
pictogramme non verrouillé ( ) et le soulever hors du socle de l’appareil.
Dans le cas de la plupart des modèles, il faut retirer le couvercle avant de
vider le contenu du récipient.
Conseils pratiques
• Couper les aliments en petits morceaux (environ 2 cm (3⁄4po)) avant de les
ajouter dans le mélangeur. Pour hacher ou râper, couper les aliments solides en
morceaux de 2 cm (
3
⁄4po).
A
Page 10

17
18
RANGEMENT
Pour faciliter le rangement, enrouler le cordon autour des
pieds au bas du socle de l’appareil (B).
B
NEED HELP?
For service, repair or any questions regarding your appliance, call the appropriate
"800" number on the cover of this book. Do not return the product to the place of
purchase. Do not mail the product back to the manufacturer nor bring it to a
service center. You may also want to consult the website listed on the cover of
this manual.
One-Year Limited Warranty
(Applies only in the United States and Canada)
What does it cover?
• Any defect in material or workmanship; provided; however, Applica’s liability
will not exceed the purchase price of the product
For how long?
• One year after the date of original purchase.
What will we do to help you?
• Provide you with a reasonably similar replacement product that is either
new or factory refurbished.
How do you get service?
• Save your receipt as proof of the date of sale.
• Check our on-line service site at www.prodprotect.com/applica, or call our
toll-free number, 1-800-231-9786, for general warranty service.
• If you need parts or accessories, please call 1-800-738-0245.
What does your warranty not cover?
• Damage from commercial use
• Damage from misuse, abuse or neglect
• Products that have been modified in any way
• Products used or serviced outside the country of purchase
• Glass parts and other accessory items that are packed with the unit
• Shipping and handling costs associated with the replacement of the unit
• Consequential or incidental damages (Please note, however, that some states do
not allow the exclusion or limitation of consequential or incidental damages, so
this limitation may not apply to you.)
How does state law relate to this warranty?
• This warranty gives you specific legal rights, and you may also have other rights
that vary from state to state or province to province.
Page 11

19
20
BESOIN D’AIDE?
Pour communiquer avec les services d’entretien ou de réparation, ou pour
adresser toute question relative au produit, composer le numéro sans frais
approprié indiqué sur la page couverture. Ne pas retourner le produit où il a été
acheté. Ne pas poster le produit au fabricant ni le porter dans un centre de
service. On peut également consulter le site web indiqué sur la page couverture.
Garantie limitée de un an
(Valable seulement aux États-Unis et au Canada)
Quelle est la couverture?
• Tout défaut de main-d’oeuvre ou de matériau; toutefois, la responsabilité de la
société Applica se limite au prix d’achat du produit.
Quelle est la durée?
• Un an après l’achat original.
Quelle aide offrons nous?
• Remplacement par un produit raisonnablement semblable nouveau ou réusiné.
Comment se prévaut-on du service?
• Conserver son reçu de caisse comme preuve de la date d’achat.
• Visiter notre site web au www.prodprotect.com/applica, ou composer sans frais
le 1 800 231-9786, pour obtenir des renseignements généraux relatifs à la
garantie.
• On peut également communiquer avec le service des pièces et des accessoires
au 1 800 738-0245.
Qu’est-ce que la garantie ne couvre pas?
• Des dommages dus à une utilisation commerciale.
• Des dommages causés par une mauvaise utilisation ou de la négligence.
• Des produits qui ont été modifiés.
• Des produits utilisés ou entretenus hors du pays où ils ont été achetés.
• Des pièces en verre et tout autre accessoire emballés avec le produit.
• Les frais de transport et de manutention reliés au remplacement du produit.
• Des dommages indirects (il faut toutefois prendre note que certains états ne
permettent pas l’exclusion ni la limitation des dommages indirects).
Quelles lois régissent la garantie?
• Les modalités de la présente garantie donnent des droits légaux spécifiques.
L’utilisateur peut également se prévaloir d’autres droits selon l’état ou la
province qu’il habite.
¿NECESITA AYUDA?
Para servicio, reparaciones o preguntas relacionadas al producto, por favor llame
al número del centro de servicio en el país donde usted compró su producto.
NO devuelva el producto al fabricante. Llame o lleve el producto a un centro de
servicio autorizado.
DOS AÑOS DE GARANTÍA LIMITADA
(No aplica en México, Estados Unidos o Canadá)
¿Qué cubre la garantía?
• La garantía cubre cualquier defecto de materiales o de mano de obra. Applica
no se responsabiliza por ningún costo que exceda el valor de compra del
producto.
¿Por cuánto tiempo es válida la garantía?
• Por dos años a partir de la fecha original de compra.
¿Cómo se puede obtener servicio?
• Conserve el recibo original de compra.
• Por favor llame al número del centro de servicio autorizado.
Esta garantía no cubre:
• Los productos que han sido utilizados en condiciones distintas a las normales
• Los daños ocasionados por el mal uso, el abuso o negligencia.
• Los productos que han sido alterados de alguna manera
• Los daños ocasionados por el uso comercial del producto
• Los productos utilizados o reparados fuera del país original de compra
• Las piezas de vidrio y demás accesorios empacados con el aparato
• Los gastos de tramitación y embarque asociados al reemplazo del producto
• Los daños y perjuicios indirectos o incidentales
Page 12

21
22
Póliza de Garantía
(Válida sólo para México)
Duración
Applica de México, S. de R. L. de C.V. garantiza este producto por 2 años
a partir de la fecha original de compra.
¿Qué cubre esta garantía?
Esta Garantía cubre cualquier defecto que presenten las piezas, componentes
y la mano de obra contenidas en este producto.
Requisitos para hacer válida la garantía
Para reclamar su Garantía deberá presentar al Centro de Servicio Autorizado la
póliza sellada por el establecimiento en donde adquirió el producto. Si no la
tiene, podrá presentar el comprobante de compra original.
¿Donde hago válida la garantía?
Llame sin costo al teléfono 01 800 714 2503, para ubicar el Centro de Servicio
Autorizado más cercano a su domicilio en donde usted podrá encontrar partes,
componentes, consumibles y accesorios.
Procedimiento para hacer válida la garantía
Acuda al Centro de Servicio Autorizado con el producto con la póliza de
Garantía sellada o el comprobante de compra original, ahí se reemplazará
cualquier pieza o componente defectuoso sin cargo alguno para el usuario final.
Esta Garantía incluye los gastos de transportación que se deriven de su
cumplimiento.
Excepciones
Esta Garantía no será válida cuando el producto:
A) Se hubiese utilizado en condiciones distintas a las normales.
B) No hubiese sido operado de acuerdo con el instructivo de uso que le
acompaña.
C) Cuando el producto hubiese sido alterado o reparado por personas no
autorizadas por Applica de México, S. de R. L. de C.V.
Nota: Usted podra encontrar partes, componentes, consumibles y accesorios en
los centros de servicios autorizados. Esta garantía incluyen los gastos de
transportación que se deriven de sus cumplimiento dentro de sus red de servicio.
Argentina
Servicio Técnico Central
Service New S.R.L.
Atención al Cliente
Ruiz Huidobro 3860
Buenos Aires, Argentina
Tel.: (54-11) 4546-1212
Chile
Servicio Máquinas y
Herramientas Ltda.
Av. Apoquindo No. 4867 Las Condes
Santiago, Chile
Tel.: (562) 263-2490
Colombia
PLINARES
Avenida Ciudad de Quito
#88-09
Bogotá, Colombia
Tel.: (57-1) 610-1604
533-4680
Costa Rica
Aplicaciones
Electromecanicas, S.A.
Calle 26 Bis y Ave. 3
San Jose, Costa Rica
Tel.: (506) 257-5716
223-0136
Ecuador
Castelcorp
Km 2-1/2 Avenida Juan T.
Marengo junto Dicentro
Guayaquil, Ecuador
Tel.: (5934) 224-7878
224-1767
El Salvador
Sedeblack Calle A San
Antonio Abad y Av. Lisboa,
Edif. Lisboa Local #21
San Salvador, El Salvador
Tel.: (503) 274-1179
274-0279
Guatemala
MacPartes, S.A.
34 Calle 4-14 Zona 9
Frente a Tecun
Guatemala City, Guatemala
Tel.: (502) 331-5020
360-0521
Honduras
Lady Lee
Centro Comercial Mega Plaza
Carretera a la Lima
San Pedro Sula, Honduras
Tel.: (504) 553-1612
México
Art. 123 y José Ma. Marroquí
#28-D Centro.
Mexico D.F.
Tel.: 01 (800) 714-2503
(55) 1106-1400
Nicaragua
H & L Electronic
Zumen 3, C. Arriba y
15 Varas al Sur
Managua, Nicaragua
Tel.: (505) 260-3262
Panamá
Authorized Service Center
Electrodomésticos, S.A.
Boulevard El Dorado, al lado
del Parque de las Mercedes
Panamá, Panamá
Tel.: (507) 236-5404
Perú
AV. REPUBLICA DE PANAMA
3535
Ofic 1303
San Isidro
Lima, Peru
Tel.: 2 22 44 14
Fax: 2 22 44 04
Puerto Rico
Buckeye Service
Jesús P. Piñero #1013
Puerto Nuevo, SJ PR 00920
Tel.: (787) 782-6175
Republica Dominicana
Plaza Lama, S.A.
Av, Duarte #94
Santo Domingo,
República Dominicana
Tel.: (809) 687-9171
Trinidad and Tobago
A.S. Bryden & Sons (Trinidad)
Limited
33 Independence Square,
Port of Spain
Trinidad, W.I.
Tel.: (868) 623-4696
Venezuela
Tecno Servicio TS2002
Av. Casanova
Centro Comercial del Este
Local 27
Caracas, Venezuela
Tel.: (58-212) 324-0969
Por favor llame al número correspondiente que aparece en la lista a continuación para
solicitar que se haga efectiva la garantía y donde Ud. puede solicitar servicio, reparaciones
o partes en el país donde el producto fué comprado.
Comercializado por:
Applica de México, S. de R. L. de C.V.
Blvd. Manuel Avila Camacho 2900-902,
Fracc Los Pirules
Tlalnepantla, Edo. de México. C.P. 54040.
R. F. C. AME-001026- PE3.
Servicio y Reparación
Art. 123 y José Ma. Marroquí # 28 D
Col. Centro, Mexico D. F., CP 06050
Servicio al Consumidor,
Venta de Refacciones y Accesorios
01 800 714 2503
Sello del Distribuidor:
Fecha de compra:
Modelo:
Page 13

2006/7-10-8E/S/F
Copyright © 2006 Applica Consumer Products, Inc.
Pub. No. 1000003144-00-RV00
Made in People’s Republic of China
Printed in People’s Republic of China
Importado por:
Applica de México S. de R.L. de C.V.
Blvd. Manuel Avila Camacho 2900-902, Fracc Los Pirules
Tlalnepantla, Edo. de México. C.P. 54040
Teléfono: (55) 1106-1400
Del interior marque sin costo
01 (800) 714-2503
Fabricado en la República Popular de China
Impreso en la República Popular de China
Fabriqué en République populaire de Chine
Imprimé en République populaire de Chine
is a trademark of The Black & Decker Corporation, Towson, Maryland, USA
Marca registrada de The Black & Decker Corporation, Towson, Maryland, E.U.
Marque de commerce déposée de la société The Black & Decker Corporation, Towson, Maryland, É.-U.
475 W 120 V 60Hz
 Loading...