

Page 1
.BIACK&DECKER@
INSTRUCTIONMANUAL
HammerDrills3/8"(10mm)and112"(13mml
SAFETYINSTRUCTIONS
Warning! Whenusingelectricaltools,thefollowingbasicsafetypre-
cautionsshouldalwaysbetakento reducethe risk of fire, electric
shockandpersonalinjury.
Readalltheseinstructionsbeforeattemptingto operatetheproduct
andsavethis booklet.
Keepworkareas clean. Clutteredareasandbenchesinviteinjuries.
Considerthe workareaenvironment.Donotexposethepowertoolto
rainanddo notuseindamporwet locations. Keepsworkareaswell
lit. Donotusethe powertool wherethere maybea risk offire or
explosion.
Guardagainst electric shock. Avoidbodycontact,wherepossible
with earthedorgroundedsurfaces(e.g.pipes,radiators,rangesand
refrigerators).
Keepchildren away. Donotlet visitorsshouldtouchthetool or
extensioncord. All visitorsshouldbekept awayfromthe work area.
Store idle tools. Whennotin use,toolsshouldbestoredin a dry,high
or lockedplace,outofthe reachofchildren.
Donot force the tool. It will deliverbetter performancewhentool is
usedat the recommendedspeed.
Usethe right tool. Donotforcesmalltoolsor attachmentsto dothe
job of a heavy-dutytool. Donot usethetool for purposesnotintended;
for example,donot usea circularsaw to cut a tree limb or logs.
Dress properly. Donotwear looseclothingorjewelry asthey canbe
caughtin movingparts. Rubberglovesandnon-slqdfootwearis
recommendedwhenworkingoutdoors.Wearprotectivehaircovering
to contain long hair.
Usesafety glasses. Use a face or dust mask as well, if the operation
is dUstyorif the tool is beingusedin enclosedspaces.
Connectingdust extraction equipment. If devicesareprovidedfor
the connectionof dustextractionandcollection,ensurethat theseare
connectedandproperlyused,especiallyinconfinedareas.
Donot abuse the cord. Nevercarrythetool by its cordor yankit to
disconnectit from the socket. Keepthe cordawayfrom heat,oil and
sharpedges.
Secure the work. Useclampsor vicesto securelyfastenthe material
youareworkingwith. It is saferthanusinga handandit frees both
handsto operatethetool.
Donot overreach. Keep proper footing and balance at all times.
Maintainthe toolwith care. Keepacuttingtool sharpandcleanfor
betterandsaferperformance.Followthe instructionsfor lubricating
andchangingaccessories.Inspectthetools andcord periodicallyand
if damaged,haverepairedbyanAuthorizedServiceCenter.Inspectthe
extensioncordperiodically,andreplaceif damaged. Keepthe handles
dry,cleanandfreefrom 011andgrease.
Disconnectthe tool. Whennotin use,beforeservicingandwhen
changingaccessoriessuchasblades,bits andclutters.
Removeadjusting key wrenches. Formthe habit ofcheckingto see
that keysandadjustingwrenchesareremovedfromthetool and
replacedinthestorageareabeforeswitchingon.
Avoid unintentional starting. -Donotcarry a plugged-intool with a
fingeronthe switch.Makesuretheswitch ISoff whenthetool is plug-
gingin. .
Useanoutdoorextensioncord. Whenatoolis usedoutdoors,only
useanextensioncordintendedfor outdooruse.
Stayalert. Watchwhat youaredoing,usecommonsenseanddonot
operatethetoolwhentired. .
Checkdamaged parts. Beforefurtheruseofthetool, guardandother
partsthat aredamagedshouldbecarefullycheckedtodetermine
whetherit wouldoperateproperlyandperformits intendedfunction.
Checkforalignmentof movingparts;free runningof movingparts;
breakageof parts;mountingandanyotherconditionsthatmayaffect
itsoperation.
If the guardor otherpartsaredamaged,theyshouldbeproperly
repairedor replacedbyanAuthorizedServiceCenterunlessotherwise
indicatedin the productbooklet. Havedefectiveswitchesreplacedby
anAuthorizedServiceCenter.
Donotusethe tool if the switch doesnotturn on oroff.
Warning! Theuseof anyaccessoryorattachmentotherthanrecom-
mendedinthe productbooklet,maypresentarisk of personalinjury.
Havethe tool repaired by a qualified person. Theelectricaltool is
in accordancewith the relevantsafetyrequirements:A qualifiedper-
sonusingoriginalspareparts shouldonlycarryoutrepairs;otherwise,
this mayresultin considerabledangertothe user.
Savetheseinstructions!
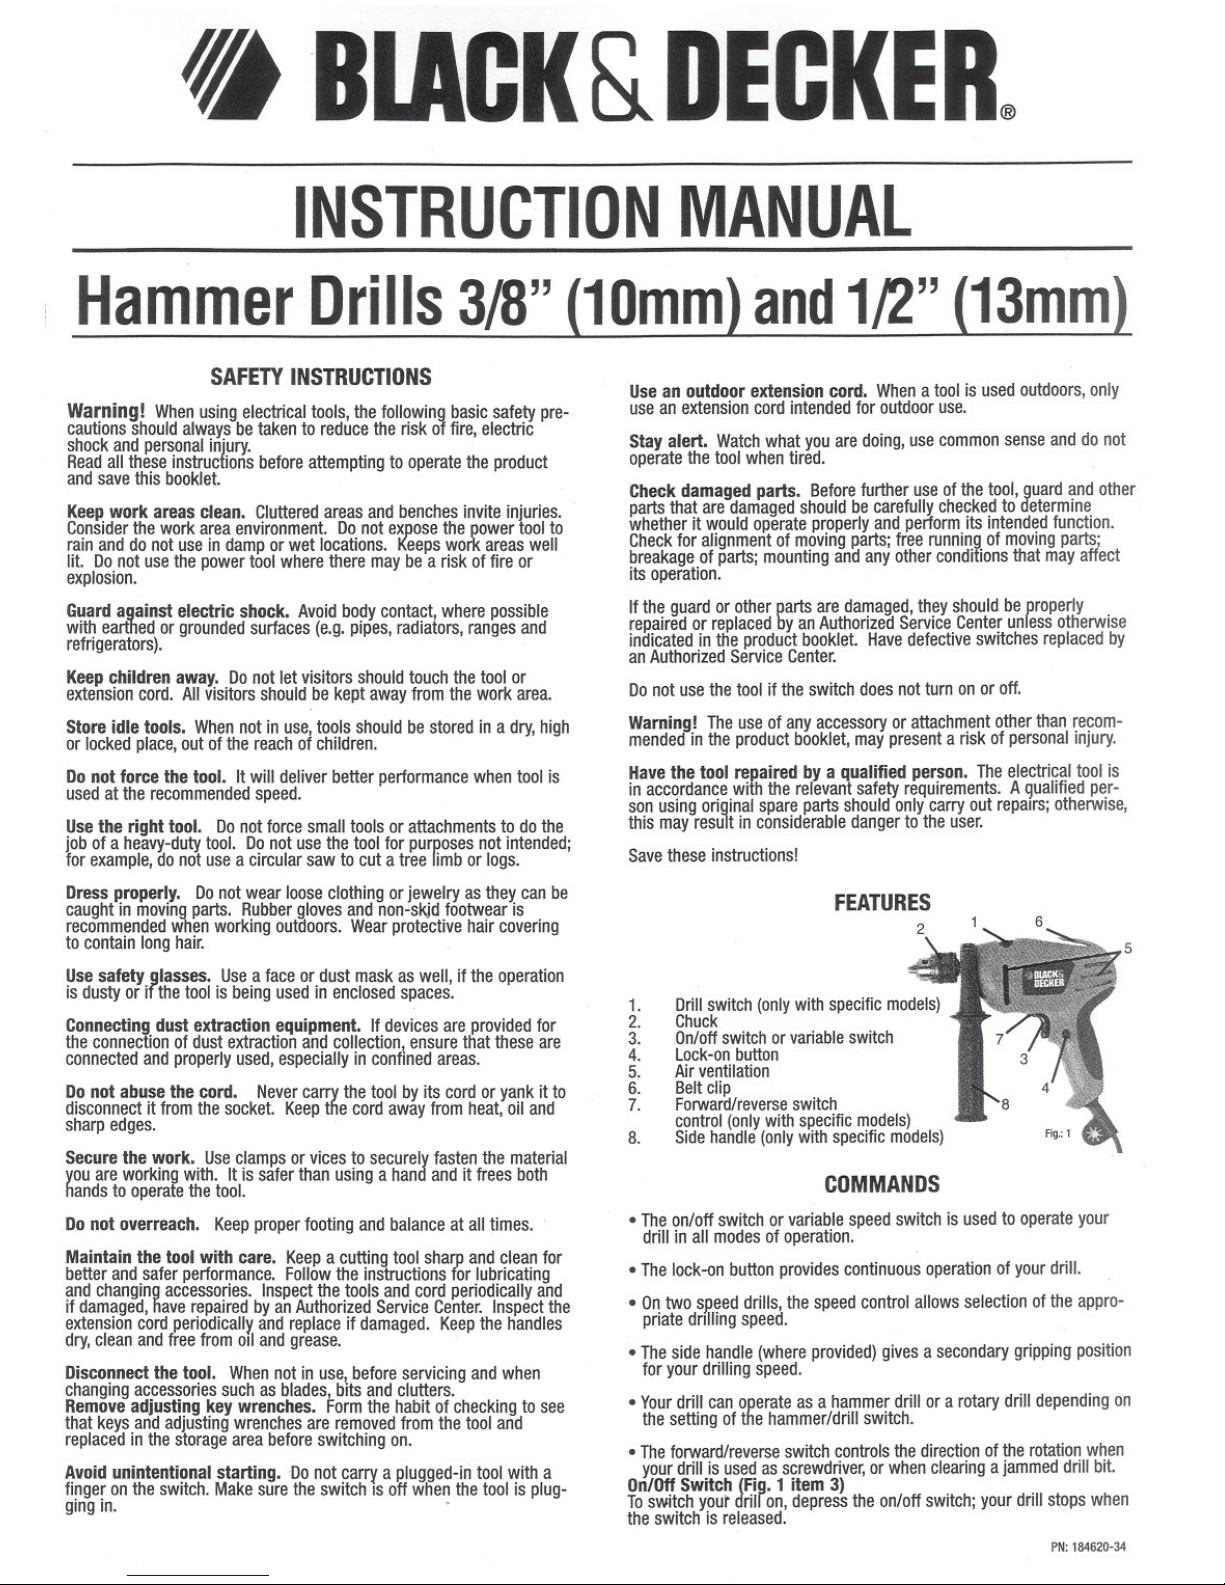
FEATURES
1.
2.
3.
4.
5.
6.
7.
8.
5
Drillswitch(onlywith specificmodels)
Chuck
On/offswitchorvariableswitch
lock-on button
Airventilation
Beltclip
Forward/reverseswitch
control(onlywithspecificmodels)
Sidehandle(onlywith specificmodels)
COMMANDS
.Theon/offswitchorvariablespeedswitchis usedto operateyour
drill in all modesof operation.
.Thelock-onbuttonprovidescontinuousoperationofyourdrill.
.Ontwospeeddrills,the speedcontrolallowsselectionofthe appro-
priatednllingspeed.
.Thesidehandle(whereprovided)givesa secondarygrippingposition
for yourdrilling speed.
.Yourdrill can operateasa hammerdrill or a rotary drill dependingon
the settingof the hammer/drillswitch.
.Theforward/reverse switch controls the direction of the rotation when
yourdrill is usedasscrewdriver,orwhenclearingajammeddrill bit.
On/OffSwitch (Fig. 1 item 3)
Toswitch you~ drill on, depress the on/off switch; your drill stops when
the switch
is released.
PN: 184620-34
Page 2
Lock-onButton (Fig. 1 item 4)
If continuosoperationisrequired,pressthe lock-onbuttonwhile the
on/offswitch ISdepressed(Fig.1 Item3).Tostopwhenoperationis
continuos,depressthe on/off switchagainandrelease.
Percussion Switch (Fig. 1 item 1)
Thisis a specialfeaturein yourdriflthatallowshitting androtatingat
the sametime.
a) Drill Mode ~
Whendrillingwoodandmetal.Usefulfor drilling projectsonly.
b) HammerMode I--
Whendrillingmasonry,setthe hammerswitchin this mode.
TwoSpeed Switch (Fig.1 item 3)
Tosetthetwo-speedswitch in lowspeedpushthe switchmidway
backward"I", to setthe switch in high-speedpushtheswitchall the
waybackward"II".
OPERATIONS
1. ASA GENERALRULE. Forlargesizedrill bits uselow speedsand
for smallerdrill bits usehighspeeds. Onvariablespeeddrills,the
morethe trigger is pressedthefasterthe speed.
2. SETTHESPEEDOFYOURDRILL.
Settheforward/reverseswitch to the desireddirectionof rotation.
Neverchangethesettingof thehammerswitch,orthe
forward/reversewhenyourdrill is in operation.
3. MAINTAINVENTSCLEAROFOBSTRUCTION.Inorderto maintain
yourtoolfrom overheatingandextendthe life of yourtool,maintain
the ventilationareasofyourtoolfree from obstructionall the time.
4. HOWTOPOSIT'')NA DRILLBITONYOURDRILL.Selecttheappro-
priatedrill bit tor the job (fOIl
.
OWthe guidelinesof thetablebelow).
First,makesurethedrill ISunplugged.Holdingtherear sectionof
the chuck,rotatethe front sectionuntilthe jaws of thechuck are
sufficientlyopen.Insertthe drill bit inthe jaws of the chuck.Hold
the rearsectionof the chuckwhile tighteningthefront. Turnthe
chuckkeyclockwiseto tightenthejaws andsecurelygripthe drill
bit. Usethechuckkey in the 3 holesfor betterresults.
A
) ~
L, "..
RIGHT
n
,
(j
.
L~
..
J(Jl
?{
'''-'------
WRONG
5. DRILLING:Makesurethe
materialto bedrilled is
tightly fastenedandwhen
dnllingthin materialsuse
a woodsupr°rt. Always
drill ata 90 angleand
placeenoughpressureon
the drill forthe drill to per-
foratethesurfaceyouare
drilling. Neveruseexces-
siveforcewhen usingyour
drill.
6. ACCESSORIES:Variousaccessoriescanfit yourdrill,allowingyou
to diversifyits use. .
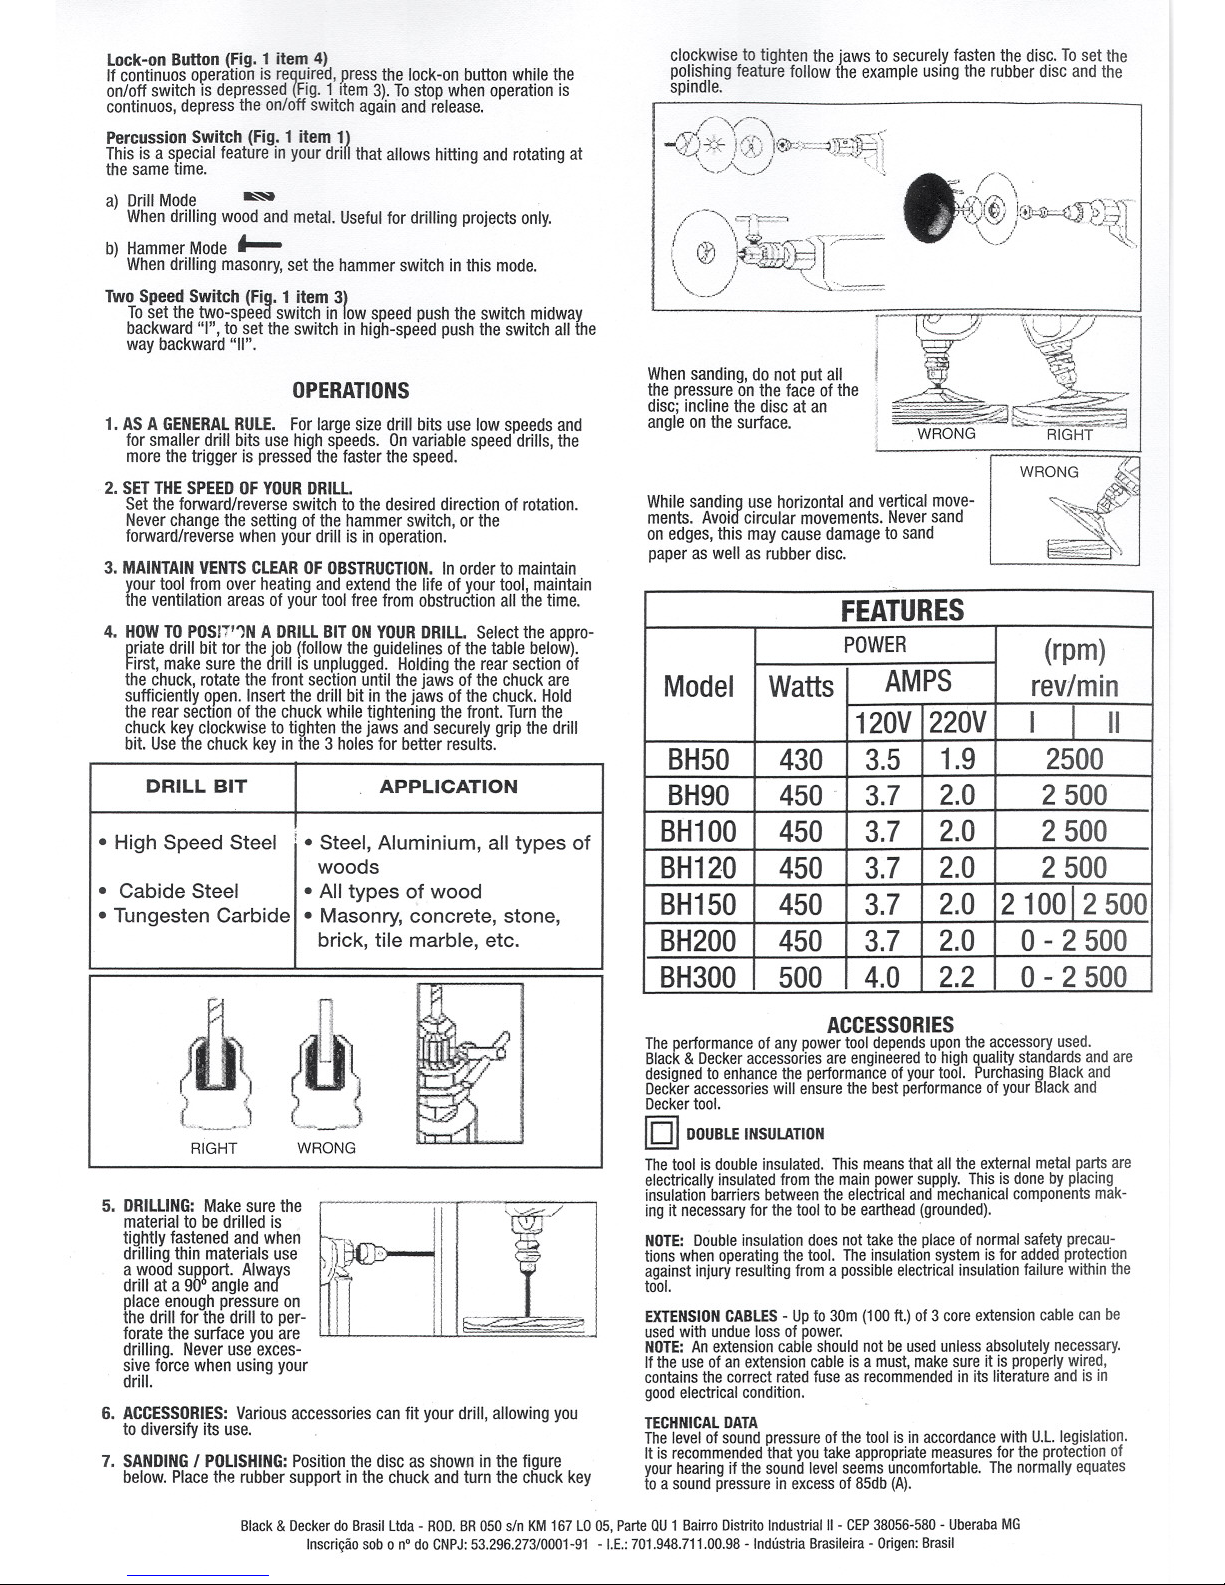
7. SANDINGI POLISHING: Positionthediscasshowninthefigure
below.Placethe rubbersupportin the chuckandturn the chuckkey
'
.
"
.
)~
'
I ~~
."
i)~
1
~
'in.. I ~1
II~-::-~
clockwisetotightenthejawstosecurelyfastenthedisc.Tosetthe
polishingfeaturefollowtheexampleusingtherubberdiscandthe
spindle.
.<'-{-:\_..,-
"'~::f-j{~))er~>:;~.:!T!;t~J
.~ '-../ .,
/' ,
,I '-
'-"" '. - -1'1(~)'i,+rt$~~Y'~Y
i/"- \:'1l
..
= <,':-== \~ //''' '.''''QJ..
, "D, ~~)I;;:::
.
'" \"';:::-
.
u
1
. ., ..
\ I<!-i
, ~'J
\, /,/ ..~..:\.:,"".""=
1-- jiV)§ ':' "7
, --- >1 "\'*--:f"'
.
/'
~- '~
Whensanding,donotput all ~ Yf,
thepressureonthefaceofthe ~~"'-. 1:: ~~-
disc;inclinethe discat an . ... -,~~ . ~
angleon the surface. WRONG" "RIGHi"'""
,y
WRONG
.
J>.:<
.
"
.
~()
~"'" r:§.f,,/'-
...~~.
-.0= ~\
~~~"
Whilesandinguse horizontalandverticalmove-
ments. Avoidcircularmovements.Neversand
onedges,thismaycausedamagetosand
paperaswell asrubberdisc.
ACCESSORIES
Theperformance of any power tool dependsuponthe accessory used.
Black& Deckeraccessories are engineeredto high quality standards and are
designedto enhancethe performanceof your tool. PurchasingBlack and
Deckeraccessories will ensurethe best performanceof your Black and
Deckertool.
IQ]DOUBLEINSULATION
Thetool is double insulated. This meansthat all the external metal parts are
electrically insulated from the main powersupply. This is doneby placing
insulation barriers between the electrical and mechanical componentsmak-
ing it necessaryfor the tool to be earthead(grounded).
NOTE: Doubleinsulation does not take the place of normal safety precau-
tions when operating the tool. The insulationsystem is for addedprotection
against injury resulting from a possible electrical insulation failure within the
tool.
EXTENSIONCABLES- Upto 30m (100ft.) of 3 core extensioncable can be
usedwith undue loss of power.
NOTE:An extension cable should not be usedunless absolutely necessary.
If the use of an extension cable is a must, make sure it is properly wired,
contains the correct rated fuse as recommendedin its literature and is in
goodelectrical condition.
TECHNICALDATA
Thelevel of sound pressureof the tool is in accordancewith U.L.legislation.
It is recommendedthat you take appropriate measuresfor the protection of
your hearing if the sound level seems uncomfortable. The normally equates
to a sound pressure in excessof 85db (A).
Black & Decker do Brasil Ltda - ROD.BR050sin KM167LO05,Parteau 1 BairroDistritoIndustrialII-CEP38056-580- UberabaMG
InscriQaosob 0 n° do CNPJ:53.296.273/0001-91 -I.E.: 701,948.711.00.98 -Industria Brasileira - Origen: Brasil
DRILL BIT APPLICATION
. High Speed Steel
i. Steel, Aluminium, all types of
woods
. Cabide Steel
. All types o,fwood
. Tungesten Carbide
. Masonry,concrete, stone,
brick, tile marble, etc.
--
FEATURES
POWER
(rpm)
Model
Watts
AMPS
rev/min
120V
220V I
I
II
BH50 430 3.5
1.9
2500
BH90 450"
3.7
2.0
2 500
BH100
450
3.7
2.0 2500
BH120 450 3.7
2.0
2500
BH150 450 3.7
2.0
210012500
BH200
450 3.7
2.0 0 - 2 500
BH300 500 4.0
2.2
0 - 2500
 Loading...