

Page 1

Please read before returning this product for any reason.
àLIRE avant de retourner ce produit pour quelque raison que ce soit.
LEA EL MANUAL antes de devolver este producto por cualquier motivo.
INSTRUCTION MANUAL
MODE D’EMPLOI
MANUAL DE INSTRUCCIONES
EASYFEEDTM STRING TRIMMER/EDGER
TAILLE-BORDURE À FIL EASYFEED
MC
DESBROZADORA/BORDEADORA DE
CUERDA EASYFEED
TM
BESTE620
final page size: 8.5 x 5.5 in
Page 2

ENGLISH
English (original instructions) 1
Français (traduction de la notice d’instructions originale) 11
Español (traducido de las instrucciones originales) 22
To register your new product, visit
www.BlackandDecker.com/NewOwner
Consulter le site Web www.BlackandDecker.com/NewOwner
pour enregistrer votre nouveau produit.
Visite www.BlackandDecker.com/NewOwner para registrar su
nuevo producto.
Thank you for choosing BLACK+DECKER!
If you have a question or experience a problem with your
BLACK+DECKER purchase, go to: http://www.blackanddecker.com/
instantanswers
If you can’t find the answer or do not have access to the Internet,
call 1-800-544-6986 from 8 a.m. to 5 p.m. EST Mon. – Fri. to speak
with an agent. Please have the CATALOG NUMBER available when
you call.
Page 3
1
3
6
7
9
8
10
5
4
2
ENGLISH
1
Definitions: Safety Alert Symbols and Words
This instruction manual uses the following safety alert symbols and words to alert you to hazardous situations and your risk
of personal injury or property damage.
DANGER: Indicates an imminently hazardous situation which, if not avoided, will result in death or seriousinjury.
WARNING: Indicates a potentially hazardous situation which, if not avoided, could result in death or seriousinjury.
CAUTION: Indicates a potentially hazardous situation which, if not avoided, may result in minor or moderateinjury.
(Used without word) Indicates a safety related message.
NOTICE: Indicates a practice not related to personal injury which, if not avoided, may result in propertydamage.
WARNING! Read all safety warnings and all
instructions. Failure to follow the warnings and
instructions may result in electric shock, fire and/or
seriousinjury.
WARNING: To reduce the risk of injury, read the
instructionmanual.
If you have any questions or comments about this or
any BLACK+DECKER tool, call us toll free at:
1-800-4-BLACK+DECKER (1-800-433-9258).
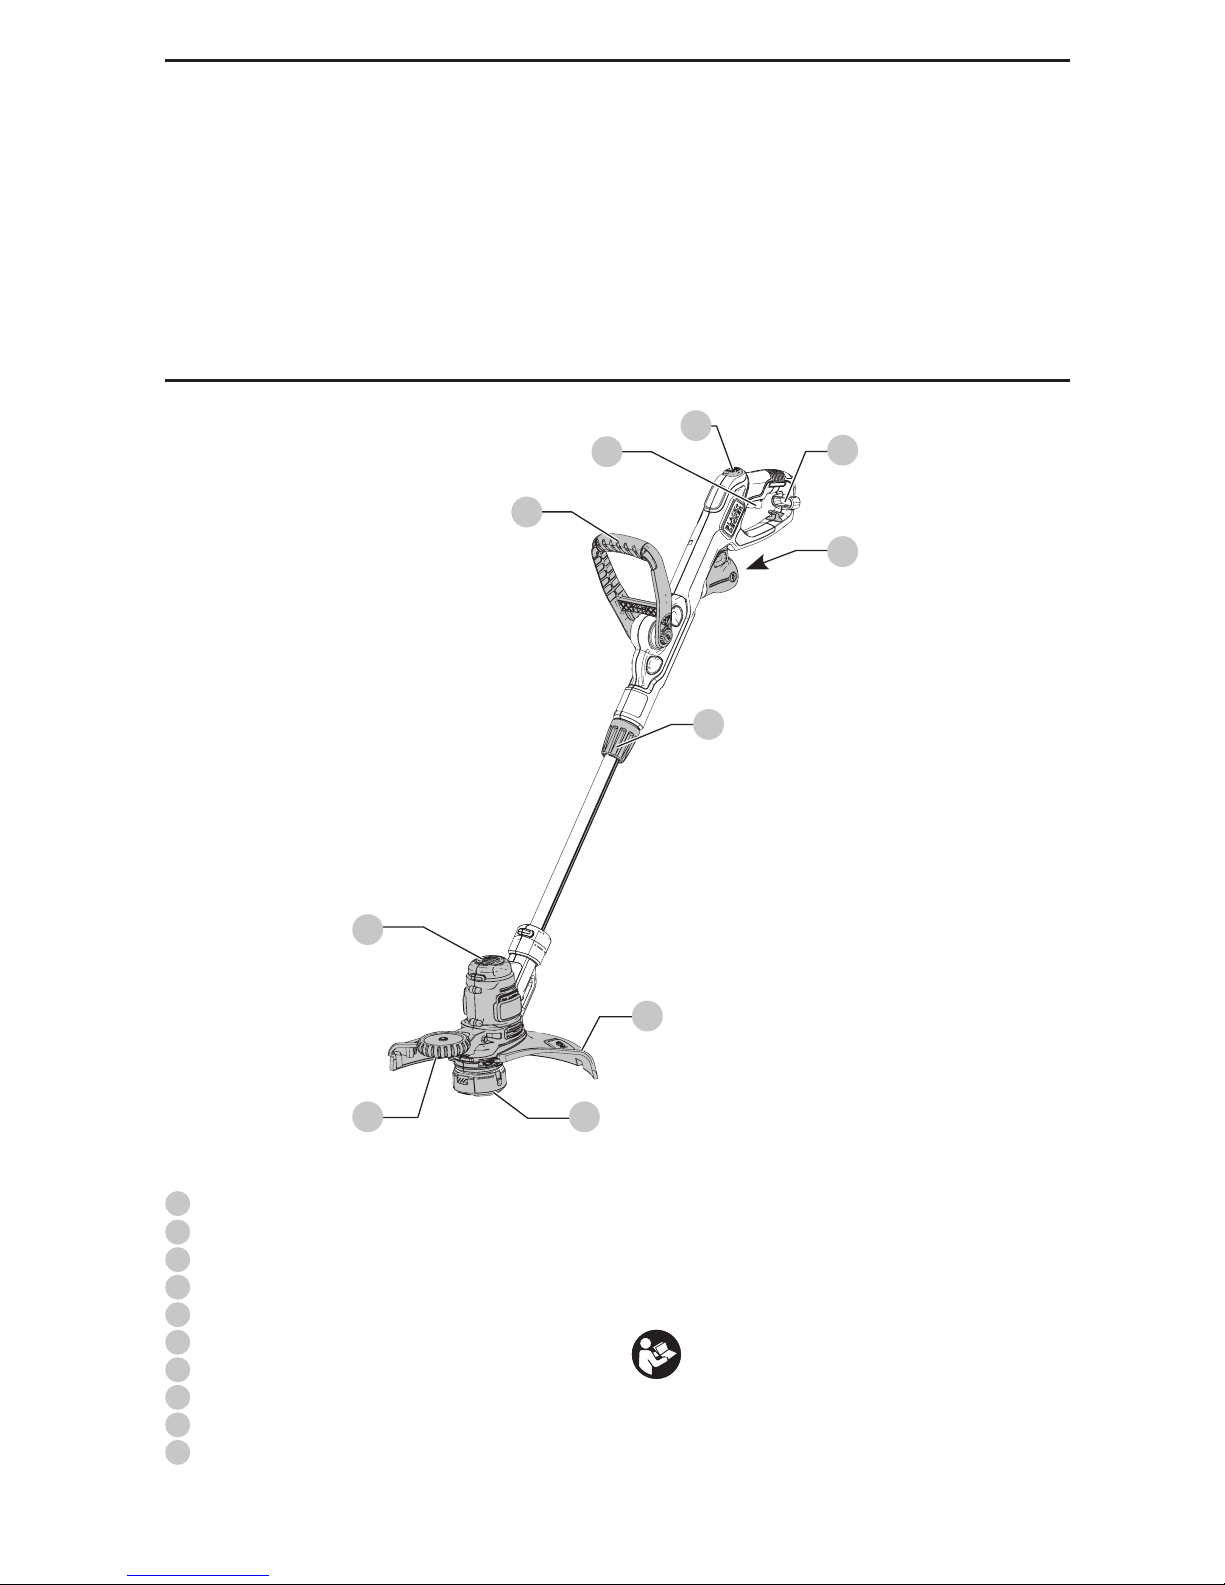
1
On/Off trigger switch
2
EASYFEEDTM button
3
Cord retainer
4
Power cord plug
5
Auxillary handle
6
Collar
7
Motor housing
8
Edge guide wheel
9
Guard
10
Spool
Fig. A
Page 4

ENGLISH
2
Important Safety Warnings
WARNING: When using electric gardening
appliances, basic safety precautions should always
be followed to reduce risk of fire, electric shock, and
personal injury, including thefollowing.
WARNING: Do not remove guard. The guard must be
attached during use. Operating this trimmer without
the guard will violate the product warranty.
CAUTION: When replacing the line, use only 0.065"
(1.65 mm) diameter round line. Other diameters or
shapes may degrade performance or cause damage
to the trimmer.
READ ALL INSTRUCTIONS
• ALWAYS WEAR EYE PROTECTION – Wear safety spectacles
or goggles at all times when plugged in. These items are
available forpurchase.
• GUARD - Do not use this appliance without the
guardattached.
• DRESS PROPERLY – Do not wear loose clothing or
jewelry. They can be caught in moving parts. Gloves and
substantial rubber soled footwear are recommended
when working outdoors. Don’t operate the appliance
when barefoot or wearing open sandals. Wear heavy long
pants to protect your legs. Wear protective hair covering
to contain longhair.
• NYLON LINE – Keep face, hands and feet clear of rotating
nylon line at alltimes.
• THE ROTATING LINE PERFORMS A CUTTING FUNCTION–
Use care when trimming around screens and
desirableplantings.
• DO NOT USE materials not recommended, such as metal
wire, rope, and thelike.
• KEEP ALL BYSTANDERS AWAY at a safe distance from work
area, especiallychildren.
• MAKE SURE that other persons and pets are at least
100feet (30m)away.
• TO REDUCE THE RISK of rebound (ricochet) injury, work
going away from any nearby solid object such as wall,
steps, large stone, tree, etc. Use great care when working
close to solid objects and where necessary, do trimming
byhand.
• AVOID ACCIDENTALLY STARTING – Don’t carry plugged-in
trimmer with finger on trigger.
• USE THE RIGHT APPLIANCE – Do not use this appliance for
any job except that for which it isintended.
• DON’T OVERREACH – Keep proper footing and balance at
alltimes.
• DON’T FORCE APPLIANCE – It will do the job better and
with less likelihood of a risk of injury at the rate for which
it wasdesigned
• DAMAGE TO UNIT – If you strike or become entangled
with a foreign object, stop appliance immediately, unplug,
check for damage and have any damage repaired before
further operation is attempted. Do not operate with a
broken hub orspool.
• DAMAGE TO CORD – Keep power cord away from rotating
line. If you damage the cord, unplug it from the power
supply before moving the tool or examining the damage. A
damaged cord must be replaced before further use.
• SECURE EXTENSION CORD using the cord retainer shown in
in this manual.
• DISCONNECT TRIMMER – when not in use, when replacing
line, or prior to cleaning.
• AVOID DANGEROUS ENVIRONMENTAL CONDITIONS – Do
not use electric appliances in damp or wet locations.
Follow all instructions in this Instruction Manual for proper
operation of your appliance. Don’t use the appliance in
therain.
• DO NOT OPERATE portable electric appliances in gaseous
or explosive atmospheres. Motors in these appliances
normally spark, and the sparks might ignitefumes.
• STORE IDLE APPLIANCES INDOORS when not in use,
appliances should be stored indoors in a dry, locked-up
place out of reach ofchildren.
• STAY ALERT – Do not operate this unit when you are tired,
ill, or under the influence of alcohol, drugs, ormedication.
• MAINTAIN APPLIANCES WITH CARE – Follow instructions
in maintenance section. Keep handles dry, clean and free
from oil andgrease.
• GROUND FAULT CIRCUIT INTERRUPTER (GFCI) protection
should be provided on the circuit(s) or outlet(s) to be used
for the trimmer. Receptacles are available having built-in
GFCI protection and may be used for this measure ofsafety.
• CHECK DAMAGED PARTS – Before further use of the
appliance, a guard or other part that is damaged should
be carefully checked to determine that it will operate
properly and perform its intended function. Check for
alignment of moving parts, binding of moving parts,
breakage of parts, mounting, and any other condition
that may affect its operation. A guard or other part that
is damaged should be properly repaired or replaced by
an authorized service center unless otherwise indicated
elsewhere in thismanual.
• DO NOT immerse appliance in water or squirt it with a
hose. DO NOT allow any liquid to get insideit.
• DO NOT store the appliance on or adjacent to fertilizers
orchemicals.
• DO NOT clean with a pressurewasher.
• Keep guards in place and in workingorder.
• Keep hands and feet away from cuttingarea.
• KEEP CHILDREN, BYSTANDERS AND ANIMALS AWAY from
the work area a minimum of 30 feet (10 meters) when
starting or operating theunit.
• INSPECT THE AREA before using the unit. Remove all debris
and hard objects such as rocks, glass, wire, etc. that can
ricochet, be thrown, or otherwise cause injury or damage
duringoperation.
• Do not leave appliance when plugged in. Unplug from
outlet when not in use and beforeservicing.
• DO NOT use with damaged cord or plug. If appliance is
not working as it should, has been dropped, damaged,
Page 5

ENGLISH
3
left outdoors, or dropped into water, return it to a
servicecenter.
• DO NOT pull or carry by cord, use cord as a handle, or pull
cord around sharp edges or corners. Keep cord away from
heatedsurfaces.
• DO NOT unplug by pulling on cord. To unplug, grasp the
plug, not thecord.
• Do not handle plug or appliance with wethands.
• Turn off all controls beforeunplugging.
• This appliance is provided with double insulation. Use only
identical replacement parts. See instructions for Servicing
of Double-InsulatedAppliances.
• To reduce the risk of electric shock, use only with an
extension cord intended for outdoor use, such as SJW
orSJTW.
• Make sure your extension cord is in good condition and
is the correct size for your appliance. The Minimum
Gauge for Cord Sets chart below shows the correct size
to use depending on cord length and nameplate ampere
rating. If in doubt, use the next heavier gage. The smaller
the gage number, the heavier the cord. An undersized
extension cord will cause a drop in line voltage resulting in
loss of power and overheating
• Maintain Appliance With Care – Inspect extension cords
periodically and replace ifdamaged.
• To reduce the risk of disconnection of appliance cord from
the extension cord during operating:
a ) Make a knot as shown below; OR
b ) Use one of the plug-receptacle retaining straps or
connectors described in this manual; OR
c ) Secure the extension cord to the appliance plug as
shown or described in the OperatingInstructions.
WARNING: To reduce the risk of personal injury due to
a loose electrical connection between the appliance’s
plug and extension cord, firmly and fully attach the
appliance plug to the extension cord. Periodically
check the connection while operating to ensure it
is fully attached. Do not use an extension cord that
provides a loose connection. A loose connection may
result in overheating, fire, and increases the risk of
aburning.
WARNING: Do not use appliance if the switch trigger
does not turn the appliance on or off. Any appliance
that can not be controlled with the switch trigger is
dangerous and must berepaired.
WARNING: Some dust created by this product
contains chemicals known to the State of California to
cause cancer, birth defects or other reproductive harm.
Some examples of these chemicals are:
• compounds in fertilizers
• compounds in insecticides, herbicides
andpesticides
• arsenic and chromium from chemically
treatedlumber
To reduce your exposure to these chemicals, wear approved
safety equipment such as dust masks that are specially
designed to filter out microscopicparticles.
Additional Safety Information
WARNING: ALWAYS use safety glasses. Everyday
eyeglasses are NOT safety glasses. Also use face or
dust mask if cutting operation is dusty. ALWAYS WEAR
CERTIFIED SAFETYEQUIPMENT:
• ANSI Z87.1 eye protection (CAN/CSA Z94.3),
• ANSI S12.6 (S3.19) hearing protection,
• NIOSH/OSHA/MSHA respiratoryprotection.
WARNING: Use of this tool can generate and/
or disperse dust, which may cause serious and
permanent respiratory or other injury. Always use
NIOSH/OSHA approved respiratory protection
appropriate for the dust exposure. Direct particles
away from face andbody.
WARNING: Always wear proper personal hearing
protection that conforms to ANSI S12.6 (S3.19)
during use. Under some conditions and duration
of use, noise from this product may contribute to
hearingloss.
• Air vents often cover moving parts and should be
avoided. Loose clothes, jewelry or long hair can be
caught in movingparts.
Safety Rules and Instructions:
Extension Cords
WARNING: To reduce the risk of electric shock, use
only with an extension cord intended for outdoor
use, such as an extension cord of cord type SW-A,
SOW-A, STW-A, STOW-A, SJW-A, SJOW-A, SJTW-A. or
SJTOW-A.
Make sure your extension cord is in good condition. When
using an extension cord, be sure to use one heavy enough
to carry the current your product will draw. An undersized
cord will cause a drop in line voltage resulting in loss of
power and overheating. The table shows the correct size
to use depending on cord length and nameplate ampere
rating. If in doubt, use the next heavier gauge. The smaller
the gauge number, the heavier the cord. If the extension
will be used outside, the cord must be suitable for outdoor
work. The letters “WA” on the cord jacket indicate that the
cord is suitable for outdoor use.
• An extension cord must have adequate wire size
(AWG or American Wire Gauge) for safety. The smaller
the gauge number of the wire, the greater the capacity
of the cable, that is, 16 gauge has more capacity than 18
gauge. An undersized cord will cause a drop in line voltage
resulting in loss of power and overheating. When using
more than one extension to make up the total length,
be sure each individual extension contains at least the
minimum wire size. The following table shows the correct
Page 6

ENGLISH
4
size to use depending on cord length and nameplate
ampere rating. If in doubt, use the next heavier gauge. The
lower the gauge number, the heavier thecord.
Minimum Gauge for Cord Sets
Volts
Total Length of Cord in Feet
(meters)
120 V 25 (7.6) 50 (15.2) 100 (30.5) 150 (45.7)
240 V 50 (15.2) 100 (30.5) 200 (61.0) 300 (91.4)
Ampere Rating
American Wire Gauge
More
Than
Not
More
Than
0 6 18 16 16 14
6 10 18 16 14 12
10 12 16 16 14 12
12 16 14 12 Not Recommended
Safety Rules and Instructions:
Polarized Plug
To reduce the risk of electric shock, this equipment has
a polarized plug (one blade is wider than the other). This
equipment must be used with a suitable polarized 2 wire or
3 wire extension cord. Polarized connections will fit together
only one way. Make sure that the receptacle end of the
extension cord has large and small blade slot widths. If the
plug does not fit fully into the extension cord, reverse the
plug. If it still does not fit, obtain a suitable extension cord. If
the extension cord does not fit fully into the outlet, contact a
qualified electrician to install the proper outlet. Do not change
the tool plug or extension cord in anyway.
The label on your tool may include the following symbols. The
symbols and their definitions are asfollows:
V ......................... volts
Hz ....................... hertz
min ..................... minutes
or DC ......direct current
...................... Class I Construction
(grounded)
…/min ..............per minute
BPM .................... beats per minute
IPM ..................... impacts per minute
RPM .................... revolutions per
minute
sfpm ................... surface feet per
minute
SPM .................... strokes per minute
A ......................... amperes
W ........................ watts
or AC ...........alternating current
or AC/DC .... alternating or
direct current
...................... Class II
Construction
(double insulated)
no ....................... no load speed
n ......................... rated speed
...................... earthing terminal
..................... safety alert symbol
..................... visible radiation
..................... wear respiratory
protection
..................... wear eye
protection
..................... wear hearing
protection
..................... read all
documentation
SAVE THESE INSTRUCTIONS FOR
FUTURE USE
Motor
Be sure your power supply agrees with the nameplate
marking. Voltage decrease of more than 10% will cause loss
of power and overheating. BLACK+DECKER tools are factory
tested; if this tool does not operate, check powersupply.
COMPONENTS (FIG. A)
WARNING: Never modify the power tool or any part
of it. Damage or personal injury couldresult.
Refer to Fig. A at the beginning of this manual for a
complete list ofcomponents.
Intended Use
This appliance is designed for residential outdoor
trimmingapplications.
DO NOT use under wet conditions or in presence of
flammable liquids orgases.
DO NOT let children come into contact with the tool.
Supervision is required when inexperienced operators use
thistool.
ASSEMBLY AND ADJUSTMENTS
WARNING: To reduce the risk of serious personal
injury, turn unit off and disconnect it from
power source before making any adjustments or
removing/installing attachments or accessories.
An accidental start-up can causeinjury.
WARNING: Unplug the trimmer before attempting
to attach the guard, EDGE GUIDE OR HANDLE. NEVER
OPERATE TOOL WITHOUT GUARD FIRMLY IN PLACE.
THE GUARD MUST ALWAYS BE ON THE TOOL TO
PROTECT THE USER.
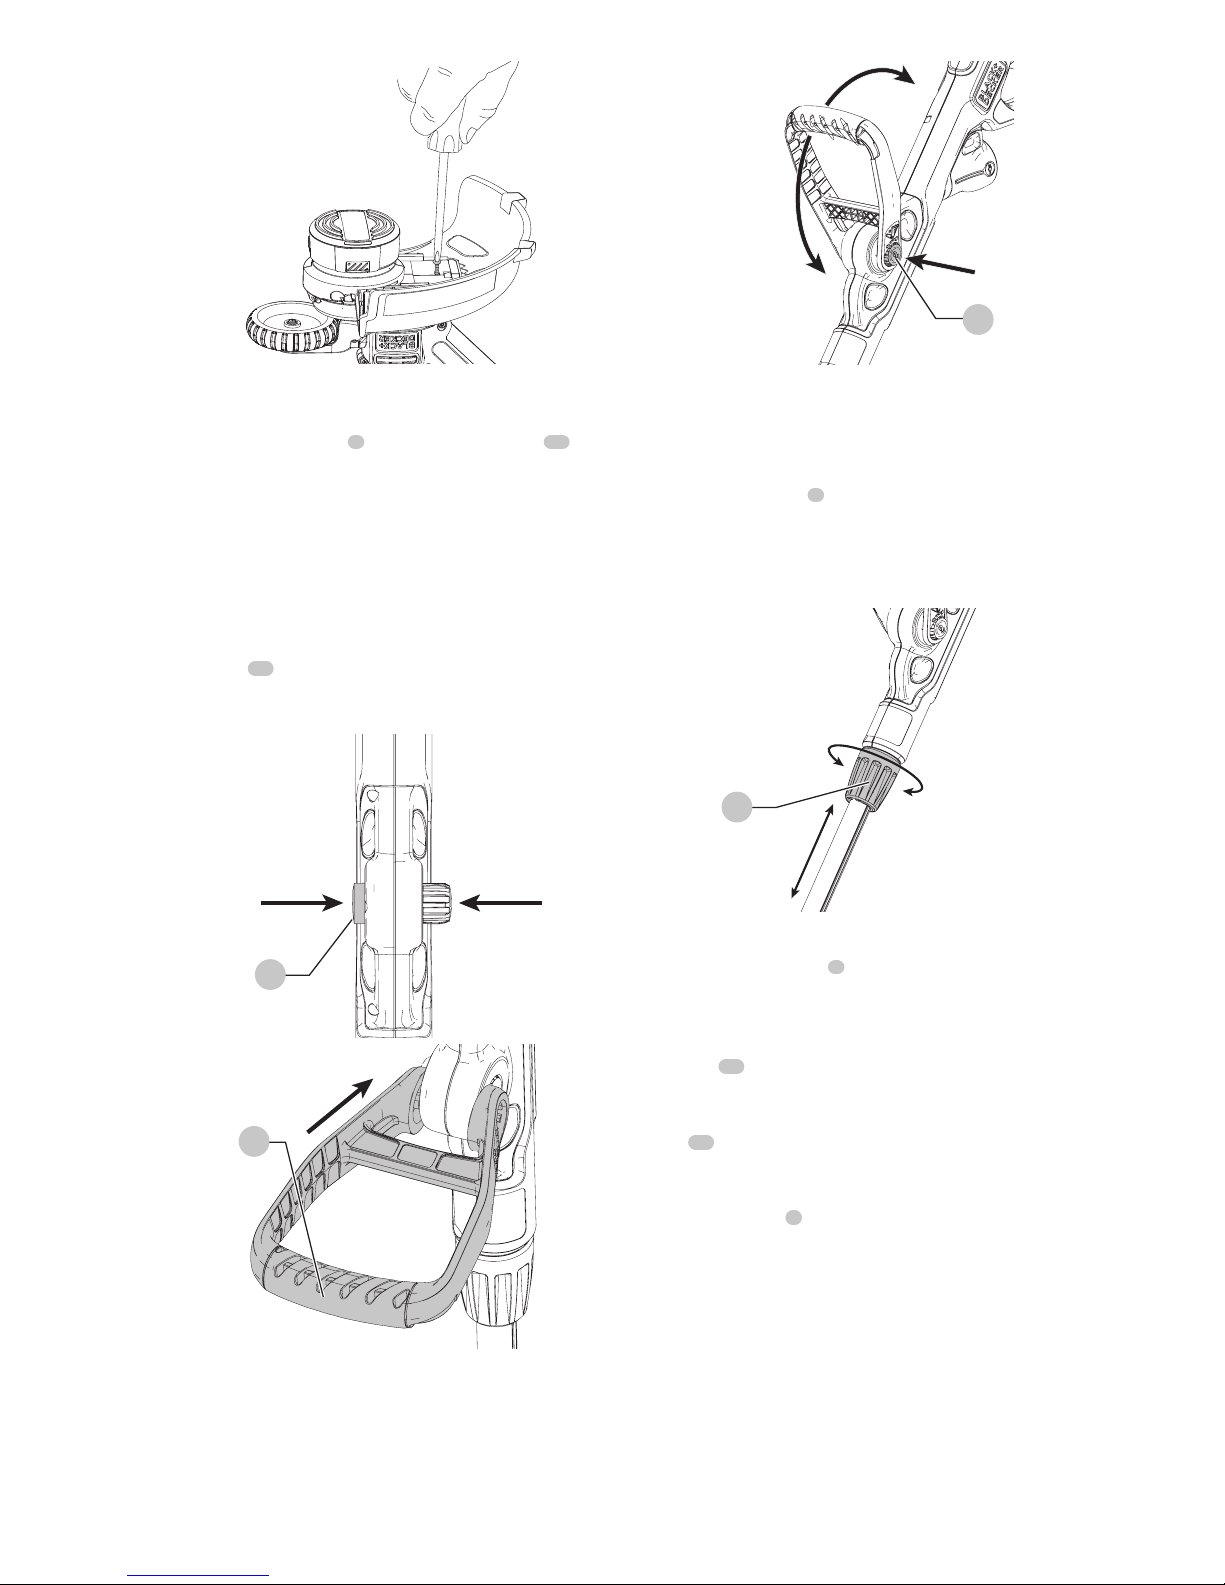
Attaching the Guard (Fig. B, C)
WARNING: NEVER OPERATE TRIMMER WITHOUT
GUARD FIRMLY IN PLACE.
• Turn the trimmer upside down so that you are looking
down at the spool
10
.
• Remove the screw from the guard with a
Phillipsscrewdriver.
• Turn the guard
9
upside down and slide it fully onto
the motor housing
7
. Make sure the tabs
11
on the
guard engage the ribs
12
on the motor housing as
shown in Figure B. The locking tab
24
should have
snapped into the housing slot
25
.
• Continue to slide the guard on until you hear it “snap”
into place.
• Insert the guard screw as shown in Figure C to complete
the guard assembly.
• Once the guard is installed, remove the covering from
the line cut-off blade, located on the edge of the guard.
Fig. B
9
10
24
25
7
11
12
Page 7
ENGLISH
5
Fig. C
Attaching the Auxiliary Handle
(Fig. D, E, F)
• To attach the handle
5
, press in on the buttons
13
on
both sides of the upper housing as shown in figure D.
• Position the handle as shown in figure E, matching
up the grooved side of the handle with the grooved
button. Partially push the handle on so that it will hold
the buttons in when you release them with your hand.
• Push the handle completely onto the housing and
position it slightly until it “snaps” into place (Fig. F).
• To adjust the handle up or down, press in on the
button
13
and raise or lower the handle.
• The handle should be adjusted so that your front arm is
straight when the trimmer is in the working position.
Fig. D
13
Fig. E
5
Fig. F
13
Height Adjustment (Fig. G)
CAUTION: Adjust the length of the trimmer to obtain
proper working positions as shown in figure I3.
• The overall height of the trimmer can be adjusted by
loosening the collar
6
and rotating it in the direction of
the arrow shown in figure G.
• Move the upper housing straight up or down. When the
desired height is achieved, tighten the collar by rotating
it opposite of the direction shown in figure G.
Fig. G
6
Attaching Extension Cord (Fig. H)
An extension cord retainer
3
is built into the switch handle
that prevents the cord from coming unplugged.
• To use this feature, simply double the extension cord
about 8" (203 mm) from the end, and insert it into
the slot
14
in the end of the handle area as shown in
figureH.
• Hook the loop formed by doubling the cord over the
tab
27
. Gently tug on the cord to ensure that it is firmly
retained in the trimmer’s handle.
• Plug the receptacle end of the extension cord into the
power cord plug
4
in the trimmer.
Page 8
ENGLISH
6
Fig. H
27 14
4
Releasing the cutting line
For shipping purposes, the cutting line is taped to the
spoolhousing.
• Remove the tape holding the cutting line to the
spoolhousing.
• See "Replacing the Spool" for instructions for removing
the spool
OPERATION
WARNING: To reduce the risk of serious personal
injury, turn unit off and disconnect it from
power source before making any adjustments or
removing/installing attachments or accessories.
An accidental start-up can causeinjury.
WARNING: Always use proper eye protection that
conforms to ANSI Z87.1 (CAN/CSA Z94.3) while
operating this appliance.
CAUTION: Before you begin trimming, only use the
appropriate type of cutting line.
CAUTION: Inspect area to be trimmed and remove
any wire, cord, or string-like objects which could
become entangled in the rotating line or spool. Be
particularly careful to avoid any wire which might be
bent outwardly into the path of the trimmer, such as
barbs at the base of a chain link fence.
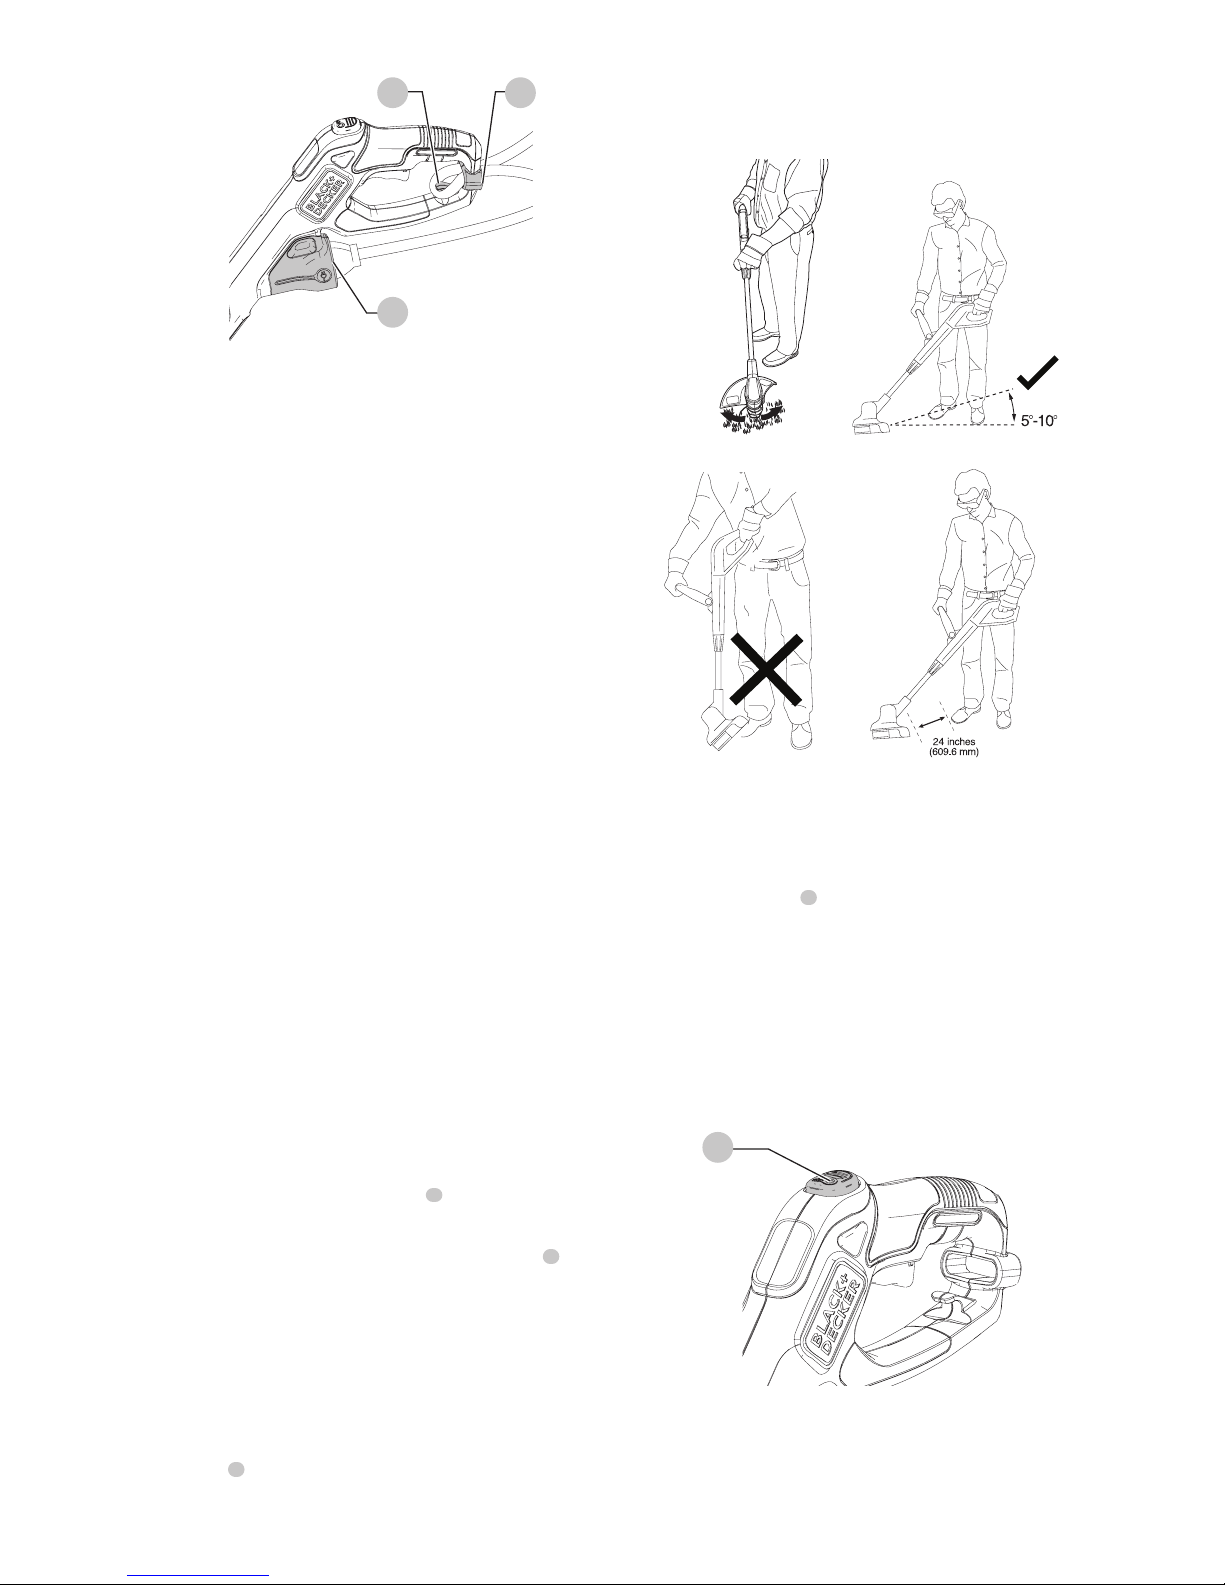
Proper Hand Position (Fig. I)
WARNING: To reduce the risk of serious personal injury,
ALWAYS use proper hand position as shown.
WARNING: To reduce the risk of serious personal
injury, ALWAYS hold securely in anticipation of a
suddenreaction.
Proper hand position requires one hand on the main handle
and one hand on the auxiliary handle
5
.
Switching On and Off
To switch the trimmer on, squeeze the trigger switch
1
.
To switch the trimmer off, release the trigger switch.
Operating the Trimmer
• With the unit on, angle unit and slowly swing the
trimmer side to side as shown in figure I.
• Maintain a cutting angle of 5° to 10° as shown in
Figure IA. Do not exceed 10° (Fig. IB). Cut with the tip of
the line. To keep distance from hard surfaces use edge
wheel
8
.
• Maintain a minimum distance of 24" (609.6 mm)
between the guard and your feet as shown in figure I.
To acheive this distance adjust the overall height of the
trimmer as shown in figure G.
Fig. I Fig. IA
Fig. IB Fig. IC
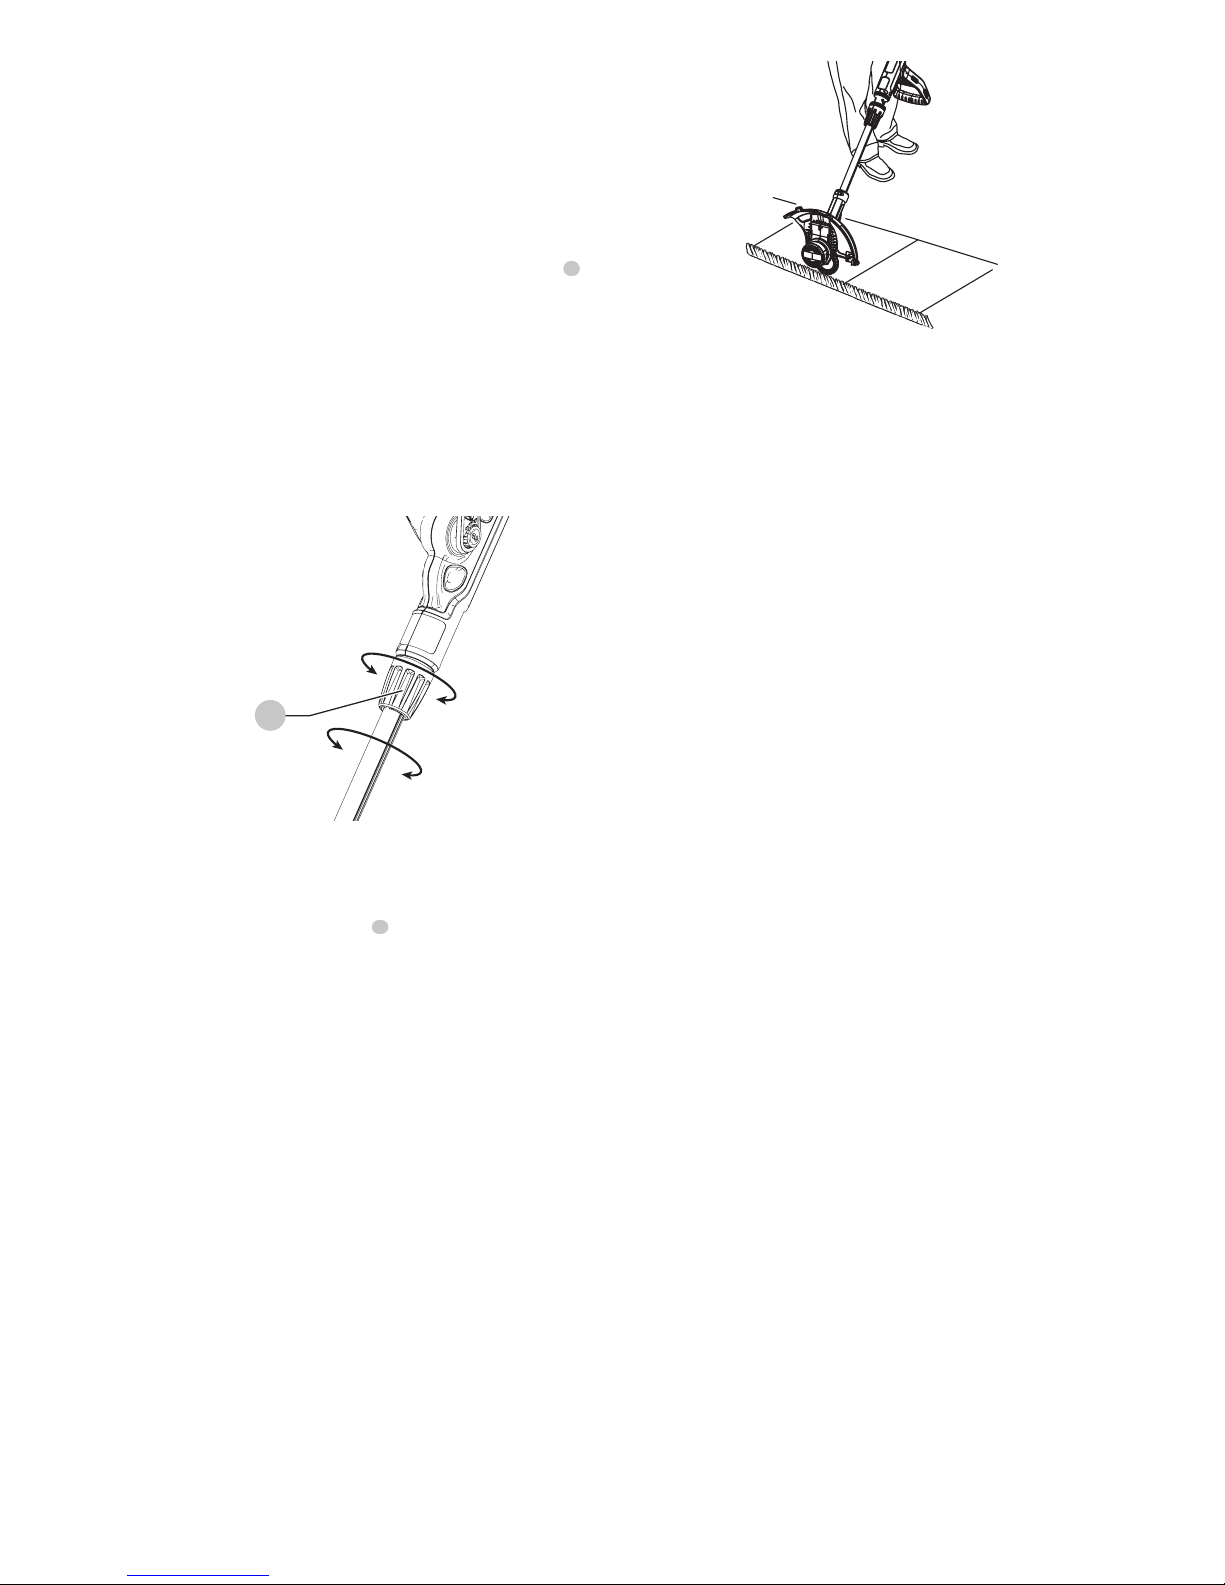
EASYFEEDTM Button (Fig. J)
The EASYFEEDTM feature allows you to advance the length
of cutting line available while trimming.
• To extend the cutting line, fully depress the
EASYFEEDTM button
2
while trimming and then
release (Fig. J).
NOTE: The trimmer will stop cutting when the EASYFEEDTM
button is pressed and will resume cutting when released.
• For maximum line length, press the button multiple
times until you hear the cutting line hitting the guard.
NOTE: Do not continue to press the EASYFEEDTM button
once the maximum length is reached. This will result in
overfeeding and will consume string quickly.
Fig. J
2
Convert to Edging Mode (Fig. K)
The trimmer can be used in trimming mode or edging
mode to trim overhanging grass along lawn edges and
flower beds.
Page 9
ENGLISH
7
WARNING: Disconnect the plug from the power
source before making any adjustments.
WARNING: When being used as an Edger, stones,
pieces of metal and other objects can be thrown out
at high speed by the line. The trimmer and guard
are designed to reduce the danger. However, MAKE
SURE that other persons and pets are at least 100 feet
(30m)away.
• To operate as a maintenance edger, turn the collar
6
as
shown in figure K.
• Hold the metal shaft and rotate the lower housing 180°
as shown in figure K.
• Turn the collar back until tight.
NOTE: The metal shaft and housing will only rotate in
onedirection.
• To return to the trimming position, loosen the lock
collar and rotate the lower housing back 180° and
retightening the collar.
Fig. K
6
Edging (Fig. L)
Optimum cutting results are achieved on edges deeper than
2" (50 mm). Do not use this trimmer to createtrenches.
• Using the edging wheel
8
, guide the trimmer as shown
in figure L.
• Position the edging wheel on the edge of the sidewalk
or abrasive surface so the cutting line is over the grass or
dirt area to be edged.
NOTE: The line feed system may not operate correctly if
wheeled edge guide is not used.
NOTE: You will experience faster than normal cutting line
wear if the edging wheel is positioned too far from the
edge with the cutting line positioned over the sidewalk or
abrasive surface.
• To make a closer cut, slightly tilt the trimmer.
• Return to the trimming postion by loosening the lock
collar and rotating the lower housing back 180°. The
tool will lock in the trimmer position.
Fig. L
Cutting Line / Line Feeding
Your trimmer uses .065" (1.65 mm) diameter, ROUND nylon
line. During use, the tips of the nylon lines will become
frayed and worn. Press the EASYFEEDTM button to feed and
trim a fresh length of line. Cutting line will wear faster and
require more feeding if the cutting or edging is done along
sidewalks or other abrasive surfaces or heavier weeds are
being cut. Do not bump trimmer on ground in attempt to
feed line or for any other purposes.
Helpful Cutting Tips
• Use the tip of the string to do the cutting; do not force
string head into uncut grass.
• Wire and picket fences cause extra string wear, even
breakage. Stone and brick walls, curbs, and wood may
wear string rapidly.
• Do not allow spool cap to drag on ground or other surfaces.
• In long growth, cut from the top down and do not
exceed 12" (304.8 mm) high.
• Keep trimmer tilted toward the area being cut; this is
the best cutting area.
• The trimmer cuts when passing the unit from the left to
right. This will avoid throwing debris at the operator.
• Avoid trees and shrubs. Tree bark, wood moldings, siding,
and fence posts can easily be damaged by the string.
MAINTENANCE
WARNING: To reduce the risk of serious personal
injury, turn unit off and disconnect it from
power source before making any adjustments or
removing/installing attachments or accessories.
An accidental start-up can causeinjury.
1. Keep the air intake slots clean to avoid overheating.
2. Your trimmer line can dry out over time. To keep your
line in top condition, store spare pre-wound spools or
bulk line in a plastic, sealable bag with a tablespoon
ofwater.
3. Plastic parts may be cleaned by using a mild soap and
a damp rag.
4. The line cutter on the edge of the guard can dull over
time. It is recommended you periodically touch-up the
sharpness of the blade with a file.
Page 10

ENGLISH
8
Cleaning
WARNING: Blow dirt and dust out of all air vents with
clean, dry air at least once a week. To minimize the risk
of eye injury, always wear ANSI Z87.1 approved eye
protection when performingthis.
WARNING: Never use solvents or other harsh
chemicals for cleaning the non-metallic parts of
the tool. These chemicals may weaken the plastic
materials used in these parts. Use a cloth dampened
only with water and mild soap. Never let any liquid
get inside the tool; never immerse any part of the tool
into aliquid.
Accessories
WARNING: Since accessories, other than those
offered by BLACK+DECKER, have not been tested with
this product, use of such accessories with this tool
could be hazardous. To reduce the risk of injury, only
BLACK+DECKER recommended accessories should be
used with thisproduct.
WARNING: The use of any accessory not
recommended by BLACK+DECKER for use with this
trimmer could be hazardous.
CAUTION: Before you begin trimming, only use the
appropriate type of cutting line.
Use BLACK+DECKER replacement spool Model No. AF-100,
and replacement cap RC-100.
Reload nylon line (either bulk or prewound replacement
spool) as shown in this manual.
• USE ONLY .065" (1.65 mm) DIAMETER ROUND NYLON
LINE. Do not use serrated or heavier gauge line, as
they will overload the motor and cause overheating.
This line is available at your local dealer or authorized
servicecenter.
• Other replacement parts (guards, spool caps, etc.) are
available through BLACK+DECKER service centers. To
find your local service location call: 1-800-544-6986 or
visit www.blackanddecker.com.
Replacing the Spool (Fig. M—P)
WARNING: To reduce the risk of serious personal
injury, turn unit off and disconnect it from
power source before making any adjustments or
removing/installing attachments or accessories.
An accidental start-up can causeinjury.
• Unplug trimmer.
• Depress the tabs
15
and remove the spool cap
21
from the spool housing
16
in the trimmer head
(Fig.M).
Fig. M
16
21
15
• For best results, replace spool with BLACK+DECKER
model no. AF-100.
• Grasp empty spool with one hand and spool housing
with other hand and pull spool out.
• If lever
17
(Fig. N) in base of housing becomes
dislodged, replace in correct position before inserting
new spool into housing.
Fig. N
17
18
19
• Remove any dirt and grass from the spool and housing.
• Unfasten the end of the cutting line and guide the line
into the eyelet
19
(Fig. O).
Fig. O
19
• Take the new spool and push it onto the boss
18
in
the housing (Fig. N). Rotate the spool slightly until it is
seated. The line should protrude approximately 5-3/8"
(136 mm) from the housing.
• Align the tabs on the spool cap with the slots
20
in the
housing (Fig. P).
Page 11
ENGLISH
9
Fig. P
20
• Push the cap onto the housing until it snaps securely
into place.
CAUTION: To avoid trimmer damage, if the cutting
line protrudes beyond the trimming blade, cut it off so
that it just reaches the blade.
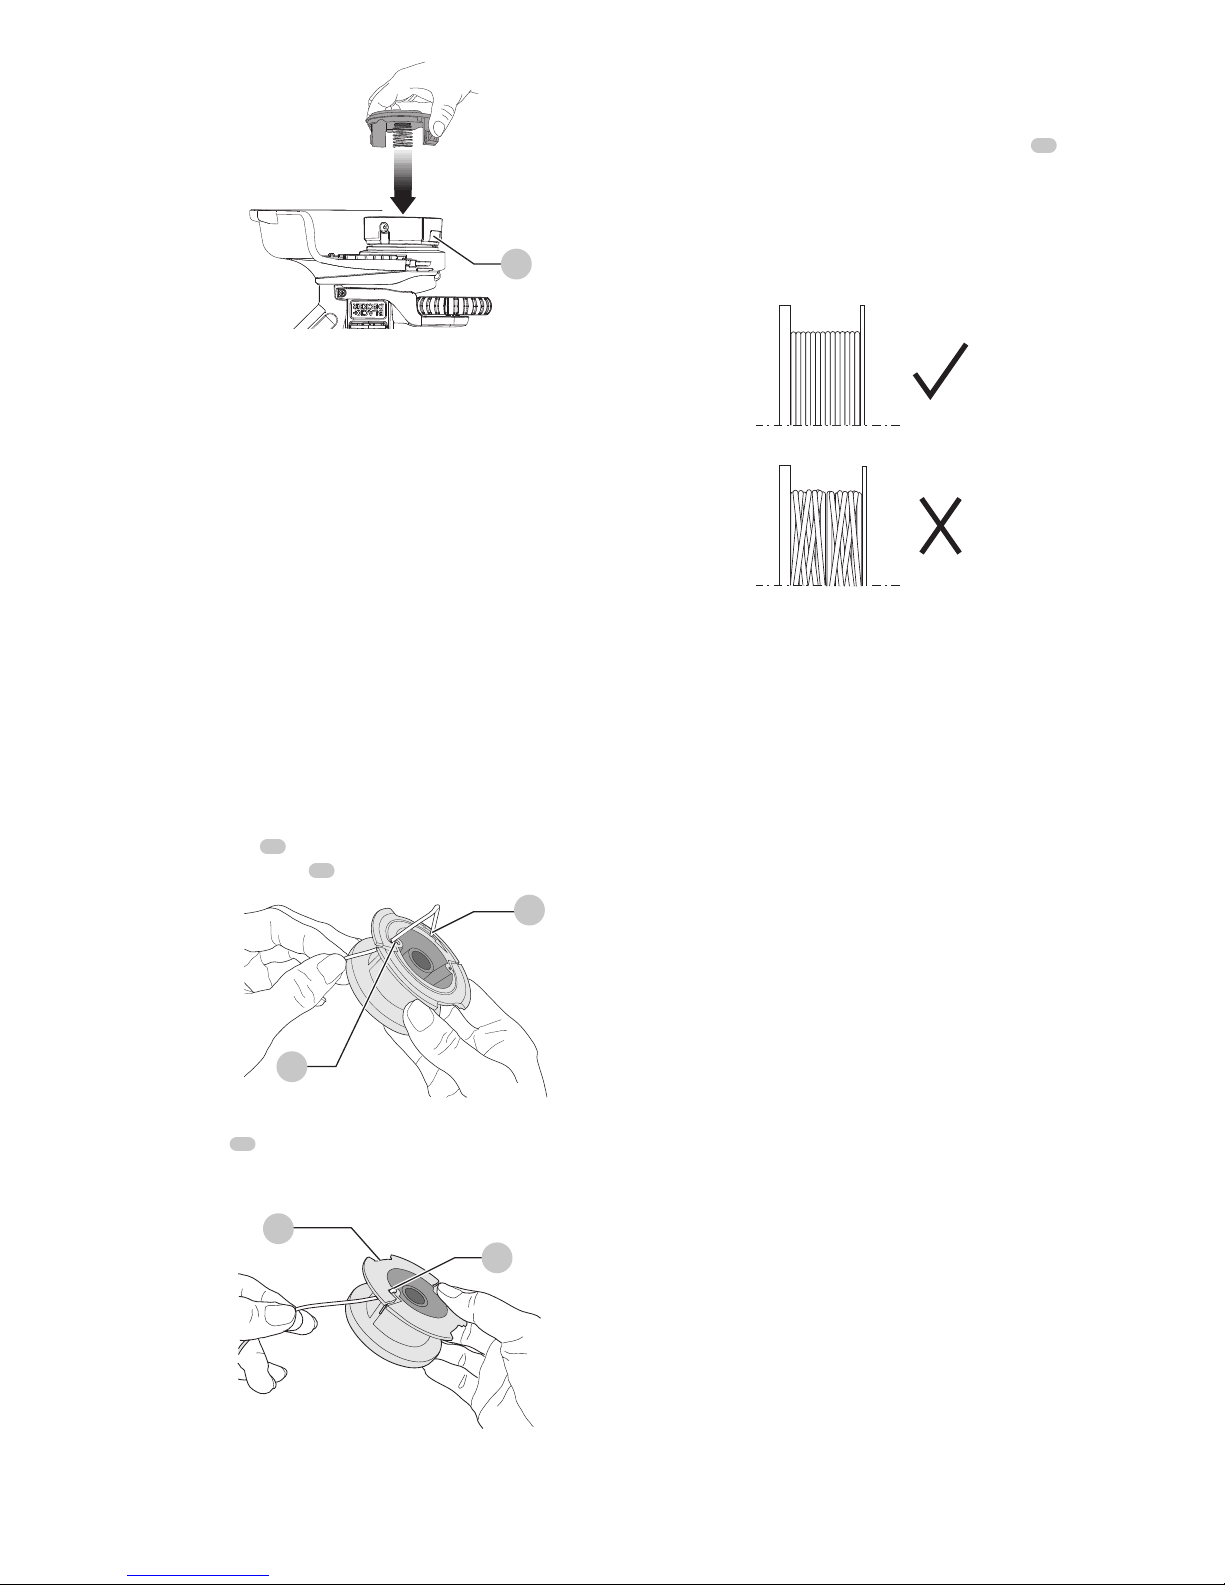
Rewinding Spool From Bulk Line (Fig.
Q—S)
(use only .065 in. ROUND diameter line)
Bulk line is also available for purchase from your local
retailer. NOTE: Hand wound spools from bulk line are likely
to become tangled more frequently than BLACK+DECKER
factory wound spools. For best results, factory wound spools
are recommended.
To install bulk line, follow the steps below:
• Unplug trimmer.
• Remove the empty spool from the trimmer as described
in “REPLACING THE SPOOL”.
• Remove any remaining cutting line from the spool.
• Make a fold at the end of the cutting line at about 3/4"
(19 mm)
22
. Feed the cutting line into one of the line
anchoring slots
23
as shown in figure Q.
Fig. Q
23
22
• Insert the 3/4" (19 mm) end of the bulk line into the
hole
26
in the spool adjacent to the slot as shown in
figure R. Make sure the line is pulled tight against the
spool as shown in figure R.
Fig. R
26
28
• Wind the cutting line onto the spool in the direction of
the arrow on the spool. Make sure to wind the line on
neatly and in layers. Do not crisscross (Fig. S).
• When the wound cutting line reaches the recesses
28
,
cut the line. (Fig. R).
• Fit the spool onto the trimmer as described in
“REPLACING THE SPOOL”.
CAUTION: Before you begin trimming, only use the
appropriate type of cutting line.
Fig. S
Troubleshooting
Trimmer Runs Slowly
1. Unplug the trimmer.
2. Check that the spool housing can rotate freely.
Carefully clean it if necessary.
3. Check that the cutting line does not protrude more
than approximately 5-3/8" (136 mm) from the spool.
If it does, cut it off so that it just reaches the line
trimmingblade.
Repairs
WARNING: To assure product SAFETY and
RELIABILITY, repairs, maintenance and adjustment
(including brush inspection and replacement, when
applicable) should be performed by a BLACK+DECKER
factory service center or a BLACK+DECKER authorized
service center. Always use identical replacementparts.
Register Online
Thank you for your purchase. Register your product nowfor:
• WARRANTY SERVICE: Registering your product will
help you obtain more efficient warranty service in case
there is a problem with yourproduct.
• CONFIRMATION OF OWNERSHIP: In case of
an insurance loss, such as fire, flood or theft, your
registration of ownership will serve as your proof
ofpurchase.
• FOR YOUR SAFETY: Registering your product will
allow us to contact you in the unlikely event a safety
notification is required under the Federal Consumer
SafetyAct.
Register online at www.blackanddecker.com
Page 12

ENGLISH
10
TWO-YEAR LIMITED WARRANTY
Black & Decker (U.S.) Inc. warranties this product to be free
from defects in material or workmanship for a period of
two (2) years following the date of purchase, provided that
the product is used in a home environment. This limited
warranty does not cover failures due to abuse, accidental
damage or when repairs have been made or attempted
by anyone other than BLACK+DECKER and its Authorized
Service Centers. A defective product meeting the warranty
conditions set forth herein will be replaced or repaired at no
charge in either of two ways:
The first, which will result in exchanges only, is to return
the product to the retailer from whom it was purchased
(provided that the store is a participating retailer). Returns
should be made within the time period of the retailer’s
policy for exchanges. Proof of purchase may be required.
Please check with the retailer for its specific return policy
regarding time limits for returns or exchanges.
The second option is to take or send the product (prepaid)
to a BLACK+DECKER owned or authorized Service Center
for repair or replacement at BLACK+DECKER’s option.
Proof of purchase may be required. BLACK+DECKER
owned and authorized service centers are listed online
at www.blackanddecker.com. This warranty does not
apply to accessories. This warranty gives you specific
legal rights aand you may have other rights which vary
from state to state or province to province. Should you
have any questions, contact the manager of your nearest
BLACK+DECKER Service Center. This product is not intended
for commercial use, and accordingly, such commercial
use of this product will void this warranty. All other
guarantees, express or implied, are hereby disclaimed.
LATIN AMERICA: This warranty does not apply to products
sold in Latin America. For products sold in Latin America,
check country specific warranty information contained in
the packaging, call the local company or see the website for
warrantyinformation.
FREE WARNING LABEL REPLACEMENT: If your warning
labels become illegible or are missing, call 1-800-544-6986
for a free replacement.
Imported by Black & Decker (U.S.), Inc.
701 E. Joppa Rd.
Towson, MD 21286
BlackandDecker.com
1-800-544-6986
Troubleshooting Guide
BE SURE TO FOLLOW SAFETY RULES AND INSTRUCTIONS
For assistance with your product, visit our website at www.blackanddecker.com for a list of service centers, or call the
BLACK+DECKER Customer Care Center at 1-800-544-6986.
PROBLEM POSSIBLE CAUSE POSSIBLE SOLUTION
- Trimmer will not start. - Cord is not plugged in.
- Circuit fuse is blown.
- Circuit breaker is tripped.
- Cord or switch is damaged.
- Plug tool into a working outlet.
- Replace circuit fuse. (If the
product repeatedly causes the
circuit fuse to blow, discontinue
use immediately and have
it serviced by an authorized
BLACK+DECKER service center.
- Reset circuit breaker. (If the
product repeatedly causes the
circuit breaker trip, discontinue
use immediately and have
it serviced by an authorized
BLACK+DECKER service center.
- Have cord or switch replaced at
an authorized BLACK+DECKER
service center.
- Cutting line is consumed
quickly in edge mode.
- Edging too far from edge
of sidewalks or abrasive
surfaces.
- The cutting line is hitting
the sidewalk or abrasive
surfaces.
- Ensure edging wheel is on the
edge of the surface and the
cutting line is positioned in the
grass or dirt area to be edged,
not the sidewalk or abrasive
surface.
Page 13

1
3
6
7
9
8
10
5
4
2
FRANÇAIS
11
Définitions : symboles et termes d'alarmes sécurité
Ces guides d'utilisation utilisent les symboles et termes d'alarmes sécurité suivants pour vous prévenir de situations
dangereuses et de risques de dommages corporels ou matériels.
DANGER: indique une situation dangereuse imminente qui, si elle n’est pas évitée, entraînera la mort ou des
blessuresgraves.
AVERTISSEMENT: indique une situation potentiellement dangereuse qui, si elle n’est pas évitée, pourrait entraîner la
mort ou des blessuresgraves.
ATTENTION: indique une situation potentiellement dangereuse qui, si elle n’est pas évitée, pourrait entraîner des
blessures légères oumodérées.
(Si utilisé sans aucun terme) Indique un message propre à la sécurité.
AVIS : indique une pratique ne posant aucun risque de dommages corporels mais qui par contre, si rien n’est fait
pour l’éviter, pourrait poser des risques de dommages matériels.
AVERTISSEMENT! lire tous les avertissements de
sécurité et toutes les directives. Le non-respect
des avertissements et des directives pourrait se
solder par un choc électrique, un incendie et/ou une
blessuregrave.
AVERTISSEMENT : afin de réduire le risque de
blessures, lire le mode d’emploi del’outil.
Pour toute question ou remarque au sujet de cet outil
ou de tout autre outil BLACK+DECKER, composez le
numéro sans frais : 1-800-4-BLACK+DECKER (1-800433-9258).
1
Gâchette
2
Bouton d’alimentation facile EASYFEED
TM
3
Crochets d’enroulement du cordon
4
Fiche du cordon d’alimentation
5
Poignée auxiliaire
6
Serre-tige
7
Carcasse moteur
8
Roulette-guide de bordure
9
Protecteur
10
Bobine
Fig. A
Page 14

FRANÇAIS
12
Avertissements importants concernant la
sécurité
AVERTISSEMENT: lors de l’utilisation d’outils de
jardinage électriques, les mesures de précaution
de base devraient toujours être prises pour réduire
la possibilité d’incendie, de choc électrique et de
blessures, en suivant les recommandations suivantes.
AVERTISSEMENT: ne pas retirer le protecteur. Le
protecteur doit être fixé durant l’utilisation. Utiliser
ce taille-bordure sans le protecteur porte atteinte à la
garantie du produit.
ATTENTION: lorsque vous remplacez le fil, utilisez
seulement un fil rond d’un diamètre de 1,65 mm
(0,065 po.). D’autres diamètres ou formes pourraient
réduire la performance ou endommager le taillebordure.
LISEZ TOUTES LES INSTRUCTIONS
• PORTEZ TOUJOURS UNE PROTECTION POUR LES YEUX :
portez des lunettes de sécurité ou de protection en tout
temps aussitôt que vous branchez l’outil. Ces articles sont
disponibles pour un achat.
• PROTECTEUR : ne pas utiliser cet outil sans avoir fixé le
protecteur.
• PORTEZ DES VÊTEMENTS APPROPRIÉS : ne pas porter des
vêtements amples ou des bijoux. Il peuvent se coincer dans
les pièces qui se déplacent. Les gants et les chaussures
à semelles en caoutchouc solides sont recommandés
lorsque vous travaillez à l’extérieur. Ne pas utiliser cet
outil lorsque vous êtes pieds nus ou que vous portez
des sandales ouvertes. Portez des pantalons longs pour
protéger vos jambes. Pour les cheveux longs, attacher en
retrait ou porter un filet à cheveux.
• FIL EN NYLON : gardez votre visage, vos mains et vos pieds
hors de portez du fil en rotation en tout temps.
• LE FIL EN ROTATION A UNE FONCTION DE COUPE : faites
attention lorsque vous coupez autour des moustiquaires et
des plantes désirables.
• NE PAS UTILISER des matériaux non recommandés,
comme un fil de métal, une corde et d’autres matériaux
semblables.
• GARDEZ TOUS LES PASSANTS ÉLOIGNÉS : à une distance
sécuritaire de la zone de travail, particulièrement les
enfants.
• ASSUREZ-VOUS que les autres personnes et les animaux
sont à une distance d’au moins 100 pieds (30 m).
• AFIN DE RÉDUIRE LE RISQUE de blessures par rebond
(ricochet), travaillez à distance de tout objet solide à
proximité comme un mur, des marches, une grosse pierre,
un arbre, etc. Faites très attention lorsque vous travaillez
près d’objets solides et au besoin, faites une coupe à la
main.
• ÉVITEZ LES DÉMARRAGES ACCIDENTELS : ne pas
transporter le taille-bordure branché avec votre doigt sur
la gâchette.
• UTILISEZ LE BON OUTIL : ne pas utiliser cet outil pour toute
tâche autre que celles pour lesquelles il est conçu.
• NE PAS S’ÉTIRER : maintenez vos pieds bien d’aplomb sur le
sol et un bon équilibre en tout temps.
• Ne pas forcer l’outil : le travail sera mieux fait et avec moins
de probabilité de risque à la vitesse pour laquelle il a été
conçu.
• DOMMAGES À L’OUTIL : si vous frappez ou si vous emmêlé
avec un objet étranger, arrêtez immédiatement l’outil,
débranchez-le, vérifiez les dommages et faites réparer les
dommages avant de tenter de le réutiliser. Ne pas l’utiliser
avec un moyeu ou une bobine brisé.
• DOMMAGES AU CORDON : éloignez le cordon
d’alimentation du fil en rotation. Si vous endommagez
le cordon, débranchez-le de l’alimentation électrique
avant de déplacer l’outil ou d’examiner les dommages.
Un cordon endommagé doit être remplacé avant toute
utilisation ultérieure.
• SÉCURISEZ LA RALLONGE à l’aide de l’enrouleur du cordon
illustré dans ce manuel.
• DÉBRANCHEZ LE TAILLE-BORDURE : lorsque vous ne
l’utilisez pas, lorsque vous remplacez le fil ou avant de le
nettoyer.
• ÉVITEZ LES CONDITIONS ENVIRONNEMENTALES
DANGEREUSES :ne pas utiliser des outils électriques
dans des endroits humides ou mouillés. Suivez toutes
les instructions dans le manuel d’instructions pour une
utilisation appropriée de votre outil. Ne pas utiliser l’outil
sous la pluie.
• NE PAS UTILISER les outils électriques portatifs dans une
atmosphère gazeuse ou explosive. Les moteurs de ces
outils produisent des étincelles et ces étincelles pourraient
enflammer les vapeurs.
• ENTREPOSEZ LES OUTILS ARRÊTÉS À L’INTÉRIEUR : lorsqu’ils
ne sont pas utilisés, les outils doivent être entreposés à
l’intérieur dans un endroit sec et verrouillé hors de portée
des enfants.
• DEMEUREZ VIGILANT : ne pas utiliser cet outil lorsque vous
êtes fatigué, malade ou sous l’influence de l’alcool, de
drogues ou de médicaments.
• ENTRETENEZ VOS OUTILS AVEC SOINS : suivez les
instructions dans la section Entretien. Garder vos mains
sèches, propres et exemptes de graisse et de poussière.
• La protection du DISJONCTEUR DIFFÉRENTIEL DE FUITE
À LA TERRE DDFT doit être fournie sur le(s) circuit(s)
ou les prise(s) pour être utilisée avec le taille-bordure. Les
connecteurs femelles sont disponibles avec une protection
DDFT intégrée et peuvent être utilisés pour cette mesure
de sécurité.
• VÉRIFIEZ LES PIÈCES ENDOMMAGÉES : avant toute
utilisation ultérieure de l’outil, un protecteur ou une autre
pièce qui est endommagé doit être soigneusement vérifié
afin de déterminer s’il fonctionnera correctement et s’il
effectuera la fonction prévue. Vérifiez l’alignement des
pièces qui se déplacent, les fixations des pièces qui se
déplacent, le bris des pièces, le montage et tout autre état
qui peut affecter son utilisation. Un protecteur ou une
autre pièce qui est endommagé doit être convenablement
réparé ou remplacé par un centre de services autorisé sauf
indication contraire dans ce manuel.
Page 15

FRANÇAIS
13
• NE PAS immerger l’outil dans l’eau ou l’asperger avec un
tuyau. NE PAS laisser pénétrer tout liquide à l’intérieur.
• NE PAS entreposer l’outil sur ou près de fertilisants ou de
produits chimiques.
• NE PAS nettoyer avec une laveuse à pression.
• Maintenez les protecteurs en place en bon état de
fonctionnement.
• Gardez vos mains et vos pieds à distance de la zone de
coupe.
• GARDEZ LES ENFANTS, LES PASSANTS ET LES ANIMAUX
LOIN de la zone de travail à un minimum de 30 pieds (10
mètres) lorsque vous démarrez ou utilisez l’outil.
• INSPECTEZ LA ZONE avant d’utiliser l’outil. Retirez tous des
débris et les objets durs comme des roches, du verre, les fils,
etc. qui peuvent ricocher, être projetés ou d’une façon ou
d’une autre causer une blessure ou des dommages durant
l’utilisation.
• Ne pas laisser l’outil lorsqu’il est branché. Débranchez-le de
la prise lorsqu’il n’est pas utilisé et avant l’entretien.
• NE PAS utiliser avec un cordon ou une fiche endommagés.
Si l’outil ne fonctionne pas comme il le devrait, a été
échappé, endommagé, laissé à l’extérieur ou échappé
dans l’eau, retournez-le dans un centre de services.
• NE PAS tirer ou transporter par le cordon, utiliser le cordon
comme une poignée, ou enrouler le cordon autour de
bords ou coins coupants. Gardez le cordon hors de portée
de surfaces chaudes.
• NE PAS débrancher en tirant sur le cordon. Pour
débrancher, saisir la fiche, et non le cordon.
• Ne pas manipuler la fiche ou l’outil avec les mains
mouillées.
• Éteignez toutes les commandes avant de débrancher.
• Cet outil est muni d’une isolation double. Utilisez
seulement des pièces de remplacement identiques.
Consultez les instructions pour l’entretien des outils à
isolation double.
• Pour réduire le risque de choc électrique, utilisez seulement
une rallonge conçue pour un usage extérieur, comme la
SJW ou SJTW.
• Assurez-vous que la rallonge est en bon état et de la bonne
taille pour votre outil. Le calibre minimum du tableau
des cordons amovibles affiche la bonne taille à utiliser
selon longueur de cordon et l’intensité nominale de la
plaque signalétique. En cas de doute, utilisez le calibre
le plus lourd suivant. Plus le numéro de calibre est bas,
plus le cordon est lourd. Une rallonge de taille inférieure
entraînera une chute de tension de secteur ce qui causera
une perte de puissance et une surchauffe.
• Entretenez l’outil avec soins : inspectez régulièrement les
rallonges et remplacez-les si elles sont endommagées.
• Afin de réduire le risque de débranchement du cordon de
l’outil de la rallonge durant le fonctionnement :
a ) Faites un nœud comme illustré dans la figure B; OU
b ) Utilisez une des sangles de fixation du connecteur
femelle de la fiche ou les connecteurs décrit dans ce
manuel; OU
c ) Branchez bien la rallonge avec la fiche de l’outil
comme illustré ou décrit dans le mode d'emploi.
AVERTISSEMENT: afin de réduire le risque de
blessure corporelle due à un mauvais branchement
électrique entre la fiche de l’outil et la rallonge, fixez
entièrement et fermement la fiche de l’outil à la
rallonge. Vérifiez régulièrement le branchement durant
l’utilisation afin de vous assurer qu’il entièrement fixé.
Ne pas utiliser une rallonge qui est mal branchée. Un
mauvais branchement peut entraîner une surchauffe,
un incendie et augmente le risque de brûlure.
AVERTISSEMENT: si la gâchette ne met pas l’outil en
marche ou si ne l’éteint pas, ne pas se servir de l’outil.
Tout outil qui ne peut être contrôlé avec la gâchette est
dangereux et doit être réparé.
AVERTISSEMENT: certaines poussières créées par ce
produit contiennent des produits chimiques reconnus
dans l’État de la Californie pour causer le cancer, des
anomalies congénitales ou autres effets nuisibles sur
la reproduction. Certains exemples de ces produits
chimiques sont:
• des composants de fertilisants;
• des composants d’insecticides, d’herbicides et de
pesticides;
• de l’arsenic et du chrome provenant du bois de
construction traité chimiquement.
Pour réduire votre exposition à ces produits chimiques, porter
un équipement de sécurité approuvé, comme un masque
antipoussière spécialement conçu pour filtrer les particules
microscopiques.
Renseignements de sécurité
supplémentaires
AVERTISSEMENT: TOUJOURS porter des lunettes
de sécurité. Les lunettes de tous les jours NE SONT PAS
des lunettes de sécurité. De plus, utilisez un masque
facial ou antipoussière si l’opération de coupe est
poussiéreuse. PORTEZ TOUJOURS UN ÉQUIPEMENT DE
SÉCURITÉ CERTIFIÉ:
• Protection des yeuxANSI Z87.1 (CAN/CSA Z94.3),
• protection auditive ANSI S12.6 (S3.19),
• protection respiratoire NIOSH/OSHA/MSHA.
AVERTISSEMENT: l’utilisation de cet outil peut
générer et/ou disperser de la poussière qui peut causer
des lésions respiratoires graves et permanentes ou
d’autres blessures. Utilisez toujours une protection
respiratoire approuvée par NIOSH/OSHA appropriée
pour l’exposition à la poussière. Dirigez les particules
loin du visage et du corps.
AVERTISSEMENT: portez toujours une protection
auditive personnelle appropriée conforme à
Page 16

FRANÇAIS
14
ANSI S12.6 (S3.19) durant l’utilisation. Dans
certaines conditions et selon la durée d’utilisation,
le bruit provenant de ce produit peut contribuer à la
perte de l’audition.
• Les évents couvrent souvent des pièces qui se
déplacent et doivent être évités. Des vêtements
amples, les bijoux ou les cheveux longs peuvent se coincer
dans des pièces qui déplacent.
Règles de sécurité et instructions :
Rallonges
AVERTISSEMENT: afin de réduire le risque de choc
électrique, utilisez seulement avec une rallonge conçue
pour l’utilisation à l’extérieur, comme une rallonge de
type SW-A, SOW-A, STW-A, STOW-A, SJW-A, SJOW-A,
SJTW-A ou SJTOW-A.
Assurez-vous que votre rallonge est en bon état. Lorsque
vous utilisez une rallonge, assurez-vous d’utiliser
suffisamment lourd pour faire circuler le courant qui
sera acheminé au produit. Un cordon de taille inférieure
entraînera une chute de tension de secteur ce qui causera
une perte de puissance et une surchauffe. Le tableau
affiche la bonne taille à utiliser selon longueur de cordon
et l’intensité nominale de la plaque signalétique. En cas de
doute, utilisez le calibre le plus lourd suivant. Plus le numéro
de calibre est bas, plus le cordon est lourd. Si la rallonge doit
être utilisée à l’extérieur, le cordon doit être approprié pour
le travail extérieur. Les lettres «WA» sur la gaine du cordon
indiquent que le cordon est approprié pour une utilisation
extérieure.
• Pour la sécurité de l’utilisateur, utiliser une rallonge
de calibre adéquat (AWG, American Wire Gauge
[calibrage américain normalisé des fils électriques]).
Plus le calibre est petit, et plus sa capacité est grande. Un
calibre16, par exemple, a une capacité supérieure à un
calibre18. L’usage d’une rallonge de calibre insuffisant
causera une chute de tension qui entraînera perte de
puissance et surchauffe. Si plus d’une rallonge est utilisée
pour obtenir une certaine longueur, s’assurer que chaque
rallonge présente au moins le calibre de fil minimum. Le
tableau ci-dessous illustre les calibres à utiliser selon la
longueur de rallonge et l’intensité nominale indiquée sur
la plaque signalétique. En cas de doute, utiliser le calibre
suivant. Plus le calibre est petit, plus la rallonge peut
supporter decourant.
Calibre minimum pour les cordons d'alimentation
Volts
Longueur totale du cordon
d'alimentation en mètre (pieds)
120 V 7,6 (25) 15,2 (50) 30,5 (100) 45,7 (150)
240 V 15,2 (50) 30,5 (100) 61,0 (200) 91,4 (300)
Ampères
AWG
Plus que Pas plus
que
0 6 18 16 16 14
6 10 18 16 14 12
10 12 16 16 14 12
12 16 14 12 Non recommandé
Instructions et consignes de sécurité :
Fiche polarisée
Pour réduire le risque de choc électrique, votre équipement
est muni d’une fiche polarisée (une lame est plus large que
l’autre) Cet outil doit être utilisé conjointement avec un
cordon de rallonge à deux conducteurs à prise polarisée
ou à trois conducteurs. La connexion polarisée ne pourra
être faite que dans le sens approprié. Assurez-vous que la
prise de la rallonge a une petite et une grande ouverture
d’insertion de lames. Si la fiche ne s’insère pas dans la prise
de la rallonge, pivotez-la de 180°. Si la connexion ne peut se
faire dans un sens ou dans l’autre, remplacez la rallonge. Si
la rallonge ne s’insère pas dans la prise murale, appelez un
électricien accrédité pour installer une prise adéquate. Ne
jamais modifier la fiche de l’outil ou la rallonge.
L’étiquette apposée sur votre outil peut inclure les symboles
suivants. Les symboles et leur définition sont indiqués ci-après:
V ......................... volts
Hz ....................... hertz
min ..................... minutes
or DC ...... courant continu
...................... fabrication classe I
(mis à la terre)
…/min .............. par minute
BPM .................... battements par
minute
IPM ..................... impacts par minute
RPM .................... revolutions per
minute
sfpm ................... pieds linéaires par
minute (plpm)
SPM (FPM) ......... fréquence par
minute
A ......................... ampères
W ........................ watts
or AC ........... courant alternatif
or AC/DC .... courant alternatif
ou continu
...................... fabrication classe II
(double isolation)
no ....................... vitesse à vide
n ......................... vitesse nominale
...................... borne de terre
...................... symbole
d’avertissement
..................... radiation visible
..................... protection
respiratoire
..................... protection oculaire
.....................protection auditive
..................... lire toute la
documentation
CONSERVER CES CONSIGNES POUR
UTILISATION ULTÉRIEURE
Moteur
S’assurer que le bloc d’alimentation est compatible avec
l’inscription de la plaque signalétique.Une diminution de
tension de plus de 10 % provoquera une perte de puissance
et une surchauffe. Les outils BLACK+DECKER sont testés en
usine; si cet outil ne fonctionne pas, vérifier l’alimentation
électrique.
DESCRIPTION (FIG. A)
AVERTISSEMENT: ne jamais modifier l’outil
électrique ni aucun de ses composants, car il y a
risques de dommages corporels oumatériels.
Reportez-vous en FigureA au début de ce manuel pour
obtenir la liste complète descomposants.
Usage Prévu
Cet appareil est conçu pour des applications d’entretien
d’environnement paysager résidentiel seulement.
Page 17

FRANÇAIS
15
NE PAS les utiliser en milieu ambiant humide ou en
présence de liquides ou de gazinflammables.
NE PAS le laisser à la portée des enfants. Une supervision
est nécessaire auprès de tout utilisateur nonexpérimenté.
ASSEMBLAGE ET AJUSTEMENTS
AVERTISSEMENT: pour réduire le risque de
blessures graves, éteindre l’outil et retirer le
débrancher avant d’effectuer tout réglage
et d’enlever ou d’installer tout accessoire. Un
démarrage accidentel peut provoquer desblessures.
AVERTISSEMENT: ne pas brancher l’appareil.
avant d’avoir installé LA GARDE PROTECTRICE,
LA ROULETTE-GUIDE OU LA POIGNÉE. NE JAMAIS
FAIRE FONCTIONNER L’OUTIL SANS QUE SA GARDEPROTECTRICE SOIT FERMEMENT FIXÉE EN PLACE.
LA GARDE-PROTECTRICE DOIT TOUJOURS ÊTRE SUR
L’OUTIL POUR PROTÉGER LES UTILISATEURS.
Fixation de la garde-protectrice
(Fig. B, C)
AVERTISSEMENT: NE JAMAIS FAIRE FONCTIONNER
LE COUPE-BORDURE SANS QUE SA GARDEPROTECTRICE SOIT FERMEMENT FIXÉE EN PLACE.
• Retournez le coupe-bordure sens-dessus-dessous four
faire face à la bobine
10
.
• À l›aide d›un tournevis Phillips, déposer la vis de retenue
de la garde protectrice.
• Retourner la garde-protectrice
9
.pour l’insérer sur la
carcasse du moteur
7
. S’assurer que les languettes
11
de la garde-protectrice s’insèrent dans les fentes
12
de
la carcasse du moteur comme montré à la figureB. La
languette de blocage
24
devrait s’être enclenchée dans
la fente
25
de la carcasse moteur.
• Poursuivre l’insertion jusqu’à ce que vous entendiez
le clic d’enclenchement de la garde-protectrice en
position.
• Visser la vis de maintien comme montré à la figureC.
• Après avoir installé la garde-protectrice retirez la
protection de la lame de coupe sur le bord de la garde.
Fig. B
9
10
24
25
7
11
12
Fig. C
Fixation de la poignée auxiliaire
(Fig. D, E, F)
• Pour fixer la poignée
5
, enfoncez les boutons
13
des
deux côtés du manche comme montré à la figureD.
• Placer la poignée comme montré à la figure E en
positionnant la rainure de la poignée sur la rainure du
bouton. Pousser partiellement la poignée de façon à
maintenir les boutons insérés
• et poursuivez son insertion jusqu’à ce qu’elle s’enclenche
en place (Fig.F).
• Pour ajuster la poignée, appuyez sur le bouton
13
pour
pouvoir faire pivoter la poignée.
• La poignée devrait être réglée de sorte que votre bras
est étendu lorsque le coupe-bordure est en position de
travail.
Fig. D
13
Fig. E
5
Page 18

FRANÇAIS
16
Fig. F
13
Ajustement de hauteur (Fig. G)
ATTENTION: ajustez la longueur du manche pour
réaliser la bonne position de travail comme montré à
la figure13.
• La longueur du coupe-bordure se règle en desserrant le
collet serre-tige
6
comme montré à la figureG
• et ajustez la longueur du manche. Resserrez ensuite le
collet serre-tige.
Fig. G
6
Fixation d’un cordon d’extension (Fig. H)
Un dispositif de retenue de cordon rallonge
3
est intégré à
la poignée de la gâchette pour prévenir le débranchement
en se déplaçant.
• Pour utiliser ce dispositif, repliez simplement le cordon
de rallonge à environ 200mm (8po) de son extrémité et
insérez les deux longueurs dans la fente
14
à l’arrière de
la poignée comme montré à la figureH.
• Accrochez la boucle formée sur la languette
27
. Tirez
délicatement sur la rallonge pour vous assurer qu’elle est
bien retenue dans la poignée du coupe-bordure.
• Raccordez la rallonge à l’outil -
4
sur le coupe-bordure.
Fig. H
27 14
4
LIBÉRATION DU FIL DE COUPE
Durant le transport, le fil de coupe est collé au boîtier de la
bobine.
• Retirer le ruban adhésif retenant le fil de coupe au
boîtier de la bobine.
FONCTIONNEMENT
AVERTISSEMENT: afin de réduire le risque
de blessure corporelle, éteignez l’appareil et
débranchez-le de la source d’alimentation avant
d’effectuer tout ajustement ou de retirer/installer
des pièces ou des accessoires. Un démarrage
accidentel peut causer des blessures.
AVERTISSEMENT: lors du travail avec cet appareil,
portez toujours une protection oculaire conforme à la
norme ANSI Z87.1 ou CAN/CSA Z94.3.
ATTENTION: n’utilisez seulement le fil de coupe
spécifié, approprié.
ATTENTION: inspecter l’aire à traiter et dégagez
tout câble, cordon ou objet pouvant se prendre et
s’enrouler sur la tête rotative ou la bobine. Soyez
particulièrement prudent afin d’éviter tout fil pouvant
être replié vers l’extérieur où vous passez le coupebordure comme les barbelés à la base de clôtures à
mailles métalliques.
Position appropriée des mains (Fig. I)
AVERTISSEMENT: afin de réduire le risque de
blessure corporelle grave, utilisez TOUJOURS la
position des mains appropriée comme illustrée.
AVERTISSEMENT: afin de réduire le risque de
blessure grave, TOUJOURS maintenir solidement en
prévision d’une rétroaction soudaine.
Une position des mains adéquate nécessite une main sur la
poignée principale
3
et une main sur la poignée auxiliaire
5
.
Mise en marche et en arrêt
Pour mettre en marche, appuyez sur la gâchette
1
.
Pour arrêter le coupe-bordure, relâchez la gâchette.
Opération du coupe-bordure
• Avec l’unité en fonction, gardez-la inclinée et oscillez
lentement la tête de coupe d’un côté à l’autre comme
montré à la figure I.
• Maintenez un angle de cinq à dix degrés comme
montré à la figure IA. Ne pas dépasser une inclinaison
de dix degrés (Fig.1B). Coupez avec le bout de la ligne.
Servez-vous de la roulette de bordure
8
pour garder le
fil dégagé des surface dures.
• Gardez une distance minimum de 610mm (24 po) entre
entre la garde-protectrice et vos pieds comme montré
à la figure I. Pour ce faire, réglez la longueur de l’outil
comme montré à la figureG.
Page 19

FRANÇAIS
17
Fig. I Fig. IA
Fig. IB Fig. IC
Bouton EASYFEEDMC (Fig. J)
La caractétique EASYFEEDMC vous permet de faire sortir le
fil tout en travaillant.
• Pour faire sortir le fil de coupe, enfoncez complètement
le bouton EASYFEEDMC
2
tout en travaillant et puis
relâcher (Fig. J).
REMARQUE : lors de l’actionnement du bouton
EASYFEEDMC, le coupe-bordure cessera de couper et
reprendra sa coupe au relâchement du bouton.
• Pour une longueur maximale de ligne, appuyez
plusieurs fois sur le bouton jusqu’à ce vous entendiez le
fil frapper la garde-protectrice.
REMARQUE : ne gardez pas le boutonEASYFEEDMC
enfoncé après que le fil ait rejoint la garde-protectrice. Ceci
causerait une vidange rapide de la bobine.
Fig. J
2
Conversion en mode de bordure (Fig. K)
Le coupe-bordure peut être utilisé en mode de bordure
pour couper les herbes en bordure des gazons et
platebandes de fleurs.
AVERTISSEMENT: avant de faire tout réglage,
débranchez la rallonge de sa source d’alimentation.
AVERTISSEMENT: lorsqu’utilisé comme coupebordure, les cailloux ou autres objets peuvent être
projetés à une grande vitesse par le fil. L’outil et sa
garde-protectrice sont conçus pour réduire le danger,
mais ASSUREZ-VOUS que les autres personnes ou
animaux de compagnie ne se rapprochent pas plus
que 30m (100pi) de vous.
• Pour utiliser en contour de platebandes, desserrez le
collet
6
(Fig.K).
• Tenir le tube métallique du bas et le faire pivoter de 180
degrés comme montré à la FigureK.
• et resserrer le collet.
REMARQUE: la partie inférieure ne tournera que dans un
sens.
• Pour remettre l’outil en position originale, desserrer le
collet de verrouillage et tourner la partie du bas de 180
degrés dans l’autre sens et resserrer le collet.
Fig. K
6
Coupe-bordure (Fig. L)
Les meilleure résultats s’obtiennent sur les bordures de plus
de 5cm (2po) de profondeur. Ne vous servez pas du coupebordure pour creuser des tranchées.
• L’utilisation de la roulette de bordure
8
comme montré
à la figureL guide l’outil.
• Placez la roulette de bordure sur le bord du trottoir ou
de la surface dure de sorte que le fil de coupe soit par
dessus le gazon ou l’aire à être traitée.
REMARQUE: si la roulette de bordure n’est pas appuyée, le
système d’alimentation de fil pourrait ne pas fonctionner à
l’actionnement du bouton Easyfeed.
REMARQUE: si la roulette de bordure est placée trop loin
du rebord avec le fil de coupe au-dessus du trottoir ou d’une
surface dure et abrasive, vous ferez l’expérience d’une usure
plus rapide que normal du fil.
• Pour faire une coupe plus rapprochée, inclinez
légèrement le coupe-bordure.
• Remettre l’outil en position originale en desserrant le
collet de verrouillage et tournant la partie du bas de
180degrés. Le coupe-bordure se verrouillera en position
normale.
Page 20

FRANÇAIS
18
Fig. L
Fil de coupe et son alimentation
Votre coupe-bordure utilise un fil de nylon ROND de
1,65mm (0,065po) de diamètre. Lors d’utilisation,
l’extrémité du fil de nylon s’usera et se divisera en plusieurs
brins. Pour alimenter et couper une nouvelle longueur de
fil, actionnez le bouton EASYFEEDMC. Si le travail est fait
en bordure de trottoirs ou autre surface abrasive, ou si des
mauvaises herbes plus denses sont coupées, le fil de coupe
s’usera plus rapidement et une alimentation plus fréquente
de nouveau fil sera requise. Ne pas frapper la tête du coupebordure sur le sol pour tenter de faire sortir le fil ou pour
toute autre raison.
Conseils pratiques de coupe
• Couper l’herbe avec l’extrémité du fil de coupe. Ne pas
forcer la tête dans les talus d’herbe.
• Les piquets et clôtures à mailles causent une plus
grande usure du fil et même son bris. Les murs
de brique ou de pierre, les bordures de trottoirs et
passerelles de bois pourraient user le fil plus rapidement.
• Ne pas laisser la tête de coupe faire contact avec le sol
ou toute autre surface.
• Pour les hautes herbes, commencer par le haut et ne pas
couper de longueurs de plus de 30cm (12po) à la fois.
• Pour une plus grande efficacité, gardez le coupebordure incliné vers la zone traitée.
• La coupe se fait en oscillant l’unité de gauche à droite.
Ceci minimisera la projection de débris sur l’utilisateur.
• Évitez les arbustes et les arbres. L’écorce, les moulures de
bois, les parements d’édifices et les poteaux de clôtures
peuvent facilement endommager le fil de coupe.
ENTRETIEN
AVERTISSEMENT: afin de réduire le risque
de blessure corporelle, éteignez l’appareil et
débranchez-le de la source d’alimentation avant
d’effectuer tout ajustement ou de retirer/installer
des pièces ou des accessoires. Un démarrage
accidentel peut causer des blessures.
1. Pour prévenir une surchauffe du moteur, gardez les
ouvertures de prise d’air dégagées et propres.
2. Le fil de nylon peut s’assécher au fil du temps. Pour
garder le fil en bonne condition, entreposez les
bobines de rechange ou le fil en vrac dans un sac de
polyéthylène scellé et y déversant une cuillère à table
(15ml) d’eau.
3. Les surfaces de plastique se nettoient à l’eau et savon
doux avec un torchon mouillé.
4. Le coupe-fil sur le bord de la garde-protectrice
peut perdre de son efficacité au fil du temps. Il est
recommandé de l’aiguiser périodiquement avec une
lime.
Nettoyage
AVERTISSEMENT : enlever les saletés et la poussière
hors des évents au moyen d’air comprimé propre et
sec, au moins une fois par semaine. Pour minimiser
le risque de blessure aux yeux, toujours porter une
protection oculaire conforme à la norme ANSI Z87.1
lors dunettoyage.
AVERTISSEMENT : ne jamais utiliser de solvants ni
d’autres produits chimiques puissants pour nettoyer
les pièces non métalliques de l’outil. Ces produits
chimiques peuvent affaiblir les matériaux de plastique
utilisés dans ces pièces. Utiliser un chiffon humecté
uniquement d’eau et de savon doux. Ne jamais laisser
de liquide pénétrer dans l’outil et n’immerger aucune
partie de l’outil dans unliquide.
Accessoires
AVERTISSEMENT: etant donné que les accessoires,
autres que ceux offerts par BLACK+DECKER, n’ont pas
été testés avec ce produit, utiliser de tels accessoires
avec cet outil pourrait être dangereux. Afin de réduire
le risque de blessures, seulement les accessoires
recommandés BLACK+DECKER doivent être utilisés
avec ce produit.
AVERTISSEMENT: l’utilisation de tout accessoire non
recommandé par BLACK+DECKER pour utilisation
avec ce coupe-bordure pourrait être dangereuse.
ATTENTION: n’utilisez seulement le fil de coupe
spécifié, approprié.
Utiliser les bobines de remplacement BLACK+DECKER
modèle AF-100, et capuchon RC-100.
Faites la recharge du fil de nylon (en vrac ou en bobine)
comme expliqué dans le présent manuel.
• UTILISEZ SEULEMENT UN FIL DE NYLON ROND de
1,65mm (0,065po) DE DIAMÈTRE. Ne pas utiliser de fil
ondulé ou de plus gros calibre car ils surchargeraient
et feraient surchauffer le moteur. Le fil adéquat est
disponible chez votre détaillant local ou un centre de
services autorisé.
• D’autres pièces de remplacement (gardes, capuchons
de bobines etc.) sont disponibles aux centres de service
BLACK+DECKER. Pour localiser votre service local,
composez: 1-800-544-6986 ou visitez
www.blackanddecker.com
Replacement de la bobine
(Fig. M, N, O, P)
AVERTISSEMENT: afin de réduire le risque
de blessure corporelle, éteignez l’appareil et
débranchez-le de la source d’alimentation avant
d’effectuer tout ajustement ou de retirer/installer
Page 21

FRANÇAIS
19
des pièces ou des accessoires. Un démarrage
accidentel peut causer des blessures.
• Débrancher le coupe-bordure.
• Dans la tête du coupe-bordure, enfoncer les languettes
15
et déposer le capuchon de la bobine
21
du corps
de la bobine
16
(Fig. M)
Fig. M
16
21
15
• Pour les meilleurs résultats, remplacez la bobine par une
autre du nº de modèle AF-100.
• Sortir la bobine vide de son logement.
• S’assurer que le levier
17
(Fig.N) du fond du logement
demeure dans sa position originale avant d’insérer la
nouvelle bobine.
Fig. N
17
18
19
• Dégager toute saleté et herbe du logement et de la
bobine.
• Libérer l’extrémité du fil de coupe et passer le fil dans
l’œillet
19
Figure O.
Fig. O
19
• Pousser la nouvelle bobine sur la bosse
18
dans le
logement (Fig.N). Tourner la bobine pour l’insérer
dans son siège. Le fil devrait sortir d’environ 136mm
(5-3/8po) du logement.
• Aligner les languettes du capuchon de bobine sur les
fentes
20
du logement (Fig. P).
Fig. P
20
• Pousser le capuchon sur le logement jusqu’à ce qu’il
s’enclenche de façon sécuritaire.
ATTENTION: si le fil de coupe dépasse de la lame de
la garde-protectrice, coupez-le à égalité à la garde
pour éviter d’endommager le coupe-bordure.
Rebobinage de bobine à partir de fil en
vrac (Fig. Q, R, S)
[utiliser seulement du fil ROND de 1,65 mm (0,065po)
de diamètre]
Le fil en vrac est aussi disponible chez votre détaillant
quincailler ou d’horticulture local. REMARQUE : les
bobines enroulées à la main à partir de fil en vrac sont
plus susceptibles de se bloquer plus fréquemment que les
bobines pré-enroulées aux ateliers BLACK+DECKER. Pour
de meilleurs résultats, les bobines enroulées à l’usine sont
recommandées.
Pour remplir une bobine vide, suivre la procédure
suivante:
• Débrancher le coupe-bordure.
• Déposer la bobine vide du coupe-bordure comme
indiqué à la section REMPLACEMENT DE LA BOBINE.
• Retirer tout fil résiduel de la bobine.
• Plier l’extrémité du fil à environ 19mm (3/4po) du bout
du fil
22
. Insérer le fil dans l’une des fentes d’ancrage
23
comme montré à la FigureQ.
•
Fig. Q
23
22
• Passer l’extrémité repliée du fil dans le trou
26
de la
bobine se trouvant près de la fente comme montré à la
figureR et s’assurer de tirer le fil de façon tendue contre
la bobine comme montré à la FigureR.
Page 22

FRANÇAIS
20
Fig. R
26
28
• Bobiner le fil de coupe sur la bobine dans le sens de la
flèche sur la bobine. S’assurer de bobiner le fil de façon
ordonnée une couche après l’autre. Ne pas croiser le fil
diagonalement (Fig.S).
• Lorsque l’accumulation des couches de fil atteindra les
encastrements
28
, coupez le fil. (Fig.R).
• Ajuster la bobine sur le coupe-bordure comme indiqué
à la section REMPLACEMENT DE LA BOBINE.
ATTENTION: n’utilisez seulement
le fil de coupe spécifié, approprié.
Fig. S
Dépannage
Le coupe-bordure tourne lentement
1. Débrancher le coupe-bordure.
2. Vérifier que le corps de réception de la bobine tourne
librement.
3. Au besoin, nettoyer soigneusement.
4. S’assurer que le fil de coupe n’est pas sorti de la bobine
de plus d’environ 136mm (5-3/8po). Sinon, le couper à
la région de la lame de coupe de la garde protectrice.
Réparations
AVERTISSEMENT : pour assurer la SÉCURITÉ et la
FIABILITÉ du produit, les réparations, l’entretien et
les réglages doivent être réalisés (cela comprend
l’inspection et le remplacement du balai, le cas
échéant) par un centre de réparation en usine
BLACK+DECKER ou un centre de réparation agréé
BLACK+DECKER. Toujours utiliser des pièces de
rechangeidentiques.
Registre en ligne
Merci pour votre achat. Enregistrez dès maintenant
votreprodui:
• RÉPARATIONS SOUS GARANTIE: cette carte remplie
vous permettra de vous prévaloir du service de
réparations sous garantie de façon plus efficace dans le
cas d’un probléme avec leproduit.
• CONFIRMATION DE PROPRIÉTÉ: en cas de perte
provoquée par un incendie, une inondation ou un vol,
cette preuve de propriété vous servira de preuve auprès
de votre compagnie d’assurances.
• SÉCURITÉ: l’enregistrement de votre produit
nous permettra de communiquer avec vous dans
l’éventualité peu probable de l’envoi d’un avis de
sécurité régi par la loi fédérale américaine de la
protection desconsommateurs.
Enregistrez-vous en ligne au www.blackanddecker.com
GARANTIE LIMITÉE DE DEUX ANS
Black & Decker (U.S.) In. garantit ce produit être libre de
défaut de matériau et de main-d’œuvre pour une durée de
deux (2) ans suivant la date d’achat, à condition qu’il ait été
utilisé en milieu domiciliaire. La présente garantie limitée
ne couvre pas les pannes causées par abus d’utilisation,
dommage accidentel ou si une réparation a été faite ou
tentée par quiconque autre que les centres de service
autorisés BLACK+DECKER. Un produit défectueux selon
les termes de la garantie décrits dans les présentes sera
remplacé ou réparé sans frais de l’une ou l’autre des façon
suivantes:
La première, qui résultera en un simple échange, est de
retourner le produit au détaillant chez lequel il a été acheté
(pourvu que le magasin est un détaillant participant). Les
retours devraient être faits à l’intérieur de la période de
temps de la politique du détaillant pour les échanges.
Une preuve d’achat pourrait être requise. Veuillez
consulter le détaillant pour connaître la limite de temps
pour échange selon sa politique particulière. La seconde
façon est d’apporter ou d’expédier le produit (port payé
d’avance) à un centre de service autorisé ou propriété de
BLACK+DECKER pour réparation ou remplacement. Une
preuve d’achat pourrait être requise. La liste des centres de
service de BLACK+DECKER et ateliers autorisés est offerte
en ligne à www.blackanddecker.com. La présente garantie
ne s’applique pas aux accessoires. La présente garantie
vous donne des droits légaux particuliers et vous pouvez
avoir d’autres droits qui varient d’une province ou d’un
état à l’autre. Pour toute question, veuillez communiquer
avec le directeur d’un centre de service de BLACK+DECKER.
L’outil acheté n’est pas prévu pour usage commercial,
conséquemment, un tel usage annulera sa garantie. Les
présentes constituent un désistement à toute garantie
expresse ou implicite d’autres sources.
AMÉRIQUE LATINE La présente garantie ne s’applique pas
aux produits vendus en Amérique latine. Pour les produits
vendus en Amérique latine, consulter les renseignements
sur la garantie particulière au pays incluse dans l’emballage,
appeler l’agence locale de distribution ou consulter le site
Web pour plus deprécisions.
Page 23

FRANÇAIS
21
Guide de dépannage
ASSUREZ-VOUS DE SUIVRE LES RÈGLES DE SÉCURITÉ ET LES INSTRUCTIONS
Pour obtenir de l’aide au sujet du produit, visitez notre site Web au www.blackanddecker.com pour une liste des centres de
services ou téléphonez au centre de service à la clientèle de BLACK+DECKER 1-800-544-6986.
PROBLÈME CAUSES POSSIBLES SOLUTIONS POSSIBLES
- Le taille-bordure ne
démarre pas.
- Le cordon n'est pas branché.
- Le fusible du circuit a sauté.
- Le disjoncteur s’est déclenché.
- Le cordon ou l’interrupteur est
endommagé.
- Branchez l’outil dans une prise qui
fonctionne.
- Remplacez le fusible du circuit. (Si le
produit fait sauter à maintes reprises
le fusible, cessez immédiatement
l’utilisation et faites-le réparer par un
centre de services BLACK+DECKER
autorisé.)
- Réenclenchez le disjoncteur. (Si le
produit fait enclencher à maintes
reprises le disjoncteur, cessez
immédiatement l’utilisation et faitesle réparer par un centre de services
BLACK+DECKER autorisé.)
- Faites remplacer le cordon ou
l’interrupteur dans un centre de
services BLACK+DECKER autorisé.
- Le fil de coupe s’use
rapide en mode
bordure.
- La bordure est trop loin du
bord du trottoir ou des surfaces
abrasives.
- Le fil de coupe frappe le trottoir
ou des surfaces abrasives.
- Assurez-vous que la roue de bordure
est sur le bord de la surface et que le
fil de coupe est placé dans la zone de
la pelouse ou de la terre à être coupée,
pas le trottoir ou la surface abrasive.
Imported by Black & Decker (U.S.), Inc.
701 E. Joppa Rd.
Towson, MD 21286
BlackandDecker.com
1-800-544-6986
Page 24

1
3
6
7
9
8
10
5
4
2
ESPAÑOL
22
¡ADVERTENCIA! Lea todas las advertencias de
seguridad e instrucciones. El incumplimiento
de las advertencias e instrucciones puede provocar
descargas eléctricas, incendios o lesionesgraves.
ADVERTENCIA: Para reducir el riesgo de lesiones, lea
el manual deinstrucciones.
Si tiene alguna duda o algún comentario sobre ésta u
otra herramienta BLACK+DECKER, llámenos al número
gratuito: 1-800-4-BLACK+DECKER (1-800-544-6986).
1
Interruptor de gatillo ON/OFF (Encendido/Apagado)
2
Botón EASYFEEDTM
3
Retenedor de cable
4
Enchufe de cable de energía
5
Manija auxiliar
6
Collar
7
Alojamiento de motor
8
Rueda de guía de borde
9
Protección
10
Carrete
Definiciones: Símbolos y palabras de alerta de seguridad
Este manual de instrucciones utiliza los siguientes símbolos y palabras de alerta de seguridad para alertarle de situaciones
peligrosas y del riesgo de lesiones corporales o daños materiales.
PELIGRO: Indica una situación de peligro inminente que, si no se evita, provocará la muerte o lesionesgraves.
ADVERTENCIA: Indica una situación de peligro potencial que, si no se evita, podría provocar la muerte o
lesionesgraves.
ATENCIÓN: Indica una situación de peligro potencial que, si no se evita, posiblemente provocaría lesiones leves
omoderadas.
(Utilizado sin palabras) indica un mensaje de seguridad relacionado.
AVISO: Se refiere a una práctica no relacionada a lesiones corporales que de no evitarse puede resultar en daños a
la propiedad.
Fig. A
Page 25

ESPAÑOL
23
Advertencias de seguridad importantes
ADVERTENCIA: Cuando use aparatos de jardinería
eléctricos, siempre se deben seguir las precauciones
de seguridad básica para reducir el riesgo de incendio,
descarga eléctrica, y lesiones personales, incluyendo
las siguientes.
ADVERTENCIA: No retire la protección. La protección
debe ser conectada durante el uso. Operar esta
desbrozadora sin la protección violará la garantía del
producto.
ATENCIÓN: Al reemplazar la línea, use sólo una línea
redonda de 1.65 mm (0.065") de diámetro. Otros
diámetros o formas pueden degradar el desempeño o
causar daños a la desbrozadora.
LEA TODAS LAS INSTRUCCIONES
• SIEMPRE USE PROTECCIÓN PARA LOS OJOS - Use gafas
o gogles de seguridad en todo momento cuando esté
conectada. Estos artículos están disponibles para su
compra.
• PROTECCIÓN - No use este aparato sin la protección
incluida.
• USE VESTIMENTA CORRECTA - No use ropa suelta o
joyas. Pueden quedar atrapados en las partes móviles. Se
recomiendan guantes y calzado de suela de hule cuando
trabaje al aire libre. No opere el aparato cuando esté
descalzo o use sandalias abiertas. Use pantalones largos
pesados para proteger sus piernas. Use una cubierta de
protección para el cabello para cubrir el cabello largo.
• LÍNEA DE NYLON - Mantenga la cara, las manos y los pies
alejados de la línea de nylon giratoria en todo momento.
• LA LÍNEA GIRATORIA REALIZA UNA FUNCIÓN DE CORTE
- Tenga cuidado al recortar alrededor de las pantallas y
plantas deseables.
• NO UTILICE materiales no recomendados, como alambre
metálico, cuerda y similares.
• MANTENGA TODOS LOS TRANSEÚNTES ALEJADOS - a
una distancia segura del área de trabajo, especialmente
a niños.
• ASEGÚRESE que otras personas y mascotas estén a una
distancia de por lo menos 100 pies (30 m).
• PARA REDUCIR EL RIESGO de lesión de rebote, trabaje
alejado de cualquier objeto sólido cercano, tal como
pared, peldaños, piedra grande, árbol, etc. Tenga mucho
cuidado al trabajar cerca de objetos sólidos y cuando sea
necesario, recorte a mano.
• EVITE EL ARRANQUE ACCIDENTAL - No lleve la
desbrozadora conectada con el dedo en el gatillo.
• UTILICE EL APARATO CORRECTO - No utilice este aparato
para ningún trabajo excepto para el que está diseñado.
• NO SE ESTIRE EN EXCESO - Mantenga la pisada y el
equilibrio adecuados en todo momento.
• No fuerce el aparato - Hará el trabajo mejor y con menos
probabilidad de un riesgo de lesión en la velocidad para
la que se diseñó
• DAÑO A LA UNIDAD - Si golpea o se enreda con un
objeto extraño, detenga el aparato inmediatamente,
desenchúfelo, revise si hay daños y repare cualquier daño
antes de intentar una nueva operación. No opere con un
cubo o un carrete rotos.
• DAÑO AL CABLE – Mantenga el cable alejado de la línea
giratoria. Si daña el cable, desconéctelo del suministro
de energía antes de mover la herramienta o examinar el
daño. Se debe reemplazar un cable dañado antes del uso
adicional.
• ASEGURE EL CABLE DE EXTENSIÓN con el retenedor de
cable mostrado en este manual.
• DESCONECTE LA DESBROZADORA – cuando no esté en
uso, cuando reemplace la línea, o antes de la limpieza.
• EVITE CONDICIONES AMBIENTALES PELIGROSAS – No
use aparatos eléctricos en ubicaciones mojadas o
húmedas. Siga todas las instrucciones de este manual de
instrucciones para la operación correcta de su aparato. No
use el aparato en la lluvia.
• NO OPERE aparatos eléctricos portátiles en una atmósfera
gaseosa o explosiva. Los motores de estos aparatos
pueden producir chispas, y éstas pueden encender los
vapores.
• GUARDE LOS APARATOS sin uso EN INTERIORES - Cuando
no se usan, los aparatos deben almacenarse en un lugar
seco y cerrado, fuera del alcance de los niños.
• PERMANEZCA ALERTA - No utilice esta unidad cuando esté
cansado, enfermo o bajo la influencia de alcohol, drogas
o medicamentos.
• MANTENGA LOS APARATOS CON CUIDADO - Siga las
instrucciones en la sección de mantenimiento. Mantenga
las manijas secas, limpias y libres de aceite y grasa.
• Se debe proporcionar protección de INTERRUPTOR DE
CIRCUITO DE FALLA A TIERRA [GROUND FAULT CIRCUIT
INTERRUPTER (GFCI)]en los circuitos o tomacorrientes
que se van a usar para la desbrozadora. Los receptáculos
están disponibles con protección GFCI integrada y pueden
ser utilizados para esta medida de seguridad.
• REVISE LAS PARTES DAÑADAS - Antes de utilizar el
aparato, se debe revisar cuidadosamente un protector u
otra parte que esté dañada para determinar si funcionará
correctamente y cumplirá su función. Revise la alineación
de las partes móviles, la unión de las partes móviles, la
ruptura de partes, el montaje y cualquier otra condición
que pueda afectar su operación. Una protección u otra
parte que esté dañada se debe reparar o reemplazar
apropiadamente por un centro de servicio autorizado, a
menos que se indique lo contrario en otra parte de este
manual.
• NO sumerja el aparato en agua ni lo rocíe con una
manguera. NO permita que entre ningún líquido en su
interior.
• NO guarde el aparato en o junto a fertilizantes o
productos químicos.
• NO limpie con una lavadora a presión.
• Mantenga las protecciones en su lugar y en buen estado
de operación.
• Mantenga las manos y los pies lejos del área de corte.
Page 26

ESPAÑOL
24
• MANTENGA A LOS NIÑOS, TRANSEÚNTES Y ANIMALES
ALEJADOS del área de trabajo un mínimo de 30 pies (10
metros) cuando arranque u opere la unidad.
• REVISE EL ÁREA antes de usar la unidad. Retire todos
los desechos y objetos duros tales como piedras, vidrio,
cable, etc. que puedan ser expulsados, arrojados, o de
otra manera causar lesiones serias o daño durante la
operación.
• No deje el aparato cuando esté conectado. Desconecte
del tomacorriente cuando no esté en uso y antes de dar
servicio.
• NO use con el cable o enchufe dañado. Si el aparato no
funciona como debería, se ha dejado caer, se dañó, se
dejó en exteriores, o se dejó caer en agua, regréselo a un
centro de servicio.
• NO jale o transporte por el cable, no use el cable como
manija, o jale el cable alrededor de bordes o esquinas
filosas. Mantenga el cable lejos de superficies calientes.
• NO desconecte jalando del cable. Para desconectar, sujete
el enchufe, no el cable.
• No maneje el enchufe o aparato con las manos húmedas.
• Apague todos los controles antes de desconectar.
• Este aparato está equipado con aislamiento doble. Sólo
use partes de reemplazo idénticas. Vea las instrucciones
para Dar servicio a aparatos con doble aislamiento.
• Para reducir el riesgo de descarga eléctrica, sólo use con
un cable de extensión diseñado para uso en exteriores, tal
como SJW o SJTW.
• Asegúrese que su cable de extensión esté en buenas
condiciones y sea del tamaño correcto para su aparato.
La gráfica Calibre Mínimo para Juegos de Cable a
continuación muestra el tamaño correcto a usar
dependiendo de la longitud del cable y la clasificación
de amperes de la placa de identificación. Si tiene duda,
use el calibre más pesado siguiente. Mientras menor sea
el número de calibre, más pesado será el cable. Un cable
de extensión de tamaño inferior causará una caída en el
voltaje en línea que resulta en una pérdida de energía y
sobrecalentamiento
• Mantenga el Aparato con Cuidado – Revise los cables de
extensión periódicamente y reemplace si están dañados.
• Para reducir el riesgo de desconexión del cable del aparato
del cable de extensión durante la operación:
a ) Realice un nudo como se muestra en la figura B; O
b ) Use una de las correas o conectores de retención de
enchufe-receptáculo descritos en este manual; O
c ) Asegure el cable de extensión al enchufe del aparato
como se muestra o describe en las Instrucciones de
Operación
.
ADVERTENCIA: Para reducir el riesgo de lesiones
personales debidas a una conexión eléctrica suelta
entre el enchufe y el cable de extensión del aparato,
conecte firme y completamente el enchufe del
aparato al cable de extensión. Revise periódicamente
la conexión mientras opera para asegurar que
esté conectada completamente. No use un cable
de extensión que proporcione una conexión
holgada. Una conexión holgada puede resultar en
sobrecalentamiento, incendio, e incrementa el riesgo
de quemaduras.
ADVERTENCIA: No use el aparato si el gatillo de
interruptor no lo enciende y apaga. Cualquier aparato
que no pueda ser controlado con el gatillo del
interruptor es peligroso y debe ser reparado.
ADVERTENCIA: Algún polvo producido por este
producto contiene químicos conocidos por el
Estado de California que causan cáncer, defectos de
nacimiento u otros daños reproductivos. Algunos
ejemplos de estos químicos son:
• compuestos en fertilizantes
• compuestos en insecticidas, herbicidas y
pesticidas
• arsénico y cromo a partir de madera tratada
químicamente
Para reducir su exposición a estos químicos, use equipo
de seguridad aprobado, tal como máscaras de polvo que
estén diseñadas específicamente para filtrar partículas
microscópicas.
Información de seguridad adicional
ADVERTENCIA: SIEMPRE use gafas de seguridad.
Las gafas de uso diario NO son gafas de seguridad.
También use una careta o máscara de polvo si la
operación de corte produce polvo. SIEMPRE USE
EQUIPO DE SEGURIDAD CERTIFICADO:
• Protección para los ojos ANSI Z87.1 (CAN/CSA
Z94.3),
• Protección auditiva ANSI S12.6 (S3.19),
• Protección respiratoria NIOSH/OSHA/MSHA.
ADVERTENCIA: El uso de esta herramienta puede
generar y/o dispersar polvo, que puede causar lesiones
respiratorias serías y permanentes u otras lesiones.
Siempre use protección respiratoria aprobada por
NIOSH/OSHA apropiada para la exposición de polvo.
Dirija las partículas lejos de la cara y el cuerpo.
ADVERTENCIA: Siempre use protección auditiva
personal adecuada que cumpla con ANSI S12.6
(S3.19) durante el uso. Bajo algunas condiciones
y duración de uso, el ruido de este producto puede
contribuir con la pérdida auditiva.
• Las ventilas de aire a menudo cubren las partes
móviles y se deben evitar. La ropa suelta, joyería, o
cabello largo podrían quedar atrapados en las partes
móviles.
Page 27

ESPAÑOL
25
Reglas e instrucciones de seguridad:
Cables de Extensión
ADVERTENCIA: Para reducir el riesgo de descargas
eléctricas, utilice sólo una extensión para uso exterior,
como una extensión del tipo de cable SW-A, SOW-A,
STW-A, STOW-A, SJW-A, SJOW-A, SJTW-A. o SJTOW-A.
Asegúrese que su cable de extensión esté en buenas
condiciones. Cuando use un cable de extensión asegúrese
de usar uno lo suficientemente pesado para llevar la
corriente que usará su producto. Un cable de tamaño
inferior causará una caída en el voltaje en línea que resulta
en una pérdida de energía y sobrecalentamiento. La tabla
muestra el tamaño correcto a usar dependiendo de la
longitud del cable y la clasificación de amperes de la placa
de identificación. Si tiene duda, use el calibre más pesado
siguiente. Mientras menor sea el número de calibre, más
pesado será el cable. Si la extensión se utiliza en exteriores,
el cable debe ser adecuado para trabajos en exteriores. Las
letras "WA" en la camisa del cable indican que el cable es
adecuado para uso en exteriores.
• Los hilos del alargador deben ser de un calibre
apropiado (AWG o American Wire Gauge) para
su seguridad. Mientras menor sea el calibre del hilo,
mayor la capacidad del cable. Es decir, un hilo calibre
16 tiene mayor capacidad que uno de 18. Un cable de
un calibre insuficiente causará una caída en la tensión
de la línea dando por resultado una pérdida de energía
y sobrecalentamiento. Cuando se utilice más de un
alargador para completar el largo total, asegúrese que
los hilos de cada alargador tengan el calibre mínimo.
La tabla siguiente muestra el tamaño correcto a utilizar,
dependiendo de la longitud del cable y del amperaje
nominal de la placa de identificación. Si tiene dudas sobre
cuál calibre usar, use un calibre mayor. Cuanto menor sea
el número del calibre, más resistente será elcable.
Calibre mínimo de conjuntos de cables
Voltios
Longitud total del cable en pies
(metros)
120 V 25 (7,6) 50 (15,2) 100 (30,5) 150 (45,7)
240 V 50 (15,2) 100 (30,5) 200 (61,0) 300 (91,4)
Amperaje
nominal
AWG
Más de Más de
0 6 18 16 16 14
6 10 18 16 14 12
10 12 16 16 14 12
12 16 14 12 Not Recommended
Reglas e instrucciones de seguridad:
Enchufe polarizado
Para reducir el riesgo de descarga eléctrica, este equipo
tiene un enchufe polarizado (una clavija es más ancha que la
otra). Este equipo debe utilizarse con un cable de extensión
polarizado de 2 o 3 alambres. Las conexiones polarizadas se
insertarán de una sola manera. Asegúrese que el extremo
del receptáculo del cable de extensión tenga anchos de
ranura de clavija grandes y pequeños. Si el enchufe no se
conecta completamente al cable de extensión, invierta
el enchufe. Si todavía no se inserta, obtenga un cable de
extensión adecuado. Si el cable de extensión no se conecta
completamente en el tomacorriente, póngase en contacto
con un electricista calificado para instalar el tomacorriente
adecuado. No cambie el enchufe de la herramienta o el
cable de extensión de ninguna manera.
La etiqueta de su herramienta puede incluir los siguientes
símbolos. A continuación se indican los símbolos y
susdefiniciones:
V ......................... voltios
Hz ....................... hertz
min ..................... minutos
or DC ...... direct current
...................... Construcción de
Clase I (tierra)
…/min .............. por minuto
BPM .................... golpes por minuto
IPM ..................... impactos por
minuto
RPM .................... revoluciones por
minuto
sfpm ................... pies de superficie
por minuto
SPM .................... pasadas por
minuto
A ......................... amperios
W ........................ vatios
or AC ........... corriente alterna
or AC/DC .... corriente alterna
o directa
...................... Construcción de
Clase II (doble
aislamiento)
no ....................... velocidad sin carga
n ......................... velocidad nominal
...................... terminal de
conexión a tierra
...................... símbolo de
advertencia de
seguridad
..................... radiación visible
..................... protección
respiratoria
..................... protección ocular
.....................protección auditiva
..................... lea toda la
documentación
GUARDE ESTAS INSTRUCCIONES PARA
VOLVER A CONSULTAR EN EL FUTURO
Motor
Asegúrese de que la fuente de energía concuerde
con lo que se indica en la placa. Un descenso en el
voltaje de más del 10% producirá una pérdida de
potencia y sobrecalentamiento. Todas las herramientas
BLACK+DECKER son probadas en fábrica; si esta herramienta
no funciona, verifique el suministro eléctrico.
COMPONENTES (FIG. A)
ADVERTENCIA: Nunca modifique la herramienta
eléctrica, ni tampoco ninguna de sus piezas. Podría
producir lesiones corporales odaños.
Consulte la Figura A al principio de este manual para
obtener una lista completa de loscomponentes.
Uso Debido
Este aparato está diseñado para aplicaciones de corte
domésticas en exteriores.
NO utilice la herramienta en condiciones de humedad o en
presencia de líquidos o gasesinflamables.
NO permita que los niños toquen la herramienta. Si el
operador no tiene experiencia operando esta herramienta,
su uso deberá sersupervisado.
Page 28

ESPAÑOL
26
MONTAJE Y AJUSTES
ADVERTENCIA: Para reducir el riesgo de lesiones
personales graves, apague la herramienta
y desconéctela de la fuente de alimentación
antes de realizar ajustes o de retirar/instalar
dispositivos o accesorios. Un arranque accidental
podría causarlesiones.
ADVERTENCIA: Desenchufe la podadora antes de
intentar sujetar la protección, la GUÍA DE BORDES
O LA MANIJA. NUNCA OPERE LA HERRAMIENTA
SIN LA PROTECCIÓN FIRMEMENTE EN SU LUGAR.
LA PROTECCIÓN SIEMPRE DEBE ESTAR EN LA
HERRAMIENTA PARA PROTEGER EL USUARIO.
Conexión de la protección (Fig. B, C)
ADVERTENCIA: NUNCA OPERE LA PODADORA SIN LA
PROTECCIÓN FIRMEMENTE EN SU LUGAR.
• Gire la podadora al revés de forma que usted mire hacia
abajo al carrete
10
.
• Retire el tornillo de la protección con un destornillador
Phillips.
• Gire la protección
9
boca abajo y deslícela
completamente en el alojamiento del motor
7
.
Asegúrese que las lengüetas
11
de la protección se
conecten con las costillas
12
del alojamiento del motor
como se muestra en la figura B. La lengüeta de bloqueo
24
debería haberse conectado a presión en la ranura
del alojamiento
25
.
• Continúe deslizando la protección hasta que escuche
que "se conecta" en su lugar.
• Inserte el tornillo de la protección como se muestra en
la figura C para completar el ensamble de protección.
• Una vez que la protección esté instalada, retire la
cubierta de la cuchilla de corte de línea, ubicada en el
borde de la protección.
Fig. B
9
10
24
25
7
11
12
Fig. C
(Fig. D, E, F)
• Para sujetar la manija
5
, presione los botones
13
en
ambos lados del alojamiento superior como se muestra
en la figura D.
• Coloque la manija como se muestra en la figura E,
haciendo coincidir el lado ranurado de la manija con el
botón ranurado. Empuje parcialmente la manija para
que sostenga los botones cuando los suelte con la
mano.
• Empuje la manija completamente sobre el alojamiento
y colóquelo ligeramente hasta que "se conecte" en su
lugar (Fig. F).
• Para ajustar la manija hacia arriba o hacia abajo,
presione el botón
13
y levante o baje la manija.
• La manija se debe ajustar para que su brazo delantero
esté recto cuando la podadora esté en la posición de
trabajo.
Fig. D
13
Page 29

ESPAÑOL
27
Fig. E
4
Fig. F
13
Ajuste de altura (Fig. G)
ATENCIÓN: Ajuste la longitud de la podadora para
obtener las posiciones de trabajo correctas como se
muestra en la figura I3.
• La altura total de la podadora se puede ajustar aflojando
el collar
6
y girándolo en la dirección de la flecha
mostrada en la figura G.
• Mueva el alojamiento superior hacia arriba o hacia
abajo. Cuando se alcance la altura deseada, apriete el
collar girándolo opuesto a la dirección mostrada en la
figura G.
Fig. G
6
Conexión de cable de extensión (Fig. H)
Un retenedor del cable de extensión
3
está integrado en la
manija del interruptor que evita que el cable se desconecte.
• Para usar esta característica, simplemente doble el
cable de extensión a unas 203 mm (8 ") del extremo, e
insértelo en la ranura
14
en el extremo del área de la
manija como se muestra en la figura H.
• Enganche el lazo formado al doblar el cordón sobre
la lengüeta
27
. Jale suavemente del cable para
asegurarse que esté firmemente retenido en la manija
de la podadora.
• Conecte el extremo del receptáculo del cable de
extensión en el enchufe del cable de energía
4
de la
podadora.
Fig. H
27 14
4
LIBERACIÓN DE LA CUERDA DE CORTE
Al despacharse de la fábrica, la cuerda de corte está sujeta
con cinta a la cubierta del carrete.
• Quite la cinta que sujeta la cuerda de corte a la cubierta
del carrete.
OPERACIÓN
ADVERTENCIA: Para reducir el riesgo de lesiones
personales, apague la unidad y desconéctela de
la fuente de energía antes de realizar cualquier
ajuste o retirar/instalar conexiones o accesorios.
Un arranque accidental puede causar lesiones.
ADVERTENCIA: Utilice siempre una protección para
los ojos adecuada que cumpla con la norma ANSI
Z87.1 (CAN / CSA Z94.3) mientras opera este aparato.
ATENCIÓN: Antes de comenzar a recortar, utilice sólo
el tipo de línea de corte apropiado.
ATENCIÓN: Revise el área a recortar y retire cualquier
alambre, cuerda u objetos similares a cuerdas que
pudieran enredarse en la línea giratoria o en el carrete.
Tenga especial cuidado para evitar cualquier alambre
que pueda doblarse hacia fuera en la trayectoria de la
podadora, tal como púas en la base de una cerca de
eslabón de cadena.
Colocación adecuada de manos (Fig. I)
ADVERTENCIA: Para reducir el riesgo de lesiones
personales serias, SIEMPRE use la posición de las
manos adecuada como se muestra.
ADVERTENCIA: Para reducir el riesgo de lesiones
personales serias, SIEMPRE sostenga firmemente en
anticipación de una reacción repentina.
La posición de manos adecuada requiere una mano en la
manija principal
3
y la otra sobre la manija auxiliar
5
.
Encendido y apagado
Para encender la podadora, oprima el interruptor de
gatillo
1
.
Para apagar la podadora, libere el interruptor de gatillo.
Page 30

ESPAÑOL
28
Operación de la podadora
• Con la unidad encendida, coloque en ángulo la unidad
y gire lentamente la podadora de lado a lado como se
muestra en la figura I.
• Mantenga un ángulo de 5° a 10° como se muestra en
la figura IA. No exceda 10° (Fig. IB). Corte la punta de la
línea. Para mantener la distancia de las superficies duras,
utilice la rueda de borde
8
.
• Mantenga una distancia mínima de 609.6 mm (24 ")
entre la protección y sus pies como se muestra en la
figura I. Para lograr esta distancia, ajuste la altura total de
la podadora como se muestra en la figura G.
Fig. I Fig. IA
Fig. IB Fig. IC
EASYFEEDTM Botón (Fig. J)
La función EASYFEEDTM le permite avanzar la longitud de la
línea de corte disponible mientras corta.
• Para extender la línea de corte, presione
completamente el botón EASYFEEDTM
2
mientras
corta y después libere (Fig. J).
NOTA: La podadora dejará de cortar cuando se presione el
botón EASYFEEDTM y reanudará el corte cuando se libere.
• Para obtener la longitud de línea máxima, presione el
botón varias veces hasta que escuche la línea de corte
golpeando la protección.
NOTA: No continúe presionando el botón
EASYFEEDTM una vez que se alcance la longitud máxima.
Esto resultará en sobrealimentación y consumirá la cuerda
rápidamente.
Fig. J
2
Conversión a modo de borde (Fig. K)
La podadora se puede utilizar en el modo de recorte o el
modo de borde para recortar el césped colgante a lo largo
de los bordes del césped y las jardineras.
ADVERTENCIA: Desconecte el enchufe de la fuente de
energía antes de realizar cualquier ajuste.
ADVERTENCIA: Cuando se utiliza como bordeadora,
las piedras, piezas de metal y otros objetos pueden ser
lanzados a alta velocidad por la línea. La podadora
y la protección están diseñadas para reducir el
peligro. Sin embargo, ASEGÚRESE que otras personas
y mascotas estén por lo menos a 100 pies (30m) de
distancia.
• Para operar como una cuchilla de mantenimiento, gire
el collar
6
como se muestra en la figura K.
• Sujete el eje metálico y gire el alojamiento inferior 180°
como se muestra en la figura K.
• Gire el collar de regreso hasta que esté apretado.
NOTA: El eje metálico y el alojamiento sólo girarán en una
dirección.
• Para regresar a la posición de corte, afloje el collar de
bloqueo y gire el alojamiento inferior hacia atrás 180° y
vuelva a apretar el collar.
Fig. K
6
Corte de borde (Fig. L)
Se obtienen resultados óptimos de corte en bordes de más
de 50 mm (2"). No utilice esta podadora para crear zanjas.
• Con la rueda de borde
8
, guíe la podadora como se
muestra en la figura L.
• Coloque la rueda de borde en el borde de la acera
o superficie abrasiva para que la línea de corte se
encuentre sobre el área de césped o tierra que se va a
cortar.
Page 31

ESPAÑOL
29
NOTA: Es posible que el sistema de alimentación de línea
no funcione correctamente si no se utiliza la guía de borde
con ruedas.
NOTA: Experimentará un desgaste de línea de corte más
rápido que lo normal si la rueda de borde está situada
demasiado lejos del borde con la línea de corte colocada
sobre la acera o la superficie abrasiva.
• Para hacer un corte más cerca, incline ligeramente la
podadora.
• Regrese a la posición de recorte aflojando el collar de
bloqueo y girando el alojamiento inferior 180° hacia
atrás. La herramienta se bloqueará en la posición de
podadora.
Fig. L
Línea de corte / Alimentación de línea
Su podadora usa una línea de nylon REDONDA de 1.65 mm
(.065") de diámetro. Durante el uso, las puntas de las líneas
de nylon se deshilacharán y desgastarán. Presione el botón
easyfeed para alimentar y recortar una nueva longitud de
línea. La línea de corte se desgastará más rápido y requiere
más alimentación si el corte o el borde se realiza a lo
largo de aceras u otras superficies abrasivas o hierbas más
pesadas están siendo cortadas. No golpee la podadora en el
suelo para intentar alimentar la línea o para cualquier otro
propósito.
Consejos útiles de corte
• Utilice la punta de la cuerda para hacer el corte; no
fuerce la cabeza de la cuerda en el césped sin cortar.
• Las cercas de alambre y picos causan un desgaste
adicional en las cuerdas, incluso ruptura. Las piedra y
paredes de ladrillo, aceras y madera pueden desgastar la
cuerda rápidamente.
• No permita que la tapa del carrete arrastre sobre el suelo
u otras superficies.
• En el crecimiento largo, corte de arriba abajo y no
exceda 304.8 mm (12") de alto.
• Mantenga la podadora inclinada hacia el área que se
está cortando; ésta es la mejor zona de corte.
• La podadora corta al pasar la unidad de izquierda a
derecha. Esto evitará arrojar residuos al operador.
• Evite árboles y arbustos. Corteza de árbol, molduras
de madera, revestimiento, y postes de cercas puede
dañarse fácilmente por la cuerda.
MANTENIMIENTO
ADVERTENCIA: Para reducir el riesgo de lesiones
personales, apague la unidad y desconéctela de
la fuente de energía antes de realizar cualquier
ajuste o retirar/instalar conexiones o accesorios.
Un arranque accidental puede causar lesiones.
1. Mantenga limpias las ranuras de entrada de aire para
evitar el sobrecalentamiento.
2. La línea de su recortadora puede secarse con el tiempo.
Para mantener su línea en perfectas condiciones,
almacene los carretes preenrollados de repuesto o la
línea a granel en una bolsa de plástico sellable con una
cucharada de agua.
3. Las partes de plástico se pueden limpiar con un jabón
suave y un trapo húmedo.
4. El cortador de línea en el borde de la protección puede
perder filo con el tiempo. Se recomienda retocar
periódicamente el filo de la hoja con una lima.
Limpieza
ADVERTENCIA: Sople la suciedad y el polvo de todos
los conductos de ventilación con aire seco, al menos
una vez por semana. Para reducir el riesgo de lesiones,
utilice siempre protección para los ojos aprobada ANSI
Z87.1 al realizar estatarea.
ADVERTENCIA: Nunca utilice solventes ni otros
químicos abrasivos para limpiar las piezas no
metálicas de la herramienta. Estos productos
químicos pueden debilitar los materiales plásticos
utilizados en estas piezas. Utilice un paño humedecido
sólo con agua y jabón neutro. Nunca permita que
penetre líquido dentro de la herramienta ni sumerja
ninguna de las piezas en unlíquido.
Accesorios
ADVERTENCIA: Ya que los accesorios, diferentes a los
ofrecidos por BLACK+DECKER, no han sido probados
con este producto, el uso de tales accesorios con
esta herramienta podría ser peligroso. Para reducir
el riesgo de lesiones, sólo se deben usar accesorios
recomendados por BLACK+DECKER con este producto.
ADVERTENCIA: El uso de cualquier accesorio no
recomendado por BLACK+DECKER para uso con esta
herramienta podría ser peligroso.
ATENCIÓN: Antes de comenzar a recortar, utilice sólo
el tipo de línea de corte apropiado.
Use el carrete de reemplazo BLACK+DECKER Modelo No.
AF-100, y la tapa de reemplazo RC-100.
Vuelva a cargar la línea de nylon (ya sea a granel o del
carrete de reemplazo pre-enrollado) como se muestra en
este manual.
• SÓLO USE LÍNEA DE NYLON REDONDA DE 1.65 mm
.065" DE DIÁMETRO. No utilice una línea de calibre
serrado o más grueso, ya que sobrecargarán el
motor y causarán sobrecalentamiento. Esta línea está
disponible en su concesionario local o centro de servicio
autorizado.
Page 32

ESPAÑOL
30
• Otras partes de repuesto (protecciones, tapas de
carretes, etc.) están disponibles a través de los centros
de servicio BLACK+DECKER. Para encontrar su ubicación
de servicio local, llame al: 1-800-544-6986 o visite www.
blackanddecker.com.
Reemplazo del carrete (Fig. M, N, O, P)
ADVERTENCIA: Para reducir el riesgo de lesiones
personales, apague la unidad y desconéctela de
la fuente de energía antes de realizar cualquier
ajuste o retirar/instalar conexiones o accesorios.
Un arranque accidental puede causar lesiones.
• Desconecte la podadora.
• Presione las lengüetas
15
y retire la tapa del carrete
21
del alojamiento del carrete
16
en el cabezal de la
podadora (Fig. M).
•
Fig. M
16
25
15
• Para mejores resultados, reemplace el carrete con el
Modelo BLACK+DECKER No. AF-100.
• Sujete el carrete vacío con una mano y el alojamiento
del carrete con la otra mano y jale el carrete hacia
afuera.
• Si la palanca
17
(Fig. N) en la base del alojamiento se
desprende, vuelva a colocarla en la posición correcta
antes de insertar el nuevo carrete en el alojamiento.
Fig. N
17
18
19
• Retire la suciedad y el césped del carrete y el
alojamiento.
• Afloje el extremo de la línea de corte y guíe la línea
hacia el ojal
19
(Fig. O).
Fig. O
19
• Tome el nuevo carrete y empújelo sobre el borde
18
del alojamiento (Fig. N). Gire el carrete ligeramente
hasta que se asiente. La línea debe sobresalir
aproximadamente a 136 mm (5-3/8") del alojamiento.
• Alinee las lengüetas de la tapa del carrete con las
ranuras
20
del alojamiento (Fig. P).
Fig. P
20
• Empuje la tapa sobre el alojamiento hasta que se
conecte firmemente en su lugar.
ATENCIÓN: Para evitar daños de la podadora, si la
línea de corte sobresale más allá de la cuchilla de
corte, córtela de modo que sólo llegue a la cuchilla.
Rebobinado de carrete de línea a granel
(Fig. Q, R, S)
(sólo use línea REDONDA de .065 pulg. de diámetro)
La línea a granel también está disponible para su compra
en su distribuidor local. NOTA: Los carretes enrollados
manualmente de la línea a granel probablemente se
enredarán con más frecuencia que los carretes enrollados
de fábrica de BLACK+DECKER. Para obtener mejores
resultados, se recomienda utilizar carretes enrollados en
fábrica.
Para instalar la línea a granel, siga los pasos a
continuación:
• Desconecte la podadora.
• Retire el carrete vacío de la podadora como se describe
en "REEMPLAZO DE CARRETE".
• Retire cualquier línea de corte restante del carrete.
• Realice un pliegue en el extremo de la línea de corte a
aproximadamente 19 mm (3/4")
22
. Alimente la línea
de corte en una de las ranuras de anclaje de línea
23
como se muestra en la figura Q.
Page 33

ESPAÑOL
31
•
Fig. Q
23
22
Inserte el extremo de 19 mm (3/4") de la línea a granel
en el orificio
26
en el carrete adyacente a la ranura
como se muestra en la figura R. Asegúrese que la línea
esté apretada contra el carrete como se muestra en la
figura R.
Fig. R
26
28
• Enrolle la línea de corte en el carrete en la dirección de
la flecha en el carrete. Asegúrese de enrollar la línea en
forma ordenada y en capas. No enrolle de forma cruzada
(Fig. S).
• Cuando la línea de corte enrollada alcance los
hundimientos
28
, corte la línea. (Fig. R).
• Coloque el carrete en la podadora como se describe en
"REEMPLAZO DE CARRETE".
ATENCIÓN: Antes de comenzar a recortar,
utilice sólo el tipo de línea de corte apropiado.
Fig. S
Solución de problemas
La podadora opera lentamente
1. Desconecte la podadora.
2. Revise que el alojamiento del carrete pueda girar
libremente.
3. Límpielo cuidadosamente si es necesario.
4. Revise que la línea de corte no sobresalga más de
aproximadamente 136 mm (5-3/8") del carrete. Si lo
hace, córtela de forma que sólo llegue a la cuchilla de
corte.
Reparaciones
ADVERTENCIA: Para asegurar la SEGURIDAD y
la CONFIABILIDAD del producto, las reparaciones,
el mantenimiento y los ajustes deben (inclusive
inspección y cambio de carbones) ser realizados
en un centro de mantenimiento en la fábrica
BLACK+DECKER u en un centro de mantenimiento
autorizado BLACK+DECKER. Utilice siempre piezas de
repuestoidénticas.
Para reparación y servicio de sus herramientas
eléctricas, favor de dirigirse al
Centro de Servicio más cercano
CULIACAN, SIN
Blvd.Emiliano Zapata 5400-1 Poniente Col.
San Rafael
(667) 717 89 99
GUADALAJARA, JAL
Av. La Paz #1779 - Col. Americana Sector
Juárez
(33) 3825 6978
MEXICO, D.F.
Eje Central Lázaro Cárdenas No. 18 - Local
D, Col. Obrera
(55) 5588 9377
MERIDA, YUC
Calle 63 #459-A - Col. Centro (999) 928 5038
MONTERREY, N.L.
Av. Francisco I. Madero 831 Poniente - Col.
Centro
(818) 375 23 13
PUEBLA, PUE
17 Norte #205 - Col. Centro (222) 246 3714
QUERETARO, QRO
Av. San Roque 274 - Col. San Gregorio (442) 2 17 63 14
SAN LUIS POTOSI, SLP
Av. Universidad 1525 - Col. San Luis (444) 814 2383
TORREON, COAH
Blvd. Independencia, 96 Pte. - Col. Centro (871) 716 5265
VERACRUZ, VER
Prolongación Díaz Mirón #4280 - Col.
Remes
(229) 921 7016
VILLAHERMOSA, TAB
Constitución 516-A - Col. Centro (993) 312 5111
PARA OTRASLOCALIDADES:
Si se encuentra en México, por favor llame al
(55) 5326 7100
Si se encuentra en U.S., por favor llame al
1-800-544-6986 (1–800 4-BLACK+DECKER)
Póliza de Garantía
IDENTIFICACIÓN DELPRODUCTO:
Sello o firma delDistribuidor.
Nombre delproducto:
Mod./Cat.:
Marca:
Núm. deserie:
Page 34

ESPAÑOL
32
(Datos para ser llenados por el distribuidor)
Fecha de compra y/o entrega delproducto:
Nombre y domicilio del distribuidor donde se adquirió
elproducto:
Este producto está garantizado por un año a partir de
la fecha de entrega, contra cualquier defecto en su
funcionamiento, así como en materiales y mano de obra
empleados para su fabricación. Nuestra garantía incluye
la reparación o reposición del producto y/o componentes
sin cargo alguno para el cliente, incluyendo mano de obra,
así como los gastos de transportación razonablemente
erogados derivados del cumplimiento de estecertificado.
Para hacer efectiva esta garantía deberá presentar su
herramienta y esta póliza sellada por el establecimiento
comercial donde se adquirió el producto, de no contar con
ésta, bastará la factura decompra.
Excepciones
Esta garantía no será válida en los siguientescasos:
• Cuando el producto se hubiese utilizado en condiciones
distintas a las normales;
• Cuando el producto no hubiese sido operado de acuerdo
con el instructivo de uso que se acompaña;
• Cuando el producto hubiese sido alterado o reparado
por personas distintas a las enlistadas al final de
estecertificado.
Anexo encontrará una relación de sucursales de servicio de
fábrica, centros de servicio autorizados y franquiciados en la
República Mexicana, donde podrá hacer efectiva su garantía
y adquirir partes, refacciones y accesoriosoriginales.
Registro en línea
Gracias por su compra. Registre su producto ahorapara:
• SERVICIO EN GARANTÍA: Si completa esta tarjeta,
podrá obtener un servicio en garantía más eficiente, en
caso de que exista un problema con suproducto.
• CONFIRMATCIÓN DE PROPIEDAD: En caso de una
pérdida que cubra el seguro, como un incendio, una
inundacíon o un robo, el registro de propiedad servirá
como comprobante decompra.
• PARA SU SEGURIDAD: Si registra el producto, podremos
comunicarnos con usted en el caso improbable que se
deba enviar una notificación de seguridad conforme a la
Federal Consumer Safety Act (Ley Federal de Seguridad
de Productos para el Consumidor).
Registro en línea en www.BLACK+DECKER.com/register.
GARANTÍA LIMITADA DE DOS AÑOS
Black & Decker (EUA) Inc. garantiza que este producto
está libre de defectos en material o mano de obra por un
periodo de dos (2) años a partir de la fecha de compra,
previendo que el producto se use en un ambiente
doméstico. Esta garantía limitada no cubre fallas debidas
a abuso, daño accidental o cuando se hayan realizado o
intentado reparaciones por cualquier otra persona diferente
a BLACK+DECKER y sus Centros de Servicio Autorizados.
Un producto defectuoso que cumpla con las condiciones
de la garantía establecidas en el presente se reemplazará o
reparará sin cargo en cualquiera de dos maneras:
La primera, que resultará en intercambios únicamente,
es devolver el producto al minorista en donde se compró
(previendo que la tienda sea un minorista participante).
Las devoluciones se deben realizar dentro del periodo
de tiempo de la política de intercambios del minorista.
Se puede requerir un comprobante de compra. Por favor
revise con el minorista su política de devolución específica
respecto a los límites de tiempo para devoluciones o
intercambios. La segunda opción es llevar o enviar el
producto (prepagado) a un Centro de Servicio propiedad
o autorizado por BLACK+DECKER para reparación o
reemplazo a opción de BLACK+DECKER. Se puede requerir
un comprobante de compra. Los centros de servicio
propiedad o autorizados por BLACK+DECKER se indican
en línea en www.blackanddecker.com. Esta garantía no
aplica a los accesorios. Esta garantía le da derechos legales
específicos y puede tener otros derechos que varían
de estado a estado o de una provincia a otra. Si tiene
cualquier pregunta, póngase en contacto con el gerente
de su Centro de Servicio BLACK+DECKER más cercano.
Este producto no está diseñado para uso comercial, y de
forma correspondiente, tal uso comercial de este producto
anulará la garantía. Se renuncia a todas las demás garantías,
expresas o implícitas, por medio del presente.
AMÉRICA LATINA: Esta garantía no aplica a productos
vendidos en América Latina. Para productos vendidos en
América Latina, revise la información de garantía específica
contenida en el empaque, llame a la compañía local o
consulte la página de Internet respecto a talinformación.
Imported by Black & Decker (U.S.), Inc.
701 E. Joppa Rd.
Towson, MD 21286
BlackandDecker.com
1-800-544-6986
Page 35

ESPAÑOL
33
Guía de Solución de Problemas
ASEGÚRESE DE SEGUIR LAS REGLAS DE SEGURIDAD E INSTRUCCIONES
Para ayuda con su producto, visite nuestra página de Internet en www.blackanddecker.com para una lista de centros de
servicio, o llame al Centro de Atención al Cliente de BLACK+DECKER al 1-800-544-6986.
PROBLEMA CAUSA POSIBLE POSIBLE SOLUCIÓN
- La desbrozadora no
arranca.
- El cable no está conectado.
- Fusible de circuito fundido.
- Interruptor de circuito activado.
- Cable o interruptor dañado.
- Conecte la herramienta en un
tomacorriente que funcione.
- Reemplace el fusible de circuito. (Si
el producto hace que el fusible del
circuito se funda repetidamente, deje
de usar inmediatamente y solicite que
le dé servicio un centro de servicio
BLACK+DECKER autorizado.
- Restablezca el interruptor de circuito.
(Si el producto hace que el interruptor
circuito se dispare repetidamente, deje
de usar inmediatamente y solicite que
le dé servicio un centro de servicio
BLACK+DECKER autorizado.
- Pida que el cable o interruptor sea
reemplazado por un centro de servicio
BLACK+DECKER autorizado.
- La línea de corte
se consume
rápidamente en
modo de borde.
- Borde demasiado lejos del
borde de las aceras o superficies
abrasivas.
- La línea de corte golpea la acera
o superficies abrasivas.
- Asegúrese que la rueda de borde esté
en el borde de la superficie y la línea
de corte esté colocada en el área de
césped o tierra que se va a bordear, no
en la acera o en la superficie abrasiva.
Page 36

Black & Decker (U.S.),Inc.
701 East Joppa Road, Towson, MD 21286
Part No. N527058
BESTE620
SEPTEMBER 2017
Copyright © 2017 BLACK+DECKER
 Loading...