

Page 1
RapidRoller™
MANUAL DE INSTRUCCIONES
MANUAL DE INSTRUÇÕES
INSTRUCTION MANUAL
Cat. N° BDPR400-LA
ADVERTENCIA: LEASE ESTE INSTRUCTIVO ANTES DE USAR EL PRODUCTO.
ADVERTÊNCIA: LEIA ESTAS INSTRUÇÕES ANTES DE USAR O PRODUTO.
WARNING: READ INSTRUCTION MANUAL BEFORE USING PRODUCT.
Español 6
Português 10
English 14
Page 2
PETROLEUMJELLY
LAGELEEDE PETROLE
LAJALEADEPETROLEO
1
2 17
4
5
6
7
1
3
2
1
4
2
3
4
8 9
10
11
12
13
14
15
16
2
1
FIG. A
FIG. F1
FIG. G
FIG. I1
FIG. J
FIG. F2
FIG. H
FIG. I2
FIG. K
FIG. B
FIG. D
FIG. C
FIG. E
3
2
1
1
1
2
2
1
Page 3
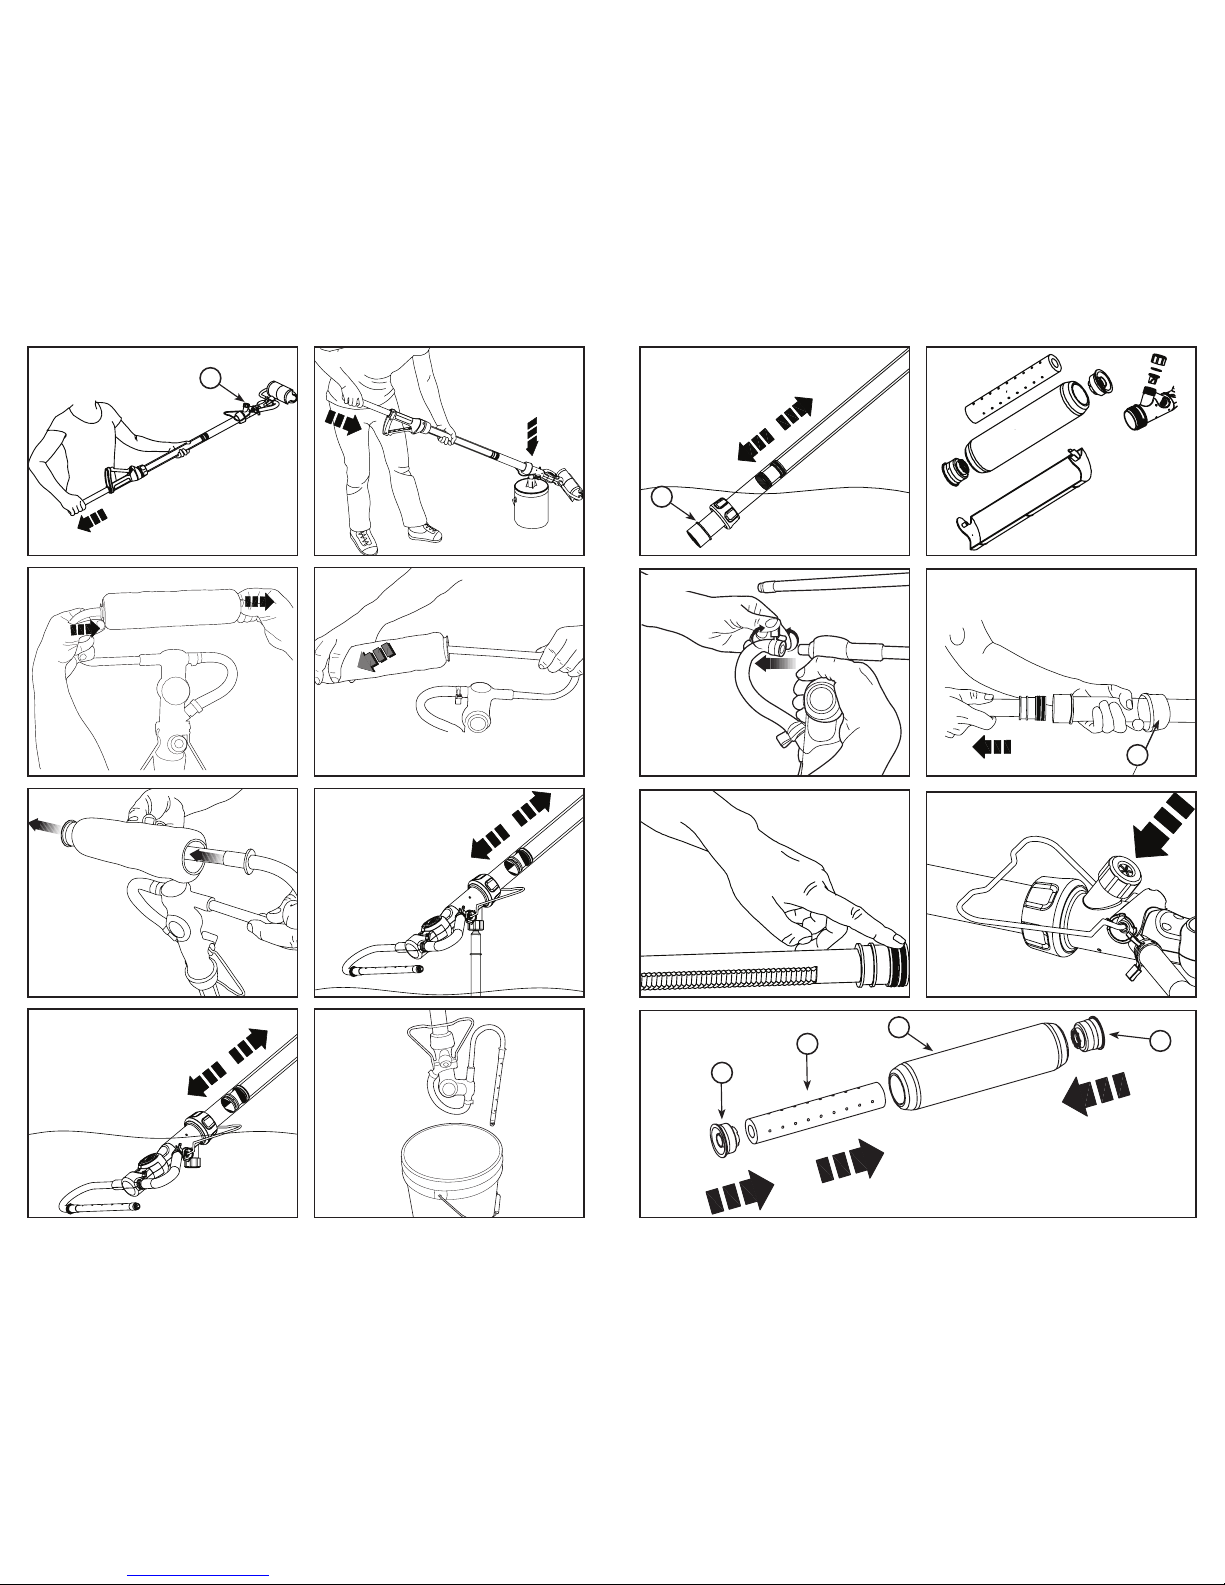
FIG. S
FIG. T2
FIG. V
FIG. X
FIG. R1
FIG. P
FIG. N
FIG. L
FIG. T1
FIG. U
FIG. W
FIG. R2
FIG. Q
FIG. O
FIG. M
1
2
1
1
4
1
3
Page 4

6 • ESPAÑOL ESPAÑOL • 7
NO DEVUELVA ESTE PRODUCTO A LA TIENDA,
comuníquese antes a las oficinas locales o con el Centro
de Servicio Black & Decker más cercano a usted.
CONSERVE ESTAS INSTRUCCIONES
¡Advertencia! Lea todas las instrucci ones antes de
operar el producto. El incumplimiento de todas y cada
una de las instrucciones enumeradas a continuación
puede provocar una descarga eléctr ica, un incendio
o lesiones graves.
INSTRUCCIONES DE SEGURIDAD
IMPO RTANT ES
ADVERTENCIA
f No utilice el rodillo RAPIDROLLER™ para propósitos
distintos de los descritos en este manual. Si no se
cumple con esta indicación, se podrían provocar
lesiones a personas y/o daños a la propiedad.
f Para uso únicamente con pinturas y tintes solubles en
agua y la mayoría de las pinturas y tintes a base de
aceite. No debe utilizarse con pinturas y tintes a
base de aceite que requieran soluciones de limpieza
más fuertes que los alcoholes minerales (consulte la
etiqueta en el envase original de la pintura). No
lo utilice con removedores de pintura ni similares.
Los líquidos que no sean pintura o tinte pueden dañar
el producto y provocar lesiones a personas o daños a
la propiedad.
f Lea la etiqueta del recipiente or iginal de la pintura y
siga todas las instrucciones. El incumplimiento de
estas instrucciones podría resultar en lesiones a las
personas o daños a la propiedad.
f Use protección adecuada para los ojos y otros
equipos de seguridad para la piel y protección para
las vías respiratorias al mezclar la pintura y al llenar,
utilizar y limpiar el producto. La pintura y sus vapores
pueden provocar lesiones personales.
f Para reducir el riesgo de lesiones, utilícelo
únicamente en un área bien ventilada.
f Limpie y enjuague el producto minuciosamente
después de utilizarlo con una determinada pintura. El
resultado de la mezcla de distintas pinturas en el
producto podría resultar en daños a la propiedad.
f Para reducir el r iesgo de lesiones, utilic e únicamente
los accesorios recomendados.
f Al realizar el mantenimiento, utilice únicamente
piezas de repuesto idénticas. El incumplimiento de
esta instrucción podría resultar en lesiones personal es.
Consejos para pintar con el rodillo RAPIDROLLER™
f Utilice únic amente una cubierta para rodillo per forado.
Las cubiertas para rodillos estándar no funcionarán.
f Antes de pintar, inspeccione para detectar pelusa en
la cubierta del rodillo; si es necesario, lávela y séquela
antes del uso.
f Al utilizar el rodillo RA PIDROLLER™ para la primera
aplicación, se necesitará la mayor parte de la pintura
en el tubo del rodillo para impregnar la cubier ta del
rodillo. Es posible que sea necesario llenar lo
nuevamente.
f Para evitar que el rodillo gotee, manténgalo en
movimiento mientras empuja el émbolo hacia adentro
o mientras oprime el gatillo.
f Deje de empujar el émbolo hacia adentro o de oprimir
el gatillo si el rodillo comienza a patinar, resbalar o
got ear.
f Al pintar en áreas estrechas, llene parcialmente el
rodillo RAPIDROLLER™ o pivote el armazón. Esto
reduce su longitud total.
f Al dejar el rodillo RAPID ROLLER™ sin usar durante
un período prolongado, envuélvalo en una bolsa
plástica para evitar que se seque y extraiga la mayor
cantidad de aire posible de la misma.
f Asegúrese de que el tipo de pintura que utiliza se
pueda limpiar c on alcohol mineral (para pinturas a
base de aceite) o una solución de agua tibia y jabón
(para pinturas solubles en agua c omo el látex).
f Utilice una tela u otro material para proteger los pisos
y cualquier otro objeto en la habitación que no desee
salpicar accidentalmente con pintura.
f Al utilizar el soporte, siempre pivote el cabezal a
la posición recta y libere presión tirando levemente del
émbolo hacia afuera.
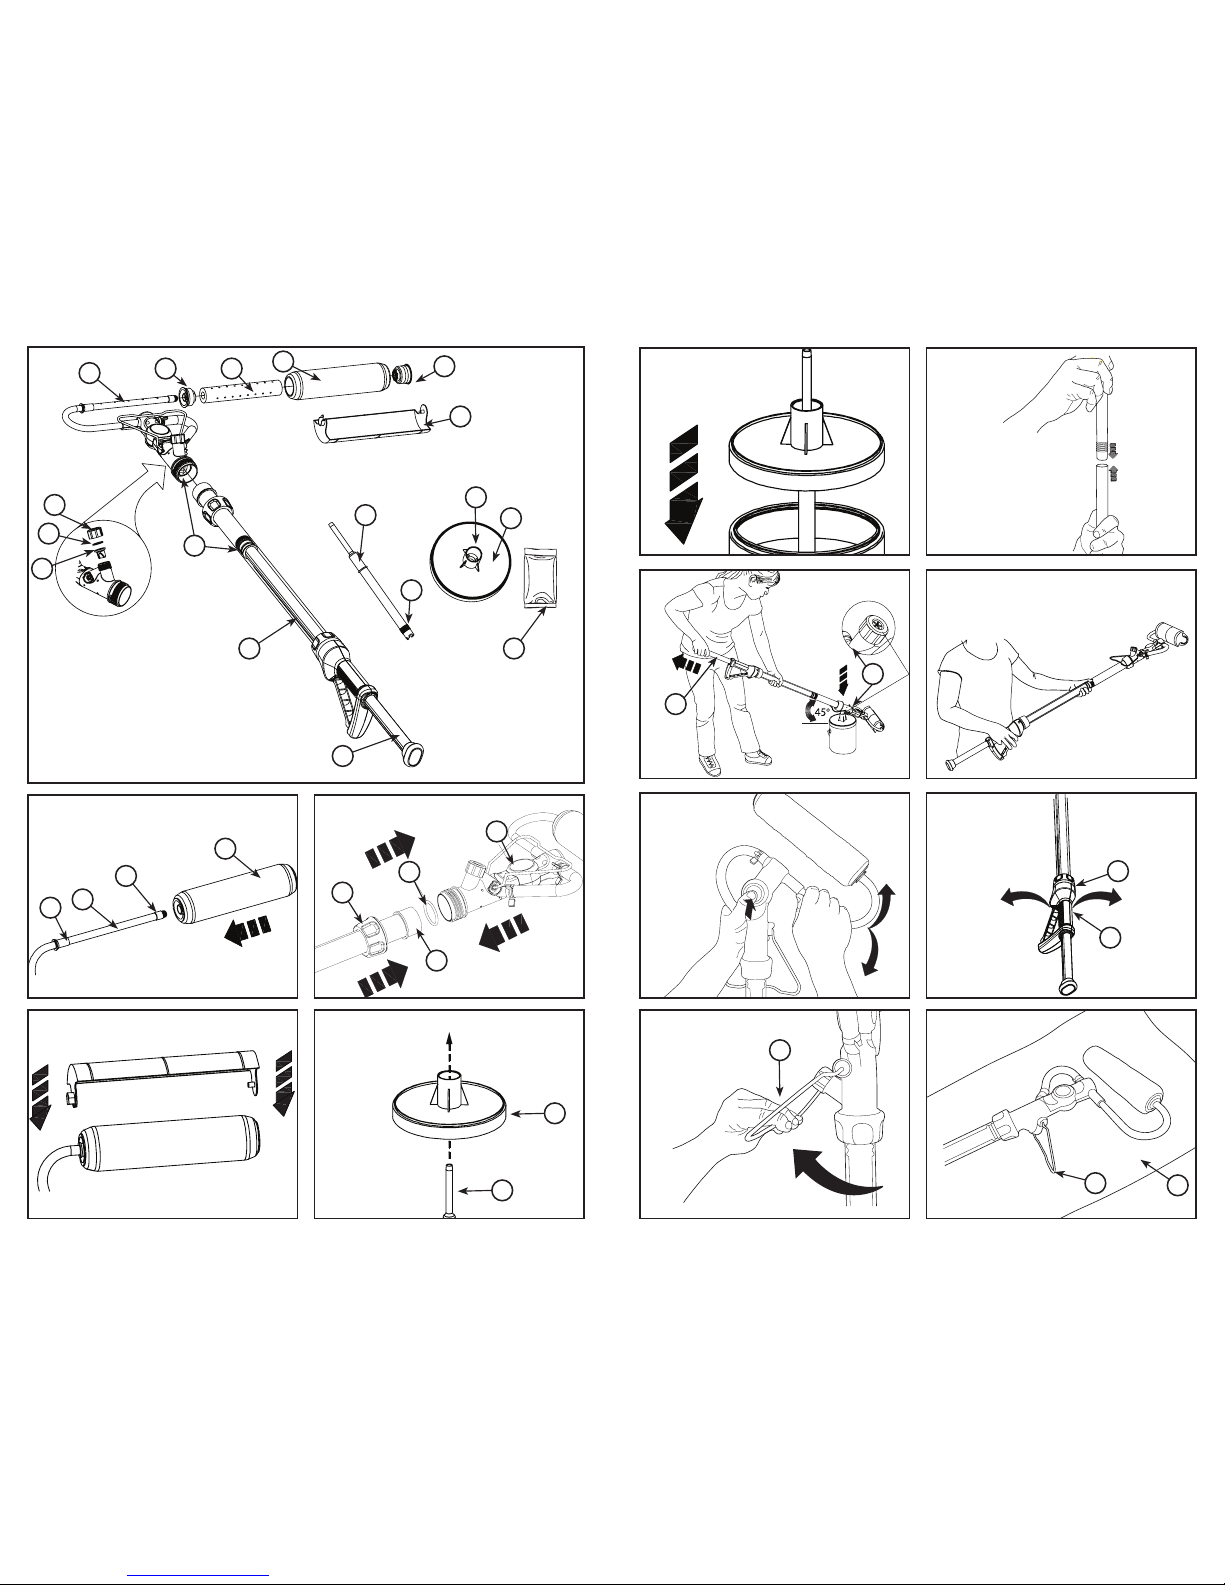
CARACTERISTICAS (FIG. A)
1. Émbolo
2. Ensamblaje del mango
3. Juntas tóricas
4. Válvula pico de pato
5. Sello rascador
6. Cubierta anaranjada del tapón de llenado
7. Armazón del rodillo
8. Tapón del extremo interior
9. Núcleo del rodillo
10. Rodillo perforado de 9 mm (3/8”)
11. Tapón del extremo exterior
12. Protector contra salpicaduras
13. Cubier ta para la lata
14. Corona
15. Tubo de llenado
16. Nervaduras de la extensión de manguera
17. Vaselina
INSTRUCCIONES DE SEGURIDAD
IMPO RTANT ES
Preparación del rodillo RAPIDROLLER™ para
pintar
1. Lubrique las piezas (1) y (3) utilizando la vaselina
provista. Conecte el rodillo ensamblado (4) al armazón
(2) del rodillo R APIDROLLER™ (Fig. B) .
Asegúrese de que el ensamblaje del rodillo encaje
en el sujetador de bloqueo sobre el tapón del extremo
exterior produciendo un chasquido.
2. Empuje el armazón del rodillo (1) sobre el extremo del
ensamblaje del mango (4) asegurándose de que la
junta tórica (2) esté asentada dentro del armazón del
rodillo. Enrosque el collar del ensamblaje del mango
(3) de manera que quede bien ajustado sobre las
roscas del ar mazón del rodillo (1) (Fig. C).
3. El protector contra salpicaduras ayuda a reducir las
salpicaduras al pintar, especialmente los cielos razos.
Ubique el protector contra salpicaduras haciéndolo
girar alrededor del armazón del rodillo (Fig. D).
Nota: El protector contra salpicaduras sir ve además
para evitar que el rodillo RA PIDROLLER™ gotee
cuando se apoya sobre el soporte y no está en uso.
Simplemente ubique el protector contra salpicaduras
debajo del rodillo.
Llenado del rodillo RAPIDROLLER™ con pintura
1. Inserte el extremo pequeño del tubo de llenado (1) a
través del orificio en la par te inferior de la tapa para la
lata de pintura (2). Empújelo hacia adentro hasta que
quede ajustado contra el borde del tubo de llenado
(Fig. E).
2. Encaje la tapa para la lata de pintura sobre la lata de
pintura (Fig. F1). Lubrique la parte sup erior del vástago
del tubo de llenado con una cantidad pequeña de
vaselina incluida en la caja.
Nota: La cubierta para la lata no c alzará en algunos
recipientes de pintura. Ésta se puede estirar sobre
latas más grandes o comprimirse levemente para que
calce con latas más pequeñas.
Para llenar el rodillo RAPIDROLLER™ cuando la
cubierta para la lata no calza con el recipiente de
pintura, omita la cubierta para la lata y coloque el tubo
de llenado directamente dentro del recipiente.
Sostenga el tubo de llenado con la mano para
estabilizarlo según se requiera.
Una pinza está disponible para sujetar el tubo de
llenado a la lata c omo un accesorio opci onal para
su uso con recipientes de otros t amaños. Consulte
“Accesorios”.
Para recipientes más profundos, como cubos de
19 l (5 galones), ajuste un trozo de tubería
transparente de 19 mm (¾ pulgada) de diámetro
interno sobre los resaltes del tubo de llenado para
extenderlo (Fig. F2) y use la pinza para sujetarlo al
costado del c ubo. Corte el extremo inferior del tubo
con un pequeño ángulo. Hay tubería disponible en la
mayoría de las ferreterías.
3. Sostenga el rodillo R APIDROLLER™ en un ángulo de
45 grados y coloque la válvula de llenado (1) sobre el
tubo de llenado. Empuje suavemente el rodillo
RAPIDROLLER™ hacia abajo hasta que llegue al
fondo del tubo de llenado (Fig. G).
Asegúrese de que la cubierta anaranjada del
tapón de llenado (1) esté com pletamente cubi erto
por la corona de la cubierta p ara la lata.
Nota: Retire el separador de cartón y oprima el gatillo
para liberar el émbolo.
Tire del émbolo (2) completamente hacia atrás para
llevar pintura al ro dillo RAPIDROLLER™ . (Es posible
que sea necesario aplicar algo de fuerza para
hacerlo). Una vez que el tubo esté lleno, todo
está listo para c omenzar a pintar. Levante el rodillo
RAPIDROLLER™ lentamente para separarlo
del tubo de llenado.
Nota:Si no logra un llenado completo la primera
vez, empuje el émbolo lentamente para devolver algo
de pintura a la lata y luego vuelva a tirar del émbolo
asegurándose de que el ángulo sea el correcto y
de que la cubierta anaranjada del tapón de llenado
esté completamente asentada.
Pintado con el rodillo RAPI DROLLER™
1. Comience a m over el rodillo sobre la pared y empuje
el mango del émbolo u oprima el gatillo para alimentar
pintura hacia la cubierta del rodillo.
Nota: Es posible que la impregnación inicial del rodillo
requiera toda la pintura del primer llenado. Rellene el
rodillo RAPIDROLLER™ según se requiera (Fig. H).
CONSEJOS ÚTILES
f El gatillo só lo debe oprimirse cuand o se requiere pintura.
f Si se produce un patrón de puntos al pintar, aplique
más pintura.
f Si el rodillo se resbala sobre la superfic ie, aplique
menos pintura.
f Es posible que note la presencia de vaselina dentro
del mango. Esto es necesario y ayudará al
funcionamiento del mismo sin afectar la pintura.
2. El cabezal del rodillo se puede ajustar en tres ángulos
distintos. Oprima el botón anaranjado del cabezal del
rodillo para c ambiar el ángulo de recto (0 grados) a
40 u 80 grados. Utilice la posición recta para pintura
en general y los ángulos de 40 u 80 grados para
lugares difíciles de alcanzar o al pintar cerc a de cielos
razos o bordes (Fig. I1).
Nota: El mango (1) se puede hacer girar para una
mayor comodidad al pintar cuando el armazón del
rodillo esté c on un ángulo.
Page 5

8 • ESPAÑOL ESPAÑOL • 9
Para hacer girar el mango a la posic ión deseada,
afloje el collar (2), ajuste el mango y vuelva a apretar
el collar (Fig . I2).
3. Cuando no esté en uso, apoye el rodillo v sobre el
cómodo soporte (1) (Fig. J).
f Al utilizar el soporte, el rodillo RAPIDROLLER™
siempre debe estar sobre una tela protectora (2) o
sobre periódicos en caso de que gotee (Fig. K).
f Al pintar, el sopor te debe apuntar en dirección
opuesta al rodillo para evitar salpicaduras sobre el
mismo.
f Siempre haga girar el rodillo a la p osición recta antes
de apoyarlo sobre el soporte.
f Para evitar goteos, libere la presión del rodillo
RAPIDROLLER™ tirando del émbolo levemente hacia
afuera.
Nota: La colocación del protector contra salpicaduras
al utilizar el soporte ayuda a asegurar la contención
de todo goteo de pintura.
Limpieza del rodillo RAPIDROLLER™
1. Tire del émbolo hacia atrás para extraer el exceso de
pintura del armazón del rodillo al tubo (Fig. L).
Consejo: Coloque un pulgar sobre la cubierta del
tapón de llenado naranja (1) para ayudar a ex traer la
mayor cantidad de pintura posible del armazón antes
de mover el émbolo hacia atrás.
2. Devuelva la pintura del rodillo RAPID ROLLER™ a
la lata sosteniendo el rodillo en un ángulo de 45
grados y empujando la válvula de llenado sobre el
tubo de llenado hasta que llegue al fondo del tubo
de llenado. Asegúrese de que la válvula anaranjada
de llenado esté c ompletamente cubiert a por la corona
de la tapa para la lata. Empuje el émbo lo hasta que se
detenga (Fig. M).
3. Raspe el exceso de pintura desde el rodillo hacia
la lata. Retire el rodillo sujetando el tapón del extremo
exterior y el armazón del rodillo, y utilizando el pulgar
de la otra mano para empujar el rodillo hacia afuera
como se muestra (Fig. N).
Consejo: Use guantes desechables o coloque una
bolsa plástica sobre el rodillo para mantener sus
manos limpias.
4. Retire el tapón del extremo interior insertando el
tubo metálic o del armazón del rodillo dentro del tapón
alrededor de 25 mm (1 pulgada) y con un ángulo
pequeño. Tire del armazón del rodillo suavemente
hacia usted (Fig. O). Retire el núcleo del rodillo.
Vacíe todo remanente de pintura. Retire el tapón
exterior insertando el armazón del rodillo dentro del
rodillo y empujando el tapón suavemente hacia afuera
(Fig. P).
5. Retire el tubo de llenado de la tapa para la lata de
pintura y empújelo directamente dentro de la válvula
de llenado. Al limpiar pinturas solubles en agua,
sumerja el tubo de llenado dentro de agua jabonosa
tibia y mueva el émbolo hacia adentro y hacia afuera
5 veces o más. Al utilizar pinturas a base de aceite,
en lugar de agua utilice un solvente de limpieza
adecuado según lo indicado en el recipiente del
fabricante y elimínelo debidamente (Fig. Q).
Consejo: Utilice un lavabo, una tina de lavado o
cualquier recipiente que permita contener agua para
efectuar el proceso de lavado antedicho.
Reemplace el agua cuando se ensucie o al ir al paso
siguiente.
6. Retire el tubo de llenado. Luego, sumerja el armazón
del rodillo y, asegurándose de que la válvula de
llenado también quede bajo el agua, mueva el émbolo
hacia adentro y hacia afuera 5 veces o más (Fig. R1).
Consejo: Al utilizar un recipiente pequeño, pivote el
armazón del rodillo hasta la posición de 80 grados
para que quepa dentro del mismo (Fig. R2).
7. Retire el armazón del rodillo y siga limpiando según
se requiera. Sumerja el mango en el agua jabonosa
tibia y mueva el émbolo hacia adentro y hacia afuera
5 veces o más (Fig. S).
Consejo: Limpie los restos de pintura del extremo del
émbolo (1).
8. Desenrosque el tapón de la válvula y retire el
sello rascador y la válvula pic o de pato para
limpiarlos. Enjuague todas las piezas restantes y
drene todo el líquido del rodillo R APIDROLLER™
(Fig. T1).
9. Quite la tubería del armazón (si fuera necesario)
aplicando las pinzas para manguera. Lave el armazón
y la tubería. Vuelva a colocar la tubería y sujétela con
las pinzas para manguera (Fig. T2).
10. Siempre compre una cubierta per forada para el
rodillo. Una cubierta estándar para rodillos no
funcionará.
Lubricación del rodillo RAPIDROLLER™
La lubricación contribuye a un funcionamiento normal y
debe realizarse después de la limpieza y antes de c ada uso.
1. Gire el collar del ensamblaje roscado hacia la
izquierda (1) cerca del gatillo hasta que el ensamblaje
del tubo principal se deslice hacia afuera.
Nota: Al reensamblar, el collar roscado negro (1)
debe apuntar hacia el mango del gatillo (Fig. U).
2. Aplique vaselina alrededor y entre los sellos de goma
que se muestran. Vuelva a ensamblar asegurándose
de que los sellos de goma no estén torcidos ni
dañados. Ajuste el collar de bloqueo (Fig. V).
3. Aplique vaselina en la válvula pico de pato y el sello
rascador, y vuelva a c olocarlos dentro de la
unidad enroscando nuevamente el tapón de la
válvula en su lugar (Fig. W).
4. Aplique vaselina en los sellos interiores de los
tapones de los extremos (3 y 4) y luego ensamble el
rodillo colocando el núcleo (1) dentro de la
cubierta del rodillo (2) y fijando los tapones de los
extremos como se muestra (Fig. X).
ACCESORIOS
Los accesorios que se recomiendan para uso con el rodillo
RAPIDROLLER™ están disponibles en su distribuidor
local o el centro de mantenimiento autorizado.
¡Advertencia! El empleo de cualquier accesori o no
recomendado para uso con est a herramienta puede ser
peligroso.
Pinza para sujetar el tubo de llena do a la lata: para
uso con recipientes que no calcen con la cubierta para
lata redonda provista. Disponibles en los centros de
mantenimiento de Black & Decker. Al utilizar recipientes
más grandes, como un cubo de 19 l (5 galones), coloque
la pinza para sujetar el tubo de llenado al recipiente con un
trozo de tubería de 19 mm (3/4 pulgada) de D.I. disponible
en la mayoría de los centros de artículos para el hogar.
La tubería calza sobre el extremo del tubo de llenado con
nervaduras. Las fundas per foradas para rodillos est án
disponibles en ferreterías.
GUÍA DE RESOLUCIÓN DE PROBLEMAS
¡PROBLEMA¡
¿QU É SUCE DE? QUÉ HACER…
La pintura t arda mucho en aparec er sobre la superf icie. Consulte la p rimera nota de “Pin tado con el rodillo
RA PIDROL LER™ ”. superf icie. Es posible que se r equiera un
segundo llenado.
Se absorb e aire en lugar de pintura ha cia el mango. Empuje el man go lentamente para expu lsar el aire. Extrai ga y
vuelva a inse rtar el producto e n el tubo de llenado. Aseg úrese
de que el tubo de l lenado esté complet amente asentado en el
cuerpo de l a válvula. Si es necesa rio, aplique vaselin a en el tubo
de llenado pa ra facilitar que se asi enten el tubo de llenado y e l
cuerpo de l a válvula. Asegúrese d e que la junta tórica e sté bien
lubricada y se encuentre en su lugar entre el ensamblaje del
mango y el arm azón del rodillo.
Dificultad para insertar o retirar el tubo de llenado de la válvula. Aplique vas elina en la entrada del o rificio de llenad o y/o en el
de la válvula. t ubo de llenado.
Dificul tad para mover el mango h acia adentro o hacia af uera. Lubrique l os sellos de goma en el ext remo del émbolo o hag a
hacia afue ra. girar el émbolo leve mente para romper el sel lo.
La pintura se s ale por los tapones d e los extremos. Asegúres e de que ambos tapones d e los extremos estén bi en
ajustados a dentro y al ras con el ext remo de la cubiert a del
rodillo. Si e stán bien, retire los t apones de los extrem os, elimine
todo resto de p intura antigua y vuelv a a lubricar con vasel ina.
La pintura se s ale por la válvula de lle nado. Lubrique l a válvula con vaselina. A segúrese de que el sel lo
rascador e sté en su lugar.
Page 6

10 • PORTUGUÊS PORTUGUÊS • 11
NÃO DEVOLVA ESTE PRODUTO NA LO JA,
entre em contato com o Centro de Serviço Black & Decker
mais próximo de sua localidade.
REGRAS GERAIS DE SEGURANÇA
Aviso! Leia e compreenda todas as instruç ões.
O descumprimento das instruções abaixo pode causar
choques elétricos, incêndio e/ou lesões pessoais graves.
INSTRUÇÕES DE SEGURANÇA
IMPO RTANT ES
ADVERTÊNCIA:
f Não use o RAPIDROLLER™ para outras finalidades
além das descr itas neste manual. Não fazer isso pode
resultar em ferimentos pessoais e danos à
propriedade.
f Para ser usado somente com tintas e corantes
solúveis em água e a maioria dos à base de óleo. Não
deve ser usado em tintas e corantes à base de óleo
que exigem soluções de limpeza mais fortes que
aguarrás (consulte o rótulo no recipiente original da
tinta). Não use com removedores de tint a ou similares.
Outros líquidos além de tinta ou corantes podem
danificar o produto e resultar em lesões pessoais ou
danos à propriedade.
f Leia o rótulo no recipiente original da tinta e siga
todas as instruções. Não fazer isso pode resultar em
ferimentos pessoais ou danos à propriedade.
f Use proteção ocular e outros equipamentos de
segurança para a pele e proteção respiratória
adequados ao misturar a tinta e ao abastecer, usar
e limpar o produto. Tinta e seus vapores podem
causar lesões pessoais.
f Para reduzir o risco de lesões, use somente em áreas
bem ventiladas.
f Limpe e enxágue c ompletamente o produto após usar
com uma tinta específica. Misturar tintas diferentes no
produto pode resultar em danos à propriedade.
f Para reduzir o risco de lesões, use somente os
acessórios recomendados.
f Ao realizar manutenção, use somente peças de
reposição idênticas. Não fazer isso pode resultar em
ferimentos pessoais.
Dicas de pintura com o RAPIDROLLER™
f Use somente rolo perfurado. Rolos padrão não
funcionarão.
f Inspecione o rolo quanto a fiapos antes de pintar; se
necessário, lave e seque antes de usar.
f Ao usar o RAPIDROLLER™ na primeira aplicação,
será necessária a maior par te da tinta no tubo do
RAPIDROLLER™ para saturar o rolo. Pode ser
necessário um segundo abastecimento.
f Mantenha o rolo se movendo enquant o pressiona
o êmbolo para dentro ou apert a o gatilho, para evitar
gotejamento.
f Pare de empurrar o êmbolo para dentro ou de apert ar
o gatilho se o rolo começar a esc orregar, deslizar ou
vaz ar.
f Ao pintar em áreas apertadas, encha parcialmente o
RAPIDROLLER™ ou articule a estrutura. Isso reduz
seu comprimento total.
f Ao deixar o RAPIDROLLER™ sem uso p or um longo
período, enrole o rolo em um saco de plástico para
evitar ressecamento, removendo o máximo possível
de a r.
f Certif ique-se de que o tipo de tint a usado pode ser
limpo com aguarrás (para tintas à base de óleo) ou
uma solução de água morna e sabão (para tintas
solúveis em água c omo látex).
f Use papel ou plástico para proteção do piso e
qualquer outra coisa no ambiente que você não
deseja que fique acidentalmente respingada de tinta.
f Quando usar suporte vert ical, sempre articule o
cabeçote para a posição reta e alivie a pressão
puxando o êmbolo ligeiramente para fora.
CARACTERÍSTICAS (Fig. A)
1. Êmbolo
2. Conjunto do cabo
3. Anéis O
4. Válvula bico de pato
5. Vedação limpadora
6. Proteção da tampa de enchimento laranja
7. Est rutura do rolo
8. Tampa da extremidade interna
9. Núcleo do rolo
10. Rolo perfurado de 3/8 pol.
11. Tampa da extremidade externa
12. Proteção anti-borrifos
13. Tampa da lata
14. Proteç ão
15. Tubo de enchimento
16. Nervuras da extensão da mangueira
17. Vaselina
Preparação do RAPIDROLLER™ com tinta
1. Lubrifique a peça (1) e (3) usando a vaselina
fornecida. Conecte o rolo m ontado (4) na estrutura
do RAPID ROLLER™ (2). Certifique- se de que o
conjunto encaixe com um clique na presilha de trava
da tampa da extremidade externa (Fig. B).
2. Pressione a estrutura do rolo (1) sobre a extremidade
do cabo (4), verificando se o anel O (2) está
assentado dentro da estrutura do rolo.
Rosqueie o colar do conjunto do c abo (3) firmemente
nas roscas da estrutura do rolo (1) (Fig. C).
3. A proteção anti-b orrifos ajuda a reduzir os borrifos
ao pintar, especialmente em tetos. Posic ione a
proteção anti-borrifos girando-a ao redor da estrutura
do rolo (Fig. D).
Nota: a proteç ão anti-borrifos também é útil
para evitar gotejamento quando o RAPIDROLLER™
está apoiado no suporte ver tical e não está em uso.
Simplesmente posicione a proteção anti-borrifos
embaixo do rolo.
Abastecimento do RAPIDROLLER™ com tinta
1. Insira a extremidade pequena do tubo de enchimento
(1) através do furo no lado inferior da tampa da lata de
tinta (2) (Fig. E).
Empurre para dentro até ficar apertado e na saliência
do tubo de enchimento.
2. Encaixe a tampa da lata de tint a na lata (Fig. F1).
Lubrifique a parte super ior da haste do tubo de
enchimento com um pouco da vaselina incluída na
caixa.
Nota: a tampa da lata não encaixará em alguns
recipientes de tinta. Ela pode ser esticada sobre
latas maiores ou comprimida ligeiramente
comprimindo-a para se adaptar a latas menores. Para
abastecer o R APIDROLLER™ quando a tampa da
lata não encaixar em seu recipiente de tinta,
omita a tampa da lata e coloque o tubo de enchimento
diretamente no recipiente. Segure o tubo de
enchimento com a mão para estabilizar, se
necessário. Uma presilha do tubo de enchimento
na lata está disponível como acessório adicional para
utilizar com recipientes de outros tamanhos. Consulte
“Acessórios”. Para recipientes mais profundos como
baldes de 18 litros, adapte uma seção de ¾ pol. de
diâmetro inter no de tubo transparente sobre as
nervuras do tubo de enchimento para prolongá-lo
(Fig. F2) e prenda na lateral do balde com a presilha.
Corte a extremidade inferior do tubo ligeiramente em
ângulo. O tubo est á disponível na maioria das lojas de
ferragens.
3. Segure o RAPIDROLLER™ em um ângulo de 45
graus e coloque a válvula de enchimento (1) sobre
o tubo de abastecimento. Empurre suavemente o
RAPIDROLLER™ para baixo até assentar no tubo de
enchimento (Fig. G).
Verifique se a proteção da tampa de enchimento
laranja (1) está c oberta completamente pela
proteção da tampa da lata.
Nota: Remova o espaçador de papelão e pressione
o gatilho para liberar o êmbolo. Puxe o êmbolo (2)
totalmente para trás para puxar tinta para o
RAPIDROLLER™. (Pode ser necessár io um pouco de
força). Quando o tubo estiver cheio você está pronto
para começar a pintar. Eleve o RAPIDROLLER™
lentamente do tubo de enchimento.
Nota: se não obt iver um enchimento completo na
primeira vez, pressione o êmbolo lentamente para
retornar tint a para a lata e em seguida puxe o êmbolo
para trás, certificando-se de que o ângulo esteja
correto e a proteção da tampa de enchimento laranja
esteja totalmente assentada.
Pintura com o RAPIDROLLER™
1. Inicie rolando na parede e pressione o cabo do
êmbolo ou aperte o gatilho par a alimentar tinta no rolo.
Nota: a saturação inicial do rolo pode requerer toda a
quantidade de tinta do primeiro enchimento.Abasteça
o RAPIDROLLER™ conforme necessário (Fig. H).
Dicas úteis
f O gatilho precisa ser pressionado somente quando
for necessária tinta.
f Se estiver obtendo um padrão manchado ao pintar,
aplique mais tinta.
f Se o rolo estiver deslizando na superfície, aplique
menos tinta.
f Você pode obser var vaselina dentro do cabo. Is so é
necessário, ajudará em sua operação e não afeta a
tinta.
2. O cabeçote do rolo pode ser ajustado em três ângulos
diferentes. Pressione o botão laranja no cabeç ote do
rolo para alterar o ângulo, de reto para 40 ou 80
graus. Use o reto par a pintura geral e os ângulos
de 40 ou 80 graus para locais difíceis de alcanç ar ou
ao pintar próximo do teto ou de guarnições (Fig. I1).
Nota: o cabo (1) pode ser girado para tornar mais
confort ável pintar com a estrutura do r olo inclinada.
Para girar o cabo para a posição desejada, afrouxe o
colar (2), ajuste o cabo e reaperte o colar (Fig. I2).
3. Quando não estiver em uso apoie o RAPIDROLLER™
no suporte adequado (1) (Fig. J).
f Quando usar o suporte, o RA PIDROLLER™ deve
ficar sempre sobre um papel ou plástico para
proteção do piso (2) ou sobre jornal em caso de
gotejamentos (Fig. K).
f Ao pintar, o suporte deve ficar longe do rolo, para
evitar que fique respingado.
f Sempre gire o rolo para a posição reta antes de
apoiá-lo no suporte.
f Para evitar gotejamentos, alivie a pressão no
RAPIDROLLER™ puxando o êmbolo para fora
ligeiramente.
Nota: acoplar a proteção anti-b orrifos ao usar o
suporte ajuda a assegurar que qualquer gotejamento
de tinta seja contido.
Limpeza do RAPIDROLLER™
1. Puxe o êmbolo par a trás para puxar o excesso de
tinta da estrutura do rolo para o tubo (Fig. L).
Dica: coloque o polegar sobre a proteção da tampa
Page 7

12 • PORTUGUÊS PORTUGUÊS • 13
de enchimento laranja (1) para ajudar a remover a
maior parte da tinta da estrutura antes de puxar o
êmbolo para trás.
2. Retorne a tinta do RAPIDROLLER™ à lata segurando
o RAPIDROLLER™ em um ângulo de 45 gr aus e
empurrando a válvula de enchimento no tubo de
enchimento até as sentar no tubo. Verifique se a
válvula de enchimento laranja está completamente
cobert a pela proteção da tampa da lata.
Empurre o êmbolo até que ele pare (Fig. M).
3. Raspe o excesso de tinta do rolo para dentro da lata.
Remova o rolo segurando a tampa da extremidade
externa e a estr utura do rolo e usando o polegar da
outra mão para empurrar o rolo c omo mostrado.
Dica: use luvas descar táveis ou use um saco plástico
sobre o rolo par a manter as mãos limpas (Fig. N).
4. Remova a tampa da extremidade interna inser indo o
tubo de metal da estrutura do rolo na tampa cerc a de
1 polegada e em ângulo. Puxe a estrutura do rolo
suavemente em sua direção (Fig. O). Remova o núcleo
do rolo. Esvazie toda a tinta remanescente. Remova a
tampa externa inserindo a estrutura do rolo no rolo e
empurrando suavemente a tampa par a fora (Fig. Q).
5. Remova o tubo de enchimento da tampa da lata de
tinta e empurre-o diretamente para dentro da válvula
de enchimento. Ao limpar tintas solúveis em água,
submerja o tubo de enchimento em água morna com
sabão e puxe o êmbolo para fora e para dentro 5
vezes ou mais. Quando usar tintas à base de óleo, em
vez de água use o solvente apropriado listado no
recipiente do fabricante e descarte- o corretamente.
Dica: use uma pia, uma tina ou qualquer recipiente
que retenha água para executar o processo de
lavagem acima. Substitua a água quando estiver suja
ou ao passar para a próxima etapa.
6. Remova o tubo de enchimento. Em seguida submerja
a estrutura do rolo e verificando se a válvula de
enchimento também está sob a água, movimente o
êmbolo para fora e para dentro 5 vezes ou mais
(Fig. R1).
Dica: quando usar um recipiente pequeno, ar ticule a
estrutura do rolo para a posiç ão de 80 graus para
ajustar dentro do recipiente (Fig. R2).
7. Rem ova a estrutura do rolo e continue limpando se
necessário. Submerja o cabo na água morna com
sabão e mova o êmbol o para dentro e para fora 5
vezes ou mais (Fig. S).
Dica: esfregue a tinta restante da extremidade do
êmbolo (1).
8. Desrosqueie a tampa da válvula e remova a gaxeta e
a válvula bico de pato para limpar. Enxágue to das as
peças restantes e drene todo o fluido do
RAPID ROL LER™ (Fig. T1).
9. Remova o tubo da estrutura (se necessár io)
comprimindo as presilhas de mangueira. Lave
a estrutura e o tubo. Reinstale o tubo e fixe com as
presilhas de mangueira (Fig. T2).
10. Sempre adquira um rolo perfurado. O ro lo padrão não
funciona.
Lubrificação do RAPIDROLLER™
A lubrific ação auxilia a operação normal e deve ser feita
após a limpeza e após cada utiliz ação.
1. Gire o colar de montagem rosqueado próximo do
gatilho no sentido anti-horário (1) até o conjunto do
tubo principal deslizar para fora.
Nota: ao montar novamente, o colar r oscado preto (1)
deve ficar voltado para o cabo do gatilho (Fig. U).
2. Aplique vaselina ao redor e entre as vedações de
borracha mostradas. Monte novamente
certif icando-se de que as vedações de borracha não
estejam torcidas ou danificadas. Aperte o colar de
trava (Fig. V).
3. Aplique vaselina na válvula bico de pato e na gaxeta
e reinstale dentro da unidade rosqueando a tampa da
válvula novamente no lugar (Fig. W).
4. Aplique vaselina nas vedações internas nas tampas
da extremidade (3 e 4) e monte o rolo colocando o
núcleo (1) dentro do rolo (2) e fixando as tampas das
extremidades como mostrado (Fig. X).
SOLUÇÃO DE PROBLEMAS
¡PROBLEM A¡
¿O QUE ESTÁ ACONTECEND O? O QUE FAZER ...
Leva muito temp o para a tinta aparece r na superfície. Consulte a pr imeira nota em “Pin tura com o RAPIDR OLLERTM”.
Pode ser necessário um segundo enchimento.
Ar em vez de tint a é puxado para dentro do c abo. Empurre len tamente o cabo para de ntro para expelir o ar.
Remova e insir a novamente o produto no tub o de
enchimento. Verifique se o tubo de enchimento está
totalmente a ssentado no corp o da válvula. Se necess ário,
aplique vaselina no tubo de enchimento, o que facilita
assentar o tu bo no corpo da válvul a. Verifique se o anel O
está no luga r entre o conjunto do cab o e a estrutura do rolo
e se está bem lu brificado.
Dificuldade para inserir ou remover o tubo de enchimento
da válvula.
Coloque va selina na abertura d o orifício de enchim ento
e/ou do tubo de e nchimento.
É difícil move r o cabo para dentro e par a fora. Lubrifique as vedações de borracha na extremidade
do êmbolo ou g ire o êmbolo ligeira mente para romper
a vedação.
Vaza tinta pela tampa da extremidade.
Verifique s e as duas tampas das extr emidades estão
pressionadas firmemente para dentro e niveladas com as
extremid ades do rolo. Se estiver em OK, remova as tampa s
das extremi dades, limpe toda a tin ta velha e relubrifi que com
vaselina.
Vaza tinta pela válvula de enchimento.
Lubrifique a válvula com vaselina. Certifique-se de que
a gaxeta este ja no lugar.
Page 8

14 • ENGLISH ENGLISH • 15
DO NOT RETURN THIS PRODUCT TO THE STORE,
first cont act your local Black & Decker office
or nearest authorized service center.
GENERAL SAFETY RULES
Warning! Read and understand all instructions. Failure
to follow all inst ructions listed below, may result in electric
shock, fire and/or serious personal injury.
IMPORTANT SAFETY INSTRUCTIONS
WARNIN G:
f Do not use R APIDR OLLER™ for purposes other than
described in this manual. Failure to do so may result in
injury to per sons and or property damage.
f For use only with water soluble and most oil based
paints and stains. Not for use with oil based paints and
stains that require cleaning solutions stronger than
mineral spirits (refer to label on original paint
container). Do not use with paint removers, or the like.
Liquids other than paint or stain may damage product
and result in injury to persons or propert y damage.
f Read the label on the original paint container and
follow all directions. Failure to do so may result in
injury to per sons or property damage.
f Use proper eye protection and other safety equipment
for skin and respiratory protection when mixing the
paint, and when filling, using, and cleaning the
product. Paint and its fumes can cause personal
injury.
f To reduce the risk of injury, use only in a well
ventilated area.
f Thoroughly c lean and rinse product after using with a
particular paint. Mixing different paints in the product
may result in property damage.
f To reduce the risk of injury, use only recommended
accessories.
f When servicing, use only identical replacement parts.
Failure to do so may result in personal injury.
Tips for painting with the RAPIDROLLER™
f Only use a per forated roller cover. Standard roller
covers will not work.
f Inspect roller cover for lint before painting, if needed
wash and dry before using.
f When using the R APID ROLLE R™ for the
first application, it will t ake most of the paint in the
RA PIDRO LLER™ ube to saturate the roller c over. A
second fill may be needed.
f Keep roller moving while pushing plunger in or
squeezing trigger to prevent dripping.
f Stop pushing plunger in or squeezing trigger if the
roller star ts to skid, slide or drip.
f When painting in tight areas par tially fill
RA PIDRO LLER™ or pivot the frame . This reduces its
overall length.
f When leaving RAP IDROL LER™ unattended for a
longer period of time, wrap roller in a plastic bag to
prevent drying, removing as much air as possible from
bag.
f Make sure the ty pe of paint you use can be cleaned
with either mineral spirits (for oil-based paints) or a
warm water and soap solution (for water soluble paints
like latex).
f Use drop cloths to protect your floors and anything
else in the room that you do not want accidentally
splattered with paint.
f When using kic kstand, always pivot head to straight
position and release pressure by pulling plunger out
slightly.
FEATURES (Fig. A)
1. Plunger
2. Handle Assembly
3. O-Rings
4. Duck Bill Valve
5. Wiper Seal
6. Orange Fill Cap Cover
7. Roller Frame
8. Inner End Cap
9. Roller Core
10. 3/8 in. perforated roller
11. Outer End Cap
12. Spatter Shield
13. Can Cover
14. Shroud
15. F ill Tu be
16. Hose Extension Ribs
17. Petroleum Jelly
Preparing the RAPIDROLLER™ to paint
1. Lubricate part (1) and (3) using petroleum jelly
provided. Attach assembled roller (4) onto
RA PIDRO LLER™ frame (2). Make sure roller
assembly snap s into locking clip on outer e nd cap (Fig. B).
2. Push roller frame (1) over end of handle assembly (4)
ensuring O-ring (2) is seated inside roller frame.
Thread handle assembly collar (3) snugly onto threads
of roller frame (1) (Fig. C).
3. The spatter shield helps reduce spat ter when painting,
especially on ceilings. Position the spatter shield by
rotating around roller frame (Fig. D).
Note: Spat ter shield is also helpful to prevent dripping
when RAPIDROL LER™ is resting on kickstand and is
not in use. Just position spatter shield under roller.
Filling the RAPIDROLLER™ with paint
1. Insert the small end of the fill tube (1) through the hole
in the bottom side of the paint can c over (2).
Push in until tigh t and to the ridge of the fill t ube (Fig. E).
2. Snap paint can cover onto paint c an (Fig. F1). Lubricate
top of fill tube stem with a small amount of petroleum
jelly included in carton.
Note: The c an cover will not fit on some paint
containers. It can be stretched over larger cans or
compressed slightly by squeezing to fit smaller cans.
To fill theR APIDROLL ER™ when the can cover does
not fit your paint
container, omit the can cover and plac e fill tube
directly into c ontainer. Hold the fill tube with hand to
stabilize as needed. A fill tube c an clip is available as
an optional accessory for use with other size
containers. See “Accessories”. For deeper containers
like 5 gallon pails, fit a section of ¾ inch I.D. (inner
diameter) clear tubing over the ribs of the fill tube to
extend it (Fig. F2) and clip to side of pail with fill tube
can clip. Cut bot tom end of tubing at slight angle.
Tubing is available at most hardware stores.
3. Hold the RA PIDRO LLER™ at a 45 degree angle and
place the fill valve (1) over the f ill tube. Gently push
the RAP IDROL LER™ down until it bottoms
on the fill tube. MAKE SURE THE ORANGE FILL
CAP COVER (1) IS COMPLETELY COVERED BY
SHROUD OF CA N COVER (Fig. G).
Note: Remove c ardboard spacer, and squeeze trigger
to free up the plunger. Pull plunger (2) all the way back
to draw paint into R APID ROLLER™. (This may
take some forc e.) Once tube is full you are ready to
start painting. Lift R APIDROLLER™ slowly off fill
tube.
Note: If you do not receive a complete fill the f irst
time, push plunger slowly to retur n paint to can and
then pull back plunger making sure angle is correct
and orange fill cap cover is fully seated.
Painting with the RAPIDROLLER™
1. Begin rolling on wall and push plunger handle or
squeeze trigger to feed paint into t he roller cover.
Note: Initial saturation of the roller may require the full
amount of paint from the first fill. Fill RAPI DROLL ER™
as needed (Fig. H).
Helpful hints
f The trigger only needs to be squeezed when paint is
needed.
f If you are getting a dot pattern when painting, apply
more paint.
f If the roller is sliding on the sur face, apply less paint.
f You may notice petroleum jelly within the handle.
This is necessary and will help in its operation and will
not affect the paint.
2. The roller head can be adjusted to three dif ferent
angles. Press t he orange button on the roller head to
change the angle from straight to 40 or 80 degrees.
Use straight on for general painting and 40 or 80
degree angles for hard to reach places or when
painting close to ceiling or edging (Fig. I1).
Note: The handle (1) c an be rotated to make it more
comfortable when painting with an angled roller frame.
To rotate handle to desired position, loosen collar (2),
adjust handle and retighten collar (Fig I2).
3. When not in use rest the R APIDROLLER™ on the
convenient kic kstand (1) (Fig. J).
f When using kic kstand, RAPIDROLLER™ should
always be on a drop cloth (2) or over newspaper in
case of drips (Fig. K).
f When painting, kickstand should be pointed away
from roller to avoid getting spatter on kickstand.
f Always rotate roller to the straight position before
pacing on kickstand.
f To prevent drips, relieve pressure on
RAPIDROLLER™ by pulling plunger out slightly.
Note: Att aching the spatter guard when using the
kickstand helps insure that any dripping paint is
contained.
Cleaning the RA PIDROLLER™
1. Pull plunger back to draw excess paint f rom roller
frame into tube (Fig. L).
Hint: Place thumb over orange fill cap cover (1) to
help remove the most paint from the frame prior to
pulling back plunger.
2. Return paint from RAPIDROLLER™ to can by holding
RAPIDROLLER™ at a 45 degree angle and pushing
fill valve onto f ill tube until it bottoms on fill tube. Make
sure orange fill valve is completely covered by shroud
of can lid. Push plunger in until it stops (Fig. M).
3. Scrape excess paint into c an from roller.
Remove the roller by grasping the outer end cap and
the roller frame and using your thumb on the opposite
hand to push the ro ller off as shown (Fig. N).
Hint: Wear disposable gloves or use a plastic bag
over roller to keep your hands clean.
4. Remove the inner end cap by inserting the metal
tube of the roller frame into the cap about 1 inch and
at an angle. Pull the roller frame gently towards you
(Fig. O). Remove the roller core. Empty any remaining
paint. Remove the outer cap by inserting the roller
frame into the roller and gently pushing the cap of f
(Fig. P).
5. Remove the fill tube from the paint can lid and push
it directly into the fill valve. When cleaning water
soluble paints, submerge the f ill tube into warm, soapy
water and pull the plunger in and out 5 or more times.
When using oil based paints, instead of water, use
proper cleaning solvent listed on manufacturers
container and dispose of properly (Fig. Q).
Page 9

16 • ENGLISH ENGLISH • 17
Hint: Use a sink, a wash tub, or any container that
will hold water to perform above flushing process.
Replace water when dirty or when moving to the next
step.
6. Remove the fill tube. Then submerge the roller frame,
and ensuring the fill valve is also under water, pull the
plunger in and out 5 or more times (Fig. R1).
Hint: When using a small container, pivot the roller
frame to the 80 degree position to fit inside c ontainer
(Fig. R2).
7. Rem ove roller frame and continue cleaning as
needed. Submerge the handle in the warm, soapy
water and pull the plunger in and out 5 or more times.
Hint: Wipe off remaining paint from the end of
plunger (1) (Fig. S).
8. Unthread valve cap and remove wiper seal and duck
bill valve to clean. Rinse all remaining parts and dr ain
all fluid from the RA PIDRO LLER™ (Fig. T1).
9. Remove tubing from frame (if needed) by pinching
hose clamps. Flush frame and tubing. Replace tubing
and secure with hose clamps (Fig. T2).
10. Always purchase a per forated roller cover. A standard
roller will not work.
Lubricating the RAPIDROLLER™
Lubrication helps with nor mal operation and should be
done after cleaning and before each use.
1. Turn the threaded assembly collar (1) near the trigger
counterclockwise until the main tube assembly slides
off.
Note: When reassembling, black threaded collar (1)
should be towards trigger handle (Fig. U).
2. Apply petroleum jelly around and in between the
rubber seals shown. Reassemble making sure the
rubber seals are not twisted or damaged. Tighten the
locking collar (Fig. V).
3. Apply petroleum jelly to the duck bill valve and wiper
seal and replac e within unit threading the valve cap
back into place (Fig. W).
4. Apply petroleum jelly to the inner seals on the end
caps (3 & 4) then assemble the roller by placing the
core (1) inside of roller cover (2) and attaching end
caps and as shown (Fig. X).
ACCESSORIES
Recommended accessor ies for use with your
RA PIDRO LLER™ are available from your loc al dealer or
authorized service center.
If you need assistance regarding accessories, please c all:
1-800-544-6986
Warning! The use of any accessor y not recommended
for use with this tool could be hazardous.
Fill tube can clip - for use with containers which do not fit
the round can c over provided. Available through a
Black & Decker Service Center.
When using larger container s such as a five gallon bucket,
use the fill tube can clip with a length of 3/4 inch I.D. tubing
available at most large home center s. The tubing
TROUBLE SHOOTING
WHAT’S WRONG? WHAT TO DO…
Takes a long time for p aint to appear on surf ace. See first n ote on “Painting with t he RAPIDROLLE RTM”. May take
a second f ill.
Air is drawn i nto handle instead of paint . Slowly pus h handle in to expel air. Remove and r einsert product
on fill tub e. Be sure fill tube is fu lly seated in valve body. If
necessa ry, apply petroleum je lly to fill tube which m akes it easier
to seat fill t ube and valve body.
Make sure O -ring is in place bet ween handle assemb ly and roller
frame and well lubricated.
Diffi cult to insert or rem ove fill tube from valve. Put petrole um jelly in fill por t opening and or fill t ube.
Handle is dif ficult to move in and o ut. Lubricat e rubber seals at end of pl unger, or twist plunger s lightly
to break seal.
Paint leaks out end c ap.
Make sure bot h end caps are pushed snu gly into and are even
with the end o f roller cover. If they are OK , remove end caps,
clean out any o ld paint and relubric ate with petroleum je lly.
Paint leaks out of fill valve.
Lubricat e valve with petroleum j elly. Make sure wiper seal is i n
place.
Page 10

Solamente para propósito de Argentina:
Importado por: Black & Decker Argentina S.A.
Pacheco Trade Center
Colectora Este de Ruta Panamericana
Km. 32.0 El Talar de Pacheco
Partido de Tigre
Buenos Aires (B1618FBQ)
República de Argentina
No. de Importador: 1146/66
Tel.: (011) 4726-4400
Imported by/Importado por:
Black & Decker do Brasil Ltda.
Rod. BR 050, s/n°- Km 167
Dist. Industrial II
Uberaba ˆ MG ˆ Cep: 38064-750
CNPJ: 53.296.273/0001-91
Insc. Est.: 701.948.711.00-98
S.A.C.: 0800-703-4644
Solamente para propósitos de Colombia
Importado por: Black & Decker de Colombia, S.A.
Carrera 85D # 51-65, Bodega 23
Complejo Logístico San Cayetano
Bogotá - Colombia
Tel.: 744 -7100
Solamente para propósito de Chile:
Importado por: Black & Decker de Chile, S.A.
Av. Pdte. Eduardo Frei M. 6001-67 Conchalí
Santiago de Chile
Tel.: (56-2) 687 1700
Impreso en China
Impresso em China
Printed in China
02/15/13
Solamente para propósito de México:
Importado por: Black & Decker S.A. de C.V.
Avenida Antonio Dovali Jaime
# 70 Torre B Piso 9
Colonia La Fé, Santa Fé
Delegación Álvaro Obregón,
México D.F. 01210
Tel. (52) 555-326-7100
R.F.C.: BDE810626-1W7
Black & Decker del Perú S.A.
Av. Enrique Meiggs 227.
Pque. Industrial - Callao
Tel.: (511) 614-4242
RUC 20266596805
 Loading...