

Page 1

Two Speed Variable
Temperature Heat Gun
INSTRUCTION MANUAL
Catalog Number BDPG700
Thank you for choosing Black &Decker!
Go to www.BlackandDecker.com/NewOwner
to register your new product.
PLEASE READ BEFORE RETURNING THIS
PRODUCT FOR ANY REASON:
If you have a question or experience a problem with your Black & Decker purchase, go to
HTTP://WWW.BLACKANDDECKER.COM/INSTANTANSWERS
for instant answers 24 hours a day.
If you canʼt find the answer or do not have access to the internet,
call 1-800-544-6986 from 8 a.m. to 5 p.m. EST Mon. -- Fri. to speak with an agent.
Please have the catalog number available when you call.
SAVETHIS INSTRUCTION MANUAL FOR FUTURE REFERENCE.
VEA EL ESPAÑOL EN LA CONTRAPORTADA.
INSTRUCTIVO DE OPERACIÓN, CENTROS DE SERVICIO Y PÓLIZADE GARANTÍA.
ADVERTENCIA: LÉASE ESTE INSTRUCTIVOANTES DE USAR EL PRODUCTO.
Page 2

GENERAL SAFETY RULES
SAFETY GUIDELINES - DEFINITIONS
Itis important for you toread and understandthis manual.Theinformation it contains relates to
protecting YOUR SAFETYandPREVENTING PROBLEMS.The symbols belowareused tohelp
you recognize this information.
DANGER: Indicates an imminently hazardous situation which, if not avoided, will
result in death or serious injury.
WARNING: Indicates a potentially hazardous situation which, if not avoided, could
result in death or serious injury.
CAUTION: Indicates a potentially hazardous situation which, if not avoided, may
result in minor or moderate injury.
NOTICE: Used without the safety alert symbol indicates potentially hazardous situation
which, if not avoided, may result in property damage.
WARNING: Read all safety warnings and all instructions. Failure to follow the warnings
and instructions may result in electric shock, fire and/or serious injury.
SAVEALLWARNINGS AND INSTRUCTIONS FOR FUTURE REFERENCE
The term “power tool” in the warnings refers to your mains-operated (corded) power tool or
battery-operated (cordless) power tool.
SAVE THESE INSTRUCTIONS
1)WORKAREASAFETY
• Keepworkarea clean and well lit.Cluttered or dark areas invite accidents.
• Donotoperate powertools inexplosiveatmospheres, such as inthe presenceofflammable
liquids,gases ordust.Power toolscreate sparks which may ignitethe dust or fumes.
• Keepchildren and bystanders away while operating a powertool. Distractions can cause
you to lose control.
2)ELECTRICAL SAFETY
a)Powertool plugs must matchthe outlet.Never modifytheplug in anyway. Do notuse
any adapter plugswith earthed (grounded) power tools. Unmodified plugs and matching
outlets will reduce risk of electric shock.
b)Avoid body contact withearthed orgrounded surfaces such as pipes, radiators,ranges
and refrigerators.There is an increased risk of electric shock if your body is earthed or grounded.
c)Do notexpose powertools to rain or wet conditions. Water entering a power tool will
increase the risk of electric shock.
d)Do notabuse the cord.Never use the cord forcarrying, pulling orunplugging the power
tool. Keep cord away from heat, oil,sharp edges or moving parts.Damaged or entangled
cords increase the risk of electric shock.
e)When operatinga power tool outdoors, use anextension cord suitable for outdoor use.
Use ofa cordsuitable for outdooruse reducesthe riskofelectricshock.
f)If operating a power tool in a damplocation isunavoidable,use a ground faultcircuit
interrupter(GFCI)protected supply. Use of a GFCI reduces the risk of electric shock.
3)PERSONAL SAFETY
a)Stayalert,watch what you are doing and use common sensewhen operatinga power
tool. Donotuse a power toolwhile you are tired or undertheinfluence of drugs,alcohol or
medication.A momentofinattention whileoperating power tools may resultinseriouspersonal injury.
b)Use personal protective equipment.Always wear eye protection.Protective equipment
such as dust mask, nonskid safety shoes, hard hat, or hearing protection used for appropriate
conditions will reduce personal injuries.
c)Preventunintentional starting.Ensure the switch is in the off position beforeconnecting
topower sourceand/ orbattery pack,picking up orcarrying the tool.Carrying power tools
with your finger on the switch or energizing power tools that have the switch on invites accidents.
d)Remove any adjustingkey or wrenchbefore turning the powertool on. A wrench or a key
left attachedtoa rotating partofthe power tool may resultinpersonal injury.
e)Do notoverreach.Keepproper footing and balance atalltimes.This enables better
control of the power tool in unexpected situations.
2
Page 3

f)Dress properly. Do not wear loose clothing orjewelry. Keep your hair, clothing and gloves
awayfrom moving parts. Loose clothes, jewelry or long hair can be caught in moving parts.
g)If devices are providedfortheconnection ofdust extraction and collection facilities,ensure
these areconnected and properlyused.Use ofdust collection can reduce dust-relatedhazards.
4)POWERTOOL USE AND CARE
a)Do notforcethepower tool.Use the correct power toolforyourapplication. Thecorrect
power tool willdothejobbetter andsafer atthe ratefor whichitwasdesigned.
b)Do notusethepower tool if the switchdoes not turn it onandoff. Any power tool that
cannot be controlled with the switch is dangerous and must be repaired.
c)Disconnecttheplug from thepower sourceand/or the batterypack from the power tool
before making any adjustments,changing accessories,or storing powertools. Such
preventive safety measures reduce the risk of starting the power tool accidentally.
d)Store idlepower tools out of the reachof children and do not allow persons unfamiliar
with the powertool or these instructions to operate the powertool.Power tools are
dangerous in the hands of untrained users.
e)Maintainpowertools.Checkfor misalignmentorbindingofmoving parts,breakageofparts
andanyotherconditionthatmay affectthepowertool’s operation.Ifdamaged,havethepower
toolrepairedbeforeuse.Many accidentsare caused bypoorly maintainedpower tools.
f)Keep cutting tools sharp and clean. Properly maintained cutting tools with sharp cutting edges
are less likely to bind and are easier to control.
g)Use the power tool, accessories and tool bits,etc.in accordance withthese instructions,
takinginto account the working conditionsandthe work tobe performed.Use of the power
tool for operations different from those intended could result in a hazardous situation.
5)SERVICE
a)Haveyourpowertoolservicedbya qualifiedrepairpersonusingonly identicalreplacement
parts.This will ensurethat the safety of the power tool is maintained.
Additional Safety Instructions
IMPORTANT SAFETY INSTRUCTIONS FOR HEAT GUNS
1. Remember that hidden areas such as those behind walls, ceilings, floors, soffit boards
and other panels may contain flammable materials that could be accidentally ignited
when stripping paint from the panel. Such a fire would not be readily apparent, and could
cause considerable damage and danger of injury. This heat gun is capable of producing
temperatures in excess of 1000° F (538° C).
2. Do not use this tool as a hair dryer.
3. Always turnheatgunoff,disconnectfrompowersourceandletthetoolcooldownforatleast 30
minutes beforemovingorstoringit.Donotlaytheheatgunonflammablesurfaceswhenoperating
thegunorimmediatelyaftershuttingit off.Always setthegunona flatlevelsurfacesothatthe
nozzle tipispointedupwardwhen allowingtocool.Foreasystorage,thetool canhangfromthe
hanghole.Theheatgunshouldbe storedindoors.
4. Always use good quality scrapers and stripping knives.
5. Never obstruct the air intake or nozzle outlet.
6. Besuretodirectthehotairblastina safedirection;awayfromotherpeopleorflammableobjects.
7. Keep fingers away from metal nozzle; it becomes very hot.
8. Donʼt touch the nozzle to any surface while running or shortly after running.
9. Avoid poking anything down inside the nozzle.
10. Know your work environment. Remember that areas behind soffit board, ceilings, and
floors may contain highly flammable materials. Check these areas before applying heat.
11. Clean dry paint from the nozzle after use; it could ignite.
12. Clean your scraper blade frequently during use; it could ignite.
13. Do not use the heat gun in combination with chemical strippers.
14. Do not use accessory nozzles as scrapers.
15. Keep nozzle away from cord.
16. Do not use to cook or warm food.
3
Page 4

17. Be constantly aware that this tool can ignite flammable materials, and soften or melt
others. Regardless of the task you are performing, shield or keep away from these
materials that are close to the work area.
You may occasionally notice some slight smoking of the tool after it is turned off. This is the
result of heating the residual oil that was deposited on the heating element during the
manufacturing process.
IMPORTANT NOTICE:
In order for this tool to be an effective paint stripper, it must produce extremely high
temperatures.As a consequence, the stripper is capable of igniting paper, wood, paint and
varnish residue and similar materials.
As you become more familiar with the tool and develop the proper technique, the danger of
accidental ignition will be greatly reduced. In establishing the proper technique, the best thing
to do is practice! Work on simple stripping projects, preferably outdoors, until you get a “feel”
for how to use your stripper safely and effectively.
As you practice, observe the following procedures for safety:
1. Always be sure the tool is turned offand disconnected from power supplywhen unattended.
2. Clean the scraper blade often during use. Built up residue on the blade is highly
flammable.
3. Experiment to find the optimum distance from the toolʼs nozzle to the surface being
stripped. This distance (usually 1-2 inches)(25-50 mm) will vary depending on the
material being removed.
4. Keep the heat gun moving ahead of the scraper blade at all times.
5. As you work, clean up loose pieces of paint as they accumulate around the work area.
6. When working indoors, keep away from curtains, papers, upholstery and similar
flammable materials.
7. Above all, remember that this is a serious power tool that is capable of producing
excellent results when used properly. Practice on simple projects until you feel
comfortable with your stripper. Only then will you have mastered the proper technique.
WARNING: Extreme care should be taken when stripping paint. The peelings, residue
and vapors of paint may contain lead, which is poisonous.Any pre-1977 paint may contain
lead and paint applied to homes prior to 1950 is likely to contain lead. Once deposited on
surfaces, hand to mouth contact can result in the ingestion of lead. Exposures to even low
levels of lead can cause irreversible brain and nervous system damage; young and unborn
children are particularly vulnerable.
Before beginning any paint removal process you should determine whether the paint you are
removing contains lead. This can be done by your local health department or by a
professional who uses a paint analyzer to check the lead content of the paint to be removed.
Lead based paint should only be removed by a professional and should not be
removed using a heat gun.
Persons removing paint should always follow these guidelines:
1. Move the work piece outdoors. If this is not possible, keep the work area well ventilated.
Open the windows and put an exhaust fan in one of them. Be sure the fan is moving the
air from inside to outside.
2. Remove or cover any carpets, rugs, furniture, cooking utensils, and air ducts.
3. Place drop cloths in the work area to catch any paint chips or peelings. Wear protective
clothing such as extra work shirts, overalls and hats.
4. Work in one room at a time. Furnishings should be removed or placed in the center of the
room and covered. Work areas should be sealed off from the rest of the dwelling by
sealing doorways with drop cloths.
5. Children, pregnant women or potentially pregnant women and nursing mothers should
not be present in the work area until the work is done and all clean up is complete.
6. Wear a dust respirator mask or a dual filter (dust and fume) respirator mask which has
been approved by the Occupational Safety and Health Administration (OSHA), the
National Institute of Safety and Health (NIOSH), or the United States Bureau of Mines.
4
Page 5

These masks and replaceable filters are readily available at major hardware stores. Be
sure the mask fits. Beards and facial hair may keep masks from sealing properly. Change
filters often. Disposable paper masks are not adequate.
7. Use caution when operating the heat gun. Keep the heat gun moving as excessive heat
will generate fumes which can be inhaled by the operator.
8. Keep food and drink out of the work area. Wash hands, arms and face and rinse mouth
before eating or drinking. Do not smoke or chew gum or tobacco in the work area.
9. Clean up all removed paint and dust by wet mopping the floors. Use a wet cloth to clean
all walls, sills and any other surface where paint or dust is clinging. Do not sweep, dry dust
or vacuum. Use a high phosphate detergent or trisodium phosphate (TSP) to wash and
mop areas.
10.At the end of each work session put the paint chips and debris in a double plastic bag,
close it with tape or twist ties, and dispose of properly.
11.Remove protective clothing and work shoes in the work area to avoid carrying dust into
the rest of the dwelling. Wash work clothes separately. Wipe shoes off with a wet rag that
is then washed with the work clothes. Wash hair and body thoroughly with soap and water.
The label on your tool may include the following symbols.The symbols and their definitions are
asfollows:
V ..........................volts A..........................amperes
Hz ........................hertz W ........................watts
min........................minutes ......................alternating
......................direct current
..........................
........................safety alert symbol .../min ..................revolutions or
WARNING: Some dust created by power sanding, sawing, grinding, drilling, and
other construction activities contains chemicals known in the state of California to
cause cancer, birth defects or other reproductive harm. Some examples of these
chemicals are:
• Lead from lead-based paints, crystalline silica from bricks and cement and other
masonry products, and arsenic and chromium from chemically-treated lumber (CCA).
Class II Construction
n
o ........................no load speed
........................earthing terminal
reciprocations per minute
current
Your risk from these exposures varies, depending on how often you do this type of
work. To reduce your exposure to these chemicals: work in a well ventilated area, and
work with approved safety equipment, such as those dust masks that are specially
designed to filter out microscopic particles.
• Avoid prolonged contact with dust from power sanding, sawing, grinding,
drilling, and other construction activities. Wear protective clothing and wash
exposed areas with soap and water. Allowing dust to get into your mouth, eyes, or
lay on the skin may promote absorption of harmful chemicals.
WARNING: Use of this tool can generate and/or disburse dust, which may cause
serious and permanent respiratory or other injury. Always use NIOSH/OSHA
approved respiratory protection appropriate for the dust exposure. Direct particles
away from face and body. Always operate tool in well-ventilated area and provide for
proper dust removal. Use dust collection system wherever possible.
WARNING: ALWAYS USE SAFETY GLASSES. Everyday eyeglasses are NOT safety
glasses. Also use face or dust mask if cutting operation is dusty. ALWAYS wear
certified safety equipment:
• ANSI Z87.1 eye protection (CAN/CSA Z94.3).
• ANSI S12.6 (S3.19) hearing protection.
• NIOSH/OSHA respiratory protection.
5
Page 6

USE OF EXTENSION CORDS
Make sure the extension cord is in good condition before using. Always use the proper
size extension cords with the tool – that is, proper wire size for various lengths of cord and
heavy enough to carry the current the tool will draw. Use of an undersized cord will cause
a drop in line voltage resulting in loss of power and overheating. For proper size cords see
chart below.
Volts Total Length of Cord in Feet
120V 0-25 26-50 51-100 101-150
240V 0-50 51-100 101-200 201-300
Ampere Rating
More Not more American Wire Gage
Than Than
0-6 18 16 16 14
6-10 18 16 14 12
10 - 12 16 16 14 12
12 - 16 14 12 Not Recommended
MOTOR
Be sure your power supply agrees with nameplate marking. 120 VoltsAC only means
your tool will operate on standard 60 Hz household power. Do not operate AC tools on
DC. A rating of 120 volts AC/DC means that you tool will operate on standard 60 Hz AC or
DC power. This information is printed on the nameplate. Lower voltage will cause loss of
power and can result in over-heating. All Black & Decker tools are factory-tested; if this
tool does not operate, check the power supply.
Minimum Gauge for Cord Sets
(0-7,6m) (7,6-15,2m) (15,2-30,4m) (30,4-45,7m)
(0-15,2m) (15,2-30,4m)(30,4-60,9m) (60,9-91,4m)
FUNCTIONAL DESCRIPTION
1. Two speed switch
2. Hang hole
3. Air vents
4. Hot air nozzle
5. Temperature adjustment knob
A
3
5
4
1
Tool Operation
SWITCH - FIGURE B
The position of the switch controls both the fan speed and the heat output of the gun.
There is considerable overlap in the temperature ranges with the use of the temperature
adjustment knob.
• To turn the tool on in low air speed, low heat, slide the switch (1)
to the position marked “I”.
• To turn the tool on in high air speed, high heat , slide the switch
(1) to the position marked “II”.
• To turn the tool off, slide the switch (1) to the position marked “0”.
2
B
1
6
Page 7

TEMPERATURE ADJUSTMENT KNOB FIGURE C
• To raise the air temperature, turn the
knob (5) clockwise.
• To lower the air temperature turn the
knob (5) counterclockwise.
C
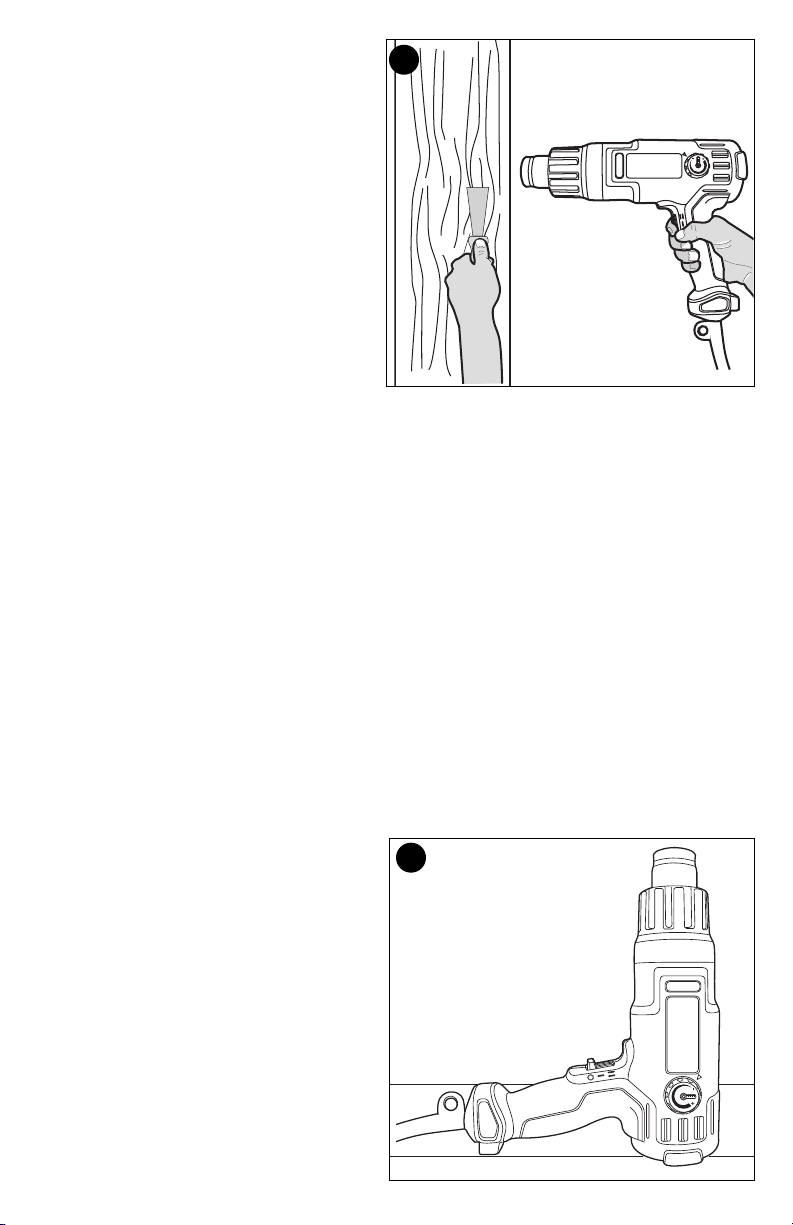
REMOVING PAINT - FIGURE D
Efficient paint removal requires the
development of technique. Follow the
guidelines in this manual and youʼll find
that you will have mastered the procedure
after a few simple projects.
Turn on the tool and hold the nozzle
about one inch (25mm) from the surface
to be stripped, as shown in figure D.
(Give the unit about 15-20 seconds
running time to reach its full heat
potential.) The paint being heated will
usually begin to blister when it reaches
the proper temperature for stripping.
When it reaches this point begin scraping
with smooth, even strokes. If the paint is
sufficiently hot and the scraper is properly
suited to the surface being stripped, the
paint should come off in a strip equal to
the full width of the scraper. Move the unit
slightly ahead of the scraper to assure
that the paint being stripped is softened.
Best results will be achieved if the heat
gun is moved slowly, but constantly, from
side to side to evenly distribute heat. Do
not linger or pause in one spot.
Remember that splinters and small
particles of stripped paint can be ignited
and blown through holes and cracks in
the surface being stripped.
HINTS ABOUT PAINT STRIPPING
A smooth, downward scraping action will give good results and will help to prevent
gouging the work surface.
With some paints, prolonged heating will actually make them tougher to strip. Try a few
different heating times until you develop the technique best suited to your particular
application.
The heat gun is designed to remove both oil based and latex based paints.
It will not remove stains or primer coats that have impregnated the wood grain.
Scrape paint as soon as it softens, it will soon cool and harden again. Clean the edge of
your scraper often to retain a clean, sharp edge. Shield areas adjacent to where youʼre
scraping. For example: shield the door with nonflammable materials if youʼre stripping the
door frame.
Donʼt concentrate the tools heat on a window pane or other glass surface. Excessive heat
may crack the glass. Use some nonflammable material to shield the glass when stripping
the window frame.
D
5
OTHER USES
For hands free operation, place the heat gun on a flat surface as shown in figure E.
Aside from stripping paint, your heat gun has a wide array of other uses. Use it for
softening linoleum and floor tile and for loosening heat sensitive adhesives. Itʼs perfect for
use with heat shrinkable tubing and anywhere you need a portable heat source. You can
even use it to thaw frozen metal water pipes.
7
Page 8

utomotive uses include reducing set up
A
ime on body fillers or drying time on paints
t
(the product manufacturerʼs
recommendations must be followed.)
Caution must be exercised around
gasoline, automotive fluids, tires, gaskets,
upholstery and hoses, etc. to prevent
damage or fires. Be constantly aware that
this tool can ignite flammable materials
and soften or melt others. Avoid
overheating adjacent flammable materials
such as wood, insulation, electrical wiring
jackets or plastic. Thaw only those metal
pipe sections that are fully exposed. Do
not attempt to thaw pipes that are inside
walls, floors, ceilings, or otherwise
enclosed. Do not attempt to thaw pipes
that are wrapped in insulation.
ACCESSORIES
WARNING: The use of any accessory
not recommended for use with this tool could be hazardous.Always unplug the tool before
attaching or removing accessories. Do not remove accessory tips until the tool has cooled
to room temperature.
The following attachments are included with the BDPG700 Heat Gun.
FAN NOZZLE
Wider distribution of the hot air, for working on large
surfaces- floors, doors, etc.
SPOOL REFLECTOR
Evenly dispenses air around whole object. Ideal for
soldering pipework, shrink sealing electrical cable.
E
CONE NOZZLE
For precise operations- concentrates the air onto
a smaller surface area.
PAINT SCRAPER
For easier paint removal from hard surfaces.
CAUTION:These nozzles remain hot after use. Use care in handling them.
8
Page 9

TROUBLESHOOTING
PROBLEM POSSIBLE CAUSE POSSIBLE SOLUTION
• Unit will not start. • Cord not plugged in. • Plug tool into a working outlet.
For assistance with your product, visit our website www.blackanddecker.com for the
location of the service center nearest you or call the BLACK & DECKER help line at
1-800-544-6986.
ACCESSORIES
Recommended accessories for use with your tool are available from your local dealer or
authorized service center. If you need assistance regarding accessories, please call:
1-800-544-6986.
WARNING: The use of any accessory not recommended for use with this tool could
be hazardous.
• Circuit fuse is blown. • Replace circuit fuse. (If the
product repeatedly causes the
circuit fuse to blow, discontinue
use immediately and have it
serviced at a BLACK& DECKER
service center or authorized
servicer.)
• Circuit breaker is tripped. • Reset circuit breaker. (If the
product repeatedly causes the
circuit breaker to trip,
discontinue use immediately
and have it serviced at a BLACK
& DECKER service center or
authorized servicer.)
• Cord or switch is damaged. • Have cord or switch replaced
at a BLACK & DECKER Service
Center or Authorized Servicer
MAINTENANCE
Use only mild soap and damp cloth to clean the tool. Never let any liquid get inside the
tool; never immerse any part of the tool into a liquid.
IMPORTANT: To assure product SAFETY and RELIABILITY, repairs, maintenance and
adjustment (other than those listed in this manual) should be performed by authorized
service centers or other qualified servicepersonnel, always using identical replacementparts.
SERVICE INFORMATION
All Black & Decker Service Centers are staffed with trained personnel to provide
customers with efficient and reliable power tool service. Whether you need technical
advice, repair, or genuine factory replacement parts, contact the Black & Decker location
nearest you. To find your local service location, refer to the yellow page directory under
9
Page 10

"Tools—Electric" or call: 1-800-544-6986 or visit www.blackanddecker.com.
FULL TWO-YEAR HOME USE WARRANTY
Black & Decker (U.S.) Inc. warrants this product for two years against any defects in
material or workmanship. The defective product will be replaced or repaired at no charge
in either of two ways.
The first, which will result in exchanges only, is to return the product to the retailer from
whom it was purchased (provided that the store is a participating retailer). Returns should
be made within the time period of the retailerʼs policy for exchanges (usually 30 to 90 days
after the sale). Proof of purchase may be required. Please check with the retailer for their
specific return policy regarding returns that are beyond the time set for exchanges.
The second option is to take or send the product (prepaid) to a Black & Decker owned or
authorized Service Center for repair or replacement at our option. Proof of purchase may
be required.Black & Decker owned and authorized Service Centers are listed under
"Tools-Electric" in the yellow pages of the phone directory.
This warranty does not apply to accessories. This warranty gives you specific legal rights
and you may have other rights which vary from state to state or province to province.
Should you have any questions, contact the manager of your nearest Black & Decker
Service Center. This product is not intended for commercial use.
FREE WARNING LABEL REPLACEMENT: If your warning labels become illegible or are
missing, call 1-800-544-6986 for a free replacement.
LATIN AMERICA: This warranty does not apply to products sold in Latin America. For
products sold in Latin America, check country specific warranty information contained in
the packaging, call the local company or see the website for warranty information.
Black & Decker (U.S.) Inc.,
Imported by
701 E. Joppa Rd.
Towson, MD 21286 U.S.A.
See ‘Tools-
Electric’
– Yellow Pages –
for Service &
Sales
10
Page 11

Pistolet thermique à température
variable et à deux vitesses
MANUEL D’INSTRUCTIONS
N° DE CATALOGUE BDPG700
Merci d’avoir choisi Black & Decker!
Consulter le site Web
www.BlackandDecker.com/NewOwner
pour enregistrer votre nouveau produit.
À LIRE AVANT DE RETOURNER CE PRODUIT
POUR QUELQUE RAISON QUE CE SOIT :
Si des questions ou des problèmes surgissent après l’achat d’un produit Black & Decker,
consulter le site Web
pour obtenir des réponses instantanément 24 heures par jour.
Si la réponse est introuvable ou en l’absence d’accès à Internet, composer le
1-800-544-6986 de 8 h à 17 h HNE, du lundi au vendredi, pour parler avec un agent.
Prière d’avoir le numéro de catalogue sous la main lors de l’appel.
CONSERVER CE MANUEL POUR UN USAGE ULTÉRIEUR.
HTTP://WWW.BLACKANDDECKER.COM/INSTANTANSWERS
11
Page 12

LIGNES DIRECTRICES EN MATIÈRE DE SÉCURITÉ - DÉFINITIONS
Il est important que vous lisiez et compreniez ce mode dʼemploi. Les informations quʼil
contient concernent VOTRE SÉCURITÉ et visent à ÉVITER TOUT PROBLÈME. Les
symboles ci-dessous servent à vous aider à reconnaître cette information.
DANGER : Indique une situation dangereuse imminente qui, si elle nʼest pas évitée,
causera la mort ou des graves blessures.
AVERTISSEMENT : Indique une situation potentiellement
dangereuse qui, si elle nʼest pas évitée, pourrait causer la mort ou de graves blessures.
MISE EN GARDE : Indique une situation potentiellement dangereuse qui, si elle nʼest
pas évitée, pourrait causer des blessures mineures ou modérées.
AVIS : Utilisé sans le symbole dʼalerte à la sécurité, indique une situation potentiellement
dangereuse qui, si elle nʼest pas évitée, peut résulter en des dommages à la propriété.
Avertissements desécuritégénérauxpourles outilsélectriques
AVERTISSEMENT : Lire tous les avertissements de sécurité et toutes
les directives. Le non-respect des avertissements et des directives pourrait se
solder par un choc électrique, un incendie et/ou une blessure grave.
Conserver tous les avertissements et toutes les directives pourun usage ultérieur.
Le terme «outil électrique» cité dans les avertissements se rapporte à votre
outil électrique à alimentation sur secteur (avec fil) ou par piles (sans fil).
1) Sécurité du lieu de travail
a) Tenir la zone de travail propre et bien éclairée. Les endroits sombres sont
souvent des causes d'accidents.
b) Ne pas faire fonctionner d’outils électriques dans un milieu déflagrant, soit en
présence de liquides inflammables, de gaz ou de poussière. Les outils
électriques produisent des étincelles qui peuvent enflammer la poussière ou les vapeurs.
c) Éloigner les enfants et les curieux au moment d’utiliser un outil électrique.
Une distraction pourrait vous en faire perdre la maîtrise.
2) Sécurité en matière d’électricité
a) Les fiches des outils électriques doivent correspondre à la prise. Ne jamais
modifier la fiche en aucune façon. Ne jamais utiliser de fiche d’adaptation avec
un outil électrique mis à la terre. Le risque de choc électrique sera réduit par
l’utilisation de fiches non modifiées correspondant à la prise.
b) Éviter tout contact physique avec des surfaces mises à la terre comme des
tuyaux, des radiateurs, des cuisinières et des réfrigérateurs. Le risque de choc
électrique est plus élevé si votre corps est mis à la terre.
c) Ne pas exposer les outils électriques à la pluie ou à d'autres conditions où il
pourrait être mouillé. La pénétration de l’eau dans un outil électrique augmente le
risque de choc électrique.
d) Ne pas utiliser abusivement lecordon d’alimentation.Ne jamais utiliserle
cordon pourtransporter, tirer ou débrancherun outil électrique.Tenir le cordon éloigné
dela chaleur,de l’huile,des bords tranchants ou des pièces mobiles. Les cordons
endommagés ou emmêlés augmentent les risques de choc électrique.
e) Pour l’utilisation d’un outil électrique à l’extérieur, se servir d’une rallonge
convenant à une telle utilisation. L’utilisation d’une rallonge conçue pour
l’extérieur réduit les risques de choc électrique.
f) S’il est impossible d’éviter l’utilisation d’un outil électrique dans un endroit
humide, brancher l’outil dans une prise ou sur un circuit d’alimentation dotés
d’un disjoncteur de fuite à la terre (GFCI). L’utilisation de ce type de disjoncteur
réduit les risques de choc électrique.
3) Sécurité personnelle
a) Être vigilant, surveiller le travail effectué et faire preuve de jugement
lorsqu’un outil électrique est utilisé. Ne pas utiliser d’outil électrique en cas
de fatigue ou sous l’influence de drogues, d’alcool ou de médicaments. Un
simple moment d’inattention en utilisant un outil électrique peut entraîner des
12
Page 13

blessures corporelles graves.
b) Utiliser des équipements de protection individuelle. Toujours porter une
protection oculaire. L’utilisation d’équipements de protection comme un masque
antipoussière, des chaussures antidérapantes, un casque de sécurité ou des protecteurs
auditifs lorsque la situation le requiert réduira les risques de blessures corporelles.
c) Empêcher les démarrages intempestifs. S’assurer que l’interrupteur se trouve
à la position d’arrêt avant de relier l’outil à une source d’alimentation et/ou
d’insérer un bloc-piles, de ramasser ou de transporter l’outil. Transporter un
outil électrique alors que le doigt repose sur l’interrupteur ou brancher un outil
électrique dont l’interrupteur est à la position de marche risque de provoquer un
accident.
d) Retirer toute clé de réglage ou clé standard avant de démarrer l’outil. Une clé
standard ou une clé de réglage attachée à une partie pivotante peut causer des blessures.
e) Ne pas trop tendre les bras. Conserver son équilibre en tout temps. Cela
permet de mieux maîtriser l’outil électrique dans les situations imprévues.
f) S’habiller de manière appropriée. Ne pas porter de vêtements amples ni de
bijoux. Garder les cheveux, les vêtements et les gants à l’écart des pièces
mobiles. Les vêtements amples, les bijoux ou les cheveux longs risquent de rester
coincés dans les pièces mobiles.
g) Si des composants sont fournis pour le raccordement de dispositifs de
dépoussiérage et de ramassage, s’assurer que ceux-ci sont bien raccordés et
utilisés. L’utilisation d’un dispositif de dépoussiérage peut réduire les dangers
engendrés par les poussières.
4) Utilisation et entretien d’un outil électrique
a) Ne pas forcer un outil électrique. Utiliser l’outil électrique approprié à
l’application. L’outil électrique approprié effectuera un meilleur travail, de façon
plus sûre et à la vitesse pour laquelle il a été conçu.
b) Ne pas utiliser un outil électrique dont l’interrupteur est défectueux. Tout outil
électrique dont l’interrupteur est défectueux est dangereux et doit être réparé.
c) Débrancher la fiche du secteur ou le bloc-piles de l’outil électrique avant de
faire tout réglage ou changement d’accessoire, ou avant de ranger l’outil
électrique. Ces mesures préventives réduisent les risques de démarrage
accidentel de l’outil électrique.
d) Ranger les outils électriques hors de la portée des enfants, et ne permettre à
aucune personne n’étant pas familière avec un outil électrique (ou son
manuel d’instruction) d’utiliser ce dernier. Les outils électriques deviennent
dangereux entre les mains d’utilisateurs inexpérimentés.
e) Entretenir les outils électriques. Vérifier les pièces mobiles pour s’assurer
qu’elles sont bien alignées et tournent librement, qu’elles sont en bon état et
ne sont affectées par aucun trouble susceptible de nuire au bon
fonctionnement de l’outil électrique. En cas de dommage, faire réparer l’outil
électrique avant toute nouvelle utilisation. Beaucoup d’accidents sont causés
par des outils électriques mal entretenus.
f) S’assurer que les outils de coupe sont aiguisés et propres. Les outils de coupe
bien entretenus et affûtés sont moins susceptibles de se coincer et sont plus faciles
à contrôler.
g) Utiliser l’outil électrique, les accessoires, les forets, etc. conformément aux
présentes directives en tenant compte des conditions de travail et du travail à
effectuer. L’utilisation d’un outil électrique pour toute opération autre que celle pour
laquelle il a été conçu est dangereuse.
5) Réparation
a) Faire réparer l’outil électrique par un réparateur professionnel en n’utilisant
que des pièces de rechange identiques. Cela permettra de maintenir une
utilisation sécuritaire de l’outil électrique.
Consignes supplémentaires de sécurité
CONSIGNES IMPORTANTES DE SÉCURITÉ AU SUJET DES PISTOLETSTHERMIQUES
1. Serappelerquelesendroitscachéscommelʼarrièredesmurs,desplafonds,souslesplanchers,
lesplanchesdesoffiteetautrespeuventcomporterdesmatériauxinflammablesquipeuventêtre
enflamméslorsdudécapagedelapeinture.Untelincendiepeutnepasêtrefacilementdétectéet
provoquerdesdommagesconsidérablesainsiquedesblessures.Latempératurede cepistolet
thermiquepeutexcéder538°C(1000°F).
13
Page 14

. Ne pas utiliser cet outil comme séchoir à cheveux.
2
3. Toujourséteindrelepistoletthermique,ledébrancheretlelaisserrefroidirdurantaumoins30
minutes avantde ledéplaceroude leranger.Nepasdéposerlepistoletthermiquesurdessurfaces
inflammablesdurantsonutilisationouimmédiatementaprèslʼavoiréteint.Toujoursdéposerle
pistoletsurunesurfaceplanedemanièreà cequelebecsoitpointéverslehautlorsdu
refroidissementdelʼappareil.Pourfaciliterlerangementdelʼoutil,celui-cipeutêtresuspenduparle
troudʼaccrochage.Lepistoletthermiquedoitêtrerangéà lʼintérieur.
4. Toujours utiliser des grattoirs et des couteaux de décapage de bonne qualité.
5. Ne jamais obstruer lʼentrée dʼair ou la buse de sortie.
6. Sʼassurer de diriger lʼair chaud dans une direction sûre, éloignée des gens ou des objets
inflammables.
7. Ne pas toucher à la buse métallique qui devient très chaude.
8. Ne pas toucher une surface quelconque avec la buse pendant que lʼoutil fonctionne ou
peu après son fonctionnement.
9. Éviter dʼintroduire quoi que ce soit dans la buse.
10.Connaître la zone de travail. Se rappeler que les endroits situés à lʼarrière des planches de
soffite, des plafonds et sous les planchers peuvent comporter des matériaux très
inflammables. Vérifier ces endroits avant dʼappliquer la chaleur.
11.Après lʼutilisation, nettoyer la peinture sèche de la buse; elle pourrait sʼenflammer.
12.Nettoyerfréquemmentla lamede raclageau coursde lʼutilisation;elle pourrait sʼenflammer.
13.Ne pas utiliser le pistolet thermique en même temps que des décapants chimiques.
14.Ne pas utiliser les buses accessoires comme grattoirs.
15.Tenir la buse éloignée du cordon dʼalimentation.
16. Ne pas utiliser lʼoutil pour cuire des aliments ou les réchauffer.
17.Toujours être conscient que cet outil peut enflammer les matériaux inflammables et amollir
ou en faire fondre dʼautres. Peu importe la tâche effectuée, protéger ou se tenir éloigné de
ces matériaux qui sont près de la zone de travail.
Après que lʼoutil est mis hors tension, on peut à lʼoccasion percevoir une légère fumée. Ceci
provient du chauffage de lʼhuile résiduelle qui a été déposée sur lʼélément de chauffage au
cours de la fabrication.
AVIS IMPORTANT :
Pour que cet outil soit efficace comme décapant pour peinture, il doit générer des
températures extrêmement élevées. Par conséquent, cet outil est en mesure dʼenflammer du
papier, du bois, de la peinture, des résidus du vernis ainsi que des matériaux semblables.
Le danger dʼinflammabilité des matériaux diminue à mesure quʼon connaît lʼoutil et quʼon met
au point une technique de travail appropriée. La pratique est le meilleur moyen dʼétablir la
technique adéquate! Travailler sur des projets simples de décapage, de préférence à
lʼextérieur, jusquʼà ce quʼon apprenne la façon dʼutiliser lʼoutil de manière sûre et efficace.
Observer les méthodes de sécurité suivantes lors de la pratique :
1. Toujourssʼassurer que lʼoutil est mis hors tensionet débranché lorsquʼil estsans surveillance.
2. Nettoyer souvent la lame de raclage au cours de lʼutilisation. Les résidus accumulés sur la
lame sont très inflammables.
3. Expérimenter pour découvrir la distance optimale de la buse de lʼoutil à la surface
décapée. Cette distance (généralement 25-50 mm) (1-2 po) varie selon le matériau enlevé.
4. En tout temps, déplacer le pistolet thermique à lʼavant de la lame de raclage.
5. Pendantletravail,nettoyerlesmorceauxdepeinturequisʼaccumulentautourdelazonedetravail.
6. Lors dʼun travail à lʼintérieur, se tenir éloigné des rideaux, des papiers, de lʼameublement et
de matériaux inflammables semblables.
14
Page 15

. Toujours se rappeler quʼil sʼagit dʼun outil électrique sérieux qui est capable de donner
7
ʼexcellents résultats sʼil est bien utilisé. Sʼexercer sur des projets simples jusquʼà ce
d
quʼon soit à lʼaise avec lʼoutil. Alors seulement aurez-vous maîtrisé la technique adéquate.
AVERTISSEMENT : Sʼassurerdʼêtretrès prudent lors dudécapage dela peinture. Le pelage,
les résidus etles émanationsde peinturepeuvent contenir du plomb qui est poison. Toute
peinture antérieureà 1997 peutcontenir du plomb et les peintures appliquées aux maisons avant
1950 en contiennent fort probablement. Une foisle plomb déposé sur des surfaces, le contact de
lamain à la bouche peut résulteren une ingestion deplomb.Lʼexposition à desniveaux même
faibles de plomb peut provoquerdesdommages irréversiblesau cerveauet au système nerveux;
les jeunes enfants ou les enfants à naître sont particulièrementvulnérables.
Avantdecommencer àenleverlapeinture,ondoitdéterminersilapeinturecontientduplomb.Ceci
peutêtreeffectuéparlebureaudesantélocalouparun professionnelquiutiliseunanalyseurde
peinturepourvérifierle contenu enplombdelapeintureà enlever.Lapeinture à base deplombne doit
êtreenlevéequeparun professionnelet nedoitpasêtreenlevéeà lʼaidedʼunpistoletthermique.
Les personnes quienlèvent dela peinture doiventtoujours suivreleslignesdirectricessuivantes:
1. Déplacer la pièce à décaper à lʼextérieur. Si cela est impossible, bien ventiler lʼespace de
travail. Ouvrir les fenêtres et placer un ventilateur dʼextraction dans lʼune de ces
dernières. Sʼassurer que le ventilateur déplace lʼair de lʼintérieur vers lʼextérieur.
2. Enlever ou couvrir les tapis, le mobilier, les vêtements, les ustensiles de cuisine et les
conduits dʼair.
3. Poser des toiles de protection dans la zone de travail pour récupérer les éclats ou les
pelages de peinture. Porter des vêtements protecteurs comme des chemises de travail
supplémentaires, des couvre-vêtements et des casquettes.
4. Travailler dans une pièce à la fois. Lʼameublement doit être enlevé ou placé au centre de
la pièce et recouvert. Les zones de travail doivent être scellées du reste de lʼhabitation en
posant des toiles de protection dans les entrées de porte.
5. Les enfants, les femmes enceintes ou potentiellement enceintes ainsi que les mères
allaitantes ne doivent pas être présents dans la zone de travail jusquʼà ce que le travail
soit terminé et lʼespace nettoyé complètement.
6. Porter un masque respirateur antipoussières ou un respirateur à double filtre (poussières
et émanations) approuvé par le Occupational Safety and HealthAdministration (OSHA),
le National Institute of Safety and Health (NIOSH) ou le United States Bureau of Mines.
Ces masques ainsi que leurs filtres remplaçables sont facilement disponibles dans les
quincailleries importantes. Sʼassurer que le masque est bien ajusté. Les barbes et les
poils faciaux peuvent empêcher le bon ajustage du masque. Changer souvent les filtres.
Les masques en papier jetables ne sont pas suffisants.
7. Prendre des précautions lors du fonctionnement du pistolet thermique. Garder le pistolet
thermique en mouvement car une chaleur excessive génère des émanations qui peuvent
être inhalées par lʼutilisateur.
8. Conserver les aliments et les breuvages hors de la zone de travail. Se laver les mains, les
bras et le visage et se rincer la bouche avant de manger ou de boire. Ne pas fumer ou
mâcher de gomme ou de tabac dans la zone de travail.
9. Nettoyer toute la peinture décapée et la poussière en lavant les planchers. Utiliser un
linge humide pour nettoyer les murs, les seuils et toutes autres surfaces comportant des
poussières de peinture ou autres. Ne pas balayer, épousseter à sec ou utiliser un
aspirateur. Utiliser un détergent à haute teneur en phosphate ou à phosphate trisodique
(TSP) pour laver les endroits en question.
10.À la fin de chaque session de travail, placer les éclats de peinture et les débris dans un
sac de plastique double, le refermer à lʼaide de ruban ou dʼattache torsadée et sʼen
débarrasser de manière adéquate.
11.Enlever les vêtements protecteurs ainsi que les chaussures de travail dans la zone de
travail pour éviter de transporter de la poussière dans le reste de lʼhabitation. Laver
séparément les vêtements de travail. Essuyer les chaussures à lʼaide dʼun chiffon humide
qui est alors lavé avec les vêtements de travail. Se laver les cheveux et le corps à fond
avec de lʼeau et du savon.
CONSERVER CES CONSIGNES POUR USAGE ULTÉRIEUR
15
Page 16

Lʼétiquette apposée sur votre outil pourrait comprendre les symboles suivants. Les
symboles et leurs définitions sont indiqués ci-après :
V ..............volts A ................ampères
Hz ............hertz W................watts
min............minutes ..............courant alternatif
..........courant continue non ............régime à vide
..............
Construction classe II
............symbole dʼalerte à la .../min ........révolutions ou alternance par minute
............
borne de terre
sécurité
AVERTISSEMENT : certains outils électriques, tels que les sableuses, les scies,
les meules, les perceuses ou certains autres outils de construction, peuvent
produire de la poussière contenant des produits chimiques reconnus par l’État
de la Californie comme étant susceptibles d’entraîner le cancer, des
malformations congénitales ou pouvant être nocifs pour le système reproductif.
Parmi ces produits chimiques, on retrouve :
· le plomb dans les peintures à base de plomb,
· la silice cristalline dans les briques et le ciment et autres produits de maçonnerie,
· lʼarsenic et le chrome dans le bois de sciage ayant subi un traitement chimique.
Le risque associé à de telles expositions varie selon la fréquence avec laquelle on effectue
ces travaux. Pour réduire lʼexposition à de tels produits, il faut travailler dans un endroit
bien aéré et utiliser le matériel de sécurité approprié, tel un masque anti-poussières
spécialement conçu pour filtrer les particules microscopiques.
• Éviter tout contact prolongé avec la poussière soulevée par cet outil ou autres
outils électriques. Porter des vêtements de protection et nettoyer les parties
exposées du corps avec de l’eau savonneuse. Sʼassurer de bien se protéger afin
dʼéviter dʼabsorber par la bouche, les yeux ou la peau des produits chimiques nocifs.
AVERTISSEMENT : Cet outil peut produire et répandre de la poussière
susceptible de causer des dommages sérieux et permanents au système
respiratoire. Toujours utiliser un appareil respiratoire anti-poussières approuvé par le
NIOSH ou lʼOSHA. Diriger les particules dans le sens opposé du visage et du corps.
AVERTISSEMENT : TOUJOURS porter des lunettes de sécurité. Les lunettes de
vue ne constituent PAS des lunettes de sécurité. Utiliser également un masque
facial ou anti-poussière si l’opération de découpe génère de la poussière.
TOUJOURS PORTER UN ÉQUIPEMENT DE PROTECTION HOMOLOGUÉ :
• protection oculaire conforme à la norme ANSI Z87.1 (CAN/CSA Z94.3);
• protection auditive ANSI S12.6 (S3.19);
• protection des voies respiratoires conformes aux normes NIOSH/OSHA/MSHA.
CORDONS DE RALLONGE
Sʼassurer que le cordon de rallonge est en bon état avant de sʼen servir. Toujours utiliser
un cordon de calibre approprié selon la longueur du cordon et la tension nécessaire au
fonctionnement de l'outil. L'utilisation d'un cordon de calibre inférieur occasionne une
baisse de tension entraînant une perte de puissance et la surchauffe. Le tableau suivant
indique le calibre approprié pour les cordons.
Tension Longueur totale du cordon en pieds
120V 0-25 26-50 51-100 101-150
240V 0-50 51-100 101-200 201-300
Intensité (A)
Au Au Calibre moyen des fils (AWG)
moins plus
0-6 18 16 16 14
6-10 18 16 14 12
10 - 12 16 16 14 12
12 - 16 14 12 Non recommandé
Calibre minimal des cordons de rallonge
(0-7,6m) (7,6-15,2m) (15,2-30,4m) (30,4-45,7m)
(0-15,2m) (15,2-30,4m)(30,4-60,9m) (60,9-91,4m)
16
Page 17

MOTEUR
eiller à ce que la tension dʼalimentation soit conforme aux exigences de la plaque
V
signalétique de lʼoutil. La mention «120 volts c.a. seulement» signifie que lʼoutil fonctionne
sʼil est branché dans une prise domestique standard de 60 Hz. Ne pas utiliser les outils à
tension secteur sur du courant continu. La mention «120 volts c.a./c.c.» signifie que lʼoutil
fonctionne sur du courant alternatif ou sur du courant continu. Ces renseignements sont
imprimés sur la plaque signalétique de lʼoutil. Une tension inférieure entraîne une baisse
de puissance et peut causer la surchauffe de lʼoutil. Tous les outils Black & Decker sont
testés en usine; si cet outil ne fonctionne pas, vérifier le bloc dʼalimentation
DESCRIPTION FONCTIONNELLE
- FIGURE A
1. Interrupteur à deux vitesses
2. Trou de suspension
3. Évents
4. Buse à air chaud
5. Bouton de réglage de la température
.
A
5
4
1
2
Fonctionnement de l’outil
COMMUTATEUR - FIGURE B
La position de lʼinterrupteur commande à la fois la vitesse du
ventilateur et la puissance calorifique du pistolet. Lʼutilisation du
bouton de réglage de la température entraîne un
chevauchement important dans la plage des températures.
• Pour allumer lʼoutil de manière à être réglé aux positions de
faible débit dʼair et de basse température, glisser lʼinterrupteur
(1) à la position arborant la lettre « I ».
• Pour allumer lʼoutil de manière à être réglé aux positions de débit dʼair élevé et de
température élevée, glisser lʼinterrupteur (1) à la position arborant les lettres « II ».
• Pour éteindre lʼoutil, glisser lʼinterrupteur (1) à la position arborant le chiffre « 0 ».
B
1
3
BOUTON DE RÉGLAGE DE LA
TEMPÉRATURE - FIGURE C
• Pour augmenter la température de lʼair,
tourner le bouton (5) dans le sens horaire.
• Pour baisser la température de lʼair,
tourner le bouton (5) dans le sens
antihoraire.
17
C
baisser augmenter
5
Page 18
DÉCAPAGE DE LA PEINTURE
- FIGURE D
Le décapage efficace de la peinture exige
la mise au point dʼune technique. Suivre
les lignes directrices du présent manuel.
Après quelques projets simples, on en
maîtrise la façon de faire.
Mettre lʼoutil en marche et tenir la buse
à environ un pouce de la surface à
décaper, comme lʼillustre la figure D.
(Laisser à lʼoutil de 15 à 20 secondes pour
atteindre sa chaleur maximale). La
peinture chauffée commence
habituellement à cloquer lorsque lʼoutil
atteint la température de décapage
adéquate. Lorsque lʼoutil en est arrivé à
ce point, commencer à racler par coups
souples et uniformes. Si la peinture est
suffisamment chaude et que le racloir est
adéquat pour la surface à décaper, la peinture doit se détacher sur la pleine largeur du
racloir. Déplacer lʼoutil légèrement à lʼavant du racloir pour sʼassurer dʼamollir la peinture.
On obtient de meilleurs résultats si le pistolet thermique est déplacé lentement, mais
constamment, dʼun côté à lʼautre pour distribuer la chaleur uniformément. Ne pas traîner
ou sʼarrêter en un endroit.
Se rappeler que les éclats et les petites particules de peinture décapée peuvent
sʼenflammer et être soufflés dans des trous et des fissures de la surface décapée.
CONSEILS SUR LE DÉCAPAGE DE LA PEINTURE
Un raclage uniforme vers le bas donne de bons résultats et aide à ne pas entailler la
surface de travail.
Dans le cas de certaines peintures, un chauffage prolongé les rend plus difficiles à
décaper. Essayer des durées de chauffage différentes jusquʼà ce quʼon soit en mesure de
mettre au point la technique la mieux adaptée à une application particulière.
Le pistolet thermique est conçu pour enlever les peintures à base dʼhuile et de latex.
Il nʼenlève pas les teintures ou les couches dʼapprêt qui ont imprégné le grain du bois.
Racler la peinture aussitôt quʼelle a ramolli car elle se refroidit et se durcit rapidement de
nouveau.
Nettoyer souvent le rebord du racloir pour le maintenir propre et coupant.
Protéger les zones adjacentes au décapage. Par exemple : protéger la porte à lʼaide de
matériaux ininflammables si on décape le cadre de porte.
Ne pas concentrer la chaleur de lʼoutil sur la vitre dʼune fenêtre ou sur une autre surface
en verre. Une chaleur excessive peut faire éclater le verre. Utiliser un matériau
ininflammable pour protéger le verre lors du décapage du cadre de fenêtre.
AUTRES UTILISATIONS
Pour une utilisation mains libres, déposer
le pistolet thermique sur une surface plate
comme le montre la figure E.
En plus de décaper la peinture, le pistolet
thermique possède une vaste gamme
dʼutilisations. Utiliser lʼoutil pour amollir le
linoléum et les carreaux de plancher ainsi
que pour décoller les adhésifs sensibles à
la chaleur. Il est dʼun emploi parfait avec
des tubes thermorétrécissables et partout
où on a besoin dʼune source de chaleur
portable. On peut même lʼutiliser pour
dégeler des tuyaux dʼeau en métal.
Dans le domaine automobile, on peut
lʼutiliser pour réduire le temps de prise des
mastics de finition ou le temps de séchage
des peintures (on doit se conformer aux
recommandations du fabricant du produit).
D
E
18
Page 19

aire preuve de prudence en présence dʼessence, de liquides automobiles, de pneus, de
F
oints dʼétanchéité, de garniture souple, de flexibles, etc. afin dʼéviter tout dommage ou
j
incendie. Être conscient en tout temps que cet outil peut enflammer les matières
inflammables et en ramollir ou en faire fondre dʼautres. Éviter de surchauffer les matières
inflammables à proximité, comme le bois, les isolants, les gaines de fils électriques ou le
plastique. Dégeler uniquement les sections de tuyau métallique qui sont entièrement
exposées. Ne pas dégeler les tuyaux qui se trouvent à lʼintérieur des murs, des planchers,
des plafonds ou dans tout endroit fermé. Ne pas dégeler les tuyaux enveloppés dʼisolant.
Problème Cause possible Solutionpossible
DÉPANNAGE
• Lʼappareil refuse de • Cordon dʼalimentation • Brancher lʼoutil dans
démarrer. non branché. une prise qui fonctionne.
Pour obtenir de lʼaide avec lʼoutil, consulter notre site Web www.blackanddecker.com
pour lʼemplacement du centre de réparation le plus près ou communiquer avec
lʼassistance BLACK & DECKER au 1-800-544-6986.
• Le fusible du circuit est grillé. • Remplacer le fusible du
circuit. (Si le produit fait
griller de façon répétée
le fusible du circuit, arrêter
immédiatement dʼutiliser le
produit et le faire réparer
dans un centre de
réparationBLACK&DECKER
ou un centre de réparation
autorisé.)
• Le disjoncteur est déclenché. • Remettre le disjoncteur à
zéro . (Si le produit fait
déclencher de façon
répétée le disjoncteur,
arrêter immédiatement
dʼutiliser le produit et le
faire réparer dans un
centre de réparation
BLACK&DECKERou un
centre deréparationautorisé.)
• Le cordon dʼalimentation • Faire remplacer le
ou la prise de courant est cordon ou lʼinterrupteur
endommagé(e). au centre de réparation
BLACK&DECKERou à un
centre de réparation
autorisé.
Accessoires
Les détaillants et le centre de service de la région vendent les accessoires recommandés
pour lʼoutil. Pour trouver un accessoire, composer le 1 800 544-6986.
AVERTISSEMENT : Lʼutilisation de tout accessoire non recommandé pour lʼoutil peut
être dangereuse.
ENTRETIEN
Nettoyer lʼoutil seulement à lʼaide dʼun savon doux et dʼun linge humide. Ne laisser aucun
liquide sʼinfiltrer dans lʼoutil et ne jamais immerger lʼoutil.
IMPORTANT : Pour assurer la SÉCURITÉ DʼEMPLOI et la FIABILITÉ de lʼoutil, nʼen
confier la réparation, lʼentretien et les rajustements quʼà un centre de service ou à un
atelier dʼentretien autorisé nʼutilisant que des pièces de rechange identiques.
19
Page 20

Les équipements suivants sont compris avec le pistolet thermique BDPG700.
BUSE À JET ÉVENTAIL
Distribution plus large de lʼair chaud pour travailler
sur des surfaces larges - planchers, portes, etc..
RÉFLECTEUR EN BOBINE
Projette lʼair également autour de lʼobjet
complet. Idéal pour souder des tuyaux,
thermorétrécir du câble électrique.
BUSE EN CÔNE
Pour travail de précision - concentre lʼair sur une plus
petite surface.
GRATTOIR À PEINTURE
Pour le décapage de peinture facile à partir
de surfaces dures.
MISE EN GARDE : Ces buses demeurent chaudes après utilisation. Les manipuler avec
prudence.
20
Page 21

Information sur les réparations
Tous les centres de réparation Black & Decker sont dotés de personnel qualifié en matière
dʼoutillage électrique; ils sont donc en mesure dʼoffrir à leur clientèle un service efficace et
fiable. Que ce soit pour un avis technique, une réparation ou des pièces de rechange
authentiques installées en usine, communiquer avec lʼétablissement Black & Decker le
plus près de chez vous. Pour trouver lʼétablissement de réparation de votre région,
consulter le répertoire des Pages jaunes à la rubrique « Outils électriques » ou composer
le numéro suivant : 1-800-544-6986 ou consulter le site www.blackanddecker.com
Garantie complète de deux ans pour une utilisation domestique
Black & Decker (É.-U.) Inc. garantit ce produit pour une durée de deux ans contre tout
défaut de matériau ou de fabrication. Le produit défectueux sera remplacé ou réparé sans
frais de lʼune des deux façons suivantes :
La première façon consiste en un simple échange chez le détaillant qui lʼa vendu (pourvu
quʼil sʼagisse dʼun détaillant participant). Tout retour doit se faire durant la période
correspondant à la politique dʼéchange du détaillant (habituellement, de 30 à 90 jours
après lʼachat). Une preuve dʼachat peut être requise. Vérifier auprès du détaillant pour
connaître sa politique concernant les retours hors de la période définie pour les échanges.
La deuxième option est dʼapporter ou dʼenvoyer le produit (transport payé dʼavance) à un
centre de réparation autorisé ou à un centre de réparation de Black & Decker pour faire
réparer ou échanger le produit, à notre discrétion. Une preuve dʼachat peut être requise.
Les centres Black & Decker et les centres de service autorisés sont répertoriés dans les
pages jaunes, sous la rubrique « Outils électriques ».
Cette garantie ne sʼapplique pas aux accessoires. Cette garantie vous accorde des droits
légaux spécifiques et vous pourriez avoir dʼautres droits qui varient dʼun État ou dʼune
province à lʼautre. Pour toute question, communiquer avec le directeur du centre de
réparation Black & Decker le plus près de chez vous. Ce produit nʼest pas destiné à un
usage commercial.
REMPLACEMENT GRATUIT DES ÉTIQUETTES D’AVERTISSEMENT : si les étiquettes
dʼavertissement deviennent illisibles ou sont manquantes, composer le 1-800-544-6986
pour en obtenir le remplacement gratuit.
Imported by / Importé par
Black & Decker Canada Inc.
100 Central Ave.
Brockville (Ontario) K6V 5W6
Voir la rubrique “Outils
électriques”
des Pages Jaunes
pour le service et les ventes.
21
Page 22

Pistola de calor de dos velocidades
y temperatura variable
MANUAL DE' INSTRUCCIONES
CATÁLOGO N° BDPG700
Gracias por elegir Black & Decker!
Visite www.BlackandDecker.com/NewOwner
para registrar su nuevo producto.
LEA EL MANUAL ANTES DE DEVOLVER
ESTE PRODUCTO POR CUALQUIER MOTIVO:
Si tiene una consulta o algún inconveniente con su producto Black & Decker, visite
HTTP://WWW.BLACKANDDECKER.COM/INSTANTANSWERS
para obtener respuestas instantáneas las 24 horas del día.
Si no encuentra la respuesta o no tiene acceso a Internet, llame al 1-800-544-6986 de
lunes a viernes de 8 a.m. a 5 p.m. hora del Este para hablar con un agente.
Cuando llame, tenga a mano el número de catálogo.
CONSERVE ESTE MANUAL PARA FUTURAS CONSULTAS.
22
Page 23

PAUTAS DE SEGURIDAD/DEFINICIONES
Es importante que lea y comprenda este manual. La información que contiene se
relaciona con la protección de SU SEGURIDAD y la PREVENCIÓN DE PROBLEMAS.
Los símbolos que siguen se utilizan para ayudarlo a reconocer esta información.
PELIGRO: indica una situación de peligro inminente que, si no se evita, provocará la
muerte o lesiones graves.
ADVERTENCIA: indica una situación de peligro potencial que, si no se evita, provocará la
muerte o lesiones graves.
PRECAUCIÓN: indica una situación de peligro potencial que, si no se evita, provocará
lesiones leves o moderadas.
PRECAUCIÓN: utilizado sin el símbolo de alerta de seguridad indica una situación de peligro
potencial que, si no se evita, puede provocar daños en la propiedad.
Advertencias generales de seguridad para herramientas eléctricas
ADVERTENCIA: Lea todas las advertencias de seguridad e instrucciones El
incumplimiento de las advertencias e instrucciones puede provocar descargas
eléctricas, incendios o lesiones graves.
Conserve todas las advertencias e instrucciones para futuras consultas.
El término “herramienta eléctrica” incluido en las advertencias hace referencia a
las herramientas eléctricas operadas con corriente (con cable eléctrico) o a las
herramientas eléctricas operadas con baterías (inalámbricas).
1) Seguridad en el área de trabajo
a) Mantenga el área de trabajo limpia y bien iluminada. Las áreas abarrotadas y
oscuras propician accidentes.
b) No opere herramientas eléctricas en atmósferas explosivas, como ambientes
donde se encuentran líquidos, gases o polvo inflamables. Las herramientas
eléctricas originan chispas que pueden encender el polvo o los vapores.
c) Mantenga a los niños y espectadores alejados de la herramienta eléctrica en
funcionamiento. Las distracciones pueden provocar la pérdida de control.
2) Seguridad eléctrica
a) Los enchufes de la herramienta eléctrica deben adaptarse al tomacorriente.
Nunca modifique el enchufe de ninguna manera. No utilice ningún enchufe
adaptador con herramientas eléctricas con conexión a tierra. Los enchufes no
modificados y que se adaptan a los tomacorrientes reducirán el riesgo de descarga
eléctrica.
b) Evite el contacto corporal con superficies puestas a tierra, como por ejemplo
tuberías, radiadores, rangos y refrigeradores. Existe mayor riesgo de descarga
eléctrica si su cuerpo está puesto a tierra.
c) No exponga las herramientas eléctricas a la lluvia o a condiciones de humedad.
Si ingresa agua a una herramienta eléctrica, aumentará el riesgo de descarga eléctrica.
d) No maltrate al cable. Nunca utilice el cable para transportar, tirar o
desenchufar la herramienta eléctrica. Mantenga el cable lejos del calor, aceite,
bordes afilados o piezas móviles. Los cables dañados o enredados aumentan el
riesgo de descarga eléctrica.
e) Al operar una herramienta eléctrica en el exterior, utilice un cable
prolongador adecuado para tal uso. Utilice un cable adecuado para uso en
exteriores a fin de reducir el riesgo de descarga eléctrica.
f) Si el uso de una herramienta eléctrica en un lugar húmedo es imposible de
evitar, utilice un suministro protegido con un dispositivo de corriente residual
(RCD). El uso de un RCD reduce el riesgo de descargas eléctricas.
3) Seguridad personal
a) Permanezca alerta, controle lo que está haciendo y utilice el sentido común
cuando emplee una herramienta eléctrica. No utilice una herramienta eléctrica si
está cansado o bajo el efecto de drogas, alcohol o medicamentos. Un momento de
descuido mientras se opera una herramienta eléctrica puede provocar lesiones
personales graves.
23
Page 24

b) Utilice equipos de protección personal. Siempre utilice protección para los
ojos. En las condiciones adecuadas, el uso de equipos de protección, como
máscaras para polvo, calzado de seguridad antideslizante, cascos o protección
auditiva, reducirá las lesiones personales.
c) Evite el encendido por accidente. Asegúrese de que el interruptor esté en laposición de
apagado antes de conectarlo a la fuente deenergíao paquete debaterías,o antes de
levantaro transportar la herramienta. Transportar herramientas eléctricas con el dedo
apoyado en el interruptor o enchufar herramientas eléctricas con el interruptor en la posición de
encendido puede propiciar accidentes.
d) Retire las clavijas de ajuste o llaves de tuercas antes de encender la
herramienta eléctrica. Una llave de tuercas o una clavija de ajuste que se deje
conectada a una pieza giratoria de la herramienta eléctrica pueden provocar
lesiones personales.
e) No se estire. Conserve el equilibrio adecuado y manténgase parado
correctamente en todo momento. Esto permite un mejor control de la
herramienta eléctrica en situaciones inesperadas.
f) Use la vestimentaadecuada.No useropas holgadas ni joyas.Mantengael cabello,la
ropa y los guantes alejadosde laspiezas en movimiento.Las ropas holgadas, las joyas o
el cabello largo pueden quedar atrapados en las piezas en movimiento.
g) Si se suministran dispositivos para la conexión de accesorios con fines de
recolección y extracción de polvo, asegúrese de que estén conectados y que
se utilicen correctamente. El uso de dispositivos de recolección de polvo puede
reducir los peligros relacionados con el polvo.
4) Uso y mantenimiento de la herramienta eléctrica
a) No fuerce la herramienta eléctrica. Utilice la herramienta eléctrica correcta
para el trabajo que realizará. La herramienta eléctrica correcta hará el trabajo
mejor y más seguro a la velocidad para la que fue diseñada.
b) No utilice la herramienta eléctrica si no puede encenderla o apagarla con el
interruptor. Toda herramienta eléctrica que no puede ser controlada mediante el
interruptor es peligrosa y debe ser reparada.
c) Desconecte el enchufe de la fuente de energía y/o el paquete de baterías de la
herramienta eléctrica antes de realizar ajustes, cambiar accesorios o
almacenar herramientas eléctricas. Estas medidas de seguridad preventivas
reducen el riesgo de encender la herramienta eléctrica en forma accidental.
d) Guarde las herramientas eléctricas que no están en uso fuera del alcance de
los niños y no permite que otras personas no familiarizadas con ella o con
estas instrucciones operen la herramienta. Las herramientas eléctricas son
peligrosas en las manos de usuarios no entrenados.
e) Mantenimiento de las herramientas eléctricas. Controle que no haya piezas
móviles mal alineadas o trabadas, piezas rotas y toda otra situación que
pueda afectar el funcionamiento de las herramientas eléctricas. Si encuentra
daños, haga reparar la herramienta eléctrica antes de utilizarla. Se producen
muchos accidentes a causa de las herramientas eléctricas que carecen de un
mantenimiento adecuado.
f) Mantenga las herramientas de corte afiladas y limpias. Las herramientas de
corte con mantenimiento adecuado, con los bordes de corte afilados son menos
propensas a trabarse y son más fáciles de controlar.
g) Utilicela herramienta eléctrica,losaccesoriosy las brocas de la herramienta,etc. de
acuerdo con estas instrucciones y teniendo en cuentalascondiciones detrabajoy el
trabajo que debe realizarse. El uso de la herramienta eléctrica para operaciones diferentes de
aquéllas para las que fue diseñada podría originar una situación peligrosa.
5) Mantenimiento
a) Haga que una persona de reparaciones calificada realice el mantenimiento de
su herramienta eléctrica y utilice piezas de repuesto idénticas solamente. Esto
garantizará la seguridad de la herramienta eléctrica.
Instrucciones de seguridad adicionales
INSTRUCCIONESDE SEGURIDADIMPORTANTES PARA PISTOLAS DE AIRE CALIENTE
1. Recuerde que las áreas ocultas, como las ubicadas detrás de paredes, cielorrasos,
intradós y otros paneles pueden contener material inflamable que podría hacer ignición
accidentalmente al quitar la pintura del panel. Este tipo de incendio no será visible de
24
Page 25

nmediato, y podría causar considerables daños y riesgo de lesión. Estas pistolas de calor
i
pueden producir temperaturas superiores a 538 °C (1000 °F).
2. No use esta herramienta como una secadora de pelo.
3. Siempre apague la pistola de calor, desconéctela de la fuente de energía y deje que la
herramienta se enfríe durante al menos 30 minutos antes de moverla o guardarla. No
apoye la pistola de calor sobre superficies inflamables mientras la utiliza ni
inmediatamente después de apagarla. Siempre ubique la pistola sobre una superficie
plana y nivelada de manera que la punta de la boquilla apunte hacia arriba mientras se
deja enfriar. Para un fácil lmacenamiento, la herramienta puede colgarse del orificio para
colgar. La pistola de calor debe guardarse bajo techo.
4. Use siempre espátulas de raspado y raspadores de papeles de buena calidad.
5. Nunca obstruya la entrada de aire o salida de aire de la boquilla.
6. Asegúrese de dirigir el aire caliente en una dirección segura; alejado de otras personas y
objetos inflamables.
7. Mantenga los dedos alejados de la boquilla de metal; ésta se pone muy caliente.
8. No toque ninguna superficie con la boquilla mientras la pistola funciona o por corto
tiempo después de funcionar.
9. Evite meter cualquier objeto dentro de la boquilla.
10. Conozca su entorno de trabajo. Recuerde que las áreas detrás de los plafones, intradós,
cielorrasos y pisos pueden contener material altamente inflamable. Verifique estas áreas
antes de aplicar aire caliente.
11. Limpie la pintura seca de la boquilla después de su uso; podría hacer ignición.
12. Limpie su raspador con frecuencia; podría incendiarse.
13. No utilice la pistola de aire caliente en combinación con quitapinturas químicos.
14. No use las boquillas accesorias como raspadores.
15. Mantenga la boquilla alejada del cable.
16. No utilice la unidad para cocinar ni calentar comida.
17. Estétodoel tiempo conscientedequeestaherramientapuedeencender materialesinflamablesy
ablandaro derretirotros.Independientementedelalaborqueestédesempeñando,protejao
manténgasealejadodeestetipodematerialescercanosal áreadetrabajo.
Usted podrá notar que la pistola humea levemente de vez en cuando después de
haberla apagado. Esto proviene del calentamiento del aceite residual que se depositó
sobre los elementos calefactores durante el proceso de fabricación.
AVISO IMPORTANTE:
Para que esta herramienta sea un quitapinturas efectivo, debe producir temperaturas
extremadamente altas. En consecuencia, la pistola de aire caliente es capaz de encender
papeles, madera, residuos de pintura y barniz, y materiales similares.
A medida que usted se familiarice con la herramienta y desarrolle la técnica apropiada, el
peligro de encendido accidental se reducirá en alto grado. Al establecer la técnica apropiada,
lo mejor que usted puede hacer es ¡practicar! Emprenda, al aire libre preferiblemente, sus
proyectos para quitar material hasta que usted obtenga una noción satisfactoria de cómo
usar la pistola de aire caliente en forma segura y efectiva.
Mientras se ejercita, siga estos procedimientos de seguridad:
1. Asegúrese siempre de que la herramienta está apagada y desconectada si la va a dejar
sin supervisión.
2. Limpie la hoja del raspador frecuentemente. El residuo acumulado en la hoja es
altamente inflamable.
3. Experimente hasta encontrar la distancia óptima desde la boquilla de la herramienta
hasta la superficie a eliminar. Esta distancia (por lo general 1-2 pulgadas) variará
dependiendo del material a quitar.
25
Page 26

. Mantengasiemprelapistoladelantedelahojadelraspadorconformeeltrabajo vaprogresando.
4
5. Limpie los pedazos de pintura que se van soltando a medida que se van acumulando en
el área de trabajo.
6. Cuando trabaje dentro de la casa, manténgase alejado de cortinas, papeles, objetos
tapizados y material inflamable similar.
7. Sobre todo, recuerde que esta es una herramienta eléctrica respetable, capaz de
producir resultados excelentes si se usa adecuadamente. Practique en proyectos
sencillos hasta que se sienta confortable con su pistola de aire caliente. Sólo entonces
habrá logrado la técnica apropiada.
ADVERTENCIA: Sedebesercuidadosoen extremoalquitarlapintura.Lasdesconchaduras,
residuosy vaporesdelapinturapuedencontenerplomo, elcualestóxico.Todapintura quedatade
antesde 1977puedecontenerplomoyla pinturaqueseutilizóenloshogaresantesde1950muy
probablementecontenganplomo.Unavezqueéstesedepositaenlassuperficies,el contactodela
manoa labocapuederesultareningestióndeplomo.Hastael estarexpuestoa nivelesbajosde
plomopuedecausardañosirreversiblesal cerebroy sistemanervioso;losniños pequeñosy en
gestaciónsonlosmásvulnerables.
Antes de comenzar todo proceso de eliminación de pintura usted debe determinar si la
misma contiene plomo. Esto lo puede hacer el departamento de salud local o un profesional
que use un analizador de pintura para verificar el contenido de plomo de la pintura a quitar.
Las pinturas a base de plomo deben ser quitadas únicamente por un profesional, y no
se deben quitar mediante una pistola de aire caliente.
Toda persona que vaya a quitar la pintura siempre debe seguir estas pautas:
1. Efectúe la labor afuera. Si esto no es posible, mantenga el área de trabajo bien ventilado.
Abra las ventanas y ponga un ventilador aspirante en una de ellas. Asegúrese de que el
ventilador mueve al aire de adentro hacia afuera.
2. Quite o cubra todas las alfombras, muebles, vestimenta, utensilios de cocina, y
conductos de aire.
3. Coloque paños protectores en el área de trabajo para atrapar todos los pedacitos o
desconchaduras de pintura. Use vestimenta protectora tal como camisas de trabajo
adicionales, overoles y sombreros.
4. Trabaje en un cuarto a la vez. El mobiliario, etc., deberá colocarse en el centro de la
habitación y cubrirse. Las áreas de trabajo deben cerrarse por completo del resto de la
vivienda con paños de protección.
5. Los niños, mujeres embarazadas o potencialmente embarazadas, así como madres que
amamantan, no deben estar presentes en el área de trabajo hasta que la labor esté
hecha y se haya limpiado todo por completo.
6. Use una máscara anti-polvo o una de filtro dual (polvo y vapores) que haya sido
aprobada por la Administración de Salud y Seguridad Laboral (OSHA), Instituto Nacional
de Seguridad y Salud (NIOSH), o el Depto. de Minas de los Estados Unidos. Estas
máscaras con sus filtros reemplazables se consiguen fácilmente en todas las ferreterías
principales. Verifique que la máscara quede bien ajustada. La barba y vello facial podría
impedir que la máscara quede bien sellada. Cambie los filtros a menudo. Las máscaras
de papel desechables no son adecuadas.
7. Sea precavido al operar la pistola de aire caliente. Manténgala en movimiento ya que el
calor excesivo generará vapores que pueden ser inhalados por el operador.
8. Mantenga las comidas y bebidas alejados del área de trabajo. Lávese las manos, brazos
y cara y enjuáguese la boca antes de comer o beber. No fume ni masque goma o tabaco
en el área de trabajo.
9. Recoja ylimpielospisosdetodalapinturaquehasidoremovida contrapoo mopahúmeda.Use
unpañohúmedoparalimpiartodaslasparedes,marcos,ytodaotra superficiedondeel polvose
hayapegado.Nobarraelpolvo,niloquiteenseconiloaspire.Utiliceundetergentealtoenfosfatos
ode fosfatotrisódico(TSP)paralavary trapearlasáreas.
10.Al final de cada sesión de limpieza ponga los pedacitos de pintura y escombros en una
bolsa de plástico doble, ciérrelo con cinta adhesiva o ligaduras y deshágase de estos
residuos en forma apropiada.
26
Page 27

1.Quítese la vestimenta protectora y zapatos de trabajo en la misma área donde hace el
1
rabajo para evitar que arrastre polvo dentro del resto de la vivienda. Lave la ropa de
t
trabajo por separado. Limpie los zapatos con un trapo húmedo que luego se lava con la
ropa de trabajo. Lávese el pelo y el cuerpo a conciencia con agua y jabón.
La etiqueta de su herramienta puede incluir los siguientes símbolos.
V ..............voltios A ............amperios
Hz ............hertz W ............vatios
min............minutos ..........corriente alterna
..........corriente continua
..............
Construcción de clase II
............símbolo de alerta de .../min ......revoluciones o reciprocidad por minuto
n
o............no velocidad sin carga
terminal a tierra
........
USO DE CABLES DE EXTENSIÓN
Asegúrese que el cable de extensión esté en buenas condiciones. Use siempre el
tamaño adecuado de los cables de extensión con la herramienta — o sea, el tamaño de
cable adecuado para los distintos largos de cable y que sea lo suficientemente “pesado”
para transportar la corriente que su producto va a extraer. Un cable de tamaño
insuficiente causará una caída en la línea de voltaje resultando en pérdida de energía y
recalentamiento. Para el tamaño de cable correcto vea la tabla a continuación.
Volts Longitud total del cable en pies
120V 0-25 26-50 51-100 101-150
240V 0-50 51-100 101-200 201-300
Amperaje
0-6 18 16 16 14
6-10 18 16 14 12
10 - 12 16 16 14 12
12 - 16 14 12 No se recomienda
Calibre mínimo para cables de extensión
(0-7,6m) (7,6-15,2m) (15,2-30,4m) (30,4-45,7m)
(0-15,2m) (15,2-30,4m)(30,4-60,9m) (60,9-91,4m)
Más de No más de American Wire Gage
ADVERTENCIA: parte del polvo producido por las herramientas eléctricas al lijar,
aserrar, esmerilar, taladrar y realizar otras actividades de la construcción, contiene
productos químicos reconocidos por el Estado de California como causantes de
cáncer, defectos de nacimiento u otros problemas reproductivos. Algunos de estos
productos químicos son:
• el plomo de las pinturas de base plomo,
• la sílice cristalina de ladrillos, el cemento y otros productos de mampostería, y
• el arsénico y el cromo de la madera con tratamiento químico.
El riesgo derivado de estas exposiciones varía según la frecuencia con la que se realice
este tipo de trabajo. Para reducir la exposición a estos productos químicos: trabaje en
áreas bien ventiladas y trabaje con equipos de seguridad aprobados, como las máscaras
para polvo especialmente diseñadas para filtrar las partículas microscópicas.
• Eviteelcontacto prolongadoconelpolvoprovenientedellijado,aserrado,amoladoy
taladradoeléctricoy otrasactividadesdeconstrucción.Usevestimenta protectoray lave
todaslasáreasexpuestasconaguay jabón.Deentrarpolvoensus ojos,boca,o queeste
permanezcasobresu pielpuedepromoverlaabsorcióndequímicosdañinos.
ADVERTENCIA: El uso de esta herramienta puede generar y/o dispersar el polvo,
el cual puede ocasionar lesión respiratoria u otro tipo de lesión grave y
permanente. Utilice siempre protección respiratoria NIOSH/OSHA apropiada para la
exposición al polvo. Dirija las partículas lejos de su cara o su cuerpo.
ADVERTENCIA: USE SIEMPRE LENTES DE SEGURIDAD. Los anteojos de uso
diario NO son lentes de seguridad. Utilice también máscaras faciales o para polvo
siel corte producepolvillo.UTILICESIEMPREEQUIPOSDE SEGURIDADCERTIFICADOS:
• Protección para los ojos según la norma ANSI Z87.1 (CAN/CSA Z94.3)
• Protección auditiva según la norma ANSI S12.6 (S3.19)
• Protección respiratoria según las normas NIOSH/OSHA/MSHA
27
Page 28
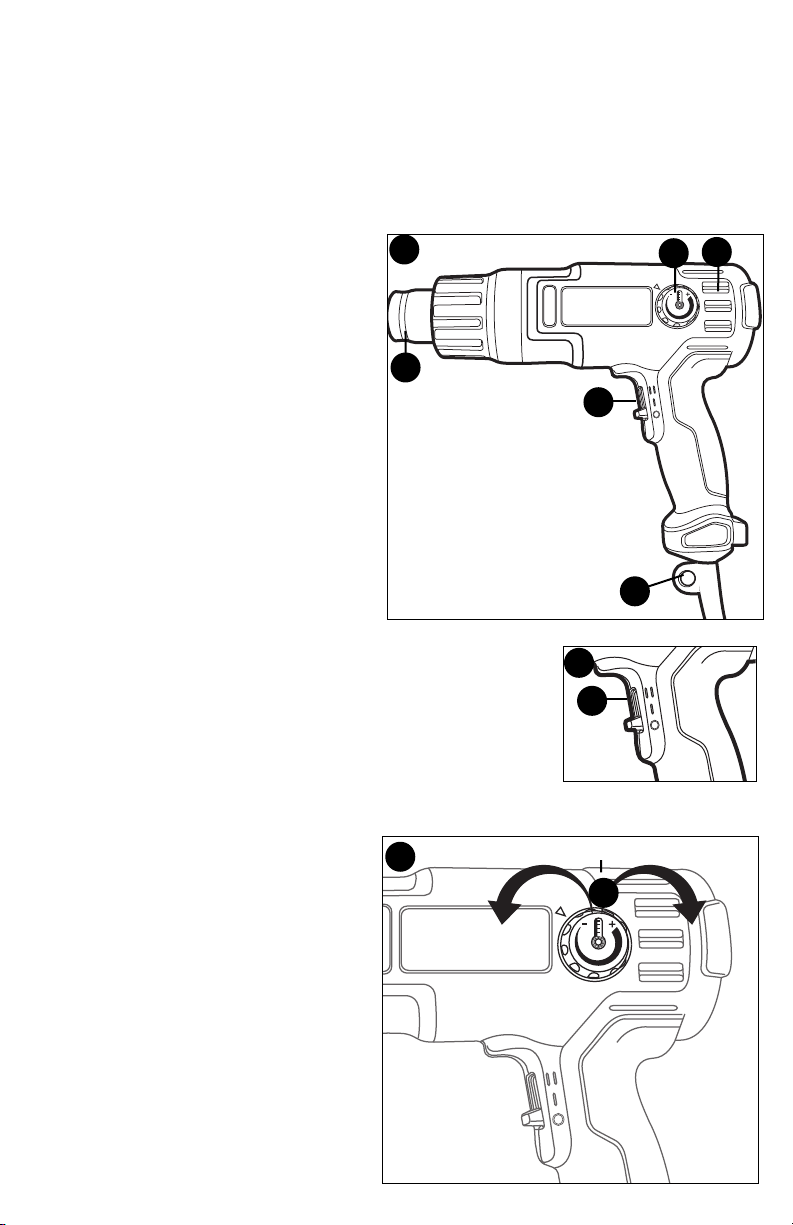
MOTOR
Verifique que su suministro de corriente concuerde con el marcaje de la placa de datos.
120 Voltios de corriente alterna (AC) solo indica que su herramienta operará con corriente
casera estándar de 60 Hz. No opere herramientas de corriente alterna (AC) con corriente
directa (DC). Una potencia de régimen de 120 voltios AC/DC significa que su herramienta
operará con corriente estándar de 60 Hz AC o DC. Esta información está impresa en la
placa de datos. Un voltaje menor ocasionará pérdida de corriente y puede resultar en
recalentamiento. Todas las herramientas Black & Decker se prueban en fábrica. Si esta
herramienta no funciona, revise el suministro eléctrico.
DESCRIPCIÓN DE LAS FUNCIONES
FIGURA A
1. Interruptor de dos velocidades
2. Orificio para colgar
3. Orificios de ventilación
4. Boquilla de aire caliente
5. Perilla de ajuste de temperatura
A
4
Operación de la herramienta
CONMUTADOR - FIGURA B
La posición del interruptor controla la
velocidad del ventilador y la
salida de calor de la pistola. Existe una superposición
considerable de los rangos de temperatura al utilizar la perilla de
ajuste de temperatura.
• Paraencenderlaherramientaconvelocidaddelairebajay calorbajo,
deslice elinterruptor(1)a laposiciónmarcadacon“I”.
• Para encender la herramienta con velocidad del aire alta y calor
alto, deslice el interruptor (1) a la posición marcada con “II”.
• Para apagar la herramienta, deslice el interruptor (1) a la
posición marcada con “0”.
3
5
1
2
B
1
PERILLA DE AJUSTE DE
TEMPERATURA: FIGURA C
• Para elevar la temperatura del aire, gire
la perilla (5) hacia la derecha.
• Para reducir la temperatura del aire, gire
la perilla (5) hacia la izquierda.
28
C
reducir elevar
5
Page 29

CÓMO QUITAR LA PINTURA - FIGURA D
Quitar la pintura eficientemente requiere
desarrollar una técnica. Siga las pautas en
este manual y usted verá que habrá
aprendido el procedimiento después de
unos proyectos sencillos.
Prenda la herramienta y mantenga la
boquilla a aprox. una pulgada de la
superficie a eliminar, como se ilustra en la
Figura D. (Deje que la unidad funcione
unos 15-20 segundos para que alcance
su potencial de calor total.) La pintura que
se está calentando comenzará por lo
general a ampollarse cuando llega a la
temperatura apropiada para su
eliminación. Cuando alcance este punto,
comience a raspar con pasadas suaves y
uniformes. Si la pintura está lo
suficientemente caliente y el raspador es
el adecuado para eliminar este tipo de
superficie, la pintura deberá levantarse en una tira igual a la anchura completa del
raspador. Mueva la unidad ligeramente delante del raspador para asegurarse de que la
pintura a quitar se está suavizando.
Se obtiene el mejor resultado cuando la pistola de aire caliente se desplaza de lado a lado
lenta pero constantemente, para distribuir el calor uniformemente. No se detenga en un
solo punto.
Recuerde que las astillas y pequeños partículas de pintura que se han quitado pueden
hacer ignición y escaparse por huecos y hendijas de la superficie que se está trabajando.
SUGERENCIAS PARA QUITAR LA PINTURA
El raspado con pasadas suaves, hacia abajo, dará buenos resultados y ayudará a
prevenir la formación de ranuras en la superficie de trabajo.
En algunas pinturas, el calor prolongado sobre las mismas hará que éstas sean más
difíciles de quitar. Pruebe varios tiempos de calentamiento unas cuantas veces hasta que
usted desarrolle la técnica más apropiada para su aplicación en particular.
La pistola de aire caliente está diseñada para quitar pinturas tanto a base de aceite como
de látex.
No quitará manchas o capas de pintura de imprimación impregnadas en la fibra de la madera.
Raspe la pintura tan pronto se ablanda, ya que pronto se enfriará y se endurecerá otra vez.
Limpie el borde de su raspador a menudo para mantener un borde limpio y afilado.
Proteja las áreas adyacentes a la que está raspando. Por ejemplo: proteja la puerta con
materiales no inflamables si está quitando la pintura al marco de la puerta.
No concentre el calor de la herramienta sobre un cristal de ventana u otras superficies de
vidrio. El calor excesivo puede quebrar el vidrio. Use algún material no inflamable para
proteger el vidrio cuando le está quitando la pintura a un marco de ventana.
OTROS USOS
Parauna operación de manos libres, coloque
la pistola de calor sobre una superficie plana
comose muestra en la Figura E.
Aparte de quitarla pintura, la pistolade aire
caliente tiene muchos otrosusos. Utilícelo
parasuavizar el linóleoy las baldosas de
pisoy para aflojar adhesivos sensibles al
calor. Es perfecta para usar con tubería
termocontraíble y en cualquier parte donde
usted necesite una fuente de calor portátil.
Hasta lo puede utilizar para derretir el agua
congelada en tuberías de metal.
Los usos automotores incluyen reducir el
tiempo de preparación de material de relleno
de carrocerías o tiempo de secado de las
pinturas (se debe seguir las
recomendaciones del fabricante).
D
E
29
Page 30

Se debe tener precaución cerca de gasolina, líquidos automotores, neumáticos, juntas,
tapizados, mangueras, etc. para evitar daños o incendios. Siempre tenga presente que
esta herramienta puede encender materiales inflamables y ablandar o derretir otros. Evite
el sobrecalentamiento de materiales inflamables adyacentes como madera, aislamiento,
cubiertas de cables eléctricos o plástico. Descongele únicamente aquellas secciones de
tubería metálica que estén completamente expuestas. No intente descongelar tuberías
que estén dentro de muros, pisos, techos o encerradas de alguna otra forma. No intente
descongelar tuberías que estén envueltas con aislamiento.
DETECCIÓN DE PROBLEMAS
Problema Causa posible Solución posible
•La unidad no enciende. • Cable desenchufado. • Enchufe el cargador en un
• Fusible quemado. • Reemplace el fusible
• El interruptor automático • Reinicie el interruptor
está activado. automático. (Si repetidamente
• Interruptor o cable dañado. • Haga reparar el cable o el
Para conocer la ubicación del centro de mantenimiento más cercano a fin de recibir
ayuda con su producto, visite nuestro sitio Web www.blackanddecker.com o llame a la
línea de ayuda de BLACK & DECKER al (55)5326-7100.
tomacorriente que funcione.
quemado. (Si repetidamente el
producto hace que el fusible del
circuito se queme, deje de
utilizarlo inmediatamente y
haga que le realicen
mantenimiento en un centro de
mantenimientoBLACK&DECKER
o en un centro de servicio
autorizado.)
el producto hace que el fusible
del circuito se queme, deje de
utilizarlo inmediatamente y
haga que le realicen
mantenimiento en un centro de
mantenimientoBLACK&DECKER
o en un centro de servicio
autorizado.)
interruptor en un centro de
mantenimiento BLACK&DECKER
o en un centro de
mantenimiento autorizado.
30
Page 31

La pistola de aire caliente BDPG700 incluye los siguientes accesorios:
BOQUILLA DE ABANICO
Provee una distribución más amplia de aire
caliente, para trabajar sobre superficies grandes,
pisos, puertas, etc.
REFLECTOR DE CARRETE
Distribuye el aire uniformemente alrededor de
todo el objeto. Ideal para soldar tuberías, sellar
cables eléctricos por contracción.
BOQUILLA CÓNICA
Para operaciones de precisión - concentra el aire
sobre un área de superficie más pequeña.
RASCADOR DE PINTURA
Para la remoción de pintura fácil de las
superficies duras.
PRECAUCIÓN: Estas boquillas permanecen calientes después de usarlas. Tenga
cuidado al manipularlas.
MANTENIMIENTO
Utilice únicamente jabón suave y un trapo húmedo para limpiar la herramienta. Nunca
permita que se introduzcan líquidos en la herramienta; nunca sumerja ninguna parte de la
herramienta en ningún líquido. IMPORTANTE: Para garantizar l SEGURIDAD y la
CONFIABILIDAD del producto, la reparaciones, el mantenimiento y los ajustes deberán
efectuarse en centros de servicio autorizado u otras organizaciones de servicio calificado,
que utilicen siempre refacciones idénticas.
ACCESORIOS
Los accesorios que se recomiendan para la herramienta están disponibles en su
distribuidor local o en el centro de mantenimiento autorizado. Si necesita ayuda con
respecto a los accesorios, llame al: (55)5326-7100
ADVERTENCIA: El uso de accesorios no recomendados para utilizar con esta
herramienta puede resultar peligroso.
INFORMACIÓN DE MANTENIMIENTO
Todos los Centros de mantenimiento de Black & Decker cuentan con personal altamente
capacitado dispuesto a brindar a todos los clientes un servicio eficiente y confiable en la
reparación de herramientas eléctricas. Si necesita consejo técnico, reparaciones o piezas
de repuesto originales de fábrica, póngase en contacto con el centro de mantenimiento de
Black & Decker más cercano a su domicilio. Para ubicar su centro de servicio local,
consulte la sección “Herramientas eléctricas” (Tools-Electric) de las páginas amarillas,
llame al (55)5326-7100 o visite nuestro sitio www.blackanddecker.com.
31
Page 32

GARANTÍA COMPLETA DE DOS AÑOS PARA USO EN EL HOGAR
Black & Decker (Estados Unidos) Inc. ofrece una garantía de dos años por cualquier
defecto del material o de fabricación de este producto. El producto defectuoso se reparará
o reemplazará sin costo alguno de dos maneras.
La primera opción, el reemplazo, es devolver el producto al comercio donde se lo adquirió
(siempre y cuando se trate de un comercio participante). Las devoluciones deben
realizarse conforme a la política de devolución del comercio (generalmente, entre 30 y 90
días posteriores a la venta). Le pueden solicitar comprobante de compra. Consulte en el
comercio acerca de la política especial sobre devoluciones una vez excedido el plazo
establecido.
La segunda opción es llevar o enviar el producto (con flete pago) a un Centro de
mantenimiento propio o autorizado de Black & Decker para su reparación o reemplazo
según nuestro criterio. Le pueden solicitar el comprobante de compra. Los Centros de
mantenimiento autorizados y de propiedad de Black & Decker se detallan en la sección
“Herramientas eléctricas” (Tools-Electric) de las páginas amarillas de la guía telefónica.
Esta garantía no se extiende a los accesorios. Esta garantía le concede derechos legales
específicos; usted puede tener otros derechos que pueden variar según el estado o la
provincia. Si tiene alguna pregunta, comuníquese con el gerente del Centro de
mantenimiento de Black & Decker de su zona. Este producto no está diseñado para uso
comercial.
Para reparación y servicio de sus herramientas eléctricas, favor de
dirigirse al Centro de Servicio más cercano:
CULIACAN, SIN
Av. Nicolás Bravo #1063 Sur
(667) 7 12 42 11
Col. Industrial Bravo
GUADALAJARA, JAL
Av. La Paz #1779
(33) 3825 6978
Col. Americana Sector Juarez
MEXICO, D.F.
Eje Central Lázaro Cardenas
No. 18
(55) 5588 9377
Local D, Col. Obrera
MERIDA,YUC
Calle 63 #459-A
(999) 928 5038
Col. Centro
PARA OTRAS LOCALIDADES LLAME AL: (55) 5326 7100
Vea “Herramientas
eléctricas (Tools-Electric)”
– Páginas amarillas –
para Servicio y ventas
MONTERREY, N.L.
Av. Francisco I. Madero
No.831
(81) 8375 2313
Col. Centro
PUEBLA, PUE
17 Norte #205
(222) 246 3714
Col. Centro
QUERETARO, QRO
Av. Madero 139 Pte.
(442) 214 1660
Col. Centro
SAN LUIS POTOSI, SLP
Av. Universidad 1525
(444) 814 2383
Col. San Luis
BLACK & DECKER S.A. DE C.V.
BOSQUES DE CIDROS ACCESO
COL. BOSQUES DE LAS LOMAS.
TORREON, COAH
Blvd. Independencia, 96 Pte.
(871) 716 5265
Col. Centro
VERACRUZ,VER
Prolongación Díaz Mirón #4280
(229)921 7016
Col. Remes
VILLAHERMOSA, TAB
Constitución 516-A
(993) 312 5111
Col. Centro
RADIATAS NO. 42
05120 MÉXICO, D.F
TEL. 55-5326-7100
Catalog Number BDPG700 Form # 90583834
Copyright © 2 012 Black & De cke r Printed in China
32
January 2012
 Loading...