

Page 1
WARNING: Read and understand all instructions. Failure to follow all instructions
listed below may result in electric shock, fire and/or serious personal injury.
SAVE THESE INSTRUCTIONS
Safety Instructions
• Do not operate the laser in explosive atmospheres, such as in the presence of flammable
liquids, gases, or dust.
• Use the laser only with the specifically designated batteries. Use of any other batteries
may create a risk of fire.
• Store idle laser out of reach of children and other untrained persons. Lasers are dangerous
in the hands of untrained users.
• Use only accessories that are recommended by the manufacturer for your model.
Accessories that may be suitable for one laser, may create a risk of injury when used on
another laser.
• Do not use optical tools such as a telescope or transit to view the laser beam. Serious eye
injury could result.
• Do not place the laser in a position which may cause anyone to intentionally or
unintentionally stare into the laser beam. Serious eye injury could result.
• Turn the laser off when it is not in use. Leaving the laser on increases the risk of staring
into the laser beam.
• Repairs and servicing MUST be performed by a qualified repair facility. Repairs performed
by unqualified personnel could result in serious injury.
• WARNING: DO NOT DISASSEMBLE THE LASER. There are no user serviceable
parts inside. Disassembling the Laser will void all warranties on the product. Do not modify
the product in any way. Modifying the tool may result in Hazardous Laser Radiation
Exposure.
• Do not operate the laser around children or allow children to operate the laser. Serious eye
injury may result.
• Do not remove or deface warning labels. Removing labels increases the risk of exposure
to radiation.
• Position the laser securely. Damage to the laser or serious injury could result if the laser
falls.
• CAUTION: Use caution when drilling, nailing or cutting into walls, floors and ceilings
which may contain electrical wiring or pipes. Always turn off the power when working
near electrical wires.
CAUTION: Use of controls or adjustments or performance of procedures other than
those specified in this manual may result in hazardous laser radiation exposure.
The label on your tool may include the following symbols.
V ..........................volts mW......................milliwatts
nm ........................wavelength in nanometers IIIa ......................Class IIIa Laser
For your convenience and safety, the following labels are on your laser .
VEA EL ESPAÑOL EN LA CONTRAPORTADA.
SAVE THIS MANUAL FOR FUTURE REFERENCE.
INSTRUCTIVO DE OPERACIÓN, CENTROS DE SERVICIO YPÓLIZADE GARANTÍA.
ADVERTENCIA: LÉASE ESTE INSTRUCTIVO ANTES DE USAR ELPRODUCT O.
INSTRUCTION MANUAL
LLLLaaaasssseeeerrrr LLLLeeeevvvveeeell
ll
Cat No. BDL250S Form #620407-00 (SEP-03) Copyright © 2003 Black & Decker Printed in Taiwan
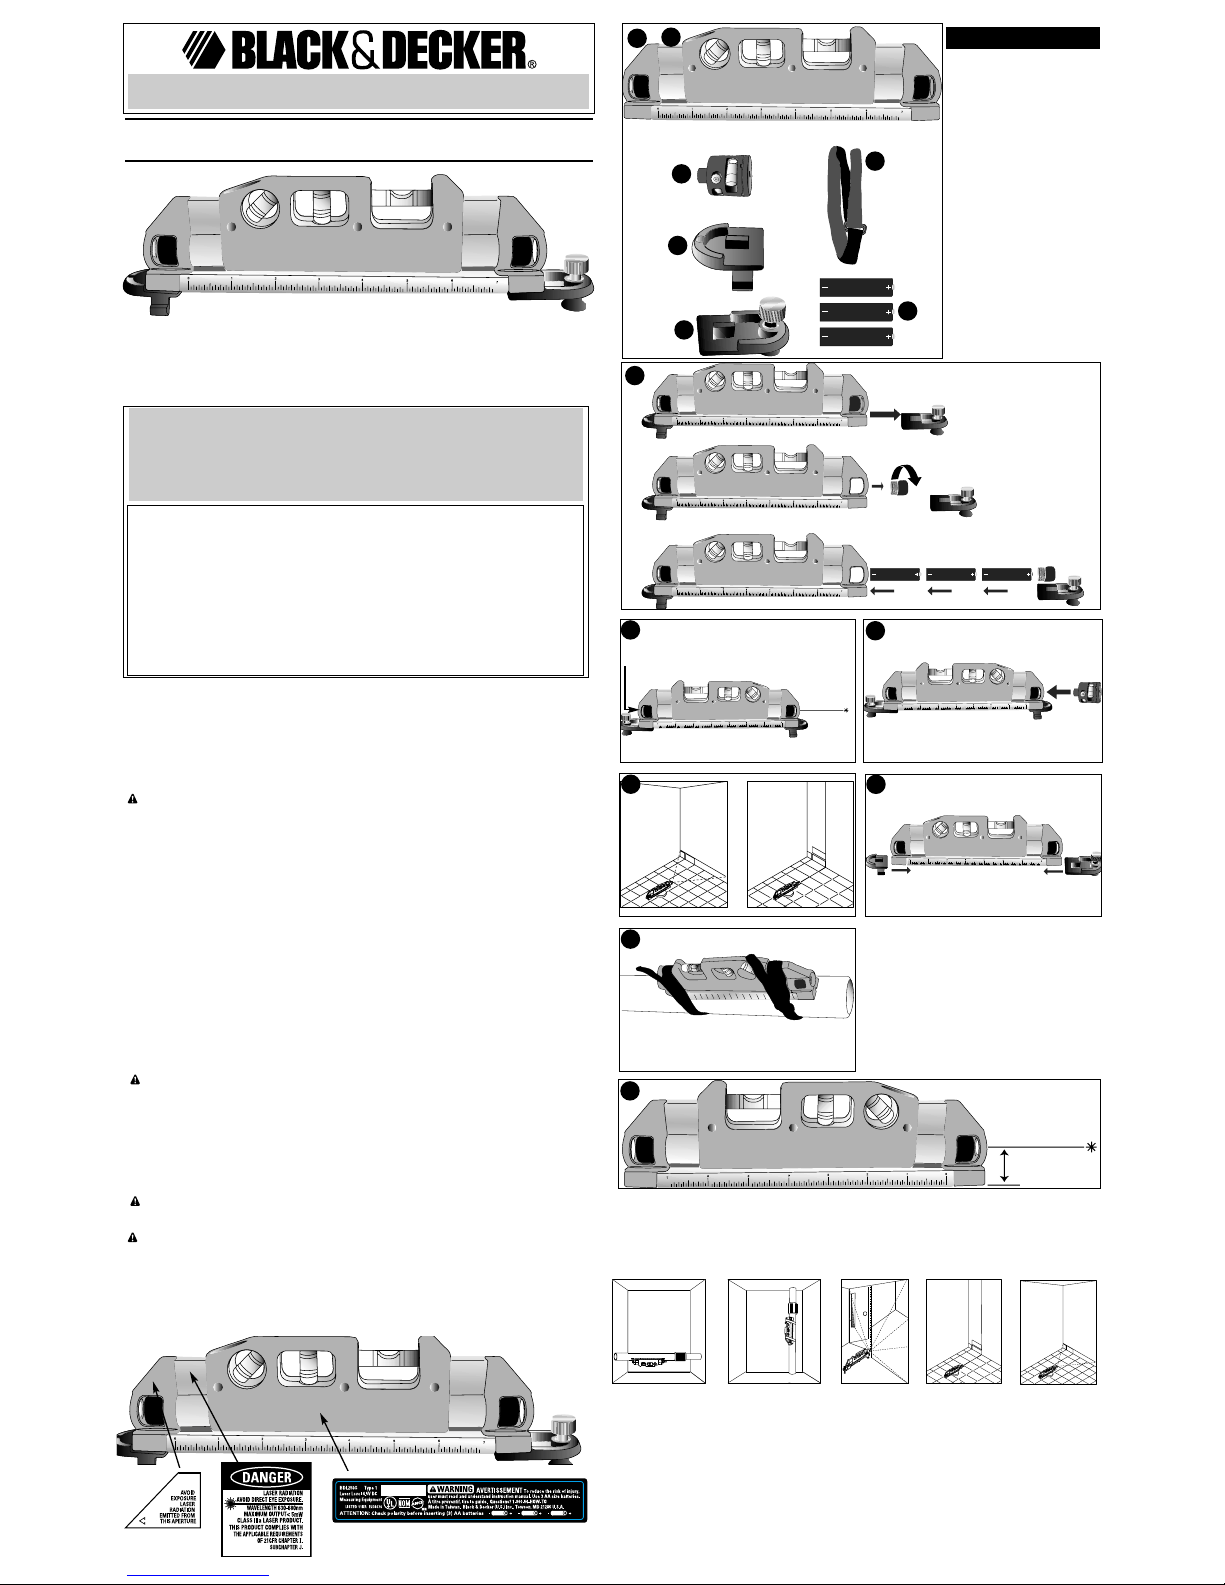
FEATURES
A.) LASER
B.) MAGNETIC LINE LENS
C.) FIXED FOOT (RIGHT)
D.) ADJUSTABLEFOOT
(LEFT)
E.) HOOK AND LOOP
STRAP (2)
F .) AAALKALINE
BATTERIES (3)
2
A
B
C
E
F
BEFORE RETURNING THIS PRODUCT
FOR ANY REASON PLEASE CALL
1-800-544-6986
IF YOU SHOULD HA VE AQUESTION OR EXPERIENCE A
PROBLEM WITH YOUR BLACK &DECKER PRODUCT,
CALL 1-800-544-6986
BEFORE YOU CALL, HAVE THE FOLLOWING INFORMATION AVAILABLE, CAT ALOG No., TYPE No., AND
DATE CODE (e.g. 20000130M). IN MOSTCASES, ABLACK & DECKER REPRESENTATIVE CAN
RESOLVE YOUR PROBLEM OVER THE PHONE. IF YOU HAVE ASUGGESTION OR COMMENT, GIVE
US ACALL. YOUR FEEDBACK IS VITALTO BLACK & DECKER.
D
Catalog No. BDL250S
1
0.87” (22mm)
PRESS - ENFONCER - PRESIONE
4
3
5
6
7
8
Applications - Applications Aplicaciones
Piping-ferrous sur Piping-non ferrous Door framing Tiling-vertical line Tiling-horizontal
faces surfaces line
Tubes – Tubes – surfaces non Cadres de Carrelages – Carrelages –
surfaces ferreuses ferreuses porte trait vertical trait horizontal
Cañerías – superficies Cañerías – superficies Enmarcado de Instalación de Instalación de –
ferrosas no ferrosas puertas azulejos línea azulejos – línea
vertical horizontal
Page 2
Installing the Battery
Ensure laser on/off switch is in the “OFF” position. Remove the adjustable foot from the left
side of the laser by pulling straight out. Unscrew the battery cover as shown in figure 2 and
insert 3 ”AA” alkaline batteries with the positive (+) side facing out toward the battery cover.
Replace the battery cover and left adjustable foot.
Operating Instructions
DANGER: Laser Radiation, avoid direct eye exposure.
On/Off Switch
Press the ON/OFF switch shown in figure 3 to turn the laser ON. Press the switch a second
time to turn the laser OFF.
Use With Magnetic Line Lens
The line lens is designed with a lens for generating a straight-line laser beam, using the
horizontal and vertical vials to find a horizontal / vertical line precisely and quickly.
•Attach the line lens to the laser as shown in figure 4.
• Press the ON/OFF switch to activate the laser function.
• Rotate the line lens to level the bubble centered in the vial so that you can find a vertical or a
horizontal laser line as illustrated in figure 5.
Use With Fixed and Adjustable Feet
While working on any uneven surface, use the adjustable foot to level the laser in a horizontal
position.
•Assemble the fixed foot and adjustable foot (figure 6) and the magnetic line lens.
• Press the ON/OFF switch to activate the laser function.
• Using the horizontal bubble to indicate levelness, turn the knob on the adjustable foot to
raise or lower the laser while working on uneven surfaces.
Use With Hook and Loop Straps
Caution: When using overhead, make sure laser is anchored securely.
• While working on non-ferrous pipes, PVC tubing or other circular objects, fasten the laser
using the two hook and loop straps as shown in figure 7.
• Press the ON/OFF switch to activate the laser function.
Use With Magnetic Base
• The laser is equipped with a strong magnetic base for use with ferrous pipes and other
ferrous surfaces, eliminating the need for the straps.
Important Note
The distance from the level base to the center of the laser aperture is 0.87 inches (22mm)
Refer to figure 8.
Helpful Hints
• If the laser light becomes dim or is no longer visible when the switch is in the on position
check or change the battery.
• The laser lines are only level on the wall against which the unit is held or hung. The short
line visible on any adjacent wall is not level.
Maintenance
Use only mild soap and damp cloth to clean the tool. Never let any liquid get inside the tool;
never immerse any part of the tool into a liquid.
IMPORTANT: T o assure product SAFETYand RELIABILITY, repairs, maintenance and
adjustment (other than those listed in this manual) should be performed by authorized service
centers or other qualified service personnel, always using identical replacement parts.
Accessories
Recommended accessories for use with your tool are available from your local dealer or
authorized service center. If you need assistance regarding accessories, please call:
1-800-544-6986.
WARNING
:The use of any accessory not recommended for use with this tool could be
hazardous.
Service Information
All Black & Decker Service Centers are staffed with trained personnel to provide customers
with efficient and reliable power tool service. Whether you need technical advice, repair, or
genuine factory replacement parts, contact the Black & Decker location nearest you. T o find
your local service location, refer to the yellow page directory under "Tools—Electric" or call:
1-800-544-6986 or visit www.blackanddecker.com
Full Two-Year Home Use Warranty
Black & Decker (U.S.) Inc. warrants this product for two years against any defects in material
or workmanship. The defective product will be replaced or repaired at no charge in either of
two ways.
The first, which will result in exchanges only, is to return the product to the retailer from whom
it was purchased (provided that the store is a participating retailer). Returns should be made
within the time period of the retailer’s policy for exchanges (usually 30 to 90 days after the
sale). Proof of purchase may be required. Please check with the retailer for their specific
return policy regarding returns that are beyond the time set for exchanges.
The second option is to take or send the product (prepaid) to a Black & Decker owned or
authorized Service Center for repair or replacement at our option. Proof of purchase may be
required. Black & Decker owned and authorized Service Centers are listed under "ToolsElectric" in the yellow pages of the phone directory and on our website
www.blackanddecker.com.
This warranty does not apply to accessories. This warranty gives you specific legal rights and
you may have other rights which vary from state to state. Should you have any questions,
contact the manager of your nearest Black & Decker Service Center. This product is not
intended for commercial use.
FREE WARNING LABELREPLACEMENT: If your warning labels become illegible or are
missing, call 1-800-544-6986 for a free replacement.
Conserver le présent guide à titre de référence.
AVERTISSEMENT : Lire, comprendre et suivre toutes les directives précisées cidessous, y compris les consignes de sécurité, afin d’éviter les risques de choc
électrique, d’incendie ou de blessure grave.
CONSERVER CES DIRECTIVES
Consignes de sécurité
• Ne pas utiliser le laser dans une atmosphère explosive, comme en présence de liquide, de
gaz ou de poussière inflammable.
• N’utiliser que des piles spécialement conçues pour les lasers; l’usage de tout autre type de
pile pourrait entraîner des risques d’incendie.
• Lorsqu’on n’utilise pas le laser, le ranger hors de la portée des enfants ou des personnes
non qualifiées; les lasers sont dangereux entre les mains de personnes inexpérimentées.
• N’utiliser que les accessoires recommandés par le fabricant pour le modèle concerné; un
accessoire destiné à un laser particulier peut devenir dangereux lorsqu’il est utilisé avec un
autre.
• Ne pas utiliser un dispositif optique, tel qu’un télescope ou une lunette de passage, pour
examiner le faisceau laser afin d’éviter de blesser grièvement les yeux.
• Ne pas mettre le laser dans une position qui pourrait encourager une personne à regarder
directement le faisceau laser, volontairement ou involontairement, car cela pourrait blesser
grièvement les yeux.
• Mettre le laser hors tension après chaque utilisation, car un laser laissé sous tension
encourage une personne à regarder directement le faisceau laser.
• La réparation et l’entretien DOIVENT être effectués dans un centre de service autorisé ou
par du personnel qualifié; toute opération d’entretien ou de réparation effectuée par une
personne non qualifiée pourrait entraîner des blessures graves.
AVERTISSEMENT! NE P AS DÉMONTER LE LASER. L’outil ne comprend aucune pièce
interne destinée à être entretenue par l’utilisateur. Le fait de démonter ce laser annulera
toute garantie appuyant ce produit; on ne doit jamais modifier ce dernier de quelque
manière que ce soit afin d’éviter d’entraîner des risques d’exposition aux rayonnements.
• Ne pas utiliser le laser en présence d’un enfant, ni autoriser les enfants à utiliser le laser
afin d’éviter les blessures graves aux yeux.
• Ne pas retirer ni abîmer les étiquettes d’avertissement; le fait de retirer les étiquettes
augmentera les risques d’exposition aux rayonnements laser.
• S’assurer de bien déposer le laser sur une surface de niveau afin de l’empêcher de tomber
et de s’endommager ou de blesser l’utilisateur.
MISE EN GARDE : On doit faire particulièrement attention lorsqu’on perce un trou, qu’on
enfonce un clou ou qu’on effectue une coupe dans un mur, un plancher ou un plafond
pouvant camoufler des fils électriques ou des tuyaux. On doit toujours couper le courant
lorsqu’on travaille à proximité de fils électriques.
MISE EN GARDE : Le fait d’utiliser des commandes, d’effectuer des réglages ou de
suivre des procédures autres que celles décrites aux présentes pourrait entraîner des
risques d’exposition aux rayonnements
.L’étiquette apposée sur l’outil peut afficher les symboles suivants :
V volts MW milliwatts
nm longueur d’onde exprimée en nanomètres IIIa Laser de classe IIIa
Pour des fins pratiques et de sécurité, le laser comprend les étiquettes d’avertissement
suivantes.
Installation de la pile
S’assurer que l’interrupteur marche-arrêt du laser est bien enclenché en position d’arrêt.
Retirer le pied réglable situé du côté gauche du laser en le tirant bien droit. Dévisser le
couvercle des piles, tel qu’illustré à la figure 2, puis insérer trois piles alcalines AAen
s’assurant d’orienter le symbole des bornes positives («+») vers l’extérieur, soit du côté du
couvercle. Replacer le couvercle et le pied réglable gauche.
Mode d’emploi
DANGER : Rayonnement laser. Éviter les risques d’exposition oculaire.
Interrupteur de marche-arrêt
Enfoncer l’interrupteur de marche-arrêt (figure 3) pour mettre le laser en marche; l’enfoncer
une deuxième fois pour l’arrêter.
Utilisation avec une lentille de trait magnétique
La lentille de trait magnétique est conçue de manière à produire un faisceau laser en ligne
droite au moyen des fioles horizontale et verticale, qui permettent de s’arrêter sur un trait
horizontal ou vertical rapidement et avec précision.
• Fixer la lentille sur le laser en suivant l’illustration indiquée à la figure 4.
• Enfoncer l’interrupteur de marche-arrêt afin d’actionner la fonction du laser.
• T ourner la lentille afin de mettre la bulle située au centre de la fiole de niveau en vue de
s’arrêter sur un trait laser vertical ou horizontal (voir l’illustration à la figure 5).
Utilisation avec les pieds fixe et réglable
Lorsqu’on travaille sur une surface inégale, utiliser le pied réglable pour mettre le laser de
niveau en position horizontale.
• Assembler les pieds fixe et réglable (figure 6) ainsi que la lentille de trait magnétique.
• Appuyer sur l’interrupteur de marche-arrêt afin d’actionner la fonction du laser.
• Utiliser la bulle horizontale pour indiquer la nivelance du laser, puis tourner l’interrupteur
situé sur le pied réglable afin de soulever ou d’abaisser le laser en travaillant sur une
surface inégale.
GUIDE D’UTILISATION
No de catalogue BDL250S
NNNNiiiivvvveeeeaaaauuuu llllaaaasssseeeerr
rr
SI VOUS ÉPROUVEZ UN
PROBLÈME A VEC L ’OUTIL,
COMPOSEZ LE 1 800 544-6986.
AVANT D’APPELER, VEUILLEZ VOUS ASSURER D’A VOIR
L’INFORMATION SUIVANTE À PORTÉE DE LAMAIN : LE NUMÉRO
DE CATALOGUE, LE NUMÉRO DE PRODUIT ET LE CODE DE
DATATION (p. ex., 20000130M). DANS LAMAJORITÉ DES CAS, LE
REPRÉSENTANTDE BLACK & DECKER SERAEN MESURE DE
RÉSOUDRE LE PROBLÈME PAR TÉLÉPHONE. VEUILLEZ NOUS
FAIRE PART DE VOS QUESTIONS OU DE VOS COMMENTAIRES
EN COMPOSANT LE MÊME NUMÉRO; CEUX-CI AIDENT À
ASSURER LAQUALITÉ DE NOTRE SERVICE.
See ‘Tools-Electric’
– Yellow Pages –
for Service & Sales
Imported by
Black & Decker (U.S.) Inc.,
701 E. Joppa Rd.
Towson, MD 21286 U.S.A.
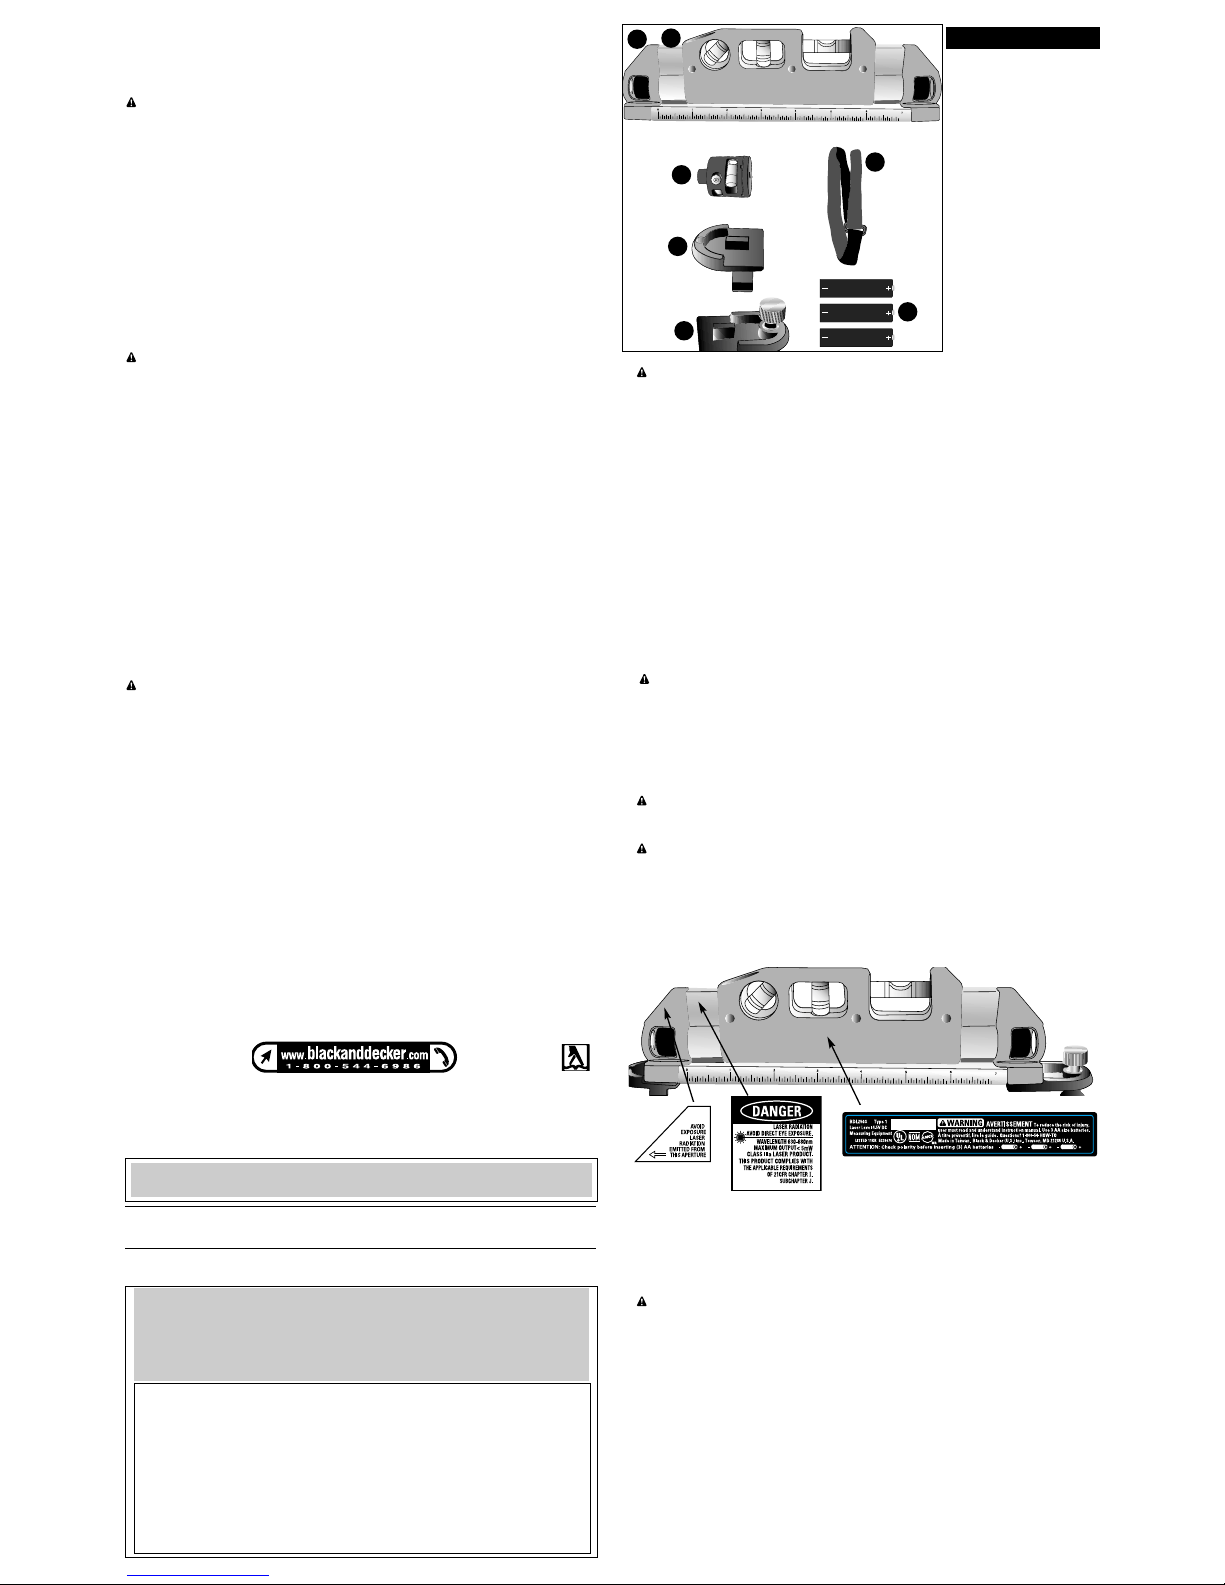
COMPOSANTS
A.) LASER
B.) LENTILLE DE TRAIT
MAGNÉTIQUE
C.) PIED FIXE (DROIT)
D.) PIED RÉGLABLE
(GAUCHE)
E.) BANDES VELCRO (2)
F .) PILES ALCALINES AA
(3)
A
B
C
E
F
D
1
Page 3

Utilisation avec les bandes Velcro
Mise en garde : Lorsqu’on utilise le laser au dessus de la tête, s’assurer qu’il est fixé
solidement.
• Lorsqu’on travaille sur des tubes non ferreux, des tubes en PVC ou d’autres objets
circulaires, fixer le laser au moyen des deux bandes Velcro, tel qu’illustré à la figure 7.
• Enfoncer l’interrupteur de marche-arrêt afin d’actionner la fonction du laser.
Utilisation avec la base magnétique
• Le laser est doté d’une base magnétique solide à utiliser avec des tubes ferreux et autres
surfaces ferreuses, éliminant ainsi le besoin d’utiliser les bandes.
Note importante
La distance entre la base de niveau et le centre de l’ouverture du laser est 22 mm (0,87 po).
Se reporter à la figure 8.
Conseils pratiques
• Si le faisceau laser s’affaiblit ou devient presque invisible lorsque l’interrupteur est en
position de marche, vérifier ou remplacer les piles.
• Le niveau indiqué par les traits laser n'est exact que si l'appareil repose ou est suspendu
contre une surface verticale. Si les traits rejoignent aussi d’autres murs adjacents, ils ne
seront pas nécessairement de niveau.
Entretien
Nettoyer l’outil au moyen d’un savon doux et d’un linge humide seulement. Ne jamais laisser
de liquide s’infiltrer à l’intérieur de l’outil ni tremper ce dernier dans un liquide quelconque.
IMPORTANT: Pour assurer la SÉCURITÉ et la FIABILITÉ de ce produit, toutes les
opérations de réparation, d’entretien et de réglage (autres que celles décrites aux
présentes) doivent être effectuées dans un centre de service autorisé ou par du personnel
qualifié; on ne doit utiliser que des pièces de rechange identiques.
Accessoires
Les accessoires recommandés pour chaque outil sont vendus séparément chez les
dépositaires locaux ou dans les centres de service autorisés. Pour obtenir plus d’information
sur les accessoires, composer le :1 800 544-6986
AVERTISSEMENT :L’usage d’un accessoire non recommandé peut présenter un danger.
Information sur les services
Tous les centres de service Black & Decker sont dotés de personnel qualifié en matière
d’outillage électrique; ils sont donc en mesure d’offrir à leur clientèle un service efficace et
fiable. Pour obtenir un conseil technique ou une pièce d’origine ou pour faire réparer un outil,
on peut communiquer avec le centre Black & Decker le plus près. Pour obtenir le numéro de
téléphone, consulter les pages jaunes sous la rubrique «Outils - électriques» ou composer
le 1 800 544-6986 ou encore, visiter notre site Web au www.blackanddecker .com
Garantie complète de deux ans pour usage résidentiel
Black & Decker (U.S.) Inc. garantit ce produit pour une période de deux ans contre tout
défaut de matériel ou de fabrication. Le produit défectueux sera remplacé ou réparé sans
frais, suivant l’une des deux méthodes suivantes.
La première méthode consiste en un échange seulement. On doit retourner le produit au
détaillant qui l’a vendu (pourvu qu’il s’agisse d’un détaillant participant), en respectant les
délais stipulés dans sa politique relative aux échanges (normalement de 30 à 90 jours après
la vente). Une preuve d’achat peut être requise. On doit vérifier la politique de retour du
détaillant pour tout produit retourné après le délai prescrit pour les échanges.
La deuxième méthode consiste à apporter ou à envoyer le produit (prépayé) à un centre
Black & Decker ou à un centre de service autorisé aux fins de réparation ou de
remplacement, selon notre choix. Une preuve d’achat peut être requise. Les centres Black &
Decker et les centres de service autorisés sont répertoriés dans les pages jaunes sous la
rubrique «Outils - électriques» ou sur notre site Web au www.blackanddecker .com.
Cette garantie ne s’applique pas aux accessoires. Elle confère des droits légaux particuliers
à l’acheteur, mais celui-ci pourrait aussi bénéficier d’autres droits variant d’un territoire à
l’autre.
Toute question doit être adressée au gérant du centre Black & Decker le plus près.
Ce produit n’est pas destiné à un usage commercial.
REMPLACEMENT GRATUITDE L ’ÉTIQUETTE D’AVERTISSEMENT: en cas de perte ou
d’endommagement des étiquettes d’avertissement, composer le 1 800 544-6986 afin d’en
obtenir de nouvelles sans frais.
• Apague el láser cuando no esté en uso. Si lo deja encendido, aumenta el riesgo de que
alguien mire directamente al rayo láser.
• Toda reparación o servicio técnico DEBE ser realizado por un centro de servicio calificado.
Reparaciones realizadas por personal no calificado podrían resultar en lesiones graves.
• ADVERTENCIA: NO DESARME EL LÁSER. No contiene piezas que puedan ser
reparadas por el usuario. Si desarma el láser, toda garantía del producto quedará nula. No
modifique el producto de ninguna forma. La modificación de la herramienta puede resultar
en una peligrosa exposición a radiación láser.
• No opere el láser en la presencia de niños ni permita que niños operen el láser. Esto podría
resultar en graves lesiones oculares.
• No quite ni escriba sobre las etiquetas de advertencia. El hacer esto aumenta el riesgo de
exposición a radiación.
• Ponga el láser en un lugar seguro. Si el láser se cayera, podría dañarse o causar lesiones
graves.
• ATENCIÓN:Tenga cautela cuando taladre, clave o corte a través de paredes, suelos y
techos que puedan contener cableado eléctrico o cañerías. Siempre corte la electricidad
cuando trabaje cerca de cables eléctricos.
• ATENCIÓN:El uso de los controles, su ajuste o realización de otros procedimientos, fuera
de los especificados en este manual, puede resultar en una peligrosa exposición a radiación
láser.
Su herramienta tiene una etiqueta que puede incluir los siguientes símbolos:
V ..........................voltios mW........................milivatios
nm ........................longitud de onda en nanómetros IIIa........................láser Clase IIIa
Para su conveniencia y seguridad, su láser tiene las siguientes etiquetas.
Instalación de la pila
Asegure que el conmutador on/off (de encendido y apagado) esté en la posición ‘off’
(apagado). Tire de la pata ajustable del costado izquierdo del láser para retirarla. Destornille
la cubierta del compartimiento de pilas, como lo muestra la Figura 2 e inserte 3 pilas alcalinas
“AA”, con el lado positivo (+) mirando hacia la cubierta del compartimiento de pilas. Reponga
la cubierta del compartimiento de pilas y la pata izquierda ajustable.
Instrucciones de funcionamiento
PELIGRO: Radiación láser. Evite la exposición directa con los ojos.
Conmutador On/Off (de encendido y apagado)
Presione el conmutador ON/OFF mostrado en la figura 3 para ENCENDER el láser. Presione
el conmutador una vez más para AP AGAR el láser.
Uso con lente de línea magnética
El lente de línea está diseñado con un lente para generar un rayo láser en línea recta,
mediante viales horizontales y verticales para encontrar una línea horizontal / vertical en
forma rápida y precisa.
• Conecte el lente de línea al láser como lo muestra la figura 4.
• Presione el conmutador ON/OFF para activar la función láser.
• Gire el lente de línea para nivelar la burbuja que se encuentra dentro del vial para poder
encontrar una línea láser vertical u horizontal como se ilustra en la figura 5.
Uso con patas fijas y ajustables
Cuando trabaje en una superficie desigual, use la pata ajustable para nivelar el láser en una
posición horizontal.
• Ensamble la pata fija y la ajustable (figura 6) y el lente de línea magnética.
• Presione el conmutador ON/OFF para activar la función láser.
• Usando la burbuja horizontal para indicar nivel, gire el botón en la pata ajustable para elevar
o bajar el láser mientras trabaje en superficies desiguales.
Uso con correas de velcro para sujeción tipo enlace
Atención: Cuando utilice el láser en alto, asegúrese que esté debidamente sujeto.
• Cuando trabaje con cañerías no ferrosas, tubería de PVC u otros objetos circulares, sujete
el láser enlazándolo en las dos correas de velcro, como lo muestra la figura 7.
• Presione el conmutador ON/OFF para activar la función láser.
Uso con base magnética
• El láser viene equipado con una base magnética fuerte para uso con cañerías ferrosas y
otras superficies ferrosas, eliminando así la necesidad de usar correas.
Nota importante
La distancia de la base de nivel al centro de la apertura del láser es de 22 mm (0,87 pulg.).
Refiérase a la figura 8.
Consejos prácticos
• Si la luz del láser se hace tenue o ya no es visible cuando el conmutador está en la posición
‘on’(encendido), revise o cambie la pila.
• Las líneas láser sólo indican nivel en la pared contra la cual se sostiene o cuelga la unidad.
La línea corta que se puede ver proyectada contra cualquier pared contigua no indica nivel.
Mantenimiento
Para limpiar la herramienta, sólo utilice un paño húmedo y jabón suave. Jamás permita que
le entre líquido a la herramienta; nunca sumerja ninguna parte de la herramienta.
IMPORTANTE: Las reparaciones, el mantenimiento y los ajustes del dispositivo (fuera de los
mencionados en este documento) deberán ser realizados por centros de servicio autorizados
u otro personal de servicio calificado, utilizando siempre repuestos idénticos, para asegurar
la SEGURIDAD y FIABILIDAD de la unidad.
Imported by / Importé par
Black & Decker Canada Inc.
100 Central Ave.
Brockville (Ontario) K6V 5W6
Voir la rubrique “Outils électriques”
des Pages Jaunes
pour le service et les ventes.
MANUAL DE INSTRUCCIONES
No. Catálogo BDL250S
NNNNiiiivvvveeeellll lllláááásssseeeerr
rr
Guarde este manual para futuras consultas.
ADVERTENCIA: Lea y comprenda todas las instrucciones. El no seguir todas las
instrucciones enumeradas más abajo podría resultar en descarga eléctrica, incendio y/o
lesiones corporales serias.
GUARDE ESTAS INSTRUCCIONES
Instrucciones de seguridad
• No opere el láser en ambientes explosivos, tales como en presencia de líquidos, gases o
polvos inflamables.
• Sólo utilice las pilas específicamente designadas para el láser. El uso de cualquier otro tipo de
pila puede crear un riesgo de incendio.
• Cuando no esté en uso, almacene el láser fuera del alcance de niños y otras personas no
capacitadas en su funcionamiento. Los láseres son peligrosos en manos de personas no
capacitadas.
• Utilice sólo aquellos accesorios que hayan sido recomendados por el fabricante para su
modelo. Algunos accesorios pueden ser apropiados para un modelo de láser pero pueden
crear un riesgo de lesión cuando se utilizan con otro modelo.
• No utilice herramientas ópticas tales como telescopios o niveles topográficos para ver el rayo
láser. Esto podría resultar en graves lesiones oculares.
• No sitúe el láser en una posición que pudiera resultar, ya sea intencionadamente o sin querer,
en que alguien mire directamente el rayo láser. Esto podría resultar en graves lesiones
oculares.
CARACTERÍSTICAS
A.) LÁSER
B.) LENTE DE LÍNEA
MAGNÉTICA
C.) PATA FIJA (DERECHA)
D.) PATA AJUST ABLE
(IZQUIERDA)
E.) CORREA DE VELCRO
PARA SUJECIÓN TIPO
ENLACE (2)
F .) PILAS ALCALINAS AA
(3)
A
B
C
E
F
D
1
ANTES DE DEVOL VER ESTE
PRODUCTO POR CUALQUIER MOTIVO,
FAVOR LLAMAR AL1-800-544-6986
DE TENER ALGÚN PROBLEMACON SU PRODUCTO BLACK &
DECKER, FA VOR LLAMAR AL1-800-54-HOW-TO (544-6986)
ANTES DE LLAMAR, TENGALASIGUIENTE INFORMACIÓN
DISPONIBLE. No. de CATALOGO, TIPO No., YCÓDIGO DE FECHA(p.ej.
20000130M). EN LAMAYORÍADE LOS CASOS, UN REPRESENTANTE
DE BLACK & DECKER LE PUEDE RESOLVER SU PROBLEMA
TELEFÓNICAMENTE. SI TIENE UNASUGERENCIAO COMENT ARIO,
LLÁMENOS. SU APORTE ES VITALPARABLACK & DECKER.
Page 4

Accesorios
Los accesorios recomendados para ser utilizados con su herramienta se encuentran
disponibles donde su distribuidor o centro de servicio autorizado locales. Si tiene alguna
consulta acerca de estos accesorios, por favor llame al 1-800-544-6986.
ADVERTENCIA: El uso de cualquier accesorio que no sea recomendado para ser utilizado
con esta herramienta podría ser peligroso.
Información de servicio
Todos los Centros de Servicio Black & Decker están dotados de personal capacitado para
proporcionar un servicio técnico eficiente y fiable a las máquinas herramientas de nuestros
clientes. Contacte al local Black & Decker más cercano para obtener consejos técnicos,
reparaciones o repuestos de fábrica originales. Para encontrar el local de servicio más
cercano, busque en las páginas amarillas bajo “Herramientas eléctricas”, llame al 1-800544-6986 o visítenos en www.blackanddecker.com
Garantía completa de dos años para uso doméstico
Black & Decker (U.S.) Inc. garantiza este producto por dos años contra cualquier defecto en
su material o fabricación. Existen dos opciones para reemplazar o reparar el producto
defectuoso, sin costo.
La primera, la cual resultará sólo en un cambio, es devolver el producto al vendedor del cual
fue comprado (siempre que sea un local participante). Las devoluciones deberán realizarse
durante el plazo especificado en la política de devoluciones del vendedor (generalmente
entre 30 y 90 días después de la fecha de compra). Puede que sea necesario presentar
prueba de compra. Por favor averigüe cuál es la política del vendedor para devoluciones
efectuadas más allá del plazo para cambios.
La segunda opción es llevar o enviar el producto (con franqueo pagado) a un centro de
servicio autorizado o al Centro de Servicio Black & Decker para su reparación o reemplazo,
a decisión nuestra. Puede que sea necesario presentar prueba de compra. Los centros de
servicio autorizados y Centros de Servicio Black & Decker se encuentran en las páginas
amarillas bajo “Herramientas eléctricas” y en nuestro sitio web www.blackanddecker.com.
Esta garantía no aplica a los accesorios. Esta garantía le da derechos legales específicos
además de los cuales puede tener otros, los cuales varían entre estados. Si tuviese alguna
pregunta, contacte al gerente de su Centro de Servicio Black & Decker más cercano. Este
producto no es para uso comercial.
REEMPLAZO GRATUITO DE SUS ETIQUETAS DE ADVERTENCIA: Si sus etiquetas de
advertencia se hacen ilegibles o se pierden, llame al 1-800-544-6986 para obtener unas
nuevas en forma gratuita.
ARA REPARACION YSER VICIO DE SUS HERRAMIENTAS ELECTRICAS FA VOR DE
DIRIGIRSE ALCENTRO DE SERVICIO MAS CERCANO
CULIACAN Av . Nicolas Bravo #1063 Sur (56 77) 12 42 10
GAUDALAJARA Av. La Paz #1770 (33 38) 26 69 78
LEON Polara #32 (47 77) 13 14 56
MEXICO Sonora #134 Hiprodromo Condesa (55 55) 53 99 79
MERIDA Calle 63 #459 (99 99) 23 54 90
MONTERREY Av. Francisco I. Madero Pte. 1820-A (81 83) 72 11 25
PUEBLA 17 Norte #2057 (22 22) 46 90 20
QUERETARO Av. Madero 139 Pte. (44 22) 14 60 60
SAN LOUIS POTOSI Pedro Moreno #408 Fracc. la Victoria (44 48) 14 25 67
TORREON Blvd. Independencia, 96 pte. (87 17) 16 52 65
VERACRUZ Prolongación Diaz Miron #4280 (29 99) 21 70 18
VILLAHERMOSA Zaragoza #105 (99 33) 12 53 17
PARAOTRAS LOCALIDADES LLAME AL: (55) 5326-7100 INFORMACIÓN DE SERVICIO
IMPORTADO: BLACK & DECKER S.A. DE C.V.
BOSQUES DE CIDROS ACCESO RADIATAS NO. 42
COL. BOSQUES DE LAS LOMAS.
05120 MÉXICO, D.F
TEL. 3-26-71-00
Epecificaciones
BDL250S
Tensión de alimentación 4,5V
 Loading...