

Page 1

To register your new product, call 1-800-544-6986
or visit www.BlackandDecker.com/NewOwner
INSTRUCTION MANUAL
ROBOTIC VACUUM
Thank you for choosing BLACK+DECKER!
PLEASE READ BEFORE RETURNING THIS PRODUCT FOR
ANY REASON.
If you have a question or experience a problem with your BLACK+DECKER
purchase, go to http://www.blackanddecker.com/instantanswers
If you can’t find the answer or do not have access to the Internet, call
1-800-544-6986 from 8 a.m. to 5 p.m. EST Mon. - Fri. to speak with an agent.
Please have the catalog number available when you call.
SAVE THIS MANUAL FOR FUTURE REFERENCE.
VEA EL ESPANOL EN LA CONTRAPORTADA.
INSTRUCTIVO DE OPERACIÓN, CENTROS DE SERVICIO Y PÓLIZA DE GARANTÍA.
ADVERTENCIA: LÉASE ESTE INSTRUCTIVO ANTES DE USAR EL PRODUCTO.
CATALOG NUMBER
BDH5000
Page 2
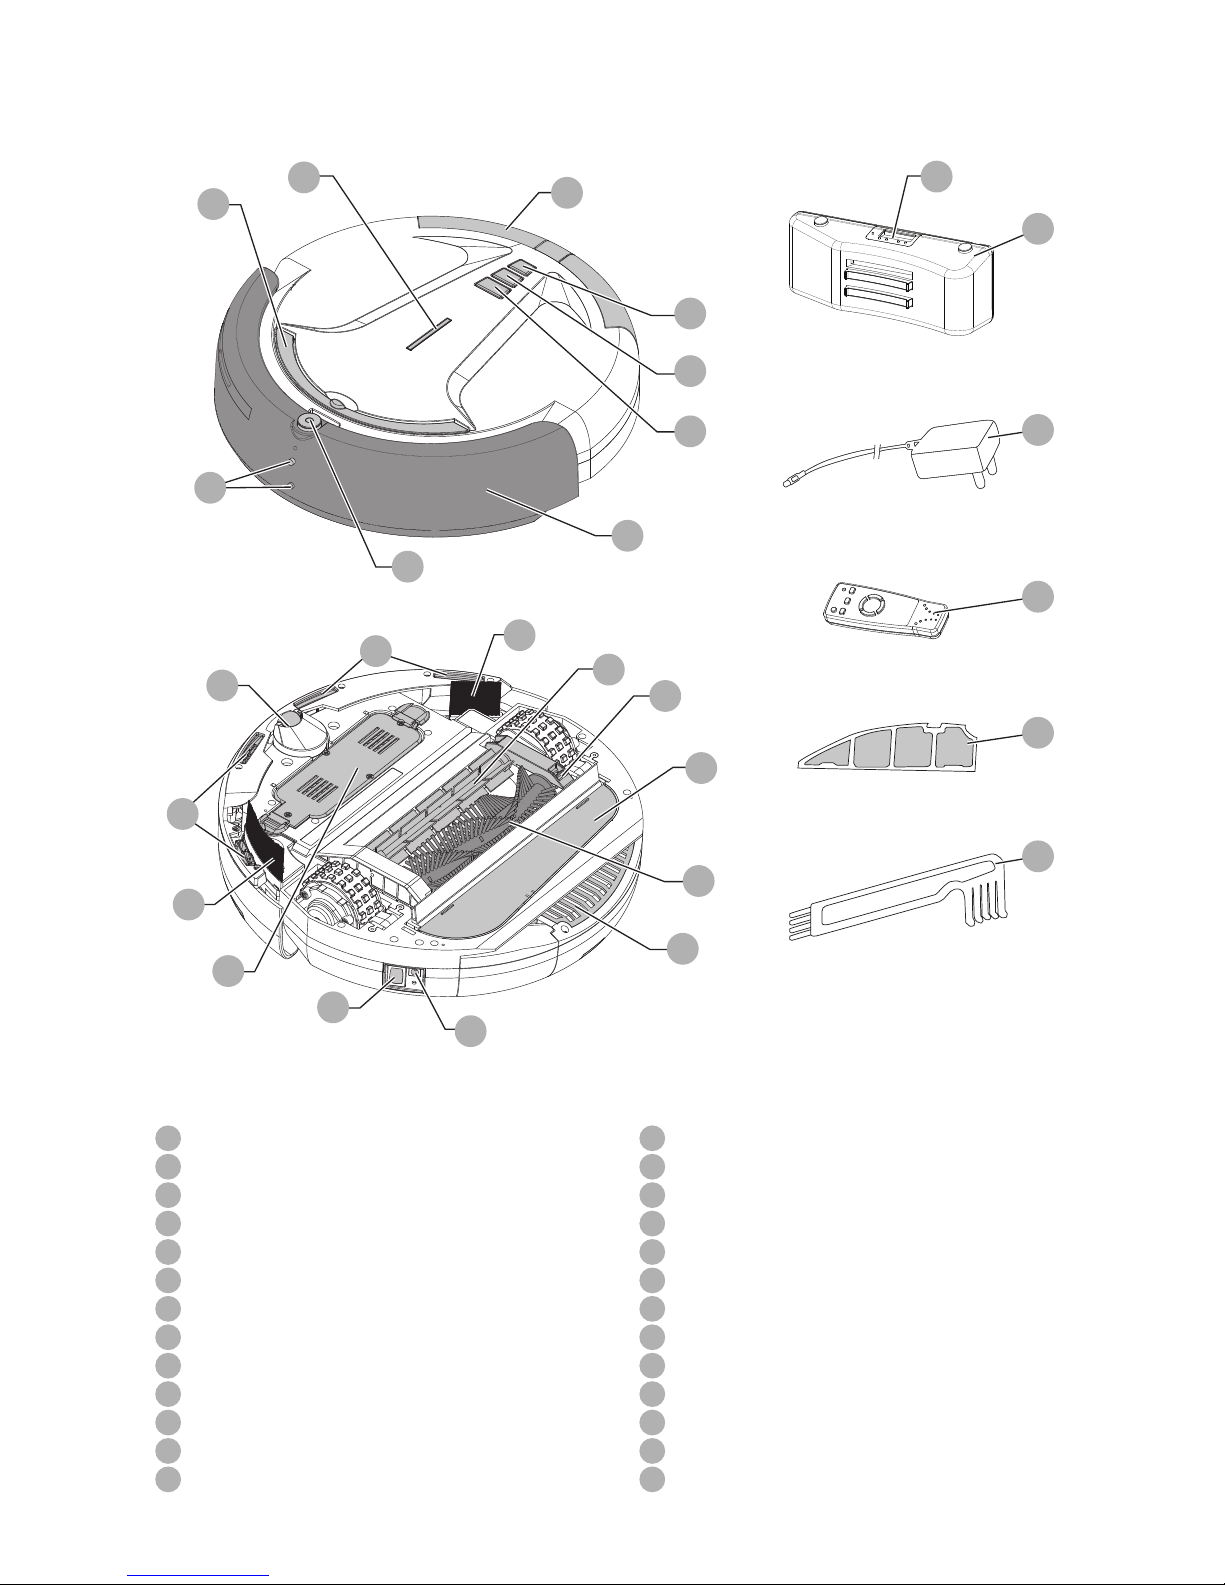
2
1
Spot button
2
Clean button
3
Max button
4
Power indicator
5
Handle
6
Infrared receiver
7
Charging electrodes
8
Front Cover
9
Dust bin
10
Fan cover
11
Power switch
12
Charging socket
13
Filter
14
Main brush
15
Rubber brush
16
Brush cover
17
Side brushes
18
Rechargeable battery
19
Sensors
20
Front wheel
21
Charging dock
22
LED screen
23
Battery Charger
24
Remote control
25
Additional mesh filter
26
Maintenance brush
Fig. A
25
26
24
23
21
12
11
10
16
15
13
14
19
19
18
20
1
2
3
7
6
5
4
8
9
22
17
17
Page 3

3
IMPORTANT SAFETY
INSTRUCTIONS
WARNING: Read all safety
warnings and all instructions. Failure to
follow the warnings and instructions listed
below may result in electric shock, fire
and/or serious injury.
WARNING: Some household dust
contains chemicals known to the State of
California to cause cancer, birth defects or
other reproductive harm such as asbestos
and lead in lead based paint.
WARNING: To reduce the risk of
electric shock – Do not use outdoors or on
wet surfaces.
• Do not allow to be used as a toy. Close
attention is necessary when used by or
near children.
• This product is not intended for use
by anyone (including children) with
inadequate physical, sensory, or mental
abilities, or who lack the experience,
knowledge or skills to operate the robot.
Children should never be left alone with
this product.
• Turn off the power switch when children
or pets are alone with the appliance.
• Use only as described in this
manual. Use only manufacturer’s
recommendedattachments.
• If appliance is not working as it should,
has been dropped, damaged, left
outdoors, or dropped into water, return it
to a service center.
• Do not step on or put objects on robot.
• Do not handle charger, including
charger plug, and charger terminals with
wethands.
• This appliance should only be used
for dry pick up. Do not use to pick up
anything wet or liquids of any kind.
• Do not put any object into openings. Do
not use with any opening blocked; keep
free of dust,lint, hair, and anything that
may reduce air flow.
• Keep hair, loose clothing, fingers, and all
parts of body away from openings and
moving parts.
• Do not pick up anything that is burning
or smoking, such as cigarettes, matches,
or hot ashes.
• Before use, remove any objects from
the floor that may become tangled in the
appliance, such as power cords, fragile
items, strings, toys, or clothing.
• Remove any objects that become lodged
in the appliance immediately.
• For rugs with tassels or loose fabric, fold
them under the rug. The appliance may
grab and unravel the rug.
• Do not use without dust bin and/or
filter in place.
• Do not charge the unit outdoors.
• Use only the charger supplied by the
manufacturer to recharge.
• Do not incinerate the appliance
even if it is severely damaged. The
batteriescan
explode in a fire.
• This appliance is intended for household
use only and not for commercial or
industrial use.
• Keep sensors clean. Sensors may not
work properly if they become blocked.
• The sensors on this appliance may
not work properly on different floor
types. Test the appliance on each
surface before allowing it to operate
independently.
• Shock Hazard. To protect against risk
of electrical shock, do not put unit or
charging base in water or other liquid.
• This appliance should not be used on
floors with exposed electrical outlets.
• The unit should be placed or mounted
away from sinks and hot surfaces.
• Plug the charger directly into an
electricaloutlet.
• Use the charger only in a standard
electrical outlet (120V/60Hz).
• Unplug the charger from outlet before
any routine cleaning or maintenance.
• Do not look into the air vents when the
unit is switched on, as sometimes
there is a possibility of small debris
being discharged from the air vents,
especially after cleaning / replacement
of the filter as debris inside the unit can
be disturbed.
• The infrared signal between the
appliance and the charging dock may
become compromised if more than one
robot vacuums are used at the same
time, or if used in a location exposed to
a halogen lamp.
Charging
Your vacuum can be manually charged
via the jack plug or automatically charged
via the charging dock.
• Before rst use, the battery must be
charged for at least 5 hours.
NOTE: While charging, the charger may
become warm. This is normal and does
not indicate a problem. The appliance
can be left connected to the charger
indenitely.
WARNING: Do not charge the
battery at ambient temperatures below
50°F or above 104 °F.
Page 4

4
LED INDICATORS
The power indicator (4) has various
settings that show the charging status.
NOTE: If the power switch (11) is turned
off, the power indicator will not illuminate.
Pulsing Blue Charging—charged
enough to vacuum
Solid Blue Fully charged
Solid Orange Low battery—can not
vacuum
All lights on Error, robot stuck
MANUALLY CHARGE (FIGURE A, B)
1. Plug the battery charger (23) into a
walloutlet.
2. Slide the jack plug (27) end of the charger
into the charging socket (12) of the
vacuum.
3. The power indicator (4) will blink,
meaning the vacuum is charging. The
power indicator will remain lit when the
vacuum is fully charged.
B
27
AUTOMATICALLY CHARGE
(FIGURE A, C, D)
1. Plug the battery charger (23) into a
walloutlet.
2. Slide the jack plug (27) end of the charger
into the charging dock’s (21) charging
socket (28) as shown in Figure C. The
charging dock’s LED screen (22) will
turnon.
3. Place the charging dock on the floor.
NOTE: Do not place anything under the
charging dock. It will prevent the vacuum
from automatically charging.
C
28
27
4. Place the vacuum against the charging
dock so that the charging electrodes
(7) contact the two charging plates (29)
as shown in Figure D.
5. The power indicator (4) will blink and
the charging icon on the LED screen
(22) will scroll, meaning the vacuum
is charging. The power indicator
will remain lit when the vacuum is
fullycharged.
NOTE: The vacuum will search for the
charging dock when it is low on battery.
However, if the room is too large or the
vacuum is obstructed from “seeing”
the dock, it may fail to find the dock to
automatically recharge. If this occurs,
place the vacuum at the charging dock as
described above.
D
29
Operation
SWITCHING ON AND OFF
In order for the vacuum to operate in any
cleaning mode, the power switch (11)
must first be switched on.
1. Press the side of the power switch
marked “ON”.
2. Choose the mode and press the
corresponding button; spot (1), clean
(2), or max (3); on either the top of
the vacuum or the remote (24). The
vacuum will begin cleaning.
3. To stop the vacuum, press any button
on the vacuum or remote.
4. To turn the vacuum off completely,
press the side of the power switch
marked “OFF”.
MODES
Spot mode - Press the spot button (1)
to select this mode. The vacuum will
clean in a spiral pattern for approximately
2-5 minutes. If the battery runs low, the
vacuum will automatically search for the
charging dock (21). This mode is ideal for
cleaning small areas, about 11 sqft (1m²).
Clean mode - Press the clean button
(2) to select this mode. The vacuum will
clean for 30 minutes depending on the
Page 5

5
objects around it. If the battery runs low,
the vacuum will automatically search
for the charging dock (21). This mode
is ideal for small rooms with less than
215sqft (20m
2
).
Max mode - Press the max button (3)
to select this mode. The vacuum will
operate until the battery is low. When
the battery runs low, the vacuum will
automatically search for the charging
dock (21). This mode is ideal for
largerooms.
Driving with remote - This mode allows
you to control where the vacuum goes.
1. Press the side of the power switch (11)
marked “ON”.
2. Press the cursor buttons (30) on
the remote to make the vacuum go
forward, backward, left, and right
(Figure E).
NOTE: Repeatedly press the left, right,
and backward buttons to make the
vacuum move in that respective direction.
Once the button is released, the vacuum
will resume moving forward.
NOTE: The cursor buttons will not drive
the vacuum if any of the preset modes
are activated or if the power switch is
“OFF”.
E
30
SETTING THE CLOCK ON THE
CHARGING DOCK (FIGURE A, F)
1. Press the clock button (32) once. The
hour digits (36) on the LED screen (22)
will blink. Press the + or - buttons (34
and 35) to set the current hour.
2. Press the clock button a second
time. The minute digits (37) will blink.
Press the + or - buttons to set the
currentminute.
3. Press the clock button a third time.
The day of the week (38) will blink at
the top of the LED screen. Press the +
or - buttons to set the current day of
theweek.
4. Press the clock button a fourth time to
exit clock set up.
09:24
Su Mo Tu We Th Fr Sa
CLK
1
2
SET
GO
F
31 32 33 34 35
36 3738
AUTO CLEAN (FIGURES A, F, G)
Once the battery is fully charged, the
vacuum will automatically leave the
charging dock (21) and clean under
maxmode.
1. Press the Charge+Start button (31)
to quickly set the auto-go function.
The “GO” icon (39) will appear in the
bottom-right corner of the LED screen
(22), indicating the auto clean function
isactive.
2. Press the Charge+Start button a
second time to deactivate auto clean.
09:24
Su Mo Tu We Th Fr Sa
CLK
1
2
SET
GO
G
39
SETTING TIMER TO AUTO CLEAN
(FIGURE A, F, H)
Setting the timer will allow your vacuum
to automatically clean at a specific time.
1. Ensure the auto clean function is
deactivated. The “Go” icon (39) should
be turned off.
2. Press the timer button (33). The hour
digits (36) on the LED screen (22)
will blink and the timer icon (40) will
display. Press the + or - buttons
(34 and 35) to set the desired hour
ofcleaning.
3. Press the timer button a second time.
The minute digits (37) will blink. Press
the + or - buttons to set the desired
minute of cleaning.
3. Press the timer button a third time. The
LED screen will display “OFF.”
4. Press the + button (34) to switch to “ON.”
The “1” under the timer icon will switch
to“2”.
5. Press the timer button again to exit
timer set up.
Page 6

6
09:24
Su Mo Tu We Th Fr Sa
CLK
1
2
SET
GO
H
40
NOTE: In order for the vacuum to start
cleaning at the set time, it must be
charged via the charging dock (21) and
turned on.
NOTE: During auto cleaning and schedule
setting, the vacuum needs to be turned on
and properly connected to the charging
dock (21), otherwise the setting will
bedeactivated.
NOTE: If the battery is not fully charged
or has been charging for less than 5
hours, the timer function will not be
activated.
NOTE: If the charging dock (21) loses
power, the clock and timer will need to
bereset.
HANDLE
The vacuum is equipped with a handle to
make carrying it easy and clean.
Maintenance
WARNING: Make sure the vacuum
is completely dry before using it.
• Use only mild soap and damp cloth to
clean the vac. Never let any liquid get
inside the vac; never immerse any part
of the vac into a liquid.
IMPORTANT: To assure product SAFETY
and RELIABILITY, repairs, maintenance
and adjustment (other than those listed
in this manual) should be performed by
authorized service centers or other qualified
service organizations, always using identical
replacement parts.
EMPTYING THE DUST BIN (FIGURE A, I)
1. Turn the power switch (11) off.
2. Press the dust bin release button (41)
and slide the dust bin (9) out of the
vacuum.
3. Empty the contents of the dust bin.
4.
Replace the dust bin. Slide it back
onto the vacuum until it clicks rmly
intoplace.
I
41
CLEANING THE INLET AND FAN COVER
(FIGURE A, J)
1. Turn the power switch (11) off.
2. Place the vacuum upside down on a
flatsurface.
3. Push in the tab (42) on the fan cover
(10) and remove the cover.
4. Clean out debris with the maintenance
brush (26). This will ensure better air
ventilation.
5. Replace cover. Align the nubs
at the ends of the cover before
pressingdown.
J
42
CLEANING THE FILTER (FIGURE A, K)
NOTE: The lter is washable and reusable
and should be cleaned regularly.
1. Turn the power switch (11) off.
2. Remove the dust bin (9) as
describedabove.
3. Turn the dust bin upside-down and
remove the filter (13) by pressing the
release tab (43).
4. Clean dust out of the filter. You
can wash filter under warm water.
Ensure filter is completely dry before
reinstalling.
5. Reinstall the filter into the dust bin.
Align the two tabs of the filter with the
notches in the dust bin.
WARNING:
Never use the appliance
without the lter. Optimum dust collection
will only be achieved with a clean lter.
Page 7

7
K
13
43
CLEANING THE BRUSHES
(FIGUREA, L‑N)
1. Turn the power switch (11) off.
2. Place the vacuum upside down on a
flat surface.
3. Press the release tab (44) on the brush
cover (16) and lift up to open.
L
44
4. Lift the main brush (14) and rubber
brush (15) out of the brush cover, then
pull them out away from the drive
shafts (45) in the brush well.
5. Remove all hair and debris using the
maintenance brush (26).
M
6. The brushes have a “D” drive and
must be installed correctly. Slide
the correct side onto the drive shaft
(45) and lower the other end into the
support slot near the release tab.
7. Close the brush cover. Ensure the
cover has fully latched.
N
45
NOTE: Large debris such as hair and big
dust can be removed from the brushes by
using the comb end of the maintenance
brush (26).
REPLACING THE BATTERY
(FIGURE A, O)
1. Turn the power switch (11) off.
2. Place the vacuum upside down on a
flatsurface.
3. With two hands, press in on the two
tabs (46) on the sides of the battery.
4. Lift the battery straight out of
thevacuum.
5. To reinstall, slide the battery into place.
Push down on the battery to ensure
both tabs have fully latched in place.
O
46
Accessories
Recommended accessories for use
with your appliance are available from
your local dealer or authorized service
center. If you need assistance regarding
accessories, please call: 1‑800‑544‑6986.
WARNING: The use of any
accessory not recommended for use with
this appliance could be hazardous.
REPLACING THE FILTER
The lter should be replaced every 6 to 9
months and whenever worn or damaged.
Replacement lters are available from
your BLACK+DECKER dealer.
Page 8

8
The RBRC® Seal
The RBRC® (Rechargeable
Battery Recycling Corp oration)
Seal on the nickel metal hydride
(or battery packs) indicates that the costs
to recycle these batteries (or battery
packs) at the end of their useful life have
already been paid by BLACK+DECKER.
In some areas, it is illegal to place spent
nickel metal hydride batteries in the trash
or municipal solid waste stream and the
Call 2 Recycle® program provides an
environmentally conscious alternative.
Call 2 Recycle, Inc., in cooperation with
BLACK+DECKER and other battery
users, has established the program
in the United States and Canada to
facilitate the collection of spent nickel
metal hydride batteries. Help protect
our environment and conserve natural
resources by returning the spent nickel
metal hydride batteries to an authorized
BLACK+DECKER service center or to
your local retailer for recycling. You may
also contact your local recycling center
for information on where to drop off the
spent battery. RBRC® is a registered
trademark of Call 2 Recycle, Inc.
Batteries for remote (AAA)
WARNING: Batteries can explode,
or leak, and can cause injury or fire. To
reduce this risk:
• Carefully follow all instructions and
warnings on the battery label and
package.
• Always insert batteries correctly with
regard to polarity (+ and -), marked on
the battery and the equipment.
• Do not short battery terminals.
• Do not charge batteries.
• Do not mix old and new batteries.
Replace all of them at the same time
with new batteries of the same brand
and type.
• Remove dead batteries immediately
and dispose of per local codes.
• Do not dispose of batteries in fire.
• Keep batteries out of reach of children.
• Remove batteries if the device will not
be used for several months.
• Transporting batteries can possibly
cause fires if the battery terminals
inadvertently come in contact with
conductive materials such as keys,
coins, hand tools and the like. The
US Department of Transportation
Hazardous Material Regulations
(HMR) actually prohibit transporting
batteries in commerce or on airplanes
(i.e. packed in suitcases and carry on
luggage) UNLESS they are properly
protected from short circuits. So when
transporting individual batteries, make
sure that the battery terminals are
protected and well insulated individual
batteries, make sure that the battery
terminals are protected and well
insulated from materials that could
contact them and cause a short circuit.
One‑Year Limited
Warranty
Black & Decker (U.S.) Inc. warranties this
product to be free from defects in material
or workmanship for a period of one (1)
year following the date of purchase,
provided that the product is used in a
home environment. This limited warranty
does not cover failures due to abuse,
accidental damage or when repairs have
been made or attempted by anyone other
than BLACK+DECKER and its Authorized
Service Centers. A defective product
meeting the warranty conditions set forth
herein will be replaced or repaired at no
charge in either of two ways:
The first, which will result in exchanges
only, is to return the product to the
retailer from whom it was purchased
(provided that the store is a participating
retailer).Returns should be made within
the time period of the retailer’s policy
for exchanges. Proof of purchase may
be required. Please check with the
retailer for its specific return policy
regarding time limits for returns or
exchanges. The second option is to
take or send the product (prepaid) to a
BLACK+DECKER owned or authorized
Service Center for repair or replacement
at BLACK+DECKER’s option.
Proof of purchase may be required.
BLACK+DECKER owned and authorized
service centers are listed online at
www.blackanddecker.com.
This warranty does not apply to
accessories. This warranty gives you
specific legal rights and you may have
other rights which vary from state to
state. Should you have any questions,
contact the manager of your nearest
BLACK+DECKER Service Center. This
product is not intended for commercial
use, and accordingly, such commercial
use of this product will void this warranty.
All other guarantees, express or implied,
are hereby disclaimed.
LATIN AMERICA:This warranty does not
apply to products sold in Latin America.
For products sold in Latin America, check
country specific warranty information
contained in the packaging, call the local
company or see the website for such
information.
Page 9

9
TROUBLESHOOTING
Problem Possible Cause Possible Solution
• Vacuum stops
cleaning.
• Main brush is blocked
or jammed.
• Battery charge is low.
• Clean brush or removed
debris using the maintenance
brush.
• Charge battery.
• Battery does not
charge.
• Battery is not installed
correctly.
• Charger is not plugged
in correctly.
• Reinstall battery. Refer
to section “Replacing the
Battery.”
• Ensure the battery charger is
fully plugged into outlet.
• Vacuum only moves
backwards or moves
a few inches before
backing up.
• Floor has dark stripes
or spots that the
vacuum detects as a
cliff.
• Sensors are blocked.
• Only use vaccum on
surfaces that do not have a
large difference in color.
• Clean sensors with dry
cloth.
• Vacuum keeps moving
in small circle.
• A wheel is blocked. • Remove debris from blocked
wheel.
For assistance with your product, visit our website www.blackanddecker.com for the
location of the service center nearest you or call the BLACK+DECKER help line at
1‑800‑544‑6986.
FREE WARNING LABEL
REPLACEMENT: If your warning labels
become illegible or are missing, call
1‑800‑544‑6986 for a free replacement.
Page 10

10
 Loading...