

Page 1

Please read before returning this product for any reason.
Àlire avant de retourner ce produit pour quelque raison que
ce soit.
Lea el manual antes de devolver este producto por cualquier
motivo.
INSTRUCTION MANUAL
MODE D’EMPLOI
MANUAL DE INSTRUCCIONES
12 V MAX* GOPAK CORDLESS
DRILL DRIVER
PERCEUSE-VISSEUSE SANS FIL
GOPAK 12 V MAX*
TALADRO INALÁMBRICO GOPAK
12 V MAX*
BCD701
final page size: 8.5 x 5.5 in
Page 2

ENGLISH
English (original instructions) 1
Français (traduction de la notice d’instructions originale) 11
Español (traducido de las instrucciones originales) 23
* Maximum initial battery pack voltage (measured without a workload) is 12 volts. Measured under a workload, nominal voltage is 10.8.
* El máximo voltaje inicial del paquete de baterías (medido sin una carga de trabajo) es 12 voltios. Si se mide con una carga de trabajo, el voltaje
nominal es 10.8.
* La tension initiale maximale du bloc-piles (mesurée sans charge de travail) est de 12 volts. La tension nominale, mesurée avec une charge de
travail, est de 10.8 volts.
To register your new product, visit
www.BlackandDecker.com/NewOwner
Consulter le site Web www.BlackandDecker.com/NewOwner
pour enregistrer votre nouveauproduit.
Visite www.BlackandDecker.com/NewOwner para registrar su
nuevoproducto.
Thank you for choosing BLACK+DECKER!
If you have a question or experience a problem with your BLACK+DECKER
purchase, go to: http://www.blackanddecker.com/instantanswers
If you can’t find the answer or do not have access to the Internet, call
1-800-544-6986 from 8 a.m. to 5 p.m. EST Mon. - Fri. to speak with anagent.
Please have the CATALOG NUMBER available when youcall.
Page 3
ENGLISH
1
Definitions: Safety Alert Symbols and Words
This instruction manual uses the following safety alert symbols and words to alert you to hazardous situations and your risk
of personal injury or property damage.
DANGER: Indicates an imminently hazardous situation which, if not avoided, will result in death or seriousinjury.
WARNING: Indicates a potentially hazardous situation which, if not avoided, could result in death or seriousinjury.
CAUTION: Indicates a potentially hazardous situation which, if not avoided, may result in minor or moderateinjury.
(Used without word) Indicates a safety related message.
NOTICE: Indicates a practice not related to personal injury which, if not avoided, may result in propertydamage.
WARNING! Read all safety warnings and all
instructions. Failure to follow the warnings and
instructions may result in electric shock, fire and/or
seriousinjury.
WARNING: To reduce the risk of injury, read the
instructionmanual.
Imported by .Black & Decker (U.S.) Inc.,
701 E. Joppa Rd.
Towson, MD 21286
BlackandDecker.com
1-800-544-6986
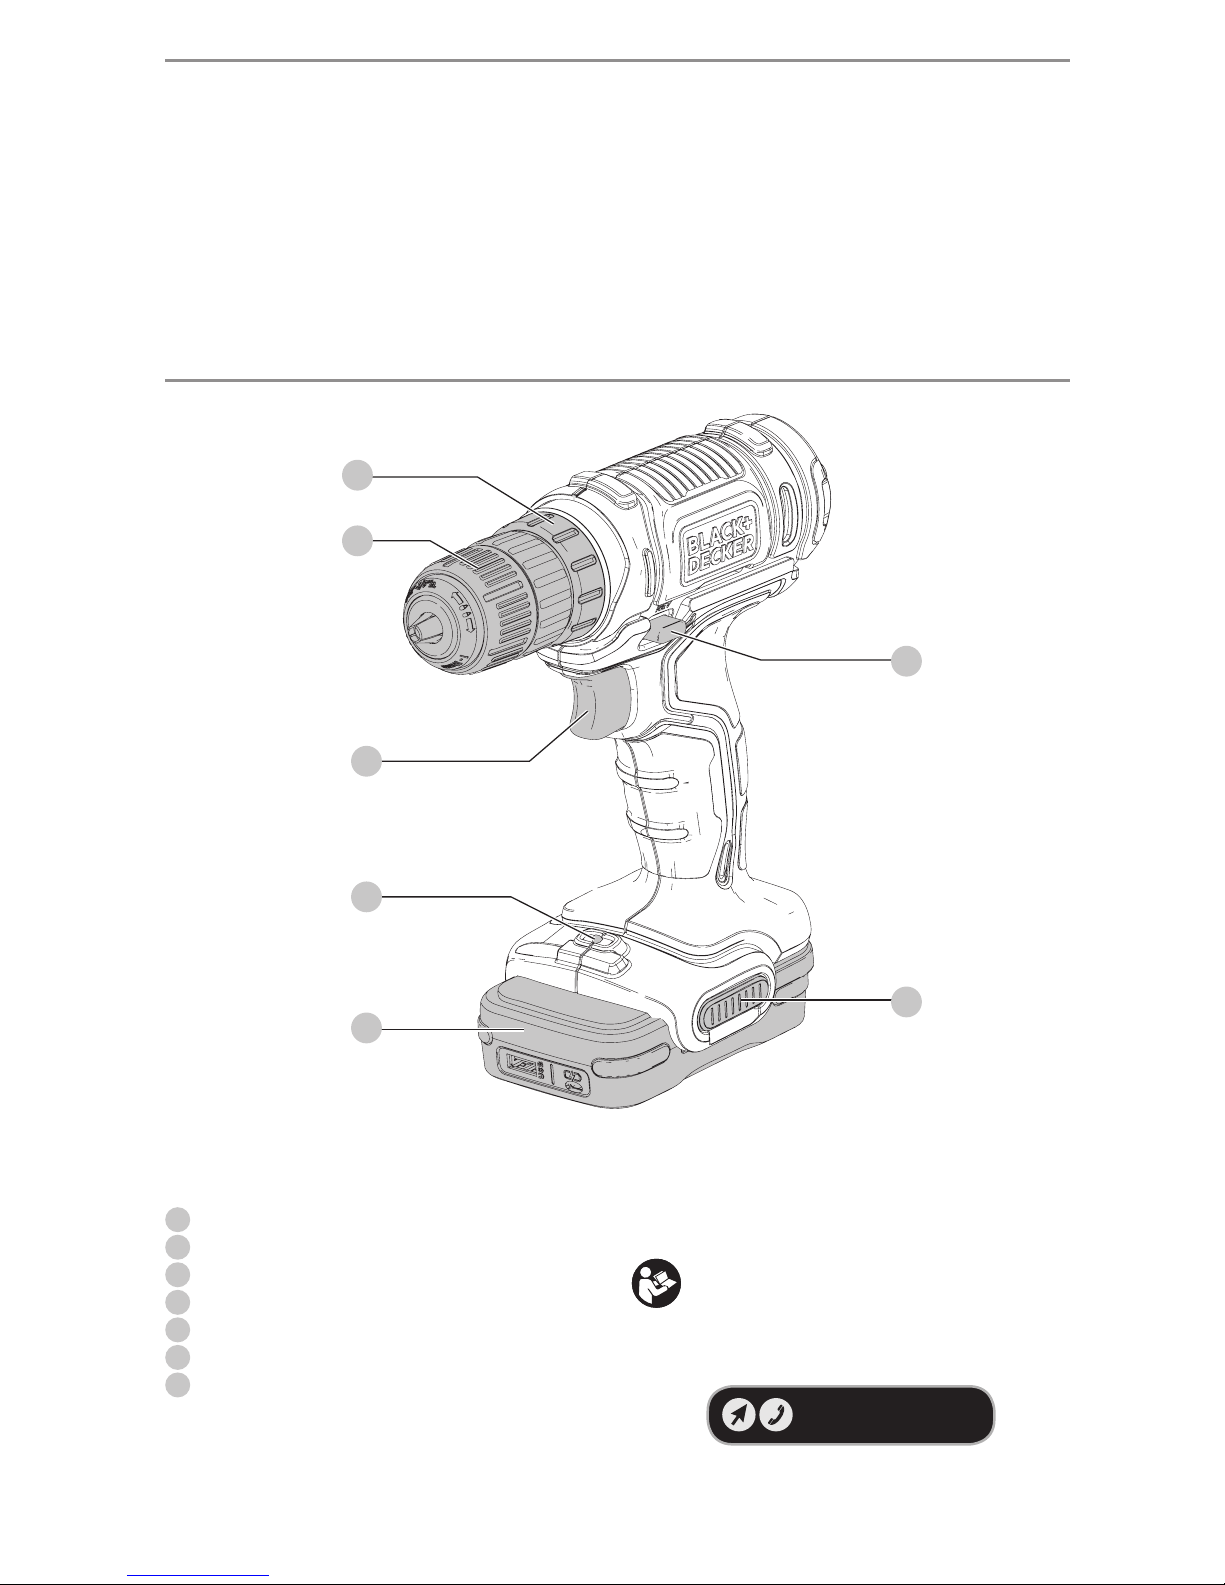
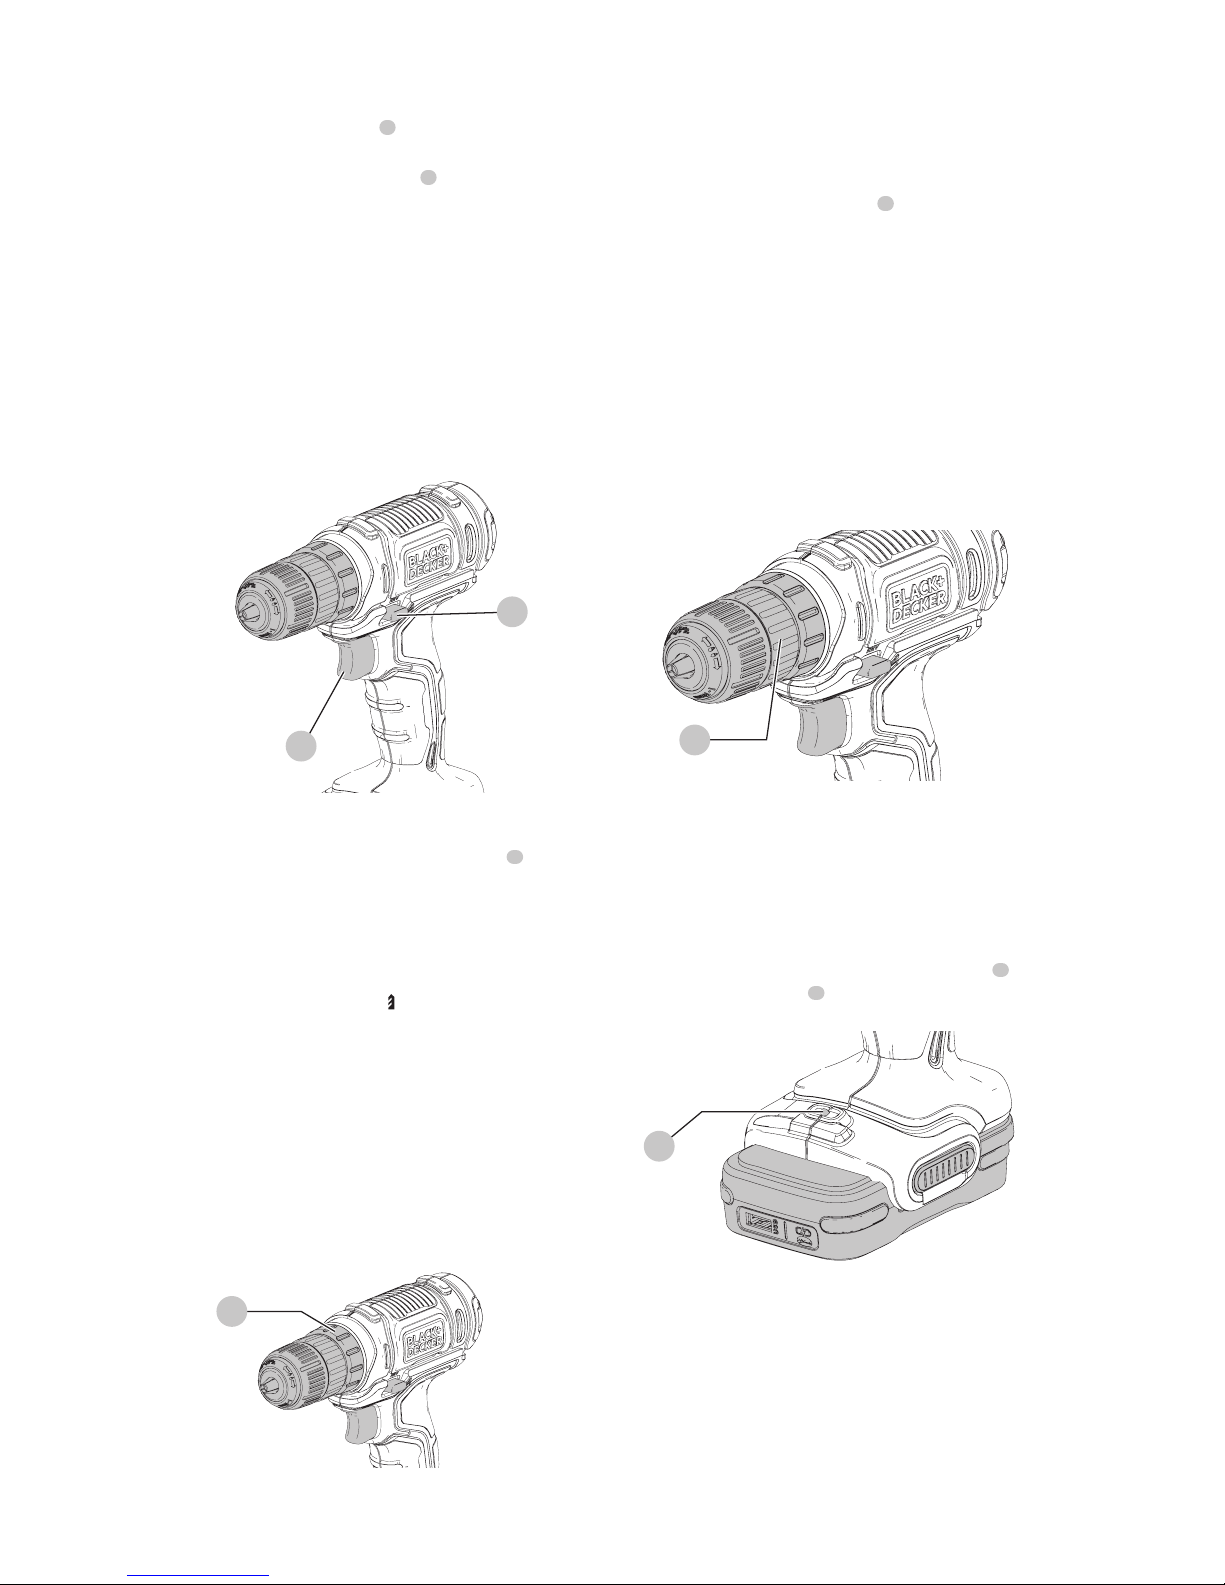
1
Variable speed switch
2
Forward/reverse button
3
Torque adjustment collar
4
Keyless chuck
5
LED work light
6
Battery
7
Battery release button
Fig. A
1
2
3
4
6
7
5
Page 4

ENGLISH
2
GENERAL POWER TOOL SAFETY WARNINGS
WARNING! Read all safety warnings and all
instructions. Failure to follow the warnings and
instructions may result in electric shock, fire and/or
seriousinjury.
SAVE ALL WARNINGS AND
INSTRUCTIONS FOR FUTURE
REFERENCE
The term “power tool” in the warnings refers to your mainsoperated (corded) power tool or battery-operated (cordless)
powertool.
1) Work Area Safety
a ) Keep work area clean and well lit. Cluttered or
dark areas inviteaccidents.
b ) Do not operate power tools in explosive
atmospheres, such as in the presence of
flammable liquids, gases or dust. Power tools
create sparks which may ignite the dust orfumes.
c ) Keep children and bystanders away while
operating a power tool. Distractions can cause you
to losecontrol.
2) Electrical Safety
a ) Power tool plugs must match the outlet. Never
modify the plug in any way. Do not use any
adapter plugs with earthed (grounded) power
tools. Unmodified plugs and matching outlets will
reduce risk of electricshock.
b ) Avoid body contact with earthed or grounded
surfaces such as pipes, radiators, ranges and
refrigerators. There is an increased risk of electric
shock if your body is earthed orgrounded.
c ) Do not expose power tools to rain or wet
conditions. Water entering a power tool will increase
the risk of electricshock.
d ) Do not abuse the cord. Never use the cord for
carrying, pulling or unplugging the power tool.
Keep cord away from heat, oil, sharp edges or
moving parts. Damaged or entangled cords increase
the risk of electricshock.
e ) When operating a power tool outdoors, use an
extension cord suitable for outdoor use. Use of
a cord suitable for outdoor use reduces the risk of
electricshock.
f ) If operating a power tool in a damp location
is unavoidable, use a ground fault circuit
interrupter (GFCI) protected supply. Use of a GFCI
reduces the risk of electricshock.
3) Personal Safety
a ) Stay alert, watch what you are doing and use
common sense when operating a power tool. Do
not use a power tool while you are tired or under
the influence of drugs, alcohol or medication. A
moment of inattention while operating power tools
may result in serious personalinjury.
b ) Use personal protective equipment. Always wear
eye protection. Protective equipment such as dust
mask, non-skid safety shoes, hard hat, or hearing
protection used for appropriate conditions will reduce
personalinjuries.
c ) Prevent unintentional starting. Ensure the
switch is in the off position before connecting to
power source and/or battery pack, picking up
or carrying the tool. Carrying power tools with your
finger on the switch or energizing power tools that
have the switch on invitesaccidents.
d ) Remove any adjusting key or wrench before
turning the power tool on. A wrench or a key left
attached to a rotating part of the power tool may
result in personalinjury.
e ) Do not overreach. Keep proper footing and
balance at all times. This enables better control of
the power tool in unexpectedsituations.
f ) Dress properly. Do not wear loose clothing or
jewelry. Keep your hair, clothing and gloves
away from moving parts. Loose clothes, jewelry or
long hair can be caught in movingparts.
g ) If devices are provided for the connection of dust
extraction and collection facilities, ensure these
are connected and properly used. Use of dust
collection can reduce dust-relatedhazards.
4) Power Tool Use and Care
a ) Do not force the power tool. Use the correct
power tool for your application. The correct power
tool will do the job better and safer at the rate for
which it wasdesigned.
b ) Do not use the power tool if the switch does not
turn it on and off. Any power tool that cannot be
controlled with the switch is dangerous and must
berepaired.
c ) Disconnect the plug from the power source and/
or the battery pack from the power tool before
making any adjustments, changing accessories,
or storing power tools. Such preventive safety
measures reduce the risk of starting the power
toolaccidentally.
d ) Store idle power tools out of the reach of
children and do not allow persons unfamiliar
with the power tool or these instructions to
operate the power tool. Power tools are dangerous
in the hands of untrainedusers.
e ) Maintain power tools. Check for misalignment
or binding of moving parts, breakage of parts
and any other condition that may affect the
power tool’s operation. If damaged, have the
power tool repaired before use. Many accidents
are caused by poorly maintained powertools.
f ) Keep cutting tools sharp and clean. Properly
maintained cutting tools with sharp cutting edges are
less likely to bind and are easier tocontrol.
Page 5

ENGLISH
3
g ) Use the power tool, accessories and tool bits, etc.
in accordance with these instructions, taking
into account the working conditions and the
work to be performed. Use of the power tool for
operations different from those intended could result
in a hazardoussituation.
5) Battery Tool Use and Care
a ) Recharge only with the charger specified by the
manufacturer. A charger that is suitable for one type
of battery pack may create a risk of fire when used
with another batterypack.
b ) Use power tools only with specifically
designated battery packs. Use of any other battery
packs may create a risk of injury andfire.
c ) When battery pack is not in use, keep it away
from other metal objects, like paper clips, coins,
keys, nails, screws, or other small metal objects,
that can make a connection from one terminal
to another. Shorting the battery terminals together
may cause burns or afire.
d ) Under abusive conditions, liquid may be ejected
from the battery; avoid contact. If contact
accidentally occurs, flush with water. If liquid
contacts eyes, additionally seek medical help.
Liquid ejected from the battery may cause irritation
orburns.
6) Service
a ) Have your power tool serviced by a qualified
repair person using only identical replacement
parts. This will ensure that the safety of the power
tool ismaintained.
Specific Safety Rules
• Use auxiliary handle(s), if supplied with the tool. Loss
of control can cause personalinjury.
• Hold power tool by insulated gripping surfaces,
when performing an operation where the cutting
accessory may contact hidden wiring. Cutting
accessory contacting a “live” wire may make exposed
metal parts of the power tool “live” and could give the
operator an electricshock.
• When not in use, place tool on its side on a stable
surface where it will not cause a tripping or falling
hazard. Some tools with large battery packs will stand
upright but may be easily knockedover.
• Use clamps or another practical way to secure and
support the work piece to a stable platform. Holding
the work by hand or against your body leaves it unstable
and may lead to loss ofcontrol.
• Keep your hair, clothing, and gloves away from air
vents. Air vents often cover moving parts in which these
items can becaught.
• Hold tool firmly with two hands. Use auxiliary
handle if provided. If auxiliary handle not provided,
grip tool at bottom of battery. Loss of control can cause
personalinjury..
• When attaching accessories in the drill chuck, hand
tighten the keyless chuckfirmly.
WARNING: Drill may stall (if overloaded or improperly
used) causing a twist. Always expect the stall. Grip
the drill firmly with both hands to control the twisting
action and prevent loss of control which could cause
personal injury. If a stall does occur, release the trigger
immediately and determine the reason for the stall
before re-starting.
SAVE THESE INSTRUCTIONS
Additional Safety Information
WARNING: ALWAYS use safety glasses. Everyday
eyeglasses are NOT safety glasses. Also use face or
dust mask if cutting operation is dusty. ALWAYS WEAR
CERTIFIED SAFETYEQUIPMENT:
• ANSI Z87.1 eye protection (CAN/CSA Z94.3),
• ANSI S12.6 (S3.19) hearing protection,
• NIOSH/OSHA/MSHA respiratoryprotection.
WARNING: Some dust created by power sanding,
sawing, grinding, drilling, and other construction
activities contains chemicals known to the State
of California to cause cancer, birth defects or
other reproductive harm. Some examples of these
chemicalsare:
• lead from lead-based paints,
• crystalline silica from bricks and cement and other
masonry products, and
• arsenic and chromium from chemicallytreatedlumber.
Your risk from these exposures varies, depending on how
often you do this type of work. To reduce your exposure to
these chemicals: work in a well ventilated area, and work with
approved safety equipment, such as those dust masks that are
specially designed to filter out microscopicparticles.
• Avoid prolonged contact with dust from power
sanding, sawing, grinding, drilling, and other
construction activities. Wear protective clothing and
wash exposed areas with soap and water. Allowing
dust to get into your mouth, eyes, or lay on the skin may
promote absorption of harmfulchemicals.
WARNING: Use of this tool can generate and/
or disperse dust, which may cause serious and
permanent respiratory or other injury. Always use
NIOSH/OSHA approved respiratory protection
appropriate for the dust exposure. Direct particles
away from face andbody.
WARNING: Always wear proper personal hearing
protection that conforms to ANSI S12.6 (S3.19)
during use. Under some conditions and duration
of use, noise from this product may contribute to
hearingloss..
The label on your tool may include the following symbols. The
symbols and their definitions are asfollows:
V ......................... volts
Hz ....................... hertz
min ..................... minutes
or DC ......direct current
Page 6

ENGLISH
4
• If battery contents come into contact with the skin,
immediately wash area with mild soap and water. If
battery liquid gets into the eye, rinse water over the open
eye for 15 minutes or until irritation ceases. If medical
attention is needed, the battery electrolyte is composed of
a mixture of liquid organic carbonates and lithiumsalts.
• Contents of opened battery cells may cause
respiratory irritation. Provide fresh air. If symptoms
persist, seek medicalattention.
WARNING: Burn hazard. Battery liquid may be
flammable if exposed to spark orflame.
WARNING: Fire hazard. Never attempt to open the
battery pack for any reason. If the battery pack case is
cracked or damaged, do not attempt to use or charge.
Do not crush, drop or damage the battery pack. Do
not use a battery pack or charger that has received a
sharp blow, been dropped, run over or damaged in
any way (e.g., pierced with a nail, hit with a hammer,
stepped on). Damaged battery packs should be
returned to the service center forrecycling.
Storage Recommendations
1. The best storage place is one that is cool and dry, away
from direct sunlight and excess heat orcold.
2. For long storage, it is recommended to store a fully
charged battery pack in a cool dry place out of the
charger for optimalresults.
NOTE: Battery packs should not be stored completely
depleted of charge. The battery pack will need to be
recharged beforeuse.
The RBRC® Seal
The RBRC® (Rechargeable Battery Recycling
Corporation) Seal on the nickel cadmium,
nickel metal hydride or lithium-ion batteries
(or battery packs) indicates that the costs
to recycle these batteries (or battery packs)
at the end of their useful life have already been paid by
BLACK+DECKER. In some areas, it is illegal to place spent
nickel cadmium, nickel metal hydride or lithium-ion
batteries in the trash or municipal solid waste stream and
the Call2Recycle® program provides an environmentally
consciousalternative.
Call 2 Recycle, Inc., in cooperation with BLACK+DECKER
and other battery users, has established the program in
the United States and Canada to facilitate the collection
of spent nickel cadmium, nickel metal hydride or
lithium-ion batteries. Help protect our environment and
conserve natural resources by returning the spent nickel
cadmium, nickel metal hydride or lithium-ion batteries to
an authorized BLACK+DECKER service center or to your
local retailer for recycling. You may also contact your
local recycling center for information on where to drop
off the spent battery. RBRC® is a registered trademark of
Call2Recycle,Inc.
...................... Class I Construction
(grounded)
…/min ..............per minute
BPM .................... beats per minute
IPM ..................... impacts per minute
RPM .................... revolutions per
minute
sfpm ................... surface feet per
minute
SPM .................... strokes per minute
A ......................... amperes
W ........................ watts
or AC ...........alternating current
or AC/DC .... alternating or
direct current
...................... Class II
Construction
(double insulated)
no ....................... no load speed
n ......................... rated speed
...................... earthing terminal
..................... safety alert symbol
..................... visible radiation
..................... wear respiratory
protection
..................... wear eye
protection
..................... wear hearing
protection
..................... read all
documentation
BATTERIES
The battery pack is not fully charged out of the carton.
Before using the battery pack, read the safety instructions
below and then follow charging proceduresoutlined. When
ordering replacement battery packs, be sure to include the
catalog number andvoltage.
READ ALL INSTRUCTIONS
Important Safety Instructions for All
Battery Packs
WARNING: Read all safety warnings and all
instructions for the battery pack, and power tool.
Failure to follow the warnings and instructions
may result in electric shock, fire and/or
seriousinjury.
• Do not charge or use the battery pack in explosive
atmospheres, such as in the presence of flammable
liquids, gases or dust. Inserting or removing the
charging cable from the battery pack may ignite the dust
orfumes.
• NEVER force the battery pack into cable insertion
or tool insertion. DO NOT modify the battery pack
in any way as battery pack may rupture causing
serious personalinjury.
• DO NOT splash or immerse in water or otherliquids.
• Do not store or use the tool and battery pack in
locations where the temperature may reach or
exceed 104°F (40°C) (such as outside sheds or metal
buildings in summer). For best life store battery packs in
a cool, drylocation.
NOTE: Do not store the battery packs in a tool with
the trigger switch locked on. Never tape the trigger
switch in the ONposition.
• Do not incinerate the battery pack even if it is
severely damaged or is completely worn out. The
battery pack can explode in a fire. Toxic fumes and
materials are created when lithium ion battery packs
areburned.
Page 7
ENGLISH
5
Important Charging Notes
1. Longest life and best performance can be obtained if
the battery pack is charged when the air temperature is
between 65°F – 75°F (18° – 24°C). DO NOT charge the
battery pack in an air temperature below 40°F (4.5°C),
or above 104°F (40°C). This is important and will
prevent serious damage to the batterypack.
2. If the battery pack does not charge properly:
a. Check operation of receptacle by plugging in a lamp
or other appliance;
b. Check to see if receptacle is connected to a light
switch which turns power off when you turn out the
lights;
c. Move the power adapter and battery pack to a
location where the surrounding air temperature is
approximately 65°F – 75°F (18° – 24°C);
d. If charging problems persist, take the tool, battery
pack and USB cable to your local servicecenter.
3. The battery pack should be recharged when it fails to
produce sufficient power on jobs which were easily
done previously. DO NOT CONTINUE to use under these
conditions. Follow the charging procedure. You may
also charge a partially used pack whenever you desire
with no adverse effect on the batterypack.
Transportation
WARNING: Fire hazard. Do not store or carry the
battery pack so that metal objects can contact
exposed battery terminals. For example, do
not place the battery pack in aprons, pockets, tool
boxes, product kit boxes, drawers, etc., with loose
nails, screws, keys, etc. Transporting batteries
can possibly cause fires if the battery terminals
inadvertently come in contact with conductive
materials such as keys, coins, hand tools and the
like. The US Department of Transportation Hazardous
Material Regulations (HMR) actually prohibit
transporting batteries in commerce or on airplanes in
carry-on baggage UNLESS they are properly protected
from short circuits. So when transporting individual
battery packs, make sure that the battery terminals
are protected and well insulated from materials that
could contact them and cause a shortcircuit.
CAUTION:
GoPak
battery
terminal cap should be
used when
battery
is not connected to a power tool.
Terminal cap is provided for use whenever the
battery
is out of the tool. Remove cap before placing
battery
intotool.
FCC requirements for all digital devices
This device complies with Part 15 of the FCC Rules and Industry
Canada License-exempt RSS standard(s). Operation is subject to the
following two conditions:
1 . This device may not cause harmful interference, and
2 . This device must accept any interference
received, including interference that may cause
undesiredoperation.
Changes or modifications not expressly approved by the party
responsible for compliance could void the user's authority to
operate theequipment.
This equipment has been tested and found to comply with
the limits for a Class B digital device, pursuant to Part15
of the FCC Rules. These limits are designed to provide
reasonable protection against harmful interference in a
residential installation. This equipment generates, uses, and
can radiate radio frequency energy and, if not installed and
used in accordance with the instructions, may cause harmful
interference to radio communications. However, there is no
guarantee that interference will not occur in a particular
installation. If this equipment does cause harmful interference
to radio or television reception, which can be determined by
turning the equipment off and on, the user is encouraged to
try to correct the interference by one of the following meaures:
ʵ Reorient or relocate the receivingantenna.
ʵ Increase the separation between the equipment
andreceiver.
ʵ Connect the equipment into an outlet on a circuit
different from that to which the receiver isconnected.
ʵ Consult the dealer or an experienced radio/TV
technician forhelp.
CAN ICES-3(B)/NMB-3(B)
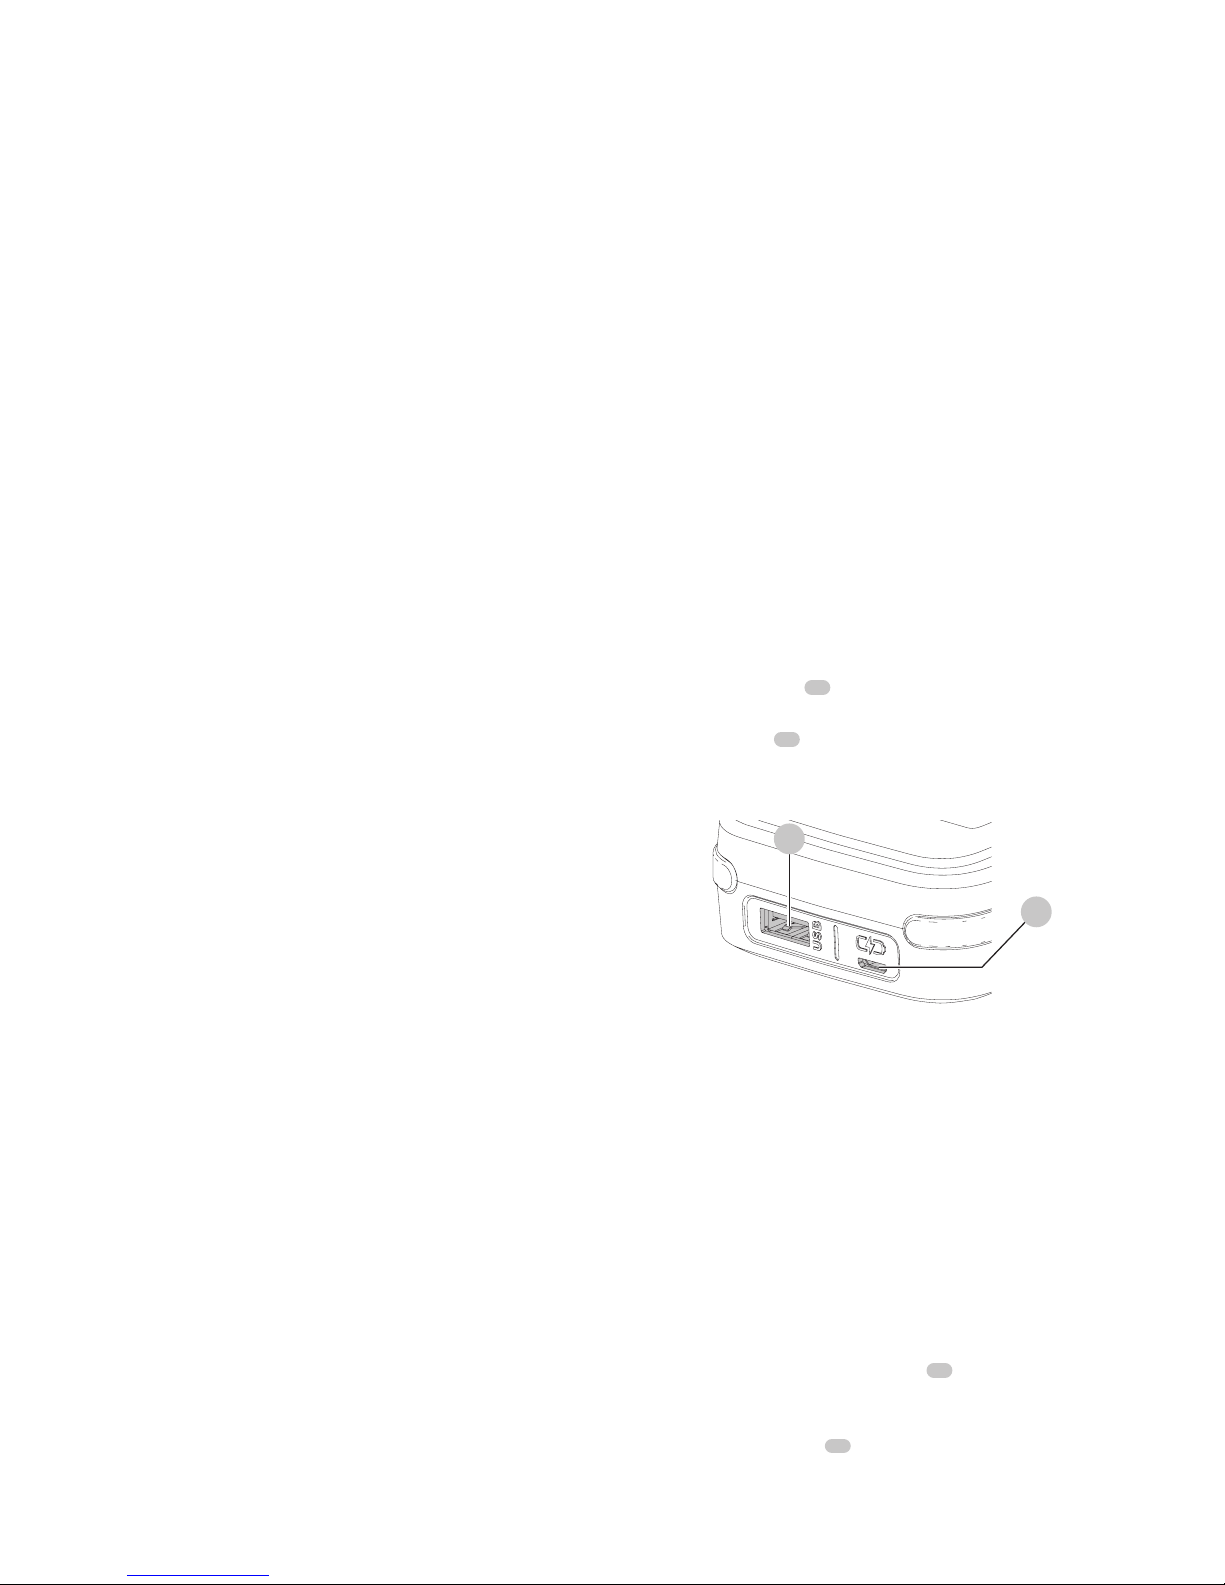
Getting Started
• The Micro USB port
12
on the BLACK+DECKER GoPak 2
in 1 battery is only to be used for charging theGoPak.
• The USB A port
11
on the BLACK+DECKER GoPak 2in1
battery is only to be used for powering USB devices
(Phone/Tablet/MP3/Wearable/Game Controller/etc.).
Fig. B
12
11
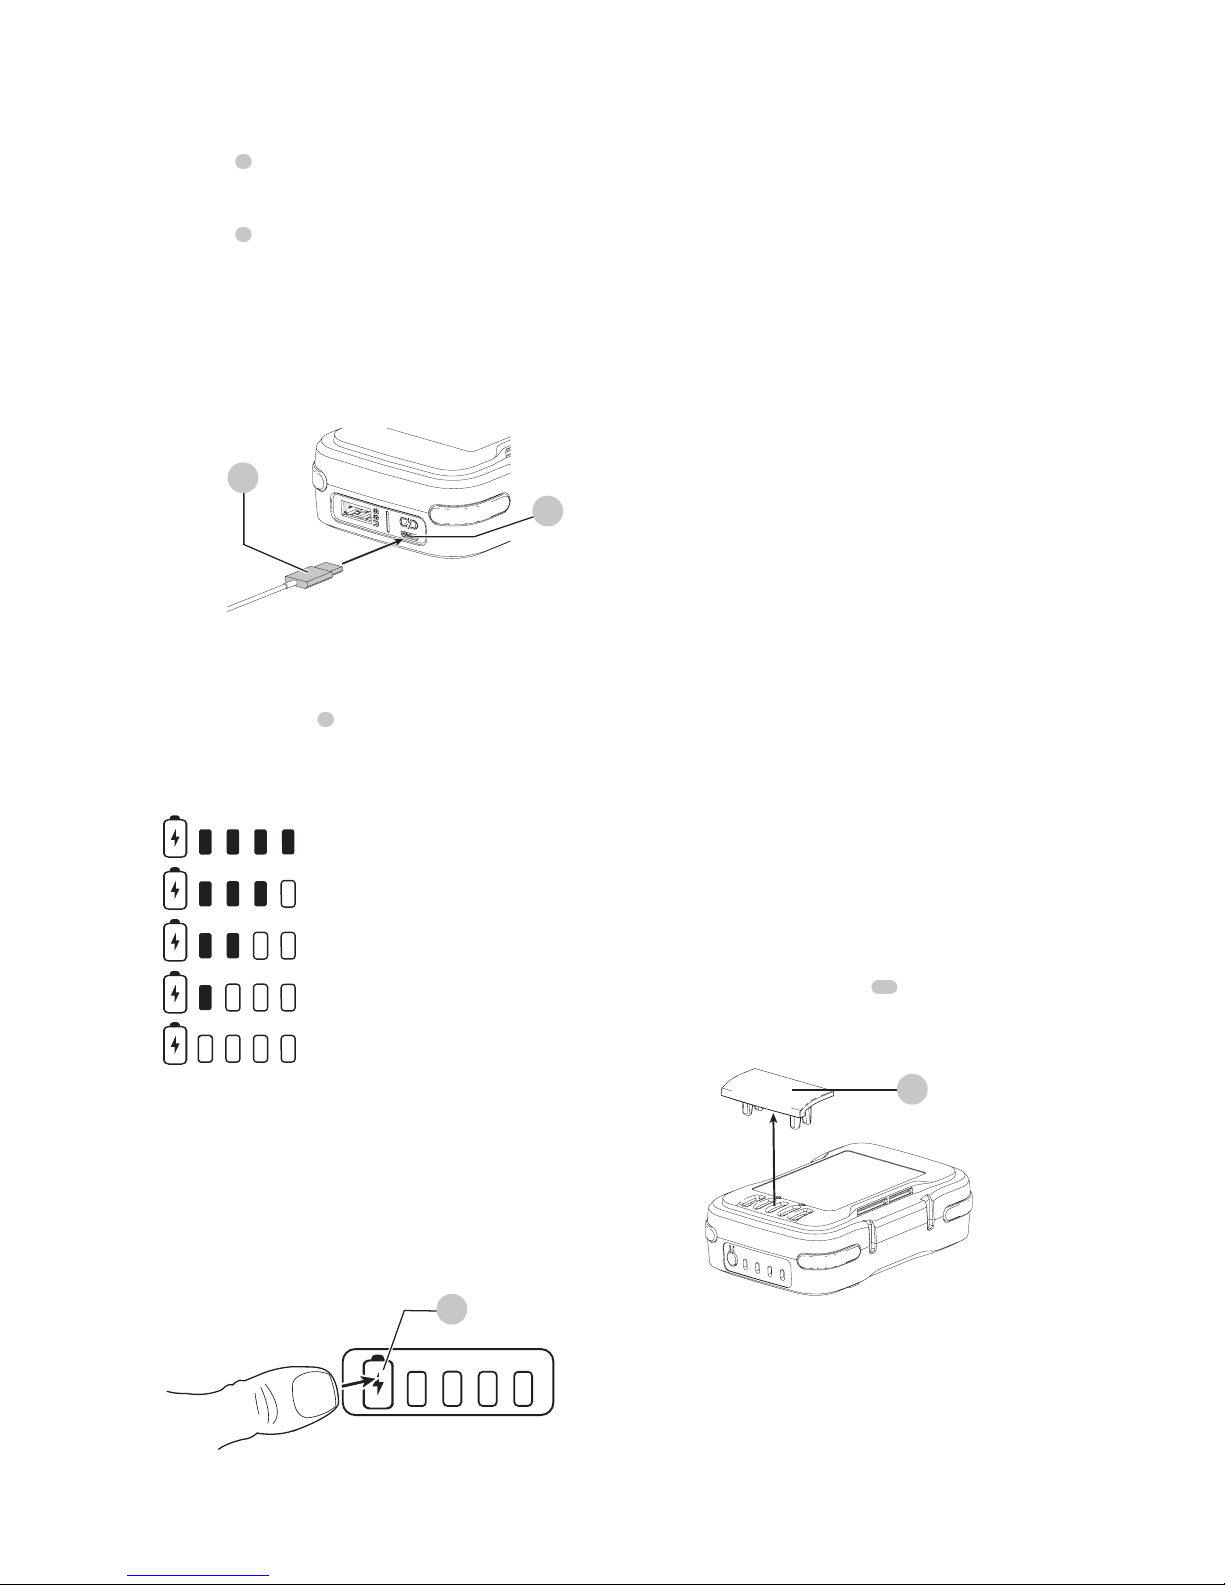
Charging the BLACK+DECKER GoPak 2 in 1
Battery (Fig. C, D)
WARNING: Never attempt to charge the
BLACK+DECKER GoPak 2 in 1 battery using the tool
terminals on theGoPak.
WARNING: You should only charge the
BLACK+DECKER GoPak 2 in 1 battery using UL or
CSA approved USB ports rated for charging high
performance devices. The GoPak can pull more
current than acceptable with older USB ports. An
error message may display on your computer if the
computer is used to charge theGoPak.
1. Plug the micro USB cable (included)
13
into a USB
power supply (notincluded).
2. Plug the micro USB plug of your charger cord into the
GoPak micro USB port
12
.
Page 8
ENGLISH
6
ASSEMBLY AND ADJUSTMENTS
WARNING: To reduce the risk of serious personal
injury, turn unit off and remove the battery pack
before making any adjustments or removing/
installing attachments or accessories. An
accidental start-up can causeinjury.
GoPak Tool Terminal Cap
A battery storage and carrying cap
10
is provided for use
whenever the battery is out of the tool. Remove the cap as
shown in Figure E before placing battery ontotool.
Fig. E
10
Intended Use
Your BLACK+DECKER drill/driver has been designed for
drilling, and screwdriving applications. This product is
intended for household, consumer useonly.
DO NOT use under wet conditions or in presence of
flammable liquids orgases.
DO NOT let children come into contact with the tool. Supervision
is required when inexperienced operators use thistool. NEVER
modify the power tool or any part of it. Damage or personal
injury couldresult.
SAVE THESE INSTRUCTIONS FOR
FUTURE USE
COMPONENTS (FIG. A)
WARNING: Never modify the power tool or any part
of it. Damage or personal injury couldresult.
Refer to Figure A at the beginning of this manual for a
complete list ofcomponents.
3. As the GoPak charges, the state of charge LEDs will
illuminate. The illuminated LED(s) indicate the state
of charge of the pack. The blinking LED indicates the
next level of charge in progress. The state of charge
button
9
is disabled during chargingonly.
4. The completion of charge is indicated by all four LEDs
turning off. Pressing the state of charge indicator
button
9
will illuminate all four LEDs. The battery is
fully charged and may be used at this time or left on
thecharger.
5. Recharge discharged batteries as soon as possible
after use or battery life may be greatly diminished. For
longest battery life, do not discharge batteries fully. It
is recommended that the batteries be recharged after
eachuse.
Fig. C
12
13
State Of Charge Indicator (Fig. D)
The BLACK+DECKER GoPak 2 in 1 battery is equipped with a
state of charge button
9
with a four LEDdisplay.
The state of charge is an indication of approximate levels
of charge remaining in the battery according to the
followingindicators:
96-100% charged
76-95%
51-75%
26-50%
Pack needs to be charged
To actuate the state of charge, press the State Of Charge
Indicator button. A combination of the four LEDs will
illuminate designating the level of charge left. When the
level of charge in the battery is below the usable limit, the
state of charge LEDs will either not light or the bottom LED
willblink.
NOTE: The state of charge LED will only display once the
state of charge button ispressed.
Fig. D
9
• Press state of charge button at anytime to display the
remaining level ofcharge.
NOTE: The state of charge Indicator is only an indication
of the charge left on the battery. It does not indicate tool
functionality and is subject to variation based on product
components, temperature and end-userapplication.
NOTE:
GoPak
battery
terminal cap should be used when
battery
is not connected to a power tool. Terminal cap is
provided for use whenever the
battery
is out of the tool.
Remove cap before placing
battery
intotool.
Page 9
ENGLISH
7
OPERATION
WARNING: To reduce the risk of serious personal
injury, turn unit off and remove the battery pack
before making any adjustments or removing/
installing attachments or accessories. An
accidental start-up can causeinjury.
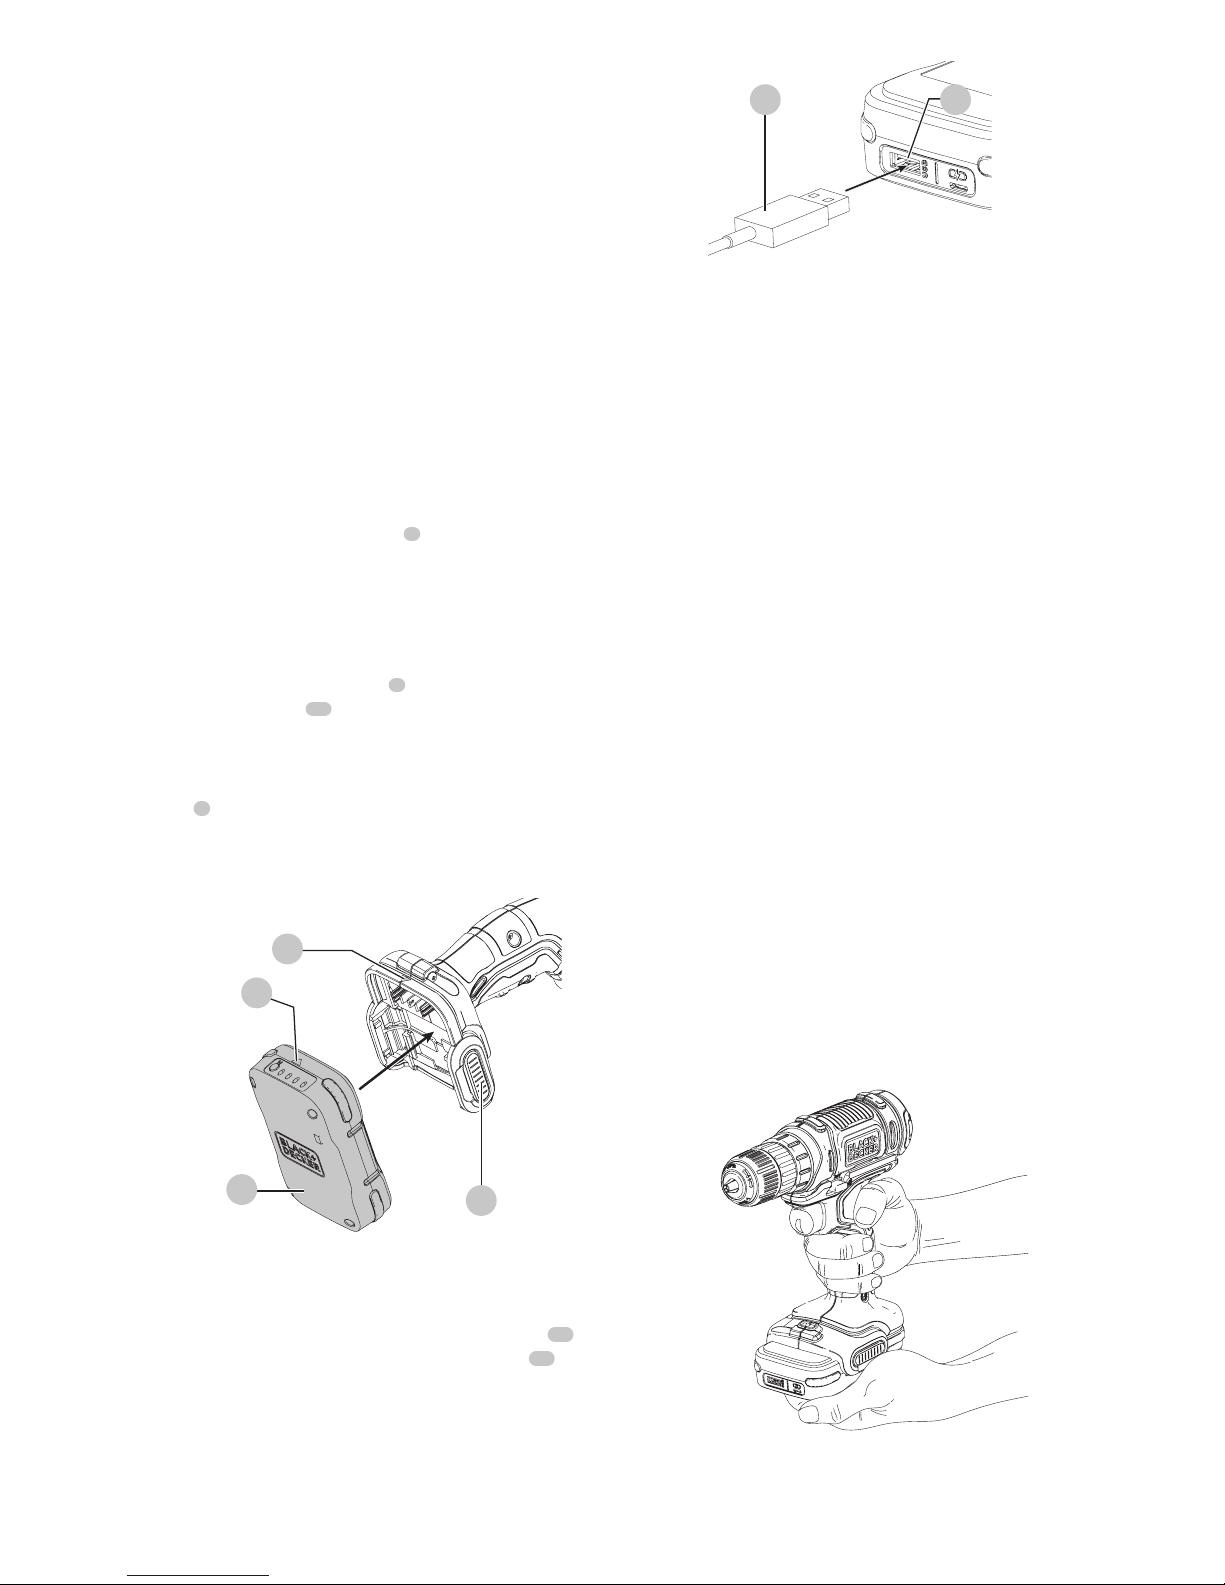
Installing and Removing the GoPak 2 in 1
Battery in a Power Tool (Fig. F)
WARNING: Remove any connected USB cords from
the BLACK+DECKER GoPak 2 in 1 battery before
connecting the GoPak to the compatibletool.
1. Remove the tool terminal cap if installed on the
BLACK+DECKER GoPak 2 in 1battery.
2. Make certain the fwd/rev button is in the center, lock-
off position before removing or installing thebattery.
3. To power a compatible GoPak 12V MAX* power tool,
align the tool terminals on the foot of the tool with the
terminal slots on the battery
6
as shown in Fig.F.
NOTE: The state of charge indicator will face the rear of
the tool and the USB ports will face the front. The arrow on
the battery will align with the arrow on the tool as shown
inFig.F.
4. Snap the BLACK+DECKER GoPak 2 in 1 battery into the
foot of the tool. The arrow
8
on the battery will align
with the arrow
15
on the tool. Ensure the battery is
fully seated and fully latched into position beforeusing.
5. To remove the BLACK+DECKER GoPak 2 in 1 battery
from the tool, depress the two battery release buttons
7
located on the tool and pull the BLACK+DECKER
GoPak 2 in 1 battery off thetool.
NOTE: The BLACK+DECKER GoPak 2 in 1 battery USB ports
are disabled when the trigger ispulled.
Fig. F
7
6
15
8
Using the GoPak 2 in 1 battery to
charge your USB device (Fig. G)
1. Plug the USB A end of your device specific cable
14
into the BLACK+DECKER GoPak 2 in 1 battery
11
and the other end of the cable into a UL or CSA listed
compatibledevice (Phone/Tablet/MP3/Wearable/Game
Controller/etc.). Charging will startautomatically.
Fig. G
1114
Functionality
The BLACK+DECKER GoPak 2 in 1 battery can power your
compatible BLACK+DECKER 12V GoPak MAX* tools or
power/charge your mobile devices. The compact, slim
battery housing is designed forportability.
- GoPak Charge Input: Up to 2.4A**
- GoPak Power Output: Up to 2.4A***
** Actual input charge rate is dependant upon power
adapter (not included).
***Actual output rate is dependant on thedevice.
USB Power Port
The BLACK+DECKER GoPak 2 in 1 battery is equipped with a
USB Type A power port. It delivers up to 2.4 amp totalcurrent.
NOTE: The current delivered to device is dependent on user
device and user's chosencable.
WARNING: Ensure the terminal cap is securly
attached to the BLACK+DECKER GoPak 2 in 1 battery
when using it to power/charge yourdevice.
• Install terminal cap on the toolterminals.
• Device charging from USB will start automatically when
device isconnected.
• To turn OFF, disconnect USBdevice.
Proper Hand Position (Fig. H)
WARNING: To reduce the risk of serious personal injury,
ALWAYS use proper hand position as shown.
WARNING: To reduce the risk of serious personal
injury, ALWAYS hold securely in anticipation of a
suddenreaction.
Proper hand position requires one hand on the main handle
and one hand around thebattery.
Fig. H
Page 10
ENGLISH
8
Trigger Switch & Reversing Button (Fig. I)
• The drill is turned ON and OFF by squeezing and
releasing the trigger switch
1
. The farther the trigger is
depressed, the higher the speed of the drill.
• A forward/reverse control button
2
determines the
direction of the tool and also serves as a lock off button.
• To select forward rotation, release the trigger switch and
depress the forward/reverse control button to the left.
• To select reverse, depress the forward/reverse control
button the opposite direction.
NOTE: The center position of the control button locks the
tool in the off position.
• When changing the position of the control button, be
sure the trigger isreleased.
NOTE: Continuous use in variable speed range is not
recommended. It may damage the switch and should
beavoided.
Fig. I
1
2
Torque Control (Fig. J)
This tool is fitted with a torque adjustment collar
3
to select
the operating mode and to set the torque for tightening
screws. Large screws and hard workpiece materials
require a higher torque setting than small screws and soft
workpiecematerials.
• For drilling in wood, metal and plastics, set the collar to
the drilling position symbol
• For screwdriving, set the collar to the desired setting. If
you do not yet know the appropriate setting, proceed
as follows:
- Set the collar to the lowest torquesetting.
- Tighten the firstscrew.
- If the clutch ratchets before the desired result
is achieved, increase the collar setting and
continue tightening the screw. Repeat until you
reach the correct setting. Use this setting for the
remainingscrews.
Fig. J
3
Keyless Chuck (Fig. K)
WARNING: Make certain the battery pack is
removed to prevent tool actuation before installing or
removingaccessories.
To insert a drill bit or other accessory:
1. Grasp the rear half of the chuck
4
with one hand
and use your other hand to rotate the front half in
the counterclockwise direction, as viewed from the
chuckend. This will open the jaws of the chuck to allow
insertion of the bit or accessory
2. Insert the bit or other accessory fully into the chuck, and
tighten securely by holding the rear half of the chuck
and rotating the front portion in the clockwise direction
as viewed from the chuckend.
WARNING: Do not attempt to tighten drill bits
(or any other accessory) by gripping the front part
of the chuck and turning the tool on. Damage to
the chuck and personal injury may occur when
changingaccessories.
Fig. K
4
Screw Driving
For driving fasteners, the reversing button should be
pushed to the left. Use reverse (button pushed to the right)
for removing fasteners. When moving from forward to
reverse, or vice versa, always release the trigger switchfirst.
LED Work Light (Fig. A, L)
When drill is activated by pulling the trigger switch
1
, the
integrated LED work light
5
will automatically illuminate
the work area. Do not use LED work light asflashlight.
Fig. L
5
Drilling
WARNING: Drill may stall if overloaded causing a
sudden twist. Always expect the stall. Grip the drill
firmly to control the twisting action and avoidinjury.
• Use sharp drill bitsonly.
• Support and secure work properly, as instructed in the
Safety Instructions.
Page 11

ENGLISH
9
NOTE: Remove tool from GoPak beforecleaning.
Use only mild soap and a damp cloth to clean the tool or
power supply. Many household cleaners contain chemicals
which could seriously damage plastic. Also, do not use
gasoline, turpentine, lacquer or paint thinner, dry cleaning
fluids or similarproducts.
Blow dirt and dust out of all air vents with clean dryair.
WARNING: To minimize the risk of eye injury, always
wear ANSI Z87.1 approved eyeprotection.
TROUBLESHOOTING
1. The GoPak will not power your device or charge.
a. The LED closest to the state of charge button will
blinkred when attempting USBfunctionality.
- The GoPak is too hot or too cold. Allow the GoPak to
cool down or warm up.
2. The GoPak will not power your compatible tool.
- Attempt to charge the battery. If the LED fails to
come on refer to number 1 in Troubleshooting.
Repairs
The BLACK+DECKER GoPak 2 in 1 battery is notserviceable.
WARNING: To assure product SAFETY and
RELIABILITY, repairs, maintenance and adjustment
(including brush inspection and replacement) should
be performed by a BLACK+DECKER factory service
center or a BLACK+DECKER authorized service center.
Always use identical replacementparts.
• Use appropriate and required safety equipment, as
instructed in the Specific Safety Rules.
• Secure and maintain work area, as instructed in the
Specific Safety Rules.
• Run the drill very slowly, using light pressure, until the
hole is started enough to keep the drill bit from slipping
out ofit.
• Apply pressure in a straight line with the bit. Use
enough pressure to keep the bit biting but not so much
as to stall the motor or deflect thebit.
• Hold the drill firmly with two hands to control its
twistingaction.
• DO NOT CLICK THE TRIGGER OF A STALLED DRILL OFF
AND ON IN AN ATTEMPT TO START IT. DAMAGE TO THE
DRILL CANRESULT.
• Minimize stalling on breakthrough by reducing pressure
and slowly drilling through the last part of thehole.
• Keep the motor running while pulling the bit out of a
drilled hole. This will help reducejamming.
• Make sure switch turns drill on andoff.
Drilling in Wood
Holes in wood can be made with the same twist drill bits
used for metal or with spade bits. These bits should be
sharp and should be pulled out frequently when drilling to
clear chips from theflutes.
Drilling in Metal
Use a cutting lubricant when drilling metals. The exceptions
are cast iron and brass which should be drilled dry. The
cutting lubricants that work best are sulfurized cutting oil or
lard oil.
Drilling in Masonry
Use carbide tipped masonry bits. Refer to Drilling section.
Keep even force on the drill but not so much that you crack
the brittle material. A smooth, even flow of dust indicates
the proper drillingrate.
MAINTENANCE
WARNING: To reduce the risk of serious personal
injury, turn unit off and remove the battery pack
before making any adjustments or removing/
installing attachments or accessories. An
accidental start-up can causeinjury.
IMPORTANT: To assure product SAFETY and RELIABILITY,
repairs, maintenance and adjustment should be performed
by authorized service centers or other qualified service
organizations, always using identical replacementparts.
Cleaning
WARNING: Never use solvents or other harsh
chemicals for cleaning the non-metallic parts of
the tool. These chemicals may weaken the plastic
materials used in these parts. Use a cloth dampened
only with water and mild soap. Never let any liquid
get inside the tool or power supply; never immerse any
part of the tool or power supply into aliquid.
TWO-YEAR LIMITED WARRANTY
Black & Decker (U.S.) Inc. warranties this product to be free
from defects in material or workmanship for a period of
two (2) years following the date of purchase, provided that
the product is used in a home environment. This limited
warranty does not cover failures due to abuse, accidental
damage or when repairs have been made or attempted
by anyone other than BLACK+DECKER and its Authorized
Service Centers. A defective product meeting the warranty
conditions set forth herein will be replaced or repaired at no
charge in either of two ways:
The first, which will result in exchanges only, is to return
the product to the retailer from whom it was purchased
(provided that the store is a participating retailer). Returns
should be made within the time period of the retailer’s
policy for exchanges. Proof of purchase may be required.
Please check with the retailer for its specific return policy
regarding time limits for returns orexchanges.
The second option is to take or send the product
(prepaid) to a BLACK+DECKER owned or authorized Service
Center for repair or replacement at BLACK+DECKER’s
option. Proof of purchase may be required. BLACK+DECKER
owned and authorized service centers are listed online at
www.blackanddecker.com. This warranty does not apply to
accessories. This warranty gives you specific legal rights and
you may have other rights which vary from state to state
or province to province. Should you have any questions,
contact the manager of your nearest BLACK+DECKER
Service Center. This product is not intended for commercial
Page 12

ENGLISH
10
Accessories
WARNING: Since accessories, other than those
offered by BLACK+DECKER have not been tested with
this product, use of such accessories with this tool
could be hazardous. To reduce the risk of injury, only
BLACK+DECKER recommended accessories should be
used with thisproduct.
Recommended accessories for use with your tool are
available at extra cost from your local dealer or authorized
service center. If you need assistance in locating any
accessory, please contact BLACK+DECKER, call
1-800-544-6986.
use, and accordingly, such commercial use of this product
will void this warranty. All other guarantees, express or
implied, are hereby disclaimed. LATIN AMERICA: This
warranty does not apply to products sold in Latin America.
For products sold in Latin America, check country specific
warranty information contained in the packaging, call the
local company or see the website for warrantyinformation.
FREE WARNING LABEL REPLACEMENT: If your warning
labels become illegible or are missing, call 1-800-544-6986
for a free replacement..
TROUBLESHOOTING
For assistance with your product, visit our website www.blackanddecker.com for the location of the service center nearest
you or call the BLACK+DECKER help line at 1-800-544-6986.
Problem Possible Cause Possible Solution
Unit will not start. Battery not installed properly. Check battery installation.
Battery not charged. Check battery charging requirements.
Internal components too hot. Allow tool to cool down.
Battery will not charge. Cables not properly connected. Check the cable connections to the battery.
Battery not plugged in. Check the connections between the battery,
the device used to charge the battery and the
working outlet.
Surrounding air temperature too hot or too cold. Move battery to a surrounding air temperature
of above 40 °F (4.5 °C) or below 105 °F
(+40.5 °C).
Unit shuts off abruptly. Battery has reached its maximum thermal limit. Allow battery pack to cool down.
Out of charge. (To maximize the life of the
battery it is designed to shutoff abruptly
when the charge is depleted.)
Remove battery and charge.
Page 13

FRANÇAIS
11
Définitions : symboles et termes d'alarmes sécurité
Ces guides d'utilisation utilisent les symboles et termes d'alarmes sécurité suivants pour vous prévenir de situations
dangereuses et de risques de dommages corporels ou matériels.
DANGER: indique une situation dangereuse imminente qui, si elle n’est pas évitée, entraînera la mort ou des
blessuresgraves.
AVERTISSEMENT: indique une situation potentiellement dangereuse qui, si elle n’est pas évitée, pourrait entraîner la
mort ou des blessuresgraves.
ATTENTION: indique une situation potentiellement dangereuse qui, si elle n’est pas évitée, pourrait entraîner des
blessures légères oumodérées.
(Si utilisé sans aucun terme) Indique un message propre à la sécurité.
AVIS : indique une pratique ne posant aucun risque de dommages corporels mais qui par contre, si rien n’est fait
pour l’éviter, pourrait poser des risques de dommages matériels.
AVERTISSEMENT! lire tous les avertissements de
sécurité et toutes les directives. Le non-respect
des avertissements et des directives pourrait se
solder par un choc électrique, un incendie et/ou une
blessuregrave.
AVERTISSEMENT : afin de réduire le risque de
blessures, lire le mode d’emploi del’outil.
Importé par Black & Decker (U.S.) Inc.,
701 E. Joppa Rd.
Towson, MD 21286
BlackandDecker.com
1-800-544-6986
1
Détente de vitesse variable
2
Bouton de marche avant/marche arrière
3
Bague de réglage du couple
4
Mandrin auto-serrant
5
Lampe de travail à DEL
6
Bloc-piles
7
Bouton de dégagement du bloc-piles
Fig. A
1
2
3
4
6
7
5
Page 14

FRANÇAIS
12
AVERTISSEMENTS DE SÉCURITÉ GÉNÉRAUX
POUR LES OUTILS ÉLECTRIQUES
AVERTISSEMENT! lire tous les avertissements de
sécurité et toutes les directives. Le non-respect
des avertissements et des directives pourrait se
solder par un choc électrique, un incendie et/ou une
blessuregrave.
CONSERVER TOUS LES
AVERTISSEMENTS ET TOUTES
LES DIRECTIVES POUR UN USAGE
ULTÉRIEUR
Le terme « outil électrique » cité dans les avertissements se
rapporte à votre outil électrique à alimentation sur secteur
(avec fil) ou par piles (sans fil).
1) Sécurité du lieu de travail
a ) Tenir l’aire de travail propre et bien éclairée.
Les lieux encombrés ou sombres sont propices
auxaccidents.
b ) Ne pas faire fonctionner d’outils électriques
dans un milieu déflagrant, tel qu’en présence de
liquides, de gaz ou de poussières inflammables.
Les outils électriques produisent des étincelles qui
pourraient enflammer la poussière ou lesvapeurs.
c ) Éloigner les enfants et les personnes à proximité
pendant l’utilisation d’un outil électrique. Une
distraction pourrait en faire perdre la maîtrise à
l’utilisateur.
2) Sécurité en matière d’électricité
a ) Les fiches des outils électriques doivent
correspondre à la prise. Ne jamais modifier la
fiche d’aucune façon. Ne jamais utiliser de fiche
d’adaptation avec un outil électrique mis à la
terre. Le risque de choc électrique sera réduit par
l’utilisation de fiches non modifiées correspondant à
laprise.
b ) Éviter tout contact physique avec des surfaces
mises à la terre comme des tuyaux, des
radiateurs, des cuisinières et des réfrigérateurs.
Le risque de choc électrique est plus élevé si votre
corps est mis à laterre.
c ) Ne pas exposer les outils électriques à la pluie ou
à l’humidité. La pénétration de l’eau dans un outil
électrique augmente le risque de chocélectrique.
d ) Ne pas utiliser le cordon de façon abusive. Ne
jamais utiliser le cordon pour transporter, tirer
ou débrancher un outil électrique. Tenir le
cordon éloigné de la chaleur, de l’huile, des
bords tranchants et des pièces mobiles. Les
cordons endommagés ou enchevêtrés augmentent les
risques de chocélectrique.
e ) Pour l’utilisation d’un outil électrique à
l’extérieur, se servir d’une rallonge convenant à
cette application. L’utilisation d’une rallonge conçue
pour l’extérieur réduira les risques de chocélectrique.
f ) S’il est impossible d’éviter l’utilisation d’un
outil électrique dans un endroit humide,
brancher l’outil dans une prise ou sur un circuit
d’alimentation dotés d’un disjoncteur de fuite à
la terre (GFCI). L’utilisation de ce type de disjoncteur
réduit les risques de chocélectrique.
3) Sécurité personnelle
a ) Être vigilant, surveiller le travail effectué et faire
preuve de jugement lorsqu’un outil électrique
est utilisé. Ne pas utiliser d’outil électrique en
cas de fatigue ou sous l’influence de drogues,
d’alcool ou de médicaments. Un simple moment
d’inattention en utilisant un outil électrique peut
entraîner des blessures corporellesgraves.
b ) Utiliser des équipements de protection
individuelle. Toujours porter une protection
oculaire. L’utilisation d’équipements de protection
comme un masque antipoussière, des chaussures
antidérapantes, un casque de sécurité ou des
protecteurs auditifs lorsque la situation le requiert
réduira les risques de blessurescorporelles.
c ) Empêcher les démarrages intempestifs. S’assurer
que l’interrupteur se trouve à la position
d’arrêt avant de relier l’outil à une source
d’alimentation et/ou d’insérer un bloc-piles, de
ramasser ou de transporter l’outil. Transporter
un outil électrique alors que le doigt repose sur
l’interrupteur ou brancher un outil électrique dont
l’interrupteur est à la position de marche risque de
provoquer unaccident.
d ) Retirer toute clé de réglage ou clé avant de
démarrer l’outil. Une clé ou une clé de réglage
attachée à une partie pivotante de l’outil électrique
peut provoquer des blessurescorporelles.
e ) Ne pas trop tendre les bras. Conserver
son équilibre en tout temps. Cela permet
de mieux maîtriser l’outil électrique dans les
situationsimprévues.
f ) S’habiller de manière appropriée. Ne pas porter
de vêtements amples ni de bijoux. Garder les
cheveux, les vêtements et les gants à l’écart des
pièces mobiles. Les vêtements amples, les bijoux ou
les cheveux longs risquent de rester coincés dans les
piècesmobiles.
g ) Si des composants sont fournis pour le
raccordement de dispositifs de dépoussiérage
et de ramassage, s’assurer que ceux-ci sont bien
raccordés et utilisés. L’utilisation d’un dispositif de
dépoussiérage peut réduire les dangers engendrés par
lespoussières.
4) Utilisation et entretien d’un outil
électrique
a ) Ne pas forcer un outil électrique. Utiliser l’outil
électrique approprié à l’application. L’outil
électrique approprié effectuera un meilleur travail,
de façon plus sûre et à la vitesse pour laquelle il a
étéconçu.
Page 15

FRANÇAIS
13
b ) Ne pas utiliser un outil électrique dont
l’interrupteur est défectueux. Tout outil électrique
dont l’interrupteur est défectueux est dangereux et
doit êtreréparé.
c ) Débrancher la fiche de la source d’alimentation
et/ou du bloc-piles de l’outil électrique avant de
faire tout réglage ou changement d’accessoire
ou avant de ranger l’outil. Ces mesures préventives
réduisent les risques de démarrage accidentel de
l’outilélectrique.
d ) Ranger les outils électriques hors de la portée
des enfants et ne permettre à aucune personne
n’étant pas familière avec un outil électrique ou
son mode d’emploi d’utiliser cet outil. Les outils
électriques deviennent dangereux entre les mains
d’utilisateursinexpérimentés.
e ) Entretien des outils électriques. Vérifier si les
pièces mobiles sont mal alignées ou coincées,
si des pièces sont brisées ou présentent toute
autre condition susceptible de nuire au bon
fonctionnement de l’outil électrique. En cas de
dommage, faire réparer l’outil électrique avant
toute nouvelle utilisation. Beaucoup d’accidents
sont causés par des outils électriques malentretenus.
f ) S’assurer que les outils de coupe sont aiguisés
et propres. Les outils de coupe bien entretenus et
affûtés sont moins susceptibles de se coincer et sont
plus faciles àmaîtriser.
g ) Utiliser l’outil électrique, les accessoires, les
forets, etc. conformément aux présentes
directives en tenant compte des conditions de
travail et du travail à effectuer. L’utilisation d’un
outil électrique pour toute opération autre que celle
pour laquelle il a été conçu estdangereuse.
5) Utilisation et entretien du bloc-piles
a ) Ne recharger l’outil qu’au moyen du chargeur
précisé par le fabricant. L’utilisation d’un chargeur
qui convient à un type de bloc-piles risque de
provoquer un incendie s’il est utilisé avec un autre
type de b loc-piles.
b ) Utiliser les outils électriques uniquement avec
les blocs-piles conçus à cet effet. L’utilisation de
tout autre bloc-piles risque de causer des blessures ou
unincendie.
c ) Lorsque le bloc-piles n’est pas utilisé, le tenir
éloigné des objets métalliques, notamment
des trombones, de la monnaie, des clés, des
clous, des vis ou autres petits objets métalliques
qui peuvent établir une connexion entre les
deux bornes. Le court-circuit des bornes du bloc-piles
risque de provoquer des brûlures ou unincendie.
d ) En cas d’utilisation abusive, le liquide peut gicler
hors du bloc-piles; éviter tout contact avec ce
liquide. Si un contact accidentel se produit, laver
à grande eau. Si le liquide entre en contact avec
les yeux, obtenir également des soins médicaux.
Le liquide qui gicle hors du bloc-piles peut provoquer
des irritations ou desbrûlures.
6) Réparation
a ) Faire réparer l’outil électrique par un réparateur
professionnel en n’utilisant que des pièces de
rechange identiques. Cela permettra de maintenir
une utilisation sécuritaire de l’outilélectrique.
Règles de sécurité spécifiques
• Utiliser les poignées auxiliaires fournies avec
l’outil. Une perte de maîtrise de l’outil peut entraîner des
blessurescorporelles.
• Saisir l’outil électrique par ses surfaces de prises
isolées lorsque l’outil peut entrer en contact avec
des fils cachés ou son cordon. En cas de contact avec
un fil sous tension, les pièces métalliques de l’outil seront
sous tension et l’utilisateur subira des secoussesélectriques.
• Lorsqu’on est installé sur une échelle ou un
échafaudage pour travailler, on doit déposer
l’outil sur le côté lorsqu’on ne s’en sert plus. Bien
que certains outils munis d’un gros bloc-piles puissent
être placés à la verticale, dans cette position, ils peuvent
facilement êtrerenversés.
• Utiliser des brides de fixation ou un autre dispositif
de fixation permettant de fixer solidement et de
soutenir la pièce sur une plateforme stable. Tenir la
pièce avec la main ou contre son corps la rend instable et
risque de provoquer une perte de maîtrise de l’outil.
• Tenir les cheveux, les vêtements et les gants loin des
évents. En effet, les évents cachent souvent des pièces
mobiles qui risquent de happer cesarticles.
• Tenir fermement l’outil à deux mains. Utiliser la
poignée auxiliaire si l’outil en est muni. Sinon, saisir l’outil
par le bas du bloc-piles. Une perte de maîtrise de l’outil
peut entraîner desblessures.
•
Lors de l’insertion d’accessoires dans le mandrin de
la perceuse, serrer fermement à la main le mandrin
sansclé
.
AVERTISSEMENT : la perceuse pourrait se bloquer (à
cause d’une surcharge ou d’une mauvaise utilisation),
produisant ainsi une torsion brusque. Toujours
s’attendre à un blocage. Saisir fermement la perceuse
avec les deux mains afin de maîtriser le mouvement
de torsion et d’éviter d’en perdre la maîtrise ce qui
pourrait entraîner des blessures corporelles. En cas
de blocage, relâcher la détente immédiatement et
déterminer la raison du blocage avant deredémarrer.
CONSERVER CES DIRECTIVES
Page 16

FRANÇAIS
14
• Prendre des précautions à proximité des évents,
car ils cachent des pièces mobiles. Vêtements amples,
bijoux ou cheveux longs risquent de rester coincés dans
ces piècesmobiles.
• Si l’utilisation d’une rallonge est absolument
nécessaire à l’extérieur, utiliser une rallonge
adéquate pour l’extérieur. Utiliser un cordon adéquat
pour l’extérieur réduit les risques de chocs électriques.
L’étiquette apposée sur votre outil peut inclure les symboles
suivants. Les symboles et leur définition sont indiqués ci-après:
V ......................... volts
Hz ....................... hertz
min ..................... minutes
or DC ...... courant continu
...................... fabrication classe I
(mis à la terre)
…/min .............. par minute
BPM .................... battements par
minute
IPM ..................... impacts par minute
RPM .................... revolutions per
minute
sfpm ................... pieds linéaires par
minute (plpm)
SPM (FPM) ......... fréquence par
minute
A ......................... ampères
W ........................ watts
or AC ........... courant alternatif
or AC/DC .... courant alternatif
ou continu
...................... fabrication classe II
(double isolation)
no ....................... vitesse à vide
n ......................... vitesse nominale
...................... borne de terre
...................... symbole
d’avertissement
..................... radiation visible
..................... protection
respiratoire
..................... protection oculaire
.....................protection auditive
..................... lire toute la
documentation
Consigne de sécurité supplémentaire
AVERTISSEMENT: porter SYSTEMATIQUEMENT
des lunettes de protection. Les lunettes courantes
NE sont PAS des lunettes de protection. Utiliser aussi
un masque antipoussières si la découpe doit en
produire beaucoup. PORTER SYSTÉMATIQUEMENT UN
ÉQUIPEMENT DE SÉCURITÉ HOMOLOGUÉ:
• Protection oculaire ANSI Z87.1 (CAN/CSA Z94.3);
• Protection auditive ANSI S12.6 (S3.19);
• Protection des voies respiratoires NIOSH/OSHA/
MSHA.
AVERTISSEMENT: les scies, meules, ponceuses,
perceuses ou autres outils de construction peuvent
produire des poussières contenant des produits
chimiques reconnus par l’État californien pour causer
cancers, malformations congénitales ou être nocifs au
système reproducteur. Parmi ces produits chimiques,
on retrouve:
• Le plomb dans les peintures à base de plomb;
• La silice cristallisée dans les briques et le ciment,
ou autres produits de maçonnerie; et
• L’arsenic et le chrome dans le bois ayant subi un
traitementchimique.
Le risque associé à de telles expositions varie selon la
fréquence à laquelle on effectue ces travaux. Pour réduire
toute exposition à ces produits: travailler dans un endroit
bien aéré, en utilisant du matériel de sécurité homologué, tel
un masque antipoussières spécialement conçu pour filtrer les
particulesmicroscopiques.
• Limiter toute exposition prolongée avec les
poussières provenant du ponçage, sciage, meulage,
perçage ou toute autre activité de construction.
Porter des vêtements de protection et nettoyer à
l’eau savonneuse les parties du corps exposées. Le
fait de laisser la poussière pénétrer dans la bouche, les
yeux ou la peau peut favoriser l’absorption de produits
chimiquesdangereux.
AVERTISSEMENT: cet outil peut produire et/
ou répandre de la poussière susceptible de causer
des dommages sérieux et permanents au système
respiratoire. Utiliser systématiquement un appareil
de protection des voies respiratoires homologué par
le NIOSH ou l’OSHA. Diriger les particules dans le sens
opposé au visage et aucorps.
AVERTISSEMENT: pendant l’utilisation, porter
systématiquement une protection auditive
individuelle adéquate homologuée ANSI S12.6
(S3.19). Sous certaines conditions et suivant la durée
d’utilisation, le bruit émanant de ce produit pourrait
contribuer à une perte de l’acuitéauditive.
ATTENTION: après utilisation, ranger l’outil
sur son côté, sur une surface stable, là où il
ne pourra ni faire trébucher ni faire chuter
quelqu’un. Certains outils équipés d’un large bloc-
piles peuvent tenir à la verticale sur celui-ci, mais
manquent alors destabilité.
BLOCS-PILES
Le bloc-piles n’est pas totalement chargé d’usine. Avant
d’utiliser le bloc-piles, lire les consignes de sécurité ci-après
puis suivre la procédure de chargement indiquée. Pour
commander un bloc-piles de rechange, s’assurer d’en
inclure le numéro de catalogue et latension.
LIRE TOUTES LES CONSIGNES
Consignes importantes de sécurité
les blocs-piles
AVERTISSEMENT: lisez tous les avertissements
de sécurité et toutes les instructions du blocpiles et de l’outil électrique. Ne pas suivre les
avertissements et les instructions peut entraîner
un choc électrique, un incendie et/ou des
blessuresgraves.
• Ne pas charger ou utiliser le bloc-piles en
atmosphères explosibles comme la présence de
liquides inflammables, de gaz ou de poussière.
Insérer ou retirer le câble de chargement du bloc-piles peut
enflammer la poussière ou lesvapeurs.
• NE JAMAIS forcer le bloc-piles à s’insérer dans le
câble ou l’outil. NE PAS modifier le bloc-piles de
quelque façon que ce soit puisque cela peut causer
des blessurescorporelles.
• NE PAS éclabousser le bloc-piles ou l’immerger dans l’eau
ou dans tout autreliquide.
Page 17

FRANÇAIS
15
hydrure métallique de nickel ou au lithium-ion (ou un blocpiles) indique que les coûts de recyclage de ces derniers
en fin d’utilisation ont déjà été réglés par BLACK+DECKER.
Dans certaines régions, la mise au rebut ou aux ordures
municipales des piles au nickel-cadmium, à l’hydrure
métallique de nickel ou au lithium-ion, est illégale; le
programme de l’Appel à Recycler® constitue donc une
solution pratique etécologique.
Appel à Recycler Canada, Inc., en collaboration avec
BLACK+DECKER et d’autres utilisateurs de piles, a mis sur
pied de programme aux États-Unis et au Canada pour
faciliter la collecte des piles au nickel-cadmium, à l’hydrure
métallique de nickel ou au lithium-ion usagées. Aidez-nous
à protéger l’environnement et à conserver nos ressources
naturelles en renvoyant les piles au nickel-cadmium, à
l’hydrure métallique de nickel ou au lithium-ion usagées à
un centre de réparation autorisé BLACK+DECKER ou chez
votre détaillant afin qu’elles y soient recyclées. On peut en
outre se renseigner auprès d’un centre de recyclage local
pour connaître d’autres sites lesacceptant.
SRPRC® est une marque déposée de l’Appel à Recycler
Canada,Inc.
Remarques importantes concernant le
chargement
1. Pour augmenter la durée de vie du bloc-piles
et optimiser son rendement, le recharger à une
température ambiante de 18° à 24°C (65°F à 75°F). NE
PAS recharger le bloc-piles à une température inférieure
à +4,5°C (+40°F) ou supérieure à +40°C (+104°F).
C’est important pour prévenir tout dommage sérieux
au bloc-piles.
2. Si le bloc-piles ne se recharge pas correctement:
a. Vérifier le bon fonctionnement de la prise
en y branchant une lampe ou tout autre
appareilélectrique.
b. Vérifier que la prise n’est pas contrôlée par un
interrupteur qui coupe le courant lorsqu’on éteint
leslumières.
c. Déplacez l’adaptateur d’alimentation et le batterie
dans un endroit où température de l’air ambiant est
d’environ 18° à 24°C (65° à 75°F);
d. Si les problèmes de chargement persistent, apportez
l’outil, le bloc-piles et le câble USB dans votre centre
de serviceslocal.
3. Recharger le bloc-piles lorsqu’il ne produit plus assez
de puissance pour effectuer un travail qu’il faisait
facilement auparavant. NE PAS CONTINUER à l’utiliser
dans ces conditions. Suivre la procédure de charge. Si
nécessaire, il est aussi possible de recharger un blocpiles partiellement déchargé sans effet nuisible sur le
bloc-piles.
Transport
AVERTISSEMENT: risques d’incendie. Au moment
de ranger ou transporter le bloc-piles, veiller à
protéger ses bornes à découvert de tout objet
métallique. Par exemple, éviter de placer le bloc-
• Ne pas entreposer ou utiliser l’appareil et le blocpiles en présence de températures ambiantes
pouvant excéder 40°C (104°F) (comme dans des
hangars ou des bâtiments métalliques l’été). Pour
préserver leur durée de vie, entreposer les blocs-piles dans
un endroit frais etsec.
REMARQUE: ne pas mettre un bloc-piles dans un
outil dont la gâchette est verrouillée en position de
marche. Ne jamais bloquer l’interrupteur en position
deMARCHE.
• Ne pas incinérer le bloc-piles même s’il est
sévèrement endommagé ou complètement usagé,
car il pourrait exploser et causer un incendie.
Pendant l’incinération des blocs-piles au lithium-ion, des
vapeurs et matières toxiques sontdégagées.
• En cas de contact du liquide de la pile avec la peau,
rincer immédiatement au savon doux et à l’eau. En
cas de contact oculaire, rincer l’œil ouvert à l’eau claire
une quinzaine de minutes ou jusqu’à ce que l’irritation
cesse. Si des soins médicaux s’avéraient nécessaires, noter
que l’électrolyte de la pile est composé d’un mélange de
carbonates organiques liquides et de sels delithium.
• Le contenu des cellules d’une pile ouverte peut
causer une irritation respiratoire. En cas d’inhalation,
exposer l’individu à l’air libre. Si les symptômes persistent,
consulter unmédecin.
AVERTISSEMENT: risques de brûlure. Le liquide de la
pile peut s’enflammer s’il est exposé à des étincelles ou
à uneflamme.
AVERTISSEMENT: risques d’incendie. Ne jamais
tenter d’ouvrir le bloc-piles pour quelque raison
que ce soit. Si le boîtier du bloc-piles est fissuré ou
endommagé, ne pas l’insérer dans un chargeur. Ne
pas écraser, laisser tomber, ou endommager les blocspiles. Ne pas utiliser un bloc-piles ou un chargeur
qui a reçu un choc violent, ou si l’appareil est tombé,
a été écrasé ou endommagé de quelque façon que
ce soit (p. ex. percé par un clou, frappé d’un coup
de marteau, piétiné). Les blocs-piles endommagés
doivent être renvoyés à un centre de réparation pour
y êtrerecyclés.
Recommandations de stockage
1. Le lieu idéal de rangement est un lieu frais et sec,
à l’abri de toute lumière solaire directe et de toute
températureexcessive.
2. Pour un stockage prolongé, il est recommandé
d’entreposer le bloc-piles pleinement chargé dans
un lieu frais et sec, hors du chargeur pour optimiser
lesrésultats.
REMARQUE: les blocs-piles ne devraient pas être
entreposés complètement déchargés. Il sera nécessaire de
recharger le bloc-piles avantréutilisation.
Le sceau SRPRC®
Le sceau SRPRC® (Société de recyclage
des piles rechargeables du Canada)
apposé sur une pile au nickel-cadmium, à
Page 18

FRANÇAIS
16
piles dans un tablier, une poche, une boîte à outils
ou un tiroir, etc. contenant des objets tels que clous,
vis, clés, etc. Le fait de transporter des blocs-piles
comporte des risques d’incendie, car les bornes
des piles pourraient entrer, par inadvertance,
en contact avec des objets conducteurs, tels
que: clés, pièces de monnaie, outils ou autres.
La réglementation sur les produits dangereux
(Hazardous Material Regulations) du département
américain des transports interdit, en fait, le transport
des blocs-piles dans les commerces ou dans les avions
dans les bagages de cabine, À MOINS qu’ils ne soient
correctement protégés de tout court-circuit. Aussi
lors du transport individuel de blocs-piles, s’assurer
que leurs bornes sont bien protégées et isolées de
tout matériau pouvant entrer en contact avec elles et
provoquer un court-circuit.
ATTENTION :
Le capuchon du bloc d’alimentation
GoPak doit être utilisé lorsque le bloc d’alimentation
n’est pas connecté à un outil électrique. Le capuchon
de transport est destiné à être utilisé lorsque le bloc
d’alimentation n’est pas connecté à l’outil. Retirez
le capuchon avant de placer le bloc d’alimentation
dansl’outil.
Exigences de la FCC pour tous les appareils
numériques
Cet appareil est conforme à la Partie 15 des règles de la FCC
et aux normes exemptes de licence RSS d’Industrie Canada. Le
fonctionnement est assujetti à ces deux conditions:
1 . Cet appareil ne doit pas provoquer d’interférences nuisibles
et
2 . Cet appareil doit accepter les interférences reçues, y
compris les interférences susceptibles d’entraîner un
fonctionnementindésirable.
Tout changement ou toute modification non expressément
approuvé par la partie responsable de la conformité peut
entraîner l’annulation du droit accordé à l’utilisateur d’opérer
l’appareil.
Cette imprimante a été testée et est conforme aux limites
des appareils numériques de classe B, en vertu de la Partie
15 des règles de la FCC. Ces limites sont prévues pour offrir
une protection raisonnable contre le brouillage préjudiciable
dans une installation résidentielle. Cet équipement génère,
utilise et peut émettre de l’énergie de radiofréquences et,
s’il n’est pas installé conformément aux instructions, peut
causer du brouillage préjudiciable aux communications
radio. Cependant, il n’y a aucune garantie que le brouillage
ne se produira pas durant une installation particulière. Si cet
équipement cause un brouillage préjudiciable à la réception
de la radio ou de la télévision, qui peut être déterminé en
allumant et en éteignant l’équipement, nous encourageons
l’utilisateur à corriger le brouillage par une des mesures
suivantes:
ʵ Réorientez ou déplacez l’antenne deréception.
ʵ Augmentez la distance entre l’équipement et
lerécepteur.
ʵ Branchez l’équipement dans une prise sur un circuit
différent de celui auquel le récepteur estbranché.
ʵ Consultez le détaillant ou un technicien en radio/
télévision expérimenté pour de l’aide.
CAN ICES-3(B)/NMB-3(B)
Démarrer
• Le micro port USB
12
sur le bloc d’alimentation 2 en 1
GoPak de BLACK+DECKER peut seulement être utilisé
pour le chargement deGoPak.
• Le port A USB
11
du bloc d’alimentation 2 en 1 GoPak
de BLACK+DECKER peut seulement être utilisé pour
alimenter les appareils USB (téléphone/tablette/MP3/
ordinateur vestimentaire/périphérique de jeu/etc.).
Fig. B
12
11
Chargement du bloc d’alimentation 2 en 1
GoPak de BLACK+DECKER (Fig. C, D)
AVERTISSEMENT: ne jamais tenter de charger le
bloc d’alimentation 2 en 1 GoPak de BLACK+DECKER
à l’aide des terminaux de l’outil sur leGoPak.
AVERTISSEMENT: vous devez seulement charger le
bloc d’alimentation 2 en 1 GoPak de BLACK+DECKER
à l’aide des ports USV conçus pour le chargement
d’appareils haute performance. Le GoPak peut laisser
passer plus de courant qu’acceptable avec les anciens
ports USB. Un message d’erreur peut s’afficher sur
votre ordinateur si celui-ci est utilisé pour charger
leGoPak.
1. Branchez le câble micro USB(comprise)
13
dans une
alimentation USB (noncomprise).
2. Branchez la fiche micro USB du cordon de votre
chargeur dans le port micro USB GoPak
12
.
3. Au fur et à mesure que le GoPak se charge, l’état des
voyants DEL du chargement s’allumera. Les voyants
DEL allumés indiquent l’état de chargement du bloc.
Le clignotement des voyants DEL indique le niveau
de chargement suivant en cours. Le bouton de l’état
de chargement
9
est désactivé seulement durant
lechargement.
4. La fin du chargement est indiquée par tous les quatre
voyants DEL qui s’éteignent. Appuyer sur le bouton
indicateur de l’état de chargement
9
allumera tous
les quatre voyants DEL. Le bloc d’alimentation est
complètement chargé et peut être utilisé à ce moment
ou laissé sur lechargeur.
5. Rechargez le bloc d’alimentation dès que possible après
utilisation ou la durée de vie du bloc d’alimentation
peut diminuer énormément. Une durée de vie du
Page 19

FRANÇAIS
17
ASSEMBLAGE ET AJUSTEMENTS
AVERTISSEMENT: pour réduire le risque de
blessures graves, éteindre l’outil et retirer le
bloc-piles avant d’effectuer tout réglage et
d’enlever ou d’installer tout accessoire. Un
démarrage accidentel peut provoquer desblessures.
Capuchon des terminaux de l’outil
GoPak
Un stockage du bloc-pile et un capuchon de transport
10
sont destinés à être utilisés lorsque le bloc-pile n’est pas
connecté à l’outil. Retirez le capuchon comme illustré dans
la Figure E avant de placer le bloc-pile sur l’outil.
Fig. E
10
Usage Prévu
Votre foret/conducteur BLACK+DECKER a été conçu pour
le forage et les applications de vissage. Ce produit est
destiné uniquement à la consommation domestique et à
usagepublic.
NE PAS les utiliser en milieu ambiant humide ou en
présence de liquides ou de gazinflammables.
NE PAS le laisser à la portée des enfants. Une supervision
est nécessaire auprès de tout utilisateur nonexpérimenté.
NE JAMAIS modifier l'outil électrique ou une partie de celuici. Des dégâts ou des blessures pourraient enrésulter.
CONSERVER CES CONSIGNES POUR
UTILISATION ULTÉRIEURE
DESCRIPTION (Fig. A)
AVERTISSEMENT: ne jamais modifier l’outil
électrique ni aucun de ses composants, car il y a
risques de dommages corporels oumatériels.
Reportez-vous en FigureA au début de ce manuel pour
obtenir la liste complète descomposants.
bloc d’alimentation plus longue, ne pas le décharger
complètement. Il est recommandé que le bloc
d’alimentation soit rechargé après chaqueutilisation.
Fig. C
12
13
Indicateur de l’état du chargement (Fig. D)
Le bloc d’alimentation 2 en 1 GoPak de BLACK+DECKER est
muni d’un bouton indicateur d’état de chargement
9
avec
quatre afficheursDEL.
L’indicateur d’état de chargement est une indication des
niveaux approximatifs du chargement restant dans le bloc
d’alimentation selon les indicateurs suivants:
96-100% chargé
76-95%
51-75%
26-50%
Pack doit être rechargée
Pour actionner l’indicateur de l’état de chargement, appuyez
sur le bouton indicateur d’état de chargement. Une
combinaison des quatre voyants DEL s’allumera désignant
le niveau de chargement restant. Lorsque le niveau de
chargement dans le bloc d’alimentation est inférieur à
limite utilisable, les voyants DEL indicateurs de l’état de
chargement ne s’allumeront pas ou le voyant DEL du
basclignotera.
REMARQUE: Les voyants DEL de l’état de chargement
s’afficheront seulement une fois que vous appuyez sur le
bouton de l’état dechargement.
Fig. D
9
• Appuyez sur le bouton de l’état de chargement en tout
temps pour afficher le niveau de chargementrestant.
REMARQUE: L’indicateur de l’état de chargement est
seulement une indication du chargement restant sur le
bloc d’alimentation. Il n’indique pas le fonctionnement de
l’outil et peut varier selon les composantes du produit, la
température et l’application de l’utilisateurfinal.
REMARQUE:
Le capuchon du bloc d’alimentation GoPak
doit être utilisé lorsque le bloc d’alimentation n’est pas
connecté à un outil électrique. Le capuchon de transport est
destiné à être utilisé lorsque le bloc d’alimentation n’est pas
connecté à l’outil. Retirez le capuchon avant de placer le bloc
d’alimentation dans l’outil.
Page 20

FRANÇAIS
18
Utiliser le bloc d’alimentation 2 en 1
GoPak pour charger votre appareil USB
(Fig. G)
1. Branchez l’extrémité A USB du câble de votre appareil
spécifique
14
dans le bloc d’alimentation 2 en 1 GoPak
de BLACK+DECKER
11
et l’autre extrémité du câble
dans un appareil compatible (téléphone/tablette/MP3/
ordinateur vestimentaire/périphérique de jeu/etc.). La
recharge démarreraautomatiquement.
Fig. G
1114
Fonctionnement
Le bloc d’alimentation 2 en 1 GoPak de BLACK+DECKER
peut alimenter vos outils 12 V MAX* GoPak de
BLACK+DECKER ou alimenter/charger vos appareils
mobiles. Le boîtier du bloc d’alimentation mince et compact
est conçu pour laportabilité.
- Entrée de chargement GoPak: Jusqu’à 2,4A**
- Puissance de sortie GoPak: Jusqu’à 2,4A***
** Le taux réel de chargement à l’entrée dépend de
l’adaptateur d’alimentation (non compris).
***Le taux de sortie réel dépend de l’appareil.
Port d’alimentation USB
Le bloc d’alimentation 2 en 1 GoPak de BLACK+DECKER est
muni d’un port d’alimentation A USB. Il offre jusqu’à 2,4 A de
couranttotal.
REMARQUE: Le courant fourni à l’appareil dépend du type
d’appareil et du câble choisis par l’utilisateur.
AVERTISSEMENT: assurez-vous que la capuchon est
fixé de façon sécuritaire au bloc d’alimentation 2 en 1
GoPak de BLACK+DECKER lorsque vous l’utilisez pour
alimenter/charger votreappareil.
• Installez le capuchon sur les terminaux del’outil.
• Le chargement de l’appareil du câble USB commencera
automatiquement lorsque l’appareil estconnecté.
• Pour arrêter le chargeur, débrancher le câbleUSB.
Position correcte des mains (Fig. H)
AVERTISSEMENT: pour réduire tout risque
de dommages corporels graves, adopter
SYSTÉMATIQUEMENT la position des mains illustrée.
AVERTISSEMENT: pour réduire tout risque
de dommages corporels graves, maintenir
SYSTÉMATIQUEMENT l’outil fermement pour
anticiper toute réactionsoudaine.
Une position des mains adéquate nécessite une main sur la
poignée principale et une main autour du bloc-piles.
UTILISATION
AVERTISSEMENT: pour réduire le risque de
blessures graves, éteindre l’outil et retirer le
bloc-piles avant d’effectuer tout réglage et
d’enlever ou d’installer tout accessoire. Un
démarrage accidentel peut provoquer desblessures.
Installer et retirer le bloc d’alimentation
2 en 1 GoPak dans un outil électrique
(Fig. F)
AVERTISSEMENT: retirez tout câble USB
connecté du bloc d’alimentation 2 en 1 GoPak de
BLACK+DECKER avant de connecter le GoPak à un
outilcompatible.
1. Retirez le capuchon des terminaux s’il est installé sur le
bloc d’alimentation 2 en 1 GoPak de BLACK+DECKER.
2. Assurez-vous que le bouton avant/arrière est au centre,
en position de verrouillage avant de retirer ou d’installer
le bloc-piles.
3. Pour alimenter un outil électrique 12V MAX* GoPak
compatible, alignez les terminaux de l’outil sur le
pied de l’outil avec le fentes des terminaux sur le bloc
d’alimentation
6
comme illustré dans la Fig.F.
REMARQUE: L’indicateur de l’état du chargement fera face
à l’arrière de l’outil et les ports USB feront face à l’avant. La
flèche sur le bloc d’alimentation s’alignera avec la flèche sur
l’outil comme illustré dans la Fig.F.
4. Enclenchez le bloc d’alimentation 2 en 1 GoPak de
BLACK+DECKER dans le pied de l’outil. La flèche
8
sur le bloc d’alimentation s’alignera avec la flèche sur
l’outil
15
. Assurez-vous que le bloc d’alimentation est
bien placé et entièrement verrouillé en place avant
l’utilisation.
5. Pour retirer le bloc d’alimentation 2 en 1 GoPak de
BLACK+DECKER de l’outil, appuyez sur les deux
boutons de libération du bloc d’alimentation
7
situé
sur l’outil et retirez le bloc d’alimentation 2 en 1 GoPak
de BLACK+DECKER de l’outil.
REMARQUE: Les ports USB du bloc d’alimentation 2 en
1 GoPak de BLACK+DECKER sont désactivés lorsque vous
appuyez sur lagâchette.
Fig. F
7
6
15
8
Page 21

FRANÇAIS
19
Fig. H
Détente et bouton inverseur (Fig. I)
• La perceuse est mise en MARCHE ou ÉTEINTE en
appuyant et en relâchant la gâchette
1
. Plus on enfonce
la détente, plus la vitesse de la perceuseaugmente.
• Un bouton de commande marche avant/marche
arrière
2
détermine le sens de l’outil et sert aussi de
bouton deverrouillage.
• Pour choisir une rotation en marche avant, relâcher la
détente et abaisser le bouton de commande marche
avant/marche arrière vers lagauche.
• Pour choisir la marche arrière, abaisser le bouton
de commande marche avant/marche arrière en
directionopposée.
REMARQUE : la position du centre du bouton de
commande verrouille l’outil en position d’arrêt.
• Toujours relâcher la détente avant de changer la
position du bouton decommande.
REMARQUE: Une utilisation continue à une gamme
de vitesses variable n’est pas recommandée. Cela peut
endommager le commutateur et doit êtreévité.
Fig. I
1
2
Réglage du couple (Fig. J)
L’outil est muni d’une bague
3
de réglage du couple qui
permet de sélectionner le mode de travail et de régler le
couple de serrage pour le serrage des vis. Les grosses vis et
les pièces en matière dure exigent un couple de serrage
plus élevé que les petites vis et les pièces de matières
plussouples.
• Pour le perçage du bois, du métal et des plastiques,
aligner la bague sur le symbole de la perceuse.
• Pour le vissage, aligner la bague sur la configuration
voulue. Si la configuration n’est pas connue, procéder
comme suit :
- Régler la bague sur le couple le plusfaible.
- Serrer la premièrevis.
- Si l’embrayage émet des cliquetis avant l’obtention
du résultat voulu, augmenter le réglage de la bague
et poursuivre le vissage. Répéter la procédure
jusqu’à l’obtention du bon réglage. Utiliser la
configuration obtenue pour les autresvis.
Fig. J
3
Mandrin sans clé (Fig. K)
AVERTISSEMENT : assurez-vous de retirer le blocpiles afin de prévenir le déclenchement de l’outil avant
d’installer ou de retirer desaccessoires.
Pour insérer une mèche ou autre accessoire :
1. Saisir la partie inférieure du mandrin avec une main et
utiliser l’autre pour faire tourner la partie supérieure
du mandrin en sens antihoraire, si vous regardez la
perceuse par lemandrin.
2. Insérer complètement la mèche ou tout autre
accessoire dans le mandrin et resserrer fermement en
retenant la partie inférieure du mandrin et en faisant
tourner sa partie supérieure en sens horaire, si vous
regardez la perceuse, par lemandrin. Cela ouvrira les
mors du mandrin pour permettre l’insertion du foret et
de l’accessoire
AVERTISSEMENT : ne pas essayer de resserrer les
mèches (ou tout autre accessoire) en saisissant la
partie avant du mandrin et en mettant l’outil en
marche. Lors du changement d’accessoires, il y a
risque d’endommager le mandrin et d’entraîner des
blessurescorporelles.
Fig. K
4
Page 22

FRANÇAIS
20
MAINTENANCE
AVERTISSEMENT: pour réduire le risque de
blessures graves, éteindre l’outil et retirer le
bloc-piles avant d’effectuer tout réglage et
d’enlever ou d’installer tout accessoire. Un
démarrage accidentel peut provoquer desblessures.
IMPORTANT: Pour assurer la SÉCURITÉ D’EMPLOI et la
FIABILITÉ de l’outil, n’en confier la réparation, l’entretien
et les rajustements qu’à un centre de service ou à un
atelier d’entretien autorisé n’utilisant que des pièces de
rechangeidentiques.
Nettoyage
AVERTISSEMENT : enlever les saletés et la poussière
hors des évents au moyen d’air comprimé propre et
sec, au moins une fois par semaine. Ne jamais laisser
tout liquide entrer à l’intérieur de l’outil ou du bloc
d’alimentation, ne jamais immerger toute pièce de
l’outil ou du bloc d’alimentation dans unliquide.
REMARQUE: Retirez l’outil du GoPak avant denettoyer.
Utilisez seulement un savon doux et un linge humide pour
nettoyer l’outil ou l’alimentation électrique. De nombreux
nettoyants domestiques contiennent des produits
chimiques qui peuvent endommager considérablement
le plastique. De plus, ne pas utiliser de l’essence, de la
térébenthine, du vernis ou du diluant, des liquides de
nettoyage à sec ou des produitssemblables.
Soufflez la saleté et la poussière de tous les évents avec de
l’air sec etpropre.
AVERTISSEMENT: afin de minimiser le risque de
blessure aux yeux, portez toujours une protection pour
les yeux approuvée ANSI Z87.1.
DÉPANNAGE
1. Le GoPak n’alimente pas ou ne charge pas votre
appareil.
a. Le voyant DEL le plus près du bouton de l’état de
chargement clignote en rouge lorsque vous essayez
la fonctionnalitéUSB.
Vissage
Pour visser des attaches, pousser le bouton de marche
arrière vers la gauche. Utiliser la marche arrière (le bouton
poussé à droite) pour retirer les attaches. Lors de la
permutation entre la marche avant et la marche arrière, ou
vice versa, s’assurer de relâcher d’abord ladétente.
Lampe de travail à DEL (Fig. A, L)
Lorsque la perceuse est actionnée en tirant sur la
détente
1
, la lampe de travail à DEL
5
intégrée s’illuminera
automatiquement. Ne pas utiliser la lampe de travail à DEL
comme lampe depoche.
Fig. L
5
Perçage
AVERTISSEMENT: la perceuse peut bloquer si elle
est surchargée entraînant une torsion soudaine.
Attendez-vous toujours à un blocage. Saisissez
fermement la perceuse pour contrôler l’action de la
torsion et éviter uneblessure.
• N’utiliser que des forets bienaffûtés.
• Veiller à ce que la pièce à percer soit solidement retenue
ou fixée en place, selon les mesures desécurité.
• Porter l’équipement de sécurité approprié et requis,
selon les Règles de sécurité spécifiques.
• Rendre la zone de travail sûre et en assurer l’entretien,
selon les Règles de sécurité spécifiques.
• Actionner la perceuse à basses vitesses en exerçant
une pression minimale jusqu’à ce que le trou soit
suffisamment percé afin d’empêcher le glissement du
foret hors dutrou.
• Toujours exercer la pression en ligne directe avec le
foret. N’user que de la force nécessaire pour que le foret
continue de percer; éviter de trop forcer, ce qui pourrait
faire étouffer le moteur ou dévier leforet.
• Bien saisir la perceuse afin de maîtrise son effet
detorsion.
• NE PAS ACTIONNER À PLUSIEURS REPRISES LA DÉTENTE
D’UNE PERCEUSE BLOQUÉE DANS LE BUT DE LA
DÉCOINCER AU RISQUE DE L’ENDOMMAGER.
• Réduire la pression exercée sur l’outil et le foret vers la
fin de la course afin d’éviter que le moteur ne cale en
traversant lematériau.
• Laisser le moteur en marche lorsqu’on retire le foret du trou
afin d’en prévenir lecoincement.
• S’assurer que l’interrupteur met l’outil en marche
et qu’il l’arrête.
Perçage du bois
On peut percer le bois au moyen des mèches hélicoïdales
qu’on utilise pour le métal ou de mèches à vrille. On doit
utiliser des mèches bien aiguisées et les sortir fréquemment
pour enlever les copeaux restés coincés dans lescannelures.
Perçage du métal
Utiliser une huile de coupe lorsqu’on perce des métaux, à
l’exception de la fonte et du laiton, car ces derniers doivent
être percés à sec. Pour cette tâche, les meilleurs lubrifiants
sont l’huile sulfurée et l’huile delard.
Perçage de la maçonnerie
Utiliser des mèches à pointe carburée (voir la section Mode
perçage) . Maintenir une pression uniforme sur la perceuse,
sans trop forcer pour éviter de fissurer les matériaux plus
cassants. La vitesse choisie est appropriée lorsque la
poussière est soulevée uniformément etrégulièrement.
Page 23

FRANÇAIS
21
Accessoires
AVERTISSEMENT : puisque les accessoires autres
que ceux offerts par BLACK+DECKER n’ont pas été
testés avec ce produit, leur utilisation pourrait s’avérer
dangereuse. Pour réduire le risque de blessures,
utiliser exclusivement les accessoires BLACK+DECKER
recommandés avec le présentproduit.
Les accessoires recommandés pour cet outil sont vendus
séparément au centre de service de votre région. Pour
obtenir de l’aide concernant l’achat d’un accessoire,
communiquer avec BLACK+DECKER; composer le
1-800-544-6986.
GARANTIE LIMITÉE DE DEUX ANS
Black & Decker (É.-U.) Inc. garantit que le produit est exempt
de défauts de matériau et de fabrication pendant deux(2)
ans à partir de la date d’achat, à condition que le produit soit
utilisé en milieu domestique. La présente garantie limitée
necouvre pas les défaillances provoquées par un abus, un
dommage accidentel ou des réparations ou tentatives de
réparations effectuées par toute autre personne que le
personnel de BLACK+DECKER et de ses centres de réparation
agréés. Un produit défectueux qui remplit les conditions
stipulées par la présente garantie sera remplacé ou réparé
sans frais d’une des deux façons suivantes :
La première façon consiste en un échange chez le détaillant
où le produit a été acheté (à la condition que le magasin soit
un détaillant participant).Tout retour doit se faire durant la
période correspondant à la politique d’échange du détaillant.
Une preuve d’achat peut être requise. Prière de vérifier la
politique de retour du détaillant au sujet des délais impartis
pour les retours ou leséchanges.
La deuxième option est d’apporter ou d’envoyer le produit
(en port payé) à un centre de réparation agréé ou à un
centre de réparation BLACK+DECKER pour faire réparer ou
échanger le produit, à la discrétion de BLACK+DECKER. Une
preuve d’achat peut être requise. Les centres de réparation
de BLACK+DECKER et les centres de réparation ou en ligne
sur www.blackanddecker.com.
Cette garantie ne s’applique pas aux accessoires. Cette
garantie accorde des droits légaux propres au propriétaire de
l’outil. Ce dernier pourrait avoir d’autres droits selon l’État ou
la province qu’il habite. Pour toute question, communiquer
avec le directeur du centre de réparation BLACK+DECKER
le plus près. Ce produit n’est pas destiné à un usage
commercial. L’usage commercial de ce produit annule
par conséquent cette garantie. Toutes autres garanties,
expresses ou implicites, sont déclinées par laprésente.
- La température du GoPak est trop chaude ou trop
froide. Laissez le GoPak se refroidir ou se réchauffer.
2. Le GoPak n’alimente pas votre outil compatible.
- Essayez de charger le bloc d’alimentation. Si le
voyant DEL ne s’allume pas, consultez le numéro 1
dans Dépannage.
Réparations
Le bloc d’alimentation 2 en 1 GoPak de BLACK+DECKER
n’est pasréparable.
AVERTISSEMENT : pour assurer la SÉCURITÉ et la
FIABILITÉ du produit, les réparations, l’entretien et
les réglages doivent être réalisés (cela comprend
l’inspection et le remplacement du balai, le cas
échéant) par un centre de réparation en usine
BLACK+DECKER ou un centre de réparation agréé
BLACK+DECKER. Toujours utiliser des pièces de
rechangeidentiques.
Page 24

FRANÇAIS
22
DÉPANNAGE
Pour de l’aide avec l’outil, consulter notre site Web www.blackanddecker.com pour l’emplacement du centre de
réparation le plus près ou communiquer avec l’assistance BLACK+DECKER au 1-800-544-6986.
Problème Causes possibles Solutions possibles
L’appareil ne démarre pas. Le bloc d’alimentation n’est pas bien installé. Vérifiez l’installation du bloc d’alimentation.
Le bloc d’alimentation n’est pas chargé. Vérifiez les exigences de chargement du bloc
d’alimentation.
Les composantes internes sont trop chaudes. Laissez l’outil se refroidir.
Le bloc d’alimentation ne se charge pas. Les câbles ne sont pas bien connectés. Vérifiez les connexions des câbles au bloc
d'alimentation.
Le bloc d’alimentation n’est pas branché. Vérifiez les connexions entre le bloc
d’alimentation, l’appareil utilisé pour le charger
et la prise qui fonctionne.
La température de l'air ambiant est trop chaude
ou trop froide.
Déplacez bloc d’alimentation dans une
température d’air ambiant au-dessus à 4,5 °C
(40 °F) ou au-dessous de +40,5 °C (105 °F).
L’appareil s'éteint brusquement. Le bloc d’alimentation a atteint sa limite
thermique maximum.
Laissez le bloc d’alimentation se refroidir.
Pile à plat. (Pour maximiser la vie du
bloc d'alimentation, il est conçu pour
s’éteindre brusquement lorsque la charge
baisse.)
Retirez la batterie et la charge.
Page 25

ESPAÑOL
23
¡ADVERTENCIA! Lea todas las advertencias de
seguridad e instrucciones. El incumplimiento
de las advertencias e instrucciones puede provocar
descargas eléctricas, incendios o lesionesgraves.
ADVERTENCIA: Para reducir el riesgo de lesiones, lea
el manual deinstrucciones.
Importado por Black & Decker (U.S.) Inc.,
701 E. Joppa Rd.
Towson, MD 21286
BlackandDecker.com
1-800-544-6986
1
Interruptor de velocidad variable
2
Botón de avance/reversa
3
Anillo de ajuste de torsión
4
Portabrocas sin llave
5
Luz de trabajo de LED
6
Batería
7
Botón de liberación de la batería
Definiciones: Símbolos y palabras de alerta de seguridad
Este manual de instrucciones utiliza los siguientes símbolos y palabras de alerta de seguridad para alertarle de situaciones
peligrosas y del riesgo de lesiones corporales o daños materiales.
PELIGRO: Indica una situación de peligro inminente que, si no se evita, provocará la muerte o lesionesgraves.
ADVERTENCIA: Indica una situación de peligro potencial que, si no se evita, podría provocar la muerte o
lesionesgraves.
ATENCIÓN: Indica una situación de peligro potencial que, si no se evita, posiblemente provocaría lesiones leves
omoderadas.
(Utilizado sin palabras) indica un mensaje de seguridad relacionado.
AVISO: Se refiere a una práctica no relacionada a lesiones corporales que de no evitarse puede resultar en daños a
la propiedad.
Fig. A
1
2
3
4
6
7
5
Page 26

ESPAÑOL
24
ADVERTENCIAS GENERALES DE SEGURIDAD
PARA HERRAMIENTAS ELÉCTRICAS
¡ADVERTENCIA! Lea todas las advertencias de
seguridad e instrucciones. El incumplimiento de
las advertencias e instrucciones puede provocar
descargas eléctricas, incendios o lesionesgraves.
CONSERVE TODAS LAS ADVERTENCIAS
E INSTRUCCIONES PARA FUTURAS
CONSULTAS
El término “herramienta eléctrica” incluido en las advertencias
hace referencia a las herramientas eléctricas operadas con
corriente (con cable eléctrico) o a las herramientas eléctricas
operadas con baterías (inalámbricas).
1) Seguridad en el Área de Trabajo
a ) Mantenga el área de trabajo limpia y bien
iluminada. Las áreas abarrotadas y oscuras
propicianaccidentes.
b ) No opere las herramientas eléctricas en
atmósferas explosivas, como ambientes donde
haya polvo, gases o líquidos inflamables. Las
herramientas eléctricas originan chispas que pueden
encender el polvo o losvapores.
c ) Mantenga alejados a los niños y a los
espectadores de la herramienta eléctrica en
funcionamiento. Las distracciones pueden provocar
la pérdida decontrol.
2) Seguridad Eléctrica
a ) Los enchufes de la herramienta eléctrica deben
adaptarse al tomacorriente. Nunca modifique el
enchufe de ninguna manera. No utilice ningún
enchufe adaptador con herramientas eléctricas
con conexión a tierra. Los enchufes no modificados
y que se adaptan a los tomacorrientes reducirán el
riesgo de descargaeléctrica.
b ) Evite el contacto corporal con superficies con
descargas a tierra como, por ejemplo, tuberías,
radiadores, cocinas eléctricas y refrigeradores.
Existe mayor riesgo de descarga eléctrica si su cuerpo
está puesto atierra.
c ) No exponga las herramientas eléctricas a la
lluvia o a condiciones de humedad. Si entra agua
a una herramienta eléctrica, aumentará el riesgo de
descargaeléctrica.
d ) No maltrate el cable. Nunca utilice el cable para
transportar, tirar o desenchufar la herramienta
eléctrica. Mantenga el cable alejado del calor, el
aceite, los bordes filosos y las piezas móviles. Los
cables dañados o enredados aumentan el riesgo de
descargaeléctrica.
e ) Al operar una herramienta eléctrica en el
exterior, utilice un cable prolongador adecuado
para tal uso. Utilice un cable adecuado para
uso en exteriores a fin de reducir el riesgo de
descargaeléctrica.
f ) Si el uso de una herramienta eléctrica en un
lugar húmedo es imposible de evitar, utilice
un suministro protegido con un interruptor de
circuito por falla a tierra (GFCI). El uso de un GFCI
reduce el riesgo de descargaseléctricas.
3) Seguridad Personal
a ) Permanezca alerta, controle lo que está
haciendo y utilice el sentido común cuando
emplee una herramienta eléctrica. No utilice
una herramienta eléctrica si está cansado o bajo
el efecto de drogas, alcohol o medicamentos.
Un momento de descuido mientras se opera una
herramienta eléctrica puede provocar lesiones
personalesgraves.
b ) Utilice equipos de protección personal. Siempre
utilice protección para los ojos. En las condiciones
adecuadas, el uso de equipos de protección, como
máscaras para polvo, calzado de seguridad
antideslizante, cascos o protección auditiva, reducirá
las lesionespersonales.
c ) Evite el encendido por accidente. Asegúrese de
que el interruptor esté en la posición de apagado
antes de conectarlo a la fuente de energía
o paquete de baterías, o antes de levantar
o transportar la herramienta. Transportar
herramientas eléctricas con el dedo apoyado en el
interruptor o enchufar herramientas eléctricas con
el interruptor en la posición de encendido puede
propiciaraccidentes.
d ) Retire la clavija de ajuste o la llave de tuercas
antes de encender la herramienta eléctrica. Una
llave de tuercas o una clavija de ajuste que quede
conectada a una pieza giratoria de la herramienta
eléctrica puede provocar lesionespersonales.
e ) No se estire. Conserve el equilibrio y párese
adecuadamente en todo momento. Esto permite
un mejor control de la herramienta eléctrica en
situacionesinesperadas.
f ) Use la vestimenta adecuada. No use ropas
holgadas ni joyas. Mantenga el cabello, la
ropa y los guantes alejados de las piezas en
movimiento. Las ropas holgadas, las joyas o el
cabello largo pueden quedar atrapados en las piezas
enmovimiento.
g ) Si se suministran dispositivos para la conexión
de accesorios con fines de recolección y
extracción de polvo, asegúrese de que estén
conectados y que se utilicen correctamente. El
uso de dispositivos de recolección de polvo puede
reducir los peligros relacionados con elpolvo.
4) Uso y Mantenimiento de la
Herramienta Eléctrica
a ) No fuerce la herramienta eléctrica. Utilice la
herramienta eléctrica correcta para el trabajo
que realizará. Si se la utiliza a la velocidad para la
que fue diseñada, la herramienta eléctrica correcta
permite trabajar mejor y de manera mássegura.
Page 27

ESPAÑOL
25
b ) No utilice la herramienta eléctrica si no puede
encenderla o apagarla con el interruptor. Toda
herramienta eléctrica que no pueda ser controlada
mediante el interruptor es peligrosa y deberepararse.
c ) Desconecte el enchufe de la fuente de energía
o el paquete de baterías de la herramienta
eléctrica antes de realizar ajustes, cambiar
accesorios o almacenar la herramienta eléctrica.
Estas medidas de seguridad preventivas reducen
el riesgo de encender la herramienta eléctrica en
formaaccidental.
d ) Guarde la herramienta eléctrica que no esté en
uso fuera del alcance de los niños y no permita
que otras personas no familiarizadas con ella o
con estas instrucciones operen la herramienta.
Las herramientas eléctricas son peligrosas si son
operadas por usuarios nocapacitados.
e ) Realice el mantenimiento de las herramientas
eléctricas. Revise que no haya piezas en
movimiento mal alineadas o trabadas, piezas
rotas o cualquier otra situación que pueda
afectar el funcionamiento de la herramienta
eléctrica. Si encuentra daños, haga reparar
la herramienta eléctrica antes de utilizarla.
Se producen muchos accidentes a causa de
las herramientas eléctricas que carecen de un
mantenimientoadecuado.
f ) Mantenga las herramientas de corte afiladas
y limpias. Las herramientas de corte con
mantenimiento adecuado y con los bordes de corte
afilados son menos propensas a trabarse y son más
fáciles decontrolar.
g ) Utilice la herramienta eléctrica, los accesorios
y las brocas de la herramienta, etc. de acuerdo
con estas instrucciones y teniendo en cuenta
las condiciones de trabajo y el trabajo que debe
realizarse. El uso de la herramienta eléctrica para
operaciones diferentes de aquéllas para las que fue
diseñada podría originar una situaciónpeligrosa.
5) Uso y Mantenimiento de la
Herramienta con Baterías
a ) Recargue solamente con el cargador
especificado por el fabricante. Un cargador
adecuado para un tipo de paquete de baterías puede
originar riesgo de incendio si se utiliza con otro
paquete debaterías.
b ) Utilice herramientas eléctricas sólo con paquetes
de baterías específicamente diseñados. El uso de
cualquier otro paquete de baterías puede producir
riesgo de incendio ylesiones.
c ) Cuando no utilice el paquete de baterías,
manténgalo lejos de otros objetos metálicos
como sujetapapeles, monedas, llaves, clavos,
tornillos u otros objetos metálicos pequeños que
puedan realizar una conexión desde un terminal
al otro. Los cortocircuitos en los terminales de la
batería pueden provocar quemaduras oincendio.
d ) En condiciones abusivas, el líquido puede ser
expulsado de la batería. Evite su contacto. Si
entra en contacto accidentalmente, enjuague
con agua. Si el líquido entra en contacto con los
ojos, busque atención médica. El líquido expulsado
de la batería puede provocar irritación oquemaduras.
6) Mantenimiento
a ) Solicite a una persona calificada en reparaciones
que realice el mantenimiento de su herramienta
eléctrica y que sólo utilice piezas de repuesto
idénticas. Esto garantizará la seguridad de la
herramientaeléctrica.
Normas de seguridad específicas
• Use los mangos auxiliares que se suministran con
la herramienta. La pérdida del control podría ocasionar
lesionespersonales.
• Sujete la herramienta eléctrica por las superficies
aislantes cuando realice una operación en que la
herramienta pueda hacer contacto con cableados
ocultos. Al hacer contacto con un cable “vivo”, las partes
metálicas de la herramienta se vuelven “vivas” y pueden
originar un choque aloperador.
• Cuando trabaje en una escalera o una plataforma
asegúrese de dejar la herramienta de lado cuando
no la use. Algunas herramientas con baterías grandes se
paran sobre su base, pero se pueden volcarfácilmente.
• Utilice abrazaderas u otra forma práctica para
asegurar y sostener la pieza de trabajo sobre una
plataforma estable. Sostener el trabajo con la mano
o contra el cuerpo no brinda la estabilidad requerida y
puede llevar a la pérdida delcontrol.
• Mantenga el cabello, la ropa y los guantes alejados
de los orificios de ventilación. Los orificios de
ventilación suelen cubrir piezas móviles donde estos
elementos se puedenenganchar.
• Sostenga la herramienta firmemente con ambas
manos. Utilice el mango auxiliar, en caso de tenerlo.
Si no tiene mango auxiliar, agarre la herramienta por la
parte inferior de la batería. La pérdida del control podría
ocasionar lesionespersonales.
• Cuando acople accesorios en el portabrocas, ajuste
manualmente y con firmeza el portabrocas sinllave.
ADVERTENCIA: El taladro se puede atascar (si se
sobrecarga o se usa inadecuadamente) y provocar
una torsión. Siempre espere el atascamiento. Sujete
el taladro firmemente con ambas manos para
controlar la torsión y evitar la pérdida de control
que podría ocasionar lesiones personales. En
caso de que la herramienta se atasque, suelte el
disparador inmediatamente y determine la causa del
atascamiento antes de encenderlanuevamente.
GUARDE ESTAS INSTRUCCIONES
Page 28

ESPAÑOL
26
BATERÍAS
La batería no viene completamente cargada de fábrica.
Antes de utilizar la batería, lea las siguientes instrucciones
de seguridad y luego siga los procedimientos de carga
indicados. Cuando pida baterías de repuesto, no olvide
indicar el número de catálogo y el voltaje.
LEA TODAS LAS INSTRUCCIONES
Instrucciones de Seguridad Importantes
Para Todas las Unidades de Batería
ADVERTENCIA: Lea todas las advertencias de
seguridad y todas las instrucciones para el
paquete de batería y la herramienta eléctrica. La
falla en seguir las advertencias e instrucciones
puede resultar en descarga eléctrica, incendio
y/o lesionesserias.
• No cargue o use el paquete de batería en atmósferas
explosivas, como en la presencia de líquidos, gases o
polvo inflamables. Insertar o retirar el cable de carga del
paquete de batería puede encender el polvo y losvapores.
• NUNCA fuerce el paquete de batería dentro de la
inserción del cable o la inserción de la herramienta.
NO modifique e paquete de batería en ninguna
• Los orificios de ventilación suelen cubrir piezas en
movimiento, por lo que también se deben evitar. Las
piezas en movimiento pueden atrapar prendas de vestir
sueltas, joyas o el cabellolargo.
• Si es absolutamente necesario utilizar un alargador
al aire libre, use un alargador apropiado para
uso en exteriores. La utilización de un alargador
adecuado para uso en exteriores reduce el riesgo de
descargaeléctrica.
La etiqueta de su herramienta puede incluir los siguientes
símbolos. A continuación se indican los símbolos y
susdefiniciones:
V ......................... voltios
Hz ....................... hertz
min ..................... minutos
or DC ...... direct current
...................... Construcción de
Clase I (tierra)
…/min ................ por minuto
BPM ................... golpes por minuto
IPM ..................... impactos por
minuto
RPM ................... revoluciones por
minuto
sfpm ................... pies de superficie
por minuto
SPM .................... pasadas por
minuto
A ......................... amperios
W ....................... vatios
or AC ........... corriente alterna
or AC/DC .... corriente alterna
o directa
...................... Construcción de
Clase II (doble
aislamiento)
no ....................... velocidad sin carga
n ......................... velocidad nominal
...................... terminal de
conexión a tierra
...................... símbolo de
advertencia de
seguridad
..................... radiación visible
..................... protección
respiratoria
..................... protección ocular
.....................protección auditiva
..................... lea toda la
documentación
Instrucción Adicional de Seguridad
ADVERTENCIA: Use SIEMPRE lentes de
seguridad. Los anteojos de diario NO SON lentes
de seguridad. Utilice además una cubrebocas o
mascarilla antipolvo si la operación de corte genera
demasiado polvo. SIEMPRE LLEVE EQUIPO DE
SEGURIDADCERTIFICADO:
• protección ocular ANSI Z87.1 (CAN/CSA Z94.3),
• protección auditiva ANSI S12.6 (S3.19),
• protección respiratoria NIOSH/OSHA/MSHA.
ADVERTENCIA: Algunas partículas de polvo
generadas al lijar, serrar, esmerilar y taladrar con
herramientas eléctricas, así como al realizar otras
actividades de construcción, contienen químicos que
el Estado de California sabe que pueden producir
cáncer, defectos congénitos u otras afecciones
reproductivas. Ejemplos de estos químicosson:
• plomo de algunas pinturas en base a plomo,
• polvo de sílice proveniente de ladrillos y cemento
y otros productos de albañilería, y
• arsénico y cromo provenientes de madera
tratadaquímicamente.
Su riesgo de exposición a estos químicos varía, dependiendo
de la frecuencia con la cual realiza usted este tipo de trabajo.
Para reducir su exposición a estas sustancias químicas:
trabaje en una zona bien ventilada y llevando equipos
de seguridad aprobados, como mascarillas antipolvo
especialmente diseñadas para filtrar partículasmicroscópicas.
• Evite el contacto prolongado con polvo generado
por el lijado, aserrado, pulido, taladrado y otras
actividades de construcción. Vista ropas protectoras
y lave las áreas de la piel expuestas con agua y
jabón. Si permite que el polvo se introduzca en la boca u
ojos o quede sobre la piel, puede favorecer la absorción de
productos químicospeligrosos.
ADVERTENCIA: La utilización de esta herramienta
puede generar polvo o dispersarlo, lo que podría
causar daños graves y permanentes al sistema
respiratorio, así como otras lesiones. Siempre use
protección respiratoria aprobada por NIOSH (Instituto
Nacional de Seguridad y Salud en el Trabajo) u OSHA
(Administración de Seguridad y Salud en el Trabajo)
apropiada para la exposición al polvo. Dirija las
partículas en dirección contraria a la cara y elcuerpo.
ADVERTENCIA: Siempre lleve la debida
protección auditiva personal en conformidad
con ANSI S12.6 (S3.19) durante el uso de esta
herramienta. Bajo algunas condiciones y duraciones
de uso, el ruido producido por este producto puede
contribuir a la pérdidaauditiva.
ATENCIÓN: Cuando no esté en uso, guarde la
herramienta apoyada en un costado sobre una
superficie estable, donde no interrumpa el paso
o provoque una caída. Algunas herramientas
con paquetes de baterías de gran tamaño pueden
colocarse paradas sobre el paquete de baterías, pero
pueden caersefácilmente.
Page 29

ESPAÑOL
27
El sello RBRC®
El sello RBRC® (Rechargeable Battery
Recycling Corporation) en las baterías
(ounidades de batería) de níquel cadmio,
níquel e hidruro metálico o de iones de
litio indica que el costo de reciclaje de
estas baterías (o unidades de batería) al llegar al final de
su vida de servicio ya ha sido pagado por BLACK+DECKER.
En algunas áreas, es ilegal depositar baterías de níquel
cadmio, níquel e hidruro metálico o de iones de litio
gastadas en la basura o la corriente de residuos sólidos
urbanos; el programa Call 2 Recycle® proporciona una
alternativaecológica.
Call 2 Recycle, Inc., en cooperación con BLACK+DECKER y
otros usuarios de baterías, han establecido programas en
los Estados Unidos y Canadá para facilitar la recolección
de baterías de níquel cadmio, níquel e hidruro metálico
o de iones de litio gastadas. Al llevar sus baterías de
níquel cadmio, níquel e hidruro metálico y de iones
de litio gastadas a un centro de servicio autorizado
por BLACK+DECKER o al minorista local para que sean
recicladas, ayuda a proteger el medio ambiente y a
conservar recursos naturales. También puede comunicarse
con el centro de reciclaje de su localidad para mayor
información sobre dónde llevar sus bateríasgastadas.
RBRC® es una marca comercial registrada de Call 2
Recycle,Inc.
Notas importantes sobre la carga
1. Se puede obtener una mayor duración y un mejor
rendimiento si la unidad de batería se carga a una
temperatura ambiente de 18 – 24 °C (65 – 75 °F).
NO cargue la unidad de batería a una temperatura
ambiental inferior a +4.5 °C (+40 °F) o superior a +40°C
(+104 °F). Esto es importante y evitará causar daños
graves a labatería.
2. Si la unidad de batería no se carga correctamente:
a. Verifique el funcionamiento de la toma enchufando
una lámpara u otro aparato;
b. Revise que la toma de corriente no esté conectada a
un interruptor de luz que corte la corriente cuando
se corte la luz;
c. Mueva el adaptador de energía y el paquete de
batería a una ubicación donde la temperatura de
aire ambiente sea de aproximadamente 65° – 75°F
(18° – 24°C);
d. Si persisten los problemas de carga, lleve la
herramienta, el paquete de batería y el cable USB a su
centro de serviciolocal.
3. La unidad de batería debería ser recargada cuando
no sea capaz de producir suficiente potencia para
trabajos que eran fácilmente realizados antes. NO
CONTINÚE usándola bajo estas circunstancias. Siga el
procedimiento de carga. También puede cargar una
unidad de batería que haya sido usada parcialmente
cuando lo desee, sindañarla.
forma ya que el paquete de batería se puede romper
causando lesiones personalesserias.
• NO salpique con ni sumerja en agua u otroslíquidos.
• No guarde ni use la herramienta y unidad de batería
en lugares donde la temperatura pueda alcanzar
o superar los 40°C (104 °F), tales como cobertizos
o construcciones de metal durante el verano).
Almacene las unidades de batería en lugares frescos y
secos para maximizar su vidaútil.
NOTA: No almacene las unidades de batería en
la herramienta con el interruptor de gatillo en
posición encendida fija. Nunca use cinta adhesiva
para mantener el interruptor de gatillo en
posiciónENCENDIDA.
• No incinere la unidad de batería, aunque esté
completamente dañada o descargada. La unidad
de batería puede explotar si se quema. Cuando se
queman unidades de batería de iones de litio, se producen
gases y materialestóxicos.
• Si el contenido de la batería entra en contacto con la
piel, lave el área de inmediato con agua y un jabón
suave. Si el líquido de la batería entra en contacto con
sus ojos, enjuáguelos con agua y los ojos abiertos por
15 minutos o hasta que cese la irritación. Si se requiere
de asistencia médica, el electrolito de la batería está
compuesto por una mezcla de carbonatos orgánicos
líquidos y sales delitio.
• El contenido de los elementos abiertos de la batería
puede causar irritación en el tracto respiratorio.
Salga al aire fresco. Si los síntomas persisten, busque
asistenciamédica.
ADVERTENCIA: Peligro de quemaduras. El líquido de
la batería puede ser inflamable si se expone a chispas
ollamas.
ADVERTENCIA: Peligro de incendio. Nunca intente
abrir la unidad de batería por ningún motivo. Si
la caja exterior de la unidad de batería se triza o
daña, no la introduzca en el cargador. No triture,
deje caer o dañe la unidad de batería. No use una
unidad de batería o un cargador que haya sido
golpeado, dejado caer, atropellado o dañado en
cualquier forma (por ejemplo, perforado por un clavo,
golpeado con un martillo, pisado). Lleve sus unidades
de batería dañadas al centro de servicio para que
seanrecicladas.
Recomendaciones de almacenamiento
1. El mejor lugar de almacenamiento es uno que sea fresco
y seco, lejos de la luz solar directa y del exceso de calor
ofrío.
2. Para resultados óptimos durante tiempos prolongados
de almacenamiento, se recomienda almacenar la
unidad de batería completamente cargada en un lugar
fresco y seco fuera delcargador.
NOTA: Las unidades de batería no deberían almacenarse
completamente descargadas. La unidad de batería deberá
recargarse antes de serusada.
Page 30

ESPAÑOL
28
Transporte
ADVERTENCIA: Peligro de incendio. No guarde o
transporte la batería de forma que los terminarles
expuestos de la misma puedan estar en contacto
con objetos metálicos. Por ejemplo, no ponga la
batería en delantales, bolsillos, cajas de herramientas,
estuches de productos, cajones, etc., junto con clavos,
tornillos, y llaves, etc. sueltos. El transporte de
baterías puede causar incendios si sus terminales
inadvertidamente entran en contacto con
materiales conductores como llaves, monedas,
herramientas manuales y otros por el estilo.
El Reglamento sobre Materiales Peligrosos (HMR)
del Departamento de Transporte de EE.UU. prohíbe
transportar baterías comercialmente o en aviones en
el equipaje de mano A MENOS que estén debidamente
protegidas contra cortocircuitos. Por lo tanto, cuando
transporte baterías individuales, asegúrese de que sus
terminales estén protegidos y debidamente aislados de
los materiales que pudieran entrar en contacto con ellos
y provocar uncortocircuito.
ATENCIÓN:
La tapa de la fuente de energía
GoPak se debe usar cuando la fuente de energía
no esté conectada a una herramienta eléctrica. Se
proporciona la tapa para uso siempre que la fuente
de energía esté fuera de la herramienta. Retire
la tapa antes de colocar la fuente de energía en
laherramienta.
Requerimientos FCC para todos los
dispositivos digitales
Este dispositivo cumple con la Parte 15 de las Reglas FCC y las
normas RSS exentas de Licencia de la Industria de Canadá. La
operación está sujeta a las siguientes dos condiciones:
1 . Este dispositivo no puede causar interferencia dañina, y
2 . Este dispositivo debe aceptar cualquier interferencia
recibida, incluyendo interferencia que puede causar
operaciónindeseada.
Los cambios o modificaciones no aprobados expresamente
por la parte responsable por el cumplimiento podrían anular
la autoridad del usuario para operar elequipo.
Este equipo se probó y se encontró que cumple con los límites
para un dispositivo digital Clase B, en conformidad con la
Parte15 de las Reglas FCC. Estos límites están diseñados
para proporcionar protección razonable contra interferencia
dañina en una instalación residencial. Este equipo genera,
usa, y puede transmitir energía de radio frecuencia y, si no se
instala y usa de acuerdo con las instrucciones, puede causar
interferencia dañina a las comunicaciones de radio. Sin
embargo, no existe garantía que no ocurra la interferencia en
una instalación particular. Si este equipo causa interferencia
dañina a la recepción de radio o televisión, que se puede
determinar al apagar o encender ele quipo, se alienta al
usuario que intente corregir la interferencia por medio de una
de las siguientes medidas:
ʵ Reoriente o reubique la antena derecepción.
ʵ Incremente la separación entre el equipo y elreceptor.
ʵ Conecte el equipo en un tomacorriente en un circuito
diferente al que esté conectado elreceptor.
ʵ Consulte al distribuidor o un técnico de radio/TV
experimentado respecto aayuda.
CAN ICES-3(B)/NMB-3(B)
Para Comenzar
• El puerto micro USB
12
en la fuente de energía GoPak
2 en 1 BLACK+DECKER sólo se debe usar para cargar
elGoPak.
• El puerto USB A
11
de la fuente de energía GoPak 2
en 1 BLACK+DECKER sólo se debe usar para energizar
dispositivos USB (Teléfono/Tablet/MP3/Usable/
Controlador de juegos/etc.).
Fig. B
12
11
Carga de fuente de energía GoPak 2 en 1
BLACK+DECKER (Fig. C, D)
ADVERTENCIA: Nunca intente cargar la fuente de
energía GoPak 2 en 1 BLACK+DECKER utilizando las
terminales de la herramienta en laGoPak.
ADVERTENCIA: Sólo debe cargar la fuente de energía
GoPak 2 en 1 BLACK+DECKER utilizando puertos
USB con capacidad para cargar dispositivos de alto
desempeño. GoPak puede extraer más corriente de
la aceptable con puertos USB más viejos. Se puede
mostrar un mensaje de error en su computadora si la
computadora se usa para cargar laGoPak.
1. Conecte el cable micro USB(incluido)
13
en un
suministro de energía USB (noincluido).
2. Conecte la micro USB de su cable de cargador en el
puerto micro USB de GoPak
12
.
3. Conforme la GoPak carga, se iluminarán los LEDs de
Estado de carga. Los LED(s) iluminados indican el
estado de carga del paquete. El LED parpadeante
indica el siguiente nivel de carga en progreso. El
botón de Estado de carga
9
se desactiva durante la
cargaúnicamente.
4. La terminación de la carga se indica cuando se apagan
todos los LED. Presionar el botón del indicador de
estado de carga
9
iluminará los cuatro LEDs. La fuente
de energía está completamente cargada y se puede
usar en este momento o dejarse en elcargador.
5. Recargue las fuentes de energía descargadas tan
pronto como sea posible después del uso o la vida de
la fuente de energía se puede disminuir ampliamente.
Para una vida de la fuente de energía más prolongada,
no descargue las fuentes de energía completamente.
Page 31

ESPAÑOL
29
MONTAJE Y AJUSTES
ADVERTENCIA: Para reducir el riesgo de lesiones
personales graves, apague la herramienta y
retire el paquete de baterías antes de realizar
ajustes o de retirar/instalar dispositivos
o accesorios. Un arranque accidental podría
causarlesiones.
Tapa de terminal de herramienta GoPak
Se proporciona una tapa de almacenamiento y transporte
de la batería
10
para uso siempre que la batería esté fuera
de la herramienta. Retire la tapa como se muestra en la
Figura E antes de colocar la batería en laherramienta.
Fig. E
10
Uso Debido
Su taladro/controlador BLACK+DECKER ha sido diseñado
para aplicaciones de perforación y atornillado. Este
producto está diseñado para uso doméstico, solo para
elconsumidor.
NO utilice la herramienta en condiciones de humedad o en
presencia de líquidos o gasesinflamables.
NO permita que los niños toquen la herramienta. Si el
operador no tiene experiencia operando esta herramienta,
su uso deberá sersupervisado. NUNCA modifique la
herramienta eléctrica o cualquier parte de la misma. Daños
o lesiones personales podríanresultar.
GUARDE ESTAS INSTRUCCIONES PARA
VOLVER A CONSULTAR EN EL FUTURO
COMPONENTES (FIG. A)
ADVERTENCIA: Nunca modifique la herramienta
eléctrica, ni tampoco ninguna de sus piezas. Podría
producir lesiones corporales odaños.
Consulte la Figura A al principio de este manual para
obtener una lista completa de loscomponentes.
Se recomienda que las fuentes de energía se recargue
después de cadauso.
Fig. C
12
13
Indicador de estado de carga (Fig. D)
La fuente de energía GoPak 2 en 1 BLACK+DECKER está
equipada con un botón de indicador de estado de carga
9
con una pantalla de cuatroLED.
El indicador de Estado de carga es una indicación de los
niveles aproximados de carga restantes en la fuente de
energía de acuerdo con los siguientesindicadores.
96-100% cargado
76-95%
51-75%
26-50%
Paquete necesita cargarse
Para activar el Indicador de estado de carga, presione el
botón del Indicador de estado de carga. Una combinación
de los cuatro LEDs se iluminará designando el nivel de
carga restante. Cuando el nivel de carga en la fuente
de energía sea menor al límite utilizable, los LEDs del
indicador de estado de carga no se iluminarán o el LED
inferiorparpadeará.
NOTA: El LED de estado de carga sólo se mostrará una vez
que se presione el botón de estado decarga.
Fig. D
9
• Presione el botón del estado de carga en cualquier
momento para mostrar el nivel de cargarestante.
NOTA: El Indicador de Estado de carga sólo es una
indicación de la carga que queda en la fuente de energía.
No indica la funcionalidad de la herramienta y está sujeto
a variación en base a los componentes del producto, la
temperatura y la aplicación del usuariofinal.
NOTA:
La tapa de la fuente de energía GoPak se debe
usar cuando la fuente de energía no esté conectada a
una herramienta eléctrica. Se proporciona la tapa para
uso siempre que la fuente de energía esté fuera de la
herramienta. Retire la tapa antes de colocar la fuente de
energía en laherramienta.
OPERACIÓN
ADVERTENCIA: Para reducir el riesgo de lesiones
personales graves, apague la herramienta y
retire el paquete de baterías antes de realizar
ajustes o de retirar/instalar dispositivos
o accesorios. Un arranque accidental podría
causarlesiones.
Page 32

ESPAÑOL
30
MP3/Usable/Controlador de juegos/etc.). La carga
comenzaráautomáticamente.
Fig. G
1114
Funcionalidad
La fuente de energía GoPak 2 en 1 BLACK+DECKER puede
energizar sus herramientas BLACK+DECKER 12 V GoPak
MAX* compatibles o energizar/cargar sus dispositivos
móviles. El alojamiento de la fuente de energía compacta y
delgada está diseñado paraportabilidad.
- Entrada de carga GoPak: Hasta 2,4A**
- Salida de energía GoPak: Hasta 2,4A***
** La velocidad de carga de entrada real depende del
adaptador de energía (no incluido).
***La velocidad de salida real depende deldispositivo.
Puerto de energía USB
La fuente de energía GoPak 2 en 1 BLACK+DECKER está
equipada con un puerto de energía USB A. Entrega hasta
2,4amp de corrientetotal.
NOTA: La corriente entregada al dispositivo depende del
dispositivo del usuario y el cable elegido por losusuarios.
ADVERTENCIA: Asegúrese que la tapa esté
firmemente sujeta a la fuente de energía GoPak 2 en 1
BLACK+DECKER cuando la use para energizar/cargar
sudispositivo.
• Instale la tapa en las terminales de laherramienta.
• El dispositivo que carga desde la USB iniciará
automáticamente cuando se conecte eldispositivo.
• Para apagar, desconecte el dispositivoUSB.
Posición adecuada de las manos (Fig. H)
ADVERTENCIA: Para reducir el riesgo de lesión
personal grave, tenga SIEMPRE las manos en una
posición adecuada como se muestra.
ADVERTENCIA: Para reducir el riesgo de lesión
personal grave, sujete SIEMPRE bien en caso de que
haya una reacciónrepentina.
La posición de manos adecuada requiere una mano en la
manija principal y la otra alrededor de labatería.
Instalación y desinstalación de Fuente de
energía GoPak 2 en 1 en una herramienta
eléctrica (Fig. F)
ADVERTENCIA: Retire cualquier cable USB
conectado de la fuente de energía GoPak 2 en 1
BLACK+DECKER antes de conectar la GoPak a la
herramientacompatible.
1. Retire la tapa de seguridad de la terminal de la
herramienta si se instala en la fuente de energía GoPak
2 en 1 BLACK+DECKER.
2. Asegúrese que el botón fdw/rev (avance/reversa) esté
en la posición de bloqueo al centro, antes de retirar o
instalar labatería.
3. Para energizar una herramienta eléctrica GoPak
12V MAX* compatible, alinee las terminales de la
herramienta en el pie de la herramienta con las ranuras
de terminal en la fuente de energía
6
como se muestra
en la Fig.F.
NOTA: El indicador de estado de carga verá hacia la parte
posterior de la herramienta y los puertos USB verán al frente.
La flecha en la fuente de energía se alinearán con la flecha
en la herramienta como se muestra en la Fig.F.
4. Conecte la fuente de energía GoPak 2 en 1
BLACK+DECKER en la pata de la herramienta. La
flecha
8
en la fuente de energía se alineará con
la flecha
15
en la herramienta. Asegúrese que la
fuente de energía esté completamente asentada y
completamente asegurada en posición antes deusarla.
5. Para retirar la fuente de energía GoPak 2 en 1
BLACK+DECKER de la herramienta, presione los dos
botones de liberación de la fuente de energía
7
ubicados en la herramienta y retire la fuente de energía
GoPak 2 en 1 BLACK+DECKER de laherramienta.
NOTA: Los puertos USB de la fuente de energía GoPak 2
en 1 BLACK+DECKER están desactivados cuando se jala
elgatillo.
Fig. F
7
6
15
8
Uso de la fuente de energía GoPak 2 en
1 para cargar su dispositivo USB (Fig. G)
1. Conecte el extremo USB A de su cable específico
del dispositivo
14
en la fuente de energía GoPak
2 en 1 BLACK+DECKER
11
y el otro extremo del
cable en un dispositivo compatible (Teléfono/Tablet/
Page 33

ESPAÑOL
31
Fig. H
Interruptor disparador y botón de
inversión (Fig. I)
• El taladro se ENCIENDE y APAGA al jalar y liberar el
interruptor de gatillo
1
. Cuanto más se oprima al
disparador, mayor será la velocidad deltaladro.
• El botón de control de avance/reversa
2
determina la
dirección de la herramienta y también sirve como botón
debloqueo.
• Para seleccionar la rotación de avance, libere el
interruptor disparador y oprima el botón de control de
avance/reversa a laizquierda.
• Para seleccionar reversa, oprima el botón de control
avance/reversa en la direcciónopuesta.
NOTA: la posición central del botón de control bloquea la
herramienta en la posición deapagado.
• Al cambiar la posición del botón de control, asegúrese
de que el disparador estéliberado.
NOTA: No se recomienda el uso continuo en rango
de velocidad variable. Puede dañar el interruptor y se
debeevitar.
Fig. I
1
2
Ajuste del control de torsión (Fig. J)
Esta herramienta viene equipada con un anillo de ajuste de
torsión
3
, para seleccionar el modo de operación y para
configurar la torsión al ajustar los tornillos. Los tornillos
grandes y las piezas de trabajo de material duro requieren
un ajuste mayor de torsión que los tornillos pequeños y las
piezas de trabajo de material blando.
• Para taladrar en madera, metal y plástico, ajuste el anillo
en la posición del símbolo de taladrado .
• Para atornillar, ajuste el anillo en la configuración deseada.
Si aún no conoce la configuración de ajuste adecuada,
proceda como sigue:
- Ajuste el anillo en la configuración de torsión
másbaja.
- Ajuste el primertornillo.
- Si el portabrocas avanza antes de lograr el resultado
deseado, aumente la configuración del anillo y
siga ajustando el tornillo. Repita el proceso hasta
que logre la configuración deseada. Utilice esta
configuración para los tornillosrestantes.
Fig. J
3
Portabrocas sin llave (Fig. K)
ADVERTENCIA: Asegúrese que se retire el paquete
de la batería para prevenir la activación de la
herramienta antes de instalar o retiraraccesorios.
Para insertar una broca u otro accesorio:
1. Tome la mitad posterior del portabrocas
4
con una
mano y use la otra mano para girar la mitad de frente
en dirección contraria a las agujas del reloj, vista desde
el extremo delportabrocas. Esto abrirá las mandíbulas
del mandril para permitir la inserción de la broca
oaccesorio
2. Inserte por completo la broca u otro accesorio en el
portabrocas y ajuste para asegurar, sosteniendo la
mitad posterior del portabrocas y girando la porción de
frente en la dirección de las agujas del reloj, vista desde
el extremo delportabrocas.
ADVERTENCIA: No tome la parte delantera del
portabrocas y encienda la herramienta para ajustar
las brocas (o cualquier otro accesorio). Cuando se
cambian los accesorios, se pueden provocar daños al
portabrocas y dañospersonales.
Fig. K
4
Page 34

ESPAÑOL
32
Destornillado
Para impulsar remaches, el botón de inversión debe
estar empujado hacia la izquierda. Use la inversa (botón
empujado hacia la derecha) para retirar remaches. Al
cambiar de avance a retroceso, o viceversa, siempre libere el
interruptor disparadorprimero.
Luz de trabajo de LED (Fig. A, L)
Cuando el taladro se activa al tirar del interruptor
disparador
1
, la luz de trabajo de LED integrada
5
automáticamente iluminará el área de trabajo. No utilice la
luz de trabajo LED como unalinterna.
Fig. L
5
Taladrado
ADVERTENCIA: El taladro puede atorarse si se
sobrecarga causando un giro repentino. Siempre
espere el atoramiento. Sujete el taladro firmemente
para controlar la acción de giro y evitarlesiones.
• Solamente utilice brocasafiladas.
• Apoye y asegure apropiadamente la pieza de
trabajo, como se recomienda en las Normas de
seguridadespecíficas.
• Utilice el equipo de seguridad apropiado y
requerido, como se señala en las Normas de
seguridadespecíficas.
• Cuide el área de trabajo, como se menciona en las
instrucciones deseguridad.
• Haga funcionar el taladro muy lentamente, utilizando
poca presión, hasta haber perforado lo suficiente para
evitar que la broca se deslice hacia afuera delbarreno.
• Aplique presión en línea recto con la broca. Haga
presión suficiente para conservar a la broca cortando,
pero no tanta como para que el motor se atasque o la
broca sedesvíe.
• Sujete firmemente el taladro para controlar su
acción detorsión.
• NO OPRIMA EL GATILLO DE UN TALADRO ATASCADO
PARA INTENTAR ENCENDERLO Y APAGARLO.
PUEDEDAÑARLO.
• Minimice el atascamiento al iniciar el barreno
reduciendo la presión y perforando lentamente a través
de la última parte delbarreno.
• Conserve el motor en funcionamiento mientras saca la
broca de un barreno. Esto ayudará a evitaratascaduras.
• Asegúrese que el interruptor enciende y apaga
eltaladro.
Taladrado en madera
Los orificios en madera se pueden realizar con las mismas
brocas de taladro helicoidales que se usan para los metales
o con brocas de pala. Estas brocas deben estar afiladas y se
deben retirar con frecuencia mientras se taladra para limpiar
las virutas de lasranuras.
Taladrado en metal
Utilice un lubricante de corte cuando taladre metales. Las
excepciones son el bronce y el hierro fundido que deben
taladrarse en seco. Los lubricantes de corte que funcionan
mejor son el aceite de corte sulfurizado o el aceite de grasa
de cerdo.
Taladrado en mampostería
Utilice brocas para mampostería con puntas de carburo.
Consulte la sección Taladrado. Mantenga una fuerza pareja
sobre el taladro, pero que no sea tanta como para agrietar
el material frágil. Un flujo de virutas uniforme y suave indica
que se taladra a la velocidadadecuada.
MANTENIMIENTO
ADVERTENCIA: Para reducir el riesgo de lesiones
personales graves, apague la herramienta y
retire el paquete de baterías antes de realizar
ajustes o de retirar/instalar dispositivos
o accesorios. Un arranque accidental podría
causarlesiones.
IMPORTANTE: Para garantizar l SEGURIDAD y la
CONFIABILIDAD del producto, la reparaciones, el
mantenimiento y los ajustes deberán efectuarse en centros
de servicio autorizado u otras organizaciones de servicio
calificado, que utilicen siempre refaccionesidénticas.
Limpieza
ADVERTENCIA: Sople la suciedad y el polvo de
todos los conductos de ventilación con aire seco, al
menos una vez por semana. Nunca permita que entre
líquido a la herramienta o el suministro de energía;
nunca sumerja ninguna parte de la herramienta o el
suministro de energía enlíquido.
NOTA: Retire la herramienta del GoPak antes delimpiar.
Sólo use jabón suave y una tela húmeda para limpiar la
herramienta o el suministro de energía. Muchos limpiadores
domésticos contienen químicos que podrían dañar
seriamente el plástico. Además, no use gasolina, aguarrás,
laca o adelgazador de pintura, fluidos de limpieza en seco o
productossimilares.
Sople la suciedad y polvo de todas las ventilas de aire con
aire limpio yseco.
ADVERTENCIA: Para minimizar el riesgo de lesiones
de los ojos, siempre use protección para los ojos
aprobada por ANSI Z87.1.
SOLUCIÓN DE PROBLEMAS
1. GoPak no energiza su dispositivo o carga.
a. El LED más cercano al botón de estado de carga
parpadeará cuando intente la funcionalidad deUSB.
Page 35

ESPAÑOL
33
Accesorios
ADVERTENCIA: Debido a que no se han probado
con este producto otros accesorios que no sean
los que ofrece BLACK+DECKER., el uso de dichos
accesorios con esta herramienta podría ser peligroso.
Para reducir el riesgo de lesiones, con este producto
deben usarse sólo los accesorios recomendados
porBLACK+DECKER.
Los accesorios que se recomiendan para utilizar con la
herramienta están disponibles a un costo adicional en
su distribuidor local o en un centro de mantenimiento
autorizado. Si necesita ayuda para localizar algún accesorio,
póngase en contacto con BLACK+DECKER, llame al
1-800-544-6986..
- GoPak está demasiado caliente o demasiado fría.
Permita que la GoPak se enfríe o caliente.
2. GoPak no energiza su herramienta compatible.
- Intente cargar la fuente de energía. Si el LED falla
en encender consulte el número 1 en Solución de
problemas.
Reparaciones
La fuente de energía GoPak 2 en 1 BLACK+DECKER no
puede recibirservicio.
ADVERTENCIA: Para asegurar la SEGURIDAD y la
CONFIABILIDAD del producto, las reparaciones, el
mantenimiento y los ajustes (inclusive la inspección
y el cambio de las escobillas, cuando proceda)
deben ser realizados en un centro de mantenimiento
en la fábrica BLACK+DECKER u en un centro de
mantenimiento autorizado BLACK+DECKER. Utilice
siempre piezas de repuestoidénticas.
GARANTÍA LIMITADA DE DOS AÑOS
Black & Decker (U.S.) Inc. garantiza que este producto está
libre de defectos de material o mano de obra durante un
período de dos (2) años desde la fecha de compra, siempre
y cuando el producto se utilice en un entorno doméstico.
Esta garantía limitada no cubre contra fallas debidas a
mal uso, daño accidental o cuando se han realizado o
intentado reparaciones por parte de cualquier otra persona
ajena a BLACK+DECKER y sus centros de mantenimiento
autorizados. Un producto defectuoso que cumple con
las condiciones de la garantía establecidas en el presente
documento será remplazado o reparado sin costo de una
dos maneras:
La primera, que únicamente dará lugar a intercambios,
consiste en devolver el producto al comerciante minorista
donde fue comprado (siempre y cuando la tienda sea un
comerciante minorista participante). Las devoluciones
deben realizarse dentro del período establecido en la
política para intercambios del comerciante minorista.
Es posible que se requiera el comprobante de compra.
Consulte al comerciante minorista sobre su política
específica de devoluciones con respecto a los límites de
tiempo para devoluciones ointercambios.
La segunda opción es llevar o enviar (pagado por
adelantado) el producto a un centro de mantenimiento de
propiedad o con autorización de BLACK+DECKER para su
reparación o remplazo a discreción de BLACK+DECKER. Es
posible que se requiera un comprobante de compra. Los
centros de mantenimiento de propiedad o con autorización
de BLACK+DECKER en línea en www.blackanddecker.com.
Esta garantía no se aplica a los accesorios. Esta garantía
le otorga derechos legales específicos y es posible que
tenga otros derechos que varían de un estado a otro. En
caso de que tenga alguna pregunta, comuníquese con el
gerente del centro de mantenimiento de BLACK+DECKER
más cercano a usted. Este producto no está diseñado para
uso comercial y, en consecuencia, dicho uso comercial de
este producto anulará la garantía. Por medio del presente
documento, se declina la responsabilidad de todas las
demás garantías, explícitas oimplícitas.
AMÉRICA LATINA: Esta garantía no se aplica a productos
vendidos en América Latina. Para los productos que se
venden en América Latina, consulte la información de
garantía específica del país contenida en el empaque,
llame a la compañía local o visite el sitio web para obtener
dichainformación.
Page 36

ESPAÑOL
34
SOLUCIÓN DE PROBLEMAS
Para conocer la ubicación del centro de mantenimiento más cercano a fin de recibir ayuda con su producto, visite nuestro
sitio Web www.blackanddecker.com o llame a la línea de ayuda BLACK+DECKER al 1-800-544-6986.
Problema Causa posible Posible solución
La unidad no arranca. La fuente de energía no está
instalada adecuadamente.
Revise la instalación de la fuente de energía.
Fuente de energía no cargada. Revise los requerimientos de carga de la fuente
de energía.
Componentes internos demasiado calientes. Permita que la herramienta se enfríe.
La fuente de energía no carga. Cables no conectados adecuadamente. Revise las conexiones de cable a la fuente
de energía.
Fuente de energía no conectada. Revise las conexiones entre la fuente de energía,
el dispositivo usado para cargar la fuente de
energía y el tomacorriente en operación.
Temperatura de aire ambiente demasiado
caliente o demasiado fría.
Mueva la fuente de energía a una temperatura
ambiente mayor a 40 °F (4.5 °C) o menor a
105 °F (+40.5 °C).
La unidad se apaga abruptamente. La fuente de energía alcanzó su límite térmico
máximo.
Permita que el paquete de fuente de energía
se enfríe.
Sin carga. (Para maximizar la vida de la
fuente de energía, está diseñada para
apagarse abruptamente cuando se
termine la carga.)
Retire la batería y la carga.
Page 37

Page 38

Page 39

Page 40

Black & Decker (U.S.)Inc.
701 East Joppa Road, Towson, MD 21286
Part No. N507074
BCD701
JULY 2017
Copyright © 2017 BLACK+DECKER
 Loading...