

Page 1
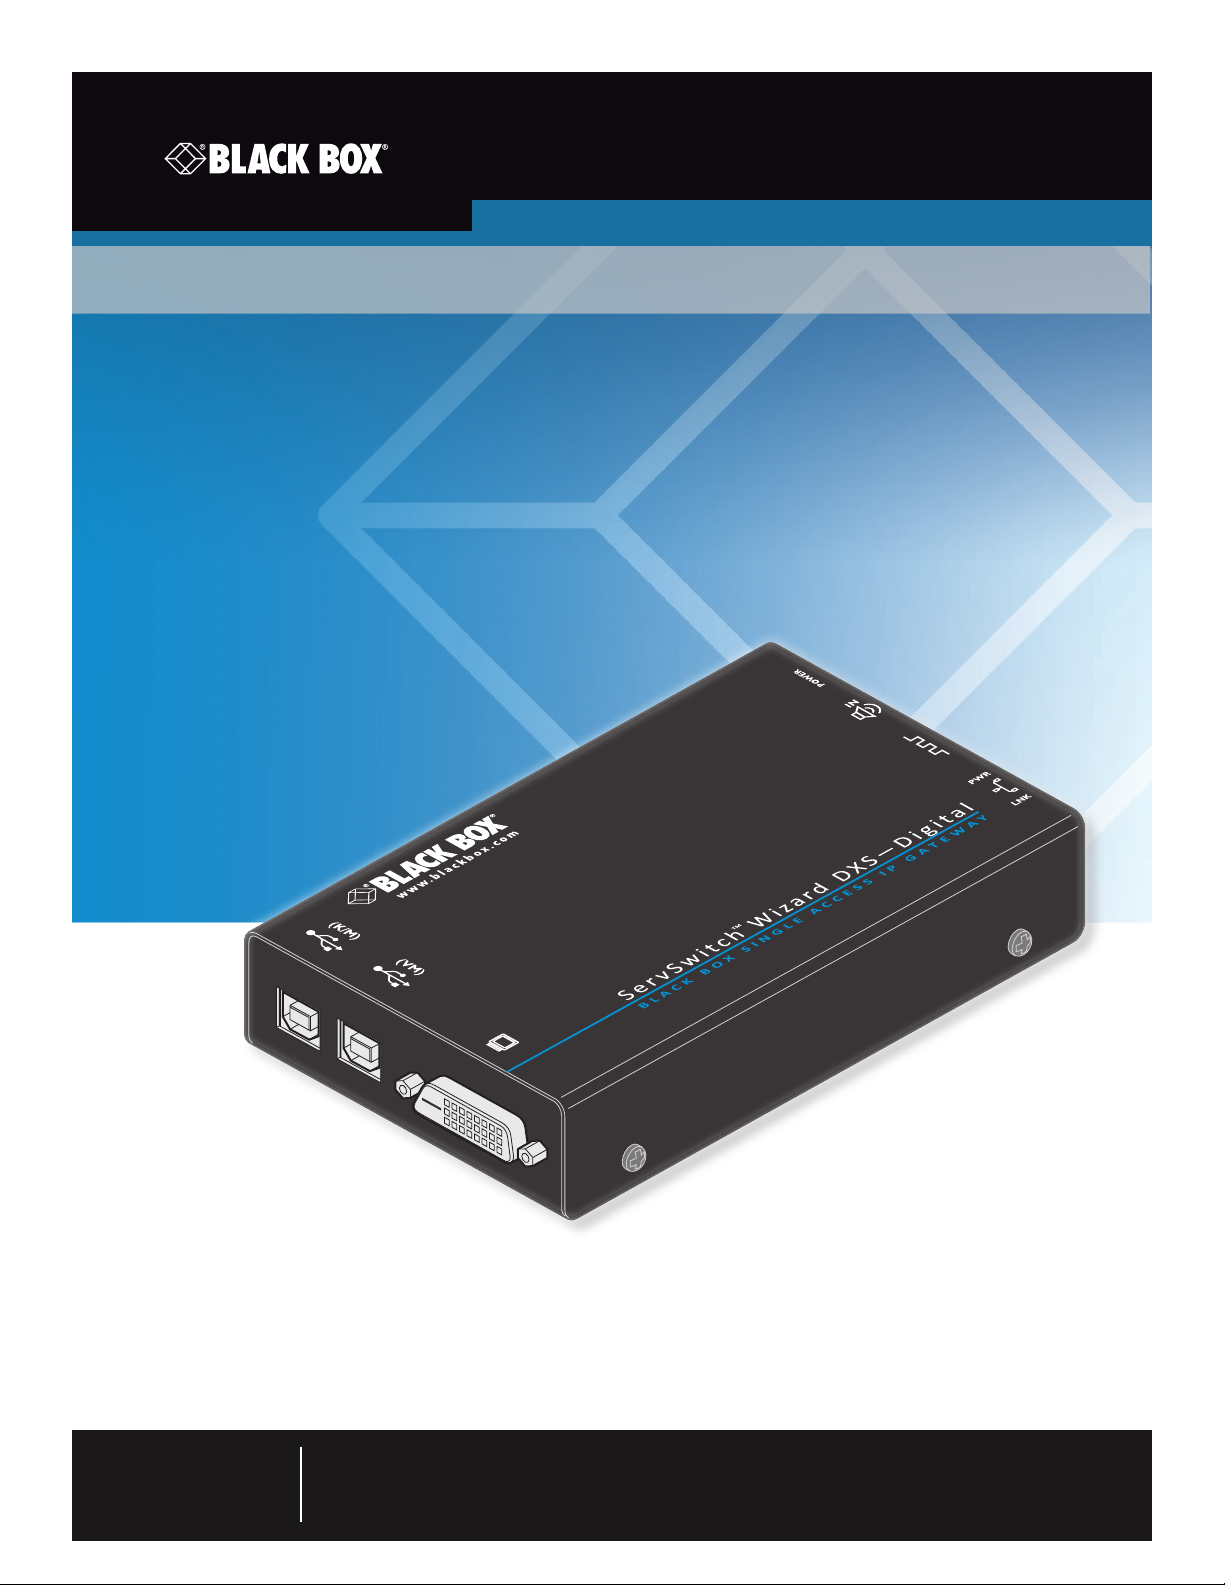
ACR101A-DVI
ServSwitch Wizard™ DXS - Digital
A powerful digital KVM-over-IP product
that allows full secure control of a PC from
remote locations.
Customer
Support
Information
Order toll-free in the U.S. or for FREE technical support 24/7: Call 877-877-BBOX
(outside U.S. call 877-877-2269)
www.blackbox.com • info @blackbox.com
Page 2
ServSwitch Wizard™ DXS - Digital
Trademarks Used in this Manual
Black Box and the Double Diamond logo are registered trademarks of BB Technologies, Inc.
Any other trademarks mentioned in this manual are acknowledged to be the property of the trademark owners.
Page 2
We‘re here to help! If you have any questions about your application
or our products, contact Black Box Tech Support at 877-877-2269
or go to blackbox.com and click on “Talk to Black Box.”
You’ll be live with one of our technical experts in less than 60 seconds.
877-877-2269 | blackbox.com
Page 3

FCC and IC RFI Statements
Radio Frequency Energy
A Category 5 (or better) twisted pair cable must be used to connect the Wizard DXS - Digital unit in order to maintain compliance
with radio frequency energy emission regulations and ensure a suitably high level of immunity to electromagnetic disturbances.
All other interface cables used with this equipment must be shielded in order to maintain compliance with radio frequency energy
emission regulations and ensure a suitably high level of immunity to electromagnetic disturbances.
European EMC directive 2004/108/EC
This equipment has been tested and found to comply with the limits for a class A computing device in accordance with the
specifications in the European standard EN55022. These limits are designed to provide reasonable protection against harmful
interference. This equipment generates, uses and can radiate radio frequency energy and if not installed and used in accordance
with the instructions may cause harmful interference to radio or television reception. However, there is no guarantee that harmful
interference will not occur in a particular installation. If this equipment does cause interference to radio or television reception,
which can be determined by turning the equipment on and off, the user is encouraged to correct the interference with one or
more of the following measures: (a) Reorient or relocate the receiving antenna. (b) Increase the separation between the
equipment and the receiver. (c) Connect the equipment to an outlet on a circuit different from that to which the receiver is
connected. (d) Consult the supplier or an experienced radio/TV technician for help.
FCC Compliance Statement (United States)
This equipment generates, uses and can radiate radio frequency energy and if not installed and used properly, that is, in strict
accordance with the manufacturer’s instructions, may cause interference to radio communication. It has been tested and found to
comply with the limits for a class A computing device in accordance with the specifications in Subpart J of part 15 of FCC rules,
which are designed to provide reasonable protection against such interference when the equipment is operated in a commercial
environment. Operation of this equipment in a residential area may cause interference, in which case the user at his own expense
will be required to take whatever measures may be necessary to correct the interference. Changes or modifications not expressly
approved by the manufacturer could void the user’s authority to operate the equipment.
Canadian Department of Communications RFI statement
This equipment does not exceed the class A limits for radio noise emissions from digital apparatus set out in the radio interference
regulations of the Canadian Department of Communications.
Le présent appareil numérique n’émet pas de bruits radioélectriques dépassant les limites applicables aux appareils numériques de
la classe A prescrites dans le règlement sur le brouillage radioélectriques publié par le ministère des Communications du Canada.
877-877-2269 | blackbox.com
Page 3
Page 4

ServSwitch Wizard™ DXS - Digital
Instrucciones de Seguridad
(Normas Oficiales Mexicanas Electrical Safety Statement)
1. Todas las instrucciones de seguridad y operación deberán ser leídas antes de que el aparato eléctrico sea operado.
2. Las instrucciones de seguridad y operación deberán ser guardadas para referencia futura.
3. Todas las advertencias en el aparato eléctrico y en sus instrucciones de operación deben ser respetadas.
4. Todas las instrucciones de operación y uso deben ser seguidas.
5. El aparato eléctrico no deberá ser usado cerca del agua—por ejemplo, cerca de la tina de baño, lavabo, sótano mojado o cerca
de una alberca, etc..
6. El aparato eléctrico debe ser usado únicamente con carritos o pedestales que sean recomendados por el fabricante.
7. El aparato eléctrico debe ser montado a la pared o al techo sólo como sea recomendado por el fabricante.
8. Servicio—El usuario no debe intentar dar servicio al equipo eléctrico más allá a lo descrito en las instrucciones de operación.
Todo otro servicio deberá ser referido a personal de servicio calificado.
9. El aparato eléctrico debe ser situado de tal manera que su posición no interfiera su uso. La colocación del aparato eléctrico
sobre una cama, sofá, alfombra o superficie similar puede bloquea la ventilación, no se debe colocar en libreros o gabinetes
que impidan el flujo de aire por los orificios de ventilación.
10. El equipo eléctrico deber ser situado fuera del alcance de fuentes de calor como radiadores, registros de calor, estufas u otros
aparatos (incluyendo amplificadores) que producen calor.
11. El aparato eléctrico deberá ser connectado a una fuente de poder sólo del tipo descrito en el instructivo de operación, o como
se indique en el aparato.
12. Precaución debe ser tomada de tal manera que la tierra fisica y la polarización del equipo no sea eliminada.
13. Los cables de la fuente de poder deben ser guiados de tal manera que no sean pisados ni pellizcados por objetos colocados
sobre o contra ellos, poniendo particular atención a los contactos y receptáculos donde salen del aparato.
14. El equipo eléctrico debe ser limpiado únicamente de acuerdo a las recomendaciones del fabricante.
15. En caso de existir, una antena externa deberá ser localizada lejos de las lineas de energia.
16. El cable de corriente deberá ser desconectado del cuando el equipo no sea usado por un largo periodo de tiempo.
17. Cuidado debe ser tomado de tal manera que objectos liquidos no sean derramados sobre la cubierta u orificios de ventilación.
18. Servicio por personal calificado deberá ser provisto cuando:
A: El cable de poder o el contacto ha sido dañado; u
B: Objectos han caído o líquido ha sido derramado dentro del aparato; o
C: El aparato ha sido expuesto a la lluvia; o
D: El aparato parece no operar normalmente o muestra un cambio en su desempeño; o
E: El aparato ha sido tirado o su cubierta ha sido dañada.
Page 4
877-877-2269 | blackbox.com
Page 5

Table of Contents
Contents
1. Specifications .............................................................................................................................................................................. 6
2. Introduction ............................................................................................................................................................................... 7
3. Installation ................................................................................................................................................................................ 10
3.1 Mounting the modules – desk or rack............................................................................................................................. 10
3.2 Connections ....................................................................................................................................................................12
3.2.1 Host computer connections ................................................................................................................................12
3.2.2 IP network port .................................................................................................................................................. 14
3.2.3 Power supply connection ....................................................................................................................................15
4. Configuration ........................................................................................................................................................................... 16
4.1 Connecting to Wizard DXS - Digital ................................................................................................................................ 16
4.2 Initial configuration ......................................................................................................................................................... 18
4.3 Performing a flash upgrade ............................................................................................................................................ 20
5. Operation ................................................................................................................................................................................. 22
5.1 Using the viewer window ............................................................................................................................................... 22
5.2 Host selection ................................................................................................................................................................. 23
5.3 Configure ....................................................................................................................................................................... 23
5.4 Auto calibrate .......................................................................................................................................................... 24
5.5 Access mode - shared/private ........................................................................................................................................ 24
5.6 Power switching ............................................................................................................................................................. 24
5.7 Editing the viewer window menu bar ............................................................................................................................. 25
5.8 Controls .......................................................................................................................................................................... 26
5.9 Virtual Media ................................................................................................................................................................. 32
5.10 Resetting the Wizard DXS - Digital to factory default .................................................................................................... 35
Appendix A. VNC viewer connection options .............................................................................................................................. 36
Appendix B. VNC viewer window options .................................................................................................................................... 40
Appendix C. Java viewer options ...................................................................................................................................................41
Appendix D. Configuration menus ............................................................................................................................................... 43
Appendix E. Networking issues .................................................................................................................................................... 68
E.1 Positioning Wizard DXS - Digital in the network.............................................................................................................. 68
E.2 Placing Wizard DXS - Digital behind a router or firewall .................................................................................................. 69
E.3 Placing Wizard DXS - Digital alongside the firewall ......................................................................................................... 72
Appendix F. An introduction to IPv6 .............................................................................................................................................74
Appendix G. The KVMADMIN utility ............................................................................................................................................ 76
Appendix H. Known working video modes .................................................................................................................................. 77
Appendix I. Hotkey sequences and Port Direct ............................................................................................................................. 78
Appendix J. End user licence agreement ...................................................................................................................................... 80
Appendix K. Safety information ................................................................................................................................................... 82
877-877-2269 | blackbox.com
Page 5
Page 6

ServSwitch Wizard™ DXS - Digital
1. Specifications
Approvals: CE, FCC
Hardware Compatibility: All computers with DVI digital video, audio and USB interfaces
Software Compatibility: Operates with all known software and operating systems including
Windows®, Linux®, Unix®, BSD, all Sun® OS, all Mac® OS, NetWare®, etc.
Connectors: Video: DVI-D single link
USB: USB 2.0 Type B (2x)
Network link: RJ-45 socket (10/100 auto sensing)
Line in: 3.5-mm stereo jack
Serial: For power control
Other: Power jack
Operating Temperature: 32 to 104°F (0 to 40°C)
Power: DC jack (power adaptor included)
Input: 100–240 VAC, 50/60 Hz
Output: 5VDC, 12.5W
Dimensions (w x h x d): 120mm (4.72”) x 27mm (1.06”) x 75mm (2.95”)
Weight: 0.34kg (0.76lbs)
Page 6
877-877-2269 | blackbox.com
Page 7
Chapter 2: Overview
2. Introduction
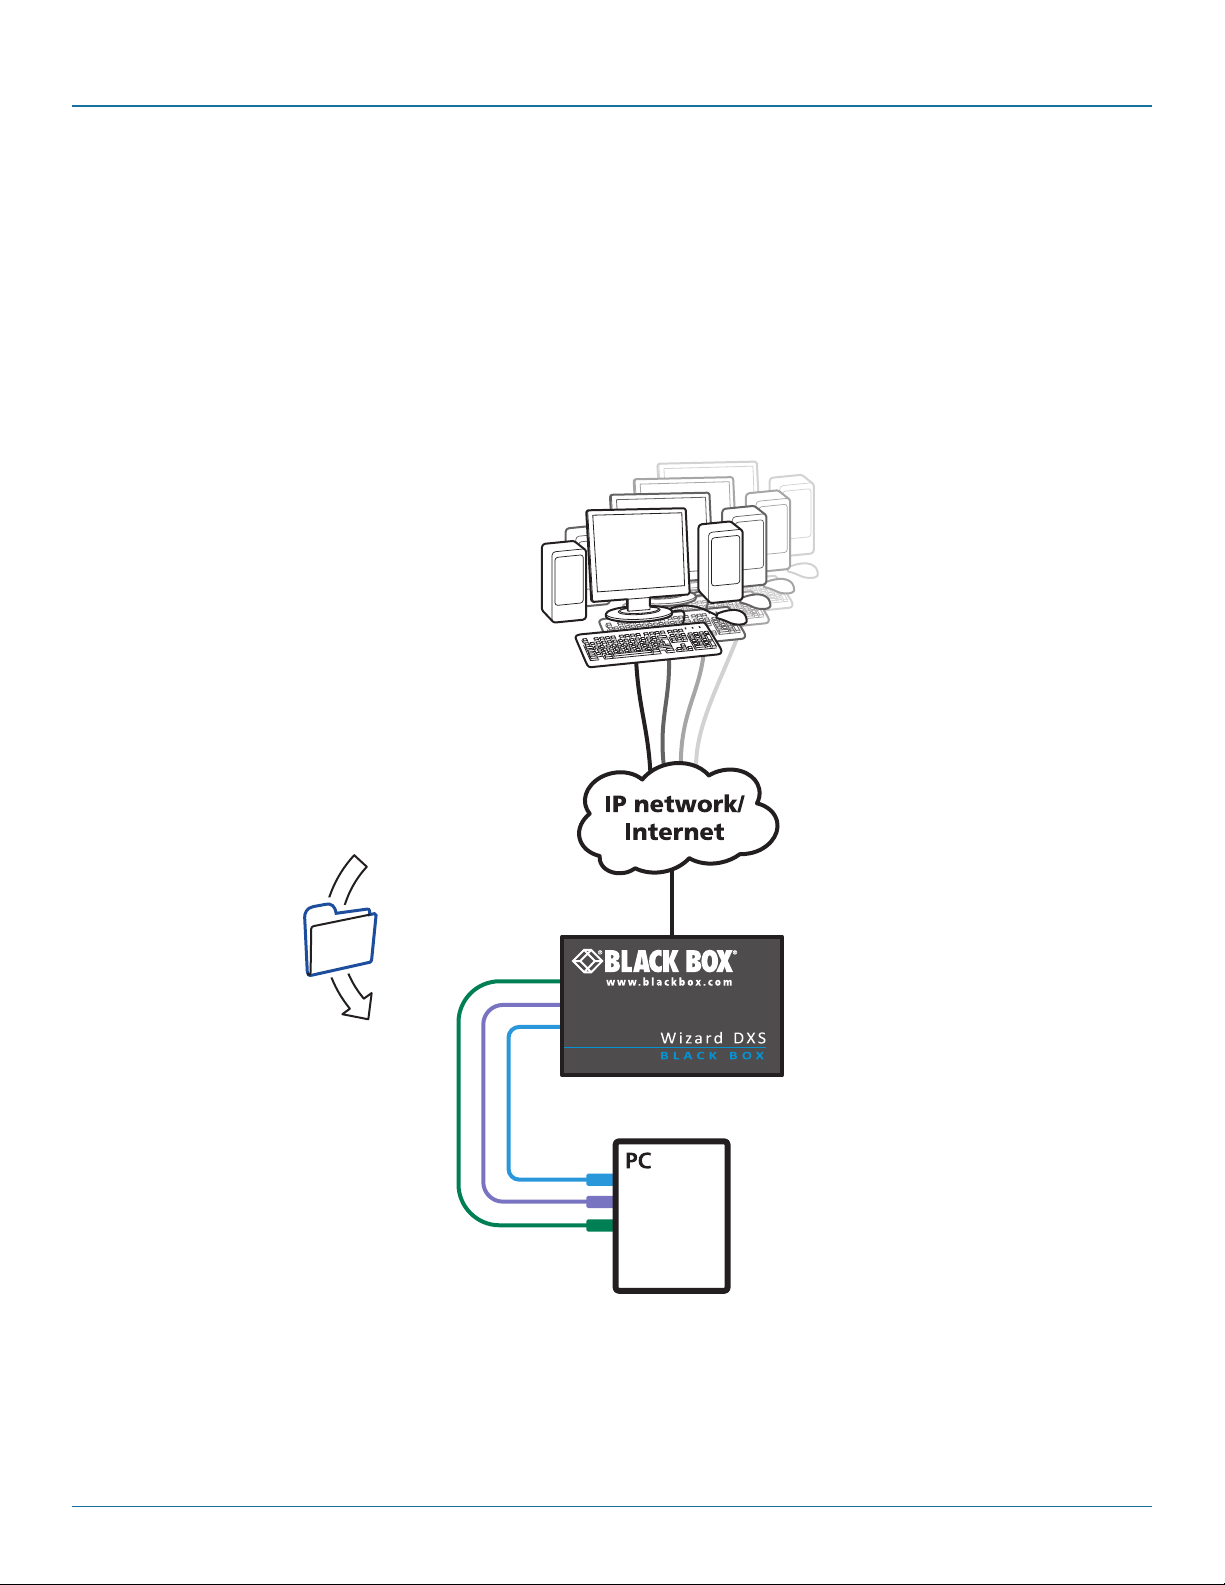
Drawing upon our long and successful history within the field of remote system control, we have taken our best KVM via IP
technology and miniaturized it. The result is the ServSwitch Wizard DXS - Digital, a highly responsive, cost efficient way to control
a single system from any remote position - worldwide.
In situations where a single system must be placed in a relatively isolated location and yet must be controlled from elsewhere,
then Wizard DXS - Digital is the solution. The host system can run its usual operating system completely unchanged and needs
only to be connected to the compact Wizard DXS - Digital unit. This ensures that there is no performance hit associated with
other remote solutions and also provides the authorized remote user with complete control. The remote user uses a compact VNC
viewer utility and can link to the Wizard DXS - Digital via any connected IP network, or via the Internet.
Four simultaneous remote users
Wizard DXS - Digital can support
Virtual Media feature
Allows an authorized remote user
to transfer files and folders to a host
computer, such that they appear as
though presented locally on removable
media (as would a memory stick or
CD-ROM). Via the IP network link, the
remote user can then control the host
and make use of the transferred files
and folders. An indispensable feature
when remotely upgrading or patching
distant host systems.
four remote users at any one time.
IP network/Internet
The IP port allows direct connection
to an Ethernet-based local network
and from there onto the wider
Internet, as required.
Alternatively, the robust Wizard DXS
- Digital security system will allow
direct connection to the outside
world.
877-877-2269 | blackbox.com
Page 7
Page 8
ServSwitch Wizard™ DXS - Digital
2.2 ServSwitch Wizard DXS - Digital features
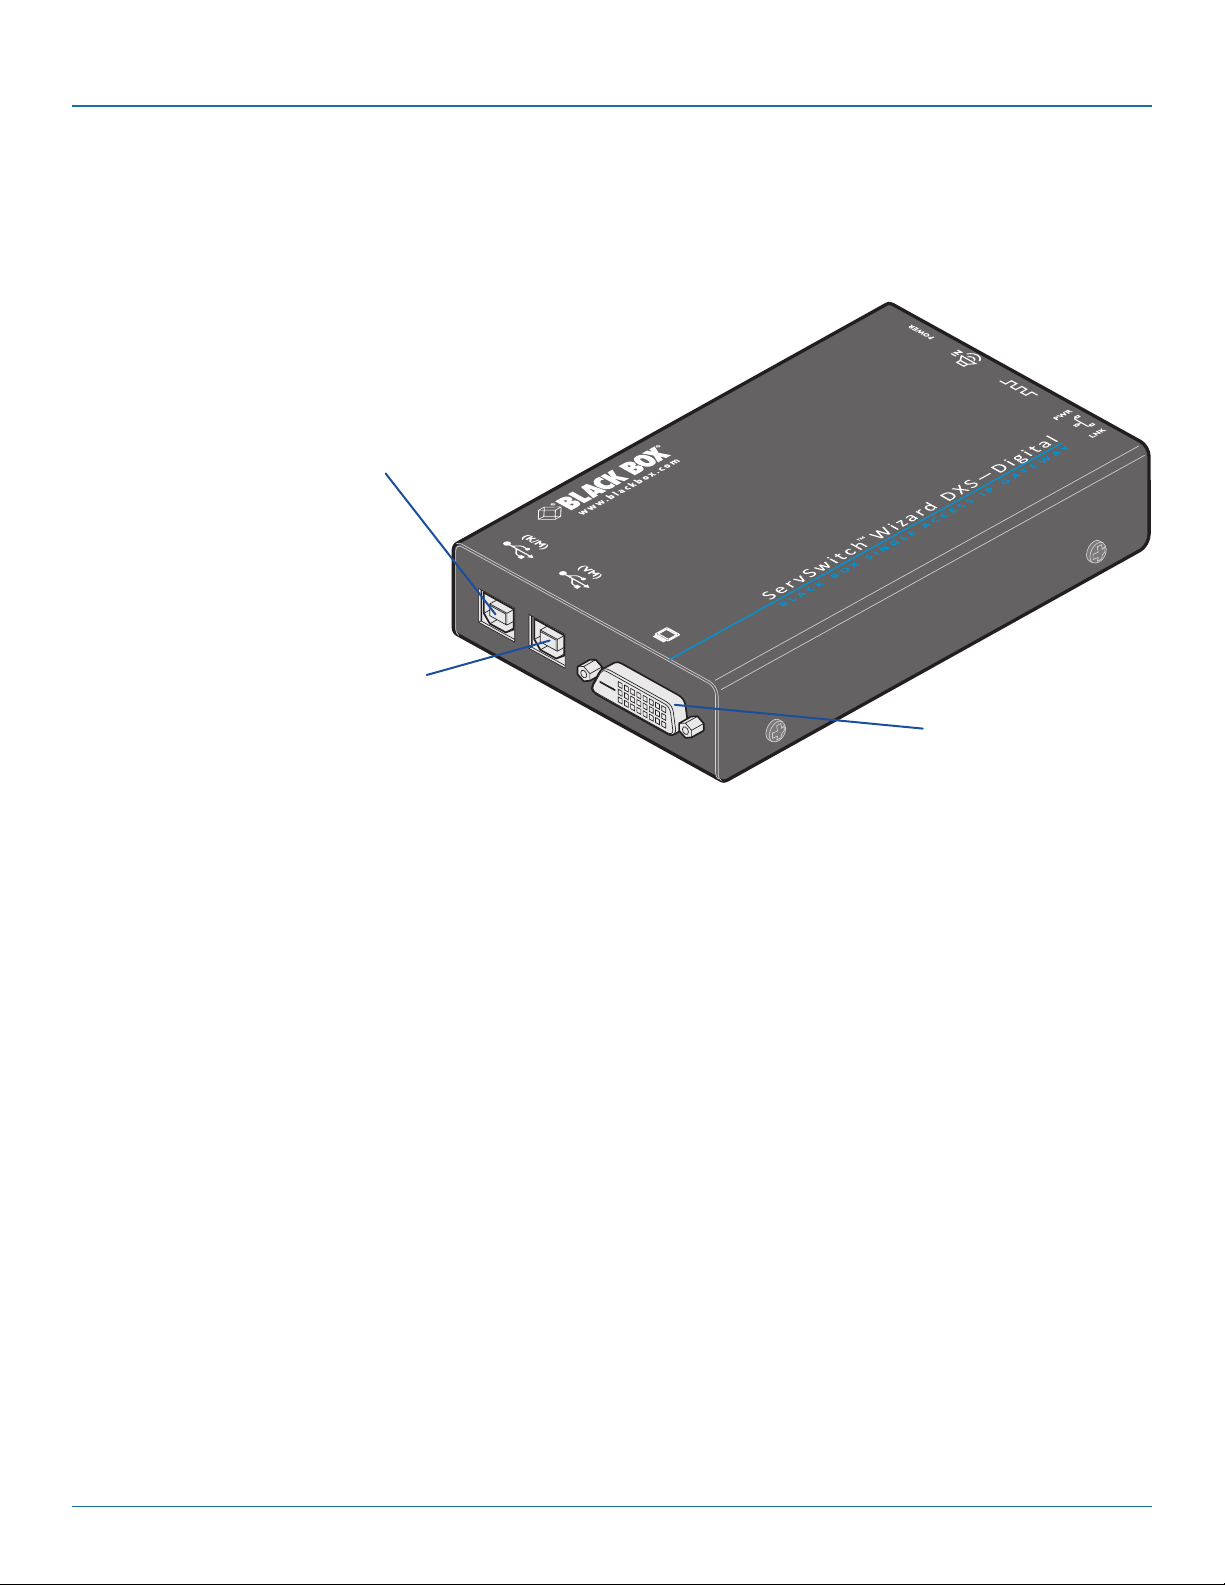
The ServSwitch Wizard DXS - Digital unit uses the following
connections to provide secure remote access to a host computer.
USB link for keyboard and mouse
Use this port to link the Wizard DXS - Digital
to a USB port on the host computer. This will
provide USB keyboard and mouse connections.
USB link for the Virtual Media feature
Optionally use this port to link the Wizard DXS Digital to a USB port on the host computer. This
will provide a USB connection specifically for the
Virtual Media feature.
Video input
DVI/D digital video input from
the host computer.
Page 8
877-877-2269 | blackbox.com
Page 9
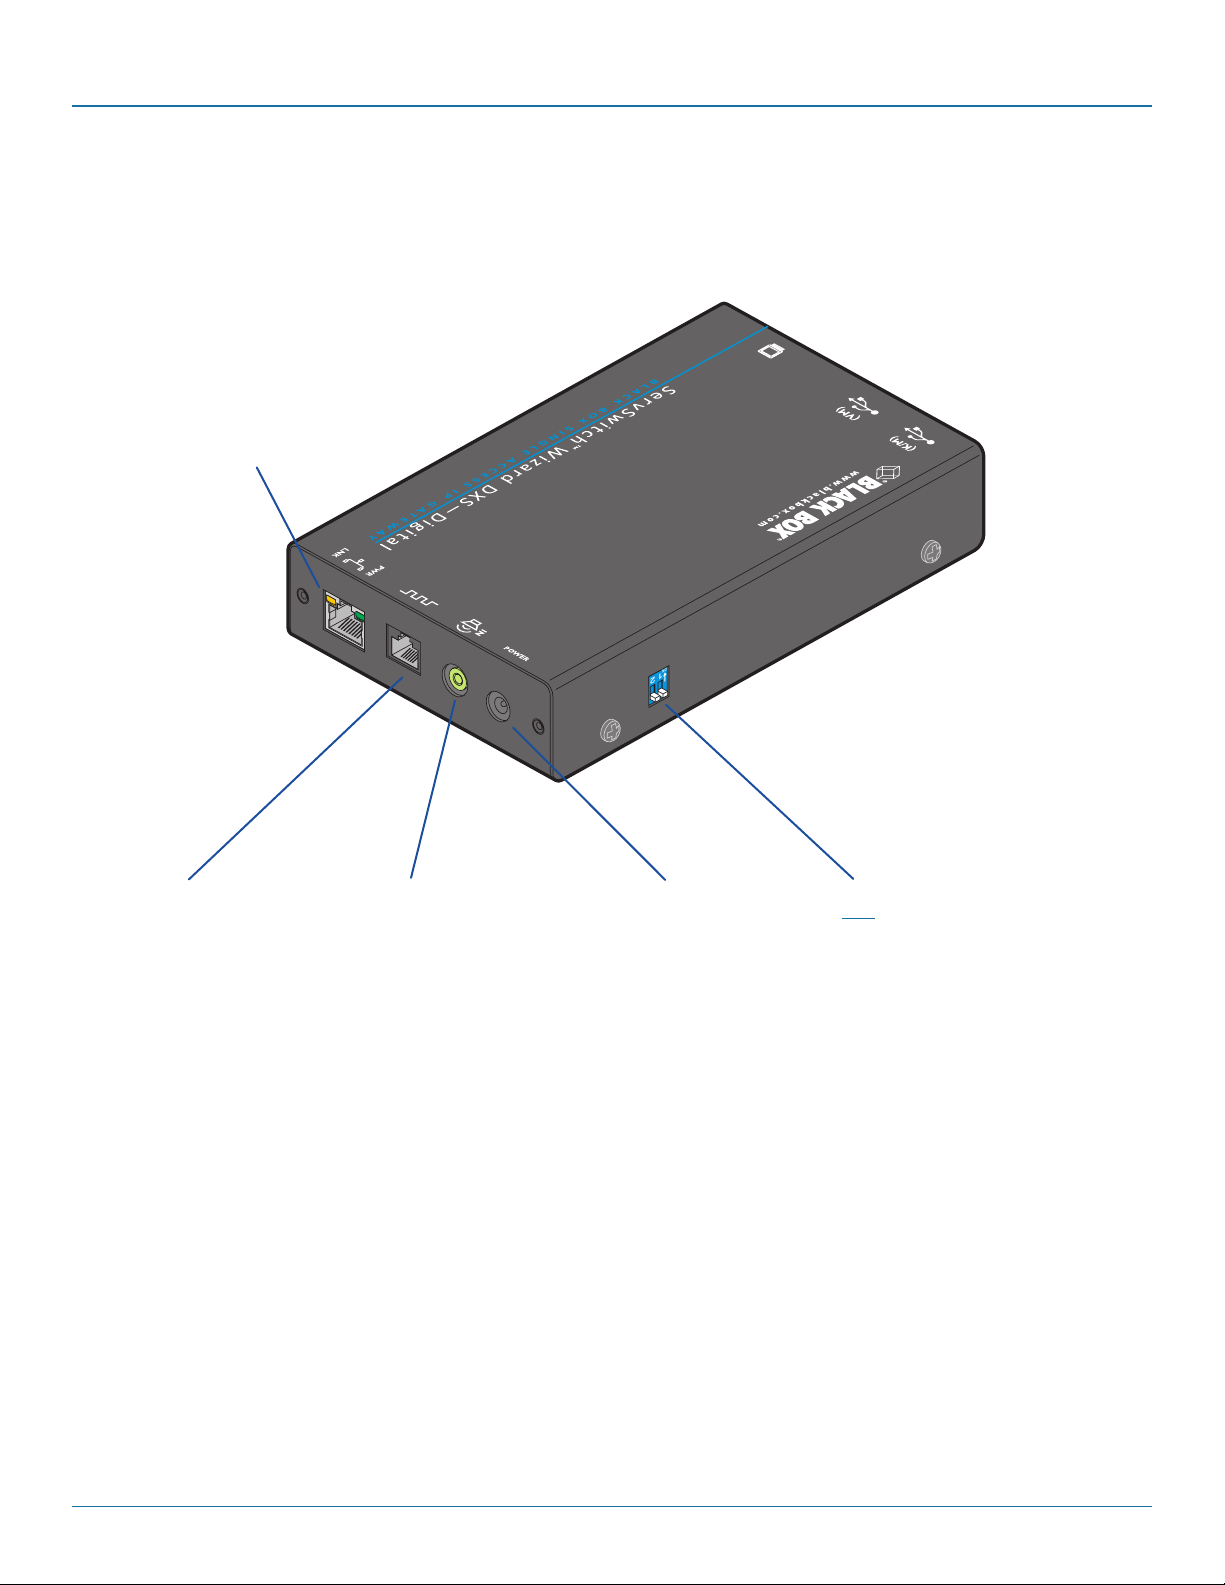
IP network port
This Ethernet port provides the connection
to the network. The port is intelligent
and can automatically sense whether it is
attached to a 10Mb or 100Mb network
and whether a cross-over or straight cable
is in use. The green and yellow indicators
provide useful status information.
Chapter 2: Overview
RS232 serial port
Optionally use the supplied power
control cable to link this port with
the RS232 port of a power switch.
Audio input
Optionally use the supplied 3.5mm
jack cable to link this port with the
audio output of the host computer.
Power input
Connect the supplied
power adaptor here.
Configuration switches
SW1 is used to determine how Wizard DXS -
Digital derives its power. SW2 is used to reset
the Wizard DXS - Digital back to its factory
defaults. SW2 is also used during firmware
upgrades.
877-877-2269 | blackbox.com
Page 9
Page 10
ServSwitch Wizard™ DXS - Digital
3. Installation
3.1 Mounting the module – desk or rack
The module can be situated on a desk or alternatively, for larger installations, mounted within an optional rack mount chassis.
3.1.1 Desk mount
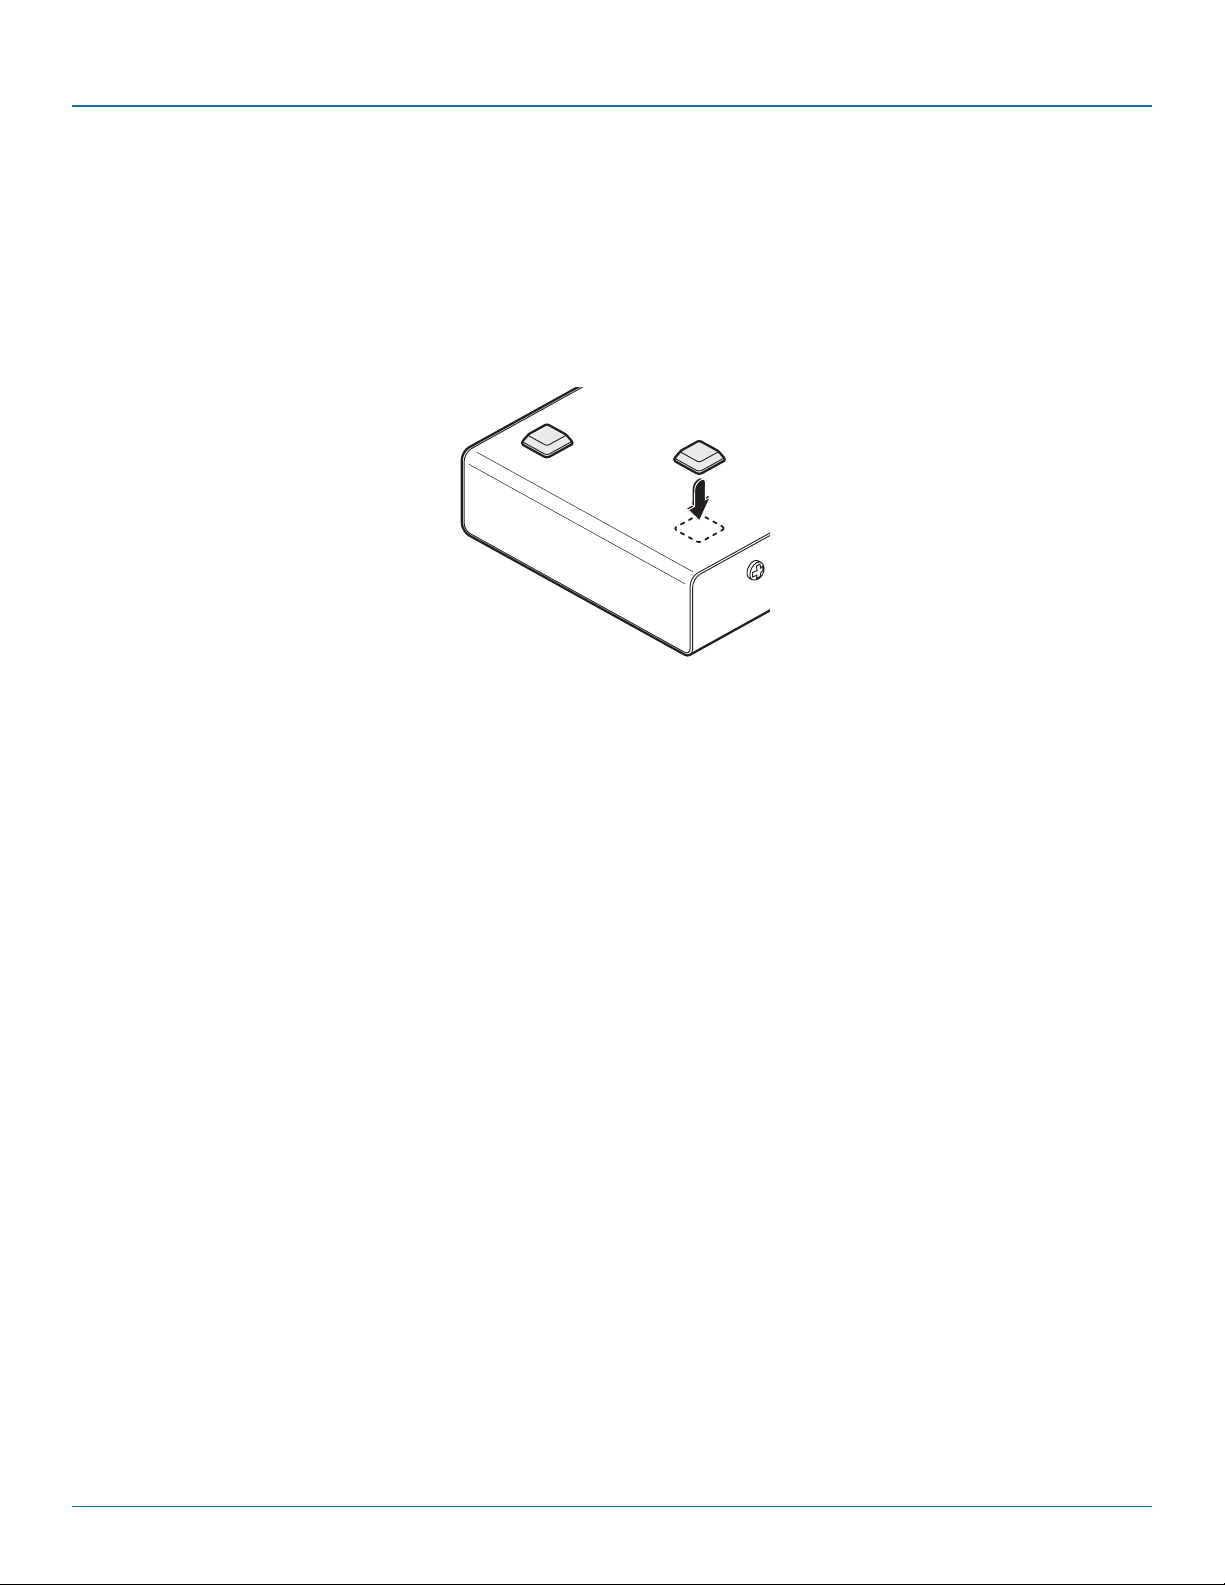
Apply the supplied self-adhesive rubber feet to the underside of the module as shown in Figure 3-1:
Figure 3-1. Applying the supplied self-adhesive rubber feet to the underside of the module
Page 10
877-877-2269 | blackbox.com
Page 11
Chapter 3: Installation
3.1.2 Rack mount
Note: The module switches are not accessible once it is inserted into the rack, therefore, check all settings before insertion.
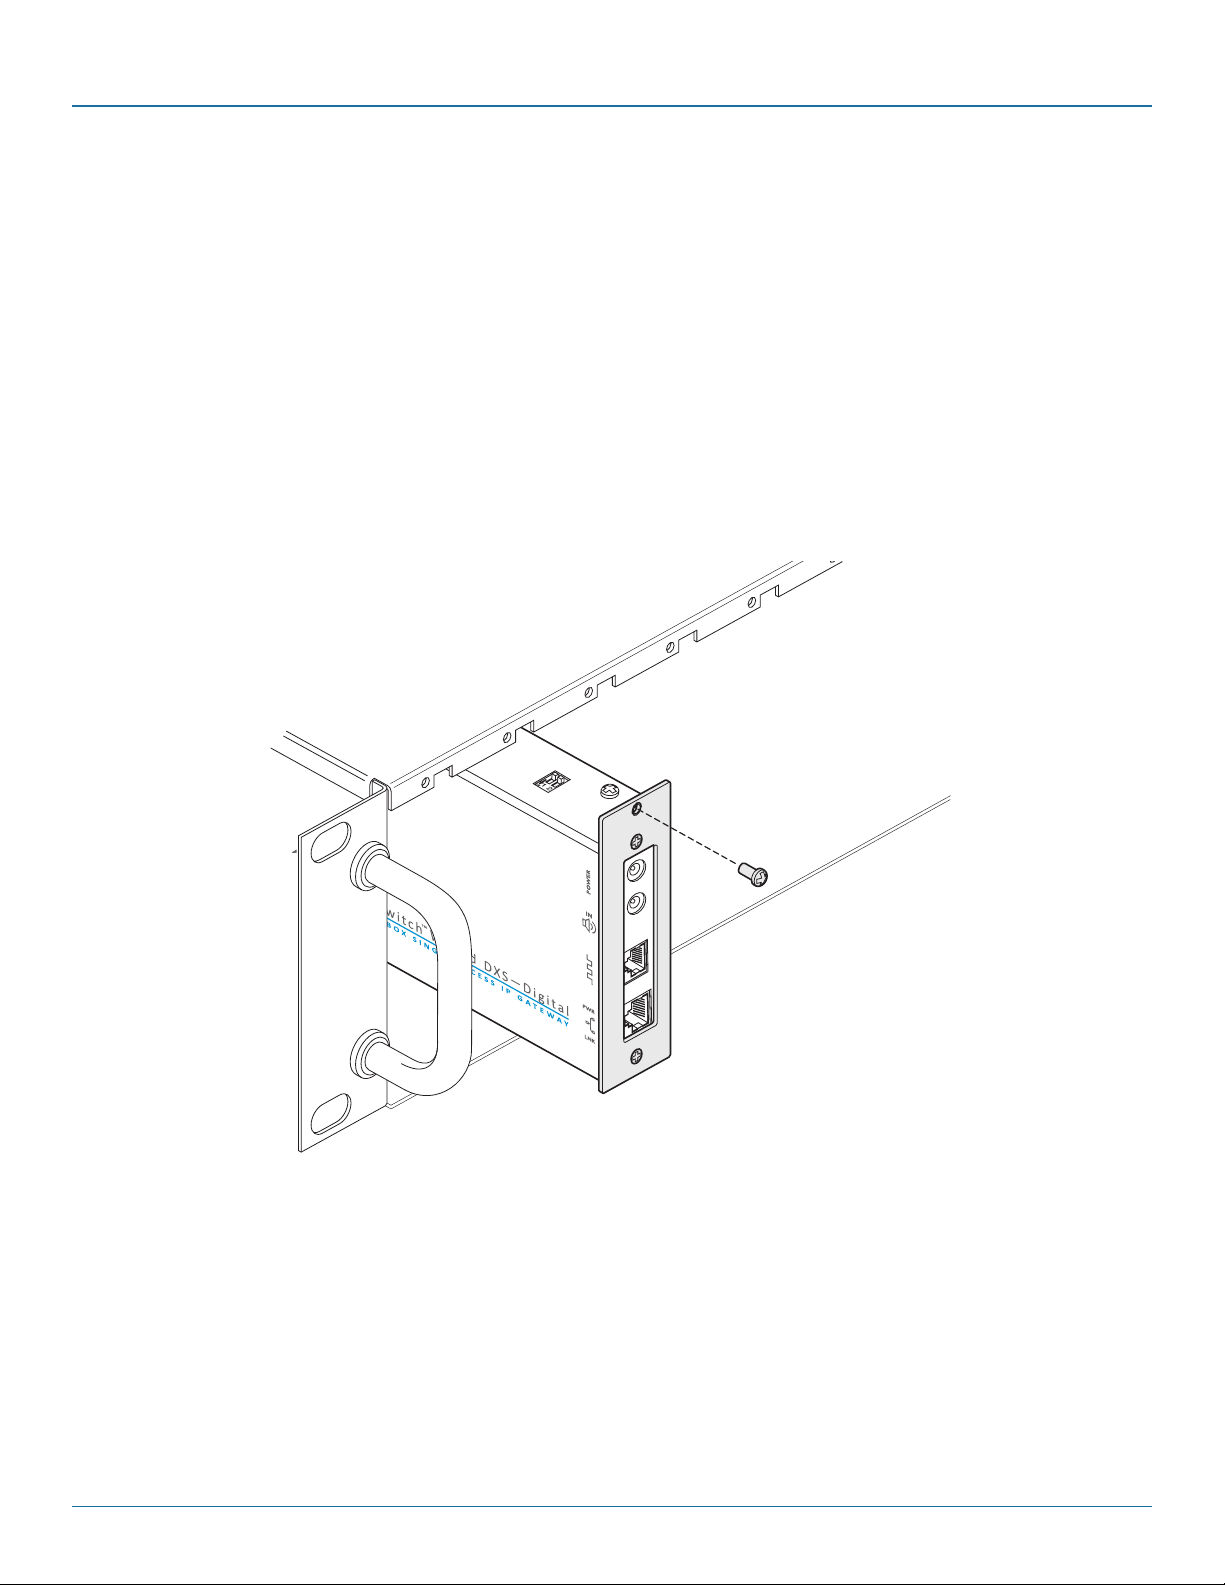
1 Place the rack securing plate (available as a separate kit) onto the front of the module and secure it with the two countersunk
screws.
2 Orient the module on its side so that its labeled face is the correct way up.
3 Slide the module into the required rack position. The rectangular cut-out in the front upper lip of the rack allows the two
screws on the module’s upper edge to slide through.
4 The rack mount chassis has a series of holes in its floor that are spaced to accommodate the two screws on the module’s lower
edge. Ensure that the screws correctly locate into the two holes of the chosen slot. The rack securing plate on the module
should now be flush with the front of the rack mount chassis.
5 Use the third (pan-head) screw, in the top hole of the rack securing plate to fasten the module to the rack as shown in Figure
3-2:
Figure 3-2. Fixing the module into the rack
877-877-2269 | blackbox.com
Pa g e 11
Page 12
ServSwitch Wizard™ DXS - Digital
3.2 Connections
Installation of the Wizard DXS - Digital involves a number of basic connections to some or all of the following items:
• Hostcomputer(below)
• IPnetworkport
• Powersupply
3.2.1 Host computer connections
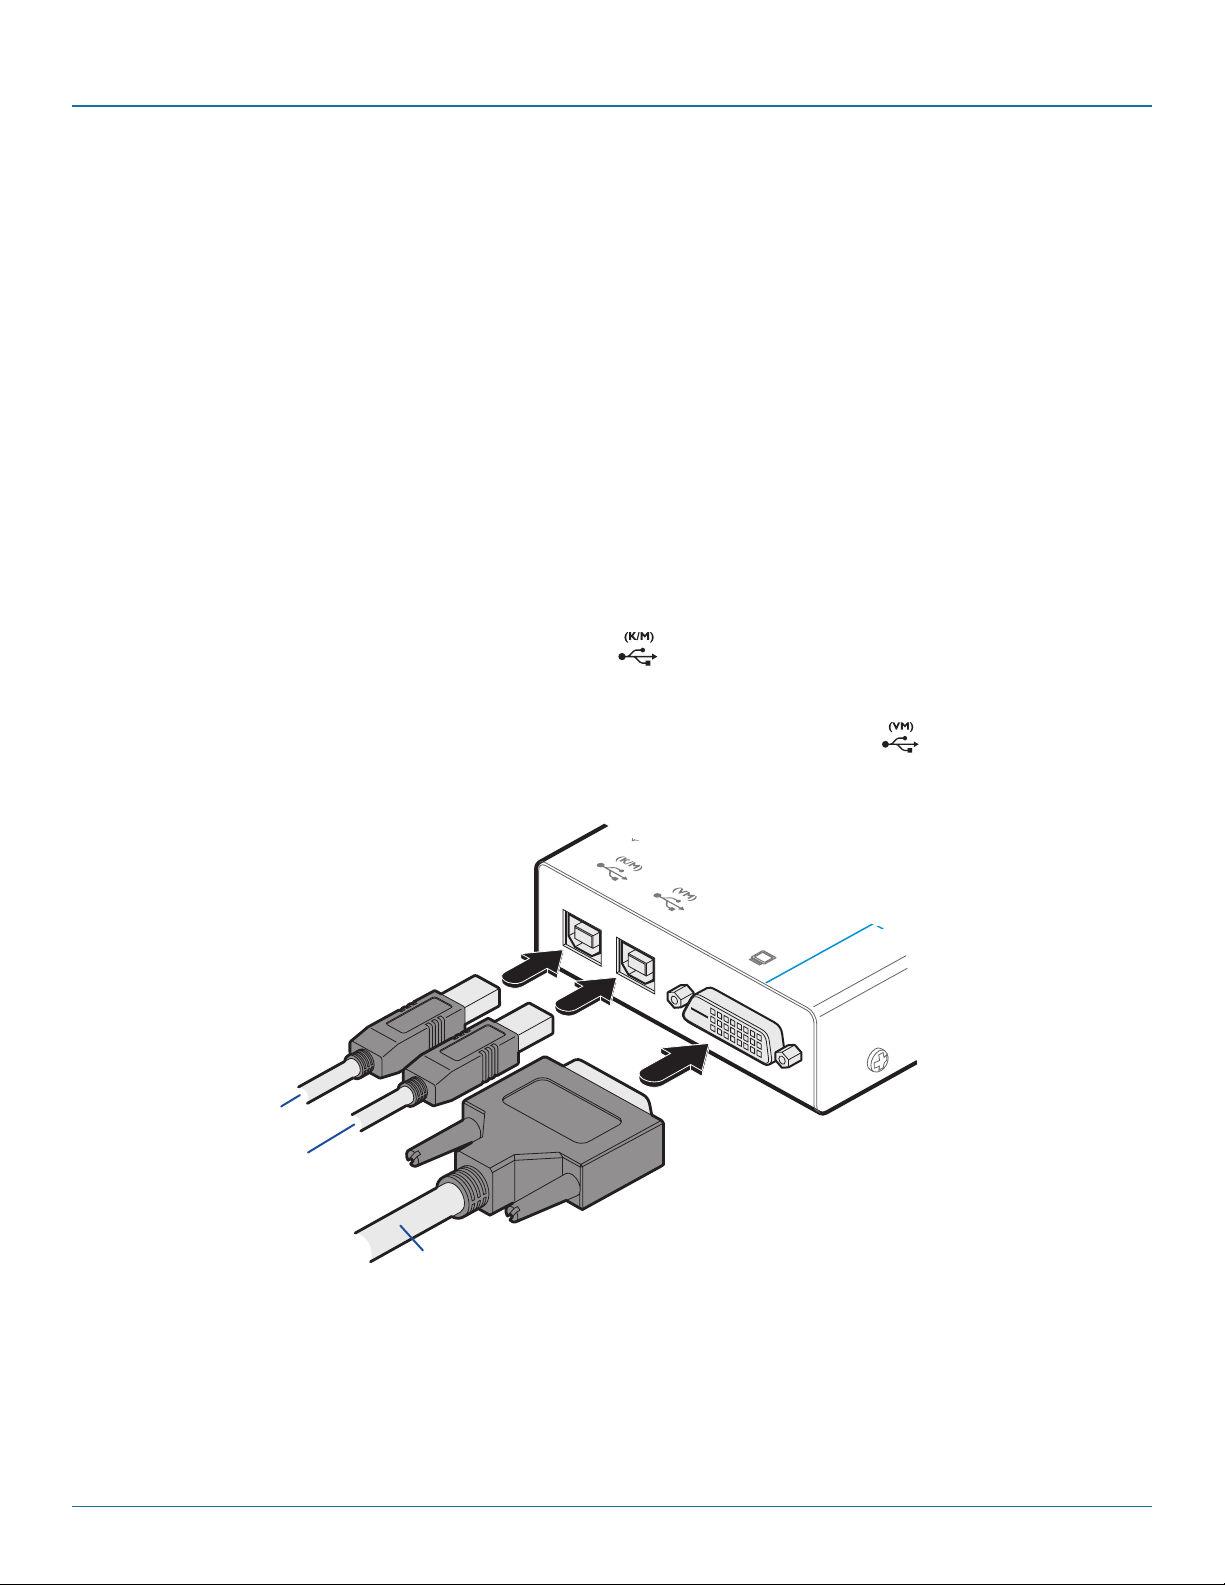
The Wizard DXS - Digital is connected to the host computer using the supplied DVI-D video, USB, audio and power control cables
(the latter two connections are optional).
3.2.1.1 To attach the video and USB cables
1 Wherever possible, ensure that power is disconnected from the Wizard DXS - Digital and the computer. Live connections are
possible but it is also preferable to power down items before connection or disconnection.
2 Connect the supplied DVI-D cable to the video socket at one end of the Wizard DXS - Digital and connect the other end to
the video output of the host computer.
3 Connect one of the supplied USB cables to the socket labeled and the other end to a vacant USB port on the host
computer.
4 [Optional step] If the Virtual Media feature is required and/or you wish to power the Wizard DXS - Digital without using the
supplied power adaptor, then also connect the other supplied USB cable to the socket labeled
If the VM USB connection is not made then the supplied power adaptor must be used.
USB cable for
keyboard and
mouse links
USB cable for Virtual
Media feature (optional
connection)
DVI-D video cable
Page 12
Figure 3-3. Connecting the video and USB cables
877-877-2269 | blackbox.com
Page 13
Chapter 3: Installation
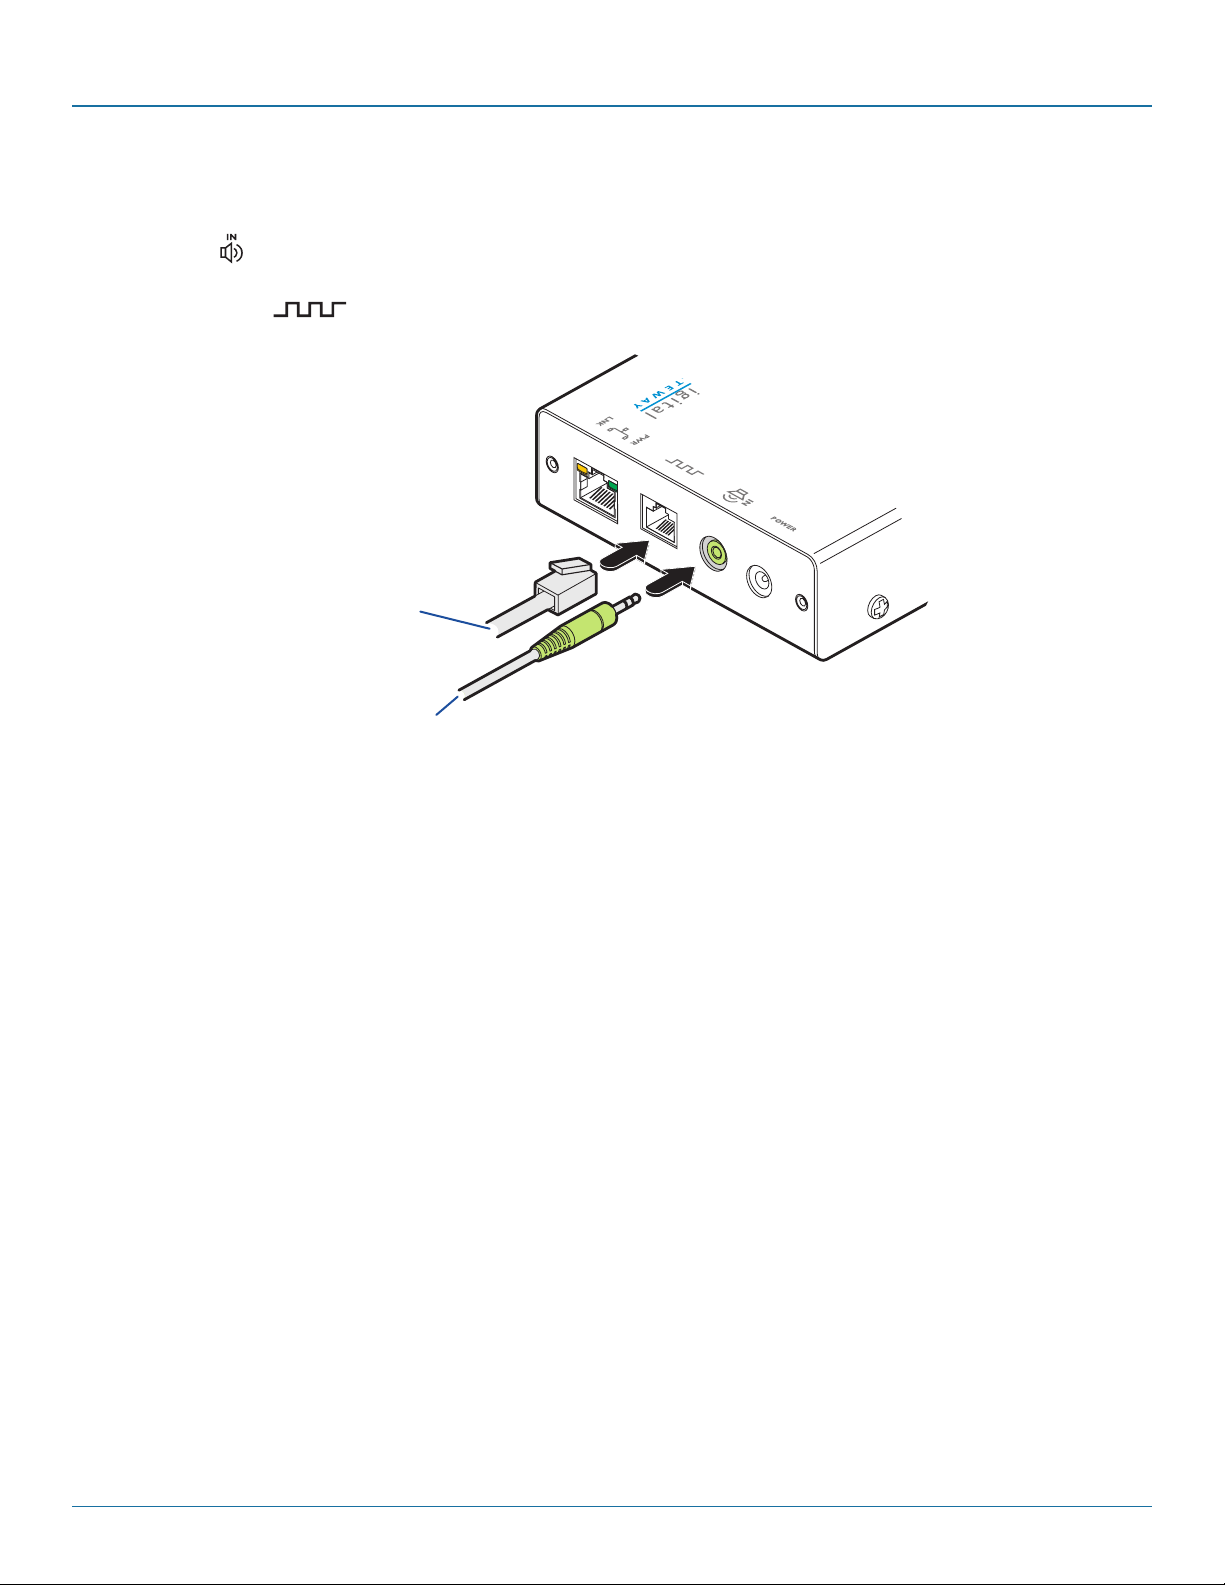
3.2.1.2 To attach the audio and power control cables
1 [Optional step] Where audio from the host computer is required, connect the supplied 3.5mm jack stereo audio cable between
the audio port of the Wizard DXS - Digital and the line output of the host computer.
2 [Optional step] Where a remote power switch is to be used with the host computer, connect the supplied power control cable
to the socket labeled on the Wizard DXS - Digital. Connect the other end to the serial port of the remote power
switch.
Power control cable for
use when a remote power
switch will be used
Audio connection to link
with the speaker output
of the host computer
Figure 3-4. Connecting the optional audio and power control cables
877-877-2269 | blackbox.com
Page 13
Page 14
ServSwitch Wizard™ DXS - Digital
3.2.2 IP network port
The Wizard DXS - Digital provides an autosensing Ethernet IP port that can operate at 10 or 100Mbps, according to the network
speed. The Wizard DXS - Digital is designed to reside easily at any part of your network:
• Itcanbeplacedwithinthelocalnetwork,behindanyfirewall/routerconnectionstotheInternet,or
• Itcanbeplacedexternallytothelocalnetwork,onaseparatesub-networkorwithanopenInternetconnection.
Wherever in the network the Wizard DXS - Digital is situated, you will need to determine certain configuration issues such as
address allocation and/or firewall adjustment to allow correct operation. Please refer to Networking issues within the
Configuration chapter for more details.
IMPORTANT: When the Wizard DXS - Digital is accessible from the public Internet, you must ensure that sufficient security
measures are employed.
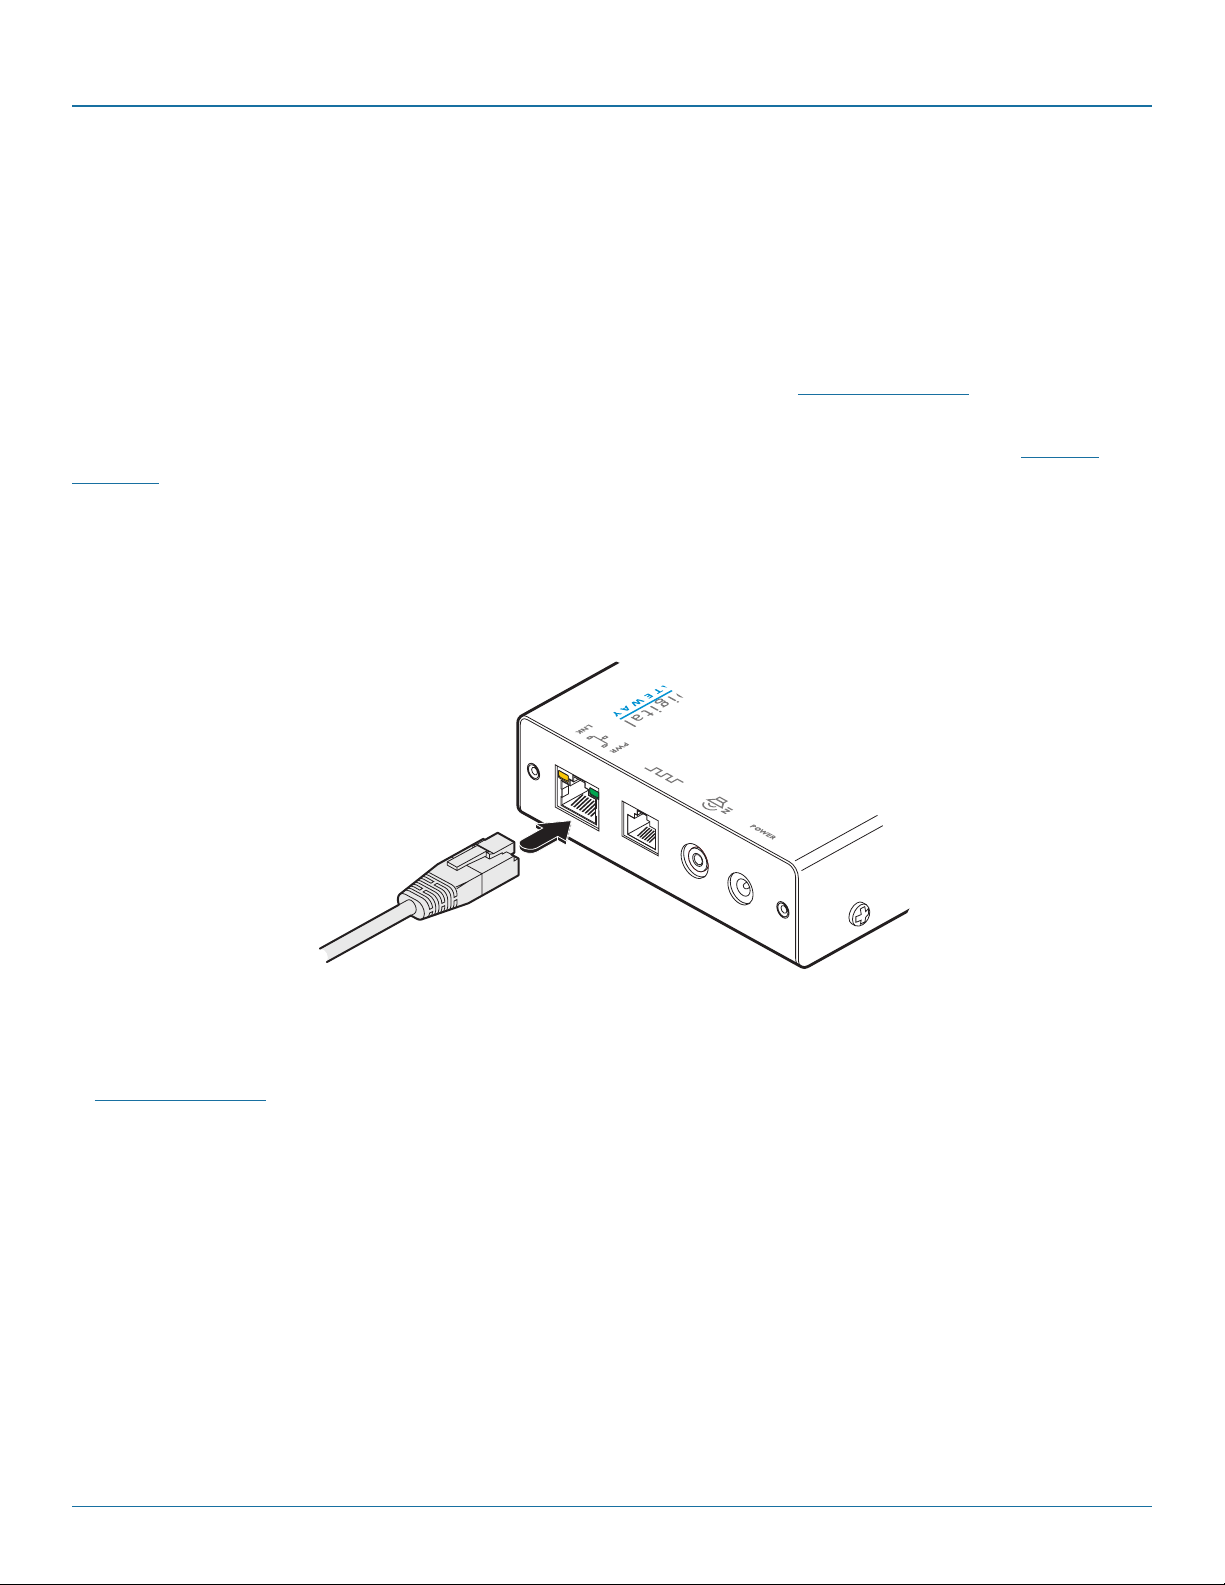
3.2.2.1 To connect the IP network port
1 Depending upon where in the network the Wizard DXS - Digital is being connected, run a category 5e or 6 cable from the
appropriate hub or router to the Wizard DXS - Digital.
2 Connect the plug of the category 5e or 6 cable into the IP port on the end panel of the Wizard DXS - Digital.
Category 5e or
6 link cable
Figure 3-5. Connecting a network cable
3 Configure the network settings as appropriate to the position of the Wizard DXS - Digital within the network - see
Networking issues for details.
Page 14
877-877-2269 | blackbox.com
Page 15
Chapter 3: Installation
3.2.3 Power supply connection
The Wizard DXS - Digital provides flexibility in the way that it is powered in order to suit your installation requirements. Each
Wizard DXS - Digital can be powered:
• ViabothUSBconnectionsfromthehostcomputer,or
• Fromthesuppliedautosensingpoweradaptor.
3.2.3.1 Power supply issues and options
If you intend to derive power from the host computer then both USB connections must be made to the host computer. The
Wizard DXS - Digital will share its requirements between the two ports and will automatically refuse to operate if only one
connection is made.
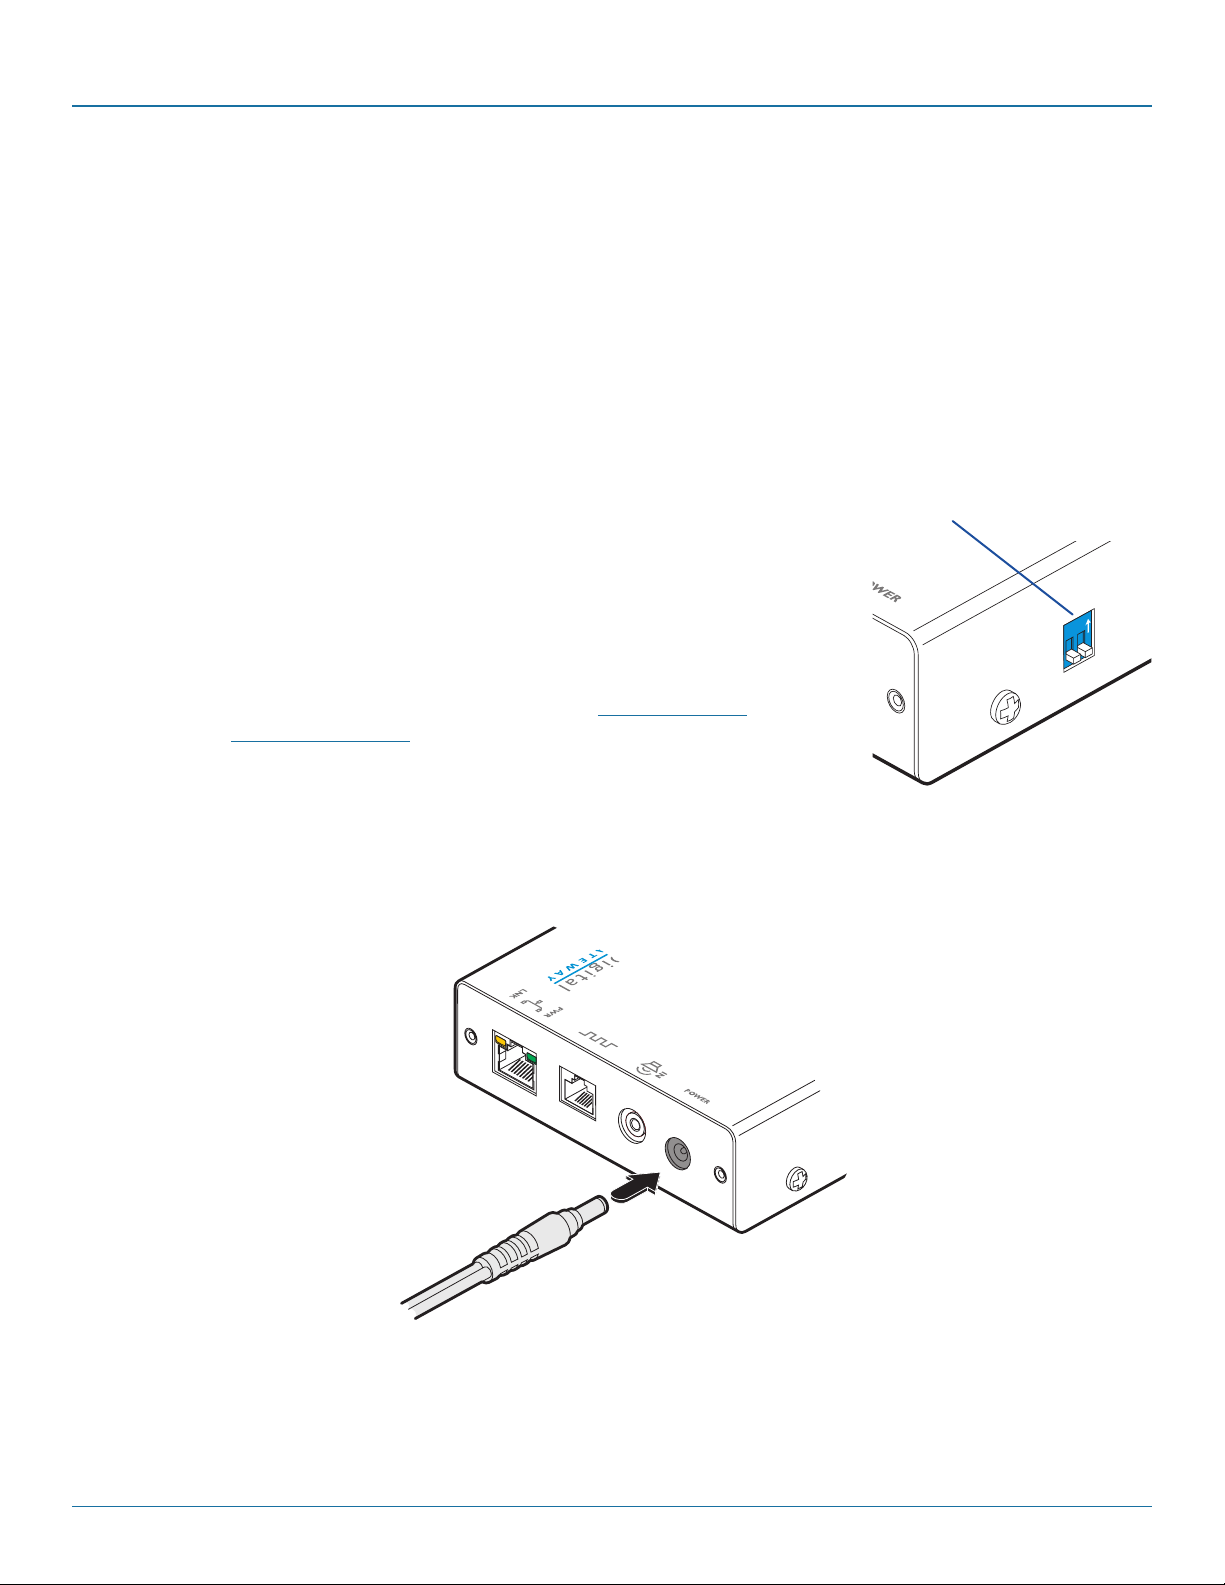
If you want to disable virtual media by omitting its USB cable, then you will need to use the supplied power adaptor. On the side
panel of the Wizard DXS - Digital, use switch 1 to determine how power should be derived:
SW1 OFF Derive Wizard DXS - Digital power from either the USB connections or the
supplied power adaptor.
ON
ON Derive Wizard DXS - Digital power only from the supplied power adaptor.
1
2
Note: SW2 is used to reset the Wizard DXS - Digital back to its factory defaults and
is also used during firmware upgrades.
Figure 3-6. Power derivation switch
3.2.3.2 To connect the power adaptor
1 Connect the low voltage output connector from the power supply adaptor to the power socket on the end panel of the
Wizard DXS - Digital.
Low voltage
output connector
from the supplied
power adaptor
Figure 3-7. Connecting the power adaptor
2 Connect the IEC connector of the supplied country-specific power lead to the socket of the power supply.
3 Connect the power lead to a nearby mains supply socket.
877-877-2269 | blackbox.com
Page 15
Page 16

ServSwitch Wizard™ DXS - Digital
4. Configuration
4.1 Connecting to Wizard DXS - Digital
Connection to (and configuration of) Wizard DXS - Digital is carried out over a network, using a VNC Viewer program running on
a computer or mobile device. VNC Viewers are available for most computers, tablets and smartphones.
• IfyoualreadyhaveaVNCviewer,pleasefollowtheInitialconfigurationinstructionsgivenonthenextpage.
If you do not already have a VNC viewer, there are three options:
• YoucandownloadaWindowsVNCViewerfromtheWizardDXS-Digitalitself.
• YoucandownloadthelatestVNCViewersformostoperatingsystemsviatheRealVNCwebsite,orfortabletsand
smartphones from the appropriate app store.
• Withoutdownloadinganything,youcanrunaJavaversionoftheVNCViewerinsideyourwebbrowser.
4.1.1 To download a Windows VNC Viewer from the Wizard DXS - Digital unit
Note: The version of VNC supplied within the Wizard DXS - Digital supports audio, however, audio is not supported in the later
viewers from RealVNC.
1 Connect the Wizard DXS - Digital to an IP network where a suitable computer is available on the same subnet (please see the
Installation chapter for connection details).
2 On that computer, open an internet browser and enter the default local IP address used by the Wizard DXS - Digital:
h ttp : / /192 .16 8.1.42
The Wizard DXS - Digital welcome screen should be displayed.
3 Click the link Download the Windows VNC Viewer from unit.
4 Once the file is downloaded, run it and follow the on screen instructions to open a VNC connection to the Wizard DXS -
Digital. (The VNC Viewer is a single executable file which does not require an ‘installation’ step. Simply put the file in a suitable
place (such as the Desktop) and run it from there.)
Page 16
877-877-2269 | blackbox.com
Page 17

Chapter 4: Configuration
4.1.2 To download a VNC Viewer
To download a (free) VNC Viewer for a desktop or notebook computer, visit the download page of the RealVNC website:
http://www.realvnc.com/download/viewer
To download a VNC Viewer app for a tablet or smartphone, visit the Apple or Android app store, or look at the RealVNC website
(www.realvnc.com) for further information.
4.1.3 To use the Java VNC Viewer
1 Connect the Wizard DXS - Digital to an IP network where a suitable computer is available on the same subnet (please see the
Installation chapter for connection details).
2 On that computer, open an internet browser and enter the default IP address used by the Wizard DXS - Digital:
htt p: / /192.168.1.42
The Wizard DXS - Digital welcome screen should be displayed (as shown above).
3 Click the link Connect using built-in Java VNC Viewer. The Java viewer will load and run inside the browser. For more details
see Appendix C. Java viewer options.
877-877-2269 | blackbox.com
Page 17
Page 18
ServSwitch Wizard™ DXS - Digital
4.2 Initial configuration
To perform the initial configuration, you need to connect the Wizard DXS - Digital to an IP network and use a computer located
on the same network to connect to it.
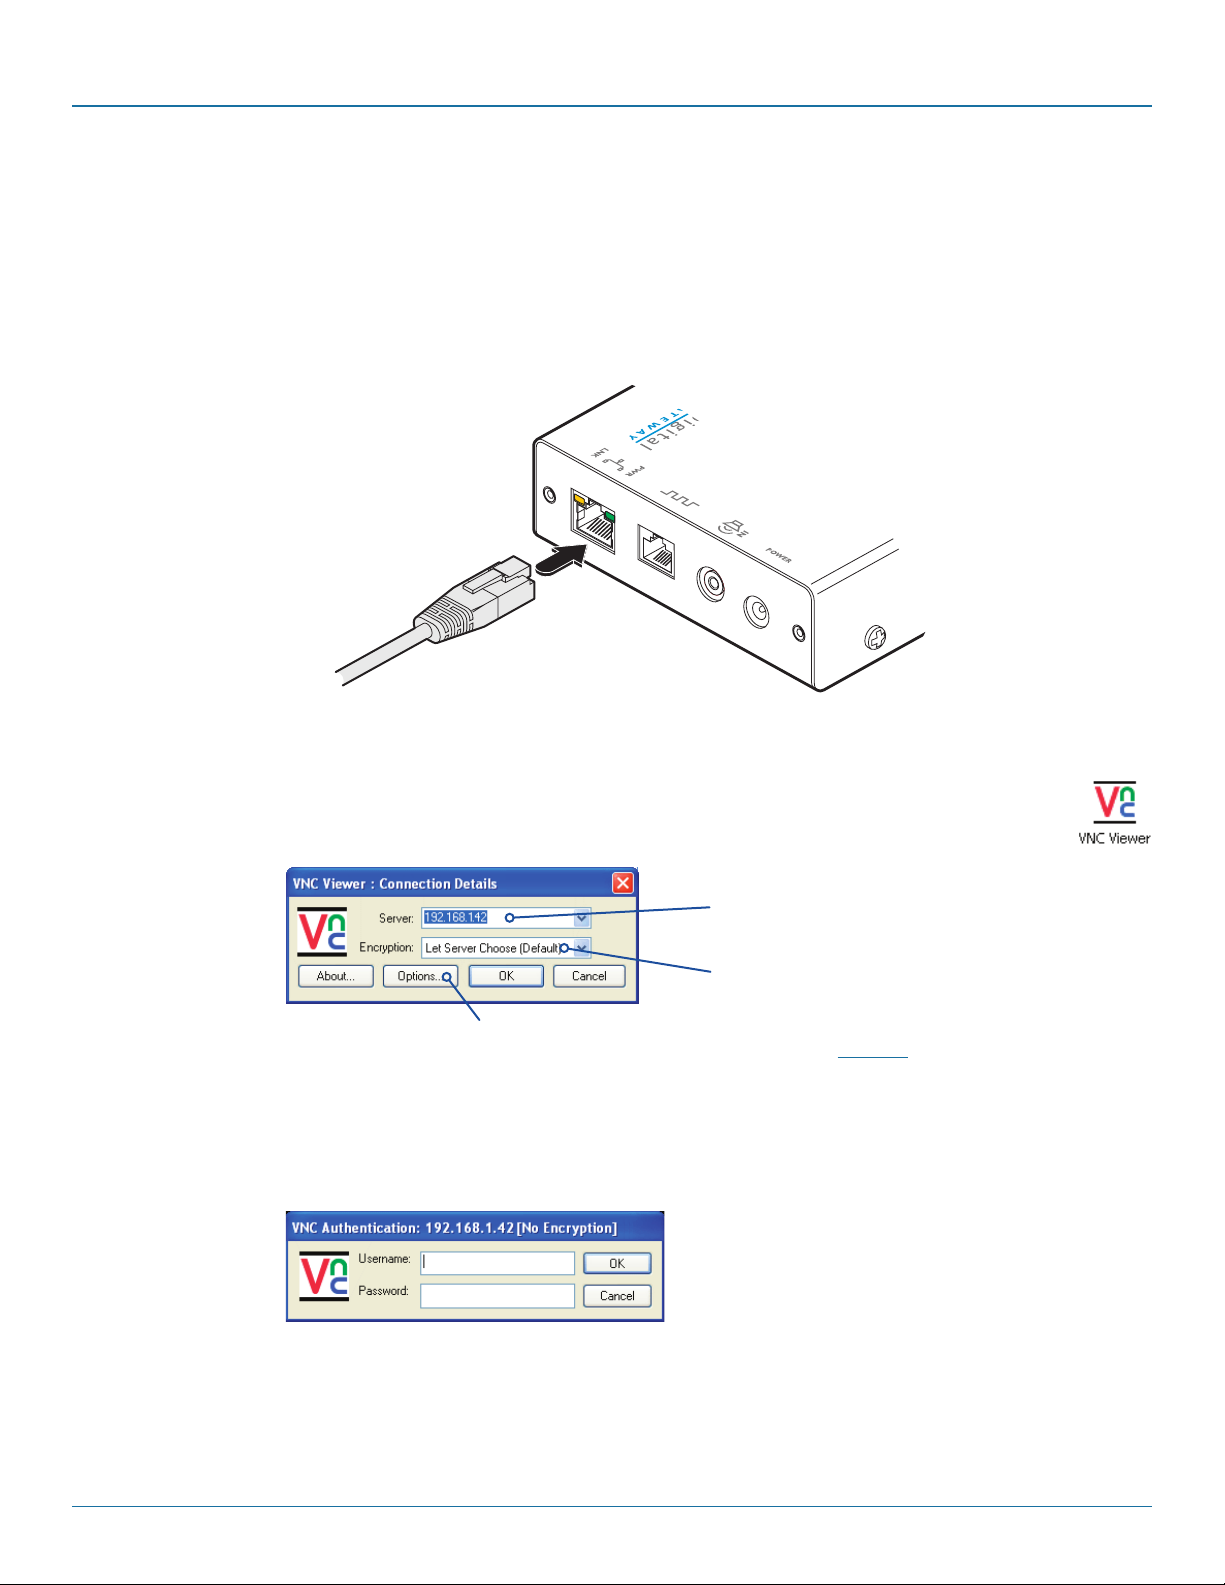
4.2.1 To perform the initial configuration
1 Connect the Wizard DXS - Digital to an IP network where a suitable computer is available on the same subnet (please see the
Installation chapter for connection details).
Figure 4-1. Connect to an IP network where a computer is available on the same subnet
2 Use a computer connected to the same subnet of the network. On that computer, select the VNC viewer icon
A connection details dialog will be displayed:
Enter the Wizard DXS - Digital address here and click OK
If required, select the encryption mode
Options button
Provides a range of viewer and connection settings - MORE [+]
3 In the ‘Server:’ entry, type the address: 192 .16 8 .1.42
4 Click the OK button. The viewer window may open straight away (if so continue at step 6) or the system may require user
authentication in which case an authentication dialog will be displayed:
Page 18
877-877-2269 | blackbox.com
Page 19
Chapter 4: Configuration
5 Enter admin as the Username, leave the password entry blank and click the OK button. You will be prompted to enter a new
password before the Viewer window opens:
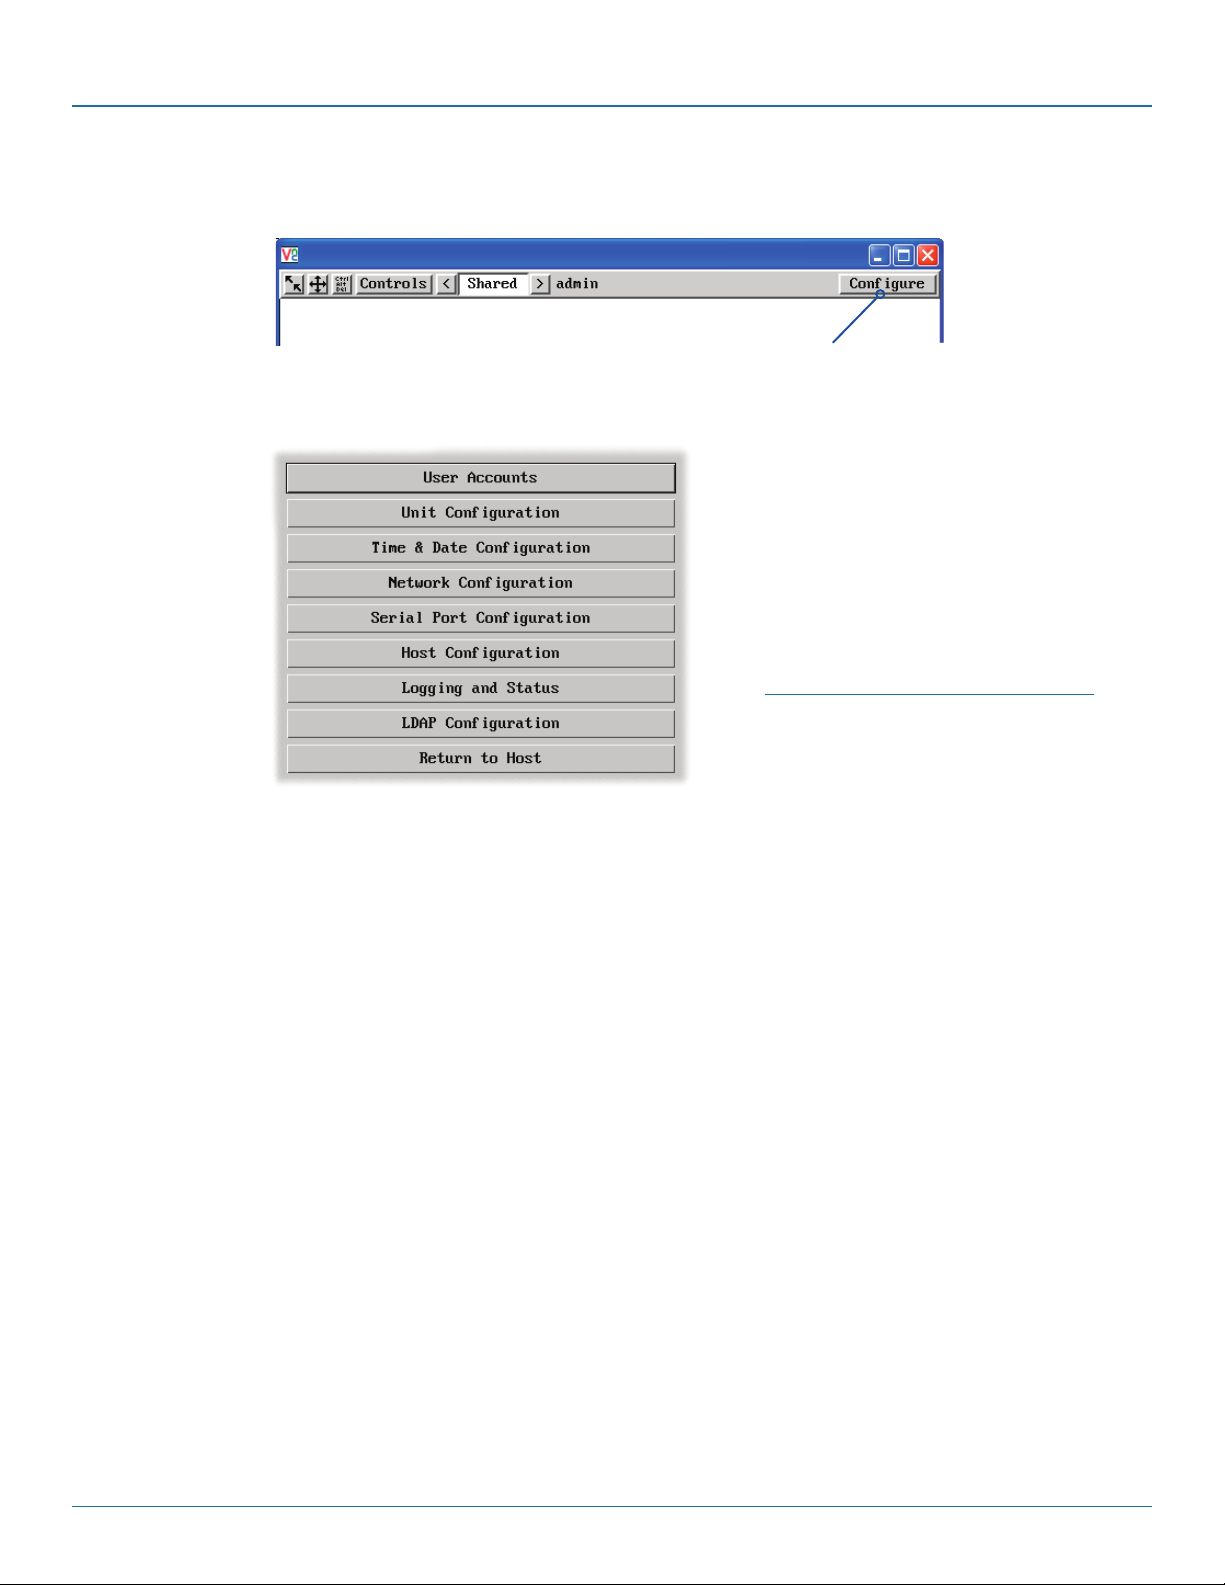
Click the Configure button
6 Click the Configure button to display the Configuration menu:
Use the various options (particularly the ‘Unit
Configuration’ and ‘Network Configuration’
options) to arrange the Wizard DXS - Digital
to suit your requirements.
See Appendix D - Configuration menus.
877-877-2269 | blackbox.com
Page 19
Page 20
ServSwitch Wizard™ DXS - Digital
4.3 Performing a flash upgrade
The firmware in Wizard DXS - Digital is fully upgradable and there are two methods that you can use:
• Theremotemethod,or
• The‘dipswitch’method.
The most streamlined upgrade procedure is the remote method because it is carried out completely from a remote system. The
‘dip switch’ method is useful because it can be carried out even if the firmware within the Wizard DXS - Digital unit has been
corrupted.
4.3.1 Flash upgrade using the remote method
Using this method, the Wizard DXS - Digital is upgraded via remote connection (through the IP network port). Upgrades are
digitally signed using a secure key. This prevents unauthorized or altered firmware images being downloaded into the unit.
4.3.1.1 To perform a flash upgrade
1 Download the latest firmware revision for the Wizard DXS - Digital from Black Box and decompress the download file. View
the decompressed files and make a note of the name and location of the .bin file that was part of the download file collection.
2 Make a remote connection to the Wizard DXS - Digital unit and login as the admin user.
3 Once logged in, click the ‘Configure’ button in the top right corner of the window.
4 Click the ‘Unit Configuration’ button.
5 Click the ‘Advanced Unit Configuration’ button.
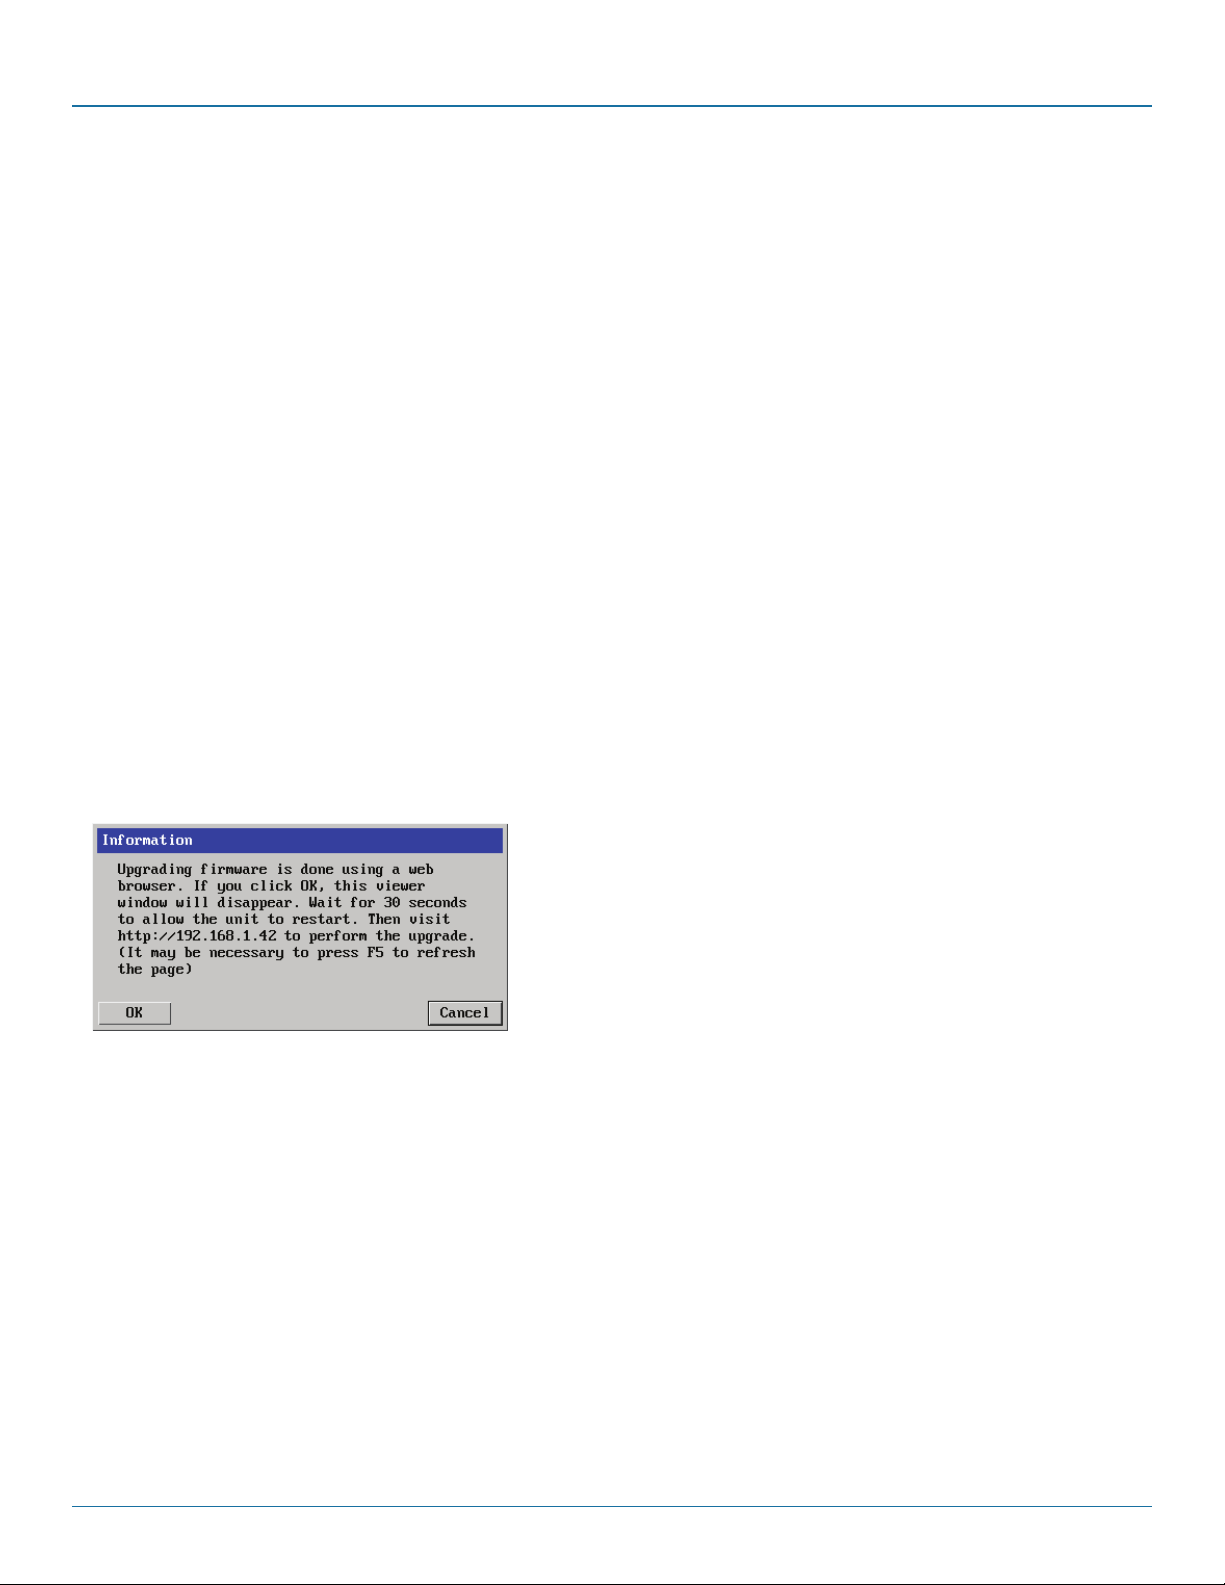
6 Click the ‘Upgrade Firmware’ button. A dialog box will be displayed:
7 Note the IP address shown in the dialog box and click OK.
Page 20
877-877-2269 | blackbox.com
Page 21
Chapter 4: Configuration
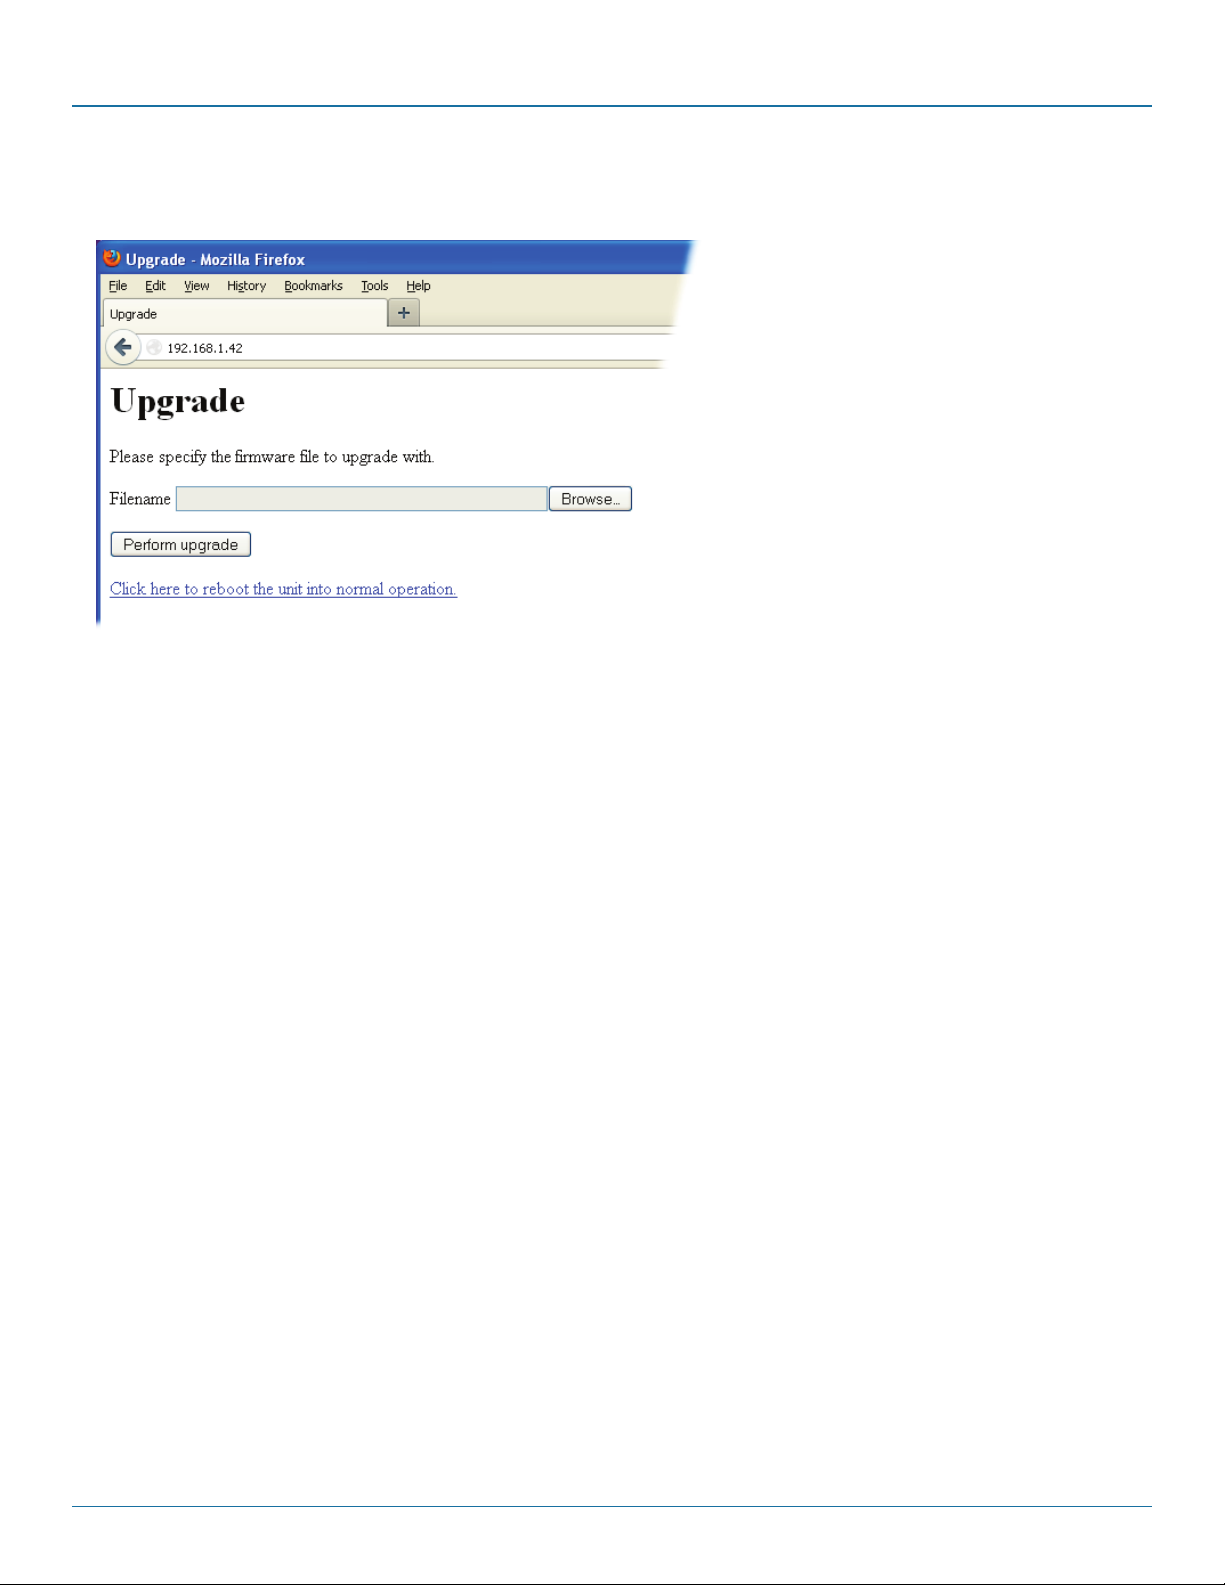
8 The unit is now ready to accept the upgrade files. Open your browser and log into the Wizard DXS - Digital using the IP
address that was confirmed in the dialog. Once connected, the unit will offer the following screen:
9 Click the ‘Browse’ button and locate the .bin upgrade file that you downloaded earlier. Click the ‘Perform Upgrade’ button.
The upgrade will take place and its progress will be shown on screen.
10 When the upgrade is complete, click the link ‘Click here to reboot the unit into normal operation’.
4.3.2 Flash upgrade using the dipswitch method
Use the dipswitch method if the firmware on the Wizard DXS - Digital has become corrupted and there is no access from a VNC
session. You will need to know the IP address of the Wizard DXS - Digital (the default IP is 192.168.1.42).
1 With the power off, change dip switch 2 to ON.
2 Power On the Wizard DXS - Digital.
3 Using a web browser go to the IP address of the Wizard DXS - Digital. You should see the upgrade page as shown above.
4 Browse to the .bin file and then click the Perform upgrade button.
877-877-2269 | blackbox.com
Page 21
Page 22
ServSwitch Wizard™ DXS - Digital
5. Operation
5.1 Using the viewer window
Once connected to the Wizard DXS - Digital via the VNC Viewer (please see Connecting to Wizard DXS - Digital for details),
the viewer window gives you the ability to view and control the Wizard DXS - Digital and its host computer(s). Its operation is
almost identical regardless of whether you used the VNC viewer or your Java viewer to display it.
5.1.1 The menu bar
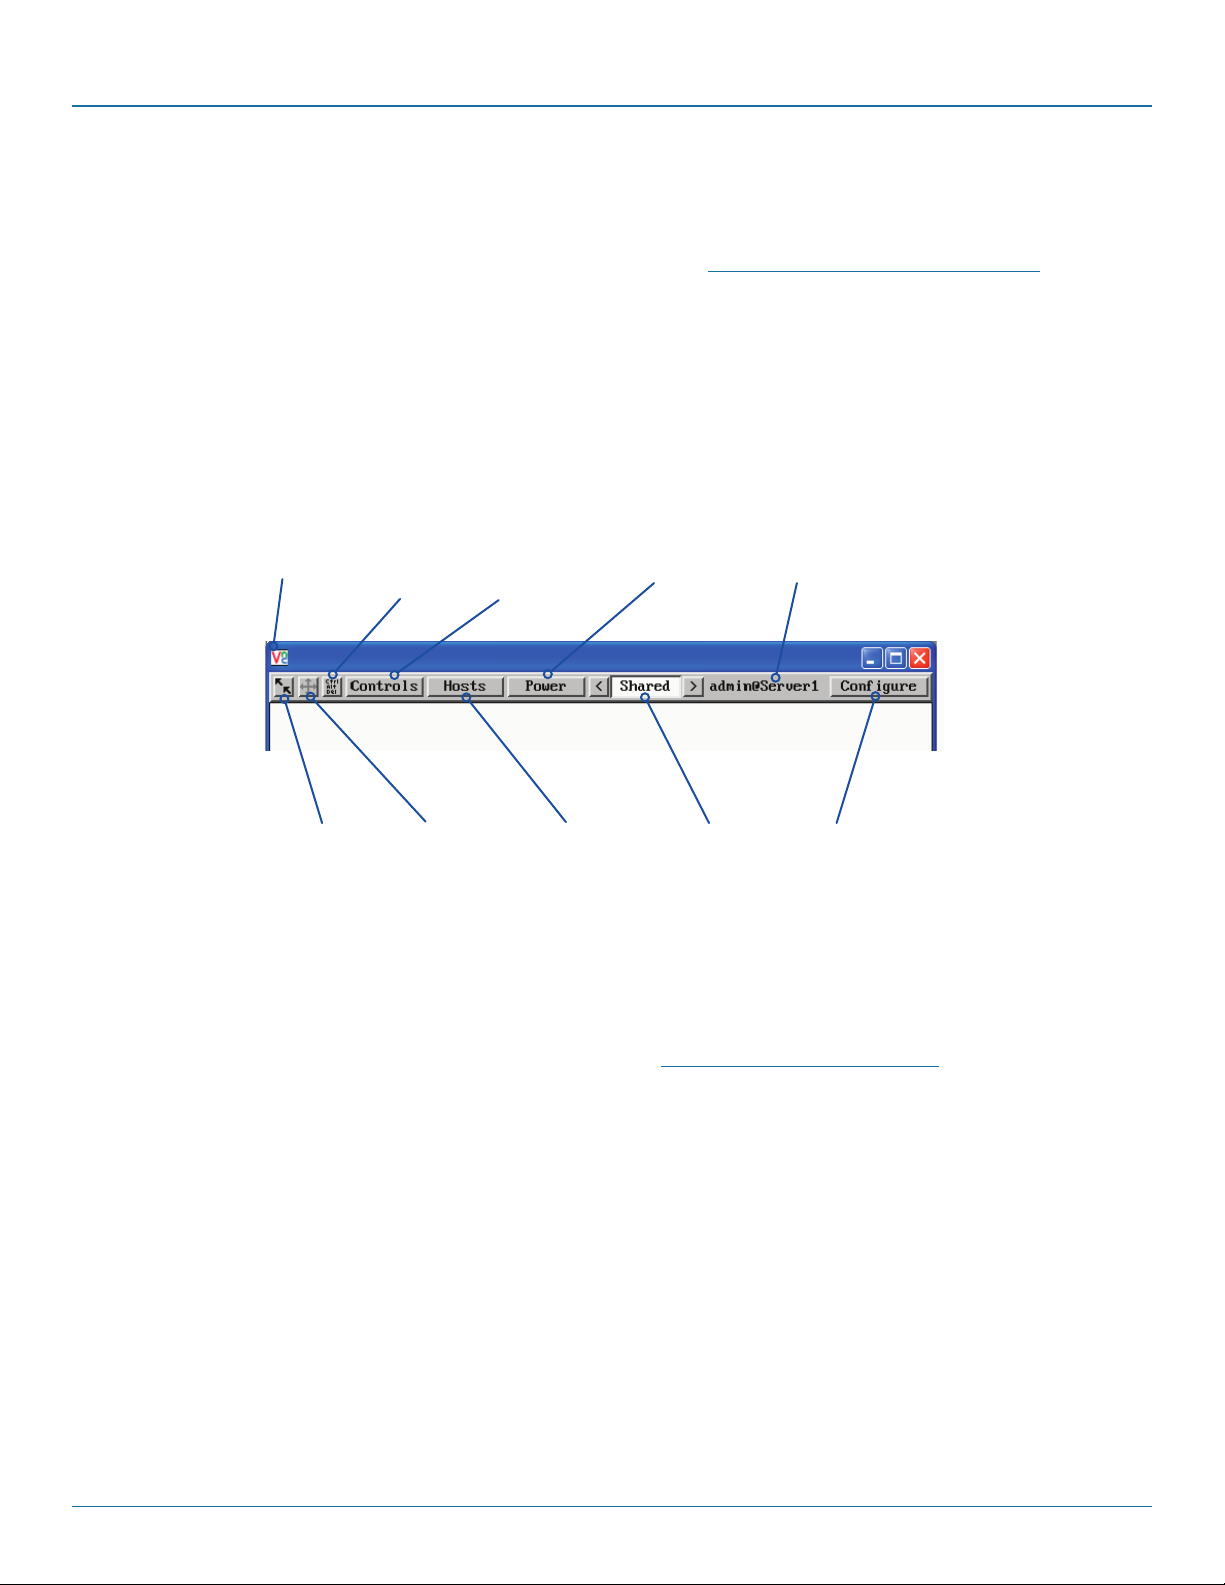
The viewer window presents a menu bar similar to that shown below. Certain items within the toolbar are displayed depending
upon your access permissions and/or the Wizard DXS - Digital configuration.
Viewer options
(VNC viewer
only) Click the
VNC icon to
view the viewer
window options.
Re-sync mouse
Ensures that the
mouse pointer
which you move
and the mouse
pointer on the
host system
are correctly
synchronized.
Note: During initial use, neither
the Hosts nor the Power buttons
will be present.
Ctrl Alt Del
Sends the
Ctrl Alt Del
sequence
to the
current host
computer.
Auto calibrate
This button will
calibrate the
mouse, but only
when relative
mouse mode is
selected.
Controls
Displays a menu
of options
concerning
keyboard, video
and mouse
operation.
Hosts
Click to
display a list
of computers.
Choose an
entry to
connect to
that host
computer.
For details about how to determine the options on the
menu bar, see Editing the viewer window menu bar.
Power
Click to access
the power on/
off options for
the current
host computer.
Access mode
Allows you
to choose
between
Shared and
Private access
modes.
Dialog area
Indicates your username
and the host system that
you are currently viewing.
This area can also display
other messages.
Configure
This option is only
available to the
admin user and
provides access
to the main
configuration
menus.
Page 22
877-877-2269 | blackbox.com
Page 23
Chapter 5: Operation
5.1.2 When using the viewer window
What is the best screen resolution to use?
The best resolution for your computer is one that is larger than the screen of the host computer that you are viewing. This will allow
you to see everything without scrolling around. Alternatively, the VNC viewer can be set to scale the image to fit your screen, but
remember that some pixel dithering effect will be seen when scaling is used.
How do I navigate around a larger screen?
If the screen that you are viewing has a larger resolution than your viewing window you will need to scroll around to see all items.
The viewer window allows you to ‘bump scroll’ (only in full screen mode). This means that when your mouse cursor bumps
against the edge of the screen, the screen image will scroll across automatically.
How do I escape from full screen mode?
Press the F8 button. This button is changeable but is most often set to F8.
How do I make the most of a slow connection?
The VNC viewer is slightly better suited to slower connections than the browser viewer because it offers more options. Click the
Options button of the VNC viewer when entering the Wizard DXS - Digital address during log on.
Rate limit mouse events
When selected, this mode greatly reduces the mouse movement data that are sent to the host computer. When you move the
local mouse, the remote cursor will catch up roughly once per second.
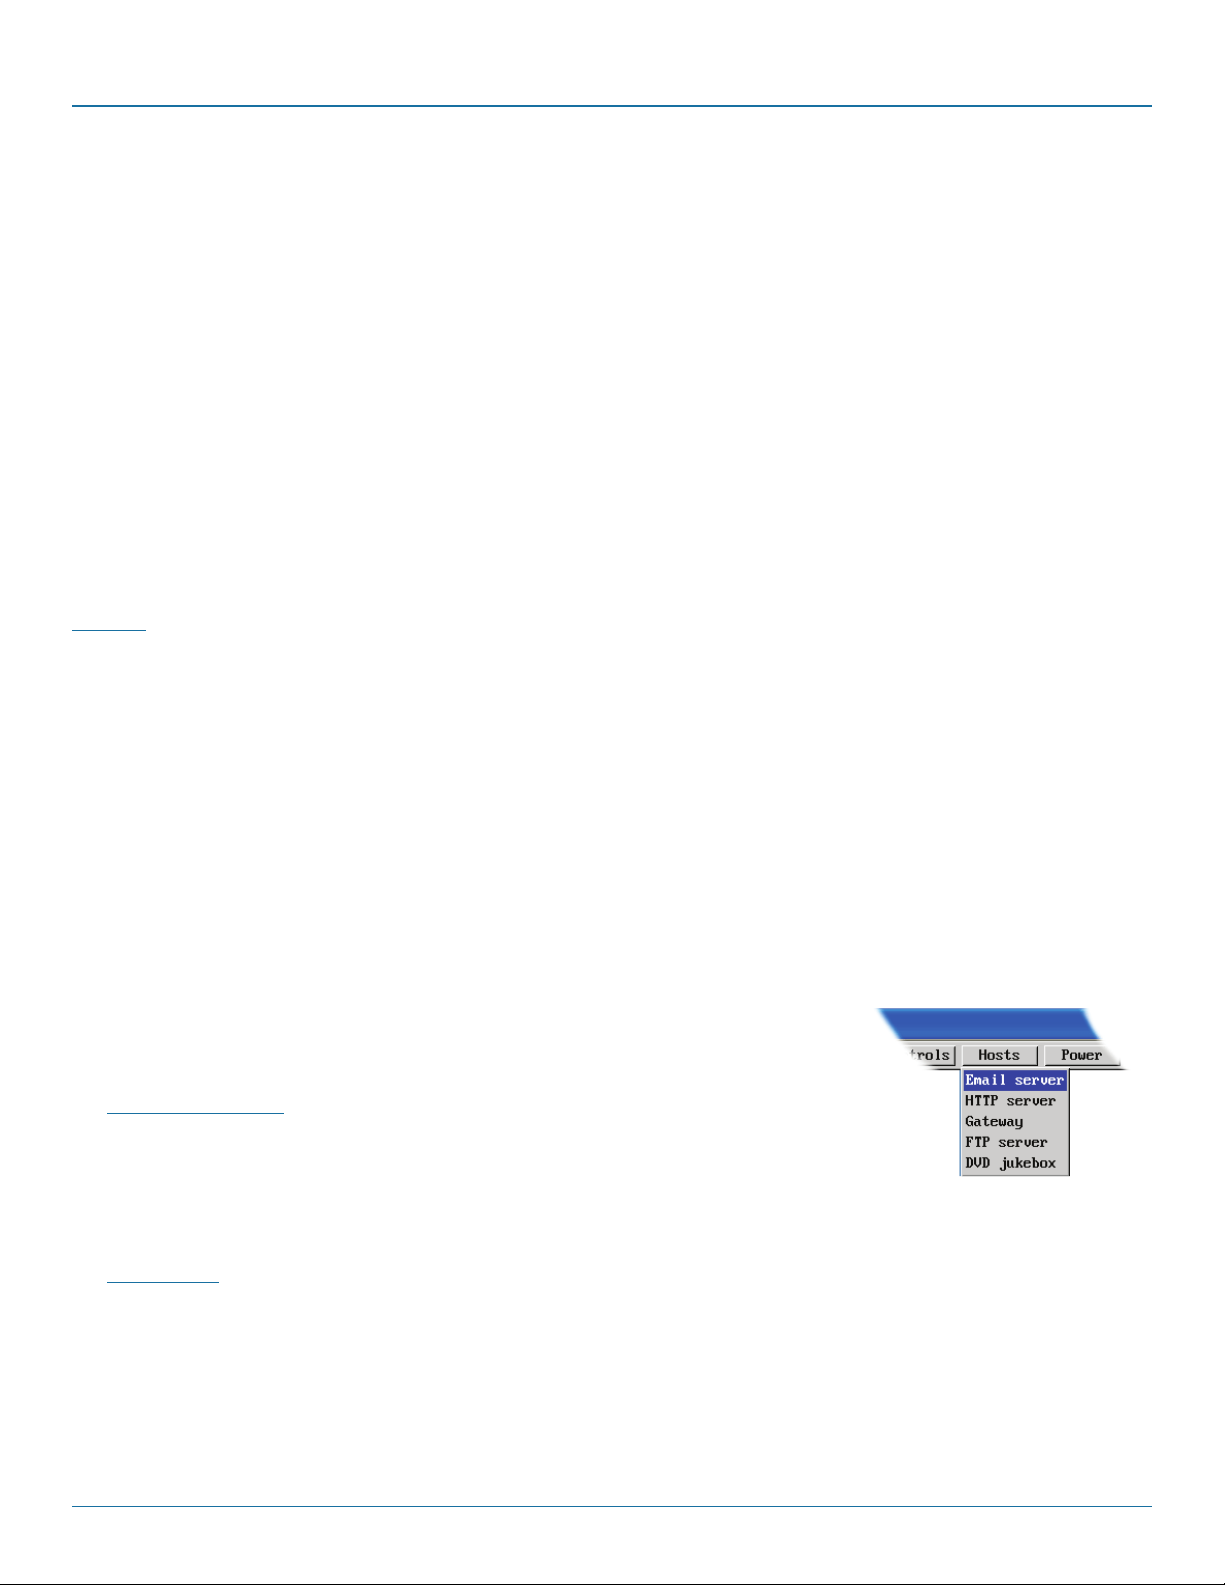
5.2 Host selection
The Hosts button on the menu bar provides the quickest and most efficient way to switch between host computers. This is
because the button is close at hand, but also because the screen calibration details for each host are reused when this method of
switching is used.
Note: The Hosts button is displayed only when the switching details for two or more computers have been declared within the
configuration section by the admin user.
5.2.1 To select a host
1 Click the Hosts button to display a list of computers.
2 Click the required computer name to view and control it.
See Host configuration for details about programming new hosts into the Wizard DXS - Digital
(‘admin’ user status required).
5.3 Configure
This option is displayed only when you are logged on as the ‘admin’ user. When selected it provides access to a wide range of
Wizard DXS - Digital settings.
See Appendix D for more details.
877-877-2269 | blackbox.com
Page 23
Page 24
ServSwitch Wizard™ DXS - Digital
5.4 Auto calibrate
Auto calibrate will calibrate the mouse only if relative mouse mode is selected.
This detects the mouse motion and will report back that the mouse has been calibrated correctly depending upon the operating
system.
See the notes on Advanced mouse configuration for more details.
Once this has been done, providing you use the ‘Hosts’ button to switch between host computers, the video settings for each
machine will be re-used.
5.4.1 Re-synchronize mouse
If you find that your local mouse pointer and that of the host are not correctly synchronized, use this feature to re-align their
movements. This operation is also selectable from the Controls menu.
5.4 .1.1 To re-synchronize the mouse
1 Use the Hosts button to select the required computer.
2 Click the button and then click OK in the subsequent pop-up message.
Note: If you find that this doesn’t work, you may need to perform a mouse calibration again.
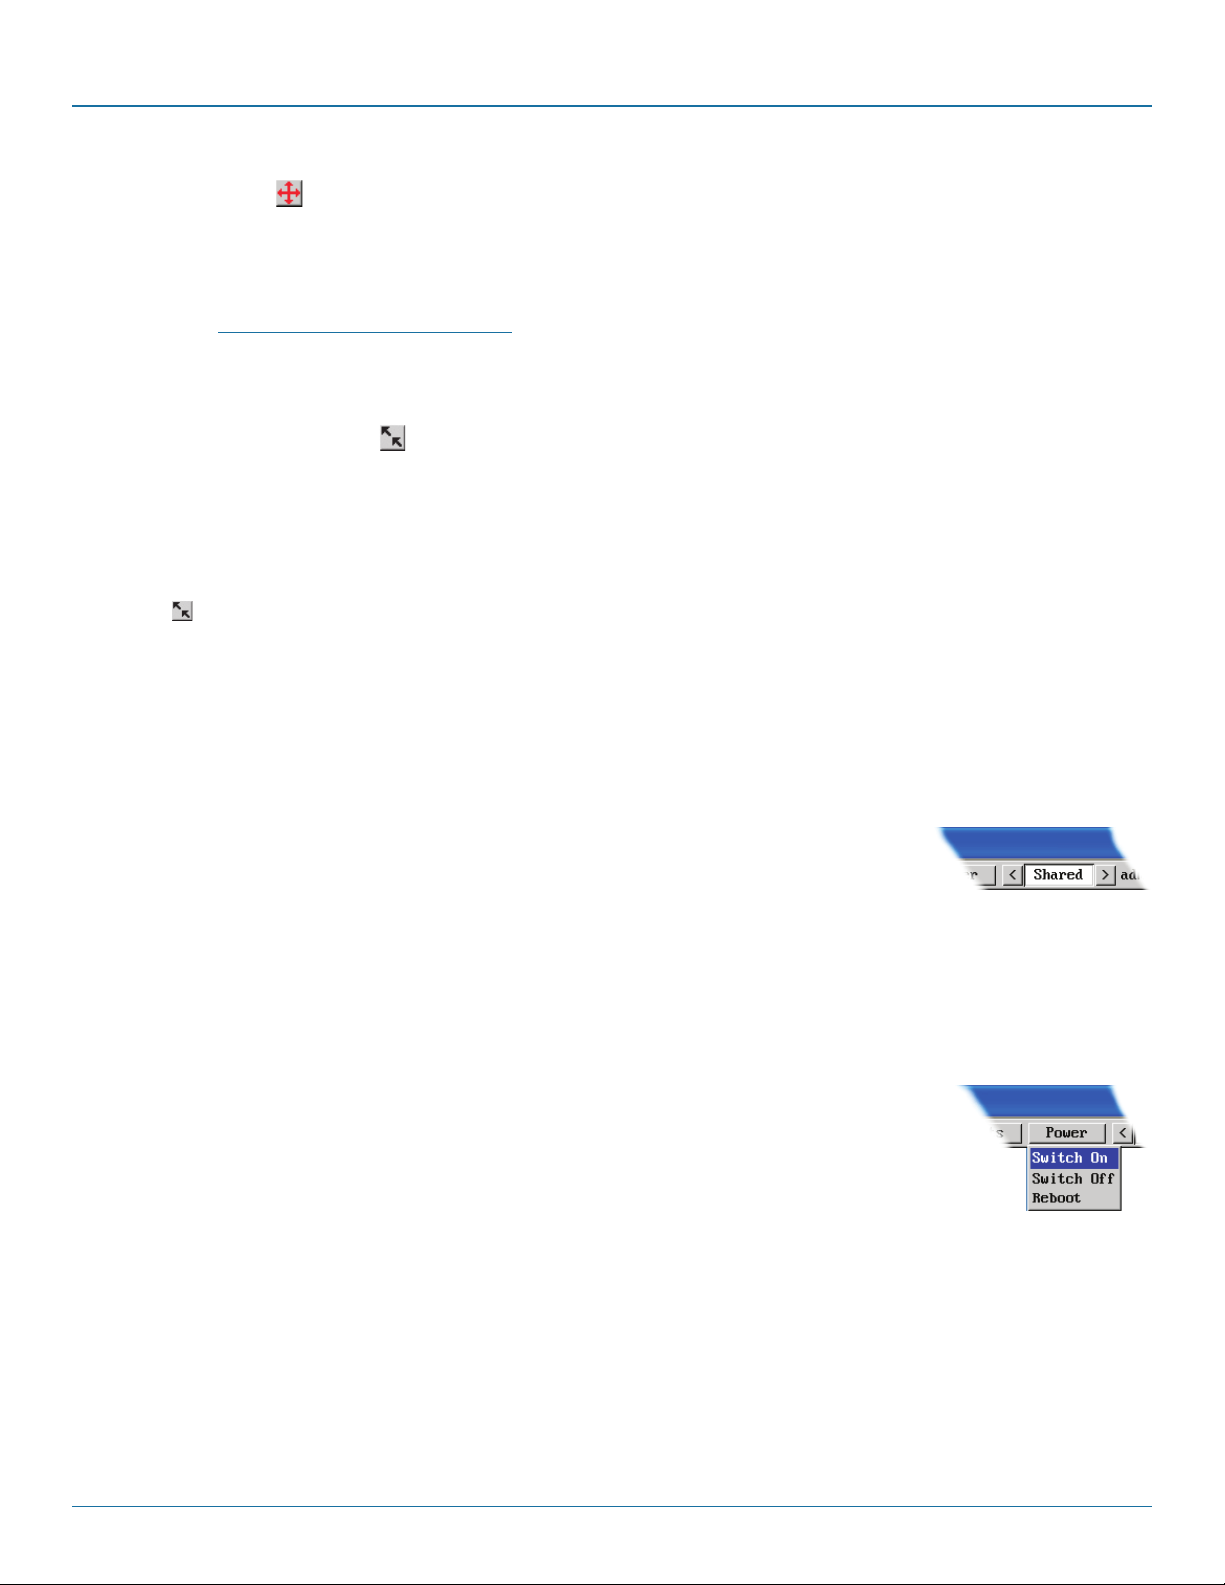
5.5 Access mode - shared/private
Up to four users can be simultaneously logged-in and all will view the same host. If you need to perform a sensitive task that
should not be viewed by other users, you can change the access mode to Private. This action prevents other users connecting at
the same time.
5.5.1.1 To change the access mode
1 Click one of the arrow buttons adjacent to the Shared/Private indicator.
5.6 Power switching
When configured (and where you have access rights) this option allows you to control the mains power input to the currently
selected host computer.
Note: This option is generally used to power cycle remote systems that have failed to respond. Before switching a system off,
ensure that all attempts have first been made to power it down through normal means.
5.6.1.1 To switch a system on or off
1 Use the Hosts button to select the required computer.
2 Click the Power button and then select the Switch on or Switch off option, as appropriate.
Page 24
877-877-2269 | blackbox.com
Page 25
Chapter 5: Operation
5.7 Editing the viewer window menu bar
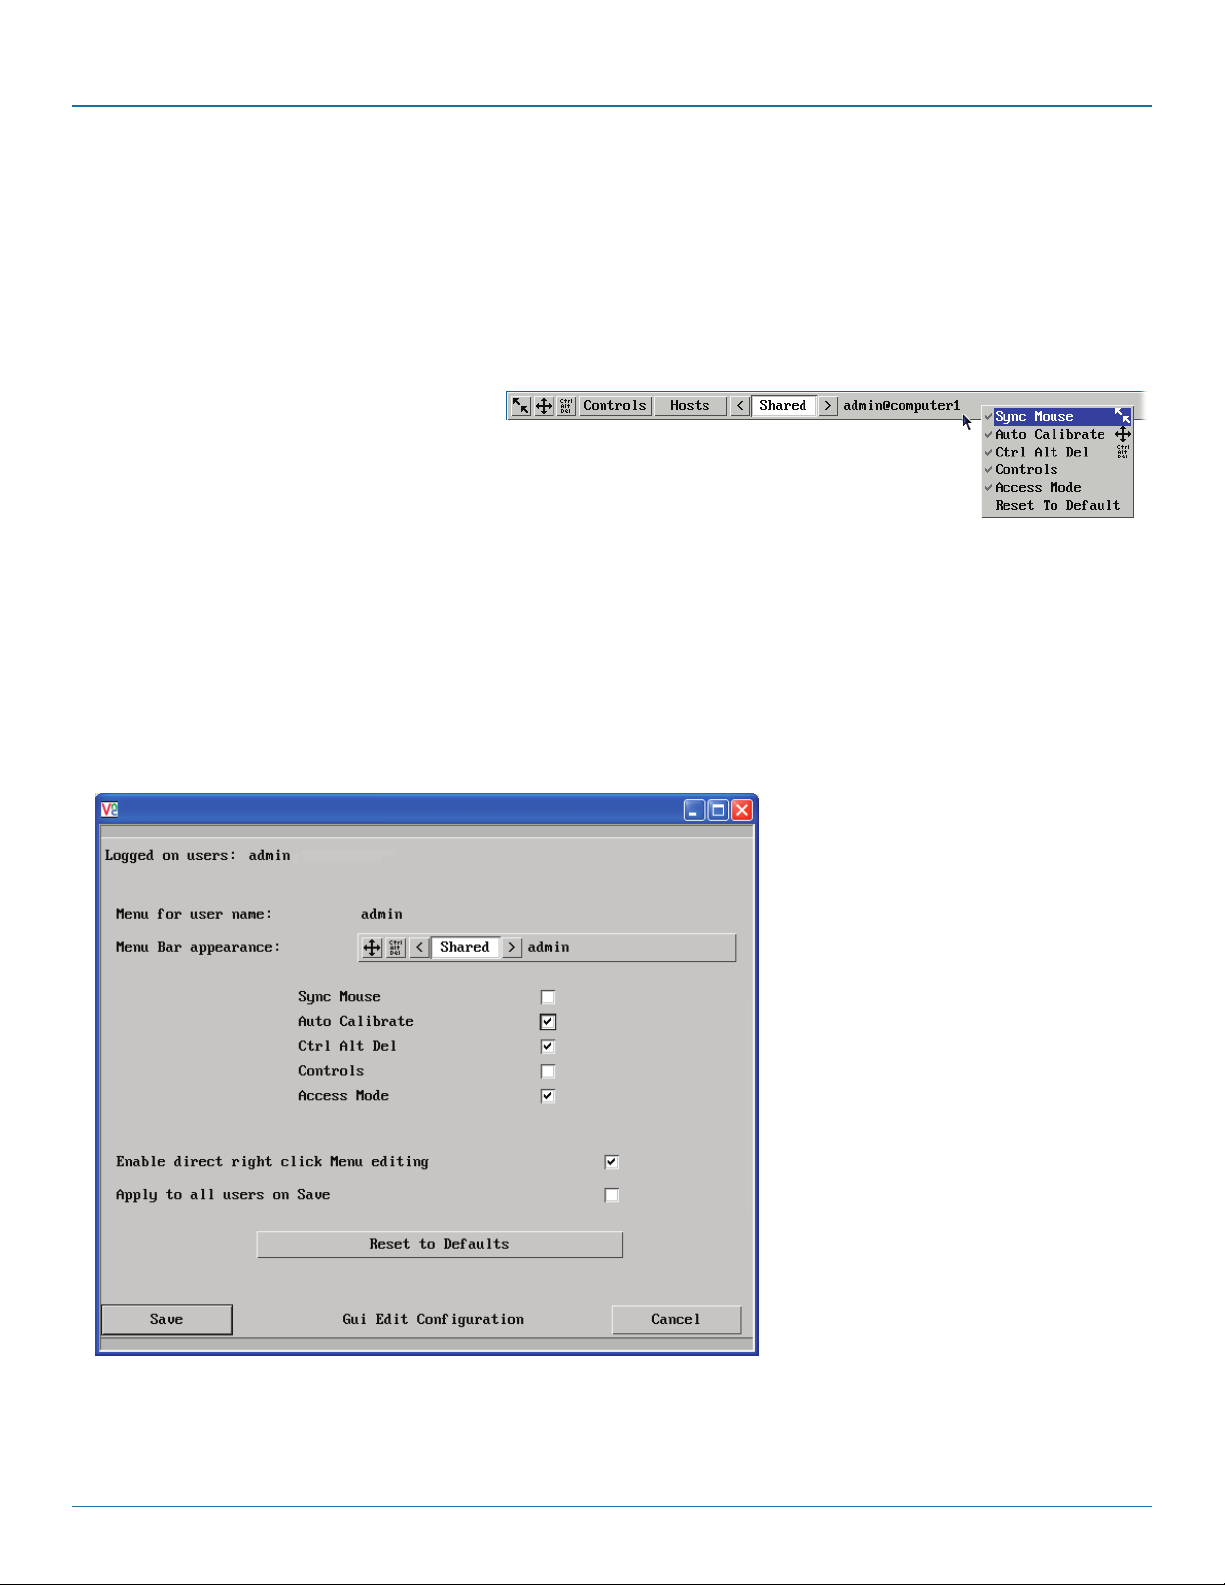
If required, you can customise the menu bar of the viewer window to ensure that it contains only the necessary options.
The menu bar can be edited locally by each user or edited singly by the admin or alternatively, the admin can globally alter the
menu bar for all users.
5.7.1.1 To edit the menu bar locally
1 Login remotely via VNC viewer and display the viewer window.
2 Place the mouse pointer on the menu bar and
click the right mouse button. A popup will be
displayed:
3 Click on any option within the popup to add it to or remove it from the menu bar.
4 When all changes have been made, click anywhere else within the viewer window.
Changes made in this way will affect the individual user only.
5.7.1.2 To edit the menu bar via admin
1 Login remotely via VNC viewer as admin user and display the viewer window.
2 Click the Configure button in the top right corner of the viewer window.
3 Click the User Accounts button.
4 Against the entry for the required user, click the Menu Bar Edit button. The following dialog will be displayed:
Note: The local menu bar edit popup
shown above will only appear if the
Enable direct right click Menu editing
option is ticked within the Gui Edit
Configuration screen (for that user) as
shown left.
5 Select/deselect the items that you wish to appear on the menu bar. As you do so, the Menu bar appearance image will show
how the bar will look using your edited settings.
6 Optional: To globally apply your changes, tick the Apply to all users on Save option.
7 Click the Save button.
877-877-2269 | blackbox.com
Page 25
Page 26
ServSwitch Wizard™ DXS - Digital
5.8 Controls
When clicked, this button reveals a menu of options concerned with keyboard, video and mouse
operation.
5.8.1 Single Mouse Mode
This mode is for fast network connections where the cursor response is sufficient to provide
instant visual feedback on the remote screen. When enabled, the cursor is ‘captured’ within the
viewer window until you use the ‘escape’ hot keys.
To quit from single mouse mode, press F8 and then P. Alternatively, enable and use the mouse
button escape sequences - see Advanced unit configuration for details.
The single mouse mode does not require calibration.
5.8.2 Resync Mouse
This option has the same effect as the button on the menu bar and re-synchronizes the local and remote mouse pointers.
5.8.3 Refresh Screen
This option refreshes the whole screen image to remove any artefacts from moved screen items. This is useful when using very
low refresh rates on slow speed communication links.
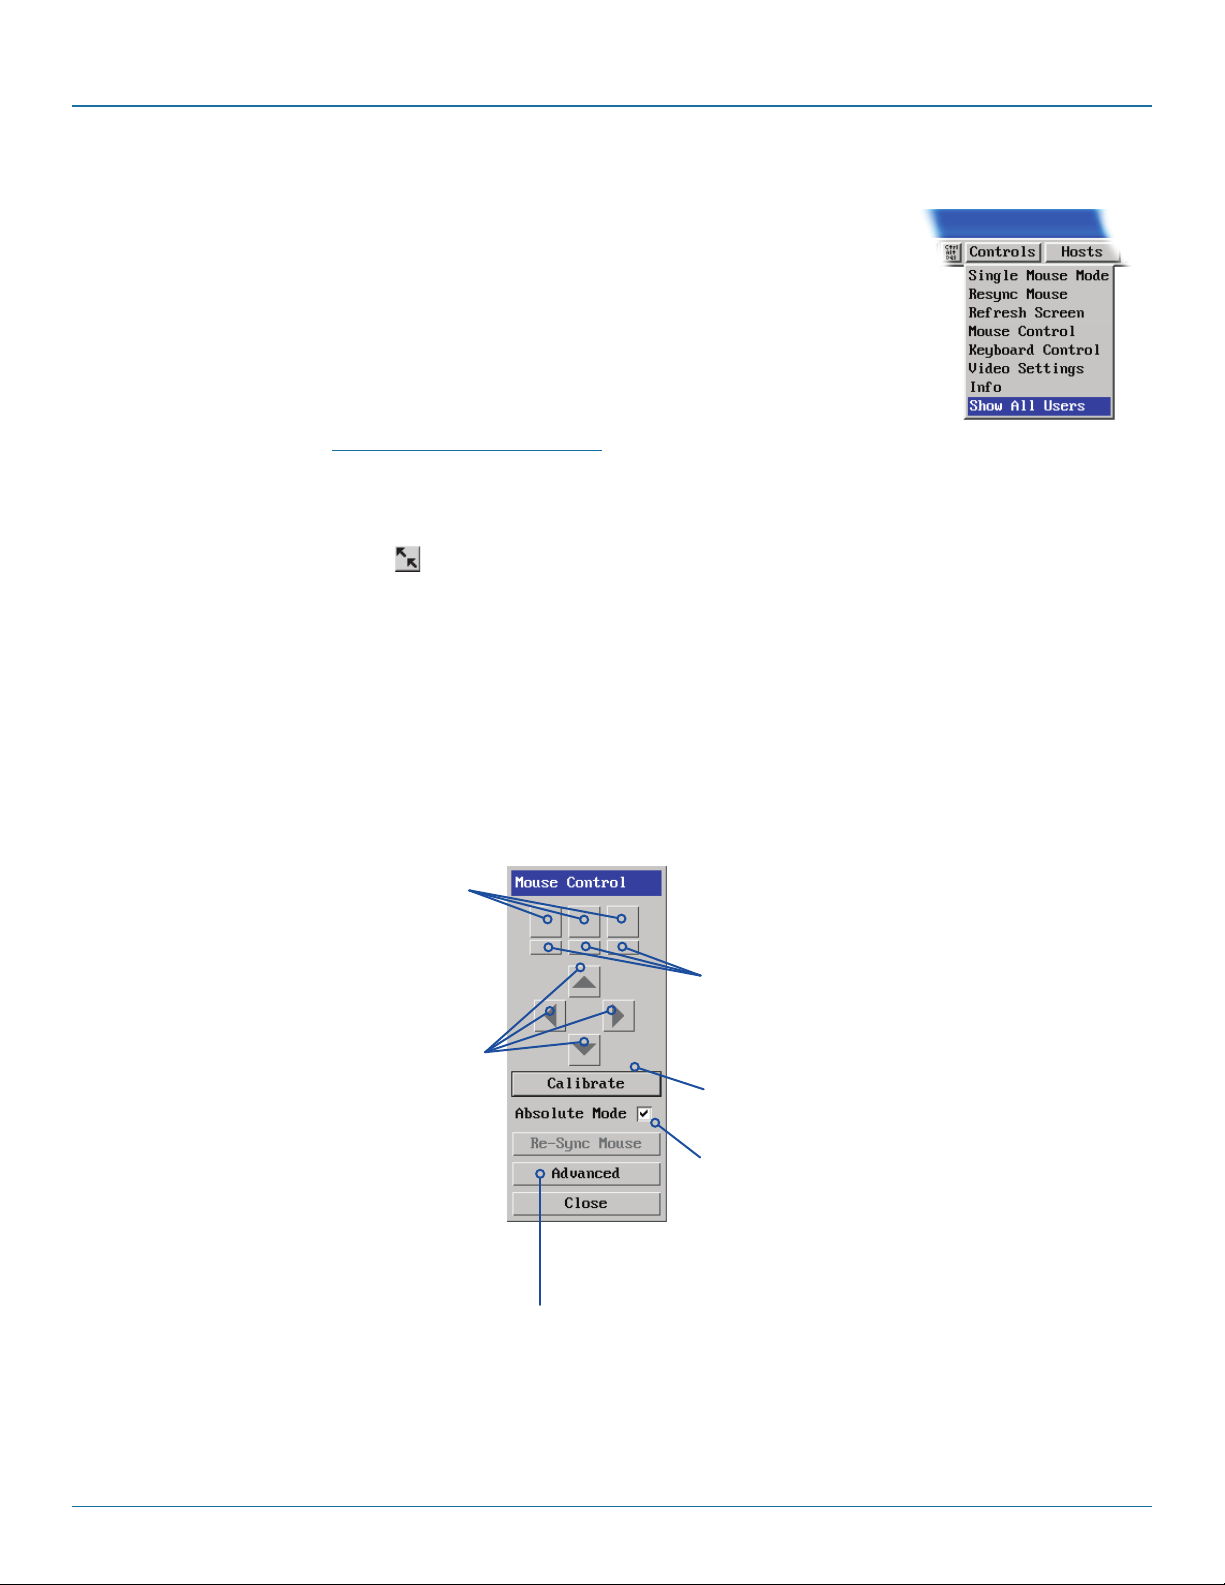
5.8.4 Mouse Control
This option displays a mouse control dialog and is useful when the remote cursor is failing to respond correctly to your mouse
movements, even after using the Resync mouse option.
The mouse control dialog allows you to control the remote mouse cursor using a selection of buttons that you click with your
local mouse.
Click to produce a single
mouse click for the left,
centre or right mouse
buttons
Click to produce a
continuous mouse click
and hold for the left,
Click to move the remote
mouse cursor up, down,
left or right
Click to display
the Advanced
Mouse
Configuration
dialog. See
opposite page.
centre or right mouse
buttons
Click to calibrate the
remote mouse
When ticked the unit
will attempt to switch
to Absolute Mouse
mode (recommended). If
the computer does not
support this then it will
display a warning and
return to relative mouse
mode.
Page 26
877-877-2269 | blackbox.com
Page 27
Chapter 5: Operation
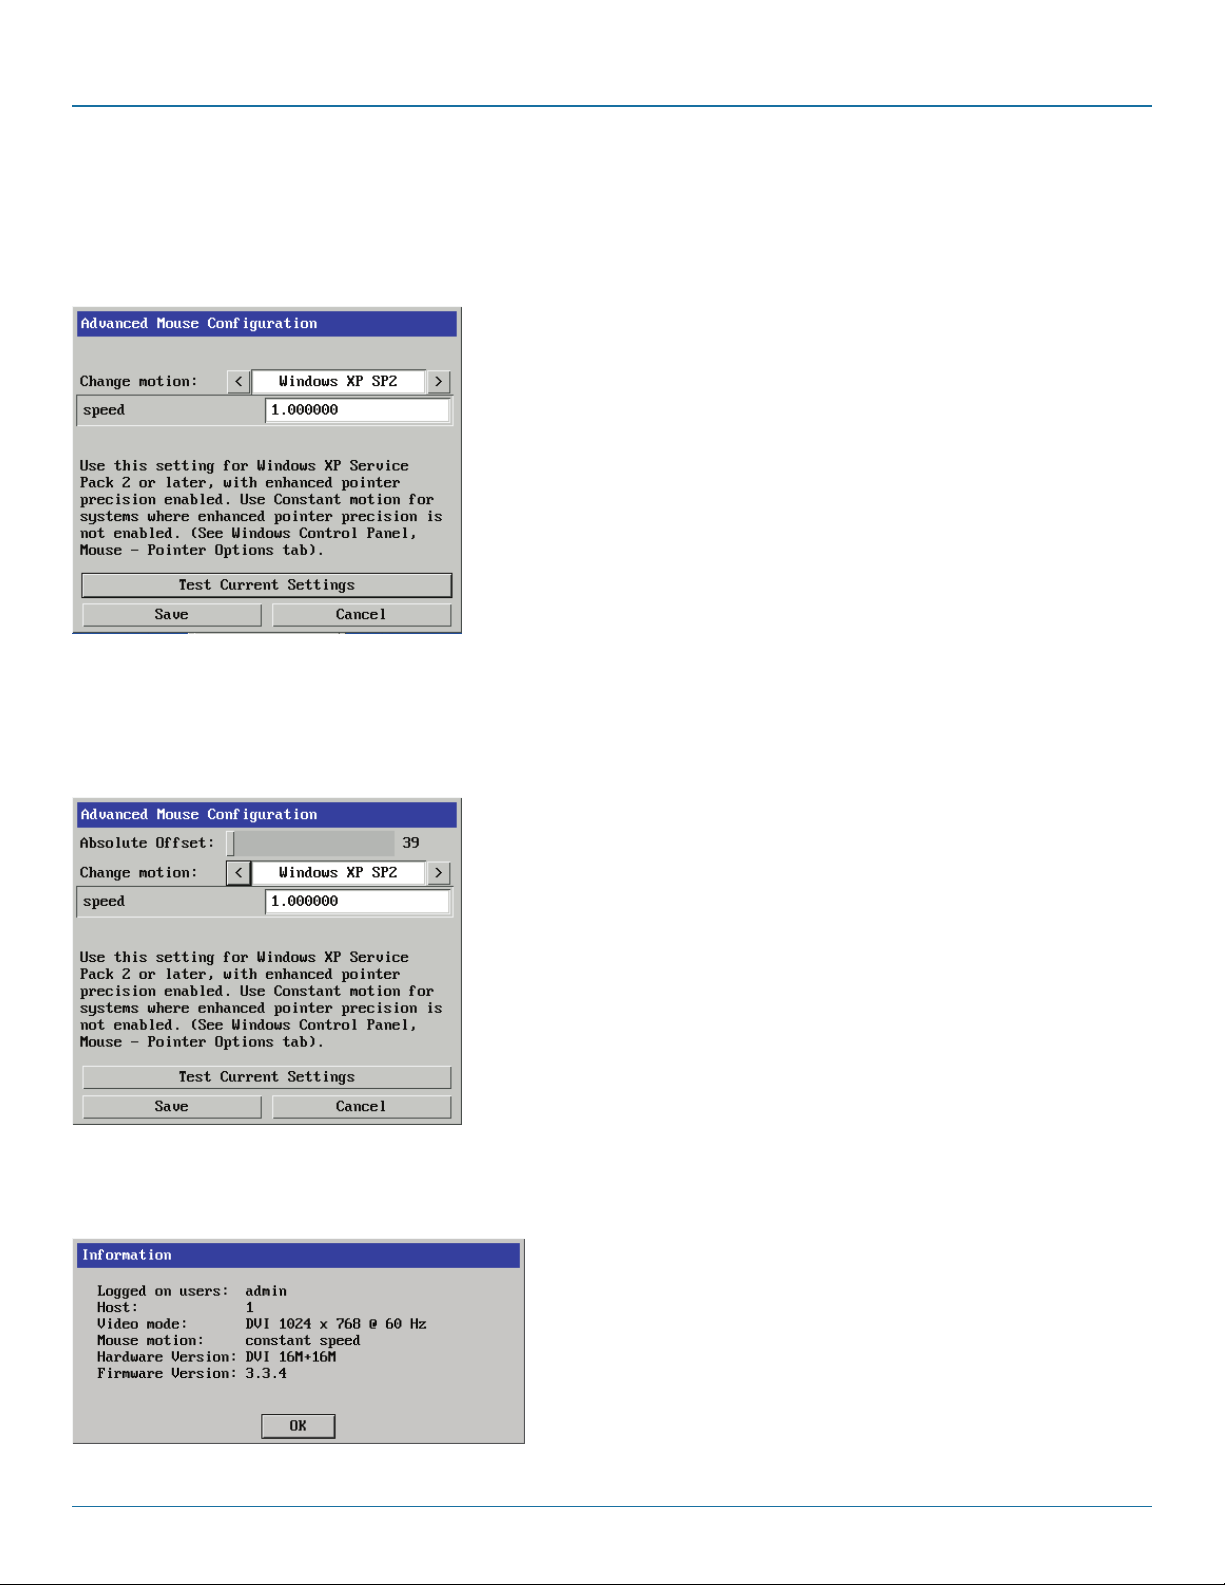
5.8.5 Advanced mouse configuration
This dialog allows the mouse acceleration to be configured according to the operating system in use and also permits manual fine
tuning for situations where problems are encountered with the Calibrate function.
For best results, choose the appropriate Change motion: entry to match the host in use.
The available Change Motion schemes are: Constant, XFree86, Windows Pre-XP, Windows XP, Windows XP SP2, OS/2, Solaris,
Solaris 9 and Mac OSX. Most of these offer the Speed setting as the only option, however, the Windows Pre-Xp and XFree86
options contain many other parameters.
When the Absolute Mode option is ticked in the main Mouse Control menu, this dialog allows you to adjust the Absolute Offset
scale:
5.8.6 Info
When selected, this option displays an information dialog showing the current logged on users, the current host, its video mode
and its mouse motion details.
877-877-2269 | blackbox.com
Page 27
Page 28
ServSwitch Wizard™ DXS - Digital
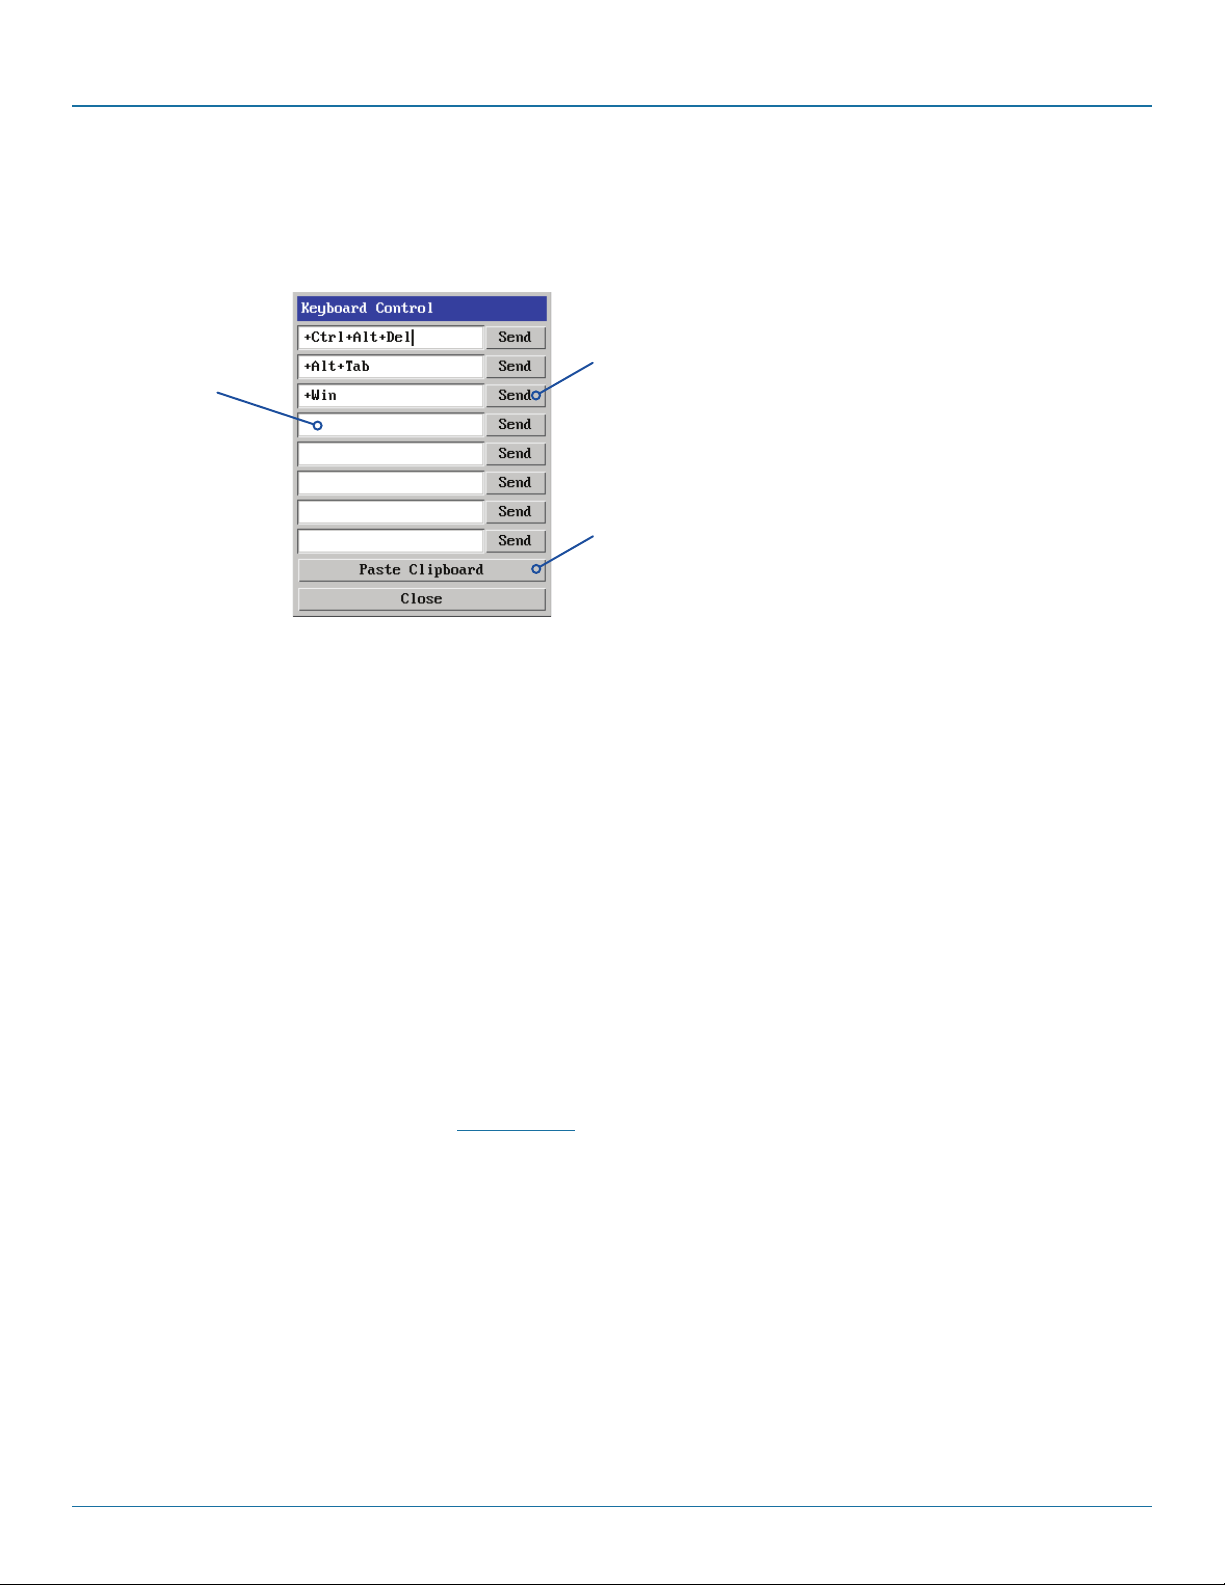
5.8.7 Keyboard Control
This option displays a keyboard control dialog and is useful for sending keyboard combinations (to the host) that are needed
regularly or that are trapped by the Wizard DXS - Digital.
Click to send
Click to send
the code
Enter the
code here
When entering codes:
the code
Click to send the
Click to send the
contents of the
contents of the
clipboard to the host
clipboard to the host
+ means press down the key that follows
– means release the key that follows
+– means press down and release the key that follows
* means wait 250ms (note: if a number immediately follows the asterisk, then the delay will equal the number, in milliseconds)
It is automatically assumed that all keys specified will be released at the end, so there is need to specify -Ctrl or -Alt if these keys
are to be released together.
Examples:
‘Ctrl + Alt 12’ would be expressed as: +Ctrl+ Alt+1–1+2
+N means press the ‘N’ key
+Scroll means press the Scroll lock key
+Space means press the space key
Note: If using the Paste Clipboard feature, within the VNC viewer properties, ensure that in the Inputs section, the Share
clipboard with server option is enabled. See Appendix A for details.
Page 28
877-877-2269 | blackbox.com
Page 29
Chapter 5: Operation
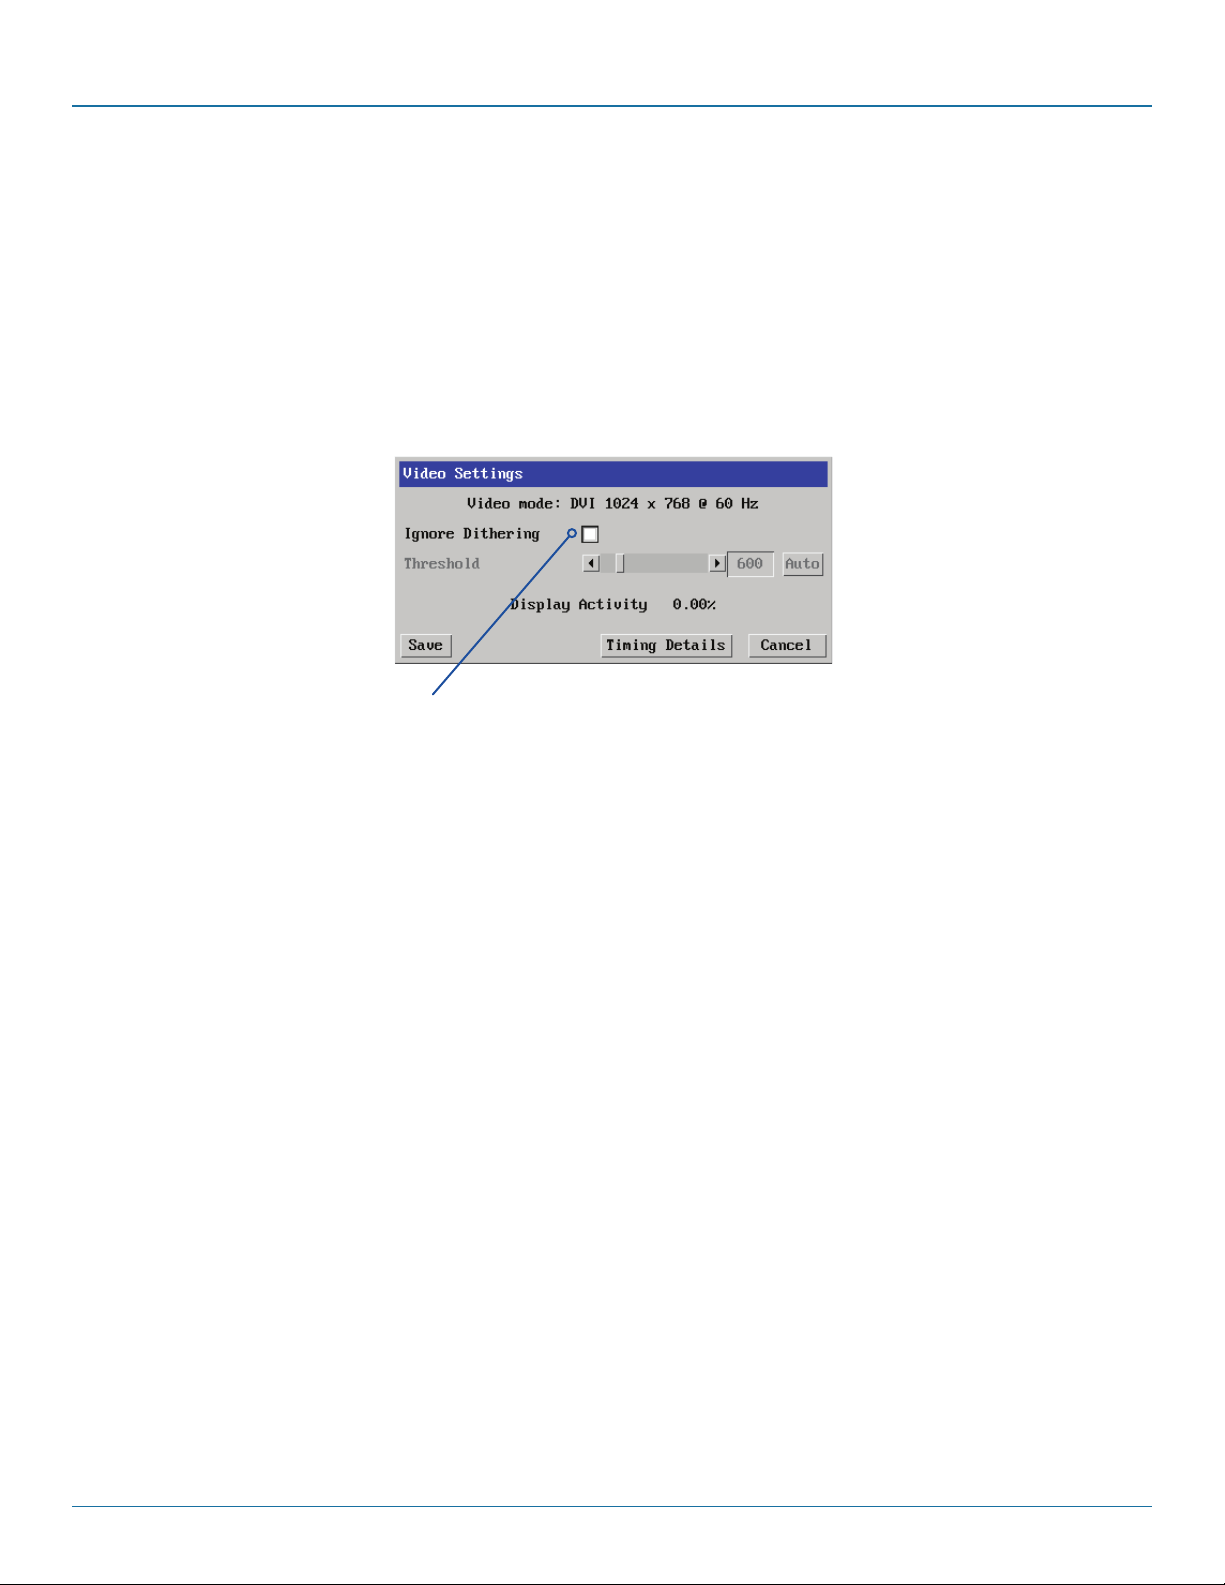
5.8.8 Video settings
This option provides a range of options related to the video configuration.
Dithering is a technique used by some graphics cards to improve perceived image quality by continuously slightly varying the color
of each pixel. This gives the illusion of more shades of color than the display can really reproduce, and smooths the appearance of
gradually shaded areas in images. Unfortunately, dithering is an issue for KVM extenders such as Wizard DXS - Digital because it
makes the image appear to be changing all the time even when it is static. This means that a great deal of unnecessary network
data is sent to the VNC viewer, reducing the video frame rate and making mouse response appear slow.
The Ignore Dithering option works by ignoring small variations in the video from frame to frame. It is disabled by default to give
full color accuracy and the best possible frame rate from non-dithered video sources.
Ignore Dithering
The ‘Ignore Dithering’ option increases performance and reduces network
traffic when the host computer is an Apple Mac or another computer that
has dithered video output. It also improves performance if the video source is
noisy (e.g. from a camera or a VGA-to-DVI converter).
The Threshold setting adjusts the level of dithering noise that is ignored. The ‘Auto’ button attempts to choose a suitable value
automatically, but the level can also be adjusted manually using the slider or arrow buttons. The best value is of course a
compromise between capturing all the ‘real’ screen changes whilst ignoring the (almost invisible) dithering noise. A good way to
choose the value is to watch the Display Activity indicator for a static screen. If the Threshold is too low, the Display Activity will
be a high percentage while nothing is really changing. If the Threshold is too high, the Display Activity will be very low (or zero)
but some real changes in the screen may be missed.
877-877-2269 | blackbox.com
Page 29
Page 30
ServSwitch Wizard™ DXS - Digital
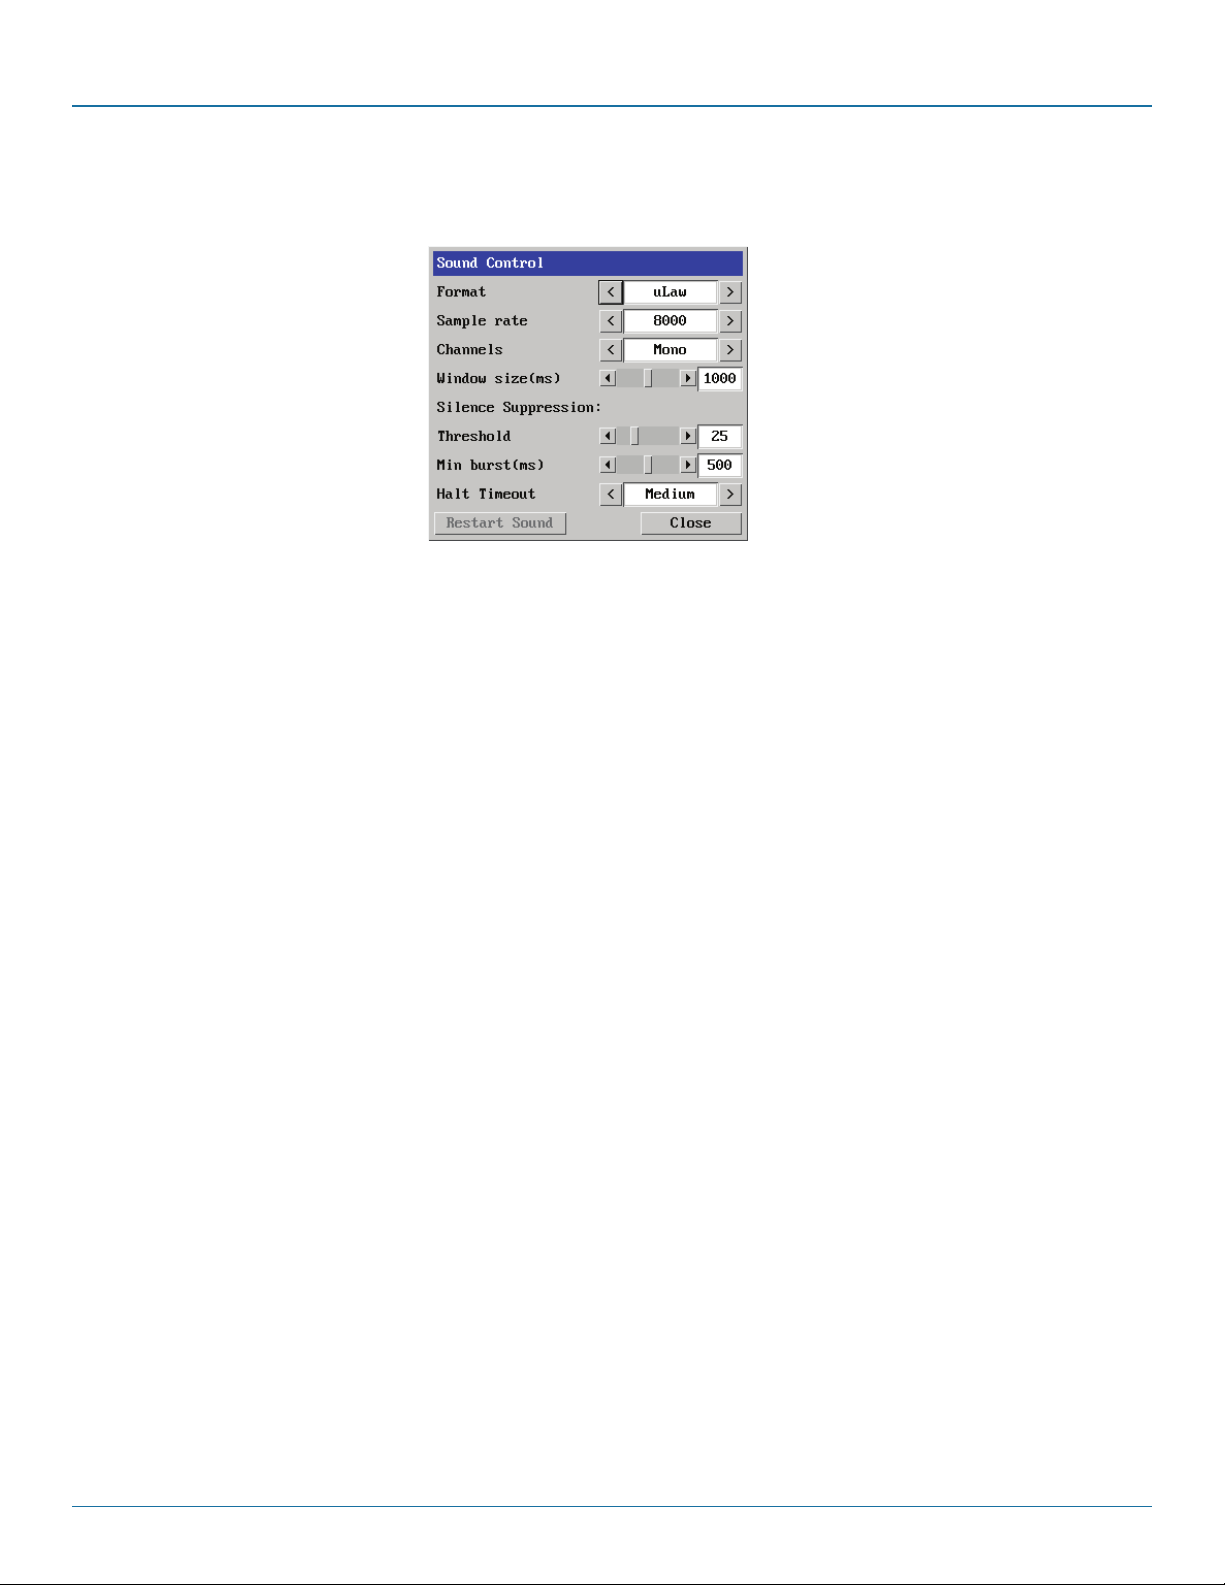
5.8.9 Sound control
This option provides a range of options related to the audio capabilities of the Wizard DXS - Digital.
Sample rate
The number of
audio samples per
second (in Hz).
8000 produces less
samples and hence
uses less network
bandwidth. 48000
(48KHz) produces
the best sound
reproduction.
Channels
Allows you to
choose between
Mono and Stereo.
Format
uLaw - Use when
transmitted data needs
to be minimised - 8-bit
compressed data.
Linear - Use when
high quality audio
performance is required
- 16-bit uncompressed
(raw) data is
transmitted.
Window size (ms)
The time frame
in which the
unit requires an
acknowledgement
from the remote
viewer when
data is sent. If
acknowledgements
are not received,
the unit will stop
sending audio data
- Click the Restart
Sound button.
Restart Sound
Click to reenable audio
transmission
following an
automatic
cutout. If cutouts
occur regularly,
try reducing
the sample rate
or format, or
increasing the
Window size
setting.
Threshold
The level above
which the audio level
should be before it is
considered to be not
background noise
and hence should
be transmitted. A
level of 25 means the
audio input needs to
be above 25% of the
maximum before it is
transmitted.
Halt timeout
Determines
how long to
wait once the
audio input
has stopped
before timing
out the audio
connection.
There are four
options: Off,
Short, Medium
and Long.
Min burst (ms)
The time period
for which the
audio input must
fall below the
threshold level
before audio
transmission
ceases.
Transmission
will begin again
as soon as the
threshold level
is once again
exceeded.
Settings can be adjusted to suit transmission characteristics and audio quality requirements (unsuitable audio settings can affect
video quality):
For use on slow links:
Format: uLaw
Sample rate: 8000
Channels: Mono
For maximum audio quality:
Format: Linear
Sample rate: 48000
Channels: Stereo
Where necessary, adjust the Window size, Threshold and Min burst settings until optimum audio output is obtained.
Page 30
877-877-2269 | blackbox.com
Page 31

Chapter 5: Operation
877-877-2269 | blackbox.com
Page 31
Page 32

ServSwitch Wizard™ DXS - Digital
5.9 Virtual Media
The Virtual Media feature allows you to remotely make files available to a host computer that is linked to the Wizard DXS - Digital.
Disk drives, single files or collections of files and folders up to 2GB in size can be mounted via the VNC link, and appear as a readonly disk on the host. This can prove to be an invaluable tool when upgrading host computers from remote positions.
Note: The file transfer is in one direction only, from viewer to host.
Note: Virtual Media does not currently work with Apple Mac systems.
In order to use the Virtual Media feature, the VM link must be made between the Wizard DXS - Digital and a USB port on the
host computer. See Host computer connections for details.
There are two main ways to use Virtual Media:
• Createaread-only‘virtualdiskdrive’onthehostfromoneormorefileschosenattheviewerend.Thisisusefulforcopying
one or more files from the computer running the VNC viewer to the host computer. See below.
• Exportadiskdrive(e.g.CD,DVDorUSBflashdrive)fromtheviewercomputersoitappearsasadiskonthehostattachedto
Wizard DXS - Digital. A particular use for this is for booting or upgrading the remote host from a CD or other media that you
have at the viewer end.
5.9.1 Remotely transferring files to the host as a virtual disk drive
There are several methods of doing this. The easiest method depends on whether:
• Thefilesarealreadyontheclipboardoftheviewercomputer(followinganEdit -> Copy operation).
See 5.10.1.1 To remotely transfer files from the clipboard >>
or
• Thefilesstillneedtobeselected.See5.10.1.2 To select and remotely transfer files from the viewer computer >>
Note: When using Virtual Media features, within the VNC viewer properties, ensure that in the Inputs section, the Share
clipboard with server and the Enable file transfer options are enabled. See Appendix A for details.
Page 32
877-877-2269 | blackbox.com
Page 33
Chapter 5: Operation
5.9.1.1 To remotely transfer files from the clipboard
1 On the remote system, log into the Wizard DXS - Digital using the VNC viewer.
2 If not already done, use Windows Explorer to locate and copy the required file(s), or folder(s) to the clipboard.
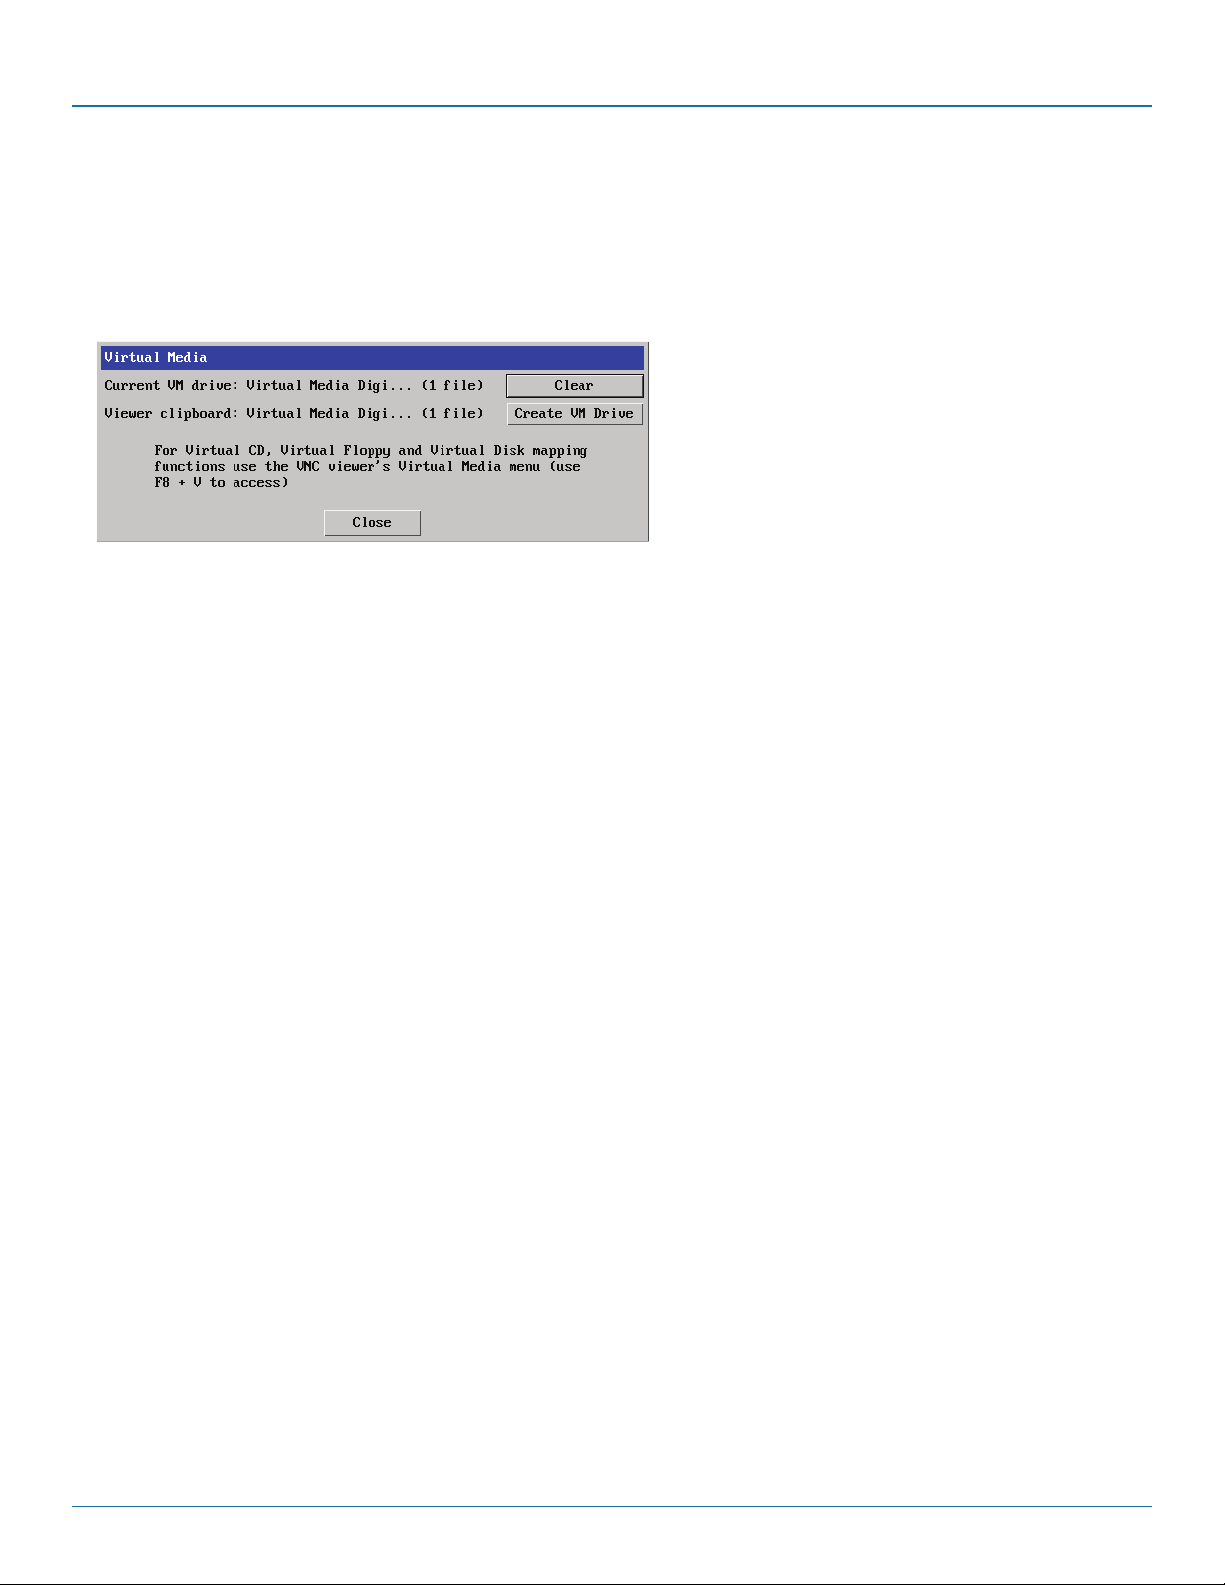
3 Within the VNC viewer window, click the Controls button and then select the Virtual Media option. A popup similar to the
following will be displayed:
Click the Create VM Drive button to announce file availability to the host computer, whereupon a popup will confirm that the
new virtual media disk is built.
Note: Remember, at this point the selected files/folders have not yet been transferred to the host system, they are just visible
there.
4 On the host computer (via the VNC viewer) locate the new virtual drive (shown as a Removable Disk) and copy the files to the
required location on the host computer.
5.9.1.2 To select and remotely transfer files from the viewer computer
1 On the remote system, log into the Wizard DXS - Digital using the VNC viewer.
2 Invoke the “Send Files” feature of the VNC viewer (called “File Transfer” in later versions), either by clicking the icon on the
viewer’s toolbar or selecting from the F8 menu.
3 The viewer will display a window allowing you to select files or a whole folder.
Highlight the required files or folders (up to a maximum of 2GB) that you wish to transfer to the host computer and click the
Open button. The new disk drive should appear on the host a few seconds later.
Note: The Use Entire Folder button provides a quick way to select a whole folder while you are viewing its contents.
Note: Remember, at this point the selected files/folders have not yet been transferred to the host system, they are just visible
there.
4 On the host computer (via the VNC viewer) locate the new virtual drive (shown as a Removable Disk) and copy the files to the
required location on the host computer.
877-877-2269 | blackbox.com
Page 33
Page 34
ServSwitch Wizard™ DXS - Digital
5.9.2 Remotely exporting a disk drive to the host
1 On the remote system, log into the Wizard DXS - Digital using the VNC viewer.
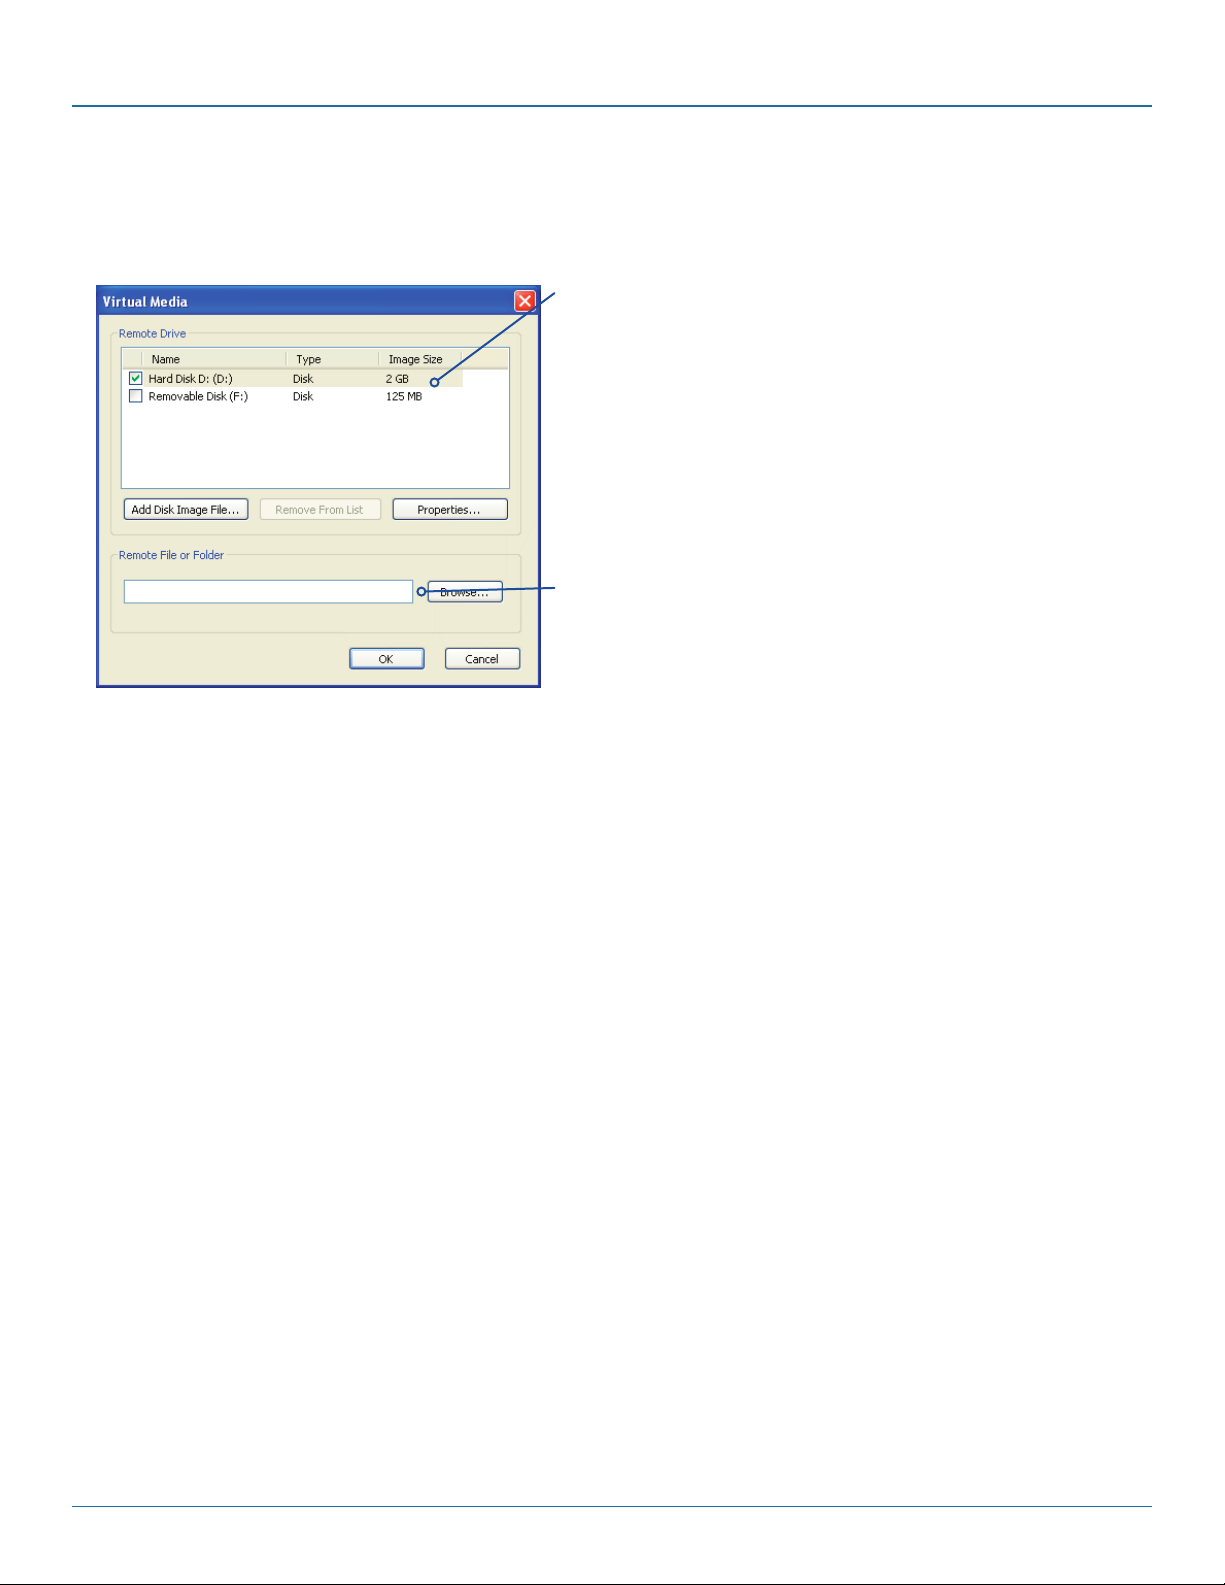
2 Press F8 and then V to display a Virtual Media dialog box:
Remote Drive(s)
This section lists any
located storage devices
on the remote system that
are 2GB or less, and which
could be copied en masse
to the host computer, if
desired.
When the Create ISO
Image option is ticked this
creates a bootable disk so
that it’s possible to boot
the host computer from
the virtual media drive.
Remote Files or Folders
Click Browse to search
for and select single or
multiple files/folders to
be copied to the host
computer.
3 You can select an entire drive or a disk image (e.g. .iso) file:
• Selectadiskdrive:Clickthecheckboxadjacenttothelisteddiskdrivethatyouwishtomakeavailabletothehostcomputer,
or
• AddaDiskImageFile:SelectthediskimagefileandclickOpen.
4 In the Virtual Media dialog box, click the OK button to announce the availability of the drive to the host computer. On the host
computer, the new drive will appear in the same way as any removable drive would on your computer.
Note: Remember, at this point the selected drive has not yet been transferred to the host system, it is just visible there.
5 On the host computer (either directly from Wizard DXS - Digital local console or via the VNC viewer) locate the new virtual
drive (shown as a Removable Disk) and copy the files to the required location on the host computer.
Note: The Remote File or Folder section of this Virtual Media dialog box provides yet another method of creating a virtual drive
from some files or folders, as described above.
Page 34
877-877-2269 | blackbox.com
Page 35

Chapter 5: Operation
5.10 Resetting the Wizard DXS - Digital to factory default
For situations where the IP address or the password has been forgotten, or the Wizard DXS - Digital is being reinstalled, it is
possible to reset the unit to its original factory settings. This erases all configuration such as hosts, users and passwords, and
restores the default network address.
5.10.1.1 To perform a factory reset:
1 Disconnect power and all other cables from the Wizard DXS - Digital unit.
2 Set Configuration Switch 2 to the ON (up) position.
3 Apply power to the unit (either from the power supply or via both USB cables).
4 Within five seconds set Switch 2 to the OFF (down) position.
Note: If the orange indicator illuminates while switch 2 is still in the ON position then it is too late to place it in the OFF
position. Power down and try again.
If the factory reset is successful, the orange indicator will flash once after fifteen seconds.
After the factory reset is complete, the unit will reboot and you can connect a VNC viewer to it using the default IP address:
192.168.1.42 to check that the configuration has been reset.
877-877-2269 | blackbox.com
Page 35
Page 36
ServSwitch Wizard™ DXS - Digital
Appendix A. VNC viewer connection options
Note: If you are using a later version of VNC viewer than that provided with the product originally, some menus may differ slightly
from those shown here.
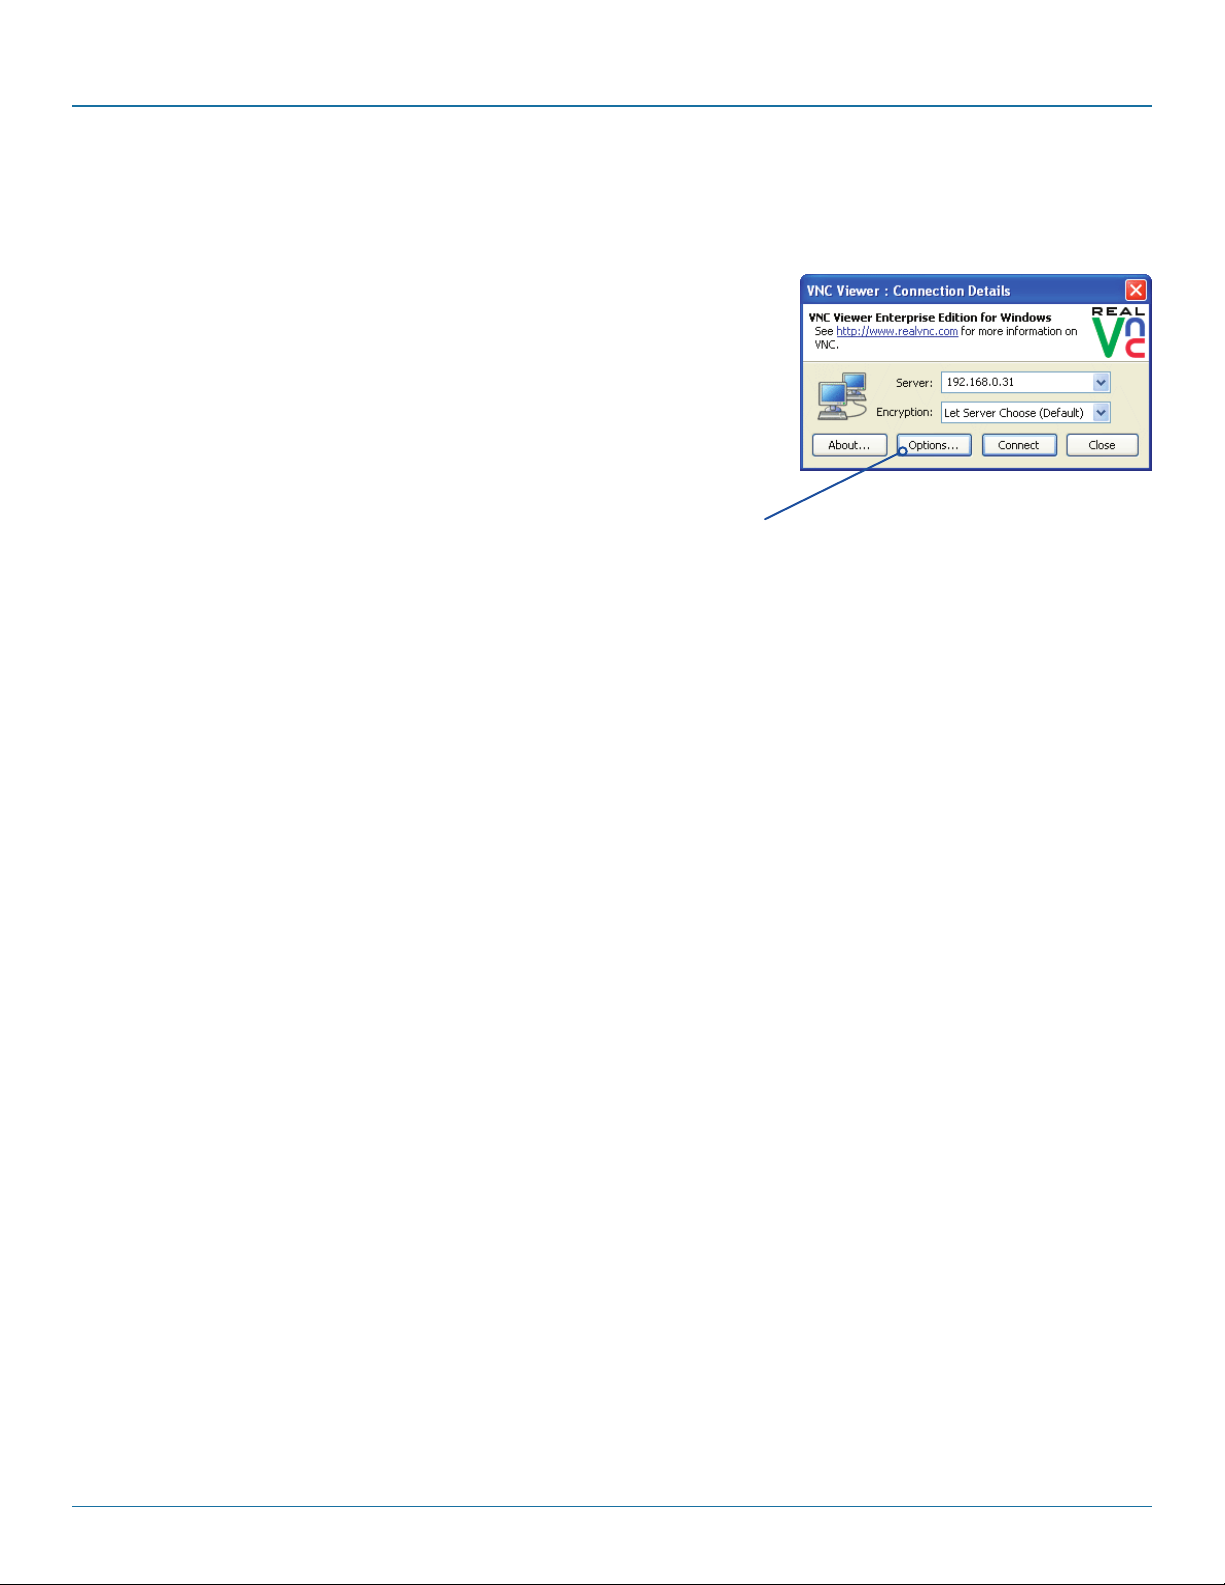
When you are connecting to the Wizard DXS - Digital using the VNC viewer, a
number of options are available.
Click here to
access the options
There are four tabbed pages of options:
• Display
• Inputs
• Connection
• Expert
You can also reduce the four standard tabs to just one that contains only the most commonly used options by clicking the Basic...
button in the lower left corner. The resulting single page includes all of the Display items shown opposite plus the Connection
options shown below:
Connection
View-only
When ticked, no control data (from keyboard or mouse) are sent to the Wizard DXS - Digital.
Pass special keys directly to server
When ticked, ‘special’ keys (the Windows key, the Print Screen key, Alt+Tab, Alt+Escape and Ctrl+Escape) are passed directly to
the Wizard DXS - Digital rather than being interpreted locally.
Menu key
This feature allows you to select which function key is used to display the VNC viewer options menu. The menu key is the only
way to exit from the full screen viewer mode.
Note: If you make any changes to the options given here and wish to retain them for successive connection sessions, ensure that
the option ‘Use these settings for all new connections’ is ticked.
Page 36
877-877-2269 | blackbox.com
Page 37
A.1 Displ a y
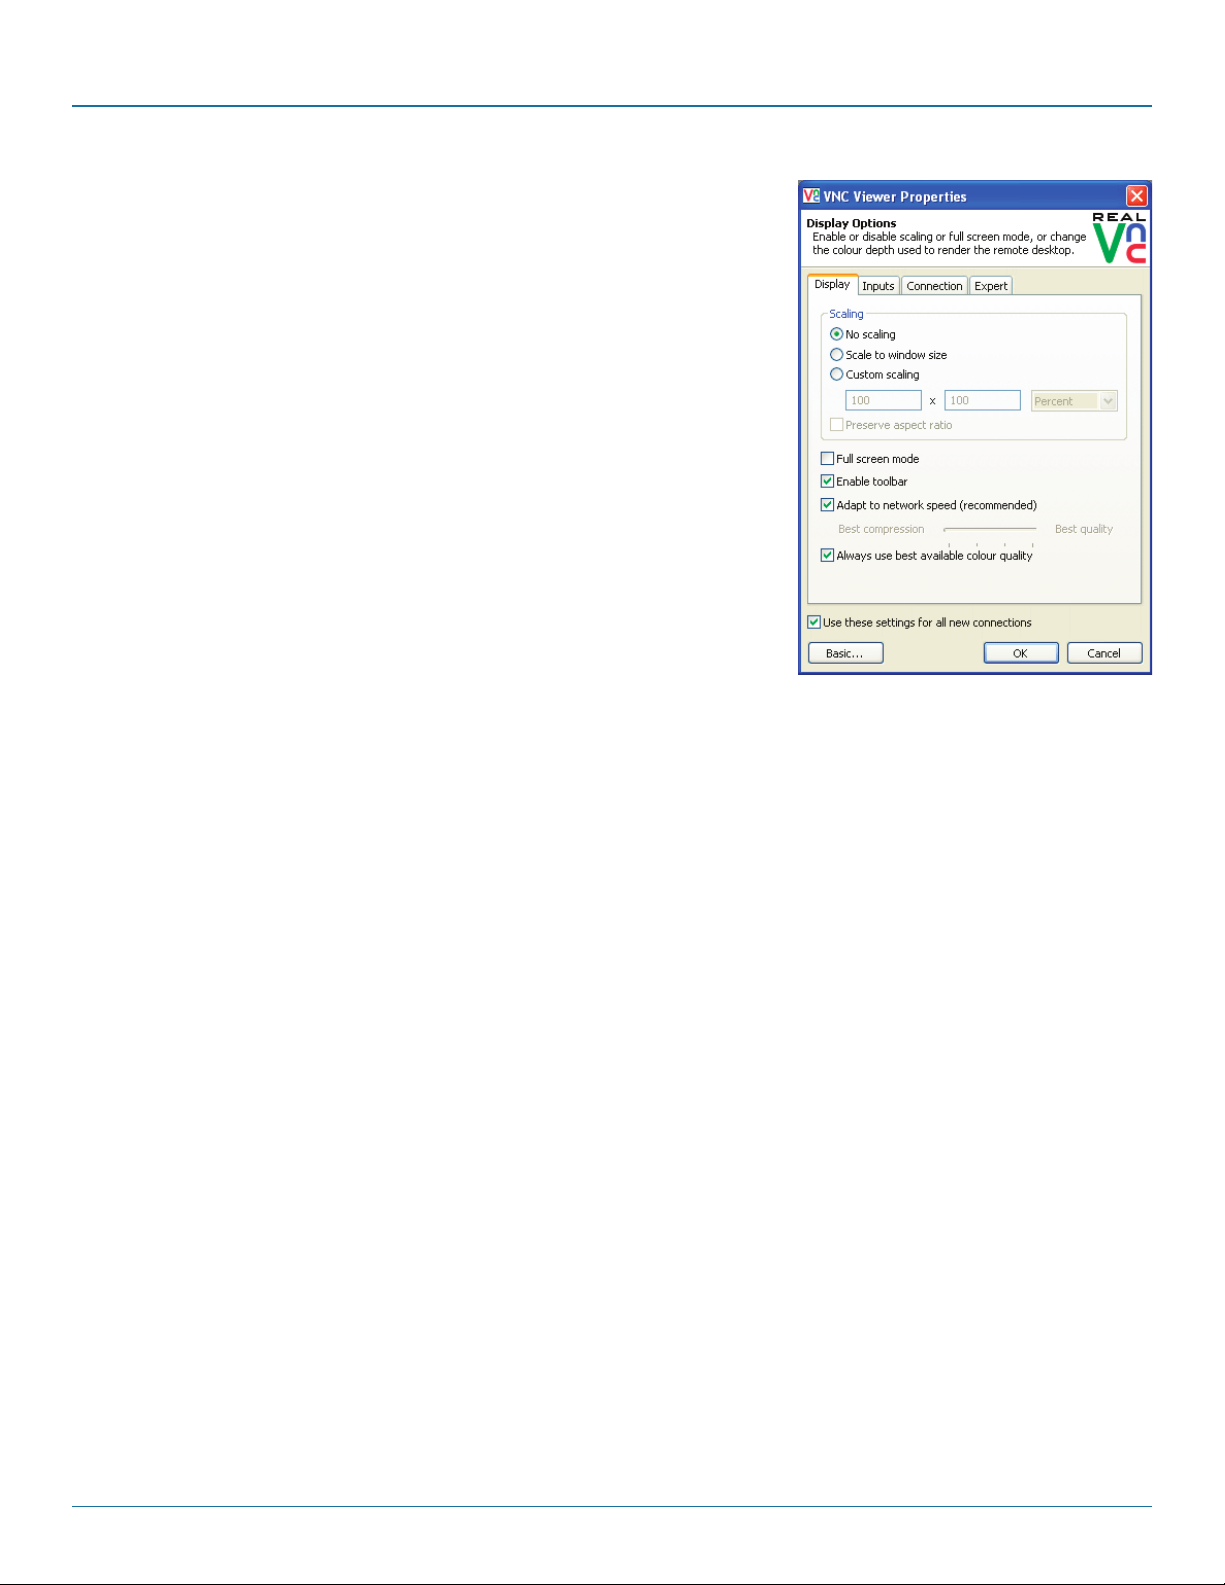
Scaling
No Scaling
No attempt is made to make the screen image fit the viewer window. You may need
to scroll horizontally and/or vertically to view all parts of the screen image.
Scale to Window Size
Adjusts the server screen image to suit the size of the viewer window.
Custom Size
Adjusts the server screen image according to the Width and Height settings in the
adjacent fields. A drop box to the right of the fields allows you to define the image
size by percentage or by pixels, as required.
Preserve Aspect Ratio
When ticked, maintains a consistent ratio between the horizontal and vertical
dimensions of the screen image.
Other options
Appendices
Full screen mode
When ticked, opens the VNC Viewer in full screen mode.
Enable toolbar
When ticked, the VNC toolbar will be displayed whenever you hover your mouse near the top centre of the VNC window.
Adapt to network speed
When ticked, VNC will automatically adjust the image quality to suit the connection speed. When unticked, a slider allows you to
choose the balance manually.
Always use best available color quality (not in V5 viewers)
When ticked, the VNC Viewer will aim to maximise performance while still maintaining a full color display (even on slower
network connections) by affecting other aspects of operation. For instance, by reducing the amount of information sent about
the mouse cursor position (which may make the mouse cursor movements appear jerky).
877-877-2269 | blackbox.com
Page 37
Page 38
ServSwitch Wizard™ DXS - Digital
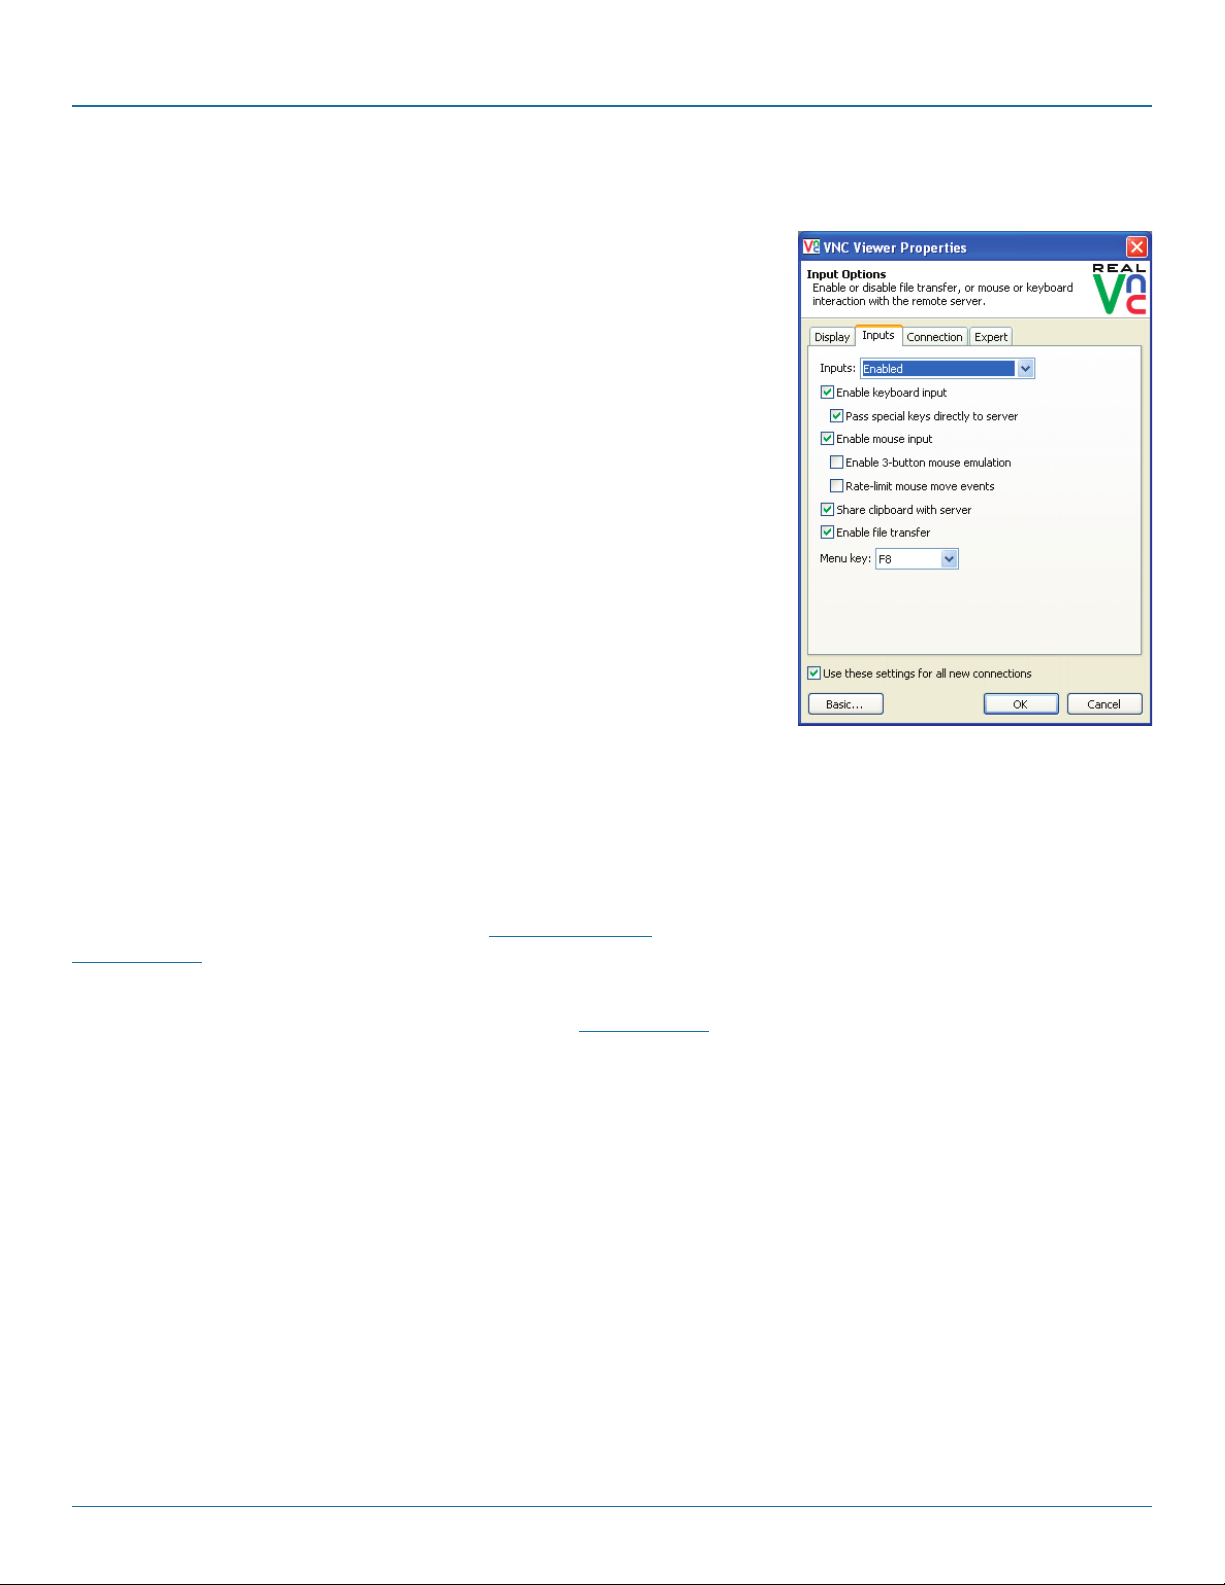
A.2 Inputs
Inputs:
When set to ‘Enabled’, all primary options below are ticked. The ‘Disabled’ setting
unticks all of the primary options (causing ‘view-only mode’ where no control data
may be sent to the Wizard DXS - Digital. The ‘Custom’ setting is shown if you choose
your own combination of options.
Enable keyboard input
Allows keyboard data to be transferred to the Wizard DXS - Digital.
Pass special keys directly to server
When ticked, ‘special’ keys (the Windows key, the Print Screen key, Alt+Tab,
Alt+Escape and Ctrl+Escape) are passed directly to the Wizard DXS - Digital rather
than being interpreted locally.
Enable mouse input
Allows mouse data to be transferred to the Wizard DXS - Digital.
Enable 3-button mouse emulation
This feature allows you to use a 2-button mouse to emulate the middle button of a
3-button mouse. When enabled, press the left and right mouse buttons
simultaneously to create a middle button action. You are advised to generally use a
3-button mouse.
Rate-limit mouse move events
When ticked, this feature reduces the mouse movement information that is sent to the Wizard DXS - Digital and host system. This
is useful for slow connections and you will notice that the remote cursor will catch up with the local cursor roughly once every
second.
Share clipboard with server
This permits the “Paste Clipboard” operation (see Keyboard control), and the “Create VM Drive” feature of Virtual Media (see
Virtual Media).
Enable file transfer
This permits the “file transfer” method of Virtual Media (see Virtual Media).
Menu key
This feature allows you to select which function key is used to display the VNC viewer options menu. The menu key is the only
way to exit from the full screen viewer mode.
Page 38
877-877-2269 | blackbox.com
Page 39
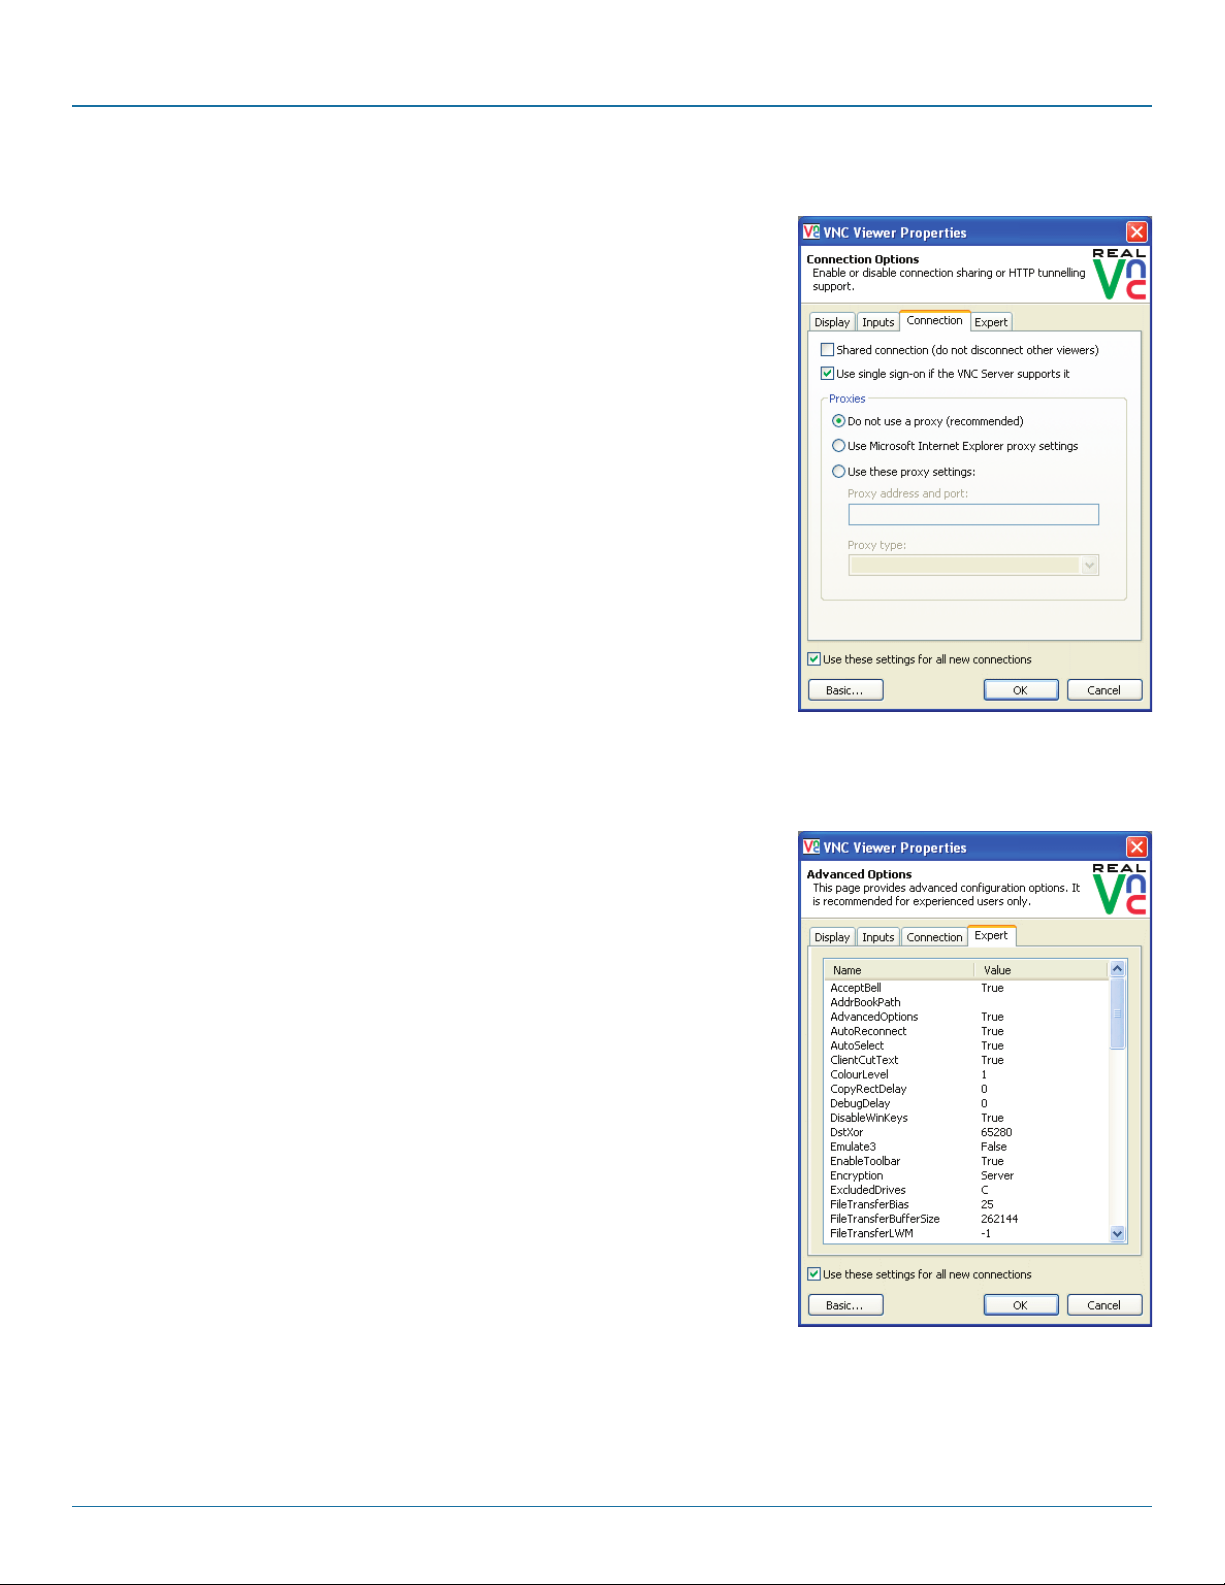
A.3 Connection
The options on this page are not relevant to Wizard DXS - Digital connections and
should be left in their default states.
Appendices
A.4 Expert
The options within this section work correctly with Wizard DXS - Digital in their
default states and should not require alteration except in special circumstances.
877-877-2269 | blackbox.com
Page 39
Page 40
ServSwitch Wizard™ DXS - Digital
Appendix B. VNC viewer window options
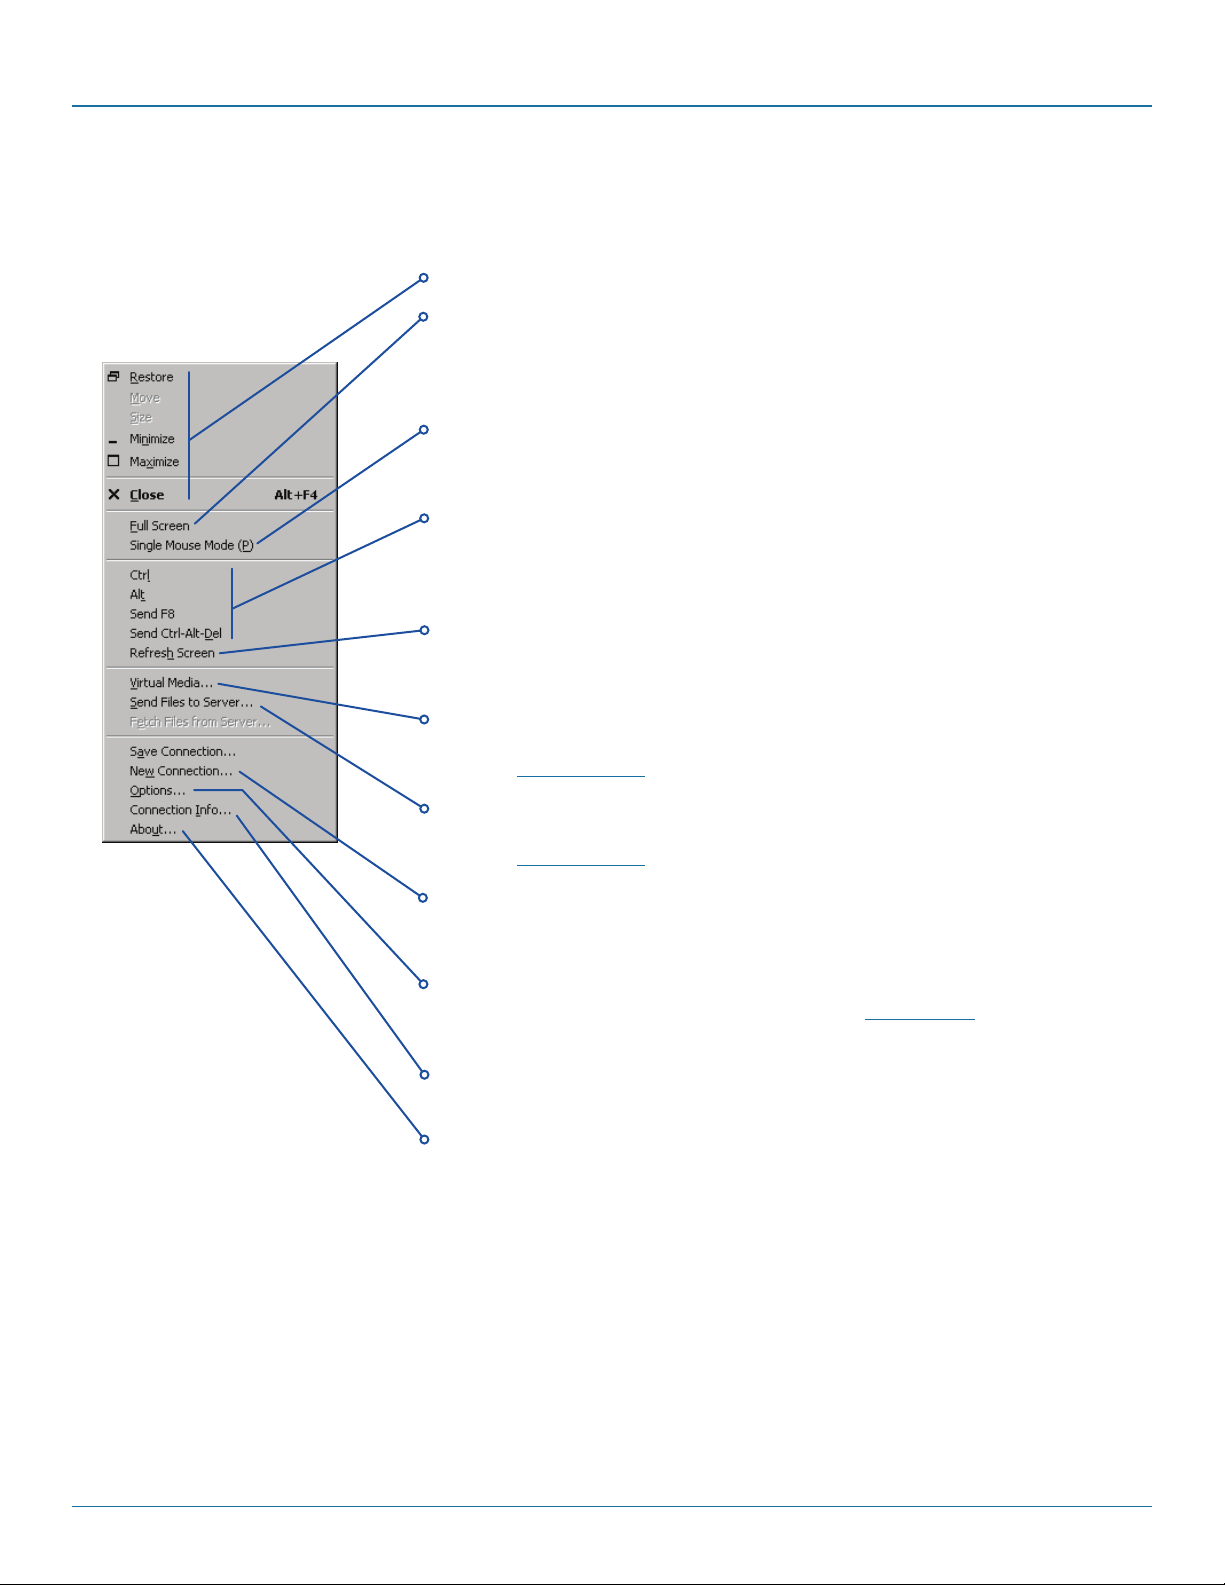
Click the VNC icon in the top left corner of the viewer window (or press F8) to display the window options:
Standard window control items
Full screen
Expands the VNC viewer window to fill the whole screen with
no visible window edges or toolbar. Press F8 to re-display this
menu.
Single mouse mode (P)
Used for fast network connections where a second, “predictor”
cursor is not required.
Ctrl, Alt, Send F8, Send Ctrl-Alt-Del
Sends the selected keypress(es) to the Wizard DXS - Digital and
host computer. This is necessary because certain keys and key
combinations are trapped by the VNC viewer.
Refresh Screen
Requests data from the server for a complete redraw of the
screen image, not just the items that change.
Virtual Media...
Allows files to be transferred from the remote computer to the
host. See Virtual Media for details.
Send Files to Server...
Allows files to be transferred from the remote computer to the
host. See Virtual Media for details.
New connection...
Displays the connection dialog so that you can log on to a
different Wizard DXS - Digital or VNC server location.
Options...
Displays the full range of connection options - see Appendix A
for more details.
Connection info...
Displays various connection and display details.
About...
Displays information about your VNC viewer.
Page 40
877-877-2269 | blackbox.com
Page 41
Appendix C. Java viewer options
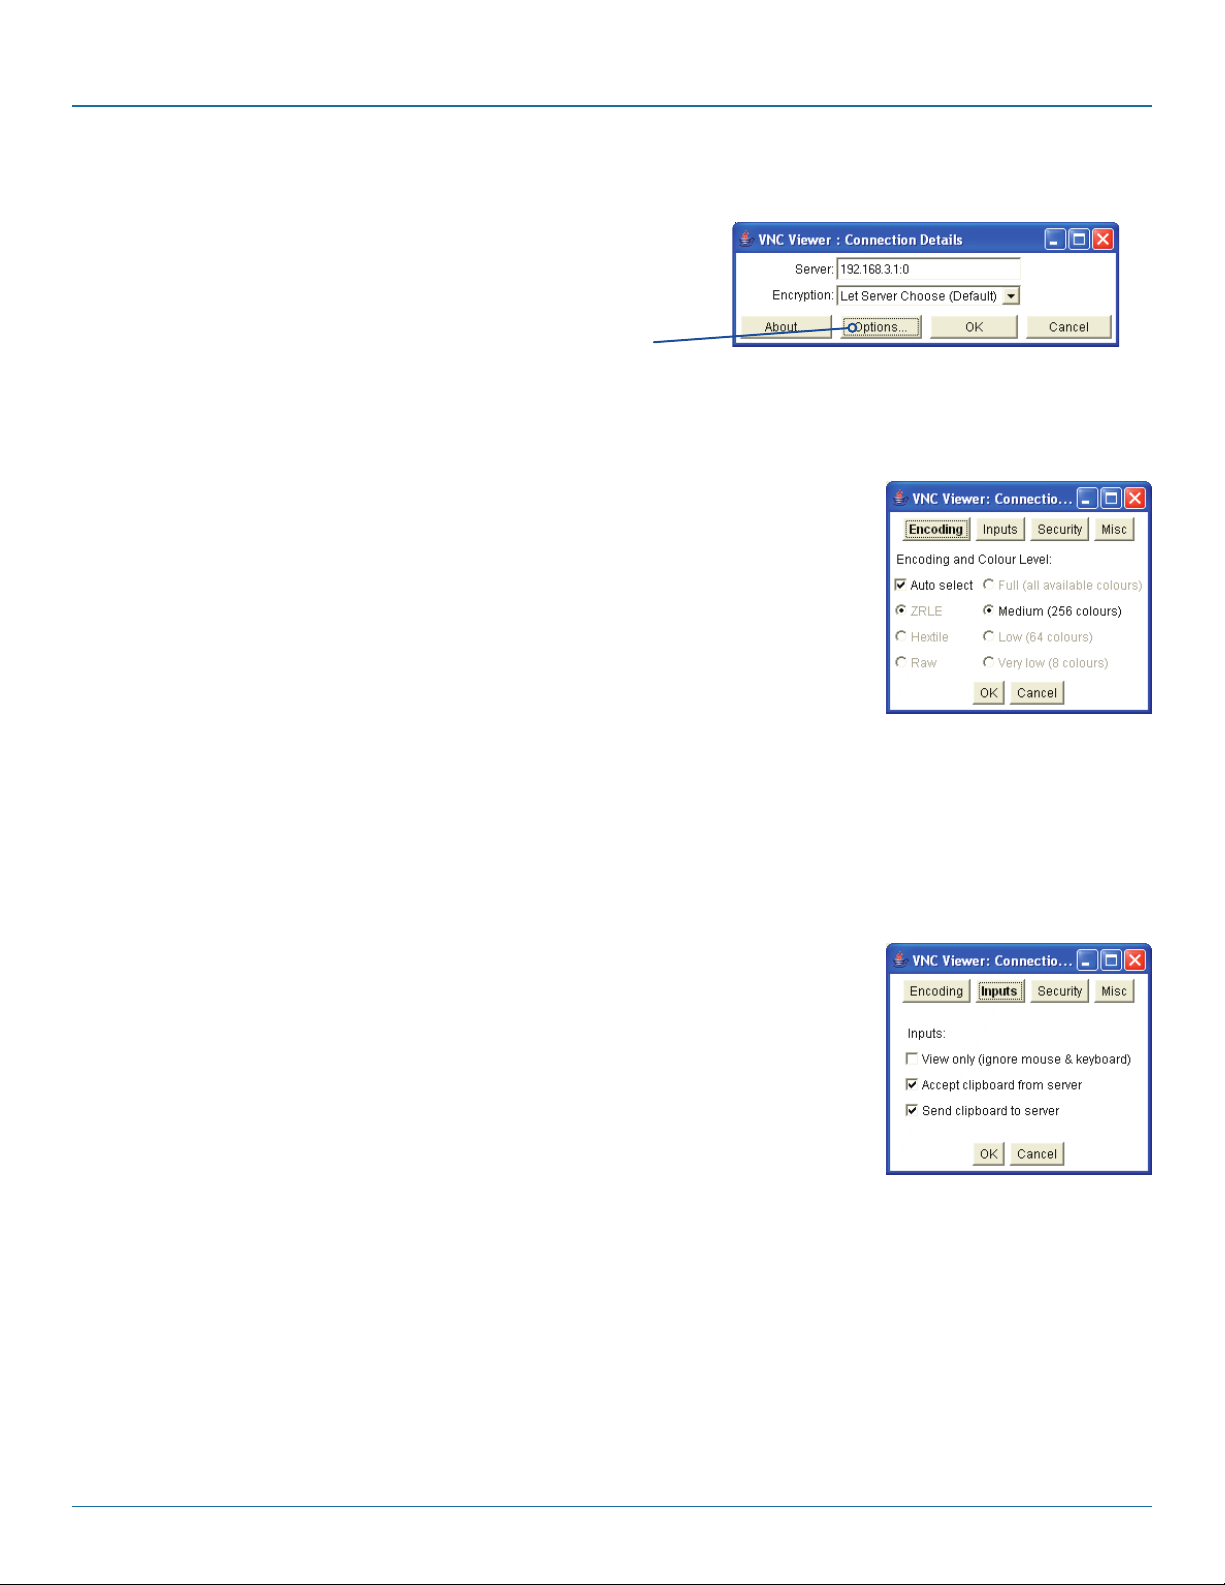
When you are connecting to the Wizard DXS - Digital using the Java
viewer, a number of options are available.
Click here to
access the options
There are four options pages:
C.1 Encoding and color level
Auto select
When ticked, this option will examine the speed of your connection to the Wizard DXS - Digital
and apply the most suitable encoding method. This option is suggested for the majority of
installations.
Preferred encoding
There are three manually selectable encoding methods which are accessible when the Auto
select option is unticked.
Appendices
• ZRLE – This is a highly compressed method that is best suited to slow modem connections.
• Hextile – This method offers better performance than the ZRLE when used over a high
speed network because there is no need for the Wizard DXS - Digital to spend time highly compressing the data.
• Raw – This is a primitive, uncompressed method that is mainly used for technical support issues. You are recommended not to
use this method.
Color level
The color level is fixed at Medium (256 colors) for almost all browsers.
C.2 Inputs
View only (ignore mouse & keyboard)
When ticked, the viewer will not send keyboard or mouse information to the Wizard DXS Digital or host computer.
Accept clipboard from server
This feature is restricted to software server versions of VNC and has no effect on Wizard DXS Digital installations.
Send clipboard to server
This feature is restricted to software server versions of VNC and has no effect on Wizard DXS Digital installations.
877-877-2269 | blackbox.com
Page 41
Page 42
ServSwitch Wizard™ DXS - Digital
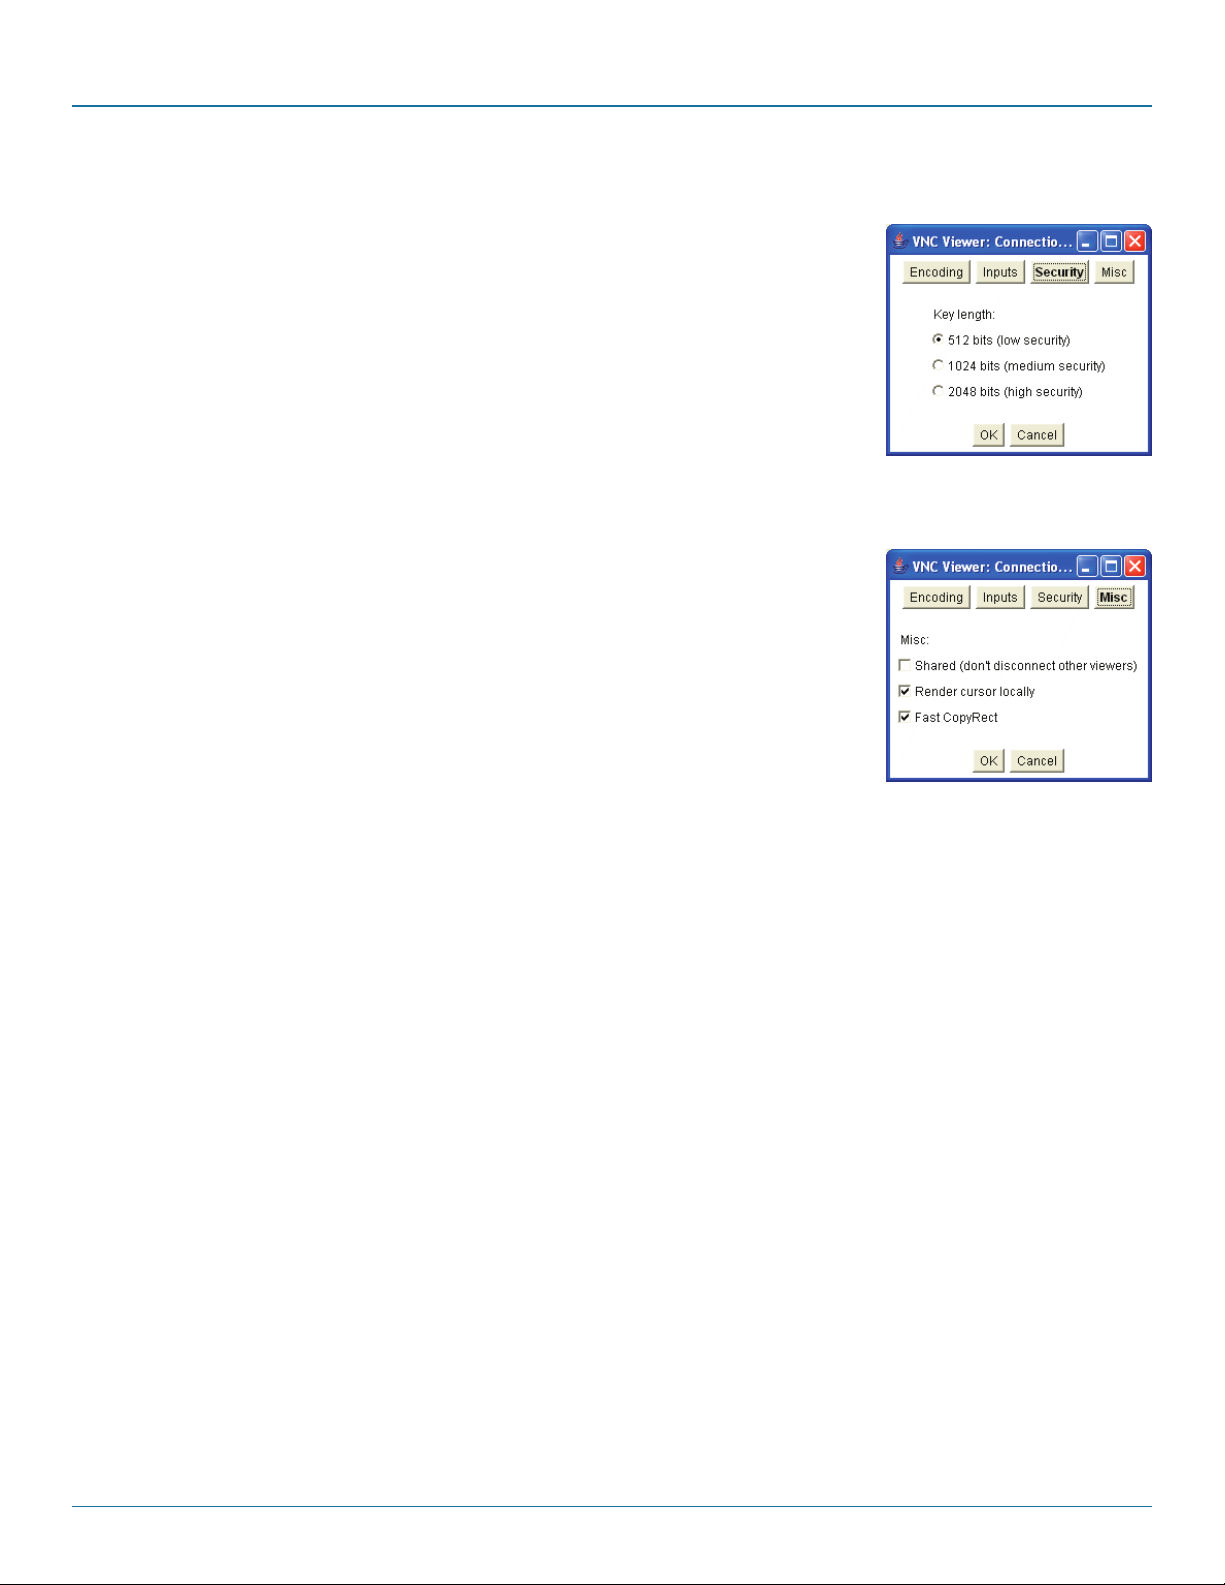
C.3 Security
512 bits (low security)
Selects the lowest level of encoding for communications between the browser and the Wizard
DXS - Digital.
1024 bits (medium security)
Selects the middle level of encoding for communications between the browser and the Wizard
DXS - Digital.
2048 bits (high security)
Selects the highest level of encoding for communications between the browser and the Wizard
DXS - Digital.
C.4 Misc
Shared (don’t disconnect other viewers)
This feature is restricted to software server versions of VNC and has no effect on Wizard DXS Digital installations.
Render cursor locally
This feature is restricted to software server versions of VNC and has no effect on Wizard DXS Digital installations.
Fast CopyRect
This option should remain enabled.
Page 42
877-877-2269 | blackbox.com
Page 43
Appendices
Appendix D. Configuration menus
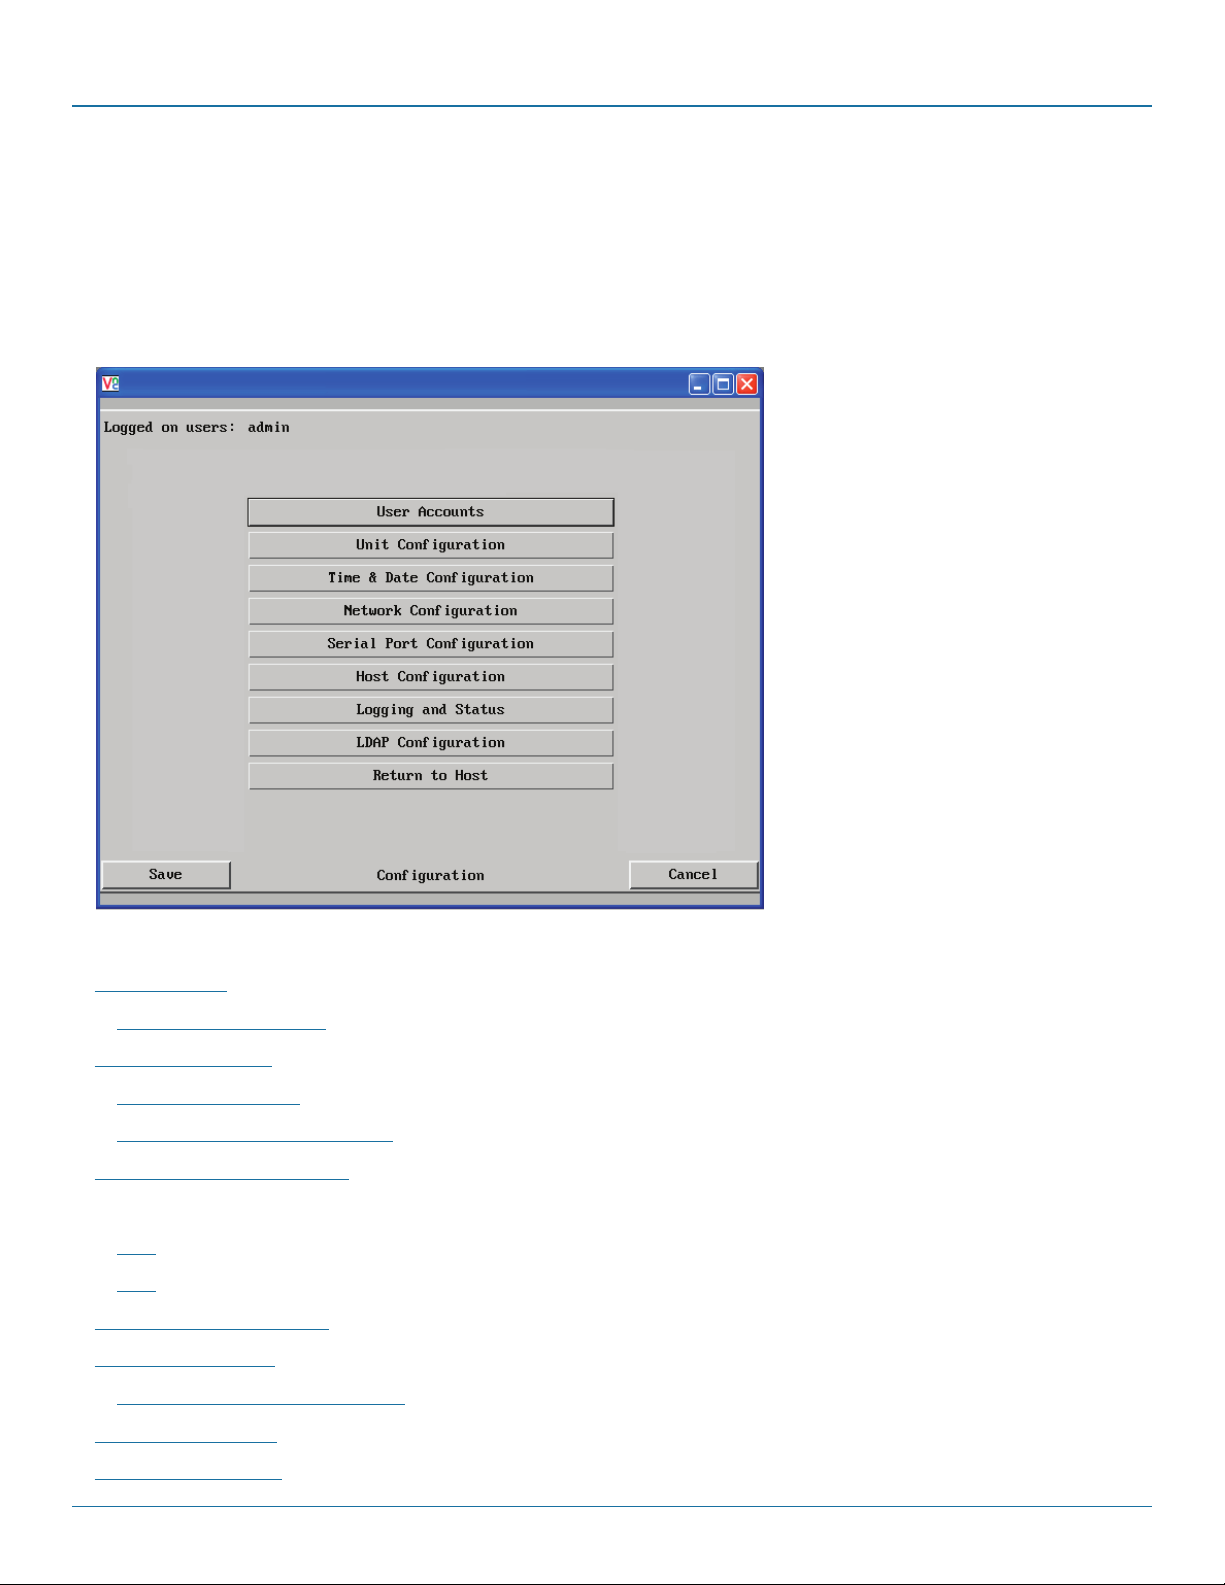
The unit has a main configuration menu through which you can access various sub menus to configure particular items.
D.1 To view the main configuration menu
1 Using VNC viewer or a browser, log on as the ‘admin’ user.
2 Click the ‘Configure’ button in the top right corner. The main configuration menu will be displayed:
The various configuration pages are covered within this appendix:
• User Accounts
• Gui edit configuration
• Unit Configuration
• EDID Configuration
• Advanced Unit Configuration
• Time & Date Configuration
• NetworkConfiguration
• IPv4
• IPv6
• Serial Port Configuration
• Host Configuration
• Power switching configuration
• Logging and Status
• LDAP Configuration
877-877-2269 | blackbox.com
Page 43
Page 44
ServSwitch Wizard™ DXS - Digital
D.2 User accounts
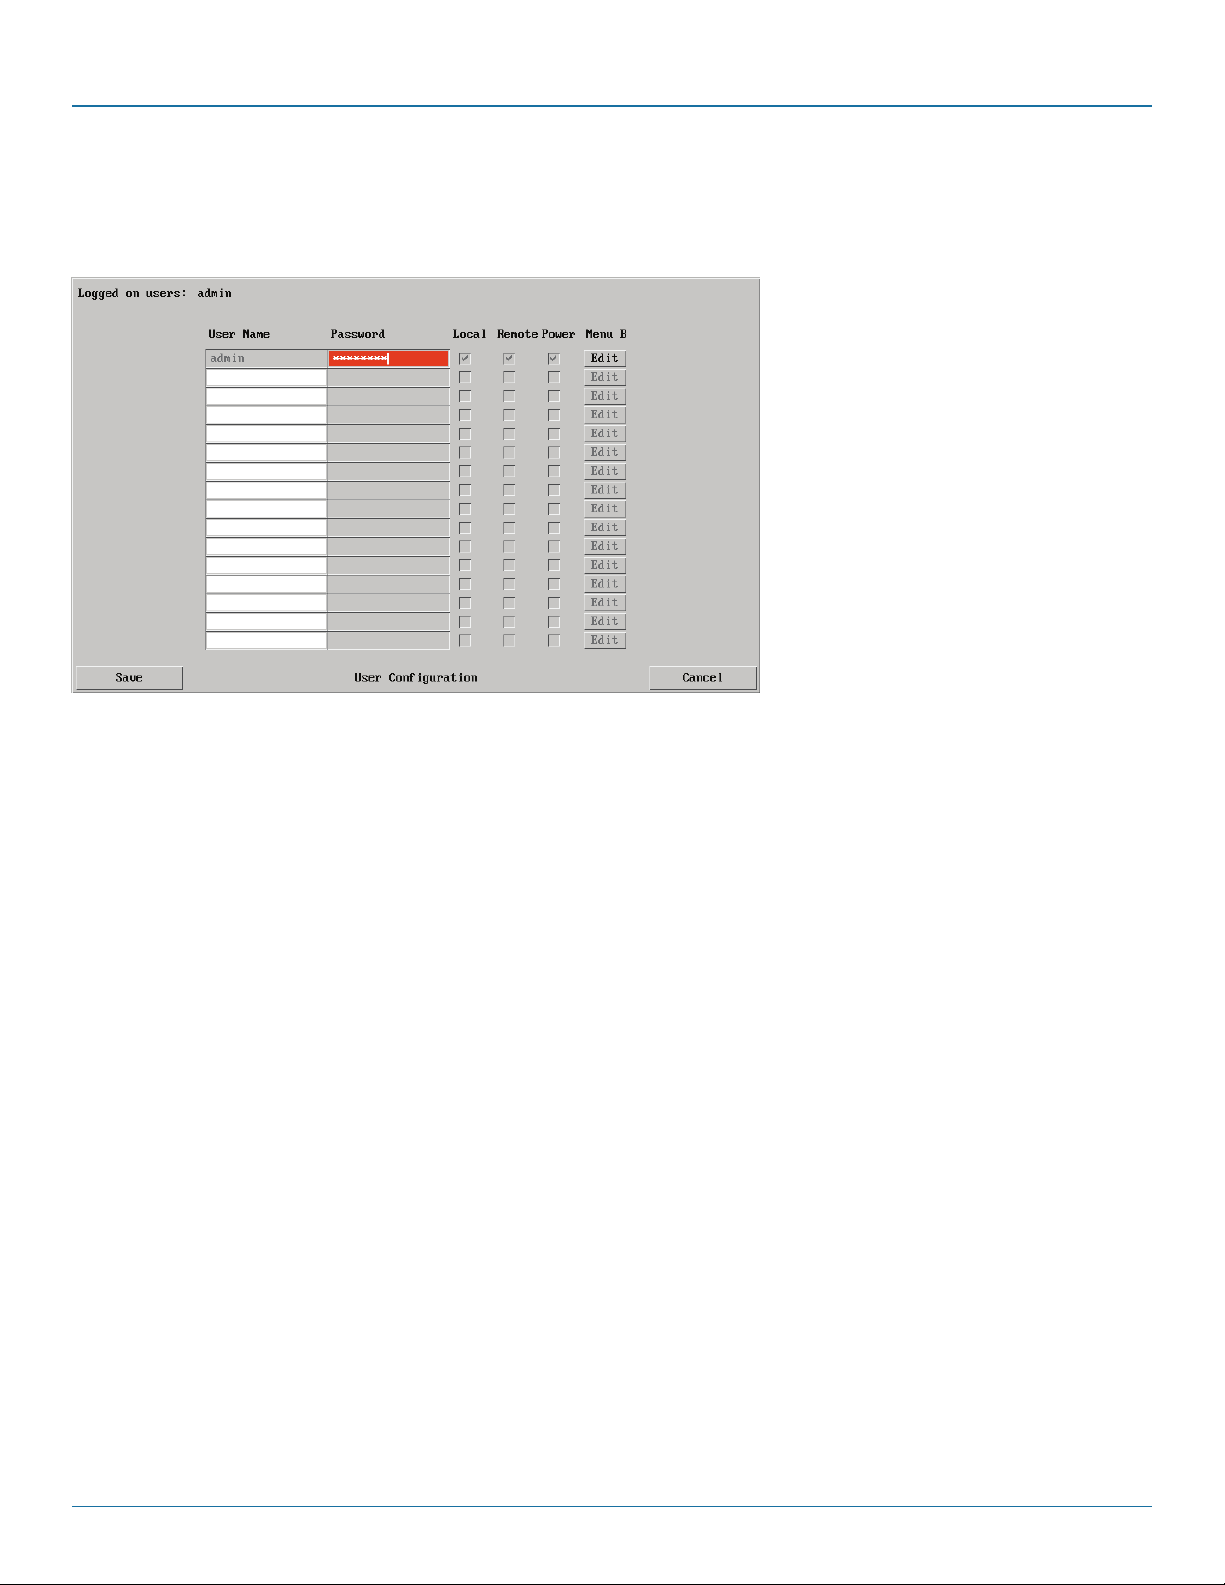
Up to 16 users can be created by the admin user, each with their password. The admin user can also determine whether the users
are allowed access to the power control menu in order to turn servers on and off.
To get here
1 Using VNC viewer or a browser, log
on as the ‘admin’ user.
2 Click the ‘Configure’ button in the top
right corner.
3 Click the ‘User Accounts’ option.
User Name
All user names must consist of lower case characters or numbers only. No symbols or upper case characters are permissible. The
user name can be between 1 and 32 characters in length but cannot contain foreign characters.
Password
Each password must be between 8 and 16 characters and contain at least 1 letter, 1 number and a special character. The
password background will remain amber whilst the password is considered to be too weak.
Local
This column is greyed out as this feature is not available on Wizard DXS - Digital.
Remote
When ticked, the selected user can gain access via an IP network link (such as a local intranet or the wider Internet, depending on
how the Wizard DXS - Digital is connected) and/or Console Server access.
Power
When ticked, the selected user will be permitted to control the power input to host systems (requires optional power control
switch unit(s) to be fitted).
Menu Bar
Optionally click to customise the menu bar for each user. See next page.
Page 44
877-877-2269 | blackbox.com
Page 45
Appendices
D.3 Gui edit configuration
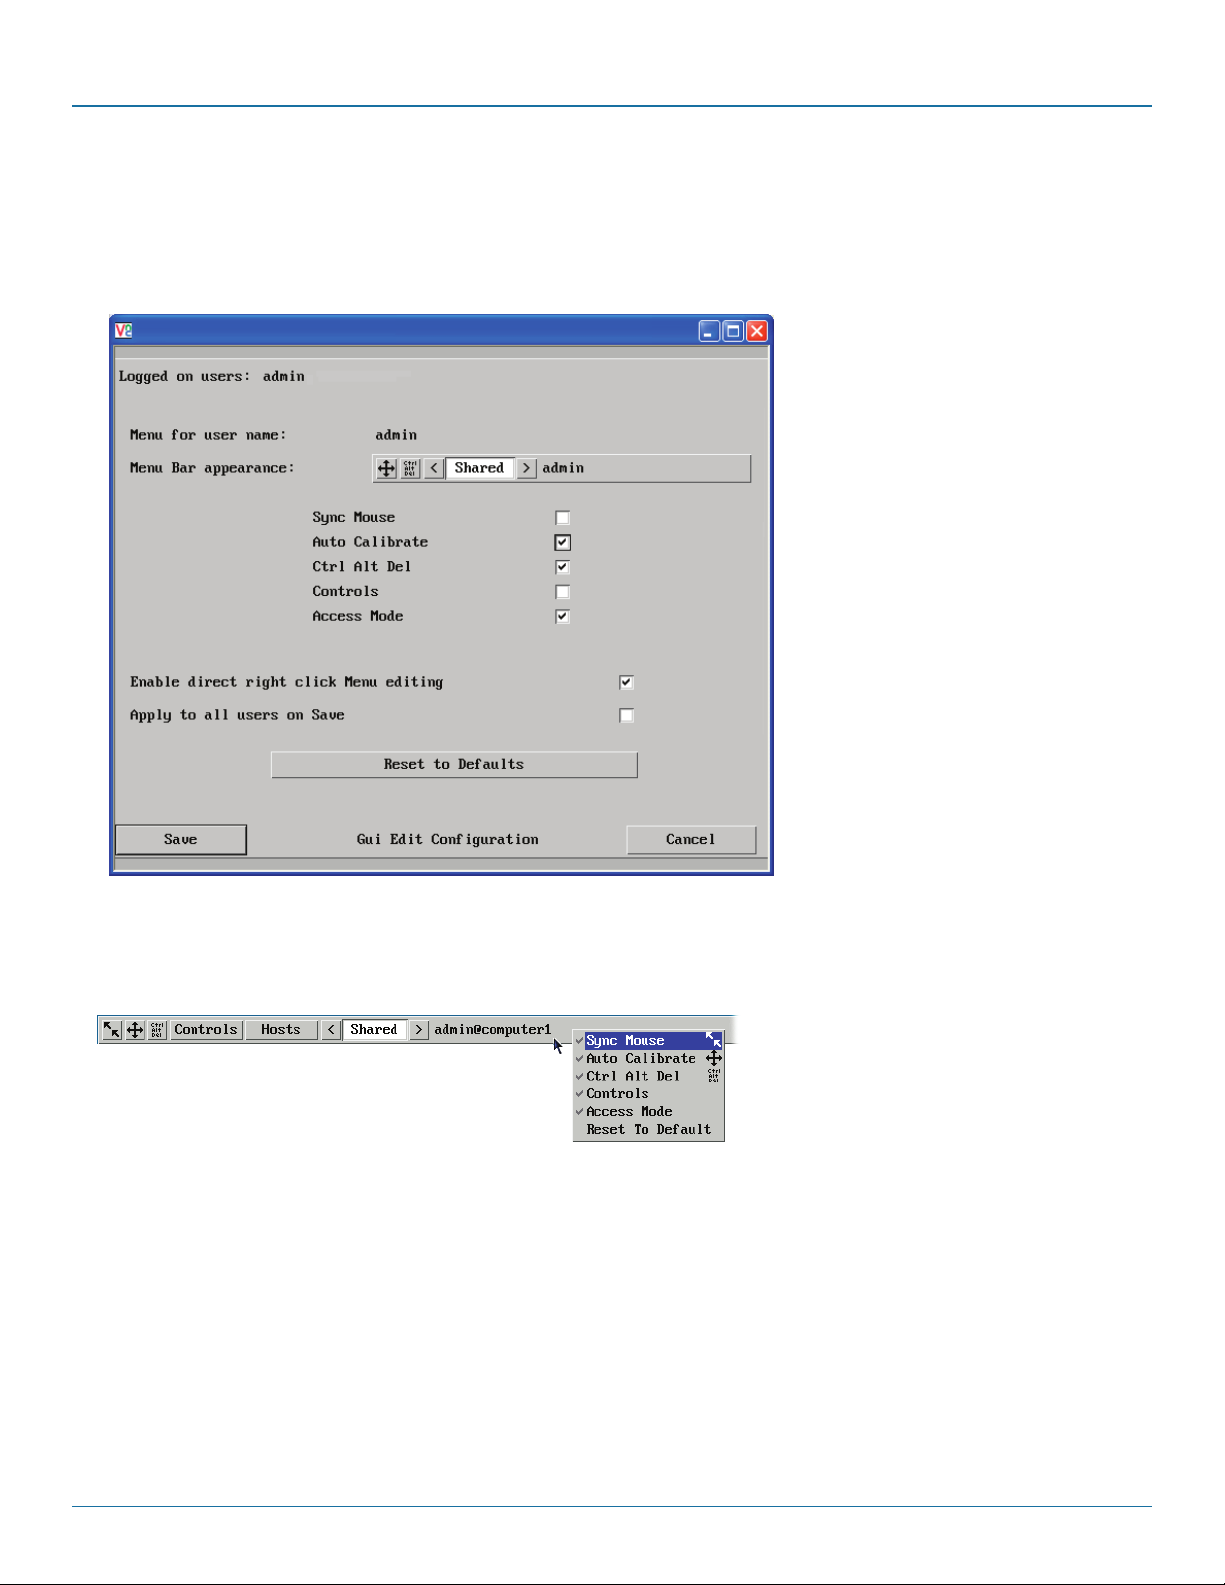
If required, you can customise the menu bar of the viewer window to ensure that it contains only the necessary options.
The menu bar can be edited locally by each user or edited singly by the admin or alternatively, the admin can globally alter the
menu bar for all users.
To globally edit the menu bar
via admin
1 Using VNC viewer or a browser, log
on as the ‘admin’ user.
2 Click the ‘Configure’ button in the
top right corner.
3 Click on User Configuration
4 Click on the relevant Edit button.
To edit the menu bar locally
1 Login remotely via VNC viewer and display the viewer window.
2 Place the mouse pointer on the menu bar and click the right mouse button. A popup will be displayed:
3 Click on any option within the popup to add it to or remove it from the menu bar.
4 When all changes have been made, click anywhere else within the viewer window.
Changes made in this way will affect the individual user only.
877-877-2269 | blackbox.com
Page 45
Page 46
ServSwitch Wizard™ DXS - Digital
D.4 Unit configuration
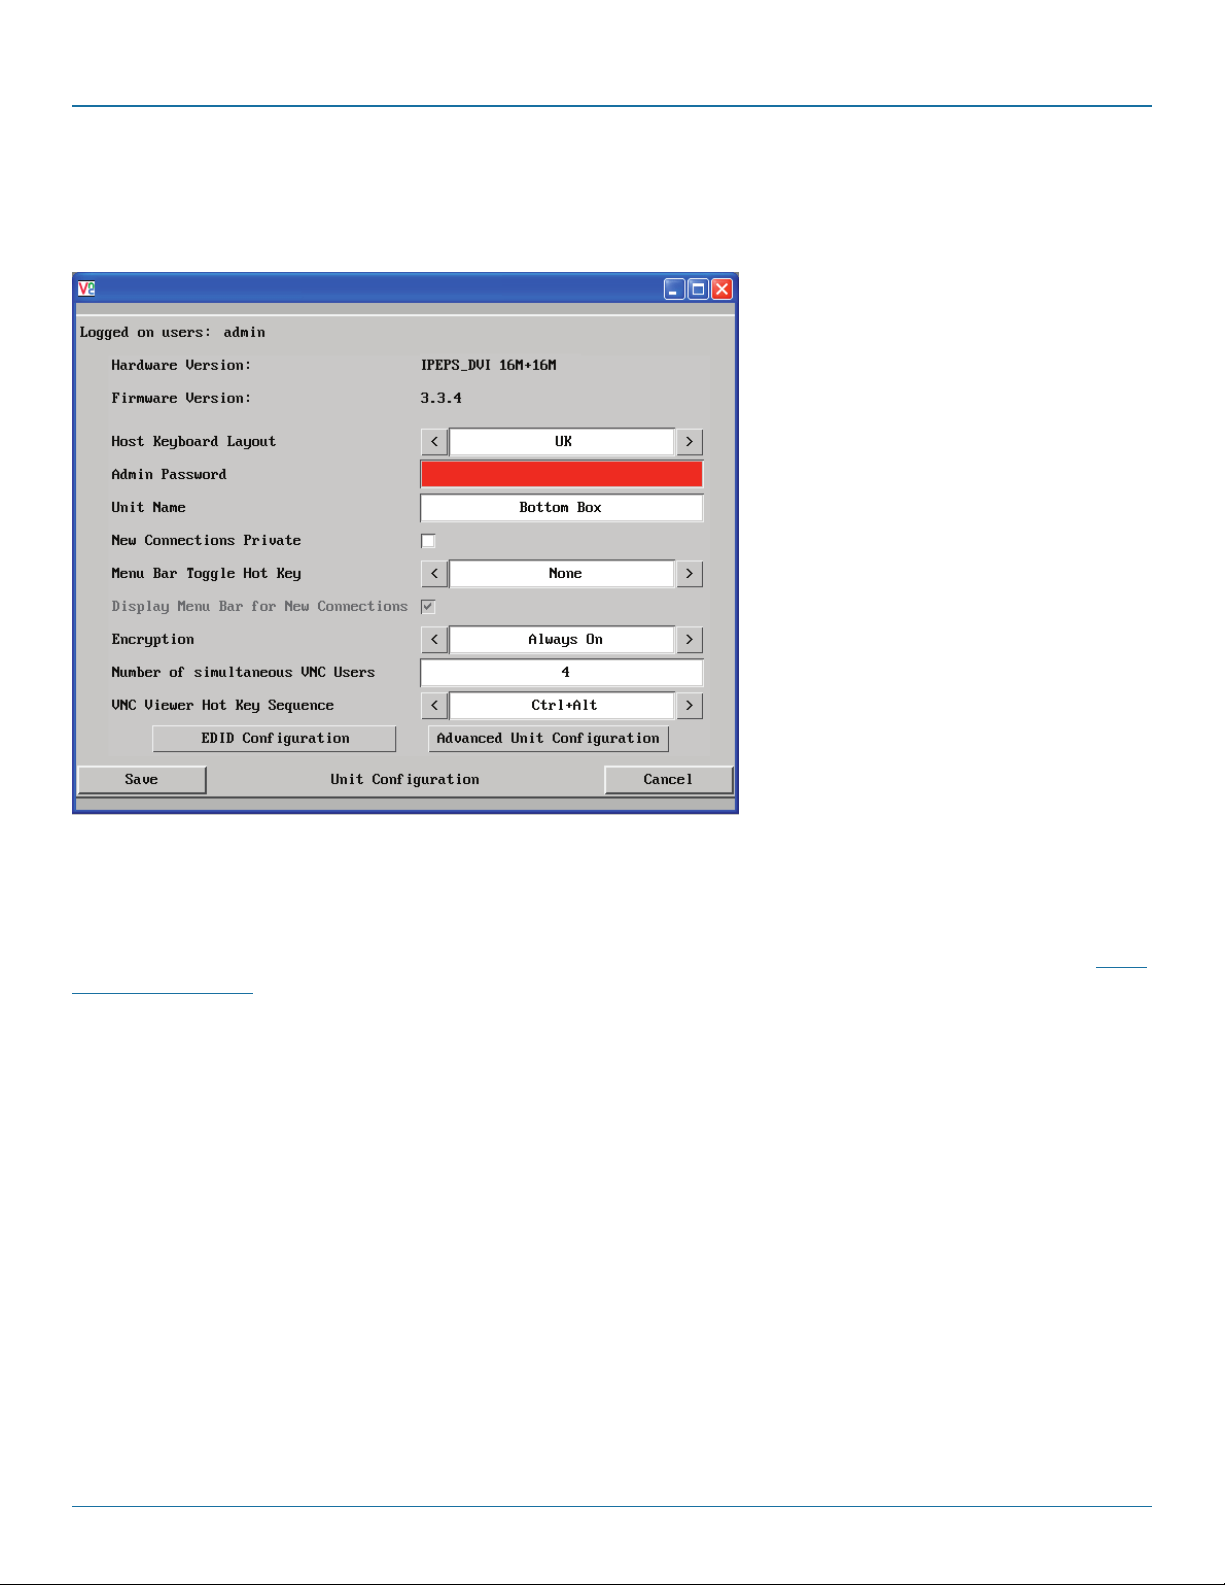
This page provides access to a selection of both basic and advanced settings for the Wizard DXS - Digital. Many of the settings
displayed here are also accessible through the on-screen menu.
To get here
1 Using VNC viewer or a browser, log on
as the ‘admin’ user.
2 Click the ‘Configure’ button in the top
right corner.
3 Click the ‘Unit Configuration’ option.
Hardware Version
Indicates the version of the electronic circuitry within the Wizard DXS - Digital unit.
Firmware Version
Indicates the version of the internal software within the Wizard DXS - Digital flash memory. This may be updated using the flash
upgrade procedure.
Host Keyboard Layout
Use the arrow buttons to match the keyboard layout expected by the host system.
Admin (Change) Password
Click this button to enter/edit the password that will be used to gain administrator access to the Wizard DXS - Digital.
Unit Name
The name entered here will be displayed on the local menus and the remote VNC viewer/browser windows.
New Connections Private
Allows you to determine whether new local or VNC connections should be set up as private (when ticked) or as shared (when
unticked).
Page 46
877-877-2269 | blackbox.com
Page 47

Appendices
Menu Bar Toggle Hot Key
Determines the function key that can be used to display/hide the menu bar within the VNC screen.
Encryption
Three options are available: Always on, prefer off, prefer on. The one to choose depends on the specific details of your
installation. The use of encryption imposes a slight performance overhead of roughly 10% but is highly secure against third party
intrusion.
Number of simultaneous VNC Users
Allows you to restrict the number of concurrent VNC sessions. The maximum number (and the default setting) is 4.
VNC Viewer Hot Key Sequence
When using the VNC Viewer, you can use key press combinations to select host computers and also to display the host selection
menu. This option allows you to choose which keys should be used to form the hotkeys that will precede a switching command.
The default setting is CTRL + ALT, so as an example when you press the CTRL ALT and 2 keys, the viewer will change to the host
with “Hotkey Host Number” 2 - see Host configuration.
EDID Configuration
Advanced Unit Configuration
877-877-2269 | blackbox.com
Page 47
Page 48
ServSwitch Wizard™ DXS - Digital
D.5 EDID configuration
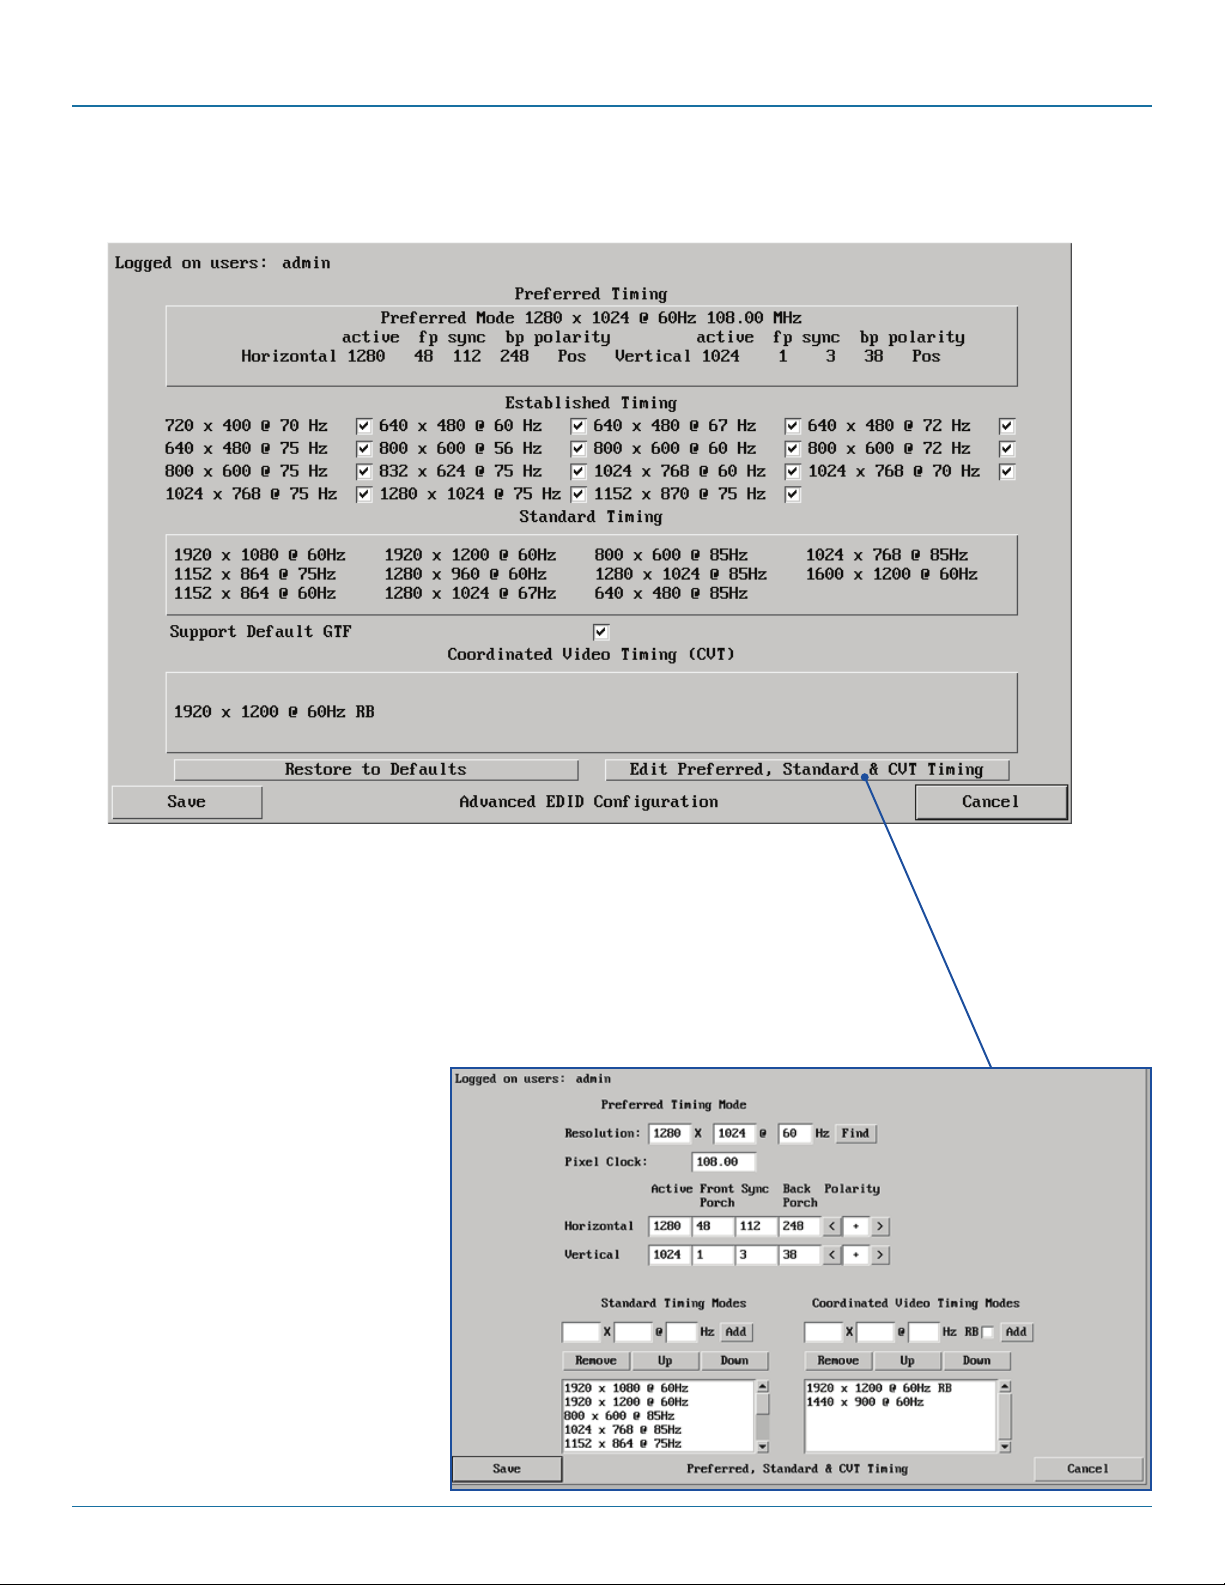
Click this button to display advanced EDID options that do not normally require alteration.
This page allows you to edit the contents of the EDID records that are used to inform the
computer of the supported video modes. The default EDID should be sufficient for the vast
majority of situations. If necessary, use the Edit Preferred and Standard Timing button fine
tune settings to support specific situations.
When you click the Save button, the EDID information within the unit will be updated. As
the EDID is usually only read when a computer is booted, it may be necessary to power
cycle the host computer to make it re-read the new EDID.
Page 48
877-877-2269 | blackbox.com
Page 49

Appendices
877-877-2269 | blackbox.com
Page 49
Page 50
ServSwitch Wizard™ DXS - Digital
D.6 Advanced unit configuration
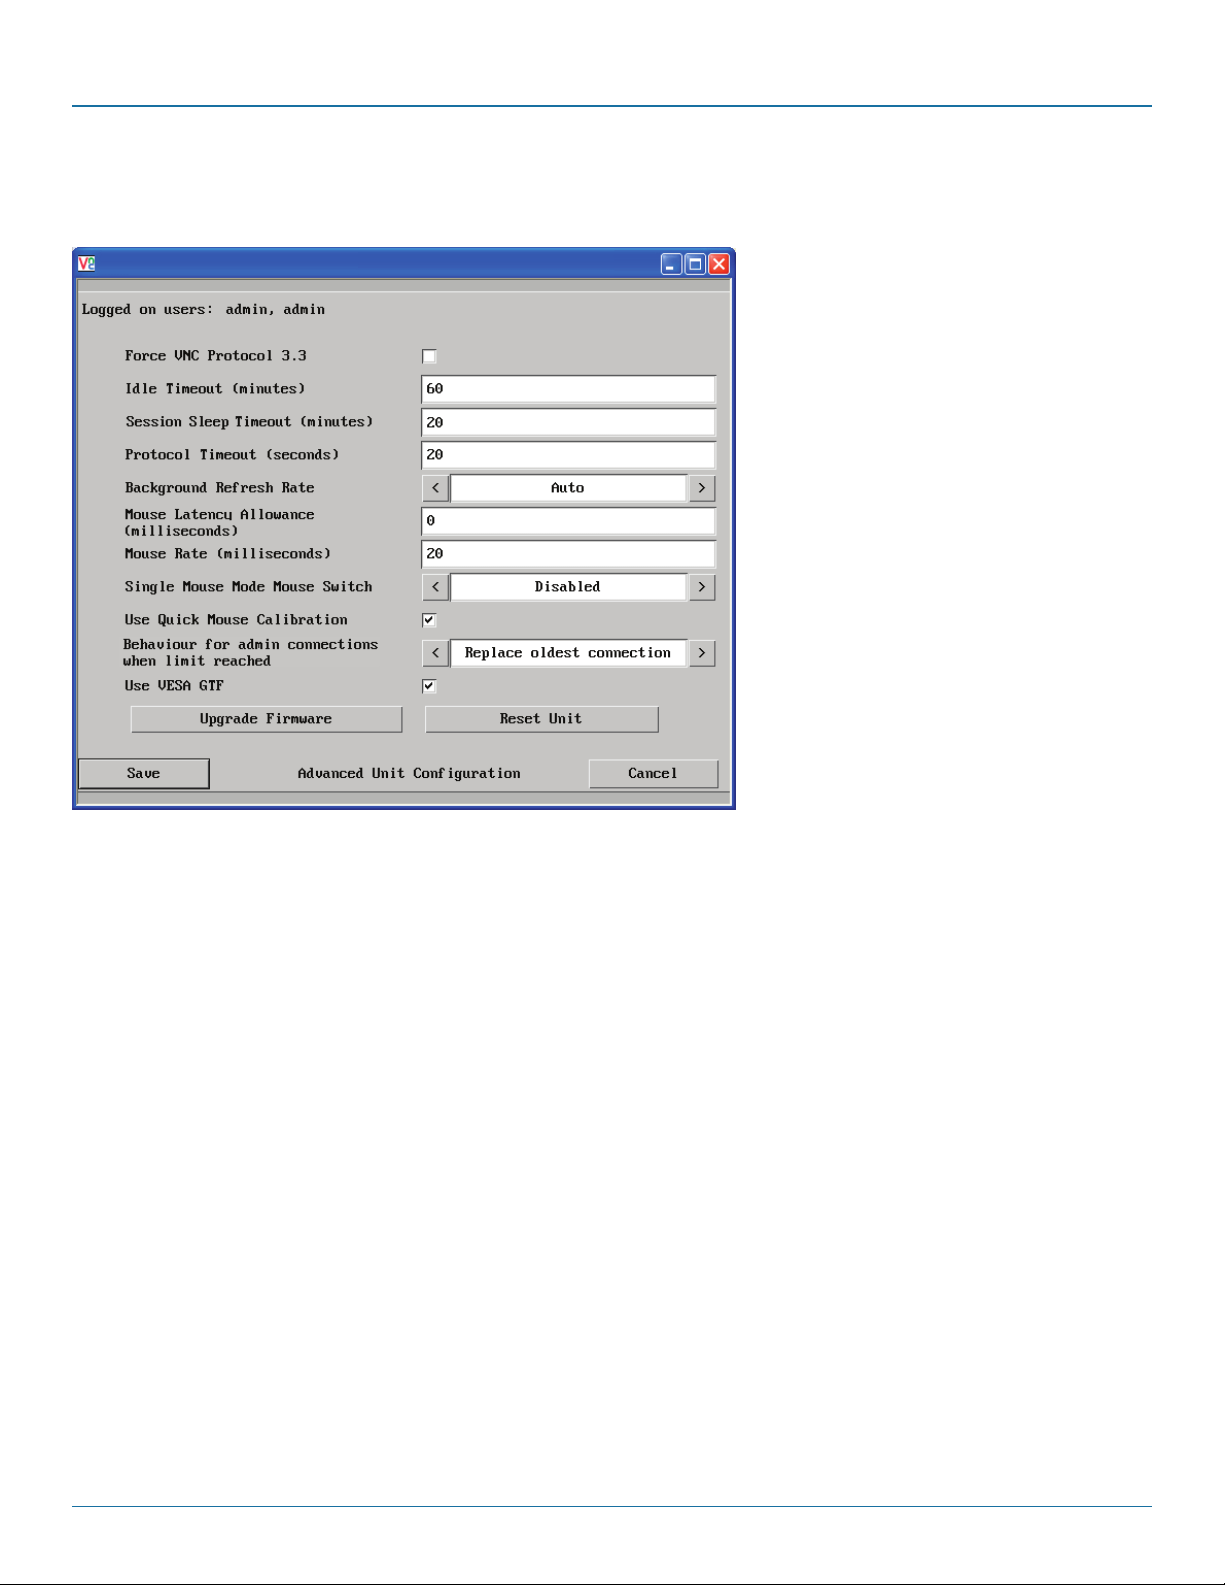
Click this button to display advanced options that do not normally require alteration.
Force VNC Protocol 3.3
IMPORTANT: The use of this option is not recommended. Protocol 3.3 is a legacy version that does not offer any encryption.
Idle Timeout
Determines the period of inactivity on a global connection before the user is logged out. The idle timeout period can be set to
any time span, expressed in minutes.
Session Sleep Timeout
Determines the period of inactivity before the viewer screen will blank and a message is displayed. When no hosts are being
viewed either because of this time out or if no viewers are active then parts of the video circuitry are powered down reducing
power consumption by up to a third.
Protocol Timeout
Sets the time period by which responses should have been received to outgoing data packets. If the stated period is exceeded,
then a connection is considered lost and terminated.
Background Refresh Rate
Use the arrow keys to alter the background refresh rate used to correct any screen changes missed in normal operation. The
options are: Slow, Medium, Fast, Auto or Disabled. The Auto option automatically varies the refresh rate when multiple VNC
sessions are active to provide a balance between the sessions.
Note: When a low connection speed is detected, the background refresh is automatically disabled, regardless of the settings of
this option.
Page 50
877-877-2269 | blackbox.com
Page 51

Appendices
Mouse Latency Allowance
This option is used during calibration to account for latency delays that may be caused as signals pass through a device.
During calibration, the Wizard DXS - Digital waits for 40ms after each mouse movement before sampling the next. If a device
adds a significant delay to the flow of data, the calibration process can be lengthened or may fail entirely. The value entered here
is added to (or subtracted from) the default 40ms sampling time.
Note: You can enter negative values (down to -40) in order to speed up the calibration process when using fast KVM switches.
Use this option with caution as it can adversely affect the calibration process.
Mouse Rate
Defines the rate at which mouse movement data are transmitted to the system. The default option is 20ms, which equates to 50
mouse events per second. This is used to slow down the rate in exceptional circumstances but normally requires no adjustment.
Single Mouse Mode Mouse Switch
Select the mouse button combination to exit from single mouse mode (when active).
Use Quick Mouse Calibration
Invokes optimized calibration techniques that handle the majority of mouse types.
Behaviour for admin connections when limit reached
Determines what should occur when four global connections already exist and a fifth, administrator connection attempt is
made. Options are: Replace oldest connection, Replace newest connection and Don’t replace. Only non-administrator
connections can be terminated in this way.
Use VESA GTF
When ticked, the VESA Generalized Timing Formula will be used to help determine the correct input video resolution and timing
details.
Upgrade firmware
Places the unit into upgrade mode. See Upgrading Wizard DXS - Digital.
Reset Unit
Performs a complete cold boot of the Wizard DXS - Digital unit.
877-877-2269 | blackbox.com
Page 51
Page 52
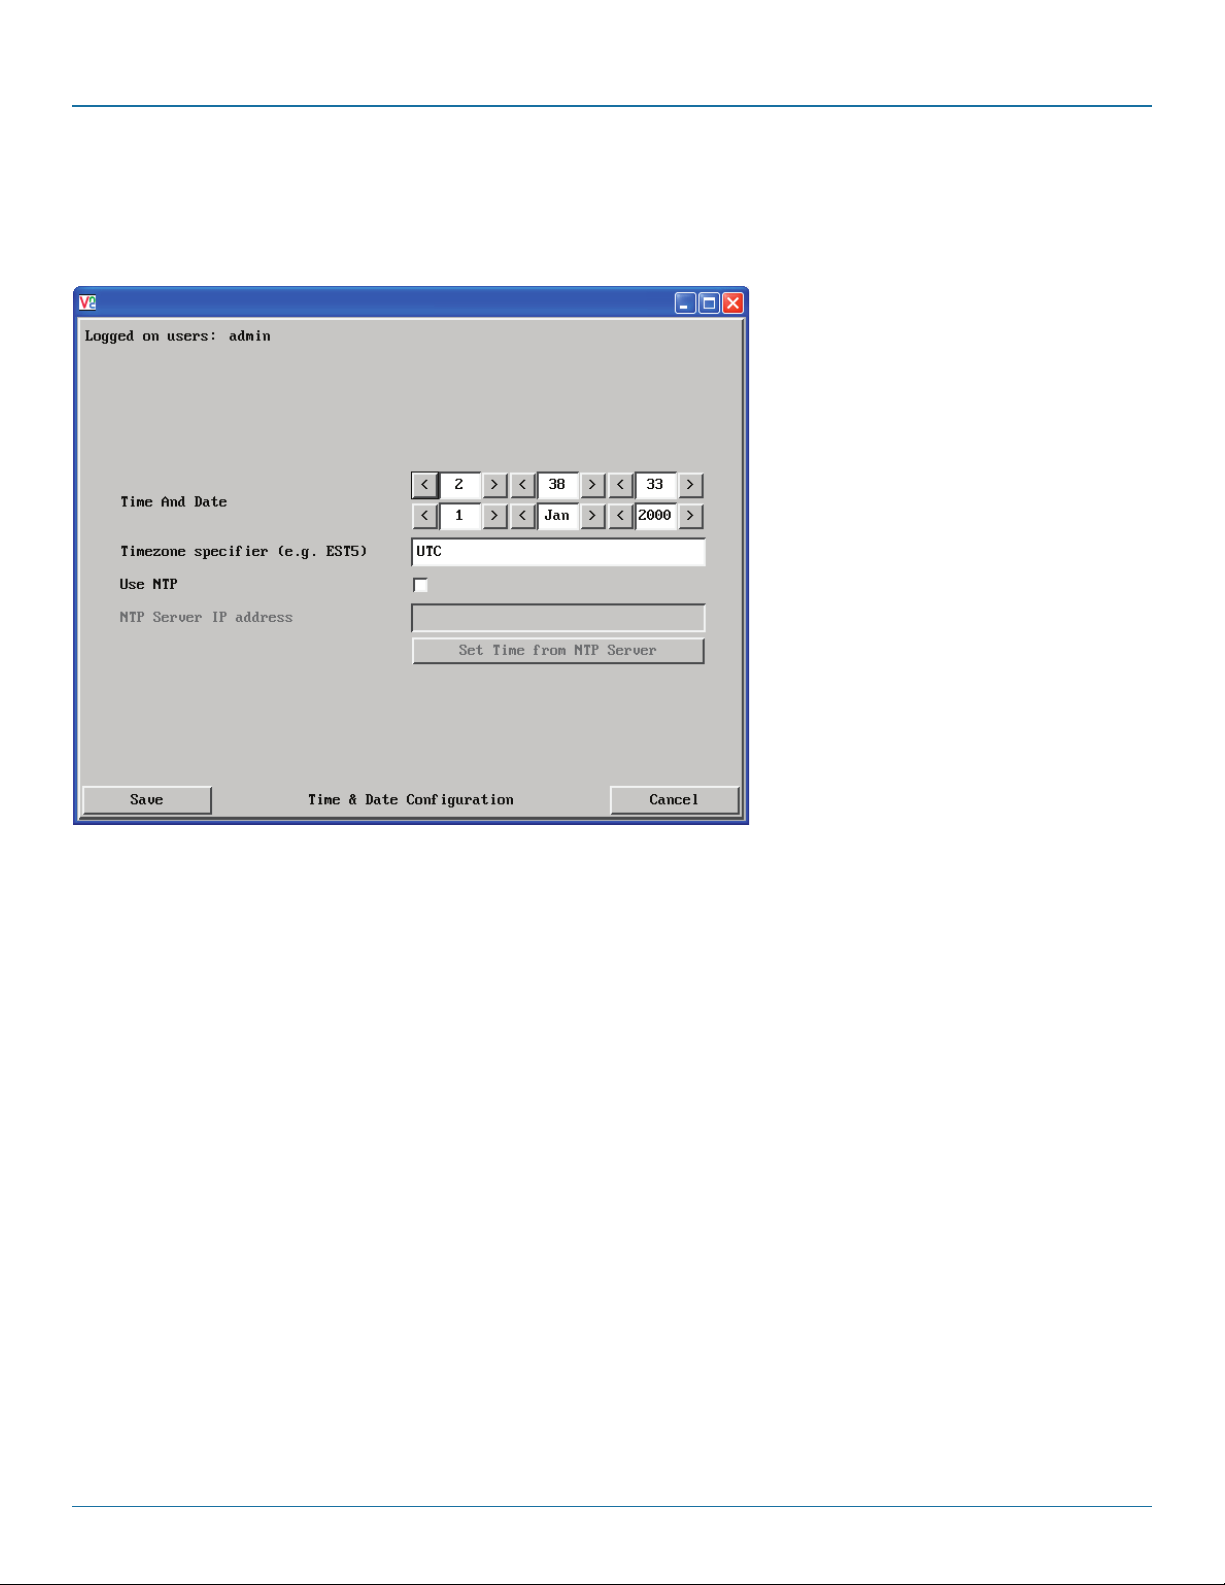
ServSwitch Wizard™ DXS - Digital
D.7 Time & date configuration
This page allows you to configure all aspects relating to time and date within the unit.
Note: The unit has a real-time clock which will maintain the date and time for a few hours without power.
To get here
1 Using VNC viewer or a browser, log on
as the ‘admin’ user.
2 Click the ‘Configure’ button in the top
right corner.
3 Click the ‘Time & Date Configuration’
option.
Time and Date
Use the arrow buttons to set the correct current time.
Use NTP
When this option is selected, the Wizard DXS - Digital will synchronize its internal clocks using information from the (Network
Time Protocol) server listed in the NTP Server IP address field.
NTP Server IP address
Optionally enter the IP address for a known Network Time Protocol server.
Set Time from NTP Server
Click to immediately use the time and date information from the listed NTP server.
Page 52
877-877-2269 | blackbox.com
Page 53

Appendices
Timezone specifier
Optionally enter a recognised timezone specifier related to the current position of the Wizard DXS - Digital unit. When an NTP
server is used, the specifier will be used to provide the correct real time.
The timezone specifier takes the following form:
std offset dst [offset],start[/time],end[/time]
The std and offset specify the standard time zone, such as GMT and 0, or CET and -1, or EST and 5, respectively.
The dst string and [offset] specify the name and offset for the corresponding Daylight Saving Time zone; if the offset is omitted,
it defaults to one hour ahead of standard time.
The remainder of the specification describes when Daylight Saving Time is in effect. The start field is when Daylight Saving Time
goes into effect and the end field is when the change is made back to standard time. The most common format used for the
daylight saving time is: Mm.w.d
Where: m specifies the month and must be between 1 and 12. The day d must be between 0 (Sunday) and 6. The week w
must be between 1 and 5; week 1 is the first week in which day d occurs, and week 5 specifies the last d day in the month.
The time fields specify when, in the local time currently in effect, the change to the other time occurs. If omitted, the default is
02:00:00.
Typical examples are:
UK: GMT0BST,M3.5.0/1,M10.5.0/2
Central Europe: CET-1CEST,M3.5.0/2,M10.5.0/3
US Eastern: EST5EDT,M3.2.0/2,M11.1.0/2
US Pacific: PST5PDT,M3.2.0/2,M11.1.0/2
For further details
• Fordetailsoftimezonespecifierformats,pleasereferto:
http://www.gnu.org/software/libc/manual/html_node/TZ-Variable.html
• FordetailsoftheNetworkTimeProtocol(mainRFCnumber:
1305; the SNTP subset used as the basis for the Wizard DXS - Digital: 4330)
http://www.ietf.org/rfc.html
877-877-2269 | blackbox.com
Page 53
Page 54
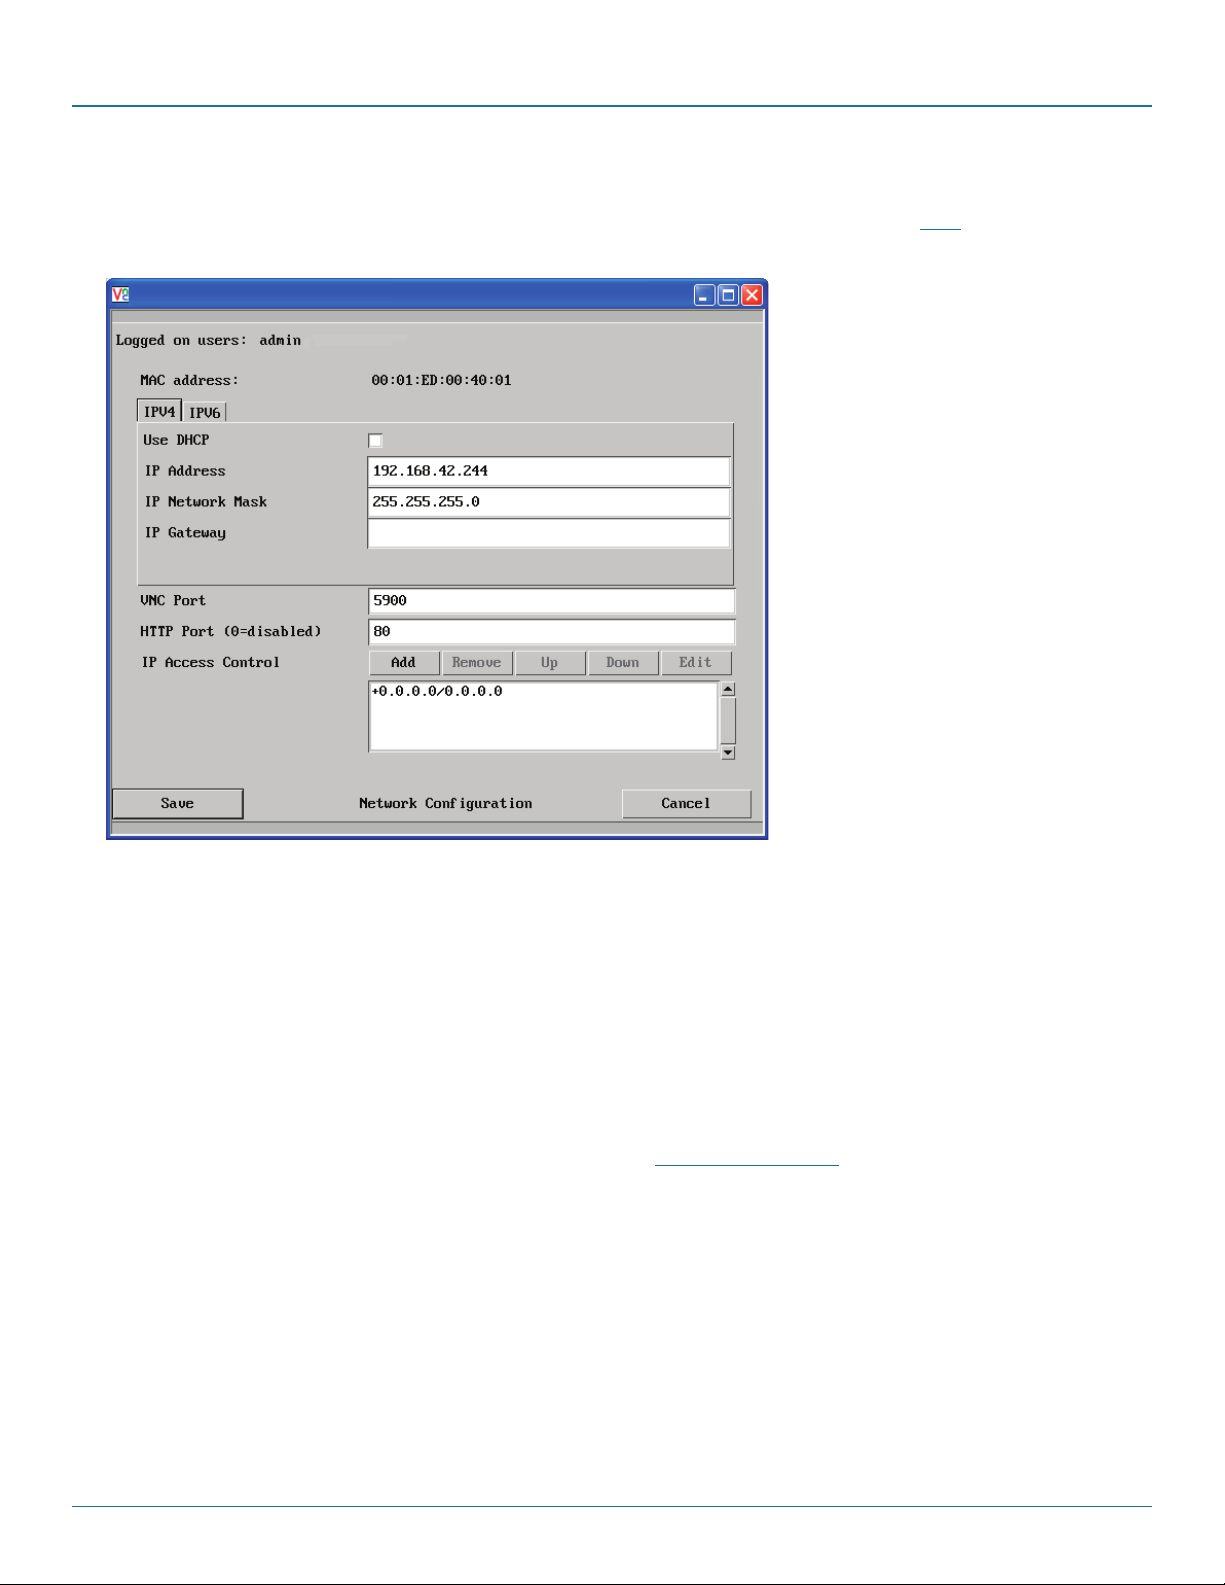
ServSwitch Wizard™ DXS - Digital
D.8 Network configuration (IPV4)
This page allows you to configure the various aspects of the IP port when it is used in IPV4 mode. For IPV6 mode, please see the
next page.
To get here
1 Using VNC viewer or a browser, log on
as the ‘admin’ user.
2 Click the ‘Configure’ button in the top
right corner.
3 Click the ‘Network Configuration’
option.
MAC address
Media Access Control address – this is the unique and unchangeable code that was hard coded within your Wizard DXS - Digital
unit when it was built. It consists of six 2-digit hexadecimal (base 16) numbers separated by colons. A section of the MAC address
identifies the manufacturer, while the remainder is effectively the unique electronic serial number of your particular unit.
Use DHCP
DHCP is an acronym for ‘Dynamic Host Configuration Protocol’. Its function is particularly useful when connecting to medium size
or larger networks.
When this option is selected, your Wizard DXS - Digital will attempt to locate a DHCP server on the network. If such a server is
located, it will supply three things to the Wizard DXS - Digital: an IP address, an IP network mask (also known as a Subnet mask)
and a Gateway address. These are not usually granted permanently, but on a ‘lease’ basis for a fixed amount of time or for as
long as the Wizard DXS - Digital remains connected and switched on. Discover allocations.
IP Address
This is the identity of the Wizard DXS - Digital within a network. The IP address can be thought of as the telephone number of
the Wizard DXS - Digital. Unlike the MAC address, the IP address can be altered to suit the network to which it is connected. It
can either be entered manually or configured automatically using the DHCP option. When the DHCP option is enabled, this entry
is greyed out.
Page 54
877-877-2269 | blackbox.com
Page 55

Appendices
IP Network Mask
Also often called the subnet-mask, this value is used alongside the IP address to help define a smaller collection (or subnet) of
devices on a network. In this way a distinction is made between locally connected devices and ones that are reachable elsewhere,
such as on the wider Internet. This process helps to reduce overall traffic on the network and hence speed up connections in
general.
IP Gateway
This is the address of the device that links the local network (to which the Wizard DXS - Digital is connected) to another network
such as the wider Internet. Usually the actual gateway is a network router and it will be used whenever a required address lies
outside the current network.
VNC Port
This is the logical link through which communications with a remote VNC viewer will be channelled. The default setting is 5900
which is a widely recognised port number for use by VNC software. However, in certain circumstances it may be advantageous to
alter this number - see ‘Security issues with ports’ for more details.
HTTP Port
This is the logical link through which communications with a remote web browser will be channelled. The default setting of 80 is
an established standard for web (HTTP – HyperText Transfer Protocol) traffic though this can be changed to suit your local
network requirements.
IP Access Control
This section allows you to optionally specify ranges of addresses which will or won’t be granted access to the Wizard DXS Digital. If this option is left unchanged, then the default entry of ‘+0.0.0.0/0.0.0.0’ ensures that access from all IP addresses will
be permitted. See Setting IP access control for details.
877-877-2269 | blackbox.com
Page 55
Page 56
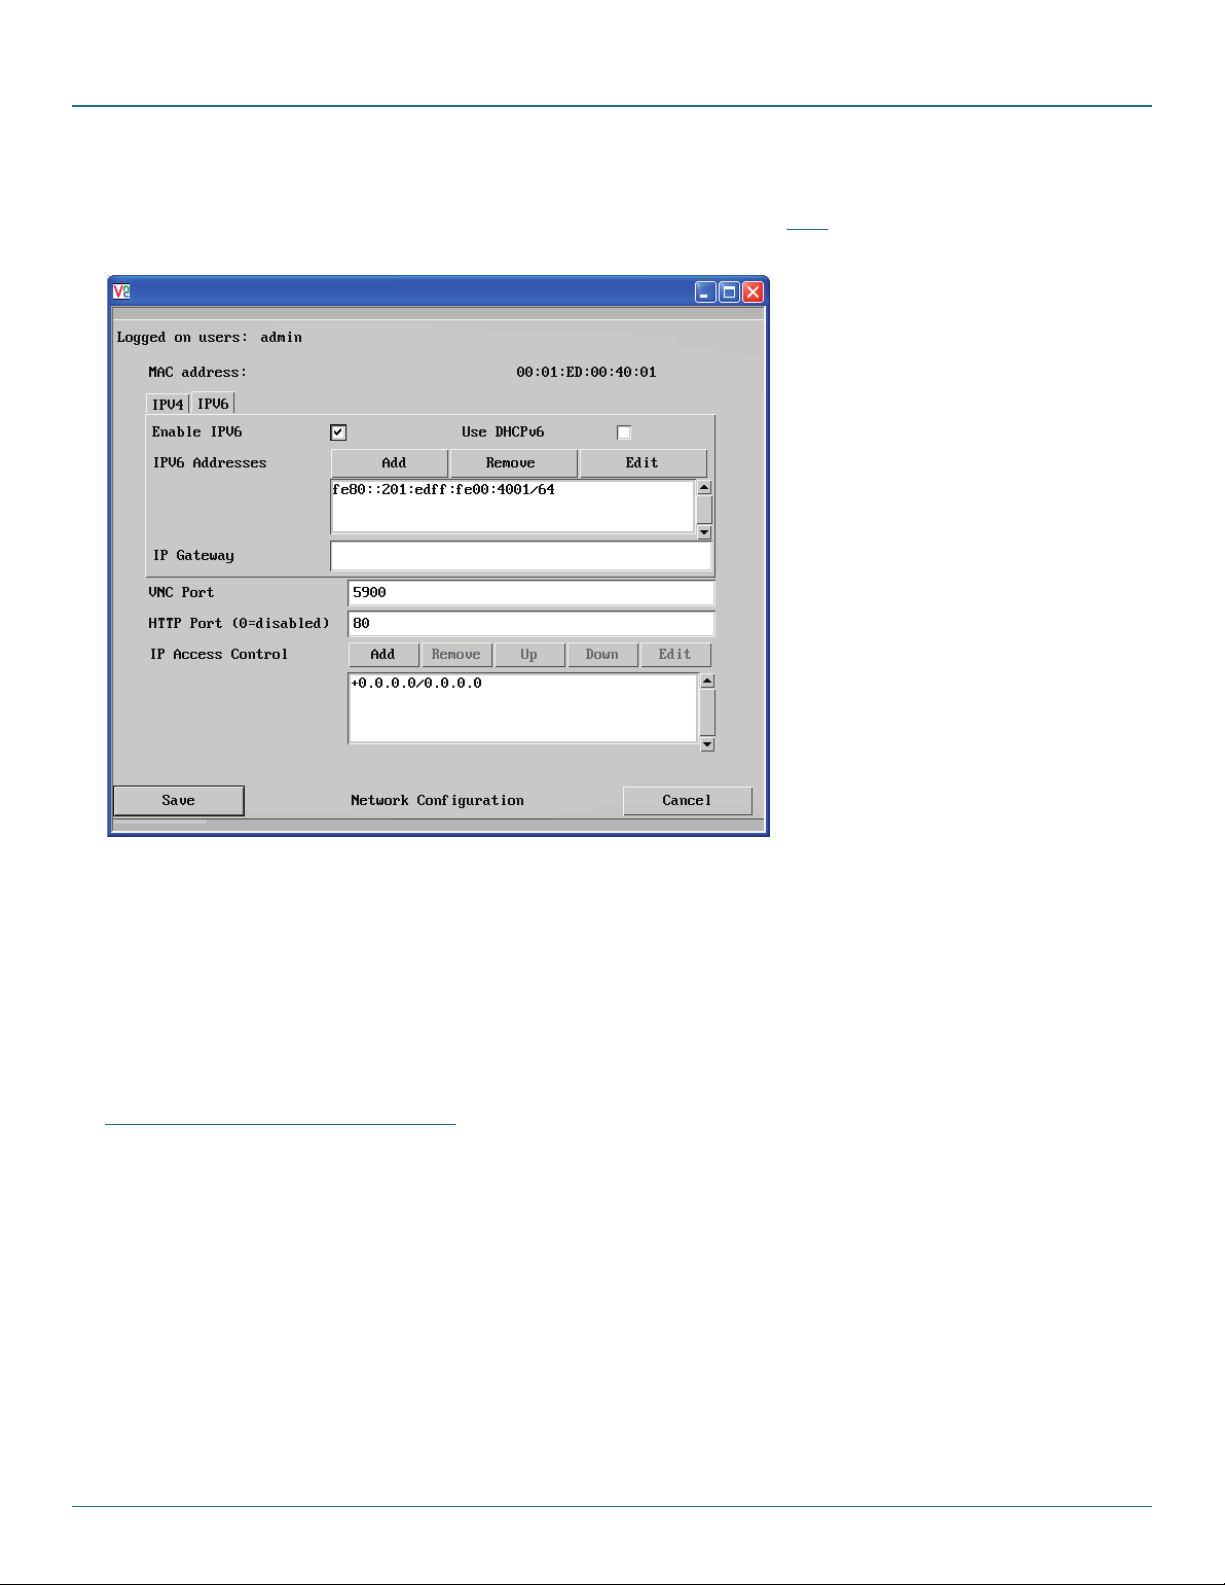
ServSwitch Wizard™ DXS - Digital
D.9 Network configuration (IPV6)
This page allows you to configure the various aspects of the IP port when it is used in IPV6 mode. For IPV4 mode, please see the
previous page.
To get here
1 Using VNC viewer or a browser, log
on as the ‘admin’ user.
2 Click the ‘Configure’ button in the top
right corner.
3 Click the ‘Network Configuration’
option.
4 Click the ‘IPV6’ tab.
MAC address
Media Access Control address – this is the unique and unchangeable code that was hard coded within your Wizard DXS - Digital
unit when it was built. It consists of six 2-digit hexadecimal (base 16) numbers separated by colons. A section of the MAC address
identifies the manufacturer, while the remainder is effectively the unique electronic serial number of your particular unit.
Enable IPV6
Change this option to Yes only if the Wizard DXS - Digital unit is connected to an IPV6 compliant network.
IPV6 Addresses
This section is used to hold the IPv6 addresses for the Wizard DXS - Digital. A link local IPv6 address is automatically added using
the Stateless Address Auto Configuration protocol. Use the Add, Remove, Edit buttons to alter the address as necessary.
Page 56
877-877-2269 | blackbox.com
Page 57

Appendices
Use DHCPv6
When this option is set to Yes, the Wizard DXS - Digital will attempt to locate a DHCPv6 server on the network to derive a unique
IPv6 address for itself as well as an address for the IPv6 Gateway. These are not usually granted permanently, but on a ‘lease’
basis for a fixed amount of time or for as long as the Wizard DXS - Digital remains connected and switched on. Discover
allocations.
If this option is set to No, the Wizard DXS - Digital will use the Stateless Address Auto Configuration protocol to determine
its own IPv6 address. This will be shown in the IPV6 Addresses field and can be edited if necessary.
IP Gateway
This is the address of the device that links the local network (to which the Wizard DXS - Digital is connected) to another network
such as the wider Internet. Usually the actual gateway is a network router and it will be used whenever a required address lies
outside the current network.
VNC Port
This is the logical link through which communications with a remote VNC viewer will be channelled. The default setting is 5900
which is a widely recognised port number for use by VNC software. However, in certain circumstances it may be advantageous to
alter this number - see ‘Security issues with ports’ for more details.
HTTP Port
This is the logical link through which communications with a remote web browser will be channelled. The default setting of 80 is
an established standard for web (HTTP – HyperText Transfer Protocol) traffic though this can be changed to suit your local
network requirements.
IP Access Control
This section allows you to optionally specify ranges of addresses which will or won’t be granted access to the Wizard DXS Digital. If this option is left unchanged, then the default entry of ‘+0.0.0.0/0.0.0.0’ ensures that access from all IP addresses will
be permitted. See Setting IP access control for details.
877-877-2269 | blackbox.com
Page 57
Page 58
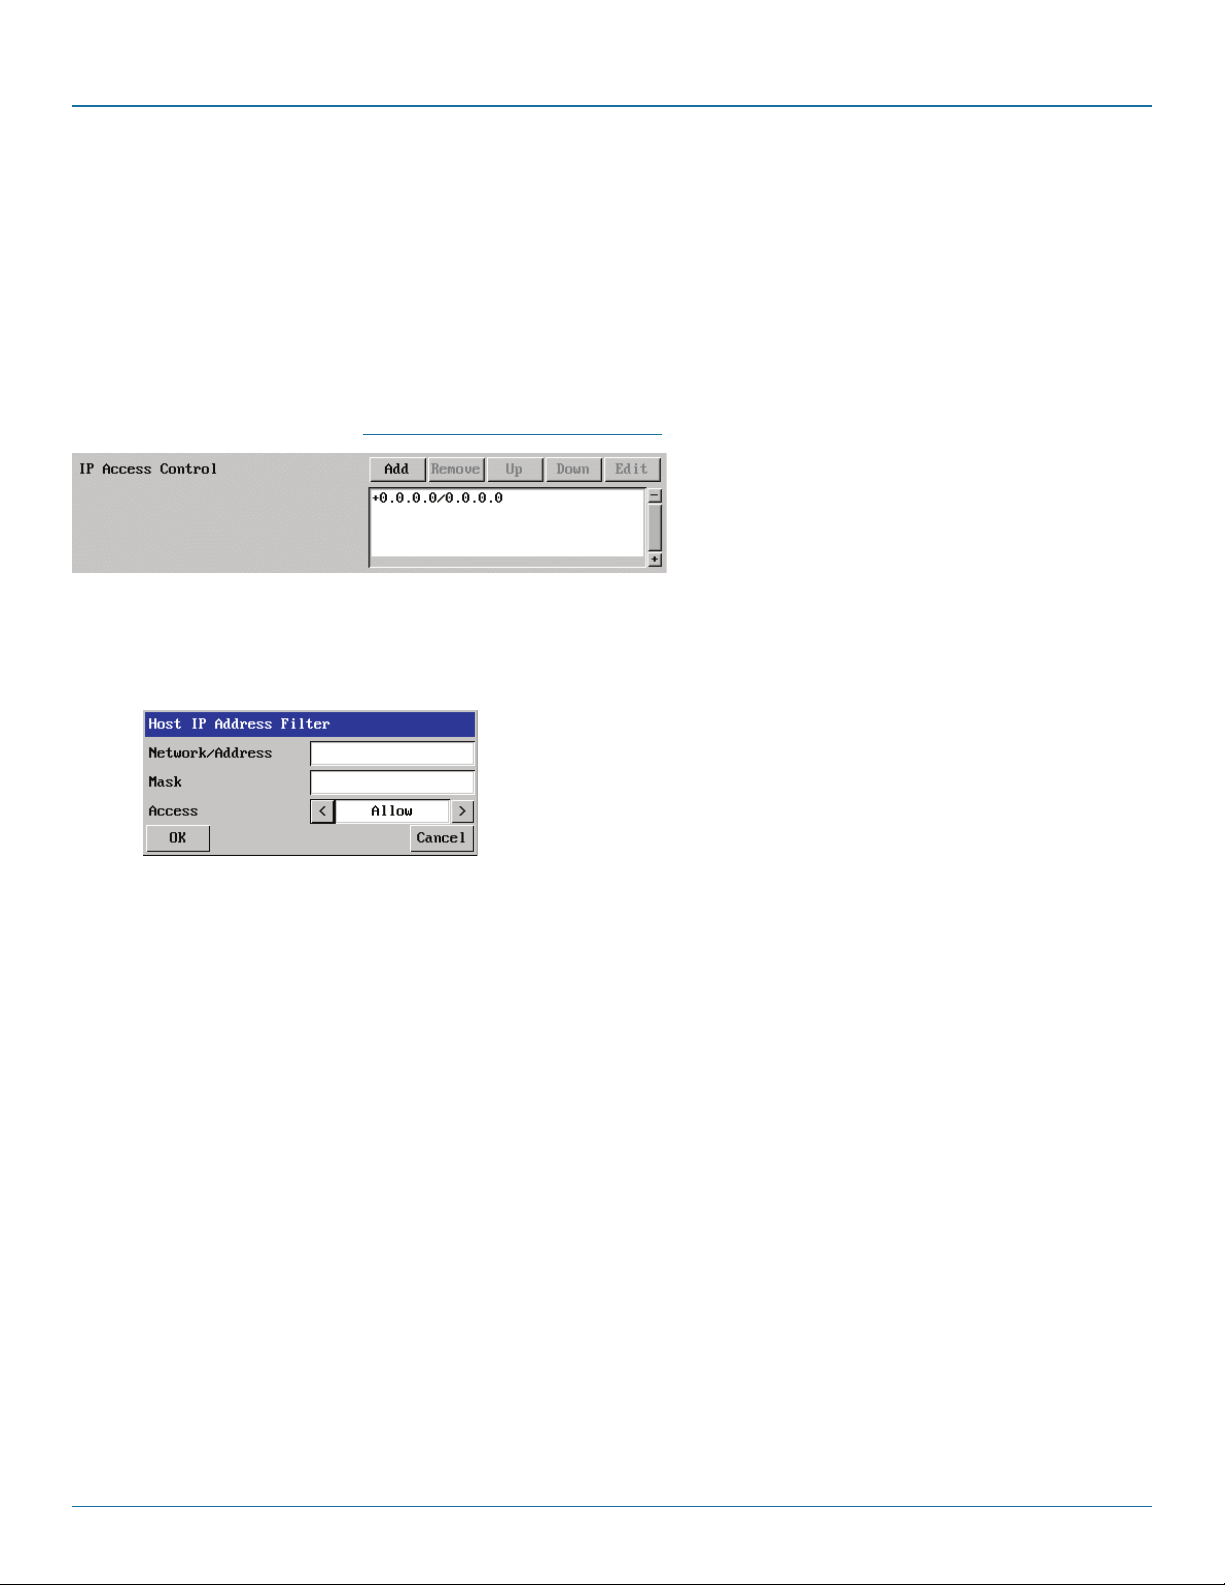
ServSwitch Wizard™ DXS - Digital
D.10 Setting IP access control
The golden rule with this feature is ‘Include before you exclude’ or to put it another way ‘Arrange allowed addresses in the list
before the denied addresses’.
This is because the positions of entries in the list are vitally important. Once a range of addresses is denied access, it is not possible
to make exceptions for particular addresses within that range. For instance, if the range of addresses from A to F are denied
access first, then the address C could not be granted access lower down the list. Address C needs to be placed in the list before
the denied range.
IMPORTANT: This feature should be configured with extreme caution as it is possible to deny access to everyone. If such an error
occurs, you will need to perform a reset to factory default settings in order to regain access.
In the list, access control addresses prefixed by ‘+’ are allow entries while those prefixed by ‘– ‘ are deny entries.
To define a new IP access control entry
1 Click the Add button to display a popup dialog:
Network/Address
Enter the network address
that is to be allowed or denied
access. If a range of addresses
is being specified then specify
any one of the addresses
within the range and use the
Mask entry to indicate the size
of the range.
Mask
Enter an IP network mask
that indicates the range of
addresses that are to be
allowed or denied access.
For instance, if only a single
specified IP address were to
be required, the mask entry
would be 255.255.255.255
in order to specify a single
location.
Access
Use the arrow buttons
to select either ‘Allow’ or
‘Deny’ as appropriate.
2 Enter the base network address, the mask and select the appropriate access setting.
3 Click the OK button.
To reorder access control entries
IMPORTANT: When reordering, ensure that any specific allowed addresses are listed higher in the list than any denied addresses.
Take care not to invoke any deny access settings that would exclude valid users.
1 In the access control list, click on the entry to be moved.
2 Click the Up or Down buttons as appropriate.
To edit/remove access control entries
1 In the access control list, click on the appropriate entry.
2 Click either the Edit or Remove button as appropriate.
Page 58
877-877-2269 | blackbox.com
Page 59
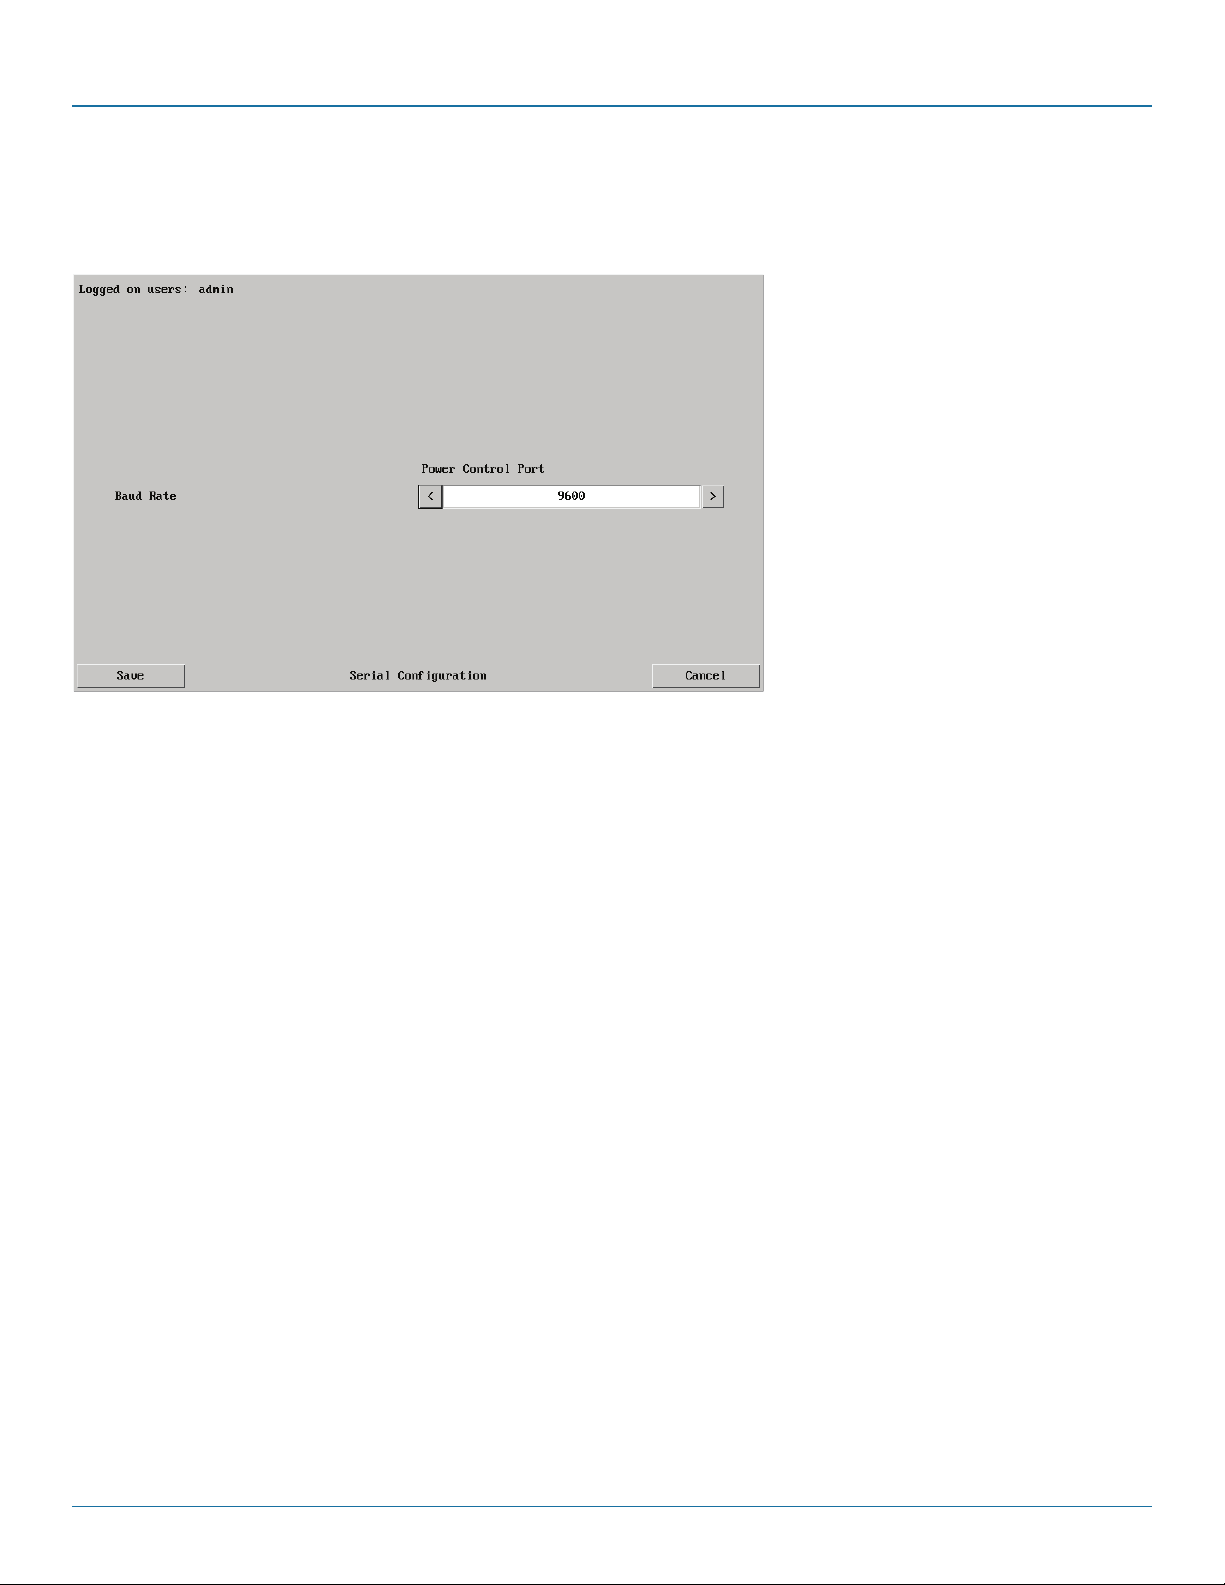
Appendices
D.11 Serial port configuration
This page allows you to configure the baud rate of the Wizard DXS - Digital serial port that is used to control power switch
devices. A full range of standard baud rates are available.
To get here
1 Using VNC viewer or a browser, log
on as the ‘admin’ user.
2 Click the ‘Configure’ button in the top
right corner.
3 Click the ‘Serial port Configuration’
option.
Baud Rate
Determines the communication speed of the OPTIONS port when the above setting is configured to ‘Power Control’. The other
communication settings are fixed as: No parity, 8 bit word, 1 stop bit.
877-877-2269 | blackbox.com
Page 59
Page 60
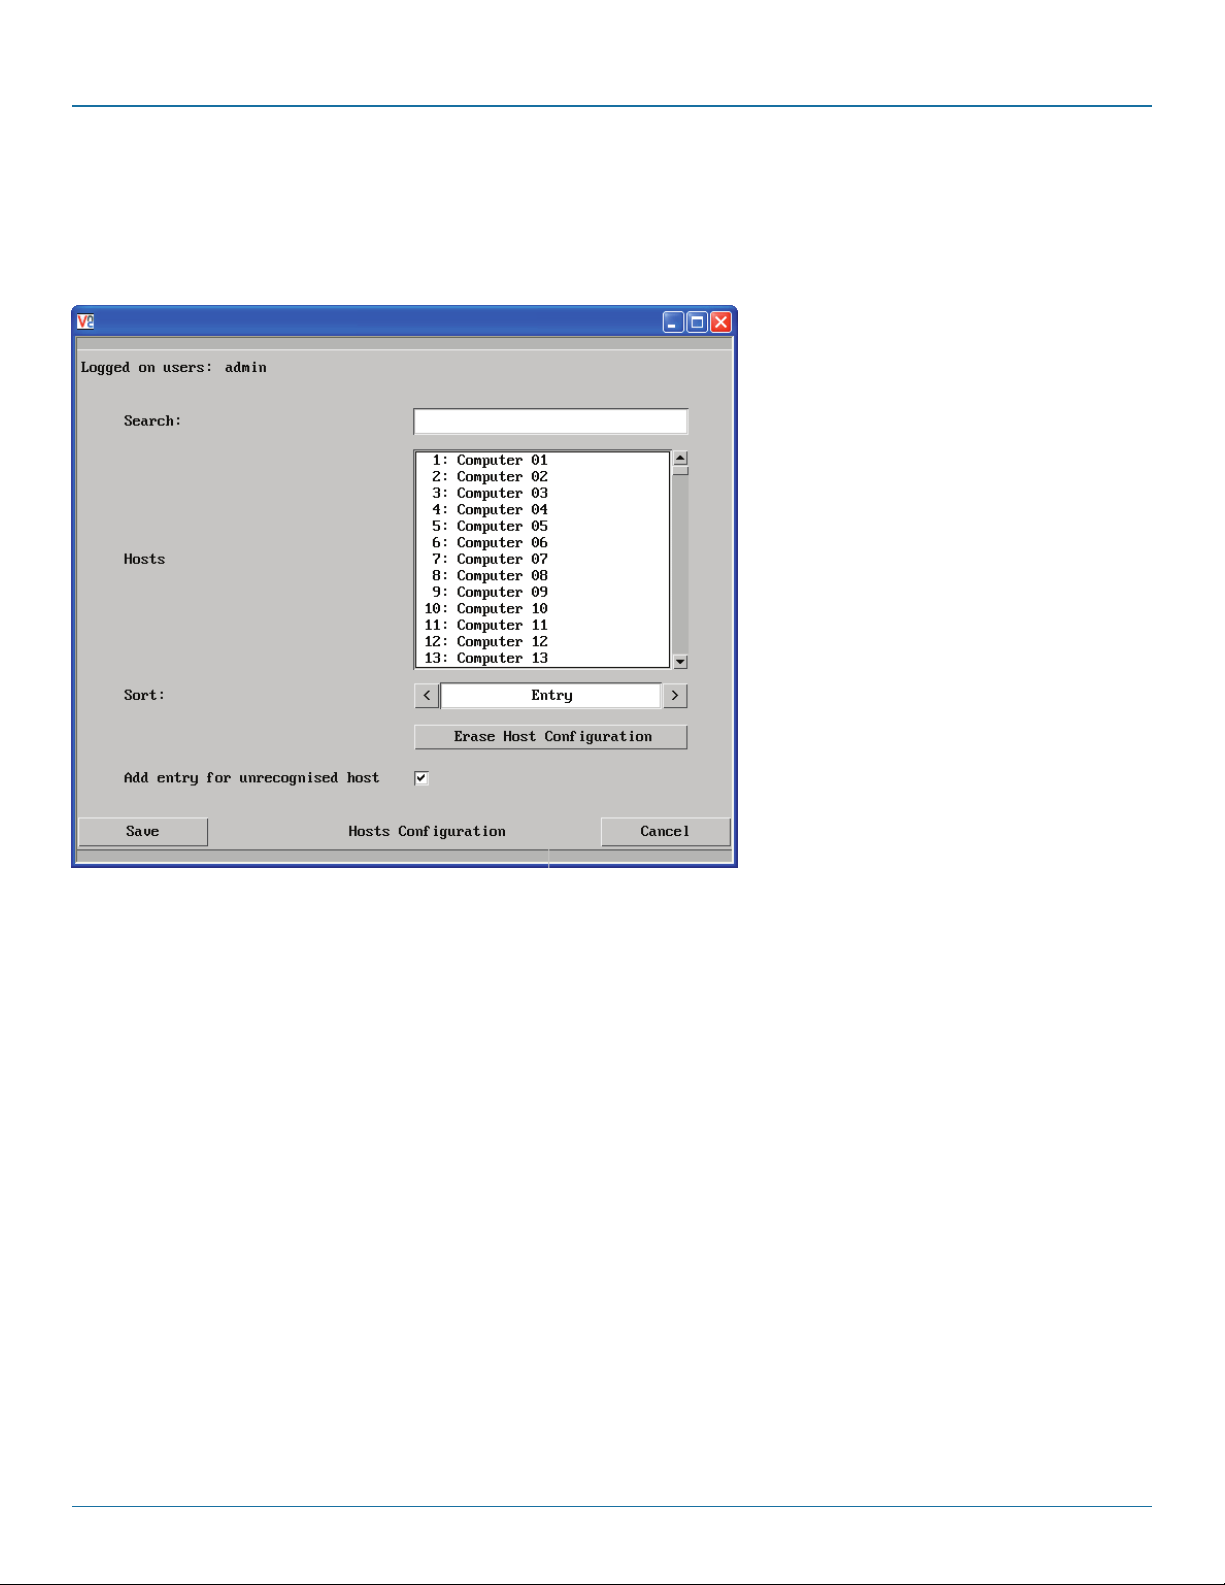
ServSwitch Wizard™ DXS - Digital
D.12 Host configuration
This page provides the opportunity to configure various details for each of the host systems that may be connected to the Wizard
DXS - Digital. Each entry can be configured with a name, the permitted users, the hot key combinations required to switch to it
and, if required, appropriate power control commands.
To get here
1 Using VNC viewer or a browser, log on as
the ‘admin’ user.
2 Click the ‘Configure’ button in the top
right corner.
3 Click the ‘Host Configuration’ option.
Add entry for unrecognised host
When selected, any systems visited that are not specified in the Hosts list, will be added to the list.
Sort
Allows you to reorder the list of hosts either alphabetically or by entry number.
Erase Host Configuration
Removes all hosts from the list.
Page 60
877-877-2269 | blackbox.com
Page 61
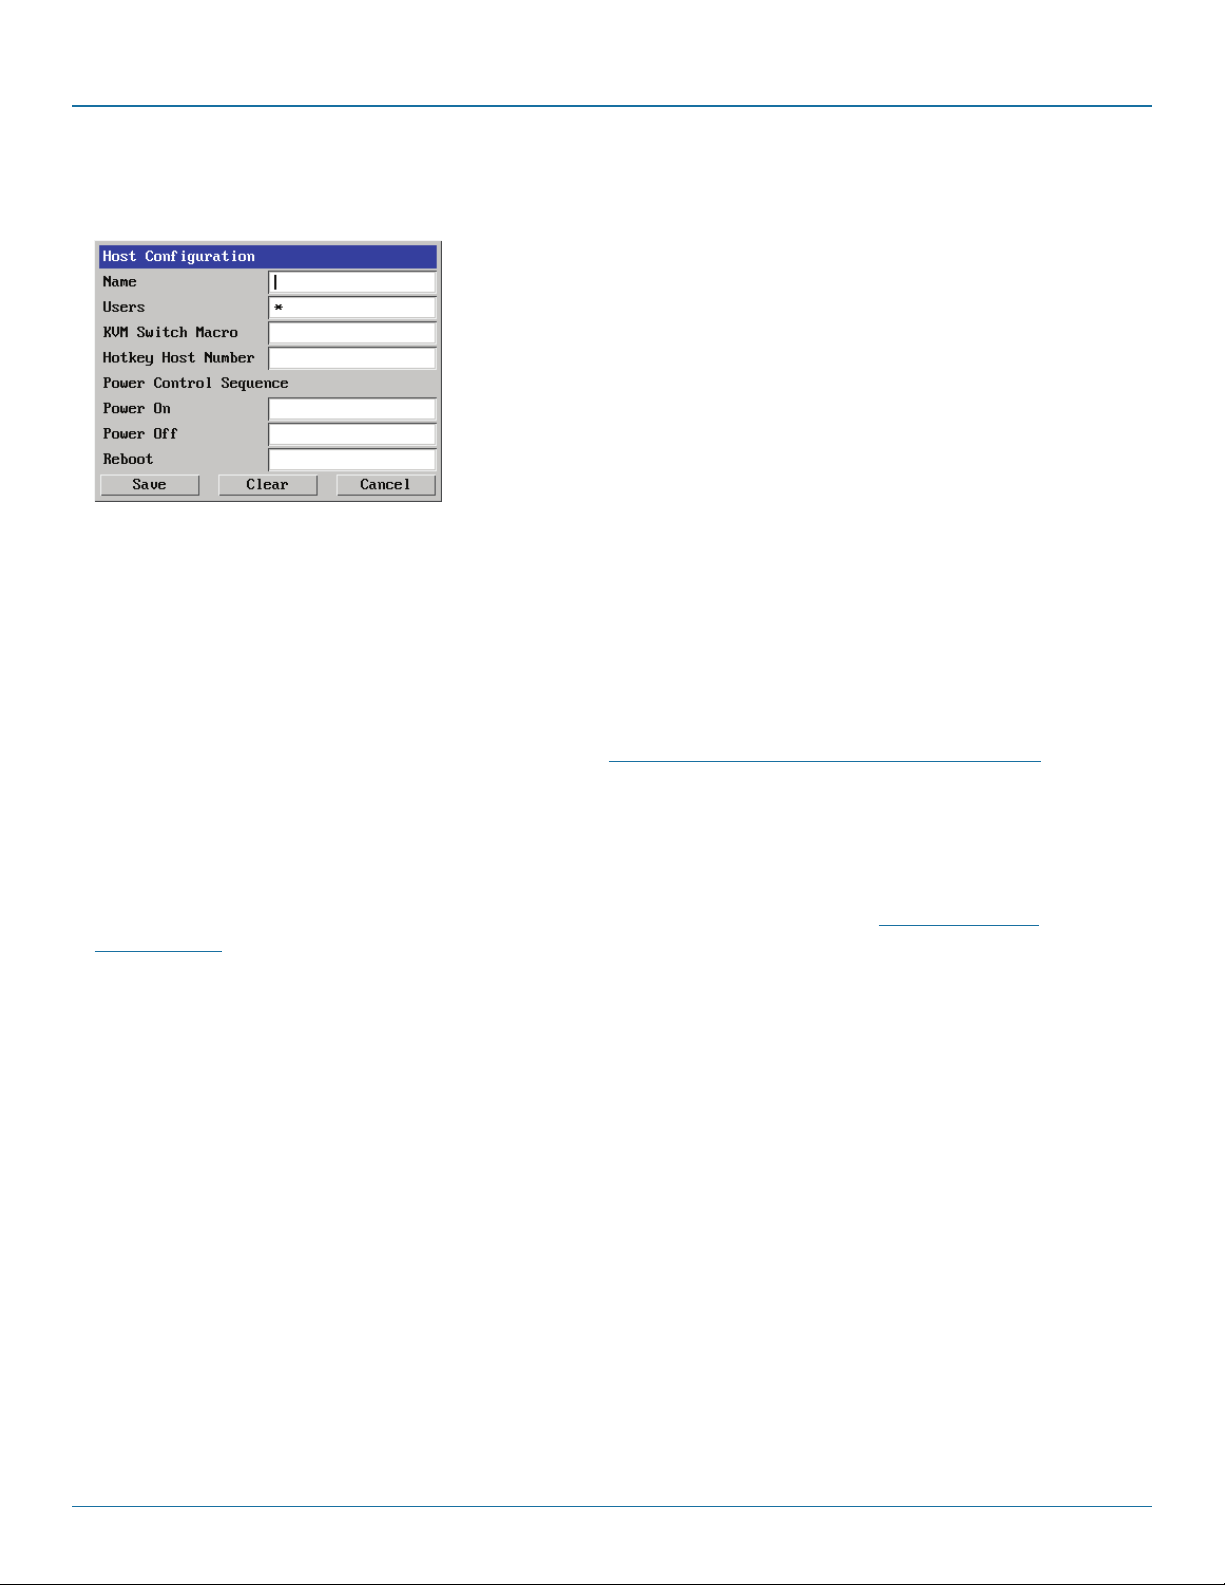
Appendices
To create a new host entry
1 Click one of the host entries to reveal a Host configuration dialog.
Name
Enter the name that will be displayed in the viewer window when you click the Host button.
Users
Select the users that will be permitted to connect to this host. Either enter * to allow all users or a list of users separated by
commas.
KVM Switch Macro
Declare the hot key sequence, or Port Direct address that will cause the KVM switch to link with the required host system. Port
Direct addresses must be entered within square brackets. See Appendix I. Hotkey sequences and Port Direct for details.
Hotkey Host Number
Declare the numeric sequence that is pressed together with the VNC viewer hotkeys (usually Ctrl + Alt) to select this host
system, which is the same value as the KVM port number.
Power On
Enter the code required to make an attached power control unit apply power to the host. See Power switching
configuration for details.
Power Off
Enter the code required to make an attached power control unit remove power from the selected host.
Reboot
Enter the code required to make an attached power control unit remove power and then re-apply it a few seconds later.
2 Enter the required information in each field.
3 Click the OK button.
877-877-2269 | blackbox.com
Page 61
Page 62
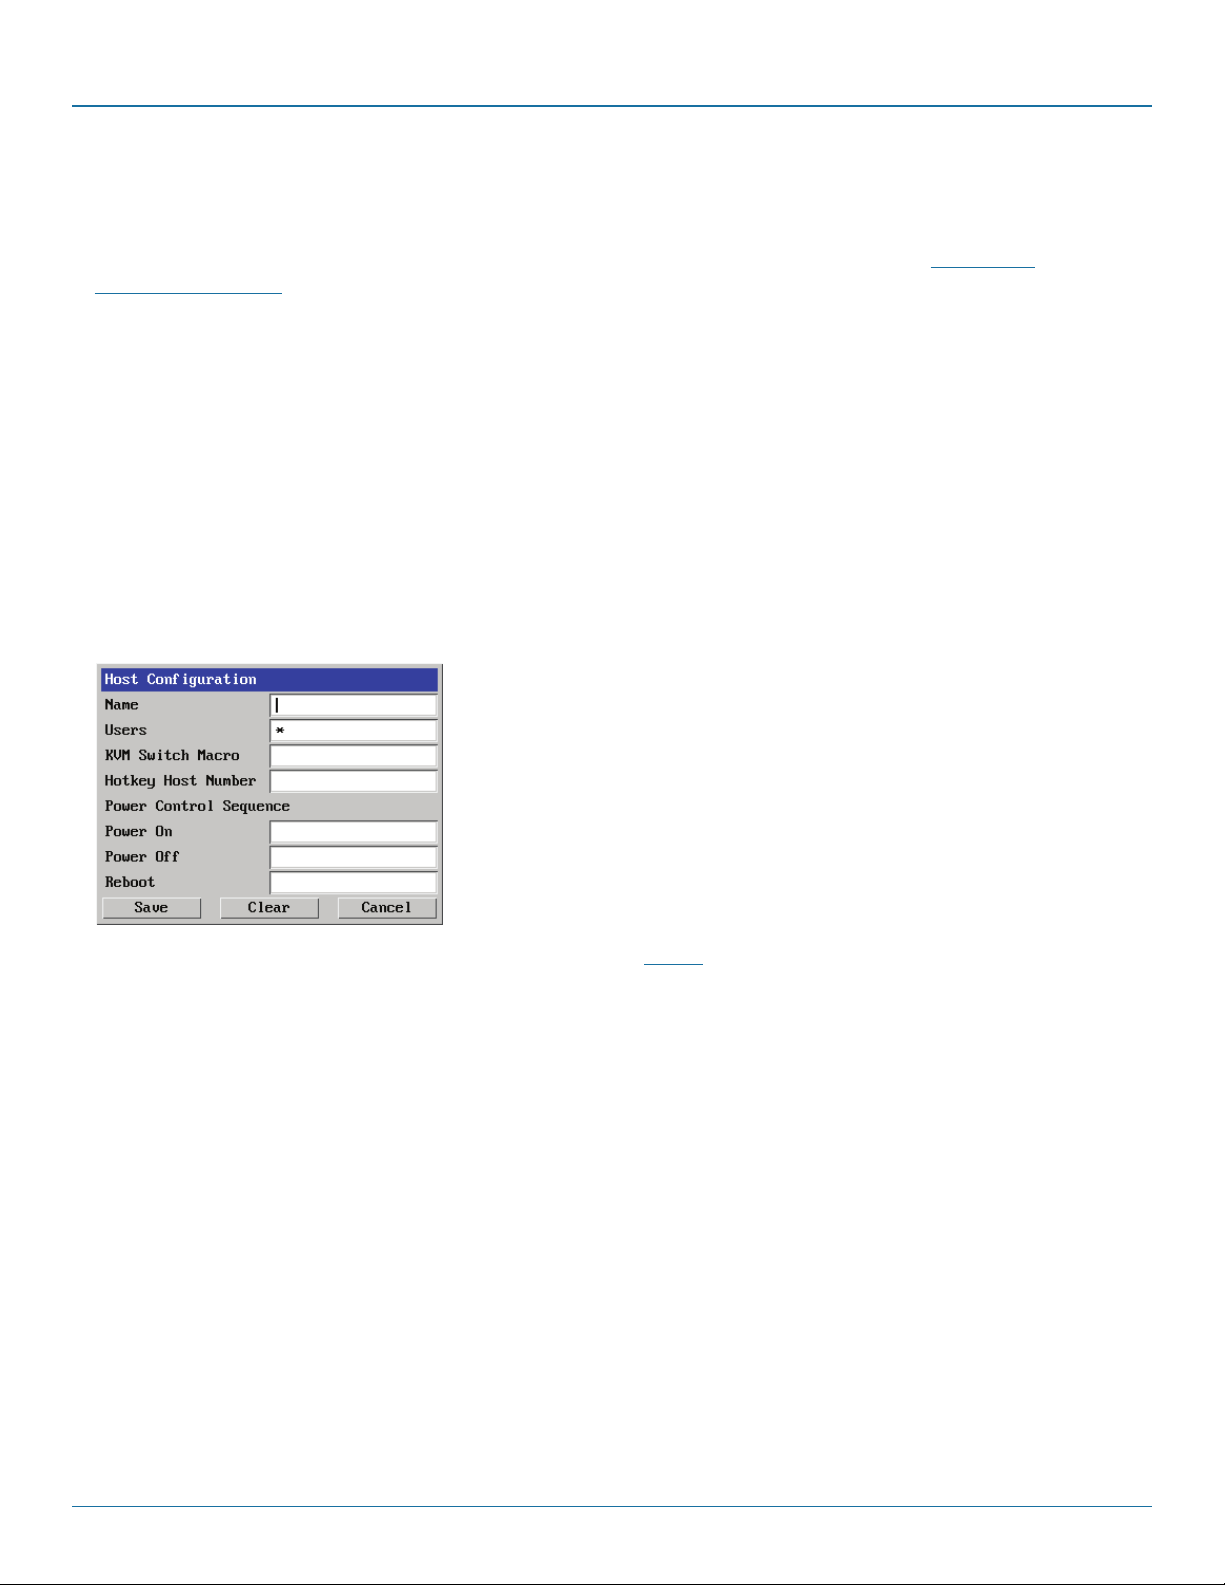
ServSwitch Wizard™ DXS - Digital
D.13 Power switching configuration
Power switch configuration comprises two main steps:
• ConfiguretheOPTIONS serial port to the same speed as used by the power switch box(es), using the Serial port
configuration menu.
• ConfigurepowerONandOFFstringsforeachrelevanthostcomputer.
For each power port there needs to be a valid ‘Power ON string’ and similarly an appropriate ‘Power OFF string’. In each case, the
strings are a short sequence of characters that combine a port address and a power on or off value.
If a particular computer has more than one power input (and thus requires an equivalent number of power ports to control
them), collections of strings can be combined to switch all of the required ports together as a group.
To configure the power sequences for each host computer
1 Using VNC viewer or a browser, log on as the ‘admin’ user.
2 Click the ‘Configure’ button in the top right corner.
3 Click the ‘Host configuration’ option.
4 Click a host entry to display a Host configuration dialog:
5 If necessary, configure other parameters (Name, Users, Hot Keys - MORE).
6 Enter the Power control sequences in the Power On, Power Off and Reboot fields
7 Click OK to close the dialog and then click the Save button in the main Host Configuration window to store the details.
Page 62
877-877-2269 | blackbox.com
Page 63

Appendices
Power control sequences
Notes: The settings given below are for a particular type of power switch - other power switches may require different settings.
Please refer to your power switch documentation for details about codes required by other power switches.
The structure of each power sequence (OFF, ON or Reboot) is as follows:
/Pxy=z\0D
Where:
x is the switch box number,
y is the power port number,
z is ‘0’ for OFF or ‘1’ for ON
r is for Reboot, and
\0D represents Enter (or Carriage return).
Example 1
To switch ON port 5 of switch box 2, the code would be as follows:
• Powersequence: P25=1\0D
Example 2
To switch OFF port 8 of switch box 3, the code would be as follows:
• Powersequence: P38=0\ 0D
For details about operating this feature, see Power switching control within the Operation chapter.
To control two or more ports simultaneously
You can control up to four power ports using a single sequence. This is done using the same command structure as shown above,
plus a delay command, for each port. Immediately following a port command, insert the characters ‘\*’ before the next port
command, and so on up to four ports. For instance, to switch on ports 1 and 2 in the first power switch, the command line
would be:
P11=1\0D\*P12=1\0D
877-877-2269 | blackbox.com
Page 63
Page 64
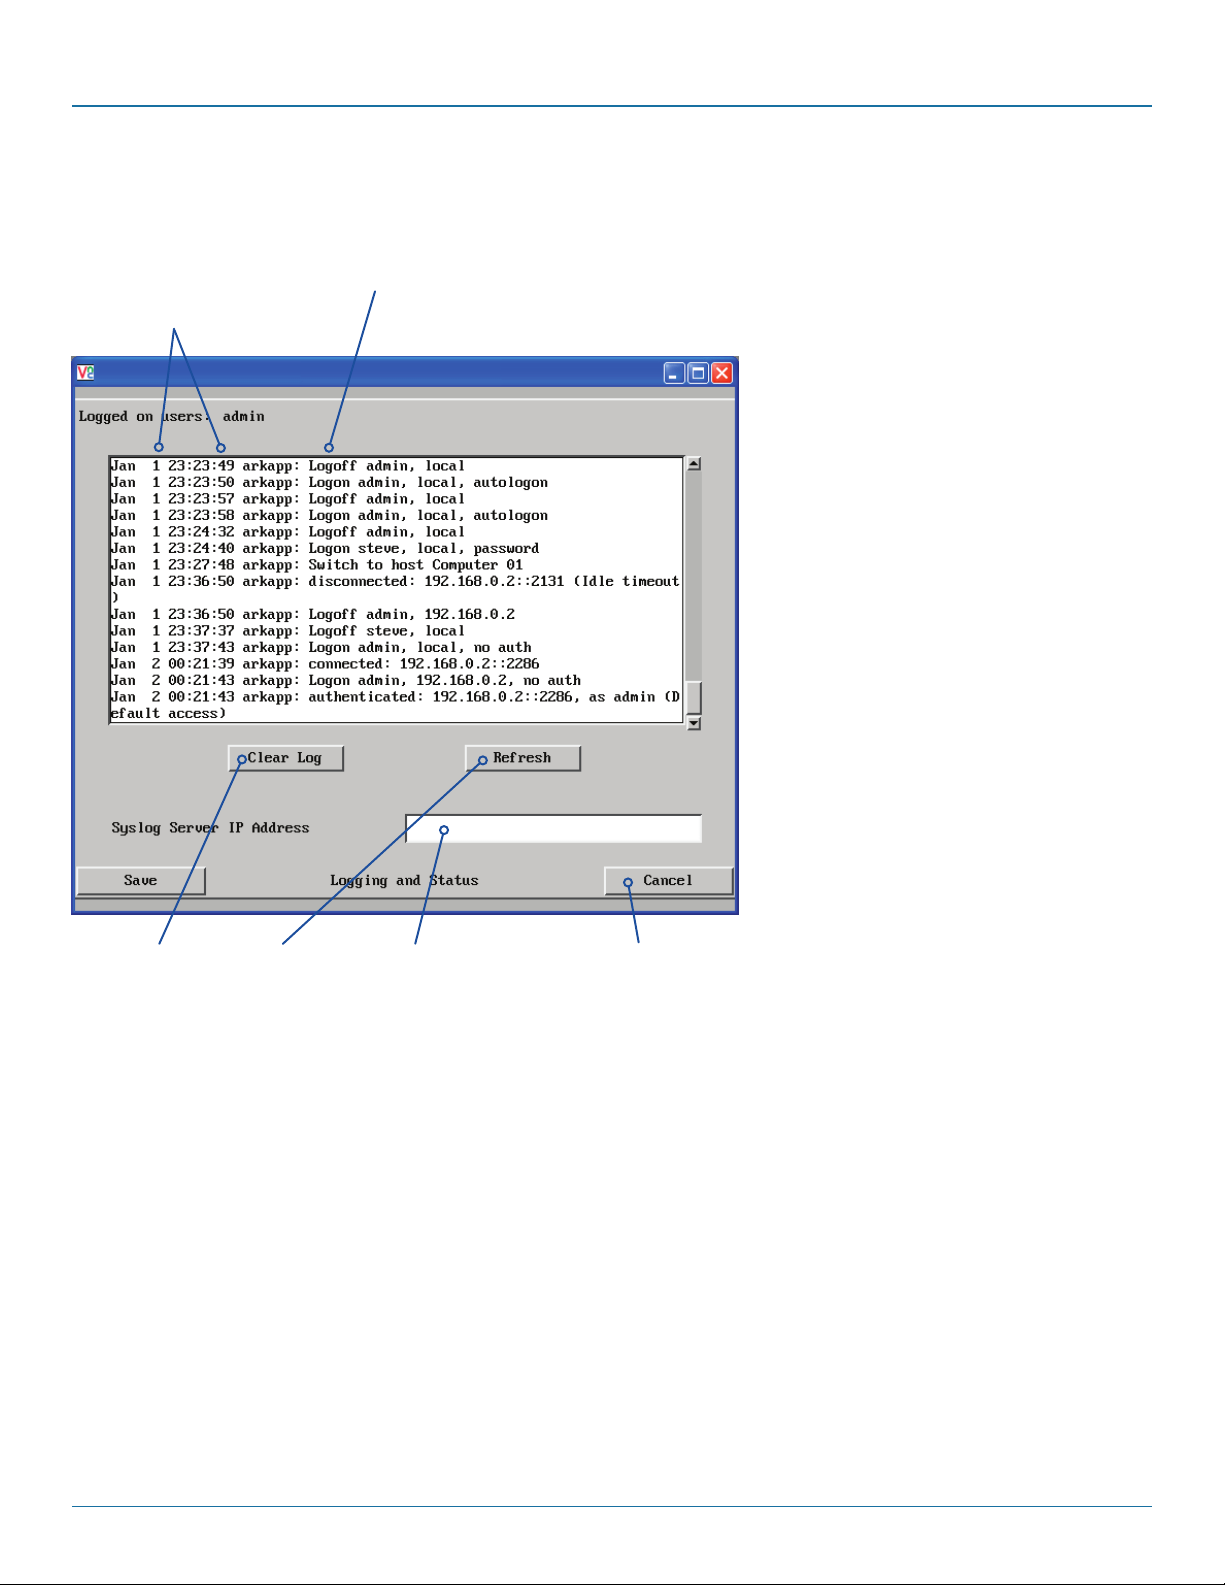
ServSwitch Wizard™ DXS - Digital
D.14 Logging and status
This screen provides various details about the user activity on the Wizard DXS - Digital unit.
Date and
time the
event
occurred
Type of event, user name and access
method or remote IP address
To get here
1 Using VNC viewer or a browser, log on
as the ‘admin’ user.
2 Click the ‘Configure’ button in the top
right corner.
3 Click the ‘Logging and Status’ option.
Click to clear
all log entries
Click to
refresh
the list
Optionally enter an
IP address to which
the status log should
be sent
Click to
return to
the main
menu
Page 64
877-877-2269 | blackbox.com
Page 65

Appendices
To copy and paste the log
You can copy the information listed within the log and paste it into another application.
1 While viewing the log screen, press Ctrl and C, to copy the data into the clipboard.
2 In a text application (i.e. Word, WordPad, Notepad) press Ctrl and V, or right mouse click and ‘Paste’.
Syslog Server IP Address
Logging information can optionally be sent, as it occurs, to a separate system using the standard Syslog protocol. Enter the IP
address of a suitable system in the field provided.
For further details
• FordetailsoftheSyslogprotocol(RFCnumber:3164)http://www.ietf.org/rfc.html
877-877-2269 | blackbox.com
Page 65
Page 66
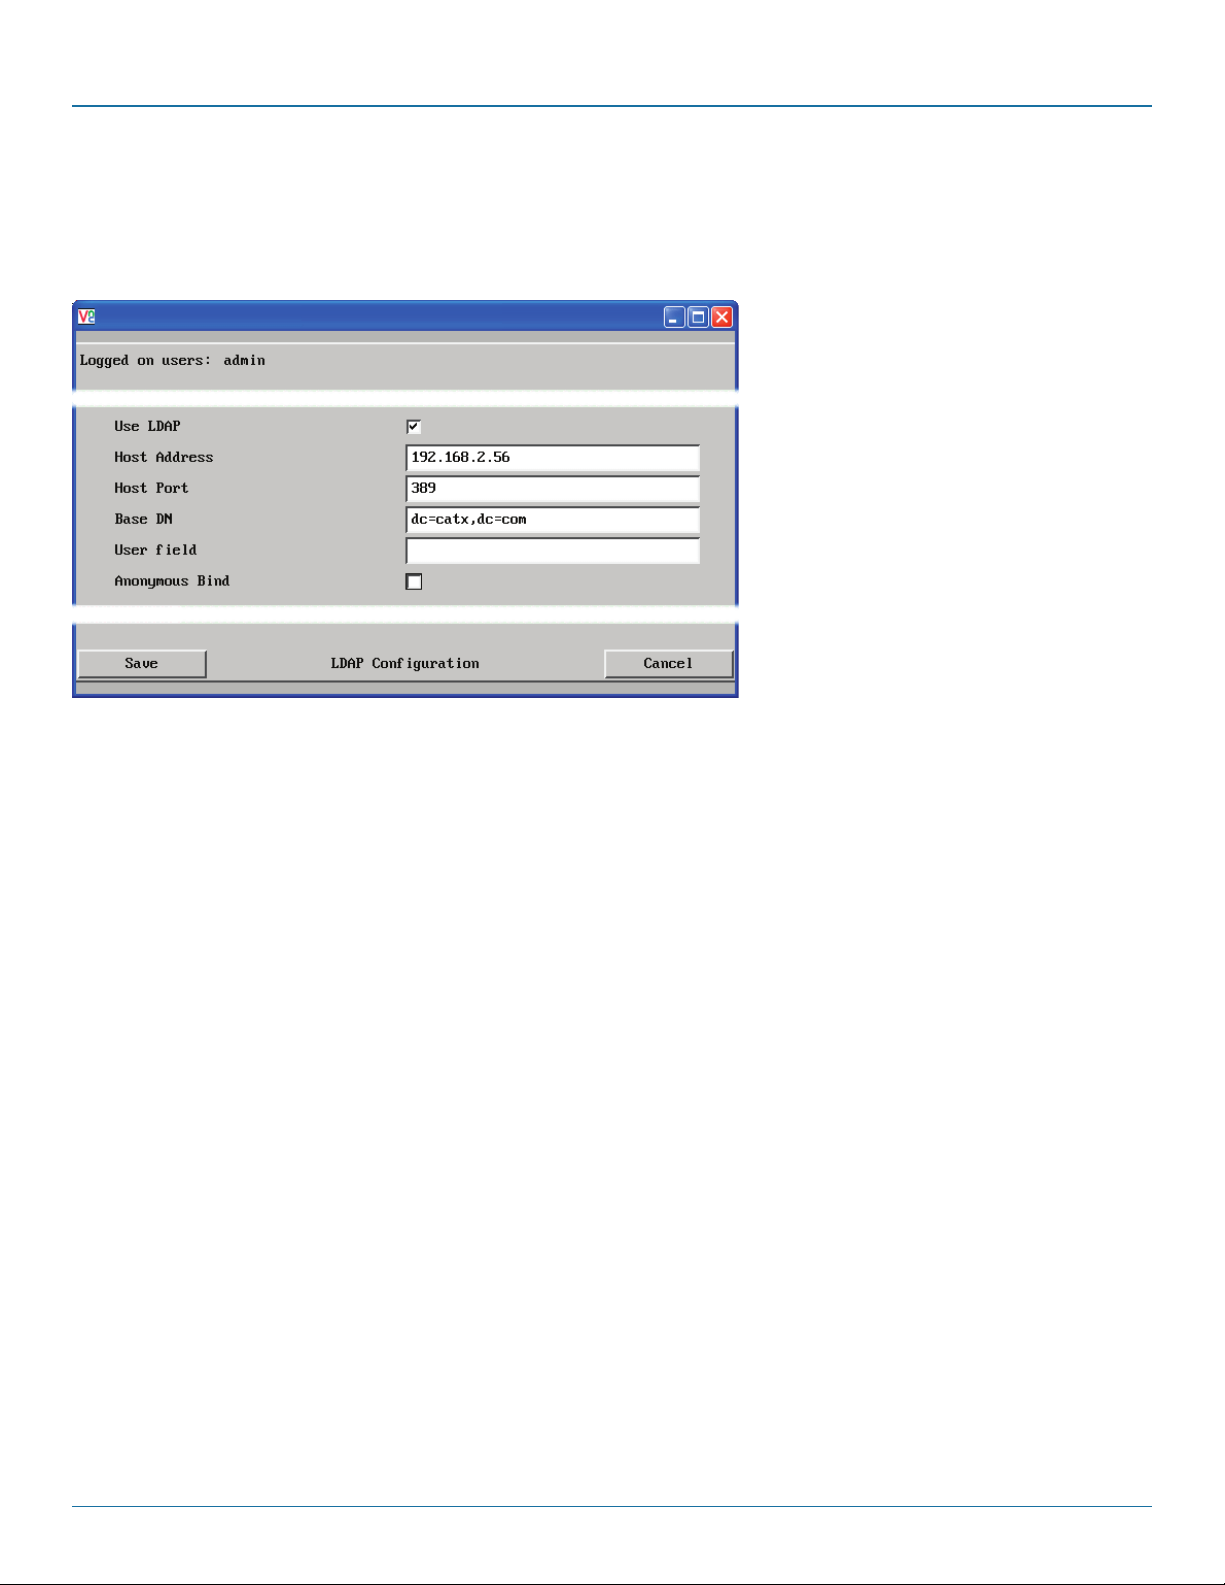
ServSwitch Wizard™ DXS - Digital
D.15 LDAP configuration
The Wizard DXS - Digital can optionally use the industry standard LDAP (Lightweight Directory Access Protocol) to allow user
authentication to occur in conjunction with an externally held database. This screen allows you to configure details related to the
creation of an LDAP link to an external directory service, such as an Active Directory server.
To get here
1 Using VNC viewer or a browser, log on as
the ‘admin’ user.
2 Click the ‘Configure’ button in the top
right corner.
3 Click the ‘LDAP Configuration’ option.
Use LDAP
Tick this option to enable the Lightweight Directory Access Protocol features of the unit.
Host Address
Enter the IP address of the LDAP server that holds the required directory service.
Host Port
The standard port address for LDAP links is 389 and this should not need to be changed unless special circumstances exist.
Base DN
This field allows you to enter the top level of the LDAP directory tree at which to start an LDAP search. An example Base DN value
might be: “dc=catx,dc=com”
User field
Enter the LDAP database field that will be used to match each user name against. The details entered here will depend on the
specific LDAP database being used - ‘uid’ or ‘cn’ are commonly used values.
Anonymous Bind
If left unchecked then bind requests are sent with username (Base DN) and password (more suitable for Active Directory
applications). If checked, bind requests are anonymous (more suitable for Linux LDAP implementations).
Page 66
877-877-2269 | blackbox.com
Page 67

Appendices
Admin Password and LDAP Support
Even if LDAP authentication is enabled, the ‘admin’ user is still authenticated locally, using the traditional authentication technique
of matching to a locally sorted password.
Active Directory authentication process
Typically, Active Directory deployments are not configured for anonymous binding. Hence, in our implementation of LDAP and
Active Directory support for the Wizard DXS - Digital we have opted have a single username and password to bind to the
directory and authenticate.
In order to use the ARQ3 LDAP with Active Directory ensure that “Anonymous bind” is not checked in the LDAP configuration
menu.
The process of authentication and associated LDAP transactions are as follows. A user enters the username and password in the
VNC viewer authentication dialog. This username and password is used as the “binddn” and “bindpw” in the “simple bind
request” sent to the Active Directory server. Upon binding to the directory successfully, a LDAP search is performed for the same
username under the specified User Field in the specified Base DN . If the the search is successful then the authentication is
performed using the password entered by the user. If the password is accepted by the Active Directory server, then the process
of authentication is completed and the user is unbound from the directory.
Linux LDAP authentication process
In order to use the Wizard DXS - Digital LDAP with Linux LDAP ensure that “Anonymous bind” is checked in the LDAP
configuration menu.
The process of authentication and associated LDAP transactions are as follows. A user enters the username and password in the
VNC viewer authentication dialog. An anonymous “simple bind request” is then sent to the LDAP server. No username or
password is sent at this stage. On binding to the directory successfully, a LDAP search is performed for the username, under the
specified User Field and in the specified Base DN. If the the search is successful then the authentication is performed using the
password entered by the user. If the password is accepted by the LDAP server, then the process of authentication is completed
and the user is unbound from the directory.
877-877-2269 | blackbox.com
Page 67
Page 68
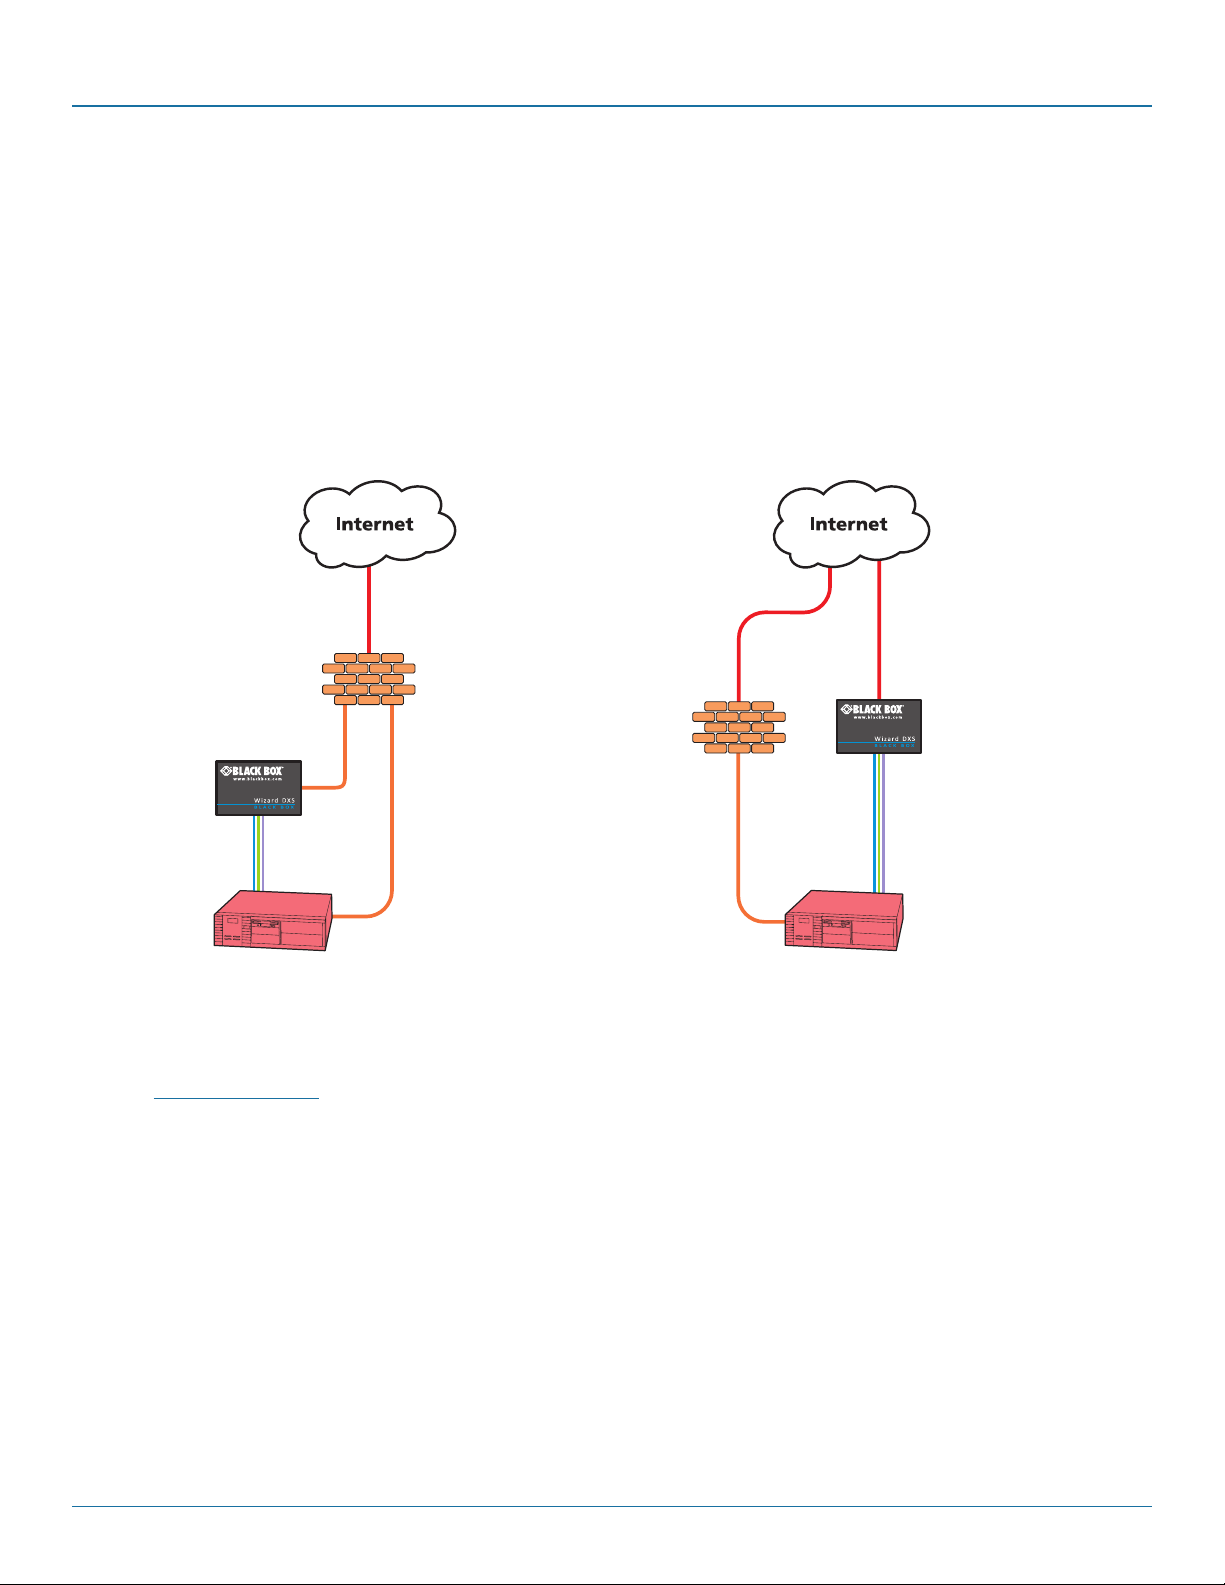
ServSwitch Wizard™ DXS - Digital
Appendix E. Networking issues
Thanks to its robust security the Wizard DXS - Digital offers you great flexibility in how it integrates into an existing network
structure. The Wizard DXS - Digital is designed to reside either on an internal network, behind a firewall/router or alternatively
with its own direct Internet connection.
E.1 Positioning Wizard DXS - Digital in the network
Every network setup is different and great care needs to be taken when introducing a powerful device such as the Wizard DXS Digital into an existing configuration. A common cause of potential problems can be in clashes with firewall configurations. For
this reason the Wizard DXS - Digital is designed to be intelligent, flexible and secure. With the minimum of effort the Wizard DXS
- Digital can reside either behind the firewall or alongside with its own separate Internet connection.
Firewall/
router
Firewall/
router
KVM link to
host system
Figure E-1. Wizard DXS - Digital
situated behind the firewall
Local
network
connection
Local
network
connection
Figure E-2. Wizard DXS - Digital
situated alongside the firewall
KVM link to
host system
IMPORTANT: When the Wizard DXS - Digital is accessible from the public Internet or dial up connection, you must ensure that
sufficient security measures are employed.
Page 68
877-877-2269 | blackbox.com
Page 69

Appendices
E.2 Placing Wizard DXS - Digital behind a router or firewall
A possible point of contention between the Wizard DXS - Digital and a firewall can occasionally arise over the use of IP ports. Every
port through the firewall represents a potential point of attack from outside and so it is advisable to minimise the number of open
ports. The Wizard DXS - Digital usually uses two separate port numbers, however, these are easily changeable and can even be
combined into a single port.
IMPORTANT: The correct configuration of routers and firewalls requires advanced networking skills and intimate knowledge of the
particular network. Black Box cannot provide specific advice on how to configure your network devices and strongly recommend that
such tasks are carried out by a qualified professional.
Port settings
As standard, the Wizard DXS - Digital uses two ports to support its two types of viewer:
• Port 80 for users making contact with a web browser, and
• Port 5900 for those using the VNC viewer.
When these port numbers are used, VNC viewers and web browsers will locate the Wizard DXS - Digital correctly using only its
network address. The firewall/router must be informed to transfer traffic, requesting these port numbers, through to the Wizard
DXS - Digital.
When a web server is also on the local network
Port 80 is the standard port used by web (HTTP) servers. If the Wizard DXS - Digital is situated within a local network that also
includes a web server or any other device serving port 80 then, if you want to use the web browser interface from outside the local
network environment, the HTTP port number of the Wizard DXS - Digital must be changed.
When you change the HTTP port to anything other than 80, then each remote browser user will need to specify the port address
as well as the IP address. For instance, if you set the HTTP port to ‘8000’ and the IP address is ‘192.168.47.10’ then browser users
will need to enter:
htt p: / /192.168. 47.10 : 8000
(Note the single colon that separates the IP address and the port number).
The firewall/router would also need to be informed to transfer all traffic to the new port number through to the Wizard DXS Digital.
If you need to change the VNC port number
If you change the VNC port to anything other than 5900, then each VNC viewer user will need to specify the port address as well
as the IP address. For instance, if you set the VNC port to ‘11590’ and the IP address is ‘192.168.47.10’ then VNC viewer users will
need to enter:
192.16 8 .47.10 ::1159 0
(Note the double colons that separate the IP address and port number).
The firewall/router would also need to be informed to transfer all traffic to the new port number through to the Wizard DXS Digital.
877-877-2269 | blackbox.com
Page 69
Page 70
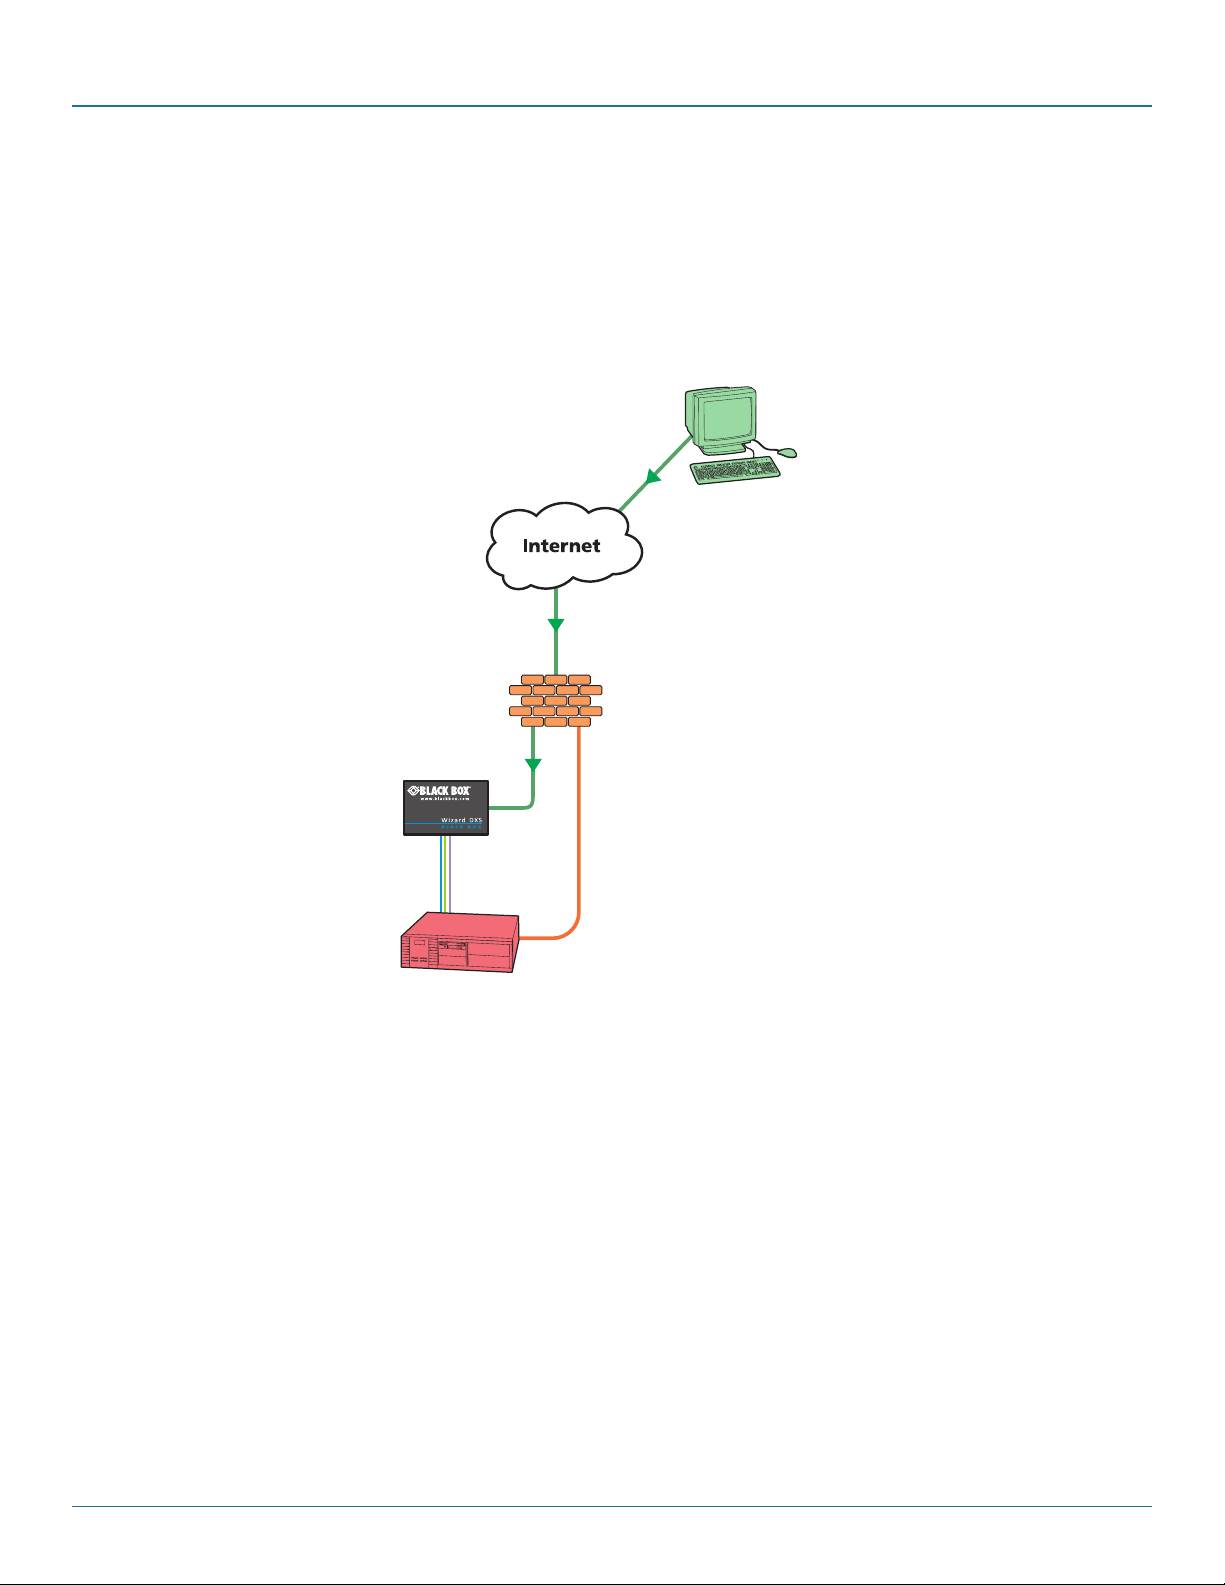
ServSwitch Wizard™ DXS - Digital
Addressing
When the Wizard DXS - Digital is situated within the local network, you will need to give it an appropriate local IP address and IP
network mask. This is achieved most easily using the DHCP server option which will apply these details automatically. If a DHCP
server is not available on the network, then these details need to be applied manually in accordance with the network
administrator.
The firewall/router must then be informed to route incoming requests to port 5900 or port 80 (if available) through to the local
address being used by the Wizard DXS - Digital.
Remote user with VNC
viewer accesses IP
address: 129.7.1.10 and
automatically uses port
5900.
Wizard DXS - Digital has
a local address and net
mask, i.e.
IP address: 192.168.0.3
Net mask: 255.255.255.0
Figure E-3. Wizard DXS - Digital addressing within the network
Firewall/router address:
129.7.1.10
The firewall routes the
request from the VNC viewer
on port 5900 through to the
Wizard DXS - Digital at local
address 192.168.0.3
Page 70
877-877-2269 | blackbox.com
Page 71

Appendices
To discover a DHCP-allocated IP address
Once a DHCP server has allocated an IP address, you will need to know it in order to access the Wizard DXS - Digital via a
network connection. To discover the allocated IP address:
1 Within Network configuration, set the ‘Use DHCP’ option to ‘Yes’ and select ‘Save’. Once the page is saved, the Wizard
DXS - Digital will contact the DHCP server and obtain a new address.
2 Re-enter the same ‘Network configuration’ screen where the new IP address and network mask should be displayed.
DNS addressing
As with any other network device, you can arrange for your Wizard DXS - Digital to be accessible using a name, rather than an IP
address. This can be achieved in two main ways:
• ForsmallnetworksthatdonothaveaDNS(DomainNameSystem)server,editthe‘hosts’filesontheappropriateremote
systems. Using the hosts file, you can manually link the Wizard DXS - Digital address to the required name.
• Forlargernetworks,declaretheIPaddressandrequirednametotheDNSserverofyourlocalnetwork.
The actual steps required to achieve either of these options are beyond the scope of this document.
877-877-2269 | blackbox.com
Page 71
Page 72

ServSwitch Wizard™ DXS - Digital
E.3 Placing Wizard DXS - Digital alongside the firewall
Wizard DXS - Digital is built from the ground-up to be secure. It employs a sophisticated 128bit public/private key system that has
been rigorously analysed and found to be highly secure. Therefore, you can position the Wizard DXS - Digital alongside the
firewall and control a computer that is also IP connected within the local network.
IMPORTANT: If you make the Wizard DXS - Digital accessible from the public Internet, care should be taken to ensure that the
maximum security available is activated. You are strongly advised to enable encryption and use a strong password. Security may
be further improved by restricting client IP addresses, using a non-standard port number for access.
Ensuring sufficient security
The security capabilities offered by the Wizard DXS - Digital are only truly effective when they are correctly used. A weak
password or unencrypted link can cause security loopholes and opportunities for potential intruders. For network links in general
and direct Internet connections in particular, you should carefully consider and implement the following:
• Ensurethatencryption is enabled.
• Ensurethatyouhaveselectedsecure passwords with at least 8 characters and a mixture of upper and lower case and
numeric characters plus a special character.
• Reservetheadminpasswordforadministrationuseonlyanduseanon-adminuserprofileforday-to-dayaccess.
• UsethelatestSecureVNCviewer(thishasmorein-builtsecuritythanisavailablewiththeJavaviewer).
• Usenon-standardport numbers.
• RestricttherangeofIPaddressesthatareallowedtoaccesstheWizardDXS-Digitaltoonlythosethatyouwillneedtouse.
To restrict IP access.
• DoNOTForceVNCprotocol3.3.
• EnsurethatthecomputeraccessingtheWizardDXS-Digitaliscleanofvirusesandspywareandhasup-to-datefirewalland
anti-virus software loaded that is appropriately configured.
• AvoidaccessingtheWizardDXS-Digitalfrompubliccomputers.
Page 72
877-877-2269 | blackbox.com
Page 73

Appendices
Security can be further improved by using the following suggestions:
• PlacetheWizardDXS-DigitalbehindafirewallanduseportthenumberstoroutetheVNCnetworktraffictoaninternalIP
address.
• Reviewtheactivitylogfromtimetotimetocheckforunauthorizeduse.
• Lockyourserverconsolesaftertheyhavebeenused.
Ports
In this configuration there should be no constraints on the port numbers because the Wizard DXS - Digital will probably be the
only device at that IP address. Therefore, maintain the HTTP port as 80 and the VNC port as 5900.
Addressing
When the Wizard DXS - Digital is situated alongside the firewall, it will require a public static IP address (i.e. one provided by your
Internet service provider).
More addressing information:
Discover DHCP-allocated addresses
DNS addressing
877-877-2269 | blackbox.com
Page 73
Page 74

ServSwitch Wizard™ DXS - Digital
Appendix F. An introduction to IPv6
During the initial design of the Internet, 4.3 billion seemed like an impossibly large number of device addresses, possibly more
than would ever be needed. It took nearly forty years, but finally the last remaining vacant address blocks within the current
Internet Protocol scheme (called IPv4) were assigned in February 2011.
The Internet Protocol is a crucial element of Internet operation and the eventual exhaustion of unique addresses was predicted
and acted upon many years ago. The replacement for IPv4 is known as IPv6 and was defined in December 1998. Since then its
uptake has been slow (reportedly used for less than 1% of Internet traffic in 2008) although this will increase rapidly as places
within the incumbent system are exhausted.
Vastly increased address space
The most notable feature of IPv6 is the size of its address space, put simply: It’s massive. By using 128 bits to define each IPv6
address (rather than the 32 bits used in IPv4), there are now 340 x 1036 unique addresses (that’s 340 trillion trillion trillion or as it
is correctly known, 340 undecillion).
The larger address size of IPv6 requires a different manner of notation. Instead of the four decimal numbers separated by dots
used for IPv4 (e.g. 192.168.0.1), IPv6 addresses consist of eight groups of four hexadecimal digits that are separated by colons
(e.g. 2002:00a2:67be:0000:0000:0e82:8723:a144) – each group of four digits represents 16 bits of the address. By necessity,
IPv6 addresses are quite long and so there are a couple of techniques to help reduce this in certain cases:
• Whereagrouphasoneormoreleadingzeroes,thesecanbeomitted.Intheaboveexample00a2 and 0e82 can be written a2
and e82, respectively.
• Whereoneormoreconsecutivegroupsconsistsolelyofzeroes,theycanbereplacedwithadoublecolon(::). In the above
example, the fourth and fifth groups could be replaced with the double colon, so that the whole line could be reduced to:
2002:a2:67be ::e 82:8723:a144. It is easy to return any such shortened address to the full version by replacing the double colons
with sufficient groups of zeroes until the total number of groups is returned to eight. For this to work it is essential that only
one set of consecutive zero groups within an address are replaced with a double colon.
Standard subnet size
Thanks to the new huge address space, IPv6 does not need to wring every last drop out of each address range and so it handles
address allocation in a different manner than its predecessor. Whereas IPv4 uses subnets of varying sizes (using the Subnet Mask
entry to define the size of each subnet), IPv6 subnets are (almost) all set to a standard size. A full 64 bits are used to define each
subnet, which means that every standard IPv6 subnet has use of an address space that is the square of the entire IPv4 address
space (that’s 1.8 x 10¹⁹ addresses per subnet). In those subnets, all addresses are valid host locations; gone are special address
formats for particular uses, such as broadcast traffic. Also, now that all standard subnets are the same size, the subnet mask is
another item that is made redundant under IPv6.
Page 74
877-877-2269 | blackbox.com
Page 75

Appendices
Address allocation
Every device attached to an IPv6 network usually has more than one address type. The two most common types are called a linklocal address and a global address and these can be assigned in a number of ways.
In IPv4, device addresses are most commonly assigned either manually or by using a Dynamic Host Configuration Protocol server
(DHCP). IPv6 also offers manual addressing and DHCP (now called DHCPv6 and fully supported by the Wizard DXS - Digital unit),
but also allows devices to automatically configure their own addresses using a series of steps defined as StateLess Address
AutoConfiguration (or SLAAC). The key parts of the SLAAC procedure occur roughly as follows:
• TheIPv6compliantdevicecreatesatentative local identifier which is usually derived from its fixed unique hardware identifier
(or MAC address). The local identifier is 64 bits in length (the lower half of the full 128 bit address) and this is one of the
advantages of having a fixed subnet size; it is very straightforward to automatically figure out the boundaries and contents of
the local network. This is exactly what the device does next with its tentative local identifier.
• ThedeviceusestheNeighbor Discovery Protocol (part of the Internet Control Message Protocol suite – IMCPv6) to check within
the local network whether its tentative local identifier is being used by any other device. If it is, then the device will create a
new one and start the process again. If the local identifier is unique within the local network, it is then combined with the
standard link-local prefix (fe80::) to form a valid link-local address. At this stage the address is valid only for communication
within the local network. The next stage is to replace the link-local prefix with a global prefix and then carry out a similar
procedure in order to prevent address duplication, resulting in a validated global address.
Mixing IPv4 and IPv6
Although IPv6 is based upon, and shares a number of similarities with IPv4, there are great differences in their address spaces and
other key details which mean that they are not directly compatible. This means that while computers and their operating systems
can support both types, IPv4 and IPv6 networks exist essentially as two parallel, independent entities with numerous cross over
points (known as relay routers). For the foreseeable future, while both versions coexist, exchanging traffic between them will
require many relay routers and various transition techniques.
One such technique involves IPv4-mapped IPv6 addresses. These are used in operating systems and applications that transparently
support both IP formats. In such cases IPv6 will be the native format with IPv4 fully supported whenever necessary. When an IPv4
address must be incorporated, it is placed into a special IPv6 address that has its first 80 bits set to zero and the next 16 bits set
to one. The remaining 32 bits are where the IPv4 address is embedded. When written, the address is an amalgam of the two
network types - ::ffff:192.0.2.128
877-877-2269 | blackbox.com
Page 75
Page 76

ServSwitch Wizard™ DXS - Digital
Appendix G. The KVMADMIN utility
Particularly useful for complex Wizard DXS - Digital configurations and the control of remote installations, KVMADMIN is a
powerful administration tool.
KVMADMIN is based upon the established VNC viewer and uses the same security system. Rather than a graphical interface such
as the standard viewer, KVMADMIN uses command line control to provide the following administration facilities:
• DiscoverandadjusttheWizardDXS-Digitalconfiguration,includinghostsystems,
• SaveandrestoretheWizardDXS-Digitalconfiguration,
• Setusernamesandpasswords,
• Downloadtheeventlog,
The use of KVMADMIN is strictly limited to the ‘admin’ user and for security purposes it is not possible to retrieve user names or
passwords from the Wizard DXS - Digital.
To use KVMADMIN you require the IP address and admin password of the Wizard DXS - Digital unit. The command line is as
follows:
kvmadmin <command> <ip address> [<parameters>]
where <command> is one of the following:
• -setconfig<config-file>
• -getconfig<config-file>
• -setusers<csv-file>
• -getlog<log-file>
• -gethosts<csv-file>
• -sethosts<csv-file>
• -setmodes<csv-file>
For instance, the command line:
kvmadmin -getconfig kvm1.cfg 192.168.2.1
... downloads the current configuration from the Wizard DXS - Digital unit at the given address and stores it in the local file kvm1.
cfg.
Whereas the command line:
kvmadmin -setusers users.csv 192.168.2.1
... configures the usernames and passwords for the same unit from the local file users.csv.
For more information about KVMADMIN, please refer to the user notes supplied with the utility.
Page 76
877-877-2269 | blackbox.com
Page 77

Appendix H. Known working video modes
640 x 480p at 60Hz
640 x 480p at 67Hz
640 x 480p at 72Hz
640 x 480p at 75Hz
640 x 480p at 85Hz
720 x 400p at 70Hz
800 x 600p at 56Hz
800 x 600p at 60Hz
800 x 600p at 72Hz
800 x 600p at 75Hz
800 x 600p at 85Hz
832 x 624p at 75Hz
Appendices
1024 x 768p at 60Hz
1024 x 768p at 70Hz
1024 x 768p at 75Hz
1024 x 768p at 85Hz
1152 x 864p at 60Hz
1152 x 864p at 75Hz
1152 x 870p at 75Hz
1280 x 960p at 60Hz
1280 x 1024p at 67Hz
1280 x 1024p at 75Hz
1280 x 1024p at 85Hz
1600 x 1200p at 60Hz
1920 x 1080p at 60Hz
1920 x 1200p at 60Hz with reduced blanking.
Note: 1366x1024@60Hz and 1366x768@60Hz are not supported.
877-877-2269 | blackbox.com
Page 77
Page 78

ServSwitch Wizard™ DXS - Digital
Appendix I. Hotkey sequences and Port Direct
Wizard DXS - Digital allows you to enter commands suitable for any KVM switch in order to choose from up to 128 host systems.
These switching commands can take the form of hotkey sequences that emulate standard keypress combinations or, for KVM
switches that support the Port Direct format, merely basic port numbers.
Hotkey sequences
Almost any combination of keypresses can be emulated using the following notations:
+ means press down the key that follows;
– means release the key that follows
+– means press and then release the key that follows
means add a delay. The standard delay period is 250ms, however, if a number immediately follows the asterisk, this will
*
define an alternate delay period (in milliseconds)
Notes
• The entries are not case sensitive.
• AllcharacterscanbeenteredusingtheirASCIIcodes,from32to126(i.e.A,B,C,…1,2,3etc.)withtheexceptionofthespecial
characters above.
• Itisnotnecessarytospecifyallkeystobereleasedattheendbecausetheyareallreleasedautomaticallyafterthelastcode.
• AnumberofKVMswitchesfromalternativemanufacturersusehotkeysequencesthatbeginwithapress/releaseofeitherthe
Scroll Lock or Ctrl keys. These often require a delay between the initial key press and the channel number to allow the switch
to respond. A 500ms delay is usually sufficient.
Examples
To send the command Ctrl + Alt 4 you should use the following: +Ctrl+Alt+4.
To send the command Ctrl + Alt 12 you should use the following: +Ctrl+ALT+ –1+2
(the ‘+–1’ entry causes the 1 key to be pressed and released before the 2 key is pressed).
To send the command Scroll lock 1 + Enter (with a 500ms delay) you should use the following: +–Scr*500+1+Ent
Main control keys (see‘Usingabbreviations’)
Backspace | Tab | Return | Enter | Ctrl | Alt | Win | Shift | LShift | RShift
LCtrl | RCtrl | LAlt | AltGr | RAlt | LWin | RWin | Menu | Escape | Space
CapsLock | NumLock | PrintScreen | Scrolllock
Math operand keys (see‘Usingabbreviations’)
Add (Plus) | Subtract (Minus) | Multiply
Central control keys (see‘Usingabbreviations’)
Insert | Delete | Home | End | PageUp | PageDown
Up | Down | Left | Right | Print | Pause
Keypad keys (see‘Usingabbreviations’)
KP_Inser t | KP_Delete | KP_Home | KP_End | KP_PageUp
KP_PageDown | KP_Up | KP_Down | KP_Left | KP_Right | KP_Enter
KP_ Add | KP_Subtrac t | KP_Divid e | KP_Multiply
KP_0 to KP_9
Page 78
877-877-2269 | blackbox.com
Page 79

Appendices
Function keys
F1 | F2 | F3 | F4 | F5 | F6 | F7 | F8 | F9 | F10 | F11 | F12
Creating macro sequences
Hot key macro sequences can be up to 256 characters long. All keys are assumed to be released at the end of a line, however,
you can also determine that a key is pressed and released within a sequence. Any of the following three examples will send a
command that emulates and a press and release of the Scroll Lock key:
+SCROLL-SCROLL
+-SCROLL
+SCROLL-
Example:
+-SCROLL+ -SCROLL+1+ ENTER
Press and release scroll twice, press 1 then enter then release all keys (equivalent definition is +SCROLL-SCROLL+SCROLLSCROLL+1+ENTER-1-ENTER)
Using abbreviations
To reduce the length of the key definitions, any unique abbreviation for a key can be used. For example: “scroll”, “scr” and even
“sc” all provide an identifiable match for “ScrollLock” whereas “en” could not be used because it might mean “Enter” or “End”
(“ent” would be suitable for “Enter”).
Note: Hotkey sequences and abbreviations are not case sensitive.
For information about where to enter these codes, please see the sections Host configuration or Keyboard control.
Port Direct
Port Direct is totally transparent communication system that allows supporting KVM switches and remote access devices to
communicate with each other. Using the keyboard connections that link each device, Port Direct allows:
• Acontrollingdevicetoprovideaddressdetailsoftherequiredport,theuser’snameandaccessrights,mousecalibrationand
video mode information.
• Acontrolleddevicetoconfirmtheaddressandotherdetailsofthecurrentport.
Such communication simplifies both the configuration and selection of systems, especially within a complex cascade structure.
Port Direct provides excellent security control to prevent users from accessing systems for which they do not access rights
(‘sideways movement’) because each unit is fully informed of each user’s precise access rights.
Port/host addressing using Port Direct
When adding new computers to the Hosts list, the option ‘Add entry for unrecognised host’ is provided to automatically add new
entries if a port is visited that does not already have a matching host entry. This is a useful option for simple KVM switch
configurations, but should be used with care when complex cascades of switches are being used as it may lead to more host
entries being added than are strictly necessary.
Additionally, you can specify the port number of the required system using the same format as if controlling the KVM switch
directly. Port numbers MUST be entered within square brackets and can be specified to a maximum of four cascaded levels.
Examples
[16] selects port 16 and is equivalent to the hotkey sequence +CTRL+ALT+–1+6
[4105] selects port 5 on a KVM switch that is cascaded through port group 41
877-877-2269 | blackbox.com
Page 79
Page 80

ServSwitch Wizard™ DXS - Digital
Appendix J. End user licence agreement
PLEASE READ THIS AGREEMENT CAREFULLY. THIS AGREEMENT CONCERNS ENHANCED VNC VIEWER SOFTWARE (“the
SOFTWARE”) FOR USE WITH THE Wizard DXS - Digital PRODUCT (“the PRODUCT”). THE SOFTWARE IS PROVIDED TO ENABLE
YOU TO OPERATE THE PRODUCT. BY USING ALL OR ANY PORTION OF THE SOFTWARE YOU ACCEPT ALL THE TERMS AND
CONDITIONS OF THIS AGREEMENT. IF YOU DO NOT ACCEPT ALL THE TERMS AND CONDITIONS OF THIS AGREEMENT THEN DO
NOT USE THE SOFTWARE. BY USING ANY UPDATED VERSION OF THE SOFTWARE WHICH MAY BE MADE AVAILABLE, YOU
ACCEPT THAT THE TERMS OF THIS AGREEMENT APPLY TO SUCH UPDATED SOFTWARE.
1. Intellectual Property Rights
The Software and its structure and algorithms are protected by copyright and other intellectual property laws, and all
intellectual property rights in them belong to RealVNC Limited (“RealVNC”), a United Kingdom Limited Company, or are
licensed to it. You may not reproduce, publish, transmit, modify, create derivative works from, publicly display the Software or
part thereof. Copying or storing or using the Software other than as permitted in Clause 2 is expressly prohibited unless you
obtain prior written permission from RealVNC.
2. Permitted and Prohibited Uses
2.1 During the term of this Agreement and as long as you comply with the terms of this agreement, you may use the Software
only with the Product for your personal use or for the internal use of your business. You may make as many copies of the
Software as you require for your own internal business purposes only and for archival purposes. You are expressly prohibited
from distributing the Software in any format, in whole or in part, for sale, or for commercial use or for any unlawful
purpose.
2.2 You may not rent, lease or otherwise transfer the Software or allow it to be copied. Unless permitted by law, you may not
reverse engineer, decompile or disassemble the Software.
3. Warranty
REALVNC DOES NOT WARRANT ANY RESULTS OBTAINED USING THE SOFTWARE. TO THE EXTENT PERMITTED BY LAW,
REALVNC DISCLAIMS ALL OTHER WARRANTIES ON THE SOFTWARE, EITHER EXPRESS OR IMPLIED, INCLUDING BUT NOT
LIMITED TO THE IMPLIED WARRANTIES OF MERCHANTABILITY, NON-INFRINGEMENT OF THIRD PARTY RIGHTS AND FITNESS
FOR PARTICULAR PURPOSE.
4. Limitation on Liability
UNDER NO CIRCUMSTANCES SHALL REALVNC BE LIABLE FOR ANY CONSEQUENTIAL INDIRECT OR INCIDENTAL DAMAGES
WHATSOEVER INCLUDING LOST PROFITS OR SAVINGS ARISING OUT OF THE USE OF THE SOFTWARE, THE SERVICE OR THE
INFORMATION, RELIANCE ON THE DATA PRODUCED OR INABILITY TO USE THE SOFTWARE, THE SERVICE OR THE
INFORMATION EVEN IF REALVNC HAS BEEN ADVISED OF THE POSSIBILITY OF SUCH DAMAGES. BECAUSE SOME STATES
AND COUNTRIES DO NOT ALLOW THE EXCLUSION OR LIMITATION OF LIABILITY FOR CONSEQUENTIAL OR INCIDENTAL
DAMAGES, THE ABOVE LIMITATION MAY NOT APPLY TO YOU.
NOTHING IN THIS AGREEMENT LIMITS LIABILITY FOR DEATH OR PERSONAL INJURY ARISING FROM A PARTY’S NEGLIGENCE
OR FROM FRAUDULENT MISREPRESENTATION ON THE PART OF A PARTY
Page 80
877-877-2269 | blackbox.com
Page 81

Appendices
5. Export Control
The United States and other countries control the export of Software and information. You are responsible for compliance with
the laws of your local jurisdiction regarding the import, export or re-export of the Software, and agree to comply with such
restrictions and not to export or re-export the Software where this is prohibited. By downloading the Software, you are
agreeing that you are not a person or entity to which such export is prohibited.
6. Term and Termination
This licence shall continue in force unless and until it is terminated by RealVNC by e-mail notice to you, if it reasonably believes
that you have breached a material term of this Agreement
In the case above, you must delete and destroy all copies of the Software in your possession and control and overwrite any
electronic memory or storage locations containing the Software.
7. General Terms
7.1 The construction, validity and performance of this Agreement shall be governed in all respects by English law, and the
Parties agree to submit to the exclusive jurisdiction of the English courts.
7.2 If any provision of this agreement is found to be invalid by any court having competent jurisdiction, the invalidity of such
provision shall not affect the validity of the remaining provisions of this agreement, which shall remain in full force and
effect.
7.3 No waiver of any term of this agreement shall be deemed a further or continuing waiver of such term or any other term.
7.4 This agreement constitutes the entire agreement between you and RealVNC.
General Public Licence (Linux)
The Wizard DXS - Digital runs an embedded version of the Linux operating system, licensed under the GNU General Public
Licence. To obtain the source code for the open-source components of the system visit:
http://www.adventiq.com/products /ARQ3/gpl.html
877-877-2269 | blackbox.com
Page 81
Page 82

ServSwitch Wizard™ DXS - Digital
Appendix K. Safety information
• Foruseindry,oilfreeindoorenvironmentsonly.
• Warning-livepartscontainedwithinpoweradaptor.
• Nouserserviceablepartswithinpoweradaptor-donotdismantle.
• Plug the power adaptor into a socket outlet close to the module that it is powering.
• Replace the power adaptor with a manufacturer approved type only.
• Do not use the power adaptor if the power adaptor case becomes damaged, cracked or broken or if you suspect that it is not
operating properly.
• If you use a power extension cord with the Wizard DXS - Digital, make sure the total ampere rating of the devices plugged into
the extension cord does not exceed the cord’s ampere rating. Also, make sure that the total ampere rating of all the devices
plugged into the wall outlet does not exceed the wall outlet’s ampere rating.
• Do not attempt to service the Wizard DXS - Digital yourself.
Safety considerations when using power switches with Wizard DXS - Digital
• Followthemanufacturer’sinstructionswhensettingupandusingpowerswitchingproducts.
• Alwaysensurethatthetotalampereratingofthedevicespluggedintothepowerswitchingproductdoesnotexceedthe
power switching product’s ampere rating. Also, make sure that the total ampere rating of all the devices plugged into the wall
outlet does not exceed the wall outlet’s ampere rating.
Page 82
877-877-2269 | blackbox.com
Page 83

Appendices
877-877-2269 | blackbox.com
Page 83
Page 84
Black Box Tech Support: FREE! Live. 24/7.
®
®
Tech support the
way it should be.
Great tech support is just 60 seconds away at 877-877-2269 or blackbox.com.
About Black Box
Black Box provides an extensive range of networking and infrastructure products. You’ll find everything from cabinets and racks
and power and surge protection products to media converters and Ethernet switches all supported by free, live 24/7 Tech support
available in 60 seconds or less.
© Copyright 2020. Black Box Corporation. All rights reserved. Black Box® and the Double Diamond logo are registered trademarks of BB Technologies, Inc.
Any third-party trademarks appearing in this manual are acknowledged to be the property of their respective owners.
ACR101A-DVI, rev. 1.1
877-877-2269 | blackbox.com
 Loading...