

BK Radio Aurora User Manual
1
Aurora User’s Manual
AURORA SERIES
PORTABLE RADIO
User ’s Manual

2
BK Radio

3
Aurora User’s Manual
1 – Radio with Belt Clip
1 – Flexible, Helical-Wound Antenna
1 – User’s Manual (P/N 7001-30927-401)
PACKING LIST
CAUTION
Do NOT operate a
damaged radio.
Aurora!
WELCOME......................................................................8
INTRODUCTION.............................................................9
Optional Accessories................................................. 9
External Speaker/Microphone .............................. 9
External VOX Headset .........................................9
Battery Packs .......................................................9
FCC REQUIREMENTS............................................10
SAFETY PRECAUTIONS ........................................10
Features ........................................................................1 1
Basic and Advanced Model Radios .........................11
Advanced Model Radios Only .................................11
Dealer Programmable Options ................................ 12
TABLE OF CONTENTS

4
BK Radio
Before Using Your Radio...............................................13
Battery Installation and Removal.............................13
Antenna Installation and Removal ...........................14
Radio Views ..................................................................15
Aurora Radio Controls ..................................................16
Front View................................................................16
Display................................................................16
Backlight.............................................................17
Keypad ............................................................... 1 7
Speaker ..............................................................1 7
Top View ..................................................................1 8
Status Indicator ..................................................1 8
On/Off Volume Knob...........................................18
Squelch Knob .....................................................18
Programmable Three-Position Switch ................20
Emergency Button ..............................................20
Channel Selector Knob ......................................20
Side Views ...............................................................21
PTT Switch .........................................................21
Programmable Softkey Buttons..........................21
Options Connector ............................................. 22
Basic Operation .............................................................23
Receive.................................................................... 23
TRANSMIT ...............................................................24
Code Guard Operation.................................................. 2 5
Code Guard Receive ...............................................25
Code Guard Transmit .............................................. 2 6
TABLE OF CONTENTS

5
Aurora User’s Manual
Built-in Features............................................................ 27
Audio ........................................................................ 27
Audio Options ..........................................................28
Battery-Saver Feature ............................................. 29
VOX Operation ........................................................29
Channel Selector ..................................................... 30
HI/LOW Transmit Power..........................................31
Function Menu .........................................................32
Mode Selections.................................................32
Backlite............................................................... 33
Selecting and Activating Frequently Called
“Phone List” Numbers.........................................3 4
Editing Frequently Called Numbers ...................35
DTMF Encoding.......................................................36
ANI Encoding...........................................................36
Transmit Time-Out Timer .........................................37
Talk Around.............................................................. 3 7
Man-Down Switch ....................................................37
Emergency Group/Channel ..................................... 38
Activation .................................................................38
Enabling/Disabling................................................... 39
Transmit Speed and Frequency...............................39
Operating Modes...........................................................40
Manual Mode ...........................................................4 0
Tone/Monitor Toggle........................................... 41
Code Guard Mode..............................................42
Variable Guard ...................................................43
TABLE OF CONTENTS

6
BK Radio
Scan Operation ....................................................... 43
Talkback Scan ....................................................43
Scan All Groups .................................................4 4
Change the Scan List .........................................44
Scanning Options ...............................................44
Scan Delay .........................................................4 4
Talk Around ........................................................ 4 5
Scan in Tone Mode.............................................46
Scan in Monitor Mode ........................................46
Transmit on Priority Channel..............................4 6
Channel Scan Delete/Add ..................................47
Priority Scan.......................................................48
Priority Scan with Code Guard ...........................48
Priority Modes.......................................................... 4 8
Priority Delay......................................................50
Priority Receiving ............................................... 50
Priority During Scan-All-Groups Scanning......... 5 0
Receive Mode..........................................................51
Groups................................................................51
Display Modes .........................................................52
Tuning Range ..........................................................52
Frequency Display Mode.........................................53
Alpha Display Mode.................................................54
Channel Display Mode.............................................55
Radio Paging Code.......................................................56
Selective Calling...................................................... 56
Receiving a Call.......................................................56
Sending a Call ......................................................... 57
Radio Check ............................................................57
DTMF Dialing..........................................................58
TABLE OF CONTENTS

7
Aurora User’s Manual
Originating a Call.....................................................58
Frequently Called Numbers and Call Paging .....59
Radio Paging...................................................... 6 1
Flex Mode ................................................................6 1
Keypad and Channel Selector Lock ........................61
Busy Channel Lockout ..................................................62
Battery Power................................................................63
Battery Saver ...........................................................6 3
Radio Power-Up ......................................................65
Error Messages.............................................................65
Stun...............................................................................65
Aurora Programmed Switch Settings ............................67
Troubleshooting Guide ..................................................69
Maintenance ..................................................................70
Service ..................................................................... 70
Specifications................................................................ 71
Definitions and Acronyms .............................................73
TABLE OF CONTENTS
8
BK Radio
Statistics show that about 80 percent of you will
not look at this manual until after you’ve already
taken the radio out of the box, tried to assemble it,
played around with it, and at some point came up
with something you didn’t understand.
IMPORT ANT
To prevent
possible
damage, read all
instructions
before operating
this radio.
So much
for this
box over
here.
WELCOME
Even if you are reading this before operating
your radio, you’re still not planning on
reading all the instructions before you try to
work with your radio, are you?
Well, just be careful
because as our warranty
states, BK Radio isn’t
going to cover defects
caused by:
• Physical abuse or
misuse of the radio
• Neglect or accident
• Improper use or
installation of the radio
• Repair or alteration by
unauthorized personnel

9
Aurora User’s Manual
INTRODUCTION
Congratulations, you now own a BK Radio Aurora Series
Flex•Mode™ Radio! This synthesized portable radio uses a
microprocessor core to give you features and performance
previously unavailable in a hand-held two-way radio. The
Aurora radio has been designed to meet the tough
requirements of today’s communications environment.
The Aurora Series Radios include two models:
• A basic radio model with 1 group of up to 16
channels without keypad or display
• An advanced radio model with 1–15 groups of up to
16 channels each with a keypad and display
These Aurora radios all offer VHF frequency band units.
OPTIONAL ACCESSORIES
External Speaker/Microphone
The Aurora radio has optional external speaker/microphones
(LAA0208 and LAA 0222). When the speaker/microphone
is installed with the options connector, the internal speaker is
defeated.
External VOX Headset
Another option for the Aurora radio is an external VOX
headset. When the headset is installed via the options
connector, the internal speaker/microphone is defeated.
Battery Packs
The following battery packs are available:
• LAA 0183 NiCd, AA, 1200 mAh
• LAA 0163 NiMH, AA, 1450 mAh
• LAA 0167 NiMH, 4/5A, 1800 mAh
• LAA 0118 Shell for alkaline disposable

10
BK Radio
Battery Charger
The optional battery charger (LAA 0337) has a dual well. One
well is fast-charge, and the other is trickle-charge.
Carry Case
To give your radio more protection, you can order the optional
carry case (LAA 0437).
FCC REQUIREMENTS
Your radio must be properly licensed by the Federal
Communications Commission prior to use. Your BK Radio
dealer can assist you in meeting these requirements. Your
dealer will program each radio with your authorized
frequencies, signaling codes, etc., and will be there to meet
your communications needs as your system expands.
SAFETY PRECAUTIONS
• Do not operate the transmitter in close
proximity to blasting caps.
• Do not operate the radio in an explosive
atmosphere (petroleum fuels, solvents,
dust, etc.) unless your radio is an
intrinsically safe model designed for such
use.

11
Aurora User’s Manual
FEATURES
All Aurora radios have features that are programmed into
both the basic and the advanced models, except for scanning
features, which are only available in the advanced model.
Below is a list of features that are standard to all Aurora
radio models, as well as those features that must be
programmed by your dealer.
BASIC AND ADVANCED MODEL RADIOS
• Busy Channel Lockout
• Code Guard™ (CTCSS/CDCSS) on any/all channels
• Transmit Timeout Timer (per channel group)
• Priority Channel Operation
• Hi/Lo Transmit Power
• Soft-key and soft-switch programming
• Emergency switch
ADVANCED MODEL RADIOS ONLY
• Code Guard user reassignment
• Channel, frequency, or alpha user-changeable display
modes
• Priority scan
• Multiple scan
• Talkback scan
• DTMF number dialing (keypad)
• Alphanumeric display
Code Guard™ is a trademark of BK Radio.

12
BK Radio
DEALER PROGRAMMABLE OPTIONS
• Five-tone ANI encode/decode
• Two-tone sequential decode
• Radio Paging: ANI (two-tone, five-tone, DTMF)
with frequently called number memory
• VOX (Voice-Operated Transmissions)
• Internal options board activation
• Keyless front panel radio parameter programming
• Man Down (requires optional factory-installed tilt
switch)
• Radio stun feature

13
Aurora User’s Manual
BEFORE USING YOUR RADIO
BATTERY INSTALLATION AND REMOVAL
Installing the Battery
The battery for the Aurora radio is connected on the back side
of the radio. To install the battery, follow the steps below:
1. With the radio in one
hand and the battery in
the other hand, face the
backside of the radio and
the inner side of the
battery toward each
other.
2. Align the bottom tabs on
the battery with the
indents on the bottom of
the radio and press the
radio and battery together
at a 45° angle.
3. While keeping the bottom
of the battery and radio
together, snap the top of
the battery to the top of
the radio. The locking
tabs will hold the battery
in place.
Figure 1. Installing and removing the battery
Bottom
Tabs
Locking Tabs
Side View
Rear View
14
BK Radio
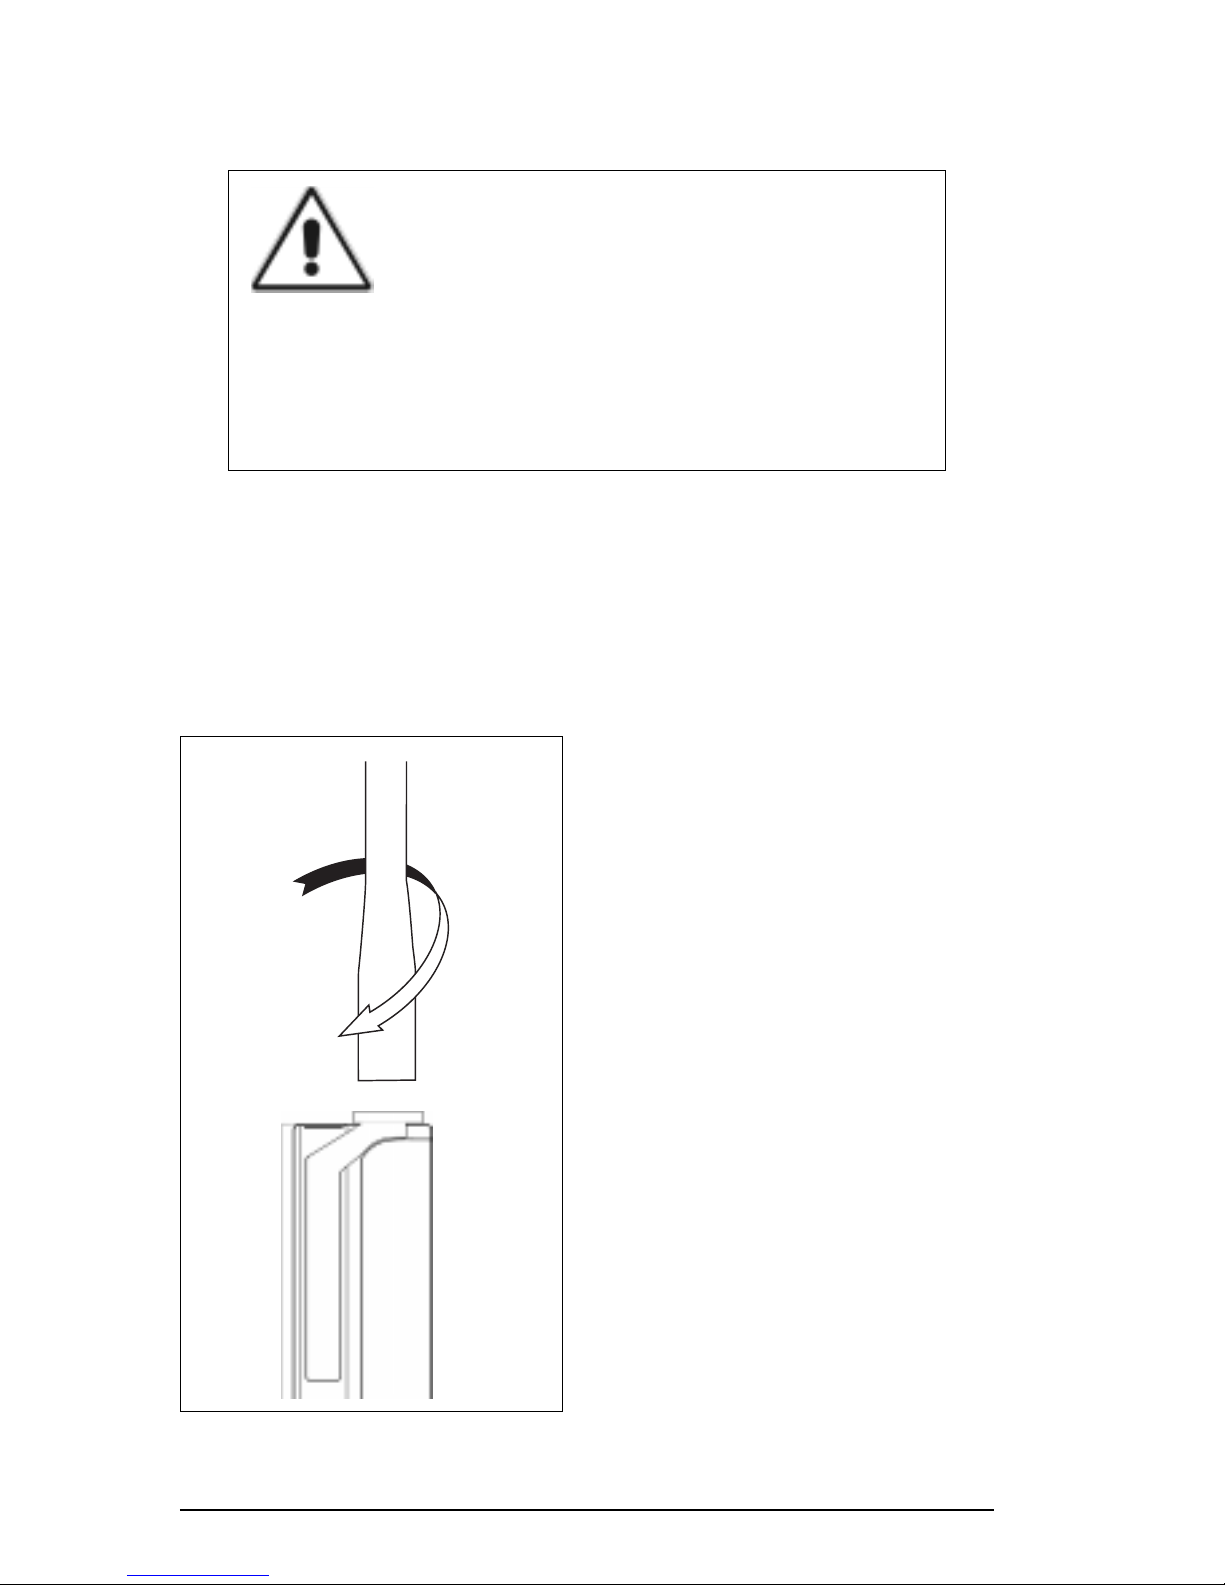
Figure 2. Installing and removing the antenna
Antenna Installation and Removal
Before using your Aurora
radio, you need to install the
antenna.
• To install the antenna,
carefully place it on the
TNC-type antenna
connector located on the
right side of the radio.
Turn the antenna
clockwise until it is firmly
attached.
• To remove the antenna,
turn the antenna
counterclockwise until
you can lift the antenna
away from the radio.
Removing the Battery
WARNING:
Explosion Hazard
Do not dispose a battery pack into a fire.
To avoid explosion, intrinsically safe radios designed
for use in hazardous environments MUST use
replacement batteries approved by Factory Mutual.
To remove the battery, press down on the locking tabs and
reverse the order for installing the battery.

15
Aurora User’s Manual
RADIO VIEWS
Figure 3. Front and back view
LED
Display
Battery
Battery
Tab
Belt
Clip
Microphone
Keypad
Battery
Recharge
Terminals
Speaker
Aurora
16
BK Radio
AURORA RADIO CONTROLS
FRONT VIEW
Display
The Aurora advanced model radios have a front panel display that
consists of status icons and an alphanumeric display of channel
information and radio status. If you select the alpha display mode,
the display will show the preprogrammed alphanumeric channel
identifier. If you switch to channel or frequency display modes, the
LCD displays either the channel number or the channel frequency
information. In all cases, the radio status indicators (icons) are
shown.
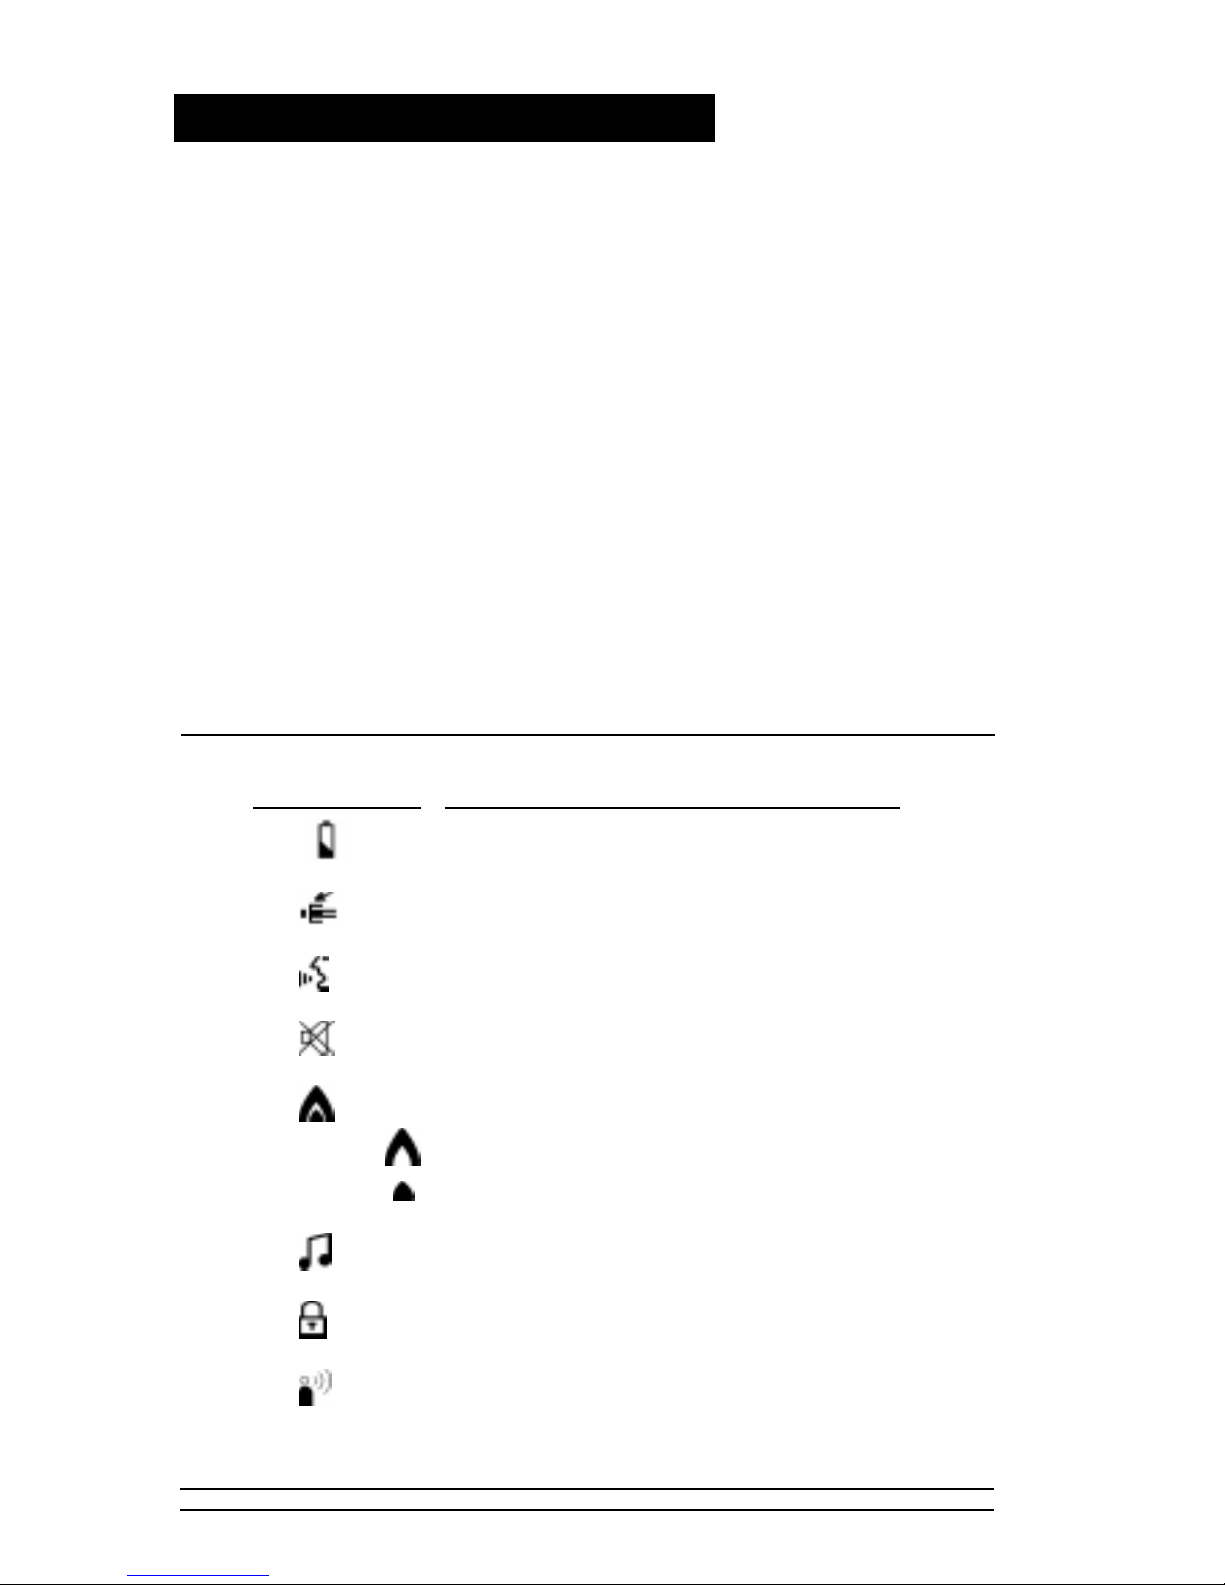
Table 1. Status Icons
Icon Status
Low Battery
Mandown / Emergency
VOX enabled
Tone mode activated
Hi/Lo Transmit Power indication
Hi power
Lo power
Radio Paging Code (audible code) assigned
Keyboard Locked indicator
Transmitter Keyed Up (mimics the transmit
status indicator except it functions even in
military mode)

17
Aurora User’s Manual
FRONT VIEW (continued)
Backlight
The Aurora radio display can be backlit, and your dealer
programmed one of the following options for your radio:
1. Backlight on whenever you press a key (1–6-second auto
timeout)
2. Backlight on whenever a signal is received and the audio is
sent to the speaker (1–6-second auto timeout starting at
carrier drop)
3. Backlight on whenever you press a key or a signal is
received and the audio is sent to the speaker (0–6-second
auto timeout starting at key press or carrier drop)
4. No backlight (military/strategic applications). This option also
prevents the Transmit/Busy/Low Battery LED to light up.
Note: If Option 4 of the display backlight LED feature is
programmed, the multicolored status LED will not light
under any condition.
Keypad
The Aurora radio advanced models have a keypad that contains the
keys necessary to access a channel group directly, generate DTMF
tones and paging codes, and change operating modes. The keypad
is backlit and controlled by the same backlight control as the
display.
Speaker
The Aurora radio has an internal speaker so you can listen to the
audio received from active carriers on tuned receive-channel
frequencies. The internal speaker also lets you hear any audible
notifications.
Microphone
The Aurora radio has an internal microphone so you can transmit
audio on active carriers with tuned transmit channel frequencies.

18
BK Radio
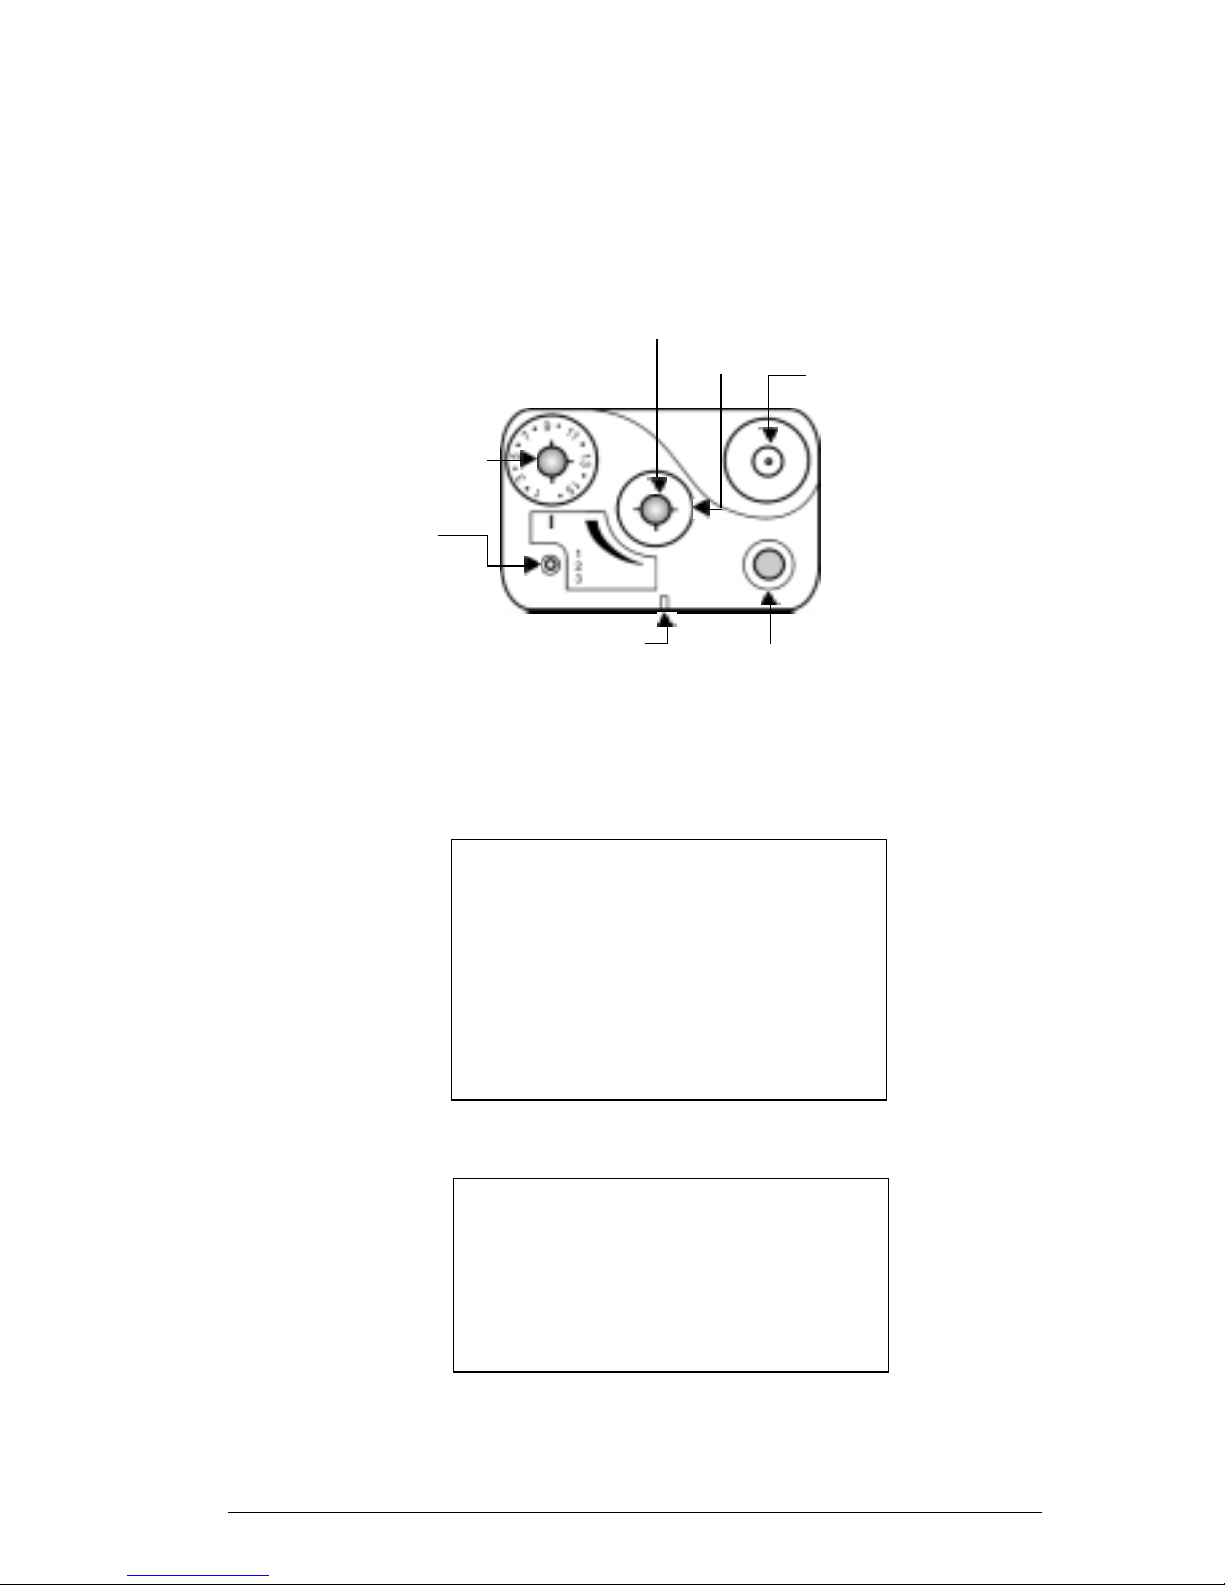
TOP VIEW
Status Indicator
A dual color LED indicates the transmit mode, active receive
carrier, priority sampling, low battery, cloning, and radio error
conditions in the Aurora radio.
Table 2. Status Indicator Colors
Color Indication
Steady The radio is transmitting
Red
Steady The receive channel is busy (carrier detected)
Green or squelch is open
Flashing The radio is sampling for the priority channel
Orange
10-second The battery is low
Blinking Red
Steady Radios are transferring data during cloning
Orange
5-Second Error—Number is shown in the display of
Steady Orange advanced radios and then the radio is reset
For example, if the radio receive channel is busy and the battery is
low, the status indicator will be green with momentary red flashes
every 10 seconds.
On/Off Volume Knob
Use the On/Off Volume knob to turn the radio on and off, and
control the volume of the unmuted internal and external speaker.
Squelch Knob
The squelch control is used to eliminate speaker noise when a
receive signal is not present and no receive Code Guard is being
used for the receiving frequency.
19
Aurora User’s Manual
Figure 4. Top view
*Three-Position Toggle Switch
(Factory Default)
1
Channel frequency
2
Channel label
3
Group number, channel
number, and bandwidth
On/Off
Volume
Squelch
Antenna
Connector
Scan Mode**
3-Position
Toggle Switch*
Channel
Selector
Status
LED
TOP VIEW
**Programmable Red Switch
Factory Default — Scan
Programmable to — Emergency

20
BK Radio
Programmable Three-Position Switch
The three-position switch on top of the radio is programmed by the
dealer for features you can select in a variety of configurations.
The default configuration is shown in Table 3 below:
Table 3. Factory Default for Three-Position Switch
Position Features
1 Channel frequency
2 Channel label
3 Group number, channel number, and
bandwidth mode
Emergency Button
The red button on the top of the radio can be programmed by the
dealer as an emergency switch to transmit an emergency ANI
sequence when pressed. The factory default for the red button,
however, is scan mode.
Channel Selector Knob
The Aurora radio has a channel selector knob on the top of the
radio that lets you determine the channel to tune to when receiving
and transmitting in manual mode.
General channel parameters include:
• Busy Channel Lockout
• Scan list assignment
• Hi/Lo transmit power specification
• Channel type (voice or data)
• Alpha display information for each channel
Channel parameters of the Aurora radio include:
• Transmit and receive frequencies
• Code Guard assignment, which is received with each
frequency
• ANI system and ANI code type
• bandwidth, whether narrow or wide
21
Aurora User’s Manual
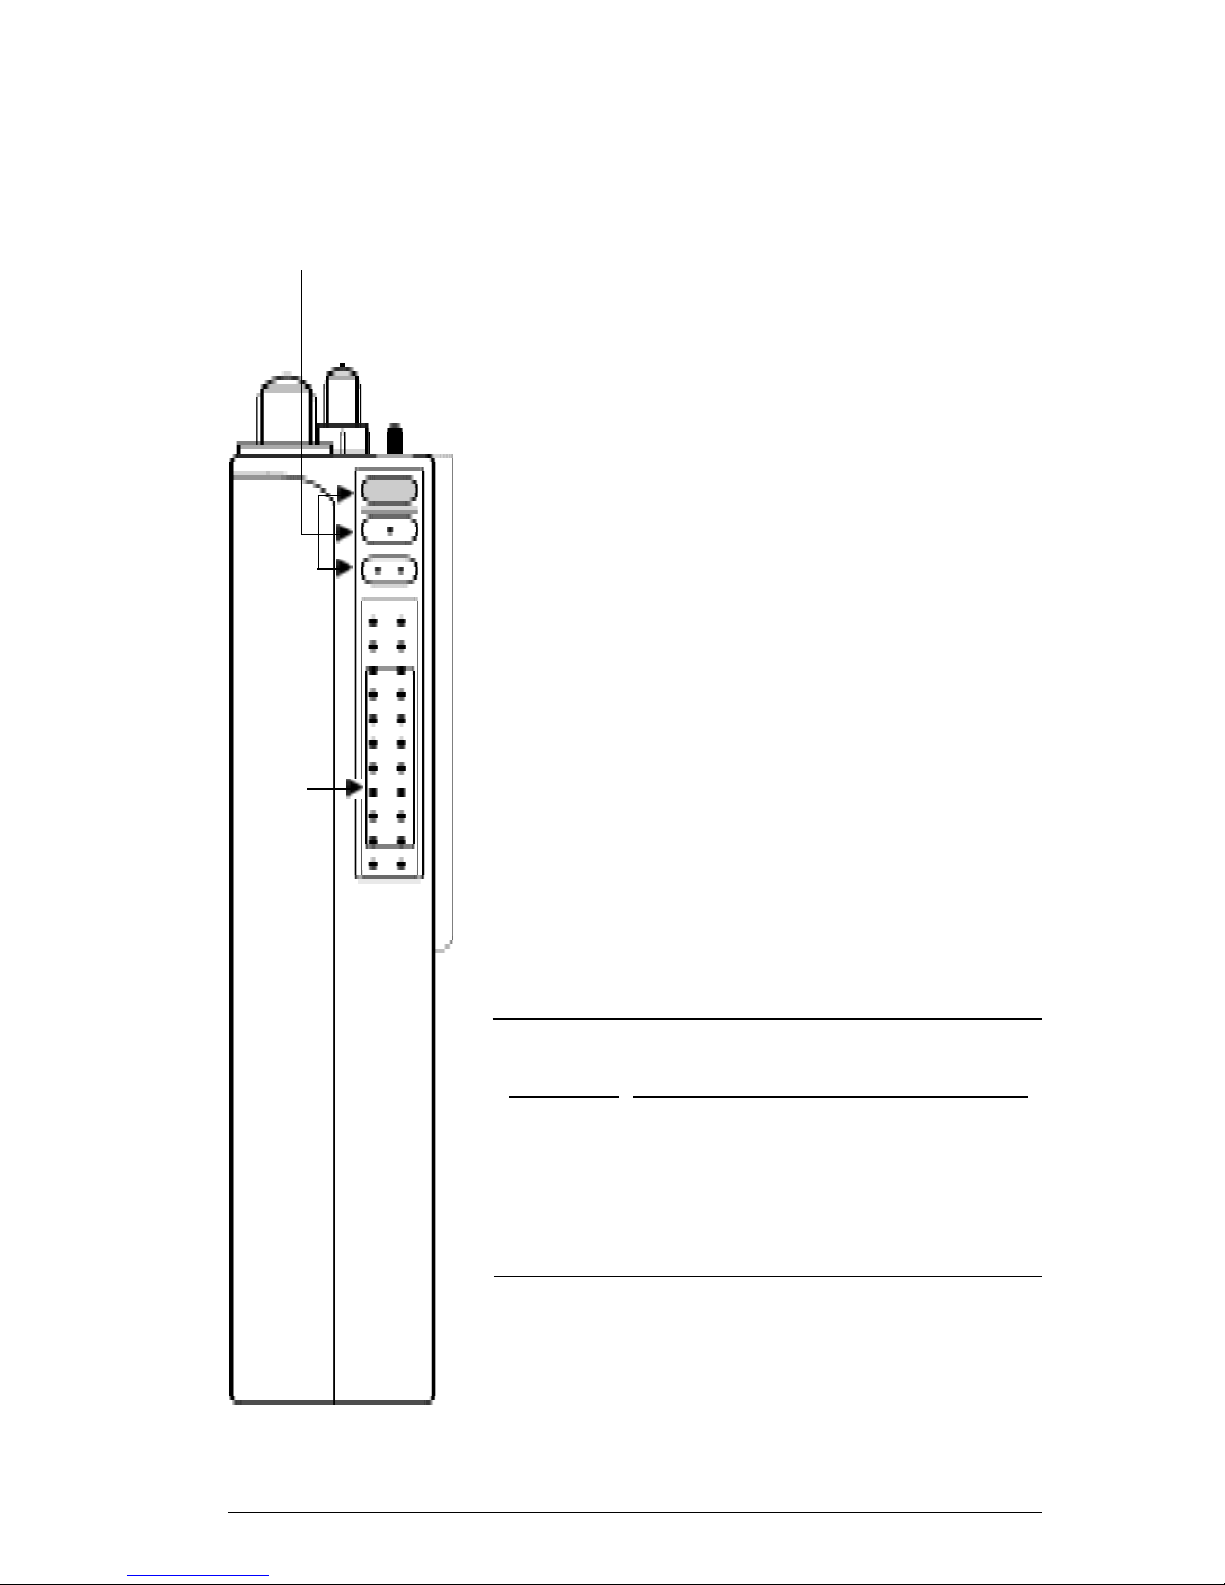
SIDE VIEWS
PTT Switch
Use the PTT Switch to key-up the radio’s
transmitter. At times, activating the PTT
switch will not allow transmitter operation,
such as when channels have active carriers
with busy channel lockout is programmed or
if no transmit frequency was programmed for
the displayed channel.
Programmable Softkey Buttons
The three softkey buttons on the side of the
radio are programmed by your dealer to give
you the radio features you want. The default
configuration for the three softkey buttons is
shown in the table below:
Table 4. Programmable Softkey Buttons
Button Feature
Top Toggles Code Guard on and off
Middle Toggles priority mode on and off
Bottom Toggles high and low power
Programmable
Switches
PTT
Figure 5. Left side view
22
BK Radio
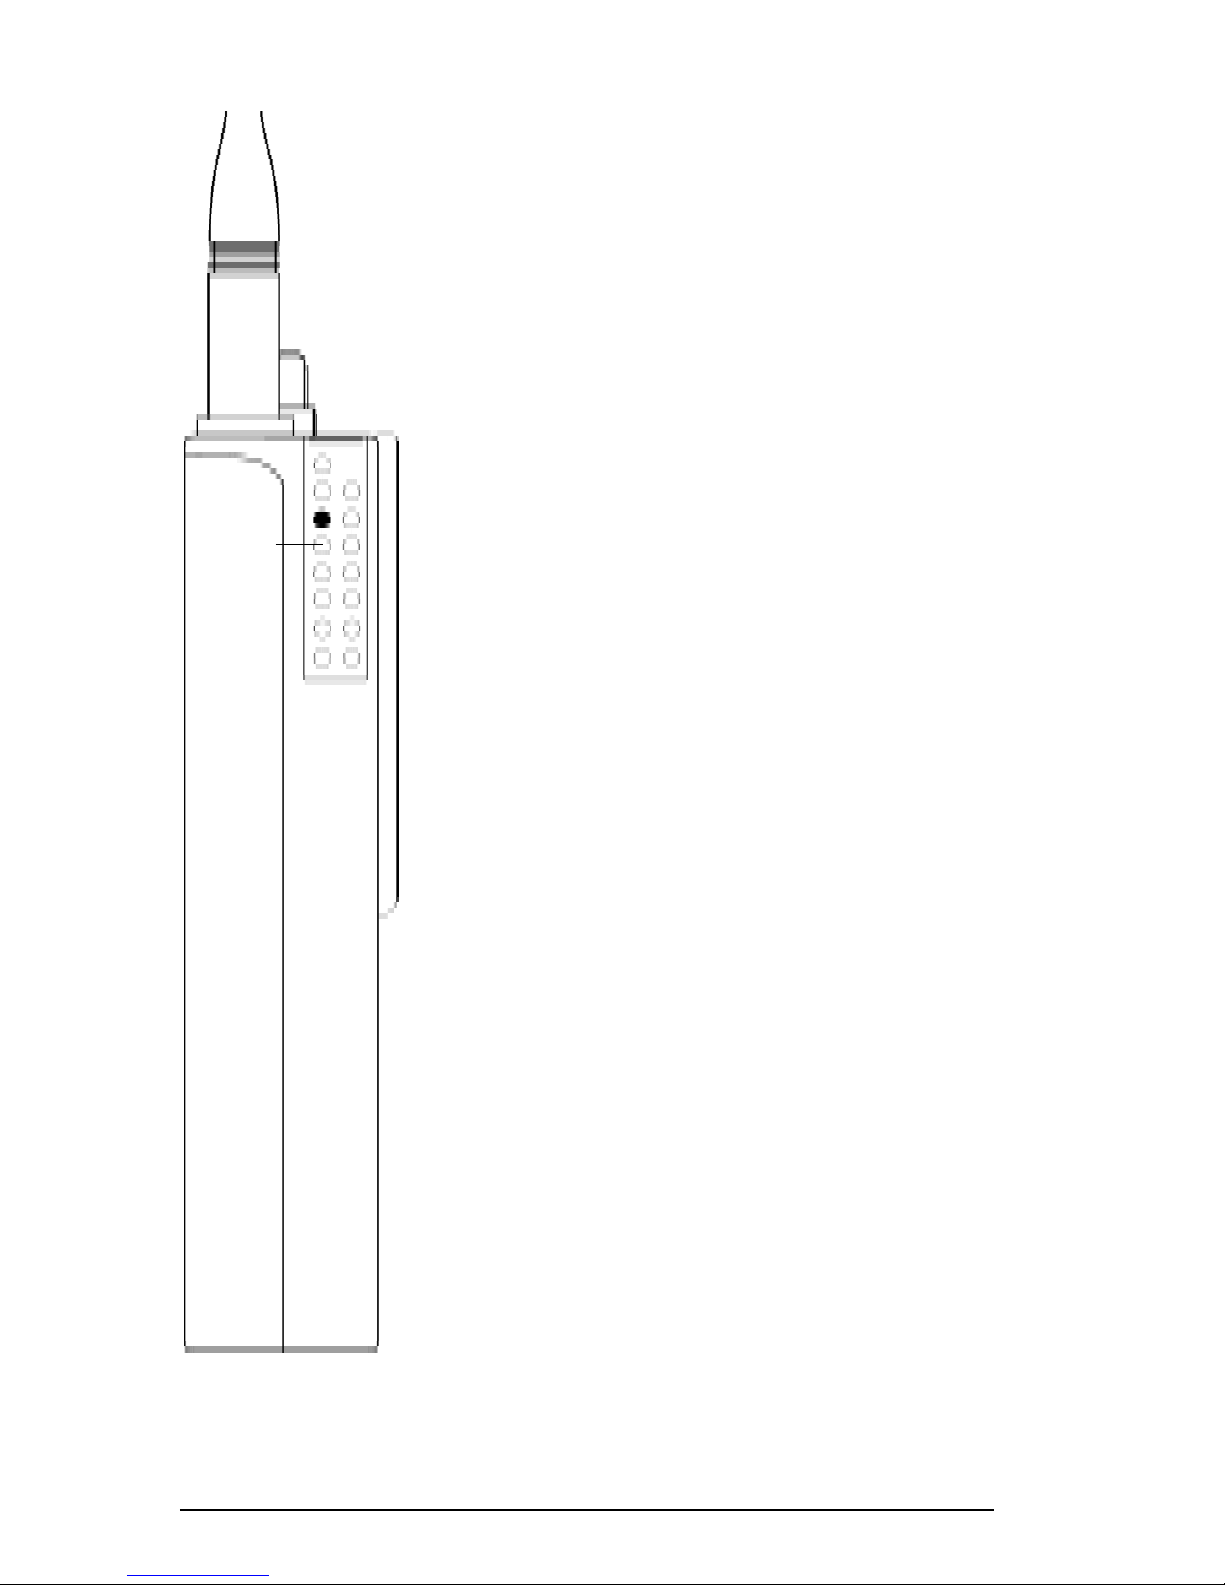
Options Connector
The Aurora radio has a sealed options
connector on the side of the radio
(opposite the softkeys and the PTT switch)
that facilitates:
• Programming the radio for dealers
• Using the RF antenna port
• Using external transmit carrier
modulation sources
• Outputting data present on receive
carriers
• Giving access to external audio,
including the microphone and
earphone, as well as the necessary
control line to switch audio from
internal to external sources
• Allowing an external PTT switch
• Allowing an external tone/monitor
line
• Using switched battery voltage
• Providing digital and RF grounds
• Inputting data to be transmitted
Options
Connector
(without
cover)
Figure 6. Right side view

23
Aurora User’s Manual
BASIC OPERATION
RECEIVE
1.Turn power on. Turn the volume knob
clockwise. The radio is operational when
you hear the beep. The display, if
installed, shows the current channel,
frequency, or alpha characters depending
on the position of the three-position
switch on top of the radio. See Table 5.
Table 5. Factory Default for
Three-position Switch
Position Display
1
Channel frequency
2
Channel label
3
Group number, channel number,
and bandwidth mode
2.Select a channel. Turn the channel
selector knob. Each time you select
another channel you will hear a beep.
3.Adjust squelch and volume.
a. Turn the squelch knob clockwise
until you hear noise.
b. Adjust the volume knob until the
noise level is comfortable.
c. Then turn the squelch knob
counterclockwise until the noise
stops. This is called the threshold
squelch setting.
On/Off
Volume
Squelch
Channel
Selector
Three-
Position
Switch
 Loading...