

Page 1

INSTRUCTION
Models 1620A/ 1621A/ 1622A/
1623A/ 1626A/ 1627A
DC REGULATED
POWER SUPPLY
Test Equipment Depot - 800.517.8431 - 99 Washington Street Melrose, MA 02176
TestEquipmentDepot.com
Page 2

2
TABLE OF CONTENTS
7. MAINTENANCE ........................................................................13
7.1 Main fuse replacement .............................................................13
7.2 Calibrations ..............................................................................13
7.3 Voltage calibration ...................................................................14
7.4 Voltmeter alignment ................................................................14
7.5 Current calibration ...................................................................14
7.6 Ammeter alignment ..................................................................14
LIMITED WARRANTY ................................................................15
SERVICE INFORMATION ..........................................................16
1. INTRODUCTION ........................................................................ 3
2. FEATURES .................................................................................. 3
3. SPECIFICATIONS ...................................................................... 4
4. PRCAUTIONS FOR USE ........................................................... 6
4.1 Confirming the supply range ..................................................... 6
4.2 Precautions for connection of output terminals ......................... 6
4.3 Operating environment .............................................................. 7
5. EXPLANATION OF PANEL...................................................... 7
5.1 FRONT PANEL ........................................................................ 7
5.2 REAR PANEL .......................................................................... 9
6. OPERATION PROCEDURES ................................................. 10
6.1 Stand-alone operation .............................................................. 10
6.2 Serial connection ..................................................................... 10
6.3 Parallel operation (MASTER / SLAVE Control) .................... 11
Page 3

1. INTRODUCTION
The BK Precision Analog and Digital series are high quality
serial control type DC Regulated Power Supplies. These models
can be operated at constant voltage or constant current mode
whose output can be varied from 0 up to the rated values for
respective model.
It is a compact unit provided with separate voltage and
current meters (Analog for 1620A, 1622A, 1626A and 3-digit
LEDS for 1621A, 1623A, and 1627A series) for monitoring the
output voltage and current simultaneously. In terms of
operability, these units enable high precision, continuous
variability via coarse and fine adjust knobs. The BK Precision
Analog and Digital series can be connected in parallel with
multiple units of the same model set up a “master/slave”
configuration to increase the output current capability. Serial
connection of multiple units can be used to increase the output
voltage level.
This family of power supplies provides clean and stable DC
output which is most suitable for many areas including
laboratory, industrial, field service, hobby, and telecommucation
applications.
2. FEATURES
• The BK Precision Analog and Digital series are constant
voltage / constant current power supplies which feature
excellent line and load regulations, low ripple and noise
characteristics.
• The units feature separate voltage and current meters so
that output voltage and current can be monitored
simultaneously.
• Output voltage and current can be adjusted continuously
in full range to any desired values. Adjustment can be
done easily and precisely by using separate coarse and
fine adjust knobs.
• The constant current circuit operates to protect against
overload and output short circuit. The limiting current
values can be preset in the full range of the rated values
for respective model.
• Multiple units of power supplies of same family can be
connected in series to provide higher output voltage.
• Multiple units of power supplies of SAME model can be
connected in parallel (master / slave configuration) to
achieve higher output current.
Test Equipment Depot - 800.517.8431 - 99 Washin
TestEquipmentDepot.com
gton Street Melrose, MA 02176
3
Page 4

4
3. SPECIFICATIONS
1620A
1626A
1622A
1621A
1627A
1623A
OUTPUT VOLTAGE
0 - 18V
0 - 30V
0 - 60V
0 - 18V
0 - 30V
0 - 60V
OUTPUT CURRENT
5A
3A
1.5A
5A
3A
1.5A
CONSTANT VOLTAGE CHARACTERISTICS
Load regulation (0-100%)
0.02% +3mV
Line regulation
(120VAC + 10 %, -6 % )
0.02% +3mV
0.02% +3mV
0.02% +3mV
0.02% +3mV
0.02% +3mV
0.02% +3mV
Ripple and noise r m.s
1mV max.
CONSTANT CURRENT CHARACTERISTICS
Load regulation (0-100%)
0.02% +3mA
Line regulation
(120VAC + 10 %, -6 % )
0.02% +3mA
0.02% +3mA
0.02% +3mA
0.02% +3mA
0.02% +3mA
0.02% +3mA
OUTPUT
Output terminals ( color )
( + ) Red , ( – ) Black , ( GND ) Green
Ground proof voltage
± 180V
INSTRUMENTATION
Voltmeter
Analog
3 digits LEDS
Ammeter
Analog
3 digits LEDS
Voltmeter accuracy
± 7% fs
± 2% + 2 digits
Ammeter accuracy
± 7% fs
± 2% + 2 digits
Page 5

5
FUNCTIONS
Serial connection
( independent control mode )
Can be connected in series ( within limits of ground proof voltage )
Parallel operation
( master – slave mode )
Can be operated in “one-control” parallel configuration ( only same model )
COOLING SYSTEM
Natural Convection
POWER CONSUMPTION
VA / W
( for rated load of AC 220V )
Approximate 210
Approximate 220
AC INPUT
Voltage , Frequency
120V AC ± 10%, 60 Hz (120/220/230/240V AC ± 10%, 50/60Hz version available)
Operating ambient temperature
5 to 40°C 10 – 80% R.H.
DIMENSIONS AND WEIGHT
Dimensions ( W x H x D )
205 x 115 x 270 ( mm )
Weight
Approximate 6 Kgs
Approximate 7.4 Kgs
FUSE RECOMMENDED
Input fuse F2
AC 100V, 110V, 120V
3AF
AC 220V, 230V, 240V
2AF
Internal fuse F1
500mAF
NOTE: Specifications and information are subject to change without notice.
Page 6

4. PRECAUTIONS FOR USE
4.1 . CONFIRMING THE SUPPLY RANGE
The unit must be used within its specified range. The rated input
voltage can be found on the rating table under the unit. Before
plugging into the AC supply outlet, check if the input rating conforms
to your local supply. For certain models, a voltage selector is
available, switch the voltage selector to the correct position before
use. Also, please check that you have the correct fuse inserted in the
fuse box below the AC input receptacle.
4.2. PRECAUTIONS FOR CONNECTION OF
OUTPUT TERMINALS
These units are a floating type power supply. For ordinary use, be
sure that the MASTER/SLAVE switch on the rear panel is set to
MASTER position and either the (+) output terminal or the (−)
terminal is connected to the GND terminal (chassis GND) via the
shorting bar.
Warning: For model 1622A and 1623A, the maximum output
voltage is up to 60Vdc. Touching the live metal part of output terminals
may be hazardous. User must avoid touching the live metal part of output
4.3. OPERATING ENVIROMENT
Be sure to use this unit within the specified ambient
temperature range listed in the specification table.
Because the unit is cooled by natural convection, do
not place objects on top to block the convection. Also
user must avoid placing the unit on or near any heat
emitting devices or use multiple units in stacked
configuration. For best results, use the unit in an
environment that has good cross-ventilation.
Altitude up to 2000M
Installation category: CAT II
Pollution degree: 2
Indoor use only
6
Test Equipment Depot - 800.517.8431 - 99 Washington Street Melrose, MA 02176
TestEquipmentDepot.com
Page 7
7
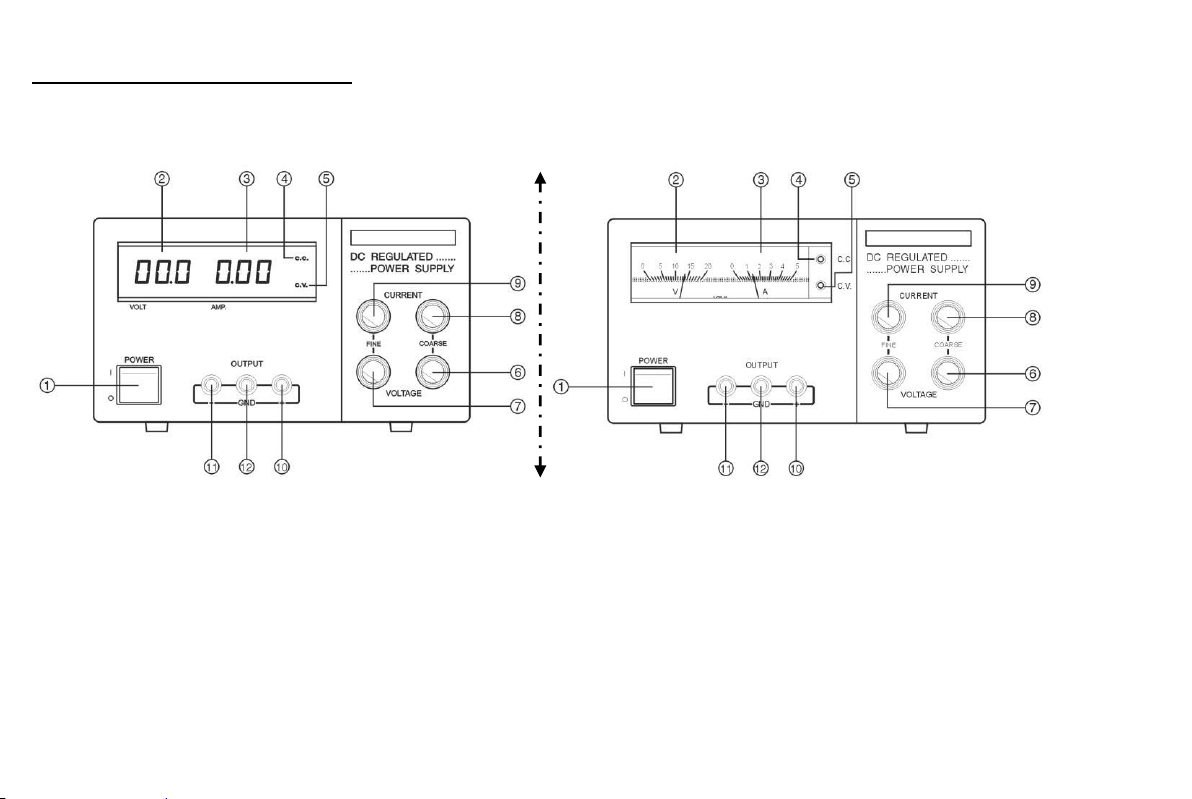
5. EXPLANATION OF PANELS
Fig. 5.1
5.1 FRONT PANEL
Page 8

8
1. Power switch
Turns the power supply ON-OFF. The switch will be
lighted up when the unit is ON.
2. DC Voltmeter
Indicates the present output voltage. (Analog for
162A, 1622A, 1626A and 3-digit LEDS for 1621A,
1623A, and 1627A series)
3. DC Ammeter
Indicates the present output current. (Analog for
162A, 1622A, 1626A and 3-digit LEDS for 1621A,
1623A, and 1627A series)
4. Constant current mode (C.C.) indicator
Indicates the power supply is operating in constant
current mode.
5. Constant voltage mode (C.V.) indicator
Indicates the power supply is operating in constant
voltage mode.
6. Voltage coarse adjust
Coarse adjust knob for the output voltage in voltage
mode.
7. Voltage fine adjust
Fine adjust knob for the output voltage in voltage mode.
8. Current coarse adjust
Coarse adjust knob for current limiting point and current
value in constant current mode.
9. Current fine adjust
Fine adjust knob for current limiting point and current
value in constant current mode.
10. Output terminal positive (+)
Terminal for tapping of positive (+) output.
11. Output terminal negative (–)
Terminal for tapping of negative (–) output.
12. Ground terminal (GND)
Chassis ground terminal. Normally, this is connected to
either (+) or (–) terminal depend on application.
Page 9

9
5.2 REAR
13. Master / Slave switch
Used during “master / slave control” parallel operation in
MASTER / SLAVE configuration. For normal operation,
switch should be set to MASTER.
14. In / out terminals for Master / Slave operation
Control terminals for use in the “MASTER / SLAVE control”
parallel operation mode.
15. Heat sink
Heat sink for the power supply. Be careful as this area can
become quite hot during operation.
16. Main Fuse
17. Power cable
Test Equipment Depot - 800.517.8431 - 99 Washington Street Melrose, MA 02176
TestEquipmentDepot.com
Page 10

10
6. OPERATION PROCEDURES
6.1 . STAND-ALONE OPERATION
When using the power supply in stand-alone mode, simply
operate by manipulation of the panel switches and
adjustment knobs as needed.
However, be sure that MASTER / SLAVE switch is set to
MASTER position.
6.2. SERIAL CONNECTION
Two or more units of the power supply can be hooked up in
series to achieve higher output voltage. The resulted output
will be sum of the outputs of the individual units. In this
situation, however, care must be taken that the voltage of
neither of the terminals with respect to the chassis GND
exceed the ground proof voltage of + 180V
• SINGLE VOLTAGE CONNECTION
For connection as shown in FIG.6.1, the output voltage
will be the sum of individual supplies and output
current will be limited to within the value specified for
a single unit whichever is lower. For positive ground
terminal to output positive point and for negative
ground system, hook-up the ground terminal to the
negative output point.
• PLUS / MINUS CONNECTION
For connection as shown in FIG.6.2 where the intermediate
point is hooked up to ground, the configuration can be used as
Plus / Minus power supply.
FIG. 6.1
FIG. 6.2
Page 11

11
6.3. PARALLEL OPERATION (MASTER /
SLAVE CONTROL)
Two or more units of the same model can be hooked up in
parallel to give an increase in output current capacity. The total
output current capacity will be the sum of the output currents of
the individual units. In this mode of operation, one supply will
act as the master and all settings are from the master unit
• Note: When connecting the supplies in parallel, be sure that
all the power supplies are turned OFF.
• HOOK-UP PROCEDURES
1. Switch OFF the power of all units.
2. Switch the master/slave switch, FIG.6.3, on all the slave
units from “MASTER” to “SLAVE” position.
3. Hook-up the IN/OUT terminals for MASTER/SLAVE
operation as shown in FIG.6.3.
4. Connect the output terminals of each of the units to the
load as shown in FIG.6.4. For proper performance, use
all cables of same length and thickness.
5. Set the voltage and current adjustment knobs of all the
slave units to the maximum position.
6. Switch “ON” the MASTER unit and SLAVE units.
The output voltage and current then can be
controlled to the desired value via the adjustment
knobs on the MASTER unit.
In the case of output goes to “0” ampere in the
parallel operation mode, output voltage can no
longer be controlled by the master machine.
Be sure to keep a minimum current flowing that is at
least several percent of the rated current at all time.
• CONNECTION OF TERMINAL ON REAR
PANEL
While pressing on the slit portion of the terminal with a
small screw driver, insert the connecting cable into the
round hole. When insertion is completed, release the
screw driver. (FIG.6.5)
Page 12

FIG. 6.3
FIG. 6.4
FIG. 6.5
12
Test Equipment Depot - 800.517.8431 - 99 Washington Street Melrose, MA 02176
TestEquipmentDepot.com
Page 13

13
7. MAINTENANCE
WARNING: The following instructions are for use by qualified
personnel only. To avoid electrical shock, do not perform any
servicing other than those contained in the operating instructions
unless you are qualified to do so.
7.1 MAIN FUSE REPLACEMENT
If the main fuse blows, the power on the LED indicator will not light
and power supply will not operate. The fuse should not normally blow
unless a problem has developed in the unit. Try to determine and
correct the cause of the blown fuse, then replace only with a fuse of
correct rating. The fuse is located on the rear panel and fuse rating can
be found next to the fuse holder. If the problem persists, return the
unit to the agent for further investigation.
7.2 CALIBRATION
This unit has accurately calibrated at the factory before shipment. Recalibration is recommended only if repairs have been made in a circuit
affecting calibration accuracy, or if you have reason to believe the unit
is out of calibration.
However, calibrations should be attempted only if a 3½ digit
multimeter with an accuracy of +0.5% DCV or better and a 0
to 50ohm, 250 Watt adjustable resistive load is available.
If re-calibration is required, use the following procedures.
Locations of the electrical calibration on the main PCB are
shown in FIG. 7.1.
FIG. 7.1
Page 14

7.3. VOLTAGE CALIBRATION
1. Connect the multimeter to measure the DC voltage across the
power supply (+) and (–) output terminals.
2. Turn on the power supply, and turn the panel VOLTAGE
adjustment knob fully clockwise (maximum output).
3. Adjust trimmer VR11 for a reading (Vmax. +0.5) ±0.1 volts
on the multimeter. Vmax is the maximum normal output of
the specific model under calibration.
7.4. VOLTAGE ALIGNMENT
1. Set the output voltage to about half the maximum allowable
output for respective model.
2. Align the voltmeter reading with the multimeter reading.
For BK Precision Analog series, adjust the trimmer VR-6 on
the main PCB.
For BK Precision Digital series, adjust the trimmer VR-1 on
the back of meter PCB.
7.5. CURRENT CALIBRATION
1. Connect the 0 – 50ohm / 250W resistive load in series with
the multimeter to measure the DC output current terminals.
2. Adjust trimmer VR-5 fully anti-clockwise (referring to the
component side).
3. Adjust the output voltage to the maximum allowable
output for respective model.
4. Adjust the variable resistive load to obtain (Imax +0.1)
±0.02 Ampere on the multimeter. Imax is the maximum
nominal allowable output current of resistive model.
5. Adjust trimmer VR-5 clockwise slowly until the limiting
point is just reached and the C.C. LED lights up at the
same time.
7.6. AMMETER ALIGNMENT
1. Adjust the output voltage to half of its maximum allowable
output voltage for respective model.
2. Adjust the variable resistive load to obtain half of its
maximum allowable current for respective model.
3. Align the ammeter reading with the multimeter reading.
For BK Precision Analog series, adjust the trimmer VR-7
on the main PCB.
For BK Precision Digital series, adjust the trimmer VR-2
on the back of meter PCB.
Test Equipment Depot - 800.517.8431 - 99 Washington Street Melrose, MA 02176
TestEquipmentDepot.com
14
Page 15

15 16
Page 16

Service Information
Warranty Service: Please go to the support and service section on our website at www.bkprecision.com to obtain a RMA #. Return the product in the
original packaging with proof of purchase to the address below. Clearly state on the RMA the performance problem and return any leads, probes,
connectors and accessories that you are using with the device.
Non-Warranty Service: Please go to the support and service section on our website at www.bkprecision.com to obtain a RMA #. Return the product
in the original packaging to the address below. Clearly state on the RMA the performance problem and return any leads, probes, connectors and
accessories that you are using with the device. Customers not on an open account must include payment in the form of a money order or credit card. For
the most current repair charges please refer to the service and support section on our website.
Return all merchandise to B&K Precision Corp. with prepaid shipping. The flat-rate repair charge for Non-Warranty Service does not include return
shipping. Return shipping to locations in North America is included for Warranty Service. For overnight shipments and non -North American shipping
fees please contact B&K Precision Corp.
B&K Precision Corp.
22820 Savi Ranch Parkway
Yorba Linda, CA 92887
www.bkprecision.com
714-921-9095
Include with the returned instrument your complete return shipping address, contact name, phone number and description of problem.
Page 17

Test Equipment Depot - 800.517.8431 - 99 Washington Street Melrose, MA 02176
TestEquipmentDepot.com
Printed in China PN# 481-375-9-001
v121417
© 2014-2017 B&K Precision Corp.
 Loading...