

Page 1
MODEL 600
INSTRUCTION
MA
NUAL DE
INSTRUCCIÓN
ES
MANUAL
MODELO 600
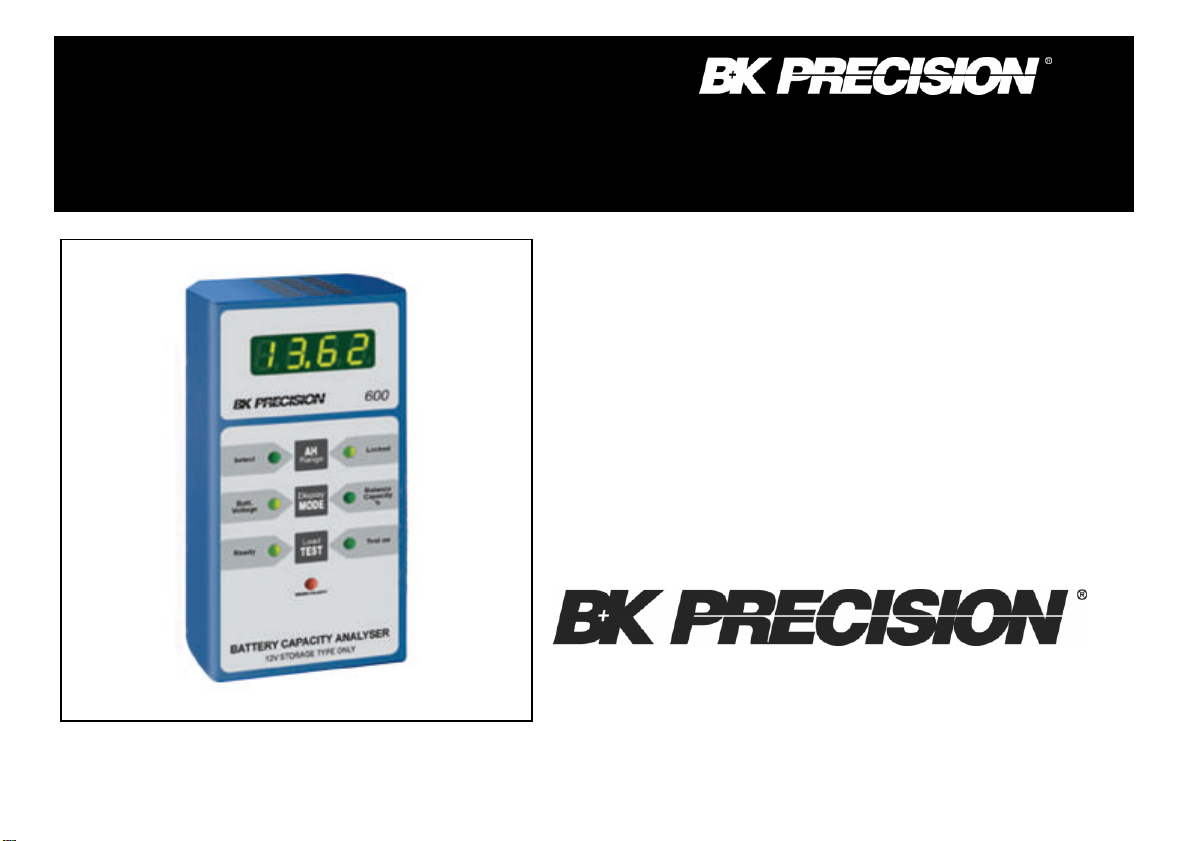
12V SLA
Battery Capacity
Analyzer
Analizador De Capacidad
De Baterias
Page 2

2
Table of Contents
Section Description Page No.
1 GENERAL DESCRIPTION
1.1 Introduction 3
1.2
1.3 Specifications 3
2 OPERATION
2.1 Front Panel Controls
2.2 Operating Procedure 5
2.2.1 Connecting Procedure 5
2.2.2 Selecting AH Capacity 5
2.2.3 Conducting a Test 6
2.2.4
2.3 Caution
Spanish Manual
Application
Observing Result after a Test
3
4
4
6
6
9
Page 3

3 Section 1
General Description
1.1 INTRODUCTION
BK's Battery Capacity Analyser Model 600 measures the % capacity left in a battery. By just selecting proper AH range & pressing TEST
switch user can get the % Balance capacity.
Model 600 supports 12V storage type lead acid batteries with wide range of AH capacity. No external power (Main or DC) is required.
The unit works on BUT (Battery Under Test).
1.2 APPLICATIONS
As the information age develops it is likely that the demand for UPS units will increase for use in hospitals, offices, labs etc. It is expected
that the importance of battery maintenance will increase alongwith increasing demand for UPS.
Looking forward to the future developments the Battery Capacity Analyser can fulfill many applications.
The instrument can be applicable for Automobile Service Stations, UPS Manufacturing, Maintenance and Field Servicing, QC Department,
Battery Systems in Railways, Telecommunications, Ships / Submarine.
1.3 SPECIFICATIONS
TECHNICAL
1) Capacity Display Range: 0% to 100%.
2) Max. Input Voltage: 20V.
3) No Load Voltage Indication Accuracy: ±2 counts.
Caution : Do not exceed max. input voltage
rating. Doing so may cause fatal damage to the
unit.
PHYSICAL
1) Dimensions: 80 (W) x 160 (H) x 40 (D) “
2) Weight: 1 Kg. (approx.).
Page 4
4 Section 2 Operation
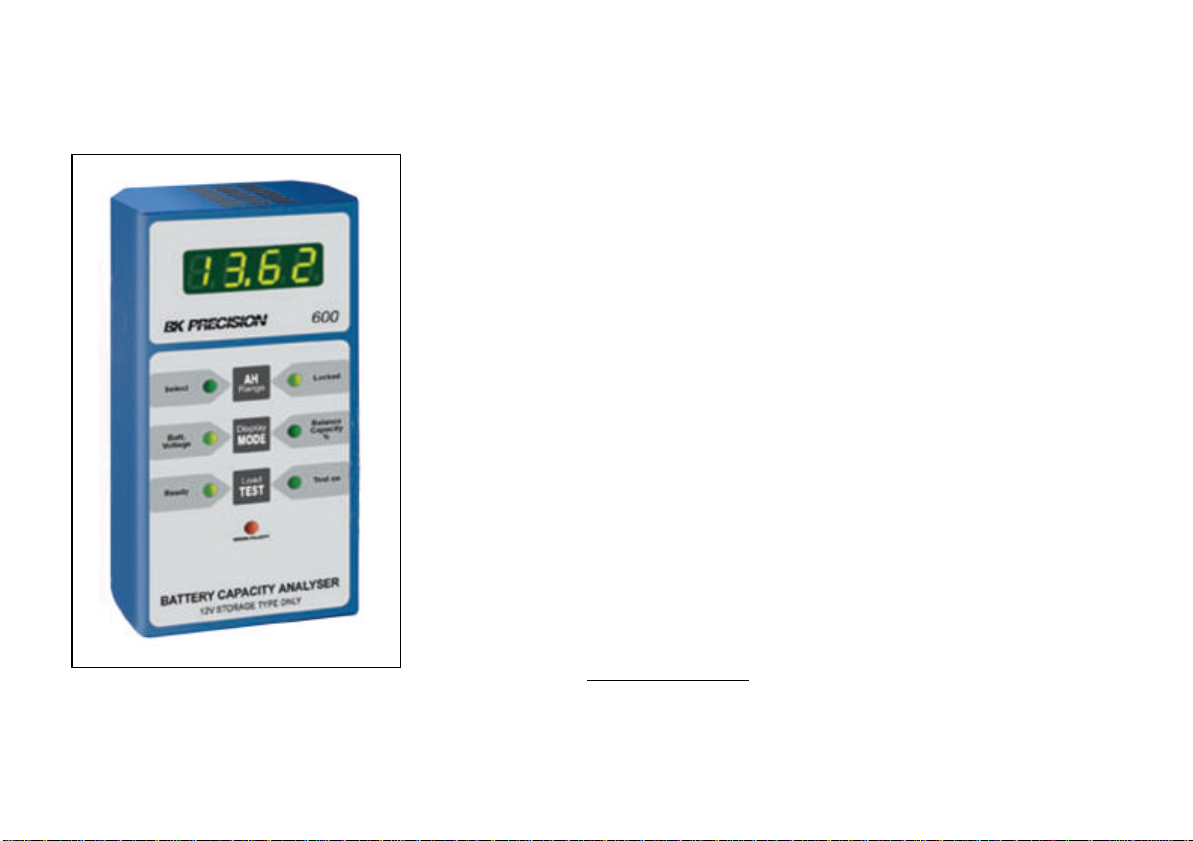
Refer to the Front view of the unit.
FRONT PANEL CONTROLS
1) AH Range : With this key the user can select the
correct AH range according to the battery
under test.
2) Select LED: This LED glows to indicate that user can
select the AH range.
3) Locked LED: This LED is ON when the unit locks to a
particular AH range set by the user.
4) Display Mode: This key selects the display either as
No load voltageor % balance
capacity.
5) Batt. Voltage: When display indicates Batt. voltage this
LED glows.
6) % Balance Capacity: This LED glows when remaining capacity
is displayed.
7) Load Test: The test starts by pressing this key.
8) Ready: When this LED glows steadily, it indicates
that the unit is ready to conduct a test.
9) Test On: This LED glows for approx. 2 sec. when
the battery test is carried out.
10) Reverse Polarity : If the unit is connected to a bat tery in
reverse polarity this LED
NOTE: Specifications and information are subject to change without notice.
Please visit www.bkprecision.com for the most current product information.
Page 5
5
2.2 OPERATING PROCEDURE
Follow the steps as outlined below :
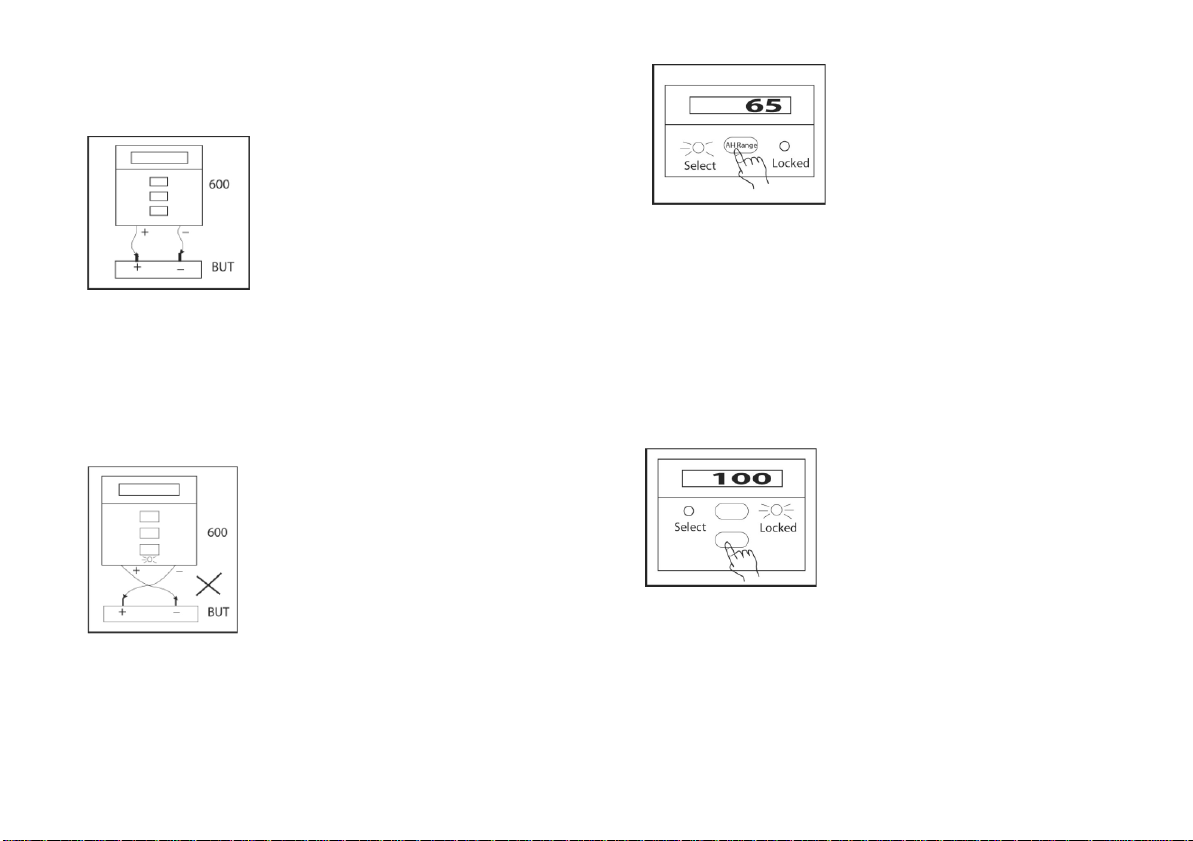
2.2.1 Connection Procedure Connect Battery Capacity
Analyser (600) to Battery UnderTest(BUT). Connect the
+ve terminal of 600 to +ve terminal of Battery. Connect-ve
terminal of 600 to –ve terminal of Battery. The 600 will be
powered with the BUT. On Power up, 600 performs a self
test by turning on the 7 segments, LEDs one after another
& finally flashing the version number.
Caution: Do not connect the +ve terminal of 600 to _ve
terminal of BUT and _ve terminal fo 600 to +ve terminal of
BUT. On doing so, the ‘Reverse Polarity’ LED glows as
shown.
2.2.2 Selecting AH Capacity
Press the 'AH Range' key. The select LED glows as
shown.
The display will show the last selected/stored AH value.
(Power ON default value is 7 AH)
To change the value to say 100 AH press the key again.
Display shows new value. Keep on pressing till the
desired AH is obtained.
To Lock the AH capacity, either press any key OTHER
than the AH Range key OR wait for about 10 seconds.
Your selected AH value
will automatically get lockedLocking is indicated by the
glowing of 'Locked' LED.
Page 6
6
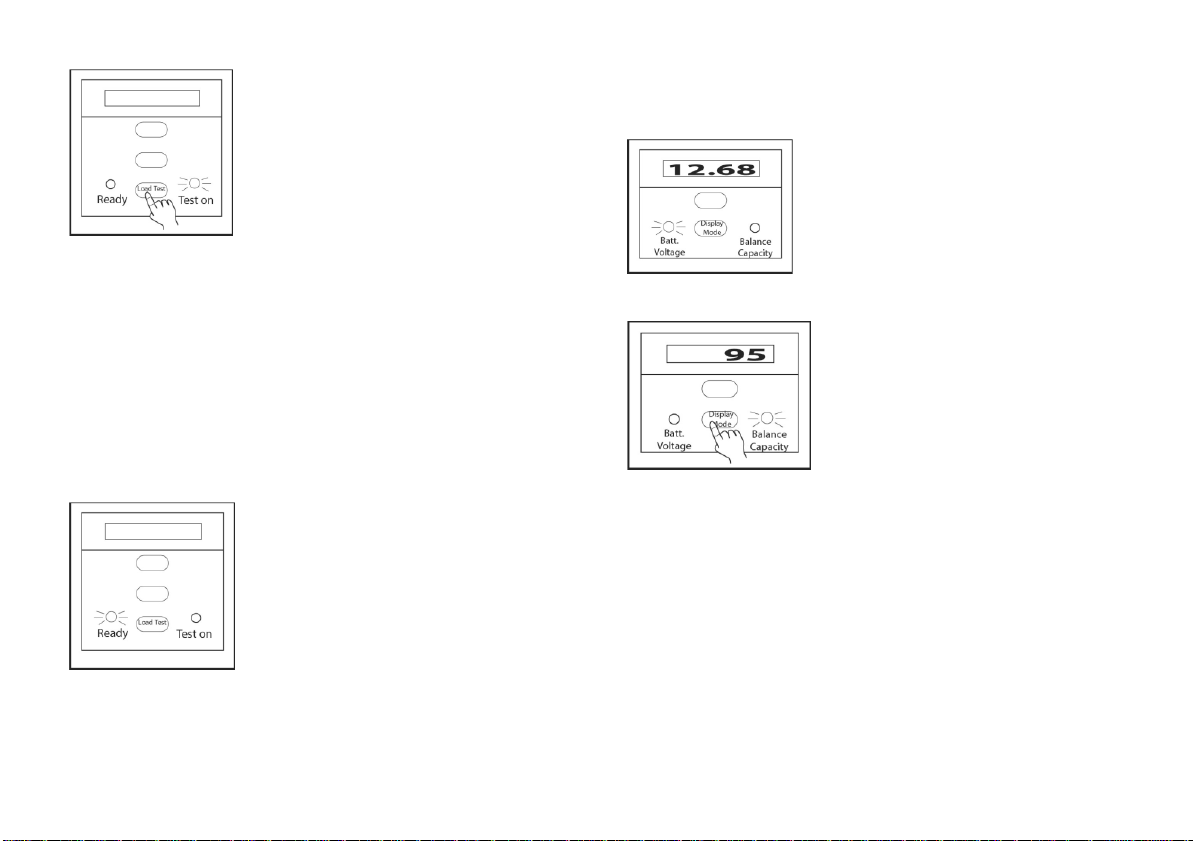
2.2.4 Observing Result After a Test
2.2.3 Conducting a Test
Test can be conducted any time by pressing the “Load
Test” key.
By doing so the ‘Test On’ LED starts glowing.
Typically, it glows for about 2 seconds. Thereafter the
‘Ready’ test starts blinking.
(The blinking time depends on the AH range slsected).
Thereafter it becomes steady.
Note: User cannot conduct a test while the ‘Ready’ LED is
blinking.
By default the Batt. Voltage is displayed on the display. To
observe the Balance Capacity left, press the ‘Display Mode’
switch.
The display will show the capacity in percentage.
Note: Balancce Capacity can have a meaningful value only after
conduction of a test. At power on, a value of 0 is shown. Hence
Balance Capacity should be seen only after conduction of a
test. To observe No Load Batt. Voltage, press the ‘Display
Mode Key’. The display will show the No Load Batt. Voltage.
2.3 CAUTION
1) Do not connect Model 600 to a voltage source more than 20V.
2) Do not connect the unit to a battery connected in circuit.
Page 7

7
Service Information
Warranty Service: Please return the product in the original packaging with proof of purchase to the address below. Clearly state in writing
the performance problem and return any leads, probes, connectors and accessories that you are using with the device.
Non-Warranty Service: Return the product in the original packaging to the address below. Clearly state in writing the performance problem
and return any leads, probes, connectors and accessories that you are using with the device. Customers not on open account must include
payment in the form of a money order or credit card. For the most current repair charges please visit www.bkprecision.com and click on
“service/repair”.
Return all merchandise to B&K Precision Corp. with pre-paid shipping. The flat-rate repair charge for Non-Warranty Service does not include
return shipping. Return shipping to locations in North American is included for Warranty Service. For overnight shipments and non-North
American shipping fees please contact B&K Precision Corp.
B&K Precision Corp.
22820 Savi Ranch Parkway
Yorba Linda, CA 92887
www.bkprecision.com
714-921-9095
Include with the returned instrument your complete return shipping address, contact name, phone number and
Page 8

8
Limited One-Year Warranty
B&K Precision Corp. warrants to the original purchaser that its products and the component parts thereof, will be free from
defects in workmanship and materials for a period of one year from date of purchase.
B&K Precision Corp. will, without charge, repair or replace, at its option, defective product or component parts. Returned product
must be accompanied by proof of the purchase date in the form of a sales receipt.
To obtain warranty coverage in the U.S.A., this product must be registered by completing a warranty registration form on
www.bkprecision.com within fifteen (15) days of purchase.
Exclusions: This warranty does not apply in the event of misuse or abuse of the product or as a result of unauthorized
alterations or repairs. The warranty is void if the serial number is altered, defaced or removed.
B&K Precision Corp. shall not be liable for any consequential damages, including without limitation damages resulting from loss
of use. Some states do not allow limitations of incident al or consequential damages. So the above limitation or exclusion may not
apply to you.
This warranty gives you specific rights and you may have other rights, which vary from state-to-state.
B&K Precision Corp.
22820 Savi Ranch Parkway
Yorba Linda, CA 92887
www.bkprecision.com
714-921-9095
Page 9

MANUAL DE INSTRUCCIÓNES
Analizador De Capacidad
MODELO 600
22820 Savi Ranch Parkway
Yorba Linda, CA 92887
www.bkprecision.com
Page 10

10
INDICE
Sección Descripción Página
1..........................................................DESCRIPCION GENERAL 11
1.1.......................................................Introducción 11
1.2.......................................................Aplicaciones 11
1.3.......................................................Especificaciones 11
2..........................................................OPERACIÓN 12
2.1.......................................................Controles del panel frontal 12
2.1.......................................................Procedimiento de operación 13
2.2.1....................................................Procedimiento de conexión 13
2.2.2....................................................Seleccionando capacidad AH 13
2.2.3....................................................Efectuando una prueba1 14
2.2.4....................................................Observando resultados de una prueba 14
2.3.......................................................Precaución 14
Page 11

11
SECCIÓN 1
3) Precisión de la indicación de voltaje sin carga
: ± 2
Descripción General
1.1 INTRODUCCION
El analizador de capacidad de batería BK Modelo 600 mide el
porcentaje de capacidad restante de una batería. Este valor se
obtiene seleccionando sólo el rango AH y oprimiendo el switch
TEST.
El modelo soporta baterías de 12V de ti po acumulador de plomoácido con un amplio rango de capacidad AH. No se requiere
potencia externa (DC o de línea); la unidad se activa con la
batería bajo prueba.
1.2 APLICACIONES
Conforma Avanza la era de la información es probable que
aumente la demanda por UPSs (Unidades de respaldo de energía)
en hospitales oficinas, laboratorios, etc. Se espera que aumente la
importancia de del mantenimiento de baterías con el de la
demanda por UPSs. Así, el analizador de capacidad de baterías
puede tener muchas aplicaciones.
El instrumento puede aplicarse en estaciones de servicio, fábricas
de UPSs, Mantenimiento de campo, sistemas de baterías de
ferrocarriles, telecomunicaciones, barcos y submarinos.
1.3 ESPECIFICACIONES
TECNICAS
1) Rango De exhibición de capacidad : 0% a 100%
2) Voltaje de entrada máximo : 20V
cuentas
Precaución: No exceda del voltaje máximo, pues puede
causar daños irreparables al instrumento.
FISICAS
1) Dimensiones (mm) : 80x160x40
2) Peso : 1 Kg (aproximado)
NOTA: Las especificaciones y la información están conforme a
cambio sin el aviso de B&K Precision Corp. Por favor visite
www.bkprecision.com para las especificaciones más corriente y
información de nuestros productos
Page 12

12
SECCION 2
Operación
CONTROLES DEL PANEL FRONTAL
Refiérase a la vista frontal de la unidad
1) Rango AH. Con esta llave el usuario puede seleccionar el rango AH correcto de acuerdo
con la batería bajo prueba
2) LED Select. Enciende para indicar que el usuario puede seleccionar el rango AH
3) LED Locked. Enciende cuando el rango AH se establece en un valor AH particular fijado
por el usuario
4) Modo de exhibición. Esta lleve selecciona la exhibición de pantalla como Voltaje sin
carga o % de capacidad de balance
5) Batt. Voltaje. Este LED enciende cuando la pantalla indica Batt. Voltaje
6) % de capacidad de balance. Este LED enciende cuando la pantalla indica % de capacidad
7) Load Test. Llave para iniciar la prueba
8) Ready. Cuando este LED enciende establemente, indica que la unidad está lista para
efectuar una prueba.
9) Test On. Este LED enciende por 2 segundos aproximadamente mientras se efectúa una
prueba
10) Reverse Polarity. Este LED enciende si la batería se conecta con polaridad inversa
Las especificaciones y la información están conforme a cambio sin el aviso de
www.bkprecision.com para las especificaciones más
Page 13

13
2.2
PROCEDIMIENTOS DE OPERACIÓ
N
2.2.2 Selección de la capacidad
2.2.1 Procedimiento de conexión. Conecte el analizador 600 a
la batería. Conecte el terminal positivo del 600 a el terminal
positivo de la batería. Conecte el terminal negativo del 600 a el
terminal negativo de la batería. Al prender, la unidad modelo 600
realiza una autopreuba dando corrient a los 7 segmentos de los
LED’s y fin almente demonstando la version.
Precaución: No conecte la Terminal +va del 600 a la –va de la
batería y la –va del 600 a la +va de la batería. De hacerlo,
encenderá el LED de “Reverse Polarity”
AH. Oprima la llave AH; el LED de selección encenderá. La
pantalla mostrará el último valor almacenado de AH. (Al
encendido, el valor por default de AH es 7).
Para variar el valor, digamos a 100 AH, oprima la llave de
nuevo repetidamente hasta que aparezca en pantalla el valor
deseado.
Para fijar el valor de AH, ocualquier otra llave o espere 10
segundos. El valor AH seleccionado quedará “atorado”,
indicado por el LED “Locked”
Page 14

14
2.2.4 Observando resultados de una prueba
Por default se muestra en pantalla el voltaje de la batería.
Para observar la capacidad restante, oprima el switch
“Display mode”.
2.2.3 Efectuando una prueba.
La prueba puede efectuarse en cualquier momento oprimiendo la
llave “Load test”. Al hacerlo, el LED “Test on” empieza a brillar;
típicamente brilla por alrededor de 2 segundos.
.A continuación parpadea durante un tiempo dependiente del
valor AH seleccionado, hasta que encienda en forma estable.
Nota: No se pueden hacer pruebas durante la fase de parpadeo
La pantalla mostrará entonces la capacidad en porcentaje
Nota: La lectura de capacidad sólo es válida al efectuar una
prueba. Alencendido se muestra un valor 0. Paraobservar el
voltaje sin carga, oprima la llave “Display mode”.
2.3 PRECAUCION
1) No conecte el modelo 600 a una fuente de voltaje
mayor de 20V
2) No pruebe una batería conectada a un circuito
Page 15

15
-921-9095
Información de Servicio
Por favor regrese el producto en el empaquetado original con prueba de la fecha de la compra a la dirección debajo. Indique
Por favor regrese el producto en el empaquetado original con prueba de la fecha de la compra a la dirección debajo.
los precisos mas corriente visite www.bkprecision.com y
cio de la No-
-Norte los honorarios americanos satisfacen el contacto B&K Precision Corp.
Page 16

16
Garantía Limitada de Un Ano
sustituir, a nuestra opción, producto defectivo o componentes. Producto devuelto tiene que ser
medio de la forma de registro en www.bkprecision.com dentro de
resultado de alteraciones desautorizado o
do en perdida de uso.
tado por estado.
-921-9095
Page 17

Declaration of CE Conformity
according to EEC directives and NF EN 45014 norm
Responsible Party Alternate Manufacturing Site
Manufacturer’s Name: B&K Precision Corporation B&K India 0650
Manufacture’s Address: 22820 Savi Ranch Pkwy.
Yorba Linda, CA 92887-4610
USA
Declares that the below mentioned product
Product Name: Battery Capacity Analyzer
Part Numbers: 600, 601, 602
complies with the essential requirements of the following applicable European Directives:
Low Voltage Directive 73/23/EEC (19.02.73) amended by 93/68/EEC (22.07.93)
Electromagnetic Compatibility (EMC) 89/336/EEC (03.05.88) amended by 92/68/EEC (22.07.93)
and conforms with the following product standards:
Safety EN 61010-1:1990 + amend 1:1992 + amend 2:1995
EMC EN 50082-1 (Immunity):
EN 61000-4-2 (EDS) EN 61000-4-3 (Radiated Surge)
IEC 801-3 (Radiated Susceptibility)
This Declaration of Conformity applies to above listed products place on the EU market after:
February 28, 2006
Date Victor Tolan
President
Page 18

9
481-402-9-001
B&K Precision Corporation
22820 Savi Ranch Parkway
Yorba Linda, California 92887
www.bkprecision.com
©2005 B&K Precision Corporation
 Loading...