

Page 1

B&K Components, Ltd.
y
Reference 10
Reference 20
A/V S
stem Controller
Owner’s Manual
p/n 12698 Rev. 9808B
Page 2

B&K Components, Ltd., 2100 Old Union Road, Buffalo, New York 14227-2725
p/n 12698 Rev. 9808B
Page 3

TABLE OF CONTENTS
Acknowledgments
Safety Precautions
Features
The Basics
Front panel
Rear Panel
Making the connection
Setup
Operation
Advanced Features
Troubleshooting
A/V System Controller Specifications
The Menu System
Rear Panel Enlarged View
........................................................................................
......................................................................................
......................................................................................
......................................................................................
..........................................................................................
......................................................................................
...............................................................................
..............................................................................
..........................................................................
.............................................................................
................................................................................
...............................................................................
.......................................................................
.............................................................
2
3
4
5
8
9
10
11Audio / Video connections .....................................................................
12Digital Connections ...........................................................................
13SURROUND output CONNECTIONS ...........................................................
14Antenna Connections .........................................................................
14Control outputs / IR Inputs .....................................................................
15Frequently Asked Questions ...................................................................
17
17The Menu System ............................................................................
18User Preference Setup ........................................................................
18Display Options ...........................................................................
21Edit Preset Options ........................................................................
22Edit Source Name .........................................................................
22Surround Mode Operation ..................................................................
24Setup/Configure ..............................................................................
24Speaker Size and Delay ....................................................................
28Speaker Calibration ........................................................................
29Source Levels .............................................................................
29AM Tuner Settings .........................................................................
30FM Tuner Settings .........................................................................
31
31Power On/Off ................................................................................
31Sleep .......................................................................................
32Choosing a source ...........................................................................
32Tuner Operation ..............................................................................
33Adjusting the Volume .........................................................................
33Temporary Level Adjustments ..................................................................
34Surround Modes .............................................................................
36Overrides ...................................................................................
36Presets .....................................................................................
38Getting A/V System Controller Status ...........................................................
38Zone 2 Operation .............................................................................
39
39Advanced Security Options ....................................................................
40Zone Configuration ...........................................................................
43Power On Titles ..............................................................................
44Control Out Setup ............................................................................
45Factory Reset ................................................................................
46
47
48
49
1
p/n 12698 Rev. 9808B
Page 4

ACKNOWLEDGMENTS
“
Manufactured under license f rom Dolby Laboratories.
trademarks of Dolby Laboratories. Confidential Unpublished Works. © 1992-1997 Dolby Laboratories, Inc. All
rights reserved.
®
is a registered trademark of Digital Theater Systems, LLC. Additionally licensed under the following US
DTS
Patent 5,451,942 & National Patent applications derived from PCT/US95/00959. Additional U.S. and Foreign
Patents pending. “DTS”, “digital sound” , and “coherent acoustic s” logos are tradem arks of DTS Technology LLC.
All rights reserved.
®
Motorola
, , “Powered by Motorola”™, Motorola name and logo are registered trademarks of Motorola, Inc.
Dolby”, ”Pro Logic”, “AC-3", and the double-D symbol are
Reference 20
The
Reference 10
The
Accessories included:
Phone (716)656-0026, Fax (716)656-1291, http://www.bkcomp.com, E-mail: info@bkcomp.com
may be used to process Dolby Pro Logic and Dolby Digital
may be used to process Dolby Pro Logic, Dolby Digital, and DTS.
B&K Components, Ltd., 2100 Old Union Road, Buffalo New York 14227-2725
Owners manual, Remote control Manual, Power cord, Remote control, 4-AAA batteries
© Copyright 1998 All Rights Reserved.
2
p/n 12698 Rev. 9808B
Page 5

SAFETY PRECAUTIONS
PLEASE READ BEFORE INSTALLING
WARNING: to prevent f ire or shock hazard, do not expose this unit to rain or moisture. Care should be taken to
prevent objects or liquid from entering the enclosure. Never handle the power cord with wet hands.
The lightning flash with arrowhead, within an equilateral triangle, is intended to alert the user of the presence of
uninsulated “dangerous voltage
The exclamation point within an equilateral triangle is intended to alert the user of the presence of important
operating and maintenance (servicing) instructions in the literature accompanying the unit.
Caution: To prevent the risk of electric shock, do not remove cover. No user-serviceable
servicing to qualified service personnel.
If an outdoor antenna is connected to the antenna input, be sure it is grounded to provide som e protection agains t
voltage surges and built up static charges. Keep the outdoor antenna away from power lines.
Unplug the A/V System Controller from the AC outlet when plugging in or unplugging cables, when left unused for
an extended period of time, moving the A/V System Controller, or when you suspect lightning in your area.
Prevent damage to the power cord. Do not bend, pull, place objects on, alter, etc. Replace the power cord if it
becomes damaged. Always grasp the plug on the power cord when plugging in or unplugging the A/V System
Controller from the AC outlet.
Your system may produce sound levels capable of causing perm anent hearing los s. Do not operate f or extended
periods of time at high volume levels.
Make sure the A/V System Controller is placed on a level surface.
Protect the A/V System Controller from impact. (Do not drop it!!!)
The A/V System Controller is equipped with raised feet to provide ventilation, reduce acoustic feedback,and
provide protection against scratc hing the surface the unit is resting on. W e advise against removing or altering
feet.
Do not stack anything on top of the A/V System Controller (amplifier, source, etc.) Leave a minimum of 3”
clearance from the top of the A/V System Controller to the next shelf (or component).
The A/V System Controller should be located away from heat sources such as heaters or amplifiers.
Do not perform any internal modifications to the A/V System Controller.
Always connect the A/V System Controller’s power cord to an unswitched AC outlet for normal operation.
If young children are present, adult supervision should be provided until the children are capable of following all
rules for safe operation.
Do not plug the A/V System Controller’s power cord into an outlet with an unreasonable number of other devices.
Be careful if using ex tension cords and ensure the total power used by all devices does not exceed the power
rating (watts/amperes) of the extension c ord. Excessive loads may cause the insulation on the cord to heat and
possibly melt.
Mistaking
System Controller or other components.
Damage can occur to your speakers if the power rating of each individual driver is exceeded by the power
amplifiers connected to the A/V System Controller. Ensure that all the drivers in your system are capable of
handling not only the average power being delivered by the power amplifier, but also the peak power that is lik ely
to be generated during strong passages.
manufacturer or the dealer where you purchased them.
The A/V System Controller should be serviced by qualified personnel when:
CONTROL OUTPUT
The A/V System Controller is not functioning propoerly.
The A/V System Controller was exposed to rain or other type of moisture.
The A/V System Controller was dropped, or the chassis is damaged.
” within the product’s enclosure that may constitute a risk of electric shock to you.
parts inside. Refer
IR INPUT
or
connectors for audio/video inputs or outputs m ay damage your A/V
If you are unsure of your speaker's power rating, contact the speaker
3
p/n 12698 Rev. 9808B
Page 6

FEATURES
Your new A/V System Controller is a versatile audio/video control center. The A/V System Controller is designed
to sound sensational and be an attractive, easy-to-use addition to your audio/video system. Although you already
have a good idea of your A/V System Controller’s features, we would like to tak e a moment to point out certain
highlights.
Remote Control
Front Panel Operation
Two-zone operation
for second listening/viewing area.
Plug and Play operation
A/V presets
Customized input and A/V preset names
Internal Digitally Synthesized AM/FM Stereo tuner
Analog inputs/outputs
S-video plus one set of 5.1 channel surround outputs
Digital inputs/outputs
output.
Control Outputs
B & K amplifier.
IR inputs/outputs
infrared repeater control system.
- easy control of your B&K equipment.
- Nearly all functions can be controlled directly from the A/V System Controller.
- complete digital/analog preamp/proces sor f or zone 1 plus fully independent analog preamp
- automatically selects the optimum input and surround sound format.
- 20 preset memories allow instant recall of user settings.
- assign names to presets, inputs, or the turn on message.
- seven A/V inputs and five A/V outputs
- seven coaxial inputs and one coaxial output plus five optical inputs and one optical
- four 12 VDC @ 50 mA outputs f or controlling ex ternal system s suc h as a proj ection sc reen or
- two IR inputs and up to four IR outputs let you integrate the A/V System Controller with an
- stores 20 AM and 20 FM channels.
all
with stereo audio, composite video and
Gold Plated Connectors State-of-the-art Design -
20 bit 48kHz A/D and 20 bit 32/44.1/48kHz D/As.
Dual Motorola DSP56K009 24 bit digital signal processors.
Upgradable - modular design allows for future A/D, D/A, digital receiver, DSP and bass management
enhancements.
better sound with minimum signal loss and degradation.
4
p/n 12698 Rev. 9808B
Page 7
THE BASICS
The following is intended to familiarize users with common terms and applications of Home Theater equipment.
Sources -
limited video from its on-screen menu system. Typically you will want to connect a number of additional sources
(VCR, DVD player, etc.) to your A/V System Controller. Your A/V System Controller is designed to accom odate a
wide range of audio and video signals.
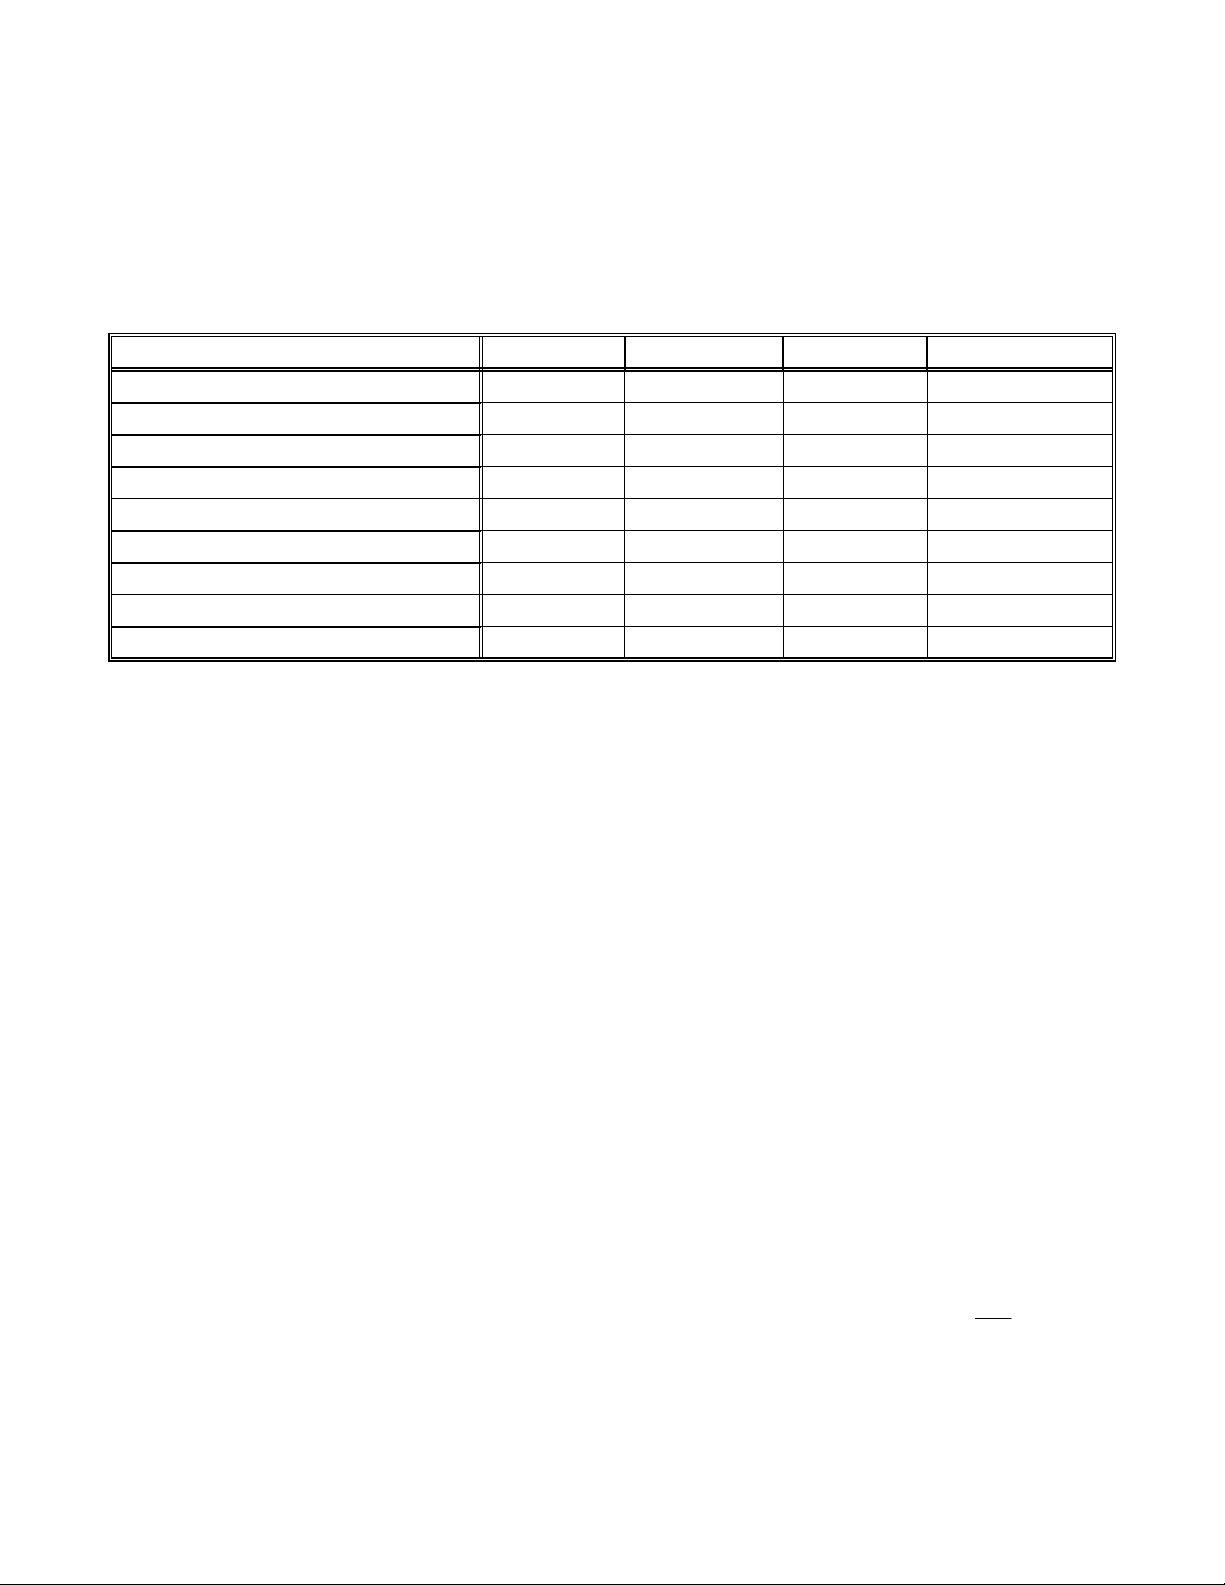
The following table lists the most popular home theater media and how the audio information is stored.
your A/V System Controller can directly provide audio from its built-in AM/FM tuner. It can also provide
DTSDolby DigitalPCMAnalogSource Media
XAudio Cassette
XVideo Cassette
XXXXLaserdisc (LD)
XXXCompact Disc (CD)
XXXDigital Versatile Disc (DVD)
XXXSatellite Broadcast
XXXDigital Audio Tape (DAT)
X (compressed)Digital Compact Cassette (DCC)
X (compressed)Minidisc (MD)
Analog vs. Digital Audio -
how they are delivered to your A/V System Controller fr om the sourc e. Analog signals ex actly represent the sound
you will hear through a continuously varying voltage. Audio and video cassettes are analog recordings and are
normally delivered to your A/V System Controller over a pair of coaxial audio cables.
Digital signals closely approximate the original audio signals with a set of numbers referred to as a bitstream . CDs
and DVDs are sources of digital audio and are normally connected to your A/V System Controller through a
coaxial or optical digital cable. There are several different bitstream formats available. The simplest format is
called Pulse Code Modulation (PCM). In PCM, the bits tream directly represents the original 2-channel audio. In
Dolby Digital and DTS (see “Surround Formats” below) bitstreams are modified using a process called
compression to squeeze m ore infor m ation into lim ited space. DT S squeezes 5.1 channels into the spac e norm ally
required for two uncompressed channels, while Dolby Digital squeezes 5.1 channels into about ¼ the space
required for two channels. Your A/V System Controller automatically detects the bitstream curr ently being provided
from the sour ce and performs the requir ed dec ompression and surround proc es sing. If no digital signal is present
your A/V System Controller will automatically switch to analog processing.
All sounds that you hear from your speakers are analog. Digital s ignals are automatically converted to analog by
your A/V System Controller before being output to your speakers.
This refers to the m ethod used to place audio inform ation on the source m aterial and
If analog signals exactly represent the audio, while digital signals only approximate it, why would I want to
use digital?
All analog sources add some amount of noise and distortion to the audio signal. Additional noise can be
picked up through the cables from the source to your A/V System Controller. It is impossible for the A/V
System Controller to tell the difference between the desired signal and the added noise and distortion, so
it reproduces both of them. T he result is increased back ground noise and decreased dynamic r ange and
fidelity. Digital signals are virtually immune to noise and distortion. The A/V System Controller can,
therefore, reproduce the signal with the gr eatest possible fidelity. W e recommend you use digital signals
wherever possible. Also Dolby Digital and DTS (see “Surround Formats” below) work only
signals.
with digital
Surround Formats
Monaural (Mono)
Modern recordings are seldom m ade in this for m at, but mos t older m ovies and m usic ar e available only in
this format. You may get mono from any source - digital or analog. Sound will nor mally come only from
your center channel speaker, but your A/V System Controller can produce mono in two or four channels
- Your source material will be in one of five possible formats described below.
- This is the oldest format available. It contains a single, full range audio channel.
5
p/n 12698 Rev. 9808B
Page 8

(see “Surround Mode”). Since all m odern sources are ster eo, the mono information is us ually replicated
on both the left and right channels.
Stereo - Stereo contains two discrete, full range audio channels. This is the most common format for
music and is also used on many movies. You may get stereo from any source - digital or analog. Sound
will normally come only from your front left and right speakers, but your A/V System Controller can
additionally produce stereo in four or five channels (see “Surround Mode”).
Dolby Pro Logic - Dolby Pro Logic is a refinement of Dolby Surround which was the earliest form of true
surround processing. Like Stereo, Dolby Surround contains two discrete, full range audio channels. In
addition, a monaural, limited range rear channel is encoded on the two stereo channels in a process
called matrixing. T he rear channel information is encoded in positive polarity on the left channel and in
negative polarity on the right channel. The Dolby Processor can detect this encoding (lef t m inus right) and
send that information to the rear channels. Dolby Pro Logic adds additional processing to produc e a full
range center channel by extracting the m ono inform ation from the left and right channel. T his is the m ost
common f orm at for all but the mos t recent m ovies. Mus ic sourc es are oc casionally encoded in Pro Logic.
However, many people prefer to use Pro Logic processing on all of their stereo sources. The center
channel extraction process often yields improved stereo imaging, especially when you are sitting away
from the “sweet spot” at center of the listening area. The rear channel processing of ten lends a pleasing
ambiance even to mater ial that is not Pro Logic encoded. Dolby Pro Logic is fully compatible with ster eo
and you may get it from any source - digital or analog. Sound will normally com e from all f ive speak ers in
your system, but your A/V System Controller can reduce the number of channels to two or four (see
“Surround Modes”).
Dolby Digital (also referred to as AC-3) - Dolby Digital contains up to five discrete, full range audio
channels plus an additional Low Frequency Effects (LFE) channel. The LFE channel contains only low
frequency information for enhanced sound eff ects in movies. This combination of f ive discrete channels
plus a LFE channel is often r eferred to as 5.1 channels. Dolby Digital is a digital f ormat only. It must be
delivered to your A/V System Controller over a coaxial or optical digital cable. As of the writing of this
manual, Dolby Digital is comm ercially available only on DVD (Also see
possible to create your own Dolby Digital CDs and DATs if you have the recording equipment. You can’t
directly record Dolby Digital onto minidisc or digital compact c assette since these devices add their own
compression which is incompatible with the Dolby Digital compression. Sound will norm ally come from all
five speakers in your system, but your A/V System Controller can reduce the number of channels to two or
four (see “Surr ound Mode”). Not all Dolby Digital recordings will inc lude all five c hannels, and, in fact, it is
common on DVDs to have two channel Dolby Digital with or without Pro Logic processing.
Dolby Digital RF (also referred to as AC3-RF) - Dolby Digital RF is identical to normal Dolby Digital
except that it uses a special RF encoding scheme to put the bitstream on Laserdiscs without replacing the
normal stereo (or Pro Logic) PCM bitstream that is normally available from laserdisc. In order to use Dolby
Digital RF laserdiscs you must have a B&K DT-1 RF demodulator or similar product from another
manufacturer. For best results with your A/V System Controller’s Plug and Play capability we strongly
recommend the DT-1.
DTS (Digital Theater Systems) - DTS is the latest surround sound technology. DTS is similar to Dolby
Digital in that it provides 5.1 discrete audio channels. However, it us es more digital data to encode the
information and may provide greater fidelity than Dolby Digital. DTS is a digital format only. It must be
delivered to your A/V System Controller over a coaxial or optical digital cable. As of the writing of this
manual, DTS is commercially available only on laserdisc and CD with DVD coming soon. No RF
demodulator is required for DTS laserdiscs since the DTS bitstream replaces the normal PCM bitstream.
Like Dolby Digital, you can create your own DTS DATs or CDs but not minidisc or digital compact
cassette. As with Dolby Digital, sound will normally come from all f ive speakers in your system, but your
A/V System Controller can reduce the number of channels to two or four (see “Surround Mode”).
Doby Digital RF
below). It is also
NOTE: The Reference 10 processes Dolby Pro Logic and Dolby Digital, it DOES NOT process DTS.
The Reference 10 can be upgraded to process DTS. Contact B&K or your B&K dealer for
information on upgrades. The Reference 20 processes Dolby Pro Logic, Dolby Digital, and DTS.
6
p/n 12698 Rev. 9808B
Page 9

Bass Management - Dolby Digital and DTS formats contain up to 5 full range channels plus LFE. Only a system
with five full-range (large) speak ers plus a subwoofer can directly reproduce these f ormats. However, almost all
commercially available center channel speakers are small and incapable of reproducing the lowest bass
frequencies without distortion or even dam age to the speak er. Many people also use sm all speak ers in the rear of
their system, while others use sm all s peakers all around. Use of a s ubwoofer is almost mandatory when using five
small speakers , but people with at least two large speakers may or may not choose to use a subwoofer . Some
people may not use a center channel or rear speak ers at all. In order to handle any possible com bination of large,
small, or missing speakers, a home theater system must contain good bass management, a concept often
missing from two-piece systems where the Dolby Digital or DTS decoder is separate from the preamp. Your A/V
System Controller contains a com plete bass m anagement s ystem. You can use as few as two lar ge front left and
right speakers or two small left and right speak ers plus a subwoofer or as many as five full range speak ers plus a
subwoofer or any combination in between without miss ing any information. Wher ever s mall speakers are used the
bass management system prevents low bass information from going to that speaker (“high pass”). This bass
information is rerouted to a speak er that can handle it, usually a subwoofer, but it can also send center, rear, or
LFE bass to large front speak ers if no subwoofer is available. W hen center or rear speak ers are not used at all,
the missing channel is sent (“downmixed”) to the front speakers.
Preamp - A preamp typically includes the capability to select from a num ber of sources , adjust volume levels and
route the data to an amplifier. Your A/V System Controller includes a high quality preamp.
Processor - A processor typically includes the capability to decode one or more surround form ats, and convert
between digital and analog as required. Your A/V System Controller is capable of decoding the surround f ormats
described above.
Zone - A zone is usually a room with speakers installed in it. Your A/V System Controller includes a full
preamp/processor for zone 1 plus an additional analog stereo pream plifier for zone 2. This allows, for example,
watching a Dolby Digital movie in zone one while simultaneously using the built-in AM/FM tuner in another room.
Amplifier - An amplifier takes the output of a preamp/processor and increases its level to that necessary to drive a
speaker. Your A/V System Controller includes direct preamp/processor surround outputs for connecting to
external amplifiers and/or powered speakers . You must also provide external amplif ication for the s econd zone if
you should use that capability.
Speakers - A surround sound system typically uses 5 speak ers located left front, center front, right front, right
rear, and left rear plus a subwoof er located anywhere in the room. Best results are achieved using five identical
full range speakers plus subwoofer. This is not always prac tical. Excellent results can be ac hieved using smaller
and/or fewer speakers, as long as you go through the set up procedures described later in the manual.
Composite vs. S-video - Composite video is the oldest standard for color video. It combines the luminance
(brightness or black-and-white) and chr ominance (color) inf ormation onto a single conductor. T hese signals must
be separated again for display resulting in som e degr adation of the video quality. S-video is a newer s tandard that
uses separate conductors f or the luminance ( Y) and chrominance (C) inf ormation res ulting in better video quality.
Your A/V System Controller is capable of switching both composite and S-video signals, but it cannot convert
between video types.
7
p/n 12698 Rev. 9808B
Page 10
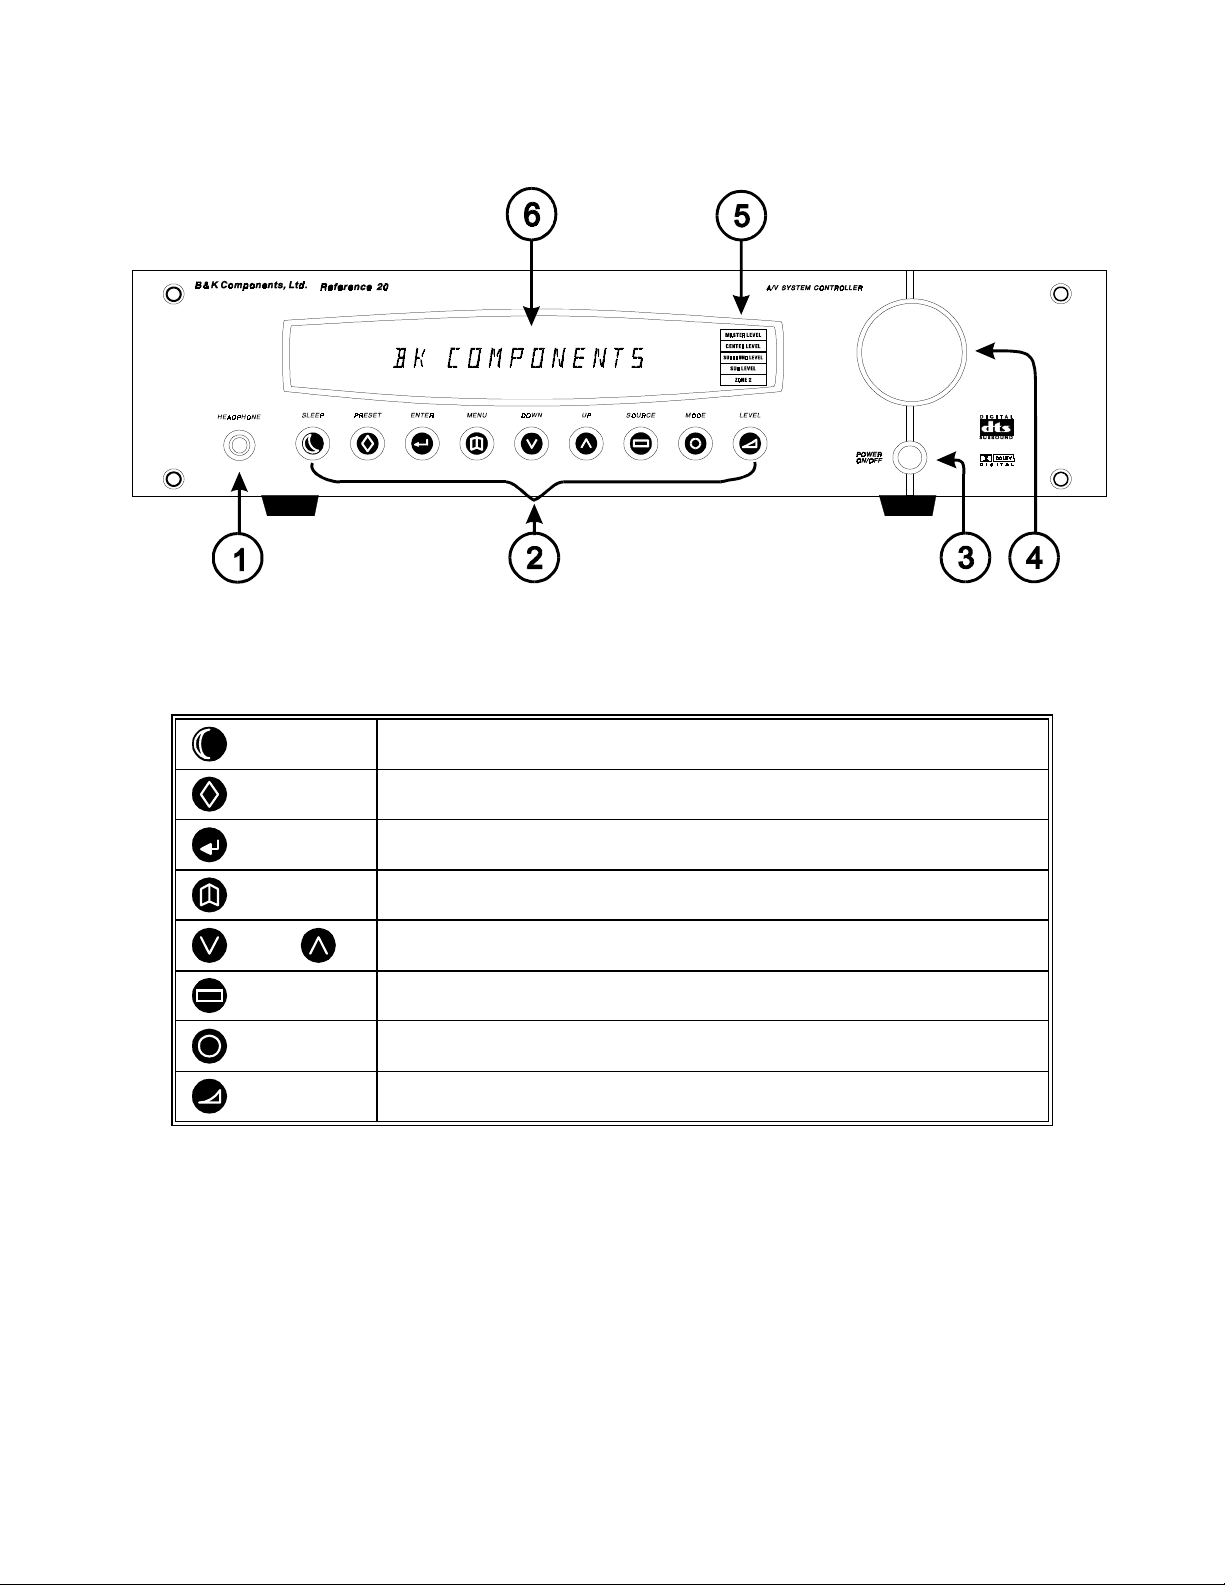
FRONT PANEL
1. Headphone Jack
- Stereo headphones having a standard ¼ inch binaural plug can be connected to the
headphone output. The A/V System Controller must be on and in HEADPHONE Mode for proper headphone
operation.
2. Front panel buttons
SLEEP
PRESET
ENTER
MENU
DOWN UP
SOURCE
MODE
LEVEL
3. Main power sw itch
- Removes all power to the A/V System Controller. Normal operation of the A/V System
Puts the A/V System Controller in standby mode.
Steps through audio / video presets for instant recall of setups.
Pressing ENTER recalls the preset.
Confirm selection or display current status of the receiver.
Enter / exit menu system
Step through menus, sources, or surround modes.
Steps through the audio / video sources.
Steps through the surround modes.
Selects MASTER, CENTER, REAR, and SUBWOOFER level
Also allows ZONE 2 operation.
Controller requires the power switch to rem ain on. Use the Sleep button for daily on and off of the A/V System
Controller. It places the unit in standby mode that allows turning back on with the remote control. Turn the A/V
System Controller off with the main power switch when not using it for an extended period of time.
4. Volume control
- For controlling system volume. Turning the shuttle-type volume control clock wise increases
the volume level, countercloc kwise decreases the volume level. The volume knob is also us ed to change other
A/V System Controller settings. See THE MENU SYSTEM and OPERATION
5. Level indicators
- Display which volume level is being changed - MASTER, CENTER, REAR, or
SUBWOOFER. The bottom indicator is for the activation of ZONE 2. It is lit when changes are made to zone 2.
6. Display
- The A/V System Controller display is a 16 character alphanumeric fluorescent display. Displays
current status of A/V System Controller and any changes being performed.
8
p/n 12698 Rev. 9808B
Page 11
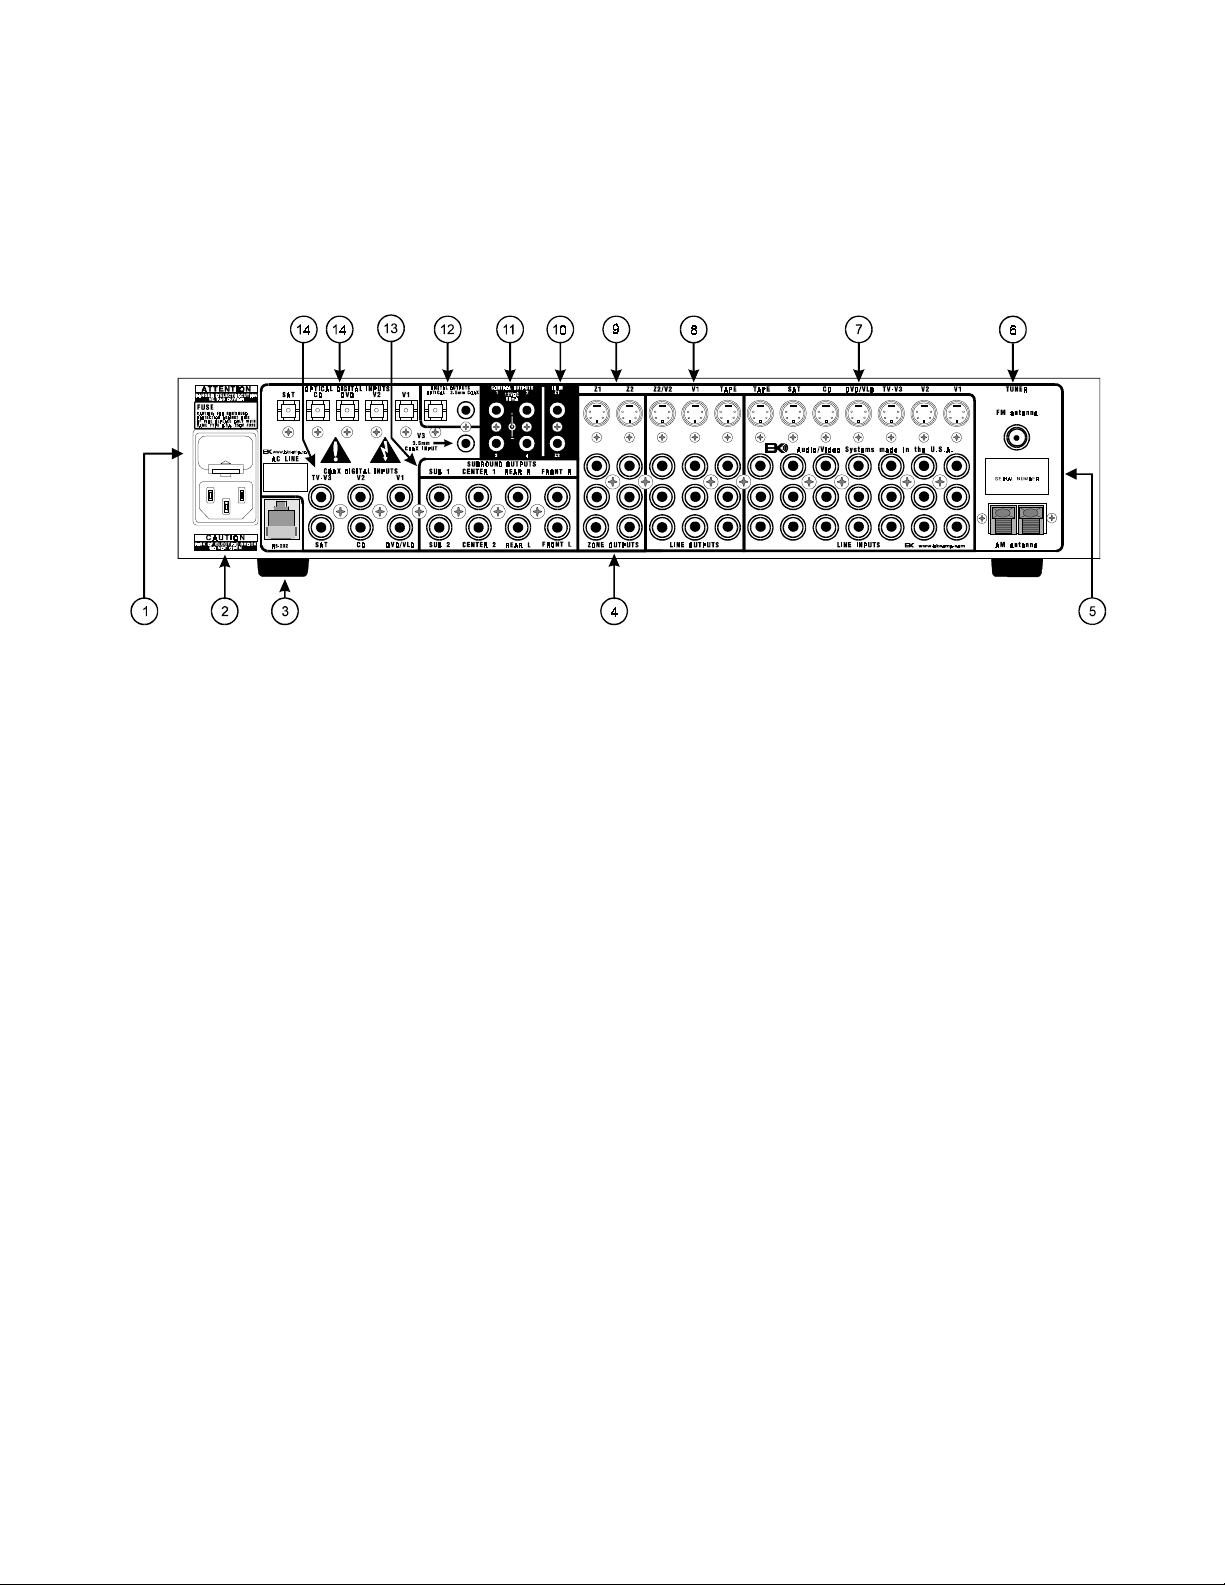
REAR PANEL
The A/V System Controller’s back panel is organized into groups of inputs and outputs for audio and video as
shown below. See back of this manual for an enlarged view.
1. AC fuse holder
2. AC input receptacle
3. RS-232 input (optional)-
4. Zone audio outputs
the surround left and right front outputs.
5. Serial number -
6. Antenna inputs -
7. Line inputs
Red RCA jacks
White RCA jacks
Yellow RCA jacks
4 pin din jacks
8. Line level outputs
9. Zone video outputs -
10. IR in
the A/V System Controller. This m ethod of control is useful when the front IR r eceptor is block ed (f or exam ple, by
a cabinet door) or to control the A/V System Controller from another room. This input is typically used in place of
an emitter attached to the front panel.
11. Control outs
12. Digital outputs
input of the A/V System Controller out to digital recorders, personal computers, etc.
13. Surround outputs
14. Digital inputs
The incoming signal may be PCM, Dolby Digital (AC-3) or DTS (Reference 20 only).
- Accepts input from external IR rec eptors. Connect an IR repeater (“ home run”) to IR IN f or controlling
- Holds the AC Line fuse. Replace only with 0.5 Amp / 250 Volt Fast Blow fuse.
- For attaching the supplied AC power cord to the A/V System Controller.
For future interface applications.
- Variable level output to your external amplifiers. Note: the zone 1 outputs are identical to
B&K Components, Ltd. serial number of your unit.
Connections for the AM and FM antennas.
- connections from your audio/video sources.
- right analog audio
- left analog audio
- composite video
- S-video
- Fixed level outputs to an audio or video recorder.
Variable level outputs to your video monitors.
- Outputs that allow you to remotely control external devices. (See “Making The Connection“).
- One optical and one 3.5 mm coax ial that carry digital information from the selected digital
- Variable level outputs for driving external power amplifiers or powered speakers.
- Inputs used to connect a digital audio s ignal from your source to the A/V System Controller.
9
p/n 12698 Rev. 9808B
Page 12

MAKING THE CONNECTION
It’s tempting to just plug in your new A/V System Controller and have great sound pour out. Before you do that,
take a few minutes to plan out how you want the A/V System Controller to fit into your audio/video system. Ask
yourself the following questions:
y
What source components do I want to connect to my A/V System Controller? (CD, VCR, etc.)
y
What equipment will be receiving the audio and video? (TV monitor, Speakers, etc.)
The answers to your questions determine how many cables you need to connect to the back of the A/V System
Controller. Good preplanning equals great sound. Keep these recommendations in mind:
y
List all components in your system and indicate whic h j ac ks of the A/V System Controller eac h c omponent will
be connected to. Your A/V System Controller has seven sets of inputs. It is convenient to connect a DVD
player to the input labeled DVD or a VCR to the input labeled V1 or TAPE, etc. However, your equipment may
differ from the labeling on the back of your A/V System Controller. In most cases you can connect any type of
source to any input (see FREQUENTLY ASKED QUESTIONS). For example, if you don’t have a satellite
receiver you can connect a DAT player or a second cassette deck to SAT . You can also reprogram the source
name that will appear on your A/V System Controller’s front panel and on-screen display (see SETUP SOURCE NAMES)
y
Also note the length of the cable for each component’s connec tion and describe how it should be routed or
draw your routing scheme below your list. You may want to label each cable with a name or number at both
ends. Use high quality connections to maintain high quality audio and video.
y
Think about the type and length of cable you need and obstacles in the cable’s path (doorways, furniture,
walkways, e tc.). To decide which ones are right f or you talk to your dealer about the various cable products
that are available.
y
For safety, keep all cables out of high traffic areas (hallways or doorways) and away from equipment that
radiates power, including amplifiers, power cords, heaters, etc.
y
If you might expand your audio/video system later, keep these ideas in mind as you plan current cable runs.
y
To provide the best tuner r eception, m ak e sure the antenna is at least sever al feet away from the A/V System
Controller and any other equipment that may produce high frequency interference such as Personal
computers, CD players, halogen lamps, etc.
Take a look at the back panel of the A/V System Controller. You will notice that the RCA-type audio input and
output connectors are identified by colors, red f or right channel and white for the left channel audio. Composite
video input and output connectors are identified by yellow. Coaxial digital inputs are identified by orange. The
surround outputs are identified by black.
10
p/n 12698 Rev. 9808B
Page 13
AUDIO / VIDEO CONNECTIONS
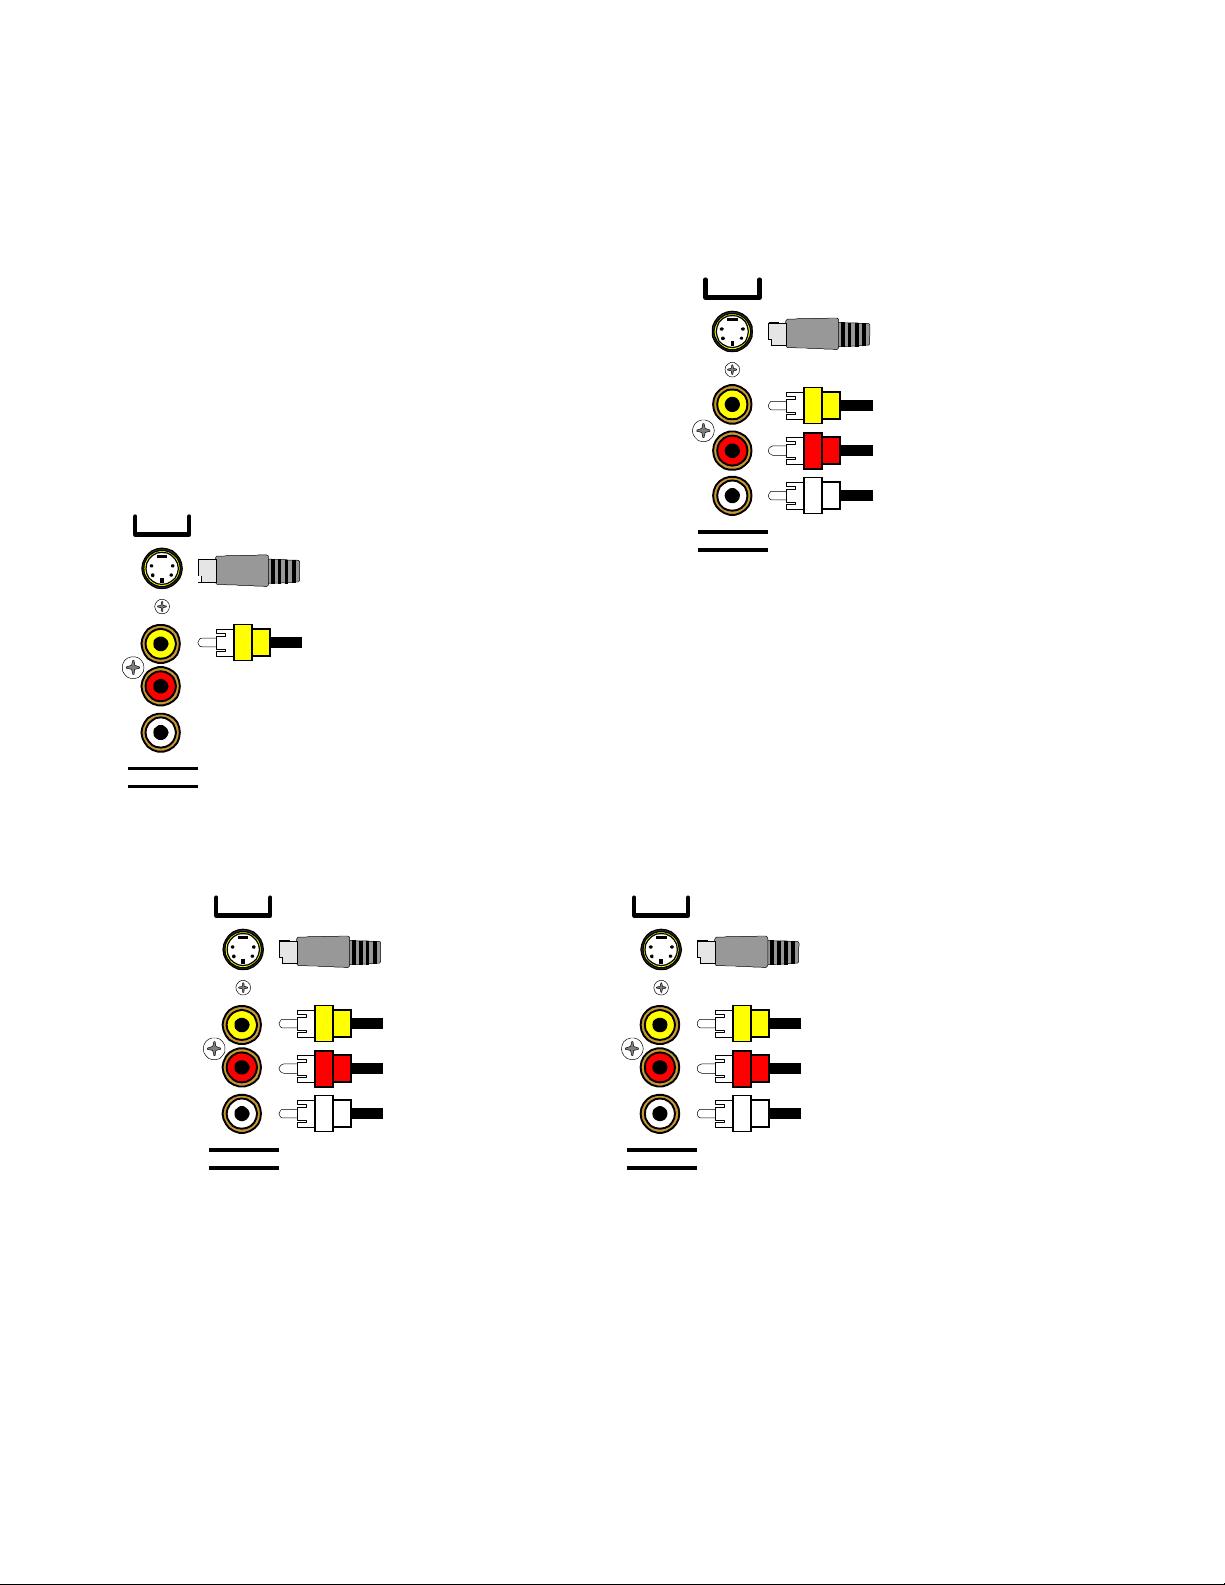
Connecting your analog sources to your A/V System Controller
Audio / Video source -
instructions for connec ting to other audio / video sources such as a television, satellite receiver, c able box, etc.
(Omit the video connections f or an audio-only component such
as a CD player)
Attach one end of the audio interconnec t cable to the left audio
output on the DVD/VLD player, then attach the other end to the
left (white) DVD/VLD audio input on the A/V System Controller.
Repeat for the right (red) audio connec tion. Attach one end of
the composite video interconnect c able to the video out on the
DVD/VLD player, then attach the other end to the yellow video
input on the A/V System Controller labeled DVD/VLD. Repeat
for the S-video connections if you are using S-video.
Z1
connecting a DVD/VLD player to the A/V System Controller’s analog inputs. Use the same
DVD
S-Video input
from DVD output
Composite video input
from DVD output
Right audio input from
DVD output
Left audio input from
DVD output
S-Video output
LINE INPUTS
to monitor input
Composite video output
to monitor input
Video Monitor -
interconnect cable to the video input on the monitor, then attach
the other end to the yellow video output on the A/V System
Attach one end of the composite video
Controller’s ZONE OUTPUTS. Repeat for the S-video
connections if you are using S-video. Use Z1 for zone 1 and Z2
for zone 2.
ZONE OUTPUTS
VCR or audio recorder -
connect a VCR to V1 . Use the same instructions f or connecting to the V2 and TAPE
analog inputs. If connecting a cassette deck or other audio-only recorder then omit the video connections.
V1
S-Video output
to VCR input
Composite video output
to VCR input
Right audio output
to VCR input
Left audio output
to VCR input
LINE OUTPUTS
V1
S-Video input
from VCR output
Composite video input
from VCR output
Right audio input
from VCR output
Left audio input
from VCR output
LINE INPUTS
Attach one end of the audio interconnect cable to the left audio output on the VCR, then attach the other end to the
left (white) V1 audio input on the A/V System Controller. Repeat for the right (red) audio connection. Attach one
end of the composite video inter connect cable to the composite video output on the VCR, then attach the other
end to the yellow video input on the A/V System Controller labeled V1. Repeat for the S-video connections if you
are using S-video.
Attach one end of the audio interconnec t cable to the left audio input on the VCR, then attach the other end to the
left (white) V1 audio output on the A/V System Controller. Repeat for the right (red) audio connection. Attach one
end of the composite video interc onnect cable to the c om posite video input on the VCR, then attac h the other end
to the yellow video output on the A/V System Controller labeled V1. Repeat for the S-video connec tions if you are
using S-video.
11
p/n 12698 Rev. 9808B
Page 14
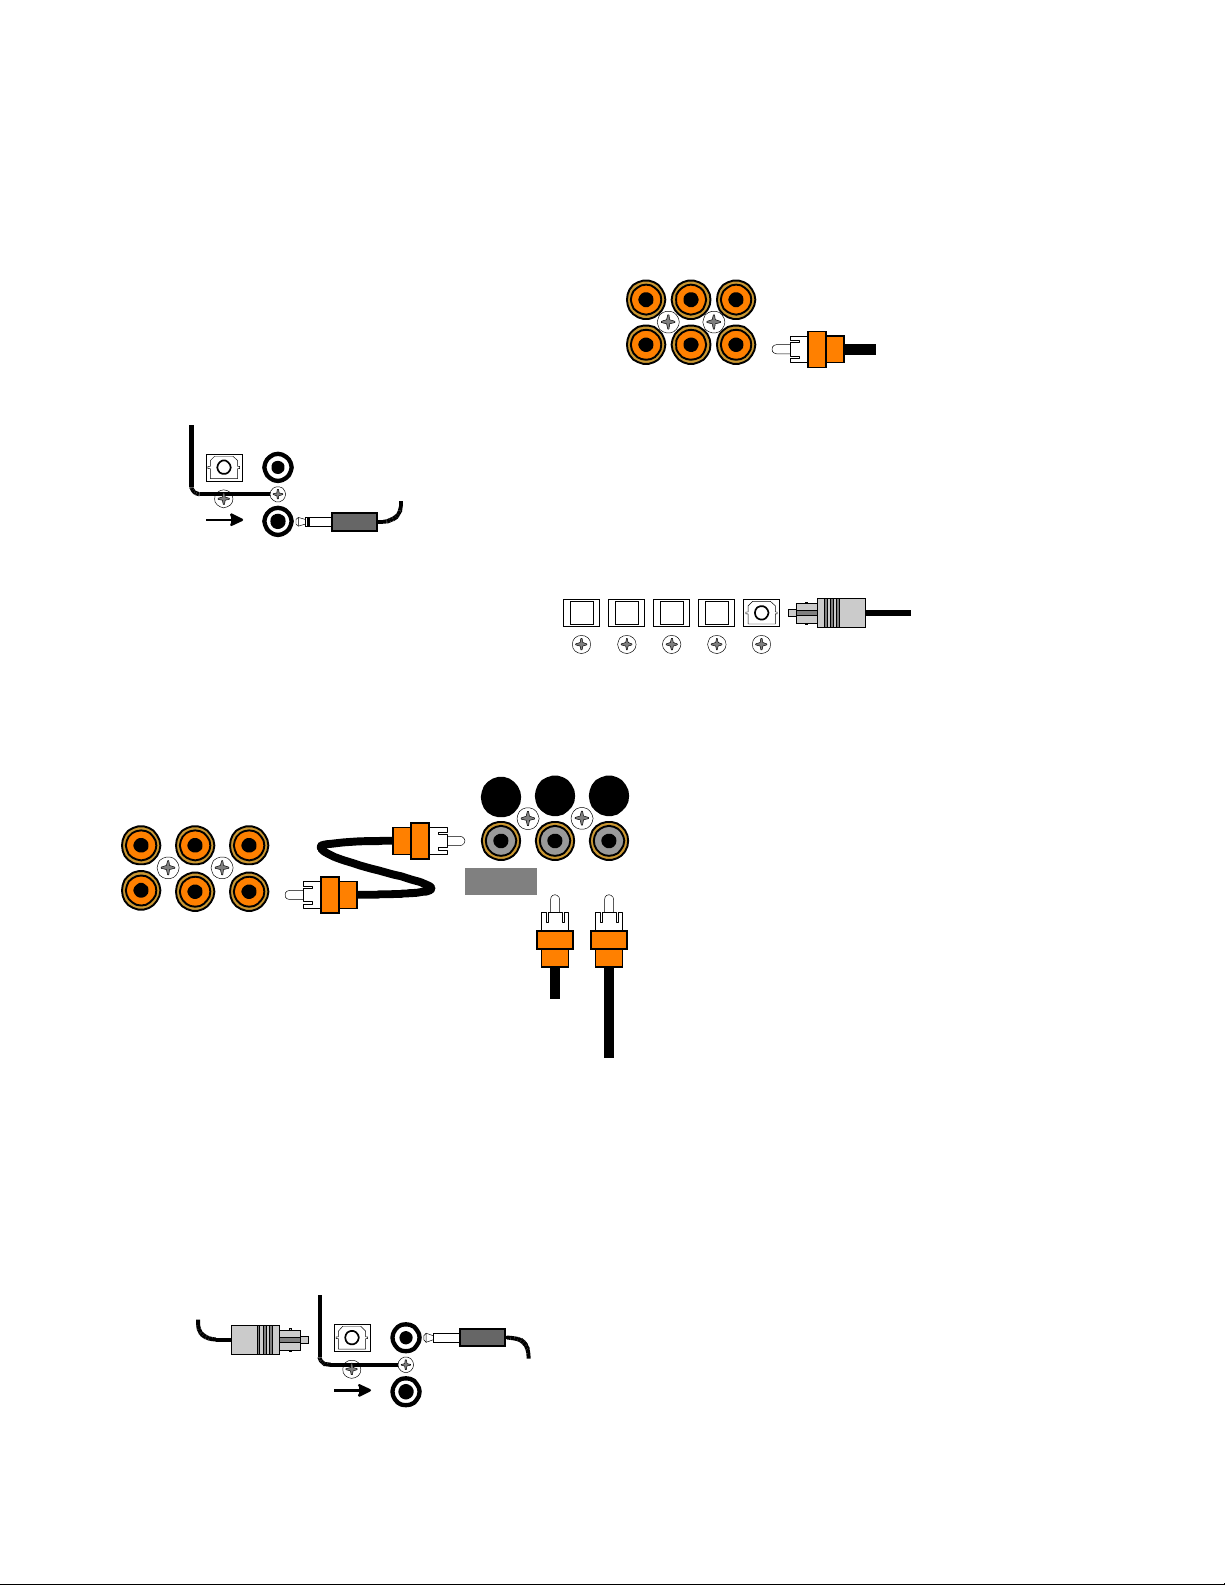
DIGITAL CONNECTIONS
Connect digital inputs (DVD, VLD, etc.) to the A/V System Controller. You will need either c oaxial or optic al digital
inputs to play Dolby Digital (AC-3) or DTS surround sound proc essing. Digital connections are also rec om m ended
for PCM sources. If your source has both optical and coaxial outputs connect only one.
COAX DIGITAL INPUTS
Coaxial digital inputs
- standard RCA type
connectors. Attach one end of your digital coaxial
cable to your source coaxial digital out and the other
end to the appropriate A/V System Controller coaxial
digital (orange) input.
TV-V3 V2 V1
SAT DVD/VLDCD
Coax digital input
from DVD output
DIGITAL OUTPUTS
OPTICAL
3.5mm
COAX
3.5 mm digital input
V3
3.5mm
COAX INPUT
from PC or portable
Optical digital inputs -
First, remove the cap on
3.5 mm
coaxial digital input - You may connect the V3 coax ial input using a
3.5 mm m ono jack instead of the RCA type jack. T his input works the
same as the other digital inputs but us es a 3.5 m m m ono jac k ins tead
of an RCA. The plug must be wired as tip (+) and the long barrel
section (-).
the optical digital input. Save the cap. Attach one
end of your digital optical cable to your source
and the other end to the appropriate digital input
on the back of the A/V System Controller.
DT-1
Receiver
COAX DIGITAL INPUTS
TV-V3 V2 V1
MAIN
OUTPUT
SAT DVD/VLDCD
Coax digital input
from VLD output
AC-3 RF input
from VLD output
OPTICAL DIGITAL INPUTS
AC-3 RF
COAX
INPUT
INPUT
V2DVDCDSAT
V1
Optical digital output
from source
Connecting A Laserdisc Player -
Dolby Digital
(AC-3) laserdiscs use a special technique called
AC-3 RF to encode the Dolby Digital bitstream. If the
laserdisc player is capable of playing back Dolby
Digital discs it will have a separate output for this
bitstream in addition to the normal coaxial and/or
optical outputs. Do not connect the AC3-RF output
directly to your A/V System Controller. The AC-3 RF
bitstream must first be converted to a normal
(non-RF) Dolby Digital type signal. It is
recommended that a B&K DT-1 be used to convert
and select between the Laser’s AC-3 RF and
PCM/DTS signals. The output from a DT-1 will
automatically select between the connected
PCM/DTS bitstreams and the converted AC-3 RF
Dolby Digital signal. Other AC-3 RF to Dolby Digital
decoders may not make this switch automatically.
Connect the laserdisc’s AC3-RF output to the DT-1’s AC-3 RF input. Connect either the laserdisc player’s PCM
coaxial or optical digital output (not both) to the DT-1’s c oaxial or optical input. Connect the DT -1’s c oaxial output
to the desired coaxial digital input on your A/V System Controller.
Digital Outputs -
Connect to a digital recorder (CD-R,
minidisc, DAT, per sonal computer, etc.) This signal is
the same as the incoming digital signal from the
selected source. If your digital recorder has both
optical and coaxial inputs you need only connect one.
Optical digital output
to digital recorder
DIGITAL OUTPUTS
OPTICAL
3.5mm
COAX
The A/V System Controller conver ts optical to coaxial
and coaxial to optical. You can connect one digital
recorder to the optical output and another recorder to
V3
3.5mm
COAX INPUT
3.5 mm digital output
to digital recorder
the coaxial. The coaxial connector is a 3.5 m m type for
direct connection to a personal computer. You will
need an adapter to connect the 3.5mm type to a
standard RCA type coaxial input
12
p/n 12698 Rev. 9808B
Page 15
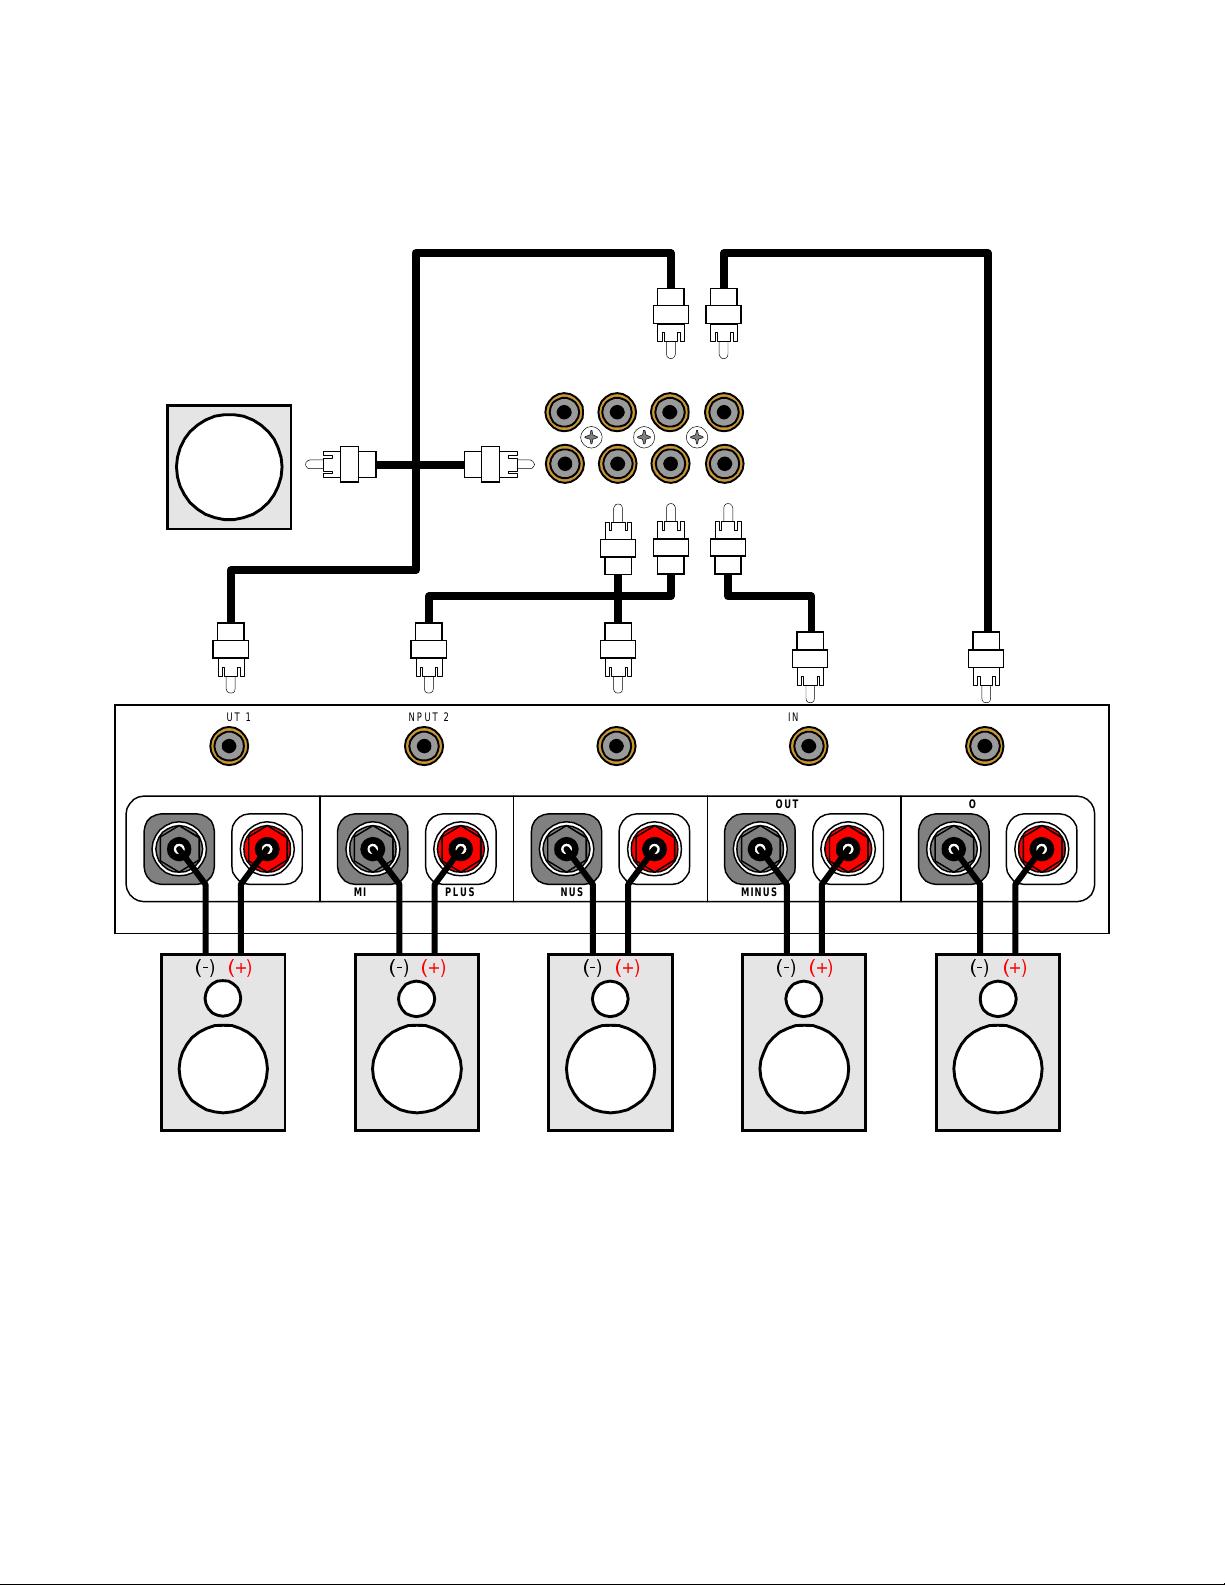
SURROUND OUTPUT CONNECTIONS
y
)
y
y
y
Connect the A/V System Controller’s surround outputs to your external amplifier(s) or powered speakers.
Here is a typical A/V System Controller output setup
POWERED
SUBWOOFER
INPUT 2 INPUT 5INPUT 3INPUT 1 INPUT 4
SUB 1 CENTER 1 REAR L FRONT L
SUB 2 CENTER 2 REAR R FRONT R
Power Amplifier
:
SURROUND OUTPUTS
OUTPUT 3OUTPUT 1 OUTPUT 2
OUTPUT 4
OUTPUT 5
PLUS
MINUS
Rear Left Rear Right Center Front Right Front Left
Subwoofer Output -
the surround outputs
Connect an RCA cable from one of the A/V S
. You may connect a second subwoofer to the other SUB output if desired. If your subwoofer
does not contain its own amplifier
A/V S
speaker output to
stem Controller’s SUB output to the audio input of the external am plifier. Connect the external amplif ier’s
our subwoofer.
PLUSMINUS
PLUSMINUS
PLUSMINUS
PLUSMINUS
stem Controller’s two SUB outputs (part of
ou will need to purchase an external B&K or other power amplifier. Connect the
13
p/n 12698 Rev. 9808B
Page 16
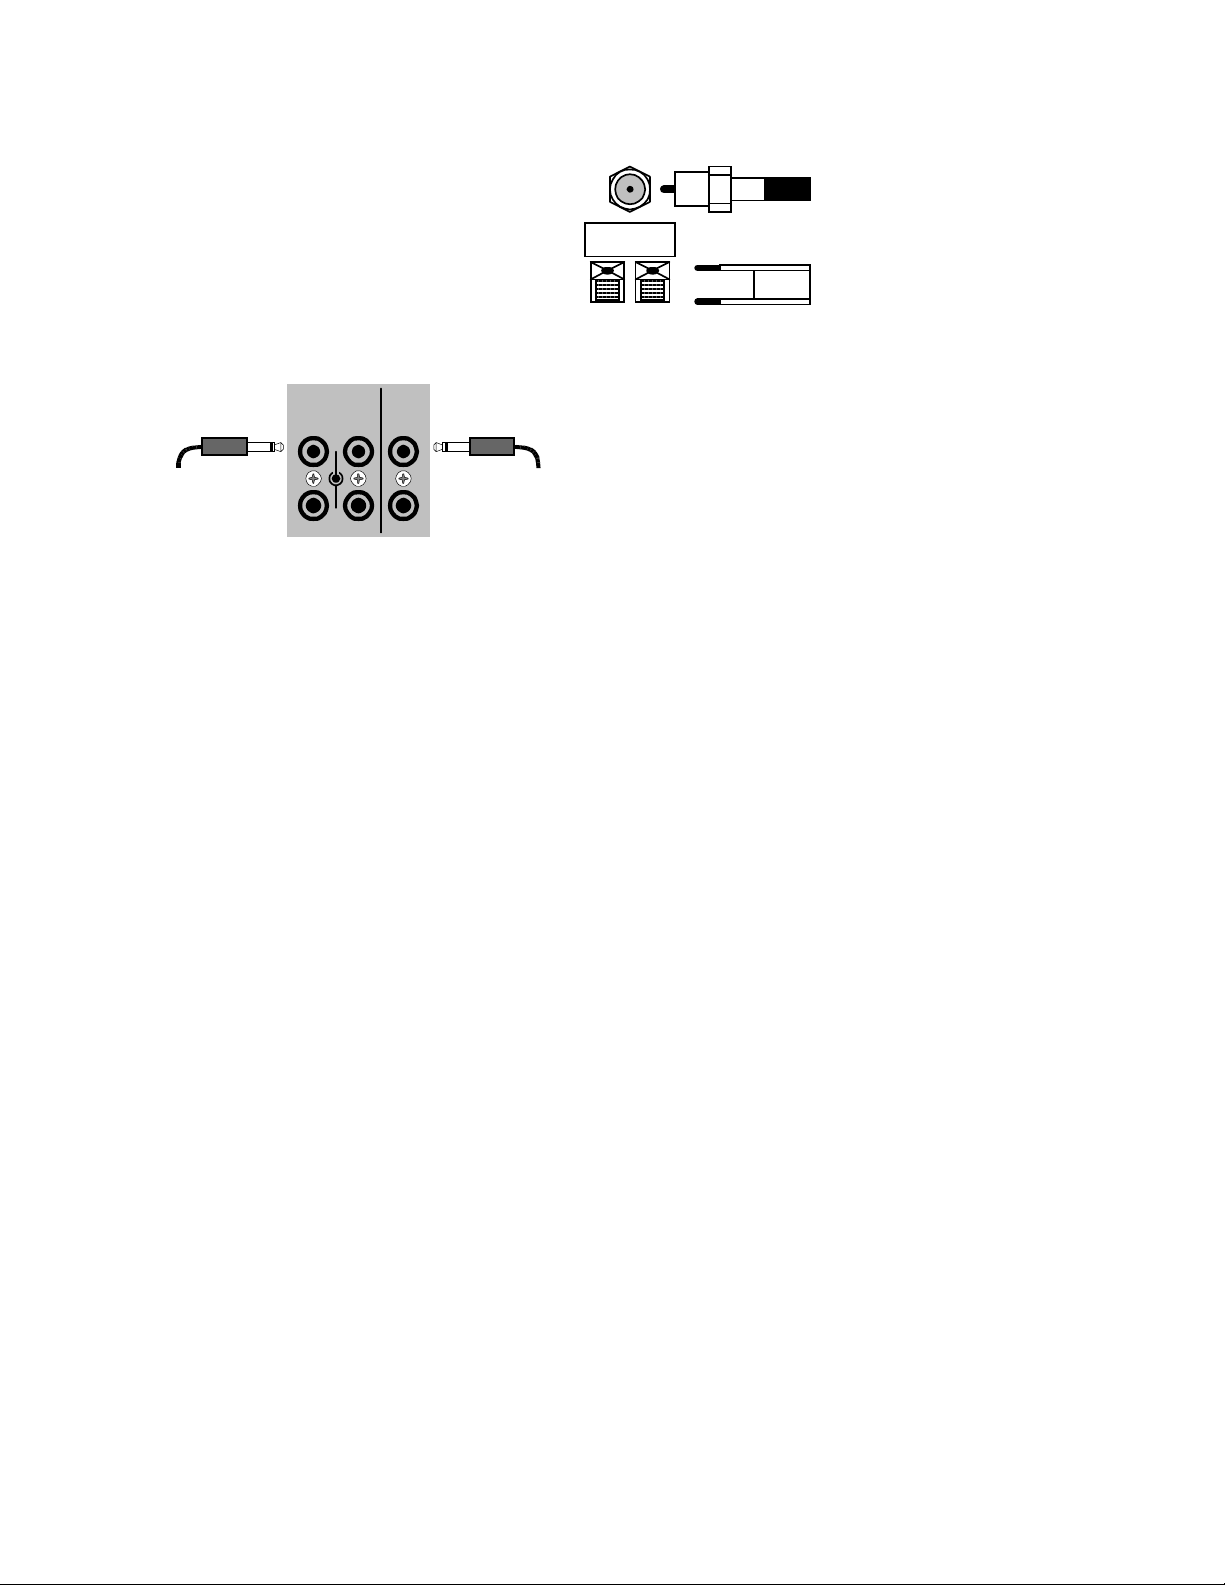
ANTENNA CONNECTIONS
The FM jack is a standard screw on F-type
connector. The AM is a push type. Strip ¼ inch of
insulation off your AM antenna wires and insert one
wire end into each hole while holding the tabs
down. Release the tabs to lock in the AM antenna
wires.
CONTROL OUTPUTS / IR INPUTS
TUNER
FM antenna
AM antenna
FM Antenna Input
from Indoor/Outdoor Antenna,
Cable Box, etc.
AM Antenna Input
from Loop Antenna
CONTROL OUT
12
+12VDC
50mA
IR IN
Z1
CAUTION!
Control Outputs -
controlling other equipment such as an external B&K
Components, Ltd. amplifier, projection screen, etc.
These connections are used for
Connect your control cable to the A/V System
3.5 mm control output
to amplifier, etc.
34
Z2
3.5 mm IR in
from remote repeater
Controller using a mono 3.5 mm jack shown at left.
The plug must be wired as tip ( +) and the long barrel
section (-).
The Control outputs are programm able for each sour ce in your system (see “Advanced Setup”). However, the A/V
System Controller provides the following factory preprogrammed setup that should serve for most standard
system applications.
Control 1
- HEADPHONE - On (+12 VDC) when zone 1 is on and not in Headphone mode, of f when zone 1 is off
or in Headphone Mode. This mode m ay be used for controlling exter nal am plifier s or powered subwoof ers in zone
1.
Control 2
- ZONE 2. On (+12 VDC) when zone 2 is on, off ( 0 VDC) when zone 2 is off. This mode is us ed for
controlling external amplifiers, projection screens, etc. in zone 2.
Control 3
- Z1 + Z2. On (+12 VDC) when zone 1, zone 2, or both zones are turned on. Off (0 VDC) when both
zones are off.
Control 4
-REMOTE. It will repeat a received 38 kH z modulated IR s ignal. The A/V System Controller will transmit
received IR signals even in sleep mode.
Note - The control outputs can output a maxim um of 50 m A. Check to see that the source you are connecting to
the control out requires 50 mA or less current.
WARNING - Not all manufacturers adhere to the +12 VDC control specification. Check to see if your
sources control inputs are +12 VDC compatible. Do not connect your A/V System Controller’s control
outputs to a source with control or remote inputs rated at +5 VDC or other voltage rating. Damage to your
source may result.
IR Inputs -
Your A/V System Controller can be controlled by a directly connected IR repeater system in
combination with or in place of the supplied remote control. Connect your IR input cable to the A/V System
Controller using a mono 3.5 mm jack shown above. The plug m ust be wired as tip (+) and the long barrel section
(-). The inputs are standard 38kHz modulated IR type with a voltage range of +5 to +12 VDC.
14
p/n 12698 Rev. 9808B
Page 17

FREQUENTLY ASKED QUESTIONS
My collection of equipment differs from the labels on the back of my A/V System Controller, how can I hook them
up?
Your A/V System Controller provides 5 identical sets of inputs - V1, V2, DVD, CD, and SAT. Each of these has
analog audio, composite video, S-video, coaxial digital audio, and optical digital audio. It is convenient to connect
components as labeled on the back of your A/V System Controller, but since all the inputs are identical, you can connect any
compatible source to any set of inputs. For example, you can connect a DAT player to V1 instead of a VCR. You can program
your A/V System Controller to display any 5 character name for any input (see SETUP - SOURCE NAMES).
The sixth input, TV-V3, is identical to the others except that the optical digital input is replaced by a 3.5 mm coaxial
for simple connection to portable equipment or personal computers. You can also connect portables to any other coaxial
digital input using adapters or special cables. If you have a source with only optical digital output don’t connect it to TV-V3.
The seventh input, TAPE, has analog audio, composite video and S-video, but has no digital inputs. It is primarily
intended for analog recorders such as VCRs or cassette decks. If you have a three-head cassette or reel-to-reel tape deck
you will prefer the TAPE input since it allows a full tape monitor capability. Tape monitor allows you to listen to what is actually
on the tape as you are recording it. The V2 input also provides full tape monitor capabilities for zone 2. If you don’t use zone 2
you can use V2 as a second independent analog tape monitor loop. V1 includes a line level output but does not provide a true
tape monitor capability.
My DVD player (or other source) has both optical and coaxial digital outputs. Should I connect both?
No, connect only one digital cable per source. (See also next question.)
Do I need an AC-3 RF demodulator (B&K DT-1 or equivalent) to playback Dolby Digital
DVDs?
No, this is required only for Dolby Digital (AC-3) laserdiscs.
Do I need an AC-3 RF demodulator (B&K DT-1 or equivalent) to playback DTS laserdiscs?
No, this is required only for Dolby Digital (AC-3) laserdiscs.
Do I need to connect both analog and digital audio from my DVD player (or other digital audio source) to the A/V
System Controller?
In general, it is simpler to connect both. However, if you can meet all of the following criteria you need only connect
digital:
I do not use zone 2. (Zone 2 is analog only - if you use zone 2 you must connect both left and right analog to hear audio.)
1.
I do not own any old laserdiscs. (Early laserdiscs contained only analog audio tracks - you must connect both left and
2.
right analog audio to play these back.)
I do not use Tape Monitor. (It is possible to tape digital-only sources. However, if you wish to listen directly to the tape as
3.
you are recording - you must connect both left and right analog audio - the tape monitor loops are strictly analog.)
If the tape monitor loop is strictly analog, how do I make an analog recording of a digital-only source?
Do not select TAPE. Select the source you wish to record. Select STEREO Lt Rt mode. If that source is digital, the
converted digital-to-analog will appear at the tape and V1 outputs. V2 out, like Z2 out, is analog only. (See also Operation Source Selection and Operation - Surround Mode.)
I want to make direct digital recordings from my CD player (or other digital source) on my DAT (or other digital
recorder). Can my A/V System Controller make this connection for me?
Yes, your A/V System Controller’s digital outputs act much like the analog tape outputs. When you select a source, if
that source has a digital connection to your A/V System Controller, then that digital signal will appear on the A/V System
Controller’s coaxial and optical digital outputs. Simply connect all of your sources digital outputs to your A/V System
Controllers digital inputs. You can then connect up to two digital recorder inputs to your A/V System Controller’s two digital
outputs.
My laserdisc player (or other digital source) has only optical output, but my CD recorder (or other digital recorder)
has only coaxial input. Do I need some sort of converter to make direct digital recordings?
No, your A/V System Controller will convert optical to coaxial and coaxial to optical. The currently selected digital
input (optical or
coaxial) will appear at both of the A/V System Controller’s digital outputs (optical and coaxial).
15
p/n 12698 Rev. 9808B
Page 18

Do I need to connect both analog and digital audio from my A/V System Controller to my CD, DAT, MD, etc. recorder?
In general, yes. If all of the sources you wish to record are digital, then you need only connect digital to your
recorder. However, your A/V System Controller does not provide digital outputs for non-digital inputs. If you wish make a
digital recording from an analog-only source you must also connect analog from your A/V System Controller (Tape or V1 out)
to your recorder.
Can I connect a phonograph directly to my A/V System Controller?
No, you will need a separate outboard phono preamplifier. The output of the phone preamp can then be connected
to any analog input on your A/V System Controller. There are several high-quality outboard phono preamps available. Talk to
the dealer where you purchased your A/V System Controller.
Do I need to connect both S-video and composite video to my A/V System Controller?
If all of your video equipment has S-video then you need only connect S-video. S-video is a higher quality video
format and you will probably not want to use composite. If all or most of your video equipment is composite then it is simplest
to just connect the composite and omit S-video.
Can I connect mixed composite and S-video sources?
Yes, but your A/V System Controller will not convert S-video to composite or composite to S-video. If your monitors
and VCRs accept only composite video then there is no point in connecting S-video from other sources. If you use mixed
S-video and composite sources you must connect both
change your monitor or VCR S-video / composite inputs manually when you change sources. This can normally be done via
the monitor’s or VCR’s remote control (or the supplied universal remote). Some monitors or VCRs may require you to
physically disconnect S-video before they will accept composite video. Some monitors are capable of automatic switching
between S-video and composite, but this may not work correctly using your A/V System Controller’s Z1 output. Refer to your
monitor or VCR manual.
S-video and composite to your monitors and VCRs. You will need to
To assist you, the A/V System Controller’s on-screen display will tell you what video is currently selected whenever
you change sources or hit the SEL (remote) or ENTER (remote or front panel) key, but it cannot switch your monitor or VCR
input for you. Note that if the currently selected source is S-video and your monitor is switched to composite, you will see a
black-and-white picture on your monitor. If the currently selected source is composite and your monitor is set to S-video, you
will see a grainy color picture.
Can I connect mixed composite and S-video monitors and VCRs?
Yes, but you must connect both S-video and composite from all of your sources - your A/V System Controller will not
convert between S-video and composite. Refer to the previous question if not all of your sources have both S-video and
composite outputs.
For example, it is common to have an S-video monitor and a composite VCR. Connect the monitor to the Zone 1
S-video output and the VCR to the V1 or TAPE composite output. The composite inputs will appear at the composite outputs
for TAPE and V1. (The S-video inputs also appear at the TAPE and V1 S-video outputs, but, in this example, they are not
connected.) To prevent feedback, TAPE IN will not appear on TAPE OUT and V1 IN will not appear on V1 OUT - this also
applies to the audio outputs. Zone 2 works the same for Z2 OUT and V2 OUT with feedback prevention on V2.
Things get a bit more complicated for the Zone 1 output because it contains your A/V System Controller’s internal
on-screen display system. You must be sure that you tell your A/V System Controller which type of monitor you have in Zone
1 (see the following SETUP procedures). For the above example, connect your monitor to the Zone 1 S-video output and set
the Zone 1 monitor type to S-video in the SETUP procedure The S-video inputs will appear at he Zone 1 S-video outputs
along with your A/V System Controller’s on-screen display. Note that, for the example, to view the tape made on the
composite VCR you will need to switch your monitor to composite - see the previous question.
16
p/n 12698 Rev. 9808B
Page 19

SETUP
For best results, perf orm the following set up pr ocedure when you initially install your A/V System Controller and
anytime you change or add sources, speakers, etc. or when you rearrange your listening area
THE MENU SYSTEM
Setup of your A/V System Controller will require you to navigate through the menu system. W e recomm end that
you use a video monitor connected to the zone 1 output along with the remote control provided with your A/V
System Controller. It is also poss ible to set up your A/V System Controller from the f ront panel. Do not leave your
video monitor on with the A/V System Controller in the menu system for long periods of time. This c an result in
permanently burning the menu dis play into your monitor’s screen. This would take sever al hours so there is no
danger of it happening during normal setup pr ocedures. T he following are general ins tructions f or using the m enu
system. A complete guide to the menu system is included at the back of this manual.
MENU
- If you are not already in the menu system, the MENU button will activate the menu system. Once you are
in the menu system, the MENU button will return you to the next higher level menu or , if you are already at the
highest level, it will exit from the menu system.
UP/DOWN ARROWS
menu selection. The currently active menu line is highlighted in a contrasting color.
SEL (remote) or ENT ER (remote or front panel)
Use the UP/DOW N ARROWS to move to the des ired menu line. Pressing SEL or ENTER will activate the nex t
menu.
NUMERIC KEYS (remote only)
corresponding line number . If there is another menu below that line it will be activated immediately (no ENTER
required).
LEFT/RIGHT ARROWS (remote) or VOLUME KNOB (front panel)
one of the A/V System Controller settings. Use the UP/DOWN ARROWS to move to the desired menu line.
Pressing the LEFT/RIGHT ARROW S will change the setting. There are no LEFT/RIG HT ARROWS on the front
panel. While in the menu system , the VOLUME KNOB acts as the LEFT/RIGHT ARROW S. This m eans that you
will not be able to adjust the volume from the f r ont panel while in the menu system. The remote c ontr ol volume will
work in most menus.
TEXT EDITING
current (blinking) charac ter. Use the LEFT/RIGHT ARROW S (or VOLUME KNOB) to m ove to another character
position.
HELP SCREENS -
also provided at the bottom of every menu. The MAIN MENU also provides a PRODUCT INFO RMATION screen
that provides basic information on your A/V System Controller. These screens will automatically scroll through
each line.
- Once you are in the menu system, us e the UP/DOW N ARROW S to move to the desired
- Some menu selections caus e another menu to be activated.
- From the remote control you may also go directly to a menu line by typing the
- Some m enu s elec tions allow you to change
- some m enu selections will require you to edit text. Use the UP/DOWN ARROWS to change the
The MAIN MENU provides a HELP GUIDE that summarizes these instructions. Specific help is
UNIVERSAL REMOTE
controls the selected device. T o return control to your A/V System Controller, you must press AUDIO.
check that your remote is set to AUDIO before attempting to control your A/V System Controller. AUDIO
will be displayed in the remotes LCD window.
- Remember that when you press a source button (DVD, CD, etc.) the remote now
ALWAYS
17
p/n 12698 Rev. 9808B
Page 20

USER PREFERENCE SETUP
You should always perform USER PREFERENCE SETUP after first installing your A/V System Controller and
after adding/changing sources or video monitors. Be sure your main power is switched on from the front panel. For
correct zone 1 video operation it is im portant that you perform the first step - DISPLAY OPTIONS - Z1 VIDEO
MONITOR. Other USER PREFERENCE setups are less important - the factory setting will work fine for most
users. Feel free to skip to SETUP/CONFIGURE after setting your Z1 monitor type.
1 Help / Navigate
2 Product Information
3 Zone 2 Operation
4 Edit Preset Title
5 User Preferences
6 Setup / Configure
↑ ↓
SEL
MENU
8VHU 3UHIHUHQFHV
AUD or POWER1
MENU2
3
(PAUSE) or
SEL or ENTER4
Display Options
This menu allows you to setup various aspects of your video and front panel displays.
MAIN MENU
(STOP)
move to new line
select menu page
exit menu system
A
SLEEP
MENU
∧ (UP) or ∨ (DOWN)
(ENTER)
↵
USER PREFERENCE SETUP
1 Edit Preset Options
2 Edit Source Names
3 Display options
4 Surround Modes
↑ ↓
SEL
MENU
ActionFrom Front PanelFrom Remote
turn on A/V System Controller
activate menu system
move to User Preferences
activate USER PREFERENCE SETUP
move to new line
select menu page
previous page
(',7 237,216
1
(PAUSE) or
SEL or ENTER2
USER PREFERENCE SETUP
1 Edit Preset Options
2 Edit Source Names
3 Display Options
4 Surround Modes
↑ ↓
SEL
MENU
move to new line
select menu page
previous page
(',7 237,216
(STOP)
∧ (UP) or ∨ (DOWN)
(ENTER)
↵
DISPLAY OPTIONS
1 Background Color Red
2 Overlay Opaque Bright
3 Front Display Bright
4 Z1 Video Monitor Composite
5 Z1 Tuner Video last
6 Z2 Tuner Video last
↑ ↓
←→
MENU
ActionFrom Front PanelFrom Remote
move to Display Options
activate DISPLAY OPTIONS
18
move to new line
adjust parameter
previous page
',63/$< 5('
p/n 12698 Rev. 9808B
Page 21

Set your Zone 1 video monitor type - You should do this first so that you will get the best possible display while
performing the rest of the setup procedure.
DISPLAY OPTIONS
1 Background Color Red
2 Overlay Opaque Bright
3 Front Display Bright
4 Z1 Video Monitor Composite
5 Z1 Tuner Video last
6 Z2 Tuner Video last
↑ ↓
←→
MENU
021,725 &20326
1
(PAUSE) or
2
(REW) or(FF)
If you have a composite-only monitor or pref er to use composite video set this to COMPOSIT E. If you have an
S-video monitor and will be using S-video sourc es set this to S-VIDEO. The S-VIDEO setting allows for mix ed
composite and S-video sources.
In COMPOSITE mode your A/V System Controller will send only composite video to your zone 1 monitor. If your
A/V System Controller detects no composite video on the currently selected source it will send its internal
composite background screen to the monitor.
In S-VIDEO mode, your A/V System Controller will look f or S-video on the s elected s ource. If it f inds S-video it will
send it to your Z1 monitor. If it finds no S- video but does find c ompos ite video it will send com posite video to your
monitor. It is up to you to set your monitor accordingly. If it finds no video it will send its internal background screen
to your monitor. If S-video was previously detected on the current source, then the background screen will be
S-video. If compos ite was previously detected then the background screen will be com posite. Setting Z1 VIDEO
MONITOR to COMPOSITE then back to S-VIDEO temporarily resets all inputs to S-video. If your monitor is
capable of both composite and S- video, make sure that its setting m atches the setting you have chosen for the
A/V System Controller. After making this setting you should have a sharp, color picture on your zone 1 monitor.
(STOP)
∧ (UP) or ∨ (DOWN)
move to new line
adjust parameter
previous page
ActionFrom Front PanelFrom Remote
move to Z1 Video Monitor
change monitor setting Composite or S-VideoVOLUME KNOB
Set the background color for your on-screen display menus -
DISPLAY OPTIONS
1 Background Color Red
2 Overlay Opaque Bright
3 Front Display Bright
4 Z1 Video Monitor Composite
5 Z1 Tuner Video last
6 Z2 Tuner Video last
move to new line
adjust parameter
previous page
',63/$< 5('
19
1
(PAUSE) or
2
(REW) or(FF)
(STOP)
↑ ↓
←→
MENU
∧ (UP) or ∨ (DOWN)
ActionFrom Front PanelFrom Remote
move to Background Color
change Background ColorVOLUME KNOB
p/n 12698 Rev. 9808B
Page 22

Set the intensity of on-screen video overlays - Overlays will appear when you change a A/V System Controller
setting or your A/V System Controller detects a change in the incoming audio or video inform ation. Transparent
mode allows video to be seen behind the overlay.
DISPLAY OPTIONS
1 Background Color Red
2 Overlay Opaque Bright
3 Front Display Bright
4 Z1 Video Monitor Composite
5 Z1 Tuner Video last
6 Z2 Tuner Video last
↑ ↓
←→
MENU
29(5/$< 23 %5,*+7
1
(PAUSE) or
2
(REW) or(FF)
Set the intensity of the front panel display or turn it off -
(STOP)
∧ (UP) or ∨ (DOWN)
1 Background Color Red
2 Overlay Opaque Bright
3 Front Display Bright
4 Z1 Video Monitor Composite
5 Z1 Tuner Video last
6 Z2 Tuner Video last
move to new line
adjust parameter
previous page
DISPLAY OPTIONS
ActionFrom Front PanelFrom Remote
move to Overlay
change Overlay TypeVOLUME KNOB
1
(PAUSE) or
2
(REW) or(FF)
(STOP)
↑ ↓
←→
MENU
∧ (UP) or ∨ (DOWN)
move to new line
adjust parameter
previous page
',63/$< %5,*+7
20
ActionFrom Front PanelFrom Remote
move to Front Display
change Display BrightnessVOLUME KNOB
p/n 12698 Rev. 9808B
Page 23
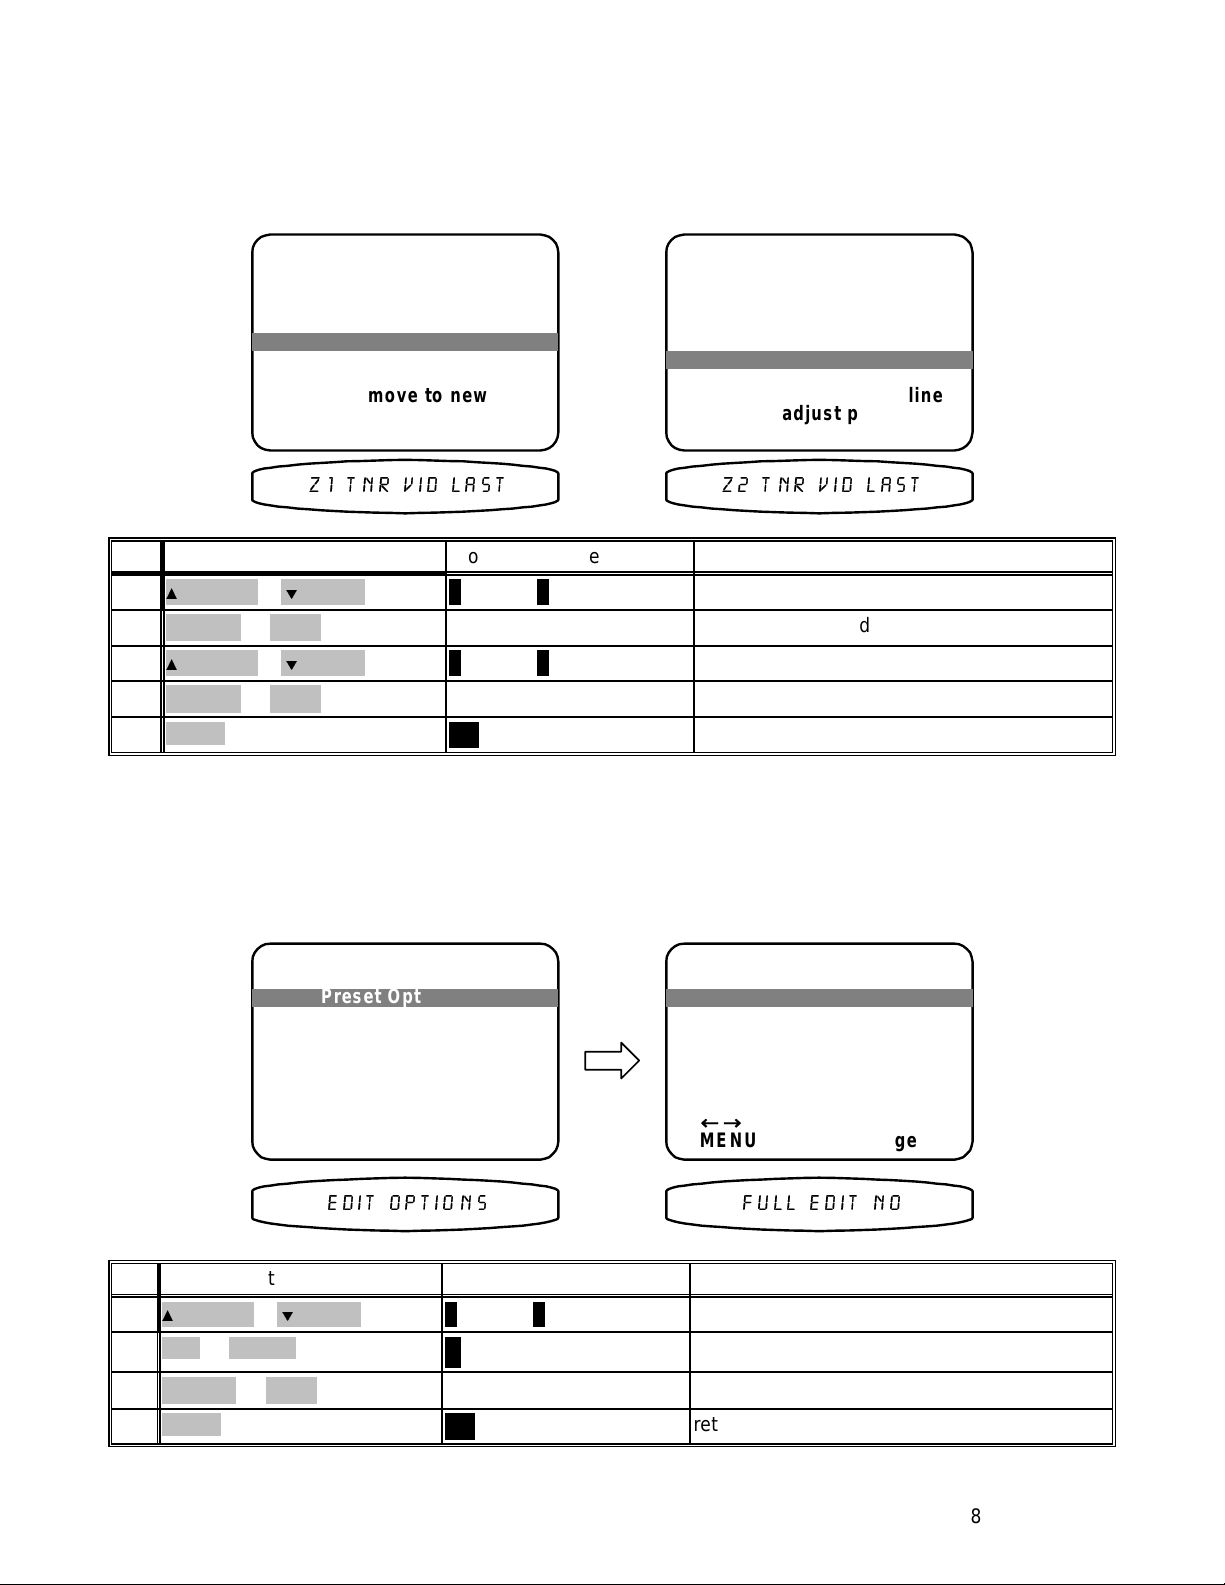
Set the tuner video - This allows you to view a TV/FM simulcast or watch a network sports broadcast while
listening to your local radio announcer. You can set any of the seven external sources. You can also choose “last”.
In “last” mode the tuner video will be from whatever source you watched before switching to TUNER. The final
choice for tuner video is off. In zone 1 “off” will cause the background color to be displayed. Zone 2 has no
on-screen display capability so off is truly off.
1 Background Color Red
2 Overlay Opaque Bright
3 Front Display Bright
4 Z1 Video Monitor Composite
5 Z1 Tuner Video last
6 Z2 Tuner Video last
1
(PAUSE) or
2
(REW) or(FF)
3
(PAUSE) or
4
(REW) or(FF)
MENU5
Edit Preset Options
DISPLAY OPTIONS
↑ ↓
←→
MENU
= 715 9,' /$67
(STOP)
(STOP)
move to new line
adjust parameter
previous page
∧ (UP) or ∨ (DOWN)
∧ (UP) or ∨ (DOWN)
MENU
DISPLAY OPTIONS
1 Background Color Red
2 Overlay Opaque Bright
3 Front Display Bright
4 Z1 Video Monitor Composite
5 Z1 Tuner Video last
6 Z2 Tuner Video last
↑ ↓
←→
MENU
= 715 9,' /$67
ActionFrom Front PanelFrom Remote
move to Z1 Tuner Video
select Z1 Tuner VideoVOLUME KNOB
move to Z2 Tuner Video
select Z2 Tuner VideoVOLUME KNOB
return to USER PREFERENCE SETUP
move to new line
adjust parameter
previous page
This menu allows you to configur e your EDIT PRESET menu (see OPERAT ION - PRESETS) to allow changing
only the preset title (as you are used to if you have used older B&K equipment) or a more versatile mode that
allows for directly editing comm on preset inf orm ation from the EDIT PRESET m enu. Check that you are in USER
PREFERENCE SETUP and that the remote is in AUDIO mode.
EDIT PRESET OPTIONS
Full Edit Preset No
←→
MENU
ActionFrom Front PanelFrom Remote
move to Edit Preset Options
activate EDIT PRESET OPTIONS
choose optionVOLUME KNOB
return to USER PREFERENCE SETUP
adjust parameter
previous page
)8// (',7 12
1
(PAUSE) or
SEL or ENTER2
3
(REW) or(FF)
MENU4
USER PREFERENCE SETUP
1 Edit Preset Options
2 Edit Source Names
3 Display options
4 Surround Modes
↑ ↓
SEL
MENU
(STOP)
move to new line
select menu page
previous page
(',7 237,216
∧ (UP) or ∨ (DOWN)
(ENTER)
↵
MENU
21
p/n 12698 Rev. 9808B
Page 24

Edit Source Name
From the factory, your A/V System Controller will display source nam es that match those printed on the rear of the
A/V System Controller and on the supplied remote. However, this menu allows you to change the displayed names
to match the actual sources used. If you do not want to change the names then sk ip this step. Note that the tuner
name cannot be changed. Check that you are in USER PREFERENCE SETUP and that the rem ote is in AUDIO
mode.
1
(PAUSE) or
SEL or ENTER2
desired
source3
AUDIO4
5
(PAUSE) or
6
(REW) or(FF)
repeat 5 - 67
repeat 3 - 78
MENU9
USER PREFERENCE SETUP
1 Edit Preset Options
2 Edit Source Names
3 Display options
4 Surround Modes
↑ ↓
SEL
MENU
(',7 6285&( 1$0(
(STOP)
(STOP)
move to new line
select menu page
previous page
∧
(UP) or ∨ (DOWN)
↵
(ENTER)
(SOURCE) step to source
(UP) or ∨ (DOWN)
∧
MENU
EDIT SOURCE NAME
DEFAULT USER
V1 VC R
Using AV system controller
select source to rename
AUD to select control
↑ ↓
←→
MENU
change character
change position
previous page
9 9&5
ActionFrom Front PanelFrom Remote
move to Edit Source Names
activate EDIT SOURCE NAME
select source to rename
return control to A/V System Controller
change blinking character
move to new character positionVOLUME KNOB
continue changing charactersrepeat 5 - 6
rename more sourcesrepeat 3 - 7
return to USER PREFERENCE SETUP
Surround Mode Operation
This menu allows you to set the level of autom ation your A/V System Controller will apply in choosing a surr ound
mode and mak e a special setup f or stereo listening. Chec k that you are in USER PREFERENCE SETUP and that
the remote is in AUDIO mode.
Set Surround Operation - Most users wll prefer the factory setting - AUTOMATIC. In this mode the A/V System
Controller automatically sets the surround mode to f ull 5.1 channel operation (or as many as permitted by your
speaker setup) whenever a Dolby Digital or DTS bitstream is detected regardless of what surround
mode you
have selected. For example, load your CD changer with a normal PCM CD, a DTS CD, and another normal PCM
CD and set the surround mode to 3- STEREO. While the PCM CD is playing you will get sound from the front and
center speakers only. When the disc changes to the DTS CD you will get sound from front, center, and rear. When
the third (PCM) CD starts the A/V System Controller returns to 3-STEREO. Note that if a Dolby Digital or DTS
source is currently playing and you change the surround mode the A/V System Controller will stay in the selected
surround mode until you change to another disc. In MANUAL mode the chosen surround mode remains set
regardless of the
bitstream detec ted. In the above example only the front and center s peakers would be used on
all three CDs even though the DTS CD was capable of providing full 5 channel sound. Note that the rear channel
information is not lost. It is simply mixed into the front speakers.
22
p/n 12698 Rev. 9808B
Page 25

USER PREFERENCE SETUP
1 Edit Preset Options
2 Edit Source Names
3 Display Options
4 Surround Modes
↑ ↓
SEL
MENU
select menu page
move to new line
previous page
SURROUND MODE OPERATION
1 Surround Operation Auto
Dolby Digital / DTS 5.1
overrides MODE setting
2 Stereo Operation Normal
STEREO MODE is Digital
Front L/R speaker size
from speaker setup menu
↑ ↓
←→
MENU
move to new line
adjust parameter
previous page
6855281' 02'(6
6855281' $872
ActionFrom Front PanelFrom Remote
1
(PAUSE) or
(STOP)
SEL or ENTER2
3
(PAUSE) or
4
(REW) or(FF)
(STOP)
Set Stereo Operation -
(UP) or ∨ (DOWN)
∧
(ENTER)
↵
(UP) or ∨ (DOWN)
∧
Most users wll prefer the fac tory setting - NORMAL. In this m ode, the settings you will
move to Surround Modes
activate SURROUND MODE OPERATION
move to Surround Operation
choose desired modeVOLUME KNOB
enter in the following speaker s etup apply to the STEREO surround mode as well as all the other m odes. Users
with large front speakers m ay wish to use them with a subwoofer for movies to k eep the extrem e bass contained
in some movies out of their front speakers. However, they may wish to use their front speakers as full range
speakers when listening to stereo m usic material. If this is your case then set STEREO OPERAT ION to LARGE.
We do not recommend using the LARGE setting if you use small, satellite or bookshelf speakers as the bass
information even in stereo m usic may damage the speakers at high volum e levels. Some users m ay prefer the
sound of their source’s (or separate) digital to analog converter over the converter contained in the A/V System
Controller but still wish to use the A/V System Controller ’s converter for Dolby Digital and DTS m aterial. If this is
your case then set STEREO OPERATION to DIRECT. Make sure you have made both analog and digital
connections from your source. In this m ode when you choose STEREO your A/V System Controller will ignore the
digital inputs. Note that direct mode also bypasses bass managem ent so that you get the purest possible sound
from your outboard equipment. This m eans that, lik e LARGE m ode, you should not use DIRECT mode with sm all,
satellite or bookshelf speakers.
1
(PAUSE) or
2
(REW) or(FF)
MENU3
MENU4
(STOP)
SURROUND MODE OPERATION
1 Surround Operation Auto
Dolby Digital / DTS 5.1
overrides MODE setting
2 Stereo Operation Normal
STEREO MODE is Digital
Front L/R speaker size
from speaker setup menu
↑ ↓
←→
MENU
move to new line
adjust parameter
previous page
67(5(2 1250$/
ActionFrom Front PanelFrom Remote
(UP) or ∨ (DOWN)
∧
move to Stereo Operation
choose desired modeVOLUME KNOB
MENU
MENU
return to USER PREFERENCE SETUP
return to MAIN MENU
23
p/n 12698 Rev. 9808B
Page 26

SETUP/CONFIGURE
You should always perform Setup/Configure after first installing your A/V System Controller and after
adding/changing speakers or sources or rearranging your listening area. If you have just completed the USER
PREFERENCE SETUP above you are already in the MAIN MENU. If not, follow the instructions above to get to
the MAIN MENU. Check that the remote is in AUDIO mode.
↑ ↓
SEL
MENU
MAIN MENU
move to new line
select menu page
exit menu system
6(783
1 Help / Navigate
2 Product Information
3 Zone 2 Operation
4 Edit Preset Title
5 User Preferences
6 Setup / Configure
1 Speaker Size and Delay
2 Speaker Calibration
3 Source Levels
4 AM Tuner Channels
5 FM Tuner Channels
SETUP MENUS
↑ ↓
SEL
MENU
move to new line
select menu page
previous page
63($.(5 6(783
ActionFrom Front PanelFrom Remote
1
(PAUSE) or
SEL or ENTER2
(STOP)
(UP) or ∨ (DOWN)
∧
(ENTER)
↵
move to Setup/Configure
activate SETUP MENUS
Speaker Size and Delay
The speaker size and delay menu lets you tell your A/V System Controller how many speakers you have in your
system, the relative size of the speakers, and their placement in the room. This is the most important setup
procedure you will perform. The A/V System Controller comes f rom the factory setup for 5 small speak ers and a
subwoofer. If this does not matc h your speakers then audio inform ation will be lost. For example, if you do not
currently have a center channel speaker and you do not perform this setup procedure, the center channel
information will be lost. If you perform this setup correctly, the A/V System Controller will know that you have no
center channel speaker and send this inf orm ation to your front left and right speak ers (along with the normal f ront
left and right information) so no audio information is lost.
About Speaker Size
- Speaker size literally refers to the size of your speakers. Audio m aterial, particularly Dolby
Digital and DTS movies, often contain large am ounts of bass. If this bass information is sent to sm all speakers
that are incapable of reproducing so m uch bass, then the bass inform ation will be lost or distorted. MANY SMALL
SPEAKERS MAY BE DAMAGED BY TOO MUCH BASS. By telling your A/V System Controller the size of your
speakers, it will be able to intelligently route the bass to speakers that can reproduce it correctly. Typically, all
bookshelf or satellite speak ers are considered small. Smaller floor s tanding speakers with single woofers 8” or
less should also be considered small. Floor standing speakers with 10” or larger woofers or multiple smaller
woofers may be considered large. These are general guidelines only - if you are unsure consult your speaker
manufacturer. If you have all small speakers we strongly recommend use of a subwoofer. If your front left and right
speakers (or more) are large then you may not require a subwoofer, but you may still get better res ults using a
subwoofer, especially with Dolby Digital and DTS movies.
24
p/n 12698 Rev. 9808B
Page 27

Set The size for your front left/right speakers - OFF is not a choice - you must have front speakers.
1
3
4
Small
Large
(PAUSE) or
SEL or ENTER2
(PAUSE) or
(REW) or(FF)
SETUP MENUS
1 Speaker Size and Delay
2 Speaker Calibration
3 Source Levels
4 AM Tuner Channels
5 FM Tuner Channels
move to new line
select menu page
previous page
63($.(5 6(783
(STOP)
(STOP)
↑ ↓
SEL
MENU
Front Bass to Subwoofer
Front Hi-Pass to Front
Front Full Range to Front
SPEAKER SIZE SETUP
1 Front L/R
2 Center
3 Rear L/R
4 Subwoofer
5 LFE
6 Center Delay
7 Rear Delay
↑ ↓
←→
MENU
)URQW /5 60$//
(UP) or ∨ (DOWN)
∧
(ENTER)
↵
(UP) or ∨ (DOWN)
∧
Front Bass to Subwoofer
Front Hi-Pass to Front
Small
Small
Small
Yes
Normal
0 ms
move to new line
adjust parameter
previous page
0 ms
ActionFrom Front PanelFrom Remote
move to Speaker Size and Delay
activate SPEAKER SIZE SETUP
move to Front L / R
choose speaker sizeVOLUME KNOB
Subwoofer OffSubwoofer OnSubwoofer UltraFront L / R setting
Front Bass is Lost
Front Hi-Pass to Front
Front Full Range to FrontFront Full Range to FrontFront Bass to Subwoofer
Set the size for your center speaker -
1
(PAUSE) or
2
(REW) or(FF)
(STOP))
(UP) or ∨ (DOWN)
∧
setting
Off
Small
Center Bass to Sub
Center Hi-Pass to Front
Center Bass to Sub
Center Hi-Pass to Center
Center Hi-Pass to Front
Center Hi-Pass to Center
Large
Center Full to Center
SPEAKER SIZE SETUP
1 Front L/R
2 Center
3 Rear L/R
4 Subwoofer
5 LFE
6 Center Delay
7 Rear Delay
↑ ↓
←→
MENU
move to new line
adjust parameter
previous page
&(17(5 60$//
Subwoofer OnSubwoofer UltraCenter
Center Bass to Sub
Small
Small
Small
Yes
Normal
0 ms
0 ms
ActionFrom Front PanelFrom Remote
move to Center
choose speaker sizeVOLUME KNOB
Subwoofer Off
Front Large
Center Full to FrontCenter Bass to Sub
Center Bass to Front
Center Hi-Pass to Center
Subwoofer Off
Front Small
Center Bass is Lost
Center Hi-Pass to Front
Center Bass is Lost
Center Hi-Pass to
Center
Center Full to CenterCenter Full to CenterCenter Full to CenterCenter Bass to Sub
25
p/n 12698 Rev. 9808B
Page 28

Set the size for your rear left/right speakers -
SPEAKER SIZE SETUP
1 Front L/R
2 Center
3 Rear L/R
4 Subwoofer
5 LFE
6 Center Delay
7 Rear Delay
↑ ↓
←→
MENU
1
(PAUSE) or
2
(REW) or(FF)
(STOP)
(UP) or ∨ (DOWN)
∧
Small
Small
Small
Yes
Normal
0 ms
move to new line
adjust parameter
previous page
5($5 /5 60$//
0 ms
ActionFrom Front PanelFrom Remote
move to Rear L / R
choose speaker sizeVOLUME KNOB
setting
Off
Rear Bass to Sub
Rear Hi-Pass to Front
Small
Rear Bass to Subwoofer
Rear Hi-Pass to Rear
Large
Rear Full to Rear
Setup your subwoofer -
Subwoofer OnSubwoofer UltraRear
Rear Hi-Pass to Front
Rear Bass to Sub
Rear Hi-Pass to Rear
SPEAKER SIZE SETUP
1 Front L/R
2 Center
3 Rear L/R
4 Subwoofer
5 LFE
6 Center Delay
7 Rear Delay
↑ ↓
←→
MENU
move to new line
adjust parameter
previous page
68%:22)(5 <(6
Subwoofer Off
Front Large
Rear Full to FrontRear Bass to Subwoofer
Rear Bass to Front
Rear Hi-Pass to Rear
Small
Small
Small
Yes
Normal
0 ms
0 ms
ActionFrom Front PanelFrom Remote
Subwoofer Off
Front Small
Rear Bass is Lost
Rear Hi-Pass to Front
Rear Bass is Lost
Rear Hi-Pass to Rear
Rear Full to RearRear Full to RearRear Full to RearRear Bass to Sub
1
(PAUSE) or
2
(REW) or(FF)
(STOP)
(UP) or ∨ (DOWN)
∧
move to Subwoofer
choose subwoofer settingVOLUME KNOB
Front SmallFront LargeSubwoofer Setting
LFE is LostLFE to Front SpeakersOff
LFE to SubwooferLFE to SubwooferOn or Ultra
Note: The subwoofer setting affects the routing of front, center, and rear bass information as shown previous ly.
This table shows the effect of the subwoofer setting for the LFE channel only.
26
p/n 12698 Rev. 9808B
Page 29

Setup your LFE channel - Usually this will be set to NORMAL. However, if you prefer less LFE you can reduce
the level or completely turn off the LFE channel. Note that this affec ts only the separate LFE channel available on
Dolby Digital and DTS material it has no effect on the reproduction of normal bass from the front, center, or rear
channels. If you have no subwoofer you may wish to reduce or turn off the LFE channel to reduce its contribution
to the bass going to your front speakers.
SPEAKER SIZE SETUP
1 Front L/R
2 Center
3 Rear L/R
4 Subwoofer
5 LFE
6 Center Delay
7 Rear Delay
↑ ↓
←→
MENU
move to new line
adjust parameter
previous page
/)( 1250$/
Small
Small
Small
Yes
Normal
0 ms
0 ms
ActionFrom Front PanelFrom Remote
1
(PAUSE) or
2
(REW) or(FF)
(STOP)
(UP) or ∨ (DOWN)
∧
move to LFE
choose LFE settingVOLUME KNOB
Set your delays for speaker placement - Ideally your front and center speakers will be the same distance away
from your listening area. If this is the case leave the Center Delay set to 0. However, physical limitations
sometimes require placing the center speaker closer than the front left and right speakers. The center delay
setting electronically “moves” the center speaker back into alignment with the front speakers. Measure the
distance in feet to your front speakers and to your center speaker. Subtract the center distance from the front
distance. Use this num ber for your delay setting (1 foot is roughly equal to 1 ms). If the result is negative s et the
delay to zero. If the result is greater than 5 feet set the delay to 5 ms.
Ideally your front and rear speakers will be the same dist ance away from your listening ar ea. If this is the case
leave the Rear Delay set to 0. However, physical limitations often require placing the rear speakers c loser than the
front speakers. T he rear delay setting electronically “moves” the rear speak ers back into alignment with the front
speakers. Measure the distance in feet to your front speakers and to your rear speakers. Subtract the rear
distance from the front dis tance. Use this number for your delay setting (1 foot is roughly equal to 1 ms). If the
result is negative set the delay to zero. If the result is greater than 15 feet set the delay to 15 ms.
1
(PAUSE) or
2
(REW) or(FF)
3
(PAUSE) or
4
(REW) or(FF)
SPEAKER SIZE SETUP
1 Front L/R
2 Center
3 Rear L/R
4 Subwoofer
5 LFE
6 Center Delay
7 Rear Delay
↑ ↓
←→
MENU
(STOP)
(STOP)
move to new line
adjust parameter
previous page
&75 '(/$< 06
Small
Small
Small
Yes
Normal
0 ms
0 ms
∧ (UP) or ∨ (DOWN)
∧ (UP) or ∨ (DOWN)
MENUMENU5
27
SPEAKER SIZE SETUP
1 Front L/R
2 Center
3 Rear L/R
4 Subwoofer
5 LFE
6 Center Delay
7 Rear Delay
↑ ↓
←→
MENU
move to new line
adjust parameter
previous page
5($5 '(/$< PV
ActionFrom Front PanelFrom Remote
move to Center Delay
adjust Center DelayVOLUME KNOB
move to Rear Delay
adjust Rear DelayVOLUME KNOB
return to SETUP MENUS
Small
Small
Small
Yes
Normal
0 ms
0 ms
p/n 12698 Rev. 9808B
Page 30

Speaker Calibration
Speaker calibration allows you to equalize the volume levels of each speaker to make up for differences in
speaker characteris tics and distances from the listener to the speaker s. For best results it is important that you
perform this calibration when you initially install your A/V System Controller, whenever you change speak ers, and
whenever you rearrange your listening area. You may use a Sound Press ure Level (SPL) meter to perf orm this
calibration or just use your ears. If you do it by ear you may wish to go through the speakers several times. Sit or
place the SPL meter in your normal listening spot. Chec k that you are in the SETUP MENUS and that your remote
is in AUDIO mode. Note that if you have turned a speak er OFF in the SPEAKER SIZE SET UP m enu then you will
not be able to select that speaker in the SPEAKER CALIBRAT ION menu. Also note that the VO L on the remote
will not function in this menu.
1
(PAUSE) or
SEL or ENTER2
3
(PAUSE) or
4
(REW) or(FF)
5
(PAUSE) or
6
(REW) or(FF)
SETUP MENUS
1 Speaker Size and Delay
2 Speaker Calibration
3 Source Levels
4 AM Tuner Channels
5 FM Tuner Channels
↑ ↓
SEL
MENU
63.5 &DOLEUDWLRQ
(STOP)
(STOP)
(STOP)
move to new line
select menu page
previous page
(UP) or ∨ (DOWN)
∧
(ENTER)
↵
(UP) or ∨ (DOWN)
∧
(UP) or ∨ (DOWN)
∧
MENUMENU8
SPEAKER CALIBRATION
1 Left
2 Center
3 Right
4 Right Rear
5 Left Rear
6 Subwoofer
↑ ↓
←→
MENU
move to new line
adjust level
previous page
/HIW GE
0.0 dB
0.0 dB
0.0 dB
0.0 dB
0.0 dB
0.0 dB
ActionFrom Front PanelFrom Remote
move to Speaker Calibration
activate SPEAKER CALIBRATION
move to Left
adjust left level to a convenient reference levelVOLUME KNOB
move to Center
adjust center level to match leftVOLUME KNOB
repeat until all levels matchrepeat 5-6 for each speakerrepeat 5-6 for each speaker7
return to SETUP MENUS
28
p/n 12698 Rev. 9808B
Page 31

Source Levels
This setup allows you to match the levels of your sources so that there are no large changes in volume as you
change from one s ourc e to another . T his is f or your convenience only and need not be performed unless you wish
to. You may use a SPL meter or your ear to adjust the levels. Note that the levels will depend not only on this
setting but also on the source material being played back. You may wish to use a test disc. Mak e sure you are in
the SETUP MENUS and your remote is in AUDIO mode.
1
(PAUSE) or
SEL or ENTER2
AUDIO4
5
(REW) or(FF)
repeat 3 - 56
SETUP MENUS
1 Speaker Size and Delay
2 Speaker Calibration
3 Source Levels
4 AM Tuner Channels
5 FM Tuner Channels
move to new line
select menu page
previous page
6285&( /(9(/6
∧ (UP) or ∨ (DOWN)
(STOP)
↑ ↓
SEL
MENU
↵ (ENTER)
(SOURCE) step to sourcedesired source3
MENUMENU7
SOURCE LEVEL
DEFAULT USER LEVEL
V1 VCR 0.0 dB
Using AV system controller
select source to rename
AUD to select control
←→
MENU
change position
previous page
9 9&5 GE
ActionFrom Front PanelFrom Remote
move to Source Levels
activate SOURCE LEVEL
select source to adjust
return control to A/V System Controller
adjust source levelVOLUME KNOB
adjust more sourcesrepeat 3 - 5
return to SETUP MENUS
AM Tuner Settings
This set up allows you to preset up to 20 AM tuner channels for f ast access. This is f or your convenience only and
need not be performed unless you wish to.
Manual Tuning - Quick presses of LEFT /RIGHT or turn and release of the VOLUME KNO B will cause tuning in
single 10 kHz steps. (9kHz steps for European version.)
Seek Tuning - Holding LEFT/RIGHT or VOLUME will cause the tuner to SEEK (tune up or down automatically
stopping on strong stations). Once the tuner has star ted seek ing you can let go of the button/knob. Onc e a station
is found you must
let go of the button/knob before you can change frequencies again. In strong signal areas the
tuner may stop one step above or below the tr ue f requency. Unless you are sur e of the station’s f requency, check
to see that the signal might be better one step above or below the fr equency that SEEK has found. In weak signal
areas the tuner may continue to seek all the way to the end of the band. T o s top this s imply press the ARROW ( or
turn the VOLUME KNOB) in the opposite direction.
29
p/n 12698 Rev. 9808B
Page 32

SETUP MENUS
1 Speaker Size and Delay
2 Speaker Calibration
3 Source Levels
4 AM Tuner Channels
5 FM Tuner Channels
↑ ↓
SEL
MENU
move to new line
select menu page
previous page
AM TUNER SETTINGS
AM 550 Channel 0
↑ ↓
←→
MENU
change channel
change frequency
previous page
$0 781(5 6(783
$0 &K
ActionFrom Front PanelFrom Remote
1
(PAUSE) or
SEL or ENTER2
3
(PAUSE) or
4
(REW) or(FF)
repeat 3 - 45
(STOP)
(STOP)
(UP) or ∨ (DOWN)
∧
(ENTER)
↵
(UP) or ∨ (DOWN)
∧
MENUMENU6
move to AM Tuner Channels
activate AM TUNER SETTINGS
select channel for programming
adjust frequencyVOLUME KNOB
program more channelsrepeat 3 - 4
return to SETUP MENUS
FM Tuner Settings
This set up allows you to preset up to 20 FM tuner channels for fast access. This is for your convenience only and
need not be performed unless you wish to. Refer to Manual / Seek tuning for AM Tuner above
Stereo/Mono
- Programming a channel to Stereo will play the channel in stereo if it is broadcast in s tereo or in
mono otherwise. Programming a channel to Mono will force the channel to m ono regardless of the broadcast. Us e
mono to reduce background noise on weak channels
SETUP MENUS
1 Speaker Size and Delay
2 Speaker Calibration
3 Source Levels
4 AM Tuner Channels
5 FM Tuner Channels
↑ ↓
SEL
MENU
move to new line
select menu page
previous page
.
FM TUNER SETTINGS
FM Stereo 103.3 Channel 15
SEL mono / stereo
↑ ↓
←→
MENU
change channel
change frequency
previous page
1
(PAUSE) or
SEL or ENTER2
3
(PAUSE) or
4
(REW) or(FF)
SEL or ENTER5
repeat 3 - 66
(STOP)
(STOP)
)0 781(5 6(783
(UP) or ∨ (DOWN)
∧
(ENTER)
↵
(UP) or ∨ (DOWN)
∧
(ENTER)
↵
MENUMENU7
MENUMENU8
MENUMENU9
30
)0 67 &K
ActionFrom Front PanelFrom Remote
move to FM Tuner Channels
activate FM TUNER SETTINGS
select channel for programming
adjust frequencyVOLUME KNOB
set Stereo/Mono
program more channelsrepeat 3 - 6
return to SETUP MENUS
return to MAIN MENU
return to normal operation
p/n 12698 Rev. 9808B
Page 33

OPERATION
The following outlines the norm al day-to-day operation of your A/V System Controller from the supplied univers al
remote or directly from your A/V System Controller’s front panel. The universal remote is also capable of
controlling other equipment and stor ing sequences of com monly used commands . Refer to the separate remote
manual for details on these functions.
POWER ON/OFF
The main power switch on the front panel of your A/V System Controller m ust be on f or the A/V System Contr oller
to operate. When this switch is off all power is rem oved from your A/V System Controller. This prevents turning it
back on with the remote control. You can use the main power switch for normal day to day operation but we
suggest you use the sleep function instead so that the A/V System Controller can be turned on and off from the
remote. After turning on the main power you must wait a few seconds while your A/V System Controller restores
its internal memory. You may want to turn off the main power switch when your A/V System Controller will be idle
for extended periods of time or during periods of power line fluctuations. Your A/V System Controller will not lose
its memory while the main power switch is off.
Powering Up -- Please Wait
BK
3/($6( :$,7
ActionFrom Front PanelFrom Remote
main power on/offPOWER ON/OFFcan’t turn off main power from remote
SLEEP
Normally you will simply put your A/V System Controller to sleep (standby) when not in use. Sleep mode k eeps a
bare minimum of f unctions r unning in order to allow remote control operation and f ast star t up. Note that the f ront
panel SLEEP button is lit while your A/V System Controller is as leep and is of f when your A/V System Controller is
operating. Also note that the remote POWER button will not toggle your A/V System Controller in and out of sleep.
You must use OFF.
BK Components
Version 1.01
Reference 20
BK Components
BK
Pwrd by Motorola
%. &20321(176
A
A
ActionFrom Front PanelFrom Remote
SLEEPAUD or POWER1
SLEEPOFF2
31
wake up A/V System Controller
put A/V System Controller to sleep (standby)
p/n 12698 Rev. 9808B
Page 34

CHOOSING A SOURCE
g
g
g
In general, the selected source will appear at the ZO NE 1 output, the TAPE output, and the V1 output. T o prevent
feedback, TAPE input will not appear at TAPE output and V1 input will not appear at V1 output.
DVD Source Composite Video
DVD PCM 2.0 Pro Lo
(SOURCE) step to sourcedesired source
Note: if your source has separate ON and OFF control lik e your A/V System Controller, pres s ing the sour c e button
will also turn on that source. If not, you will have to hit POWER while the remote is still set to the desired source.
TAPE MONITOR -
use TAPE MONITOR, which allows you to hear exactly what is on the tape as you are recording.
desired
TAPE
Note: The tape monitor loop only allows recording of analog inputs. If you simply choose the source you wish to
tape without
analog inputs.
source
then selecting TAPE MONITOR then you can make analog recordings of digital inputs as well as
If you have an analog three-head cassette or reel-to-reel analog tape r ec order you may wish to
Tape Source S-Video
Analo
2.0 Pro Logic
(SOURCE) step to source
(SOURCE) step quickly to TAPE
ic
ActionFrom Front PanelFrom Remote
select desired source - remote now controls source
return control to A/V System Controller if desiredAUDIO
'9' 352 /2*,&
7$3( 352 /2*,&
ActionFrom Front PanelFrom Remote
select desired source or TUNER
source will appear on TAPE and V1 outs
wait a few seconds while A/V System Controller
analyzes selected source
select TAPE monitor
TAPE will appear on Z1 out
TUNER OPERATION
FM St 96.9 Composite Video
Ch 10 Pro Lo
(SOURCE) step to AM or FMAUDIO1
TUNER2
BAND3
4
CHAN
TUNE+ or TUNE-5
SEL or ENTER6
Note: the front panel VOLUME KNOB controls frequency for a few seconds after changing tuner channel.
SEL or ENTER will control stereo/mono selection for a few seconds after changing channel or frequency.
∧ or
CHAN
∧ (UP) or ∨ (DOWN)
∨
↵ (ENTER)
ic
32
)0 67 &+
ActionFrom Front PanelFrom Remote
make sure remote is in AUDIO mode
select TUNER
select AM or FM
change to another channel
see AM/FM TUNER SETTING for SEEK/TUNE
manually tune frequency VOLUME KNOB
set FM stereo/mono
p/n 12698 Rev. 9808B
Page 35

ADJUSTING THE VOLUME
g
g
g
g
g
g
MASTER LEVEL
Master Volume 0 dB
ActionFrom Front PanelFrom Remote
∧
or
VOL
MUTE
Note: The front panel VOLUME KNOB is used to control m ultiple functions and, therefore, c annot always control
the volume. MASTER LEVEL will li
VOLUME KNOB never controls volume in the menu system. Dur in
switch to controllin
∨
will always chan
VOL
menus.
VOL
∨
can’t do from front panel
ht to let you know when the VOLUME KNOB will control volume. The
other functions but will return to MASTER LEVEL af ter a f ew sec onds . T he r emote’s VOL
e master volume level except in the SPEAKER CALIBRATION and SOURCE LEVEL
adjust volumeVOLUME KNOB
instant volume all the way down
press
92/80( '%
MUTE again to restore
normal operation the VOLUME KNOB may
MASTER LEVEL
∧
or
TEMPORARY LEVEL ADJUSTMENTS
Occasionally you may find that a you can’t hear the dialog very well in a particular movie, or a movie has too much
bass, etc. You can temporar ily adjust the center, rear , and subwoofer settin
s you made in the SPEAKER CALIBRATION setup.
settin
CENTER LEVEL
s without changing the permanent
Center Volume 0 dB
∠ (LEVEL) step to CENTER LEVEL
CENTER or CENTER
REAR or REAR
SUB or SUB
DELAY
(REW) or(FF)
Note: your A/V System Controller remembers a set of temporary adjustments for each source. If, for some reason,
you wanted to adjust CENTER LEVEL for all sources you would need to select each source and adjust it
individually. Also note that these settings are tem porary and will be lost when you put your A/V System Controller
to sleep or turn off the main power.
or DELAY
then use VOLUME KNOB
∠ (LEVEL) step to REAR LEVEL
then use VOLUME KNOB
∠ (LEVEL) step to SUB LEVEL
then use VOLUME KNOB
can’t adjust from front panel
&(17(5 '%
ActionFrom Front PanelFrom Remote
adjust center volume
adjust rear volume
adjust subwoofer volume
adjust rear delaycan’t adjust from front panel
adjust balance Note: only in STEREO
mode
CENTER LEVEL
33
p/n 12698 Rev. 9808B
Page 36

SURROUND MODES
Your A/V System Controller provides a number of listening modes. The following table shows how your A/V
System Controller responds to the chos en surround mode setting f or various types of source m aterial. The table
assumes five full range s peakers plus a subwoofer. If your speaker c onfiguration is different f rom this m ake sure
you have performed the set up proc edures descr ibed previously. When the setup is c orrectly performed your A/V
System Controller will automatically route audio to fewer/smaller speak ers with no loss of inform ation. If you wish
to temporarily reduce the number of speakers you are using do not repeat the setup procedure - simply choose
the appropriate surround mode.
Mono
Stereo
Pro Logic
Dolby Digital 2.0
Dolby Digital 2.0
(Stereo)
Dolby Digital 5.1
DTS 5.1
Surround
3 Stereo
Hall
3 Stereo
Stereo
Hall
Stereo
F/R
Stereo
Stereo
Lt Rt
M L R LF C RF
M
M LF+LR C RF+RR
M M LF+C RF+C
M M
M M
M M
L-M M R-M
L-R L-R
L-M M R-M
L-R L-R
L-M M R-M
L R
L-R L-R
L R
L R
L R
L RM M
L-M M R-M
L-R L-R
L-M M R-M
L R
L-R L-R
L R
L R
L R
L R
LR LFE RR
LF C RF
LR LFE RR
LFE
LR LFE RR
LF+C+LR RF+C+RR
LF+C+LR
LF+C+LR RF+C+RR
LF+C+LFE
+(LR+RR)
LFE
LFE
RF+C+RR
RF+C+LFE
-(LR+RR)
Headphone
M - mono, same information on both channels of analog, PCM, or Dolby Digital 2.0 bitstream
L - left channel of stereo information of analog, PCM, or Dolby Digital 2.0 bitstream
R - right channel of stereo information of analog, PCM, or Dolby Digital 2.0 bitstream
LF - left front channel of a Dolby Digital 5.1 or DTS 5.1 bitstream
C - center channel of a Dolby Digital 5.1 or DTS 5.1 bitstream
RF - right front channel of a Dolby Digital 5.1 or DTS 5.1 bitstream
RR - right rear channel of a Dolby Digital 5.1 or DTS 5.1 bitstream
LR - left rear channel of a Dolby Digital 5.1 or DTS 5.1 bitstream
LF E - low frequency effects channel of a Dolby Digital 5.1 or DTS 5.1 bitstream
M M
L R
L R
34
LF+C+LR
+LFE
RF+C+RR
+LFE
p/n 12698 Rev. 9808B
Page 37

Surround Modes (cont.)
g
DVD Source Composite Video
DVD PCM 2.0 Pro Lo
MODE
Note: your A/V System Controller keeps track of a surround mode for each of the sources. It would be possible, for
example, to have your DVD player set to SURROUND while your CD player is set to STEREO. All you need to do
is change sources and the surround mode you last used for that source will be recalled. HEADPHONE mode,
unlike the other surround m odes, applies to all sources. This allows you to change sourc es while remaining in
HEADPHONE mode. When you leave HEADPHONE mode, each s our ce will retur n to the SURROUND mode that
was previously active for that source.
Why do I need all these modes?
Many people will be happy leaving their A/V System Controller in SURROUND mode all the time. Your A/V System
Controller will automatically switch back and forth between Dolby Pro Logic, Dolby Digital and DTS (Reference 20
only). Stereo material will be played back with Pro Logic decoding. ProLogic’s extraction of mono information to
the center channel works just as well on stereo (non-ProLogic encoded) material and may provide improved
imaging, especially when sitting away from the “sweet spot” in the center of your speaker s. Only Dolby Pro Logic
encoded 2-channel material has true r ear speak er infor m ation. However, ProLogic’s r ear speak er pr ocess ing m ay
provide a pleasing ambiance ef fect on m any stereo (non-ProLogic) soundtrack s. You can turn off center channel
processing by using STEREO HALL mode, you can turn off rear channel processing by using 3 STEREO mode, or
you can turn off both center and rear processing by using STEREO mode.
STEREO F/R (F
for all their stereo lis tening. It m ay also be useful when you have a large group where it is dif ficult to put everyone
near the optimum listening position.
ront/Rear) mode puts you in the orchestra instead of in front of it. Som e people prefer this mode
(MODE)
ic
ActionFrom Front PanelFrom Remote
step to desired mode
'9' 352 /2*,&
STEREO Lt Rt (R
sources including Dolby Digital and DTS. Your tape outputs contain the sam e audio information as your left and
right front speaker outputs. If you make a tape in a normal listening m ode such as SURROUND then the center
and rear information will not appear on the tape. Sinc e the c enter channel c ontains m uch of the dialog f or m ovies ,
the tape will be almost useless . ST EREO Lt Rt m ode allows you to mak e a tape with little loss of infor m ation. You
can’t directly make an analog tape of Dolby Digital 5.1 or DTS 5.1, but STEREO Lt Rt will produc e a Dolby Pro
Logic compatible tape from 5.1 sources that will preserve much of the surround information. Note that Dolby
Digital will not mix LFE to the tape.
WARNING: in order to make STEREO Lt Rt recordings with full range audio, it is necessary to override
the bass management processing in your A/V System Controller. This means that full range audio
(including LFE for DTS) will also be sent to your front left and right speakers. If you have small front
speakers we strongly suggest you turn the volume down or ev en mute the volume w hile making ST EREO
Lt Rt recordings. Otherwise you can damage your speakers. T he volume or mute setting does not ef fect
the level from the TAPE and V1 outputs.
HEADPHONE mode is identical to STEREO mode except that the internal amplifiers in your A/V System
Controller are turned off. Also, some of the CONTROL outputs may also be turned off (typically CONTROL OUT
1) depending on how your A/V System Controller has been set up (s ee ADVANCED FEATURES), allowing you to
turn off any external amplifiers or powered subwoofers with compatible CONTROL inputs.
WARNING: in order to provide full range audio to your headphones, it is necessary to override the bass
management processing in your A/V System Controller. This is not a problem if you are using the internal
amplifiers in your A/V System Controller since they will be turned off. However, if you are using external
amplifiers or powered speakers with no CONT RO L OU T capability th en full range audio ( including LFE f or
DTS) will also be sent to your front left and right speakers. If you have small front speakers we strongly
suggest you manually turn off your external amplifiers or powered speakers before
HEADPHONE mode. Otherwise you can damage your speakers.
ight total Left total) is provided for making Pro Logic compatible analog recordings from all
switching to
35
p/n 12698 Rev. 9808B
Page 38
OVERRIDES
(
)
Some laserdiscs contain the normal movie soundtrack on the PCM, AC-3 RF or DTS digital soundtrack along with
supplemental inform ation on the laserdisc ’s analog track . Your A/V System Controller will automatically select the
digital track if one is available. In order to reach the analog track we have provided an analog override to force the
A/V System Controller to ignore the digital soundtrack . Note that your laserdisc player norm ally puts out converted
digital soundtracks on its analog output. You will also need to adjust your laserdisc player to get the analog track.
Refer to your laserdisc manual. The override is not limited to laserdisc. It can be used with any source anytime you
wish to hear the analog input rather than the digital.
Warning
PCM tracks resulting in a loud noise on the source’s analog outputs. If you’re not sure, turn your A/V
System Controller’s volume down before engaging the analog override. This warning does not apply to
DVD players. All DVD players can properly interpret Dolby Digital tracks. Currently available DTS
compatible DVD players have no analog output when the DTS track is selected.
When DTS started to make CDs and Laserdiscs, they made the bitstream fully compatible with the PCM
standards. Unfortunately, this mak es it difficult to tell the dif ference between PCM and DT S. The result is that you
will often hear a short extraneous sound at the beginning of DTS CDs and laserdiscs while your A/V System
Controller determines that the inc oming bitstream is DTS rather than PCM. The alternative would have been to
mute the output of your A/V System Controller while making this decision, but this would have cut off the beginning
of many PCM CDs. This problem does not apply to DTS DVDs. We have provided an override to elim inate this
extraneous sound at the cost of automatic bitstream detection. If you find the extraneous s ound unacceptable,
engage the DTS override before playing your DTS disc. Rem ember that if you subsequently try to play any non
DTS material you will need to manually switch back to auto (plug and play) operation.
Dolby Digital recordings may contain passages with very large dynamic range. This normally will enhance the
Home Theater ex perience. However, it m ay not be desirable at all tim es, for ex ample, during late night listening.
Dolby Digital bitstreams allow for listening with a compressed dynamic range that reduces high level passages and
increases low level passages. T his allows the listener to hear quiet passages even at low volum e levels while at
the same time limiting the m aximum volum e of very loud passages. Note: this override is available only for Dolby
Digital recordings.
-
DTS and Dolby Digital are digital only formats. Your source may try to interpret these as normal
DVD Plug and Play ?
Press SEL to Engage Override
'9' $872 #
ActionFrom Front PanelFrom Remote
1
SEL or ENTER2
Note: your A/V System Controller remembers an over ride independently for each source. If , for som e reas on, you
wanted to set DTS or analog override for all sources you would need to select each source and override
individually. Also note that these settings are tem porary and will be lost when you put your A/V System Controller
to sleep or turn off the main power.
↵
(ENTER) then
(UP) or
∧
↵
(ENTER)
DOWN
∨
step to desired override mode or
plug and play (auto)
engage override
PRESETS
Presets allow you to save your favorite settings and rec all them instantly. Your A/V System Controller can store
two banks of 10 presets (0..9 & A0..A9) in each of 2 Zones. The s aved information includes the selected s ource,
the volume, the surround mode, the tuner station and band, and all of the temporary settings and overrides
described above. A convenient set of presets come preprogrammed with your A/V System Controller.
36
p/n 12698 Rev. 9808B
Page 39

Recalling a Preset
Preset 0 Music Video
TV-V3 Surround 0dB
Press SEL to Recall
086,& 9,'(2
ActionFrom Front PanelFrom Remote
number or A + number1
SEL or ENTER2
Saving a Preset
SAVE2
3
(PAUSE) or
(REW) or > (FF)
<
SEL or ENTER4
(PRESET) step to desired preset
↵
(ENTER)
SAVE PRESET A2
'Watch DVD/VLD'
DVD Stereo Lt Rt -14 dB
0. . A9 change preset
↑ ↓
←→
SEL save preset
MENU
$ ZDWFK GYGYOG
(STOP)
change character
change position
previous page
(UP) or ∨ (DOWN)
∧
VOLUME KNOB
(ENTER)
↵
review settings for recall
recall preset
SAVE PRESET A2
Saving Current Settings
DVD Stereo Lt Rt -14 dB
0. . A9 change preset
↑ ↓
←→
SEL save preset
MENU
6$9,1* 6(77,1*6
change character
change position
previous page
ActionFrom Front PanelFrom Remote
prepare for saving presetmake all settings you wish to savemake all settings you wish to save1
activate preset savefunction not available from front panel
rename preset if desired
save preset
Recalling/Saving Presets via the Menu System
You can also recall and save presets via your A/V System Controller’s menu s ystem from the rem ote or from the
front panel. If using the remote be sure it is in AUDIO mode, if not, press AUDIO.
ActionFrom Front PanelFrom Remote
2
(PAUSE) or
SEL or ENTER3
5
(PAUSE) or
(REW) or(FF)
6
source then AUDIO
MODE
∧ or
VOL
VOL
SEL or ENTER7
(STOP)
(STOP)
∨
MENUMENU1
∧ (UP) or ∨ (DOWN)
↵ (ENTER)
(PRESET) step to desired presetnumber or A + number4
∧ (UP) or ∨ (DOWN)
VOLUME KNOB
(SOURCE)
(MODE)
can’t adjust volume
(ENTER)
↵
activate menu system
move to Edit Preset (Titles)
activate EDIT PRESET (TITLE)
recall preset
rename preset if desired
edit preset if desired
(full preset edit must be enabled see USER PREFERENCE SETUP)
save preset if desired
edit more presetsrepeat 4 - 7repeat 4 - 78
MENUMENU9
MENUMENU10
37
return to main menu
exit menu system
p/n 12698 Rev. 9808B
Page 40

GETTING A/V SYSTEM CONTROLLER STATUS
g
g
g
g
g
If you are not in a menu, press ing ENTER will bring up a two-line status m essage. This display will also pop up
automatically whenever you change sources or whenever the sourc e inform ation changes. T he video type is very
important if you are using mixed composite and S-video sources since it will tell you how you must set your
monitor for the bes t picture. T he bitstream and c hannel inform ation is particularly impor tant with DVDs since they
may contain multiple soundtracks. When you initially start the DVD you may get a Dolby Digital 2.0 soundtrack. To
get the best possible sound, you may have to use the DVD player’s menu system to get to a Dolby Digital or DTS
5.1 channel soundtrack. If you ever need to call B&K r egarding a pr oblem with your A/V System Controller be sure
to note the status display before calling.
'9' 352 /2*,&
SEL or ENTER
The audio/video source
you have chosen
DVD Source Composite Video
DVD PCM 2.0 Pro Logic
The bitstream source
your controller has detected
The bitstream type
your controller has detected
↵
(ENTER)
your controller has detected
ActionFrom Front PanelFrom Remote
recall A/V System Controller status
The surround mode
you have chosen
The video type
your controller has detected
The number of channels
ZONE 2 OPERATION
Via the Front Panel
You can control zone 2 from your A/V System Controller’s front panel by usin
2. The front panel will now control zone 2. After a few seconds of inactivity, control will return to zone1. The
SLEEP, PRESET, ENTER, UP/DOWN ARROWS, SOURCE and VOLUME KNOBS will function exactly as for
zone 1. MENU and MODE buttons will not function in zone 2. The level button will instantly return front panel
control to zone 1.
the LEVEL button to step to ZONE
Via the Remote Control
You can set up your remote to control zone 2 instead of zone 1. Follow the instructions in the separate remote
control manual for settin
ADVANCED ZONE SETTINGS). After settin
e it back. If you use zone 2 often you may wish to purchase an additional B&K AV 5.1 system controller (or
chan
other compatible universal rem ote control) and leave it set up for zone 2. You may also wish to install a remote
repeater system to allow zone 2 control from other rooms.
Via the Menu System
You can control zone 2 from the menu system usin
instructions for zone 1 preset operation via the menu system except choos e Zone 2 Operation from MAIN MENU.
(Be sure the remote is in AUDIO mode.)
the AUDIO product ID to m atch zone 2 (product ID 2 unless you have changed it in
your remote for zone 2 it will no longer control zone 1 until you
either the front panel or zone 1 remote. Follow the
38
p/n 12698 Rev. 9808B
Page 41

ADVANCED FEATURES
WARNING -
The following describes the advanced features of the A/V System Controller. Since
changing some of these f unctions m ay cause severe eff ects such as no sound or no rem ote contr ol operation, we
suggest you leave this menu disabled (hidden) f or normal operation. If you are unsure of what you are changing
DO NOT
perform any advanced operations. These features may be activated by simultaneously pressing the
SLEEP, DOWN, and UP buttons on the front panel of the A/V System Controller.
ADVANCED SECURITY OPTIONS
Advanced Security options allow you to hide the ADVANCED SYSTEM SETUP menu to prevent inadvertent
changes to advanced system settings. This menu also allows you to lock your preset and tuner channel settings to
prevent inadvertent reprogramming
Advanced Menu Visibility -
entering MAIN MENU and selecting Setup / Configure (refer to SET UP). Advanced Systems Settings will appear
as line 6 in SETUP MENUS. Make sure your A/V System Controller is on and the remote is in AUDIO mode.
If you select Advanced Menu Visible then you can return to this menu directly by
Advanced Security Options
1 Advanced Menu Visible
2 Memory Lock No
↑ ↓
←→
MENU
$'9$1&(' 9,6,%/(
move to new line
adjust parameter
previous page
1
Function not available
from remote
2
(PAUSE) or
3
(REW) or(FF)
Memory Lock -
1
(PAUSE) or
2
(REW) or(FF)
ActionFrom Front PanelFrom Remote
A
SLEEP,
(UP) and
∧
(DOWN)
∨
enable advanced features
simultaneously
(STOP)
(UP) or ∨ (DOWN)
∧
move to Advanced Menu
set to Hidden (recommended) or VisibleVOLUME KNOB
Locking memory will prevent changing of your presets, tuner channels, and system setup.
Advanced Security Options
1 Advanced Menu Visible
2 Memory Lock No
↑ ↓
←→
MENU
move to new line
adjust parameter
previous page
0(025< /2&. 12
ADVANCED SYSTEM SETUP
1 Zone Configuration
2 Power On Titles
3 Control Out
4 Security Options
↑ ↓
MENU
move to new line
select menu pageSEL
previous page
=21( 6(783
ActionFrom Front PanelFrom Remote
(STOP)
(UP) or ∨ (DOWN)
∧
VOLUME KNOB
move to Memory Lock
No - can change memory
Yes - memory is locked
MENUMENU3
move up to ADVANCED SYSTEM SETUP
39
p/n 12698 Rev. 9808B
Page 42

ZONE CONFIGURATION
Zone Configuration will allow you to set maxim um volume levels for each zone, change rem ote control ID codes
for each zone and turn off the on-screen display overlays in zone 1. Make sure you are in the ADVANCED
SYSTEM SETUP menu and the remote is in AUDIO mode.
Z1 Max Level -
Z1 max level allows you to set a m aximum volume level for zone 1. This is very useful if you are
using speakers that can’t handle the max imum power output from your A/V System Controller or if you simply wish
to limit the volume that can be achieved using normal front panel or remote operation.
WARNING
-
If you set this level too low, the A/V System Controller may appear broken (no sound).
ADVANCED SYSTEM SETUP
1 Zone Configuration
2 Power On Titles
3 Control Out
4 Security Options
↑ ↓
MENU
move to new line
select menu pageSEL
previous page
=21( 6(783
ADVANCED ZONE SETTINGS
1 Z1 Max Level +15 dB
2 Z1 Product ID 1
3 Z1 On Screen Enabled
4 Z2 Level Control Variable
5 Z2 Max Level +15 dB
6 Z2 Product ID 2
↑ ↓
←→
MENU
move to new line
adjust parameter
previous page
= 0$; /9/
ActionFrom Front PanelFrom Remote
1
(PAUSE) or
SEL or ENTER2
3
(PAUSE) or
4
(REW) or(FF)
(STOP)
(STOP)
(UP) or ∨ (DOWN)
∧
(ENTER)
↵
(UP) or ∨ (DOWN)
∧
move to Zone Configuration
activate ADVANCED ZONE SETTINGS
move to Z1 Max Level
set desired maximum levelVOLUME KNOB
40
p/n 12698 Rev. 9808B
Page 43

Z1 / Z2 Product ID - Each message transmitted from your remote includes a Product Code, identifying the
manufacturer, and a product ID code from 1 to 16. The product ID code allows multiple B&K products to be
controlled from the sam e r em ote. Your A/V System Controller ac tually uses two product ID codes - one f or zone 1
(normally set to ID code 1) and the other for zone 2 (norm ally set to ID code 2). If you have a system with multiple
B&K products then you may wish to set the product ID codes to other values. Note that you cannot set the Z1
product ID to the sam e s etting as zone 2 or vice ver s a. If you need to set zone 1 to the c urr ent zone 2 setting then
set zone 2 to some other value first. Make sure you are in the ADVANCED ZONE SETTINGS menu and the
remote is in AUDIO mode.
WARNING - if you change the product ID code in the A/V System Controller without making the
corresponding change to the remote then the remote will no longer work. Refer to the separate remote
manual for details on changing the remote’s product ID (“device code”).
ADVANCED ZONE SETTINGS
1 Z1 Max Level +15 dB
2 Z1 Product ID 1
3 Z1 On Screen Enabled
4 Z2 Level Control Variable
5 Z2 Max Level +15 dB
6 Z2 Product ID 2
↑ ↓
←→
MENU
move to new line
adjust parameter
previous page
ADVANCED ZONE SETTINGS
1 Z1 Max Level +15 dB
2 Z1 Product ID 1
3 Z1 On Screen Enabled
4 Z2 Level Control Variable
5 Z2 Max Level +15 dB
6 Z2 Product ID 2
↑ ↓
←→
MENU
move to new line
adjust parameter
previous page
= 352' ,' = 352' ,'
ActionFrom Front PanelFrom Remote
1
(PAUSE) or
2
(REW) or(FF)
3
(PAUSE) or
4
(REW) or(FF)
(STOP)
(STOP)
(UP) or ∨ (DOWN)
∧
(UP) or ∨ (DOWN)
∧
move to Z1 Product ID
set desired product IDVOLUME KNOB
move to Z2 Product ID
set desired product IDVOLUME KNOB
Z1 On Screen - During normal operation, when you make a change to a system setting or your A/V System
Controller detects a change to the incom ing audio or video a message is overlaid along the bottom of your video
screen. You can turn off the overlay display from this menu. T his will not affect the on-screen dis plays when you
enter the menu system.
1
(PAUSE) or
2
(REW) or(FF)
(STOP)
ADVANCED ZONE SETTINGS
1 Z1 Max Level +15 dB
2 Z1 Product ID 1
3 Z1 On Screen Enabled
4 Z2 Level Control Variable
5 Z2 Max Level +15 dB
6 Z2 Product ID 2
↑ ↓
←→
MENU
(UP) or ∨ (DOWN)
∧
move to new line
adjust parameter
previous page
26' (1$%/('
41
ActionFrom Front PanelFrom Remote
move to Z1 Product On Screen
set Enabled or DisabledVOLUME KNOB
p/n 12698 Rev. 9808B
Page 44

Z2 Level Control - You may wish to install an in-wall volume control in your second zone. This can cause
confusion between your A/V System Controller’s internal zone 2 volume controls and your in-wall controls. You
can set your A/V System Controller to provide a fixed level to zone 2 instead of the variable level. The fixed level
can be used to limit the maximum volume in zone 2 but setting lower volumes must be done with the in-wall
controls.
WARNING - Setting Z2 LEVEL CONTROL to FIXED will cause your A/V System Controller to immediately
send its maximum zone 2 volume to your second zone (if zone 2 is on). Turn down your in-wall volume
controls before making this change.
ADVANCED ZONE SETTINGS
1 Z1 Max Level +15 dB
2 Z1 Product ID 1
3 Z1 On Screen Enabled
4 Z2 Level Control Variable
5 Z2 Max Level +15 dB
6 Z2 Product ID 2
↑ ↓
←→
MENU
move to new line
adjust parameter
previous page
= /(9(/ 9$5,
ActionFrom Front PanelFrom Remote
1
(PAUSE) or
2
(REW) or(FF)
(STOP)
(UP) or ∨ (DOWN)
∧
move to Z2 Level Control
set desired Z2 Level ControlVOLUME KNOB
Z2 Max (Fixed) Level - Z2 m ax level allows you to set a maximum volume level fo r zone 2. This is very useful if
you are using speakers that can’t handle the maximum power output from your external amplifier or if you simply
wish to limit the volume that can be ac hieved using normal front panel or rem ote operation. If you have chosen
zone 2 fixed level above then this setting becomes the fixed level for zone 2.
WARNING - If you set this level too low, the A/V System Controller may appear broken (no sound).
ADVANCED ZONE SETTINGS
1 Z1 Max Level +15 dB
2 Z1 Product ID 1
3 Z1 On Screen Enabled
4 Z2 Level Control Variable
5 Z2 Max Level +15 dB
6 Z2 Product ID 2
↑ ↓
←→
MENU
move to new line
adjust parameter
previous page
= 0$; /9/ = ),; /9/
or
ADVANCED ZONE SETTINGS
1 Z1 Max Level +15 dB
2 Z1 Product ID 1
3 Z1 On Screen Enabled
4 Z2 Level Control Variable
5 Z2 Fixed Level +15 dB
6 Z2 Product ID 2
↑ ↓
←→
MENU
move to new line
adjust parameter
previous page
ActionFrom Front PanelFrom Remote
1
(PAUSE) or
2
(REW) or(FF)
(STOP)
(UP) or ∨ (DOWN)
∧
MENUMENU3
move to Z2 Max (Fixed) Level
set desired Max (Fixed) LevelVOLUME KNOB
return to ADVANCED SYSTEM SETUP
42
p/n 12698 Rev. 9808B
Page 45
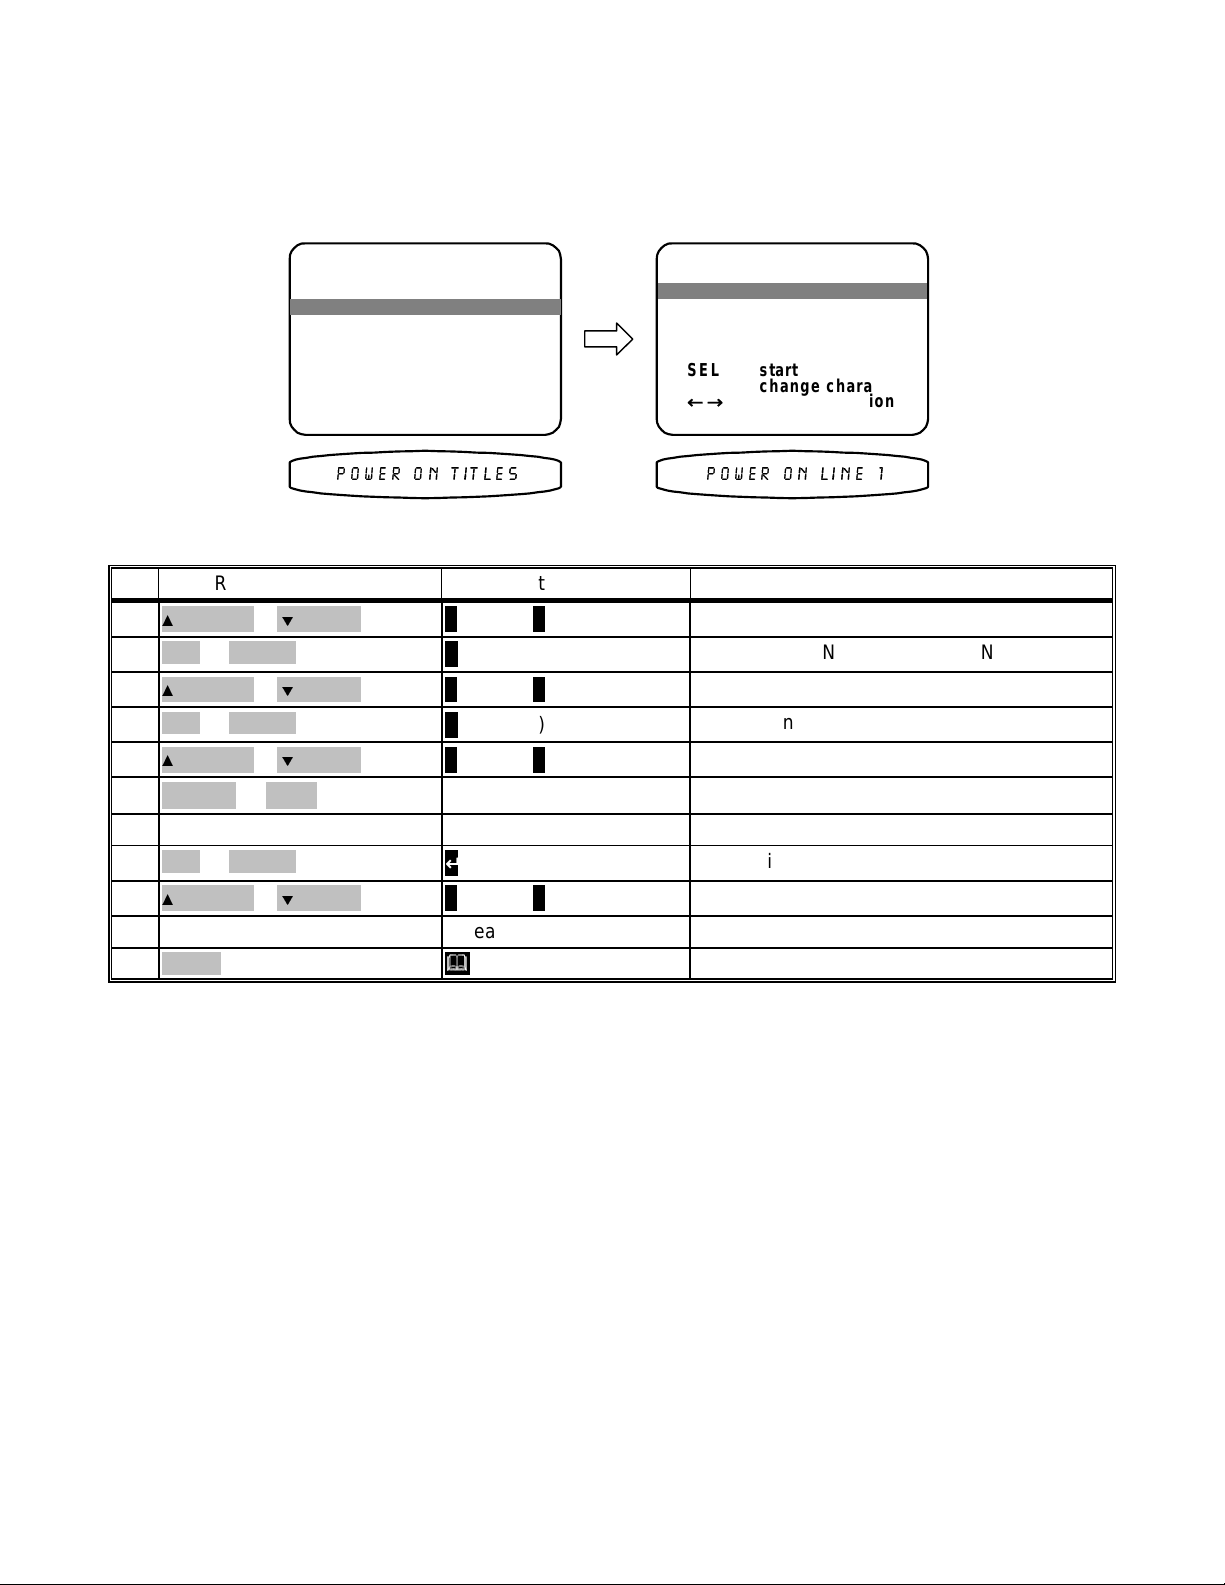
POWER ON TITLES
When you turn your A/V System Controller on it displays two lines of text. You can change this text to a
personalized message. Make sure you are in the ADVANCED SYSTEM SETUP menu and the remote is in
AUDIO mode.
1
(PAUSE) or
SEL or ENTER2
3
(PAUSE) or
SEL or ENTER4
5
(PAUSE) or
6
(REW) or(FF)
repeat 5 - 67
SEL or ENTER8
9
(PAUSE) or
repeat 4 - 810
ADVANCED SYSTEM SETUP
1 Zone Configuration
2 Power On Titles
3 Control Out
4 Security Options
move to new line
select menu pageSEL
previous page
32:(5 21 7,7/(6
(UP) or ∨ (DOWN)
∧
(ENTER)
↵
(UP) or ∨ (DOWN)
∧
(ENTER)
↵
(UP) or ∨ (DOWN)
∧
(ENTER)
↵
(UP) or ∨ (DOWN)
∧
(STOP)
(STOP)
(STOP)
(STOP)
↑ ↓
MENU
MENUMENU11
ADVANCED POWER ON TITLES
1 Power On Line 1
' BK Components '
2 Power On Line 2
' Pwrd by Motorola'
SEL start editing
↑ ↓
←→
MENU
change character
change position
previous page
32:(5 21 /,1(
ActionFrom Front PanelFrom Remote
move to Power On Titles
activate ADVANCED POWER ON TITLES
move to Power On Line 1
activate Line 1
change blinking character
move to new characterVOLUME KNOB
continue changing charactersrepeat 5 - 6
finish editing line 1
move to Power On Line 2
edit Line 2repeat 4 - 8
return to ADVANCED SYSTEM SETUP
43
p/n 12698 Rev. 9808B
Page 46

CONTROL OUT SETUP
Your A/V System Controller’s control outputs allow you to control up to 4 external devices such as power
amplifiers, projec tion screens, etc. T he control outputs can be program med on/off depending on which source is
selected. They may also have global control for all sources for headphone listening or remote repeater functions.
Control Out 1 -
example you may wish to use the control out to pull down a projection screen for your V1 and DVD sources but roll
it up for Tuner and CD. Contr ol out 1 can also be s et to HEADPHONE m ode. HEADPHONE m ode is intended to
control external amplifier s to permit headphone listening without the need for manually turning off your external
amplifiers. HEADPHON E is a global setting for all sources - if you set HEADPHONE for one source it will be set
for all other sources.
Control out 1 is dedicated to zone 1 it can be programmed to be on or off f or each source. For
1
(PAUSE) or
SEL or ENTER2
3
(PAUSE) or
AUDIO5
6
(REW) or(FF)
ADVANCED SYSTEM SETUP
1 Zone Configuration
2 Power On Titles
3 Control Out
4 Security Options
move to new line
select menu pageSEL
previous page
&21752/ 287
(UP) or ∨ (DOWN)
∧
(ENTER)
↵
(UP) or ∨ (DOWN)
∧
(SOURCE) step to sourcedesired source4
(STOP)
(STOP)
↑ ↓
MENU
CONTROL OUT SETUP for DVD
1 Control Out 1 Phones
2 Control Out 2 Zone 2
3 Control Out 3 Z1+Z2
4 Control Out 4 Remote
Using AV system controller
select a source to setup
AUD to select control
↑ ↓
←→
MENU
move to new line
adjust parameter
previous page
'9' & 3+21(6
ActionFrom Front PanelFrom Remote
move to Control Out
activate CONTROL OUT SETUP
move to Control Out 1
select source for Control Out setup
return control to A/V System Controller
set desired control outVOLUME KNOB
set control out 1 for other sourcesrepeat 4 - 6repeat 4 - 67
44
p/n 12698 Rev. 9808B
Page 47

Control Out 2, 3, and 4 - Control out 2, 3, and 4 can be used in either zone. For each source they can be
programmed to be on when that sourc e is selected in zone 1, zone 2, or both zones. If the source is selected in
neither zone the control out will be off. Control outs 2, 3, and 4 can also be set to REMOTE. In REMOTE mode
your A/V System Controller acts like a remote repeater - IR remote signals detected by your A/V System Controller
are repeated on the control out. REMOTE mode is a global override for all sources.
CONTROL OUT SETUP for DVD
1 Control Out 1 Phones
2 Control Out 2 Zone 2
3 Control Out 3 Z1+Z2
4 Control Out 4 Remote
Using AV system controller
select a source to setup
AUD to select control
↑ ↓
←→
MENU
move to new line
adjust parameter
previous page
'9' & =21(
ActionFrom Front PanelFrom Remote
1
(PAUSE) or
AUDIO3
4
(REW) or(FF)
repeat 2 - 45
repeat 1 - 56
(STOP)
(UP) or ∨ (DOWN)
∧
(SOURCE) step to sourcedesired source2
MENUMENU7
MENUMENU8
MENUMENU9
MENUMENU10
move to Control Out 2
select source for Control Out setup
return control to A/V System Controller
set desired control outVOLUME KNOB
set control out 2 for other sourcesrepeat 2 - 4
set control out 3 and 4repeat 1 - 5
return to ADVANCED SYSTEM SETUP
return to SETUP MENUS
return to MAIN MENU
return to normal operation
FACTORY RESET
Should you ever need to completely reset the A/V System Controller to the original factory settings from the front
panel press the SLEEP, DOW N , and LEVEL buttons sim ultaneously. The
complete reset and erase all user programmed presets and menus.
45
A/V System Controller w ill perform a
p/n 12698 Rev. 9808B
Page 48

TROUBLESHOOTING
POSSIBLE SOLUTIONPOSSIBLE CAUSEPROBLEM
No sound, display
will not light
No sound, display
on.
Loud hum or buzz
on one or more
channels
Surround sound
does not sound
correct.
1. Power cord not plugged in.
AC
2. Power off at
3. Power switch off.
AC
power inlet fuse blown or faulty.
4.
*
1. A/V System Controller in mute
2. Volume control to minimum.
3. Wrong source selected.
4. Line stage to amp. cables loose or
faulty.
5. Source to line stage cables loose
or faulty.
1. Poor ground connection in
interconnect cables.
2. Poor ground in main
3. Poor ground on cable box.
4. Cables running across back of
1. Recordings are not Pro Logic.
2. Recordings are not Dolby Digital.
3. Surround processor not in correct
mode.
4. Check speaker setup.
5. Speakers phase wrong.
source.
AC
supply.
TV
1. Reconnect power cord.
2. Check power at plug.
3. Turn power switch on.
4. Check for shorts or overloading. Replace
fuse.
1. Unmute A/V System Controller.
2. Increase volume.
3. Select source.
4. Tighten, repair, or replace cable.
5. Tighten, repair, or replace cable.
1. Check all connectors and repair as
necessary.
2. Check ground of outlet. Have it checked by
qualified serviceman.
3. Check ground.
.
4. Reposition cables.
1. Play a Pro Logic recording.
2. Play a Dolby Digital recording.
3. Select proper surround mode.
4. Pick correct speaker setup for your system.
5. Check wiring of speakers (+) of speaker to
(+) on amplifer. (-) on speaker to (-) on
amplifer.
Remote will not
operate unit.
Video is in Black
and White
One or more
channels sound
bad
* Note
:
1. Batteries missing.
2. Batteries dead.
3. Batteries inserted wrong.
4. Remote signal blocked.
5. Lens requires cleaning.
6. Wrong programming.
1. Z1 video monitor is selected to the
wrong signal type.
1. It is possible that the A/V System
Controller needs to be reset (cold
power boot).
1. Check for batteries inside remote.
2. Put in fresh batteries.
3. Follow diagram in battery compartment.
4. Clear path to front panel of unit.
5. Clean lens with a soft cloth.
6. Refer to remote manual.
1. Select the proper video signal type
(composite or S-video).
1. Cycle the A/V System Controller’s front panel
POWER switch to OFF then back to ON.
If unit continues to blow power inlet fuses, replace only with fuses of same type and rating.
,
DO NOT USE A HIGHER RATED FUSE!
have it serviced by your dealer or B&K.
46
p/n 12698 Rev. 9808B
Page 49

A/V SYSTEM CONTROLLER SPECIFICATIONS
Audio Specifications
Frequency Response:
Signal to Noise Ratio:
5 Hz - 20 kHz ,
63 mVInput Sensitivity:
9 V rmsMaximum Output Level:
89 dB CCIR 2 k Weighted
max level
50 k OhmsInput Impedance:
221 OhmsOutput Impedance:
-12.5 dBNoise Test Reference Level:
8Surround Outputs
7Audio Analog Inputs
5Audio Analog Outputs
7/ 5Digital Inputs coax/optical
1/1Digital Outputs coax/optical
2 dBCapture Ratio:
12 dBfIHF (Usable) Sensitivity:
70 dB, A WeightedSignal to Noise Ratio:
+0/−
0.5dB
Video Specifications
Frequency Response:
20 Hz - 10 MHz ±3dB
2 V P-PMaximum Input Level:
2 V P-PMaximum Output Level:
75 OhmsInput Impedance:
75 OhmsOutput Impedance:
7Video Inputs
5Video Outputs
AM sectionTuner SpecificationsFM SectionTuner Specifications
520 - 1620 kHz Frequency Range:87.5 - 107.9 MHzFrequency Range:
Less than 0.3%Total Harmonic Distortion:Less than 0.25%Total Harmonic Distortion:
28 dBfSensitivity:20 Hz - 15 kHz, +1/ -3 dBFrequency Response
28 dBfSensitivity:15 / 35 dBfMono/Stereo Sensitivity:
30 dBSelectivity:65 dBAlternate Channel Selectivity:
300 OhmsAntenna Input Impedance:75 OhmsAntenna Input Impedance:
Upgradability:
MiscellaneousProcessor Specifications
120/220/240 VACLine voltage:20 Bit 48kHzA/D Conversion
30 watts maxPower consumption:20 Bit 32/44.1/48kHzD/A Conversion
Line -.5 Amp/250 Volt Replacement fuses:Motorola 24 Bit 43 MIPSDolby Digital DSP:
17"(w)x10"(d)x3.50"(h)Dimensions:Motorola 24 Bit 46 MIPSDTS DSP:
10 poundsWeight:
A/D, D/A, digital receiver,
and DSP(s)
Warranty:
See Warranty page for
complete explanation
5 years processor
1 year remote
Specifications subject to change without notice
47
p/n 12698 Rev. 9808B
Page 50

THE MENU SYSTEM
+15 dB
1
Disabled
Variable
+15 dB
2
move to new line
adjust parameter
exit menu system
ADVANCED ZONE SETTINGS
1 Z1 Max Level
2 Z1 Product ID
↑ ↓
3 Z1 On Screen
←→
4 Z2 Level Control
5 Z2 Max Level
6 Z2 Product ID
MENU
ADVANCED POWER ON TITLES
1 Power On Line 1
change character
change position
previous page
' Pwrd by Motorola '
' BK Components '
↑ ↓
SEL start editing
←→
2 Power On Line 2
MENU
CONTROL OUT SETUP for TUNER
Phones
Zone 2
Z1 + Z2
Remote
adjust parameter
move to new line
↑ ↓
←→
AUD to select control
select source to rename
Using AV system controller
2 Control Out 2
3 Control Out 3
4 Control Out 4
1 Control Out 1
Visible
No
previous page
MENU
ADVANCED SECURITY OPTIONS
1 Advanced Menu
2 Memory Locked
move to new line
↑ ↓
adjust parameter
previous page
←→
MENU
Small
Small
Small
Yes
Normal
0ms
0ms
move to new line
adjust parameter
SPEAKER SIZE SETUP
1 Front L/R
2 Center
3 Rear L/R
4 Subwoofer
5 LFE
6 Center Delay
↑ ↓
←→
7 Rear Delay
1
0.0 dB
0.0 dB
0.0 dB
exit menu system
SPEAKER CALIBRATION
MENU
1 Left
2 Center
3 Right
Full Edit Preset No
EDIT PRESET OPTIONS
0.0 dB
0.0 dB
0.0 dB
move to new line
adjust level
exit menu system
SOURCE LEVEL SETUP
↑ ↓
←→
5 Left Rear
6 Subwoofer
MENU
4 Right Rear
2
adjust parameter
previous page
changes allowed only to
the PRESET TITLES
EDIT SOURCE NAME
←→
MENU
1
1
adjust level
previous page
AM TUNER SETTING
DEFAULT USER LEVEL
DVD DVD 0.0 dB
←→
AUD to select control
MENU
select source to adjust
Using AV system controller
3
change position
previous page
change character
DEFAULT USER
DVD DVD
↑ ↓
AUD to select control
select source to rename
Using AV system controller
←→
MENU
DISPLAY OPTIONS
2
2
change character
change position
previous page
FM TUNER SETTING
AM 520 Channel 0
↑ ↓
←→
MENU
FM Stereo 96.9 Channel 0
4
move to new line
adjust parameter
exit menu system
↑ ↓
←→
1 Background Color Red
2 Overlay Opaque Bright
3 Front Display Bright
4 Z1 Video Monitor Composite
MENU
5 Z1 Tuner Video Last
6 Z2 Tuner Video Last
Dolby Digital / DTS 5.1
SURROUND MODE OPERATION
1 Surround Operatio Auto
3
3
change position
previous page
change character
↑ ↓
SEL mono/stereo
ADVANCED SYSTEM SETUP
←→
MENU
1 Zone Configuration
2 Power On Titles
5
move to new line
adjust parameter
exit menu system
Front L/R speaker size
overrides MODE setting
STEREO MODE is digital
from speaker setup menu
↑ ↓
←→
2 Stereo Operation Normal
MENU
4
4
move to new line
select menu page
exit menu system
↑ ↓
SEL
3 Control Out
MENU
4 Security Options
6
New Line or Text
Menu or Go Back
Select or Save
Adjust or Cursor
HELP GUIDE
↑ ↓
SEL
←→
MENU
1
Press MENU to Exit
ENTER Select or Save
Featuring
Plug n Play
Reference 20
BK Components Ltd.
2-Zone Preamp/Processor
Made in the USA
Dolby Digital and DTS
2
Press MENU to Exit
ZONE 2 OPERATION
PRESET 3 'Watch V1 '
POWER SOURCE VOLUME
Off V1 0dB
3
change position
save preset
previous page
change character
↑ ↓
SEL
←→
0. . A9 change preset
MENU
MAIN MENU
1 Help / Navigate
2 Product Information
3 Zone 2 Operation
4 Edit Preset Title
5 User Preferences
48
change position
save preset
'TV simulcast '
EDIT PRESET TITLE 1
change character
SOURCE MODE VOLUME
DVD St Lt Rt 0dB
↑ ↓
SEL
←→
0. . A9 change preset
4
move to new line
select menu page
exit menu system
↑ ↓
SEL
MENU
6 Setup / Configure
previous page
USER PREFERENCE SETUP
MENU
1 Edit Preset Options
2 Edit Source Name
3 Display Options
4 Surround Modes
5
move to new line
select menu page
exit menu system
SETUP MENUS
↑ ↓
SEL
MENU
1 Speaker Size and Delay
2 Speaker Calibration
3 Source Levels
move to new line
↑ ↓
4 AM Tuner Channels
5 FM Tuner Channels
6 Advanced System Settings
6
p/n 12698 Rev. 9808B
select menu page
exit menu system
SEL
MENU
Page 51
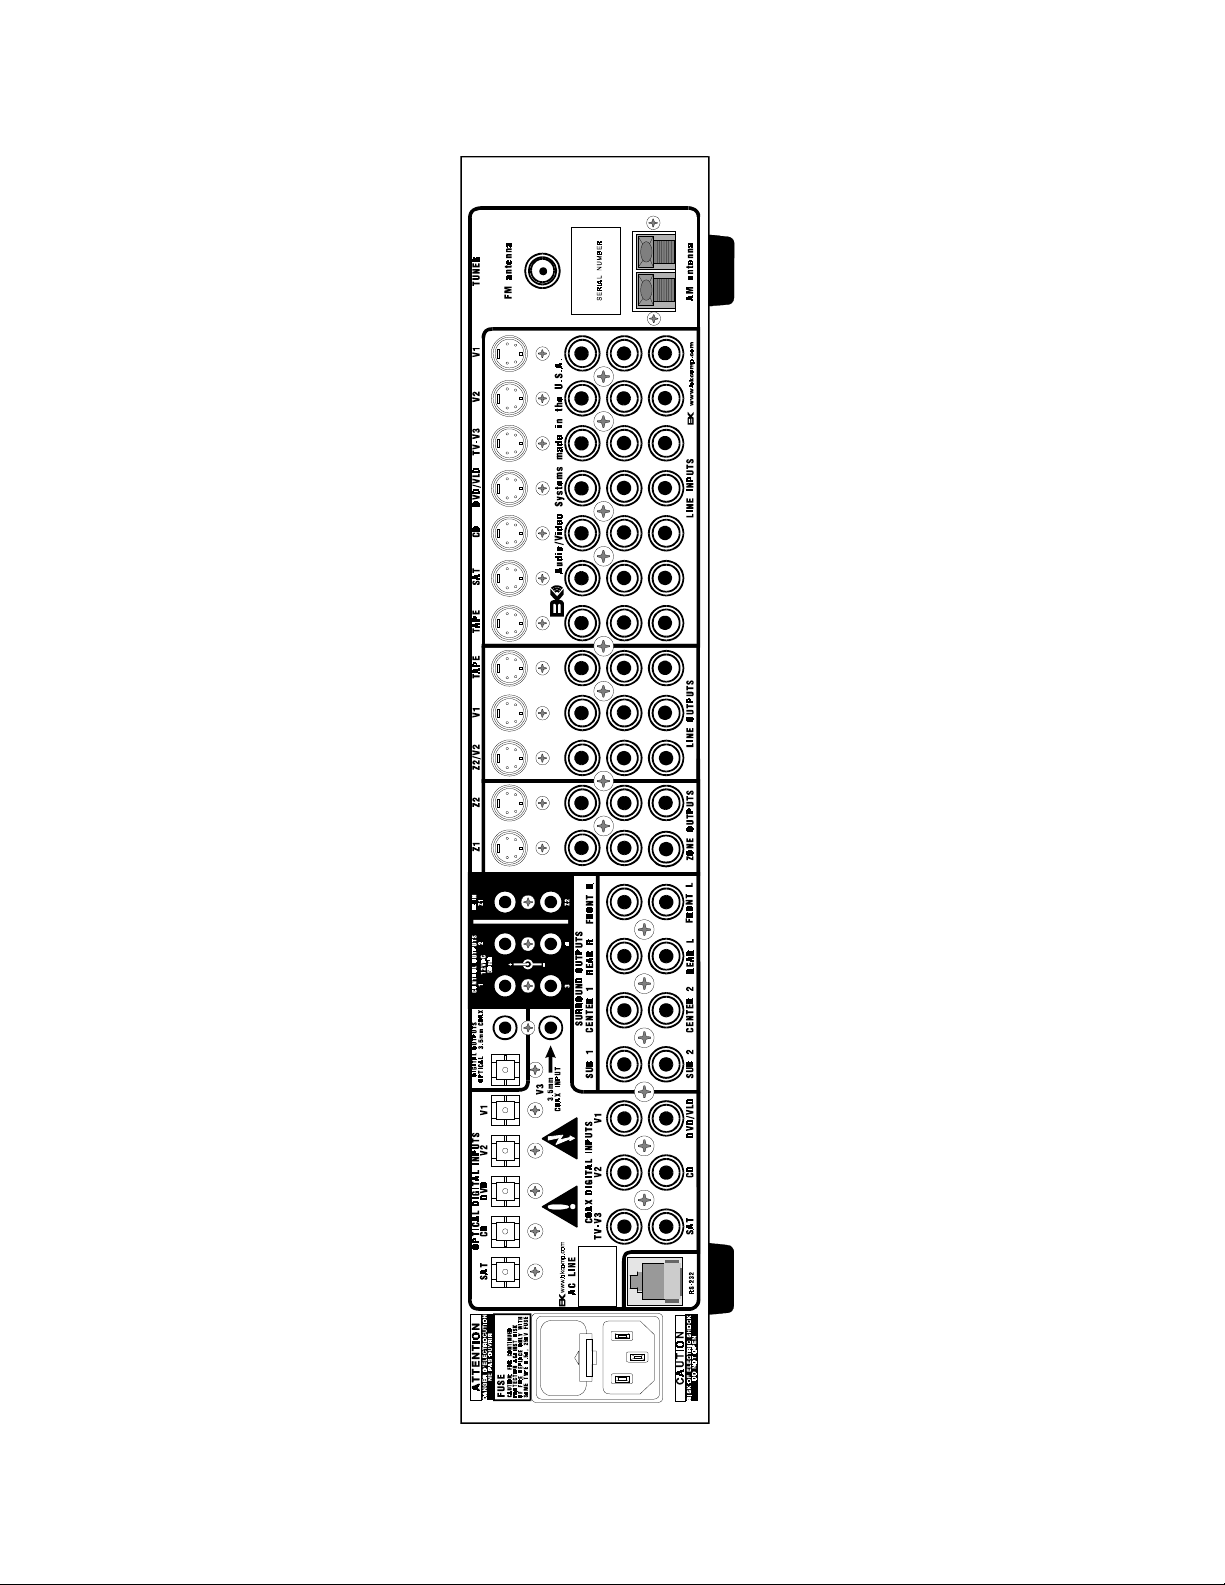
REAR PANEL ENLARGED VIEW
49
p/n 12698 Rev. 9808B
Page 52

B&K Components, Ltd
2100 Old Union Road
Buffalo, New York 14227
716-656-0023
www.bkcomp.com
50
p/n 12698 Rev. 9808B
 Loading...