

Page 1

B&K Components, Ltd.
User Manual
CT600.1
CT600.3
CT300.3
14067 121206
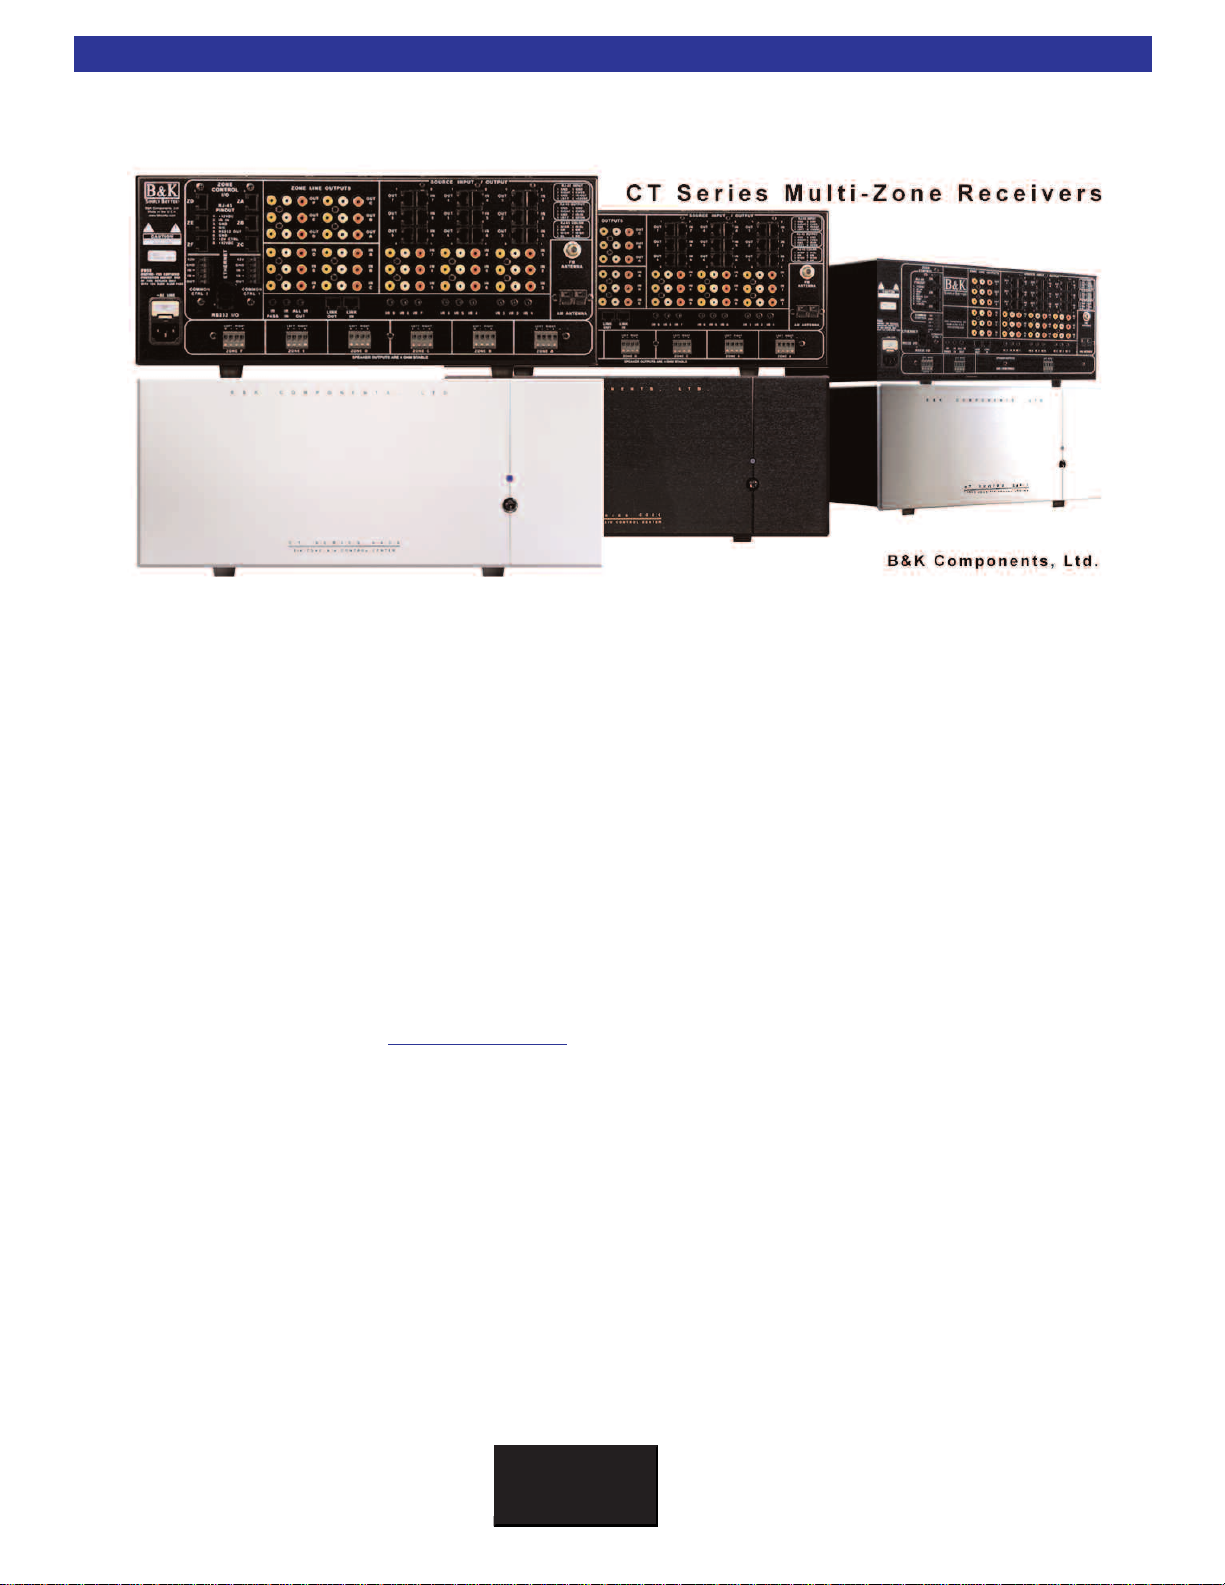
Multi-Zone Audio/Video Receivers
Page 2

CT Receiver and Benefits
BK
&
SB
IMPLY ETTER!
COMPLETE USER MANUAL - CT RECEIVER
© 2006 B& K Components, Ltd. All rights reserved.
The information in this manual is copyright protected. No part of this manual may be copied or reproduced in
any form without prior written consent from B & K Components, Ltd.
B & K Components, Ltd. SHALL NOT BE LIABLE FOR OPERATIONAL, TECHNICAL OR EDITORIAL
ERRORS/OMISSIONS MADE IN THIS MANUAL. The information in this manual may be subject to change
without prior notice.
The information in this manual may be subject to change without prior notice.
***- PC requirements - 128MB RAM, Pentium grade or better processor, ‘. (Exception - BK Suite not sup-
ported on Windows NT) ***
SIMPLY BETTER!Ô
marks or registered trademarks of their respective companies or organizations.
B&K Components, Ltd. sells its products through authorized dealers. Buying from an authorized B&K
Components, Ltd. dealer insures that you have a FACTORY WARRANTY on your B& K Components, Ltd.
product.
from an unauthorized dealer or an E-tailer or if the factory serial number has been removed, defaced or
replaced in any way.
A warranty on B &K Components, Ltd. products is NOT VALID if the products have been purchased
© is a trademark of B & K Components, Ltd. All other brand or product names are trade-
Accessories Included
1 - MZ-128 Remote Control
4 - AAA Batteries
1 - Power Cord
1 - CT Series CD
1 - CT
1 - FM Dipole Antenna
1 - AM Antenna
1 - DB9 to RJ-45 Adapter
1 - Warranty Card
Receiver Quick Reference Manual
B&K Components, Ltd.
2100 Old Union Road
ork 14227
falo, New
Buf
1.800.543.5252 In NY: 716.656.0026
Fax: 716.656.1291
E-mail: info@bkcomp.com
On the web:
Y
www
.bkcomp.com
Page 3

Table of Contents
BK
&
SB
IMPLY ETTER!
Table of Contents III
Introduction / Overview 1
CT Receiver Features and Benefits 2
CK 1.1 and CK1.2 Keypad Features and Benefits 3
CT Receiver Front Panel 4
CT Receiver Back Panel 5
Accessories Guide 6
The CK1.2 Keypad Front Panel/Back Panel 6
The CK1.1 Keypad Front Panel/Back Panel 7
B&K CT Series MZ-128 Remote Controller Reference Sheet 8
DB-9 to RJ-45 Adapter P/N:13290 9
BK Toolbox CD-ROM P/N: 13323 9
Installation and System Diagrams 10
Basic System Hookup 11
III
Installation Considerations 12
AC Power and Line Fuse 13
Speaker Connections for CT Receiver 13
Shared Source Inputs 14
Dedicated (Local) Source Inputs 14
Digital Audio Connection 15
Buffered Outputs 15
CT Receiver Speaker Connections 16
Connecting an External Amplifier 17
Composite Video Outputs18
CK1.2 Keypad Connections 19
Adding Additional Keypads in the Same Zone 20
IR Emitter Outputs 21
Local IR Source Control 21
Common Control Triggers 22
Additional Connections 23
Factory Reset 23
System Expansion 24
Connecting Multiple CT Receivers 25
Page 4

BK
&
SB
IMPLY ETTER!
IV
Table of Contents
Adding a Home Theater 26
Adding an HD6 27
Setup Using a PC and BK Suite 28
Connecting to a PC 29
BK Suite Setup and Overview 30
BK Suite Task Bar Explained 32
Basic Setup Menu 33
Advanced Setup Menu 35
Hardware Zone Settings - Tab 1 36
Groups / Code Sets / Zones - Tab 2 38
Code-Set Description and Overview 39
Groups with Mono Zones 40
Sub-Zoning 41
Input Settings - Tab 3 42
Power On Titles - Tab 4 43
Power-On Preferences - Tab 5 44
Input Configuration - Tab 6 45
Page / Event - Tab 7 46
Display - Tab 8 48
Control - Tab 9 49
Security - Tab 10 51
RS-232 Communication - Tab 11 52
Preset Operation - Tab 12 54
Keypad Feedback - Tab 13 55
Room Equalization 56
Preset Editor 58
Serial Macro Editor 60
Setup Using the On Screen Display 61
On Screen Menu Operation with the MZ-128 62
On Screen Menu Tree Diagram 63
On Screen Main Menu 64
Zone Operation 65
Zone Favorite Presets Menu 65
Page 5

Table of Contents
BK
&
SB
IMPLY ETTER!
Audio/Video System Setup 66
Control Menu Setup 69
Setup Presets 72
Control System Setup 73
System Status 74
Zone Planning Worksheets 75
Troubleshooting Guide 78
Limited Warranty 79
Specifications 80
CT Series A / V Control Center 81
Additional Information 82
V
Page 6

BK
&
SB
IMPLY ETTER!
VI
THIS PAGE IS INTENTIONALL
Y LEFT BLANK
Page 7
Introduction / Overview
BK
&
SB
IMPLY ETTER!
The Finesse and Power To Please A Household...
1
The CT Receiver family serve the same goals; it is to bring the same performance and sound quality that B&K
has brought to audiophile home theaters and music rooms to the entire house. The CT
innovation in automation. The CT Receiver may operate an entire house’s audio/video equipment with a matter of one touch while still bringing the legendary B& K warmth, dynamics, and detail that make critical listening possible in every room of the house.
available by separates in the past.
Typically
Receiver is used for systems with one to six stereo zones. ACT Receivers delivers 55 watts per channel into
8 ohm speakers and up to 85 watts per channel while driving 4 ohm speakers. In addition, CT Receivers may
be linked for use in up to 127 zones configurations allowing 9 shared sources all with independent command
and control.
Please visit B&K on the web at www
ing digital preamplifiers, receivers and high current power amplifiers for the best in movie and music reproduction. High quality amplifiers start at 125 watts per channel with the option of 2 or 7 channels. B&K also carries
200 watt per channel amplifiers with the option of 1, 2, 5, or 7 channels for the most demanding listener. All
of B&K’s home theater amplifiers are class A pre-driver with a class A-B mosfet output stage in order to supply the most challenging speakers with massive amounts of driving current. B&K also uses toroidal transformer
power supply, computer grade capacitors, and discrete circuitry, which use 1% metal film resistors to provide
superior dynamics and sound quality
, a three zone CT Receiver is used for systems with one to three stereo zones and the six zone CT
The CT Receiver family bring a level of performance that was only
.bkcomp.com for information on our hand assembled product lines, includ-
, Simply Better!
B&K
.
Receiver is the new
Page 8

BK
&
SB
IMPLY ETTER!
2
CT Receiver Features and Benefits
CT Receiver Features and Benefits
Separates Performance
The CT Receivers are born from the heritage of twenty years experience in building high current, low distortion,
high-end separates. Every design, concept, and tested part, unifies the critical listening vision, which happens
when the music matters. With a B&K Multi-Zone receiver, any room may get the solid deep bass, the warmth,
and the transparency of B &K. The CT Receiver is built by using 1% Metal Film resistors and computer grade
electrolytic capacitors in order to create precision, linearity and dynamics that will reveal every detail of your
source components. The ultimate reason to own B&K is the astonishing revolution in performance that you will
enjoy . The CTReceiver is available in 17” (standard) and 19” (rack mount) faceplates with a black or silver color
choice.
Built-In Intelligence
The CT Receivers work quietly behind the scenes to provide simple automation and flexibility for everyday live.
The CT Receiver may instantly recall your favorite settings without any additional external automation systems
by using unique Personal Action MacrosTMand B&K's SmartZoneTMsystem. The intelligence is built-in.
A Single Keypad in Each Room - Multi-Zone From One Central System
The CT300.3 provides three independent listening Zones whereas the CT 600.1/600.3 provides six. In each
zone, the user may select sources, raise/lower volume, adjust bass/treble independently without affecting users
in other zones! The CT Receivers give all the performance and ability that a dedicated stack of high-end separates would give a user in each room, without any of the visible clutter
be concealed in a cabinet or rack in one central location.
The user only needs a keyp
. The receiver and all shared sources may
ad to take control!
Connect Up to Nine Shared Sources
More than any other single feature, the nine input capability frees the system architecture from restriction. Nine
inputs enable your system to grow in the future and accommodate any new technology . Built-in IR routing allows
any of the source components to be identical, yet still be controlled independently without problems.
Video For The Entire House
The CT Receivers incorporate a composite video matrix, delivering a pristine picture to every room in the house.
One touch to your remote control or keypad enables you to select different video sources.
Three AM/FM Tuners Allow Simultaneous Listening to Three Radio Stations
The CT Receiver Family offers a combination of internal AM/FM tuner configurations. The CT 600.1 includes 1
tuner, and the CT 300.3 and CT 600.3 include 3 tuners.
Six Dedicated Zone Inputs
Each zone has its own dedicated local Audio/Video source input. The dedicated inputs have the ability to sense
an audio/video input. Once the audio/video input is detected, the zone will be switched automatically to the dedicated input. All the user needs to do is turn on the local source, simple!
Page 9

CK 1.1 and CK1.2 Keypad Features and Benefits
BK
&
SB
IMPLY ETTER!
CK 1.1 and CK 1.2 Keypad Features and Benefits
Automation Everywhere!
Automate the Central System with Local TVs and Components
The CK1.2 keypad may control up to twenty devices or rooms with 5 hard buttons and four pages of custom
labeled buttons per device. The CK 1.1 has 4 pages of custom labeled buttons and 5 hard buttons. Each button on either keypad may be programmed with a single IR command (pre-programmed from the database or
learned) or it may be programmed with a macro with up to 190 steps, which may include IR commands, delays,
and jumps to another page. A vast database of more than one thousand brands instantly programs IR Codes
for most products. B &K Batch Learning does the rest in a fraction of the time of any other system. The CK
1.2 has input synchronization with the zone where it operates. The CK 1.1 and CK1.2 also have RS-232 status
feedback. Macros may be programmed using the fastest macro programming method available (simply click on
the button to make it a macro step). Once one keypad is programmed, the rest of the keypads may be cloned
by downloading the program to each keypad. Each keypad stores its program on an EEPROM, so even if the
power is lost, the memory is still good for up to 10 years.
Point Any Remote Control at the Keypad
The integrated IR pass-through sends the commands of any IR remote control to both local inst
nents and the central system. If your client wants to use a remote control in any room, they may simply point it
at the B&K keypad.
alled compo
3
-
Realtime Status Feedback to Keypads
Both the CK 1.2 and CK 1.1keyp
atus feedback includes zone input name or radio station, volume, bass, treble and EQ settings.
st
a 12VDC status signal lights up the Green Status LED whenever the zone is on. CK 1.2 also offers RS-232
feedback from the CT Receiver so the keyp
of how it was selected (by a remote control, the front panel controls or the keyp
ads will also display zone status when the backlight button is pressed. Realtime
Additionally
ads will be kept in sync with the source that is selected regardless
self).
ad it
Multiple Keypads In One Zone
Keypads may be used in a daisy chain application to accommodate up to 6 keypads per hardware zone. Any
keypad has the ability to control any zone regardless of whether it is daisy chained (slaved) off another keypad.
Slaved keypads are perfect for large rooms that require user interface at both ends. Keypads may be interconnected and used with up to 1000ft using CAT5-E cable.
,
Page 10
4
CT Receiver Front Panel
CT Front Panel (CT300.3 and 600.1/600.3)
1. Main Power Indicator.
2. Master Power Switch, used to disengage power to the CT Receiver. Normally, this switch is set
to ON (in) which allows the power function of a remote or keypad to power the zones on or off.
While the unit is in SLEEP the electrical consumption is reduced to about 35 watts.
1
Available faceplate options are 17” Black (st
Rackmount Silver
. Unit shown is 17” Silver
.
2
andard), 17” Silver, 19” Rackmount Black and 19”
Page 11
CT Receiver Back Panel
BK
&
SB
IMPLY ETTER!
5
1
13
12
11
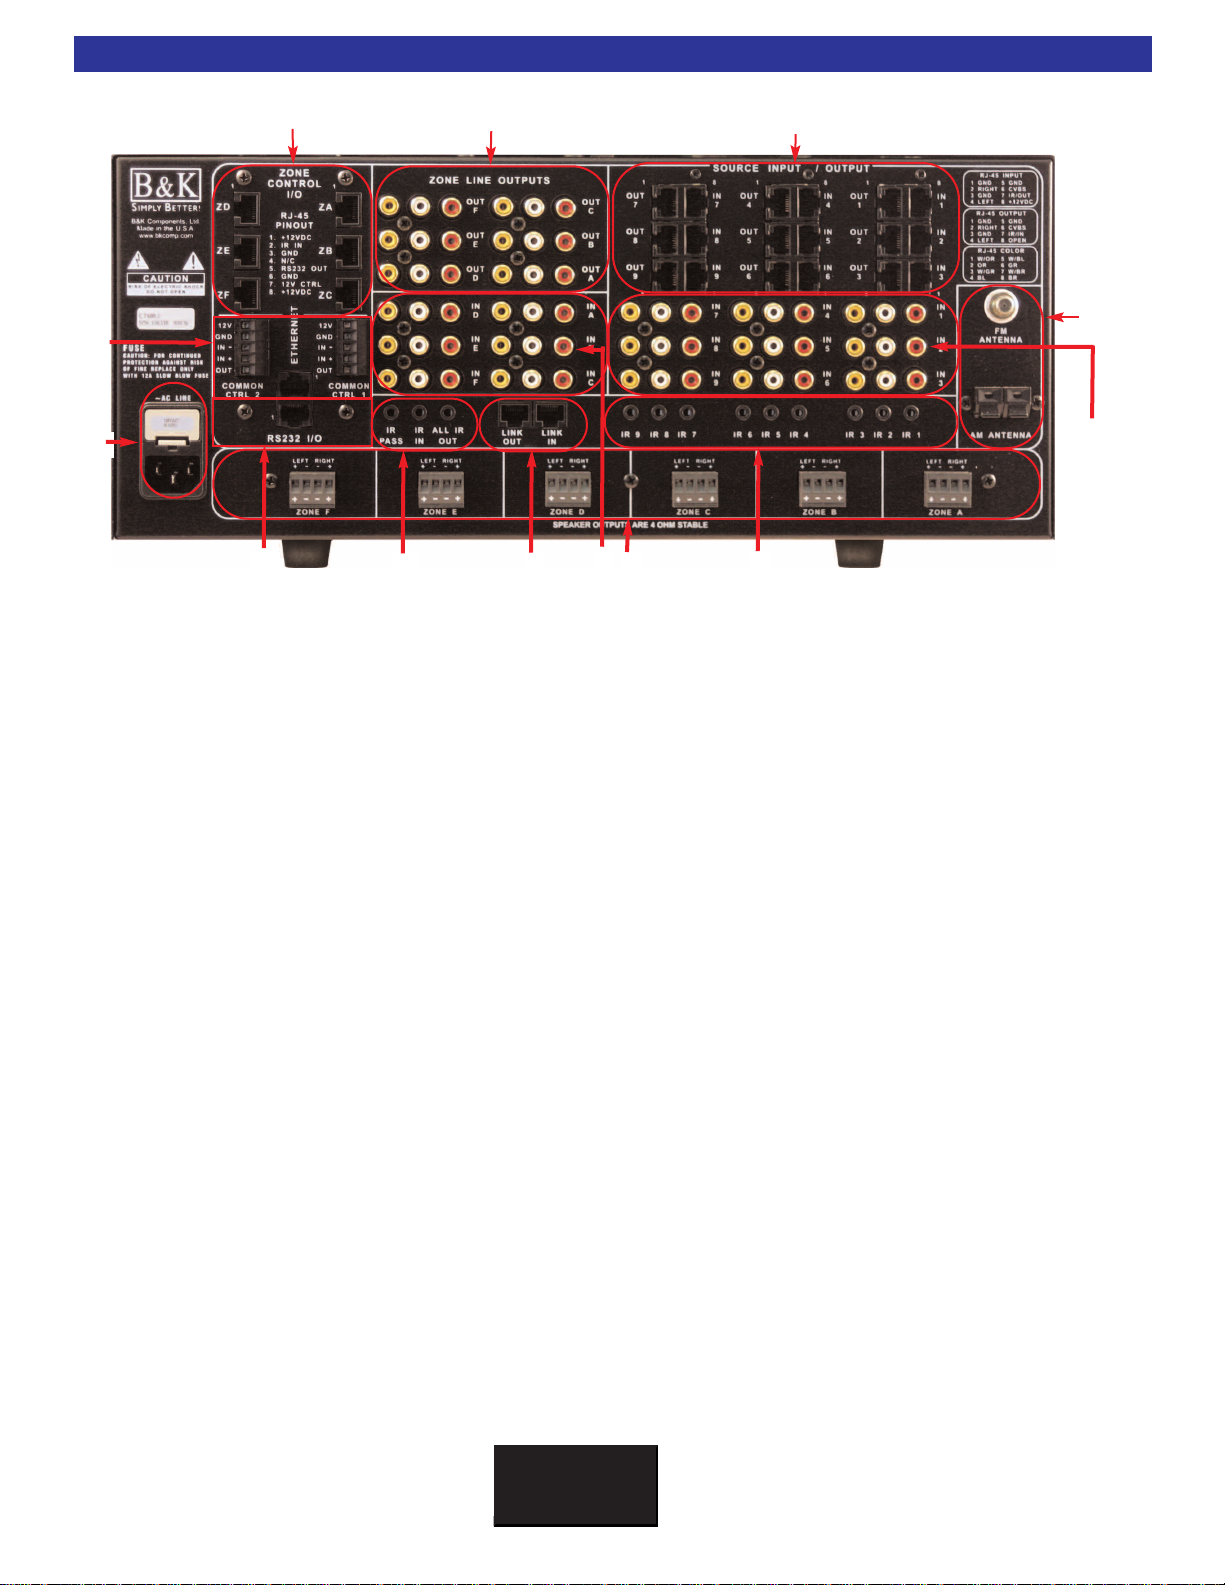
1. 6 Keypad control connections provide 12VDC power, common ground, RS-232 transmit, IR Data IN
and 12VDC control output triggers. The 300.3 has three keypad control connections. See page 19.
2. 6 Zone Audio/Video Line outputs for external amplification (factory fixed output or may be set to variable output) and video monitors
through the zone Avideo output. See pages 17 and 18.
10
2
9
(1 per zone)
3
4
5
7
8
. On Screen Display (OSD) menu access is only provided
6
3. 9 Buffered Audio/Video inputs and outputs for daisy-chain applications. See page 15.
4. AM and FM Antenna connection. Internally split for multiple tuners in the CT600.3/300.3.
See page 23.
5. 9 Audio/Video shared Source inputs that may be shared throughout all zones. See page 14.
6. 9 Infrared emitter outputs for IR routing to source pieces. 1/8” (3.5mm) mini jack. See page 21.
7. Removable four position phoenix speaker connections. Speaker connections are 4 ohm stable.
See page 16.
8. 6 Zone dedicated
9. Link In and Link out for connecting multiple CT units. See page 25.
ass, IR In and All IR Out 1/8” minijack connections for IR routing. See page 25
10. IR
11. RS-232 I/O and Ethernet RJ-45 for serial and network communication. See page 23
12. AC Power inlet and AC fuse. See page 13.
13. 2 Common control connections with up to 24V
p
control on CT 300.3. See page 22.
Audio/Video inputs for local sources, one per zone. See page 14.
AC or DC sensing on CT
600.1/600.3. One common
Page 12
BK
&
SB
IMPLY ETTER!
6
Accessories Guide
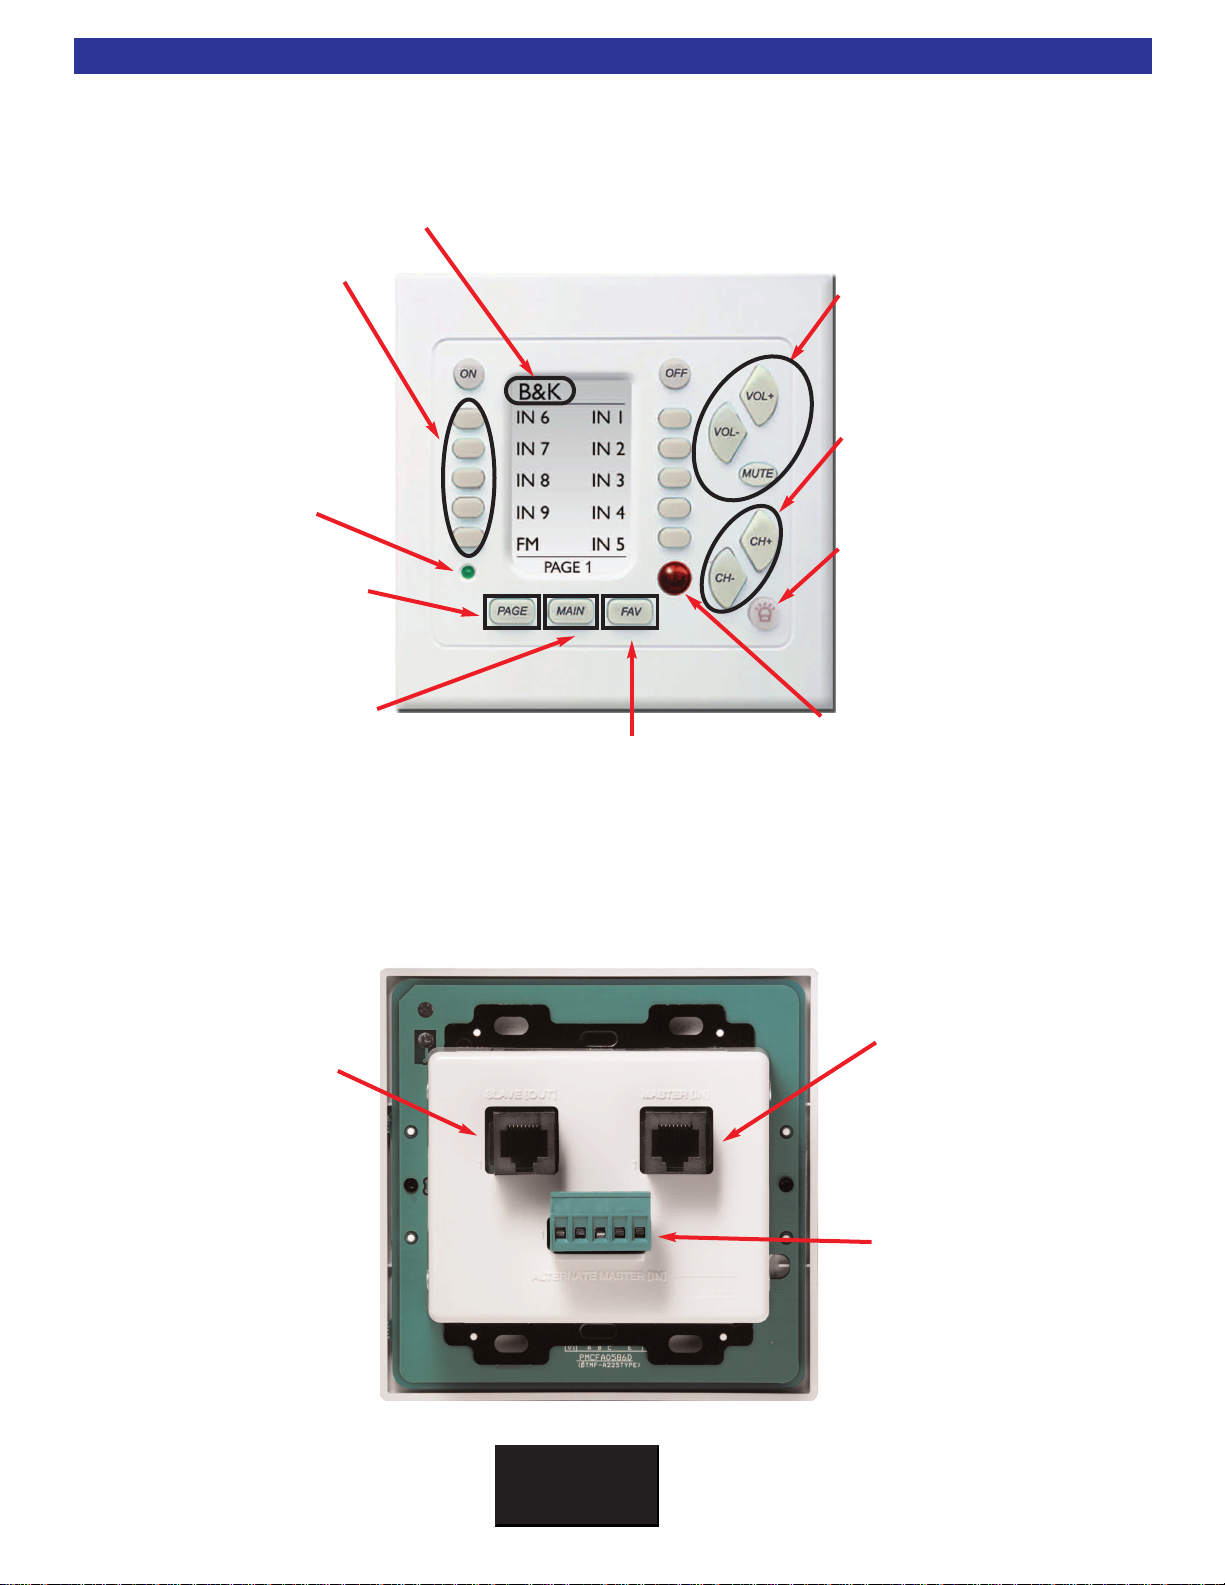
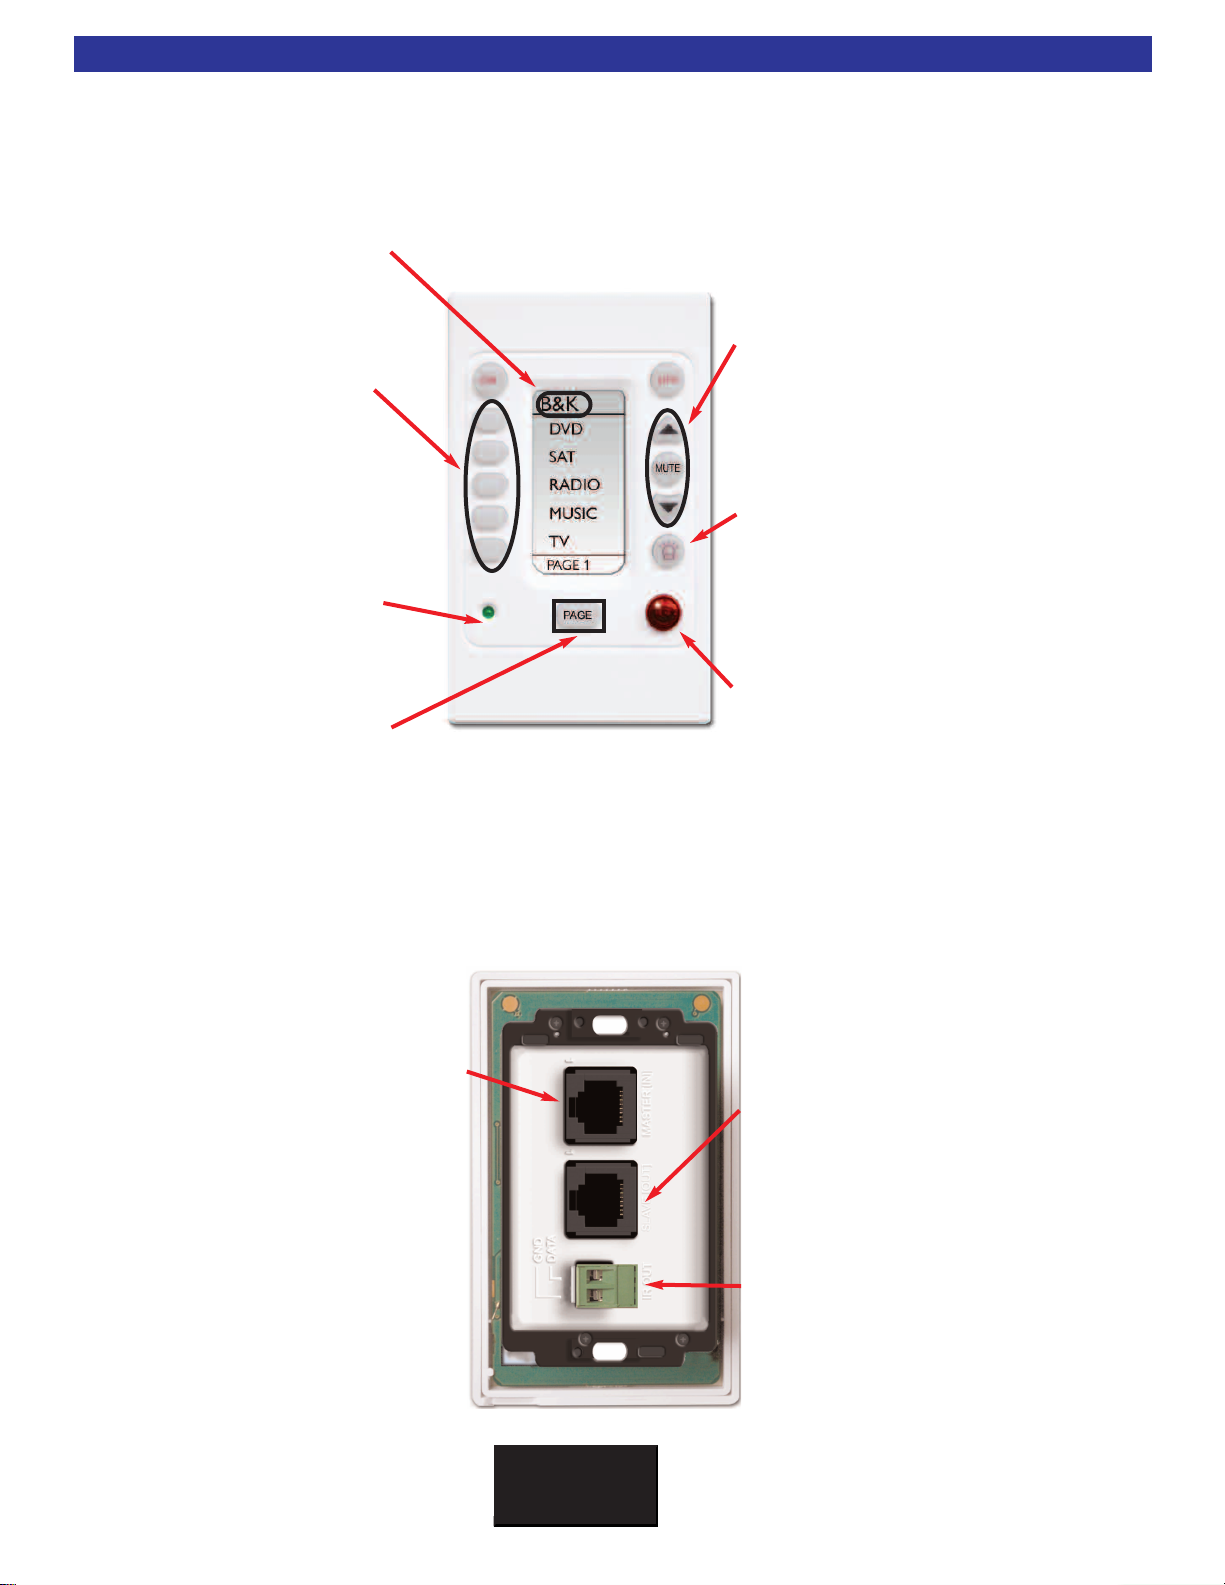
The CK1.2 Keypad Front Panel/Back Panel
sold separately
LCD Buttons Names on the screen
change depending on what
activity has been selected.
For example, when CD is
the activity, you’ll see the
button names change to
Play, Stop etc. so the
source may be controlled.
Power LED lights up when this
Zone/Room is ON. (Controlled
by the 12V Control)
Page Button press to display
any additional pages of functions.
Main Button
The Main button always returns
to the Main Menu so that a may
new device (activity) or zone
may be selected.
Screen Title - Displays what Source is selected ( i.e. device or activity like “CD”
or “SAT”). “Main” indicates the Main Menu for selecting a new device or activity.
Volume/Mute Buttons control the
level of the audio.
Change Buttons - Change to
the next channel, chapter, song
or B&K sound preset; depending
on the selected activity.
Backlight Button lights the keypad display and also recalls status feedback for that zone.
Status feedback will display input,
radio station, volume, bass, treble and EQ settings.
Remote Control IR Receiver
conceals an IR (Infrared) Sensor
Favorites Button
Availability to create up to five pages
of radio station presets or source
stations or macros.
which relays commands from hand
held IR remote control to the main
unit and components connected to
flashers.
Programming Jack - Behind the Faceplate
Four tabs hold the faceplate to the keypad chassis. To remove the faceplate, simply pull the faceplate off the keypad
chassis. Once removed, the Programming Jack is revealed. Note: When testing keypad functionality, remove the programming jack. The keypad will not receive RS-232 communication while the programming jack is plugged in.
Slave [OUT]
Used when running multiple keypads in one zone or
daisy chaining additional
zones.
Master [IN]
The RJ-45 Master [IN] is used for
the home run back to the
CT Receiver. RJ-45 termination
allows the use of CAT-5
cable to be used for keypad
installation.
Alternate Master [IN]
The alternate master operates
identically to the Master [IN].
Additionally, 12V controls or local
source emitters may be terminated here. See Page 19
Page 13
BK
&
SB
IMPLY ETTER!
The CK1.1 Keypad Front Panel/Back Panel
Screen Title - Displays a custom title edited from the LCD button editor. Under
default programming it will display “Main”.
LCD Buttons Names on the screen
change depending on what
function is programmed on
the button. For Example, if
page 1 holds all controls for
the CD player the LCD buttons will display Play, Stop,
etc. so the device (CD in
this case) may be controlled.
Power LED lights up when this
Zone/Room is ON. (Controlled
by the 12V Control)
Accessories Guide
old separately
s
Up, Down and Mute Controls
may be programmed for Volume and
Mute control for the B&K zone or any
device.
Backlight Button lights the keypad
display and also recalls status
feedback for that zone. Status
feedback will display input, radio
station, volume, bass, treble and
loudness levels.
7
Remote Control IR Receiver
Page Button press to display
any additional pages of functions.
Programming Jack - Behind the Faceplate
Four tabs hold the faceplate to the keypad chassis. To remove the faceplate, simply pull the faceplate off the keypad chassis. Once removed, the Programming Jack is revealed. Note: When testing keypad functionality, remove the programming
jack. The keypad will not receive RS-232 communication while the programming jack is plugged in.
Master [IN]
The RJ-45 Master [IN] is used for the home
run back to the CT Receiver. RJ-45 termination allows the use of CAT-5 cable to be
used for keypad installation. See Page 19
conceals an IR (Infrared) Sensor
which relays commands from hand
held IR remote control to the main
unit and components connected to
flashers.
Slave [OUT]
Used when running multiple keypads in one zone or
daisy chaining additional
zones.
IR OUTPUT
The IR Output may be used to connect an emitter directly from the key
ad to a local IR source.
p
-
Page 14
BK
&
SB
IMPLY ETTER!
8
Accessories Guide
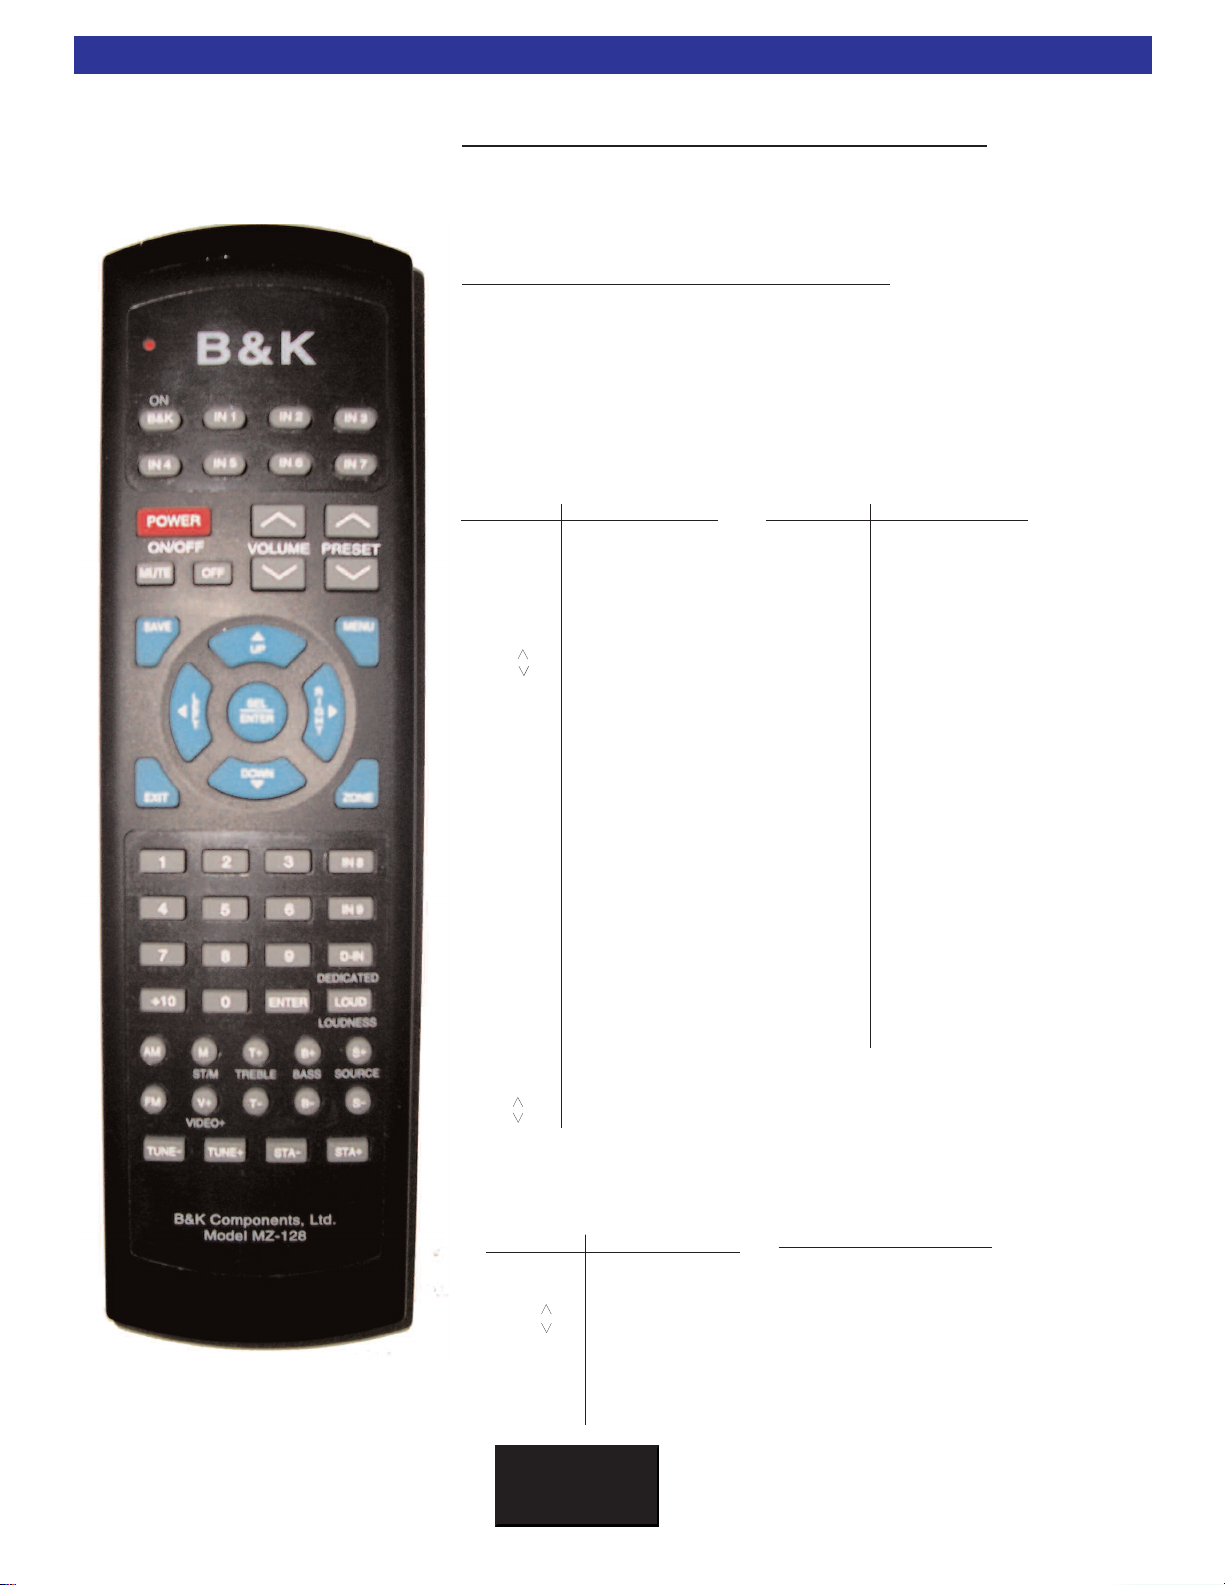
B&K CT Series MZ-128 Remote Controller Reference Sheet
The MZ-128 Remote Controller has multiple useful functions:
.The MZ-128 Remote Controller may be used to control and setup a CT Receiver.
1
2. The MZ-128 may be used as a source of IR for use in programming learning keypads, etc.
3. The MZ-128 may be set to source the B&K IR functions listed below, for code sets
000-128 and 999.
Setup the MZ-128 to use a discrete B&K code set:
1. Install 4 AAAbatteries into the remote. Observe polarity.
2. Press and hold the B&K and MUTE buttons simultaneously for two seconds. The
LED will light up solid red and stay illuminated.
3. Firmly press the desired B&K three digit code set. Always use three digits
(i.e. 0-1-1 Zone A)
4. Press the B&K button again to confirm setup. The red LED will blink three times
when the IR code has been successfully programmed.
(MZ-128 Default Factory Code-Set is: 0-0-0 Whole House Control)
CODE SET 000-128
MZ-128 BUTTON B&K IR FUNCTION
B&K POWER ON
POWER POWER TOGGLE
OFF POWER OFF
MUTE MUTE TOGGLE
VOLUME MASTER VOL UP
VOLUME MASTER VOL DOWN
B+ BASS UP
B- BASS DOWN
T+ TREBLE UP
T- TREBLE DOWN
LOUD LOUDNESS TOGGLE
S+ SOURCE UP
S- SOURCE DOWN
V+ VIDEO SOURCE UP
D-IN ZONE DEDICATED INPUT
AM AM TUNER
FM FM TUNER
IN1 IN 1 OR [V1]
IN2 IN 2 OR [V2]
IN3 IN 3 OR [TV]
IN4 IN 4 OR [DVD]
IN5 IN 5 OR [CD]
IN6 IN 6 OR [SAT]
IN7 IN 7 OR [TAPE]
IN8 IN 8 OR [V4]
IN9 IN 9 OR [V5]
PRESET FAVORITE PRESET UP
PRESET F
[POWER STATE]
[VOLUME]
[TONE CONTROL]
[INPUT SOURCE]
AVORITE PRESET]
[F
VORITE PRESET
A
DOWN
MZ-128 BUTTON B&K IR FUNCTION
[TUNER]
AM SELECT THE AM BAND
FM SELECT THE FM BAND
TUNE + TUNE FREQUENCY UP
TUNE - TUNE FREQUENCY DOWN
STA+ TUNER FAV PRESET UP
STA- TUNER FAV PRESET
M STEREO / MONO
[NAVIGATION]
MENU MENU UP/DOWN LEVEL
LEFT LEFT OR BALANCE [L]
RIGHT RIGHT OR BALANCE [R]
SEL/ENTER SELECT OR ENTER
UP UP
DOWN DOWN
SAVE SAVE
EXIT TOTAL EXIT FROM ALL
ZONE ZONE SELECT
[NUMERIC]
0 0
1 1
2 2
3 3
4 4
5 5
6 6
7 7
8 8
9 9
+10 +10
CODE SET
MZ-128 BUTTON B&K IR FUNCTION
ON/B&K/POWER ALL B&K POWER UP
OFF ALL B&K POWER OFF
VOLUME ALL B&K VOLUME UP
VOLUME ALL B&K VOLUME DOWN
0 ALL
2 ALL B&K VOLUME -20DB
4 ALL B&K VOLUME -40DB
6 ALL B&K VOLUME -60DB
MUTE ALL
999
[B&K ALL COMMANDS]
B&K VOLUME 0DB
B&K MUTE
OGGLE
T
Code-Set 128 Simply Explained
Code-set 128 is a special code-set which allows
individual control of the Hardware Zone that the
a is received by. It will not function when
dat
IR
received by the unit’s front panel i.e. Two keypads are plugged into Zone A&B’s Control I/O
s, when the remote comes into IR
port
keypad in Zone A, the 128 Code-Set remote will
only control Zone A, when in Zone A. Take that
same remote into Zone B and it will only control
Zone B.
view of the
Page 15

BK
&
SB
IMPLY ETTER!
Accessories Guide
DB-9 to RJ-45 AdapterP/N:13290 (Included)
Included with any CT Receiver product, this adapter allows easy interface between a PC and any B&K product using a standard terminated CAT-5 cable. The adapter plugs into the serial port of the PC.
BK CT Series CD P/N: 14069
9
B&K of
to expedite the setup process by allowing users to edit presets, save files, and create templates virtually before
downloading them to the unit. The BK CT Series CD includes programming software for B&K receivers/processors, the SR10.1 remote control and CK1.2/CK1.1Keyp
and the HD6 and the Flash File Download for updating the HD6, CT 600.1,CT 600.3 and CT 300.3. A PDF
library of the B &K product line is also included with BK Suite. The library includes all B&K product manuals,
systems diagrams, and reference material for RS-232 communication. Additional information and all programs
are available on the web at www
***- PC requirements - 128MB RAM, Pentium grade or better processor, Windows XP is the recommended
operating system. (Exception - BK Suite not supported on Windows NT) ***
fers PC based setup sof
tware (BK Suite) for all of its receivers and preamplifiers . BK Suite is designed
ad Editors, B&K Hardware Quick T ools for CT
.bkcomp.com.
Receivers
Page 16
BK
&
SB
IMPLY ETTER!
10
Installation and System Diagrams
Installation and System Diagrams
Zone F
Keypad
Zone E
Keypad
Zone D
Keypad
Zone C
Keypad
Zone B
Keypad
Zone A
Keypad
Composite Video
Left Audio
ight Audio
R
Zone F
Speakers
Zone E
Speakers
Zone D
peakers
S
Zone
peaker
S
Connections
Positive
Negative
See the following p
inst
Zone C
Speakers
Zone B
Speakers
ages for details describing
allation procedures.
A
Zone
Speakers
Page 17
BK
&
SB
IMPLY ETTER!
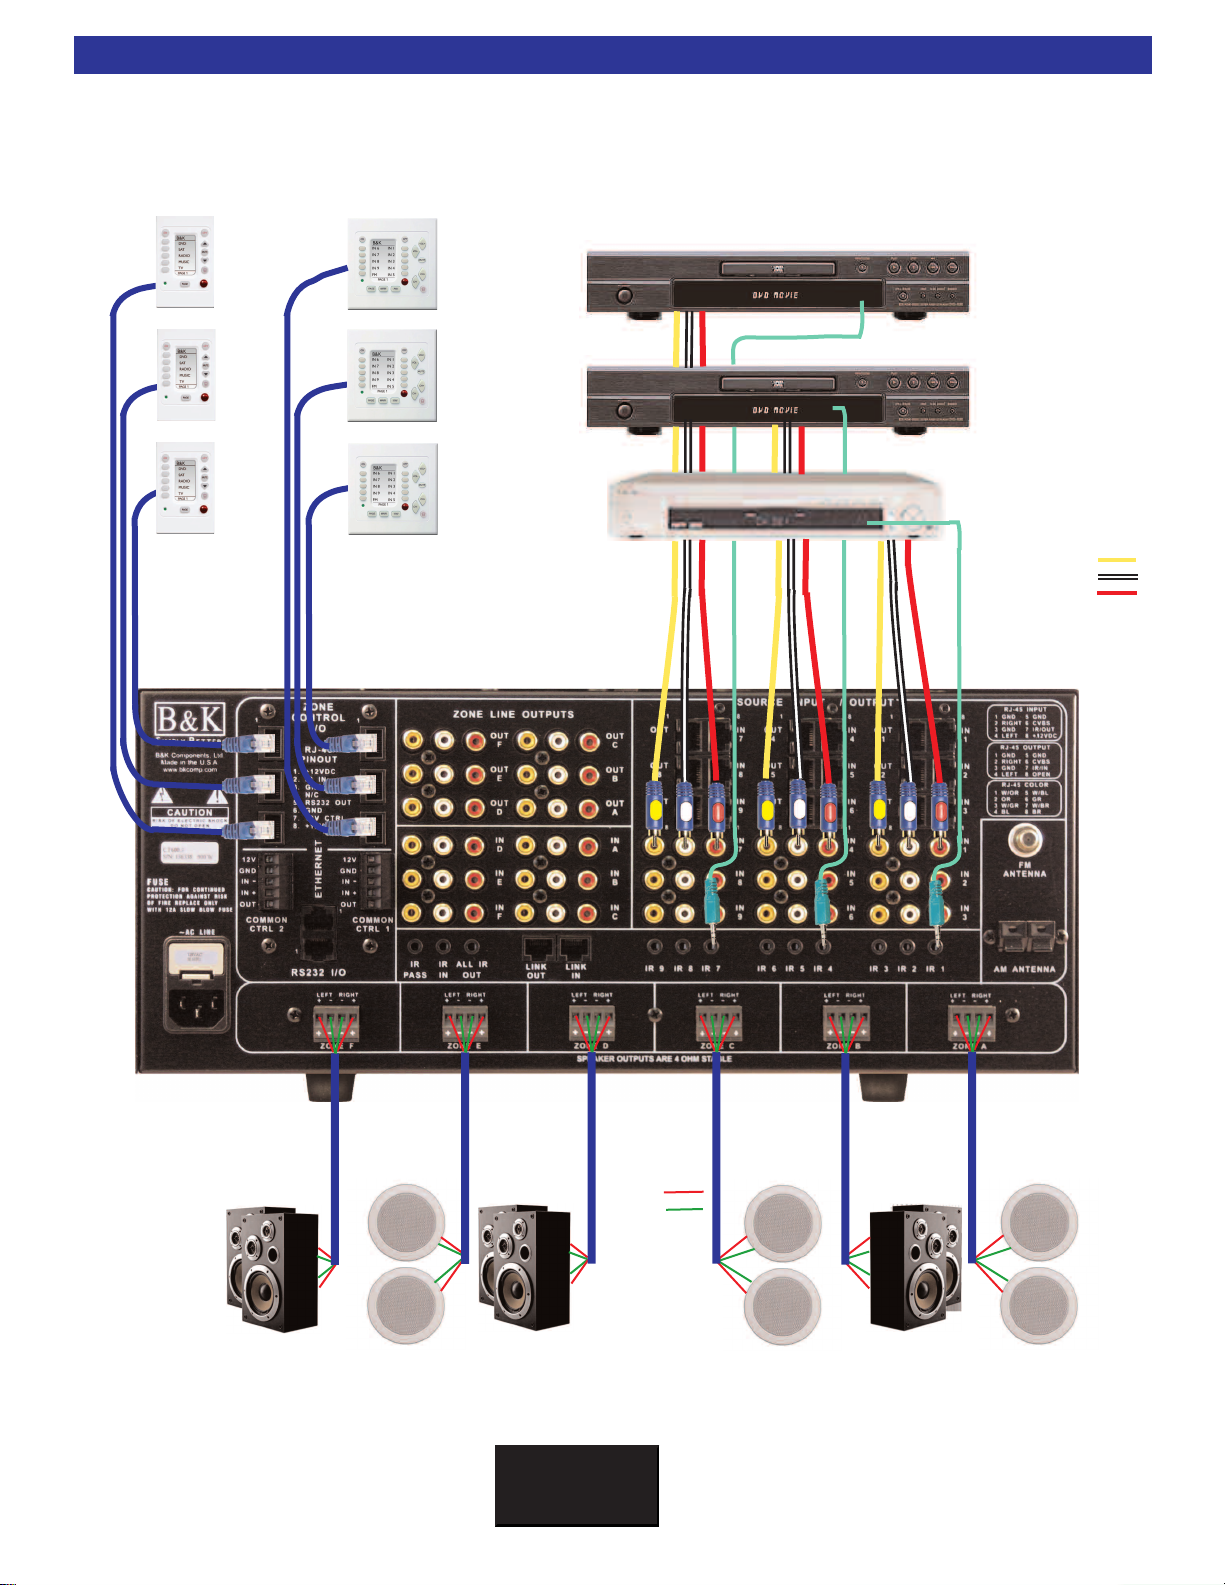
Basic System Hookup
Basic CT Receiver & Keypad System Hookup
Keypads connect to the Zone Control terminals on the CT Receiver using CAT-5 cable. Composite
video is used for video distribution, usually RG-6 or better.
11
Zone F
Keypad
Zone E
Keypad
Zone D
Keypad
Zone C
Keypad
Zone B
Keypad
Zone A
Keypad
Zone F
Monitor
Zone E
Monitor
Zone D
Monitor
Zone C
Monitor
Zone B
Monitor
Zone A
Monitor
Composite Video
Left Audio
Right Audio
Speakers
Zone F
Zone E
Speakers
Zone D
Speakers
Zone
Speaker
Connections
Positive
Negative
Zone C
peakers
S
Zone B
Speakers
Zone A
Speakers
Page 18

BK
&
SB
IMPLY ETTER!
12
CAUTION
RISKOFELECTRICSHOCK
DONOTOPEN
Installation Considerations
Installation Considerations
Placement and Ventilation
The CT Receiver incorporates built in power amplifiers and requires at least 3" of free air space above the
unit. If built into a rack, please insert at least one rack space of vent panel immediately above the unit.
Default Operation
The factory default settings of a B&K CT Receiver are designed for simplicity and functionality right out of the
box! Default settings will allow for simple functions such as zone power, volume control, input changing and
video connections to be checked as soon as they are connected. No programming required!
Connection Strategy
Installation of a complex A/V system may be a daunting task at first glance. However, the secret to a great
looking and easy to service installation is to be as deliberate as possible. Make the installation SERVICEABLE as well as neat! Dress the wires in groups according to purpose:
·AC Power lines tied together and attached to the cabinet/rack on the opposite side of the signal
cabling.
should have its length extended with a dedicated extension cord.
·Speaker wires tied together and att
·Antennas should be routed so that they may be re-positioned later.
·IR emitters should be routed and tied down, but NOT attached to source components. Remember,
emitter position is best done with the system powered up! Emitter wires may safely be run adjacent to
AC Power cables.
·Combine Keypad/IR Sensor cables together with any Dedicated Zone Input cables that originates in
another zone. Tie each Zone Control cable together with its dedicated source. Tie everything
together; make sure there is a service loop of free cable and dress on the opposite side of the AC
Power cables.
·Combine all cables coming from the sources, label each cable and connect them to the nine inputs.
·Combine all buffered outputs and connect to additional preamplifiers/receivers in the system.
·If you are utilizing any external power amps, combine the zone line outputs and connect to each
amplifier in turn.
Any component without enough slack in the power wire to enable rotating it or extracting it
ached to the cabinet/rack on the opposite side of AC Power lines.
Always leave enough slack at the ends of the cable so that the CT Receiver may be rotated and pulled out of
the shelf. Do not leave wires tied down so tightly that the components are unable to be rotated or extracted
from the rack.
Page 19
BK
&
SB
IMPLY ETTER!
Power Connections
AC Power and Line Fuse
Before connecting any A/V cables, verify that the CT Receiver powers up. Check functionality of the receiver by
connecting the AC power cord and powering on the receiver using the main power button, the front panel LED
should now be lighted. Af ter 45 seconds, the receiver has finished it’ s boot process. Turn off the main power button and disconnect the AC power cord. Connect all A/V and other interconnect cables and re-connect the AC
power cord. The CT Receiver connection process should now be complete.
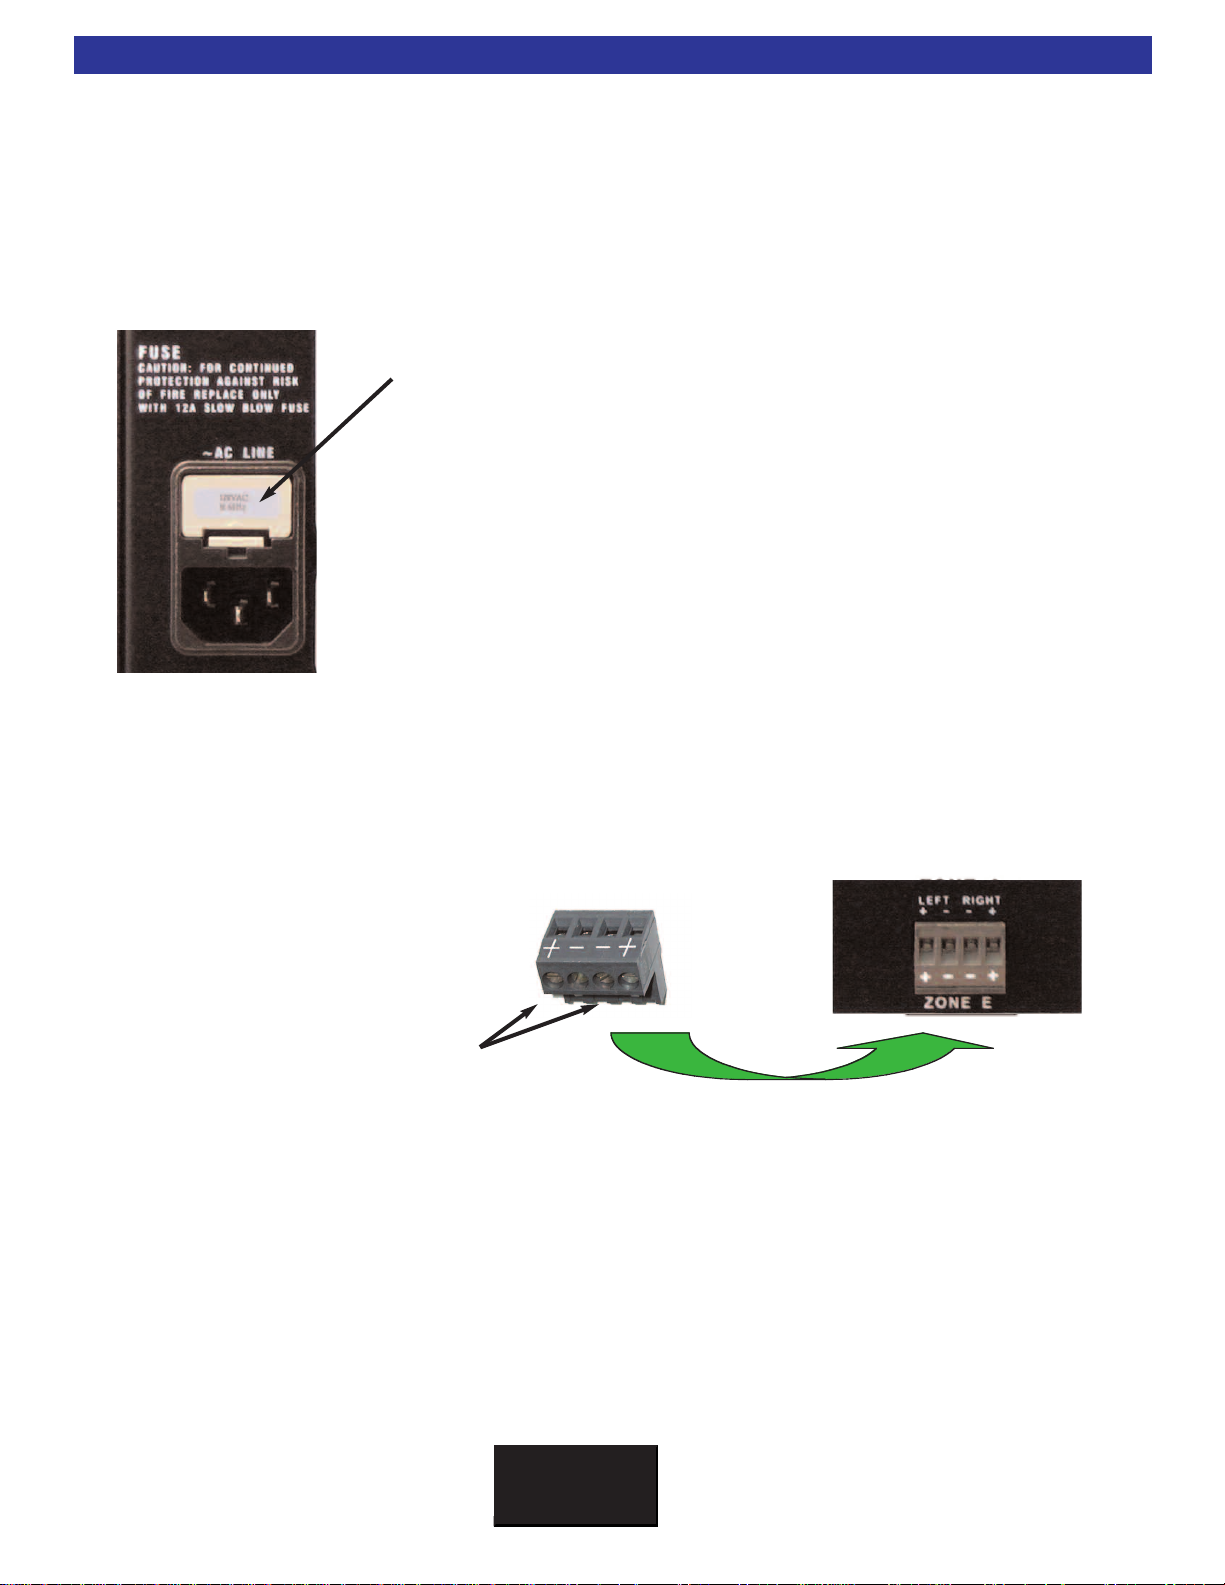
Checking the AC Power fuse:
1. Power off the unit and unplug the power cord.
2. Push up on the fuse release tab.
3. Pull the entire fuse holder out.
4. Remove the fuse from the fuse holder and measure the fuse
with a meter. It is not possible to know if the fuse is
blown by looking at it.
5. The CT 600.3/600.1 requires a 12A Slow-Blow type fuse.
The CT 300.3 requires a 8A Slow- Blow type fuse.
Replace only with fuse of same type and value.
Caution! A blown fuse is usually an indicator of an installation or serv-
ice problem. If the fuse continues to fail, the installer should contact
B&K Components Customer Service at 716-656-0026 or contact an
authorized B&K Service Center for assistance.
13
Speaker Connections for CT Receiver
The CT Receiver connects to speakers using 4 position plug-in Phoenix connectors. Speaker wires are home
run from each zone to the back panel of the CT Receiver. Unplug the connector from the rear of the receiver,
strip the speaker wire approximately ¼" and insert the bare end into the gate on the connector. Use a small
flat blade screwdriver to tighten the con
nection to each conductor. Connectors
accommodate up to 12-gauge wire.
Make sure to observe polarity as you
hold the connector upside down to connect Left and Right as shown. T
guide tabs also insure proper orientation.
-
wo
Page 20
BK
&
SB
IMPLY ETTER!
14
Source Connections
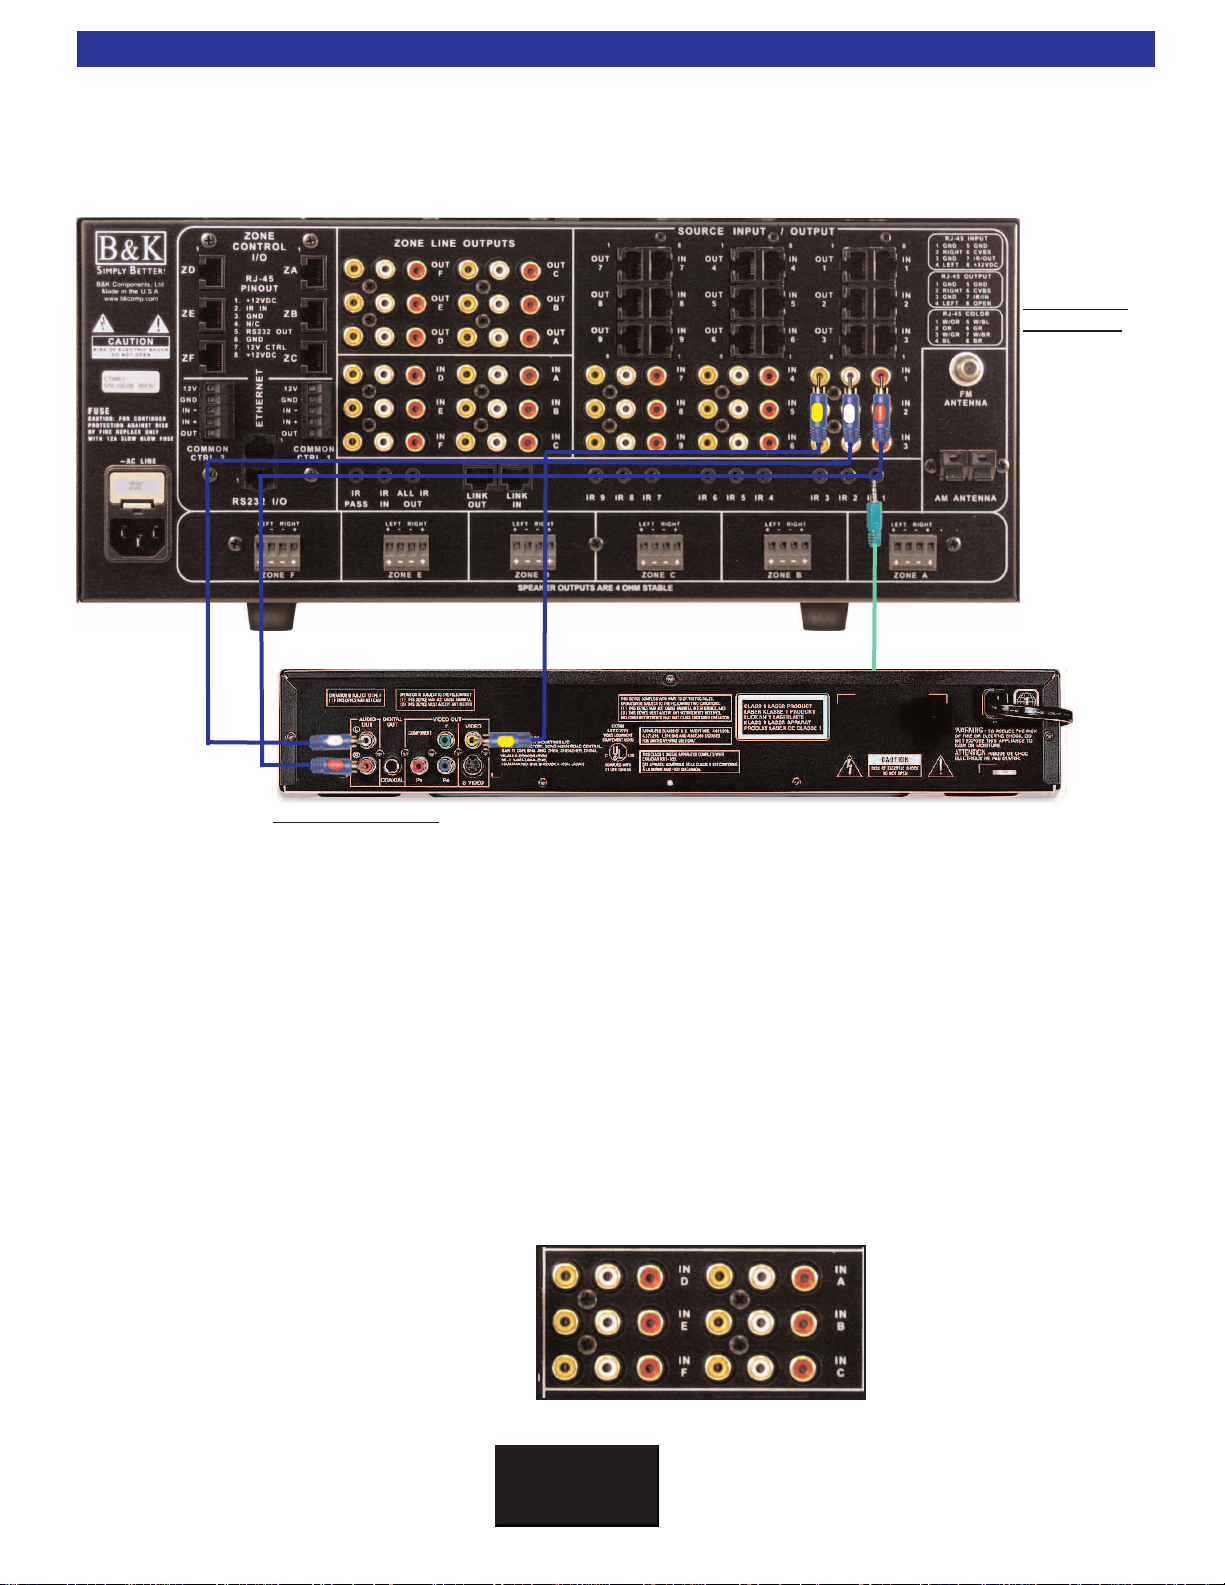
Shared Source Inputs
Any source that is desired to be shared throughout the system will connect to one of the 9 A/V Source Inputs.
N
ine sources may be "shared" throughout any zone in the entire system. Internal tuners in the CT receiver
products do not utilize an input. Each of the nine shared sources should be connected as follows:
CT Receiver
Connection
Plug the analog
audio L&R,
c
video, and the
IR emitter into
the back panel.
omposite
Source
Source Connection
Use the analog audio and composite video from the source.
Composite video and analog audio may be distributed
throughout the system. Digital audio may be passed through
the composite video inputs and outputs See Page 15.
Mount the IR Emitter on the front
panel, in front of the IR receptacle
of the source.
Dedicated (Local) Source Inputs
Dedicated source inputs are used for local sources that are dedicated only to that individual zone. Typically
this feature is appropriate for sources that are physically located in the zone, such as DVD players or satellite
boxes in bedrooms or dens. By running well shielded audio and video cable from the local source back to
the CT Receiver, the user may utilize the auto-sense capability, which is built into these inputs. The CT
Receiver will immediately auto-detect the audio or video signal from a Dedicated input and switch that zone
to its dedicated input. By default, this feature is set to on; however it may be turned off to add an additional
manually selectable input for that particular zone. Dedicated source inputs are identified on the back panel
by the zone to which they are associated, i.e. IN A, IN B, etc. When auto-detect is used, the CT Receiver will
store previous state of the zone before the Dedicated input detected a signal. Therefore, when the dedicated
signal is switched of
f, the zone is returned to it
s previous st
ate.
Dedicated inputs require an additional run from the zone to the CT Receiver for the audio/video connections.
CT Receiver Dedicated
Inputs (Back Panel)
Page 21
Buffered Outputs
BK
&
SB
IMPLY ETTER!
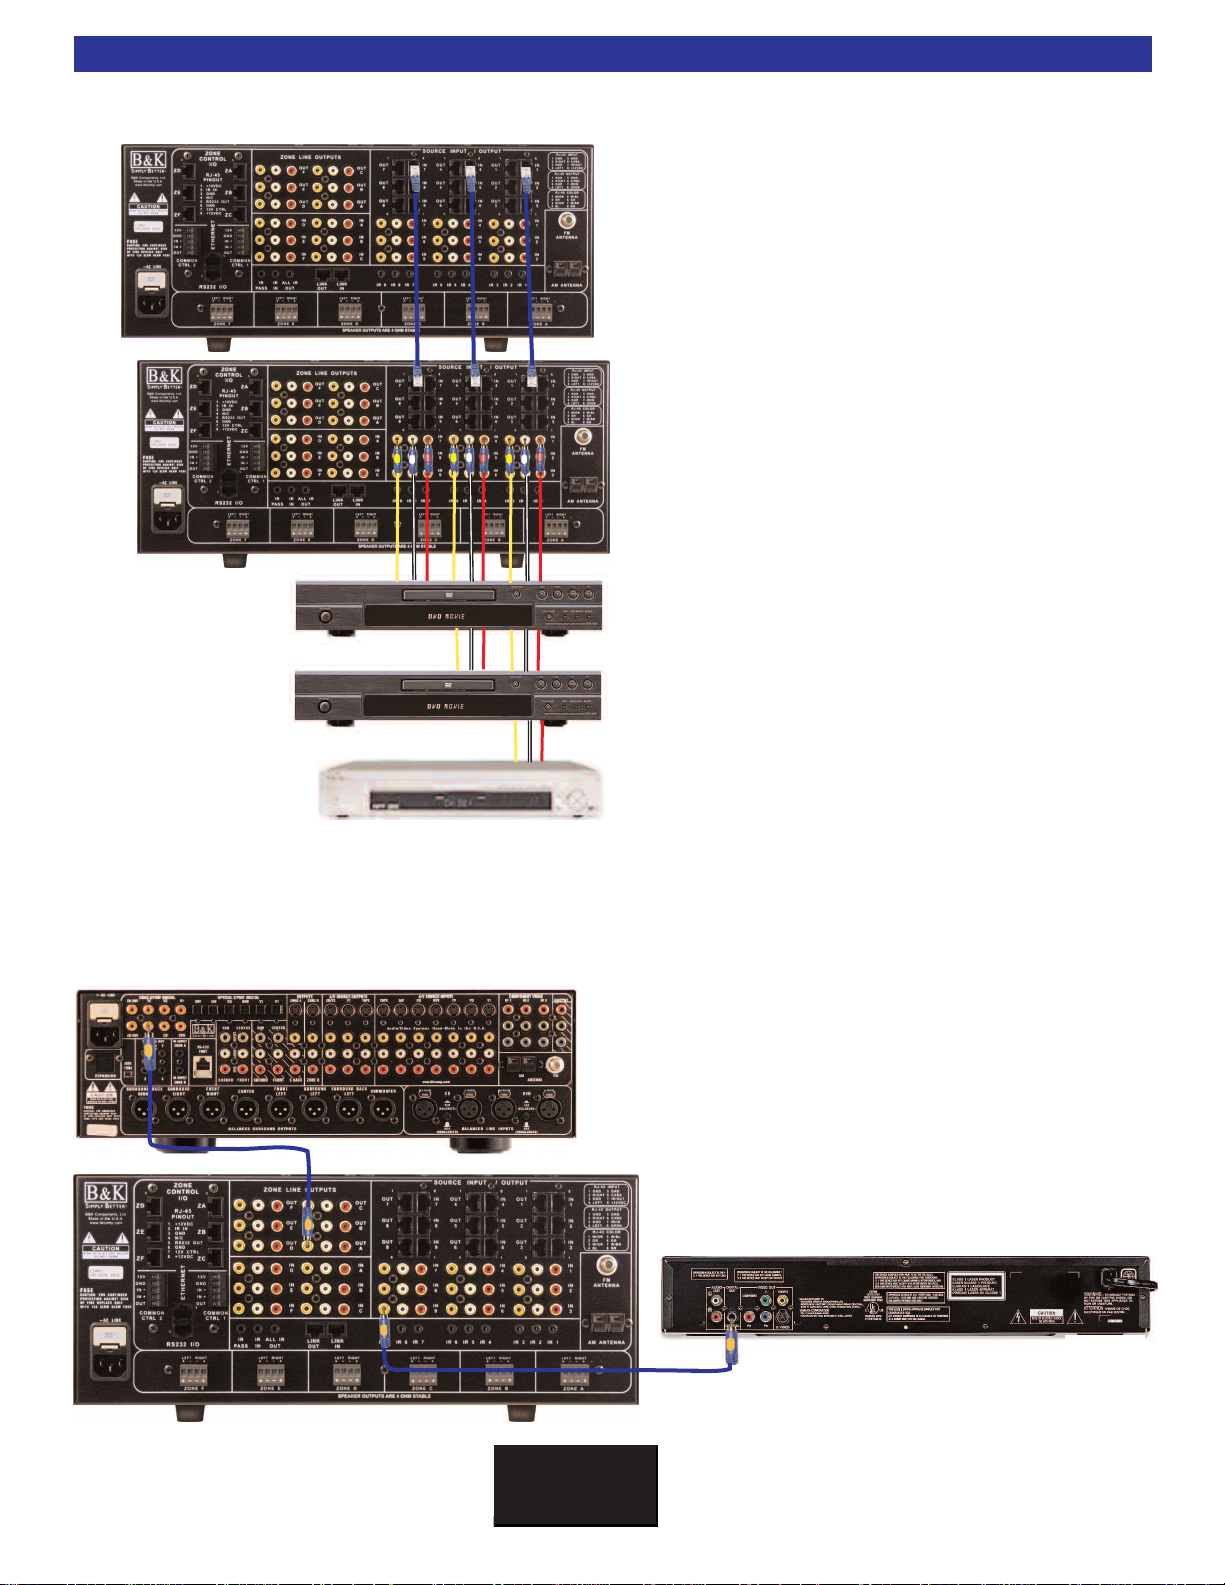
Buffered Outputs
Line level, impedance matched, (buffered) outputs are
provided in order to pass source signals from one unit
to another. Each of the 9 shared A/V inputs has a
buffered output. These outputs are buffered in order
to minimize signal degradation as the signal passes
from unit to unit in series. Essentially they eliminate
the need for Y-cables. The Buffered outputs will primarily be used for sharing of sources between other
whole house units or home theater systems.
Note: When setting up a CT System, connect all
audio/video inputs and respective infrared emitters to
the first CT
multiple CT Receivers with standard CAT-5 cabling.
Connect one CAT-5 cable per shared input (9 total)
and 1 CAT-5 cable from “Link Out”
page 25.
Receiver
15
. Expand the system by linking
to “Link In” See
Digital Audio Connection
When video is not needed to be routed, the CT Receiver composite video inputs/outputs may be used to route
coax digital audio. Simply connect the digital coax connection from the source device into the shared or dedicated video input
s. The CT
zone video outputs will now switch digital audio to a surround processor
Ref 50 S2
.
Source
Page 22
BK
&
SB
IMPLY ETTER!
16
CT Receiver Speaker Connections
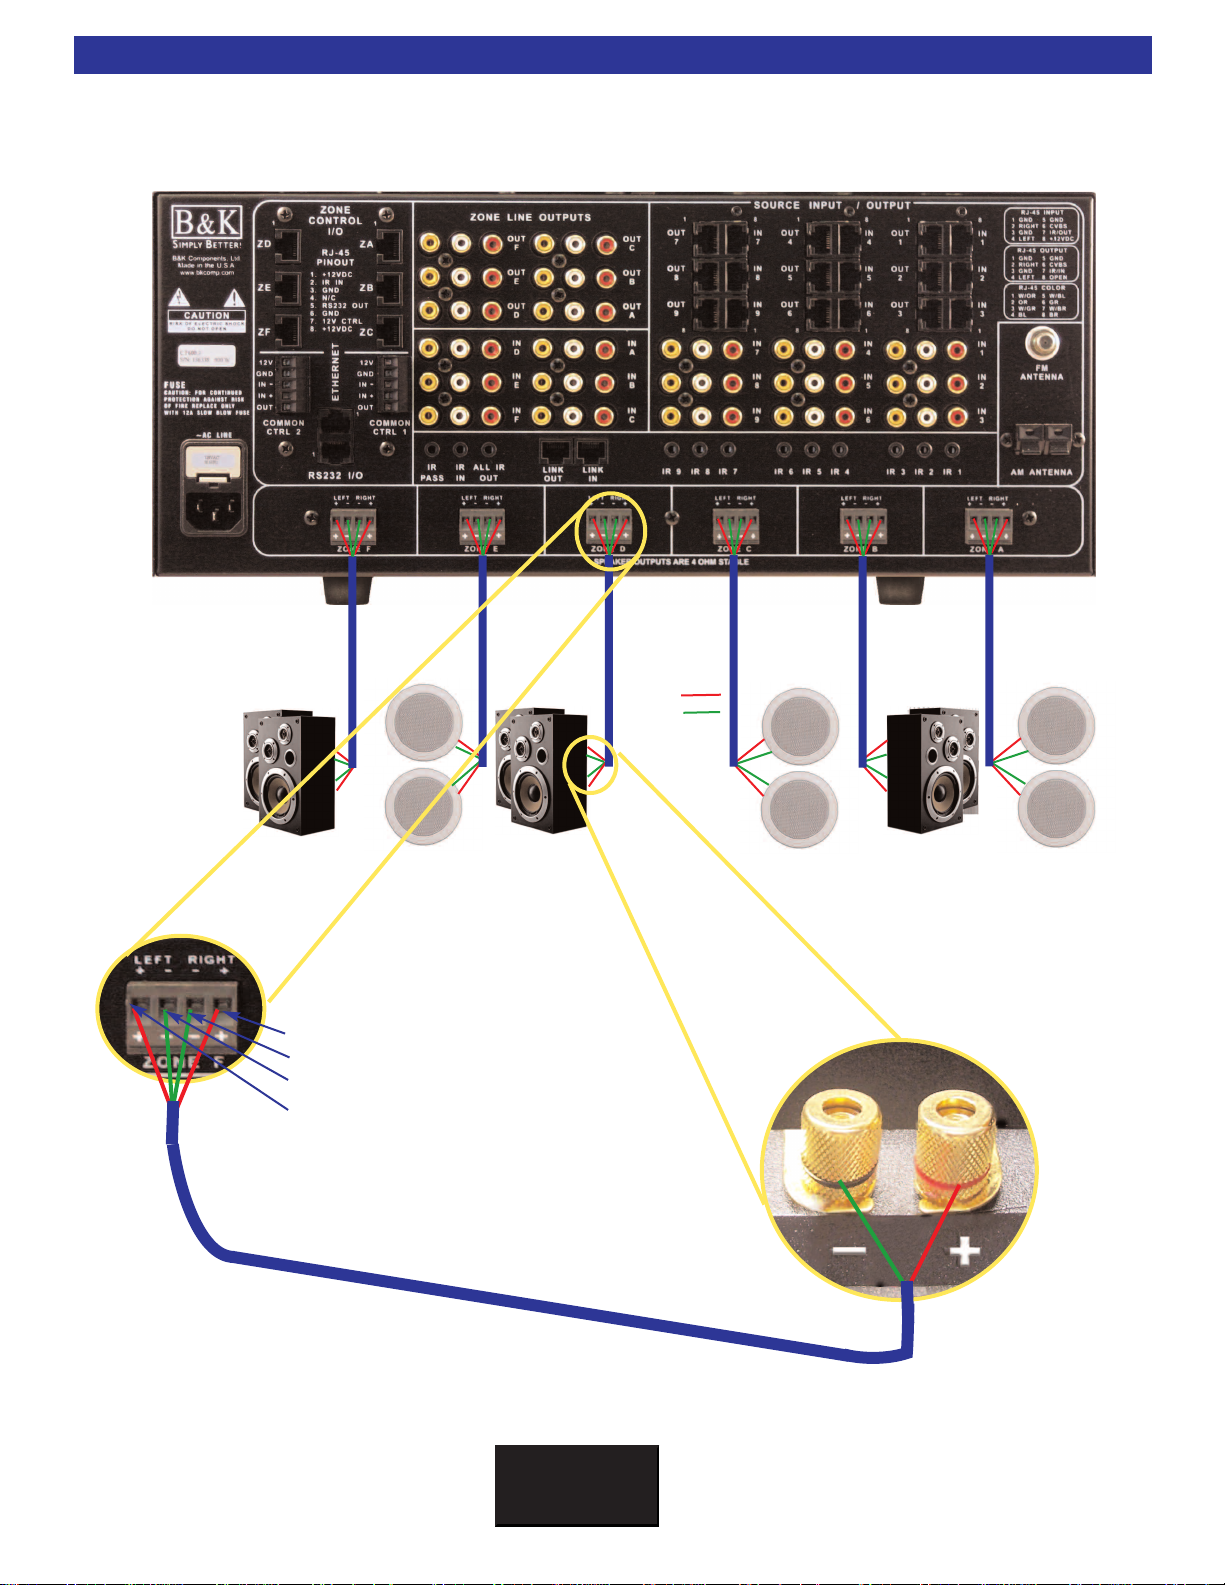
Example CT Receiver Six Zone Speaker Connections
Zone
Speaker
Connections
Positive
Negative
Zone F
Speakers
[R+] Right Positive Speaker Output (Red Wire)
[R-] Right Negative Speaker Output (Green Wire)
[L+] Left Positive Speaker Output (Red Wire)
[L-] Left Negative Speaker Output (Green Wire)
Zone B
Speakers
Zone D
Speakers
Zone C
Speakers
[-] Negative Speaker Input (Green Wire)
[+] Positive Speaker Input (Red Wire)
Zone E
Speakers
Zone A
Speakers
Amp channels are 4W stable.
Page 23
BK
&
SB
IMPLY ETTER!
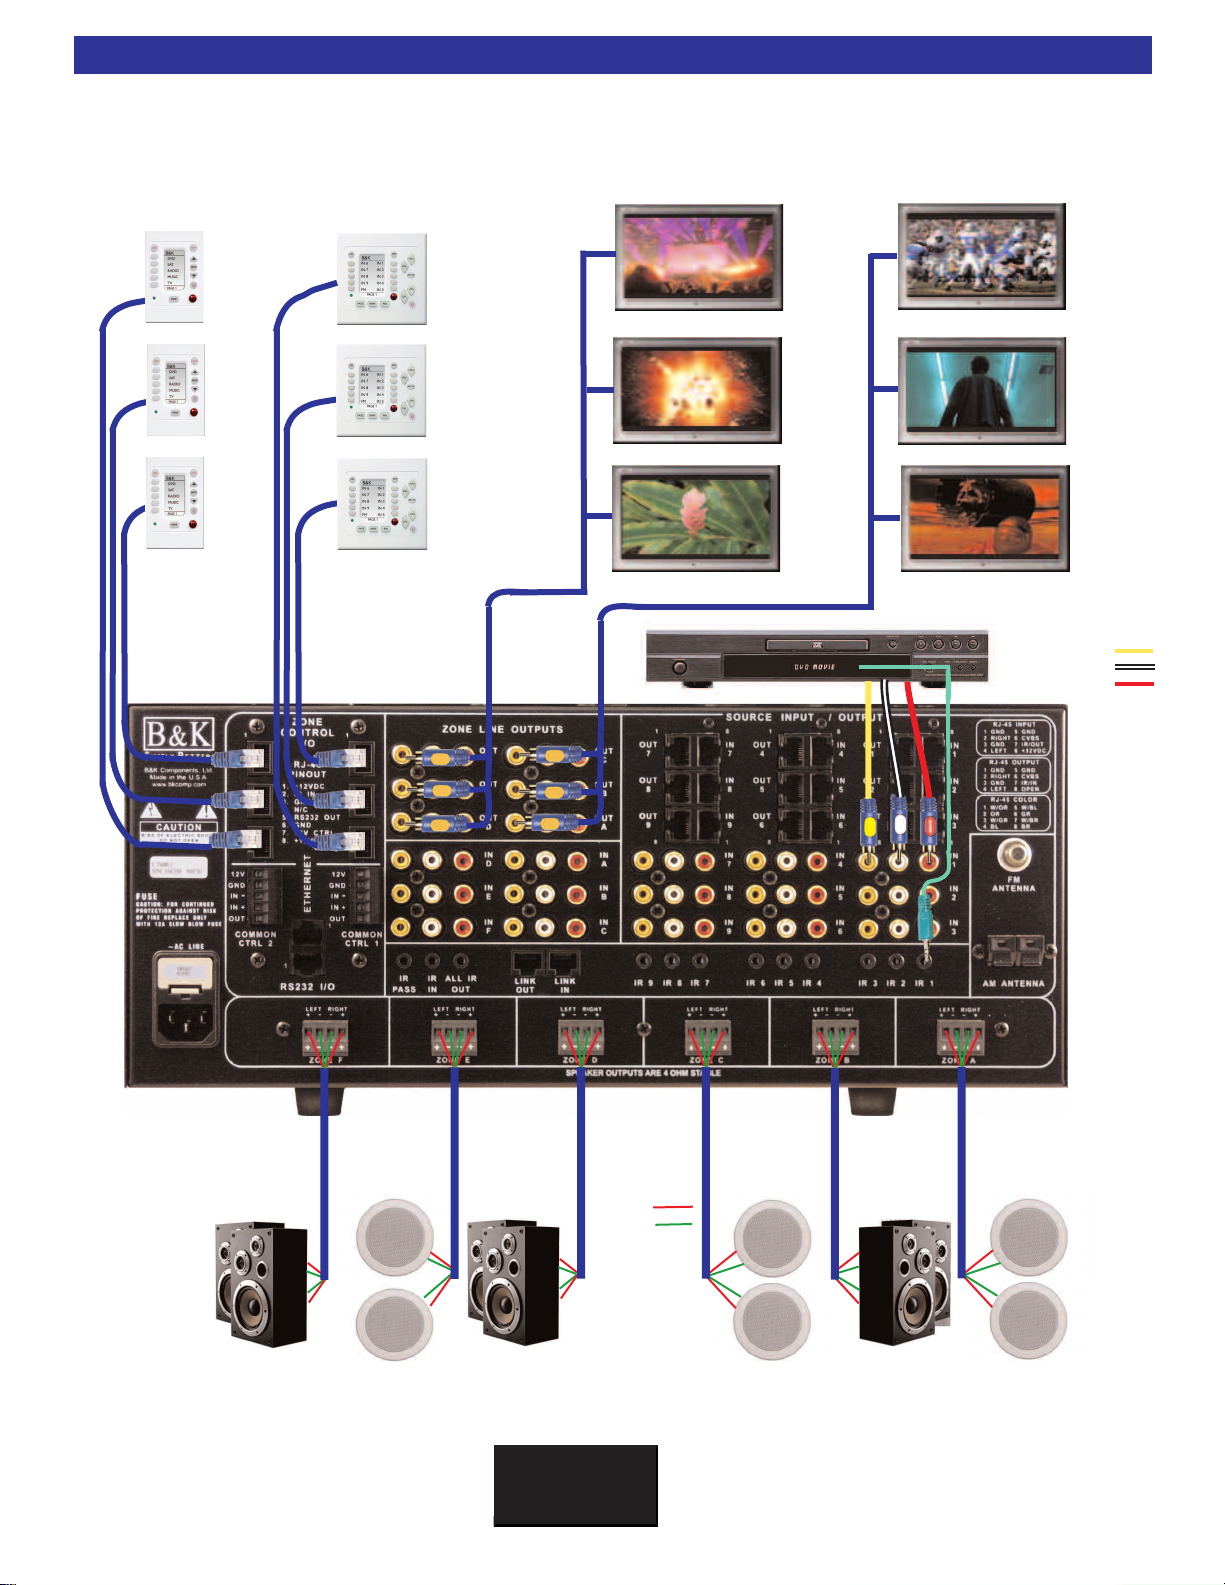
Zone Line Outputs
BK
&
SB
IMPLY ETTER!
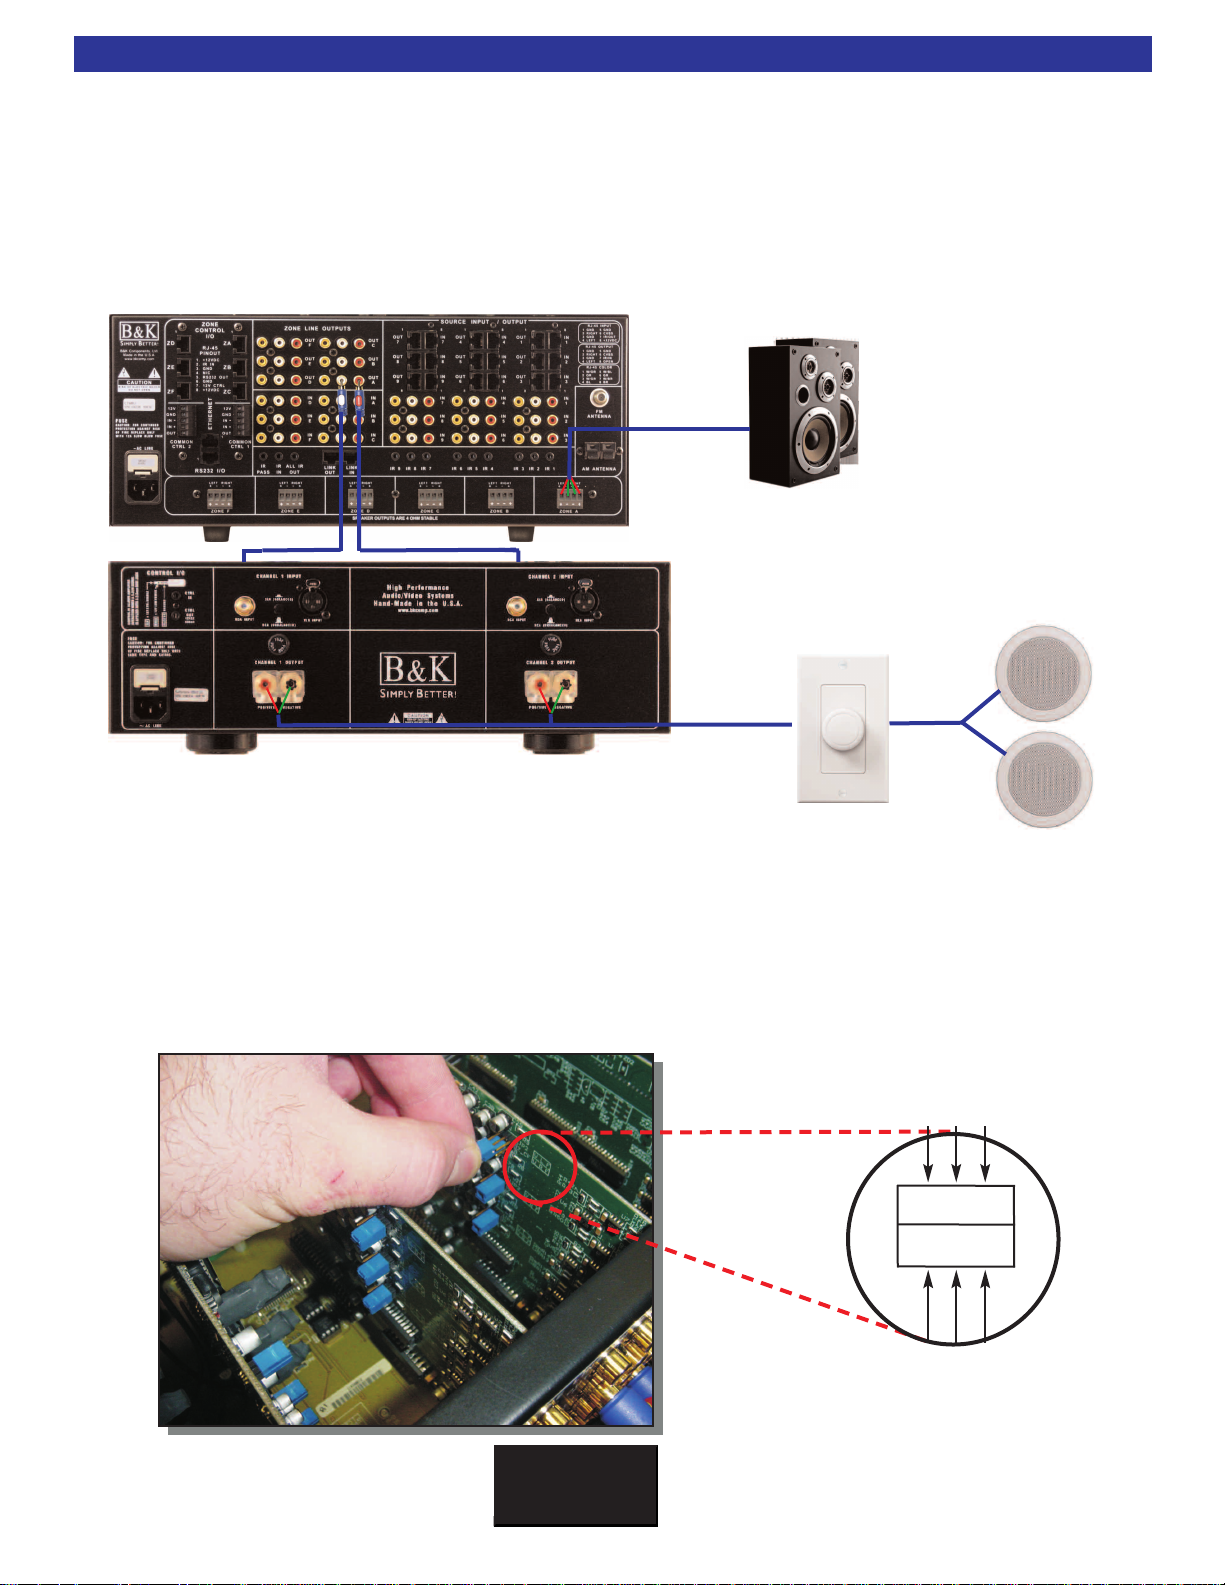
Connecting an External Amplifier
Zone line outputs are used to run the audio and/or video into each zone. Line level audio outputs are supplied for each zone in order to provide a means for external amplification in any zone. These line outputs
may be configured for either fixed at line level or variable to match the volume level of the receiver (See
Below). The Zone Line outputs will not output audio when the zone is off. By factory default on a CT
600.3/600.1, the line outputs for zones A, B and C are set to variable output and zones D,E and F are set to
line level fixed output. By factory default on a CT 300.3, the line outputs for zones A and B are set to line
level fixed output and zone C is set to variable. An external volume control is needed for line level fixed applications.
Ref 200.2 S2 amplifier
17
Changing Line Level Outputs From Fixed to Variable
An internal jumper is used to change the zone RCA
ration is most beneficial when a zone is to be used with additional external amplification. Open the chassis and
locate the blue jumper on the audio card for the Zone Line Outputs. The jumpers are in line with each channel
on the back panel. The right position is fixed (F) line level, the left position is variable (V) volume control. When
the jumper is set to variable, the volume level of the output will be matched with the volume level of the receiver
amplifier output. The jumper has the ability to change either the left (L) or the right (R) side of each zone if
desired. An external volume control is required for a fixed output application.
outputs between line level fixed or variable. This configu-
Left
Fixed
Variable
VLF
VRF
Right
Fixed
Variable
Page 24
BK
&
SB
IMPLY ETTER!
18
Zone Line Outputs
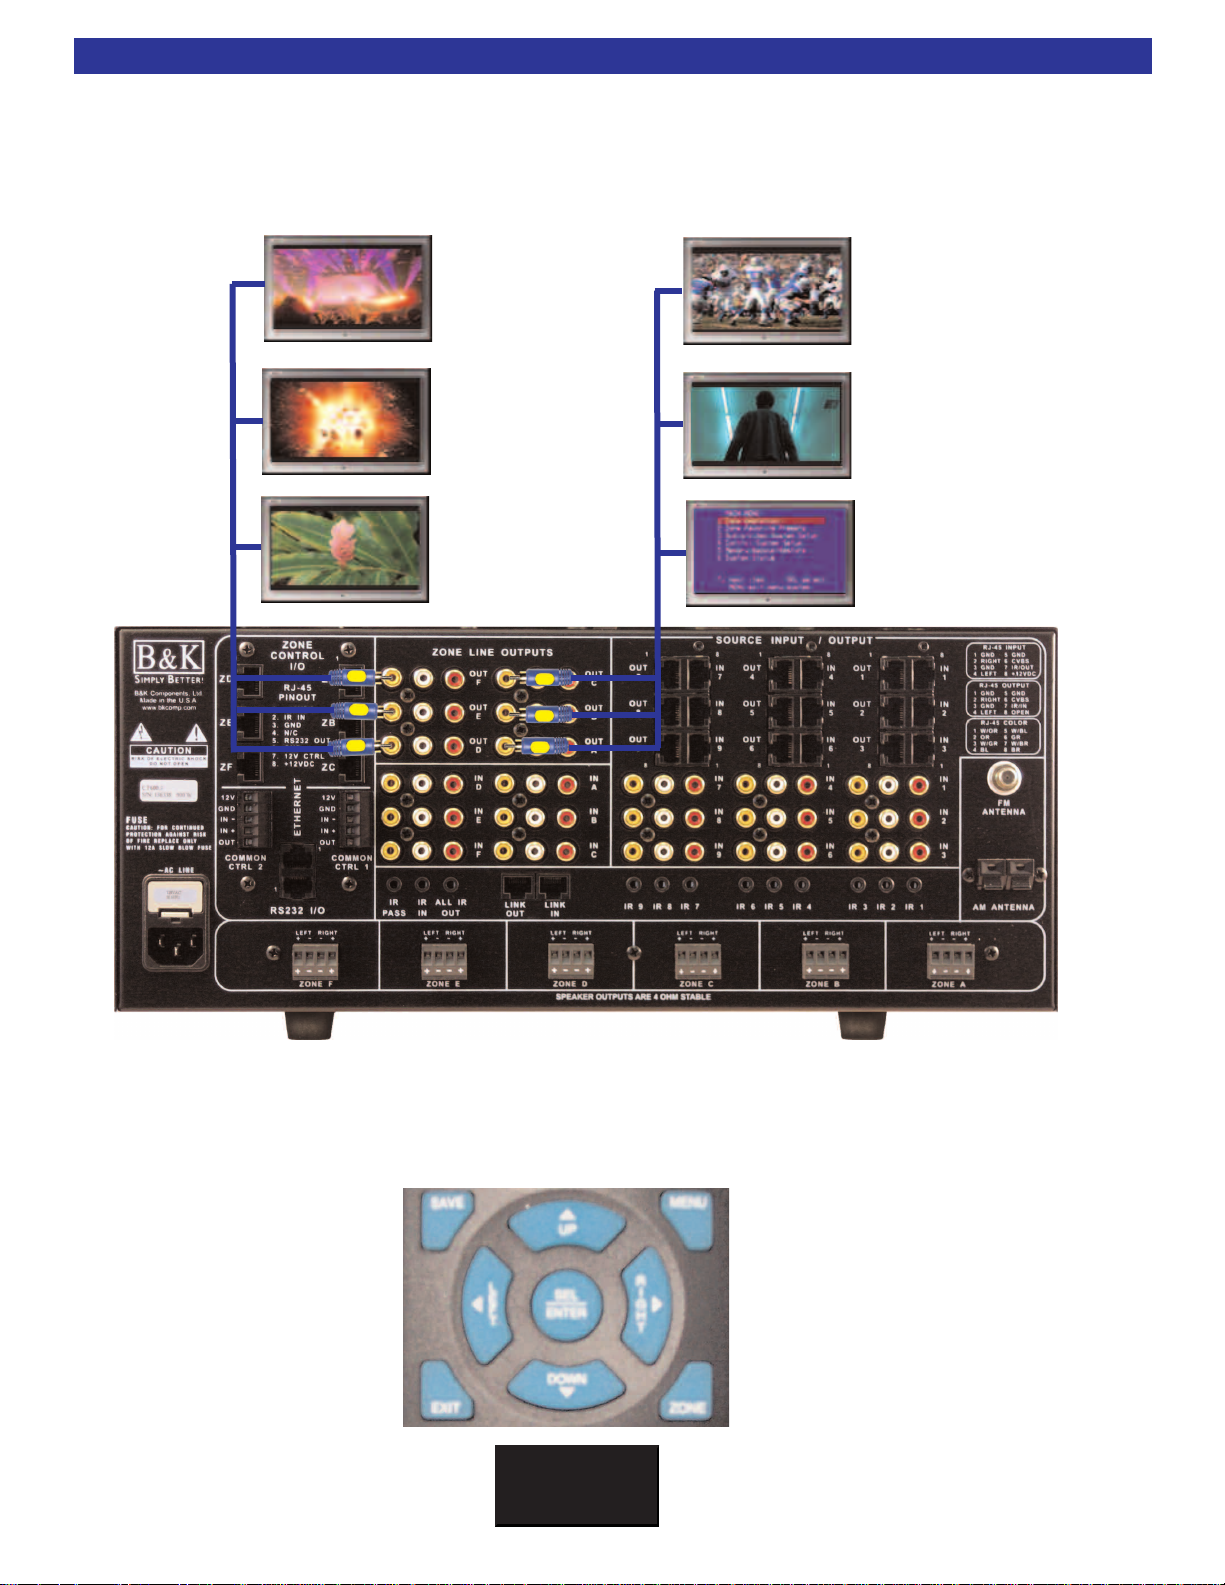
Composite Video Outputs
Composite video outputs supply video to monitors in each zone. Zone A's video output provides access to
the on screen display, which is used for unit setup. The setup menu is only accessible through Zone A’s
composite video output. The video signal will shut off when the zone is shut off.
Zone F
Monitor
Zone E
Monitor
Zone D
Monitor
Zone C
Monitor
Zone B
Monitor
Zone A
Monitor
Menu System
To access the menu, make sure you have a monitor coming from the zone A video out. Then push MENU on
the MZ-128 remote. Use the UP, DOWN, LEFT, RIGHT and SEL buttons in the center of the remote along
with the number keys to go through the menu functions.
Page 25
BK
&
SB
IMPLY ETTER!
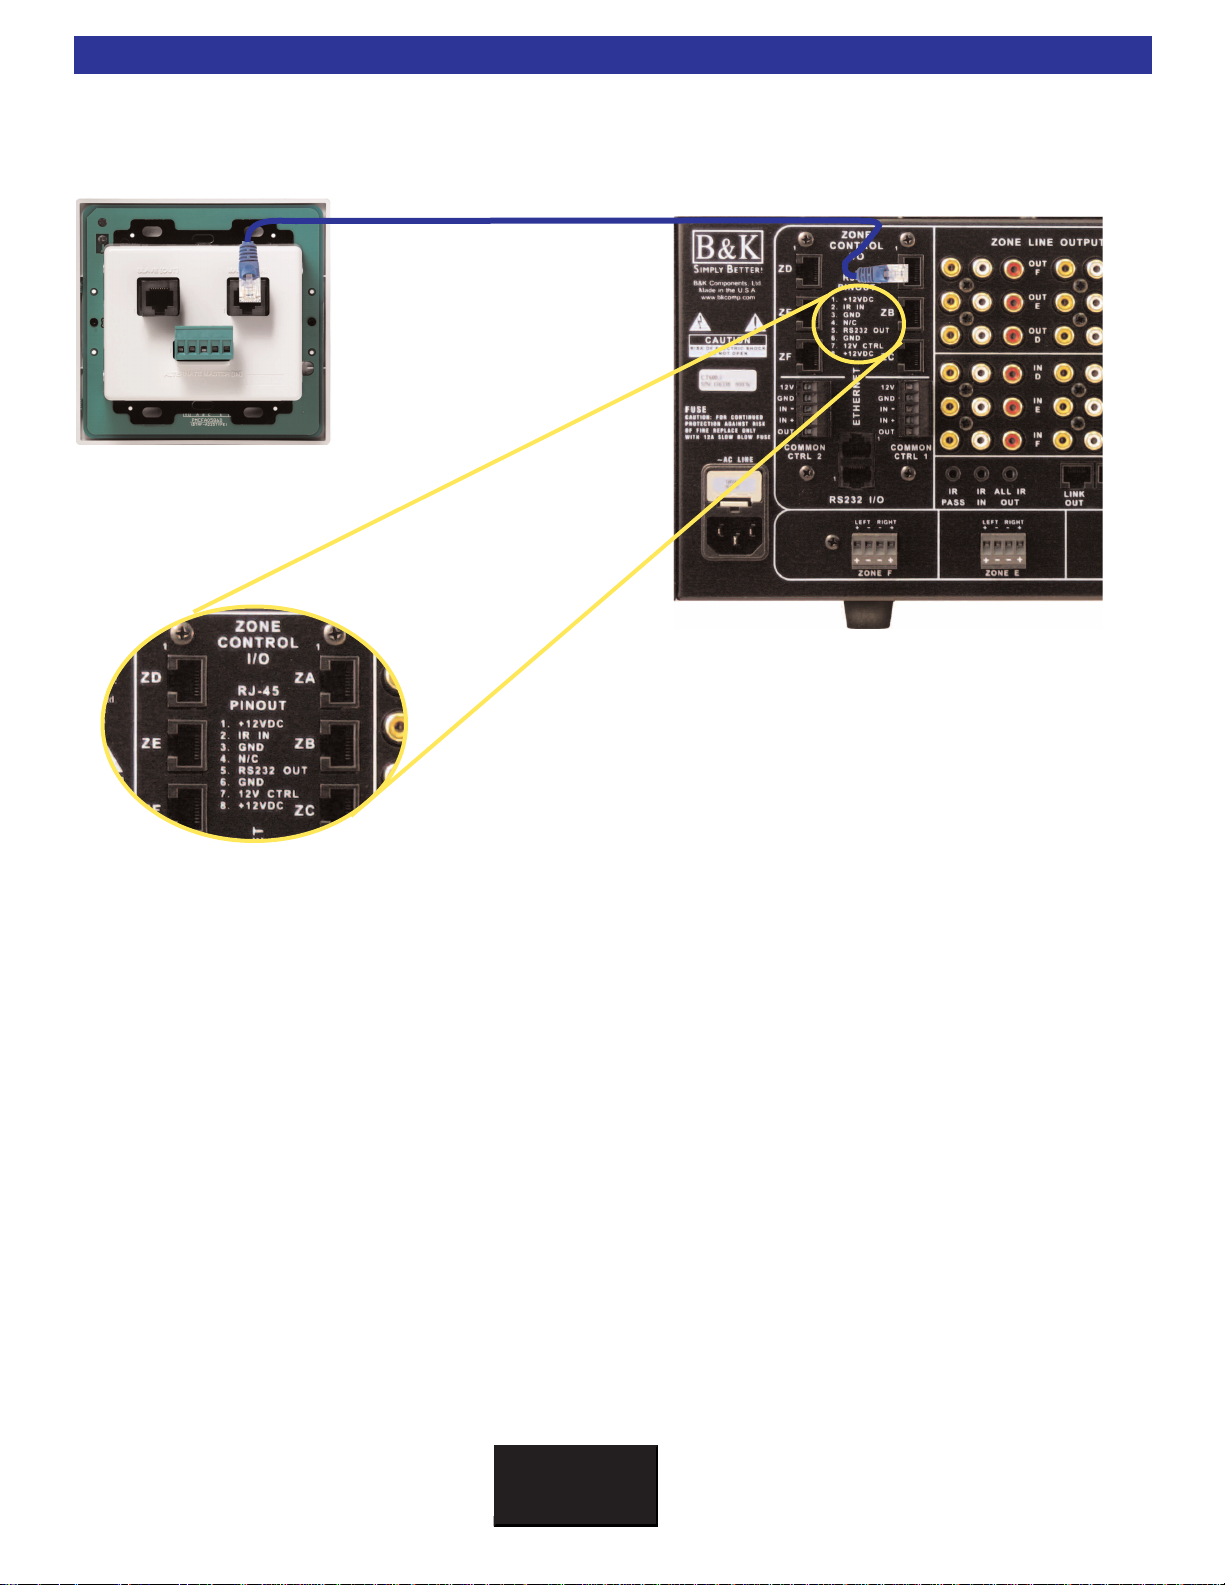
CK1.2 Keypad Connections
Keypad Connections
Keypads connect to the CT Receiver at the Zone Control I/O Terminals. Termination of the Keypad cables to
the Control Terminals is done by a straight through CAT-5 cable.
19
If needed, the pin out configuration of the keypad wiring is
located on the back of the CT receiver.
Each of the 5 functions for the keypad control ports are defined as follows:
+12VDC - Use this terminal to power the sensors and keypads for this zone. Each control card is limited to 1 amp capacity per three
zones in each vertical array. See the next page for examples.
GND - Use this terminal as a common ground for dat
RS-232 XMIT - This terminal transmits RS-232 information. This pin allows RS-232 status feedback to the CK1.2 keypad or other RS-
232 capable devices. It may be configured with Tab 11 of BK Suite. The CT Receiver may not receive RS-232 via this terminal.
IN -
A
DAT
ma in CT microprocessor for B& K commands.
CTRL OUT - The 12VDC 200mAoutputs are used to control external amplifiers, relays, screens or devices that activate when a volt-
age is detected.
going into the Advanced FULL Setup Tab 9 in BK Suite. The 12VDC controls may be modified to the following choices:
This terminal is an IR data port feeding both the flasher port of the selected input (unless routing is set to
The default action is that the voltage is ON when the Zone is ON, OFF when the zone is off. This is controlled by
Zone On The 12V Control Out is on if the corresponding Zone is on (This is Default).
Active
Zone
Zone Off The 12V Control Out will turn on only if the corresponding hardware Zone is off.
Selected Input The 12V Control Out is on only if this input is selected (switched to) by the user.
The 12V Control Out will turn on only if the Zone is on
detect an audio or video signal on the selected input for that hardware zone.
Note - when this option is selected, the input check boxes are active. Check all inputs that are desired to
turn on the Zones Control Out.
a, control and power.
ALL) and the
AND the CT Receiver may
Page 26
BK
&
SB
IMPLY ETTER!
20
BK
&
SB
IMPLY ETTER!
CK 1.2 Keypad Connections
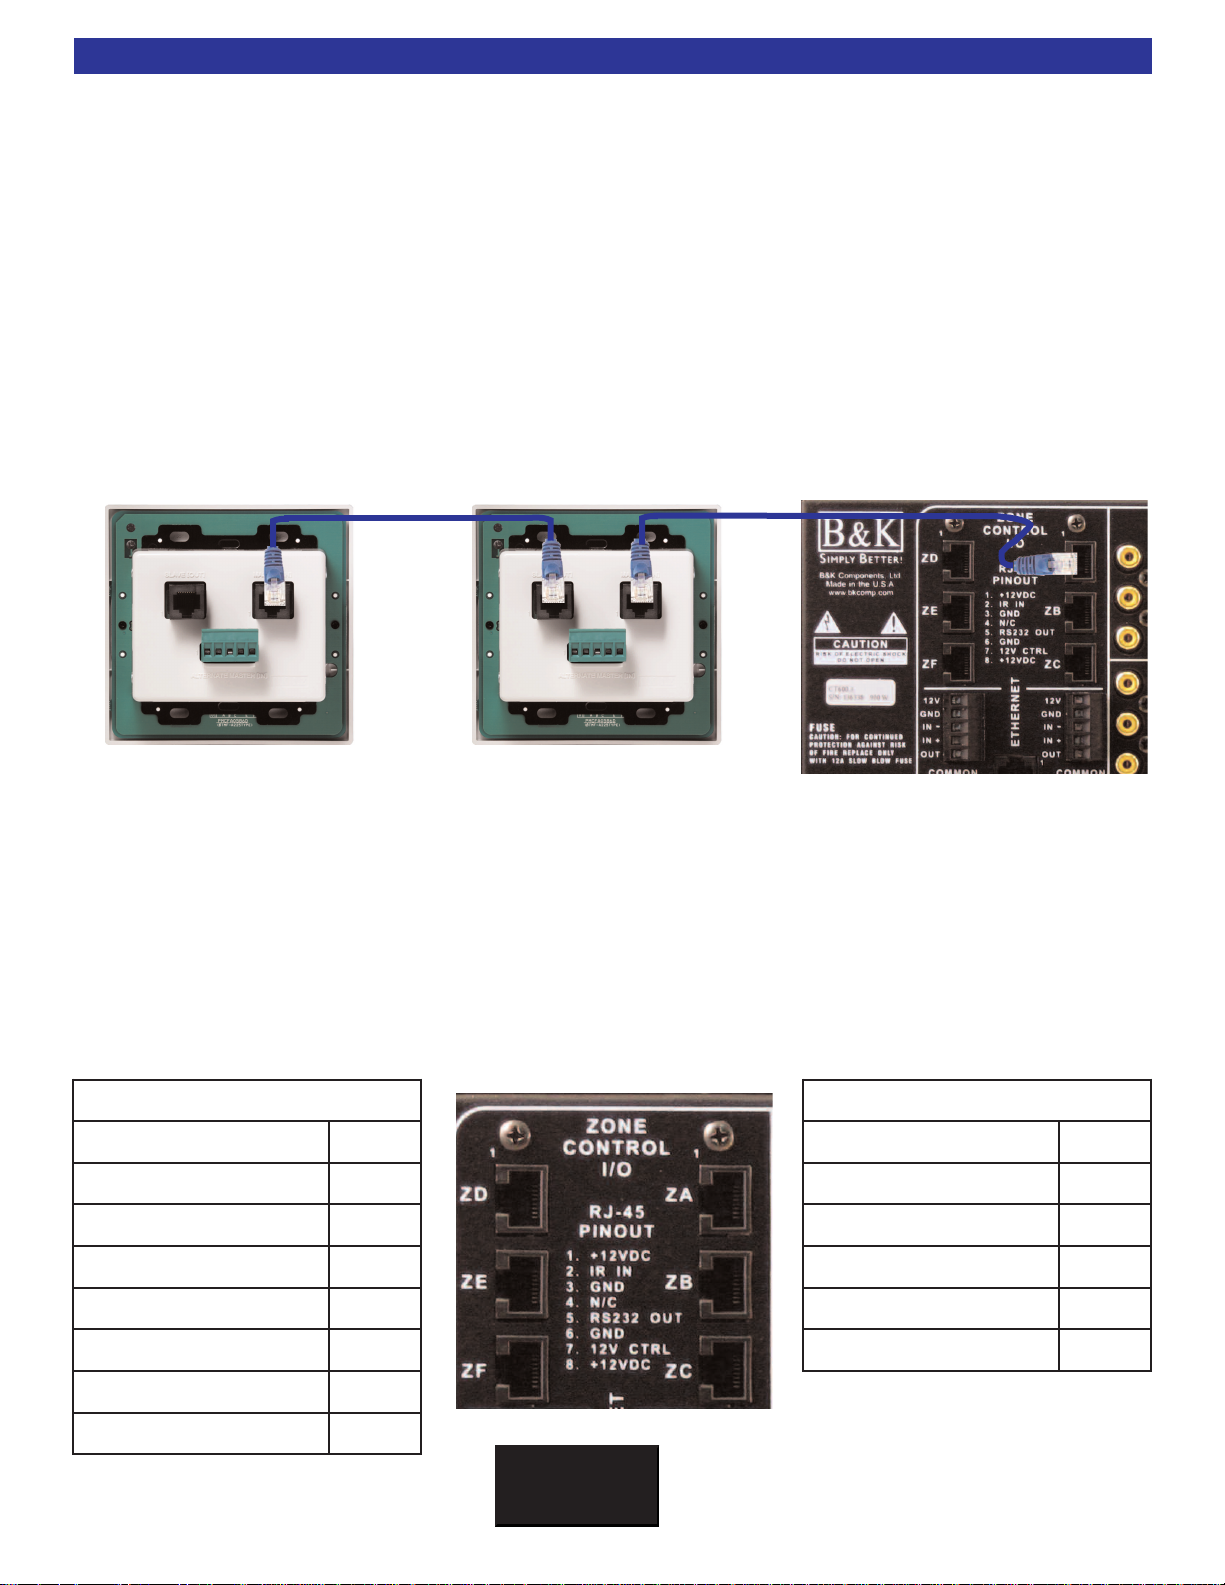
Adding Additional Keypads in the Same Zone
When rooms are interconnected or are open to each other (for example: interconnecting family room, kitchen,
and dining areas are common in many homes) you may opt to expand a zone to include several rooms.
Many keypads may be connected in a daisy chain from the master keypad in that zone. The master is the
keypad which is home run back to the CT Receiver. To daisy chain keypads, simply connect a straight
through CAT-5 cable terminated into RJ-45 between the two keypads. All the chained keypads need be programmed separately . Daisy-chained keypads may be programmed for independent zone control using the
appropriate code-set.
The home run (master) keypad is connected using the MASTER [IN] on the keypad back panel. From the
Master Keypad's SLAVE[OUT] connect to the second keypad's MASTER [IN]. You may continue the daisychain to as many as four keypads per zone control terminal. When programming daisy chained keypads,
each keypad must be programmed separately. Do not program a slaved keypad while it is physically
connected to the master keypad.
POWER SUPPLY IS CURRENT LIMITED TO 1 AMP PER EVERY THREE ZONES
The six zone receivers have two zone/controller cards, each is identical to the single controller card in a three
zone receiver
It is not allowed to draw more than 1 amp from each of the cards (a card is the vertical strip of zone and common control connections). The control outputs are current limited to 200mA.
The CT 300.3 has one power supply card for keypads, IR sensors and 12VDC control outs. Anything connected to the +12V zone keypad output, a zone control out or a common control out must have its power
consumption noted and added up. The total must not draw more than 1 amp for a CT 300.3.
LEFT CONTROLLER CARD
Fam Room Keypad 75 mA
Fam Room Sensor 50 mA
Family Rm Screen Relay 200 mA
Kitchen Keypad 75 mA
Bedroom Keyp
Bedroom TV Lift 200 mA
. Each card has its own independent 1 amp power supply with built in current limiting protection.
RIGHT CONTROLLER CARD
Living Room Keypad 75 mA
Patio Keypad 75 mA
Den Keypad 75 mA
Den Sensor 50 mA
ad
75 mA
TOTAL 275 mA
TOTAL 675 mA
Page 27
BK
&
SB
IMPLY ETTER!
IR Emitter Outputs
IR Flasher Emitter Output
Each of the nine shared sources may be controlled from any zone in the system using the CT Receiver built
in IR routing circuitry. By default, when the IR Flasher outputs are set to “selected input,” IR will route from
the keypad terminal to the IR output for only the input that is selected for that zone. This allows identical
source components to be used independently in the system. The flasher outputs may also be set to all input
configuration,where all 9 IR outputs will flash simultaneously. The IR outputs are compatible with any standard 1/8” (3.5mm) miniature flasher/emitter from Niles, Xantech, Elan, Sonance or Speakercraft, etc. The IR
outputs operate at 5V and may supply up to 10mA of current (475W internal output resistance). All outputs
accommodate a wide range of carrier frequencies used in current source pieces. Make sure to use IR
shields when using multiple identical sources in the same rack.
By factory default, the IR outputs are set to ‘SELECTED INPUTS’ where IR routing is taking place.
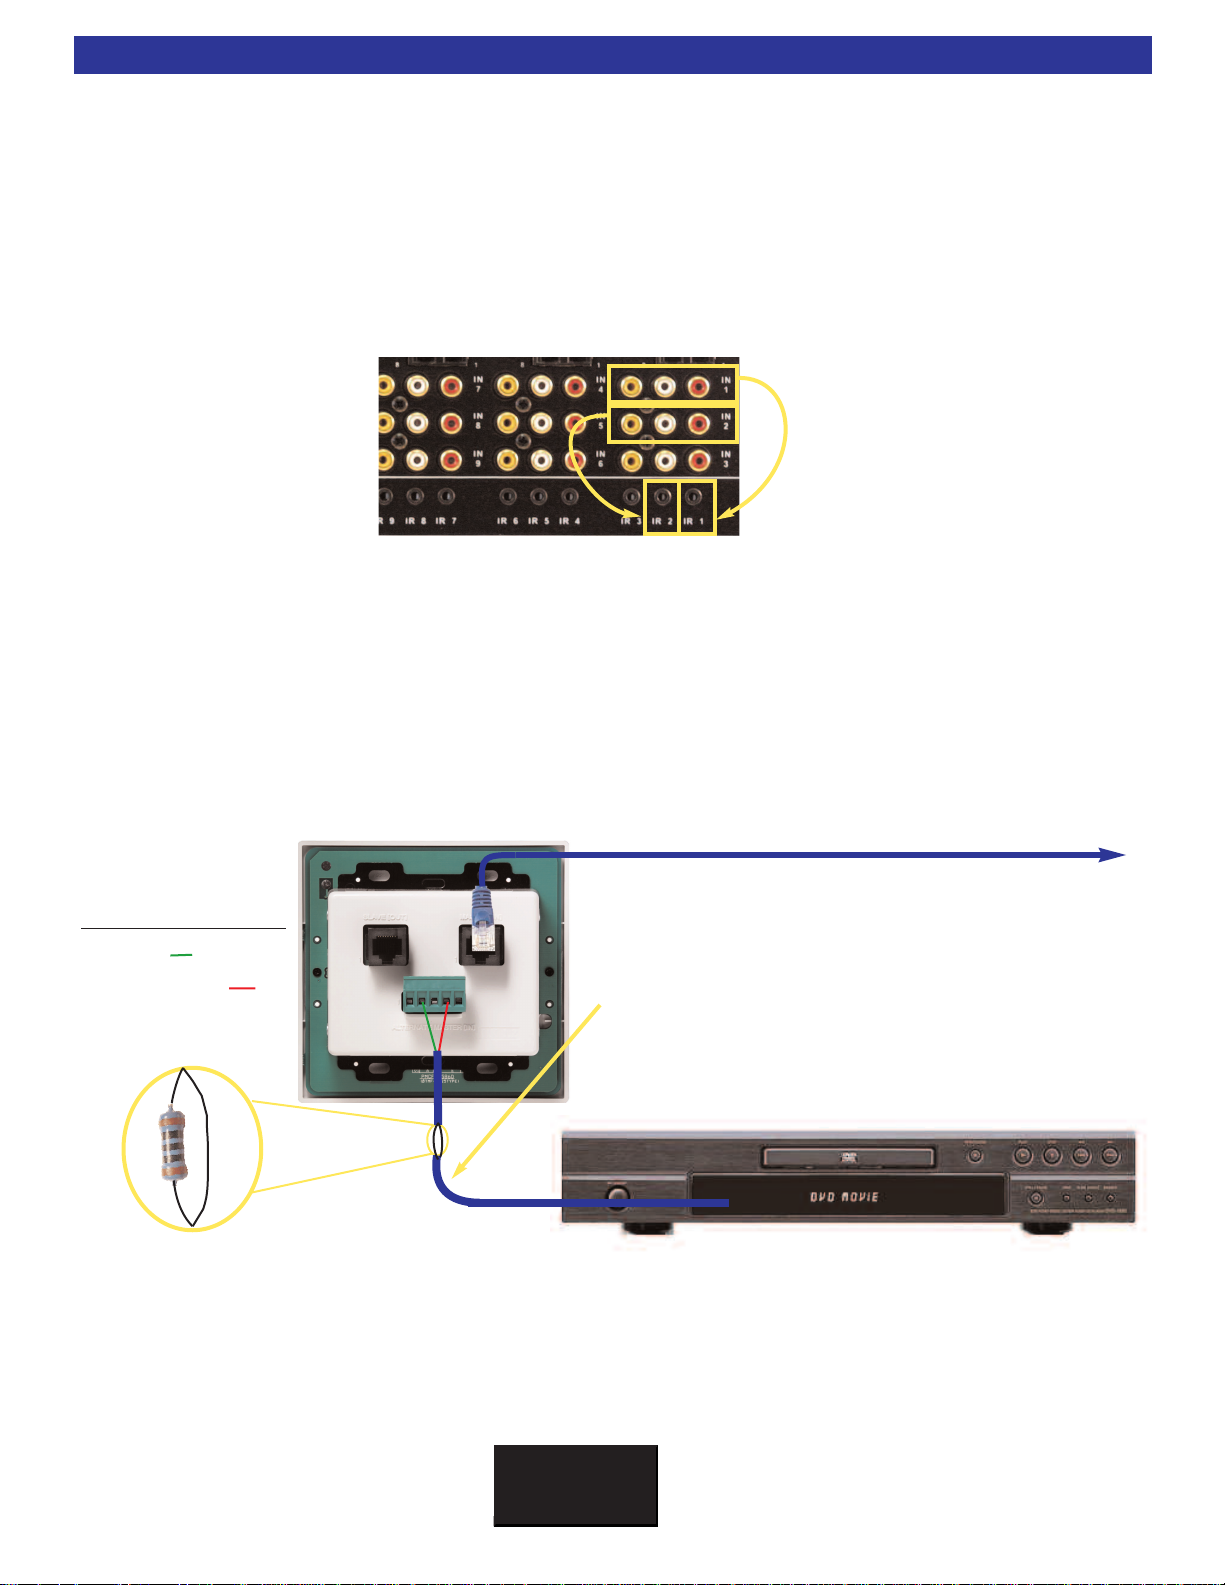
Local IR Source Control
21
Local source control is accomplished by connecting IR emitters to the
Local control is not limited to one source, up to four IR emitters may be wired in series directly from the
keypad. NOTE: Additional resistance will need to be added when running emitters directly from the keypad.
Resistance may vary depending on the dist
ance will range from 100W (for long runs) to 500W (for short runs). If resistance is not added, control of
shared sources may be lost. 12V Control voltages for local amplifiers or other voltage sensing devices may
also be terminated directly to the keypad’s Alternate Master [IN] using the 12V control and ground.
Alternate Master Pin on CK 1.2
1. +12VDC IN
2. GROUND
3. RS-232 RECEIVE
4.KEYP
AD DATAOUT
5. STATUS IN
ance of the wire and the size of the wire.
Standard 2 conductor 16 gauge
speaker wire is ideal for long runs
from the keypad to a Local TV or
device using an IR emitter. Utilizing
CAT-5 cable will also work well.
Alternate Master [IN] of the keypad.
Typical in line resist-
To CT Back Panel
Note: Additional resistance may be needed to be inserted
in line when running an IR flasher directly off a keypad.
Resistance will vary depending on length of run usually
W
between (100
series with the flasher. The resistor may either be on the +
or - side of the connection.
if the keyp
nected to the 9 IR output
W
- 500
ad is not able to control the shared sources
W
W
). The resistor needs to be wired in
Additional resist
s.
ance is needed
con
Multiple emitters should be connected in SERIES!
Most common brands of emitter may be used, how
-
ever all Emitter output more consistent levels when
connected in series. Parallel connections may work
“some of the time”. Series connections are recom
mended for consistent operation!
-
-
Page 28

BK
&
SB
IMPLY ETTER!
22
Common Control Triggers
Common Control Triggers
T
he B&K CT Receiver line incorporates common control triggers that may be used for whole house or speci-
f
ied zone events such as telephones and doorbells. There are two common controls on the six zone receiver
(one on the three zone). The common control allows up to 24VAC or DC voltage sensing. For example, typical applications might involve a doorbell and front door security camera. When the doorbell is pressed, the
CT receiver will switch all zones to the specified A/V source input that the camera is connected to. The user
may specify which zones should or should not respond to either or both Page/Events (see Page/Event explanation on page 47). The diagram below illustrates the installation of a front door security camera coupled with
a doorbell. By default, Page/Event 1 switches to input 8 when a voltage is detected through Common
Control 1 IN- and IN+. Also, Page/Event 2 switches to input 9 when a voltage is detected through Common
Control 2 In - and In +.
Zone Control Trigger
Each zone also has an available 12VDC trigger. An external amplifier, fan, screen, etc. may be triggered with
the 12VDC control out from the zone that it is connected to.
Ground
Control Out
12V
T856A standard
Pin 3 is Ground
Pin 7 is 12V
Control
Page 29

BK
&
SB
IMPLY ETTER!
Additional Connections
RJ-45 Adapters
Ethernet - Used for flashing the software of the CT Receiver or network control.
Please see the B&K website at www.bkcomp.com for more information.
RS-232 I/O - Used for serial control using B&K Hardware Quick Tools and setup of CT
Receiver using BK Suite.
AM Loop Antenna
Three internal AM/FM tuners included in the CT 600.3 and 300.3. A single tuner in
included with the CT 600.1. The AM tuner requires a AM loop antenna oriented for best
tuner frequency reception. The signals are internally split to eliminate the need for multiple antennas in multi-tuner Receivers.
FM Antenna
Three internal
with the CT 600.1. The tuner requires a single coaxial FM antenna oriented for best
tuner frequency reception. The signals are internally split to eliminate the need for multiple antennas in multi-tuner Receivers.
AM/FM tuners included in CT 600.3 and 300.3. A single tuner in included
23
Factory Reset
Sometimes a factory reset is necessary in order to clear problematic symptoms sometimes experienced in
the field. A factory reset will clear all system settings, all presets, and all serial macros. Afactory reset will
also clear any information backed up onto the EEPROM that may have been accomplished by a Memory
Backup.
Factory Reset On a CT 600.3/600.1/300.3 through the Menu
A factory reset may be set from the on screen menu system. OSD menus may be viewed through the Zone
A video output. RESET is located in the Memory/Backup restore option. Using a IR control device in Zone A
press [menu - 5 - left - enter]. A factory reset takes approximately 60 seconds to execute.
Factory Reset On a CT 600.3/600.1/300.3 through Quick T
Connect to the B&K
and com port then click on Com Start (appropriate IP address and port if using networking availability).
When connected to the unit, click on Reset Unit. Afactory reset takes approximately 60 seconds to execute.
A “(00,U,S,0=’BKC-DIP ACTIVE;)” message will appear in the RS-232 receive window when the reset is
completed.
Factory Reset On a CT 600.3/600.1/300.3 through RS-232
Connect to the B&K Suite software or any hyperterminal software. If using B&K Suite software, when unit is
detected click on BK terminal. Type in command (FF,X,7;) and send command to unit. A factory reset takes
approximately 60 seconds to execute. A “(00,U,S,0=’BKC-DIP ACTIVE;)” message will appear in the RS-232
receive window when the reset is completed.
Quick Tools software (available on www.bkcomp.com). Select the appropriate baud rate
ools
Page 30

BK
&
SB
IMPLY ETTER!
24
System Expansion
System Expansion
There are many ways to expand upon a CT system. The pages in this section will highlight simple methods for adding zones to a CT system. For all installations, simple back and forth IR communication will be
needed.
IR, RS-232 and Ethernet (pending) may be used for the CT system interface. Typically only one form is
used, however, all may be used in more advanced systems. RS-232 or Ethernet greatly enhance the com
mand and control of the CT system controller when combined with the advanced features such as Serial
Macros.
If user interfaces primarily communicate and control the system with IR, link multiple CT Receivers with the
IR Link In and Out. If user interfaces communicate and control the system with RS-232, follow the recommendations set by the manufacturer of the serial controller.
-
Page 31

BK
&
SB
IMPLY ETTER!
Connecting Multiple CT Receivers
BK
&
SB
IMPLY ETTER!
Connecting Multiple CT Receivers
CT Receivers may be linked for up to 127 different zones. The Link Out RJ-45 of the first CT Receiver (CT#1
as shown) would connect with a straight CAT-5 cable to the Link In on the second CT Receiver (CT#2 as
shown). Then, the Link Out RJ-45 of the second CT Receiver (CT #2 as shown) would connect with a straight
CAT-5 cable to the Link In on the third CT Receiver. This would continue until all CT Receivers are linked
together. All flashers going to source pieces would be connected using the 1/8” mini jack Flasher Outs (IR
Outputs 1 through 9) on the FIRST CT Receiver, like shown.
Note: The LINK IN/LINK OUT is for IR only. Audio and video signals still need to be connected using the
buffered inputs and outputs. See Page 15 for more information.
CT #3
25
CT #2
CT #1
Along with the RJ-45 Link In and Out, there are also connec
tions for IR through 1/8” minijack.
IR PASS - will pass anything that comes in from the IR IN.
IR IN- will control the CT Receiver and source pieces. See Page 49 for more
information.
OUT
IR
ALL
keypads or from the IR IN.
- will send all IR information being sent to the unit either from
-
Page 32

BK
&
SB
IMPLY ETTER!
26
Adding Home Theater Products
Adding a Home Theater
B&K manufactures Home Theater preamplifier/processors and receivers. Any of these products may be combined to share sources in a CT system using an AV40DP breakout box. Once a B&K home theater is added
to the system, the theater becomes a CT zone. IR Code-sets work consistently with the home theater line as
they do with the CT line. Code-set 001 is used for zone 1, code-set 002 is used for zone 2. The following
depicts the communication between CT and Home Theater products.
shown Ref 50 S2
Front of AV40DP breakout box RCA side
Back of AV40DP breakout box RJ-45 side
From source piece
Page 33

Adding an HD6
BK
&
SB
IMPLY ETTER!
Adding an HD6
The HD6 is designed to operate seamlessly with a CT Receiver. Simply connect the HD6’s CT RS-232 LINK
connector to the CT’s RS-232 I/O connector using a straight through CAT-5 cable. At power up, the HD6 will
learn all of it’s settings from the CT Receiver. No additional HD6 setup is required. The LINKING process
takes about 15 seconds.
When connected in this manner, the HD6 will stay in sync with the CT Receiver for keypad and IR messages.
Dedicated input and page/event settings that depend on video detection will continue to work as expected
even though the video is connected to the HD6 instead of the CT.
27
Page 34

BK
&
SB
IMPLY ETTER!
28
Setup Using a PC and BK Suite
Setup Using a PC and BK Suite
B&K Tool Suite may be installed using the CD-ROM included with the CT Receiver. The B&K Hardware
Quick Tools and Flash Download Update programs are also included on the CD-ROM.
this software at www
Suite includes software for setting up B&K Receivers, Preamplifiers, SR10.1 remote, and CK1.2/CK 1.1
Keypads. B&K Hardware Quick
Receivers. The Flash Download Update is the program used to update the software in the HD6, CT 600.3,
CT 600.1 and CT 300.3.
The installation path for BK Suite is [c:/program files/B &K Components Lt/BK Suite.exe]
***- PC requirements - 128MB RAM, Pentium grade or better processor, Windows XP is the recommended
operating system. (Exception- BK Suite not supported on Windows NT) ***
.bkcomp.com. Your PC should be equipped with a CD-ROM or DVD-ROM. B&K Tool
Tools is a RS-232 test sof
tware for troubleshooting with the HD6 and CT
You may also obt
ain
Page 35

BK
&
SB
IMPLY ETTER!
Connecting to a PC
IR12v 12v
C
TR
TX
12v
TX
RCV
12VDCPowerSupply
IR
IRInput
CTR
12VDCControlOutput
RS-232Host Transmit
Signal/CommonGround
RCV
RS-232HostReceive
DB9
DB25
Function
RJ45 Connection
Pin 3
Pin 2
Host Transmit
To RJ45 Red
Pin 2
Pin 3
Host Receive
To RJ45 Green
Pin 5
Pin 7
Host Ground
To RJ45 Black
Connection to a PC
N
ote that many modern laptops do not come equipped with a DB-9 style serial port. If your computer only has
a USB style serial port, you'll need to obtain a USB to DB-9 Serial port adapter cable.
B&K offers a pre-made connector suitable for connecting a serial port to a standard network CAT-5 cable
with RJ-45 connectors (p/n 13290). However, if you wish to make your own, the pin configuration for a RJ-45 is:
CT Receiver Connection
Plug one end of a RJ-45 terminated CAT5 cable into the main RS-232 communications port on the back of the CT
Receiver.
29
Serial Connection
Plug one end of a RJ-45 terminated straight through CAT-5 cable into the serial communications port on the
back of the computer using the serial DB-9 to RJ-45 Adapter. Plug the other end of the RJ-45 terminated
cable into the RS-232 I/O port on the CT
B&K Suite, Hardware Quick Tools, and B&K Editors for simple and easy setup.
USB to Serial Adapter
USB to Serial
necting to a computer that has no available DB-9 style
serial ports. Install the required drivers and then verify
which comport the USB Adapter is connected to. Once
your COM settings are determined, configure the B&K
Suite, Hardware Quick
ple and easy setup.
Adapters are a convenient solution for con
Tools, and B&K Editors for sim-
Receiver. Once your COM settings are determined, configure the
-
Page 36

BK
&
SB
IMPLY ETTER!
30
BK Suite Setup and Overview
BK Suite Setup and Overview
BKTask automatically installs a shortcut icon on the desktop [BKTask icon (grey)].
M
ake sure all other applications which use the serial port are closed before opening
the taskbar. B&K has the capability to connect in real-time (live) to any of our receivers or preamplifiers.
However, it is recommended that all setup be done virtually to avoid system errors. Once the setup files
have been created, connect to the unit and open the saved files. Typical PC setup should follow the
described procedure:
1. DO NOT CONNECT UNIT TO COMPUTER. This is considered virtual mode. Open BK Suite A/V
Setup from BKTask.
2. When Tool Suite is first opened, the Device Investigator automatically scans to find a connected B&K
product. Choose “select product for operation without a connected device.”
3. Choose the product you wish to work with.
Page 37

BK
&
SB
IMPLY ETTER!
BK Suite Setup and Overview
4. Create and save the system setup file using either the Basic Setup menu or the Advanced Setup
m
enu of BK Suite See Page 32.
5. Either let the program automatically scan com ports 1 through 4 at all baud rates or manually
configure the com port and baud rate settings as shown below.
31
6. Connect the PC to the
nection will be established.
7. Once a live connection has been established, open the file previously created. Once the file is
opened, it will overwrite the settings in the B&K product with the settings configured in the setup
file.
B&K product run the device investigator. The unit will be found and con-
Note: While a live connection is est
immediately update inside the unit it
backup. System settings are normally stored with a .bks extension (Advanced and Basic setup) while
presets are stored with .bkp extension (Preset editor) and macro files are stored with a .bkm extension
(Serial Macro Editor).
ablished with a CT
self. The system file should be saved on your computer as a
Receiver
, any changes made in BK Suite will
Page 38

BK
&
SB
IMPLY ETTER!
32
BK Suite Task Bar Explained
BK Suite Task Bar Explained
Once you have chosen the product you wish to configure, BK Suite will display the tool bar of applications
within the Suite. Asingle click of the mouse on any of the icons in the tool bar will activate the appropriate
application. The applications are described below:
Run the Basic Setup Editor for a
tandard CT Receiver.
s
etup the Room Equalization and
S
Notch Filtering for zones.
Run the Preset Editor
hen you are ready to pro-
w
gram the system presets.
Open the Advanced System
Editor to program all of the fundamental parameters of your CT
Receiver system.
se the Serial Macro Editor to to con-
U
trol or communicate with a RS-232
apable device (B &K Keypads, etc).
c
Run terminal for use with BKC
ommands for control of
DIP c
nit
u
Select another B &K
irtual Product to setup.
V
Run the Device Investigator so
that you may connect to the
CT Receiver and upload your
setup files.
View and Set communication
roperties including Com Port and
P
Baud Rate
B&K Networking Availability.
Please see the B&K website at
www.bkcomp.com for more
information.
Open an Adobe .pdf file for
any of B &K’s user manu-
ls and info sheets.
a
(PDF library)
Get information about your
urrent connection to a
c
B&K product.
Page 39

BK
&
SB
IMPLY ETTER!
Basic Setup Menu
BK
&
SB
IMPLY ETTER!
Basic Setup Menu
The basic setup menu in BK Suite has been created to simplify the setup process. It is meant for streamlined
setup of basic systems operating with B&K keypads.
Basic Setup
Tab 1 in the Basic menu allows users to name zones, configure power on preferences, and name sources.
When a file is saved to the PC in the Basic Menu, both a .txt and .csv file are created in the same directory.
These files create keypad button layout templates based off the locations of the devices assigned in Tab 2.
These files may be used as a reference when creating keypad files in the keypad editor See Next Page. The
following figure details how Tab 1 may be used in the Basic Setup Menu of BK Suite:
33
Page 40

BK
&
SB
IMPLY ETTER!
34
Basic Setup - Keypad Feedback
T
ab 2 is provided to set up a keypad for RS-232 feedback synchronization. Tab 2 tells the CT Receiver
where devices are located on the keypad so the zone input syncing will operate properly. Match each input
with the it’s corresponding location on the keypad.
Basic Setup Menu
Page 41

BK
&
SB
IMPLY ETTER!
Advanced Setup Menu
Advanced Full Setup Menu
The advanced setup menu in BK Suite is designed with the intention of displaying the features found in the
on screen setup menu using thirteen defining tabs. Each tab allows the user to customize different features
found within the CT Receiver. Setup should proceed in the numerical order of the tabs.
Advanced Full Setup
35
Remember, it is always best to save frequently.
Typically, choose to save settings with the customer’s last name and a data or revision number.
It is usually best to save all of your files in one
directory. The default directory is C:\Program
Files\B&K
BK Suite should be updated regularly using the Live update feature found in the BKTask window.
Components Lt
d\BK Suite.
Live Update for BK
Suite
Page 42

BK
&
SB
IMPLY ETTER!
36
1
2
2
Hardware Zone Settings - Tab 1
1. Since a CT600.3/600.1 has six hardware zones, BK Suite will display a zone
button corresponding to each of the six
zones. (If you are programming a
CT300.3, three zone buttons appear).
Select the zone you wish to adjust the settings of.
2. You may set Zone A to stereo or mono
as required. When stereo is selected, the
form will appear as shown to the left.
If mono is chosen, the Zone Aform will
change its appearance to the mono version as shown to the left.
The form displays new choices for the split
mono zone. The right or left side may configured fixed or variable or may have volume limits set. The changes made in the
Hardware Zone setting Tab affect amp
channels only
.
Page 43

BK
&
SB
IMPLY ETTER!
Hardware Zone Settings - Tab 1
37
3
3. Fixed or Variable Levels for
Stereo Zones
4
5
This setting dictates the configuration for
the amplifier. The Variable assignment will
allow speakers connected to the Zone
Speaker Outputs to be controlled using an
IR keypad or remote control. Selecting the
Fixed assignment is available for external
rotary type volume controls. This fixed or
variable selection is applicable to the amp
channels only. It does not apply to the line
level pre-outputs.
4.Maximum Level (Limits the Output whether Fixed or Variable)
Each zone may have the volume limited to a particular maximum level. Adjust the slide bar to limit the maximum volume level for each zone. When the zone is set to fixed, slide the bar to the desired fixed volume
level. You may click on the volume number to enter the volume manually.
5. Left and Right Level Calibration
Normally these levels are left untouched. However, you may adjust the speaker balance for this zone
permanently here.
A. Fixed or Variable Levels for
A
B
A
B
fixed or variable selection is applicable to the amp channels only
outputs.
Mono Zones
This setting dictates the configuration for
the amplifier
will allow speakers connected to the Zone
Speaker Outputs to be controlled using an
IR keypad or remote control. Selecting
the Fixed assignment is available for
external rotary type volume controls. This
. It does not apply to the line level pre-
. The Variable assignment
B. Maximum Level for the Mono Zone (Fixed or Variable)
Each zone may have the volume limited to a p
mum volume level for each zone. When the zone is set to fixed, slide the bar to the desired fixed volume level.
You may also click on the volume number to enter the volume manually.
ip:
T
Set the Max Level to -6dB.
Tuner Assignment
Assign a tuner for each zone by clicking the appropriate button. Once a tuner is assigned to a zone, that
zone will always use that tuner. When multiple zones are assigned to the same tuner, the tuner will act as a
shared source. The CT 600.3 and 300.3 have 3 tuners available for zone assignment. All zones will use the
same tuner in a CT
articular maximum level. Adjust the slide bar to limit the maxi-
This will prevent the amplifier from clipping on most CD's.
600.1.
Page 44

BK
&
SB
IMPLY ETTER!
38
BK
&
SB
IMPLY ETTER!
Groups / Code Sets / Zones - Tab 2
38
1. Groups: A maximum of 18 groups for each CT Receiver labeled a - r. Group 0 may not be changed, it
is pre-programmed with code-set 0-0-0 (controls ALL CT
within one CT Receiver. If multiple CT’s are going to utilize the same code for a group spread across multiple
CT Receivers, that code-set must be programmed into each CT receiver.
2. Code-Sets: For each group, assign a code-set between 001 and 127. B&K recommends the follow-
ing: in the first CT Receiver assign Code-Sets 011 to 016 to each individual zone A-F (or Code-Sets 011-013
for each individual zones A-C on a 3 zone Receiver). When working with a system with more than one CT,
assign code-sets 021 to 026 to the second CT, 031 to 036 to the third and so on.
3. Title:
one zone, name it for that zone. If it will control several zones, name it intuitively for the area it controls.
4. Hardware Zones: W
ure above, code 0-1-7 has been assigned to control zones A, B, and C while codes 0-1-1 through 0-1-6 control each zone individually . ID128 may not be used for group control. It should only be used from a keyp
remote to control a zone.
5. Absolute/Relative: These settings decipher how volume will be controlled among grouped zones.
Absolute: will sync all volumes to the volume level of the zone from which the volume command was
received before adjusting up or down.
Relative: control will adjust volume levels up or down without syncing to the same volume level.
Name the group (zone) with a name that will make sense to the client. If the group controls just
ork by row
, check the boxes for zones that will make up each group. In the fig
Zones). Each group may control any or all zones
-
ad or
Page 45

BK
&
SB
IMPLY ETTER!
Code-Set Description and Overview
Code-Set Description and Overview
B&K uses discrete code-sets to control any audio/video zones. Code-sets range from code 0-0-0 (zero zero
zero) to 1-2-8. This is the same practice that satellite manufacturers use so that one remote controller could
control three identical satellites. The satellites are set (via switches or on-screen menus) to be either an A, B
or C satellite. When the remote control is set to SAT A, only SATA responds and so on. In the BK Suite
advanced setup, CT Receiver code-sets are assigned to control each zone. B& K applies this theory to each
of its zones. Once the codes have been assigned, Junior room’s volume may be controlled by kitchen keypad. Code-Sets may also be used to control a group of zones (such as upstairs or party modes) or control
the whole house (all zones) using Code-Set 0-0-0.
In a basic default system, all keypads are pre-programmed with Code-Set 1-2-8. The CT Receiver monitors
which one of the six Zone Control terminals the IR command was received from and responds only in that
zone. Thus, as long as each keypad is hard wired to the correct Zone Control terminal, all keypads may be
programmed identically using code 1-2-8. However, the user may be provided with powerful convenience
features by utilizing discrete Code-Sets to enable any keypad to control any zone, any group of zones or the
whole house.
B&K created 128 different sets of the same CT Receiver commands. These commands will also work with
B&K home theater units assigned to the same code set. The primary commands are as follows:
39
Power State Tone Input Sources Tuner
ZONE BASS - SOURCE +
POWER ON BASS + SOURCE - INPUT 6 FM
POWER OFF TREBLE - VIDEO SOURCE + INPUT 7 BAND TOGGLE
TREBLE +
LOUDNESS INPUT 1 INPUT 9 TUNE +
Volume INPUT 2 TUNER
MUTE ON INPUT 3 STATION +
MUTE OFF INPUT
STEREO/MONO
MUTE (TOGGLE)
MASTER VOL+
MASTER VOL- *
Each code-set differs from the next only in the initial IR code identification or prefix, i.e. 128 - Power On. This
way a CT Receiver zone may be setup to recognize an intended command no matter what Zone Control terminal the command is received from.
gramming a remote control or a keyp
Code-Set 000 Controls ALL zones simultaneously. (Multi Zone and Home Theater)
Code-Set 001-127 May be utilized for group or independent zone operation. (Discrete)
Code-Set 128 Controls only the zone it is connected to or received from. (Hardware S
Code-Set 999 Controls a set of
B&K
DEDICA
Thus, any zone may control any other zone (or group of zones) by pro
ad with the appropriate set or sets of codes from the following choices:
commands (Multi Zone and Home
ALL
TED IN INPUT
4
INPUT
This list is not a complete list of commands. For a
complete list please refer to
5 AM
8 TUNE -
STATION -
page 8 of this manual.
pecific)
Theater)
-
Page 46

BK
&
SB
IMPLY ETTER!
40
When a zone is split to mono, two columns of check boxes appear representing the right and left channel of
t
he split zone. Splitting a zone to mono allows independent ability to control power and volume on each side
of the zone. The left or the right channel may now be controlled with a discrete code-set from the keypad, or
from an external volume control (in wall). If an in wall volume control is desired, set the desired side of the
zone to Fixed volume in Tab 1.
A split mono zone may utilize 3 different code-sets if variable volume control is desired; one code-set for the
left side, one code-set for the right side and one code-set to control both sides together. Check the desired
side of the zone corresponding to the Code-Set it will be controlled by. Regardless of how this is set, this split
mono zone will always listen to the same input. When the input is changed for one side of the mono zone,
the input will be changed for the other side as well. Bass, treble and EQ settings will be shared between the
split mono zone at the same level.
Groups with Mono Zones
In the example above, the Master Suite is served using three groups. Each adjoining room may be adjusted
without af
keypad uses Code-Set 014, both rooms within the Master Suite will be adjusted together. The absolute volume in Code-Set 014 is selected in order to sync the volumes at the same level when the suite is controlled
as one zone.
fecting the others by using keypads or remote set to Code-Sets 018 and 019. However, when a
Page 47

BK
&
SB
IMPLY ETTER!
Sub-Zoning
Splitting a Zone To Mono
Once a zone has been split into mono it has the ability to have a discrete IR Code-Set assigned to it and
therefore the user is given the capability to control volume, mute, and power in the split zone independently.
For more information on Code-Sets, see Page 38. The Installation diagram of a mono zone split for control
is illustrated below. The split mono zone will still share the same source, bass, treble and EQ settings.
41
In this example, the master bath and master bedroom split a zone into two mono zones. Each mono zone
must listen to the same source, but volume and on/off st
pads are daisy chained to the same zone control terminal. The CT Receiver must be setup to respond to
the discrete Code-Set for each mono zone. Furthermore, the corresponding Code-Set should be programmed onto the keyp
Bed keypad will affect only the Master Bed. When keypads are slaved off of one another, programming
should be done in series order st
have the ability to control both zones together as a suite.
the the master bed and master bath to separate independent zones.
ad. Thus, the Master Bath keyp
arting with the master keyp
ates are independent via the two keypads.
ad will affect only the Master Bath and the Master
ad, then slave 1, etc. Both keypads may also
The alternative to mono split zones is to assign
The key-
Page 48

BK
&
SB
IMPLY ETTER!
42
Input Settings - Tab 3
3
1
2
1. Shared Source Input Names:
The programmer may customize the input name to a user friendly name (up to a 5 letter name). Inputs 1
through 9 may be selected in every zone, thus they are shared inputs.
play on the keypad when zone status is recalled by pressing the backlight button on the CK1.2 or CK1.1
Keypad.
2. Dedicated Source Input Names:
Dedicated inputs are identified by the letter of the zone to which it is assigned. The programmer may customize the input name to a user friendly name (up to a 5 letter name). Each dedicated zone input may only
be selected from it
3. Input Settings To Compensate Levels:
Since some sources’ output levels are louder or softer than others, use the input level adjustments to
compensate. Adjustments of up to +/- 6dB is available for each source and tuner.
s zone. Use the sp
ace bar to make it blank.
This is the same name that will dis-
Page 49

BK
&
SB
IMPLY ETTER!
Power On Titles - Tab 4
43
Power-On Titles are not available on the CT 600.3, 600.1 and 300.3.
Page 50

BK
&
SB
IMPLY ETTER!
44
Power-On Preferences - Tab 5
1
2
4
3
Power-On preferences describe a specific state of a zone or group of zones will power on every time the
zone or group is powered on.
1. Select Code Set:
All of the code-sets that were programmed previously appear on this list with the title given for that zone. The
settings adjust what will happen when each code-set is powered on.
2. Select Power On Setting:
Set the Power On Preferences for the Audio Input, Video Input, Volume, Bass, Treble, Equalization, AM
Frequency, FM Frequency and/or FM Stereo mode.
3. Last Used:
When powered on, the zone (or group of zones) will return to its’ last used state. For example, if the audio
input was set to In 1 when powered off, the zone will power on with the audio from In 1.
4. Power On Preference:
The zone (or group of zones) for the selected code-set will power on to the selected setting. S
umes or radio st
ations, bass, treble and equalization
pecific vol-
may be chosen as power-on preferences.
Page 51

BK
&
SB
IMPLY ETTER!
1
5
Input Configuration - Tab 6
45
2
3
4
2
1. Select which Zone Dedicated Input you wish to setup.
2. Video No / Yes:
If “NO” is selected, the CT Receiver will keep the video input selection from the last selected video source.
If “YES” is selected, the video input selected will change along with the audio input selection.
3. Input Mode:
Mono or S
and left input signals are summed.
tereo - Select the best mode for the source connected to this Input. When set to mono, the right
3
4. Selection Mode:
Manual or
audio or video is sensed at the dedicated source input. When using auto-sense to detect an input signal, the
CT Receiver will “remember” the previous state of the zone. Once the dedicated input signal is switched off
the zone will return to its previous state. If desired, the auto-sensing feature may be turned off by selecting
“Manual”. The dedicated input may be selected at any time using the IR command “D-IN” from the B&K IR
abase.
dat
5. Release Time:
Release time dictates how long the the auto-sense feature will wait before releasing the dedicated input (125 seconds or Forever). Use forever (bar to the right) if you don't want the Input to change until the user
manually select
audio only, use 25 seconds so that a quiet passage in the music will not release the input prematurely.
Auto - When using Auto, the CT Receiver will select the source and/or turn the zone on if EITHER
s a new input. If the source has a video output, set to 5 seconds or less. If the source has
Page 52

BK
&
SB
IMPLY ETTER!
46
Page / Event - Tab 7
1
2
A Page/Event is an action triggered by a 5-24VAC or DC trigger (Common Control), RS-232 command, or
Audio/Video Sense.
1. Action:
When this Event is triggered, choose between switching to one of the nine shared sources, changing the volume or no action at all (OFF). When one of the nine shared inputs is selected, both volume level and input
will be affected when the Page/Event is triggered. To only adjust volume level during a Page/Event choose
“Change Volume.”
Note: On Tab 9, the Page/Event default setting is (BOTH) and all zones will be affected by both Page/Events.
Page/Event 1 will switch to input 8, Page/Event 2 will switch to input 9. However, you may override this, in
the Zone Page/Event selection box shown below.
(From Tab 9)
2. Activated By:
Select the desired application to determine when the Event is ACTIVE. If you select Audio or Video Sensing,
an audio or video signal present in the selected input will trigger the Page/Event. If Common Control is
selected, then a voltage must be present at the Common Control 1 IN+ and IN- located in the Common
Control phoenix adapter See Page 23. If you select RS-232, the event will be triggered and ended by RS232 command strings. When using RS-232, the event must be asserted and deasserted. For more information see the RS-232 document
ation available on the B&K
website
www.bkcomp.com.
Page 53

BK
&
SB
IMPLY ETTER!
5
4
6
3
Page / Event - Tab 7
47
3. Level:
Set the volume desired for the Page/Event. When the event is triggered, the volume will be switched to this
level in the zones set to respond to the Page/Event. Built in intelligence "remembers" the previous state of
the zones before the Page/Event occurred; therefore, it will return the zones to their previous st
Page/Event is finished.
4. Turn Off Delay:
Adjust the time for which the Page/Event will remain on. If a voltage is momentarily sensed, the Page/Event
will last for the time selected.
from the time the voltage is dropped. Use Forever (slide bar all the way to the right) if you don't want the
event to end until the user manually selects a new input or a new volume setting. If audio/video sensing is
used, adjusting the delay will affect how long the CT Receiver will wait once the signal is lost.
5. Page/Event Affects Control Out and Flasher Outputs:
Yes - When the event activates, the flasher outputs will change their routed location to the output
designated by the page/event input selection. Control outputs would also be triggered for specified
inputs.
No - The control and IR flashers will stay in the last selected state. Thus, if the client were just watching a DVD, they may still use the DVD remote to pause the DVD. By default, Event Flasher Output is
set to no.
6. Page Event 2:
Sets up in the same way as Page/Event 1.
The Page/Event will st
ay active as long as a voltage is preset, the timer starts
ate once the
Page 54

BK
&
SB
IMPLY ETTER!
48
Display - Tab 8
Front Panel Display is not available on the CT 600.3, 600.1 and 300.3.
Page 55

BK
&
SB
IMPLY ETTER!
Control - Tab 9
49
1
3
2
1. Zone Control:
Since a CT 600.3/600.1 has 6 hardware zones, BK Suite will display a zone button corresponding to each of
the 6 zones (If a CT 300.3 is being programmed, three zone buttons will appear.) Select the zone you wish to
adjust the settings of.
2. Zone Control Out:
Control Out is a switchable 12VDC 200mA control voltage useful for status lights on keypads, power strips,
external amplifiers or any other voltage sensing device. The default setting of each of the individual Zone
Control Output is Zone ON - the voltage turns on only when that p
zone is off.
RS-232 - If you select RS-232, only an RS-232 command will turn on or of
Zone On - The Control Out turns on only when that particular zone is on and turns off when the
zone is of
f (Default Setting)
Zone Active - The Control Out will turn on only if the zone is on AND the CT Receiver may
detect an audio or video signal on the input the zone has selected.
Zone Off -The Control Out will turn on only if the zone is of
Selected Input - The Control Out is on only if the zone is on and this input is selected (switched
to) by the user. Note that when this option is selected, the input check boxes are now active
(no longer grayed out). Check the box next to the inputs that are desired to turn the 12VDC Zone
Control Out on. The input does not have to have a A/V signal present in order for the 12VDC trigger to be on.
articular zone is on and turns off when the
f that zone's Control Out.
f.
2. Common Control Out:
Control Out is a switchable 12VDC 200mA control voltage useful for triggering power strips, external amplifiers or any other voltage sensing device. The default setting of both of the Control Output is Any Zone ON the volt
age turns on when any zone is on and turns off when all zones are off.
Page 56

BK
&
SB
IMPLY ETTER!
50
Control - Tab 9
3
4
5
6
3.Zone Rear Data In Setting:
Allows the IR data input port for each zone control terminal to be switched off. When set to OFF, any keypads or IR sensors connected to the back panel the CT Receiver will be rendered inoperable because no IR
will be allowed to pass through the IR data input for the selected zone.
4. Zone Page/Event Selection:
Please see page 45 for Page/Event configurations.
5.Flasher Outputs:
Selected Input - If IR routing is desired, set the Flasher Outputs to Selected Input. When IR routing
is enabled, IR will route from the keypad terminal to the IR output for only the input that is selected
for that zone.
(Default Setting)
All Input
control terminals or ‘All IR
Off - All 9 IR outputs will be turned off.
This allows identical source component
s - If simultaneous flashing is desired set to All Inputs. Any IR data received from the keypad
In’ connection will be sent to all 9 IR outputs.
s to be used independently in the system.
6.Rear Panel IR to Flasher Outputs:
Configure the unit as to whether the minijack ‘IR IN’ will pass IR to the 9 flasher outputs. Only the sources
that are selected in a zone will p
B on In 6 with the other zones powered of
ass through the Flasher Outputs. For example, if zone A is on In 3 and zone
f, IR will be sent from Flasher Output
s 3 and 6.
Page 57

BK
&
SB
IMPLY ETTER!
1
2
3
Security - Tab 10
51
4
1. Front Panel Buttons:
This is not available on a CT600.3,600.1 or 300.3.
2. Memory Locked:
This will prevent the user from saving any changes to presets or system settings.
3. Setup Menu Visible:
If set to Hidden, the user may not access the setup menu.
4. Rear Panel Remote Setting:
This sets the unit as to whether the minijack ‘IR IN’ is enabled or not.
ip -
Advanced - Unlock Security Settings via an IR Button Press
TTip -
Advanced - Unlock Security Settings via an IR Button Press
Should there be a need to make adjustments to the CT Receiver without a PC, and the CT Receiver has
locked or hidden menus, there is a simple procedure to unlock and edit the security settings.
o unlock the advanced security settings:
T
1.Cold boot the unit (main power switch set to of
2.Wait 12 seconds for the initial power up sequence to finalize.
3.Within the next few seconds, press the ENT command on the MZ-128 remote using a
code-set that is valid within the unit (ie. 000 or 011, 012, etc for a default unit)
**Note - the "window of opportunity" is only available immediately after hard power up**
f then on)
Page 58

BK
&
SB
IMPLY ETTER!
52
RS-232 Communication - Tab 11
1
2
3
4
5
6
7
8
9
10
Note: Parameters on this tab do not need to be changed and should be left for advanced programmers.
1. RS-232 Port Enable:
It is not possible to disable the RS-232 ports on the back of the CT 600.3, 600.1 and 300.3.
2. Baud Rate:
does not
B&K
baud rates are used, keypad feedback status and keypad synchronization might be lost.
3 & 4. RS-232 Receive & Transmit ID:
Used in sophisticated configurations such as Serial Macros, the Receive and Transmit ID in B&K RS-232
protocol allows B&K product to “listen” (receive ID) or “talk” (transmit ID) to other B&K products. The programmer need to change the identifier when external automation system to control more than one B&K products is used. For instance, if you wanted to send a Reference 50 preamplifier an IR triggered RS-232 macro
(to power off the Reference 50) from a CT Receiver, you should set the Transmit ID of the CT Receiver to 1
and the Receive ID of the Reference 50 to 1, and set the
ID of the CT Receiver to 0.
Note - If you change the Receive or Transmit ID, it does not affect the setup in BK Suite.
recommend using any baud rate other than 9600. The default baud rate is 9600. When other
ransmit of the Reference 50 to 0 and the Receive
T
5. RS-232 Echo Enabled:
This setting is used when external control systems are connected to
product via RS-232.
B&K
The echo will
Page 59

BK
&
SB
IMPLY ETTER!
RS-232 Communication - Tab 11
repeat any RS-232 transmission, which is received through the RS-232 I/O port.
6. RS-232 Feedback Selection (Continuous Reply):
Disabled (Default)= No BKC-DIP Update or Reply is generated.
Update = An Update message, which represents the specific current state of the CT Receiver, is sent when
there is a change in a logical zone’s state. Then, the CT receiver must be polled to determine the current status.
Reply = When feedback selection set to “REPLY”, the CT Receiver will automatically generate BKC-DIP reply
messages to allow unsolicited continuous feedback to the external controller. Whenever a change is executed
in a logical zone, a BKC-DIP reply message will automatically be generated. The reply message represents
the new state of the affected logical zone. I.e. System change to Volume, Bass, Treble, EQ, Source and/or
Tuner Frequency.
T
ypical format example of a BKC-DIP Reply :
The CT Receiver will automatically generates BKC-DIP Reply message whenever a master volume change is
seen in Logical Zone 11. The reply message is “(0,R,P0B=FF,01=60;)”. Logical Zone 11’s current Preset
Parameter Volume value is set to 60 hex or 0dB (assuming 0dB is the current setting).
“0” is the transmit ID
“R” is the BKC-DIP Reply message.
“P0B=FF” is the BKC-DIP command for the current preset in logical Zone 11 (0B=11).
“01=60” is the current preset parameter 01 (Volume), is set to the Hex value 60 (volume 0dB ).
All (Both) = Outputs both BKC-DIP Update and BKC-DIP Reply message.
53
7. V2.0 Enabled:
Allows for more advanced BKC-DIP
control of the Receivers including preset p
arameters.
8. Convert IR to BKC-DIP Messages:
When enabled, the CT Receiver will convert and repeat the B&K IR commands into RS-232. The RS-232
message is repeated out to the RS-232 I/O RJ-45. This may be used for a system with B&K Home Theater
component
s. These relayed IR commands may simply connect to a home theater without creating an IR loop.
9. Transmit BKC-DIP to Zones:
When a zone is enabled, the CT Receiver will repeat any BKC-DIP messages via that zone's RS-232 port
(labeled “RS-232 XMIT” on the CT back p
repeat auto BKC-DIP commands through its transmit port. Zone status feedback, zone input synchronization,
and serial macros will continue to operate for any zone even though the zone’s RS-232 XMIT being disabled.
This setting does not apply to the Serial Macro Editor. See page 61 for more information.
anel). When a zone is disabled, the zones RS-232 port will not
10. BKC-DIP Transmit ID:
Select which ID is in use for communication with another B&K
Global(ALL) all connected
product, only that product will be controlled. This is useful if several B&K products are interconnected for
other purposes. The transmit ID corresponds to the receive ID you used in the setup process of the other
B&K product.
Please visit our website at
B&K products will be controlled. However, if you select the ID of a specific B& K
www.bkcomp.com for additional information about RS-232 communication.
product, or select Global (ALL). If you select
Page 60

BK
&
SB
IMPLY ETTER!
54
Preset Operation - Tab 12
1
2
3
1. Preset Recall Options:
Input/Tone: Preset will recall Input and EQ settings.
Input/Tone/Volume:
Input Only: Preset will recall input only.
2. Auto Naming:
If auto naming is set to YES, the CT Receiver will automatically name a new preset for source and volume
setting. If it is set to NO, the user must enter the preset name manually or retain the previous name.
3. Favorite Preset Recall:
Favorite presets are accessed by using the B&K’s Channel Up and Channel Down Commands. There are two
modes of operation. If it is set to “Enter Button Required”, then the user is required to tap the Enter button to
recall the preset after the user taps on Channel Up and/or Down. The second option is “Automatically Recall”.
Automatically Recall allows the user to tap the channel up or down button and the preset will automatically be
recalled without tapping enter button afterward. Automatic Recall is the default selected value.
Preset will recall Input, Volume and EQ
settings.
Page 61

BK
&
SB
IMPLY ETTER!
Keypad Feedback - Tab 13
55
ab 13 rather than
The programmer may set more precise keypad feedback positions in the advanced setup’
basic setup. Keypad input feedback is triggered upon the acknowledgment of an input change from a zone
or group of zones. When a zone is powered on or the input is changed, the keypad will jump to the page corresponding to the input the user has selected. This is useful for multiple keyp
grouped zones.
To set Tab 13 up correctly
CD player is IN1 on the CT Receiver and is found in the upper right hand button on Main Page 1 on all CK
1.2 (D1), the Keypad Device drop down for IN1 DVD should have the keypad device of D1. This way the the
CD player is selected, the CT
page should be displayed. Keypad Jump defines if the keypad should display Main page 1, Main page 2, or
page 1, 2, 3, or 4 of that device. This example is pictured above.
Do not change the Keyp
with a corresponding Keyp
require keypad feedback to SOME of the keypads rather than ALL keypads. If you use keypad transmit ID
255 (FFh), ALL keypads will respond to the CT Receiver feedback jump commands.
If utilizing RS-232 keypad input syncing, be certain that ALL keypads in the house have the devices located
in the SAME positions on all keyp
Note: If utilizing multiple zones on one keypad the keypad device must be set to “NONE” to prevent “random”
page jumps on keypads.
, match the device number with the correct CT Receiver input. For example, if a
Receiver will send out the jump command correctly telling the keypad what
ransmit ID from the default 255 (FFh) unless you plan to program every keypad
T
ad
ad Receive ID using CK editor. This feature supports custom applications that
ads. Otherwise, the keyp
ad will display the wrong p
ad connected in series or
s t
age.
Page 62

BK
&
SB
IMPLY ETTER!
56
Use this tab to configure default bass and treble settings for each zone. The settings made here will be applied
each time a zone is powered on, and is independent of the user controlled bass and treble adjustments. For
e
ach zone, setup the default bass and treble levels, as well as their affected shelving frequency. In addition,
each zone also allows three notch filtering functions. Use the notch filters to make audio corrections in zones
that may suffer from audio problems due to location, building materials, and other factors.
Room Equalization
1
2
3
Note: An external frequency generator or setup disk may have to be used in order to accurately determine
which frequencies need to be reduced using the notch filtering.
Page 63

BK
&
SB
IMPLY ETTER!
Room Equalization
1. Selecting a Zone
Since a CT600.3/600.1 has six hardware zones, BK Suite will display a zone button corresponding to each of
the six zones. (If you are programming a CT300.3, three zone buttons appear). Select the zone you wish to
adjust the settings of.
2. Bass and Treble Adjustments
The bass and treble adjustments are used to boost or reduce the levels above or below a certain frequency.
Choose frequency the shelving equalization would begin. For bass equalization, frequency adjustments may
be made from 20 Hz to 300Hz. For treble equalization, frequency adjustments may be made from 2kHz to 16
kHz. Then choose the reduction or gain in level for the shelf of frequencies to be adjusted. The gain may be
adjusted from -12 dB to +12 dB for both the bass and treble frequencies.
3. Notch Filtering
Notch filtering is used to correct for the enhanced lower frequencies due to resonant wave forms. When lower
frequencies become in phase, they add to increase the volume (amplitude) in dB of the waveform. The intention of the Notch Filter is to decrease the volume (amplitude) in dB of these enhanced lower frequencies.
Typically a room will have 3 large peaks due to the distance between the front/back walls, left/right walls and
the floor/ceiling. B&K provides 3 notch filters to address each of these peaks.
Zone Notch Gain
The level of decrease in dB level for the notch frequency and width.
57
Zone Notch Frequency
The frequency that will be affected at the lowest point of the notch slope.
Zone Notch Width
The width of the frequencies that will be affected around the notch frequency. The more decreased
the notch wid
increased the notch width, the more frequencies that will be affected around the notch frequency.
Below is a graph showing a before and after example of notch filtering.
response in the lower end of the frequency spectrum more linear due to decreasing the emphasized frequencies.
th, the less frequencies that will be affected around the notch frequency
The notch filtering makes the room
. The more
Note:
selected user EQ (auto-level or loudness EQ).
Room Equalization and Notch Filtering parameters are applied globally regardless of the
Page 64

BK
&
SB
IMPLY ETTER!
58
Preset Editor
Preset Editor Features and Benefits
P
resets are a powerful feature that may instantly recall commonly used parameters instantly. B&K preset
s
ettings may be recalled with the press of a single button. Parameters such as independent audio/video
inputs, bass and treble settings and volume levels, EQ settings and tuner frequencies may be recalled with
one touch access.
Opening the Preset Editor
Preset editor files are defined by the extension (*.bkp). As with System files, it is suggested to edit all presets using virtual mode. Open a virtual product and then open the Edit Preset tab on BK Suite. In virtual
mode, the presets will default presets will be displayed on the preset editor table.
When the presets are edited, save to file by going up to File and then Save Presets to File.
When a live connection to the CT Receiver has been established, to send the presets to the CT Receiver
open the preset editor and open the file that was saved. The preset
message box will appear asking if the presets should be overwritten in the unit.
If editing the presets while connected to the CT Receiver, the preset editor will interrogate the unit for the current preset settings. The current internal presets will be displayed once a live connection is established.
s will then load onto the CT
Receiver. A
Page 65

BK
&
SB
IMPLY ETTER!
Preset Editor
The Preset Editor Window
T
his shows the presets contained within the CT Receiver preset editor file.
1
5
59
2
6
4
3
Editing Presets
1. Selecting a Preset
Selecting a preset to edit is done by clicking on the number of the preset.
2. Selecting Preset Parameters
Select Volume, Bass Level, Treble Level, and EQ settings for each preset.
3. Choosing a source
Select the audio input (or AM or FM) and/or Video input. When it is desired to set audio and video together,
check the “View Source” button. To separate audio and video, check “View Audio/Video” button and select
an audio source and a video source.
4. Am/FM Frequency
When selecting an AM or FM frequency, move the indicator to the desired frequency or click on the box to
the right of the indicator and type in the desired frequency.
5. Zone Favorites
Once all of other p
available in. Zone Favorite are used to define what presets are available in which zones. By “checking” a
zone(s), the preset configured will be available for use in that zone(s) when using the Channel (+) and
Channel (-) commands for that zone. Example: If you do not want Preset #1 to be accessed when cycling
through the preset
6. Saving
After a preset has been configured, simply click on Save. This will save only the preset that is highlighted.
Note: When finished configuring all presets, remember to save the Preset File (.bkp). See previous page.
arameters have been set, it must be decided which zone(s) the preset is to be made
s using the Channel (+) and (-) commands in zone A then uncheck the box for zone A.
Page 66

BK
&
SB
IMPLY ETTER!
60
Serial Macro Editor
Serial Macro Editor
The Serial Macro Editor allows a CT Receiver to control other RS-232 devices as well as the B&K keypads.
Specific examples could include other B &K products, RS-232 controllable source pieces or light controllers.
The serial macro editor works by using an IR trigger command to send a RS-232 message. In this editor, the
user may specify the IR trigger, the RS-232 message and the RS-232 transmit port the command will be
sent. These commands may be triggered by any B&K
Note: The macros will always be transmitted out the RS-232 I/O RJ-45 jack on the back panel. The six zone
RS-232 transmit (XMIT) ports are independently selectable.
B& K provides RS-232 parameters for all products in the directory for documentation in BK Suite.
c:\ Program Files\ B&K Components\ BK Suite\ Documentation. Or go to the B&K support section of our
website at www
Below is a simple example using the Serial Macro Editor to trigger the zone status feedback when a zone
powers on. This example may be used on a default CK1.2 keypad. Select a macro in the serial macro editor. Choose the BK Code-set 128. Choose the IR command Power On (40h) from BK Data, this will be the
trigger. Create the RS-232 string (FF,K,D20,P1,B19;). Allow RS-232 data to transmit out (mask) all zone(s)
232 transmit ports (all zone boxes are checked). Click Save. What has been done is specified a “trigger” and
RS-232 string to send when the “trigger” is sent to the CT Receiver. When the CT product receives the
ID128 Power ON command, the RS-232 serial macro will be transmitted out zones A-F 232 transmit ports
(and the main RS-232 I/O). The RS-232 macro will trigger zone status on the keypad when any zone is powered on (assuming ID128 is used).
be displayed at the bottom of the keypad window.
.bkcomp.com.
This st
atus (Source / Volume / Bass / Treble / Loudness On or Off), will
IR command using Codes-Sets 0-0-0 through 1-2-8.
To convert Hex to
ASCII, include two back slashes (\\) before each nibble p
air, (ex: \\FE ).
Page 67

BK
&
SB
IMPLY ETTER!
Setup Using the On Screen Display
Setup Using the On Screen Display
61
It is possible to completely program the CT Receiver via the on-screen menus or the front panel dis-
. However
play
ten convenient to touch up one or two parameters of the system using the on-screen or front
is of
panel menus. All on screen setup on a CT Receiver must be done through the zone A video output
run to a monitor accessed by remote control. Remote control access to the on screen menu is limited
to zone Aonly.
The on screen menu may not be accessed by any zone other than zone
, it is not nearly as fast and straightforward as using a PC and BK Suite. Nevertheless, it
A.
Page 68

BK
&
SB
IMPLY ETTER!
62
On Screen Menu Operation with the MZ-128
Using a Remote Control
The on screen display may be navigated by use of the MZ-128 remote controller or any remote may be used
once it is set to the zone ACode-Set. Zone A is default code set to 0-1-1.
Using The Remote Control and On-Screen Menus
Tapping the MENU button on the remote
control brings up the On-Screen MAIN
MENU.
Use the Up and Down arrows to navigate
to the sub menu you want and press the
center SEL/ENTER button.
Use the Left and Right arrows to adjust the
selected item.
The MAIN MENU appears with the first
sub menu title highlighted in red.
The MENU button always backs up one
level at a time. Pressing the MENU button
when in the MAIN MENU screen will exit
the menu system.
At any time, the menu’s may be exited
completely by pressing the EXIT button.
(note, when changing settings, pressing
exit may not completely allow an adjustment, it is recommended to press Menu
until the menu system is completely
exited)
In the example displayed, the Audio Input
of Zone A(under Zone Operation) has
been selected, using the left and right
arrows, adjust the audio input to whatever
setting is desired.
Page 69

BK
&
SB
IMPLY ETTER!
OSD MENU STRUCTURE
Z L R B T
O V V A R
N O O S E E
E AUDIO L L S B Q
A IN 1 Off Off 0 0 L
B IN 1 Off Off 0 0 L
C IN 1 Off Off 0 0 L
D IN 1 Off Off 0 0 L
E IN 1 Off Off 0 0 L
F IN 1 Off Off 0 0 L
CONTROL I/O STATUS
Common In1 Off
Common Out1 Off
Zone Out A Off
Zone Out B Off
Zone Out C Off
Common In2 Off
Common Out2 Off
Zone Out D Off
Zone Out E Off
Zone Out F Off
SETUP GROUP a CODE SETS
1 Name ZoneA
2 Code Set 11
3 Include Zone A Left+Right
4 Include Zone B NO
5 Include Zone C NO
6 Include Zone D NO
7 Include Zone E NO
8 Include Zone F NO
next item adjust
MENU setup control
ZONE A CONTROL
1 Control Out Zone on
2 Rear data In On
next item adjust
MENU setup control
CONTROL OUT 1
Input 1 On Input 2 On
Input 3 On Input 4 On
Input 5 On Input 6 On
Input 7 On Input 8 On
Input 9 On Zone In On
FM Tuner On AM Tuner On
next item adjust
MENU setup control
SETUP RS-232 PORT
1 Port Enable
2 Baude Rate 9600
3 Echo Disable
4 Update Disable
5 Receive ID 0
6 Transmit ID 0
7 Setup RS-232 Slave Control
next item adjust
MENU setup control
A/V DETECTOR STATUS
IN 1 AUD VID IN A
IN 2 IN B
IN 3 IN C
IN 4 IN D AUD VID
IN 5 IN E
IN 6 AUD VID IN F
IN 7
IN 8
IN 9 AUD VID
S
ELECTED INPUT
COMMON CONTROL
1 Control 1 Any zone on
2 Control 2 Any zone on
3 Flasher Out SelectedInput
4 IR to flasher out Off
control out 1 will beon
when any zone is on
next item adjust
MENU setup control
SETUP PRESETS
1 Preset Volume No
2 Preset Names Auto
3 Preset Enter Key No
when recalling a preset
volume and tone remains at
current level
next item adjust
MENU setup control
SECURITY OPTIONS
1 Setup Menu Visible
2 Memory Unlocked
next item adjust
MENU setup control
SETUP RS-232 SLAVE CONTROL
1 Enable Slave Control Yes
2 Transmit ID Global
3 Enable Port A Yes
4 Enable Port B Yes
5 Enable Port C Yes
6 Enable Port D Yes
7 Enable Port E Yes
8 Enable Port F Yes
next item adjust
MENU setup control
ZONE 0 Whole House OPERATE
Power On
Audio IN 1 Volume -60dB
Video IN 1 Bass +12dB
Freq 103.3 Treble 12dB
EQ OFF
next item adjust
0. .9 +10 recall preset SAVE
MENU main menu
Zone 0 WHOLE HOUSE
FAVORITE PRESETS
Preset 0 Yes
' Our Favorite '
0..9 +10 preset rename SEL
next item adjust
MENU main menu
SETUP AUDIO/VIDEO SYSTEM
1 Inputs
2 Zones
3 Power On Settings
4 Page /Event
5 Zone Sync
6 Room Equalization
next item SEL select
MENU main menu
SETUP CONTROLSYSTEM
1 Zone Code Sets/Names
2 Zone Control I/O
3 Common Control I/O
4 Preset Operation
5 Security
6 RS-232
next item SEL select
MENU main menu
MEMORY BACKUP/RESTORE
1 Memory Operation Backup
save all settings to
EEPROM memory
SEL Backup adjust
MENU main menu
SYSTEM STATUS
1 Unit Information
2 Audio Status
3 Detector Status
4 Control Status
next item SELselect
MENU main menu
SETUP ZONE A EQUALIZATION
Treble 10.0 kHz 0.0dB
Bass 100.0 Hz 0.0 dB
Notch 1 30.0 Hz 0.0 dB
Notch 1 Width 29.3 - 30.7 Hz
Notch 2 60.0 Hz 0.0 dB
Notch 2 Width 58.6 - 61.4 Hz
Notch 3 90.0 Hz 0.0 dB
Notch 3 Width 87.9 - 92.1 Hz
SEL toggle last used
next item adjust
MENU setup A/V
Z 0 Whole House ZONE SYNC
1 Changes absolute
when changing volume bass
and treble - linked zones
will change relative to
their current levels
next item adjust
MENU setup A/V
SETUP PAGE / EVENT 1
1 Action Switch to 8
2 Activated by Control 1
3 Level -46 dB
4 Turn offdelay 5sec
5 Affects Control Out
and Flasher Out No
next item adjust
MENU setup A/V
Z0 Whole House POWER ON
1 Audio Last Used
2 Video Last Used
3 Volume LastUsed
4 Bass Last Used
5 Treble Last Used
6 EQ LastUsed
SEL toggle last used
next item adjust
MENU setup A/V
SETUP ZONE A AUDIO
1 Mode Stereo
2 Page / Event Both
3 Use Tuner 1
4 Level Control Variable
5 Max Level 0dB
6 Left Calibration 0dB
7 Right Calibration 0dB
next item adjust
MENU setup A/V
SETUP INPUT 1
1 Name IN 1
2 Level 0dB
3 Mode Stereo
4 Video Yes
next item adjust
MENU setup A/V
MAIN MENU
1 Zone Operation
2 Zone FavoritePresets
3 Audio/Video System Setup
4 Control SystemSetup
5 Memory Backup/Restore
6 System Status
next item SEL select
MENU exit menu system
UNIT INFORMATION
Unit CT 600.3 Receiver
Software Version 3.00
BKC-DIP Version 2.00.00
Serial Number 123456
On Screen Menu Tree Diagram
BK
&
SB
IMPLY ETTER!
63
Page 70

BK
&
SB
IMPLY ETTER!
64
On Screen Main Menu
Main Menu
While navigating the menus, page 62 , the On Screen Menu Tree Diagram, may be used as a reference. At
anytime the MENU button maybe used to step back one level to discover which function is being adjusted.
Using the ENTER button will select the choice displayed. press the EXIT or MENU button accordingly to
navigate or exit the menu system.
The On Screen Display Menu will read:
If the DOWN button is pressed on the front p
As in the example above, the single line displays are of
Audio/Video System Setup becomes A/V Setup, etc.
Tip - For a complete setup, B&K suggests you use (in the order of ease-of-use):
1. BK Suite
2.
On-Screen Display Setup
anel, the monitor display would change like this:
ten abbreviated to fit the menu information.
Thus,
Page 71

BK
&
SB
IMPLY ETTER!
Zone Operation
Zone Operation Menu
Once in the Zone Operation Menu, current zone parameters
may be adjusted. As these parameters are adjusted, they
affect the zone that is selected, in this example zone A
(code-set 0-1-1).
If you keep pressing the Left/Right adjust buttons, you
will cycle through all of the logical zones you setup.
65
Once which zone tone control is decided, press the Down
button on the remote. This selects the first item to adjust in
the Zone Operation sub menu for this logical zone.
Alternatively, you could press the Up button, which will select
the last item in this sub menu.
Zone Favorite Presets Menu
Select the zone in which you would like to adjust the
favorite presets using the Left and Right
arrows.
Use the Up/Down arrows to highlight Preset.
menu will only change the name of the preset.
This
In order to save a preset, configure the zone parameters
for the preset, then save the preset by pressing the SAVE
button on the remote control. The preset parameters will
be saved in the next unused numerical preset position.
save a preset under a specific number, configure the settings then press SAVE and then the preset number to be
saved. For example, to save preset 11 press SAVE +10 1.
T
o
Page 72

BK
&
SB
IMPLY ETTER!
66
Main Menu Sub Menu
To re-name a preset, use the SEL or Enter key to
s
elect the name, then left/right arrows for position and
u
p/down arrows to pick a character. Up to 13 characters
are available for each preset name. In addition the following keymap may be used to to aide in the naming
process: 1=ABC, 2=DEF, etc.
Press SEL or Enter to save the new name.
Audio/Video System Setup
Navigate with the arrow keys (or the number keys on the
remote) then use the SEL or Enter buttons to jump to the
new sub-menu. Once in the sub menu, a tap of menu
button will return you to this menu.
Inputs Sub-Menu
Select one of the nine shared inputs or the 6 dedicated
zone inputs. Then do the following steps:
1. Name the input.
2. If needed adjust the level to match other inputs.
3. Select S
4. Select Yes or No for video. If you select NO, the
Receiver will remain on the last used video source
CT
when that input is selected.
tereo or Mono
Naming an Input
Select Line one (Name) with the Up and Down keys,
Press the Right arrow key to show the blinking cursor
Then select which character position you want using the
Left and Right keys. Use the Up and Down keys to
change the character. You may also use the keymap to
aide the naming process:1=ABC, 2=DEF
name is correct, use the SEL or Enter button to save it.
, etc....Once the
.
Page 73

BK
&
SB
IMPLY ETTER!
Audio / Video Sub Menu
Menu Items for a Dedicated Input
Configuring name, level, mode and video is the same for
t
he dedicated inputs as it is for the shared inputs. But
also, the auto-sense has to be configured for the dedicated inputs. When a dedicated input is used, select Auto
if the CT Receiver should detect and automatically select
the dedicated input when audio or video is
detected.Select a adequate amount of turn off time, typically 20-25 seconds if there is no video from this source,
0-5 seconds if this is a video source, or “Forever” if you
don't want the input to return to the previous source once
the input signal is lost.
Zone Menu
First select which of the six zones you want to configure.
Then do the following steps:
1. Set the zone for stereo or mono depending on the
requirements. If it is set to stereo, go to the next menu
screen description.
2. Page/Event - Select if this zone should respond to
common control 1, 2, both or none.
3. Assign the zones default tuner
600.1 or Tuners 1,2 or 3 for a CT 600.3 or 300.3).
67
. (Tuner 1 for a CT
4. Level Control - Set to VARIABLE for standard adjustable volume via keypads and remote controls. Set to FIXED if this zone uses impedance matching volume controls for background music or if you
desire it be set to a fixed output level. This is for amplified outputs only.
5. Max Level - Set this to the maximum level the zone is to be able to achieve if the output it set to
variable. If set to fixed, this will be the output level.
6. Left Calibration - Use this to permanently compensate for odd speaker placement or the relative
difference between linked zones.
7. Right Calibration - Same as Lef
t Calibration.
Zone Menu when set to MONO
(the Zone is SPLIT into two independent areas)
When a zone is set to mono, the zone may operate simply as a mono zone or you have the ability to separate
the left and right sides of the zone independently. When
a zone is split to mono you are given independent control of power
of the zone.
and EQ settings across the mono zone. You may also
set each amplified output (left or right) to a fixed or variable volume level using this menu.
, volume & mute for the right and lef
You must share input (tuner), bass, treble
t sides
plit mono zone’
S
as in stereo mode, however each side of the channel
may have a maximum volume limit specified.
s do not have the cap
ability to calibrate
Page 74

BK
&
SB
IMPLY ETTER!
68
Audio / Video Submenu
Zone Power On Settings
U
se Left/Right to select a zone to setup for power on settings. Settings that may be configured include audio input,
video input, volume level, bass level, treble level, and EQ
setting. Use Up/Down to select an item to adjust. Use
Left/Right to adjust the item selected.
Settings may be configured for use when a zone is first
powered on. Use the Up/Down on the remote to highlight a
setting to be changed and the Left/Right to change the setting.
Page/Event Setup
Use Left/Right to select which Page/Event to configure.
Then use Up/Down to select an item to adjust and use
Left/Right to adjust the item selected.The zone may switch
to any shared input, change volume or mute volume, etc.
*Note: Only Zones which have been setup under the
Zone(s) Menu to respond to Page/Event 1 or 2 or Both
will be af
Page/Events are described on page 45.
Use Lef
Then use up/down to select changes. Use Left/Right to
adjust between relative and absolute.
Relative: all volumes change relative to one another.
Absolute: All volumes sync to same volume level before
change is made, referenced from the zone the command
is received from.
*Note: The expression "linked zones" means the hardware zones that make up a code-set group (i.e. the logical zone "Downstairs" may consist of the hardware zones
B - “Dining Room”, C - “Kitchen”, and D - “Patio”).
fected by the Setup Page/Event screen.
t/Right to select which group of zones to set up.
Page 75

BK
&
SB
IMPLY ETTER!
Control System Menu
Setup Zone Room Equalization
F
irst select which of the six zones you want to configure.
Adjust Treble and Bass frequencies and level using the Left
and Right functions on the remote and Up/Down to move to
the next setting. Use the same remote functions to adjust
notch frequency, gain and width.
For an explanation of Room Equalization and Notch Filtering
see Page 55
Control Menu Setup
From the Setup Control Menu use the Up/Down to
highlight a sub menu.
Select by pressing SEL or ENTER.
69
Zone Code-Sets/Names and Group Titles
For a detailed explanation of using Code-Sets and
Groups, see the section: Groups/Code-Set
page 40.
Select the Group you want to define by using the
Left/Right key when the top row is highlighted as
shown. Once the correct Group is shown use the
Up/Down keys to select Name. Use the Lef
keys to activate name editing (blinking cursor). You
may also use the numeric keys to aid in the naming
process: 1=ABC, 2=DEF, etc....
s/Zones on
t/Right
Page 76

BK
&
SB
IMPLY ETTER!
70
Control System Menu
Zone Code-Sets/Groups and Group Titles continued...
Once the name has been entered, use the Up/Down
keys to select a Code-Set.
Use the Left/Right keys to select one of the available
128 code-sets.
Move Up/Down to include the hardware zones for this
group. In this example Group Aconsists of only one
hardware zone, Zone A.
If you would like a group to contain more than one hardware
zone (as shown to the left) adjust each hardware zone to
include Left, Right, or Left + Right. When additional hardware
zones are included they are all controlled by the code-set, in this
case code 017.
Zone Control I/O
Use the Left/Right keys to select the zone. Use the Up/Down
keys to select the setting to adjust. Use the Left/Right keys to
pick from the available options.
Control Out will determine when the 12VDC 200mA control voltage is sent for each zone. It is labeled on the back panel under
the Zone Control I/O as 12V CTRL.
Rear data in controls the IR data input for each zone. It is
labeled on the back p
IN.
Specifications for the control settings may be found on page 48.
anel under the Zone Control I/O
as “DA
TA
Page 77

BK
&
SB
IMPLY ETTER!
Control System Menu
Common Control I/O
The CT600.3 and 600.1 are equipped with two 12VDC 200mA
common control voltages (the CT300.3 is equipped with one).
This menu setting assign operation to the “OUT” located in the
common control section on the back panel of the CT Receiver.
They are programmed at the factory to turn on when any Zone
is powered on.
To change this setting use the Up/Down keys to select the
Control Out you wish to program. Use the Left/Right keys to
pick from the available options.Specific options for the common
control settings may be found on page 48.
Flasher Out
Below are the three possible choices for the 9 IR outputs:
Selected Input - IR commands are routed from the keypad ter-
minal to the corresponding IR output for only the input that is
selected for that zone.
to be used independently in the system. (Default Configuration)
All Inputs - All flash / simultaneous flash. IR commands from
any zone are routed to all flashers regardless of what input the
zone(s) is on.
Off - All flashers may be turned off for troubleshooting purposes. No IR data will transmit out the 9 IR output
This allows identical source component
s.
71
s
Rear Panel IR to Flasher Out
This setting configured whether the minijack ‘IR IN’ will pass IR
to the 9 flasher outputs.
Page 78

BK
&
SB
IMPLY ETTER!
72
Setup Presets
Setup Presets
Preset Recall
Input/Tuner/Tone: Preset will recall Input, Tuner Frequency
and EQ settings
Input/Tuner/Tone/Vol: Preset will recall Input, Tuner
Frequency, Volume and EQ settings.
Input/Tuner: Preset will recall Input or Tuner Frequency
only.
Preset Names
If auto naming is set to YES, the CT Receiver will automatically name a nee preset for source and volume settings. If
it is set to NO, the user must enter the preset name manually or retain the previous name.
Preset Enter Key
If set to NO, (default) when using the B&K Channel Up
and Channel Down buttons, the ENTER button is not
required for the preset to be recalled.
If set to YES, when using B&K Channel Up and Channel
Down buttons, the ENTER button is required for the preset
to be recalled.
Note: ENTER must be pressed after a preset is numerically selected.
Security Options
Use the Up/Down to select a security setting to configure.
Then use the Left/Right keys to select from one of the
available options.
Setup Menu
Visible (Default) - This allows access to all menu items.
Disabled - This setting does not allow any setup of the
unit. However
Memory
Unlocked (Default)- Allows users to save system setting to
memory.
Locked - Does not allow users to make/save any changes
to preset
viewed but changes may not be made or saved.
, it still allows viewing of system st
s or settings.
Advanced setup menus may be
atus.
To unlock advanced system settings, see page 50.
Page 79

BK
&
SB
IMPLY ETTER!
Control System Setup
RS-232 Options
Note: Parameters 1 through 7 do not need to be changed and
should be left for advanced programmers.
Use the Up/Down keys to select a setting to configure. Then
use the Left/Right keys to select from one of the available
options. NOTE: Please see page 51 of this manual describing
details about the RS-232 options.
RS-232 Slave Control
RS-232 Slave control enables set up for communication
between multiple connected B&K products.
The Transmit ID is normally set to ALL. If ALL is selected, control of any connected B&K products will then be possible.
However
that unit will be controlled. This is useful if several B&K products are interconnected for other purposes.
, if you select the ID of a specific
B&K product, only
73
YES (Default) - Enables all RS-232 commands to be transmitted
out the zones port.
NO - Only disables only auto BKC-DIP commands from being
transmitted out the zones port.
Note: Macro strings (Serial) and Keypad feedback information
will still be transmitted out the zones port.
When Memory Backup/Restore is highlighted, press the
SEL/ENTER key to backup all system settings to the EEPROM.
To Retore all system settings, use the Left/Right keys to change
the option to RESTORE. Press the SEL/ENTER key to restore
all settings that were previously backed up on the EEPROM.
If the system has never been backed up, selecting RESTORE
will restore the unit to factory default.
Refer to page 23 for the CT 600.3,600.1 and 300.3 reset procedure.
Page 80

BK
&
SB
IMPLY ETTER!
74
System Status
System Status
Status is very useful troubleshooting aid for installations.
There are four screens that show the status of A/V
inputs, zones and control in/out activity.
Unit Information:
The Unit information screen gives factory information
that is useful for both the end user and B&K technical
support including model, serial number and software
version.
Audio Status:
The Audio status screen enables you to view power
state, input, tuner frequency, volume, balance, bass,
treble and EQ settings for all zones.
* is an indicator for FM in Stereo
A/V Detector Status:
The A/V Detector status screen enables you to view
Audio or V
232 controllers this menu may be queried to determine whether a source is sending a signal. Please
see the RS-232 documentation on the B&K website at
www.bkcomp.com for more information.
Control I/O Status:
The control I/O st
state of both common and zone control triggers.
When using RS-232 or Ethernet controllers, this menu
may be used to determine whether a control is on or
off. Please see the RS-232 documentation on the
B&K website at www.bkcomp.com for more information.
ideo signal on any input. When using RS-
atus screen enables you to view the
Page 81

BK
&
SB
IMPLY ETTER!
Zone Planning Worksheets
CT Receiver Zone Planning
Residence Project Manager Date
Zones A B C D E F
Name of
Zone
How Many
Keypads?
Master
Slave #1
Slave #2
Slave #3
75
Zone TV?
Stereo /
Mono ?
Number of
Speakers
External
Amplifier
Line Level
Output
If Fixed-
# of Volume
Controls
Dedicated
Source?
Name on the
ad
Keyp
Local Source
Control from the
ad
keyp
# of Emitters
Yes No Yes No Yes No Yes No Yes No Yes No
Stereo
Mono
Yes No Yes No Yes No Yes No Yes No Yes No
Variable
Fixed
Yes No Yes No Yes No Yes No Yes No Yes No
Yes No Yes No Yes No Yes No Yes No Yes No
Stereo
Mono
Variable
Fixed
Stereo
Mono
Variable
Fixed
Stereo
Mono
Variable
Fixed
Stereo
Mono
Variable
Fixed
Stereo
Mono
Variable
Fixed
Total Number of Keypads Total Number of Volume Controls
Page 82

BK
&
SB
IMPLY ETTER!
76
Input Planning Worksheet
CT Receiver Input Planning
Residence Project Manager Date
IN 1 IN 2 IN 3 IN 4 IN 5 IN 6 IN 7 IN 8 IN 9
Shared?
Yes
No
Identical?
Yes
No
Shared?
Yes
No
Identical?
Yes
No
Shared?
Yes
No
Identical?
Yes
No
Shared?
Yes
No
Identical?
Yes
No
Shared?
Yes
No
Identical?
Yes
No
Shared?
Yes
No
Identical?
Yes
No
Shared?
Yes
No
Identical?
Yes
No
Shared?
Yes
No
Identical?
Yes
No
Shared?
Identical?
Cable Calculation
Source Distance for Home Run Total
Yes
No
Yes
No
Additional Cables for Home Theater or Local TV’s and Components:
# of Emitters : # of Blocking Covers:
Page 83

BK
&
SB
IMPLY ETTER!
Power On Preferences and Presets
BK
&
SB
IMPLY ETTER!
CT Receiver Preferences and Presets
Residence Project Manager Date
Zone Power On Preferences
77
ZONE
A
B
C
D
E
NAME
AUDIO FROM
Last Used
Last Used
Last Used
Last Used
Last Used
IDEO FROM VOLUME
V
Last Used
Last Used
Last Used
Last Used
Last Used
Last Used
Last Used
Last Used
Last Used
Last Used
RADIO FREQUENCY
AM
AM
AM
AM
AM
FM
FM
FM
FM
FM
F
1
2
3
4
5
6
7
8
9
10
Last Used
Last Used
Preset Radio Stations
Last Used
AM
FM
Page 84

BK
&
SB
IMPLY ETTER!
78
Troubleshooting Guide
Troubleshooting Guide For BK Suite
1. Make sure your PC meets the requirements outlined in the BK Suite Section of this manual. Page 32.
2. Make sure the CT/CK/SR product is connected to the PC’s serial port. (DB-9, nine pin)
3. Be sure to select “Local Com” in the BK Suite software, as “Network” is not currently supported.
4. If the unit will not communicate through RS-232, perform a factory reset. (See Factory Reset Section)
5. Know how to properly set the COM port protocol in your version of Windows:
W
indows 2000/XP - Go to your system’s “Control Panel.” Click the icon labeled “System.” In the
Hardware tab, click the Device Manager button. Double click on the icon labeled “Ports” to expand the
tree and view the installed communication ports. Double click the COM port corresponding to the port
the CT/CK/SR product is physically connected to and go to section 6 below.
6. Set the proper communication properties. The parameters for Port Settings should be entered as
follows: Bits per second - 9600
Data Bits - 8
Parity - None
Stop Bits - 1
Flow Control - None
In the advanced section of the Communication properties window is the “FIFO Buffer” configuration.
Most modern laptops have the ability to take full advantage of these buffers, so it is recommended to
enable them and drag their slider to the “max” setting. Once you have finished making the selections,
click “OK” to all windows and prompt to return to the Control Panel.
Control Panel.
7. Disable any and all power management services including any Universal Power Supplies (UPS).
8 Disable any palm computer / PDA
Sync, Clie Connect, etc.
9. Disable other RS-232 / Serial protocol programs that may be using the COM port. I.e CK1.2 Keypad
, SR10.1 Remote Editor, serial controllers such as Weatherbug’
Editor
UPS freight scales.
10. In case you encounter any “Out of Memory” or “Out of Resources” errors, be sure your PC meets the
minimum requirements outlined in the BK Suite section of this manual. Close all other unnecessary
programs that may be running. It is recommended to let Windows manage your virtual memory, how
ever, if you manually set the virtual memory size, set it at least 1.5 times your actual RAM size.
syncing sof
tware and services such as Hot Sync Manager, Pam
At that point you may close the
s external display or FEDEX /
Troubleshooting Guide for CT Receivers
Problem Possible Solution
CT Receiver will not power up. Check power cord and/or main AC fuse
Keypads will not power up. Check connection at the receiver back panel. Re-terminate
Keypad will not pass IR. Re-terminate CAT-5 ends and securely connect to receiver
On Screen Menu will not display. Menu is only accessible from Zone A.
Keypads are going to a blank page. Keypad feedback is out of sync. See page 54.
Slaved keyp
Control of sources is inconsistent or not operating at all. Check flasher output setting. See p
ads are not operating properly.
CAT-5 ends
back panel. See page 14.
Reprogram slaved keyp
slave 1, etc.
ads in series order. Master first, then
age 48.
Page 85

BK
&
SB
IMPLY ETTER!
Limited Warranty
BK
&
SB
IMPLY ETTER!
B& K Components Lt., referred to herein as B&K, warrants your B&K equipment against all defects in material and workmanship for a period of five years from the date of purchase. This warranty applies only to the original purchaser and only to equipment in normal residential use and service. Defective equipment must be
returned to B&K, prepaid, accompanied by proof of purchase and sufficient p ayment to cover the cost of return
shipping and handling, and will be repaired or replaced at the discretion of B & K whose decision as to the
method of reparation will be final.
This warranty shall not apply to any equipment which is found to have been improperly installed, incorrectly
fused, misused, abused, or subjected to harmful elements, used in any way not in accordance with instructions
supplied with the unit, or to have been modified, repaired or altered in any way without the expressed, written
consent of B&K. This warranty does not apply to the cabinet or appearance items such as the faceplate or control buttons, nor does it cover any expenses incurred in shipping the unit to and from the manufacturer's service depot.
This warranty on B&K Components, Lt. products is NOT VALID if the products have been purchased from an
unauthorized dealer or an E-tailer or if the original factory serial number has been removed, defaced or replaced
in any way. B & K Components, Lt. sells its products through authorized dealers in order to insure that consumers obtain proper dealer service and support. Buying from an authorized B &K Components, Lt. dealer
insures that you have a FACTORY WARRANTY on your B&K Components, Lt. product. If you have any questions concerning your Factory Warranty call B &K Components, Lt. at 716-656-0026.
Upgradability: B&K is one the first manufacturers in the audio/video industry to consistently offer software and
hardware upgrades to its processing of audio signals. Through upgrades B&K delivers exceptional value to its
customers. But what is "Upgradability"? Upgradability is not a guarantee; we define it as a philosophy of designing and manufacturing products so that as audio technology evolves, B & K can provide enhancements and
improvement
s to its products that are economically viable.
79
THE EXPRESS FACTORY WARRANTY HEREIN CONTAINED IS IN LIEU OF ANY AND ALL OTHER WARRANTIES, EXPRESSED OR IMPLIED, INCLUDING ANY WARRANTY OF MERCHANTABILITY, UPGRADABILITY
UNDER ANY CIRCUMSTANCES BE LIABLE FOR DAMAGES, INCLUDING SPECIAL, INCIDENTAL, EXEMPLARY, PUNITIVE OR CONSEQUENTIAL DAMAGES ARISING OUT OF OR IN CONNECTION WITH THE
PURCHASE, USE OR PERFORMANCE OF
This warranty gives you specific legal right
Some States do not allow the exclusion or limitation of incidental or consequential damages and the foregoing
exclusions may not apply to you. No agent, representative, dealer or employee of B &K has the authority to
increase or alter the obligations or terms of this warranty
No equipment may be returned to B &K Components Lt. without a RETURN AUTHORIZATION (RA) number.
Should you find it necessary to return equipment to B&K, for any reason, a RETURN AUTHORIZATION (RA)
number must be issued by B&K in respect of the equipment being returned. You may request an RA number
by calling
have it ready before you call.
OR OF FITNESS FOR
at the numbers below. We will need the following information to issue your RA number. Please
B&K
1. Your name, address, and phone number.
2. The model and serial number of the equipment being returned.
3. A description of the problem being experienced.
our sales receipt.
4.
Y
ANY PARTICULAR PURPOSE. B&K COMPONENTS, Lt. SHALL NOT
ANY B&K
Your may also have other right
s.
RETURNING EQUIPMENT
PRODUCT.
s which vary from State to State.
.
Your call will be referred to a Technical Service Representative who will work with you to resolve the problem.
If it is determined that the unit must be returned for repair, an RA number will be issued.
Page 86

BK
&
SB
IMPLY ETTER!
80
Specifications
Multi - Zone Receivers
Specifications CT600.3 CT300.3 CT600.1
Number of Zones 6 Stereo / 12 Mono 3 Stereo / 6 Mono 6 Stereo / 12 Mono
Internal AM / FM Tuner 3 3 1
Power Rating @ 8W
(4W stable all Ch driven)
Signal To Noise Ratio 89 dB 89 dB 89 dB
Audio Frequency Response 20 Hz - 20 kHz 20 Hz - 20 kHz 20 Hz - 20 kHz
Audio Source Inputs 9 (RCA) 9 (RCA) 9 (RCA)
Audio Loop Outputs (Buffered) 9 (RCA) 9 (RCA) 9 (RCA)
Audio Buffered Output Impedance
Video Freq. Response - Composite 20 Hz - 10 MHz 20 Hz - 10 MHz 20 Hz - 10 MHz
Video Source Input Impedance
Video Source Inputs 9 Composite 9 Composite 9 Composite
Video Loop Outputs (Buffered) 9 Composite 9 Composite 9 Composite
Video Output Impedance (Buffered)
Dedicated Zone AV Inputs 6 (RCA) 3 (RCA) 6 (RCA)
Zone Line AV Outputs 6 (RCA) 3 (RCA) 6 (RCA)
Source IR Flasher Outputs 9 (1/8” plug) 9 (1/8” plug) 9 (1/8” plug)
IR flasher voltage
Command and Control
All Zones
55 Watts / Ch
220W 220W 220W
75W 75W 75W
75W 75W 75W
5V with 475W in-series 5V with 475W in-series 5V with 475W in-series
IR/RS-232/
Ethernet (pending)
All Zones
55 Watts / Ch
IR/RS-232/
Ethernet (pending)
All Zones
55 Watts / Ch
IR/RS-232/
Ethernet (pending)
IR In 1 (1/8” plug) 1 (1/8” plug) 1 (1/8” plug)
IR Pass 1 (1/8” plug) 1 (1/8” plug) 1 (1/8” plug)
All IR Out 1 (1/8” plug) 1 (1/8” plug) 1 (1/8” plug)
IR Link In 1 (RJ-45) 1 (RJ-45) 1 (RJ-45)
IR Link Out 1 (RJ-45) 1 (RJ-45) 1 (RJ-45)
RS-232 Device Control Yes - triggered using IR Yes - triggered using IR Yes - triggered using IR
Keypad Data Inputs 6 (RJ-45) 3
atus Outputs
olt Control / S
12 V
Common Control Inputs 2 1 2
Common Control Outputs 2 1 2
Whole House Presets 100 100 100
Overall Dimensions
(Cutout Dimensions)
Shipping Weight 55 lbs. 50 lbs. 55 lbs.
t
Height
idth
W
Depth
17.00” (17.12”)
15.50” (16.62”)
6 3 6
7.50” (7.62”)
(RJ-45)
7.50” (7.62”)
17.00” (17.12”)
15.50” (16.62”)
(RJ-45)
6
7.50” (7.62”)
17.00” (17.12”)
15.50” (16.62”)
Page 87

BK
&
SB
IMPLY ETTER!
CT Series A / V Control Center
FEATURES:
• The CT600.3 & CT600.1 have 6 fully independent A/V stereo zones; the CT300.3 has 3 fully independent A/V
stereo zones.
• Each stereo zone has independent power, volume, bass, treble and and selectable EQ settings for loudness or
auto-level.
• Each stereo zone has a separate Room EQ available for use with correcting it’s audio sound-field.
81
• Each stereo zone may be configured for use as 2 mono zones.
• 9 source inputs each with stereo audio and composite video, each with a dedicated IR flasher output.
• Each of the 9 source inputs have a buffered stereo audio and composite video output available for use with
the cascading of multiple units.
• All stereo zones have one additional dedicated input (for a local source) with auto-selecting audio and video.
• All stereo zones have speaker outputs and line-level audio and video outputs.
• All speaker outputs are stable into a 4 ohm load for use with stereo or mono zone configurations.
• 100 Personal Action Macros© may be preset for instant use in any combination of zones.
• All system setup may be accomplished using B & K’s intuitive software suite and a computer. This allows fast,
easy, system configuration, backup, and database archiving.
• Command and Control of multiple CT Receivers inked via RS-232 and IR Link In/Out.
• Expansion to 6 zones of High Definition Video when linked to the HD6 video transcoding switcher.
• All B & K products sold through authorized dealers are covered by a 5 year, parts and labor factory warranty.
ADDITIONAL B & K PRODUCTS
CK1.2 and CK1.1 Keyp
tion. Programmable LCD screen capable of operating 20 different devices. Over 1000 IR codes available to fully automate
and control audio/video accessories.
Programmable.
ad Control – Complex control veiled in Simple Elegance is B & K’
Also, features 2-way feedback & intelligent input synchronization. Macro
s solution to whole house automa-
HD6 High Definition V
anion to a CT Receiver. One HD6 may be mated (linked) to one CT Receiver.
p
SR10.1 Remote Control – The compliment to the CK1.2 for intelligent control of B & K’s Home Theater and Multi-Zone
units. Programmable LCD screen capable of operating 20 different devices. Over 1000 IR codes to fully command
audio/video accessories. (Macro Programmable)
-1 IR System Integrator – Integration of 3 CT Multi-Zone and 1 AVR/REF Home Theater System.
CT
ideo Control Center – 6 zone video transcoding switcher designed to be a simple Plug n Play com-
Page 88

BK
&
SB
IMPLY ETTER!
82
COMPLETE USER MANUAL - CT RECEIVER
© 2006 B&K Components, Ltd. All rights reserved.
The information in this manual is copyright protected. No part of this manual may be copied or reproduced in
any form without prior written consent from B & K Components, Ltd.
B & K Components, Ltd. SHALL NOT BE LIABLE FOR OPERATIONAL, TECHNICAL OR EDITORIAL
ERRORS/OMISSIONS MADE IN THIS MANUAL. The information in this manual may be subject to change
without prior notice.
The information in this manual may be subject to change without prior notice.
***- PC requirements - 128MB RAM, Pentium grade or better processor, Windows XP is the recommended
operating system. (Exception - BK Suite not supported on Windows NT) ***
Additional Information
SIMPLY BETTER!Ô
marks or registered trademarks of their respective companies or organizations.
B&K
Components, Ltd. dealer insures that you have a FACTORY WARRANTY on your B &K Components, Ltd.
product. A warranty on B& K Components, Ltd. products is NOT VALID if the products have been purchased
from an unauthorized dealer or an E-t
replaced in any way.
For additional information on B&K product including past and current product manuals, all software including
BK Suite, Hardware Quick Tools, the SR 10.1 and CK 1.2 / 1.1 editors and all RS-232 protocol can be found
on the B&K website at www.bkcomp.com
To contact customer service, please call 1-800-543-5252 or go to www.bkcomp.com
Components, Lt
© is a trademark of B & K Components, Ltd. All other brand or product names are trade-
d. sells it
s product
s through authorized dealers. Buying from an authorized B&K
ailer or if the factory serial number has been removed, defaced or
B&K Components, Ltd.
2100 Old Union Road
falo, New
Buf
1.800.543.5252 In NY: 716.656.0026
Fax: 716.656.1291
E-mail: info@bkcomp.com
On the web: www
York 14227
.bkcomp.com
 Loading...