

Page 1

B &KCOMPONENTS, LTD.
The B & K CK1.2
Guide To Programming
Keypad
2004
Customizing
Saving Installation Time
Automating
REV B 0104
Page 2

GUIDE T
O PROGRAMMING THE B & K CK1.2 KEYPAD
© 2004 B & K Components Ltd. All rights reserved.
The information in this manual is copyright protected. No part of this manual may be copied or reproduced in any
form without prior written consent from B&K Components, Ltd.
B & K Components Ltd. SHALL NOT BE LIABLE FOR OPERATIONAL,TECHNICAL OR EDITORIAL ERRORS/OMISSIONS MADE IN THIS MANUAL.
The information in this manual may be subject to change without prior notice.
SIMPLY BETTER is a registered trademark of B & K Components, Ltd. All other brand or product names are trademarks or registered trademarks of their respective companies or organizations.
B & K Components, Ltd. sells its products through authorized dealers. Buying from an authorized B& K Components,
Ltd. dealer insures that you have a FACTORY WARRANTY on your B & K Components, Ltd. product.A warranty on
B & K Components, Ltd. products is NOT VALID if the products have been purchased from an unauthorized dealer or
an E-tailer or if the factory serial number has been removed, defaced or replaced in any way.
B & K Components, Ltd.
2100 Old Union Road
Buffalo, New York 14227
1.800.543.5252 In NY: 716.656.0026
Fax: 716.656.1291
E-mail: info@bkcomp.com
On the web: www.bkcomp.com
SBIMPLY ETTER!
BK
&
Page 3

BEFORE YOU STA RT 1
Read This First! 1
You Need a Personal Computer With Serial Port 1
Close ALL Applications That Use Serial Ports - Use B&K Task Manager! 1
You Need an RS232 Connecting Cable & Adapters As Necessary 1
Keep Your Database Up to Date — USE LIVE UPDATE 1
OVERVIEW OF
OPERATIONS 2
The Goal - Minimize Training Time and Effort 2
Keypad Basic Controls and Displays
Standard Keypad Operations 3
Customize The Operation Manual 3
Utilizing FAV - Favorite Macros 4
PROGRAMMING CONSIDERATIONS FOR THE CT610/310/600 5
Keypad Feedback 5
Programming the CT610/310/600 for Keypad Feedback 6
BKcSuite Determines Device Layout for the CK1.2 8
PROGRAMMING OVERVIEW 9
W
INDOWS,MENUS AND TOOLS 10
The Menu Bar and the Menus 11
File Menu 11
Program Menu 11
Communications Menu 12
Help Menu 12
The Toolbar and Shortcut Buttons 12
The Simulator and the Phantom Hard Buttons 13
Navigating and Selecting Buttons 13
Button Capabilities and Flags 13
Tree View 14
i
Table of Contents
T
H
E
B
&
K
A
U
T
O
M
A
T
E
D
H
O
U
S
E
BK
&
SBIMPLY ETTER!
Page 4

Devices and Pages 14
The Edit and Label Buttons Window 15
The Edit and Label Buttons Toolbar 15
The Delete Window 16
Labels 16
Shortcuts - Copying Buttons 16
The Macro/Favorite Window 17
The Macro Toolbar 17
Re-Ordering Macro Steps 17
Macro Details 17
PROGRAMMING TUTORIAL 18
Creating, Naming and Arranging Devices 18
Open the Create and Name Devices Window 18
Creating Devices 18
Using the IR Database 20
Discrete Codes,Toggles and other New Words 20
Selecting a Code Set from the Database 20
Hidden Codes in Keypad Database 22
Shortcutting To Hidden Codes and Other Device IR commands 22
Testing 23
Downloading to TEST Pre-Programmed IR Commands From The Database 23
Preparing the List of Buttons to be Learned 23
Using LCD Button Editor 24
Labeling and Deleting Buttons 24
Dragging and Dropping Buttons 25
Hiding Pages 25
Moving Through Pages In Favorites 25
Shortcuts - Copying Existing Buttons 25
ii
Table of Contents
U
S
I
N
G
C
K
E
D
I
T
O
R
T
O
P
R
O
G
R
A
M
BK
&
SBIMPLY ETTER!
Page 5

Learning Tips 26
Learning IR Codes One at a Time 26
Learning a Batch of Buttons Efficiently 27
Download and Test All Learned Buttons 28
Copying and Pasting Devices 28
Importing and Exporting Device 29
Importing Step by Step 29
Macro Programming 30
What is a Macro? 30
What Buttons Can Playback a Macro? 30
Discrete IR Codes vs Toggle IR Codes 30
Toggle Commands create “Point & Pray” Macros 31
Finding Workarounds for Toggle Commands in Macros 31
Programming the Power On Macro 32
Programming a Power Off Macro 36
Programming Activity Macros on MAIN LCD “Device” Buttons 37
Programming FAVORITE Macros 38
Inserting Macros (Copying or Cloning a Macro) 39
Programming Punch Through 40
Backlight On Time 41
Downloading to CK1.2 Keypad 42
Download Failures 43
Uploading from the Keypad to the PC 43
ADVANCED
PROGRAMMING TIPS 44
Push and Hold Macros 44
Push and Hold for Activity Macros and Tap to Switch Devices 44
Two Functions on One LCD Button 44
iii
Table of Contents
T
H
E
B
&
K
A
U
T
O
M
A
T
E
D
H
O
U
S
E
BK
&
SBIMPLY ETTER!
Page 6

Status Messages for Impatient Clients with Long Macros 45
Helping Confused Clients With BOBS and LISTS 47
BOBS for Scrolling or Toggling Commands 47
LISTS - When You Have Lots of Components WITHOUT Discrete Power Commands 48
Controlling the CK1.2 Via RS232 49
Overview 49
Examples of RS232 Macros 49
Purpose of Keypad ID Numbers 49
ID# FF(255) is the Global Default 50
Resetting Keypad Unit ID 50
Sending Messages To A CK1.2 Via RS232 50
Need for Delay Between Messages 50
Enter Keypad ID# In Hexadecimal 51
Device Number Mapping 51
Button Number Mapping 51
iv
Table of Contents
U
S
I
N
G
C
K
E
D
I
T
O
R
T
O
P
R
O
G
R
A
M
BK
&
SBIMPLY ETTER!
Page 7

Read This First!
You Need a Personal Computer With Serial Port
CKEditor will run on any Pentium II or faster Windows PC. Your PC should be equipped with an adequate amount
of RAM for the operating system you use. CKEditor is compatible with the Windows 98, ME, 2000, XP and XP Pro
operating systems. It is not compatible with Windows 95 or previous versions of windows. Note that many modern
laptops do not come equipped with a serial port. If there is no serial port, purchase a USB to Serial adapter.
Although many manufacturers supply adapters or hubs for this purpose, we can vouch for the
operation of Belkin and Keyspan hubs and adapters.
CKEditor is installed via a self extracting installer file downloadable from www
.bkcomp.com. You need a connection
to the internet to download the file or to update CKEditor.
Close ALL Applications That Use Serial Ports - Use B&KTask Manager!
Although you may be using an adapter with multiple serial ports (or your PC may
be equipped with more than one), don’t use more than one at a time. Doing so
will overtask many system’s resources and cause errors and problems. B&K’s Task
Manager will only open CKEditor after you have closed BKcSuite or SR10.1 Remote Editor (and vice versa).
However, you must manually close such programs as Hotsync for the Palm Pilot and LapLink if they are running (right
click on any icons in the windows task bar representing these programs and exit them).
You Need an RS232 Connecting Cable & Adapters As Necessary
B&K include a pre-made cable suitable for connecting a Serial port to the CK1.2 keypad. However, if this is lost or
misplaced here is the pin configuration for a serial cable:
DB 9 DB25 Function Stereo 3.5mm Plug Connection
Pin 3 Pin 2 Host Transmit To Tip
Pin 2 Pin 3 Host Receive To Middle Ring
Pin 5 Pin 7 Host Ground To Base Ring
Keep Your Database Up to Date — USE LIVE UPDATE
CKEditor includes a vast library of IR codes for hundreds of brands and models of A/V components.This database is
constantly growing with the inclusion of new devices every month. Keep your software up to date by using the Live
Update feature. Rather than un-installing and re-installing the software, you download updates to the software from
the internet. Simply follow these steps:
1 Connect to the Internet normally.
2 Open CKEditor
3 From the Help Menu, select Live Update
4 In the Live Update window, click on Update Now.
5 Wait for the window to indicate the download is
completed. Close the Window.
6 Close and re-open CKeditor. You do not need to restart Windows
1
Before You Start
T
H
E
B
&
K
A
U
T
O
M
A
T
E
D
H
O
U
S
E
BK
&
SBIMPLY ETTER!
Page 8
2
U
S
I
N
G
C
K
E
D
I
T
O
R
T
O
P
R
O
G
R
A
M
Overview
The Goal - Minimize Training Time and Effort
Training clients has traditionally taken too much of an installer’s time and effort. Creating
hand written summary sheets and instruction books for customers is a waste of time.The
CK1.2 Keypad is designed to save time.With each keypad, B & K includes a pre-printed
customizable Operation Manual. Unlike other keypads, this manual has nothing to do with
setup or programming. It is a guide to operating the client’s home theater! Although the
flexibility of the CKEditor software enables you to program keypads in thousands of different ways, the operations manual will show the customers how to operate their home theater if you follow a few tips as you program.
TIP - Program To Operate As Shown In The Guide to
Operation
1 You must create a DEVICE (a set of 1 to 4 dedicated LCD pages) for each remote control you want the
keypad to replace. Use the IR database or IR learning so that the CK1.2 Keypad can control all needed
functions.
2 The MAIN Power On and Power Off buttons turn on and off the entire zone (including any local compo-
nents or devices) with a macro.
3 Each of the MAIN LCD Device buttons issues a macro that reconfigures the system
inputs and modes as necessary for the client to watch or listen to the selected source.
4 Punch Through Volume and Mute have been programmed for all devices so that the client can always
adjust the volume regardless of which device has been selected.
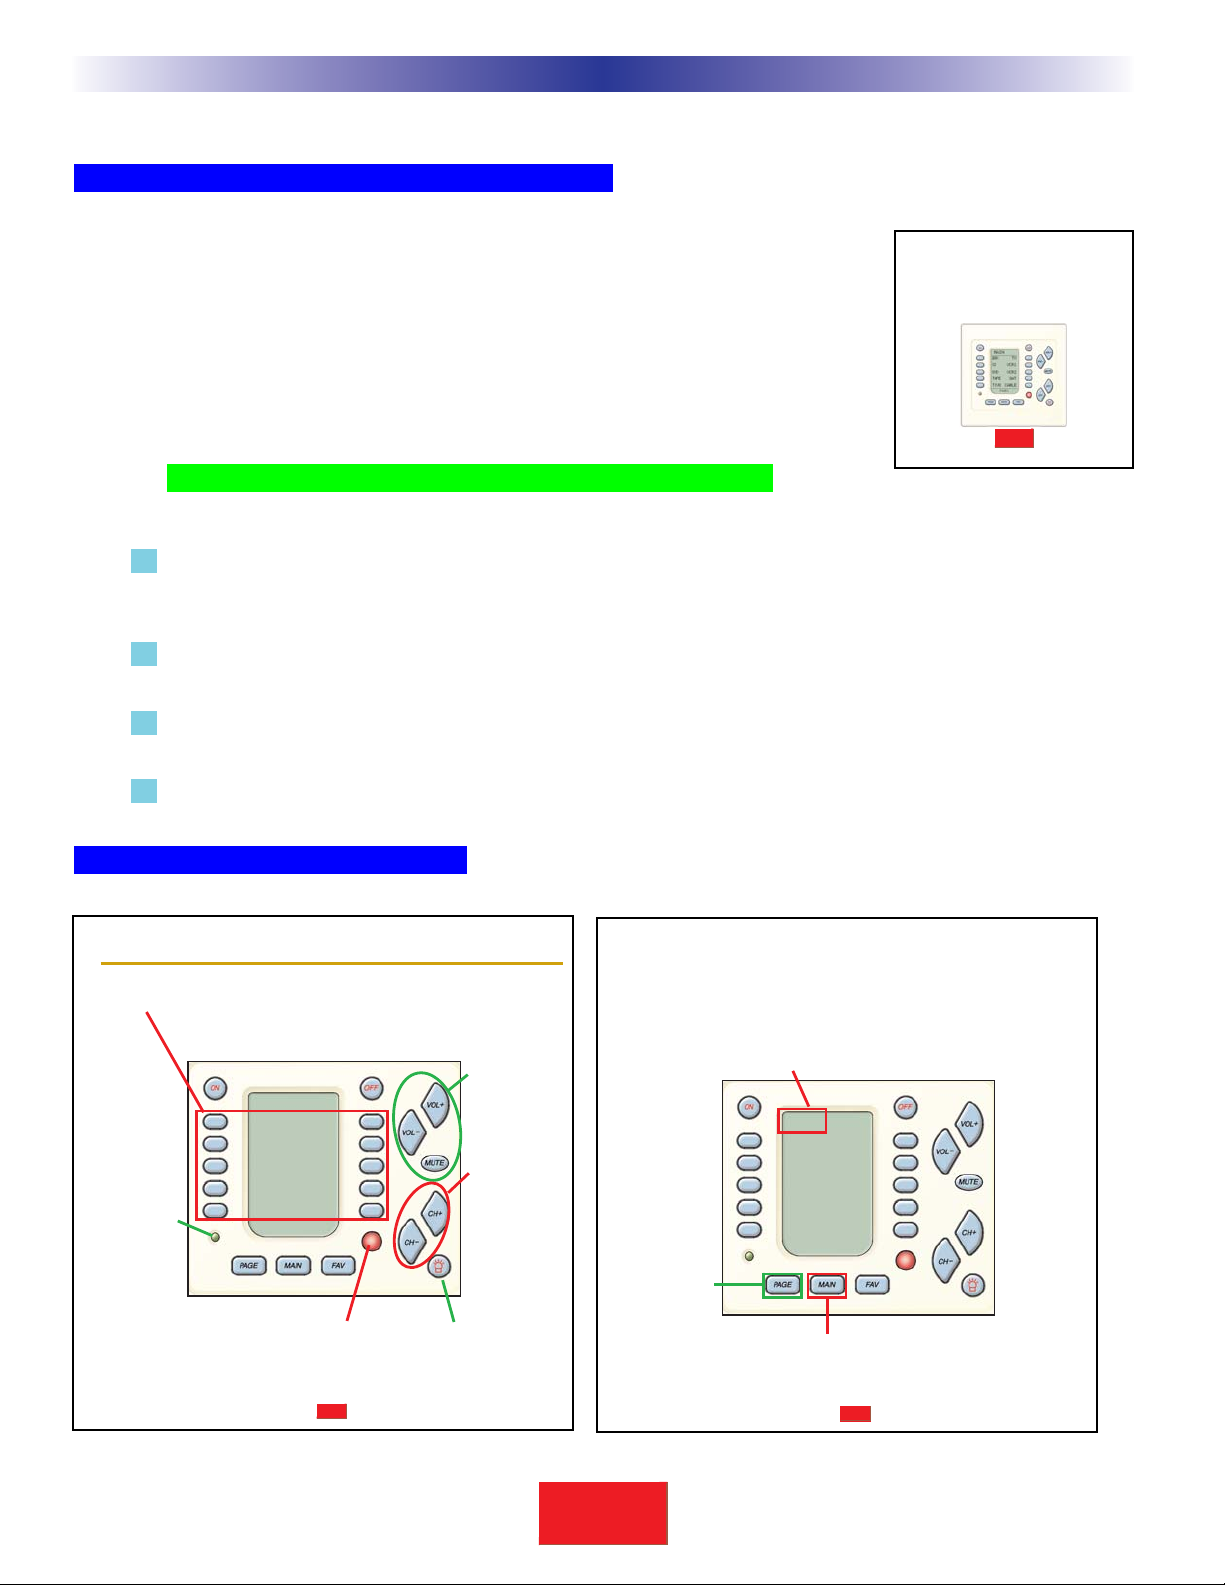
Keypad Basic Controls and Displays
2
Overview of Operations
The Owner’s Manual
SBIMPLY ETTER!
BK
&
SBIMPLY ETTER!
BK&
SBIMPLY ETTER!
BK&
AUDIO/VIDEO SYSTEM OPERATION
IN YOUR
_____________
WITH Y OUR B&K CK1.2 KEYPAD
Page 1
Basic Controls and Displays
LCD Buttons - Labels on the Screen change depending on what you
Power LED
Lights up
when this
Zone/Room
is ON.
activity you have selected. For example, when you
select CD listening as the activity, you’ll see the labels
change to Play, Stop etc. so that you can control the CD.
Volume/Mute
Buttons
MAIN
CD NEWS
SAT JAZZ
DVD CLASS
TAPE ROCK
HOUSE AUDIO
PAGE 1
Remote Control Target
conceals an IR (Infrared) Sensor
which relays commands from your
remote controls to your components.
control the
level of the
sound.
Change
Buttons
Change to the
next channel,
chapter, song
or B & K sound
preset; depending on your
activity.
Backlight Button
lights the keypad
display.
Screen Title - Main indicates that you are looking at the Main Menu, which
enables you to select what you want to watch/listen to in
this zone. When you have selected a new activity, the
screen title will display the change (for example: “CD” indicates you can control the CD player).
Page Button
When other
pages of functions are available, pressing
the page button will display
them.
Page 2
MAIN
CD NEWS
SAT JAZZ
DVD CLASS
TAPE ROCK
HOUSE AUDIO
PAGE 1
Main Button - The Main button always returns
you to the Main Menu so that
you can select a new activity or
turn the system on or off.
BK
&
SBIMPLY ETTER!
Page 9
Standard Keypad Operations
Customize The Operation Manual
In the center spread, write in the names of
each device/activity and clarify anything that
might confuse the client.
3
T
H
E
B
&
K
A
U
T
O
M
A
T
E
D
H
O
U
S
E
3
Overview of Operations
TV, DDSS aand SSound SSystem OOn
You aare wwatching DDSS!
Turns tthe KKitchen OOFF!
(TV aand SSound SSystem oonly!)
TV iis tturned ooff iif oon,
CD iis tturned oon aand
starts pplaying.
TV aand DDSS aare tturned
on iif ooff, DDSS iis ttuned
to tthe FFood cchannel!
TV aand DDSS aare tturned
on iif ooff, DDSS iis ttuned
to tthe CCooking cchannel!
TV iis tturned ooff iif oon,
Tape iis tturned oon aand
starts pplaying.
On the cover page of the manual,
write in the Client’s name for the
room the keypad controls.
SBIMPLY ETTER!
BK
&
KKiittcchheenn
SBIMPLY ETTER!
BK&
SBIMPLY ETTER!
BK&
Page 5
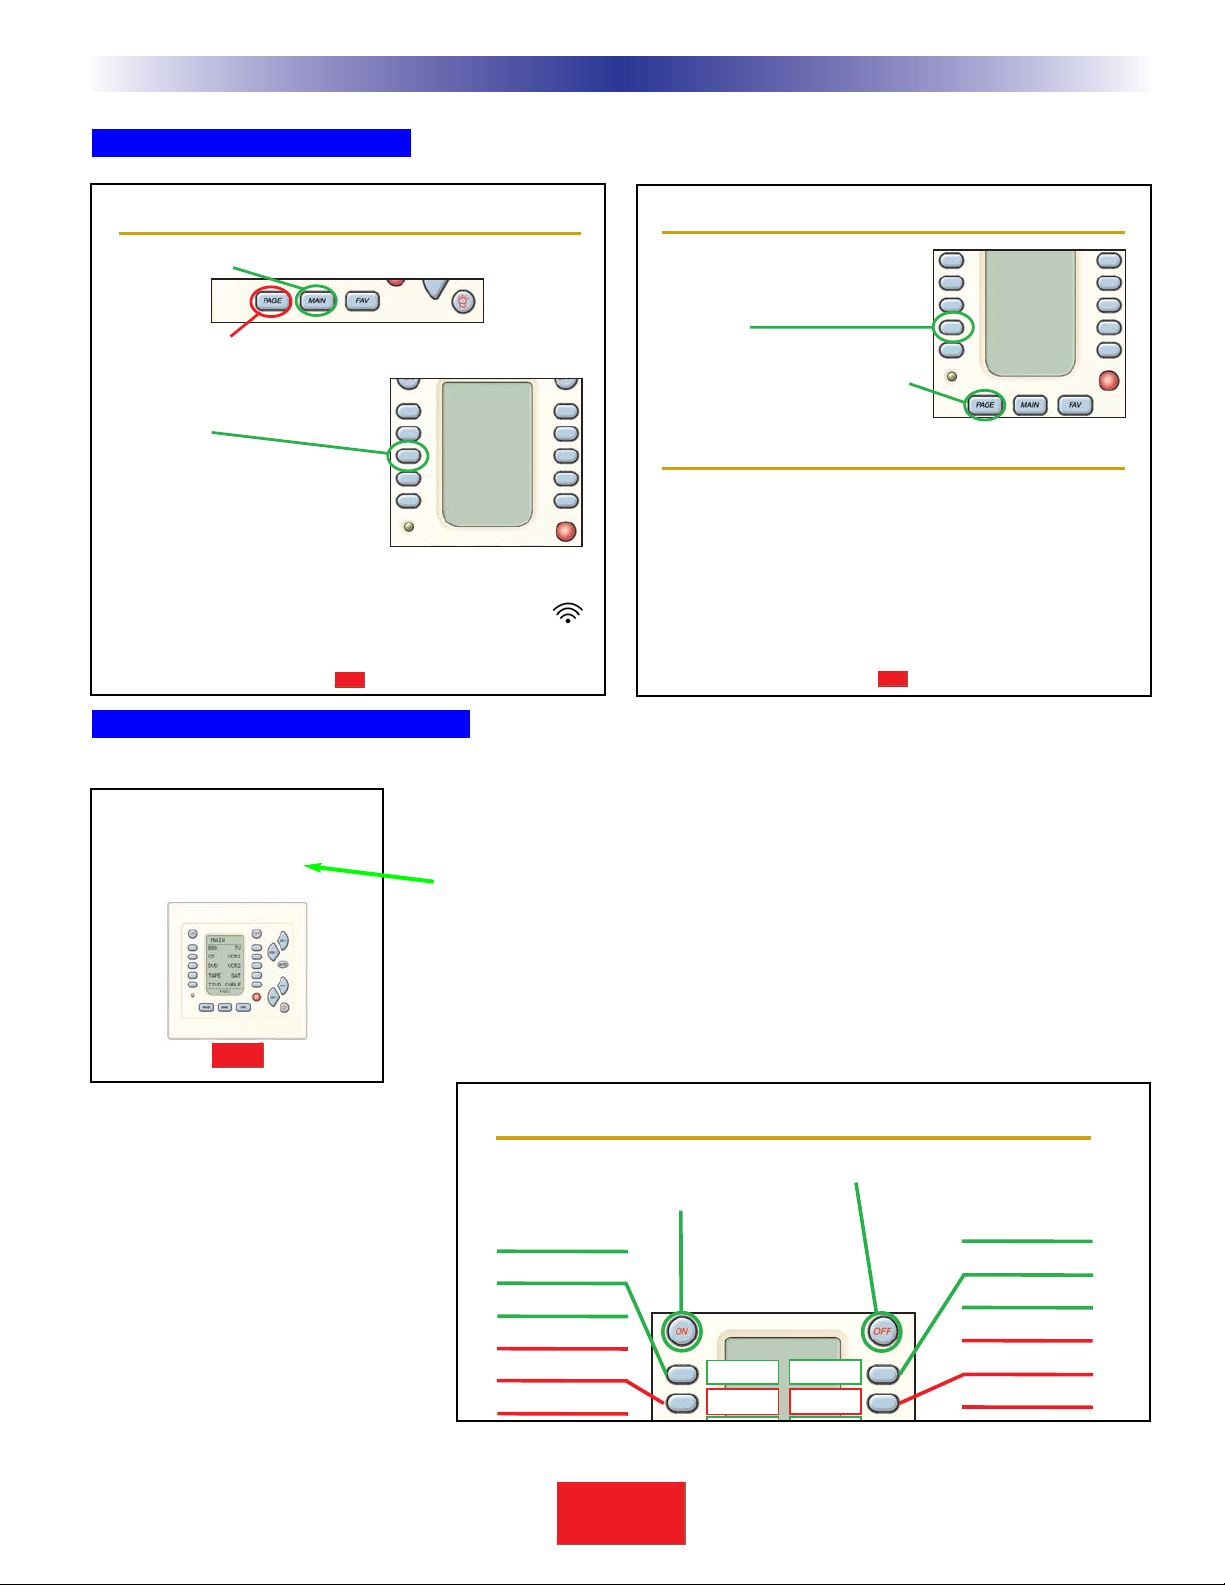
Automatic One Touch Operation
1. Press the MAIN button to make sure that you are on the MAIN Menu.
Touch the PAGE button if you don’t see the activity you want.
2. Press the activity button next to the
desired screen label. For example if you
wish to watch a DVD movie, press the
DVD button.
When you simply
ton, the keypad issues MACROS that reset
the sound and picture of all of the components you need for the new activity.
TIP – The keypad will not respond to any other button pushes until
the macro indicator in the top right corner of the screen stops
flashing.
PRESS a MAIN Menu but-
MAIN
CD NEWS
SAT JAZZ
DVD CLASS
TAPE ROCK
HOUSE AUDIO
PAGE 1
Page 6
Control the Device You Are Listening To...
1. After selecting a new activity, the screen
will change and display the basic commands of the device you are listening to.
Simply press any button to issue the
command.
2. If there are more than 10 commands,
pressing the Page button will display
any other features or controls you have
asked your installer to provide.
Control a Device Without Listening To It
1. Touch the MAIN button to make sure that you are on the MAIN Menu.
Touch the Page button if you don’t see the activity you want.
2. Press and hold the MAIN button. While holding the MAIN button down,
touch the button next to the desired screen label. The remote control
will now display the name of the selected device and all buttons will
operate the device, however, the sound and the picture of your system
have not been changed.
3. Return to normal operation by touching the MAIN button and reselecting the activity you were using.
STOP PLAY
REW FF
DISC- DISC+
RNDM
PAGE 1
AUDIO/VIDEO SYSTEM OPERATION
IN YOUR
_____________
WITH YOUR B & K CK1.2 KEYPAD
Page 3
Your Main Menu Button Descriptions
ON Button: _________________
_______________
MAIN
OFF Button: ______________
______________
BK
&
SBIMPLY ETTER!
Page 10

4
U
S
I
N
G
C
K
E
D
I
T
O
R
T
O
P
R
O
G
R
A
M
Utilizing FAV - Favorite Macros
Although this is typically programmed as channel or radio station macros, you should keep in mind that a channel
lineup change in the future will require a service call to reprogram a few pages of channel macros for your client. If
the client approves the costs of reprogramming whenever the channel lineup changes, then by all means program
channel macros in FAV. However, there are many other uses for FAV that will not be affected by channel lineup
changes. It is easy to write macros that recall B & K presets to give the client one touch macros that reset the tone,
enable loudness compensation, set surround modes and speakers etc.
Remember the advantage of FAV. Whenever you press the FAV button, the
CK1.2 Keypad remembers the device you were last on. So, when you are finished using FAV, you simply tap the MAIN
button. The CK1.2 Keypad will return to the device and page you were last using!
FAV LCD buttons can do a macro with 1 to 190 steps. Thus it can issue (by programming a MACRO of one step)
any single IR command that is learned or preprogrammed with one exception. FAV LCD buttons cannot store
learned or pre-programmed IR commands.This makes them incompatible with commands that have to be pressed
and held (like volume up or bass+). However, by utilizing B&K presets you can recall particular settings for bass, treble
etc.The best approach is to program some useful presets with BKcSuite then recall them with a short two digit
macros in FAVS.
4
Overview of Operations
SBIMPLY ETTER!
BK&
Page 7
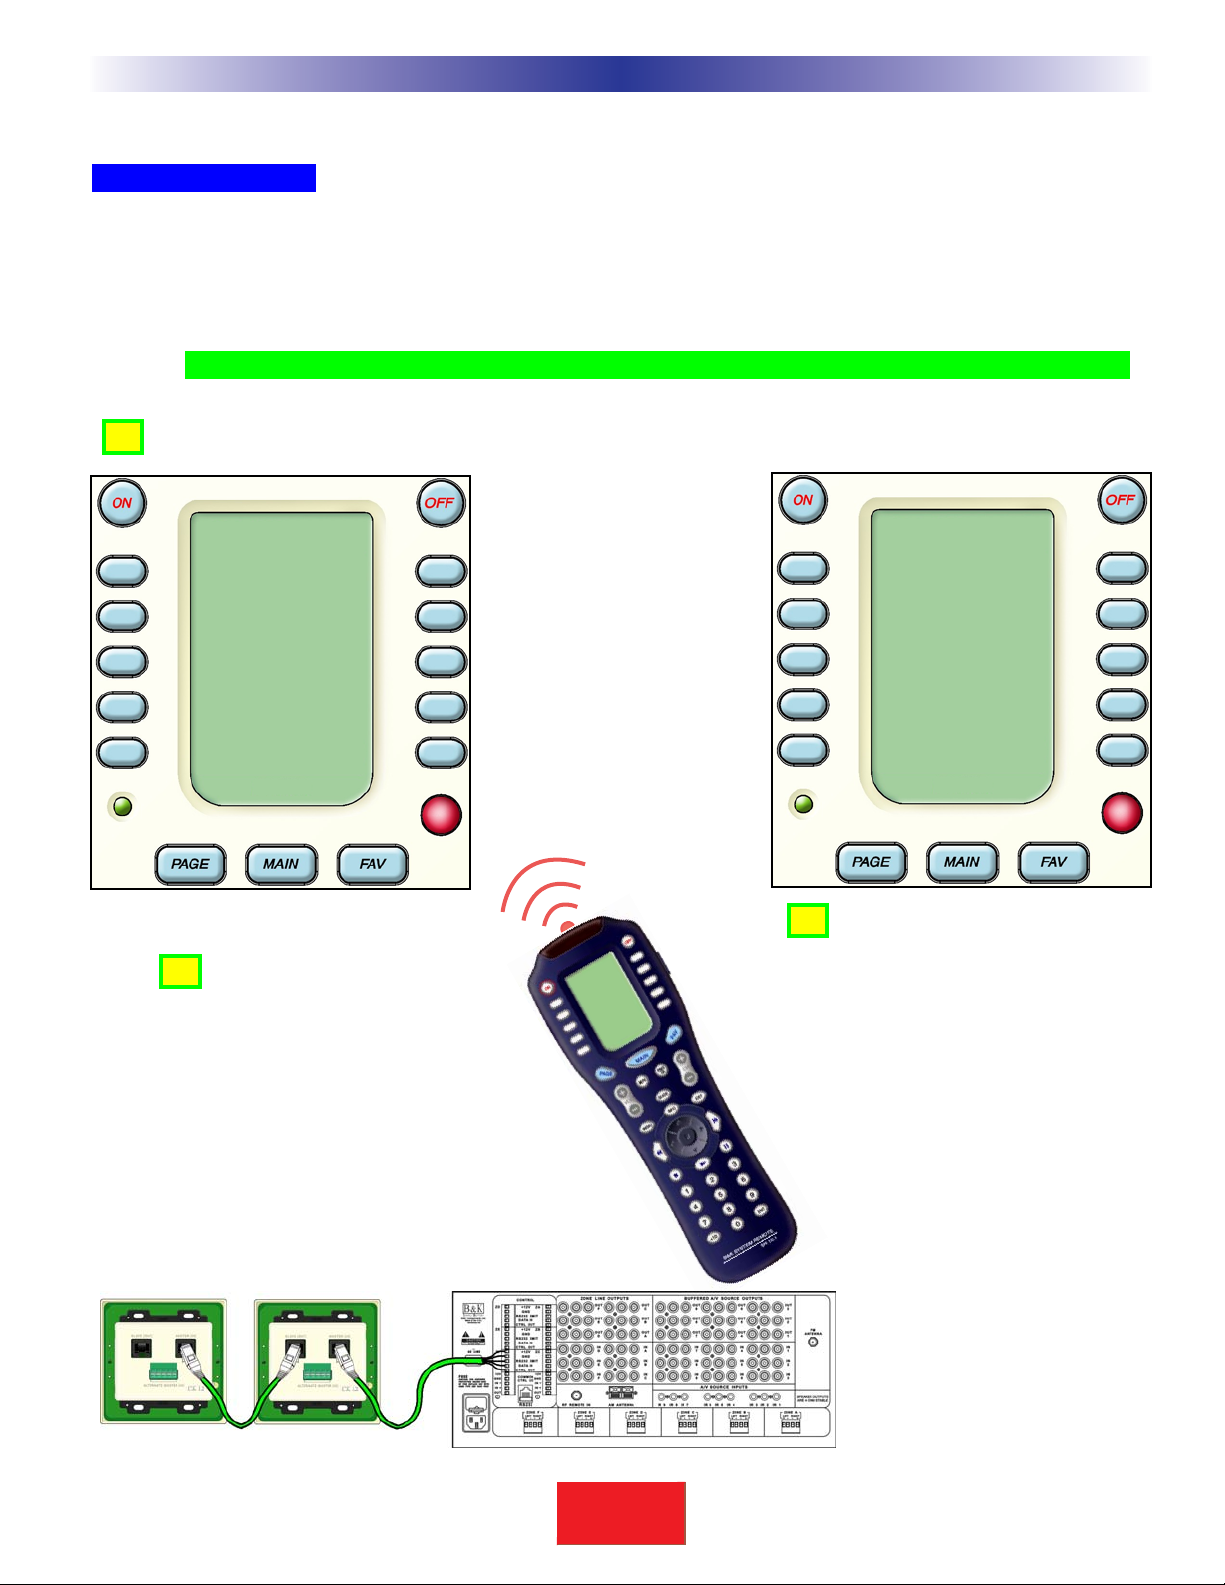
Using FAV - Favorites
The favorites menu is created uniquely for
you by your custom installer. The screen
labeled buttons now issue MACROS that
will reset your system with one touch.
Typically, the favorites menu is programmed with one touch “shortcut” buttons
that issue all of the necessary commands
to change the channel of your satellite dish
or television. Thus, instead of entering a
two or three digit number (which you must
remember) and the enter command, you
simply select the favorite button labeled
HBO, CNN, TNT etc.
To use the FAVORITE Menu:
1. Press the FAV button. The top title bar will now display FAV.
Use the FAV button and the PAGE button to navigate through your various pages of FAVORITES. The FAV button scrolls up and the PAGE button scrolls down through the pages available.
To EXIT Fav and return to the last activity/device selected, press the
MAIN button ONCE. To EXIT Fav and go to the MAIN Menu, press the
MAIN button twice.
FAV
HBO CNN
SHOW DISCO
VH1 PBS
TNN MTV
AMC TNT
PAGE 1
BK
&
SBIMPLY ETTER!
Page 11
5
Type in Section Title
T
H
E
B
&
K
A
U
T
O
M
A
T
E
D
H
O
U
S
E
Programming Considerations for the CT610/310/600
Keypad Feedback
Whenever the user selects a new zone input, the CT610/310/600 will/can update the keypad. This has a lot of advantages to the user, since the keypad will stay synchronized even if the user selects a new input via a remote control,
the front panel, a slave keypad, an RS232 macro or someone in the house uses a global command. Zone status feedback is accesible by pressing the backlight button.
TIP - Use Keypad Feedback in your systems, so that the keypad displays zone input
Programming Considerations for the CT610/310/600
SAT
HBO CNN
SHOW MSNBC
MOVIE WEATH
CINE DISC
DISNY LEARN
PAGE 1
RADIO
103.7 NEWS
92.1 JAZZ
88.5 CLASS
104.5 ROCK
105.9 POP
PAGE 1
The keypad is displaying the
currently selected source.
The USER selects RADIO on
the remote control.The remote
sends an IR command to the
CT610/310/600 and the Zone
Input is changed to FM radio.
Even when multiple slave keypads are daisy-chained to a single zone terminal on the
CT610/310/600, keypad feedback works.Whenever the zone
input is changed, all keypads will
stay in “Sync”!
The CT610/310/600 sends an
RS232 message to all the keypads in this ZONE to jump to
the RADIO device, page 1.
1
2
3
BK
&
SBIMPLY ETTER!
Page 12
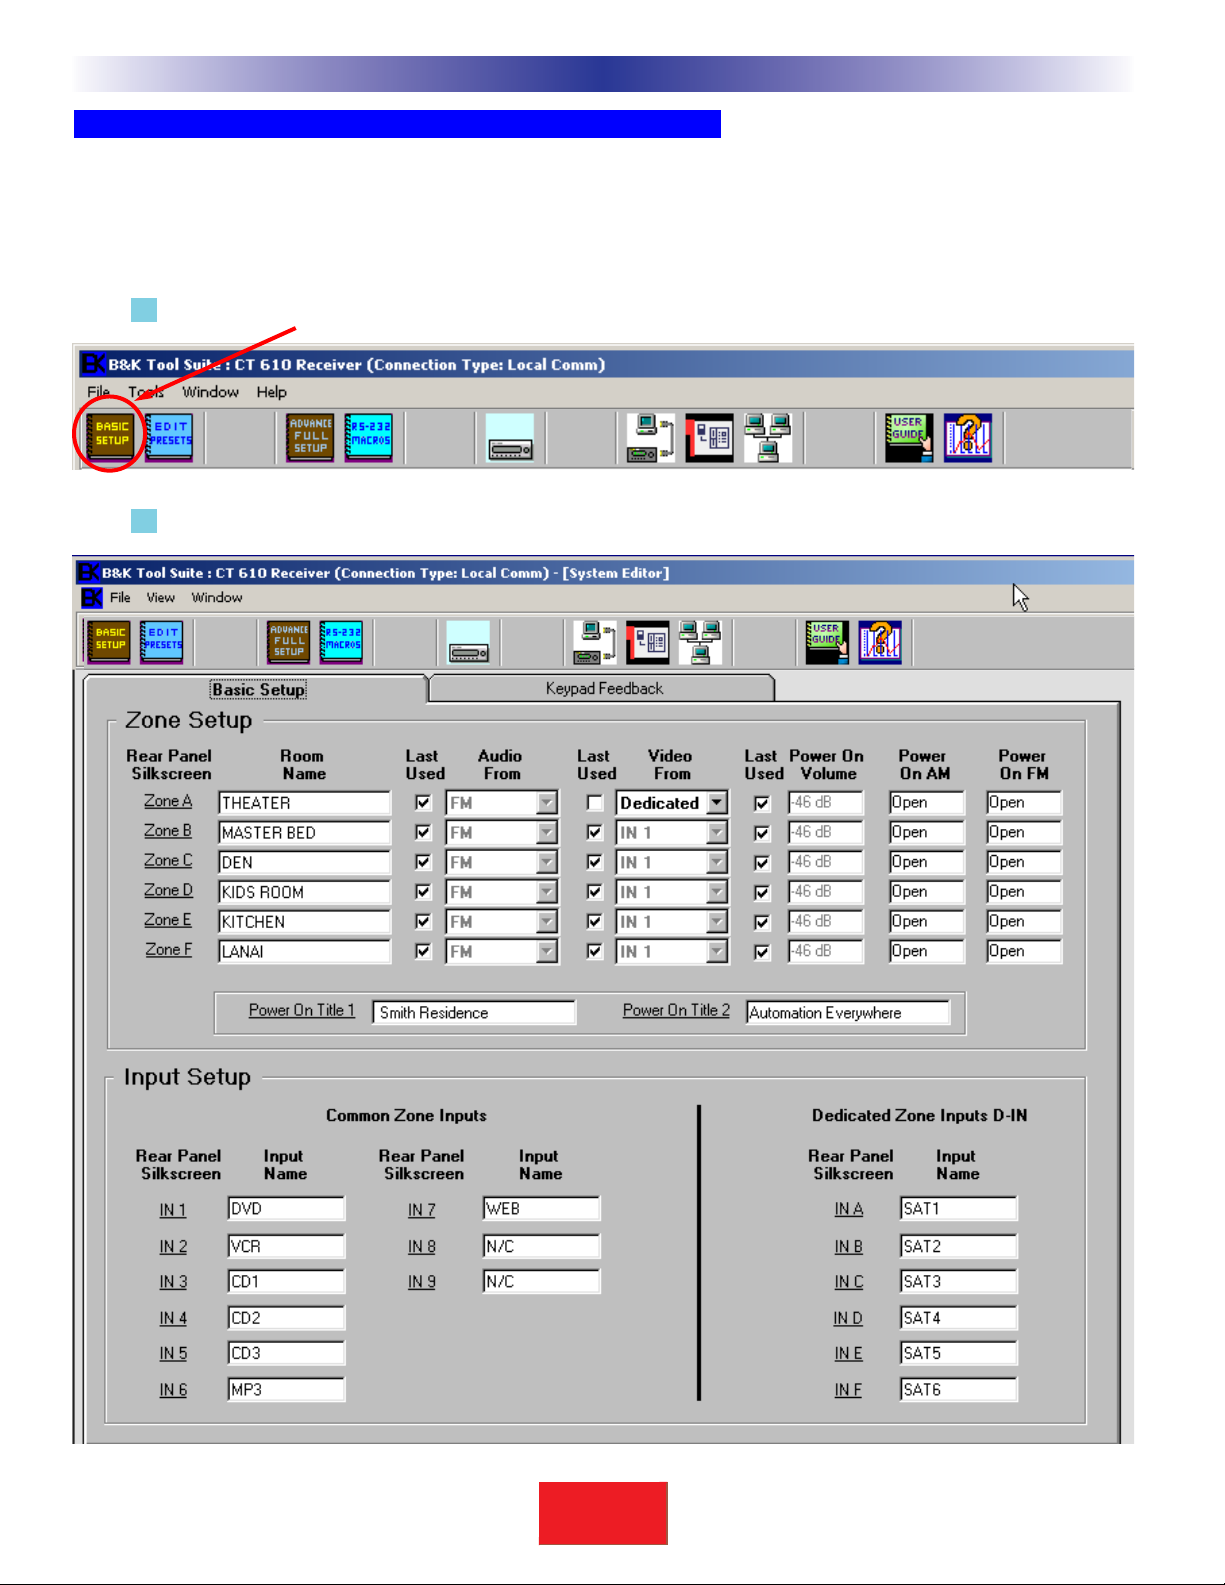
Programming the CT610/310/600 for Keypad Feedback
You are completely free to assign keypad feedback as you like. The flexibility of the CK1.2 enables you to make the
system as intuive and user friendly as you can imagine. Each zone has eleven potential input changes and twenty possible keypad status positions.You must assign each input you use the correct keypad status jump. An unused input
should have it’s keypad status TURNED OFF.
1 Connect the B&K to your PC, open BKcSuite and select BASIC SETUP for the CT610/310/600.
2 On the Basic Setup tab, name the zones and the inputs (including the dedicated inputs).
6
Type in Section Title
U
S
I
N
G
C
K
E
D
I
T
O
R
T
O
P
R
O
G
R
A
M
Programming Considerations for the CT610/310/600
BK
&
SBIMPLY ETTER!
Page 13
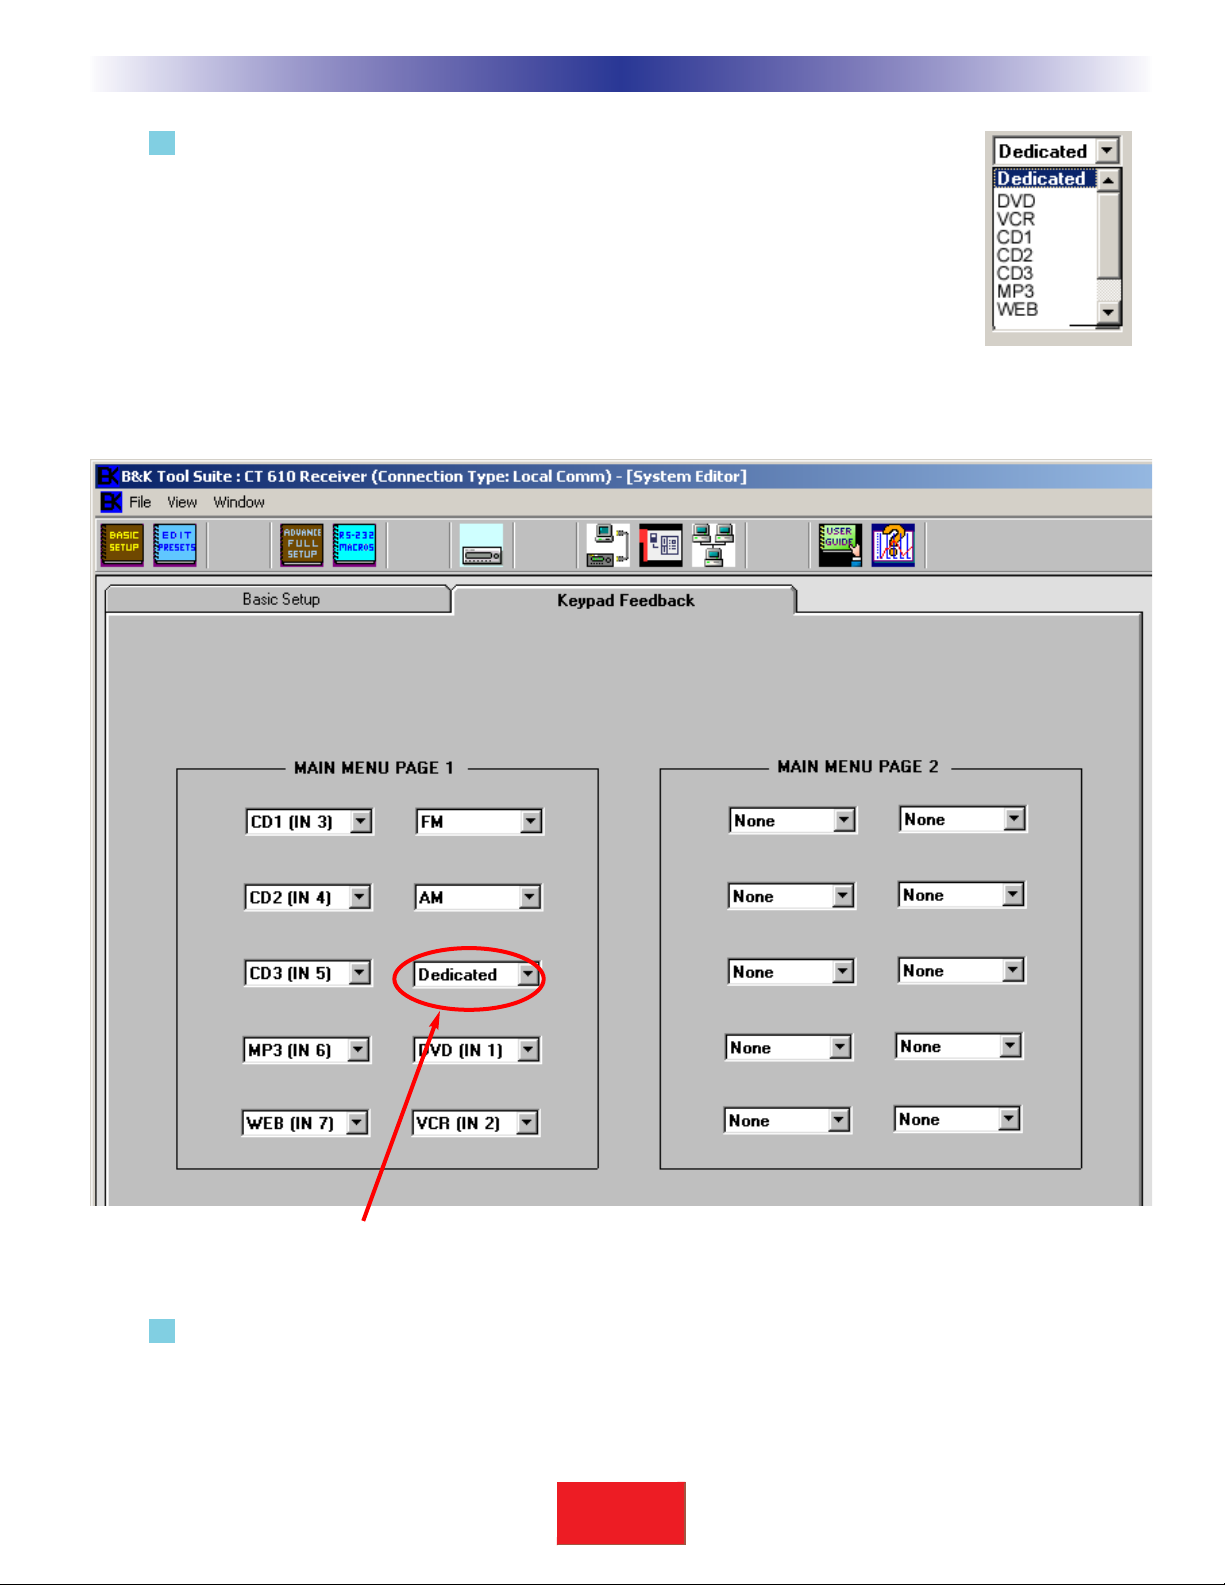
3 Now, select the Keypad Feedback tab and choose the position each source will occupy
on the Keypad’s MAIN MENU pages. Simply pull down the list box for each position and
select one of the CT610/310/600 sources. As each source is assigned a position, it
dissapears from the list boxes of the other positions.
If you wish to reposition a source, first set the old position to NONE, then the source
name you want will reappear in the lists for the other positions.
4 Record the list of sources, the names and the Keypad positions on your worksheets.
7
Type in Section Title
T
H
E
B
&
K
A
U
T
O
M
A
T
E
D
H
O
U
S
E
Programming Considerations for the CT610/310/600
Important Note! Only assign a keypad position to an input that will be used by
the keypads. If an input does not have a source connected to it, don’t assign a
keypad position to it.
The dedicated inputs in this example system have all been connected to a stack
of six satellite receivers, so the keypad itself will be labeled SAT in this position.
BK
&
SBIMPLY ETTER!
Page 14
BKcSuite Determines Device Layout for the CK1.2
Open up CKEditor and go to program step #1, Create and Name Devices (described in detail on the following
pages). Simply refer to your notes and create devices in the same positions you recorded in your worksheets.
8
Type in Section Title
U
S
I
N
G
C
K
E
D
I
T
O
R
T
O
P
R
O
G
R
A
M
Programming Considerations for the CT610/310/600
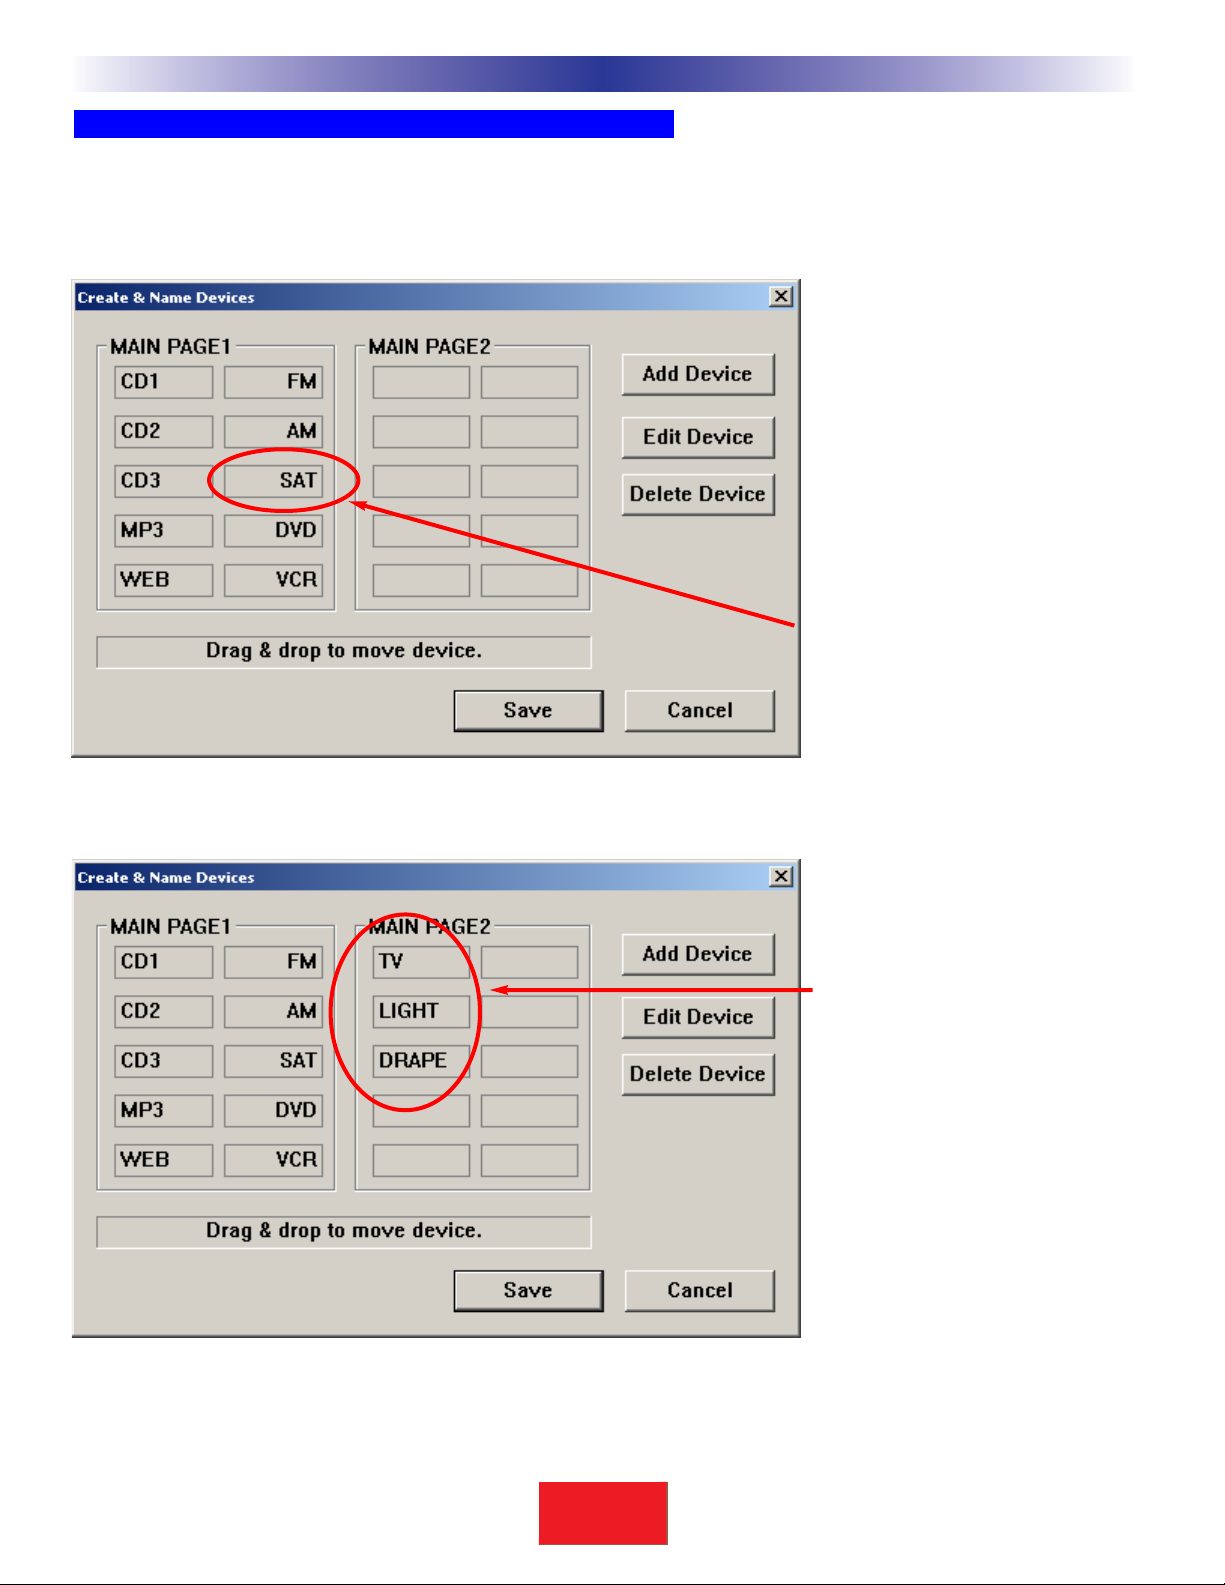
Source Devices Created
In this example, the devices
corresponding to the settings
you made for the receiver are
made.This master file will be
used as a starting point for
every keypad. In the empty
device spots you may insert
devices for local TV’s etc.
In this example, the Dedicated
Input is labeled SAT since each
zone has it’s own dedicated
DSS receiver connected to the
dedicated inputs.
Local Devices Added
In this example, the bedroom
zone incorporates a television
set, a Lutron Graphic Eye (IR
controlled lighting), and Makita
IR controlled drapes. Other
zones will not have these
devices added to them. Only
the bedroom keypads need
them.
BK
&
SBIMPLY ETTER!
Page 15

Programming Overview
A. Start with a New File, Existing File on PC or in an Installed Keypad
NEW - Starting from scratch on a new job, go to the File Menu, choose New from the File Menu and pick
the type of template you would like to use to program with. The B&K Default file has CT610/310/600 specific IR commands pre-loaded in.This is particularly useful for testing operation before any programming
has begun.Typically, it is easiest to just start with an empty configuration.
OPEN - Open a configuration that you have worked on before and saved onto the PC hard drive.
UPLOAD - Get a file from a client’s keypad that another installer created. Now, you can save the file on
your laptop, make any edits or changes as the client requests or the jobsite requires.
B. Use SAVE AS to Name and Save First!
The templates files are simply configuration files that have been preprogrammed for you. They will keep any changes
you make. Utilize Save As to make a new file with a new file name. All configuration files are saved with the file
extension .mxf; all device files are saved with the extension .mxd (see D. Save and Export, below).
C. Use the Program Menu In Order
The Program Menu is your lifeline to a fast, easy programming experience. It is important
that you do all of the tasks for each step before moving on to the next step. In the tutorial
you will see how important it is to download between several of the steps.
D. Save and Export Your Work
Archive and save your customer files. In addition, you can export devices as .mxd files. Programming systems with
similar components gets even faster when you don’t have to redo your work over and over. You have your own ideas
about what buttons should be labeled and how they should be arranged. You’ll save all of your work in a unique and
time saving way by exporting the device stand alone.That way, you can import just the device in any new configuration.
E. Download to Each Keypad
For once, you have a pre-printed summary sheet and an instruction manual for the entire Home Theater! Enjoy a
brief training with your client and get home on time tonight!
9
Type in Section Title
T
H
E
B
&
K
A
U
T
O
M
A
T
E
D
H
O
U
S
E
Programming Overview
BK
&
SBIMPLY ETTER!
Page 16

The Programming Window
Menus and Shortcut buttons for common tasks. The Program Menu activates each task in the correct order.
Tree View of the CK1.2 Keypad configuration. Tree View enables quick navigation and powerful right click
context menus.
The CK1.2 Keypad Simulator is used to navigate and to select a button to learn to, shortcut to or edit or
record a macro to.
Floating Edit and Label Buttons window is used to label buttons and move IR commands via shortcuts.
The floating Macro and Favorite window is used to view and edit macros.
The floating Hard Button window displays “Phantom” buttons that are useful for storing commands to be utilized in macros.
The important thing to remember as you program is that most Windows conventions hold true in CKEditor. Explore
the program menus. Hover your mouse over most of the buttons and controls and a balloon will appear with a hint
as to purpose. Navigate around the program window and explore a little before you begin programming.
10
U
S
I
N
G
C
K
E
D
I
T
O
R
T
O
P
R
O
G
R
A
M
Windows, Menus,Tools and Definitions
A
B
C
D
E
F
A
B
C
D
E
F
BK
&
SBIMPLY ETTER!
Page 17
The Menu Bar and the Menus
Like all Windows programs, the menu bar reveals menus of commonly used tasks. Simply click on the menu title and
the menu appears. Move the mouse cursor over the menu choice you wish to select and click.
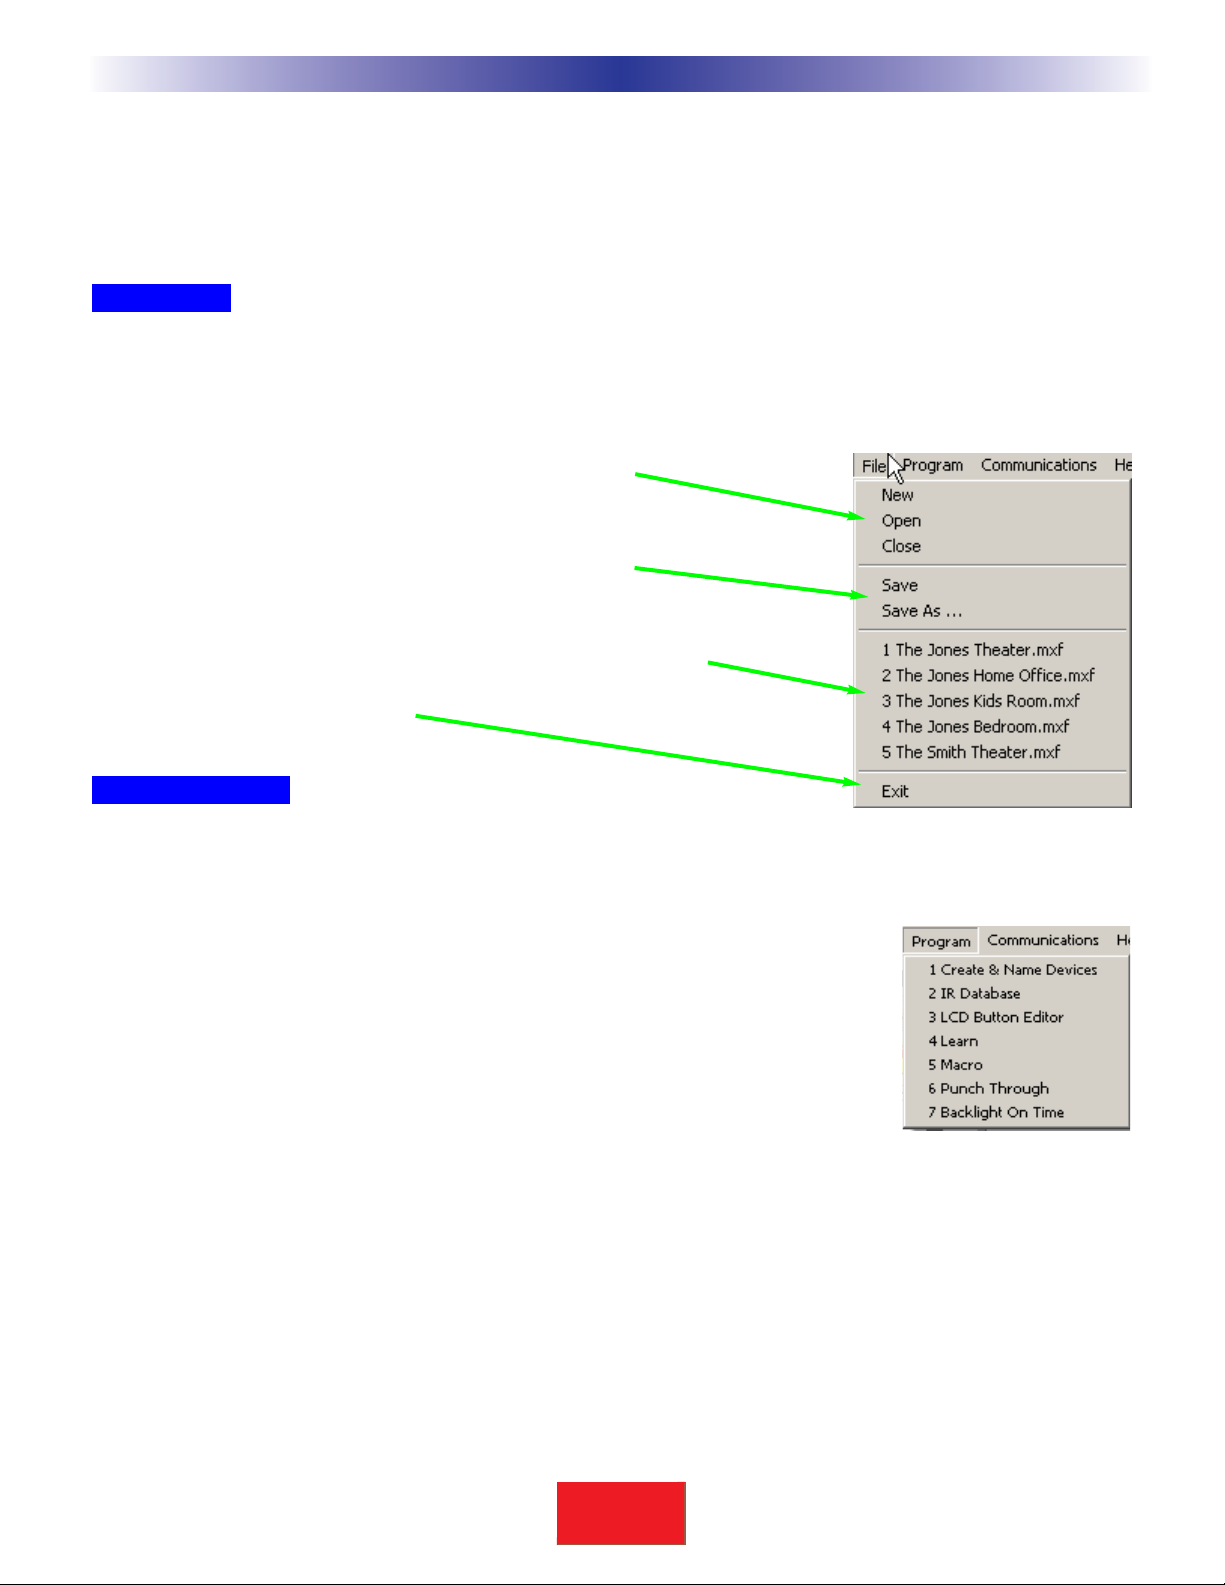
File Menu
Configurations for particular clients are saved as files on your PC.Thus the file menu enables you to open, save and
save copies of configurations.
New - Use this to start programming a file from scratch.
Open - Use this to open a file anywhere on your computer.
Close - Closes only the current file, not CKEditor.
Save - If you wish to save your work to the current file.
Save As - If you wish to save a new copy of the current file
with a new file name.
Recently opened files appear here for you to reopen with a click.
Exit - To exit CKEditor completely.
Program Menu
Many of the Program Menu steps will open a new window in front of the main window. Simply click on Cancel to
close these windows if you open them in the course of exploring CKEditor.
1. Create & Name Devices - Opens a new floating window for creating and
naming Devices. You’ll need a grouping of hard buttons and LCD pages for every keypad
that you are replacing. That is called a Device. With the Create & Name Devices window, you will be able to create, name and rearrange up to twenty devices.
2. IR Database - Opens a new floating window to test and program IR code sets from
the B & K IR database
3. LCD Button Editor - Opens a new floating window that allows you to arrange, label
and program the LCD buttons for MAIN, Devices and your Favorites.
4. Learn - Grayed out until you select a button. Once you have selected a button, selecting LEARN on the
Programming Menu activates the LEARNING function (which is a button on the Edit and Label buttons window) on
whatever button is currently selected.
5. Macro - This menu choice is grayed out until you select a button capable of being programmed with a macro
(Power On, Power Off or an LCD button only). Once you have selected a button, selecting Macro activates the
MACRO recorder. Now, use the CK1.2 Keypad Simulator to select each step of your macro. The recorded steps
appear in the Macro window.
6. Punch Through - Opens a floating window that enables you to program a button to “punch through” to
11
T
H
E
B
&
K
A
U
T
O
M
A
T
E
D
H
O
U
S
E
Windows, Menus,Tools and Definitions
BK
&
SBIMPLY ETTER!
Page 18
12
U
S
I
N
G
C
K
E
D
I
T
O
R
T
O
P
R
O
G
R
A
M
another device.Typically used to program Volume Up, Down and Mute to always operate the surround sound
receiver/preamp.
7. Backlight On Time - Opens a new window for adjusting the amount of time the backlighting will stay on.
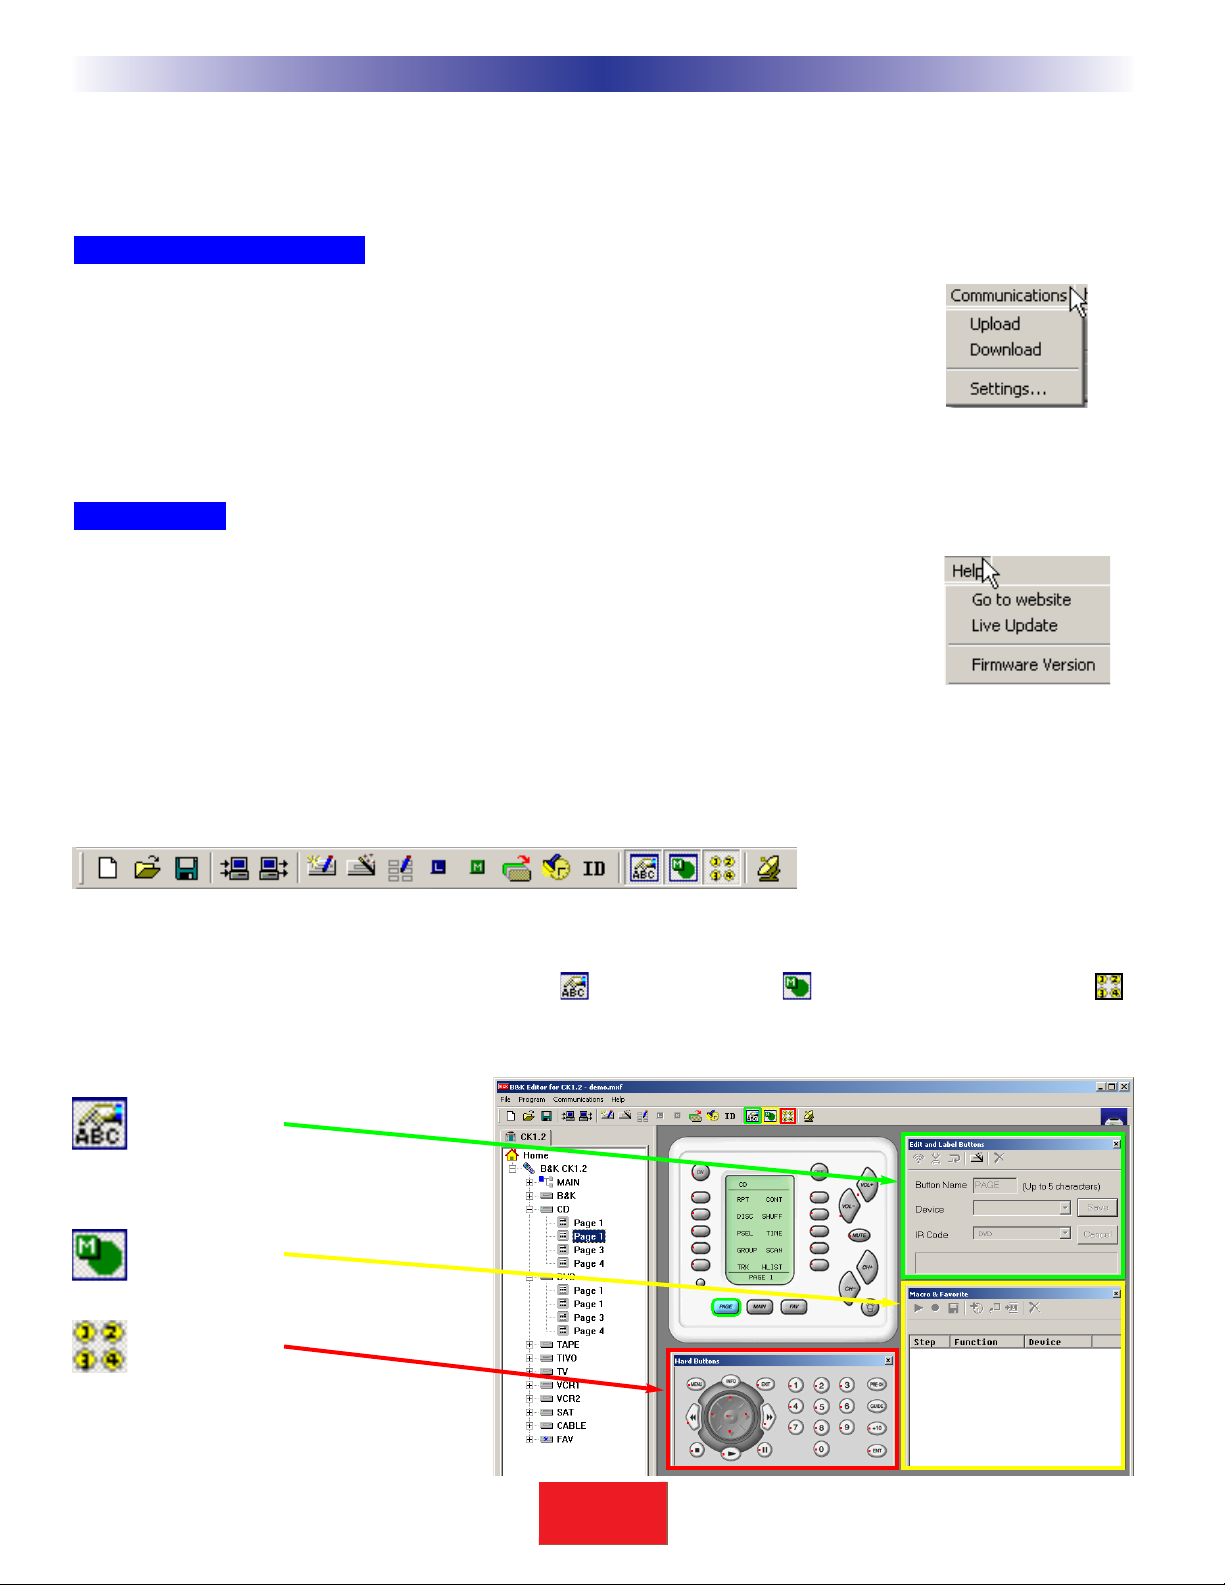
Communications Menu
Upload - Get the programming from a keypad and open it in CKEditor as a new file. Once it is
uploaded, you can save it, edit it and/or export the devices in it.
Download - Send the currently open file to the keypad.
Settings - Choose a different com port for the cable connecting the keypad to your computer.
Help Menu
Go to website - This will open your internet browser, connect to the internet and link you to
the B & K website for additional technical support and resources.
Live Update - Click on this after connecting to the Internet to download the newest version
of CKEditor.
Firmware Version - Connect your keypad to the PC and click on this to identify the firmware version of the keypad when asked to do so by technical support.
The Toolbar and Shortcut Buttons
Hover your mouse over the Shortcut buttons, you will see a popup flag displaying the function of the shortcut. Click
on the button to activate it. The most common functions of the menus are displayed on the toolbar, plus the two
icons for displaying the Edit & Label Buttons Window , the Macro Window and the Hard Buttons window .
When you click on these shortcut buttons you turn the corresponding windows display on and off.
Windows, Menus,Tools and Definitions
Edit and Label
Buttons
Macro &
Favorites
Hard Buttons
(Phantom)
BK
&
SBIMPLY ETTER!
Page 19

The Simulator and the Hidden Hard Buttons
Navigating and Selecting Buttons
This is the center of programming. Click on a button to SELECT it for programming.
When a button is SELECTED it has a green circle around it. Once a button is
SELECTED, you can use the Edit and Label Buttons Window or the Macro Window
to program it.
When you want to switch to a new device, first, click on the MAIN button.
Choose the new device from the MAIN MENU by double
clicking
on it.
On a real CK1.2 Keypad, the double click is not necessary. But within
CKEditor you sometimes will want to program an LCD button on the MAIN
page and single clicking the button enables you to select it for editing or
macro programming.
Cycle through Pages 1 to 4 of any device by clicking on the PAGE button.
Navigate to the FAV device by clicking on the FAV button.
Hover your mouse over a button to see the drag and drop flag.
Click on a button to SELECT it.
Button Capabilities and Flags
A button with no flag will not do anything when pressed. It is empty and has no programming yet.
A red dot indicates that the button is programmed with an IR database code. An IR database code can be
tapped or pressed and held for a sustained burst.All buttons except the hard buttons within the MAIN or
FAV devices can be programmed with IR database codes (you cannot program the navigation buttons-PAGE,
MAIN or FAV either) .
An L flag indicates that the button is programmed with a learned IR code. A learned code can be tapped or
pressed and held for a sustained burst. All buttons can be programmed with learned codes (including all
MAIN buttons, hard and LCD) except the buttons on FAV pages and the navigation buttons themselves.
An M or F flag indicates that the button is programmed with a Macro (the F flag indicates the Macro is on
one of the Favorites pages). Only the LCD buttons and the Power ON and Power OFF buttons can be programmed with MACROS. Hard buttons cannot be programmed with MACROS directly (they can issue a
macro, if you program the macro on an LCD button and create a shortcut from the hard button to the LCD
button). A macro with a single step cannot be pressed and held for a sustained burst.
A black arrow on yellow indicates that the button is programmed with a shortcut to another button. A
shortcut programs the button to do whatever is programmed on the button the shortcut points to (thus if
it shortcuts to a learned or preprogrammed code, the button can be pressed and held for a sustained burst;
while if it points to a macro with a single step, it cannot). A shortcut can point to any kind of
button. FAV buttons cannot be programmed with shortcuts.
A PT flag indicates that the button is programmed to “Punch Through” to another device.
The drag and drop flag appears when you hover your mouse over a button. It will reveal the device and the
button label plus indicators for pre-programmed, learned, etc.
13
T
H
E
B
&
K
A
U
T
O
M
A
T
E
D
H
O
U
S
E
Windows, Menus,Tools and Definitions
BK
&
SBIMPLY ETTER!
Page 20

Tree View
Devices and Pages
Tree View controls what you see in the Simulator. It serves as the quickest way to navigate (especially when
programming macros) and enables you to cut, copy and delete devices and/or pages via the right click context
menus.
A Page refers only to a group of ten LCD buttons, not to the hard buttons in the same device.
A Device is comprised of up to four pages of LCD buttons and one set of functions for the hard buttons.
Click on a device to SELECT it (the highlighting indicates it is selected) and the corresponding MAIN LCD
button (the green circle indicates that a button is selected).
Double Click on a device to expand or collapse your view of its pages (or you can single click on the +/-).
A single click on a page in Tree View will change the SIMULATOR to the selected PAGE and DEVICE.
Right click on a device to reveal the Device Context Menu:
Insert Page will insert an additional page to the device (to a maximum of 4).
Cut will copy the entire device and when pasted will delete the original.
Copy will copy the entire device without changing the original.
Paste will paste the copied or cut device into the selected device, completely
replacing whatever previous programming you had.
Import Device will enable you to import a device you have previously exported,
replacing the selected
device.
Export Device will allow you to save the selected device for future import.
Delete Contents will delete all labels and codes but not the pages of a device or
the name of the selected
device.
Delete will delete everything about the selected
device.
14
U
S
I
N
G
C
K
E
D
I
T
O
R
T
O
P
R
O
G
R
A
M
Windows, Menus,Tools and Definitions
Collapsed
Expanded
BK
&
SBIMPLY ETTER!
Page 21

Right click on a page to reveal the Context Menu for pages:
You can delete the contents of a page, or delete the entire selected page.When you select the last page (4
of 4, 3 of 3, 2 of 2 or 1 of 1) you can HIDE a page. A page that is hidden can still be used to hold
commands that are used for macros. However, the end user will not be able to navigate to a HIDDEN page,
so he/she will never accidentally issue codes that you place there.
Cut, copy and paste are always grayed out, you cannot cut, copy and paste PAGES.
The Edit and Label Buttons Window
If the Edit and Label Buttons Window is closed, reopen it by clicking on the shortcut button on the toolbar.
Whenever you SELECT a button, the Edit and Label Buttons window displays the button name (editable), the Device
and the IR Code from the database. If you change the button name, the IR Code list box displays both the name you
created and the original database name for the code (in paranthesis).
The Edit and Label Buttons Toolbar
Like the main toolbar, the shortcut buttons will display a hint if you hover your mouse over them. A single click
activates their function.
15
T
H
E
B
&
K
A
U
T
O
M
A
T
E
D
H
O
U
S
E
Windows, Menus,Tools and Definitions
BK
&
SBIMPLY ETTER!
Page 22

TEST - For learned codes. Will only test pre-programmed codes if you have downloaded to the remote.
LEARN - Puts the software into learning mode, if an CK1.2 Keypad is connected to the PC (See p. 23).
CONTINUE - When you are learning a number of IR codes, use CONTINUE mode to automatically save and
select the next button of that device. This saves tremendous time. See the section on LEARNING on p. 24.
IR DATABASE - Another way to open the IR Database window.
DELETE - Opens up the DELETE window, which enables you to selectively delete any part of a button’s
programming.
The Delete Window
Simply click on the function you want to delete. For example, you can
selectively delete just a MACRO, leaving the button to perform a
previously programmed learned IR command.
Or, you can delete all programming by selecting Button.
Labels
You can change the name of any button.When you change the name of a button, it not only affects how the button
appears in an LCD display, it also changes how the button displays in the pull down Code list (although the original
name still appears beside the new label).
Shortcuts - Copying Buttons
You can create a SHORTCUT to another button by selecting it via the pull down lists under Device and IR Code. A
SHORTCUT is simply a duplicate of whatever is programmed in the button you select via the two pull down lists.
TIP - Make a hard button issue a macro by shortcutting to a macro on an LCD button somewhere.
1 On the simulator, select the button you want
to program with a shortcut.
2 Select the DEVICE from the first pull down list.
3 Select the IR Code from the second list.
4 Click on the SAVE button in this window to
make the shortcut symbol appear.
16
U
S
I
N
G
C
K
E
D
I
T
O
R
T
O
P
R
O
G
R
A
M
Windows, Menus,Tools and Definitions
BK
&
SBIMPLY ETTER!
Page 23

The Macro/Favorite Window
If the Macro Window is closed, reopen it by clicking on the shortcut button on the toolbar.
The Macro Toolbar
TEST You must select the first step you want played back first, then connect the remote to the PC.
All steps after the selected step will play back, including any delays.
RECORD This starts and stops the recording of macro steps.
SAVE Any macro programming you do will be discarded unless you press the SAVE button.
DELAY Opens the Delay window so that you can specify a delay in between macro steps.
If you
place a delay as the first step in a macro, the user has to hold down the button for
that much time before the macro will be issued. If the user does not hold down the
button for the specified delay, the macro is not issued.
JUMP Enables you to jump to any PAGE of any DEVICE at the end of a MACRO.
INSERT You must select the button you want the macro inserted in, click on the INSERT button, then
click on the button containing the macro you want copied. All of the macro steps are inserted
into the new button in one step. Make any changes you want to the new macro, it is independent
of the original (the original is not affected by any changes you make, nor is the copy affected
by changes you make in the original).
DELETE You must select the first step you want deleted first, then click on DELETE.
Re-Ordering Macro Steps
You can simply drag and drop steps to any order once they are programmed. Just click on if you want the
changes you made SAVED.
Macro Details
The location (Device/Page/Name) of the button that will issue the
macro when pressed.
A Macro Step indicates the type of step with an icon, the # of the
step, the function (name) of the step, and the Device it is actually
taken from.
Tip - There is more information on Programming Macros in the Tutorial on p. 30.
17
Type in Section Title
T
H
E
B
&
K
A
U
T
O
M
A
T
E
D
H
O
U
S
E
Windows, Menus,Tools and Definitions
BK
&
SBIMPLY ETTER!
Page 24

Step 1 - Creating, Naming and Arranging Devices
Before beginning, you should have powered up a CK1.2, connected it to the serial port of your PC, closed any other
open Windows applications that use the serial port, opened CKEditor via the B & K Task bar, started a new file, used
Save As to save the file with a new name. Now you are ready to create new Devices for each of the remote controls
you intend to replace.
Open the Create and Name Devices Window
You can open the Create and Name Devices window by clicking on the first item of the Program Menu or by clicking
on the Toolbar icon as shown here.
TIP - Hover the mouse over the Toolbar buttons and a pop-up label identifies it!
Creating Devices
1 Click on the position you would like to create a new device in.Type the new name and hit either the
ENTER or the TAB key on your keyboard, then type another name in. If you wish to leave a position blank,
simply TAB past it.
2 You must hit the SAVE button to create all the new devices in the order you selected.
3 Tree View reveals the new devices you’ve created and the simulator shows the new MAIN MENU LCD
button names.
18
Type in Section Title
U
S
I
N
G
C
K
E
D
I
T
O
R
T
O
P
R
O
G
R
A
M
Programming Tutorial
BK
&
SBIMPLY ETTER!
Page 25

4 Try the simulator out now. If you click once a MAIN MENU button, you’ll simply select the button, if you
click again you will jump-link to the device group. Once at the new device group, you can
touch the MAIN button to return to the MAIN MENU, etc.
5 Open the Create and Name Device window again, and experiment with rearranging devices by simply
dragging them to an empty location. Remember to match your CT610/310/600 source positions to the
ones you selected in BKcSuite’s Keypad Feedback settings.
TIP - When all positions are filled, you must delete one to do any rearranging of devices.
6 To delete a device, simply select it by clicking on it once, then click on the DELETE key of your keyboard
or the Delete Device button.
19
Type in Section Title
T
H
E
B
&
K
A
U
T
O
M
A
T
E
D
H
O
U
S
E
Programming Tutorial
Both Tree View and the CK1.2 Keypad
Simulator show the newly created
devices.
In this example the TV device is dragged to the empty spot.The mouse
cursor changes to indicate you are dragging a device.When you
release the mouse, the device positions are swapped.
You cannot drag and drop to
an occupied space.
To delete a device, select it first, then click on the
Delete Device button.
BK
&
SBIMPLY ETTER!
Page 26

Using the IR Database
Discrete Codes,Toggles and other New Words
The CKEditor database is unique in the industry because it includes “secret” discrete codes that are not on the
actual keypads for many components. These codes are highly sought after by professional installers because they
make automation of the home theater possible via reliable macros! Here are the facts you need to know:
Discrete Commands versus Toggle Commands
When a keypad’s only button to turn on and off a TV set is labeled Power, it is usually a “toggle” command.Test it by
pressing the button twice. If the power button turns on the TV, then turns it off, it is a toggle command. If the component stays on, it is a discrete (vital for reliable macros).
“Secret” Discrete Codes exist for some components. Why are they secret? Because the manufacturer
wants the keypad that accompanies the component to have the simplest appearance (fewest buttons). Since toggles
reduce the number of buttons, they make the keypad appear easier to operate. Many manufacturers understand the
needs of custom installers and build their components to also respond to discrete codes. They
distribute the discrete codes via service remotes, etc. For the first time, those codes are collected and integrated
into our database.
Not all components respond to the discrete codes in the Database. A component has to be BUILT to
respond to discrete codes.The fact that other models from the same manufacturer do respond to discrete codes
is the reason the codes are added to a code set. However, some models will not respond, because the manufacturers
did not build it to respond through budgetary considerations, time constraints or a simple oversight.
Selecting a Code Set from the Database
1 Open the Database Window - Select IR Database from the Program Menu or the Toolbar.
2 Select the Device - selecting it from the list box as
shown:
2 Category - Select the type or category of component
(i.e.TV, VCR or DVD player).
20
Type in Section Title
U
S
I
N
G
C
K
E
D
I
T
O
R
T
O
P
R
O
G
R
A
M
Programming Tutorial
TIP - Start with the top Device first, so that after you
have programmed the first device, you can avoid
pulling down the menu again, simply tap the Next
Device button.
IMPORTANT- Use the B & K CATEGORY NOT
AUDIO!
Because of the large number of B & K codes available, there is a separate CATEGORY for B&K.
Although some codes are available under the
AUDIO category, they are not complete.
BK
&
SBIMPLY ETTER!
Page 27

3 Brand - If B & K, select between Home Theater, Zone ID, Multi-Zone Receivers (CT610/310/600) or
B & K ALL commands. If another brand,select the company that made the component (i.e. Sony, Panasonic etc.)
4 Model - Select the Model or the Code Set number (sometimes the actual model, sometimes a generic #
assigned by us to a code set that operates many models over the years).
WARNING! USE B&K MULTIZONE 128 ONLY FOR BASIC SYTEMS!!!
5 Test the Code Set
A.Verify the CK1.2 Keypad is connected to the PC and an emitter attached to the component.
B.Turn the component ON.
C. Click on the Test button.
D. Observe the component. If it stays
on, click on another Model and continue until you find the Code Set that
turns the component off. When it
turns off, click on Save.
E.After you find the correct Code Set,
click on SAVE. When you do, the
LCD Button Editor window pops
open. You can correct any labels that
you think could be more user friendly.
Feel free to rearrange buttons as you
wish. Moving LCD buttons with the
LCD button Editor is exactly like moving Devices, simply click and drag to an empty location. Once
you are reasonably satisfied with the arrangement, click on the Apply button.
6 Continue with the rest of the devices you need, using the Next Device button to move to the next device
(or manually picking them from the Device list box).When you have finished all of your devices, click on
the Close button.
21
Type in Section Title
SBIMPLY ETTER!
BK
&
T
H
E
B
&
K
A
U
T
O
M
A
T
E
D
H
O
U
S
E
Programming Tutorial
1
2
3
4
5
6
Page 28

Hidden Codes in Keypad Database
The database used in CKEditor is the same as the one for the SR10.1 remote control. However, the CK1.2 keypad
has many fewer buttons available since it’s role is to automate a system and perform basic functions only. To speed
up programming, the first one to two pages of every device in the database have been updated for keypad operation.
Thus, for any device programmed from the database from the CABLE or SAT categories, you will see the Number
commands on Page 1, and the Menu commands on Page 2.The commands that were on Page 1 and 2 in the SR10.1
will be moved to Page 3 and 4. Commands that were in Page 3 ad 4 will be inserted in the Hidden Code list for
Shortcuts if you need one.
Similarly you will see hard button commands that are deemed the most commonly used moved to page 1 and 2 in
other categories.The missing commands are located in the Hidden code list for shortcuts if you need one.
Shortcutting To Hidden Codes and Other Device IR commands
You can create a SHORTCUT to another button with a Learned or pre-programmed command OR a HIDDEN Code
by selecting it via the pull down lists under Device and IR Code in the Edit and Label Buttons window.
TIP - Discrete On and Off codes are listed in the Hidden Code lists as P-ON and P-OFF
1 On the simulator, select the button position you
want to program with a new command.
2 Select the DEVICE from the Device list box.
3 Select the IR Code from the IR Code list box.
4 Click on the SAVE button in this window to
make the shortcut symbol appear.
22
Type in Section Title
U
S
I
N
G
C
K
E
D
I
T
O
R
T
O
P
R
O
G
R
A
M
Programming Tutorial
Remember you can shortcut to ANY command that has been assigned to a device Learned or Pre-Programmed. Because the
CK1.2 has fewer buttons than the SR10.1
remote control, the missing commands,
including powerful discrete Input, Mode
and Power ON and Power OFF commands
are often placed in the bottom of the IR
Code list for a device.
BK
&
SBIMPLY ETTER!
Page 29

Testing
In most home theater systems, you will find that some codes have to be learned. You may have a brand new
component whose codes are not yet in the B & K Database or you may have most of the codes for a
component, but a few are missing. To find out what you’ll need to learn, you must rigorously test all of the codes
you have programmed using the IR Database and correctly label the buttons that have to be learned. Of course
you can simply test a button and if it doesn’t work, go into learn mode, test the command, relearn as necessary
and so on. However, this wastes time. The best approach is to download, test all the commands, make a list, then
use CKEditor to modify labels, and delete unnecessary codes.
Downloading to TEST Pre-Programmed IR Commands From The Database
When you choose Download from the File Menu or click on the Download button on the Toolbar, the Download
window appears.There are two choices for downloading:
Partial Download - This quickly downloads all of the pre-programmed codes from the database.This stage of
programming (before any learning or macro programming has been accomplished) is really the only time you can
use this option. It does save you time!
Full Download - This is the normal download you will use most of the time. It takes a little longer, but all
commands, macros and programming are downloaded to the keypad.
Once you’ve selected a Partial or Full download, click on the Download button.
Preparing the List of Buttons to be Learned
1 Test ALL Buttons
Begin testing the codes you downloaded to the CK1.2 Keypad. Make sure that you test all
buttons (hard buttons and the LCD buttons on each page or every device). Don’t try to learn new
commands yet, wait until you can do all of them at once systematically.
2 Make a List of all buttons that don’t work.
3 Compare the original keypad to the CK1.2 Keypad. Add missing functions that need to be learned to the
List.
23
Type in Section Title
T
H
E
B
&
K
A
U
T
O
M
A
T
E
D
H
O
U
S
E
Programming Tutorial
BK
&
SBIMPLY ETTER!
Page 30

24
Type in Section Title
U
S
I
N
G
C
K
E
D
I
T
O
R
T
O
P
R
O
G
R
A
M
Programming Tutorial
Using LCD Button Editor
Add, Edit & Delete Buttons - Select the button location where you would like to add, edit or delete a
button, then simply single click on the desired action. In fact, there is no difference in function between Add
and Edit.There are two buttons to prevent confusion.
Symbol Shortcuts - Click on one of these buttons to type a symbol instead of a letter or number.
Device List - Select the device whose pages you would like to edit.
Scroll Pages - Since you can only view four pages at a time, the scroll pages buttons become active in FAV,
which has five pages.
Button Labels - Select the button you would like to rename by double clicking.To delete, single click then
click on the Delete button in E.
Hide Page Check Boxes - You must hide pages back to front. If you want page 1 hidden, move the buttons
to page 4, then hide page 4. See Hiding pages section on the next page for more detail on HIDDEN pages.
Save and Cancel - Only by clicking on SAVE, will your work be saved. No matter how many buttons you
move or edit, hitting CANCEL will discard all the work you have done.
Labeling and Deleting Buttons
Use the LCD Button Editor to correct labels for LCD buttons on each of the devices you’ve created. Label empty
buttons for codes that you need to learn.To LABEL a button, SELECT it by single clicking on it, then begin typing.
Delete a button by selecting it with a single click and then clicking on either the DELETE key on your keyboard or
the Delete button. Pressing the TAB or ENTER buttons on your keyboard will select the next position.
TIP - If you label a button on a blank page, a new page will be added after you save.
B
A
G
D
F
E
C
A
B
C
D
E
F
G
BK
&
SBIMPLY ETTER!
Page 31

Dragging and Dropping Buttons
You can drag and drop a programmed button/label to any empty button. If there are no empty buttons, simply
delete unused buttons first, then re-arrange as desired. Drag and drop requires that you click and hold on a button,
then move to the new location and let go of the mouse button.
Hiding Pages
A hidden page is accessible during MACRO programming but the end user cannot manually access the page using
the PAGE button. If all pages are hidden, the end user cannot access the hard buttons of the device either, essentially
creating a HIDDEN DEVICE. This is the only way to prevent the automatic jump action that occurs on the MAIN
menu for any DEVICE LCD button. You HIDE pages using the HIDE checkbox. However, you must hide pages from
THE BACK TO THE FRONT. You cannot hide page 1, you must move buttons to page 4 and hide page 4. Once
page 4 is hidden, you are allowed to hide page 3; after page 4 and page 3 is hidden, you may hide page 2. Only
after page 4, 3 and 2 are hidden may you hide page 1.
Tip - You can still program a Macro to jump to a HIDDEN page for special purposes!
Moving Through Pages In Favorites
FAV or the Favorites device has five pages, thus you cannot view all pages at once in LCD button editor. However,
two scroll buttons (normally grayed out) become active when you are editing FAV. By utilizing these buttons, you can
edit and view pages 1 through 4 or 2 through 5.
Shortcuts - Copying Existing Buttons
Any button on MAIN or a Device (not FAV buttons) can be programmed with a shortcut to another button. When
you program a shortcut the icon will appear next to the button. When a button is programmed with a shortcut,
it is essentially an exact copy of the other button regardless of how it is programmed (Learned IR, IR Database or
Macro). Since a shortcut can copy a macro, it is the only way you can get a hard button to issue a macro (you
program the macro on an LCD button on a hidden page somewhere, but the end user issues it by pressing a
hard button programmed with a shortcut).To program a shortcut:
1 Select the button you want to program.
2 Open the Edit and Label Buttons window if it is
closed.
3 Pull down the Device list and select the device
where the button you want to copy is located.
4 Pull down the IR Code list and select the button
you want by clicking on it.
5 Click on SAVE.
25
Type in Section Title
T
H
E
B
&
K
A
U
T
O
M
A
T
E
D
H
O
U
S
E
Programming Tutorial
2
3
4
5
BK
&
SBIMPLY ETTER!
Page 32

Learning Tips
Start with the remote control about an inch apart from the keypad.
Vary the learning distance from one inch to as much as four feet if the
code doesn’t test correctly. Make sure the remote is pointed at the
red lens of the CK1.2’s IR sensor.
Fresh Batteries in the Original Remote Control -Weak batteries will cause CKEditor to fail to correctly learn. Note that EVEN
if the original remote still operates the component, the batteries can
be too weak to produce a strong enough carrier for any learning
keypad to detect!!!! When you have learning problems, replace the
batteries FIRST!
Tap instead of Pressing and Holding - With normal short burst
codes (buttons the user would simply tap, rather than press and
hold), this will produce better results. Normally, you should press
and hold.
The “Flutter” Technique - If you are having problems with a “Press and Hold” Code (like volume up or down a button the user would press and hold), sometimes fluttering the button while in learn mode will work.
The “Semaphore” Technique - Typically only used when you are trying to isolate one command from a remote with
a pre-programmed macro. Use a book or another opaque object in between the two remotes. Press the button on the
original remote, then remove the obstruction for a moment, then put it back. Experiment with different timings.
Learning IR Codes One at a Time
Select the Button - Select the button that you want to teach to by single clicking it.
Click on the LEARN Shortcut Button - The Learn shortcut button stays depressed to indicate that you
have selected LEARN mode.
Wait for READY to Appear - The CK1.2 Keypad must be connected to the PC. Once you see the READY
indicator, press and hold the corresponding button on the original keypad while pointing it at the TOP of the
CK1.2 Keypad. When the code is successfully learned, the window will say GOOD, confirming that the code
learned “correctly.” Actually, the GOOD means that the code might be good.... Press the test icon and point
the connected CK1.2 Keypad at the component to test if it really is good! Reteach as necessary.
` Click on SAVE - You must click on SAVE to save the LEARNED command.
26
Type in Section Title
U
S
I
N
G
C
K
E
D
I
T
O
R
T
O
P
R
O
G
R
A
M
Programming Tutorial
1
2
3
4
1
2
3
4
BK
&
SBIMPLY ETTER!
Page 33

27
Type in Section Title
T
H
E
B
&
K
A
U
T
O
M
A
T
E
D
H
O
U
S
E
Programming Tutorial
Learning a Batch of Buttons Efficiently
Tip - Find the correct “learning distance” using single code learning before
beginning batch learning.
Select the STARTING Button - Select the button that is the top left of the buttons you want to teach
to. When learning a batch of buttons, CKEditor starts at the top left, moves down the LCD buttons on the
left, then goes to the top right LCD button.When learning Hard buttons, CKEditor starts at the top left,
moves across each row, then moves down.
Select both the LEARN and the CONTINUE shortcut buttons - The combination activates the batch
learning capability of CKEditor.
Watch the INFO Window - When the info window says READY, press and hold the button on the
original keypad.When it says GOOD, release the button.
Automatic SAVE and ReSelect - During batch processing, CKEditor automatically saves and then
reselects the next button. When you see that a new button has been selected and the INFO window says
READY, then teach the corresponding button on the original keypad. This greatly speeds the learning process.
Tip - To skip a button in the automatic sequence, simply select a new button.
1
2
3
4
1
2
3
4
BK
&
SBIMPLY ETTER!
Page 34

28
Type in Section Title
U
S
I
N
G
C
K
E
D
I
T
O
R
T
O
P
R
O
G
R
A
M
Programming Tutorial
Download and Test All Learned Buttons
This time when you download, make sure that you choose FULL DOWNLOAD, otherwise your learned codes will not
download to the keypad.Test all the learned buttons, and go ahead and correct the problems as you find them.
Copying and Pasting Devices
Tip - Use Copy and Paste to create a duplicate of your customer’s receiver device,
then rename the duplicate “Tuner” or “Radio”.Then use LCD button editor to
eliminate all of the surround sound and input buttons in the RADIO device and all
of the Tuner functions from the “RCVR” device. This creates a very simple RADIO
device that is much easier for your clients to understand.
Many installers go a step further and HIDE all the pages in the RCVR device, so that
their clients cannot readjust and accidentally ruin the surround sound calibration.
Remember, buttons on hidden pages are still programmable as macro steps!
If you right click on a device in Tree View, a context menu appears that enables
you to Copy a device.When you select another device, right click and select
Paste.The entire contents of the selected device will be erased and replaced
by the contents of the device you copied.The original copy stays in place
unchanged.
If you wish to delete the original, choose Cut instead of Copy.When you
choose Cut, then the original device is deleted when you Paste into a selected
new device.
BK
&
SBIMPLY ETTER!
Page 35

Importing and Exporting Devices
Tip - Name your EXPORTED device files by Category, Manufacturer & the Model #.
Importing Step by Step
1 Right click on Tree View and choose Import Device.
2 When the Open dialog window appears (as you see below), navigate to the folder you stored your device
files and select the one you want to import.
3 Once you select a file, the Import Device window will open as you see below.
4 In the Available Devices window, select the device you see (it will have the original 5 letter LCD label from
the original configuration, rather than the Manufacturer/Model/Category name you filed it as).
5 Now select an EMPTY position on either MAIN page 1 or MAIN page 2.You cannot replace an existing
device, only an empty spot.
6 Click on the ARROW pointing to the right at the MAIN pages, then click on SAVE.
29
Type in Section Title
T
H
E
B
&
K
A
U
T
O
M
A
T
E
D
H
O
U
S
E
Programming Tutorial
If you right click on a device in Tree View, a context menu appears that enables
you to Import or Export a device.When you select a device, right click and
select Export.The entire contents of the selected device will be saved to your
PC with a new file name.The original copy stays in place unchanged.
If you have some saved DEVICE files, choose Import to add the device to
your client’s keypad.
BK
&
SBIMPLY ETTER!
Page 36

Macro Programming
What is a Macro?
A macro is a recording of a sequence of commands that is played back when the user presses a single button. A
macro can have up to 190 steps. A step can be:
IR Command - Any IR command on any hard button, LCD button on any device. IR commands in the IR
Database are not available to Macros until they have been programmed into a button somewhere within
the configuration.
Delay - Adjustable delay between steps of .1 and 30 seconds. Longer delays can be created by using more
than one delay. If a delay is programmed as the first step in a Macro, the macro will not be issued until the
button is pressed and held for the specified amount of time.
Jump - As the last step in a Macro, you can specify a jump to any page of any device. However, an LCD
button on MAIN is automatically programmed to jump to the first page of the device as the first step in a
Macro (unless all pages are hidden). You can program another jump in the macro, so that the automatic
jump will happen at the beginning of the macro and the manually programmed jump will happen at the end
of the macro. See Advanced Programming Tips on page 45 for examples of how you can utilize this feature.
What Buttons Can Playback a Macro?
Only LCD buttons and the Power On and Power Off buttons can be PROGRAMMED with a Macro. However, any
button can playback a Macro by using a shortcut to a button that has a Macro in it.Thus, if you need a Macro on a
hard button (i.e. CH-), you can program the macro on an LCD button (could be in a hidden page somewhere) and
simply shortcut to it (see page 22 for step by step info on shortcuts).
Discrete IR Codes vs Toggle IR Codes
Manufacturers program their products to respond to IR codes with one action or many:
Toggle - More than one action can occur when the code is sent by a keypad. An example is a POWER button.The
manufacturer programs the TV to respond to a POWER command by turning it on if it was off and
turning off if it was on. So one button can do two things. This requires that the user “know” or “see” that the
television is on or off before pressing the button.
Another example is a television with an “INPUT” command. When the code is issued, the television changes its
input. Since the television has 5 inputs, the single “INPUT” command can have five different results, depending on
what input was previously selected.The user has to “know” or “see” what input was previously selected before
deciding how many times to push the INPUT button.
Discrete - Only one action can occur when the code is sent by a keypad. An example is a television with
a POWER ON button and a POWER OFF button. If the television is already on, the POWER ON command has no
effect. If the television is off, the POWER ON command will turn on the television. Another example is a television
with five discrete input commands (ANT A, ANT B, EXT 1, EXT 2 and EXT 3). No matter what input was previously
selected, any of these commands will change the television to the desired input WITHOUT the end user “knowing”
or “seeing” what the previously selected input was!
Tip - Not all components have “discrete” codes on their original remotes, check the IR Database!.
30
Type in Section Title
U
S
I
N
G
C
K
E
D
I
T
O
R
T
O
P
R
O
G
R
A
M
Programming Tutorial
BK
&
SBIMPLY ETTER!
Page 37

Toggle Commands create “Point & Pray” Macros
Imagine a system with three components (a TV, a VCR and a surround sound Receiver). Each has a toggle type
POWER command on the original keypad. You program a macro with the three power commands on the MAIN
Power ON button and tell your client to turn on their system with this button. Here’s what will happen:
The client will pick out a videotape and insert it in the VCR (the VCR will now automatically turn on).The client sits
down, picks up their CK1.2 Keypad and presses the MAIN Power On button.The three toggle type power commands
are issued. So, since the TV and the Receiver were Off, they turn on, however the VCR was already on from inserting
the tape, so it turns off. The client is puzzled that they don’t see a picture, so they press the MAIN Power On button again.The three toggle type power commands are issued again.This time the TV and the Receiver turn off and
the VCR turns on.The client begins to get frustrated...
TIP - For systems with lots of toggle Power codes, create a “Power” help list.
You cannot successfully train a family to use a Point & Pray macro. It is too inconsistent. You are
better off creating a help list device named “POWER.” On the Power Page 1, create shortcut
buttons to all of the components toggle power commands.Train the customer to turn on the system
by pressing the Power button on MAIN, then turning anything that they need on one at a time. Once
the system is on, they press MAIN and decide what they want to watch or listen to.
Professional Installations Require “Bullet-Proof” (Reliable) Macros or a help list.The use of Point &
Pray macros will create service calls and a lot of bad will. Never leave a customer with a remote
programmed to “maybe” work...
Finding Workarounds for Toggle Commands in Macros
By creatively experimenting you may find that you can workaround the lack of discrete codes.This takes time and
there is no guarantee that you will find a workaround for any given component. Here are some common examples:
DVD and VCR Power Workaround
Most DVD players will turn on when off when they receive a Play command.Thus you can workaround like this:
DVD ON = 1) Play
2) DVD Stop
TV scrolling “INPUT” Workarounds
Many televisions respond to a channel up or a channel number command by changing to the Antenna input regardless
of what input was last selected.This creates an “anchor” action that puts the television in a known input.Thus you
can create a workaround as follows:
EXAMPLE - CH Up takes TV to the ANT A input (and the TV has 5 inputs -Ant A, Ant B, EXT1, EXT2 and EXT3)
TV to EXT3 = 1) Ch Up (takes TV to ANT A regardless of what input was last selected)
2) Input (takes TV to next input - ANT B)
3) Input (takes TV to next input - EXT 1)
4) Input (takes TV to next input - EXT 2)
5) Input (takes TV to desired input - EXT 3)
31
Type in Section Title
T
H
E
B
&
K
A
U
T
O
M
A
T
E
D
H
O
U
S
E
Programming Tutorial
DVD OFF=1) DVD Play
2) Delay (amount of delay varies with brand and model, typically 1
or 2 seconds)
3) DVD Power
BK
&
SBIMPLY ETTER!
Page 38

EXAMPLE 2 - Any channel number and ENTER takes TV to the ANT A input (and the TV has 5 inputs -Ant A, Ant B, EXT1,
EXT2 and EXT3)
TV to EXT3 = 1) “0”
2) “2”
3) “Enter” (takes TV to ANT A)
2) Input (takes TV to next input - ANT B)
3) Input (takes TV to next input - EXT 1)
4) Input (takes TV to next input - EXT 2)
5) Input (takes TV to desired input - EXT 3)
Programming the Power On Macro
Set up your laptop and a connected keypad in front of the components while programming the Power On macro.
Power On macros usually require extensive testing of delays and you can expect to do a lot of experimenting while
programming.
1 Select the Power On button on the MAIN page.
2 Click on the RECORD icon
3 Take a look at the MAIN page (both pages if you have two MAIN pages). Decide which components you
want to power on. Start adding their Power On commands to the list by navigating to the device and page
where the codes are located and clicking on the buttons with the Power On commands.
Select the device by clicking its button on the MAIN menu.
Now, click on the button with the device’s Power On command.
The new step appears in the list.
32
Type in Section Title
U
S
I
N
G
C
K
E
D
I
T
O
R
T
O
P
R
O
G
R
A
M
Programming Tutorial
BK
&
SBIMPLY ETTER!
Page 39

4 Once you have all of your Power On Commands in the list, re-arrange them as desired by clicking and
dragging them into whatever order you want.
5 Ask the client what they think they will watch most often (TV, satellite, DVD, etc.). Program steps to select
the correct TV and Receiver input for that activity. In this example, both the television and the receiver
have discrete input codes and the client’s favored activity is watching Satellite.
Select the Audio (receiver/preamp/zone controller) by clicking its button on the MAIN menu.
Now, click on the button with the SAT input command.
The new step appears in the list.
Select the TV by clicking its button on the MAIN menu.
Now, click on the button with the
correct input command.
The new step appears in the list.
33
Type in Section Title
T
H
E
B
&
K
A
U
T
O
M
A
T
E
D
H
O
U
S
E
Programming Tutorial
BK
&
SBIMPLY ETTER!
Page 40

6 OPTIONAL - Program a jump to the MAIN page you would like them to choose their favorite activity
from. This ensures that if they were on MAIN page 2, after they power up, they will automatically be on
MAIN page 1.
Click on the JUMP icon.
Select the MAIN device.
Select PAGE 1 by clicking its button on the MAIN menu.
The new step appears in the list.
7 Make sure the CK1.2 Keypad is connected and properly working through all emitters by using the original
remote via the Infrared sensor to change everything to the wrong input and turn it all off . Select the first step
in the list by clicking on it. Now, click on the TEST button. Observe the components. Did they all turn on
and switch to the correct input?
34
Type in Section Title
U
S
I
N
G
C
K
E
D
I
T
O
R
T
O
P
R
O
G
R
A
M
Programming Tutorial
BK
&
SBIMPLY ETTER!
Page 41

8 Programming additional delay in the macro is sometimes necessary. Each macro step usually takes some
time, so there may be enough built in delay for the television and the receiver to both be fully active by
the time the input commands are sent. Sometimes the component is not fully awake. It is fashionable for
many modern televisions and receivers to require 5 or more seconds of warm up time before they are
responsive to new commands. In a case like that, you will need to add more delay between steps.
Select the Delay icon
Now, click on the preset amount of delay or enter any time between .1
second and 30 seconds in the “Customize” window.
The new step appears in the list.
Now, drag the delay step to the correct location.
TIP - Sometimes a change in order can provide the delay you need.
35
Type in Section Title
T
H
E
B
&
K
A
U
T
O
M
A
T
E
D
H
O
U
S
E
Programming Tutorial
BK
&
SBIMPLY ETTER!
Page 42

9 Again, turn everything to the wrong input, then turn it all off. Select the first step in the list by clicking on
it. Now, click on the TEST button. Observe the components. Did they all turn on and switch to the
correct input? Continue to revise the macro with delays or changes in order and test until the macro
ALWAYS correctly turns everything on and switches to the correct inputs.
When the macro is perfect, click on the SAVE shortcut button.
Programming a Power Off Macro
A Power Off macro is much simpler than a Power On macro, since there are rarely any delays to test, etc. Usually, to
give the client some feedback that the macro is working, the TV is turned off first.
When you are forced to “workaround” a DVD player or VCR without a discrete off command, you will make the
macro more reliable if you place the time consuming anchor (the play command) at the beginning of the macro.
Make sure that you turn the DVD player off before testing this kind of workaround. You are testing the worst case,
you know that a toggle type power command will turn the DVD player off, you are concerned about an event that
might happen.The DVD player is already off, but the client presses the MAIN Power Off to turn everything else on. If
you only programmed a toggle Power command, everything else would turn off, but the DVD player would turn on.
This “workaround” ensures that the DVD player turns off.
36
Type in Section Title
U
S
I
N
G
C
K
E
D
I
T
O
R
T
O
P
R
O
G
R
A
M
Programming Tutorial
Play command turns on DVD player if OFF. If it is
already on, it stays on.
Power command turns off DVD player.
Other power commands provide enough delay
that the DVD player will respond to a Power
command if the play command just turned it off.
BK
&
SBIMPLY ETTER!
Page 43

Programming Activity Macros on MAIN LCD “Device” Buttons
An Activity Macro is typically programmed to be as fast as possible. They simply select the correct input on both the
television and the receiver/preamp/zone controller and power on any new components needed.
There is no need to program a JUMP to a page in a MAIN LCD
“Device” button.They are automatically programmed to JUMP to the
Device.
Sometimes activity macros will share the same input settings. Here, a DVD player doubles as a CD player. The
programmer has copied the DVD device, named it CD, so that there are two identical devices (with the same DVD
player IR codes).The only difference between them is the Activity Macros you see below. The DVD Activity Macro
selects THX Surround Sound with 5 speakers with the TV on, while the CD Activity selects Stereo with 4 speakers
and forces the TV off. For components that have play commands it is typically ok to have a “Play” command in the
macro.Watch out for components with toggle type play/pause buttons.That kind of “Play/Pause” command should
not be placed in an Activity Macro without a preceding “Stop” command, to make sure that the toggle can only play
the component!
One DVD Player - Two Devices and Two Activity Macros
DVD Activity Macro CD Activity Macro
Note how the programmer is using the same DVD input on the surround sound receiver for both activities, the
macro simply changes the surround sound settings.
TIP - Don’t OVERAUTOMATE, make sure that every step is truly useful!
37
Type in Section Title
T
H
E
B
&
K
A
U
T
O
M
A
T
E
D
H
O
U
S
E
Programming Tutorial
BK
&
SBIMPLY ETTER!
Page 44

Programming FAVORITE Macros
Programming fifty favorite channels may sound like a lot of work, but if you take advantage of CKEditor’s time
saving capabilities, you can program all fifty in five minutes or less! First, get a program guide for the satellite service
or Cable TV provider your client uses. Have them mark their favorites for you. Use LCD Button Editor to relabel as
needed and hide any unnecessary pages. Now, you are ready to program:
1 In Tree View, click on the + sign next to the Device (SAT, CABLE) that you will need to program the
favorites from.This expands the device, so that you can see the Pages.
2 On the Simulator, click on the Favorite you would like to program and click the RECORD button.
3 In Tree View, click on one of the Pages of the device (SAT, CABLE) you are using to make the favorite.This
instantly changes the Simulator from FAV to the device, whereas using the Simulator to navigate would
have taken several mouse clicks.
38
Type in Section Title
U
S
I
N
G
C
K
E
D
I
T
O
R
T
O
P
R
O
G
R
A
M
Programming Tutorial
1
2
BK
&
SBIMPLY ETTER!
Page 45

4 Click on the satellite # keys to record the channel number you want. If you forget which favorite you are
programming, remember that the name of the favorite is displayed above the macro list of steps.You can open
the Hard Button window if the IR database was used (the IR database automatically installs # commands in
both the LCD pages and the Phantom Hard Buttons).
5 Add delay if needed. You should test the first favorite
thoroughly for any need for delay. Components vary widely
in their response time. Some brands will be fine with no
delay step in between IR commands. Other brands require
delays between commands. However, if the channel
favorite has two identical digits, you will most certainly
require delay between the two identical commands.
6 Click on the SAVE icon and continue to the next Favorite
until all are complete.
Inserting Macros (Copying or Cloning a Macro)
You can often speed programming by instantly inserting all of the steps of a previously programmed macro as the
starting point of a new macro.The inserted steps are completely editable, without changing the original macro.
1 Do not start recording at the new location. Simply select
the button where you would like the macro inserted.Then
click on the IMPORT MACRO button.
39
Type in Section Title
T
H
E
B
&
K
A
U
T
O
M
A
T
E
D
H
O
U
S
E
Programming Tutorial
4
6
BK
&
SBIMPLY ETTER!
Page 46

2 Navigate to the device and page where the original macro is programmed. Click on the button that
contains the macro. During navigation, you might click on a device button which happens to contain a
macro. A popup window will appear asking if you want to insert this macro.
Answer NO if you are simply using the device button to navigate. Answer YES
if you want this macro copied/cloned/inserted.
3 When you click on the button that contains the original macro, all of the steps are copied/cloned into the
new button location and the Simulator jumps back to the new button’s device and page:
4 Edit as needed and click on SAVE.
Programming Punch Through
CKEditor enables you to quickly set up common functions on all devices for the hard buttons. Usually used only for
Volume Up, Down and Mute; however, you may occasionally find it convenient to punch through to the channel up
and down. Punch Through is not available for the LCD buttons.
1 Open the Punch Through window by clicking on the shortcut button in the toolbar or by selecting
Punch Through from the Program Menu.
2 Select the devices which you want to change programming by clicking on them
while holding down the CONTROL key on the keyboard. If you want them all
selected (normal for Volume Up, Down and Mute), simply click on the Select All
button. Any device you select will be HIGHLIGHTED in the “Punch To” list.
40
Type in Section Title
U
S
I
N
G
C
K
E
D
I
T
O
R
T
O
P
R
O
G
R
A
M
Programming Tutorial
BK
&
SBIMPLY ETTER!
Page 47

3 Select the device that has the codes you want used from the “Punch From” List:
4 Click on SAVE. Check the devices you programmed, you should see the orange PT (Punch Through) flag
on every button affected on all the devices you programmed:
TV VCR1 MAIN
5 Repeat for any other groups of codes as you like.
Backlight On Time
1 Open the Backlight On Time window by clicking on the shortcut button on the toolbar or selecting it
from the Program Menu.
2 Enter the amount of time you would like the backlighting to stay on (after the backlight button is pushed).
41
Type in Section Title
T
H
E
B
&
K
A
U
T
O
M
A
T
E
D
H
O
U
S
E
Programming Tutorial
BK
&
SBIMPLY ETTER!
Page 48

Downloading to CK1.2 Keypad
You download to both keypads the same way:
1 Make sure the keypad has fresh batteries inserted correctly.
2 Connect the cable between the PC and the keypad.
3 Verify that the file you have open in CKEditor is the one you want to download to the keypad.
4 Click on the Download to keypad shortcut button on the toolbar or choose Download from the
Communications Menu.
5 When the Download window appears, select the Full Download checkbox and click on the Download
button. Do not move the mouse or touch the keyboard during the download.
42
Type in Section Title
U
S
I
N
G
C
K
E
D
I
T
O
R
T
O
P
R
O
G
R
A
M
Programming Tutorial
BK
&
SBIMPLY ETTER!
Page 49

Download Failures
Should you have a download failure, try repeating the download. In certain circumstances, the keypad can become
locked up and might display an error message. If this occurs, do the following:
1 Disconnect the keypad from power until the display fades away. Then, reconnect to power and the PC.
2 Do a PARTIAL Download.
3 If successful, do a FULL Download. If not successful go to step 4.
4 Save your work and restart Windows.
5 Do a PARTIAL Download.
6 Do a FULL Download.
TIP - Make sure that the cable plug is solidly pushed all the way in to the connector.
Uploading from the Keypad to the PC
Uploading is necessary when you arrive at a jobsite with an existing CK1.2 Keypad system that you would like to
service, edit or clone. Simply upload the file to your PC, save it with a new file name and you can edit the file, send it
to other remotes, make a touch up and download back into the customer’s remote.
TIP - You cannot upload from the SR 10.1, only from the CK1.2 Keypad!.
1 Make sure the keypad has fresh batteries inserted correctly.
2 Connect the cable between the PC and the keypad.
3 Save any work and open a NEW empty file.
4 Click on the Upload from keypad shortcut button on the toolbar or choose Upload from the
Communications Menu.
5 When the Upload window appears, click on the Upload button. Do not move the mouse or touch the
keyboard during the Upload.
43
Type in Section Title
T
H
E
B
&
K
A
U
T
O
M
A
T
E
D
H
O
U
S
E
Programming Tutorial
BK
&
SBIMPLY ETTER!
Page 50

Push and Hold Macros
Any macro can be programmed so that nothing will happen if the button is simply tapped. You can force the client to
press and hold for any time between .1 and 30 seconds to issue a macro. For most clients, this would be a bad idea
since it makes things more difficult and more time consuming. However, here is an application that we think you
might find useful for particular clients:
Push and Hold for Activity Macros and Tap to Switch Devices
If you have a hobbyist client, a power user who is constantly switching devices and making adjustments to different
components, this can improve operation for him/her.
Here’s how this application works:
Program all of the MAIN LCD Activity Macros with a 1 or 2 second delay as the first step.This ensures
that the client will have to Press and Hold the button to issue the Macro.
When the client simply taps a MAIN activity button, he/she simply switches devices.
Two Functions on One LCD Button
If the LCD button is programmed with an IR code from the Database, then a tap will issue the code, while a press
and hold will issue both the preprogrammed code and a macro. However, the two functions on one button “feature”
will not work with shortcuts.You might have just the surround sound receiver’s input if you tap, and a macro if you
press and hold the button.The only caveat is that if the normal action is a Learned Code, you select LEARN &
MACRO from the Device list in the Edit and Label Buttons window.This enables two functions on one button for a
Learned code. No special action is required for Pre-Programmed codes from the database. Just program the Macro
AFTER the database code is programmed.
44
Type in Section Title
U
S
I
N
G
C
K
E
D
I
T
O
R
T
O
P
R
O
G
R
A
M
Advanced Programming Tips
BK
&
SBIMPLY ETTER!
Page 51

Status Messages for Impatient Clients with Long Macros
For clients who have problems waiting for long macros to finish, it is helpful to
design the system to give a dramatic status message while the macro is working,
otherwise they may put the remote down in the middle of the macro, frustrating
themselves. This is possible for a system with UP TO 10 DEVICES. Here’s how
to do it:
1 Move all of the devices with their IR programming to MAIN Page 2. Just drag and drop them using Create
and Move Devices (Program Menu #1).
2 Now, create new devices on MAIN Page 1. Duplicate the exact order of MAIN Page 2.
3 Use LCD Button Editor to label page 1 of each of the first ten devices (the ones on MAIN Page 1 without
IR codes) with a message that will be visible as long as the macro is working:
45
Type in Section Title
T
H
E
B
&
K
A
U
T
O
M
A
T
E
D
H
O
U
S
E
Advanced Programming Tips
This is the kind of status message you can have the keypad
display WHILE a macro is being issued!
BK
&
SBIMPLY ETTER!
Page 52

4 Program Activity Macros normally on all the MAIN page 2 buttons.
5 On Main Page 1, import the corresponding Macro from Page 2 to each LCD button on Page 1:
6 Add a page jump to each of the MACROs on MAIN Page 1 to the Devices with the IR Codes programmed
in them:
7 In operation, the only inconsistency that occurs is that if
the client goes to MAIN page 2 and operates from there,
they will not get the status message during the macro.
Solve this by opening LCD Button Editor, select MAIN as
the Device and checking the HIDE checkbox for Page 2.
46
Type in Section Title
U
S
I
N
G
C
K
E
D
I
T
O
R
T
O
P
R
O
G
R
A
M
Advanced Programming Tips
As you can see, when you pull
down the list of devices, there
are two of each device.
You want to create a jump to
the second device on the list,
they are the page 2 devices
with codes, rather than the ten
phony devices you created with
status messages.
BK
&
SBIMPLY ETTER!
Page 53

Helping Confused Clients With BOBS and LISTS
When do clients get confused? When their system is full of old gear they couldn’t afford to replace! When the
salesmen sell components without discrete codes! When the manufacturer of a cool new product blows it and
incorporates hard to use, but vital features! In any event, by using CKEditor you can often solve confusion very effectively by using BOBS (Big Obvious Buttons on every page the client might need them).
BOBS for Scrolling or Toggling Commands
When you have a component that is difficult to automate, it helps to call it names (TOAD, for Toggle Only Actuated
Device, has been suggested). Once you have vented your feelings, get out CKEditor and go to work.There is a
relatively simple way to make operation of a device like this much less confusing. Here’s how to go about it:
1 Using LCD Button Editor, move the top right button in every device that uses the TV to another location
on another page if necessary.
2 Now, program each empty button on each device to shortcut to the TV Input command. In this example,
the Satellite device’s top left button is programmed with the TV’s scrolling Input command.
3 Using
LCD Button Editor relabel each of these shortcut buttons an easy name for the client to remember.
The end result is a client who always knows how to fix his TV...
47
Type in Section Title
T
H
E
B
&
K
A
U
T
O
M
A
T
E
D
H
O
U
S
E
Advanced Programming Tips
BK
&
SBIMPLY ETTER!
Page 54

LISTS - When You Have Lots of Components WITHOUT Discrete Power Commands
1 Create a new device named “Power”.
2 On the new device’s first page, create a shortcut to each problem component’s power command, by pulling
down the device list, then the command list.
3 After the shortcut is created, rename it for the component it controls as shown above.
Using this system of a “list” that helps your client through a difficult process, you
can create devices that help them through any complex process. For example
here is a help list for a client who wants to occasionally record and cannot
remember all of the steps to the process.The installer creates a list
of shortcut buttons that indicate the order of the steps top to bottom.
48
Type in Section Title
U
S
I
N
G
C
K
E
D
I
T
O
R
T
O
P
R
O
G
R
A
M
Advanced Programming Tips
BK
&
SBIMPLY ETTER!
Page 55

49
Type in Section Title
T
H
E
B
&
K
A
U
T
O
M
A
T
E
D
H
O
U
S
E
Advanced Programming Tips
Controlling the CK1.2 Via RS232 From the B& KCT610/310/600 or an Automation System
Overview
The B&K CT610/310/600 has the ability to send RS232 messages to the CK1.2 keypad when triggered by a B&K IR
command, video sense, audio sense or voltage sense. These messages can instruct any or all keypads to jump to a
specific device and page (this is what is done to provide keypad status of a zone input change) or in more advanced
systems, to instruct the keypad to jump to a specific device, page and button (thus triggering the macro or infrared
command stored in that button).
Any automation system with the abiltiy to send RS-232 text strings can successfully control a B & K CK1.2 keypad as
well, offering complete local control of IR devices by running a single CAT 5 cable to a locally installed CK1.2.
Examples of RS232 Macros
Example 1 - Turn Off ALL TV’s Everywhere When Leaving the House
The CT610/310/600 has hundreds of B&K unique IR codes available for use as RS232 macro triggers.You simply
assign one of them to trigger an ALL OFF RS232 Macro using BKcSuites RS232 Macro Editor then teach that “trigger” IR command into the TVOFF button on the kitchen keypad next to the garage door.
Then you program each of the keypads controlling a local TV by placing a different discrete Off command for each
unique local television in exactly the same button location (Device, Page and Button address) on every keypad.That
way, you don’t have to create six different RS232 macros. Instead, you use one macro with the global ID # FF (255)
which will command all of the keypads in the system.
In use, when the CT610/310/600 sees this unique IR code from the Kitchen keypad, it will issue the RS232 macro to
all of the other keypads. Each room’s keypad will then issue a discrete Off command to each of the local TV’s. With
some automation systems, you could accomplish the same thing by assigning the RS232 message to a touch screen
icon.
Example 2 - Turn Off Junior’s Stereo from any Keypad
If Junior’s room is equipped with a local stereo unconnected to the central system, it is still advantageous to program
and install a keypad to control that local system. Not only does Junior get the advantages of instant availability and
control when he walks into the room, his parents can turn off the system from any other keypad in the house.Thus,
if Junior falls asleep listening to music, Mom and Dad can turn it off without going to Junior’s room.
To program; simply teach the kid’s room Keypad to control the system, set the keypad ID# to a unique ID, then note
the ID# and the button address (Device, Page, Button) and program an RS232 Macro with BKcSuite (assigning an
unused B&K code to trigger the macro). Program all of the other keypads with a JROFF button which contains the
trigger code.
In use, any keypad with a JROFF button sends the trigger code to the receiver.The CT610/310/600 sends an RS232
message to Juniors keypad which turns off the local stereo(since the message is specifically addressed to that keypad,
no other keypad jumps anywhere). Of course, no serial macro can turn Junior off when he complains that someone
has turned his system off.
Purpose of Keypad ID Numbers
The purpose of the Keypad Unit ID # is to enable specific keypads to be addressed via RS232 communications.Thus
you could have a keypad in the Kitchen send a special B&K IR command to the CT610, then the CT would in turn
send a specific RS232 message to each room’s keypad instructing each one to turn off the local TV in that room.
Since each room’s keypad has a unique ID#, they will only respond to the correct command.
BK
&
SBIMPLY ETTER!
Page 56

50
U
S
I
N
G
C
K
E
D
I
T
O
R
T
O
P
R
O
G
R
A
M
Advanced Programming Tips
ID# FF(255) is the Global Default
When you set a Keypad’s ID # you enable an RS232 message to be sent to this specific keypad without affecting any
other keypad. However, the keypad will still respond to any message from the CT610/310/600 with the FF|255 prefix.
FF|255 is the default and cannot be deactivated.This is very useful, since the CT610/310/600 keypad status messages
are sent with the FF|255 prefix.Thus, you can set a keypad’s ID# to enable RS232 Macros to be sent to a specific
keypad, but the keypad will still respond to the normal keypad status messages sent by the receiver whenever a zone
input is changed by a remote control, the front panel or another keypad.
Resetting Keypad Unit ID
1 Open the ID # window by clicking on the shortcut button on the toolbar of CKEditor.
2 Enter the new ID in either the Hex or the
Decimal window (the window is actually a hex
to decimal and a decimal to hex converter).
3 Click on OK.
4 Download to the Keypad.
Sending Messages To A CK1.2 Via RS232
Creating an RS232 command to control the Keypad is simple. The message has start with a paranthesis, each parameter is separated from the next with a comma and you must end the last parameter with a semi-colon and a closing
paranthesis. You can instruct any keypad or all of them to:
Jump to a Specific Page for Display Purposes:
1 Jump to the Main Menu, Page 1 or Page 2
2 Jump to any Device, Page 1, 2, 3 or 4
3 Jump to FAV, Page 1, 2, 3, 4, or 5
TRIGGER an IR Command or Macro to be EXECUTED:
1 Jump to the Main Menu, Page 1 or 2; then a Button
2 Jump to any Device, Page 1, 2, 3 or 4; then a Button
3 Jump to the FAV, Page 1, 2, 3, 4, or 5; then a Button
Need for Delay Between Messages
The CK1.2 needs a short delay to digest an RS232 string. Do not send more than one string every 1/2 second for
jump commands. For Button Execute commands, be aware that while the keypad is executing a macro, it will ignore
any RS232 messages sent to it.
(FF, K, D3, P4;)
Keypad ID# in Hex
Opening
paranthesis
Semicolon
and closing
paranthesis
Comma separators
Page Number must be
Numeric without a leading 0
Mandatory K
D3=Device 3
(M for Main, F for Favorites)
(FF, K, D3, P4, B73;)
Button Number
Requirements for a JUMP Message
Additional Requirements
for a Button Execute Message
BK
&
SBIMPLY ETTER!
Page 57

Enter Keypad ID# In Hexadecimal
The keypad ID# must be in Hexadecimal numbering 0 to FF (0-255) where FF (255) is the Global ID used
to control ALL keypads regardless of their ID#. Do not add any 0’s to a single digit number. For example if
you are addressing a Keypad with the ID # of 3, do not type in 03, just 3. The ID# is followed by a comma.
Device Number Mapping
Button Number Mapping
Hard Buttons
ON=B0 CH+=B1 VOL+=B3 MUTE=B5
OFF=B35 CH- =B2 VOL- =B4
LCD Buttons for MAIN and All Devices
LCD Buttons for FAV
51
Type in Section Title
T
H
E
B
&
K
A
U
T
O
M
A
T
E
D
H
O
U
S
E
Advanced Programming Tips
MAIN
D6 DD1
D7 DD2
D8 DD3
D9 DD4
D10 DD5
PAGE 11
MAIN
D16 DD11
D17 DD12
D18 DD13
D19 DD14
D20 DD15
PAGE 22
MAIN/DEVICE
B41 BB36
B42 BB37
B43 BB38
B44 BB39
B45 BB40
PAGE 11
MAIN/DEVICE
B51 BB46
B52 BB47
B53 BB48
B54 BB49
B55 BB50
PAGE 22
DEVICE
B61 BB56
B62 BB57
B63 BB58
B64 BB59
B65 BB60
PAGE 33
DEVICE
B71 BB66
B72 BB67
B73 BB68
B74 BB69
B75 BB70
PAGE 44
FAV
B6 BB1
B7 BB2
B8 BB3
B9 BB4
B10 BB5
PAGE 11
FAV
B16 BB11
B17 BB12
B18 BB13
B19 BB14
B20 BB15
PAGE 22
FAV
B26 BB21
B27 BB22
B28 BB23
B29 BB24
B30 BB25
PAGE 33
FAV
B36 BB31
B37 BB32
B38 BB33
B39 BB34
B40 BB35
PAGE 44
FAV
B46 BB41
B47 BB42
B48 BB43
B49 BB44
B50 BB45
PAGE 55
Devices are entered in standard roman numerals 1 through 20.
However, the numbering of devices follows an unusual pattern, so
use these maps of device locations.Again, do not place a leading 0,
use the device numbers as shown D6, D15 etc.
Hidden Buttons are defined by “B” followed by the
address, i.e. ENTER = B19.
19
18
20
17
21
18
33
20
22
17
21
26
3432
2827
12
6
9
10
13
8
7
11
14
16
31
23
3029
15
22
BK
&
SBIMPLY ETTER!
Page 58

52
Type in Section Title
U
S
I
N
G
C
K
E
D
I
T
O
R
T
O
P
R
O
G
R
A
M
A
Activity Macros 37
Automation Systems 49
B
Backlight On Time 41
BOBS 47
Brand 21
Button Flags 13
Button Mapping 51
C
Category 21
Copying and Pasting Devices 28
Copying Macros 39
Creating Devices 18
D
Delete Window 16
Deleting Buttons 24
Device 14
Discrete Commands 20
Download Failures 43
Downloading 23
Downloading Procedure 42
Dragging and Dropping 25
E
Edit and Label Buttons Window 15
F
Favorite Macros 4
Feedback 5
Flags 13
Full Download 23
H
Hidden Codes 22
Hidden Hard Button 13
Hiding Pages 25
I
ID 50
Importing and Exporting Devices 29
Inserting Macros 39
IRDatabase 20
K
Keypad Feedback 5
Keypad Mapping 51
Keypad Unit ID 50
L
Labeling and Deleting Buttons 24
LCD Button Editor 24
Learning 26
Learning a Batch of Buttons 27
LISTS 47
Live Update 1
Index
BK
&
SBIMPLY ETTER!
Page 59

53
T
H
E
B
&
K
A
U
T
O
M
A
T
E
D
H
O
U
S
E
Index
M
Macro Programming 30
Menus 11
Model 21
O
Operations 2
P
Page 14
Partial Download 23
Pin Out (serial cable) 1
Point & Pray 31
Power Off Macro 36
Power On Macro 32
Programming Considerations for the CT610 8
Programming Overview 9
Programming Window 10
Punch Through 40
Push and Hold Macros 44
R
RS232 Macros 50
S
Serial Cable Pin Out 1
Serial Macros 49
Serial Port 1
Shortcuts 16
Shortcutting To Hidden Codes 22
Simulator 13
Status Messages 45
T
Task Manager 1
Test the Code Set 21
Testing 23
Toggle Commands 20
Toolbar 12
Tree View 14
Turn Off ALL TV’s 49
Two Functions on One LCDButton 44
U
Unit ID 50
UPDATE 1
Uploading 43
USB to Serial adapter 1
W
Workarounds 31
BK
&
SBIMPLY ETTER!
 Loading...