

Page 1
Software Manual
Virtual COM for Ethernet
Driver / Configuration Tool
Rev. 2.02
SRP-270 / SRP-275
SRP-280 / SRP-350
SRP-350plus / 352plus
SRP-370 / SRP-372
SRP-500
http://www.samsungminiprinters.com
Page 2

Virtual COM for Ethernet Driver / Configuration Tool
Rev. 2.02
- 2 -
■ Table of Contents
1. Manual Information........................................................................................................3
2. Usage Environment.......................................................................................................3
2-1 Recommended Specifications ....................................................................................3
2-2 Virtual COM for Ethernet Driver Supported Printer Models ........................................3
3. Software Installation & Deletion ...................................................................................4
3-1 Installation ..................................................................................................................4
3-2 Deletion ......................................................................................................................6
4. Configuration Tool Usage .............................................................................................7
4-1 Configuration Tool Functions ......................................................................................7
4-2 Printer Search.............................................................................................................9
4-3 Configuration of the Ethernet and the Virtual COM Port.............................................9
4-4 Virtual COM Port Addition.........................................................................................10
4-5 Virtual Serial Port Deletion........................................................................................12
4-6 Firmware Update of the Ethernet Interface ...............................................................12
5. Virtual Serial Port Management..................................................................................13
5-1 Port Deletion Via the Device Manager......................................................................13
5-2 Port Setting/Number Modification Via the Device Manager......................................14
6. Win32 API.....................................................................................................................16
6-1 File I/O API...............................................................................................................16
6-2 Communication API..................................................................................................16
6-3 Precautions for Serial Communication Programming...............................................16
Page 3
Virtual COM for Ethernet Driver / Configuration Tool
Rev. 2.02
- 3 -
1. Manual Information
This manual provides information on the usage of the “Virtual COM for Ethernet Driver”
and “Configuration Tool” software associated with Ethernet interface use on BIXOLON
printers.
This software can be used to set and use the Ethernet interface via the serial
communication mode.
Executing the installation file (BXLVCOM4ETHERNET Installer.exe) will install both the
“Virtual COM for Ethernet Driver” and “Configuration Tool” programs.
※ The file is available for download from the BIXOLON website
(www.samsungminiprinters.com).
2. Usage Environment
The “Virtual COM for Ethernet Driver” and “Configuration Tool” programs operate under
the following conditions.
2-1 Recommended Specifications
Hardware IBM PC/AT or IBM PC/AT-compatible
Supported Operating Systems Windows 2000 / XP / 2003 / Vista (32bit only)
Hard Disk Capacity Minimum 1Mbyte or higher space required
Memory Capacity 128Mbytes or higher
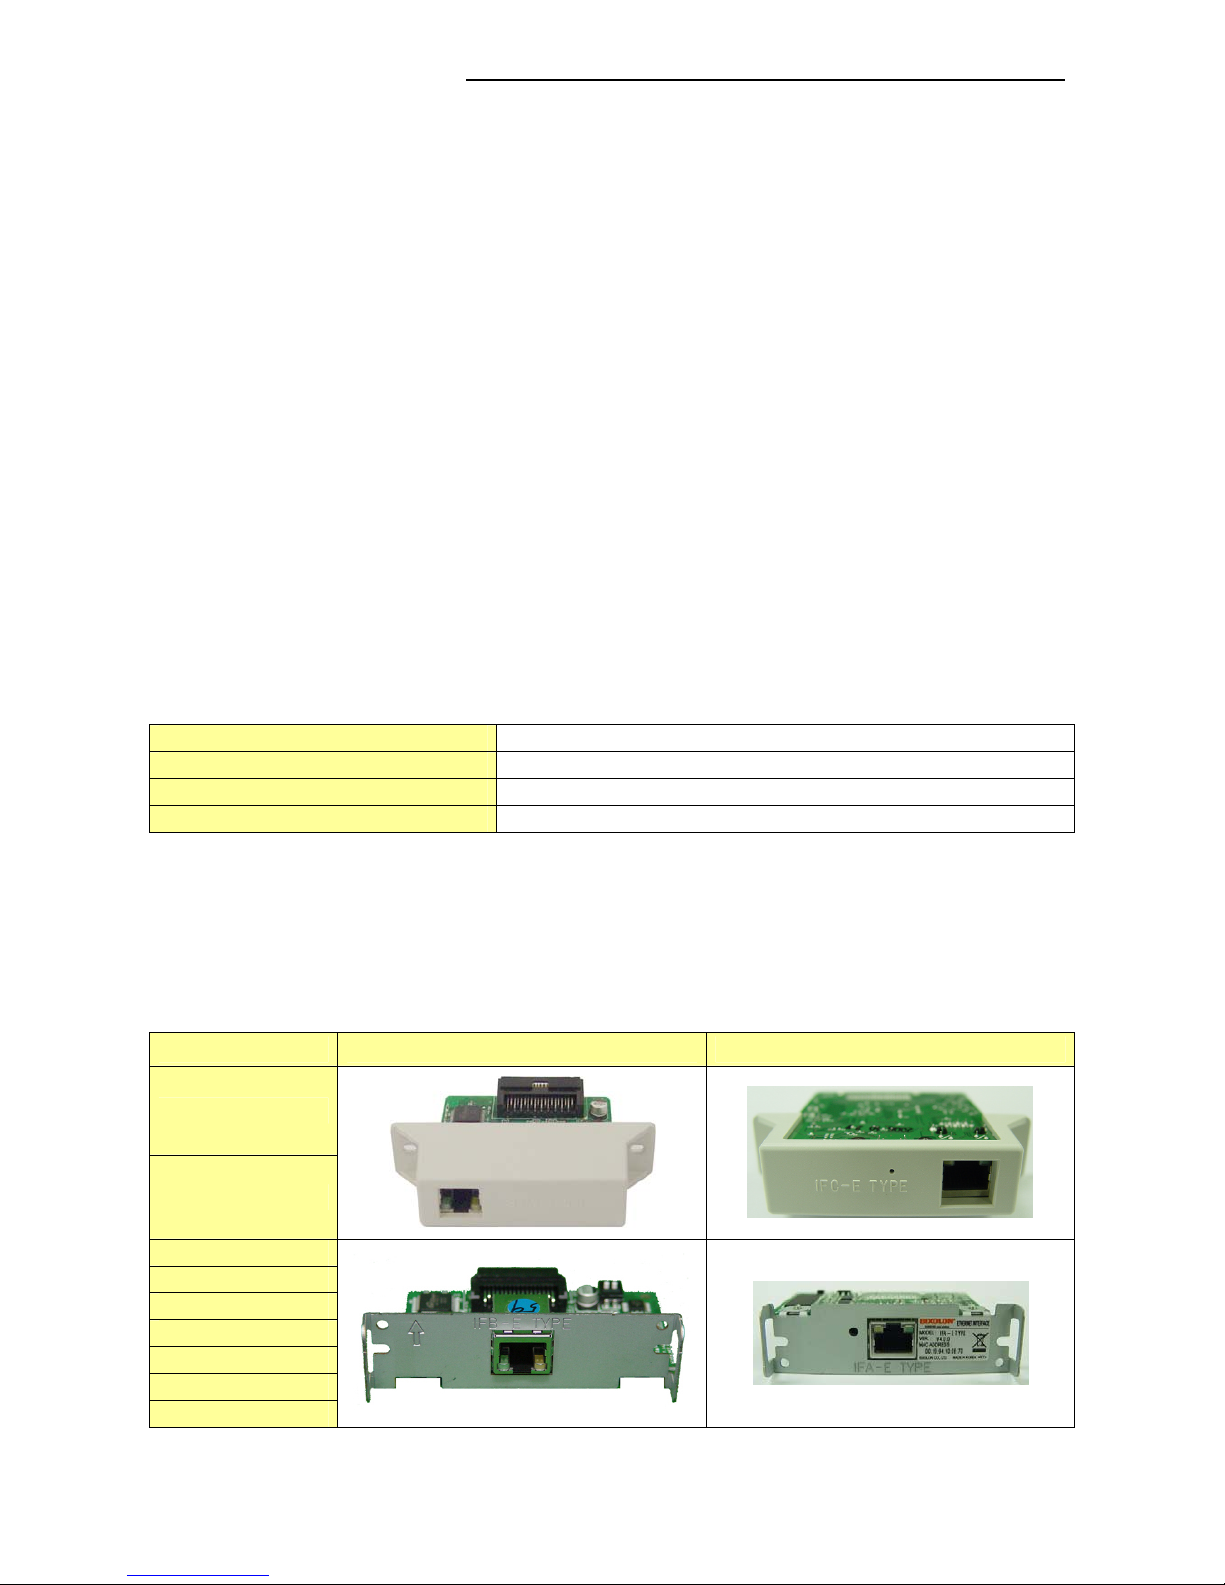
2-2 Virtual COM for Ethernet Driver Supported Printer Models
The “Virtual COM for Ethernet Driver” software can be used only with Ethernet-supported
printers. The supported printer models, the versions and the Forms of the Ethernet
Interface are listed as follows.
Model Ethernet Interface V3.x Ethernet Interface V4.x
SRP-275
SRP-500
SRP-270
SRP-280
SRP-350
SRP-350plus
SRP-352plus
SRP-370
SRP-372
Page 4
Virtual COM for Ethernet Driver / Configuration Tool
Rev. 2.02
- 4 -
3. Software Installation & Deletion
3-1 Installation
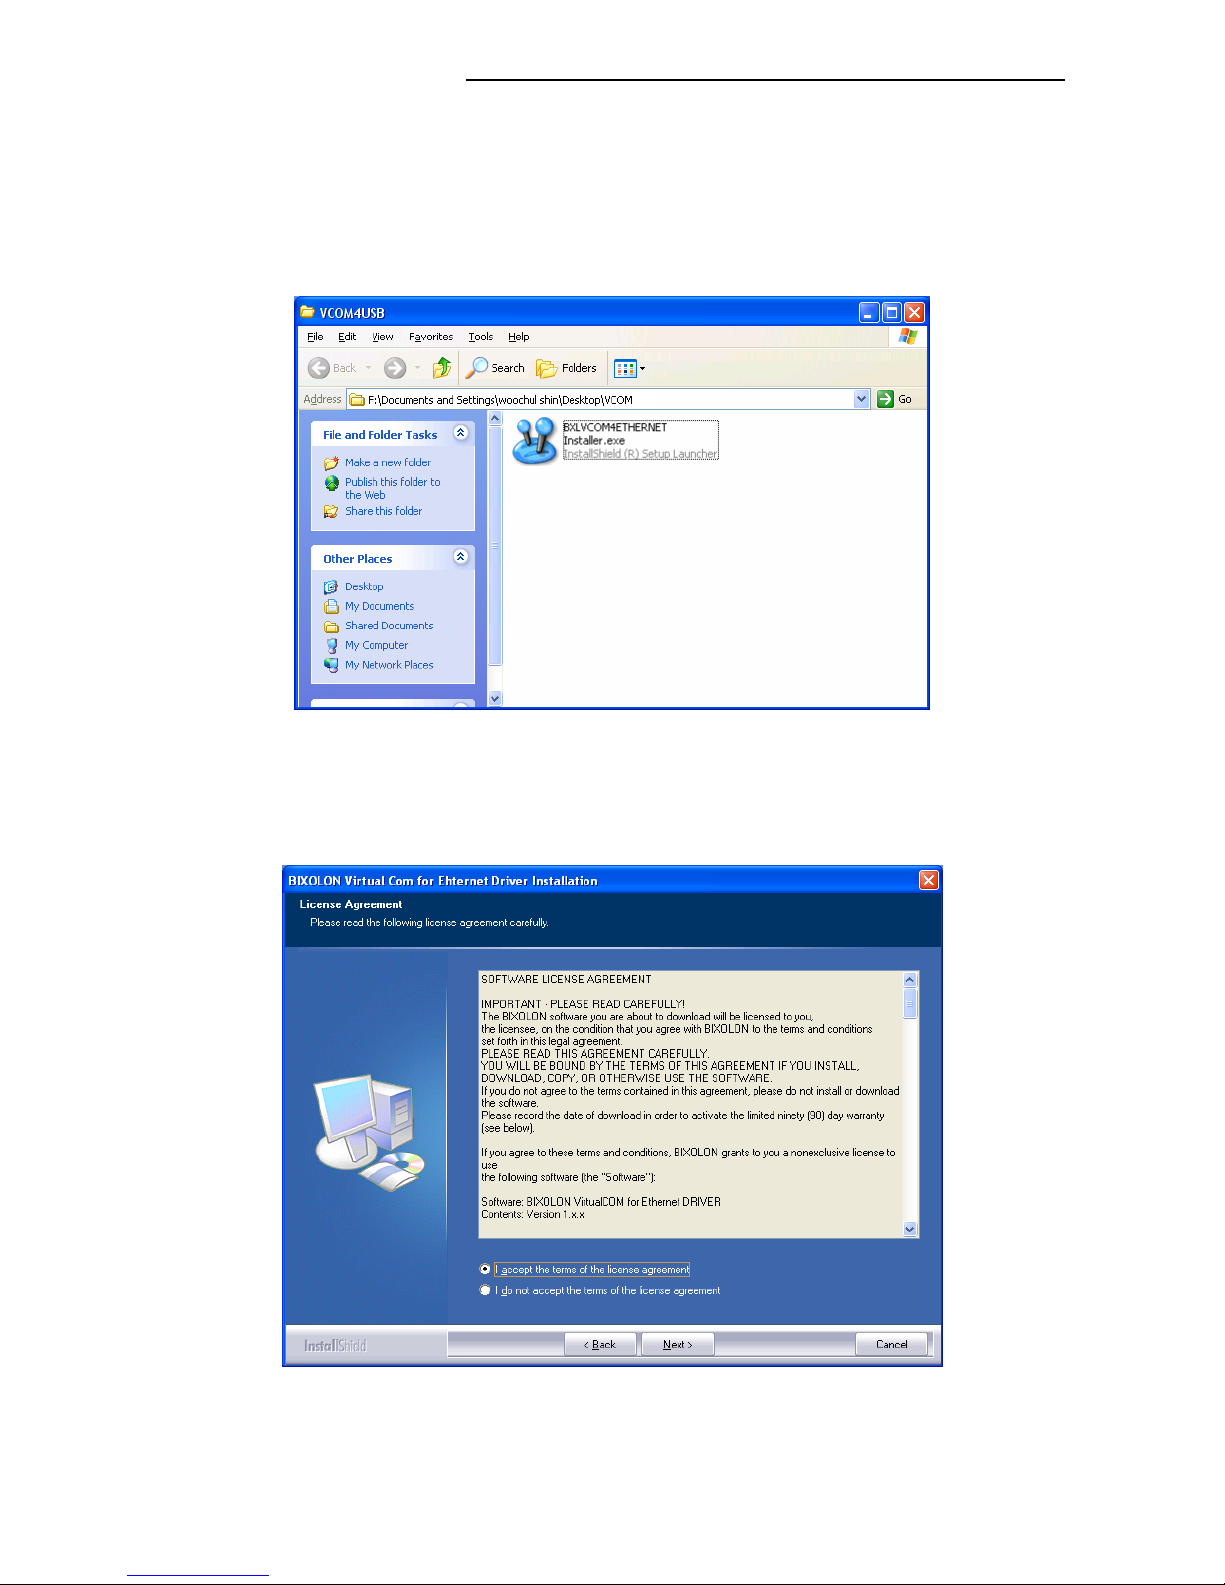
1) Execute the “BXLVCOM4ETHERNET Installer.exe” file.
(This file must first be downloaded.)
2) Accept the terms of the software license, and click the “Next” button.
Page 5
Virtual COM for Ethernet Driver / Configuration Tool
Rev. 2.02
- 5 -
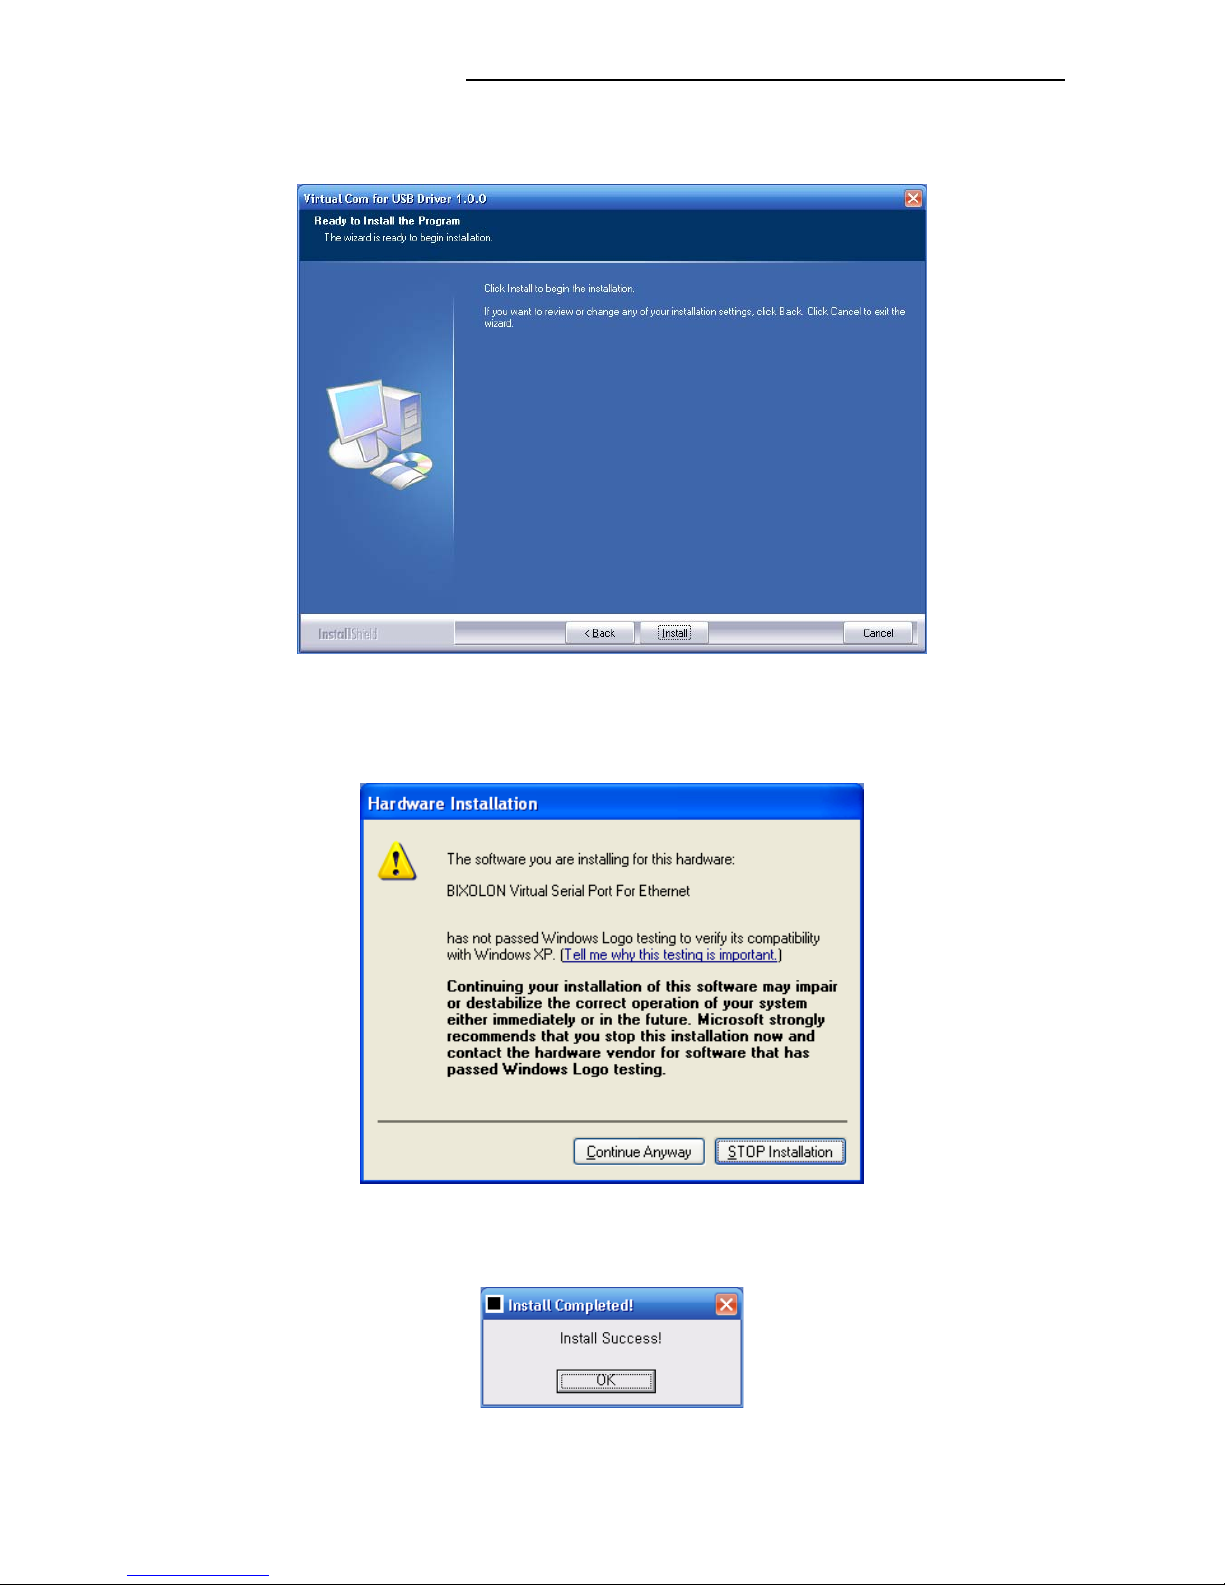
3) Clicking the “Install” button begins the installation process.
(Install to: BIXOLON\VCOM4NET\ in the Windows Root Folder)
4) During installation, the following message will appear. Click the
“Continue Anyway” button.
5) The following message appears upon the successful completion of installation.
Page 6
Virtual COM for Ethernet Driver / Configuration Tool
Rev. 2.02
- 6 -
3-2 Deletion
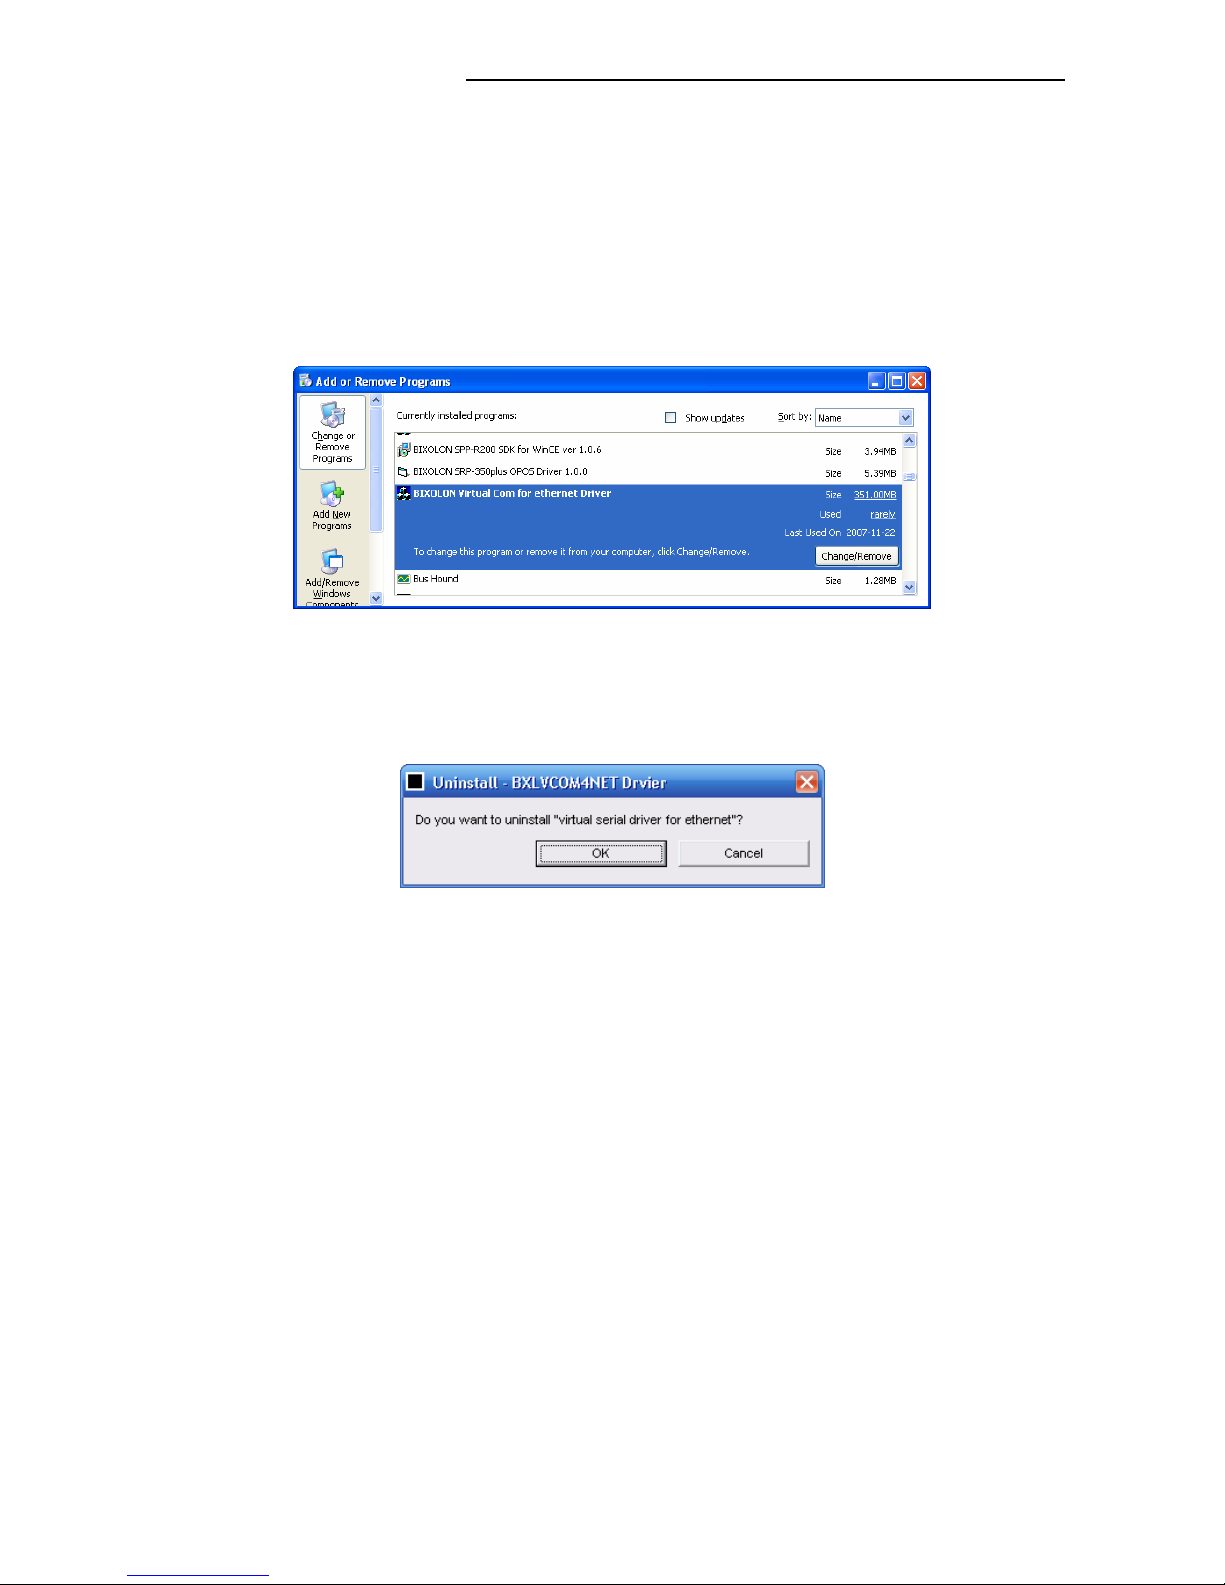
1) Click and activate the “Add/Remove Programs” icon in the Control Panel.
2) Select “Virtual Com for Ethernet Driver 1.x.x” and click the
“Change/Remove“ button.
3) Click the “OK” button to completely remove the application.
Page 7
Virtual COM for Ethernet Driver / Configuration Tool
Rev. 2.02
- 7 -
4. Configuration Tool Usage
The “Configuration Tool” program can be used to create a serial port, and set and/or delete
printer devices.
4-1 Configuration Tool Functions
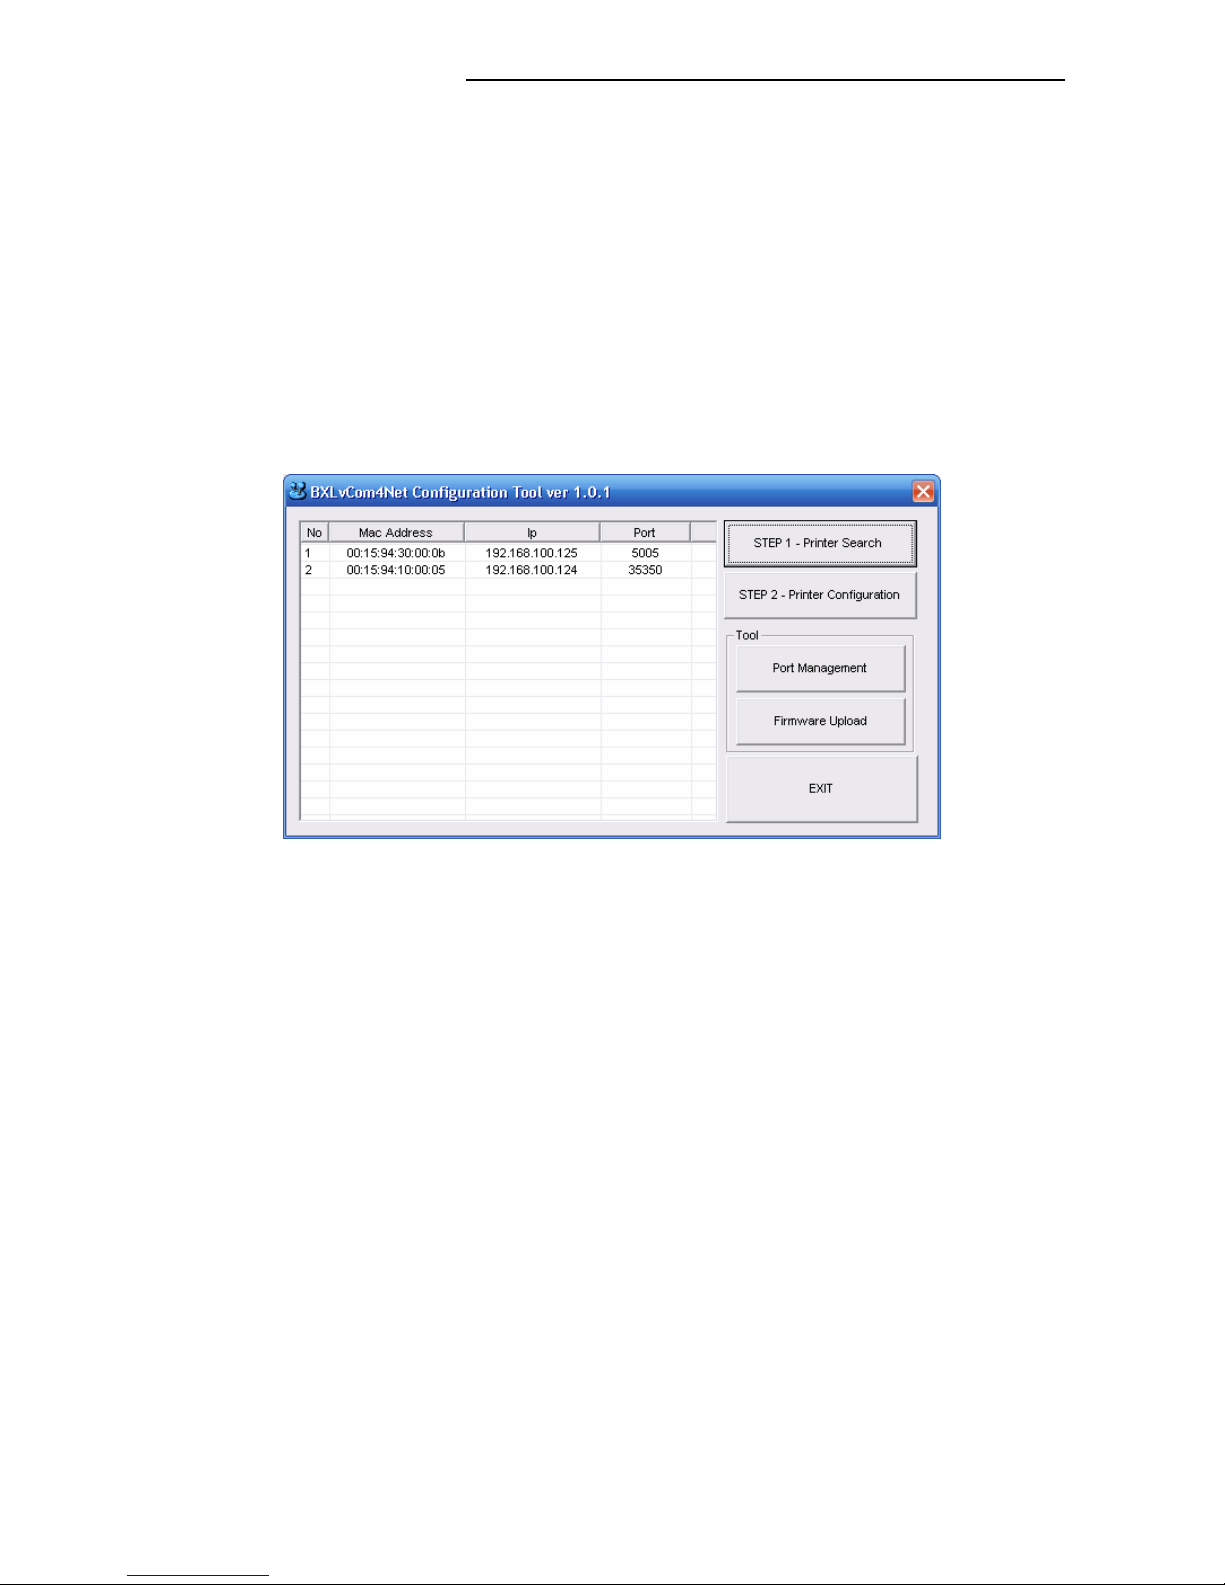
After completing installation via the “BXLVCOM4ETHE RNET Installer.exe” file,
run the “Configuration Tool” program. The program location is indicated as follows.
(Start Program Menu-> BIXOLON -> BXLVCOM4NET -> Click the “Configuration Tool
“ shortcut icon.)
The “Configuration Tool” functions are described as follows.
1 Main Screen
- This is the main screen of the “Virtual COM for USB Configuration Tool”
program.
2 Printer Device Sequence Number
- This function displays the connection sequence of printer devices.
3 Mac Address of the connected Printer via the Ethernet interface
- This function displays the printer device models that are turned on and
connected via the Ethernet interface.
4 Assigned IP Address
- This function displays the current IP Address of the connected printer via the
Ethernet Interface.
-
5 Assigned Port Number
- This function displays the current Port Number of the connected printer via the
Ethernet Interface.
42 3
1
5
6
7
8
9
Page 8
Virtual COM for Ethernet Driver / Configuration Tool
Rev. 2.02
- 8 -
6 STEP 1 – Printer Search
- This function is used to search the printer device models that are turned on and
connected via the Ethernet interface.
7 STEP 2 – Printer Configuration
- This function is used to configure the Ethernet Interface and the Virtual Serial
port Number.
8 Port Management
- This function is used to add/remove virtual serial ports.
9 Firmware Upload
- This function is used to update the Firmware of the Ethernet Interface.
Exit
- This function is used to exit the “Configuration Tool” program.
NOTE
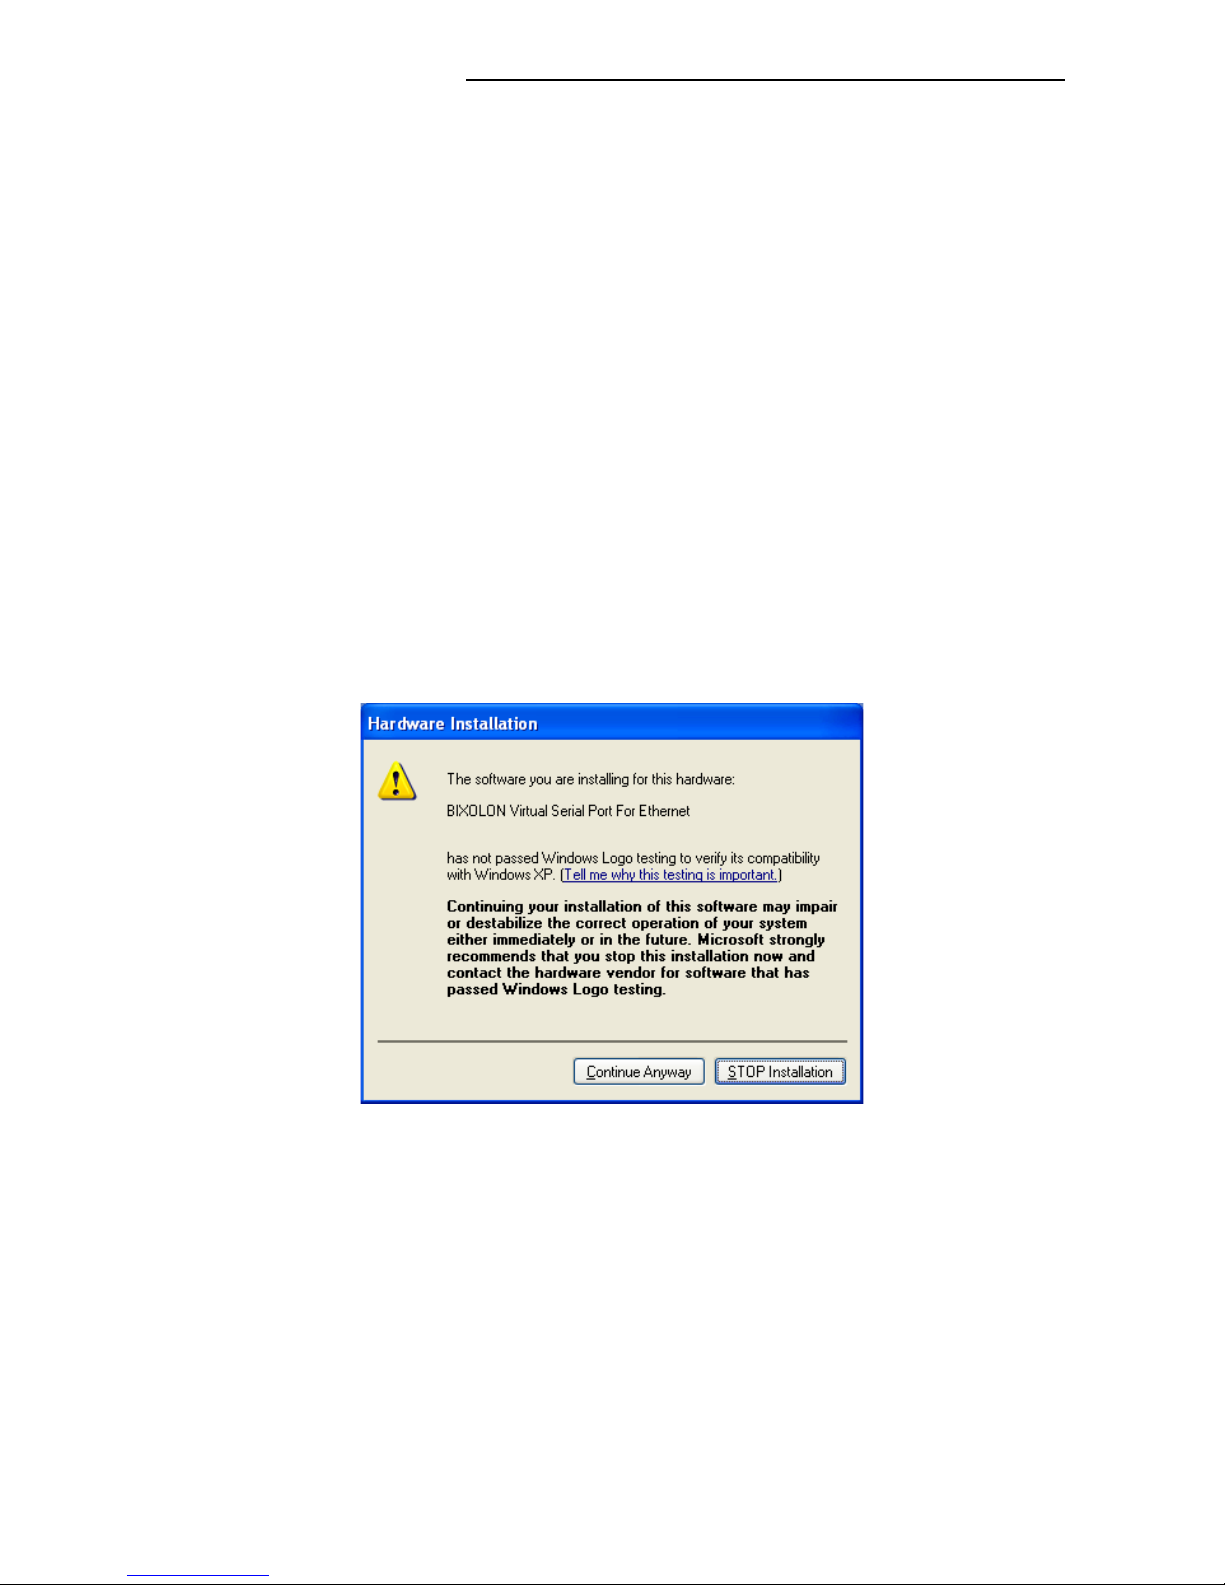
Each time the “Configuration Tool” program is executed, each port driver is updated.
While processing, the following warning message will appear.
When the warning message appears, click the “Continue Anyway” button to go to the next
process.
While updating is in progress, the warning message will appear once for each
registered virtual serial port. Because of the Initialization of Virtual port Information,
It needs to save again the Virtual port Information while executing the
“Configuration Tool”.
(Will not appear if using Windows 2000)
Page 9
Virtual COM for Ethernet Driver / Configuration Tool
Rev. 2.02
- 9 -
4-2 Printer Search
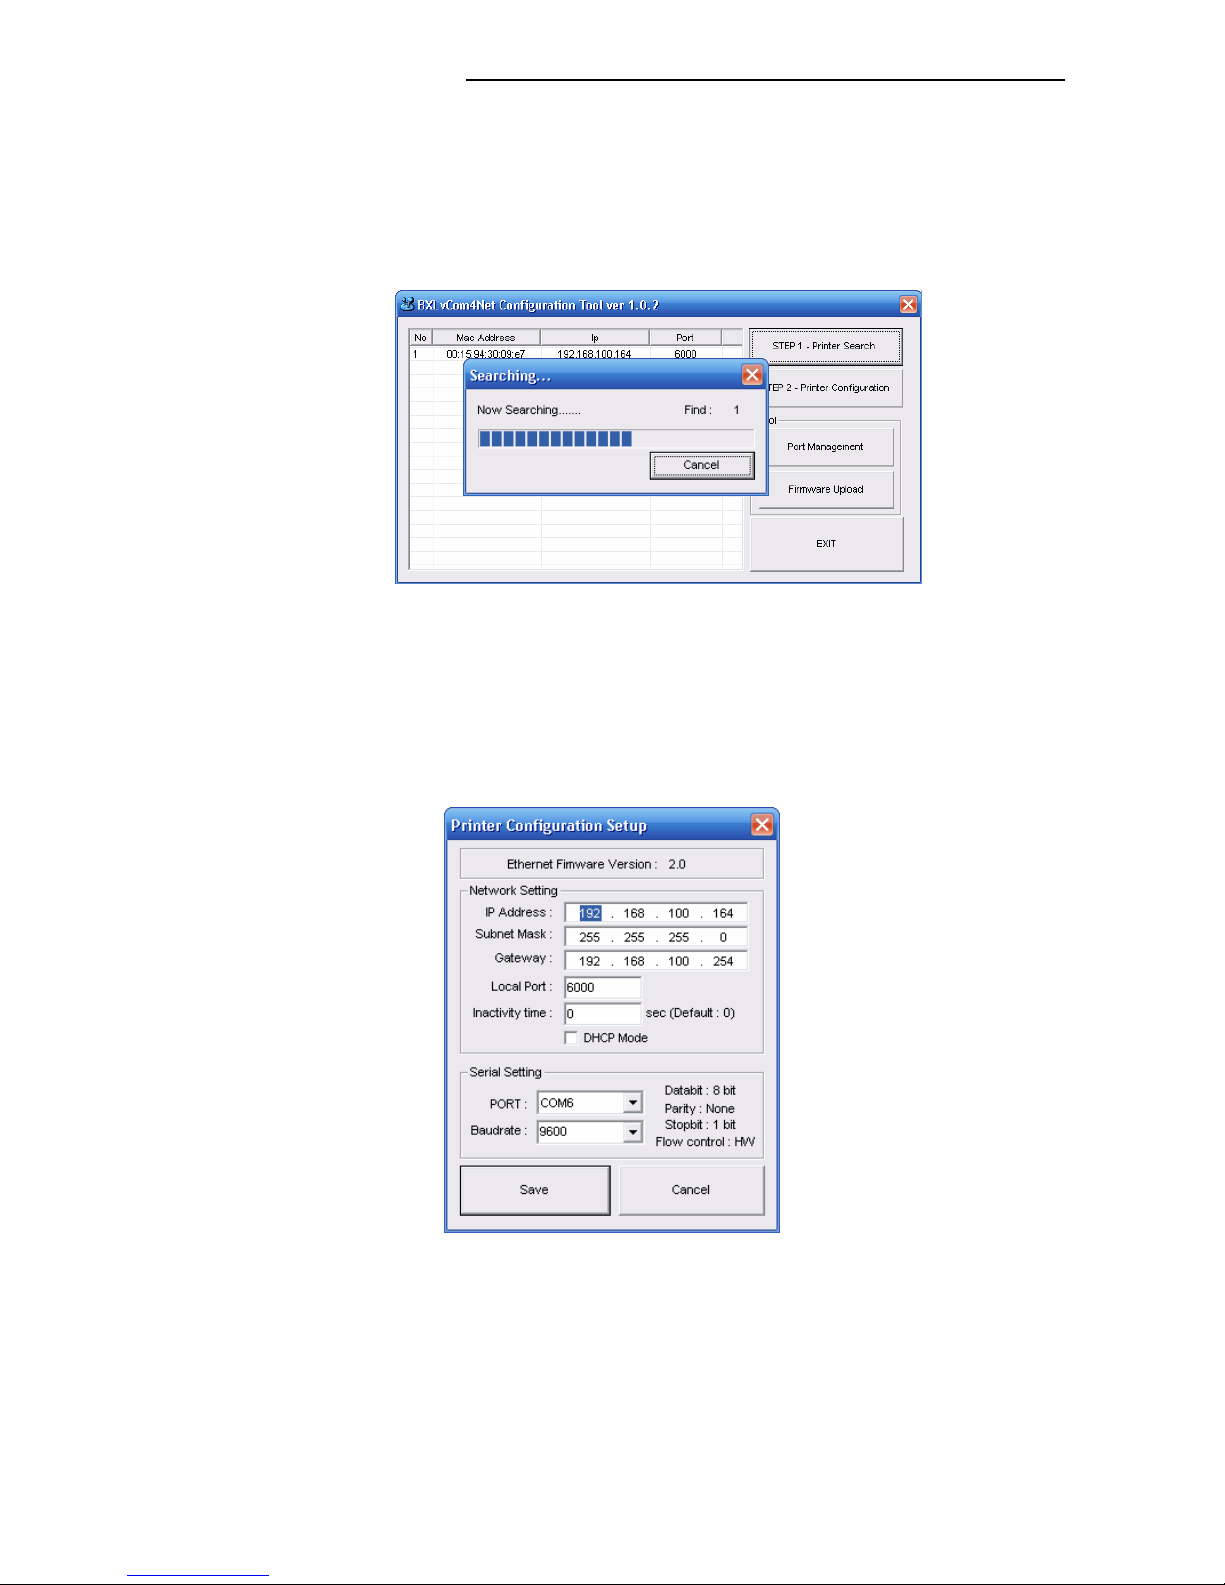
The “Configuration Tool” program is used to search the printer. To search the connected
printer via Ethernet interface, click the “STEP 1 –Printer Search” button in the
“Configuration Tool”. The following window appears during the searching the printer.
4-3 Configuration of the Ethernet and the Virtual COM Port
To configure the Ethernet and the Virtual COM port, click the “STEP 2 –Printer
Configuration” button in the “Configuration Tool”. Clicking the Configuration” button brings
up the following dialog box.
1) Enter the IP Address, Subnet Mask, Gateway, Local Port, and Inactivity Time in the
Network Setting section of the Ethernet interface card settings.
2) Select the port number to be used from the added virtual serial ports list to set the
virtual port, and designate the Baudrate. Match the Baudrate to that specified on the
test page printout from the corresponding printer.
Page 10
Virtual COM for Ethernet Driver / Configuration Tool
Rev. 2.02
- 10 -
3) After completion of settings, click the “Save” button to save the setting values.
NOTE
- For information regarding the “Network Setting” section,
submit an inquiry to the network administrator of the corresponding area.
- When connecting a virtual serial port, if the corresponding port is connected to another
printer, the existing connection is automatically disconnected and the connection is made
to the selected printer.
- The test page printout is generated by holding down the “Feed” button while turning
the printer power on.
- Following the saving of settings, a printer search is repeated.
4-4 Virtual COM Port Addition
The “Configuration Tool” program is used to add a virtual COM port. To create a port,
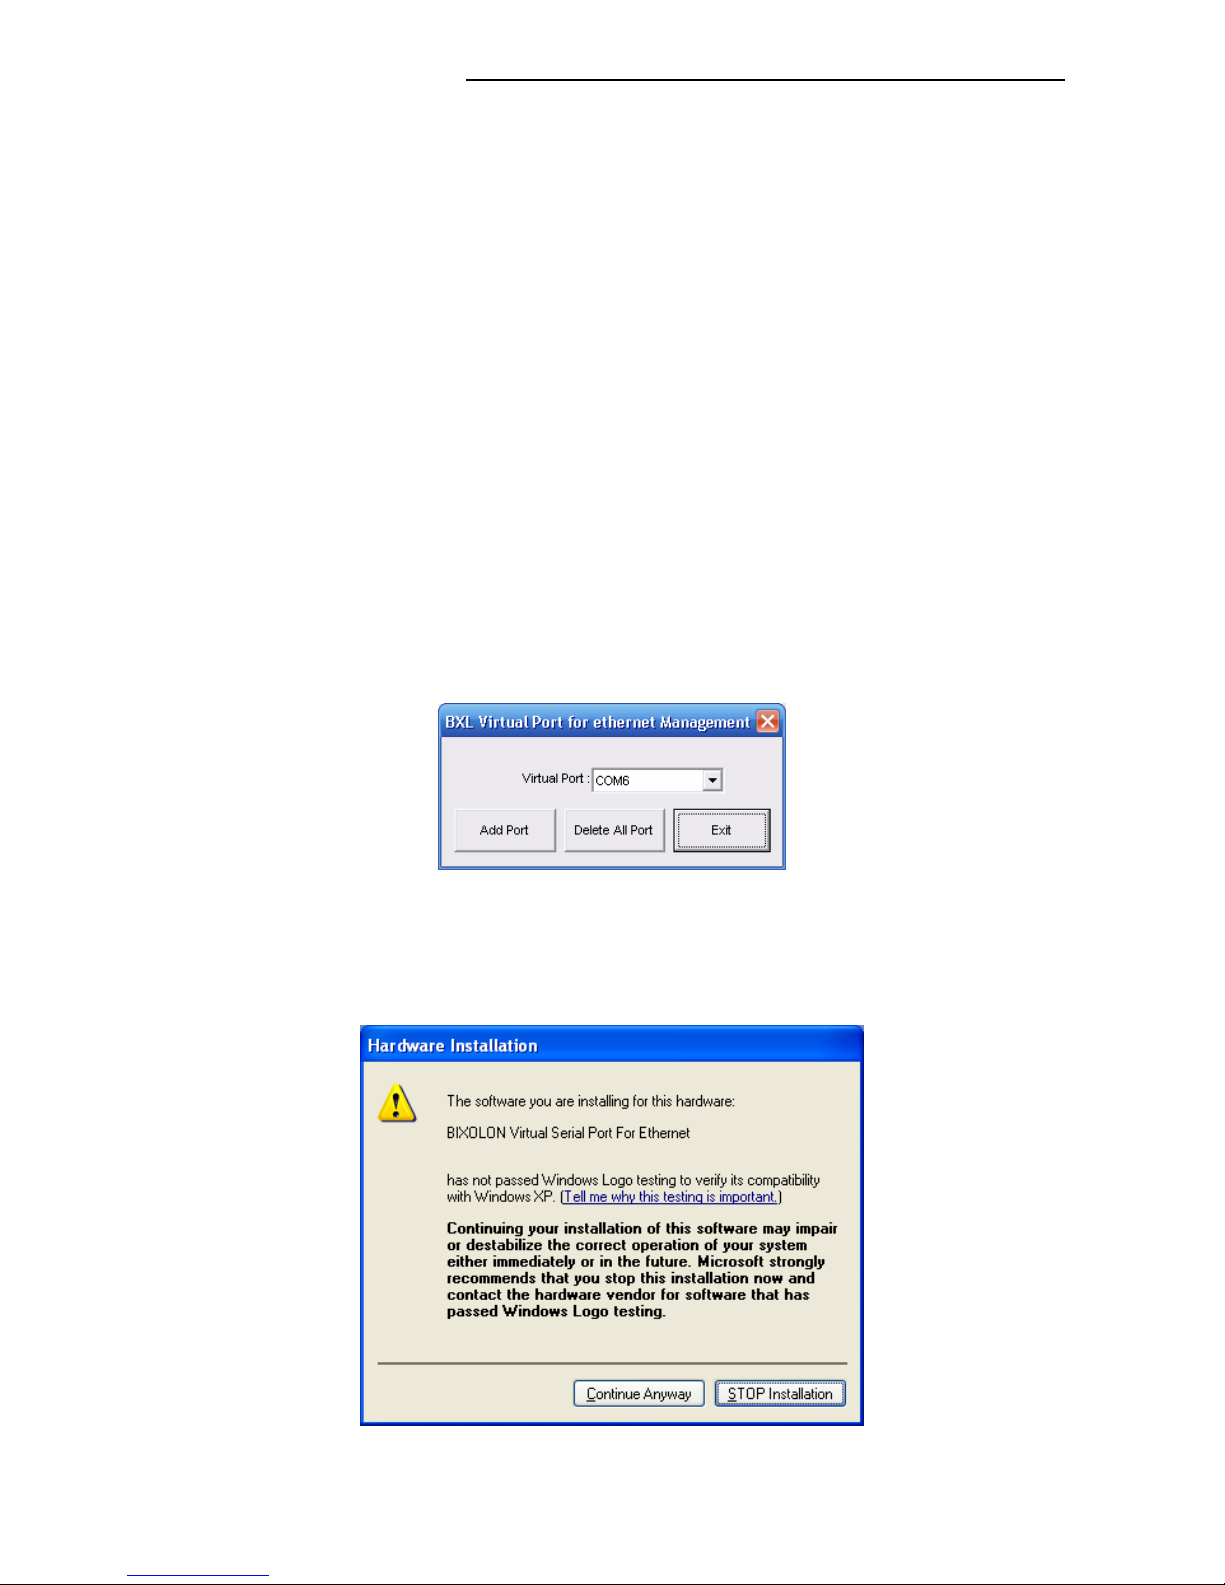
click the “Port Management’ button in the “Configuration Tool”.
1) Clicking the “Port Management” button of the “Configuration Tool” brings up the
following dialog box.
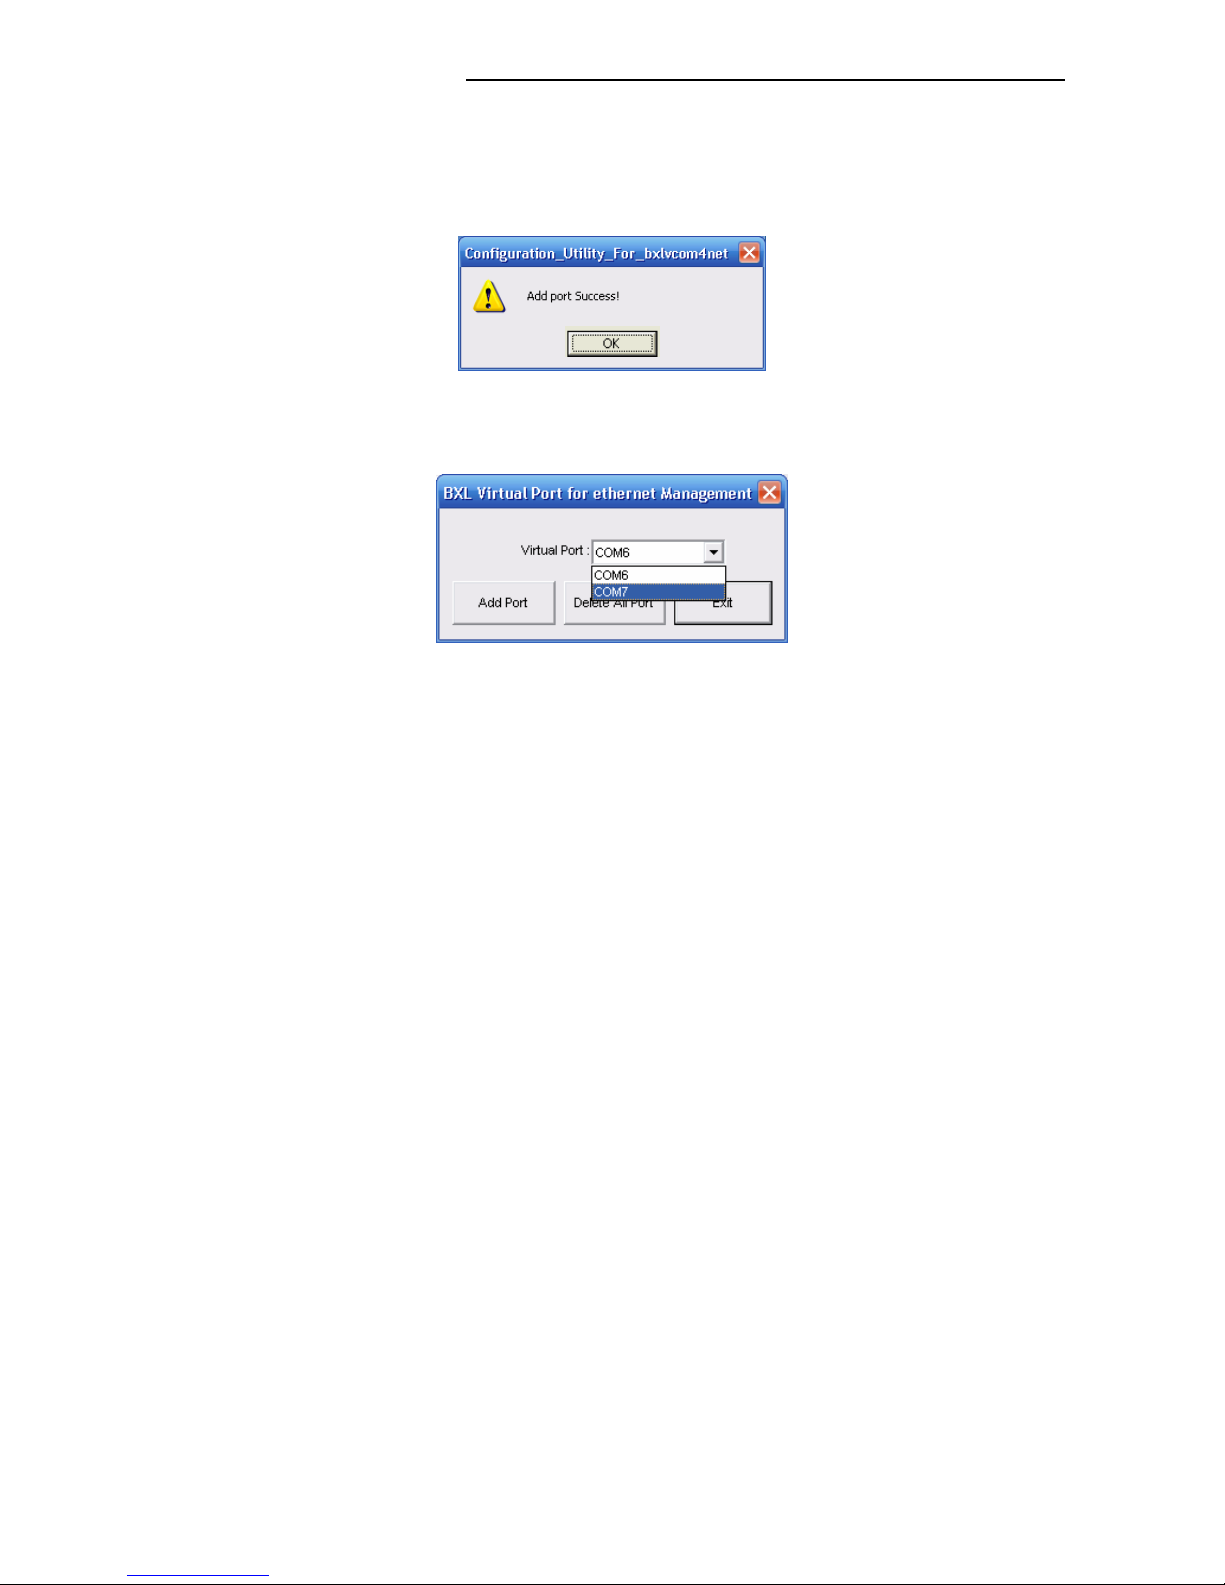
2) Click the “Add Port” button to add a port. The following warning message appears
when adding a port if using a Windows XP or higher operating system.
Page 11
Virtual COM for Ethernet Driver / Configuration Tool
Rev. 2.02
- 11 -
3) Click “Continue Anyway” on the warning message, and the following message will
appear upon port addition success.
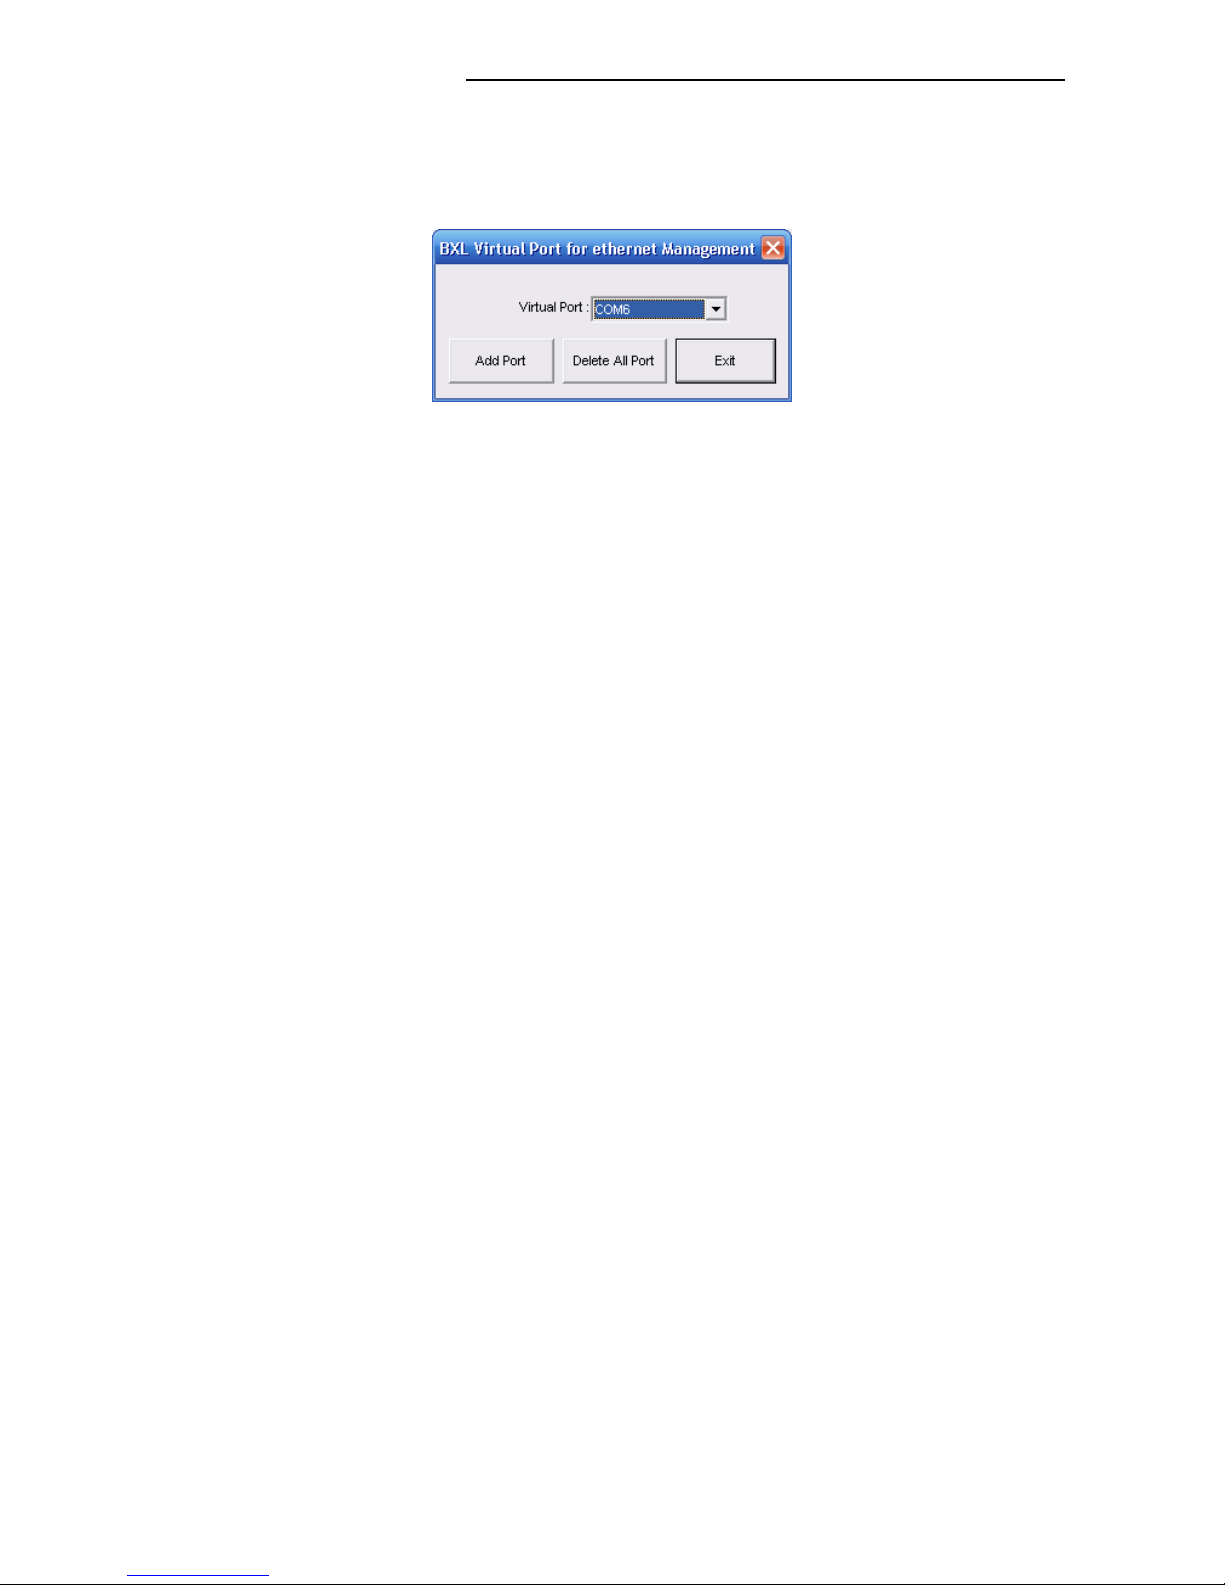
4) If the port has been added successfully, the virtual serial port added will appear
as follows.
NOTE
When adding a virtual serial port via the “Add Port” function, the port number indicated in
“COM#” is determined according to the operating system.
Refer to section 5 (Virtual Serial Port Management) of this manual for information on
modifying the virtual serial port number. In addition, the warning message appears once
for each virtual serial port added.
Page 12
Virtual COM for Ethernet Driver / Configuration Tool
Rev. 2.02
- 12 -
4-5 Virtual Serial Port Deletion
Click the “Port Management” button to delete the connection settings of virtual serial ports.
The “Delete All Port” button can be used to delete all virtual serial ports.
4-6 Firmware Update of the Ethernet Interface
1) To update the Ethernet interface firmware, the firmware update file must first
be prepared.
2) After setting the file to a specified folder, click the “Firmware Update” button.
3) The file is selected, and the Ethernet interface firmware is updated.
NOTE
- The “Firmware Update” button and its function differs from that of the printer firmware
update, and thus a different utility must be used for the firmware upgrade of the printer
itself.
- If the printer power is turned off during a firmware update, damage to the Ethernet
interface card may result.
Page 13
Virtual COM for Ethernet Driver / Configuration Tool
Rev. 2.02
- 13 -
5. Virtual Serial Port Management
Port number modification, port deletion, and serial communication setting are done via the
Device Manager.
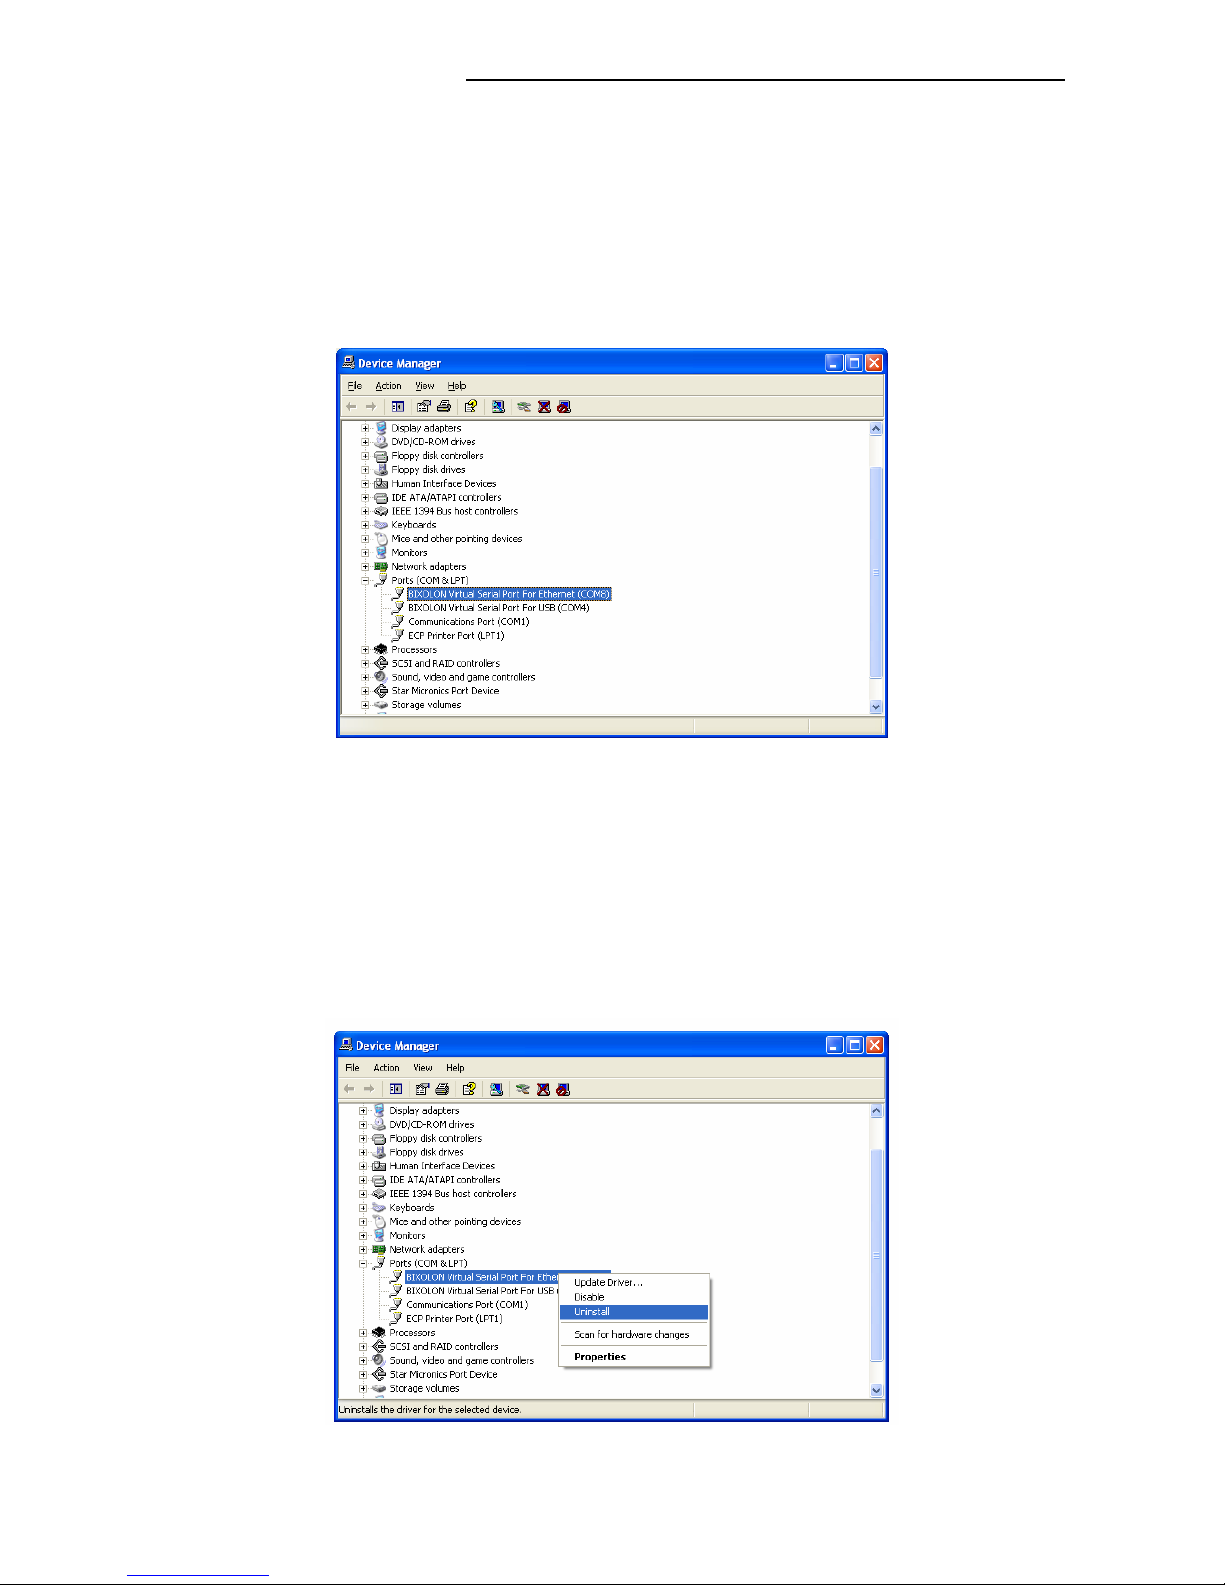
Control Panel -> System -> Device Manager: Upon examination of the ports (COM & LPT)
section, the port(s) added previously via the “Configuration Tool” program can be seen.
5-1 Port Deletion Via the Device Manager
Select the virtual serial port to be deleted and click the right mouse button. On the popup
menu, select “Uninstall” to delete the port.
Following deletion, the “Configuration Tool” program must be executed, and the changes
must be updated.
Page 14
Virtual COM for Ethernet Driver / Configuration Tool
Rev. 2.02
- 14 -
5-2 Port Setting/Number Modification Via the Device Manager
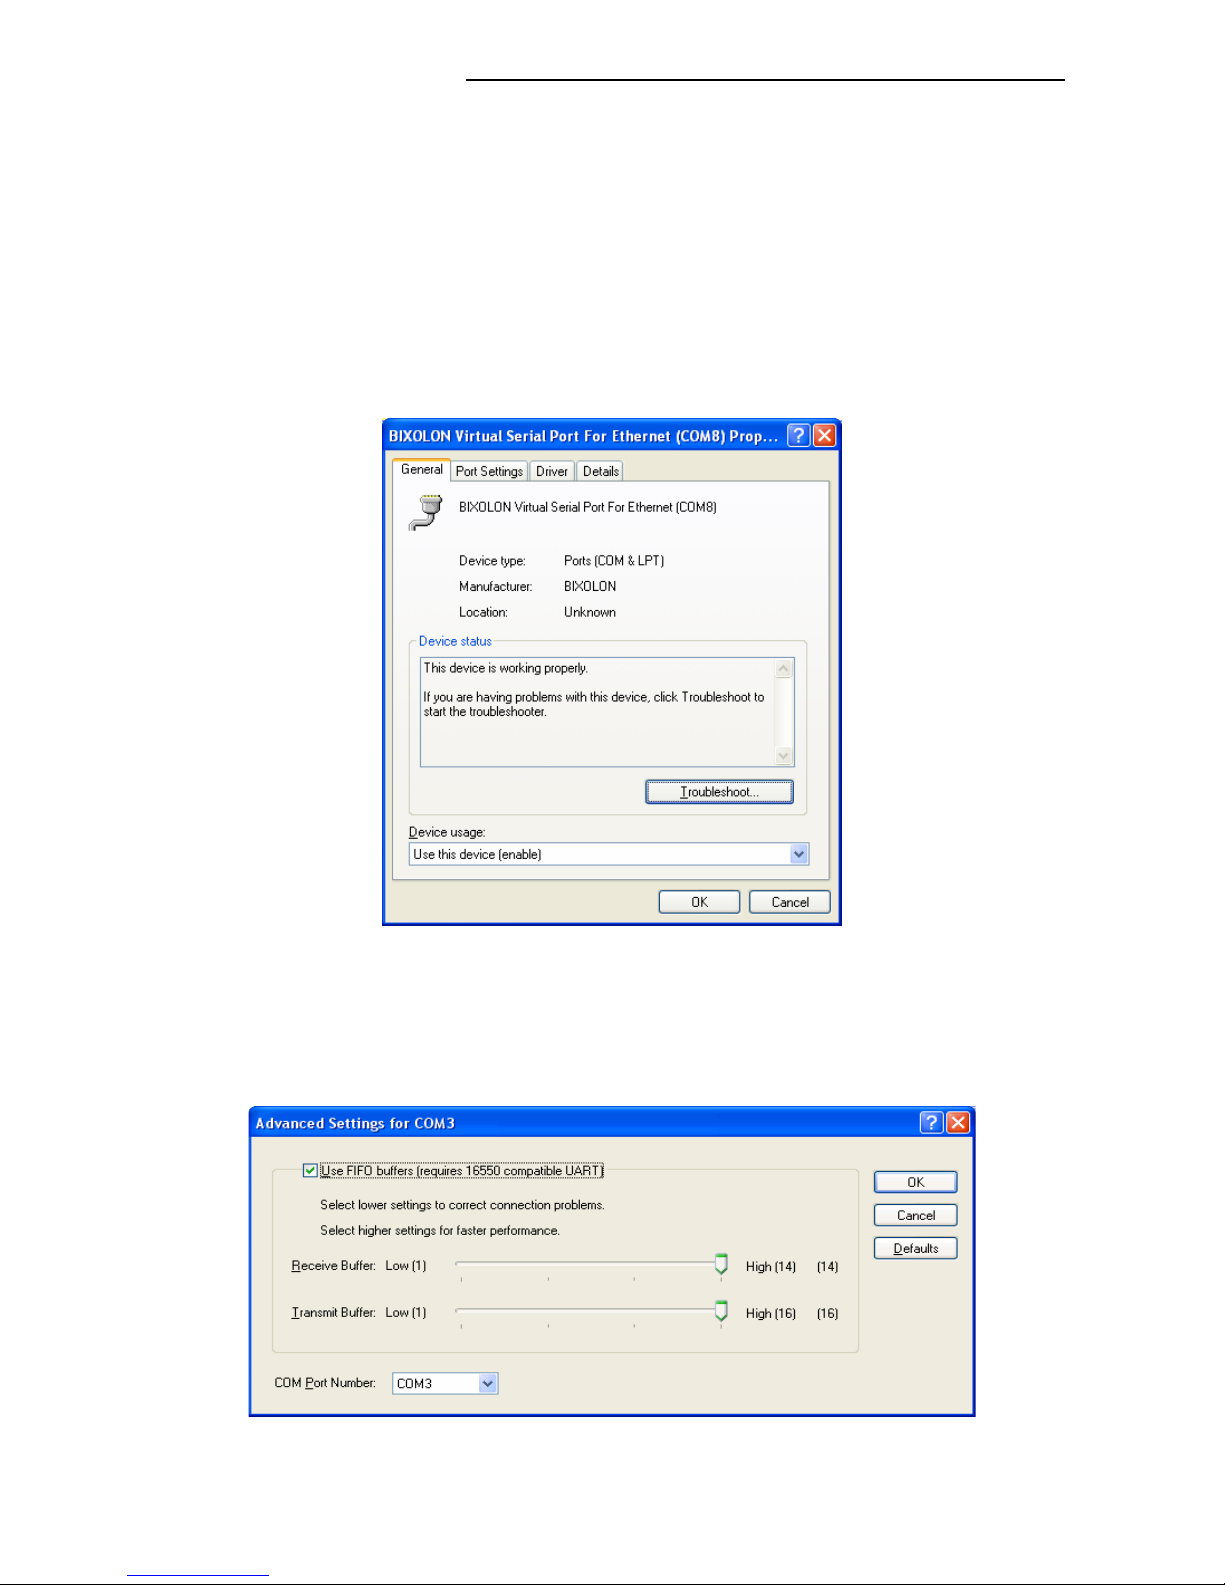
1) Select the desired virtual serial port and click the right mouse button. On the popup
menu, select “Properties”.
2) In the “Properties” window, click the “Port Settings” tab.
3) The “Port Settings” tab can be used to set the baud rate, data bits, parity, stop bits, and
flow control of a port.
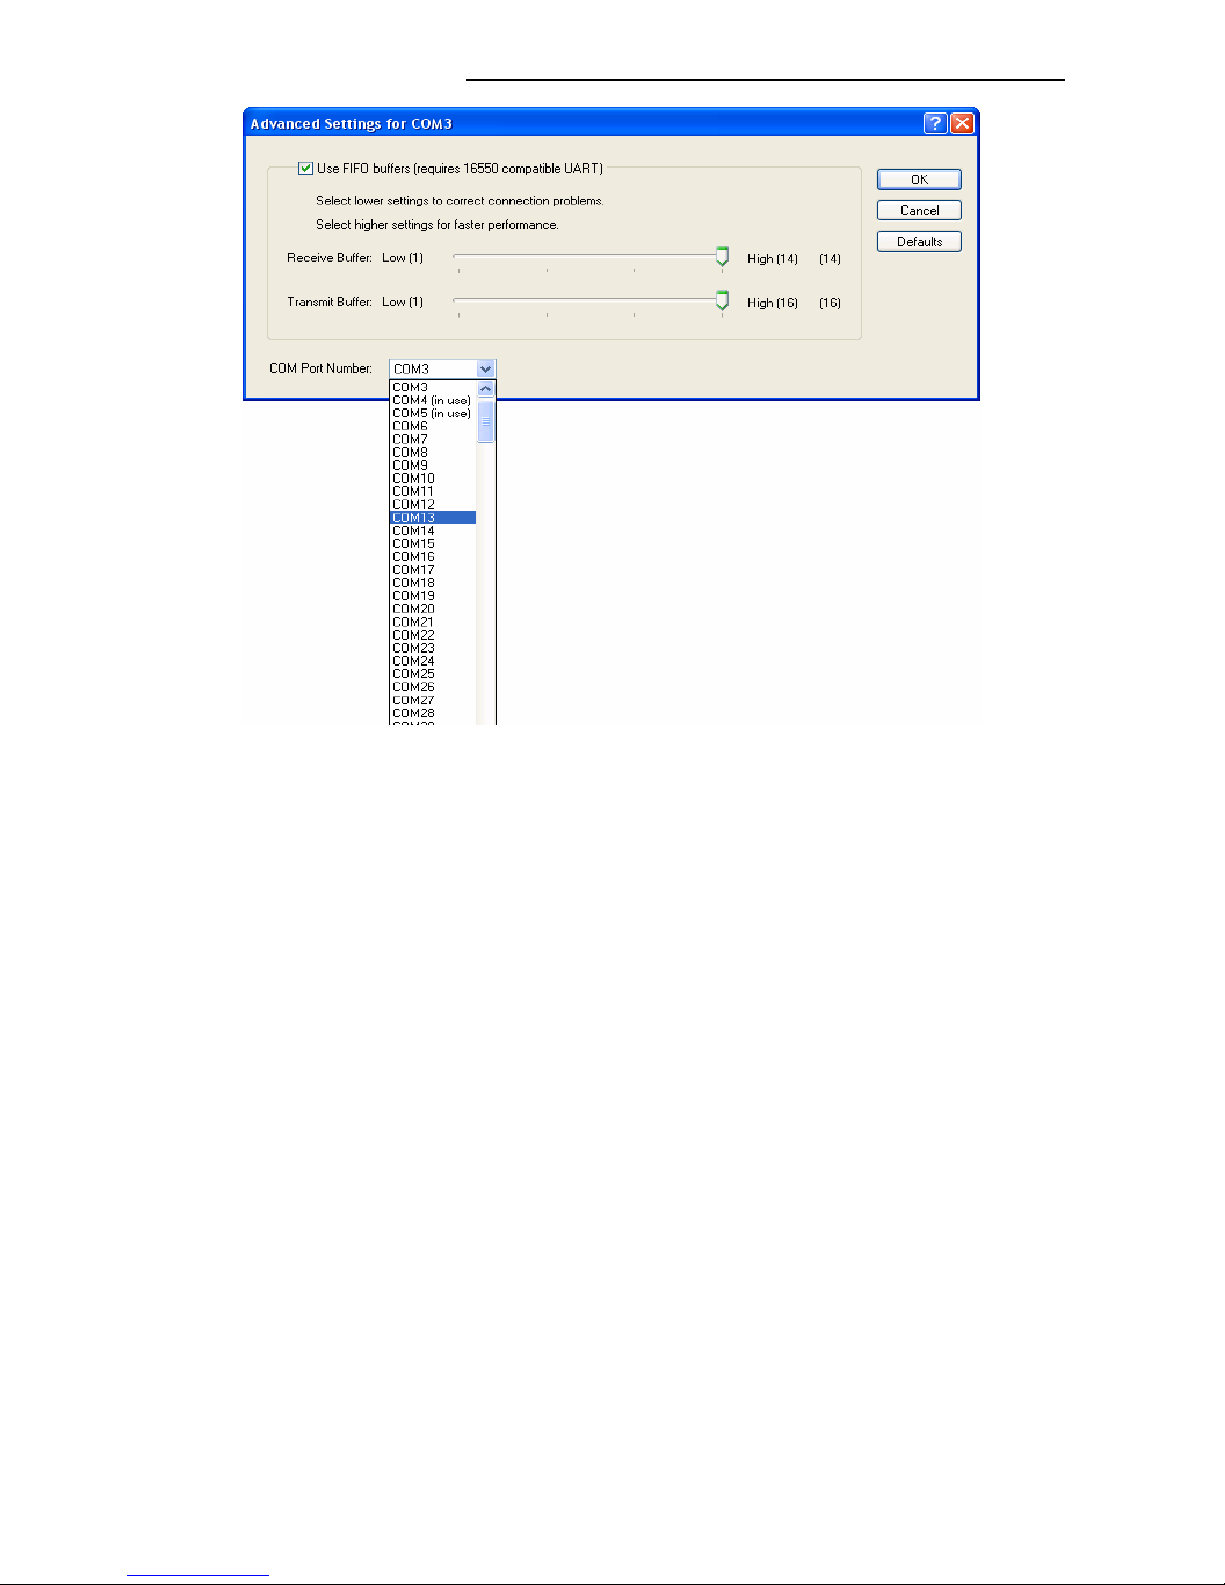
4) Click the “Advanced” button to modify the port number and/or designate buffer settings.
Modification of buffer settings is not recommended. The COM port number is changed
by selecting a number in the combo box.
Page 15
Virtual COM for Ethernet Driver / Configuration Tool
Rev. 2.02
- 15 -
Following port modifications, the settings utility must be run to update changes.
If a printer was connected previously, the connection setting must be disconnected.
CAUTION
The selecting port must not already be in use.
Following port modification, clicking the “Yes” button can result in the appearance
of a warning message. Click the “Yes” button to finalize and set the modified
information and settings.
Port modification on certain operating systems will require the repeat opening of
the Device Manager to confirm changes.
Page 16

Virtual COM for Ethernet Driver / Configuration Tool
Rev. 2.02
- 16 -
6. Win32 API
The “Virtual COM for USB Driver” program can be used in serial communication
programming. Refer to Microsoft MSDN regarding the Win32 API for serial communication.
NOTE
Currently, only basic serial communication APIs are supported.
In the future, additional APIs suited to user needs are set to be added.
6-1 File I/O API
1) CreateFile(): Supported
2) WriteFile():Supported
3) ReadFile():Supported
4) CloseHandle():Supported
6-2 Communication API
1) BuildCommDCB():Supported
2) BuildCommDCBAndTimeouts():Supported
3) CommConfigDialog():Supported
4) DeviceIoControl():Supported
5) GetCommModemStatus():Supported
6) GetCommState():Supported
7) GetCommTimeouts():Supported
8) PurgeComm():Supported
9) SetCommState():Supported
10) SetCommTimeouts():Supported
6-3 Precautions for Serial Communication Programming
With CreateFile, any port name ranging from 1 to 9 may be used as “COM1” to “COM9”.
To use ports 10 to 256, the following format must be used, “\\\\.\\COM10” to
“\\\\.\\COM256”.
 Loading...