

Page 1
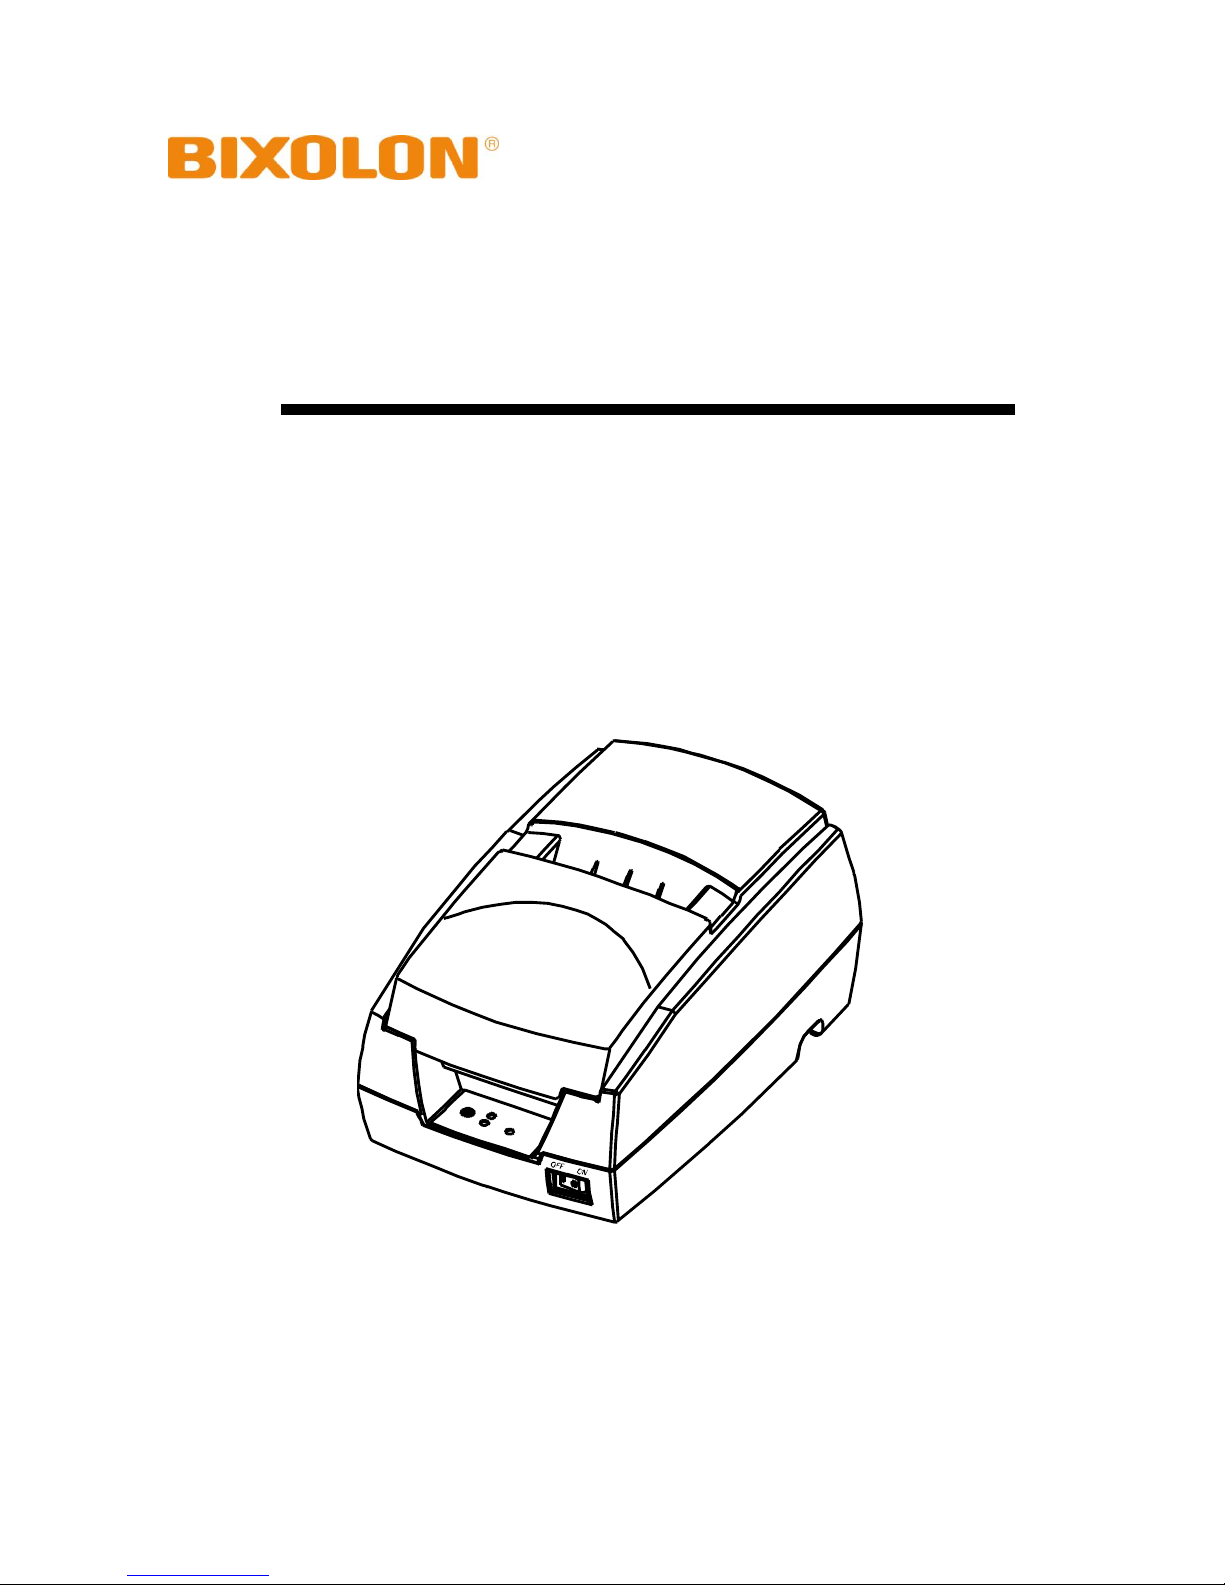
User’s Manual
SRP-280
Impact Printer
Rev. 1.11
http://www.bixolon.com
Page 2

Rev. 1.11
- 2 -
SRP-280
■ Table of Contents
※ Manual Information & Usage Precautions ................................................................. 3
1. Content Confirmation ................................................................................................... 7
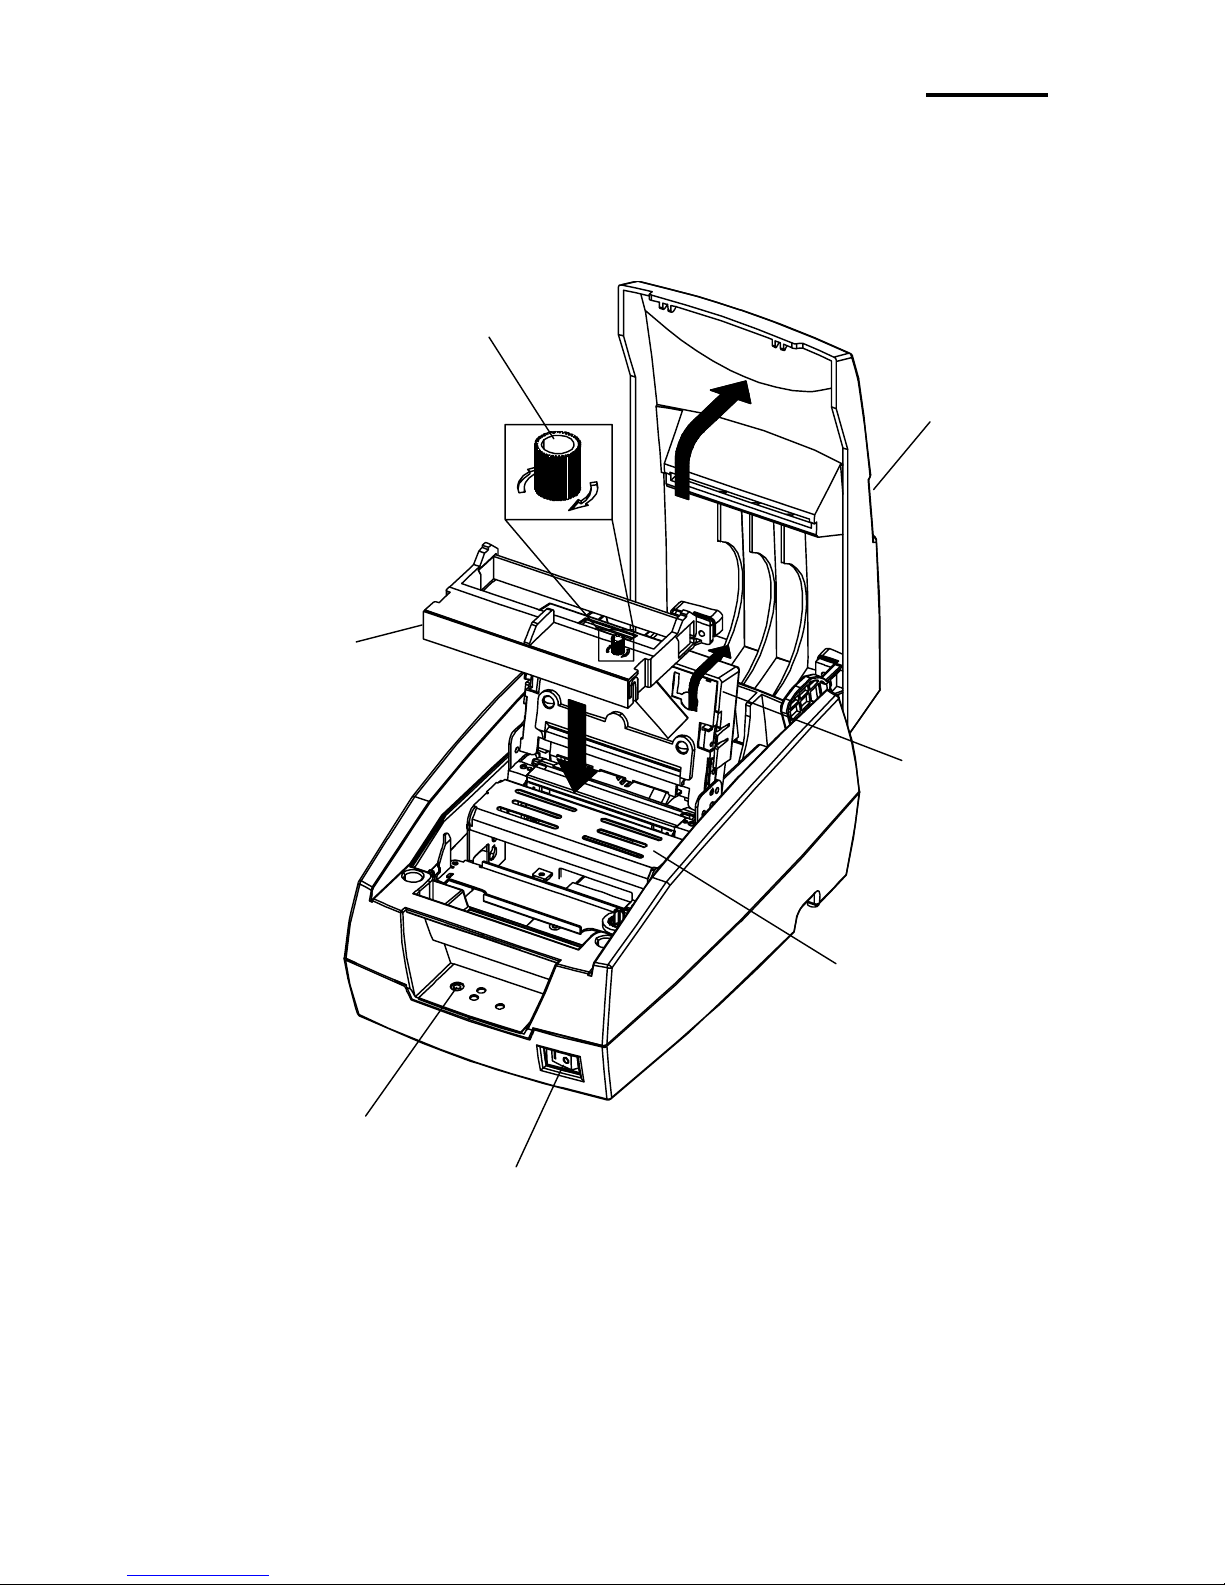
2. Product Part Names...................................................................................................... 8
3. Installation & Usage ...................................................................................................... 9
3-1 Power Connection ..................................................................................................... 9
3-2 Interface Cable Connection ..................................................................................... 10
3-3 Cash Drawer Connection ......................................................................................... 11
3-4 Ribbon Cartridge Installation ................................................................................... 12
3-5 Paper Installation ..................................................................................................... 13
3-6 Control Panel Usage ................................................................................................ 15
4. Self-Test ....................................................................................................................... 16
5. Fine Tuning ................................................................................................................. 17
5-1 Dip Switch Adjustment ............................................................................................. 17
5-2 Paper Width Adjustment .......................................................................................... 19
5-3 Paper Jam Removal ................................................................................................ 20
6. Appendix ..................................................................................................................... 22
6-1 Specifications........................................................................................................... 22
6-2 RS-232C (Serial Interface) Cable Specifications ..................................................... 23
6-3 IEEE1284 (Parallel Interface) Cable Specifications ................................................. 24
6-4 USB Interface Cable Specifications ......................................................................... 25
6-5 Cash Drawer Cable Specifications .......................................................................... 25
6-6 Certification .............................................................................................................. 26
6-7 Label Types ............................................................................................................. 26
Page 3

Rev. 1.11
- 3 -
SRP-280
■ Manual Information
※ Manual Information & Usage Precautions
This user manual contains basic information for product usage as well as for emergency
measures that may be required.
※ The following separate manuals provide more detailed content on various technological
issues and areas.
1. Windows Driver Manual
This manual provides information on installation and main functions of the Windows
Driver for this product.
2. OPOS Driver Manual
This manual provides information on installation and main functions of the OPOS
Driver for this product.
3. Control Commands Manual
This manual provides information on the protocol and functions of the control
commands that can be used with this product.
4. Code Pages Manual
This manual provides information on each character code page that can be used
with this product.
We at BIXOLON maintain ongoing efforts to enhance and upgrade the functions and
quality of all our products. In following, product specifications and/or user manual content
may be changed without prior notice.
Page 4
Rev. 1.11
- 4 -
SRP-280
■ Safety Precautions
In using the present appliance, please keep the following safety regulations in order to
prevent any hazard or material damage.
WARNING
Violating following instructions can cause serious injury or death.
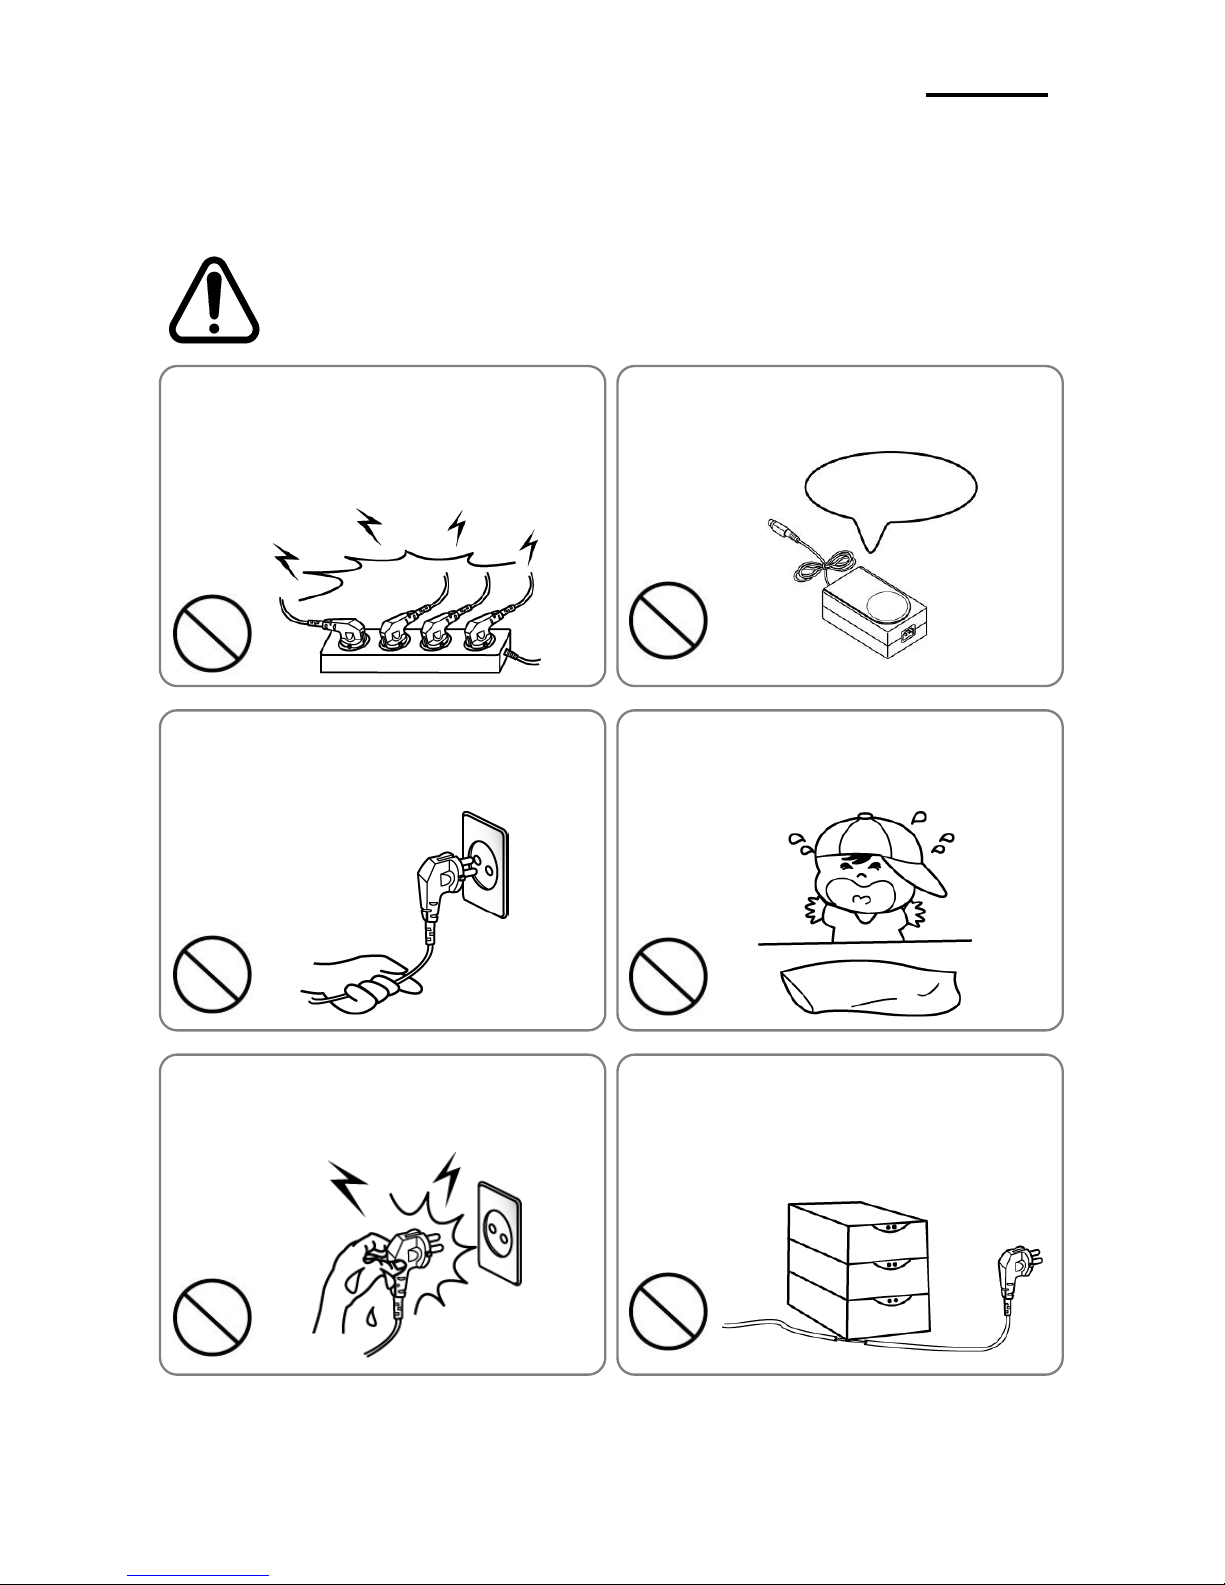
Do not bend the cable by force or leave it under any
heavy object.
• A damaged cable can cause a fire.
Do not plug in or unplug with your hands wet.
• You can be electrocuted.
Keep the plastic bag out of children’s reach.
• If not, a child may put the bag on his head.
Do not pull the cable to unplug.
• This can damage the cable, which is the origin of a fire or a
breakdown of the printer.
You must use only the supplied adapter.
• It is dangerous to use other adapters.
Do not plug several products in one multi-outlet.
• This can provoke over-heating and a fire.
• If the plug is wet or dirty, dry or wipe it before usage.
• If the plug does not fit perfectly with the outlet, do not plug in.
• Be sure to use only standardized multi-outlets.
PROHIBIT
PROHIBIT
PROHIBIT
PROHIBIT
PROHIBIT
ONLY SUPPLIED ADAPTER
PROHIBIT
Page 5
Rev. 1.11
- 5 -
SRP-280
CAUTION
Violating following instructions can cause slight wound or damage the appliance
.
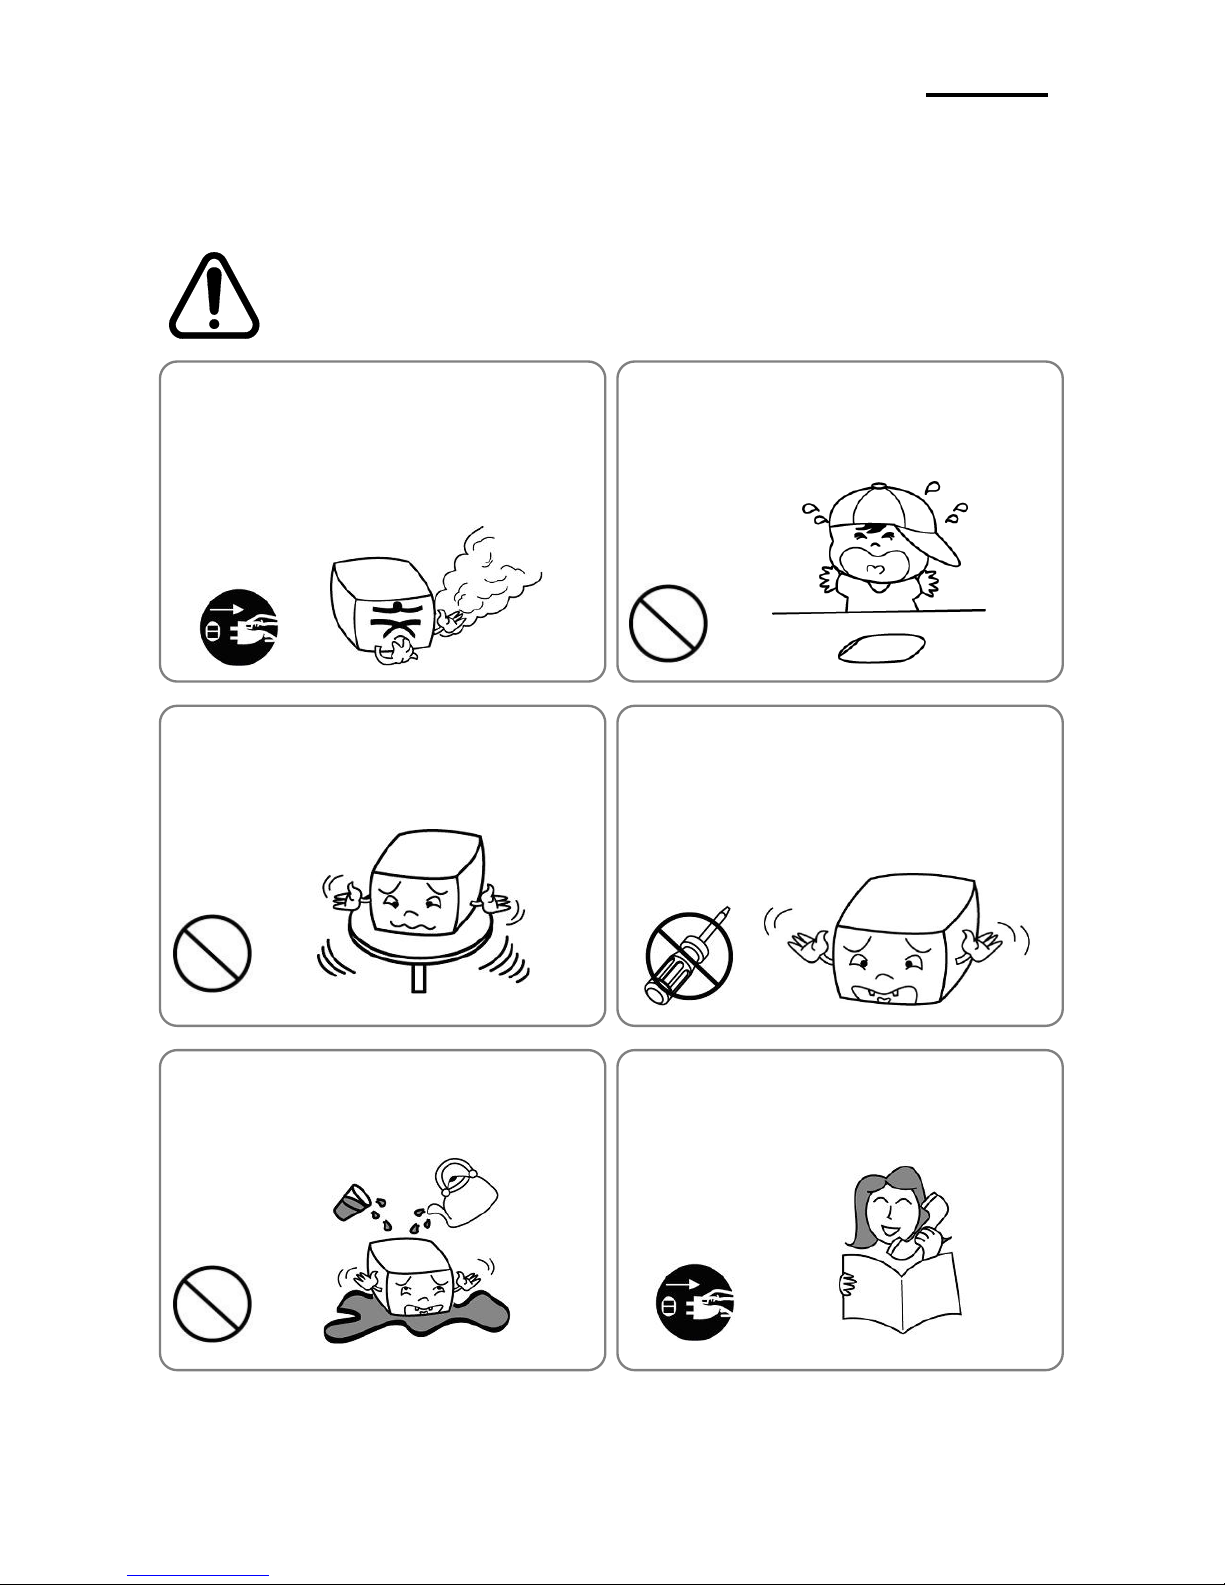
Do not use the printer when it is out of order. This
can cause a fire or an electrocution.
• Switch off and unplug the printer before calling your dealer.
Do not let water or other foreign objects in the
printer.
• If this happened, switch off and unplug the printer before
calling your dealer.
Use only approved accessories and do not try to
disassemble, repair or remodel it for yourself.
• Call your dealer when you need these services.
• Do not touch the blade of auto cutter.
Install the printer on the stable surface.
• If the printer falls down, it can be broken and you can hurt
yourself.
Keep the desiccant out of children’s reach.
• If not, they may eat it.
If you observe a strange smoke, odor or noise from
the printer, unplug it before taking following
measures.
• Switch off the printer and unplug the set from the mains.
• After the disappearance of the smoke, call your dealer to
repair it.
TO UNPLUG
PROHIBIT
DISASSEMBLING
PROHIBITED
PROHIBIT
PROHIBIT
TO UNPLUG
PRINTER
PRINTER
PRINTER
PRINTER
DEALER
PRINTER
Page 6

Rev. 1.11
- 6 -
SRP-280
■ Other Precautions
The copyright for this user manual and various other manuals is property of the BIXOLON
Co., Ltd. Any copying or conversion into electronic firm and saving of this material
without the express written permission of BIXOLON Co., Ltd. is strictly prohibited.
Use of the information contained in this manual is not subject to any patent liability. This
manual has been prepared with utmost care and attention to detail but may contain certain
errors and/or omissions.
BIXOLON Co., Ltd. is not legally liable for any damages resulting from the use of the
information in this manual.
BIXOLON Co., Ltd. and its affiliates are not legally liable (United States excluded) for any
damages, loss, costs, and/or expenses that result from the breakdown, malfunction, and/or
misuse of the product due to violation or neglect of the operation and maintenance
information and instructions provided by the BIXOLON Co., Ltd., as well as from the
unauthorized alteration, repair, and/or modification of the product by the user and/or third
party.
BIXOLON Co., Ltd. is not legally liable for any damages and/or issues resulting from the
use of options and/or parts that are not authentic BIXOLON products or authorized
products.
Page 7
Rev. 1.11
- 7 -
SRP-280
1. Content Confirmation
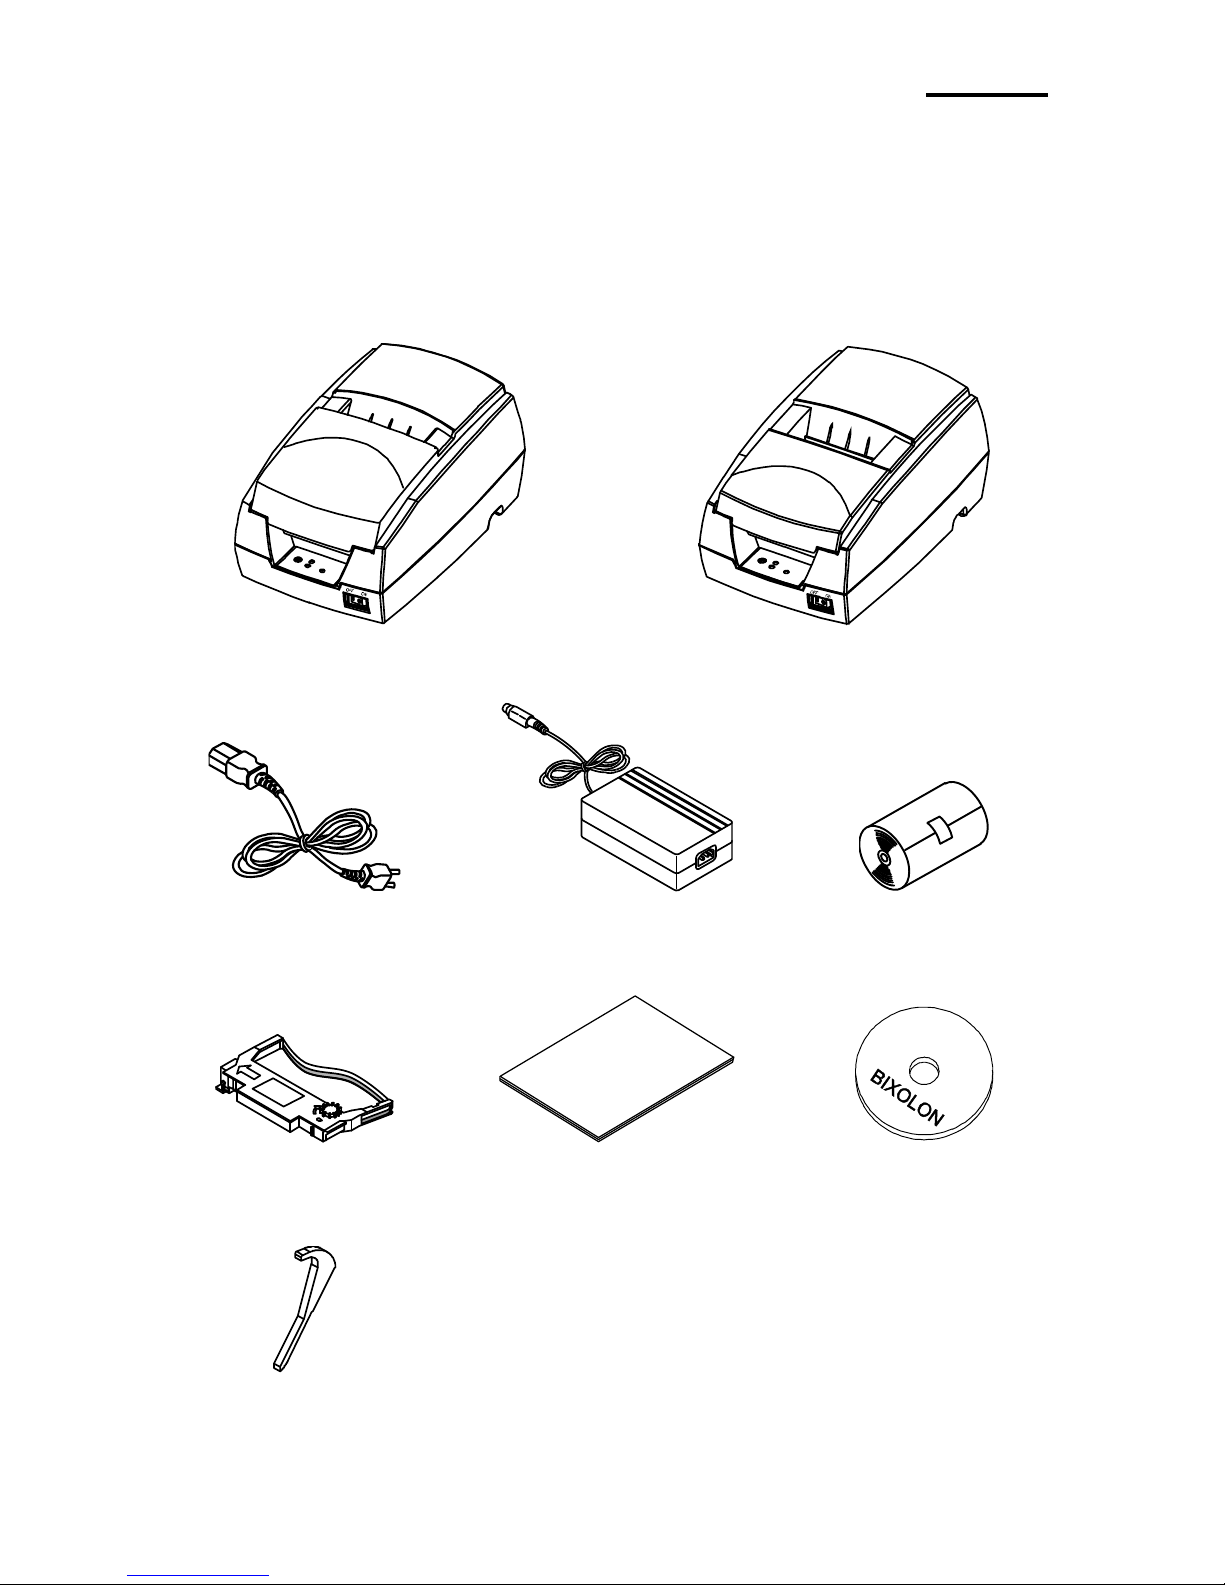
The following items should all be contained in the printer package.
Contact the dealer from which the purchase was made if any item is damaged and/or
missing.
SRP-280C
SRP-280A
Power Cord
AC Adapter
Paper Roll
Ribbon Cartridge
Installation Guide
CD
Two-Inch Paper Guide
Page 8
Rev. 1.11
- 8 -
SRP-280
2. Product Part Names
Cartridge Knob
Printer Cover
Ribbon Cartridge
Auto Cutter
Power Switch
Head Cover
Paper Feed Button
Page 9
Rev. 1.11
- 9 -
SRP-280
3. Installation & Usage
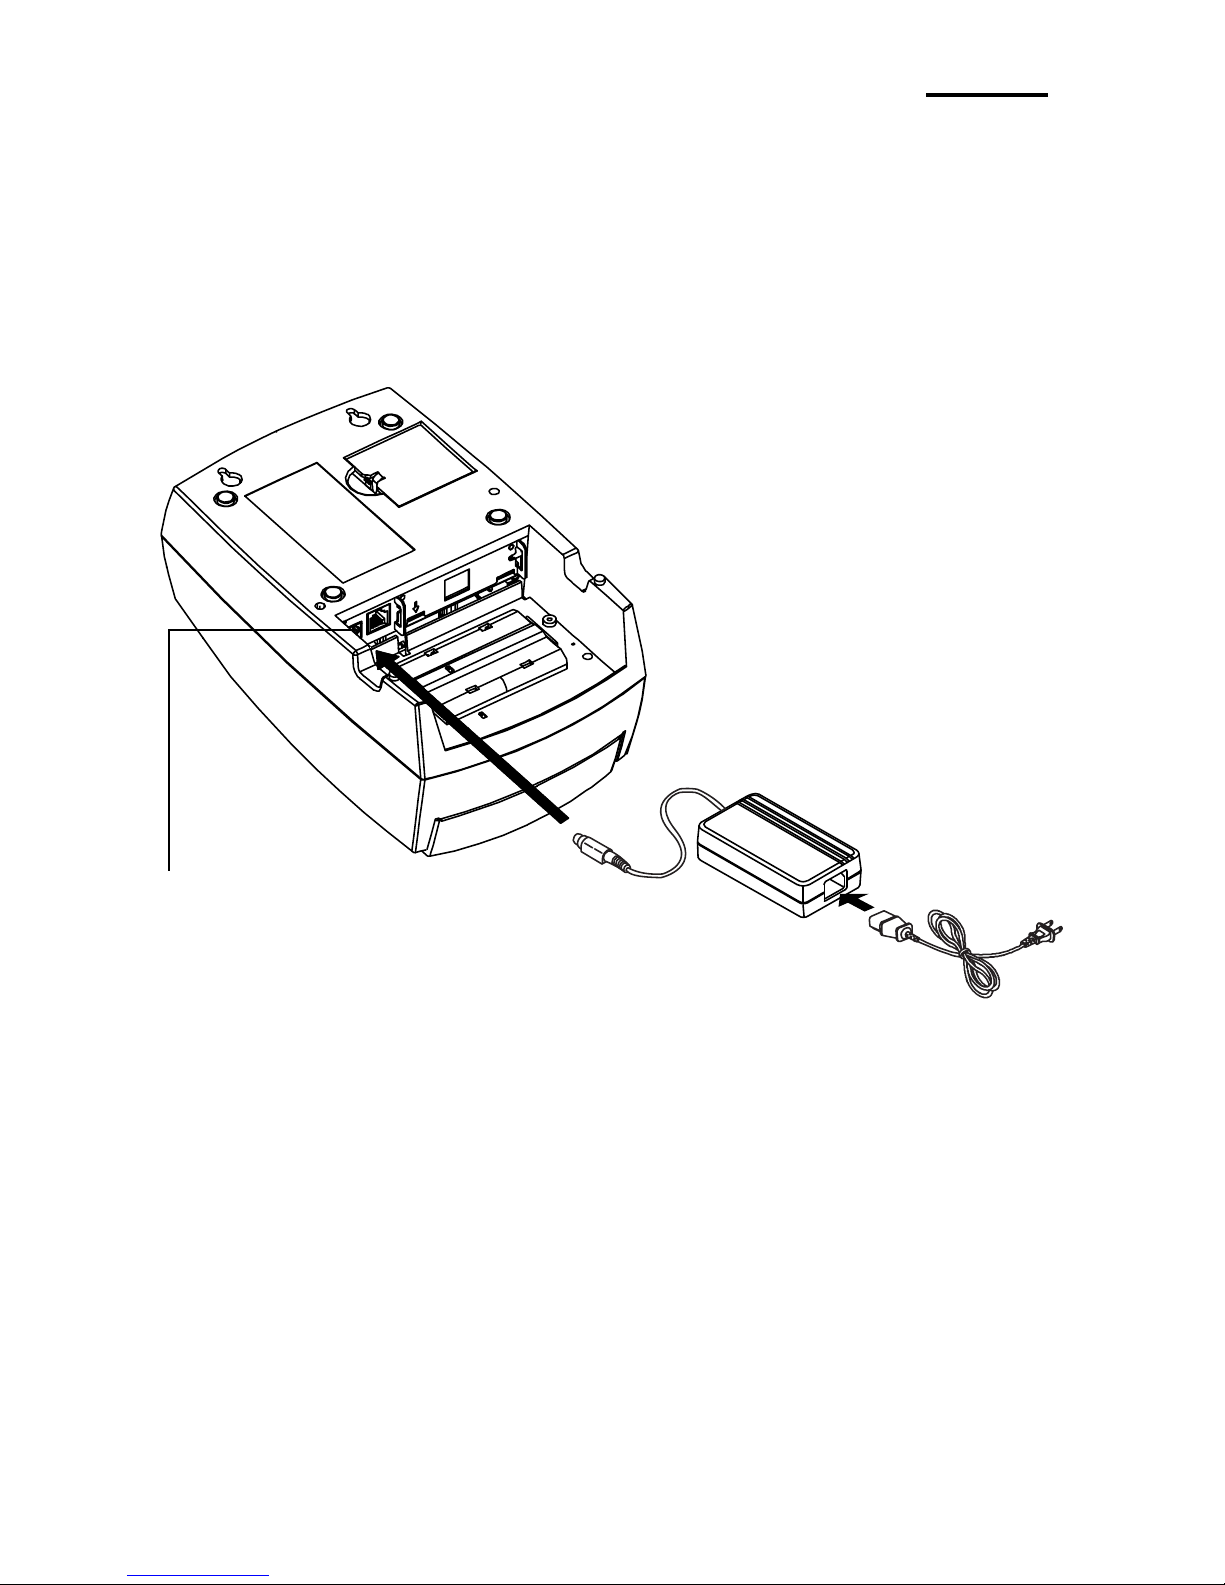
3-1 Power Connection
Connect power to the printer as shown below.
1) Turn off the printer power switch.
2) Check to see that the AC adapter voltage matches that of the power source.
3) Connect the AC adapter jack to the printer power connector.
4) Connect the power cord to the AC adapter.
5) Connect the power cord to a power source/outlet.
Power Connector
AC Adapter
Power Cord
Page 10
Rev. 1.11
- 10 -
SRP-280
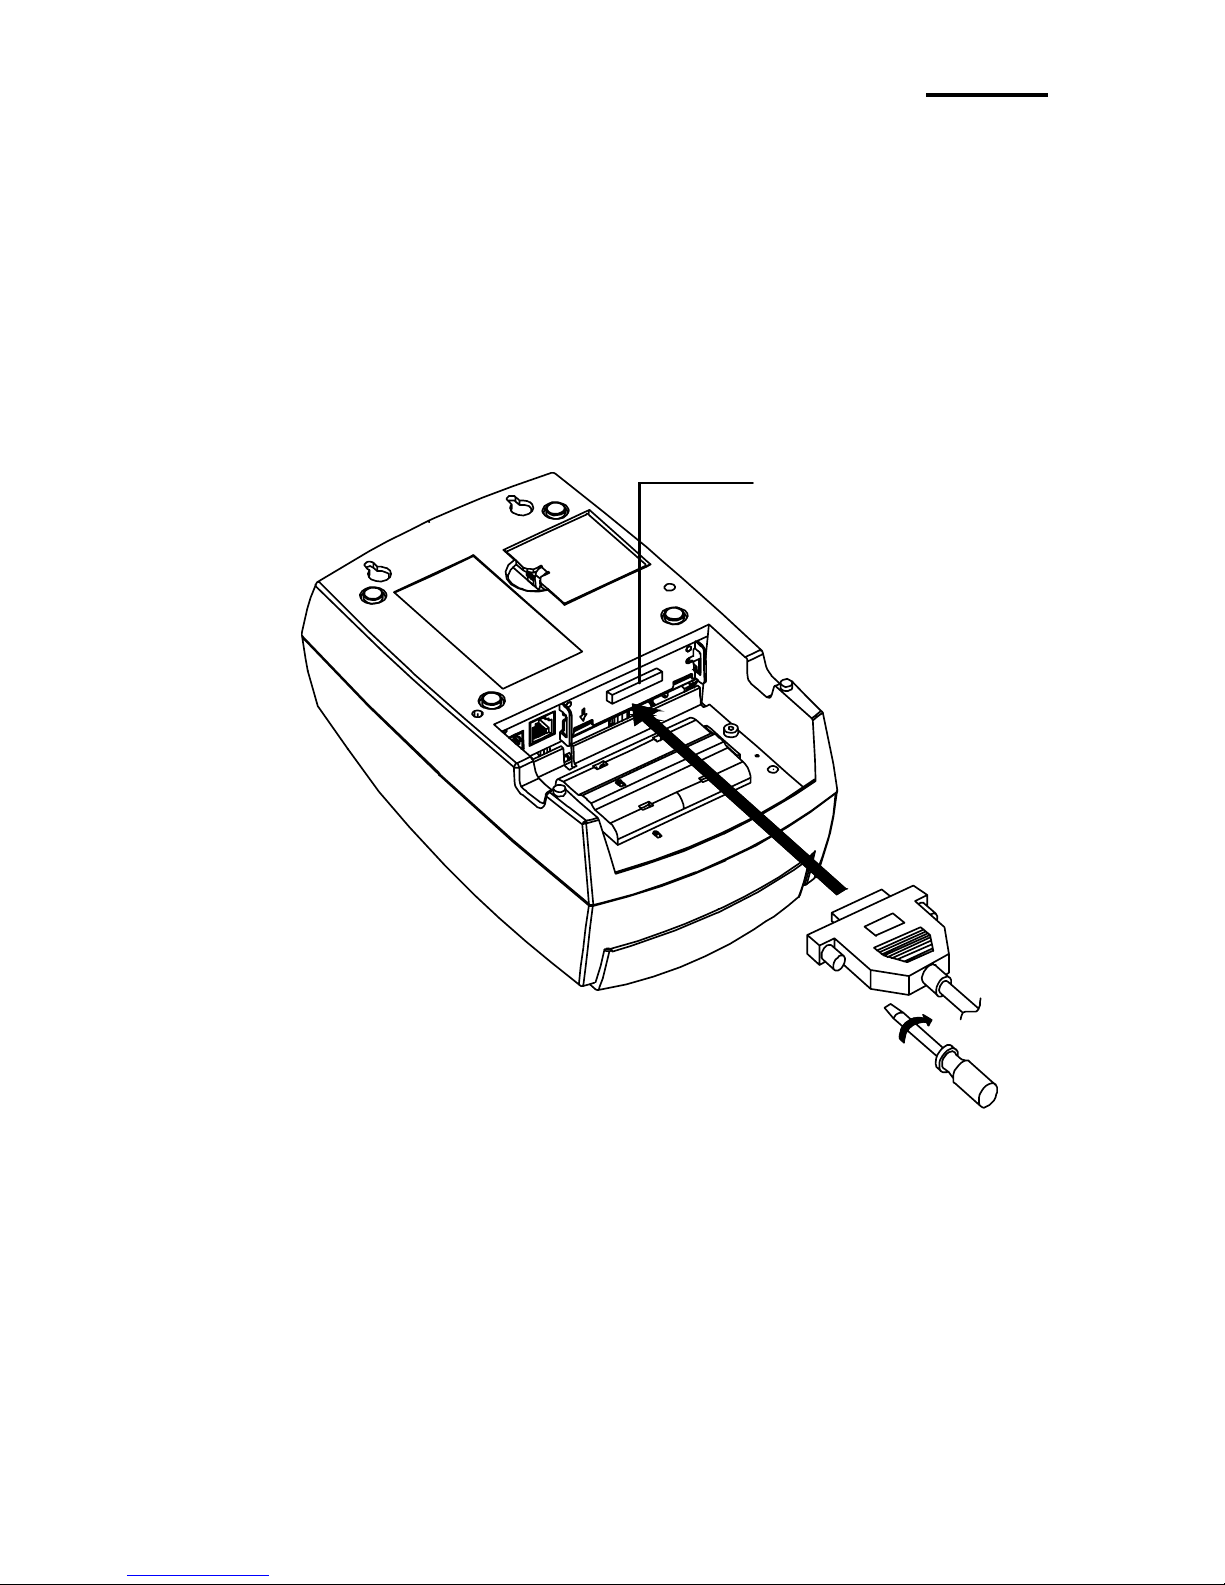
3-2 Interface Cable Connection
Connect the printer with a POS system (PC, ECR, etc.) via an interface cable as shown
below.
This printer supports the following communications interface standards.
- RS-232C (Serial)
- IEEE1284 (Parallel)
- USB
1) Turn off the power switch on both the printer and the POS system (PC, ECR, etc.).
2) Connect the interface cable to the printer interface connector.
- For a Serial cable, secure by tightening the screws on both sides.
- For a Parallel cable, secure by fastening the clips on both sides.
Interface Cable
Interface Connector
Page 11

Rev. 1.11
- 11 -
SRP-280
3-3 Cash Drawer Connection
Connect the printer and cash drawer via the interface cable as shown below.
1) Turn off the power switch on both the printer and the POS system (PC, ECR, etc.).
2) Connect the cash drawer cable to the printer cash drawer connector.
※ CAUTION
Do not connect a telephone line to the printer cash drawer connector.
Doing so may cause damage to the printer and telephone line.
Cash Drawer Cable
Cash Drawer Connector
Page 12
Rev. 1.11
- 12 -
SRP-280
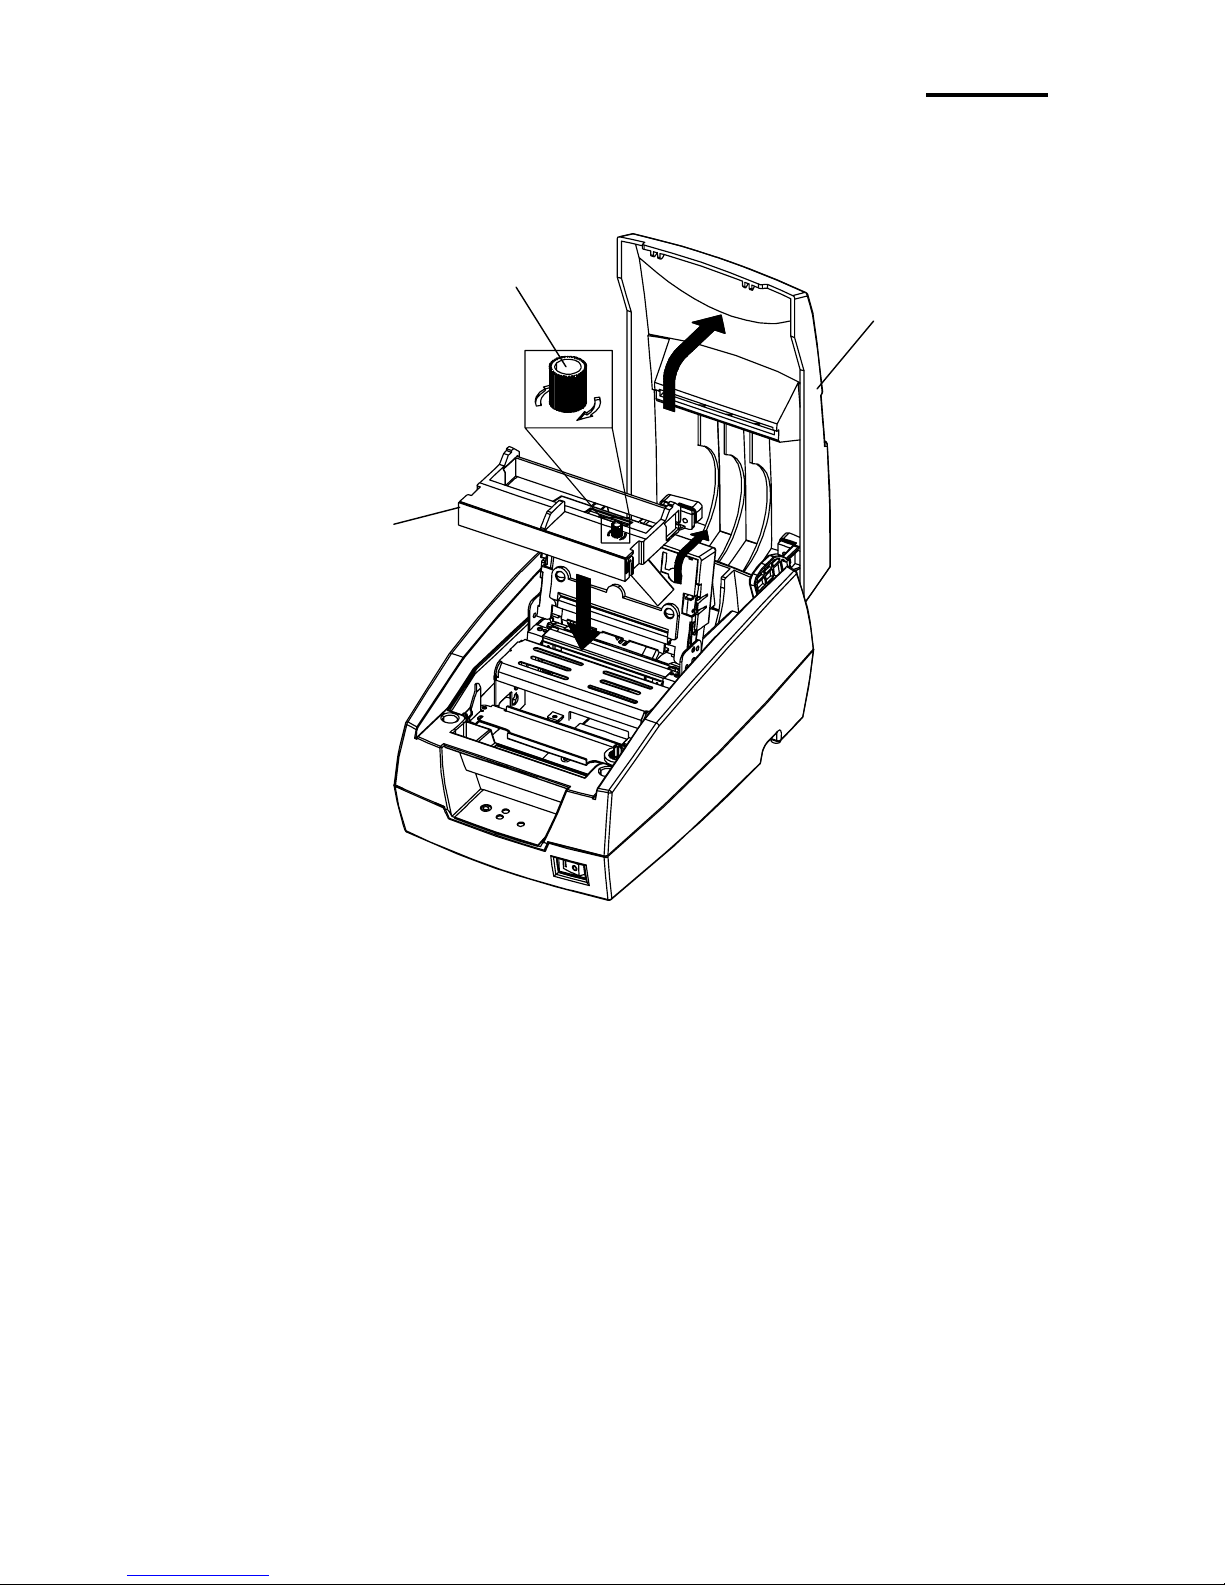
3-4 Ribbon Cartridge Installation
Install the ribbon cartridge as shown below.
1) Turn off the printer power switch.
2) Open the printer cover.
3) Before inserting the ribbon cartridge, turn the cartridge knob clockwise in order prevent
the ribbon from tangling.
4) Insert the ribbon cartridge as shown in the image above, and set the ribbon so that is
behind the printer head.
5) To allow the ribbon to move freely within the ribbon cartridge during insertion, turn the
cartridge knob clockwise once more.
※ CAUTION
Using unauthorized ribbon cartridges may result in poor printing quality or
malfunction and will void the warranty.
Refer to page 6-1 of the User Manual for the specifications of the supported
ribbon cartridges.
Cartridge Knob
Printer Cover
Ribbon Cartridge
Page 13

Rev. 1.11
- 13 -
SRP-280
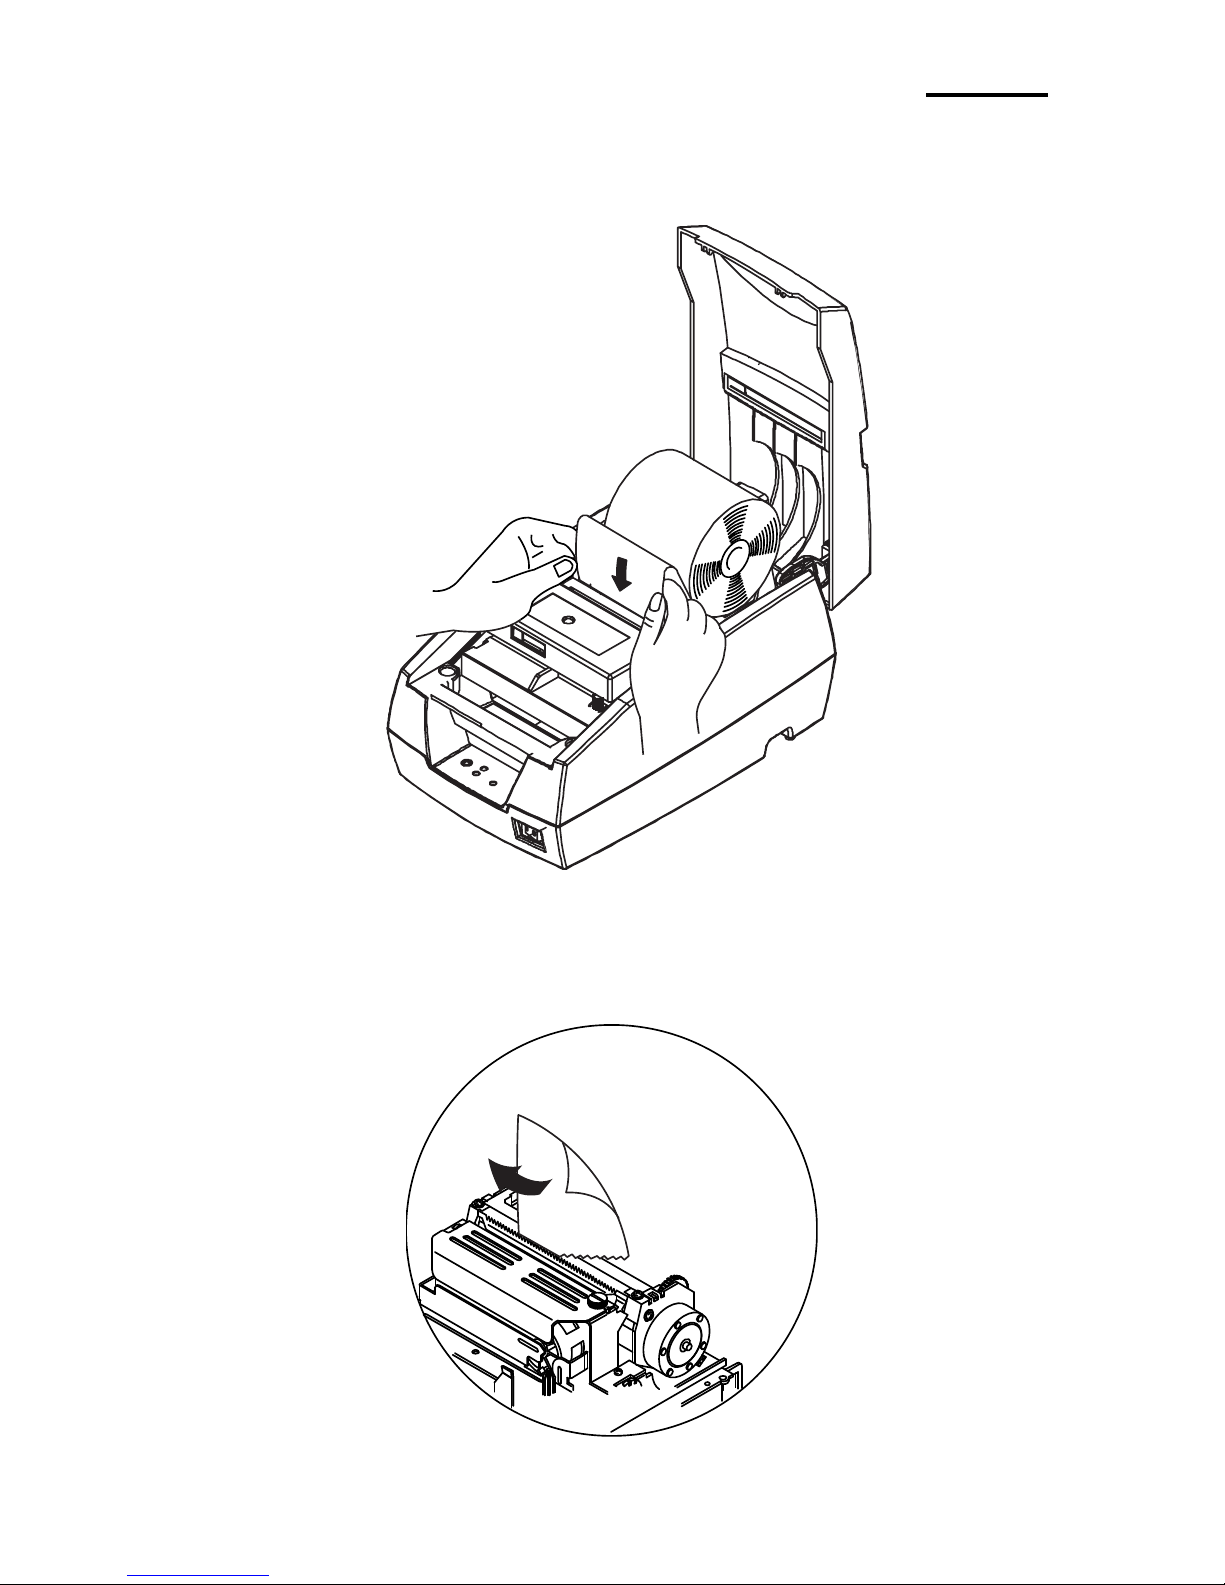
3-5 Paper Installation
1) Turn on the printer power.
2) Open the printer cover. (Remove any core of a fully used paper roll if present.)
3) Undo the paper roll, and make sure that the lower edge is cleanly cut.
4) Insert the paper roll as shown below.
Page 14
Rev. 1.11
- 14 -
SRP-280
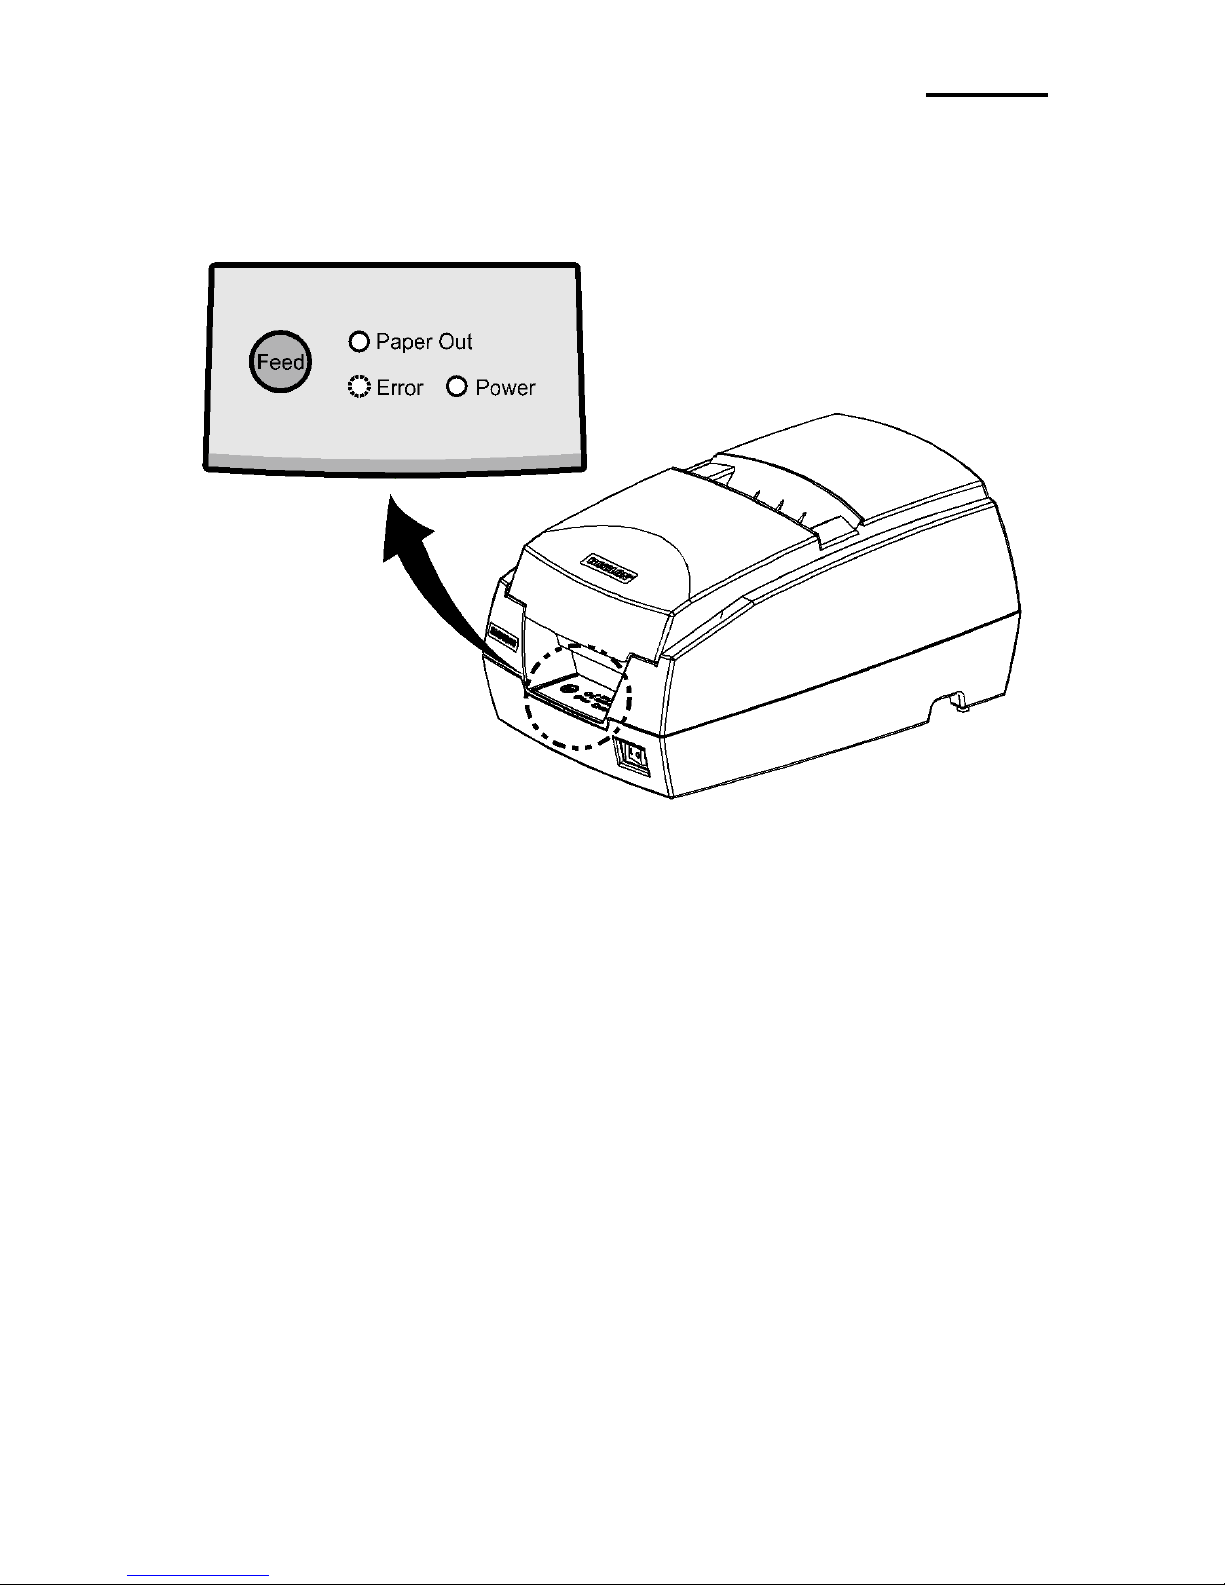
5) Insert the end of the paper roll into the paper slot as shown below. The paper then
feeds automatically.
Automatic cutting is available for printer models equipped with auto cutters.
(SRP-280C)
- For printer models without auto cutters, tear off the paper as shown below.
(SRP-280A)
Page 15
Rev. 1.11
- 15 -
SRP-280
3-6 Control Panel Usage
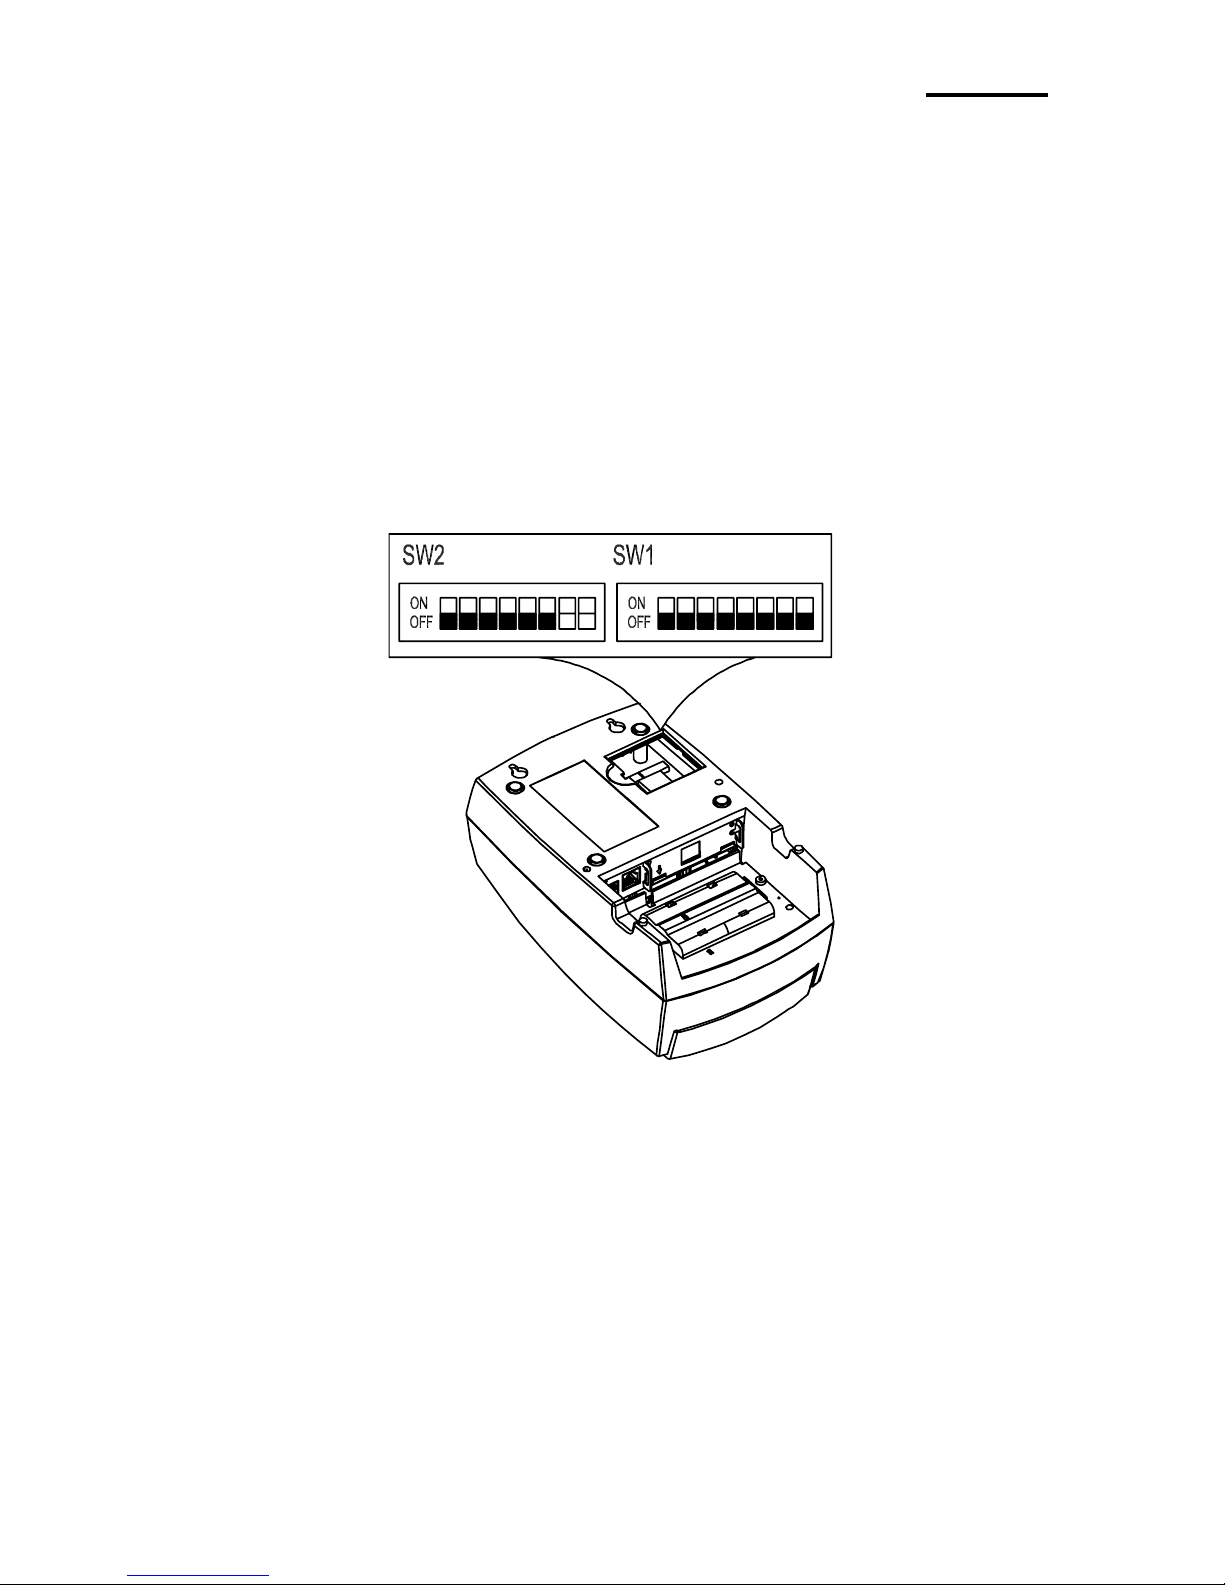
O Feed Press this button to feed paper.
This button is also used for self-tests and hexa-printing.
- Refer to “4. Self-Test” for details related to self-tests.
- Refer to the service manual for information on hexa-printing.
O Power This lamp turns green when the printer power is on.
O Error This lamp turns red when a printer error occurs.
O Paper Out This lamp turns red when paper has been fully used.
Page 16

Rev. 1.11
- 16 -
SRP-280
4. Self-Test
Run the self-test when first setting the printer or when encountering a problem. The
following printer attributes can be assessed.
- Control Circuits, Mechanisms, Print Quality, and ROM Version.
If no issue is found with the printer after running the self-test, examine the other devices or
peripherals and software. This function is independent of such other devices and
software.
Self-Test instructions are as follows.
1) Check to see that the paper is properly installed.
2) Turn off the printer power and close the printer paper cover.
3) Press the paper feed button and simultaneously turn on the printer power to commence
the self-test.
4) The test ceases after printing the current printer status and the following message.
(The 'PAPER LED' lamp blinks.)
SELF-TEST PRINTING.
PLEASE PRESS THE FEED BUTTON.
5) To additionally print the embedded characters in the printer, press the paper feed button
once more.
6) The self-test ends automatically after the following message is printed.
** CHARACTER TEST COMPLETED **
Page 17
Rev. 1.11
- 17 -
SRP-280
5. Fine Tuning
5-1 Dip Switch Adjustment
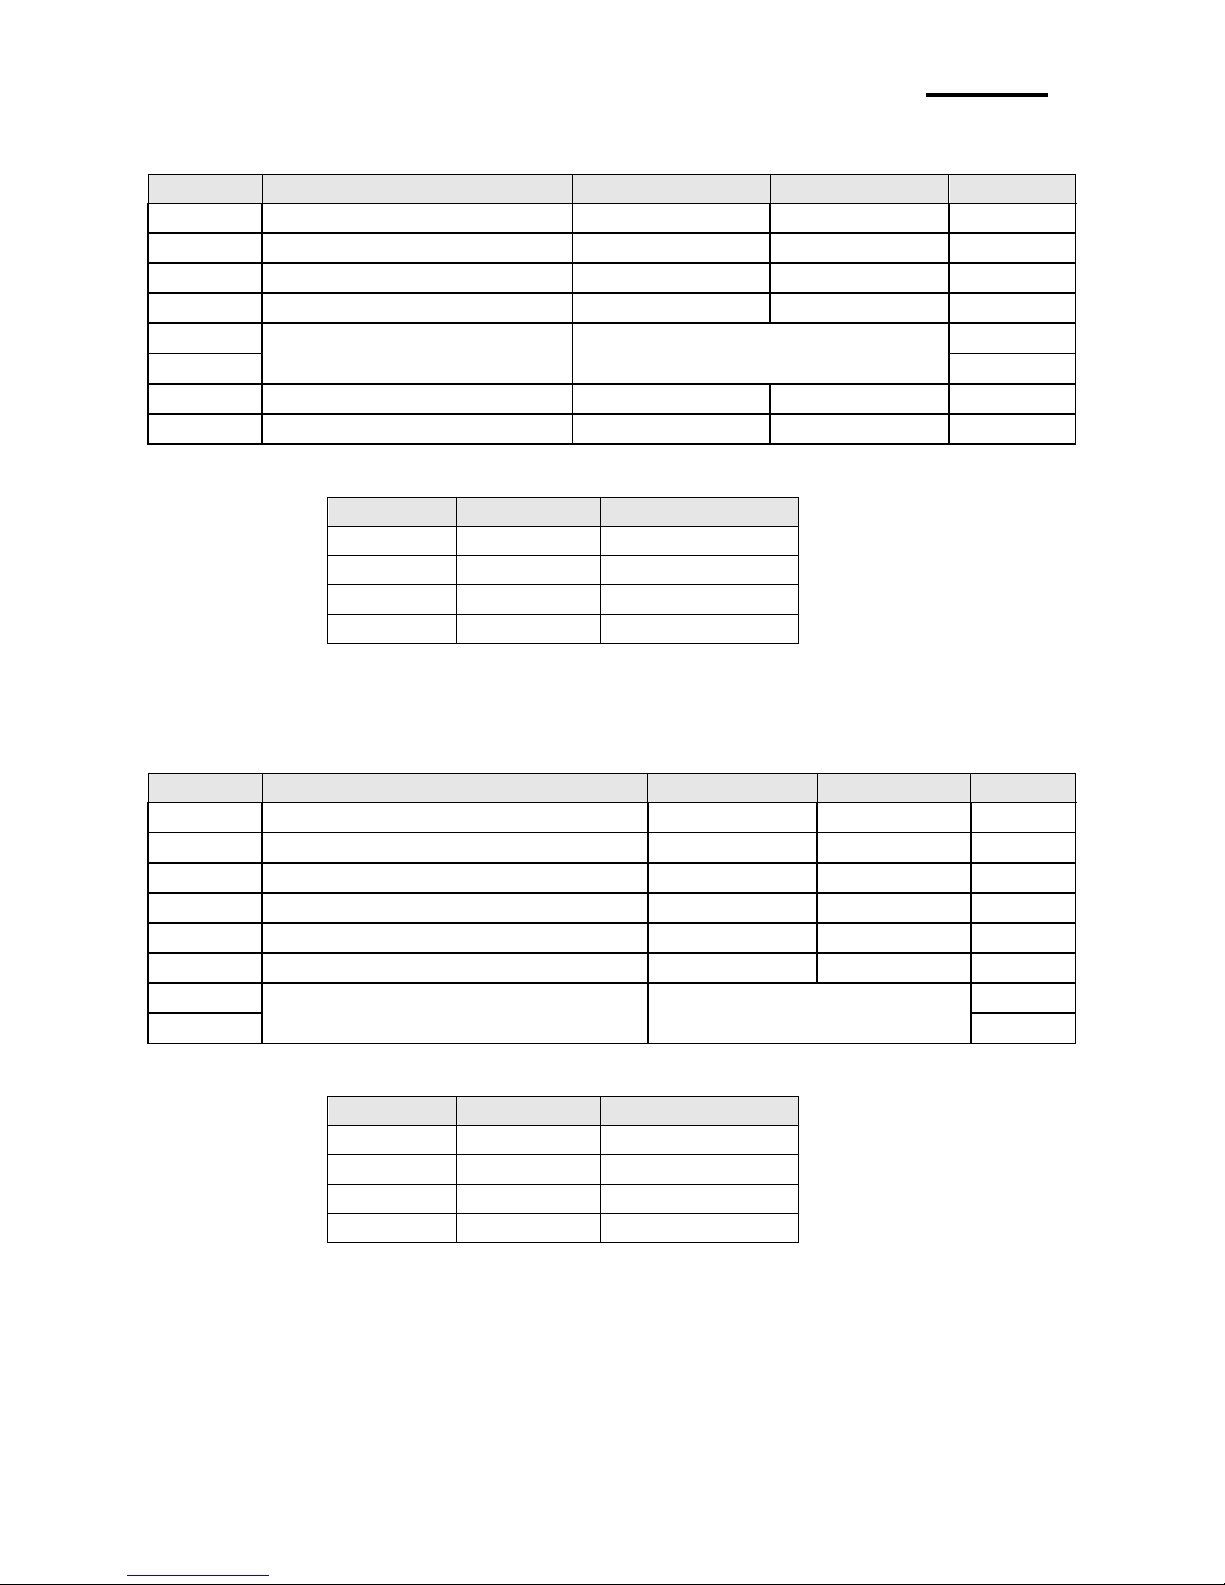
The dip switches can be used to select the following printer functions.
- Emulation
- Auto Cutter, Font Interval, Auto Line Feed
- Serial Communications Settings, Hexa-Printing
The dip switches are located on the under side of the printer.
Dip switch adjustment instructions are as follows.
1) Turn off the printer power.
2) Turn the printer over and remove the dip switch cover.
3) Use a pointy edged object to adjust the dip switches.
(Refer to the following diagram for functions per switch.)
4) New settings take effect when turning the printer back on.
Page 18
Rev. 1.11
- 18 -
SRP-280
[Diagram 1] Dip Switch 1 Settings
Switch
Function
On
Off
Default
SW1-1
Emulation Selection
STAR
BXL/POS
OFF
SW1-2
Language Selection
Standard
Chinese
-
SW1-3
Auto Cutter Setting
Enable
Disable
by Model
SW1-4
Font Interval Setting
2 (46 column)
3 (42 column)
OFF
SW1-5
Vertical Alignment
Refer to Chart (1) below.
OFF
SW1-6
OFF
SW1-7
Service Technician Mode
OFF
SW1-8
Black-Mark Setting
Black-mark mode
Normal mode
OFF
Chart (1) Vertical Alignment
SW-5
SW-6
Mode
ON
OFF
Backlash #0
OFF
OFF
Backlash #1
OFF
ON
Backlash #2
ON
ON
Backlash #3
[Diagram 2] Dip Switch 2 Settings
Switch
Function
On
Off
Default
SW2-1
Paper Width Selection
2 inch
3 inch
OFF
SW2-2
Hexa-Printing Selection
Enable
Disable
OFF
SW2-3
Reserved
SW2-4
RS-232C Setting – Data Length
7 bits
8 bits
OFF
SW2-5
RS-232C Setting – Parity Check
Enable
Disable
OFF
SW2-6
RS-232C Setting – Parity Selection
EVEN
ODD
OFF
SW2-7
RS-232C Setting – Baud Rate
Refer to Chart (2) below.
OFF
SW2-8
OFF
Chart (2) RS-232C Setting – Baud Rate
SW-7
SW-8
Baud Rate
OFF
ON
2400
ON
OFF
4800
OFF
OFF
9600
ON
ON
19200
Page 19
Rev. 1.11
- 19 -
SRP-280
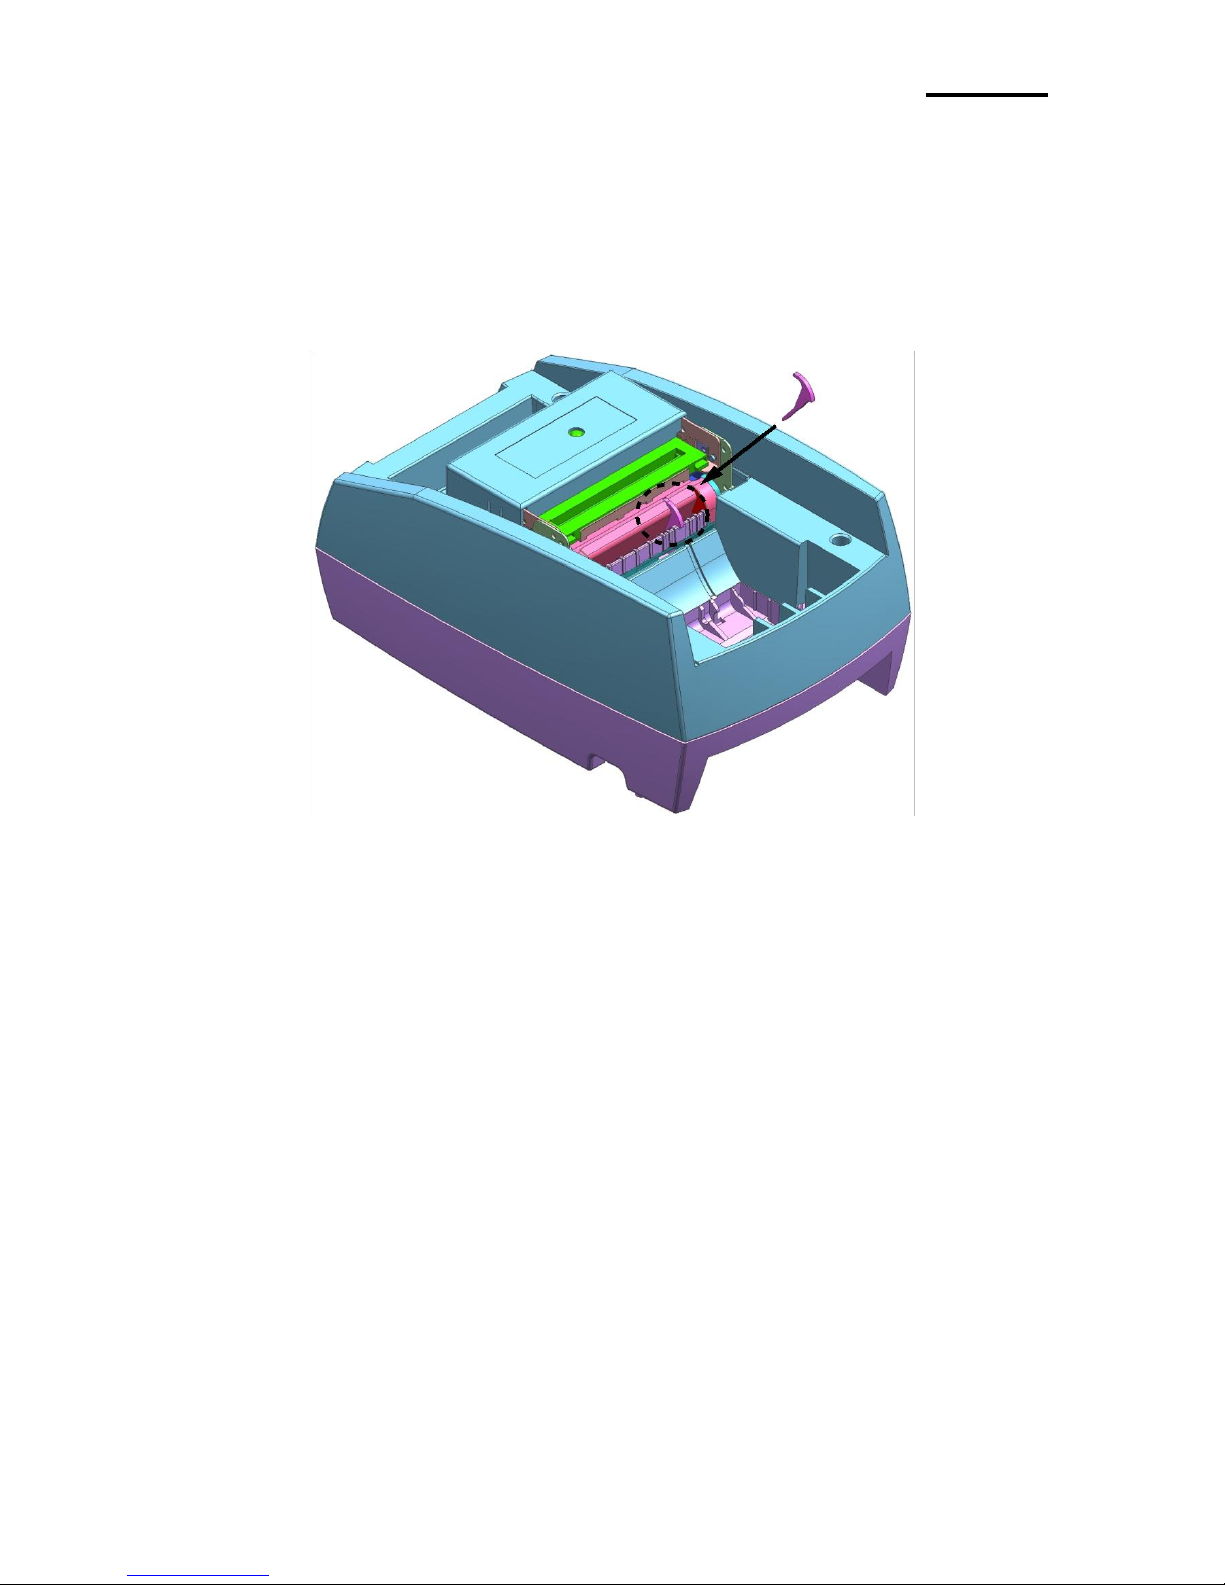
5-2 Paper Width Adjustment
This printer supports the use of two-inch and three-inch paper.
To use two-inch paper, install the two-inch paper guide as shown below.
1) Turn off the printer power and open the printer cover.
2) Confirm the location of the hole for the “two-inch paper guide” inside the printer.
3) Insert the “two-inch paper guide” into the hole as shown above.
(Affix the “two-inch paper guide” securely so that it does not shake loose.)
4) Change dip switch 2-1, on the under side of the printer, from OFF to ON.
5) Turn on the printer power.
6) Install the two-inch paper roll and use.
Printer Front
Printer Rear
Two-Inch Paper Guide
Page 20
Rev. 1.11
- 20 -
SRP-280
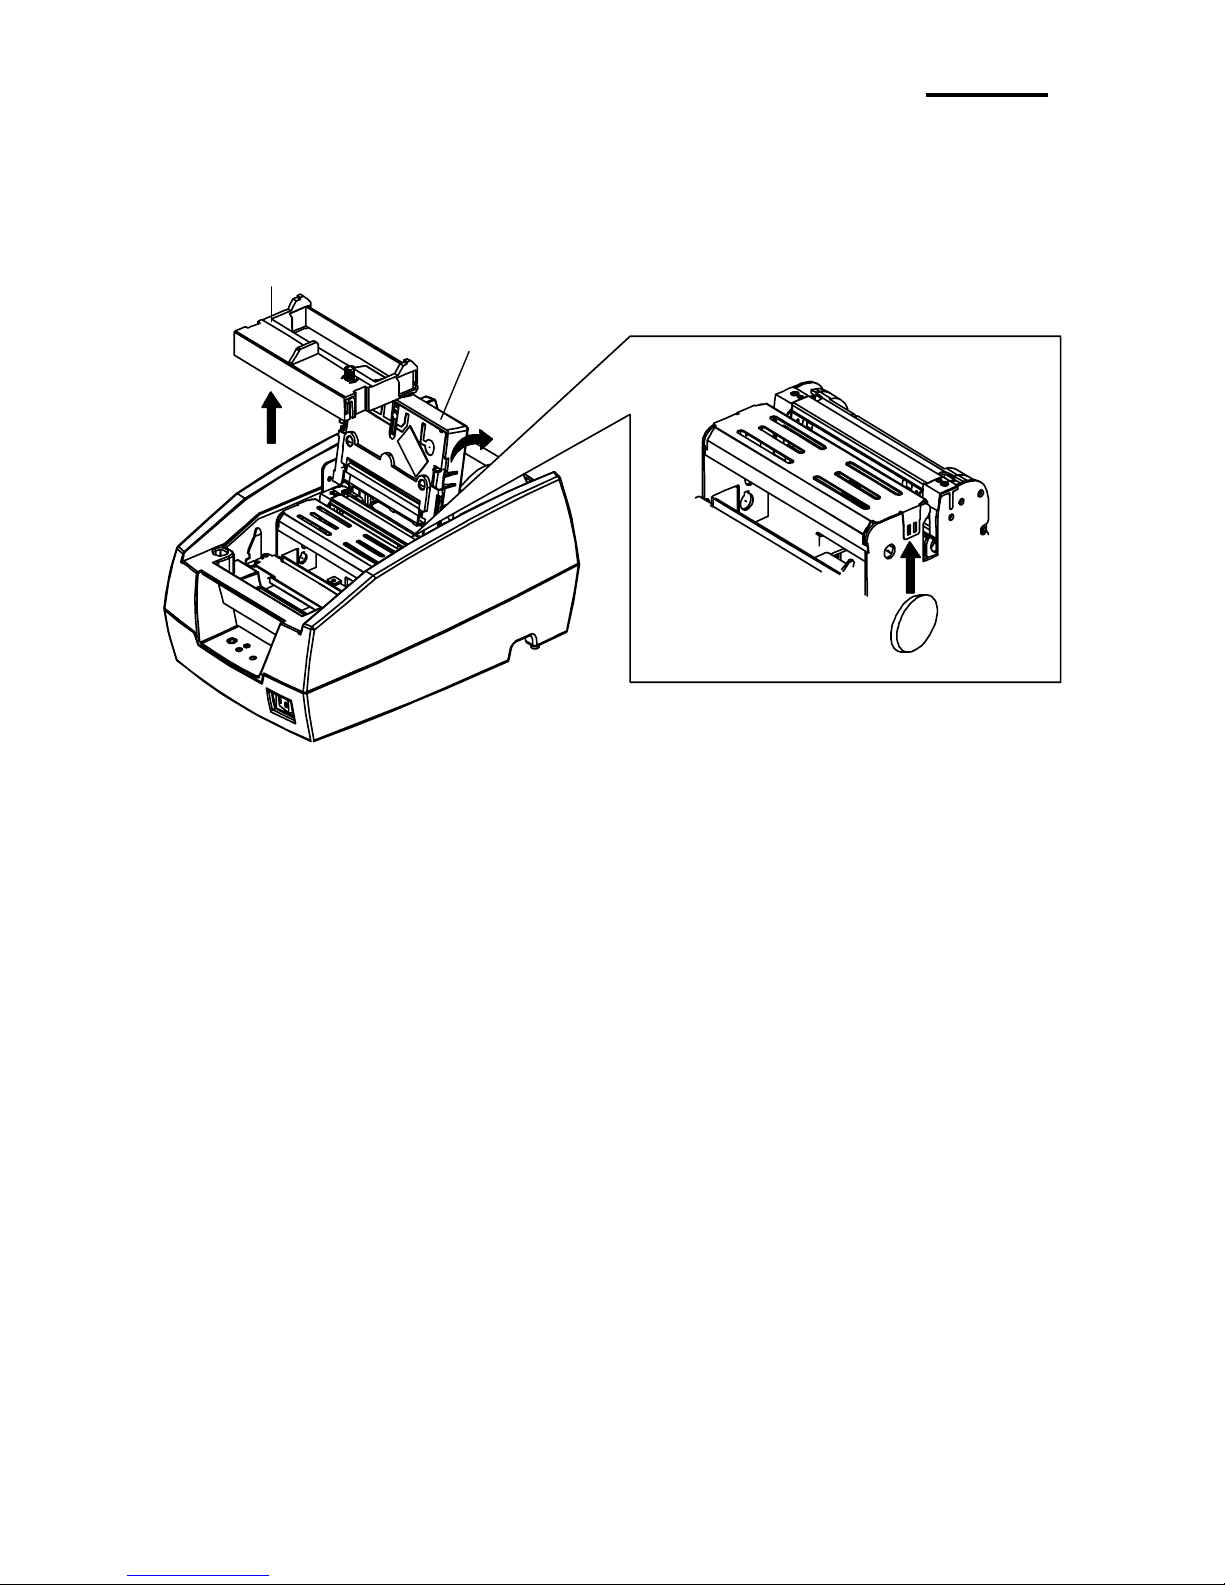
5-3 Paper Jam Removal
Remove jammed paper as shown below.
1) Open the printer cover.
2) Raise the auto cutter.
3) Remove the ribbon cartridge.
4) Use a screwdriver or coin to loosen the screw as shown above.
5) Remove the head cover.
6) Push the head to the left and fix in place.
7) Turn the paper feed knob and remove the jammed paper.
8) Replace the head cover and fasten the screw.
9) Place the ribbon cartridge and paper back in their original positions and close the printer
cover.
※ WARNING
The printer head can get hot during printing.
After printing, wait at least 10 minutes to allow cooling before handling the printer
interior.
Ribbon Cartridge
Auto Cutter
Coin
Page 21
Rev. 1.11
- 21 -
SRP-280
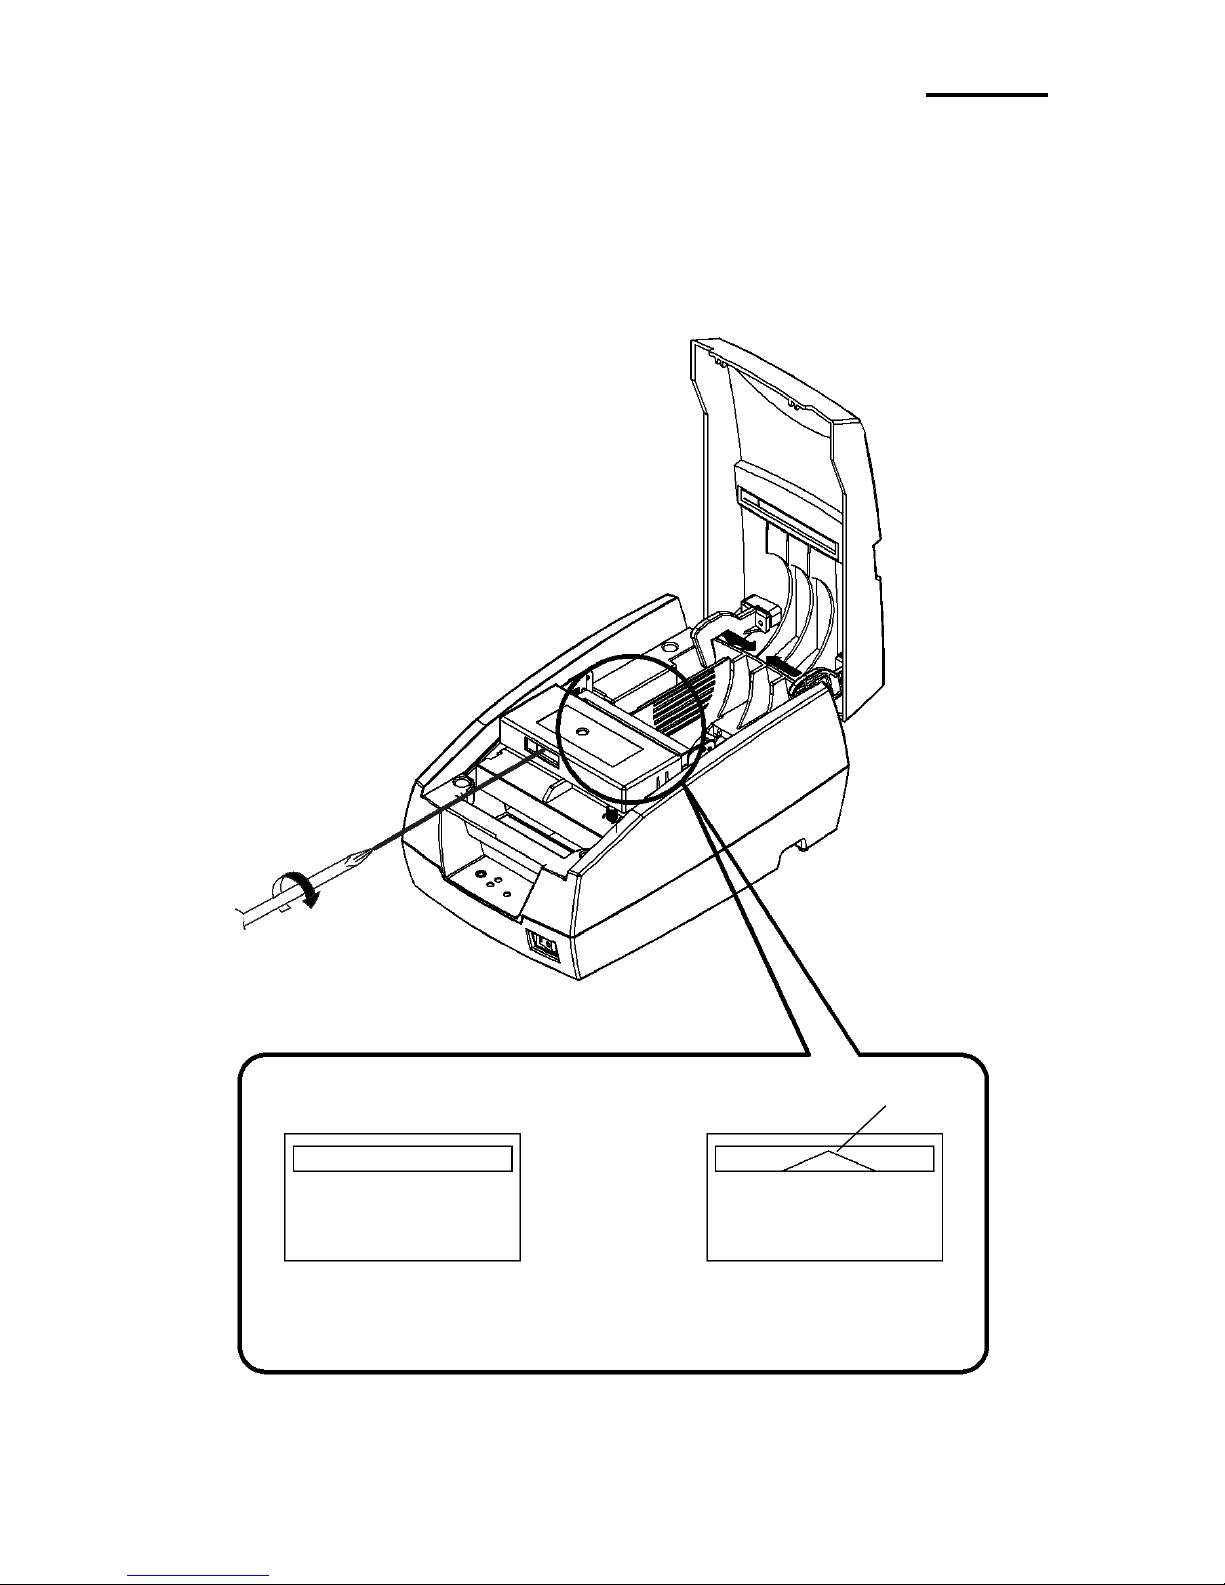
※ CAUTION
If the cutting edge of the auto cutter is not in its normal position, paper cannot be
inserted properly.
Insert a screwdriver into the hole near the bottom of the auto cutter as shown below, and
turn the gear within the auto cutter to adjust the cutting edge to its normal position.
Cutting Edge
Normal Position
Wrong Position
[Cutting Edge Position]
Page 22
Rev. 1.11
- 22 -
SRP-280
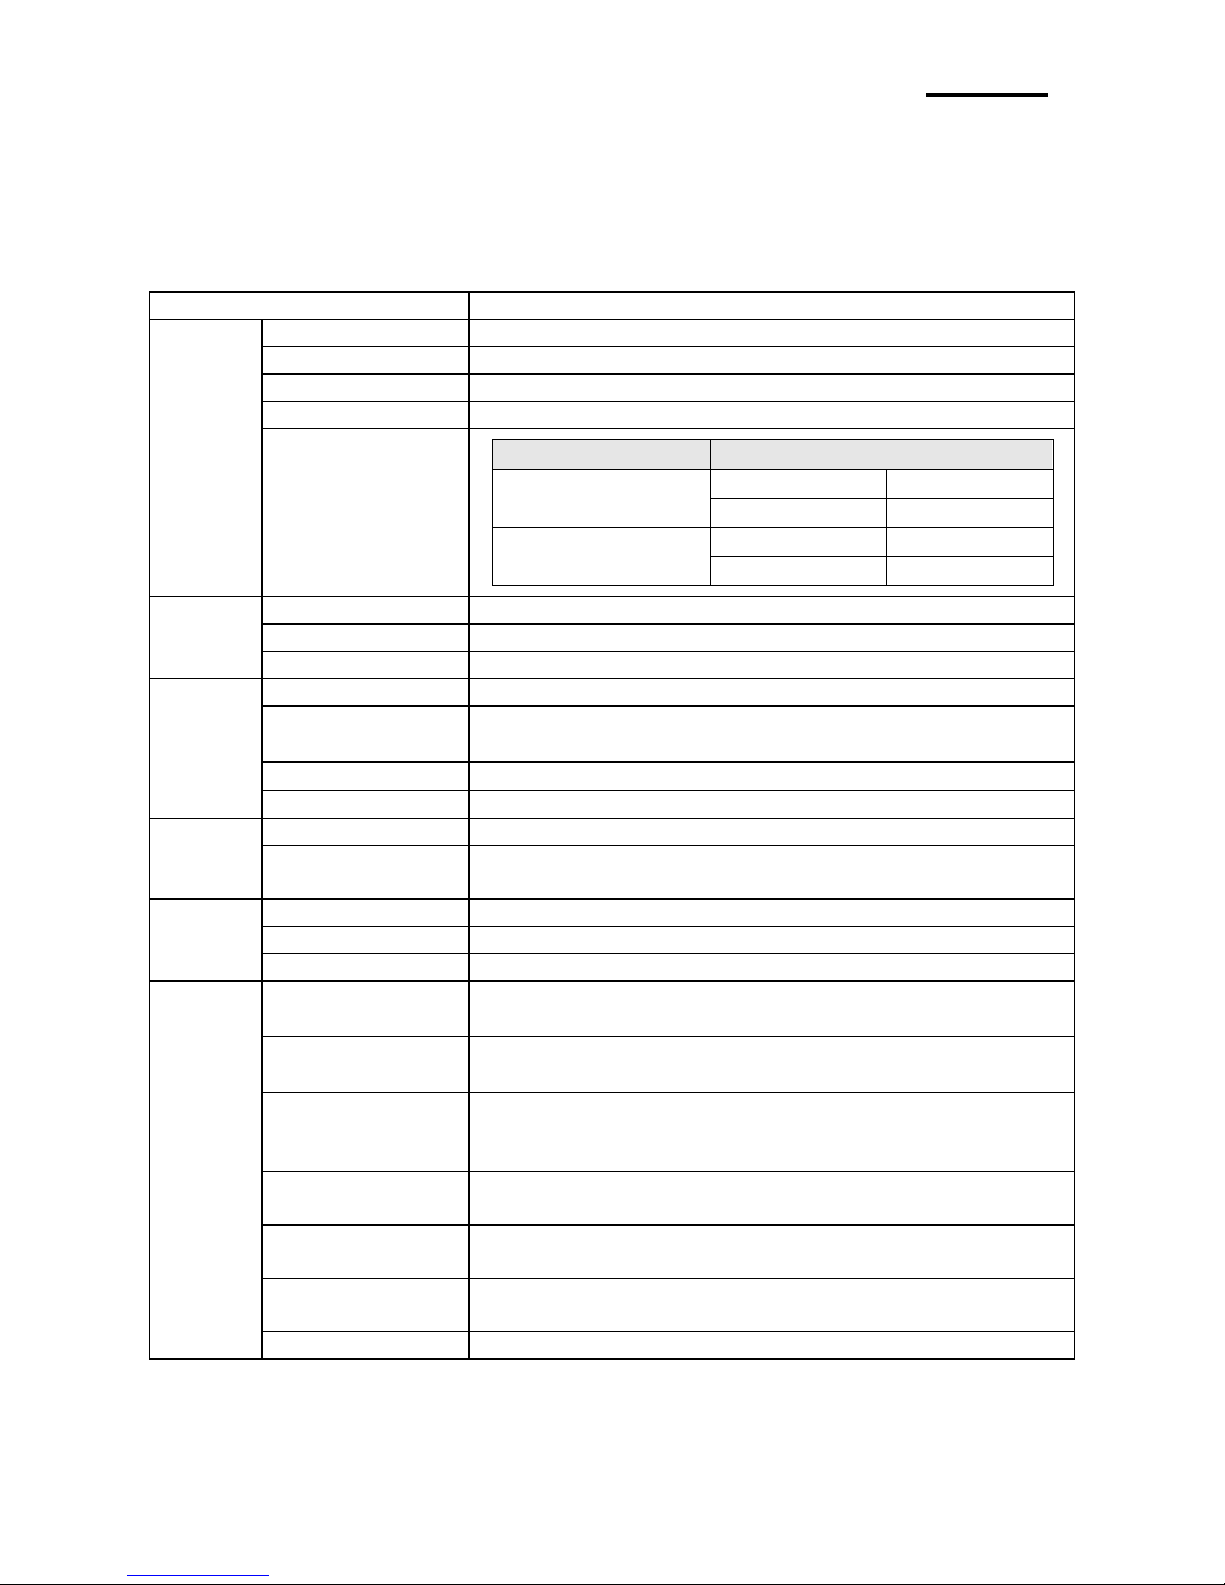
6. Appendix
6-1 Specifications
Item
Description
Printer
Printing Method
Serial Impact Dot
Head Pin Number
9
Print Direction
Two-way
Print Speed
4.3 LPS (lines per second)
Characters Per
Line
ASCII
3” printing
9 X 9
7 X 9
35 char.
42 char.
2” printing
9 X 9
7 X 9
25 char.
30 char.
Ribbon
Type
Cartridge type (GRC-202B)
Color
Black
Life
4 million characters
Paper
Type
Roll
Width
3 inch: 76 ± 0.5mm
2 inch: 57.5 ± 0.5mm
Diameter
Max. 83mm (3.26")
Thickness
0.06mm ~ 0.085mm (0.002" ~ 0.003")
Adapter
SMPS AC Input
AC100 ~ 240V (50Hz ~ 60Hz)
SMPS Voltage,
Current
DC 24 V, 1.5 A
Auto
Cutter
Cutter Type
Guillotine type
Cutter Width
Max. 85 mm
Cutter Thickness
Max. 0.1mm
Other
Total Volume
• A type: 165 X 270 X 130
• C type: 165 X 270 X 132
Weight
Weight (printer only) / Weight
(with box & accessories): 1.85kg / 2.8kg
Reliability
Head : 300 million dots
Printer : 10 million lines (MCBF)
Auto Cutter : 1 million cuts
Operation
Temperature
0℃ ~ 45℃ (32℉ ~ 113℉)
Operation
Humidity
10% ~ 80%
Storage
Temperature
-20℃ ~ 60℃ (-4℉ ~ 140℉)
Storage Humidity
10% ~ 90%
Page 23
Rev. 1.11
- 23 -
SRP-280
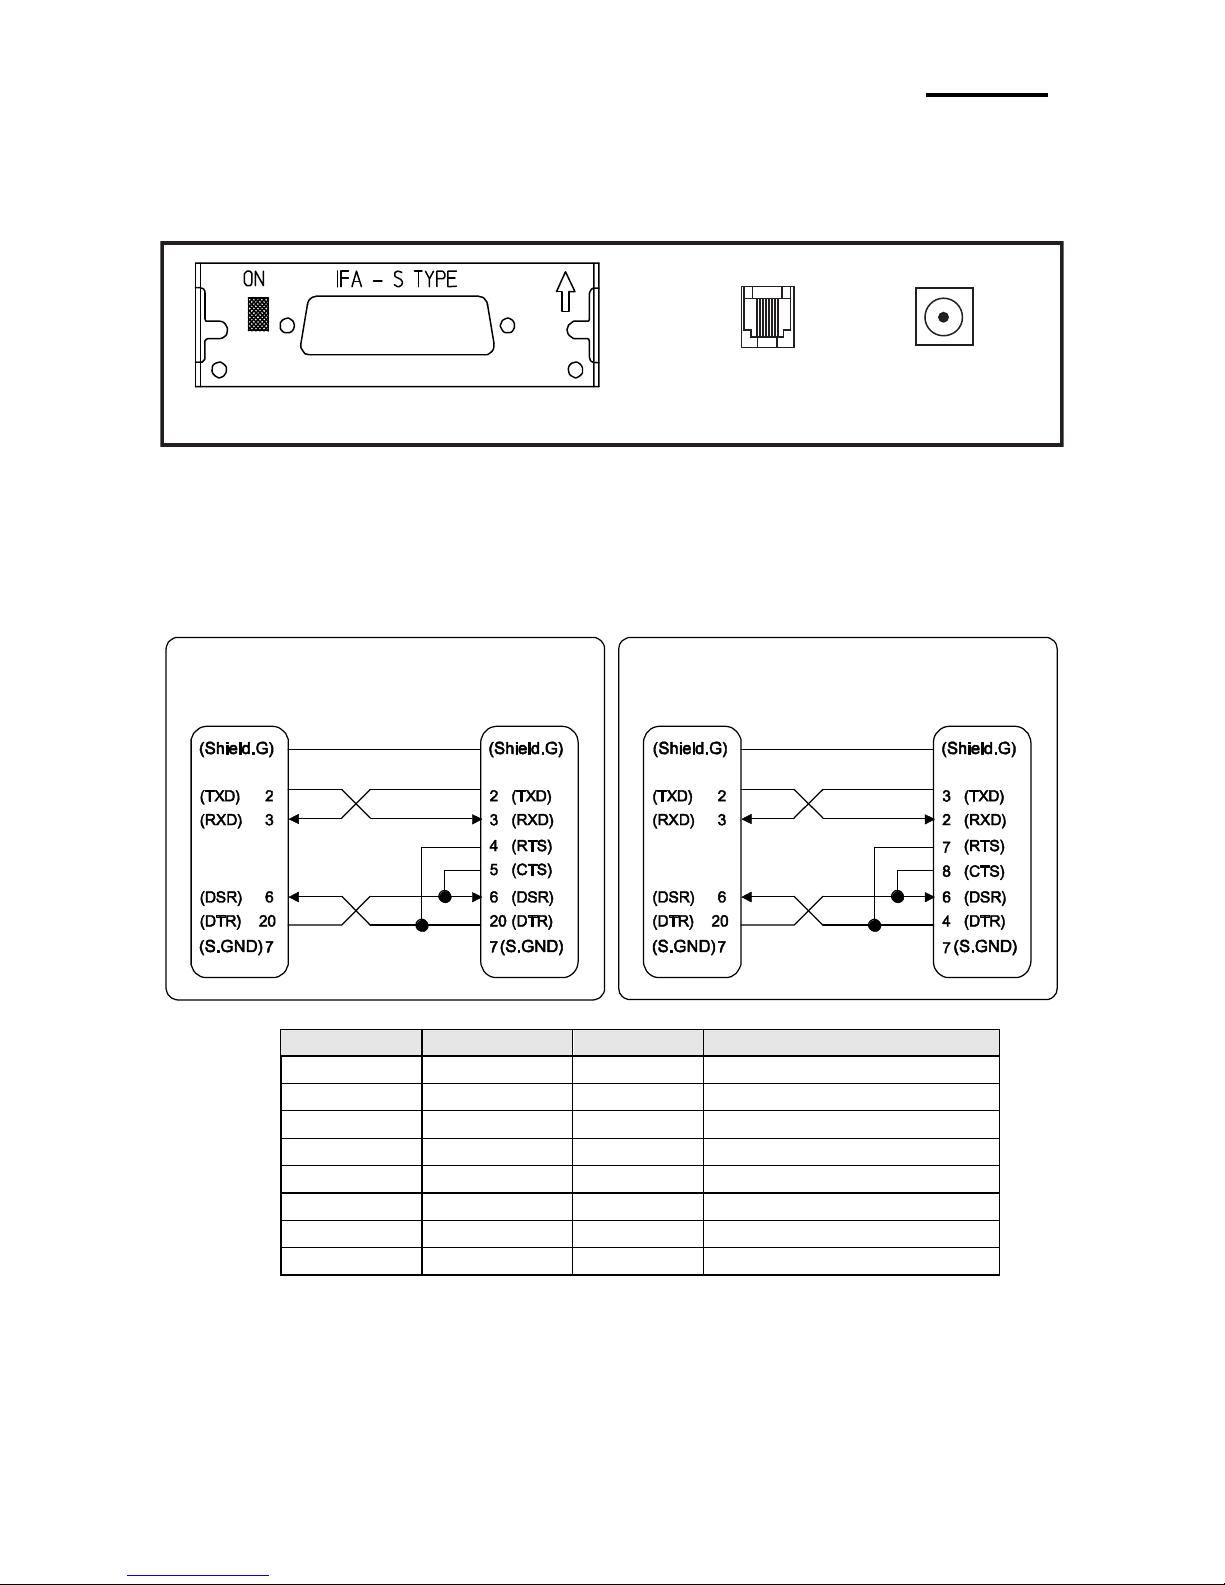
6-2 RS-232C (Serial Interface) Cable Specifications
1) Printer Rear Image
※ Turning the dip switch on the Serial interface to the ON position connects DTR and
RTS signals together.
2) Cable Specifications
Pin No.
Signal
Direction
Function
1
FG
-
Frame Ground
2
TxD
Output
Transmit Data
3
RxD
Input
Receive Data
4
RTS
Output
Ready To Send
5
CTS
Input
Clear To Send
6
DSR
Input
Data Set Ready
7
SG
-
Signal Ground
20
DTR
Output
Data Terminal Ready
Cash Drawer
Connector
Serial Interface
Power Connector
Printer Side
(25P)
Host Side
(25P)
Printer Side
(25P)
Host Side
(9P)
Page 24
Rev. 1.11
- 24 -
SRP-280
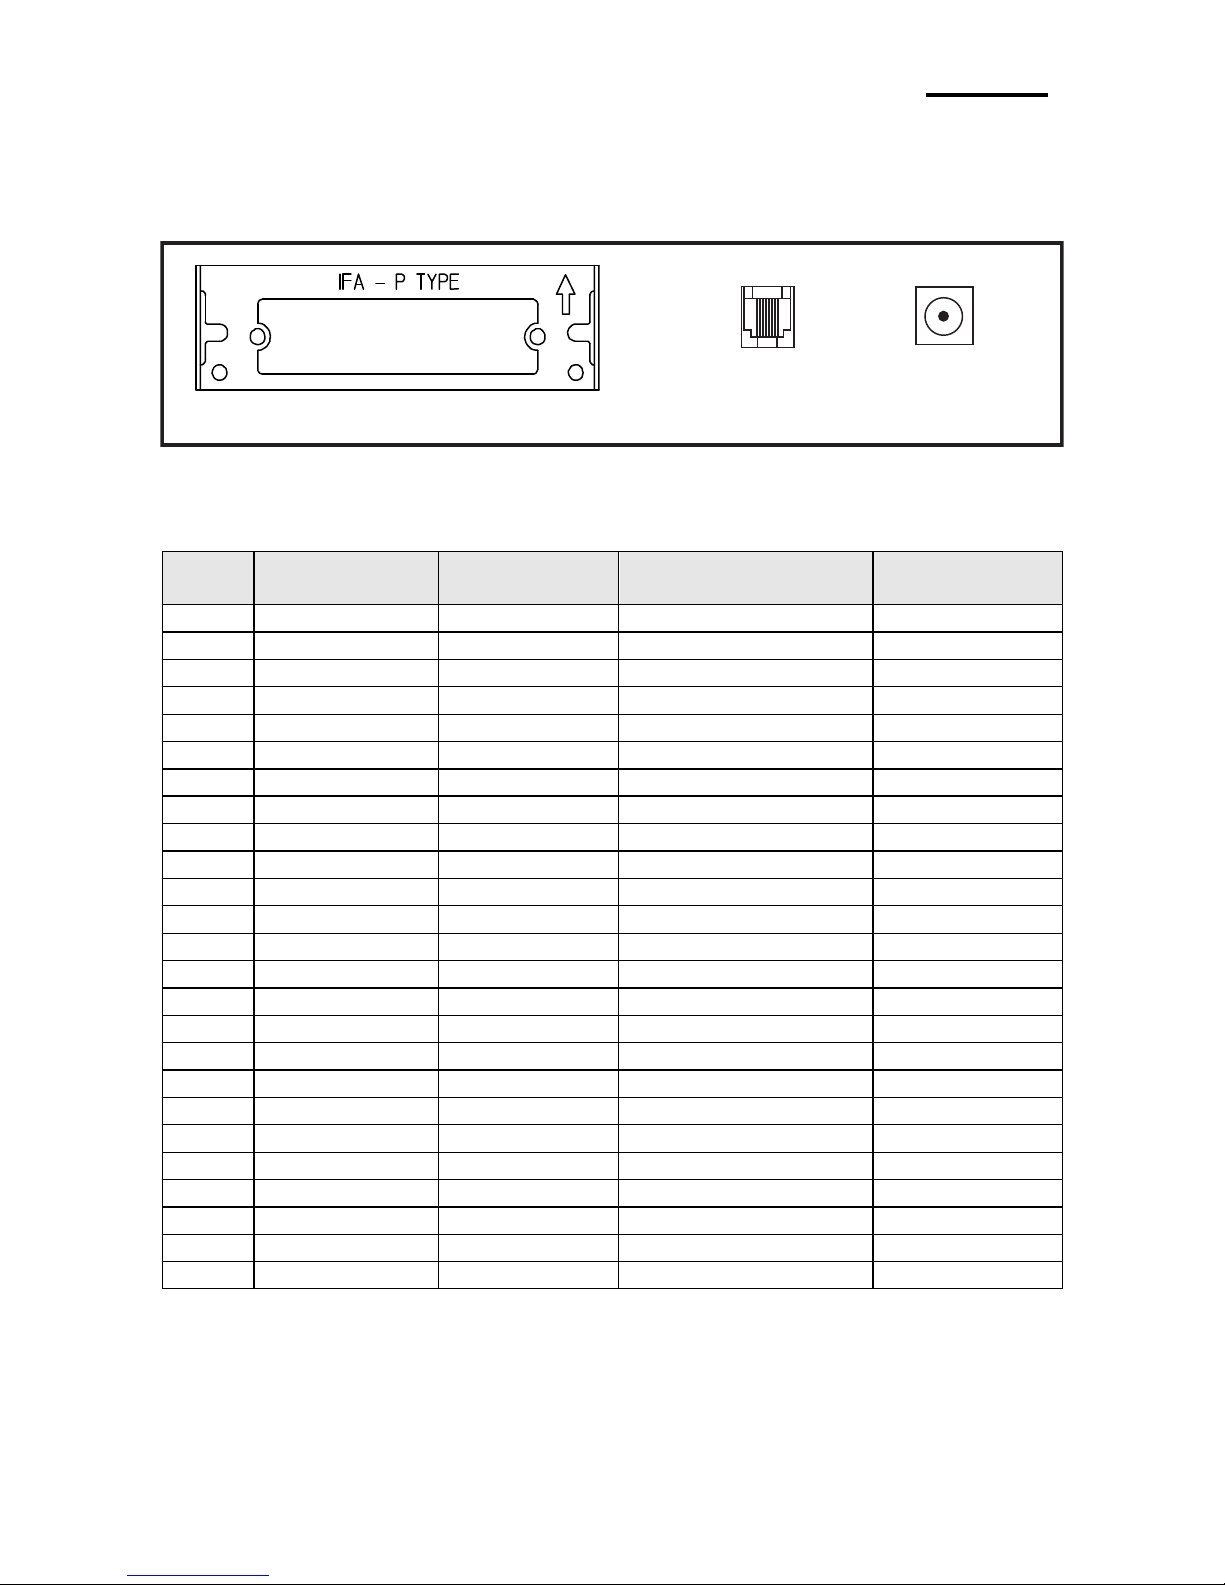
6-3 IEEE1284 (Parallel Interface) Cable Specifications
1) Printer Rear Image
2) Cable Specifications
Pin
No.
Source
Compatibility
Mode
Nibble Mode
Byte Mode
1
Host
nStrobe
HostClk
HostClk
2
Host / Printer
Data 0
(LSB)
-
Data 0 (LSB)
3
Host / Printer
Data 1
-
Data 1
4
Host / Printer
Data 2
-
Data 2
5
Host / Printer
Data 3
-
Data 3
6
Host / Printer
Data 4
-
Data 4
7
Host / Printer
Data 5
-
Data 5
8
Host / Printer
Data 6
-
Data 6
9
Host / Printer
Data 7
(MSB)
-
Data 7 (MSB)
10
Printer
Nack
PtrClk
PtrClk
11
Printer
Busy
PtrBusy /Data3,7
PtrBusy
12
Printer
Perror
AckDataReq/Data2,6
AckDataReq
13
Printer
Select
Xflag/Data1,5
Xflag
14
Host
nAutoFd
HostBusy
HostBusy
15
-
NC
NC
NC
16
-
GND
GND
GND
17
-
FG
FG
FG
18
Printer
Logic-H
Logic-H
Logic-H
19~30
-
GND
GND
GND
31
Host
nInit
nInit
nInit
32
Printer
nFault
nDataAvail/Data0,4
nDataAvail
33
-
GND
ND
ND
34
Printer
DK_Status
ND
ND
35
Printer
+5V
ND
ND
36
Host
nSelectIn
1284-Active
1284-Active
Cash Drawer
Connector
Parallel Interface
Power Connector
Page 25
Rev. 1.11
- 25 -
SRP-280
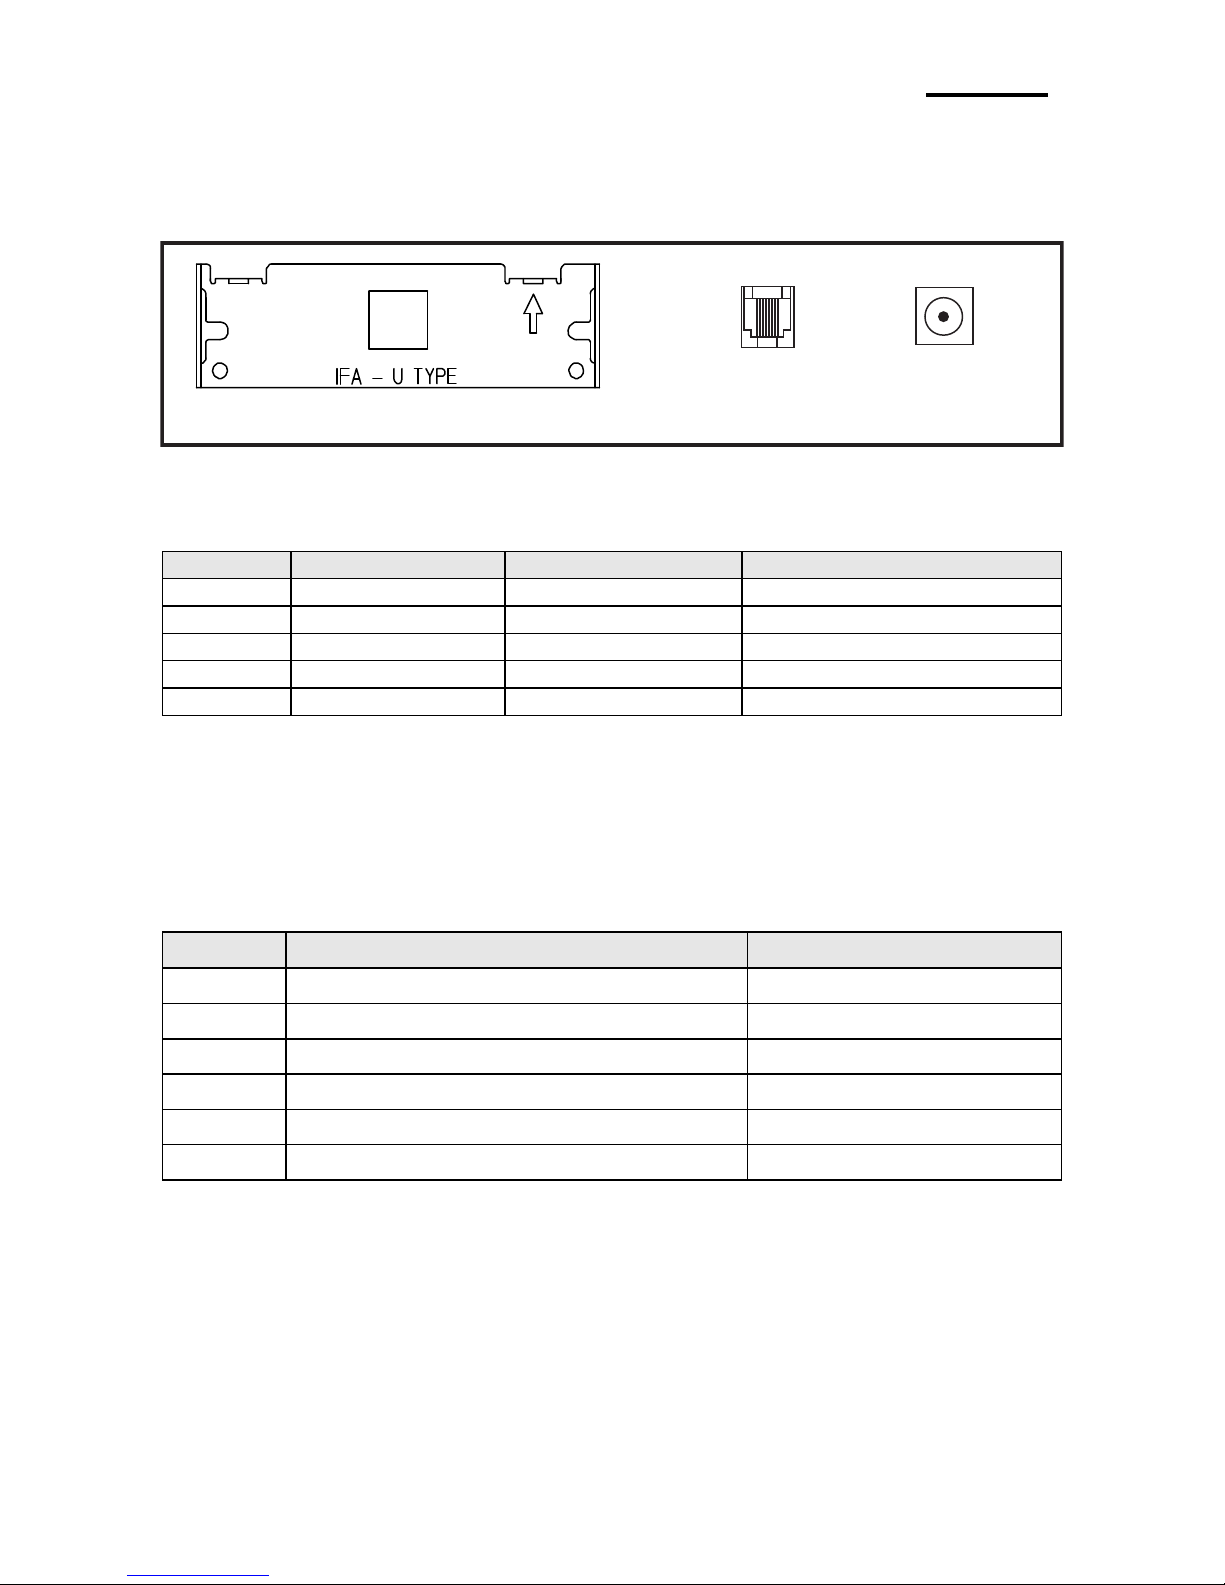
6-4 USB Interface Cable Specifications
1) Printer Rear Image
2) Cable Specifications
Pin No.
Signal
Wire Color
Function
1
VBUS
Red
Host Power
2
D-
White
Data (D-)
3
D+
Green
Data (D+)
4
GND
Black
Signal Ground
Shell
Shield
Drain Wire
Frame Ground
6-5 Cash Drawer Cable Specifications
Pin No.
Signal
Direction
1
Frame Ground
-
2
Cash Drawer Control Signal 1
Output
3
Cash Drawer Operation Confirm Signal
Input
4
+24V - 5
Cash Drawer Control Signal 2
Output
6
Signal Ground
-
Cash Drawer
Connector
USB Interface
Power Connector
Page 26
Rev. 1.11
- 26 -
SRP-280
6-6 Certification
1) EMC & Safety Standards
• Europe: CE EMC,CB-Scheme:IEC60950-1, GS: EN60950-1: 2001
• North America: FCC rules parts 15B
WARNING
Use of an unprotected interface cable with this printer conflicts with EMC standards.
Users should only use cables approved by BIXOLON.
2) CE Mark
• EMC Directive 89/336/EEC EN55002:1994+A1:1995+A2:1997
EN55024:1998+A1:2001+A2:2003
EN61000-3-2:2000
EN61000-3-3:1995+A1:2001
EN6100-4-2:1995+A1:1998+A2:2001
EN6100-4-3: 2002+A1:2002
EN6100-4-4:2004
EN6100-4-5:1995+A1:2001
EN6100-4-6:1996+A1:2001
EN6100-4-8:1993+A1:2001
EN6100-4-11:1994+A1:2001
• Low Voltage Directive 73/23/EEC Safety: EN60950-1:2001
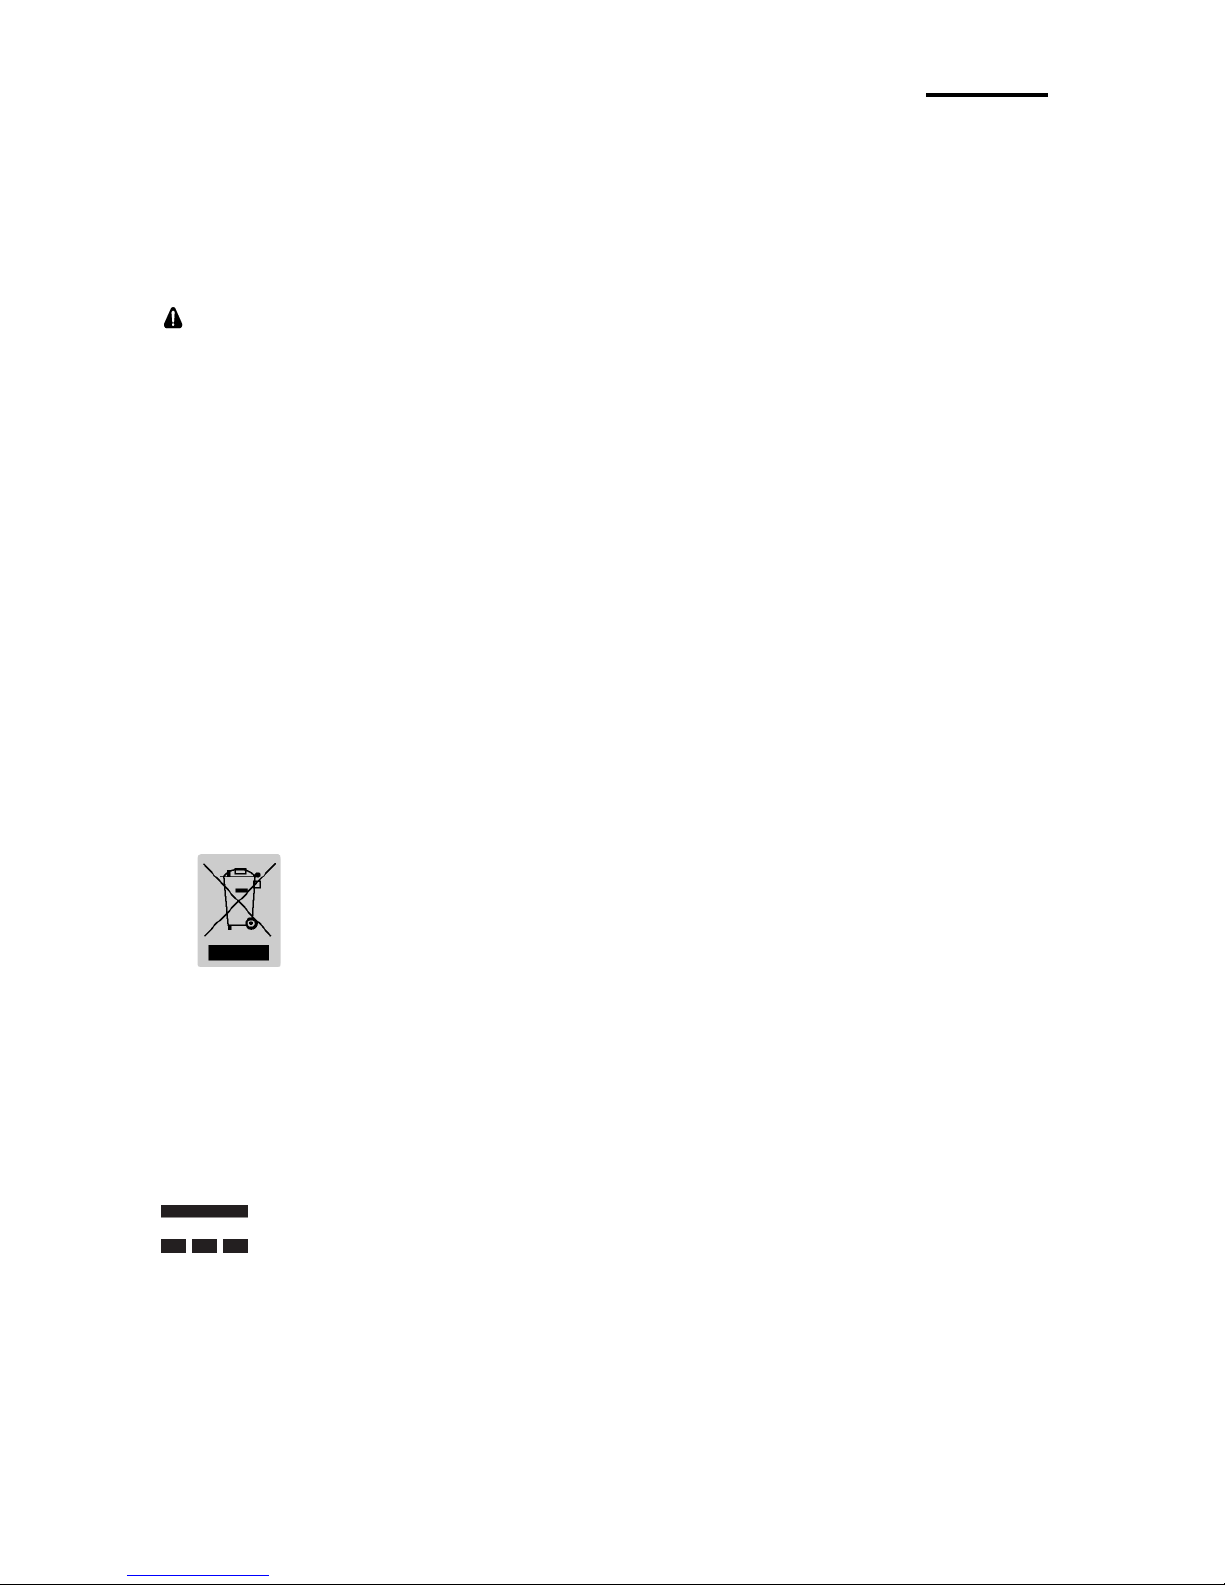
3) WEEE (Waste Electrical and Electric Equipment)
This mark shown on the product or its literature indicates that the
corresponding item should not be discarded at the end of its working life with
other household waste. To prevent possible harm to the environment or
human health from uncontrolled waste disposal, please separate marked
items from other types of waste and recycle them responsibly to promote the
sustained reuse of material resources. Household users should contact either the
retailer where they purchased this product, or their local government office for details
of where and how they can conduct environmentally safe recycling of such items.
Commercial users should contact their suppliers and check the terms and conditions of
purchase contracts. This product should not be combined with other commercial
waste for disposal.
4) Rating Label Symbol Information
DC (Direct current)
6-7 Label Types
The label types used with this printer are as follows.
• Control Labels: PC
• Other Labels: PET
 Loading...