


HBCR001
Universal Remote User Manual
FCC ID:NMCHBCR001
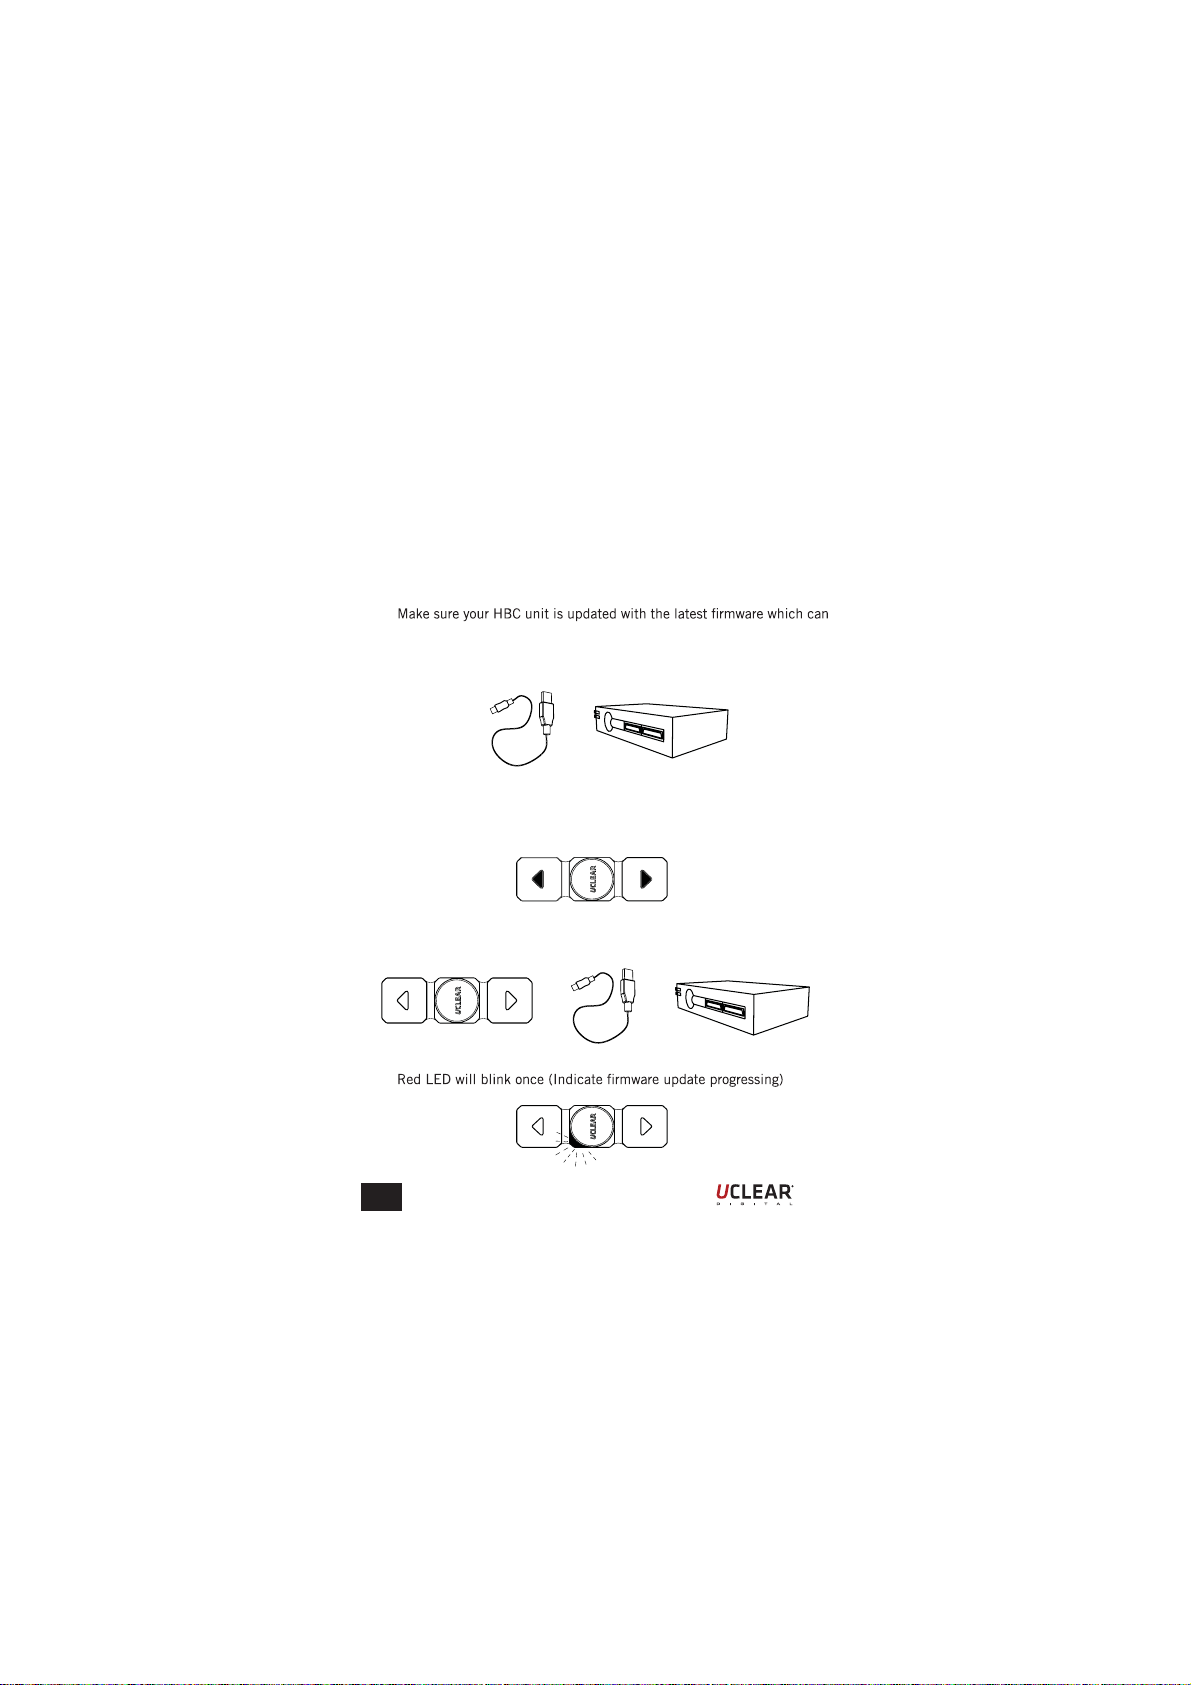
Make sure your HBC unit is updated with the latest firmware
which can support your Universal Remote.

Contents
Contents --------------------------------------------------------------
Quick User Guide --------------------------------------------------
Warnings and Safety Instructions ------------------------------
Features --------------------------------------------------------------
Kit Includes ---------------------------------------------------------
Installation ------------------------------------------------------------
General Operaions --------------------------------------------------
Intercom Connection -----------------------------------------------
General Button Configurations -----------------------------------
General Status Indicator Configurations ----------------------
Technical Data ------------------------------------------------------
Notices ----------------------------------------------------------------
1
2
6
7
8
9
11
14
18
19
20
21
EN
1
Quick User Guide
General Functions and Layouts
LED Indicator
DFU/
Charging Socket
Velcro Hook
Back view Front view
Button functionality is identical to HBC Unit.
For more complete instructions, please refer to your HBC Series User Manual.
Vol ‘Up’ Button
‘Power’/
‘Answer’ Button
Vol ‘Down’ Button
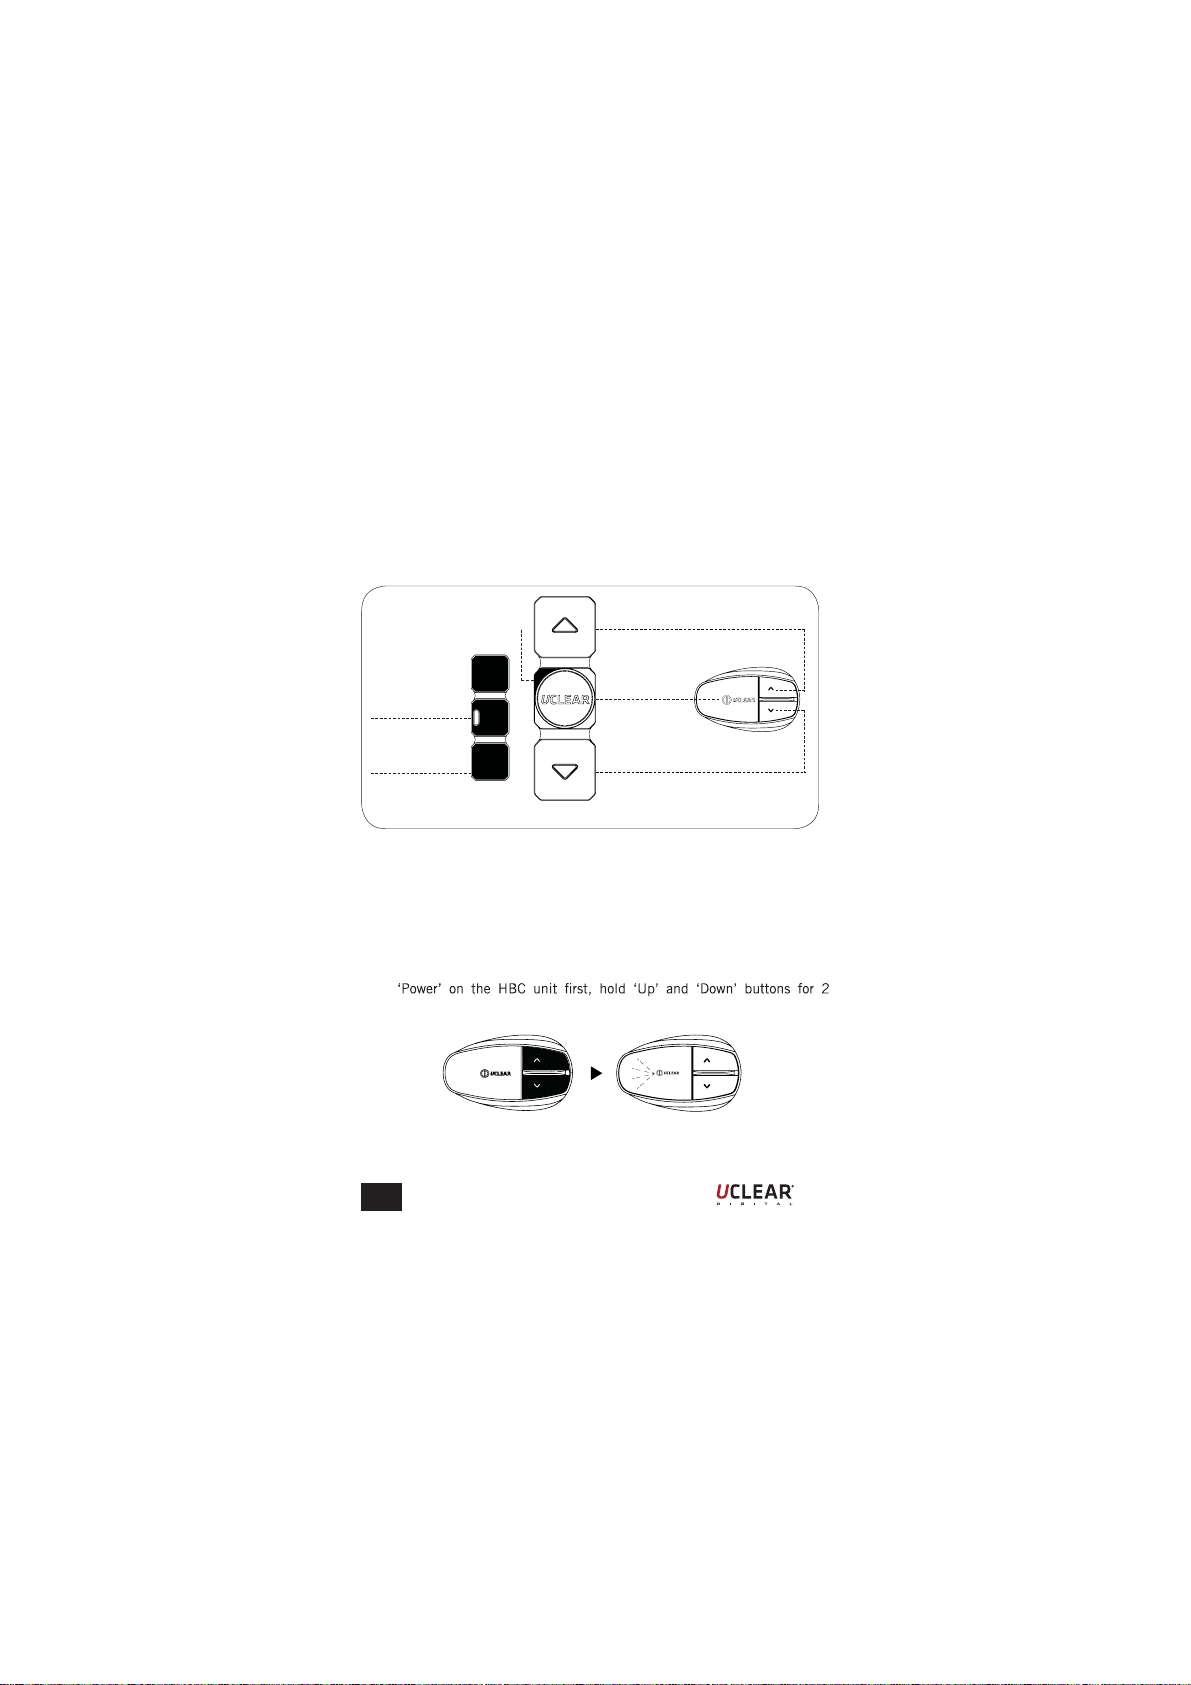
Pairing with HBC unit
1.
seconds until LED blink blue and red alternatively.
EN
2
Quick User Guide
2. While holding the ‘Up’ or ‘Down’ button, power ‘On’ the Universal
Remote, only release the ‘Up’ or ‘Down’ button until the LED blinks
blue and red alternatively.
OR
Just Connect Mode
It is only necessary to do the pairing for the first time. After pairing with
your unit, your Universal Remote will connect automatically to your paired
unit once you power on your device.
1. Make sure the ‘Power’ for the paired HBC unit is on.
2. Power on Universal Remote by pressing the ‘Answer’ button once, it
will connect to the paired HBC unit automatically.
Attention:
If pairing or Just Connect Mode fails, the Universal Remote will be turned
off automatically. If fails, redo step 1 and 2.
EN
3
Quick User Guide
Power On
Press the ‘Power’ button once, the Universal Remote will be turned on.
Power Off
The Universal Remote will be turned off automatically once the paired HBC
unit is off.
Reset
Connected Micro USB cable to the computer USB port or power sources.
Plug in and plug out the micro USB cable from Universal Remote.
Battery Low
LED indicator will appear blinking red every second to indicate that the
battery is low, hence charging is required.
Charging
Insert the Micro USB charger to the Universal Remote DFU/ Charging Socket.
> Solid red LED will appeared while charging.
> Solid blue LED will appeared when fully charged.
DO NOT PRESS on any buttons while plugging in. It may cause the device to
EN
4
Quick User Guide
Firmware Update
1. Download and install the new version software from UCLEAR website.
support your Universal Remote.
2. Connected securely the USB cable to the computer USB port.
+
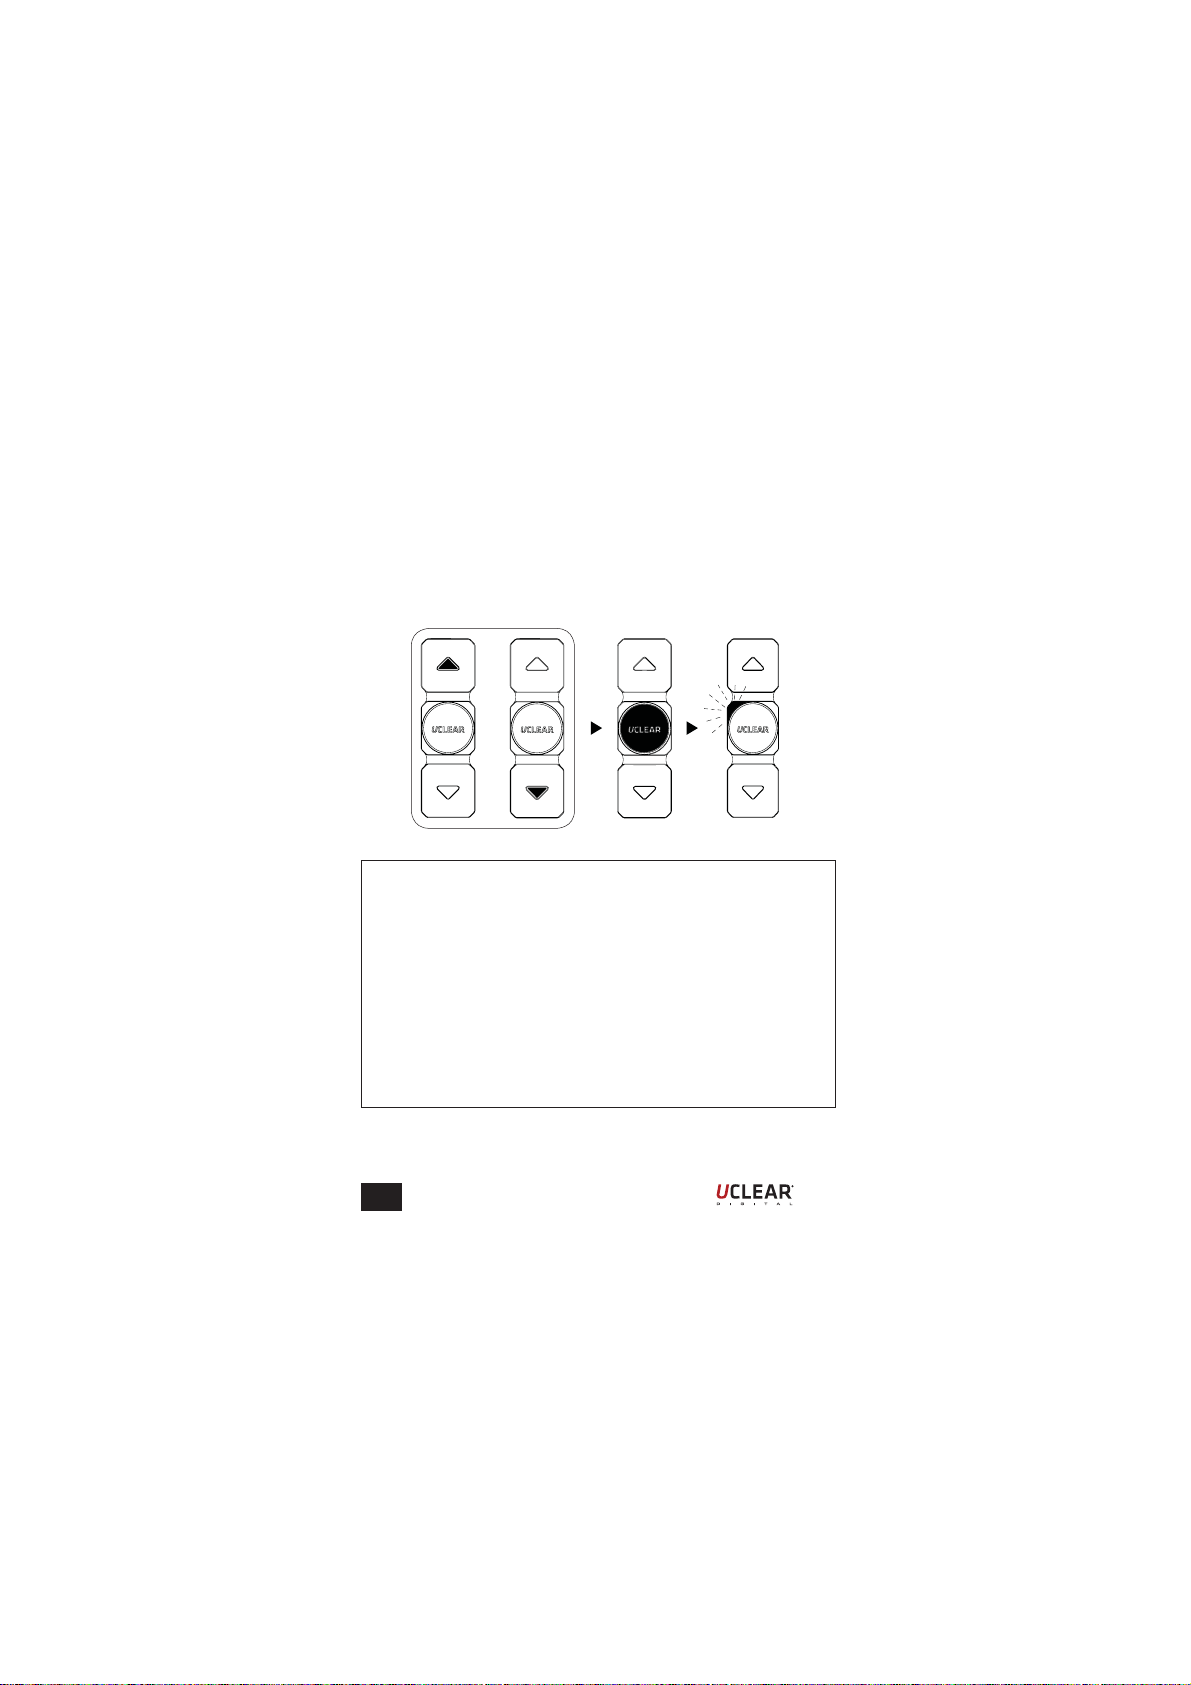
3. Powered off the Universal Remote by holding ‘Up’ and ‘Down’ buttons
at the same time.
4. Insert the Micro USB to the Universal Remote DFU/ Charging Socket.
++
5.
EN
5
Warning and Safety Instructions
This manual uses the and icons to highlight certain instructions.
Below is an explanation of the icons.
!
Attention
This icon highlights special instructions and precautions intended to avoid
damage to the system. Non-compliance may void the product warranty.
Warning
This icon provides precautions important to prevent injuries to the user.
Attention
!
Please read through the operating instructions to understand how to operate
the system, in particular the safety instructions.
Warning
s Prolonged exposure to loud sounds may lead to permanent hearing
damage.
s Speaker volume is greater than 90dBm may lead to permanent hearing
damage.
s Do not attempt to place an outgoing call through the mobile phone
while riding on the motorcycle at any point of time.
s Please do not use the Universal Remote in anyway that may distract
you or hinder your judgment while on the move. Never ever compromise
your safety and the safety of others.
!
EN
6
Warning and Safety Instructions
Attention
!
Charging and handling rechargeable battery products incorrectly may cause
instructions below:
s Never change the batteries yourself, always bring the device to an
authorised dealer to perform the replacement for you.
s When charging, use ONLY the charging cable provided or replacement
cable from the UCLEAR dealer. Using similar, compatible or any
other cables may lead to permanent product damage and will void the
product warranty.
s
Remote in any way as it may cause the system to malfunction causing
hurt to you.
Features
The UCLEAR Universal Remote is a convenient and safe alternative or
replacement for the 3 buttons on Helmet Communicator.
s Compatible with product series (HBC200, HBC100+, and future
product series)
s Firmware upgradable
s Rechargeable battery
s Versatile mounting mechanism
s Weather resistant
s Auto shut down
EN
7
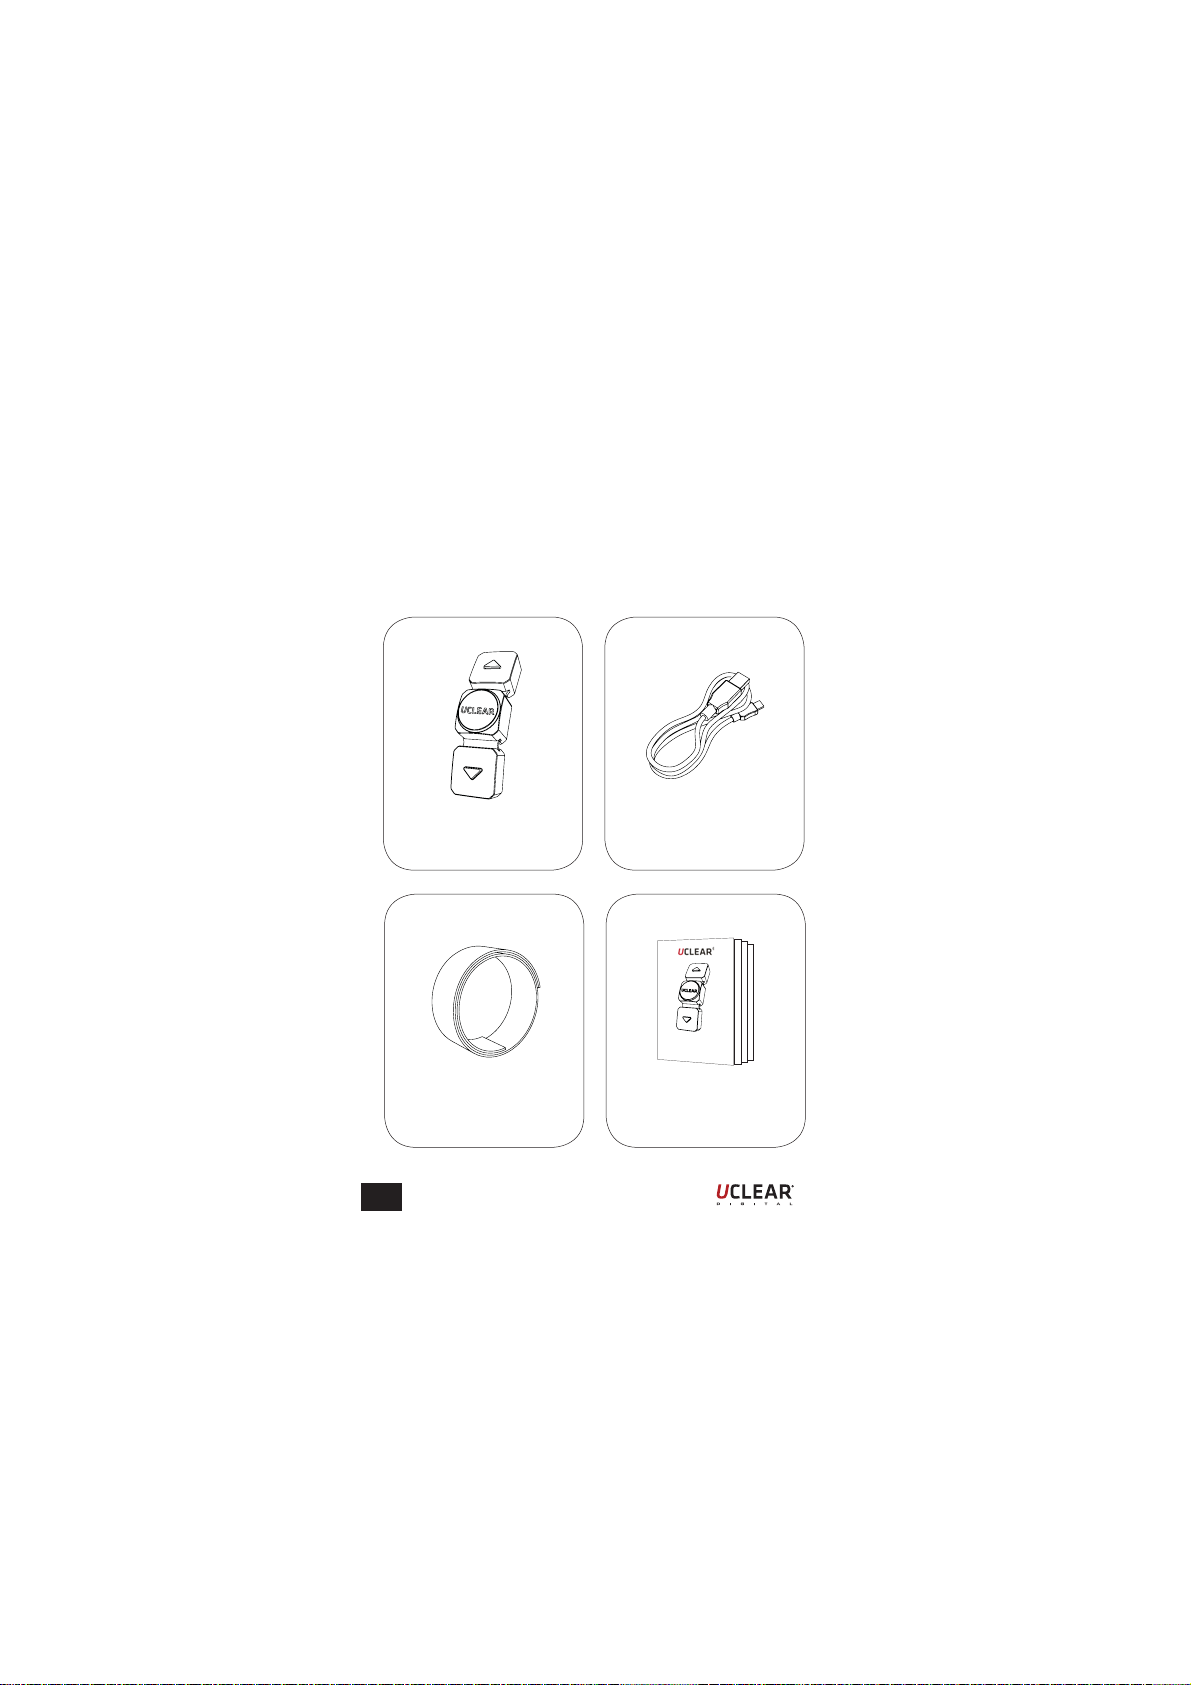
Kit Includes
Universal Remote Package Contains:
1 Universal Remote
EN
1 Velcro Strap
(150mm long)
1 Micro USB Charger
(1m long)
Universal Remote
Quick Start Guide
1 Quick Start Guide
8

Installation
EN
1. Place the Velcro strap near to the handle bar.
(As per illustration above)
2. Loop the Velcro strap around the handle bar.
9

Installation
3. Place the Universal Remote onto the Velcro strap.
4. Ensures the Universal Remote is fastened.
Installation completed. Enjoy!
EN
10

General Operations
Your UCLEAR Universal Remote is now all set and ready to go!
Universal Remote to HBC, HBC to Mobile Phone
Establish connection between Universal Remote and HBC:
s Power ‘On’ the HBC unit, hold ‘Up’ and ‘Down’ buttons for seconds
until LED blinks blue and red alternately.
s While holding the ‘Up’ or ‘Down’ button, power ‘On’ the Universal
Remote, only release the ‘Up’ or ‘Down’ button until the LED blinks
blue and red alternately.
s Once the connection is successful, HBC unit and Universal Remote
will blink blue.
s
Mode is a more convenient way of establishing connection between
HBC unit and Universal Remote.
EN
11

General Operations
Establish connection between HBC and Mobile Phone
s Hold the ‘Up’ and ‘Down’ buttons on the HBC unit for 2 seconds.
s The LED indicator would blink blue and red alternately.
s Turn on the mobile phone bluetooth and select the respective UCLEAR
HBC name to pair with the unit.
When prompted to enter a passcode, enter ‘0000’.
*Most mobile phones when paired would be automatically connected with
both phone and music bluetooth capabilities.
All the connections among Universal Remote, Helmet Communicator, and
Mobile Phone are established. You may now use the Universal Remote to
control the helmet communicator to answer your calls, make outgoing calls
or listen to music.
EN
12

General Operations
Pick up incoming call:
Press the Universal Remote ‘Answer’ button once.
Reject calls:
Hold the Universal Remote ‘Answer’ button for 2 seconds.
Voice calls:
Hold the Universal Remote ‘Down’ and ‘Answer’ buttons for 2 seconds.
Last number redial:
Hold the Universal Remote ‘Up’ and ‘Answer’ buttons for 2 seconds.
Play music
Press the Universal Remote ‘Answer’ button for 2 times.
Stop music
Press the Universal Remote ‘Answer’ button 1 times.
Fast forward music
Press the Universal Remote ‘Up’ button for 2 times.
Back track music
Press the Universal Remote ‘Down’ button for 2 times.
Attention
Please DO NOT HOLD the Universal Remote ‘Answer’ button for too long
while rejecting calls. It may turn off the connected HBC unit ( 5 seconds will
turn off the connected HBC unit), unless you want to turn it off.
EN
13

Intercom Connection
Step 1
Pair the Universal Remote to respective HBC unit, if they have not been
paired before.
To connect the Universal Remote to the helmet communicator,
s Power ‘On’ the HBC unit and hold ‘Up’ and ‘Down’ buttons for 2
seconds until LED blinks blue and red alternately.
s While holding the ‘Up’ or ‘Down’ button, power ‘On’ the Universal
Remote, only release the ‘Up’ or ‘Down’ till the LED blinks blue and
red alternately.
s Once the connection is successful, HBC and Universal Remote will
blink blue.
s Power ‘Off’ the Universal Remote and respective HBC unit. The
Universal Remote to the respective HBC unit preparation is done.
Attention
Pairing is only necessary for establishing your initial connection. You can use
Just Connect Mode to establish future connections between your Universal
Remote and HBC controller.
EN
14

Intercom Connection
Step 2
Pairing between HBC units.
other HBC units.
Pairing process needs to be carried out only once.
s
s Pick one units as the 1st device, hold ‘Answer’ and ‘Up’ buttons for 3
seconds.The status indicator wouldblink purple.
s For the 2nd device, hold ‘Answer’ and ‘Up’ buttons for 3 seconds. The
status indicator wouldblink purple. Wait until the 1st device status
indicator to turn blue, then proceed to pair the next device.
s Hold ‘Answer’ and ‘Up’ buttons for 3 seconds on the 3rd device.
The status indicator will blink purple. Wait for the 2nd device status
indicator to turn blue, then proceed to pair the next device.
s Repeat all steps for all other units until all the devices are paired.
s The last device will remain blinking purple if the maximum HBC that
can be connected have not been reached. You can press any button on
the device toend the pairing process. The status indicator will turn blue.
s Off all the HBC units and the preparation is done.
Or More...
Unit 1 Unit 2 Unit 3 Unit 4
EN
15

Intercom Connection
The time of in use
Step 2
Turn ‘On’ all HBC units, connecting up all the intercom.
To enable the intercom, hold the ‘Up’ button for 2 seconds. All the paired
HBC units will be chained up automatically.
Or more…
Step 3
Connect respective Universal Remote by pressing ‘Power’ button once.
(Turning ‘On’ the power, the Universal Remote will connect to the already
paired HBC units).
Or more…
Step 4
Connect the Phone to HBC device if phone is used
s If the phone is paired with the respective HBC unit, turn on the mobile
phone bluetooth functions, select the UCLEAR HBC device name to
connect.
EN
Or more…
16

Intercom Connection
s If the phone has not paired with the respective HBC unit yet, pairing
is necessary by holding the ‘Up’ and ‘Down’ buttons of the Universal
Remote for 2 seconds. This will let the helmet communicator into
pairing mode. The status indicator ofthe HBC unit would blink blue
and red alternately.
Or more…
s Next turn on the mobile phone bluetooth functions and search for
bluetooth devices. Select the UCLEAR HBC device name to pair with
the desired device.
s Most mobile phones when paired would be automatically connected
with both phone and music bluetooth capabilities.
EN
17

General Button Configurations
Action Button
Not Connected
Power on Press ‘Answer’ button once
Pairing
Connected to HBC (HBC connected to phone)
Activate HBC pairing Hold ‘Up’ and ‘Down’ buttons for 2 seconds
Reset HBC
Pick up call Press ‘Answer’ button once
End call Hold ‘Answer’ button for 2 seconds
Reject call Hold ‘Answer’ button for 2 seconds
Voice dial Hold ‘Answer’ and ‘Down’ buttons for 2 seconds
Last number redial Hold ‘Answer’ and ‘Up’ buttons for 2 seconds
Play music Press ‘Answer’ button 2 times quickly
Stop music Press ‘Answer’ button 1 time
Fast forward track Press ‘Up’ button 2 times quickly
Backtrack Press ‘Down’ button 2 times quickly
Connected to HBC (Intercom is used)
Connect intercom Hold ‘Up’ button for 2 seconds
Disconnect intercom Hold ‘Down’ button for 2 seconds
Common instruction commands (For phone call, music, intercom)
Volume Up Press ‘Up’ button once
Volume Down Press ‘Down’ button once
While holding ‘Up’ or ‘Down’ button, on the
‘Power’
Press ‘Answer’, ‘Up’ and ‘Down’ buttons
simultaneously
EN
18

General Status Indicator Configurations
The table below shows the status indicator configurations
State Status Indicator
Power on (No connection) Blink purple once every second
1
Pairing to HBC unit Blink blue and red alternatively slowly
2
Connecting to HBC unit Blink blue and red alternatively quickly
3
Connected to HBC unit Blink blue slowly once every 2 seconds
4
Battery low Blink red every minute
5
Power off Blink red 5 times
6
Battery charging Solid red
7
Battery fully charged Solid blue
8
Entering DFU mode Blink red once (All LED off completely)
9
Power off All LED off
10
EN
19

Technical Data
Unit
Dimension (L x W x H) 60mm x 20mm x 12mm
Weight 10g
Bluetooth
Version 4.1 , Class 2
RFComm
Carrier frequency 2.402 – 2.480 GHz
RF output power 7.76dBm
Power
Power consumption 50mW (max)
Power input (Charging) 5V / 300 mA
Built-in-battery
Operation time 15 hours
Temperature
Operation temperature
Charging temperature
Storage temperature
3.7V, 30mAh x 2, Lithium-ion Polymer
(Rechargeable)
- 28.9 C to 60 C
(-20 F to 140 F)
0 C to +45 C
(+35 F to +113 F)
-40 C to +80 C
(-38 F to +176 F)
EN
20

Notices
compliance could void the user’s authority to operate the equipment.
This equipment has been tested and found to comply with the limits for a
Class B digital device, pursuant to Part 15 of the FCC Rules. These limits
are designed to provide reasonable protection against harmful interference
radio frequency energy and if not installed and used in accordance with
the instructions, may cause harmful interference to radio communications.
installation.
If this equipment does cause harmful interference to radio or television
reception, which can be determined by turning the equipment off and on,
the user is encouraged to try to correct the interference by one or more of the
following measures:
ż Reorient or relocate the receiving antenna.
ż
Increase the separation between the equipment and receiver.
ż Connect the equipment into an outlet on a circuit different from
that to which the receiver is connected.
ż
Consult the dealer or an experienced radio/TV technician for help.
This equipment complies with FCC radiation exposure limits set forth for
instructions for satisfying RF exposure compliance. This transmitter must
not be co-located or operating in conjunction with any other antenna or
transmitter.
etaidar nac dna sesu ,setareneg tnempiuqe sihT .noitallatsni laitnediser a ni
ralucitrap a ni rucco ton lliw ecnerefretni taht eetnaraug on si ereht ,revewoH
EN
21

Notices
BATTERY WARNING:
!
The UCLEAR Universal Remote contains a rechargeable lithium ion polymer
!
CHARGING NOTICE:
equipments, please follow all the instructions below:
ż Do not immerse the product, AC adaptor or speakers in water.
ż Do not install, place or use the product near any source of heat
for example: stove, radiator, oven, toaster, coffee maker or otherapparatus that gives off heat.
ż Always use the provided AC power adaptor and cable included in
the package to charge the product. Use of any incorrect power
supply to charge the product may cause permanent damage to the
product and render the warranty void.
WARRANTY:
Without prejudice of legal warranty, the product is covered under a 2 year
warranty by manufacturer from the date of purchase. Please provide the proof
of purchase when you return the item to the supplier. The warranty covers
manufacturing defects only. The warranty is voided by any unauthorized
upgrading or results of any failures to follow the guidelines as set out in
anywhere in our technical publishing released to the public from time to time
which would have voided the warranty.
Warranty does not cover data recovery and physical deterioration due to
use, damages resulting from accidents, storage, loss or data loss or damage
during repairs or transits. The sender will bear all transportation charges for
functioning products but which were declared defective.
EN
22

Notices
LIMITATIONS OF WARRANTY:
All product warranties for the product by are limited to those mentioned in
the product manual.
WAIVER AND DISCLAIMER:
BITwave, and all their representatives, partners, agents, distributors, suppliers
and resellers shall not be liable and will be held harmless from any and
all litigation, claims, debts, demands, actions and liability which may arise,
directly or indirectly, from operating or using the product for any damages,
losses, distress, pain, suffering, discomfort, loss and injuries including
bodily harm illness, strains, fractures, partial and/or total paralysis, death
or other ailments that could cause serious disability either to any persons,
or any parties whether the user or other third parties or their possessions,
or to any goods, vehicles, properties, assets among others including your
own suffered by any persons, organizations, or any third parties whether
physical or otherwise and which may accrue to you in the future, to the fullest
extent permitted by law as a result of the use, operation, malfunctioning,
misuse, disposal or repairs of the product or any other reasons, conditions
or circumstances or attempts to do so whether due to negligence, omissions,
or otherwise of BITwave, or any of their representatives, partners, agents,
.distributors, suppliers, resellers, designer, manufacturer or any others in its
supply and distribution chain or any third parties involved.
All
risks from operating or usage of the product rest solely and entirely with
the user of this product, the original purchaser or any third parties, who
assumes full responsibility for all injuries, losses and/ or damages, whether
caused in whole or in part by the negligence, omissions or other conduct
of others, including that of BITwave, and all their representatives, partners,
agents, distributors, suppliers, resellers and all others in its supply and
distribution chain either due to the designer’s or manufacturer’s negligence
or omissions or any third parties involved.
EN
23

Notices
CORRECT DISPOSAL OF THIS PRODUCT:
Do not dispose this product with other household wastes at the end of
its working life. There is a separate collection system for used electronic
products in accordance with legislation that requires proper treatment,
recovery and recycling. Household users should contact either the retailer
details of where and how they can take this item for environmentally safe
recycling. Business users should contact their suppliers and refer to the terms
and conditions of the purchase contract. This product should not be mixed
with other commercial wastes for disposal.
PRODUCT INFORMATION:
BITwave, and all their representatives, agents, distributors, suppliers or
resellers shall not be held responsible for any consequences arising from
any errors or omissions in the guide or resulting directly or indirectly from
the use of the information herein. BITwave reserves the right to amend or
improve the product design or user guide without any restrictions and without
any obligation to notify users. All information here is accurate as of the date
of printing.
product on www.uclear-digital.com from time to time
PERSONAL SAFETY:
Do not open the seal of the hardware, tamper, repair or modify any parts.
Do not touch the product with metal objects or parts or chemical products.
Please contact the technical support or your local supplier if your product
use of the product is not permitted or allowed by any laws and regulations
restrictions. You will bear the full responsibilities of any breaches of law and
regulations.
EN
24

Notices
You should not allow the operations or use of the product or any attempts
to use it by any persons including yourself to compromise anyone’s safety
including your own or to cause harm to any vehicles, property, objects,
livestock, inventories, assets and the like under any circumstances. You
or any users of the product are to take all necessary safety measures and
precautions and to remain alert to all surrounding conditions. You are warned
not to operate the product if you are not physically capable of doing so in a
safe manner, if you have or will consume any alcohol or any mind-altering
substance during its operation so that your alertness is compromised or if
you have any medical conditions or needs that may compromise your abilities
to do so in a safe manner. We warn you of the inherent, unforeseeable and
injury or illness, strains, fractures, partial and/or total paralysis, death or other
ailments that could cause serious disability due to any causes.This product
is only for use by persons eighteen (18) years of age and above who have
have read this release of liability and fully understand its terms and that you
have given up substantial rights by using or attempting to use the product.
TECHNICAL SUPPORT:
For additional information please visit our website at
www.uclear-digital.com
For customer and technical support in the US and Canada, please contact:
BITwave USA LLC
1093 E lron Eagle Dr. #115
Eagle, ID 83616
1-855-BIT-WAVE
EN
25

Notices
COPYRIGHTS:
Copyright © 2014 BITwave Pte Ltd. All rights reserved. No part of this guide
may be reproduced in any form or by any process whatsoever without prior
written consent from BITwave Pte Ltd.
LICENCES:
The UCLEAR trademark and logo is exclusively owned by BITwave Pte Ltd.
Any use of the mark by any other parties without prior written permission of
BITwave Pte Ltd constitutes an infringement of legal rights. The Bluetooth
trademark is owned by Bluetooth SIG and is used under licence by
BITwave Pte Ltd.
FCC COMPLIANCE STATEMENT:
This device complies with part 15 of the FCC rules. Operation is subject to
the following two conditions:
(1). This device may not cause harmful interference, and
(2). This device must accept any interference received, including
interference that may cause undesired operations.
Note: The manufacturer is not responsible for any radio or tv interference
to the equipment will void the manufacturer’s warranty.
This device complies with Industry Canada license-exempt RSS standard(s).
Operation is subject to the following two conditions:
(1) this device may not cause interference, and (2) this device must accept
any interference, including interference that may cause undesired operation
of the device. This Class[B] digital apparatus complies with Canadian ICES-
003.
EN
26

Notices
Cet appareil s’accorde avec Industrie Canada licence-exempte RSS standard.
(1) cet appareil ne peut pas causer l’intervention, et (2) cet appareil doit
accepter de l’intervention, y compris l’intervention qui peut causer l’opération
non désirée de.
Cet appareil numérique de la classe B est conforme à la norme NMB-003
du Canada
EN
27EN28

 Loading...