

Bissell 18M9V Owner’s Manual

®
i
eewind eewind Rewind .e.'°eewlnd"
USER'S GUIDE
58F8, 18M9, 84G9, 26T5 SERIES
Thank You
Safety Instructions
Product View
Assembly
Operations
Maintenance and Care
Troubleshooting
Replacement Parts
Accessories
Warranty
Consumer Services

lanks for buying a BISSELL vacuum
We're glad you purchased a BISSELLvacuum. Everything we know
about floor care went into the design and construction of this com-
plete, high-tech home cleaning system.
Your BISSELLvacuum is well made, and we back it with alimited three
year warranty. We also stand behind it with a knowledgeable, dedicat-
ed Consumer Services department, so, should you ever have a prob-
lem, you'll receive fast, considerate assistance.
My great-grandfather invented the floor sweeper in ] 876. Today,
BISSELL is a global leader in the design, manufacture, and service of
high quality homecare products like your BISSELLvacuum.
Thanks again, from all of us at BISSELL.
Mark J. Bissell
Chairman, President & CEO
2
www. b is s ell. co m y_, 800.237.7691

SAFETY INSTRUCTIONS
When using an electrical appli-
ance, basic precautions should be
observed, including the following:
READ ALL INSTRUCTIONS
BEFORE USING YOUR
UPRIGHT VACUUM.
Always connectto a polarized outlet (leftslot is
wider than right). Unplug from outletwhen not
in useand before conducting maintenance.
WARNING: To
reducethe risk of fire, electric shock,or injury:
• Do not modify the polarized plug to fit a
non-polarized outlet or extension cord.
• Do not leave vacuum cleaner unattended
when it is plugged in.
• Unplug from outlet when not in useand
before servicing.
• Unplug before attaching the TurboBrush.
• Do not use outdoors or on wet surfaces.
• Do not allow children to operate vacuum
cleaner or use as a toy.
• Close attention is necessary when used
by or near children.
• Do not use for any purpose otherthan
described in this user'sguide.
• Use only manufacturer's recommended
attachments.
• Do not usewilh damagedcordor plug.
• If appliance is notworking as it should,
has been dropped, damaged, left out-
doors, or dropped into water, have it
repaired at an authorized service center.
• Do not joullor carry by cord, usecord as
a handle, close a door on cord, or pull
cord around sharp edges or corners. Do
not run appliance over cord. Keep cord
away from heated surfaces.
• Do not unplug by pulling on cord. To
unplug, grasp the plug, not thecord.
• Do not handlevacuum cleaner or plug
with wet hands.
• Do not put any object into openings. Do
not usewith any opening blocked; keep
openings free of dust, lint, hair, and any-
thing that may reduce air flow.
• Keep hair, looseclothing, fingers, and all
parts of body away from openings and
moving parts.
www. bi ss ell. co m _;y_ 800.237. 7691
• Turn off all controls before plugging or
unplugging vacuum cleaner.
• Useextra care when cleaning stairs.
• Do not pick up flammable materials
(lighter fluid, gasoline, kerosene, etc.) or
use in the presence of explosive liquids
or vapors.
• Do not pick up toxic material (chlorine
bleach, ammonia, drain cleaner, etc.).
• Do not usevacuum cleaner in an
enclosed space filled with vapors given
off by oil base paint, paint thinner, some
moth proofing substances,flammable
dust, or other explosive or toxic vapors.
• Do not pick up hard or sharp objects
such as glass, nails, screws, coins, etc.
• Do not pick up anythingthat isburning or
smoking,suchas cigarettes,matches,or
hot ashes.
• Do not usewithout filtersin place.
• Useonly on dry, indoor surfaces.
• Keep appliance on a level surface.
• Do not carry the vacuum cleaner while it
is running.
• Hold plug when rewinding onto cord
reel. Do not allow plug to whip when
rewinding.
SAVE THESE
INSTRUCTIONS
FOR FUTURE USE
THIS APPLIANCE
HAS A
POLARIZED PLUG
To reduce the risk of electric shock, this
appliance has a polarized plug (one
blade is wider than the other). This plug
will fit in a polarized outlet only one way.
If the plug does not fit fully in the outlet,
reverse the plug. If it still does not fit,
contact a qualified electrician to install a
proper outlet. Do not change the plug in
any way.
This model is for household use only.
3

Stretch Hose.
TurboBrush®\
Tool
PET
Tool
(selectmodelsonly)
Clean Carpet
Sensor
(selectmodelsonly)
Clean
Indicator
(selectmodelsonl'
Crevice
Wand
Easy
DirtContainer
Filter
Activated
Carbon
(select
only)
Lock
SealTM Lever
Headlic
FurnitureProtection
Guard
view
Handle
Filter
'Powerfoot
HoseCli
Carr)_in
Handle
Combination
Washable
Release
Pedal
Height
Adjustment
Knob
Quick
Reach®
,Handle
Hose
Wand
Base
"Foot
Hose
CAUTION:
Do not plugin your vacuum
cleaner untilyou are familiar
with all instructionsand
operating procedures.
4
www.bJssell.com 800.237.7691
[/k WARNING:
Plasticfilm can bedangerous.
Toavoid danger of suffocation,
keep away from babies and
children.
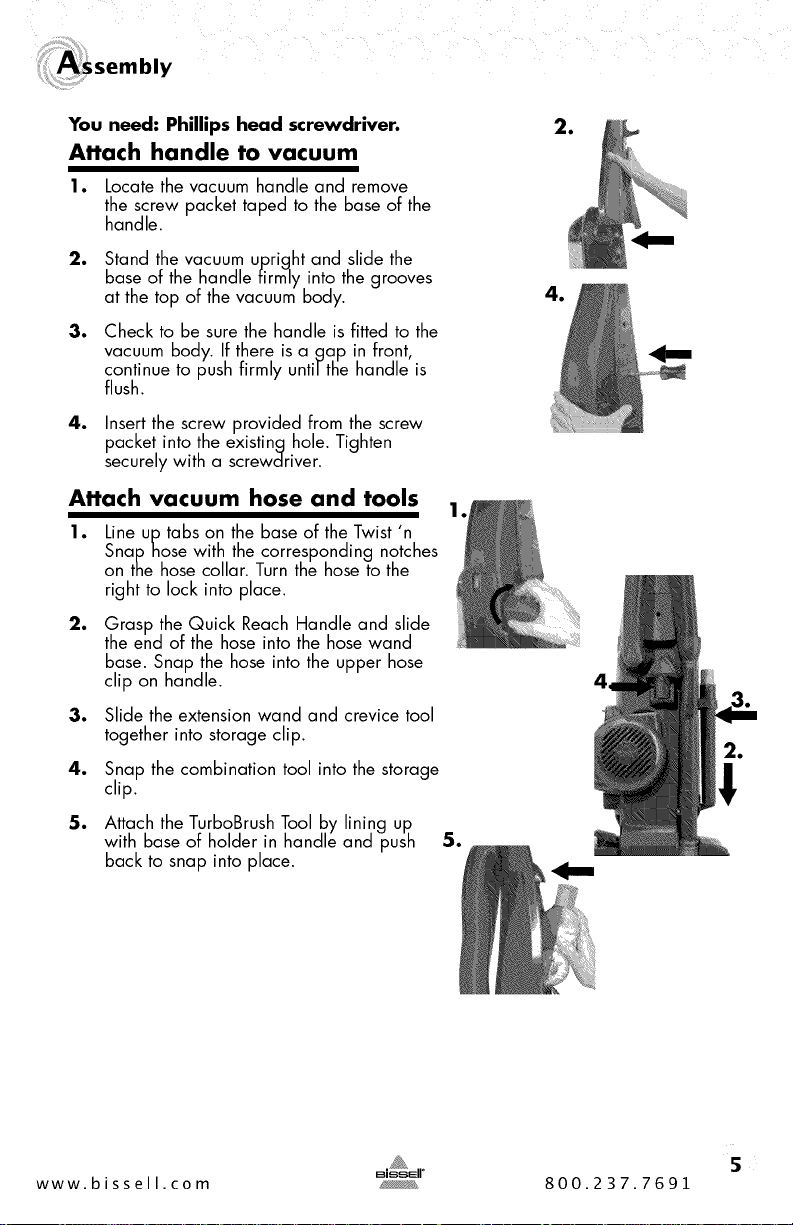
You need: Phillips heacl screwdriver.
Attach handle to vacuum
1. Locate the vacuum handle and remove
the screw packet taped to the base of the
handle.
2. Stand the vacuum upright and slide the
base of the handle firmly into the grooves
at the top of the vacuum body.
3. Check to be sure the handle is fitted to the
vacuum body. If there is a _ap in front,
continue to push firmly unti/the handle is
flush.
4. Insert the screw provided from the screw
packet into the existing hole. Tighten
securely with a screwdriver.
Attach vacuum hose and tools
I. Line up tabs on the base of the Twist 'n
Snap hose with the corresponding notches
on the hose collar. Turn the hose to the
right to lock into place.
2. Grasp the Quick Reach Handle and slide
the end of the hose into the hose wand
base. Snap the hose into the upper hose
clip on handle.
3. Slide the extension wand and crevice tool
together into storage clip.
4.. Snap the combination tool into the storage
clip.
5. Attach the TurboBrush Tool by lining up
with base of holder in handle and push
back to snap into place.
www.bissell.com _,_®_ 800.237.7691
S
 Loading...