

Page 1
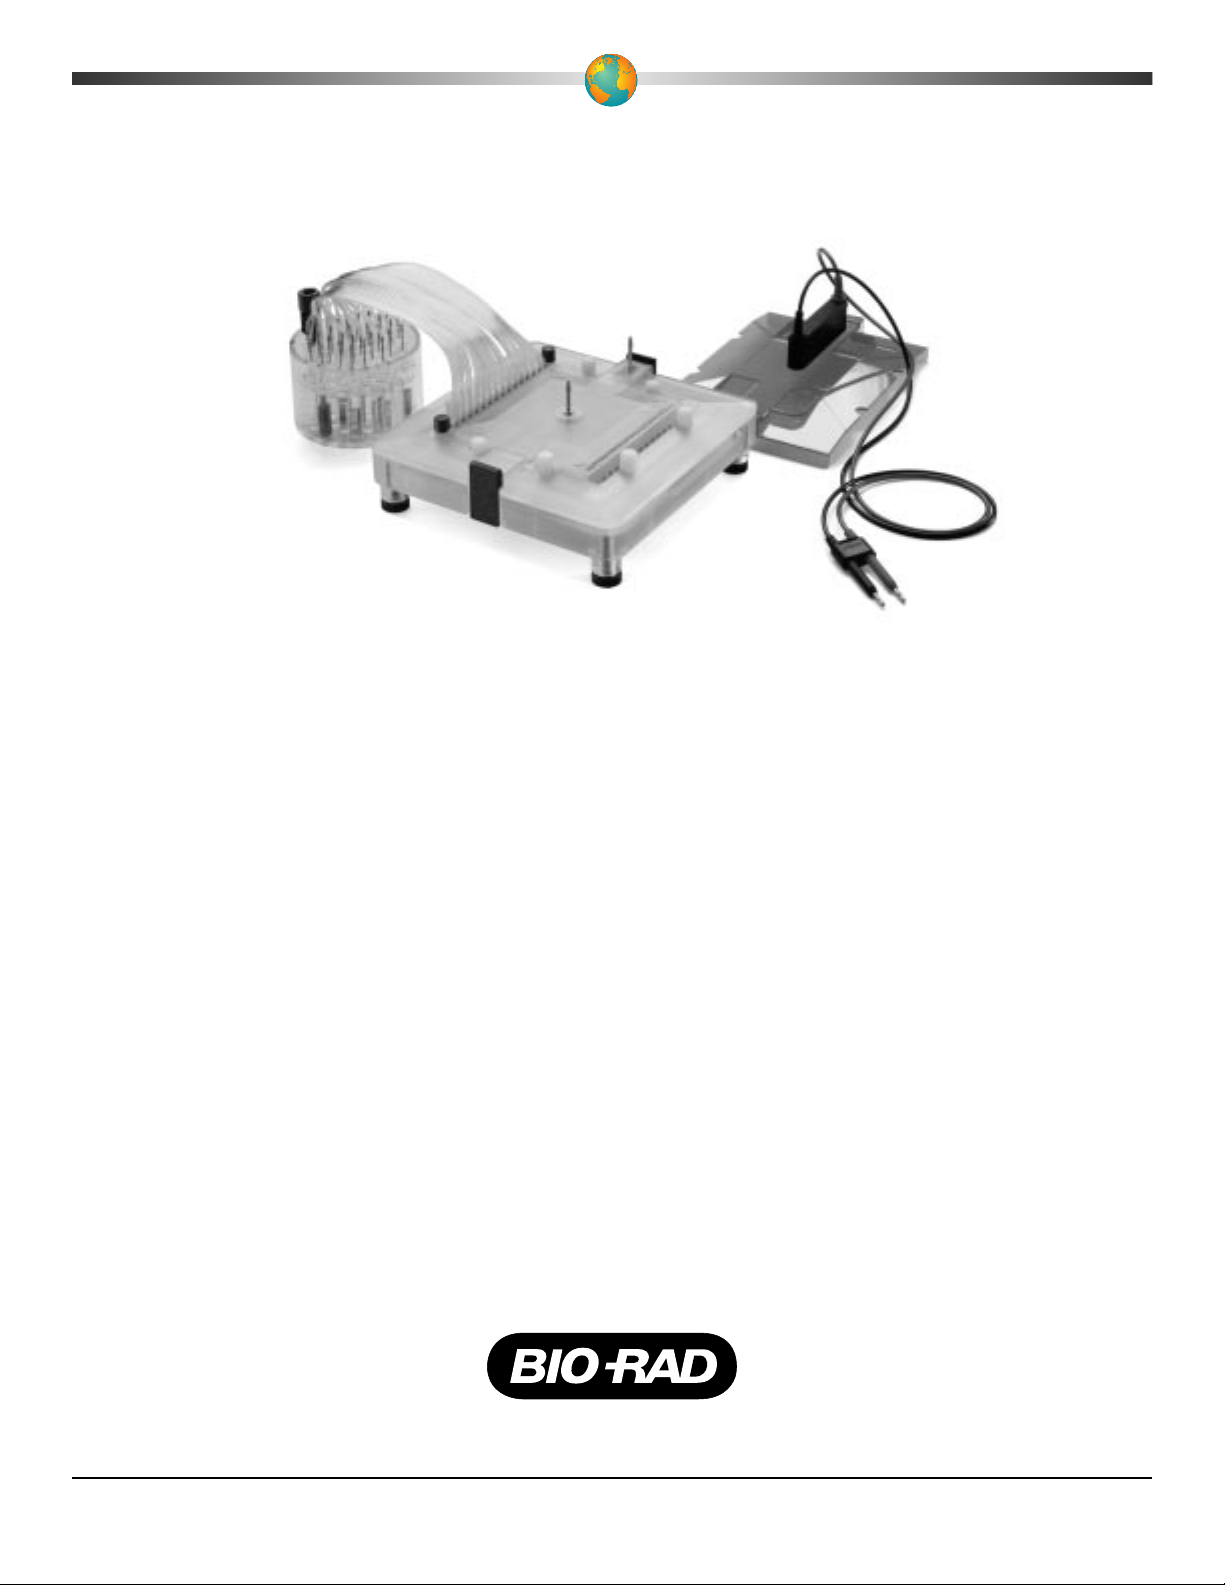
Whole Gel Eluter
and
Mini Whole Gel Eluter
Instruction Manual
Catalog Numbers
165-1250
165-1251
165-1255
165-1256
For Technical Service Call Your Local Bio-Rad Office or in the U.S. Call 1-800-4BIORAD (1-800-424-6723)
Page 2

Table of Contents
Page
Section 1 General Information....................................................................................1
1.1 Introduction ................................................................................................................1
1.2 Specifications .............................................................................................................1
1.3 Safety..........................................................................................................................2
Section 2 Description and Assembly of Components...............................................3
2.1 Whole Gel Eluter Components..................................................................................4
2.2 Vacuum Harvester Components................................................................................5
Section 3 Assembly and Operation.............................................................................6
3.1 Preparative Slab Gel Electrophoresis.........................................................................6
3.2 Whole Gel and Mini Whole Gel Eluter Assembly....................................................6
3.3 Running the Whole Gel Eluter.................................................................................10
3.4 Harvesting Eluate.....................................................................................................10
Section 4 Optimizing Conditions ..............................................................................12
4.1 Buffer Selection........................................................................................................12
4.2 Running Conditions .................................................................................................13
4.3 Optimization Procedure ...........................................................................................14
Section 5 Maintenance and Sterilization..................................................................14
5.1 Cleaning the Whole Gel Eluter................................................................................14
5.2 Sterilization of the Whole Gel Eluter.......................................................................14
5.3 Cleaning the Vacuum Harvester..............................................................................14
Section 6 SDS-PAGE..................................................................................................15
6.1 Reagents for SDS-PAGE Slab Gels (Laemmli buffer system)3.............................15
6.2 Preparing SDS-PAGE Gels of any %T ...................................................................16
6.3 Separating Gels - Calculating %T............................................................................17
6.4 Stacking Gel - 4%T (0.125 M Tris pH 6.8).............................................................17
Section 7 Native PAGE...............................................................................................18
7.1 Native PAGE Slab Gels...........................................................................................18
7.2 Reagents for Discontinuous Native PAGE (Ornstein-Davis).................................18
7.3 Prepare Ornstein-Davis Acrylamide Gels ...............................................................19
7.4 Reagents for Continuous Native PAGE ..................................................................19
7.5 Prepare Continuous Gels (10 ml acrylamide monomer solution)...........................21
7.6 Sample Preparation ..................................................................................................21
Section 8 Troubleshooting Guide..............................................................................21
Section 9 Equipment and Accessories......................................................................22
Section 10 References...................................................................................................22
Page 3

Section 1
General Information
1.1 Introduction
The Whole Gel Eluter provides an alternative method for recovering samples from SDS
and Native PAGE slab gels. It is a preparative electrophoresis instrument which allows simultaneous electro-elution of multiple protein bands separated on a polyacrylamide gel. Elution
is in the transverse direction, through the thickness of the gel. Proteins are eluted into narrow
chambers with each of these fractions containing individual or multiple protein bands.
The eluter consists of a solid acrylic base, a drop-in bottom electrode, an elution chamber core, an upper plate/spring electrode and a lid. The Whole Gel Eluter comes in two sizes.
The large format accommodates slab gels up to 20 cm long and the small format is designed
for mini-gels (Mini-PROTEAN®II and Ready Gels). Filter paper and a cellophane sheet are
placed between the bottom electrode and the elution chamber core. The gel is sandwiched
between the top of the elution chamber core and the spring electrode. During elution, the proteins are captured in one of the 30 elution chambers of the large eluter or one of the 14 chambers of the mini eluter.
One important application for this instrument is the purification and subsequent direct
screening of protein mixtures. Andersen and Heron describe a direct cellular analysis of a
complex protein mixture for biological activity.1The eluter acts as an electrodialyzer removing SDS from protein, leaving them in a non-toxic physiological buffer that can then be used
directly in a cellular assay. The Rotofor®and Prep cell are recommended for larger scale electrophoretic protein purification.
Simple procedures are provided in this manual for optimizing elution conditions. It is
recommended that these procedures be performed for each new sample and when making
changes to slab gel electrophoresis conditions.
1.2 Specifications
Construction
Base acrylic/polycarbonate insert
Elution chamber core acrylic/polycarbonate insert
Bottom electrode platinum coated titanium plate
Upper plate/spring electrode acrylic/platinum coated titanium plate
Lid polycarbonate
Cutting template acrylic
Consumables Large Mini
Upper filter paper 50 sheets 50 sheets
Lower filter paper 75 sheets 50 sheets
Sealing tabs 50 tabs 50 tabs
Cellophane membrane 25 sheets 25 sheets
Other Specifications Large Mini
Shipping weight 9.25 lb 4.75 lb
Overall size 5.0” H x 6.0” W x 6.0” D 5.0” H x 10.5” W x 10.5” D
Voltage limit 300 volts 200 volts
Power limit 15 watts 10 watts
Elution sample volume ~3 ml ~0.5 ml
1
Page 4
2
1.3 Safety
Power to the Whole Gel Eluter is to be supplied by an external DC power supply. This
power supply must be ground isolated in such a way that its DC voltage output floats with
respect to ground. The recommended power supply for this instrument is the PowerPac 300.
The maximum specified operating parameters are:
Whole Gel Eluter Mini-Whole Gel Eluter
300 VDC 200 VDC
15 W 10 W
The lid assembly provides a safety interlock for the unit. Current flow to the cell is broken when the lid assembly is removed. Do not attempt to circumvent this safety interlock and
always turn off and disconnect the power supply when working with the cell.
The recommended power supplies are ground isolated by design to minimize potential
shock hazard. However, working around high voltage equipment in a laboratory environment
is potentially dangerous. It is the user’s responsibility to always exercise care in setting up
and running electrophoresis instruments. Always turn off the power supply before removing
the lid. Do not attempt to use the cell without the safety lid.
Important:
This Bio-Rad product is designed and certified to meet EN61010-1 safety standards.
Certified products are safe to use when operated in accordance with the instruction manual.
This instrument should not be modified or altered in any way. Alteration of this instrument
will:
• Void the manufacturer’s warranty
• Void the EN61010-1 certification, and
• Create a potential safety hazard
Bio-Rad is not responsible for any injury or damage caused by use of this instrument for
purposes other than those for which it is intended or by modifications of the instrument not
performed by Bio-Rad or an authorized agent.
This product conforms to the class A standards for Electromagnetic Emissions, intended
for laboratory equipment applications. It is possible that emissions from this product may
interfere with some sensitive appliances when placed nearby or on the same circuit as those
appliances. The user should be aware of this potential and take appropriate measures to avoid
interference.
* EN61010-1 is an internationally accepted electrical safety standard for laboratory instruments.
!
Page 5
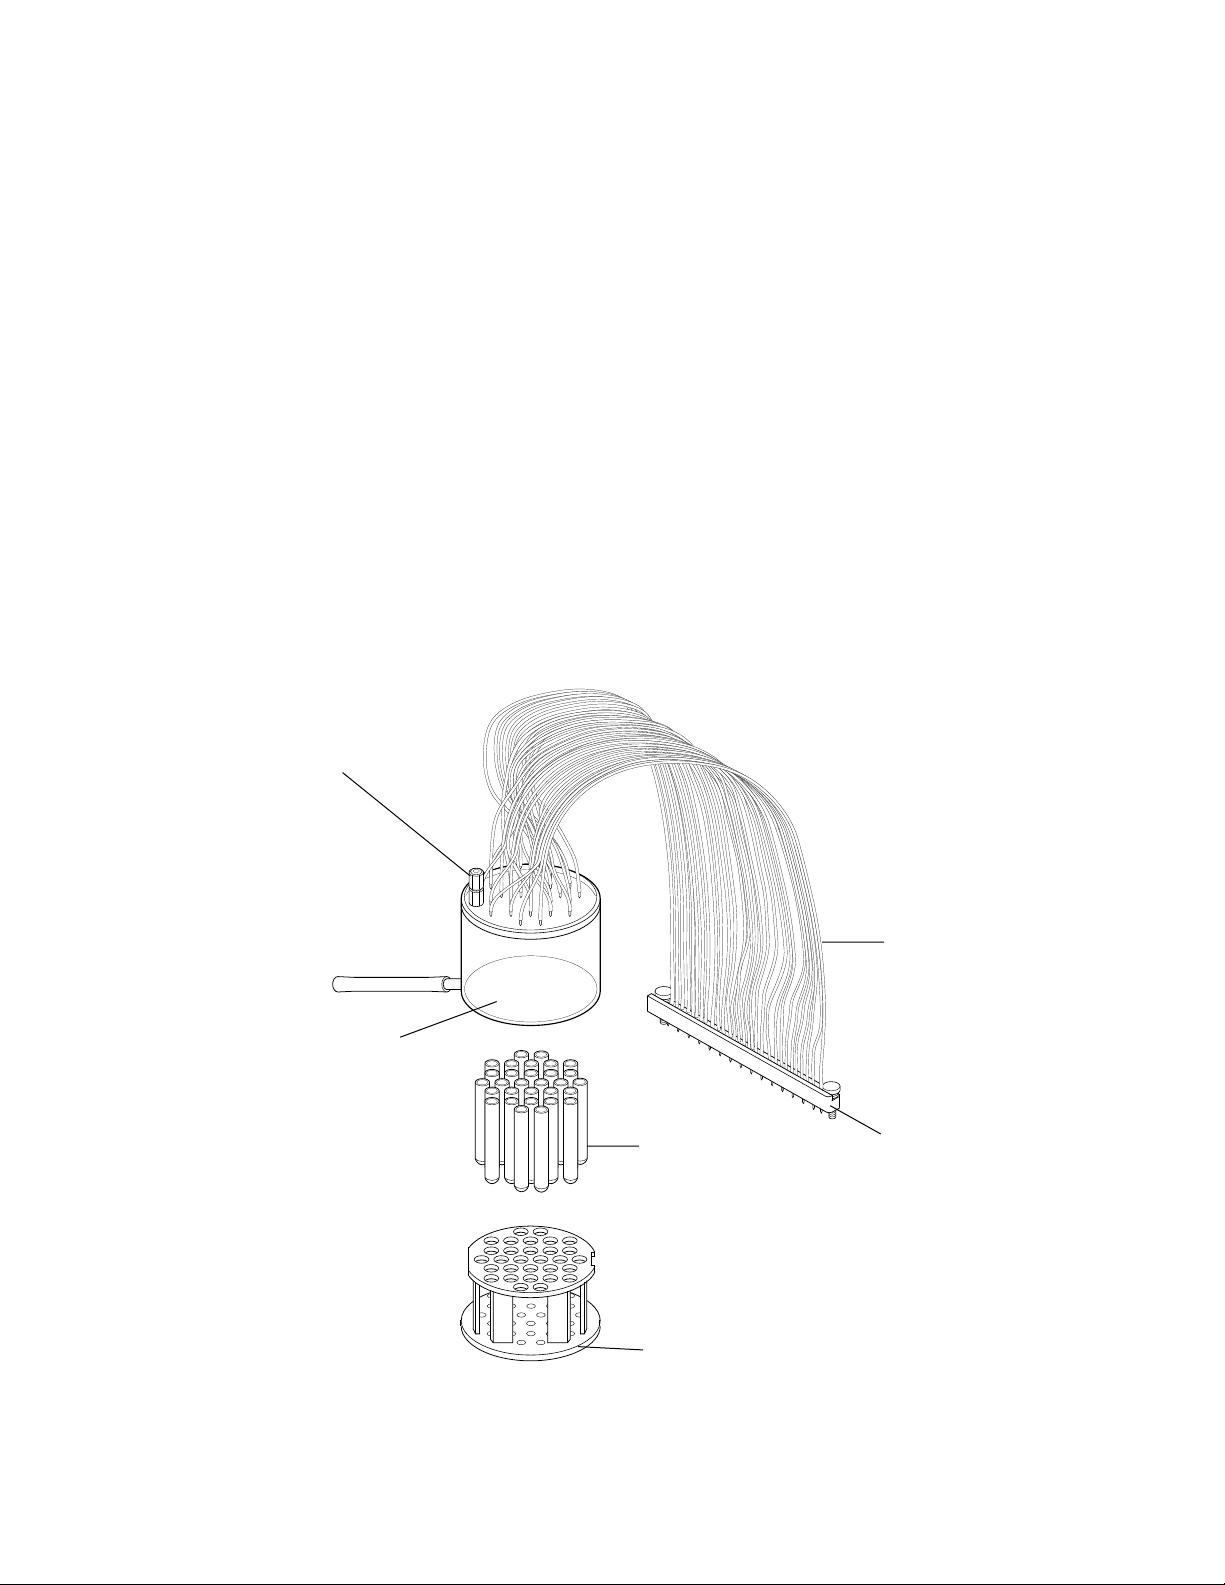
Section 2
Description and Assembly of Components
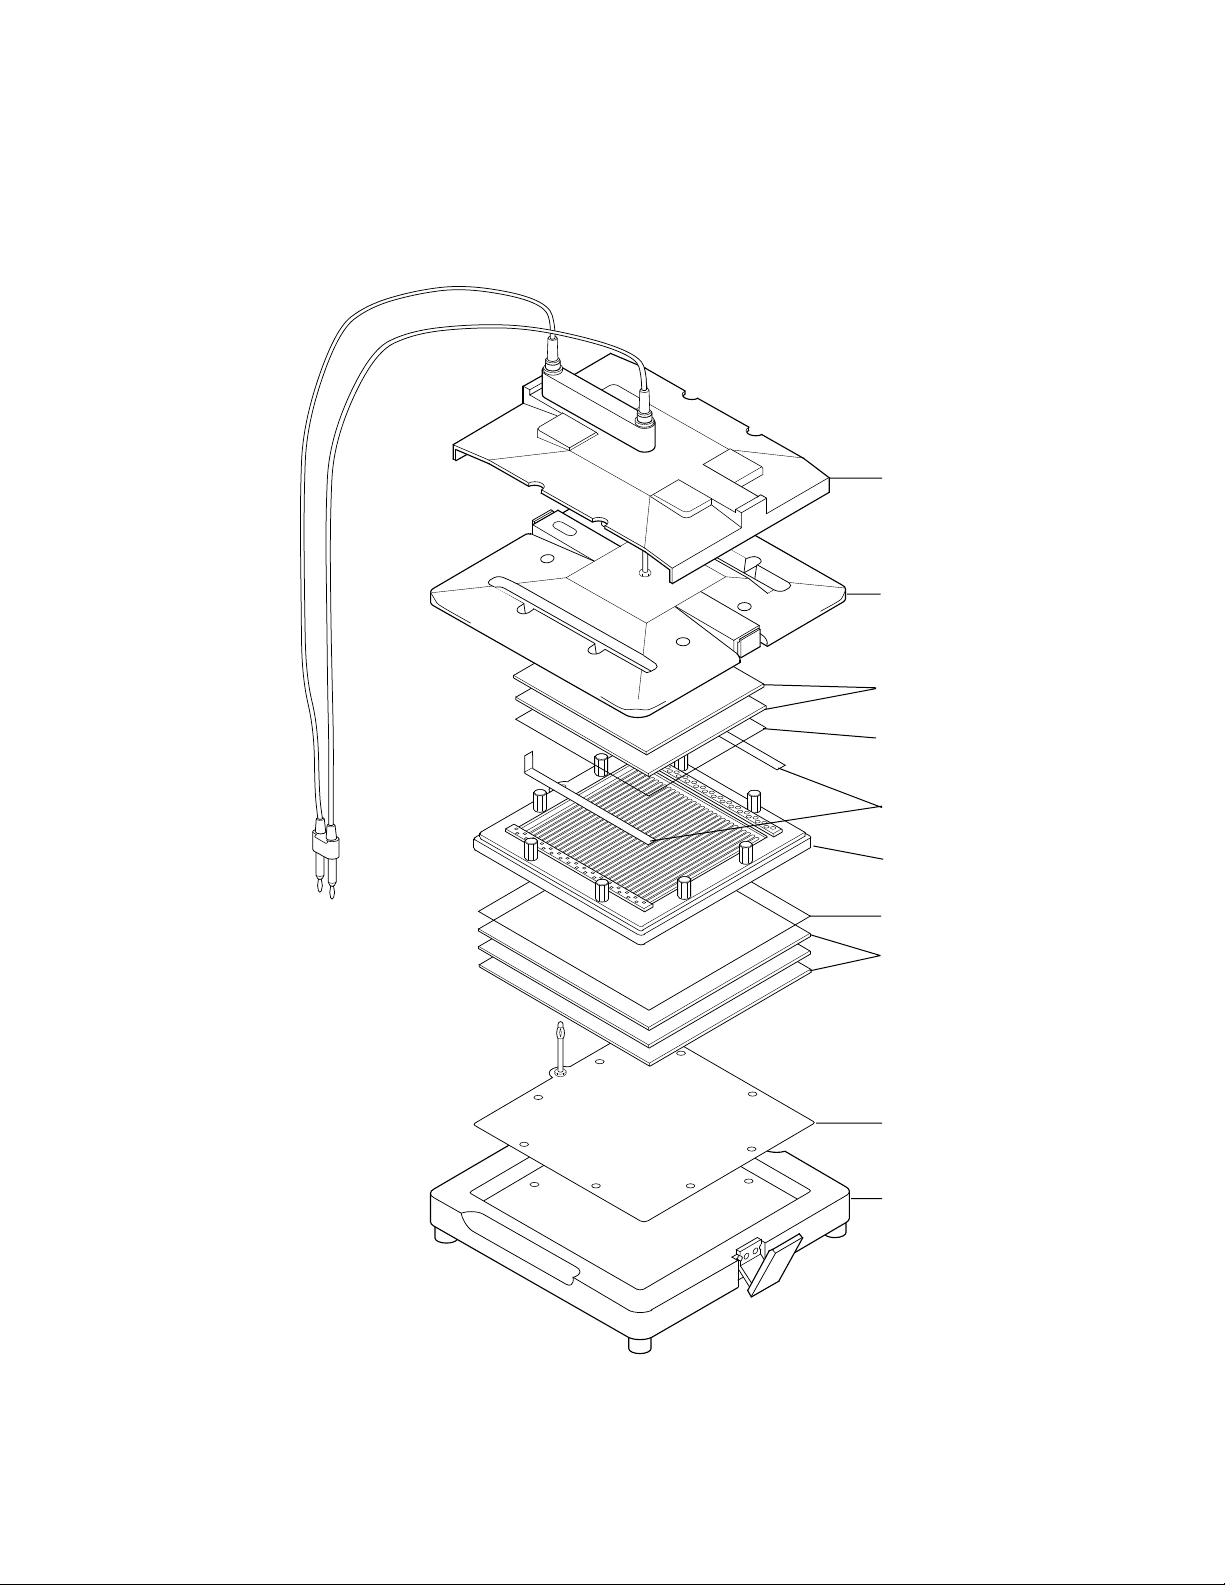
Whole Gel Eluter exploded view.
3
Lid
Upper plate/
spring electrode
Upper chamber
filter paper
Acrylamide gel
Sealing tabs
Elution
chamber core
Cellophane
Lower chamber
filter paper**
Lower plate
electrode
Base
** Mini Whole Gel Eluter is assembled with
2 sheets of lower chamber filter paper.
Page 6
2.1 Whole Gel Eluter Components
Base and Lower Electrode
The base forms a stable foundation for the eluter. The recess in it houses the lower electrode, the lower filter paper, the cellophane membrane and the elution chamber core.
Adjustable feet enable leveling of the eluter.
Elution Chamber Core
The elution chamber core is a multi-channel collection vessel which is dropped into the
base plate and screwed down over the filter paper and cellophane membrane. Proper sealing
of the core is important for preventing cross-contamination of the fractions. Proteins eluted
from the gel are held in the individual chambers until they are collected with the vacuum harvester or transfer pipet.
Upper Plate/Spring Electrode
Attached to the upper plate is the spring electrode. The electrode makes contact with the
upper filter paper. The tension on the spring holds the slab gel in place and seals the tops of
the elution chambers.
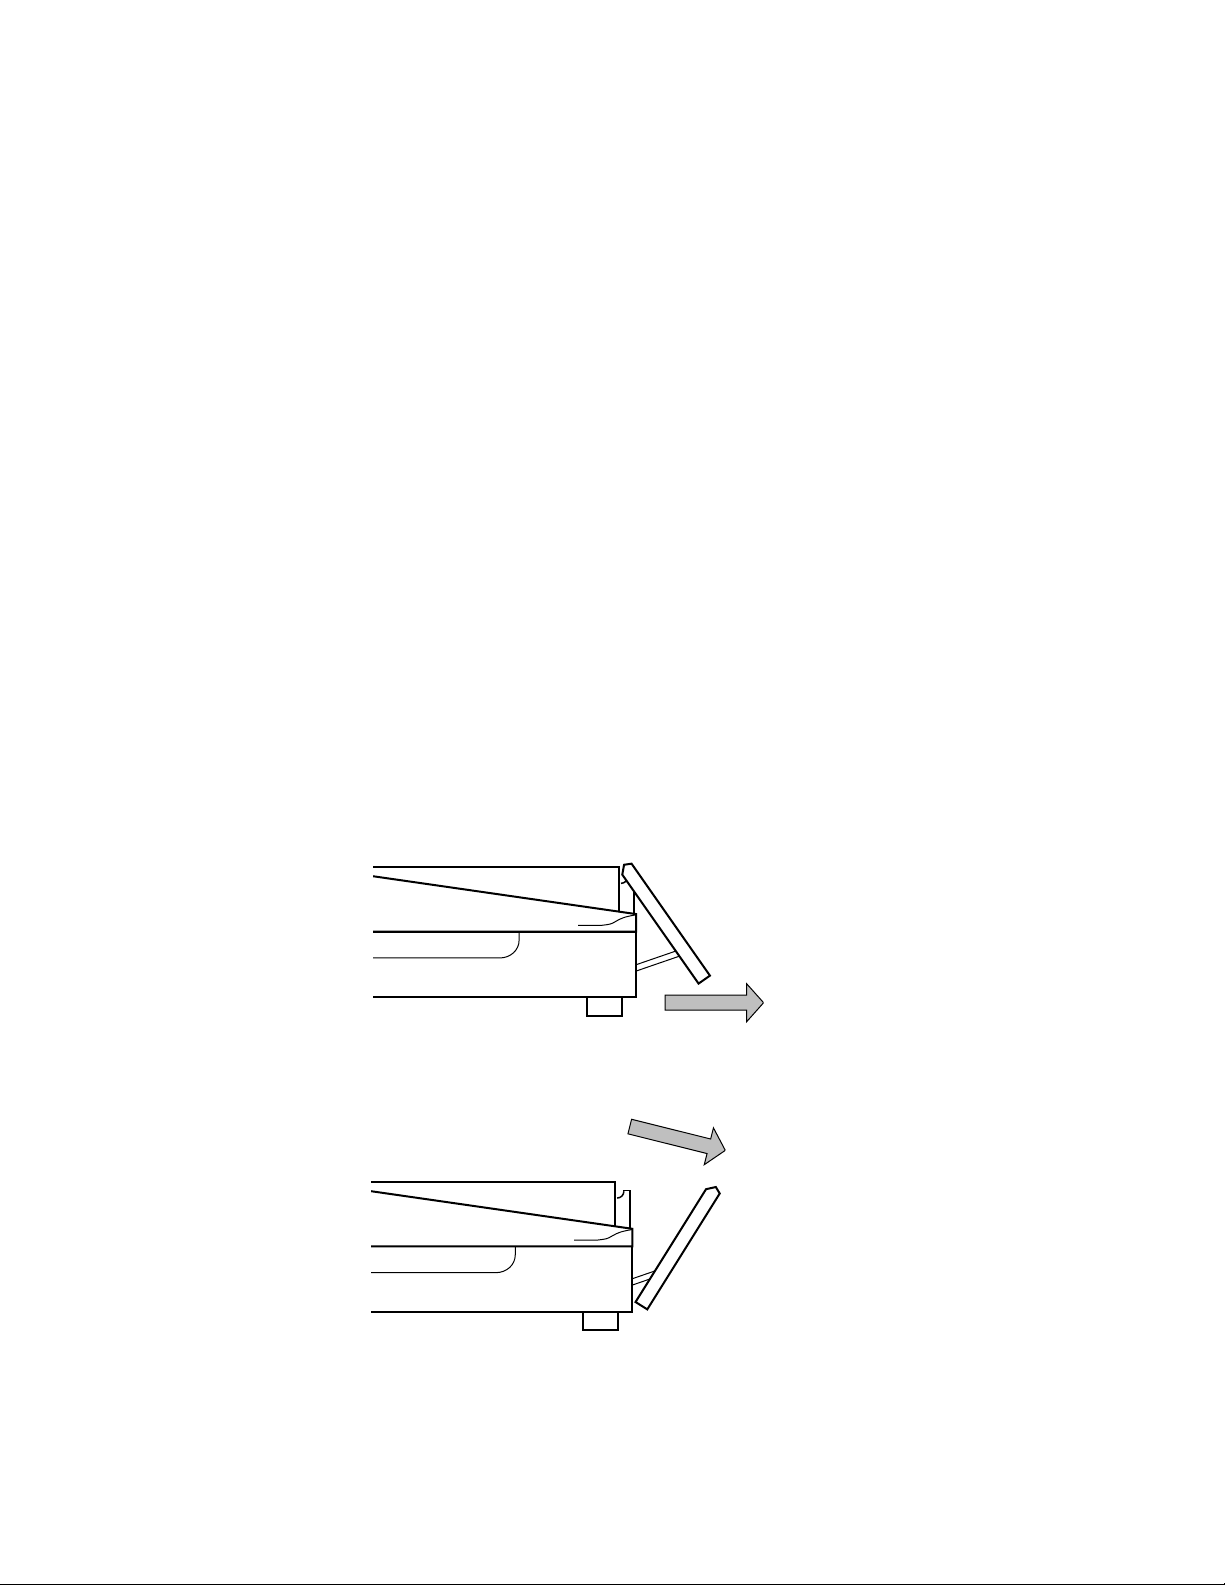
Clamps
The upper plate and base plate are held together by clamps on the sides of the eluter. To
open the clamps of the Whole Gel Eluter, pull the bottom outward as shown in Figure A.
Then disengage the clamp as shown in Figure B. The Mini-Whole Gel Eluter has its clamps
mounted in the opposite direction. To open the clamps of the Mini-Whole Gel Eluter, pull
the top outward. Then disengage the clamp at the bottom. To close the clamps, reverse these
procedures.
A. Step 1
B. Step 2
Opening Whole Gel Eluter Clamps
4
Page 7
Lid
The lid covers the electrical contacts during elution to provide electrical insulation. The
lid cannot be removed without breaking the electrical circuit. It can be placed on the eluter in
only one alignment, so that the anode and cathode connections cannot be accidentally reversed.
Cutting Template
The cutting template is a guide for excising the portion of the slab gel intended to be eluted. It also functions as a template for cutting your own upper and lower filter paper and cellophane membrane.
Ruler
The ruler has been calibrated to the distance between elution channels. It can be used as
a guide to approximate where individually resolved protein bands may elute.
In order to purify an individual protein, the nearest contaminant must be at least 5 mm
away on a preparative gel for the Mini Whole Gel Eluter or 6 mm for the Whole Gel Eluter.
2.2 Vacuum Harvester Components
* The Mini Whole Gel Eluter uses 14, 1.5 ml microcentrifuge tubes.
5
Vacuum tubing
Harvest needle
array
30, 12 x 75 mm
tubes*
Harvesting lid
Vacuum control
valve
Harvesting
tube rack
Page 8

Tube Rack
The tube rack forms a stable base for the harvester as well a housing for the collection
tubes. The rack is numbered for easy identification of fractions.
Lid and Needle Array
The lid fits onto the base only one way for proper alignment of the harvester needles with
the collection tubes. Connected to the lid by tubing is the needle array. The needle array inserts
into the harvest ports on the left side of the eluter. Thumb screws hold the needle array in
place, forming a seal between the array and the eluter. The array is designed to be inserted into
the eluter collection ports only one way for proper alignment during harvesting.
Vacuum Control Valve
The vacuum control valve is attached to the lid of the harvesting unit. The valve can be
gradually adjusted to increase or decrease the vacuum preventing uneven harvesting and splattering of eluates.
Section 3
Assembly and Operation
3.1 Preparative Slab Gel Electrophoresis
The Whole Gel Eluters can accommodate SDS or Native PAGE preparative gels up to 3
mm thick. Gel thickness can have a major effect on the elution and recovery efficiency of
proteins. In addition, proteins not eluted into a buffer containing SDS, may adhere to the cellophane (or dialysis) membrane. The thicker the gel, the longer it will take to elute the proteins and the longer they will be in contact with the membrane. Protein recovery can be greatly
improved by reversing the current for 10 to 15 seconds after elution and by keeping elution
times down to a minimum.
1. Run the SDS or Native gel with a preparative comb following standard electrophoresis
procedures. Refer to Sections 6–7 and References for information on running SDS and
Native PAGE gels. The Mini Whole Gel Eluter requires a preparative gel with a minimal
width of 6.5 cm and the large format eluter requires a minimal width of 14.5 cm. The
length of the gel is not critical. It is acceptable for some unused elution chambers to be left
empty. It is convenient to have a lane of prestained standard proteins adjacent to the
preparative well to facilitate alignment of the cutting template, but this lane must be cut
off before placing the gel in the eluter.
2. Make up a liter of elution buffer for the Whole Gel Eluter and 500 ml for the Mini Whole
Gel Eluter. This buffer will be used to equilibrate the preparative slab gel and for the sub-
sequent eluter assembly. Refer to Sections 4.1 and 7.4 for elution buffer selection.
3. Following electrophoresis, remove the gel from the gel cassette and equilibrate it in elu-
tion buffer for 15–20 minutes. This is to allow an exchange of buffers and minimize
swelling of the gels during elution.
3.2 Whole Gel and Mini Whole Gel Eluter Assembly
One of the most important factors in the successful use of the Whole Gel Eluter is the
assembly of the unit. As with blotting techniques, it is vital to remove and (or) prevent bubble formation under the gel. Second, proper alignment of the protein bands parallel to the elution chambers enhances selectivity.
6
Page 9

1. Place the base of the eluter on a level surface. Place the leveling bubble in the center of
the base and use the adjustable feet to level the base. Insert the bottom electrode plate in
the depression in the base. Align the electrode with the holes for the screws and electrode
stem.
2. Moisten two or three sheets of precut lower chamber filter paper with elution buffer and
lay them on top of the bottom electrode plate. The mini eluter requires two sheets and
the large eluter requires three sheets of filter paper to seal the bottoms of the elution cham-
bers.
3. Wet a precut sheet of cellophane (or dialysis) membrane and place it on the blotting paper.
Work out all air bubbles with the roller provided.
Wet a precut sheet of cellophane and place it on the precut, wetted filter paper.
Using the roller, work out all air bubbles.
7
Page 10

4. Insert the elution chamber core, aligning the holes for the screws and the electrode stem.
Finger tighten the hex screws in numerical order (crisscross pattern) while push-
ing down on the core. (See diagram below.)
Finger tighten the hex screws in numerical order (criss-cross pattern) while pushing down
on the core.
5. Turn the assembly upside down over a sink and shake out any excess buffer squeezed
into the buffer overflow channel during the tightening of the screws.
6. Fill the elution chamber with elution buffer so as to cover all of the channels. Carefully
remove any bubbles trapped in or around the channels.
7. Lay the preparative gel on a clean flat surface and place the cutting template on top of it.
Use the template to outline the portion of the gel to be eluted. The template is made of clear
acrylic and has numbered lines with which to align the template with the dye front and
molecular markers. Wear clean gloves when handling the gel.
8
1
2
3
4
5
6
7
8
Page 11

8. Carefully excise the part of the gel within the template with a razor. (See diagram below.)
Use a downward, chopping motion when cutting the gel. Drawing the blade through
the gel will cause it to tear. It is very important to insure parallel alignment of the protein
bands with the chambers of the eluter for sharply defined and reproducible fractionation
of proteins. With experience, it should be possible to achieve a high degree of gel-to-gel
reproducibility.
Carefully excise the part of the gel within the template with a razor.
9. Starting at one end, gently lay the excised gel in the elution chamber so that the protein
bands are parallel to the channels. Do not introduce air bubbles under the gel.
10. Soak two sheets of precut upper chamber filter paper in the elution buffer, then lay them
on top of the gel, working out any air bubbles with the roller provided.
11. Blot any excess buffer and thoroughly dry the two raised areas containing the aspiration
ports. Seal these ports with the tabs provided or use transparent tape folded back on itself
to form a tab. (See diagram below.)
Sealing tabs cover all elution ports before running the eluter.
9
Sealing tab
Page 12

12. Thread the tabs through the cutouts of the upper electrode/clamping assembly. (See dia-
gram below.) Place the upper electrode assembly on top of the chamber, aligning the
holes for the screw heads and the stem of the bottom electrode. Gently push down while
closing the side clamps.
Confirm that the sealing tabs are threaded through the cutouts of the upper
electrode/clamping assembly.
3.3 Running the Whole Gel Eluter
1. Place the lid on top of the assembled eluter so that it is fully enclosed. Note that the lid can
be placed in only one orientation, so that the anode and cathode connections cannot be
reversed.
2. Attach the electrical leads to a suitable power supply with the proper polarity.
3. Apply power to the Whole Gel Eluter to begin the elution. As a safety precaution, do not
exceed the voltage and power limits. See Section 4.2 for specific running conditions.
4. Turn off the power at the end of the elution time. Reverse the polarity of the electrical leads
at the power supply. Apply reverse current to the Whole Gel Eluter for 10–15 seconds to
dislodge proteins bound to the cellophane (or dialysis) membrane.
3.4 Harvesting Eluate
Vacuum Harvesting
1. After elution is complete, turn off the power supply, disconnect the electrical leads and
remove the lid. Do not disassemble the eluter.
2. Remove the harvest port sealing tabs from both sides of the eluter. Grasp the tabs and
gently pull them away from the eluter. Pulling too quickly will disturb the samples. Some
spraying from the neighboring holes is normal and not caused by too much elution buffer.
3. For the large format harvester, load the rack with thirty 12 x 75 mm test tubes. Use four-
teen 1.5 ml microcentrifuge tubes with separate press on or screw on lids for the mini-for-
mat harvester. Tubes with caps attached to them will not fit in the rack.
10
Sealing tabs
Upper electrode
clamping assembly
Page 13

4. Place the lid on top of the harvester. Note that the lid is keyed to the base for proper align-
ment of harvester needles and collection tubes.
5. Attach the harvester to a house vacuum or other vacuum source in the off position. Insert
the needle array into the harvest ports on the left hand side of the Whole Gel Eluter
(unnumbered side). Tighten the thumb screws on both sides of the needle array so that the
gasket seals against the harvest ports. Note that the needle array is keyed for proper align-
ment.
6. With the vacuum control valve fully open, turn on the vacuum source. Slowly close the
control valve to draw a gentle vacuum with which to aspirate the eluates. Aspiration
should be done slowly to prevent splattering and uneven harvesting. It may be nec-
essary to slightly tilt the eluter toward the collection ports to facilitate complete aspiration
of the eluates.
** Thirty tubes of eluate from the Whole Gel Eluter are collected in the Harvesting Box and fourteen
tubes are collected from the Mini-Whole Gel Eluter.
11
Vacuum control
valve
Harvesting box**
Page 14

Manual Harvesting
1. If a vacuum harvester is not available, eluates may be removed with the proper size
Bio-Rad Disposable Plastic Transfer Pipet (DPTP). The numbered harvest ports on the
right side of the eluter are used for manual aspiration of samples. The mini format eluter
requires Bio-Rad DPTP style M (catalog number 223-9563) and the large format eluter
requires Bio-Rad DPTP style D (catalog number 223-9523).
Eluates are collected manually with a Disposable Plastic Transfer Pipet (DPTP).
Section 4
Optimizing Conditions
4.1 Buffer Selection
SDS-PAGE or Native PAGE preparative gels can be eluted on the Whole Gel Eluter
using denaturing (SDS) or non-denaturing elution buffer systems. Virtually any buffer can
be used if it proves appropriate for the proteins under investigation, which must be determined empirically. Buffers used for elution are not limited to those described in the fol-
lowing sections.
SDS-PAGE
Preparative SDS-PAGE gels can be eluted with either a denaturing or non-denaturing
buffer. The advantage of using a non-denaturing buffer is that the electro-elution process
strips much of the SDS off the proteins, leaving proteins in a non-toxic buffer that can be
used directly in a cellular assay. See the Table in Section 7.4 for a list of non-denaturing elution buffers. The addition of SDS to the elution buffers has the advantage of preventing proteins from adhering to the cellophane (or dialysis) membrane and insuring complete
electro-elution of all proteins.
12
Page 15

Native PAGE
Preparative Native PAGE gels are usually eluted with non-denaturing buffer systems (see
Section 7.4 for buffers useful in non-denaturing elution). The buffer initially used in running
the preparative Native PAGE gel should be the first non-denaturing buffer tried for elution.
In contrast to SDS-PAGE where proteins migrate according to size only, the mobilities
of proteins in native PAGE systems depends on both their charges and sizes. There is no single elution/electrophoresis buffer system that will optimally elute all native proteins. When
selecting conditions for the elution of native proteins it is important to consider the pI of the
protein under investigation relative to the pH of the buffer system.
The most important consideration for optimum elution/electrophoresis of a protein is the
pH of the buffer. The pH of the buffer must be within the pH range over which the proteins
under study are stable and retain biological activity. In addition, the pH of the chosen buffer
system must impart sufficient charge to the protein for it to move through the gel at a reasonable rate during the run.
The pH of the elution buffer determines the charges (and shapes) of proteins. Therefore,
during native elution/electrophoresis, the pH of the buffer will affect the migration of the proteins. For example, a buffer with an alkaline pH value relative to the pI of a particular protein will impart net negative charge to the protein. In such a buffer system, the protein migrates
toward the positive electrode (anode). Elution buffers with acidic pH values relative to the pI
of a protein impart net positive charge to the protein so that it migrates toward the negative
electrode (cathode). A buffer with a pH value identical to the pI of a protein results in net
neutral charge on the protein and it will not move at all in an electric field. Buffers with pH
values far from the pI of the proteins result in fast elution/electrophoresis rates.
4.2 Running Conditions
The McLellan buffers described in this manual are a good starting point when selecting
an elution buffer (Section 7.4).2Eluting with any one of these buffers will give similar voltage and current readings based on their similar ionic strengths.
The elution rate of any given protein will vary depending on its pI and the pH of the elution buffer. As a general guide the buffer should be at least two pH units away from the pI of
the protein to impart sufficient charge to the protein. This must be tempered when the stability and biological activity of the protein must be maintained by a given pH range. Proteins
bound with SDS will have a net negative charge. Under these conditions elution is best in a
high pH buffer. Determining the proper elution time will require following the optimization
procedure detailed below (Section 4.3).
Elution Constant Elution
Buffers Current Time
Large Eluter 200–250 mA 10–30 min
Small Eluter 75–100 mA 10–30 min
Note: Elution parameters are based on use of the McLellan buffers in the pH range of
8.1–10.2 to elute E. Coli lysate from a 1 mm thick 12% SDS-PAGE gel. A total of 200
µg of protein was loaded per gel. Elution times will vary with buffer pH, protein pI, gel
thickness, and gel porosity.
13
Page 16

4.3 Optimization Procedure
There are multiple factors that can affect the elution of a protein or mixture of proteins
from a slab gel (i.e. protein pI, buffer pH, molecular weight, gel porosity, gel thickness, etc.).
Therefore, for every new sample, change in elution buffer or running conditions, and when
making changes to the conditions of the initial preparative slab gel electrophoresis, we recommend doing the following optimization procedure.
1. Run a preparative gel with your sample. Make sure that the parameters used for this gel
are the same ones used for subsequent elutions (i.e. denatured or non-denatured gels and
gel thickness).
2. Follow Sections 3.1–3.2 for the setup of the Whole Gel Eluter, except excise the prepar-
ative gel so that the separated protein bands run perpendicular to the elution chambers
and not parallel to them.
3. Run the Whole Gel Eluter according to Section 3.3.
4. Eluted samples are harvested over a time course. On the first time point, turn off the
power supply and harvest one elution chamber with a disposable transfer pipet. Re-estab-
lish the current to the eluter after sampling.
5. Repeat step 4 for each time point until all of the chambers have been harvested. Then
assay the samples or total protein.
6. Plotting protein concentration versus sampling time will show the optimum elution time
for the buffer system and set running conditions.
Following every elution run, stain the gel and the membrane with Coomassie®Blue. This
will indicate the completeness of the elution and whether proteins were lost due to membrane
binding.
1
Section 5
Maintenance and Sterilization
5.1 Cleaning the Whole Gel Eluter
The Whole Gel Eluter should be cleaned after every use. The base plate, bottom electrode, elution chamber core and upper plate/electrode should be washed with a laboratory
detergent (for example, Bio-Rad Cleaning Concentrate, catalog number 161-0722), then rinsed
thoroughly with distilled water. The lid with electrical leads should be wiped with a damp
cloth and allowed to dry thoroughly before use.
5.2 Sterilization of the Whole Gel Eluter
The Whole Gel Eluter is not autoclavable. The unit may be sterilized with 70% ethanol.
Do not attempt to sterilize the lid (ethanol will cause crazing of the plastics). The blotting
paper and cellophane (or dialysis) membrane may be autoclaved if desired.
5.3 Cleaning the Vacuum Harvester
The harvester and tube rack should be washed with a laboratory detergent, then rinsed thoroughly with water. The vacuum tubing and needle array should be thoroughly rinsed as well.
Turn the harvester lid upside down and fill it with water. This will allow water to flow through
the tubing and out the array. Dry the tubing by pulling air through the harvester while it is
attached to a vacuum source.
Note: Do not attempt to sterilize the Vacuum Harvester. Use autoclaved or pre-sterilized
transfer pipets if sterile harvesting is required.
14
Page 17

Section 6
SDS-PAGE
6.1 Reagents for SDS-PAGE Slab Gels (Laemmli buffer system)
3
Premixed liquid acrylamide (concentrated solution) and premixed electrophoresis buffers
are available (see product information section). Sections 6.2–6.4 describe preparation of polyacrylamide gels using the following stock solutions.
A. 30% Acrylamide Stock Solution
Acrylamide/Bis (30% T, 2.67% C)
146 g acrylamide (29.2 g/100 ml)
4 g N'N'-Bis-methylene-acrylamide (0.8 g/100 ml)
Dissolve in about 350 ml deionized water.
Make to 500 ml with distilled water. Filter and store at 4 °C in the dark.
Or substitute Bio-Rad’s Preweighed Acrylamide/Bis 37.5:1 mixture or 40%
Acrylamide/Bis stock solution.
Caution: Acrylamide monomer is a neurotoxin. Avoid breathing acrylamide dust, do
not pipet acrylamide solutions by mouth, and wear gloves when handling acrylamide
powder or solutions containing it. For disposal of unused acrylamide, add bis-acrylamide
(if none is present), induce polymerization, and discard the solidified gel.
B. Separating (resolving) Gel Buffer Stock
1.5 M Tris-HCl, pH 8.8
Dissolve 54.5 g Tris base in approximately 150 ml deionized water.
Adjust to pH 8.8 with 1 N HCl (Do not back titrate).
Make to 300 ml with deionized water and store at 4 °C.
C. Stacking Gel Buffer Stock
0.5 M Tris-HCl, pH 6.8
Dissolve 6 g Tris base in approximately 60 ml deionized water.
Adjust to pH 6.8 with 1 N HCl (Do not back titrate).
Make to 100 ml with deionized water and store at 4 °C.
D. Sample Buffer (SDS-reducing buffer)
Deionized water 2.8 ml
0.5 M Tris-HCl, pH 6.8 1.0 ml
Glycerol 2.0 ml
10% (w/v) SDS* 1.6 ml
ß-mercaptoethanol 0.4 ml
0.5% (w/v) bromophenol blue 0.2 ml
Total Volume 8.0 ml
Mix equal volumes of sample buffer and sample, and heat at 95 °C for 4 minutes. SDS
reducing buffer is 0.06 M Tris-HCl, pH 6.8, 2% SDS, 5% beta-mercaptoethanol, 25% glycerol (w/v) and 0.01% bromophenol blue.
*To make a 10% SDS solution: Dissolve 1.0 gram of SDS in deionized water with
gentle stirring, then adjust the volume to 10 ml with water.
15
Page 18

E. 10x Electrode (Running) Buffer, pH 8.3 (Makes 1 Liter)
Tris base 30.3 g
Glycine 144.0 g
SDS 10.0 g
Dissolve and adjust to 1,000 ml with deionized water. DO NOT adjust pH with acid or
base. To make 1 liter of 1x electrophoresis buffer (0.025 M Tris, 0.192 M glycine, 0.1% SDS,
pH 8.3) dilute 100 ml of 10x stock with 900 ml of deionized water.
6.2 Preparing SDS-PAGE Gels of Any %T
The following table can be used to prepare Tris-HCl acrylamide gels from 4% to 17 % T.
Sections 6.3 and 6.4 provide detailed formulas for calculating specific gel types.
Acrylamide/Bis stock solution of 30% (37.5:1) is used. The amounts listed for the components
in the table below are based on a total volume of 10 ml. When SDS is included in the sample
buffer and the upper electrophoresis running buffer it can be left out of the gels during their
preparation.
% T Deionized Gel buffer Acrylamide/Bis solution
(acrylamide H2O solution* 30% stock (37.5:1)
monomer) (ml) (ml) (ml)
4% 6.15 2.50 1.33
5% 5.80 2.50 1.67
6% 5.55 2.50 2.00
7% 5.15 2.50 2.33
8% 4.80 2.50 2.67
9% 4.47 2.50 3.00
10% 4.17 2.50 3.33
11% 3.80 2.50 3.67
12% 3.47 2.50 4.00
13% 3.15 2.50 4.33
14% 2.80 2.50 4.67
15% 2.47 2.50 5.00
16% 2.15 2.50 5.33
17% 1.80 2.50 5.67
* Resolving Gel buffer - 1.5 M Tris-HCl, pH 8.8
* Stacking Gel buffer - 0.5 M Tris-HCl, pH 6.8
Catalysts 10% APS* TEMED*
Resolving Gel 50 µl 5 µl
Stacking Gel 50 µl 10 µl
* Amounts are per 10 ml gel volume. To make 10% APS, dissolve 100 mg in 1 ml of deionized water. TEMED is used neat.
16
Page 19

6.3 Separating Gels - Calculating %T
Monomer Concentration
(% T/2.67% C) %T = x(%)
Acrylamides/Bis - 30% T c ml
or for 40% T Stock* or c’ ml
Deionized water d ml
1.5 M Tris-HCl, pH 8.8 2.5 ml
10% Ammonium Persulfate
(make fresh daily) 50 µl
TEMED 5 µl
Total Monomer 10 ml (volume needed for
two mini gels)
Determine (c ml) and (d ml) for 10 ml of total monomer:
c ml: Calculate the volume of 30% (or 40%) Acrylamide/Bis stock required for 10 ml
of the desired total monomer concentration (x) with the following formula: For
30% stock:
c ml = (x%)(10 ml)/(30%) = (x)(0.333) ml
c'ml: *Similarly, for 40% stock solution:
c' ml = (x%)(10 ml)/(40%) = (x)(0.25) ml
d ml: Calculate the volume of water required at the desired total monomer concentra-
tion with the following formula:
d ml = (10 ml - 2.5 ml - 50 µl - 5 µl) - c ml = 7.445 ml - c ml
Important: One can prepare any desired volume of monomer solution by multiplying the
10 ml recipe by the appropriate multiplying factor.
6.4 Stacking Gel - 4% T (0.125 M Tris, pH 6.8)
Monomer Concentration
(% T/2.67% C) %T = x(%)
Acrylamides/Bis - 30% T c ml
or for 40% T Stock* or c' ml
Deionized water d ml
0.5 M Tris-HCl, pH 6.8 2.5 ml
10% Ammonium Persulfate
(make fresh daily)* 50 µl
TEMED 5 µl
Total Monomer 10 ml (volume needed for
two mini gels)
* To make 10% APS, dissolve 100 mg in 1 ml of deionized water.
17
Page 20

Section 7
Native-PAGE
7.1 Native PAGE Slab Gels
The discontinuous buffer system of Ornstein-Davis (Tris/chloride/glycine) should be the
first non-denaturing gel system tried.4An advantage of discontinuous systems for dilute protein solution is the use of stacking gels to concentrate the sample. However, the stacking phenomena encountered in discontinuous systems can cause aggregation of some proteins and this
can severely interfere with resolution.
The pH attained in the resolving gel of the Ornstein-Davis system approaches pH 9.5,
which may be outside the range of stability for some proteins. Alternative discontinuous
buffer systems derived for preparative work can be found in an article by Chrambach and
Jovin.5The electrophoresis buffers described in this article span the pH range from pH 3 to
pH 10.
If discontinuous systems cannot be used because of stacking-induced aggregation, a continuous buffer system will be required. In continuous systems the same buffer is used in the
upper and lower electrode chambers and in the gel. McLellan describes various continuous
buffer systems from pH 3.8–10.2 which can be tried.2See Section 7.4 for preparation of these
continuous buffers.
7.2 Reagents for Discontinuous Native PAGE (Ornstein-Davis)
A. 30% Acrylamide Stock Solution
Acrylamide/Bis (30% T, 2.67% C)
146 g acrylamide (29.2 g/100 ml)
4 g N'N'-Bis-methylene-acrylamide (0.8 g/100 ml)
Dissolve in about 350 ml deionized water.
Make to 500 ml with distilled water. Filter and store at 4 °C in the dark.
Or substitute Bio-Rad’s Preweighed Acrylamide/Bis 37.5:1 mixture or 40%
Acrylamide/Bis Stock solution.
Caution: Acrylamide monomer is a neurotoxin. Avoid breathing acrylamide dust, do
not pipet acrylamide solutions by mouth, and wear gloves when handling acrylamide
powder or solutions containing it. For disposal of unused acrylamide, add bis-acrylamide
(if none is present), induce polymerization, and discard the solidified gel.
B. Separating (resolving) Gel Buffer Stock
1.5 M Tris-HCl, pH 8.8
Dissolve 54.5 g Tris base in approximately 150 ml deionized water.
Adjust to pH 8.8 with 1 N HCl (Do not back titrate).
Make to 300 ml with deionized water and store at 4 °C.
18
Page 21

C. Stacking Gel Buffer Stock
0.5 M Tris-HCl, pH 6.8
Dissolve 6 g Tris base in approximately 60 ml deionized water.
Adjust to pH 6.8 with 1 N HCl (Do not back titrate).
Make to 100 ml with deionized water and store at 4 °C.
D. Sample Buffer
Deionized water 4.8 ml
0.5 M Tris-HCl, pH 6.8 1.0 ml
Glycerol 2.0 ml
0.5% (w/v)bromophenol blue 0.2 ml
Total Volume 8.0 ml
E. 10x Electrode (Running) Buffer, pH 8.3 (Makes 1 Liter)
Tris base 30.3 g
Glycine 144.0 g
Dissolve in deionized water and adjust the final volume to 1,000 ml. DO NOT adjust pH
with acid or base. To make 1 liter of 1x electrophoresis buffer (0.025 M Tris, 0.192 M glycine,
pH 8.3) dilute 100 ml of 10x stock with 900 ml deionized water.
7.3 Prepare Ornstein-Davis Acrylamide Gels
Use the following table to prepare gels with %T ranging from 4%T to 10%T.
% T Deionized Gel buffer Acrylamide/Bis solution
(acrylamide H2O solution* 30% stock (37.5:1)
monomer) (ml) (ml) (ml)
4% 6.15 2.50 1.33
5% 5.80 2.50 1.67
6% 5.55 2.50 2.00
7% 5.15 2.50 2.33
8% 4.80 2.50 2.67
9% 4.47 2.50 3.00
10% 4.17 2.50 3.33
* Resolving Gel buffer - 1.5 M Tris-HCl, pH 8.8
* Stacking Gel buffer - 0.5 M Tris-HCl, pH 6.8
Catalysts 10% APS* TEMED*
Resolving Gel 50 µl 5 µl
Stacking Gel 50 µl 10 µl
* Amounts are per 10 ml gel volume. To make 10% APS, dissolve 100 mg in 1 ml of deionized water. TEMED is used neat.
7.4 Reagents for Continuous Native-PAGE
In continuous systems, the same buffer is used in the electrode chambers and in the gels.
Since stacking gels are not commonly employed, proteins migrate in bands at least as wide as
the applied sample. Therefore, the sample volume must be kept at a minimum, i.e., the sample should be at as high a concentration as possible. The mobilities of proteins in continuous
systems are dictated primarily by pH rather than by sieving through the polyacrylamide gel.
19
Page 22

For this reason, 6% polyacrylamide gels are recommended for most applications. For very
large proteins 4% or 5% gels may be used.
Continuous and Elution Buffer Systems
McLellan describes various continuous buffer systems from pH 3.8 to pH 10.2 all with
the same ionic strength.2Use the table below to prepare 5x continuous, non-denaturing buffers.
Add both the acidic and basic components to 1 liter of water. Do not adjust pH with acid or
base. If the final pH is outside the listed range, discard the buffer and remake it.
Buffer Basic 5X Acidic 5X
pH±0.1 component solution component solution
and MW g/L or ml/L and MW g/L or ml/L
Beta-Alanine Lactic Acid
3.8 89.09 mw 13.36 g/L 85% soln. 7.45 ml/L
Beta-Alanine Acetic Acid
4.4 89.09 mw 35.64 g/L 17.4 M 11.5 ml/L
GABA Acetic Acid
4.8 103.1 mw 41.24 g/L 17.4 M 5.75 g/L
Histidine MES
6.1 155.2 mw 23.28 g/L 195.2 mw 29.5 g/L
Histidine MOPS
6.6 155.2 mw 19.4 g/L 209.3 mw 31.4 g/L
Imidazole HEPES
7.4 68.08 mw 14.64 g/L 238.33 mw 41.7 g/L
Tris EPPS
8.1 121.14 mw 19.38 g/L 252.2 mw 37.85 g/L
Tris Boric Acid
8.7 121.14 mw 30.29 g/L 61.83 7.73 g/L
Tris CAPS
9.4 121.14 mw 36.34 g/L 221.3 mw 44.26 g/L
Ammonia CAPS
10.2 14.8 M 12.5 ml/L 221.3 mw 22.13 g/L
To make 1 liter of 1X elution buffer, dilute 200 ml of 5X buffer with 800 ml deionized
water. The final concentrations of buffer components will be:
Buffer pH Basic Component Acidic Component
3.8 30 mM Beta-Alanine 20 mM Lactic Acid
4.4 30 mM Beta-Alanine 40 mM Acetic Acid
4.8 80 mM GABA 20 mM Acetic Acid
6.1 30 mM Histidine 30 mM MES
6.6 25 mM Histidine 30 mM MOPS
7.4 43 mM Imidazole 35 mM HEPES
8.1 32 mM Tris 30 mM EPPS
8.7 50 mM Tris 25 mM Boric Acid
9.4 60 mM Tris 40 mM CAPS
10.2 37 mM Ammonia 20 mM CAPS
20
Page 23

7.5 Prepare Continuous Gels
(10 ml acrylamide monomer solution)
% T Deionized Gel buffer Acrylamide/Bis solution
(acrylamide H2O solution* 30% stock (37.5:1)
monomer) (ml) (ml) (ml)
4% 6.65 2.00 1.33
5% 6.30 2.00 1.67
6% 6.05 2.00 2.00
Catalysts 10% APS* TEMED*
Resolving Gel 50 µl 5 µl
Stacking Gel 50 µl 10 µl
* Amounts are per 10 ml gel volume. To make 10% APS, dissolve 100 mg in 1 ml of deionized water. TEMED is used neat.
Below pH 6, TEMED becomes less effective as a catalyst. Between pH 4 and pH 6, increasing the concentration of TEMED
5-fold to 10-fold will polymerize the gel.
7.6 Sample Preparation
Sample buffer for continuous native PAGE is a dilution of the electrophoresis buffer.
The concentration of the sample buffer is generally 1/10 that of the running buffer. Glycerol
is added to the sample buffer to a final concentration of 20%.
Section 8
Troubleshooting Guide
Problem Cause Solution
1. Incomplete elution of a. Air bubble formation a. Refer to Section 3.2.
proteins from the gel. between the anode
and cathode.
b. Buffer or running b. Refer to Section 4.
conditions are not
optimized.
2. No detectable proteins a. Insufficient protein a. Increase total protein
in collected fractions load. loaded. Use silver stained
(complete elution). SDS-PAGE gels to
analyze individual
fractions.
b. Protein adhering to the b. Reverse current for
cellophane membrane. 10 seconds after the
elution run. Decrease the
run time.
3. Cross-contamination a. Elution chamber core a. Tighten the hex screws
of fraction. not tightened down. in a crisscross pattern.
b. Filter paper or cello- b. Refer to Section 3.2
phane membrane (assembly).
missing or placed in
wrong order.
21
Page 24

Problem Cause Solution
4. Poorly defined fraction- a. Protein bands are a. Carefully align the
ation of proteins. not parallel to the cutting template with the
elution chambers. dye front and molecular
markers of the gel when
cutting.
5. Running conditions a. Buffer concentration a. Make fresh buffer.
outside recommended or pH is incorrect.
range.
6. Splattering of sample a. Vacuum is too strong. a. Decrease vacuum.
in vacuum harvester.
7. Harvester is collecting a. Vacuum is too strong. a. Decrease vacuum.
uneven sample volumes.
Section 9
Equipment and Accessories
Catalog
Number Product Description
165-1250 Whole Gel Eluter
165-1251 Whole Gel Eluter with large harvester
165-1255 Mini Whole Gel Eluter
165-1256 Mini Whole Gel Eluter with Mini Harvester
165-1260 Large Harvester
165-1261 Mini Harvester
Consumables
165-1270 Whole Gel Eluter Template
165-1271 Mini Whole Gel Eluter Template
165-1275 Cellophane for Whole Gel Eluter, 25
165-1276 Cellophane for Mini Whole Gel Eluter, 25
165-1277 Sealing Tabs for Whole Gel Eluter, 50
165-1278 Sealing tabs for Mini Whole Gel Eluter, 50
165-1279 Roller, 1
165-1280 Lower Chamber filter paper for Whole Gel Eluter, 75
165-1281 Upper Chamber filter paper for Whole Gel Eluter, 50
165-1282 Lower Chamber filter paper for Mini Whole Gel Eluter, 50
165-1283 Upper Chamber filter paper for Mini Whole Gel Eluter, 50
223-9563 DPTP, non-sterile, style M, 500
223-9523 DPTP, non-sterile, style D, 500
223-9645 Culture tubes, 12 x 75 mm, 5 ml capacity, non-sterile, natural
polypropylene, 2,000
223-9500 Micro Test Tube, 1.5 ml, polypropylene, natural, capless, 500
22
Page 25

Catalog
Number Product Description
224-0100 Micro Test Tube, 1.5 ml, conical, with separate O-ring scewcaps,
non-sterile, 500
165-1284 Ruler, Whole Gel Eluter
Accessories
165-5050 PowerPac 300, 100/120 V
165-5051 PowerPac 300, 220/240 V
165-5054 PowerPac 1000, 100/120 V
165-5055 PowerPac 1000, 220/240 V
165-5004 Vacuum Station, 120 V, includes vacuum pump, vacuum, regula-
tor, instructions
165-5005 Vacuum Station, 240 V
165-5006 Vacuum Regulator
Section 10
References
1. Andersen, P. and Heron, I., Journal of Immunological Methods, 161, 29 (1993).
2. McLellan, T., Analytical Biochemistry, 126, 94 (1982).
3. Laemmli, U. K., Nature, 227, 680 (1970).
4. Ornstein, L. and B. J. Davis, Anal. NY Acad. Sci., 121, 321 (1964).
5. Chrambach, A. and T. M. Jovin, Electrophoresis, 4, 190 (1984).
6. Hames, B. D., (1990), in Gel Electrophoresis of Proteins: A Practical Approach, (ed. D. Rickwood
and B. D. Hames), Oxford University Press, New York.
7. Andrews, A. T., (1986), in Electrophoresis: Theory, Techniques and Biochemical and Clinical
Applications, Clarendon Press, Oxford.
8. Allen, R. C., C. A. Saravis and H. R. Maurer, (1984), in Gel Electrophoresis and Isoelectric
Focusing of Proteins: Selected Techniques, de Gruyter, New York.
Coomassie is a trademark of ICI.
23
Page 26

Life Science
4006086 Rev B
Bio-Rad
Laboratories
Group
2000 Alfred Nobel Drive
Hercules, California 94547
Telephone (510) 741-1000
Fax: (510) 741-5800
Australia,
Austria,
Belgium,
Canada,
China,
Bio-Rad Laboratories, 14, Zhi Chun Road, Hai Dian District, Beijing 100088 • Phone (01) 2046622 • Fax (01) 2051876
Denmark,
Finland,
France,
Germany,
India,
Bio-Rad Laboratories, C-248 Defence Colony, New Delhi 110 024 • Phone 91-11-461-0103 • Fax 91-11-461-0765
Italy,
Bio-Rad Laboratories S.r.l.,Via Cellini, 18/A, 20090 Segrate Milano • Phone 02-21609 1 • Fax 02-21609-399
Japan,
Nippon Bio-Rad Laboratories, 7-18, Higashi-Nippori 5-Chome, Arakawa-ku, Tokyo 116 • Phone 03-5811-6270 • Fax 03-5811-6272
The Netherlands,
New Zealand,
Pacific,
Singapore,
Spain,
Bio-Rad Laboratories, S. A. Avda Valdelaparra 3, Pol. Ind. Alcobendas, E-28100 Alcobendas, Madrid • Phone (91) 661 70 85 • Fax (91) 661 96 98
Sweden,
Switzerland,
United Kingdom,
Bio-Rad Laboratories Pty Limited, Block Y Unit 1, Regents Park Industrial Estate, 391 Park Road, Regents Park, NSW 2143 • Phone 02-9414-2800 • Fax 02-9914-2888
Bio-Rad Laboratories Ges.m.b.H., Auhofstrasse 78D, 1130 Wien • Phone (1) 877 89 01 • Fax (1) 876 56 29
Bio-Rad Laboratories S.A./N.V., Begoniastraat 5, 9810 Nazareth Eke • Phone 09-385 55 11 • Fax 09-385 65 54
Bio-Rad Laboratories (Canada) Ltd., 5671 McAdam Road, Mississauga, Ontario L4Z 1N9 • Phone (905) 712-2771 • Fax (905) 712-2990
Bio-Rad Laboratories, Symbion Science Park, Fruebjergvej 3, DK-2100 Copenhagen • Phone 39 17 9947 • Fax 39 27 1698
Bio-Rad Laboratories, Business Center Länsikeskus, Pihatörmä 1A SF-02240, Espoo, • Phone 90 804 2200 • Fax 90 804 1100
Bio-Rad S.A., 94/96 rue Victor Hugo, B.P. 220, 94 203 Ivry Sur Seine Cedex • Phone (1) 49 60 68 34 • Fax (1) 46 71 24 67
Bio-Rad Laboratories GmbH, Heidemannstraße 164, D-80939 München/Postfach 450133, D-80901 München • Phone 089 31884-0 • Fax 089 31884-100
Bio-Rad Laboratories B. V., Fokkerstraat 10, 3905 KV Veenendaal • Phone 0318-540666 • Fax 0318-542216
Bio-Rad Laboratories Pty Ltd., P. O. Box 100-051, North Shore Mail Centre, Auckland 10 • Phone 09-443 3099 • Fax 09-443 3097
Bio-Rad Laboratories, Unit 1111, 11/F., New Kowloon Plaza, 38, Tai Kok Tsui Road, Tai Kok Tsui, Kowloon, Hong Kong • Phone 7893300 • Fax 7891257
Bio-Rad Laboratories (Singapore) Ltd., 221 Henderson Rd #05-19, Henderson Building, Singapore 0315 • Phone (65) 272-9877 • Fax (65) 273-4835
Bio-Rad Laboratories AB, Gärdsvägen 7D, Box 1276, S-171 24 Solna • Phone 46-(0)8-735 83 00 • Fax 46-(0)8-735 54 60
Bio-Rad Laboratories AG, Kanalstrasse 17, Postfach, CH-8152 Glattbrugg • Phone 01-809 55 55 • Fax 01-809 55 00
Bio-Rad Laboratories Ltd., Bio-Rad House, Maylands Avenue, Hemel Hempstead, Herts HP2 7TD • Free Phone 0800 181134 • Fax 01442 259118
SIG 020996 Printed in USA
 Loading...