

Page 1

ProteinChip®SELDI System:
Reader Guide
Personal Edition and
Enterprise Editon
Page 2

Page i
Bio-Rad Laboratories, Inc.
Notice to Purchaser: Limited License
Surface Enhanced Laser Desorption/Ionization (“SELDI”) is a patented process. To use the SELDI
process an end user must obtain a two-part license, including an up-front fee component and a
running-royalty component, under U.S. Patent 5,719,060 or its foreign counterparts, from Bio-Rad
Laboratories, Inc. (“Bio-Rad”). The purchase price of your ProteinChip® SELDI system (the “Reader”)
includes limited, nontransferable rights under the up-front fee component to use this Reader to
practice SELDI and related processes described in said patents for the research and development
activities of the purchaser when this product is used in conjunction with Bio-Rad ProteinChip products
whose use is covered by the running-royalty component. The rights under the running-royalty
component may be purchased only from Bio-Rad or one of its authorized distributors as part of the
purchase of SELDI ProteinChip products. No rights of use are granted herein in the field of clinical
diagnostics. Further information on licenses to practice the SELDI process and on assigning your
exclusive clinical diagnostic rights to any intellectual property developed by you using our SELDI
products, if any, may be obtained by contacting the Legal Department at Bio-Rad Laboratories, Inc.,
1000 Alfred Nobel Drive, Hercules, California 94547.
Microsoft, Windows, and Windows XP are trademarks of Microsoft Corporation. ONEAC is a
trademark of ONEAC Corporation.
Page 3

Page ii
ProteinChip SELDI System: Reader Guide
Page 4

Table of Contents
Page iii
Introduction 1
Specifications 1
ProteinChip SELDI Reader 1
Mass Analysis Range 1
Sensitivity 1
Mass Resolving Power 2
Mass Accuracy 2
Laser 2
Sample Handling 2
Vacuum System 2
Control System 3
Equipment Ratings 3
Electrical Requirements 3
Identification and Certification
Label 3
Environmental Conditions
During Operation 3
Environmental Conditions
During Storage or Transport 4
Safety Precautions 4
Laser Radiation 5
High Voltage 6
Radio Frequency Energy 6
Set Up
Requirements 6
Packing Case 6
ProteinChip SELDI Reader 6
Ventilation 7
Mounting 7
Network Connection 7
Installing the ProteinChip
SELDI Reader 7
Setup Time 7
Pre-Installation Reader
Inspection 7
Optional Accessories 8
Setting Up the ProteinChip
SELDI System 9
Setting Up the ProteinChip
SELDI System 9
Operating the ProteinChip
SELDI Reader 13
Multicassette Autoloader
(Enterprise Edition) 14
Overview of Operation 14
Shutting Down the ProteinChip
SELDI Reader 18
Page 5

Page iv
Basic Maintenance 18
Load Lock Door Cleaning for
Enterprise Edition Instruments 18
Load Lock Door Cleaning for
Personal Edition Readers 23
Warranty and Service Agreements 23
Getting Technical Assistance 24
Moving the ProteinChip
SELDI System Reader 24
Appendix A: Networking the
ProteinChip SELDI System 25
Networking the ProteinChip SELDI
System Using DHCP 26
Overview 26
Verify the Reader Software
Version 26
Set the Reader to DHCP 28
Change the Server to DHCP 31
Redirect Client Computers to the
New Server Address 32
Redirect Client Computers to
the New Server Address 42
Obtain a New License File (If
Necessary) 43
Connect to the Reader 44
Edit the Reader Options 47
Troubleshooting 48
How To 48
Questions or Comments? 49
Obtain a New License File (If
Necessary) 34
Connect to the Reader 34
Edit the Reader Options 37
Networking the ProteinChip SELDI
System Using Static IP Addresses 38
Overview 38
Obtain Static IP Address 38
Assign Static IP to the Reader 38
Assign a Static IP to the Server
Computer 41
ProteinChip SELDI System: Reader Guide
Page 6

Introduction
ProteinChip SELDI System: Reader Guide
Page 1
Introduction
Specifications
The ProteinChip SELDI System, Personal Edition and Enterprise Edition, is
designed to read Bio-Rad’s proprietary ProteinChip arrays in conjunction with
Bio-Rad software. Sample preparation, protocol development, and analysis are
outside the scope of this guide. For information on ProteinChip arrays, sample
preparation, and protocols, please see the
(bulletin 10008221), volumes 1–2. For data analysis, see the ProteinChip
Guide
Data Manager Software Operation Manual.
1
The ProteinChip SELDI reader is a linear laser desorption/ionization time-offlight mass spectrometer.
ProteinChip SELDI System Applications
ProteinChip SELDI Reader
Designed for benchtop operation
Dimensions: 115 cm (H) x 59 cm (W) x 79 cm (D)
Mass: 105 kg
Mass Analysis Range
From less than 0.02 kD to greater than 150 kD
Sensitivity
Lower limit of detection less than 10 fmol 150 kD protein per spot
1. All specifications are for reference only and are subject to change without notice as part of Bio-Rad’s policy of
continuous improvement.
Page 7

Page 2
Mass Resolving Power
Peptide
Better than 1000 for [Arg8]-vasopressin at 1084 Da, standard operating voltage
Mass Accuracy
Inherent
Measured mass will be within 0.5% of true mass with 95% confidence
(0.25% CV)
External calibration
Measured mass will be within 0.1% of true mass with 95% confidence
(0.05% CV)
Internal calibration
Measured mass will be within 0.01% of true mass with 95% confidence
(0.005% CV)
Laser
Pulsed nitrogen laser (337 nm), 4 ns pulse width
Sample Handling
Personal
Runs one 8-spot array within 20 minutes using 250 transients per spot
Enterprise
Runs a cassette of up to twelve 8-spot ProteinChip arrays within 2 hours using
250 transients per spot
Vacuum System
Operating pressure < 2.7 x 10⁻⁴ Pa
Gauges: active inverted magnetron (high vacuum) and active Pirani (low
vacuum) turbomolecular pump
ProteinChip SELDI System: Reader Guide
Page 8

Equipment Ratings
Page 3
Equipment
Ratings
Personal Edition:
Enterprise Edition:
70 L/s high compression with two-stage rotary-vane
backing pump
250 L/s high compression with two-stage rotary-
vane backing pump
Control System
Network compatible PC with Microsoft Windows 2000 or XP for reader
operation and data storage.
Electrical Requirements
For safety, the ProteinChip SELDI system must be connected with a certified
power cord rated to at least 10 A to a grounded outlet. Power supply voltage
fluctuations must not exceed ±10% of the nominal voltage.
Supply voltage, current ratings, and fuse ratings
Fig. 1:
Supply voltages, current ratings, and fuse ratings for the ProteinChip SELDI
system Personal Edition (left) and Enterprise Edition (right).
Identification and Certification Label
Fig. 2:
ProteinChip SELDI system identification and certification label.
Environmental Conditions During Operation
Intended for indoor use
Temperature 18°C to 27°C
Page 9

Page 4
20–80% relative humidity, noncondensing
Mains supply voltage fluctuations not to exceed ±10% of the nominal voltage
Environmental Conditions During Storage or Transport
Temperature -20°C to 60°C (-4°F to 140°F)
Maximum relative humidity 93% non-condensing at 35°C
Maximum operational altitude 2,000 meters
Safety Precautions
Safety symbols are present on the user-accessible parts of the system, on the
top rear of the tower. These labels are shown in Fig. 4. Internal symbols used
are:
ISO 3864, No. B.3.6 Caution, risk of electric shock
ISO 3864, No. B.3.1 Caution (refer to accompanying documents)
The indicator light, which shows when high-voltage power and laser power are
enabled, is labeled with the “caution” (refer to accompanying documents)
symbol (symbol 14, Table 1 of EN61010-1) and a label worded “CAUTION:
high-voltage power supplies and laser are enabled when yellow LED is
illuminated”. Documentation needs to be consulted in all cases where symbol
14, Table 1 of EN61010-1 is used in order to find out the nature of the potential
hazard and any actions which have to be taken.
Fig. 3:
Safety symbols associated with the indicator LED.
There is a risk of electric shock from the high-voltage cables and connections.
Caution is required when working with the components that require periodic
maintenance. In all cases, the instrument should be shut down and power
any
removed from the instrument before performing
maintenance.
All high-voltage connections are labeled with the “Caution, risk of electric
shock” symbol (symbol 12, table 1 of EN 61010-1) and the words “Danger”
and “High Voltage.”
service, including periodic
ProteinChip SELDI System: Reader Guide
Page 10
Safety Precautions
Page 5
DANGER
HIGH VOLTAGE
Fig. 4:
Safety symbols indicating high voltage inside the ProteinChip SELDI system
cabinet. These labels are located on the exterior of the instrument, near the screws
retaining the side covers.
Warning:
If the equipment is used in a manner other than specified, the
protection provided by the equipment may be impaired. No contact with
hazardous parts or emissions is possible if the instrument panels are kept in
place. It is the user’s responsibility to ensure that untrained persons do not
access the interior. Serious injury or death may result from contact with
components inside the cabinet under single-fault conditions.
The enclosure is an integral part of the safety of this unit. In all cases, the
instrument should be shut down and power removed from the instrument
any
before removing
external cover.
Only personnel aware of the hazards of high voltage and Class 3B laser
radiation should service the reader. The following label should be present near
the safety interlock defeat port and near the safety interlock switches associated
with panels protecting the user from laser radiation:
Fig. 5:
Laser safety warning label inside the system cabinet. This label is visible from
the front when the side panels are removed.
Laser Radiation
Warning:
laser (337 nm, 250 µJ maximum energy/4 ns pulse, 20 Hz maximum pulse
rate). The mass analyzer is a CLASS 1 LASER PRODUCT according to EN 60825:
1993. This means it is safe under reasonably foreseeable conditions of
operation. However, normal operation does not include maintenance or
service. When the enclosure panels and any of the optics covers inside the
instrument are removed, human access to Class 3B laser radiation becomes
possible. Laser safety glasses must be worn when servicing the instrument. The
The system contains an ultraviolet (UV)-emitting pulsed nitrogen
Page 11

Page 6
glasses must have an optical density of >5 at 337 nm. Care should be taken to
avoid specular reflection of the beam. Laser energy levels up to 250 µJ at
337 nm could be accessible in the interior if the inner cover is removed.
High Voltage
Warning:
are fully insulated under normal conditions, electrostatic charge can accumulate
on wires and feedthroughs carrying high voltage as well as nearby components.
Contact with these components should be avoided when high voltage may be
present.
The unit contains high-voltage power supplies. While the components
Radio Frequency Energy
Note:
This equipment has been tested and found to comply with the limits for
a Class A digital device, pursuant to part 15 of the Federal Communications
Commission (FCC) rules and regulations. These limits are designed to provide
reasonable protection against harmful interference when the equipment is
operated in a commercial environment. This equipment generates, uses, and
can radiate radio frequency energy and, if not installed and used in accordance
with the instruction manual, may cause harmful interference to radio
communications. Operation of this equipment in a residential area is likely to
cause harmful interference, in which case the user will be required to correct
the interference at his expense.
Set Up Requirements
The ProteinChip SELDI reader (Fig. 6) is approximately 115 cm high, 59 cm
wide, and 79 cm deep. The reader will fit on a normal height laboratory
bench. The reader will be delivered in a packing case and weighs about
105 kg. The packing case must be unloaded and moved with a forklift or
pallet jack.
Packing Case
143 cm (H) x 84 cm (W) x 89 cm (D)
ProteinChip SELDI Reader
115 cm (H) x 59 cm (W) x 79 cm (D)
Weight 105 Kg
4 x 120 V in US
2 x 13 A in EU
2 m bench space
ProteinChip SELDI System: Reader Guide
Page 12

Installing the ProteinChip SELDI Reader
Page 7
Ventilation
The ProteinChip SELDI reader requires 3.0 cm of space at the rear and 3.0 cm
above the vents on the top of the main enclosure and at the top of the tower
for adequate ventilation. The air on all sides of the enclosure must meet the
environmental conditions specified above during operation. The region around
the system should be kept free of dust.
Mounting
The ProteinChip SELDI reader has no special mounting requirements. If your
location is subject to earthquakes, adequate restraints should be used to
prevent the reader from moving.
Network Connection
A network connection can be made to the computer according to the
computer manufacturers’ instructions.
Installing the
ProteinChip
SELDI Reader
Setup Time
It takes approximately one day to get the ProteinChip SELDI reader ready for
operation, including unpacking and moving the reader to the laboratory,
connecting it to the power supply, connecting a computer to the reader, and
allowing the unit to reach operating pressure. Installation is generally
performed by a Bio-Rad engineer.
Pre-Installation Reader Inspection
1. Position the reader’s shipping case on a level surface.
2. Release the straps at the bottom of the case, then remove the upper part of
the case. The reader is secured to the bottom part of case with four bolts
which can now be released.
Page 13

Page 8
Fig. 6:
The ProteinChip SELDI reader, Personal Edition, on its shipping pallet.
3. Inspect the reader for physical damage. If the reader appears to be
damaged, contact Bio-Rad customer service.
4. Check the voltage label on the rear of instrument to verify that the
operating voltage is correct for your line voltage.
If the selected voltage is incorrect, change it by removing and reinserting
the fuse assembly with the arrows aligned to the proper operating voltage.
Optional Accessories
Uninterrupted power supply
An uninterrupted power supply (UPS) is recommended to ensure continuous
operation and to guard against data loss.
We recommend the following UPS for North American systems:
Model:
ProteinChip SELDI System: Reader Guide
S1000XA-1 from ONEAC (available from Bio-Rad)
Page 14

Setting Up the ProteinChip SELDI System
Page 9
Setting Up the ProteinChip SELDI System
Description:
Ordering: Uninterruptible Power Supply, 120 V
We recommend the following UPS for countries utilizing 230 V AC,
50 Hz power:
Model:
Description:
Ordering: Uninterruptible Power Supply, 230 V
Sinergy 1KVA UPS, 120 V AC input/output, 60 Hz line
frequency. 5-minute backup time.
(catalog # A30-10010)
One kVA UPS provides clean and uninterruptible power
for the US and countries utilizing 120 V AC, 60 Hz power.
This unit will provide 5–8 minutes of backup time in the
event of a utility power loss.
S1000XA-2 from ONEAC (available from Bio-Rad)
Sinergy 21KVA UPS, 230 V AC input/output, 50 Hz
line frequency. 5-minute backup time.
(catalog # A30-10020)
One kVA UPS provides clean and uninterruptible
power for countries utilizing 230 V AC, 50 Hz power.
This unit will provide 5–8 minutes of backup time in
the event of a power loss.
Setting Up the ProteinChip SELDI System
If you are planning to put the reader onto your network please refer to
Appendix A
Required materials
• ProteinChip SELDI reader
• Workstation computer and associated peripherals
• Crossover cable (included)
Connect the reader and the workstation
1. After the ProteinChip SELDI system reader has been powered up, allow up
to 2 hours for the vacuum pump to reach optimum pressure.
2. Plug the crossover cable into the network slots on the reader, and into the
computer. The crossover cable is clearly labeled (on the cable itself).
3. Power up the computer.
Page 15

Page 10
Launch the software
1. Locate the ProteinChip data manager client software shortcut on the
desktop and double-click it to launch the client (please refer to the
ProteinChip Data Manager Installation and Setup guide Bulletin#
10008270 for software installation instructions).
1.
Login
2. In the
for the
Fig. 7:
The
dialog box (Fig. 7), enter
Password
Login
. Leave the
dialog box.
Server
3. Log in to the ProteinChip data manager client software by pressing the
Logon
button.
admin
set to
for the
Local host
User name
.
, and
admin
New
Instrument
button
Create the instrument profile using ProteinChip data manager
client software
1. Click the
2. Click the New Instrument button on the toolbar or select File | New |
Instrument. The New Instrument dialog box will open.
ProteinChip SELDI System: Reader Guide
Instruments node in the Explorer pane.
Page 16

Setting Up the ProteinChip SELDI System Page 11
Fig. 8: The New Instrument dialog box.
3. Enter a name for the reader into the Name field. This can be any name of
your choosing. This is a required field.
4. Enter the reader’s Serial Number. This is a required field. See Fig. 8, below,
for the location of the serial number.
Fig. 9: The serial number plate.
5. Enter the IP address of the instrument in the Host Name/IP field. The IP
address is preconfigured to be “192.168.1.200”. This is a required field.
6. Click the Create button to complete the instrument profile.
Page 17
Page 12
Connect to the reader using ProteinChip data manager client
software
1. After the reader profile has been created, connect to the reader by
highlighting the reader name in the Explorer pane.
2. Once the connection is made, the Home tab will be displayed. You may
receive a “Server mismatch” error message on connecting. You must now
configure the reader to communicate with the ProteinChip data manager
server software.
Set up communication between the reader and ProteinChip data
manager server software
In order for the reader to save data to the server, you must specify the name of
the computer running the ProteinChip data manager server software.
1. On the ProteinChip data manager client computer, open the Control Panel,
then click System. In the System Properties dialog box, click the Computer
Name tab.
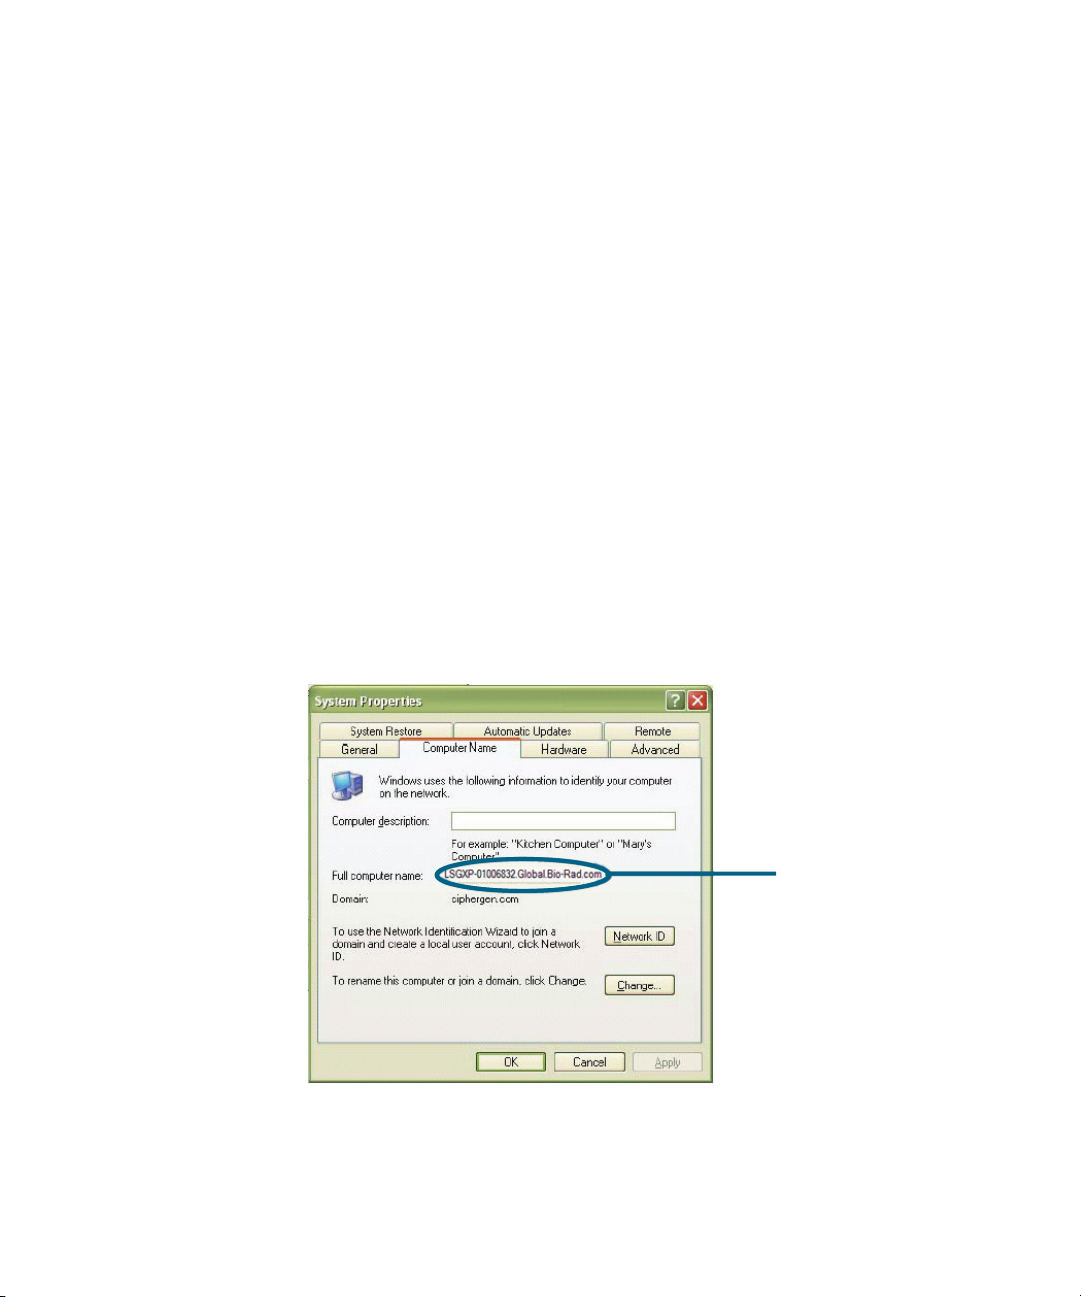
2. To determine the computer name, locate the field called Full computer
name and copy down the text up to the first decimal point (Fig. 10). Once
recorded, you can click Cancel to close the dialog box.
Fig. 10: The System Properties dialog box.
ProteinChip SELDI System: Reader Guide
Server computer name
Page 18

Operating the ProteinChip SELDI Reader Page 13
3. In ProteinChip data manager client software, connect to the reader by
clicking its name in the Explorer pane.
4. Once connected, select Instrument | Instrument Options. Allow a few
moments for the dialog box to retrieve the current settings from the
ProteinChip SELDI reader.
Fig. 11: The Instrument Options dialog box.
5. Enter the computer name recorded in step 2 into the ProteinChip Data
Manager Name field and click the Update button to update the
instrument. Click the Close button to exit.
6. You are now ready to begin using the ProteinChip SELDI system. Please
refer to the ProteinChip data manager software manual for details.
Operating the ProteinChip SELDI Reader
Except for the power switch (located at the back of the reader), there are no
operating controls on the ProteinChip SELDI reader. For the Personal Edition, the
only movable part is the door, which is opened to insert or remove an array. For
the Enterprise Edition, the only movable parts are the cassette dust cover lids,
which are opened to insert or remove cassettes. The reader is controlled through
the software. See the ProteinChip data manager software manual for more
information. Please note that if the reader is used in a manner not specified by
Bio-Rad, the safety protection system provided by the reader may be impaired.
CAUTION
Use of controls and adjustments or performance of procedures other than
those specified herein may result in hazardous radiation exposure.
Page 19

Page 14
Multicassette Autoloader (Enterprise Edition)
The ProteinChip SELDI system Enterprise Edition comes with a multicassette
autoloader. It contains cassette loader and unloader assemblies designed to
allow the automated processing of multiple cassettes from a stack. The purpose
of this feature is to allow unattended operation of the reader for significant
periods of time. The loader processes the cassettes sequentially, removing each
cassette from an input stack, cycling the designated arrays in the cassette
through the load lock and source chamber, then transferring the processed
cassette to the output unloader before returning to collect the next cassette. This
system is designed for continuous unattended processing of up to 14 cassettes
in one run. A maximum of 14 cassettes can be loaded into the stacker at one
time. The cassette lids must be closed in order for the reader to run.
Overview of Operation
The following instructions are intended to be a brief guide only. For more
information on data acquisition and analysis, please consult the ProteinChip data
manager software manual.
Acquiring control of the reader
The status of the sensors is displayed in the Home tab of the software interface
for the reader (refer to Fig. 12). The sensors should have the following status
before beginning operation:
Enterprise Edition
• Vacuum state — operating
• High voltage — off
• Cassette — present
• Loader cover — closed
• Unloader cover — closed
• High vacuum — <2.7 x 10
-6
Pa.
Control of the reader is obtained by clicking the Start icon.
Personal Edition
• High voltage — off
• Door — closed
• Lock — locked
Control of the reader is obtained by clicking the Start icon.
ProteinChip SELDI System: Reader Guide
Page 20

Operating the ProteinChip SELDI Reader Page 15
Fig. 12: Sensor status before beginning operation.
Manual Mode
Manual Mode allows you to manually set data acquisition parameters for
individual pixels on spots, to optimize reader settings, or as a quick test. All data
are collected using the Manual Mode tab’s data collection settings.
Single laser shots can be fired using the Fire Once button.
Multiple laser shots can be fired using the Fire Continuously button.
Click the button a second time to stop firing.
Page 21

Page 16
Fig. 13: Collecting data in Manual Mode (Enterprise Edition).
Protocol Mode
Protocol Mode allows you to apply and run existing protocols on arrays or
spots. All data will be collected using the currently selected protocol (displayed
at the top of the Protocol Mode tab). The protocol settings can be adjusted by
clicking the Protocol Settings button beside the Cassette/Spot map (the
Spot/Pixel Selector, if using the Personal Edition). The Partitions settings
indicate which parts of each spot will be used. Protocol Mode can also be used
for creating protocols from templates, and for modifying existing protocols.
Click the Run button to begin data collection.
Click the Stop Run button to halt data acquisition.
ProteinChip SELDI System: Reader Guide
Page 22

Operating the ProteinChip SELDI Reader Page 17
Fig. 14: Collecting data in Protocol Mode (Enterprise Edition).
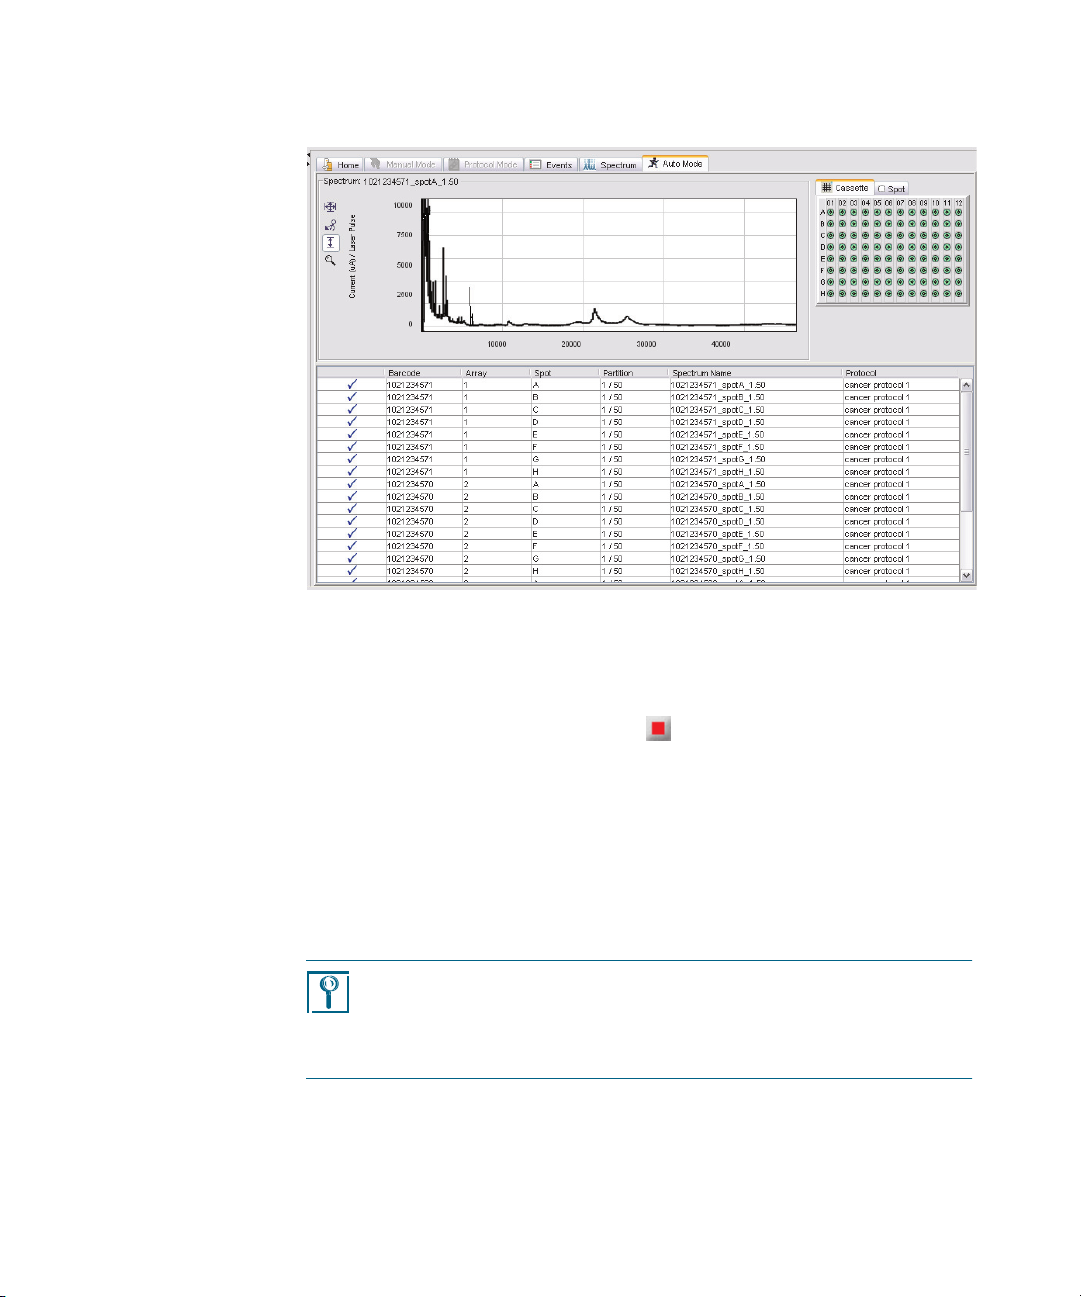
Auto Mode (Enterprise Edition only)
Auto Mode allows you to run cassettes automatically, as long as the barcodes
on the arrays match those in a Virtual Notebook’s bioprocessor maps (please
refer to the ProteinChip data manager software manual for more information
on Virtual Notebooks). You can run multiple cassettes automatically by
assigning sample properties and protocols to arrays using the ProteinChip data
manager software Virtual Notebook. First, enter the barcodes into a Virtual
Notebook bioprocessor map, then apply sample properties and protocols as
desired to the arrays. Next, place the cassette(s) into the reader. The software
will automatically associate the arrays with the appropriate protocols and begin
acquisition. The Auto Mode tab allows you to view the status of the current
automatic run, without having to take control of the reader.
Page 23
Page 18
Fig. 15: Collecting data in Auto Mode (Enterprise Edition).
Shutting Down the ProteinChip SELDI Reader
Basic Maintenance
To shut down the reader and turn off the power, first stop data collection, if
necessary, by clicking on the Stop Run ( ) button on the toolbar, then select
Instrument Shutdown from the Instrument menu. Wait for the System Active
light on the lower right side of the reader to go out. It is then safe to shut off
power to the reader.
Load Lock Door Cleaning for Enterprise Edition Instruments
NOTE
Training on the following maintenance procedures will be provided during
basic training course. For technical service, call your local Bio-Rad office, or in
the US, call 1-800-4-BIORAD (1-800-424-6723).
1. Shut down the reader by choosing Instrument Shutdown from the
Instrument menu.
ProteinChip SELDI System: Reader Guide
Page 24

Basic Maintenance Page 19
2. Wait for the System Active light on the lower right side of the reader to go
out, then turn off the reader power.
3. Remove the front cover from the reader. You will need to remove the two
screws at the top rear corners of the front cover and carefully disconnect
the “stack full” sensor cable.
4. Completely loosen the captive screws on either side of the rear cassette guide
(Fig. 16).
Rear cassette guide
aptive screw
Captive screw
Fig. 16: The rear cassette guide, installed.
5. Remove the rear cassette guide from the autoloader back plate (Fig. 17).
Fig. 17: The rear cassette guide, removed.
6. Remove the two thumbscrews on either side of the pawl drive front
plate (Fig. 18).
Page 25

Page 20
Pawl drive
thumbscrew
Pawl drive
thumbscrew
Fig. 18: Pawl drive front.
7. Gently pull the pawl drive assembly back and up to clear it from the
load lock door. Be careful not to damage the wires connected to the
pawl drive assembly (Fig. 19).
ProteinChip SELDI System: Reader Guide
Page 26

Basic Maintenance Page 21
Fig. 19: Pawl drive assembly, pulled back from front plate.
8. Using the pins on the front, unscrew the load lock door from its post
(counterclockwise).
9. Clean the load lock O-ring and the flat side of the door with a clean lab
wipe and alcohol (Fig. 20).
Load lock seal Load lock door, seal side
Fig. 20: Load lock seal, and load lock seal door.
Page 27

Page 22
10. Replace the load lock door by screwing it clockwise back on to the post.
11. Tighten the door until it seals against the O-ring.
12. Unscrew the load lock door about 1/2 turn until it is in the open position
(cutout in door should match opening in load lock).
13. Carefully replace the pawl drive assembly, lining up the posts on the load
lock door with the pawl drive plate. Take care not to catch the load lock
door home sensor wires between the pawl drive plate and the autoloader
mounting plate (Fig. 21).
Fig. 21: Load lock door sensor wires.
ProteinChip SELDI System: Reader Guide
Page 28

Warranty and Service Agreements Page 23
14. Replace the thumb screws on the front of the pawl drive.
15. Manually open and close the load lock door to verify proper operation and
sealing. Leave the load lock door in the closed position.
16. Replace the rear cassette guide.
17. Reconnect the “stack full” sensor cable, then replace the reader front cover.
18. Turn on the reader power.
19. Verify that the reader initializes correctly.
20. Insert a cassette and insert an array to verify proper load lock door operation.
Load Lock Door Cleaning for Personal Edition Readers
1. Open the sample exchange door on the front of the reader.
2. Using the pins on the front, unscrew the load lock door from its post
(counterclockwise).
3. Clean the load lock O-ring and the flat side of the door with a clean lab
wipe and alcohol.
4. Replace the load lock door by screwing it clockwise back on to the post.
5. Tighten the door until it seals against the O-ring.
Warranty and Service Agreements
The ProteinChip SELDI system that is delivered as part of a ProteinChip SELDI
system package has three components: the ProteinChip SELDI reader,
ProteinChip data manager software, and ProteinChip arrays. Bio-Rad
Laboratories, Inc. offers a number of warranty options for purchase to cover
reader servicing and upgrades of ProteinChip data manager software beyond
the initial warranty. Please call your local Bio-Rad office for complete
information on our warranties.
Page 29

Page 24
Getting Technical Assistance
Moving the ProteinChip SELDI System Reader
For technical service, call your local Bio-rad office, or in the US, call 1-8004BIORAD (1-800-424-6723).
The ProteinChip SELDI system reader is not intended to be carried by hand.
Carrying the reader is not recommended because its weight poses a significant
risk of physical harm. In the event that it is necessary to move the reader, use
the following guidelines:
• If a lift or dolly is to be used, the reader should first be placed in its
original shipping crate
• If the original shipping crate is not available, the reader can be strapped
to a pallet capable of supporting its weight
Do not use any device that will support the reader by only one edge because
the frame may bend.
It is recommended that you contact Bio-Rad technical support before moving
the reader.
ProteinChip SELDI System: Reader Guide
Page 30

Moving the ProteinChip SELDI System Reader Page 25
Appendix A: Networking the
ProteinChip SELDI System
The ProteinChip SELDI system requires a computer that serves as both the
ProteinChip data manager server and the primary workstation. Additional client
workstation computers can be networked to the reader (Fig. 22). Connecting
the ProteinChip SELDI system to a network gives the flexibility to perform data
analysis and monitor data acquisition.
Reader workstation
ProteinChip data manager server,
database software, and client software
Desktop workstation
client software
Desktop workstation
client software
Fig. 22: Client-server configuration for the ProteinChip SELDI System.
Desktop workstation
client software
Desktop workstation
client software
Page 31

Page 26 Networking the ProteinChip SELDI System
Two methods can be used to network the ProteinChip SELDI system instrument
and its workstation:
• Dynamic host configuration (DHCP), or
• Assigning a static IP address to each device.
Please refer to the section appropriate to the method.
NOTE
These instructions should only be used by persons that have experience with
computers and networking.
Networking the ProteinChip SELDI System Using DHCP
Overview
1. Verify the reader software version
2. Set the reader to DHCP
3. Change the server to DHCP
4. Redirect client computers to new server address
5. Obtain new license file (if necessary)
6. Connect to the reader
7. Edit the Instrument Options settings
NOTE
These instructions assume that the reader and the computer are connected
through a single crossover cable (usually a red cable) and is not currently
plugged into your general network. Also, it is assumed that the system is
working properly.
Verify the Reader Software Version
In order to assign IP addresses using DHCP, the reader software must be at
version R 01.01.13 or later. The version number can be checked on the reader
web page.
1. Open Internet explorer on the client workstation.
2. Enter in the following URL into the address bar:
http://192.168.1.200.
3. The reader web page will appear (Fig. 23).
ProteinChip SELDI System: Reader Guide
Page 32

Networking the ProteinChip SELDI System Using DHCP Page 27
Fig. 23: The reader web page.
4. Next, click the Software link. If the first number in the Current Software
Version is 01, the last number must be greater than or equal to 13 to use
DHCP. Otherwise, you should use a static IP address (refer to Networking
the ProteinChip SELDI System Using Static IP Addresses on page 38).
Page 33

Page 28 Networking the ProteinChip SELDI System
Fig. 24: Checking the reader software version.
Set the Reader to DHCP
By default, the reader is configured with the IP address 192.168.1.200 when it
is initially installed, and is set up to communicate with the supplied workstation
(IP address 192.168.1.10). The workstation is used to update the reader
settings.
NOTE
If you need to configure a separate computer to communicate with the
reader, please see the troubleshooting section.
1. Make sure that no one is using the reader.
2. Open Internet Explorer on the client workstation.
3. Enter the following URL into the address bar:
http://192.168.1.200.
The reader web page shown in Fig. 25 will appear.
ProteinChip SELDI System: Reader Guide
Page 34

Networking the ProteinChip SELDI System Using DHCP Page 29
Fig. 25: The reader web page.
4. Click on the Settings link. The Network Settings page will appear
(Fig. 26).
Page 35

Page 30 Networking the ProteinChip SELDI System
Fig. 26: The Network Settings web page.
5. Click the Obtain network settings automatically (DHCP) option then
click the Save Changes button. The changes may take a few minutes to
take effect.
IMPORTANT
Clicking the Save Changes button will change your reader’s settings
immediately. Thereafter, the client workstation will be unable to
communicate with the reader until the workstation’s settings are also
changed.
6. Unplug the cross-over cable, and plug the network cable from the reader
into network outlet, using a standard network cable (do not use the red
cross-over cable, as it will not work).
ProteinChip SELDI System: Reader Guide
Page 36

Networking the ProteinChip SELDI System Using DHCP Page 31
7. Record the reader's hostname. The format of the hostname is pcs4000xxxx, where xxxx are the last 4 digits from the serial number, as shown in
Fig. 27. You will find the serial number on the reader itself on lower left side
(when facing the front of the reader).
Fig. 27: The reader serial number.
8. Test the connection by using a computer already on your network to ping
the reader's hostname (from the command prompt, type ping followed by
the hostname). Be aware that it may take a few minutes for the DHCP
settings to take effect. If the computer receives a reply to the ping, then the
reader settings have been changed correctly. If you cannot ping the reader
hostname, proceed to the Troubleshooting section (page 48).
Change the Server to DHCP
1. In the Windows Start menu, select Control Panel | Network Connections
| Local Area Connection | Properties dialog. Under This computer uses
the following items, highlight Internet Protocol TCP/IP, then click
Properties. This will open the Internet Protocol Properties dialog box as
shown in Fig. 28.
Page 37

Page 32 Networking the ProteinChip SELDI System
Fig. 28: The Internet Protocol (TCP/IP) Properties dialog box.
2. Click on Obtain an IP address automatically and click OK.
3. Test the connection. Use a different computer already on your network to
ping the server's hostname (from the command prompt, type ping
followed by the hostname). Be aware that it may take a few minutes for the
DHCP settings to take effect. If the computer receives a reply to the ping,
then the reader settings have been changed correctly. If you cannot ping
the reader hostname, proceed to the Troubleshooting section (page 48).
Redirect Client Computers to the New Server Address
The new server settings must be entered onto each installation of ProteinChip
data manager client software separately.
1. Start the client.
2. In the Login dialog box, click the “…” button. This will open the Servers
dialog box (Fig. 29).
ProteinChip SELDI System: Reader Guide
Page 38

Networking the ProteinChip SELDI System Using DHCP Page 33
Fig. 29: The Servers dialog box.
3. Highlight the alias for the current server (not the localhost) and click the
Edit button. The Edit Server dialog box will open (Fig. 30).
Fig. 30: The Edit Server dialog box.
4. In the Edit Server dialog box, enter the server's hostname into the Host
field. The server's hostname can be obtained by opening the Windows
Control Panel, opening the System item, then click on the Computer
Name tab. The hostname is given in the Full computer name field.
5. Click the Update button, then close the Servers dialog.
Page 39

Page 34 Networking the ProteinChip SELDI System
Obtain a New License File (If Necessary)
After changing the server's IP address, it may be necessary to obtain a new
license file.
1. Log in using the ProteinChip data manager client software.
2. If either of the messages shown in Fig. 31 appears, the computer's settings
do not match the settings specified in the current license file.
Fig. 31: Errors produced when the server needs a new license file after changing the
IP address.
3. Send an email to lsg_techserv_us@BIO-RAD.com, containing the following
information (see How To on page 48 for information on finding some of
the necessary information):
• Company name
• ProteinChip data manager software version
• Server IP address
• Server’s MAC (physical) address
• Server hostname
• Personal Edition or Enterprise Edition
Connect to the Reader
After logging in as the “admin” user, you must specify the new reader
hostname in the ProteinChip data manager client software.
1. Log in to the client software.
ProteinChip SELDI System: Reader Guide
Page 40
Networking the ProteinChip SELDI System Using DHCP Page 35
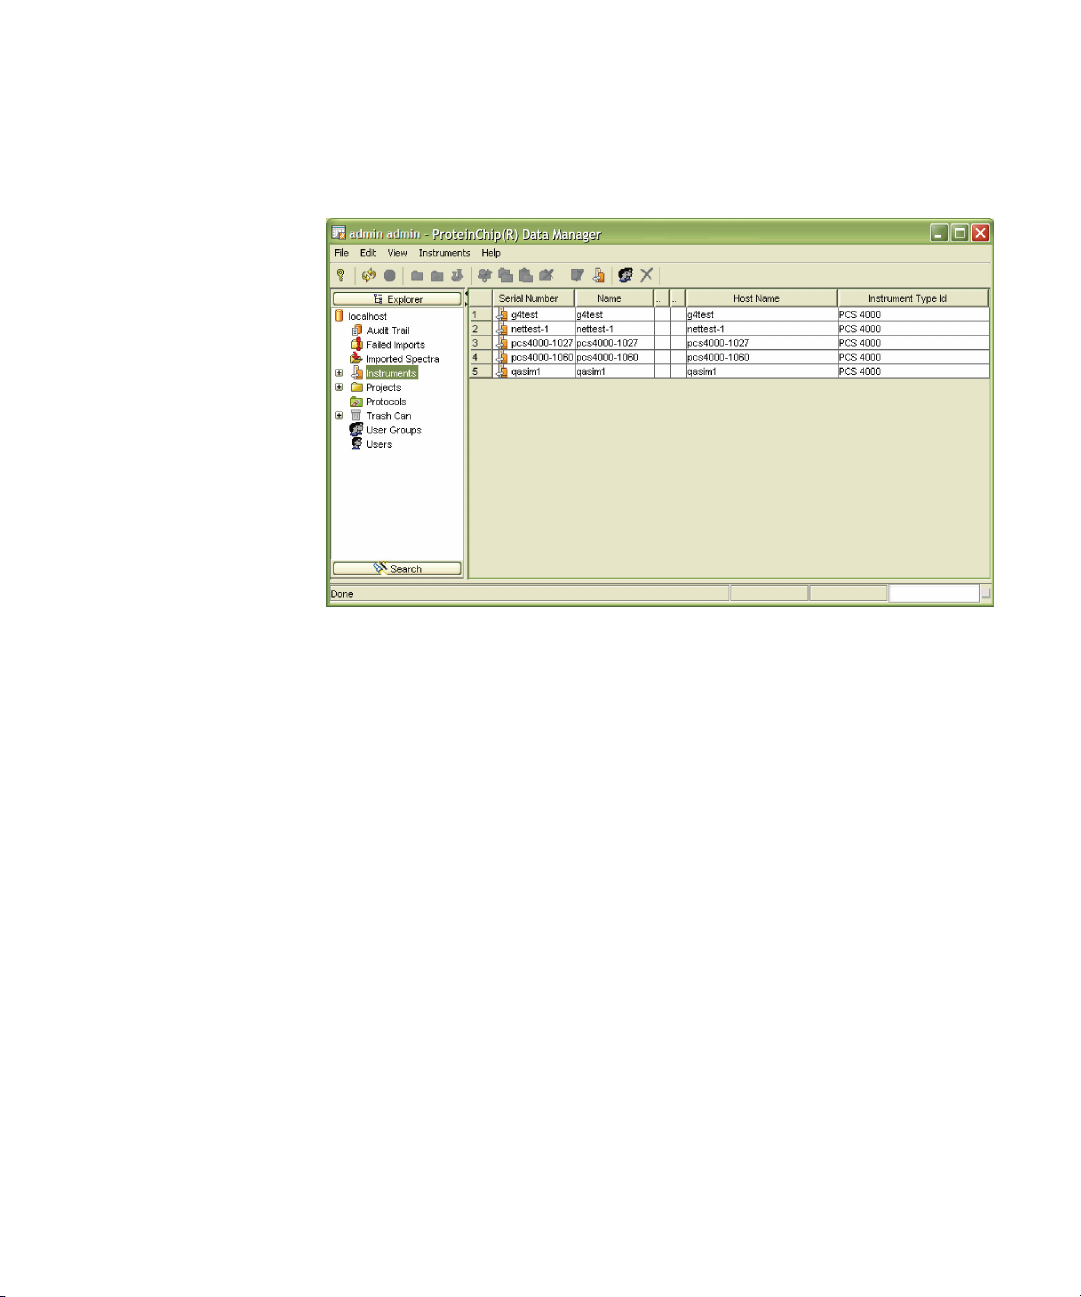
2. Click on the Instruments node in the Explorer tree. A table of the available
instrument will be displayed in the main pane of the software (Fig. 32).
Fig. 32: Connecting the client software to a reader.
3. Right-click on the desired reader in the table, then select Properties from
the pop-up menu. The Instrument Properties dialog box will open.
Page 41

Page 36 Networking the ProteinChip SELDI System
Fig. 33: The Instrument Properties dialog box.
4. Enter the hostname into the Host Name/IP field. Click OK to save the
change and close the dialog box.
5. Click on the reader name in the Explorer tree to connect to the reader. You
will see the Home tab screen similar to the one in Fig. 34.
ProteinChip SELDI System: Reader Guide
Page 42

Networking the ProteinChip SELDI System Using DHCP Page 37
Fig. 34: The Home tab of the ProteinChip data manager software.
Edit the Reader Options
After connecting to the reader, you must enter the server's hostname into the
reader (see the How To on page 48 to find the server’s current hostname).
1. After connecting to the reader, select Instrument > Instrument Options
from the menu. The Instrument Options dialog box will open (Fig. 35).
Fig. 35: The Instrument Options dialog box.
Page 43

Page 38 Networking the ProteinChip SELDI System
2. Enter the hostname of the server into the Data Manager Server hostname
field.
3. Click the Update button to save the changes.
NOTE
If the server hostname does not save properly (i.e. reverts back to its original
settings, please see Instrument Options in the Troubleshooting section,
starting on page 48.)
Networking the ProteinChip SELDI System Using Static IP Addresses
Overview
1. Obtain static IP addresses from the local IT group for server and the reader
2. Assign static IP to reader
3. Assign static IP to server computer
4. Redirect client computers to new server address
5. Obtain new license file (if necessary)
6. Connect to the reader
7. Edit the Instrument Options settings
Obtain Static IP Address
Static IP addresses are required for the reader and server in order to ensure
uninterrupted network communication between the ProteinChip SELDI system
reader and the server.
You will need the following pieces of information for the server and the reader:
• IP address
• Subnet mask
• Default gateway
• DNS domain name
• DNS server IP address
Assign Static IP to the Reader
The reader should already be configured with the IP address 192.168.1.200
when it arrived, and should already be set up to communicate with the
supplied workstation. The workstation will be used to update the reader
settings.
ProteinChip SELDI System: Reader Guide
Page 44

Networking the ProteinChip SELDI System Using Static IP Addresses Page 39
If you need to configure a separate computer to communicate with the reader,
please see the troubleshooting section.
1. Make sure that no one is using the reader.
2. Open Internet Explorer on the client workstation.
3. Enter the following URL into the address bar:
http://192.168.1.200.
The reader web page shown in Fig. 36 will appear.
Fig. 36: The reader web page.
4. Click on the Settings link. The Network Settings page will appear
(Fig. 37).
Page 45

Page 40 Networking the ProteinChip SELDI System
Fig. 37: The Network Settings web page.
5. Enter the network settings for the reader obtained from your IT group, then
press the Save Changes button. The changes may take a few minutes to
take effect.
IMPORTANT
Clicking the Save Changes button will change your reader's settings
immediately. Thereafter, the client workstation will be unable to
communicate with the reader until the workstation’s settings are also
changed.
6. Plug the network cable from the reader into a network outlet (do not use
the red cross-over cable, as it will not work).
ProteinChip SELDI System: Reader Guide
Page 46

Networking the ProteinChip SELDI System Using Static IP Addresses Page 41
Assign a Static IP to the Server Computer
A second static IP address must be given to the server computer.
1. In the Windows Start menu, select Control Panel | Network Connections
| Local Area Connection | Properties dialog. Under This computer uses
the following items, highlight Internet Protocol TCP/IP, then click
Properties. This will open the Internet Protocol Properties dialog box as
shown in Fig. 38.
Fig. 38: The Internet Protocol (TCP/IP) Properties dialog box.
2. Click on Use the following IP address and enter the static IP address,
subnet mask, default gateway and DNS server information obtained from
IT.
3. Test the connection. Use a different computer already on your network to
ping the server's hostname (from the command prompt, type ping
followed by the hostname). Be aware that it may take a few minutes for the
Page 47

Page 42 Networking the ProteinChip SELDI System
DHCP settings to take effect. If the computer receives a reply to the ping,
then the reader settings have been changed correctly. If you cannot ping
the reader hostname, proceed to the Troubleshooting section (page 48).
Redirect Client Computers to the New Server Address
The new server settings must be entered onto each installation of ProteinChip
data manager client software separately.
1. Start the client.
2. In the Login dialog box, click the “…” button. This will open the Servers
dialog box (Fig. 39).
Fig. 39: The Servers dialog box.
3. Highlight the alias for the current server (not the localhost) and click the
Edit button. The Edit Server dialog box will open (Fig. 40).
ProteinChip SELDI System: Reader Guide
Page 48

Networking the ProteinChip SELDI System Using Static IP Addresses Page 43
Fig. 40: The Edit Server dialog box.
4. In the Edit Server dialog box, enter the server's new IP address into the
Host field.
5. Click the Update button, then close the Servers dialog.
Obtain a New License File (If Necessary)
After changing the server's IP address, it may be necessary to obtain a new
license file.
1. Log in using the ProteinChip data manager client software.
2. If either of the messages shown in Fig. 41 appears, the computer's settings
do not match the settings specified in the current license file.
Page 49

Page 44 Networking the ProteinChip SELDI System
Fig. 41: Errors produced when the server needs a new license file after changing the
IP address.
3. Send an email to lsg_techserv_us@BIO-RAD.com, containing the following
information (see How To on page 48 for information on finding some of
the necessary information):
• Company name
• ProteinChip data manager software version
• Server IP address
• Server’s MAC (physical) address
• Server hostname
• Personal Edition or Enterprise Edition
Connect to the Reader
After logging in as the “admin” user, you must specify the new reader IP
address in the ProteinChip data manager client software.
1. Log in to the client software.
2. Click on the Instruments node in the Explorer tree. A table of the available
readers will be displayed in the main pane of the software (Fig. 32).
ProteinChip SELDI System: Reader Guide
Page 50

Networking the ProteinChip SELDI System Using Static IP Addresses Page 45
Fig. 42: Connecting the client software to a reader.
3. Right-click on the desired reader in the table, then select Properties from
the pop-up menu. The Instrument Properties dialog box will open.
Page 51

Page 46 Networking the ProteinChip SELDI System
Fig. 43: The Instrument Properties dialog box.
4. Enter the new IP address into the Host Name/IP field. Click OK to save the
change and close the dialog box.
5. Click on the reader alias in the Explorer tree to connect to the reader. You
will see the Home tab screen similar to the one in Fig. 34.
ProteinChip SELDI System: Reader Guide
Page 52

Networking the ProteinChip SELDI System Using Static IP Addresses Page 47
Fig. 44: The Home tab of the ProteinChip data manager software.
Edit the Reader Options
After connecting to the reader, you must enter the server’s new IP address into
the reader.
1. After connecting to the reader, select Instrument > Instrument Options
from the menu. The Instrument Options dialog box will open (Fig. 35).
Fig. 45: The Instrument Options dialog box.
Page 53

Page 48 Networking the ProteinChip SELDI System
2. Enter the IP address of the server into the ProteinChip data manager
server hostname field.
3. Click the Update button to save the changes.
NOTE
If the server hostname does not save properly (i.e. reverts back to its original
settings, please see Instrument Options under Troubleshooting.)
Troubleshooting
The reader's backdoor IP address
After changing the reader IP address, if you are unable communicate with the
reader, you can simply communicate with the reader using its backdoor IP
address. The reader is programmed with a backdoor IP address of
10.234.234.234.
To access the reader web page, connect a client computer to the reader using
the network hub, or using the supplied crossover cable. Make sure to set the
computer’s networking settings to access the reader. For example, change the
computer's IP address to 10.234.234.100, set the subnet mask to
255.255.255.0, and the default gateway to 10.234.234.100.
Instrument Options
When using the ProteinChip data manager client software, there may be
occasions in which you cannot edit the hostname in the Instrument Options
dialog box, or after editing the hostname in the dialog box it reverts back to its
initial value. In this case you need to change the hostname using the reader’s
web page:
1. Log onto the reader's web page at
http://<reader hostname or IP>/index.jsp.
2. Click on the Settings link, then click on the Instrument Options link.
3. Enter the server's hostname in this field and click the Update button. You
can test the connection to the server by clicking the Test Connection
button.
How To
Find the server's hostname, IP and MAC addresses
1. On the server computer, select Start | Run.
2. Type in ‘cmd’ then click the OK button.
ProteinChip SELDI System: Reader Guide
Page 54

Networking the ProteinChip SELDI System Using Static IP Addresses Page 49
3. At the command prompt, type in ‘ipconfig /all' then press Enter.
4. The hostname will be listed under Windows IP configuration, and the IP
address under Ethernet adapter Local Area Connection. The physical (or
MAC) address will be listed here as well.
Find the reader's MAC address
Ping the reader from another computer.
1. On the server computer, select Start | Run.
2. Type in ‘cmd’ then click the OK button.
3. At the command line, type “arp -a”. This will result in a list of IP addresses
and the MAC (physical) addresses that they correspond to.
Questions or Comments?
Please send an email to lsg_techserv_us@bio-rad.com, or contact your local BioRad office.
Page 55

Page 50 Networking the ProteinChip SELDI System
ProteinChip SELDI System: Reader Guide
Page 56

Index
Page 51
A
accessories 8–9
Auto Mode 17–18
enabling cassette processing 17
autoloader 14
C
cassettes 14
connection, network 7
controlling instrument 14
E
electrical requirements 3
equipment ratings 3–4
F
Fire Continuously button 15
Fire Once button 15
L
laser safety warning 5
lock door cleaning 18–23
M
maintenance 18–23
Manual Mode 15
mounting requirements 7
moving instrument 24
multicassette autoloader 14
N
network connection 7
O
operating conditions 3
operating controls 13
operating the ProteinChip SELDI
system 14–18
I
identification/certification label 3
installation 7–8
P
power requirements 6
ProteinChip SELDI system
Page 57

Page 52 Index
networking 25
Protocol Mode 16–17
R
requirements
mounting 7
power 6
space 6
ventilation 7
Run button 16
S
safety interlocks 5
safety labels 4–5
safety precautions 4–6
setting up the ProteinChip SELDI
system 7–8
shutting down 18
software 14–18
controlling reader 14
sensor status 14
space requirements 6
specifications 1–3
Start icon 14
starting status (of sensors) 14
storage and transport conditions 4
support 24
system dimensions 6
U
uninterrupted power supply (UPS) 8
V
ventilation 7
ventilation requirements 7
W
warranty 23
T
technical support 24
ProteinChip SELDI System: Reader Guide
Page 58

Life Science
Group
06-0054 0207 Sig 1106
Bulletin 10008220 US/EG Rev C
Bio-Rad
Laboratories, Inc.
Web site www.bio-rad.com USA 800 4BIORAD Australia 61 02 9914 2800 Austria 01 877 89 01 Belgium 09 385 55 11 Brazil 55 21 3237 9400
Canada 905 712 2771 China 86 21 6426 0808 Czech Republic 420 241 430 532 Denmark 44 52 10 00 Finland 09 804 22 00
France 01 47 95 69 65
Germany 089 318 84 0 Greece 30 210 777 4396 Hong Kong 852 2789 3300 Hungary 36 1 455 8800 India 91 124 4029300 Israel 03 963 6050
Italy 39 02 216091 Japan 03 5811 6270 Korea 82 2 3473 4460 Mexico 52 555 488 7670 The Netherlands 0318 540666 New Zealand 0508 805 500
Norway 23 38 41 30 Poland 48 22 331 99 99 Portugal 351 21 472 7700 Russia 7 495 721 14 04 Singapore 65 6415 3188 South Africa 27 861 246 723
Spain 34 91 590 5200 Sweden 08 555 12700 Switzerland 061 717 95 55 Taiwan 886 2 2578 7189 United Kingdom 020 8328 2000
 Loading...