

Page 1
BIO-RAD
DNA Extraction Module
Catalog #12016408EDU
Instruction Manual
Note: Duplication of any part of this document is permitted for noncommercial, educational use only. Commercial use of
copyrighted content, including use in instructional materials for which payment is received, requires express permission from
Bio-Rad Laboratories, Inc. Contact us at [email protected] for more information.
For technical support, call your local Bio-Rad office, or in the U.S. call 1-800-4BIORAD (1-800-424-6723) option 2.
Page 2

Table of Contents
Before You Start
Storage ..................................................................................................................................................... 1
Safety Guidelines ....................................................................................................................................... 1
Components ............................................................................................................................................. 2
Ordering Information .................................................................................................................................. 3
Instructor Guide
Preparation Instructions ............................................................................................................................. 4
Tips and Notes ......................................................................................................................................... 6
Student Guide
Materials Required ..................................................................................................................................... 7
Protocol ..................................................................................................................................................... 7
i
Page 3
Before You Start
–20°C
500 ml
LB
Agar
00:00
Storage
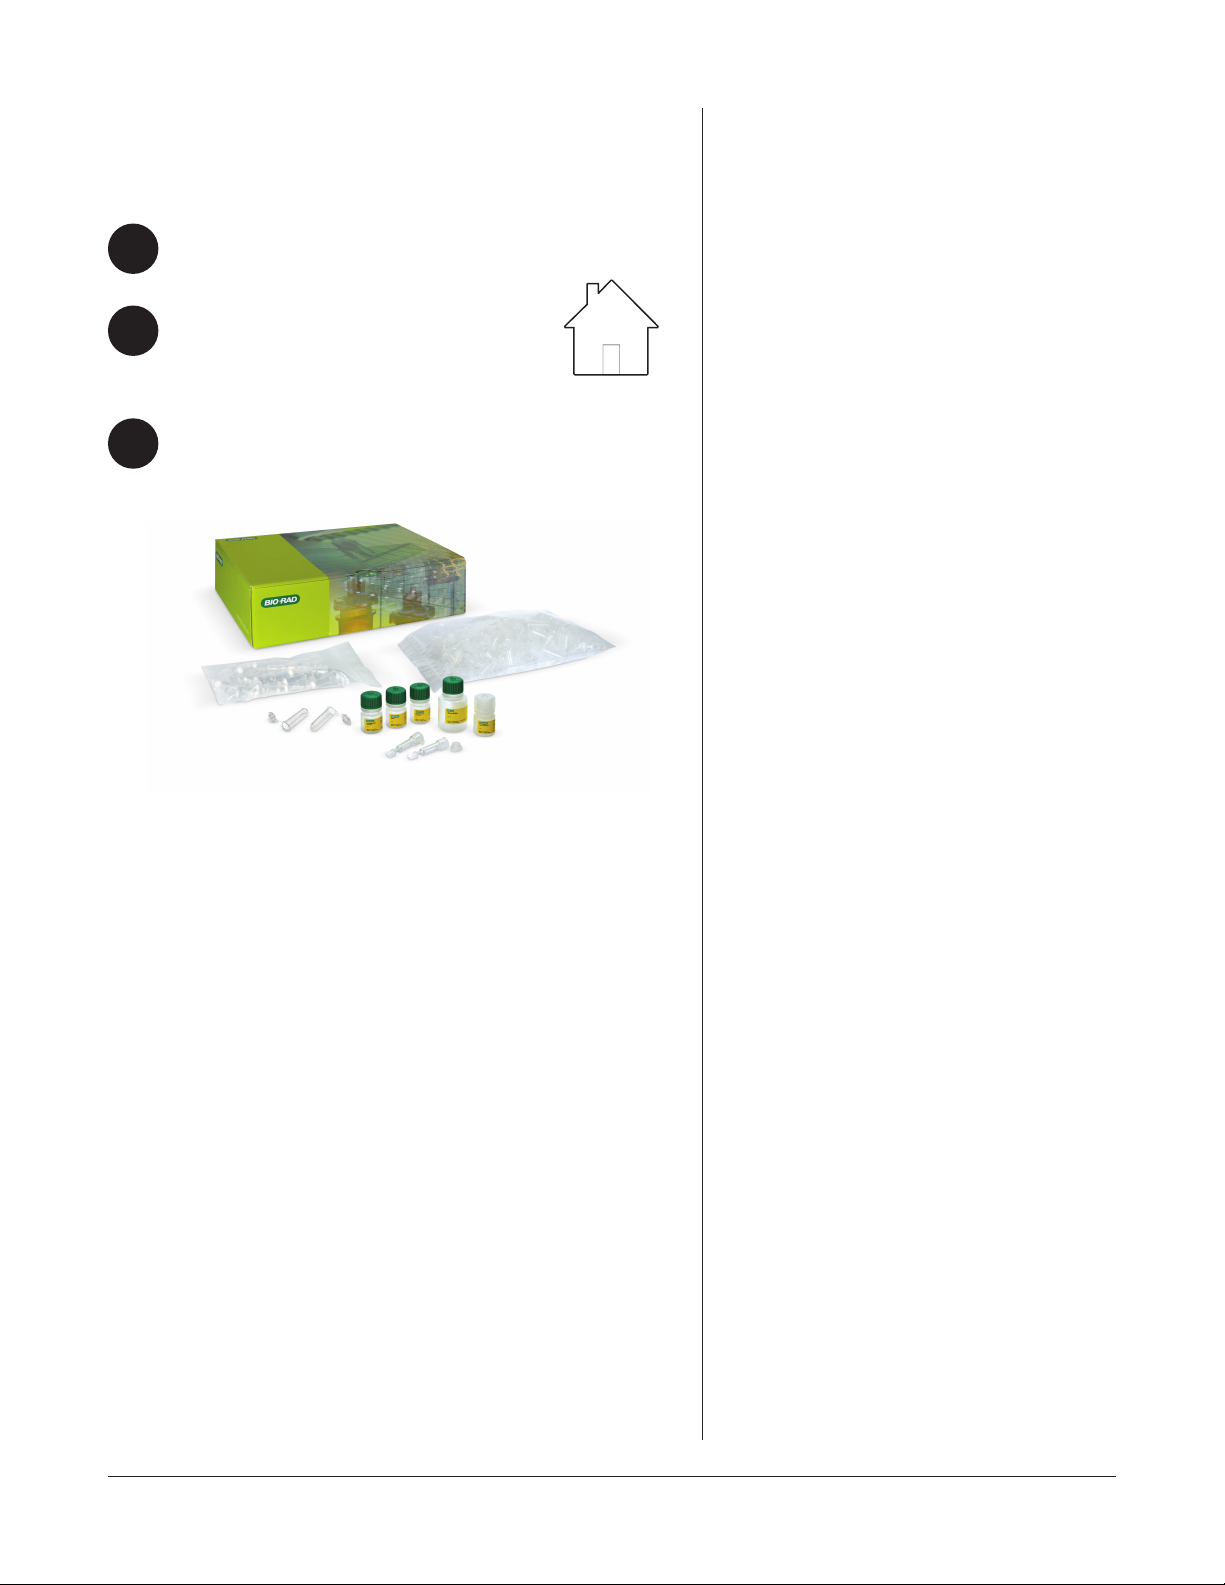
When you receive the DNA Extraction Module:
Note storage location and record the batch
1
numbers from the product labels.
Store the DNA Extraction Module at room
2
temperature.
Visit bio-rad.com/DNAExtractionMod to
3
download the most up-to-date instruction manual.
Technical Support is available at [email protected] or
1-800-4BIORAD, option 2.
Room Temp
~20°C
Safety Guidelines
Eating, drinking, smoking, and applying cosmetics
are not permitted in the work area. Wearing
protective eyewear and gloves is strongly
recommended. Students should wash their hands
with soap before and after this exercise. If any
solution gets into a student’s eyes, flush with water
for 15 min. Lab coats or other protective clothing
should be worn to avoid staining clothes.
Always use proper safety precautions when
collecting and processing samples. Some
organisms are harmful and/or poisonous if handled
improperly. Improper handling may result in serious
injury or death. It is recommended that students
work only with samples that have been positively
identified as nontoxic, or otherwise use samples
from a reliable retailer such as a grocery store, pet
store, or science supply company. Use appropriate
personal protective equipment minimally including
gloves and safety goggles. Use extreme caution
when using cutting utensils to prevent injury. Use
standard microbiology safety practices when
working with samples that may contain pathogenic
bacteria. Place any materials that contacted
bacteria in a 10% bleach solution for at least 20 min
to decontaminate. Follow local regulations for further
disposal recommendations.
explorer.bio-rad.com
Visit explorer.bio-rad.com to access Safety Data
Sheets for individual products.
1
Page 4
Before You Start
Components
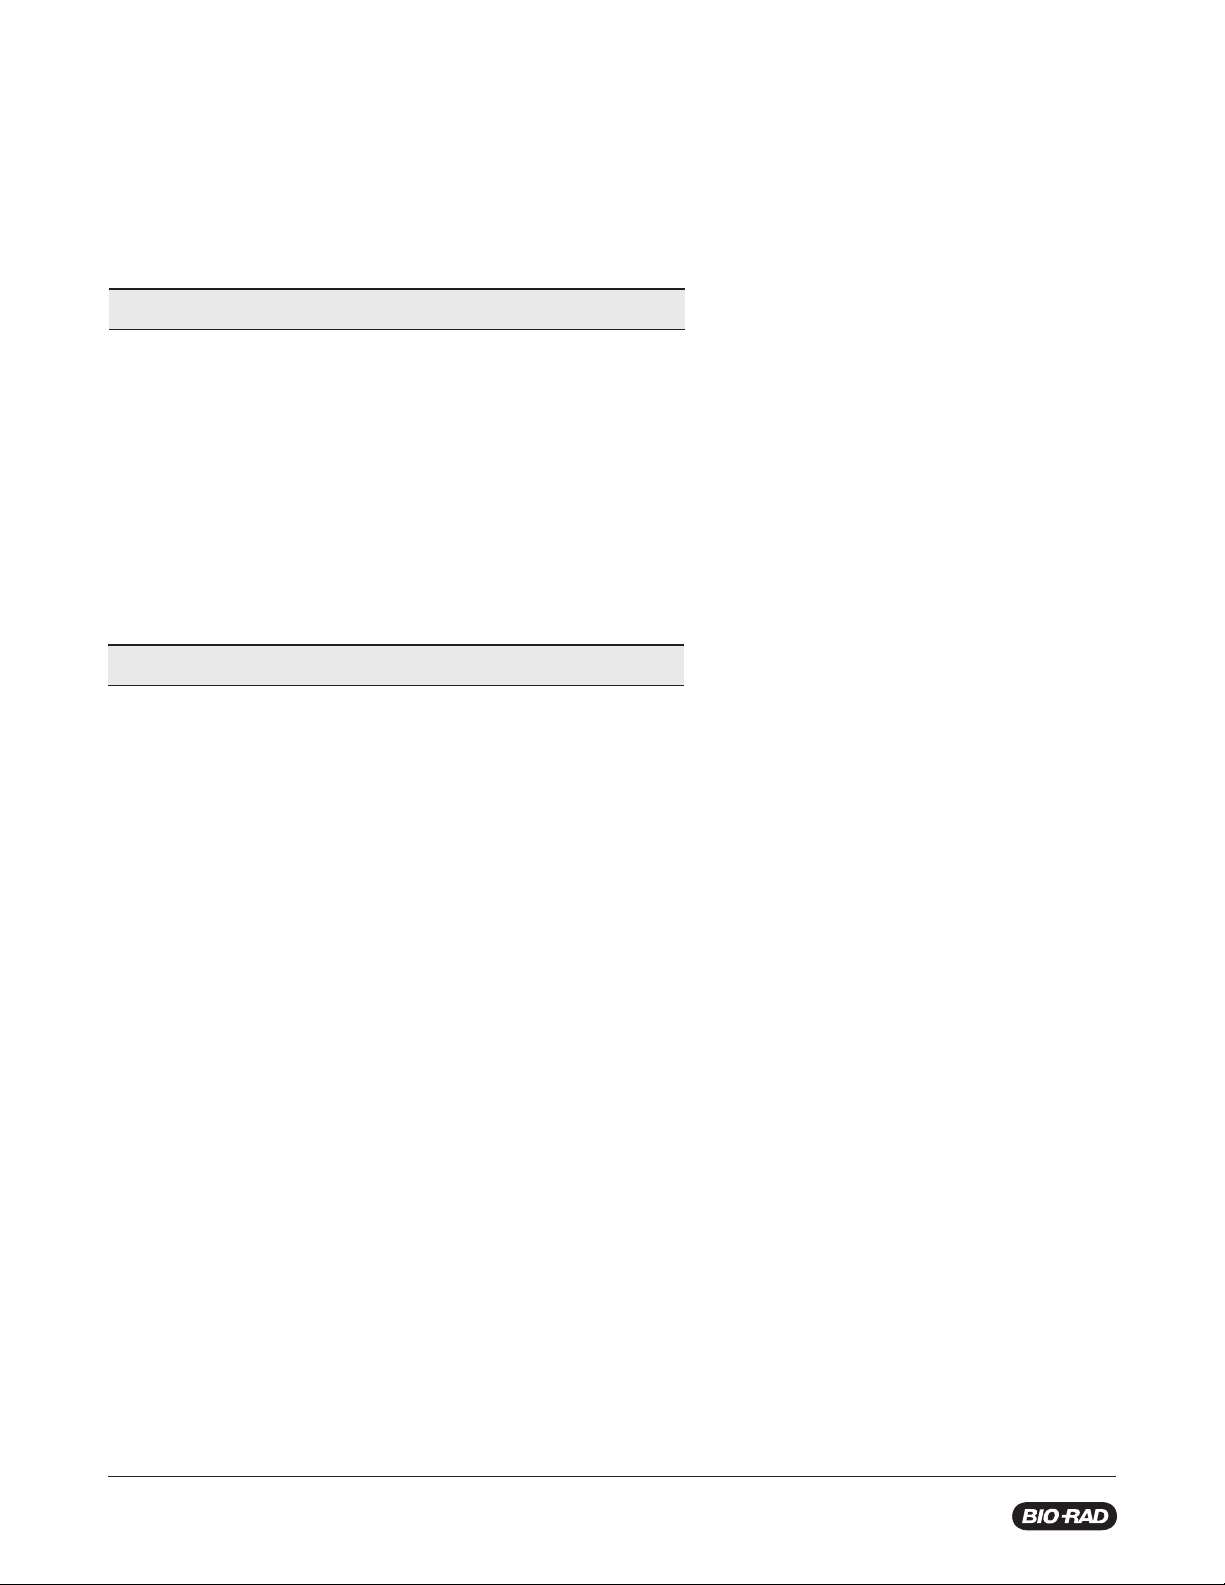
The DNA Extraction Module includes materials for 16 samples, or
32 students working in pairs (one sample each) or groups of four
(two samples each).
Materials included in this module
Item Quantity
DNA Extraction Module
Resuspension solution 5 ml
Lysis solution 5 ml
Neutralization solution 5 ml
Matrix 5 ml
Wash buffer 10 ml
Spin columns 20
2 ml capped microcentrifuge tubes 250
Required materials not included in this module
Item Quantity
Equipment
100–1,000 μl adjustable-volume micropipet and tips 8–16
Dry bath or water bath 1
Microcentrifuge, ≥14,000 x g 1
Inoculation loop, sterile, if using bacterial samples 16
Razor blade or plastic knife, new and unused, if using 16
tissue samples
Weigh boat 16
Microcentrifuge tube rack 8–16
Permanent marking pen 8–16
Reagents and Consumables
Bulk tissue samples or bacteria culture 1–16
Distilled water 3 ml
Ethanol, 95% 10 ml
Bleach solution, 10%
2
Page 5

Ordering Information
Catalog # Description
Kits and Refill Packs
12016408EDU DNA Extraction Module
1665105EDU DNA Extraction Reagent Pack
Reagents and Consumables
2239430EDU EZ Micro Test Tubes, 500
1660471EDU Inoculation Loops, Sterile, 100
Equipment and Laboratory Supplies
1660506EDU Professional Adjustable-Volume Micropipet, 2–20 μl
1660507EDU Professional Adjustable-Volume Micropipet, 20–200 μl
1660508EDU Professional Adjustable-Volume Micropipet, 100–1,000 μl
1660562EDU Digital Dry Bath, 120 V
1660504EDU Temperature-Controlled Water Bath, 120 V
12011919EDU Mini Centrifuge, 100–240 V
1660602EDU Model 16K Microcentrifuge, 120 V
1660610EDU BR-2000 Vortexer, 120 V
1660481EDU Green Racks, set of 5
Before You Start
Visit explorer.bio-rad.com for a full list of 220–240 V equipment.
explorer.bio-rad.com
3
Page 6
Instructor Guide
Preparation Instructions
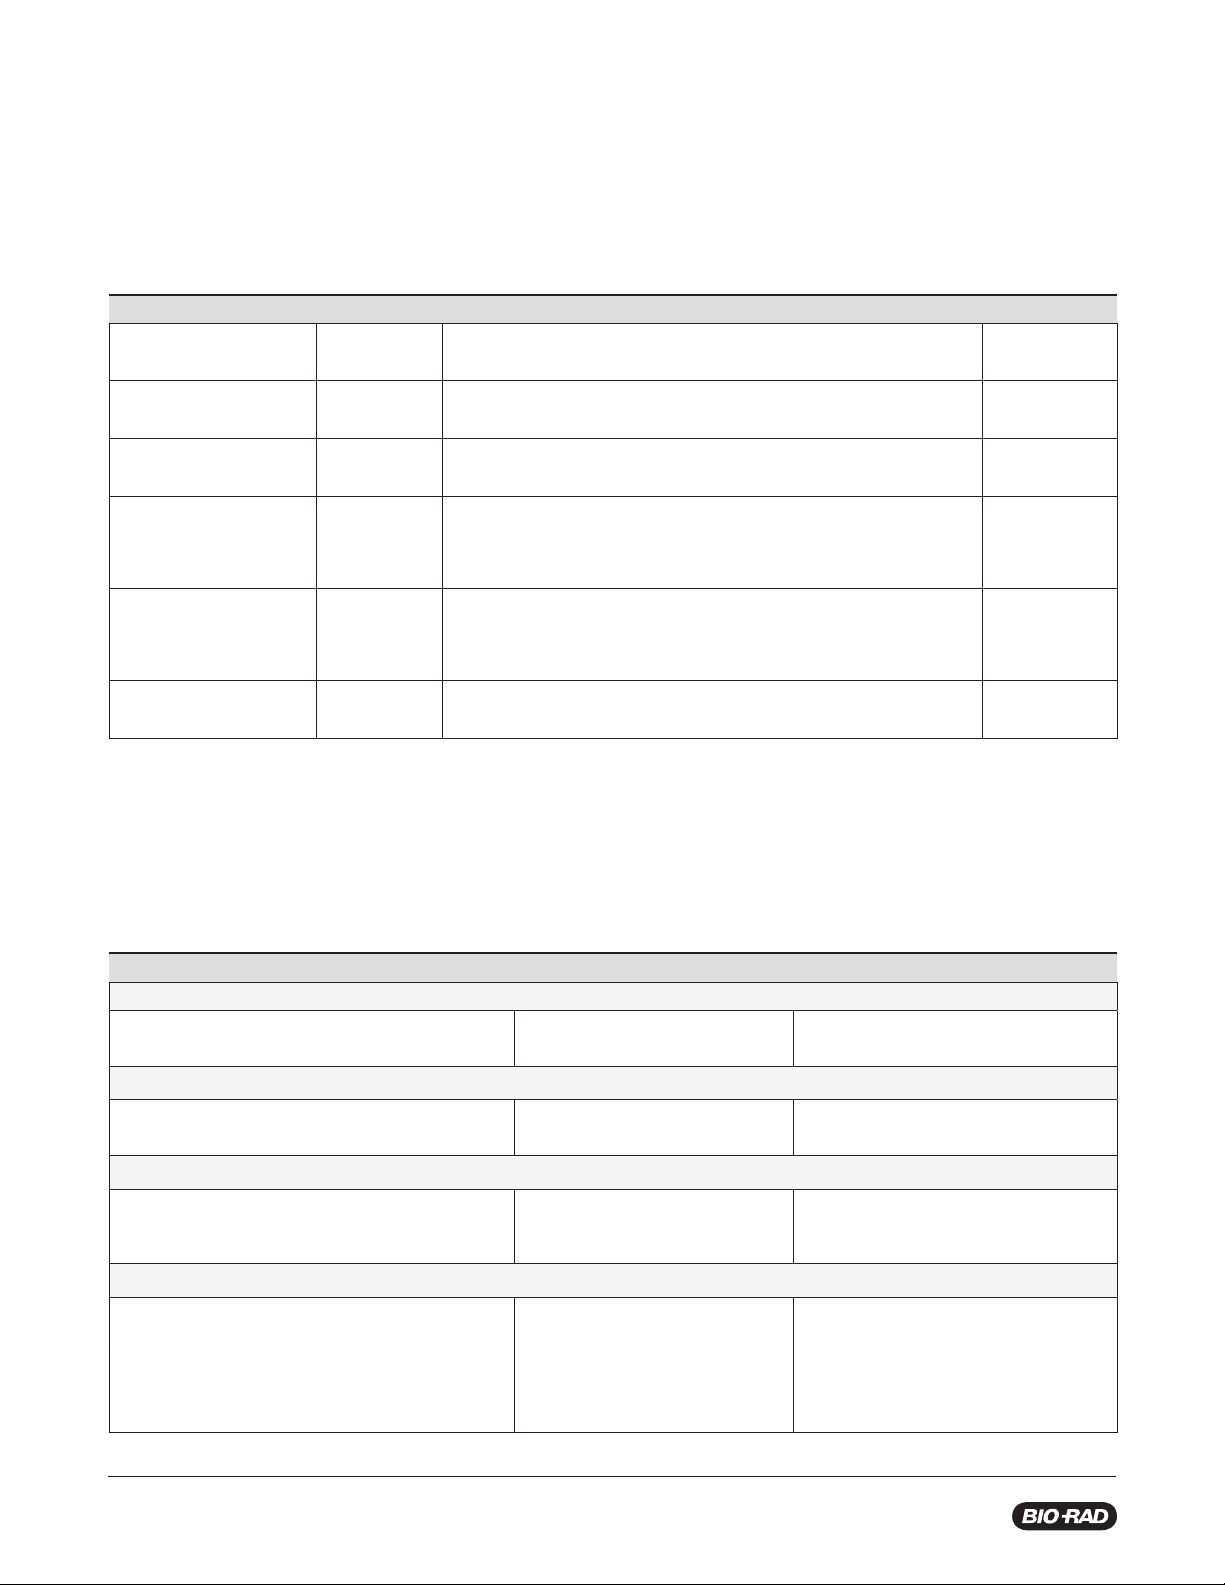
1. Use Table 1 to prepare and dispense solutions up to four weeks before the activity.
To help prevent cross-contamination, label tubes and dispense one solution at a time. Be sure to use a new pipet tip for each solution.
Table 1. Reagent preparation and dispensing instructions.
Tube Type and Quantity
16 microcentrifuge
tubes with caps, 2.0 ml
16 microcentrifuge
tubes with caps, 2.0 ml
16 microcentrifuge
tubes with caps, 2.0 ml
16 microcentrifuge tubes
with caps, 2.0 ml
16 microcentrifuge tubes
with caps, 2.0 ml
16 microcentrifuge
tubes with caps, 2.0 ml
2. Acquire tissue samples (if using) any time before the lessons.
Source tissue samples or have your student source tissue samples any time before the activity. To avoid spoilage and
contamination, store tissue samples frozen and then thaw the day of the activity. Plant tissue samples are not recommended for
this DNA extraction protocol.
Tube Label
R 250 μl resuspension solution Up to 4 weeks
Lys 300 μl lysis solution Up to 4 weeks
N 300 μl neutralization solution Up to 4 weeks
X
Wash
dH2O
Tube Contents and Preparation Instructions Storage
at room temp.
at room temp.
at room temp.
250 μl resuspended matrix
Preparation: Before dispensing, resuspend the resin matrix by
shaking, stirring manually, or vortexing
1 ml wash buffer plus ethanol solution
Preparation: Before dispensing, add 10 ml of 95% ethanol to the
bottle of wash buffer, replace the cap, and shake to mix.
150 µl distilled water
Up to 4 weeks
at room temp.
1–2 days at
room temp.
Indefinitely
Table 2. Samples, by species, that reliably produce successful results.
Robust
Insects
Beetles
Moths
Mammals and Birds
Cow
Pig
Fungi
Fresh mushroom caps Dried mushrooms are less robust
Fish
Dried fish
Catfish
Shark
Sturgeon
Trout
Rock cod
Butterflies
Bees
Sheep
Deer
True cod
Tilapia
Mackerel
Yellowfin tuna
Sea bass
Opah
Wasps
Flies
Pheasant
Duck
Imitation crab
Flying fish roe
Bonito flakes
Shrimp
Less Robust
Spiders Molted exoskeletons
Elk
Turkey
than fresh mushrooms, but can
still produce good results
Salmon
Salmon roe
Anchovy
Arctic char
Sardine
Difficult/Not Robust
Cocoons
Ground meat
Fur
Older mushrooms, due to the risk of
contamination
Fried fish
Canned fish
Sea urchin
Red tuna
Mussel
Clam
Gastropods
Feathers
Bones
4
Page 7
Instructor Guide
3. Prepare bacteria cultures (if using) 1–5 days before the DNA extraction activity.
For each student sample, prepare a bacterial culture plate or 3 ml of liquid bacterial culture from a single colony. Chromosomal
DNA can be extracted from either bacterial colonies or liquid culture.
4. Prepare student workstations.
Use Tables 3–4 to set up workstations just before the activity. Each workstation has enough materials to extract DNA from one
sample. Micropipets can be shared if necessary between groups. Other materials should not be shared,to avoid contamination.
Table 3. Student workstation.
Materials Quantity
Resuspension buffer (R)
Lysis buffer (Lys)
Neutralization buffer (N)
Matrix (X)
Wash buffer (Wash)
Distilled water (dH2O)
Empty 2 ml microcentrifuge tubes with caps
Empty 2 ml microcentrifuge tubes with caps removed
Spin column
Bulk tissue sample or bacterial culture
Empty, clean weigh boat
Inoculation loop, sterile, if using bacterial samples
(Note: It is critical to use one loop per sample)
Razor blade, plastic knife, or other clean cutting utensil, if using tissue samples
(Note: it is critical to use one utensil per sample)
100–1,000 µl adjustable-volume micropipet and tips
Marking pen
Bleach solution, 10%
Table 4. Common workstation.
250 µl
300 µl
300 µl
250 µl
1 ml
250 µl
1
2
1
1
1
1
1
1
1
Materials Quantity
Water bath or dry bath set to 55°C
Microcentrifuge
explorer.bio-rad.com
1
1–2
5
Page 8

Instructor Guide
of contamination.
Tips and Notes
The success of many downstream analyses, including polymerase chain reaction (PCR), is highly dependent on the quality and
quantity of DNA extracted from your samples. Use the following tips to ensure successul DNA extraction.
Preventing contamination is of utmost importance. Use the following precautions to minimize the chance
of contamination.
• New, clean, and DNA-free cutting utensils are required for each sample. Do not cross-contaminate samples. The DNA
from a single contaminating cell can ruin results. Use gloves and change them between specimens
• Wiping a utensil and rinsing in ethanol between samples will not suffi ciently remove DNA present on a cutting utensil
• When working with non-bacterial samples, it is possible for DNA from contaminating bacteria to coamplify with sample DNA.
Taking samples from the interior of bulk animal tissue can reduce the chances of contamination with bacteria
• When selecting samples, avoid fur, feathers, exoskeleton, bones, or other keratinous or chitinous samples. Also avoid
canned or processed samples, as acidic conditions can damage DNA. High fat–content samples (for example, fried foods)
may also inhibit DNA extraction and subsequent PCR. Fresh, frozen, or dried samples can produce excellent results
• Once lysis buffer is added during DNA extraction, there is no convenient stopping point until the DNA is eluted from the spin
purifi cation column. If you choose to stop before adding the lysis buffer, be sure student samples are labeled with their initials,
and store them refrigerated at 4°C for up to 1 week
• Wipe down surfaces and rinse plastic pipet barrels, mortars, and pestles with 10% bleach to remove any surface DNA
contamination.
6
Page 9
Materials Required
Student Workstation
Materials Quantity
Student Guide
Resuspension buffer (R)
Lysis buffer (Lys)
Neutralization buffer (N)
Matrix (X)
Wash buffer (Wash)
Distilled water (dH2O)
Empty 2 ml microcentrifuge tubes with caps
Empty 2 ml microcentrifuge tubes with caps removed
Spin column
Bulk tissue sample or bacterial culture
Empty, clean weigh boat
Inoculation loop, sterile, if using bacterial samples
(Note: It is critical to use one loop per sample)
Razor blade, plastic knife, or other clean cutting utensil
(Note: It is critical to use one utensil per sample)
100–1,000 µl adjustable-volume micropipet and tips
Marking pen
Bleach solution, 10%
Common Workstation
Materials Quantity
250 µl
300 µl
300 µl
250 µl
1 ml
150 µl
1
2
1
1
1
1
1
1
1
Water bath or dry bath set to 55°C
Microcentrifuge
1
1–2
explorer.bio-rad.com
7
Page 10
Student Guide
Protocol
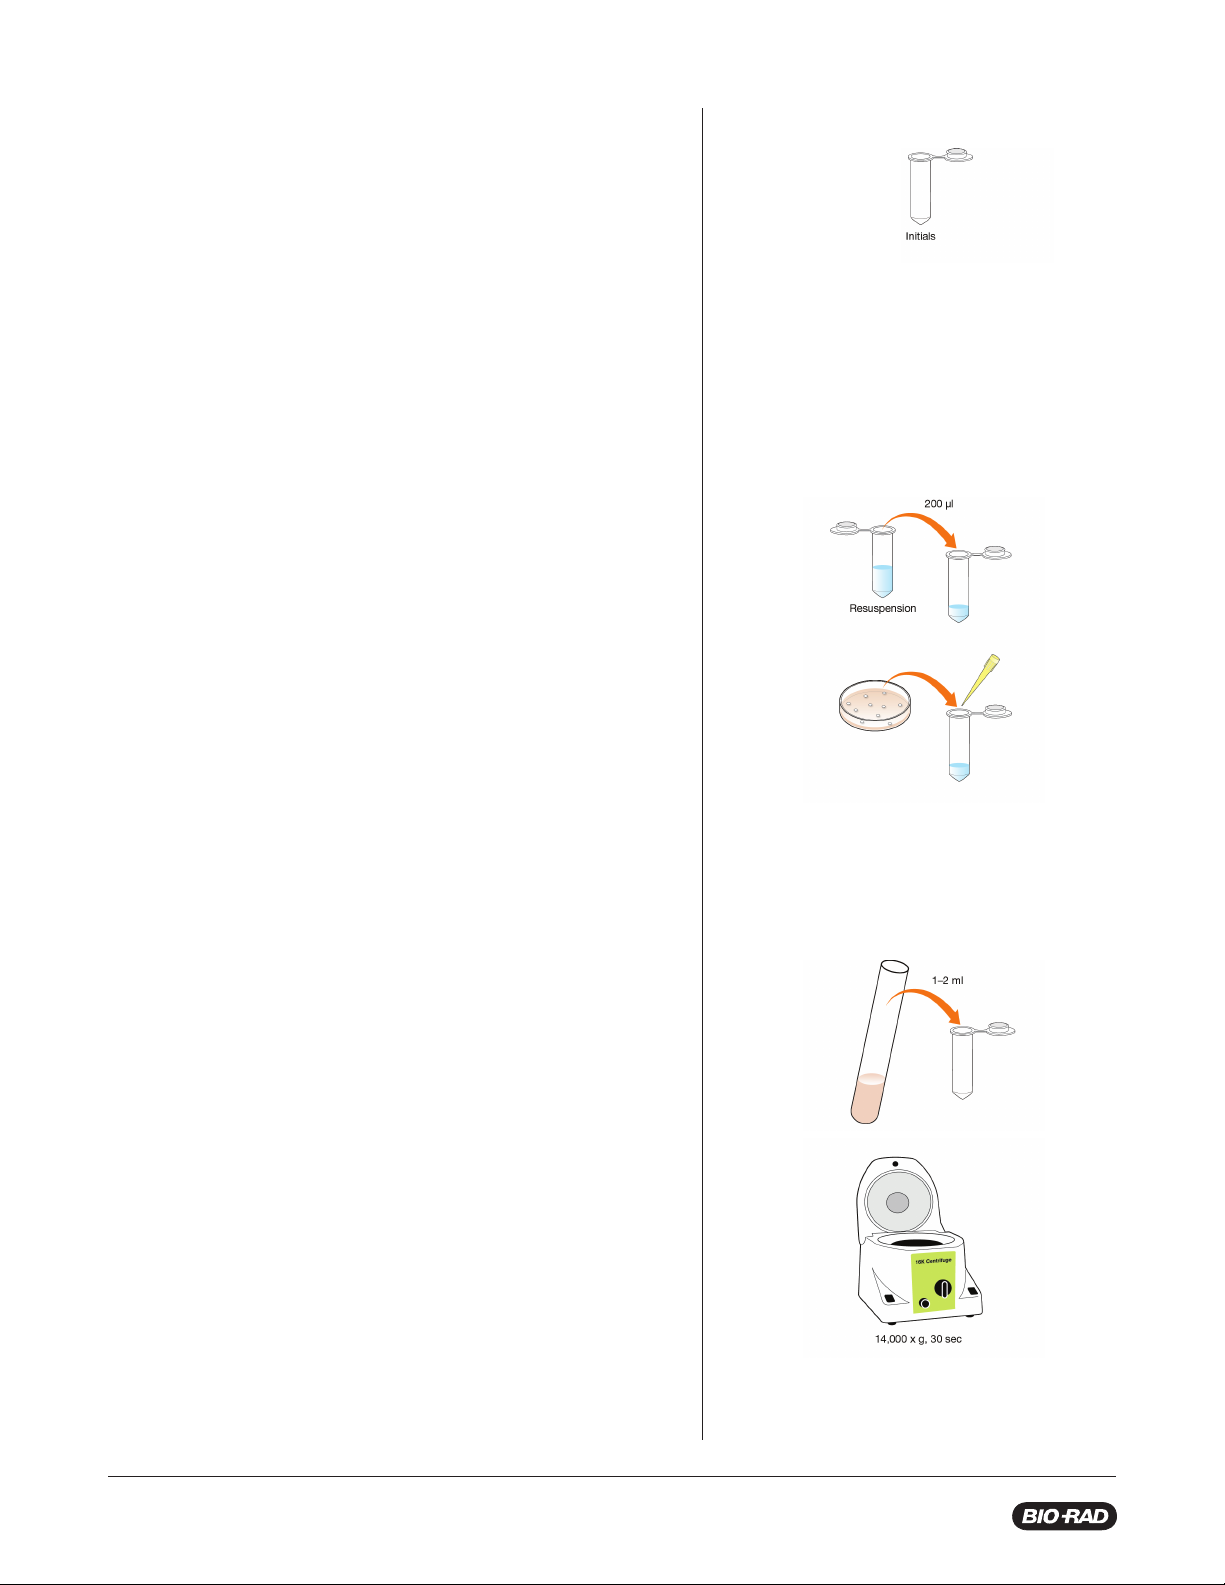
1. Label one capped 2 ml microcentrifuge tube with
your initials.
If provided or known, record the ID or a description
of the tissue sample you will be using.
Sample __________________
2. Prepare your sample by following the steps below
that correspond to your sample type.
For bacteria samples on solid media
a. Add 200 µl resuspension buffer (R) to the
labeled 2 ml microcentrifuge tube.
b. Use a new sterile pipet tip or inoculating loop to
pick one bacterial colony from a culture plate
and transfer to the tube.
➜
➜
➜
c. Completely resuspend the colony in the
resuspension buffer by pipetting up and down
or vortexing for 10–20 sec.
For bacteria samples in liquid culture
a. Transfer 1–2 ml fresh overnight bacteria liquid
culture to the labeled 2 ml microcentrifuge tube.
b. Centrifuge the sample at 14,000 x g for 30 sec
to form a cell pellet. Be sure to use a
counterbalance.
➜
➜
8
Page 11
Student Guide
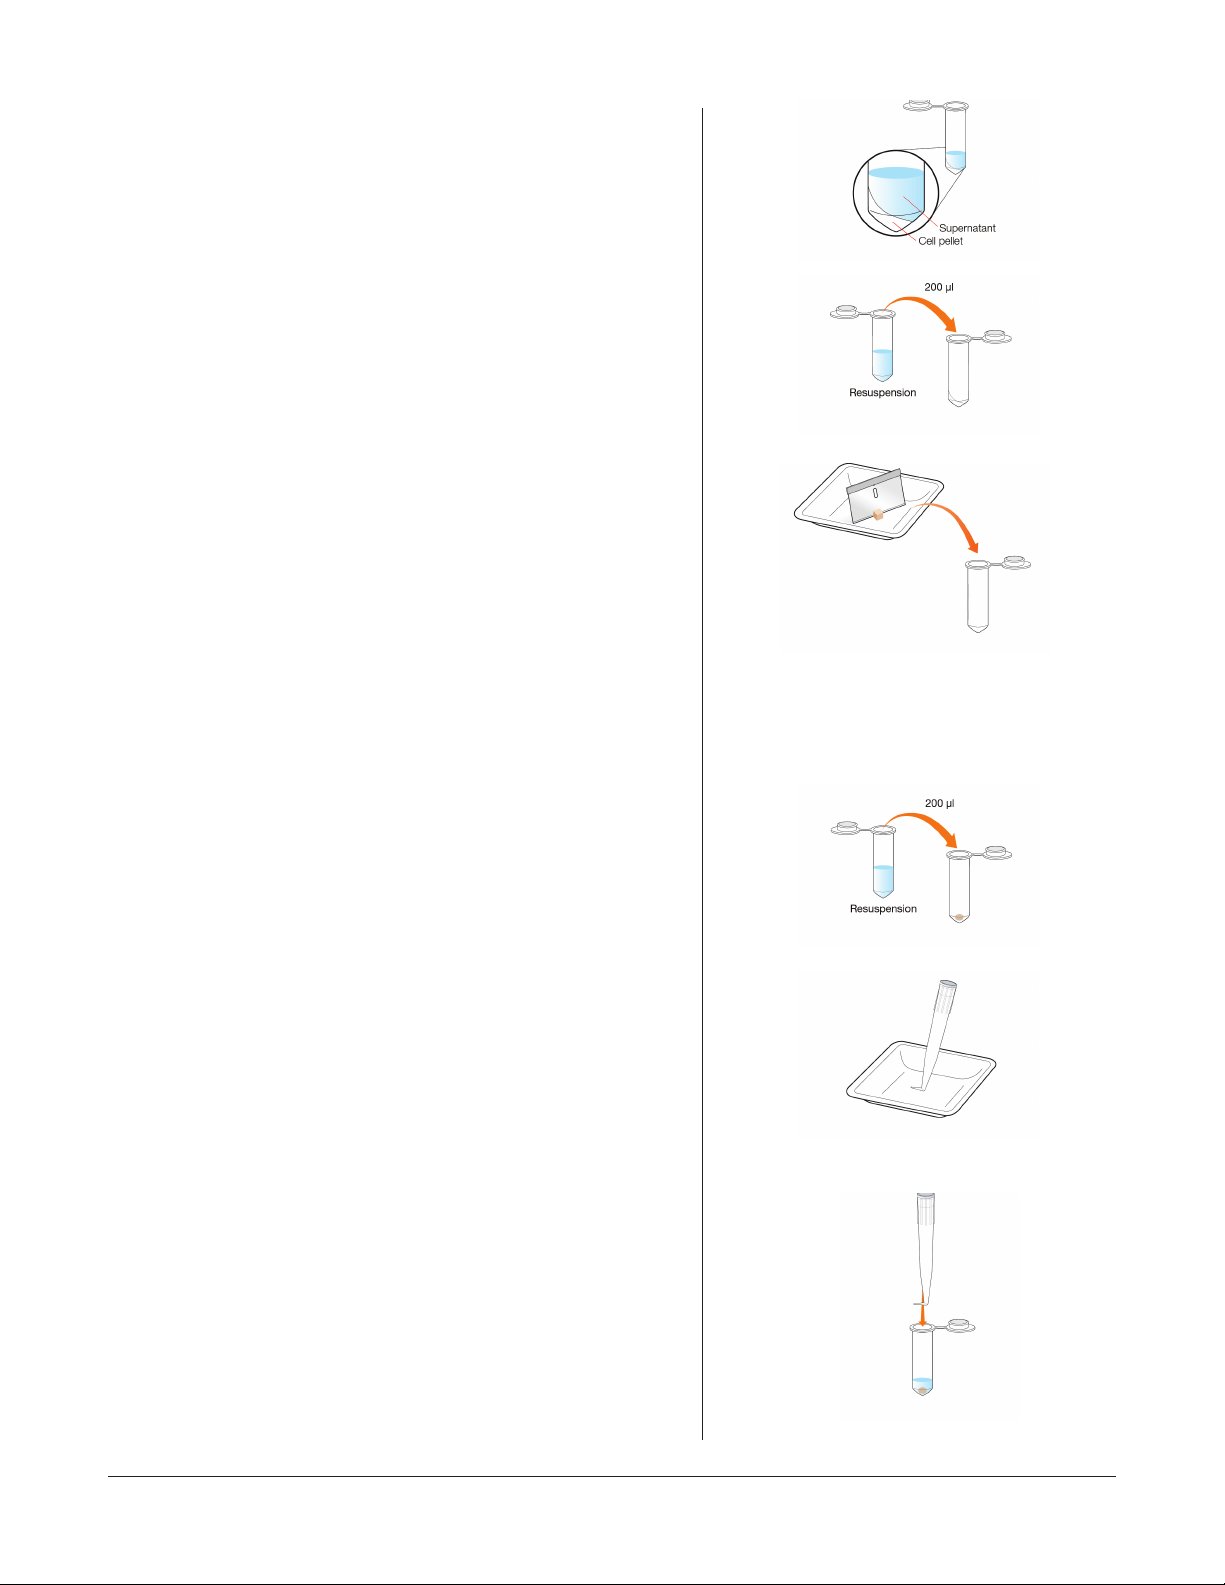
c. Use a micropipet to carefully remove the
supernatant without disturbing the pellet.
Discard the supernatant into a 10% bleach
solution.
d. Add 200 µl of resuspension buffer (R) and pipet
up and down or vortex to completely resuspend
the bacteria.
For fi sh, mammalian, bird, or fungal samples
a. Cut a piece of tissue sample up to 100 mg,
approximately the size of an eraser-head, from
the bulk tissue sample and place it directly into
the appropriately labeled 2 ml microcentrifuge
tube.
➜
➜
➜
Note: Cut a sample from the interior of the
bulk tissue to avoid bacterial contamination
that may be present on the surface. Avoid fur,
scales, or feathers.
b. Add 200 µl resuspension buffer (R).
c. Take a micropipet tip in hand and fi rmly press
the narrow end at a slight angle into the sample
weigh boat or a new weigh boat to bend and
crush a small portion of the tip.
d. Use the crushed micropipet tip as a pestle to
grind the sample in the microcentrifuge tube
for at least 30 sec until the sample becomes
cloudy. Then discard the tip.
➜
➜
➜
explorer.bio-rad.com
9
Page 12
Student Guide
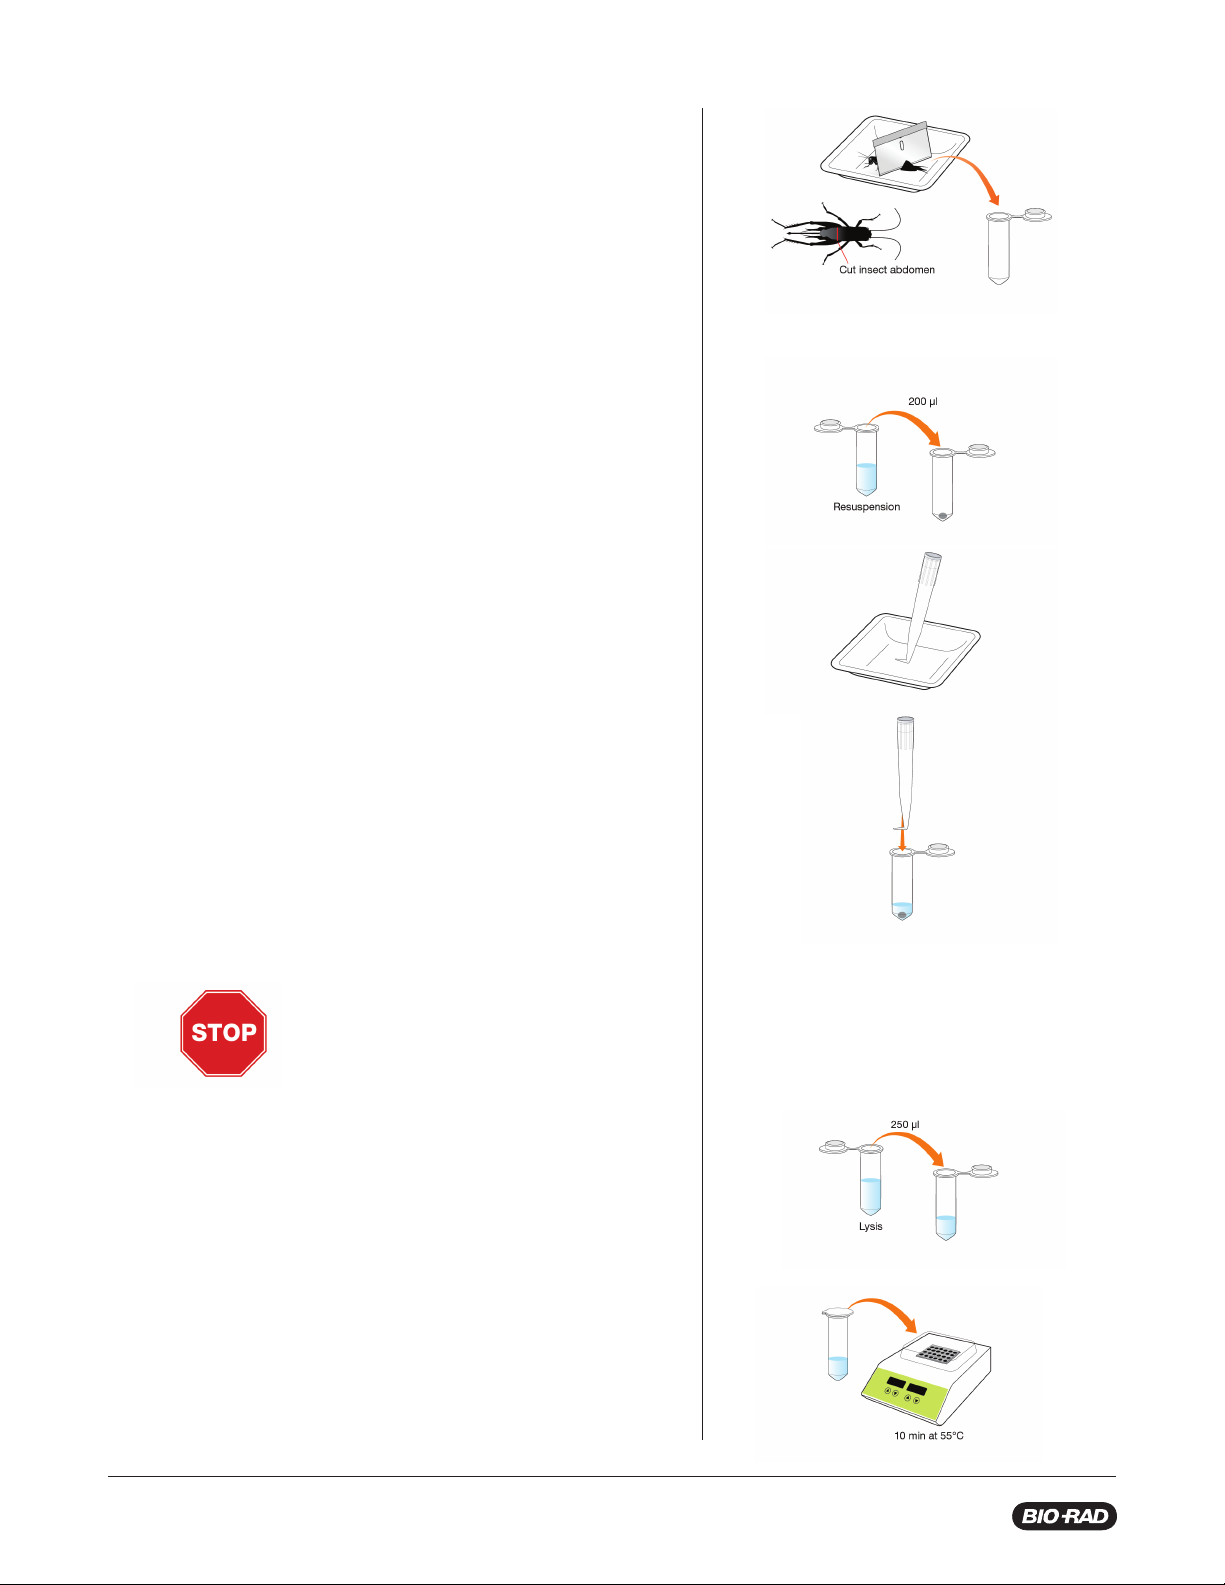
For insect samples
a. Cut a small piece of tissue approximately half
the size of an eraser-head from the abdomen
of your insect. The total mass will vary. Place
the piece directly into the appropriately labeled
microcentrifuge tube.
Note: Avoid wings, legs, and other chitinous
parts of the insect body, as they are much less
effective for DNA extraction.
b. Add 200 µl resuspension buffer (R).
c. Take a micropipet tip in hand and fi rmly press
the narrow end at a slight angle into the sample
weigh boat or a new weigh boat to bend and
crush a small portion of the tip.
➜
➜
➜
d. Use the crushed micropipet tip as a pestle to
grind the sample in the microcentrifuge tube
for at least 30 sec until the sample becomes
cloudy. Then discard the tip.
Stop. Ask your instructor whether
to proceed now or later.
3. Add 250 µl lysis buffer (Lys) and mix gently by
inverting each tube 10 times. DO NOT VORTEX.
Vortexing may shear genomic DNA, which can
inhibit PCR amplifi cation.
4. Incubate sample at 55°C for 10 min in a water bath
or dry bath.
➜
➜
➜
10
Page 13
Student Guide
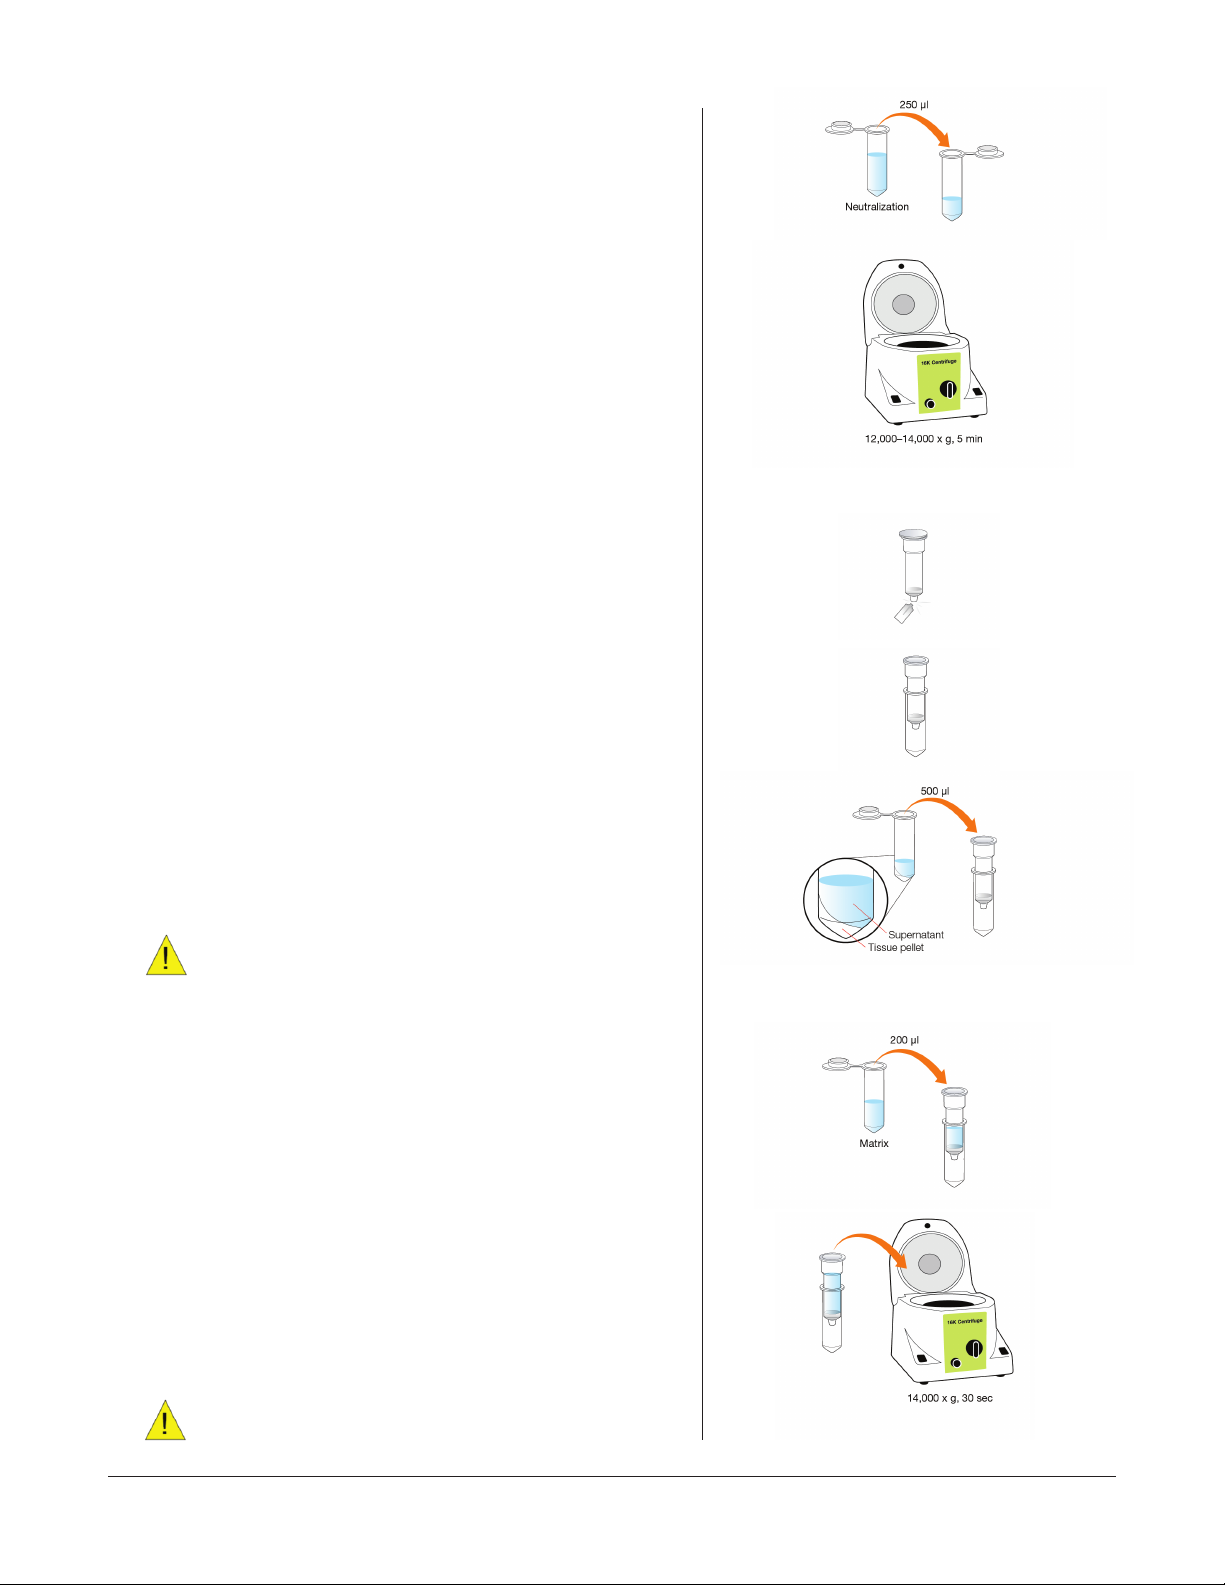
5. Add 250 µl neutralization buffer (N) and mix gently
by inverting 10 times. DO NOT VORTEX. A cloudy
precipitate may form.
6. Centrifuge for 5 min at 12,000–14,000 x g. Be sure to
use a counter balance. A compact pellet will form
along the side of the tube. The supernatant contains
the DNA.
If there are many particulates in the supernatant
after centrifugation, centrifuge the tubes for an
additional 5 min.
7. Snap off (do not twist!) the bottom of the spin
column. Insert the column into a capless 2 ml
microcentrifuge tube.
➜
➜
➜
8. Label the spin column with your initials.
9. Using a new pipet tip for each sample, transfer
~500 µl supernatant from each sample to the
appropriately labeled spin column.
Do not disturb the tissue pellet.
10. Vortex or repeatedly shake the matrix (X) to make
sure the resin is completely resuspended.
11. Quickly add 200 µl thoroughly resuspended matrix
(X) to the spin column. Pipet up and down to mix.
12. Centrifuge the spin column with the capless
microcentrifuge tube at full speed (14,000 x g)
for 30 sec. Be sure to use a counter balance.
➜
➜
➜
➜
Centrifuge for only 30 sec! Completely drying
the matrix at this point will result in DNA loss.
explorer.bio-rad.com
11
Page 14
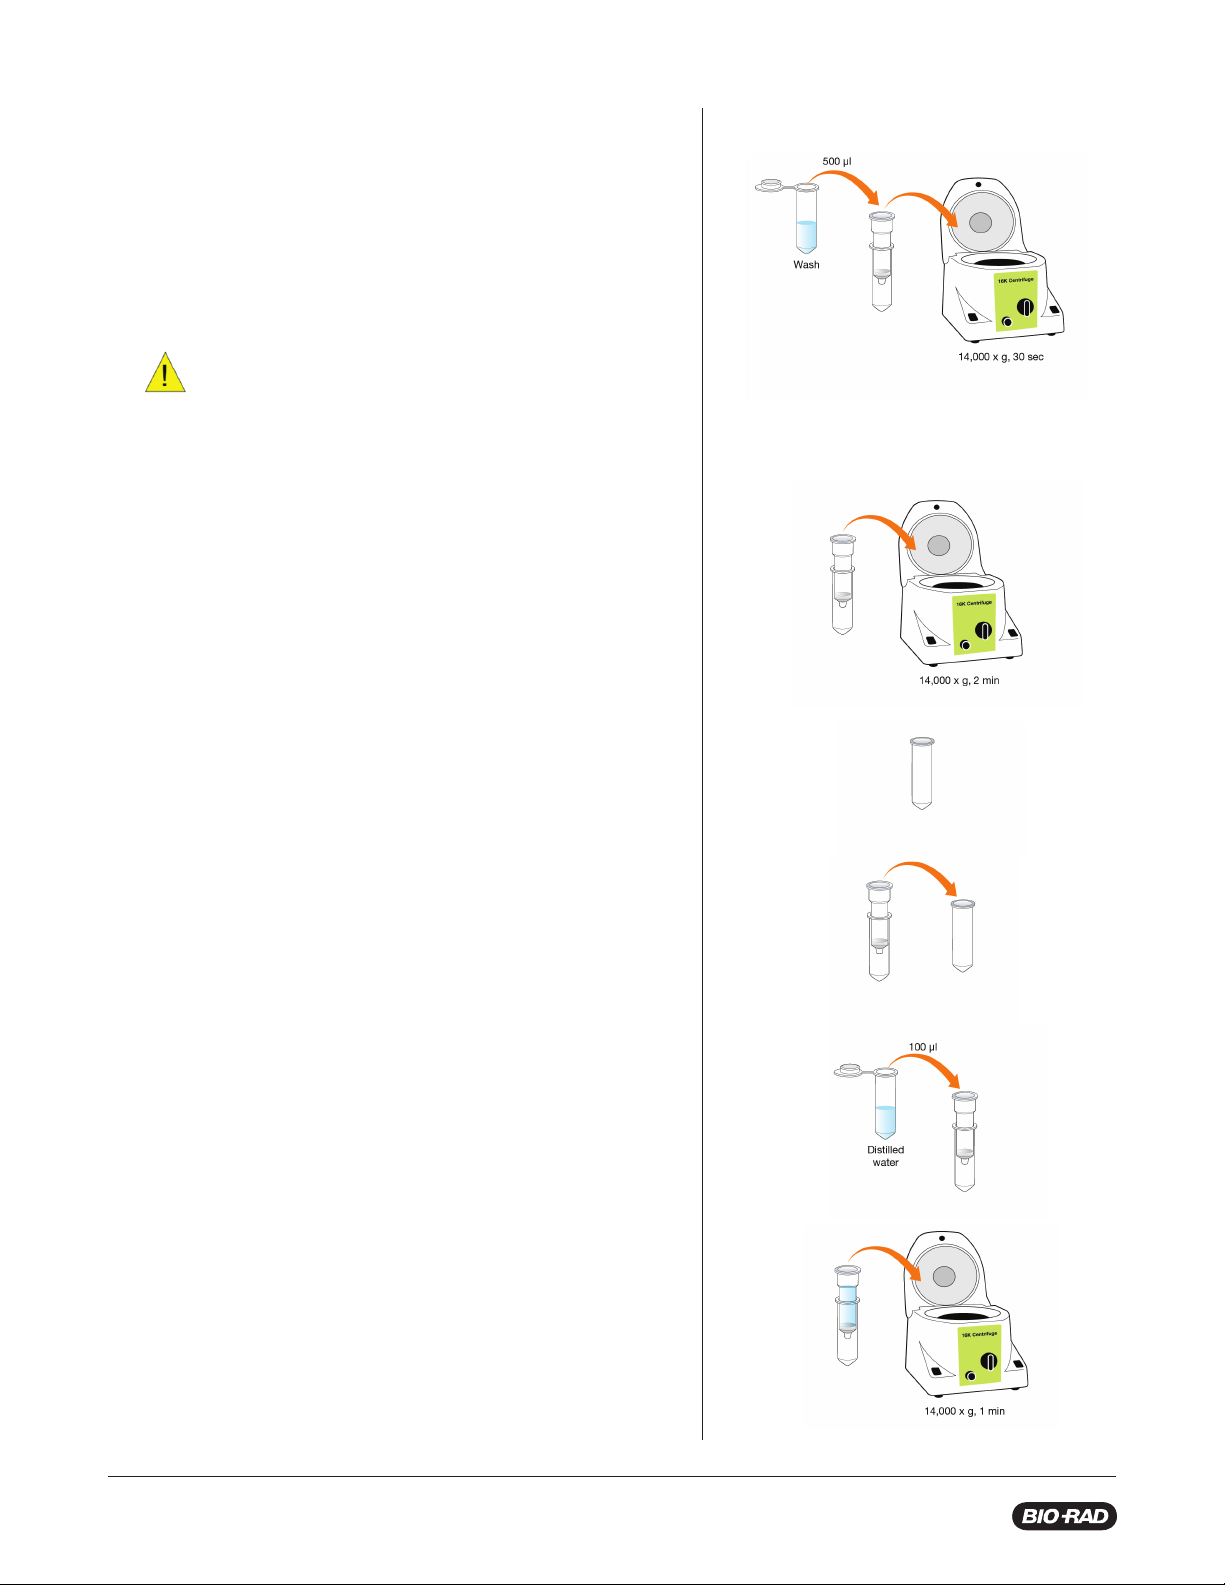
13. Remove the spin column from the capless 2 ml
microcentrifuge tube, discard the fl owthrough, and
replace the spin column into the same tube.
14. Add 500 µl wash buffer (Wash) and wash the
matrix by centrifuging for 30 sec. Be sure to use a
counterbalance.
Centrifuge for only 30 sec! Completely drying
the matrix at this point will result in DNA loss.
15. Remove the spin column from the capless 2 ml
microcentrifuge tube, discard the fl owthrough,
and replace the spin column into the same tube.
16. Finally, centrifuge the spin column with the
capless microcentrifuge tube at full speed for a
full 2 min to remove residual traces of ethanol
and dry out the matrix. Be sure to use a
counterbalance.
17. Label a clean 2 ml capless microcentrifuge tube with
your initials.
➜
➜
➜
18. Transfer the spin column into the appropriately
labeled new, clean capless microcentrifuge tube.
Discard the used capless microcentrifuge tube along
with any liquid in the tube.
19. Using a new pipet tip, add 100 µl distilled water to
the spin column, being careful not to touch the resin.
20. Centrifuge the spin column with the capless
microcentrifuge tube at full speed (14,000 x g)
for 1 min. Be sure to use a counterbalance.
➜
➜
➜
12
Page 15
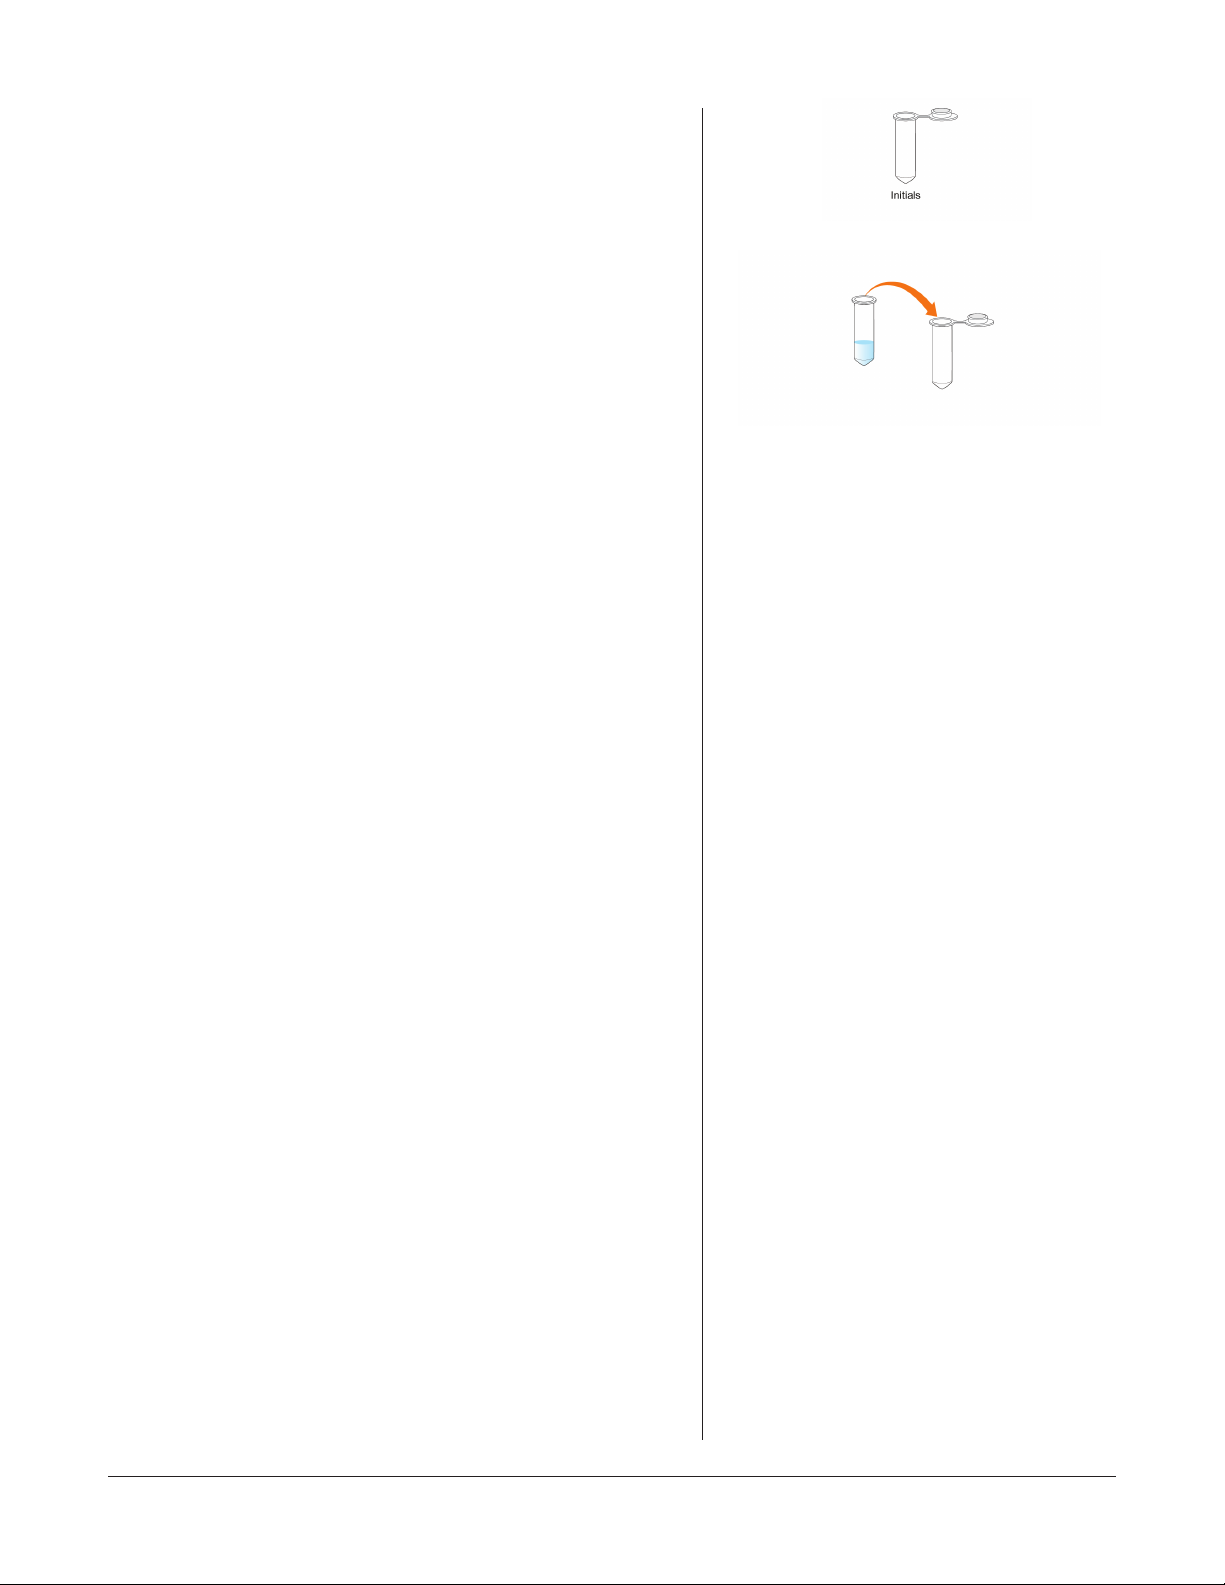
21. Label a new 2 ml capped microcentrifuge tube
with your initials.
➜
22. Remove the spin column from the capless
microcentrifuge tube and transfer the fl owthrough
which contains eluted DNA, into the appropriately
labeled 2 ml capped microcentrifuge tube.
➜
explorer.bio-rad.com
13
Page 16
BIO-RAD
Life Science
Group
10000145587 Ver A US/EG
© 2021 Bio-Rad Laboratories, Inc.
BIO-RAD is a trademark of Bio-Rad Laboratories, Inc. All trademarks used herein are the property of their respective owner.
Bio-Rad
Laboratories, Inc.
Website bio-rad.com USA 1 800 424 6723 Australia 61 2 9914 2800 Austria 00 800 00 24 67 23 Belgium 00 800 00 24 67 23 Brazil 4003 0399
Canada 1 905 364 3435 China 86 21 6169 8500 Czech Republic 00 800 00 24 67 23 Denmark 00 800 00 24 67 23 Finland 00 800 00 24 67 23
France 00 800 00 24 67 23 Germany 00 800 00 24 67 23 Hong Kong 852 2789 3300 Hungary 00 800 00 24 67 23 India 91 124 4029300
Israel 0 3 9636050
Mexico 52 555 488 7670 The Netherlands 00 800 00 24 67 23 New Zealand 64 9 415 2280 Norway 00 800 00 24 67 23 Poland 00 800 00 24 67 23
Portugal 00 800 00 24 67 23 Russian Federation 00 800 00 24 67 23 Singapore 65 6415 3188 South Africa 00 800 00 24 67 23
Spain 00 800 00 24 67 23 Sweden 00 800 00 24 67 23 Switzerland 00 800 00 24 67 23 Taiwan 886 2 2578 7189 Thailand 66 2 651 8311
United Arab Emirates 36 1 459 6150 United Kingdom 00 800 00 24 67 23
Italy 00 800 00 24 67 23 Japan 81 3 6361 7000 Korea 82 2 3473 4460 Luxembourg 00 800 00 24 67 23
21-0559 0721 Sig 0121
 Loading...