


Introduction
Computer System Requirements
Installation
Link to Computer
Recharge Battery
The Indicatoin of LED Lamp
Un-install Program
Language Setting
Creating User Profiles
Main Features
Importing Data
Viewing Your Data
Data Analysis
Advanced Data Analysis
Printing Reports
Changing User Settings
Backup and Recovery
To-Do List
Customer Service
GP700 Specification
2
3
4
5
6
7
8
9
10
13
15
16
18
20
24
25
26
28
29
30
Introduction
Computer System Requirements
The GP200, BIONIME’s Diabetes Assistant Software, is intended for use by Healthcare Professionals, and patients with
Diabetes. Once the GP200 is installed on your computer, a database is created that can be used to store multiple user
profiles, and can manage your Blood Glucose Readings. Each person who uses the Software will have his or her own ID, and
must log in at each use. The GP200 enables users to view and organize their Blood Glucose Readings, which are uploaded
from your Bionime Meter. Users can backup their profiles, and print their blood glucose data directly from their computer.
This Software helps you understand your Diabetes and can help you manage your Blood Glucose Readings efficiently.
The GP200 is not intended to provide treatment decisions, and is not to be used as a substitute for a Healthcare
Professional’s judgment. All medical diagnoses and treatment plans are to be performed by a licensed Healthcare
professional.
NOTE
1. BIONIME’s GM550 and GM700 Meters are compatible with the Diabetes Assistant GP200 Software.
2. The GP550 Rightest™ PC Link Adaptor is needed to connect your Meter to your computer.
2
Before you install the GP200 Software, please make sure the following requirements are met:
1. A Microsoft Windows computer with the following components are needed:
- CPU: 550 MHz Intel Pentium 3 or above
- DRAM: 512 MB or more
- HD: 600 MB
- OS: Windows XP (SP3 or above), Windows Vista, or Windows 7
- Internet Explorer 7.0 or above
- USB 2.0 or above
- LCD with resolution of 1024*768 or above, and 65536 colors or more
- Printer (if you want to print any Reports)
- CD-ROM drive
- Mouse and keyboard
2. The GP200 Installation CD
3. The Rightest™ PC link adapter GP550 and GP550 Installation CD (PL2303).
3
Installation
Link to Computer
Before using the Diabetes Assistant Software, make sure that the CD is included in the product box.
Please install the GP200 Installation CD following these Installation Steps:
Installation Steps:
1. Turn on your computer, and insert the GP200 Installation CD into your computer.
2. Locate the file, and double click on “BIONIME GP200”. Follow the instructions in consecutive order, and complete the
installation.
NOTE
After installing the GP200, you must install the Rightest™ PC link adapter GP550 Installation CD.
If you DO NOT install the GP550 CD, your Blood Glucose Readings WILL NOT transfer to your computer.
4
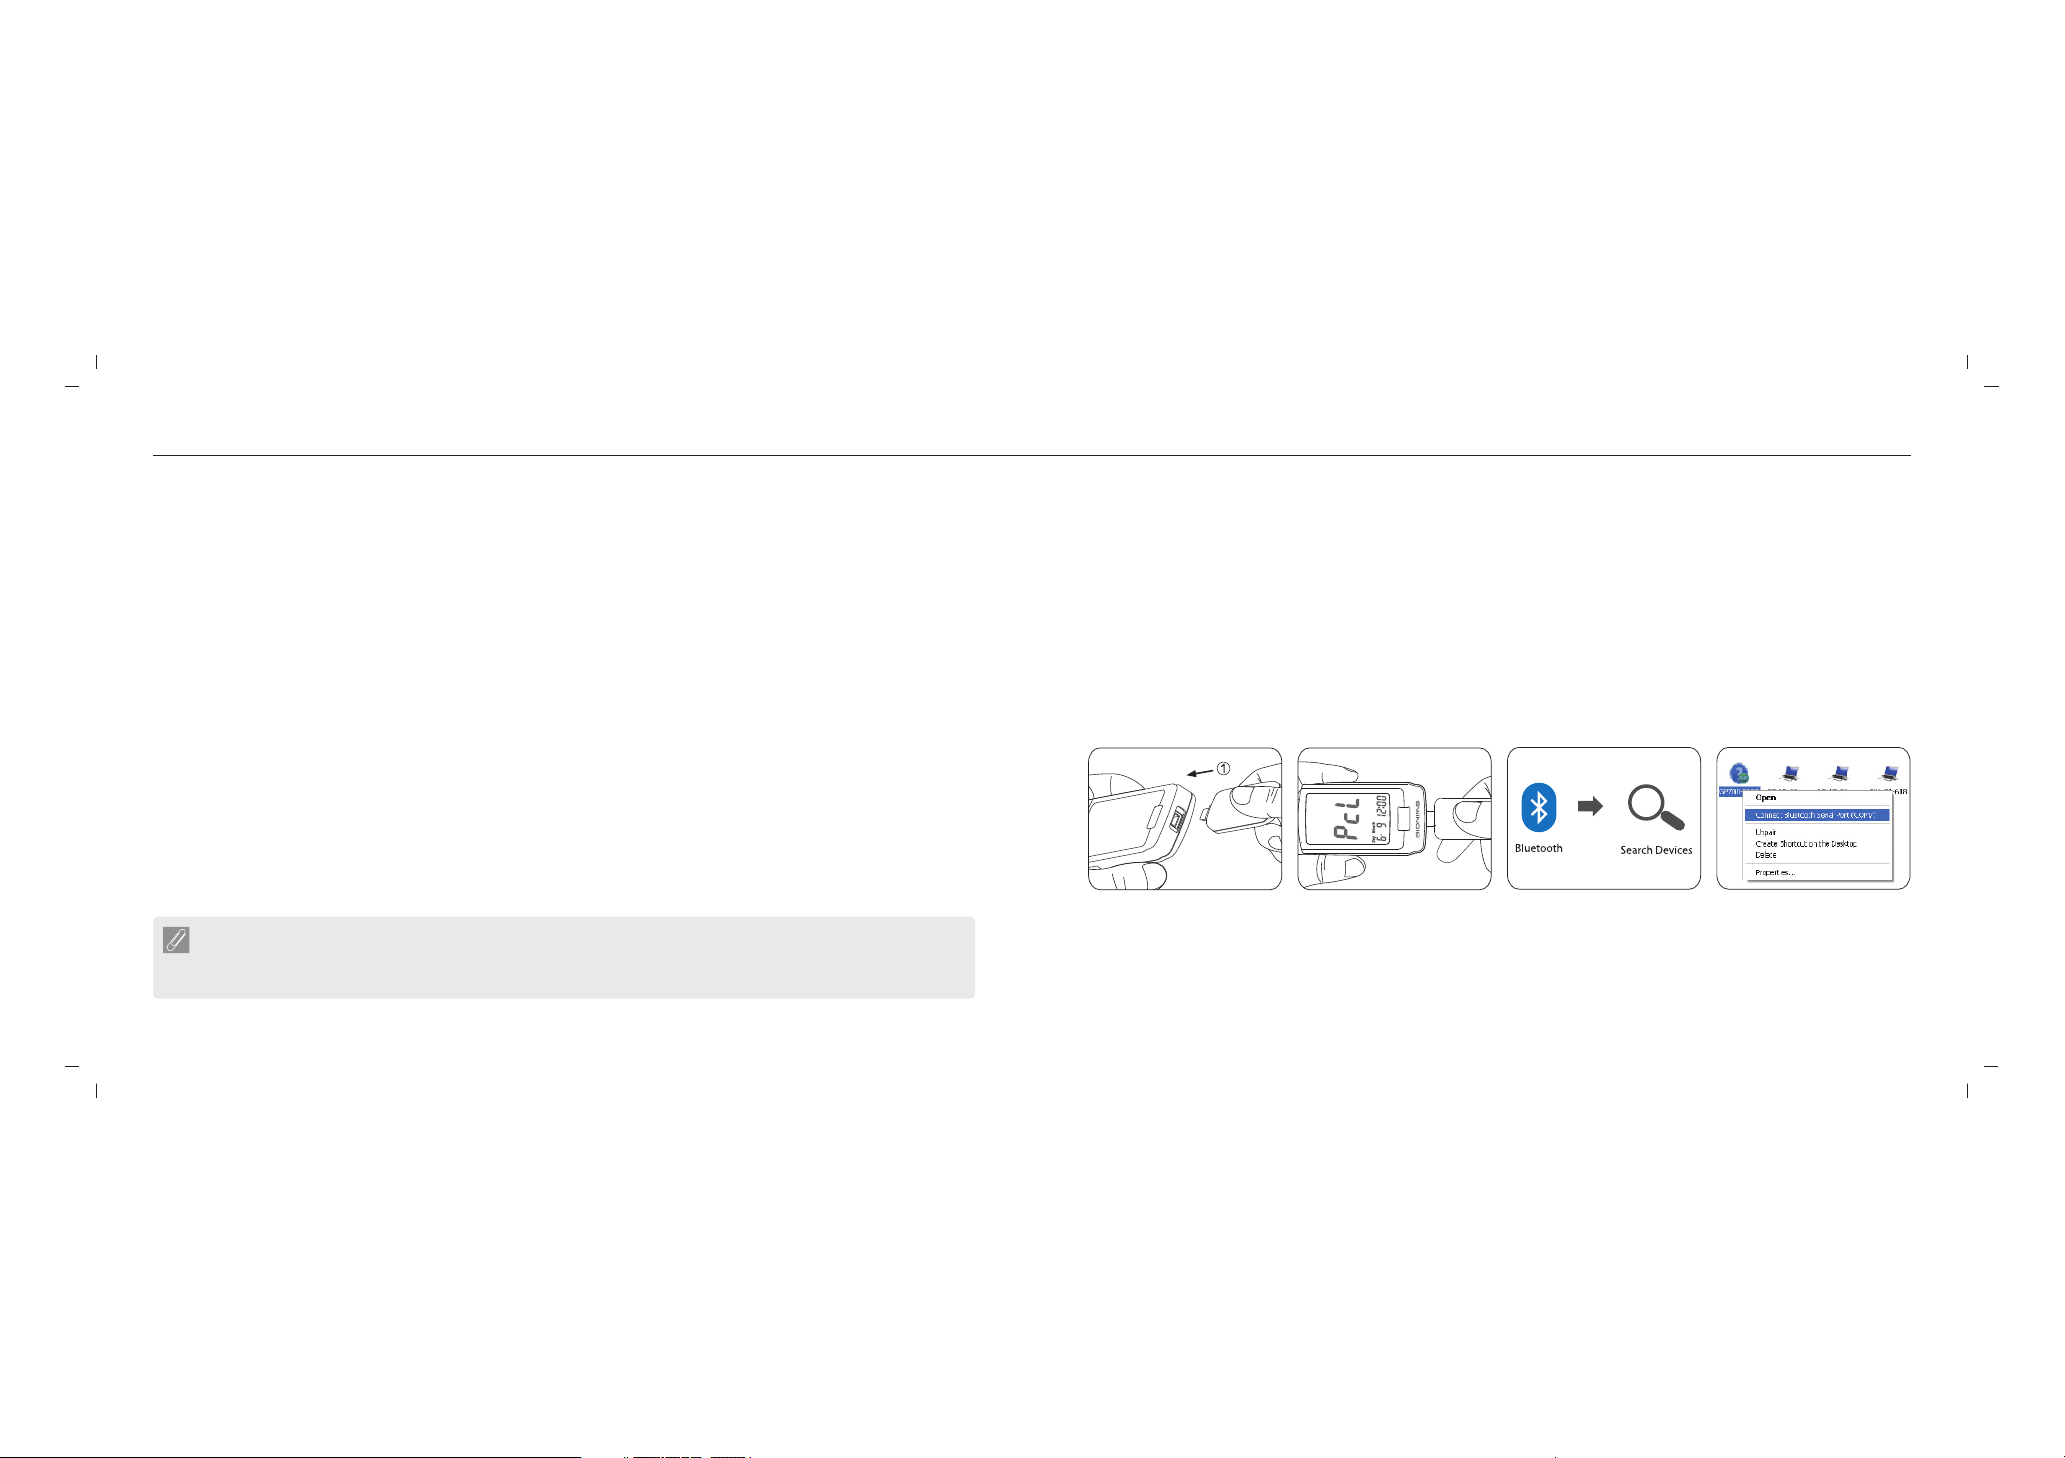
BIONIME Diabetes Assistant Software GP200 supports BIONIME BGMS GM700. The following instructions will help
you connect your device to your personal computer thrugh bluetooth PC link conducter GP700 .
Connection Steps
1. Plug mini USB connector of GP700 into mini USB port of you devise, GP700
2. ”PcL” will appear on the screen, and you will see the green light is on from the indicator lamp of POWER.
3. Click on Bluetooth logo “ ” and search the devises which are with Bluetooth function.
4. Click on “GP700” and connect Bluetooth serial port of computer. You are required to key in passwords “0000” when first
connection.
5. After connection is established successfully,
you can transfer blood glucose readings to GP200.
1
The linkage of the GM700 and your computer is now completed.
Rightest™
3
2
4
5
Recharge Battery
The Indicatoin of LED Lamp
When the battery almost run out electricity, the indicator lamp of POWER will turn to red. Please plug in USB charge cable to
charge GP700. The indicator lamp is red during charging, once the indicator lamp become to green, the GP700 is full
charged.
NOTE:
1. Please Verify whether your computer have Bluetooth function, if there is no this function, please buy an Bluetooth dongle
and set up completely.
2. Before you can connect GP700 and Bluetooth serial port of computer, please verify that GP700 is on and “PcL” appears on
the screen. If “PcL” is not shown, please check the mini USB connection between the device and GP700. (Refer to
Connection Setup on page 5)
3. GP700 will shut down automatically after 2 minutes idle, and the "PcL" will disappear from screen of your device. If you
want to transfer data, please plug GP700 and connect to Bluetooth serial port of computer again.
6
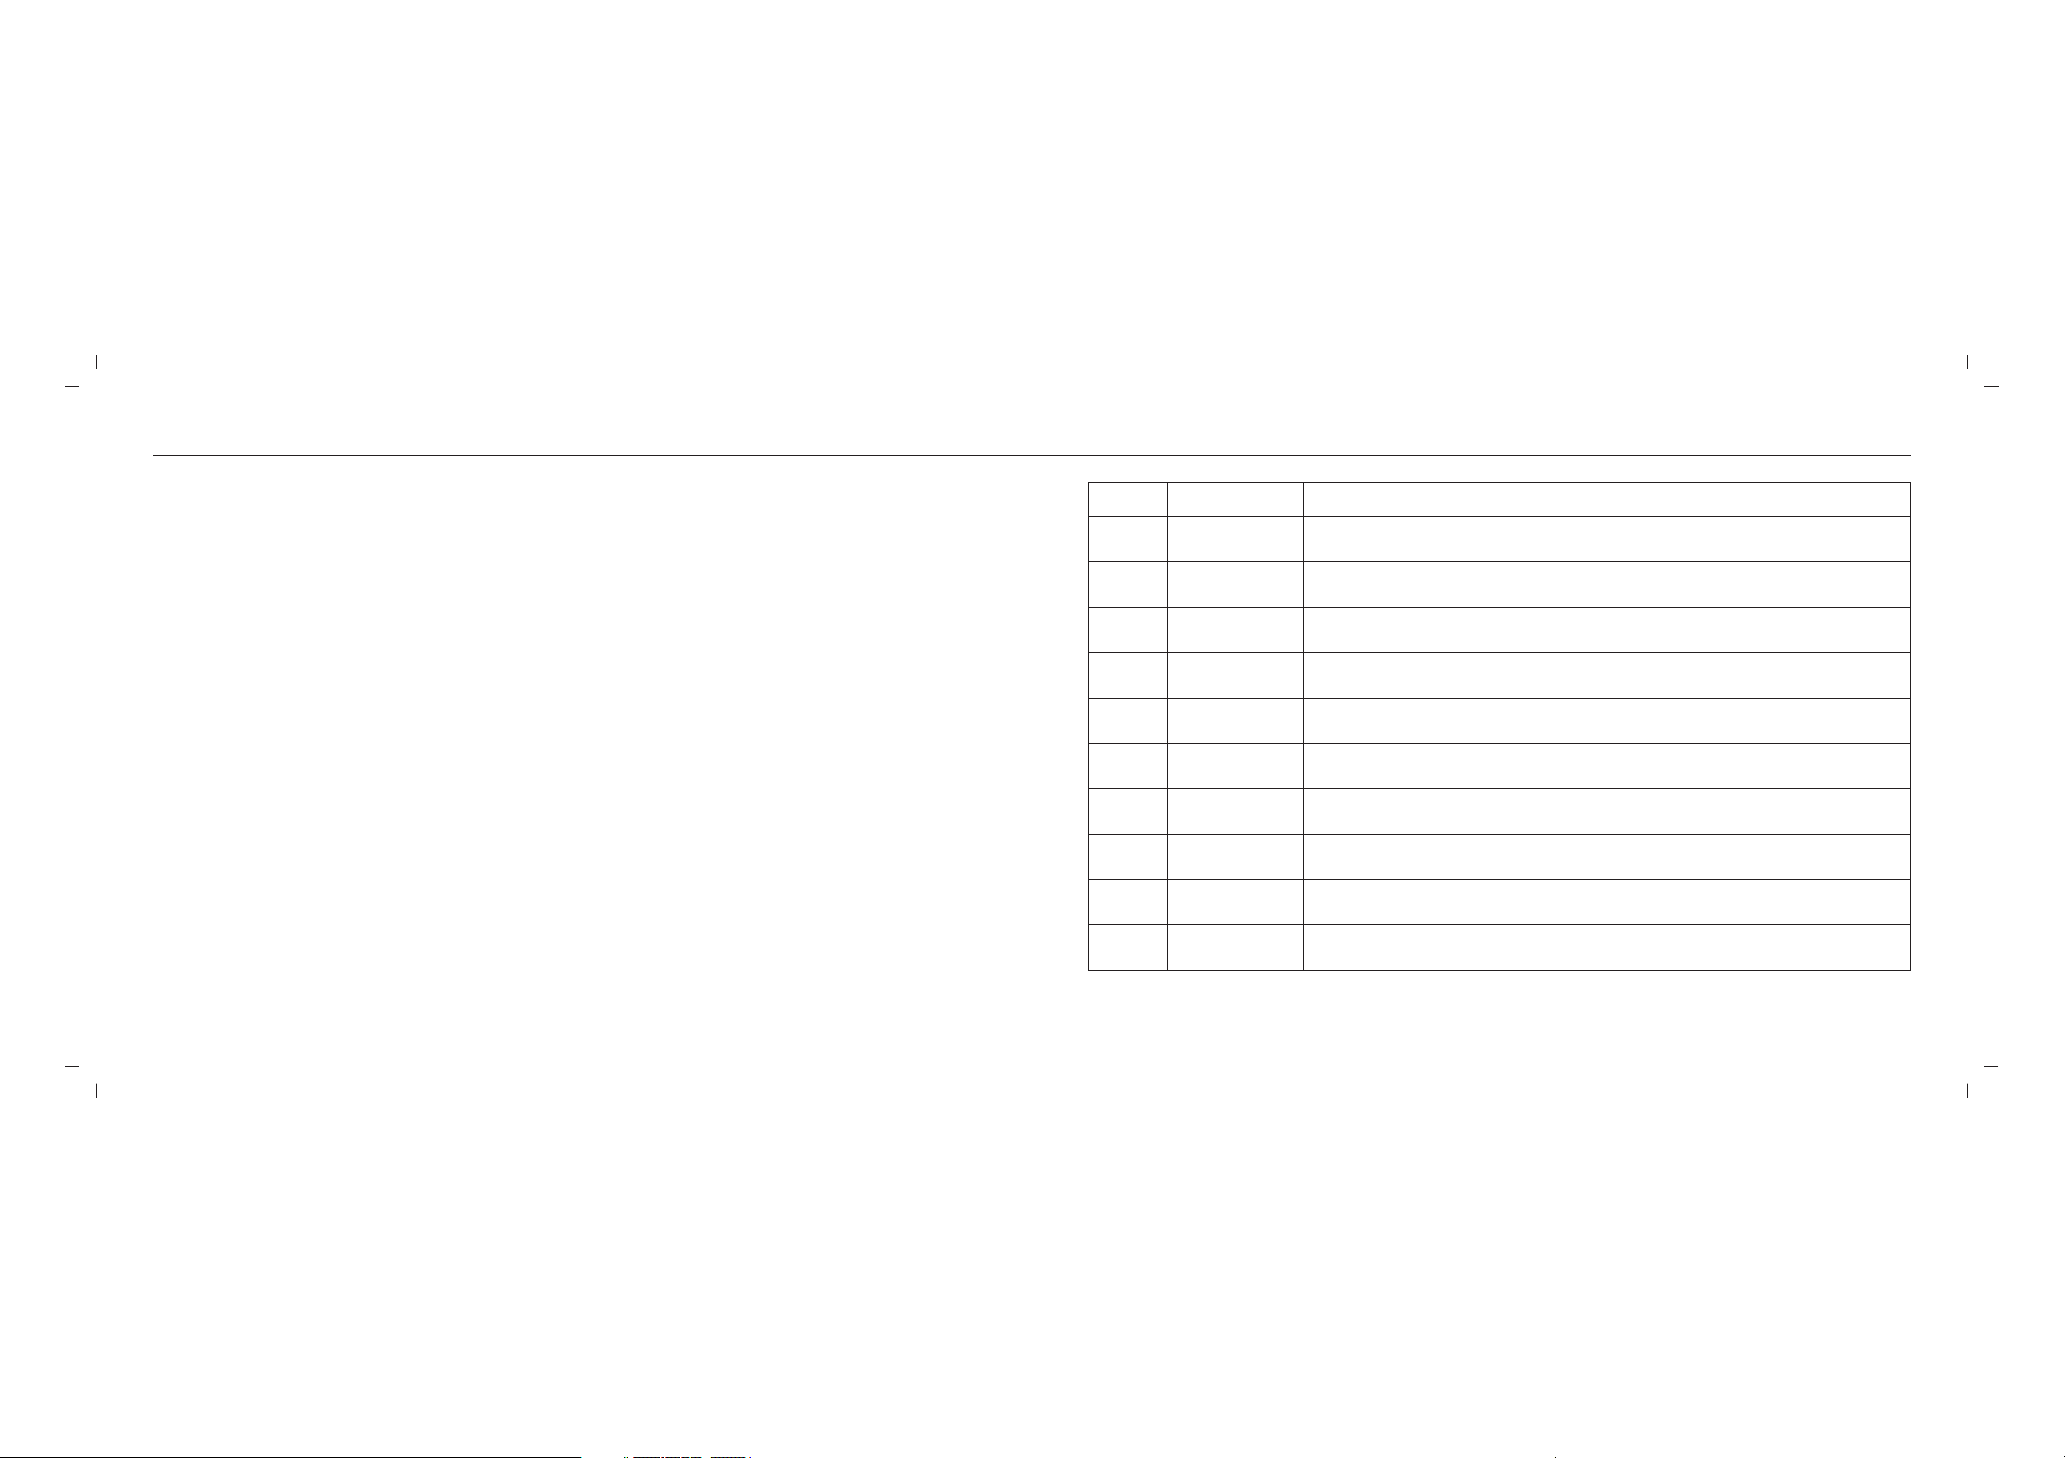
Indication
POWER
Bluetooth
What you see…
Green color
Red color
None
None
Blue Color
Blue and Flashing
What does it mean?
When GP700 is pluged into your device, the power supply is sufficient for transferring
data.
When GP700 is full charged, the color will change to Green from Red.
When GP700 is pluged into your device, the power supply is insufficient, but still able
to transfer data.
When GP700 is during charging.
When GP700 is pluged into your device, the power supply can't start your devise.
When GP700 is pluged into your device, and after 2 minutes idle, the power is shut
down automatically.
When GP700 is pluged into your device, but waiting to connect to Bluetooth serial port
of computer.
When GP700 is disconnected with Bluetooth serial port of computer.
When GP700 connect successfully to Bluetooth serial port of computer.
When GP700 connect successfully to Bluetooth serial port of computer, and under data
transferring.
7
Un-install Program
Language Setting
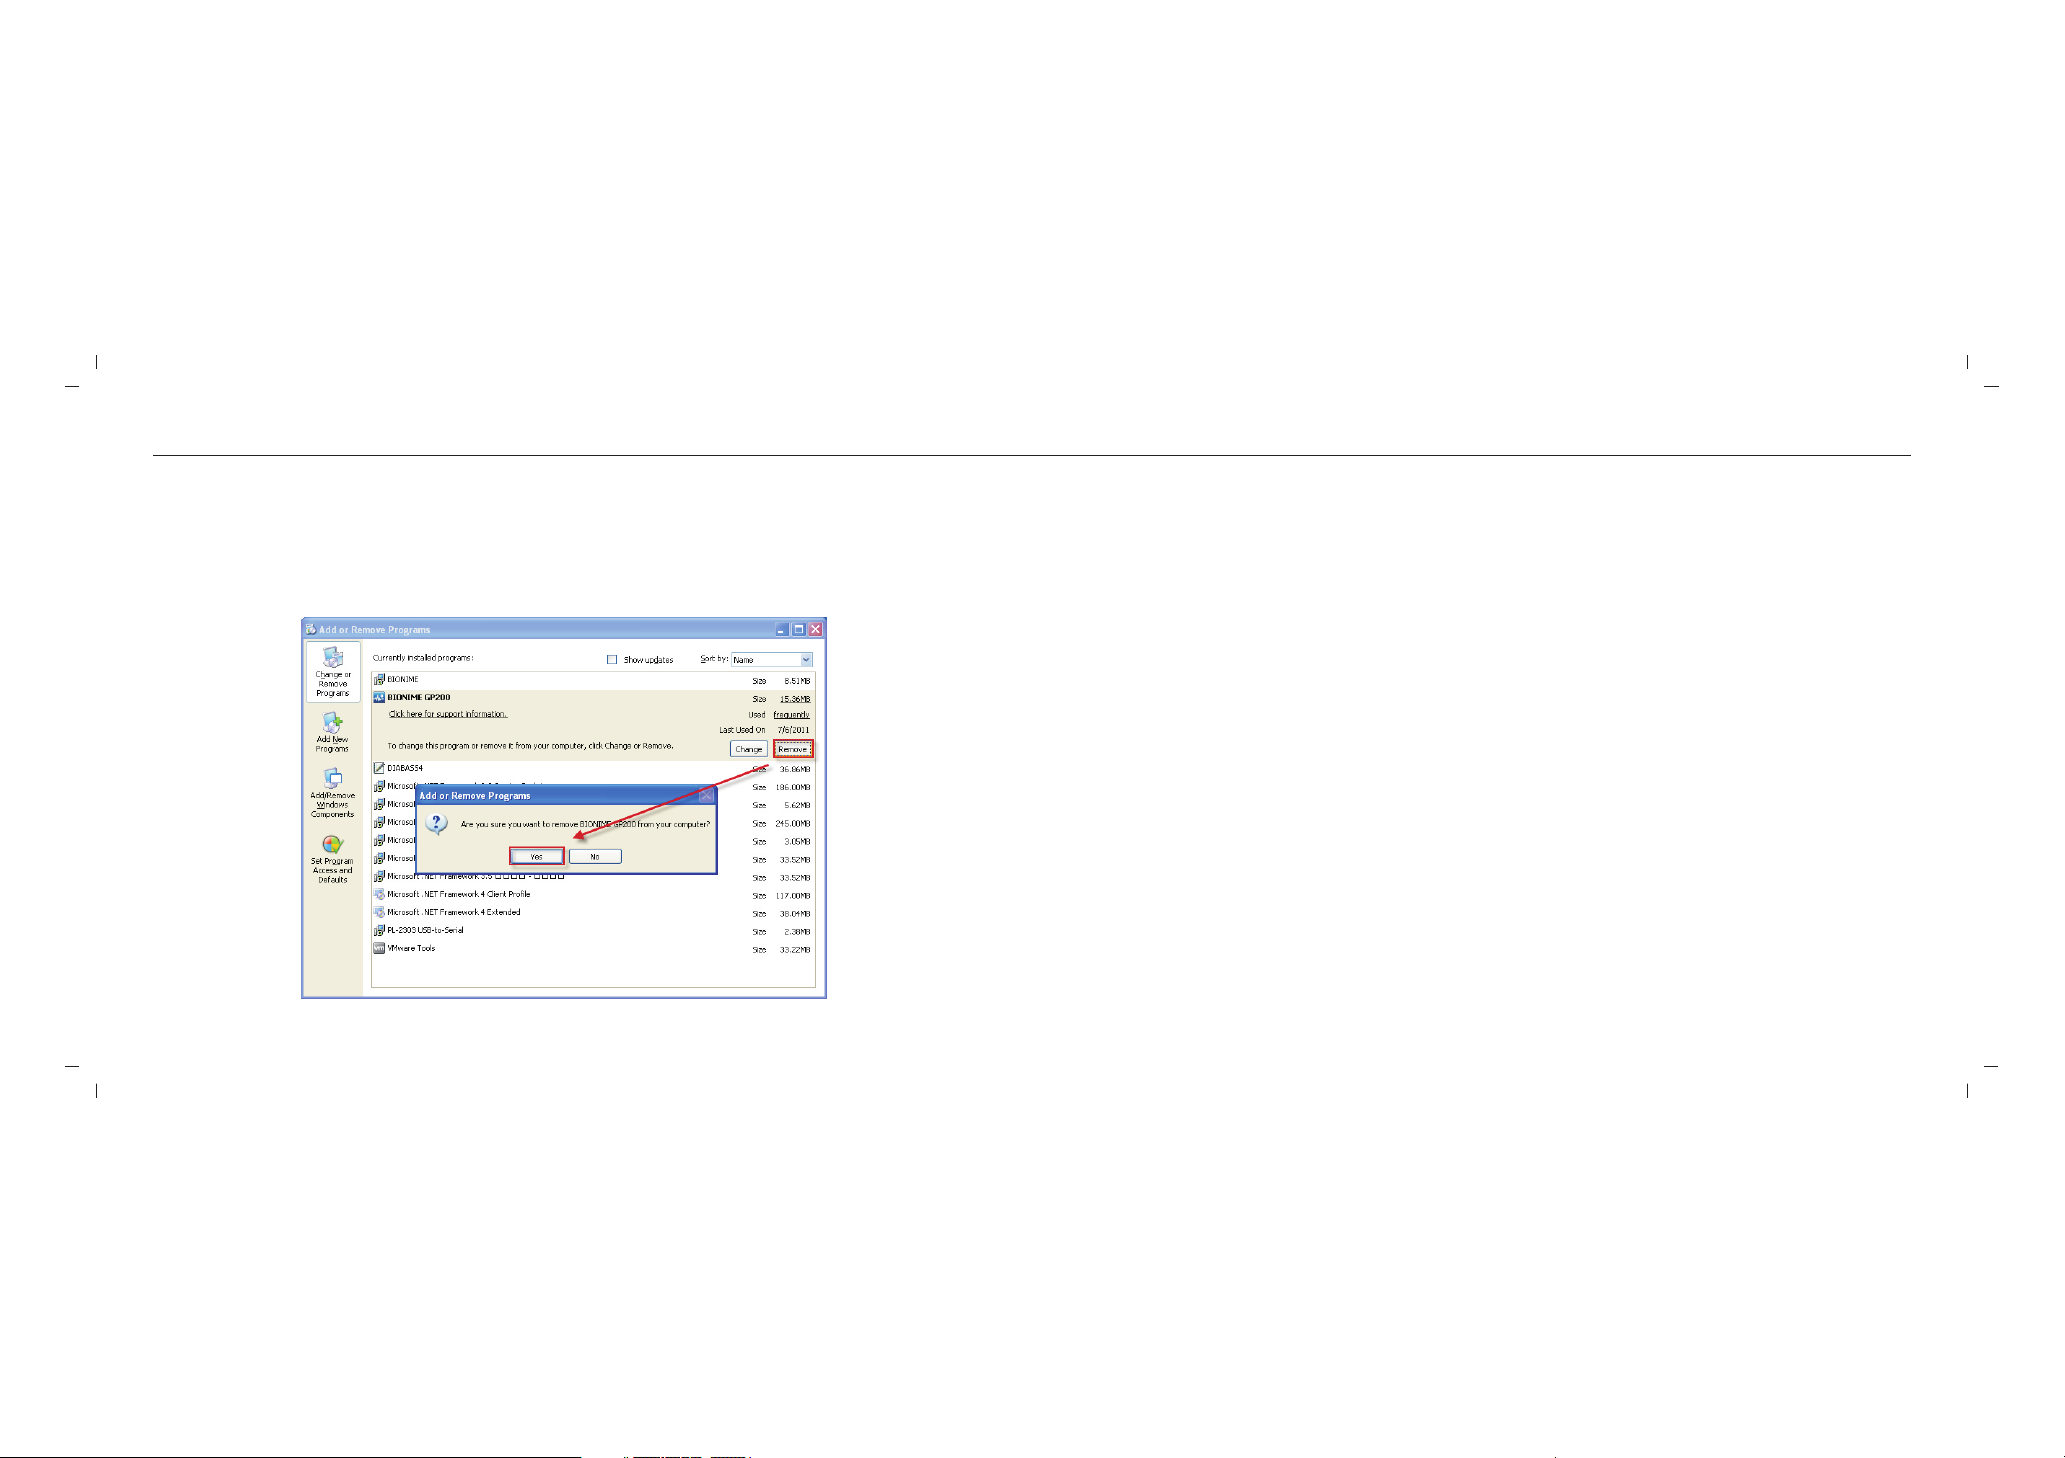
To un-install the GP200 Software, please complete the following steps.
To Un-install:
1. Go to the Add/Remove Program under your Computer’s Settings.
2. Select BIONIME GP200.
3. Click on “Remove” or “un-install”, and then confirm. The program is now un-installed.
8
After installation, the first time you launch the GP200 Diabetes Assistant Software you will be asked to select
a Language. Please choose your desired language setting, and then click on the ‘OK’ button to finish the setup.
9

Creating User Profiles
The GP200 Software can be used by multiple users. Before using the program, each user must create their own individual
profile. In order to operate the program, each user must log in an individual ID. Please create your own profile by following
the steps listed below.
1. Click on to create your user profile. Follow the instructions carefully, and be sure to input your personal
information, meal time schedule, and Blood Glucose information.
2. Basic Setup:
Enter in your last name, first name, date of birth, sex, height, and weight. The Software will calculate your BMI value based
on your Height and Weight.
3. Meal Time Schedule:
The Software has 3 different meal time slots available for you to set. Make sure to set the 3 Meal Times based on your
normal daily eating schedule. This allows the data analysis to track the blood glucose variation between each of your
meals.
MEAL TIME KEY:
Before Bfast.: BEFORE BREAKFAST Before L.: BEFORE LUNCH Before Din.: BEFORE DINNER
After Bfast.: AFTER LUNCH After L.: After Lunch After Din.: AFTER DINNER
4. Blood Glucose Limits and Ranges Setting:
Specified limits and ranges will be displayed in the Analysis Reports. They will be based on appointed Blood Glucose
values including hyperglycemia and hypoglycemia limits, and normal Blood Glucose ranges. You should consult with a
Healthcare Professional or your Physician to discuss what your personal limits and ranges should be. Your Blood Glucose
Readings will be color coded in tables and trend charts. This will allow you to read the Blood Glucose Reports easily, and
will also help you to accurately control your Blood Glucose levels based on your personal trends.
5. Click on to finish and exit the Profile set up.
6. You can now login with your individual ID and start using your GP200 Software.
10
Creating User Profiles
11

Creating User Profiles (continued)
Main Features
NOTE
1.
To ensure that all of your Blood Glucose Readings from your Meter appear in the corresponding meal time slot in
the Software, it is extremely important that the meal schedule you set in the Software matches your actual daily
meal schedule.
2. When you are entering in your name and Blood Glucose Ranges, it is important NOT to leave those fields blank. If
they are left blank, the program will not allow you to proceed to the next step.
3. According to the AACC (The American Association for Clinical Chemistry):
- Hyperglycemia is any value higher than 126mg/dL.
- The normal Range for those without Diabetes should have a Blood Glucose Reading within 70~99 mg/dL.
* Please discuss with your Healthcare Physician on what values to enter for your Blood Glucose Ranges and limits.
http://www.labtestsonline.org/understanding/analytes/glucose/test.html
12
On the Home Page, your 10 latest Blood Glucose Readings will appear. Also, your To-Do List with the 5 most recent “To-Dos”
will also be visible. On this page, you will also see icons with all of the Main Features. Below, please see descriptions of the
Features.
Home Page: This feature allows you
to return to the Home Page.
Import Data: This feature uploads your Blood
Glucose Readings from your Meter.
View Data: This feature allows you
to view your Blood Glucose Readings.
To-Do List: This feature lets you input important
reminders such as dates, times, and notifications.
13

Main Features (continued)
Importing Data
Blood Glucose Readings: This is an extensive review of your Blood Glucose Readings.
Advanced Data Analysis: This is an extensive review of the Trend Chart and Distribution of your Blood Glucose.
Print Report: This allows you to print your Blood Glucose Analysis Report and your user information.
User Settings: Under Settings, you can change your profile information.
NOTE
14
: This allows you to access BIONIME’s services through the internet or through email.
Help: This goes directly to the online user manual.
All of your Blood Glucose Readings from your Meter, including the date and time of the Readings, can be transferred to your
computer. During the data transfer, your Blood Glucose Readings will not be altered, and the Readings on your Meter will
not be deleted after the transfer is complete. The steps to Import Data are as follows:
Steps to Import Data:
1. Click on to start transferring the data.
2. As the data is transferring, you will see a completion percentage until it has finished downloading.
3. Click on to finish and exit.
NOTE
1. In order for Data Importing to successfully work, “PcL” needs to appear on the Meter screen BEFORE the data can
be transferred. If “PcL” does NOT appear on your screen, please check the connection between the GP550 and
the GM550. You can refer to Page 5 on how to properly connect your Meter to your computer.
2. You can choose which Blood Glucose Readings you want to import from your Meter, and the rest of the data will
NOT be transferred to your computer. However, if there is data that you choose NOT to upload, those Readings
will not be able to be uploaded again.
15

Viewing Your Data
With your GP200 Software, you have the ability to review and analyze all of your Blood Glucose Readings on your
computer. When viewing your data, a table showing your Blood Glucose Readings and a Trend Chart will appear
on the screen.
Measuring dates, time stamps, and meal times will be displayed in the data table while viewing your Readings.
As shown below, on the left of the Data Table you have the ability to select certain time periods to review.
In the Blood Glucose Trend Chart, you will see two lines that represent the hyperglycemia and hypoglycemia
limits. In between these two values resides the Normal Blood Glucose Range. The limits and range can help you to
understand your Blood Glucose Readings better. Please follow the steps listed below to view your data.
Steps to View your Data
1. Click on to view your Blood Glucose Readings.
2. Select your desired time period based on which Readings and Trends you would like to see.
16
Viewing Your Data
1. Click on to enlarge the Trend Chart.
2. Make sure to consult with a Healthcare Professional or your Physician before inputting the hyperglycemia and
hypoglycemia limits, as well as the normal Blood Glucose Range.
3. On the Trend Chart:
- The Gray Area in between the limits indicates the normal Blood Glucose Range.
- The Red Line is the hyperglycemia value.
- The Blue Line is the hypoglycemia value.
If you move your mouse cursor over the Trending Line, you can see your Blood Glucose Readings.
17

Data Analysis
Data Analysis
By clicking on you are able to view and analyz
page.
Data Analysis Tools:
1. You have the ability to choose different time periods to view your Blood Glucose Readings. What you see on the display
screen will be adjusted based on the time period you selected.
2. You can also review your Blood Glucose Readings by selecting different meal times. You have 9 meal times that you can
choose from: before/after breakfast, before/after lunch, before/after dinner, before/after meal, or View All Data. Your data
will be displayed based on your selection.
3. Your Blood Glucose Readings will be represented by different colors, based on its value. Below is a Color Key for each:
[Red] Your Blood Glucose Reading is higher than the hyperglycemia value
[Orange] Your Glucose Reading is between the hypoglycemia value and the highest value of the normal Range
[Green] Your Blood Glucose Reading is within the normal Range
[Blue] Your Blood Glucose Reading is between the hypoglycemia value and the lowest value of the normal Range
[Indigo] Your Blood Glucose Reading is lower than the hypoglycemia value
[White] There is an ERROR in the Data
4. The Software has 5 different ways to view your Data in Statistical Analysis form: View All Data, Total Analysis Data, Average
Value, Standard Deviation, and Coefficient of Variation. Within these Reports, you can choose which time period to view.
In the table, you can also view the percentage of each Blood Glucose Reading.
5. When analyzing your Data, you can choose which Readings you want it to include. Keep in mind that the unselected
Readings will be excluded from ALL calculations and Reports in the Data Analysis and as well as in the Advanced Data
Analysis.
e all of your Blood Glucose Readings, as seen on the following
18
NOTE
Any Data in the Meter that has an ERROR will be transferred to the database, but will be excluded from all
calculations and analysis.
19

Advanced Data Analysis
There are 2 ways to view the Advanced Data Analysis Report: in aTrend Chart or in a Distribution of Blood
Glucose Readings.
Blood Glucose Trend Chart Instructions:
1. In the Trend Chart, you can choose different time periods to view. The Trend Chart will adjust based on the time period
that you select.
2. Data can also be viewed based on different meal times. You can choose from the following: Before/after breakfast,
before/after lunch, before/after dinner, before/after meal, or View All Data. The Trend Chart will be displayed based on
your selection.
3. In the Trend Chart, you can either display a Regression Curve or a Move Average Line. A Regression Curve lets you see the
long-term patterns of the selected time period. The Move Average Line allows you to view the short-term changes within
the selected time period. It does this by creating a series of averages based on different time periods.
NOTE
1.
You have the option to unselect all of your Blood Glucose Readings if you do not want to see them. If you do this,
then only the minimum and maximum values will be shown on the Trend. When you move the cursor over the
Blood Glucose Data, it will show each Reading, along with the date and time.
2. If you choose to view your Blood Glucose Readings for one specic day only, then the Regression Curve and the
Move Average Line will NOT be displayed.
3. Click on to enlarge the Trend Chart.
4. On the Trend Chart:
- The Gray Area in between the limits indicates the normal Blood Glucose Range.
- The Red Line is the hyperglycemia value.
- The Blue Line is hypoglycemia value.
5. It is important to consult with a Healthcare Professional or your Physician before inputting the hyperglycemia
and hypoglycemia values, as well as the normal Blood Glucose Range.
20
Advanced Data Analysis
21

Advanced Data Analysis (continued)
The GP200 Software lets you view your Blood Glucose Readings in many formats, including in a Pie Chart. The visual set up
of the Pie Chart can be very helpful in understanding your Blood Glucose Readings better. The only data not available in the
Pie Chart is the percentage of each Blood Glucose Reading (like in the Table Format).
Instructions for Pie Chart Use:
1. You can display certain Blood Glucose Readings by selecting different time periods. The Pie Chart will change based on
the time period you choose.
2. In the Pie Chart, your Blood Glucose Readings will be represented by dierent colors, based on what the value is. On the
following page you will find a COLOR KEY for each value.
[Red] Your Blood Glucose Reading is higher than the hyperglycemia value.
[Orange] Your Blood Glucose Reading is between the hypeglycemia value and the highest value of the normal range.
[Green] Your Blood Glucose Reading is within the normal Range.
[Blue] Your Blood Glucose Reading is between the hypoglycemia value and the lowest value of the normal range.
[Indigo] Your Blood Glucose Reading is lower than the hypoglycemia value.
22
Advanced Data Analysis (continued)
NOTE
1. Any errors within the data will NOT be included in the Pie Chart.
2. Be sure to contact your Physician or a Healthcare Professional BEFORE you input the hyperglycemia and
hypoglycemia values.
23

Printing Reports
Changing User Settings
With the GP200 Software, you can print your Blood Glucose Readings and Reports.
To print a report:
1. Click on to enter the printing settings.
2. Select the time period for the readings and Reports you want to print.
3. You can click on ‘Advanced Print’ to view and print the Advanced Analysis Reports.
NOTE
1.
If you do not want to print ALL of the Reports, you can use ‘Print Review’ and select certain pages to print.
2. You can only print The Regression Curve and the Move Average Line when you select the Advanced Print
Function.
3. If you choose to only print one day of your Blood Glucose Data, the Regression Curve and the Move Average
Line that are in the Trend Chart will NOT be available to print.
24
After logging into the Software, you can update or change the information in your user profile.
Refer to the following steps to modify or change your User Information:
1. Click on to access your User Profile.
2. Now you can modify your personal information, your meal time schedules, and your Blood Glucose limits and ranges.
3. Click on to save your settings.
NOTE
1.
It is important that the meal time schedule you set up in the GP200 Software is the same as your daily meal
schedules. This way your Blood Glucose Readings that you transfer from your Meter match the Software’s set
meal times.
2. If there is a scheduled meal time or a Blood Glucose Reading that is blank or has an error, the Software will not
allow you to proceed to the next step.
3. According to the AACC (The American Association of Chemistry), the suggested Hyperglycemia maximum is any
reading higher than 126mg/dL, and the normal Blood Glucose range is any Blood Glucose Reading within 70~99
mg/dL. Be sure to consult with a Healthcare Professional or your Physician BEFORE entering in your Blood
Glucose limits and ranges.
FOR MORE INFORMATION PLEASE VISIT:
http://www.labtestsonline.org/understanding/analytes/glucose/test.htm
25

Backup and Recovery
Backup and Recovery
You can back up your user prole or ALL User Proles on the Welcome Screen before you login. This allows you to recover
any lost data.
Backup Instructions:
1. Click on to your individual User Profile, or click on to all User Profiles.
2. Select the folder you want to save.
3. Click on to finish backing up.
26
Recovery Instructions:
1. Click on to retrieve your backed
up data.
2. Select the file you want to recover.
3. Click on to finish the recovery.
NOTE
Please note that no matter which file you choose to recover, once you have confirmed to recover your data, your
CURRENT profile will be replaced by the BACKUP profile that you selected.
27

To-Do List
Customer Service
The GP200 Software gives you the option to set up reminders of upcoming events, medicine measurements, or important
comments and alerts. The instructions on how to create a To-Do List are below.
1. Click on for To-Do List options.
2. Click on to create a new event.
3. Set up the time, choose the category of the
reminder, and enter in any notes about the event.
4. Click on to finish and save.
28
NOTE
1. In each event, the maximum number of characters you can
use in a note is 255. If you exceed that amount, an ERROR
message will pop up.
2. All Reminder messages will alert you at their appointed time.
Please be sure to read and review ALL instructions prior to using the Software.
At Bionime, our number one goal is to provide our customers with complete and high quality service. If you have
any questions or concerns, please contact the Technical Service Department at Bionime toll free at
1-(888) 481-8485. You can also contact us directly by email at technicalsupport@bionime.com, OR by clicking on
the internet icon when using the GP200 Software. We will do everything we can to provide you with satisfactory
customer service.
If you have any health related questions or concerns, be sure to contact a Healthcare Professional or your Physician.
29

GP700 Specification
FEDERAL COMMUNICATIONS COMMISION (FCC) STATEMENT
Size
Weight
Color
Bluetooth standard
Transmission Distance
Power supply
Time of charg
Charging times
Transferring times
Time of transferring
Operating temperature
Charging temperature
Accessories
30
mm x 26 mm x15 mm
66
16.5 +/- 0.5 g
Black
Class 2.1
< = 10 meter
One rechargeable lithium battery
< 4 hours
300 times
Continue 128 times with 1000 sets blood glucose data after full charged
< 3 minutes (at 1000 sets blood glucose data)
32~122 ˚F ( 0 ~ 50 ˚C)
41~104 ˚F ( 5 ~ 40 ˚C)
USB charge cable
15.21
You are cautioned that changes or modifications not expressly approved by the part responsible for compliance could void
the user’s authority to operate the equipment..
15.105(b)
Federal Communications Commission (FCC) Statement
This equipment has been tested and found to comply with the limits for a Class B digital device, pursuant to part 15 of the
FCC rules. These limits are designed to provide reasonable protection against harmful interference in a residential
installation. This equipment generates, uses and can radiate radio frequency energy and, if not installed and used in
accordance with the instructions, may cause harmful interference to radio communications. However, there is no guarantee
that interference will not occur in a particular installation. If this equipment does cause harmful interference to radio or
television reception, which can be determined by turning the equipment off and on, the user is encouraged to try to correct
the interference by one or more of the following measures:
• Reorient or relocate the receiving antenna.
• Increase the separation between the equipment and receiver.
• Connect the equipment into an outlet on a circuit different from that to which the receiver is connected.
• Consult the dealer or an experienced radio/TV technician for help.
31

FEDERAL COMMUNICATIONS COMMISION (FCC) STATEMENT
This device complies with Part 15 of the FCC Rules. Operation is subject to the following two conditions:
1) This device may not cause harmful interference.
2) This device must accept any interference received, including interference that may cause undesired operation of the
device.
FCC RF Radiation Exposure Statement:
1. This Transmitter must not be co-located or operating in conjunction with any other antenna or transmitter.
2. This equipment complies with FCC RF radiation exposure limits set forth for an uncontrolled environment. This
equipment should be installed and operated with a minimum distance of 20 centimeters between the radiator and your
body.
32
 Loading...