

Page 1
BIONIME CORPORATION
No. 100, Sec. 2, Daqing St., South Dist.,
Taichung City 40242, Taiwan
Tel: +886 4 2369 2388
Fax: +886 4 2261 7586
http: //www.bionime.com
E-mail: [email protected]
BIONIME GmbH
Tramstrasse 16, 9442 Berneck
Switzerland
E-mail: [email protected]
0197
Rev. Date: September/2014
101-3GM782-XXX
EN
Blood Glucose Monitoring System GM782
GM782
USER’S MANUAL
Page 2

Page 3

Preface
Preface
Thank you for selecting the Blood Glucose Monitoring System This manual
provides all the information you need to operate this product for accurate test results. Please read
this entire manual before you start any testing.
For people living with diabetes, it is important to regularly monitor blood glucose levels to effectively
reduce complications from the disease. The easy-to-use Blood Glucose Monitoring
GM782
System provides accurate, reliable test results to help you better manage your diabetes.
Rightest GM782
The Blood Glucose Monitoring System is designed for in vitro diagnostic use
only (for self-testing by a single user outside the body). Testing requires only a small amount of
fresh capillary whole blood from either the fingertip, palm or forearm.
Venous, arterial, and neonatal blood testing is limited to healthcare professional use only.
TM
Rightest GM782
TM
Rightest
TM
Rightest GM782
The Blood Glucose Monitoring System is a personal blood glucose monitoring
system to be used for self-testing only. It is not recommended for multiple users.
The testing result is calibrated to be plasma equivalent for test with fresh capillary, venous, arterial
and neonatal whole blood samples. Capillary samples may be drawn from the fingertip, palm and
forearm, and in the case of neonates, the heel. You may consult your healthcare professional for
instructions on how to use the system correctly. Our customer support staff is available to assist
you as well.
A healthcare professional should be contacted when Customer Service is not available.
Please forward your warranty card to customer support to activate your warranty coverage.
Rightest GM782The Blood Glucose Monitoring System is manufactured and supported by
Bionime Corporation. If you have any questions or concerns, please contact your local
Customer
TM
TM
Bionime
Customer Service or call us at +886-0800-371-688 GMT+08:00, 08:30~17:30.
32
Page 4
Caution Caution
- Before using the Blood Glucose Monitoring System to test your blood glucose,
please read all of the instructions and conduct all of the tests including the quality control test
(Refer to page 37).
- Please perform the quality control test regularly to make sure the test results are accurate.
- The Blood Glucose Meter can only be used with Blood Glucose
Rightest GM782 Rightest
Test Strips .
use of other brands’ strips may give inaccurate results.
-
The Rightest Blood Glucose Monitoring System GM782 is intended for in vitro diagnostic use
only. The Rightest Blood Glucose test results using fresh capillary whole blood samples from
the fingertip, palm and forearm are calibrated to be the equivalent to that of plasma testing.
Venous, neonatal or arterial blood may also be used only if drawn by healthcare professionals.
- The Blood Glucose Monitoring System is intended for self-testing. It should not
Rightest GM782
be used to diagnose diabetes mellitus.
- If the Rightest Blood Glucose Meter GM782 and Test Strips GS700 are exposed to a substantial
change in temperature, please wait 30 minutes before measurement.
- Follow all environmental protection regulations when disposing of batteries.
Rightest GM782
TM TM
GS700 Other brands’ test strips should not be used under any circumstances. The
TM
TM
TM
TM
TM
- Avoid contact with dripping or splashing liquids.
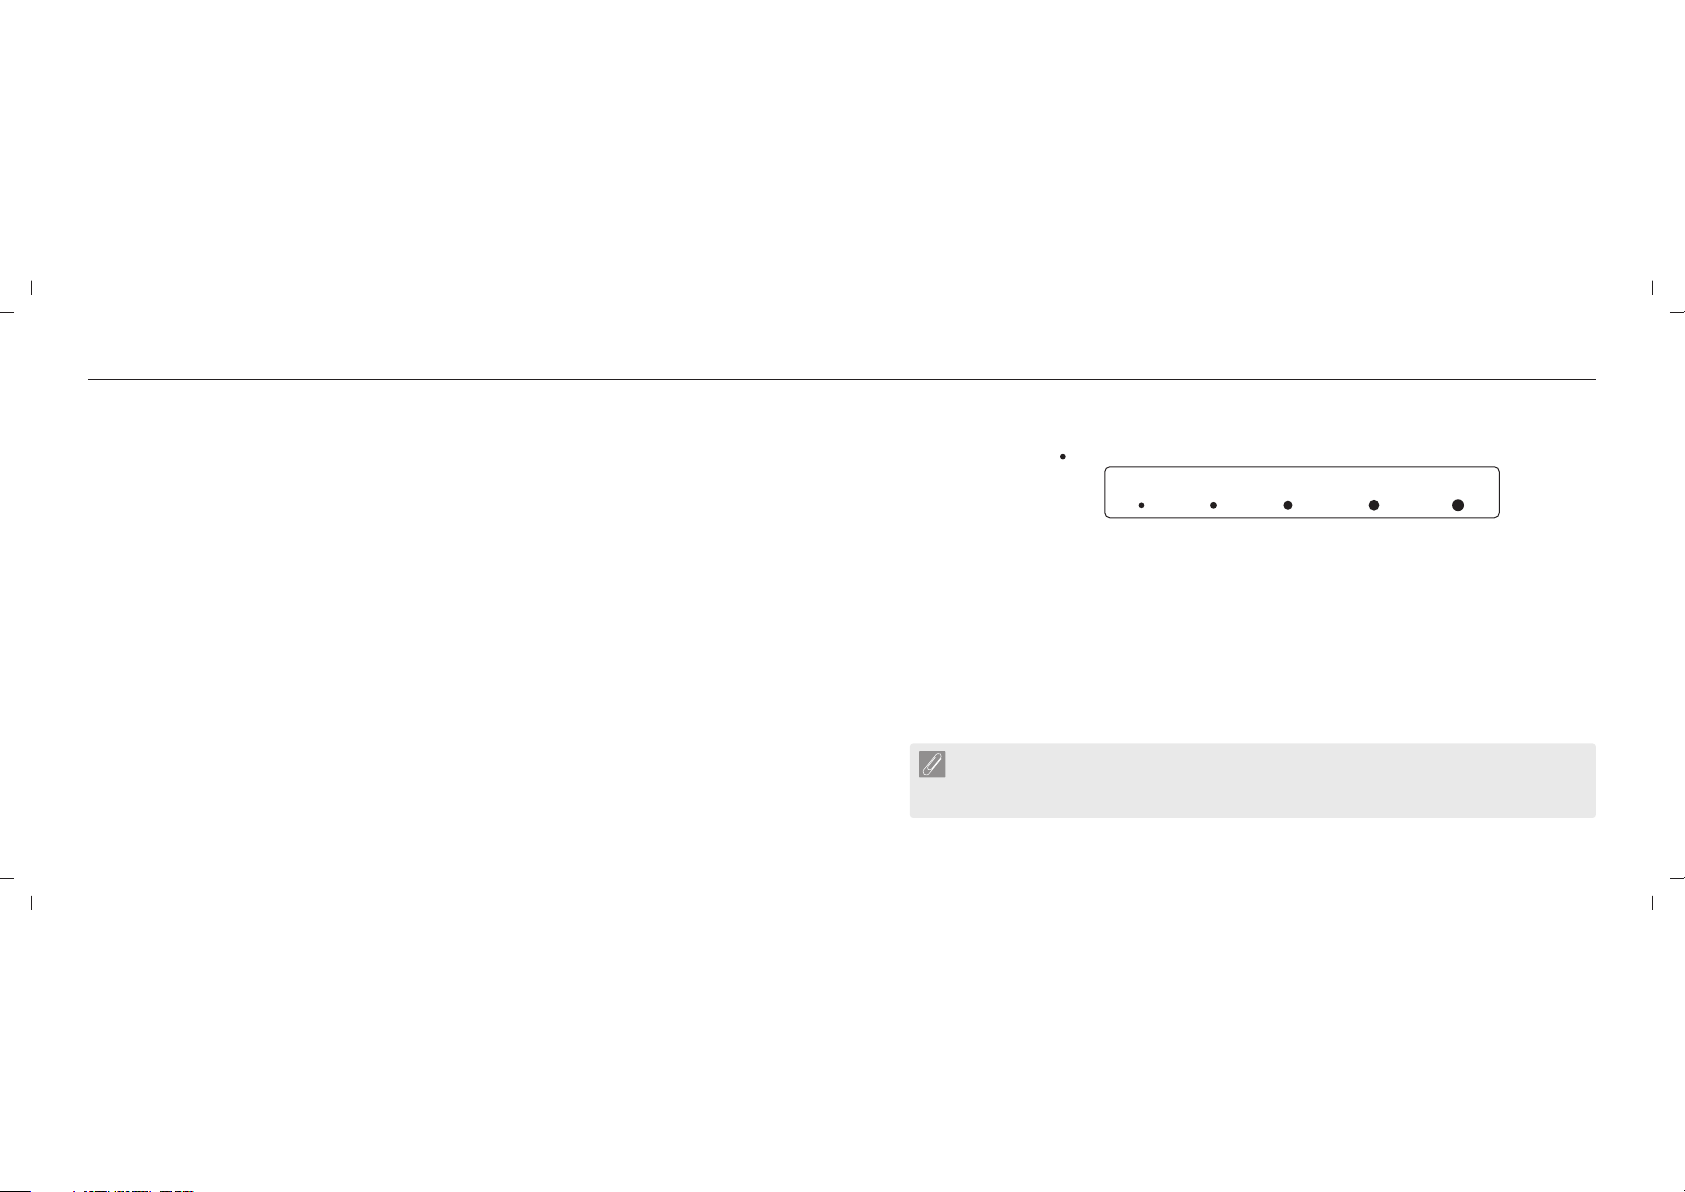
- The minimum blood sample size to test using the Blood Glucose Monitoring System
Sample Size Example
Blood sample size above 3.0µL might contaminate the test strip port and the meter.
Blood sample size below 0.75µL may cause an inaccurate result or may prevent a meter reading.
An Er4 reading will be displayed if the sample size is too small. In this case, repeat the test with a
new test strip.
The system has been tested with neonatal blood. As a matter of good clinical practice, caution is
advised in the interpretation of neonate glucose value below 50 mg/dL. Please follow the
recommendations for follow-up care that have been set by your intuition for critical glucose values
in neonates. Results for neonates exhibiting symptoms of galactosemia should be confirmed by
laboratory tests.
is 0.75µL: ( )
GM782
0.75µL 1.0µL 1.5µL 2.0µL 3.0µL
Important Safety Notes:
- Users should wash their hands thoroughly with soap and water before and after handling
the meter, lancing device, or test strips.
Rightest
TM
54
Page 5

Table of Contents
Table of Contents
About the Blood Glucose Monitoring System
The Blood Glucose Monitoring System ............................................................
The Blood Glucose Meter ................................................................................
The Blood Glucose Test Strip ..............................................................................
Before Testing
Meter Activation and Battery Change...............................................................................................
Setting Up Your Meter - Setting the Date, Time and Volume.............................................................
Turning On/Off the Meter....................................................................................................................
Handling the Blood Glucose Test Strip ..............................................................
Testing Procedure
Getting Ready for Testing...................................................................................................................
Performing a Blood Glucose Test.......................................................................................................
Setting Markers.................................................................................................................................
Alternative Site Testing.......................................................................................................................
View Window Appearance.................................................................................................................
Understanding Test Results and Messages......................................................................................
Rightest GM782
Rightest GM782
Rightest GM782
Rightest GS700
TM
TM
TM
TM
Rightest GS700
TM
8
10
14
16
18
22
23
25
26
31
34
36
37
Quality Control
About Quality Control Testing.............................................................................................................
Performing a Quality Control Test.......................................................................................................
Understanding Control Test Results...................................................................................................
Test Memory
Recalling Test Results........................................................................................................................
Recalling Average Test Results..........................................................................................................
Caring for Your
Meter...................................................................................................................................................
Error Messages and Troubleshooting................................................................................................
Limitations..........................................................................................................................................
Specifications.....................................................................................................................................
Warranty..............................................................................................................................................
Customer Service...............................................................................................................................
Expected Blood Glucose Values Without Diabetes...........................................................................
Federal Communications Commission (FCC)Statement..................................................................
Component Manufacturer Information...............................................................................................
39
42
44
45
46
48
49
53
54
56
57
58
59
60
76
Page 6
2
2
The Blood Glucose Monitoring System
Rightest GM782
TM
The Blood Glucose Monitoring System
Rightest GM782
TM
Contents
Rightest
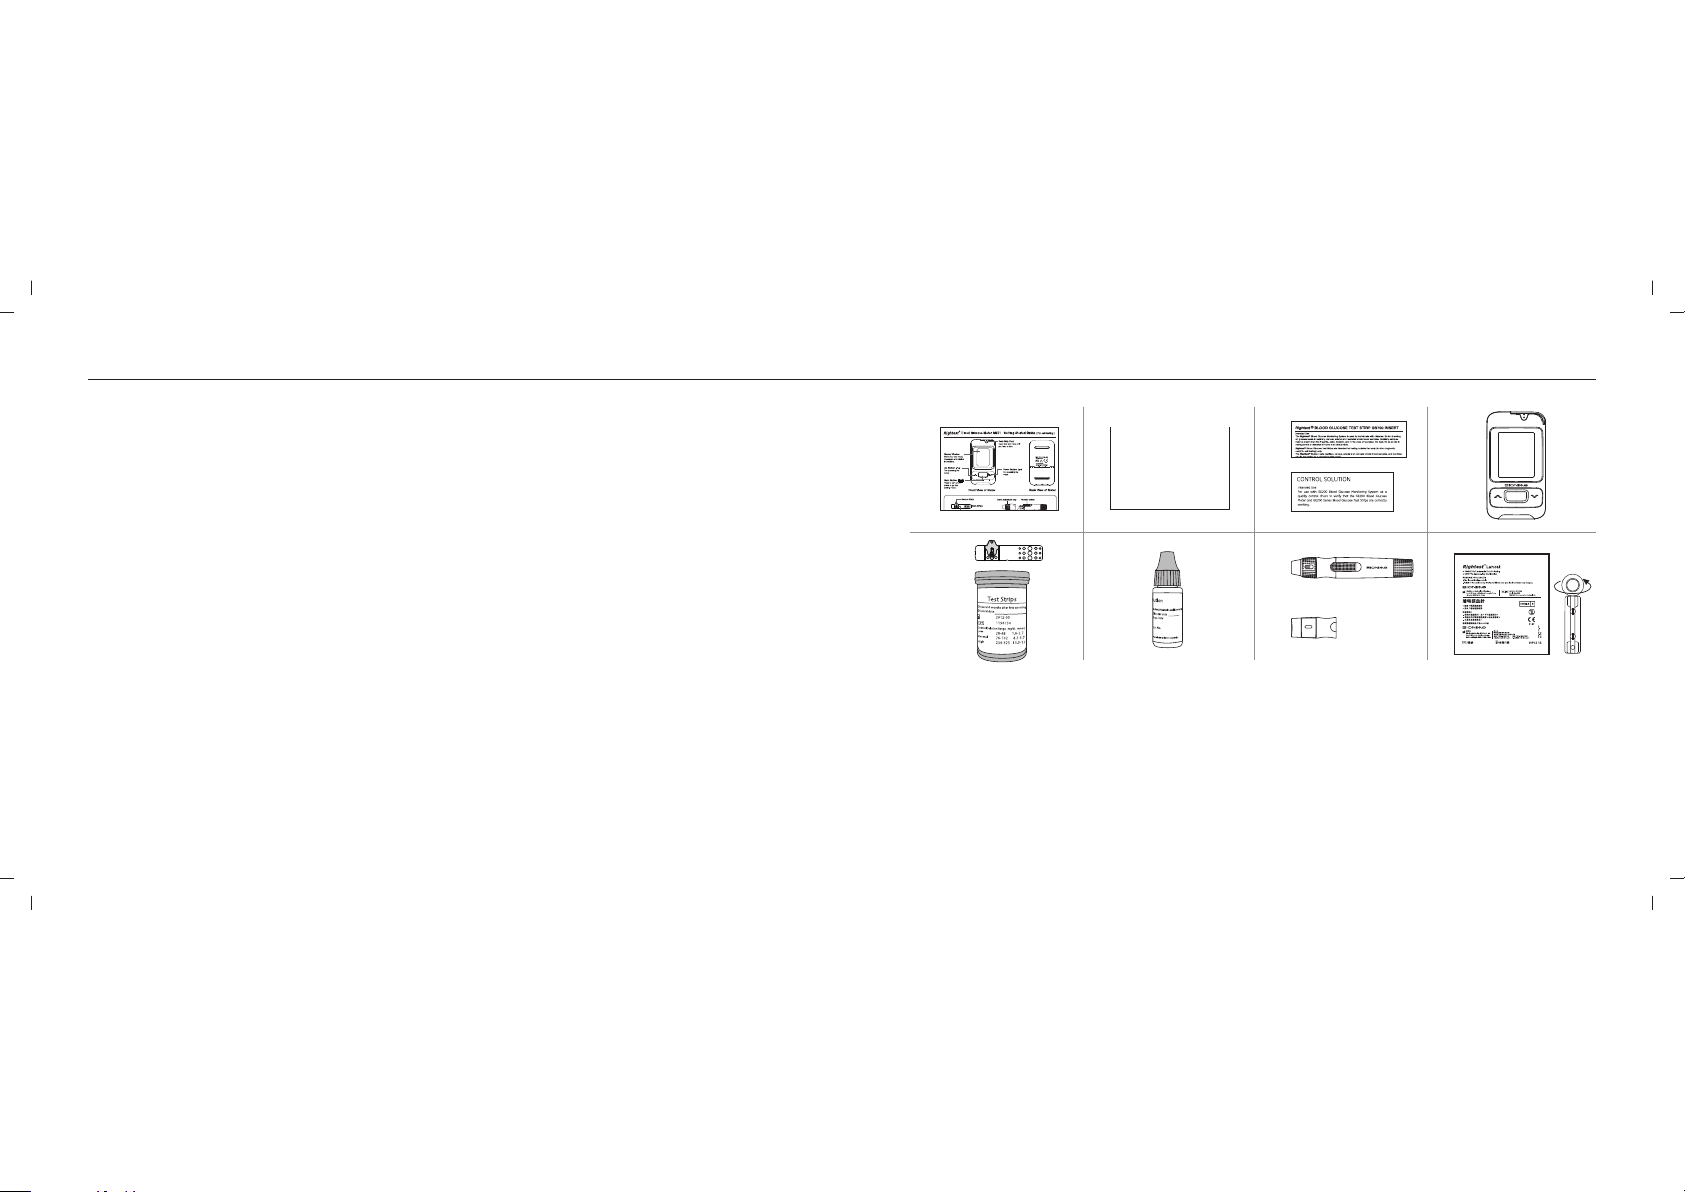
Your Blood Glucose Monitoring System GM782 consists of several items. Please
TM
identify each item, learn its name and how it is used.
Below are the items included in your Blood Glucose Monitoring System GM782:
Rightest
TM
1. Getting Started Guide
2. User's Manual (includes Log Book, Warranty Card, Emergency Card )
Rightest
3. Blood Glucose Test Strip GS700 Package Insert *
Rightest
4. Control Solution GC700 Package Insert *
Rightest
5. Blood Glucose Meter ( with 1 CR2032 batteries installed )
Rightest
6. Blood Glucose Test strips GS700 ( 10/25 pcs )*
Rightest
7. Control Solution GC700 *(Normal Level is provided in your starter kit)
Rightest
8. Lancing Device *
TM
TM
TM
TM
TM
TM
GM782
9. Clear Cap *
10. Disposable Sterile Lancets ( 10 pcs ) *
11. Carrying Case ( not shown )*
12. Instruction for the lancing device ( not shown )*
(* Different packages have different bundled items. Some of packages might not include * items.)
1
6 *
7 *
4 *
8 *
9 *
53 *2
10*
GM782
98
Page 7
TM
The Blood Glucose Meter
Rightest GM782
GM782
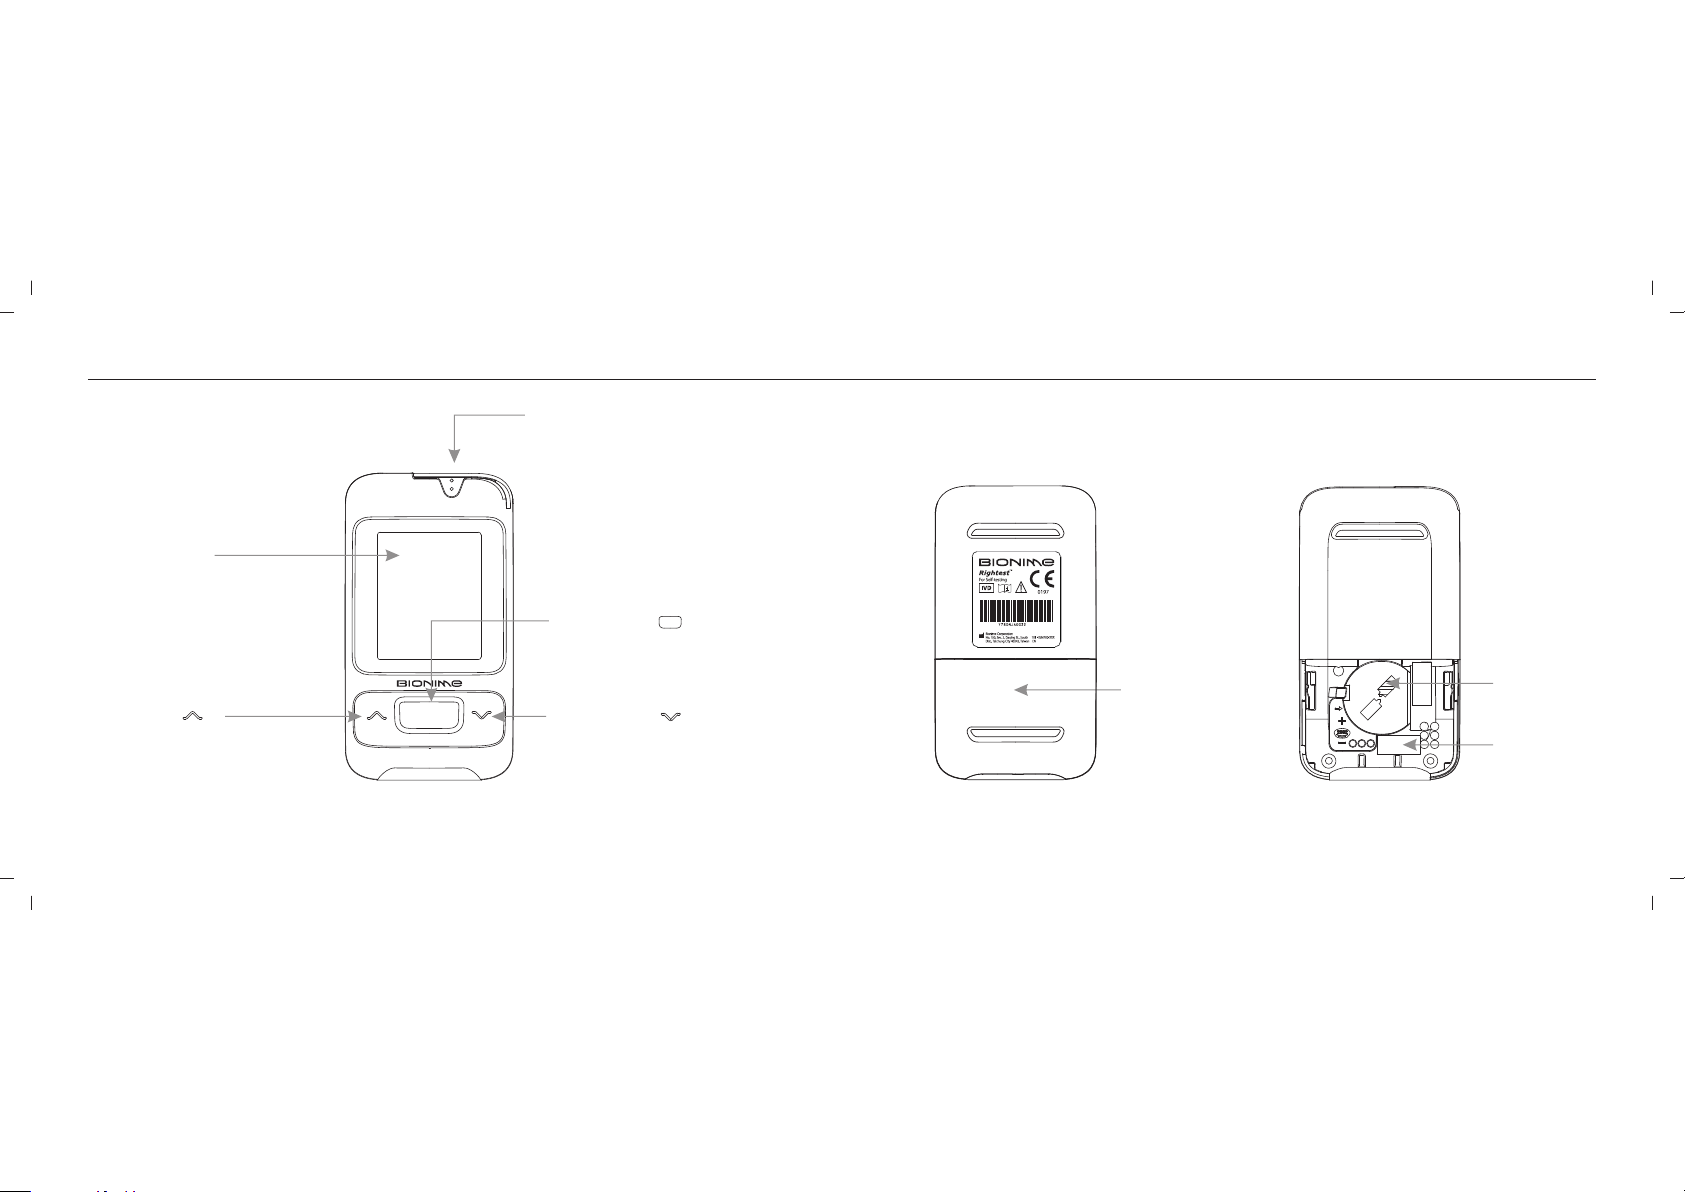
Test Strip Port
The Blood Glucose Meter
Rightest GM782
TM
Display Window
Left Button ( )
Main Button ( )
Right Button ( )
GM782
Battery Cover
Meter Battery
2D barcode
with serial
number
1110
Page 8
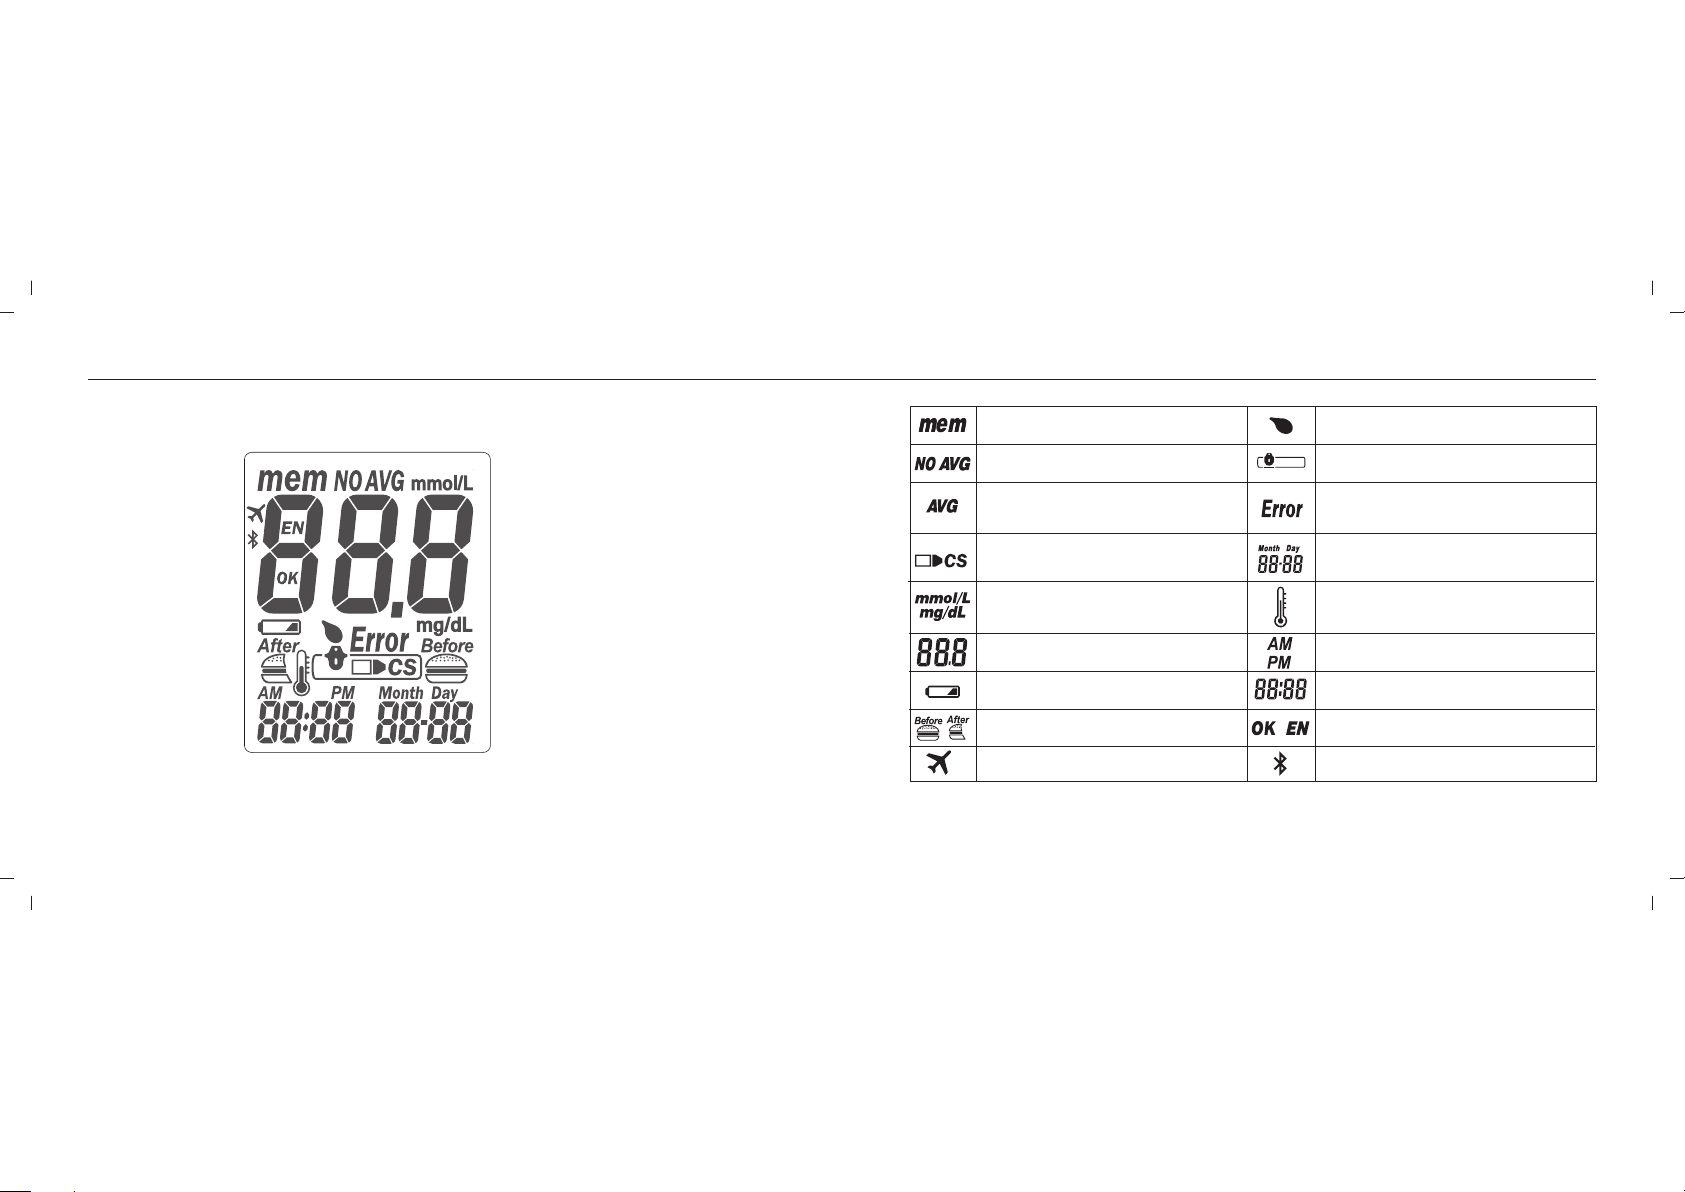
The Blood Glucose Meter
Rightest GM782
TM
The Blood Glucose Meter
Rightest GM782
TM
Indicates a test result stored in memory
Indicates a test result not included into the
average results of the meter
Indicates the average result
Indicates a control solution test result
Unit of test result
Test result
Warns when the batteries are low or must be
replaced
indicates that the Bluetooth is turned off indicates that the Bluetooth is turned on
Indicates when to apply the blood sample
Appears after you insert test strip into meter
Appears when an error occurs
Current date under time mode or testing date
under memory mode
Warns when the operational temperature limit is
exceeded during testing
Indicates the time in 12H format
Displays current time or testing
time under memory mode
Manufacturing use onlyindicates a meal marker with test result
under time mode
1312
Page 9
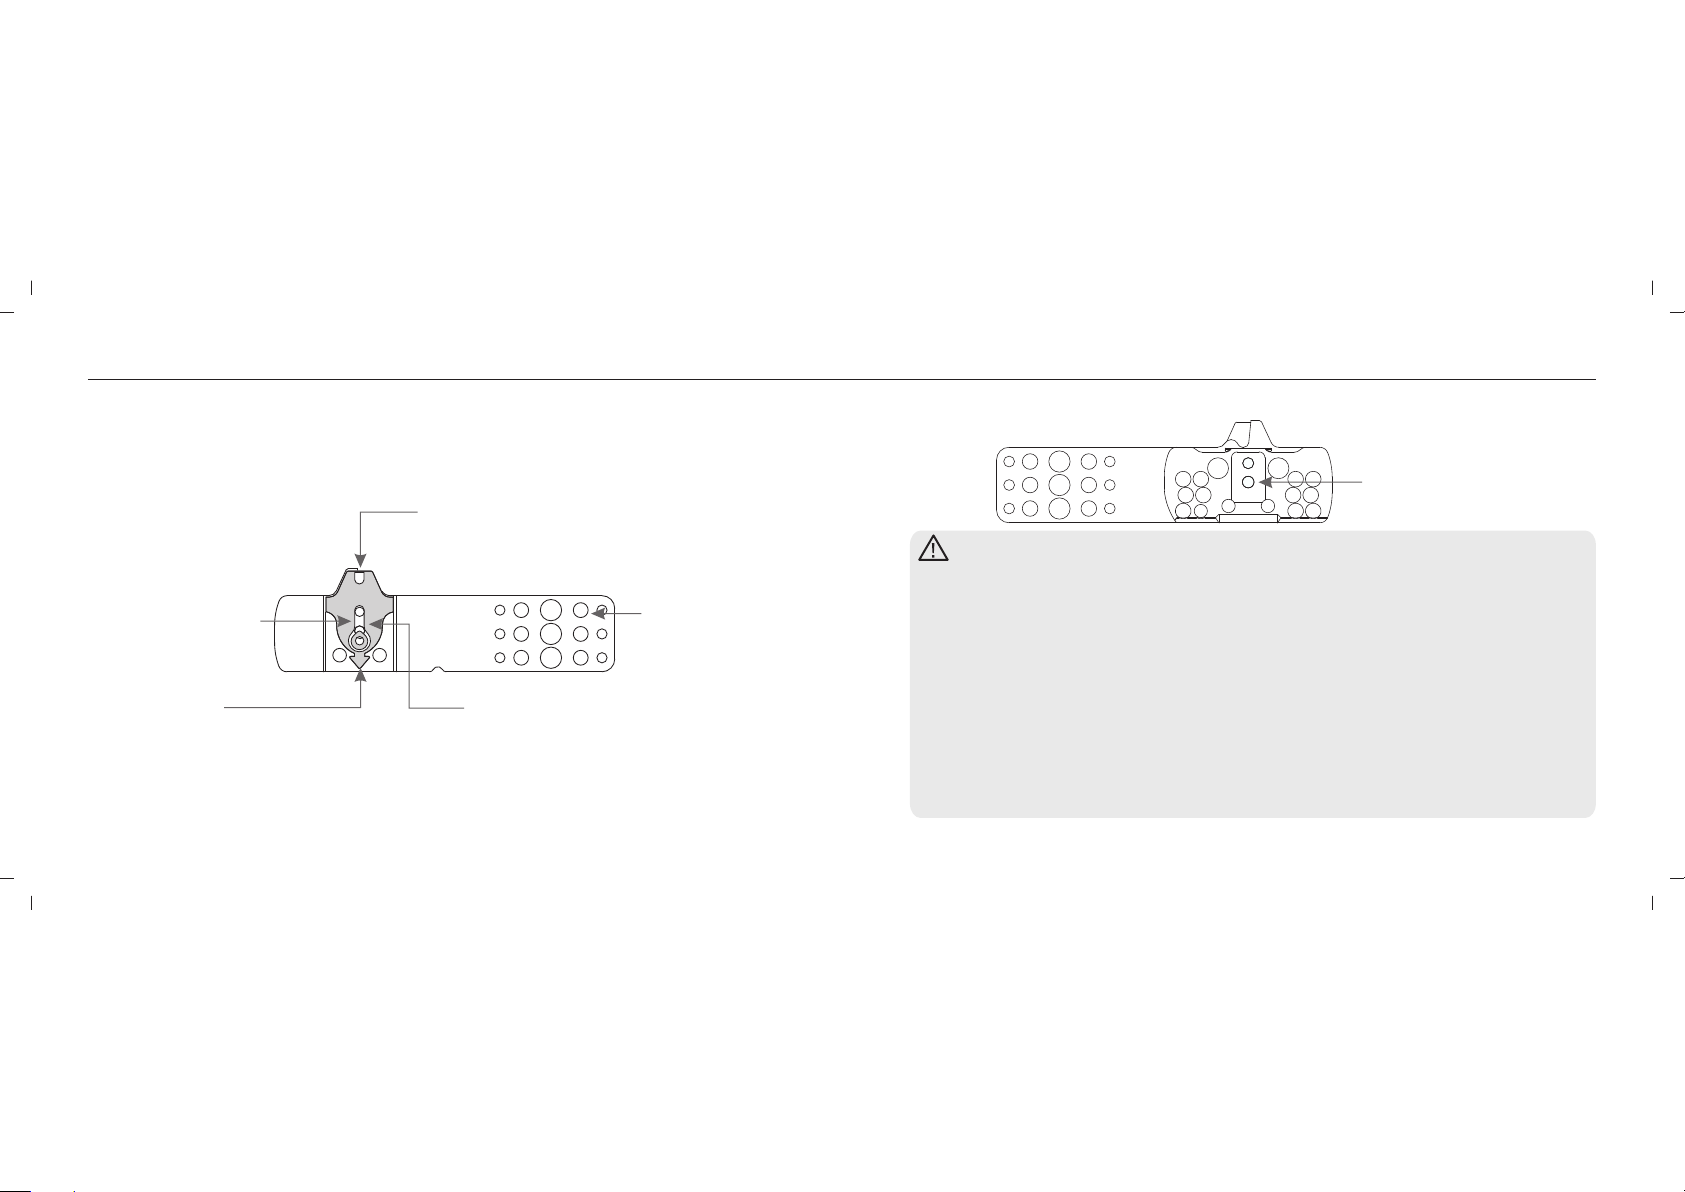
The Blood Glucose Test Strip GS700
Rightest
TM
The Blood Glucose Test Strip GS700
Rightest
TM
The Blood Glucose Meter G 782 can only be used with Blood Glucose Test
Rightest M Rightest
Strips GS700 and Control Solution GC700. The use of other test strips or control
TM TM
Rightest
TM
solutions can lead to incorrect results.
Sample Entry
Apply a drop of blood or control solution here.
The test request is only 0.75 of blood.
Noble Metal Electrodes
Electrochemical sensor
µL
Hand Bar
Grip here to insert
test strip into the
strip port of auto
Indication Symbol
Insert strip with indication symbol
up and toward meter.
View Window
This window is yellow
before applying blood
code key.
sample. It gradually turns
red when filled with blood.
Electrode Contacts
Sensing signal output terminals.
PRECAUTION
- Close the lood Glucose Test Strip GS700 vial immediately after removing a
Rightest B
test strip.
- Do not reuse .
- Do not use expired .
-
When you open a new vial of Rightest Blood Glucose Test Strip GS700, record the date
on the vial.
- Store the in a cool ( 39-86°F or 4-30°C ) and
Rightest Blood Glucose Test Strip GS700
dry location (< 90% relative humidity). Do not expose to direct sunlight or heat.
- If the Rightest Blood Glucose Meter and Test Strips are exposed to a substantial
change in temperature, please wait 30 minutes before measurement.
- For detailed information, please refer to the Rightest Blood Glucose Test Strip GS700
TM
Rightest Blood Glucose Test Strip GS700
Discard the vial of test strips after 4 months from opening.
TM
Rightest Blood Glucose Test Strip GS700
TM
TM
TM
TM
GM782
TM
Package Insert.
1514
Page 10

Meter Activation and Battery Change
GM782
GM782GM782
GM782
TM
Rightest
Your Blood Glucose Meter comes with one CR2032, 3volt, batteries installed.
one
new batteries will provide power to perform approximately 1000 tests under normal use. Press
the main button or insert a strip to activate your meter.
GM782
Meter Activation and Battery Change
1. Turn the
4. The Blood Glucose Meter
5. Press any button to exit the self-test and enter Setting Mode.
6. You must set the time and date when replacing the battery. See Chapter “Setting Up Your Meter -
GM782 Blood
Glucose Meter
and slide the battery cover
to open.
Rightest
replacing the battery (all symbols will appear on the screen).
Setting the Date, Time, and Volume" on page 18. Test results are still stored in the memory.
CAUTION
- Please follow the local regulation to properly discard a used battery.
over. Press
TM
2. Install the batteries. Be sure
to put the batteries in the
correct direction (polarity
(+) facing up).
GM782 will enter Self-Testing Mode automatically when
3. Slide the battery cover back
until it snaps into place.
1716
17
Page 11
Setting Up Your Meter - Setting the Date, Time and Volume
Setting Up Your Meter - Setting the Date, Time and Volume
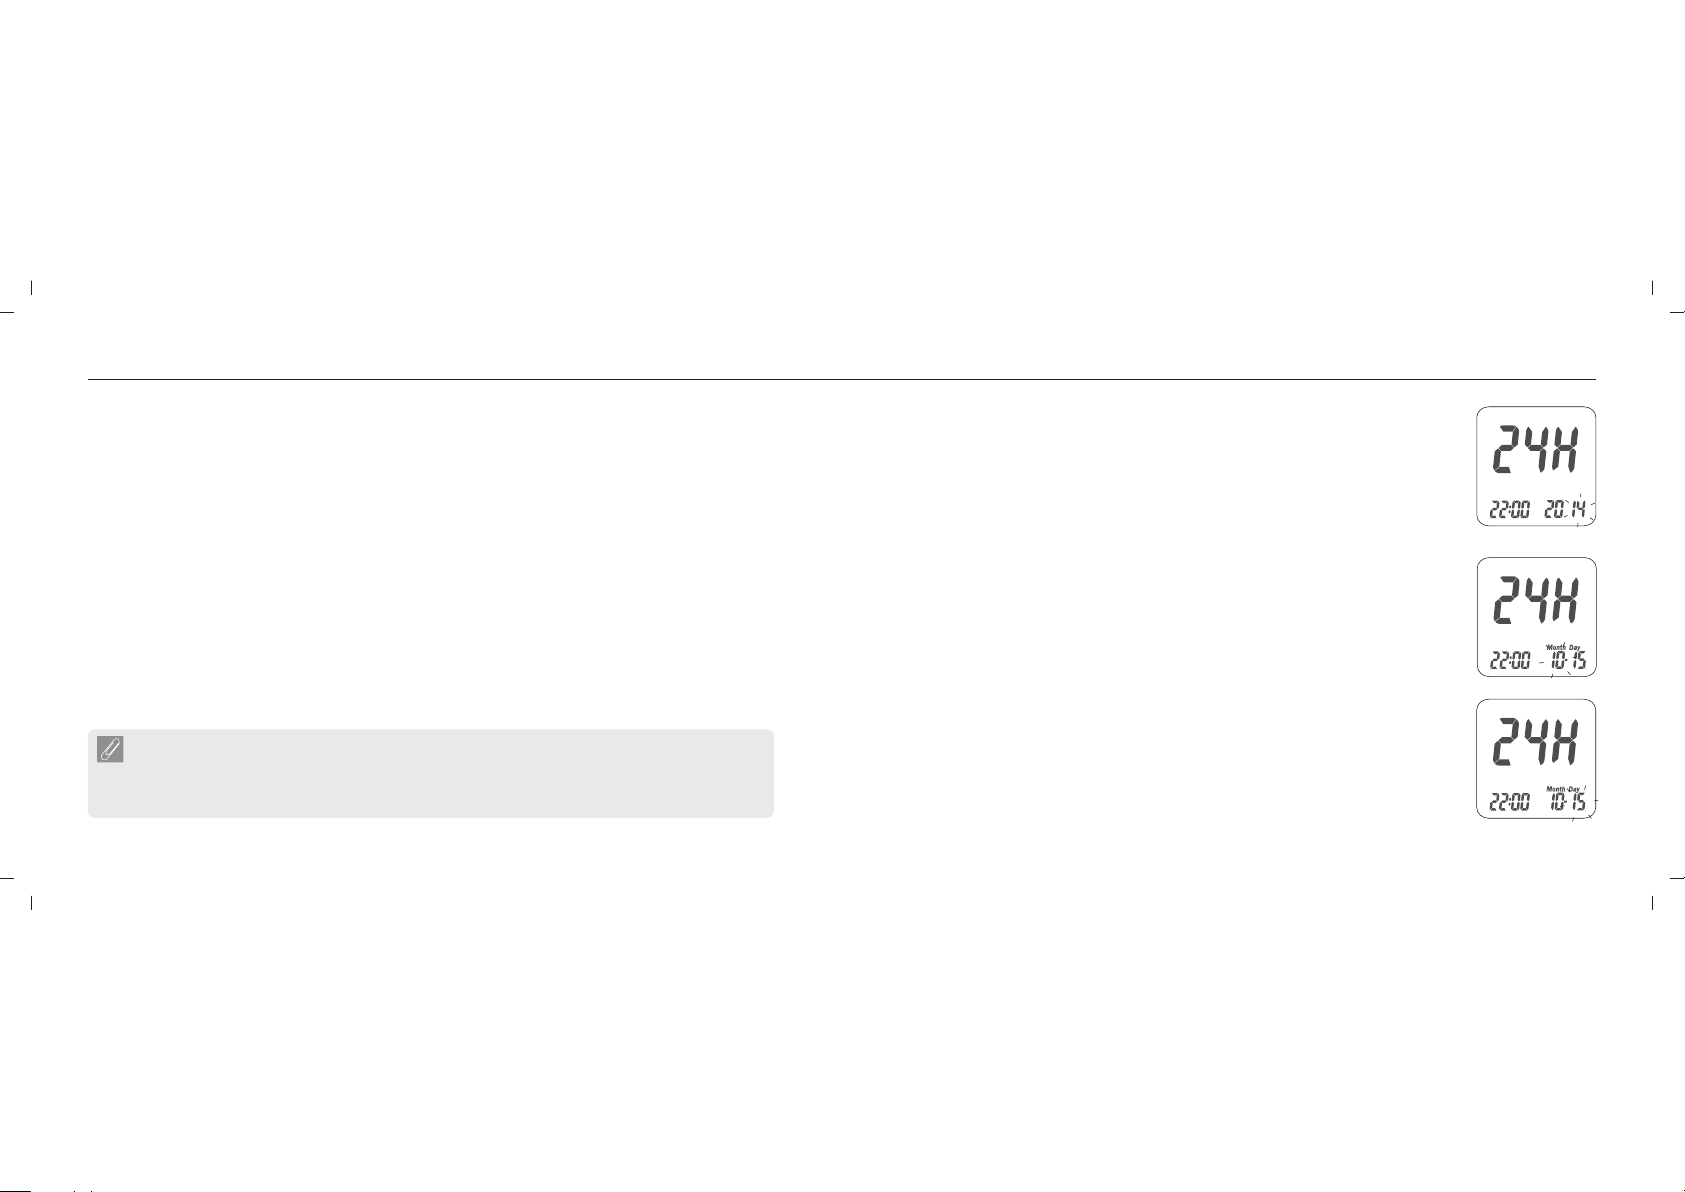
You can enter the Setting Mode two ways.
1. Replace the Battery
After removing the battery, press the main button several times until there is no signal on screen,
then follow the battery installation steps to replace battery. The Rightest Blood Glucose Meter
will perform a self-test. Press the main button to exit the self-test and enter the Setting
GM782
TM
Mode.
2. With Battery Inserted
Press the main button to turn on the Rightest Blood Glucose Meter . Hold down the
TM
GM782
main button for 7 seconds. During this time the screen will go blank until you hear a beep. After
the beep, the meter will turn on into the Setting Mode. The display screen will show setting data.
NOTE
- Use the Left and Right buttons to select your setting data and press the main button to
confirm each selection. After confirming all of the settings, you will return to the Time
Mode.
18
1. Year setting
With the year format blinking
current year. Press the Main button to confirm.
, press the Left or Right button until you see the
Once the year is confirmed,
the Month Setting will appear.
2. Month setting
With the month blinking, press the Left or Right button until you see the
current month. Press the Main button to confirm.
Once the month is
confirmed, the Day Setting will appear.
3. Day setting
With the day blinking, press the Left or Right button until you see the current
day. Press the Main button to confirm.
Once the day is confirmed, the Time
Setting will appear.
1)
2)
3)
19
Page 12
Setting Up Your Meter - Setting the Date, Time and Volume
Setting Up Your Meter - Setting the Date, Time and Volume
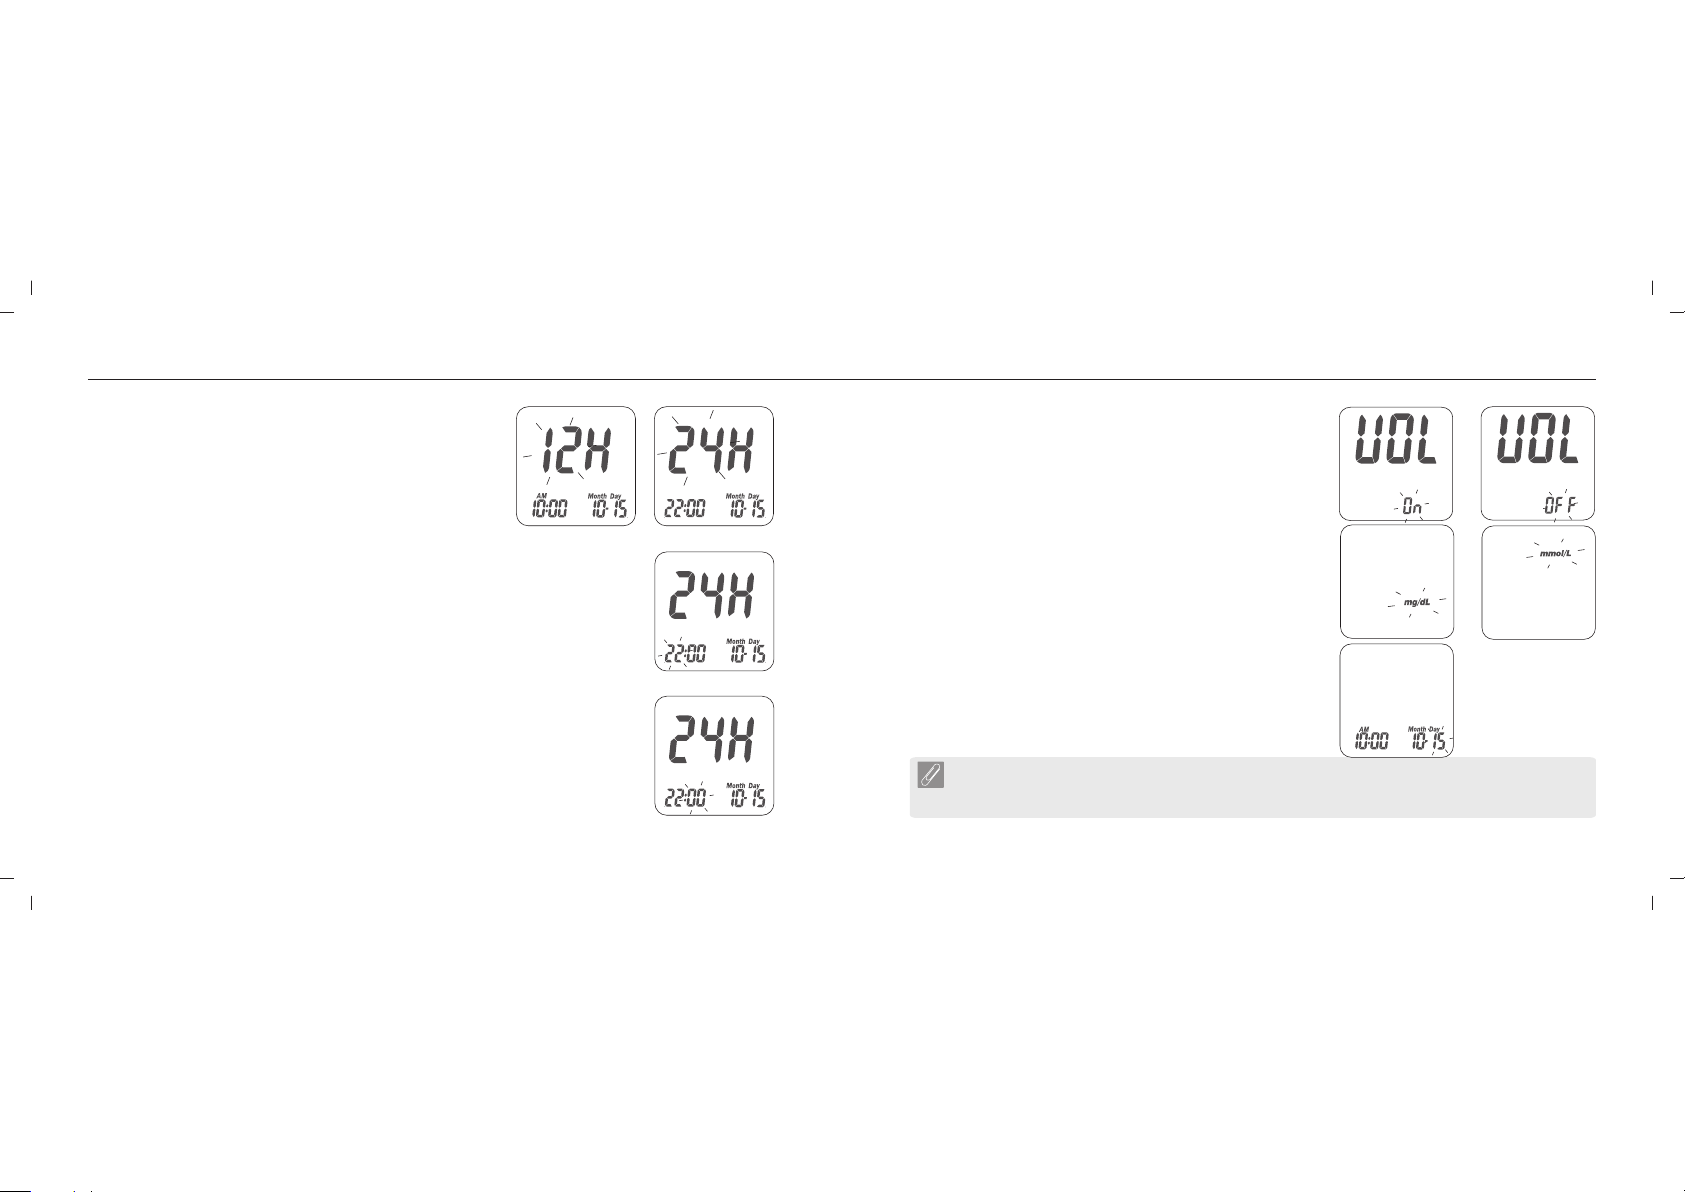
4. Time format 12/24H selection
With the time format blinking, press the Left or Right
button to switch between 12H and 24H. Press the Main
button to confirm.
Once confirmed, the Hour Setting will
appear.
5. Hour setting
With the hour blinking, press the Left or Right button
until you see the current hour. Press the Main button to
confirm.
Once the hour is confirmed, the Minute Setting
will appear.
6. Minute setting
With the minutes blinking, press the Left or Right button
until you see the current minute. Press the Main button
to confirm.
Once the minute is confirmed, the Volume
Setting will appear.
4a) 4b)
7. Volume Setting
7a) 7b)
With the volume blinking, press the Left or Right button
to turn the volume on or off. Press the Main button to
confirm and finish the settings.
8. Setting the Unit of Measurement
With milligrams per deciliter (mg/dL) or millimoles per
5)
liter (mmol/L) blinking, press the Left or Right button to
switch. Then press the Main button to confirm it and
8a) 8b)
finish the settings.
9. Ending setting
After measurement of unit setting, for confirmation you
will hear a beep (if volume is turned on). All the settings
9)
are saved and completed and will return to time screen.
6)
(If Volume is turned off, the display will directly return to
time screen without a sound of “beep”.)
NOTE
- If you do no change any settings during Meter Set-up for over 2 minutes, the
Blood Glucose Meter will leave setting mode and power off automatically.
GM782
Rightest
TM
2120
Page 13
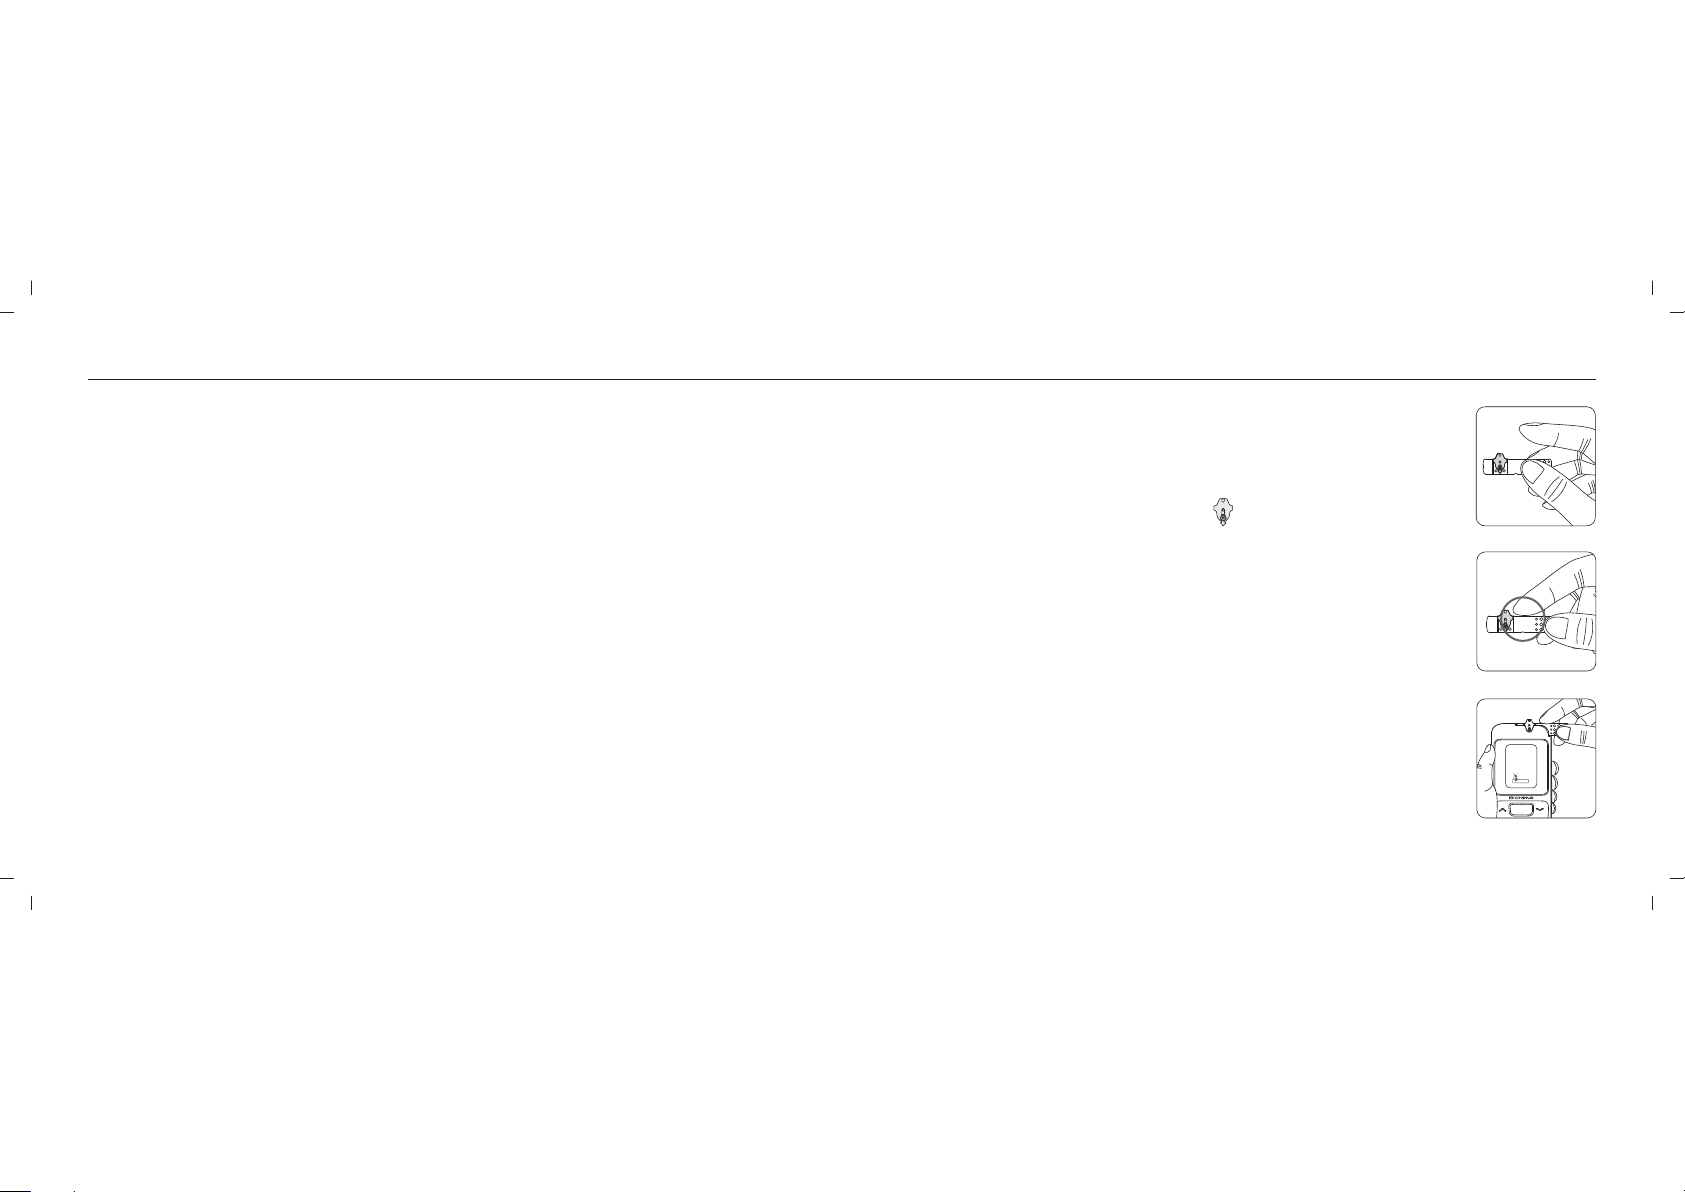
Turning On / Off the Meter
GM782
TM
Handling the Blood Glucose Test Strip
Rightest
GS700
1. How to turn on the Blood Glucose Meter
Rightest
TM
GM782
Press the Main button or Insert a test strip.
2. Manual Power off
To power off the Blood Glucose Meter , press and hold the Main button for 3
Rightest
TM
GM782
seconds.
3. Auto Power off
The Rightest Blood Glucose Meter will power off automatically after 2 minutes if no
TM
GM782
buttons are pressed or no strip is inserted.
How to handle the ood Glucose Test Strip .
Inserting the Blood Glucose Test Strip :
1. Hold the Blood Glucose Test Strip between your thumb
Rightest Bl
Rightest
Rightest
TM
TM
GS700
TM
GS700
GS700
and middle finger with the view window " " facing up.
2. Put your forefinger on the side of the strip as shown.
3. Insert the Blood Glucose Test Strip into test strip port
Rightest
TM
GS700
until it clicks and firmly stops.
1
2
3
2322
Page 14
GM782
TM
GM782
GM782
Handling the Blood Glucose Test Strip
Rightest
GS700
Getting Ready for Testing
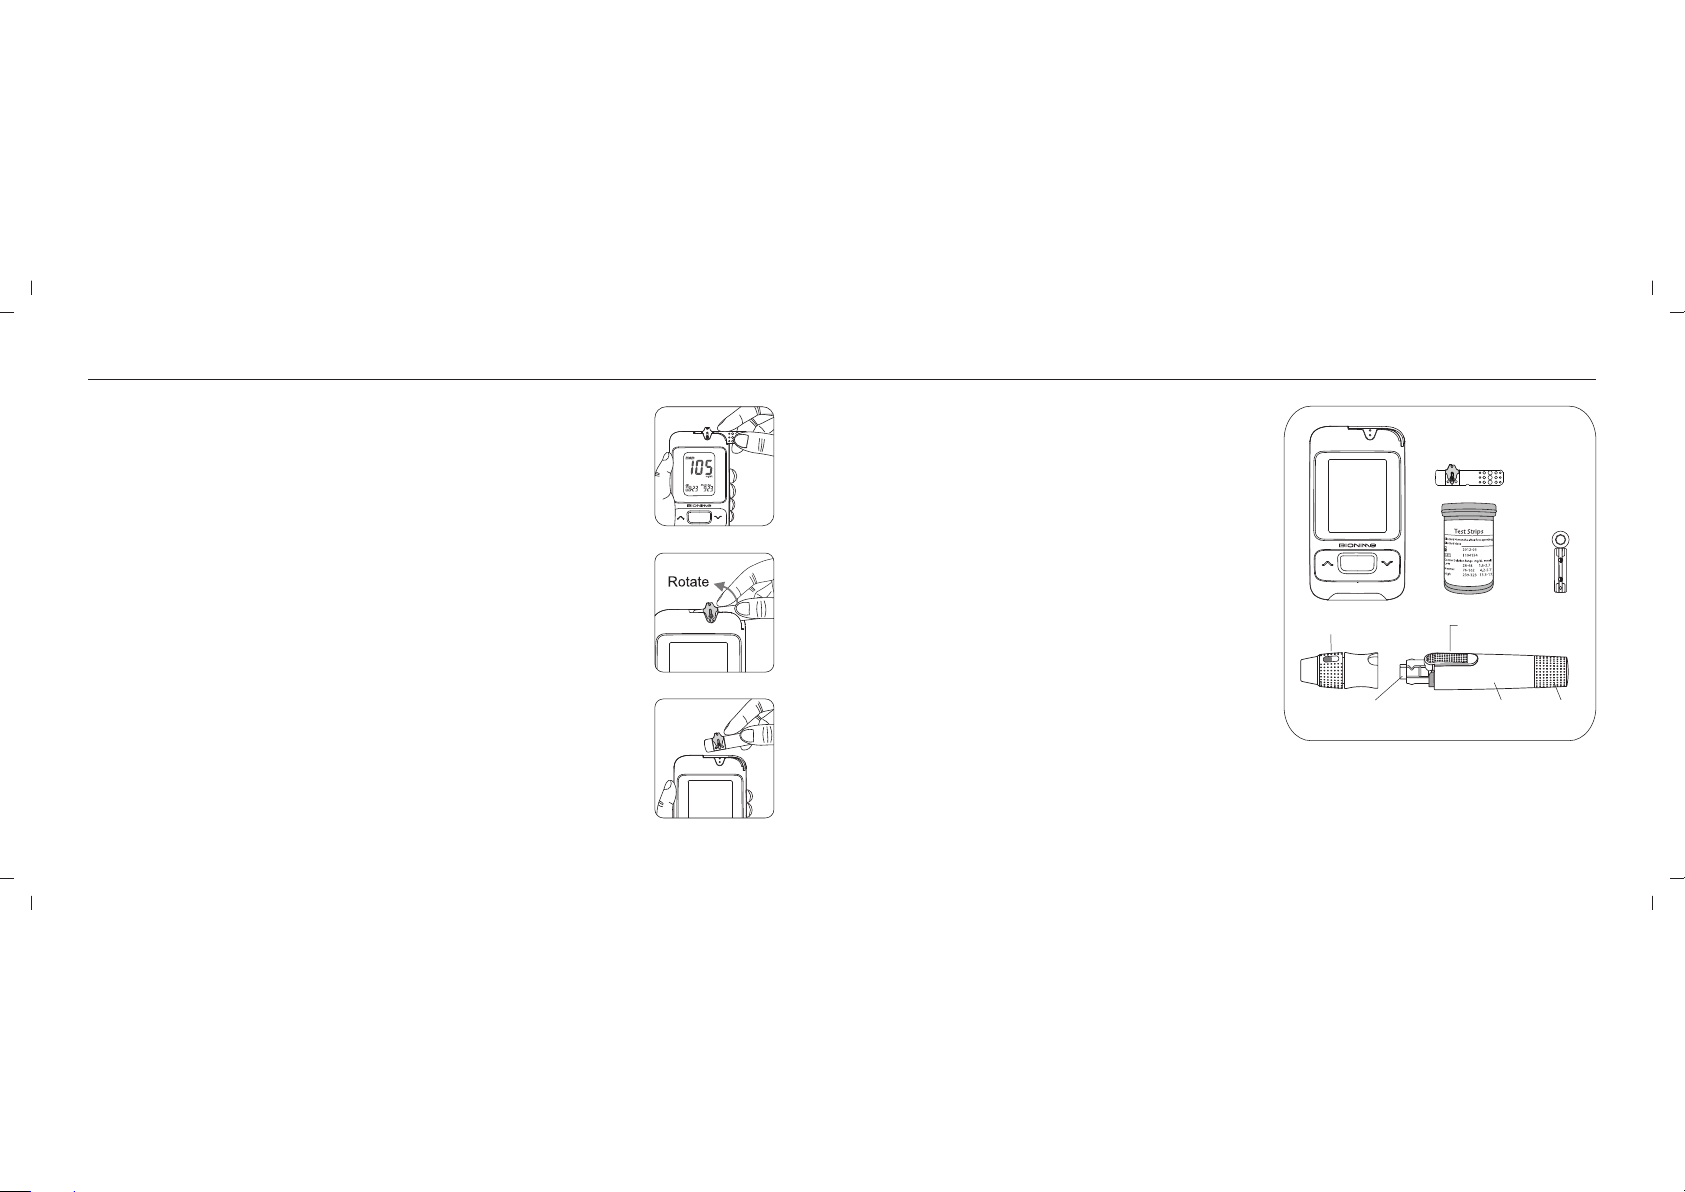
Removing the Blood Glucose Test Strip :
1. Hold the Blood Glucose Test Strip as shown.
2. Rotate the Blood Glucose Test Strip counterclockwise
Rightest
Rightest
Rightest
TM
TM
TM
GS700
GS700
GS700
and pull up simultaneously.
3. Take the Blood Glucose Test Strip out of the test strip
Rightest
TM
GS700
port.
Please follow your local regulations and discard used strips properly.
24
1
Before performing a blood glucose test,
prepare the items below :
- Blood Glucose Meter
Rightest
- Blood Glucose Test Strips
Rightest
TM
TM
GM782
GS700
GM782
(Please check the expiration date on the test strip
2
vial. Do not use expired test strips)
TM
- Lancing device GD500
Rightest
- Sterile lancet
- Alcohol swab (optional)
Depth adjustable cap
3
Release button
PlungerBaseLancet carrier
25
Page 15
Performing a Blood Glucose Test
Performing a Blood Glucose Test
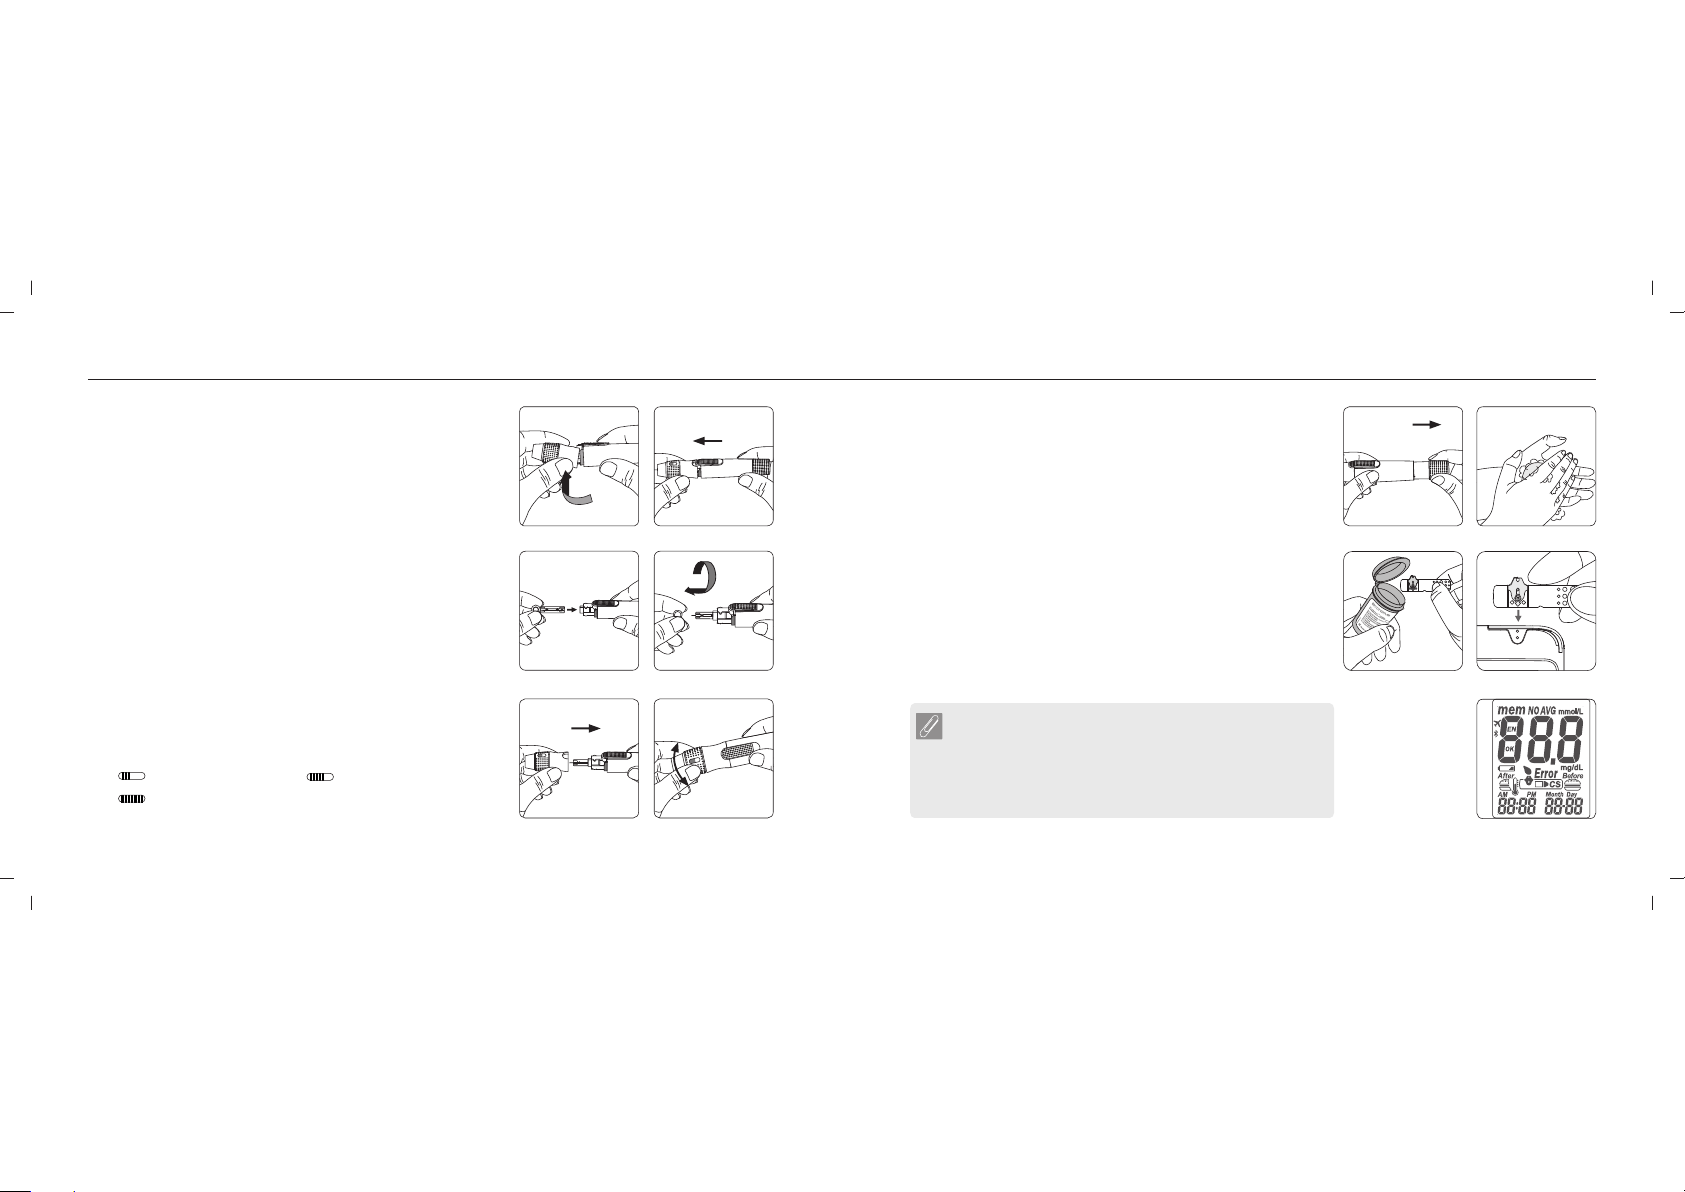
1. Hold the depth adjustable cap in one hand and hold the
base with the other hand. Bend the cap down. When a
gap appears between the cap and base, pull the cap
and base in opposite directions.
2. Pull off the depth adjustable cap.
3. Insert a new disposable lancet firmly into lancet carrier.
4. Twist off and set aside the protective cover of the
disposable lancet.
5. Replace the depth adjustable cap.
6. Choose a depth of penetration by rotating the top portion
of the depth adjustable cap until your desired setting is
visible in the window. Settings are based on skin type
" " for soft or thin skin; " " for average skin;
" " for thick or calloused skin.
26
1 2
3
5
7. Hold the base in one hand and pull on the plunger with
7
8
the other hand. The device will be cocked. Release the
plunger and it will automatically move back to its original
position near the base.
8. Wash your hands with warm soapy water and dry
thoroughly.
4
from the vial. Close the vial cap immediately.
9. Take one Blood Glucose Test Strip GS700
Rightest
10. Insert the strip into the test strip port of the
TM
Rightest
9
TM
10
Blood Glucose Meter GM782 with the view window facing
up.
11. Once the strip is inserted, all symbols will appear on your
meter display and will be accompanied by a beep (if
volume is turned on).
6
NOTE
Rightest Blood Glucose Meter GM782
- The will
TM
11
automatically detect the Code number on the test
strip. You do not have to check the Code number on
the meter display and strip vial.
27
Page 16

Performing a Blood Glucose Test
GM782
GM782
Performing a Blood Glucose Test
12. A blood drop icon will appear on the display window
and will be accompanied by a beep (if volume is turned
on). Apply the blood sample within 2 minutes.
13. Place the lancing device against your fingertip and
press the release button.
14. Touch and hold the blood drop to the edge of sample
port until the view window is filled with blood. If the view
window is not completely filled with blood the test will
not start. If the blood sample was insufficient, discard
the test strip and repeat with a new Blood
Rightest
TM
Glucose Test Strip GS700.
15. Countdown Mode will begin on the display window. After
5 seconds, your test result will appear.
28
12
14a
14c
13
14b
15
16. Pull off the depth adjustable cap. Without touching the
used disposable lancet, insert the lancet tip into the
protective lancet cover.
17. Hold the release button in one hand (see picture 17, step
1) and pull on the plunger with the other hand (see
picture 17, step 2) to safely eject the used disposable
lancet.
18. Discard the used disposable lancet into an appropriate
puncture-proof or biohazard container.
19. Replace the depth adjustable cap after finishing the test.
16
18
17
19
2
1
29
Page 17
Performing a Blood Glucose Test
Setting Markers
CAUTION
- Do not apply your blood drop to the sample port on the strip until you see the " " appear.
Rightest
The Blood Glucose Meter is performing an internal test and will display
" " and " " if you apply blood too soon. If this occurs, please repeat the test with a
new test strip.
- Record the opening date of a new test strip vial. Discard the vial of test
strips 4 months after opening.
- Always keep the metal contacts of the test strip port clean. If any dust or
impurities are present, please clean with a small, soft brush.
Rightest Rightest
- The Blood Glucose Monitoring System GM782 and Lancing device
GD500 are intended for a single user only. Do not share these devices with anyone,
including other family members.
- Users should wash hands thoroughly with soap and water after handling the meter, lancing
device, and test strips.
30
TM
TM TM
GM782
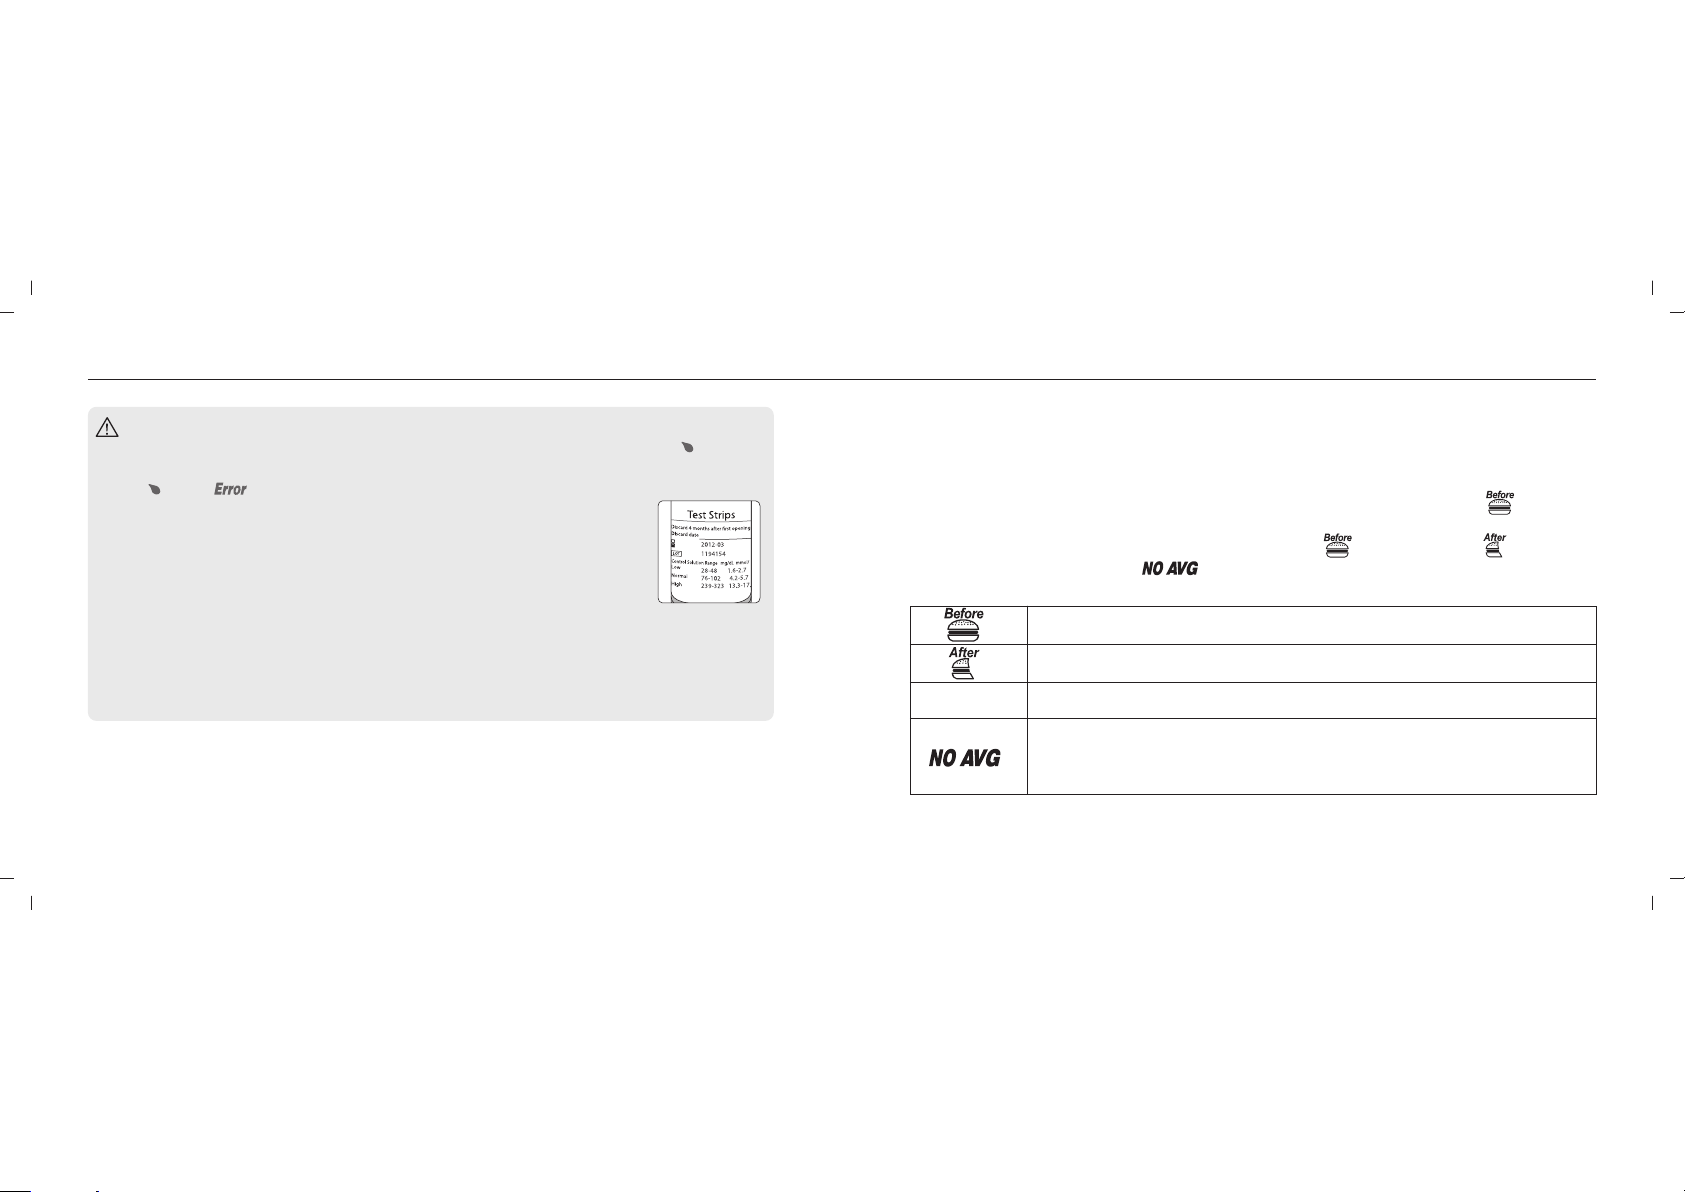
According to actual life status, you can set meal markers with test result.
You have to perform meal marker setting immediately after the meter displays the reading of your
test result.
1. After test, the test result is displayed on the screen with time, date and flashing “ ”.
2. Keep pressing the Right button to choose between the “ ” (before meal), “ ” (after
meal), ” ” (no marker) and “ ” then press main button to confirm and save this record.
Before meal: You execute this blood glucose test before a meal.
After meal: You execute this blood glucose test after a meal.
(Blank) no marker: regular test or definition by user.
No average: You will exclude this test result from average calculation.
Please refer to "Excluding test results from the average calculation"on
page 44 for more information.
31
Page 18
Upload Data
Airplane Mode
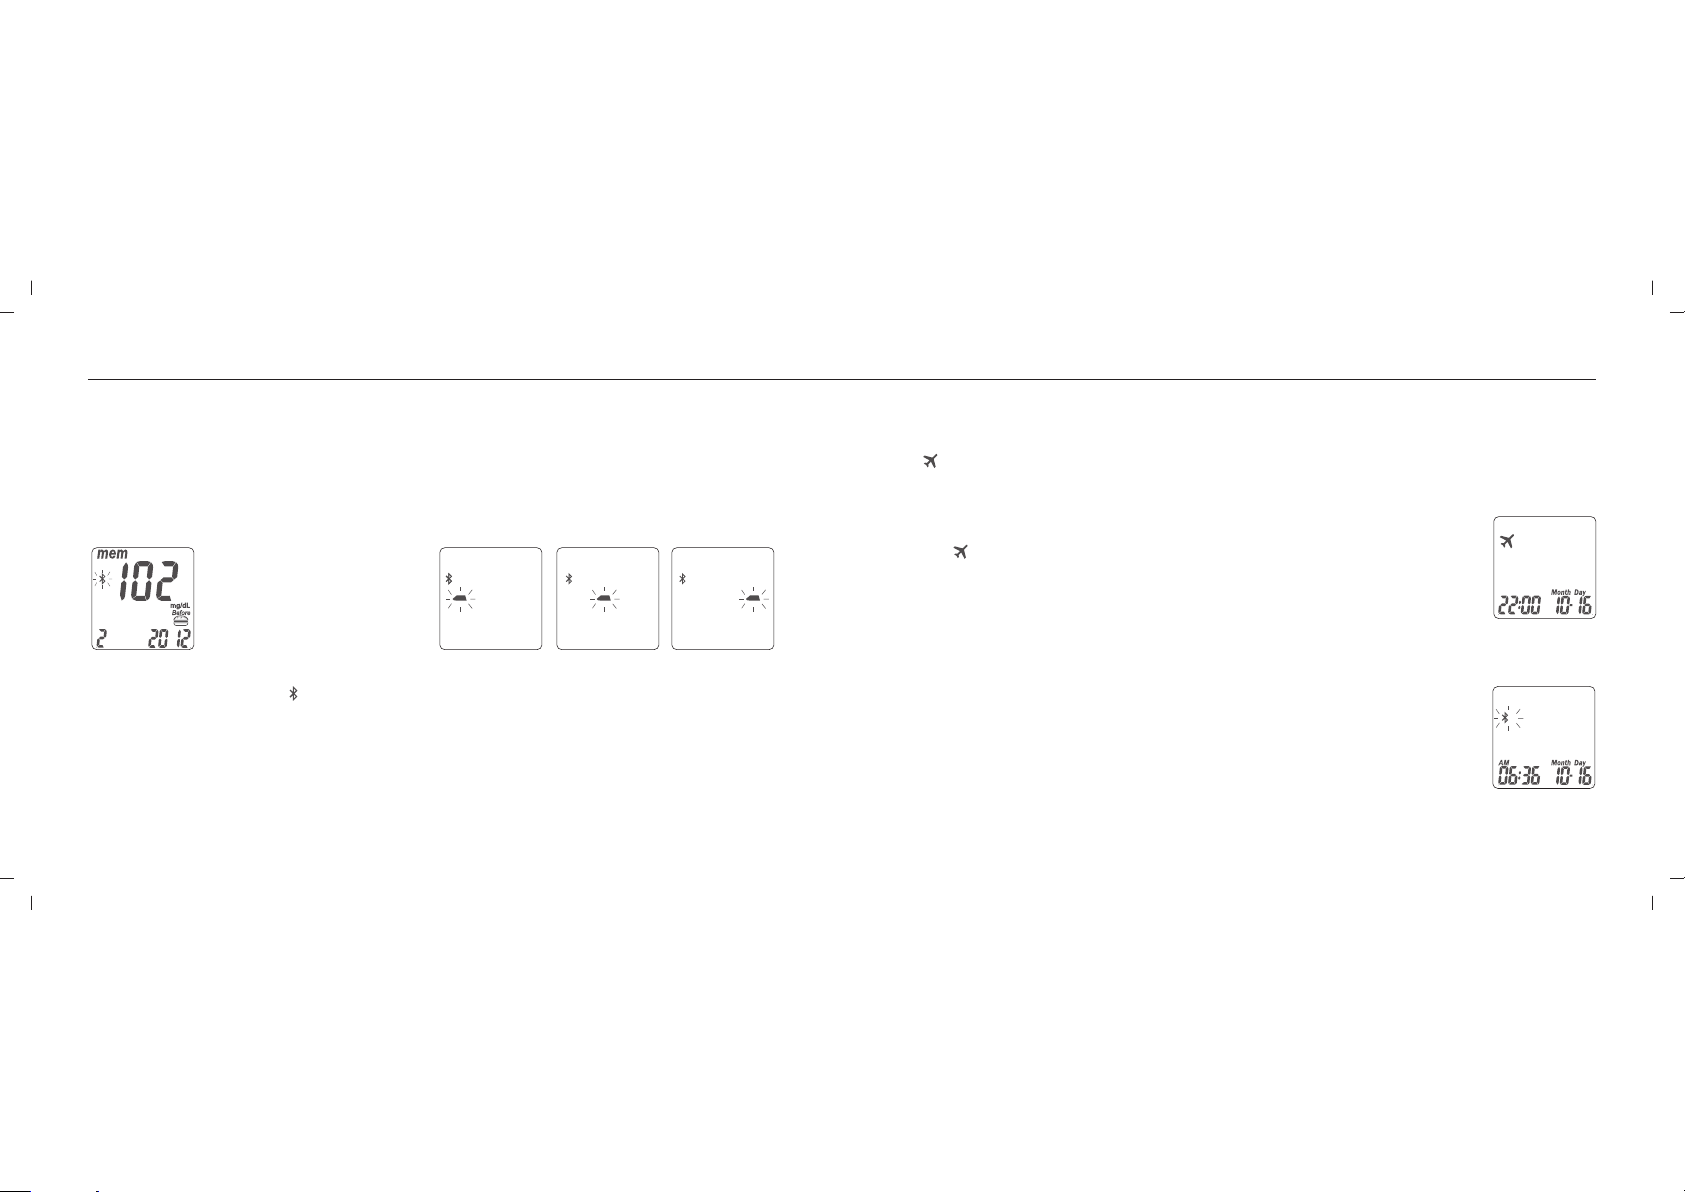
After the marker setting, Bluetooth will turn itself on and start to pair with your mobile device or PC.
Once the connection successfully pairs, test results will start uploading to the connected mobile
device or PC.
When the test result uploading has completed, Bluetooth will turn itself off.
Bluetoot h pa ir ing.
The symbol o f Bl ue tooth flashes.“ ”
NOTE
1.Users don't need to manually turn the Bluetooth on.
2.The meter only stays in pairing mode for 20 seconds, and then turns Bluetooth off
and returns to Time Mode.
323534
Data uploading.
The GM782 meter is now uploading test results
to your mobile device or PC.
Turn on Airplane Mode
Press on the right or left button for 3 seconds to turn it on. When airplane mode is on, you'll see
on the screen. In Airplane Mode, the Bluetooth feature for test results uploading is turned off.“ ”
Airplane Mode
The symbol appears in the left corner on screen.“ ”
Turn off Airplane Mode
Press on the right or left button for 3 seconds to turn it
off. Once Airplane Mode be turned off, meter will start
checking and uploading the test results using Bluetooth
feature.
33
Page 19
Alternative Site Testing
Alternative Site Testing
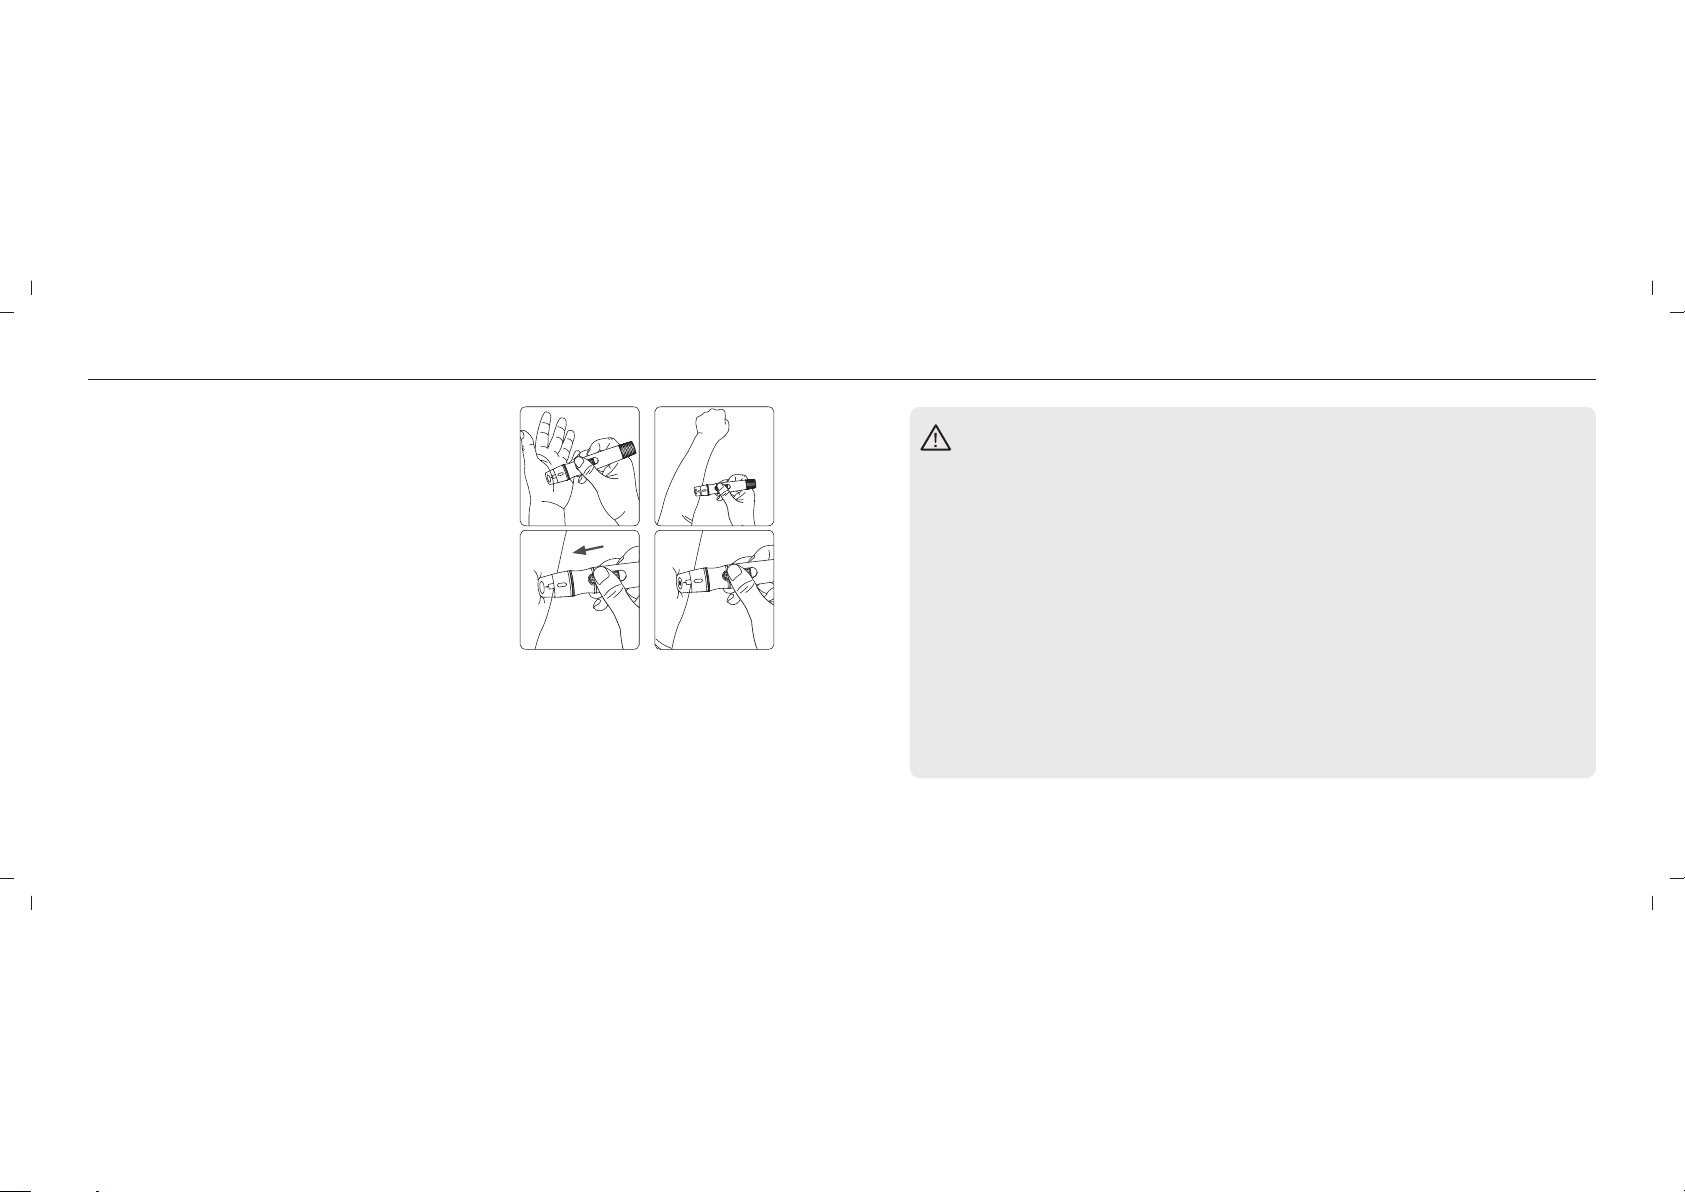
Alternative site testing: palm or forearm blood sampling
- To perform alternative site testing, install the clear cap for
your Rightest Lancing Device GD500. ( For detailed
information, refer to the instruction manual for the
Rightest Lancing Device GD500. )
TM
TM
Palm
Forearm
- To increase the blood flow, massage the intended puncture
area of your palm or forearm for a few seconds.
- Immediately after massaging the intended puncture area,
Pressing for
a few seconds
Releasing
button
press and hold the lancing device with the clear cap
against palm or forearm.
- Press the release button.
- Continue holding the lancing device against your palm or forearm and gradually increase pressure
for a few seconds until the blood sample size is sufficient. DO NOT test on the palm or forearm if
(
you are testing for hypoglycemia (Low blood glucose).
CAUTION
- Test results may vary if blood samples are taken from different sites or under certain
conditions where glucose levels are changing rapidly such as: following a drink, a meal,
an insulin dose or exercise. In these cases, only the fingertip should be used.
- DO NOT test on the palm or forearm if you are testing for hypoglycemia (Low blood
glucose).
- Fingertip samples can show the rapid change in glucose faster than palm or forearm
samples.
- Consult your healthcare professional before sampling from your palm or forearm.
- Since the blood flow in the forearm and palm is slower than in the fingertip,
cap provided with the Rightest Lancing Device GD500 when testing
TM
use the clear
sites other than
fingertip.
- If you use the normal lancing device for your palm or forearm, the blood sample may not
be sufficient for meter operation.
- Periodically compare the test system to a laboratory test system that is known to be well
maintained and monitored by a healthcare provider.
Page 20

View Window Appearance Understanding Test Results and Messages
Make sure your blood sample covers the
whole area of the view window to get an
accurate test result. An insufficient blood
sample will result in an error message
("Er4"). If this occurs, repeat the test with a
new test strip.
Insufficient blood sample Sufficient blood sample
CAUTION
- Check the expiration date printed on the strip vial every time you use a test strip. Do not use
expired Blood Glucose Test Strips GS700.
Rightest
- Use each Blood Glucose Test Strip immediately after removing it from
the vial.
- Do not reuse Blood Glucose Test Strips .
Do not perform testing immediately after moving from one ambient temperature to another
-
TM
Rightest GS700
TM
Rightest GS700
TM
(e.g. after coming indoors from the outside). Allow 30 minutes for the temperature of the
meter and the test strips to equilibrate.
- Apply the blood sample only on the sample port of the test strip.
36
If your blood glucose result is unusually high or low, or if you question your test results, repeat the
test with a new Blood Glucose Test Strip GS700.
You can also run a Quality Control Test with the Control Solutions GC700 to check your
Rightest Rightest
Rightest
TM TM
Blood Glucose Meter and Blood Glucose Test Strip GS700 (Refer to
TM
Rightest
GM782
TM
“Performing a Quality Control Test” on page 40) .
If the test result still remains unusually high or low, contact your healthcare professional
immediately.
If you are experiencing symptoms that are not consistent with your blood glucose test results and
you have made sure to follow all instructions in this manual, contact your healthcare professional
immediately.
Follow local regulations or consult your health care provider for appropriate disposal of used test
strips and lancets.
37
Page 21
Understanding Test Results and Messages About Quality Control Testing
Rightest Blood Glucose
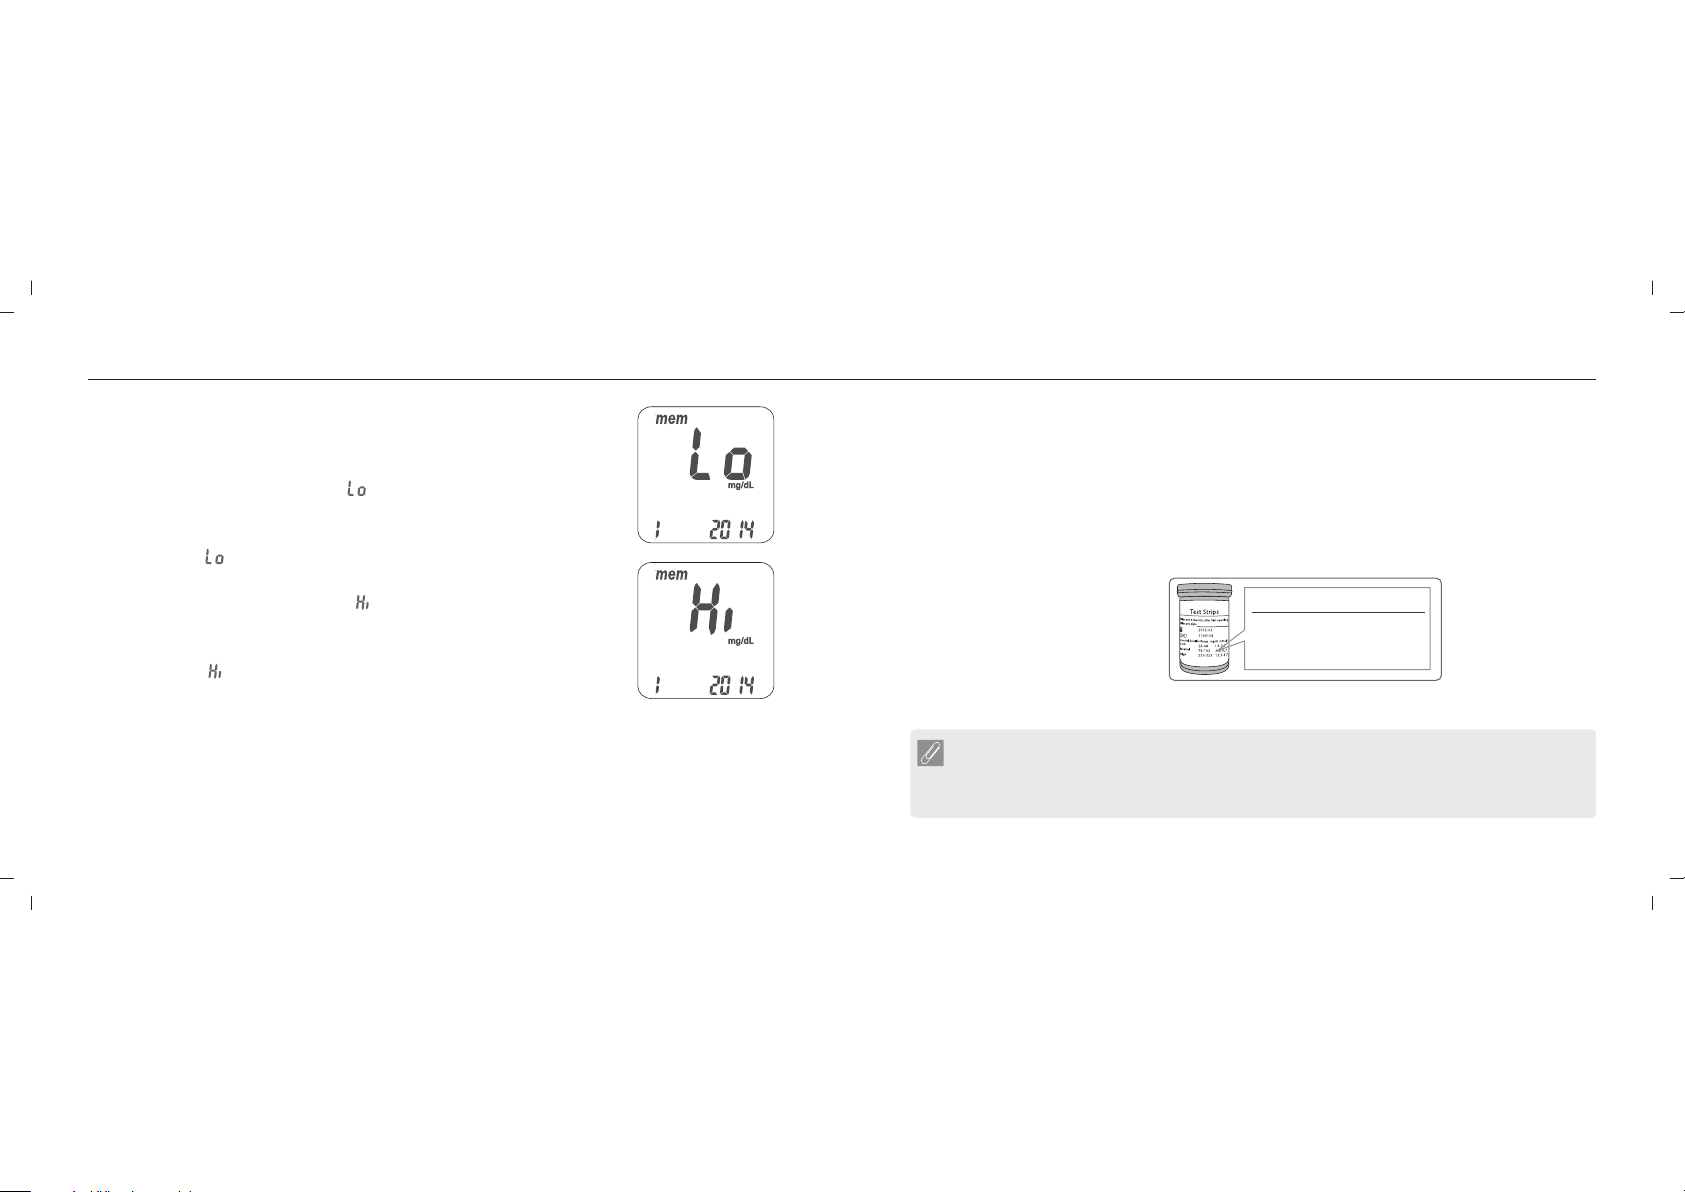
The Meter displays results between 10
TM
GM782
and 600 mg/dL.
If the test result is below 10 mg/dL , “ ” will appear on the screen. Please
repeat your test with by a new test strip.
If you still get a “ ” result, contact your healthcare professional.
If the test result is above 600 mg/dL, “ ” will appear on the screen. Please
repeat your test again with a new test strip.
If you still get a “ ” result, contact your healthcare professional.
What is a Quality Control Test ?
To ensure proper monitoring function, it is necessary to regularly perform a quality control test.
Use one of the Control Solutions GC700 when testing your Blood Glucose
Rightest Rightest
Monitoring System GM782 in the Control Solution Mode. If the test result is within the Control
Solution Range printed on the strip vial label, the Blood Glucose Monitoring System
GM782 passes the Quality Control Test and your Blood Glucose Monitoring System
TM TM
TM
Rightest
Rightest
TM
GM782 is working properly.
Control Solution Range:
Example of Control Solution Range
printed on your test strip vial label.
NOTE
- Normal of Control Solution GC700 is provided in your starter kit. If you want to
Rightest
TM
Control Solution Range mg/dL
Low: 28-48
Normal: 107-145
High: 315-426
purchase, High or another Normal control solutions, please contact customer service.
3938
Page 22
About Quality Control Testing
About Quality Control Testing
When should a Quality Control Test Be Performed ?
- To ensure that your Blood Glucose Meter and Blood Glucose Test
GS700
Strip are working properly.
Rightest Rightest
TM TM
GM782
- To confirm that you are following the correct testing procedures.
- To prepare for your initial blood glucose test.
- To check the Blood Glucose Test Strip when you open a new vial of strips.
To check your Rightest Blood Glucose Meter after it has been dropped, damaged or
-
Rightest
TM
TM
GM782
GS700
exposed to liquids.
- If you suspect that your test results are inaccurate, or if your test results are not consistent with the
way you feel.
- To practice testing.
Required Items for Quality Control Tests
To perform a quality control test, prepare the items below :
Rightest
- Blood Glucose Meter
Rightest
- Blood Glucose Test Strips
Rightest
- Control Solution GC700
TM
TM
TM
GM782
GS700
40
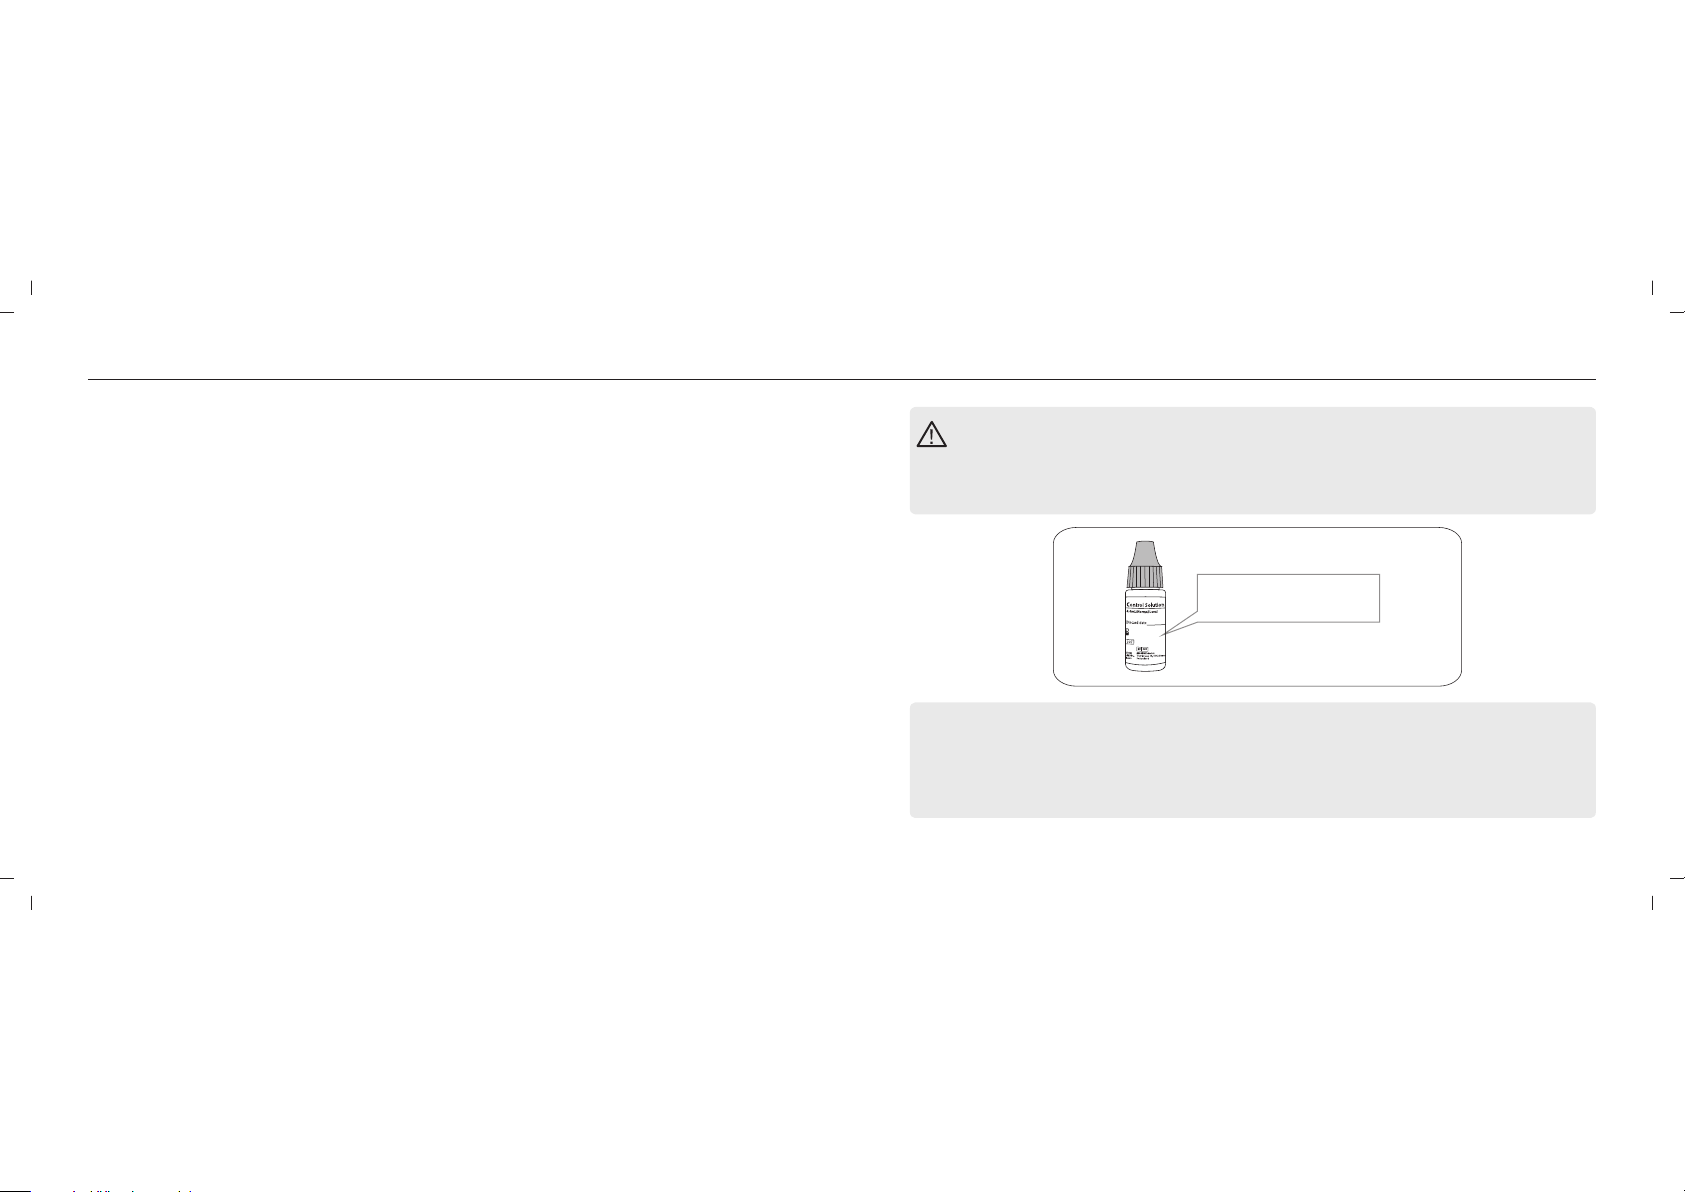
CAUTION
- Each time you open a new bottle of control solution, write the expiration date on the label.
The Control Solution GC700 is good for 3 months after opening the bottle, or
Rightest
TM
until the expiration date printed on the label, whichever comes first.
Example
Exp. Date 2014-06
- Wipe the bottle cap with a clean tissue before tightly closing the bottle of control solution.
- Close the bottle of control solution tightly immediately after using.
- Check the expiration date before use. (Refer to the Control Solution GC700
Rightest
TM
Package Insert).
- Keep control solution bottles out of reach of children.
41
Page 23
Performing a Quality Control Test
GM782
GM782
Performing a Quality Control Test
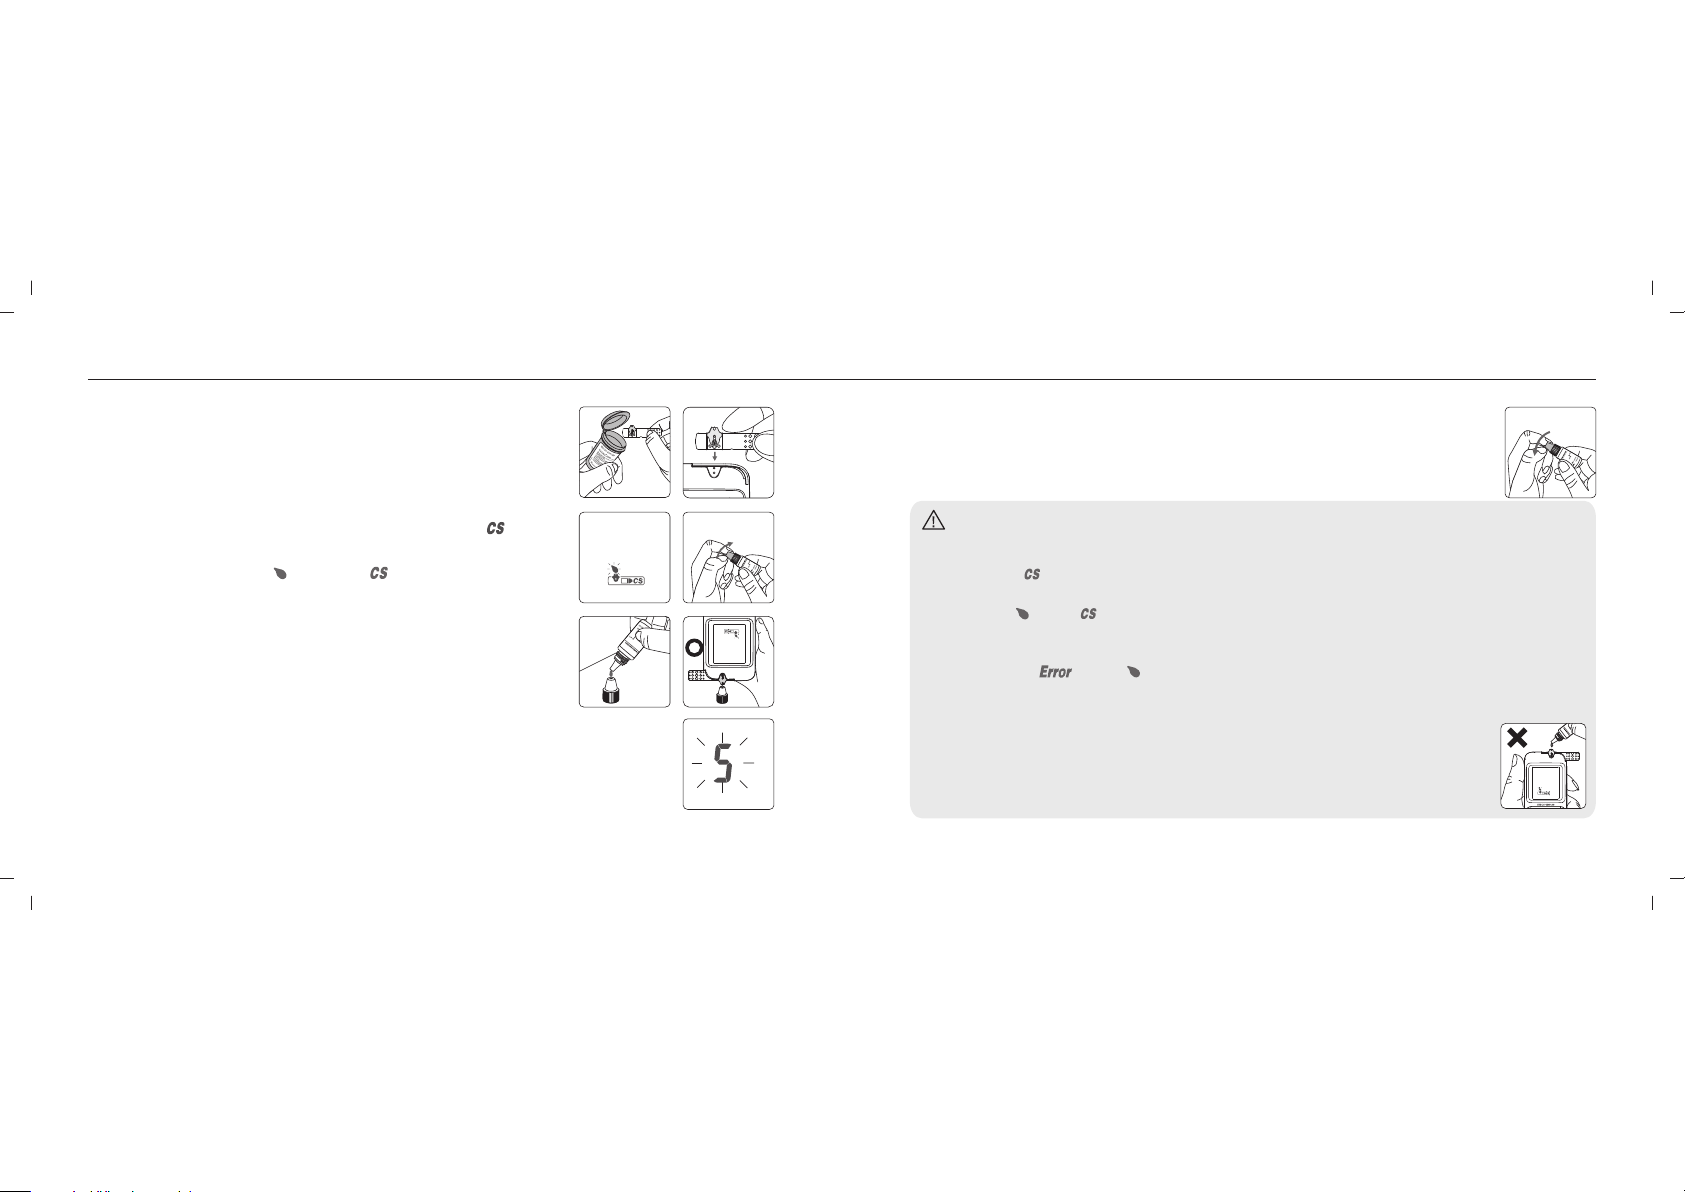
1. Take one Blood Glucose Test Strip GS700 from the vial
Rightest
and close the vial cap immediately.
2. Insert the strip into the test strip port of the Blood
TM
Rightest
TM
Glucose Meter GM782 with the view window facing up.
3. While the blood drop icon is flashing on the display window, press
and hold the Main button for at least 3 seconds until the " "
symbol appears.
4. You will see the blinking " " icon and " " icon on the screen,
prompting you to apply the corresponding level of
Control Solution GC700.
5. Shake the bottle of Control Solution GC700 well before
opening the cap. Place the cap on a flat surface.
6. Place a drop of control solution onto the top of the cap.
Rightest
TM
Rightest
TM
7. Gently touch the sample port of the strip with the control solution from
the top of the cap.
8.
The screen will display the count time starting from 5 (you will hear a
beep if the volume is turned on).
42
1
2
9. Tightly replace the cap on the Control Solution GC700 bottle.
Rightest
10. The control solution result will appear. Compare your Quality Control Test result
to the Control Solution Range printed on the Blood Glucose Test
TM
Rightest
9
CLOSE
TM
Strip GS700 vial label.
3
5
OPEN
CAUTION
- Your Control Solution Test results will not be included in the average calculations, however,
they can still can be recalled and viewed. The Control Solution Test result will be shown
with the " " icon on the screen.
- The Control Solution Test should be conducted between 43-111°F (6-44°C).
6
7
- Before " " and " " appear, do not touch the control solution to the sample port on the
strip. The Blood Glucose Meter GM782 is performing an internal check.
Rightest
TM
Touching the control solution to the sample port before prompted will result in an error
message: " " and " " .
- Do not drip the control solution on to the sample port of the test strip directly. The reagent
on the strip might leak into the bottle of control solution and may cause the degeneration
8
of the control solution. This could contaminate the meter via the test strip port.
and be accompanied by beeps (if volume is turned on)
- Keep the test strip port clean and dry. Clean immediately if the test strip port is
stained or is overly exposed to moisture.
- Do not touch the tip of the control solution bottle. If the tip is touched, clean
with water.
43
Page 24
Understanding Control Test Results Recalling Test Results
Your control solution test results should fall within the control solution range printed on the test strip
vial label. If the results are within the range, the Blood Glucose Monitoring System
Rightest
TM
GM782 is working correctly.
Example of control solution range printed on your test strip vial label
Low
40~60 mg/dL
Possible reasons your Control Solution results are out of the range :
- Your Control solution GC700 is expired or was first opened more than 3 months ago.
Rightest
- Your Blood Glucose Test Strip GS700 has expired.
Rightest
- You left the cap of the Blood Glucose Test Strip vial or the control solution off for a period of time.
- You did not perform the test procedure correctly.
- The Blood Glucose Meter or Blood Glucose Test Strip GS700 have
Rightest Rightest
TM
TM
TM TM
GM782
Normal
88~120 mg/dL
High
250~340 mg/dL
malfunctioned.
If Control Solution GC700 results are out of range, your Blood Glucose
Rightest Rightest
Monitoring System GM782 may not be working properly. Repeat the Quality Control Test. If your
control solution results are still out of range, do not use Blood Glucose Meter
to test your blood glucose. Please contact
TM TM
Rightest
TM
customer service.
GM782
44
Rightest
The Blood Glucose Meter is able to automatically store a maximum of 500 test
TM
GM782
results with time and date. If your meter has stored 500 results, the newest test result will replace
the oldest one.
To recall your test memory, start the meter without a test strip inserted.
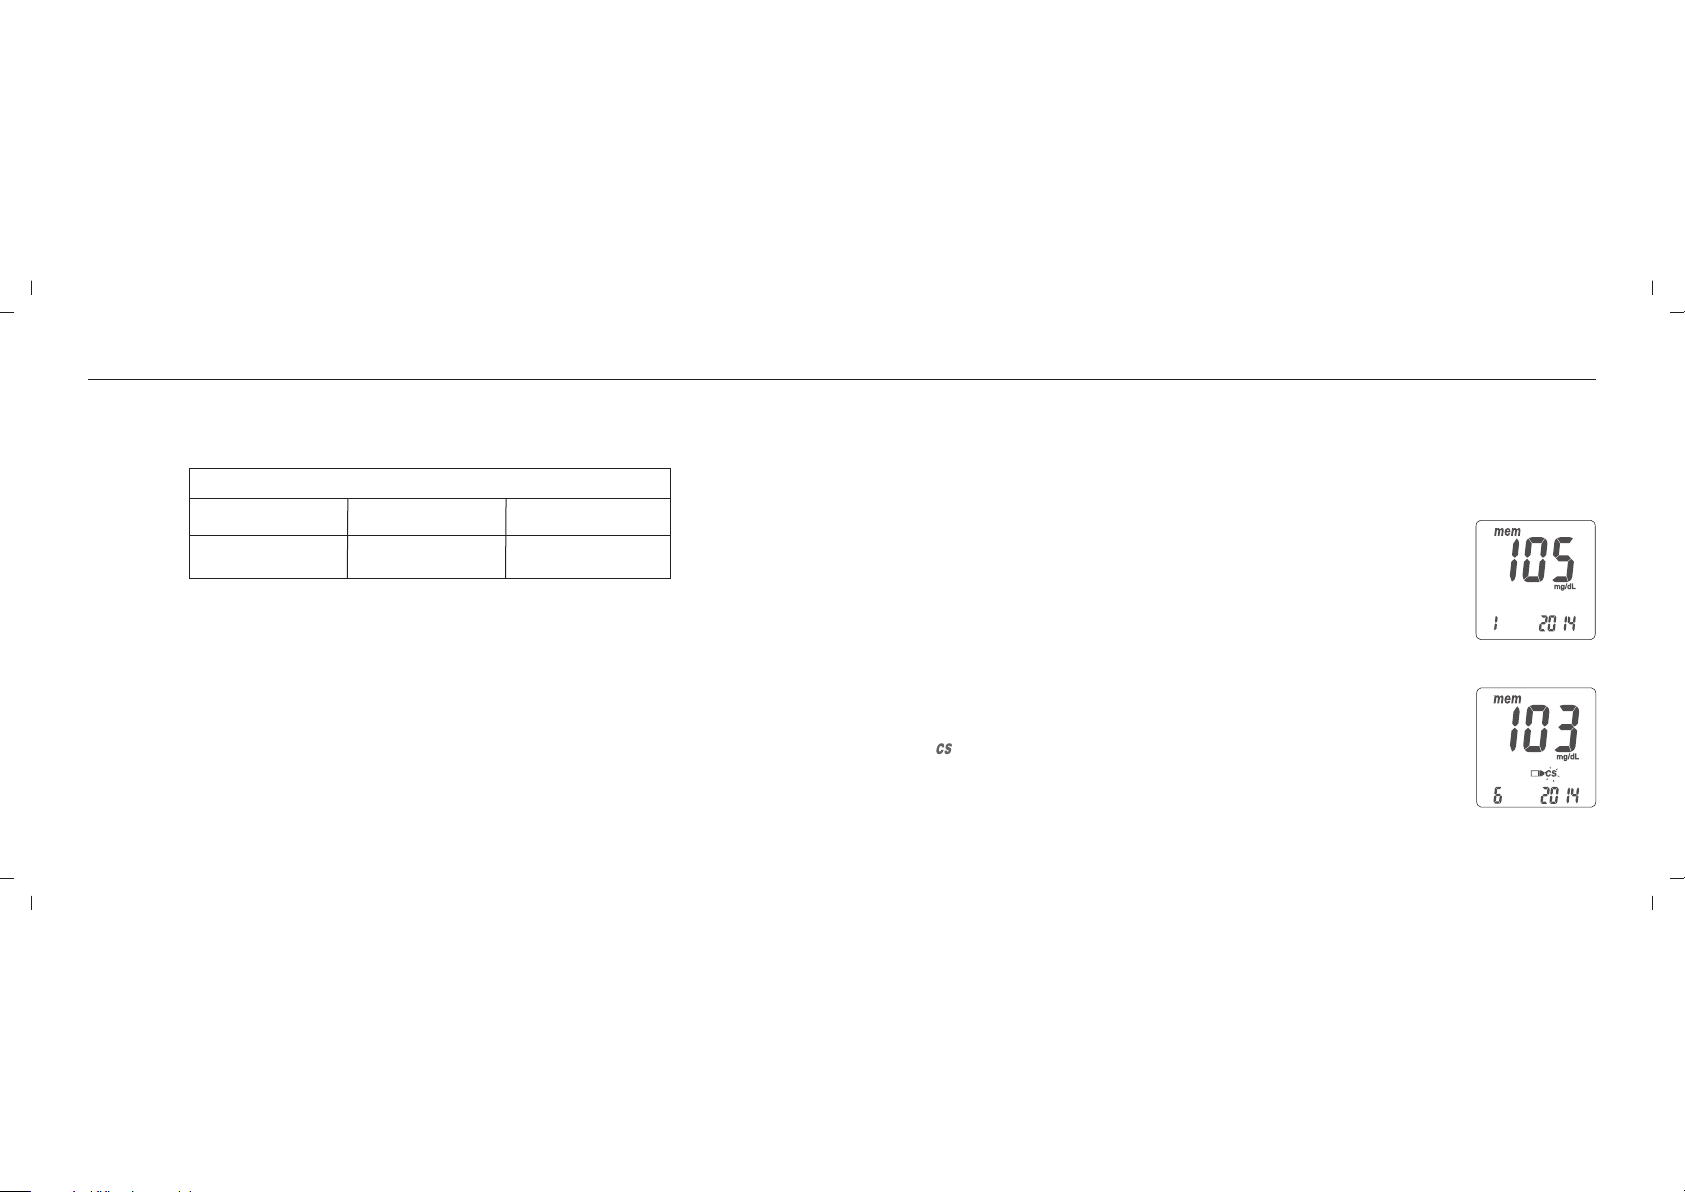
1. Press the Main button to switch from the Time Mode to Memory Mode. You
will see the “mem” icon in the upper left corner of the display. The latest test
result will appear with the number “1”.
2. Use either the Left or Right button on the side to review all previous results
with date and time. Results display from the most recent (Sequence no. “1”)
to the oldest (Sequence no. “500”) in the lower right hand corner of the
screen.
3. The Quality Control Test result can be recalled from the saved data. When
" appears next to the data, the test was performed using the
" Rightest
TM
Control Solution GC700. The control solution test result will not be used when
recalling test average results.
45
Page 25
Recalling Average Test Results
Recalling Average Test Results
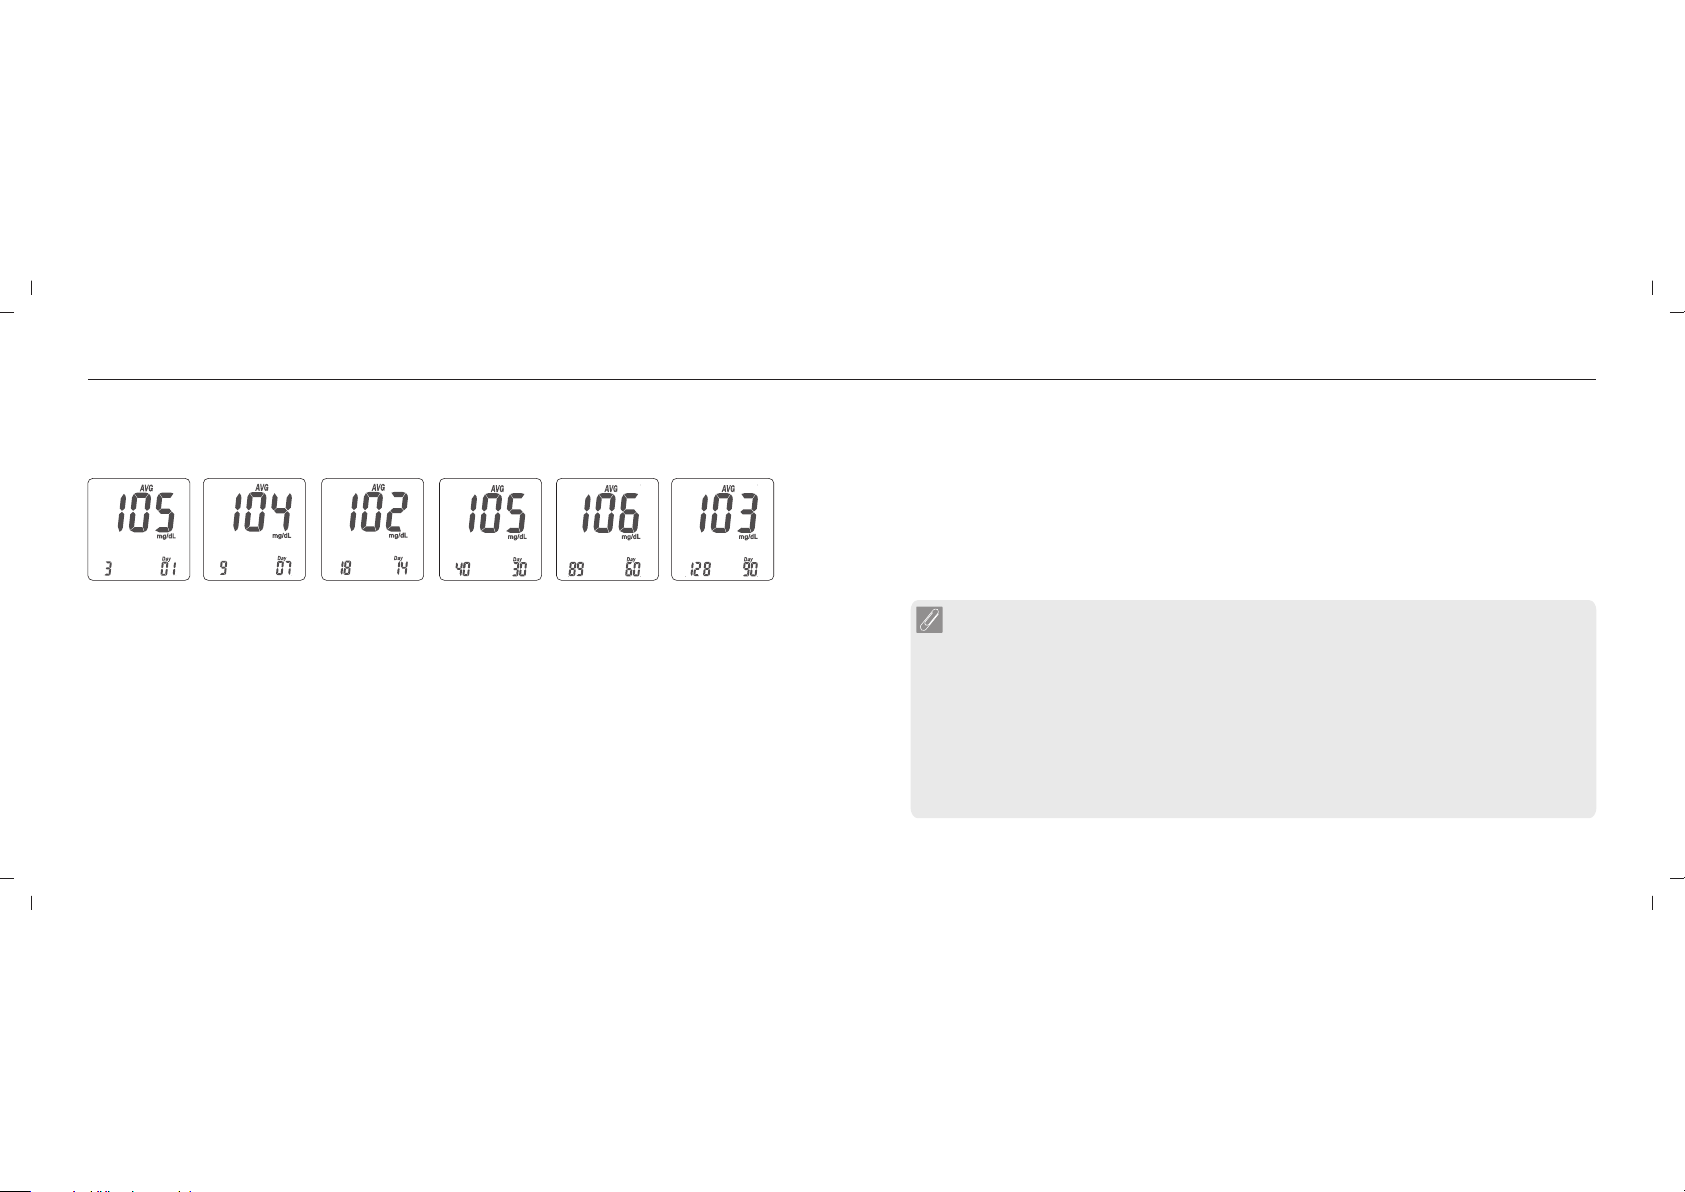
The Blood Glucose Meter provides several average test results. View the 1-day,
Rightest
7-days, 14-days, 30-days, 60-days and 90-days average test results for better blood glucose
monitoring.
1. Press the Main button to switch the screen to Average Mode.
2. On the average screen, use either the Left or Right button to view 1-day, 7-days, 14-days, 30days, 60-days or 90-days averages.
3. The number shown in the lower right hand corner indicates how many test results have been
calculated.
4. Excluding test results from the average calculation:
You may exclude the test result from average calculation right after each test.
You have to perform this exclusion immediately after the meter displays the reading of your test
result. Press the Right or Left button to choose "NO AVG" then press the main button to confirm.
The test result is now excluded from averaging.
46
TM
GM782
5. Quick Searching:
To view test results in sequential order automatically, enter the Memory Mode. Press the Right or
Left button for 2 seconds. (The Right button is for viewing from the most current to the oldest test
results. The Left button is for viewing from the oldest to the most current test results). Release the
button to stop at any particular test result.
NOTE
The Average function requires that the correct time and date is set.
- Test results must exist
during the desired time interval. For example: To get a 14-day average on 1/30/11, you
must have test results dated between 1/17 and 1/30. If no test results exist during that time
frame you will not receive an average.
- To exclude test results from average calculation, you need to remain in Test Mode and
perform the exclusion right after you get the test result. Once you move to MEM Mode,
Average Mode or Time Mode, you will not be able to perform the exclusion.
- The "Lo", "Hi" results, control solution test results and test results under abnormal
temperature < 43°F (6°C), > 111°F (44°C) will be excluded from average calculations.
47
Page 26
Caring for Your Meter
Error Messages and Troubleshooting
Maintenance
Keep your meter and test strip free of dust, water or any other liquid. Store the meter in the carrying
case when not in use. If your meter is dropped or damaged, perform a quality control test with the
control solution before performing a blood glucose test.
Cleaning Meter
Clean the outside of the meter with a damp cloth and mild soap/detergent. Do not get the test strip
port wet.
Cleaning Test Strip Port
If your test strip port is stained with blood, control solution or any liquid, please use a dry tissue or
alcohol swab to clean it immediately. Do not use anything wet to clean it. Perform a quality control
test to ensure the Blood Glucose Meter is working properly.
48
Rightest
TM
GM782
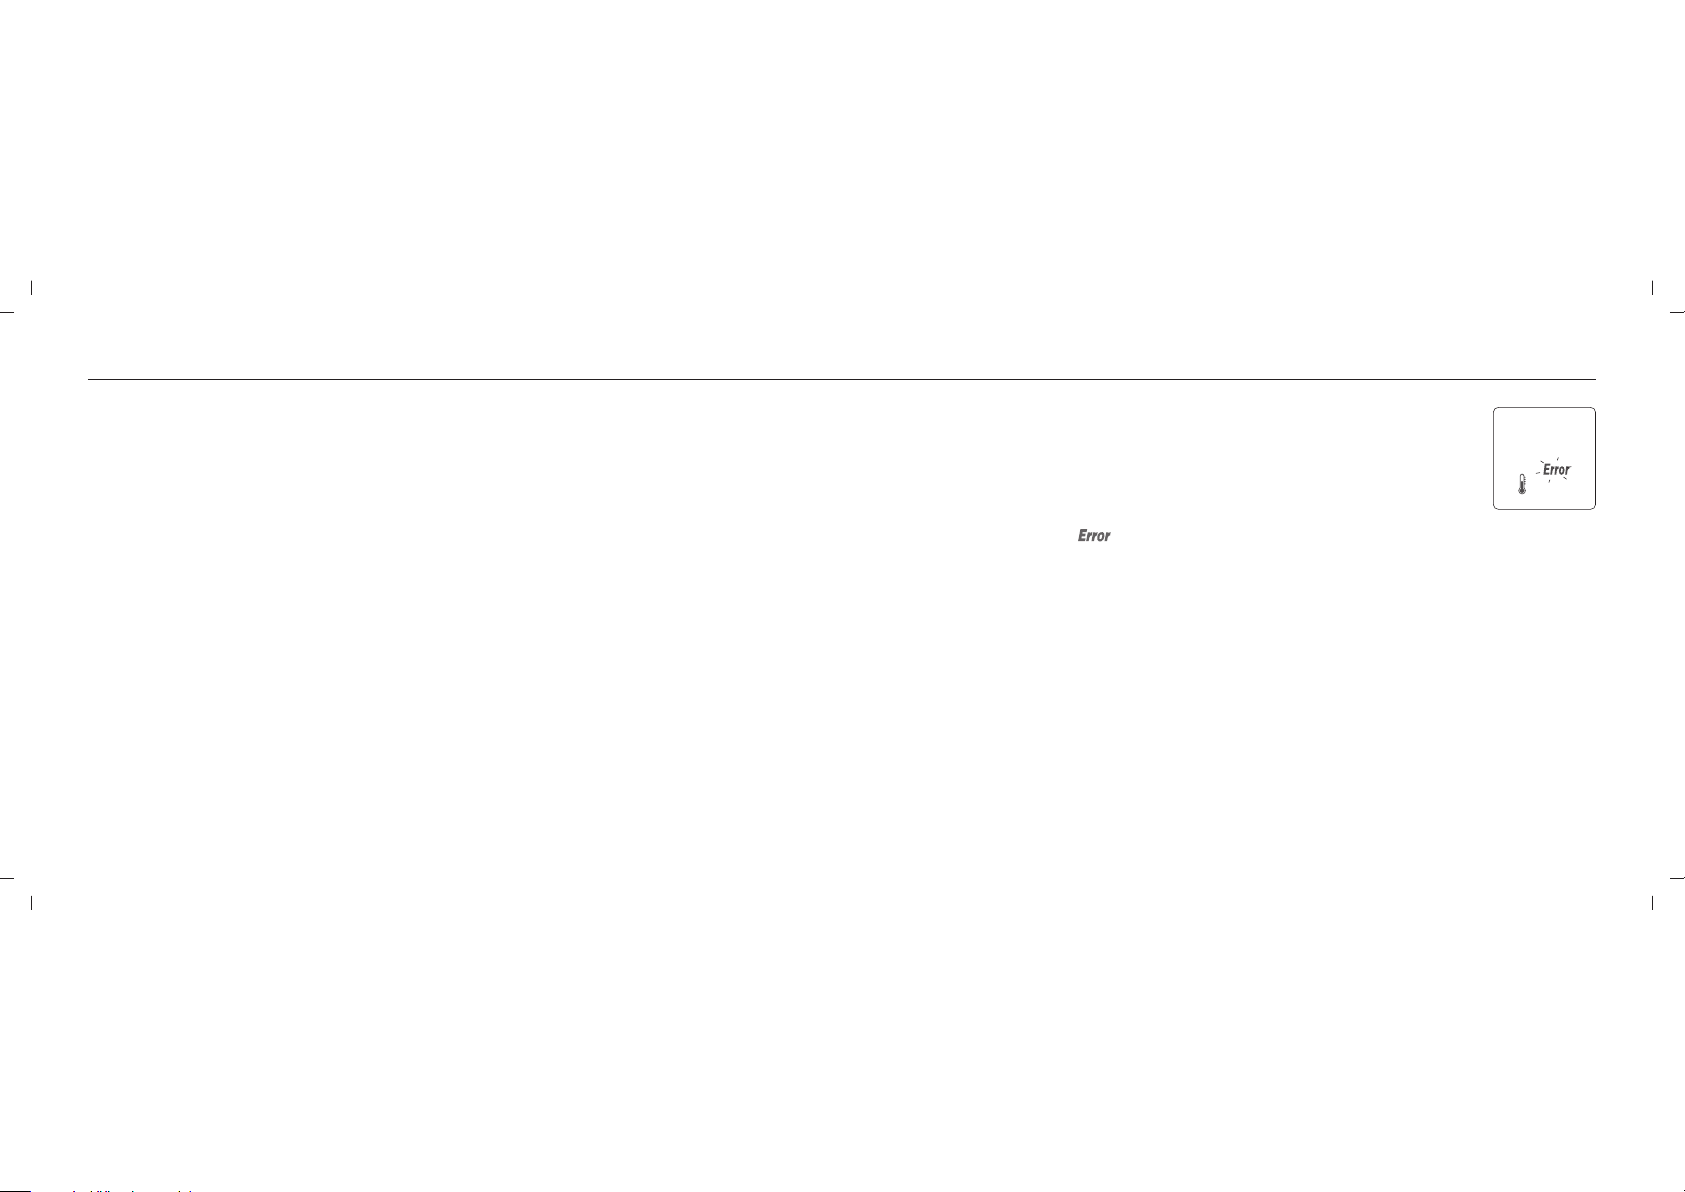
Temperature Error
1. In order to get accurate testing results, please test between 43-111 °F ( 6-44 °C).
2. When the temperature is below 43 °F (6 °C) or over 111 °F (44 °C), the meter will
not function and the " " symbol will blink.
TM
3. If the Blood Glucose Meter and Test Strips are exposed to a
Rightest GM782
substantial change in temperature, please wait 30 minutes before measurement.
49
Page 27

Error Messages and Troubleshooting
Battery Error
1. The " " and " " symbols appear and the meter will not function when
the battery is low. Change the batteries immediately.
Strip Error
1. When the test strip is inserted incorrectly, the meter will beep 4 times while the
2. If, after performing the required steps, the and flashing
Sampling Error
Please do not apply the blood to the sample port of the test strip before the
meter displays " ". Discard the test strip If the meter shows " ".
50
symbol flashes. Do not apply a sample on the test strip. Please re-
" "
insert the unused test strip correctly (refer to “Handling the Blood
Rightest
TM
Glucose Test Strip GS700“ on Page 23 for more information).
symbols appear on the screen, it means the Blood Glucose Test
Rightest
" " " "
TM
Strip GS700 has been inserted incorrectly more than twice. Please, re-insert
the unused test strip again after reviewing the steps on how to insert a test
strip correctly on p.23 or call Customer Service for support. This error message
can also indicate that you may have used the wrong test strips. Please check
the test strip vial to ensure you are using the Blood Glucose Test
Rightest
TM
Strip GS700.
Error Messages and Troubleshooting
Er1 -
The inserted test strip has been used or damaged. Please use a new test
strip.
Er2 - The m
Er3 - The s
Er4 - The blood sample volume is insufficient.
Er5 - An issue calibrating the Meter has occurred. Please follow the steps below:
If one of the above error messages still appears, please contact Bionime
Customer Service.
Meter Malfunction
If the Blood Glucose Meter will not turn on, please follow the steps below:
1. Open the battery cover and remove the batteries.
2. Wait for 5 minutes and reinsert the batteries as described as instructed on page 16, (Meter
The meter should work normally after finishing the above steps. If the meter still does not work,
please contact your local customer service.
eter has malfunctioned. Do a Quality Control Test or reinstall the
batteries to check if the meter works properly.
ignal transmission is disrupted. Repeat the test using a new test strip.
strip.
(1) Remove the test strip from the meter.
(2) Turn off the meter (press and hold the Main button for 3 seconds).
(3) Press the main button to turn ON the meter.
If after turning on the Meter, you do not see Er5, your meter is functioning
properly and able to perform a test.
Rightest GM782
TM
Repeat the test using a new test
Activation and Changing the Battery).
Bionime
51
Page 28
Error Messages and Troubleshooting
Limitations
CAUTION
A blood sample should ONLY be applied to the test strip after the test strip has been
inserted correctly and the Meter's screen is showing the image of the test strip and a blood
drop flashing symbol. If the blood drop flashing symbol is NOT showing on the screen, do
not apply a sample to the test strip. Please re-insert the unused test strip correctly. The
screen MUST show the image of the test strip accompanied by the blood drop symbol
flashing (this symbol take 3 seconds to show after correctly inserting the test strip) in order
for a sample to be applied. Please consult your User Manual and/or contact Customer
Service for support on how to correctly insert a Blood Glucose Test Strip GS700.
52
Rightest
TM
Rightest
- Blood Glucose Monitoring System GM782 is not intended for serum or plasma testing.
- Inaccurate test results may be obtained at altitudes greater than 10,000 feet (3048 meters) above
sea level.
- Severe dehydration and excessive water loss may cause inaccurately low results.
- The glucose test may be invalid in the presence of abnormally high concentration: Ascorbic acid
( 6 mg/dL), Dopamine ( 2.5 mg/dL),
L-Dopa ( 3 mg/dL), .
- Not for screening or diagnosis of diabetes mellitus.
- Not for use on critically ill patients in shock, dehydrated patients or hypo-osmolar patients.
- Alternative site testing (AST) should only be performed during steady-state times (when glucose is
not changing rapidly).
- Alternative Site Testing should not be used to calibrate continuous glucose monitoring systems
(CGMS).
Alternative site testing should not be performed if testing for hypoglycemia (Low blood glucose).
-
- Results from alternative site testing should not be used in insulin dose calculation.
- Regarding potential electromagnetic or other interference, keep meter out of electromagnetic
radiation sources.
TM
≧ ≧
≧ Xylose (≧ 20 mg/dL) and Uric Acid (≧ 20 mg/dL)
53
Page 29
Specification
Specification
Measurement Technology
Sample
Minimum Sample Volume
Measuring Range
Test Time
Memory Capacity
Power Saving
Operating Temperature
Operating Relative Humidity
54
Dehydrogenase Electrochemical Sensor
Capillary, Venous, Arterial and Neonatal whole blood
0.75 microliters
10 - 600 mg/dL
5 seconds
500 blood glucose test results with date and time
Turns off automatically 2 minutes after last user action. To
turn off manually, press the button " " for 3 seconds.
43 - 111°F (6 - 44°C )
10 - 90%
Hematocrit
Power Supply
Battery Life
Meter Dimension
Meter Weight
Monitor
Display Area
Meter Storage/ Transportation Conditions
Test Strip Storage/ Transportation Conditions
10-70%
One CR2032 Battery (3 Voltage)
Approximately 350 standard tests
82 mm x 45 mm x 15.5 mm
43 ± 5g with batteries
LCD
34 mm x 27.5 mm
14 - 140°F ( -10 - 60°C )
( ), < 90% relative humidity 39 - 86°F 4 - 30°C
55
Page 30
Warranty
Customer Service
Bionime Corporation warrants that this product will be free from defects in materials and
workmanship for five years from the date of purchase.
This warranty does not apply to the performance of a Blood Glucose Meter that
Rightest GM782
TM
has been altered, misused, tampered with or abused in any way.
This warranty applies only to the original purchaser of the Blood Glucose Monitoring
System .
GM782
Rightest
TM
Please complete and return the enclosed warranty card.
Different models have different specifications. This warranty applies only to the Rightest Blood
TM
Glucose Monitoring System GM782; other models are not covered with this warranty card.
NOTE
- During blood glucose measurement, the Blood Glucose Meter itself may
Rightest GM782
come into contact with blood. All parts of the Blood Glucose Monitoring System
GM782 are considered biohazardous and can potentially transmit infectious diseases.
Please follow your local regulations to properly dispose of the used Blood
TM
Rightest
TM
TM
Rightest
Glucose Monitoring System GM782 after removing the batteries.
56
We sincerely like to provide complete, considerate services to our customers. Please review all the
instructions to make sure you are performing the steps correctly. If you have any questions or in
case of problems with the products, please contact your local Bionime customer service.
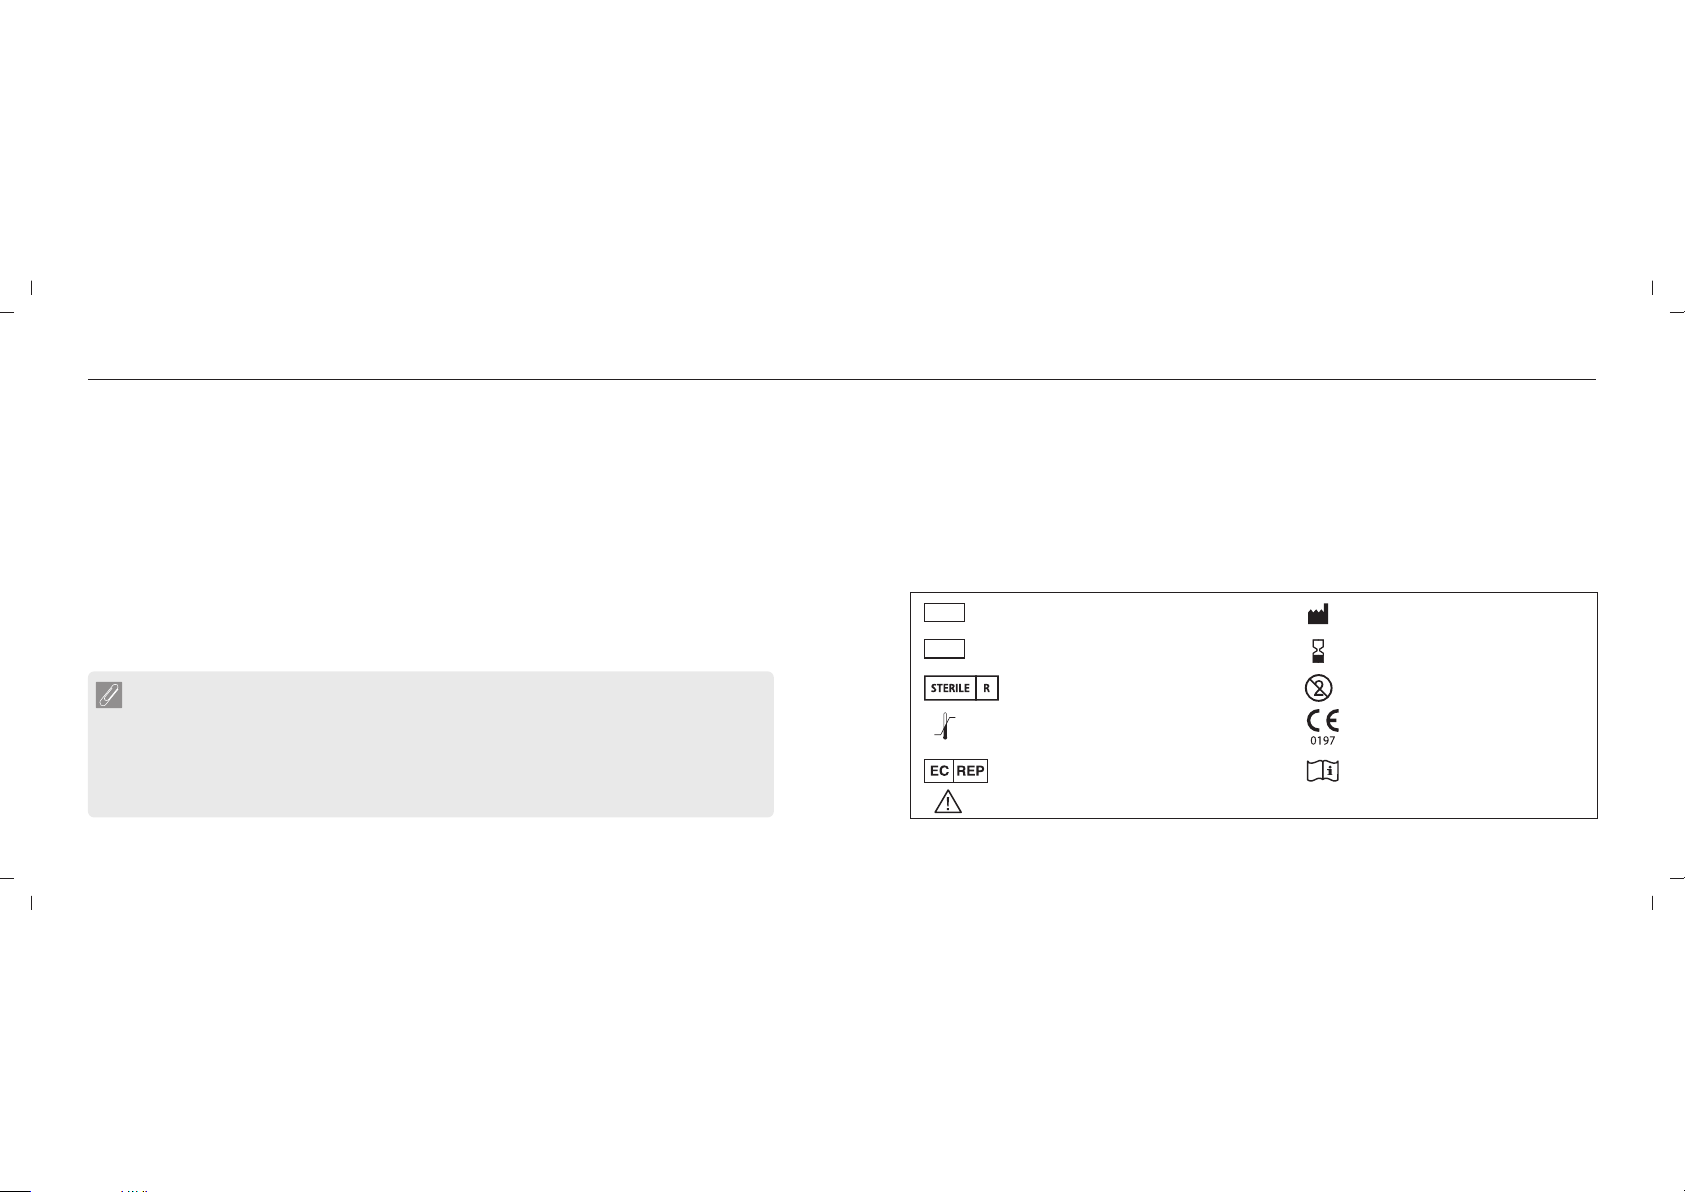
Description of used symbols
For in vitro diagnostic use
IV D
LO T
Lot number
Temperature limitation
EC Representive
Method of sterilization using irradiation
Manufacturer
Expiry date
For single use only
CE-mark (with No. of notified body)
Consult the instruction for use
Caution (consult instructions foruse and warnings)
57
Page 31
Federal Communications Commission (FCC) StatementExpected Glucose Values Without Diabetes
Expected glucose values without diabetes ⁽¹⁾
Status
Fasting
Two Hours after meals
Range (mg/dL)
<100
<140
References
1) American Diabetes Association: Standard of Medical Care in Diabetes 2011, Diabetes Care,
Vol.34, supplement 1, S11-S61, January 2011.
58
Federal Communications Commission (FCC) Statement
15.21
You are cautioned that changes or modifications not expressly approved by the part responsible for compliance could void the user's
authority to operate the equipment.
15.105(b)
This equipment has been tested and found to comply with the limits for a Class B digital device, pursuant to part 15 of the FCC rules.
These limits are designed to provide reasonable protection against harmful interference in a residential installation. This equipment
generates, uses and can radiate radio frequency energy and, if not installed and used in accordance with the instructions, may cause
harmful interference to radio communications. However, there is no guarantee that interference will not occur in a particular installation. If
this equipment does cause harmful interference to radio or television reception, which can be determined by turning the equipment off
and on, the user is encouraged to try to correct the interference by one or more of the following measures:
-Reorient or relocate the receiving antenna.
-Increase the separation between the equipment and receiver.
-Connect the equipment into an outlet on a circuit different from that to which the receiver is connected.
-Consult the dealer or an experienced radio/TV technician for help.
This device complies with Part 15 of the FCC Rules. Operation is subject to the following two conditions:
1) this device may not cause harmful interference and
2) this device must accept any interference received, including interference that may cause undesired operation of the device.
RF Exposure:
To comply with the FCC RF exposure compliance requirements, this device and its antenna must not be co-located or operating in
conjunction with any other antenna or transmitter.
59
Page 32
Component Manufacturer Information
Blood Glucose Meter, Test Strip, Control Solution
Manufacturer: Bionime Corporation
No. 100, Sec. 2, Daqing St., South Dist., Taichung City 40242, Taiwan
Product complies with In Vitro Diagnostic Medical Device Directive 98/79/EC. (CE0197)
EC-Rep: Bionime GmbH, Tramstrasse 16, 9442 Berneck / Switzerland
Lancing Device
Manufacturer: Bionime Corporation
No. 100, Sec. 2, Daqing St., South Dist., Taichung City 40242, Taiwan
Product complies with Medical Device Directive 93/42/EEC
EC-Rep:
Disposable Sterile Lancets
Manufacturer: SteriLance Medical (SuZhou) Inc.
No.68 LiTangHe RD, XiangCheng, SuZhou, JiangSu 215133, P.R. China
Product complies with Medical Device Directive 93/42/EEC. (CE0197)
EC- Rep: EMERGO EUROPE, Molenstraat 15, 2513 BH The Hague, The Netherlands
Bionime GmbH, Tramstrasse 16, 9442 Berneck / Switzerland
60
61
 Loading...