

Page 1

5061-068 Rev 1.0
Novaspec III
+
Novaspec III+80-2120-40
Page 2

2 | P a g e
Table of Contents
Essential Safety Notes .....................................................................................................................................................4
Unpacking, Positioning, Installation ..............................................................................................................................4
Warranty and Repair ........................................................................................................................................................5
Technical Specifications ……………………………………………………………………………………………………………….6
Operation..……………………………………………………………………………………………………………………………….7
Introduction ………………………………………………………………………………………………………………….………7
Sample Handling Tips ..…………………………………………………………………………….………………………………7
Keypad and Display ..………………………………………………………………………………………………………………8
Software Style …………..………………………………………………………..…………………………………………………9
Parameters …….. …………………………………………………………………………………………………………………….10
Absorbance ………………..….……………………………..…………………………………………………………………….10
Transmission ……………………..………………………………………………………………………………………………..13
Concentration with a Factor …….………………………………………………………………………………………………..16
Concentration with a Standard .………………..………………………………………………………………………………..19
Rate …………………………………. ...…………………………………………………………………………………………..22
Methods Folder ………………………………………………………………………………………………………………………..25
Saving a Method …………………………………………….…………………………………………………………………….25
Folder Names……………………………………………………………………….……………………………………………..26
Lock Folder……………………………………………………………………….………………………………………………..27
Unlock Folder……………………………………………………………………….……………………………………………..27
Delete a Method ……………………………………………………………………….………………………………………….28
Lock Method……………………………………………………………………….………………………………………………28
Unlock Method……………………………………………………………………….……………………………………………29
When saving to a USB Memory Stick …………………………..………………………...…………………………………...30
Utilities Folder ………………………………………………………………………….………………………………….………….32
Date and Time …………………………………………………………………………………………………………………….33
Regional ……………………………………………………………………………………………………………………………33
Export Data …………………………………………………………………………..……………………………………………34
Preference …………………………………………………………………………………………………………………………34
Contrast ……………………………………………………………………….……………………………………………………35
About ………………………………………………………………………………………….…………………………………….35
Page 3

3 | P a g e
Print Via Computer ………………………………………………………...………………………………………………………….36
Installation ………………………………………………………………………………………………………………………….36
Test Tube and Heated Cell Holder Installation……………………………………………………………………………………..37
Accessories ……………………...…………………………………………………………………………………………………….38
Cleaning and General Care of the Instrument ……….……………..…..…………………………………………………………38
External cleaning ……………………………….……………………………………………………………...………………….38
Changing cell holder or removal for cleaning ……………………………………….……………………..…………………..38
Icon Glossary ………………………………………………………………………………………………………………………….39
Page 4
4 | P a g e
Essential Safety Notes
There are a number of warning labels and symbols on your instrument. These are there to inform you where potential
danger exists or particular caution is required. Before commencing installation, please take time to familiarize yourself
with these symbols and their meaning.
Caution (refer to accompanying documents).
Unpacking, Positioning and Installation
Check the contents of the package against the packing list. If any shortages are discovered, inform your supplier
immediately.
Inspect the instrument for any signs of damage caused in transit. If any damage is discovered, inform your supplier
immediately.
Ensure your proposed installation site conforms to the environmental conditions for safe operation:
Indoor use only.
Temperature range 5°C to 35°C. Note that if you use the instrument in a room subjected to extremes of
temperature change during the day, it may be necessary to recalibrate (by switching off and then on again).
Maximum relative humidity of 80% up to 31°C decreasing linearly to 50% at 40°C.
The instrument must be placed on a stable, level bench or table that can take its weight (1.55 kg) to allow air to
circulate freely around the instrument.
This equipment must be connected to the power supply with the power cord supplied. It can be used on 90 – 240 V~,
50-60 Hz supplies.
If the instrument has just been unpacked or has been stored in a cold environment, it should be allowed to come to
thermal equilibrium for 2-3 hours in the laboratory before turning the instrument on. This will prevent calibration failure
as a result of internal condensation.
Switch on the instrument via the keypad ( ) after it has been plugged in. The instrument will perform a series of
self-diagnostic checks.
Please read through this user manual prior to use.
Please contact your original supplier in the first instance if you experience technical or sample handling difficulties.
If this equipment is used in a manner not specified or in environmental conditions not appropriate for safe operation, the
protection provided by the equipment may be impaired and instrument warranty withdrawn.
Page 5

5 | P a g e
Warranty and Repair
Biochrom warrants this instrument for a period of 12 months (1 year) from the date of purchase.Where appropriate,
Biochrom will repair or replace the unit for defects of workmanship or materials. This warranty does not extend to damage
resulting from misuse, neglect, or abuse, normal wear and tear, or accidental damage. This warranty extends only to the
original consumer purchaser.
Products failing within the first 30 days of end user operation are considered dead on arrival (DOA) and where appropriate
a replacement will be given if a repair is not possible. In the instance of a DOA; Biochrom will incur shipping charges of
returning the unit back to the facility.
IN NO EVENT SHALL BIOCHROM BE LIABLE FOR INCIDENTAL OR CONSEQUENTAL DAMAGES. Some states do
not allow the exclusion or limitation of incidental or consequential damages so the above limitation to exclusion may not
apply to you. THERE ARE NO IMPLIED WARRANTIES OF MERCHANTABILITY, FITNESS FOR A PARTICULAR USE,
OR OF ANY OTHER NATURE. Some states do not allow this limitation on an implied warranty, so the above limitation
may not apply to you.
If any defect arises within or outside the warranty period, please contact:
US Office Technical Support
Email support@hbiosci.com
Telephone (Toll Free) 1-800-272-2775
Telephone (Outside the US) 1-508-893-8999
Address 84 October Hill Road
Holliston MA 01746
USA
UK Office Technical Support
Email support@hbiosci.com
Telephone +44 (0) 1223-423-723
Address 1020 Cambourne Business
Park
Cambourne
Cambridge UK
CB23 6DW
Goods will not be accepted for return unless a RMA (Returns Materials Authorization) number has been issued by our
Returns-Repairs Department. The customer is responsible for shipping charges. Please allow a reasonable period of time
for completion of repairs or replacement.
Page 6

6 | P a g e
Technical Specifications
Wavelength range
325nm to 1100nm
Monochromator
Flat grating
Wavelength calibration
Automatic upon switch on
Spectral bandwidth
<7nm
Wavelength accuracy
± 2nm
Wavelength reproducibility
± 1nm
Light sources
Pulsed Tungsten halogen
Detector
CMOS array
Photometric range
- 0.300 to 2.500A, 0.3 to 199%T
Photometric linearity
± 2.0 % or ± 0.010A to 1.000A at 546nm,
whichever is the greater
Photometric reproducibility
< 0.002 A at 0A and 500nm
Stray Light
< 1%T 340nm
Stability
± 0.005A/h at 0A and 546nm after warm-up
Noise
± 0.002A near 0A and ± 0.020A near 2A at
600nm
Digital output
USB memory stick data storage
USB PC connection with PVC software
Data Export
PC via USB cable
USB memory stick
Method Storage
90 with PIN number protection
Graphical Display
Yes, zoom and track function
Sample ID
Yes
Languages
English, German, French, Spanish, Italian,
Japanese, Chinese
Dimensions
120 x 230 x 320 mm
Weight
1.55 kg
Power input
18 Vdc at max 18VA from a supplied 100 to
240V~, 50/60 Hz Mains Power Adapter
Page 7
7 | P a g e
Operation
Introduction
Your spectrophotometer is a simple-to-use visible instrument. It has no moving parts, which is the basis of the rapid
scanning operating system. It has been designed to meet the routine spectroscopy needs of customers requiring a
compact instrument that is easy to use. The product is reliable and requires low maintenance.
After it is turned on and calibrated the Novaspec III+will show an absorbance measurement display.
To select different measurement modes, change parameters or change other settings, click on the menu key and
select the required menu item by clicking on the associated menu number using the keypad.
Measurement Modes Absorbance, Transmission, Concentration with a Factor, Concentration with a Standard,
Rate (Kinetics)
Methods Contains eight folders that can store less frequently used configured methods (eight
methods per folder)
Utilities Instrument set up (date, time, language, data output, preferences and display settings)
The instrument is supplied with a program, PVC (Print via Computer) on the accompanying CD. When used with a USB
cable to connect to a PC onto which the software has been installed, it enables the user to “print through” the PC directly
to the printer that is connected to it. The data may also be stored as an Excel spreadsheet, as an EMF graphics file, a
comma delimited (csv) data file, a tab delimited (txt) data file or in native PVC format for later access.
The instrument has a USB connector located at the front of the unit which allows data to be stored on a USB memory
stick. This data can be stored in a PVC format which can be opened using PVC software, a comma separated variable
(CSV) data file or a tab separated variable format which can be imported into Excel.
Sample Handling Tips
The light beam is directed from RIGHT to LEFT through the cell chamber; therefore please ensure the cell is inserted
with the correct alignment.
The cell holder supplied with the instrument accepts standard 10 mm path length quartz, glass or plastic cells.
The optical height is 15 mm
Page 8
8 | P a g e
Keypadand Display
The back-lit liquid crystal display is very easy to navigate around using the alphanumeric entry and navigation arrow keys
on the hard wearing, spill proof membrane keypad.
Key Action
On/Standby
Key
Turns the instrument on or back to standby.
Arrow Keys
Use the four arrow keys to navigate around the display and select the required
setting for the active (highlighted) option.
View Options
Used to view current options.
Alphanumeric
Keys
Used to select items in a menu or to enter parameters and text descriptions
where. Repeated key presses can be used to cycle through lower case, upper
case, and numbers. Wait 1 second before entering the next character. Use the
C key to backspace and the 1 key to enter a space.
Escape/
Cancel
Escape from a selection and return to the previous screen.
OK
Confirm parameters/selection.
Set
Reference
Set reference to 0.000A or 100%T on a reference solution at the current
wavelength in the measurement mode selected. When in scan mode, do a
reference scan.
Take a
Measurement
Take a measurement.
On/Standby
Key
Escape/Cancel
OK Key
Page 9
9 | P a g e
Software Style
The user interface is built around the options key . The instrument will open automatically to an
application and you will use the options key to select different parameters.
Keypad Number Description
1 Parameter
Allows you to run in different modes: Absorbance, Transmission,
Concentration with Factor, Concentration with Standard, Rate
(Kinetics)
2 Print Export results via the selected method.
3 Graph
Allows you to toggle back and forth between how the results are
given, digital versus a graph.
4 Run Standard
Allows you to measure your standard when in Concentration
Standard measurement mode.
5 Utilities
Instrument set up (date, time, language, data output,
preferences and display settings).
6 Methods
Sub folder selection or user selected and configured method (8
sub folders each containing a maximum of 9 methods). To
return to the previous measurement mode, select the methods
followed by “Esc” button.
7 Sample Number Allows you to name your sample manually or can be prompted.
8 Save Method
Use the left and right arrow key to select a folder to store in and
using the alphanumeric keypad to name your method.
9 Auto-Print Toggles auto-print on/off.
Page 10
10 | P a g e
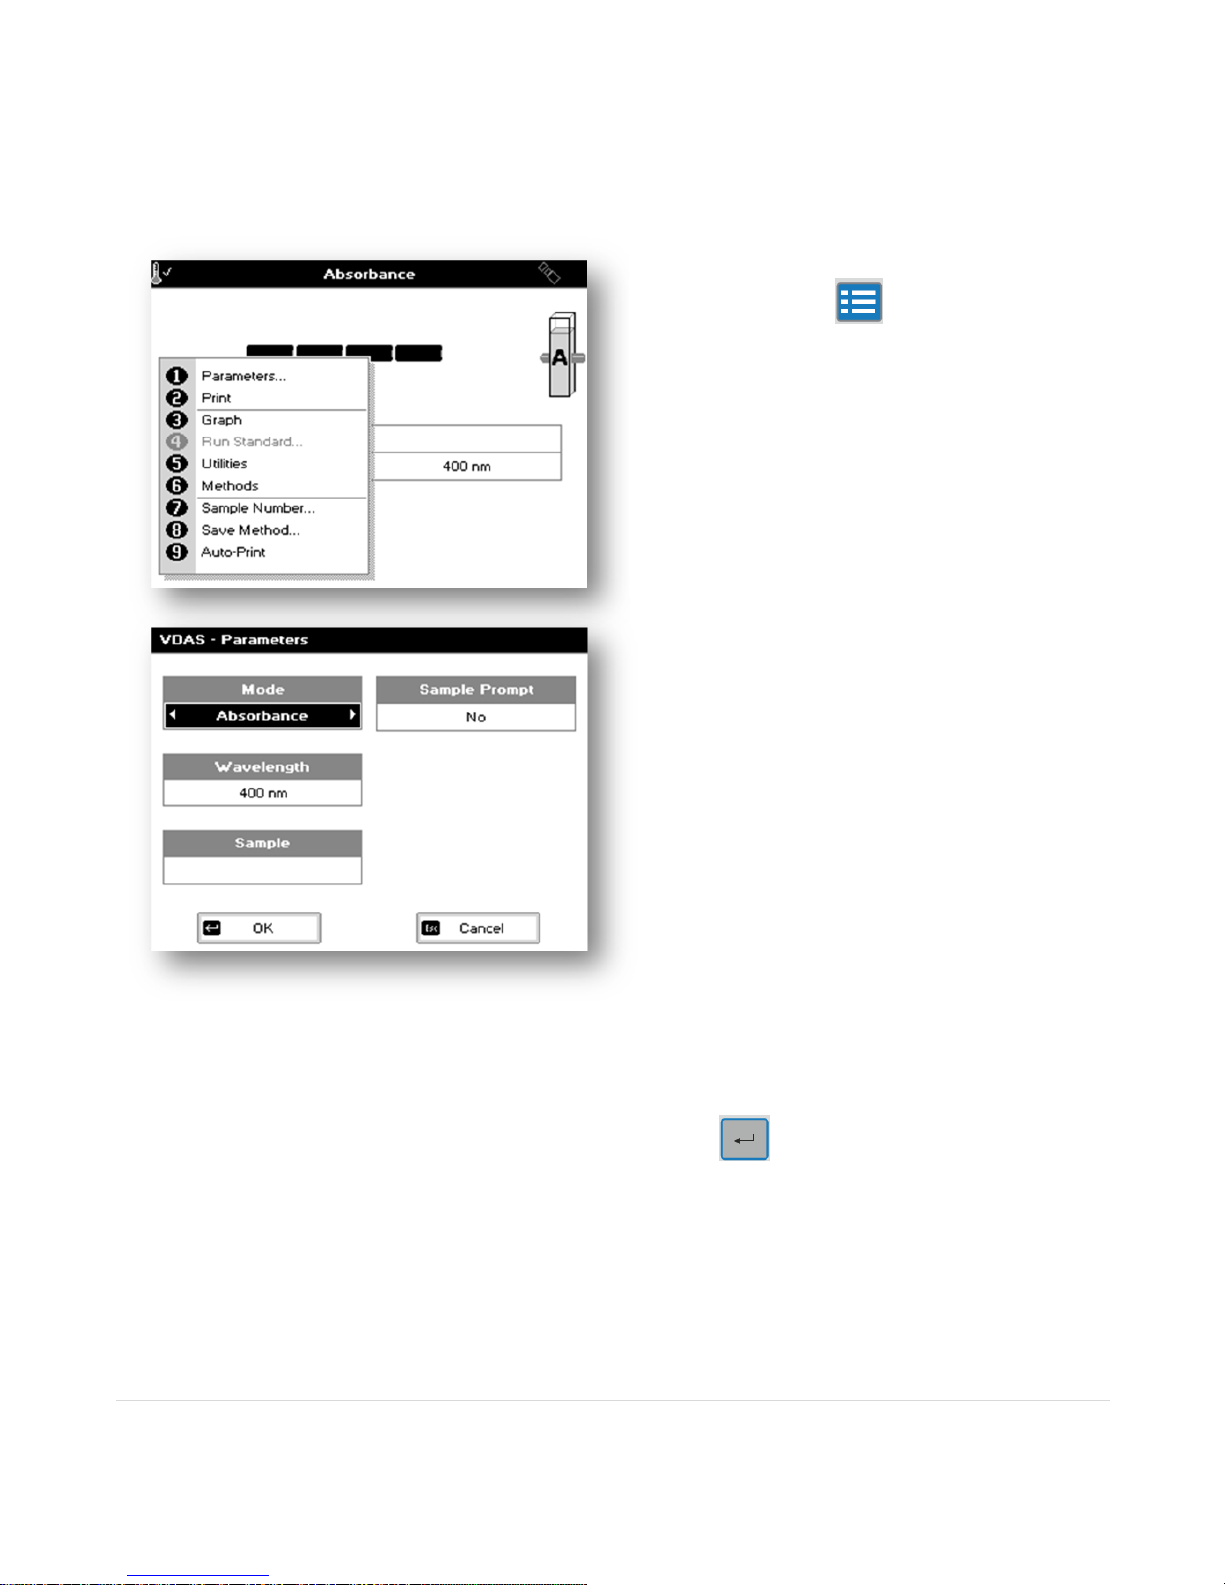
Step 1
Press the Options Key .
Step 2
Press 1 to set parameters.
Step 3
If not already in Absorbance mode, use left or right
arrow keys to select Absorbance mode.
Press the down arrow key.
Step 4
Use the left and right arrow keys to change the
wavelength, or use the number keypad.
Press the down arrow key.
Step 5
If required, enter a sample name. This name
followed by an incrementing sample number will be
used for naming subsequent results.
Press the down arrow key.
Step 6
Set this option to yes, if you need to measure many
different samples and assign different sample
names. The prompt will, by default, contain the
sample name last entered.
Press the down arrow key.
Step 7
Press ok when all parameters have been
entered.
Parameters
Absorbance
Page 11

11 | P a g e
Step
8
Insert reference sample, press .
Step 9
Insert sample, press .
Repeat Step 9 for all samples.
Step 10
Press to see options
For example: Press 3 to see a graph of the result,
press 3 to return to the digital display.
Page 12
12 | P a g e
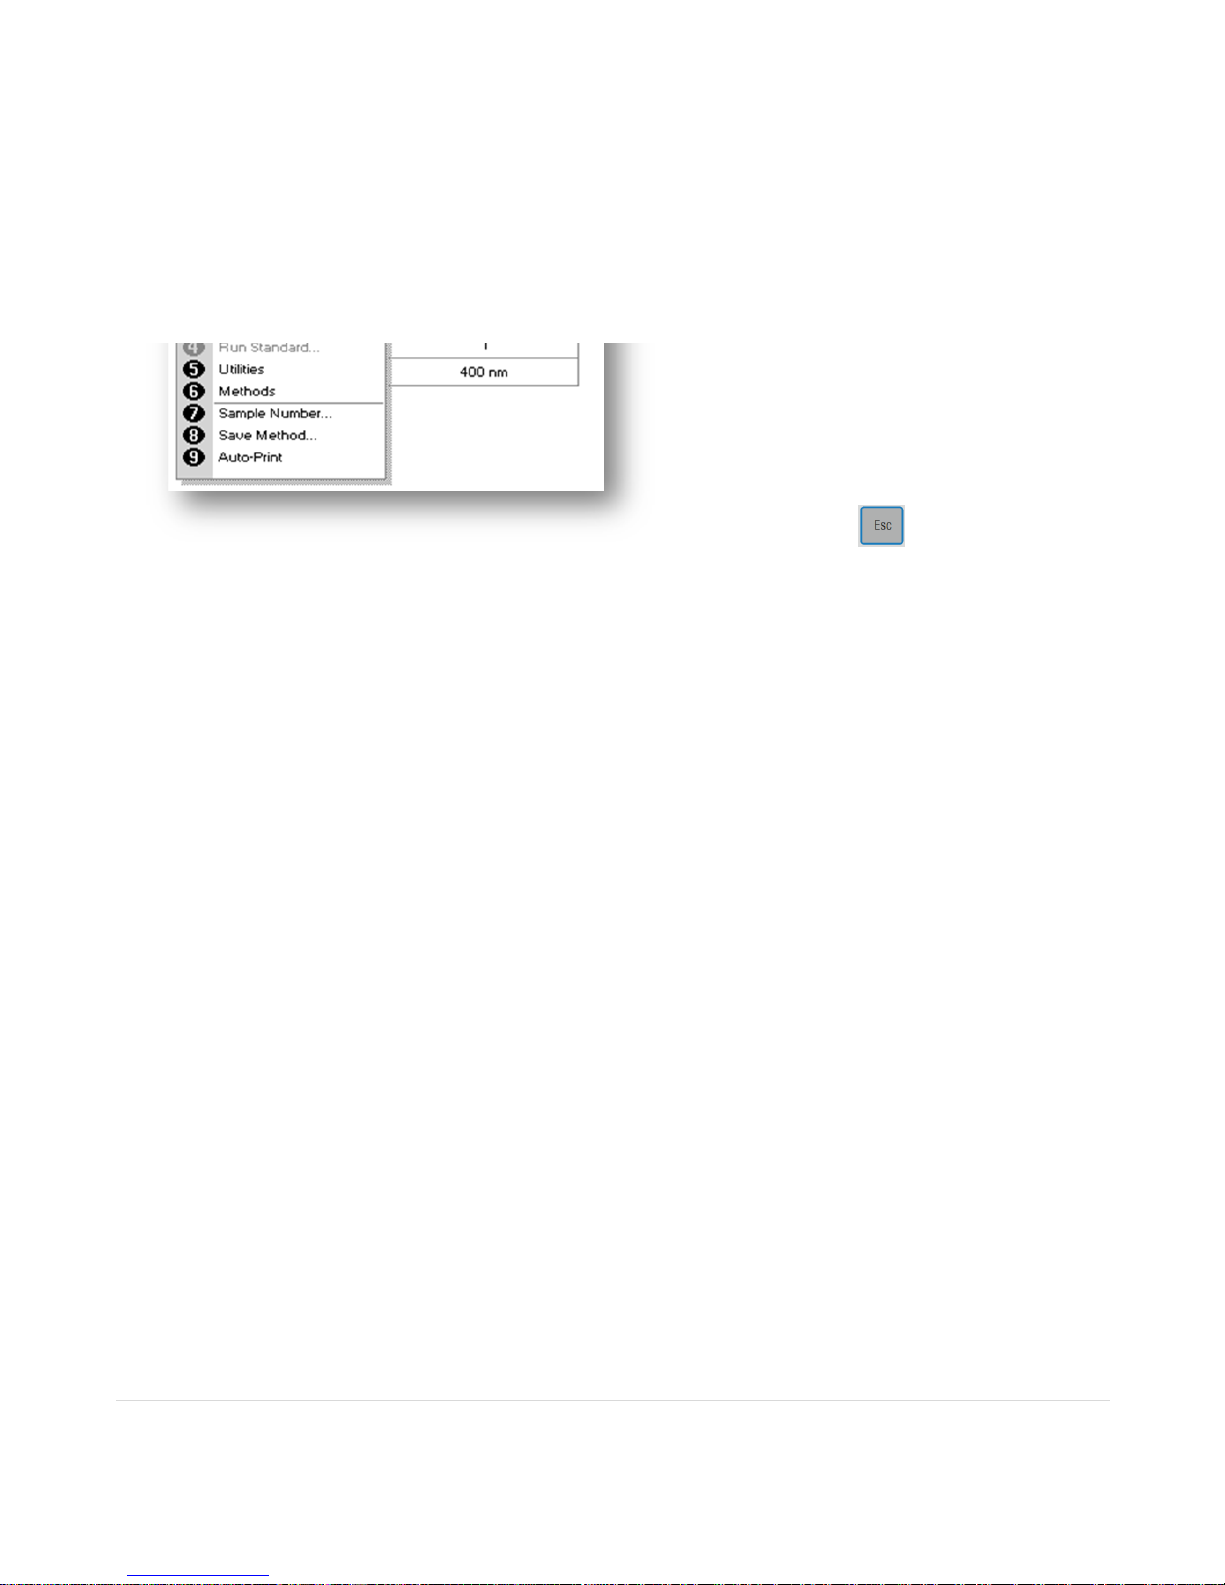
Options
(select using key pad numbers)
1. Return to parameters screen (Step 2 above).
2. Export result via selected method.
3. Toggle between digital results screen and
graph results screen.
4. Run standard – unavailable under this mode.
5. Go to Utilities Folder
6. Go to Methods Folder
7. Save method – use the left and right arrows to
select a folder to store in (Favourites/Methods
1-9), press the down arrow and enter name.
8. Sample number – add a prefix to the sample
number and reset the incrementing number to
the desired value, toggle the sample prompt.
9. Auto-print – toggles auto-print on/off.
Exit options by pressing .
Page 13
13 | P a g e
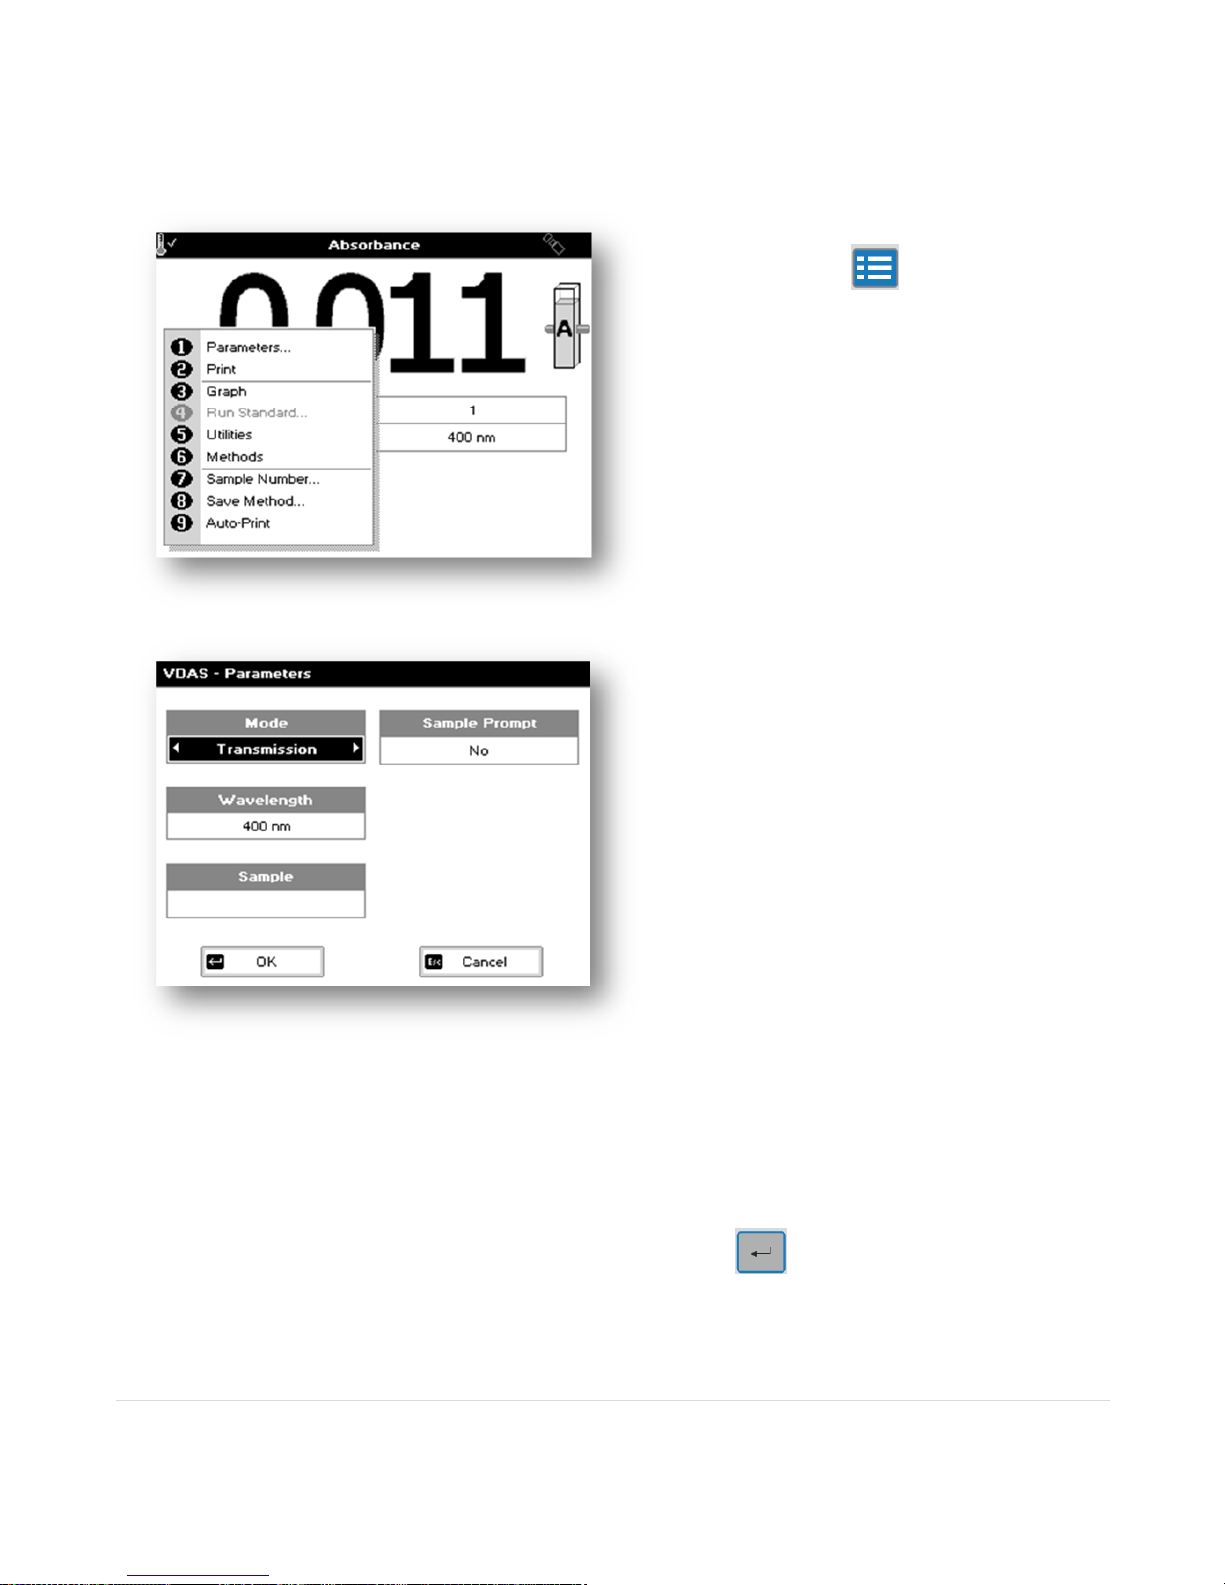
Step 1
Press the Options Key .
Step 2
Press 1 to set parameters.
Step 3
If not already in Transmission mode, use the left
and right arrow keys to choose Transmission
mode.
Press the down arrow key.
Step 4
Use the left and right arrow keys to change the
wavelength, or use the number keypad.
Press the down arrow key.
Step 5
If required enter a sample name. This name
followed by an incrementing sample number will
be used for naming subsequent results.
Press the down arrow key.
Step 6
Set this option to yes, if you need to measure
many different samples and assign different
sample names. The prompt will, by default,
contain the sample name last entered.
Press the down arrow key.
Step 7
Press ok when all parameters have been
entered.
Transmission
Page 14

14 | P a g e
Step 8
Insert reference sample, press .
Step 9
Insert sample, press .
Repeat Step 9 for all samples.
Step 10
Press to see options.
For example: Press 3 to see a graph of the result,
press 3 to return to the digital display.
Page 15

15 | P a g e
Options
(select using key pad numbers)
1. Return to parameters screen (Step 2 above).
2. Export result via selected method.
3. Toggle between digital results screen and graph
results screen.
4. Run standard – unavailable under this mode.
5. Go to Utilities Folder
6. Go to Methods Folder
7. Sample number – add a prefix to the sample
number and reset the incrementing number to the
desired value.
8. Save method – use the left and right arrows to
select a folder to store in, press the down arrow
and enter name.
9. Auto-print – toggles auto-print on/off.
Exit options by pressing .
Page 16

16 | P a g e
Concentration with a Factor
Entering a known factor.
Step 1
Press the Options Key .
Step 2
Press 1 to set parameters.
Step 3
If not already in Conc. Factor mode, use left or right
arrow keys to Conc Factor mode.
Press the down arrow key.
Step 4
Use the left and right arrow keys to change the
wavelength, or use the number keypad.
Press the down arrow key.
Step 5
Using the keypad, enter the factor.
Press the down arrow key.
Step 6
The units can be manually written in using the
keypad, or press and use the left and right
arrow keys to select the units (µg/ml, µg/µl,
pmol/µl, mg/dl, mmol/l, µmol/l, g/l, mg/l, µg/l, U/l, %,
ppm, ppb, conc or none).
This screen also allows the number of displayed
decimal points (DP) to be selected, from 0 to 2.
Note that the result will always be fixed to 5
significant figures regardless of how many decimal
points are selected (so 98768.2 will display as
98768 even with 1 decimal point selected).
Page 17

17 | P a g e
Press ok to save and exit the units
selection.
Step 7
If required, enter a sample name. This name
followed by an incrementing sample number will be
used for naming subsequent results.
Press the down arrow key.
Step 8
Set the sample option to yes, if you need to
measure many different samples and assign
different sample names. The prompt will, by
default, contain the sample name last entered.
Press the down arrow key.
Step 9
Press ok when all parameters have been
entered.
Step 10
Insert reference sample, press .
Step 11
Insert sample, press .
Repeat Step 11 for all samples.
Page 18

18 | P a g e
Step 12
Press to see options
For example: Press 3 to see a graph of the result,
press 3 to return to the digital display.
Options (select using key pad numbers)
1.Return to parameters screen (Step 2 above).
2.Print result via selected method.
3.Toggle between digital results screen and graph
results screen.
4.Run standard – unavailable under this mode.
5.Go to Utilities Folder
6.Go to Methods Folder
7.Save method – use the left and right arrows to
select a folder to store in, press the down arrow and
enter name.
8.Sample number – add a prefix to the sample
number and reset the incrementing number to the
desired value.
9.Auto-print – toggles auto-print on/off.
Exit options by pressing .
Page 19

19 | P a g e
Step 1
Press the Options Key .
Step 2
Press 1 to set parameters.
Step 3
If not already in Conc. Standard mode use left or
right arrow keys to Conc Standard mode.
Press the down arrow key.
Step 4
Use the left and right arrow keys to change the
wavelength, or use the number keypad.
Press the down arrow key.
Step 5
Using the keypad, enter the concentration.
Press the down arrow key.
Step 6
The units can be manually written in using the
keypad, or press and use the left and right
arrow keys to select the units (µg/ml, µg/µl, pmol/µl,
mg/dl, mmol/l, µmol/l, g/l, mg/l, µg/l, U/l, %, ppm,
ppb, conc or none).
This screen also allows the number of displayed
decimal points (DP) to be selected, from 0 to 2.
Note that the result will always be fixed to 5
significant figures regardless of how many decimal
points are selected (so 98768.2 will display as
98768 even with 1 decimal point selected).
Concentration with a Standard
Single point calibration curve with known standard and need to calculate a factor.
Page 20

20 | P a g e
Press ok to save and exit the units
selection.
Step 7
If required enter a sample name. This name
followed by an incrementing sample number will
be used for naming subsequent results. Press the
down arrow key.
Step 8
Set this option to yes, if you need to measure
many different samples and assign different
sample names. The prompt will, by default,
contain the sample name last entered.
Press the down arrow key.
Step 9
Press ok when all parameters have been
entered.
Step 10
Insert reference sample, press .
Step 11
Insert sample, press
Step 12
A Run Standard screen will appear, confirm
concentration or enter new concentration. Press
ok .
Page 21

21 | P a g e
Step 13
Result is displayed digitally.
Press to see options
For example: Press 3 to see a graph of the result,
press 3 to return to the digital display.
Options (select using key pad numbers)
1.Return to parameters screen (Step 2 above).
2.Print result via selected method.
3.Toggle between digital results screen oandgraph
results screen.
4.Run standard – unavailable under this mode.
5.Go to Utilities Folder
6.Go to Methods Folder
7.Save method – use the left and right arrows to
select a folder to store in, press the down arrow
and enter name.
8.Sample number – add a prefix to the sample
number and reset the incrementing number to the
desired value.
9.Auto-print – toggles auto-print on/off.
Exit options by pressing
Page 22

22 | P a g e
Step 1
Press the Options Key .
Step 2
Press 1 to set parameters.
Step 3
Use the left and right arrow keys to choose Rate
mode.
Press the down arrow key.
Step 4
Use the left and right arrow keys to change the
wavelength, or use the number keypad.
Press the down arrow key.
Step 5
If required enter a sample name. This name
followed by an incrementing sample number will be
used for naming subsequent results. Press the
down arrow key.
Step 6
Set this option to yes, if you need to measure many
different samples and assign different sample
names. The prompt will, by default, contain the
sample name last entered .
Press the down arrow key.
Step 7
Press ok when all parameters have been
entered.
Rate
This application has a fixed 10 second interval. I twill keep collecting data until you manually stop it by pressing the C
button.
Page 23

23 | P a g e
Step 8
Insert reference sample, press .
Step 9
Insert sample, press . Data will keep
collecting until manually stopped by pressing the C
button. You can toggle between seeing the results
digitally or in a graph form.
Step 10
Press C to stop collecting data.
Step 11
Press to see options
Press 3 to see a graph of the result, press 3 to
return to the digital display.
Page 24

24 | P a g e
Options
(select using key pad numbers)
1.Return to parameters screen (Step 2 above).
2.Print result via selected method.
3.Toggle between digital results screen oandgraph
results screen.
4.Run standard – unavailable under this mode.
5.Go to Utilities Folder
6.Go to Methods Folder
7.Save method – use the left and right arrows to
select a folder to store in, press the down arrow
and enter name.
8.Sample number – add a prefix to the sample
number and reset the incrementing number to the
desired value.
9.Auto-print – toggles auto-print on/off.
Exit options by pressing .
Page 25

25 | P a g e
Saving a Method
In the results screen of the application, press
key to display the options. Use the keypad to select
Save Method (8).
Methods Folder
These folders are the storage locations for any user modified Applications (Methods) that are saved in the Options menu.
There are 8 total folders and can store up to 9 methods per folder. In addition, if a USB memory stick has been inserted,
it is possible to store on the memory stick.
Saved methods can be locked, unlocked and deleted using the Options menu. Select the method by pressing the relevant
key pad number and then press the key.
Page 26

26 | P a g e
Use the left and right arrow keys to save the method
to a methods folder (1-8) or to a USB memory stick is
a USB stock is inserted.
Press the down arrow key.
Name your method.
Press to save your method or to cancel
and return to the results screen.
While in the main methods screen, press to
display the following options:
1. Folder Names
2. Lock Folder
3. Unlock Folder
4. USB Memory Stick
Folder Names
Press 1 to select Folder Name.
Press the down arrow key.
Choose which folder to rename.
Press the down arrow key.
Enter new name.
Press to lock the method or to cancel
and return to the Methods folder.
Page 27

27 | P a g e
Lock Folder
Press 2 to select Lock Folder.
Press the down arrow key.
Select which method folder to be locked using the
left and right arrows.
Press the down arrow key.
Select a pass code using the keypad numbers or left
and right arrows.
Press to lock the method or to cancel
and return to the Methods folder.
Unlock Folder
Press 3 to select Unlock Folder.
Press the down arrow key.
Select the method to be unlocked using the left and
right arrows.
Press the down arrow key.
Enter the pass code using the keypad numbers or
left and right arrows.
Press to unlock the method or to cancel
and return to the Methods folder.
USB Memory Stick
Press 4 to select USB Memory Stick.
Press the down arrow key.
You have the ability to backup one folder, all folders,
restore one folder or restore (load) all folders.
This is convenient for teaching labs that needs to
upload many different folders/methods on multiple
instruments.
Page 28

28 | P a g e
Within a methods folder, press to display the
following options:
1. Delete Method
2. Lock Method
3. Unlock Method
Delete Method
Press 1 to select delete method.
Select the method to be deleted using the left and
right arrows.
Press to delete the method or to cancel
and return to Methods folder.
Lock Method
Press 2 to select lock method.
Select the method to be locked using the left and
right arrows.
Press the down arrow key.
Select a pass code using the keypad numbers or left
and right arrows.
Press to lock the method or cancel to
return to the Methods folder.
Page 29

29 | P a g e
Unlock Method
Press 3 to select unlock method.
Select the method to be unlocked using the left and
right arrows.
Press the down arrow key.
Enter the pass code using the keypad numbers or
left and right arrows.
Press to unlock the method or cancel to
return to the Methods folder.
Page 30

30 | P a g e
When a USB stick is inserted and an
application selected, an icon will appear on the
top right hand side of the status bar.
When the stick is being written to the icon will
change
Saving Data onto a USB Memory Stick
When a USB memory stick is inserted into the connector in front of the instrument an audible click will be heard as the
stick is recognized. Whenever a USB stick is inserted, all data will automatically be saved to the USB memory stick. The
format used is selected from the utilities menu under printer options. The options available are PVC format (the PC PVC
program is used to open the data which can then be printed or exported). TSV tab separated format or CSV comma
separator format can be imported into programs such as Excel. However, CSV format should not be selected when the
number format is set to use a comma instead of a decimal point, otherwise, the data will not load cleanly into Excel.
Page 31

31 | P a g e
Data is stored on the USB memory stick under the following directory structure
\Instrument serial no\PVC
Double clicking on a file opens it into the PVC application from which it can be exported or saved. Full details on the use
of PVC are covered in the PVC user manual
Page 32

32 | P a g e
Utilities Folder
Folder Keypad
Number
Description
1 Set correct time and date
2 Select preferred language and number format
3 Export output options
4
Select preferences including screen layout (themes),
cell heater enable (where fitted) and automatic stanby
mode enable
5 Adjust screen contrast & brightness
6 Serial number and software version
Page 33

33 | P a g e
Enter the day using the keypad numbers or left and
right arrows.
Press the down arrow key.
Select the month using the left and right arrow
keys.
Press the down arrow key.
Enter the year month using the keypad or left and
right arrow keys.
Press the down arrow key.
Enter the hour using the keypad or left and right
arrow keys.
Press the down arrow key.
Enter the minute using the keypad or left and right
arrow keys. Seconds are zeroed when OK is
pressed.
Press OK tostore the settings and return to
the Utilities folder or press Cancel to return
to the Utilities folder without changing the time.
Select a language using the left or right arrow
keys. Options are English, Deutsch, Francais,
Espanol, Italiano, Japanese, and Chinese.
Press the down arrow key.
Set the decimal point style. Options are “,” or “.”.
Press OK tostore the settings and return to
the Utilities folder or press Cancel to return
to the Utilities folder without updating the settings.
1. Date and Time
2. Regional
Page 34

34 | P a g e
Select whether auto-print is on or off using the
left and right arrows. When auto-print is on the
results are automatically printed after a
measurement is taken. When it is off, printing has
to be initiated manually. This can also be set
using the Options key in each application
or method. The default is OFF.
Press the down arrow key.
Data is sent via Computer (USB).
Press the down arrow key.
Select the format for USB Stick Output. The
options are PVC (Print Via Computer), TSV, or
CSV.
Press OK to store the settings and return to
the Utilities folder or press Cancel to return
to the Utilities folder without storing the settings.
Select games function. This determines whether
the games folder is displayed or not. Options are
Yes or No.
Press the down arrow key.
Define the screen layout of folders. Options are
either list (default) or grid format.
Press the down arrow key.
Select whether to use a standby mode after
defined periods. Options are 1 hour, 2 hours, at
night or off.
Press the down arrow key.
Select whether the heater function for your cell
holder is on or off.
Press OK to store the settings and return to
the Utilities folder or press Cancel to return
to the Utilities folder without storing the settings.
This option is only available if a heated cell
holder is fitted.
3. Export Data
4. Preference
Page 35

35 | P a g e
Ambient light and temperature can affect the
display. This function can optimize the display for
local conditions.
Adjust the contrast using the left and right arrows.
Press the down arrow key.
Adjust the brightness using the left and right
arrows.
Press the down arrow key.
Adjust the contract using the left and right arrows.
Press OK to store the settings and return to
the Utilities folder
5. Contrast
6. About
Displays the instrument serial number and
software version.
Page 36

36 | P a g e
Print Via Computer (PVC)
This PC application running on a Windows computer can be used to transfer result data from an attached
instrument. The result data transferred can be printed or stored in a variety of formats including Excel
spreadsheet, graphical (EMF), comma delimited text (CSV), tab delimited text (TXT), rich text format (RTF)
and PVC.
PVC can store data either to a common data folder or be configured to save to independent directories
according to both file format and instrument connected
Data stored in PVC format can be retrieved and printed or exported into any of the supported formats
Installation
See the manual included on the PVC CDROM for installation and operating instructions.
Page 37

37 | P a g e
Test Tube and Heated Cell Holder Installation
Installation
1. Lay the instrument upside down on a soft surface.
2. Unscrew the two screws and remove the cuvette cell holder by tilting the holder to allow the cell ring to clear the
baseplate.
3. There are two positioning areas to help indicate the orientation of the cell holders when installing. The cell holders
will not fit unless this is correctly aligned.
4. Insert the new cell holder and screw in the two screws.
Align towards the front
of the instrument
Align towards the back
of instrument
Front of instrument
Back of instrument
Front of instrument
Back of instrument
Page 38

38 | P a g e
Accessories
Description
Catalog Number
Heated cell holder 80-3007-13
Test tube holder 80-3007-12
Cleaning and General Care of the Instrument
External cleaning
Switch off the instrument and disconnect the power cord.
Use a soft damp cloth.
Clean all external surfaces.
A mild liquid detergent may be used to remove stubborn marks.
Changing cell holder or removal for cleaning
This can be removed by undoing the appropriate screws on the bottom of the instrument.
Page 39

39 | P a g e
Icon Glossary
Status Bar Icons Meaning
Measurement in progress (lamp lit). The icons are cycled through to indicate the lamp
coming up to full brightness and then shown in reverse when the lamp is turned off.
Heated cell holder at temperature.
Heated cell holder fitted but not enabled.
Heated cell holder heating.
Heated cell holder cooling.
Heated cell holder error.
Auto print off i.e. no icon just blank.
Auto print via USB to PC enabled.
Auto print to USB memory stick enabled.
USB memory stick insertion detected.
“Printing” to USB memory stick in progress.
“Printing” via USB to PC in progress.
Rate/kinetics inter-measurement delay.
Display and
Menu Icons
Meaning
About - used to view unit identification information.
Date and time setup.
Display setup settings of contrast and brightness.
Page 40

40 | P a g e
Preferences setup.
Regional settings.
Data export setup defines the settings for the “Print” output to PC and USB memory stick.
Spectro Blocks game (only available if enabled in preferences).
Sudoko game (only available if enabled in preferences).
Method storage folder.
Menu folder.
Method folder on USB memory stick.
Display icons to
represent
measurement
modes
Meaning
Absorbance measurement mode.
%Transmission measurement mode.
Concentration factor measurement mode.
Concentration standard measurement mode.
Rate measurement mode.
Page 41

41 | P a g e
United Kingdom
Biochrom
Building 1020
Cambourne Business Park
Cambourne
Cambridge, CB23 6DW, United Kingdom
Telephone +44 (0) 1223 423 723
Fax +44 (0) 1223 4220 164
Email support@hbiosci.com
Website www.biochromspectros.com
China
Biochrom
Room 1902E 19F, Building B
Zhong Shan Plaza
1065 West Zhig Shan Road
Changning District
Shanghai, China 200051
Telephone +86 21 2230 5128
Email support@hbiosci.com
Website www.biochromspectros.com
USA
Biochrom US
84 October Hill Road
Holliston, Massachusetts 01746
Telephone (508) 893 3999
Toll Free (800) 272 2775
Fax (508) 429 5732
Email support@hbiosci.com
Website www.biochromspectros.com
 Loading...