


Important note — emergency calls
The Pegasys 8 Triple is not designed for making
emergency calls when the mains power fails. So you
should make alternative arrangements for access to
Emergency Services —
this means that you should also have a basic phone
that does not need mains power, connected to your
line so that you can make calls during a power
failure.
If you need help …
The Binatone Help Line is available from 9.00 am to
5.00 pm, Monday to Friday, on
0208 344 8870
Contents Where to find it 2–3
Diagrams showing the parts of the handsets, base unit
and charger pod
Notes about installation 4
Connection and conditions for use
Sites for the base unit and charger pod
Installation and set-up 5–7
Connecting the base unit and charger
Fitting and charging the battery packs
Connection to the telephone line
Notes about using the phone 8–9
The handset ringer
Interference
‘Battery low’ warning
Electrical safety
Making and answering calls 9
… including Last Number Redial
‘Out of range’ warning
Hold and transfer 10
Putting a call on hold
Transferring a call
Unpacking your Pegasys 8 Triple
In the box are:
n
three cordless handsets
n
three rechargeable battery packs and three battery
compartment covers for the handsets
n
the base unit
n
a mains power lead with adapter, for the base unit
n
a telephone line cable
n
two charger pods
n
two mains power leads with adapters, for the charger
pods
Keep the packaging materials in a safe place in case you
later need to transport the unit.
Keep your sales (till) receipt, which is your guarantee.
Memory dialling 11
How to store numbers in memory and make calls to them
Registering and deregistering handsets 12
Troubleshooting 13–15
What to do if you have problems using you Pegasys 8 Twin
Technical information 16
Guarantee and service 17
Cleaning and care 17
Index 18
Binatone Help Line: 0208 344 8870, 9.00 am to 5.00 pm, Monday to Friday 1

WHERE TO FIND IT
y
f
y
WHERE TO FIND IT
The handsets
Telescopic antenna
This should be fully extended to
approximately 19–20 cm when you
want to use the handset.
Handset number
Handsets are numbered 1, 2 and 3
In Use / Battery Low light
REDIAL/PAUSE button
Press to make a repeat
call to the last number
ou dialled.
Press to generate pauses
when using the phone
or calls on a PBX.
RINGER ON/OFF
SWITCH
MEMORY button
Press to make a call
to a number stored
in memory.
VOLUME button
Press to change the
volume in the earpiece
during a call (two volume
levels)
PHONE button
Press to begin and end a
telephone call.
Battery charging
contacts
This comes on when you have a
connection to the line; it flashes
rapidly for an incoming call and
slowly when the battery is
running low.
CH button
Press this to change channels if
you have problems with
interference during a call.
HOLD/TRANSFER button
Press to mute the mouthpiece
during a call. When you have put
a call on hold, you can transfer it
to another handset
RECALL/STORE button
You will need the Recall function
if your phone is connected to a
PBX, or if you use BT’s Select
Services.
The Store function is for storing
numbers in memory.
IN USE/CHARGE
This flashes when a call
comes in, and comes on
when you are connected to
the telephone line.
This also comes on when
the handset’s battery is
being charged.
light
The base unit and charger pods
Telescopic antenna
This should be fully extended
vertically for best quality reception.
PAGE button
When you press this, all
handsets registered to the
base unit will ring.
This may be useful to help
you find a handset if you
can’t remember where you
put it.
Press this button again to
stop the handsets ringing.
You also need to press this
button when registering a
handset.
Before you start …
2
Before you can use handsets, you will need to fit battery packs
and fully charge the batteries, as described on pages 5 and 6.
Please read the notes on page 4 before you install the base
unit and charger pod.
CHARGE
This comes on when the
handset’s battery is
being charged.
IMPORTANT — before using a handset for the first time,
!
you need to leave it on the base unit or charger pod for
12 hours so that the batter
Binatone Help Line: 0208 344 8870, 9.00 am to 5.00 pm, Monday to Friday 3
becomes fully charged.
light
INSTALLATION AND SET-UP
R
I
O
A
D
W
A
V
E
S
INSTALLATION AND SET-UP
Connection and
conditions for use
Sites for the base
unit and charger
pod
Read these notes before installation
You can connect your Pegasys 8 Triple to a public exchange
line in the UK; or to an extension on an approved PBX using
DTMF (tone) signalling and timed-break recall (TBR).
The ringer equivalence numbers (RENs) of all instruments
(phones, fax machines, etc.) connected to an exchange line
must not add up to more than 4 — otherwise, one or more
of them may not ring and/or answer calls correctly. The
Pegasys 8 Triple has a REN of 1, and most other telephones
have a REN of 1 unless marked otherwise.
The base unit should be installed where:
the mains adapter plug will reach a 230-V AC switched
n
mains supply socket — never try to lengthen the mains
power cable
the telephone cable will reach your telephone line socket or
n
extension socket
it is not close to another telephone — this can cause radio
n
interference
n
it is not close to a sink, bath or shower, or anywhere else
where it might get wet
n
it is not close to other electrical equipment — fridges,
washing machines, microwave ovens, TVs, fluorescent
lights, etc.
To use your handsets and base unit together, you must be
able to establish a radio link between them. Be aware that:
n
Siting the base unit as high as possible will
give better results — in a two-storey house,
the best position may be on the first-floor
landing.
n
Any large metal object — like a refrigerator,
or a filing cabinet — between the handset
and base unit may block the radio signal.
n
Other solid structures, like walls, may reduce
the signal strength.
The charger pods should be installed where
the mains adapter plug will reach a 230-V
switched mains supply socket — never try to
lengthen the mains power cable. Do not
place a charger pod where it might get wet.
AC
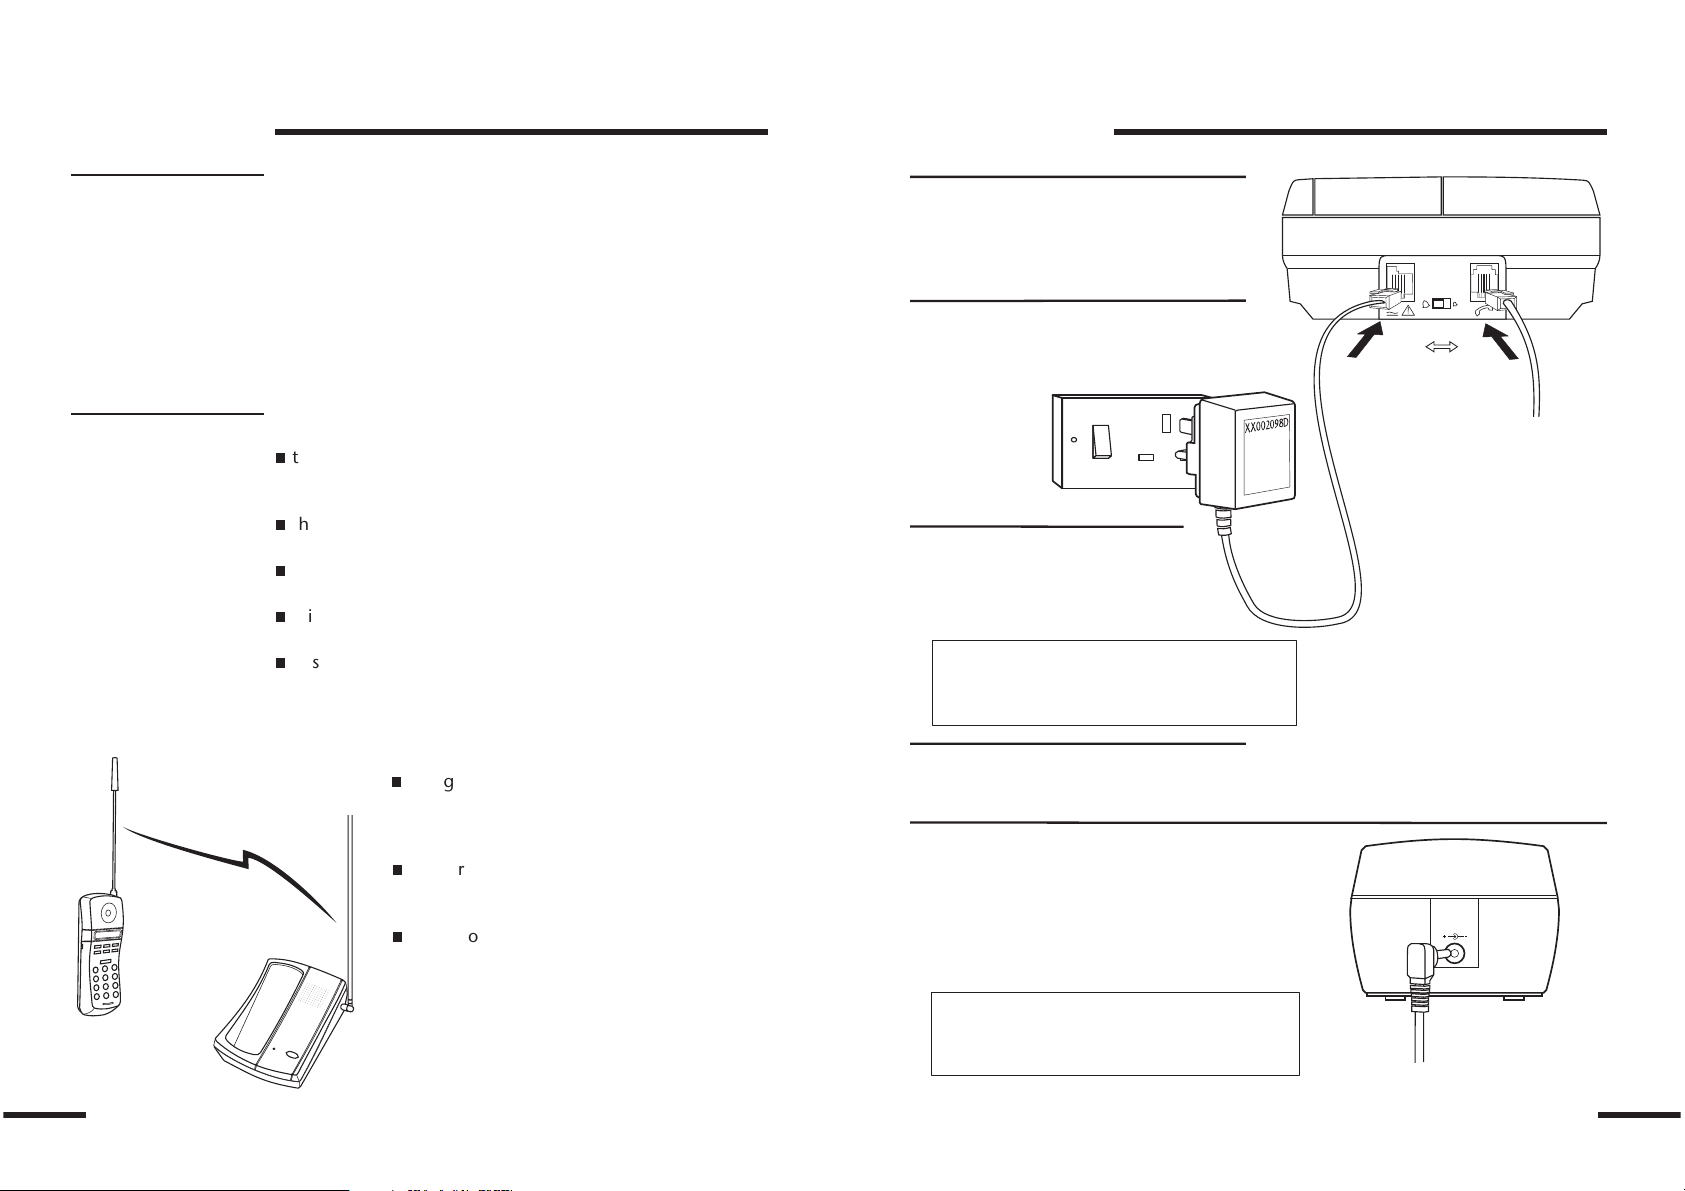
Connecting the base unit and chargers
Choose a suitable site for the base unit.
1
Make sure it is not near to another
telephone, nor to other electrical
equipment
Plug the mains power lead and the
2
telephone line cord into the back of
the base unit
Plug the mains adapter into a
3
230 V AC, 50 Hz mains socket,
with the switch on the socket
set to OFF
The Pegasys 8Triple base unit must be used with mains adapter,
part no. XX002098D, supplied with the unit. Using any other
adapter will result in non-compliance with EN41003, and will
invalidate any approval given to this apparatus.
Switch on mains power at the socket
4
Connect a mains power lead into the
5
socket on back of each charger pod
Plug each mains adapter into a 230 V AC,
50 Hz mains socket and switch on mains
power
The charger pods do not have a connection
to the telephone line
The Pegasys 8Triple charger pods must be used with mains
adapter, part no. XX002101D, supplied with the unit. Using any
other adapter will result in non-compliance with EN41003, and
will invalidate any approval given to this apparatus.
RINGER
HIGH LOW
NOTE: you can set
the base unit ringer
volume using the
switch located
between the two
cable connectors
DC 9V
4
Binatone Help Line: 0208 344 8870, 9.00 am to 5.00 pm, Monday to Friday 5

INSTALLATION AND SET-UP
INSTALLATION AND SET-UP
Fitting and charging the battery packs
Fit a battery pack in each handset
6
Plug the connector
in as shown
RED
BLACK
Charge the battery for 12 hours
7
Before you use a handset for the first
time, it is important to charge the
battery fully.
Leave it on the charging cradle of the
base unit, or on the charger pod, for
12 hours.
Tuck the wires in and lay the
battery pack in the compartment
Fit the battery compartment cover,
sliding it into place and pressing firmly
on the dots to make sure it is secure
Connection to the telephone line
Connect the base unit to the telephone line
8
Switch off power at the mains socket
Insert the telephone line plug into the socket
as shown
Switch mains power back on
Make sure the mains socket is
switched on if you want to
use the phone — it will not
work without electrical power
Check for Dial tone in each handset
9
Lift one handset from the base unit or charger pod
Press the button and check that you hear
Dial tone in the earpiece
Press the button to close the connection to
the base unit
Repeat with the other handset
NOTE: only one handset can be connected to the
line at once. Make sure you have closed the first
connection before trying for Dial tone in the
second handset.
Use the plug to raise the
shutter before pushing it
into the socket
You hear a ‘beep’
when you press the
PHONE button
The light flashes
then comes on
steadily
The IN USE/CHARGE light
comes on when the handset is
correctly positioned in the
charging cradle.
6
If you do not hear Dial tone, check that the base unit is correctly connected
to mains power and the telephone line, and that the handsets’ batteries are
fully charged. Try again.
If you still don’t hear Dial tone, try the registration procedure on page 12.
Leave the handsets on the base unit or
charger pod whenever you are not using
them, to keep the battery charged.
Binatone Help Line: 0208 344 8870, 9.00 am to 5.00 pm, Monday to Friday 7
 Loading...