

Page 1

About your MR700
You can use your MR700 handset as:
■
a private mobile radio (PMR), for communicating with other
people
■
an FM receiver, for listening to broadcast radio stations
■
a panic alarm
■
a stopwatch (timer)
■
a torch
Private mobile radio (PMR) lets you talk to as many people as you
wish, as often as you like, with no need for a licence, subscription or
tax payment. It’s very easy to use, even for children.
Unpacking your MR700
In the box are:
■
two MR700 handsets
■ one dual charger pod
■ one mains power lead with adapter, for the
charger pod
■
two hands-free headsets
■
two rechargeable battery packs
If you need help …
The Binatone Help Line is available from 9.00 am to 5.00 pm,
Monday to Friday, on 01325 304 473.
Emergency calls
In the event of an incident or accident, the MR700 cannot be
used for contacting Emergency or Rescue services.
Page 2
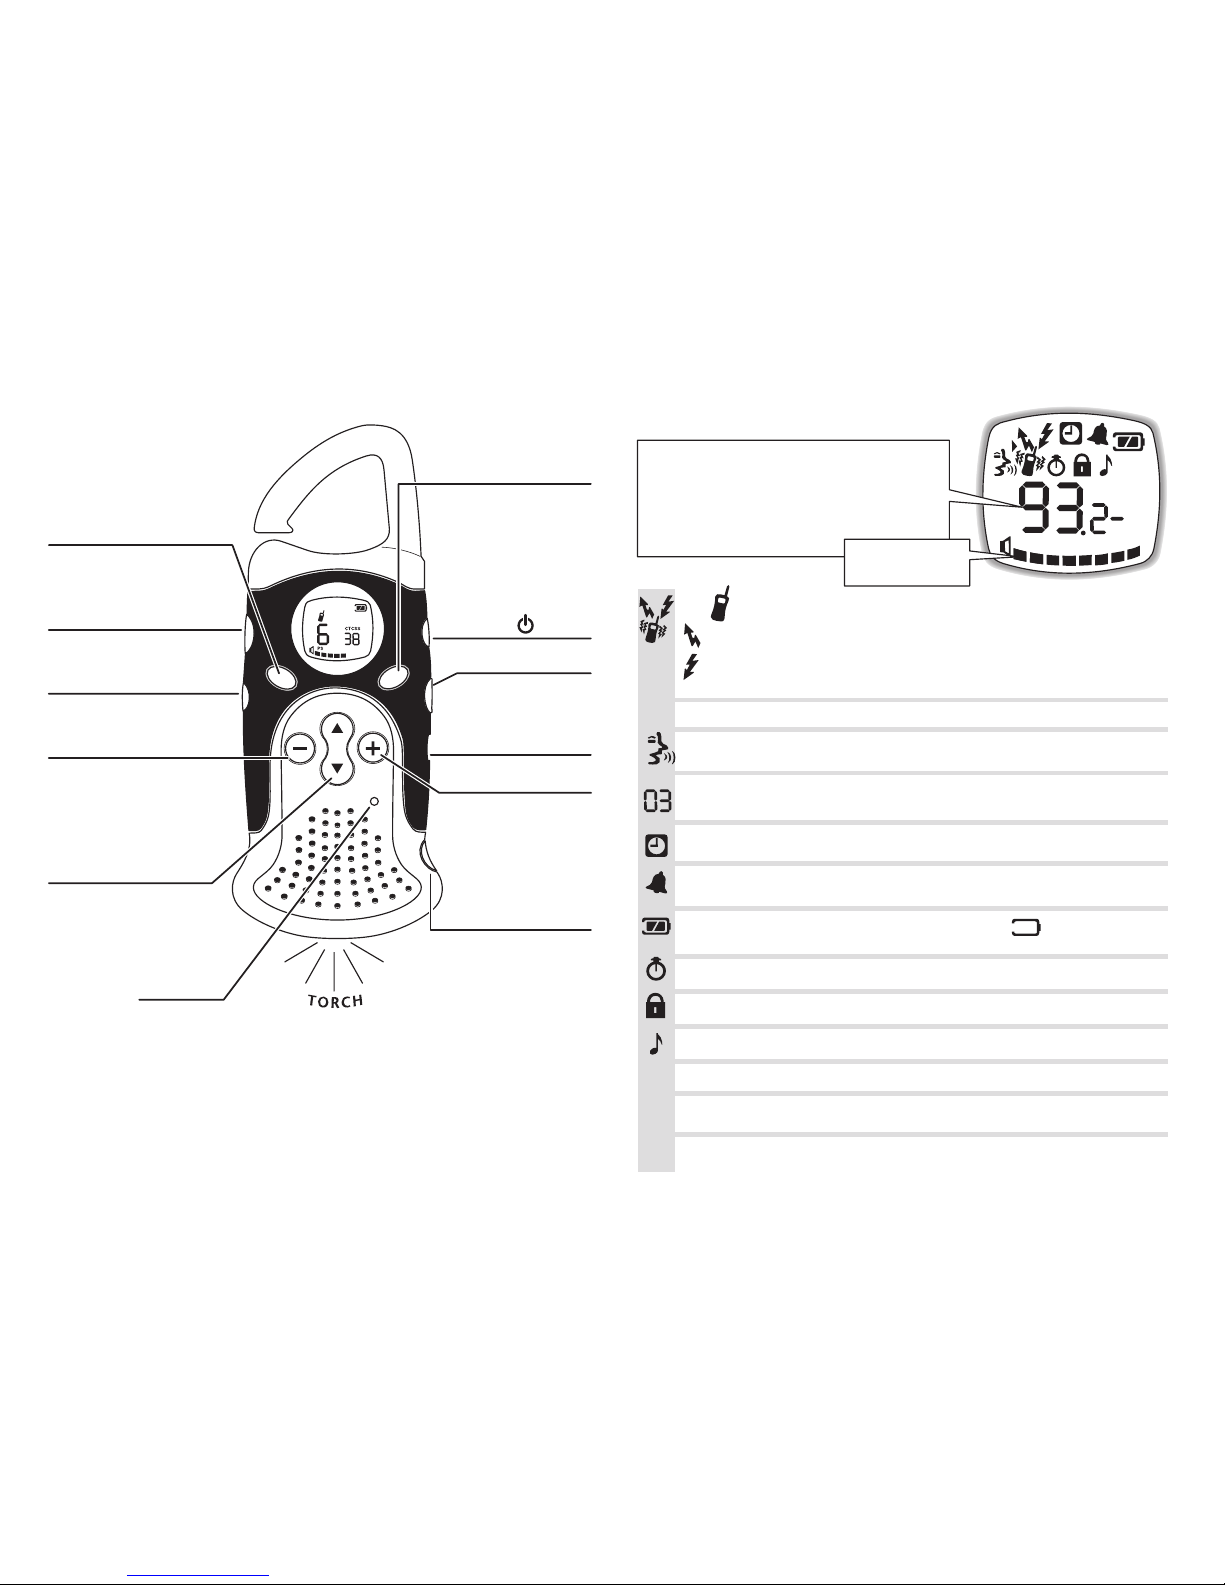
Quick reference
LOCK/STOP/– button
Press and hold to lock and
unlock the keypad.
Press to stop the
stopwatch (timer)
Press to tune the FM radio
VOL and buttons▲▼
Press to change the
speaker volume
Press to scroll through
options when using
MENU functions
START/ buttonCALL/+
Press to send ringing
tone to other handsets
Press to start the
stopwatch (timer)
Press to tune the
FM radio
TORCH button
Press and hold to
shine the torch (even
if the handset is
switched off)
MODE button
Press and hold to
switch between modes:
PMR — private
mobile radio only
FM — FM radio
receiver only
PMR/FM — both
n
n
n
PANIC button
Press and hold for 3
seconds to emit a
panic signal*
ON/OFF button
Socket for headset
Microphone
PTT (PUSH to TALK) button
Press and hold this while
you’re transmitting
MENU button
Press (a number of times)
to program the handset’s
settings
MON (MONITOR) button
Press and hold to monitor
the current channel
START
CALL
V
O
L
STOP
LOCK
MODE
MENU
* When you press and hold the button
for 3 seconds, the handset will emit a highpitched tone for up to 30 seconds. You can stop
the panic signal by pressing any button except
the button.
The button won’t work if the handset is
switched off, or if you’ve plugged in a headset.
But it will work while the handset is locked.
PANIC
TORCH
PANIC
The display
PS
PS
MHz
DW
DW
FM
SCAN
SCAN
CTCSS
CHAN
MEM
Battery charge level indication. When this shows (empty), you need
to recharge the battery pack or fit new batteries.
The symbol is shown when the handset is in .
appears when you’re transmitting
PMR mode
appears when you’re receiving a transmission from another handset
user.
(It appears when anyone is transmitting on the same channel, but if
their CTCSS code is different from yours, you won’t hear the transmission.)
This is shown when the handset’s buttons are locked.
This is shown when the ‘Roger’ beep function is turned on.
Power Save — this flashes when the handset is idle.
FM
This is shown when the handset is in .FM radio receiver mode
This is shown when is turned on.Auto-Power-Off (APO)
This is shown when you’re transmitting Call Ring tone, or changing your Call
Ring melody.
CTCSS
This is the (01 to 38). If is shown here, the CTCSS function
is turned off. See ‘Channels and codes’ for more information.
CTCSS code --
This is shown when you’re turning the function on and off.stopwatch
This is shown when you have activated , so the handset will
continuously scan all channels for transmissions.
scanning
This is shown when you have activated , to monitor two
channels at once.
Dual Watch
This is shown when you have turned on , so that your handset
will transmit whenever it detects your voice.
VOX mode
The is shown here when
you’re using the .
The is shown (with )
when you’re using the .
are shown when
you’re using the .
channel number
PMR
FM wavelength
radio receiver
Minutes and seconds
stopwatch
Speaker volume
level
MHz
Page 3

Contents
Getting ready for use 2
Getting started 4
Switching on and off, 4
Changing modes, 4
Volume control, 4
The torch, 4
Safety warnings, 5
The display, 5
Transmission range, 5
Using the PMR 6
About channels and codes, 6
To set the channel, 6
To set the CTCSS code, 7
Transmitting and receiving, 7
Call Ring tone, 8
Using the VOX function, 8
Monitoring the current channel, 9
Scanning channels, 10
The Dual Watch function, 11
Locking the buttons, 11
The ‘Roger’ beep function, 12
Using the stopwatch 13
To turn the stopwatch function on
and off, 13
To use the stopwatch, 13
Using the FM radio 14
To tune the radio, 14
To store radio stations in memory, 14
To select and play a stored station,
15
Auto-Power-Off (APO) 16
Using the hands-free kit 16
Technical details 17
Declaration of confirmity 17
Cleaning and care 17
Troubleshooting 18
Binatone Help Line: 01325 304 473 1
Page 4
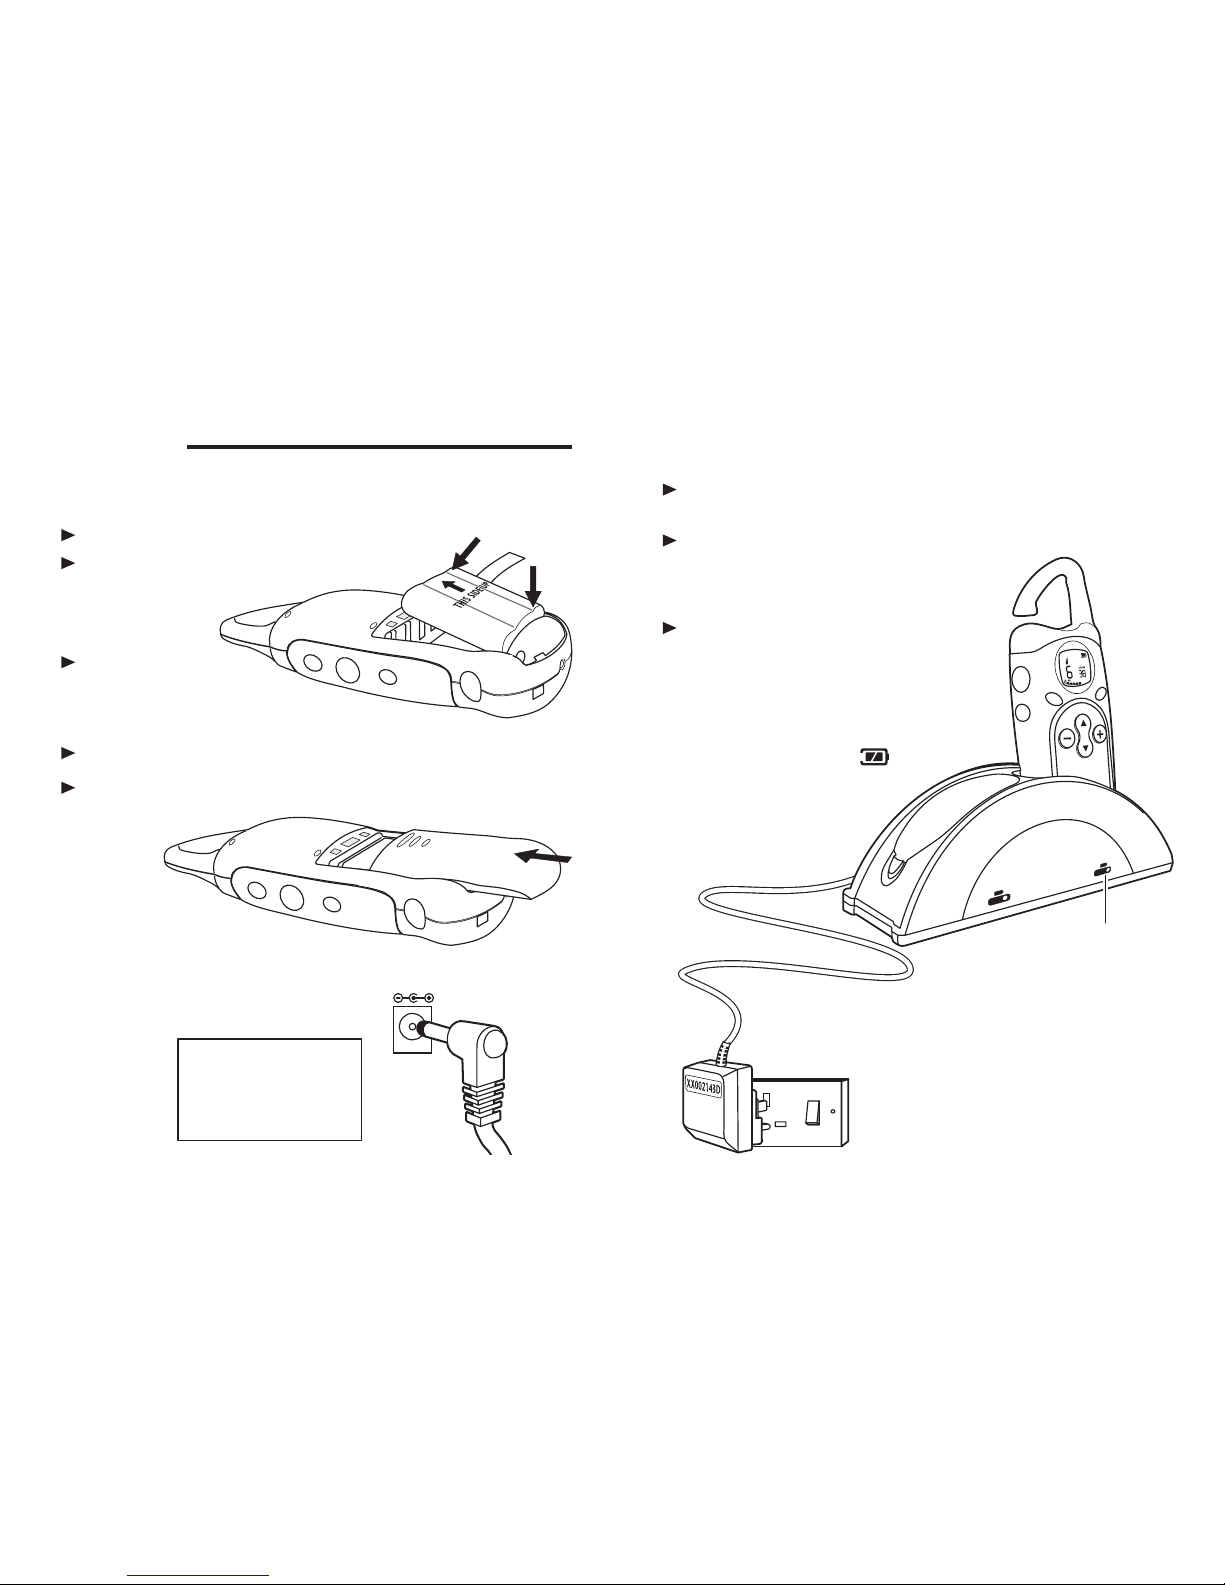
Getting ready for use
2
1
Fit a battery pack in each handset
Remove the battery compartment cover
To fit the battery, insert the lower
edge first ( ) …A
… then press the
upper edge into the
compartment ( ), clicking the
battery firmly into position
B
Lay the ribbon across the top of the battery pack
Replace the battery compartment cover, and firmly close
the latch
A
B
2
Connect the mains power lead
to the socket on the back of the
charger pod
DC 9V
The MR700 must be used with
mains adapter, part no.
XX002143D, supplied with the
unit. Using any other adapter will
result in non-compliance with
EN61554, and will invalidate any
approval given to this apparatus.
Getting ready for use
Binatone Help Line: 01325 304 473 3
Make sure the handsets are switched off
Place them in the charging cradles
Leave them for 12 hours to charge the
batteries fully
3
4
Connect the charger pod to the mains power supply
Charge the handsets’ battery packs
Switch on mains power at the socket
Switch on mains power at the
socket after you’ve plugged in
the mains adapter
Plug the mains adapter into a 230 V AC, 50 Hz mains socket,
with the switch on the socket set to OFF
When the handset is
correctly positioned in
the charging cradle,
the light comes on.
When you’re not using your MR700
handsets, switch them off and leave
them on the charger pod to keep the
batteries charged.
When you switch the handsets
on, the battery level display
should show (full).
Page 5
Getting started
Switching on
and off
To switch the handset ON:
◗
Press and hold the ON/OFF button until the
display comes on
To switch the handset OFF:
◗
Press and hold the ON/OFF button until the
display goes blank
You hear a musical tone each time to confirm.
Changing
modes
To switch between modes:
■
PMR — private mobile radio only
■
FM — FM radio receiver only
■ PMR/FM
◗
Press and hold the MODE button
Refer to the diagram inside the front cover to
see what’s shown on the display.
In PMR/FM mode, the radio will play except
when you press the PTT button to send or
receive a PMR transmission.
Volume
control
To adjust the loudspeaker volume:
◗
Press the ▲ or ▼ buttons
The current volume level is shown by the bars
on the display.
You can change the volume either while you’re
using your MR700 handset, or while the
handset is idle (switched on but not in use).
The torch To shine the torch, press and hold the TORCH button.
The torch works even when the handset is switched off.
4
Safety
warnings
IMPORTANT —
■
If you are using a hands-free headset — to protect
your hearing, do not turn the volume to the
highest level.
■
To reduce radio frequency exposure when you’re
using the MR700, hold the handset at least 5 cm
(2 inches) from your face.
■
Never use your MR700 outdoors in a thunderstorm.
■
The MR700 is splashproof. But if it is likely to get
very wet, carry it in a plastic bag — you will still be
able to use it through the bag.
■
If your MR700 gets very wet, turn it off and remove
the batteries. Dry the battery compartment and leave
the cover off for a few hours. Do not use the
handset until it is completely dry.
The display Whenever you press a button — except PTT — the
display lights up for 5 seconds. It then goes dim, to save
battery power.
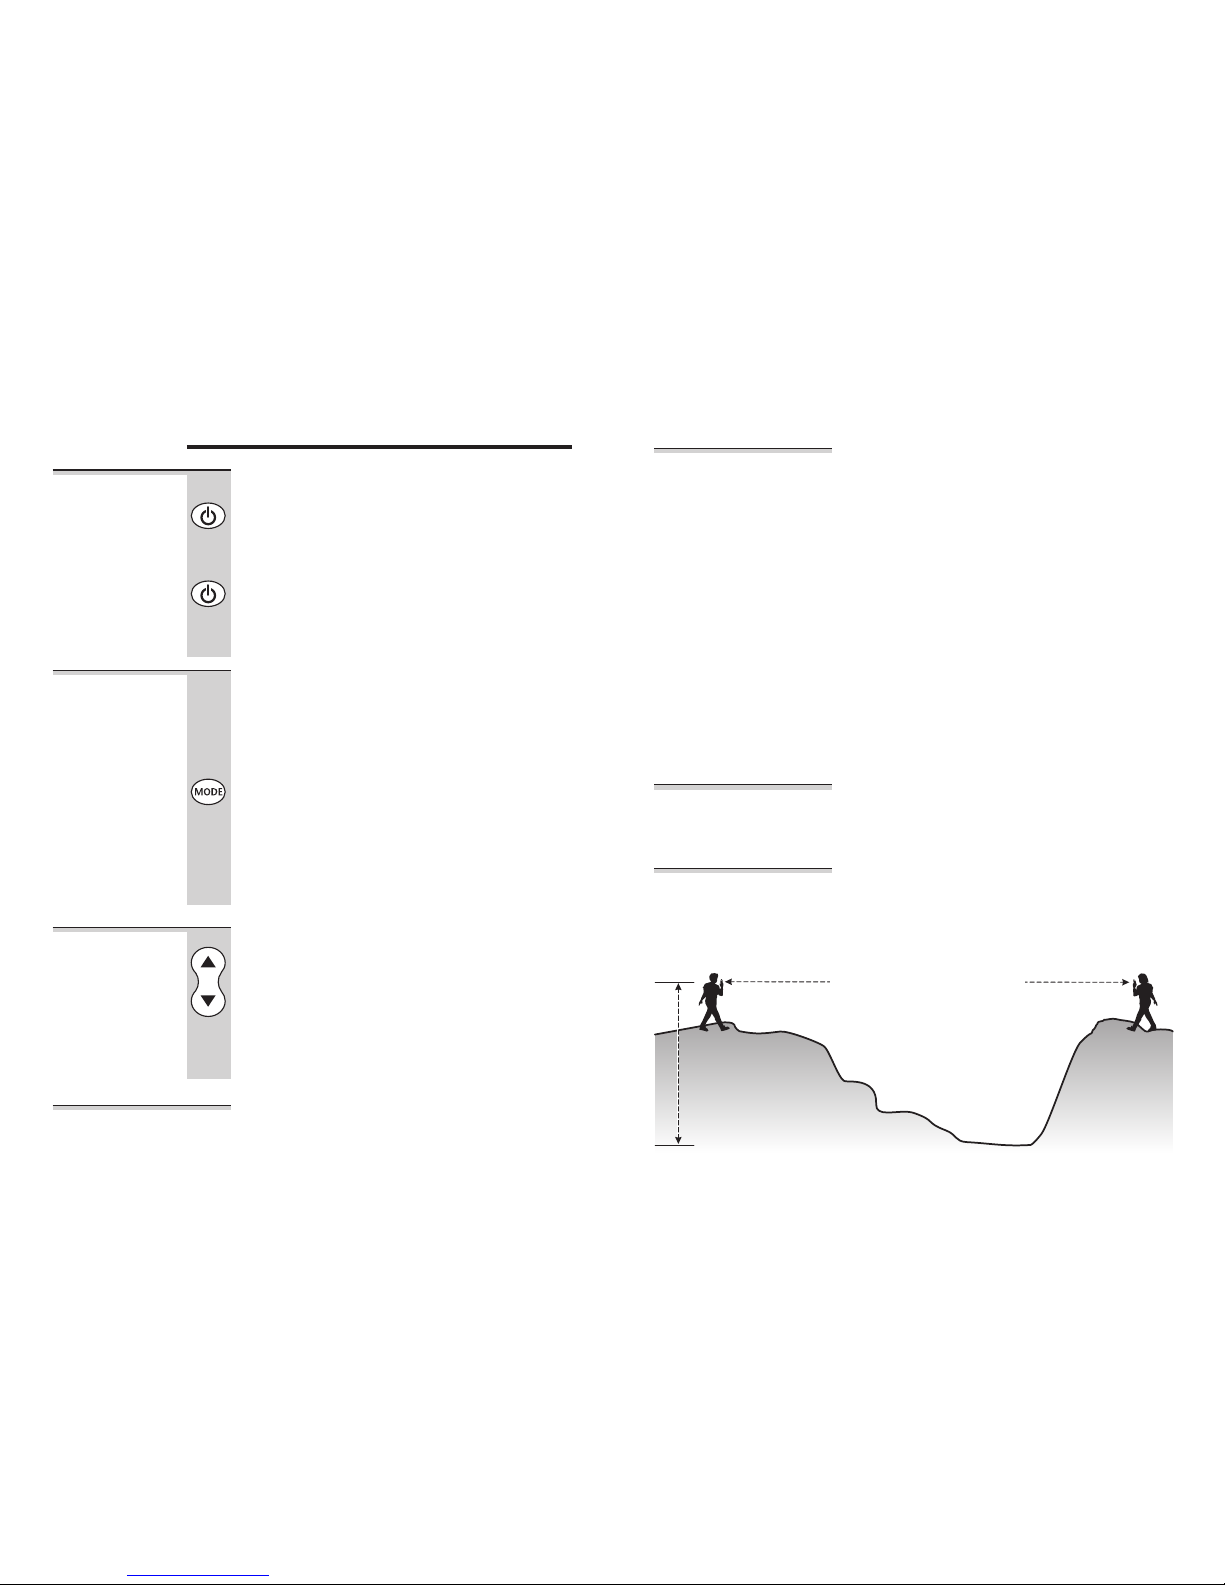
Transmission
range
The talk range depends on environment and terrain. It
will be greatest (up to 3 km, or 1¾ miles) in wide open
spaces, without obstructions such as hills or buildings.
This diagram shows the ideal conditions.
Getting started
Binatone Help Line: 01325 304 473 5
Up to 3 km (1¾ miles), when
users are at the same level, at
least 5 metres above any lowlevel ground
5 m
… so you’ll get best results if you
can find some high ground to
stand on, and there are no
obstructions between you.
Page 6
Using the PMR
About
channels and
codes
PMR has eight channels, numbered 1 to 8. When you
select a channel, you can communicate on that channel
with other PMR users within range (see page 5).
Each channel also has 38 CTCSS* codes, letting you set
up groups of users within the same channel, for more
private communication. If you have set a code, you can
communicate only with other users tuned to the same
channel and the same code.
You can turn the CTCSS function off, by setting ‘no
code’. This lets you communicate with any PMR user on
the same channel who has also turned off CTCSS (or
whose PMR handset does not have this feature).
!
PMR446 is an open-licence band — always identify
yourself when transmitting, as other people may be
communicating on the same channel.
* CTCSS stands for Continuous Tone-Coded Squelch System.
To set the
channel
If you want to communicate with other handset
users, you must all have your handsets tuned to
the same channel.
1 Press the MENU button ONCE
CHAN flashes on the display and the current
channel is shown.
2 Press the ▲ or ▼ button to go to the
channel you want
3 Press the PTT button to return to normal
operation
You can also use channel scanning, as
described on page 10.
6
To set the
CTCSS code
1 Press the MENU button TWICE
CTCSS flashes on the display and the current
code is shown.
2 Press the ▲ or ▼ button to go to the code
you want
OR, to turn off the CTCSS function, press the
▼ button until the display shows
--
3 Press the PTT button to return to normal
operation
Transmitting
and receiving
Note: PMR transmission is ‘one-way-at-a-time’ — while
you are speaking, you cannot receive a transmission.
Don’t try to use two PMR handsets which are less than
1.5 m (5 feet) apart. If you do, you may get interference.
To speak to another handset user
1 Press and hold the PTT button so that
appears on the display
2 Speak clearly into the microphone, in a
normal tone — don’t shout
3 When you’ve finished speaking, release the
PTT button
To listen to another handset user
◗
Make sure you are NOT pressing the PTT button
appears on the display when the other person is
speaking.
If appears on the display but you can’t hear
anything, this means that someone is transmitting on
the same channel but is using a different CTCSS code.
Using the PMR
Binatone Help Line: 01325 304 473 7
Page 7
Call Ring tone You can transmit Call Ring tone to other handsets
within range and tuned to the same channel, to alert
them that you want to communicate with them. The
MR700 gives you a choice of ten Call Ring tones.
To choose a Call Ring tone
1 Press the MENU button THREE times
appears on the display and the current tone is
played.
2 Press the ▲ or ▼ button to listen to each
Call Ring tone in turn
When you’ve decided which one you want,
and its number is shown on the display …
3 Press the PTT button to return to normal
operation
To send Call Ring tone
◗
Briefly press the START/CALL/+ button
Using the VOX
function
With the VOX function, your handset will automatically
start to transmit when it detects your voice (or other
noise), without the PTT button pressed. It will then
transmit for at least 2 seconds, even if you stop talking
before then.
There are three levels of VOX sensitivity. Level 1 is the
most sensitive, meaning that the handset will pick up
softer noises; at Level 3, it will pick up only quite loud
noises.
1 Press the MENU button SEVEN times
appears on the display and the current
setting (123or o
ff) is shown.
Using the PMR
8
2 Press the ▲ or ▼ button to go to the settng
you want
3 Press the PTT button to return to normal
operation
As long as the VOX function is switched on, the
‘Vox’ symbol stays on the display.
The VOX function will be temporarily disabled
while you’re transmitting, receiving, scanning,
monitoring or programming the handset.
Monitoring
the current
channel
The MR700 has an automatic squelch circuit, which
turns the speaker off when no-one’s transmitting a
message to you. But if a transmission is weak, this may
prevent your handset picking up the signal.
So you can temporarily de-activate (turn off) the
squelch and monitor all sounds on the channel —
◗
Press and hold the MON button
Your handset will pick up any signals on the
current channel, including any background
noise.
◗
To stop monitoring, simply release the MON button
(You can’t use monitoring while you’re scanning
channels.)
Using the PMR
Binatone Help Line: 01325 304 473 9
Page 8
Scanning
channels
When the SCAN function is turned on, the
handset will continuously scan through all
eight channels until it finds one on which
another user is transmitting.
1 Press the MENU button FOUR times
SCAN flashes on the display and the current
setting (o
n or off) is shown.
2 Press the ▲ or ▼ button to change the
setting
3 Press the PTT button to return to normal
operation
With SCAN turned on, when the handset
detects an active channel, it will pause for
4 seconds. If your CTCSS code matches that of
the transmitting handset, you will hear the
transmission.
If you want to communicate on this channel:
◗
Press and release the PTT button during the
4 seconds
Your handset will now be set to this channel
and you can carry on receiving and
transmitting on it.
If you don’t press the PTT button, the handset
will carry on scanning.
Using the PMR
10
The Dual
Watch
function
With Dual Watch, you can monitor two
channels at once.
1 Press the MENU button SIX times
DW flashes on the display and the current
setting (1 to 8 or o
ff) is shown.
2 Press the ▲ or ▼ button to select a channel
or switch Dual Watch off.
Make sure the channel you select is different
from the one the handset’s already tuned to.
3 Press the PTT button to return to normal
operation
Locking the
buttons
With the handset locked, all buttons except
PTT, MON, PANIC and TORCH are disabled.
To lock and unlock the buttons:
◗
Press and hold the STOP/LOCK/– button for
one second
You hear a ‘beep’ each time.
is shown on the display while the buttons
are locked.
Using the PMR
Binatone Help Line: 01325 304 473 11
Page 9
The ‘Roger’
beep function
‘Roger’ is the radio signal to say you‘ve finished
transmitting and the other person can speak.
With this function turned on, when you release
the PTT button to stop speaking, your handset
will send a confirmation beep.
1 Press the MENU button EIGHT times
flashes on the display and the current
setting (o
n or off) is shown.
2 Press the ▲ or ▼ button to change the
setting
3 Press the PTT button to return to normal
operation
stays on the display while ‘Roger’ beep is
switched on.
Using the PMR
12
Using the stopwatch
To turn the
stopwatch
function on
and off
1 Make sure the handset is in PMR mode
2 Press the MENU button FIVE times
flashes on the display and the current
setting (o
n or off) is shown.
3 Press the ▲ or ▼ button to change the
setting
4 Press the PTT button to return to normal
operation
While the stopwatch function is activated, the
lapsed time (in minutes, seconds and tenths of
seconds) is shown on the display — starting at
00.
00.00.
You can still use the PMR for transmitting and
receiving, as long as the stopwatch is not
actually running.
To use the
stopwatch
To start the stopwatch running:
◗
Press the START/CALL/+ button
To pause the stopwatch:
◗
Press the STOP/LOCK/– button
To reset the stopwatch to zero (00.
00.00):
◗
Press the STOP/LOCK/– button again
Binatone Help Line: 01325 304 473 13
Page 10
Using the FM radio
See page 4 for details of how to switch between modes.
To tune the
radio
1 Make sure the handset is in FM or PMR/FM
mode
2 Press the + (START/CALL) or – (STOP/LOCK)
button to go to the station you want
You can either press and hold the button then
release it for auto-scanning; or press the button
briefly and repeatedly to go to a specific channel
(manual scanning).
To store radio
stations in
memory
The MR700 has five memories for storing your
favourite radio stations.
1 Make sure the handset is in FM or PMR/FM
mode
2 Press the + (START/CALL) or – (STOP/LOCK)
button to go to the station you want
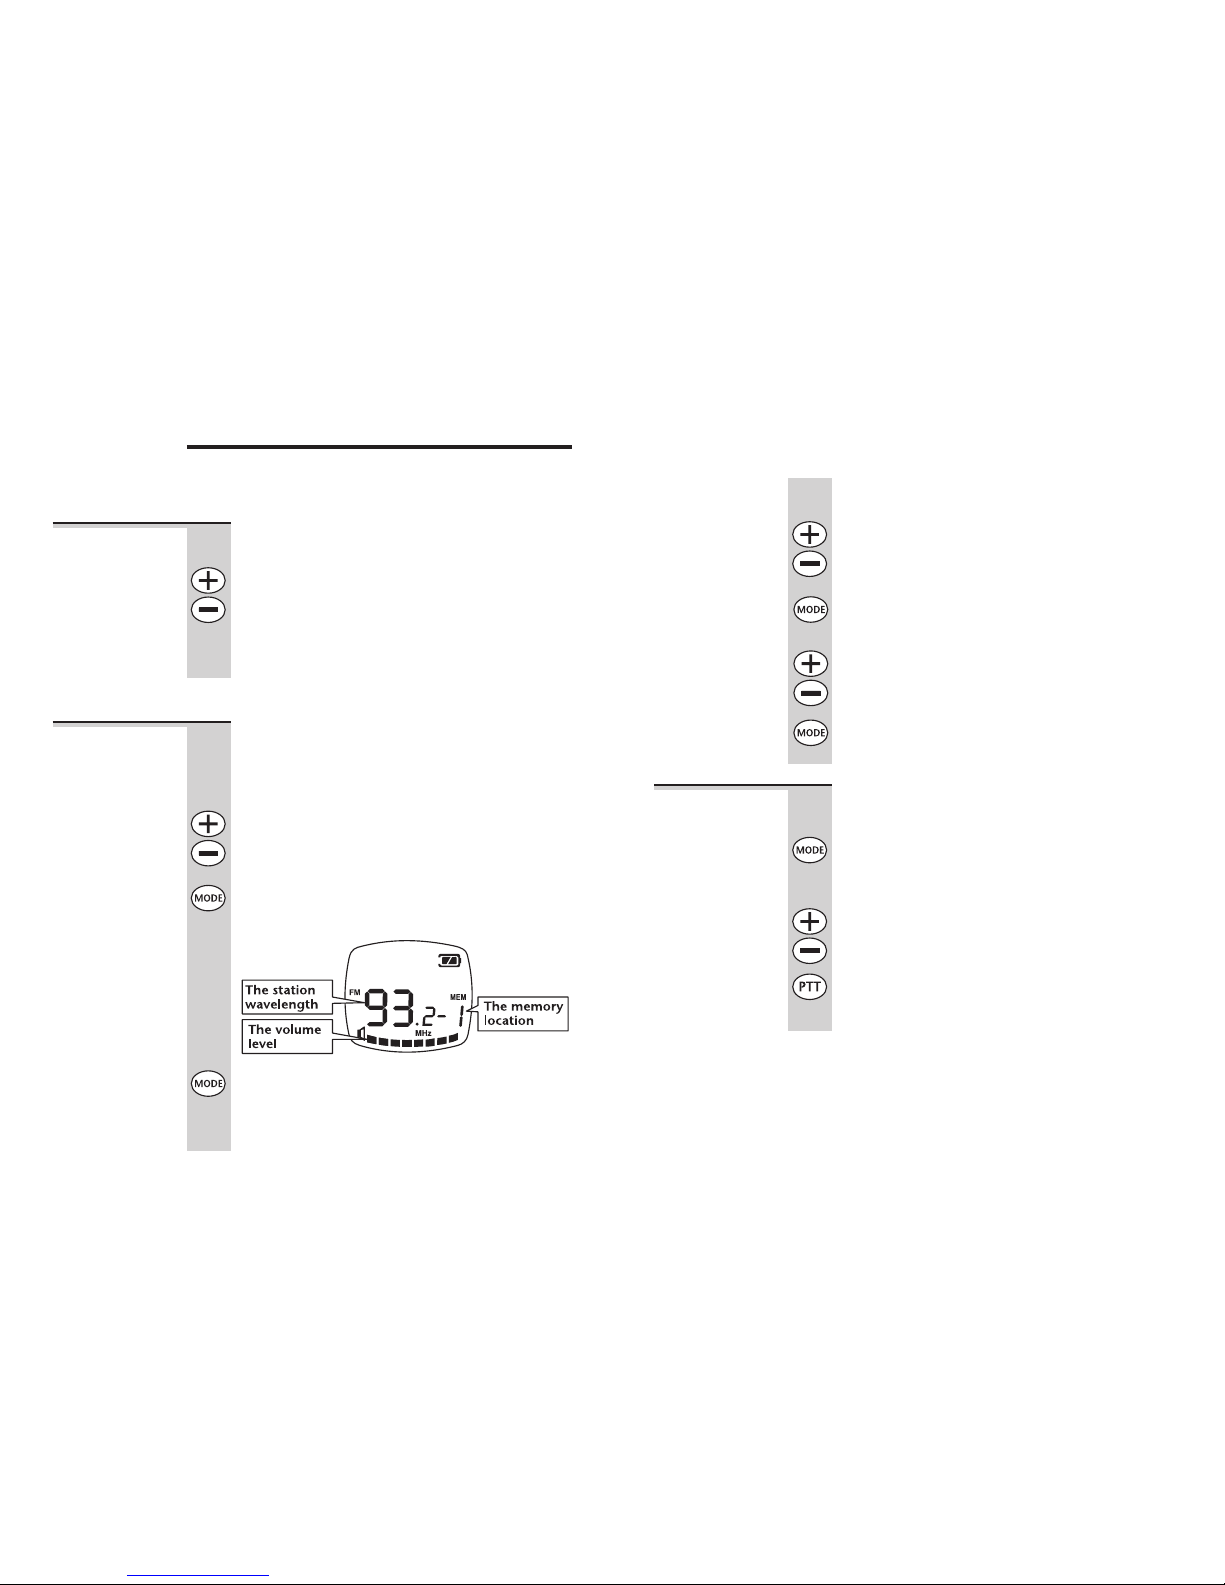
3 Press the MODE button TWICE
Memory location 1 flashes on the display — for
example:
4 Press and hold the MODE button for 1 second
until you hear a double-beep tone
You have now stored this station in memory
location 1.
14
To store stations in memories 2 to 5
1 Make sure the handset is in FM or PMR/FM
mode
2 Press the + (START/CALL) or – (STOP/LOCK)
button to go to the station you want
3 Press the MODE button TWICE
Memory location 1 flashes on the display.
4 Press the + (START/CALL) or – (STOP/LOCK)
button to go to the memory location you
want
5 Press and hold the MODE button for 1 second
until you hear a double-beep tone
To select and
play a stored
station
1 Make sure the handset is in FM or PMR/FM
mode
2 Press the MODE button ONCE
Memory location 1 flashes on the display and
the station wavelength is shown.
3 Press the + (START/CALL) or – (STOP/LOCK)
button to go to the memory location you
want
4 Press the PTT button
Using the FM radio
Binatone Help Line: 01325 304 473 15
Page 11
Auto-Power-Off (APO)
This feature saves battery life by automatically turning
the handset off if you have not pressed any button for a
set time. You can set the timeout to 1, 2 or 3 hours; or
set it to 0 (zero) to turn APO off.
1 Press the MENU button NINE times
flashes on the display and the current
setting (0
hr to 3hr) is shown.
2 Press the ▲ or ▼ button to change the
setting
3 Press the PTT button to return to normal
operation
is shown on the display as long as APO is
turned on. It disappears if you set APO
to 0
hr.
Using the hands-free kit
To connect the hands-free kit to your MR700 handset,
plug it into the socket at the side of the handset.
With the hands-free kit connected, you may want to
transmit using the VOX function (see page 8). If you
find that this doesn’t work very well, you can turn the
VOX sensitivity to 0 (off) and press the PTT button to
transmit, as normal.
!
If you use any hands-free accessories other than the
kit supplied, make sure they are approved, and from
a reputable supplier. Other accessories may cause
damage not covered by the guarantee.
16
Technical details
Operating frequency 446.00625 to 446.09375 MHz
(eight channels)
Channel spacing 12.5 kHz
Power source 4 × AAA rechargeable NiCad battery.
4.8 V, 300 mAh
Channel Frequency
(MHz)
Channel Frequency
(MHz)
1 446.00625 5 446.05625
2 446.01875 6 446.06875
3 446.03125 7 446.08125
4 446.04375 8 446.09375
Declaration of conformity
The Binatone MR700 conforms to the following
standards:
■
EN 301489 (RF testing)
■
EN 300296 (EMC testing)
■
EN 60065 (safety testing)
Cleaning and care
To clean your MR700, use a soft cloth dampened with
water. Do not use cleaners or solvents, which may
cause permanent damage not covered by the guarantee.
Binatone Help Line: 01325 304 473 17
Page 12

Troubleshooting
If you have problems using your MR700, check these
points first. If you still have problems, reset your
handset by switching it off and removing the
batteries. Then replace the batteries and switch the
handset on again.
Problem Possible cause — things to do/check
No reception
■
Handset set to wrong channel — check with other user
■
Handset set to wrong CTCSS code — check with other
user
■
Other user may not be transmitting
■
Handset not switched on — switch on
■
Volume too low — increase the volume
■
Batteries flat or not fitted correctly — check
■ Handset not in PMR or PMR/FM mode — change mode
■ Other user out of range — move back within range
No transmission
■
You are not pressing the PTT button
■
Handset not switched on — switch on
■
Handset not in PMR or PMR/FM mode — change mode
■
Batteries flat or not fitted correctly — check
Cannot change
channel/code
■
Handset may be locked — unlock it
■
Handset not in PMR or PMR/FM mode — change
mode
Poor or ‘noisy’
reception
■
Local conditions may be impairing reception — try
moving, preferably to a higher location
■
The handset’s batteries may be low — charge them
■
Noisy reception is more likely when using high-numbered
CTCSS codes — try using a lower-numbered code, agreeing
this with the rest of your group first
18
Problem Possible cause — things to do/check
Interference
from other users
outside
your group
■
Try changing to a different channel and/or code, agreeing
this with the rest of your group first
■
If you’re not already using a CTCSS code — try doing so
Privacy cannot be guaranteed, as PMR446 is an openlicence free band.
Using VOX
function, the unit
transmits all
the time
■
Ambient noise may be too high — move to a quieter
place or turn the VOX function off
■
VOX sensitivity may be too high — decrease the
sensitivity
Using VOX, the
unit does not
transmit
■
Sound may be too low — talk in a louder voice or hold
the unit closer to your mouth
■
VOX sensitivity may be too low — increase the
sensitivity (level 1 is the highest)
Problems using
VOX with a handsfree kit
■ Turn off the VOX function by setting VOX sensitivity
to 0 (zero), and transmit as normal by pressing the
PTT button.
Cannot use the
stopwatch
■
Handset not in PMR mode — change mode
■
Handset may be locked — unlock it
■
Batteries flat or not fitted correctly — check
Cannot hear the
radio
■
Handset not in FM or PMR/FM mode — change mode
■
Volume too low — increase the volume
■
Batteries flat or not fitted correctly — check
Cannot tune the
radio
■
Use the +/START/CALL and –/STOP/LOCK buttons for
tuning (the
▲ and ▼ buttons are for volume
control)
■
If the radio isn’t finding a channel using autoscanning — try manual scanning instead
Troubleshooting
Binatone Help Line: 01325 304 473 19
Page 13

Index
A approvals, 17
automatic squelch circuit, 9
Auto-Power-Off (APO), 16
B batteries
charging the batteries, 3
fitting the battery pack,
2–3
specification, 17
C Call Ring tone, 8
channels and codes, 6–7
cleaning and care, 17
CTCSS codes, 6–7
D the Dual Watch function,
11
F FM radio operation, 14–15
H hands-free kit, 16
L locking the buttons, 11
M mains power, 3
modes, 4
monitoring the current
channel, 9
O operating frequency, 17
outdoor use, 5
P the Power Save function, 5
PMR operation, 6–12
R the ‘Roger’ beep function,
12
radio frequency exposure,
5
receiving a transmission, 7
resetting the handset, 18
S scanning channels, 10
stopwatch, 13
switching on and off, 4
T talk range, 5
technical details, 17
thunderstorms, 5
timer, 13
torch, 4
transmission range, 5
transmitting, 7
troubleshooting, 18–19
V volume control, 4
VOX function, 8
20
 Loading...