

Page 1
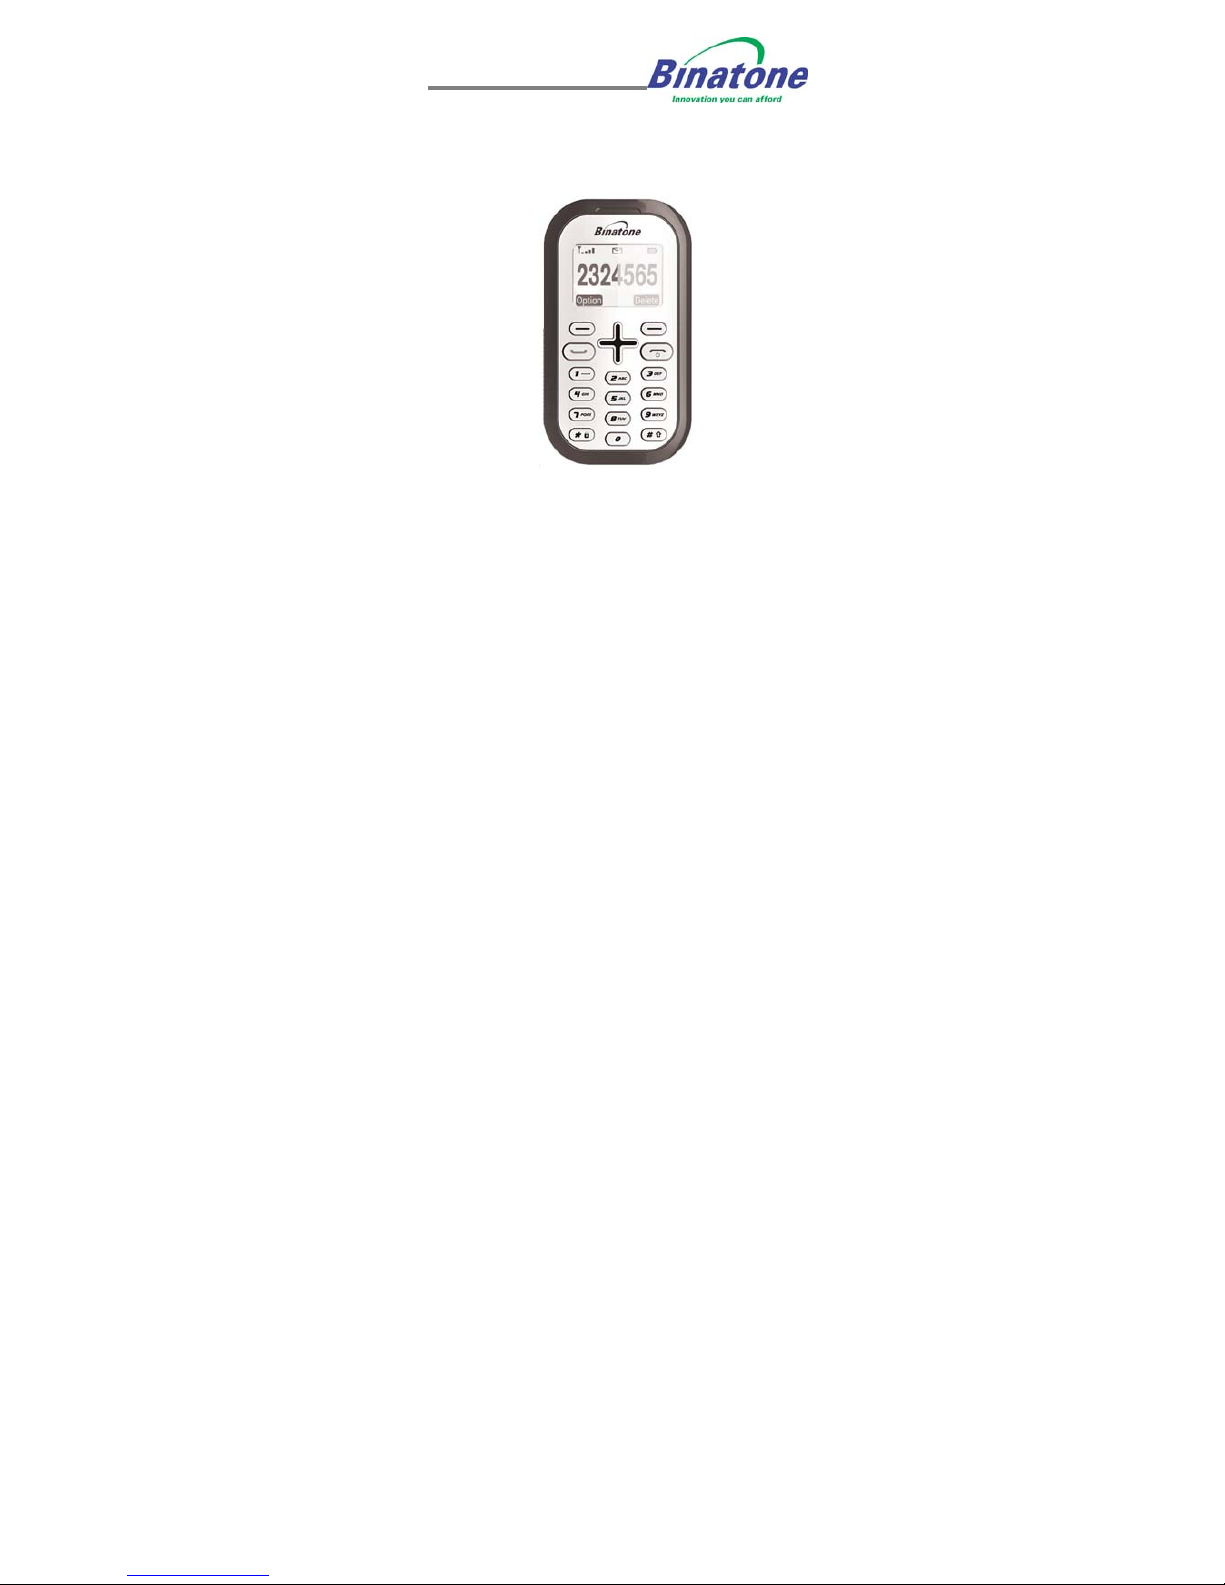
USER GUIDE
Mini Mobile
Before operating this set,
please read these instructions carefully.
Page 2

Unpacking your Mini Mobile
In the box are:
• the mobile handset
• a mains power adaptor (traveler charger)
• the handset back cover
• a rechargeable battery pack
• this user guide
Keep the packing materials for future use.
Keep your sales receipt - it is your
guarantee.
IMPORTANT – Your handset is not supplied with
a SIM card. The Mini Mobile works in most of all
networks. You will need to insert a SIM card for
the handset to work correctly.
Network Services – The Mini Mobile is approved
for use on the GSM900 and GSM1800 networks.
Check with your mobile phone service provider to
see if you can use the Dualband feature or other
Network Services described in this guide. Some
networks may not support all language dependent
1
Page 3

2
characters and/or services.
Page 4

Where to find it…………….……..……..……… 5
Contents
Symbols on the display ………………………. 6
Menu Operation …………..………………….… 8
Read these notes first……....…….…………… 8
Installation and setup……………………..…… 10
Switching On and Off ………………..……….. 15
Making & answering calls…………………… 16
Using the Phone Book ………………………. 18
Call Records .……………………………….…. 21
SMS (Short Message) ..…………………….… 22
Settings………………………..……………..… 25
Phone Settings ……………………………………25
Clock settings………………………..……………. 26
Call Settings ……………………………………… 26
Network Settings ……………………..…………. 26
Sound profiles……………………………………. 27
Extras……………………………………………..27
Alarm…………………………………………...27
To Do List………………………………………28
3
Page 5

Contents
Calculator ……....…………………………29
Troubleshooting……………………………… 30
Guarantee and Service information……….. 32
Battery Information…………………………… 34
Additional Safety Information………………. 34
Declaration of Conformity ……..……………. 37
Technical Specification ………...……………. 38
4
Page 6
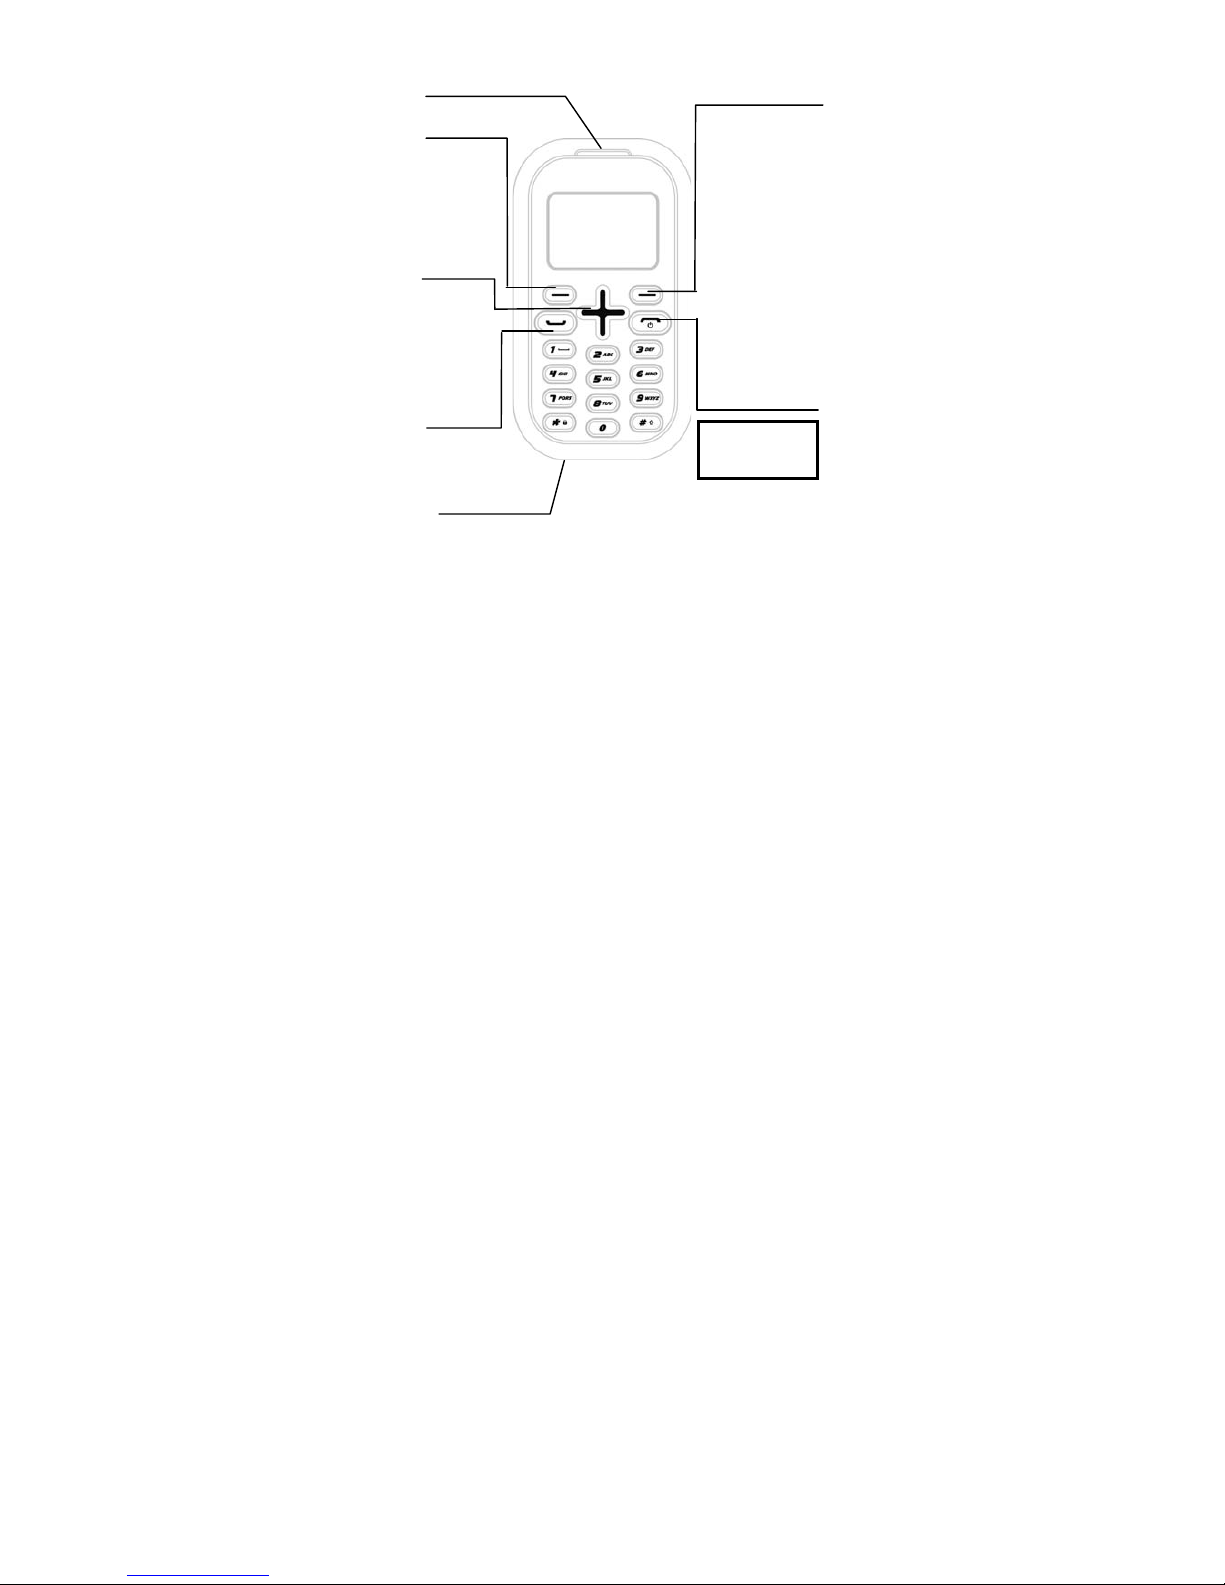
Where to find it
5
Earpiece
Press to end or
reject a call.
Press to return
to standby mode
Press and hold to
switch the phone
on or of
f
End Call / Power
On-Off button
Wrist strap holes
Select buttons
(Left/Right soft keys)
Perform
functions
indicated by
the display
text above
Left – to
Incoming
Call list
Right – to
Missed Call
list
Left/Right
buttons
Press to adjust
receiving volume in
alk modes. t
Press to step
through names,
phone numbers,
menus and settings.
Standby mode
shortcuts:
Up - to Sound
Profiles
Down - to
Phonebook
Up/Down buttons
Talk button
Press to
answer a
phone call.
Page 7

Symbols on the display
6
1 - The left selection key in the standby mode is
Menu.
1
2
XXXXXX
The network name
or logo in service
(If display option
set)
2 - The right selection key in the standby mode is
SMS.
The Soft keys change to different functions in
other modes.
Radio link/signal level - On steady when
linked and shows the signal strength.
Flashes if handset is trying to establish a
link.
Battery charge level - Charge handset as
soon as possible if it shows nearly empty.
While the batteries are being charged, this
blinks.
Page 8

Call Divert - On if call divert unconditional
is set.
Alarm - On if an alarm is set.
Ringer Off - On if handset's ringer is
turned off.
7
Headset - On when a headset is plugged
in.
New SMS - Indicates you have new text
messages.
Lock - On when the handset's keypad is
locked.
Vibrator - On if the vibrating ring alert is on.
Missed Call - On if you have missed Call
records.
Mute - On if the handset microphone is
muted.
Page 9

Menu Operation
Menu lists are used for set up and operation.
The left and right soft keys initially are Menu and
SMS.
Press Menu (
) and the display changes and
the soft keys become Select and Back.
Use Up or Down to move up or down menu lists,
and Select or Back for the next or previous
display.
When writing text, use the # key to switch cases:
Upper case (ABC), Title case (Abc), Lower case
(abc) or Numerals (123).
Use Up, Left, Right or Down to move the cursor,
and Cancel to delete letters.
Read these notes first
Your phone is an electronic product and should be
treated with care to meet any warranty and safety
obligations.
• SWITCH ON SAFELY – Don’t use when
mobile phone are prohibited or may cause
interference or danger.
8
Page 10

9
• HEARING AID COMPATIBILITY – With the
hearing aid set to normal, adjust the phone
volume. If this fails to be ok, then to try the
hearing aid in the ‘T’ position.
• WATER-RESISTANCE – Keep it dry. The
phone is not water-resistant.
• TEMPERATURE RANGE – Operating 0°C to
40°C. Storage -20°C to 60°C.
• CARE & CLEANING - Do not drop or knock
the phone excessively, and keep it clean using
a damp cloth if necessary - do not use
chemicals, cleaning solvents, or strong
detergents.
Page 11
Installation and setup
Before operating the Mini Mobile a SIM card must
be installed. Keep the SIM card out of small
children’s reach.
The SIM card and its contacts can be damaged
easily by scratches or bending, so handle the card
carefully.
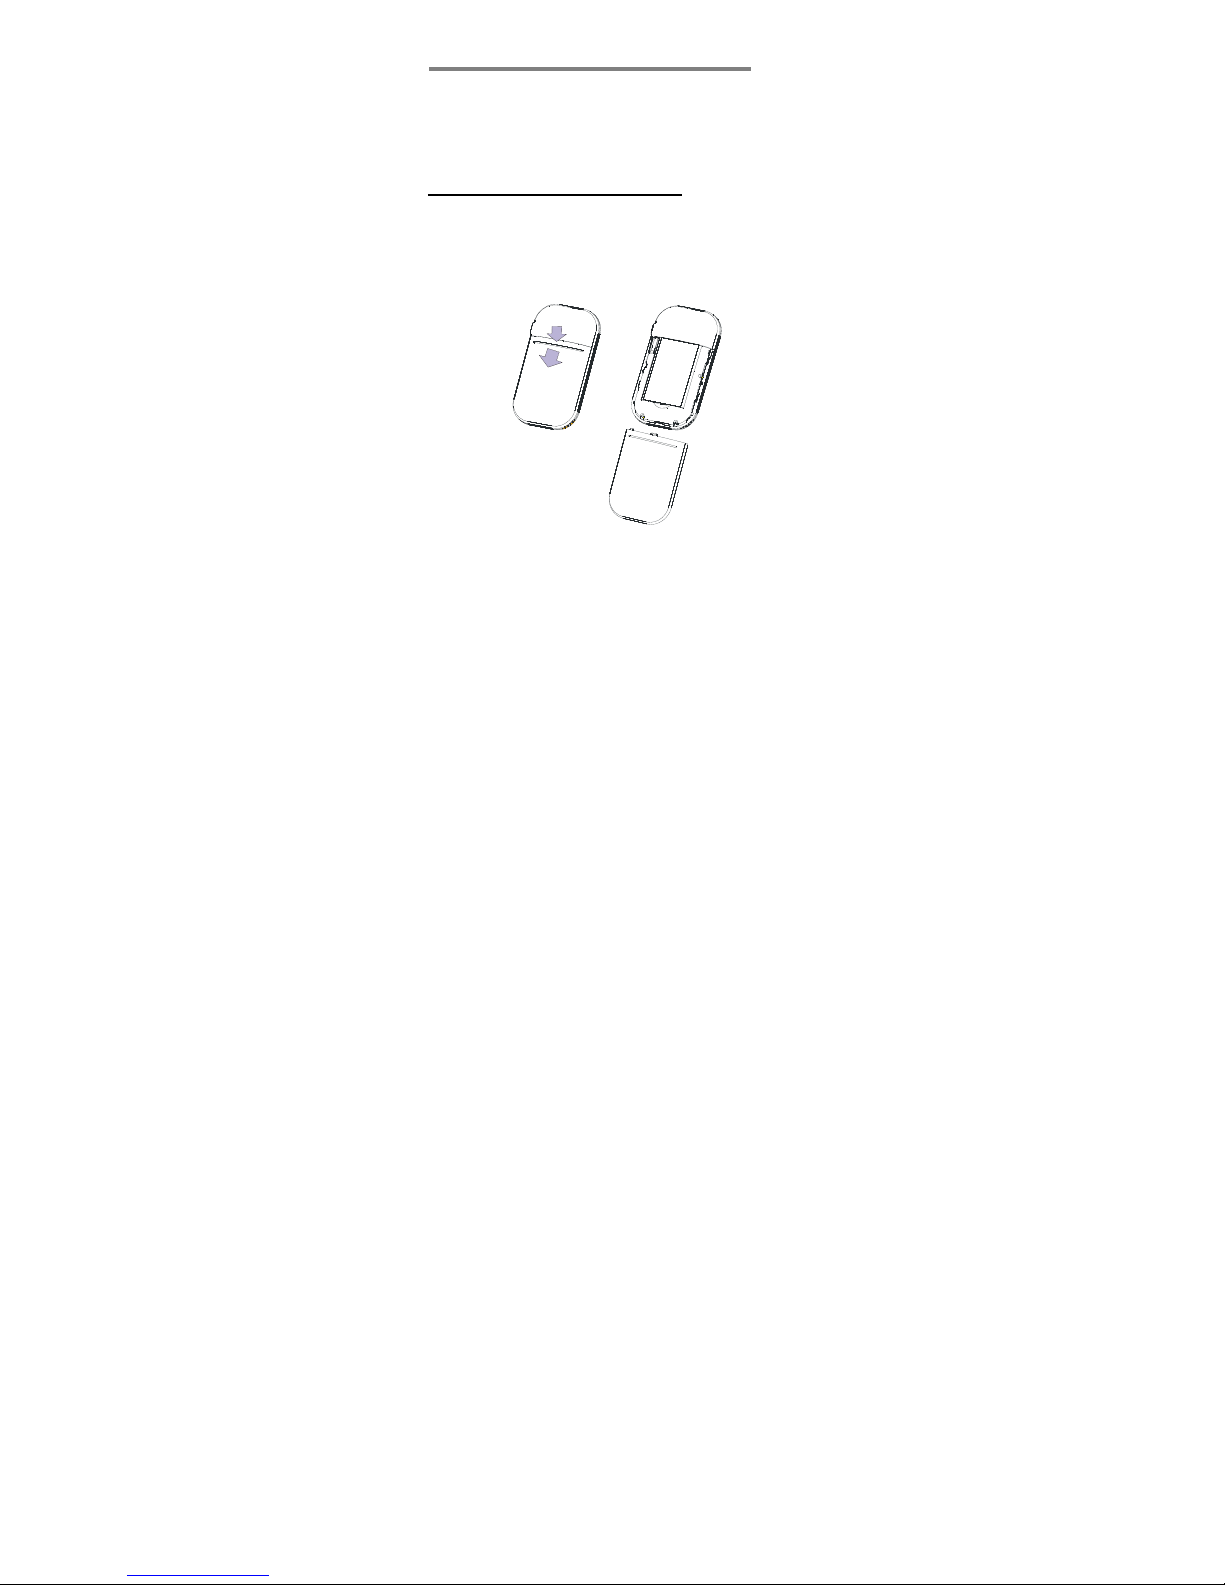
Install the SIM card and battery
1. Switch off the phone, disconnect the power
adaptor and remove the battery.
2. To remove the battery cover press from the top
of the battery cover and slide the cover down.
10
Page 12
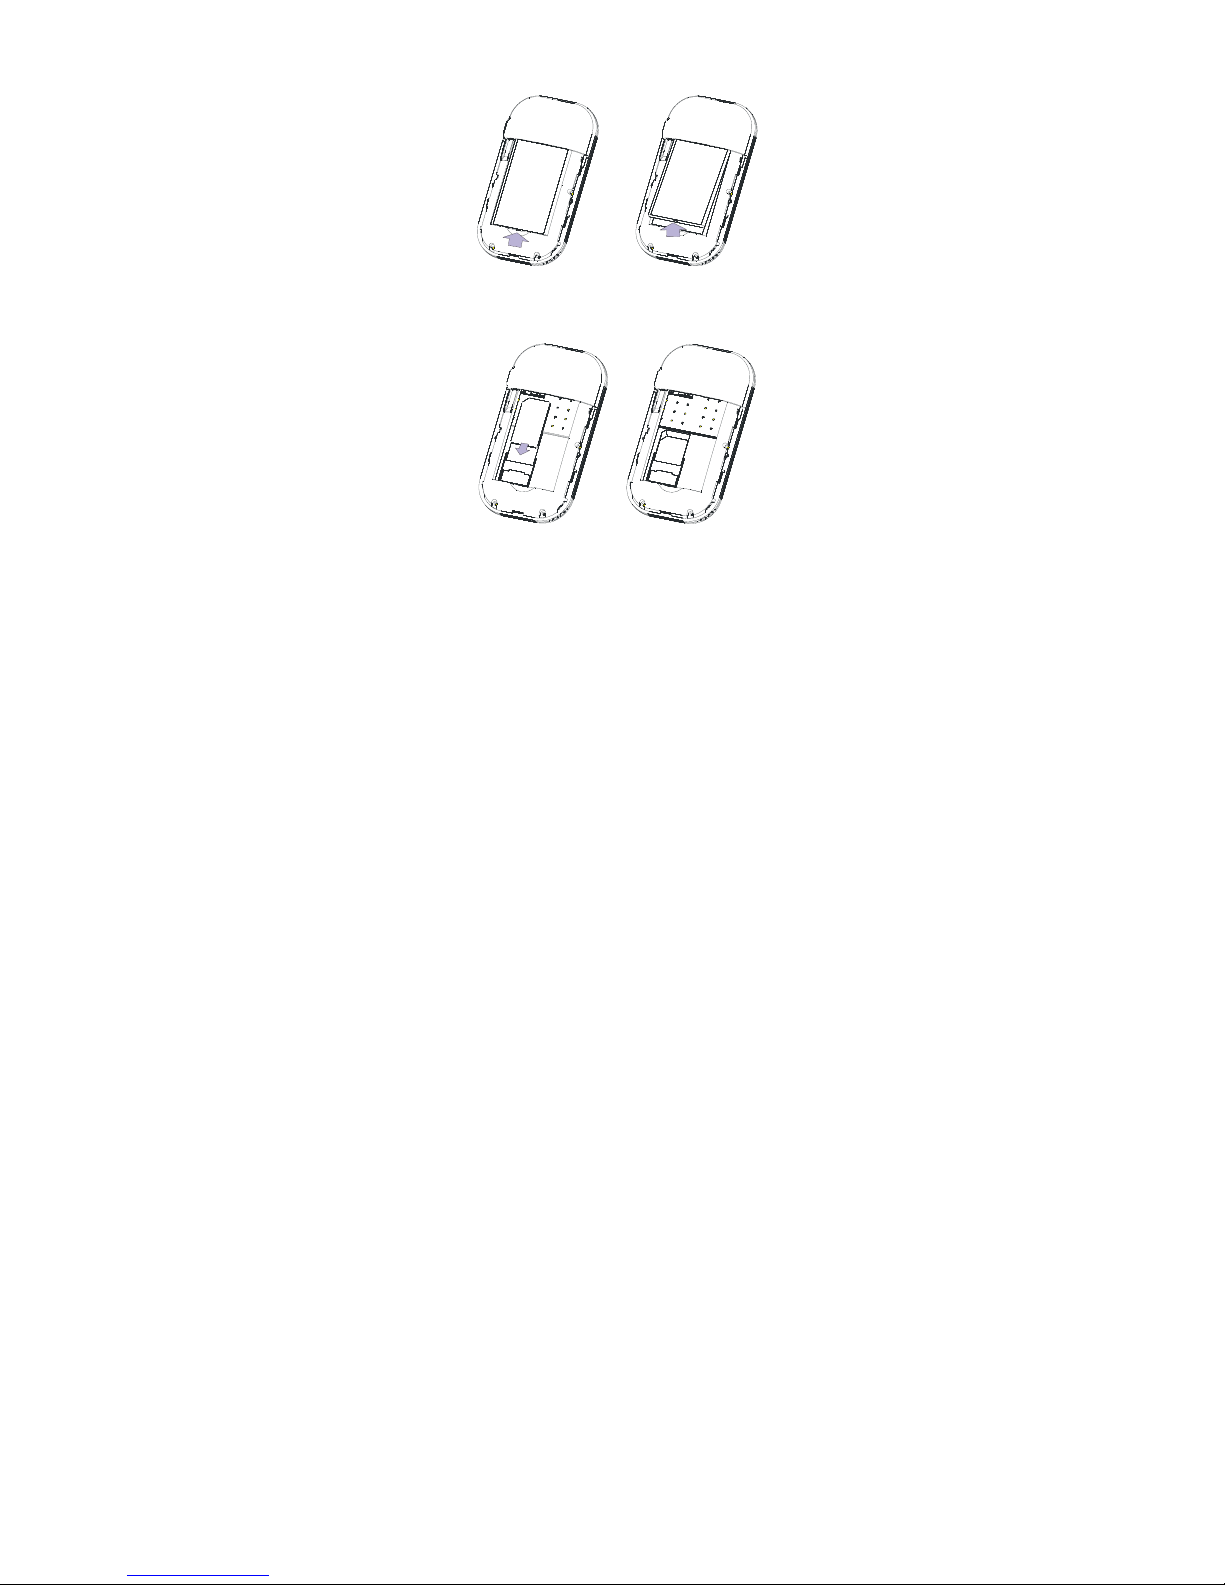
3. Remove the battery by lifting from the bottom
edge.
4. Carefully slide the SIM card into the holder with
the gold connectors face down and angled
corner top left.
11
Page 13

5. Replace the battery by aligning the gold
connectors on the battery with those on the
phone, and push the top end of the battery
down until it clicks into place.
6. Replace the battery cover by placing it flat on
the back of the handset and sliding up until it
clicks into place.
Charge the battery
Warning! Use only batteries and chargers
supplied with or approved by Binatone for this
model. Use of others will invalidate approvals or
warranty and may be dangerous.
Do not charge the battery with the battery cover
removed.
1. Connect the charger lead firmly into the socket
on the side of the handset.
2. Plug the charger into an AC mains socket. The
battery indicator bar scrolls and “Charging…” is
displayed.
3. Charging the battery may take up to 15 hours.
12
Page 14

4. If No charging is displayed, disconnect the
charger, and retry. If charging still fails, contact
the helpline.
5. The battery is fully charged when the bar stops
scrolling. Disconnect the charger from the
phone and the AC outlet.
Connect a compatible headset (Optional)
You can use the Mini Mobile with a Binatone
approved headset (not supplied). The connector
must be a jack plug that inserts in the Power/
Headset socket on the right side of the handset.
When connecting a headset (Binatone supplied
only) for use with this device, pay special attention
to volume levels. Read its user guide for detailed
safety instructions. Do not connect incompatible
products.
When correctly inserted the headset icon will
show on the handset display.
13
Page 15

Headset / Charging Connector
Plug in power adapter to charge battery.
Plug in headset accessory (not supplied) for
headset use.
14
Page 16

Switching On and Off
To switch the phone on and off
To switch off, press and hold End Call until
the display clears.
To switch back on, press and hold End Call
until the display turns on.
Warning! Do not switch on when mobile phone
use is prohibited or it may cause
interference or danger.
To lock the handset keypad
Press and hold the */LOCK button Î the
display shows
To unlock press once the left soft key
Unlock
Then follow with */LOCK button to unlock.
Note: When the keypad is locked, you can
answer, end or reject a call in the normal
way. During a call, you can operate the
phone as usual.
15
Page 17

Making & Answering calls
To make a call
Ensure the phone is switched on and in service.
Key in the telephone number including area
code.
(To add prefix "+" press the “*” key twice
quickly)
Press Talk to dial the number on the display.
To end calls press the End Call button.
Outgoing calls
In standby mode, press Talk to see the last
10 numbers & press Up / Down to go to the
number
Press Talk to dial the number.
To answer a call
When the phone rings, press Talk to answer
it.
Note: you can press right soft key
Silence to
suppress the ringer
16
Page 18

17
Earpiece volume
During a call, press Up / Down to alter the
volume. The volume level displays, & stays
for future calls.
To mute the microphone
During a call, press Options & Down to go
to Mute, & then Select Æ the display shows
.
To unmute, press Options and select
Unmute.
To make a conference call
Conference call is a Network Service that lets up
to four parties talk together. (Check with your
provider)
1. Make a call to the first person.
2. Press the Hold button, to put the call on hold.
3. Make a call to the second person.
4. When the new call answers, press Options
and select Conference to connect all parties.
(Note: Or press Swap to switch between the two
calls.)
Press the End Call button to end the call.
Page 19

Using the Phone Book
You can store names and phone numbers in the
Internal phone book (up to 250) and in the SIM
phone book.
To access the phonebook
In standby mode, press Down.
In a call, select Options, Main Menu,
Phonebook.
Note:
Indicates entries in SIM phone book,
Indicates entries in the Internal phone
book.
To review the Memory Status
To check how many names and numbers are
saved:
Select Menu, Phonebook, Memory Status
to show the phone and SIM memory being
used.
To add a new Phone Book entry
Press Down to open the phonebook
18
Page 20

Select Options, Create & select Save to
SIM or Save to phone,
Press Select to select Name entry then
enter the letters and select Accept for name
confirmation.
Press Down to confirm number entry
Press Select then key in the digits and
select Accept for number confirmation.
Press Save to save the new contact.
To call a stored number
Press Down to open the phonebook
Press Up / Down to find the name you
want, or key the first letter of the name then
Up / Down.
Press Talk to dial the number.
To edit (change) a Phone Book entry
Find the entry to edit, select Options, Edit,
Select then modify the name.
Press Accept to confirm.
Press Down, Select & modify the number.
Press Accept to confirm.
19
Page 21

Press Save to save the change(s).
To delete a Phone Book entry
Find the entr y to edit, select Options, Delete,
Accept
To copy all entries from the phone or SIM
card
Select Menu, Phonebook, Copy
Select From Phone to SIM Card or From
SIM card to Phone
Press Select to confirm the copying
20
Page 22

Call Records
Indicates new missed entries in the Call Log.
If a call is not answered, “1 Missed Call”
displays until Select (to view) or Cancel (to
clear) is pressed.
To review the call records
Select Menu, then Down to Call Records
& then Select
Press Up / Down to Received Calls,
Outgoing Calls, or Missed calls, then
press Select to view that list, or select Call
duration to see the last call duration.
Or: (fr
21
om standby mode)
Press Left / Right to Received Calls or
Missed Calls
Press Talk to show Outgoing Calls
Note: When in a list, press Options to see
Details of it, Dial to dial it, Edit Number to
edit it, Send message to send SMS to it,
Save Number to save to phonebook,
Delete or Delete all to delete entries.
Page 23

SMS (Short Message)
Send & receive text messages. These are saved
in the phone memory (max. 100) or on the SIM
card.
Received SMS are stored in the Inbox and the
icon indicates new messages. Also “1 New
message” displays until Select (to view) or
Cancel (to clear) is pressed.
To access the SMS Menu
Press SMS to display the options:
Write Message – to write a new message
Inbox – to go to your inbox
Outbox – to go to your outbox
Drafts – to go to your draft box
Delete all – to delete all messages
Check Space – to see phone/SIM SMS
space
To write and send a text message
Select SMS, Write Message, as above, to
display Text
22
Page 24

Write your message using the digit / letter
keys.
To send, press Options, Select (Send) to
display Number. Enter the full number,
including area code. Or:
To send to more than one contact, press
Options, Select (Send to Many) one by one
from the phonebook.
Press Accept to send.
Note: This sends it without saving it, but you can
also:
Save - save in drafts without sending
Send and save - send but also save in the
Outbox.
Note: For a number from the Phone Book you
can also press Search and Select the entry
you want.
Note: If the message send fails, it returns to
writing mode.
To read your messages
Select SMS, Inbox to display the message
list, and use Up / Down to step through them.
23
Page 25

Press Select and Up / Down to display the
full text and received date and time of the
message.
Press Options to display:
Reply – reply to the sender of the message
Delete – delete the message from the Inbox
Forward – send the message to another
number
Edit – edit the message from the Inbox
Extract Number – extract the phone number
to save
Dial Back – use the number to dial back
voice call.
Select the option required and follow the
menus.
To review the Drafts, Outbox or Check
Space
Select SMS, and then follow the menus.
To delete all Messages
24
Select SMS, Delete All to display Delete All,
Delete Inbox, Delete Outbox, Delete
Drafts
Page 26

Select the option to delete the required
messages.
Settings
Allows you to adjust various settings on the phone,
and also to reset them to their factory default
values.
Press Menu, then press Down to go to
Settings, and Select to display the list of
settings available.
Phone Settings
Language – language used on the display
Display settings – Backlight duration, Date time
display enable/disable at idle screen
Security – to need a PIN before allowing use
(Note: some
SIM cards don’t allow it turned
off)
Warning: if you enter an incorrect PIN three
times the SIM card is blocked, and you
must enter the PUK number or contact
your service provider, to unblock it and
set a new PIN code.
25
Page 27

26
PIN and PUK numbers come with your SIM
card.
Factory reset – default values for phone
settings. This requires a Password.
(Default password = 0000)
Clock settings
Date & Time – the displayed date and time
Date Format – YYYY-MM-DD, MM-DD-
YYYY or DD-MM-YYYY
Time Format – 12 hour or 24 hour
Call Settings*
Auto redial – auto-dial up to 10 redial
attempts
Anykey answer – so any key press will
answer a call
Send own number – withhold your number
* Some network services may not be available
Network Settings**
Call waiting – press Talk to answer 2nd call /
hold 1st
Page 28

Diverts – to set different incoming call diverts
such as Unconditional Divert, Busy Divert, No
Answer Divert, No Service Divert
Call Barring – to restrict making and receiving
calls
Network select – to select a different network
at manual or automatic modes.
** You may need to check with your service
provider.
Sound profiles –
Five sound profiles for quick changes to the phone
sounds when in different places. The profile
names General, Meeting, Outdoor, Silent and
Customise can be changed and each profile can
be personalised to give a different Ring tone,
Message tone, Call alert, Ring volume, Keytone
volume, Vibrator on/off and Alarm tone.
Extra
Alarm
You can set three alarms to alert once only or on
selected days. When it sounds, press Cancel to
27
Page 29

stop it, or Snooze to delay the alarm for another
five minutes.
Press Menu, Extra, Down to Alarm &
Select
Select from Alarm 1 or Alarm 2
Select On or Off – the current selection is
ticked
If On is selected, set the time & One Time or
Weekly where each day can be selected
using the Talk key.
The
icon will appear on the display.
To Do List
You can save message in the to do list as
reminder.
Press Menu, Extra, Down to To Do List &
Select
Select Add
Key in 4 digits YYYY for year then 2 digits
MM for month and 2 digits DD for day.
Select Accept to go next to time entry
28
Key in HH (hour): MM (minute).
Page 30

Select Accept to go next to write the text
messages.
Write your message using the digit / letter
keys.
Select Accept to save the messages
You can review the saved messages by Browse
under To Do List menu and apply necessary
options:-
View – to review the message content, date
and time
Edit – to make change in date, time and content
Delete – to delete unwanted messages
Delete All – to delete all unwanted messages.
Calculator
You can do simple mathematical operation – add,
subtract, multiply and divide.
29
Page 31

Troubleshooting
“Call failed”
appears
Check dialled number is correct, with full
area code
SIM card fitted –
only makes
emergency call
Some SIM cards are thinner than others.
Lightly press the SIM card holder to
ensure a proper contact is made.
The phone is in energy saving mode and
the display has switched off (Note: You
can still receive calls). Press any key and
the display will switch back on.
The mobile phone
display is blank
(screen off)
The phone is switched off. Press Power
On/Off for 3 seconds to switch it on again.
If you are away from your network
provider, your phone may link with
another GSM network.
Phoning outside
your own country
Contact your network provider for
additional costs incurred using the phone
abroad.
You cannot make a call if the phone has
no signal.
If your display says Limited Service or
SOS, the phone cannot receive a signal
from your network, or has run out of
credit, so can only call the emergency
number 112 (or 999).
Can an emergency
call be made
without a signal or
credit?
You can call 112 (or 999) if there is no
credit on your phone.
30
Page 32

How can reception
be improved?
If the signal is weak, try another location
to make or continue with a call, e.g. when
indoors move towards a window.
Reception is often poor in elevators,
tunnels or underground railways and car
parks.
Can I suppress /
withhold my
telephone number?
If you want withhold your phone telephone
number, use the main menu under Call
settings/ Send own number. (This network
service may not be available)
displayed, unit
does not respond.
Slide the switch on the right hand side of
the phone upwards in the direction of the
“open lock” symbol.
What is the SMS
service centre
number?
A number for the short message service
usually stored on the SIM card by the
operator and should not need to be
entered or changed.
When do I start to
incur call charges?
Charges start when a call connects to a
person or an answering machine. There is
no charge for writing or receiving an SMS,
only when sending an SMS, and none for
using phone features e.g. alarm clock.
Did I successfully
send my SMS?
If your SMS is in the SMS Outbox then it
was OK, or you can get confirmation after
the SMS is delivered – contact your
operator for details.
31
Page 33

Guarantee and Service Information
The Mini Mobile is guaranteed for 12 months from the
date of purchase on your sales receipt, but does not
cover any faults or defects caused by accidents, misuse,
fair wear and tear, neglect, lightning, tampering with the
equipment, or any attempt at adjustment or repair other
than through approved agents.
Please keep your sales (till) receipt (this is your
guarantee).
You should also keep the original packing material.
In the unlikely event that you need to return your Mini
Mobile to our Repair Center while it is under guarantee,
there may be a handling charge.
While the unit is under Guarantee
1. Pack up all of the Mini Mobile, using the original
packing. Remember to include the power adaptor.
2. Return the unit to the shop where you bought it,
making sure you take your sales receipt.
32
Page 34

33
After the Guarantee has expired
1. Follow step 1 and 2 as for repair under Guarantee.
Then …
2. Make sure you include your name & address, and
cheque or postal order for the repair charge, with the
Mini Mobile.
3.
Return your Mini Mobile GSM to the address given.
This does not affect your statutory rights.
Page 35

Battery information
The rechargeable battery needs several charge and
discharge cycles to reach full capacity! When the
operating time becomes noticeably shorter than normal,
it is time to buy a new battery.
Use only batteries & chargers approved by Binatone and
unplug the charger when not in use. Don’t leave the
battery connected to a charger for more than 24hr overcharging may shorten its life. If left unused a
charged battery will discharge itself over time.
Temperature extremes affect the battery charge - try to
keep the battery between 15°C and 25°C.
Use the battery only for its intended purpose.
Never use a damaged charger or battery.
Keep metal objects away from the battery terminals, as
short-circuiting them may damage the battery or the
connecting object.
Dispose of batteries according to local recycling
regulations, not as household waste and not in a fire.
Additional safety Information
Operating environment
Follow regulations in force in any area and always
switch off your phone whenever it is forbidden to use it,
or when it may cause interference or danger, e.g. when
34
Page 36

35
driving, on an aircraft, in a petrol station, in a hospital or
any other area with warning signs.
Pacemakers
Pacemaker manufacturers recommend keeping at least
20cm between a handheld wireless phone and a
pacemaker to avoid potential interference with the
pacemaker. This is consistent with independent
research by and recommendations of Wireless
Technology Research.
If you use a pacemaker, don’t carry the phone in a
breast pocket, use the ear opposite the pacemaker and
if you suspect that interference is taking place, switch off
your phone immediately.
Hearing aids
Mobile phones may interfere with some hearing aids. In
the event of interference, contact your hearing aid
provider.
Other medical devices
Any radio transmitting equipment, including mobile
phones, may interfere with inadequately protected
medical devices. Consult a physician or the medical
device supplier to check if it is shielded adequately from
external RF energy.
Placing the unit
Do not place the handset in the area over an air bag or
in the air bag deployment area.
Page 37

36
Parts of the phone are magnetic and may attract small
objects, so check there are no sharp items, particularly
by the earpiece.
Do not place credit cards or other magnetic storage
media near the phone, because information stored on
them may be erased.
Emergency calls
All mobile phones use radio signals and coverage in all
areas cannot be guaranteed, so never rely solely upon
your mobile phone for essential communications (e.g.
medical emergencies).
Emergency calls may not be possible on all wireless
phone networks or when certain network services and/or
phone features are in use. You may need to turn those
features off first before you can make an emergency
call. Consult this guide and your network service
provider.
To make an emergency call:
Ensure the phone is switched on, is in idle mode and
has a signal. Some networks require a valid SIM card is
fitted. Dial the emergency number (e.g. 112, 999) and
press Talk.
When making an emergency call, remember to give all
the necessary information as accurately as possible.
Remember that your wireless phone may be the only
means of communication at the scene of an accident -
do not cut off the call until given permission to do so.
Page 38

Declaration of Conformity
FONEXION SPAIN S.A. declares that the Mimo Mobile
GSM, identified as Binatone MiMo, complies with the
essential protective requirements and objectives of the
European directive 1999/05/CE.
You can download the entire declaration from the
website
http://www.fonexion.com/doc
–
37
Page 39

38
Technical Specifications
Standard GSM Mobile
Frequency range GSM-900: 880–915Mhz (uplink)
925–960Mhz (downlink)
DCS-1800: 1.71–1.79Ghz
(uplink) 1.80–1.88Ghz (downlink)
Channel
bandwidth
200Khz
Operating time
(with fully charged
battery and
network/ location
dependant)
Standby: 130 hours approx.
Talking: 2.5 hours approx.
Battery charge time: 15 hours
Temperature
range
Operating: 0 ºC to 40 ºC
Storage: -20 ºC to 60 ºC
Electrical power Phone: Li-ion 3.7V 730mAh
rechargeable battery pack
Travel Charger: 100~240VAC /
5VDC 150mA
Page 40

Binatone Telecom plc operates a policy of
continuous product improvement, and so reserves
the right to make changes to the product and
functions without notice.
UK (BTP) Version 1.0, Nov 2009
39
 Loading...