

Page 1

USER GUIDE
Eclipse Plus / Eclipse Plus-2 /
Eclipse Plus-3 / Eclipse Plus-4
DECT Telephone
with Answering Machine
Binatone North America
5875 Castle Creek Pkwy Suite 315
Indianapolis, IN 46250
TEL: (1) 317 436 8383
Visit our website: www.idectonline.com
Contact Customer Service in the US and Canada at (1) 317 436 8383
Before operating this set,
please read these instructions carefully.
THIS EQUIPMENT IS NOT DESIGNED FOR MAKING
EMERGENCY
TELEPHONE CALLS WITHOUT MAINS POWER.
ALTERNATIVE ARRANGEMENTS SHOULD BE MADE FOR
ACCESS TO EMERGENCY SERVICES.
Page 2

1
Table of Contents
1
IMPORTANT SAFETY INSTRUCTIONS........................................ 6
2
INSTALLING YOUR PHONE ....................................................... 9
2.1
Connecting the Base Station ................................................... 9
2.2
Installing and Charging the Rechargeable Batteries in the Main
Eclipse Handset ....................................................................... 9
2.3
Installing and Charging the Rechargeable Batteries in an
Additional Handset ................................................................ 10
2.4
Removing the back cover of the Main Eclipse Handset ......... 10
3
GETTING TO KNOW YOUR PHONE ......................................... 11
3.1
Overview of the Main Eclipse Handset and the Base Station 11
3.2
Display Icons and Symbols on the Main Eclipse Handset ...... 14
3.3
Overview of the Handset, Base Station and *Charging Pod
Error! Bookmark not defined.
3.4
Display Icons and Symbols ......... Error! Bookmark not defined.
3.5
Overview of the Additional Handset and Charging Pod (for
ECLIPSE-2 / -3 / -4 models only) ............................................ 16
3.6
Display Icons and Symbols on the Additional Handsets (for
ECLIPSE-2 / -3 / -4 models only) ............................................ 19
3.7
Menu Map and Menu Navigation on the Main Eclipse Handset
.............................................................................................. 21
3.8
Menu Map and Menu Navigation on the Additional Handsets
(for ECLIPSE-2 / -3 / -4 models only) ...................................... 22
3.9
Text and Number Entry.......................................................... 23
Page 3

2
3.9.1 Character Map of the Main Eclipse Handset ......................... 23
3.9.2 Character Map of the Additional Handsets (for ECLIPSE-2 / -3 /
-4 models only) ...................................................................... 24
4
USING YOUR PHONE .............................................................. 25
4.1
Make a Call ............................................................................ 25
4.1.1 Pre-dialling ............................................................................ 25
4.1.2 Direct Dialling ........................................................................ 25
4.1.3 Call from the Redial List(5 last number on handset) ............. 25
4.1.4 Call from the Call Log(30 name & number call log) ............... 26
4.1.5 Call from the Phonebook(30 entries on handset) ................. 26
4.2
Answer and End a Call ........................................................... 27
4.3
Handset Speakerphone ......................................................... 27
4.4
Adjust Earpiece Volume ........................................................ 27
4.5
Adjust Speaker Volume ......................................................... 27
4.6
Mute/Unmute the Microphone ............................................ 28
4.7
Paging .................................................................................... 28
4.8
Switching the Handset On/Off............................................... 28
4.9
To Lock/Unlock the Keypad ................................................... 29
4.10
Make an Internal Call (Multi - handset models only) ............ 29
4.11
Initiate an Intercom Call ........................................................ 29
4.12
Answer an External Call during an Intercom Call ................... 30
4.13
Initiate an Intercom during a Call .......................................... 31
4.14
Transfer an External Call to another Handset ........................ 32
5
DIRECT ACCESS MEMORY ...................................................... 33
Page 4

3
5.1
Add Direct Access Memory ................................................... 33
5.2
Delete Direct Access Memory ............................................... 35
6
PHONEBOOK ......................................................................... 36
6.1
Store a Contact in the Phonebook ......................................... 36
6.2
Access the Phonebook .......................................................... 38
6.3
Modify a Phonebook Entry .................................................... 39
6.4
Delete a Phonebook Entry ..................................................... 40
6.5
Delete All Entries from the Phonebook List ........................... 41
7
CALLER DISPLAY (NETWORK DEPENDENT) ............................ 42
7.1
Call Log .................................................................................. 42
7.1.1 Access the Call Log ................................................................ 42
7.1.2 Save a Call Log Entry into the Phonebook ............................. 43
7.1.3 Delete a Call Log Entry ........................................................... 44
7.1.4 Delete All Entries in the Call Log ............................................ 44
7.2
Redial List .............................................................................. 45
7.2.1 Access the Redial List............................................................. 45
7.2.2 Save a Redial Number into the Phonebook ........................... 45
7.2.3 Edit a Redial Number ............................................................. 46
7.2.4 Delete a Redial Number ........................................................ 47
7.2.5 Delete All Entries from the Redial List ................................... 47
8
CLOCK AND ALARM SETTINGS ............................................... 49
8.1
Date and Time Settings.......................................................... 49
8.1.1 Change the Time Format ....................................................... 51
8.1.2 Change the Date Format ....................................................... 52
Page 5

4
8.2
Alarm Settings ....................................................................... 53
8.2.1 Set the Alarm Melody............................................................ 54
9
HANDSET OPTS ...................................................................... 56
9.1
Set the Ring Volume .............................................................. 56
9.2
Set the Ring Tone ................................................................... 57
9.3
Set the Key Tone .................................................................... 58
9.4
Rename the Handset ............................................................. 59
9.5
Set the Display Language ....................................................... 60
9.6
Set Auto Hang-up .................................................................. 61
10
SETTINGS ............................................................................... 62
10.1
Handset Registration ............................................................. 62
10.2
Register Additional Handsets ................................................ 62
10.3
Deregister your Handset ....................................................... 63
10.4
Change the Recall Time ......................................................... 64
10.5
Reset the Unit ........................................................................ 65
10.6
AREA CODE ............................................................................ 66
11
ANSWERING MACHINE .......................................................... 67
11.1
Turning the Answering Machine On/Off ............................... 67
11.2
Answering Machine Settings ................................................. 68
11.2.1 Set the Ring Delay ................................................................. 68
11.2.2 Activate/Deactivate Remote Access ...................................... 69
11.2.3 Change the Voice Language................................................... 70
11.3
Message Playback ................................................................. 71
Page 6

5
11.4
Delete All Messages .............................................................. 72
11.5
Announcement ...................................................................... 72
11.5.1 Record a Personal Announcement ........................................ 73
11.5.2 Listen to an announcement ................................................... 74
11.5.3 Delete a Personal Announcement ......................................... 75
11.6
Change Security Code ............................................................ 76
11.7
Remote Access ...................................................................... 76
11.7.1 Access the Answering Machine Remotely ............................. 77
12
help ....................................................................................... 78
13
General information .............................................................. 80
13.1
If your product is not working properly... .............................. 80
13.2
Important safety instructions ................................................ 80
13.3
Unplug this cordless phone immediately from an outlet if: .. 81
13.4
Battery Safety Instructions .................................................... 82
13.5
Consumer Products and Accessories Limited Warranty
("Warranty") .......................................................................... 82
13.6
Exclusions .............................................................................. 84
13.7
FCC, ACTA and IC regulations ................................................. 86
14
TECHNICAL DETAILS ............................................................... 89
15
Industry Canada .................................................................... 90
Page 7

6
1 IMPORTANT SAFETY INSTRUCTIONS
WARNING
Do not place your phone in the bathroom or other humid areas.
Location
When choosing a location for your new phone, here are some important
guidelines you should consider:
Avoid sources of noise and heat, such as motors, fluorescent lighting,
microwave ovens, heating appliances and direct sunlight.
Avoid areas of excessive dust, moisture and low temperature.
Avoid other cordless telephones or personal computers.
Never install telephone wiring during a lightning storm.
Never install telephone jacks in wet locations unless the jack is
specifically designed for wet locations.
Never touch non-insulated telephone wires or terminals, unless the
telephone line has been disconnected at the network interface.
Use caution when installing or modifying telephone lines.
HANDSET RANGE
Optimal range is reached when there are no other electrical appliances
working within the range area. Any obstruction between the base and
handset will also reduce the range significantly.
SIGNAL STRENGTH
When out of range of the corded base, the screen shows OUT OF RANGE.
If you are on a call, the line will hang up. Move back within in range. The
cordless handset will automatically re-connect to the corded base.
Setting up
IMPORTANT
The base must be plugged into an electrical outlet at all times. Do not
connect the telephone line cord into the telephone wall jack until the
handset is fully charged. Only use the adapter and telephone line cord
supplied with the product.
WHICH POWER ADAPTER?
The power adapter with the smaller pin is for the base unit and the
power adapter with the bigger pin is for the charger unit (only for
multi-handset packs).
Page 8

7
Package Content for Eclipse model
The package contains the following items:
1 Eclipse Handset
1 Base Station
1 Mains Power Adapter for the Base Station
1 Telephone Line Cord
1 AAA NiMH Rechargeable Battery Pack
1 Back Cover for the Eclipse Handset
1 Back Cover Unlock Tool
1 User Guide
Note: If you have purchased a Eclipse-2, Eclipse-3 or Eclipse-4 system,
you will also have the corresponding extra handset(s) and batteries, a
charging pod and a back cover for each extra handset.
Connection and Conditions for Use
You can connect your phone to a direct exchange line (DEL) on a local
exchange with its own phone number; to an extension socket connected
to a DEL; or to an extension on an approved compatible PBX. Do not
connect as an extension to a pay phone.
The ringer equivalence numbers (REN) of all equipment (phones, fax
machines, modems, etc.) connected to an exchange line must not
add up to more than 4, otherwise one or more of them may not ring
and/or answer calls correctly. The phone has a REN of 1, and most
other telephones have a REN of 1 unless marked otherwise.
Page 9

8
Handset & Base Connection
1) When purchased, all handsets are already registered to the base
unit and should link to it when they are all powered up.
2) To use your cordless handset and base unit together, you must be
able to establish a radio link between them. The signal between the
handset and the base unit is in accordance with the normal
standards for a DECT phone: Maximum range up to 300 metres
outdoors or 50 metres indoors. Be aware that:
> Large metal objects, such as refrigerators, mirrors or filing
cabinets, between the handset and the base unit may block the
radio signal.
> Solid structures, such as walls, may reduce the signal strength.
> Electrical equipment may cause interference and/or affect the
range.
3) Do not place the base unit close to another telephone, TV or audio
equipment - it may cause interference.
4) Putting the base unit as high as possible ensures the best signal.
5) If the sound in the earpiece becomes faint or distorted during a call,
you may be going out of range of the base unit. Move nearer to the
base unit within 20 seconds; otherwise the line may be cut off.
Page 10
9
2 INSTALLING YOUR PHONE
2.1 Connecting the Base Station
1) Plug the mains power cable and telephone line
cord
into the base station.
2) Plug the power adapter into a 100 - 240Vac,
50 - 60Hz mains power socket, and the
telephone line cord
into a telephone line socket.
Warning:
Always use the cables provided in the box.
Use only the supplied adaptor. Using other power
cables may damage the unit.
Note:
Place the base unit within easy reach of the mains power socket.
Never try to lengthen the mains power cable.
The base station needs mains power for normal operation, and the
cordless handsets will not work without it.
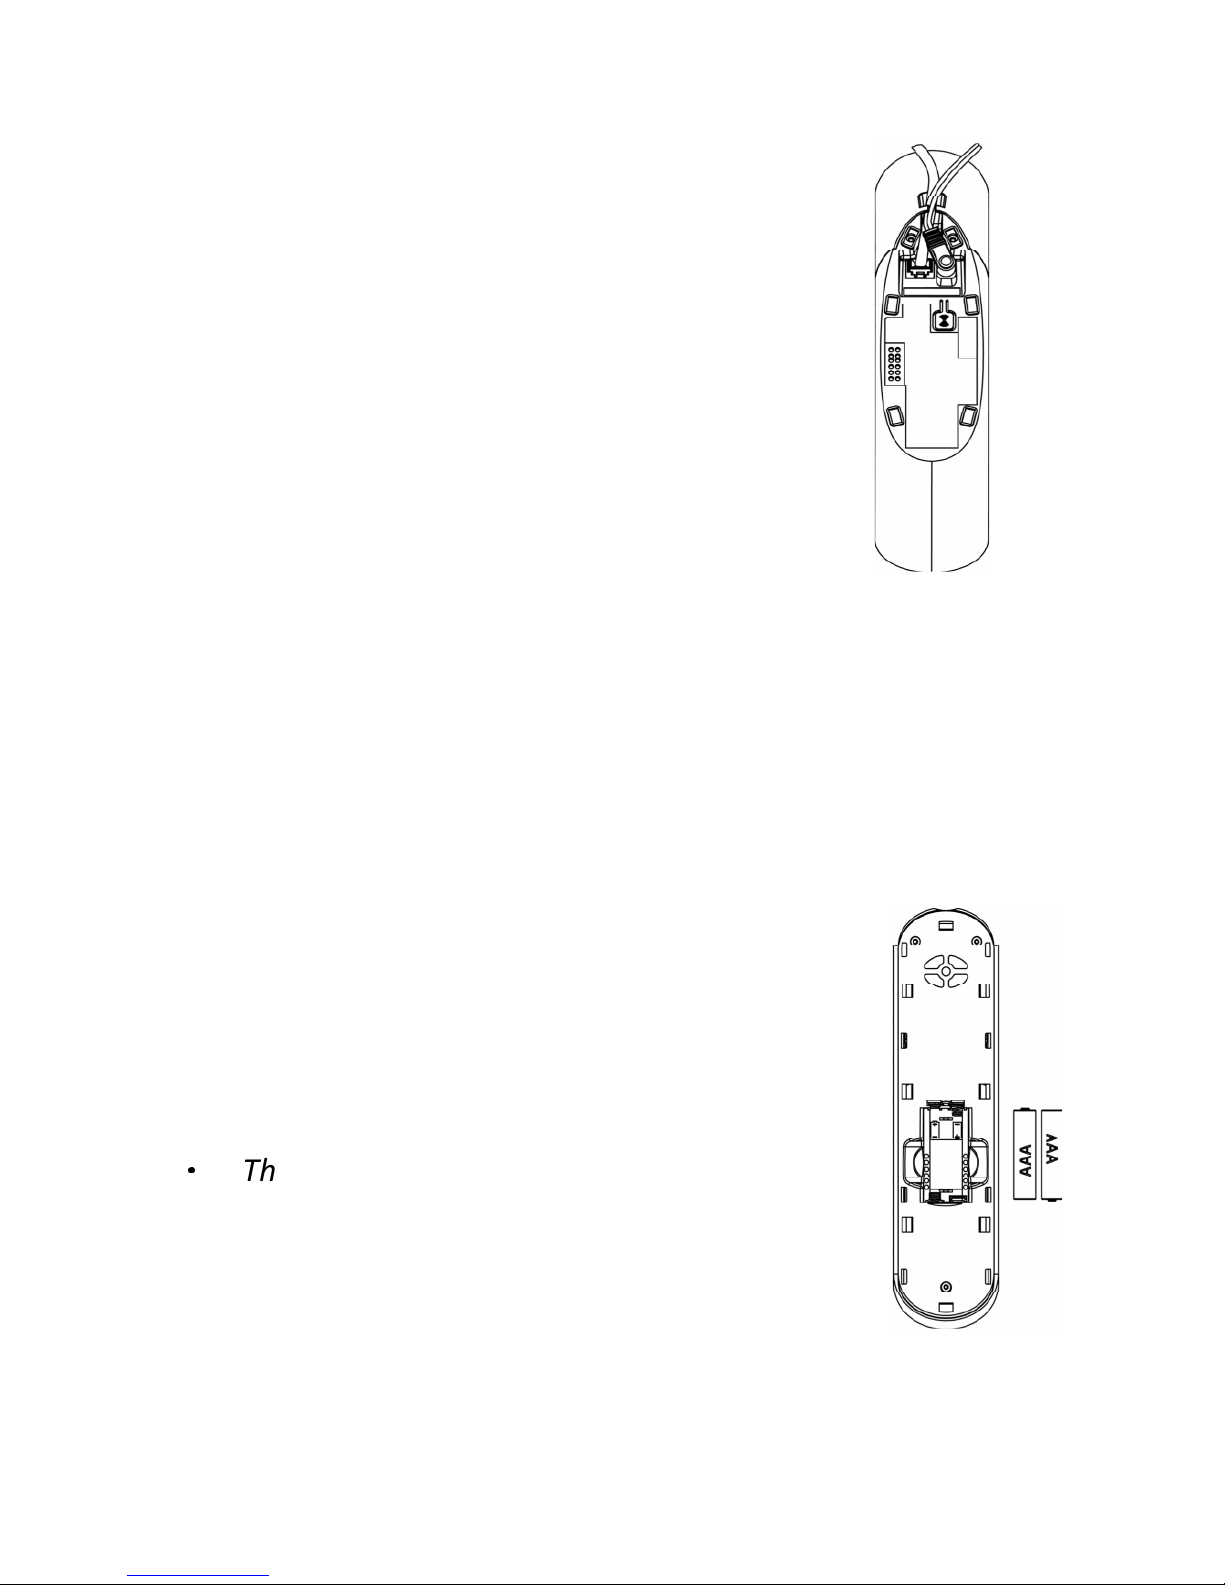
2.2 Installing and Charging the Rechargeable Batteries in the Main
Eclipse Handset
1) Insert the 2 supplied batteries into the battery compartment,
observing the correct polarity (see markings inside battery
compartment).
Warning: Use only the supplied NiMH rechargeable
batteries.
2) Place the back cover over the back of the
handset and press down until it clicks into place.
3) Place the handset on the base and charge for 15
hours before using the handset for the first time.
•
The handset will give a double beep when it
is properly placed on the base and the
battery charging indicator on the base lights
up to indicate charging.
Note: The handset may become warm when the
batteries are being charged or during prolonged periods of use. This is
normal and does not indicate a fault.
T
o the
telephone line
socket
To the mains
power socket
Page 11

10
2.3 Installing and Charging the Rechargeable Batteries in an
Additional Handset
1) Insert the 2 supplied batteries into the
battery compartment, observing the
correct polarity (see markings inside
battery compartment).
Warning: Use only the supplied NiMH
rechargeable batteries.
2) Place the back cover over the back of the
handset and press down until it clicks
into place.
3) Place the handset on the charging pod
and charge for 15 hours before using the
handset for the first time.
•
The handset will give a double beep when it is properly placed
on the charging pod and the battery charging indicator on the
charging pod lights up to indicate charging.
2.4 Removing the back cover of the Main Eclipse
Handset
Insert the supplied key into the groove as
indicated in the illustration and twist it
clockwise to release the back cover.
If you have a broadband line
If you connect your telephone to a line with a
broadband connection, you will need to insert a
micro-filter between the telephone and the telephone line; otherwise
you may get interference between the telephone and the broadband,
which could cause problems.
In a home with broadband, every telephone must have a micro-filter
connected, not just the one at the telephone point that your modem is
connected to.
If you need more broadband micro-filters contact your broadband
supplier.
Page 12
11
3 GETTING TO KNOW YOUR PHONE
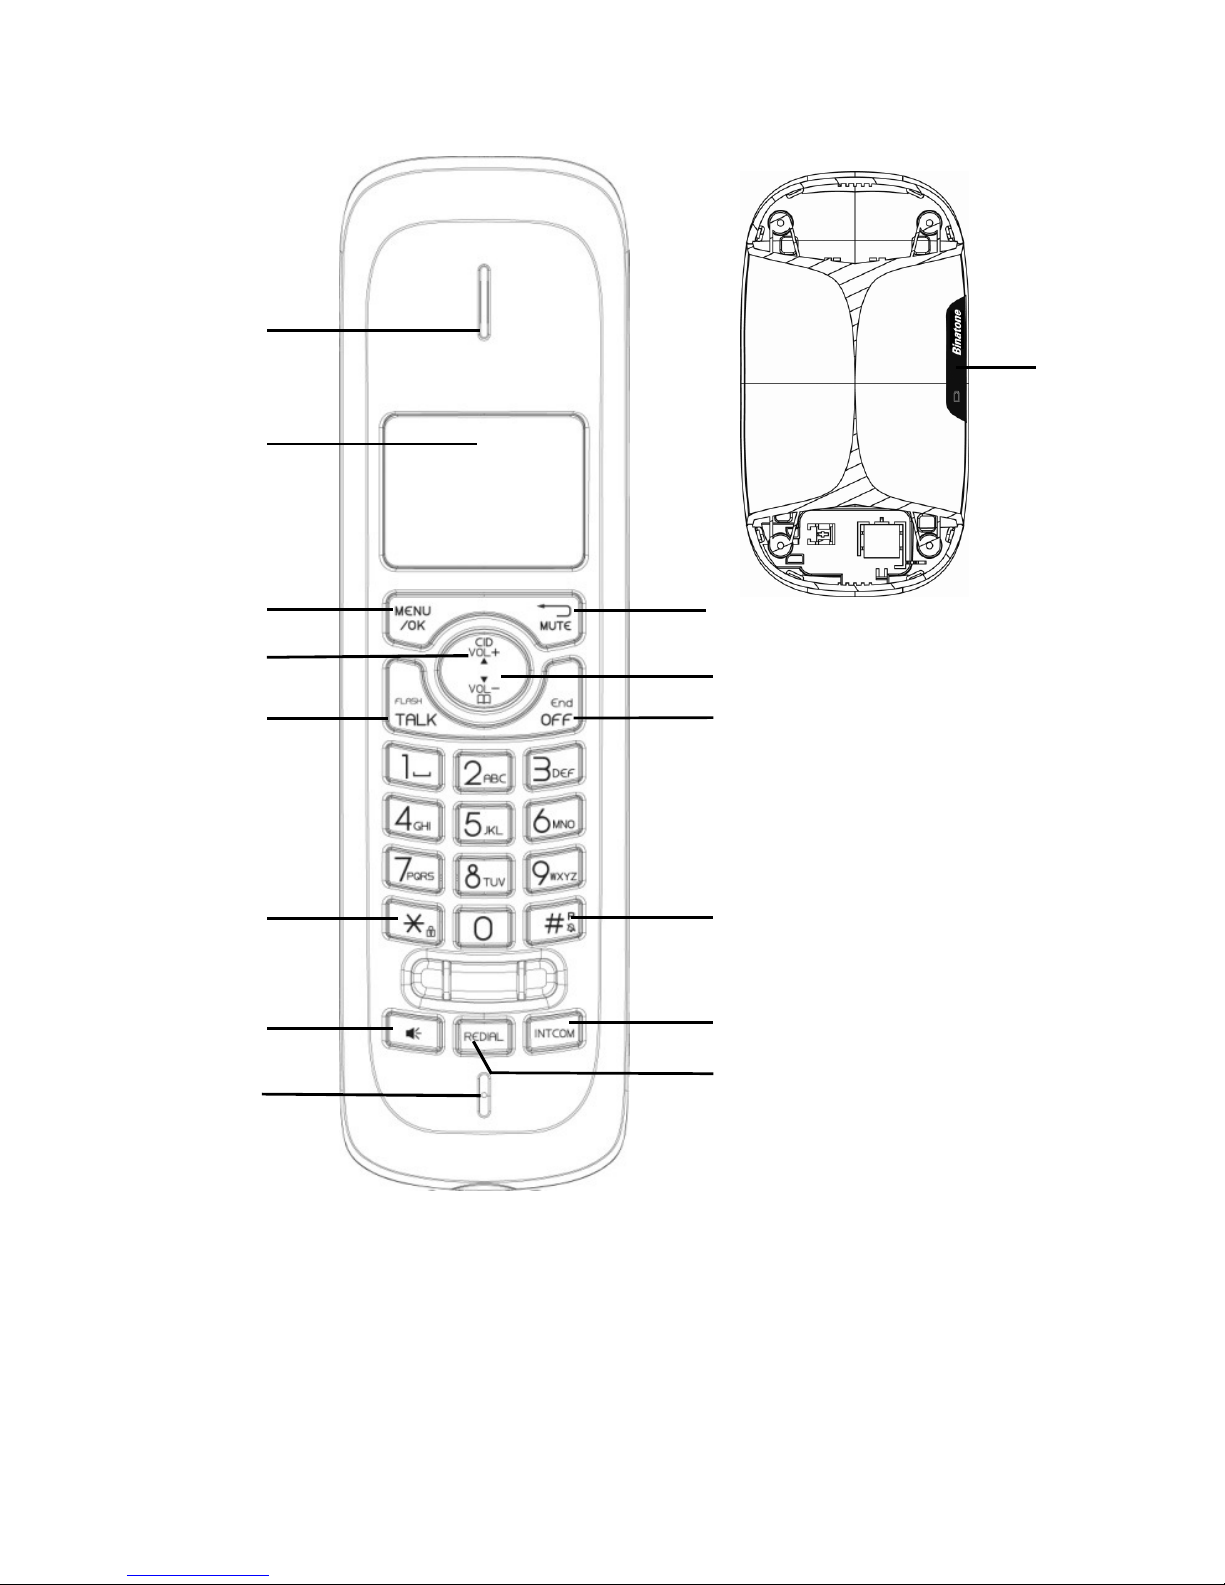
3.1 Overview of the Main Eclipse Handset and the Base Station
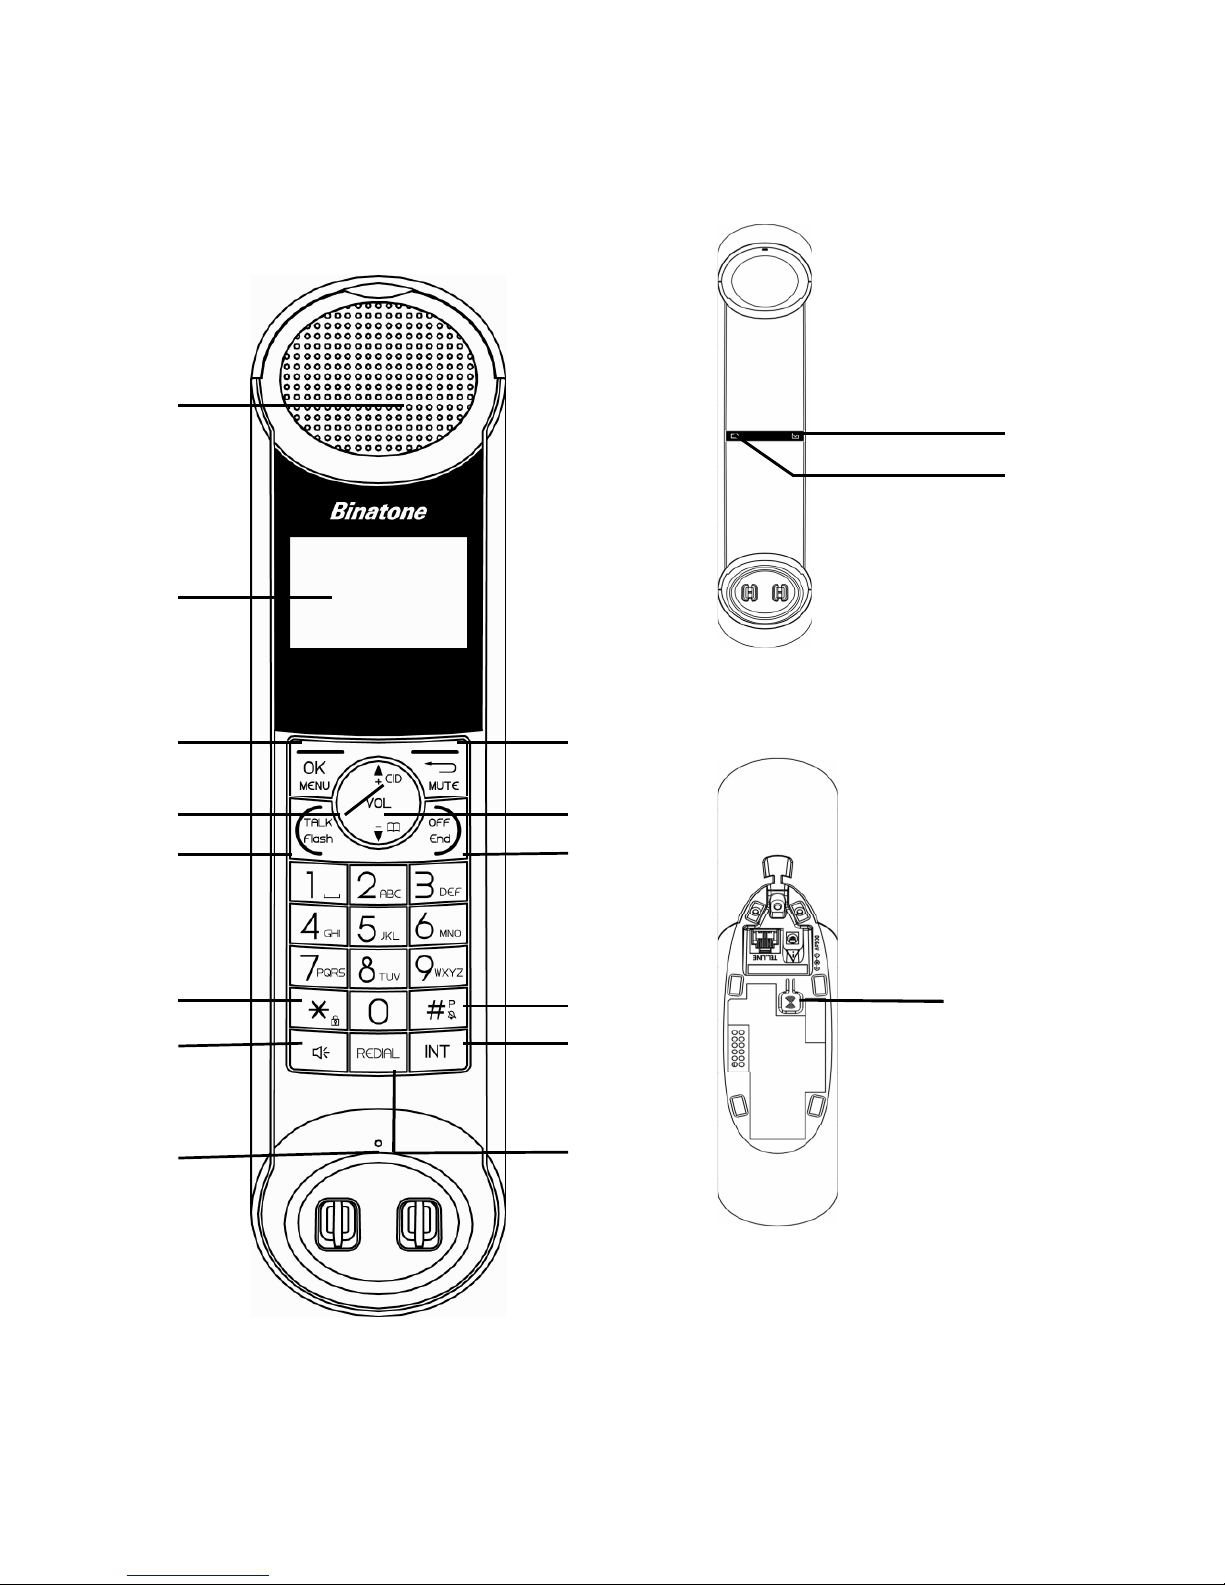
①
②
③
④
⑤
⑥
⑦
⑧
⑨
⑩
⑪
⑫
⑬
⑭
Eclipse Handset
Base station (top)
⑮
⑯
Base station (b
ottom
)
⑰
Page 13

12
①
EARPIECE
②
LCD DISPLAY
Displays menus, phone numbers, handset
name, date/time
and status icons.
③
M
In standby mode, press to enter the Main
Menu list.
Press to select an item, or to save an entry
or setting.
④
+
In menu mode, press to scroll up.
During a call or message playback, press
to increase the volume.
In standby mode, press to access the call
log
(CID)
.
⑤
T
In standby mode, p
ress to make or answer
a call.
During a call, press to send a Flash signal
(also called Recall) for network services.
⑥
*
In standby mode, p
ress and hold to switch
the key lock on or off.
⑦
F
In standby mode, press to make or answer
a call in speakerphone mode.
During a call or message playback, press
to switch between speakerphone and
earpiece.
⑧
MICROPHONE
⑨
m
Press to cancel an action.
During pre-dialling, press to delete the last
digit entered.
During a call, press to mute the
microphone, and press again to resume
conversation.
⑩
-
In menu mode, press to scroll down.
During a call, or message playback, press
to decrease the volume.
In standby mode, press to access the
phonebook list.
Page 14
13
⑪
O
During a call, press to
end the call
.
During programming, press to cancel and
exit without making changes.
In standby mode, press and hold to power
the handset on/off.
⑫
#
In standby mode, p
ress and hold to turn the
handset ringer on/off.
Press and hold to add a dialling pause when
dialling or entering numbers into the
phonebook.
⑬
I
In standby mode or during a call, press to
initiate an intercom call or transfer a call.
⑭
R
In standby mode, press to access the redial
list.
⑮
Lights up in Green when the answering
machine is on.
Flashes if there are new messages.
Flashes rapidly if the answering machine
memory is full.
⑯
Lights up in Red when a handset is on the
base to indicate it is charging.
⑰
Press to find
/
page
all registered handsets.
Press the button again, or any key on the
handset to turn off the page signal.
Press and hold to start registration process.
Page 15
14
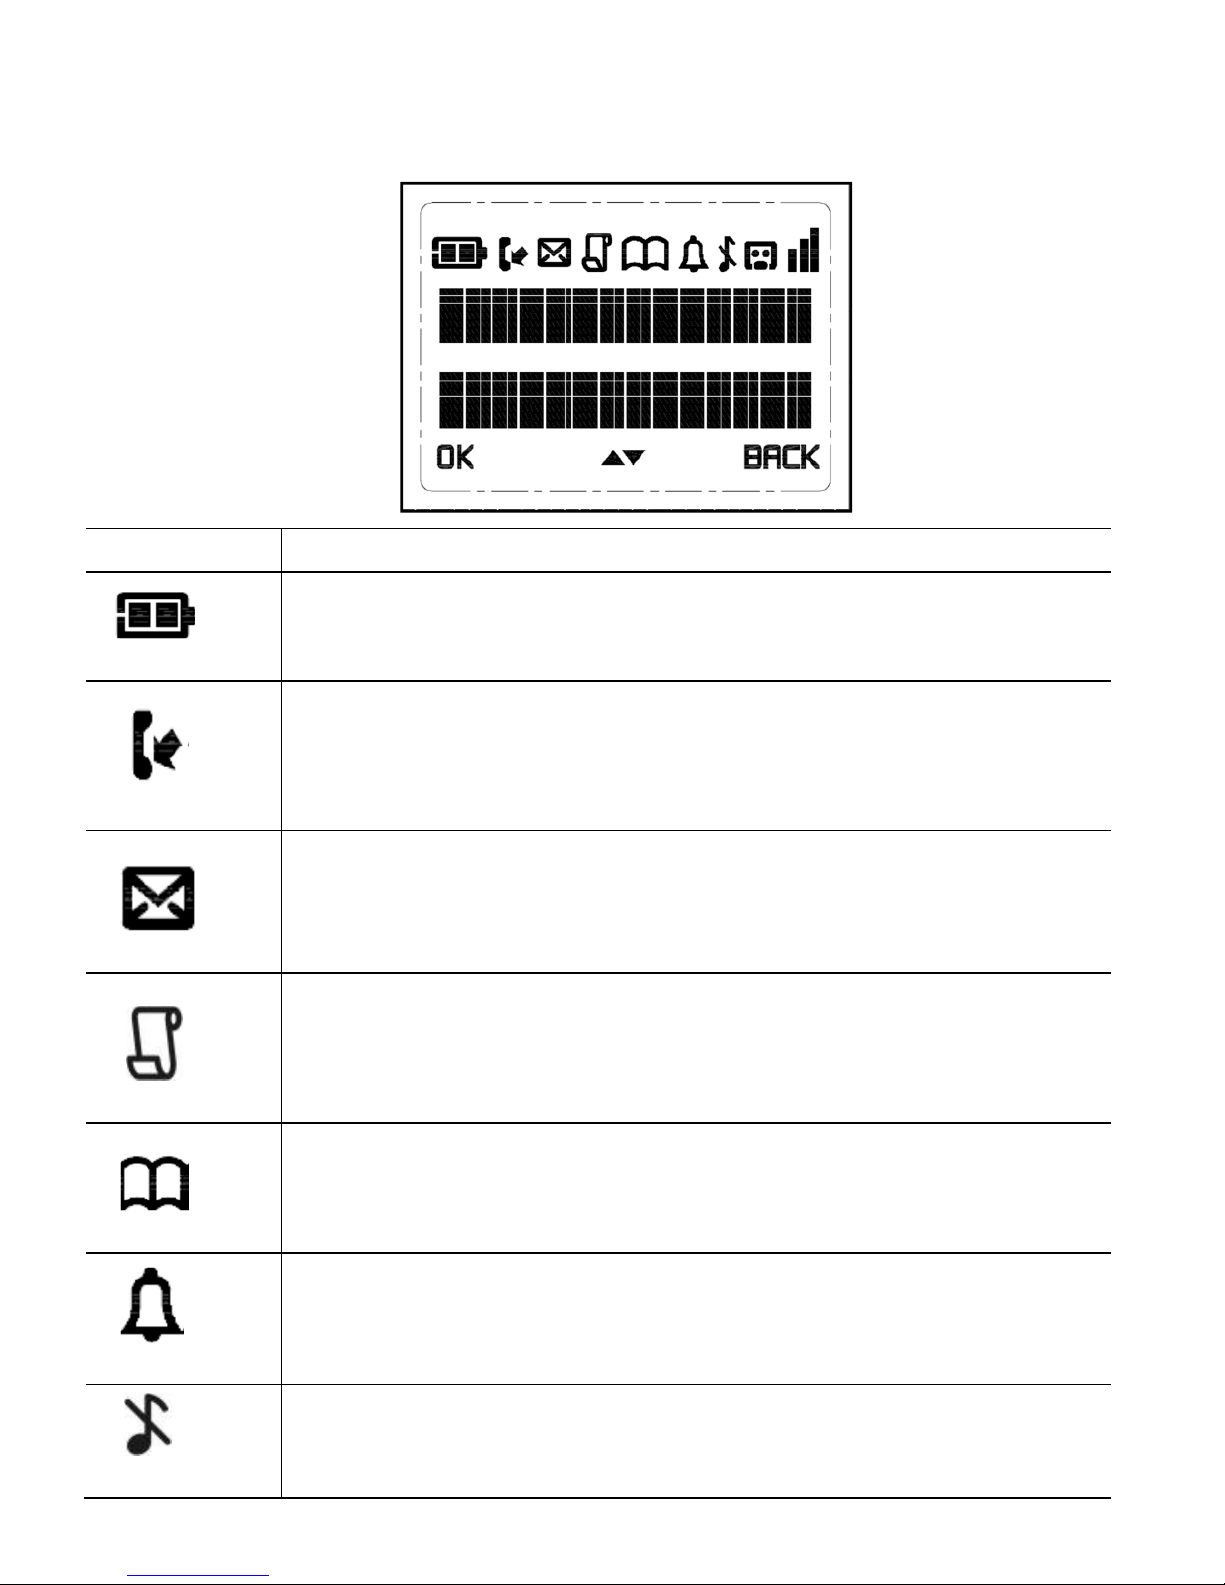
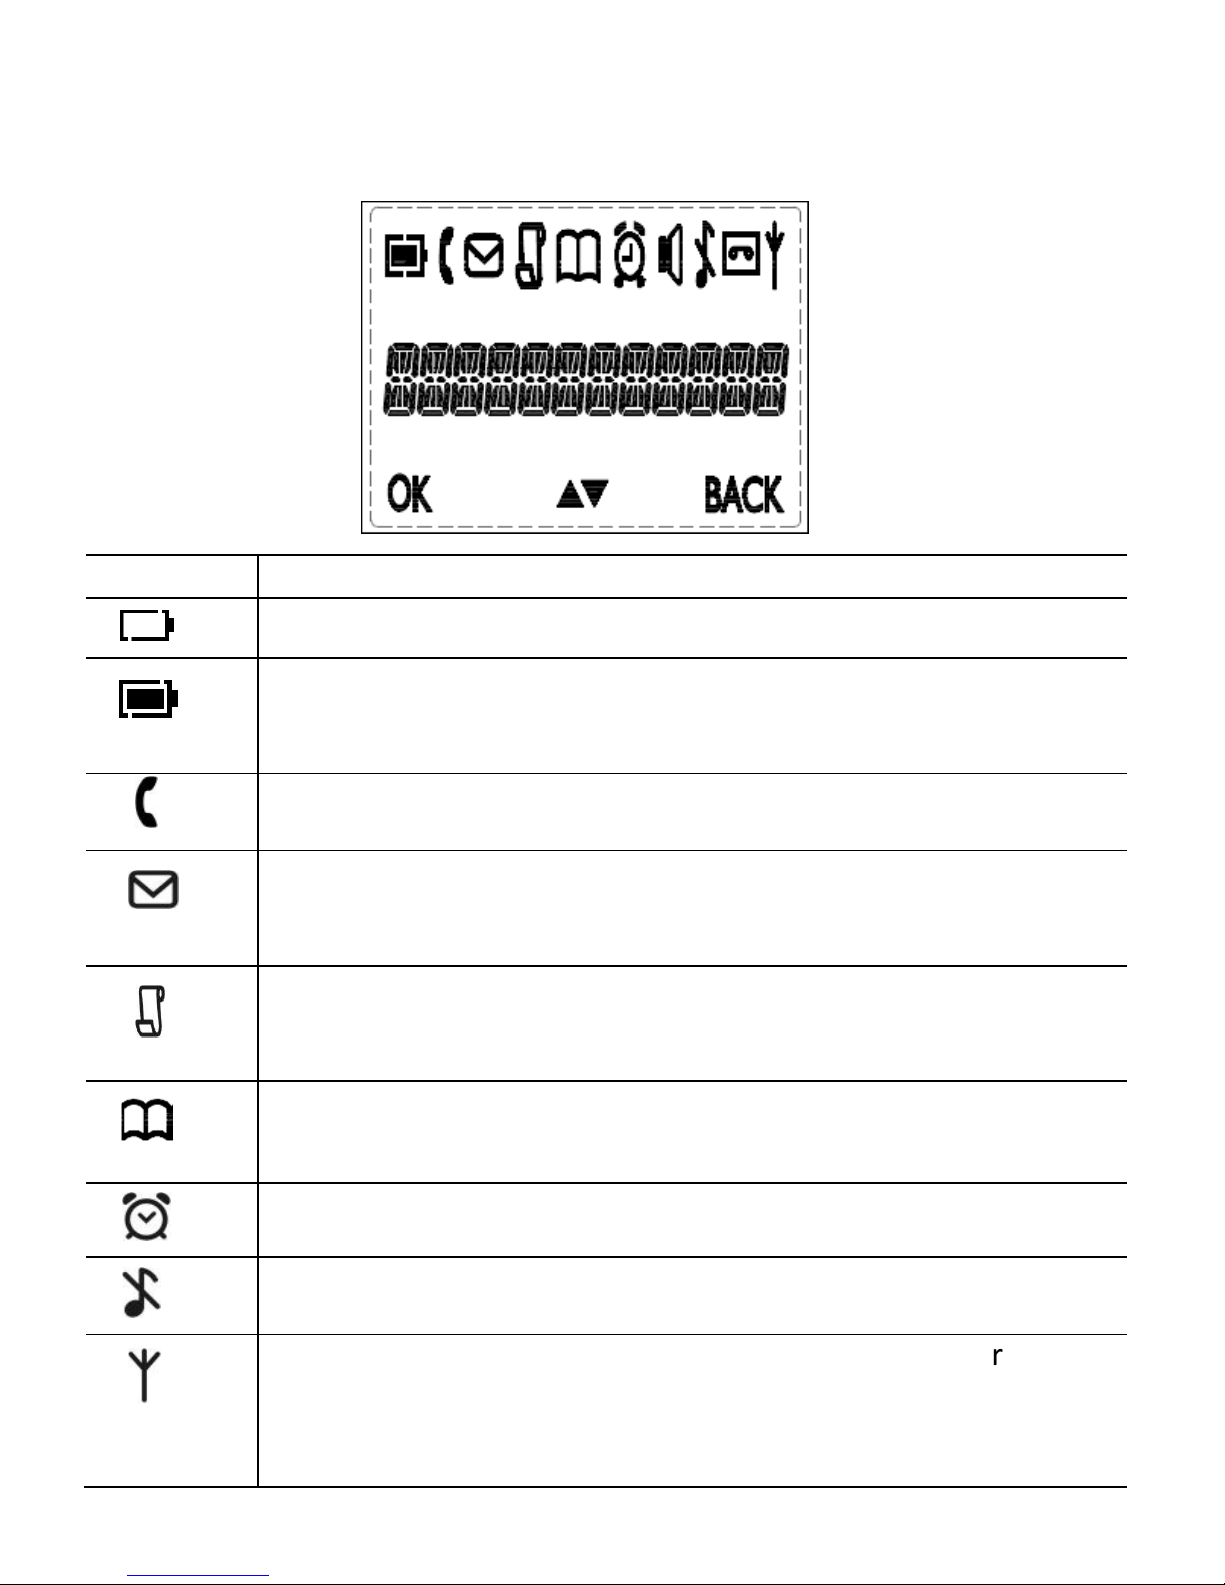
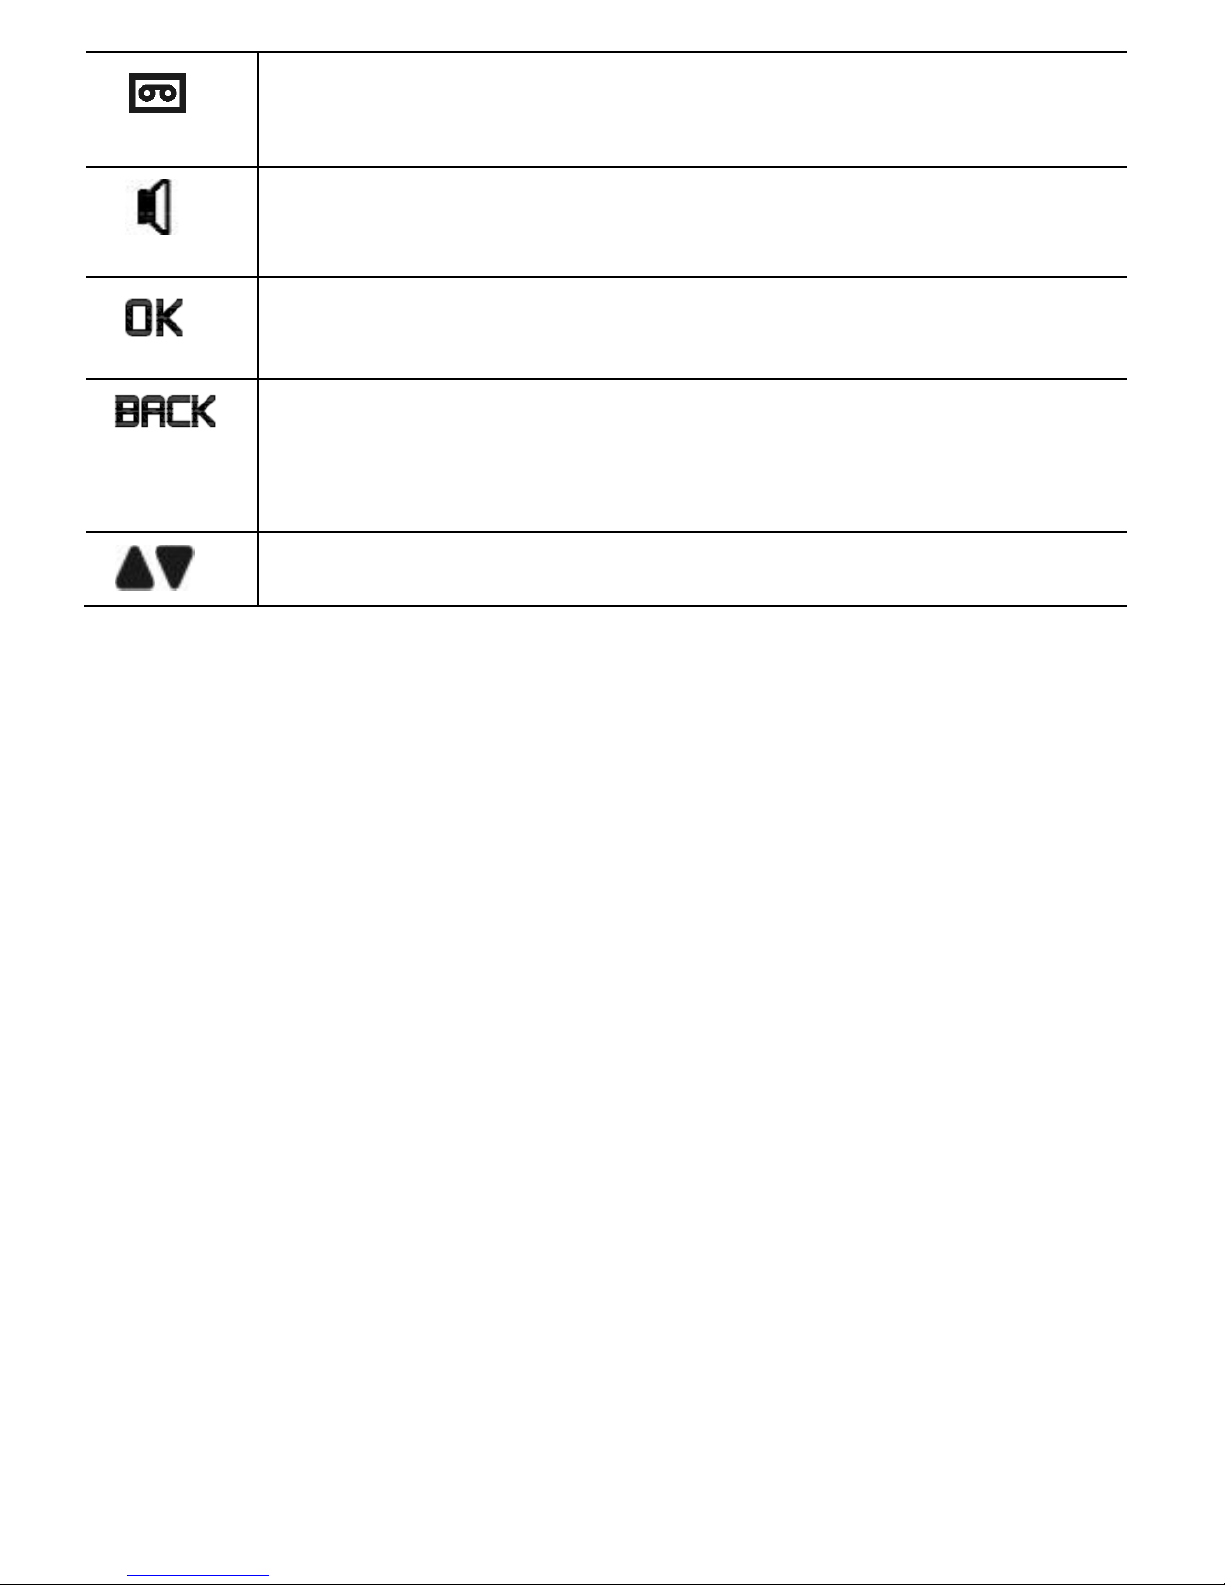
3.2 Display Icons and Symbols on the Main Eclipse Handset
The home screen of the Main Eclipse Handset gives you information on
the current status of the phone.
Icon
Meaning
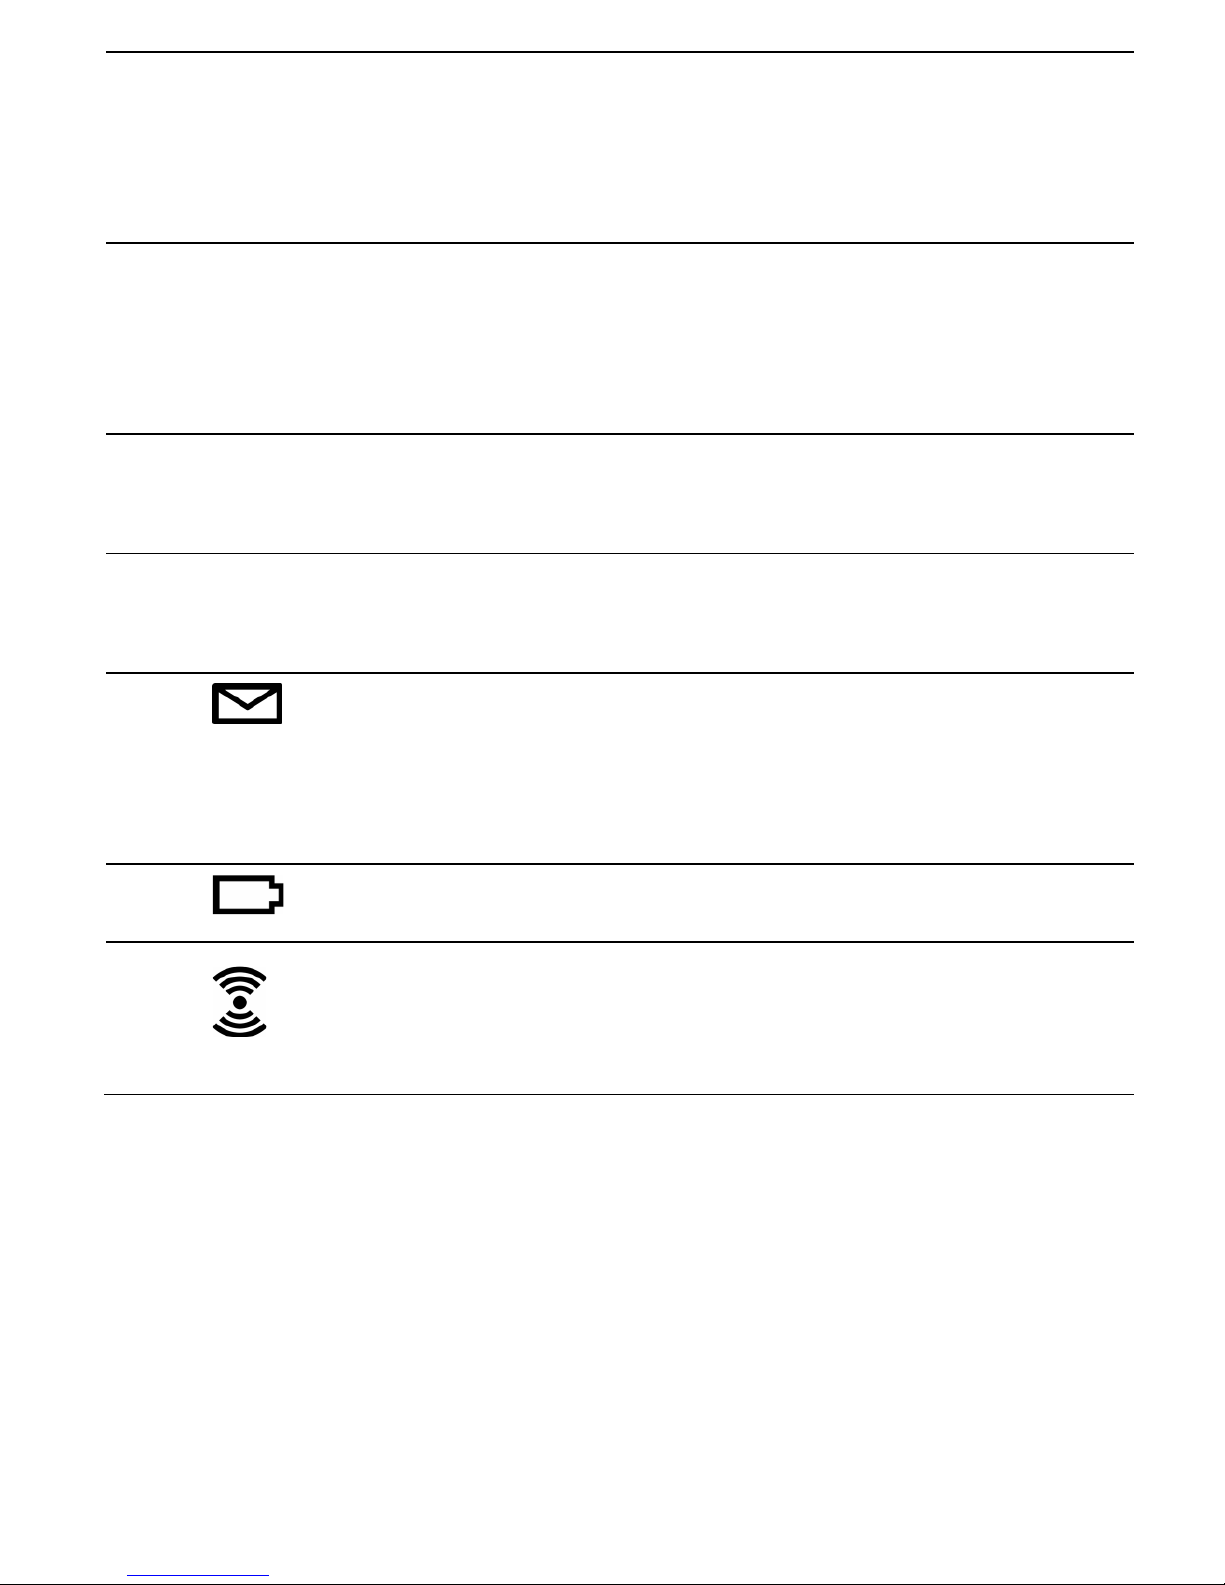
Displays when the battery is fully charged.
Internal segments cycle while charging.
Displays when the line is in use.
Flashes when there is an incoming call.
Flashes when you have a new voicemail message.
(This is
a caller display service and is not usually available from
UK network providers.)
Displays when you have new missed calls, or the call log
is being viewed.
Displays when the phonebook is
accessed.
Displays when the alarm is set.
Displays when handset ringer is turned off.
Page 16
15
Displays when the handset is registered and within
range of the base station.
Flashes when the handset is out of range and is
searching for a base.
Displays
when the answering machine is on.
Flashes slowly when there are new answering machine
message(s) or when the answering machine memory is
full.
Turns on when confirmation of selection or programming
is available.
Turns on during phonebook editing mode
to delete the
last digit.
Turns on during menu mode when you can return to the
previous state or previous step.
Turns on when the screen display is on.
Page 17
16
3.3 Overview of the Additional Handset and Charging Pod (for
ECLIPSE-2 / -3 / -4 models only)
⑮
⑬
⑩
⑭
①
②
③
⑤
⑥
⑦
⑧
⑨
⑪
⑫
④
Page 18

17
①
EARPIECE
②
LCD DISPLAY
Displays menus, phone numbers,
handset name and status icons.
③
M
In standby mode, press to enter the
Main Menu list.
Press to select an item, or to save an
entry or setting.
④
+
In menu mode, press to scroll up.
During a call or message playback,
press to increase the volume.
In standby mode, press to access the
call log (CID).
⑤
I
n standby mode, p
ress to make or
answer a call.
during a call, press to send a flash
signal (also called recall) from
network service
.
⑥
*
In standby mode, press and hold to
switch the key lock on or off.
⑦
During a call
or
message playback
,
press to switch between
speakerphone and earpice
.
⑧
MICROPHONE
⑨
m
Press to cancel an action.
During pre-dialling, press to delete
the last digit entered.
During a call, press to mute the
microphone, and press again to
resume
conversation.
⑩
-
In menu mode, press to scroll down.
During a call, or message playback,
press to decrease the volume.
In standby mode, press to access the
phonebook list.
Page 19
18
⑪
O
During a call, press to end the call.
During programming, press to cancel
and exit without making changes.
In standby mode, press and hold to
power the handset on/off.
⑫
#
In standby mode, press and hold to
turn the handset ringer on/off.
Press and hold to add a dialling
pause when dialling or entering
numbers into the phonebook.
⑬
I
In standby mode or during a call,
press to initiate an intercom call or
transfer a call.
⑭
R
In standby mode, press to access the
redial list.
⑮
Lights up in Red when a handset is
on the charging pod to indicate it is
charging.
Page 20
19
3.4 Display Icons and Symbols on the Additional Handsets (for
ECLIPSE-2 / -3 / -4 models only)
The home screen of the additional handsets gives you information on the
current status of the phone.
Icon
Meaning
Displays
when the battery is almost empty.
Displays when the battery is fully charged.
Blinks (3s on / 1s off) when the battery is partly discharged.
Flashes (1s on / 1s off) when the battery level is low.
Displays when the line is in use.
Flashes when there
is an incoming call.
Flashes when you have a new voicemail message.
(This is a
caller display service and is not usually available from UK
network providers.)
Displays when you have new missed calls, or the call log is
being viewed.
Displays
when the phonebook is accessed.
Displays when the alarm is set.
Displays when handset ringer is turned off.
Displays when the handset is registered and within
range of
the base station.
Flashes when the handset is out of range and is searching
for a base.
Page 21
20
Displays when the answering machine is on.
Flashes slowly when there are new answering machine
message(s).
Displays when the handset is in speaker mode.
Turns on when confirmation of selection or programming is
available.
Turns on
during phonebook editing mode to delete the last
digit.
Turns on during menu mode when you can return to the
previous state or previous step.
Turns on when the screen display is on.
Page 22

21
3.5 Menu Map and Menu Navigation on the Main Eclipse Handset
From the home screen of the Main Eclipse handset, press
M
to access
ANS. SYSTEM, the first option in the Main Menu list.
Press
+
or
-
to go to other options in the menu list.
Press
M
to enter a sub-menu or function.
Press
m
to go back to the previous level.
Press
O
to cancel the current operation and return to the home screen.
Note: If you do not press any key on the handset for 15 seconds, the
display will automatically return to the home screen.
ANS. SYSTEM
PHONEBOOK CLOCK&ALARM HANDSET OPTS
SETTINGS
PLAY
DELETE ALL
ANS. ON/OFF
ANNOUNCEMENT
ANSWER MODE
ANS. SETTING
RING DELAY
LANGUAGE
NEW ENTRY
VIEW ENTRIES
EDIT ENTRY
DELETE
DELETE ALL
DIRECT MEM.
DATE & TIME
SET FORMAT
TIME FORMAT
DATE FORMAT
ALARM
ALARM MELODY
HANDSET NAME
RINGER&TONES
RING VOLUME
RING TONE
KEY TONE
LANGUAGE
AUTO HANG-UP
REGISTRATION
DEREGISTER
RESET
AREA CODE
RECALL TIME
Page 23

22
3.6 Menu Map and Menu Navigation on the Additional Handsets (for
ECLIPSE-2 / -3 / -4 models only)
From the home screen of your additional handset, press
M
to access
PHONEBOOK, the first option in the Main Menu list.
Press
+
or
-
to go to other options in the menu list.
Press
M
to enter a sub-menu or function.
Press
m
to go back to the previous level.
Press
O
to cancel the current operation and return to the home screen.
Note: If you do not press any key on the handset for 15 seconds, the
display will automatically return to the home screen.
PHONEBOOK
HANDSET OPTS CLOCK&ALARM SETTINGS ANS. SYSTEM
NEW ENTRY
VIEW ENTRIES
EDIT ENTRY
DELETE
DELETE ALL
DIRECT MEM.
HANDSET NAME
RINGER & TONES
RING VOLUME
RING TONE
KEY TONE
LANGUAGE
AUTO HANG-UP
DATE & TIME
SET FORMAT
TIME FORMAT
DATE FORMAT
ALARM
ALARM MELODY
REGISTRATION
DEREGISTER
RESET
AREA CODE
RECALL TIME
PLAY
DELETE ALL
ANS. ON/OFF
ANNOUNCEMENT
PLAY
RECORDING
DELETE
SECURITYCODE
ANS. SETTING
RING
RING DELAY
LANGUAGE
Page 24

23
3.7 Text and Number Entry
The following table shows you where each letter and punctuation
character can be found, by using repeated presses of the alphanumeric
keypad. This will be helpful when storing a name in the phonebook or
renaming your handset.
For example, to enter the name Tom:
T Press
8
once
O Press
6
three times
M Press
6
once
In editing mode, a cursor is displayed to indicate the current text entry
position.
It is positioned at the right of the last character entered.
Writing Tips:
1. Once a character is selected, the cursor will move to the next
position after a short pause.
2. Press
m
(main Eclipse handset) or
m
(additional handset) to delete
the last letter or number.
3.7.1 Character Map of the Main Eclipse Handset
Key
1st
press
2nd
press
3rd
press
4th
press
5th
press
6th
press
1 Space
1 _ < > *
2 A B C 2
3 D E F 3
4 G H I 4
5 J K L 5
6 M N O 6
7 P Q R S 7
8 T U V 8 ?
9 W X Y Z 9
0 0 - / Space
# +
* *
# #
Page 25
24
3.7.2 Character Map of the Additional Handsets (for ECLIPSE-2 / -3 / -4
models only)
Key
1st
press
2nd
press
3rd
press
4th
press
5th
press
6th
press
1 Space
1 _ ( ) *
2 A B C 2
3 D E F 3
4 G H I 4
5 J K L 5
6 M N O 6
7 P Q R S 7
8 T U V 8 ?
9 W X Y Z 9
0 0 - / \ o +
* *
# o
Page 26
25
4 USING YOUR PHONE
4.1 Make a Call
4.1.1 Pre-dialling
- On Your Main Eclipse Handset
1. Enter the phone number (maximum 24 digits).
If you make a mistake, press
m
to delete the last entered number.
2. Press
T
or F to dial the phone number.
- On Your Additional Handset
1. Enter the phone number (maximum 24 digits).
If you make a mistake, press
m
to delete the last entered number.
2. Press or to dial the phone number.
4.1.2 Direct Dialling
1. Press
T
or F on your Main Eclipse Handset or or on
your additional handset.
2. Dial the number.
Note: If you make a mistake, you cannot correct it with
m
on your Main
Eclipse Handset or
m
on your additional handset.
Press
O
on your Main Eclipse Handset or
O
on your additional
handset and then press
m
on your Main Eclipse Handset or
m
on
your additional handset to return to the home screen.
4.1.3 Call from the Redial List(5 last number on handset)
- On Your Main Eclipse Handset
1. Press
R
in standby mode.
•
The last number dialled is displayed.
2. Press
+
/
-
to select the desired entry in the redial list and
then press
T
or F
to dial out the selected redial number.
Page 27
26
- On Your Additional Handset
1. Press
R
in standby mode.
•
The last number dialled is displayed.
2. Press
+\-
to select the desired entry in the redial list and
then press or to dial out the selected redial number.
4.1.4 Call from the Call Log(30 name & number call log)
- On Your Main Eclipse Handset
1. Press
+
in standby mode.
2. Press
+
/
-
to select the desired entry in the call log and
then press
T
or F
to dial out the selected call log number.
- On Your Additional Handset
1. Press
+
in standby mode.
2. Press
+\-
to select the desired entry in the call log and
then press or to dial out the selected call log number.
Note: You need to subscribe to Caller Line Identification service to be
able to see the caller’s number or name in the call log.
4.1.5 Call from the Phonebook(30 entries on handset)
- On Your Main Eclipse Handset
1. Press
-
in standby mode.
2. Press
+
/
-
to select the desired entry in the phonebook
and then press
T
or F
to dial out the selected phonebook
number.
- On Your Additional Handset
1. Press
-
in standby mode.
2. Press
+\-
to select the desired entry in the phonebook
and then press or to dial out the selected phonebook
number.
Page 28

27
4.2 Answer and End a Call
1. When the phone rings, press
T
or F on your Main Eclipse
Handset or press or on your additional handset.
2. To end a conversation, press
O
on your Main Eclipse Handset or
press
O
on your additional handset.
Warning: When the handset is ringing, please do not hold it too close to
your ear as the volume of the ringing tone may damage your hearing.
Note: You can simply place the main Eclipse handset back on its base
station or the additional handset back on its charging pod to end the call,
provided you have not deactivated the Auto hang-up feature. (See Set
Auto Hang-up on page 61.)
4.3 Handset Speakerphone
During a call, you can press
F
on your Main Eclipse Handset or on
your additional handset to alternate between hands-free speakerphone
and handset earpiece.
4.4 Adjust Earpiece Volume
There are 5 levels of earpiece volume on your Main Eclipse Handset and
5 levels on the additional handsets.
1. During a call, press
+ /-
to select from VOLUME 1 to
VOLUME 5 on your Main Eclipse Handset, or press
+\-
to
select from VOLUME 1 to VOLUME 5 on the additional handsets.
•
The current setting is shown.
•
When you end the call, the setting will remain at the last
selected level.
4.5 Adjust Speaker Volume
There are 5 levels of speaker volume on both the Main Eclipse Handset
and the additional handsets.
1. During a call, press
+ /-
on your Main Eclipse Handset or
press
+\-
on the additional handsets to select from
VOLUME 1 to VOLUME 5.
•
The current setting is shown.
•
When you end the call, the setting will remain at the last selected level.
Page 29

28
4.6 Mute/Unmute the Microphone
When the microphone is muted, the handset displays MUTE ON, and
your caller cannot hear you.
During a call, press
m
(Main Eclipse handset) or press
m
(additional
handsets) to turn on/off the microphone.
4.7 Paging
The paging feature enables you to locate a missing handset if the handset
is in range and contains charged batteries.
1. Press the key under the base unit.
•
All the registered handsets that are in range will start to ring.
You can stop the paging by pressing any key on a handset or the key
under the base unit again.
4.8 Switching the Handset On/Off
Press and hold
O
on your main Eclipse Handset or press
O
on the
additional handsets for more than 2 seconds to switch the handset on or
off in standby mode.
•
When first turned on, the display shows SEARCHING… until the
handset finds the base.
Note: You can switch the handset off to save battery life, if the handset is
not on the base or a charging pod and you do not want to use it for a
while.
IMPORTANT: When the handset is OFF, it cannot be used for making calls
including emergency calls. It will not ring when there is an incoming call.
To answer a call, you will need to switch it back on and it may take some
time for the handset to re-establish a radio link with the base unit.
Page 30
29
4.9 To Lock/Unlock the Keypad
You can lock the keypad on your main Eclipse Handset or the additional
handset to avoid making calls or pressing the keys accidentally.
1. In standby mode, press and hold
*
for 1 second to lock the keypad.
•
The handset displays KEYS LOCKED.
2. To turn the keypad lock off, press and hold
*
again.
Note: Incoming calls can still be answered even if the keypad is locked.
4.10 Make an Internal Call (Multi - handset models only)
The system allows an intercom call between any two handsets registered
to the same telephone base. It also allows you to transfer external calls
from one handset to another, and set up a 3-way conference with two
handsets and an external call.
If you try to make a call while another handset is already on an external
call, you will be connected to the call in conference mode automatically,
without giving any warning to the other parties.
4.11 Initiate an Intercom Call
1. In standby mode, press
I
on your Main Eclipse Handset, or
I
on the additional handset.
•
Intercom is established immediately if there are only 2
registered handsets.
•
If there are more than 2 registered handsets, the handset
numbers which are available for intercom will be displayed.
2. Press the handset number you wish to call or press
*
to call all
handsets.
3. Press
T
or F (main Eclipse handset) or or
(additional handsets) on a called handset to answer the internal call,
where both internal callers can talk.
4. To end the intercom call, press
O
(main Eclipse handset) or
O
(additional handsets) on either handset.
Page 31

30
Note:
1) You can cancel the intercom call before it is answered by pressing
I
(main Eclipse handset) /
I
(additional handsets), or
O
(main Eclipse handset) /
O
(additional handsets) on the
originating handset.
2) If there is no answer from the called handset within one minute, the
paging will be cancelled automatically.
3) If no other handset is registered to the base, 4 beeps will be heard
and it will return to standby mode.
4.12 Answer an External Call during an Intercom Call
You will hear an alert tone when you receive an incoming external call
during an intercom call, and you can choose from the following options:
1) Press
O
(main Eclipse handset) or
O
(additional handsets) to
cancel the intercom call and let the handsets receive normal
incoming ringing.
2) Press
T
or F (main Eclipse handset) or or
(additional handsets) to answer the incoming call and end the
intercom call.
3) Press
I
(main Eclipse handset) or
I
(additional handsets) to
answer the incoming call and put the intercom call on hold.
4) When the incoming external call is connected and the intercom call
is on hold, press and hold
I
(main Eclipse handset) or
I
(additional handsets) to start a three-party conference call with
both the incoming and the intercom parties.
5) When either the main Eclipse handset or the additional handset is
connected to an external call, you can press
T
or F (main
Eclipse handset) or or (additional handsets) to enter into
a three-party conference call directly.
Page 32

31
4.13 Initiate an Intercom during a Call
You can intercom with another system handset during a call, or invite
another system handset to join in a conference call with you and the
external caller.
1. During the call, press
I
(main Eclipse handset) or
I
(additional handsets) to put the external call on hold.
•
Intercom is established immediately if there are only 2
registered handsets.
•
If there are more than 2 registered handsets, the handset
numbers which are available for intercom will be displayed.
2. Press the handset number you wish to call or press
*
to call all handsets.
Note: If there is no answer from the called handset, or you wish to cancel
the intercom call before it is answered, press
I
(main Eclipse handset)
or
I
(additional handsets) to return to the external call.
3. Press
T
or F or or on the called handset to
answer the internal call, where both internal callers can talk.
4. When the intercom call is connected, you can choose from the
following options on the originating handset:
1) Press and hold
I
(main Eclipse handset) or
I
(additional
handsets) for 2 seconds to connect both handsets to the call in
conference mode.
2) Press
T
or F or or on either handset to terminate
the intercom on that handset, and leave the external call connected to
the other handset.
Page 33

32
4.14 Transfer an External Call to another Handset
1. During the call, press
I
(main Eclipse handset) or
I
(additional handsets) to put the external call on hold.
•
Intercom is established immediately if there are only 2
registered handsets.
•
If there are more than 2 registered handsets, the handset
numbers which are available for intercom will be displayed.
2. Press the handset number you wish to call or press
*
to call all
handsets.
Note: If there is no answer from the called handset, or you wish to cancel
the intercom call before it is answered, press
I
(main Eclipse handset)
or
I
(additional handsets) to return to the external call.
3. Press
T
or F (main Eclipse handset) or or
(additional handsets) on the called handset to answer the internal
call, where both internal callers can talk.
4. Press
O
(main Eclipse handset) or
O
(additional handsets) on
the originating handset to transfer the external call to the called
handset.
•
The external call is transferred.
Page 34

33
5 DIRECT ACCESS MEMORY
In addition to the phonebook memory, there are 2 direct access
memories (Keys 1 & 2) on all handsets. A long press on the keys in
standby mode will automatically dial the stored phone number.
5.1 Add Direct Access Memory
- On Your Main Eclipse Handset
1. From the home screen, press
M
.
2. Press
+/-
to PHONEBOOK and then press
M
to select.
3. Press
+/-
to DIRECT MEM. and then press
M
to select.
4. Press
+/-
to KEY 1 or KEY 2 and then press
M
to select.
•
The stored name is displayed, or NO NUMBER if it is empty.
5. Press
M
to enter the DIRECT MEM. menu to add/edit the name
or number.
6. Press
M
again to select EDIT NUMBER.
•
The display shows the currently stored name or just ENTER
NAME if it is empty.
7. Edit or enter the name of your contact and press
M
.
If you make a mistake, press
m
to delete the last character
entered.
•
The display shows the currently stored number or just ENTER
NUMBER if it is empty.
8. Edit or enter the number of your contact and press
M
.
If you make a mistake, press
m
to delete the last digit entered.
•
A confirmation tone is played.
9. Press
O
to return to standby mode.
Page 35

34
- On Your Additional Handset
1. From the home screen, press
M
.
2. Press
M
again to select PHONEBOOK.
3. Press
+\-
to DIRECT MEM. and then press
M
to select.
4. Press
+\-
to KEY 1 or KEY 2 and then press
M
to select.
•
The stored name is displayed, or NO NUMBER if it is empty.
5. Press
M
to enter the DIRECT MEM. menu to add/edit the name
or number.
6. Press
M
again to select EDIT NUMBER.
•
The display shows the currently stored name or just ENTER
NAME if it is empty.
Note: If the main phonebook is already full, MEMORY FULL is displayed,
and you cannot store or edit a direct memory until a phonebook entry
has been deleted.
7. Edit or enter the name of your contact and press
M
.
If you make a mistake,
m
delete the last character entered.
•
The display shows the currently stored number or just ENTER
NUMBER if it is empty.
8. Edit or enter the number of your contact and press
M
.
If you make a mistake, press
m
to delete the last digit entered.
•
A confirmation tone is played.
9. Press
O
to return to standby mode.
Page 36

35
5.2 Delete Direct Access Memory
- On Your Main Eclipse Handset
1. From the home screen, press
M
.
2. Press
+/-
to PHONEBOOK and then press
M
to select.
3. Press
+/-
to DIRECT MEM. and then press
M
to select.
4. Press
+/-
to KEY 1 or KEY 2 and then press
M
to select.
•
NO NUMBER is displayed if it is empty. Otherwise, the stored
name is displayed.
5. Press
M
to enter the menu options.
6. Press
+/-
to DELETE and then press
M
to select.
•
CONFIRM? is displayed.
7. Press
M
again to confirm.
•
A confirmation tone is played.
8. Press
O
to return to standby mode.
- On Your Additional Handset
1. From the home screen, press
M
.
2. Press
M
again to select PHONEBOOK.
3. Press
+\-
to DIRECT MEM. and then press
M
to select.
4. Press
+\-
to KEY 1 or KEY 2 and then press
M
to select.
•
NO NUMBER is displayed if it is empty. Otherwise, the stored
name is displayed.
5. Press
M
to enter the menu options.
6. Press
+\-
to DELETE and then press
M
to select.
•
DELETE? is displayed.
7. Press
M
again to confirm.
•
A confirmation tone is played.
8. Press
O
to return to standby mode.
Page 37

36
6 PHONEBOOK
The Main Eclipse Handset can store up to 30 phonebook entries, and
each additional handset can store up to 30 phonebook entries. Each
phonebook entry can have a maximum of 24 digits for the phone number
and 12 characters for the name.
6.1 Store a Contact in the Phonebook
- On Your Main Eclipse Handset
1. From the home screen, press
M
.
2. Press
+/-
to PHONEBOOK and then press
M
to select.
3. Press
M
to select NEW ENTRY.
•
The screen displays ENTER NAME.
4. Enter the name of the contact (maximum 12 characters) using the
keypad.
If you make a mistake, press
m
to delete the last character
entered.
5. Press
M
to confirm the name entry.
•
The screen displays ENTER NUMBER.
6. Enter the number of the contact (maximum 24 digits) using the
keypad.
If you make a mistake, press
m
to delete the last digit entered.
7. Press
M
to confirm.
•
A confirmation tone is played.
8. Press
O
to return to standby mode.
Page 38

37
- On Your Additional Handset
1. From the home screen, press
M
.
2. Press
M
again to select PHONEBOOK.
3. Press
M
to select NEW ENTRY.
•
The screen displays ENTER NAME.
4. Enter the name of the contact (maximum 12 characters) using the
keypad.
If you make a mistake, press
m
to delete the last character
entered.
5. Press
M
to confirm the name entry.
•
The screen displays ENTER NUMBER.
6. Enter the number of the contact (maximum 24 digits) using the
keypad.
If you make a mistake, press
m
to delete the last digit entered.
7. Press
M
to confirm.
•
A confirmation tone is played.
8. Press
O
to return to standby mode.
Note:
You cannot store a new phonebook entry when the memory is full. In this
case, you have to delete existing entries to make space for new ones.
When storing the number for a local call, you can enter only the 6 or
7-digit local number without STD (area) code, and it will still display the
name if there is an incoming call and you subscribe to caller display.
Page 39

38
6.2 Access the Phonebook
- On Your Main Eclipse Handset
1. From the home screen, press
-
to open the phonebook list.
Alternatively, from the home screen, you can press
M
, then
+
/
-
to PHONEBOOK, then press
M
and
+
/
-
to VIEW
ENTRIES, then press
M
to open the phonebook list.
•
The phonebook entries are listed in alphabetical order.
2. Press
+
/
-
to scroll through the list of entries.
3. Press
#
to view the details of the selected entry.
4. Press
O
to return to standby mode.
- On Your Additional Handset
1. From the home screen, press
-
to open the phonebook list.
Alternatively, from the home screen of the additional handsets, you can press
M
twice to select PHONEBOOK, then press
+\-
to VIEW
ENTRIES and press
M
again to open the phonebook list.
•
The phonebook entries are listed in alphabetical order.
2. Press
+\-
to scroll through the list of entries.
3. Press
M
to view the details of the selected entry.
4. Press
O
to return to standby mode.
Note:
Instead of pressing
+
/
-
(main Eclipse handset) or
+\-
(additional handsets) to browse the phonebook entries, you can press the
numeric key corresponding to the first letter of the entry you wish to locate.
For example, pressing
2
will show the first entry starting with A. Pressing
2
again will show the first entry starting with B, and so on..., and then press
+
/
-
(main Eclipse handset) or
+\-
(additional handsets) , if
necessary, to find the entry you want.
Page 40

39
6.3 Modify a Phonebook Entry
- On Your Main Eclipse Handset
1. From the home screen, press
-
to open the phonebook list.
2. Press
+/-
to select the entry you want to modify.
3. Press
M
to open the phonebook menu options.
4. Press
+
/
-
to EDIT ENTRY and then press
M
to select.
•
The current name is displayed.
5. Edit the name using the keypad, using
m
to delete characters.
6. Press
M
to confirm.
7. Edit the number and then press
M
to confirm.
•
A confirmation tone is played.
8. Press
O
to return to standby mode.
- On Your Additional Handset
1. From the home screen, press
-
to open the phonebook list.
2. Press
+\-
to select the entry you want to modify.
3. Press
M
to open the phonebook menu options.
4. Press
+\-
to EDIT ENTRY and then press
M
to select.
•
The current name is displayed.
5. Edit the name using the keypad, using
m
to delete characters.
6. Press
M
to confirm.
7. Edit the number and then press
M
to confirm.
•
A confirmation tone is played.
8. Press
O
to return to standby mode.
Page 41

40
6.4 Delete a Phonebook Entry
- On Your Main Eclipse Handset
1. From the home screen, press
-
to open the phonebook list.
2. Press
+
/
-
to select the entry you want to delete.
3. Press
M
to open the phonebook menu options.
4. Press
+
/
-
to DELETE and then press
M
to select.
•
CONFIRM? is displayed.
5. Press
M
again to confirm.
•
A confirmation tone is played.
6. Press
O
to return to standby mode.
- On Your Additional Handset
1. From the home screen, press
-
to open the phonebook list.
2. Press
+\-
to select the entry you want to delete.
3. Press
M
to open the phonebook menu options.
4. Press
+\-
to DELETE and then press
M
to select.
•
DELETE? is displayed.
5. Press
M
again to confirm.
•
A confirmation tone is played.
6. Press
O
to return to standby mode.
Page 42

41
6.5 Delete All Entries from the Phonebook List
- On Your Main Eclipse Handset
1. From the home screen, press
-
to open the phonebook list.
2. Press
M
to open the phonebook menu options.
3. Press
+
/
-
to DELETE ALL and then press
M
to select.
•
CONFIRM? is displayed.
4. Press
M
again to confirm.
•
A confirmation tone is played.
5. Press
O
to return to standby mode.
- On Your Additional Handset
1. From the home screen, press
-
to open the phonebook list.
2. Press
M
to open the phonebook menu options.
3. Press
+\-
to DELETE ALL and then press
M
to select.
•
DELETE? is displayed.
4. Press
M
again to confirm.
•
A confirmation tone is played.
5. Press
O
to return to standby mode.
Page 43

42
7 CALLER DISPLAY (NETWORK DEPENDENT)
If you have subscribed to the Calling Line Identification (CLI) service with
your network service provider, the phone number of your caller will
appear on the handset display when there is an incoming call and then
stored in your Call Log.
If the caller’s number is stored in your phonebook along with a name, the
name will appear on the handset display when the call is received and in
the Call Log.
Note:
If the call is from someone whose number is unavailable (e.g. an
international call or from a private exchange), the handset will display
UNAVAILABLE when you receive the call and in the Call Log afterwards.
If the call is from someone whose number is withheld (e.g. by dialing
141), the handset will display WITHHELD when you receive the call and in
the Call Log afterwards.
If you have not subscribed to the Caller Line Identification service, the
handset will display UNKNOWN when you receive the call when it is
received, and it will not be saved in the Call Log.
Information about incoming calls varies by country and network
operators.
7.1 Call Log
The Call Log stores the last 30 external calls for the Main Eclipse Handset
and the last 30 external calls for the additional handsets, whether or not
you have answered the call.
Only the most recent call is saved if there are repeat calls from the same
number.
When the Call Log is full, the next new call will replace the oldest entry.
7.1.1 Access the Call Log
1. From the home screen, press
+
on your Main Eclipse Handset
or press
+
on the additional handset.
2. Press
+/-
(main Eclipse handset) or
+\-
(additional handsets) to browse through the call list.
•
The calls are displayed in chronological order with the most
recent call at the top of the list.
Page 44

43
7.1.2 Save a Call Log Entry into the Phonebook
- On Your Main Eclipse Handset
1. From the home screen, press
+
.
2. Press
+/-
to select an entry and then press
M
.
3. Press
M
again to select SAVE NUMBER.
4. Enter the name of the contact (maximum 12 characters) and then
press
M
to save.
5. Edit the number (if necessary) and then press
M
to save the entry.
•
A confirmation tone is played.
6. Press
O
to return to standby mode.
- On Your Additional Handset
1. From the home screen, press
+
.
2. Press
+\-
to select an entry and then press
M
.
3. Press
M
again to select SAVE NUMBER.
4. Enter the name of the contact (maximum 12 characters) and then
press
M
to save.
•
A confirmation tone is played.
5. Press
O
to return to standby mode.
Page 45

44
7.1.3 Delete a Call Log Entry
- On Your Main Eclipse Handset
1. From the home screen, press
+
.
2. Press
+/-
to select an entry and then press
M
.
3. Press
+/-
to DELETE and then press
M
to select.
•
CONFIRM? is displayed.
4. Press
M
again to confirm.
•
A confirmation tone is played.
5. Press
O
to return to standby mode.
- On Your Additional Handset
1. From the home screen, press
+
.
2. Press
+\-
to select an entry and then press
M
.
3. Press
+\-
to DELETE and then press
M
to select.
•
DELETE? is displayed.
4. Press
M
again to confirm.
•
A confirmation tone is played.
5. Press
O
to return to standby mode.
7.1.4 Delete All Entries in the Call Log
- On Your Main Eclipse Handset
1. From the home screen, press
+
.
2. Press
M
.
3. Press
+/-
to DELETE ALL and then press
M
to select.
•
CONFIRM? is displayed.
4. Press
M
again to confirm.
•
A confirmation tone is played.
Page 46

45
- On Your Additional Handset
1. From the home screen, press or
+
.
2. Press
M
.
3. Press
+\-
to DELETE ALL and then press
M
to select.
•
DELETE? is displayed.
4. Press
M
again to confirm.
•
A confirmation tone is played.
7.2 Redial List
The redial list stores the last 5 numbers dialled for the Main Eclipse
Handset and the last 5 numbers dialled for the additional handsets. A
maximum of 24 digits can be displayed for each entry.
7.2.1 Access the Redial List
1. From the home screen, press
R
.
2. Press
+/-
on your Main Eclipse Handset or press
+\-
on the additional handset to browse the redial list.
•
The last dialled number will appear first in the redial list.
•
If the number has more than 14 digits on the Main Eclipse
Handset, press
#
to see other digits; if the number has more
than 12 digits on the additional handset, press
m
to see the
other digits.
7.2.2 Save a Redial Number into the Phonebook
- On Your Main Eclipse Handset
1. From the home screen, press
R
.
2. Press
+/-
to select an entry and press
M
.
3. Press
M
again to select SAVE NUMBER.
4. Enter the name of the contact (maximum 12 characters) and then
press
M
.
5. Edit the number (if necessary) and then press
M
to save.
•
A confirmation tone is played.
6. Press
O
to return to standby mode.
Page 47

46
- On Your Additional Handset
1. From the home screen, press
R
.
2. Press
+\-
to select an entry and press
M
.
3. Press
M
again to select SAVE NUMBER.
4. Enter the name of the contact (maximum 12 characters) and then
press
M
.
•
A confirmation tone is played.
5. Press
O
to return to standby mode.
7.2.3 Edit a Redial Number
- On Your Main Eclipse Handset
1. From the home screen, press
R
.
2. Press
+/-
to select an entry and then press
M
.
3. Press
+/-
to EDIT ENTRY and then press
M
to select.
4. Edit the number and press
M
to confirm.
•
A confirmation tone is played.
5. Press
O
to return to standby mode.
- On Your Additional Handset
1. From the home screen, press
R
.
2. Press
+/-
to select an entry and then press
M
.
3. Press
+/-
to EDIT ENTRY and then press
M
to select.
4. Edit the number and press
M
to confirm.
•
A confirmation tone is played.
5. Press
O
to return to standby mode.
Page 48

47
7.2.4 Delete a Redial Number
- On Your Main Eclipse Handset
1. From the home screen, press
R
.
2. Press
+/-
to select an entry and then press
M
.
3. Press
+/-
to DELETE and then press
M
to select.
•
CONFIRM? is displayed.
4. Press
M
again to confirm.
•
A confirmation tone is played.
5. Press
O
to return to standby mode.
- On Your Additional Handset
1. From the home screen, press
R
.
2. Press
+\-
and then press
M
.
3. Press
+\-
to DELETE and then press
M
to select.
•
DELETE? is displayed.
4. Press
M
again to confirm.
•
A confirmation tone is played.
5. Press
O
to return to standby mode.
7.2.5 Delete All Entries from the Redial List
- On Your Main Eclipse Handset
1. From the home screen, press
R
.
2. Press
M
.
3. Press
+/-
to DELETE ALL and then press
M
to select.
•
CONFIRM? is displayed.
4. Press
M
again to confirm.
•
A confirmation tone played.
Page 49

48
- On Your Additional Handset
1. From the home screen, press
R
.
2. Press
M
.
3. Press
+\-
to DELETE ALL and then press
M
to select.
•
DELETE? is displayed.
4. Press
M
again to confirm.
•
A confirmation tone played.
Page 50

49
8 CLOCK AND ALARM SETTINGS
8.1 Date and Time Settings
If you have subscribed to the Calling Line Identification service, the time
and date settings will be automatically updated by the network when you
receive an incoming call, but you may still need to set the correct year.
You can also set the date and time manually.
- On Your Main Eclipse Handset
1. From the home screen, press
M
.
2. Press
+/-
to CLOCK&ALARM and the press
M
to select.
3. Press
M
again to select DATE & TIME.
•
The last stored date is displayed, with the third digit of the year
flashing.
4. Enter the current date and press
M
to confirm, the default setting
date format is MM/DD.
Enter 03 May 2012 as [1], [2], [0], [5], [0], [3].
If you make a mistake, press
m
to delete the last digit entered.
5. Enter the current time and press
M
to confirm. The default time
format is 12 HOURS. (To change time format, see Change the Date
Format on page 52.)
For 24-hour format, enter 1:30pm as [1], [3], [3], [0].
For 12-hour format, enter the time and then press
+
to select
am , or press
-
to select pm.
If you make a mistake, press
m
to delete the last digit entered.
•
A confirmation tone is played.
6. Press
O
to return to standby mode.
Page 51

50
- On Your Additional Handset
1. From the home screen, press
M
.
2. Press
+\-
to CLOCK&ALARM and the press
M
to select.
3. Press
M
again to select DATE & TIME.
•
The last stored date is displayed, with the third digit of the year
flashing.
4. Enter the current date and press
M
to confirm, the default setting
date format is MM/DD.
Enter 03 May 2012 as [1], [2], [0], [5], [0], [3].
If you make a mistake, press
m
to delete the last digit entered.
5. Enter the current time and press
M
to confirm. The default time
format is 12 HOURS. (To change time format, see Change the Time
Format on page 51.)
For 24-hour format, enter 1:30pm as [1], [3], [3], [0].
For 12-hour format, enter the time and then press
+
to select
AM, or
-
to select PM.
If you make a mistake, press
m
to delete the last digit entered.
•
A confirmation tone is played.
6. Press
O
to return to standby mode.
Page 52

51
8.1.1 Change the Time Format
The time can be displayed either as 12-hour or 24-hour. The default
setting is 12 HOURS.
- On Your Main Eclipse Handset
1. From the home screen, press
M
.
2. Press
+/-
to CLOCK&ALARM and then press
M
to select.
3. Press
+/-
to SET FORMAT and then press
M
to select.
4. Press
M
again to select TIME FORMAT.
•
The current setting is displayed.
5. Press
+/-
to select 12 HOURS or 24 HOURS and then
press
M
to confirm.
•
A confirmation tone is played.
6. Press
O
to return to standby mode.
- On Your Additional Handset
1. From the home screen, press
M
.
2. Press
+\-
to CLOCK&ALARM and then press
M
to select.
3. Press
+\-
to SET FORMAT and then press
M
to select.
4. Press
M
again to select TIME FORMAT.
•
The current setting is displayed.
5. Press
+\-
to select 12 HOURS or 24 HOURS and then
press
M
to confirm.
•
A confirmation tone is played.
6. Press
O
to return to standby mode.
Page 53

52
8.1.2 Change the Date Format
The date can be displayed either as Month/Day or Day/Month. The
default setting is MM/DD.
- On Your Main Eclipse Handset
1. From the home screen, press
M
.
2. Press
+/-
to CLOCK&ALARM and then press
M
to select.
3. Press
+/-
to SET FORMAT and then press
M
to select.
4. Press
+/-
to DATE FORMAT and then press
M
to
select.
•
The current setting is displayed.
5. Press
+/-
to select DD/MM or MM/DD and then press
M
to confirm.
•
A confirmation tone is played.
6. Press
O
to return to standby mode.
- On Your Additional Handset
1. From the home screen, press
M
.
2. Press
+\-
to CLOCK&ALARM and then press
M
to select.
3. Press
+\-
to SET FORMAT and then press
M
to select.
4. Press
+\-
to DATE FORMAT and then press
M
to
select.
•
The current setting is displayed.
5. Press
+\-
to select DD/MM or MM/DD and then press
M
to confirm.
•
A confirmation tone is played.
6. Press
O
to return to standby mode.
Page 54

53
8.2 Alarm Settings
An alarm can be set on a handset, to sound at a set time only once or
repeated each day.
When an alarm is set, the alarm icon is shown on the handset display.
When the alarm time is reached, the handset will flash -ALARM- on the
display and sound an alarm for 1 minute, at the same volume setting as
the handset ringer. If the ringer is off, it will ring at volume setting 1.
When the alarm rings, you can press any key on the handset to stop the
ringing, even if the keylock is activated.
- On Your Main Eclipse Handset
1. From the home screen, press
M
.
2. Press
+/-
to CLOCK&ALARM and then press
M
to
select.
3. Press
+/-
to ALARM and then press
M
to select.
4. Press
+/-
to an alarm option.
OFF: Turn alarm off
ONCE: The alarm sounds once at the set time.
DAILY: The alarm sounds daily at the set time.
5. Press
M
to select the option.
6. If ONCE or DAILY is selected, enter the desired hour and minute.
Press
+
to select am, or press
-
to select pm if the time is
in 12-hour format.
7. Press
M
to confirm the alarm setting.
•
A confirmation tone is played.
8. Press
O
to return to standby mode.
Page 55

54
- On Your Additional Handset
1. From the home screen, press
M
.
2. Press
+\-
to CLOCK&ALARM and then press
M
to
select.
3. Press
+\-
to ALARM and then press
M
to select.
4. Press
+\-
to an alarm option.
OFF: Turn alarm off
ON ONCE: The alarm sounds once at the set time.
ON DAILY: The alarm sounds daily at the set time.
5. Press
M
to select the option.
6. If ON ONC E or ON DAILY is selected, enter the desired hour and
minute.
Press
+
to select AM, or press
-
to select PM if the time is
in 12-hour format.
7. Press
M
to confirm the alarm setting.
•
A confirmation tone is played.
8. Press
O
to return to standby mode.
8.2.1 Set the Alarm Melody
You can select from 3 alarm melodies.
- On Your Main Eclipse Handset
1. From the home screen, press
M
.
2. Press
+/-
to CLOCK&ALARM and then press
M
to
select.
3. Press
+/-
to ALARM MELODY and then press
M
to select.
4. Press
+/-
to select the desired alarm tone (each tone will
sound as it is selected) and then press
M
to confirm.
Page 56

55
•
A confirmation tone is played.
5. Press
O
to return to standby mode.
- On Your Additional Handset
1. From the home screen, press
M
.
2. Press
+\-
to CLOCK&ALARM and then press
M
to select.
3. Press
+\-
to ALARM MELODY and then press
M
to
select.
4. Press
+\-
to select the desired alarm tone (each tone will
sound as it is selected) and then press
M
to confirm.
•
A confirmation tone is played.
5. Press
O
to return to standby mode.
Page 57

56
9 HANDSET OPTS
Your phone comes with a selection of settings that you can change to
personal list your phone to the way you like it to work.
9.1 Set the Ring Volume
You can set the handset ringer volume from Level 1 to Level 4 or turn the
ringer off.
- On Your Main Eclipse Handset
1. From the home screen, press
M
.
2. Press
+/-
to HANDSET OPTS and then press
M
to select.
3. Press
+/-
to RINGER&TONES and then press
M
to select.
Press
M
again to select RING VOLUME.
4. Press
+/-
to select the desired setting (each volume level
will play as it is selected) and then press
M
to confirm.
•
A confirmation tone is played.
5. Press
O
to return to standby mode.
- On Your Additional Handset
1. From the home screen, press
M
.
2. Press
+\-
to PERSONAL SET and then press
M
to
select.
3. Press
+\-
to RINGER & TONES and then press
M
to select.
4. Press
M
again to select RING VOLUME.
5. Press
+\-
to select the desired setting (each volume level
will play as it is selected) and then press
M
to confirm.
•
A confirmation tone is played.
6. Press
O
to return to standby mode.
Page 58

57
Note: Press and hold
#
to switch the ringer On and Off when the
handset is in standby mode. The ringer off icon displays on the screen
when ringer off feature is activated.
9.2 Set the Ring Tone
You can select from 10 ringer melodies for both internal and external calls.
- On Your Main Eclipse Handset
1. From the home screen, press
M
.
2. Press
+/-
to HANDSET OPTS and then press
M
to select.
3. Press
+/-
to RINGER&TONES and then press
M
to select.
4. Press
+/-
to RING TONE and then press
M
to select.
5. Press
+/-
to select the desired ringer melody from 1 to 10
(each melody will play as it is selected) and then press
M
to confirm.
•
A confirmation tone is played.
6. Press
O
to return to standby mode.
- On Your Additional Handset
1. From the home screen, press
M
.
2. Press
+\-
to HANDSET OPTS and then press
M
to
select.
3. Press
+\-
to RINGER & TONES and then press
M
to select.
4. Press
+\-
to RING TONE and then press
M
to select.
5. Press
+\-
to select the desired melody from 1 to 10 (each
melody will play as it is selected) and then press
M
to confirm.
•
A confirmation tone is played.
6. Press
O
to return to standby mode.
Page 59

58
9.3 Set the Key Tone
The handset emits a tone with each key press. You can choose to turn
this tone on or off. The default setting is ON.
- On Your Main Eclipse Handset
1. From the home screen, press
M
.
2. Press
+/-
to HANDSET OPTS and then press
M
to select.
3. Press
+/-
to RINGER&TONES and then press
M
to select.
4. Press
+/-
to KEY TONE and then press
M
to select.
5. Press
+/-
to select ON or OFF and then press
M
to confirm.
•
A confirmation tone is played.
6. Press
O
to return to standby mode.
- On Your Additional Handset
1. From the home screen, press
M
.
2. Press
+\-
to HANDSET OPTS and then press
M
to
select.
3. Press
+\-
to RINGER & TONES and then press
M
to select.
4. Press
+\-
to KEY TONE and then press
M
to select.
5. Press
+\-
to select ON or OFF and then press
M
to confirm.
•
A confirmation tone is played.
6. Press
O
to return to standby mode.
Page 60

59
9.4 Rename the Handset
You can personalise your handset by changing the name shown on the
handset in standby mode.
- On Your Main Eclipse Handset
1. From the home screen, press
M
.
2. Press
+/-
to HANDSET OPTS and then press
M
.
3. Press
M
to select HANDSET NAME.
•
The current handset name is displayed.
4. Press
m
to delete the letters one by one and enter the new name
(maximum 10 characters).
5. Press
M
to confirm.
•
A confirmation tone is played.
6. Press
O
to return to standby mode.
- On Your Additional Handset
1. From the home screen, press
M
.
2. Press
+\-
to HANDSET OPTS and then press
M
to
select.
3. Press
M
to select HANDSET NAME.
•
The current handset name is displayed.
4. Press
m
to delete the letters one by one and enter the new name
(maximum 10 characters).
5. Press
M
to confirm.
•
A confirmation tone is played.
6. Press
O
to return to standby mode.
Page 61

60
9.5 Set the Display Language
You can change the display language on your handset. The default setting
is ENGLISH.
- On Your Main Eclipse Handset
1. From the home screen, press
M
.
2. Press
+/-
to HANDSET OPTS and then press
M
to select.
3. Press
+/-
to LANGUAGE and then press
M
to select.
4. Press
+/-
to select your preferred language and then
press
M
to confirm.
•
A confirmation tone is played.
5. Press
O
to return to standby mode.
- On Your Additional Handset
1. From the home screen, press
M
.
2. Press
+\-
to HANDSET OPTS and then press
M
to select.
3. Press
+\-
to LANGUAGE and then press
M
to select.
4. Press
+\-
to select your preferred language and then
press
M
to confirm.
•
A confirmation tone is played.
5. Press
O
to return to standby mode.
Note: Once the display language is set, the handset will switch to display
in the selected language immediately.
Page 62

61
9.6 Set Auto Hang-up
This function enables you to end a call automatically by simply placing
the handset back on the base unit (main Eclipse handset) or charging pod
(additional handsets). By default, the Auto Hang-up feature is ON, but it
can be turned off.
- On Your Main Eclipse Handset
1. From the home screen, press
M
.
2. Press
+/-
to HANDSET OPTS and then press
M
to select.
3. Press
+/-
to AUTO HANG-UP and then press
M
to select.
4. Press
+/-
to select ON or OFF and then press
M
to confirm.
•
A confirmation tone is played.
5. Press
O
to return to standby mode.
- On Your Additional Handset
1. From the home screen, press
M
.
2. Press
+\-
to HANDSET OPTS and then press
M
to select.
3. Press
+\-
to AUTO HANG-UP and then press
M
to select.
4. Press
+\-
to select ON or OFF and then press
M
to confirm.
•
A confirmation tone is played.
5. Press
O
to return to standby mode.
Page 63

62
10 SETTINGS
10.1 Handset Registration
IMPORTANT: When you purchase your phone system, all handsets are
already registered to your base, so you do not need to register them.
Handset registration is only necessary when you buy extra handsets or if
a handset has become faulty.
You can register up to four handsets to one base station, with each
handset’s number (1 to 4) shown on its display.
Note: Each handset can only be registered to one base.
10.2 Register Additional Handsets
- For a Main Eclipse Type Handset
1. Press and hold the key under the base unit for approximately 5 seconds.
•
The message indicator on the base will flash for up to 1 minute,
while it is in registration mode.
2. On the handset, press
M
.
3. Press
+/-
to SETTINGS and then press
M
to select.
4. Press
+/-
to REGISTRATION and then press
M
to select.
5. Press
M
to confirm.
- For an Additional Type Handset
1. Press and hold the key under the main Eclipse base unit for
approximately 5 seconds.
•
The message indicator on the base will flash for up to 1 minute,
while it is in registration mode.
2. On the handset, press
M
.
3. Press
+\-
to SETTINGS and then press
M
to select.
4. Press
+\-
to REGISTRATION and then press
M
to
select.
5. Press
M
to confirm.
Page 64

63
Note:
•
WAITING flashes on the screen.
•
A confirmation tone is played to indicate successful registration,
and the handset returns to standby mode, with its handset number
displayed.
•
If no base is found, error tones are played to indicate failed
registration and PLS REG H/S is displayed on the screen. You will
need to repeat from step 1 above.
•
During steps 2-5, if no key is pressed on the handset within 10
seconds, the registration procedure will be aborted. If this happens,
repeat from step 1 above.
10.3 Deregister your Handset
You can deregister the handset you are using, or any other handset
registered to the same base.
- Using Your Main Eclipse Handset
1. From the home screen, press
M
.
2. Press
+/-
to SETTINGS and then press
M
to select.
3. Press
+/-
to DEREGISTER and then press
M
to select.
4. Press
M
to confirm.
5. Press
+/-
to select the handset number you want to
deregister and then press
M
to confirm, or press
O
to cancel
the deregistration procedure.
- Using an Additional Handset
1. From the home screen, press
M
.
2. Press
+\-
to SETTINGS and then press
M
to select.
3. Press
+\-
to DEREGISTER and then press
M
to select.
4. Press
M
to confirm.
5. Press
+\-
to select the handset number you want to
deregister and then press
M
to confirm, or press
O
to cancel
the deregistration procedure.
Page 65

64
Note: After confirming the handset you want to remove on either the
Main Eclipse Handset or the additional handset,
•
A confirmation tone is played to indicate successful
deregistration.
•
PLS REG H/S is displayed on the home screen of the
deregistered handset.
•
During steps 1-5, if no handset key is pressed within 10
seconds, the procedure will abort and the handset returns to
standby mode.
10.4 Change the Recall Time
You may need to press
T
or F (main Eclipse handset) or or
(additional handsets) to send a Flash signal (also called Recall or
Timed Break Recall) if you are connected to a PBX or using certain
network services. You should normally leave the Recall Time at its
default setting, LONG(600ms), as this is the standard recall required in
the UK telephone network. However, it can be changed to Medium
(270ms) or SHORT(100ms) if your telephone is connected to a PBX that
requires a different recall time.
- On Your Main Eclipse Handset
1. From the home screen, press
M
.
2. Press
+/-
to SETTINGS and then press
M
to select.
3. Press
+/-
to RECALL TIME and then press
M
to select.
4. Press
+/-
to select SHORT, MEDIUM or LONG and then
press
M
to confirm.
•
A confirmation tone is played.
5. Press
O
to return to standby mode.
- On Your Additional Handset
1. From the home screen, press
M
.
2. Press
+\-
to SETTINGS and then press
M
to select.
Page 66

65
3. Press
+\-
to RECALL TIME and then press
M
(additional handsets) to select.
4. Press
+\-
to select SHORT, MEDIUM or LONG and then
press
M
to confirm.
•
A confirmation tone is played.
5. Press
O
to return to standby mode.
10.5 Reset the Unit
You can reset your phone to its default settings with this feature.
Note: Upon reset, all your personal settings, call log and redial list entries
will be deleted and the phone will return to its default settings, including
the Master PIN. However, your phonebook will remain unchanged after
reset, and any recorded messages will remain unchanged, while all other
settings will be reset.
- On Your Main Eclipse Handset
1. From the home screen, press
M
.
2. Press
+/-
to SETTINGS and then press
M
to select.
3. Press
+/-
to select RESET and then press
M
to select.
4. Press
M
again to confirm.
•
A confirmation tone is played and the unit is reset to its default
settings.
- On Your Additional Handset
1. From the home screen, press
M
.
2. Press
+\-
to SETTINGS and then press
M
to select.
3. Press
+\-
to select RESET and then press
M
to select.
4. Press
M
again to confirm.
•
A confirmation tone is played and the unit is reset to its default
settings.
Page 67

66
10.6 AREA CODE
- On Your Main Eclipse Handset
1. From the home screen, press
M
.
2. Press
+/-
key to SETTINGS and then press
M
key to
select.
3. Press
+/-
key to AREA CODE and then press
M
key to
select.
4. Key in area code then press
M
key to confirm.
•
A confirmation tone is played.
5. Press
O
key to return to standby mode.
- On Your Additional Handset
1. From the home screen, press
M
.
2. Press
+\-
key to SETTINGS and then press
M
key to
select.
3. Press
+\-
key to AREA CODE and then press
M
key to
select.
4. Key in area code then press
M
key to confirm.
A confirmation tone is played.
5. Press
O
key to return to standby mode.
Page 68

67
11 ANSWERING MACHINE
Your phone includes a telephone answering machine that records
unanswered calls when it is on.
The answering machine can store up to 59 messages within the
maximum recording time of approximately 30 minutes and each message
can be up to 3 minutes long.
When the answering machine is on, calls are answered after the set RING
DELAY.
If you have selected ANS ON/OFF to ON (main Eclipse handset) or ANS
ON/OFF to ON (additional handsets), then the caller can leave you a
message after hearing your announcement.
If you have selected ANS. ON/OFF to OFF mode, the caller can only listen
to your announcement but cannot leave you a message.
If the answering machine memory is full, the answering machine LED
on the base flashes rapidly, the answering machine icon on the Main
Eclipse Handset flashes slowly, and the announcement will be played
to new callers. You will have to delete some messages before any new
ones can be recorded.
11.1 Turning the Answering Machine On/Off
- On Your Main Eclipse Handset
1. From the home screen, press
M
.
2. Press
M
again to select ANS. SYSTEM.
3. Press
+/-
to ANS. ON/OFF and then press
M
to select.
4. Press
+/-
to select ON or OFF and then press
M
to confirm.
•
A confirmation tone is played.
5. Press
O
to return to standby mode.
- On Your Additional Handset
1. From the home screen, press
M
.
2. Press
+\-
to ANS. SYSTEM and then press
M
to select.
3. Press
+\-
to ANS. ON/OFF and then press
M
to select.
4. Press
+\-
to select ON or OFF and then press
M
to confirm.
•
A confirmation tone is played.
5. Press
O
to return to standby mode.
Page 69

68
Note: If the answering machine is OFF and the SECURITY CODE is still set
at its default 0000, the answering machine will not answer any incoming
calls. However, if the SECURITY CODE has been changed, it will answer
incoming calls after 14 rings to allow remote access, and the
announcement will play. (See Remote Access on page 76.)
11.2 Answering Machine Settings
11.2.1 Set the Ring Delay
You can select the number of rings before the answering machine
answers a call and starts playing the announcement.
You can set the delay from 2 to 7 RINGS or TOLL SAVER on the Main
Eclipse Handset or TOLL SAVER on the additional handset.
IMPORTANT: If your network voice messaging system is enabled, you
must set your RING DELAY to less than 6 rings; otherwise the network
service will answer all your calls before the answering machine of your
telephone and prevent it from recording any messages.
- On Your Main Eclipse Handset
1. From the home screen, press
M
.
2. Press
M
again to select ANS. SYSTEM.
3. Press
+/-
to ANS. SETTING and then press
M
.
4. Press
M
to select RING DELAY.
5. Press
+/-
to select 2 RINGS – 7 RINGS or TOLL SAVER and
then press
M
to confirm.
•
A confirmation tone is played.
6. Press
O
to return to standby mode.
-
Page 70

69
- On Your Additional Handset
1. From the home screen, press
M
.
2. Press
+\-
to ANS. SYSTEM and then press
M
to select.
3. Press
+\-
ANS. SETTING and press
M
to select.
4. Press
M
to select RING DELAY.
5. Press
+\-
select 2 RINGS – 7 RINGS or TOLL SAVER and
then press
M
to confirm.
•
A confirmation tone is played.
6. Press
O
to return to standby mode.
Note: If you select TOLL SAVER on the Main Eclipse Handset or TOLL
SAVER on the additional handset, the answering machine will answer an
incoming call on the fifth ring if you have no new messages and on the
third ring if you do.
When you call your answering machine to check messages, if it does not
answer on the third ring, then you can hang up immediately, knowing
that you have no new messages. This feature can save you the cost of a
long-distance call when you check your messages remotely.
11.2.2 Activate/Deactivate Remote Access
Note: The remote control access is set to activated before exit factory,
you can check the messages on your answering machine when you are
away from home, by calling from another phone.
The SECURITY CODE is used for accessing the answering machine
remotely. If your answering machine is off, you must change your
SECURITY CODE from its default 0000 before you can use the remote
access feature to turn on your answering machine.
Page 71

70
11.2.3 Change the Voice Language
You may be able to select a different language for the answering
machine’s pre- recorded announcements. The default setting is ENGLISH.
- On Your Main Eclipse Handset
1. From the home screen, press
M
.
2. Press
M
again to select ANS. SYSTEM.
3. Press
+/-
to ANS. SETTING and then press
M
to select.
2. Press
+/-
to LANGUAGE and then press
M
to select.
3. Press
+/-
to select your preferred language (if available)
and then press
M
to confirm.
•
A confirmation tone is played.
4. Press
O
to return to standby mode.
- On Your Additional Handset
1. From the home screen, press
M
.
2. Press
+\-
to ANS. SYSTEM and then press
M
to select.
3. Press
+\-
to ANS. SETTING and then press
M
to select.
4. Press
+\-
to LANGUAGE and then press
M
to select.
5. Press
+\-
to select your preferred language (if available)
and then press
M
to confirm.
•
A confirmation tone is played.
6. Press
O
to return to standby mode.
Page 72

71
11.3 Message Playback
When there are new messages on the answering machine, the tape icon
flashes on the handset screen.
- On Your Main Eclipse Handset
1. From the home screen, press
M
.
2. Press
M
again to select ANS. SYSTEM.
3. Press
M
again to select PLAY.
•
Your messages will automatically playback through the
handset’s speakerphone.
•
The display will show the message number and the date and
time of the call.
•
Press
T
to listen to your messages privately through the
earpiece of your handset.
4. During playback, press
M
and then press
+/-
to access
the following options:
REPEAT
Repeat the currently playing message
NEXT
Play the next message
PREVIOUS
Play the previous message
DELETE
Delete the current message
Note: To return to the screen showing the message number and
date/time, press
m
.
5. Press
O
to return to standby mode.
- On Your Additional Handset
1. From the home screen, press
M
.
2. Press
+\-
to ANS. SYSTEM and then press
M
to select.
3. Press
M
again to select PLAY.
•
Your messages will automatically playback through the
handset’s speakerphone.
•
The display will show the message number, and with the date
and time of the call alternating.
•
Press to listen to your messages privately through the
earpiece of your handset.
Page 73

72
4. During playback, press
M
and then press
+\-
to access the
following options:
REPEAT
Repeat the currently playing message
NEXT
Play the next message
PREVIOUS
Play the previous message
DELETE
Delete the current message
Note: You cannot exit from this menu list without stopping the playback.
5. Press
O
to return to standby mode.
11.4 Delete All Messages
Note: Only old messages can be deleted. New messages must be played
before they can be deleted.
- On Your Main Eclipse Handset
1. From the home screen, press
M
.
2. Press
M
again to select ANS. SYSTEM.
3. Press
+/-
to select DELETE ALL and then press
M
.
4. Press
M
again to confirm.
•
A confirmation tone is played.
5. Press
O
to return to standby mode.
- On Your Additional Handset
1. From the home screen, press
M
.
2. Press
+\-
to ANS. SYSTEM and then press
M
to select.
3. Press
+\-
to select DELETE ALL and then press
M
.
4. Press
M
again to confirm.
•
A confirmation tone is played.
5. Press
O
to return to standby mode.
11.5 Announcement
When the answering system answers a call, the pre-recorded
announcement is played to the caller unless you have recorded your own
announcement.
The phone comes with pre-recorded announcements.
Page 74

73
11.5.1 Record a Personal Announcement
You can choose to replace the default announcement with your own
personal announcements.
Note: The maximum length of an announcement is 2 minutes.
- On Your Main Eclipse Handset
1. From the home screen, press
M
.
2. Press
M
again to select ANS. SYSTEM.
3. Press
+/-
to ANNOUNCEMENT and then press
M
to select.
4. Press
+/-
to select ANNOUNCEMENT to record
announcement.
•
A confirmation tone is played.
5. Speak into the handset to start recording your new announcement
and press
M
again to end the recording.
•
A confirmation tone is played.
6. Press
O
to return to standby mode.
- On Your Additional Handset
1. From the home screen, press
M
.
2. Press
+\-
to ANS. SYSTEM and then press
M
to select.
3. Press
+\-
to ANNOUNCEMENT and then press
M
to
select.
4. Press
+\-
to select ANNOUNCEMENT to record
announcement..
•
A confirmation tone is played.
5. Speak into the handset to start recording your new announcement
and press
M
again to end the recording.
•
A confirmation tone is played.
6. Press
O
to return to standby mode.
Note: The maximum length of an announcement is 2 minutes
Page 75

74
11.5.2 Listen to an announcement
- On Your Main Eclipse Handset
1. From the home screen, press
M
.
2. Press
M
again to select ANS. SYSTEM.
3. Press
+/-
to ANNOUNCEMENT and then press
M
to select.
4. Press
+/-
to select PLAY, and then press
M
to confirm.
•
The announcement plays through the phone’s speaker.
•
Press
T
if you wish to listen to the announcement privately
over the earpiece.
5. Press
O
to return to standby mode.
- On Your Additional Handset
1. From the home screen, press
M
.
2. Press
+\-
to ANS. SYSTEM and then press
M
.
3. Press
+\-
to ANNOUNCEMENT and then press
M
to
select.
4. Press
+\-
to select PLAY and then press
M
to confirm.
•
The announcement plays through the phone’s speaker.
•
Press if you wish to listen to the announcement privately
over the earpiece.
5. Press
O
to return to standby mode.
Page 76

75
11.5.3 Delete a Personal Announcement
If you want to return to using the default announcement, simply delete
your personal announcement.
- On Your Main Eclipse Handset
1. From the home screen, press
M
.
2. Press
M
again to select ANS. SYSTEM.
3. Press
+/-
to ANNOUNCEMENT and then press
M
to select.
4. Press
+/-
to DELETE and press
M
to confirm.
•
The default pre-recorded announcement plays through the
phone’s speaker.
•
Press
T
if you wish to listen to the announcement privately
over the earpiece.
5. Press
O
to return to standby mode.
- On Your Additional Handset
1. From the home screen, press
M
.
2. Press
+\-
to ANS. SYSTEM and then press
M
.
3. Press
+\-
to ANNOUNCEMENT and then press
M
to
select.
4. Press
+\-
to DELETE and press
M
to confirm.
•
The default pre-recorded outgoing message plays through the
phone’s speaker.
•
Press if you wish to listen to the message privately over
the earpiece.
5. Press
O
to return to standby mode.
Page 77

76
11.6 Change Security Code
- On Your Additional Handset
1. From the home screen, press
M
key.
2. Press
+/-
key to ANS. SYSTEM and then press MENU key
to select.
3. Press
+/-
key to SECURITY CODE and then press
M
key
change the security code, and then press
M
key to confirm.
4.
Press
O
key to standby mode.
- On Your Additional Handset
1. From the home screen, press
M
key.
2. Press
+\-
key to ANS. SYSTEM and then press MENU key
to select.
3. Press
+\-
key to SECURITY CODE and then press
M
key
change the security code, and then press
M
key to confirm.
4. Press key to standby mode.
11.7 Remote Access
The phone lets you listen to the messages on your answering machine, or
otherwise operate your answering machine by calling in to your
answering machine from another touch-tone phone.
You need to enter a remote access code (same as your SECURITY CODE)
to access your answering machine remotely.
The remote access code is used to prevent unauthorized access of your
answering machine.
Remote Access always be enabled you can to use this feature in any time.
(See Activate/Deactivate Remote Access on page 69.)
Page 78

77
11.7.1 Access the Answering Machine Remotely
1. Dial your phone number from any touch-tone phone.
2. When your answering machine answers your call and starts playing
your announcement, press the < # > key.
•
The announcement will stop playing.
3. Enter your Remote Access Code (same as your security code) within 8
seconds using the numeric keypad on the touch-tone phone.
Note that the answering machine will drop the call if you do not
enter the SECURITY CODE within 8 seconds.
4. If the code is accepted, you will hear a confirmation tone.
5. The answering machine will start to playback all the messages on
your answering machine, beginning with new messages, or if there
are no recorded messages you will hear four beeps.
6. Use the keypad on the touch-tone phone to carry out the following
operations:
Keys
1 Repeat the previous message.
2 Playback messages
/ Repeat the current message
.
3 Skip to the next message.
6 Delete the current message.
7 Stop message playback.
8 Turn off the answering machine.
7. When you have finished listening to your messages, simply hang up
the phone to end.
Note:
If your answering machine is off and Remote Access is always activated
(See Activate/Deactivate Remote Access on page 69 ), the answering
machine will answer your call after 14 rings.
If you enter an incorrect Remote Access Code, you will hear a triple-beep
error tone, and you will need to enter the code again. If you enter the
wrong Remote Code twice consecutively, the call will end automatically.
Page 79

78
12 HELP
The icon is not scrolling when the handset is placed on the base
Handset not properly seated on the base cradle -
readjust the handset on the base.
Dirty contact - clean the charge contacts by wiping with an alcohol
moistened cloth.
Battery is full - charging is not necessary at this time.
No dial tone
If there is no base power, check the connections. Reset
the phone by unplugging then plugging it back into an electrical
outlet.
If the handset batteries are empty, recharge the battery pack for at
least 24 hours.
Move the handset closer to the base.
Be sure to use only the provided telephone cords.
Poor audio quality
If the base is too close to electrical appliances, reinforced
concrete walls, or metal door frames, move the base from these
areas.
No ring tone
The ringer may be off.
The volume may need to be increased.
Caller ID does not work
Check your subscription with your network operator.
If you subscribe to high-speed internet service (Digital Subscriber Line
- DSL) through your telephone lines, you must install a DSL filter
between the telephone base and the telephone wall jack. The filter
will prevent noise and caller ID problems caused by DSL interference.
Please contact your DSL service provider for more information about
DSL filters.
A phonebook entry cannot be stored
The phonebook is full. Delete an entry to free memory
Page 80

79
No display
Try recharging or replacing the rechargeable battery pack.
Reset the base. Unplug the unit's electrical, then plug it back in.
If the LED is not lit up, then try to unplug the unit's
electrical power, and then plug it back in.
If the handset disconnects from the base during a phone call
Check that the power cord is connected properly into the
base.
Check that the power adapter is connected properly into the
electrical outlet.
Move the handset closer to the base. It may be out of range.
Reset the base by unplugging the unit's electrical power.
Reset the handset by unplugging and re-plugging its battery pack.
Wait for around 15 seconds and re-plug the power again. Allow up to
one minute for the handset to synchronize with the registered base
again.
Noise interference on your radio or television
Your base or charger may be too close. Move it as far
away as possible.
Page 81

80
13 GENERAL INFORMATION
13.1 If your product is not working properly...
1. Read this User's Guide.
2. Visit our website: www.idectonline.com
3. Contact Customer Service in the US and Canada at
(1) 317 436 8383.
To order a replacement battery pack contact customer service or visit our
website.
13.2 Important safety instructions
Follow these safety precautions when using your phone to reduce the
risk of fire, electric shock, and injury to persons or property:
1. Keep all vents and openings of the phone unblocked.
Do not set the phone on a heating register or over a radiator.
Ensure that proper ventilation is provided at the installation site.
2. Do not use while wet or while standing in water.
3. Do not use this product near water (for example, near a bath tub,
kitchen sink, or swimming pool).
4. Do not allow anything to rest on the power cord. Place the power
cord so that it will not be walked on.
5. Never insert objects of any kind into the product vents as that may
result in fire or electric shock.
6. Unplug this product from the electrical outlet before cleaning. Do
not use liquid cleaners or aerosol cleaners. Use a damp cloth for
cleaning.
7. Do not disassemble this product. If service or repair work is
equired,contact the customer service helpline found in this User's Gide.
8. Do not overload wall outlets and extension cords.
9. Avoid using during an electrical storm. Use a surge protector to
protect the equipment.
10. Do not use this phone to report a gas leak, especially if you are in
the vicinity of the gas line.
Page 82

81
CAUTION
To reduce the risk of fire, use only No. 26 AWG or larger UL Listed or CSA
Certified Telecommunication Line Cord.
13.3 Unplug this cordless phone immediately from an outlet if:
The power cord or plug is damaged or frayed.
Liquid has been spilled on the product.
The product has been exposed to rain or water. Do not retrieve the
handset or base until after you have unplugged the power and phone
from the wall. Then retrieve the unit by the unplugged cords.
The product has been dropped or the cabinet has been damaged.
The product exhibits a distinct change in performance.
Installation Guidelines.
1. Read all instructions and save them for future reference.
2. Follow all warnings and instructions marked on the product.
3. Do not install this product near a bath tub, sink, or shower.
4. Operate this phone using only the power source that is indicated on
the marking label. If you are unsure of the power supply to your
home, consult with your dealer or local power company.
5. Do not place this product on an unstable cart, stand, or table. This
product may fall, causing serious damage to the product.
6. Adjust only those controls that are covered by the operating
instructions. Improper adjustment of other controls may result in
damage and will often require extensive work to restore the
product to normal operation.
7. Clean this product with a soft, damp cloth. Do not use chemicals or
cleaning agents to clean this phone.
8. Use only the power supply that came with this unit.
Using other power supplies may damage the unit.
9. Because this phone operates on electricity, you should have at least
one phone in your home that operates without electricity in case of
a power outage.
10. To avoid interference to nearby appliances, do not place the base of
the phone on or near a TV, microwave oven, or VCR.
Page 83

82
CAUTION
To maintain compliance with the FCC's RF exposure guidelines, place the
base unit at least 20 cm from nearby persons.
13.4 Battery Safety Instructions
Do not burn, disassemble, mutilate, or puncture the battery. The
battery contains toxic materials that could be released, resulting in
injury.
CAUTION
There is a risk of explosion if you replace the battery with an incorrect
battery type. Use only the battery pack that came with your phone or an
authorized replacement recommended by the manufacturer.
Keep battery packs out of the reach of children.
Remove battery packs if storing over 30 days.
Do not dispose of battery packs in fire, which could result in explosion.
The rechargeable battery packs that power this product must be
disposed of properly and may need to be recycled. Refer to the
battery label for battery type. Contact your local recycling center for
proper disposal methods.
SAVE THESE INSTRUCTIONS
13.5 Consumer Products and Accessories Limited Warranty
("Warranty")
Thank you for purchasing this IDECT branded product manufactured
under license by Binatone Electronics International LTD ("BINATONE").
What Does this Warranty Cover?
Subject to the exclusions contained below, BINATONE warrants that this
IDECT branded product ("Product") or certified accessory ("Accessory")
sold for use with this product that it manufactured to be free from
defects in materials and workmanship under normal consumer usage for
the period outlined below. This Warranty is your exclusive warranty and
is not transferable.
Who is covered?
This Warranty extends only to the first consumer purchaser, and is not
transferable.
Page 84

83
What will BINATONE do?
BINATONE or its authorized distributor at its option and within a
commercially reasonable time, will at no charge repair or replace any
Products or Accessories that does not conform to this Warranty. We may
use functionally equivalent reconditioned/ refurbished/ pre-owned or
new Products, Accessories or parts.
What Other Limitations Are There?
ANY IMPLIED WARRANTIES, INCLUDING WITHOUT LIMITATION THE
IMPLIED WARRANTIES OF MERCHANTABILITY AND FITNESS FOR A
PARTICULAR PURPOSE, SHALL BE LIMITED TO THE DURATION OF THIS
LIMITED WARRANTY, OTHERWISE THE REPAIR OR REPLACEMENT
PROVIDED UNDER THIS EXPRESS LIMITED WARRANTY IS THE EXCLUSIVE
REMEDY OF THE CONSUMER, AND IS PROVIDED IN LIEU OF ALL OTHER
WARRANTIES, EXPRESS OF IMPLIED. IN NO EVENT SHALL IDECT OR
BINATONE BE LIABLE, WHETHER IN CONTRACT OR TORT (INCLUDING
NEGLIGENCE) FOR DAMAGES IN EXCESS OF THE PURCHASE PRICE OF THE
PRODUCT OR ACCESSORY, OR FOR ANY INDIRECT, INCIDENTAL, SPECIAL
OR CONSEQUENTIAL DAMAGES OF ANY KIND, OR LOSS OF REVENUE OR
PROFITS, LOSS OF BUSINESS, LOSS OF INFORMATION OR OTHER
FINANCIAL LOSS ARISING OUT OF OR IN CONNECTION WITH THE ABILITY
OR INABILITY TO USE THE PRODUCTS OR ACCESSORIES TO THE FULL
EXTENT THESE DAMAGES MAY BE DISCLAIMED BY LAW.
Some jurisdictions do not allow the limitation or exclusion of incidental
or consequential damages, or limitation on the length of an implied
warranty, so the above limitations or exclusions may not apply to you.
This Warranty gives you specific legal rights, and you may also have other
rights that vary from one jurisdiction to another.
Page 85

84
Products Covered
Length of Coverage
Consumer Products One (1) year from the date
of the
products original purchase
Consumer
Accessories
Ninety (90) days from the
date
of the accessories original
Consumer Products
and
Accessories that are
The balance of the original
warranty or for ninety (90)
days
13.6 Exclusions
Normal Wear and Tear. Periodic maintenance, repair and replacement of
parts due to normal wear and tear are excluded from coverage.
Batteries. Only batteries whose fully charged capacity falls below 80% of
their rated capacity and batteries that leak are covered by this Warranty.
Abuse & Misuse. Defects or damage that result from: (a) improper
operation, storage, misuse or abuse, accident or neglect, such as physical
damage (cracks, scratches, etc.) to the surface of the product resulting
from misuse; (b) contact with liquid, water, rain, extreme humidity or
heavy perspiration, sand, dirt or the like, extreme heat, or food; (c) use of
the Products or Accessories for commercial purposes or subjecting the
Product or Accessory to abnormal usage or conditions; or (d) other acts
which are not the fault of IDECT or BINATONE., are excluded from
coverage.
Use of Non-IDECT branded Products and Accessories. Defects or damage
that result from the use of Non-IDECT branded or certified Products or
Accessories or other peripheral equipment are excluded from coverage.
Unauthorized Service or Modification. Defects or damages resulting from
service, testing, adjustment, installation, maintenance, alteration, or
modification in any way by someone other than IDECT, BINATONE or its
authorized service centers, are excluded from coverage.
Altered Products. Products or Accessories with (a) serial numbers or date
Page 86

85
tags that have been removed, altered or obliterated; (b) broken seals or
that show evidence of tampering; (c) mismatched board serial numbers;
or (d) nonconforming or non-IDECT branded housings, or parts, are
excluded from coverage.
Communication Services. Defects, damages, or the failure of Products or
Accessories due to any communication service or signal you may
subscribe to or use with the Products or Accessories is excluded from
coverage.
How to Obtain Warranty Service or Other Information?
To obtain service or information, please call:
US and Canada: (1) 317 436 8383
You will receive instructions on how to ship the Products or Accessories
at your expense and risk, to a BINATONE Authorized Repair Center.
To obtain service, you must include: (a) the Product or Accessory; (b) the
original proof of purchase (receipt) which includes the date, place and
seller of the Product; (c) if a warranty card was included in your box, a
completed warranty card showing the serial number of the Product; (d)
a written description of the problem; and, most importantly; (e) your
address and telephone number.
These terms and conditions constitute the complete warranty agreement
between you and BINATONE. regarding the Products or Accessories
purchased by you, and supersede any prior agreement or representations,
including representations made in any literature publications or
promotional materials issued by BINATONE. Or representations made by
any agent employee or staff of BINATONE, that may have been made in
connection with the said purchase.
Page 87

86
13.7 FCC, ACTA and IC regulations
FCC Part 15
This equipment has been tested and found to comply with the
requirements for a Class B digital device under Part 15 of the Federal
Communications Commission (FCC) rules. These requirements are
intended to provide reasonable protection against harmful interference
in a residential installation. This equipment generates, uses and can
radiate radio frequency energy and, if not installed and used in
accordance with the instructions, may cause harmful interference to
radio communications. However, there is no guarantee that interference
will not occur in a particular installation. If this equipment does cause
harmful interference to radio or television reception, which can be
determined by turning the equipment off and on, the user is encouraged
to try to correct the interference by one or more of the following
measures:
Reorient or relocate the receiving antenna.
Increase the separation between the equipment and receiver.
Connect the equipment into an outlet on a circuit different
from that to which the receiver is connected.
Consult the dealer or an experienced radio/TV technician for help.
Changes or modifications to this equipment not expressly approved by
the party responsible for compliance could void the user's authority to
operate the equipment.
This device complies with Part 15 of the FCC rules. Operation is subject to
the following two conditions: (1) this device may not cause harmful
interference, and (2) this device must accept any interference received,
including interference that may cause undesired operation. Privacy of
communications may not be ensured when using this telephone.
To ensure safety of users, the FCC has established criteria for the amount
of radio frequency energy that can be safely absorbed by a user or
ystander according to the intended usage of the product. This product
has been tested and found to comply with the FCC criteria. Both the
Page 88

87
Handset may be safely held against the ear of the user. The telephone
base shall be installed and used such that parts of the user's body other
than the hands are maintained at a distance of approximately 20 cm
(8 inches) or more.
This Class B digital apparatus complies with Canadian ICES-003.
FCC Part 68 and ACTA
This equipment complies with Part 68 of the FCC rules and with technical
requirements adopted by the Administrative Council for Terminal
Attachments (ACTA). The label on the back or bottom of this equipment
contains, among other things, a product identifier in the format US:
AAAEQ##TXXXX. This identifier must be provided to your local telephone
company upon request.
The plug and jack used to connect this equipment to premises wiring and
the telephone network must comply with applicable Part 68 rules and
technical requirements adopted by ACTA. A compliant telephone cord
and modular plug is provided with this product. It is designed to be
connected to a compatible modular jack that is also compliant. An RJ11
jack should normally be used for connecting to a single line and an RJ14
jack for two lines. See Installation Instructions in the User's Guide.
The Ringer Equivalence Number (REN) is used to determine how many
devices you may connect to your telephone line and still have them ring
when you are called. The REN for this product is encoded as the 6th and
7th characters following the US: in the product identifier (e.g., if ## is 03,
the REN is 0.3). In most, but not all areas, the sum of all RENs should be
five (5.0) or less. For more information, please contact your local
telephone company.
This equipment may not be used with Party Lines. If you have specially
wired alarm dialing equipment connected to your telephone line, ensure
the connection of this equipment does not disable your alarm equipment.
If you have questions about what will disable alarm equipment, consult
your telephone company or a qualified installer.
Page 89

88
If this equipment is malfunctioning, it must be unplugged from the
odular jack until the problem has been corrected. Repairs to this
elephone equipment can only be made by the manufacturer or its
uthorized agents. For repair procedures, follow the instructions outlined
under the Limited Warranty.
If this equipment is causing harm to the telephone network, the
telephone company may temporarily discontinue your telephone service.
The telephone company is required to notify you before interrupting
service. If advance notice is not practical, you will be notified as soon as
possible. You will be given the opportunity to correct the problem and
the telephone company is required to inform you of your right to file a
complaint with the FCC. Your telephone company may make changes in
its facilities, equipment, operation, or procedures that could affect the
proper functioning of this product. The telephone company is required to
notify you if such changes are planned.
If this product is equipped with a corded or cordless handset, it is hearing
aid compatible.
If this product has memory dialing locations, you may choose to store
emergency telephone numbers (e.g., police, fire, medical) in these
locations. If you do store or test emergency numbers, please:
Remain on the line and briefly explain the reason for the call before
hanging up.
Perform such activities in off-peak hours, such as early morning or
late evening.
Page 90

89
14 TECHNICAL DETAILS
Standard Digital Enhanced Cordless Telecommunication
(DECT)
Frequency range
1921.536 - 1928.448MHz
Channel
bandwidth
1.728 MHz
Operating range Up to 300m outdoors; Up to 50m indoors
Operating time
Standby: 230 hours; Talking: 13 hours
Battery charge time: 15 hours
Temperature
range
Operating: 0oC to 40oC; Storage: -20oC to 50oC
Electrical power
Base unit power adapter:
Ten Pao: S005IU0600050
Input 120Vac 60Hz; Output 6Vdc/500mA.
Charger unit power adapter:
Ten Pao: U060030A12V
Input 120Vac 60Hz; Output 6Vac/300mA.
Battery information (each handset):
2.4V AAA size, 650mAh NiMH (Rechargeable)
SANIK: 2SN-AAA65H-S-X2
CORUN: Ni-MHAAA650*2
Page 91

90
15 INDUSTRY CANADA
Operation is subject to the following two conditions: (1) this device may
not cause harmful interference, and (2) this device must accept any
interference, including interference that may cause undesired operation.
The term "IC: " before the certification/registration number only signifies
that the Industry Canada technical specifications were met.
The Ringer Equivalence Number (REN) for this terminal equipment is 0.0.
The REN is an indication of the maximum number of devices allowed to
be connected to a telephone interface. The termination on an interface
may consist of any combination of devices subject only to the
requirement that the sum of the RENs of all the devices does not exceed
five.
This product meets the applicable Industry Canada technical
specifications.
Page 92

1
MODE D’EMPLOI
Eclipse Plus / Eclipse Plus-2 /
Eclipse Plus-3 / Eclipse Plus-4
Téléphone DECT avec répondeur
Visitez notre site Internet : www.binatoneglobal.com
Appelez le service après-vente aux États-Unis et au Canada au :
(1) 317 436 8383
Avant d’utiliser l’appareil,
veuillez lire attentivement les instructions
CET APPAREIL N’EST PAS CONÇU POUR EFFECTUER DES
APPELS D’URGENCE EN CAS DE PANNE D’ÉLECTRICITÉ.
D’AUTRES DISPOSITIONS DEVRAIENT ÊTRE PRISES POUR
APPELER LES SERVICES D’URGENCE.
Page 93

2
Table des matières
1
IMPORTANTES CONSIGNES DE SÉCURITÉ ................................ 6
2
INSTALLATION DE VOTRE TÉLÉPHONE ..................................... 9
2.1
Connexion de la base............................................................... 9
2.2
Mise en place et charge du bloc-piles rechargeable du
combiné Eclipse ....................................................................... 9
2.3
Retirer le capot arrière du combiné Eclipse ........................... 10
3
FAITES CONNAISSANCE AVEC VOTRE TÉLÉPHONE ................. 11
3.1
Présentation du combiné et de la base Eclipse ..................... 11
3.2
Icônes et symboles de l’écran du combiné Eclipse ................ 14
3.3
Présentation du combiné, de la base et du chargeur* .......... 15
3.4
Icônes et symboles ................................................................ 19
3.5
Arborescence des menus et navigation dans les menus du
combiné Eclipse ..................................................................... 21
3.6
Saisie de texte et de numéros ............................................... 22
3.6.1 Table des caractères du combiné Eclipse............................... 22
4
UTILISATION DE VOTRE TÉLÉPHONE ...................................... 23
4.1
Appeler .................................................................................. 23
4.1.1 Pré-numérotation .................................................................. 23
4.1.2 Numérotation directe ............................................................ 23
4.1.3 Appeler un numéro de la liste des appels émis (5 derniers
numéros appelés) .................................................................. 23
4.1.4 Appeler un numéro du journal des appels (30 noms et
numéros de téléphone) ......................................................... 23
4.1.5 Appeler un contact du répertoire (30 contacts enregistrés sur
le combiné) ............................................................................ 24
Page 94

3
4.2
Répondre et mettre fin à un appel ........................................ 24
4.3
Haut-parleur du combiné ...................................................... 24
4.4
Régler le volume de l’écouteur .............................................. 24
4.5
Régler le volume du haut-parleur .......................................... 25
4.6
Couper ou rouvrir le micro .................................................... 25
4.7
Recherche de combiné .......................................................... 25
4.8
Allumer ou éteindre le combiné ............................................ 25
5
MÉMOIRES À ACCÈS DIRECT .................................................. 26
5.1
Enregistrer un numéro dans une mémoire à accès direct ..... 26
5.2
Supprimer un numéro d’une mémoire à accès direct ........... 27
6
RÉPERTOIRE ........................................................................... 28
6.1
Enregistrer un contact dans le répertoire .............................. 28
6.2
Accéder au répertoire............................................................ 29
6.3
Modifier un contact du répertoire ......................................... 29
6.4
Supprimer un contact du répertoire ...................................... 30
6.5
Supprimer tous les contacts du répertoire ............................ 30
7
IDENTIFICATION DE L’APPELANT ............................................ 31
7.1
Journal des appels ................................................................. 31
7.1.1 Accéder au journal des appels............................................... 31
7.1.2 Enregistrer un numéro du journal des appels dans le
répertoire .............................................................................. 32
7.1.3 Supprimer un numéro du journal des appels ........................ 32
7.1.4 Supprimer tous les numéros du journal des appels .............. 33
7.2
Liste des appels émis ............................................................. 33
7.2.1 Accéder à la liste des appels émis ......................................... 33
7.2.2 Enregistrer un numéro de la liste des appels émis dans le
répertoire. ............................................................................. 33
Page 95

4
7.2.3 Modifier un numéro de la liste des appels émis .................... 34
7.2.4 Supprimer un numéro de la liste des appels émis ................. 34
7.2.5 Supprimer tous les numéros de la liste des appels émis ....... 35
8
RÉGLAGES DE L’HORLOGE ET DE L’ALARME ........................... 36
8.1
Réglages de la date et de l’heure........................................... 36
8.1.1 Changer le format de l’heure ................................................ 37
8.1.2 Changer le format de la date ................................................. 37
8.2
Réglages de l’alarme .............................................................. 38
8.2.1 Choisir la mélodie de l’alarme ............................................... 39
9
OPTIONS DU COMBINÉ ......................................................... 40
9.1
Volume de la sonnerie ........................................................... 40
9.2
Mélodie de la sonnerie .......................................................... 40
9.3
Bip des touches ..................................................................... 41
9.4
Renommer le combiné .......................................................... 42
9.5
Langue d’affichage ................................................................. 42
9.6
Raccrochage automatique ..................................................... 43
10
RÉGLAGES .............................................................................. 44
10.1
Souscription du combiné ....................................................... 44
10.2
Souscrire des combinés supplémentaires ............................. 44
10.3
Dé-souscrire votre combiné .................................................. 45
10.4
Changer la durée flash ........................................................... 46
10.5
Réinitialiser l’appareil ............................................................ 47
10.6
INDICATIF RÉGIONAL ............................................................. 47
11
RÉPONDEUR .......................................................................... 48
11.1
Activer ou désactiver le répondeur ....................................... 48
11.2
Réglages du répondeur .......................................................... 49
Page 96

5
11.2.1 Nombre de sonneries ............................................................ 49
11.2.2 Activer et désactiver l’accès à distance ................................. 50
11.2.3 Changer la langue de l’annonce............................................. 50
11.3
Lecture des messages ............................................................ 51
11.4
Supprimer tous les messages ................................................ 51
11.5
Annonce ................................................................................ 52
11.5.1 Enregistrer une annonce personnalisée ................................ 52
11.5.2 Écouter une annonce ............................................................ 53
11.5.3 Supprimer une annonce personnalisée ................................. 53
11.6
Changer le code de sécurité .................................................. 54
11.7
Accès à distance .................................................................... 54
11.7.1 Contrôle à distance du répondeur ......................................... 54
12
AIDE ....................................................................................... 56
13
GÉNÉRALITÉS ......................................................................... 58
13.1
Si votre produit ne fonctionne pas correctement… ............... 58
13.2
Importantes consignes de sécurité ........................................ 58
13.3
Débranchez immédiatement le téléphone de la prise de
courant dans les cas suivants : ............................................... 59
13.4
Conseils d’installation. ........................................................... 59
13.5
Consignes de sécurité pour le bloc-piles ............................... 60
13.6
Garantie limitée pour les produits et accessoires grand public
(« Garantie »)......................................................................... 61
13.7
Exclusions .............................................................................. 63
13.8
Réglementation FCC, ACTA et IC ............................................ 65
14
Industrie Canada ................................................................... 69
15
CARACTÉRISTIQUES TECHNIQUES ......................................... 70
Page 97

6
1 IMPORTANTES CONSIGNES DE SÉCURITÉ
AVERTISSEMENT
Ne placez pas votre téléphone dans la salle de bain ou dans tout autre
lieu humide.
Emplacement
Lorsque vous choisissez un emplacement pour votre nouveau téléphone,
observez les recommandations suivantes :
Évitez la proximité de sources de parasites et de chaleur telles que
moteurs, éclairages fluorescents, fours à micro-ondes, appareils de
chauffage, ainsi que la lumière directe du soleil.
Évitez les endroits très poussiéreux, très humides et dont la
température est trop basse.
Éloignez l’appareil d’autres téléphones sans fil ou d’ordinateurs
personnels.
N’installez jamais un câble téléphonique pendant un orage.
N’installez jamais les prises téléphoniques dans des endroits humides,
sauf si elles sont spécifiquement conçues pour cela.
Ne touchez jamais des câbles téléphoniques ou des bornes non isolés
avant d’avoir débranché le téléphone de l’interface réseau.
L’installation ou la modification des lignes téléphoniques doivent être
faites avec précaution.
PORTÉE DU COMBINÉ
La portée optimale est atteinte lorsqu’aucun autre appareil électrique ne
fonctionne dans la zone de portée. Tout obstacle entre le combiné et la
base peut considérablement réduire la portée.
PUISSANCE DU SIGNAL
Lorsque le combiné est hors de portée de la base, HORS PORTÉE s’affiche.
Si vous êtes en communication, la ligne sera coupée. Pour rétablir la
connexion entre le combiné et la base, rapprochez-vous de celle-ci.
Page 98

7
Installation
IMPORTANT
La base doit être branchée en permanence à une prise de courant. Ne
branchez pas le cordon téléphonique à la prise téléphonique murale
avant d’avoir complètement chargé le combiné. Utilisez uniquement
l’adaptateur secteur et le cordon téléphonique fournis avec l’appareil.
QUEL ADAPTATEUR SECTEUR ?
L’adaptateur secteur avec la plus petite fiche est celui de la base et
l’adaptateur secteur avec la plus grande fiche est celui du chargeur (pour
les packs multi-combinés seulement).
Contenu de la boîte du modèle Eclipse
La boîte contient les éléments suivants :
1 combiné Eclipse
1 base
1 adaptateur secteur pour la base
1 cordon téléphonique
1 bloc-piles rechargeable AAA NiMH
1 capot arrière pour le combiné Eclipse
1 clé pour déverrouiller le capot arrière
1 mode d’emploi
Page 99

8
Connexion de la base et du combiné
1) Lorsque vous achetez l’appareil, tous les combinés sont déjà
souscrits à la base et doivent se connecter à celle-ci dès qu’ils sont
complètement chargés.
2) Pour utiliser ensemble votre combiné sans fil et votre base, vous
devez pouvoir établir une liaison radio entre les deux. Le signal entre
le combiné et la base est conforme aux normes en vigueur pour les
téléphones DECT : Portée maximale d’environ 980 pieds (300 mètres)
à l’extérieur et environ 165 pieds (50 mètres) à l’intérieur. Veuillez
notez que :
> Les objets métalliques volumineux tels que réfrigérateurs,
miroirs ou classeurs de bureau entre le combiné et la base
peuvent bloquer le signal radio.
> Les structures solides telles que les murs peuvent aussi réduire la
puissance du signal.
> Les appareils électriques peuvent causer des interférences ou
diminuer la portée.
3) Ne placez pas la base trop près d’un autre téléphone, d’un téléviseur
ou d’appareils audio. Ceux-ci pourraient provoquer des interférences.
4) Vous obtiendrez un meilleur signal si vous placez la base le plus
haut possible.
5) Si le son dans l’écouteur devient faible ou déformé pendant un appel,
vous êtes peut-être hors de portée de la base. Rapprochez-vous de
la base dans un délai de 20 secondes, sinon la ligne sera coupée.
Page 100

9
2 INSTALLATION DE VOTRE TÉLÉPHONE
2.1 Connexion de la base
1) Branchez le câble d’alimentation et le
cordon téléphonique à la base.
2) Branchez l’adaptateur secteur à une prise
de courant 120 V ca / 60 Hz et le cordon
téléphonique à une prise téléphonique murale.
Avertissement :
Utilisez uniquement les câbles fournis.
Utilisez uniquement l’adaptateur secteur fourni.
L’utilisation d’autres câbles d’alimentation pourrait
endommager l’appareil.
Remarque :
Placez la base à proximité de la prise de courant.
N’essayez jamais de rallonger le câble d’alimentation.
La base doit être alimentée pour fonctionner normalement ; les
combinés sans fil ne fonctionneront pas si la base n’est pas branchée
à une prise de courant.
2.2 Mise en place et charge du bloc-piles rechargeable du combiné
Eclipse
1) Insérez le bloc-piles fourni dans son logement en l’alignant avec les
marques à l’intérieur du logement.
Avertissement : Utilisez uniquement le bloc-piles
rechargeable NiMH fourni.
2) Placez le capot arrière sur le dos du combiné et
appuyez jusqu’à ce qu’il s’enclenche.
3) Posez le combiné sur la base et laissez-le en
charge pendant 15 heures avant de l’utiliser.
•
Lorsque le combiné est correctement posé
sur la base, vous entendez un double bip et
le voyant de charge de la base s’allume pour
indiquer que la charge est en cours.
Remarque : le combiné peut chauffer lorsque le
bloc-piles se charge ou pendant des périodes prolongées d’utilisation.
Ceci est normal et n’indique pas un défaut.
Vers la prise
téléphonique
Vers la prise de
courant
 Loading...