

Page 1
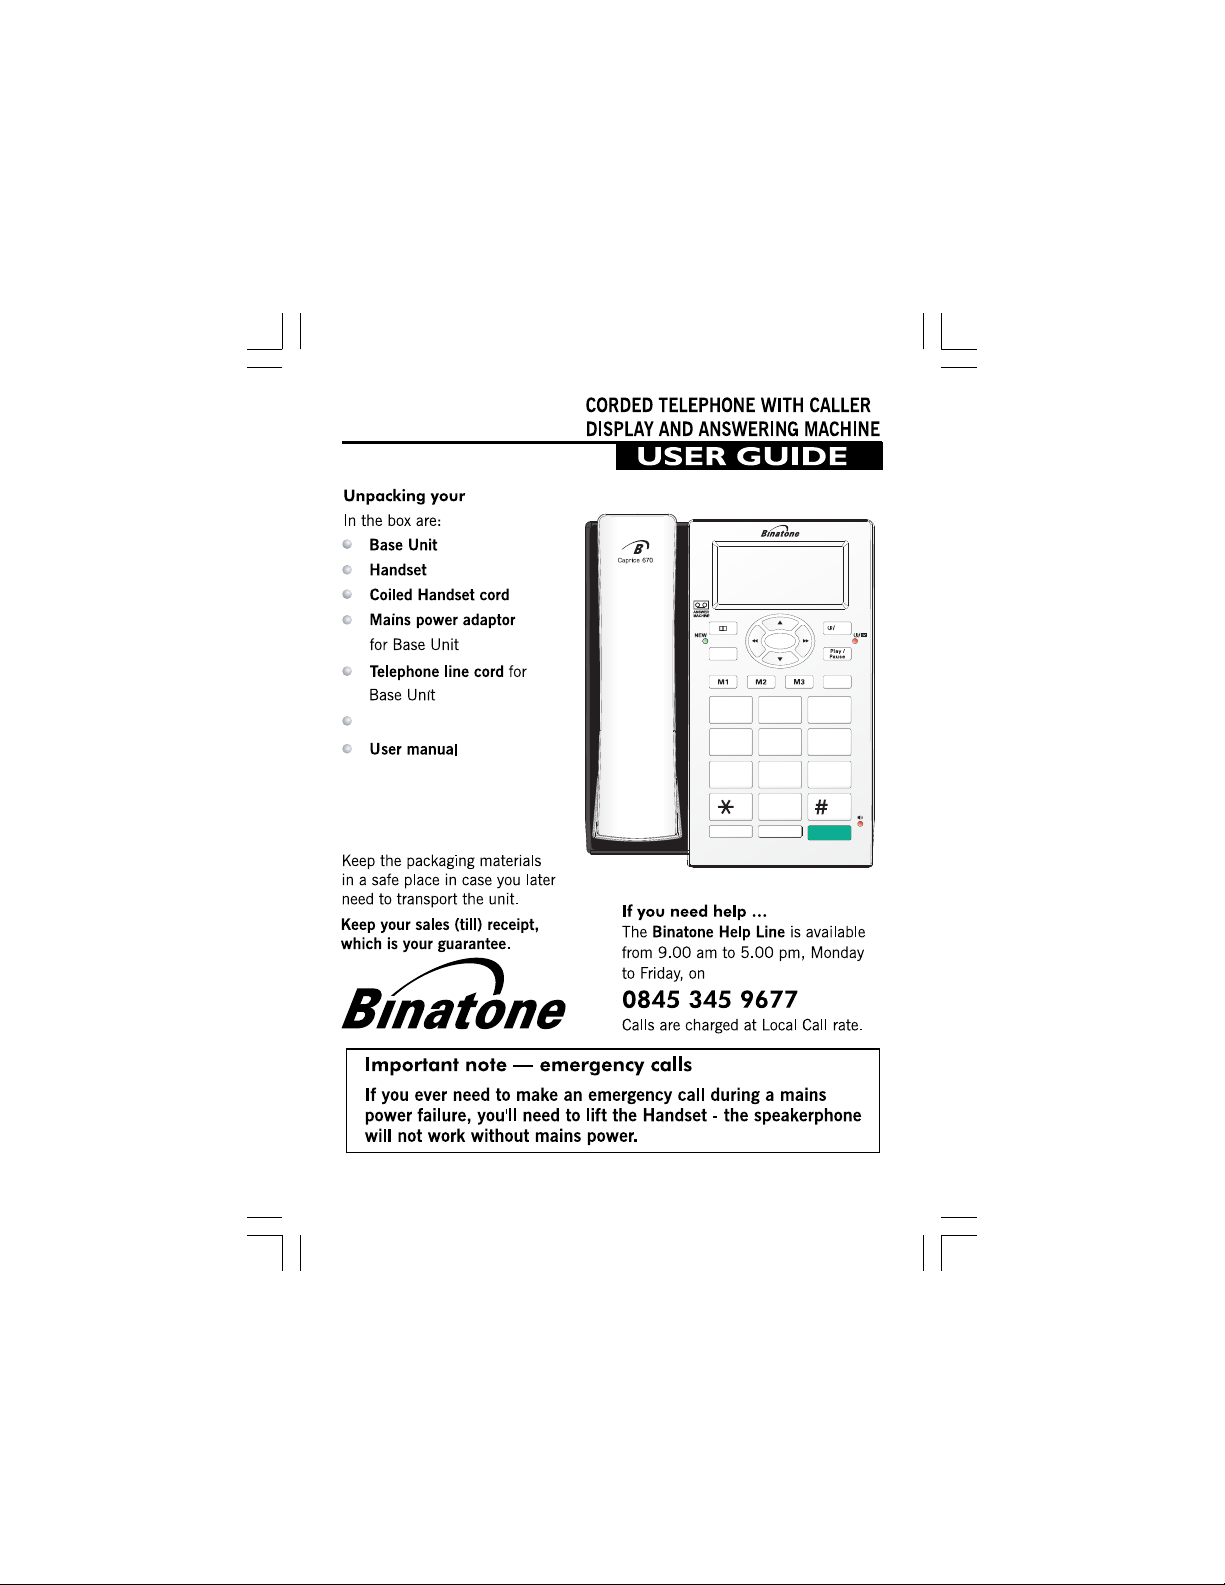
Caprice 670
Caprice 670
Mounting Stand
OGM
MENU/ OK
Delet e
1
2
GHI
5
4
PQRS
8
7
0
Recal l Pause/ Redia l
Calls
Stop
MEMO
FWDREW
Store /
Mute
DEF
ABC
3
MNO
JKL
6
TUV
WXYZ
9
Hands free
1
Page 2

MENU/OK Button
- Press to enter Options
Menu to set the Date,
Time,Screen
phone/TAM settings.
Contrast,
UP-DOWN (Calls) Buttons
- To access the caller
display records, and
to scroll through lists
and options.
(PHONEBOOK) Button
- Press to access the
Phonebook records.
New call light
when you have new
- Flashes
Caller Display records.
OGM/REW Button
- Press and hold to record
your outgoing messages.
Press during message
playback to repeat the
current message or to
to the previous
go back
message(s).
DELETE Button
- Press to delete individual
messages, memos, stored
numbers or Caller Display
records.
M1, M2, M3 one-Touch
Memory Buttons
RECALL Button
- You may need this function if your
phone is connected to a PBX, or if
you use BT Calling Features.
PAUSE/REDIAL Button
- Press to access the LNR lists
when in standby mode. Press to
insert a pause when dialing.
HADNSFREE Button
- Press to make, answer, or end a call
using the speakerphone.
Important:
OGM
MENU/OK
Delete
2
1
GHI
5
4
PQRS
8
7
0
Recall
Pause/Re dial
Microphone -For
speakerphone use
and answering
machine OGM &
Memo recording.
/STOP (ANSWER ON/OFF)
Button - Press to stop recording
or playback. Press and hold to
switch the answering maching
ON or OFF.
With TAM ON is standby mode,
press to select OGM1 or OGM2.
FWD / MEMO
- Press and hold to record
a memo.
Calls
FWDREW
ABC
JKL
TUV
Press during message
Stop
playback to skip to the
MEMO
next message.
Store /
MESSAGE light
Mute
- Turns ON
DEF
3
is on. Flashes
have new
MNO
6
SPEAKER Volume control
WXYZ
9
- Used to adjust the volume
level of the Speakerphone.
Handsfre e
PLAY/PAUSE Button
- Press to play back
messages and memos.
Press to pause playing of
a memo or message.
when the TAM
TAM
STORE/MUTE Button
during a call
- Press
mute the microphone or
mouthpiece. Press to store
the (M1, M2
touch memory dialing
buttons
SPEAKERPHONE
light - Turns ON
when using the
speakerphone.
Button
when you
messages.
and M3) one
- When the instruction simply say 'press' a button, this means you should press it
briefly then release it.
- When the instruction say 'press and hold' a button, this means you should keep
it pressed until the display changes or you hear a tone.
2
to
Page 3
Phone
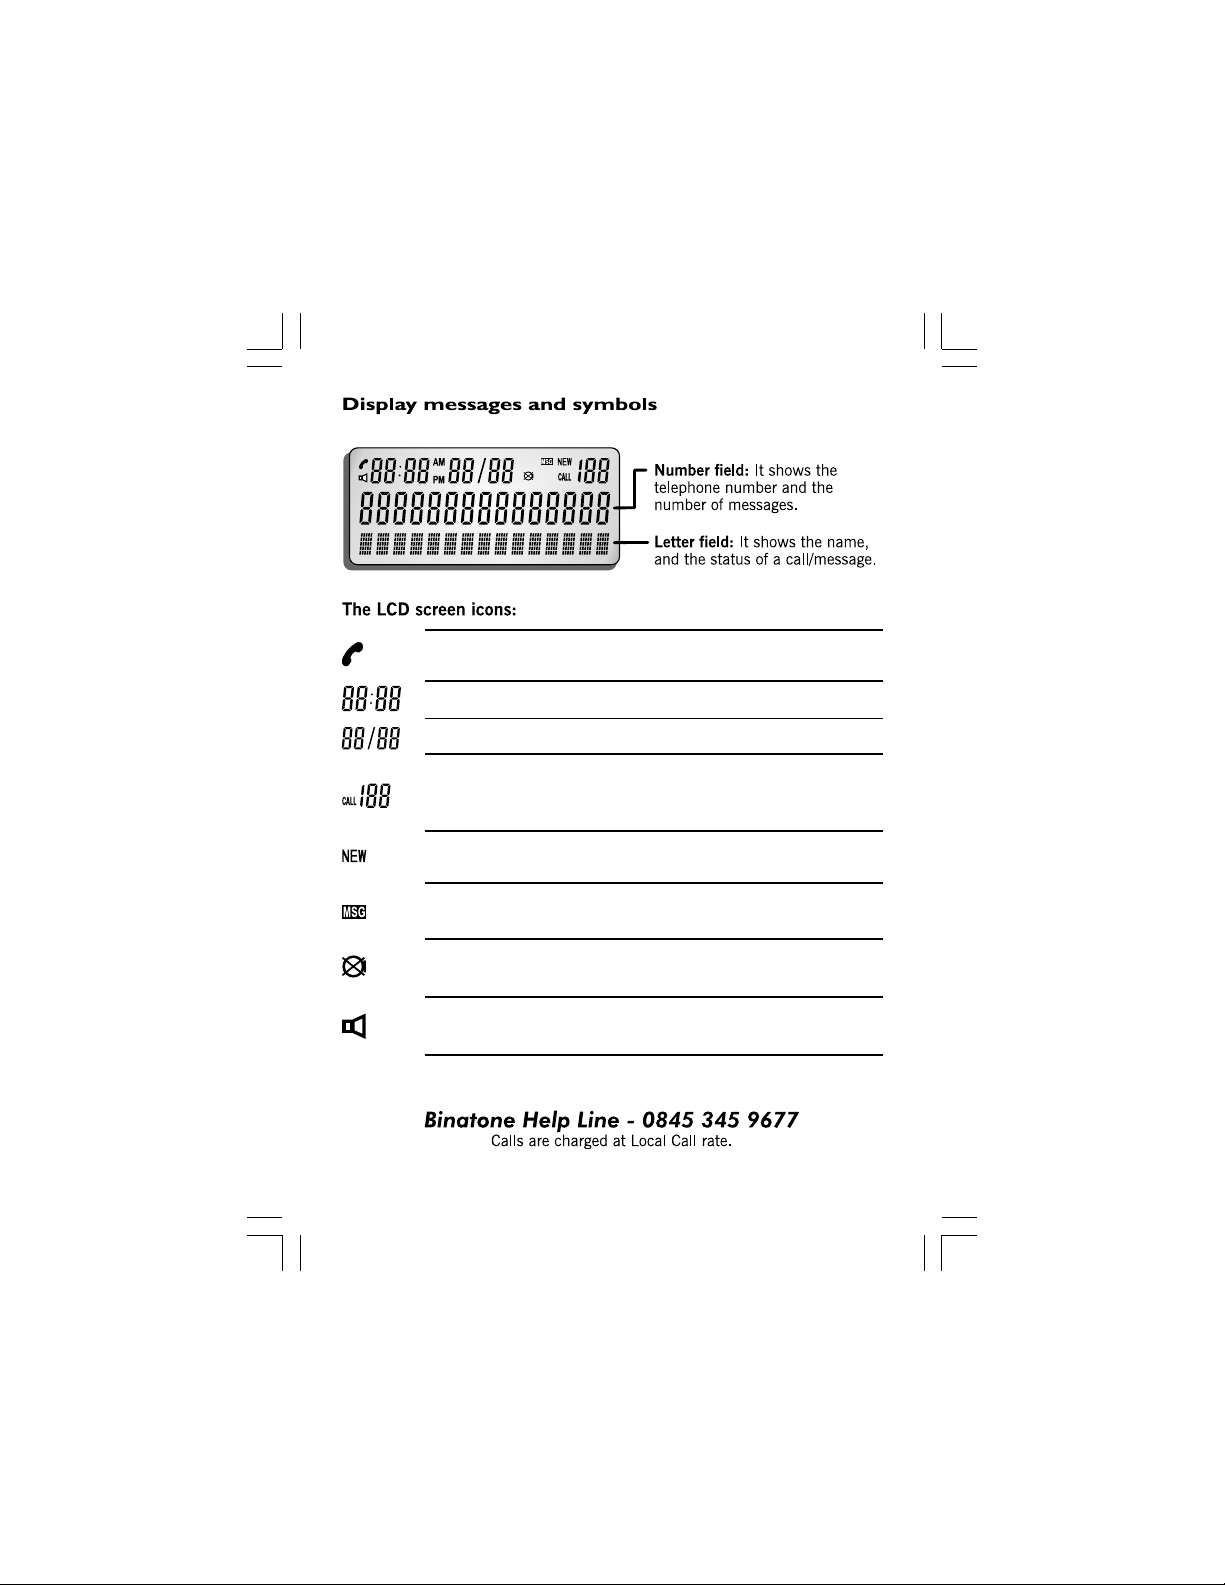
Time
You are connected to the telephone line - your
Handset is ‘offhook’.
Displays the time.
Date/Month
Caller Display
Record
NEW
Message
Mute
Speakerphone
Displays the day and month setting.
Shows the total number of Caller Display records
when the caller display is being received or when
the call lists is being viewed.
The NEW icon only appears when viewing
New Caller Display records.
Appears only when viewing a Caller display entry
with a recorded answering machine message.
Appears when you press the MUTE button to
mute the mouthpiece or microphone.
Appears when the speakerphone function is
turned ON.
3
Page 4
2. Installation
1. Locating the Base unit
The Base unit should be placed on a level surface, in a position where:
the mains adapter plug will reach an easily accessible 230-V AC
switch mains supply socket - never try to lengthen the mains power cable.
the telephone line cable will reach your telephone line socket or
extension socket.
it is not close to a sink, bath or shower, or anywhere else where it
might get wet.
it is not close to other electrical equipment - fridges, washing
machines, microwave ovens, TVs, fluorescent lights, etc.
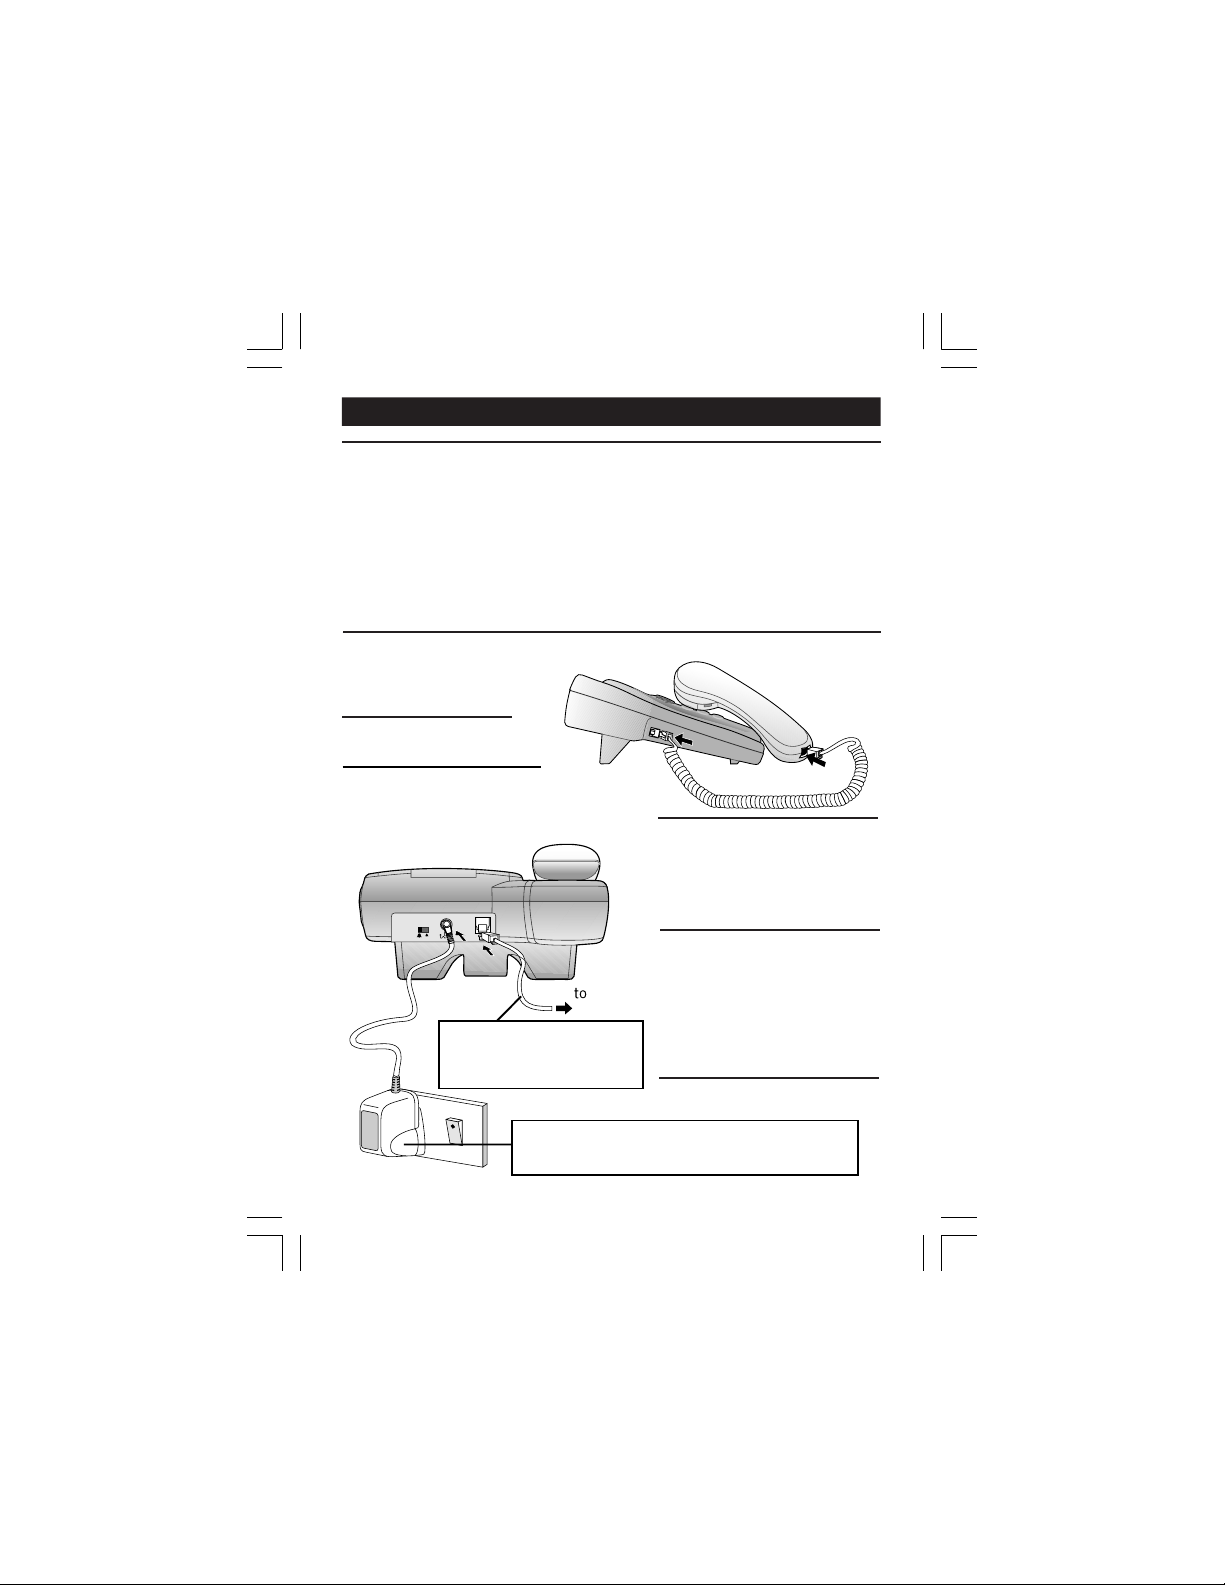
2. Plug the coiled handset cord into the Handset. Plug the other end into
the jack on the left side of the Base unit.
Note: The base unit does
require a battery.
3. Place the Handset on
the Base unit.
4. Plug the telephone line cord into
the PHONE LINE jack at the back
of the Base unit. Plug the other
end into your telephone line socket
or extension socket.
Always use the telephone
line cord supplied with your
Caprice 670. Other telephone
line cords may not work.
n't
Make sure the plugs click
into place.
5. Plug the power supply cord
into the POWER jack at the
back of the
the other end to a 230V AC,
50Hz mains socket, with the
switch on the socket set to OFF
6.Switch ON the mains power at
the socket. Wait while the
Modular
Wall jack
display shows INITIALISATION,
then the announcement
Answering
“
Announcement one
the display changes to the
standby screen.
7.Lift the Handset and check
for Dial tone in
Note:The Caprice 670 Base unit must be used
only with the Switch adapter Shen Zhen G.EREDIT
Electronics Co.,Ltd.5E-AD070042-B.
4
Base unit. Plug
machine on.
”
the earpiece.
before
Page 5
3.Stand/ Half stand installation
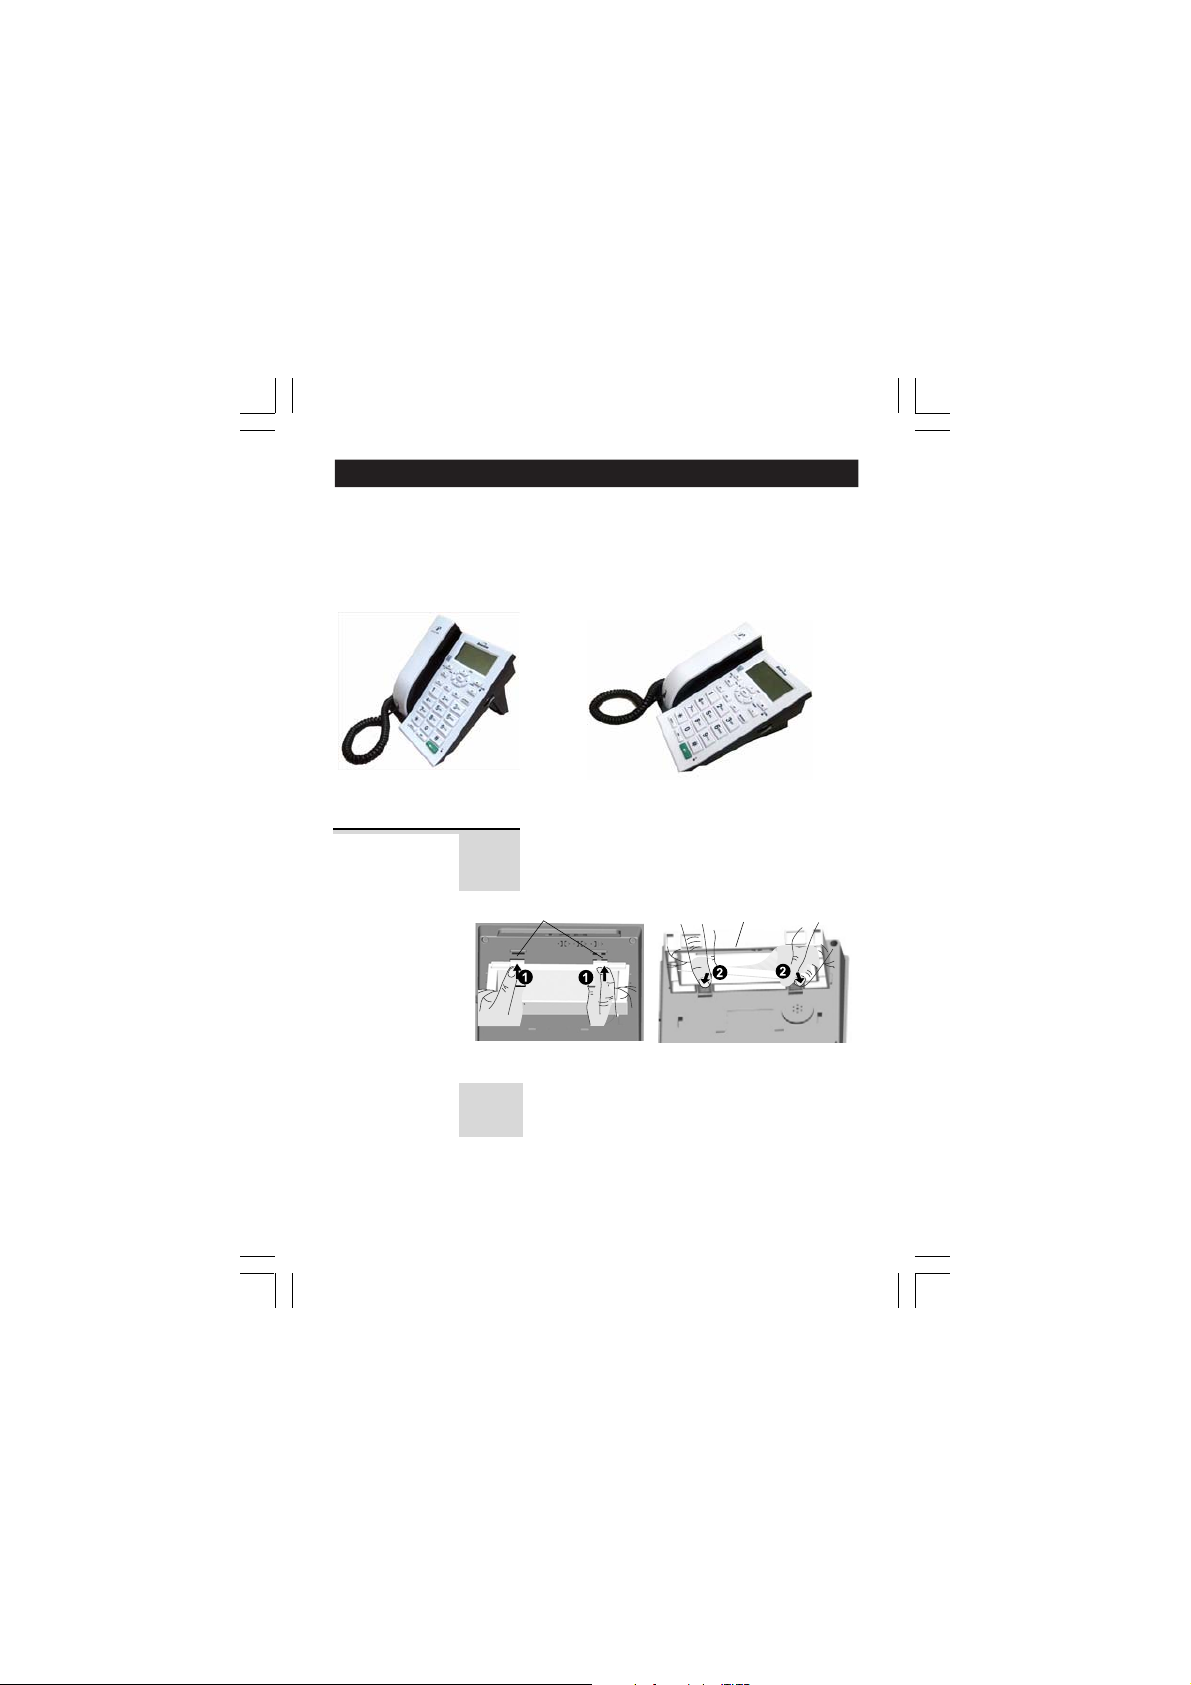
The base stand can be fitted in two positions to tilt the base forward at
different angles.
(1) Full stand mount
Stand Mount
(2) Half stand mount
T o stand the Caprice 670 at a larger angle, fit
the stand to the bottom of the phone in the
slots
in the base, as shown below.
rigid clips
Insert the rigid clips (1) of the stand into the slots
on the bottom of the phone (near the rear of
the base). Press down firmly until the flexible
clips (2) click into place.
stand
Binatone Help Line - 0845 345 9677
Calls are charged at Local Call rate.
5
Page 6
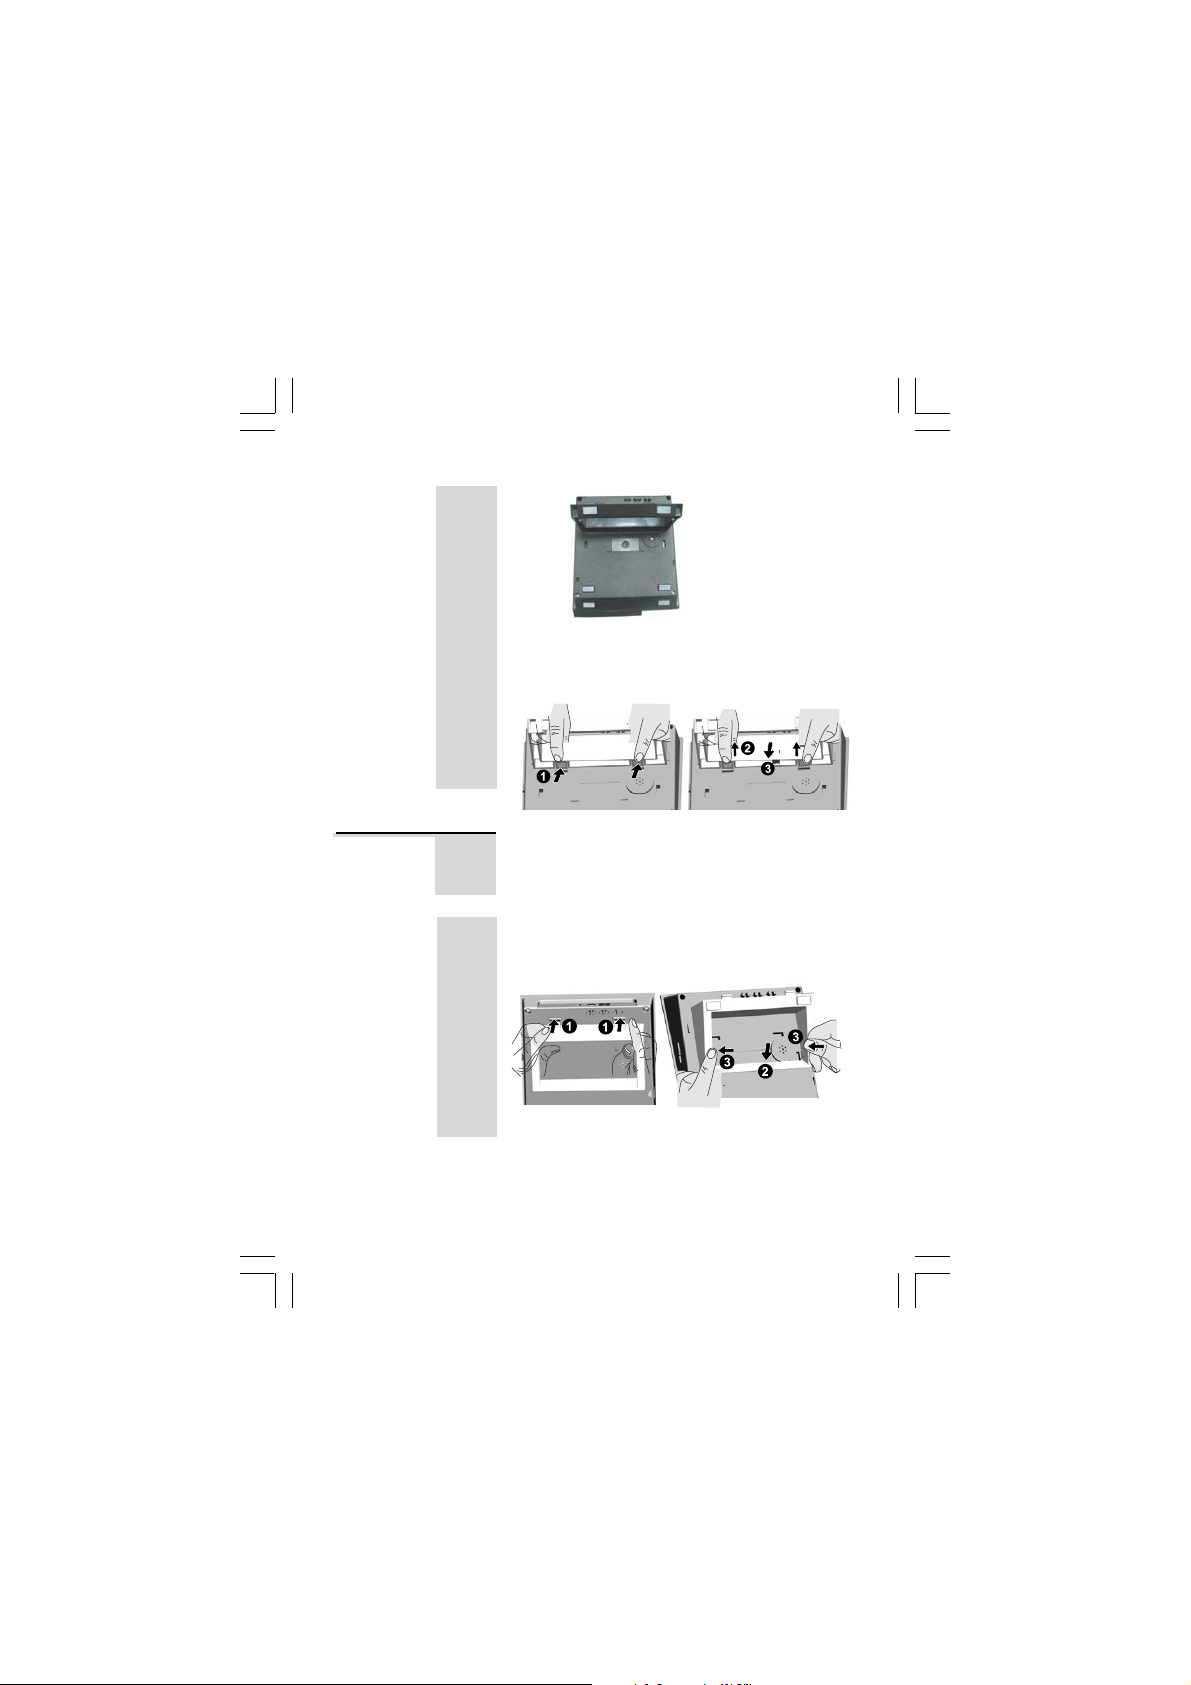
Stand/Half Stand mounting continue...
To remove the stand, (1) pinch the flexible
clips, (2) pull back the stand, and then (3)
(3) as shown below.move up and forward
Half Stand
Mount
Binatone Help Line - 0845 345 9677
To stand the Caprice 670 at a lower angle,
fit the stand to the bottom of the phone in
the alternative slots in the base,
below.
Insert the rigid clips (1) of the stand into the slots
near the rear of the base and press down firmly
until the flexible clips (3) click into place.
To remove the half stand,
clips (3), then lift the front (2) and slide
forward to remove.
Calls are charged at Local Call rate.
6
as shown
pinch the flexible
Page 7
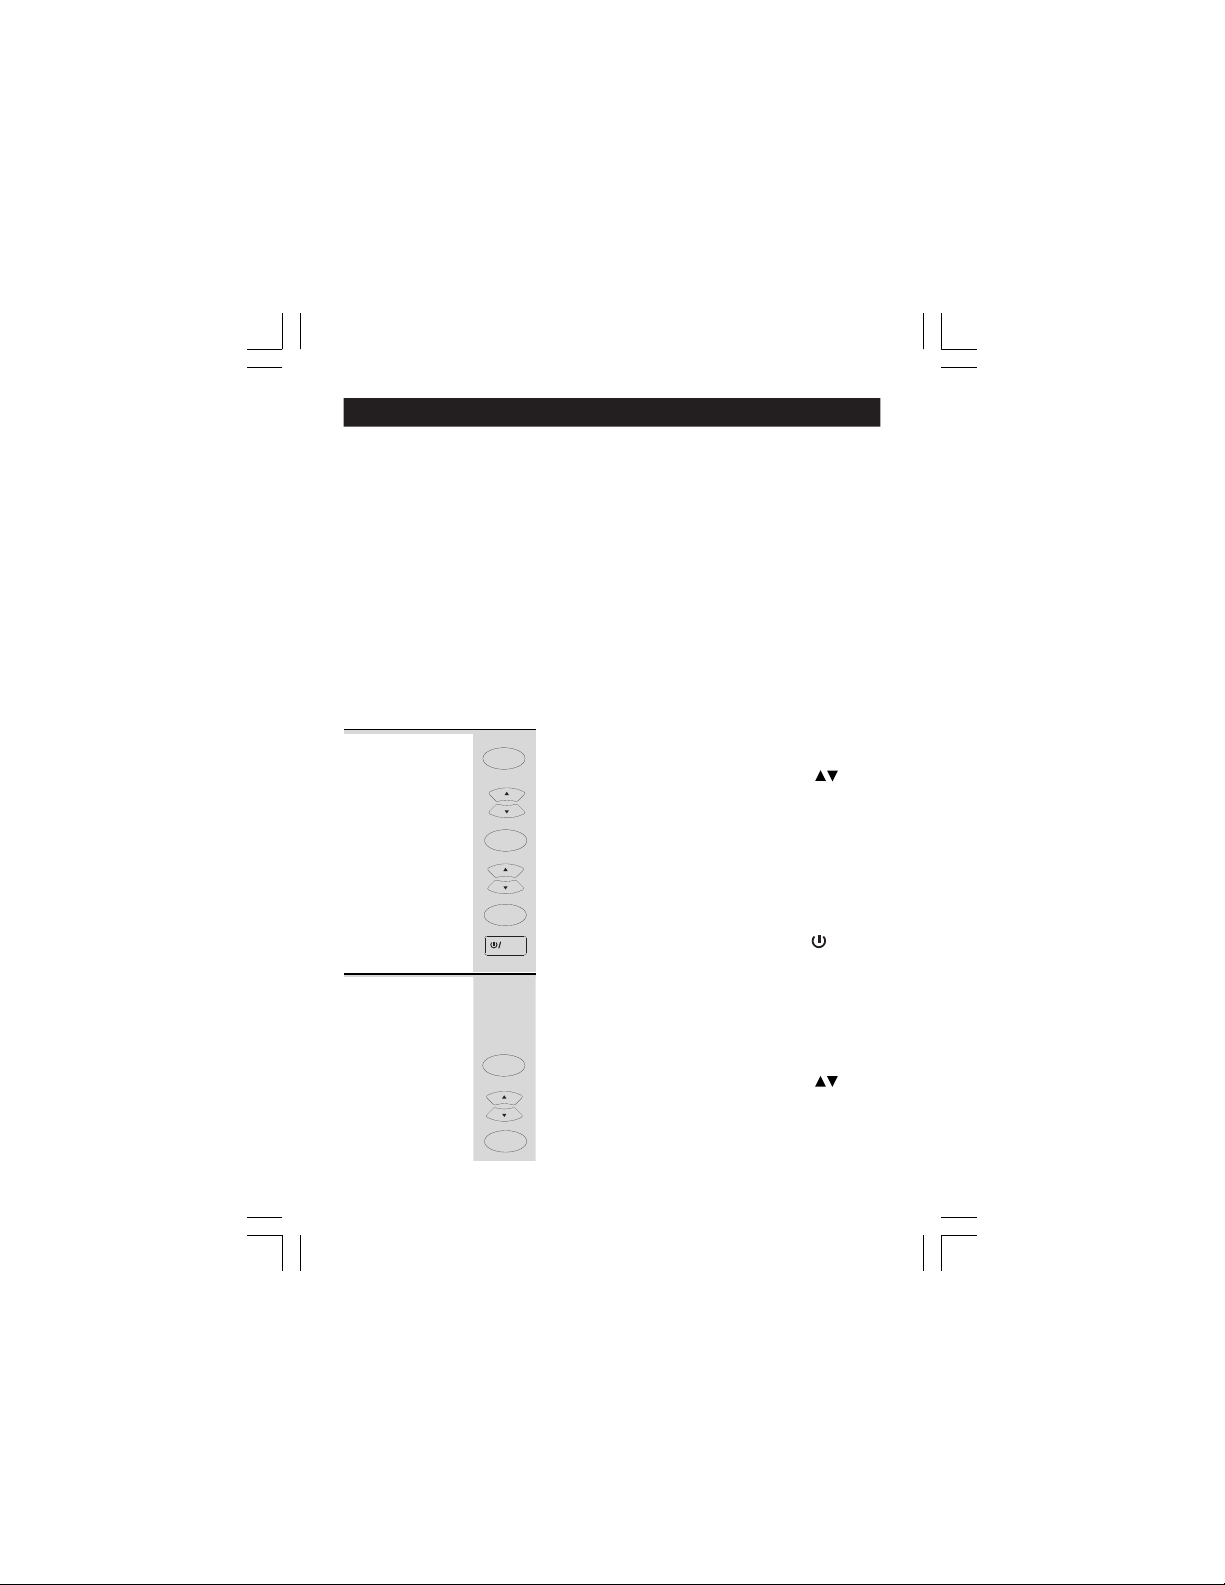
4. Setting up the Caprice 670
The following section details how to set up your telephone.
Press the MENU button to enter the Options menu and then use
the UP or DOWN buttons to cycle through the following options:
SET LANGUAGE
SET TIME/DATE
SET FLASH TIME
LCD CONTRAST
MESSAGE LENGTH
RINGS TO ANSWER
REMOTE ACCESS
TAM HD: ON/OFF
recording quality / total recording time.(ON gives up to 8
minutes of higher quality, OFF gives up to 20 minutes of
lower quality.)
EXIT OPTION
Note: The system will time out if you leave more than
!
10 seconds between key presses.
SET
LANGUAGE
1 Press MENU/OK button.
2 Press UP button to go to the language setting.
3 Press MENU/OK button to confirm.
4 Press UP or DOWN button to select ENGLISH
With the phone in standby mode;
MENU /OK
Ö The display shows
Calls
Ö
MENU /OK
The display shows
Calls
(default), FRANCAIS, or DEUTSCH.
MENU /OK
5 Press MENU/OK button to confirm.
6 Continue with programming, or press /STOP
Stop
button to return to standby mode.
Note: if you subscribe to the caller display service
SET TIME/
DATE
(see section 9) the time and date will be set
automatically,but the year may still need to be
adjusted to ensure the answering machine time
stamp gives the correct day.
MENU /OK
1 Press MENU/OK button.
Ö The display shows
Calls
2 Press UP or DOWN button until the display
shows
3 Press MENU/OK button to confirm.
MENU /OK
Ö The ‘year’ will be blinking.
Binatone Help Line - 0845 345 9677
Ö
To set the Answering Machine
SET TIME/DATESET TIME/DATE
SET TIME/DATE
SET TIME/DATESET TIME/DATE
Calls are charged at Local Call rate.
7
OPTIONS MENUOPTIONS MENU
OPTIONS MENU
OPTIONS MENUOPTIONS MENU
SET LANGUAGESET LANGUAGE
SET LANGUAGE
SET LANGUAGESET LANGUAGE
OPTIONS MENUOPTIONS MENU
OPTIONS MENU
OPTIONS MENUOPTIONS MENU
.
.
.
.
Page 8
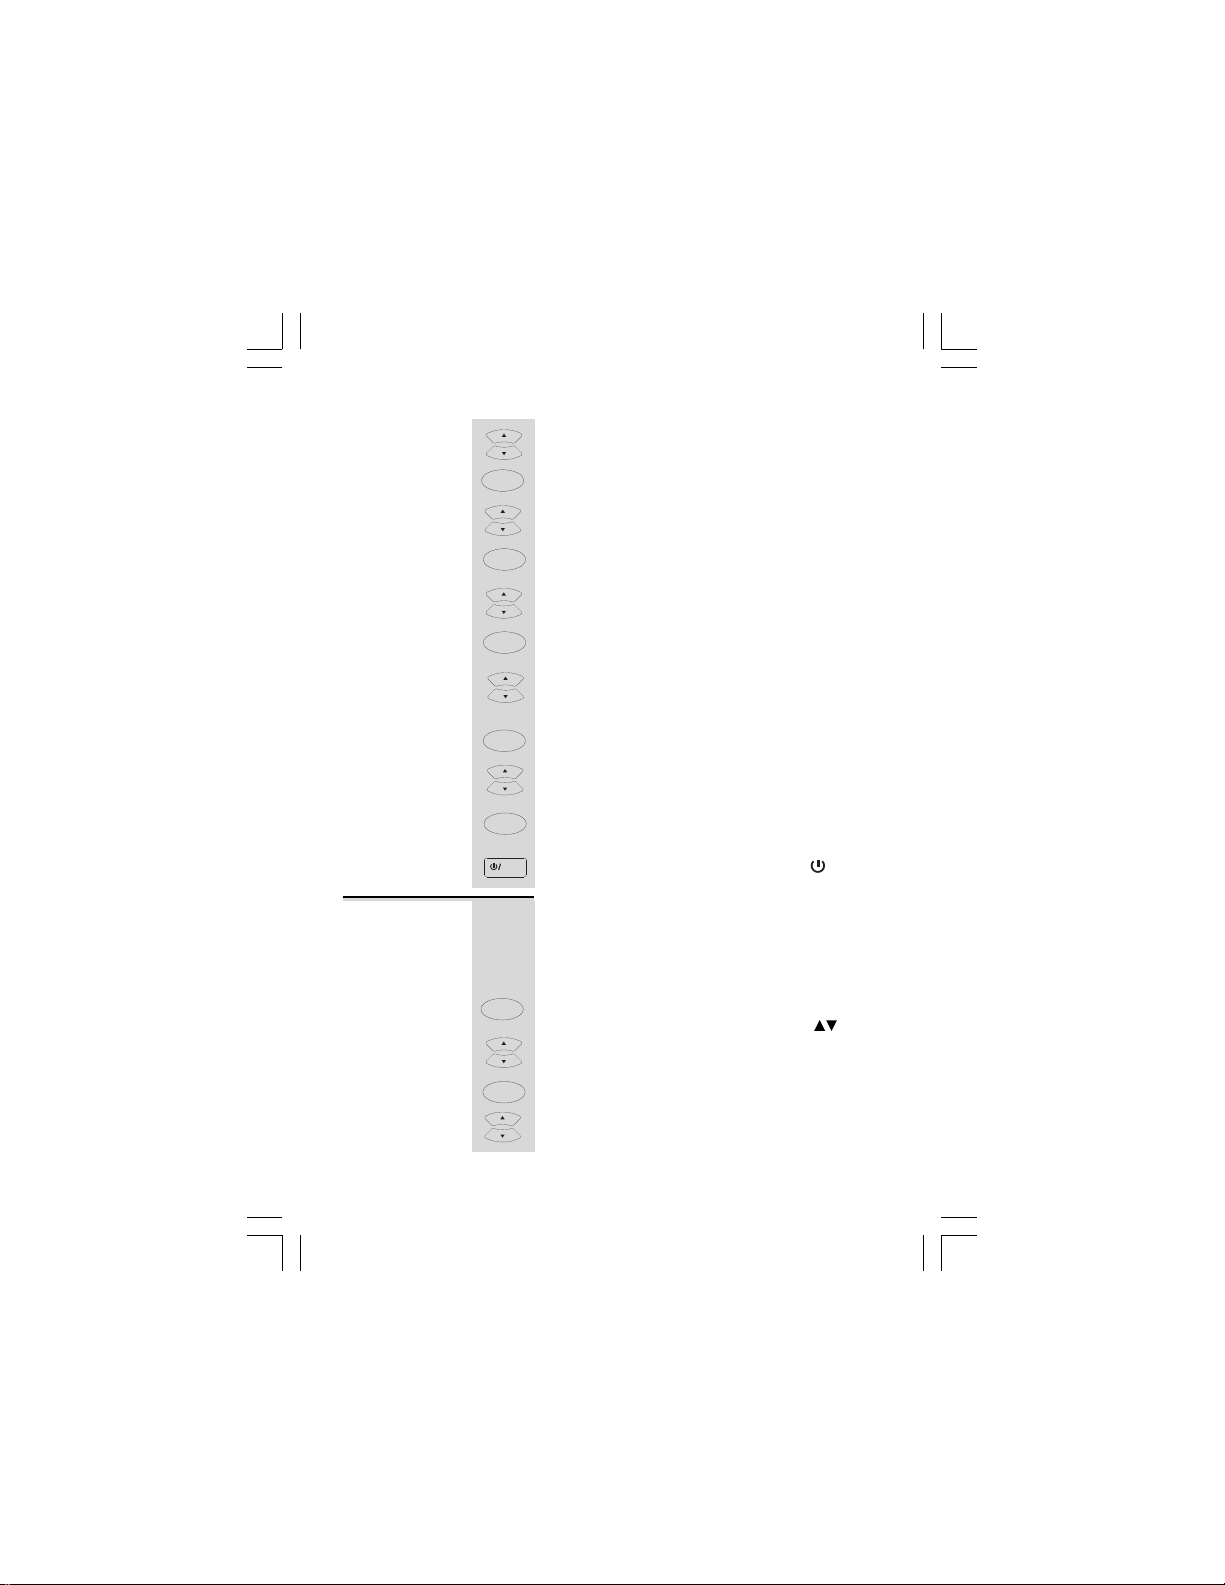
Setting up continue...
Calls
4 Press UP or DOWN button to set the year.
5 Press MENU/OK button to confirm.
MENU /OK
Ö The ‘month’ will be blinking.
Calls
6 Press UP or DOWN button to set the month.
MENU /OK
7 Press MENU/OK button to confirm.
8 Press UP or DOWN button to set the date.
9 Press MENU/OK button to confirm.
1 0 Press UP or DOWN button to set the hour.
1 1 Press MENU/OK button to confirm.
1 2 Press UP or DOWN button to set the minute.
1 3 Press MENU/OK button to confirm the TIME and
1 4 Continue with programming, or press /STOP
SET FLASH
TIME
1
2
3
4
Ö The ‘date’ will be blinking.
Calls
MENU /OK
Ö The ‘hour’ will be blinking.
Calls
When setting the 'hour' it is in 24 hour
Ö
mode only.
MENU /OK
Ö The ‘minutes’ will be blinking.
Calls
MENU /OK
DATE setting.
Stop
button to return to standby mode.
You may need the Recall function if your phone is
connected to a PBX, or if you use BT Calling Features.
Flash is another name for the R (Recall) button,
and the normal UK requirement is for 100ms, but
some PBX may need a longer time, in which case
you can change the setting from the Options Menu.
MENU /OK
Press MENU/OK button.
Ö The display shows
Calls
Press UP or DOWN button until the display
shows
MENU /OK
Press MENU/OK button to confirm.
Calls
Press UP or DOWN button to select 100MS
(default), 300MS, 600MS or 1000MS.
SET FLASH TIMESET FLASH TIME
SET FLASH TIME
SET FLASH TIMESET FLASH TIME
OPTIONS MENUOPTIONS MENU
OPTIONS MENU
OPTIONS MENUOPTIONS MENU
.
.
Binatone Help Line - 0845 345 9677
Calls are charged at Local Call rate.
8
Page 9
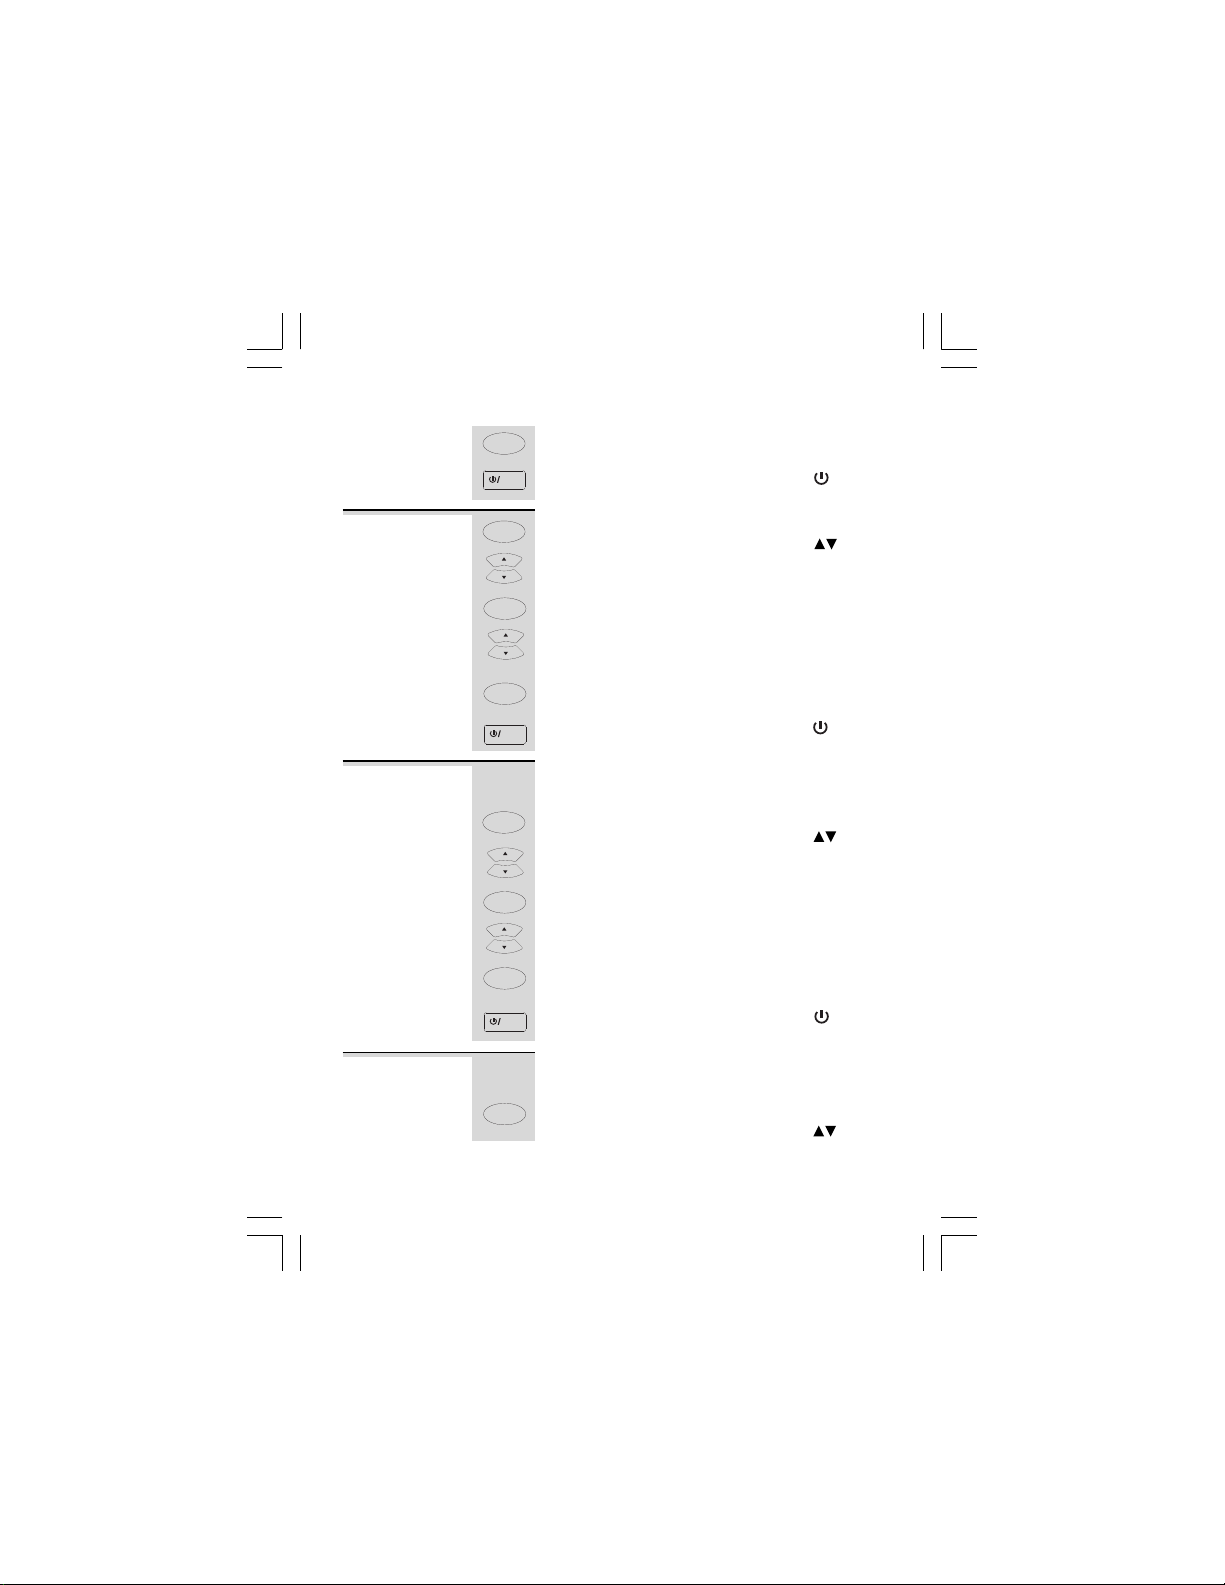
Setting up continue...
MENU /OK
5 Press MENU/OK button to confirm.
Stop
LCD
CONTRAST
MESSAGE
LENGTH
RINGS TO
ANSWER
6 Continue with programming, or press /STOP
1 Press MENU/OK button.
2 Press UP or DOWN button until the display
3 Press MENU/OK button to confirm.
4 Press UP or DOWN button to select your
5 Press MENU/OK button to confirm.
6 Continue with programming, or press /STOP
1 Press MENU/OK button.
2 Press UP or DOWN button until the display
3 Press MENU/OK button to confirm.
4 Press UP or DOWN button to select 1 or 2
5 Press MENU/OK button to confirm the MESSAGE
6 Continue with programming, or press /STOP
1 Press MENU/OK button.
button to return to standby mode.
MENU /OK
Ö The display shows
Calls
shows
MENU /OK
Calls
comfortable display viewing level (1~5). The
default setting is 3.
MENU /OK
Stop
button to return to standby mode.
To set the maximum recording time for each
incoming message or memo message on the
Answering Machine.
MENU /OK
Ö The display shows
Calls
shows
MENU /OK
Calls
minutes. The default setting is 2 minutes.
MENU /OK
LENGTH setting.
Stop
button to return to standby mode.
To set the number of rings before the machine
answers a call;
MENU /OK
Ö The display shows
LCD CONTRASTLCD CONTRAST
LCD CONTRAST
LCD CONTRASTLCD CONTRAST
MESSAGE LENGTHMESSAGE LENGTH
MESSAGE LENGTH
MESSAGE LENGTHMESSAGE LENGTH
OPTIONS MENUOPTIONS MENU
OPTIONS MENU
OPTIONS MENUOPTIONS MENU
.
OPTIONS MENUOPTIONS MENU
OPTIONS MENU
OPTIONS MENUOPTIONS MENU
.
OPTIONS MENUOPTIONS MENU
OPTIONS MENU
OPTIONS MENUOPTIONS MENU
.
.
.
Binatone Help Line - 0845 345 9677
Calls are charged at Local Call rate.
9
Page 10
Setting up continue...
Calls
2 Press UP or DOWN button until the display
3 Press MENU/OK button to confirm.
4 Press UP or DOWN button to select TOLL SAVER,
5 Press MENU/OK button to confirm.
6 Continue with programming, or press /STOP
shows
MENU /OK
Calls
2, 3, 4, 5, 6, 7, 8, or 9 rings. The default setting is 5.
Ö Use ‘TOLL SAVER’ when checking your Caprice 670
for messages from a remote location using long
distance service or from a pay phone. The
Answering machine responds
if you have a new
new messages, the phone will answer after the 4th
ring. You can then hang up after the 3rd ring to
avoid paying for the call.
MENU /OK
Stop
button to return to standby mode.
RINGS TO ANSWERRINGS TO ANSWER
RINGS TO ANSWER
RINGS TO ANSWERRINGS TO ANSWER
.
message waiting. If there are no
after the 2nd ring only
REMOTE
ACCESS
The REMOTE ACCESS is a three-digit code you
need if you call away from home to check
messages.The default is 321. You can change it to
any three digits you want.
MENU /OK
1 Press MENU/OK button.
2 Press UP or DOWN button until the display
3 Press MENU/OK button to confirm.
Ö The display shows
Calls
shows
MENU /OK
REMOTE ACCESSREMOTE ACCESS
REMOTE ACCESS
REMOTE ACCESSREMOTE ACCESS
Ö The first digit of the code will be blinking.
4 Press UP or DOWN button to set the first digit
Calls
of the REMOTE ACCESS code.
MENU /OK
5 Press MENU/OK button to confirm.
Ö The second digit of the code will be blinking.
Calls
6 Press UP or DOWN button to set the second
digit of the REMOTE ACCESS code.
MENU /OK
7 Press MENU/OK button to confirm.
Ö The third digit of the code will be blinking.
Binatone Help Line - 0845 345 9677
Calls are charged at Local Call rate.
10
OPTIONS MENUOPTIONS MENU
OPTIONS MENU
OPTIONS MENUOPTIONS MENU
.
your
.
Page 11

Setting up continue...
Calls
8 Press UP or DOWN button to set the third
digit of the REMOTE ACCESS code.
MENU /OK
9 Press MENU/OK button to confirm the REMOTE
ACCESS setting.
Stop
1 0 Press /STOP button to return to standby mode.
TAM HD:
ON/OFF setting
Two different compression rates (ON and OFF) are
provided for you to select the recording quality /
total recording time of incoming messages.
With the compression rate set to ON the recording
quality will be higher, but it will only save up to 8
minutes of messages.
With the compression rate set to OFF the
recording quality will be lower, but it will only
save up to 20 minutes of messages.
MENU /OK
1 Press Menu/OK button.
2 Press UP or DOWN button until display shows
Ö
The display shows
Calls
TAMHD:ON (or OFF).
3
Calls
4
5
MENU /OK
ON (or OFF)
The will be blinking.
Ö
Press UP or DOWN button
Press Menu/OK button to confirm the TAM HD
Press Menu/OK button to confirm.
MENU /OK
setting.
5. Telephone Operation
Ringer volume
To make a
call
1
2 Dial the telephone number.
The Ringer High-Low switch
Base unit allows you to adjust the
- High volume
- Low volume
Lift the handset or press the HANDSFREE
button on the Base unit.
Hand sfree
Ö Check for dial tone.
The display shows the duration of the call in
Ö
minutes and seconds.
Using the Pre-dial mode
OPTIONS MENU
OPTIONS MENU
OPTIONS MENUOPTIONS MENU
OPTIONS MENU
to select ON or OFF.
located at the
volume of the ringer.
.
back of the
Binatone Help Line - 0845 345 9677
Calls are charged at Local Call rate.
11
Page 12

Telephone operation continue...
To answer a
call
To adjust the
speakerphone
volume
To end a call
To switch
between the
Handset and the
Speakerphone
To mute the
mouthpiece or
microphone
3
4
1 Press STORE/MUTE button once.
2 Press STORE/MUTE button again to get back to
Dial the telephone number.
If you make a mistake you can correct it by using the
button to delete digits and then adding the right ones.
Hand sfree
Lift the Handset or press the HANDSFREE
button on the Base unit to dial out the number.
When the phone rings;
Lift the handset or press the HANDSFREE
Hand sfree
button on the Base unit.
Ö
The display shows the duration of the call in
minutes and seconds.
During a call;
Adjust the volume of the speakerphone to your
comfortable volume level using the
volume switch located at the right side of the Base unit.
Replace the Handset on the Base unit cradle or
Hand sfree
press the HANDSFREE button on the Base unit.
The SPEAKERPHONE light indicator will
Ö
During a phone conversation through the Handset,
Hand sfree
press the HANDSFREE button to speak hands-free.
The Speakerphone light will turn on, but conversation
remains through the Handset until the Handset is
replaced on the Base unit cradle.
While in speakerphone mode, lift the Handset to
enable a private conversation.
During a call, you can mute the microphone
or the mouthpiece so that the person on the
other end cannot hear you.
Store /
Mute
Store /
Mute
While the microphone is muted,
Ö
be shown on the lower right corner of the display.
the call.
DEL
SPEAKERPHONE
turn OFF.
MUTE
will
MUTEMUTE
MUTEMUTE
6. One Touch Memory
Store (M1,
M2,M3)
Memory
Binatone Help Line - 0845 345 9677
Store /
1
In standby mode, press the STORE/MUTE button
Mute
Key in the telephone number you wish to store,
up to a maximum of 24 digits.
Calls are charged at Local Call rate.
12
Page 13
One Touch Memory Operation Continue...
2
Press the M1,M2, or M3 button to store the
number in the selected memory
Dial out
Stored memory
Number
1
2
Press the M1,M2,M3 button
The programmed memory number will be
Ö
displayed.
Lift the handset or
Hand sfree
Press the HANDSFREE button.
The phone automatically redials the number
Ö
using handset or speakerphone mode selected.
7. Outgoing call record
Last
Number
redial
Viewing the
Outgoing call
1
2
1
Pause /Redi al
Pause /Redi al
records
2
1
Making a
call from the
Outgoing
Pause /Redi al
2
call record
3
1
Deleting an
Outgoing
call record
Binatone Help Line - 0845 345 9677
Pause /Redi al
2
3
Lift the handset or press the HANDSFREE
Hand sfree
button.
Press the PAUSE/REDIAL button.
Ö The phone automatically redials the last
number you called.
The telephone remembers the last 50 outgoing
In standby mode, press the PAUSE/REDIAL
Ö The most recent outgoing call record will be
displayed with both the number and the call
Calls
duration shown.
Press the UP or DOWN button to view the other
records.
In standby mode, press the REDIAL/PAUSE
button.
Calls
Press the UP or DOWN button to find the record
you wish to call.
Lift the handset or
Press the HANDSFREE button.
Hand sfree
The phone automatically redials the number
Ö
using handset or speakerphone mode selected.
In standby mode, press the PAUSE/REDIAL
button.
Calls
Press the UP or DOWN button to find the record
you wish to delete.
Del ete
When the record is displayed, press the DELETE
button.
Ö The display prompts
Calls are charged at Local Call rate.
13
calls.
button.
When the number is displayed.
DELETE CALL?DELETE CALL?
DELETE CALL?
DELETE CALL?DELETE CALL?
Page 14

Outgoing call record continue...
Press the DELETE button again to confirm.
Del ete
Ö The display shows next record.
Calls
When viewing the Outgoing call records, press
the UP or DOWN button to find the record you
wish to store.
When the record is displayed, press the
PHONEBOOK button.
Ö The display shows the cursor blinking on the
first digit of the number.
Ö To modify the number, press the UP or DOWN
button to move the cursor to the number you
want to change then input the new one or press
the
DELETE button to delete.
Press the PHONEBOOK button to confirm.
Input the name. See page 15 for entering letters.
Ö To modify an existing name, press the
DOWN button to move the cursor to the
character you want to change then input the
new one or press the
Press the PHONEBOOK button again to save
the record into the Phonebook memory.
Storing an
Outgoing
call record
into the
Phonebook
memory
4
1
2
3
4
5
8. Phonebook
The Phonebook can store up to 120 names
(max. of 15 characters) and telephone
numbers (max. of 24 digits) in the Memory.
To view the
Phonebook
records
Binatone Help Line - 0845 345 9677
1 Make sure the Handset is idle (not connected
2
3
4
to a call).
Press the PHONEBOOK button.
Ö The display shows
‘SEARCH’ option blinking.
Press the PHONEBOOK button again.
Ö If the Phonebook memory is empty, the
phone will automatically return to the standby
display. Otherwise, the first alphanumeric
Phonebook entry will be shown.
Press the NUMERIC key (2/
that corresponds to the first letter of a name
Calls are charged at Local Call rate.
14
UP
DELETE button to delete.
SEARCH ADDSEARCH ADD
SEARCH ADD
SEARCH ADDSEARCH ADD
ABC
~ 9/
, with the
WXYZ
)button
or
Page 15

Phonebook continue...
and the search will jump to the first entry in the
Phonebook beginning with that letter.
Calls
1
2
Press the UP or DOWN button to scroll through
the other records.
Stop
Press the /STOP button repeatedly to return to
standby mode or wait until the program times out.
To add a
new record
into the
Phonebook
1
2
3
Press the PHONEBOOK button.
Ö The display shows
Calls
‘SEARCH’ option blinking.
SEARCH ADDSEARCH ADD
SEARCH ADD
SEARCH ADDSEARCH ADD
Press the UP or DOWN button to select
Press the PHONEBOOK button to confirm.
, with the
‘
Ö The display shows the cursor blinking on the
number field.
4 Input the telephone number, maximum of 24
digits.
5
Press the PHONEBOOK button to confirm.
Ö The display shows the cursor blinking on the
name field.
6 Input the name, maximum of 15 characters
using keypad buttons 2/ABC to 9/WXYZ.
Ö Refer to the table below to get the following
characters.
ADD
ADD
ADD
ADD
.’
Binatone Help Line - 0845 345 9677
Calls are charged at Local Call rate.
15
Page 16

Phonebook continue...
7
Press the PHONEBOOK button to confirm.
To make a
call from the
Phonebook
To edit a
stored
number
and/or name
8
Press the /STOP button repeatedly to return to
Stop
standby mode or wait until the program times
out.
Calls
1
When viewing the Phonebook records, press the
UP or DOWN button to find the record you
wish to call.
2
Lift the handset or press the HANDSFREE
button. The phone automatically dials the
3
1
2
speakerphone mode selected.
Calls
When viewing the Phonebook records, press the
UP or DOWN button to find the record you
wish to edit.
When the record is displayed, press the
displayed record using the handset or
Hand sfree
PHONEBOOK button.
Ö The display shows the cursor blinking on the
first digit of the telephone number.
Calls
3
Press the UP or DOWN button to move the
cursor to the digit you wish to change then input
the new one or press DELETE button to delete.
4
Press the PHONEBOOK button to confirm.
Ö The display shows the cursor blinking on the
first character of the name.
Calls
5
Press the UP or DOWN button to move the cursor
to the character you wish to change then input
the new one or press DELETE button to delete.
6
Press the PHONEBOOK button to save the edited
record.
Stop
7
Press the /STOP button repeatedly to return to
standby mode or wait until the program times out.
Binatone Help Line - 0845 345 9677
Calls are charged at Local Call rate.
16
Page 17

Phonebook continue...
Calls
To delete a
record from
memory
1
When viewing the Phonebook records, press the
UP or DOWN button to find the record you
wish to delete.
Del ete
2
When the record is displayed, press the DELETE
button.
Ö The display prompts
Del ete
3
Press the DELETE button again to confirm.
Ö The display shows next Phonebook record.
Stop
4
OR press the /STOP button to cancel and return
to the previous menu.
5
Press the /STOP button repeatedly to return to
Stop
the standby mode or wait until the program
times out.
9. Caller Display operation
VERY IMPORTANT: The Caller Display feature
of this product requires a subscription to
Caller Display service from your telephone
company.
If you subscribe to this feature from your local
telephone company, you can see the phone
number of the person calling you before you
answer. The caller display information includes:
The caller’s number (max. 24 digits).
The date and time of the call.
The caller ’s name (max. of 15 characters) if
the network sends it. (not normally available in UK)
DELETE?DELETE?
DELETE?
DELETE?DELETE?
Note:
1. The Caller Display information will also
include a name from the phonebook if the
incoming number fully matches an entry in
the Phonebook.
Binatone Help Line - 0845 345 9677
Calls are charged at Local Call rate.
17
Page 18
Caller Display operation continue...
WITHHELD will be displayed if the call is from
their number,
for example by dialling 141.
UNAVAILABLE will be displayed if the number
for example from
Withheld and Unavailable calls are saved in
as missed calls.
an international call.
Caller Display list
This phone automatically stores the last 99
It stores the data even if a
When the caller display
replace the oldest record.
show that you have a new Caller Display call
The display flashing will
records.
Viewing the
1
Caller
Display list
2
3
To return a
call from the
Caller’s list
power failure occurs
list is full, the new caller display entry will
NEW / CALLS will alternate on the
only stop after viewing ALL new caller display
Calls
With the phone on standby mode, press the UP
or DOWN button.
Ö The display shows the most recent record. If
there are no Caller Display records, the display
will show
Ö
T
he ‘MSG’ icon will show to indicate that the
caller has recorded a message.
Calls
Press the UP or DOWN button again to scroll
to the next Caller Display record.
Ö The display shows
reaching the end of the first and last record.
Stop
Press the /STOP button to return to standby
mode or wait until the program times out.
When the Caller Display record is displayed;
Lift the handset or press the HANDSFREE
button. The phone automatically dials the
Hand sfree
displayed record,using the handset or
speakerphone mode selected.
someone who has withheld
of the caller is unavailable,
the calls list and show
calls received.
stored in memory.
NO CALLSNO CALLS
NO CALLS
NO CALLSNO CALLS
.
END OF LISTEND OF LIST
END OF LIST
END OF LISTEND OF LIST
display to
upon
Binatone Help Line - 0845 345 9677
Calls are charged at Local Call rate.
18
Page 19

Caller Display operation continue...
Storing an
Incoming
call record
into the
Phonebook
memory
To delete a
Caller Display
record
Calls
1 When viewing the Caller Display records, press
UP or DOWN button to find the record you
wish to store.
2
When the record is displayed, press the
PHONEBOOK button.
Ö The display shows the cursor blinking on the
first digit of the number.
Ö To modify the number, press the UP or DOWN
button to move the cursor to the number you
want to change then input the new one or press
the
DELETE button to delete.
3 Press thePHONEBOOK button to confirm.
Input the name.
See page 15 for entering letters.
Ö To modify an existing name, press the
DOWN button to move the cursor to the
character you want to change then input the
new one or press the
4
Press the
PHONEBOOK button again to save the
DELETE
Caller Display record into the Phonebook memory.
When the Caller Display record is displayed;
Del ete
1
Press the DELETE button.
Ö The display prompts
Del ete
2
3
Press the DELETE button again to confirm.
Stop
Press the /STOP button to return to the
standby mode.
button to delete.
DELETE CALL?DELETE CALL?
DELETE CALL?
DELETE CALL?DELETE CALL?
UP
or
To delete
all Caller
Display
records
1
2
When the Caller Display record is displayed.
Del ete
Press and hold the DELETE button.
Ö The display prompts
Press the DELETE button to confirm.
Del ete
Ö The display automatically returns to standby
mode.
Stop
3
OR press the /STOP button to cancel and return
to the previous menu.
Binatone Help Line - 0845 345 9677
Calls are charged at Local Call rate.
19
DEL ALL CALLS?DEL ALL CALLS?
DEL ALL CALLS?
DEL ALL CALLS?DEL ALL CALLS?
Page 20

10. Answering Machine system
Outgoing
Messages
(OGM)
The machine has enough memory to record
(OGM/Caller’s message/Memo),up
there is no further
and the machine will announce,
The display
alternately with and
NOTE: You will need to delete some messages before that answering
memory available to record, it will answer after 15rings
shows
MESSAGESMESSAGES
MESSAGES
MESSAGESMESSAGES
machine can be turned on again.
To play the
current
OGM
OGM
To record
OGM 1
1
2
OGM
3 Start recording your OGM1. Speak directly
4 As soon as you have finished speaking, press
Binatone Help Line - 0845 345 9677
An OGM is the announcement callers will hear
when the machine answers a call.The
has two pre-recorded
announcements available if
you choose not to record your own OGMs.
OGM1
- this invites callers to leave a
message after the tone. The default is
leave your message after the beep”
- this informs callers to call later and
OGM2
does not give them the opportunity to leave a
message. The default is,
about 20
Please call later
“
minutes of messages
to a maximum of 59 messages.When
“
Memory full,please call later.
will be shown
MEMORY FULLMEMORY FULL
MEMORY FULL
MEMORY FULLMEMORY FULL
XXXX
XX
XXXX
and it
XXXX
XX
XXXX
NEWNEW
NEW
NEWNEW
Make sure the machine is switched on;
Press the OGM/REW button.
REW
Ö The display shows
PLAY OGMPLAY OGM
PLAY OGM
PLAY OGMPLAY OGM
the current announcement.
Make sure the answering machine is turned on.
Note: Each OGM must be at least 3 seconds
and no more than 1 minute in length.
Stop
Press the /STOP button briefly until you
hear, “Announcement 1.”
Press and hold the OGM/REW button until you
REW
hear a ‘beep.’
Ö The display shows
the message counter starts to count.
OGM RECORDINGOGM RECORDING
OGM RECORDING and
OGM RECORDINGOGM RECORDING
into the Base unit’s Microphone from a
distance of about 15 cms. (6 inches).
Stop
the /STOP button to stop recording.
PLAY OGMPLAY OGM
Ö The display shows
recorded message will be played back for
your approval.
Calls are charged at Local Call rate.
PLAY OGM, and your
PLAY OGMPLAY OGM
20
, and plays
Caprice 670
“Please
.
.”
.”
Page 21

Answering Machine System continue...
To record
OGM 2
To turn
the
Answering
machine
ON or OFF
1
After setting the OGM1, briefly press the
Stop
/ STOP button again. You will hear,
“Announcement 2.”
2
OGM
Press and hold the OGM/REW button until
REW
you hear a ‘beep.’
OGM RECORDINGOGM RECORDING
Ö The display shows
OGM RECORDING
OGM RECORDINGOGM RECORDING
the message counter starts to count.
Start recording your OGM2. Speak directly
into the Base
unit’s Microphone from a
distance of about 15 cms. (6 inches).
Stop
3
As soon as you have finished speaking, press
the /STOP
Ö The display shows
recorded message will be played back for
your approval.
button to stop recording.
PLAY OGMPLAY OGM
PLAY OGM, and your
PLAY OGMPLAY OGM
NOTE: The machine does not record messages with
Announcement 2 selected; make sure Announcement 1 is
selected if you want callers to leave messages.
Stop
1
Press and hold the /STOP button to
turn ON the answering system.
Answering machine ON.Announcement one
“
display shows
ANSWER ONANSWER ON
ANSWER ON
ANSWER ONANSWER ON
You will hear,
Ö
and the MESSAGE
light will light up.
Press and hold the /STOP button again
Stop
2
to turn OFF the answering system.
Ö You will hear, “Answering machine OFF.” The
display shows
ANSWER OFFANSWER OFF
ANSWER OFF
ANSWER OFFANSWER OFF
and the
MESSAGE light will turn off.
Note: Once turned OFF, you can still call the
machine and it will answer after 15 rings.
and
The
”
To switch
between
OGMs
Press and release the /STOP button to
Stop
switch between OGM1 and OGM2.
Ö The machine does not record messages with
OGM2 (Announcement 2) selected; make sure
OGM1 is selected if you want callers to leave
messages.
Binatone Help Line - 0845 345 9677
Calls are charged at Local Call rate.
Page 22
Answering Machine System continue...
To record a
memo
1
2 Start recording your memo. Speak directly
3 As soon as you have finished speaking, press
To playback
your
message/s
Playback
1
and Pause
2
3
4
Binatone Help Line - 0845 345 9677
You can record a memo directly into the
The length of the memo message
depends on the MESSAGE LENGTH
page 9.
The memo message will be played back
together with any messages from callers.
With the Handset on hook, press and hold
MEM O
FWD
the FWD/MEMO button until you hear a ‘beep’.
Ö The display shows
MEMO RECORDINGMEMO RECORDING
MEMO RECORDING
MEMO RECORDINGMEMO RECORDING
the message counter starts to count.
into the Base unit’s Microphone from a
distance of about 15 cms. (6 inches).
Stop
the /STOP button to stop recording.
Ö Day and time are automatically stamped at
the end of the message.
If you have messages or memos, the display
shows the total number of messages
and the
MESSAGE light flashes.
If you have new messages or memos, the
display shows and it will be shown
alternately with the total messages.
XXXX
XX
XXXX
NEWNEW
NEW
NEWNEW
Press the PLAY/PAUSE button. The machine
will play all new messages/memos.
Ö While a message is being played, the display
shows the Caller Display information (if
PLAY MESSAGEPLAY MESSAGE
PLAY MESSAGE
subscribed) or for received
messages;
Ö If there are no messages/memos present, you
will hear,
PLAY MESSAGEPLAY MESSAGE
PLAY MEMOPLAY MEMO
PLAY MEMO
PLAY MEMOPLAY MEMO
“You have no messages.”
for recorded memos.
To pause a message playback, press the PLAY/
PAUSE button again
Press the PLAY/PAUSE button again to restart
message playback, otherwise it will restart
automatically after a 30-second pause.
After playing all new messages, press the PLAY/
PAUSE button again. The system will play all
of its messages/memos.
Calls are charged at Local Call rate.
22
recording
setting, see
MESSAGESMESSAGES
MESSAGES
MESSAGESMESSAGES
machine.
and
XXXX
XX
XXXX
Page 23

Answering Machine System continue...
Repeat/Rewind
Skip/Fast
Forward
Stop playback
Volume Control
To intercept
a call
To delete
incoming
messages
To repeat the current message from the
OGM
FWD
beginning,press the
REW
To replay the previous message, press the
REW button twice.
OGM/
To skip to the next message, press the
MEM O
F
WD/MEMO
To stop the message playback, press the
Stop
/STOP
button.
OGM/REWIND button.
button.
Use the SPEAKERPHONE volume switch located
on the right side of the Base unit to adjust the
volume of the loudspeaker during playback.
If you hear the answering machine recording
a message, you can intercept the call and
1
2
speak to the caller, EITHER by:
Lifting the Handset,
Hand sfree
or Pressing the
HANDSFREE button on
or lifting the Handset of any other phone
connected to the same line.
When you have intercepted the call, the
will stop recording the caller’s
the Base unit,
message.
machine
Any recording up to the intercept will
be saved as a New Message.
Stop
3
If you intercept a call within 3 seconds of its
start, you may sometimes need to press the
button to stop recording.
/STOP
To delete the current incoming message;
Del ete
1
During message playback, press the DELETE
button.
Ö The display prompts
Del ete
2
Press the DELETE button again to confirm.
Ö After the erasure is complete, the numeric order
of the remaining messages will be
DELETE?DELETE?
DELETE?
DELETE?DELETE?
.
rearranged.
Binatone Help Line - 0845 345 9677
Calls are charged at Local Call rate.
23
Page 24

Answering Machine System continue...
Del ete
To delete all
messages
To go back to
the default
OGM
1 After playing back all of your messages, press
and hold the DELETE button.
2
Press the DELETE button again to confirm, the
Ö The display prompts
Del ete
DELETE ALL?DELETE ALL?
DELETE ALL?.
DELETE ALL?DELETE ALL?
display shows "DELETE . . ." and after a short
delay, you will hear, “All messages erased.”
Ö The machine will not delete any messages
that you haven’t yet listened to.
3 The display automatically returns to standby
mode.
If you no longer want callers to hear the OGMs
that you have recorded, you can delete
revert to the pre-recorded defaults
Stop
1 Make sure the machine is switched on.
Ö If necessary, press and release the
button to switch to the OGM you want
OGM
2 Press the OGM/REW button to play the
REW
current announcement.
Del ete
3
While the announcement is playing, press the
DELETE button twice.The display automatically
returns to standby mode.
ÖPress the OGM/REWIND button to play the
pre-recorded OGM for confirmation.
them and
as follows:
/STOP
to delete.
11. Remote operation
You can use the Answering System features of Caprice 670
from home. To protect your privacy,
you enter the
three-digit
REMOTE ACCESS Code. The base will display
REMOTE while the Caprice 670 is being accessed remotely.
1
To check
your
REMOTE
MENU /OK
Calls
2
ACCESS code
MENU /OK
3
Stop
4
Binatone Help Line - 0845 345 9677
most of the features can be used only after
In standby mode, press the MENU/OK button.
Press the UP or DOWN button until the display
shows REMOTE ACCESS.
Press the MENU/OK button to display your code
setting.
Ö The default code is ‘321.’
Press the /STOP button twice to return to standby
mode.
Calls are charged at Local Call rate.
24
when you are away
Page 25

Remote operation continue...
To check
your
messages
from a
remote
location
Notes:
During remote operation, you must press a key within
otherwise the machine will cut off your call.
During remote operation, the playback is paused
about minutes, and to continue
2¾
within 10 seconds, or the
Using the
remote
instruction
code
1 Using a tone dialing phone, dial your home
2
3
4 Press keypad “2” to playback your messages.
phone number.
Listen to or bypass the OGM (by pressing *).
Enter your REMOTE ACCESS Code. A list of
options
will be heard.
Ö For other instructions, see the Remote
Intruction code menu shown on the next page.
machine will cut you off.
The following is the Remote Instruction Code Help Menu:
To bypass the Outgoing Message, press “*”
To play new messages, press “2”
ÖAfter playing back new messages, press “2”
again to play all recorded messages.
ÖTo pause and restart during message
playback, press “2” playback can be paused for
up to 30 seconds, but after that the playback
automatically restarts.
the "2" key must be pressed
automatically after
,
10 seconds,
Caprice 670
Remote operation
Using a tone dialling phone, dial your home phone number.
1
When you hear your outgoing message, press .
2
Key in your remote PIN (security code).
3
The default code is 321. For details on how to set a new code, see the User
Guide.
ABC
2
Press to play back your messages.
4
You can also use the keys shown on the back of this card.
5
Binatone Help Line - 0845 345 9677
Calls are charged at Local Call rate.
25
Page 26

Remote operation continue...
Using the
remote
instruction
code
Switching
ON from
a remote
location
1 Using a tone dialing phone, dial your home
2 When you hear a ‘beep’, key in your REMOTE
3 Press keypad “9” to switch ON.
To repeat message
Ö To skip back to the previous message
“1” twice
To skip message, press “3”
To play announcement, press “4”
To record greeting, press “5”
To stop function, press “6”
To delete message, press “7”
To set Answer OFF, press “8”
To set Answer ON, press “9”
Ö After setting to Answer ON, press “9” to
between OGM1 and OGM2,
To delete all messages, press “0” twice quickly.
(There could be a delay while the delete is being
done, before you hear a beep and the menu list again.)
To disconnect the call, press "#"
If the answering machine is switched off, it will
answer your call after 15 rings allowing you
to switch the machine ON from a remote
, press
“1”
phone number.
ACCESS code.
,
press
switch
location;
Interrupt and bypass the
outgoing message (OGM)
Pause and restart during
message playback
Skip forward to next
message
Repeat the current
message
Skip back to the
previous message
Stop playback or
recording
1
Binatone Help Line - 0845 345 9677
currently being played back
Voice prompt: “Message erased”
Delete all messages that
2
ABC
have been played back
Voice prompt: “Message erased”
Play the outgoing message
3
DEF
(OGM1 or OGM2)
Record a new outgoing
1
message (OGM1 or OGM2)
Switch the machine on
1
Switch between OGM1
and OGM2
Switch the machine off
6
MNO
Voice prompt: “Answering is off ”
Calls are charged at Local Call rate.
26
PQRS
7
0
0
4
GHI
5
JKL
9
WXYZ
8
TUV
Page 27

12. Operational notes
Electrical safety
DON’T let the Base unit get wet. Electrical equipment can cause serious
injury if used while you are wet or standing in water.
If the Base unit ever falls into water, DON’T retrieve it until you have
unplugged the power lead from the mains and the telephone line plug
from the telephone socket; then pull it out by the unplugged cables.
NEVER use your Caprice 670 outdoors during a thunderstorm -
unplug the Base unit from the telephone line and the mains socket when
there are storms in your area. Damage caused by lightning is not
covered by the guarantee.
Locating the Base unit
The Base unit should be placed on a level surface, in a position where:
the mains adapter plug will reach an easily accessible 230-V AC switch
mains supply socket - never try to lengthen the mains power cable.
the telephone line cable will reach your telephone line socket or extension
socket.
it is not close to a sink, bath or shower, or anywhere else where it might
get wet.
it is not close to other electrical equipment - fridges, washing machines,
microwave ovens, TVs, fluorescent lights, etc.
Cleaning and care
Don’t clean any part of your Caprice 670 with benzene, thinner or
other solvent chemicals - this may cause permanent damage which is
not covered by the Guarantee. When necessary, clean it with a damp
cloth.
Keep your Caprice 670 away from hot, humid conditions or strong
sunlight, and don’t let it get wet.
Every effort has been made to ensure high standards of reliability for
your Caprice 670. However , if something does go wrong, please do not
try to repair it yourself - consult your supplier or the Binatone Help
Line.
Binatone Help Line - 0845 345 9677
Calls are charged at Local Call rate.
27
Page 28

13. Troubleshooting
The Caprice 670 must be serviced by trained engineers. NEVER
attempt any repairs or adjustments yourself - you could make the
!
problem worse and invalidate the Guarantee.
ALWA YS check you have followed the steps listed in Section 2 to
first that: install and set up your Caprice 670.
“I cannot make or Make sure you’re using the telephone line cable that
answer calls.” was supplied with your Caprice 670 . Other telephone
“The phone does Make sure you’re using the telephone line cable
not ring” that was supplied with your Caprice 670 . Other
“The phone does Make sure you’re using the telephone line cable
not dial” that was supplied with your Caprice 670. Other
“The Caller You need to subscribe to Caller Display service
Display feature
isn’t working.”
all connectors are firmly inserted in their sockets.
mains power is switched on at the socket.
Everyday use
line cables might not work.
Switch off power at the mains socket, wait for a few seconds
and then switch back on. This may solve
telephone line cables might not work.
Set the ringer volume to High, using the switch at
the back of the unit.
Check that the total REN value of all equipment
connected to your telephone line is not more than
4. Disconnect one or more telephones.
telephone line cables might not work.
your local telephone company. Contact the
telephone lcompany for
The caller may have withheld their number by
dialing 141. Or they may be calling from a network
that does not transmit the Caller Display (for
example, it may be an international call).
details on how to
the problem.
local
subscribe.
from
Binatone Help Line - 0845 345 9677
Calls are charged at Local Call rate.
28
Page 29

Troubleshooting continue...
Be sure to wait until the second ring before
Answering Machine
“The machine The machine’s memory may be full. You need to
won’t record enough recorded messages to free at least one minute
any messages” recording time. Or you can delete all
“Remote
operation
doesn’t work.”
to make room for new ones
Make sure the machine is switched on - the
MESSAGE light should be on.
Make sure you have not selected OGM2 - with OGM2
selected, callers cannot leave messages
Make sure you are using the correct remote
Check that you are using a suitable tone-dialling phone.
Some cordless or mobile phones do not generate
continuous tones and so are not ideal for
Don’t leave more than 10 seconds between key
presses; otherwise, your call will be cut off.
.
Using your Caprice 670 on a PBX
“Last Number When you first make a call, try pressing the REDIAL/
Redialand/or PAUSE button for a pause between the outside line
memory dialing access digit (e.g. 9) and the telephone number.
don’t work on a You should later be able to redial the number.
PBX.
When storing numbers in memory, you can include
the outside line access digit (e.g. 9) with each
number.
If your PBX requires you to wait for a second Dial
tone before dialing the telephone number, press the
REDIAL/PAUSE button for a pause between the
access digit and the number.
answering.
delete
recorded messages
(see page 20).
security code
remote operation.
Binatone Help Line - 0845 345 9677
Calls are charged at Local Call rate.
29
Page 30

Troubleshooting continue...
If the fault persists …
Disconnect all other instruments connected to the
same line as the Caprice 670 and see whether you
can make a call.
Disconnect the Base unit from the telephone line
and plug a different phone into the master telephone
socket. Try making a call. If this works, the line is
OK.
If the call does not work, and you are using a two-
way socket adapter, remove it and plug a telephone
directly into the socket. If the call now works, the
adapter may be faulty.
If you cannot make a call, the fault may be on the
exchange line. Contact the service provider (the BT
engineers on 151, or your cable company).
If you still cannot identify the cause of the problem,
contact the Binatone Help Line on 0845 345 9677
Calls are charged at Local Call rate.
14. Guarantee and Service
This product is guaranteed against manufacturing defects for a period of 1 Year.
This does not cover the product where the fault is due to misuse, abuse,
use in contravention of the instructions, or where the product has been the
subject of unauthorised modifications or alterations, or has been the subject
of commercial use.
In the event of a problem with the product within the guarantee period
please return it to your nearest Argos store.
If the item is shown to have had an inherent defect present at the time of sale,
the store will provide you with a replacement.
Your statutory rights remain unaffected.
Guarantor; Argos Ltd
489 - 499 Avebury Boulevard
Central Milton Keynes
MK9 2NW
Binatone Help Line - 0845 345 9677
Calls are charged at Local Call rate.
30
Page 31

15. Technical details
Standard Corded Telephone with Caller Display and Answering
Machine
Temperature range Operating 0 ºC to 40 ºC
;Storage -20 oC to 60 oC
Electrical power Base unit - input 100V-240 V AC, 50/60 Hz;0.15A
output DC 7 V, 420 mA; polarity
BINATONE TELECOM PLC
1 Apsley Way London NW2 7HF,United Kingdom.
Tel: +44(0) 20 8955 2700 Fax: +44(0) 20 8344 8877
e-mail: [email protected]
________________________________________ .
We the manufacturer / Importer : Binatone Telecom Plc
1 Apsley Way London
Declare under our sole responsibility that the following product
Type of equipment:
Model Name:
Country of Origin:
Brand:
Binatone
complies with the essential protection requirements of R&TTE Directive 1999/5/EC on the
approximation of the laws of the Council Directive 2004/108/EC on the approximation of
the laws of the Member States relating to electromagnetic compatibility (EMC) and the
European Community Directive 2006/95/EC relating to Electrical Safety.
Assessment of compliance of the product with the requirements relating to the essential
requirements according to Article 3 R&TTE was based on Annex III of the Directive
1999/5/EC and the following standard:
EMC:
Electrical Safety:
The product is labelled with the European Approval Marking CE as show. Any Unauthorized
modification of the product voids this Declaration.
Manufacturer / Importer
(signature of authorized person)
Corded phone
Caprice 670
China
EN 55022:2006
EN 55024:1998+A1+A2
EN 60950-1:2006+A11:2009
k
EC Declaration of Conformity
NW2 7HF, United Kingdom.
Waste electrical products must not be
disposed of with household waste.
This equipment should be taken to
your local recycling centre for safe
treatment.
London,
Signature:
Binatone Help Line - 0845 345 9677
Place & Date: 8th Sep , 2010
Calls are charged at Local Call rate.
31
Page 32

Connection and conditions for use
You can connect your Caprice 670 to a direct exchange line (DEL) - a line
connected to a local exchange, with its own phone number; to an extension
socket connected to a DEL; or to an extension on an approved compatible
PBX. Do not connect the Caprice 670 as an extension to a payphone.
The ringer equivalence numbers (RENs) of all instruments (phones, fax
machines, etc.) connected to an exchange line must not add up to more than
4 - otherwise, one or more of them may not ring and/or answer calls correctly.
The Caprice 670 has a REN of 1, and most other telephones have a REN of
1 unless marked otherwise.
Contents of this User Guide
1. Where to find it
2. Installation
3. Desk/Wall mount installation
4. Setting up the Caprice 670
5. Telephone operation
6. One - Touch Memory
7. Outgoing call record
8. Phonebook function
9. Caller Display operation
10. Answering Machine system
11. Remote operation
12. Operational notes
13. Troubleshooting
14.
Product Guarantee
15. Technical details
Pressing buttons on your phone
When the instructions in this user guide tell you simply to ‘press’ a
button, this means that you should press the button briefly, then
release it.
When the instructions tell you to ‘press and hold’ a button, this means
you should keep the button pressed until the display changes and/or you
hear a tone.
If you need help …
The Binatone Help Line is
available from 9.00 am to
5.00 pm, Monday to Friday, on
0845 345 9677
Calls are charged at Local Call
rate.
32
UK (DI) Ver2.0 Sep,2010
 Loading...