


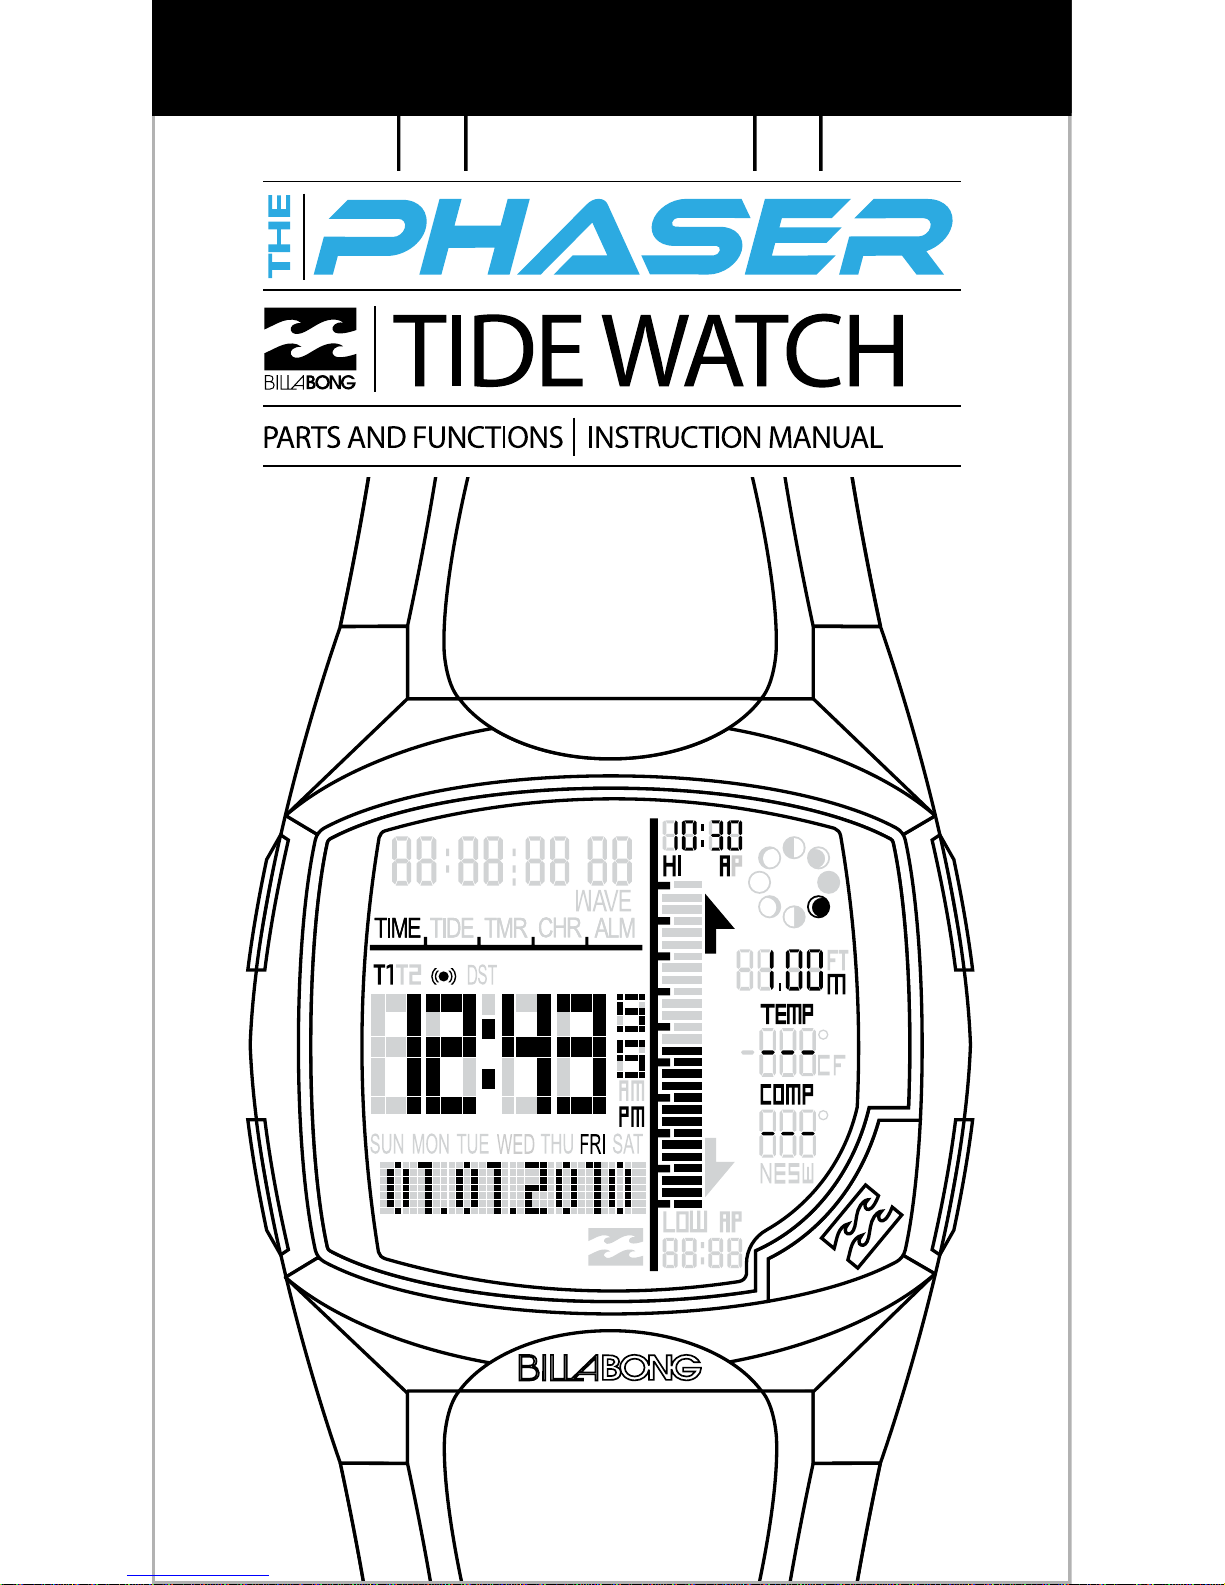
Phasher

*For the online guide & more language translations please go to,
www.billabong.com/watches

1.
INDEX
Features & Functions
Buttons
Reset Procedure
Setting the Time/Day/Date
Calibrating the Compass
Setting the Screensaver
Setting the Local Tide
Setting the Spot X Tide
Operating the Timer
Setting the Chronograph
Setting the Alarms
Temperature Function
Digital Compass Function
Moon Phase Icons
Global Rules
Recommended usage
Care Procedures
International Warranty
Five Year Limited Warranty
Compass Oset List
Beach List
FAQ’s
After sales/Warranty Service
Page 02
Page 04
Page 05
Page 06
Page 08
Page 09
Page 10
Page 11
Page 13
Page 15
Page 16
Page 18
Page 19
Page 20
Page 21
Page 22
Page 23
Page 24
Page 26
Page 27
Page 28
Page 32
Page 33

2.
ENGLISH
FEATURES & FUNCTIONS:
TIME
Hours, minutes, and second display in 12/24
hour format
Date, month, and day of week display in
Date-Month/Month-Date format
Two Time zones
DST feature
100 year auto calendar (01JAN200031DEC2099)
Hourly chime and Key tone enabled
Scrolling “Phaser” Screensaver
TIDE
295 Pre-programmed beaches from 20102035
One Spot X location per time zone
Tide alarm for hitting High/Low peak: chime
with arrow blinking
TIMER
Eight selectable timers: seven preset timers
and one custom timer
One-second resolution up to 10 hours of
count-up time
Three timer types: Countdown-Stop,
Countdown-Up and Countdown-Repeat
CHRONOGRAPH (STOP WATCH)
1/100-second resolution up to 1 hour;
one-second resolution up to 10 hours
Wave counter up to 99 waves

3.
ENGLISH
ALARM
Two daily alarms with blinking Billabong
wave logo
Selectable Time zone dependency
Three selectable chime noises
TEMPERATURE GAUGE
Displays temperature in degree Celsius or
Fahrenheit
Shows temperature in +/- 1º resolution
COMPASS
Displays 4 cardinal points
Shows the bearing in 1º resolution
MOON PHASE
Displays 8 phases
Auto-orient with North/South hemisphere
Update every 12:00am
OTHER FEATURES
3 VDC Operating Voltage
Electro-luminescent (EL) backlight
FSTN LCD Display
Five (5) button operation:
LIGHT, MODE, START, RESET, DIRECT TIDE

4.
ENGLISH
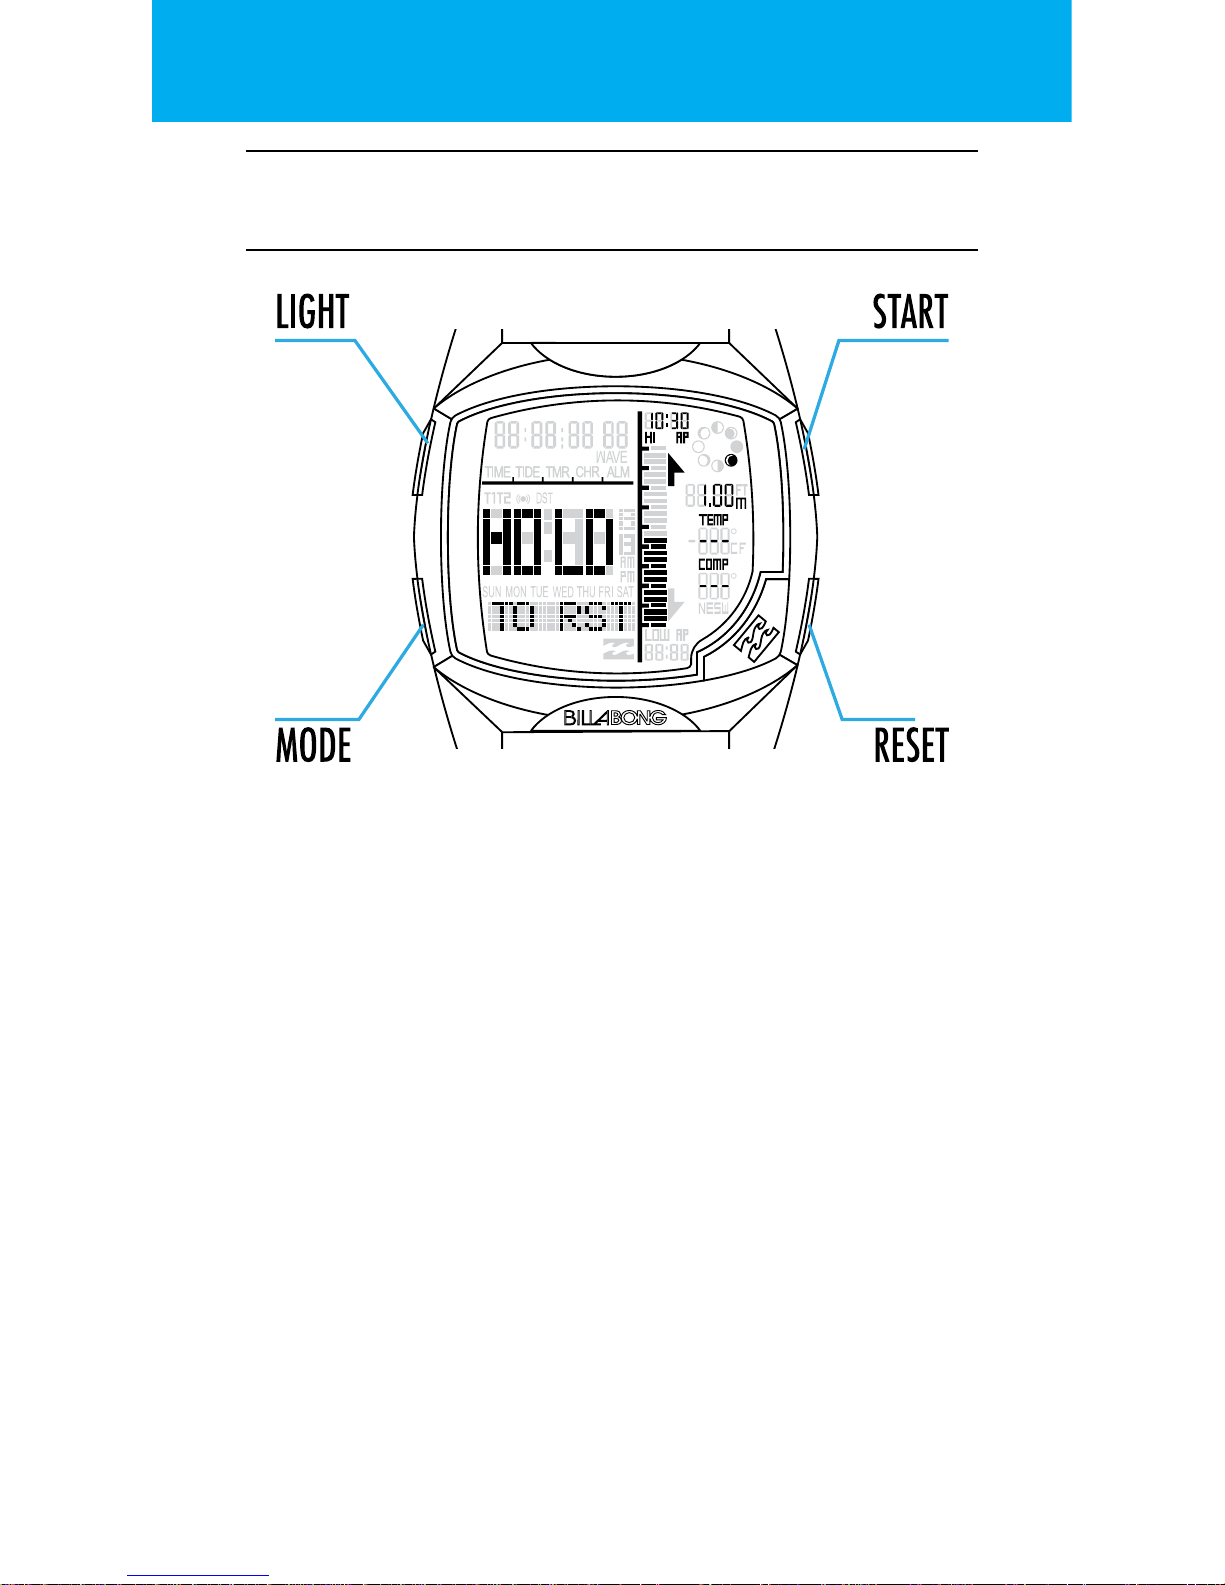
Press: Turns on backlight /
Conrm & Exit setting state
Hold: Enters setting state
Press: Peek background time
zone / Starts & stops timers /
Increments the value being set
Hold: Toggles foreground time
zone / Fast increments the value
being set
Press: Toggles Key tone & Hourly
Chime / Used to reset timers /
Decrements the value being set
Hold: Toggles DST / Fast decrements the value being set
Press: Direct access to TIDE
application
Hold: Toggles Compass
Press: Changes foreground
application / Moves to next
setting eld
Hold: Toggles Temperature
Gauge
BUTTONS:
5.
ENGLISH
RESET PROCEDURE:
1. Hold down the LIGHT, MODE, START and RESET
buttons for 5 seconds.
2. Watch should generate a 1 second beep to conrm.
3. Watch should turn on lamp and all LCD segments.
4. Ensure all buttons are released before continuing
further.
5. Wait for 2 seconds.
6. Watch should turn o all LCD segments.
7. Watch should display the module number for 2
seconds.
8. Watch should display the software release number
for 2 Seconds.
9. Watch should display the build number for 2
seconds.
10. Watch should turn o lamp.
11. Reset is nished watch will go to the Time of Day
application.
6.
ENGLISH
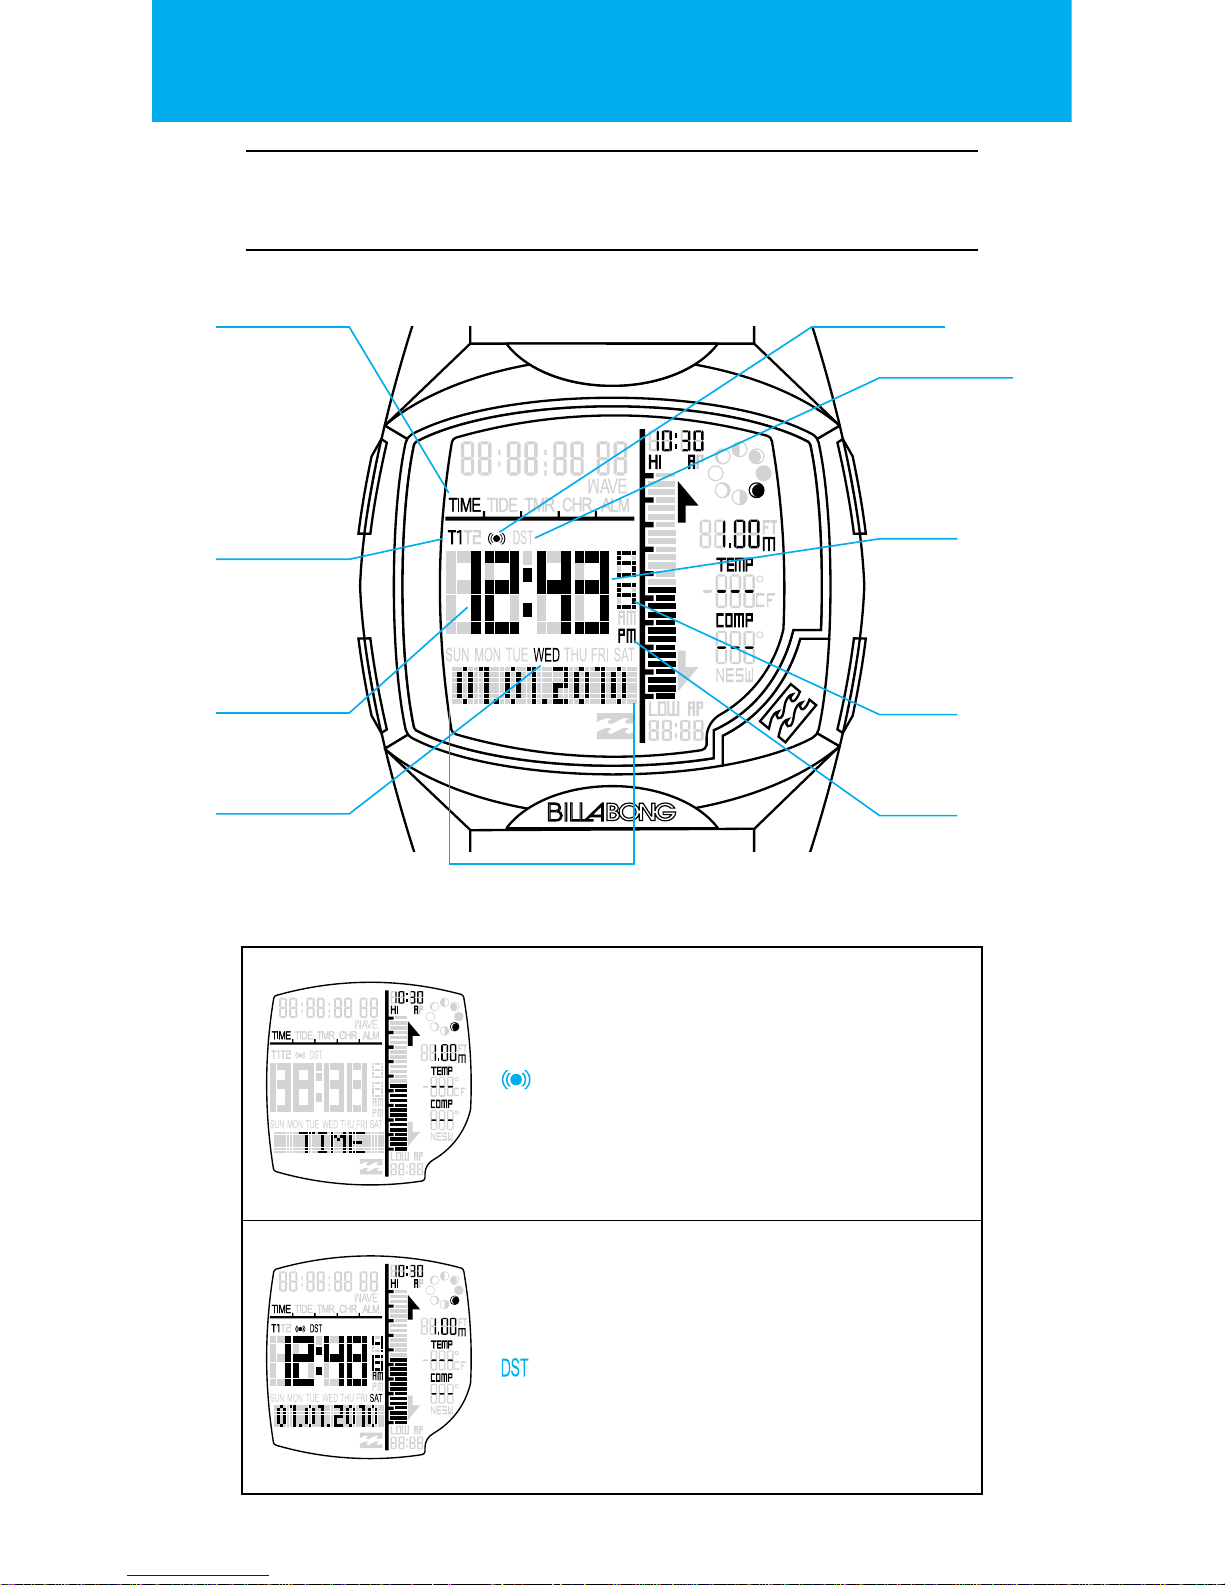
SETTING THE TIME/DAY/DATE:
BANNER STATE
Banner will time out after 3 seconds.
The KEY TONE and HOURLY CHIME setting
can be toggled on/o by pressing the
RESET button.
MAIN STATE
The display shows current time, Hour,
Minutes, Seconds, and the current Day, Date,
Month and Year.
DAYLIGHT SAVINGS TIME
Hold the RESET button to toggle the DST
setting on/o. The CONFIRMATION tone will
chime when the new time has been set.
Time of Day
application icon
Hourly chime & key tone
setting indicator
Time zone T1/T2
indicator
Minutes
DST ON indicator
Hour Seconds
Day of the Week
MM.DD.YYYY or
DD.MM.YYYY
AM/PM
7.
ENGLISH
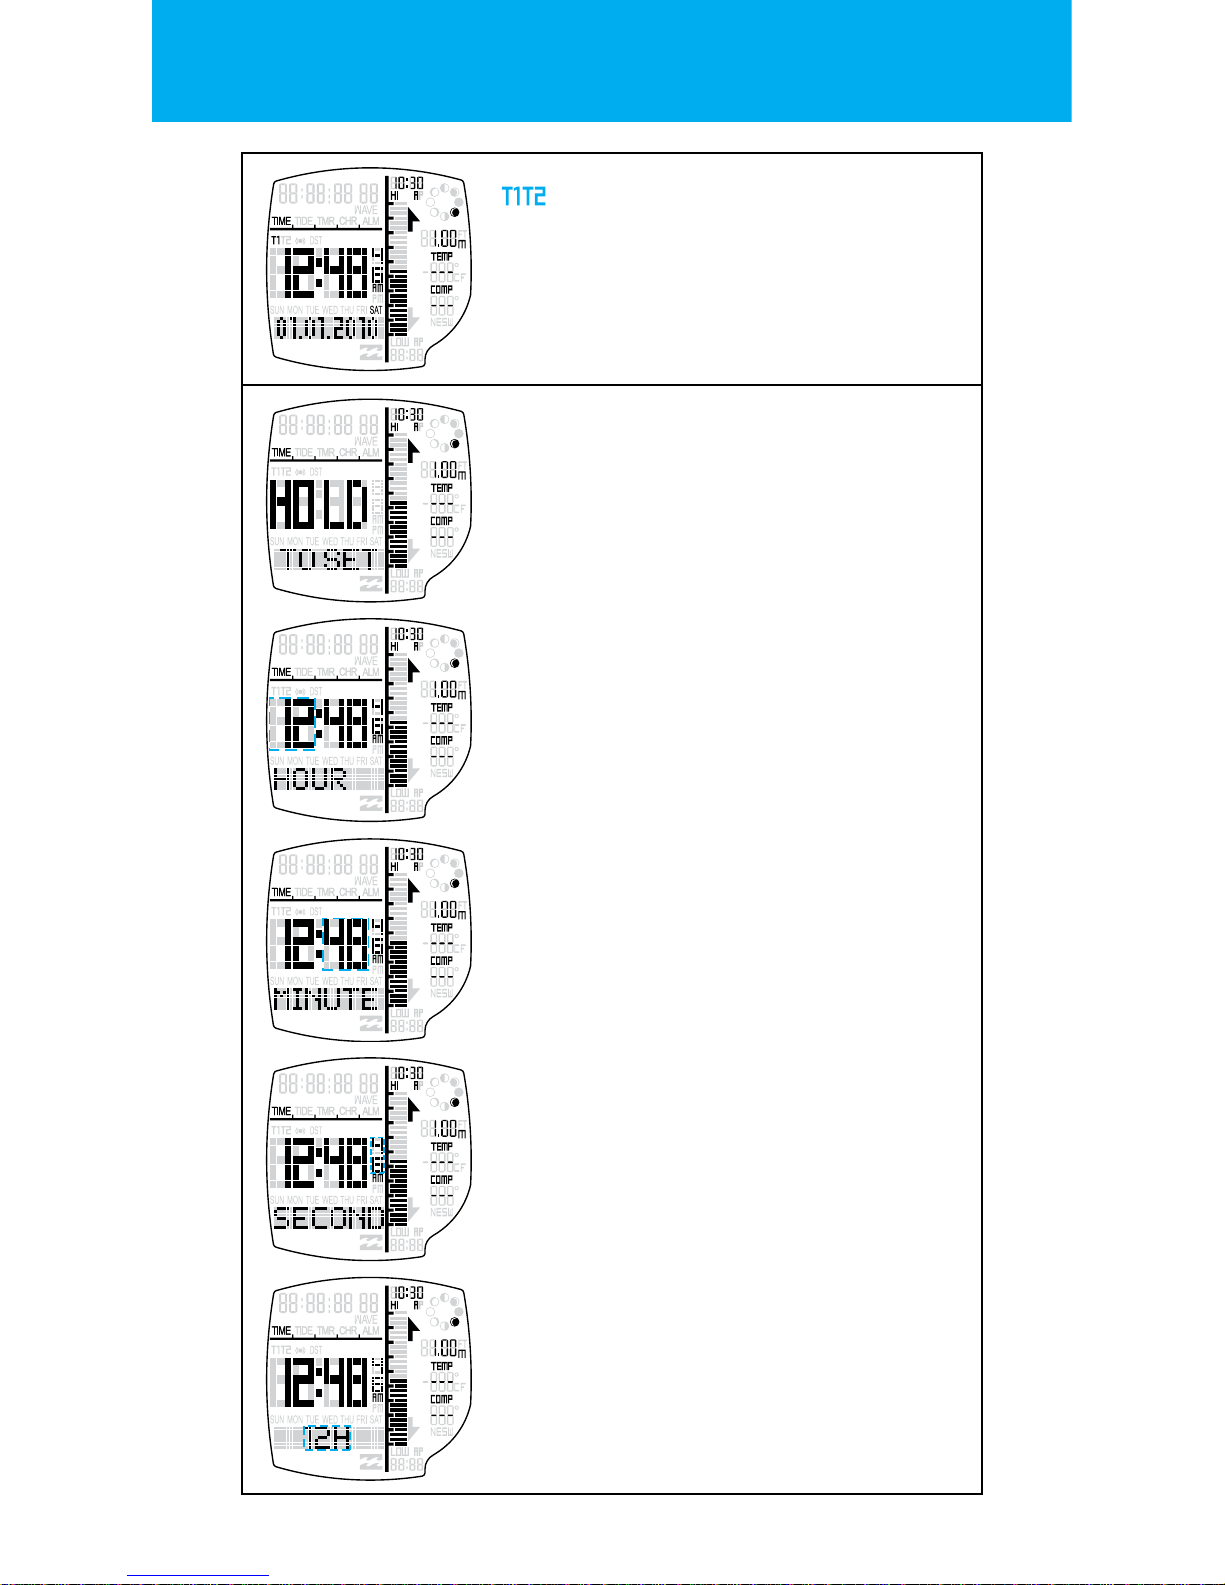
TIME ZONES
Press the START button to peek the background time zone. Hold the START button to
toggle the foreground time zone.
The KEY TONE will chime when the new time
zone has been set.
SETTING STATE FOR TIME
Hold LIGHT button to enter the SETTING STATE.
One second after the depression of the button,
the HOLD TO SET banner will display.
One second further and the CONFIRMATION
tone will sound o.
HOUR
Press the START button to increment & the
RESET buttons to decrement the hour setting.
(Hold the buttons for 2 seconds to speed up
the increment or decrement)
Press the MODE button to go to the
next setting.
HOUR FORMAT
The hour can be displayed in 24hr (military
time) or in 12hr (AM & PM).
Press the START button or the RESET button to
change the HOUR FORMAT setting.
Press the MODE button to go to the
next setting.
MINUTE
Press the START button to increment & the
RESET buttons to decrement the minute setting. (Hold the buttons for 2 seconds to speed
up the increment or decrement)
Press the MODE button to go to the
next setting.
SECONDS
Press the START button or the RESET button to
reset the seconds setting to zero.
Press the MODE button to go to the
next setting.
8.
ENGLISH
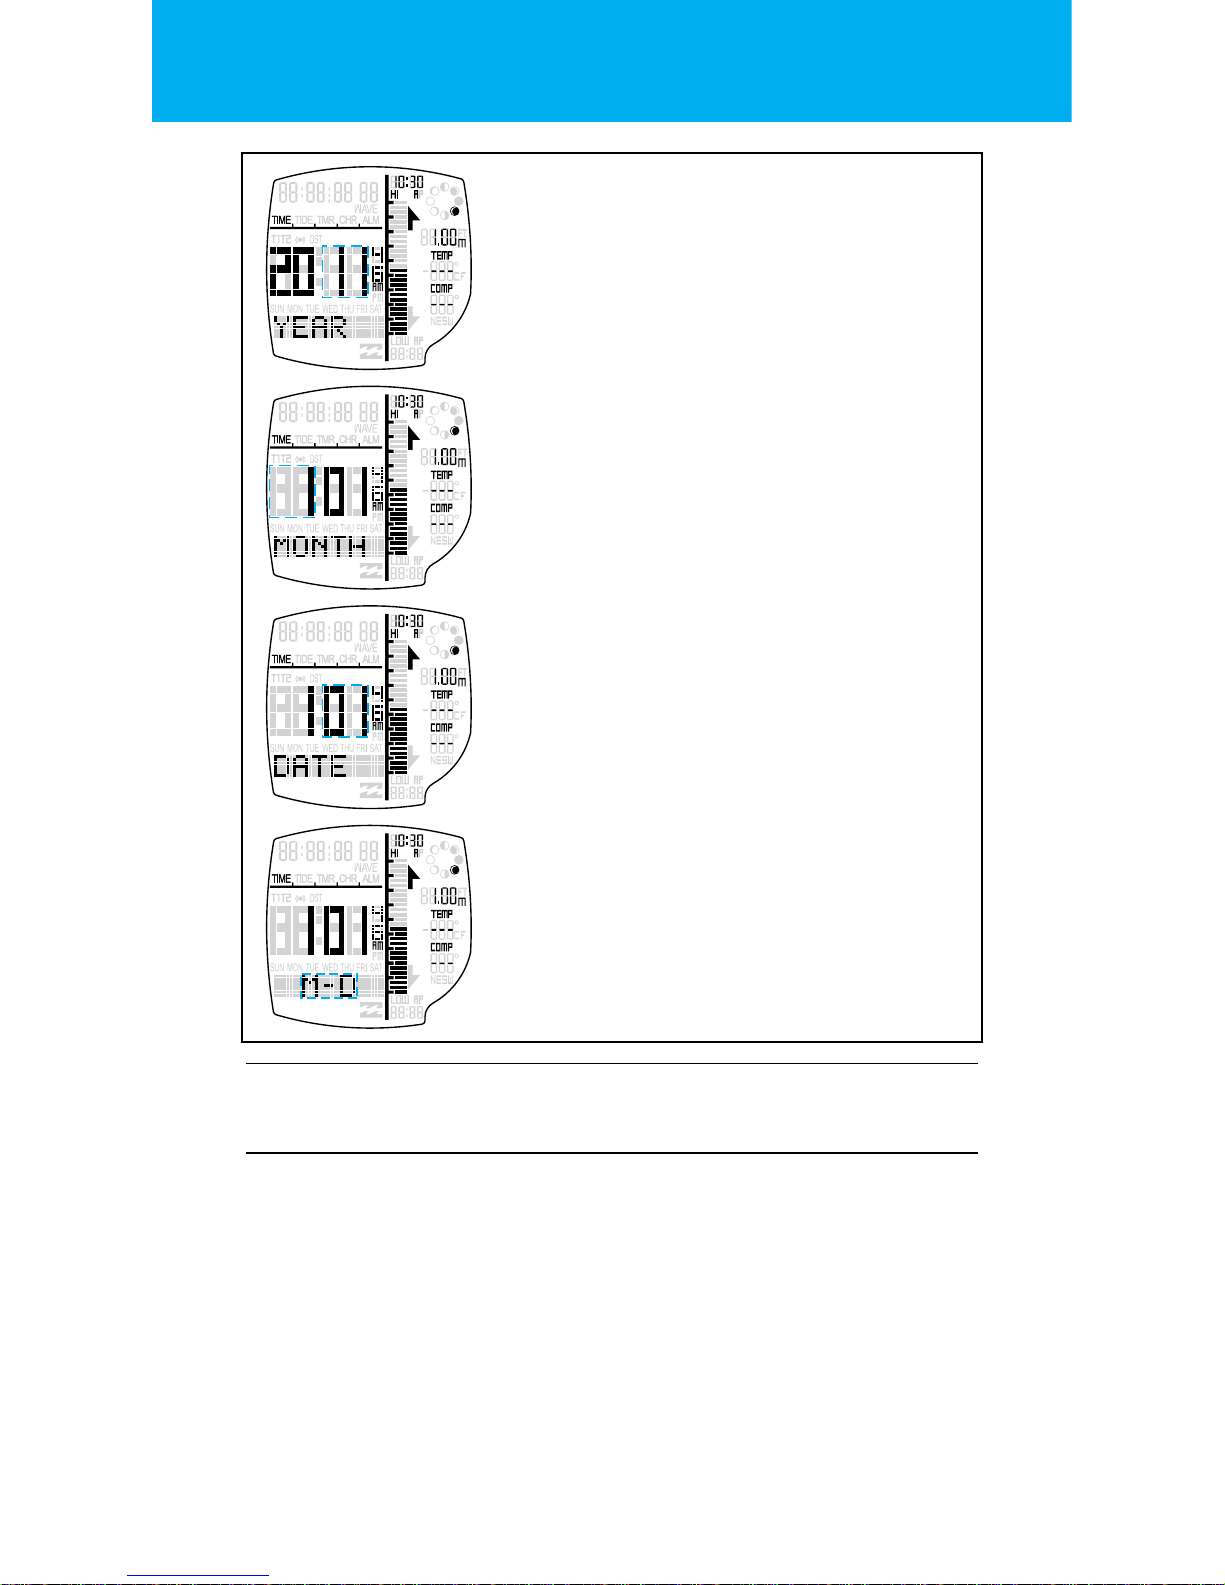
YEAR
Press the START button to increment & the
RESET buttons to decrement the year setting.
(Hold the buttons for 2 seconds to speed up
the increment or decrement)
Press the MODE button to go to the
next setting.
MONTH
Press the START button to increment & the
RESET buttons to decrement the month setting. (Hold the buttons for 2 seconds to speed
up the increment or decrement)
Press the MODE button to go to the
next setting.
DATE
Press the START button to increment & the
RESET buttons to decrement the date setting.
(Hold the buttons for 2 seconds to speed up
the increment or decrement)
Press the MODE button to go to the
next setting.
DATE FORMAT
The date can be displayed in “M-D” or
“D-M” format.
Press the START button or the RESET button to
change the DATE FORMAT setting.
Press the MODE button to go to the
next setting.
CALIBRATING THE COMPASS:
IMPORTANT: Before using the compass MUST be calibrated
for accurate readings.
Accurate calibration is best done outside and away from
strong magnetic forces and large metal objects.
You can calibrate the watch for MAGNETIC NORTH, but for
TRUE NORTH an OFFSET is required.
See the compass setting procedure on page 19.
See the compass oset list on page 27.
9.
ENGLISH
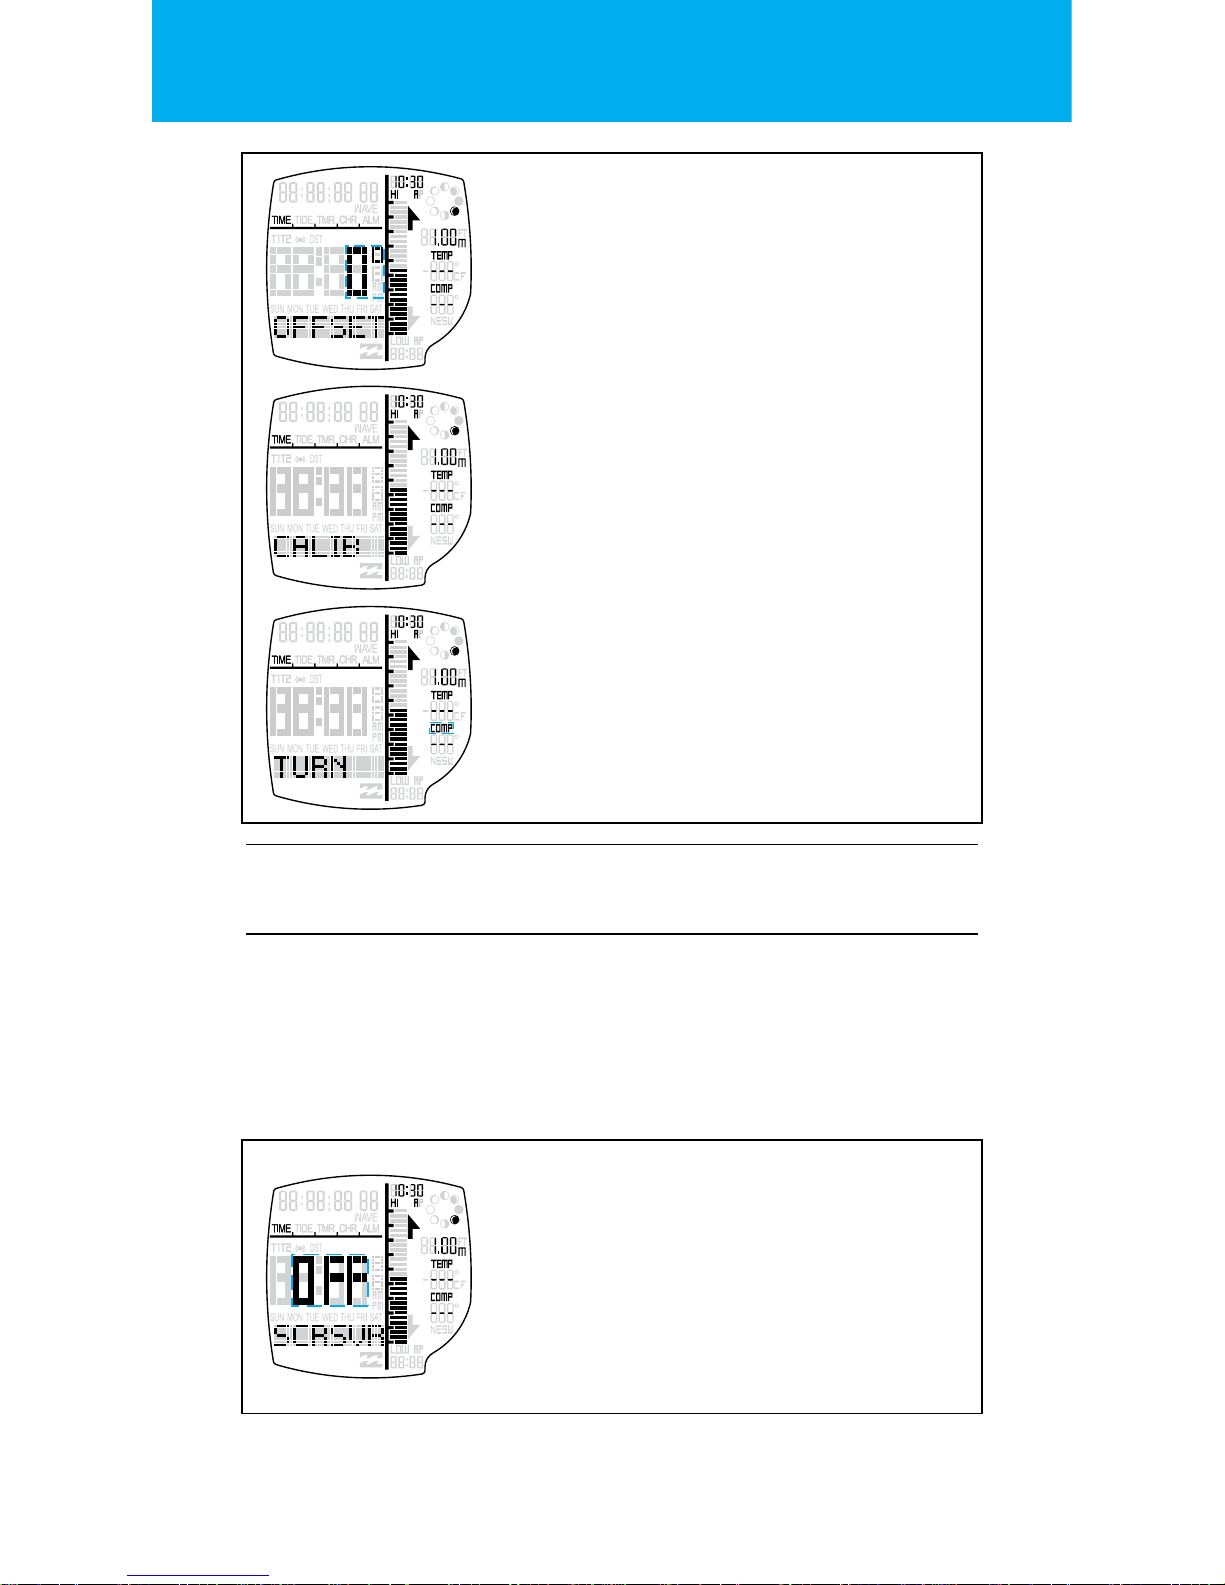
COMPASS OFFSET
The compass oset is the next setting after the
DATE FORMAT in the TIME SETTING STATE.
Press the START button or the RESET button to
change the COMPASS OFFSET.
Press the MODE button to go to the
next setting.
COMPASS CALIBRATE
The compass must be calibrated before use for
accurate readings.
Press the START button to calibrate the watch.
Your watch will instruct you to TURN.
COMPASS TURN CLOCKWISE
Take the watch o and hold it level, slowly turn
clockwise. The watch should take 1 minute
of slow rotating to complete the calibration. Or this can be manually stopped by
pressing RESET.
Press the MODE button to go to the
next setting.
SCREENSAVER
The Screensaver ON/OFF is the next setting
after the COMPASS CALIBRATE in the TIME
SETTING STATE.
The screensaver can be toggled ON/OFF by
pressing the START button or the RESET button.
Exit the setting state by pressing the
LIGHT button.
SETTING THE SCREENSAVER:
The screensaver is automatically set to OFF by default.
If you want to turn this ON you can do this in the
TIME SETTING STATE.
If ON, when the watch is inactive for 30 seconds, “PHASER”
will scroll once and will stay until a key press is done.
 Loading...