

Page 1

Page 2
2
ENGLISH FRANÇAIS DEUTSCH NEDERLANDS ESPAÑOL ITALIANO PORTUGUÊS
Thank you for purchasing the Bigben Interactive Quickfi re 2 controller. This
product has been designed to enhance your console.
Please keep this instruction manual for future reference. If you require any
assistance or help please contact the Helpline.
WARRANTY
This product bearing the Bigben Interactive trademark, is guaranteed by the
manufacturer for a period of 1 year from the date of purchase, and will, during
this period be replaced with the same or a similar model, at our option, free
of charge, if there is a defect due to faulty material, or workmanship. This
guarantee does not cover defects arising from accidental damage, misuse or
wear and tear, and is available only to the original purchaser of the pr oduct. This
does not affect your statutory rights.
THIS PRODUCT INCLUDES:
• Full Colour LCD screen
• 3 axis tilt sensors
• 2 x vibration motors
• Ergonomic, non slip triggers.
• 1x USB Receiver unit
Supplied with 2 x AA Alkaline batteries.
PRODUCT FEATURES*:
• Programmable Quickfi re mode
• Dual combo sequence buttons
• Sniper mode
• Duck and fi re mode
• Auto aim mode
• Reverse L\R buttons
• Auto reload \weapon swap mode
• Button logging
• Illuminated \ Flashing buttons
* Please note that certain features may not be compatible with all games
CONTROLLER SET-UP AND USE
Battery Installation
01. Remove the battery compartment cover from underneath the controller
02. Insert 2 x 1.5 volt AA size batteries, observing the correct polarity
03. Refi t the battery compartment cover.
Page 3
3
PORTUGUÊS ITALIANO ESPAÑOL NEDERLANDS DEUTSCH FRANÇAIS ENGLISH
Using the Controller with a PS3™
Slide the switch on the Receiver Unit to PS3™ mode.
Receiver Connection
Plug the Receiver Unit into one of the USB ports on your PS3™ console. The
Red LED on the Receiver Unit will fl ash constantly.
Using your Controller
01. Switch on the controller by sliding the power On/Off switch on the
controller to on. The LCD screen will then Illuminate.
02. Press the `PS Home’ button on the centre of the controller. This is the button
with the house symbol.
03. The controller will connect to your PlayStation®3 console and your player
number will be indicated in the top left of the LCD screen.
04. The controller will connect to your PlayStation®3 console and your player
number will be indicated in the top left of the LCD screen.
05. Ensure that your controller is assigned as controller 1.
If it is not recognised as controller 1, press and hold the home button
to bring up the option menu, while you have a game loaded. Select the
controller settings and then select the ‘Reassign the Controller’ option. Scroll
down with the D-pad on the controller until it says 1 on the TV screen. Press
X to select it and then press O twice to go back to your game.
* For further information on assigning controller ports please refer to your console
instruction manual.
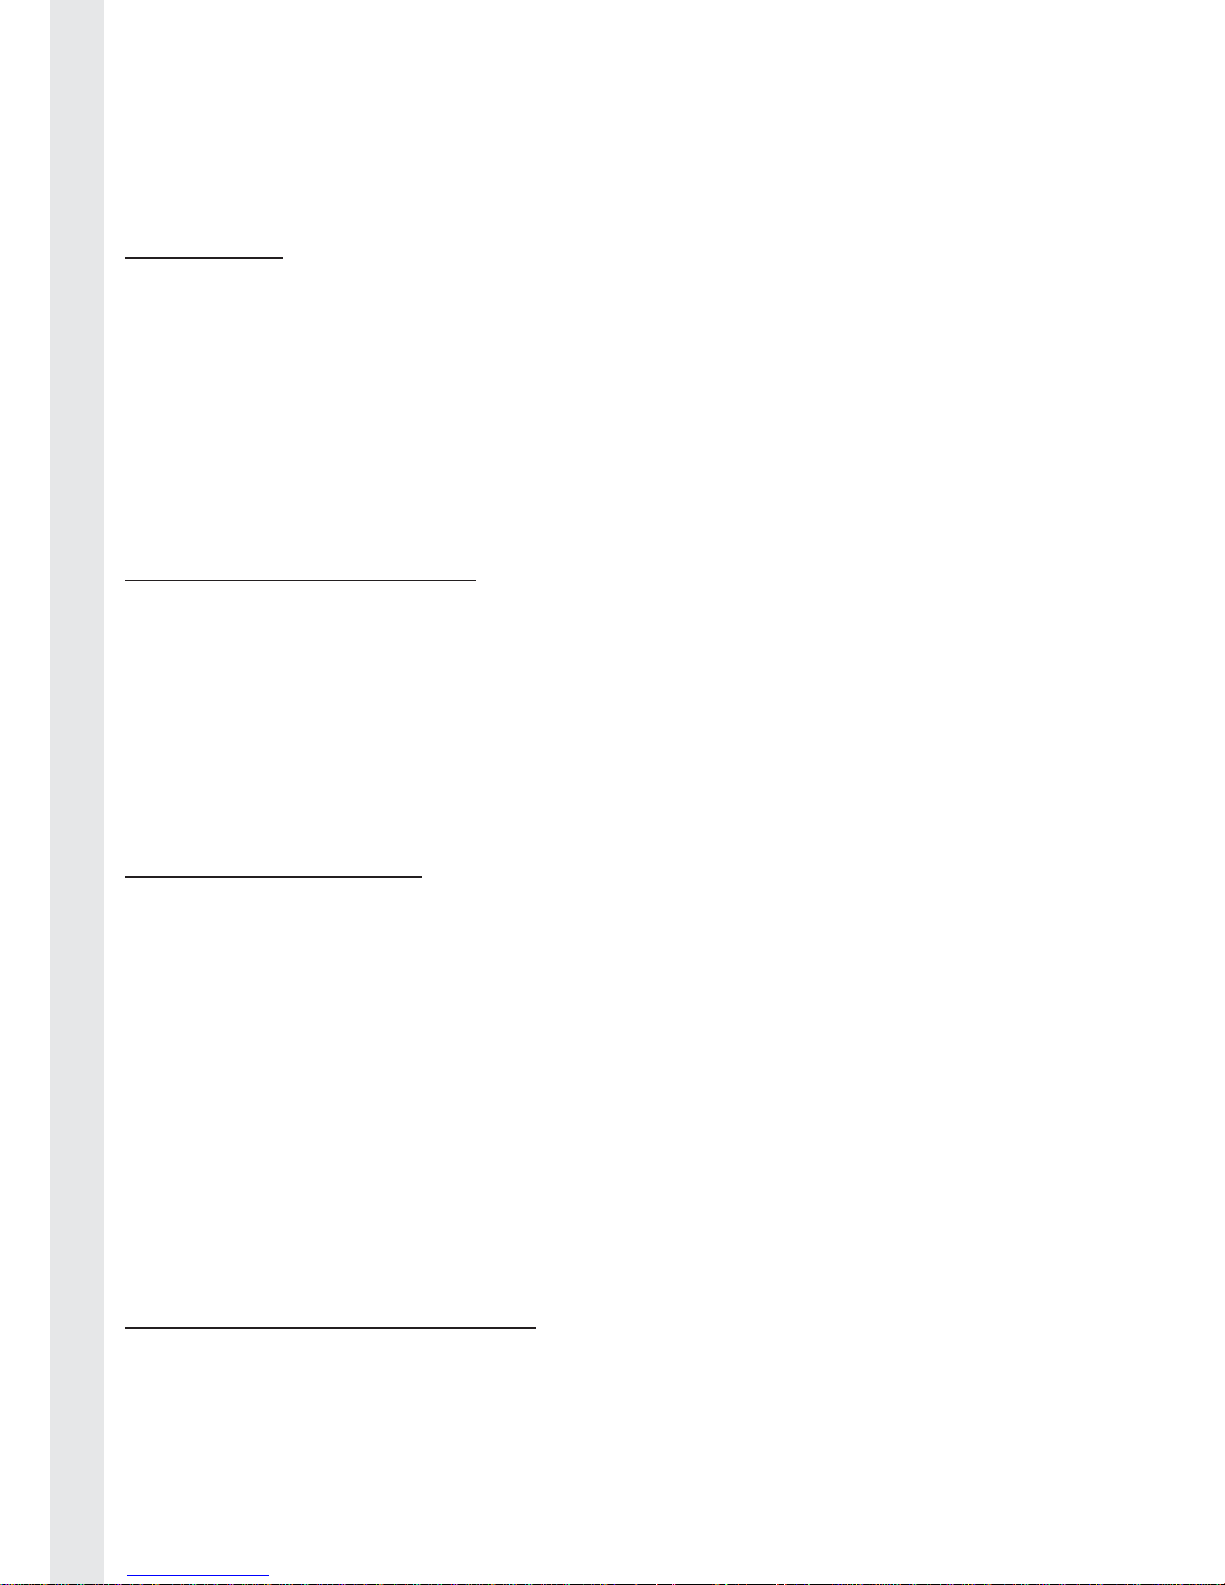
01. Controller \ player number
02. Active setting
03. Battery level indicator (Green when full, Yellow when part full. Red when
low).
04. Mode icons. Active options are green. Inactive options are red.
Page 4
4
ENGLISH FRANÇAIS DEUTSCH NEDERLANDS ESPAÑOL ITALIANO PORTUGUÊS
Using the settings on your controller.
Your Quickfi re 2 controller has been designed so it can be easily set up using
the LCD screen. The modes can be activated, deactivated and customised using
the simple icon system.
Firstly, give a short press on the Home button to enter the settings screen.
Use the left controller stick to move between the different icons. The selected
icon will have a white frame around it to indicate it is currently selected. Press
the start button to choose this feature.
This will then take you to another screen where you can switch the feature
on or off by selecting Y or N. You can also reprogram some of the features,
depending on the mode selected. If the feature is switched on, the icon will
appear in green. If the feature is off it will appear in red.
Using the Quick mode buttons
4 of the features can be switched on and off quickly during play, so you do not
have to enter the settings mode whilst in a game.
There are 2 buttons on the underside of the controller that are used for this.
To switch these features on and off during play, use the following actions.
• A short press of the left button for less than 1 sec toggles sniper mode on and off.
• A long press of the left button for 1 second or more toggles r apid fi re on and off.
• A short press of the right button for less than 1 sec toggles duck and fi re on and off.
• A long press of the right button for 1 second or mor e toggles auto aim on and off .
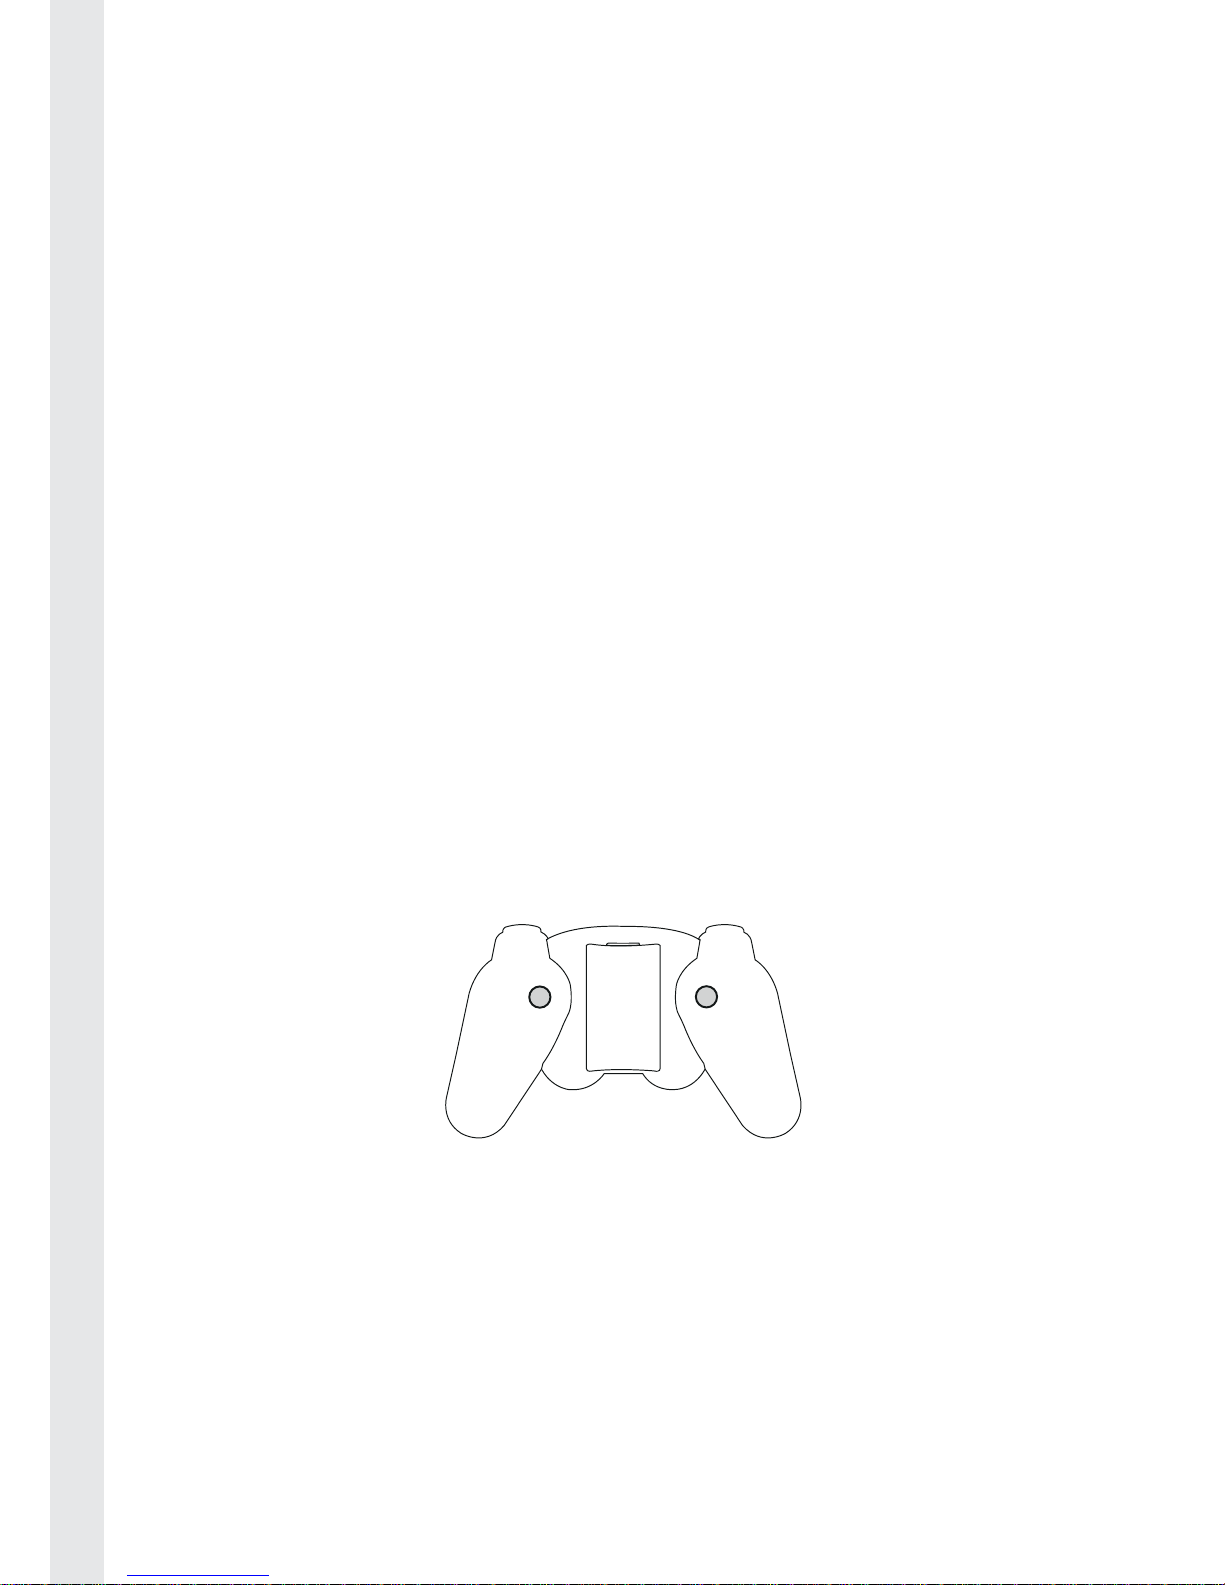
Set selection
For convenience, your Quickfi re 2 controller has memory to recall 2 different
custom settings. This is useful if you want to make 2 custom settings for 2
different games, without having to re-programme each time. To choose your
setting, follow these steps.
01. Short press the Home button to enter the settings page mode.
02. Move down with the left stick to go down to the lower row of options.
03. Select the Set1 \ Set2 icon and press the select button.
04. Choose Set 1 or Set 2 and press select.
Page 5
5
PORTUGUÊS ITALIANO ESPAÑOL NEDERLANDS DEUTSCH FRANÇAIS ENGLISH
05. The screen will then return to the home page and S1 or S2 will be dislayed
at the top of the screen to indicate what setting you are on. All changes
will then be saved to that Set.
06. If you want to program a different set of instructions for a different game,
simply change the set number.
IMPORTANT: When changing between your Set 1 and Set 2 settings you also need to
reselect your P1 and P2 settings in the combo options, if you want to use this function.
Please check the combo button section for full instructions.
MODES
Quickfi re*
The Quickfi re 2 controller has 6 different Quickfi re modes to suit all
of your favourite shooting games. The controller is set to Mode 1
which is 8 shots per second by default.
The mode is displayed on the LCD screen as M1 08SPS. Quick fi re is set to the R1
button of your controller as this is the most common fi ring button for shooting
games. Rapid fi re is switched on by default. The Icon is highlighted as green to
indicate that it is active.
To switch Quickfi re mode off in the menu, select the Quickfi re icon and select
‘N’.
Page 6
6
ENGLISH FRANÇAIS DEUTSCH NEDERLANDS ESPAÑOL ITALIANO PORTUGUÊS
Changing the quickfi re modes
The quickfi re modes have been designed to work on all of your shooting
games. To ensure full compatibility please select the correct mode for your
game.
The modes are as follow:
M1 8SPS – Call of Duty 4 Modern Warfare
M2 10SPS – Call of Duty World at War and Call of Duty: Black Ops
M3 20SPS – Call of Duty Modern Warfare 2
M4 32SPS – Call of Duty Modern Warfare 2
M5 48SPS - Call of Duty Modern Warfare 2
Please note that modes M4 and M5 may have varied results depending on
which guns you are using in the game. If you experience any problems, stick
with the M3 mode.
These modes will also work with other popular shooting games, like Battlefi eld,
Killzone, Resistance etc. Try the different modes to select which works best.
TO CHANGE BETWEEN MODES FOLLOW THESE STEPS:
01. Short press the Home button to enter the settings page mode.
02. Select the Rapid fi re icon and press the start button.
03. Use the left stick to move to the M1 position in the settings screen.
04. Move the left stick up or down to select the mode you want to use.
05. Press the select button to choose the fi ring mode you want to use. The
screen will then return to the home page.
06. The controller will now fi re at your chosen speed when you press R1.
CUSTOM QUICKFIRE MODE
The Quickfi re 2 controller also includes a custom mode to ensure future
compatibility with new games and so you can experiment with different fi ring
rates. The rates can range for 6 shots to 60 shots per second.
Page 7

7
PORTUGUÊS ITALIANO ESPAÑOL NEDERLANDS DEUTSCH FRANÇAIS ENGLISH
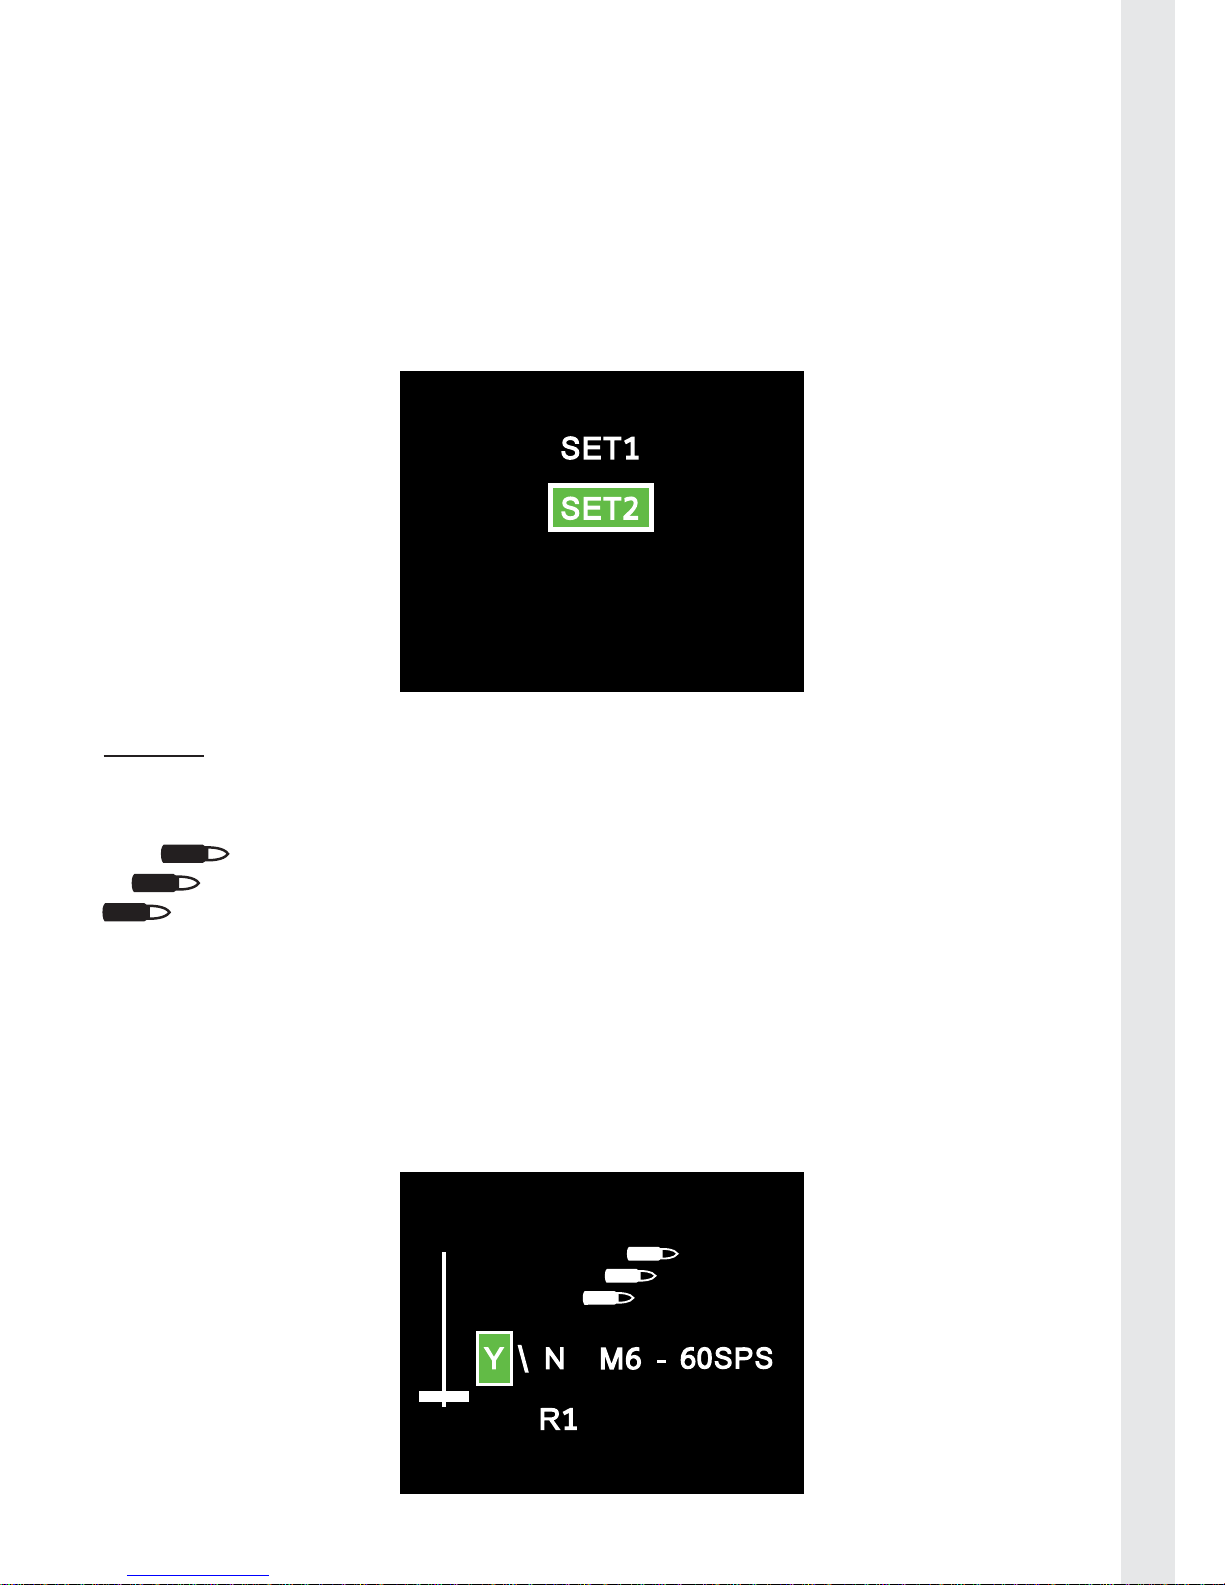
To set the custom fi ring rates follow these steps:
01. Short press the Home button to enter the settings page mode.
02. Select the Rapid fi re icon and press the start button.
03. Use the left stick to move to the M1 position in the settings screen.
04. Move the left stick up or down to the M6 position.
05. When M6 is selected, move the left stick to the right to select the shots per
second rate (SPS).
06. Move the left stick up or down to adjust the fi ring rate to your desired
selection.
07. Press select to confi rm your selection. The screen will then return to the
home page.
08. The controller will now fi re at your chosen speed when you press R1. Please
note that some guns in some games may not function correctly at certain
rates. You will need to experiment to fi nd out which rate works best for your
game.
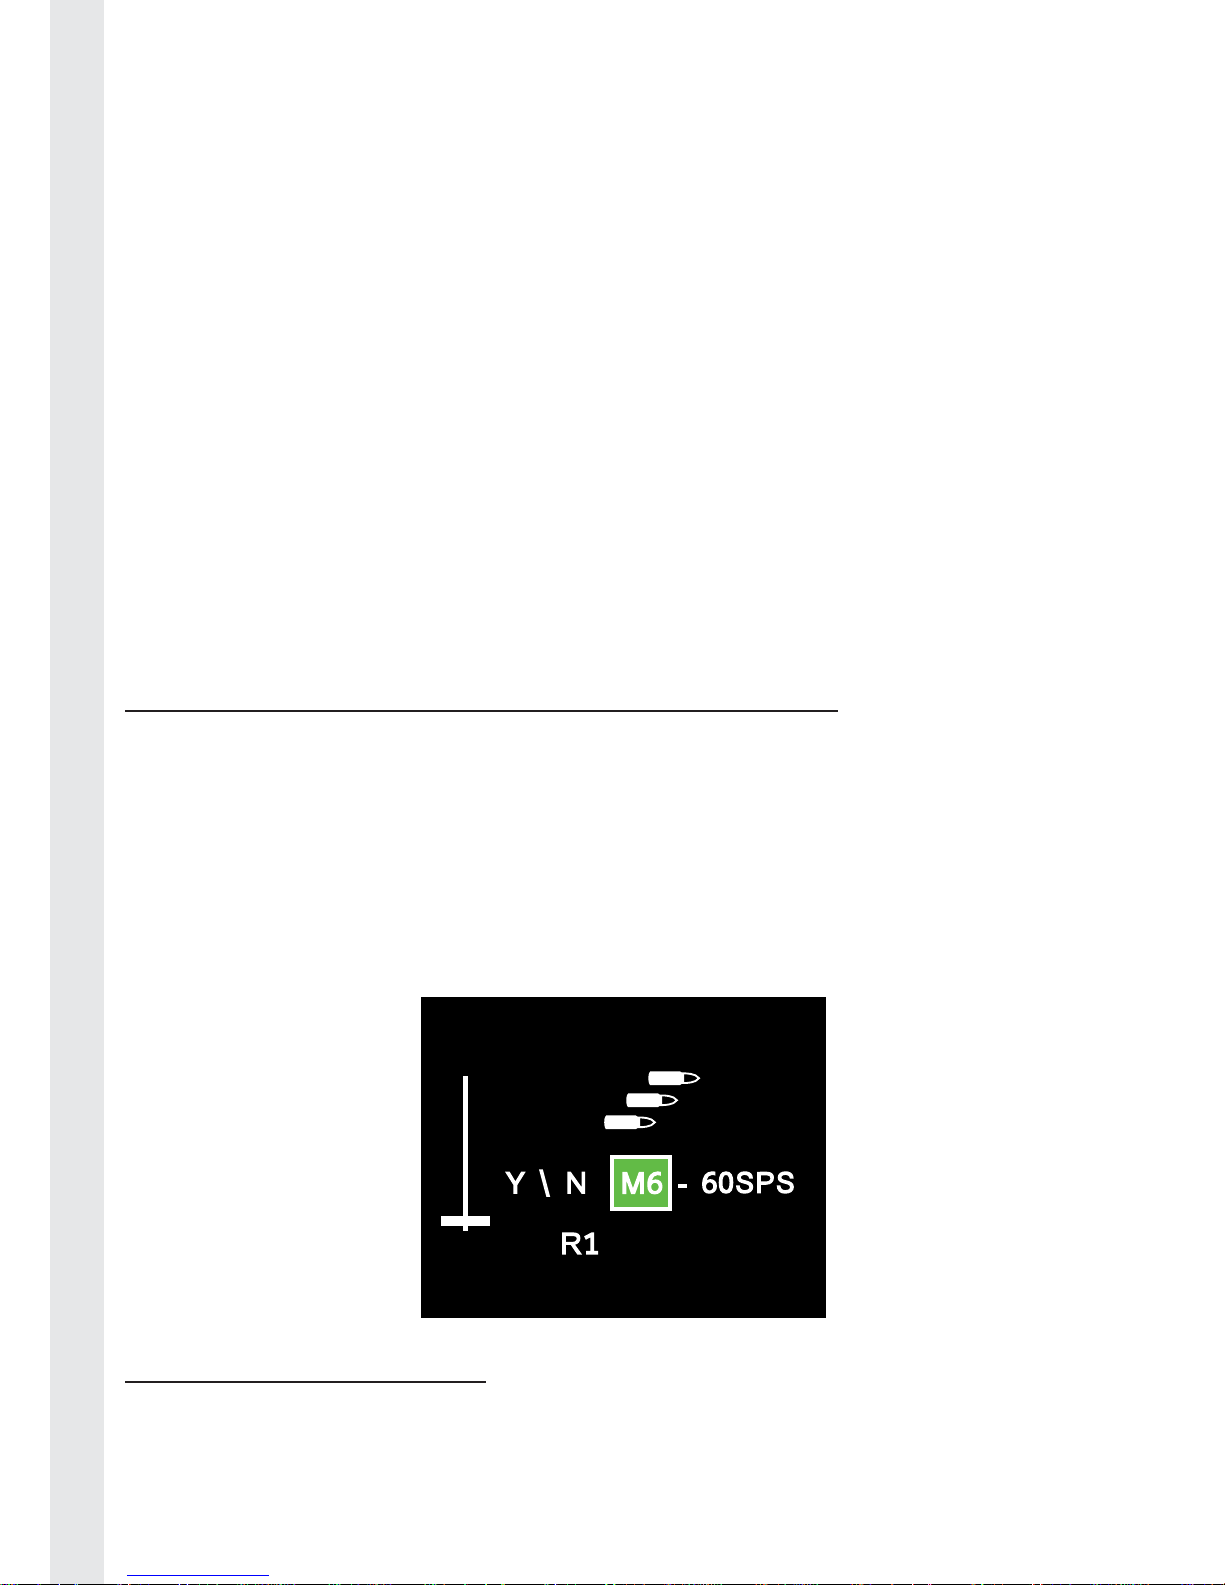
Programming other buttons for Quickfi re mode
By default, only the R1 button is used for Quickfi re, but if you are playing games
that use another button for fi ring, you can also program.
To set other buttons for Quickfi re, follow these steps:
01. Short press the Home button to enter the settings page mode.
02. Select the Rapid fi re icon and press the start button.
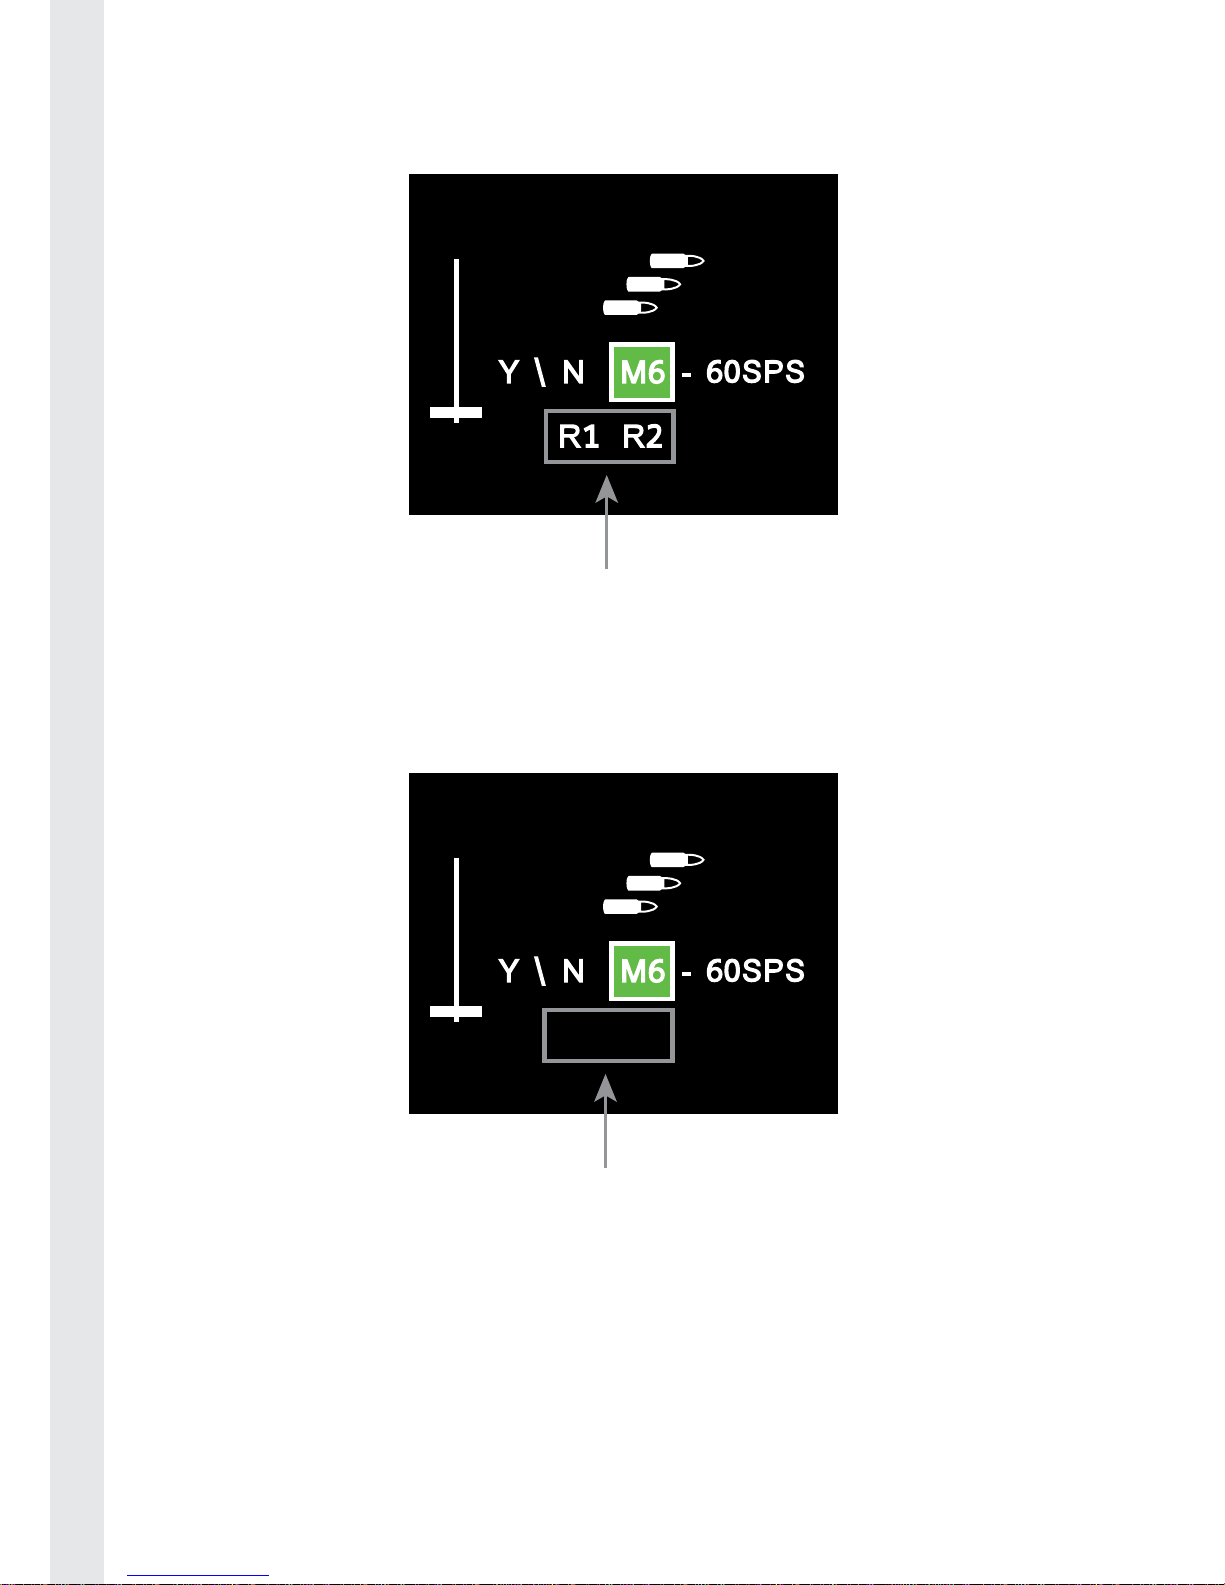
03. Move the left stick to select the rapid fi re button selections at the bottom of
the screen. R1 should currently be shown.
04. Now press any other button you wish to assign as rapid fi re, R2 for example.
R2 will now be displayed at the bottom of the screen, alongside R1.
05. You can select up to 4 different buttons for the rapid fi re action. To switch
them off again, just press the same button again.
Page 8
8
ENGLISH FRANÇAIS DEUTSCH NEDERLANDS ESPAÑOL ITALIANO PORTUGUÊS
06. Press select to confi rm your selection. The screen will then return to the
home page.
07. Your button selections will now have rapid fi re all at the same fi ring rate.
Disable Quickfi re on R1 button
To disable rapid fi re on the R1 button, follow the same instructions as noted
above and press the R1 button to deselect it. The R1 button will then disappear
from the bottom of the screen.
Quickfi re toggle on \ off
The QuickFire 2 controller has 2 underside buttons which allow you to quickly
switch Quickfi re mode on and off with a single button press, without having to
go into the menu.
To switch on / switch off Quickfi re mode, follow these steps:
01. Hold the left button for 1 second to switch Quickfi re mode On.
02. Controller emits 2 beeps to indicate that Quickfi re is On.
Page 9
9
PORTUGUÊS ITALIANO ESPAÑOL NEDERLANDS DEUTSCH FRANÇAIS ENGLISH
03. Hold again to switch it back Off.
04. Controller emits a beep to indicate that Quickfi re is off.
05. The Rapid fi re icon will also change colour to show that it is on or off.
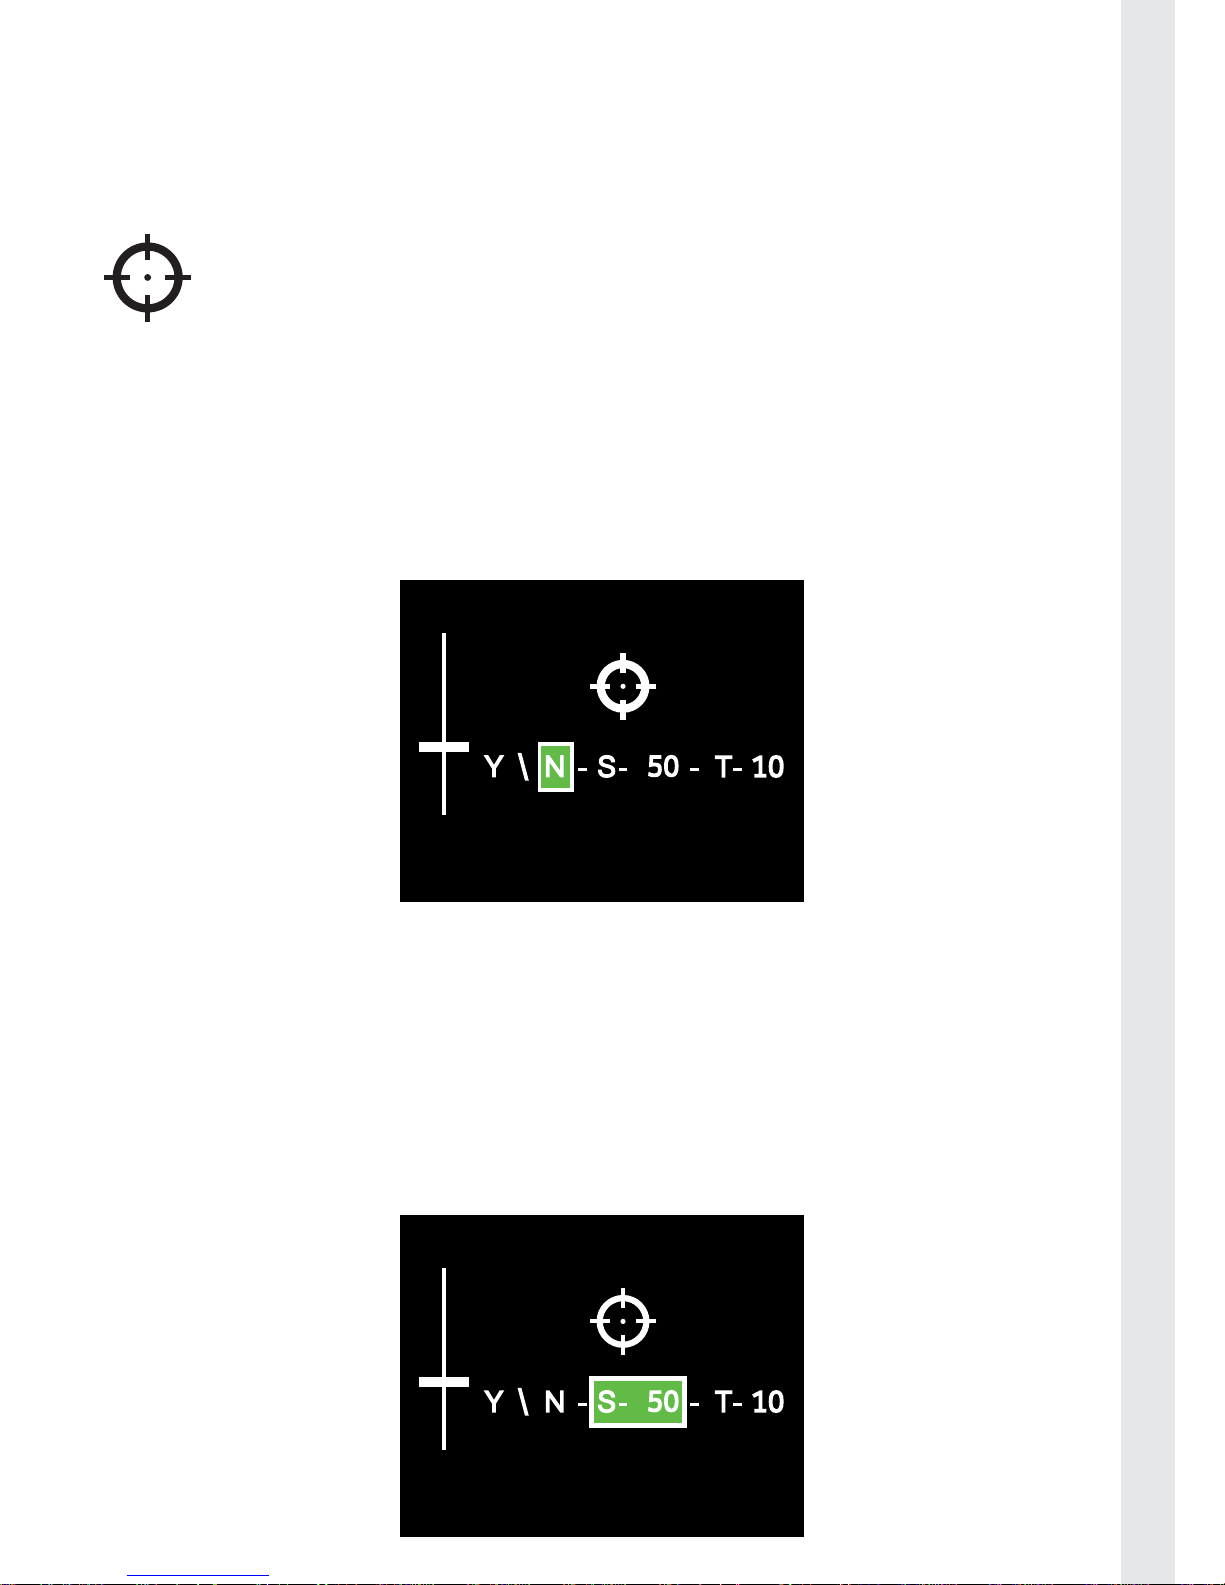
Sniper mode*
The Sniper mode allows you to adjust the sensitivity and dead band of
the right stick for better aiming. This mode is programmable to let you
fi nd the best setting.
Sensitivity can be adjusted from 20% to 100% in 5% increments. Dead band
cancellation can be adjusted from 0 to 30% in 2% increments. By default,
sensitivity is set to 50% and deadband is 10%.
Sniper mode is switched off by default and the icon will appear red.
To switch it on enter the settings screen, select the sniper mode and select Y.
The sniper mode icon will then appear green.
To set the sensitivity, follow these steps:
01. Short press the Home button to enter the settings page mode.
02. Select the Sniper mode icon on the menu with left stick, and press start to
enter mode setting.
03. Move the left stick right to the ‘S’ position to adjust the sensitivity.
04. Move the left stick up or down to increase or decrease the amount of
sensitivity you want on the stick.
Page 10
10
ENGLISH FRANÇAIS DEUTSCH NEDERLANDS ESPAÑOL ITALIANO PORTUGUÊS
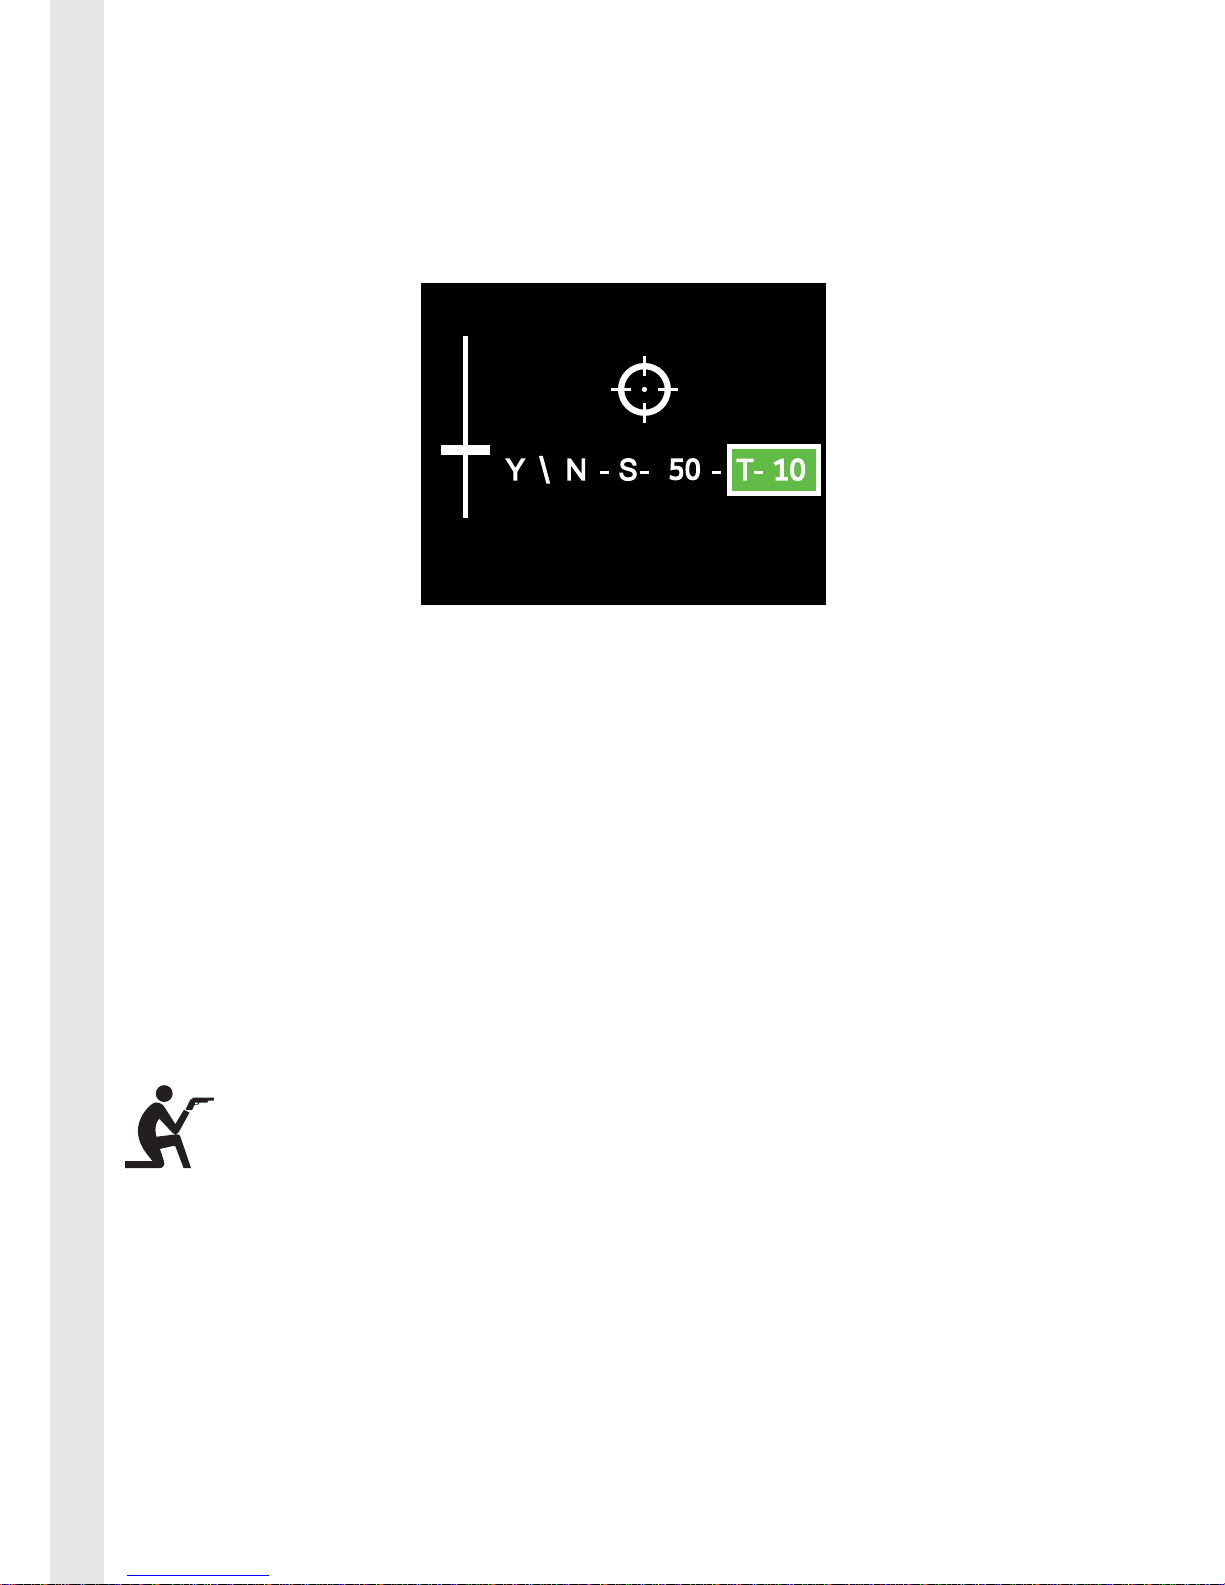
05. Move the left stick right to the ‘T’ position to adjust the deadzone threshold.
06. Move the left stick up or down to increase or decrease the amount of
deadzone you want on the stick. A lower deadzone will mean that the stick
will move at the slightest touch. A higher deadzone will mean that you will
need to move the stick more before it will activate.
07. Press select to confi rm your selection and return to the menu screen.
Sniper mode toggle on \ off :
The Sniper mode can be switched on and off on during play using the buttons
underside the controller.
To switch on /switch off Sniper mode, follow these steps:
01. Hold the left button for less than1 second to switch Sniper mode On.
02. Controller emits 2 beeps to indicate that the mode is On.
03. Hold the left button for less than1 second to switch it back Off
04. Controller emits a beep to indicate that Sniper mode is off.
05. The Sniper icon will also change colour to show that it is on or off.
Duck and Fire mode (D&F)*
The duck and fi re mode instantly makes your character go prone or
crouch and shoot, so you can evade the enemy and take them out.
This mode is programmable as it depends on the game and buttons
used to duck and crouch.
By default, button mapping is the current fi ring button and O button for
crouch. D&F is off by default and the icon is red. To switch it on enter the
settings screen, select the duck and fi re mode and select Y. The duck and fi re
mode icon will then appear green.
Page 11

11
PORTUGUÊS ITALIANO ESPAÑOL NEDERLANDS DEUTSCH FRANÇAIS ENGLISH
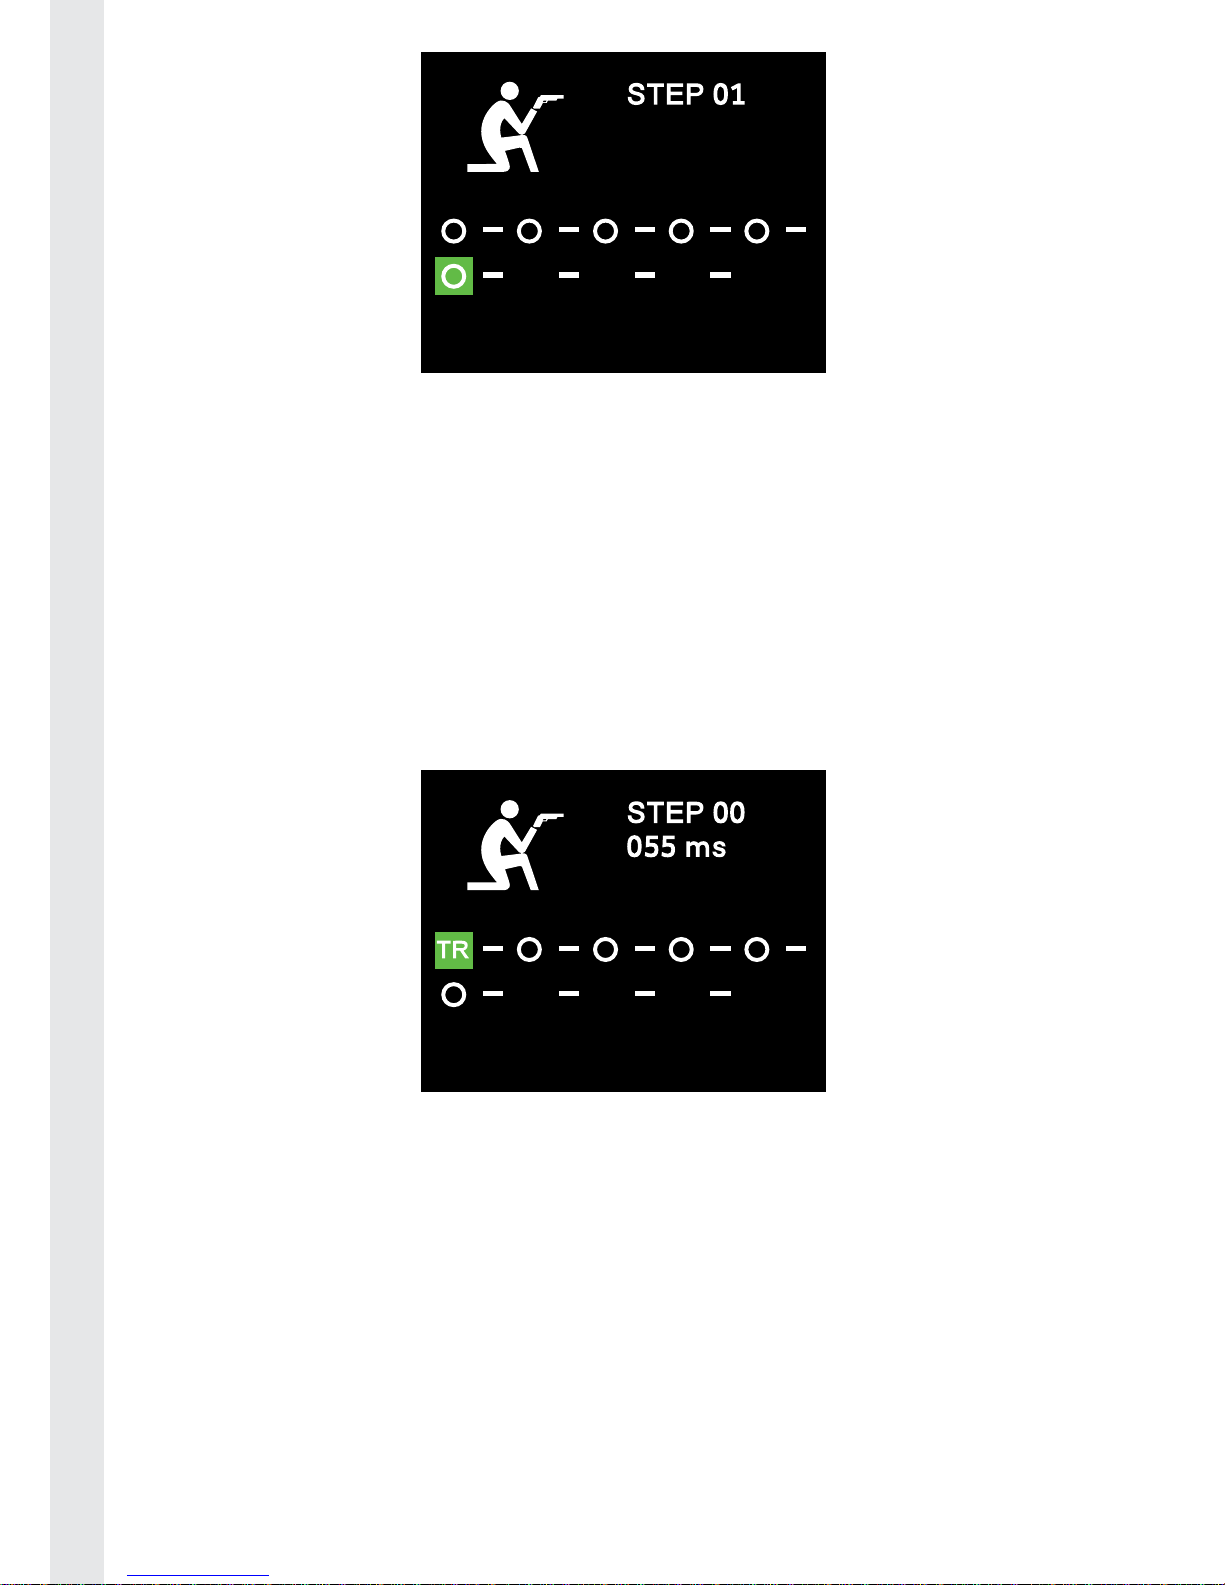
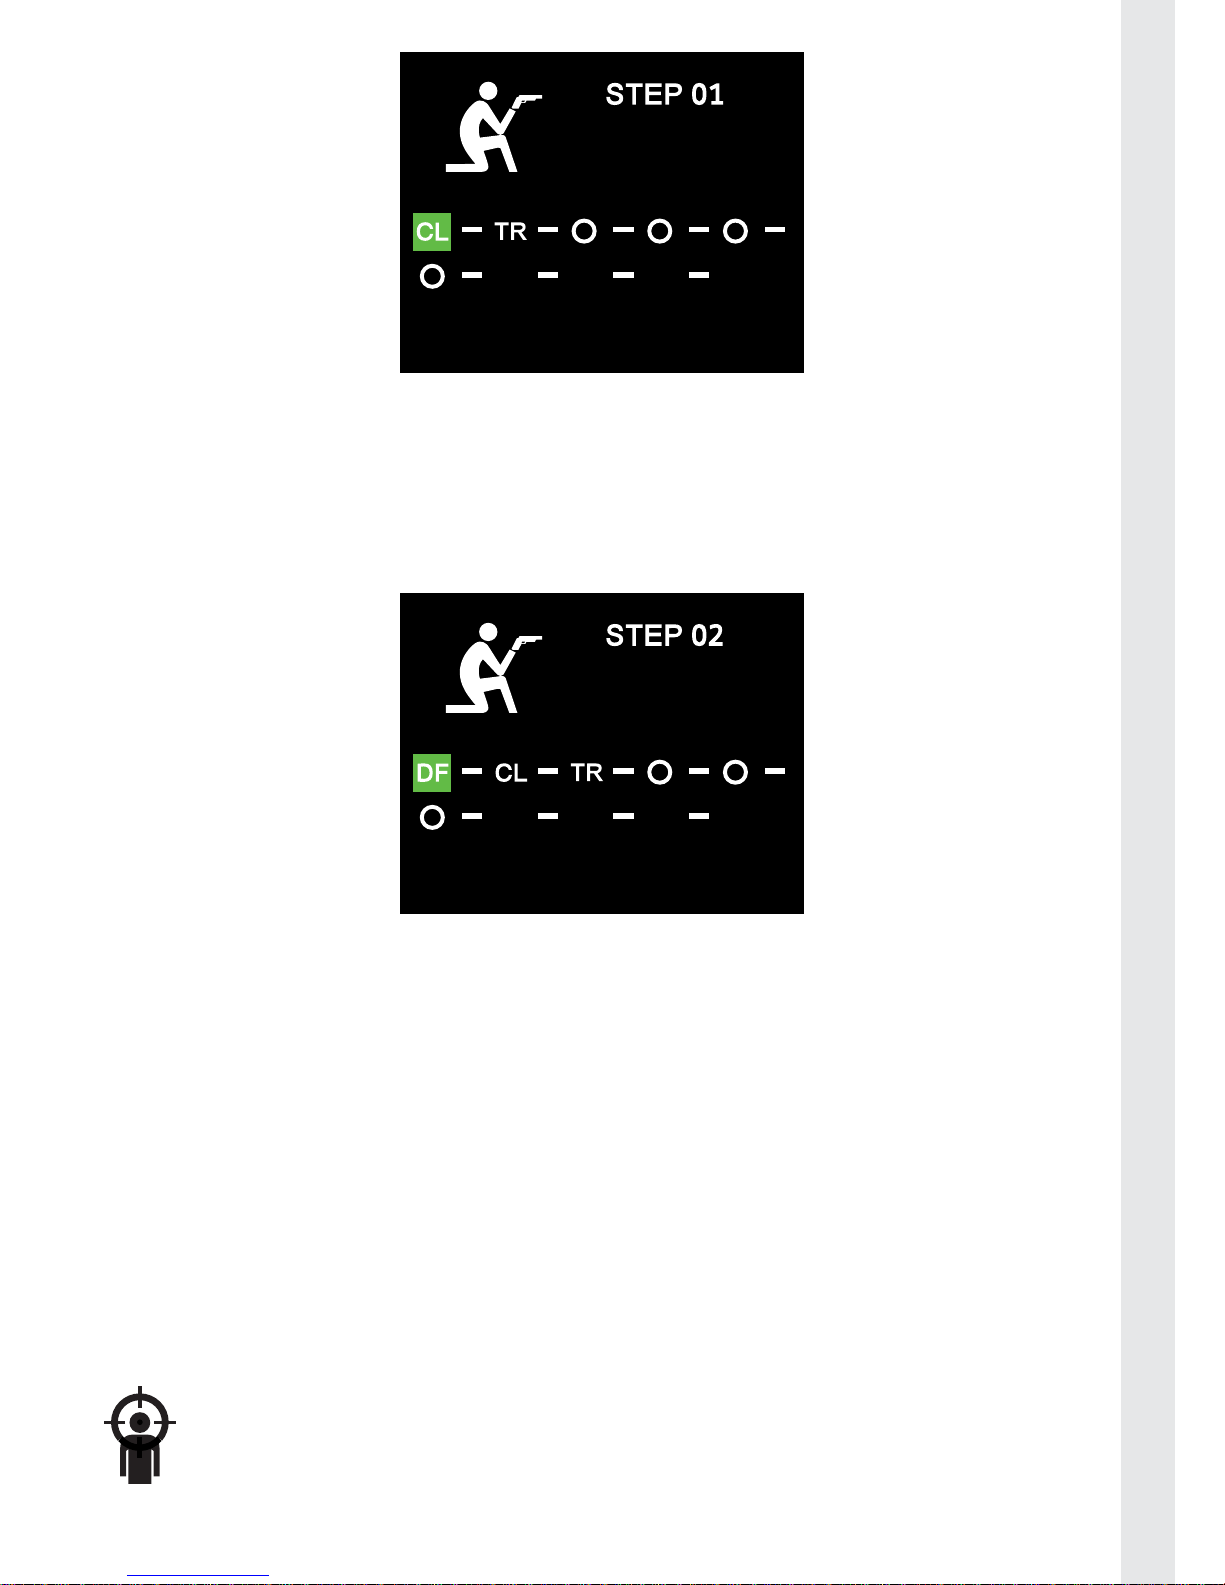
Editing D&F mode
If your game uses different buttons other than R1 to shoot and O to crouch you
will need to edit the sequence. To do this, follow these steps:
01. Short press the Home button to enter the settings page mode.
02. Select the Duck and Fire icon and press the start button.
03. Use the left stick to move to the Edit position and press start.
04. Enter the correct buttons for shoot and duck in the spaces provided.
05. Press select to confi rm your selection. The screen will then return to the
home page.
STEP 01
Page 12
12
ENGLISH FRANÇAIS DEUTSCH NEDERLANDS ESPAÑOL ITALIANO PORTUGUÊS
Additional editing options
The editing feature can be used on the D&F, Auto Aim, Auto Reload and Combo
modes. It also has 3 additional options that can be used.
01. When starting the editor, if you move the left stick to the left one step, you
will fi nd the ‘Timing option.’ This allows you to edit the gap timing between
each step. To use this simply go to the ‘TR’ option, press start and then push
up or down on the left stick to change the timing. The timing can be set
between 5ms and 100ms and will increase or decrease in 5ms steps each
time.
02. If you move the left stick to the left 2 step, you will fi nd the ‘Clear’ option.
This allows you to clear the whole sequence rather than alter it step by step.
To use simply go to the ‘CL’ option, press start and the current sequence will
be cleared. You can then start again at step one.
Page 13
13
PORTUGUÊS ITALIANO ESPAÑOL NEDERLANDS DEUTSCH FRANÇAIS ENGLISH
03. If you move the left stick to the left 3 steps you will fi nd the default settings
option. This will reset the chosen sequence back to the factory default. To
use simply go to the ‘DF’ option, press start and factory setting will be reset.
This is particulary useful if you are having troubles with the chosen feature
after editing.
D&F mode toggle on \ off :
The D&F mode can be switched on and off on during play using the buttons on
the underside the controller.
To switch on / switch off D&F mode, follow these steps:
01. Press the right button for less than one second to switch the D&F mode on.
02. Controller emits 2 beeps to indicate that the mode is on.
03. Press the right button again for less than one second to switch it back off.
04. Controller emits a beeps to indicate that Sniper mode is off.
05. The D&F icon will also change colour to show that it is on or off.
Auto Aim Mode*
The auto aim mode automatically tracks your enemy. It works in
conjunction with looking down the sights to improve your aim.
By default this mode is mapped to L1.
Page 14

14
ENGLISH FRANÇAIS DEUTSCH NEDERLANDS ESPAÑOL ITALIANO PORTUGUÊS
To switch it on enter the settings screen, select the Auto aim mode and select Y.
The Auto aim mode icon will then appear green.
Set aim \ iron sights button
The button for aim \ Iron sights can be edited.
To set aim \ iron sights button, follow these steps:
01. Short press the Home button to enter the settings page mode.
02. Select the auto aim icon and press the start button.
03. Use the left stick to move to the aim position button. It will display L1 as
default.
04. Press the button you now wish to assign as aim \ ironsights.
05. Press select to confi rm your selection. The screen will then return to the
home page.
Auto Aim timing
The auto aim timing can be edited.
The default timing sequence is 60ms on and 20ms off, and repeat the sequence.
You should not really need to alter this setting, but if you fi nd a game that does
not quite function correctly, you can try and fi x the issue with this option.
Page 15

15
PORTUGUÊS ITALIANO ESPAÑOL NEDERLANDS DEUTSCH FRANÇAIS ENGLISH
IMPORTANT ! As noted above, this function will not with all games, so even editing the
sequence may not resolve it.
To edit the sequence, follow these steps:
01. Short press the Home button to enter the settings page mode.
02. Select the auto aim icon and press the start button.
03. Use the left stick to move to the Edit position and press start.
04. Move the left stick up or down to adjust the ON timing.
05. Move the left stick right to the next position.
06. Move the left stick up or down to adjust the OFF timing.
07. Press select to confi rm your selection. The screen will then return to the
home page.
Auto aim mode toggle on \ off :
The auto aim mode can be switched on and off on during play using the
buttons underside the controller.
To switch on /switch off auto aim mode, follow these steps:
01. Hold the right button for 1 second to switch auto aim mode On.
02. Controller emits 2 beeps to indicate that auto aim is On.
03. Hold the right button again for 1 second to switch it back Off.
Page 16

16
ENGLISH FRANÇAIS DEUTSCH NEDERLANDS ESPAÑOL ITALIANO PORTUGUÊS
04. Controller emits a beep to indicate that auto aim is off.
05. The auto aim icon will also change colour to show that it is on or off.
Swap L\R BUTTONS*
This feature allows the R1 or L1 buttons to be mapped to the R2 and L2
buttons and vice versa. This is useful for those players that prefer to use
the lower shoulder buttons for shooting. This option can only be
activated/desactivated in the menu. By default, this feature is off.
To switch it on enter the settings screen, select the Swap L\R icon and select Y.
The Swap L \ R mode icon will then appear green.
Combo buttons*
The Quickfi re 2 controller has 2 extra buttons on front face for
programming macro sequences. A 30 move sequence can be
programmed onto each of the 2 buttons. X, square, triangle, circle, L
and R buttons and D-pad can all be programmed in a sequence. This function is
particularly useful for fi ghting games that use long and complex combinations
to activate special moves.
The default for these buttons is an empty sequence with a 20ms timing gap
selected.
Page 17

17
PORTUGUÊS ITALIANO ESPAÑOL NEDERLANDS DEUTSCH FRANÇAIS ENGLISH
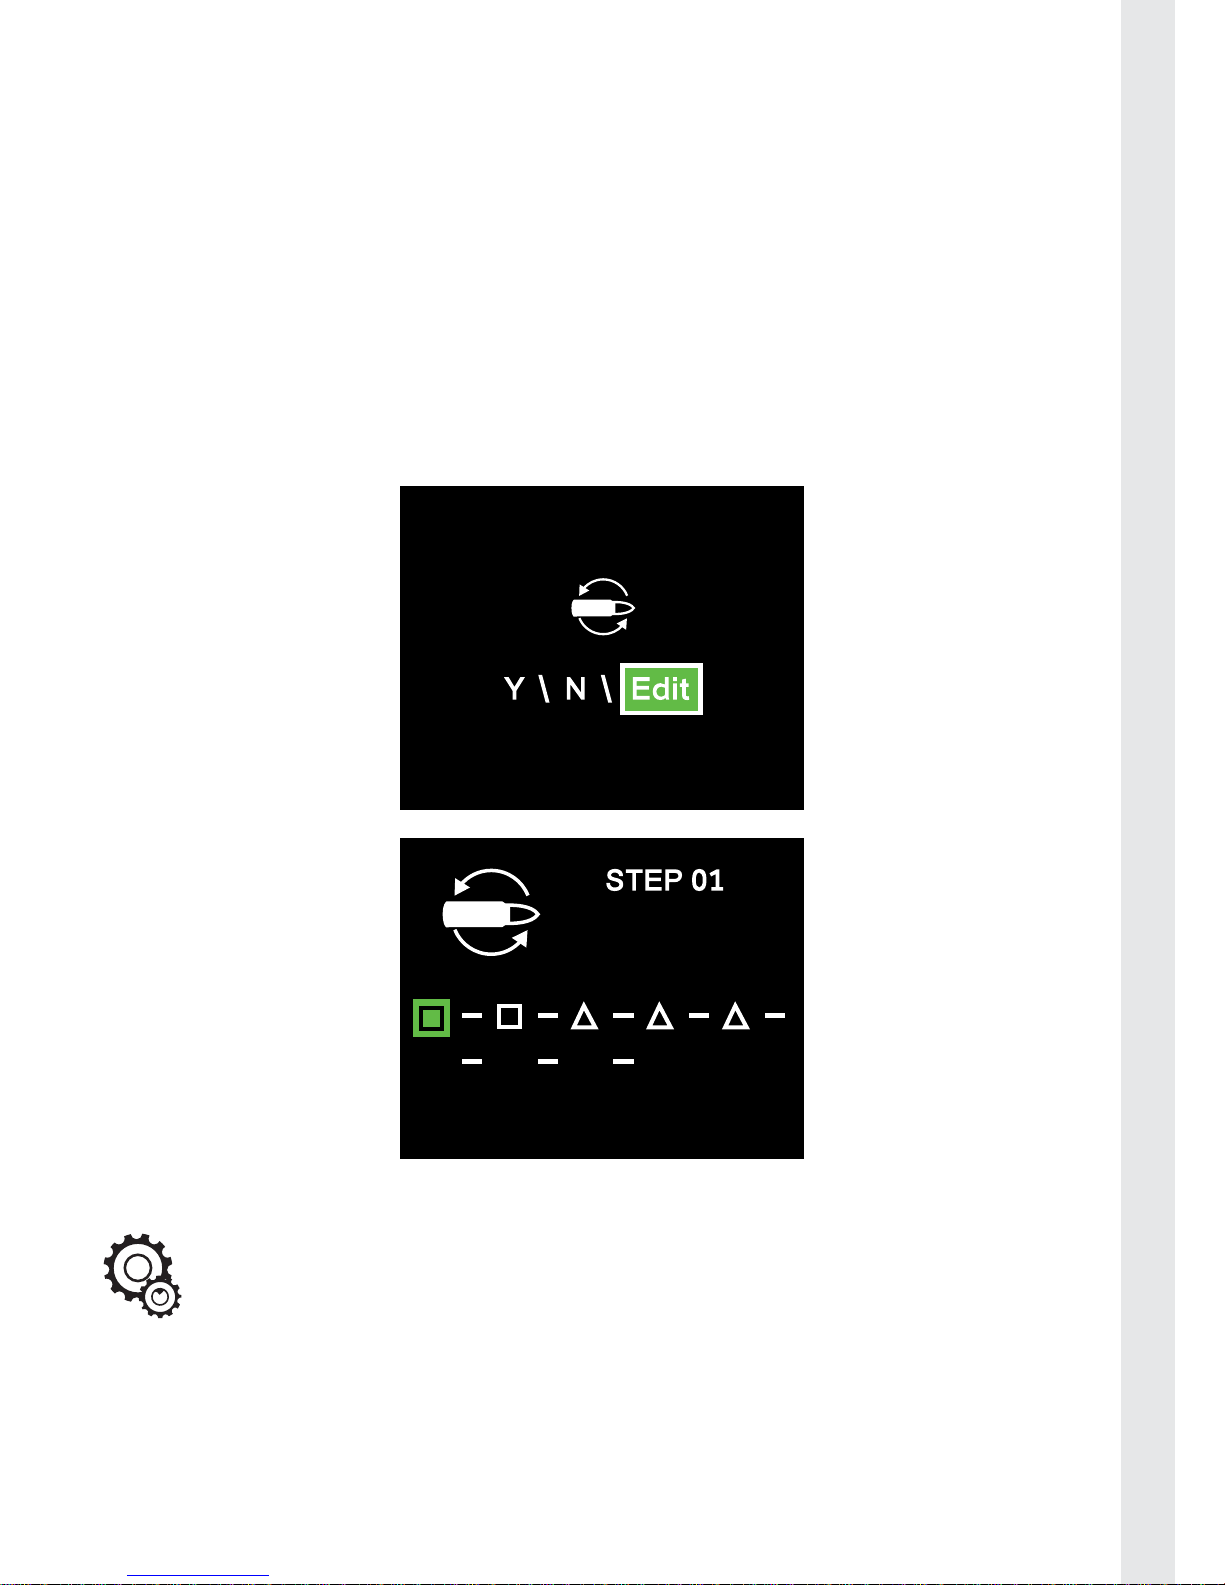
To edit a sequence, follow these steps:
01. Short press the Home button to enter the settings page mode.
02. Move down with the left stick to show the bottom row of icons and select
the combo icon and press the start button.
03. Select the P1 or P2 option. And press start. P1 represents the left combo
button and P2 represents the right combo button.
04. Press the fi rst action button for your sequence. Then push right on the
left stick to move to the next button position. You will also see that the
sequence position number is shown on the screen. This number will
increase by one each time a new step is added.
05. The screen will display a dash to indicate that there will be another button
press in the sequence. The dash gives a 20 millisecond (ms) gap.
06. Then press the next button in your sequence, followed by another push to
the right. This will insert the next button in your sequence.
07. Continue this until you have inserted all of your required moves.
08. If you wish to insert a D-pad press direction in the sequence, simply push
the direction you require in the sequence in the same way as inserting a
button press. It will be represented on the screen as an arrow to show the
direction you have selected.
09. If you wish to have a simultaneous button press or D-pad press in the
sequence, do not push right on the stick. Push and hold the fi rst button in
the sequence and then press the next required button. The selected move
will appear on the screen WITHOUT a dash inbetween. The shows that the
required move is a simultaneous press. To add more simultaneous button
presses, continue to hold the fi rst button and then enter the other button
presses.
10. Some games may require a slight pause in the sequence to complete the
required move. If you wish to insert a short gap or space in the sequence,
simply press up on the joystick. This will then insert a 20ms gap in the
combo. For longer gaps, simply insert more spaces. You may need to
experiment with the game to see what works best.
11. To delete a move, simply press down on the left stick. The move will then be
deleted.
12. To edit any of the moves in your current sequence, press left on the stock to
go back to the step you want to edit. You can then delete the move and \ or
insert a new step in the sequence. You can see what position you are at in
the sequence by checking the number at the top of the screen.
13. Press select to confi rm your selection. The screen will then return to the
home page.
Page 18

18
ENGLISH FRANÇAIS DEUTSCH NEDERLANDS ESPAÑOL ITALIANO PORTUGUÊS
IMPORTANT: When swapping between your Set 1 and Set 2 selections you will also need
to reselect the P1 and P2 settings if you intend to use the 2 different combo settings. To
do this, simply go to the combo icon and press start to check your combo sequences are
loaded. Check both the P1 and P2 settings by pressing start on each one. This will then
ensure the correct sequences are loaded.
Auto reload / Weapon Swap*
The Auto reload / weapon swap mode automatically reloads or
changes your weapon when you have run out of ammo. This is useful
for those games that do not include this feature as standard. This
option can be switched on in the menu. By default Auto reload mode is Off.
To switch it on enter the settings screen, select the Auto reload mode and
select Y. The Auto aim mode icon will then appear green.
*Depends on the game
(example: Zombie mode in Call Of Duty: Black Ops).
Page 19
19
PORTUGUÊS ITALIANO ESPAÑOL NEDERLANDS DEUTSCH FRANÇAIS ENGLISH
Editing Auto reload / weapon swap mode
If your game uses different buttons other than square to reload and triangle
to change weapon, you will need to edit the sequence. To do this, follow these
steps:
01. Short press the Home button to enter the settings page mode.
02. Select the Auto reload icon and press the start button.
03. Use the left stick to move to the Edit position and press start.
04. Enter the correct buttons for reload and weapon swap in the spaces
provided.
05. Press select to confi rm your selection. The screen will then return to the
home page.
Toolbox settings
The toolbox settings page allows access to 3 additional features:
• Button logging statistics
• LED options
• Full factory reset
Page 20

20
ENGLISH FRANÇAIS DEUTSCH NEDERLANDS ESPAÑOL ITALIANO PORTUGUÊS
To enter the Tool Box follow these steps
01. Short press the Home button to enter the settings page mode.
02. Move down with the left stick to go down to the lower row of options.
03. Select the toolbox icon in the bottom right corner of the screen and press
the select button.
04. You can then select one of the 3 options.
Button logging statistics
This feature records all of the button presses, so you can see which button is
being pressed the most. This can be checked by current session and a total
cumulative count from when the controller was fi rst powered on. These totals
Page 21

21
PORTUGUÊS ITALIANO ESPAÑOL NEDERLANDS DEUTSCH FRANÇAIS ENGLISH
can be seen in a menu option. To enter this option simply select the ‘Log’
option. Once you enter this option it will show you how many times you have
pressed a certain action button. The top number shows you the number of
presses for the current session, i.e. from when the controller was switch on.
This number will return to zero each time the controller is powered off. The
bottom number shows the total cumulative button presses from when you fi rst
switched the controller on. Note that this number may already have a button
press count from when it was tested in the factory. To check any button count,
simply press the action button and the totals will appear.
LED Function
The Action buttons, sticks and D-pad are all illuminated. This option can be
switched on and off in the menu to preserve battery life.
The lights can also be set to fl ash on and off when a vibration signal is sensed.
By default the option is set ON.
To change the LED function follow these steps:
01. Enter the toolbox as noted above and the select the LED icon.
02. To switch the illumination off, select the unlit light bulb icon on the left side.
03. To switch the illumination on, select the lit light bulb icon in the centre.
04. To make the LEDs fl ash with the vibration feature, select the vibrating
controller icon.
Page 22

22
ENGLISH FRANÇAIS DEUTSCH NEDERLANDS ESPAÑOL ITALIANO PORTUGUÊS
Reset to factory settings
This option allows to reset all settings of the controller.
To reset settings, follow these steps:
01. Enter the toolbox as noted above and select the Reset icon on the screen.
02. The ‘N’ option is selected as default to prevent accidental reset.
03. Use the left stick to choose ‘Y’ option and press start
04. All modes will now be reset to default factory settings.
05. Press SELECT button to exit the menu.
Page 23

23
PORTUGUÊS ITALIANO ESPAÑOL NEDERLANDS DEUTSCH FRANÇAIS ENGLISH
TROUBLESHOOTING
Controller is not working.
• Ensure that the power button is the ‘On’ position.
• Check that the batteries are not low. If so, replace the batteries. If power is
low the battery indicator on the screen will appear red to indicate that the
batteries need replacing.
• Ensure that the receiver is connected to the console and press the home
button on the controller to connect.
• Check that the switch on the receiver is set to PS3™ mode.
The guns are not working or jamming in my game
• Check that you have selected the correct mode for your game. If the guns are
still jamming, try a lower fi ring rate mode or create a custom mode that works.
The guns are not quick fi ring
• Check that the game you are playing uses R1 for fi ring. If not, program the
fi ring button for that game (i.e. program R2 for rapid fi re)
• Ensure that you have not un-programmed the fi ring button. If so, reprogram it.
All my buttons are rapid fi ring
• Clear all of the programming by using the edit feature of the rapid fi re mode
or use the reset function of the controller.
The features are not acting as expected
• Clear all of the programming by using the edit feature and selecting the DF
option or use the reset function of the controller.
The controller is not lighting up or the lights are dim.
• Check that the batteries are not low. If so, replace the batteries. If power is
low the battery indicator on the screen will appear red to indicate that the
batteries need replacing.
• Check that the LEDS are switched on in the toolbox option.
The right control stick is too sensitive \ not sensitive enough.
• Switch the Sniper mode off to see if this improves the control.
• Check the settings of the stick in Sniper mode as they may be set too extreme.
Set the ‘S’ setting to 50 and the ‘T’ setting to 10 for the default settings.
• Clear all programming by using the reset feature of the controller.
Page 24

24
ENGLISH FRANÇAIS DEUTSCH NEDERLANDS ESPAÑOL ITALIANO PORTUGUÊS
Combos are not working correctly with my games.
• Ensure you have entered the correct sequence with the correct timing gaps.
DISPOSAL OF OLD ELECTRICAL & ELECTRONIC EQUIPMENT
This symbol on the product or on its packaging indicates that this
product shall not be treated as household waste. Instead it should be
taken to an applicable collection point for the recycling of electrical and
electronic equipment. By ensuring that this equipment is disposed of correctly
you will help prevent potential negative consequences for the environment
and human health, which could otherwise be caused by inappropriate waste
handling of this product. The recycling of materials will help to conserve natural
resources. For more information please contact your local council or waste
disposal service.
RTTE
Hereby, Bigben Interactive SA, declares that the PSPADQUICKFIRE2 device
complies with the essential requirements of the directive 1995/5/EC of the
European Parliament and of the Council of 9 March 1999 on radio equipment
and telecommunications terminal equipment and the mutual recognition of
their conformity.
To download the full statement, please visit our website: http://www.bigben.
eu/support and the section `declaration of conformity’.
IMPORTANT SAFEGUARDS & PRECAUTIONS
01. This Unit is for indoor use only.
02. Do not expose to dust, direct sunlight, wet weather conditions, high
humidity, high temperatures or mechanical shock.
03. Do not expose the unit, to splashing, dripping rain or moisture. Do not
immerse in liquid.
04. Do not disassemble; there are no serviceable parts inside.
05. Do not use if the equipment is damaged.
06. Never carry the unit by its cables.
07. For external cleaning, use a soft, clean, damp cloth only. Use of detergents
may damage the cabinet fi nish.
08. If you experience loss of feeling in your hands or limbs stop playing and
rest until the symptons pass.
09. We recommend that for every 1 hour of game play you take a 15 minute
break.
10. Do not dispose of batteries in fi re or leave them near a heat source such as
a radiator.
Page 25

25
PORTUGUÊS ITALIANO ESPAÑOL NEDERLANDS DEUTSCH FRANÇAIS ENGLISH
TECHNICAL HELPLINE INFORMATION
The Technical Helpline is a live one-to-one service
UK: 0905 710 0015
Hours: 10:00am till 5:00pm, Monday to Friday
(All calls are charged at 30 pence per minute. All callers must be over 16 years of age.
Permission must be obtained from the person paying the bill. Parental supervision is
recommended).
Eire: 154 056 3001
Hours: 10:00am till 5:00pm, Monday to Friday
(All calls are charged at 60 euro cents per minute. All callers must be over 16 years of age.
Permission must be obtained from the person paying the bill. Parental supervision is
recommended).
To ensure that your call is handled quickly and effectively please ensure that
you have the model number and any other relevant information regarding your
product.
Calls may be recorded for training purposes.
• Playstation®, PS3™ is a registered trademark of Sony C omputer Entertainment Inc.
• This product is not licensed , authorised or approved by Son y Computer
Entertainment.
Page 26

www.bigben.eu
 Loading...