

Page 1

MCD11
CD/ FM / AUX IN
MP3 / USB (OPTION)
FR
MODE D’EMPLOI
LISEZ COMPLÈTEMENT CE MANUEL D’UTILISATION AVANT
D’UTILISER CET APPAREIL ET CONSERVEZ CE LIVRET POUR
VOUS Y RÉFÉRER ULTÉRIEUREMENT.
BBI_MCD11_1606_Ver1
Page 2

Table des matières
8Démarrage 1
Avertissements et précautions de sécurité 1
Entretien du produit 2
Contenu du coffret 3
Description des pièces 3
Télécommande 3
Alimentation 4
Utilisation 4
Régler l’horloge 4
Écouter la radio 5
Lecture CD 5
Lecture MP3 6
Prise casque 7
Prise entrée AUX 7
Spécications de l’appareil 7
Remarque 8
Démarrage
• Enlevez l’appareil du carton d’emballage.
• Enlevez tous les matériaux d’emballage du produit.
• Placez les matériaux d’emballage dans le carton puis rangez-le ou jetez-le dans un endroit approprié.
Avertissements et précautions de sécurité
Lisez et comprenez toutes les instructions avant d’utiliser ce produit. Si un dommage est causé par un
non-respect des instructions, la garantie ne couvrira pas un tel dommage.
Sécurité
Avertissement
• Ne retirez jamais le boîtier de cet appareil.
• Ne lubriez jamais aucun composant de cet appareil.
• Ne placez jamais cet appareil sur un autre équipement électrique.
• Veillez à ce que l’appareil ne soit pas exposé à la lumière directe du soleil, à une
amme nue ni à une source de chaleur.
• Ne regardez jamais directement le faisceau laser à l’intérieur de cet appareil.
• Veillez à toujours pouvoir accéder facilement au câble d’alimentation, à la che ou
à l’adaptateur pour débrancher l’appareil de l’alimentation.
1. Lisez ces instructions.
2. Conservez ces instructions.
3. Prenez en compte tous les avertissements.
4. Respectez toutes les instructions.
5. N’utilisez pas cet appareil à proximité d’un point d’eau.
6. Nettoyez l’appareil exclusivement avec un chiffon sec.
7. N’obstruez aucun des orices de ventilation du produit. Installez l’appareil en respectant les
instructions du fabricant.
8. Ne placez pas l’appareil près d’une source de chaleur, par exemple un radiateur, une grille de
distribution d’air chaud, un réchaud/cuisinière et tout autre appareil (y compris les amplicateurs)
produisant de la chaleur.
9. Disposez le câble de manière à ce qu’il ne puisse pas être piétiné ou écrasé, notamment au niveau
de la che, de la prise de courant et du connecteur de branchement sur l’appareil.
10. Utilisez uniquement les pièces de rechange/accessoires spéciés par le fabricant.
11. Utilisez uniquement un chariot, un socle, un trépied, un support ou une table spécié par le
fabricant ou vendu avec l’appareil. Lorsque vous utilisez un chariot, soyez prudent(e) lorsque vous
déplacez le chariot avec l’appareil pour éviter toute blessure due à un basculement.
12. Débranchez l’appareil durant les orages et avant toute période d’inutilisation prolongée.
- FR 1 -
Page 3
13. Toute réparation doit être conée à un réparateur qualié. Faites systématiquement réviser
le produit s’il a été endommagé de quelque manière que ce soit, par exemple si son câble
d’alimentation ou sa che est endommagé, si un liquide s’est déversé sur l’appareil, si des objets
sont tombés dessus, si l’appareil a été exposé à la pluie ou à l’humidité, s’il ne fonctionne plus
correctement ou s’il est tombé.
14. L’appareil ne doit pas être exposé à des égouttements ou des éclaboussures.
15. Ne placez aucune source de danger sur l’appareil (par exemple, un objet rempli de liquide ou une
bougie allumée).
16. Si la prise d’alimentation ou le coupleur de l’unité est utilisé comme système de déconnexion,
le système de déconnexion doit rester facilement accessible.
17. Assurez-vous qu’il y a assez d’espace libre autour de l’appareil pour la ventilation.
18. Les piles (ou bloc de piles ou batterie) ne doivent pas être exposées à une chaleur excessive,
comme la lumière du soleil, le feu, etc.
Entretien du produit
1. Débranchez toujours l’appareil avant de le nettoyer et quand vous ne l’utilisez pas.
2. N’écoutez pas la musique à un niveau sonore excessif, car cela pourrait provoquer une perte
d’acuité auditive ou endommager l’appareil.
3. N’utilisez pas cet appareil dans un environnement humide ou mouillé.
4. Débranchez toujours l’appareil de la prise secteur avant de le nettoyer. Nettoyez le produit avec un
chiffon doux, humide et sans ouate. N’utilisez pas de produit nettoyant agressif ou abrasif.
Respect de l’environnement
Votre produit est conçu et fabriqué avec des matériaux et composants de haute
qualité qui peuvent être recyclés et réutilisés.
Votre produit contient des piles relevant de la Directive Européenne 2006/66/CE qui
ne peuvent être jetées avec les ordures ménagères. Veuillez vous informer sur les
réglementations locales concernant la collecte séparée des piles car une mise au
rebut correcte permet d’empêcher les conséquences négatives sur l’environnement
et sur la santé humaine.
Lorsque ce symbole d’une poubelle barrée sur roues se trouve sur un produit, cela
signie que le produit est couvert par la Directive Européenne 2002/96/CE. Veuillez
vous informer du système local de collecte séparée pour les produits électriques
et électroniques. Veuillez agir selon les règles locales et ne jetez pas vos anciens
produits avec les ordures ménagères. En assurant l’élimination de ce produit, vous
aidez également à prévenir les conséquences potentiellement négatives pour
l’environnement et la santé humaine.
PRODUIT LASER DE CLASSE 1
ATTENTION
RAYONNEMENT LASER
INVISIBLE QUAND LE BOÎTIER
EST OUVERT OU QUAND LE
SYSTÈME DE FERMETURE EST
ÉVITEZ TOUTE EXPOSITION AU
Cet appareil est équipé d'un laser à basse puissance.
FAUSSÉ.
FAISCEAU LASER.
- FR 2 -
Page 4

Contenu du coffret
Inspectez et vériez le contenu de votre emballage :
• Unité principale
• Enceintes
• Adaptateur
• Télécommande (pour la version USB uniquement)
• Notice d’utilisation
• Set d'autocollant (optionnel)
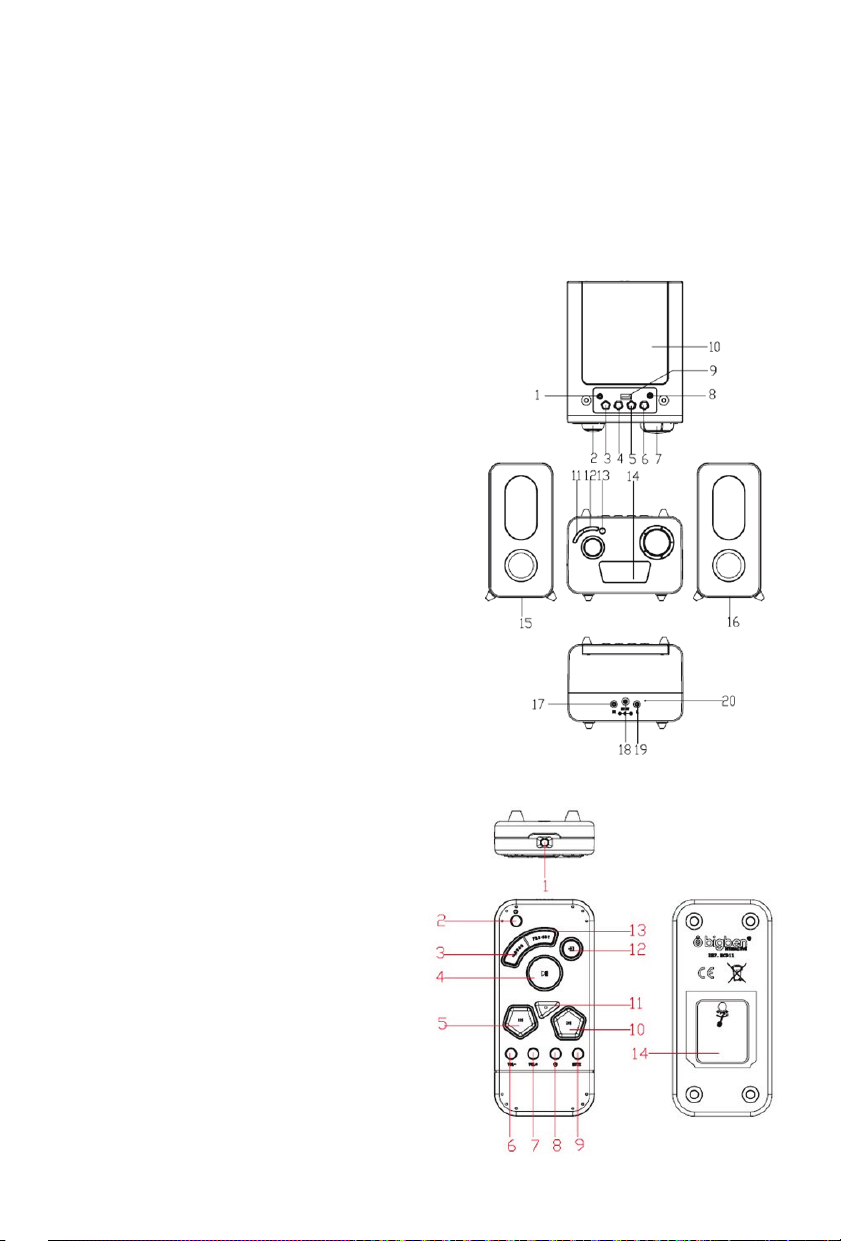
Description des pièces
1. PRISE CASQUE
2. BOUTON DU VOLUME
3. TOUCHE PRÉCÉDENT
4. TOUCHE SUIVANT
5. TOUCHE STOP
6. TOUCHE LECTURE/PAUSE/RÉGLER HEURE
7. BOUTON DE SYNTONISATION +/-
8. ENTRÉE AUX
9. PORT USB (pour la version USB uniquement)
10. COUVERCLE DU PLATEAU CD
11. TOUCHE RÉPÉTER/PROG
12. TOUCHE PRÉRÉGLER
13. TOUCHE MARCHE-ARRÊT/FONCTION
14. ÉCRAN LCD
15. ENCEINTE GAUCHE
16. ENCEINTE DROITE
17. SORTIE ENCEINTE DROITE
18. PRISE D’ALIMENTATION
19. SORTIE ENCEINTE GAUCHE
20. ANTENNE FM
Télécommande (pour la version USB UNIQUEMENT)
1. LED IR
2. TOUCHE MARCHE/ARRÊT
3. TOUCHE RÉPÉTER/PROG
4. TOUCHE LECTURE/PAUSE
5. TOUCHE PRÉCÉDENT
6. VOLUME –
7. VOLUME +
8. TOUCHE RÉGLER HEURE
9. TOUCHE SOURDINE
10. TOUCHE SUIVANT
11. TOUCHE STOP
12. TOUCHE FONCTION
13. TOUCHE PRÉRÉGLER
14. COUVERCLE DU LOGEMENT DE LA PILE
- FR 3 -
Page 5
Alimentation
• Risque de détérioration du produit ! Vériez que la tension du secteur correspond
à la tension indiquée sur la plaque signalétique de l’appareil.
• Risque de choc électrique ! Pour débrancher le câble CA, tirez toujours sur la che
ATTENTION
Mode de veille automatique
Lorsque aucune musique n’est en lecture à partir d’un appareil connecté, le produit passe
automatiquement en mode de veille si:
• Aucun bouton n’est pressé pendant 10 minutes,
• Aucune lecture audio n’est activée à partir d’un appareil connecté pendant 10 minutes.
Connexion des enceintes
Déroulez les câbles d'enceinte et branchez-les dans les prises correspondantes.
Alimentation par adaptateur secteur
1. Branchez l’adaptateur secteur dans la prise d'alimentation de l'appareil.
2. Branchez l'adaptateur secteur dans une prise murale correctement installée (CA 230 V/50 Hz).
Remarque :
Débranchez l'adaptateur de la prise secteur et de l'appareil avant toute période d’inutilisation prolongée.
L'adaptateur doit être installé près de l’appareil et il doit rester facilement accessible.
Alimentation par piles
Assurez-vous que les piles sont correctement insérées pour éviter tout dommage sur l’appareil.
Enlevez toujours les piles de l’appareil si celui-ci ne sera pas utilisé durant une longue période, car
cela pourrait causer une fuite des piles et par conséquent, des dommages sur l’appareil.
Ne pas avaler la pile. Risque de Brûlure Chimique. Ce produit contient une pile bouton. Si la pile
bouton est avalée, elle peut provoquer de graves brûlures internes en seulement 2 heures et cela peut
entraîner la mort. Maintenez les piles neuves et usagées hors de portée des enfants. Si le logement
de la pile ne peut pas être solidement fermé, cessez d’utiliser l’appareil et maintenez-le hors de portée
des enfants. Si vous pensez que des piles ont peut-être été avalées ou placées dans une partie du
corps, consultez immédiatement un médecin.
Fonction Veille
Mettez l'appareil en veille pour économiser l'électricité.
1. Appuyez sur la touche pendant 3 secondes pour éteindre l’appareil. L'écran afche l'horloge,
ce qui indique que l'appareil est en veille.
2. Pour éviter une consommation électrique inutile, mettez toujours l'appareil en veille.
de l’adaptateur. Ne tirez jamais sur le câble.
• Avant de brancher le câble d’alimentation CA, vériez que tous les autres
branchements ont été effectués.
Utilisation
1. Sélectionnez la source audio en appuyant sur la touche .
2. Réglez le volume avec le bouton VOL.
3. Éteignez l'appareil en appuyant sur la touche pendant 3 secondes.
Régler l’horloge
Éteindre l'appareil (dans le mode veille)
1. Appuyez sur la touche pendant 3 secondes, les chiffres des heures se mettent à clignoter.
2. Réglez les chiffres des heures avec les touches et .
3. Appuyez sur la touche pour conrmer, les chiffres des minutes se mettent à clignoter.
4. Réglez les chiffres des minutes avec les touches et .
5. Appuyez sur la touche pour conrmer.
- FR 4 -
Page 6
Écouter la radio
1. Allumez l’appareil en appuyant sur la touche .
2. Appuyez plusieurs fois sur la touche pour sélectionner la fonction « FM ».
Antenne : Pour recevoir la radio FM, déployez complètement l'antenne laire FM externe et réglez sa
position an d'optimiser la réception.
Régler une station de radio FM
Syntonisation manuelle
• Réglez la fréquence avec le bouton de syntonisation +/-.
Syntonisation automatique
1. Réglez la station de radio désirée avec la touche ou , la fréquence s'afche.
2. Quand une station de radio dont le signal est sufsamment puissant est reçue, la syntonisation
automatique s'arrête. Vous pouvez aussi l'arrêter manuellement en appuyant à nouveau sur la
touche.
3. Procédez ainsi jusqu'à trouver la station désirée.
4. Réglez le volume en tournant le bouton VOL.
PRÉRÉGLER DES STATIONS DE RADIO (FRÉQUENCE)
1. Réglez une station de radio en procédant comme décrit précédemment.
2. Appuyez sur la touche /PROG, puis appuyez sur la touche PRESET pour modier le numéro
de mémoire de préréglage de la station. (de 1 à 20)
3. Préréglez la fréquence actuelle en appuyant à nouveau sur la touche /PROG quand le numéro
de mémoire désiré est afché.
4. Répétez cette procédure pour prérégler d'autres fréquences et les affecter aux numéros de
mémoire 1 à 20.
Remarques :
Une fréquence mémorisée ne peut être supprimée qu'en préréglant une autre fréquence à sa place.
L'appareil permet de prérégler jusqu'à 20 stations de radio.
RAPPEL MÉMOIRE
Pour écouter l'une des stations préréglées, appuyez sur la touche PRESET pour sélectionner la
station 1 à 20.
LECTURE CD
LIRE UN CD
1. Ouvrez le couvercle du plateau CD en appuyant dessus.
2. Insérez un CD face imprimée vers le haut.
3. Refermez le couvercle du plateau CD.
4. Allumez l'appareil en appuyant sur la touche , puis appuyez plusieurs fois sur cette touche
jusqu'à ce que « CD » s'afche à l'écran.
5. La lecture du CD démarre automatiquement à partir de la première piste.
6. Appuyez sur la touche pour mettre la lecture en pause temporairement.
7. Pour arrêter la lecture, appuyez sur la touche .
TOUCHE RETOUR/AVANCE
Pendant la lecture d'un CD, les touches / vous permettent de sauter à une autre piste ou de
faire un retour/avance rapide dans un morceau.
1. Appuyez une fois sur la touche pour écouter le début de la piste actuelle.
2. Appuyez deux fois sur la touche pour écouter la piste précédente du CD.
3. Appuyez sur la touche pour écouter la piste suivante du CD.
4. Maintenez la touche appuyée. La piste actuelle est scannée vers l'arrière jusqu'à la(aux)
piste(s) précédente(s). Une fois que vous avez trouvé le passage désiré, relâchez la touche
pour que la lecture normale reprenne.
- FR 5 -
Page 7
5. Maintenez la touche appuyée. La piste actuelle est scannée vers l'avant jusqu'à la(aux)
piste(s) suivante(s). Une fois que vous avez trouvé le passage désiré, relâchez la touche pour
que la lecture normale reprenne.
PROGRAMME DE LECTURE
Jusqu'à 20 pistes peuvent être programmées dans un programme de lecture, dans n'importe quel
ordre.
1. Dans le mode CD stop, Appuyez sur la touche /PROG jusqu'à ce que l'indicateur PROGRAM
01 s'afche à l'écran.
2. Appuyez sur la touche ou pour sélectionner la piste désirée à programmer.
3. Appuyez sur la touche /PROG pour programmer la piste.
4. Répétez les étapes 2 et 3 pour ajouter d'autres pistes au programme.
5. Appuyez sur la touche pour démarrer la lecture.
6. Pour annuler la lecture du programme, appuyez deux fois sur la touche STOP.
RÉPÉTER LA LECTURE
Pour répéter la lecture d'une seule piste,
Appuyez sur la touche /PROG pendant la lecture de la piste dont vous voulez répéter la lecture.
« » s'afche à l’écran.
• Pour répéter la lecture d'une autre piste, appuyez sur la touche ou .
• Pour annuler la répétition de lecture, appuyez 3 fois sur la touche /PROG.
RÉPÉTER TOUTES LES PISTES
Appuyez deux fois sur la touche /PROG pendant la lecture. « ALL » s'afche à l'écran.
• La lecture de toutes les pistes dans l'ordre est répétée en continu.
• Pour annuler la répétition de lecture, appuyez 2 fois sur la touche /PROG.
LECTURE ALÉATOIRE
Appuyez 3 fois sur la touche /PROG pendant la lecture. « RAND » s'afche à l’écran.
• Toutes les pistes sont lues dans un ordre aléatoire.
• Pour annuler la répétition de lecture, appuyez à nouveau sur la touche /PROG.
Lecture MP3 (pour la version USB uniquement) :
Port USB
L'appareil est pourvu d'un port USB permettant de lire les chiers audio (MP3) stockés sur une clé
USB.
• Aucun CD ne doit être en cours de lecture.
• Branchez une clé USB dans le port USB de l’appareil.
• Appuyez plusieurs fois sur la touche jusqu'à ce que « USB » s'afche à l'écran. Le contenu de
la clé USB est lu automatiquement.
RÉPÉTER UNE SEULE PISTE
Appuyez sur la touche /PROG pendant la lecture de la piste dont vous voulez répéter la lecture.
« » s'afche à l’écran.
• Pour répéter la lecture d'une autre piste, appuyez sur la touche ou .
• Pour annuler la répétition de lecture, appuyez 4 fois sur la touche /PROG.
RÉPÉTER UN DOSSIER
Appuyez deux fois sur la touche /PROG pendant la lecture. « FOLDER » s'afche à l’écran.
• La lecture de toutes les pistes dans l'ordre est répétée en continu.
• Pour annuler la répétition de lecture, appuyez 3 fois sur la touche /PROG.
RÉPÉTER TOUTES LES PISTES
Appuyez 3 fois sur la touche /PROG pendant la lecture. « ALL » s'afche à l’écran.
• La lecture de toutes les pistes dans l'ordre est répétée en continu.
• Pour annuler la répétition de lecture, appuyez 2 fois sur la touche /PROG.
- FR 6 -
Page 8
LECTURE ALÉATOIRE
Appuyez 4 fois sur la touche /PROG pendant la lecture. « RAND » s'afche à l’écran.
• Toutes les pistes sont lues dans un ordre aléatoire.
• Pour annuler la lecture aléatoire, appuyez à nouveau sur la touche /PROG.
Remarque : Seules les clés USB formatées en FAT32 et d'une capacité maximale de 16 Go peuvent
être lues par l'appareil.
Prise casque
L'appareil est pourvu d'une PRISE CASQUE permettant une lecture privée. Branchez simplement
la che 3,5 mm d'un casque stéréo dans la PRISE CASQUE. Quand un casque est branché, les haut-
parleurs de l'appareil sont automatiquement déconnectés.
Prise entrée AUX
1. Branchez le câble AUX dans l'appareil et branchez son autre che dans une source audio.
2. Allumez l'appareil en appuyant sur la touche , puis appuyez plusieurs fois sur cette touche
pour sélectionner la fonction « AUX ». L'écran LCD afche « AUX ».
3. Démarrez la lecture sur la source audio externe. Pour savoir comment démarrer la lecture sur la
source audio externe, consultez sa notice d'utilisation.
Spécications de l'appareil (version CD basique)
• Entrée : 100-240 V ~ 50/60 Hz 0,3 A
• Sortie : 5 V 1,5 A
• Bande de fréquences : FM : 87.5 – 108 MHz
• Piles de secours : 2 x 1,5 V, AAA, LR03
Spécications de l'appareil (version USB)
• Entrée : 100-240 V ~ 50/60 Hz 0,3 A
• Sortie : 5,9 V 1,5 A
• Sortie du port USB : CC 5 V 100 mA
• Bande de fréquences : FM : 87.5 – 108 MHz
• Pile de la télécommande : 1 x 3 V, CR2032
AVERTISSEMENT : risque d’altération de l’ouïe
• Réglez le lecteur sur un faible niveau sonore avant de brancher le casque d’écoute à
la source sonore.
• An d’éviter des dommages auditifs éventuels, ne pas écouter à un niveau sonore élevé
pendant une longue durée. Un volume élevé peur engendrer une altération durable de
l’ouïe.
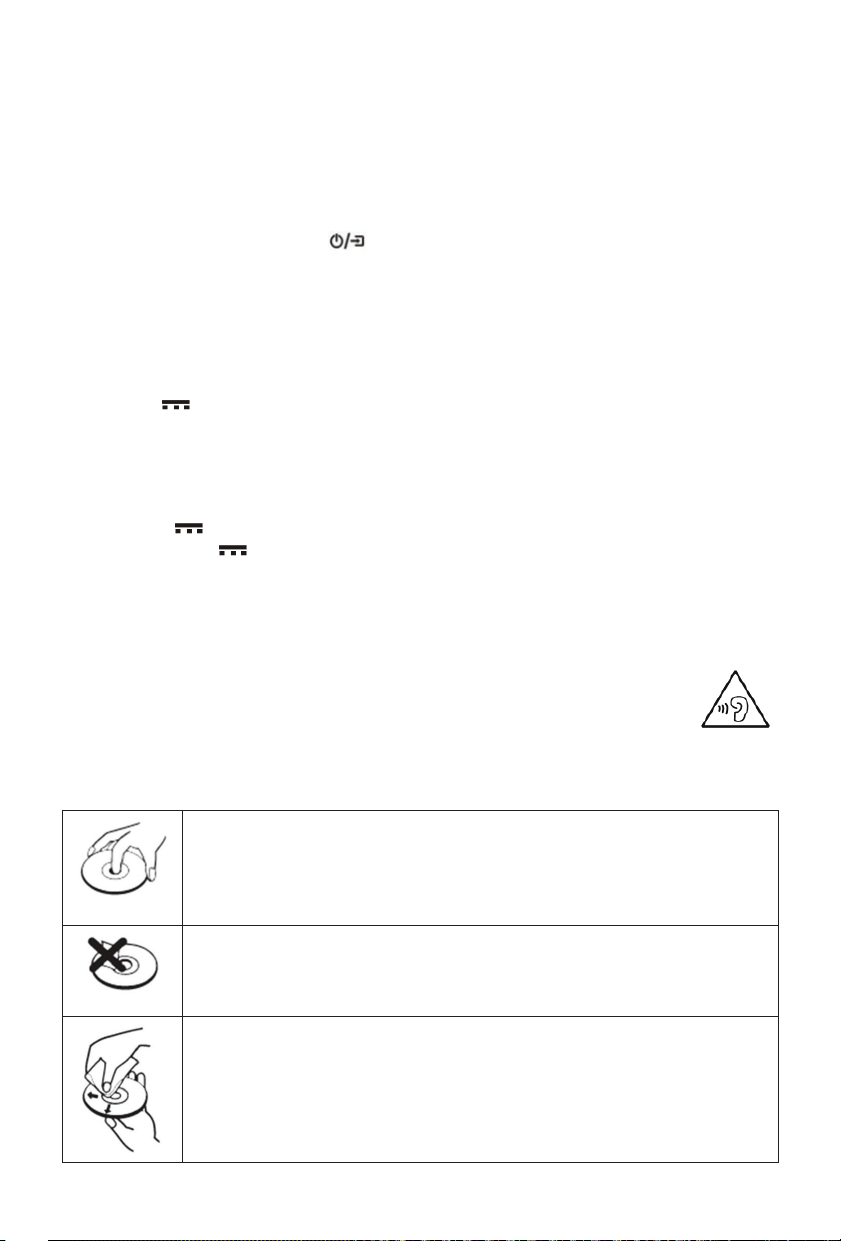
PRECAUTIONS CONCERNANT LES DISQUES
Maniement
• Ne touchez pas la surface interne des disques.• Tenez le disque par ses bords
an de ne pas laisser d’empreintes de doigts sur la surface.• Toutes les poussières,
les empreintes digitales ou les rayures peuvent provoquer un dysfonctionnement.•
Ne collez jamais d’étiquette ni d’autocollant sur le disque.
- FR 7 -
Page 9

Rangement
• Rangez les disques dans leur coffret après l’utilisation.• N’exposez pas les
disques à la lumière directe du soleil ou à des sources de chaleur. Ne laissez
jamais les disques à l’intérieur d’une voiture en plein soleil.
Nettoyage
• Utilisez un chiffon propre, doux et non pelucheux pour nettoyer le disque, en
essuyant du centre vers l’extérieur en ligne droite. N’utilisez pas de solvants,
comme de l’alcool, du diluant, des nettoyants ou des aérosols anti-statiques pour
disques vinyles disponibles dans le commerce.
Remarque :
Ne pas éliminer les appareils électriques et électroniques dans les déchets ménagers.
• Les apporter à un point de collecte.
• Certaines pièces contenues dans ces appareils peuvent être dangereuses pour la
santé et pour l’environnement.
• An d’économiser l’énergie, lorsque l’appareil n’émet aucune sortie sonore pendant un certain
temps, il se mettra automatiquement en mode de veille. Il peut alors être remis en marche en
utilisant à nouveau le bouton d’alimentation.
• Vous pouvez trouver les informations sur la plaque située à l’arrière de l’unité.
Pour télécharger la version complète de cette déclaration, veuillez vous rendre sur notre site internet,
http://www.bigben.fr/support, dans la section Déclaration de conformité.
Importé par BIGBEN INTERACTIVE SA
396, Rue de la Voyette
CRT2 – FRETIN
CS 90414
59814 LESQUIN Cedex – France
www.bigben.eu
Fabriqué en Chine
Importateur : Bigben Interactive FRANCE
396, Rue de la Voyette, C.R.T. 2 Fretin,
CS 90414 - 59814 LESQUIN Cedex
Bigben Interactive DEUTSCHLAND GmbH
Walter Gropius Str. 28, 50126 Bergheim, Deutschland
Bigben Interactive BELGIUM
Avenue Ernest Solvay, 1480 Tubize, Belgique
Bigben Interactive NEDERLAND b.v.
Franciscusweg 249-3B, 1216 SG Hilversum, Nederland
Bigben Interactive SPAIN S.L.
C/ Musgo 5, 2ª planta, 28023 Madrid, Spain
Bigben Interactive ITALIA s.r.l
Corso Sempione 221, 20025 Legnano - MI, Italia
FABRIQUÉ EN CHINE / MADE IN CHINA
HOTLINE
FRANCE, du lundi au vendredi (sauf jours fériés) :
9h00-19h00 ou sav.audio@bigben.fr
DEUTSCHLAND, Montag bis Sonntag von 8:00 bis 24:00 Uhr
09001-84 30 44*
Mobil funknet zen nicht mö glich)
*Minderjährige müssen vorher einen Erziehungsberechtigten um Erlaubnis fragen.
(0,49 €/Min. au s dem deuts chen Fest netz, An rufe aus al len
oder support@bigben-interactive.de
BELGIQUE / NEDERLAND, klantenservice@bigben-interactive.nl
customerservice@bigben-interactive.be
ESPAÑA, sat@bigbeninteractive.es
ITALIA, support@bigbeninteractive.it
www.bigben.eu
- FR 8 -
Page 10

MCD11
CD/ FM / AUX IN
MP3 / USB (OPTIONAL)
EN
OPERATING INSTRUCTIONS
PLEASE READ THIS USER MANUAL CAREFULLY BEFORE
OPERATING THIS UNIT AND RETAIN FOR
FUTURE REFERENCE.
BBI_MCD11_1606_Ver1
Page 11

Contents
Setting Started 1
Safety and Notice 1
Care for your product 2
What’s in the box 3
Description of Parts 3
Remote Control 3
Power 4
Operation 4
Setting the clock 4
Listening to the radio 5
CD Play 5
MP3 Play 6
Headphone jack 7
AUX input jack 7
Product specications 7
Remarks 8
Setting Started
• Remove the appliance from the box.
• Remove any packaging from the product.
• Place the packaging inside the box and either or dispose of safely.
Safety and Notice
Read and understand all instructions before you use this product. If damage is caused by failure to
follow the instructions, the warranty does not apply.
Safety
Warning
• Never remove the casing of this apparatus.
• Never lubricate any part of this apparatus.
• Never place this apparatus on other electrical equipment.
• Keep this apparatus away from direct sunlight, naked Fames or heat.
• Never look into the laser beam inside this apparatus.
• Ensure that you always have easy access to the power cord, plug or adaptor to
disconnect this apparatus from the power.
1. Read these instructions.
2. Keep these instructions.
3. Heed all warnings.
4. Follow all instructions.
5. Do not use this apparatus near water.
6. Clean only with dry cloth.
7. Do not block any ventilation openings. Install in accordance with the manufacturer’s instructions.
8. Do not install near any heat sources such as radiators, heat registers, stoves, or other apparatus
(including ampliers) that produce heat.
9. Protect the power cord from being walked on or pinched, particularly at plugs, convenience
receptacles, and the Point where they exit from the apparatus.
10. Only use attachments/accessories specied by the manufacturer.
11. Use only with the cart, stand, tripod, bracket, or table specied by the manufacturer or sold with
the apparatus. When a cart is used, use caution when moving the cart/apparatus combination to
avoid injury from tip-over.
12. Unplug this apparatus during lightning storms or when unused for long periods of time.
- EN 1 -
Page 12
13. Refer all servicing to qualied service personnel. Servicing is required when the apparatus has
been damaged in anyway, such as power-supply cord or plug is damaged, liquid has been spilled
or objects have fallen into the apparatus, apparatus has been exposed to rain or moisture, does
not operate normally, or has been dropped.
14. Apparatus shall not be exposed to dripping or splashing.
15. Do not place any sources of danger on the apparatus (e.g. liquid lled objects, lighted candles).
16. Where the MAINS plug or an appliance coupler is used as the disconnect device, the disconnect
device shall remain readily operable.
17. Make sure there is enough free space around the product for ventilation.
18. Batteries (battery pack or batteries installed) shall not be exposed to excessive heat such as
sunshine, re or the like.
Care for your product
1. Always unplug the appliance when not in use and before cleaning.
2. Do not play music at excessive volume levels as damage to hearing and or the equipment may
occur.
3. Do not use this unit in wet or damp conditions.
4. Always disconnect the unit from the mains power supply before cleaning. Clean the appliance with
a soft, damp, lint free cloth. Do not use abrasives or harsh cleaners.
Care of the environment
Your product is designed and manufactured with high quality materials and
components, which can be recycled and reused.
Your product contains batteries covered by the European Directive 2006/66/EC,
which cannot be disposed with normal household waste. Please inform yourself about
the local rules on separate collection of batteries because correct disposal helps to
prevent negative consequences for the environmental and human health.
When this crossed-out wheeled bin symbol is attached to a product it means that the
product is covered by the European Directive 2002/96/EC. Please inform yourself
about the local separate collection system for electrical and electronic products.
Please act according to your local rules and do not dispose of your old products with
your normal household waste. Correct disposal of your old product helps to prevent
potential negative consequences for the environment and human health.
CLASS 1 LASER PRODUCT
INVISIBLE LASER RADIATION
WHEN OPEN AND INTERLOCKS
AVOID EXPOSURE TO BEAM
This product contains a low power laser device.
- EN 2 -
CAUTION
DEFEATED.
Page 13
What’s in the box?
Check and identify the contents of your package:
• Main unit
• Speakers
• Adaptor
• Remote control (for USB version only)
• User manual
• Sticker set (optional)
Description of Parts
1. HEADPHONE JACK
2. VOLUME KNOB
3. PREVIOUS TRACK BUTTON
4. NEXT TRACK BUTTON
5. STOP BUTTON
6. PLAY/PAUSE/TIME SET BUTTON
7. TUNING +/- KNOB
8. AUX JACK
9. USB PORT(For USB version only)
10. CD DOOR
11. REPEAT/PROG BUTTON
12. PRESET BUTTON
13. POWER/FUNCTION BUTTON
14. LCD DISPLAY
15. LEFT SPEAKER
16. RIGHT SPEAKER
17. RIGHT SPEAKER OUTPUT JACK
18. DC JACK
19. LEFT SPEAKER OUTPUT JACK
20. FM ANTENNA
Remote Control (For USB version ONLY)
1. IR LED
2. POWER ON/OFF
3. REPEAT/PROG
4. PLAY/PAUSE BUTTON
5. PERVIOUS TRACK BUTTON
6. VOLUME –
7. VOLUME +
8. CLOCK SET
9. MUTE
10. NEXT TRACK BUTTON
11. STOP BUTTON
12. FUNCTION BUTTON
13. PRESET BUTTON
14. BATTERY DOOR
- EN 3 -
Page 14
Power
• Risk of product damager! Make sure that the power voltage corresponds to the
voltage printed on the back label.
• Risk of electric shock! When you unplug the AC power cord always pull the plug
CAUTION
Auto standby
When no music play from a connected device, the product automatically switches to standby if:
• No button is pressed for 10 minutes,
• No audio from a connected device for 10 minutes.
Speaker connection
Unfurl the loudspeaker wires and connect them to the corresponding terminals.
Power supply by AC adaptor
1. Connect the AC/DC adaptor to the DC JACK of the unit.
2. Connect the AC/DC adaptor to a properly installed wall socket (AC 230V/50Hz).
Note:
Unplug the adaptor from the mains and the unit when the unit is not in use for a prolonged period of
time.
Adapter shall be installed near the equipment and shall be easily accessible.
Battery power
Be sure that the batteries are inserted correctly to avoid damage to the appliance. Always remove the
batteries when appliance will not be used for a long period of time, as this will cause leakage to the
batteries and subsequently damage to your set.
Do not ingest the battery. Chemical Burn Hazard. This product contains a coin/button cell battery. If the
coin/button cell battery is swallowed, it can cause severe internal burns in just 2 hours and can lead
to death. Keep new and used batteries away from children. If the battery compartment does not close
securely, stop using the product and keep it away from children. If you think batteries might have been
swallowed or placed inside any part of the body, seek immediate medical attention.
Standby Function
Switch power to standby to save energy
1. Press and hold the button for 3 seconds to turn off the Unit. The display will show the clock
and this indicates that the unit is in standby mode.
2. To avoid unnecessary energy consumption always set the unit to standby mode.
from the socket. Never pull the cord.
• Before connecting the AC power cord, ensure you have completed all other
connections.
Operation
1. Select your sound source by pressing the button.
2. Adjust the sound by VOL knob.
3. Switch off the set by pressing and holding the button for 3 seconds.
Setting the clock
Power off (in standby mode)
1. Press and hold the BUTTON for 3 seconds and the hour will begin to ash.
2. Press the or button to adjust the hour.
3. Press the BUTTON to conrm and the minute will begin to ash.
4. Press the or button to adjust the minute.
5. Press the BUTTON to conrm.
- EN 4 -
Page 15
Listening to the radio
1. Turn on the unit by pressing the button.
2. Press the button repeatedly to select “FM” function.
Antenna: For FM reception fully extend the external FM antenna wire and adjust the direction for
optimum reception.
FM radio channels setting
Manual adjustment of channels (frequency)
• Adjust the frequency using the tuning +/- knob
Automatic channel (frequency) tracking
1. Tune to the desired radio station by using the or button and the frequency will be displayed.
2. When a channel of sufcient strength has been found, tracking function will stop, or you can stop
the automatic tuning by pressing it again.
3. Repeat until you reach your desired channel.
4. Adjust the volume by rotating the VOL knob
PRESET CHANNELS (FREQUENCY)
1. Tune to your desired station according to the normal tuning procedure.
2. Press the /PROG button, then press the PRESET button to change the number where the
station will be stored. (No.1 to No.20)
3. Store the current frequency by pressing the /PROG button again when you get the desired
number.
4. Repeat the same procedure to save other desired frequencies to Memory No.1 up to No.20
Remarks:
A stored frequency can only be erased by storing another frequency in its place.
The unit can hold up to 20 preset stations.
MEMORY RECALL
Recall the stored frequencies by pressing the PRESET button to select station 1 to 20 as desired
CD Play
PLAYING A CD
1. Open the CD Door by pressing it.
2. Insert a CD with the printed side facing up.
3. Close the CD Door
4. Power on the unit by pressing the button and press it repeatedly until “CD” indicator appears
on the LCD display.
5. The CD will automatically play from the rst track.
6. Press the button to momentarily pause.
7. To stop playback, press the button .
REWIND/FORWARD BUTTON
While playing a CD, the / button can be used to jump to a different track number or to scan
tracks at high speed.
1. Press the button once to hear the beginning of the current track.
2. Press the button two times to hear the previous tracks on the disc.
3. Press the button to hear the next track on the disc.
4. Press and hold the button. The current track will be scanned and will move backwards to the
previous track(s). When the desired track section is found, release the button and normal play
will resume.
5. Press and hold the button. The current track will be scanned and will move forward to the next
track(s). When the desired track is found, release the button and normal play will resume.
- EN 5 -
Page 16
PROGRAMMED PLAYBACK
Up to 20 tracks can be programmed to play in any desired sequence.
1. In CD stop mode, press the /PROG Button until PROGRAM 01 indicator appears on the display.
2. Press the or button to select a desired track to be memorised.
3. Press the /PROG Button to program the track.
4. Repeat steps 2 and 3 to program tracks.
5. Press the button to start playing.
6. To cancel program-play, Press the STOP button twice.
REPEAT PLAY
To repeat a single track during audio CD play.
Press the /PROG Button while the track you want to repeat is playing. The “ ” will appear on the
display.
• To repeat another track, press the Button or Button.
• To cancel repeat-play, Press the /PROG Button 3 times.
TO REPEAT ALL TRACKS
Press the /PROG Button twice during play. The “ ALL” will appear in display.
• All tracks will be played through in sequence and then the sequence will be repeated continuously.
• To cancel repeat-play, press the /PROG Button 2 times.
RANDOM PLAY
Press the /PROG Button 3 times during play. The “RAND” will appear on the display.
• All tracks will be played randomly.
• To cancel random-play, press the /PROG button again.
MP3 Play (for USB version only):
USB Port
The appliance is tted with a USB port to play music les (MP3) stored on a USB key.
• No disc should be playing.
• Connect a USB drive to the USB port of the reader.
• Press successively and ”USB” will appear on the screen and the contents of the USB stick will
be read automatically.
TO REPEAT A SINGLE TRACK
Press the /PROG Button while the track you want to repeat is playing. The “ ” will appear on the
display.
• To repeat another track, press the or button.
• To cancel repeat-play, Press the /PROG Button 4 times.
TO REPEAT A FOLDER
Press the /PROG Button twice during play. The “ FOLDER” will appear on the display.
• All tracks will be played through in sequence and then the sequence will be repeated continuously.
• To cancel repeat-play, press the /PROG button 3 times.
TO REPEAT ALL TRACKS
Press the /PROG button 3 times during play. The “ ALL” will appear on the display.
• All tracks will be played through in sequence and then the sequence will be repeated continuously.
• To cancel repeat-play, press the /PROG button 2 times.
RANDOM PLAY
Press the /PROG Button 4 times during play. The “RAND” will appear on the display.
• All tracks will be played randomly.
• To cancel random play, press the /PROG button again.
Remark: Please note that only FAT32 format USB keys with a capacity of 16GB and under can be
read by the unit.
- EN 6 -
Page 17
Headphone jack
The unit is equipped with a HEADPHONE JACK for private listening. Simply plug any 3.5 mm plug
type stereo headphone into the HEADPHONE JACK. With the headphone connected the speaker in
the unit will be automatically disconnected.
AUX input jack
1. Plug in the Aux Cable and conect the other end to an Audio Playing Device.
2. Power on the unit by pressing the button and press it repeatedly to select the “AUX” function.
The LCD display will show “AUX” to indicate.
3. Start Playing from your Audio Playing Device. For instructions on how to play from your Audio
Playing Device, please refer to its own manual.
Product specications (basic CD version)
• Input: 100-240V ~ 50/60Hz 0.3A
• Output: 5V 1.5A
• Frequency ranges: FM: 87.5 – 108Mhz
• Clock Backup: 2 X 1.5V, AAA, LR03
Product specications (USB version)
• Input: 100-240V ~ 50/60Hz 0.3A
• Output: 5.9V 1.5A
• USB output: DC5V 100mA
• Frequency ranges: FM: 87.5 – 108Mhz
• Remote Backup: 1 X 3V, CR2032
WARNING! Risk of hearing impairment
• Set a low volume on the playback device before connecting the headphones to the
sound source.
• Avoid excessive volume, particularly over extended periods or frequent use. Excessive
volume can result in permanent hearing impairment.
ABOUT THE DISKS
Handling
Do not touch the underside of disks.
Hold disks by the edges to avoid leaving ngerprints on the surface.
Any dust, ngerprints or scratches may cause a malfunction.
Never afx a label or sticky tape to the disk.
Storage
Put disks back in their case after use.
Never expose disks to direct sunlight or heat sources. Never leave disks inside a
car parked in full sunlight.
Cleaning
Use a clean, soft, lint-free cloth to clean the disk, working from the centre outwards
in a straight line. Do not use solvents such as petrol, thinners, commercially
available cleaners or antistatic sprays for vinyl disks.
- EN 7 -
Page 18
Remarks :
Don’t discard the electrical and electronic appliances in the regular waste disposal.
• Take them to a collection point.
• Some components in these appliances may be hazardous to health and the
environment.
• In order to save energy when the unit has no sound output for a while, the unit will be switched to
stand-by automatically. It can be switched ON by using the POWER selector again.
• You can nd the information on the plate located at the back of the unit.
To download the full statement, please visit our website: http://www.bigben-interactive.co.uk/support
and the section <<declaration of conformity>>.
Imported by BIGBEN INTERACTIVE SA
396, Rue de la Voyette
CRT2 - FRETIN
CS 90414
59814 LESQUIN Cedex - France
www.bigben.eu
Made in China
Importateur : Bigben Interactive FRANCE
396, Rue de la Voyette, C.R.T. 2 Fretin,
CS 90414 - 59814 LESQUIN Cedex
Bigben Interactive DEUTSCHLAND GmbH
Walter Gropius Str. 28, 50126 Bergheim, Deutschland
Bigben Interactive BELGIUM
Avenue Ernest Solvay, 1480 Tubize, Belgique
Bigben Interactive NEDERLAND b.v.
Franciscusweg 249-3B, 1216 SG Hilversum, Nederland
Bigben Interactive SPAIN S.L.
C/ Musgo 5, 2ª planta, 28023 Madrid, Spain
Bigben Interactive ITALIA s.r.l
Corso Sempione 221, 20025 Legnano - MI, Italia
FABRIQUÉ EN CHINE / MADE IN CHINA
HOTLINE
FRANCE, du lundi au vendredi (sauf jours fériés) :
9h00-19h00 ou sav.audio@bigben.fr
DEUTSCHLAND, Montag bis Sonntag von 8:00 bis 24:00 Uhr
09001-84 30 44*
Mobil funknet zen nicht mö glich)
*Minderjährige müssen vorher einen Erziehungsberechtigten um Erlaubnis fragen.
(0,49 €/Min. au s dem deuts chen Fest netz, An rufe aus al len
oder support@bigben-interactive.de
BELGIQUE / NEDERLAND, klantenservice@bigben-interactive.nl
customerservice@bigben-interactive.be
ESPAÑA, sat@bigbeninteractive.es
ITALIA, support@bigbeninteractive.it
www.bigben.eu
- EN 8 -
Page 19
MCD11
CD/ FM / AUX IN
MP3 / USB (OPCIONAL)
ES
INSTRUCCIONES DE FUNCIONAMIENTO
LE ROGAMOS QUE LEA ÍNTEGRAMENTE EL PRESENTE MANUAL
DEL USUARIO ANTES DE UTILIZAR EL EQUIPO Y QUE CONSERVE
ESTE FOLLETO PARA PODER CONSULTARLO EN EL FUTURO.
BBI_MCD11_1606_Ver1
Page 20

Contenido
Inicio 1
Medidas de seguridad y advertencias 1
Cuidado del producto 2
Contenido de la caja 3
Descripción de los componentes 3
Mando a distancia 3
Alimentación 4
Utilización 4
Ajuste del reloj 4
Cómo escuchar la radio 5
Reproducción de CD 5
Reproducción de MP3 6
Conector de auriculares 7
Conector de entrada AUX 7
Especicaciones del producto 7
Nota 8
Inicio
• Saque el aparato del embalaje.
• Retire todo el material de embalaje del producto.
• Coloque el material de embalaje dentro de la caja y deséchelo todo de forma segura.
Medidas de seguridad y advertencias
Lea y entienda las instrucciones antes de usar este producto. Si el producto resultara dañado por
incumplimiento de las instrucciones, la garantía quedaría anulada.
Seguridad
¡Advertencia!
• No abra nunca la carcasa de este aparato.
• No lubrique nunca ninguna de las piezas de este aparato.
• No coloque nunca este aparato sobre otros equipos eléctricos.
• Mantenga este aparato alejado de la luz directa del sol, de llamas desnudas o de
fuentes de calor.
• No mire nunca directamente al rayo láser ubicado dentro del aparato.
• Compruebe que el cable, el enchufe o el adaptador para desconectar este aparato
de la toma de corriente están siempre fácilmente accesibles.
1. Lea estas instrucciones.
2. Conserve estas instrucciones.
3. Preste atención a todas las advertencias.
4. Siga todas las instrucciones.
5. No use este aparato cerca del agua.
6. Limpie el aparato solo con un paño seco.
7. No bloquee las ranuras de ventilación. Instale el aparato de acuerdo a las instrucciones del
fabricante.
8. No instale el aparato cerca de fuentes de calor, tales como radiadores, calentadores, cocinas o
cualquier otro aparato (incluso amplicadores) que produzca calor.
9. Coloque el cable de alimentación de forma que no se pueda pisar o pinzar, especialmente a la
altura de los enchufes, tomas de corriente y otros puntos de salida del aparato.
10. Use solo complementos/accesorios recomendados por el fabricante.
11. Use solamente el carrito, pie, trípode, soporte o mesa especicados por el fabricante o vendidos
con el aparato. Cuando se usa un carrito, tome cuidado al moverlo junto con el aparato para evitar
lesiones personales llegara a volcarse.
12. Desenchufe el aparato cuando haya tormentas eléctricas o si no va a utilizarse durante largos
periodos de tiempo.
- ES 1 -
Page 21

13. El aparato debe ser reparado siempre por personal autorizado. Lleve el aparato a reparar si se ha
dañado en modo alguno: cuando el cable de alimentación o el enchufe están deteriorados, si le
ha caído líquido o algún objeto se ha introducido en su interior, si ha quedado expuesto a la lluvia
o a la humedad, si no funciona con normalidad o se ha caído al suelo.
14. No exponga el aparato a goteos o salpicaduras de líquidos.
15. No coloque ningún tipo de objeto que pueda presentar un peligro sobre el aparato (por ejemplo:
recipientes con líquidos o velas encendidas).
16. Cuando se use el enchufe de la TOMA DE CORRIENTE o el acoplador del aparato como sistema
de desconexión, el dispositivo de desconexión debe estar siempre fácilmente accesible.
17. Compruebe que haya siempre suciente espacio libre alrededor del aparato para su ventilación.
18. Las pilas (pack de pilas o pilas instaladas) no deben estar expuestas al calor excesivo, a la luz del
sol, al fuego o similares.
Cuidado del producto
1. Desenchufe siempre el aparato cuando no esté usándolo y antes de limpiarlo.
2. No reproduzca música a un nivel de volumen excesivo ya que puede dañarse el oído o el aparato.
3. No use este aparato en lugares mojados o húmedos.
4. Desenchufe siempre el aparato de la toma de corriente antes de limpiarlo. Limpie el aparato con
un paño suave, húmedo y sin bras. No use productos de limpieza abrasivos o ásperos.
Cuidado del medioambiente
Este producto está diseñado y fabricado con materiales y componentes de alta
calidad que pueden reciclarse o reutilizarse.
Este producto contiene pilas que cumplen con la Directiva europea 2006/66/CE y que
no se pueden desechar junto con la basura doméstica. Infórmese sobre la normativa
local relacionada con la recolección separada de pilas usadas ya que al eliminarse
de forma correcta se evitan consecuencias negativas sobre el medioambiente y la
salud humana.
Cuando el producto posee el símbolo de un contenedor con ruedas tachado signica
que se encuentra conforme con la Directiva europea 2002/96/CE. Infórmese sobre el
sistema local de recolección separado de productos eléctricos y electrónicos. Siga la
normativa local y no deseche los productos usados junto con los residuos domésticos.
Una eliminación correcta de este producto ayuda a evitar las consecuencias negativas
para el medioambiente y la salud humana.
PRODUCTO LÁSER DE CLASE 1
PRECAUCIÓN
RADIACIÓN LÁSER INVISIBLE
SI SE ABRE Y SE RETIRAN LOS
INTERBLOQUEOS.
EVITE LA EXPOSICIÓN AL HAZ
Este producto contiene un dispositivo láser de baja potencia.
- ES 2 -
Page 22

Contenido de la caja
Compruebe e identique los contenidos del paquete:
• Unidad principal
• Altavoces
• Adaptador
• Mando a distancia (únicamente para la versión USB)
• Manual del usuario
• Juego de pegatinas (opcional)
Descripción de los componentes
1. CONECTOR DE AURICULARES
2. MANDO DE VOLUMEN
3. BOTÓN DE PISTA ANTERIOR
4. BOTÓN DE PISTA SIGUIENTE
5. BOTÓN DE STOP
6. BOTÓN DE REPRODUCCIÓN/PAUSA/AJUSTE DE
LA HORA
7. BOTÓN DE SINTONIZACIÓN +/-
8. CONECTOR AUXILIAR
9. PUERTO USB (únicamente para la versión USB)
10. PUERTA DEL CD
11. BOTÓN REPETIR/PROG
12. BOTÓN DE PRESINTONIZACIÓN
13. BOTÓN DE ENCENDIDO/FUNCIÓN
14. PANTALLA DE LCD
15. ALTAVOZ IZQUIERDO
16. ALTAVOZ DERECHO
17. CONECTOR DE SALIDA DE ALTAVOZ DERECHO
18. CONECTOR DE CC
19. CONECTOR DE SALIDA DE ALTAVOZ IZQUIERDO
20. ANTENA DE FM
Mando a distancia (ÚNICAMENTE para la versión USB)
1. LED DE INFRARROJOS
2. ENCENDIDO/APAGADO
3. BOTÓN REPETIR/PROG
4. BOTÓN REPRODUCIR/PAUSA
5. BOTÓN DE PISTA ANTERIOR
6. VOLUMEN –
7. VOLUMEN +
8. AJUSTE DEL RELOJ
9. SILENCIAR
10. BOTÓN DE PISTA SIGUIENTE
11. BOTÓN DE STOP
12. BOTÓN DE FUNCIÓN
13. BOTÓN DE PRESINTONIZACIÓN
14. COMPUERTA DE LA PILA
- ES 3 -
Page 23

Alimentación
• ¡Riesgo de dañar el producto! Compruebe que el voltaje de la toma de
corriente se corresponde con el voltaje indicado en la etiqueta ubicada en la
parte posterior del aparato.
• ¡Riesgo de descargas eléctricas! Al desenchufar el cable de alimentación de
PRECAUCIÓN
Standby automático
Cuando no se reproduzca música desde un dispositivo conectado, el producto pasará automáticamente
al modo en espera si:
• no se presiona ningún botón durante 10 minutos.
• no se reproduce ningún archivo de audio durante 10 minutos desde un dispositivo conectado.
Conexión de los altavoces
Desenrolle los cables de los altavoces y conéctelos a los terminales correspondientes.
Alimentación mediante adaptador de CA
1. Conecte el adaptador de CA/CC al CONECTOR DE CC de la unidad.
2. Conecte el adaptador de CA/CC a una toma de corriente instalada correctamente (230 V CA/50 Hz).
Nota:
Desenchufe el adaptador de la corriente y la unidad cuando no la vaya a utilizar durante un período
de tiempo prolongado.
El adaptador deberá instalarse cerca del equipo y permanecer fácilmente accesible.
Alimentación por pilas:
Asegúrese de instalar las pilas observando la polaridad correcta para así evitar que se produzcan
daños en el aparato. Retire siempre las pilas del aparato si no va a utilizarlo durante periodos
prolongados, ya que, de lo contrario, podrían producirse fugas de ácido que acabarían dañándolo.
No ingiera la pila. Peligro de quemaduras químicas. Este producto contiene una pila de tipo moneda/
botón. Si la pila de tipo moneda/botón se tragara, podría causar graves quemaduras internas en tan
sólo 2 horas y provocar la muerte. Mantenga las pilas nuevas y usadas alejadas de los niños. Si el
compartimento de la pila no cerrara de forma segura, deje de usar el producto y manténgalo alejado
de los niños. Si cree que la pila pudiera haber sido tragada o introducida en cualquier parte del cuerpo,
solicite atención médica inmediatamente.
Función de espera
Ponga la unidad en modo en espera para ahorrar energía.
1. Pulse y mantenga presionado el botón durante 3 segundos para apagar la unidad. La pantalla
mostrará el reloj y esto indicará que la unidad se encuentra en modo en espera.
2. Para evitar el consumo innecesario de energía, ponga siempre la unidad en el modo en espera.
la toma de corriente tire siempre del enchufe. No tire nunca del cable.
• Antes de conectar el cable de alimentación a la toma de corriente, compruebe
que ha completado todas las demás conexiones.
Utilización
1. Seleccione la fuente de sonido pulsando el botón .
2. Ajuste el sonido con el mando VOL.
3. Apague la unidad pulsando y manteniendo presionado el botón durante 3 segundos.
Ajuste del reloj
Apagado (en el modo en espera)
1. Pulse y mantenga presionado el botón durante 3 segundos y la hora comenzará a parpadear.
2. Pulse el botón o para ajustar la hora.
3. Pulse el botón para conrmar y los minutos comenzarán a parpadear.
4. Pulse el botón o para ajustar los minutos.
5. Pulse el botón para conrmar.
- ES 4 -
Page 24

Cómo escuchar la radio
1. Encienda la unidad pulsando el botón .
2. Pulse el botón repetidamente para seleccionar la función “FM”.
Antena: Para la recepción de FM, extienda totalmente el cable de antena de FM externo y ajuste la
dirección para una recepción óptima.
Ajuste de canales de radio de FM
Ajuste manual de los canales (frecuencia)
• Ajuste la frecuencia utilizando el mando de sintonización +/-
Búsqueda automática de canales (frecuencia)
1. Sintonice la emisora de radio deseada utilizando el botón o y se mostrará la frecuencia.
2. Cuando se haya encontrado un canal con suciente potencia, la función de búsqueda se detendrá,
o podrá detener la sintonización automática pulsando de nuevo el botón.
3. Repita hasta encontrar el canal deseado.
4. Ajuste el volumen girando el mando VOL
CANALES PRESINTONIZADOS (FRECUENCIA)
1. Sintonice la emisora deseada de acuerdo con el procedimiento de sintonización normal.
2. Pulse el botón /PROG y, a continuación el botón PRESET (Presintonizar) para cambiar el
número en el que se almacenará la emisora (nº 1 a nº 20).
3. Guarde la frecuencia actual pulsando el botón /PROG de nuevo cuando obtenga el número
deseado.
4. Repita el mismo procedimiento para guardar otras frecuencias deseadas en las memorias nº 1
hasta la nº 20.
Notas:
Una frecuencia guardada solamente podrá borrarse almacenando otra frecuencia en su lugar.
La unidad puede conservar un máximo de 20 emisoras presintonizadas.
RECUPERACIÓN DE LA MEMORIA
Recupere las frecuencias almacenadas pulsando el botón PRESET para seleccionar la emisora
1 a 20 según desee
Reproducción de CD
CÓMO REPRODUCIR UN CD
1. Abra la puerta del CD presionándola.
2. Introduzca un CD con el lado impreso hacia arriba.
3. Cierre la puerta del CD.
4. Encienda la unidad pulsando el botón y púlselo repetidamente hasta que aparezca el
indicador “CD” en la pantalla de LCD.
5. El CD se reproducirá automáticamente desde la primera pista.
6. Pulse el botón para pausar temporalmente la reproducción.
7. Para detener la reproducción, pulse el botón .
BOTÓN DE RETROCESO/AVANCE
Mientras reproduce un CD, podrá utilizar el botón / para saltar a un número de pista diferente
o para buscar pistas a alta velocidad.
1. Pulse el botón una vez para oír el comienzo de la pista actual.
2. Pulse el botón dos veces para oír las pistas anteriores del disco.
3. Pulse el botón para oír la siguiente pista del disco.
4. Pulse y mantenga presionado el botón . Se explorará la pista actual y se realizará un
desplazamiento hacia atrás a la(s) pista(s) anterior(es). Cuando encuentre la sección de pista
deseada, libere el botón y se reanudará la reproducción normal.
5. Pulse y mantenga presionado el botón . Se explorará la pista actual y se realizará un
desplazamiento hacia adelante a la(s) pista(s) siguiente(s). Cuando encuentre la pista deseada,
libere el botón y se reanudará la reproducción normal.
- ES 5 -
Page 25

REPRODUCCIÓN PROGRAMADA
Podrán programarse hasta 20 pistas para que se reproduzcan en cualquier secuencia deseada.
1. En el modo de parada de CD, pulse el botón /PROG hasta que el indicador PROGRAM 01
aparezca en la pantalla.
2. Pulse el botón o para seleccionar una pista que desee memorizar.
3. Pulse el botón /PROG para programar la pista.
4. Repita los pasos 2 y 3 para programar pistas adicionales.
5. Pulse el botón para iniciar la reproducción.
6. Para cancelar la reproducción programada, pulse el botón STOP dos veces.
REPRODUCCIÓN REPETIDA
Para repetir una pista sencilla durante la reproducción de CD de audio.
Pulse el botón /PROG mientras se está reproduciendo la pista que desea repetir. Aparecerá
“ ” en la pantalla.
• Para repetir otra pista, pulse el botón o el botón .
• Para cancelar la reproducción repetida, pulse el botón /PROG 3 veces.
PARA REPETIR TODAS LAS PISTAS
Pulse el botón /PROG dos veces durante la reproducción. Aparecerá “ ALL” en la pantalla.
• Todas las pistas se reproducirán secuencialmente y, a continuación, la secuencia se repetirá
continuamente.
• Para cancelar la reproducción repetida, pulse el botón /PROG 2 veces.
REPRODUCCIÓN ALEATORIA
Pulse el botón /PROG 3 veces durante la reproducción. Aparecerá “RAND” en la pantalla.
• Todas las pistas se reproducirán aleatoriamente.
• Para cancelar la reproducción aleatoria, pulse de nuevo el botón .
Reproducción de MP3 (únicamente para la versión USB):
Puerto USB
El aparato dispone de un puerto USB para reproducir archivos de música (MP3) almacenados en una
memoria USB.
• No deberá haber ningún disco en reproducción.
• Conecte una unidad USB al puerto USB del reproductor.
• Puse sucesivamente y ”USB” aparecerá en la pantalla y el contenido de la memoria USB se
leerá automáticamente.
PARA REPETIR UNA PISTA INDIVIDUAL
Pulse el botón /PROG mientras se está reproduciendo la pista que desea repetir. Aparecerá
“ ” en la pantalla.
• Para repetir otra pista, pulse el botón o .
• Para cancelar la reproducción repetida, pulse el botón /PROG 4 veces.
PARA REPETIR UNA CARPETA
Pulse el botón /PROG dos veces durante la reproducción. Aparecerá “ FOLDER” en la pantalla.
• Todas las pistas se reproducirán secuencialmente y, a continuación, la secuencia se repetirá
continuamente.
• Para cancelar la reproducción repetida, pulse el botón /PROG 3 veces.
PARA REPETIR TODAS LAS PISTAS
Pulse el botón /PROG 3 veces durante la reproducción. Aparecerá “ ALL” en la pantalla.
• Todas las pistas se reproducirán secuencialmente y, a continuación, la secuencia se repetirá
continuamente.
• Para cancelar la reproducción repetida, pulse el botón /PROG 2 veces.
- ES 6 -
Page 26

REPRODUCCIÓN ALEATORIA
Pulse el botón /PROG 4 veces durante la reproducción. Aparecerá “RAND” en la pantalla.
• Todas las pistas se reproducirán aleatoriamente.
• Para cancelar la reproducción aleatoria, pulse de nuevo el botón /PROG.
Nota: Tenga en cuanta que la unidad únicamente leerá memorias USB con formato FAT32 y una
capacidad máxima de 16 GB.
Conector de auriculares
La unidad está equipada con un CONECTOR DE AURICULARES para escuchar de forma privada.
Simplemente conecte unos auriculares con una clavija estéreo de 3,5 mm en el CONECTOR DE
AURICULARES. Cuando se conecten los auriculares, los altavoces de la unidad se desconectarán
automáticamente.
Conector de entrada AUX
1. Enchufe el cable auxiliar y conecte el otro extremo a un dispositivo de reproducción de audio.
2. Encienda la unidad pulsando el botón y púlselo repetidamente para seleccionar la función
“AUX”. La pantalla mostrará “AUX” para indicarlo.
3. Inicie la reproducción en su dispositivo de reproducción de audio. Para obtener instrucciones
acerca de cómo reproducir desde su dispositivo de reproducción de audio, consulte el manual
del mismo.
Especicaciones del producto (versión de CD básica)
• Entrada: 100-240 V ~ 50/60 Hz 0,3 A
• Salida: 5 V 1,5 A
• Rangos de frecuencia: FM: 87,5 – 108 Mhz
• Respaldo del reloj: 2 pilas de 1,5 V AAA, LR03
Especicaciones del producto (versión USB)
• Entrada: 100-240 V ~ 50/60 Hz 0,3 A
• Salida: 5,9 V 1,5 A
• Salida USB: 5 V CC 100 mA
• Rangos de frecuencia: FM: 87,5 – 108 Mhz
• Alimentación del mando a distancia: 1 pila de 3 V, CR2032
ADVERTENCIA sobre daños auditivos
• Seleccione un nivel bajo de volume en el reproductor antes de connectar los auriculares
a la fuente de sonido.
• Evite los niveles de volume extremadamente altos, especialmente si utiliza los
auriculares durante periodos de tiempo prolongados o con mucha frecuencia. Un nivel
de volume muy alto puede provocar daños auditivos permanentes.
INFORMACIÓN RELACIONADA CON LOS DISCOS
Manipulación
• Procure no tocar la cara grabada de los discos.• Sujete el disco por sus cantos
a n de evitar dejar huellas dactilares sobre su supercie.• La presencia de polvo,
huellas dactilares o arañazos en la cara grabada del disco podría afectar su
correcta reproducción.• Nunca coloque etiquetas ni cinta adhesiva en los discos.
- ES 7 -
Page 27

Almacenamiento
• Guarde los discos en sus cajas o fundas después de su utilización.• Nunca deje
expuesto los discos a la acción directa de los rayos del sol ni a fuentes de calor.
Nunca deje discos en el interior de un vehículo aparcado en pleno sol.
Limpieza
• Para limpiar los discos, utilice un paño suave que nos suelte pelusas y desplácelo
en línea recta desde el centro del disco hacia sus cantos. No utilice disolventes,
tales como gasolina, aguarrás, limpiadores de venta en comercios o aerosoles
antiestéticos formulados para discos de vinilo.
Nota :
No tire los aparatos eléctricos o electrónicos a la basura normal.
• Llévelos a un punto de recogida para este material,
• ya que algunas piezas de estos aparatos pueden ser dañinos para la salud o el
medio ambiente.
• Para ahorrar energía, si el aparato cesa su actividad durante rato, se apagará y entrará en modo
standby automáticamente. Se puede volver a encender mediante el selector de ENCENDIDO.
• Encontrará esta información en la placa de especicaciones técnicas situadas en la parte posterior
del aparato.
Para descargar la declaración al completo, por favor, visita nuestra página web: http://www.bigben.eu
dentro de la sección declaración de conformidad.
Importado por BIGBEN INTERACTIVE SA
396, Rue de la Voyette
CRT2 - FRETIN
CS 90414
59814 LESQUIN Cedex - Francia
www.bigben.eu
Fabricado en China
Importateur : Bigben Interactive FRANCE
396, Rue de la Voyette, C.R.T. 2 Fretin,
CS 90414 - 59814 LESQUIN Cedex
Bigben Interactive DEUTSCHLAND GmbH
Walter Gropius Str. 28, 50126 Bergheim, Deutschland
Bigben Interactive BELGIUM
Avenue Ernest Solvay, 1480 Tubize, Belgique
Bigben Interactive NEDERLAND b.v.
Franciscusweg 249-3B, 1216 SG Hilversum, Nederland
Bigben Interactive SPAIN S.L.
C/ Musgo 5, 2ª planta, 28023 Madrid, Spain
Bigben Interactive ITALIA s.r.l
Corso Sempione 221, 20025 Legnano - MI, Italia
FABRIQUÉ EN CHINE / MADE IN CHINA
HOTLINE
FRANCE, du lundi au vendredi (sauf jours fériés) :
9h00-19h00 ou sav.audio@bigben.fr
DEUTSCHLAND, Montag bis Sonntag von 8:00 bis 24:00 Uhr
09001-84 30 44*
Mobil funknet zen nicht mö glich)
*Minderjährige müssen vorher einen Erziehungsberechtigten um Erlaubnis fragen.
(0,49 €/Min. au s dem deuts chen Fest netz, An rufe aus al len
oder support@bigben-interactive.de
BELGIQUE / NEDERLAND, klantenservice@bigben-interactive.nl
customerservice@bigben-interactive.be
ESPAÑA, sat@bigbeninteractive.es
ITALIA, support@bigbeninteractive.it
www.bigben.eu
- ES 8 -
Page 28

MCD11
CD / RADIO FM / AUX IN
MP3 / USB (OPZIONALE)
IT
PRIMA DI UTILIZZARE L’APPARECCHIO, LEGGERE PER
INTERO IL PRESENTE MANUALE E CONSERVARLO PER
BBI_MCD11_1606_Ver1
ISTRUZIONI D‘USO
CONSULTAZIONI FUTURE.
Page 29

Indice
Per iniziare 1
Avvertenze di sicurezza ed altre informazioni 1
Manutenzione del prodotto 2
Contenuto della confezione 3
Descrizione delle parti 3
Telecomando 3
Accensione 4
Funzionamento 4
Impostazione dell’orologio 4
Funzionamento della radio 5
Riproduzione di CD 5
Riproduzione di MP3 6
Jack cufe 7
Jack Aux 7
Speciche tecniche 7
Nota 8
Per iniziare
• Estrarre l’apparecchiatura dalla confezione.
• Rimuovere tutti i materiali di imballaggio dal prodotto.
• Rimettere i materiali di imballaggio nella confezione o smaltirli in modo adeguato.
Avvertenze di sicurezza ed altre informazioni
Leggere con attenzione tutte le istruzioni prima di utilizzare questo prodotto. La garanzia decade in
caso di danni causati dalla mancata osservanza delle istruzioni.
Sicurezza
Avvertenza
• Non rimuovere l’alloggiamento dell’apparecchiatura.
• Non lubricare nessun componente dell’apparecchiatura.
• Non posizionare l’apparecchiatura sopra altri dispositivi elettrici.
• Tenere l’apparecchiatura lontana dalla luce solare diretta, da amme libere e da
sorgenti di calore.
• Non guardare direttamente il raggio laser all’interno di questo apparecchio.
• Assicurarsi di poter sempre raggiungere facilmente il cavo di alimentazione, la
spina o l’adattatore per scollegare l’apparecchio dall’alimentazione elettrica.
1. Leggere queste istruzioni.
2. Conservare queste istruzioni.
3. Rispettare tutte le avvertenze.
4. Seguire tutte le istruzioni.
5. Non utilizzare l’apparecchiatura vicino all’acqua.
6. Pulire solo con un panno asciutto.
7. Non ostruire le aperture di ventilazione. Installare in conformità con le istruzioni del produttore.
8. Non installare vicino a fonti di calore come radiatori, termosifoni, stufe o altri apparecchi (inclusi gli
amplicatori) che producono calore.
9. Proteggere il cavo di alimentazione dall’essere calpestato o schiacciato, particolarmente in
corrispondenza di spine, prese di corrente e del punto in cui esce dall’apparecchiatura.
10. Utilizzare solo accessori specicati dal produttore.
11. Utilizzare solo con il carrello, il supporto, il treppiede, la staffa od il tavolo specicati dal produttore
o venduti con l’apparecchio. Se si usa un carrello, prestare attenzione quando si sposta l’insieme
carrello/apparecchio per evitare il pericolo che si ribaltino.
12. Scollegare il dispositivo durante i temporali o se non viene utilizzato per lunghi periodi di tempo.
- IT 1 -
Page 30

13. Per qualsiasi intervento di assistenza, rivolgersi a tecnici qualicati. L’assistenza è necessaria
quando l’apparecchio ha subito in qualche modo dei danni, per esempio se il cavo di alimentazione
o la spina sono danneggiati, se è stato versato del liquido o sono caduti degli oggetti dell’apparato,
se l’apparecchio è stato esposto a pioggia o umidità, se non funziona normalmente o è caduto.
14. L’apparecchio non deve essere esposto a spruzzi o gocce d’acqua.
15. Non collocare sull’apparecchio eventuali fonti di pericolo (per esempio contenitori con liquidi,
candele accese).
16. Quando per scollegare la tensione di rete si usa la spina o un accoppiatore, il dispositivo di
disconnessione deve essere sempre comodo da raggiungere.
17. Assicurarsi che vi sia sufciente spazio libero attorno al prodotto per la ventilazione.
18. Le batterie (batterie singole o pacco batterie) non devono essere esposte a calore eccessivo come
luce solare diretta, fuoco o simili.
Manutenzione del prodotto
1. Scollegare sempre l’apparecchio quando non in uso e prima della pulizia.
2. Non riprodurre musica a volume troppo elevato per evitare il rischio di danni all’udito e/o
all’apparecchio stesso.
3. Non utilizzare l’apparecchio in condizioni di eccessiva umidità.
4. Scollegare sempre l’apparecchio dalla rete di alimentazione prima della pulizia. Pulire l’apparecchio
con un panno morbido, umido e privo di lanugine. Non utilizzare detergenti abrasivi o caustici.
Protezione dell’ambiente
Il prodotto è stato progettato e fabbricato con materiali e componenti di alta qualità
che possono essere riciclati e riutilizzati.
Il prodotto contiene batterie che in base alla direttiva europea 2006/66/CE non possono
essere smaltite assieme ai normali riuti domestici. Informarsi sulle normative locali
relative alla raccolta differenziata delle batterie in quanto il loro corretto smaltimento
permette di evitare conseguenze negative per l’ambiente e la salute.
Il simbolo del bidone della spazzatura barrato da una croce indica che il prodotto
è soggetto alla direttiva europea 2002/96/CE. Si prega di informarsi sul sistema
di raccolta differenziata per i riuti RAEE (prodotti elettrici ed elettronici). Attenersi
alle normative locali e non smaltire i vecchi prodotti con i normali riuti domestici.
Lo smaltimento corretto del prodotto aiuta a prevenire potenziali conseguenze
negative per l’ambiente e la salute.
PRODOTTO LASER DI CLASSE 1
ATTENZIONE
RADIAZIONI LASER INVISIBILI
SE APERTO O MANOMESSO.
EVITARE L'ESPOSIZIONE AL
Questo prodotto contiene un dispositivo laser a bassa potenza.
RAGGIO
- IT 2 -
Page 31

Contenuto della confezione
Controllare e identicare il contenuto della confezione:
• Unità principale
• Altoparlanti
• Adattatore
• Telecomando (solo per versione con USB)
• Manuale di istruzioni
• Set di adesivi (opzionale)
Descrizione delle parti
1. JACK CUFFIE
2. MANOPOLA DEL VOLUME
3. PULSANTE TRACCIA PRECEDENTE
4. PULSANTE TRACCIA SUCCESSIVA
5. PULSANTE STOP
6. PULSANTE RIPRODUCI/PAUSA/OROLOGIO
7. MANOPOLA FREQUENZA +/-
8. JACK AUX
9. PORTA USB (solo per versione con USB)
10. VANO CD
11. PULSANTE RIPETI/PROG
12. PULSANTE MEMORIA
13. PULSANTE ACCENSIONE/FUNZIONE
14. DISPLAY LCD
15. ALTOPARLANTE SINISTRO
16. ALTOPARLANTE DESTRO
17. JACK USCITA ALTOPARLANTE DESTRO
18. JACK ALIMENTAZIONE
19. JACK USCITA ALTOPARLANTE SINISTRO
20. ANTENNA FM
Telecomando (SOLO per versione con USB)
1. LED IR
2. ACCENSIONE
3. RIPETI/PROGRAMMA
4. RIPRODUCI/PAUSA
5. TRACCIA PRECEDENTE
6. VOLUME –
7. VOLUME +
8. OROLOGIO
9. MUTE
10. TRACCIA SUCCESSIVA
11. STOP
12. FUNZIONE
13. MEMORIA
14. VANO BATTERIA
- IT 3 -
Page 32

Accensione
• Rischio di danneggiare il prodotto! Assicurarsi che la tensione di alimentazione
corrisponda a quella indicata sull’etichetta sul retro.
• Rischio di scossa elettrica! Quando si stacca il cavo di alimentazione CA,
afferrare la spina per estrarla dalla presa di corrente. Non tirare mai il cavo di
ATTENZIONE
Auto standby
Quando non viene riprodotta musica da un dispositivo collegato, il prodotto entra automaticamente in
stand-by se:
• Non viene premuto nessun tasto per 10 minuti,
• Non si riceve nessuna riproduzione audio/video da un dispositivo collegato per 10 minuti.
Collegamento degli altoparlanti
Svolgere i cavi degli altoparlanti e collegarli ai terminali corrispondenti.
Alimentazione tramite adattatore CA
1. Collegare l'adattatore CA/CC al JACK ALIMENTAZIONE dell'unità.
2. Collegare l'adattatore CA/CC a una presa di corrente adatta (CA 230 V/50 Hz).
Nota:
Scollegare l'adattatore dalla presa di corrente e dall'unità in previsione di un lungo periodo di inutilizzo.
L'adattatore deve essere installato in prossimità dell'apparecchio e deve rimanere facilmente
accessibile.
Autonomia batterie:
Assicurarsi che le batterie siano inserite correttamente per evitare di danneggiare l’apparecchio.
Rimuovere le batterie quando l’apparecchio non sarà utilizzato per un lungo periodo, poiché ciò
causerà la perdita di liquido dalle batterie e, dunque, danni all’apparecchio.
Non ingerire la batteria. Rischio di ustione chimica Questo prodotto contiene una batteria a bottone. Se
la batteria viene ingerita può causare gravi ustioni interne in appena 2 ore, e può portare alla morte.
Conservare le batterie nuove e usate fuori dalla portata dei bambini. Se il vano batterie non si chiude
saldamente, non usare il prodotto e tenerlo fuori dalla portata dei bambini. Se si teme che le batterie
siano state ingerite o siano penetrate all'interno del corpo, contattare immediatamente un medico.
Funzione di standby
La funzione di standby permette di risparmiare energia.
1. Tenere premuto il pulsante per 3 secondi per spegnere l'unità. Sul display apparirà l'orologio,
a indicare che l'unità è in modalità di standby.
2. Per evitare un consumo di energia non necessario, impostare sempre la modalità di standby.
alimentazione.
• Prima di collegare il cavo di alimentazione CA, accertarsi di aver eseguito tutti
gli altri collegamenti.
Funzionamento
1. Selezionare la sorgente sonora premendo il pulsante .
2. Regolare il volume con l'apposita manopola.
3. Per spegnere l'apparecchio, tenere premuto il pulsante per 3 secondi.
Impostazione dell'orologio
L'unità deve essere in modalità di standby.
1. Tenere premuto il pulsante per 3 secondi; le cifre delle ore inizieranno a lampeggiare.
2. Premere il pulsante o per impostare le ore.
3. Premere il pulsante per confermare; le cifre dei minuti inizieranno a lampeggiare.
4. Premere il pulsante o per impostare i minuti.
5. Premere il pulsante per confermare.
- IT 4 -
Page 33

Funzionamento della radio
1. Accendere l'unità premendo il pulsante .
2. Premere ripetutamente il pulsante per selezionare la funzione "FM".
Antenna: per la ricezione FM, estendere completamente l'antenna FM esterna e orientarla per una
ricezione ottimale.
Impostare le stazioni radio FM
Impostazione manuale delle stazioni (frequenza)
• Impostare la frequenza con la manopola Frequenza +/-.
Ricerca automatica delle stazioni (frequenza)
1. Sintonizzarsi sulla stazione radio desiderata usando il pulsante o ; sul display apparirà la
frequenza.
2. Quando l'apparecchio trova una stazione con segnale sufcientemente forte, la ricerca si
interromperà; è possibile interrompere la ricerca automatica premendo nuovamente il pulsante.
3. Ripetere no a trovare la stazione desiderata.
4. Regolare il volume con l'apposita manopola.
MEMORIZZARE UNA STAZIONE (FREQUENZA)
1. Sintonizzarsi sulla stazione desiderata seguendo la normale procedura di sintonizzazione.
2. Premere il pulsante /PROG, quindi premere il pulsante MEMORIA per selezionare il numero di
memorizzazione della stazione (da 1 a 20).
3. Memorizzare la frequenza corrente premendo nuovamente il pulsante /PROG dopo aver
selezionato il numero desiderato.
4. Ripetere la stessa procedura per memorizzare altre frequenze no alla posizione 20.
Note:
l'unico modo per eliminare una frequenza memorizzata è memorizzarne un'altra al suo posto.
L'unità può memorizzare no a 20 stazioni.
ASCOLTARE UNA STAZIONE MEMORIZZATA
Per ascoltare una stazione memorizzata, premere il pulsante MEMORIA e selezionare la posizione in
memoria da 1 a 20.
Riproduzione di CD
RIPRODURRE UN CD
1. Aprire il vano CD premendolo.
2. Inserire un CD con il lato stampato rivolto verso l'alto.
3. Chiudere il vano CD.
4. Accendere l'unità premendo il pulsante e premerlo ripetutamente nché sul display non
appare "CD".
5. Il CD verrà riprodotto automaticamente dalla prima traccia.
6. Premere il pulsante per interrompere momentaneamente la riproduzione.
7. Per annullare la riproduzione, premere il pulsante .
PULSANTE AVANTI/INDIETRO
Durante la riproduzione di un CD, è possibile usare i pulsanti / per passare a un'altra traccia
o per scorrere le tracce ad alta velocità.
1. Premere una volta il pulsante per tornare all'inizio della traccia corrente.
2. Premere due volte il pulsante per ascoltare la traccia precedente del disco.
3. Premere il pulsante per ascoltare la traccia successiva del disco.
4. Tenendo premuto il pulsante è possibile scorrere la traccia corrente muovendosi verso la
traccia precedente. Dopo aver trovato il passaggio desiderato nella traccia, rilasciare il pulsante
per tornare alla riproduzione normale.
5. Tenendo premuto il pulsante è possibile scorrere la traccia corrente muovendosi verso la
traccia successiva. Dopo aver trovato il passaggio desiderato nella traccia, rilasciare il pulsante
per tornare alla riproduzione normale.
- IT 5 -
Page 34

RIPRODUZIONE PROGRAMMATA
È possibile programmare la riproduzione di 20 tracce al massimo nell'ordine desiderato.
1. Quando il CD non è in riproduzione, premere il pulsante /PROG nché sul display non appare
PROGRAM 01.
2. Premere il pulsante o per selezionare la traccia desiderata da programmare in prima
posizione.
3. Premere il pulsante /PROG per confermare.
4. Ripetere i passaggi 2 e 3 per programmare altre tracce.
5. Premere il pulsante per avviare la riproduzione.
6. Per annullare la riproduzione programmata, premere due volte il pulsante Stop .
RIPRODUZIONE RIPETUTA
Ripetere una traccia singola durante la riproduzione di un CD
Premere il pulsante /PROG mentre la traccia da ripetere è in riproduzione. Sul display apparirà " ".
• Per ripetere un'altra traccia, premere il pulsante o .
• Per annullare la riproduzione ripetuta, premere tre volte il pulsante /PROG.
RIPETERE TUTTE LE TRACCE
Premere due volte il pulsante /PROG durante la riproduzione. Sul display apparirà " ALL".
• Tutte le tracce saranno riprodotte in sequenza, quindi la sequenza verrà riprodotta continuativamente.
• Per annullare la riproduzione ripetuta, premere 2 volte il pulsante /PROG.
RIPRODUZIONE CASUALE
Premere 3 volte il pulsante /PROG durante la riproduzione. Sul display apparirà "RAND".
• Tutte le tracce saranno riprodotte in ordine casuale.
• Per annullare la riproduzione casuale, premere nuovamente il pulsante /PROG.
Riproduzione di MP3 (solo per versione con USB)
Porta USB
L'apparecchio è dotato di una porta USB per riprodurre le audio (MP3) memorizzati su una chiavetta USB.
• Nessun CD deve essere in riproduzione.
• Collegare una chiavetta USB alla porta USB dell'unità.
• Premere ripetutamente il pulsante nché sul display non appare "USB". Il contenuto della
chiavetta USB verrà letto automaticamente.
RIPETERE UNA TRACCIA SINGOLA
Premere il pulsante /PROG mentre la traccia da ripetere è in riproduzione. Sul display apparirà " ".
• Per ripetere un'altra traccia, premere il pulsante o .
• Per annullare la riproduzione ripetuta, premere 4 volte il pulsante /PROG.
RIPETERE UNA CARTELLA
Premere due volte il pulsante /PROG durante la riproduzione. Sul display apparirà " FOLDER".
• Tutte le tracce saranno riprodotte in sequenza, quindi la sequenza verrà riprodotta continuativamente.
• Per annullare la riproduzione ripetuta, premere 3 volte il pulsante /PROG.
RIPETERE TUTTE LE TRACCE
Premere 3 volte il pulsante /PROG durante la riproduzione. Sul display apparirà " ALL".
• Tutte le tracce saranno riprodotte in sequenza, quindi la sequenza verrà riprodotta continuativamente.
• Per annullare la riproduzione ripetuta, premere 2 volte il pulsante /PROG.
RIPRODUZIONE CASUALE
Premere 4 volte il pulsante /PROG durante la riproduzione. Sul display apparirà "RAND".
• Tutte le tracce saranno riprodotte in ordine casuale.
• Per annullare la riproduzione casuale, premere nuovamente il pulsante /PROG.
Nota: l'unità supporta esclusivamente chiavette USB formattate FAT32 con capacità non superiore a
16 GB.
- IT 6 -
Page 35

Jack cufe
L'unità è dotata di un JACK CUFFIE per collegare delle cufe. Inserire nel JACK CUFFIE cufe
stereo con connettore da 3,5 mm. Quando le cufe sono collegate all'unità, gli altoparlanti vengono
automaticamente disattivati.
Jack Aux
1. Collegare il cavo Aux e collegare l'altra estremità a un dispositivo di riproduzione audio.
2. Accendere l'unità premendo il pulsante e premerlo ripetutamente nché sul display non
appare "AUX". Sul display apparirà "AUX".
3. Avviare la riproduzione sul dispositivo esterno. Per le istruzioni relative alla riproduzione sul
dispositivo esterno, fare riferimento al relativo manuale.
Speciche tecniche (versione CD basica)
• Ingresso: 100-240 V ~ 50/60 Hz 0,3 A
• Uscita: 5 V 1,5 A
• Gamma di frequenza: FM: 87.5 – 108 Mhz
• Batterie orologio: 2 X 1,5 V, AAA, LR03
Speciche tecniche (versione con USB)
• Ingresso: 100-240 V ~ 50/60 Hz 0,3 A
• Uscita: 5,9V 1,5 A
• Uscita USB: CC 5 V 100 mA
• Gamma di frequenza: FM: 87.5 – 108 Mhz
• Batteria telecomando: 1 X 3 V, CR2032
AVVERTENZA rischio di Danni all’udito
• Prima di collegare la cufa all’apparecchio audo regolare un volume basso.
• Evitare un volume troppo alto, specialmente per periodi prolungati o in caso di uilizzo
frequente. Un volume eccessivo può causare Danni permanenti all’udito.
INFORMAZIONI SUI DISCHI
Maneggio
• Non toccare la parte inferiore dei dischi.• Tenere i dischi dai bordi per evitare
di lasciare impronte sulla supercie.• Polvere, impronte o graf possono causare
malfunzionamenti.• Non applicare etichette o nastro adesivo sui dischi.
Conservazione
• Riporre i dischi nella relativa custodia dopo l’uso.• Non esporre i dischi alla
luce diretta del sole o a fonti di calore. Non lasciare i dischi all’interno di un’auto
parcheggiata completamente al sole.
Pulizia
• Utilizzare un panno pulito, morbido e che non lascia pelucchi per pulire i dischi,
eseguire la pulizia partendo dal centro e procedere verso l’esterno seguendo una
linea retta. Non utilizzare solventi come benzina, diluenti, detergenti disponibili sul
mercato o spray antistatici per vinili.
- IT 7 -
Page 36

Nota :
Non gettare gli apparecchi elettrici ed elettronici tra i riuti indifferenziati.
• Depositare gli apparecchi presso un apposito punto di raccolta.
• Alcuni componenti contenuti in questi apparecchi possono essere pericolosi per la
salute e per l’ambiente.
• Per risparmiare energia, quando l’unità non emette uscita audio per un certo periodo di tempo,
l’unità passa automaticamente in modalità stand-by. Può essere riaccesa utilizzando il selettore di
alimentazione.
• È possibile trovare informazioni sull’etichetta situata sulla parte posteriore dell’unità.
Per scaricare la dichiarazione completa, visitare il nostro sito Web all’indirizzo:
http://www.bigbeninteractive.it/support, nella sezione relativa alla dichiarazione di conformità.
Importato da BIGBEN INTERACTIVE SA
396, Rue de la Voyette
CRT2 - FRETIN
CS 90414
59814 LESQUIN Cedex - Francia
www.bigben.eu
Prodotto in Cina
Importateur : Bigben Interactive FRANCE
396, Rue de la Voyette, C.R.T. 2 Fretin,
CS 90414 - 59814 LESQUIN Cedex
Bigben Interactive DEUTSCHLAND GmbH
Walter Gropius Str. 28, 50126 Bergheim, Deutschland
Bigben Interactive BELGIUM
Avenue Ernest Solvay, 1480 Tubize, Belgique
Bigben Interactive NEDERLAND b.v.
Franciscusweg 249-3B, 1216 SG Hilversum, Nederland
Bigben Interactive SPAIN S.L.
C/ Musgo 5, 2ª planta, 28023 Madrid, Spain
Bigben Interactive ITALIA s.r.l
Corso Sempione 221, 20025 Legnano - MI, Italia
FABRIQUÉ EN CHINE / MADE IN CHINA
HOTLINE
FRANCE, du lundi au vendredi (sauf jours fériés) :
9h00-19h00 ou sav.audio@bigben.fr
DEUTSCHLAND, Montag bis Sonntag von 8:00 bis 24:00 Uhr
09001-84 30 44*
Mobil funknet zen nicht mö glich)
*Minderjährige müssen vorher einen Erziehungsberechtigten um Erlaubnis fragen.
(0,49 €/Min. au s dem deuts chen Fest netz, An rufe aus al len
oder support@bigben-interactive.de
BELGIQUE / NEDERLAND, klantenservice@bigben-interactive.nl
customerservice@bigben-interactive.be
ESPAÑA, sat@bigbeninteractive.es
ITALIA, support@bigbeninteractive.it
www.bigben.eu
- IT 8 -
Page 37

MCD11
CD / FM / AUX IN
MP3 / USB (OPCIONAL)
PT
INSTRUÇÕES DE FUNCIONAMENTO
LEIA TODO O MANUAL DE UTILIZADOR ANTES DE
TRABALHAR COM ESTA UNIDADE E GUARDE O FOLHETO
PARA REFERÊNCIA FUTURA.
BBI_MCD11_1606_Ver1
Page 38

Índice
Começar 1
Instruções de segurança 1
Cuidados com o produto 2
O que se encontra na caixa 3
Descrição das peças 3
Telecomando 3
Alimentação 4
Funcionamento 4
Acertar o relógio 4
Ouvir rádio 5
Reprodução do CD 5
Reprodução de MP3 6
Entrada dos auscultadores 7
Entrada auxiliar 7
Especicações do produto 7
Nota 8
Começar
• Retire o aparelho da caixa.
• Retire quaisquer materiais de empacotamento do produto.
• Coloque o material de empacotamento dentro da caixa e guarde-o ou elimine-o com segurança.
Instruções de segurança
Leia e compreenda todas as instruções antes de usar este produto. Se ocorrerem danos causados
pelo não seguimento das instruções, a garantia perde a sua validade.
Segurança
Aviso
• Nunca retire a estrutura deste aparelho.
• Nunca lubrique nenhuma peça deste aparelho.
• Nunca coloque este aparelho dentro de outro equipamento elétrico.
• Mantenha este aparelho afastado da luz direta do sol, chamas sem proteção ou
calor.
• Nunca olhe para o raio laser dentro deste aparelho.
• Certique-se de que acede facilmente ao o da alimentação, cha ou adaptador
para desligar este aparelho da alimentação.
1. Leia estas instruções.
2. Guarde estas instruções.
3. Tenha atenção a todos os avisos.
4. Siga todas as instruções.
5. Não use este aparelho perto de água.
6. Limpe apenas com um pano seco.
7. Não bloqueie quaisquer aberturas de ventilação. Instale de acordo com as instruções do fabricante.
8. Não instale próximo de fontes de calor, tais como radiadores, registadores de calor, fornos ou
outros aparelhos (incluindo amplicadores) que produzam calor.
9. Proteja o o da alimentação para que não seja calcado ou esmagado, especialmente nas chas,
recetáculos e no ponto de onde saem do aparelho.
10. Use apenas acessórios especicados pelo fabricante.
11. Use apenas com o carrinho, suporte, tripé ou mesa especicados pelo fabricante ou vendidos
com o aparelho. Quando usar um carrinho, tenha cuidado quando mover o carrinho/aparelho,
para evitar lesões devido a quedas.
12. Desligue a cha da tomada durante trovoadas ou quando não usar o aparelho durante um longo
período de tempo.
- PT 1 -
Page 39

13. Todas as reparações devem ser feitas por pessoal qualicado. São necessárias reparações
quando o aparelho tiver sido danicado de alguma forma, tal como o o da alimentação ou a cha
estiverem estragados, se derramarem líquidos ou caírem objetos no aparelho, o aparelho ter sido
exposto à chuva ou humidade, não funcionar normalmente ou tiver caído.
14. O aparelho não deve ser exposto a pingos ou salpicos.
15. Não coloque quaisquer fontes perigosas em cima do aparelho (por ex., objetos cheios de líquido,
velas acesas).
16. Quando usar a cha da alimentação ou um acoplador para desligar o aparelho, este deverá
permanecer pronto a ser utilizado.
17. Certique-se de que tem espaço livre suciente em redor do produto para a ventilação.
18. As pilhas (conjunto de pilhas ou pilhas instaladas) não devem ser expostas a calor em excesso,
como luz solar direta, fogo ou algo semelhante.
Cuidados com o produto
1. Retire sempre a cha da tomada quando não usar o aparelho e antes de proceder à limpeza.
2. Não reproduza música com um nível de volume excessivo, pois podem ocorrer lesões auditivas
ou danos no aparelho.
3. Não use esta unidade em condições de humidade.
4. Retire sempre a cha da tomada antes de proceder à limpeza. Limpe o aparelho com um pano
suave ligeiramente embebido em água e sem linho. Não use produtos abrasivos nem detergentes
fortes.
Cuidados com o ambiente
O seu produto foi criado e fabricado com materiais e componentes de alta qualidade,
que podem ser reciclados e reutilizados.
O seu produto contém pilhas abrangidas pela Diretiva Europeia 2006/66/CE que não
podem ser eliminadas juntamente com o lixo doméstico comum. Informe-se acerca
das normas locais relativas à recolha em separado de pilhas, pois uma eliminação
correta ajuda a prevenir consequências negativas para o ambiente e para a saúde
humana.
Quando este símbolo de um caixote do lixo com uma cruz vier no produto, signica
que o produto é abrangido pela Diretiva Europeia 2002/96/CE. Por favor, informe-se
acerca do sistema de recolha em separado para produtos elétricos e eletrónicos. Aja
de acordo com as regras locais e não elimine o seu produto antigo juntamente com
o lixo doméstico comum. A eliminação correta do seu velho produto ajuda a prevenir
potenciais consequências negativas para o ambiente e para a saúde humana.
PRODUTO LASER DE CLASSE 1
RADIAÇÃO LASER INVISÍVEL
ABERTURA E BLOQUEIO
EVITE A EXPOSIÇÃO AO RAIO.
Este produto contém um dispositivo a laser de fraca potência.
CUIDADO
QUANDO O SISTEMA DE
ESTIVER DEFEITUOSO.
- PT 2 -
Page 40

O que se encontra na caixa
Verique e identique o conteúdo da caixa:
• Unidade principal
• Altifalantes
• Adaptador
• Telecomando (apenas para a versão USB)
• Manual do utilizador
• Conjunto de autocolantes (opcional)
Descrição das peças
1. ENTRADA PARA AUSCULTADORES
2. BOTÃO DO VOLUME
3. BOTÃO DE FAIXA ANTERIOR
4. BOTÃO DE FAIXA SEGUINTE
5. BOTÃO DE PARAR
6. BOTÃO DE REPRODUÇÃO/PAUSA/HORAS
7. MANÍPULO DE SINTONIZAÇÃO +/-
8. ENTRADA AUXILIAR
9. PORTA USB (apenas para versão USB)
10. PORTA DO CD
11. BOTÃO DE REPETIR/PROG
12. BOTÃO DE PREDEFINIÇÕES
13. BOTÃO DE ENERGIA/FUNÇÃO
14. ECRÃ LCD
15. ALTIFALANTE ESQUERDO
16. ALTIFALANTE DIREITO
17. ENTRADA DO ALTIFALANTE DIREITO
18. ENTRADA DC
19. ENTRADA DO ALTIFALANTE ESQUERDO
20. ANTENA FM
Telecomando (APENAS para a versão USB)
1. LED por IV
2. LIGAR/DESLIGAR
3. REPETIR/PROG
4. BOTÃO DE REPRODUÇÃO/PAUSA
5. BOTÃO DA FAIXA ANTERIOR
6. VOLUME –
7. VOLUME +
8. ACERTO DO RELÓGIO
9. SEM SOM
10. BOTÃO DE FAIXA SEGUINTE
11. BOTÃO DE PARAR
12. BOTÃO DE FUNÇÕES
13. BOTÃO DE PREDEFINIÇÕES
14. PORTA DO COMPARTIMENTO DAS PILHAS
- PT 3 -
Page 41

Alimentação
• Risco de danos no produto! Certique-se de que a voltagem da alimentação
corresponde à voltagem impressa na etiqueta traseira.
• Risco de choque elétrico! Quando desliga a alimentação CA, retire sempre a cha
CUIDADO
Espera automática
Quando não for reproduzida música a partir de um dispositivo conetado, o produto passa
automaticamente para o estado inativo se:
• Não premir qualquer botão durante 10 minutos.
• Não houver áudio a partir de um dispositivo conetado durante 10 minutos.
Ligação do altifalante
Desenrole os os do altifalante e ligue-os aos respetivos terminais.
Alimentação através do adaptador AC
1. Ligue o adaptador AC/DC na entrada DC da unidade.
2. Ligue o adaptador AC/DC a uma tomada devidamente instalada (AC 230V/50Hz).
Nota:
Desligue o adaptador da alimentação e da unidade quando não usar a unidade durante um longo
período de tempo.
O adaptador deverá estar instalado perto do equipamento e ser facilmente acessível.
Alimentação a pilhas
Certique-se de que as pilhas são inseridas corretamente, para evitar danos no aparelho. Retire
sempre as pilhas quando o aparelho não for utilizado durante um longo período de tempo, pois isso
causa derrames nas pilhas e acaba por danicar o aparelho.
Não ingira a pilha. Perigo de queimaduras químicas. Este produto contém uma pilha do tipo botão. Se
a bateria do tipo botão for engolida, pode causar queimaduras internas severas em apenas 2 horas,
e pode dar origem à morte. Mantenha as pilhas novas e usadas fora do alcance das crianças. Se o
compartimento da pilha não fechar bem, pare de usar o produto e mantenha-o afastado das crianças.
Se achar que as pilhas foram engolidas ou colocadas dentro de alguma parte do corpo, consulte
imediatamente um médico.
Função de espera
Passe para o modo de espera para poupar energia.
1. Prima e mantenha premido o botão durante 3 segundos para desligar a unidade. O visor
apresenta o relógio e isto indica que a unidade está no modo de espera.
2. Para evitar um consumo desnecessário de energia, coloque sempre a unidade no modo de
espera.
da tomada. Nunca puxe o o.
• Antes de ligar o o da alimentação CA, certique-se de que completou todas as
outras ligações.
Funcionamento
1. Selecione a sua fonte de som, premindo o botão .
2. Ajuste o som com o manípulo VOL.
3. Desligue o conjunto premindo e mantendo premido o botão durante 3 segundos.
Acertar o relógio
Desligar (no modo de espera)
1. Prima e mantenha premido o botão durante 3 segundos e as horas começam a piscar.
2. Prima o botão ou para acertar as horas.
3. Prima o botão para conrmar e os minutos começam a piscar.
4. Prima o botão ou para acertar os minutos.
5. Prima o botão para conrmar.
- PT 4 -
Page 42

Ouvir rádio
1. Ligue a unidade premindo o botão .
2. Prima repetidamente o botão para selecionar a função "FM".
Antena: Para a receção FM, estique por completo a antena externa FM e ajuste a direção para uma
receção ótima.
Denição dos canais de rádio FM
Ajuste manual dos canais (frequência)
• Ajuste a frequência usando o manípulo de sintonização +/-.
Busca automática do canal (frequência)
1. Sintonize a estação de rádio desejada usando o botão ou e a frequência será apresentada.
2. Quando um canal com força suciente for encontrado, a função de busca pára, ou pode parar a
sintonização automática premindo de novo.
3. Repita até atingir o seu canal desejado.
4. Ajuste o volume rodando o manípulo VOL.
CANAIS PREDEFINIDOS (FREQUÊNCIA)
1. Sintonize a sua estação desejada usando o procedimento normal de sintonização.
2. Prima o botão /PROG, depois prima o botão PRESET para alterar o número onde a estação
será guardada. (Nº 1 ao Nº 20)
3. Guarde a frequência atual, premindo de novo o botão /PROG quando chegar ao número
desejado.
4. Repita o mesmo procedimento para guardar outras frequências desejadas na memória Nº 1 à Nº 20.
Notas:
Uma frequência guardada só pode ser apagada guardando outra frequência no seu lugar.
A unidade pode memorizar até 20 estações predenidas.
RELEMBRAR A MEMÓRIA
Relembre as frequências guardadas premindo o botão PRESET para selecionar a estação 1 a 20
conforme desejado.
Reprodução do CD
REPRODUZIR UM CD
1. Abra a porta do CD premindo-a.
2. Insira um CD com o lado impresso virado para cima.
3. Feche a porta do CD.
4. Ligue a unidade premindo o botão e prima repetidamente até que o indicador "CD" apareça
no ecrã LCD.
5. O CD começa a reprodução a partir da primeira faixa.
6. Prima o botão para fazer uma pausa.
7. Para parar a reprodução, prima o botão .
BOTÃO DE RETROCEDER/AVANÇAR
Enquanto reproduz um CD, o botão / pode ser usado para passar para o número de uma faixa
diferente, ou para correr faixas a alta velocidade.
1. Prima uma vez o botão para ouvir o início da faixa atual.
2. Prima duas vezes o botão para ouvir as faixas anteriores do disco.
3. Prima o botão para ouvir a faixa seguinte no disco.
4. Prima e mantenha premido o botão . A faixa atual será analisada e retrocede para a faixa
anterior. Quando a secção desejada da faixa for encontrada, liberte o botão e a reprodução
volta ao normal.
5. Prima e mantenha premido o botão . A faixa atual será analisada e avança para a faixa
seguinte. Quando a faixa desejada for encontrada, liberte o botão e a reprodução volta ao
normal.
- PT 5 -
Page 43

REPRODUÇÃO PROGRAMADA
Pode programar até 20 faixas para reproduzir em qualquer sequência desejada.
1. No modo de CD parado, prima o botão /PROG até que o indicador PROGRAM 01 apareça
no ecrã.
2. Prima o botão ou para selecionar uma faixa desejada a ser memorizada.
3. Prima o botão /PROG para programar a faixa.
4. Repita os passos 2 e 3 para programar outras faixas.
5. Prima o botão para começar a reprodução.
6. Para cancelar a reprodução do programa, prima duas vezes o botão STOP .
REPRODUÇÃO REPETIDA
Para repetir uma única faixa durante a reprodução do CD de áudio.
Prima o botão /PROG enquanto a faixa que deseja repetir estiver em reprodução. " " aparece
no ecrã.
• Para repetir outra faixa, prima o botão ou .
• Para cancelar a repetição da reprodução, prima 3 vezes o botão /PROG.
REPETIR TODAS AS FAIXAS
Prima duas vezes o botão /PROG durante a reprodução. " ALL" aparece no ecrã.
• Todas as faixas serão reproduzidas em sequência e, depois, a sequência será repetida
continuamente.
• Para cancelar a repetição da reprodução, prima 2 vezes o botão /PROG.
REPRODUÇÃO ALEATÓRIA
Prima três vezes o botão /PROG durante a reprodução. "RAND" aparece no ecrã.
• Todas as faixas serão reproduzidas aleatoriamente.
• Para cancelar a reprodução aleatória, prima de novo o botão /PROG.
Reprodução de MP3 (apenas para a versão USB):
Porta USB
O aparelho vem com uma porta USB para reproduzir cheiros de música (MP3) guardados numa pen
USB.
• Não deverá haver qualquer disco a ser reproduzido.
• Ligue uma unidade de disco USB à porta USB do leitor.
• Prima sucessivamente e "USB" aparece no ecrã, e os conteúdos da pen USB serão lidos
automaticamente.
REPETIR UMA ÚNICA FAIXA
Prima o botão /PROG enquanto a faixa que deseja repetir estiver em reprodução. " " aparece
no ecrã.
• Para repetir outra faixa, prima o botão ou .
• Para cancelar a repetição da reprodução, prima 4 vezes o botão /PROG.
REPETIR UMA PASTA
Prima duas vezes o botão /PROG durante a reprodução. " FOLDER" aparece no ecrã.
• Todas as faixas serão reproduzidas em sequência e, depois, a sequência será repetida
continuamente.
• Para cancelar a repetição da reprodução, prima 3 vezes o botão /PROG.
REPETIR TODAS AS FAIXAS
Prima três vezes o botão /PROG durante a reprodução. " ALL" aparece no ecrã.
• Todas as faixas serão reproduzidas em sequência e, depois, a sequência será repetida
continuamente.
• Para cancelar a repetição da reprodução, prima 2 vezes o botão /PROG.
- PT 6 -
Page 44

REPRODUÇÃO ALEATÓRIA
Prima quatro vezes o botão /PROG durante a reprodução. "RAND" aparece no ecrã.
• Todas as faixas serão reproduzidas aleatoriamente.
• Para cancelar a reprodução aleatória, prima de novo o botão /PROG.
Nota: Tenha em conta que apenas pens USB com o formato FAT32 com uma capacidade inferior a
16GB podem ser lidas pela unidade.
Entrada dos auscultadores
A unidade vem equipada com uma ENTRADA PARA AUSCULTADORES para escutar sem perturbar os
outros. Basta ligar quaisquer auscultadores estéreo de 3,5 mm na ENTRADA PARA AUSCULTADORES.
Com os auscultadores ligados, o altifalante na unidade é desligado automaticamente.
Entrada auxiliar
1. Ligue o cabo auxiliar e ligue a outra extremidade a um dispositivo de reprodução de áudio.
2. Ligue a unidade premindo o botão e prima repetidamente para selecionar a função "AUX".
O ecrã LCD apresenta "AUX" para indicar.
3. Comece a reprodução a partir do seu dispositivo de reprodução de áudio. Para mais instruções
sobre como reproduzir a partir do seu dispositivo de reprodução de áudio, consulte o respetivo
manual.
Especicações do produto (versão básica do CD)
• Entrada: 100-240V ~ 50/60Hz 0.3A
• Saída: 5V 1,5A
• Alcance da frequência: FM: 87.5 – 108Mhz
• Pilha de segurança: 2 pilhas AAA, LR03, de 1,5V
Especicações do produto (versão USB)
• Entrada: 100-240V ~ 50/60Hz 0.3A
• Saída: 5,9V 1,5A
• Saída USB: DC 5V 100mA
• Alcance da frequência: FM: 87.5 – 108Mhz
• Pilha de segurança do telecomando: 1 pilha de 3V, CR2032
AVISO de danos auditivos
• Regule o nível de som para um nível baixo no aparelho de reprodução, antes de ligar
os auscultadores à fonte de som.
• Evite um volume de som demasiado elevado, especialmente durante um tempo
prolongado ou numa utilização frequente. Um volume de som demasiado alto pode
causar danos auditivos permanents.
ACERCA DOS DISCOS
Manuseamento
• Não toque no lado inferior dos discos.• Segure os discos pelas extremidades,
para evitar deixar impressões digitais na superfície.• Qualquer pó, dedadas ou
riscos podem causar um mau funcionamento.• Nunca cole uma etiqueta ou ta
adesiva no disco.
- PT 7 -
Page 45

Armazenamento
• Volte a colocar os discos na caixa após a utilização.• Nunca exponha os discos à
luz direta do sol ou fontes de calor. Nunca deixe os discos no interior de um carro
estacionado exposto à luz direta do sol.
Limpeza
• Use um pano limpo, suave e sem linho para limpar o disco, indo do centro
para fora em linha reta. Não use solventes, como gasolina, diluente, produtos de
limpeza disponíveis comercialmente ou sprays antiestáticos para discos de vinil.
Nota :
Não deite fora os aparelhos elétricos e eletrónicos no caixote de lixo normal.
• Entregue-os no ponto de recolha.
• Algumas partes deste aparelho podem ser perigosas para a saúde e para o
ambiente.
• De modo a poupar energia quando a unidade não emitir som durante algum tempo, a unidade entra
automaticamente no modo de espera. Pode ligá-la usando novamente o botão da energia.
• Pode encontrar a informação na placa localizada na parte traseira da unidade.
Para descarregar a declaração completa, por favor consulte o nosso website: http://www.bigben.eu
na secção declaração de conformidade.
Importado pela BIGBEN INTERACTIVE SA
396, Rue de la Voyette
CRT2 - FRETIN
CS 90414
59814 LESQUIN Cedex - França
www.bigben.eu
Fabricado na China
Importateur : Bigben Interactive FRANCE
396, Rue de la Voyette, C.R.T. 2 Fretin,
CS 90414 - 59814 LESQUIN Cedex
Bigben Interactive DEUTSCHLAND GmbH
Walter Gropius Str. 28, 50126 Bergheim, Deutschland
Bigben Interactive BELGIUM
Avenue Ernest Solvay, 1480 Tubize, Belgique
Bigben Interactive NEDERLAND b.v.
Franciscusweg 249-3B, 1216 SG Hilversum, Nederland
Bigben Interactive SPAIN S.L.
C/ Musgo 5, 2ª planta, 28023 Madrid, Spain
Bigben Interactive ITALIA s.r.l
Corso Sempione 221, 20025 Legnano - MI, Italia
FABRIQUÉ EN CHINE / MADE IN CHINA
HOTLINE
FRANCE, du lundi au vendredi (sauf jours fériés) :
9h00-19h00 ou sav.audio@bigben.fr
DEUTSCHLAND, Montag bis Sonntag von 8:00 bis 24:00 Uhr
09001-84 30 44*
Mobil funknet zen nicht mö glich)
*Minderjährige müssen vorher einen Erziehungsberechtigten um Erlaubnis fragen.
(0,49 €/Min. au s dem deuts chen Fest netz, An rufe aus al len
oder support@bigben-interactive.de
BELGIQUE / NEDERLAND, klantenservice@bigben-interactive.nl
customerservice@bigben-interactive.be
ESPAÑA, sat@bigbeninteractive.es
ITALIA, support@bigbeninteractive.it
www.bigben.eu
- PT 8 -
Page 46

MCD11
CD/FM/AUX-IN
MP3/USB (OPTIONAL)
DE
BEDIENUNGSANLEITUNG
BITTE LESEN SIE DIESE BETRIEBSANLEITUNG VOR GEBRAUCH
DES PRODUKTES SORGFÄLTIG DURCH UND BEWAHREN SIE
SIE ANSCHLIESSEND ZU NACHSCHLAGEZWECKEN AUF.
BBI_MCD11_1606_Ver1
Page 47

Inhalt
Erste Schritte 1
Sicherheit und Hinweise 1
Produktpege 2
Verpackungsinhalt 3
Beschreibung der Teile 3
Fernbedienung 3
Stromversorgung 4
Benutzung 4
Einstellen der Uhr 4
Radio hören 5
CD-Wiedergabe 5
MP3-Wiedergabe 6
Kopfhörerbuchse 7
AUX-Eingang 7
Technische Daten 7
Anmerkung: 8
Erste Schritte
• Sound Tower aus dem Karton herausnehmen.
• Sämtliches Verpackungsmaterial vom Produkt entfernen.
• Verpackungsmaterial im Karton aufbewahren oder sicher entsorgen.
Sicherheit und Hinweise
Alle Anweisungen vor Benutzung des Produkts lesen und nachvollziehen. Treten Schäden aufgrund
von Nichtbeachtung der Anweisungen auf, wird die Garantie gegenstandslos.
Sicherheit
Warnhinweise
• Niemals das Gehäuse des Geräts entfernen.
• Niemals Teile des Geräts mit Schmiermittel behandeln.
• Niemals das Gerät auf anderen elektrischen Vorrichtungen aufstellen.
• Gerät vor direkter Sonneneinstrahlung, offenen Flammen und Hitze schützen.
• Niemals in den Laserstrahl im Inneren des Geräts blicken.
• Stets einfachen Zugang zu Stromkabel, Netzstecker und Netzadapter sicherstellen,
damit das Gerät vom Strom getrennt werden kann.
1. Anweisungen lesen.
2. Anweisungen aufbewahren.
3. Alle Warnungen beachten.
4. Alle Anweisungen befolgen.
5. Gerät nicht in der Nähe von Wasser verwenden.
6. Nur mit einem trockenen Tuch reinigen.
7. Lüftungsöffnungen nicht blockieren. Gemäß den Angaben des Herstellers aufstellen.
8. Nicht in der Nähe von Wärmequellen aufstellen, wie Heizkörper, Heizlüfter, Öfen oder anderen
Geräten (einschließlich Verstärker), die Wärme erzeugen.
9. Stromkabel vor Belastungen durch Quetschen und Einklemmen schützen, insbesondere an
Steckern, Mehrfachsteckdosen und den Austrittsstellen aus dem Gerät.
10. Erweiterungen/Zubehör nur wie vom Hersteller angegeben verwenden.
11. Nur in Verbindung mit Rollwagen, Ständern, Stativen, Halterungen oder Tischen verwenden, die
vom Hersteller angegeben wurden oder mit dem Gerät verkauft werden. Bei Verwendung eines
Rollwagens ist Vorsicht beim Verschieben des Wagens/Geräts geboten, um Verletzungen durch
umfallende Teile zu verhindern.
12. Bei Gewitter oder längerer Nichtbenutzung Gerät vom Netzstrom trennen.
13. Service-Reparaturen nur von qualiziertem Fachpersonal durchführen lassen. Eine Service-
Reparatur ist nötig, wenn das Gerät in irgendeiner Weise beschädigt wurde, z. B. bei Schäden
an Stromkabel oder Netzstecker, nach dem Verschütten von Flüssigkeiten über dem Gerät, nach
dem Aufprall von Objekten auf dem Gerät, nach Kontakt mit Regen oder Feuchtigkeit, bei nicht
ordnungsgemäßer Funktionsweise oder nach dem Herunterfallen des Geräts.
- DE 1 -
Page 48

14. Das Gerät darf keinen Tropfen oder Spritzern ausgesetzt werden.
15. Keine Gefahrenquellen (z. B. mit Flüssigkeit gefüllte Objekte, brennende Kerzen) auf das Gerät
stellen.
16. Wenn eine Wandsteckdose oder ein Geräteadapter zum Anschluss des Geräts verwendet wird,
muss dieser Anschluss stets zugänglich bleiben.
17. Um das Produkt herum muss genügend Freiraum zur Luftzirkulation bleiben.
18. Batterien (integrierte Akkupacks oder Batterien) dürfen keiner übermäßigen Hitze ausgesetzt
werden, wie Sonneneinstrahlung, offenes Feuer o. Ä.
Produktpege
1. Das Gerät muss stets von der Steckdose getrennt werden, wenn es nicht in Betrieb ist oder
gereinigt werden soll.
2. Musik nicht mit übermäßiger Lautstärke hören, da dies dem Gehör und/oder dem Gerät schaden
kann.
3. Gerät nicht im nassen oder feuchten Zustand verwenden.
4. Gerät vor der Reinigung stets von der Netzstromversorgung trennen. Gerät mit einem weichen,
feuchten, usenfreien Tuch reinigen. Keine Scheuermittel oder aggressiven Reinigungsmittel
verwenden.
Umweltschutz
Das Produkt wurde mit qualitativ hochwertigen Werkstoffen und Komponenten
konzipiert und hergestellt, die recycelt und wiederverwendet werden können.
Ihr Produkt enthält Batterien, für die die europäische Richtlinie 2006/66/EG gilt und die
nicht mit den normalen Haushaltsabfällen entsorgt werden dürfen. Bitte informieren
Sie sich über die örtlichen Vorschriften bezüglich der getrennten Sammlung von
Batterien, da eine ordnungsgemäße Entsorgung dazu beiträgt, Umweltschäden zu
verhindern und Ihre Gesundheit zu schützen.
Dieses Symbol einer durchgestrichenen Mülltonne auf Rädern auf einem Produkt
weist daraufhin, dass für das Produkt die europäische Richtlinie 2002/96/EG gilt.
Bitte informieren Sie sich über das örtliche Abfalltrennsystem für elektrische und
elektronische Produkte. Bitte richten Sie sich nach den in Ihrer Region geltenden
Vorschriften für die Abfalltrennung und entsorgen Sie Ihre alten Produkte nicht mit Ihren
normalen Haushaltsabfällen. Die Entsorgung alter Produkte hilft, Umweltschäden zu
verhindern und Ihre Gesundheit zu schützen.
LASERPRODUKT DER KLASSE I
LASERSTRAHLUNG BEI
ÖFFNUNG UND UMGEHUNG
DER VERRIEGELUNG
KONTAKT MIT DEM
LASERSTRAHL VERMEIDEN
Dieses Produkt enthält einen Niederstromlaser.
- DE 2 -
VORSICHT
UNSICHTBARE
Page 49

Verpackungsinhalt
Prüfen und identizieren Sie den Inhalt Ihrer Verpackung:
• Basisgerät
• Lautsprecher
• Netzteil
• Fernbedienung (nur für die USB-Version)
• Bedienungsanleitung
• Aufkleber-Set (optional)
Beschreibung der Teile
1. KOPFHÖRERBUCHSE
2. LAUTSTÄRKEREGLER
3. ZURÜCK-TASTE
4. WEITER-TASTE
5. STOPP-TASTE
6. TASTE FÜR WIEDERGABE/PAUSE/UHRZEIT
EINSTELLEN
7. +/- DREHKNOPF
8. AUX-EINGANG
9. USB-PORT(nur für die USB-Version)
10. CD-KLAPPE
11. WIEDERHOLEN/PROG-TASTE
12. FESTSENDER-TASTE
13. EINSCHALTEN/FUNKTIONS-TASTE
14. LCD-ANZEIGE
15. LINKER LAUTSPRECHER
16. RECHTER LAUTSPRECHER
17. AUSGANGSBUCHSE DES RECHTEN
LAUTSPRECHERS
18. DC-BUCHSE
19. AUSGANGSBUCHSE DES LINKEN
LAUTSPRECHERS
20. FM-ANTENNE
Fernbedienung (NUR für die USB-Version)
1. IR-LED
2. EIN-/AUSSCHALTEN
3. WIEDERHOLEN/PROG
4. WIEDERGABE/PAUSE-TASTE
5. ZURÜCK-TASTE
6. LAUTSTÄRKE –
7. LAUTSTÄRKE +
8. UHR EINSTELLEN
9. STUMMSCHALTEN
10. WEITER-TASTE
11. STOPP-TASTE
12. FUNKTIONS-TASTE
13. FESTSENDER-TASTE
14. BATTERIEFACHABDECKUNG
- DE 3 -
Page 50

Stromversorgung
• Risiko eines Produktschadens! Die Stromspannung muss der Spannungsangabe
auf dem Rückseitenetikett entsprechen.
• Risiko eines Stromschlags! Beim Trennen des Wechselstromkabels stets den
VORSICHT
Auto-Stand-by
Wenn keine Musik von einem verbundenen Gerät abgespielt wird, wechselt das Produkt automatisch
in den Stand-by-Modus, sofern:
• 10 Minuten lang keine Taste gedrückt wurde,
• 10 Minuten lang keine Musik von einem angeschlossenen Gerät abgeschlossen wurde.
Anschluss des Lautsprechers
Kabel des Lautsprechers abwickeln und mit den entsprechenden Anschlüssen verbinden.
Stromversorgung über AC-Netzteil
1. AC/DC-Netzteil mit der DC-BUCHSE des Gerätes verbinden.
2. AC/DC-Netzteil mit einer ordnungsgemäß installierten Wandsteckdose verbinden (AC 230 V/50 Hz).
Hinweis:
Wenn das Gerät voraussichtlich längere Zeit nicht benutzt wird, bitte das Netzteil von dem Gerät und
der Stromquelle trennen.
Das Netzteil sollte in der Nähe des Gerätes installiert und gut zugänglich sein.
Batteriestrom
Achten Sie darauf, die Batterien korrekt herum einzulegen, um Beschädigungen am Gerät zu
vermeiden. Entfernen Sie die Batterien immer, wenn das Gerät voraussichtlich längere Zeit nicht
benutzt wird. Batterien können auslaufen und folglich Ihr Gerät beschädigen.
Batterie nicht verschlucken. Es besteht Verätzungsgefahr. Dieses Produkt enthält eine
Knopfzellenbatterie. Wenn die Knopfzellenbatterie verschluckt wird, kann sie innerhalb von nur 2
Stunden schwere innere Verätzungen verursachen, die tödlich sein können. Halten Sie neue und
gebrauchte Batterien von Kindern fern. Wenn sich das Batteriefach nicht korrekt schließen lässt,
stellen Sie den Gebrauch des Gerätes ein und halten Sie es von Kindern fern. Wenn Sie glauben,
dass Batterien verschluckt wurden oder in einen Teil des Körpers eingeführt wurden, suchen Sie sofort
einen Arzt auf.
Stand-by-Funktion
Schalten Sie in den Stand-by-Modus, um Energie zu sparen.
1. Halten Sie die Taste 3 Sekunden lang gedrückt, um das Gerät auszuschalten. Das Display
zeigt die Uhr. Dies weist darauf hin, dass das Gerät im Stand-by-Modus ist.
2. Um unnötigen Energieverbrauch zu vermeiden, schalten Sie das Gerät immer in den Stand-byModus.
Stecker aus der Steckdose ziehen. Niemals am Kabel ziehen.
• Vor dem Einstecken des Wechselstromkabels überprüfen, dass alle anderen
Anschlüsse verbunden sind.
Benutzung
1. Wählen Sie Ihre Audioquelle, indem Sie die Taste drücken.
2. Stellen Sie die Lautstärke mithilfe des VOL-Drehreglers ein.
3. Schalten Sie das Gerät aus, indem Sie die Taste 3 Sekunden lang gedrückt halten.
Einstellen der Uhr
Ausschalten (im Stand-by-Modus)
1. TASTE 3 Sekunden lang gedrückt halten. Daraufhin beginnt die Stunden-Ziffer zu blinken.
2. oder Taste drücken, um die Stunde einzustellen.
3. TASTE zur Bestätigung drücken. Daraufhin beginnt Minuten-Ziffer zu blinken.
4. oder Taste drücken, um die Minute einzustellen.
5. Zur Bestätigung die TASTE drücken.
- DE 4 -
Page 51

Radio hören
1. Gerät durch Drücken der Taste einschalten.
2. Mehrmals die Taste drücken, um den „FM“-Modus auszuwählen.
Antenne: Die externe FM-Antenne für den FM-Empfang ganz ausziehen und die Ausrichtung für den
optimalen Empfang anpassen.
Einstellen der FM-Radiosender
Manuelle Einstellung der Sender (Frequenz)
• Stellen Sie die Frequenz mithilfe des +/- Einstellknopfes ein.
Automatischer Sendersuchlauf (Frequenz)
1. Stellen Sie den gewünschten Sender mithilfe der oder Taste ein. Daraufhin wird die
Frequenz angezeigt.
2. Wenn ein Sender mit einem ausreichend starken Signal gefunden wurde, stoppt der Sendersuchlauf,
oder Sie können die automatische Einstellung durch erneutes Drücken der Taste abbrechen.
3. Wiederholen Sie diesen Schritt, bis Sie Ihren gewünschten Sender gefunden haben.
4. Lautstärke durch Drehen des VOL-Drehreglers einstellen.
VOREINGESTELLTE SENDER (FREQUENZ)
1. Gewünschten Sender mithilfe des normalen Sendersuchvorgangs einstellen.
2. /PROG-Taste drücken und dann die PRESET-Taste, um die Senderplatznummer zu ändern,
unter welcher der Sender gespeichert wird. (Nr. 1 bis Nr. 20)
3. Speichern Sie die aktuelle Frequenz durch erneutes Drücken der /PROG-Taste, wenn Sie die
gewünschte Senderplatznummer erreicht haben.
4. Vorgang wiederholen, um andere gewünschte Frequenzen unter Nr. 1 bis Nr. 20 zu speichern.
Anmerkungen:
Eine gespeicherte Frequenz kann nur gelöscht werden, indem eine andere Frequenz unter ihrem
Senderplatz gespeichert wird.
Das Gerät kann bis zu 20 voreingestellte Sender speichern.
SPEICHERABRUF
Rufen Sie die gespeicherten Frequenzen durch Drücken der PRESET-Taste ab, um den gewünschten
Sender von 1 bis 20 auszuwählen.
CD-Wiedergabe
ABSPIELEN EINER CD
1. Öffnen Sie die CD-Klappe, indem Sie darauf drücken.
2. Eine CD mit dem Etikett nach oben zeigend einlegen.
3. CD-Klappe schließen.
4. Gerät durch Drücken der Taste einschalten. Dann diese Taste mehrmals drücken, bis „CD“
auf dem LCD erscheint.
5. Die CD-Wiedergabe beginnt automatisch mit dem ersten Titel.
6. Um die Wiedergabe kurzzeitig zu unterbrechen, die Taste drücken.
7. Um die Wiedergabe abzubrechen, die Taste drücken.
SCHNELLRÜCKLAUF/VORLAUF-Taste
Wenn eine CD abgespielt wird, können Sie mithilfe der / Taste zu einer anderen Titel-Nummer
springen oder die Titel schnell durchsuchen.
1. Einmal kurz die Taste drücken, um den Anfang des aktuellen Titels zu hören.
2. Zweimal die Taste drücken, um die vorherigen Titel auf der CD zu hören.
3. Taste drücken, um den nächsten Titel auf der CD zu hören.
4. Halten Sie die Taste gedrückt. Der aktuelle Titel wird rückwärts durchsucht und anschließend
der/die vorherige/n Titel. Wenn der gewünschte Abschnitt des Titels gefunden wurde, die Taste
loslassen. Die normale Wiedergabe wird daraufhin fortgesetzt.
- DE 5 -
Page 52

5. Halten Sie die Taste gedrückt. Der aktuelle Titel wird vorwärts durchsucht und anschließend
der/die nächste/n Titel. Wenn der gewünschte Titel gefunden wurde, die Taste loslassen. Die
normale Wiedergabe wird daraufhin fortgesetzt.
PROGRAMMIERTE WIEDERGABE
Es können bis zu 20 Titel programmiert werden, um in jeder beliebigen Reihenfolge abgespielt zu
werden.
1. Drücken Sie im CD-Stopp-Modus /PROG-Taste, bis PROGRAM 01 auf dem Display angezeigt
wird.
2. Mithilfe der oder Taste den gewünschten Titel zum Speichern auswählen.
3. /PROG-Taste drücken, um den nächsten Titel zu programmieren.
4. Wiederholen Sie Schritt 2 und 3, um Titel zu programmieren.
5. Taste drücken, um die Wiedergabe zu starten.
6. Zum Abbrechen der programmierten Wiedergabe zweimal die STOPP-Taste drücken.
WIEDERGABEWIEDERHOLUNG
Wiederholen eines einzelnen Titels während der CD-Wiedergabe
/PROG-Taste drücken, während der Titel, den Sie wiederholen möchten, abgespielt wird. Auf dem
Display erscheint „ “.
• Zum Wiederholen eines anderen Titels die Taste oder die Taste drücken.
• Zum Abbrechen der Wiedergabewiederholung die /PROG-Taste dreimal drücken.
WIEDERHOLEN ALLER TITEL
Zweimal die /PROG-Taste während der Wiedergabe drücken. Auf dem Display wird „ ALL“
angezeigt.
• Es werden alle Titel in Reihenfolge abgespielt. Anschließend wird die Folge kontinuierlich wiederholt.
• Zum Abbrechen der Wiedergabewiederholung die /PROG-Taste zweimal drücken.
ZUFALLSWIEDERGABE
Dreimal die /PROG-Taste während der Wiedergabe drücken. Auf dem Display erscheint „RAND“.
• Alle Titel werden in zufälliger Reihenfolge abgespielt.
• Zum Abbrechen der Zufallswiedergabe die /PROG-Taste erneut drücken.
MP3-Wiedergabe (nur die USB-Version):
USB-Port
Das Gerät ist mit einem USB-Port versehen, um auf einem USB-Stick gespeicherte Musikdateien
(MP3) abzuspielen.
• Es sollten keine Discs abgespielt werden.
• Verbinden Sie einen USB-Wechseldatenträger mit dem USB-Port des Lesegerätes.
• Drücken Sie mehrmals . Daraufhin wird „USB“ auf dem Display angezeigt und der Inhalt des
USB-Sticks wird automatisch abgelesen.
WIEDERHOLEN EINES EINZELNEN TITELS
/PROG-Taste drücken, während der Titel, den Sie wiederholen möchten, abgespielt wird. Auf dem
Display erscheint „ “.
• Zum Wiederholen eines anderen Titels oder drücken.
• Zum Abbrechen der Wiedergabewiederholung die /PROG-Taste viermal drücken.
WIEDERHOLEN EINES ORDNERS
Zweimal die /PROG-Taste während der Wiedergabe drücken. Auf dem Display erscheint
„ FOLDER“.
• Es werden alle Titel in Reihenfolge abgespielt. Anschließend wird die Folge kontinuierlich wiederholt.
• Zum Abbrechen der Wiedergabewiederholung die /PROG-Taste dreimal drücken.
- DE 6 -
Page 53

WIEDERHOLEN ALLER TITEL
Dreimal die /PROG-Taste während der Wiedergabe drücken. Auf dem Display erscheint„ ALL“.
• Es werden alle Titel in Reihenfolge abgespielt. Anschließend wird die Folge kontinuierlich wiederholt.
• Zum Abbrechen der Wiedergabewiederholung die /PROG-Taste zweimal drücken.
ZUFALLSWIEDERGABE
Viermal die /PROG-Taste während der Wiedergabe drücken. Auf dem Display erscheint „RAND“.
• Alle Titel werden in zufälliger Reihenfolge abgespielt.
• Zum Abbrechen der Zufallswiedergabe die /PROG-Taste erneut drücken.
Anmerkung: Bitte beachten Sie, dass nur USB-Sticks mit FAT32-Format und einer Kapazität von
höchstens 16 GB von dem Gerät gelesen werden können.
Kopfhörerbuchse
Das Gerät ist mit einer KOPFHÖRERBUCHSE für ungestörtes Hören versehen. Verbinden Sie
einfach einen beliebigen 3,5-Stereokopfhörer mit der KOPFHÖRERBUCHSE. Wenn ein Kopfhörer
angeschlossen ist, sind die Lautsprecher des Gerätes automatisch deaktiviert.
AUX-Eingang
1. Verbinden Sie das AUX-Kabel und verbinden Sie das andere Ende mit einem Audio-Player.
2. Gerät durch Drücken der Taste einschalten und mehrmals diese Taste drücken, um die
„AUX“ Funktion auszuwählen. Das LCD zeigt zur Bestätigung „AUX“ an.
3. Starten Sie die Wiedergabe von Ihrem Audio-Player. Um Anleitungen zur Benutzung Ihres AudioPlayers zu erhalten, lesen Sie bitte seine Bedienungsanleitung.
Technische Daten (einfach CD-Version)
• Eingangsleistung: 100-240 V ~ 50/60 Hz 0,3A
• Ausgangsleistung: 5 V 1,5 A
• Frequenzbereiche: FM: 87,5 – 108 Mhz
• Uhrsicherung: 2 X 1,5 V, AAA, LR03
Technische Daten (USB-Version)
• Eingangsleistung: 100-240 V ~ 50/60 Hz 0,3A
• Ausgangsleistung: 5,9V 1,5A
• USB-Ausgang: DC 5 V 100 mA
• Frequenzbereiche: FM: 87,5 – 108 Mhz
• Fernbedienungssicherung: 1 X 3 V, CR2032
WARNUNG vor Gehörschäden
• Stellen Sie anm Wiedergabegerät eine geringe Lautstärke ein, bevor Sie den Kopfhörer
an die Tonquelle anschließen.
• Vermeiden Sie eine zu hode Lautsärke, insbesondere über längere Zeiträume oder bei
häuger Benutzung. Zu große Lautstärke kann zu dauerhaften Gehörschäden führen.
ÜBER DISCS
Handhabung
• Berühren Sie nicht die Unterseite der Discs.• Fassen Sie Discs an den Rändern
an, um keine Fingerabdrücke auf der Oberäche zu hinterlassen.• Staub,
Fingerabdrücke oder Kratzer können zu Fehlfunktionen führen.• Befestigen Sie
niemals ein Etikett oder Klebeband auf der Disc.
- DE 7 -
Page 54

Aufbewahrung
• Legen Sie nach dem Gebrauch die Discs zurück in ihre Hülle.• Setzen Sie Discs
keiner direkten Sonnenstrahlung oder Wärmequellen aus. Lassen Sie Discs
niemals in einem Auto, das direkt in der Sonne geparkt ist, liegen.
Reinigung
• Reinigen Sie die Disc mit einem sauberen, weichen, fusselfreien Tuch.
Wischen Sie von der Mitte in einer geraden Linie nach außen. Verwenden Sie
keine Lösungsmittel wie etwa Benzin, Farbverdünner, im Handel erhältliche
Reinigungsmittel oder antistatische Sprays für Vinyl-Schallplatten.
Anmerkung:
Bitte entsorgen Sie elektrische und elektronische Geräte nicht in den Hausmüll.
• Bringen Sie sie zu einer entsprechenden Sammelstelle.
• Einige Komponenten in diesen Geräten können gesundheits- und umweltschädlich
sein.
• Zum Energiesparen schaltet das Gerät automatisch in Stand-by, wenn für eine gewisse Zeit keine
Audio-Wiedergabe erfolgt. Es kann durch Verwendung des POWER-Schalters wieder eingeschaltet
werden.
• Sie nden diese Informationen auf dem Schild an der Rückseite des Gerätes.
Die vollständige Erklärung ndet sich auf unserer Website http://www.bigben-interactive.de/support
im Abschnitt zur Konformitätserklärung.
Importiert von BIGBEN INTERACTIVE SA
396, Rue de la Voyette
CRT2 - FRETIN
CS 90414
59814 LESQUIN Cedex - Frankreich
www.bigben.eu
Hergestellt in China
Importateur : Bigben Interactive FRANCE
396, Rue de la Voyette, C.R.T. 2 Fretin,
CS 90414 - 59814 LESQUIN Cedex
Bigben Interactive DEUTSCHLAND GmbH
Walter Gropius Str. 28, 50126 Bergheim, Deutschland
Bigben Interactive BELGIUM
Avenue Ernest Solvay, 1480 Tubize, Belgique
Bigben Interactive NEDERLAND b.v.
Franciscusweg 249-3B, 1216 SG Hilversum, Nederland
Bigben Interactive SPAIN S.L.
C/ Musgo 5, 2ª planta, 28023 Madrid, Spain
Bigben Interactive ITALIA s.r.l
Corso Sempione 221, 20025 Legnano - MI, Italia
FABRIQUÉ EN CHINE / MADE IN CHINA
HOTLINE
FRANCE, du lundi au vendredi (sauf jours fériés) :
9h00-19h00 ou sav.audio@bigben.fr
DEUTSCHLAND, Montag bis Sonntag von 8:00 bis 24:00 Uhr
09001-84 30 44*
Mobil funknet zen nicht mö glich)
*Minderjährige müssen vorher einen Erziehungsberechtigten um Erlaubnis fragen.
(0,49 €/Min. au s dem deuts chen Fest netz, An rufe aus al len
oder support@bigben-interactive.de
BELGIQUE / NEDERLAND, klantenservice@bigben-interactive.nl
customerservice@bigben-interactive.be
ESPAÑA, sat@bigbeninteractive.es
ITALIA, support@bigbeninteractive.it
www.bigben.eu
- DE 8 -
Page 55

MCD11
CD/ FM / AUX IN
MP3 / USB (OPTIONEEL)
NL
VEILIGHEIDSINSTRUCTIES
LEES DEZE GEBRUIKSAANWIJZING VOLLEDIG DOOR
ALVORENS DEZE EENHEID TE BEDIENEN, EN BEWAAR DIT
BOEKJE VOOR UW ADMINISTRATIE.
BBI_MCD11_1606_Ver1
Page 56

Inhoud
Aan de slag 1
Veiligheidsvoorschriften 1
Uw product op de juiste manier gebruiken 2
Wat bevindt er zich in de verpakking 3
Beschrijving van de onderdelen 3
Afstandsbediening 3
Voeding 4
Werking 4
De klok instellen 4
Naar de radio luisteren 5
CD’s afspelen 5
MP3 afspelen 6
Koptelefoonaansluiting 7
AUX-ingangsaansluiting 7
Productgegevens 7
Let op 8
Aan de slag
• Haal het toestel uit de doos.
• Verwijder al het verpakkingsmateriaal van het product.
• Plaats het verpakkingsmateriaal in de doos en bewaar of verwijder het op een correcte en veilige
manier.
Veiligheidsvoorschriften
Lees en begrijp alle instructies voordat u dit product in gebruik neemt. De garantie is ongeldig voor
schade die wordt veroorzaakt door het negeren van de instructies.
Veiligheid
Waarschuwing
• Verwijder nooit de behuizing van dit apparaat.
• Smeer nooit een onderdeel van dit apparaat.
• Plaats dit apparaat nooit op andere elektrische apparaten.
• Houd dit apparaat uit de buurt van direct zonlicht, open vlammen of warmte.
• Kijk nooit in de laserstraal binnenin dit apparaat.
• Zorg dat het snoer, stekker of adapter altijd eenvoudig bereikbaar zijn zodat u het
apparaat indien nodig snel van de voeding kunt ontkoppelen.
1. Lees deze gebruiksaanwijzing.
2. Bewaar deze gebruiksaanwijzing.
3. Houd rekening met alle waarschuwingen.
4. Bevolg alle instructies.
5. Gebruik dit apparaat niet in de buurt van water.
6. Maak het apparaat alleen schoon met een droge doek.
7. Zorg dat de ventilatieopeningen niet worden geblokkeerd. Installeer het apparaat volgens de
instructies van de fabrikant.
8. Installeer het apparaat niet in de buurt van warmtebronnen zoals radiatoren, warmteafvoeren,
kachels of andere warmteproducerende apparaten (waaronder versterkers).
9. Bescherm het snoer tegen knikken, vooral bij de stekker, het stopcontact en het punt waar het
snoer uit het apparaat komt, en zorg dat er niet over het snoer gelopen kan worden.
10. Gebruik alleen hulpstukken/accessoires die door de fabrikant zijn aanbevolen.
11. Gebruik het apparaat alleen met de wagen, standaard, driepoot, beugel of tafel die door de
fabrikant wordt aangegeven of die samen met het apparaat wordt verkocht. Wanneer een wagen
wordt gebruikt, wees voorzichtig wanneer u de wagen met het geïnstalleerde apparaat verplaatst
om letsel veroorzaakt door het omvallen van het apparaat te voorkomen.
12. Haal de stekker uit het stopcontact tijdens onweer of als u het apparaat gedurende een lange
periode niet zult gebruiken.
- NL 1 -
Page 57

13. Laat alle reparaties door een vakbekwame reparateur uitvoeren. Reparaties zijn nodig als
het apparaat beschadigd is, bijv. als het snoer of de stekker beschadigd is, als er vloeistoffen
of voorwerpen in het apparaat zijn terechtgekomen, als het apparaat aan regen of vocht is
blootgesteld, niet normaal functioneert of als het is gevallen.
14. Stel het apparaat niet bloot aan drup- of spatwater.
15. Plaats geen voorwerpen die gevaar kunnen opleveren op het apparaat (bijv. met water gevulde
vazen, aangestoken kaarsen).
16. Wanneer de netstekker of connector als stroomonderbreker wordt gebruikt, moet deze
stroomonderbreker gemakkelijk te bedienen zijn.
17. Zorg voor voldoende vrije ruimte rondom het product voor een goede ventilatie.
18. Stel batterijen (geïnstalleerde accu’s of batterijen) nooit bloot aan overmatige warmte zoals
zonlicht, vuur, etc.
Uw product op de juiste manier gebruiken
1. Trek altijd de stekker uit het stopcontact als het apparaat niet wordt gebruikt en vóór reiniging.
2. Speel geen muziek af op een zeer hoog volume, dit kan gehoorbeschadiging of schade aan het
apparaat veroorzaken.
3. Gebruik dit toestel niet in een vochtige of natte omgeving.
4. Haal altijd de stekker uit het stopcontact voordat u het apparaat schoonmaakt. Maak het apparaat
schoon met een zachte, vochtige en pluisvrije doek. Gebruik geen oplosmiddelen of agressieve
schoonmaakmiddelen.
Houd rekening met het milieu
Uw product is ontworpen en gemaakt met hoogwaardige materialen en componenten
die gerecycled en opnieuw gebruikt kunnen worden.
Uw product bevat batterijen die onder de Europese Richtlijn 2006/66/EG vallen en
niet met het gewone huisafval weggegooid mogen worden. Vraag uw gemeente om
advies over hoe batterijen op een juiste manier weg te gooien. Een juiste verwijdering
helpt negatieve gevolgen voor het milieu en de menselijke gezondheid te voorkomen.
Als dit ‘doorgekruiste vuilnisbak’-symbool op een product is vermeld, geeft dit aan
dat het product onder de Europese richtlijn 2002/96/EG valt. Informeer u over het
inzamelsysteem voor elektrische en elektronische producten dat in uw gemeente
van kracht is. Verwijder uw afgedankt product in overeenstemming met de lokale
wetgeving en gooi het niet met uw normale huisafval weg. Door te zorgen voor een
juiste verwijdering van uw afgedankt product helpt u mogelijke negatieve gevolgen
voor het milieu en de menselijke gezondheid te voorkomen.
KLASSE 1 LASERAPPARAAT
LASERSTRALING KOMT VRIJ
WANNEER GEOPEND EN DE
VERGRENDELING NIET WERKT.
VERMIJD BLOOTSTELLING
AAN DE STRAAL
Dit product bevat een laser van laag vermogen.
- NL 2 -
OPGELET
ONZICHTBARE
Page 58

Wat bevindt er zich in de verpakking?
Controleer en identiceer de inhoud van uw verpakking:
• Toestel
• Luidsprekers
• Adapter
• Afstandsbediening (alleen voor USB-versie)
• Gebruiksaanwijzing
• Set met stickers (optioneel)
Beschrijving van de onderdelen
1. KOPTELEFOONAANSLUITING
2. VOLUME KNOP
3. VORIGE TRACK KNOP
4. VOLGENDE TRACK KNOP
5. STOP KNOP
6. AFSPELEN/PAUZE/TIJD INSTELLEN KNOP
7. AFSTEMMEN +/- KNOP
8. AUX-AANSLUITING
9. USB-POORT (Alleen voor USB-versie)
10. CD-KLEP
11. HERHALEN/PROG KNOP
12. PRESET KNOP
13. AAN/UIT /FUNCTIE KNOP
14. LCD-DISPLAY
15. LINKER LUIDSPREKER
16. RECHTER LUIDSPREKER
17. UITGANGSAANSLUITING RECHTER
LUIDSPREKER
18. DC-AANSLUITING
19. UITGANGSAANSLUITING LINKER LUIDSPREKER
20. FM-ANTENNE
Afstandsbediening (ALLEEN voor USB-versie)
1. IR LED
2. IN-/UITSCHAKELEN
3. HERHALEN/PROG
4. AFSPELEN/PAUZE KNOP
5. VORIGE TRACK KNOP
6. VOLUME –
7. VOLUME +
8. KLOK INSTELLEN
9. DEMPING
10. VOLGENDE TRACK KNOP
11. STOP KNOP
12. FUNCTIE KNOP
13. PRESET KNOP
14. BATTERIJDEKSEL
- NL 3 -
Page 59

Voeding
• Risico op schade aan het product! Zorg dat de netspanning overeenstemt met de
spanning die op het zwarte label is vermeld.
• Risico op een elektrische schok! Haal altijd de stekker uit het stopcontact door de
OPGELET
Automatisch stand-by
Wanneer er geen muziek vanaf het aangesloten apparaat wordt afgespeeld, gaat het product
automatisch in stand-by als:
• Er gedurende 10 minuten geen enkele knop wordt ingedrukt,
• Er gedurende 10 minuten geen audio vanaf een aangesloten apparaat wordt afgespeeld.
De luidsprekers aansluiten
Ontrol de luidsprekerkabels en sluit ze aan op de overeenkomstige aansluitklemmen.
Stroomvoorziening via AC-ingang
1. Sluit het ene uiteinde van de AC/DC-adapter aan op de DC-AANSLUITING van het apparaat.
2. Sluit het andere uiteinde van de AC/DC-adapter aan op een juist geïnstalleerd stopcontact
(AC 230v/50Hz).
Opmerking:
Ontkoppel de adapter van de voeding en het apparaat als het apparaat gedurende een lange periode
niet gebruikt zal worden.
Het gebruikte stopcontact moet zich dichtbij het apparaat bevinden en eenvoudig bereikbaar zijn.
Batterijvermogen
Zorg dat de batterijen juist worden geïnstalleerd om schade aan het apparaat te vermijden. Verwijder
altijd de batterijen wanneer u het apparaat gedurende een lange periode niet zult gebruiken, om
lekkage van de batterijen en eventuele schade aan uw toestel te vermijden.
De batterij niet inslikken. Gevaar op chemische brandwonden. Dit product bevat een knoopcelbatterij.
Als de knoopcelbatterij wordt ingeslikt, kan dit reeds binnen 2 uur ernstige interne brandwonden
veroorzaken en tot de dood leiden. Houd nieuwe en gebruikte batterijen uit de buurt van kinderen. Als
het batterijvak niet juist sluit, gebruik het product niet langer en houd het uit de buurt van kinderen. Als
u denkt dat er batterijen zijn ingeslikt of in het lichaam zijn terechtgekomen, raadpleeg onmiddellijk
een arts.
Stand-byfunctie
Schakel naar stand-by om energie te besparen.
1. Druk en houd de knop 3 seconden ingedrukt om het apparaat uit te schakelen. Het display
geeft de klok weer, wat aangeeft dat het apparaat in stand-by staat.
2. Om het onnodig verbruiken van energie te vermijden, zet het apparaat altijd in stand-by.
stekker vast te houden en eruit te halen, en nooit door aan het snoer te trekken.
• Voordat u de stekker in het stopcontact steekt, controleer of alle andere aansluitingen
gemaakt zijn.
Werking
1. Selecteer uw gewenste audiobron door op de knop te drukken.
2. Regel het volume met de VOL knop.
3. Schakel het apparaat uit door de knop 3 seconden ingedrukt te houden.
De klok instellen
Uitgeschakeld (in stand-by)
1. Druk en houd de knop 3 seconden ingedrukt totdat de uurweergave start met knipperen.
2. Druk op de of knop om het uur aan te passen.
3. Druk op de knop om te bevestigen en de minutenweergave start met knipperen.
4. Druk op de of knop om de minuten aan te passen.
5. Druk op de knop om te bevestigen.
- NL 4 -
Page 60

Naar de radio luisteren
1. Druk op de knop om het apparaat aan te zetten.
2. Druk herhaaldelijk op de knop om de “FM” functie te selecteren.
Antenne: Voor de beste FM-ontvangst, rol de externe FM-antennedraad volledig uit en pas de richting
aan.
Op FM-radiostations afstemmen
Handmatig op radiostations (frequentie) afstemmen
• Pas de frequentie aan met behulp van de afstemmen +/- knop
Automatisch op radiostations (frequentie) afstemmen
1. Stem af op het gewenste radiostation met behulp van de of knop en de frequentie wordt
op het scherm weergegeven.
2. Als er een radiostation met een voldoende sterk signaal wordt gevonden, stopt het apparaat met
zoeken. U kunt het automatisch afstemmen tevens stoppen door opnieuw op de knop te drukken.
3. Herhaal totdat u uw gewenst radiostation hebt gevonden.
4. Draai de VOL knop om het volume te regelen.
VOORKEUZESTATION (FREQUENTIE)
1. Stem af op uw gewenst station met behulp van de normale afstemprocedure.
2. Druk op de /PROG knop. Druk vervolgens op de PRESET knop om het nummer waarin u het
station wilt opslaan te wijzigen. (Nr.1 tot Nr.20)
3. Eenmaal u het gewenste nummer hebt bereikt, sla de huidige frequentie op door opnieuw op de
/PROG knop te drukken.
4. Herhaal dezelfde procedure om andere radiostations in het geheugen (Nr.1 tot Nr.20) op te slaan.
Opmerkingen:
Een opgeslagen frequentie kan alleen worden verwijderd door een andere frequentie op dezelfde
locatie op te slaan.
Het toestel kan tot 20 radiostations in het geheugen opslaan.
RADIOSTATIONS UIT HET GEHEUGEN OPROEPEN
Roep het gewenste opgeslagen radiostation (1 tot 20) op door op de PRESET knop te drukken.
CD’s afspelen
EEN CD AFSPELEN
1. Druk op de CD-klep om te openen.
2. Plaats een CD met de bedrukte zijde naar boven gericht.
3. Sluit de CD-klep.
4. Zet het apparaat aan door op de knop te drukken en druk er vervolgens herhaaldelijk op
totdat de “CD” indicator op het LCD-display wordt weergegeven.
5. De CD wordt automatisch vanaf de eerste track afgespeeld.
6. Druk op de knop om het afspelen tijdelijk te onderbreken.
7. Om het afspelen te stoppen, druk op de knop.
SNEL TERUG-/DOORSPOELEN KNOP
Tijdens het afspelen van een CD, gebruik de / knop om naar een andere track te gaan of om
tracks aan een hoge snelheid te doorlopen.
1. Druk eenmaal op de knop om het begin van de huidige track te horen.
2. Druk tweemaal op de knop om naar de vorige tracks op de disc te luisteren.
3. Druk op de knop om naar de volgende track op de disc te luisteren.
4. Druk en houd de knop ingedrukt. De huidige track wordt achterwaarts doorlopen en keert terug
naar de vorige track(s). Eenmaal de gewenste track wordt gevonden, laat de knop los en het
normaal afspelen wordt hervat.
5. Druk en houd de knop ingedrukt. De huidige track wordt voorwaarts doorlopen en gaat naar de
vorige track(s). Eenmaal de gewenste track wordt gevonden, laat de knop los en het normaal
afspelen wordt hervat.
- NL 5 -
Page 61

GEPROGRAMMEERD AFSPELEN
U kunt tot 20 tracks programmeren om ze in uw gewenste volgorde te laten afspelen.
1. In de CD-modus, druk op de /PROG knop totdat de PROGRAM 01 indicator op het display
verschijnt.
2. Druk op de of knop om een bepaalde track in het geheugen op te slaan.
3. Druk op de /PROG knop om de track te programmeren.
4. Herhaal stap 2 en 3 om tracks te programmeren.
5. Druk op de knop om het afspelen te starten.
6. Om het geprogrammeerd afspelen te annuleren, druk tweemaal op de STOP knop.
HERHAALD AFSPELEN
Om één track tijdens het afspelen van een audio-CD te herhalen:
Druk op de /PROG knop terwijl de track die u wilt herhalen wordt afgespeeld. Het “ ” verschijnt
op het display.
• Om een andere track te herhalen, druk op de knop of knop.
• Om herhaald afspelen te annuleren, druk drie keer op de /PROG knop.
ALLE TRACKS HERHALEN
Druk tijdens het afspelen tweemaal op de /PROG knop. “ ALL” verschijnt op het display.
• Alle tracks worden op volgorde afgespeeld en deze volgorde wordt vervolgens continu herhaald.
• Om herhaald afspelen te annuleren, druk twee keer op de /PROG knop.
WILLEKEURIG AFSPELEN
Druk tijdens het afspelen drie keer op de /PROG knop. “RAND” verschijnt op het display.
• Alle tracks worden willekeurig afgespeeld.
• Om herhaald afspelen te annuleren, druk opnieuw op de /PROG knop.
MP3 afspelen (alleen voor USB-versie):
USB-poort
Het apparaat is uitgerust met een USB-poort voor het afspelen van muziekbestanden (MP3) die op
een USB-stick zijn opgeslagen.
• Er mag geen disc worden afgespeeld.
• Sluit het USB-station aan op de USB-poort van de speler.
• Druk herhaaldelijk, “USB” verschijnt op het display en de inhoud van de USB-stick wordt
automatisch gelezen.
EEN BEPAALDE TRACK HERHALEN
Druk op de /PROG knop terwijl de track die u wilt herhalen wordt afgespeeld. Het “ ” verschijnt
op het display.
• Om een andere track te herhalen, druk op de knop of knop.
• Om herhaald afspelen te annuleren, druk vier keer op de /PROG knop.
EEN MAP HERHALEN
Druk tijdens het afspelen tweemaal op de /PROG knop. “ FOLDER” verschijnt op het display.
• Alle tracks worden op volgorde afgespeeld en deze volgorde wordt vervolgens continu herhaald.
• Om herhaald afspelen te annuleren, druk drie keer op de /PROG knop.
ALLE TRACKS HERHALEN
Druk tijdens het afspelen drie keer op de /PROG knop. “ ALL” verschijnt op het display.
• Alle tracks worden op volgorde afgespeeld en deze volgorde wordt vervolgens continu herhaald.
• Om herhaald afspelen te annuleren, druk twee keer op de /PROG knop.
WILLEKEURIG AFSPELEN
Druk tijdens het afspelen vier keer op de /PROG knop. “RAND” verschijnt op het display.
• Alle tracks worden willekeurig afgespeeld.
• Om herhaald afspelen te annuleren, druk opnieuw op de /PROG knop.
Opmerking: Het apparaat kan alleen FAT32-formaat USB-sticks met een geheugen van max. 16GB lezen.
- NL 6 -
Page 62

Koptelefoonaansluiting
Het apparaat is voorzien van een KOPTELEFOONAANSLUITING om alleen naar muziek te luisteren.
Sluit een stereo-koptelefoon met een 3,5mm stekker aan op de KOPTELEFOONAANSLUITING.
Eenmaal een koptelefoon op het toestel is aangesloten, komt er niet langer muziek uit de luidsprekers.
AUX-ingangsaansluiting
1. Sluit een uiteinde van de AUX-kabel aan op het apparaat en het ander uiteinde op een extern
audioapparaat.
2. Druk op de knop om het toestel aan te zetten en druk vervolgens herhaaldelijk om de “AUX”
functie te selecteren. Het LCD-display geeft “AUX” weer.
3. Start met het afspelen van muziek vanaf uw extern audioapparaat. Voor instructies over het
afspelen van muziek vanaf uw extern audioapparaat, raadpleeg de relevante gebruiksaanwijzing.
Productgegevens (basis CD-versie)
• Invoer: 100-240V ~ 50/60Hz 0,3A
• Uitvoer: 5V 1,5A
• Frequentiebereik: FM: 87.5 – 108Mhz
• Back-up voor klok: 2 X 1,5V, AAA, LR03
Productgegevens (USB-versie)
• Invoer: 100-240V ~ 50/60Hz 0,3A
• Uitvoer: 5,9V 1,5A
• USB-uitgang: DC5V 100mA
• Frequentiebereik: FM: 87.5 – 108Mhz
• Back-up voor afstandsbediening: 1 X 3V, CR2032
WAARSCHUWING woor ghoorschade
• Stele en lag volume op het weergaveapparaat in, voordat u de koptelefoon op de
geluidsbron aansluit.
• Vookom een te hoog volume, met name gedurende langere periodes of bij frequent
gebruik. Een te luid volume kan leiden tot permanente gehoorschade.
OVER DE DISKS
Hantering
• Raak de onderkant van de disks niet aan.• Houd de disks bij de rand vast om
geen vingerafdrukken op het oppervlak achter te laten.• Stof, vingerafdrukken of
krassen kunnen storing veroorzaken.• Kleef nooit een etiket of plakband op de disk.
Opslag
• Doe de disks opnieuw in hun doosje na gebruik.• Stel disks nooit bloot aan direct
zonlicht of een warmtebron. Laat disks nooit achter in een auto die in de zon is
geparkeerd.
Reiniging
• Veeg de disk schoon met een schone, zachte en pluisvrije doek, dit vanaf het midden
van de disk naar de rand toe en in een rechte lijn. Gebruik nooit oplosmiddelen zoals
benzine, verdunners, in de handel verkrijgbare reinigingsmiddelen of antistatische
sprays voor vinyl platen.
- NL 7 -
Page 63

Let op :
Gooi elektrische en elektronische apparaten niet in een normale vuilnisbak.
• Breng ze naar een verzamelpunt.
• Sommige onderdelen in deze apparatuur kunnen gevaarlijk zijn voor de gezondheid
en het milieu.
• Het apparaat gaat automatisch in stand-by na een bepaalde periode van inactiviteit om energie te
besparen. U kunt het apparaat opnieuw inschakelen met behulp van de AAN/UIT-knop.
• De informatie bevindt zich op het plaatje aan de achterkant van het toestel.
Bezoek onze website om de volledige verklaring te lezen:http://www.bigbeninteractive.nl/support in het
gedeelte Verklaring van conformiteit.
Geïmporteerd door BIGBEN INTERACTIVE SA
396, Rue de la Voyette
CRT2 - FRETIN
CS 90414
59814 LESQUIN Cedex - Frankrijk
www.bigben.eu
Gemaakt in China
Importateur : Bigben Interactive FRANCE
396, Rue de la Voyette, C.R.T. 2 Fretin,
CS 90414 - 59814 LESQUIN Cedex
Bigben Interactive DEUTSCHLAND GmbH
Walter Gropius Str. 28, 50126 Bergheim, Deutschland
Bigben Interactive BELGIUM
Avenue Ernest Solvay, 1480 Tubize, Belgique
Bigben Interactive NEDERLAND b.v.
Franciscusweg 249-3B, 1216 SG Hilversum, Nederland
Bigben Interactive SPAIN S.L.
C/ Musgo 5, 2ª planta, 28023 Madrid, Spain
Bigben Interactive ITALIA s.r.l
Corso Sempione 221, 20025 Legnano - MI, Italia
FABRIQUÉ EN CHINE / MADE IN CHINA
HOTLINE
FRANCE, du lundi au vendredi (sauf jours fériés) :
9h00-19h00 ou sav.audio@bigben.fr
DEUTSCHLAND, Montag bis Sonntag von 8:00 bis 24:00 Uhr
09001-84 30 44*
Mobil funknet zen nicht mö glich)
*Minderjährige müssen vorher einen Erziehungsberechtigten um Erlaubnis fragen.
(0,49 €/Min. au s dem deuts chen Fest netz, An rufe aus al len
oder support@bigben-interactive.de
BELGIQUE / NEDERLAND, klantenservice@bigben-interactive.nl
customerservice@bigben-interactive.be
ESPAÑA, sat@bigbeninteractive.es
ITALIA, support@bigbeninteractive.it
www.bigben.eu
- NL 8 -
Page 64

BBI_MCD11_1606_Ver1
 Loading...