

Page 1
Parlé
TCM-X-FM Flush Mount Kit
Installation Guide
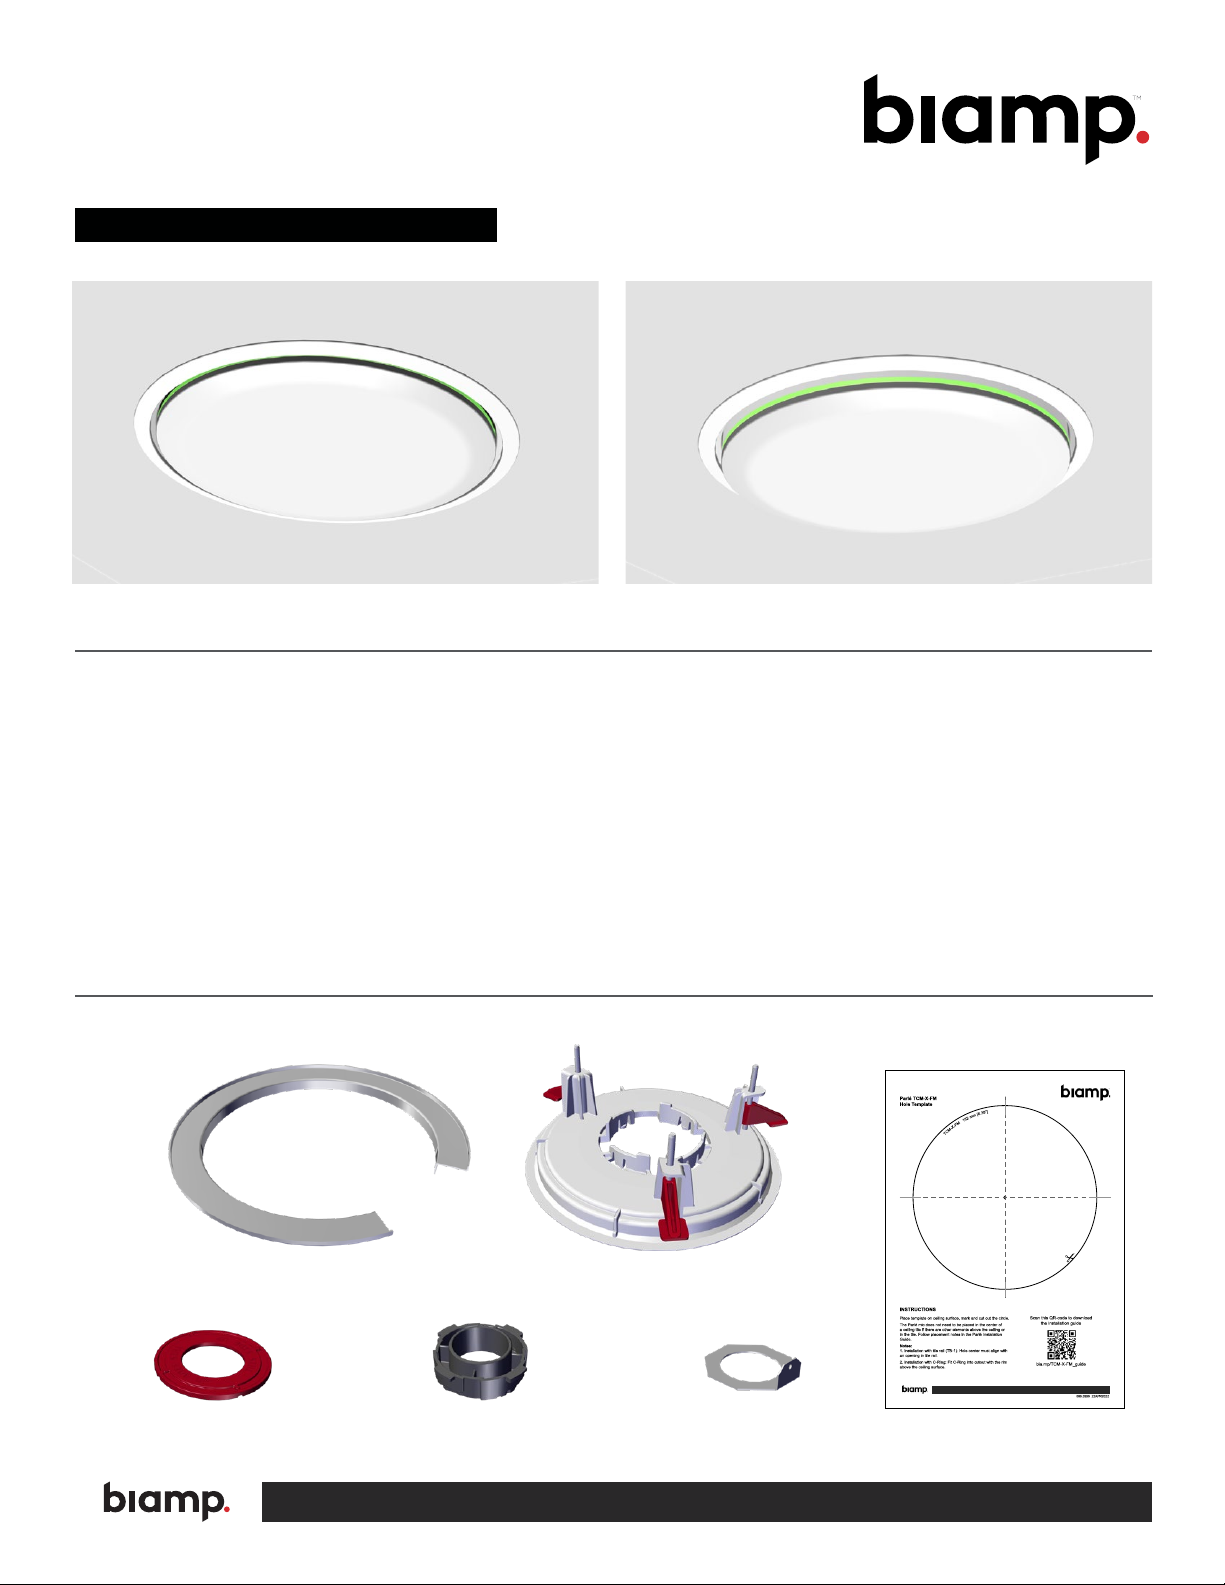
Flush Mount TCM-X (Mic ush with ceiling) Recessed Mount TCM-X (LED ush with ceiling)
PRODUCT DESCRIPTION / FEATURES
The TCM-X-FM provides options to mount the Parlé TCM-X
microphone in flush and recessed mounting positions.
• Available in white or black
• Supports two LED viewing angles: Flush mount 130°;
Recessed mount 170°
• Can install in drop tile ceilings or finished drywall
ceilings with at least 64 mm (2.5") clearance
Connecting people through extraordinary audiovisual experiences™
• Can mount in ceilings with a thickness of
13-24 mm (0.5" - 0.95") using the C-Ring or
16-25 mm (0.625" - 1") if using an optional tile bridge
• Meets UL 2043 Requirements – Suitable for
Installation in Plenum/Air Handling Spaces
KIT CONTENTS
Spacer Adapter
C-Ring
A: 9300 S.W. Gemini Drive Beaverton, OR 97008 USA W: www.biamp.com
Flush Mount Bracket
Strain Relief Washer
A: 9300 S.W. Gemini Drive Beaverton, OR 97008 USA W: www.biamp.com
Hole Template
Page 2

C-RING INSTALLATION
Prepare ceiling using hole template. Remove any debris
from around the hole. Hole diameter is 162 mm (6.38").
Note: This method can also be used with prewired nished
drywall ceilings (minimum 64 mm [2.5"] clearance above ceiling).
1. Insert C-RIng into hole above ceiling. Flex and rotate
C-Ring up/in, if above-ceiling access isn't available.
2. With clamps rotated in, insert ush mount bracket into
the ceiling. Remove any tape holding the clamps.
3. Clamp bracket onto the C-Ring by screwing (3)
clamps down with a Phillips screwdriver. Ensure
clamps are all positioned on the C-Ring before fully
tightening.
4. Screw the adapter, washer, and conduit nut onto the
TCM-X shaft, with or without the spacer depending
on desired position in the ceiling. See next page for
exploded views and images.
Note: The spacer and adapter both have notches that must
t onto the ribs on the top of the mic (see Alignment Detail).
5. Insert the assembled mic into the bracket, push up
and rotate to lock into place.
Note: Make wiring connections to mic before inserting it in
nished drywall ceiling.
Finish installation per the Parlé TCM-X installation guide.
TCM-X-FM Exploded Assembly
21
3
page 2 Installation and Operation Guide TCM-X-FM
Page 3
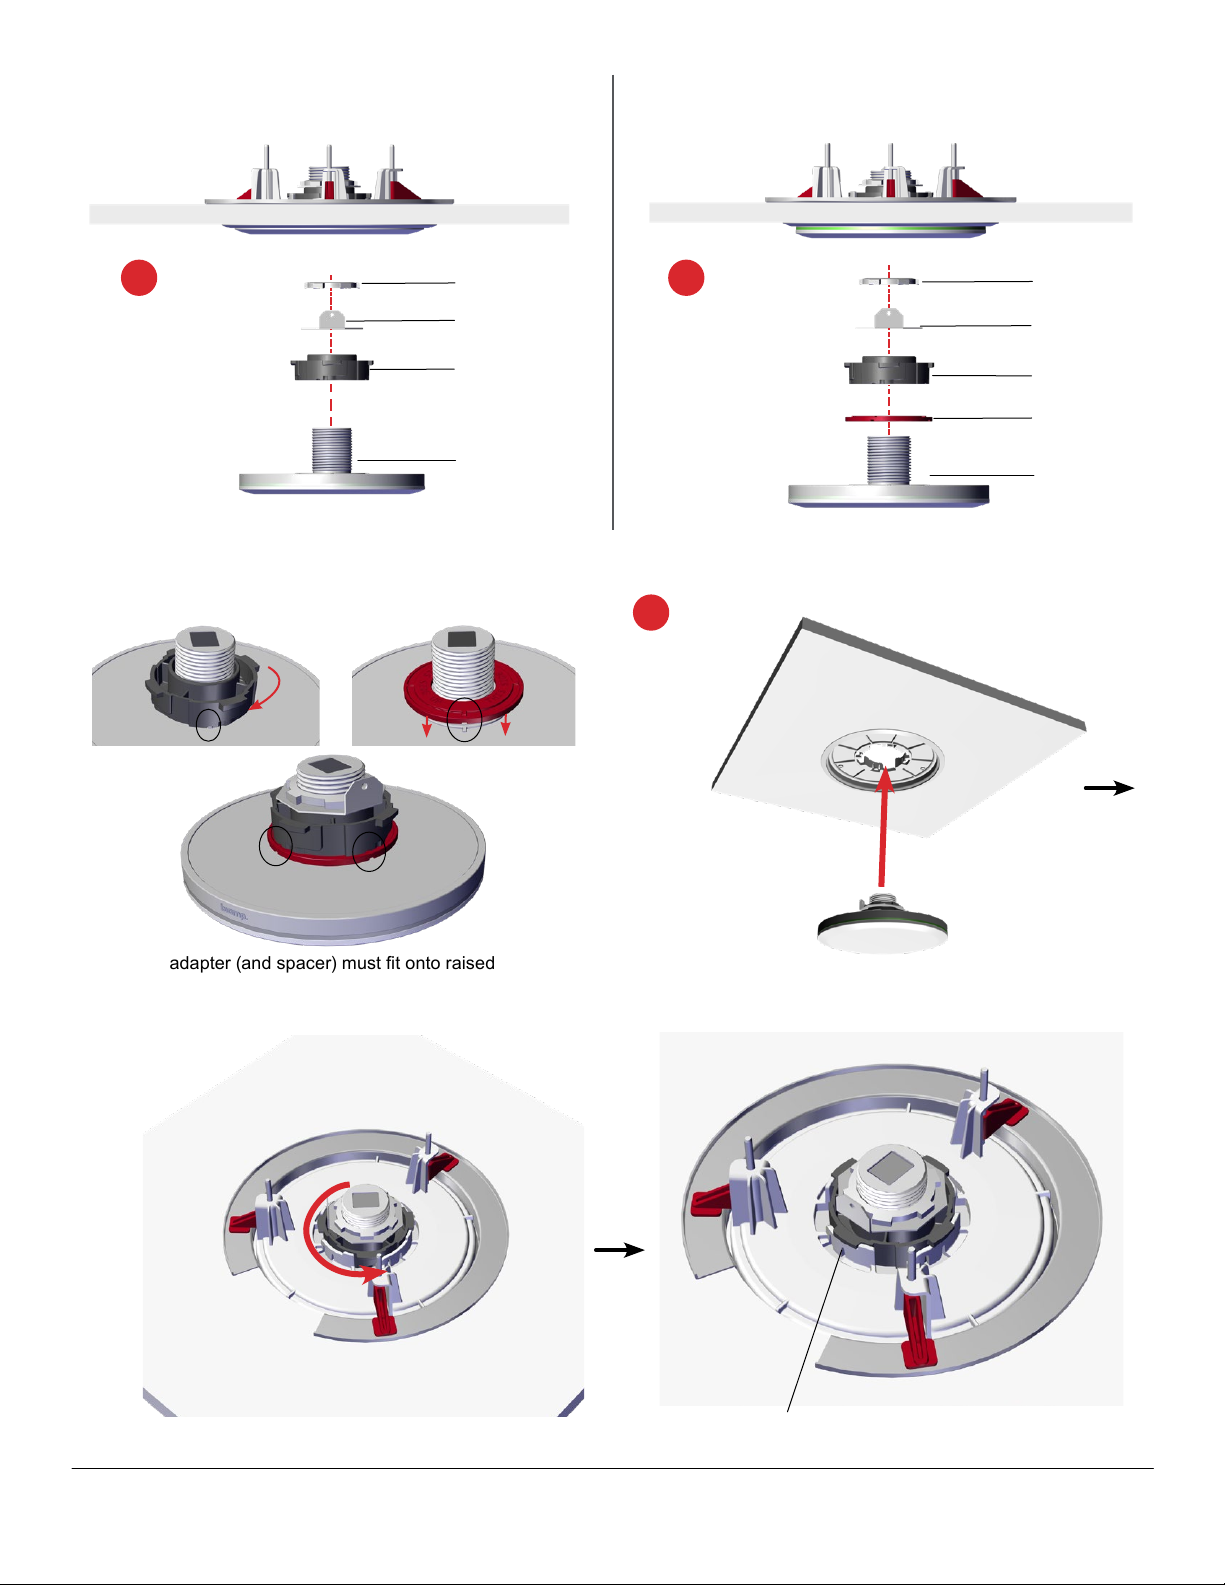
Flush Mount Recessed Mount
4
Alignment Detail
Conduit Nut
Strain Relief
Washer
Adapter
TCM-X
5
4
Conduit Nut
Strain Relief
Washer
Adapter
Spacer
TCM-X
Notches in adapter (and spacer) must t onto raised ribs on the
top of the microphone (circled) before tightening conduit nut
TCM-X fully seated
TCM-X-FM Installation and Operation Guide page 3
Page 4
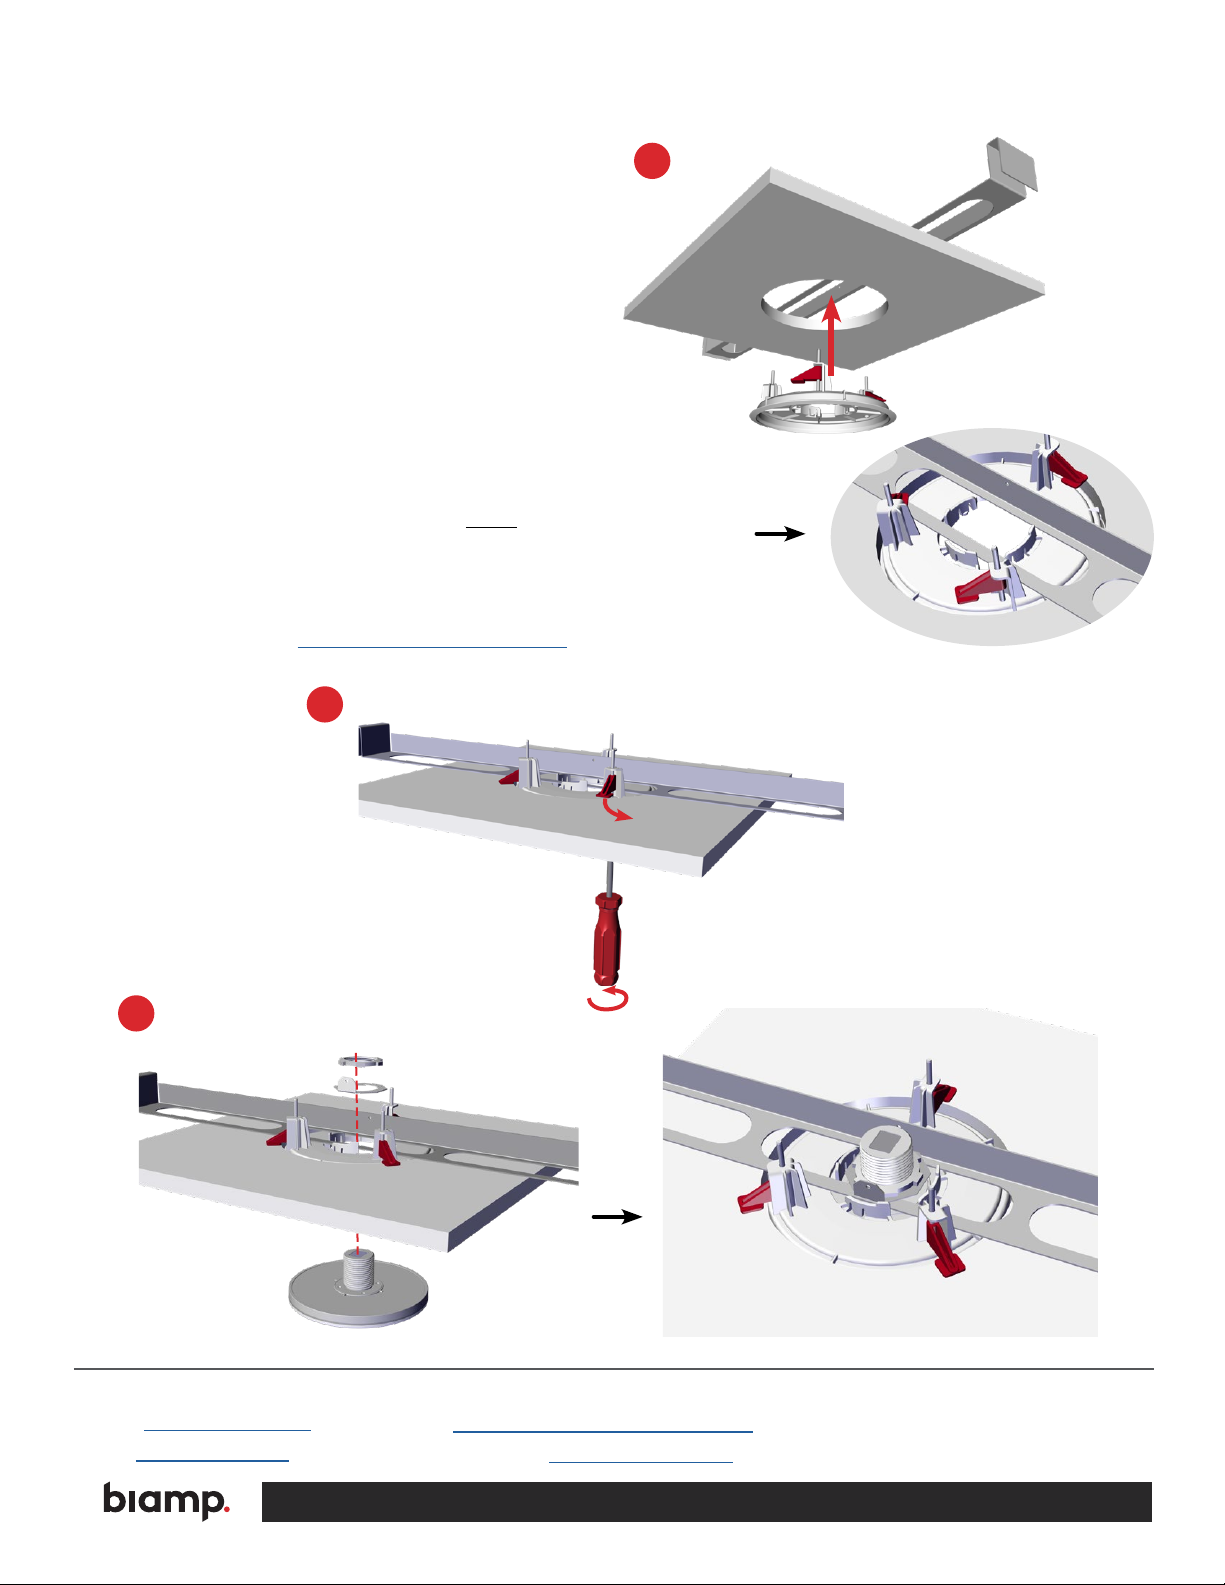
INSTALLATION WITH OPTIONAL TILE BRIDGE (TB-1)
Install tile bridge and prepared ceiling tile in the ceiling grid.
Note: Access to the tile bridge above the ceiling will be necessary
to complete this installation.
1. Rotate the clamps in, and insert the bracket in the
hole. It must t in the tile bridge opening as shown in
the detail.
2. Tighten clamps with a Phillips head screwdriver. They
should hold the bracket in place, but not deform the
tile.
3. Insert the mic into the bracket and tile bridge. Secure
the mic on the assembly with the octagonal strain
relief washer and conduit nut. The adapter will not be
used.
Notes:
1. Recessed mount option: place the spacer on the shaft
(correct side up - tting onto ribs in the mic) before inserting
the TCM-X in the bracket.
2. Place the washer with a at side against the upright of the
tile bridge. Do not block the access to the hole in the strain
relief tab.
Finish installation per the Parlé TCM-X installation guide.
1
Bracket orientation in tile bridge opening
2
3
CONTACT US
Email: support@biamp.com
Web: support.biamp.com
Warranty: biamp.com/legal/warranty-information
Safety & Compliance: biamp.com/compliance
A: 9300 S.W. Gemini Drive Beaverton, OR 97008 USA W: www.biamp.com
17OCT2022
 Loading...