

Page 1

BiflieiTi
INDUSTRIE
Via
Fogliano
1 •
25030
Coceaglio
ITALY
www.bìalettiindustrieJt
^800-011045
(BS)
Bimem
MACCHINA
ESPRESSO COFFEE
CF36
PER
CAFFÈ'
MAGHINE
ESPRESSO
451.12.360.2
Ed.
07/2009
Istruzioni
Instructions
per
l'uso
for use
Page 2

3
-
Page 3

-
5 -
Page 4

-
6 -
Page 5

Italiano
pag.
Introduzione
-
Dichiarazione
-
Informazioni normative
Avvertenze
-Avvertenze
dell'apparecchio
Caratteristiche
-
Caratteristiche
-
Descrizione apparecchio...
-
Descrizione comandi
Utilizzo
123-
3a3b-
3c4-Consigli
5-
5a6-
6a7-Consigli
Manutenzione........
Pulizia
abSmaltimento dell'apparecchio
"
di
conformità
generali
relative
"
"
"
"
Preparazione macchina
Riscaldamento
Preparazione
Utilizzo
Utilizzo
Utilizzo delle capsule
Erogazione vapore
Riscaldare l'acqua o montare
Erogazione
Preparazione
"
Pulizia apparecchio
Ciclo
macchina
del
del
caffè
delle
cialde
....."
di
acqua
"
di
decalcificazione
o
if
latte.. " 19
.. " 20
10
10
10
11
13
14
14
14
14
15
15
15
16
16
17
18
19
19
20
21
22
22
22
23
24
"
"
"
all'uso
corretto
"
"
"
"
caffè
"
macinato
"
"
"
"
calda
di
"
té o bevande calde
"
"
"
"
i 5
9
-
Page 6

- -
Introduzione
Gentile
DICHIARAZIONE
INFORMAZIONI
Cliente,
la
ringraziarne
II
Produttore dichiara
dì
soddisfi a pieno
Prima
presente
funzionali
uso
sotto
"libretto
CE
SÌ
delle perturbazioni
Ai
di
di
aver scelto
di
utilizzare questo apparecchio,
"libretto
ed
eliminare quaisiasi inconveniente
errato
o non
la
propria responsabilità
di
istruzioni
in
materia
dichiara
inoltre
fine
di
migliorare
apportare variazioni tecnologiche, estetiche e dimensionali
preavviso.
un
le Sue
conforme
di
apparecchi
nostro prodotto e confidiamo
aspettative.
di
istruzioni
dello
Di
CONFORMITÀ
per
l'uso" è conforme a quanto prescritto
che è
conforme a quanto
radio-elettriche.
il
prodotto
La
per
l'uso"
al
stesso.
che
l'apparecchio
ad uso
domestico.
per
esigenze costruttive,
NORMATIVE
L'apparecchio oggetto
è
conforme
alle
del
presente
Direttive:
2006/95/CE e 89/336/CE.
libretto
- -
che
questa scelta
invitiamo a leggere attentamente
fine
di
ottimizzarne
che
prescritto
le
caratteristiche
potrebbe insorgere
a cui si
riferisce
dalla
in
materia
di
il
produttore
senza
ii
presente
Direttiva
limitazione
si
riserva
obbligo
da un
- -
Avvertenze generali
AVVERTENZE
Leggere attentamente
il
forniscono
e
di
manutenzione. Conservare
consultazione.
•
Dopo aver tolto l'imballaggio e prima
meccanica
•
La
guaina
polature o rotture.
Nei
caso
la
spina
tecnica
•
Gli
elementi dell'imballaggio (sacchetti
ecc.)
non
fonti
di
•
Prima
a
quelli della rete
corpo
•
In
caso
la
presa
Quest'ultimo,
della presa
sconsigliabile
uso
si
semplici o multipli e prolunghe conformi alle vigenti norme
però
attenzione
cato sull'adattatore semplice e sulle prolunghe, e quello
marcato
J\o
di
alimentare l'apparecchio
differenziale
ÌV
L'apparecchio dovrà
per
mezzo
Evitare
/k
Durante
accessibile
Questo
persone (inclusi i bambini)
soriali e mentali, o senza esperienza e istruzione, a meno
non
siano
della
loro
I
bambini devono
recchio.
GENERALI
le
avvertenze contenute nelle presenti istruzioni
importanti indicazioni riguardanti
dell'apparecchio
e la
spina
del
si
verifichi quanto sopra,
dalla
presa
autorizzato
pericolo.
di
collegare l'apparecchio accertarsi
apparecchio.
di
con
rendesse indispensabile è necessario utilizzare solamente adattatori
sull'adattatore
dì
il
apparecchio
di
per
devono essere lasciati
di
distribuzione elettrica.
incompatibilità
altra
di
tipo adatto
in
particolare, dovrà anche accertare
sia
idonea
l'uso
di
adattatori, prese multiple
a non
con una
dì
una
presa
scollegare l'apparecchio
funzionamento,
nel
caso
sorvegliati o istruiti all'uso
sicurezza,
essere
con
e di
tutti i suoi accessori.
cavo
di
alimentazione
non
corrente e portarlo presso
le
necessarie verifiche.
alla
tra la
presa
da
personale professionalmente qualificato.
alla
potenza assorbita dall'apparecchio.
superare
il
limite
multiplo.
per
mezzo
corrente d'intervento massima
essere
tassativamente
dì
terra.
la
presa
in cui
fosse necessario scollegare l'apparecchio.
non è
inteso
con
ridotte
sorvegliati
- -
in
la
sicurezza
di
cura questo libretto
di
ogni
utilizzare l'apparecchio, staccare subito
in
plastica, polistirolo espanso, chiodi,
portata
dei
che i
La
e la
spina dell'apparecchio fare sostituire
di
portata,
di un
interruttore
tirando
di
corrente deve essere facilmente
per
essere
capacità fisiche, sen-
da
persone
perché
installazione, d'uso
per
uso
assicurarsi dell'integrità
non
devono evidenziare scre-
un
centro
bambini
in
dati targa siano rispondenti
targa è situata
che la
e/o
prolunghe. Qualora
di
sicurezza, facendo
in
valore
di
massima potenza
di
collegato
alla rete
il
cavo
di
alimentazione.
utilizzato
responsabili
non
giochino
quanto
ogni
ulteriore
di
assistenza
quanto potenziali
sul
fondo
sezione
dei
In
generale
il
di
corrente, mar-
30mA.
elettrica
da
che
con
l'appa-
del
cavi
loro
4W
è
- TI -
Page 7

- -
Avvertenze
L'uso
di
qualsiasi
fondamentali,
-
non
non
-
non
la
spina dalla presa
non
ecc.);
- non
senza
Prima
rire
l'apparecchio
o
spegnendo l'interruttore dell'impianto.
In
caso
non
manometterlo.
Per
l'eventuale riparazione rivolgersi solamente
tecnica
originali.
Il
mancato rispetto
dell'apparecchio.
Allorché
comanda
aver
staccato
Si
raccomanda, inoltre,
scettibili
servirsi
L'installazione deve essere effettuata secondo
tore.
Una
cose,
responsabile.
Per
evitare surriscaldamenti pericolosi,
ia sua
consigliato
chio".
Non
lasciare l'apparecchio inutilmente inserito. Staccare
di
alimentazione quando l'apparecchio
Non
ostruire
Se
il
cavo
sostituito
costruttore,
apparecchio
in
particolare:
toccare l'apparecchio
usare l'apparecchio a piedi nudi;
tirare
il
cavo
di
alimentazione o l'apparecchio stesso,
di
lasciare esposto l'apparecchio
permettere
sorveglianza.
di
effettuare qualsiasi operazione
di
guasto
autorizzato
si
decida
di
renderlo inoperante tagliandone
la
di
costituire
dell'apparecchio fuori
errata installazione
nei
confronti
lunghezza
nel
le
di
alimentazione
esclusivamente
poiché sono necessari
corrente;
che
l'apparecchio
dalla
rete
di
e/o di
cattivo funzionamento dell'apparecchio, spegnerlo
dal
costruttore e richiedere l'utilizzo
di
quanto sopra
di non
utilizzare
spina dalla presa
di
rendere innocue
un
pericolo,
dei
quali
il
cavo
di
paragrafo "Avvertenze relative
aperture o fessure
alimentazione
dì
da un
generali
elettrico
comporta
con
mani bagnate o umide;
ad
agenti atmosferici (pioggia, sole,
sia
usato
di
alimentazione elettrica, o staccando
uso per i
il
questo apparecchio è danneggiato, deve essere
12
pulizia
può
compromettere
più un
apparecchio
di
specialmente
può
costruttore
centro assistenza tecnica autorizzato
-
il
corrente.
quelle
propri giochi.
causare danni a persone,
non può
si
raccomanda
e di
utilizzare l'apparecchio come
non è
utilizzato.
di
ventilazione
utensili
speciali.
- -
l'osservanzadi
per
da
bambini
o da
o di
manutenzione, disinse-
ad un
centro
di
di
parti e ricambi
la
di
questo
cavo
di
alimentazione dopo
parti dell'apparecchio
per i
bambini
che
le
istruzioni
essere considerato
di
svolgere
all'uso
corretto dell'apparec-
la
spina dalla
o di
smaltimento
alcune regole
staccare
incapaci,
la
spina,
assistenza
sicurezza
tipo,
si
rac-
su-
potrebbero
del
costrut-
animati
per
tutta
rete
calore.
dal
j- - Avvertenze
AVVERTENZE
RELATIVE
generali
- -
ALL'USO CORRETTO
DELL'APPARECCHIO
Questo
apparecchio è stato concepito
vapore e acqua calda
utilizzato.
Ogni altro
uso è da
Il
costruttore
i
danni
derivanti
Sistemare
l'apparecchio
Non
e
o
lasciare incustodito l'apparecchio durante
Non
lasciare l'apparecchio
Se
si
intende lasciare inattivo l'apparecchio
lungo, svuotare
Alla
prima
utilizzazione,
dei
materiali
Non
utilizzare
Non
spostare l'apparecchio quando
Durante l'erogazione della bevanda prestare attenzione
schizzi
di
liquido caldo.
Non
toccare
gazione caffè (9), etc.] subito dopo l'uso dell'apparecchio.
Pericolo
di
Non
togliere
della
bevanda.
Il
prelievo
di
fettuato utilizzando recipienti alti e proteggendo
presine
per
per uso
considerarsi improprio e quindi pericoloso.
non può
essere considerato
da usi
impropri,
su di una
in
ambienti
il
serbatoio dell'acqua (5).
la
di
l'apparecchio senza acqua
le
scottature
il
vapore dall'apposito tubetto
evitare possibili scottature
macchina potrà emanare odore
isolamento e degli
parti calde [tubetto emissione vapore (10), mozzo ero-
^.
portafiltro (12)
o il
RACCOMANDAZIONE
In
caso
di
competente.
Qualunque
incompetenti
Il
genere
La
non
problemi sull'apparecchio, contattare
Evitare
di
riparare
derivante
o da uso
non può
al
da
improprio
essere considerato responsabile
in tal
caso
termine.
fabbricante
di
guasti.
garanzia
fosse
giunta
guasto
sarebbe
l'apparecchio
interventi
non è
coperto
invalidata,
13
per
domestico e solo
erronei
superficie piana, regolare e stabile.
elementi
porta-capsula (13) durante l'erogazione
produrre caffè espresso,
responsabile
ed
irragionevoli.
il
funzionamento.
la
cui
temperatura
per un
riscaldanti;
nel
serbatoio (5).
è in
funzione.
(10)
/K\
per
questo deve essere
per
eventuali
sia
pari o inferiore
periodo
di
tempo piuttosto
di
bruciato a causa
il
tutto è normale.
ad
eventuali
deve essere sempre
le
mani
con
guanti
A
il
servizio
da
soli.
effettuati
da
persone
dalla
garanzia.
par
questo
anche
se la sua
durata
ef-
o
Page 8

—
Caratteristiche
CARATTERISTICHE
Tensione
di
•
Potenza
Dimensioni
Capacità
alimentazione
(W):.....
apparecchio completo
max
serbatoio acqua: 1100
(V):..
(I x p x
h):..,34
DESCRIZIONE APPARECCHIO
1 -
Corpo apparecchio
2 -
Impugnatura
3 -
Base
4 -
Copèrchio serbatoio acqua
5 -
Serbatoio acqua
Sa - Foro troppo pieno
6 -
Indicatore livello acqua
7 -
Griglia
8 -
Vaschetta
di
9 -
Mozzo
10 -
Tubetto erogazione vapore
11 - Montalatte
12 -
Portafiltro
13 -
Porta-capsula
14a -
Filtro
14b - Filtro
15 -
Filtro
16a -
Spillo
16b -
Misurino pressino
DESCRIZIONE
17 - Interruttore
18 -
Interruttore luminoso
19 -
Manopola
(_)
^>
^y//iC\e
raccolta
per
caffè
in
per
caffè
in
per
cialda
per
pulizia foro
luminoso
a tre
apparecchio
erogazione
vapore/acqua calda
polvere (per 1 tazza)
polvere (per 2 tazze)
COMANDI
accensione / spegnimento apparecchio
per
posizioni
in
stand
caffè
vapore
by
gj)
(Fio
m
vedere
riportata
x 29 x 32
mi
IF\.M
—
la
targhetta
sul
fondo
dell'apparecchio
cm
(
caratteristiche
-
Utilizzo
PREPARAZIONE
Prima
di
collegare
ruttore (17)
posizione "O".
Posizionare l'apparecchio
Sollevare
raggiungere
Non
utilizzare
inferiore
al
Durante
serbatoio
attenzione
l'acqua
in
d'appoggio
Collegare
di
rete corrispondano
posizionata
2.,..
RISCALDAMENTO MACCHINA
Per
preparare
sia ben
calda.
Premere l'interruttore luminoso
La
spia inizia a lampeggiare.
Inserire
verso destra portandolo
Posizionare
Attendere
caso contrario
(19)
su
Per
terminare l'erogazione dell'acqua riportare
posizione Q .
elettricamente
sia in
posizione
il
coperchio
il
livello
MAX
l'apparecchio senza acqua
riferimento
MIN
l'utilizzo dell'apparecchio, è possibile riempire o rabboccare
(5)
semplicemente sollevando
a non
eccedere nella quantità
eccesso
che
dell'apparecchio..
elettricamente l'apparecchio
sul
fondo dell'apparecchio.
un
buon
il
portafiltro
(12)
una
tazza
che la
spia dell'interruttore
la
pompa
VA
per
erogare acqua calda
» -
MACCHINA
di
"spento"
su una
(4) e
versare acqua fredda
indicato sulle stesso (quantità massima
indicato sullo stesso.
fuoriesce
dal
con i
dati tecnici riportati sull'apposita targa
caffè
alla
giusta temperatura occorre
(
o il
porta-capsula (13)
in
posizione frontale
sulla
griglia
non
viene azionata),
l'apparecchio assicurarsi
e che la
manopola (19)
superficie
piana e stabile..
nel
serbatoio
nel
serbatoio
(5) o se il
il
coperchio
(4)
di
acqua versata.
foro (5a) potrebbe riversarsi
assicurandosi
)
(17)
per
accendere
per
(7)
sotto
al
(17)
si sia
dal
beccuccio
(fig."D"),
che le
la
sul
mozzo
agganciarlo correttamente
beccuccio
del
accesa
in
quindi
ruotare
del
portafiltro.
la
manopola (19)
che
(5)
1100
livello
facendo
In
caso contrario
sul
caratteristiche
che la
macchina
macchina.
(9) e
ruotarlo
portafiltro.
modo fisso
la
manopola
l'inter-
sia in
sino
mi)
piano
dati
(in
sulla
a
è
il
- 14 -
-
15
Page 9
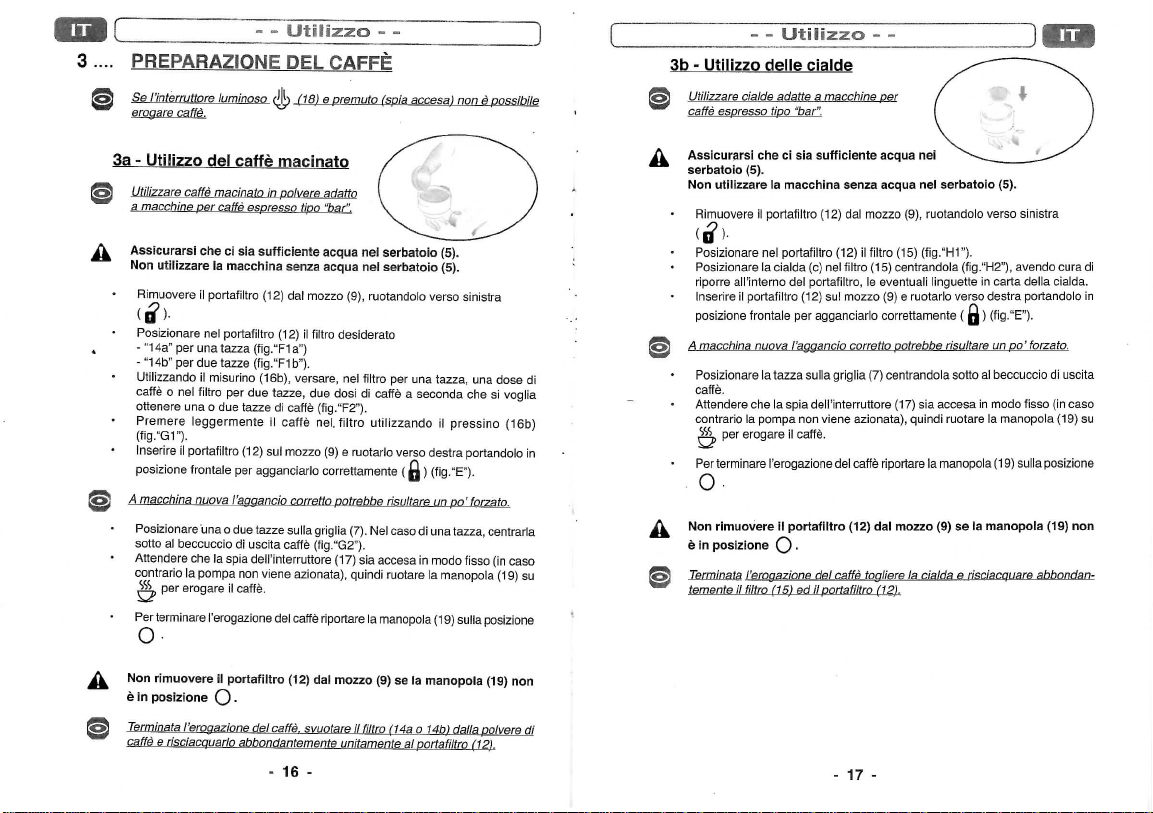
3....
PREPARAZIONE
Se
l'interruttore luminoso
erogare
caffè.
3a - Utilizzo
fe
Utilizzare
caffè
a
macchine
Assicurarsi
Non
utilizzare
Rimuovere
Posizionare
-
"14a"
per una
-
"14b"
per due
Utilizzando
caffè
o nel
ottenere
una o due
Premere leggermente
(fig."Gr).
Inserire
il
portafiltrc
posizione
frontale
A
macchina nuova l'aggancio corretto potrebbe
Posizionare
sotto
al
beccuccio
Attendere
contrario
la
W>
per
erogare
Per
terminare
O
del
caffè
macinato
per
caffè
espresso
che ci sia
fa
macchina
il
portafiltro
nel
portafiltro
tazza
tazze
il
misurino
filtro
per due
tazze
(1
per
una o due
di
che la
spia dell'interruttore
pompa
non
i!
caffè.
l'erogazione
- - Utilizzo
DEL
(
(18) e premuto
- -
CAFFÈ
macinato
in
polvere
adatto
tipo
"bar".
sufficiente
(12)
(fig.Tla")
(fig.Tlb").
(16b),
2)
agganciarlo correttamente
tazze sulla griglia
uscita caffè
acqua
senza
dal
(12)
tazze,
di
caffè
il
caffè nel.
sul
mozzo
viene
del
il
versare,
azionata),
caffè
nel
acqua
nel
mozzo (9), ruotandolo verso sinistra
filtro
desiderato
nel
filtro
due
dosi
di
caffè a seconda
(fig."F2").
filtro
utilizzando
(9) e
ruotarlo verso destra portandolo
(7).
Nel
(fig."G2").
{1
7)
sia
quindi
riportare
la
(spia
accesa)
non è
serbatoio (5).
serbatoio (5).
per una
tazza,
una
che si
i!
pressino (16b)
( fi )
(fig."E").
risuttare_un po' forzato.,
caso
di una
tazza,
accesa
in
modo fisso
ruotare
la
manopola
manopola
(1
9)
sulla
possibile
dose
di
voglia
in
centrarla
(in
caso
(1
9)
su
posizione
3b - Utilizzo
fè
Utilizzare
caffè
/k
Assicurarsi
serbatoio
Non
Rimuovere
<f>.
Posizionare
Posizionare
riporre
Inserire
posizione frontale
jjg^j
A_macchina
Posizionare
caffè.
Attendere
contrario
W>
Per
O-
Non
è
in
Terminata
temente
Utilizzo
delle
cialde
cialde
espresso
utilizzare
adatte a macchine
tipo
"bar".
che ci sia
(5).
la
macchina
il
portafiltro
nel
portafiltro
la
cialda
all'interno
il
portafiltro
la
per
erogare
terminare l'erogazione
rimuovere
posizione Q .
l'erogazione
il
filtro
(e)
del
portafiltro,
(1
2)
per
nuova
l'aggancio
la
tazza sulla
che la
spia dell'interruttore (17)
pompa
non
il
caffè.
il
portafiltro
(15)
ed il
- -
per
sufficiente
agganciarlo correttamente ( n ) (fig."E").
del
acqua
nei
senza acqua
(12)
dal
(12)
ne!
filtro
su!
mozzo
corretto potrebbe risultare
griglia
viene azionata),
del
caffè
(12)
caffè
portafiltro (12).
nel
serbatolo
mozzo (9), ruotandolo verso sinistra
il
filtro
(15)
(fig."H1").
(1
5)
centrandola
le
eventuali linguette
(9) e
ruotarlo
verso destra portandolo
(7)
centrandola sotto
sia
accesa
quindi
ruotare
riportare
la
manopola
dal
mozzo
(9) se la
togliere
la
cialda e risciacquare
(5).
(fig."H2"),
in
carta della cialda.
un po'
al
beccuccio
in
modo fisso
la
manopola
(1
9)
manopola
avendo cura
sulla posizione
forzato.
di
uscita
(in
(1
(19)
abbondan-
caso
9)
non
di
in
su
/JL
Non
è
in
[^3
Terminata
J
caffè
rimuovere
posizione Q ,
e risciacquarlo
il
portafiltro
l'erogazione
(12)
dal
mozzo
(9) se
del
caffè,
svuotare
il
filtro
abbondantemente unitamente
-
16
-
(14a o 14b)
Sa
manopola
dalla
al
portafiltro (12).
(19)
non
polvere
di
17 -
Page 10

3c - Utilizzo
H
Utilizzare solo capsule
/k
Assicurarsi
serbatoio (5).
Non
Rimuovere
Premere
(fig.'LT).
Posizionare
Rilasciare
Dopo
coperchio
zata,
Inserire
verso
per
A
macchina nuova
Posizionare
caffè.
Attendere
contrario
Per
delle
capsule
che ci sia
utilizzare
la
macchina senza acqua
il
porta-capsula (13)
sulìa
leva (13a)
la
capsula
la
leva
(13a)
l'utilizzo
le
superfici
di
chiusura e tutta
sono
calde.
Pericolo
il
porta-capsula (13)
l'alto quindi ruotarlo verso destra
agganciario correttamente ( Q ) (fig."L4").
l'aggancio
la
tazza sulla
che la
spia dell'interruttore
la
pompa
erogare
l'erogazione
il
non
caffè.
W>
per
terminare
o.
Non
rimuovere
non
è in
Terminata
per
Premere
(fig."L5").
Far
colpi
posizione
l'erogazione
sganciarlo
sulla leva (13a)
fuoriuscire
(fig."L6").
il
porta-capsula (13)
O •
( fl ).
la
capsula
Utilizzo
Caffè
Bialetti.
sufficiente acqua
in
modo
(g) nel
in
modo
del
la
di
sul
corretto potrebbe risultare
griglia
viene
azionata),
del
caffè riportare
del
caffè, ruotare
in
modo
(g)
"scuotendo"
- 18 -
nel
nel
serbatoio (5).
dal
mozzo (9), ruotandolo verso sinistra
da
mantenere aperto
portafiltro
(fig."L2°).
da
chiudere
il
coperchio
gruppo
di
capsula auto conservante, appena utiliz-
scottatura
mozzo
(7)
erogazione
/^
.
(9)
esercitando
sino a portarlo
centrandola sotto
(1
7)
sia
accesa
quindi
ruotare
la
manopola
dal
mozzo
il
porta-capsula
da
mantenere aperto
il
porta-capsula
(9) se la
il
coperchio (13b)
(13b)
(fig."L3").
in
alluminio,
una
leggera pressione
in
posizione frontale
un po'
forzato.
al
beccuccio
in
modo fisso
la
manopola
(1
9)
sulla posizione
manopola (19)
(13)
verso sinistra
il
coperchio (13b)
(13)
con dei
di
uscita
(in
(1
leggeri
del
caso
9)
-
Utilizzo
Risciacquare
4....
CONSIGLI
Per
calda
Utilizzare
Il
della
Un
del
determinare un'erogazione troppo lenta.
L'assenza
-
-
-
-
Per
la
prima
5....
EROGAZIONE
5a -
su
tL
Assicurarsi
nel
Non
nel
Il
prelievo
montalatte (11) deve essere sempre effettuato
utilizzando recipienti alti o proteggendo
per
Attendere
Posizionare
bricco,
Premere
abbondantemente
ottenere
un
caffè
dai
portafiltro vuoto (senza
sempre caffè
grado
di
macinazione
macchina e della qualità della bevanda.
grado
di
macinazione
caffè
troppo
veloce
della caratteristica schiuma
grado
di
macinazione
tostatura
del
caffè
macchina
pressione
caffè scadente
una
macchina
dell'utilizzo.
non
non
sufficientemente calda,
del
caffè (esercitata
o di
per
vecchia data.
della
circa
bevanda
RISCALDARE
che ci sia
serbatoio (5).
utilizzare
la
serbatoio (5).
evitare
macchina senza acqua
di
vapore dall'apposito
possibili
scottature
che la
spia
un
contenitore alto (tazza
etc) sotto
i!
montalatte (11)
l'interruttore luminoso
- -
il
porta-capsula (13)
più
caldo
preriscaldare
caffè).
di
ottima
qualità.
del
caffè è fondamentale
troppo
"grosso"
mentre
un
grado
del
caffè
non
ottimale;
con il
massima
min.
qualità,
con il
20
le
tazzine
per il
corretto funzionamento
può
determinare
di
macinazione troppo fine
può
essere causata
corretto;
pressino
"16b")
si
consiglia
portafiltro vuoto agganciato
VAPORE
L'ACQUA O MONTARE
sufficiente acqua
le
mani
A.
dell'interruttore
(^)
(17)
da
(fig."M").
(18);
con
sia
accesa
cappuccino, bicchiere a collo alto,
la
spia inizia a lampeggiare.
per una
corretta
erogando
un'erogazione
da:
non
corretta.
di
lasciare
riscaldare
IL
LATTE
guanti o presine
in
modo
fisso..
a!
puli-
acqua
può
mozzo
- 19 -
Page 11

Attendere
che
la
temperatura
Ruotare
Derogazione
di
acqua
Per
sopperire
nitore
prima
Per
terminare l'erogazione
posizione Q • e spegnere l'interruttore luminoso A (18),
continuerà a lampeggiare
abbia scaricato
temperatura.
Se
l'interruttore
Dopo
aver
per
qualche secondo
6....
EROGAZIONE
spia luminosa (18a),
di
vaporizzazione,
la
manopola
di
vapore
calda.
all'inconveniente
di
riscaldare
la
luminoso i(18> e premuto
tolto
il
tubetto
6a - PREPARAZIONE
/i
Assicurarsi
serbatoio (5).
Non
nel
Il
prelievo
tubetto
utilizzando recipienti alti o proteggendo
mani
cedere
che
ci
utilizzare
la
serbatoio (5).
con
Attendere
Posizionare
bricco,
macchina senza acqua
di
acqua calda dall'apposito
(10)
deve essere sempre effettuato
guanti o presine
a
filtro
all'erogazione dell'acqua calda.
che la
spia dell'interruttore
un
contenitore aito (tazza
etc) sotto
al
- -
Utilizzo
sia
(19)
su
c//
può
essere preceduta
erogare
con il
vapore
dei
per
sovrapressione
sia
(12)
tubetto (10) senza montalatte (11)
qualche istante finche l'apparecchio
dal
latte,
un
pò
di
vapore
DI
ACQUA CALDA
DI
TÉ O BEVANDE CALDE
sufficiente acqua
per
evitare possibili
o il
porta-capsula (13)
- -
che
indica
accesa
in
modo
per
erogare
dalla
fuoriu_scLt_a_di_alaun_e_g_QCce
per
qualche
la
bevanda,
vapore riportare
del
vapore e ripristinato
(spia
per
favorire
la
pulizia
in un
contenitore vuoto.
nel
le
dal
(17)
si
spenga.
da
cappuccino, bicchiere a collo
il
la
ac,
scottature
il
raggiungimento
fisso..
vapore.
attimo
in un
manopola
dell'ugello,
mozzo
(9)
prima
(fig.T").
delia
altro conte-
(19)
sulla
la cui
spia
non
la
corretta
erogare
di
pro-
aito,
Per
vapore (10)
presine
7....
CONSIGLI
BoB
Dopo
vapore
L'operazione
alle
Per
terminare l'erogazione
posizione
Q .
rimuovere o riposizionare
con
apparecchio acceso,
per
evitare possibili scottature
Per
riscaldare
liquidi,
riempirli eccessivamente.
Prima
di
estrarre
manopola
Per
ottenere
immergere
in
su ed in giù per
Per
ottenere
ambiente.
ogni
riscaldamento
per
qualche secondo
sostanze grasse contenute
utilizzare sempre recipienti piuttosto
il
montalatte (11)
(19) sulla posizione Q per
una
schiumatura
troppo a fondo
"interessare" tutta
una
buona schiumatura utilizzare latte freddo
riduce
lapossibilitédiotturszìonedelforellino"x"{fig."R").
il
montalatte
di
liquido,
in un
del
vapore riportare
il
montalatte (11)
proteggere
A-
o il
tubetto (10)
terminare l'erogazione.
consistente
(11)
ed
la
superficie
in
modo particolare
recipiente vuoto.
negli
alimenti.
del
latte
eseguire
del
la
dal
dal
manopola
le
latte
(19) sulla
tubetto
erogazione
mani
con
guanti
aiti e stretti senza
contenitore ruotare
(cappuccino),
dei
movimenti lenti
(fig."N°).
o a
temperatura
se
latte,
erogare
dovuta
o
non
de!
Ruotare
la
manopola
(1
9)
su
<|b//J!'\r
erogare acqua calda.
-
20 -
Page 12

mrm
PULIZIA
J\n
/V
Prima
di
effettuarel'operazionedi
SEMPRE
la
Non
acqua o altri
a-PULIZIA
utilizzare oggetti
che
Non
evitare
spina dalla presa
immergere
liquidi
APPARECCHIO
Per
la
pulizia
panno
abrasivi.
Dopo
utilizzato sotto
di
Eventualmente, utilizzando
la
Nel
l'apposito
Pulire periodicamente
per
Dopo
(11),
umida, sfilarlo e pulire
"x"
lo
(fig.'R").
Periodicamente:
-
Rimuovere
-
Svuotare l'acqua presente
La
può
del
umido
evitando
ogni utilizzo pulire
caffè.
parte esterna e interna
caso
il
foro
spillo
potrebbero rovinare
eliminare eventuali residui
ogni utilizzo
pulirlo
con una
di
erogazione vapore
spillo
(16a)
vaschetta
di
lavarli
con
normali detergenti
per
stoviglie.
pulizia
di
tutti i componenti,
essere effettuata
lavare
il
portafiltro (12)
di
danneggiarlo.
- - Manutenzione
pulizia, disinserire
di
mai il
né,
corpo apparecchio
il
getto d'acqua
di
erogazione
(16a)
per la
metallici
del
montalatte
in
dotazione
la
griglia
raccolta
corrente.
corpo apparecchio
lavarlo
in
l'impiego
il
portafiltro
del
rubinetto
uno
spazzolino a setole morbide, pulire a fondo
del
filtro utilizzato
dei
filtri
rimozione
di
diametro grosso quali aghi, chiodi,
il
filtro.
con un
panno umido
di
caffè.
spugna
il
forellino
con
(7) e la
(8) e
nel
serbatoio (5), sciacquarlo
ad
con
acqua tiepida e normali detergenti
e il
porta-capsula (13)
(1) in
lavastoviglie.
(1 )
usare
di
detersivi
(12),
il
porta-capsula (13)
per
(fig."Q°).
(14a
-14b
di
eventuali impurità (vedi fig.
la
spillo
per
pulizia
filtri(14a-14b)e(15)
(fig.-Q")
spillo
per
foreliino
vapore
eccezione
del
- -
un
eliminare i residui
-15)
fosse ostruito,
sede
del
portafiltro
foro
pulizia
erogazione
(fig."R")
ed
corpo
apparecchio
in
lavastoviglie
ed il
di
polvere
utilizzare
etc
(fig."S")
asciugarlo.
per
stoviglie.
filtro
Q)
,16a
per
(1).
- -
Manutenzione
b - CICLO
•
Effettuare periodicamente
i)
La
DI
DECALCIFICAZIONE
frequenza
di
questa operazione dipende
Riempire
d'acqua
Immettere
nel
liquida
caffè).
Togliere
contenitore.
Premere
Attendere
ruotare
Riportare
Ripetere
nel
serbatoio.
Ad
operazione
ripetere
Per
l'uso
sulla
serbatoio acqua
{non
tossica e reperibile
il
portafiltro (12)
l'interruttore
che la
spia dell'interruttore
la
manopola
la
manopola
l'operazione 2/3
ultimata,
le
operazioni sopra descritte
dei
prodotti decalcificanti attenersi sempre
confezione e fomite dalla casa
- -
la
decalcificazione della
il
serbatoio fino
(17)
(19)
(19)
al
livello massimo.
(5) una
dose
in
commercio
dal
mozzo e posizionare sulla griglia
per
accendere
su
volte e fino
per
(17)
r-T>
per
erogare
sulla
posizione Q •
ad
esaurimento dell'acqua contenuta
rimuovere ! residui della soluzione
impiegando
pmduttrice.
macchina,
dal
grado
di
durezza dell'acqua
di
soluzione decalcificante
ed
adatta
la
macchina.
sia
accesa
in
due o tre
tazze
solo acqua pulita.
al/e
in
per
macchine
da
(7) un
modo fisso, quindi
di
acqua.
dal
circuito.
22
- 23
Page 13

- - Smaltimento
p
i
•
Questo prodotto è conforme
•
II
simbolo
del
il
prodotto,
separatamente
di
raccolta differenziata
oppure riconsegnato
apparecchiatura equivalente.
L'utente è responsabile
appropriate strutture
legislazione
L'adeguata raccolta differenziata
dismesso
compatibile contribuisce
e
sulla
prodotto.
Per
rivolgersi
stato effettuato l'acquisto.
I
produttori
riciclaggio,
sia
direttamente
cestino barrato riportato sull'apparecchio indica
alla
fine della propria vita utile, dovendo
dai
rifiuti domestici, deve essere conferito
al rivenditore al
del
di
sui rifiuti.
al
riciclaggio,
salute e favorisce
informazioni
al
servizio locale
e gli
il
raccolta, pena
al
più
dettagliate inerenti i sistemi
importatori ottemperano
trattamento
sia
partecipando
dell'apparecchio
alla
Direttiva
2002/96/EC.
essere
trattato
in un
per
apparecchiature
conferimento dell'apparecchio a fine vita alle
per
trattamento e allo smaltimento ambientalmente
ad
evitare possibili effetti negativi sull'ambiente
il
riciclo
di
smaltimento
e lo
smaltimento ambientalmente compatibile
ad un
elettriche
momento dell'acquisto
le
sanzioni previste
l'awio
successivo dell'apparecchio
dei
materiali
di cui è
di
raccolta disponibili,
rifiuti,
o al
alla
loro responsabilità
sistema collettivo.
ed
elettroniche
di una
dalia
composto
negozio
centro
nuova
vigente
in cui è
per il
che
- -
L_
¥
EnglìSh
il
page
Introduction
-
Declaration
-
Regulatory
General
-
Warnings regarding
Characteristics
-
Characteristics...
-
Description
-
Description
Operation
123-
4-
5-
6-
7-Tips
Maintenance
Cleaning....
a- How to
bDisposai
For
"
of
conformity
information
warnìngs
of
thè
appliance
"
of
thè
of
thè
.,
"
Machine
preparation
Heating
thè
Coffee
3a3b-
3c-
Tips
Dispensing
5a~
Dispensing
6a-
Lime
UKonly
machine
preparation
Using ground
Using
pods
Using
capsuies
for use
"
steam
Heating
water
of hot
Preparing
tea or hot
for use
"
"
"
clean
thè
bui!d-up
of
thè
appliance
"
"
"
"
thè
correct
"
"
appliance
controis
"
"
"
"
coffee.....
"
"
,..."
or
frothing
water
"
beverages
appliance
removal
cycle
"
25
26
26
26
...."
....'....."
27
29
30
30
30
30
31
31
31
32
32
33
34
35
35
35
36
36
37
38
38
38
39
40
41
use
...."
"
milk
"
"
L'azienda produttrice
discrezione, ogni opportuna modifica dettata
si
riserva
di
apportare
industriali, commerciali o estetiche.
-
24 -
ai
prodotti, a propria
da
ragioni normative,
i:
- 25 -
Page 14

-
Introducilo!!
Dear
Customer,
Thank
you for
choosing
our
with
your
purohase.
Before
using
for
use" booklet
performance
or
improper use.
DECLARATION
The
manufacturer declares
that
thè
appliance described
with
thè
provisionsof
The
manufacturer aiso declares that
thè
limitation
The
manufacturer
dimensionai variations without prior notice
manufacturing
REGULATORY
The
appliance described
complies
with
produci.
this
appliance,
in
order
to
and to
prevent
OF
CONFORMITY
thè
EC
of
radio-electrical
reserves
reasons.
INFORMATION
in
this instruction booklet
2006/95/EC
We are
certain that
we
invite
operate
you to
thè
appliance
any
problems that
in
this "instructions
Direcìive regarding
it
complies with regulations governing
emissions.
thè
right
to
make
and
89/336/EC
you
wilì
be
fully
carefully
read
this
properly,
to
may
appiiancesfordomesticuse.
technoiogical,
in
order
Directives.
ensure
arise
from
for
use" booklet complies
improve
aesthetic
thè
to
satisfied
"instructions
its
best
its
incorrect
and
product
for
- -
Generai
GENERAL
j
Read these instructions
•
The
•
The
•
If
/k
The
£^
The
JV
During operation,
/L
This
f^
Children must
WARNINGS
safe
installation,
Keep
this manual
After
removing
appliance
and
electrical
Should
you
appliance from
for
of
Before
See
plug replaced with another suitable type
nician must
absorbed
multiple
or
being certain
extension cord,
operating current
Plug*
Do
it
children)withreducedphysical,sensoryormentalcapabilities,
or
unless under
a
appiiance.
detect
thè
necessary repairs
packing materials (plastic bags, styrofoam,
children's
reacri
connecting
thè
label located
thè
appliance's plug
also
by
sockets
multiple adapters
appliance
appliance must
not
dlsconnect
be
necessary
appliance
those
without
person responsible
warnings
carefully
use and
for
thè
packaging,
ali
thè
plug
and
thè
thè
electrical outlet
since they
thè
be
thè
appliance.
and/or
not to
and
must
of no
thè
to
is not
thè
supervision
be
as
maintenance.
future reference.
and
accessories
power cord must
conditions described above, immediately unplug
or
examinations.
are
appliance, make sure that
on
thè
bottom
is not
compatible with
certain that
and
exceed
thè
thè
unplug
supervised
thè
In
generai,
extension
cords.
extension cords that conform
thè
load limits indicated
maximum power indicated
be
powered
more
than
be
conneeted
appliance
electrical outlet must
thè
appliance.
intended
for use by
necessary experience
or by
for
their safety.
to
- -
they contain
before using
are
and
potential sources
by a
by
receiving instructions from
ensure that they
importarli
intact.
not be
take
it to an
of
thè
body
thè
by a
qualified technician.
electrical cord
it is not
If
they
are
differential
30mA.
to
thè
power source using a grounded
pulling
on
be
persons
and
^J
thè
appliance, make sure
cracked
authorized
nails,
etc.) must
of
danger.
thè
line voltage
of
thè
appliance.
electrical outlet, have
is
suitable
advisable
necessary,
to
on
on
thè
Circuit
thè
power
easily accessible Should
(including
knowledge,
do not
f=Q|
Information
or
broken.
service center
be
kepi
is
correct.
The
for
thè
to use
adapters,
use
only
safety regulations,
thè
adapter
and
multiple adapter.
breaker
with
cord.
play with
about
thè
thè
out
thè
tech-
power
simple
thè
an
thè
- 26
- 27
Page 15

- - General
•
The use of any
mental
- do not
- do not use
-
do not
electrical
- do not
etc.);
- do not
without
Before
appiiance
by
turning
If
thè
tamper
authorized
Failure
of
thè
•
If you
make
thè
You
dangerous,
as
a
/k
Installation
tions.
Incorrect Installation couid cause damage
perty,
•
To
unwind
in
thè
•
Do not
Remove
Do
If
thè
authorized service centre since specialized
electrical appiiance requires
rules.
In
particular:
touch
thè
appiiance
thè
appiiance with bare feet;
pulì
on
thè
electrical cord
outlet;
leave
thè
appiiance exposed
allow
thè
appiiance
supervision.
performing
from
thè
off
thè
appiiance breaks
electrical outlet.
shouid also render harmiess those parts
toy.
prevent dangerous
not
main
with
it.
Repairs must
by
thè
to
observe
appiiance.
decide
not to use
it
inoperable
especially
must
for
which
thè
electrical cord
section "Warnings regarding
leave
thè
thè
plug from
obstruct openings,
electrical
cord
to be
any
cleaning
electrical outlet
circuii
or
does
manufacturer. Always insist
any of
thè
thè
appiiance
by
cutting
to
children
be
performed according
thè
manufacturer
overheating,
and
appliance plugged
thè
electrical outlet.
air
of
this appliance
- 28
warnìngs
thè
with
wet or
darnp
or
thè
appiiance
to
atmospheric conditions
used
by
children
or
maintenance operation, disconnect
by
removing
breaker
switch.
not
function properly, turn
be
carried
out
exclusively
above
poìnts
any
thè
who
that
power cord
canno)
it is
you use
thè
in
or
is
more,
might
recommended that
thè
correct
when
heat
damaged,
tools
off
intakes
- -
observance
hands;
to
pulì
or
incompetent persons,
thè
plug from
by a
for
originai spare parts.
may
compromise
it is
recommended that
after
removing
of
thè
appiiance that couid
use
thè
abandoned appiiance
to
thè
manufacturer's
to
persons, animais
be
held
responsible.
appiiance
use of
thè
not in
use.
outlets.
iì
must
are
necessary.
of
certain funda-
thè
plug
out of
(rain,
thè
outlet
it off and do not
service
center
thè
safety
thè
plug from
instruc-
or
you
completely
as
recommended
appliance".
be
replaced
thè
sun,
thè
or
you
be
prò-
by an
- - General warnings
WARNINGS
OF THE
This
water
Any
The
improper,
Set
Do
not
&
Da
not
or
lessjhan
If
thè
water
•
When using
due to
ggJ3
Do
noi
Do
not
A
When dispensing
liquid.
Do
not
etc.]
Danger
Do
not
beverage
tube (10) always
mitts
Contaci a qualified
Do
not
repair
Any
improper
The
malfunctions.
In
this case,
expired.
thè
malfunction
use is not
manufacturer
thè
REGARDING
APPLIANCE
appliance
was
for
domestic
other
use
manufacturer
thè
would
incorrect
appliance
on a
leave
thè
appliance unattended
leave
thè
applianc&jn
0°&
appliance will
tank (5).
thè
appliance
thè
insulating
use
thè
appliance without
move
thè
appliance when
thè
touch
thè
immediately after
remove
or pot
technician
appliance
due to
cannot
warranty
hot
of
burns ^ .
thè
filler
is
being
dispensed. When dispensing steam from
use
holders
A
IMPORTANT
for
on
your
servlcing
covered
by
be
held
will
designed
to
use and
must
be
improper
canno!
be
held liable
or
unreasonable uses.
fiat,
even
and
environments
not be
used
for an
for
thè
materiate
to
thè
be
first time,
and
water
in
beverage,
parts [steam tube
thè
appliance
holder
(12)
tali
containers
prevent burns
problems with
own.
by
unqualified
warranty.
responsible
void, evcn
29
- -
THE
CORRECT
make espresso
be
used
for
and
stable
thè
use.
beware
or
NOTE
for
if it has not yet
these purposes
therefore
for any
surface.
during
use.
where
extended
period
thè
machine
heating elements; this
in
thè
tank (5).
of
accidental splashes
(10),
coffee
has
been
used.
capsule
filler
and
protect
X?K
•
A
thè
appliance.
persons
or by
these types
USE
coffee,
steam
and hot
dangerous.
damage deriving from
thè
temperature
may
dispensing
holder
thè
of
only.
is
equa!
of
time, empty
emit a burnt
hands with oven
is
(13)
thè
normal.
of hot
hub
while
special
odor
(9),
thè
thè
Page 16

- -
CHARACTERISTICS
•
Mains Power (V):
•
Max
power
•
Dimensions
Maximum capacity
DESCRIPTION
1 -
Body
2 -
Handle
3 - Base
4
-Water
5 -
Water tank
Sa - Overflow
6 -
Water level indicator
7 - Grill
8 -
Drip tray
9
-Hub
10
-Steam
11
-Milkfrother
12 -
Filler
13 -
Capsule
14a - Filter
14b -
Filter
15
-Pod
16a -
Filter cleaning
16b - Measuring
jsee
rating
(W):
of
thè
appliance
of
OF THE
of
thè
appliance
tank
lid
hole
tube
holder
filter
holder
for
ground
coffee
for
ground coffee
filter
pin
scoop / tamper
DESCRIPTION
17 - Appliance
18
- LED
19 -
on/off
LEO
steam switch
Dial with
three
O
Appliance
<V|1^
settings
in
Dispense coffee
Dispense steam/hot water
Characteristics
| of
(I x d x h): 34 x 29 x 32
water tank: 1100
APPLIANCE
(for 1 cup}
(for2cups)
OF
CONTROLS
switch
(T)
A
stand-by
(Ha
thè
label
mi
- -
on
thè
appliance
cm
BI
bottom
....
MAGHINE
A.
Before
S5J
Do not use
2....
HEATING
g|»]
Jb
- - Operation
connecting
thè
switch
(17)
position.
Set
Lift
thè
water
level
It
is
use
water.
spill
Connect
listed
mains supply.
is in
thè
appliance
lid
(4) and
leve!
indicated (maximum
thè
appliance without
indicated
on
possible
to
simply
by
lifting
Any
excess water will come
onto
thè
surface where
thè
appliance
on
thè
label located
THE
make
good
thè
thè
filter
it to
thè
(fig."E").
a cup on
for
thè
thè
filter
thè
coffee
LEO
switch
holder
right until
thè
LEO
holder spout.
water
hot
Press
flashing.
Inserì
turn
correctly
Set
Wait
activated), then turn
from
Po
stop
- -
PREPARATIQN
thè
appliance
to
thè
position
even
and
stable
water into
thè
quantity
water
in
water
to
thè
(fig."D"),
out of
thè
appliance
electrical outlet making certain that
on
thè
bottom
fili
thè
thè
on a
pour
tank.
up
thè
OFF
fiat,
cold
or add
lid (4)
to
thè
MAGHINE
at
thè
right temperature
(T)
(17)
to
turn
on
(12)
or
capsule
filter
front-facing position
thè
filter holder spout.
up
steadily
(19)
to
thè
-^
thè
dial
(19)
grill
(17)
flow
it is in a
(7)
under
to
light
thè
dial
return
power
supply,
and
that
thè
surface.
tank
(5)
until
1100
mi)
(fig."D").
thè
tank
I5Ì or
tank
(5)
thè
overflov/
is
positioned.
of
thè
thè
thè
machine.
holder
(otherwise,
W>
setting
to
thè Q setting.
while
appliance
mschine
(13)
making certain
make
dial
(19)
it
reaches
ifit
is
below
thè
appliance
not to add too
hole (5a)
matches
must
The
light
into
thè
in
order
thè
pump
to
dispense
certain
that
is in
thè
"O"
thè
MAX
thè
MIN
is in
much
and may
thè
rating
your
be
very
will begin
hub (9) and
to
lock
it on
will
not be
hot
water
- 30 -
- 31 -
Page 17

3....
COFFEE
jojj
If
3a - Usìng
PREPARATION
thè
LEO
switch m (18)
ground
Use_gmun_d_coffee
type
espresso
Make
certaJn
Do
noi use
Remove
Piace
-
"14a"
-
"14b"
Using
according
cups,
two
Press
Inserì
a
front-facing position
hoider
on
Set
one or two
both
coffee spouts
Wait
for
be
activated), then turn
To
stop
Do
not
on
thè Q setting
When
thè
grounds
appropriate
coffee
that
there
thè
machine
thè
filter
hoider
thè
filter
in
thè
for one cup
for two
thè
thè
thè
remove
(fig."F1"a)
cups
measuring scoop (16b), pour
to
thè
number
scoopfuls
coffee lightly into
filter holder
thè
hub.
cups
(fig."G2").
thè
LEO
switch (17)
thè
coffee flow, return
thè
coffee
has
from
thè
filter
- - Operation
is
pressed
coffee
for
is
(12)
of
(12)
in
thè
thè
holder
without
cups
into
order
"café"
enough
water
from
thè
(12)
b").
te
prepare:
thè
filter
thè
hub (9) and
to
lock
grill
(7). When using
to
light
dial
(19)
thè
dial
(12)
flowing
and
water
in
hub
using
it on
ome
up
steadily (otherwise
to
W>
(19)
from
from
thoroughly
machines.
filter holder
(fig."F1
(fig."F2")
on
filter
.
fin/shed
(14a o 14b)
(light
on)
coffee
in
thè
tank
(5).
thè
tank
(5).
(9),
by
turning
it
io
thè
thè
coffee into
for one
thè
tamper
correctly ( n ) (fig."E").
force
to
to
thè O setting.
thè
hub (9) if
thè
turn
only
start
spouf,
cup,
it to
to
one
thè
rinse
thè
one
scoopful;
(16b)
thè
righi
properìy
cup, center
thè
coffee
thè
remove
both
chosen
(fig."G1").
pump
dial
thè
cannai
left
until
lock
thè
it
will
flow.
(19)
thè
filter
be
filter
for two
it is in
fiìter
under
not
is not
coffee
and
3b - Usìng
[jg»|
Use
espresso
fk
Make
In
thè
Do
not use
Remove
Piace
Position
any
Inserì
a
front-facing position
gSfl
When
hoider
Set
out.
Wait
be
To
/V
Do not
on
thè O setting.
When
'*'"'
thoroughly
- - Operation
pods
coffee
pods suitabìe
coffee
machines.
certaìn
that
tank
thè
paper tabs
thè
thè
on
thè
for
activated), then turn
stop
remove
thè
there
(5).
thè
machine
thè
filter holder (12) from
filter
(15)
into
thè
pod
(e)
in
on
thè
filter holder (12) into
machine
is new it may
thè
hub.
cup on
thè
grill
thè
LEO
switch
thè
coffee flow, return
thè
filter
coffee
has
finished
rinse
thè
filter
for
"café"
Is
enough
without
thè
filter holder
thè
center
pod are
in
order
(7)
directly under
(17)
thè
dial
holder
(15)
- -
style
water
water
thè
of
thè
placed inside
thè
hub (9) and
to
lock
require
to
light
up
(19)
to
thè
dial
(12)
from
flowing
and
thè
in
thè
tank
hub (9) by
turning
(12)
(fig."H1
filter
(15)
(fig."H2"),
thè
filter holder.
turn
it on
correctly
some force
thè
spout where
steadily (otherwise
W>
to
start
(19)tothe
from
filler
(3
thè
hub (9) if
thè
spout. remove
holder (12).
(5).
it to
").
making
it to
thè
right
(fig."E").
to
properly lock
thè
thè
thè
coffee fiow.
setting.
thè
thè
left.
sure
until
thè
coffee pours
pump will
dial
(19)
thè
pod and
that
it is in
filler
not
is not
-
32 -
33
-
Page 18

3c - Using
Use
/k
Make
in
Do
£i
After
^^
cover
can
capsule
Do
(19)
thomughlv
capsules
only
Bialett!
coffee
certain
thè
Remove
left
Push
(fig."L1").
Inserì
Let go of
capsule
Position
then turning
posìtion
Set
out.
Wait
be
To
When coffee supply
thè
Push
Ejectthe
of
When
that there
tank
(5).
not use
lile
machine
thè
capsule
( fl* ).
thè
lever
thè
capsule
thè
lever
(fig."L3").
thè
use
thè
of
closing
be
warm,
Danger
thè
capsule
it to
for
thè
correct functioning ( |j ) (fig."L4").
filter
holder
thè
cup on
thè
for
thè
LEO
activated), then turn
stop
thè
coffee flow, return
not
remove
to
thè
(fig."L6").
thè
unlock
lever (13a)
capsule
coffee
rinse
thè
thè Q setting.
has
thè
is not on
left
times
capsules.
is
enough
without
filler
holder
(13a)
on
thè
handle
(g) in
thè
capsule
(13a)
so as to
surfaces
of
and
thè
switch
it ( fi ).
thè
thè
entire
of bum A •
filler
holder
(1
right
end
bring
on
thè
hub.
grill
(7)
directly under
(1
7) to
light
thè
dial
thè
capsule filter holder
has
finished, turn
to
raise open
(g)
by
gently tapping
finished
fìowing
capsule
filter
-
34 -
water
water
in
thè
tank (5).
(13)
from
thè
hub
(9),
by
in
order
to
open
thè
filler
holder
(13)
allow
thè
group
of
stay fresh capsule, straight
3)
in
thè
thè
capsule
thè
up
steadily
(19)
to
W>
dial
(1
9)
thè
thè
cover (13b)
thè
from
thè
holder
(131.
(fig."L2°).
cover
(13b)
to
disbursement
hub (9)
spout
to
to
(13)
capsule filter holder
capsule filter holder
spout. remove
in
pushing
it
filler
holder
where
thè
(otherwise
start
thè O setting.
from
thè
coffee
thè
hub
(fig."L5").
thè
turning
it
cover (13b)
dose
over
aluminum,
after
slightly
upwards
to
thè
coffee pours
pump
flow.
(9)
if
thè
(13)
towards
(13)
acouple
thè
capsule
to
thè
thè
thè
using,
frontal
will
dial
and
not
4....
TIPS
5....
DISPENSINO
FOR USE
To
obtain hotter coffee, preheat
thè
empty
Always
use
The
grind
and
thè
An
overly "coarse" grind
an
overly "fine" grind
Coffee
may be
-
an
incorrect grind
-
poorly roasted coffee;
-
thè
machine
-
coffee
-
coffee that
To
obtain
approximately
hub
priorto
5a - HEATING
JjK
Make certain that
in
thè
tank
Do
not use
in
thè
tank
When dispensing steam from
frother
(11),
or
protect
pot
holders
Wait
for
Piace a tali
thè
milk frother (11)
Press
thè
Wait
for
Wait
for
that
thè
that
thè
Turn
thè
- - Operation
filter
holder
{without
premium quality coffee.
of
thè
coffee
quality
that
thè
is
of
thè
beverage.
may
lacking
in its
of
coffee;
not
being sufficiently hot;
is not
properly
is
expired
or not
best quality beverage, allow
20
min. with
use.
thè
coffee}.
fundamental
may
cause
cause
thè
characteristic
pressed
fresh.
thè
ernpty
- -
cups
for
thè
thè
coffee
flow
to be too
(using
filter holder locked
STEAM
WATER
(5).
thè
machine
(5).
always
thè
hands
to
prevent
thè
LEO
container (cappuccino cup, high necked
LEO
switch
thè
LEO
thè
LEO
steam temperature
steam temperature
dial
(19)
there
use
switch
(fig."M").
switch
switch
to
(j|ì>/;!;Nto
OR
is
enough
without
tali
containers
with oven
burns ^ .
(17)
to
(|j)
(18);
(1
Sa)
(1
Sa)
has
has
- 35 -
FROTHING
water
water
thè
milk
mitts
or
light
up
steadily without blinking.
thè
light will begin
to
light
up
steadily
to
light
up
steadily
been reached.
been reached.
dispense
thè
by
dispensing
correct operation
to
flow
siow.
cream
due to:
tamper
"16b").
thè
machine
MILK
glass,
to
blink.
with
without
steam.
hot
out too
in
pitcher,
blinking,
to
water through
of
thè
machine
quickly
while
heat
up for
piace
on
thè
etc) under
indicating
Page 19
A few
To
prevent
before
To
stop
thè
LEO
pressure
been restored.
If
thè
LEO
After
nozzle,
seconds
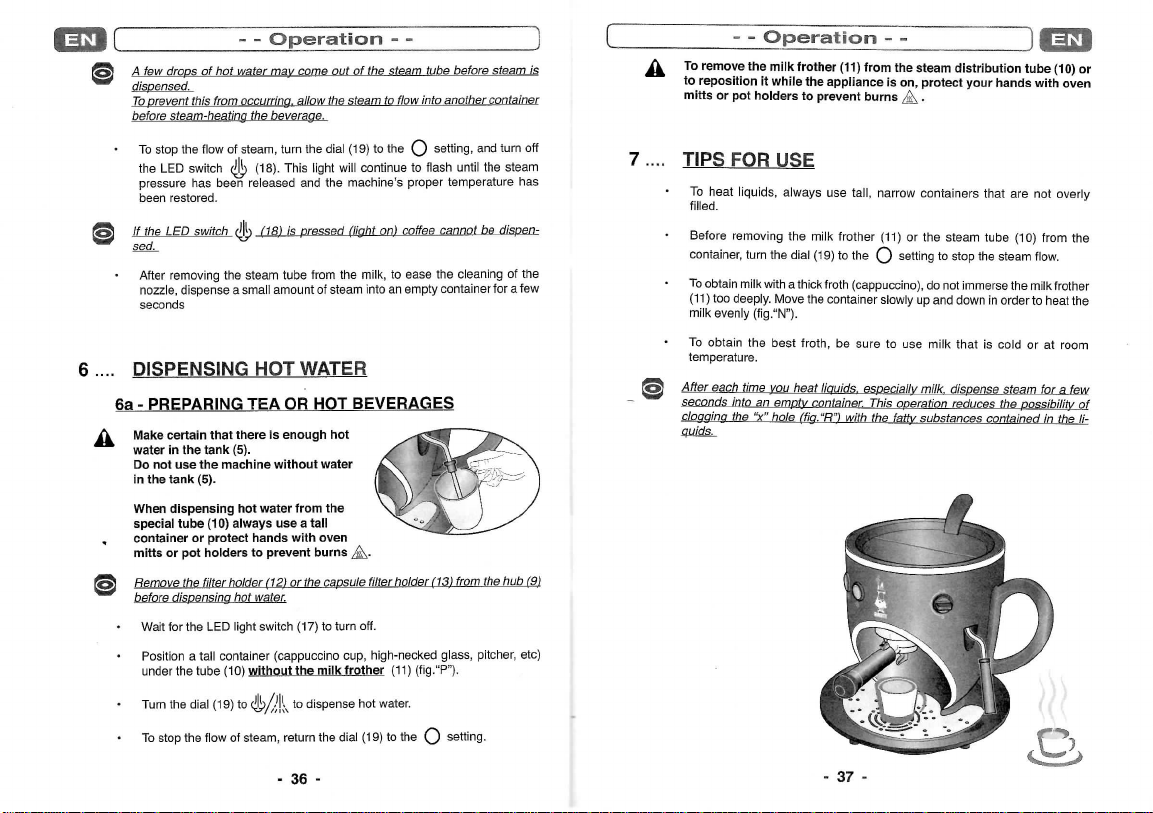
6....
DISPENSINO
6a -
PREPARINO
Make
water
Do
not use
in
thè
When
special
container
mitts
Remove
before
Wait
Position a tali
under
Turn
To
stop
- - Operation
drops
of hot
water
may
come
ibis
from
occurring.
steam-heating
thè
flow
of
switch
<^|)
has
been released
switch
<tìh
removing
thè
dispense a small
allow
thè
beverage.
steam,
turn
thè
(18),
This
light
and
(18)
is
pressed
steam tube from
amount
HOT
WATER
of
TEA OR HOT
certain that there
in
thè
tank (5).
thè
tank (5).
dispensing
tube
(1
or
protect hands with oven
or pot
holders
thè
filler
dispensino
for
thè
LEO
thè
tube (10) without
thè
dial
thè
flow
Is
enough
machine without water
hot
water from
0)
always
use a
tali
to
prevent
burns
holder (12)
container (cappuccino cup, high-necked
(19)
of
hot
water.
light switch
to
<^/)f
j;N
steam, return
or
thè
(17)
thè
to
dispense
milk
- -
out of
thè
steam tube before steam
thè
steam
to
flow
into another container
dial
(19)
to
thè O setting,
will
continue
to
on)
coffee
to
ease
an
empty container
flash
canno!
thè
thè
machine's proper temperature
(Ughi
thè
milk,
steam into
BEVERAGES
hot
thè
/è,,.
capsule
filler
holder (13)
to
turn off.
glass,
(11 ) (fig."P").
to
thè O setting.
thè
frolher
hot
dial
water.
(19)
and
until
thè
be
cleaning
from
thè
pitcher, etc)
turn
off
steam
has
dlspen-
of
thè
for a few
hub
19)
- -
Operation - -_
To
remove
thè
is
to
reposition
mitts
7..,,
TIPS
To
heat liquids,
filled.
Before
container, turn
To
obtain milk with a thick
(11
) too
milk evenly
To
obtain
temperature.
[jgp
After
~ ' seconds into
each
clogging
milk frother (11) from
!t
while
or pot
holders
FQR USE
removing
thè
deeply. Move
(fig."N").
thè
best froth,
lime
you
an
empty container.
thè
"x"
hole
thè
to
always
thè
milk
dial
heat
(fig."R"i
prevent burns
(19)
thè
liquids.
appliance
use
froth (cappuccino),
container
be
thè
steam distribution
Is on,
protect
A .
tali,
narrow
frother
(11)
to
with
or
thè Q setting
slowly
sure
to use
especially milk. dispense steam
Thln
nperation
thè
fatìy
your
containers that
thè
steam tube (10) from
to
stop
do not
immerse
up and
down
milk that
reduces
substances
hands
are not
thè
steam flow.
in
order
is
cold
thè
conta/ned
tube
with oven
thè
milk
to
or at
for a few
possibilìty
in
(10)
overly
frother
heat
room
thè
thè
thè
of
or
li-
-
36 -
-
37 -
Page 20

CLEANING
/V
Before
clearing,
from
thè
Never
immerse
or
other
a
- HOW
To
clean
Do
not use
After
each use, clean
and
thè
If
needed, clean
brush (fig.
If
thè
dispensing spouts
use
thè
Do
not use
they
could
Periodically
any
coffee residues.
Each
time
it
and
clean
where
thè
using
thè
thè
appliance
Periodically:
-
Remove
drip
with normal
-
Drain
thè
tank (5),
dry
thè
Ali
of
thè
with
warm
Do
not
wash
dishwasher
- -
Maintenance
ALWAYS
electrical
thè
liquids.
Do
TP
CLEAN
thè
body
abrasive
filter under running water
thè
Q).
special
pin
large
diameter
irreparably damage
clean
thè
milkfrother
thè
small
steam
is
pin
(16a)
(fig.
thè
grill
tray
(8) and
disii
thè
water
rinse
tank
parts,
except
water
thè
filter holder (12)
to
avoid damaging
unplug
outlet.
body
of
thè
not
wash
THE
of
thè
appliance
detergents.
thè
filter
outer
and
on
thè
(16a)
to
remove
metal
thè
filter holder
(11)
"x"
hole
from
dispensed,
included with
"R").
(7) and
thè
wash
them
detergent.
contained
and
then
for
Ine
and
normal dish detergent.
thè
appliance
appliance(l)
in
thè
dishwasher.
APPLIANCE
(1 ) use a
holder
(12)
or
to
remove
inner
parts
of
filters
(14a
-14b
any
residues (see
otajects
such
thè
filler.
stand
(fig.
"S")
is
used, clean
Cleaning
filler
holes
and(15)(fig."Q")
Cleaning
in
dispensing
body
of
Ihe
or
thè
capsule filter holder
it.
- -
in
water
damp
cloth.
thè
capsule
any
thè
-15)
itwith a damp
pin for
pin for
applianee
filler
residuai coffee grounds.
filter
using a soft
should become clogged,
fig."Q").
as
needles,
nails,
with a damp cloth
spenge,
(14a - 14b)
steam
hole
(fig."R")
(1).
can fae
holder
bristled
to
remove
remove
cleaned
(13)
etc.
716a
in
(13)
as
thè
Maintenance
b -
LIME
BUILD-UP
Periodically remove
M
The
frequency
Fili
thè
Pour a dose
and
suitable
Remove
(7).
Press
Wait
(1
9)
Repositionthedial(19)tothe Q setting.
Repeat
is
emptìed.
When
machine
;&
Always
lime
^^
remover produci
water tank
thè
thè
switch
until
thè
to
Q>
thè
thè
operation
by
toltovi
for
filter holder
to
operation
repeating
thè
thè
lime
of
this
operation
to
thè
of
lime removal
coffee machines) into
(1
7)
LEO
on
dispense
2 or 3
is
thè
manufacture
REMOVAL
build-up
from
depends
maximum
solution
(12)
from
to
turn
on
thè
thè
switch
(17)
two or
three cups
times
until
complete,
remove
above
operations
CYCLE
thè
machine.
on
thè
degree
of
level.
(non-toxic, widely available
thè
water tank (5).
thè
hub
and set a
container
machine.
lights
up
steadily, then turn
of
water.
ali
of
thè
water contained
thè
remaining
using clean water
ions
listed
on
thè
hardness
solution
only.
packaging
i
mi
of
for
on
thè
thè
in
thè
from
o!
thè
sale
grill
dial
tank
thè
thè
-
38 -
39
-
Page 21

- - Disposai
This
product
conforms
to
The
crossed-out
its
useful
life
taken
or
It
appropriate channeis
subject
disposai.
By
an
negative
thè
For
locai
purchased.
The
to
compatible way, both dìrectly
systems.
it
to a
collection center
returned
to
is
thè
user's
to
thè
properly disposing
environmentally compatible
effects
recyciing
of
further
information
waste disposai
manufacturers
recycle, process
The
manufacturer
products,
at
for
regulatory, industriai, commerciai
European Directive 2002/96/EC.
wheeled
must
thè
penaities provisioned
their
bin on
not
be
retailer when purchasing a replacement applianoe.
responsìbility
at
thè
of
thè
on
thè
environment
thè
materials
on
service,
and
thè
and
dispose
reserves
own
discretion,
of
thè
this
appliance
disposed
of as
for
waste electrical
to
dispose
end of its
useful life
by
ourrent
appliance
for its
way,
you
and
thè
product
waste collection
or
thè
shop
importers
will uphold
of
products
and
through their
thè
righi
in any way
applìance
means
domestic waste,
and
electronic equipment,
of
this
appliance
or
thè
laws
governing waste
successive recycling
will
help
prevent
human
heaith whiie promoting
is
made
with.
and
disposai,
where
thè
their
in an
environmentally
participation
to
make
changes
deemed necessary
or
aesthetic reasons.
that
at
thè
but
through
user
thè
potential
contaci:
appliance
responsibility
in
collective
to
thè
- -
end of
must
be
thè
may be
your
was
- - For UK
FOR UK
•
In
•
In
•
When
•
If
in
•
Fit
ONL.Y
Wìrìng
ìnstructìons
APPLIANCES
/k
For
incorporating
thè
event
to
BS1362 must
thè
socket outlets
plug
connected
cut
off, this plug
be
disposed
thè
fuse cover
covers
can be
thè
appropriate plug according
alternative
plugs a 15
fuse box.
APPLIANCES
The
wires
in
GREEN & YELLOW : EARTH
BLUE
:
BROWN
:
As
thè
colours
markings
identifying
The
wire which
plug which
is
green
and
yellow.
which
is
marked with
The
wire which
with
thè
letter
^5^
The
**-
fuse.
correo,
for
WITH FITTED PLUG.
your convenìence this
of
replacing a fuse
to
of
safely.
obtained
thè
in
is
marked with
is
"L"
U.K.
a 13 amp
be
used.
are not of
this appliance,
is a
shock hazard
is
detachable, never
from
your service agent.
amp
fuse must
WITHOUT
mains
thè
coloured GREEN & YELLOW must
or
fuse
Should
FITTED
lead
are
NEUTRAL
LIVE
mains iead
thè
terminals
thè
The
wire which
thè
letter
coloured BROWN must
coloured red.
cover
of a
thè
fuse
replacement
in
thè
coloured
of
letter
"N"
non-rewireable
fuse
only_-_-_
and
Ireland only:
appliance
fuse.
thè
plug supplied,
13A
BS1363
cut off
thè
plug.
if
inserted
use
thè
plug with
to
thè
instructions
be
fitted either
PLUG
PITTING A PLUG - IMPORTANT
in
accordance with
this
appliance
in
your plug, proceed
"E" or by
is
or
cover
thè
coloured BLUE must
coloured
black.
be
connected
plug must
beccarne
lost.
cover
is
obtained
is
supplled
complete with a plug
a 13 amp
fuse
type,
and
therefore
into a socket outiet
thè
cover omitted. Replacement
in
paragraph
in
thè
piug
or
thè
following code:
may not
correspond with
as
follows.
be
connected
earth
symboi
© or
be
connected
to
thè
terminal which
be
refitìed
thè
plug must
from
pur
service
approved
do not
accept
and
must therefore
"Fitting a plug".
adaptor
or at
thè
to
thè
terminal
coloured green
to
thè
when
changing
not be
used
department
by
ASTA
thè
main
coloured
in
terminal
is
marked
unta
thè
With
thè
thè
thè
or
or
•
40 -
- 41
Page 22
- - Note
- -
- -
Note
- -
- 42 -
43
 Loading...