

Bialetti Capsule Coffee Machine Automatica/Manuale Macchina per espresso 0,7 L, Super Macchina da Caffè a Capsule Bundle Super Bianco + 32 caps, Macchina Caffè Super Rosso User guide

SUPER
CF69
Istruzioni per l’uso
Instructions for use
Instructions d’emploi
Gebrauchsanleitung
Instructiones de uso
IT
EN
FR
DE
ES


Istruzioni originali .............................................. 5
IT
EN
FR
DE
ES
Translation of original instructions .................... 34
Traduction des instructions d’origine ................ 63
Übersetzung der Originalanleitung ................... 92
Traducción de las instrucciones originales ....... 121


1. Introduzione
Gentile cliente,
Lei ha appena acquistato una macchina da Caè Espresso Bialetti!
La ringraziamo per avere scelto un nostro prodotto e condiamo che
questa scelta soddis a pieno le sue aspettative.
Il Sistema Espresso Bialetti è il risultato di anni di passione e di attenta
ricerca sul caè e sui modi di prepararlo. Sin dal 1933, con l’invenzione ed il lancio di Moka Express, l’omino con i ba è, a tutti gli eetti,
sinonimo di caè e icona dell’autentico espresso italiano.
Grazie alla presenza di un innovativo sensore la sua macchina può
essere utilizzata esclusivamente con le originali capsule Bialetti in
alluminio, perfettamente dosate, che sono state da noi studiate per
garantirle anche a casa un caè come quello del bar.
La invitiamo a leggere attentamente il seguente libretto prima di
utilizzare questo apparecchio e a collegarsi al sito www.bialetti.com per
avere tutte le informazioni per accedere ai vantaggi riservati ai nostri
clienti.
Nell’ augurarle una piacevole degustazione in tazza, Bialetti Industrie
la saluta cordialmente.
Dichiarazione di conformità
Il Produttore dichiara sotto la propria responsabilità che
l’apparecchio a cui si riferisce il presente “libretto di
istruzioni per l’uso” è conforme a quanto prescritto dalla
Direttiva CE in materia di apparecchi ad uso domestico,
Al ne di migliorare il prodotto e/o per esigenze costruttive, il produttore si riserva di apportare variazioni tecnologiche, estetiche e dimensionali senza obbligo di preavviso.
Informazioni Normative
L’apparecchio oggetto del presente libretto è conforme alle Direttive 2014/30/UE; 2014/35/UE ; Reg. (CE) n.1935/2004 e Reg. (CE)
n.2023/2006.
come LVD, EMC, EMF, ErP, RoHS, REACH, “Food contact”.
IT
5

IT
2. Avvertenze
Descrizione dei simboli adottati
ATTENZIONE
Osservare sempre scrupolosamente le informazioni contrassegnate con il pittogramma ATTENZIONE o AVVERTENZA.
La segnalazione AVVERTENZA indica il pericolo di possibili
lesioni gravi; ATTENZIONE indica invece il pericolo di possibili
lesioni lievi.
LEGGERE IL MANUALE D’UTILIZZO
Indica di leggere il presente manuale prima dell’utilizzo per
un corretto funzionamento e per evitare qualsiasi rischio di
shock elettrico e/o scottatura.
ATTENZIONE – SUPERFICIE CALDA!
La temperatura superciale della zona cui è applicato può
raggiungere valori pericolosi e per questo motivo deve essere
evitato il contatto diretto con la pelle e con tessuti/materiali
sensibili al calore.
RACCOMANDAZIONI
Questo simbolo indica di seguire le raccomandazioni che
vengono indicate dall’azienda costruttrice per la salvaguardia
e l’uso corretto del prodotto che si sta utilizzando.
6

2. Avvertenze
AVVERTENZE GENERALI
Leggere attentamente le avvertenze contenute nelle presenti
istruzioni in quanto forniscono importanti indicazioni riguardanti la sicurezza di installazione, d’uso e di manutenzione.
Conservare con cura questo libretto per ogni ulteriore consultazione.
QUESTO APPARECCHIO È INTESO PER USO
DOMESTICO O SIMILARE, COME AD ESEM-
PIO:
- AREE CUCINA IN NEGOZI, UFFICI E
ALTRI AMBIENTI LAVORATIVI;
- CASCINE;
- BED AND BREAKFAST E STRUTTURE SI-
MILI;
- HOTEL, MOTEL E ALTRI AMBIENTI RESIDENZIALI (SOLO DAI CLIENTI).
I BAMBINI DEVONO ESSERE
SORVEGLIATI PERCHÉ NON
GIOCHINO CON L’APPARECCHIO.
IT
7

IT
2. Avvertenze
L’APPARECCHIO PUÒ ESSERE UTILIZZATO DA BAMBINI DI ETÀ NON
INFERIORE A 8 ANNI PURCHÉ SOTTO SORVEGLIANZA OPPURE DOPO
CHE LE STESSE ABBIANO RICEVUTO ISTRUZIONI RELATIVE ALL’USO
SICURO DELL’APPARECCHIO E ALLA
COMPRENSIONE DEI PERICOLI AD
ESSO INERENTI. LE OPERAZIONI DI
PULIZIA E MANUTENZIONE POSSONO ESSERE EFFETTUATE DA BAMBINI DI ETÀ NON INFERIORE AGLI 8
ANNI ADEGUATAMENTE SORVEGLIATI. TENERE IL PRODOTTO ED IL SUO
CAVO DI ALIMENTAZIONE LONTANO DAI BAMBINI DI ETÀ INFERIORE
AGLI 8 ANNI.
L’APPARECCHIO PUÒ ESSERE UTILIZZATO DA PERSONE CON CAPACITÀ FISICHE, SENSORIALI O MENTALI
RIDOTTE O PRIVE DI ESPERIENZA E
CONOSCENZA DELL’APPARECCHIO
PURCHÉ SIANO SOTTO CONTROLLO
O AD ESSE SIANO STATE IMPARTIRE
ISTRUZIONI SU COME USARE L’APPARECCHIO IN SICUREZZA E SUI
RISCHI CONNESSI ALL’USO DELLO
STESSO.
8

2. Avvertenze
NON IMMERGERE L’APPARECCHIO IN
ACQUA O IN ALTRI LIQUIDI.
SE IL CAVO DI ALIMENTAZIONE DI
QUESTO APPARECCHIO È DANNEGGIATO, DEVE ESSERE SOSTITUITO
ESCLUSIVAMENTE DA UN CENTRO
ASSISTENZA TECNICA AUTORIZZATO
DAL COSTRUTTORE, POICHÉ SONO
NECESSARI UTENSILI SPECIALI.
DURANTE L’EROGAZIONE DELLA BEVANDA, PRESTARE ATTENZIONE AD
EVENTUALI SCHIZZI DI LIQUIDO CALDO. NON TOCCARE LE PARTI CALDE
DELL’APPARECCHIO SUBITO DOPO L’USO PER EVITARE IL RISCHIO DI USTIONE. L’USO SCORRETTO PUÒ PROVOCARE LESIONI.
IT
9

IT
2. Avvertenze
QUESTO APPARECCHIO È STATO
CONCEPITO PER PRODURRE CAFFÈ
ESPRESSO IN CAPSULA BIALETTI E
DEVE ESSERE UTILIZZATO SOLO PER
QUESTO SCOPO. OGNI ALTRO USO
È DA CONSIDERARSI IMPROPRIO E
QUINDI PERICOLOSO. IL COSTRUTTORE NON PUÒ ESSERE CONSIDERATO RESPONSABILE PER EVENTUALI
DANNI DERIVANTI DA USI IMPROPRI, ERRONEI ED IRRAGIONEVOLI.
• L’apparecchio è stato progettato solo per uso interno e per temperature non estreme; non lasciare esposto l’apparecchio ad agenti
atmosferici (pioggia, sole, etc.).
• In caso di uso commerciale, movimentazione o uso impropri,
eventuali danni derivanti dall’uso per altri scopi, cattivo funzionamento, riparazione non professionale o inosservanza delle istruzioni,
il produttore declina qualsiasi responsabilità ed è autorizzato a non
applicare i termini di garanzia.
• Dopo aver tolto l’imballaggio e prima di ogni uso, assicurarsi dell’integrità meccanica dell’apparecchio e di tutti i suoi accessori. La guaina e
la spina del cavo di alimentazione non devono evidenziare screpolature o rotture. Nel caso si verichi quanto sopra, staccare subito la
spina dalla presa di corrente e portare l’apparecchio presso un centro
di assistenza tecnica autorizzato per le necessarie veriche.
• Gli elementi dell’imballaggio (sacchetti in plastica, polistirolo espanso, chiodi, ecc.) non devono essere lasciati alla portata dei bambini
in quanto potenziali fonti di pericolo.
• Posizionare l’apparecchio su una supercie piana, regolare e stabile.
Non posizionarlo accanto a/su ripiani roventi, come caloriferi, piani
cottura, forni, cucine a gas, amme libere, etc.
• Prima di collegare l’apparecchio accertarsi che i dati targa siano
rispondenti a quelli della rete di distribuzione elettrica. La targa è
situata sul fondo del corpo dell’apparecchio.
• In caso di incompatibilità tra la presa e la spina dell’apparecchio fare
10

2. Avvertenze
sostituire la presa con altra di tipo adatto da personale professionalmente qualicato. Quest’ultimo, in particolare, dovrà anche
accertare che la sezione dei cavi della presa sia idonea alla potenza
assorbita dall’apparecchio. In generale è sconsigliabile l’uso di adattatori, prese multiple e/o prolunghe. Qualora il loro uso si rendesse
indispensabile, è necessario utilizzare solamente adattatori semplici
o multipli e prolunghe conformi alle vigenti norme di sicurezza,
facendo però attenzione a non superare il limite di portata, in valore
di corrente, marcato sull’adattatore semplice e sulle prolunghe, e
quello di massima potenza marcato sull’adattatore multiplo.
• Non lasciare l’apparecchio inutilmente inserito. Staccare la spina
dalla rete di alimentazione quando l’apparecchio non è utilizzato.
• Se si intende lasciare inattivo l’apparecchio per un periodo di tempo
piuttosto lungo, svuotare il serbatoio dell’acqua.
• Non mettere l’apparecchio in un mobile durante il funzionamento.
COLLEGARE L’APPARECCHIO ALL’IMPIANTO ELETTRICO
ESCLUSIVAMENTE CON UNA SPINA DI MESSA A TERRA.
SI CONSIGLIA DI ALIMENTARE L’APPARECCHIO
TRAMITE UN INTERRUTTORE DIFFERENZIALE (RDC)
CON CORRENTE D’INTERVENTO NON SUPERIORE A
30MA.
IT
EVITARE DI SCOLLEGARE L’APPARECCHIO TIRANDO
IL CAVO DI ALIMENTAZIONE.
11

IT
2. Avvertenze
DURANTE IL FUNZIONAMENTO, LA PRESA DI CORRENTE
DEVE ESSERE FACILMENTE ACCESSIBILE NEL CASO IN
CUI FOSSE NECESSARIO SCOLLEGARE L’APPARECCHIO.
• Non toccare l’apparecchio con mani bagnate o umide.
PRECAUZIONI
• Non usare l’apparecchio a piedi nudi.
• Non accostare il cavo a bordi taglienti, non ssarlo o lasciarlo
pendere.
• Per evitare surriscaldamenti pericolosi, si raccomanda di svolgere
per tutta la sua lunghezza il cavo di alimentazione e di utilizzare
l’apparecchio come consigliato nel paragrafo “Avvertenze” relative
all’uso corretto dell’apparecchio.
• Non ostruire le aperture o le fessure di ventilazione o di smaltimento calore.
• In caso di guasto e/o di cattivo funzionamento dell’apparecchio, spegnerlo e non manometterlo. Per l’eventuale riparazione rivolgersi solamente ad un centro di assistenza tecnica autorizzato dal costruttore, richiedendo l’utilizzo di parti e ricambi originali. Il mancato rispetto
di quanto sopra può compromettere la sicurezza dell’apparecchio.
• Allorché si decida di non utilizzare più un apparecchio di questo
tipo, è consigliabile di renderlo inoperante tagliandone il cavo di
alimentazione dopo aver staccato la spina dalla presa di corrente.
Si raccomanda, inoltre, di rendere innocue quelle parti dell’apparecchio suscettibili di costituire un pericolo, specialmente per
i bambini che potrebbero servirsi dell’apparecchio fuori uso per i
propri giochi.
IL PRODOTTO DEVE ESSERE UTILIZZATO SECONDO LE
ISTRUZIONI DEL COSTRUTTORE. UN ERRATO UTILIZZO
PUÒ CAUSARE DANNI A PERSONE, ANIMALI O COSE,
NEI CONFRONTI DEI QUALI IL COSTRUTTORE NON PUÒ
ESSERE CONSIDERATO RESPONSABILE
12

2. Avvertenze
• Non lasciare incustodito l’apparecchio durante il funzionamento.
NON UTILIZZARE L’APPARECCHIO SENZA ACQUA NEL
SERBATOIO.
• Non spostare l’apparecchio quando è in funzione.
A SEGUITO DELL’INSTALLAZIONE INIZIALE,
L’APPARECCHIO POTREBBE EMANARE ODORE DI
BRUCIATO A CAUSA DEI MATERIALI ISOLANTI E DEGLI
ELEMENTI RISCALDANTI; IL TUTTO È NORMALE.
3. Contenuto della confezione
1 Macchina da caè espresso;
1 Libretto di istruzioni;
1 Opuscolo informativo “I caè d’Italia”;
1 Confezione di prova delle miscele “I caè d’Italia” (solo se indicato
sulla confezione).
IT
13
IT
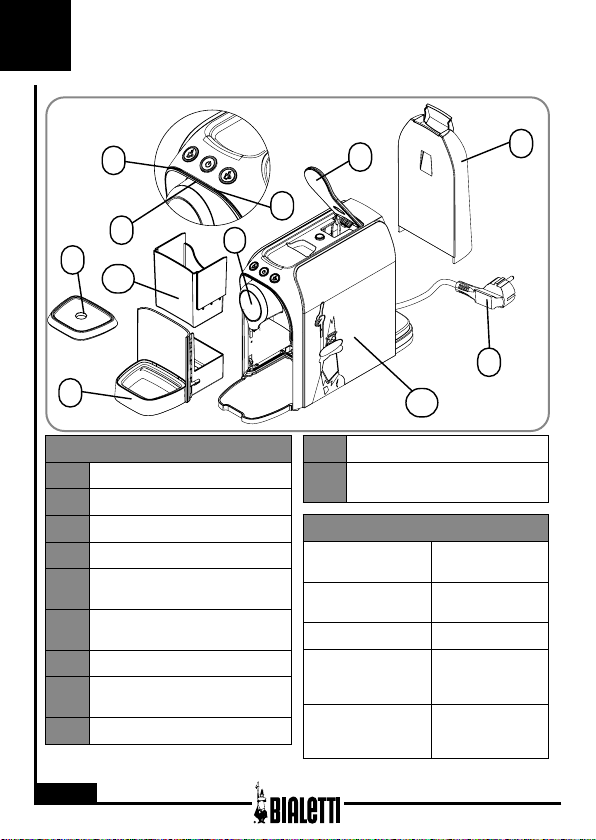
4. Descrizione
dell’apparecchio
5
4
3
2
11
1
Legenda
1 Vassoio raccogli gocce
2 Griglia poggia tazzina
3 Erogatore
4 Pulsante on/o
pulsante erogazione caè
5
espresso
pulsante erogazione caè
6
lungo
7 Leva
Serbatoio acqua estraibile
8
con coperchio
9 Cavo di alimentazione
7
6
10
10 Corpo apparecchio
Contenitore capsule usate
11
(massimo 8)
Dati tecnici
Dimensioni
LxPxH(mm)
Tensione di ali-
mentazione (V)
Potenza (W) 1145-1360
Capacità mas-
sima serbatoio
acqua
Tempo automatico di spegni-
mento
220-240 V 50-
8
9
12x32x23
60 Hz
0,7 l
circa 10’
14

5. Primo utilizzo
dell’apparecchio
IT
1
A macchina scollegata, estrarre
il serbatoio (8) e riempirlo di
acqua potabile, senza superare il
livello MAX.
Inserire la spina (9) dell’apparecchio nella presa, seguendo le
indicazioni riportate nella sezione
‘Avvertenze’.
3
Accendere la macchina tramite
l’interruttore (4) posto nella parte
superiore della macchina.
NON UTILIZZARE MAI L’APPARECCHIO SENZA ACQUA
NEL SERBATOIO.
Durante il riscaldamento della
caldaia,la spia del pulsante on/o
(4) e le spie dei pulsanti di erogazione (5-6) lampeggiano di rosso.
Quando le spie diventano di colore
verde sse, la macchina è pronta
per l’erogazione.
2
4
15

IT
5. Primo utilizzo
dell’apparecchio
Tenendo la leva (7) abbassata,
posizionare una tazza capiente
sull’apposita griglia e attivare la
modalità pulizia premendo il pulsante di erogazione caè espresso
(5) e caè lungo(6) contemporaneamente per 5 sec. Stoppare la
modalità pulizia, premendo uno
dei due tasti di erogazione quando
il serbatoio sarà vuoto.
5
DURANTE LA FUNZIONE PULIZIA PER UN MINUTO CIRCA
LA MACCHINA EROGHERA’ ACQUA AD INTERMITTENZA
IN MODO DA PULIRE E RISCIACQUARE A FONDO I
CIRCUITI INTERNI. DOPO UN MINUTO L’EROGAZIONE
TORNERA’ CONTINUA. DURANTE TUTTO QUESTO CICLO
LE SPIE DEI DUE PULSANTI DI EROGAZIONE E LA SPIA
DEL PULSANTE ON/OFF, LAMPEGGERANNO DI COLORE
VERDE VELOCEMENTE.
NON INSERIRE MAI LA CAPSULA DURANTE IL PRIMO
UTILIZZO E DURANTE LA MODALITÀ PULIZIA
16

6. Preparazione del caè
IT
6
Prima di procedere con l’erogazione, controllare il livello di acqua
nel serbatoio (8) e accertarsi che
i pulsanti di erogazione (5-6) e la
spia del pulsante on/o (4) siano
accesi di colore verde, quindi
sollevare la leva (7).
Inserire la capsula nell’apposito alloggiamento e chiudere la leva (7)
prestando attenzione per evitare
lo schiacciamento delle mani.
SE LA CAPSULA È DEFORMATA, SISTEMARE I BORDI.
Posizionare una tazza sulla griglia
(2). Iniziare l’erogazione desiderata del caè, secondo le procedure
descritte di seguito.
8
7
17

IT
6. Preparazione del caè
NON INSERIRE LE DITA FRA I MECCANISMI, NÉ NELL’ALLOGGIAMENTO
DELLA CAPSULA.
NON SOLLEVARE MAI LA LEVA DURANTE IL FUNZIONAMENTO
18

6. Preparazione del caè
PROCEDURA PREPARAZIONE CAFFÈ ESPRESSO
Premere il pulsante di erogazione
caè espresso (5). La spia del pulsante di erogazione caè lungo (6)
si spegne.
NOTA: Durante l’erogazione, la
spia del pulsante di erogazione
caè espresso (5) inizia a
lampeggiare di colore verde.
Una volta terminata l’erogazione, la
macchina ritorna in modalità pronta
per l’uso: entrambe le spie dei pul-
9
santi di erogazione e il tasto ON/OFF
NOTA: La quantità di erogazione del caè espresso è di 25 ml Per
modicare questa quantità consultare il capitolo ‘7. Impostazione quantità
di caè erogato.
sono accese.
PROCEDURA PREPARAZIONE CAFFÈ LUNGO
Premere il pulsante di erogazione
caè lungo (6). La spia del pulsante
di erogazione caè espresso (5) si
spegne.
NOTA: Durante l’erogazione, la
spia del pulsante di erogazione
caè lungo (6) inizia a lampeggiare
di colore verde.
Una volta terminata l’erogazione, la
macchina ritorna in modalità pronta
per l’uso: entrambe le spie dei pul-
10
santi di erogazione e il tasto ON/OFF
sono accese.
NOTA: La quantità di erogazione del caè lungo è di 40 ml. Per modicare
questa quantità consultare il capitolo ‘7. Impostazione quantità di caè
erogato.
IT
19

IT
6. Preparazione del caè
Per ogni caè successivo, sollevare la leva (7) per inserire una nuova
capsula.
NOTA: Sollevando la leva (7), la capsula utilizzata viene espulsa
automaticamente all’interno del contenitore capsule usate (11).
NOTA: E’ possibile in qualsiasi momento interrompere l’erogazione del
caè premendo uno qualsiasi dei due pulsanti di erogazione.
QUANDO SI ESAURISCE L’ACQUA DURANTE IL
FUNZIONAMENTO
Quando la spia del pulsante ON/OFF lampeggia in rosso il serbatoio
acqua è vuoto.
Espellere la capsula e richiudere la leva SENZA caricare una nuova
capsula. Riempire il serbatoio no al livello MAX.
Premere uno dei due tasti di erogazione e attendere che la macchina
termini il ciclo di caricamento del circuito idraulico.
Quando tutte le spie diventano di colore verde sso, la macchina è
pronta per l’utilizzo.
LA MACCHINA E’ PROVVISTA DI APPOSITO SENSORE
CHE CONSENTE L’UTILIZZO DELLA MACCHINA SOLO
CON CAPSULE DI ALLUMINIO.
IN CASO DI UTILIZZO DI CAPSULE IN PLASTICA LA
MACCHINA NON EROGHERA’ IL CAFFE’ LE SPIE DEI
PULSANTI DI EROGAZIONE E LA SPIA DEL PULSANTE
ON/OFF LAMPEGGERANNO DI ROSSO PER 3 SEC CIRCA.
IN CASO DI TENTATA EROGAZIONE SENZA CAPSULA
LA MACCHINA NON EROGHERA’ IL CAFFE’ LE SPIE DEI
PULSANTI DI EROGAZIONE E LA SPIA DEL PULSANTE
ON/OFF LAMPEGGERANNO DI ROSSO PER 3 SEC CIRCA.
20

6. Preparazione del caè
IN CASO DI TENTATA EROGAZIONE SENZA ACQUA NEL
SERBATOIO, LA MACCHINA NON EROGHERA’ IL CAFFE’
E LA SPIA DEL PULSANTE ON/OFF LAMPEGGERA’ DI
ROSSO. IN QUESTA FASE SCARICARE SEMPRE LA
CAPSULA, CHIUDERE LA LEVA E PREMERE UNO DEI DUE
TASTI DI EROGAZIONE PER RICARICARE IL CIRCUITO
IDRAULICO.
IN CASO SIA NECESSARIO EROGARE ACQUA, ATTIVARE
LA MODALITA’ PULIZIA PREMENDO IL PULSANTE DI
EROGAZIONE CAFFE’ ESPRESSO (5) E CAFFE’ LUNGO
(6) CONTEMPORANEAMENTE PER 5 SEC. ACCERTARSI
CHE NON SIA INSERITA LA CAPSULA DURANTE QUESTA
FUNZIONE.
IT
21

IT
7. Impostazione quantità di
erogazione
In questa tipologia di macchina da caè espresso è possibile modicare la quantità di caè erogato.
IMPOSTAZIONE QUANTITÀ DI EROGAZIONE DEL CAFFÈ
ESPRESSO
DURANTE QUESTA FASE È NECESSARIO CHE
ALL’INTERNO DELLA MACCHINA SIA PRESENTE UNA
CAPSULA DI ALLUMINIO.
Quando la macchina è pronta
all’uso, premere il pulsante di
erogazione caè espresso (5) per
più di 3 secondi, la macchina inizia
l’erogazione del caè. Una volta
raggiunto il volume desiderato,
premere nuovamente il pulsante di
erogazione caè espresso (5) per
interrompere l’erogazione.
Il tempo di erogazione verrà
memorizzato per il pulsante di
erogazione caè espresso (5).
11
PER RIPRISTINARE LE IMPOSTAZIONI DI FABBRICA
Per ripristinare le impostazioni programmate dalla fabbrica, tenere premuto il pulsante ON/OFF (4) e il pulsante di erogazione caè espresso
(5) per 3 sec. Le due spie dei pulsanti di erogazione lampeggeranno
per 3 secondi verde/rosso per confermare l’avvenuto reset.
IL VOLUME DI EROGAZIONE IMPOSTABILE PER IL
CAFFÈ ESPRESSO È COMPRESO TRA 15 ML E 250 ML
CIRCA.
22

7. Impostazione quantità di
erogazione
IMPOSTAZIONE QUANTITÀ DI EROGAZIONE DEL CAFFÈ
LUNGO
DURANTE QUESTA FASE È NECESSARIO CHE
ALL’INTERNO DELLA MACCHINA SIA PRESENTE UNA
CAPSULA DI ALLUMINIO.
Quando la macchina è pronta
all’uso, premere il pulsante di
erogazione caè lungo (6) per più
di 3 secondi, la macchina inizia
l’erogazione del caè. Una volta
raggiunto il volume desiderato,
premere nuovamente il pulsante
di erogazione caè lungo (6) per
interrompere l’erogazione.
Il tempo di erogazione verrà
memorizzato per il pulsante di
erogazione caè lungo (6).
12
PER RIPRISTINARE LE IMPOSTAZIONI DI FABBRICA
Per ripristinare le impostazioni programmate dalla fabbrica, tenere premuto il pulsante ON/OFF (4) e il pulsante di erogazione caè espresso
(5) per 3 sec. Le due spie dei pulsanti di erogazione lampeggeranno
per 3 secondi verde/rosso per confermare l’avvenuto reset.
IL VOLUME DI EROGAZIONE IMPOSTABILE PER IL
CAFFÈ LUNGO È COMPRESO TRA 15 ML E 250 ML CIRCA.
IT
23

IT
8. Manutenzione
PULIZIA DELL’APPARECCHIO
PRIMA DI EFFETTUARE L’OPERAZIONE DI PULIZIA,
DISINSERIRE SEMPRE LA SPINA DALLA PRESA
DI CORRENTE. NON IMMERGERE MAI IL CORPO
DELL’APPARECCHIO IN ACQUA O ALTRI LIQUIDI E
NON LAVARE IN LAVASTOVIGLIE ALCUN COMPONENTE
DELL’ APPARECCHIO.
• Per la pulizia del corpo apparecchio, usare un panno umido evitando l’impiego di detersivi abrasivi.
• E’ preferibile risciacquare ogni giorno il serbatoio. Non lasciare acqua nel serbatoio per più di 5 giorni o, se questo dovesse
accadere, cambiare l’acqua ed erogarne 50 ml utilizzandola la
funzione pulizia
Il contenitore delle capsule usate
(11) è estraibile; rimuoverlo
periodicamente e svuotare quando
è pieno.
Il contenitore può contenere sino
a 6-8 capsule usate prima di
dover essere svuotato. È consigliabile controllare il livello delle
capsule.
Non azionare la macchina con il
contenitore delle capsule (11) piena per evitare di danneggiarla.
13
Fare attenzione durante lo svuotamento del contenitore delle capsule, in quanto potrebbero esserci
residui di acqua e/o caè.
24

8. Manutenzione
Lavare il vassoio raccogli gocce
(1), la griglia poggia tazzina (2), il
contenitore capsule usate (11) con
acqua e detersivo per piatti.
Non lavare tali componenti in lavastoviglie.
14
ALLARME DECALCIFICAZIONE
la macchina è dotata di un sistema di allarme che dopo 400 erogazioni,
avverte l’utilizzatore tramite luce lampeggiante verde/rossa del pulsante
on/o che la macchina necessita di decalcicazione. Per ripristinare tale
allarme è necessario eseguire un ciclo completo di decalcicazione con
funzione pulizia. Vedi paragrafo seguente.
PROCEDURA DI DECALCIFICAZIONE
Il normale utilizzo della macchina con acque naturali minerali in bottiglia
o da rubinetto comporta la formazione di calcare.
Si consiglia di eseguire la decalcicazione quando il sistema di allarme
si attiva o quando si osserva una riduzione costante della portata nel
usso di caè erogato.
LA FREQUENZA DI QUESTA OPERAZIONE DIPENDE DAL
GRADO DI DUREZZA DELL’ACQUA UTILIZZATA.
A) Versare nel serbatoio acqua (8) una dose di soluzione decalcicante
Bialetti o equivalente (purché non tossica e adatta per macchine da
caè.
IT
NON UTILIZZARE ACETO O SOLUZIONI A BASE D’ACETO COME DECALCIFICANTE.
25

IT
8. Manutenzione
B) Riempire con acqua fredda il serbatoio no al raggiungimento della
tacca MAX.
C) Premere il pulsante on/o (4) per accendere la macchina.
D) Accertarsi che non vi siano capsule nella macchina. Se necessario,
aprire e chiudere la leva (7)
E) Posizionare una tazza capiente sull’ apposita griglia e attivare la
modalità pulizia premendo il pulsante di erogazione caè espresso
(5) e caè lungo (6) contemporaneamente per 5s.
DURANTE LA FUNZIONE PULIZIA PER UN MINUTO CIRCA
LA MACCHINA EROGHERA’ ACQUA AD INTERMITTENZA
IN MODO DA PULIRE E RISCIAQUARE A FONDO I
CIRCUITI INTERNI. DOPO UN MINUTO L’EROGAZIONE
TORNERA’ CONTINUA. DURANTE TUTTO QUESTO CICLO
LE SPIE DEI DUE PULSANTI DI EROGAZIONE E LA
SPIA DEL PULSANTE ON/OFF LAMPEGGERANNO DI
COLORE VERDE.
F) Stoppare la modalità pulizia, premendo uno dei tre pulsanti, quando
l’acqua avrà raggiunto circa metà della capienza del serbatoio.
G) Lasciare agire il decalcicante per circa 15-20 minuti con la macchina
spenta.
H) Accendere la macchina ed eseguire nuovamente le operazioni
descritte al punto E), no al completo svuotamento del serbatoio.
I) Lasciare spenta la macchina per circa 5 minuti.
J) Estrarre il serbatoio e risciacquarlo abbondantemente con acqua
fredda pulita.
K) Riempire il serbatoio con acqua pulita no al livello “MAX” e inserirlo
nell’apposita sede.
L) Attivare la modalità pulizia premendo il pulsante di erogazione caè
espresso (5) e caè lungo (6) contemporaneamente per 5sec sino al
completo svuotamento del serbatoio. Se necessario, avviare più volte
la modalità di pulizia (la macchina ha un sistema di sicurezza che
interrompe l’erogazione automaticamente dopo dopo aver erogato
0,7L di liquido consecutivamente).
M) Ripetere le operazioni descritte al punto L).
26

9. Modalità di
risparmio energetico
Questo apparecchio è stato progettato in conformità alle direttive europee
EC1275 /2008 e 2009/125/EC relative ai requisiti della modalità di
risparmio energetico.
Questo apparecchio integra una funzione di auto spegnimento che si attiva
dopo 10 minuti di inattività nel caso in cui non venga erogato alcun cae’.
Per riattivare la macchina è necessario premere il pulsante on/o (4)
posto sulla parte frontale dell’apparecchio; la macchina avvierà la fase
di pre-riscaldamento della caldaia (led rossi pulsanti di erogazione e
pulsante di accensione) e, una volta raggiunta la temperatura operativa,
indicherà lo stato di pronto (led verde pulsante di erogazione e pulsante
di accensione).
IL TEMPO DI PRE-RISCALDAMENTO DIPENDE DAL TEMPO IN CUI
L’APPARECCHIO È RIMASTO INATTIVO E PUÒ DURARE FINO A 50
SECONDI.
IT
27

IT
10. Risoluzione dei problemi
Problemi Causa Soluzioni
La macchina non si
riscalda.
La macchina non eroga
caè.
Il caè risulta freddo. L’apparecchio non ha ri-
La spia del pulsante on/
o è di colore rosso sso
Macchina non collegata
alla rete elettrica.
La macchina non è
accesa.
La capsula è incastrata o
posizionata male.
Una capsula potrebbe
essere caduta all’interno
della macchina.
Manca acqua nel serbatoio.
I condotti sono ostruiti
dal calcare.
scaldato completamente
l’acqua prima di erogare
il caè.
L’apparecchio è parzialmente ostruito dal
calcare.
Temperature non correta
Time out riscaldamentonon rispettato
Il sensore NTC è scollegato o in cortocircuito
Collegare la macchina
alla rete elettrica.
Accendere la macchina
tramite il pulsante di
accensione on/o.
Scollegare l’apparecchio
dalla presa di corrente
e attendere che si
rareddi; sollevare la
leva e togliere la capsula
manualmente.
Utilizzare un utensile,
non usare mai le dita.
Estrarre il contenitore di
raccolta e vericare.
Caricare il serbatoio
d’acqua.
Eettuare un ciclo di
decalcicazione.
Prima di erogare il caè,
attendere sempre che
le spie verdi dei pulsanti
di erogazione siano
illuminate.
Eseguire un ciclo di
decalcicazione.
Spegnere e riaccendere
la macchina, se il problema persiste, rivolgersi
ad un centro assistenza
Bialetti.
28

10. Risoluzione dei problemi
Problemi Causa Soluzioni
Non è possibile abbassare la leva.
La capsula cade dall’alloggiamento.
La macchina non eroga
ed entrambe le spie dei
pulsanti di erogazione
(5-6) lampeggiano di
rosso.
Il tasto on/o lampeggia
rosso-verde
Il tasto on/o lampeggia
rosso
La capsula è incastrata o
posizionata male.
Il contenitore delle capsule usate è pieno.
La leva non è completamente alzata.
é presente una capsula
in plastica o la sede della
capsula è vuota
La macchina necessità
di un ciclo di decalcicazione
Mancanza di acqua nel
serbatoio
Scollegare l’apparecchio
dalla presa di corrente
e attendere che si
rareddi; sollevare la
leva e togliere la capsula
manualmente. Utilizzare
un utensile, non usare
mai le dita.
Svuotare il contenitore.
Abbassare completamente la leva e ri aprirla
no a ne corsa.
Estrarre la capsula in
plastica e inserire una
capsula in alluminio
Bialetti, premere i
pulsanti di erogazione
(5-6) per 3 sec al ne di
ritornare nelle condizioni
di erogazione.
Eseguire un ciclo di
decalcicazione come da
paragrafo 8.
Riempire il serbatoio
e premere un tasto
qualsiasi per uscire
dalla modalità allarme.
Premere il tasti espresso
o lungo per ripetere
l’erogazione.
IT
11. Consigli per un buon caè
• Per una crema più spessa e persistente: usa tazzine con una base
interna ovoidale.
29

IT
12. Capsule Bialetti
Le nuove capsule brevettate Bialetti sono uniche nel mercato perché
garantiscono in un unico prodotto tutti i requisiti necessari per un
Espresso Bialetti perfetto:
• PERFETTAMENTE DOSATE: contengono 7 grammi di caè, come
espressamente previsto dall’Espresso Italiano Certicato.
• IN ALLUMINIO: l’unico materiale che, a dierenza delle comuni
capsule in plastica, è in grado di preservare tutte le sostanze
organiche del caè, garantendo un prodotto sempre fresco ed con
tutto l’aroma del caè appena macinato.
Le capsule “I caè d’Italia Bialetti” possono essere acquistate:
1. Nei Negozi Bialetti, presso più di 500 punti vendita Partner Bialetti
e nei migliori supermercati.
L’elenco completo e aggiornato è consultabile sul sito
www.bialetti.com
2. Chiamando (solo per l’Italia) comodamente da casa:
3. Accedendo allo shop online sul sito:
www.bialetti.com
30

13. Garanzia
L’apparecchio è garantito per un periodo di due anni dalla data di consegna,
fa fede la data riportata sullo scontrino/fattura, a meno che l’acquirente non
provi che la consegna sia avvenuta successivamente. In caso di difetto del
prodotto preesistente alla data di consegna, Bialetti garantisce la riparazione
o la sostituzione senza spese dell’apparecchio, salvo che uno dei due rimedi
risulti sproporzionato rispetto all’altro. L’acquirente è tenuto a denunciare al
venditore qualsiasi difetto di conformità entro due mesi dalla scoperta dello
stesso.
Non sono coperte da garanzia tutte le parti che dovessero risultare difettose
a causa di negligenza o trascuratezza nell’uso, ad esempio:
• Danni causati da urti, cadute o gra dovuti all’utilizzo di utensili non
appropriati.
• Guasti causati dal calcare o da una mancata decalcicazione periodica.
• Mancata osservanza delle istruzioni per il funzionamento dell’apparec-
chio.
• Errata installazione o manutenzione operate da persone non autorizzate.
• Normale usura.
• Danni causati da modiche apportate internamente.
• Danni causati da un voltaggio diverso da quello indicato sul manuale
di uso e manutenzione.
• Danni da trasporto ovvero circostanze che comunque non possono
essere riconducibili a difetti di fabbricazione dell’apparecchio.
• Danni causati da interventi eseguiti da centri di assistenza non autorizzati.
La garanzia è inoltre esclusa in tutti i casi di uso improprio dell’apparecchio e
in caso di uso professionale. Bialetti declina ogni responsabilità per eventuali
danni che possano essere causati direttamente o indirettamente da persone,
cose ed animali domestici come conseguenza della mancata osservanza di
tutte le prescrizioni indicate in questo libretto di istruzione in tema di installazione, uso e manutenzione dell’apparecchio.
Sono fatte salve le azioni contrattuali di garanzia nei confronti del venditore.
L’AZIENDA PRODUTTRICE SI RISERVA DI APPORTARE AI PRODOTTI, A PRO-
PRIA DISCREZIONE, OGNI OPPORTUNA MODIFICA DETTATA DA RAGIONI
NORMATIVE, INDUSTRIALI, COMMERCIALI O ESTETICHE.
IT
31

IT
14. Smaltimento
• Questo prodotto è conforme alla direttiva 2012/19/CE.
• Il simbolo del cestino barrato riportato sull’apparecchio indica che
il prodotto, alla ne della propria vita utile, dovendo essere trattato separatamente dai riuti domestici, deve essere conferito in
un centro di raccolta dierenziata per apparecchiature elettriche ed
elettroniche oppure riconsegnato al rivenditore al momento dell’acquisto di una nuova apparecchiatura equivalente.
• L’utente è responsabile del conferimento dell’apparecchio a ne vita
alle appropriate strutture di raccolta, pena le sanzioni previste dalla
vigente legislazione sui riuti.
• L’adeguata raccolta dierenziata per l’avvio successivo dell’appa-
recchio dismesso al riciclaggio, al trattamento e allo smaltimento
ambientalmente compatibile contribuisce ad evitare possibili eetti
negativi sull’ambiente e sulla salute e favorisce il riciclo dei materiali
di cui è composto il prodotto.
• Per informazioni più dettagliate inerenti i sistemi di raccolta disponi-
bili, rivolgersi al servizio locale di smaltimento riuti, o al negozio in
cui è stato eettuato l’acquisto.
• I produttori e gli importatori ottemperano alla loro responsabilità
per il riciclaggio, il trattamento e lo smaltimento ambientalmente
compatibile sia direttamente sia partecipando ad un sistema collettivo.
32

Nota/Remarks/Note/Notizen/Notes
.....................................................................................................................................
.....................................................................................................................................
.....................................................................................................................................
.....................................................................................................................................
.....................................................................................................................................
.....................................................................................................................................
.....................................................................................................................................
.....................................................................................................................................
.....................................................................................................................................
.....................................................................................................................................
.....................................................................................................................................
.....................................................................................................................................
.....................................................................................................................................
.....................................................................................................................................
.....................................................................................................................................
.....................................................................................................................................
.....................................................................................................................................
.....................................................................................................................................
.....................................................................................................................................
.....................................................................................................................................
.....................................................................................................................................
.....................................................................................................................................
.....................................................................................................................................
.....................................................................................................................................
.....................................................................................................................................
.....................................................................................................................................
.....................................................................................................................................
.....................................................................................................................................
.....................................................................................................................................
.....................................................................................................................................
.....................................................................................................................................
.....................................................................................................................................
.....................................................................................................................................
.....................................................................................................................................
.....................................................................................................................................
.....................................................................................................................................
.....................................................................................................................................
.....................................................................................................................................
.....................................................................................................................................
.....................................................................................................................................

EN
1. Getting Started
Dear Customer,
Congratulations on choosing to purchase a Bialetti Espesso coee
machine!
Thank you for choosing one of our products; we are sure that you will
be completely satised with your choice.
The Bialetti Espresso System is the result of years of passion and careful research on coee and the various methods of preparation. Since
1933, with the invention and launch of the Moka Express, the little
man with moustache has been and continues to be a genuine icon of
the authentic Italian espresso.
Thanks to its innovative sensor, your machine can only be used with
the original Bialetti capsules in aluminium that contain the correct
dose and are designed to oer an espresso, like that made at the bar,
in the comfort of your own home.
Please read this manual with care before using this appliance and visit
our website www.bialetti.com for any information and to access the
advantages reserved to our customers.
Bialetti Industrie wishes you a pleasant tasting.
Declaration of conformity
The manufacturer declares under his own responsibility
that the appliance that this “Instruction manual” refers to
complies with the EC Directive on appliances for domestic
use, as LVD, EMC, EMF, ErP, RoHS, REACH, “Food
In order to improve the product and/or for manufacturing purposes,
the manufacturer reserves the right make technological, aesthetic or
dimensional variations without notice.
Regulatory information
The appliance object of this manual complies with the Directive
2014/30/EU; 2014/35/EU; Reg. (EC) n.1935/2004 and Reg. (EC)
n.2023/2006.
contact”.
34

2. Warnings
Description of symbols
ATTENTION
Always strictly comply with the information marked with
ATTENTION or WARNING pictograms.
The WARNING sign warns against a serious injury hazard,
while ATTENTION warns against minor injury hazard.
READING THE OPERATING MANUAL
It states to read this manual before using for a correct functioning and to prevent any electric shock and/or burn hazard.
ATTENTION - HOT SURFACE!
The surface temperature of the area where it is located may
reach dangerous values and for this reason the direct contact
with the skin and heat-sensitive fabrics/materials must be
avoided.
RECOMMENDATIONS
This symbol warns to follow the recommendations of the
manufacturer concerning safeguard and proper use of the
product being used.
EN
35

EN
2. Warnings
GENERAL WARNINGS
Please read this booklet carefully, as it provides important
information on the safe installation, use and maintenance of
the appliance.
Keep this booklet in a safe place for future reference.
THIS APPLIANCE IS INTENDED FOR
HOUSELHOLD USE OR SIMILAR, AS:
- KITCHEN AREAS IN SHOPS, OFFICES
AND OTHER WORKING PLACES;
- FARMHOUSES;
- BED AND BREAKFASTS AND SIMILAR
STRUCTURES;
- HOTELS, MOTELS AND OTHER RESIDENTIAL ENVIRONMENTS (FOR CUSTOMER’S USE ONLY).
CHILDREN SHOULD BE SUPERVISED TO ENSURE THAT
THEY DO NOT PLAY WITH THE
APPLIANCE.
36

2. Warnings
THIS APPLIANCE CAN BE USED BY
CHILDREN AGED FROM 8 YEARS AND
ABOVE IF THEY HAVE BEEN GIVEN
SUPERVISION OR INSTRUCTION
CONCERNING USE OF THE APPLIANCE IN A SAFE WAY AND IF THEY
UNDERSTAND THE HAZARDS INVOLVED. CLEANING AND USER MAINTENANCE SHALL NOT BE MADE BY
CHILDREN UNLESS THEY ARE OLDER
THAN 8 AND SUPERVISED. KEEP THE
APPLIANCE AND THE POWER CORD
OUT OF REACH OF CHILDREN UNDER
8 YEARS OF AGE.
APPLIANCES CAN BE USED BY PERSONS WITH REDUCED PHYSICAL,
SENSORY OR MENTAL CAPABILITIES OR LACK OF EXPERIENCE AND
KNOWLEDGE IF THEY HAVE BEEN
GIVEN SUPERVISION OR INSTRUCTION CONCERNING USE OF THE APPLIANCE IN A SAFE WAY AND UNDERSTAND THE HAZARDS INVOLVED.
EN
37

EN
2. Warnings
NEVER IMMERSE THE APPLIANCE IN
WATER OR OTHER LIQUIDS.
IF THE ELECTRICAL CORD OF THIS
APPLIANCE IS DAMAGED, IT MUST BE
REPLACED BY AN AUTHORIZED CUSTOMER SERVICE CENTRE SINCE SPECIALIZED TOOLS ARE NECESSARY.
DURING DISPENSING OF THE BEVERAGE, PAY ATTENTION TO ANY POSSIBLE SPLASHES OF HOT LIQUID.
DO NOT TOUCH THE APPLIANCE HOT
PARTS IMMEDIATELY AFTER USE TO
PREVENT THE RISK OF BURNS. IMPROPER USE MAY CAUSE INJURY.
THIS APPLIANCE WAS DESIGNED TO
MAKE ESPRESSO COFFEE IN BIALETTI CAPSULES AND MUST BE USED
FOR THIS PURPOSE ONLY. ANY OTHER USE IS CONSIDERED IMPROPER
AND THEREFORE DANGEROUS. THE
MANUFACTURER CANNOT BE HELD
RESPONSIBLE FOR ANY DAMAGE
ARISING FROM IMPROPER, INCORRECT, OR UNREASONABLE USES.
38

2. Warnings
• The appliance was designed only for indoor use and non-extreme
temperature conditions; do not leave it exposed to the elements
(rain, sun, etc.).
• The manufacturer accepts no responsibility and the warranty will
not apply for any commercial use, inappropriate handling or use of
the appliance, any damage resulting from use for other purposes,
malfunctioning, non-professional repair or failure to comply with
the instructions.
• After removing the packaging, and before use, make sure the
appliance and all the attachments are working well. The electrical
plug and sheath should not be cracked or broken. If the conditions
described above are observed, immediately unplug the appliance
from mains outlet and take it to an authorized After-Sales Service
Centre for necessary checking.
• The packing materials (plastic bags, expanded polystyrene, nails,
etc.) should be kept away from children since they are potential
sources of danger.
• Place the appliance on a at, smooth, and stable surface. Do not
put it close to/on hot surfaces, as heaters, cooking hobs, ovens,
gas ranges, open ames, etc.
• Before connecting the appliance, make sure the line voltage is correct. The label is located on the bottom of the appliance body.
• If the plug does not t into the wall outlet, have the wall outlet
replaced with another type by a qualied electrician. He/she must
also check that the cord is suitable for the power absorbed by the
appliance. In general, it is not advisable to use an adaptor, multiple
socket or an extension cord. If they are necessary, use only simple
or multiple adaptors and extension cords that conform to safety
regulations, being careful not to exceed the load limits indicated
on the adaptor and the extension cord, and the maximum power
indicated on the multiple adaptor.
• Do not leave the appliance connected when not in use. Remove the
plug from the mains outlet when the appliance is not used.
• If the appliance is not intended to be used for a quite long period,
empty the water tank.
• Do not put the appliance into a cupboard during use.
EN
39

EN
2. Warnings
CONNECT THE APPLIANCE TO THE POWER MAINS ONLY
WITH AN EARTHED PLUG.
FOR YOUR PERSONAL SAFETY, IT IS ADVISABLE TO
POWER THE APPLIANCE BY MEANS OF A DIFFERENTIAL
SWITCH (RCD), WHOSE OPERATING CURRENT DOES
NOT EXCEED 30MA.
AVOID UNPLUGGING THE APPLIANCE BY PULLING THE
POWER CORD.
WHILE IN USE, THE POWER SOCKET MUST BE EASILY
REACHABLE IN CASE IT IS NECESSARY TO UNPLUG THE
APPLIANCE.
40

2. Warnings
EN
• Do not touch the appliance with wet or damp hands.
PRECAUTIONS
• Do not use the appliance with bare feet.
• Do not put the wire close to sharped edges, do not x it and do not
leave it hang.
• To avoid dangerous overheating, it is recommended that you
unwind the electrical cord to its entire length and that you use the
appliance as recommended in “Warnings” related to a correct use
of the appliance.
• Do not block vent openings/intakes or heat outlets.
• If the appliance breaks down or functions improperly, shut it o
and do not tamper with it. Repairs must only be carried out by an
after-sales centre authorized by the manufacturer. Non-compliance
with what has been stated above could compromise the safety of
the appliance.
• If the appliance of this type is not be used anymore, it is recommended to make it inoperable by cutting o the power cord after
removing the plug from the mains outlet. You should also render
harmless those parts of the appliance that could be dangerous,
especially for children who might use an abandoned appliance as
a toy.
THE PRODUCTS MUST BE USED ACCORDING TO THE
MANUFACTURER’S INSTRUCTIONS. IMPROPER USE
COULD CAUSE DAMAGE TO PERSON, ANIMALS AND
THINGS, FOR WHICH THE MANUFACTURER CANNOT
BE HELD RESPONSIBLE.
41

EN
2. Warnings
• Do not leave the appliance unattended while turned on.
DO NOT USE THE APPLIANCE WHEN THE WATER TANK
IS EMPTY.
• Do not move the appliance whilst operating.
WHEN USING THE APPLIANCE FOR THE FIRST TIME, IT
MAY EMIT SMELL OF BURNING OWING TO INSULATION
MATERIALS AND HEATING ELEMENTS; ALL THIS IS
NORMAL.
3. Package contents
1 Espresso coee machine
1 Instructions manual
1 Consumer leaet “I Caè d’Italia”
1 Tester kit of blends “I Caè d’Italia” (only if indicated on the pack-
age)
42

4. Description
of the appliance
EN
5
4
3
2
11
1
Key
1 Drip tray
2 Cup rack
3 Nozzle
4 On/O button
espresso coee push
5
button
6 long coee push button
7 Lever
Removable water tank
8
with lid
9 Power cord
10 Appliance body
7
6
10
Compartment of used
11
capsules (max 8)
Technical Data
Dimensions
LxDxH(mm)
Voltage (V)
Power (W) 1145-1360
Max. water
tank capacity
Automatic
switching o
time
8
9
12x32x23
220-240 V
50-60 Hz
0.7 l
about 10’
43

EN
5. First use
of the appliance
1
With the machine unplugged,
take the tank (8) out and ll it
with drinking water up to the MAX
level.
Insert the power cord (9) of the
appliance in the socket as per
instructions of “Warnings” section.
3
Switch on the machine using the
switch (4) on the machine top.
NEVER USE THE APPLIANCE IF THE TANK IS EMPTY.
44
During boiler heating, the light
of the on/o button (4) and the
lights of the pouring push buttons
(5-6) blink in red. Once the lights
turn steady green, the machine is
ready for dispensing.
2
4

5. First use
of the appliance
Keeping the lever (7) lowered,
position a suitable cup on the apposite rack and start the cleaning
mode using the espresso coee
push button (5) and the long
coee one (6) at the same time
for 5 secs. Stop the cleaning mode
by pressing one of the two pouring
push buttons, when the tank will
be empty.
5
DURING CLEANING MODE, FOR ABOUT ONE MINUTE,
THE MACHINE DISPENSES WATER INTERMITTENTLY
IN ORDER TO CLEAN AND RINSE THE INNER CIRCUITS
OF THE MACHINE DEEPLY. AFTER ONE MINUTE,
DISPENSING IS CONTINUOUS AGAIN. DURING THIS
CYCLE, THE LIGHTS OF THE TWO POURING PUSH
BUTTONS AND THE LIGHT OF THE ON/OFF BUTTON
WILL BLINK IN GREEN QUICKLY.
EN
45

EN
6. Coee making
6
Before dispensing, check water
level in the tank (8) and make
sure the pouring push buttons
(5-6) and the light of the On/O
button (4) are on in green, then
lift the lever (7).
Insert the capsule in the apposite
compartment and close the lever
(7), being careful to prevent hand
crushing.
IF THE CAPSULE IS MISSHAPEN, BEND THE EDGES BACK INTO
SHAPE.
Place a cup onto the rack (2).
Start the required dispensing of
coee, according to the following
procedures.
8
46
7

6. Coee making
NEVER PLACE FINGERS BETWEEN
THE MECHANISMS OR INSIDE THE
CAPSULE COMPARTMENT.
NEVER PULL UP THE LEVER DURING
OPERATION.
EN
47

EN
6. Coee making
ESPRESSO COFFEE MAKING PROCEDURE
Press the espresso coee push
button (5). The light of the long
coee push button (6) turns o.
NOTE: During dispensing, the light
of the espresso coee push button
(5) starts blinking in green.
At the end of dispensing, the
machine goes back to the ready
mode. Both lights of the pouring
9
push buttons are on.
NOTE: The dispensing quantity of espresso coee is 25 ml. To modify
this quantity, refer to the chapter ‘7. Setting quantity of coee dispensed.
LONG COFFEE MAKING PROCEDURE
Press the long coee push button
(6). The light of the espresso coffee push button (5) turns o.
NOTE: During dispensing, the light
of the long coee push button (6)
starts blinking.
At the end of dispensing, the
machine goes back to the ready
mode. Both lights of the pouring
push buttons are on.
10
NOTE: The dispensing quantity of long coee is 40 ml. To modify this
quantity, refer to the chapter ‘7. Setting quantity of coee dispensed.
48

6. Coee making
For every following coee, pull the lever (7) up to insert a new capsule.
NOTE: By pulling the lever (7) up, the capsule used is automatically
ejected into the compartment of used capsules (11).
NOTE: Coee dispensing can be stopped at any time by pressing one of
the two pouring push buttons.
WHEN THE WATER FINISHES DURING OPERATION:
When the light of On/O button blinks red means the water tank is
empty.
Eject the capsule pulling the lever. Close the lever WITHOUT insert any
new capsule. Fill the water tank up to the MAX level.
Press one of the two brewing button and wait for the machine to complete the water circuit lling cycle.
Once all the lights turn steady green, the machine is ready to use.
THE MACHINE IS EQUIPPED WITH AN APPOSITE
SENSOR, WHICH ALLOWS TO USE THE MACHINE WITH
ALUMINIUM CAPSULES ONLY.
IN CASE OF PLASTIC CAPSULES, THE MACHINE DOES
NOT DISPENSE COFFEE, THE LIGHTS OF THE POURING
PUSH BUTTONS AND THE LIGHT OF THE ON/OFF
BUTTON WILL BLINK RED FOR ABOUT 3 SECONDS.
WHEN TRYING TO DISPENSE WITHOUT CAPSULE, THE
MACHINE WILL NOT DISPENSE COFFEE, THE LIGHTS
OF THE POURING BUTTONS AND THE ON/OFF BUTTON
WILL BLINK IN RED FOR ABOUT 3 SEC.
EN
49

EN
6. Coee making
WHEN TRYING TO DISPENSE WITHOUT WATER IN
THE TANK, THE MACHINE WILL NOT DELIVER COFFEE
AND THE LIGHT OF THE ON/OFF BUTTON WILL
FLASH IN RED. IN THIS STAGE, ALWAYS REMOVE THE
CAPSULE, CLOSE THE LEVER AND PRESS ONE OF THE
TWO POURING BUTTONS FOR REFILLING THE WATER
CIRCUIT.
TO DISPENSE WATER, START THE CLEANING MODE
USING THE ESPRESSO COFFEE PUSH BUTTON (5) AND
THE LONG COFFE ONE (6) AT THE SAME TIME FOR 5
SECS. MAKE SURE THE CAPSULE IS NOT INSERTED
DURING THIS FUNCTION.
50

7. Setting dispensing quantity
This type of espresso coee machine allows to modify the quantity of
coee dispensed.
SETTING ESPRESSO COFFEE DISPENSING QUANTITY
DURING THIS STAGE, THERE MUST BE AN ALUMINIUM
CAPSULE INSIDE THE MACHINE.
When the machine is ready for
use, press the espresso coee
push button (5) for more than 3
seconds to start coee dispensing.
Once having reached the required
volume, press the espresso coee
push button (5) again to stop
dispensing.
The dispensing time is saved for
the espresso coee push button
(5).
11
RESETTING THE DEFAULT SETTINGS
To reset the default settings, keep pressed the On/O push button (4)
and the espresso coee push button (5) for 3 secs at the same time.
The two lights of the pouring push buttons will blink in green/red for 3
seconds to conrm reset.
EN
THE DISPENSING VOLUME THAT CAN BE SET FOR THE
ESPRESSO COFFEE RANGES APPROX.LY FROM 15 ML
TO 250 ML.
51

EN
7. Setting dispensing quantity
SETTING THE LONG COFFEE DISPENSING QUANTITY
DURING THIS STAGE, THERE MUST BE AN ALUMINIUM
CAPSULE INSIDE THE MACHINE.
When the machine is ready for
use, press the long coee push
button (6) for more than 3 seconds to start coee dispensing.
Once having reached the required
volume, press the long coee
push button (6) again to stop
dispensing.
The dispensing time is saved for
the long coee push button (6).
12
RESETTING THE DEFAULT SETTINGS
To reset the default settings, keep pressed the On/O push button (4)
and the espresso coee push button (5) for 3 secs at the same time.
The two lights of the pouring push buttons will blink in green/red for 3
seconds to conrm reset.
THE DISPENSING VOLUME THAT CAN BE SET FOR THE
LONG COFFEE RANGES APPROX.LY FROM 15 ML TO 250
ML.
52

8. Maintenance
APPLIANCE CLEANING
ALWAYS UNPLUG THE APPLIANCE BEFORE CLEANING
IT. NEVER IMMERSE THE APPLIANCE BODY IN WATER
OR OTHER LIQUIDS AND DO NOT PUT ANY APPLIANCE
PART IN THE DISHWASHER.
• To clean the appliance body, use a wet cloth but avoid abrasive
detergents.
• It is recommended to rinse the tank on a daily base. Never leave
water in the tank for more than 5 days or, if it occurs, change
water and dispense 50ml of water using the cleaning mode.
The compartment of used capsules (11) is removable; take it
out regularly and empty it when
full.
The compartment can hold up to
6-8 used capsules before it needs
emptying. It is advisable to check
the capsule level.
Do not run the machine with full
compartment of used capsules
(11) to prevent damage.
13
Be careful when emptying the
compartment of used capsules
as it could contain water and/or
coee remains.
EN
53

EN
8. Maintenance
Wash the drip tray (1), the cup
rack (2), the compartment of used
capsules (11) with water and dish
detergent.
Do not put these parts in the
dishwasher.
14
DESCALING ALARM
the machine is equipped with an alarm system that warns the user of the
need of descaling of the machine after 400 dispensing series via a blinking
green/red light of the On/O button. To reset such alarm, carry out a
complete descaling cycle with the cleaning mode. See following paragraph.
DESCALING PROCEDURE
The normal use of the machine with natural mineral water, both in bottle
and from the tap, entails the formation of limescale.
It is recommended to carry out the descaling cycle when a constant
decrease of the dispensed coee ow is noticed.
THE FREQUENCY OF THIS OPERATION DEPENDS ON
THE HARDNESS OF WATER USED.
A) Pour a dose of Bialetti descaling solution or equivalent (provided it
is not toxic and is suitable for coee machines) into the water tank
(8).
DO NOT USE VINEGAR OR VINEGAR-BASED SOLUTIONS AS DESCALING AGENT.
54

8. Maintenance
B) Fill the tank with cold water up to the MAX level.
C) Press On/O button (4) to switch the machine on.
D) Make sure the machines does not contain any capsule. If needed,
open and close the lever (7).
E) Position a suitable cup on the apposite rack and start the cleaning
mode pressing the espresso coee push button (5) and the long
coee one (6) at the same time for 5 secs.
DURING CLEANING MODE, FOR ABOUT ONE MINUTE,
THE MACHINE DISPENSES WATER INTERMITTENTLY
IN ORDER TO CLEAN AND RINSE THE INNER CIRCUITS
OF THE MACHINE DEEPLY. AFTER ONE MINUTE,
DISPENSING IS CONTINUOUS AGAIN. DURING THIS
ENTIRE CYCLE, THE LIGHTS OF THE TWO POURING
PUSH BUTTONS AND THE LIGHT OF THE ON/OFF
BUTTON WILL BLINK IN GREEN.
F) Stop the cleaning mode by pressing one of the three buttons, when
water reaches about half of the tank capacity.
G) Let the descaling agent act for aprox.ly 15-20 minutes with the
machine o.
H) Switch the machine on and carry out again the operations described
in point E) until the tank is completely empty.
I) Leave the machine o for approx.ly 5 minutes.
J) Remove the tank and rinse it thoroughly with clean cold water.
K) Fill the tank with clean water up to the “MAX” level and insert it in
its seat.
L) Start the cleaning mode pressing the espresso coee push button
(5) and the long coee one (6) at the same time for 5 secs until
the tank is completely empty. If necessary, start the cleaning
mode several times (the machine features a safety system, which
interrupts dispensing automatically after having dispensed 0.7 l of
liquid consecutively).
M) Carry out the operations described in point L).
EN
55

EN
9. Energy saving
mode
This appliance was designed in compliance with the European Directives
EC1275/2008 and 2009/125/EC, stating the need to adopt the energy
saving mode.
This appliance features an auto power o function that activates after 10
minutes of downtime if no coee is dispensed.
To restart the machine it is necessary to press the On/O button (4)
located on the front side of the appliance: the machine will start the
pre-heating stage of the boiler (red pour push buttons LEDs and On/O
button) and once it reaches the operating temperature, it will indicate the
ready state (green pour push button LED and On/O button).
TIME OF PRE-HEATING IS BASED ON THE DOWNTIME OF THE MACHINE,
AND CAN LAST UP TO 50 SECONDS.
56

10. Troubleshooting
Problem Cause Solution
The machine does not
heat up.
The machine is not
connected to the mains
power.
The machine is not
switched on.
Connect the machine to
the mains power.
On/o button to switch
on the machine.
EN
The machine does not
pour coee.
The coee is cold. The machine has not
The On/O button light
is steady red.
The capsule is stuck or
badly positioned.
A capsule may have fallen into the machine.
There is no water in the
tank.
The pipes are clogged
with scale.
completely heated the
water before pouring the
coee.
The machine is partly
clogged by scale.
Incorrect temperature.
Heating time out not
observed.
The NTC sensor is
disconnected or in
short-circuit.
Unplug the machine
from the power mains
and wait for it to cool
down; lift the lever and
remove the capsule
manually.
Use a tool, never use
ngers.
Take out the capsule
compartment and check.
Fill the tank with water.
Carry out a scale removal cycle.
Before dispensing coee,
always await the green
lights of the dispensing
buttons are on.
Carry out a descaling
cycle.
Switch the machine o
and then on again and, if
the problem still occurs,
contact a Bialetti service
centre.
57

EN
Problem Cause Solution
It is not possible to
lower the lever.
The capsule falls from its
compartment
The machine does not
dispense and both lights
of the pour push buttons
(5-6) blink in red.
The On/o button blinks
red/green.
The On/o button blinks
red.
10. Troubleshooting
The capsule is stuck or
badly positioned.
The compartment of
used capsules is full.
The lever is not completely raised.
there is a plastic capsule
or the capsule seat is
empty.
The machine requires a
descaling cycle.
No water in the tank. Fill the tank and press
Unplug the machine
from the power mains
and wait for it to cool
down; lift the lever and
remove the capsule
manually. Use a tool,
never use ngers.
Empty the compartment.
Completely lower the
lever and open it until it
gets to its end point.
Remove the plastic
capsule and insert a Bi-
aletti aluminium capsule,
press the pour push buttons (5-6) for 3 secs to
return to the dispensing
conditions.
Carry out a descaling cycle as per paragraph 8.
any button to exit the
alarm mode. Press the
espresso or long buttons
to repeat dispensing.
11. Tips for a good coee
• In order to obtain a thicker and more persistent cream, use cups
with an inner ovoid-shape base.
58

12. Bialetti capsules
The new patented capsules from Bialetti are unique on the market
because they guarantee everything necessary for a perfect Bialetti
Espresso in a single product:
• THE PERFECT AMOUNT: they contain 7 grams of coee, as
expressly envisaged by Espresso Italiano Certicato (Certied
Italian Espresso).
• ALUMINIUM: the only material that, unlike the common plastic
capsules, can preserve all of the organic substances of coee,
ensuring a product that is always fresh with the avour of freshly
ground coee.
The capsules of “I caè d’Italia Bialetti” can be bought:
1. In the Bialetti stores, in more than 500 Bialetti partner points of
sale, as well as in the best supermarkets.
The complete, updated list is on the web site
www.bialetti.com
2. Calls (for Italy only) from the comfort of our own homes:
EN
3. Access to the online shop on the web site:
www.bialetti.com
59
EN
13. Guarantee
The appliance is guaranteed for two years from the date of delivery,
as shown by the date on the receipt/invoice, unless the purchaser can
prove that delivery took place on a later date. In case of defects on the
product existing prior to delivery, Bialetti guarantees the repair or replacement of same, at no charge to the purchaser, unless one of the two
remedies is disproportionate to the other. The purchaser is responsible
for reporting any conformity defects no later than two months from
discovery of same.
The warranty does not cover those parts found to be faulty as a result of
negligence or careless use, for example:
• Damages caused by impacts, falls or scratches owing to the use
of improper objects.
• Damages caused by limestone or failure to decalcify it on a regular basis.
• Failure to abide by the operating instructions for the appliance.
• Incorrect installation or maintenance carried out by unauthorized
persons
• Normal wear and tear.
• Damages caused by modications made to the inside of the
appliance.
• Damages caused through use of a voltage other than that stated
in the use and maintenance manual.
• Damages from transport or circumstances that cannot be attributed to defects in the material or workmanship of the appliance.
• Damages arising from repairing carried out by unauthorized
service centres.
The warranty also excludes all cases of improper use of the appliance or
any instances of professional use. Bialetti refuses to accept any liability
for damage that may directly or indirectly be caused to people, property
or pets as a result of failure to abide by all of the guidelines and instructions in this booklet concerning the installation, use and maintenance
of the appliance.
This warranty is without prejudice to contractual guarantees made to
the retailer.
THE MANUFACTURER RESERVES THE RIGHT TO MAKE CHANGES FOR
REGULATORY, INDUSTRIAL, COMMERCIAL OR AESTHETIC REASONS.
60

14. Disposal of the appliance
• This product complies with the Directive 2012/19/EC.
• The symbol representing the crossed out trash can on the appli-
ance indicates that the product, at the end of its useful life, must
be treated separately from domestic waste. It must be taken to a
recycling centre for electrical and electronic appliances or turned in
to the point of sale when purchasing a new, equivalent, appliance.
• The user is responsible for taking the appliance to the recycling
centre at the end of its life, under penalty of the sanctions foreseen
by the current legislation on waste handling.
• Correct consignment of the no-longer used appliance to a recycling
centre for treatment and environmentally compatible elimination
contributes to avoiding a negative impact on the environment and
public health, and permits recycling of the materials from which the
product is made.
• For more detailed information regarding the available collection sys-
tems, contract the local refuse centre or the store where the product
was purchased.
• The manufacturer and the importers comply with their responsibility
for recycling, treating, and environmentally compatible disposal of
waste both directly and in a collective system.
EN
61

Nota/Remarks/Note/Notizen/Notes
.....................................................................................................................................
.....................................................................................................................................
.....................................................................................................................................
.....................................................................................................................................
.....................................................................................................................................
.....................................................................................................................................
.....................................................................................................................................
.....................................................................................................................................
.....................................................................................................................................
.....................................................................................................................................
.....................................................................................................................................
.....................................................................................................................................
.....................................................................................................................................
.....................................................................................................................................
.....................................................................................................................................
.....................................................................................................................................
.....................................................................................................................................
.....................................................................................................................................
.....................................................................................................................................
.....................................................................................................................................
.....................................................................................................................................
.....................................................................................................................................
.....................................................................................................................................
.....................................................................................................................................
.....................................................................................................................................
.....................................................................................................................................
.....................................................................................................................................
.....................................................................................................................................
.....................................................................................................................................
.....................................................................................................................................
.....................................................................................................................................
.....................................................................................................................................
.....................................................................................................................................
.....................................................................................................................................
.....................................................................................................................................
.....................................................................................................................................
.....................................................................................................................................
.....................................................................................................................................
.....................................................................................................................................
.....................................................................................................................................
1. Introduction
Cher client,
Vous venez d’acheter une machine à Café Expresso Bialetti !
Nous vous remercions pour ce choix, certains qu'il saura satisfaire
pleinement vos attentes.
Le système Expresso Bialetti est le résultat d’années de passion et
de recherches attentives sur le café et sur les diérentes façons de le
préparer. Depuis 1933, avec l’invention et l’introduction sur le marché
de Moka Express, l’homme aux moustaches est, à tous les eets,
synonyme de café et icône de l’expresso italien authentique.
Grâce à la présence d’un nouveau capteur innovant, votre machine
est utilisable exclusivement avec les capsules originales Bialetti en
aluminium, parfaitement dosées, que nous avons mises au point pour
vous garantir de déguster chez vous un café aussi savoureux qu’au
bar.
Nous vous invitons à lire attentivement cette notice d'instructions
avant d'utiliser l'appareil et à visiter notre site www.bialetti.it an
d'obtenir toutes les informations nécessaires pour accéder aux avantages réservés à nos clients.
En vous souhaitant une agréable dégustation d'une tasse de café,
Bialetti Industrie vous salue bien cordialement.
Déclaration de conformité
Le fabricant déclare sous sa propre responsabilité que
l’appareil auquel se réfère ce « Manuel de mode
d’emploi » est conforme aux prescriptions de la directive
CE en matière d’appareils à usage domestique, comme
An d’améliorer le produit et/ou pour des exigences de fabrication, le
producteur se réserve le droit d’apporter des modications techniques,
esthétiques et dimensionnelles sans obligation de notication.
LVD, EMC, EMF, ErP, RoHS, REACH, « Food contact ».
FR
Informations sur les Normatives
L'appareil faisant l'objet de cette notice est conforme aux Directives
2014/30/UE; 2014/35/UE ; Rég. (CE) n.1935/2004 et Rég. (CE)
n.2023/2006.
63

FR
2. Remarques
Description des symboles employés
ATTENTION
Suivre toujours scrupuleusement les informations portant le
pictogramme d’ATTENTION ou d’AVERTISSEMENT.
Le signal AVERTISSEMENT indique un danger de possibles
lésions graves ; ATTENTION indique par contre un danger de
possibles lésions légères.
LIRE LE MANUEL DE MODE D’EMPLOI
Indique qu’il faut lire ce manuel avant l’utilisation de l’appareil pour un fonctionnement correct an d’éviter tout risque
de choc électrique et/ou de brûlures.
ATTENTION - SURFACE CHAUDE !
La température supercielle de la zone d’installation peut
atteindre des valeurs dangereuses et il faut donc, pour cette
raison, éviter le contact direct avec la peau et avec les tissus/
matériaux sensibles à la chaleur.
CONSEILS
Ce symbole indique les conseils indiqués par le constructeur
de l’appareil pour l’intégrité et l’usage correct du produit.
64

2. Remarques
AVERTISSEMENTS GÉNÉRAUX
Lire attentivement les avertissements contenus dans ces instructions car ils fournissent des indications importantes sur la
sécurité d’installation, d’emploi et d’entretien.
Conserver avec soin cette notice pour toute consultation ultérieure.
CET APPAREIL EST CONÇU POUR UN USAGE
DOMESTIQUE OU SIMILAIRE, COMME PAR
EXEMPLE :
- LES ZONES DESTINÉES A LA CUISINE
DANS LES MAGASINS, LES BUREAUX
ET AUTRES LIEUX PROFESSIONNELS ;
- HABITATIONS RURALES ;
- CHAMBRES D’HÔTES ET STRUCTURES
SIMILAIRES ;
- HÔTEL, MOTEL ET AUTRES LIEUX
RÉSIDENTIELS (SEULEMENT POUR
CLIENTS).
LES ENFANTS DOIVENT ÊTRE
SURVEILLÉS AFIN QU’ILS NE
JOUENT PAS AVEC L’APPAREIL.
FR
65

FR
2. Remarques
L’APPAREIL PEUT ÊTRE UTILISÉ PAR
LES ENFANTS DE MOINS DE 8 ANS À
CONDITION QU’ILS SOIENT SURVEILLÉS OU QU’ILS AIENT REÇU UNE FORMATION ADÉQUATE SUR L’USAGE DE
L’APPAREIL ET SUR LA COMPRÉHENSION DES DANGERS QUI Y SONT LIÉS.
LES OPÉRATIONS DE NETTOYAGE ET
D’ENTRETIEN PEUVENT ÊTRE EFFECTUÉES PAR DES ENFANTS DE PLUS DE
8 ANS CORRECTEMENT SURVEILLÉS.
GARDER L'APPAREIL, AINSI QUE SON
CORDON D’ALIMENTATION, HORS DE
LA PORTÉE DES ENFANTS DE MOINS
DE 8 ANS.
L’APPAREIL PEUT ÊTRE UTILISÉ PAR
LES PERSONNES À CAPACITÉS PHYSIQUES, SENSORIELLES OU MENTALES RÉDUITES, OU DÉPOURVUES
DE L’EXPÉRIENCE ET DE LA CONNAISSANCE NÉCESSAIRES, À CONDITION QU’ILS SOIENT SURVEILLÉS OU
QU’ILS AIENT REÇU UNE FORMATION
ADÉQUATE SUR L’USAGE DE L’APPAREIL ET SUR LA COMPRÉHENSION DES
DANGERS QUI Y SONT LIÉS.
66

2. Remarques
NE PAS PLONGER L'APPAREIL DANS DE
L’EAU OU AUTRES LIQUIDES.
SI LE CORDON D’ALIMENTATION DE
CET APPAREIL EST ENDOMMAGÉ, IL
DOIT ÊTRE REMPLACÉ EXCLUSIVEMENT PAR UN CENTRE TECHNIQUE
AGRÉÉ PAR LE CONSTRUCTEUR ET
AVEC DES PIÈCES SPÉCIALES ET
APPROPRIÉES AU BON FONCTIONNEMENT DE L’APPAREIL.
PENDANT LA DISTRIBUTION DE LA
BOISSON, PRÊTER LA PLUS GRANDE
ATTENTION AUX ÉVENTUELLES ÉCLABOUSSURES DE LIQUIDE CHAUD. NE
TOUCHEZ PAS LES PARTIES CHAUDES
DE L’APPAREIL TOUT DE SUITE APRÈS
SON UTILISATION POUR ÉVITER LES
RISQUES DE BRÛLURE. UN USAGE
INCORRECT PEUT ENTRAÎNER DES
LÉSIONS.
FR
67

FR
2. Remarques
CET APPAREIL A ÉTÉ CONÇU POUR
PRODUIRE DES CAFÉS EXPRESSO
ET DES INFUSIONS EN CAPSULE
BIALETTI ET IL DOIT ÊTRE DESTINÉ
EXCLUSIVEMENT A CET USAGE. TOUT
AUTRE UTILISATION EST CONSIDÉRÉE
IMPROPRE ET DONC DANGEREUSE.
LE CONSTRUCTEUR NE PEUT ÊTRE
TENU RESPONSABLE POUR D’ÉVENTUELS DOMMAGES DÉRIVANT D’UNE
MAUVAISE UTILISATION, IMPROPRE,
ERRONÉE OU DÉRAISONNÉE.
• L’appareil a été conçu pour un usage interne et non pas pour des
températures extrêmes ; par conséquent, ne l’exposez pas aux
agents atmosphériques (pluie, soleil, etc.).
• En cas d’usage commercial, de déplacement ou d’usage impropre, de
dommages éventuels dérivant de destinations d’usage impropres, de
mauvais fonctionnement, de réparation non professionnelle ou de non
observance des instructions, le producteur décline toute responsabilité et est autorisé à ne pas appliquer les termes de la garantie.
• Après avoir enlevé l’emballage et avant l’utilisation de cet appareil,
vérier son intégrité mécanique et de tous ses accessoires. La gaine
et la che du cordon d’alimentation ne doivent pas présenter de
ruptures ou de ssures. Si c’est le cas, débrancher immédiatement
la che de la prise de courant et porter l’appareil dans un centre
d’assistance agréé pour eectuer les vérications nécessaires.
• Les éléments d’emballage (sachet plastique, polystyrène expansé,
agrafe, etc.) ne doivent pas être laissés à la portée des enfants
an d’éviter tout danger.
• Positionner l’appareil sur une surface plane, régulière et stable.
Ne jamais positionner l'appareil près ou sur des plans réchaués
comme les radiateurs, les plaques de cuisson, les fours, les cuisinières au gaz, les ammes libres, etc.
• Avant de brancher l’appareil, s’assurer que les données indiquées sur
68

2. Remarques
la plaque signalétique correspondent à celles du réseau d’alimentation
électrique. La plaque est apposée sur le fond du corps de l’appareil.
• En cas d’incompatibilité entre la prise de votre appareil et celle de la
prise secteur, faire substituer la prise par une prise adaptée, par un
professionnel qualié. Ce dernier en particulier, devra vérier que la
section des câbles de la prise est conforme à la puissance absorbée
par l’appareil. En général, l’emploi d’adaptateurs, de prises multiples
et / ou de rallonges est déconseillé. Si toutefois leur emploi était
indispensable, il est nécessaire de n’utiliser que des adaptateurs
simples ou multiples et des rallonges conformes aux normes de
sécurité en vigueur, en veillant cependant à ce que la limite de résistance en valeur de courant, indiquée sur l’adaptateur simple et sur
les rallonges, ainsi que la limite de puissance maximale indiquée sur
l’adaptateur multiple, ne soient pas dépassées.
• Ne pas laisser l’appareil inutilement sous tension. Débrancher la
prise d’alimentation lorsque l’appareil n’est pas utilisé.
• Si ’appareil n’est pas utilisé pendant une période de temps plutôt
prolongée, vider le réservoir de l’eau.
• Ne pas mettre l'appareil dans un meuble pendant le fonctionnement.
BRANCHER L’APPAREIL A L'INSTALLATION ÉLECTRIQUE
EXCLUSIVEMENT AVEC UNE FICHE DE MISE À LA TERRE.
IL EST RECOMMANDÉ D’ALIMENTER L’APPAREIL AVEC UN
INTERRUPTEUR DIFFÉRENTIEL (RCD) DONT LE COURANT
DE FONCTIONNEMENT NE DÉPASSE PAS 30MA.
FR
ÉVITER DE DÉBRANCHER L'APPAREIL EN TIRANT SUR LE
CORDON D’ALIMENTATION.
69

FR
2. Remarques
PENDANT LE FONCTIONNEMENT, LA PRISE DE COURANT
DOIT ÊTRE FACILEMENT ACCESSIBLE DANS LE CAS OÙ
IL SERAIT NÉCESSAIRE DE DÉBRANCHER L’APPAREIL.
• Ne touchez pas l’appareil avec les mains mouillées ou humides.
PRÉCAUTIONS
• N'utilisez pas l’appareil nu-pieds.
• Ne pas approcher le cordon à des rebords coupants, ne pas le xer
pas et ne pas le laisser pendre.
• Pour éviter les surchaues dangereuses, il est conseillé de dérouler
le cordon d’alimentation sur toute sa longueur et d’utiliser l’appareil selon les instructions reportées dans le paragraphe « Avertissements » concernant l’usage correct de l’appareil.
• Ne bouchez pas les ouvertures ou les fentes de ventilation ou
d'évacuation de la chaleur.
• En cas de dommage et/ou de mauvais fonctionnement de l’appareil, l’éteindre sans le modier. Pour l’éventuelle réparation contacter uniquement un centre d’assistance technique habilité par le
constructeur pour commander les pièces de rechanges originales.
La non observation de cette recommandation peut compromettre
la sécurité de l’appareil.
• Dès lors que vous décidez de ne plus utiliser un appareil de ce
type et de vous en séparer, nous vous recommandons de le rendre
inopérant en coupant la prise après l’avoir débranché de la prise
secteur. Aussi, est-il recommandé de rendre inutilisables toutes
les parties dangereuses de l’appareil, surtout pour les enfants qui
pourraient jouer avec l’appareil.
CE PRODUIT DOIT ÊTRE UTILISÉ CONFORMÉMENT AUX
INDICATIONS DU FABRICANT. UN USAGE IMPROPRE
PEUT CAUSER DES DOMMAGES AUX PERSONNES,
AUX ANIMAUX OU AUX CHOSES, POUR LESQUELS LE
FABRICANT NE POURRA EN AUCUN CAS ÊTRE TENU
RESPONSABLE
70

2. Remarques
• Ne jamais laisser l’appareil sans surveillance pendant le fonction-
nement.
NE PAS UTILISER L'APPAREIL AVEC SON RÉSERVOIR
VIDE.
• Ne pas déplacer l’appareil pendant son fonctionnement.
LORS DE L'INSTALLATION INITIALE, L'APPAREIL PEUT
ÉMANER UNE ODEUR DE BRÛLÉ À CAUSE DES MATÉRIAUX
D’ISOLATION ET DES ÉLÉMENTS RÉCHAUFFANTS ; CELA
EST NORMAL.
3. Contenu de l'emballage
1 Machine à Café Expresso ;
1 Notice d'instructions ;
1 Opuscule informatif « I Caè d’Italia » ;
1 Emballage d'essai avec les mélanges de « I Caè d’Italia » (seule-
ment si cette information est indiquée sur l’emballage).
FR
71

FR
4. Description
de l’appareil
5
4
3
2
11
1
Légende
1 Plateau à gouttes
2 Grille de soutien de la tasse
3 Distributeur
4 Touche ON/OFF
touche de distribution du
5
café expresso
touche de distribution du
6
café léger
7 Levier
Réservoir amovible de
8
l’eau avec couvercle
9 Cordon d’alimentation
7
6
10
10 Corps de l’appareil
Récipient pour capsules
11
usées (8 au maximum)
Caractéristiques techniques
Dimensions
LxPxH(mm)
Tension d’ali-
mentation (V)
Puissance (W) 1145-1360
Capacité
maximum du
réservoir d'eau
Temps automatique d’arrêt
environ 10
8
9
12x32x23
220-240 V
50-60 Hz
0,7 l
minutes
72

5. Première utilisation
de l’appareil
FR
1
Avec la machine débranchée,
extraire le réservoir (8) et le
remplir avec de l’eau potable,
sans dépasser le niveau MAX.
Brancher le cordon d’alimentation
(9) de l’appareil au secteur en suivant les indications reportées dans
la section «Mises en garde».
3
Allumer la machine à l’aide de la
touche ON/OFF (4) situé sur la
partie supérieure de la machine.
NE JAMAIS UTILISER L’APPAREIL SANS EAU DANS LE
RÉSERVOIR.
Lors du réchauement de la chaudière, le voyant lumineux de la
touche ON/OFF (4) et les voyants
des touches de distribution (5-6)
clignotent en rouge. Quand les
voyants deviennent verts et xes,
la machine est prête pour la distribution.
2
4
73

FR
5. Première utilisation
de l’appareil
En gardant le levier (7) abaissé,
placer une grande tasse sur la
grille et activer le mode nettoyage
en appuyant simultanément
pendant 5 secondes sur le touche
de distribution Café expresso (5)
et Café léger (6). Interrompre
le mode nettoyage en appuyant
sur l'une des deux touches de
distribution lorsque le réservoir
5
est vide.
PENDANT LA FONCTION NETTOYAGE, LA MACHINE
DISTRIBUERA DE L’EAU PAR INTERMITTENCE PENDANT
ENVIRON UNE MINUTE AFIN DE NETTOYER ET RINCER
À FOND LES CIRCUITS INTERNES DE LA MACHINE. AU
BOUT D’UNE MINUTE, LA DISTRIBUTION REDEVIENT
CONTINUE. PENDANT TOUT CE CYCLE, LES VOYANTS
LUMINEUX DES TOUCHES DE DISTRIBUTION ET LE
VOYANT DE LA TOUCHE ON/OFF CLIGNOTENT EN VERT
EN MODE RAPIDE.
NE JAMAIS INTRODUIRE LA CAPSULE LORS DE LA
PREMIÈRE UTILISATION ET DURANT LE MODE NETTOYAGE
74
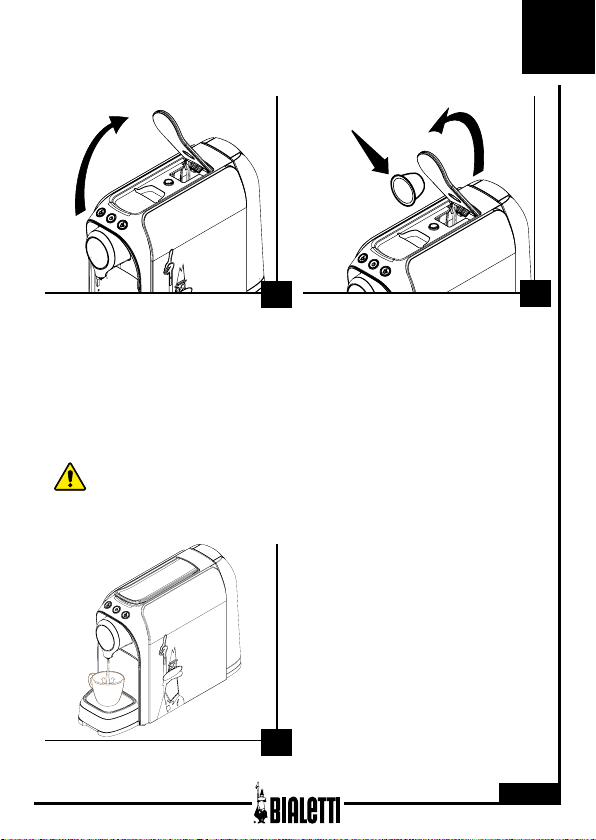
6. Préparation du café
FR
6
Avant de procéder à la distribution
de la boisson, contrôler le niveau
d’eau dans le réservoir (8) et
s’assurer que les touches de distribution (5-6) et le voyant lumineux
de la touche ON/OFF (4) soient
allumés en vert ; soulever ensuite
le levier (7).
Insérer la capsule dans le logement prévu à cet eet et fermer
le levier (7) en faisant attention
de ne pas s’écraser les doigts de
la main.
SI LA CAPSULE EST DÉFORMÉE, REDRESSER LES BORDS.
Positionner une tasse sur la grille
(2). Lancer la distribution désirée
du café selon les indications reportés ci-dessous.
8
7
75

FR
6. Préparation du café
NE PAS INTRODUIRE LES MAINS
ENTRE LES ENGRENAGES, NI DANS LE
LOGEMENT DE LA CAPSULE.
NE JAMAIS SOULEVER LE LEVIER PENDANT LE FONCTIONNEMENT.
76
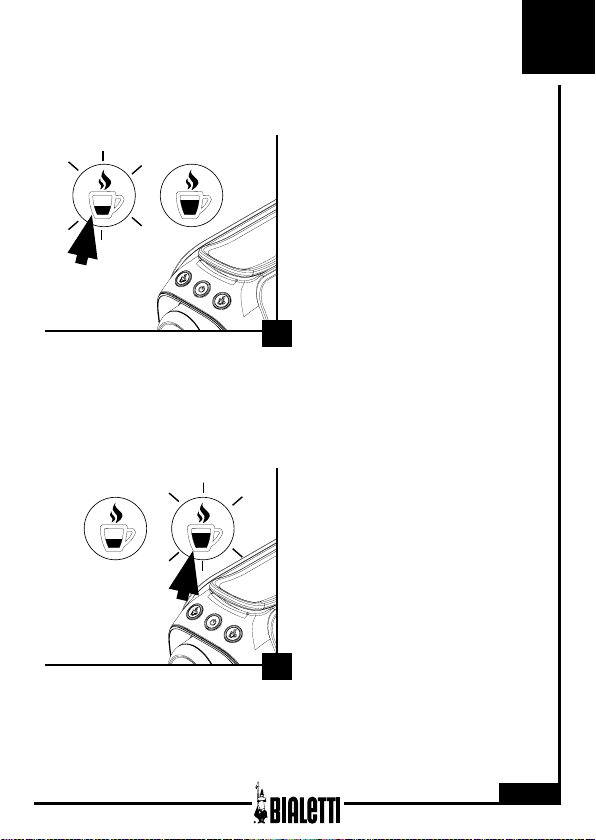
6. Préparation du café
PROCÉDURE DE PRÉPARATION DU CAFÉ EXPRESSO
Appuyer sur la touche de distribution Café expresso (5). Le voyant
de la touche de distribution Café
léger (6) s’éteint.
N.B. : Pendant la distribution, le
voyant de la touche de distribution
Café expresso (5) se met à
clignoter en vert.
À la n de la distribution, la machine retourne en mode Prête à
l’emploi : les deux voyants lumi-
9
neux des touches de distribution et
de la touche ON/OFF sont allumés.
N.B. : La quantité distribuée de café expresso est de 25 ml. Pour modier
cette quantité, consulter le chapitre ‘7. Programmation quantité de café
distribué.
PROCÉDURE DE PRÉPARATION DU CAFÉ LÉGER
Appuyer sur la touche de distribution Café léger (6). Le voyant de la
touche de distribution Café expresso (5) s’éteint.
N.B. : Pendant la distribution, le
voyant lumineux de la touche de
distribution Café léger (6) se met
à clignoter en vert.
À la n de la distribution, la machine retourne en mode Prête à
l’emploi : les deux voyants lumi-
10
neux des touches de distribution et
de la touche ON/OFF sont allumés.
N.B. : La quantité distribuée de café léger est de 40 ml. Pour modier
cette quantité, consulter le chapitre ‘7. Programmation quantité de café
distribué.
FR
77
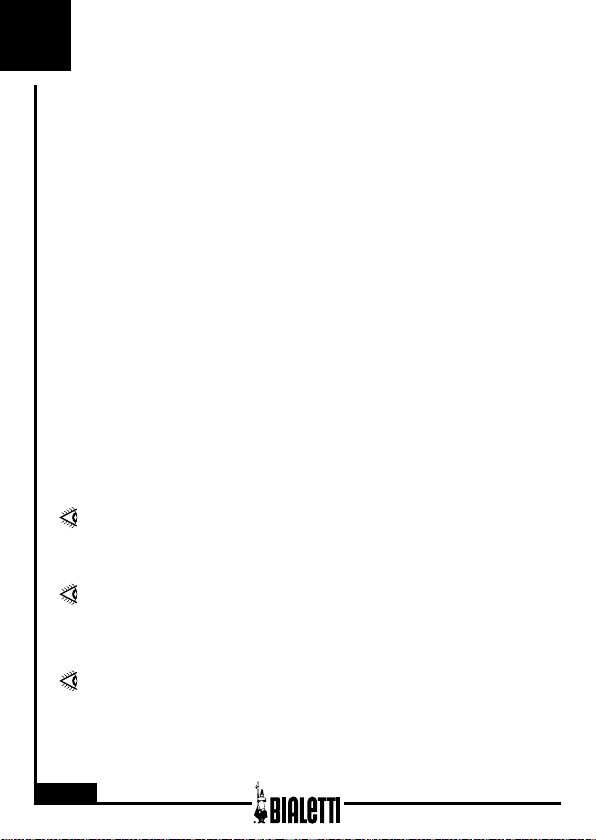
FR
6. Préparation du café
Pour tous les autres cafés distribués, soulever le levier (7) pour introduire une nouvelle capsule.
N.B. : En soulevant le levier (7), la capsule utilisée est expulsée automatiquement
à l’intérieur du récipient pour capsules usées (11).
N.B. : Il est possible d'interrompre la distribution du café à tout moment
en appuyant sur l’une des deux touches de distribution.
QUAND L’EAU S’ÉPUISE PENDANT LE FONCTIONNEMENT
Lorsque le voyant du bouton ON/OFF clignote en rouge, le réservoir
d’eau est vide.
Éjectez la capsule et fermez le levier SANS charger une nouvelle capsule. Remplissez le réservoir jusqu’au niveau MAX.
Appuyez sur l’une des deux touches de distribution et attendez que la
machine termine le cycle de chargement du circuit d’eau.
Lorsque tous les voyants passent au vert xe, la machine est prête à
être utilisée.
LA MACHINE EST DOTÉE D’UN CAPTEUR DÉDIÉ NE
PERMETTANT D’UTILISER LA MACHINE QU’AVEC DES
CAPSULES EN ALUMINIUM.
EN CAS D'UTILISATION DE CAPSULES EN PLASTIQUE, LA
MACHINE NE DISTRIBUE PAS DE CAFÉ ; LES VOYANTS LUMINEUX
DES TOUCHES DE DISTRIBUTION ET DE LA TOUCHE ON/OFF
CLIGNOTENT EN ROUGE PENDANT 3 SECONDES ENVIRON.
EN CAS DE TENTATIVE DE DISTRIBUTION SANS CAPSULE, LA
MACHINE NE DISTRIBUE PAS DE CAFÉ ; LES VOYANTS LUMINEUX
DES TOUCHES DE DISTRIBUTION ET DE LA TOUCHE ON/OFF
CLIGNOTENT EN ROUGE PENDANT 3 SECONDES ENVIRON.
78

6. Préparation du café
SI ON ESSAIE DE DISTRIBUER UN CAFÉ SANS EAU DANS
LE RÉSERVOIR, LA MACHINE NE VERSE PAS DE CAFÉ ET
LE VOYANT DU BOUTON ON/OFF CLIGNOTE EN ROUGE.
PENDANT CETTE PHASE, IL FAUT TOUJOURS EXTRAIRE
LA CAPSULE, FERMER LE LEVIER ET APPUYER SUR
L’UNE DES DEUX TOUCHES DE DISTRIBUTION POUR
RECHARGER LE CIRCUIT D’EAU.
EN CAS DE NÉCESSITÉ DE DISTRIBUER DE L’EAU,
ACTIVER LA MODALITÉ NETTOYAGE EN APPUYANT
SIMULTANÉMENT SUR LES TOUCHES DE DISTRIBUTION
CAFÉ EXPRESSO (5) ET CAFÉ LÉGER (6) PENDANT 5
SECONDES. S’ASSURER QUE LA CAPSULE NE SOIT PAS
INSÉRÉE PENDANT L’ACTIVATION DE CETTE FONCTION.
FR
79

FR
7. Programmation quantité
distribuée
Dans ce type de machine à Café Expresso, il est possible de modier la
quantité de café distribué.
PROGRAMMATION QUANTITÉ DE CAFÉ EXPRESSO
DISTRIBUÉ
LORS DE CETTE PHASE, IL EST NÉCESSAIRE QU’UNE
CAPSULE EN ALUMINIUM SOIT PRÉSENTE À L’INTÉRIEUR
DE LA MACHINE.
Lorsque la machine est prête à
l’emploi, appuyer sur la touche
de distribution Café expresso (5)
pendant plus de 3 secondes ; la
machine commence à distribuer le
café. Après avoir atteint le volume
désiré, appuyer de nouveau sur
la touche de distribution Café
expresso (5) pour interrompre la
distribution.
Le temps de distribution sera
enregistrée pour la touche de distribution Café expresso (5).
11
RÉINITIALISATION DES RÉGLAGES
Pour rétablir les paramètres programmés lors de la fabrication en
usine, maintenir la touche ON/OFF (4) appuyée ainsi que la touche de
distribution Café expresso (5) pendant 3 secondes. Les deux voyants
lumineux des touches de distribution se mettent à clignoter pendant 3
secondes en vert/rouge pour conrmer la réinitialisation.
LE VOLUME DE DISTRIBUTION PROGRAMMABLE POUR
LE CAFÉ EXPRESSO EST COMPRIS ENTRE 15 ML ET 250
ML ENVIRON.
80

7. Programmation quantité
distribuée
PROGRAMMATION QUANTITÉ DE CAFÉ LÉGER DISTRIBUÉ
LORS DE CETTE PHASE, IL EST NÉCESSAIRE QU’UNE
CAPSULE EN ALUMINIUM SOIT PRÉSENTE À L’INTÉRIEUR
DE LA MACHINE.
Lorsque la machine est prête pour
l’utilisation, appuyer sur la touche
Café léger (6) pendant plus de 3
secondes. La machine commence
à distribuer le café. Après avoir
atteint le volume désiré, appuyer
de nouveau sur la touche de
distribution Café léger (6) pour
interrompre la distribution.
Le temps de distribution sera
mémorisé pour la touche de distribution Café léger (6).
12
RÉINITIALISATION DES RÉGLAGES
Pour rétablir les paramètres programmés lors de la fabrication en
usine, maintenir la touche ON/OFF (4) appuyée ainsi que la touche de
distribution Café expresso (5) pendant 3 secondes. Les deux voyants
lumineux des touches de distribution se mettent à clignoter pendant 3
secondes en vert/rouge pour conrmer la réinitialisation.
LE VOLUME DE DISTRIBUTION PROGRAMMABLE POUR
LE CAFÉ LÉGER EST COMPRIS ENTRE 15 ML ET 250 ML
ENVIRON.
FR
81

FR
8. Entretien
NETTOYAGE DE L'APPAREIL
AVANT D’EFFECTUER LES OPÉRATIONS DE NETTOYAGE,
TOUJOURS DÉBRANCHER LA FICHE DE LA PRISE DE
COURANT. LE CORPS DE L’APPAREIL NE DOIT JAMAIS
ÊTRE PLONGÉ DANS DE L’EAU OU D’AUTRES LIQUIDES ET
AUCUN ÉLÉMENT DONT IL EST COMPOSÉ NE DOIT ÊTRE
LAVÉ AU LAVE-VAISSELLE.
• Pour nettoyer le corps de l’appareil, utiliser un chion humide en
évitant l’emploi de produits abrasifs.
• Il est préférable de rincer le réservoir tous les jours. Ne pas laisser de café dans le réservoir pendant plus de 5 jours ou, si cela
devait se produire, changer l’eau puis distribuer 50 ml d'eau en
utilisant la fonction nettoyage.
Le récipient pour capsules usées
(11) est amovible ; enlevez-le
périodiquement an de pouvoir
l’extraire pour le vider quand il
est plein.
La récipient peut contenir jusqu’à
6-8 capsules usées avant d’être
vidé. Il est conseillé de contrôler
le niveau des capsules dans le
récipient.
Ne pas actionner la machine avec
le récipient pour capsules usées
13
(11) plein pour éviter d’endommager la machine.
Faire attention quand on vide le
récipient des capsules : il peut
contenir des résidus d’eau et/ou
de café.
82

8. Entretien
Laver le plateau à gouttes (1),
la grille de support de la tasse à
café (2), le récipient pour capsules
usées (11) avec de l’eau et un
produit vaisselle ordinaire.
Ne pas laver les composants au
lave-vaisselle.
FR
ALARME DÉCALCIFICATION
La machine est munie d’un système d’alarme qui, après 400 distributions,
avertit l’opérateur, à travers le voyant lumineux clignotant vert/rouge
de la touche ON/OFF, que la machine nécessite une intervention de
décalcication. Pour réinitialiser cette alarme, il est nécessaire d’eectuer
un cycle complet de décalcication avec la fonction nettoyage. Voir
paragraphe précédent.
14
PROCÉDURE DE DÉCALCIFICATION
L’utilisation normale de la machine avec des eaux minérales en bouteille
ou du robinet comporte la formation de calcaire.
Nous conseillons d’eectuer la décalcication lorsque le système d’alarme
se déclenche ou quand on observe une réduction constante du débit de
café distribué.
LA FRÉQUENCE DE CETTE OPÉRATION DÉPEND DU DEGRÉ
DE DURETÉ DE L’EAU UTILISÉE.
A) Verser dans le réservoir à eau (8) une dose de solution décalciante
Bialetti ou équivalente (non toxique et indiquée pour les machines à café).
NE PAS UTILISER PAS DE VINAIGRE
OU DE SOLUTIONS À BASE DE VINAIGRE COMME DÉCALCIFIANT.
B) Remplir le réservoir avec de l’eau froide jusqu’au niveau MAX indiqué
83

FR
8. Entretien
sur le réservoir.
C) Appuyer sur la touche ON/OFF (4) pour allumer la machine.
D) S’assurer qu’il n’y ait aucune capsule dans la machine. Si nécessaire,
ouvrir et fermer le levier (7).
E) Positionner une grande tasse sur la grille et activer la modalité
nettoyage en appuyant simultanément sur les touches de distribution
café expresso (5) et café léger (6) pendant 5 s.
PENDANT LA FONCTION NETTOYAGE, LA MACHINE
DISTRIBUERA DE L’EAU PAR INTERMITTENCE PENDANT
ENVIRON UNE MINUTE AFIN DE NETTOYER ET RINCER
À FOND LES CIRCUITS INTERNES DE LA MACHINE. AU
BOUT D’UNE MINUTE, LA DISTRIBUTION REDEVIENT
CONTINUE. PENDANT TOUT CE CYCLE, LES VOYANTS
LUMINEUX DES DEUX TOUCHES DE DISTRIBUTION ET DE
LA TOUCHE ON/OFF CLIGNOTENT EN VERT.
F) Interrompre le mode nettoyage en appuyant sur l’une des 3 touches,
lorsque l’eau aura atteint environ la moitié de la capacité du réservoir.
G) Laisser agir le décalciant pendant 15-20 minutes environ avec la
machine éteinte.
H) Rallumer la machine et répéter les opérations décrites au point E),
jusqu’à ce que le récipient soit entièrement vidé.
I) Éteindre de nouveau la machine pendant 5 minutes environ.
J) Extraire le réservoir et le rincer abondamment avec de l’eau froide
propre.
K) Remplir le réservoir avec de l’eau propre jusqu’au niveau « MAX »
et le remettre à sa place.
L) Activer la modalité nettoyage en appuyant simultanément sur les
touches de distribution café expresso (5) et café léger (6) pendant
5sec jusqu’à ce que le réservoir soit complètement vide. Si besoin,
lancer plusieurs fois le mode nettoyage (la machine possède un
système de sécurité qui interrompt la distribution automatiquement
après avoir distribué de façon continue 0,7 l de liquide).
M) Répéter les opérations décrites au point L).
84

9. Mode
d'économie d'énergie
Cet appareil a été conçu conformément aux directives EC1275/2008 et
2009/125/EC qui prévoient la nécessité d'adopter la modalité d'économie
d'énergie.
Cet appareil intègre une fonction d’arrêt automatique qui s’active après
10 minutes d’inactivité, si aucun café n’est distribué.
Pour remettre la machine en marche, appuyer sur la touche ON/OFF (4)
située sur la partie frontale de l’appareil ; la machine démarre la phase
de réchauement de la chaudière (voyants rouges sur les touches de
distribution et sur la touche de mise en marche) et, quand la chaudière
atteint la température de fonctionnement, la machine indique l’état
« prête à l’emploi » (voyant vert sur la touche de distribution et sur la
touche de mise en marche).
LE TEMPS DE RÉCHAUFFEMENT DÉPEND DU TEMPS PENDANT LEQUEL
LA MACHINE EST RESTÉE ARRÊTÉE ET PEUT DURER JUSQU’À 50
SECONDES.
FR
85

FR
10. Résolution des problèmes
Problèmes Cause Solutions
La machine ne se
réchaue pas.
La machine ne distribue
pas de café.
Le café versé est froid. L’appareil n’a pas
Le voyant de la touche
ON/OFF est allumé en
rouge en mode xe
La machine n’est pas
branchée au réseau
électrique.
La machine n’est pas
allumée.
La capsule est encastrée
ou mal positionnée.
Une capsule pourrait
être tombée à l’intérieur
de la machine.
Manque d’eau dans le
réservoir.
Les conduites sont obstruées par le calcaire.
réchaué complètement
l’eau avant de distribuer
le café.
L'appareil est partiellement obstrué par du
calcaire.
Température non
correcte
Temps limite de réchauffement non respecté
Le capteur NTC est
débranché ou en courtcircuit
Brancher la machine à la
prise de courant.
Allumer la machine à
l’aide de la touche de
mise en marche ON/OFF.
Débrancher la machine
de la prise de courant et
attendre qu’il se refroidisse ; soulever le levier
et retirer la capsule
manuellement.
Utiliser un outil, ne
jamais utiliser les doigts.
Extraire le récipient et
vérier.
Remplir le réservoir
d’eau.
Eectuer un cycle de
décalcication.
Avant de distribuer le
café, attendre toujours
que les voyants verts
des touches de distribution soient allumés.
Eectuer un cycle de
décalcication.
Éteindre et rallumer la
machine ; si le problème
persiste, contacter un
centre d’assistance
après-vente Bialetti.
86

10. Résolution des problèmes
Problèmes Cause Solutions
Il est impossible de
baisser le levier.
La capsule tombe en
dehors du logement.
La machine ne distribue
pas et les deux
voyants des touches
de distribution (5-6)
clignotent en rouge.
La touche ON/OFF
clignote en rouge-vert
La touche ON/OFF
clignote en rouge
La capsule est encastrée
ou mal positionnée.
Le récipient des capsules
usées est plein.
Le levier n’est pas entièrement levé.
présence d’une capsule
en plastique ou le siège
de la capsule est vide
La machine nécessite un
cycle de décalcication
Manque d'eau dans le
réservoir
Débrancher la machine
de la prise de courant et
attendre qu’il se refroidisse ; soulever le levier
et retirer la capsule
manuellement. Utiliser
un outil, ne jamais utiliser les doigts.
Vider le récipient.
Baisser entièrement
le levier et le relever
jusqu’à sa n de course.
Extraire la capsule en
plastique et introduire une capsule en
aluminium Bialetti ;
appuyer sur les touches
de distribution (5-6)
pendant 3 sec an de
revenir sur les conditions
de distribution.
Eectuer un cycle de
décalcication comme
indiqué au paragraphe 8.
Remplir le réservoir
et frapper une touche
quelconque pour quitter
la condition d’alarme.
Frapper les touches expresso ou café léger pour
répéter la distribution.
FR
11. Conseils pour un bon café
• Pour obtenir une crème plus épaisse et plus persistante : utilisez
une tasse avec une base interne ovoïdale.
87

FR
12. Capsules Bialetti
Les nouvelles capsules brevetées Bialetti sont uniques sur le marché
car elles garantissent en un seul produit toutes les caractéristiques
requises pour obtenir un Expresso Bialetti parfait :
• PARFAITEMENT DOSÉES : elles contiennent 7 grammes de café,
comme expressément prévu par l'Expresso Italien Certié.
• EN ALUMINIUM : le seul matériau qui, à la diérence des capsules
communes en plastique, est en mesure de préserver tous les
substances organiques du café, en garantissant un produit toujours frais et un café comme à peine moulu.
Les capsules « I caè d'Italia Bialetti » peuvent être achetées :
1. Dans les magasins Bialetti, auprès de plus de 500 points de vente
Partenaires Bialetti et dans les meilleurs supermarchés.
Vous trouverez la liste complète et mise à jour sur le site
www.bialetti.com
2. En appelant (seulement pour l'Italie) le fabricant :
3. En accédant à la boutique en ligne sur le site :
www.bialetti.com
88

13. Garantie
L’appareil est garanti pour une période de deux ans à compter de la date
de livraison. La date faisant foi sera celle reportée sur le bon d’achat/
facture, à moins que l’acheteur ne prouve que la livraison a été successive à cette date. En cas de vice du produit préexistant à la date de
livraison, Bialetti garantit la réparation ou la substitution de l’appareil
sans aucun frais, à moins que l’une des deux solutions résulte disproportionnée par rapport à l’autre. L’acheteur a le devoir de dénoncer
au vendeur le défaut de conformité dans les deux mois qui suivent la
découverte du défaut.
La garantie ne couvre pas les parties résultant défectueuses à cause
d’une négligence ou d’une utilisation impropre, comme par exemple :
• Dommages dérivant de heurts, chutes ou rayures dues à l’emploi
d’ustensiles non appropriés.
• Pannes causées par le calcaire ou par une décalcication non
périodique.
• Non respect des instructions pour le fonctionnement de l’appareil.
• Installation incorrecte ou mauvais entretien eectués par des
personnes non autorisées.
• Usure normale.
• Dommages provoqués par des modications eectuées par l’acheteur.
• Dommages dus à un voltage diérent de celui indiqué sur le
manuel de mode d’emploi et d’entretien.
• Dommages dus au transport à savoir à des circonstances qui ne
peuvent pas être imputées à des vices de fabrication de l’appareil.
• Dommages provoqués par des interventions eectuées par des
centres de service après-vente non qualiés.
La garantie est par ailleurs exclue dans tous les cas d’usage impropre
de l’appareil et en cas d’usage professionnel. Bialetti décline toute responsabilité face aux éventuels dommages directs ou indirects envers les
personnes, choses et animaux domestiques, dérivant de la non observation de toutes les prescriptions indiquées dans cette notice d’instructions
en thème d’installation, d’usage et d’entretien de l’appareil.
Exception faite pour les actions contractuelles de garantie envers le vendeur.
LE FABRICANT SE RÉSERVE LE DROIT D’APPORTER À SES PRODUITS
TOUTE MODIFICATION OPPORTUNE DICTÉE PAR DES RAISONS NORMATIVES, INDUSTRIELLES, COMMERCIALES OU ESTHÉTIQUES.
FR
89

FR
14. Élimination de l’appareil
• Ce produit est conforme à la directive 2012/19/CE.
• Le symbole de la corbeille barrée reporté sur l’appareil indique que
le produit doit être traité séparément des déchets urbains à la n de
sa durée de vie. Il doit être remis à un centre de récolte diérenciée
pour appareillages électriques et électroniques ou bien au vendeur
lors de l’acquisition d’un nouvel appareil équivalent.
• L’utilisateur est responsable de la remise de l’appareil en n de vie
aux structures de collecte appropriées, sous peine de sanctions prévues par la loi en vigueur en matière de déchets.
• La récolte diérenciée, permettant l’envoi successif de l’appareil
usagé au recyclage, au traitement et à l’élimination dans le respect
de l’environnement, permet d’éviter tout impact négatif sur l’environnement et sur la santé, et favorise le recyclage des matières du
produit.
• Pour plus d’informations sur les systèmes de collecte disponibles,
s’adresser au service locale d’élimination des déchets, ou au magasin où la cafetière a été achetée.
• Les constructeurs et les importateurs obtempèrent, sous leur propre
responsabilité, au recyclage, au traitement et à l’élimination dans le
respect de l’environnement, soit directement, soit en participant à
un système collectif.
90

Nota/Remarks/Note/Notizen/Notes
.....................................................................................................................................
.....................................................................................................................................
.....................................................................................................................................
.....................................................................................................................................
.....................................................................................................................................
.....................................................................................................................................
.....................................................................................................................................
.....................................................................................................................................
.....................................................................................................................................
.....................................................................................................................................
.....................................................................................................................................
.....................................................................................................................................
.....................................................................................................................................
.....................................................................................................................................
.....................................................................................................................................
.....................................................................................................................................
.....................................................................................................................................
.....................................................................................................................................
.....................................................................................................................................
.....................................................................................................................................
.....................................................................................................................................
.....................................................................................................................................
.....................................................................................................................................
.....................................................................................................................................
.....................................................................................................................................
.....................................................................................................................................
.....................................................................................................................................
.....................................................................................................................................
.....................................................................................................................................
.....................................................................................................................................
.....................................................................................................................................
.....................................................................................................................................
.....................................................................................................................................
.....................................................................................................................................
.....................................................................................................................................
.....................................................................................................................................
.....................................................................................................................................
.....................................................................................................................................
.....................................................................................................................................
.....................................................................................................................................

DE
1. Einführung
Verehrter Kunde,
Sie haben gerade eine Bialetti Espresso-Maschine erworben!
Wir danken Ihnen für die Wahl eines unserer Produkte und sind gewiss,
dass die Maschine Ihre Erwartungen voll erfüllen wird.
Das Bialetti Espresso-System ist das Ergebnis langer, leidenschaftlicher
und sorgfältiger Forschung über Kaee und seine Zubereitung. Seit
1933, mit der Erndung und der Markteinführung von Moka Express,
ist der kleine Männchen mit dem Schnurrbart zum Emblem für Kaee
und zum Symbol für echten italienischen Espresso geworden.
Dank des Vorhandenseins eines innovativen Sensors funktioniert Ihre
Maschine nur mit Original Bialetti- Kapseln aus Aluminium, perfekt
dosiert und wurden von uns entwickelt, um Ihnen auch zu Hause einen
Espresso zu gewährleisten, der so gut ist, wie in einem italienischen
Café.
Bitte lesen Sie diese Anleitung, bevor Sie das Gerät in Betrieb nehmen,
und holen Sie sich auf der Website www.bialetti.com alle Informationen, um in den Genuss der Vorteile zu können, die wir unseren Kunden
vorbehalten.
Bialetti Industrie wünscht Ihnen angenehmen Kaeegenuss und verbleibt mit freundlichen Grüßen
Konformitätserklärung
Der Hersteller erklärt unter eigener Verantwortung, dass
das Gerät, auf welches sich diese Betriebsanleitung
bezieht, mit den Vorschriften der EG-Richtlinien für
Haushaltsgeräte konform ist, wie LVD, EMC, EMF, ErP,
Der Hersteller behält sich das Recht vor, zur Verbesserung des Produkts und aus konstruktiven Gründen alle technologischen, ästhetischen und größenmäßigen Änderungen vorzunehmen, ohne dies
ankündigen zu müssen.
RoHS, REACH, “Food contact”.
Angewandte Vorschriften
Das Gerät, das Gegenstand dieser Betriebsanleitung ist, ist konform
mit den Richtlinien 2014/30/UE; 2014/35/UE; Verordnung (EG) Nr.
1935/2004 und Verordnung (EG) Nr. 2023/2006.
92

2. Hinweise
Beschreibung der verwendeten Symbole
ACHTUNG
Informationen, die mit dem Piktogramm ACHTUNG oder
WARNHINWEIS gekennzeichnet sind, müssen stets strikt
eingehalten werden.
Die Angabe „WARNHINWEIS“ weist auf die Gefahr möglicher
schwerer Verletzungen hin. Die Angabe „ACHTUNG” weist
dagegen auf die Gefahr möglicher leichter Verletzungen hin.
BITTE BETRIEBSANLEITUNG LESEN
Es weist auf die Notwendigkeit hin, vor Beginn des Betriebs
die vorliegenden Anleitung zu lesen, um eine einwandfreie
Funktion zu erzielen und die Gefahr von Stromschlägen und/
oder Verbrennungen zu vermeiden.
ACHTUNG - HEISSE OBERFLÄCHE!
Die Oberächentemperatur des Bereichs, an dem diese
Warnung angebracht ist, kann gefährlich hoch sein. Aus
diesem Grund muss der direkte Kontakt mit der Haut und
mit hitzeempndlichen Geweben oder Materialien vermieden
werden.
EMPFEHLUNGEN
Dieses Symbol bedeutet, dass die Empfehlungen des Herstellers bezüglich des Schutzes und der korrekten Verwendung
des jeweiligen Produkts befolgt werden müssen.
DE
93

DE
2. Hinweise
ALLGEMEINE HINWEISE
Die Bedienungshinweise in der vorliegenden Bedienungsanleitung aufmerksam durchlesen, da sie wichtige Anweisungen für
Installierung, Gebrauch und Wartung des Geräts enthalten.
Das Handbuch sorgfältig für die spätere Einsichtnahme aufbewahren.
DIESES GERÄT IST FÜR DEN HAUSGEBRAUCH BZW. EINEN VERGLEICHBAREN
EINSATZ AUSGELEGT, WIE BEISPIELSWEISE:
- TEEKÜCHEN IN GESCHÄFTEN, BÜROS
UND ANDEREN ARBEITSPLÄTZEN;
- BAUERNHÖFE;
- BED AND BREAKFASTS UND VER-
GLEICHBAREN STRUKTUREN;
- HOTELS, MOTELS UND SONSTIGE UNTERKÜNFTE (NUR FÜR KUNDEN).
KINDER MÜSSEN ÜBERWACHT
WERDEN, DAMIT SIE NICHT
MIT DEM GERÄT SPIELEN.
94

2. Hinweise
DAS GERÄT KANN VON KINDERN AB
8 JAHREN VERWENDET WERDEN,
WENN SIE BEAUFSICHTIGT WERDEN
ODER ANWEISUNGEN ZUM SICHEREN GEBRAUCH DES GERÄTS ERHALTEN HABEN UND DIE DAMIT VERBUNDENEN GEFAHREN KENNEN. DIE
REINIGUNG UND WARTUNG KANN
VON KINDERN IM ALTER VON MINDESTENS 8 JAHREN DURCHGEFÜHRT
WERDEN, WENN SIE ORDNUNGSGEMÄSS BEAUFSICHTIGT WERDEN.
DAS PRODUKT UND DAS ZUGEHÖRIGE VERSORGUNGSKABEL AUS DER
REICHWEITE VON KINDERN UNTER
8 JAHREN FERNHALTEN.
DAS GERÄT DARF VON PERSONEN
MIT BESCHRÄNKTEN KÖRPERLICHEN, SENSORIELLEN ODER GEISTIGEN FÄHIGKEITEN, MANGEL AN
ERFAHRUNG ODER KENNTNIS, NUR
UNTER AUFSICHT BENUTZT WERDEN, NACHDEM SIE IN DIE SICHERE
VERWENDUNG DES GERÄTS DURCH
EINE PERSON EINGEWIESEN WURDEN, DIE FÜR IHRE SICHERHEIT
VERANTWORTLICH IST.
DE
95

DE
2. Hinweise
DAS GERÄT NIEMALS IN WASSER
ODER ANDERE FLÜSSIGKEITEN TAUCHEN.
SOLLTE DAS VERSORGUNGSKABEL
DES GERÄTS BESCHÄDIGT SEIN,
DARF ES AUSSCHLIESSICH VON
EINEM AUTORISIERTEN KUNDENDIENSTZENTRUM DES HERSTELLERS
AUSGETAUSCHT WERDEN, DA DAZU
SPEZIALWERKZEUG ERFORDERLICH
IST.
WÄHREND DER AUSGABE DES GETRÄNKS MUSS AUF EVENTUELL HERAUSSPRITZENDE HEISSE FLÜSSIGKEIT GEACHTET WERDEN. DIE
HEISSN TEILE DES GERÄTS NICHT
SOFORT NACH DEM GEBRAUCH BERÜHREN, UM EINE VERBRENNUNGSGEFAHR ZU VERMEIDEN. UNSACHGEMÄSSE VERWENDUNG KANN ZU
VERLETZUNGEN FÜHREN.
96

2. Hinweise
DIESES GERÄT WURDE FÜR DIE ZUBEREITUNG VON ESPRESSO-KAFFEE MIT
BIALETTI-KAPSELN ENTWICKELT UND
DARF NUR ZU DIESEM ZWECK VERWENDET WERDEN. JEDE ANDERE VERWENDUNG IST ALS MISSBRÄUCHLICH
ANZUSEHEN UND DAMIT GEFÄHRLICH.
DER HERSTELLER HAFTET NICHT FÜR
SCHÄDEN, DIE AUS UNSACHGEMÄSSER, FALSCHER ODER VERNUNFTWIDRIGER VERWENDUNG ENTSTEHEN.
• Das Gerät wurde für den Einsatz in Innenräumen konzipiert und
ist nicht für extreme Außentemperaturen geeignet. Das Gerät darf
keinen Wettereinüssen ausgesetzt werden (Regen, Sonne usw.).
• Im Fall kommerzieller Verwendung, unsachgemäße Beförderung
oder Missbrauch, Schäden infolge der Verwendung zu anderweitigen Zwecken, nicht fachgerecht ausgeführten Reparaturen
und Nichteinhaltung der vorliegenden Anleitung verweigert der
Hersteller jede Haftung und ist berechtigt, die Garantieleistung zu
verweigern.
• Prüfen Sie sofort nach dem Auspacken und vor jedem Gebrauch,
ob das Gerät und alle seine Zubehörteile unbeschädigt sind. Der
Kabelmantel und der Stecker dürfen keine Risse oder Bruchstellen
aufweisen. Sollte das hingegen der Fall sein, dann ziehen Sie den
Stecker sofort aus der Steckdose und bringen Sie das Gerät zu
einem autorisierten Kundendienst.
• Alle Verpackungsteile (wie Plastikbeutel, Styropor, Nägel usw.)
müssen außerhalb der Reichweite von Kindern aufbewahrt werden,
weil sie eine mögliche Gefahrenquelle darstellen.
• Das Gerät auf einer ebenen, gleichmäßigen und stabilen Fläche aufstellen. Nicht neben oder auf heißen Flächen wie Heizkörpern, Kochplatten, Backöfen, Gasherden, oenen Flammen usw. aufstellen.
• Bevor das Gerät an den Strom angeschlossen wird, sicherstellen,
dass die Angaben auf dem Typenschild mit den Merkmalen des
Stromnetzes übereinstimmen. Das Typenschild bendet sich am
DE
97

DE
2. Hinweise
Boden des Geräts.
• Sollten die Steckdose und der Stecker des Geräts nicht zusammenpassen, die Steckdose von Fachkräften durch eine geeignete
ersetzen lassen. Der Fachmann muss dabei darauf achten, dass
der Kabelquerschnitt des neuen Steckers für die Leistungsaufnahme des Geräts geeignet ist. Im Allgemeinen sollte man auf die
Benutzung von Adaptern, Mehrfachsteckdosen und/oder Verlängerungskabeln verzichten. Sollte deren Verwendung aber unumgänglich sein, benutzen Sie nur einfache oder mehrfache Adapter und
Verlängerungskabel, die den geltenden Sicherheitsbestimmungen
entsprechen, und achten Sie auch darauf, dass der Grenzwert der
Strombelastbarkeit (auf einfachen Adaptern und Verlängerungskabeln angegeben) nicht überschritten wird. Bei mehrfachen Adaptern achten Sie auf die angegebene Maximalleistung.
• Das Gerät nicht unnötig eingeschaltet lassen. Wenn es nicht gebraucht wird, den Stecker aus der Steckdose ziehen.
• Wenn das Gerät längere Zeit nicht benutzt wird, sollte der Wassertank entleert werden.
• Das Gerät während des Betriebs nicht in einen Schrank stellen.
DAS GERÄT MUSS UNBEDINGT AN EINE GEERDETE
STECKDOSE ANGESCHLOSSEN WERDEN.
DAS GERÄT SOLLTE ÜBER EINEN FEHLERSTROMSCHUTZSCHALTER (RCD) MIT AUSLÖSESTROM NICHT
ÜBER 30MA GESPEIST WERDEN.
NICHT AM STROMKABEL ZIEHEN, UM DEN STECKER AUS
DER STECKDOSE ZU ENTFERNEN.
98

2. Hinweise
WÄHREND DES BETRIEBS MUSS DIE STECKDOSE FÜR
DEN FALL, DASS DIE STROMVERSORGUNG DES GERÄTS
UNTERBROCHEN WERDEN MUSS, LEICHT ZU ERREICHEN
SEIN.
DE
• Das Gerät nicht mit nassen oder feuchten Händen anfassen.
VORSICHTSMASSNAHMEN
• Das Gerät nicht barfuß benutzen.
• Das Kabel nicht über scharfe Kanten führen, befestigen oder hän-
gen lassen.
• Um ein gefährliches Überhitzen zu vermeiden, sollte das Kabel in
seiner ganzen Länge ausgerollt werden. Außerdem müssen die
Empfehlungen im Abschnitt „Hinweise für korrekten Einsatz des
Geräts“ eingehalten werden.
• Die Önungen oder Schlitze für Belüftung bzw. Ableitung der Wärme dürfen nicht verschlossen werden.
• Bei Schäden und/oder Funktionsstörungen das Gerät ausschalten,
ohne Eingrie daran vorzunehmen. Für Reparaturen wenden Sie
sich ausschließlich an eine vom Hersteller autorisierte Kundendienststelle. Verlangen Sie nur Originalersatzteile. Die Nichtbeachtung dieser Bestimmungen kann die Sicherheit des Gerätes in
Frage stellen.
• Wenn Sie beschließen, ein Gerät dieses Typs nicht mehr zu benutzen, muss es funktionsuntüchtig gemacht werden, indem das Elektrokabel nach Herausziehen des Steckers durchgeschnitten wird.
Außerdem sollte man die Teile des Gerätes unschädlich machen,
die eine Gefahrenquelle für Kinder darstellen, wenn diese damit
spielen sollten.
DAS GERÄT MUSS HINSICHTLICH DER ANWEISUNGEN
DES HERSTELLERS BENUTZT WERDEN. EINEN
FALSCHEN GEBRAUCH KANN SCHÄDEN AN PERSONEN,
TIEREN ODER SACHEN VERURSACHEN, FÜR DIE DER
HERSTELLER NICHT HAFTET.
99

DE
2. Hinweise
• Während des Betriebs das Gerät nicht unbeaufsichtigt lassen.
DAS GERÄT NICHT BEI LEEREM WASSERTANK BENUTZEN.
• Das Gerät nicht transportieren, solange es in Betrieb ist.
NACH DER ANFANGSINSTALLATION DES GERÄTS
IST ES MÖGLICH, DASS DURCH DIE VERWENDETEN
ISOLIERSTOFFE UND DIE HEIZELEMENTE EIN GEWISSER
BRANDGERUCH ENTSTEHT. DIES IST GANZ NORMAL.
3. Packungsinhalt
1 Espressomaschine;
1 Gebrauchsanleitung;
1 Informationsblatt über die Reihe “I caè d’Italia”;
1 Probepackung mit den Kaeemischungen “I caè d’Italia” (wenn auf
der Packung angegeben)
100
 Loading...