

Bh fitness SK6900 User Manual
Treadmill Owner’s Manual
BH Fitness SK6900 - SK6900TV
BH FITNESS
20155 Ellipse, Foothill Ranch, CA 92610
Phone: 949-206-8152, 800-475-7899 (USA only), 866-325-2339 (USA & Canada)
Fax: 949-206-0013
Email: fitness@bhnorthamerica.com
Web: www.bhnorthamerica.com
and www.bhfitness.com
Revised: April 10, 2008 (v2)
BH Fitness • 20155 Ellipse • Foothill Ranch • CA • 92610
www.bhfitness.com

TABLE OF CONTENTS
SECTION PAGE
User Safety Instructions . . . . . . . . . . . . . . . . . . . . . . . . . . . . . . . . . . . . . . . . 2
Treadmill Safety and General Instructions . . . . . . . . . . . . . . . . . . . . . . . . . . 3
Assembly . . . . . . . . . . . . . . . . . . . . . . . . . . . . . . . . . . . . . . . . . . . . . . . . . . . . 5
Maintenance. . . . . . . . . . . . . . . . . . . . . . . . . . . . . . . . . . . . . . . . . . . . . . . . . . 10
Fitness and Exercise . . . . . . . . . . . . . . . . . . . . . . . . . . . . . . . . . . . . . . . . . . . 13
Troubleshooting . . . . . . . . . . . . . . . . . . . . . . . . . . . . . . . . . . . . . . . . . . . . . . . 15
SK6900TV Computer Console . . . . . . . . . . . . . . . . . . . . . . . . . . . . . . . . . . . 16
SK6900TV Tuning . . . . . . . . . . . . . . . . . . . . . . . . . . . . . . . . . . . . . . . . . . . . . 21
SK6900TV Remote Control . . . . . . . . . . . . . . . . . . . . . . . . . . . . . . . . . . . . . 24
SK6900TV Manual Exercise Mode . . . . . . . . . . . . . . . . . . . . . . . . . . . . . 25
SK6900TV Programs . . . . . . . . . . . . . . . . . . . . . . . . . . . . . . . . . . . . . . . . . . 26
SK6900TV Heart Rate Control . . . . . . . . . . . . . . . . . . . . . . . . . . . . . . . . 26
SK6900TV P1 - 9 Hole Run . . . . . . . . . . . . . . . . . . . . . . . . . . . . . . . . . . 28
SK6900TV P2 - 5 Km Run . . . . . . . . . . . . . . . . . . . . . . . . . . . . . . . . . . . . 29
SK6900TV P3 - Calorie . . . . . . . . . . . . . . . . . . . . . . . . . . . . . . . . . . . . . . 30
SK6900TV P4 - Aerobic . . . . . . . . . . . . . . . . . . . . . . . . . . . . . . . . . . . . . . 31
SK6900TV P5 - Highland Run . . . . . . . . . . . . . . . . . . . . . . . . . . . . . . . . 32
SK6900TV P6 - Hill Interval . . . . . . . . . . . . . . . . . . . . . . . . . . . . . . . . . . . 33
SK6900TV P7 - Fat Burn . . . . . . . . . . . . . . . . . . . . . . . . . . . . . . . . . . . . . 34
SK6900 Computer Console . . . . . . . . . . . . . . . . . . . . . . . . . . . . . . . . . . . . . 42
SK6900 Programs . . . . . . . . . . . . . . . . . . . . . . . . . . . . . . . . . . . . . . . . . . . . 48
SK6900 Programs . . . . . . . . . . . . . . . . . . . . . . . . . . . . . . . . . . . . . . . . . . . . . 48
SK6900 P0 Manual Mode . . . . . . . . . . . . . . . . . . . . . . . . . . . . . . . . . . . . 48
SK6900 P1 - P8 Graphic . . . . . . . . . . . . . . . . . . . . . . . . . . . . . . . . . . . . . 49
SK6900 P9 - USER . . . . . . . . . . . . . . . . . . . . . . . . . . . . . . . . . . . . . . . . . 50
SK6900 P10 - Male and P11 - Female. . . . . . . . . . . . . . . . . . . . . . . . . . . 51
SK6900 P12 - Constant Heart Rate . . . . . . . . . . . . . . . . . . . . . . . . . . . . . 52
Program Profiles . . . . . . . . . . . . . . . . . . . . . . . . . . . . . . . . . . . . . . . . . . . . . . 55
Warranty . . . . . . . . . . . . . . . . . . . . . . . . . . . . . . . . . . . . . . . . . . . . . . . . . . . . 57
SK6900 & SK6900TV
BH Fitness • 20155 Ellipse • Foothill Ranch • CA • 92610
www.bhfitness.com • Phone 949-206-8152 • Fax 949-206-0013
1

USER SAFETY INSTRUCTIONS
PRECAUTIONS
This treadmill has been designed and constructed to provide maximum safety. Nevertheless,
certain precautions should be taken when using exercise equipment. The following safety
instructions should also be taken into consideration: Always observe basic safety precautions
when using the SK treadmill, including the following:
1. Users should pass a full medical examination before they embark upon any type of
exercise program.
2. For safety, maintain a minimum clearance around the treadmill. Maintain 18 inches on the
front and on each side of the treadmill plus 24 inches at the rear of the treadmill.
3. To guarantee your safety and that of the equipment read through the entire manual
carefully before assembling and/or using the treadmill.
4. To ensure correct and safe use of the equipment, make sure that all those who use the
machine have read this manual or are aware of its content. The contents of this manual
should form part of your training program.
5. To reduce the risk of electric shock, always unplug the unit before proceeding to carry out
cleaning and/or maintenance tasks.
6. To reduce the risk of burns, fire, electrical shocks or personal injuries, observe the following
precautions:
7. Do not allow children or people who are unfamiliar with the operation of the appliance get
too near and/or on the unit. Under no circumstances must this appliance be used as a toy.
8. Do not leave the treadmill operating unsupervised. Unplug the unit from the power supply
when not in use and before cleaning it or removing any of its component parts. Never
adjust the drive belt while the treadmill is being used.
9. Install and use the SK treadmill on a flat, stable surface. Do not place it alongside walls or
furniture. Check the unit before each use and make sure that the belt is in good condition.
10. Keep the SK treadmill in good working order.
11. The SK treadmill must only be used as described in this manual. Do not use accessories
that are not recommended by the manufacturer, as these may cause injuries.
12. The SK treadmill can only be used by one person at a time.
SAVE THESE INSTRUCTIONS
SK6900 & SK6900TV
BH Fitness • 20155 Ellipse • Foothill Ranch • CA • 92610
www.bhfitness.com • Phone 949-206-8152 • Fax 949-206-0013
2
TREADMILL SAFETY AND GENERAL INSTRUCTIONS
Carefully read through the instructions contained in this manual. It provides you with important
information about assembly, safety and use of the machine.
1. For safety, maintain a minimum clearance around the treadmill. Maintain 18 inches on the
front and on each side of the treadmill plus 24 inches at the rear of the treadmill.
2. This unit has been designed for professional use. The weight of the user must not exceed
400 lbs. (181 kg.).
3. Keep your hands well away from any of the moving parts.
4. The owner is responsible for ensuring that anyone who uses the machine is informed about
all of the necessary precautions.
5. Be careful when stepping on or off the SK treadmill. Use the side supports whenever
necessary. Start the exercise on the treadmill belt at a speed of less than 1.8 miles/hr.
6. Do not step off the belt while it is still in motion.
7. Keep your body and head facing forward toward the console.
8. Never try to turn around while using the equipment.
9. Do not start the machine while there is someone on it.
10. Wear appropriate clothing and footwear for the exercise. Do not wear baggy clothing. Tie
your hair up if it is long.
11. Do not exert too much force on the frame of the machine. Do not lean against the computer
console or the machine casing.
12. Do not drop or insert objects into any of the openings on the machine. Keep hands and
towels well away from moving parts.
13. Do not overexert yourself or exercise beyond your capabilities. Stop exercising immediately
if you are in pain or feel strange, and seek professional medical advice.
14. To prevent the risk of electric shock keep liquids away from all electrical components
(motor, switches, etc.). Do not rest anything on the casing, the treadmill belt or the
computer console. Place liquids on the storage rack inside the appropriate container.
15. Do not use the equipment if it is damaged, does not work correctly or if it has been dropped
from a height or fallen in water. Take the equipment to a technical service center to have it
checked and repaired.
16. Make sure that the supply voltage is suitable for the machine before plugging it in. The
voltage output must be 110 V-120V, 20 amp and the outlet must have the same pin layout
as the plug. If this is not the case, please consult your technical service center.
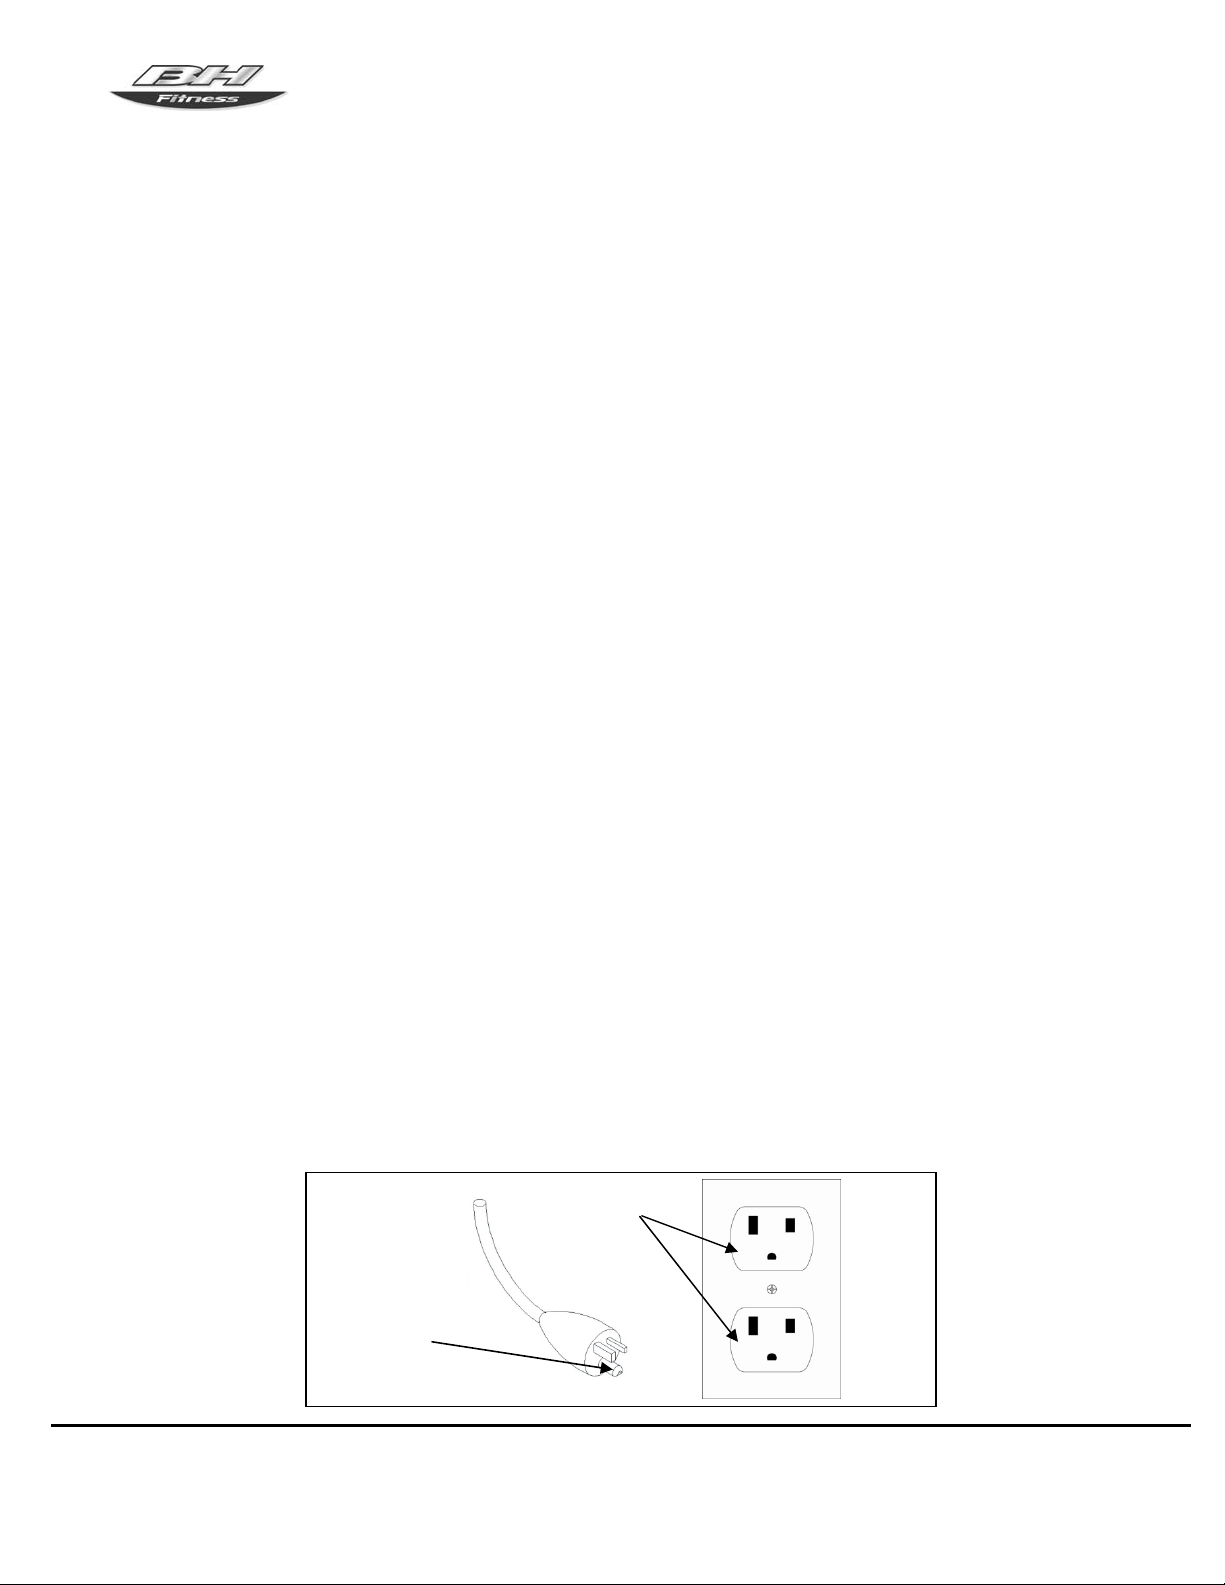
17. The equipment must only be connected to a dedicated electrical circuit with an earth
ground connection. If not, the user risks receiving an electric shock. Make sure that the wall
outlet has the same pin layout as the plug on the appliance. See Fig. A.
Fig A.
GROUNDING
PIN
GROUNDED
OUTLET
SK6900 & SK6900TV
BH Fitness • 20155 Ellipse • Foothill Ranch • CA • 92610
www.bhfitness.com • Phone 949-206-8152 • Fax 949-206-0013
3
TREADMILL SAFETY AND GENERAL INSTRUCTIONS
18. Do not use the machine if the power cord becomes damaged or worn.
19. Do not tug on the power cord in order to unplug the unit.
20. Keep the plug and power cable away from hot surfaces.
21. Do not use the equipment in areas where aerosol sprays are used.
22. Do not use the machine outdoors.
23. Do not attempt any maintenance and/or repair work other than that stated in this manual.
For more complicated tasks, please get in touch with your technical assistance service.
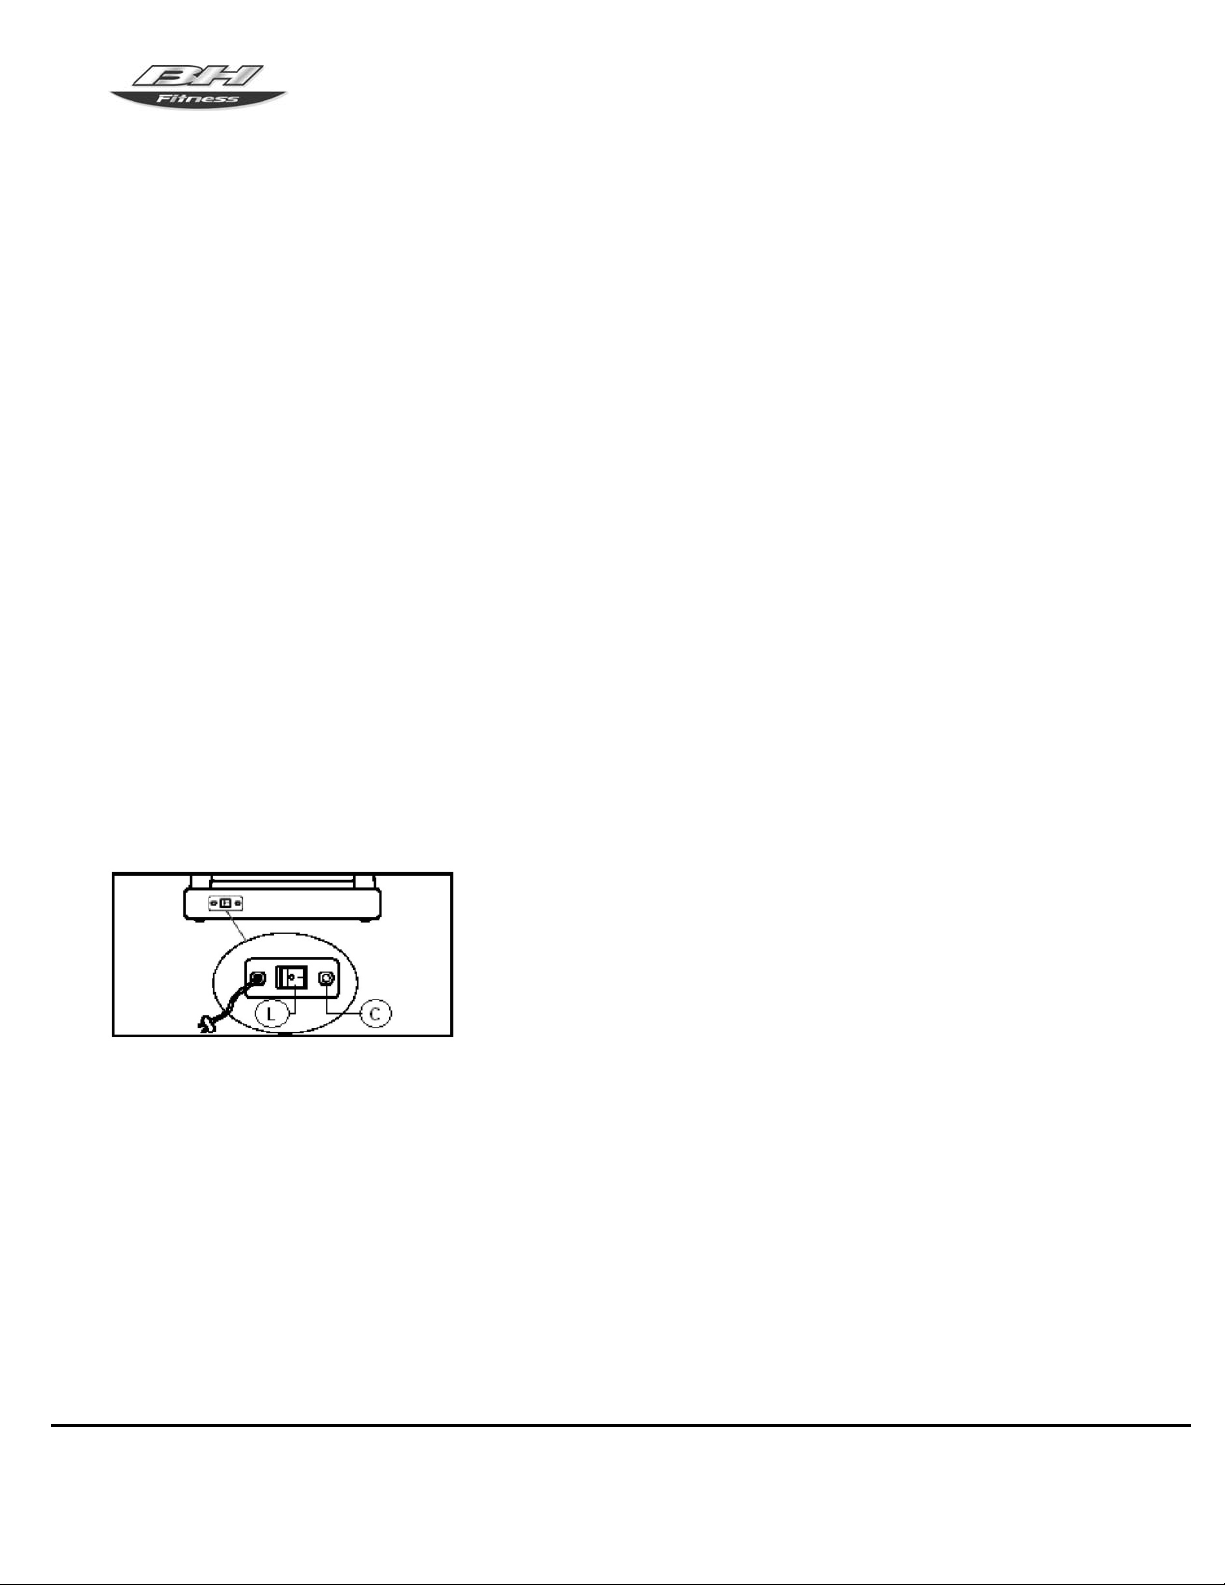
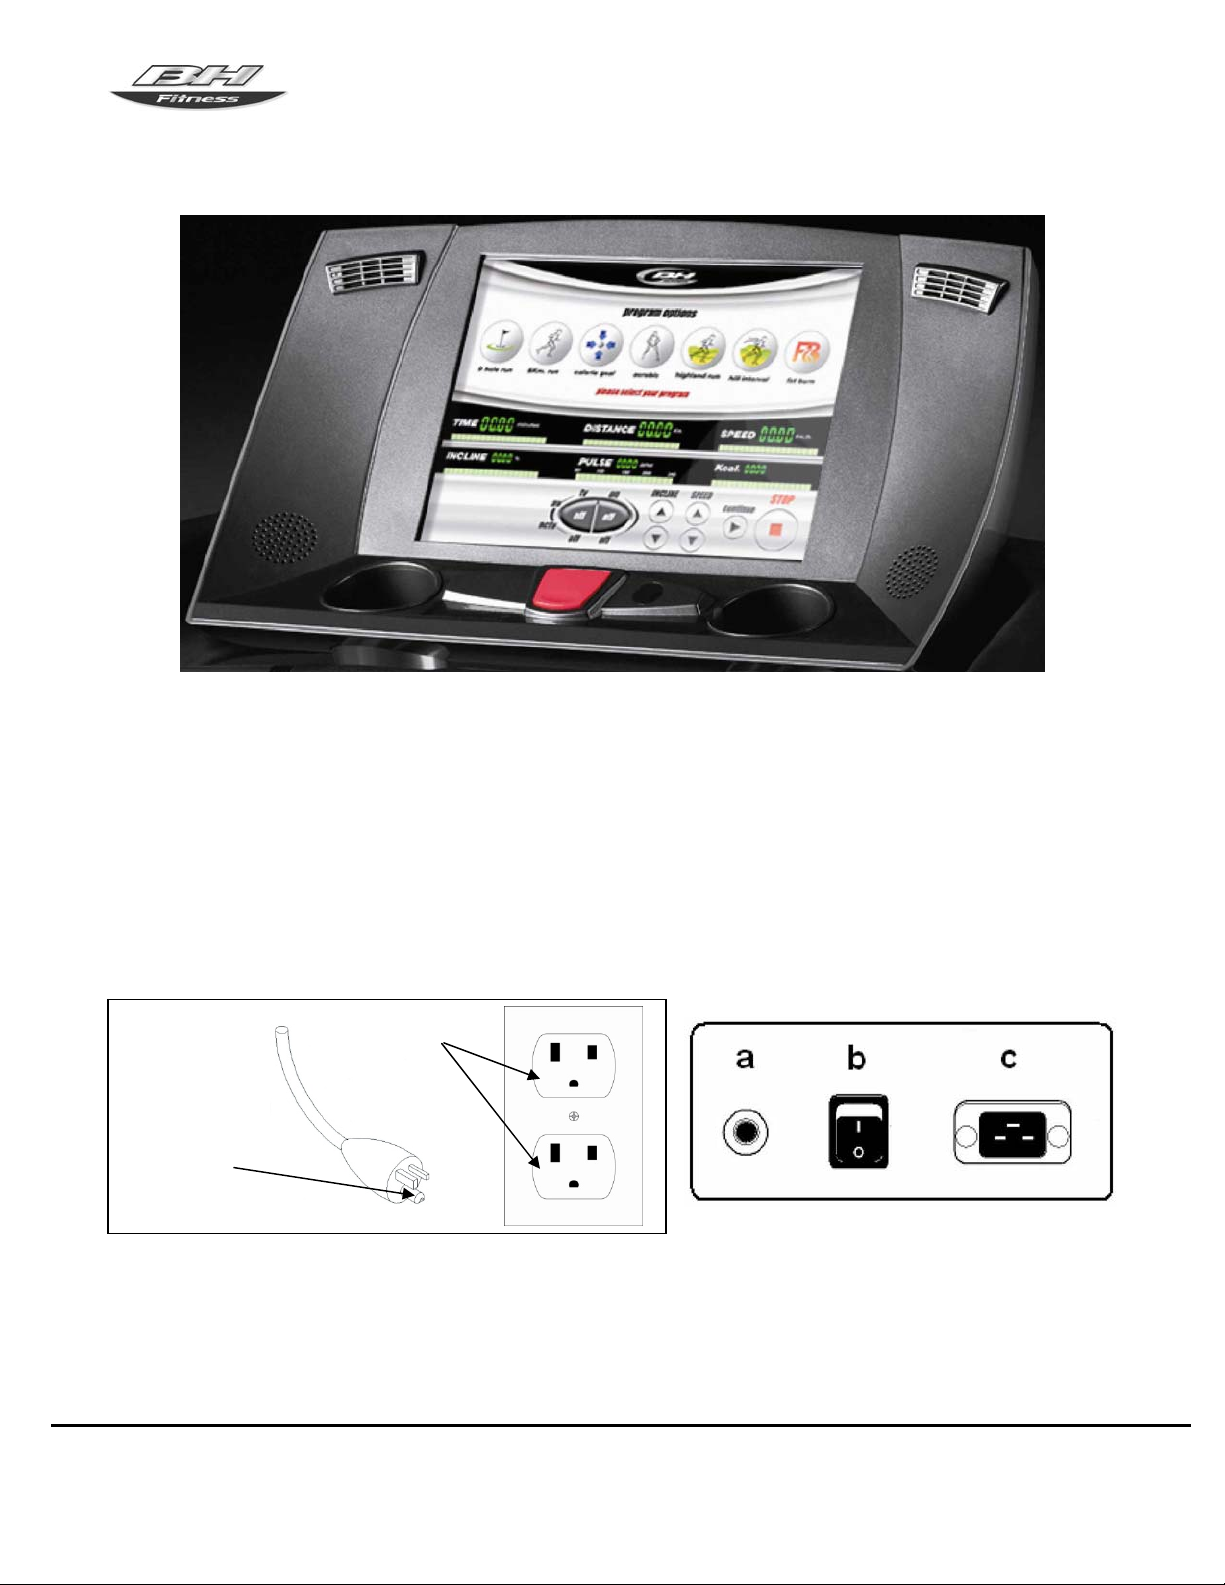
SAFETY BREAKER
This model is equipped with an electronic circuit breaker to protect both the electronic and
electrical circuits. Figure B.
The circuit breaker will be automatically triggered if the unit is subjected to abnormal force or
heat.
Should this occur:
1. Set switch (L), located on the main body, to the “0” (OFF) position.
2. Press the circuit button (C) to reset the unit.
3. Next, set switch (L) to the “I” (ON) position and the unit will be ready for use again.
Should the circuit breaker trip repeatedly then the most probable causes are:
-Abnormal working conditions,
-Treadmill belt in need of lubricant (Figure (7)),
-Solvent based lubricants used (use BH type),
-Belt is too tight.
Plug the unit into a wall socket with a ground terminal. Set switch (L) to Position [1].
Figure B
SK6900 & SK6900TV
BH Fitness • 20155 Ellipse • Foothill Ranch • CA • 92610
www.bhfitness.com • Phone 949-206-8152 • Fax 949-206-0013
4
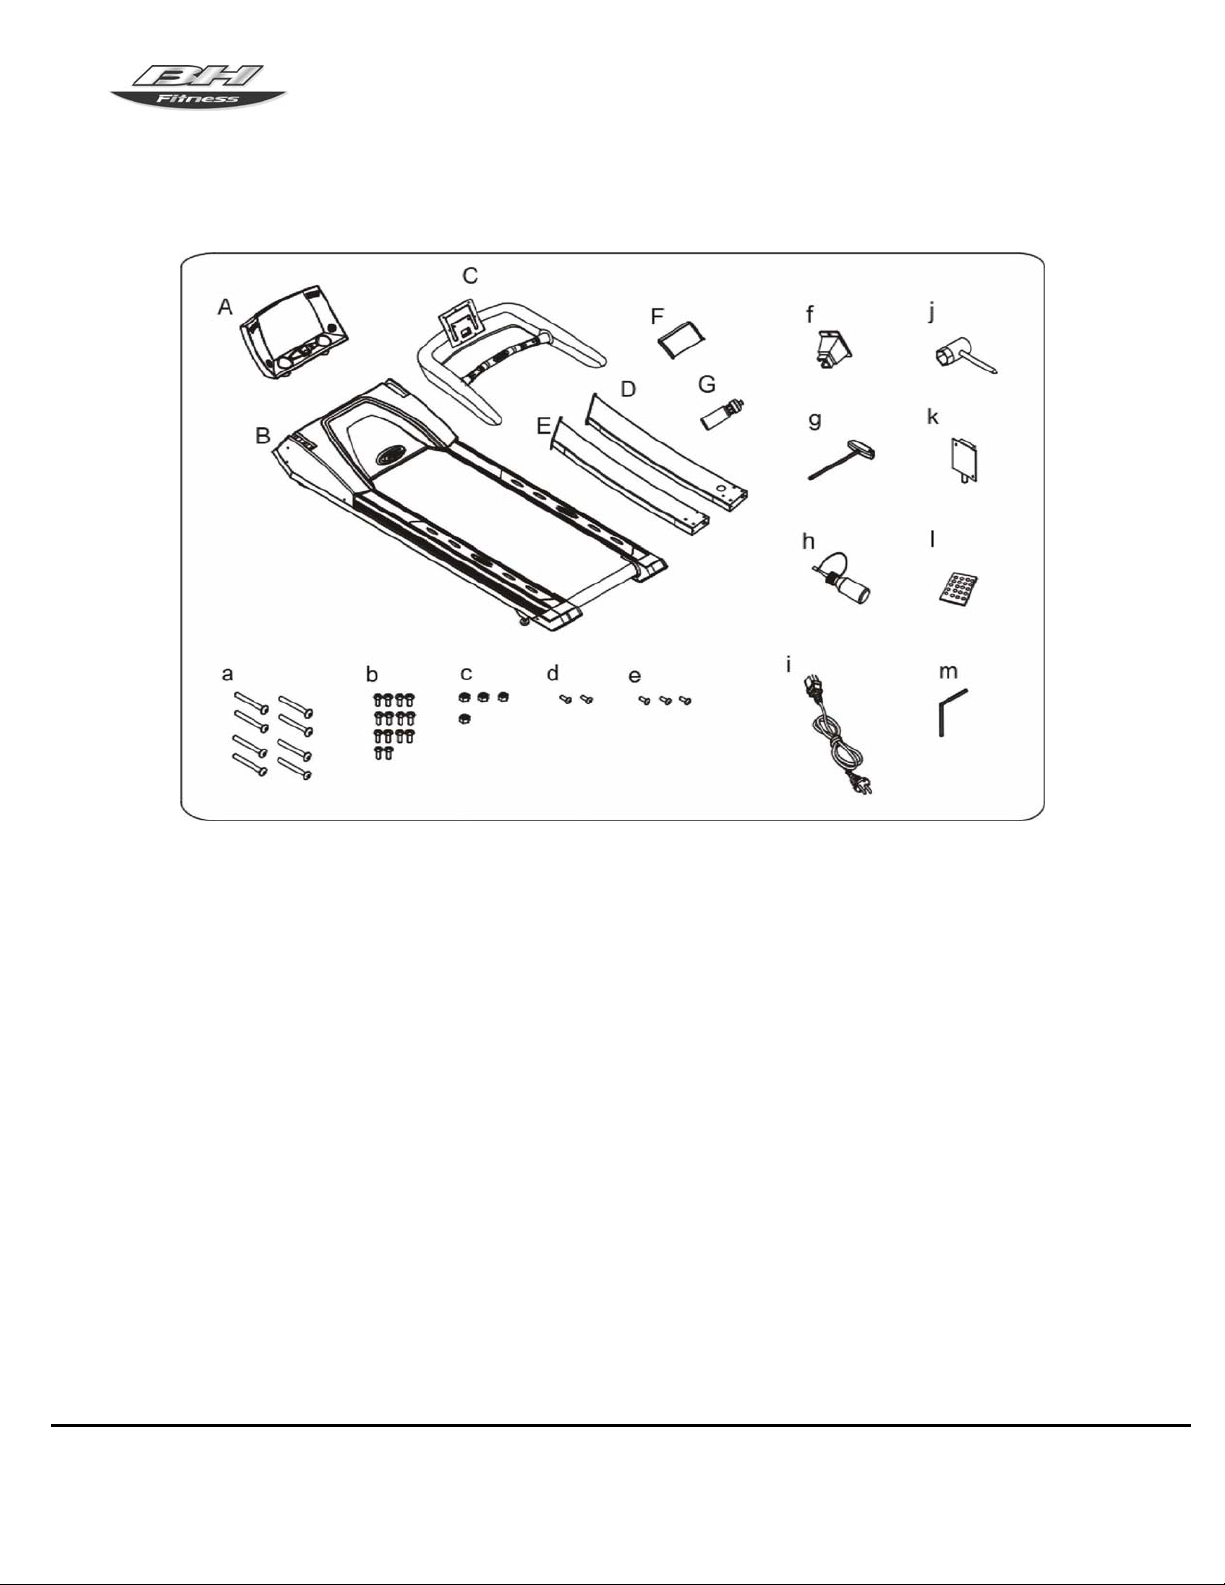
ASSEMBLY
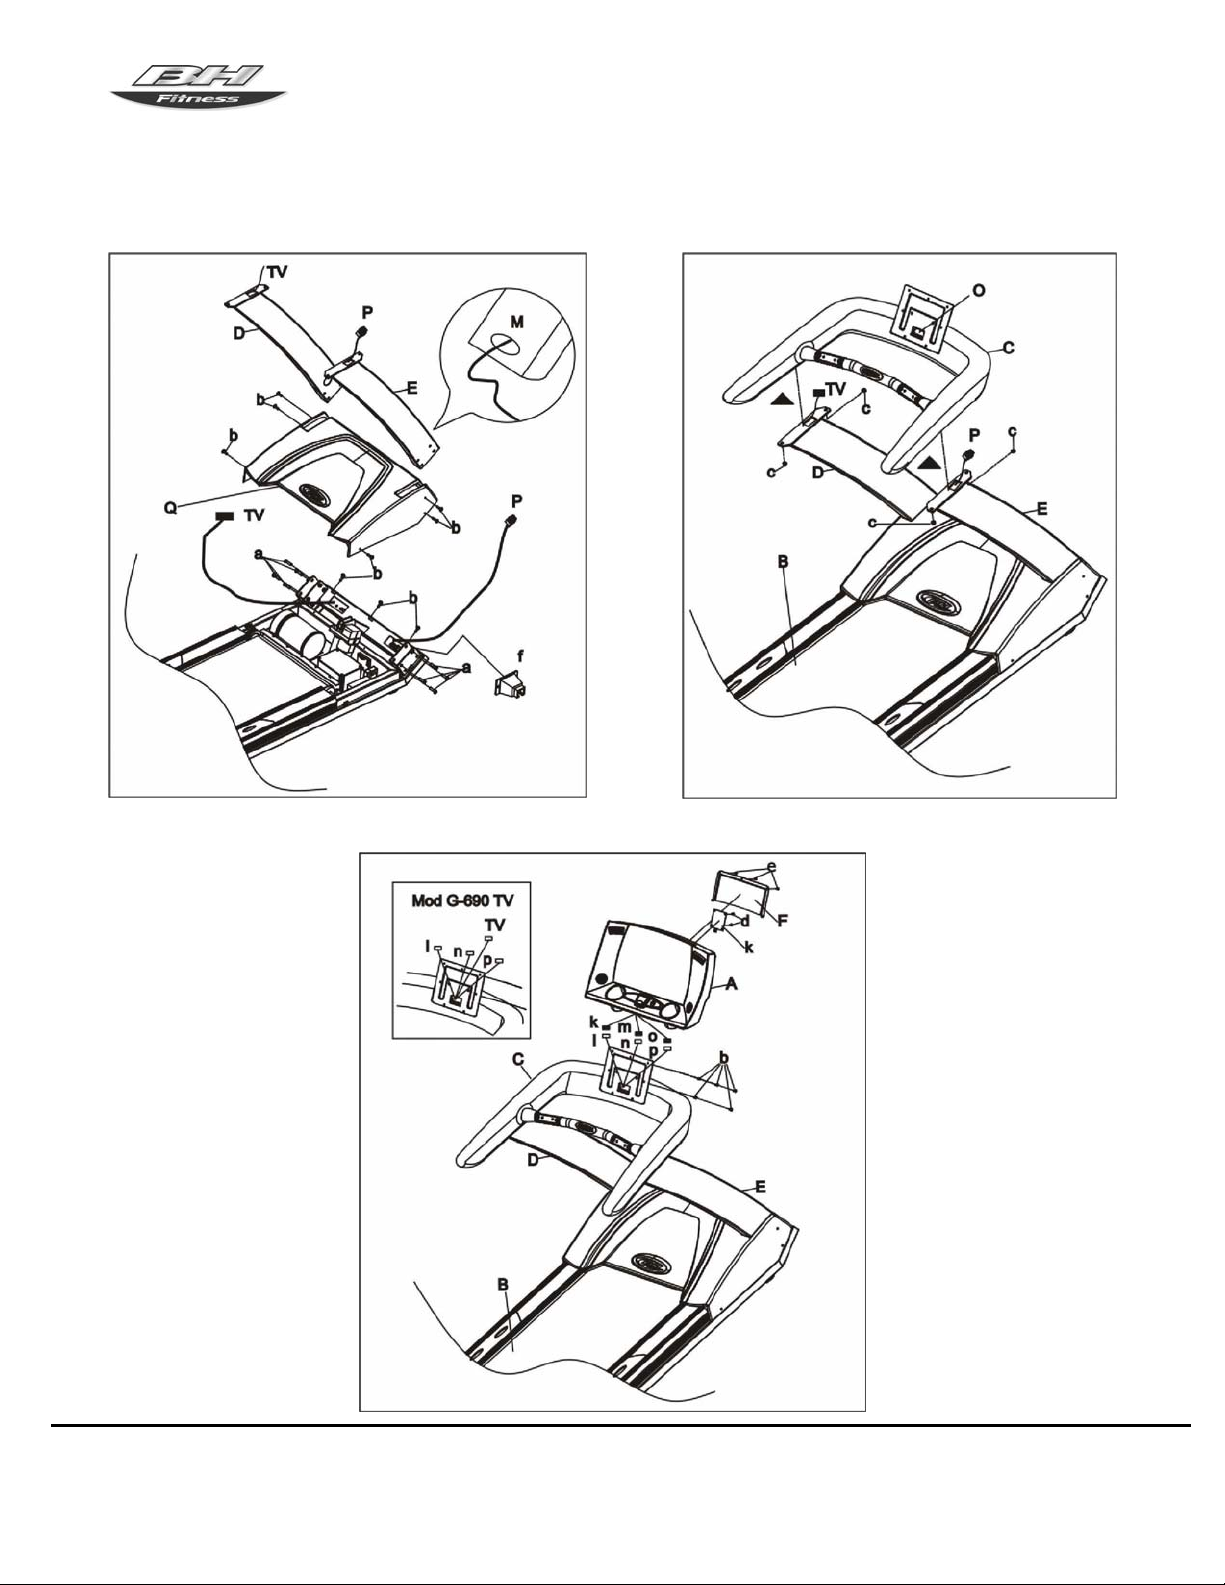
Figure 1
A) Console a) Screw M-10x70 Quantity 8
B) Main body b) Screw M-5x10 Quantity 14
C) Handrail Handlebar c) Nut M8 Quantity 4
D) Left-hand side bar d) Screw M-4x10 Quantity 2
E) Right-hand side bar e) Screw M-4x12 Quantity 3
F) Rear cover for console f) Switch
G) Bottle g) Star driver spanner
h) Bottle of lubricant
i) Power connection cable
j) Combination spanner
k) TV support plate (Mod. SK6900 TV)
l) Remote control unit. (Mod. SK6900 TV)
m) Allen key
SK6900 & SK6900TV
BH Fitness • 20155 Ellipse • Foothill Ranch • CA • 92610
www.bhfitness.com • Phone 949-206-8152 • Fax 949-206-0013
5
ASSEMBLY CONTINUED
Figure2 Figure 3
Figure 4
SK6900 & SK6900TV
BH Fitness • 20155 Ellipse • Foothill Ranch • CA • 92610
www.bhfitness.com • Phone 949-206-8152 • Fax 949-206-0013
6
ASSEMBLY CONTINUED
Figure 5 Figure 6
Figure 7 Figure 8
Lift with two
people.
SK6900 & SK6900TV
BH Fitness • 20155 Ellipse • Foothill Ranch • CA • 92610
www.bhfitness.com • Phone 949-206-8152 • Fax 949-206-0013
7

ASSEMBLY CONTINUED
ASSEMBLY INSTRUCTIONS
Take the unit out of the box and place it on the floor as shown in Figure 1. Verify that the parts
are undamaged and quantities are correct.
ATTENTION: The assistance of a second person is advisable for the assembly work.
Follow the assembly instructions step by step:
ATTACHING THE SIDE BARS
ATTENTION: At least two people are needed when fastening the side bars (D and E). One
person should hold the side bar while the other fastens the screws.
1. Remove the screws (b) on the motor cover (Q), Figure (2).
2. Remove the motor cover (Q).
3. Only for the SK6900TV model, locate the TV coaxial cable on the left side of the main body
(B). Pass the cable through the left side bar (D) (using the fishing wire) until the cable sticks
out per Figure (2).
4. Insert the left side bar (D) into the bottom left main body (B). Secure using screws (a). Only
for the SK6900TV model, verify cable is not damaged.
5. Locate the cable (P) on the right side of the main body (B). Pass the cable through the right
side bar (E) (using the fishing wire) until the cable sticks out per Figure (2).
6. Insert the right side bar (E) into the bottom right main body (B). Verify cable is not
damaged. Secure using screws (a).
ATTACHING THE HANDRAIL HANDLEBAR
ATTENTION: At least two people are needed when handling the handrail (C). One person
should hold the handrail (C) while the other inserts the cable and secures the nuts (c).
7. Only for the SK6900TV model, locate the coaxial TV cable sticking up out of the left side
bar (D). Pass the cable through the handrail (C) (using the fishing wire) and bring it out
through the central hole (O), Figure (3).
8. Locate cable (P), sticking up out of the right side bar (E). Pass the cable through the
handrail (C) (using the fishing wire) and bring it out through the central hole (O), Figure (3).
9. Rest the handrail handlebar (C) on top of the side bars (D) and (E), making sure not to
damage any of the cables, and secure using nuts (c).
SK6900 & SK6900TV
BH Fitness • 20155 Ellipse • Foothill Ranch • CA • 92610
www.bhfitness.com • Phone 949-206-8152 • Fax 949-206-0013
8

ASSEMBLY CONTINUED
ATTACHING THE CONSOLE AND THE REAR CONSOLE SUPPORT
10. Connect terminals k, m and o, Figure (4), coming out of console (A) to terminals l, n, and p
coming out of the handrail handlebar (C).
11. Push all the terminal connections through the central hole (O) in the handrail handlebar
(C), Figure (4),
12. Verify cables are not damaged. Secure console (A) using screws (b).
13. Only for SK6900TV model, install the TV support plate (k), Figure (4). Secure using screw
(d).
14. Place the rear cover for the console (F) into position. Use screws (e) to tighten securely.
ATTACHING THE MOTOR COVER
15. Install motor cover (Q) onto the main body (B) and attach it using screws (b).
POSITION THE TREADMILL
16. For safety, maintain a minimum clearance around the treadmill. Maintain 18 inches on the
front and on each side of the treadmill plus 24 inches at the rear of the treadmill.
NOTE: Safe movement of the treadmills is explained in the MAINTENANCE section of this
manual.
SK6900 & SK6900TV
BH Fitness • 20155 Ellipse • Foothill Ranch • CA • 92610
www.bhfitness.com • Phone 949-206-8152 • Fax 949-206-0013
9
MAINTENANCE
LEVELING
Once the unit has been placed into its final position for doing exercise, make sure that the
treadmill sits flat on the floor and that it is level. This can be achieved by doing the following:
A) - Switch the treadmill on to see if the console shows that the treadmill is at zero inclination
level.
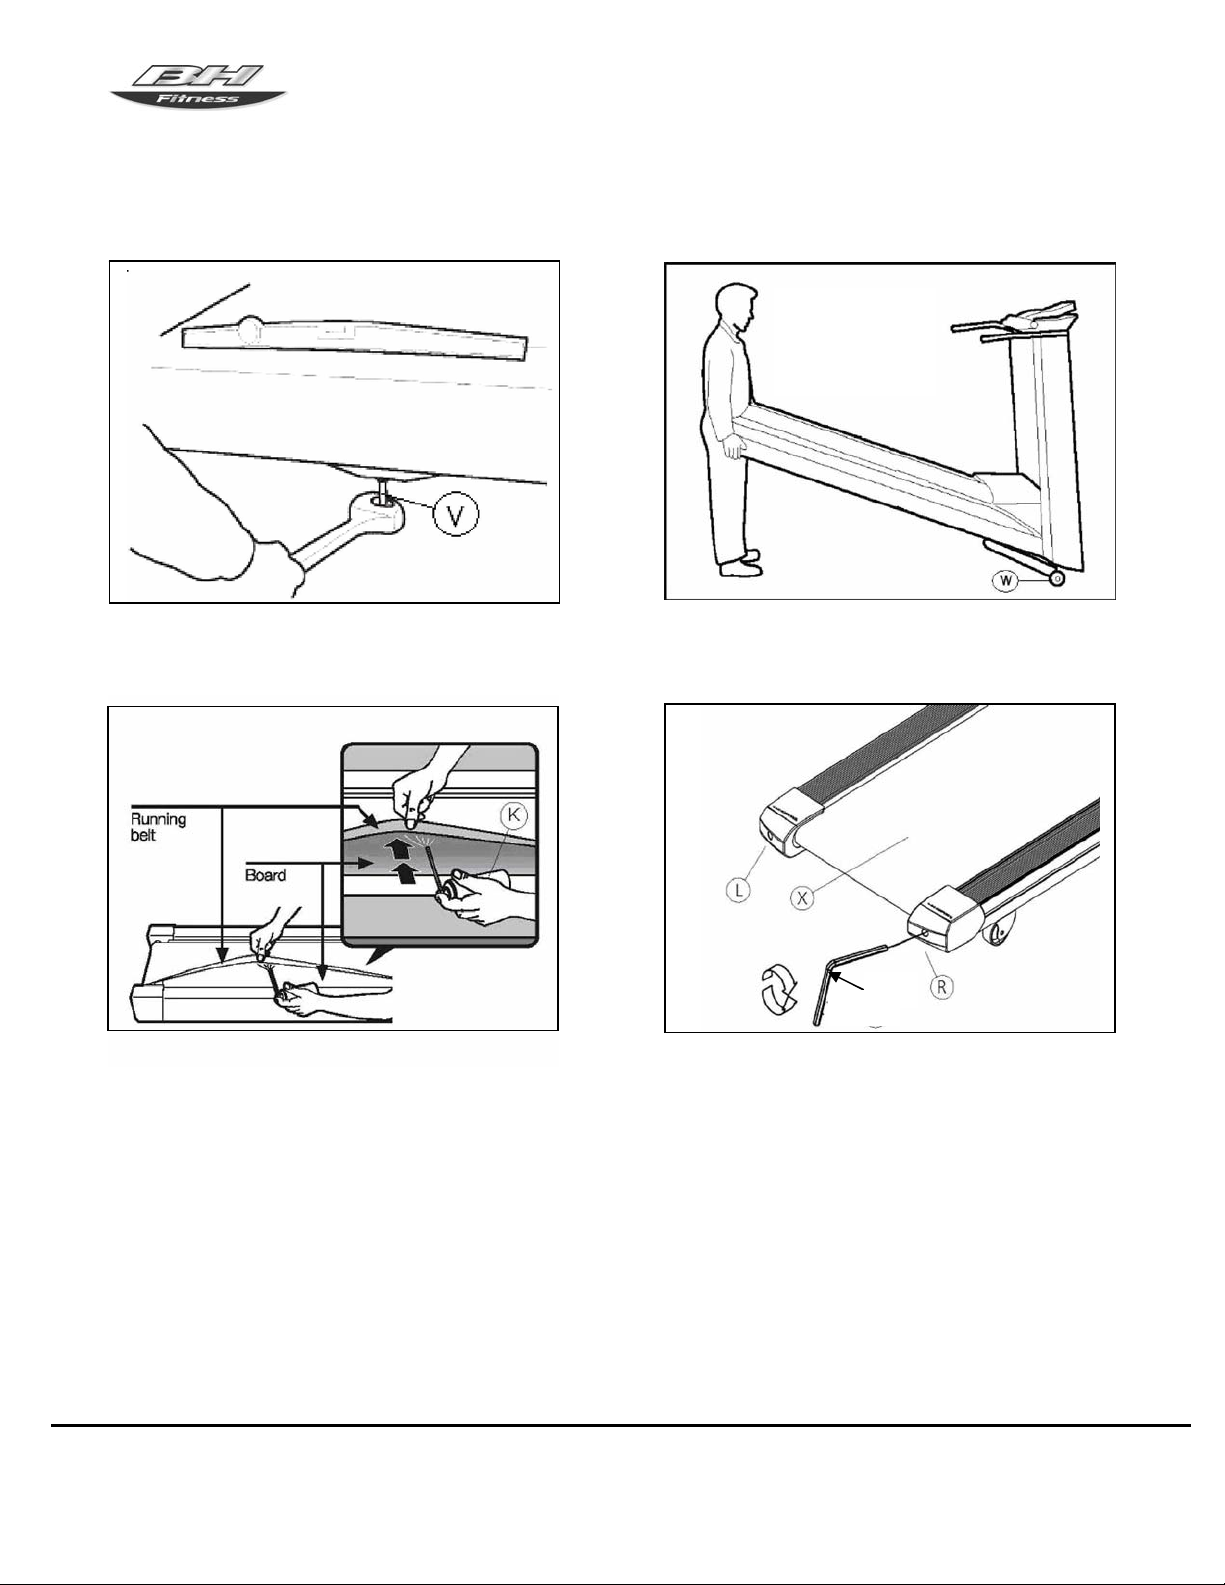
B) – Figure 5. Once you have checked the inclination, place a spirit level on the running belt
and screw the adjustable feet (V) either in or out to level up the belt.
It is advisable to do this by regulating the two adjustable feet.
MOVEMENT & STORAGE
NOTE: Lift and roll the treadmill using two people.
NOTE: To prevent accidents DO NOT move the treadmill across uneven floors.
Figure 6. The treadmill is easier to roll if the incline is higher than zero. Unplug the power cord
prior to moving the treadmill. To move the treadmill, tilt the treadmill, so that the front wheels
(W) rest on the floor.
LUBRICATION
Figure 7. Use the bottle of lubricant (h) to lubricate the inside of the belt in order to keep your
unit in top condition and to ensure that friction between the belt and the board is kept to a
minimum (due to different running styles, always apply more lubrication to the area where you
place your feet during the exercise). It is advisable to lubricate the base of the belt every 3-12
months, depending on how often it is used.
If the belt starts to slip after lubrication, then check the tension of the belt. To tension the belt,
Figure 6, take the Allen key (m) and with the machine set to 2.5 miles/hr (4 km/h) turn screws
(R & L) one full turn in a clockwise direction.
Table I
Operating Speed Recommended lubrication period
1 to 3.7 miles (1 to 6 km) per hour 1 year
3.7 to 7.4 miles (6 to 12 km) per hour 6 months
7.4 to 9.9 miles (12 to 16 km) per hour 3 months
Do not use solvent based lubricants.
SK6900 & SK6900TV
BH Fitness • 20155 Ellipse • Foothill Ranch • CA • 92610
www.bhfitness.com • Phone 949-206-8152 • Fax 949-206-0013
10

MAINTENANCE
ADJUSTING THE BELT
If your unit is not seated evenly on the four contact points, this may cause the belt shown on
Figure 8, area (X) to shift sideways. Rigorous quality control adjusts and checks the running
belt. However, due to weight differences and individual styles of running, the belt may be prone
to shift sideways.
If the belt does shift to the left or right, stop the machine and adjust the belt.
NOTE: Over tightening of the belt can lead to a loss of speed on the machine and even stretch
the belt itself. Bear In mind that one turn of the right screw (R) in a clockwise direction has the
same effect on the position of the belt as one turn of the left screw (L) in a counterclockwise
direction. Consequently, in the event of excessive belt movement you can use either of the two
screws in order to avoid over tightening the belt.
BELT SHIFTED TO THE RIGHT (Figure 8)
1. Turn off and unplug the treadmill each time before using the hex wrench.
2. Use the hex wrench to turn the right hexagonal head socket a 1/4 turn clockwise.
3. Turn on treadmill for a few minutes at a speed of 2.5 mph (4 km/h) and check belt location.
4. If the belt is not centered, then turn the left hexagonal head socket a 1/4 turn
counterclockwise.
5. If the belt is not centered, then repeat steps.
BELT SHIFTED TO THE LEFT (Figure 8)
1. Turn off and unplug the treadmill each time before using the hex wrench.
2. Use the hex wrench to turn the left hexagonal head socket a 1/4 turn clockwise.
3. Turn on treadmill for a few minutes at a speed of 2.5 mph (4 km/h) and check belt location.
4. If the belt is not centered, then turn the right hexagonal head socket a 1/4 turn
counterclockwise.
5. If the belt is not centered, then repeat steps.
TREADMILL CLEANING
Switch the unit off and unplug the power cable. Use a damp cloth or towel to clean the dust off
the treadmill, especially the side bars and the electronic console. Do not use solvents.
NOTE: Unplug the treadmill before using a vacuum near the treadmill.
Use a vacuum cleaner to carefully vacuum around the visible components (belt, structure,
etc.). You can increase the INCLINE in order to vacuum the underside of the unit. You can
vacuum the inside of the motor housing by removing the cover that protects the motor (be
careful with the wires).
NOTE: Press STOP to lower the INCLINE.
SK6900 & SK6900TV
BH Fitness • 20155 Ellipse • Foothill Ranch • CA • 92610
www.bhfitness.com • Phone 949-206-8152 • Fax 949-206-0013
11

MAINTENANCE
TIGHTENING THE FASTENERS
Check the connections and tighten all the parts on your unit every three months.
Use of this machine with worn parts, e.g. the drive belt, running belt or rollers, may cause the
user injury. If you are unsure about the condition of any part, we recommend that you replace it
with original spare parts. The use of other spare parts may cause injuries or affect the
performance of the machine.
SK6900 & SK6900TV
BH Fitness • 20155 Ellipse • Foothill Ranch • CA • 92610
www.bhfitness.com • Phone 949-206-8152 • Fax 949-206-0013
12
FITNESS AND EXERCISE
FITNESS
All doctors agree that regular exercise is a good way to control our weight, make us more fit
and help us to relax. Before starting any exercise program, it is advisable to consult your
doctor. You will achieve better results based on his/her advice or suggestions. Exercise
programs vary depending on age and physical condition.
ADVANTAGES OF EXERCISE
Regular exercise below a certain level for 15/20 minutes becomes aerobic. Aerobic exercise is
basically exercise that uses oxygen. Normally, this is a continuous exercise without pauses. In
addition to sugars and fats, the body also needs oxygen. Regular exercise improves the body’s
ability to supply oxygen to all of the muscles and at the same time improve lung function, the
heart’s pumping capacity and better blood circulation. In short, the energy produced during
exercise burns kilocalories (known as calories).
EXERCISE & WEIGHT CONTROL
The food we eat is transformed into, among other things, energy (calories) for our body. If we
take in more calories than we burn then the result is an increase in weight and vice versa, if we
burn more calories than we eat, we lose weight. When resting the body burns around 70
calories per hour to keep our vital functions active. The table shows approximate energy use
for an average person doing various activities.
Table II
ACTIVITY CALORIES USED PER HOUR
Walking, moderate pace 140
Housework 150
Swimming (400 m/h) 300
Dancing 350
Walking, brisk (6 km/h) 370
Tennis 420
Cycling (30 km/h) 500
Squash 690
EXERCISE PROGRAM
Regardless of whether your goal is to become more fit, control your weight or for
physiotherapy, always remember that your exercise should be gradual, planned, varied and
not too demanding. We recommend that you should exercise 3 to 5 times per week.
Before beginning a session it is important to do a warm-up for 2-3 minutes at low speed. This
will help protect your muscles and prepare your cardio respiratory system.
The next stage will last 15-20 minutes at a pulse rate of between 65 to 75%, or between 75 to
85% for those already accustomed to exercise. At a later stage, once we have become more
fit, we can divide this time between both levels but always remembering that the pulse rate
must not exceed 85% (aerobic area) and never reach the maximum heart rate limit that
corresponds to our age.
SK6900 & SK6900TV
BH Fitness • 20155 Ellipse • Foothill Ranch • CA • 92610
www.bhfitness.com • Phone 949-206-8152 • Fax 949-206-0013
13

FITNESS AND EXERCISE
When you have finished, it is important to relax the muscles. This can be done by walking at a
low speed for 2-3 minutes until the heart rate drops below the 65% line. This will prevent
muscle pain, especially after an intense session. It is also advisable to finish the program with
some relaxation exercises on the floor.
FINAL NOTE
We hope that you enjoy your unit. You will soon notice the benefits of your controlled exercise
program, you will feel better, have more energy and suffer less stress. You will see for yourself
that it is worth staying in shape with BH Fitness.
SK6900 & SK6900TV
BH Fitness • 20155 Ellipse • Foothill Ranch • CA • 92610
www.bhfitness.com • Phone 949-206-8152 • Fax 949-206-0013
14

PROBLEM CHECKS SOLUTIONS
1. The console does
not switch on.
2. The console switches on
but the AC motor fails to
start.
3. Walking motion is jerky
on the treadmill.
4. The machine stops (the
breaker trips).
5. Electrical shocks through
the handrail.
6. The treadmill belt skews
off center.
TROUBLESHOOTING
Table III
1a) Make sure that the
machine is plugged in and the
ON/OFF switch is in
position I.
1b) Verify that the console
electric supply cable is
connected.
2a) Check if the circuit
breaker is pressed in.
2b) Check if the AC motor is
working.
3a) Check if the belt is
lubricated.
3b) Check the tension on the
running belt.
3c) Check the tension on the
AC motor drive belt drive belt.
4) Check that the belt is
lubricated.
5) Check that the machine is
plugged into a grounded wall
outlet.
6a) Check if the machine is
level on the floor.
6b) Check if the machine
wobbles.
6c) Check alignment of the
front and rear rollers.
1a) Plug the machine into the
power supply. Set the switch
to position I.
1b) Connect the console
electric supply cable.
2a) Switch the machine off
and press the circuit breaker
in. Lubricate the treadmill belt.
2b) Replace the AC motor.
3a) Lubricate the sliding belt.
3b) Adjust the belt tension.
3c) Adjust the drive belt
tension.
4) Review SAFETY
BREAKER on page 4 and
reset the circuit button.
Then review LUBRICATION
on page 10 and lubricate the
treadmill belt.
5) Plug the machine into a
grounded wall outlet.
6a, 6b) Use the adjustable
feet to level the machine.
6c) Align the front and rear
rollers.
SK6900 & SK6900TV
BH Fitness • 20155 Ellipse • Foothill Ranch • CA • 92610
www.bhfitness.com • Phone 949-206-8152 • Fax 949-206-0013
15
SK6900TV COMPUTER CONSOLE
GENERAL INSTRUCTIONS
The computer console is designed to be easy and intuitive to use. The messages that appear
on Screen 1 of the console will guide the user throughout the whole exercise. Operation of the
Electronic Monitor is explained here.
CONNECTING THE MACHINE
First plug the power cord for the machine into a 110-120 V grounded wall outlet, as shown in
Figure 1.
Next set the main On/Off switch (b) at the bottom front of the machine to position I, Figure (2).
Figure 1 Figure 2
GROUNDING
PIN
GROUNDED
OUTLET
SK6900 & SK6900TV
BH Fitness • 20155 Ellipse • Foothill Ranch • CA • 92610
www.bhfitness.com • Phone 949-206-8152 • Fax 949-206-0013
16
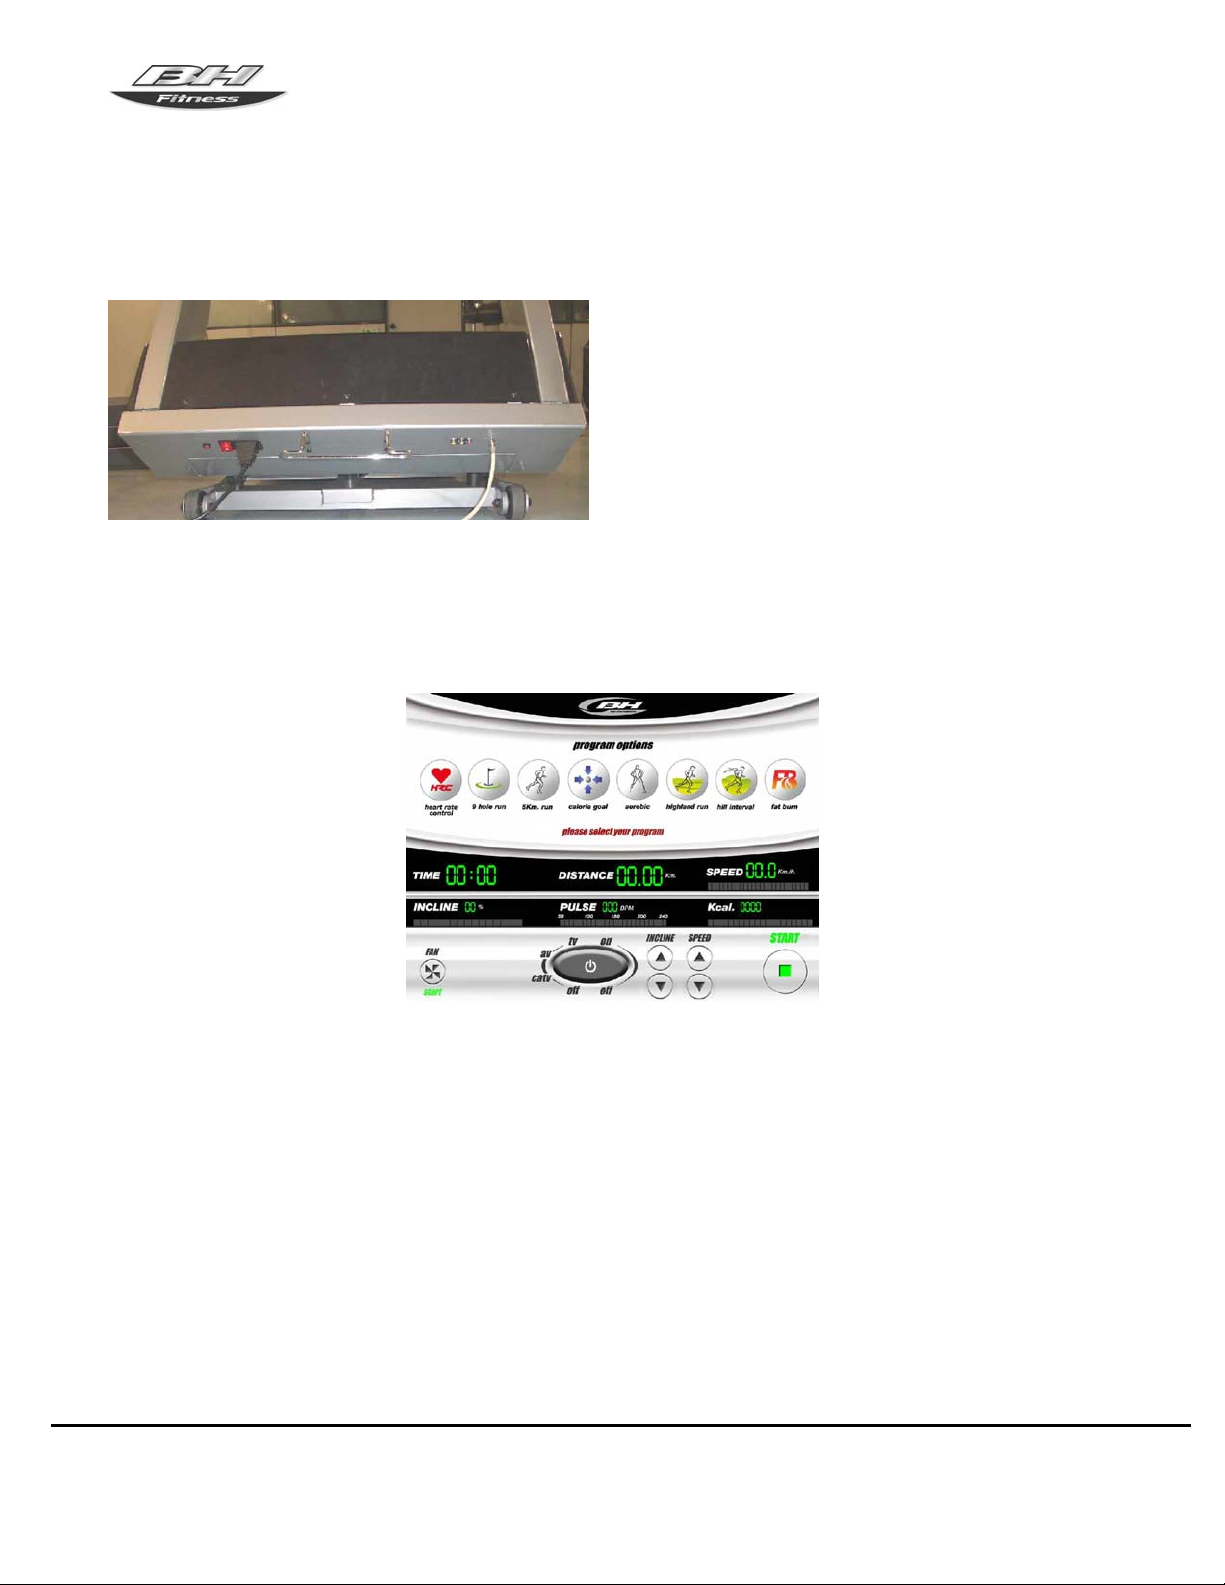
SK6900TV COMPUTER CONSOLE
Plug the television cable into the TV image input socket on the bottom right of the machine,
Figure3.
Figure 3
Once you have finished connecting the machine, the program options screen will appear on
the console, see Screen 1. The machine is now in the READY position, in manual program
mode. This console screen is touch sensitive, so to press a key just place your finger on the
key displayed on the screen.
Screen 1
SK6900 & SK6900TV
BH Fitness • 20155 Ellipse • Foothill Ranch • CA • 92610
www.bhfitness.com • Phone 949-206-8152 • Fax 949-206-0013
17
 Loading...