

BH FITNESS H-283 User Manual
H-283
UNIDAD ELECTRONICA
ELECTRONIC MONITOR
UNITÉ ÉLECTRONIQUE
ELEKTRONIKEINHEIT
UNIDADE ELECTRÓNICA
IMPIANTO ELETTRONICO
ELEKTRONISCHER MONITOR


Español
COLOCACION PILAS.-
Este monitor utiliza dos PILAS
ALCALINAS de 1,5 voltios.
Para colocar las pilas, suelte la tapa
trasera del monitor, Fig.1, e inserte
con precaución pilas alcalinas del tipo
«R-6» en el compartimento de las
pilas (A) orientando correctamente la
polaridad de las pilas (haciendo
coincidir el polo «+» de las pilas con la
señal «+» del compartimento de las
pilas y el polo «-» con la señal «-»).
Cierre la tapa, como muestra la Fig.1.
Si después de conectar el monitor
electrónico, se produjeran indicaciones erróneas o sólo aparecen los
segmentos parcialmente, extraiga las
pilas y espere unos 15 segundos
antes de volver a instalarlas.
Las baterías débiles (descargadas)
generan cifra débiles (sin contraste) e
indicaciones erróneas. Cámbielas
inmediatamente.
El monitor se apagara automáticamente cuando la unidad este 3
minutos parada .
Importante: Deposite los componentes electrónicos en contenedores
especiales, Fig.2.
COLOCACION MONITOR
ELECTRONICO.-
Suelte los tornillos de la parte trasera
del monitor, conexione los terminales
del reenvío (21) con los del monitor
(32) Fig.3, seguido introduzca el
monitor de arriba hacia abajo
deslizándolo por la
chapa del tubo
remo (4), teniendo cuidado de no pillar
los cables, coloque los tornillos y
apriete, conexione el terminal del
hand-grip (24) en la parte trasera del
monitor Fig.4.
MONITOR ELECTRONICO.-
Para hacer más cómodo y simple el
control de su ejercicio este electrónico
muestra simultáneamente la
Velocidad, la distancia, el tiempo de
ejercicio, las calorías consumidas y el
pulso.
La pantalla se encenderá automáticamente al comenzar el ejercicio o
pulsando cualquier tecla.
El monitor se apagará automáticamente cuando la unidad esté 3
minutos parada.
A.FUNCIÓN SCAN.-
En el modo SCAN, el ordenador
revisa y visualiza continuamente
durante sus ejercicios todas las
funciones. La función visualizada se
indica por medio de parpadeos.
Para seleccionar la función SCAN:
1. Al comenzar el ejercicio o pulsando
cualquier tecla se enciende el monitor
en la función SCAN, que cada 8
segundos se visualizará en la pantalla
principal el TIEMPO, VELOCIDAD,
DISTANCIA, CALORÍAS, PULSO y en
la parte inferior del monitor también se
visualizará el valor en forma de
parpadeo.
2. Pulse la tecla MODE y se eliminara
la función SCAN.
3

B.FUNCIÓN TIEMPO.-
La función cuenta o descuenta en
incrementos de un segundo hasta un
máximo de 99:00 segundos. Pulsando
durante mas de dos segundos la tecla
DOWN todos los valores pasan a cero
a excepción de la información
personal.
1. Pulse cualquier tecla, para poner en
marcha el monitor.
2. Pulsando la tecla MODE
parpadeara la ventana pequeña de
TIME.
3. Pulsando las teclas UP ó DOWN
seleccione el tiempo.
4. Comience el ejercicio y empezara a
disminuir el tiempo, una vez haya
llegado a cero emitirá unos pitidos
durante 3 segundos, advirtiéndole que
ha llegado al tiempo seleccionado,
comenzando a contar el tiempo hacia
arriba.
C.FUNCIÓN DISTANCIA.-
La función cuenta o descuenta en
incrementos de 0,1 Km/ml hasta un
máximo de 999 Km/ml. Pulsando
durante mas de dos segundos la tecla
DOWN todos los valores pasan a cero
a excepción de la información
personal.
1. Pulse cualquier tecla, para poner en
marcha el monitor.
2. Pulsando la tecla MODE
parpadeara la ventana pequeña de
DIST (DISTANCIA).
3. Pulsando las teclas UP ó DOWN
seleccione la distancia.
4. Comience el ejercicio y empezará a
disminuir la distancia, una vez haya
llegado a cero emitirá unos pitidos
durante 3 segundos, advirtiéndole que
ha llegado al valor seleccionado,
comenzando a contar la distancia
hacia arriba.
D.FUNCIÓN CALORÍAS.-
La función cuenta y descuenta de una
en una caloría, hasta un máximo de
999 calorías. Pulsando durante más
de dos segundos la tecla DOWN
todos los valores pasan a cero a
excepción de la información personal.
1. Pulse cualquier tecla, para poner en
marcha el monitor.
2. Pulsando la tecla MODE
parpadeara la ventana pequeña de
CAL (CALORIAS).
3. Pulsando las teclas UP ó DOWN
seleccione las calorías.
4. Comience el ejercicio y empezará a
disminuir las calorías, una vez haya
llegado a cero emitirá unos pitidos
durante 3 segundos, advirtiéndole que
ha llegado al valor seleccionado,
comenzando a contar las calorías
hacia arriba.
Cuando termine las calorías
programadas, el monitor emite una
señal acústica de 3 segundos, y
empieza automáticamente a aumentar
las calorías.
E.FUNCIÓN PULSO.-
La función pulso le muestra las P.P.M
(pulsaciones por minuto). Para ello
coloque las manos Fig.5 sobre los
sensores del manillar (R) y al cabo de
unos segundos le mostrara su ritmo
cardíaco.
No es un aparato médico por lo cual el
valor es orientativo.
4

Para seleccionar el THR (ritmo
cardíaco objetivo ) siga los siguientes
pasos:
1. Pulse cualquier tecla, para poner en
marcha el monitor.
2. Pulsando la tecla MODE
parpadeara la ventana pequeña de
pulso y le saldrá THR.
3. Pulsando las teclas UP ó DOWN
seleccione el valor del pulso que
usted quiere hacer el ejercicio entre
40 y 199 (PPM), valor inicial
programado en el monitor 150 PPM.
4. Comience el ejercicio y visualizará
en la pantalla PULSE, su ritmo
cardíaco, una vez haya llegado al
valor seleccionado emitirá unos
pitidos, advirtiéndole que ha
alcanzado el valor seleccionado.
NOTA:
Si no visualiza ninguna señal de
pulsaciones después de 15 segundos
en la pantalla le mostrara «E 3»,
asegúrese de tener colocadas ambas
manos sobre los sensores (R) del
manillar, Fig.6. Si no hay ninguna
señal después de transcurridos 5
segundos, la pantalla principal volverá
a su función anterior.
INSTRUCCIONES - USO DEL
HAND-GRIP (PULSO).-
El pulso de este modelo se mide
colocando ambas manos en los
sensores (R), que están puestos en el
manillar como se indica en la Fig.6.
Una vez colocadas ambas manos en
los sensores, comenzará a parpadear
el corazón en la parte derecha de la
pantalla que indica PULSE de la
5
pantalla del monitor y al cabo de unos
segundos aproximadamente
aparecerá el valor de su ritmo
cardíaco.
Si no tiene colocadas ambas manos
correctamente como muestra Fig.6, el
pulso no funciona.
Si en pantalla aparece un «0» o no
parpadea el corazón, asegúrese de
que tiene colocadas ambas manos en
los sensores y de que los conector
(32) estén conectados en la parte de
atrás del electrónico.
F.MEDICION DEL TEST:
ESTADO DE FORMA.-
Este electrónico está equipado con la
función de pulso de recuperación.
Esto tiene la ventaja de que usted
puede medir el pulso de recuperación
después de terminado el ejercicio.
Después de terminar su ejercicio y sin
quitar las manos de los sensores de
pulso, presione el botón de «Recovery
Test: Estado de Forma» y comenzará
la cuenta atrás de un minuto.
Solamente estarán encendidas las
líneas de las funciones de Tiempo y
de Pulso. El electrónico medirá su
pulso durante este minuto. El pulso de
recuperación irá apareciendo en la
línea del pulso.
Cuando termine este minuto, el
electrónico calcula y valoriza la
diferencia y la nota de su estado de
forma aparecerá en la pantalla: «F1,
F2,..., F5, F6»; siendo «F1» el mejor
(estado de forma: «Excelente») y
«F6» el peor (estado de forma: «Muy
Deficiente»).
Presionando el botón de RECOVERY,
volverá a la pantalla principal donde
las funciones estarán en modo de que
ha comenzado el TEST.

La comparación entre el pulso de
esfuerzo y el pulso de recuperación es
una posibilidad sencilla y rápida de
controlar su estado de forma. La nota
de su estado de forma es un valor
orientativo para su capacidad de
recuperación después de esfuerzos
físicos. Si usted efectúa un
entrenamiento regular, usted
comprobará que su nota mejora.
El test no funciona si los sensores no
están conexionados adecuadamente
o si en la pantalla aparece la letra
«E1».
El TEST no funciona si no tiene
colocadas ambas manos sobre las
sensores (R) (hand-grip) y usted ha
parado de hacer el ejercicio.
Si en la pantalla le aparece el
mensaje «E1» significa que no tiene
correctamente colocadas las manos
sobre las sensores (R) (hand-grip).
Si en la pantalla le aparece el
mensaje «E2» significa que no ha
detenido el ejercicio.
G.FUNCION BODY-FAT.-
Este monitor dispone de una memoria
para grabar el SEXO (Hombre 1 –
Mujer 0 ); ALTURA (100 – 200 cm);
PESO (30 – 200 Kg); EDAD (10 –
100).
1. Pulse cualquier tecla, para poner en
marcha el monitor.
2. Pulsando la tecla BODY-FAT
parpadeará la silueta hombre,
pulsando las teclas UP–DOWN
seleccione Hombre ó Mujer.
3. Pulse la tecla BODY-FAT y le
aparecerá en pantalla la altura, (100 –
200 cm), con las teclas UP-DOWN
seleccione su altura.
4. Pulse la tecla BODY-FAT y le
aparecerá el peso, (30–200 Kg), con
6
las teclas UP-DOWN seleccione su
peso.
5. Pulse la tecla BODY-FAT y le
aparecerá la edad, (10–100), con las
teclas UP-DOWN seleccione su edad.
6. Colocando ambas manos sobre los
sensores de pulso del manillar (R)
aparecerá en la pantalla unos
caracteres (
) de tiempo
de medición de grasa BMR (Ritmo
Basal Metabólico valores entre (1–
9999), BMI: (Indice de masa corporal
valores entre (1,0–99,9), FAT % (% de
grasa corporal valores entre (5–50%)
se mostrara este valor el la pantalla
del monitor y los anteriores valores se
mostrarán en las pantallas inferiores
del monitor.
NOTA:
Si aparece el mensaje «E3» en la
pantalla, significa que no ha colocado
correctamente las manos sobre los
sensores (R), situados en el manillar.
Para medir el estado de GRASA
CORPORAL, consulte la tabla
siguiente
TABLA DE REF.
PORCENTAJE GRASA
CORPORAL % (BODY FAT).-
SEXO /
GRASA%
HOMBRE <
MUJER <23% 23%-
BAJO BAJO /
MEDIO
13%-
13%
25,8%
35,8%
MEDIO ALTO
26%-
30%
36%40%
>30%
>40%

D. TIPOS DE CUERPO:
Hay 9 tipos de cuero divididos según
el porcentaje de grasa calculado.
TIPO 1 Varón muy deportista
TIPO 2 Varón deportista ideal
TIPO 3 Muy esbelto
TIPO 4 Deportista
TIPO 5 Salud ideal
TIPO 6 Esbelto
TIPO 7 Demasiado obeso
TIPO 8 Obeso
TIPO 9 Ultra obeso
GUIA DE PROBLEMAS.-
Problema: Se enciende el display y
sólo funciona la función de Tiempo
Solución:
a.- Compruebe si el cable de conexión
está conectado.
Problema: El display no se enciende
o la visualización de los segmentos
del display es muy débil
Solución:
a.- Compruebe que las pilas estén
colocadas correctamente
b.- Compruebe la carga de las
baterías
c.- Si están bajas, cambie las pilas
inmediatamente.
Problema: Si algún segmento de
alguna función no se enciende o si se
producen indicaciones erróneas en
alguna función.
Solución:
a.- Desconecte las pilas durante 15
segundos y vuelva a instalarlas
correctamente.
b.- Compruebe la carga de las pilas.
Si están bajas, cambie las pilas.
c.- Si los pasos anteriores no le
ayudan, reemplace el monitor
electrónico
Evite que le dé a su monitor
electrónico la luz directa del sol, pues
se puede estropear la pantalla del
cristal líquido. No lo exponga tampoco
al agua ni a golpes.
BH SE RESERVA EL DERECHO A
MODIFICAR LAS ESPECIFICACIONES DE SUS PRODUCTOS SIN
PREVIO AVISO.
7

English
FITTING THE BATTERIES.-
This monitor uses two 1.5 volt
ALKALINE BATTERIES. To fit the
batteries, remove the rear cover on
the monitor, Fig.1, and carefully insert
the two “R-6” type batteries into the
battery compartment (A) making sure
that the battery’s polarity is correct
(matching the battery’s «+» terminal
with the «+» sign inside the battery
compartment, and the «-» terminal
with the «-» sign). Close the cover, as
shown in Fig.1.
If, after having switched the monitor
on, it displays errors or merely partial
segments then remove the batteries
and wait for about 15 seconds before
reinstalling them.
Weak batteries (run down) produce a
weak digital display (poor contrast)
and erroneous readings. Change them
immediately.
The monitor will switch itself off
automatically if the unit remains
motionless for 3 minutes.
Important: Deposit electronic
components in special containers, Fig.2.
FITTING THE ELECTRONIC
MONITOR.-
Remove the screws from the base of
the monitor, connect the terminals for
the feedback cable (21) to those on
the monitor (32), Fig.3, then slide the
front of the monitor down onto the
plate on the main post (4), making
sure not to snag any of the wires, fit
the screws and tighten, plug the
terminal for the handgrip (24) into the
rear of the monitor, Fig.4.
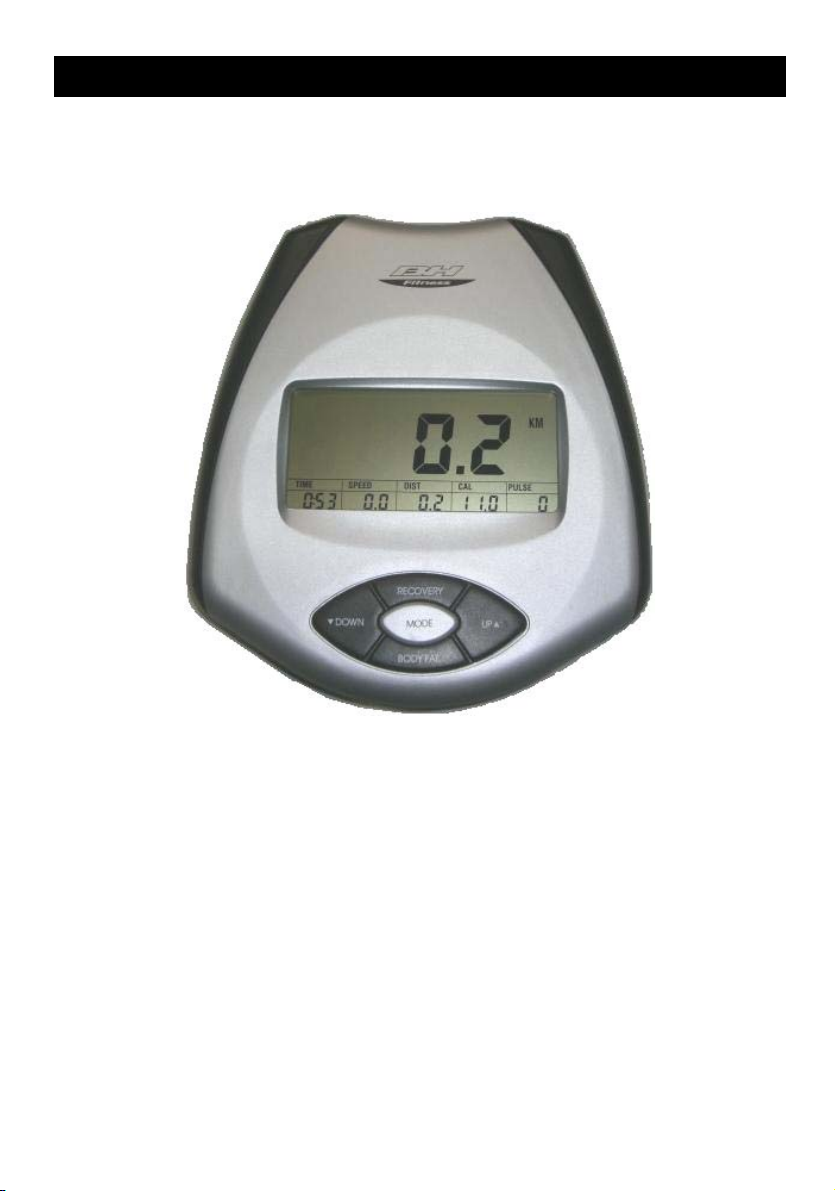
ELECTRONIC MONITOR.-
To give you greater control over the
exercise, this electronic unit provides
simultaneous read-outs of speed,
distance, exercise time, calories burnt
and pulse rate.
The screen will switch itself on
automatically as soon as you start
exercising or by pressing any key.
The monitor will switch itself off
automatically if the unit stands idle for
more than 3 minutes.
A.SCAN FUNCTION.-
In SCAN mode the computer
continuously scans and displays all of
the functions during exercise. The
function being displayed will flash on
and off.
To select the SCAN function:
1. The monitor starts in SCAN mode
as soon as exercise begins or if any
key is pressed, the main screen will
display TIME, SPEED, DISTANCE,
CALORIES, PULSE RATE values
every 8 seconds, this value will also
be displayed flashing on the lower
section of the monitor.
2. Press the MODE key and this will
cancel the SCAN function.
B.TIME FUNCTION.-
This function counts up or down in
steps of one second, up to a
maximum of 99:00 seconds. Pressing
the DOWN key for more than two
seconds will reset all of the values,
except those relating to personal
information.
1. Press any key to switch the monitor
on.
8

2. Press the MODE key to start the
small TIME window flashing.
3. Press the UP or DOWN keys to
select the time.
4. Begin the exercise and the time
value will begin the countdown, when
it reaches zero it will beep for 3
seconds, advising you that the
selected time has elapsed, the time
value will then start counting upward.
C.DISTANCE FUNCTION.-
This function counts up or down in
steps of 0.01 km/ml, up to a maximum
of 99.99 km/ml. Pressing the DOWN
key for more than two seconds will
reset all of the values, except those
relating to personal information.
1.Press any key to switch the monitor
on.
2. Press the MODE key to start the
small DIST (DISTANCE) window
flashing.
3. Press the UP or DOWN keys to
select the distance.
4. Begin the exercise and the distance
value will begin the countdown, when
it reaches zero it will beep for 3
seconds, advising you that the
selected distance has been covered,
the distance value will then start
counting upward.
D.CALORIE FUNCTION.-
This function counts up or down in
steps of one calorie, up to a maximum
of 999 calories. Pressing the DOWN
key for more than two seconds will
reset all of the values, except those
relating to personal information.
1. Press any key to switch the monitor
on.
2. Press the MODE key to start the
small CAL (CALORIE) window
flashing.
3. Press the UP or DOWN keys to
select the calories.
4. Begin the exercise and the calorie
value will begin the countdown, when
it reaches zero it will beep for 3
seconds, advising you that the
selected calorie value has been
reached , the calorie value will then
start counting upward.
When the programmed calories have
finished, the monitor will beep for 3
seconds and begin to tally the new
calories burnt automatically.
E.PULSE FUNCTION.-
The pulse function shows you heart
beats per minute (BPM). To use this
function place your hands on the
handlebar sensors (R), Fig.5, and your
heart rate will be displayed after a few
seconds. This is not a medical
appliance and therefore these values
are for guideline purposes only.
To select the THR (Target Heart Rate)
carry out the following steps:
1. Press any key to switch the monitor
on.
2. Press the MODE key to start the
small pulse window flashing and THR
will appear.
3. Press the UP or DOWN keys to set
the pulse rate value that you wish to
use during the exercise, between 40
and 199 (BPM), the monitor’s default
value is 150 BPM.
4. Begin exercising and your heart
rate will be displayed in the PULSE
window, when you reach the selected
value the monitor will beep to advise
you that you have reached the set
pulse rate.
NOTE:
If, after 15 seconds, the sensor does
not detect a signal then the error code
9

“E 3” will appear on the screen, make
sure that both your hands are placed
on the handlebar sensors (R), Fig. 6. If
no signal is received after a further 5
seconds then the screen will revert to
the previously displayed function.
HAND-GRIP (PULSE)
INSTRUCTIONS/USE.-
On this model the pulse rate is
measured by placing both hands on
the sensors (R), located on the
handlebar, as shown in Fig.6.
When both hands are placed on the
sensors the heart symbol on the righthand side of the screen, marked
PULSE, will begin to flash and after a
few seconds a heart rate reading will
be displayed.
If both hands are not placed correctly
as shown in Fig.6 then the pulse
function will not work.
If a “0” appears on the screen or the
heart symbol does not flash then
make sure that both hands are placed
on the sensors and that the
connectors (32) are connected at the
back of the electronic unit.
F.TEST MEASUREMENTS:
FITNESS.-
This electronic device is equipped with
a recovery test function. This offers
you the advantage of being able to
measure how long it takes your heart
rate to recover after having finished
the exercise. After finishing the
exercise leave your hands on the
pulse sensors (R) and press the
“RECOVERY Fitness Test” button and
this will start a one minute countdown.
Only the Time and Pulse rate function
read-outs will remain displayed. The
electronic device will measure your
pulse rate during this minute. The
heart rate recovery time will be
displayed on the Heart rate line.
When the minute is up, the elec tronic
device will work out the difference and
your fitness rating will be displayed up
on the screen: “F1, F2,..., F5, F16;
where F1 is the best (fitness
“Excellent”) and F6 the worst (fitness
“Very Poor”).
Pressing the RECOVERY button will
take you back to the main screen,
where the functions will be in the
same mode as when the TEST began.
The comparison between the worked
heart rate and the recovery heart rate
provides a fast, simple method of
gauging how fit you are. Your fitness
rating is a guideline that shows you
how fast your heart recovers after
physical exertion. If you exercise
regularly then you will see your fitness
rating improve.
The test will not work if the sensor is
not positioned correctly or if the error
code “E1” appears on the screen.
The TEST will not work if you do not
have both hands placed on the handgrip sensors (R) after you have
stopped doing the exercise.
If the error code “E1” is shown on the
screen then this means that you do
not have your hands positioned
correctly on the hand-grip sensors (R).
If the error code “E2” appears on the
screen, this means that you have not
stopped exercising.
G.BODY-FAT FUNCTION.-
This monitor has a memory to record
SEX (Male 1 – Female 0); HEIGHT
(100 – 200 cm); WEIGHT (30 – 200
kg); AGE (10 – 100).
1. Press any key to switch the monitor
on.
10

2. Press the BODY FAT key and the
male Fig. will start flashing, use the
UP or DOWN keys to select Male or
Female.
3. Press the BODY FAT key and the
height screen will appear, (100 – 200
cm), use the UP – DOWN keys to
select your height.
4. Press the BODY FAT key and the
weight screen will appear, (30 – 200
kg), use the UP – DOWN keys to
select your weight.
5. Press the BODY FAT key and the
age screen will appear, (10 – 100),
use the UP – DOWN keys to select
your age.
6. Place both hands on the hand-grip
sensors (R) and certain characters
(
) will appear on the
screen displaying your BMR (Basal
Metabolic Rate, values between 1 –
9999), BMI (Body Mass Index, values
between 1.0 – 99.9), FAT% ( Body fat
%, values between 5 – 50%), this last
value will be shown on the main
screen and the previous values on the
bottom screens.
NOTE:
If the error code “E3” is shown on the
screen then this means that you do
not have your hands positioned
correctly on the hand-grip sensors (R).
Personal data is not stored and will be
lost when the monitor is reset or
switched off.
Refer to the following table to gauge
your BODY FAT status:
REFERENCE TABLE: BODY
FAT PERCENTAGE %
SEX /
FAT%
MALE <
FEMALE <23% 23%-
LOW LOW /
AVERAGE
13%-
13%
25.8%
35.8%
AVERAGE HIGH
26%-30% >30%
36%-40% >40%
D. BODY TYPES:
There are 9 body types based on the
percentage of fat calculated.
TYPE 1 Extremely athletic
TYPE 2 Ideal sportsman
TYPE 3 Very slender
TYPE 4 Sportsman
TYPE 5 Ideal health
TYPE 6 Slender
TYPE 7 Very overweight
TYPE 8 Overweight
TYPE 9 Extremely obese
TROUBLESHOOTING GUIDE.-
Problem: The display comes on but
only the Time function works
Solution:
a.- Make sure that the connection
cable is connected.
Problem: The display does not come
on or the displayed segments are very
weak
Solution:
a.- Check that the batteries are fitted
correctly.
b.- Check the battery charge
c.- If they are run down change them
immediately
Problem: Display segments of a
function read-out are not visible or
error messages for a particular
function appear.
11

Solution:
a.- Remove the batteries for 15
seconds and then refit them correctly.
b.- Check the battery charge If they
are run down change the batteries
c.- If the above steps do not help then
replace the electronic monitor.
Avoid leaving the electronic monitor in
direct sunlight as this might damage
the liquid crystal display. Similarly, do
not expose it to water or knocks.
BH RESERVES THE RIGHT TO
MODIFY THE SPECIFICATIONS OF
ITS PRODUCTS WITHOUT PRIOR
NOTICE
12
 Loading...