

BH Fitness G6508N Service Manual
G6508N
Instrucciones de montaje y utilización
Instructions for assembly and use
Instructions de montage et utilisation
Montage- und Gebrauchsanleitung
Instruções de montagem e utilização
Istruzioni di montaggio e uso
Montage-en gebruiksinstrukties

Fig.0
Fig.1

Fig.2
Fig.3

Fig.4
Fig.5
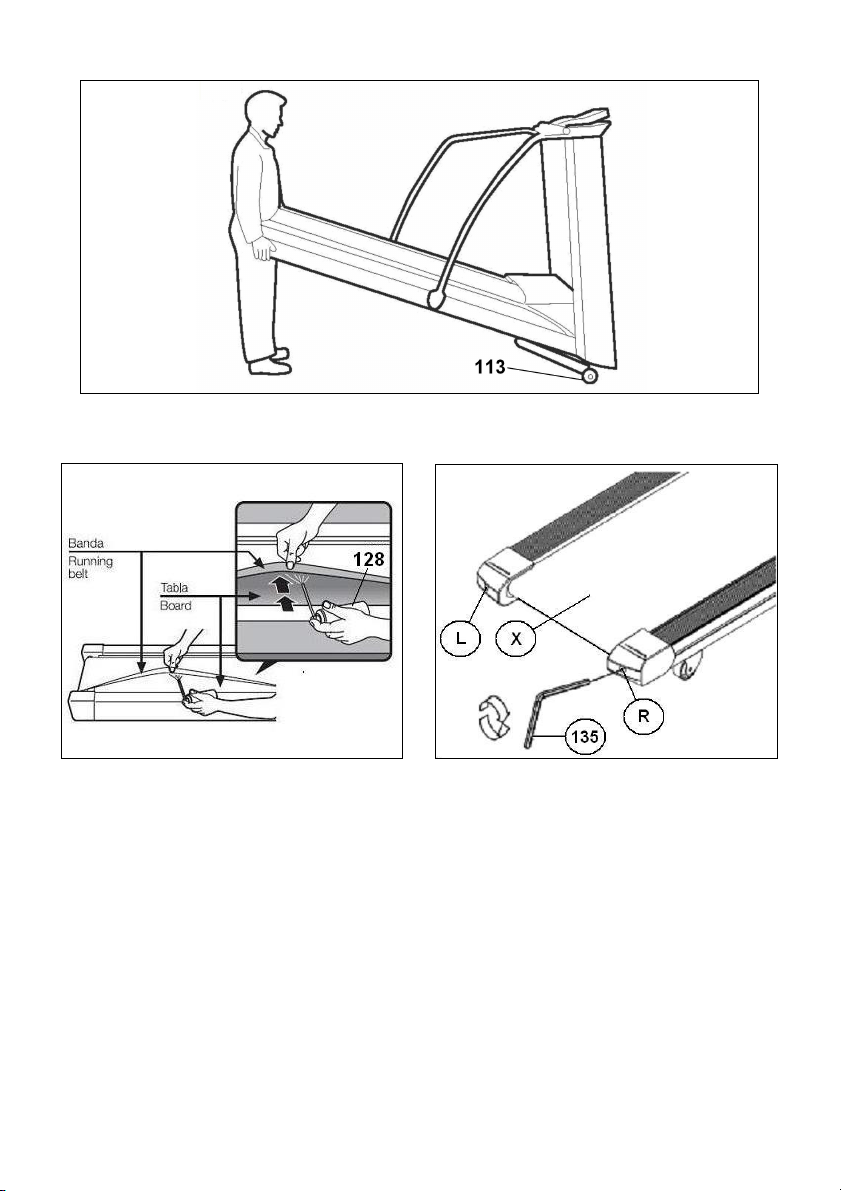
Fig.6
Fig.7 Fig.8

Español
INDICACIONES GENERALES.-
Lea atentamente las instrucciones de
este manual. Este le da indicaciones
importantes sobre la seguridad, el uso y
el mantenimiento de la cinta de andar.
Siga las siguientes recomendaciones:
1 Esta unidad esta diseñada para uso
doméstico únicamente.
2 La cinta de andar sólo puede ser
usada por una persona al mismo
tiempo. Deberá ser usada solamente
por personas cuyo peso sea 150kg. o
menos.
3 Coloque su unidad en una superficie
plana, con al menos 2 metros de
espacio en la parte posterior y 1 metro
alrededor. No coloque su unidad
cerca de una superficie que pueda
bloquear cualquier apertura de aire.
Para proteger el piso o la alfombra de
algún daño, coloque un tapete debajo
de su unidad.
4 Su unidad dispone de una llave de
seguridad. Ésta deberá estar
introducida en su alojamiento. En
caso contrario, la máquina no se
pondrá en marcha. Cuando haga uso
de la máquina, fije la cuerda a la ropa
mediante el clip.
Quite la llave de seguridad si esta no
va a ser usada y guárdela fuera del
alcance de los niños y de terceras
personas.
5 Antes de utilizar la cinta de andar,
asegúrese de que funciona
correctamente. No utilice un aparato
que pueda estar dañado.
6 Es responsabilidad del propietario
asegurarse que todos los usuarios de
la máquina de andar estén adecuados
informados sobre todas las
precauciones necesarias.
7 Los padres y otras personas
responsables de los niños deber de tener
en cuenta la naturaleza curiosa de éstos
y que puede llevarles a situaciones y
conductas que pueden resultar
peligrosas. Por ésto, siempre deben
estar vigilados. Este aparato no ha de
utilizarse en ningún caso como juguete.
8 No permita que los niños o personas
discapacitadas utilicen el aparato sin
la estricta supervisión de una persona
cualificada.
9 En caso de emergencia, coloque los
pies en los rieles agarrándose en la
barandilla hasta que la unidad se
detenga.
10 Utilice la barandilla para subir y
bajar de la cinta de andar y para
cambiar de velocidad. No salte de la
cinta cuando esté en movimiento.
11 Mantenga las manos alejadas de
cualquiera de las partes móviles. No
coloque las manos, pies o cualquier
otro objeto bajo la cinta de andar.
12 No se pare sobre la cinta cuando
esté funcionando.
13 Utilice prendas de vestir y calzado
adecuados. Átese los cordones
correctamente. Para evitar lesiones y un
desgaste innecesario de la banda,
asegúrese de que el calzado no tenga
suciedad.
14 Nunca utilice la máquina al aire libre.
15 No es aconsejable mantener su
unidad permanente en un lugar
húmedo debido a que la oxidación
sería inevitable.
16 Tenga cuidado de no lubricar en
exceso ya que se puede manchar el
suelo o las alfombras donde la unidad
esté colocada.
17 No use accesorios no
recomendados por el fabricante.
6
INSTRUCCIONES DE SEGURIDAD.-
Este producto debe conectarse a tierra.
Si no funciona correctamente o se ha
averiado, la conexión a tierra
proporciona una recorrido de menor
resistencia para la corriente eléctrica y
reducir el riesgo de descargas
eléctricas. Este producto está equipado
con un cable que tiene un conductor de
tierra y un enchufe con toma de tierra.
El enchufe debe conectarse en una
toma apropiada, correctamente
instalada y conectada a tierra, de
acuerdo con la normativa local.
¡PELIGRO!: Una conexión incorrecta
del conductor del equipo a tierra
puede dar como resultado el riesgo de
descargas eléctricas. En caso de
dudas, consulte a un electricista o
técnico especializado. No modifique el
enchufe que incluye el aparato; si no
encaja en la toma eléctrica, solicite a
un electricista la instalación de una
toma adecuada.
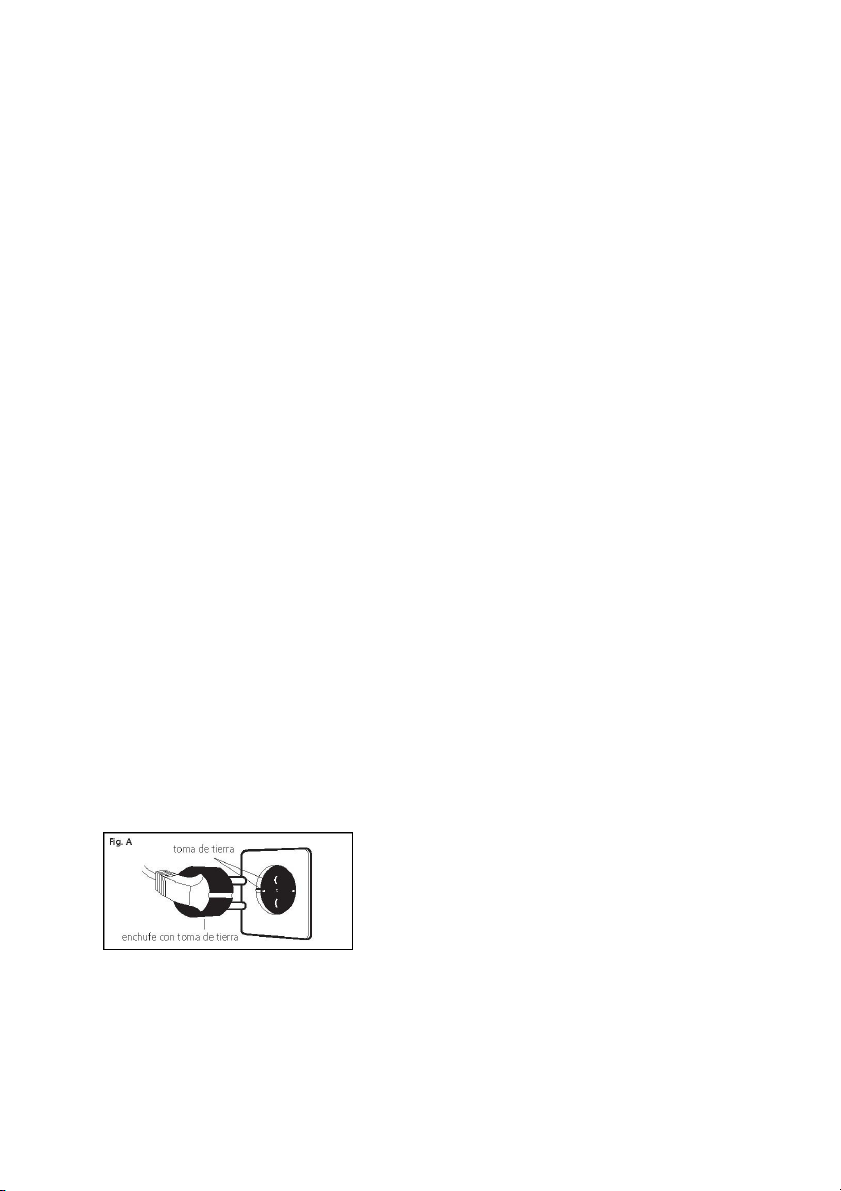
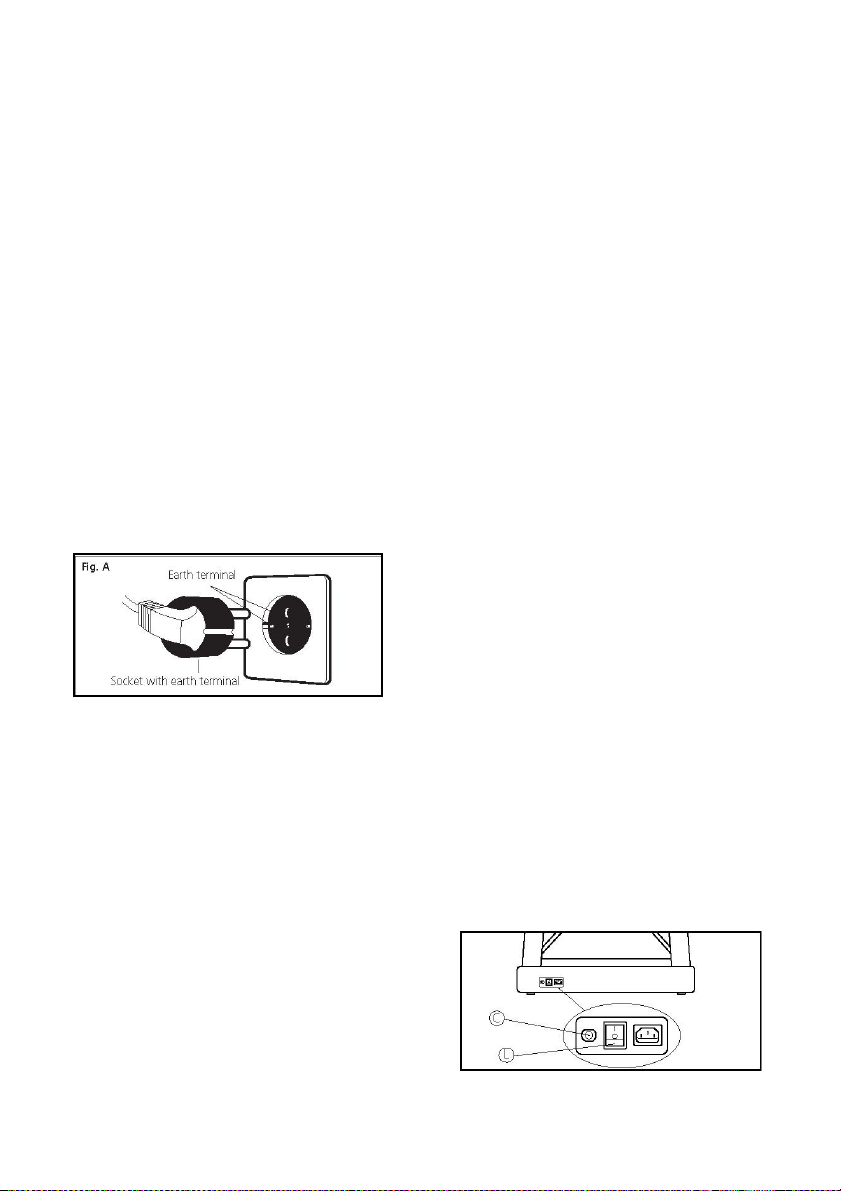
Este producto debe utilizarse en un
circuito de 220-240 voltios y tiene una
clavija de tierra similar a la que se
muestra en la figura A. Asegúrese de
que el aparato se conecta a una toma
con la misma configuración que el
enchufe. No utilice ningún adaptador
con este aparato.
Siempre que utilice un aparato
eléctrico, deberá seguir estas
recomendaciones:
1 Antes de enchufar la unidad
compruebe si el voltaje de su
instalación coincide con el de la
máquina. El voltaje de su instalación
debe ser el que marca en la etiqueta
de características y debe asegurarse
de que está conectada a una salida
con la misma configuración del
enchufe.
2 Para reducir el riesgo de sacudidas
eléctricas, ponga el interruptor en la
posición «0» y entonces desenchufe
de la red. Desenchufe siempre la
unidad inmediatamente después de
su utilización.
3 Asegúrese de que la cinta de andar
está desenchufada y desconectada
antes de comenzar cualquier
procedimiento de montaje,
mantenimiento y antes de proceder a
su limpieza.
4 No desenchufe la cinta de andar
tirando del cable.
5 No utilice la máquina con el cable
eléctrico dañado o desgastado.
6 Mantenga el cable eléctrico lejos de
superficies calientes.
PROTECCIÓN.-
Este modelo esta dotado de una
protección electrónica de parada
automática para una óptima
conservación de los circuitos tanto
electrónicos como eléctricos.
Esta protección se activará si la
unidad es sometida a un esfuerzo o
calentamiento anormal.
Si esto ocurriese:
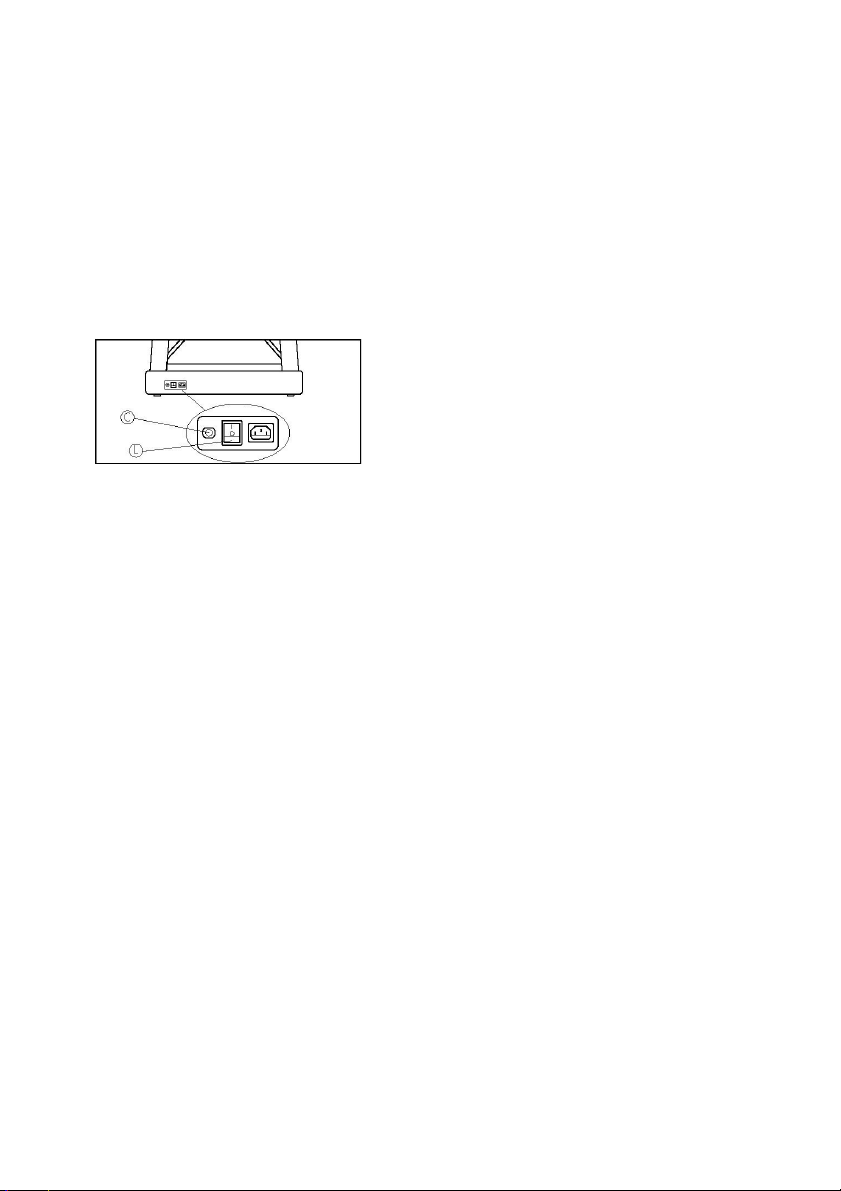
1.- Ponga el interruptor (L) situado en
la carcasa en la posición «0» (OFF).
2.- Presione el interruptor de circuito
(C) para resetear.
3.- A continuación ponga el citado
interruptor en la posición «I» (ON) y la
unidad se encontrará preparada de
nuevo para su uso.
7
En caso de que la protección se
activará repetidamente, las causas
probables son:
- condiciones de trabajo anormales,
- falta de lubricación de la banda,
- utilización de lubricantes con
disolventes (usar tipo BH),
- banda demasiado tensa.
Conecte la unidad a un enchufe
provisto de terminal TIERRA. Ponga
el interruptor (L) en posición [1] Fig. B.
Fig.B
INSTRUCCIONES DE MONTAJE.-
Saque la unidad de la caja y colóquela
en el suelo como muestra la Fig.0.
Se recomienda la ayuda de una
segunda persona para el montaje.
Compruebe que tiene todas las
piezas:
(1) Monitor.
(120) Estructura principal.
(5) Soporte monitor.
(50) Barandilla vertical (izquierda).
(51) Barandilla vertical (derecha).
(73) Cable de conexión a la red
eléctrica.
(74) Tapa sujeción cable de
acometida.
(146) Tapa inferior barandilla (Izq).
(147) Tapa inferior barandilla derecha.
(128) Bote de lubricante.
(3) Tuercas autoblo.M-8.
(17) Porta botellines.
(52) Tornillo c/ alomada allen
(55) Tornillo c/ alomada allen M-5x15.
(62) Arandela M8
(79) Tornillo rosca chapa 3,5x15.
(153) Botellin.
Llave de tubo combinada.
M-8x75.
Llave Allen 5mm.
(135) Llave Allen 6mm.
Siga cada uno de los pasos de las
instrucciones de este montaje.
1 Se necesita un mínimo de dos
personas para estos pasos.
Durante el montaje de las barandillas,
una persona sujetará la barandilla
mientras la otra aprieta los tornillos (52).
De este modo, se evitarán posibles
accidentes.
2 En primer lugar coja la barandilla
derecha (51), Fig.1.
Introduzca la punta del cable de control
(35), atándolo al cable de guía (N) que
esta introducido en la barandilla Fig.1 y
saque la punta por la parte superior de
la barandilla, como muestra la Fig.1,
seguido introduzca la barandilla en el
soporte inferior derecho de la estructura
(120), y atornille con los tornillos (52).
3 Seguido coja la barandilla (50) y la
introduzca por el soporte inferior
izquierdo de la estructura (120) y
atornille con los tornillos (52).
4 Posicione las tapas inferiores (146)
izquierda y (147) derecha en la
dirección de la flecha hacia la barandilla
correspondiente como muestra la Fig.2
y fíjelas con los tornillos (55), según se
muestra la Fig.2.
5. COLOCACIÓN DEL
PASAMANOS.-
Introduzca la punta del cable de control
(35), atándolo al cable de guía (R) que
esta introducido en el pasamanos Fig.2
y saque la punta por la parte superior
del pasamanos, como muestra la Fig.2,
y teniendo cuidado de no pillar los
cables introdúzcalo en los tubos
pasamanos en dirección de las flechas.
A continuación atornille las tuercas (3)
Fig.2.
8
6. COLOCACIÓN DEL MONITOR.-
Coja el monitor (1) conexione los
terminales (H); (K); (34) y (35) que
salen del manillar (5) Fig.3, en los
terminales (J); (141); (140) y (139) del
monitor (1), seguido coja los tornillos
(52) y (175), coloque las arandelas (62)
con los tornillos (175) y atornille el
monitor, teniendo cuidado de no pillar
los cables.
7. A continuación coloque los dos porta
botellines (17) en los laterales del
monitor Fig.4 en dirección de la flecha.
8. MONTAJE CABLE DE
ACOMETIDA ELÉCTRICA.-
Suelte los tornillos (79) situados en la
parte inferior de la estructura (120)
Fig.5. Conexione el extremo del cable
de conexión eléctrica (73) en el
enchufe (C) en la parte delantera
inferior de la estructura (120) Fig.5.
A continuación introduzca la tapa de
sujeción (74) en el cable de conexión
eléctrica (73) Fig.5 y atorníllela con los
tornillos (79) soltados anteriormente.
MOVIMIENTO Y ALMACENAJE.-
La unidad está equipada con ruedas
(113), Fig.6, lo que hace más sencillo
su movimiento. Asegúrese de que el
cable eléctrico está desenchufado de
la red eléctrica.
Para evitar peligros, NO mueva la
cinta sobre suelos que no sean lisos.
MANTENIMIENTO.-
Para un óptimo mantenimiento de su
unidad, y que la fricción entre la banda
y la tabla sea la mínima, lubrique la
parte interior, Fig.7, (debido a los
diferentes estilos de correr lubrique con
más atención la zona donde usted
apoya los pies al realizar el ejercicio)
con el bote de lubricante (128).
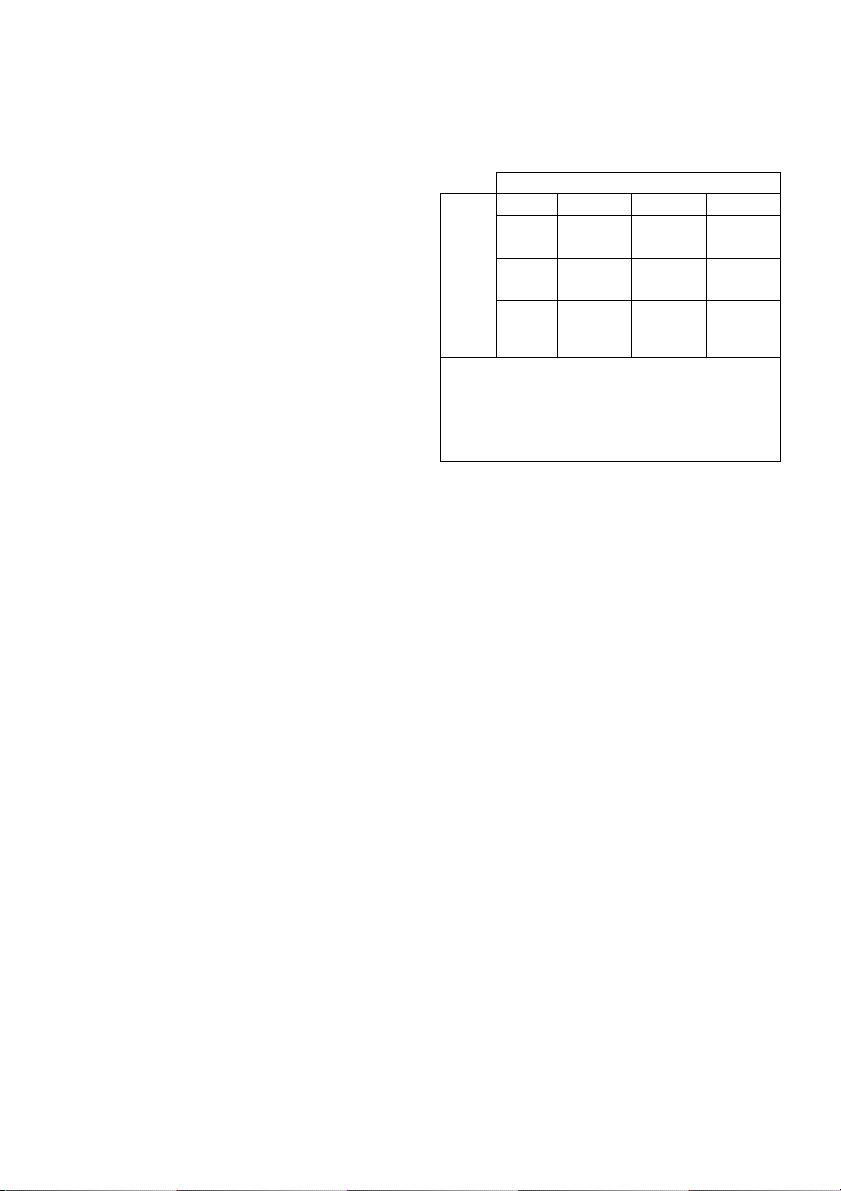
Se recomienda lubricar la base de la
cinta entre la tabla y la banda según la
frecuencia de uso.
Nº de horas semanales
<3 3-7 >7
<6 1 año 6
meses 3 meses
6-12 6
meses 3 meses 2 meses
>12 3
Velocidad (km/h)
Nota: Este programa de mantenimiento
preventivo está destinado,
exclusivamente, para uso doméstico.
Para usos comerciales se recomienda
el mantenimiento mensual de la unidad.
meses 2 meses
1 mes
Tras lubricar, si la banda resbala,
compruebe la tensión de la misma. Para
tensar la banda coja la llave de allen de
6mm. (135) y con la máquina a 4Km/h
gire los tornillos (R y L) una vuelta en
sentido de las agujas del reloj.
AJUSTE DE BANDA.-
Un mal asentamiento de la unidad en
los cuatro puntos de apoyo puede
producir un desplazamiento lateral de
la banda (X). Un riguroso control de
calidad regula y comprueba la banda
de deslizamiento. Sin embargo, debido
a las diferencias de peso y a los
individuales estilos de correr, puede
sufrir desplazamientos laterales.
Si la banda se desvía a la derecha o
la izquierda, pare la unidad.
DESPLAZAMIENTO DE LA BANDA
HACIA LA DERECHA.-
Esta acción es muy importante. Siga
estos pasos. Para proceder al ajuste
de la banda ponga la unidad a una
velocidad de 4Km/h.
9

En el caso de que la banda se haya
desplazado hacia la derecha, gire el
tornillo (R) del lado derecho de su
máquina 1/4 de vuelta en el sentido
de las agujas del reloj. Observe la
posición de la banda, si al cabo de un
minuto la banda no queda totalmente
centrada, repita la operación. Si
observa un desplazamiento excesivo
de la banda hacia la izquierda,
proceda a girar ligeramente el tornillo
derecho en el sentido contrario al de
las agujas del reloj. Fig.8.
Una vez ajustada la cinta de correr,
puede comenzar el ejercicio de nuevo.
DESPLAZAMIENTO DE LA BANDA
HACIA LA IZQUIERDA.-
Caso de que la banda se haya
desplazado hacia la izquierda, gire el
tornillo (L) del lado izquierdo de su
máquina 1/4 de vuelta en el sentido
de las agujas del reloj. Observe la
posición de la banda, si al cabo de un
minuto la banda no queda totalmente
centrada, repita la operación. Si
observa un desplazamiento excesivo
de la banda hacia la derecha, proceda
a girar ligeramente el tornillo izquierdo
en el sentido contrario al de las agujas
del reloj. Fig.8.
Importante: Una excesiva tensión de
la banda puede llevar a la pérdida de
velocidad de su máquina e incluso a
deformaciones de la banda. Por ello,
tenga en cuenta que produce el
mismo efecto sobre la posición de la
banda un giro en el sentido de las
agujas del reloj del tornillo derecho (R)
que un giro en el sentido contrario al
de las agujas del reloj en el tornillo
izquierdo (L). Con lo cual en el caso
de desplazamientos excesivos, puede
proceder alternativamente con uno u
otro tornillo para evitar tensiones
excesivas de la banda.
INSTRUCCIONES DE USO.-
CONDICIÓN FÍSICA.
Estar en forma física, significa vivir
plenamente. En la sociedad moderna
se sufre de una gran tensión. El tipo
de vida en las grandes ciudades es
básicamente sedentario. Nuestro
régimen se ha vuelto demasiado rico
en calorías y grasas. Los médicos son
unánimes en recomendar la práctica
regular de ejercicio para controlar
mejor nuestro peso, mejorar nuestro
peso, mejorar nuestra forma física y
relajarnos.
VENTAJAS DE LA PRÁCTICA
DE EJERCICIO.-
Un ejercicio regular por debajo de
cierto nivel y de una duración de
15/20 minutos, se vuelve aeróbico. El
ejercicio aeróbico es el ejercicio que
utiliza oxígeno fundamentalmente.
Normalmente se tratará de un
ejercicio continuo sin pausas. En
efecto, además de azúcar y grasa, el
cuerpo tiene necesidad de oxígeno.
La práctica regular de un ejercicio,
mejora la facultad del cuerpo para
suministrar oxígeno a todos sus
músculos, al mismo tiempo mejora la
función pulmonar, la capacidad de
bombeo del corazón y se facilita la
circulación sanguínea.
En resumen, la energía desarrollada
con la práctica de un ejercicio quema
kilocalorías (conocidas como calorías).
Nuestra alimentación se traduce entre
otros elementos, en energía (calorías)
para nuestro organismo.
10
Si consumimos más calorías que las
que quemamos, el resultado es un
aumento de peso y viceversa, si se
queman más calorías que las
consumidas se pierde peso. En
reposo nuestro cuerpo quema
alrededor de 70 calorías por hora para
mantener activas las funciones vitales.
CONTROL DEL RITMO
CARDIACO.-
El trabajo realizado por el organismo
viene reflejado en el ritmo cardiaco
(pulsaciones), que aumenta cuando la
intensidad de trabajo aumenta. En el
caso de la máquina de andar, el
esfuerzo depende de la velocidad y de
la inclinación. El aumento de la
velocidad conlleva un aumento de la
intensidad de trabajo y, por lo tanto,
un aumento del ritmo cardiaco. En el
supuesto de que la intensidad del
trabajo se mantenga constante, es
decir, tensión y ritmo de pedaleo
constantes, el ritmo cardiaco aumenta
hasta un punto en el cual permanece
invariable.
Al máximo número de pulsaciones
que una persona nunca debe
sobrepasar se le denomina ritmo
máximo y éste disminuye con la edad.
Una sencilla fórmula para calcular es
restar a 220 la edad en años. El
ejercicio, para que sea correcto, debe
mantenerse de 15 a 20 minutos entre
el 65 y el 85% del ritmo cardiaco
máximo y se recomienda no
sobrepasar el 85%.
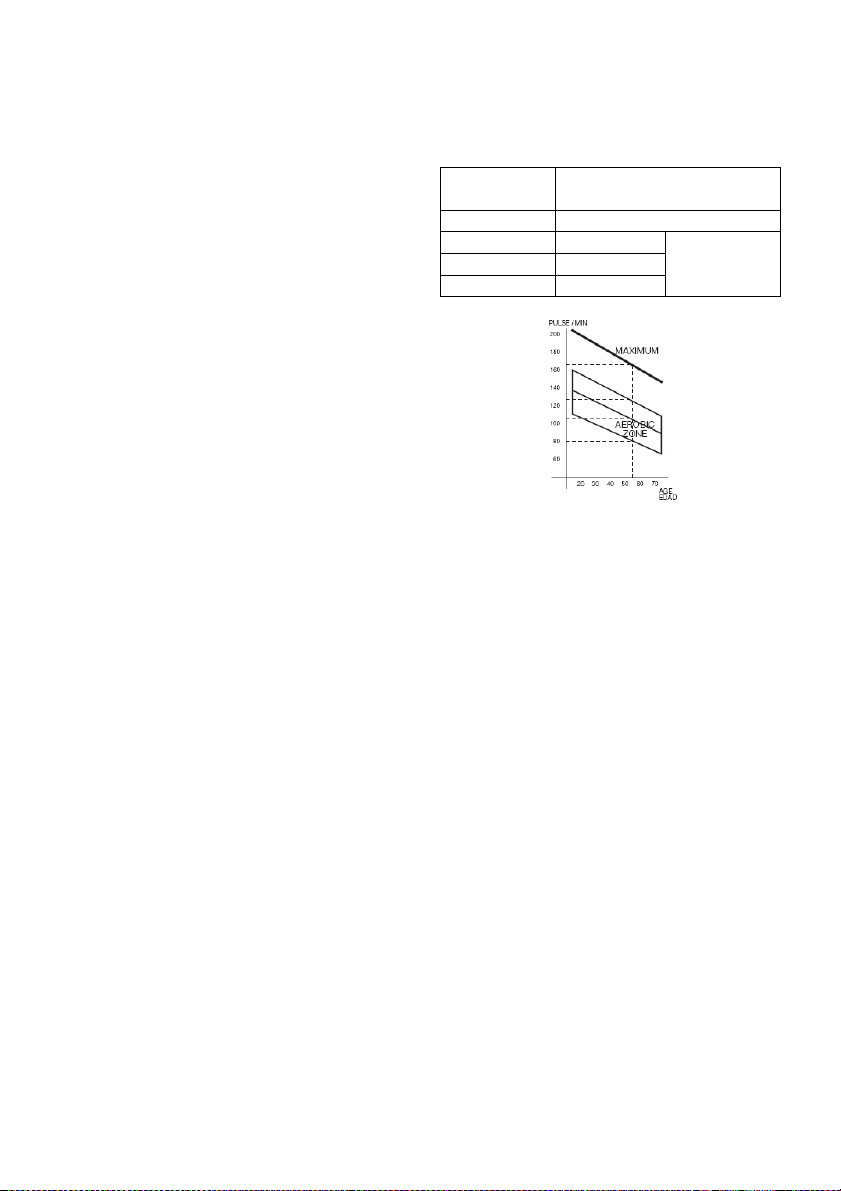
En el monitor de su máquina de andar
la zona aeróbica queda representada
por dos zonas. La primera
corresponde a un esfuerzo ligero
entre el 65 y el 74% del ritmo cardiaco
máximo y la segunda a esfuerzos
elevados entre el 75 y el 85% para
personas entrenadas.
EJEMPLO: Edad 50 años
220-50= 170 pulsaciones
Ritmo
cardiaco
Máximo 170
85% 144
75% 127
65% 112
Pulsaciones
Zona
aeróbica
PROGRAMA DE EJERCICIO.-
Antes de comenzar cualquier programa
de ejercicio y teniendo en cuenta que
programas de ejercicio varían en
función de la edad y del estado físico,
es recomendable una consulta a su
médico, ya que con sus sugerencias o
recomendaciones especificas logrará
mejores resultados.
Sea su objetivo final una mejora de su
forma física, un control de su peso o
una rehabilitación, tenga en cuenta que
su ejercicio debe ser progresivo,
planificado, variado y sin exceso.
Recomendamos que la frecuencia de
sus ejercicios sea de 3 a 5 veces por
semana.
Antes de comenzar una sesión es
importante realizar un calentamiento de
unos 2-3 minutos con una velocidad
suave. Ello preparará adecuadamente
su sistema cardiorrespiratorio.
11

El siguiente paso será durante 15-20
minutos con un ritmo que le lleve a un
número de pulsaciones situado entre el
65 y el 75% o entre el 75 y el 85% en el
caso de personas entrenadas.
Más adelante, cuando hayamos
mejorado nuestra forma física, podemos
repartir el tiempo entre ambos niveles,
pero teniendo en cuenta que el número
de pulsaciones no debe sobrepasar el
85% (zona aeróbica) y nunca llegar al
máximo ritmo cardíaco que no podemos
sobrepasar de acuerdo a nuestra edad.
Finalmente, es importante relajar sus
músculos. Para ello basta andar con
una velocidad ligera durante 2-3
minutos hasta que sus pulsaciones
bajen de la línea del 65%. Esto evitará
dolores musculares, sobre todo
después de una sesión intensa. Es
también recomendable acabar el
programa con unos ejercicios de
relajación en el suelo.
NOTA FINAL.
Esperamos que disfrute de su unidad.
Con su programa controlado de
ejercicios se dará cuenta de las
ventajas, de sentirse mejor, con más
vigor y con más resistencia a la
tensión.
Juzgará por sí mismo que merece la
pena mantenerse en forma con BH.
INSPECCIONES Y
MANTENIMIENTO.-
Desconecte la unidad y desenchufe el
cable de la red.
Limpie el polvo de las superficies de la
cinta de andar especialmente las
barandillas y la consola electrónica
con un paño o una toalla húmeda. No
utilice disolventes.
Utilice un aspirador para aspirar
cuidadosamente alrededor de todos
los componentes visibles (cinta,
estructura, etc.). Apoyando la unidad
sobre uno de los laterales también se
puede aspirar la parte inferior. Aspire
también el interior de la caja del motor
soltando la tapa que protege el motor
(tenga cuidado con los cables).
ATENCIÓN:
Compruebe periódicamente que todos
los elementos de sujeción estén
debidamente apretados y
correctamente conectados.
Revise y apriete todas las partes de
su unidad cada tres meses.
El uso de esta máquina con partes
gastada o debilitada como por
ejemplo la correa, la banda de
deslizamiento o los rodillos podría
lesionar al usuario.
Cuando tenga duda sobre la condición
de cualquier parte de la maquina, no
dude en ponerse en contacto con el
(S.A.T).Servicio de Asistencia
Técnica, llamando al teléfono de
atención al cliente (ver pagina final del
presente manual).
Le recomendamos que reponga las
piezas de desgaste o rotura usando
componentes originales.
El uso de otros componentes o partes
podría producir lesiones o afectar al
rendimiento de la máquina.
BH SE RESERVA EL DERECHO A
MODIFICAR LAS ESPECIFICACIONES
DE SUS PRODUCTOS SIN PREVIO
AVISO.
12

LOCALIZACIÓN DE FALLOS O AVERIAS
SÍNTOMAS
COMPROBACIONES
SOLUCIONES
1. No se enciende el
1) Asegúrese de que la
máquina está enchufada a
la red, el interruptor general
en posición 1 y la llave de
cable a la red.
Coloque el interruptor en
posición 1 y ponga la llave
2. Se enciende el monitor y
2) Comprobar que el
limitador de corriente esté
2) Desconectar la máquina
y pulsar el limitador de
3. Tirones al andar encima
3.a) Comprobar lubricación
3.b) Comprobar tensión
3.c) Comprobar tensión
3.a) Lubricar la banda de
3.b) Tensar la banda de
3.c) Tensar la correa de
4. La máqunia se para
(salta el limitador de
4) Comprobar lubricación
4) Pulsar el limitador de
corriente con el interruptor
en 0 y lubricar la banda de
5. La barandilla da
5) Comprobar que el
enchufe donde está
5) Enchufar la máquina en
6.a) Comprobar nivelación
6.b) Comprobar la cojera de
monitor.
seguridad puesta.
no funciona el motor.
hacia dentro.
1) Enchufe el
de seguridad.
corriente. Lubricar la banda.
de la banda.
corriente).
calambres en las manos.
6. La banda se descentra.
banda
banda deslizamiento
correa de transmisión
banda
conectada tiene toma tierra
del suelo.
la máquina.
deslizamiento .
deslizamiento.
transmisión.
deslizamiento.
enchufe con toma de tierra.
ERRORES DE LA MAQUINA
Aparece en la pantalla monitor E1 - Posible sobrecarga del motor.
- Lubricar banda.
Aparece en la pantalla monitor E2 - Apagar y volver a encender la máquina.
Aparece en la pantalla monitor E4 - Fallo de la función body fat.
- Reiniciar la maquina y colocar las manos
adecuadamente para una correcta lectura
de pulso.
Aparece en la pantalla monitor E6-E7 - Fallo de elevación.
Para cualquier consulta, no dude en ponerse en contacto con el (S.A.T).Servicio
de Asistencia Técnica, llamando al teléfono de atención al cliente (ver página
final del presente manual).
13

English
GENERAL INSTRUCTIONS.-
Carefully read through the instructions
contained in this manual. It provides you
with important information about safety,
use and maintenance of the treadmill.
You should always observe certain
safety precautions when using this
unit, including the following:
1 This unit has been designed for
home use only.
2 Your unit can only be used by one
person at a time. It can only be used
by people who weigh 150kg or less.
3 Place your unit on a flat surface,
with at least 2 metres of free space at
the rear and 1 m around. Do not place
your unit on any surface that might
block a ventilation opening. Place a
protective sheet below your unit to
protect the floor or carpet from
possible damage.
4 Your unit is equipped with a safety
key. The safety key must be inserted
into its housing, otherwise the
machine will not operate. When you
are using the machine always clip the
cord on the safety key to your clothing.
Remove the safety key whenever the
machine is not being used and keep it
safe from children and others.
5 Make sure that the treadmill unit
operates correctly before attempting to
use it. Never use an appliance that
might be faulty.
6 The owner is responsible for
ensuring that anyone who uses the
machine is duly informed about all of
the necessary precautions.
7 Parents and/or those responsible for
children must always be aware of their
curious nature and how this can often
lead to hazardous situations and
behaviour which could cause
accidents. This is why they should
always be supervised. Under no
circumstances should this appliance
be used as a toy.
8 Do not allow children or the disabled
to use the appliance without the strict
supervision of a qualified person.
9 In the event of any emergency, place
your feet on the side rails and hold onto
the handrail until the unit stops.
10 Use the handrail to help you get on
and off the treadmill and when
changing the speed. Do not jump onto
the belt while it is moving.
11 Keep your hands well away from
any of the moving parts. Do not place
your hands, feet or any other object
below the treadmill belt.
12 Do not stand still on the belt while it
is moving.
13 Use suitable clothing and footwear.
Make sure that all laces/cords are tied
correctly. To avoid injury and
unnecessary wear on the belt, make
sure that your footwear is not dirty.
14 Do not use the machine outdoors.
15 It is not advisable to keep your unit
in a damp place for long periods as it
will be prone to rust.
16 Make sure not to overlubricate the
unit as this might stain the floor or
carpeting where the unit stands.
17 Never use accessories not
recommended by the manufacturer.
SAFETY INSTRUCTIONS.-
This product must have an earth
connection. In the event that the
appliance malfunctions then the earth
connection will redirect the electrical
current away from the machine and
reduce the risk of an electrical shock.
14
This product is supplied with a mains
cable that has an earth wire and a
plug with an earth pin.
DANGER! If the equipment is not
earthed correctly then there is a risk of
electrical shock. If in doubt, get an
electrician or technical specialist to
check that the earth connection is
correct. Do not modify the plug
supplied with the equipment, if it does
not fit the wall socket then get an
electrician to install an electrical
socket that does.
This product must only be used on a
220-240 volt circuit, with an earthed
socket similar to that shown in Fig. A.
Make sure that the appliance is only
connected to a wall socket with the
same pin layout as the plug. Do not
use an adaptor with this appliance.
Always observe the following
recommendations when using
electrical appliances:
1 Make sure that the mains supply
voltage matches that of the machine
before plugging it in. The supply
voltage must be the same as that
stated on the characteristics plate and
the holes in wall socket must match
the pins for plug on the machine.
2 To reduce the risk of electrical
shock, first put the switch to the “0”
position and then unplug it from the
wall socket. Always unplug the unit
immediately after use and before
proceeding to clean it.
3 Make sure that the treadmill is
switched off and unplugged before
beginning any type of maintenance or
assembly work on it.
4 Do not unplug the treadmill by
tugging on the mains cable.
5 Do not use the machine if the mains
cable becomes damaged or worn.
6 Keep the mains cable away from hot
surfaces.
SAFETY BREAKER.-
This model is equipped with an
electronic circuit breaker to protect both
the electronic and electrical circuits.
This safety device will be
automatically triggered if the unit is
subjected to abnormal force or heat.
Should this occur:
1.- Set switch (L), located on the
casing, to the “0” (OFF) position Fig.B.
2.- Press the circuit button (C) to reset
the unit.
3.- Next, set switch (L) to the “I” (ON)
position and the unit will be ready for
use again.
Should the circuit breaker trip
repeatedly then the most probable
causes are:
-Abnormal working conditions,
-Treadmill belt in need of lubricant,
-Solvent based lubricants used (use
BH type),
- Belt is too tight.
Plug the unit into a wall socket with an
EARTH terminal. Set switch (L) to
Position [1].
Fig.B
15

ASSEMBLY INSTRUCTIONS.-
Take the unit out of the box and place
it on the floor as shown in Fig.0.
The assistance of a second person
is advisable for the assembly work.
Make sure that all of the pieces are
there:
(1) Monitor.
(120) Main structure.
(5) Monitor support.
(50) Side bar (left).
(51) Side bar (right).
(73) Mains cable.
(74) Mains cable fastening cover
(146) Side bar base cover (Left).
(147) Side bar base cover (Right).
(128) Bottle of lubricant.
(17) Bottle holder.
(3) Self-locking nuts M-8.
(55) Allen screw M-5x15.
(52) Allen screw M-8x75.
(62) Washer M8
(79) Self-tapping screw 3.5x15
(153) Bottle.
Combination box spanner.
Allen key 5mm.
(135) Allen key 6mm.
Follow the instructions step by step to
assemble:
1. At least two people are needed for
this step. When fitting the side bars, one
person should hold the side bar while
the other one tightens the screws (52).
This will prevent any possible accidents.
2. First, take the right-hand side bar
(51), Fig.1.
Insert the tip of the control cable (35)
tying it to the guide cable (N) inserted
in the side bar Fig.1, pull the tip out
through the top of the side bar, as
shown in Fig.1, then insert the side
bar into the bottom right-hand support
on the structure (120) and use screws
(52) to secure it.
3. Now take the left side bar (50) and
insert it into the bottom left-hand
support on the structure (120) and use
screws (52) to secure it.
4 Position the left and right base
covers (146) and (147) in the direction
of the arrow facing the corresponding
side bar, as shown in Fig.2 and attach
them by using screws (55), as shown
in Fig.2.
5. ATTACHING THE MONITOR
TUBE.-
Insert the tip of the control cable (35)
tying it to the guide cable (R) inserted
in the monitor tube Fig.2, pull the tip out
through the top of the monitor tube, as
shown in Fig.2, and making sure not to
pinch any of the cables when inserting
these onto the handrail tubes in the
direction of the arrows. Now tighten
using self-locking nuts (3) Fig.2.
6. ATTACHING THE MONITOR.-
Take the monitor (1), connect
terminals (H), (K), (34) and (35),
coming out of the handlebar (5) Fig.3,
to the terminals (J), (141), (140) and
(139), of the monitor, next take the
screws (52) and (175), fit the washers
(62) with the screws (175) and secure
the monitor, making sure not to pinch
the cables.
7. Next, lift the two bottle holder (17)
over the sides of the monitor Fig.4 in
the direction of the arrow.
8. FITTING THE MAINS CABLE.-
Loosen off screws (79) located at the
bottom of the frame (120).
Plug the end of the mains cable (73)
into socket (C) at the bottom front of
the frame (120), Fig.5.
16
Next, insert the fastening cover (74)
onto the mains cable (73), Fig.5, and
secure using screws (79) removed
previously.
MOVEMENT & STORAGE.-
The unit is equipped with wheels (113),
Fig.6 to make it easier to move. Make
sure that the mains cable is unplugged
from the wall socket.
To prevent accidents DO NOT move
the treadmill
across
uneven floors.
MAINTENANCE.-
Use the bottle of lubricant (128) to
lubricate the inside of the belt Fig.7 in
order to keep your unit in top condition
and to ensure that friction between the
belt and the board is kept to a
minimum (due to different running
styles, always apply more lubrication
to the area where you place your feet
during the exercise).
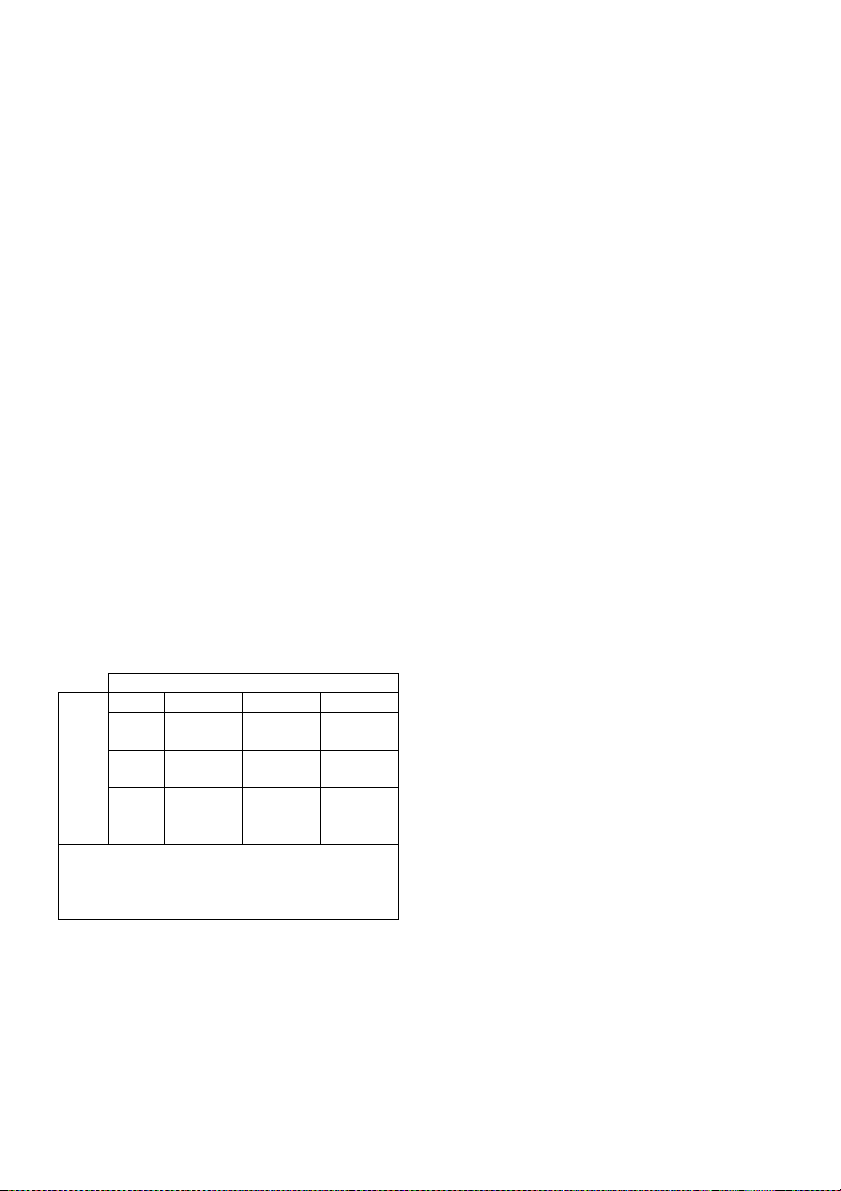
It is advisable to lubricate the base of
the belt between the board and the
band depending on how often it is used.
Hours per week
<3 3-7 >7
<6 1 year 6
6-12 6
months 3 months 2 months
>12 3
Speed (km/h)
Note: This preventive maintenance schedule
is only meant for home use.
It is suggested to maintain the unit every
month for commercial use.
months 2 months 1 month
If the belt starts to slip after lubrication,
then check the tension of the belt. To
tension the belt, take the 6mm Allen
key (135) and with the machine set to
4km/h turn screws (R & L) one turn in
a clockwise direction.
months 3 months
ADJUSTING THE BELT.-
If your unit is not seated evenly on the
four contact points, this may cause the
belt (X) to shift sideways. Rigorous
quality control adjusts and checks the
running belt. However, due to weight
differences and individual styles of
running, the belt may be prone to shift
sideways. If the belt does shift to the
left or right, stop the machine.
BELT OFFSET TO THE RIGHT.-
This procedure is very important.
Follow these steps. In order to adjust
the belt, set the unit in motion at a
speed of 4km/h.
If the belt has moved to the right, turn
screw (R) on the right-hand side of the
machine a 1⁄4 turn clockwise. Note the
position of the belt, if after one minute
the belt is not completely centred then
repeat the operation. If you see that the
belt has moved too far over to the left
then turn the right screw back slightly in
an anticlockwise direction Fig.8.
As soon as you have adjusted the belt
you can begin exercising again.
BELT OFFSET TO THE LEFT.-
In the event that the belt has moved to
the left, turn screw (L) on the left-hand
side of the machine a 1⁄4 turn
clockwise. Note the position of the
belt, if after one minute the belt is not
completely centred then repeat the
operation. If you see that the belt has
moved too far over to the right then
turn the left screw back slightly in an
anticlockwise direction Fig.8.
Important: Overtightening of the belt
can lead to a loss of speed on the
machine and even stretch the belt
itself.
17

Bear In mind that one turn of the right
screw (R) in a clockwise direction has
the same effect on the position of the
belt as one turn of the left screw (L) in
an anticlockwise direction.
Consequently, in the event of
excessive belt movement you can use
either of the two screws in order to
avoid overtightening the belt.
OPERATING INSTRUCTIONS.-
FITNESS.
Being fit means living life to the full.
Modern society suffers greatly from
stress. City life is basically sedentary.
There are too many calories and too
much fat in our diet. All doctors agree
that regular exercise is a good way to
control our weight, make us fitter and
help us to relax.
ADVANTAGES OF EXERCISE.-
Regular exercise below a certain level
for 15/20 minutes becomes aerobic.
Aerobic exercise is basically exercise
that uses oxygen. Normally, this is a
continuous exercise without pauses.
In addition to sugars and fats, the
body also needs oxygen. Regular
exercise improves the body’s ability to
supply oxygen to all of the muscles
and at the same time improve lung
function, the heart’s pumping capacity
and better blood circulation. In short,
the energy produced during exercise
burns kilocalories (known as calories).
The food we eat is transformed into,
among other things, energy (calories)
for our body. If we take in more
calories than we burn then the result is
an increase in weight and vice versa,
if we burn more calories than we eat,
we lose weight. When resting the body
burns around 70 calories per hour to
keep our vital functions active.
MONITOR THE HEART BEAT.-
The body’s work rate is reflected by
the rate of the heart beat (pulsations)
which increases as the work rate
increases. The effort in your treadmill
depends on the speed. If you increase
the speed, the work rate and the heart
rate increase too. If the work rate
maintains constant, the heart rate
increases up to a point where no
matter how much work increases the
heart does not beat any faster. This is
known as the maximum heart rate and
it decrease with age. A familiar
formula for calculating this maximum
heart rate, where exhaustion sets in, is
22 minus age.
Exercising should be carried out at
between 65% to 85% of the maximum
heart rate for 15-20 mins and it is
recommentded that is should not
exceed 85%.
Example: 50 years old
220-50=170 puls
Heart rate Pulsations
Maximum 170
85% 144
75% 127
65% 112
Aerobic
zone
EXERCISE PROGRAM.-
Before starting any exercise program,
bearing in mind that exercise
programs vary depending on age and
physical condition.
18

It is advisable to consult your doctor
given that you will achieve better
results based on his/her advice or
suggestions. Regardless of whether
your goal is to become fitter, control
your weight or for physiotherapy,
always remember that your exercise
should be gradual, planned, varied
and not too demanding. We
recommend that you should exercise
3 to 5 times per week.
Before beginning a session it is
important to do a warm-up for 2-3
minutes at low speed. This will help
protect your muscles and prepare your
cardiorespiratory system.
The next stage will last 15-20 minutes
at a pulse rate of between 65 to 75%,
or between 75 to 85% for those
already accustomed to exercise. At a
later stage, once we have become
fitter, we can divide this time between
both levels but always remembering
that the pulse rate must not exceed
85% (aerobic area) and never reach
the maximum heart rate limit that
corresponds to our age.
We you have finished, it is important
to relax the muscles. This can be done
by walking at a low speed for 2-3
minutes until the heart rate drops
below the 65% line. This will prevent
muscle pain, especially after an
intense session. It is also advisable to
finish the program with some
relaxation exercises on the floor.
FINAL NOTE.
We hope that you enjoy your unit. You
will soon notice the benefits of your
controlled exercise program, you will
feel better, have more energy and
suffer less stress. You will see for
yourself that it is worth staying in
shape with BH.
INSPECTION & MAINTENANCE.-
Switch the unit off and unplug the
mains cable.
Use a damp cloth or towel to clean the
dust off the treadmill, especially the
side bars and the electronic console.
Do not use solvents.
Use a vacuum cleaner to carefully
vacuum around the visible
components (belt, structure, etc.). You
can also vacuum the underside of the
unit by resting it on one of its sides.
Similarly, you can vacuum the inside
of the motor housing by removing the
cover that protects the motor (be
careful with the wires).
ATTENTION:Periodically check that
all of the fastening elements are duly
tightened and connected correctly.
Check and tighten all the parts on your
unit every three months.
Use of this machine with worn parts,
e.g. the drive belt, running belt or
rollers, may cause the user injury.
When in doubt about any parts on the
machine, do not hesitate to get in
touch with the Technical Assistance
Service by phoning customer services
(see last page in manual).
We recommend that your use original
spare parts to replace any worn
components. The use of other spare
parts may cause injuries or affect the
performance of the machine.
BH RESERVES THE RIGHT TO
MODIFY THE SPECIFICATIONS OF
ITS PRODUCTS WITHOUT PRIOR
NOTICE.
19

FAULT FINDING CHART
PROBLEM
CHECKS
SOLUTIONS
The monitor does not
1) Make sure that the
in, the
ON/OFF switch in position 1
and that the safety key is
1) Plug the machine into the
mains supply. Set the
switch to position 1 and
The monitor switches
on but the motor fails to
2) Check that the current
2) Switch the machine off
and press the circuit
breaker in. Lubricate the
Walking motion is jerky
3.a) Check that the belt is
3.b) Check the tension on
tension on
3.a) Lubricate the sliding
3.c) Adjust the drive belt
The machine stops (the
4) Check that the band is
4) Reset the overload
switch at „0“ and lubricate
Electrical shocks
5) Check that the machine
is plugged into an earthed
5) Plug the machine into an
The treadmill belt
eck that the machine
6.b) Check that the machine
1.
switch on.
2.
start.
3.
on the treadmill.
4.
breaker trips).
5.
through the handrail.
machine is plugged
inserted.
limiter is pressed in.
lubricated.
the sliding belt.
3.c) Check the
the drive belt.
lubricated.
mains socket.
insert the safety key.
treadmill band.
belt.
3.b) Adjust the belt tension.
tension.
button with the On /Off
the treadmill band.
earthed mains socket.
6.
skews off centre.
6.a) Ch
is level on the floor.
does not wobble.
ERROR CODES
Monitor screen displays E1 - Possible motor overload.
- Lubricate the belt.
Monitor screen displays E2 - Switch the machine off and on again.
Monitor screen displays E4 - Body fat function fault.
- Restart the machine and place your
hands correctly for a pulse rate reading.
Monitor screen displays E6-E7 - Elevation fault.
Do not hesitate to get touch with the Technical Assistance Service if you have any
queries by phoning customer services (see last page in manual).
20

Français
CONSIGNES GÉNÉRALES.-
Lire cette notice très attentivement. Elle
contient d’importantes informations sur
la sécurité et l’utilisation et la
maintenance du tapis de course.
Il est indispensable de prendre des
précautions de sécurité, dont celles
indiquées ci-après:
1 Cette machine a été conçue pour être
utilisée uniquement chez soi.
2 Le tapis de course ne peut être utilisé
que par une personne à la fois et par
des personnes pesant 150kg et moins.
3 La machine doit être installée sur une
surface plane. Prévoir un dégagement
d’au moins 2 mètres derrière l’appareil.
Ne pas installer la machine près d’un
endroit où l’un des ouvertures d’air
risque d’être fermée. Pour protéger le
sol ou le tapis, placez un tapis de
protection sous la machine.
4 Cet appareil dispose d’une clé de
sécurité. La clé de sécurité doit être
introduite dans son logement, faute de
quoi, la machine ne se mettra pas en
marche. Durant les exercices effectués
sur cette machine, l’utilisateur doit
attacher la clé de sécurité à l’un des
vêtements qu’il porte, par l’intermédiaire
d’un clip. Si vous n’allez pas utiliser la
machine, retirez la clé de sécurité et
gardez-la hors de la portée des enfants
et de tierces personnes.
5 Avant d’utiliser le tapis de course,
vérifier qu’il fonctionne correctement. Ne
pas utiliser un appareil endommagé.
6 Il incombe au propriétaire de vérifier si
tous les utilisateurs de la machine sont
habilités pour le faire et de leur fournir
les informations requises à propos des
précautions à prendre.
7 Les parents ou personnes à qui des
enfants ont été confiés doivent tenir
compte de leur soif de curiosité qui peut
les conduire à avoir des conduites
risquant de se traduire par des
situations dangereuses. C’est pourquoi,
les enfants doivent être particulièrement
bien surveillés. Cet appareil ne doit en
aucun cas être utilisé comme un jouet.
8 Les enfants et les personnes
handicapées ne pourront utiliser cette
machine que sous la surveillance d’une
personne qualifiée.
9 En cas d’urgence, posez vos pieds
dans les rails et accrochez-vous à la
main courante jusqu’à l’arrêt de la
machine.
10 Servez-vous de la main courante
pour monter et pour descendre du tapis
ainsi que pour changer la vitesse.Ne
sauter pas du tapis en marche.
11 Tenir les mains à l’écart des
éléments mobiles. Ne pas placer les
mains, les pieds ni d’objets sous le tapis
de course.
12 Ne vous arrêter pas sur le tapis en
marche.
13 L’utilisateur de la machine doit porter
des vêtements et des chaussures
appropriés. Nouez bien vos lacets de
chaussures. Pour éviter de vous blesser
et pour que le tapis ne s’use pas
prématurément, portez des chaussures
propres.
14 Ne pas utiliser la machine en plein
air.
15 Il est déconseillé de tenir en
permanence la machine dans un endroit
humide car l’oxydation serait alors
inévitable.
16 Veillez à ne pas graisser la machine
exagérément car vous risquez de tacher
le sol ou les tapis sur lesquels repose la
machine.
21
 Loading...