

BH Fitness G6182I Service Manual

G6180i-G6182i
UNIDAD ELECTRÓNICA
ELECTRONIC MONITOR
UNITÉ ÉLECTRONIQUE
ELEKTRONIKEINHEIT
UNIDADE ELECTRÓNICA
IMPIANTO ELETTRONICO
ELEKTRONISCHER MONITOR
1
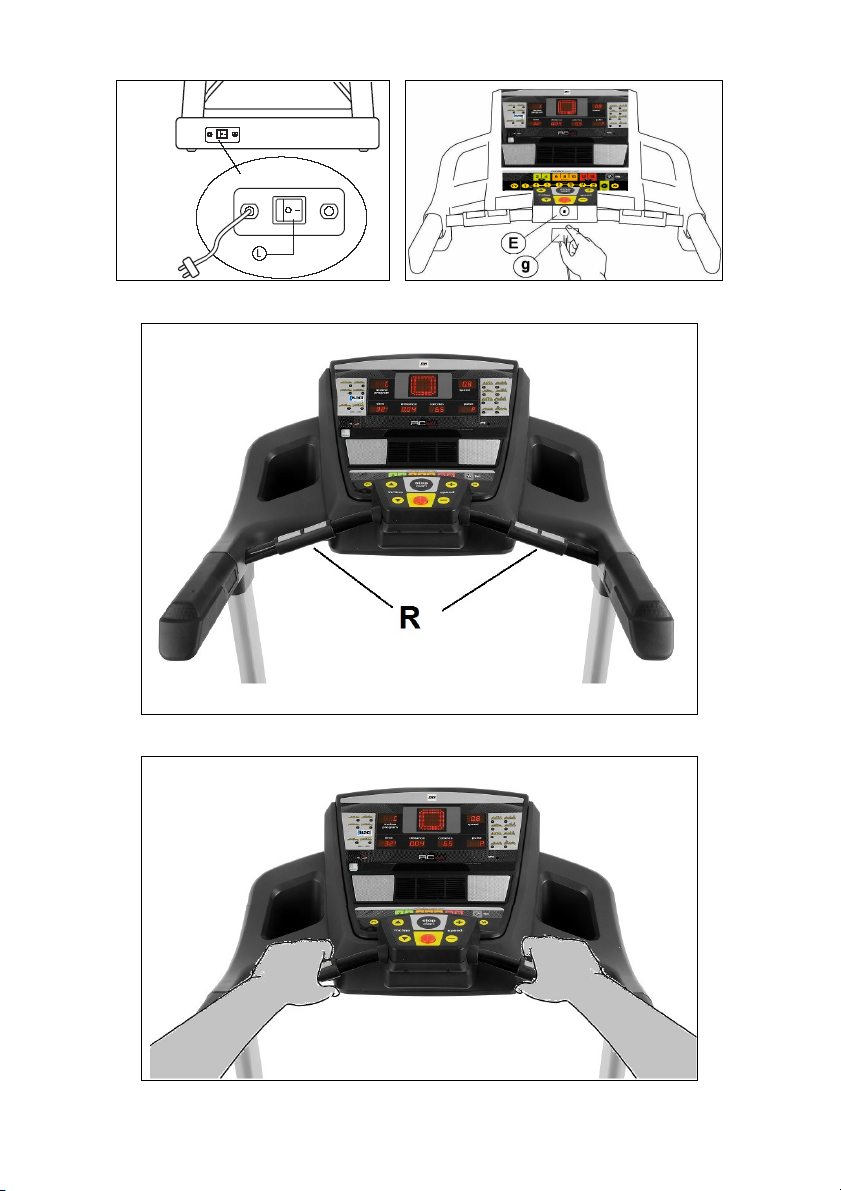
Fig.1 Fig.2
Fig.3
Fig.4
2
Español
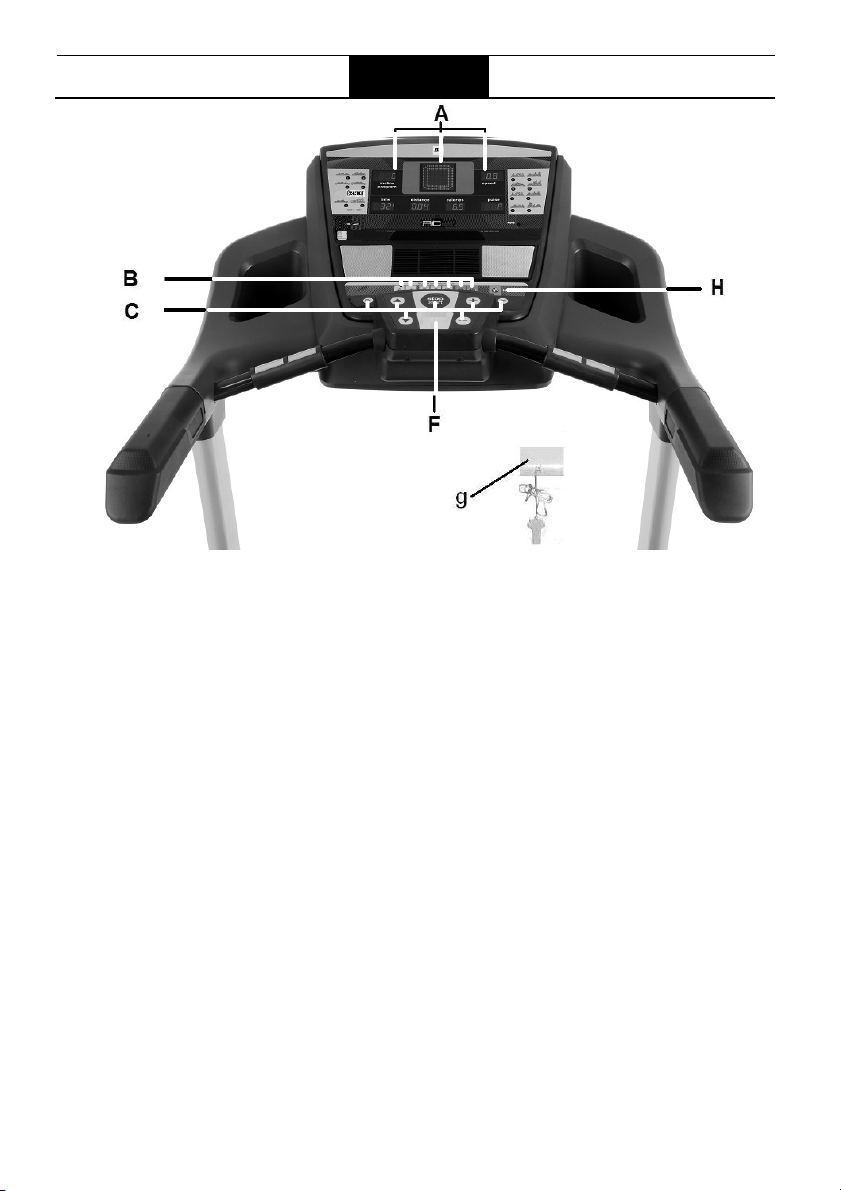
ELEMENTOS DEL MONITOR.-
A: Este electrónico (Monitor) dispone
de 7 displays: Inclinación; Tiempo;
Programas; Velocidad; Distancia;
Pulso y Calorías.
B: Pulsadores o teclas de acceso
rápido a inclinación (2- 4- 6- 8- 10- 12-
15).
C: Este electrónico (Monitor) dispone
de 7 pulsadores o teclas: PROGRAM;
MODE; INCLINACIÓN (↨); START/
STOP; VELOCIDAD Km/h (↨).
E: Alojamiento de llave de seguridad.
F: Pulsadores o teclas de acceso
rápido a la velocidad (2- 4- 6- 8- 1014- 16 Km/h).
g: Llave de seguridad.
H: Tecla ECO
PUESTA EN MARCHA.-
Conecte la unidad a un enchufe
provisto de terminal TIERRA ponga el
interruptor (L) en posición (1). Fig.1.
La llave de seguridad (g) deberá estar
colocada en su alojamiento (E) Fig.2.
En caso contrario la máquina no se
pondrá en marcha. Al colocar la llave
de seguridad (g) en su lugar (E),
sonará un pitido y todos los displays
mostrarán el valor “00:00”, lo que
significa que la máquina está en
posición de marcha (READY).
CAMBIO DE KILÓMETROS A
MILLAS.-
La velocidad de esta máquina tiene la
opción de mostrársela en Km/h o en
Millas. La velocidad de la máquina
sale de fábrica en Km/h.
3

Para cambiar de Km/h a Millas siga
los pasos siguientes:
Pulse a la vez las teclas PROGRAM y
MODE durante 5 segundos
aproximadamente, pulse MODE para
seleccionar el parámetro F4 y le
aparecerá en la ventana (A) “KM”.
Pulse +/- para cambiarlo a millas “M”.
Pulse a la vez las teclas PROGRAM y
MODE durante 5 segundos
aproximadamente para guardarlo.
INSTRUCCIONES DE
FUNCIONAMIENTO.-
MODO MANUAL.
Este monitor dispone del programa
(MANUAL).
Dentro del programa MANUAL se
puede programar el Tiempo de
duración del ejercicio entre (5 y 99
Minutos), o la distancia entre (1 y
99,9) o las calorías entre (5 y 999).
Pulsando la tecla START/STOP, y la
máquina se pondrá en marcha,
transcurridos 3 segundos, indicados
en forma descendente en el display
de tiempo (A), con una velocidad de
1.0 Km/h.
Estando en el modo manual usted
puede aumentar o disminuir la
velocidad pulsando las teclas SPEED
(↨) entre los valores de 1.0–22 Km/h.
Pulsando la tecla START/STOP o
quitando la LLAVE DE SEGURIDAD
la máquina se parará.
MODO PROGRAMAS.-
Este monitor dispone de 20 programas
(MANUAL; P01; P02; P03; P04; P05;
P06; P07; P08; P09; P10; P11; P12;
P13; P14; U01; U02; U03; HRC; BODYFAT).
Dentro de los programas del P01 al
P14 se puede programar el Tiempo de
duración del ejercicio entre (5 y 99
Minutos).
Gráficos de programas del P1 al P14.
Ver páginas finales.-
Estando la máquina preparada, pulse
la tecla PROGRAM y le aparecerá en
el display P01, pulsando la tecla
PROGRAM accede a los programas
del (P1 al P14; BODY-FAT).
Después de introducido el programa
deseado, en el display se mostrará el
nivel (L1-L3). Pulsando las teclas
SPEED (↨) elija el nivel que desea,
pulse MODE para confirmar y le
parpadeará el display de TIME
(Tiempo). Para programar la duración
del tiempo en el programa elegido pulse
las teclas SPEED (↨) (5 –99 minutos).
El monitor tiene un tiempo predefinido
de 30 minutos para la duración del
programa.
Pulse la tecla START/STOP y la
máquina se pondrá en funcionamiento
transcurridos 3 segundos, indicados
en forma descendente en el display
central de acuerdo con los valores
que haya introducido.
Usted puede variar en cualquier
momento del programa, la velocidad,
pulsando las teclas SPEED (↨) y la
inclinación, pulsando las teclas
INCLINE (↨) del monitor.
FUNCIÓN ECO.-
Pulse este botón en modo programas
o modo manual para entrar en modo
económico. La máquina cambiará la
inclinación y la configuración para
disminuir el consumo eléctrico y en la
ventana de tiempo se alternará el
tiempo con la palabra ECO. Pulse de
nuevo el botón ECO para salir de esta
función.
4

MODO PROGRAMAS USUARIO.-
Los programas de usuario le permite
diseñar los gráficos de velocidad y de
inclinación con referencia a su forma
física.
Estando la máquina preparada, pulse
la tecla PROGRAM y le aparecerá en
el display U01, pulsando la tecla
PROGRAM accede a los programas
usuario del (U01; U02; U03), una vez
haya elegido su programa pulse la
tecla MODE y visualizara en la
ventana TIME/DISTANCE que le esta
indicando el primer paso del programa
que usted esta grabando (S01), que a
su vez también le estará parpadeando
la ventana SPEED/INCLINE.
Con las teclas INCLINE seleccione
la inclinación que usted desee en el
primer paso (entre 0 y 15 niveles),
pulsando las teclas SPEED,
seleccione la velocidad que usted
desee en el primer paso (entre 1 y
22Km/h).
Pulse la tecla MODE y pasara al
segundo paso (S02) realice los
mismos pasos que para el punto
(S01) variando se lo desea la
velocidad y la inclinación y así
sucesivamente hasta el paso 16 que
esta compuesto el grafico del
programa usuario.
Pulsando la tecla MODE le aparecerá
el tiempo de duración del ejercicio
entre (10 y 99minutos).
Si el tiempo programado para la
realización del ejercicio ha sido de 16
minutos, cada paso corresponde a 1
minuto.
Pulse START y la máquina se pondrá
en marcha, transcurridos 3 segundos,
indicados en forma descendente en el
display central.
HRC (Heart Rate Control).-
Este programa le sirve para realizar el
ejercicio en esta máquina, con un
pulso constante que usted haya
seleccionado. Pulsando las teclas
(SPEED + o -) seleccione su edad
entre los valores (13–80), pulse MODE
para confirmar, le parpadeará la
ventana de (TIME), seleccione las
pulsaciones máximas que desea para
hacer el ejercicio comprendidas entre
80–186) P.P.M. (Pulsaciones Por
Minuto) y pulse MODE para confirmar.
Por último, introduzca el tiempo
deseado de programa (entre 5-99
minutos) o pulse START para
comenzar.
Si por ejemplo usted ha programado
100 P.P.M (pulsaciones por minuto)
en el momento que se rebasa esa
cifra, la maquina le irá disminuyendo
la velocidad. Si por el contrario no
llegase a las P.P.M. programadas, la
máquina aumentará la velocidad,
hasta llegar al valor programado.
PROGRAMA DE GRASA
CORPORAL.-
BODY-FAT.
El programa (“F” BODY-FAT) esta
diseñado para calcular el porcentaje de
grasa corporal del usuario.
Pulse la tecla Programa (“F” BODYFAT), seguido pulse la tecla MODE
y pulsando las teclas (↨) seleccione el
Sexo (Hombre 01– Mujer 02), pulse
MODE para confirmar, seleccione con
las teclas (↨) su Edad (AGE 10 – 99
años) pulse MODE para confirmar,
seleccione con las teclas (↨) la Altura
(HEIGHT 100-200cm), pulse MODE
para confirmar. Seleccione con las
teclas (↨)
150Kg), pulse MODE para confirmar.
5
su Peso (WEIGHT 20 –
Coloque las manos sobre los sensores
SEXO /
BAJO
BAJO /
MEDIO
ALTO
HOMBRE
MUJER
(R) de pulso (hand-grip) como muestra
la Fig.4 y al cabo de unos segundos le
dará el resultado en el display el valor.
FAT. (Body fat).–
La función de grasa corporal tiene
como fin ayudarle a evaluar el valor
de su grasa corporal.
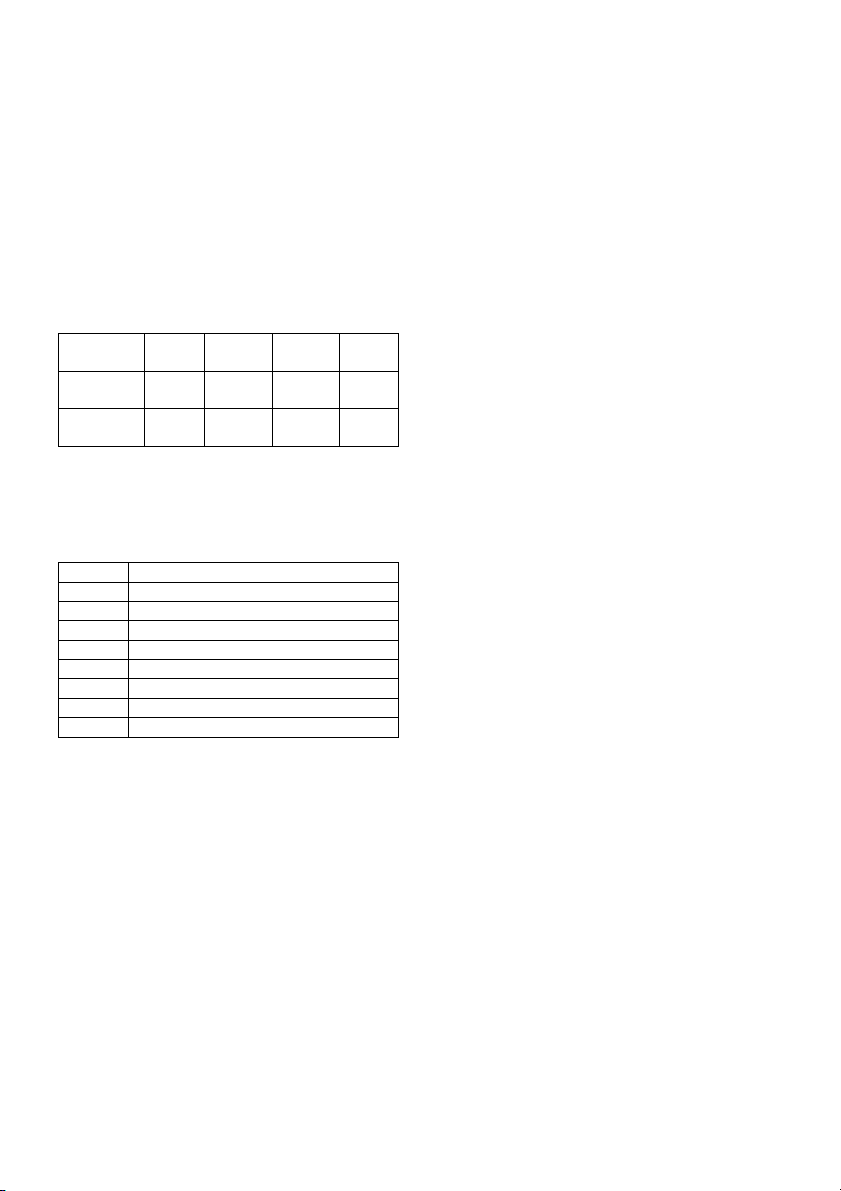
TABLA DE REF.: PORCENTAJE
GRASA CORPORAL % (BODY FAT)
GRASA%
MEDIO
<13% 13%-
25,8%
<23% 23%-
35,8%
26%30%
36%40%
>30%
>40%
TABLA DE REF.:
TIPOS DE CUERPO / BODY TIPE:
Hay 9 tipos de cuerpo divididos según
el porcentaje de grasa calculado.
TIPO 1 (5%-9%) Varón muy deportista
TIPO 2 (10%-14%) Varón deportista ideal
TIPO 3 (15%-19%) Muy esbelto
TIPO 4 (20%-24%) Deportista
TIPO 5 (25%-29%) Salud ideal
TIPO 6 (30%-34%) Esbelto
TIPO 7 (35%-39%) Demasiado obeso
TIPO 8 (40%-44%) Obeso
TIPO 9 (45%-50%) Ultra obeso
En la pantalla principal le dará el tipo
de perfi l para su tipo de cuerpo.
Si le aparece en el display el símbolo
«E-3» quiere decir que se ha tenido un
error, posicione bien las manos sobre
los sensores de pulso (R) de la Fig.4.
FUNCIONAMIENTO iOS (iPod
Touch/iPhone/iPad)
Este monitor dispone de un módulo
Bluetooth 4.0 integrado.
Active la función Bluetooth en el
iPod/iPhone/iPad y realice una
búsqueda de dispositivos Bluetooth.
Seleccione su módulo BH de la lista
de dispositivos para vincularlo.
A continuación descargue una
aplicación compatible Pafers de Apple
Store y e
jecútela.
FUNCIONAMIENTO CON
DISPOSITIVOS ANDROID
Este monitor dispone de un módulo
Bluetooth 4.0 integrado.
Active la función Bluetooth en el
dispositivo Android.
A continuación descargue una
aplicación compatible Pafers de
Google Play y ejecútela.
Cuando la aplicación lo requiera
seleccione su módulo BH de la lista
de dispositivos para vincularlo.
PARADA DE EMERGENCIA.-
Para dar máxima seguridad al
usuario, esta unidad dispone de una
llave de seguridad (g) y de un botón
de START/STOP. La llave de
seguridad (g) deberá estar colocada
en su alojamiento (E), ver Fig.2. En
caso contrario, la máquina no se
pondrá en marcha.
Cuando haga uso de la máquina, fije
la llave de seguridad a la ropa
mediante el clip. Con un tirón, la llave
de seguridad saldrá de su alojamiento
y la máquina se parará de forma
instantánea. Para ponerla de nuevo
en marcha, vuelva a colocar la llave
en su alojamiento.
Quite la llave de seguridad (g) si esta
no va a ser usada y guárdela fuera del
alcance de los niños. Pulsando el
botón rojo de START/STOP la unidad
se parará inmediatamente.
Para ponerla de nuevo en marcha
pulsar el botón START/STOP.
6

INCLINACIÓN.-
La inclinación es una función
independiente a todas las funciones.
Cada vez que ponga el interruptor
general (L) en la posición I, como se
indica en la puesta en marcha, Fig.1.
En el display de inclinación aparecerá
el valor de inclinación que usted ha
dejado.
Si la inclinación no está a cero cuando
comienza el ejercicio con la tecla
START/STOP, ésta irá a cero
mientras la máquina se pone en
funcionamiento.
Pulsando los botones INCLINE(+) o
INCLINE(-), usted podrá ajustar la
inclinación de su unidad desde el nivel
0 hasta el nivel 15 según a la
inclinación a la que desee hacer el
ejercicio.
Importante. No cambie la inclinación
de su cinta de correr poniendo objetos
debajo de la banda.
IMPORTANTE (G6180i): LA
INCLINACIÓN DEBE ESTAR EN SU
NIVEL MAS BAJO ANTES DE
PONER LA MÁQUINA DE ANDAR
EN SU POSICIÓN DE PLEGADO
MEDICIÓN DEL PULSO.-
El pulso se mide mediante la
colocación de ambas manos en los
sensores de pulso (R) que están en la
unidad electrónica. La medida de
pulso aparece después de unos
segundos.
El símbolo del corazón al lado de la
cifra de pulso parpadea al ritmo de su
pulso, Fig.4.
IMPORTANTE. Este no es un aparato
médico y por tanto la información del
ritmo cardiaco es orientativa.
Para cualquier consulta, no dude en
ponerse en contacto con el
(S.A.T).Servicio de Asistencia
Técnica, llamando al teléfono de
atención al cliente (ver página final del
presente manual).
BH SE RESERVA EL DERECHO A
MODIFICAR LAS ESPECIFICACIONES DE SUS PRODUCTOS SIN
PREVIO AVISO.
7

LOCALIZACIÓN DE FALLOS O AVERIAS
SÍNTOMAS COMPROBACIONES SOLUCIONES
1. No se enciende el
monitor.
2. Se enciende el
monitor y no
funciona el motor.
3. Tirones al andar
encima de la banda.
1) Asegúrese de que la máqunia
está enchufada a la red, el
interruptor general en posición 1
y la llave de seguridad puesta.
2) Comprobar que el limitador de
corriente esté hacia dentro.
3.a) Comprobar lubricación banda
3.b) Comprobar tensión banda
deslizamiento
3.c) Comprobar tensión correa de
transmisión
1) Enchufe el cable a la red.
Coloque el interruptor en
posición 1 y ponga la llave
de seguridad.
2) Desconectar la máquina y
pulsar el limitador de
corriente. Lubricar la banda.
3.a) Lubricar la banda de
deslizamiento .
3.b) Tensar la banda de
deslizamiento.
3.c) Tensar la correa de
transmisión.
4. La máqunia se
para (salta el
limitador de
corriente).
5. La barandilla da
calambres en las
manos.
6. La banda se
descentra.
4) Comprobar lubricación banda 4) Pulsar el limitador de
corriente con el interruptor
en 0 y lubricar la banda de
deslizamiento.
5) Comprobar que el enchufe
donde está conectada tiene
5) Enchufar la máquina en
enchufe con toma de tierra.
toma tierra
6.a) Comprobar nivelación del
suelo.
6.b) Comprobar la cojera de la
máquina.
ERRORES DE LA MÁQUINA
Pantalla de
monitor E1
Posible mensaje de
fallo.
Conecte el cable correctamente entre el
controlador superior y el controlador inferior
Pantalla de
monitor E2
Pantalla de
monitor E3
Pantalla de
monitor E5
Pantalla de
monitor E7
Apagado
Sin señal del sensor de
velocidad
Posible sobrecarga del
motor
Llave de seguridad
Funcionamiento con voltaje correcto; conecte
de nuevo el cable del motor.
Sustituya la luz del sensor del controlador
inferior o el sensor de velocidad.
Lubrique la cinta.
Coloque la llave de seguridad en su
alojamiento.
Para cualquier consulta, no dude en ponerse en contacto con el (S.A.T).Servicio
de Asistencia Técnica, llamando al teléfono de atención al cliente (ver página
final del presente manual).
8

English
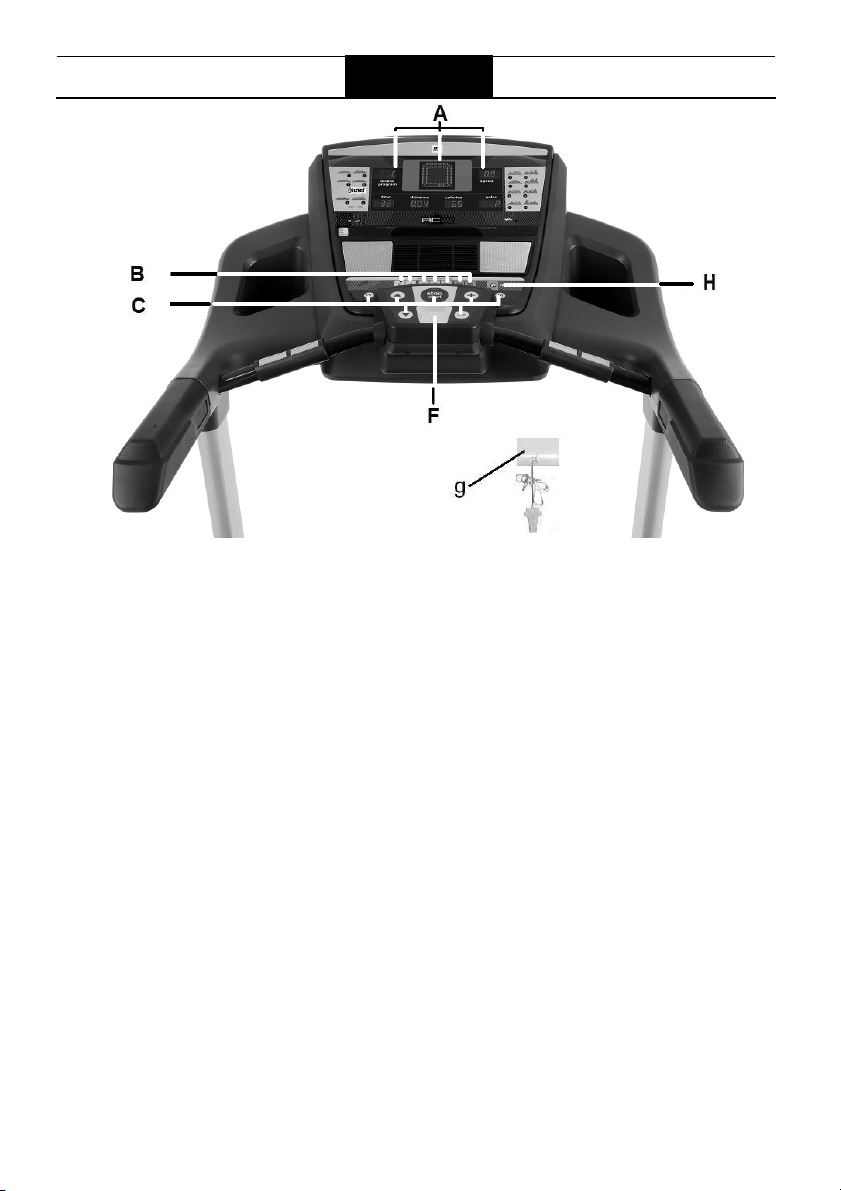
ELEMENTS OF THE MONITOR.-
A: The electronic monitor has 7
displays: Time; Programs; Speed;
Distance; Incline; Pulse rate and
Calories.
B: Incline function quick access keys
or buttons (2- 4- 6- 8- 10- 12- 15).
C: The electronic monitor has 7 push
buttons or keys; PROGRAM; MODE;
INCLINE(↨); START/STOP; SPEED
Km/h (↨).
E: Slot for safety key.
F: Speed function quick access keys or
buttons (2- 4- 6- 8- 10- 14- 16Km/h).
g: Safety key.
H: ECO key
START/STOPING.-
Plug the unit into a wall socket with an
EARTH terminal and set switch (L) to
position (1), Fig.1.
The safety key (g) must be inserted
into its spot (E) Fig.2, otherwise the
machine will not operate. As soon as
the safety key (g) is in place, the
machine will beep and all of the
displays will show a [00:00] value,
indicating that the machine is READY
to be used.
CHANGING FROM
KILOMETRES TO MILES.-
This machine has the option to display
speed in km/h or mph.
The factory setting for the machine is
km/h.
9

To change from km/h to mph follow
these steps:
Press and hold the PROGRAM and
MODE keys at the same time for 5
approximately seconds.
Press MODE to select F4 parameter
in display (A). Press +/- to select “M”
Miles or “km” kilometers. Press and
hold the PROGRAM and MODE keys
at the same time for 5 approximately
seconds to save and exit.
OPERATING INSTRUCTIONS.-
MANUAL MODE
This monitor has program (MANUAL).
For programs MANUAL you can specify
the duration of the exercise between (5
to 99) minutes, distance between (1 to
99.9) and calories between (5 to 999).
Pressing the START/STOP key will light
the MANUAL and the machine will start
within 3 seconds, shown by a
countdown on the TIME display, at a
speed of 1.0km/h.
You can increase or decrease the
speed setting in MANUAL mode by
pressing the SPEED (↨) keys, between
1.0–22 km/h.
The machine will stop if you press the
START/STOP key or if you remove the
SAFETY KEY
PROGRAM MODE.-
This monitor has 20 programs
(MANUAL, P01; P02; P03; P04; P05;
P06; P07; P08; P09; P10; P11; P12;
P13; P14; U01; U02; U03; HRC, BODYFAT).
For programs P1 to P14 you can
specify the duration of the exercise
between (5 to 99) minutes.
Program graphics for P1 to P14.
See end pages.-
With the machine ready, press the
PROGRAM key and P01 will appear
on the display, by pressing the
PROGRAM key you can access the
programs (P1 al P14: BODY-FAT).
Press MODE to select it.
After you have confirmed your chosen
program, you will be prompted to
select the level (L1-L3). Use the
SPEED (↨) keys to choose the level
and press MODE to confirm and TIME
will begin to flash.
Use the SPEED (↨) keys to specify the
duration of the program (5 – 99
minutes). The monitor has a default
program setting of 30 minutes.
Press the START/STOP key and the
machine will start to operate after 3
seconds, shown by the countdown on
the central display, based on the
values it has been given.
You can change the speed settings at
any time during the exercise by
pressing the SPEED (↨) keys, and the
inclination settings by pressing the
INCLINE (↨) keys.
ECO FUNCTION.-
Press this button when in manual or
program mode to enter into economic
mode. The machine will change the
incline and configuration to reduce
power consumption and the time
window will alternate time with the
word ECO.
Press the ECO button again to exit
this function.
USER PROGRAM MODE.-
The user programs allow you to design
the speed and inclination graphs with
reference to your fitness level.
10

With the machine ready, press the
SEX /
LOW LOW /
AVE
HIGH
MALE
FEMALE
PROGRAM key and U01 will appear
on the display, by pressing the
PROGRAM key you can access the
user programs (U01; U02; U03), once
you have chosen a program press the
MODE key and the first step of the
program you are designing will be
shown in the TIME/DISTANCE
window, (S_01), the SPEED/INCLINE
window will also be flashing.
Use the INCLINE keys to select the
inclination level you want for the first
stage (between 0 to 15), press the
SPEED keys to select the speed that
you want for the first stage between 1
and 22 km/h).
Press the MODE key and this will take
you to the second stage (S02) carry
out the same procedure as in (S01)
varying the speed and inclination
settings for this stage, and so on up to
stage 16 to complete the User
Program Graph.
By pressing the MODE key you can
program a time limit for the exercise
(between 10 to 99 minutes).
If the programmed exercise time is 16
minutes then each stage will last 1
minute.
Press START and the machine will
start after a 3 second countdown,
shown on the central display.
HRC (Heart Rate Control).-
This program allows you to do exercise
on the machine at a constant userdefined pulse rate.
Use the (SPEED + - or ▼▲) keys to
specify your age (between 13 to 80),
then press MODE to confirm it.
The (TIME) window will start to flash,
select the maximum pulse rate for the
exercise (between 80–186 BPM beats
per minute) and press MODE to confirm
it. Lastly, introduce program time (5-99
minutes) or pulse START to begin
workout.
E.g. If you have specified 100 B.P.M
(Beats Per Minute) then the machine
will slow down automatically whenever
you go above this value. If, on the other
hand, you fail to reach the specified
BPM value, then the machine will
speed itself up until you do.
BODY FAT PROGRAM.-
The (“F” BODY-FAT) program is
designed to calculate the user’s body
fat percentage.
Press the (“F” BODY-FAT) program
key, then press the MODE key and by
using the (↨) keys to select SEX
(Male01– Female 02), press the MODE
key to confirm, use the (↨) keys select
your AGE (10 – 99) press the MODE
key to confirm, use the (↨) keys to select
HEIGHT (100 - 200cm), press the
MODE key to confirm use the (↨) keys
to select your WEIGHT (20 – 150Kg),
press the MODE key to confirm.
Place your hands on the handgrip
sensors (R), as shown in Fig.4, and
after a few seconds the screen will
display the result.
FAT. (Body fat).–
The body fat function helps you to
calculate your body fat percentage.
REF. TABLE:
BODY FAT PERCENTAGE %
FAT%
< 13% 13%-
<23% 23%-
AVE
RAGE
25,8%
35,8%
RAGE
26%30%
36%40%
>30%
>40%
11

BODY TYPE
There are 9 body types based on the
percentage of fat calculated.
TYPE 1 (5%-9%) Extremely athletic
TYPE 2 (10%-14%) Ideal sportsman
TYPE 3 (15%-19%) Very slender
TYPE 4 (20%-24%) Sportsman
TYPE 5 (25%-29%) Ideal health
TYPE 6 (30%-34%) Slender
TYPE 7 (35%-39%) Very overweight
TYPE 8 (40%-44%) Overweight
TYPE 9 (45%-50%) Extremely obese
The main screen will display the type
of profile for your body type.
If the error code “E-3” appears then
this means that an error has occurred,
position your hands correctly on the
pulse sensors (R), Fig.4.
iOS OPERATION (compatible
iPhone, iPad and iPod Touch)
This monitor has an integrated
Bluetooth 4.0 module.
Download a Pafers App from the App
Store (Check compatible apps at the
BH website: www.bhfitness.com).
Turn Bluetooth to “ON” in settings on
the iOS device and the device will
begin to search for active Bluetooth
equipment in range.
Select the appropriate BH Module
from the list displayed on the iOS
device to pair. Open the Pafers app to
run it.
ANDROID OPERATION
(compatible Android devices)
This monitor has an integrated
Bluetooth 4.0 module.
Download a Pafers App from Google
Play (Check compatible apps at the
BH website: www.bhfitness.com).
Turn Bluetooth to “ON” in settings on
the Android device. Open the Pafers
app to run it. When prompted by the
app, select the appropriate BH Module
from the list displayed on the Android
device to pair.
EMERGENCY STOP.-
For the user’s maximum safety, this unit
is equipped with a safety key (g) and a
STOP button. The safety key (g) must
be slotted into its housing (E), Fig.2,
otherwise the machine will not start.
When you are using the machine
always clip the cord on the safety key
to your clothing. Tugging on the cord
will pull the safety key out of its slot
and the machine will stop immediately.
To restart the machine simply put the
key back into the key slot.
Remove the safety key (g) whenever
the machine is not being used and
keep it out of children’s reach.
Pressing the red button marked STOP
will also stop the unit immediately.
To restart it, press the button marked
START/STOP again.
ELEVATION.-
The inclination function operates
independently of all other functions.
Each time that you set switch (L) to
position I, as described in the Starting
section, Fig.1. the inclination level that
was last used will be displayed.
If inclination is not at zero when the
START/STOP key is used to begin
exercising, the machine will zero itself
while it is starting.
You can adjust the elevation level by
pressing the INCLINE(+) or INCLINE() keys to specify a value of 0 to 15,
depending on how you would like to
do the exercise.
Important: Do not change the
inclination level of your treadmill by
propping it up on objects.
12

IMPORTANT (G6180i): THE
INCLINATION LEVEL MUST BE AT
ITS LOWEST SETTING BEFORE
ATTEMPTING TO PUT THE
TREADMILL INTO THE FOLDED
POSITION.
PULSE MEASUREMENT.-
Your pulse rate is measured by
placing both hands on pulse sensors
(R) with which the electronic unitis
equipped. The pulse rate readout will
appear after a few seconds. The heart
symbol beside the pulse rate value will
flash in time with your heart rate,
Fig.4.
IMPORTANT: This is not a medical
appliance and therefore the heart rate
shown is merely for guideline purposes.
Do not hesitate to get touch with the
Technical Assistance Service if you
have any queries by phoning customer
services (see last page in manual).
BH RESERVES THE RIGHT TO
MODIFY THE SPECIFICATIONS OF
ITS PRODUCTS WITHOUT PRIOR
NOTICE.
13

FAULT FINDING CHART
PROBLEM CHECKS SOLUTIONS
1.The monitor does not
switch on.
1) Make sure that the
machine is plugged in, the
ON/OFF switch in position 1
and that the safety key is
1) Plug the machine into the
mains supply. Set the switch to
position 1 and insert the safety
key.
inserted.
2.The monitor switches
on but the motor fails
to start.
3.Walking motion is
jerky on the
treadmill.
2) Check that the current
limiter is pressed in.
3.a) Check that the belt is
lubricated.
3.b) Check the tension on the
2) Switch the machine off and
press the circuit breaker in.
Lubricate the treadmill band.
3.a) Lubricate the sliding belt.
3.b) Adjust the belt tension.
3.c) Adjust the drive belt tension.
sliding belt.
3.c) Check the tension on the
drive belt.
4.The machine stops
(the breaker trips).
4) Check that the band is
lubricated.
4) Reset the overload button with
the On /Off switch at „0“ and
lubricate the treadmill band.
5.Electrical shocks
through the handrail.
5) Check that the machine is
plugged into an earthed
5) Plug the machine into an
earthed mains socket.
mains socket.
6.The treadmill belt
skews off centre.
6.a) Check that the machine
is level on the floor.
6.b) Check that the machine
does not wobble.
ERROR CODES
Monitor screen display
E1
Possible message fault.
Connect the wire well between top
controller and bottom controller
Monitor screen display
E2
Monitor screen display
E3
Monitor screen display
E5
Monitor screen display
E7
Burst clash.
No speed sensor signal
Possible motor overload. Lubricate the belt.
Safety key. Insert the safety key.
Operating with correct voltage; Connect the
motor wire again.
Replace the sensor light on the bottom
controller or speed sensor.
14
Français
MONITEUR.-
A: Ce moniteur dispose de 7 display:
Durée; Les Programmes; La Vitesse;
La Distance; L’inclinaison; Le Pólux; et
Les Calories.
B: Boutons ou touches d’accès rapide
à l’inclinaison (2- 4- 6- 8- 10- 12- 15).
C: Ce moniteur dispose de 7 boutons ou
touches: PROGRAM; MODE, INCLINE
(↨); START/STOP; VITESSE Km/h (↨).
E: Logement de la clé de sécurité.
F: Boutons ou touches d’accès rapide
à la vitesse (2- 4- 6- 8- 10- 1416Km/h).
g: Clé de sécurité.
H: Bouton ECO
MISE EN MARCHE.-
Connectez le moniteur à une prise
munie d’une mise à la TERRE. Placez
l’interrupteur (L) sur la position (1).
Fig.1.
La clé de sécurité (g) doit être introduite
dans son logement (E) Fig.2, faute de
quoi, la machine ne se mettra pas en
marche. Dès que la clé de sécurité (g)
sera située à sa place (E), un signal
sonore retentira et tous les écrans
afficheront la valeur “00:00” ce qui
voudra dire que lamachine se trouve sur
la position marche (READY).
PASSER DES KILOMÈTRES
AUX MILLES.-
La vitesse de cette machine peut être
affichée en km/h ou en milles. À la
sortie d’usine de la machine la vitesse
est indiquée en km/h.
Pour passer des km/h aux milles faire
comme indiqué ci-après:
15
 Loading...