

Page 1
WBYMW2-OM-USA-ENG-Rev 01
Page 2

Page 3

Important Safety Instructions
1
Important Safety Instructions
Precautions to avoid possible
exposure to excessive microwave
energy
(a) Do not attempt to operate this oven with the door open
since open-door operation can result in harmful exposure to
microwave energy. It is important not to defeat or tamper with
the safety interlocks.
(b) Do not place any object between the oven front face and
the door or allow soil or cleaner residue to accumulate on sealing surfaces.
(c) Do not operate the oven if it is damaged. It is particularly
important that the oven door close properly and that there is
no damage to the: (1) door (bent), (2) hinges and latches (broken or loosened), (3) door seals and sealing surfaces.
(d) The oven should not be adjusted or repaired by anyone
except properly qualified service personnel.
Page 4

Microwave Oven Owner’s Manual
2
Precautions to reduce the risk of burns,
electric shock, fire, injury to persons,
or exposure to excessive microwave
energy
1. Read all instructions before using the appliance.
2. Read and follow the specific precautions to avoid possible
exposure to excessive microwave energy found on page 3.
3. This appliance must be grounded. Connect only to properly
grounded outlet.
4. Install or locate this appliance only in accordance with the
provided installation instructions.
5. Some products such as whole eggs and sealed containers –
for example, closed glass jars – are able to explode and
should not be heated in this oven.
6. Use this appliance only for its intended use as described in
the manual. Do not use corrosive chemicals or vapors in this
appliance. This type of oven is specifically designed to heat,
cook, or dry food. It is not designed for industrial or laboratory
use.
7. As with any appliance, close supervision is necessary when
used by children.
8. Do not operate this appliance if it has a damaged cord or
plug, if it is not working properly, or if it has been damaged or
dropped.
Page 5

Important Safety Instructions
3
9. This appliance should be serviced only by qualified service
personnel. Contact nearest authorized service facility for
examination, repair, or adjustment.
10. Do not cover or block any openings on the appliance.
11. Do not store this appliance outdoors. Do not use this product near water– for example, near a kitchen sink, in a wet
basement, or near a swimming pool or similar locations.
12. Do not immerse cord or plug in water.
13. Keep cord away from heated surfaces.
14. Do not let cord hang over edge of table or counter.
15. To reduce the risk of fire in the oven cavity:
i) Do not overcook food. Carefully attend appliance when
paper, plastic, or other combustible materials are placed
inside the oven to facilitate cooking.
ii) Remove wire twist-ties from paper or plastic bags before
placing bag in oven.
iii) If materials inside the oven ignite, keep oven door closed,
turn oven off, and disconnect the power cord, or shut off
power at the fuse or circuit breaker panel.
iv) Do not use the cavity for storage purposes. Do not leave
paper products, cooking utensils, or food in the cavity when
not in use.
Page 6

Microwave Oven Owner’s Manual
4
16. Liquids, such as water, coffee, or tea are able to be overheated beyond the boiling point without appearing to be
boiling. Visible bubbling or boiling when the container is
removed from the microwave oven is not always present.
Warning: Hot liquids could suddenly boil over when the container is dis-
turbed or a spoon or other utensil is inserted into the liquid.
Additional Important Safety Instructions
1. Oversize foods or oversize metal utensils should not be
inserted in a microwave oven as they may create a fire or risk
of electric shock.
2. Do not clean with metal scouring pads.
3. Do not store any materials, other than manufacturer’s recommended accessories, in this oven when not in use.
4. Do not store anything directly on top of the appliance surface when the appliance is in operation.
5. Liquids such as water, coffee or tea are able to be overheated beyond the boiling point without appearing to be
boiling.
6. Do not use narrow necked containers to boil or reheat
liquids.
Page 7

Important Safety Instructions
5
7. The liquid may splash out during or after heating or when
adding ingredients (instant coffee, etc) resulting in possible
harm or injury to persons.
8. To reduce the risk of injury, stir the liquid several times
before heating.
9. After heating, allow the container to stand in microwave
oven for at least 40 seconds before removing the container.
10. Do not heat water and oil, or a fat together which may
cause a violent eruption.
Grounding Instructions
This appliance must be grounded. In the event of an electrical
short circuit, grounding reduces the risk of electric shock by
providing an escape wire for the electric current. This appliance is equipped with a cord having a grounding wire with a
grounding plug. The plug must be plugged into an outlet that is
properly installed and grounded.
Warning: Improper use of the grounding can result in a risk of electric shock.
Page 8

Microwave Oven Owner’s Manual
6
Consult a qualified electrician or serviceman if the grounding
instructions are not completely understood, or if doubt exists as
to whether the appliance is properly grounded.
Caution: Do not use an extension cord. If the power supply cord is too short,
have a qualified electrician or serviceman install an outlet near the
appliance.
Testing Containers and Utensils
Some non-metallic containers and utensils become extremely
hot when used in a microwave oven. To avoid risk of scalding, use the following procedure to determine if a container
or utensil is safe for microwave use:
1. Fill a microwave-safe container with 1 cup (250 ml) of cold
water. Place it in the microwave oven along with the container
or utensil in question.
2. Turn the oven on maximum power for 1 minute. Do not
exceed 1 minute cooking time.
3. Carefully feel the container. If the empty container is warm,
do not use it for microwave cooking.
Page 9
Important Safety Instructions
7
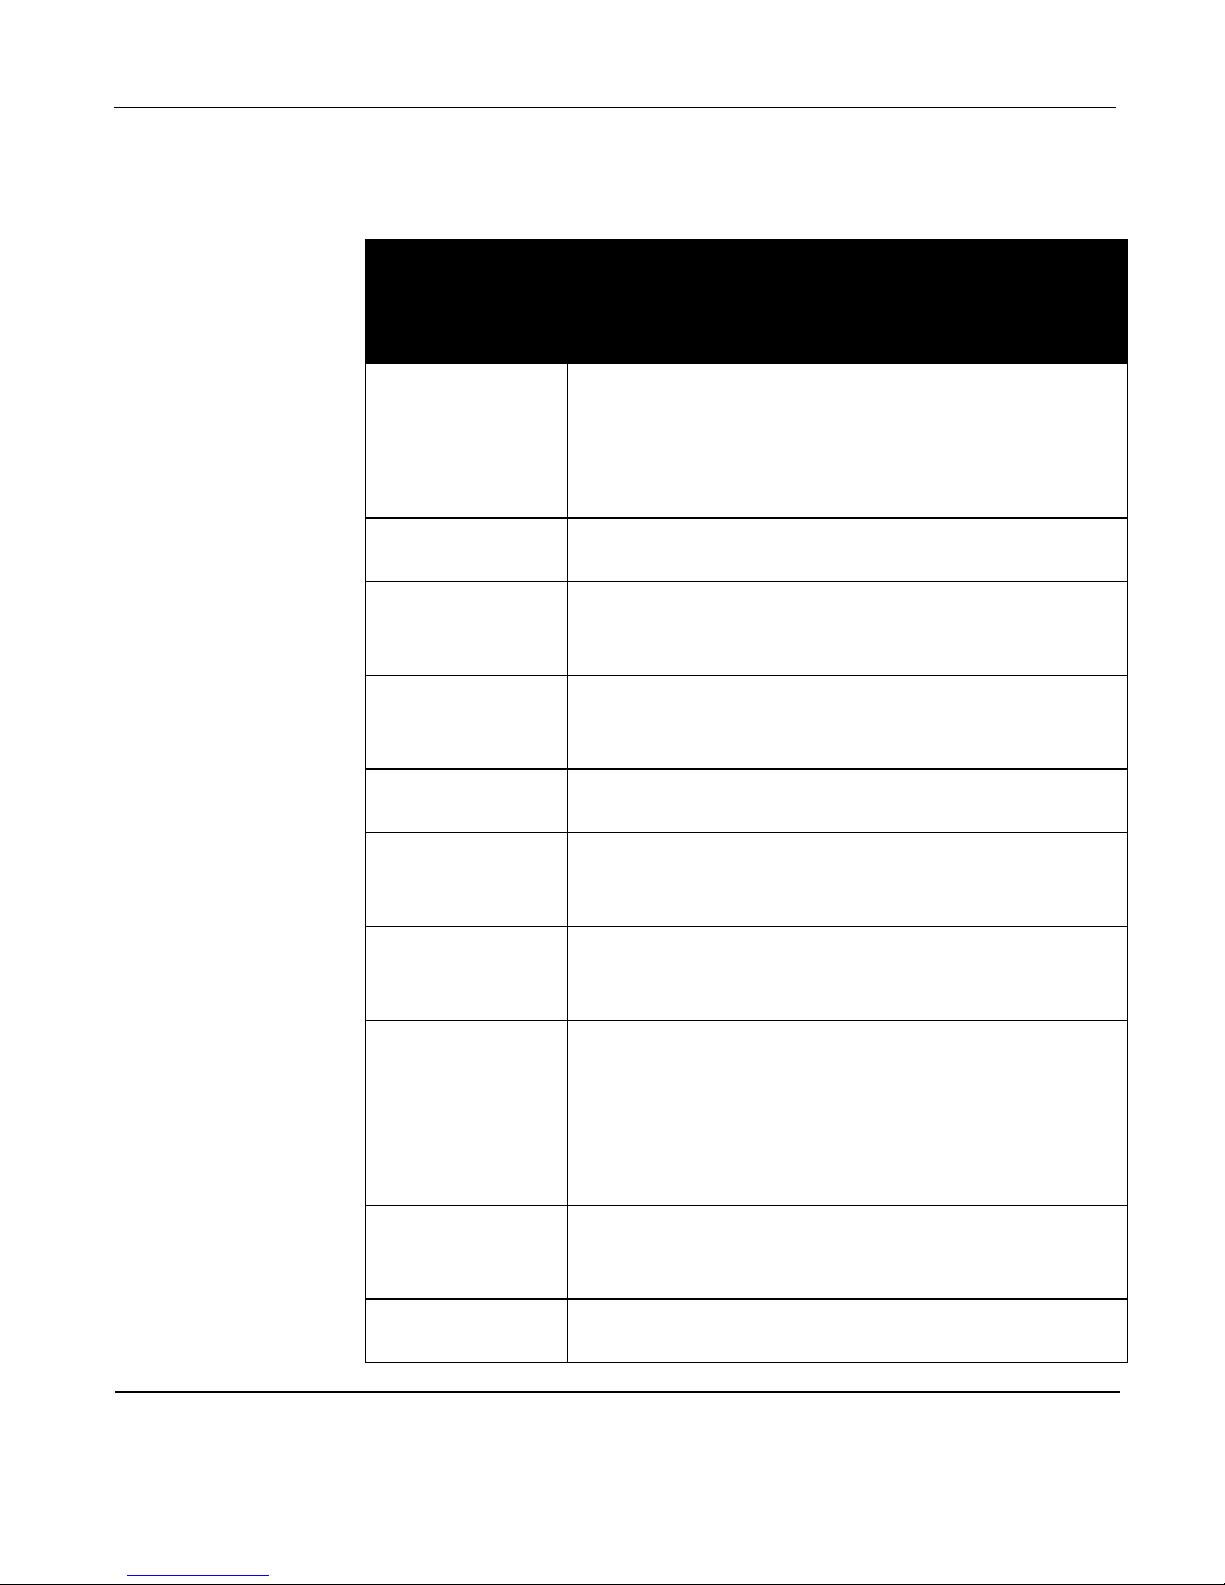
TABLE 1. Materials You Can Use in a Microwave Oven
Cooking
Accessories
(not included with
Microwave)
Remarks
Aluminum foil Shielding only. To prevent overcooking, use small,
smooth pieces to cover the thin areas of meat or
poultry. Arcing can occur if the foil is too close to
the oven walls. The foil should be at least 1 inch
away from oven walls.
Dinnerware Microwave-safe only. Follow manufacturer’s instruc-
tions. Do not use cracked or chipped dishes.
Glass jars Always remove lid. Use only to heat food until just
warm. Most glass jars are not heat resistant and
may break.
Glassware Heat-resistant oven glassware only. Make sure there
is no metallic trim. Do not use cracked or chipped
dishes.
Oven cooking
bags
Follow manufacturer’s instructions. Do not close
with metal tie. Make slits to allow steam to escape.
Paper plates Use microwave-safe plates only for short-term cook-
ing/warming only. Do not leave oven unattended
while cooking.
Paper towels Use microwave-safe paper towels only to cover
food for reheating and absorbing fat. Use with
supervision for short-term cooking only.
Plastic containers Use microwave-safe containers only. Follow the
manufacturer’s instructions. Containers should be
labeled Microwave-Safe. Some plastic containers
soften as the food inside gets hot. Boiling bags and
tightly closed plastic bags should be slit, pierced, or
vented as directed by package.
Plastic wrap Microwave-safe only. Use to cover food during
cooking to retain moisture. Do not allow plastic
wrap to touch food.
Wax paper Use a cover to prevent splattering and to help retain
moisture.
Page 10
Microwave Oven Owner’s Manual
8
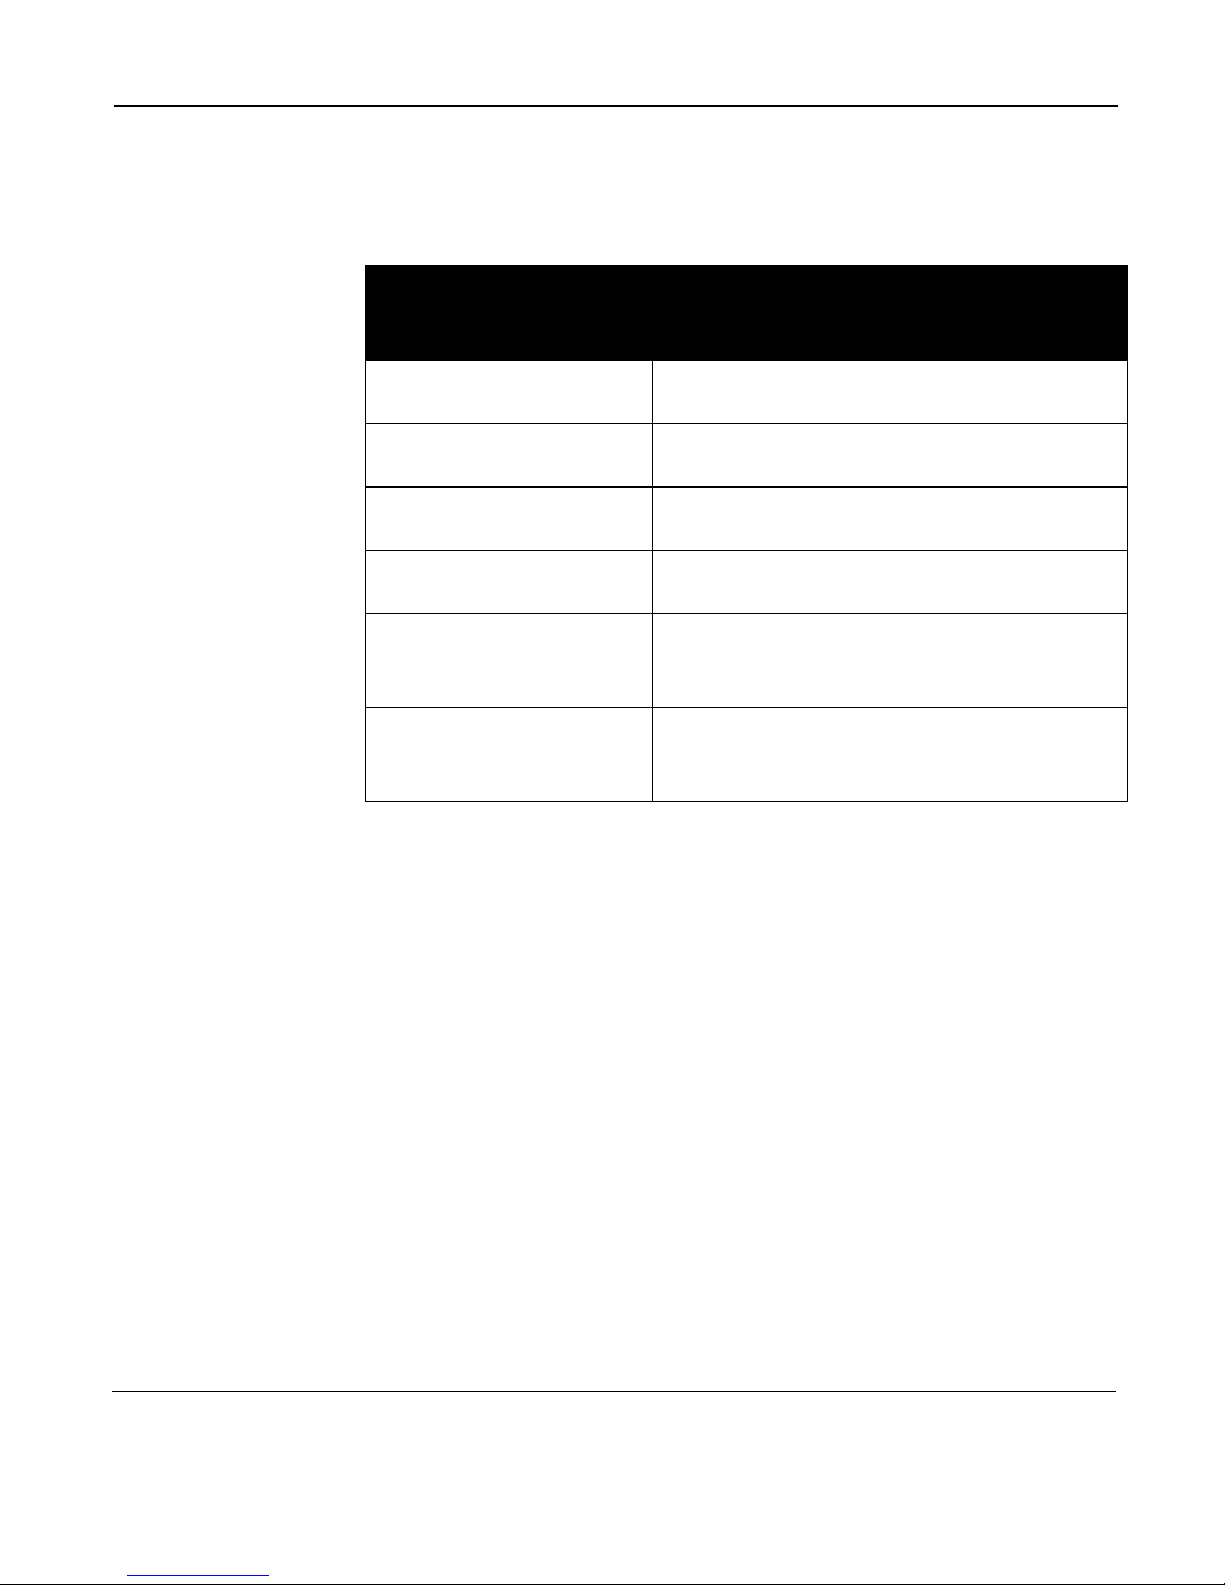
TABLE 2. Materials to Avoid in a Microwave Oven
How Your Microwave Oven Works
The microwave oven has an electronic tube called a magnetron that produces microwaves, very short radio waves. The
microwaves then pass through a wave-guide and into the oven
cavity. The microwaves penetrate the food and cause water
molecules within the food to vibrate extremely rapidly. This
vibration causes considerable friction or heat between the
water molecules resulting in a rapid rise in temperature. This
type of heating is very efficient and the cooking time is therefore shorter than in a conventional oven. The rate of heating
depends on the moisture content, shape, volume, and amount
of food present. Metallic materials totally reflect microwaves.
Non-metallic materials such as glass, paper, and plastics are
Cooking Accessories
(not included with
Microwave)
Remarks
Aluminum pan or tray May cause arcing. Transfer food into micro-
wave-safe dish.
Food carton with metal
handle
May cause arcing. Transfer food into microwave-safe dish.
Metal or metal-trimmed
utensils
Metal shields the food from microwave
energy and may cause arcing.
Metal twist ties May cause arcing and could cause a fire in
the oven.
Plastic foam Plastic foam may melt or contaminate the
liquid inside when exposed to high
temperature.
Wood Wood will dry out and may split. Avoid
using wooden containers or utensils in the
oven.
Page 11

Important Safety Instructions
9
partially transparent to microwaves. Microwaves do not
directly heat the oven walls and most cooking utensils because
they do not absorb microwave energy. However, they frequently get very warm through being in direct contact with hot
food.
Page 12

Microwave Oven Owner’s Manual
10
Introducing the Beyond™
Microwave Oven
Your Beyond Microwave Oven delivers the ultimate ease of
use and convenience in microwave cooking. The Beyond
Microwave Oven is ideal for routine microwaving chores:
warming your cup of coffee, reheating leftovers, defrosting
that roast or baking potatoes and so on. But the Beyond Microwave Oven can do so much more.
The Beyond Microwave Oven is packed with advanced features, like "Scan and Learn" and the latest networking
technology to take the guesswork out of microwave cooking.
You won’t need to wonder anymore about the correct cooking
time and power level. No more food that’s burned on the
edges and frozen in the middle.
The Beyond ’s built-in intelligence allows you to automatically
cook nearly any packaged food to perfection. Use the oven’s
scanning wand to swipe the bar code on a package of microwaveable food and the Beyond Microwave Oven is instantly
programmed for precisely the right power level and cooking
time – even when the cooking requires defrosting, multiple
power levels and varying cooking times.
You can use the oven’s Add 30 Seconds feature to cook in multiples of 30 seconds, or easily add a minute or two to a
previously selected cooking time.
The Beyond Microwave Oven is equipped with a control panel
safety lock to prevent inadvertent operation.
Page 13

Introducing the Beyond™ Microwave Oven
11
Please read this manual thoroughly before using the Beyond
Microwave Oven. Familiarize yourself with the safety precautions and all the great features of your Beyond Microwave
Oven.
Keep this manual handy for future reference.
Let’s get cooking!
Unpack Your Beyond™ Microwave
Oven
1. Carefully remove the Beyond Microwave Oven and all
other contents from the carton. Remove all packing materials
from the interior of the oven.
Note: Do not remove the light brown, mica wave-guide cover,
which is located on the right interior wall.
2. When the oven is packaged for shipment, a clear plastic
film is placed over the control panel; carefully peel it off.
3. Verify that you have all the items for turntable assembly, see
figure1. Be sure all items are in good condition. Check the
oven for any damage, such as a misaligned or bent door,
damaged door seals and sealing surfaces, broken or loose
door hinges and latches, or dents on the door or interior walls.
If there is any damage, do not operate the oven. Contact your
Beyond retailer or contact Beyond Customer Relations at
1-800-947-3744 between 7:30 a.m. and 6:00 p.m., CST,
Monday through Friday, or by e-mail at [email protected].
Page 14

Microwave Oven Owner’s Manual
12
Choose a Location
Because you will be using your Beyond Microwave Oven frequently, choose a location that allows convenient access.
Keep these points in mind when deciding where to place your
oven:
• The oven must be placed on a firm, level surface.
• Be sure that air can circulate freely around the oven. Allow
two inches of clearance around all vents.
• Do not install oven over a range cook-top or other heat-producing appliance.
• Place the oven as far away from radios and TVs as possible. Operation of microwave ovens may cause interference
with your radio or TV reception.
• The oven should be the only appliance on the circuit.
Page 15
Introducing the Beyond™ Microwave Oven
13
Install the Turntable
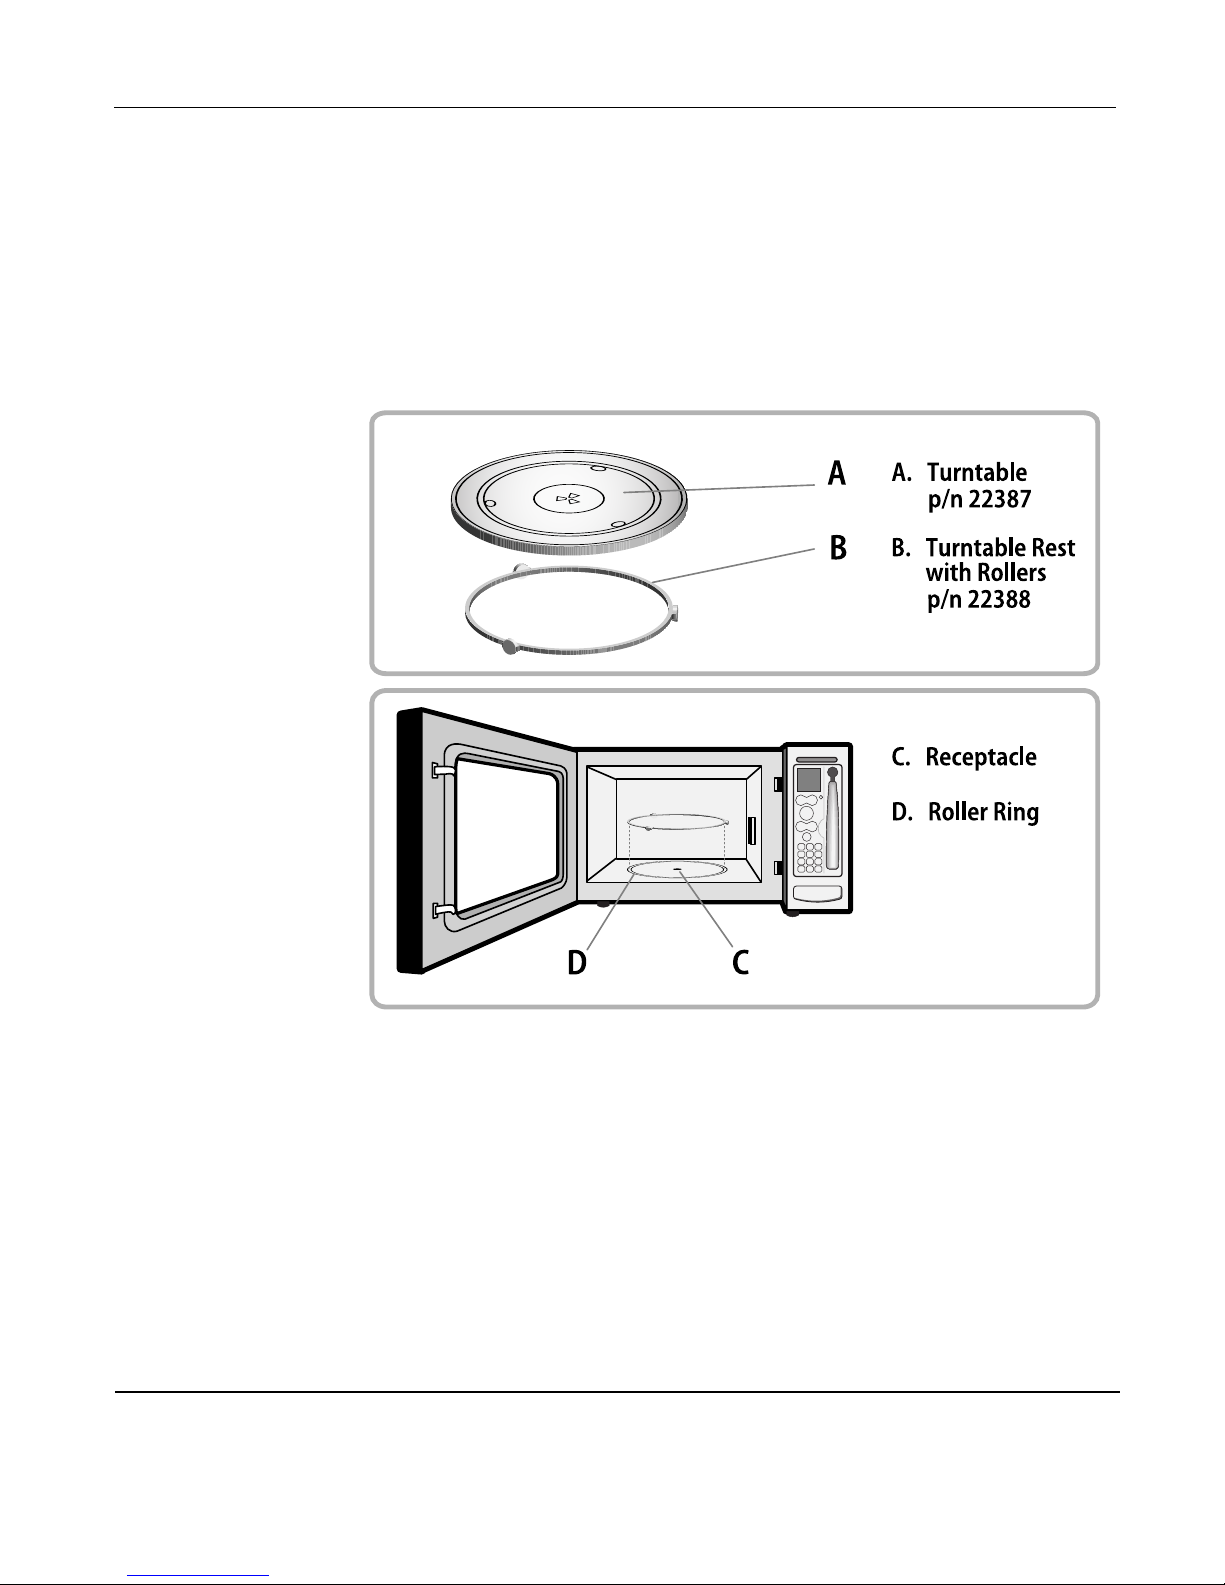
The turntable must be installed before using the Beyond Microwave Oven. Refer to Figure 1 for turntable installation.
FIGURE 1. Turntable Installation
1. Place the turntable rest with rollers (B) on the roller ring (D)
in the floor of the microwave oven.
2. Place the turntable (A) on top of the turntable rest (B). The
turntable should turn freely when the microwave oven is in use.
If it does not, make sure the turntable and turntable rest with
rollers are in position.
Page 16

Microwave Oven Owner’s Manual
14
Note: Never operate the microwave oven without the turntable installed.
• The turntable must be able to rotate freely during oven use.
• Never place the turntable upside down.
• Always place food and containers of food on the turntable
for cooking.
• The turntable may reverse direction when the oven is
stopped and restarted.
• If the turntable or any part of the turntable assembly is damaged, contact Consumer Relations at 1-800-947-3744 for
replacement parts.
Set the Clock
Note: If you do not have a Home Hub or an iCEBOX, set the
oven’s clock according to the instructions provided here. If you
have a Home Hub or an iCEBOX, the clock will be set automatically. Skip this step. All instructions in this Owner’s Manual
are written as though the clock is set.
Before using the Beyond Microwave Oven for the first time,
you must set the clock to the correct time of day.
To set the clock:
1. Press CLOCK on the control panel. The display will flash
0:00.
Page 17

Introducing the Beyond™ Microwave Oven
15
2. Use the digits on the number pad to enter the hour and minutes. For example, if you want to set the clock to "5:30," press
in sequence: 5 3 0. To set the clock to "10:45," press in
sequence: 1 0 4 5.
Note: The clock is a 12-hour clock. It does not distinguish
AM /PM.
3. Once you have entered the correct time of day, press
CLOCK again to save the time setting.
Note: Colon flashes when clock is running.
Page 18
Microwave Oven Owner’s Manual
16
Get To Know Your Beyond™
Microwave Oven
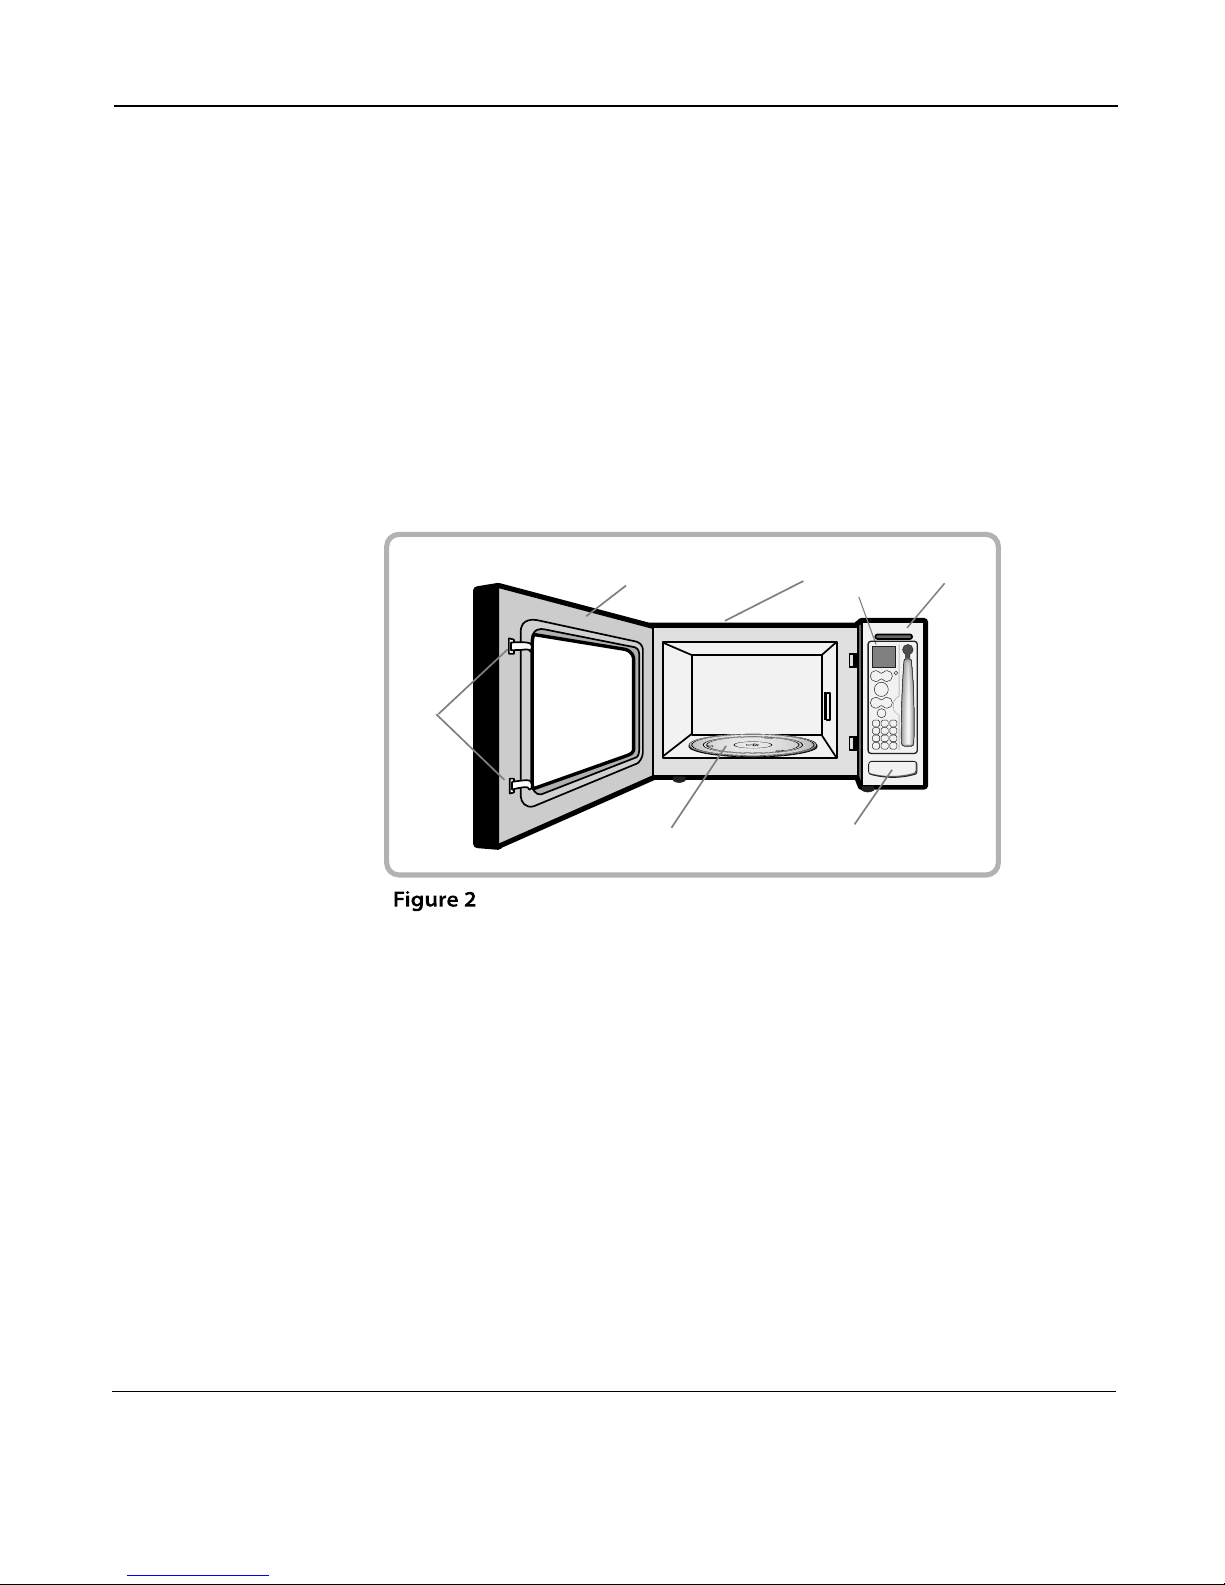
The main features of your Beyond Microwave Oven are shown
below in Figure 2.
FIGURE 2. Microwave Oven Features
A
A. Door with Viewing Window
B. Vents (Top, Back and
Bottom of Microwave)
C. Control Panel
D. SANI Card Slot
E. Door Release
F. Turntable
G. Safety Interlock System
B
C
D
E
F
G
Page 19
Get To Know Your Beyond™ Microwave Oven
17
Control Panel
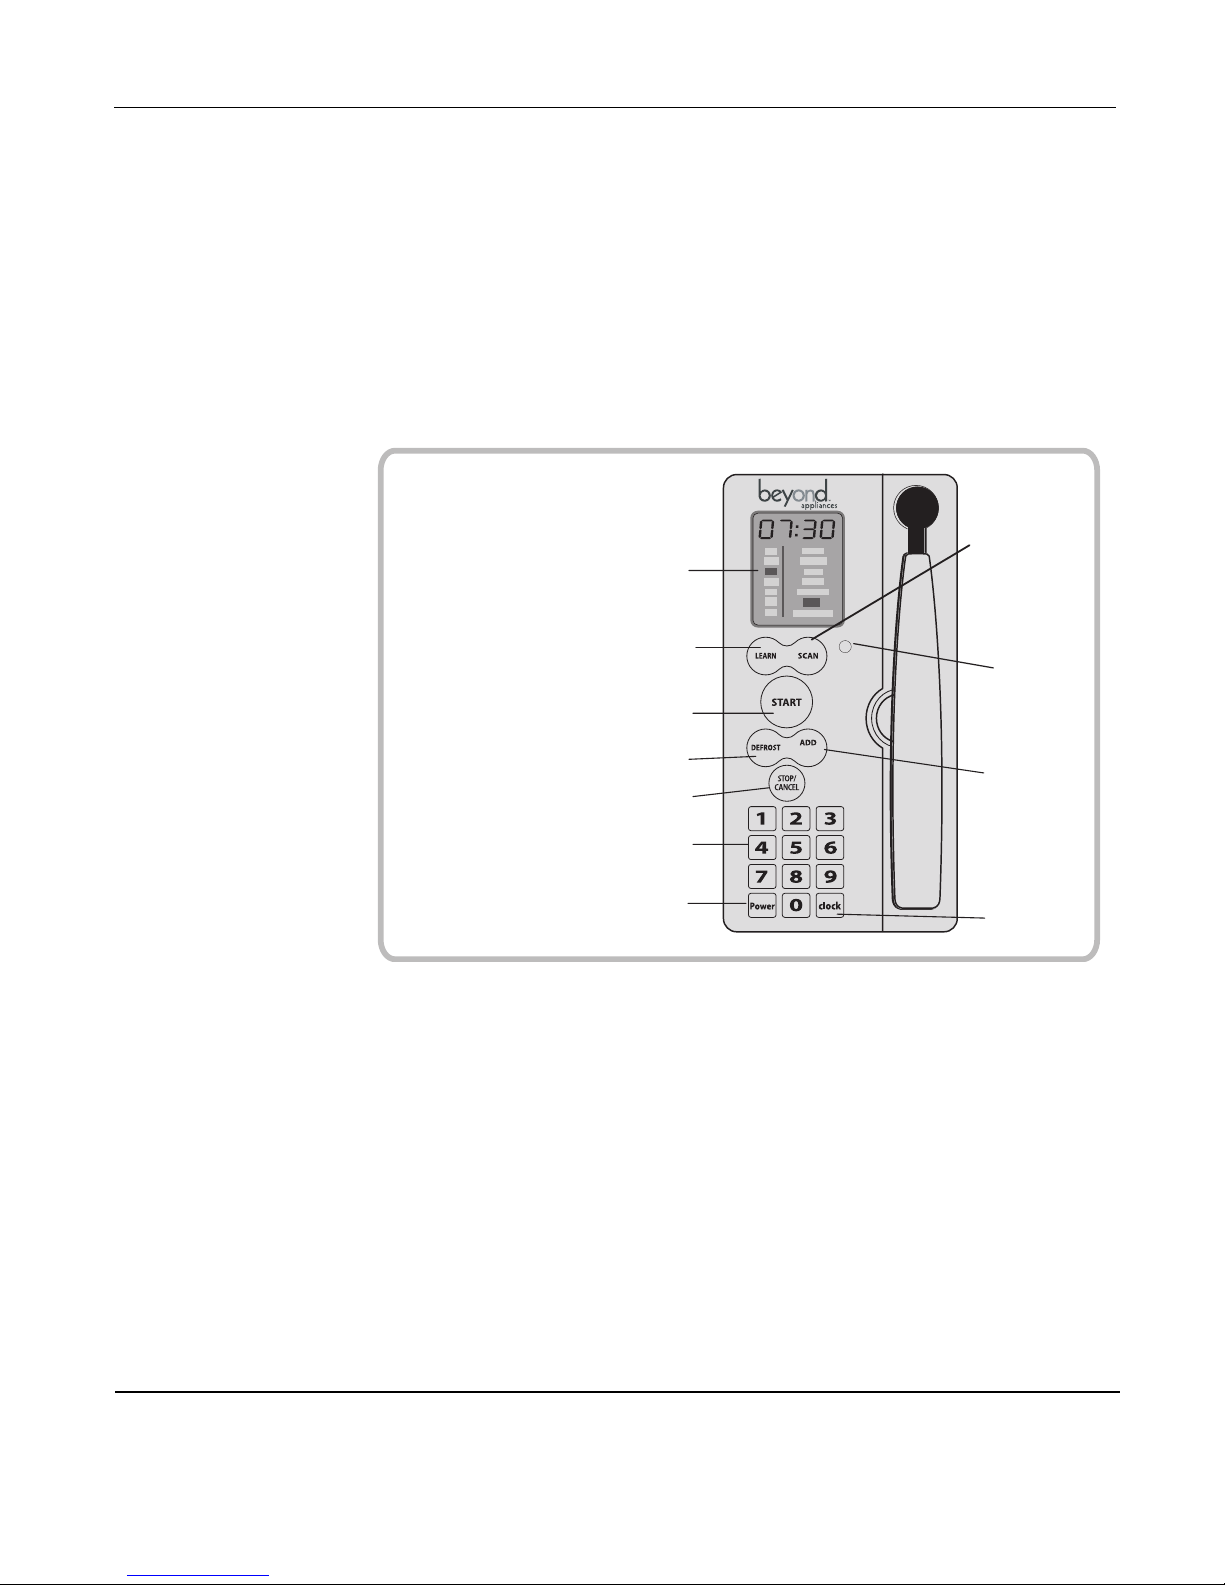
The control panel is shown in Figure 3, below. Control panel
push buttons and features are described in Table 1, immediately following.
FIGURE 3. Microwave Control Panel
2. Number Pad
3. STOP/CANCEL
4. DEFROST
5. START
6. LEARN
7. Display Window
8. SCAN
9. NETWORK
10. ADD 30 SEC
11. CLOCK
1. Power Level
Selector
1
11
10
9
8
2
3
4
5
6
7
30 SEC.
NETWORK
Page 20
Microwave Oven Owner’s Manual
18
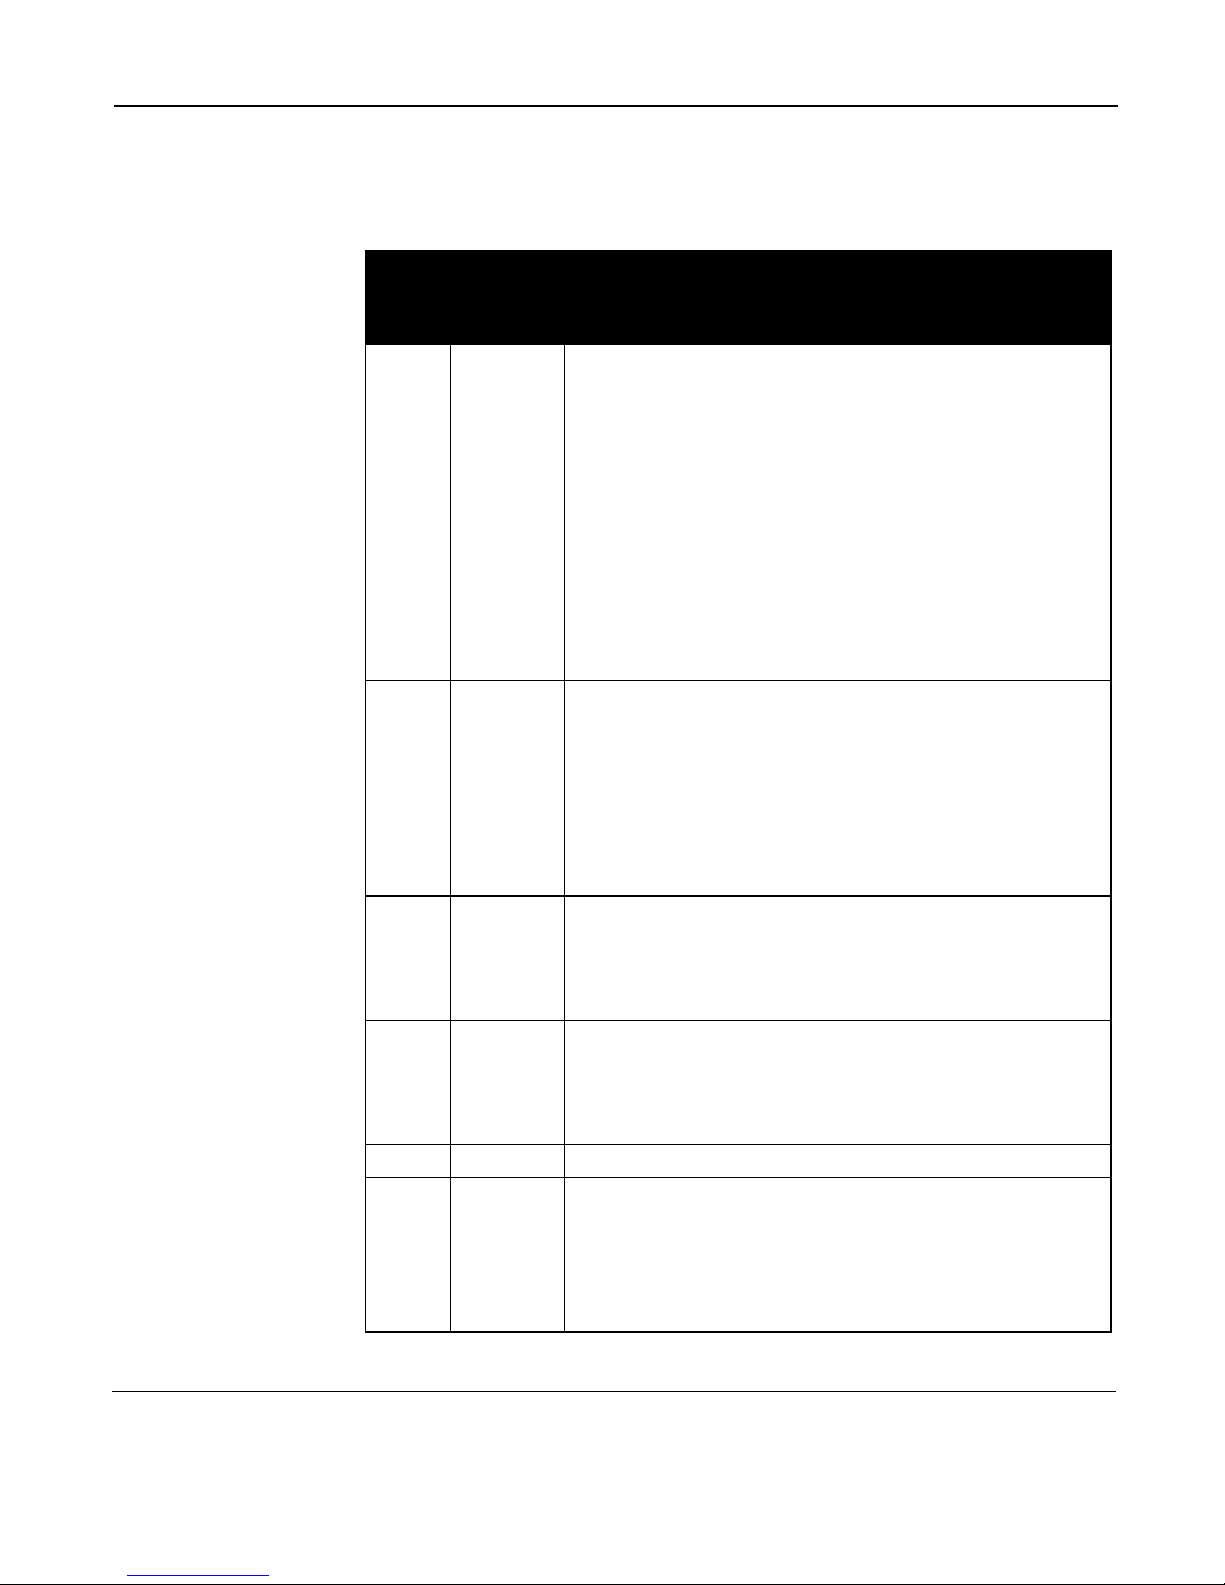
TABLE 3. Beyond Microwave Oven Control Panel
Figure
No.
Push
Button or
Feature
Function
1 POWER Press POWER to select a power setting. The
power setting (P 10, P 9 etc.) will appear in the
display window. The default setting is P 10, the
highest power setting. Pressing POWER repeatedly causes the power setting to decrease one
level at a time, from P 10 (highest) to P 1 (lowest).
To change levels more rapidly, press and hold
POWER until you reach the desired level.
During oven operation, pressing POWER will
cause the current power level to appear briefly on
the display.
2Number
Pad
The number pad allows you to enter digits for
time.
•For setting the clock, See Set the Clock on
page 14.
•Please See Basic Heating/Reheating on
page 23. for instructions on entering cooking
times.
3STOP/
CANCEL
Press STOP/CANCEL once to temporarily interrupt any oven operation. To resume, press START.
Press STOP/CANCEL twice to cancel any oven
operation or program.
4 DEFROST Press DEFROST once to use the oven’s Auto
Defrost function. Press twice to begin Time Defrost.
See Defrosting on page 26. for detailed instruc-
tions on using the defrost function.
5 START Press START to begin cooking.
6 Learn Press LEARN to teach your microwave how to
cook a food not in the oven’s memory so that it
will recognize it in the future. Please see Using the
Learn Function on page 40 for instructions on
using the Learn function.
Page 21
Get To Know Your Beyond™ Microwave Oven
19
Other Important Oven Features
Control Panel Safety Lock
The oven control panel can be locked to prevent inadvertent
operation.
To lock the Control Panel:
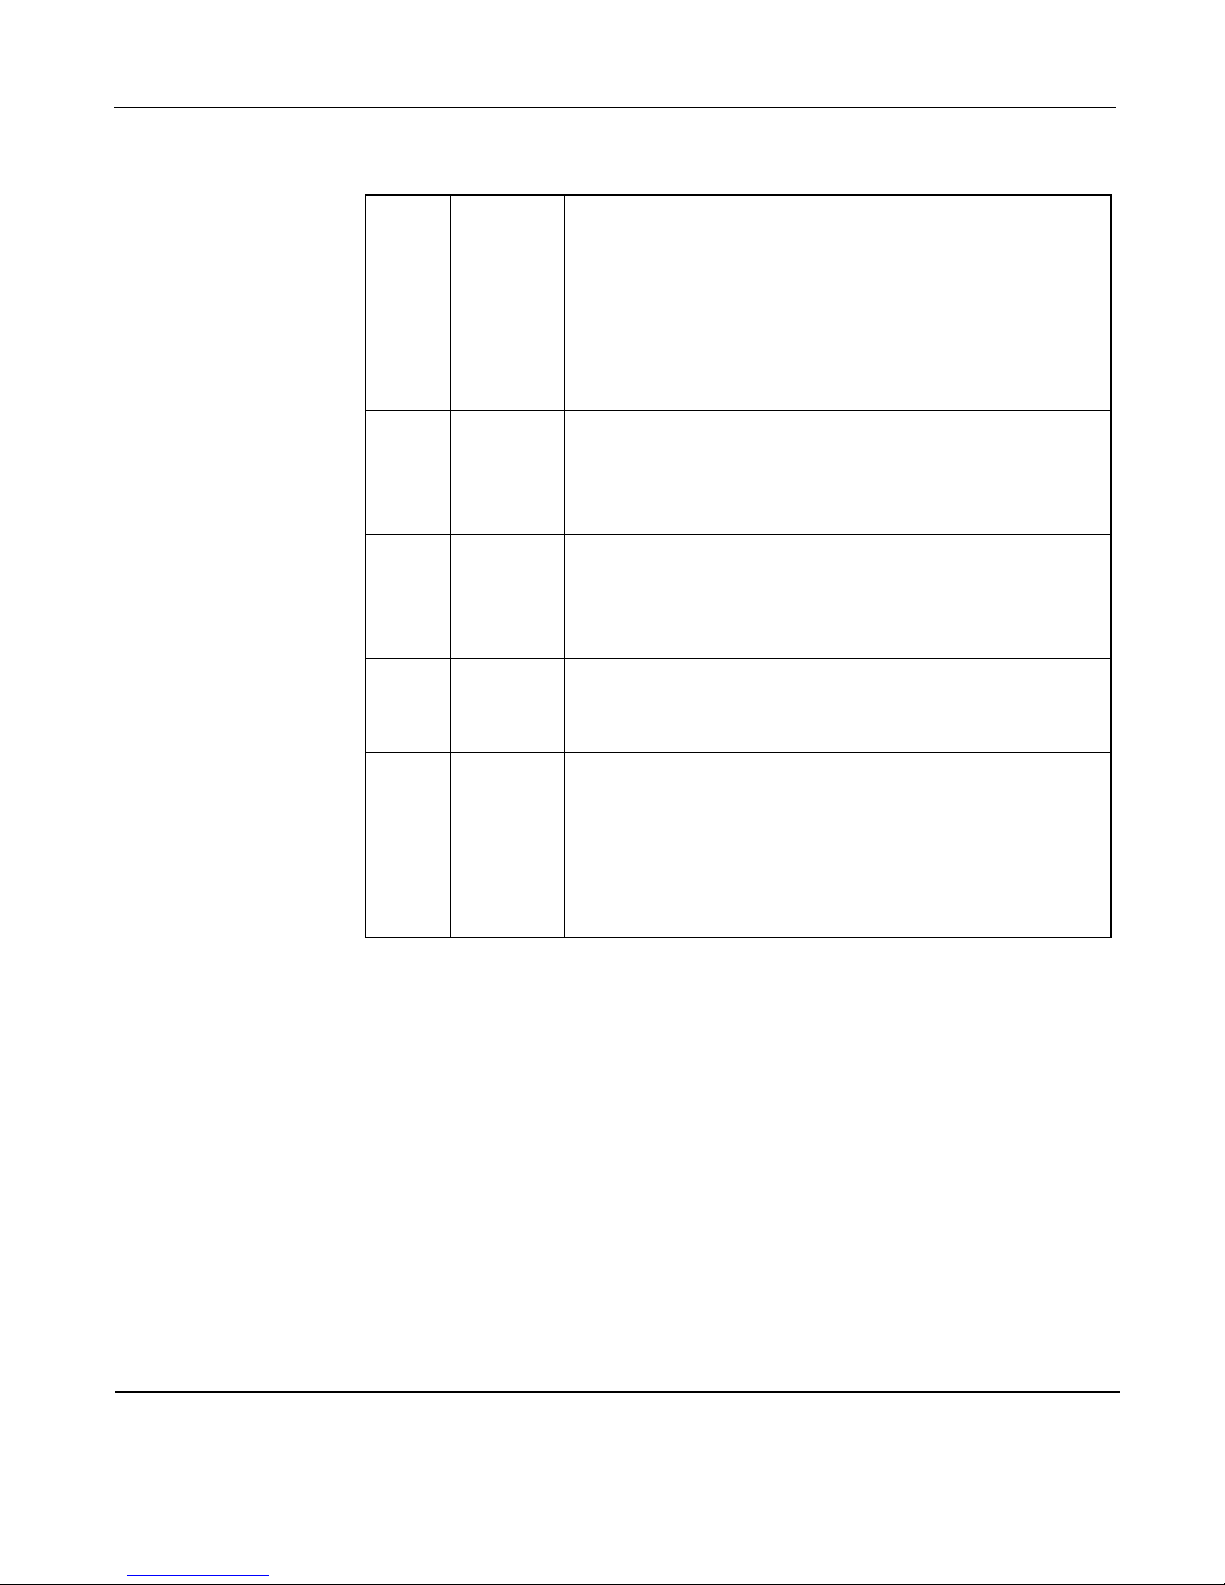
7 Display
Window
The display window shows the time of day, cook-
ing time, food weight, power level, learn and user
prompts such as Push Start or Scan.
If the control panel safety lock is activated, LOC
appears in the display window. Please see Other
Important Oven Features on page 19 for instruc-
tions on using the control panel safety lock.
8 SCAN Press SCAN to initiate the scan function. Please
see More About Beyond Microwaving on
page 32 for complete information on using this
feature of your microwave oven.
9 NET-
WORK
The NETWORK button works in conjunction with
the Home Hub or the iCEBOX. Please see More
About Beyond Microwaving on page 32 for
instructions on using this feature.
10 ADD 30
SEC.
Press ADD 30 SEC. to add 30 more seconds of
cooking at the current power level. This function
does not work in defrost mode.
11 Clock If you have a Home Hub, the clock is set and the
correct time is maintained automatically.
If you DO NOT have a Home Hub: Press CLOCK
to set the correct time of day. To set the clock,
pleaseSee Set the Clock on page 14.
The clock allows viewing the time during cooking.
Page 22

Microwave Oven Owner’s Manual
20
• Make sure the oven is not in use. If necessary, clear or stop
any functions.
• Press and hold STOP/CANCEL for approximately 4 seconds. LOC will appear in the display window. The control
panel will not function in lock mode.
To unlock the Control Panel:
• Press and hold STOP/CANCEL for approximately 4 sec-
onds. The time of day will appear in the display window.
Auto Cancel
The oven will automatically clear itself and return to the time of
day display if START is not pressed within 1 minute of select-
ing a cook time.
Instant On
The oven features one button operation for cooking on high
power for one to six minutes. Press a number from 1 to 6 on
the number pad, the oven will begin cooking immediately in
accordance with the number pressed.
Pause Function
During cooking, the oven will stop operating if:
• The door is opened
• STOP/CANCEL is pressed
Page 23

Get To Know Your Beyond™ Microwave Oven
21
However, the cooking program is not canceled. To resume
cooking, close the door and press START. To cancel the cook-
ing program completely, press STOP/CANCEL again.
Fan Protection
When the cooking time is longer than 5 minutes, the fan will
continue to run and the turntable will continue to rotate for
approximately 15 seconds after the cooking time is complete.
To turn off immediately, press STOP/CANCEL.
Page 24

Microwave Oven Owner’s Manual
22
Basic Oven Operation
Follow the instructions below for basic heating, reheating and
cooking needs.
In a Nutshell
1. Prepare the food.
Place your food in a microwave-safe package or container. Set
it carefully in the center of the turntable and close the oven
door securely.
2. Select a power level.
• Press POWER to select the power level. P 10 appears in
the display window.
• If you want to reduce the power level, press POWER
repeatedly until you reach the desired level. Each power level
will appear in the display window counting down from P 10 to
P 1.
• Please see Guidelines for General Microwave Cooking: on
page 47 for recommended cooking power levels.
3. Next, set the cooking time.
Use the digits on the number pad to enter a cooking time. For
example, to enter a cooking time of one minute and thirty seconds (1:30), press in sequence: 1 3 0. "Push Start" will flash
in the display window.
Page 25

Basic Oven Operation
23
4. Start Cooking.
• Press START to start cooking. The display window shows
the time remaining.
• You may interrupt cooking at any time by pressing STOP/
CANCEL. "Push Start" will flash in the display window if cooking is interrupted.
• To cancel the cooking program press STOP/CANCEL two
times. The time of day will appear in the display window.
5. Using the Instant On feature.
You may also enter the cooking time in multiples of 1 minute
by pressing a number from 1 to 6. The oven will begin cooking immediately.
Basic Heating/Reheating
• Please refer to Figure 3, for an illustration of the control
panel.
• When preparing packaged food, follow the instructions on
the label for container size and preparation, power setting,
and cooking time. EXCEPT: Disregard instructions to rotate containers midway through cooking as the turntable makes this
unnecessary.
• Avoid using containers with metallic parts or metallic finishes such as painted gold trim. Remove twist ties with metal
wires.
Page 26

Microwave Oven Owner’s Manual
24
• Cover foods loosely with a microwave-safe paper towel or
microwave-safe plastic wrap to avoid splatters, reduce cooking time, and prevent drying the food.
For basic heating, reheating, and cooking:
1. Place your food in a microwave-safe package or container.
Set it carefully in the center of the turntable and close the oven
door securely.
2. Press POWER to select the power setting. P 10 will appear
in the display window. Pressing POWER repeatedly will
reduce the power setting one level at a time from P 10 (highest) to P 1 (lowest). If you do not select a power setting, the
oven automatically operates at P 10, the highest level.
3. Enter the desired cooking time by pressing the digits on the
number pad. For example, to enter two minutes and ten seconds, press in sequence: 2 1 0. The digits you select will
appear at the top of the display window while the prompt
PRESS START flashes in the lower half of the display window.
If you make a mistake or decide to change the cooking time,
press STOP/CANCEL one time and re-enter the desired
power setting and cooking time.
4. Press START to begin cooking. The display window will
show the remaining cooking time, counting down continuously. When the full cooking time has elapsed, the oven will
beep four times and the time of day will reappear on the display window.
5. Press the door release to open the door and using oven
mitts, remove your food.
Page 27

Basic Oven Operation
25
6. If the food needs to cook longer, you may follow the steps
above, selecting a power level and cooking time. Or, simply
press ADD 30 SECONDS to add 30 seconds of cooking time
at high power.
Note: You may interrupt cooking at any time by pressing the
door release or by pressing STOP/CANCEL one time. To
resume cooking, close the door and press START.
• To cancel the program completely, press STOP/CANCEL
twice. The time of day will appear in the display window.
• While the oven is in operation, you may view the time of
day by pressing CLOCK. The time of day will be displayed for
a few seconds, and then the cooking time will reappear.
• While the oven is running, you may view the current power
level by pressing POWER. The power level will be displayed
for a few seconds, and then the cooking time will reappear.
• When the cooking time is longer than 5 minutes, the fan will
continue to run and the turntable will continue to rotate for
approximately 15 seconds after the cooking time is complete.
To turn off immediately, press STOP/CANCEL.
Two Stage Microwave Cooking
For best results, many foods need to be cooked in two stages;
that is, you begin cooking at one power level and then complete cooking on a second power level.
Page 28

Microwave Oven Owner’s Manual
26
To program your Beyond Microwave Oven for
two stage cooking:
1. Select the desired power level for stage one by pressing
POWER until the desired power level appears.
2. Use the number pad to enter the cooking time in minutes
and seconds. For example, to enter a time cooking time of 6
minutes and 45 seconds, press in sequence 6 4 5.
3. Next, select the power level for stage two by pressing
POWER until the desired power level is displayed.
4. Set the desired cooking time for stage two by entering the
desired minutes and seconds using the number pad.
5. Press START. At the end of stage one cooking stage two
cooking will begin. At the end of stage two cooking, the oven
will beep four times.
Defrosting
The Beyond Microwave Oven has two defrost modes: Auto
Defrost and Time Defrost. Use Auto Defrost to thaw food based
on weight. Use Time Defrost to thaw for a specified amount of
time.
Auto Defrost
The Beyond Microwave Oven automatically calculates the correct defrosting time and power level based on the weight of
the frozen food.
Page 29

Basic Oven Operation
27
The maximum food weight that can be entered is six pounds. If
a higher weight is entered, the oven will beep twice and the
display window will return to the time of day.
To Auto Defrost:
1. The frozen food must be removed from packaging and
placed in a microwave-safe package or container. Be sure to
remove twist ties that contain metal wire. Place the frozen food
on the turntable and close the oven door securely.
2. Press DEFROST one time. The display will flash 0.0.
3. Using the number pad, enter the weight of the frozen
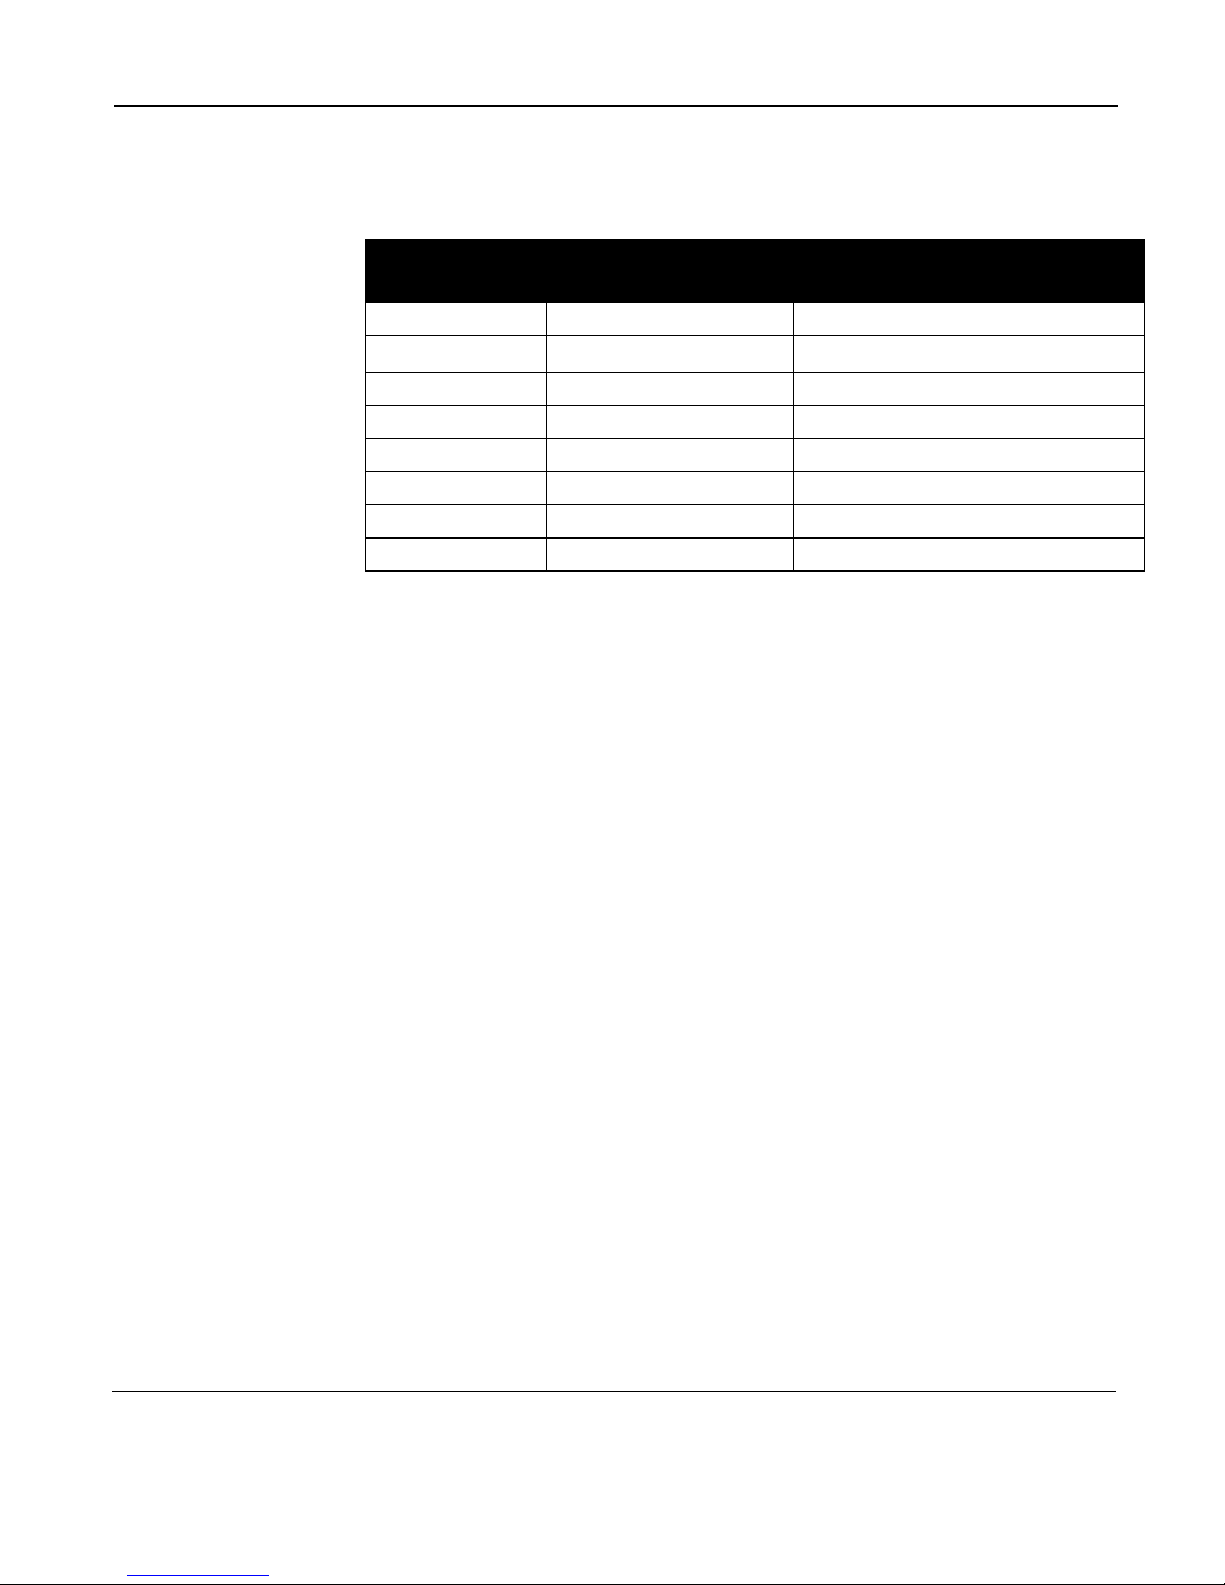
food in pounds and decimal fractions of a pound. The microwave will only allow you to enter a single digit for pounds
and a single digit for any decimal fraction of a pound. Round
any decimal fractions to the nearest tenth. Please refer to the
table below for sample entries.
Page 30
Microwave Oven Owner’s Manual
28
TABLE 4. Defrosting Times
4. Press START to begin defrosting. The defrost time (minutes
: seconds) will appear in the display window and begin counting down. When the timer reaches 0:00 the oven will shut off
and beep four times. The time of day will reappear on the display window.
5. The oven will beep twice periodically during the defrosting
time. This is to remind you to temporarily interrupt defrosting to
turn the food over, stir, or break into smaller pieces, as appropriate. The oven will continue to defrost until the time is
elapsed.
To temporarily interrupt defrosting:
• Press the door release or press STOP/CANCEL one time.
• Turn the food over, stir, or break into smaller pieces, as
appropriate.
• Close the oven door and press START to resume defrosting.
If the food
weighs
Press Display Reads
.25 pounds 2 0.2
.50 pounds 5 0.5
.75 pounds 7 0.7
1.0 pounds 1 0 1.0
1.25 pounds 1 2 1.2
1.50 pounds 1 5 1.5
1.75 pounds 1 7 1.7
2.0 pounds 2 0 2.0
Page 31

Basic Oven Operation
29
6. When the defrosting time is complete, the oven will beep
four times and the time of day will reappear in the display window. Press the door release to open the door and using oven
mitts, remove the food. If the food needs to defrost longer, stir,
or turn over, as appropriate .
7. Allow food to sit a few minutes before stirring and serving.
Most meat needs to stand 5 minutes to complete defrosting.
Large roasts should stand for about 30 minutes.
Time Defrost
To defrost food for a specified time:
1. The frozen food must be in a microwave-save package or
container. Be sure to remove twist ties that contain metal wire.
Place the frozen food on the turntable and close the oven door
securely.
2. Press DEFROST twice. The display window will flash 0:00.
3. Enter the desired defrost time in minutes and seconds using
the digits on the number pad.
4. Press START.
5. The oven will beep twice halfway through the defrosting
time. This is to remind you to temporarily interrupt defrosting to
turn the food over, stir, or break into smaller pieces, as appropriate. The oven will continue to defrost until the time is
elapsed.
Page 32

Microwave Oven Owner’s Manual
30
To temporarily interrupt defrosting:
• Press the door release or press STOP/CANCEL one time.
• Turn the food over, stir, or break into smaller pieces, as
appropriate.
6. Close the oven door and press START to resume
defrosting.
7. At the end of the defrost cycle, the oven will beep four
times and the time of day will reappear in the display window.
Press the door release to open the door and remove the food.
Defrosting Tips:
• Remove any foil or metal twist ties that may have been used
to secure the package.
• Casseroles, soups, and stews will require stirring once or
twice during defrosting. As a reminder, the oven will beep
twice periodically during the defrost cycle. However, the oven
will continue to defrost unless interrupted.
• Turn over or crumble food halfway through the defrosting
time. Smaller pieces will defrost more quickly and more evenly
than larger pieces.
• The length of time necessary to defrost food will depend on
how solid the food is frozen.
Page 33

Basic Oven Operation
31
• When defrosting food that has been stored in plastic containers: thaw only until the food will slide out of the plastic
container. Transfer the food to a microwave-proof container to
complete defrosting.
• If you are unsure about the weight of the food, it is best to
underestimate the weight in order to avoid drying or overheating the food. Complete thawing by using the Time Defrost
procedure described in the preceding instructions.
• With foods of varying thicknesses, use small, smooth
pieces of aluminum foil to prevent over cooking the thinner
parts, for example, the tail of a fish. Use foil to cover any
areas that begin to cook before defrosting is complete. Cover
loosely so that the foil can be easily removed partway through
defrosting.
Page 34

Microwave Oven Owner’s Manual
32
Beyond Microwaving
Your Beyond Microwave Oven takes you beyond simple
reheating and defrosting to fully automated microwave cooking. Your Beyond Microwave Oven is pre-programmed to
perfectly prepare over 4000 different kinds of packaged
foods. This feature takes the guesswork out of microwaving
foods that require multiple power settings and cooking times.
When you use the oven’s scanning wand to scan the barcode
(UPC) on a package of microwaveable food, the oven
searches its database for the corresponding cooking instructions and then programs itself for the correct time and power
setting. The oven’s display window displays the cooking time
and prompts by flashing in the display window to perform the
steps indicated on the package, ie. stir, turn, uncover, etc.
Note: The Beyond Microwave Oven recognizes the barcodes
of most national brands of microwaveable foods. It may not
recognize the barcodes of local brands, in-store, boutique, or
distributor foods.
More About Beyond Microwaving
When you scan the barcode on a package of food, the
Beyond Microwave Oven searches its database of over 4000
barcodes. Each barcode in the oven’s memory has a corresponding set of cooking instructions. If the oven finds the
barcode in its memory, it automatically programs itself to cook
the food. At this point, the display window will prompt you to
press START.
Page 35

Beyond Microwaving
33
If the oven cannot find a barcode, the message NOT IN
MEMORY appears on the display window. When this hap-
pens, you may opt to use the Learn function to manually
program the cooking instructions and save them in the oven’s
memory. The oven will always "remember" this barcode in the
future and program itself according to your instructions.
When individual packages of food with a UPC number are
packaged inside of a larger package also with a UPC number,
either number may be scanned.
What is the Beyond Appliance Home
Network?
Beyond Appliances are able to exchange information with
other Beyond appliances in your home. They do this through a
wireless home network that you can set up. To use the wireless
network of your Beyond appliances, you must have a Home
Hub or an iCEBOX and your Microwave or other appliance
must have a SANI card installed.
The Home Hub and the iCEBOX retrieve new or favorite food
cooking programs from the Internet and send them to your
microwave oven and other Beyond appliances over the wireless SANI network.
When using this system, any barcodes you scan that are not
already in the oven’s memory are sent to the Beyond Information Network test kitchens (via your SANI network) so that we
can research the best cooking method. The more products you
scan, the smarter and more customized your oven becomes!
Page 36

Microwave Oven Owner’s Manual
34
Adding Your Beyond Microwave Oven to Your
Home Hub Network or iCEBOX Appliance
Network
If you do not have a Home Hub or an iCEBOX, skip this
procedure.
Note: Your Microwave must be equipped with a SANI card to
use the networking features. The SANI card is an optional item
you can purchase from your iCEBOX or Home Hub retailer.
For Instruction on installing the SANI Card, see the SANI Card
User Guide that comes in the SANI Card Package.
To add your Microwave to your Home Hub
Network
1. On your Home Hub, press MENU to open the Main Menu.
2. When the Main Menu opens, press DOWN or UP until
APPLIANCE is highlighted. Press SELECT.
3. The Appliance Menu will open.
4. Select DETECT APPL from the APPLIANCE menu.
5. On the Microwave control panel, press the NETWORK but-
ton. The Microwave will enter Binding mode. The word
BIND will display and the word “Network” will blink on the
Microwave display.
If the Microwave double-beeps and the word Bind disappears, there is a SANI Card problem.
If the word Network was already on the display, the Microwave is already networked. Press and hold the NETWORK
Page 37

Beyond Microwaving
35
button for five seconds to unbind the Microwave, then press
the NETWORK button once to enter bind mode again.
6. When the Home Hub detects the Microwave, it will prompt
you to bind. You must press the Select button to bind the
Microwave.
When you have accepted the Microwave, the Microwave will
beep, the word “Network” will remain lit and the Microwave
clock will synchronize to the Home Hub. From then on, the
Microwave status will be viewable on your Home Hub and the
Microwave network features will be available. If you turn off
the Microwave or the Home Hub, you do not have to rebind.
The network connection will reestablish when the the appliances are turned back on.
To Add your Microwave to your iCEBOX
Appliance Network
1. On your iCEBOX, open the My Kitchen Options Menu.
2. On the My Kitchen Options Menu, select New Appliance.
3. On the Microwave control panel, press the NETWORK but-
ton. The Microwave will enter Binding mode. The word
BIND will display and the word “Network” will blink on the
Microwave display.
If the Microwave double-beeps and the word Bind disappears, there is a SANI Card problem.
If the word Network was already on the display, the Microwave is already networked. Press and hold the NETWORK
button for five seconds to unbind the Microwave, then press
the NETWORK button once to enter bind mode again.
4. When the iCEBOX detects the Microwave, it will prompt
you to bind. You must choose OK to bind the Microwave.
Page 38

Microwave Oven Owner’s Manual
36
When you have accepted the Microwave, the Microwave will
beep, the word “Network” will remain lit and the Microwave
clock will synchronize to the iCEBOX. From then on, the Microwave status will be viewable on your iCEBOX and the
Microwave network features will be available.
Updating Settings From Your Beyond
Information Network Account
1. Navigate to the Home Hub’s Internet menu. Select UPDATE.
“Internet Downloading” will appear in the display.
2. When Internet downloading is complete, press OK to return
to the main display.
3. The Home Hub will display “Microwave Database Down-
load Started”. Press OK
Several minutes later, the Home Hub will display “Microwave
Database Download Finished”. Press OK
Using the Scanning Wand
Your Beyond Microwave Oven is equipped with a scanning
wand that is similar to scanning equipment used in many retail
settings. The scanning wand on your Beyond Microwave is
like having a "magic" wand that tells your oven to automatically program itself for the ideal cooking time and power
levels for packaged, microwaveable foods.
Page 39
Beyond Microwaving
37
To use the scanning wand:
1. Locate the barcode on the package of food that you wish
to prepare. On the oven control panel, press SCAN. A red
light will come on in the end of the scanning wand.
Whenever you press SCAN, the Scan icon on the display
will blink. You can press Stop/Cancel to stop the scan
-
ning.
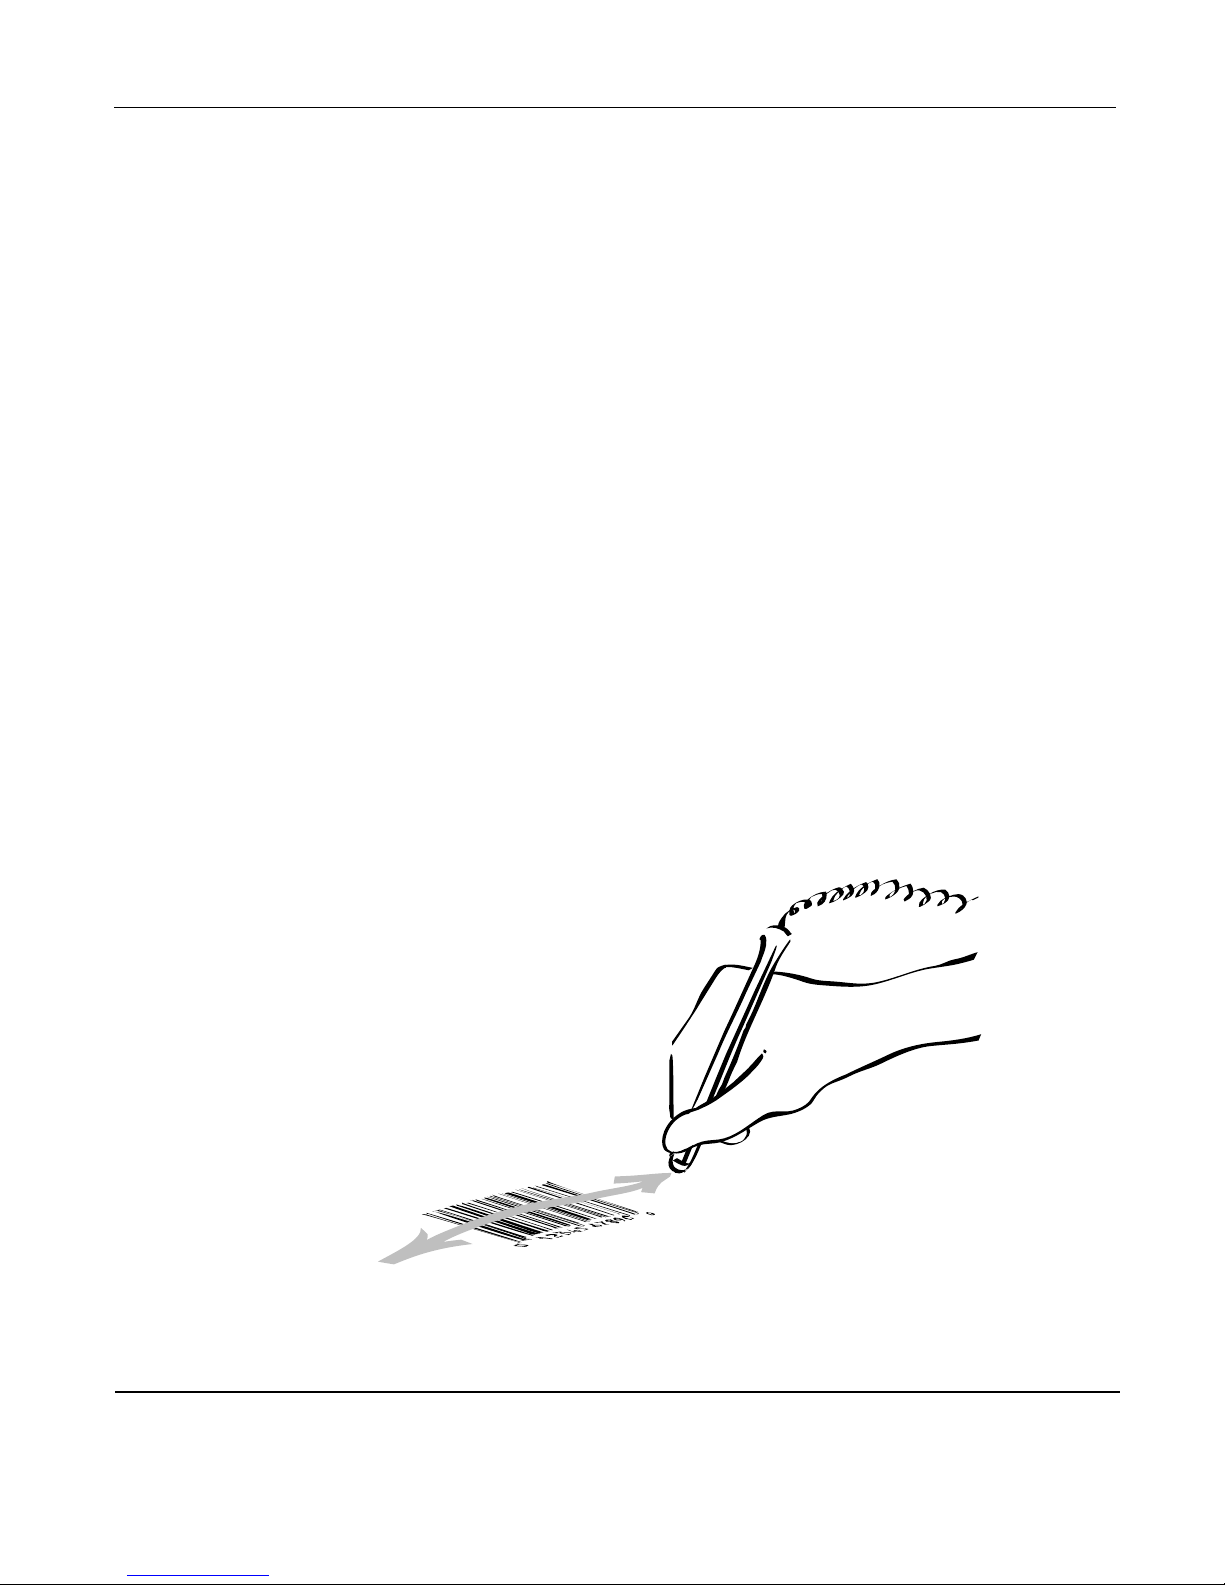
2. Hold the scanning wand as you would hold a pencil.
Place the lighted end of the wand flat against the package and
to the left of the barcode.
3. Using a steady sweeping motion, move the wand across
the bar code from left to right and from right to left at a
medium to fast speed. Be sure to scan the entire barcode and
to keep the wand tip touching the package. A beep tells you
that the barcode was scanned successfully.
FIGURE 4. Scanning With the Wand
Page 40

Microwave Oven Owner’s Manual
38
4. Scan the entire barcode from left to right beginning outside the left edge then back across it right to left.
If you are having any trouble, review the following list:
• Try moving the wand back and forth across the barcode
several times.
• Try scanning from corner to corner. It is easier to move the
scanning wand smoothly with a quick motion rather than a
slow motion.
• Angle the wand so that the surface of the lens is flat against
the barcode.
• Scan the entire barcode from left to right or right to left.
Scan in a straight line, perpendicular to the bars.
• Clean the barcode scanner lens.
• Make sure the barcode is not damaged or dirty.
If the oven finds the barcode in its database:
If the oven finds the barcode in its database, it will automatically program itself for the correct time and power setting to
prepare the food.
1. Before placing the food in the oven, be sure to follow label
instructions for the recommended container type and size.
• If the food is prepared in the original packaging, follow
label instructions for package preparation (peeling back a corner, piercing, puncturing, or slitting).
• Or, follow label directions for selecting an appropriate
microwave-safe container and covering or uncovering the dish
as needed.
Page 41

Beyond Microwaving
39
2. Place the food in the oven and press START to begin
cooking.
3. If the message STIR appears on the display window during
cooking, open the oven door, using oven mitts, perform the
appropriate steps indicated on the package, i.e. stir, turn,
uncover, etc. Close the door, and press START to resume the
cooking program.
4. At the end of the cooking time, the oven will beep four
times and the time of day will reappear in the display window.
Press the door release to open the door and using oven mitts,
remove the food.
If the oven does NOT find the barcode in its
database:
If the oven does not find the barcode in its database, the message NOT IN MEMORY appears on the display window.
Why Does NOT IN MEMORY Appear in the
Display Window?
Your Beyond Microwave Oven comes pre-programmed with
thousands of cooking directions for national brand microwave
foods. However, your oven may not recognize the barcodes
for new, regional, private label, store, or distributor foods.
When you scan a barcode that your oven does not recognize,
NOT IN MEMORY appears in the display window. Your oven
saves a list of all unrecognized barcodes.
Page 42

Microwave Oven Owner’s Manual
40
If you have a Beyond Appliance Network, the network center
will search each evening for cooking programs for any NOT
IN MEMORY barcodes that you have scanned that day. If the
barcodes are in the larger Network database, your network
center retrieves them and adds them to your oven’s memory.
So, the next time you scan the food that was previously NOT
IN MEMORY your oven will be able to recognize the barcode
and program itself with the proper cooking instructions.
You may also use your oven’s Learn function, explained in the
following section, to "teach" your oven to recognize new barcodes and to learn new cooking programs.
Either way, the more you use your Beyond Microwave Oven,
the smarter it gets!
Using the Learn Function
When you scan a barcode that’s not already in the oven’s
database, the message NOT IN MEMORY appears on the display window. If this happens, you can use the Learn function to
manually enter and save the required cooking program to the
oven’s database. This will allow your oven to recognize the
barcode in future uses.
Manually Adding a New Cooking Program to the Oven’s
Memory:
1. Press LEARN. The red light at the end of the scanning
wand will illuminate. The Learn and Scan icon will blink on
the display.
2. Scan the barcode on the package.
Page 43

Beyond Microwaving
41
3. Press the POWER button to select the power setting. P 10
will appear in the display window. Pressing POWER repeatedly will reduce the power setting one level at a time from P
10 (highest) to P 1 (lowest).
4. Enter the desired cooking time by pressing the digits on
the number pad.
If Two Stage Microwave cooking is required, enter the second
power level and cooking time. If it is necessary to perform any
step such as stir, turn, uncover etc., it will be necessary to manually stop the oven at the appropriate time and do so. It is not
possible to program in a pause (stir) feature using the Learn
Feature.
5. Press the LEARN button to save the cooking program.
The next time you scan another package of the same food, the
oven will recognize the barcode and automatically program
itself to cook the food according to the instructions that you
entered.
Removing a learned recipe from the microwave memory:
1. Press LEARN. The red light at the end of the scanning
wand will illuminate. The Learn and Scan icon will blink on
the display.
2. Scan the barcode on the package.
3. Press the LEARN button again to erase the cooking
program.
The next time you scan another package of the same food, the
oven will display the NOT IN MEMORY message.
Page 44

Microwave Oven Owner’s Manual
42
Using the Learn Function to Customize
Cooking Programs
You may also use the Learn function to tailor the oven’s pre-programmed cooking instructions to your individual preferences.
Cooking instructions that you manually enter using the Learn
function take priority over pre-programmed cooking
instructions.
Retrieving New Cooking Programs from the
Home Network
If you have a Beyond Appliance Network, you can "ask" your
Beyond Microwave Oven to search the Network for new cooking programs.
• Scan the barcodes for as many foods as desired. For example, you can scan all your packaged grocery items as you put
them away. Your oven will save a list of all unrecognized
barcodes.
• Each night, your Network Center will automatically search
for barcodes matching those from your oven’s NOT IN MEMORY list.
• If your center finds the barcodes in the Network database,
it downloads them to oven’s memory.
• The next time you scan those foods, the oven will be able to
program itself to prepare the food.
Page 45

Beyond Microwaving
43
To retrieve new recipes from the Beyond
Information Network:
1. Press SCAN. The red light at the end of the scanning wand
will illuminate. The Learn and Scan icons will blink on the
display.
2. Scan the barcode on the package.
3. Press CANCEL. The oven will save a list of all NOT IN
MEMORY barcodes and look for them on the Network during
the night.
Page 46

Microwave Oven Owner’s Manual
44
Maintenance
User Maintenance Instructions
This appliance requires little maintenance. It contains no user
serviceable parts. Do not try to repair it yourself. Any servicing
requiring disassembly other than cleaning must be performed
by a qualified appliance repair technician.
Cleaning and Care
Routine cleaning will enhance the performance and reliability
of your Beyond Microwave Oven. Clean the oven on a weekly
basis, more often, if needed.
To ensure safe and efficient operation, be sure to keep the
inner door, door seal, hinges, and latches clean and free of
food residue.
• Wipe spills and splatters from the interior after each use to
avoid arcing.
• Clean all oven surfaces with soft, lint-free cloths and a mild,
non-abrasive detergent.
• Wash the turntable roller ring by hand.
• The glass turntable may be washed in the dishwasher.
Note: Never use any type of chemicals, solvents, or abrasive
cleaners on the oven surface.
Page 47

Maintenance
45
• Unplug the oven before cleaning exterior surfaces or vents.
- OR - Clean with the oven door open to prevent the oven from
accidentally turning on.
After Cleaning
• Be sure to replace the turntable roller ring and turntable in
the proper position.
• If necessary, press STOP/CANCEL to clear the display
window.
• If the oven was unplugged, plug it back in and reset the
clock.
Page 48
Microwave Oven Owner’s Manual
46
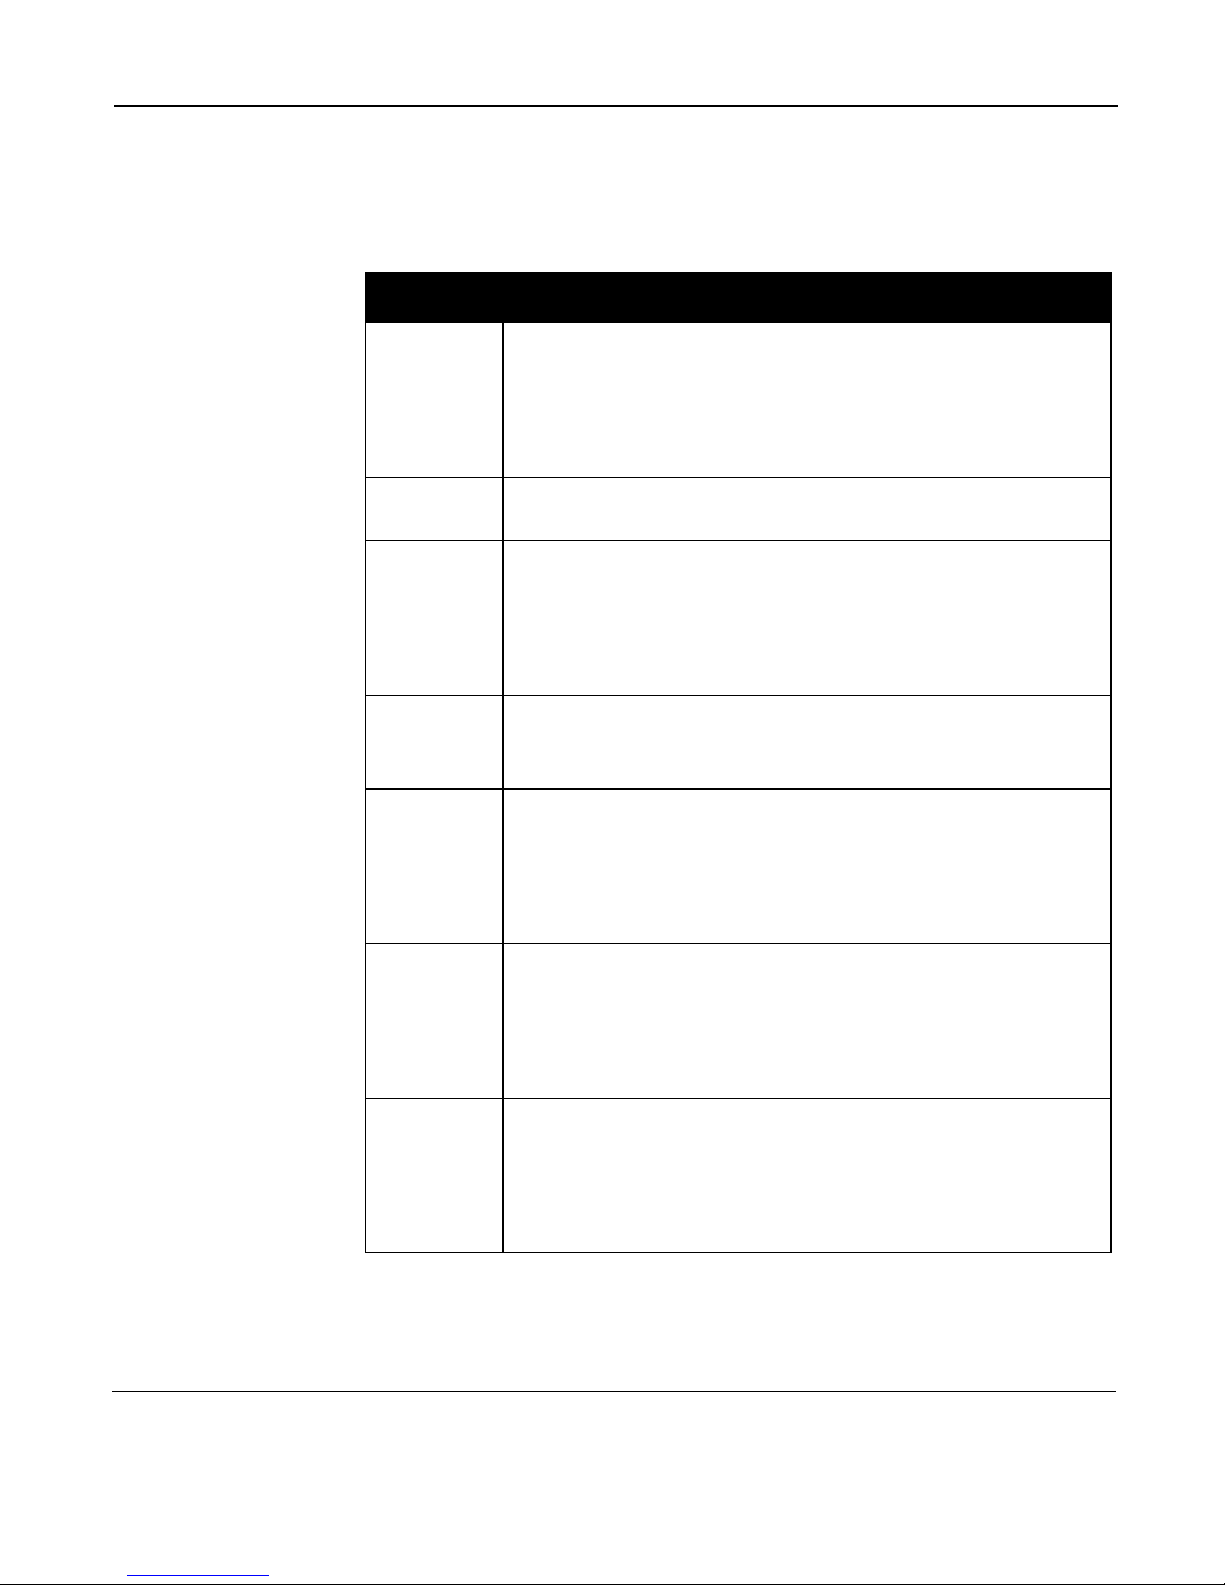
TABLE 5. Cleaning and Care of the Beyond Microwave
Oven
Surface Cleaning Procedure
Door Wipe the window on both sides with a damp cloth to
remove any spills or spatters. Do not use any type of
abrasive cleaner. Gently wipe around the inside of the
doorframe, seals, latches, and hinges
to remove any food particles and condensation.
Exterior Clean with mild soap and water. Rinse and dry with a
soft cloth. Do not use any type of abrasive cleaner.
Interior Clean with mild soap and water. Rinse and dry with a
soft cloth. Do not use any type of abrasive cleaner. For
heavier soil, use baking soda or a mild soap; rinse thoroughly with hot water. Never Use Oven Cleaners
Intended For Conventional Ovens.
Scanning
Wand
Wipe tip with a soft, dry cloth. Do not allow liquids to
come into contact with the end of the scanning wand.
Do not use a paper towel which may scratch the lens.
Odor
Removal
To remove odors: combine 1 cup water, grated peel and
juice of 1 lemon and several whole cloves in a 2 cup,
microwave-safe, glass measuring cup. Boil for several
minutes using 100% power. Leave the liquid in oven
until it cools. Wipe the interior with a soft, dry cloth.
Control
Panel
Open the oven door before cleaning. GENTLY wipe the
panel with a slightly dampened cloth. Dry with a soft
cloth. Do not scrub or use any detergents, solvents,
chemicals or abrasive cleaners. Close the oven door
and press STOP/CLEAR.
Wave
Guide
Cover
The wave-guide cover is a light brown mica panel
located on the right side of the oven interior. Carefully
clean with mild soap and water; rinse and dry with a
soft cloth. Do not use any type of abrasive cleaner. Do
not remove the wave-guide cover.
Page 49

Reference
47
Reference
Guidelines for General Microwave Cooking:
• Cook the food for the shortest time possible. If necessary,
add cooking time until the food reaches the appropriate
temperature.
• The quantity, denseness, and temperature of food will all
determine the cooking time necessary. Check for doneness,
and if necessary cook or reheat for additional time.
• Foods high in fat and sugar cook faster than foods with
high water content.
• Foods similar in size and shape cook more evenly.
• When cooking large pieces of food, reduce the power
level to allow for more even cooking.
• Very moist foods cook more evenly than dryer foods. Foods
with low moisture content should be covered during cooking.
Allow the food to stand after cooking so that the heat can disperse evenly.
• Stirring or turning foods during cooking will help to distribute the heat evenly throughout the food and will prevent
overcooking on the edges of the food. If possible, stir the food
before serving.
Page 50

Microwave Oven Owner’s Manual
48
• The edge of the cooking container gets more microwave
energy than the center. So, place the densest part of the food
(broccoli stem, for example) near the outside, and the less
dense part (broccoli head) towards the center.
• Covering food while cooking will reduce cooking time,
reduce splattering, and help to keep food moist.
• For best results, use a fork to pierce foods with a skin or
membrane (for example: potatoes, tomatoes, sausages, egg
yolks) to prevent steam from building up during cooking.
• Always allow food cooked in the microwave to stand for a
short period of time before serving. This allows the heat to disperse evenly throughout the food.
• The size and shape of a container will influence the cooking time. Food prepared in a narrow and shallow casserole
will cook more quickly than the same amount of food prepared
in a taller container. Since microwaves penetrate from all
sides, round shapes cook more evenly
• Arrange frozen food item on a microwave-safe plate like
the spokes of a wheel and leave the center open.
• Allow space between foods when arranging on plate
before microwaving.
• Use a large 10-½ inch microwave-safe plate to allow room
between foods.
• Use microwave-safe paper towels, paper plates, dishes
and bowls.
• Use oven mitts when removing dishes and food from the
microwave after cooking.
Page 51

Reference
49
Guidelines for Preparing Packaged Foods:
• Prepare one whole package of food or one packet from a
multipack at a time.
• Food should be as fresh as possible and not past the expiration date.
• Use microwave-safe cooking containers. When using plastic wrap or paper towels, use those specially formulated for
microwave cooking.
• Follow package directions for adding water, butter, salt,
milk, or other ingredients and then stir together.
• Follow manufacturer’s instructions for puncturing, peeling
back film, covering tightly with microwaveable plastic warp,
slitting film, etc.
• Omit instructions on package to rotate containers midway
during cooking; this is not necessary since the Beyond Microwave has a turntable.
• If there are directions on the package for cooking food frozen or thawed, the Beyond Microwave is programmed to cook
the food thawed.
• Center the food or container on turntable.
• Stir the food (and recover) according to package directions
during cooking or at end of cooking time.
• When instructed to stir food during cooking, try to break up
large lumps of food.
Page 52

Microwave Oven Owner’s Manual
50
• Food may be returned to the microwave for further cooking; press Add 30 Seconds to increase cooking time by one
minute.
• Allow the food to sit in microwave after cooking if indicated on package.
• If the directions list to allow food to sit for a few minutes
before serving, remove from the microwave unless instructed
to leave in microwave.
• Recommended cooking times for most foods are set until
the food is tender, hot and steamy, no burnt edges and/ or
food is ready to eat, or approximately 165º F unless otherwise
stated on the package.
• Kid’s Meals need to cook to 165º F unless the package
instructs otherwise. Food will be HOT, adult supervision recommended.
Container Size Guidelines for Microwave
Cooking
When heating foods in a microwave oven, it is important to
use a microwave-safe, clear, glass container that is large
enough to allow the food to heat evenly and to prevent hot liquids from boiling over.
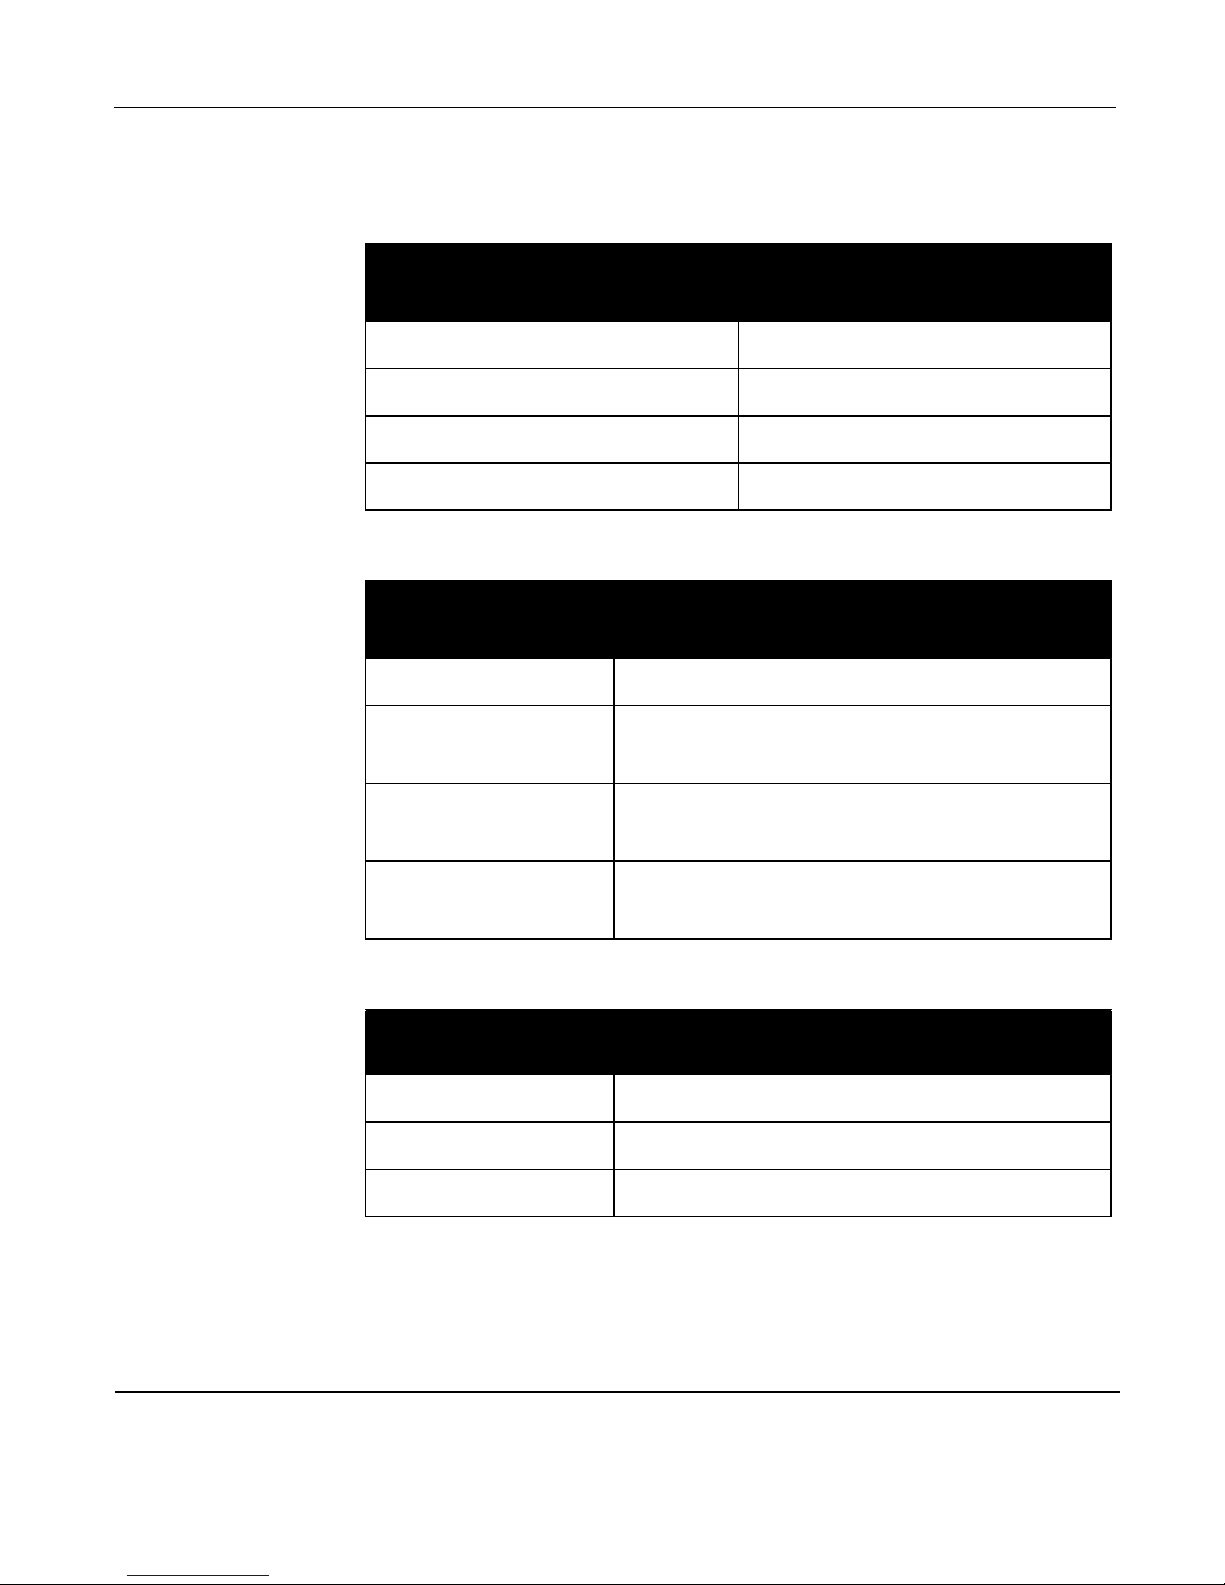
Always follow package directions for the recommended container size, or use the following guidelines:
Page 53
Reference
51
Guidelines for Canned, Ready-to-Eat
Soups, Stew, Chili and Pasta:
Can Size Microwave Container Size
14 to 16 oz (397 to 567 gm) 1 quart/4 cups/946 ml
17 to 28 oz (482 to 794 gm) 1½ quarts/6 cups/1420 ml
29 to 52 oz (822 to 1474 gm) 2 quarts/8 cups/1893 ml
Guidelines for Condensed
Soups:
Can Size Microwave Container Size
10 to 16 oz (283 to 567
gm)
1 quart/4 cups/946 ml
17 to 26 oz (482 to 737
gm)
1½ quarts/6 cups/1420 ml
27 to 52 oz (765 to 1474
gm)
2 quarts/8 cups/1893 ml
Guidelines for Dry Soups:
Amount of Water Added Microwave Container Size
¾ cup large mug/cup
3 to 4 cups 2 quarts/8 cups/1893 ml
Page 54
Microwave Oven Owner’s Manual
52
Guidelines for Canned
Vegetable s:
Can Size Microwave Container Size
8 oz (226 gm) 2 cups (473 ml)
9 to 15 oz (255 to 425
gm)
1 quart/4 cups/946 ml
16 to 28 oz (453 to 793
gm)
1½ quarts/6 cups/1420 ml
29 to 55 oz (822 to 1559
gm)
2 quarts/8 cups/1893 ml
Guidelines for Dehydrated Scalloped
Potatoes:
Amount Microwave Container Size
5 to 6 oz (141 to 170 gm) 3 quarts/12cups/2839 ml
Guidelines for Dehydrated Mashed
Potatoes:
Amount Microwave Container Size
7 to 8 oz (198 to 227 gm) 1 quart/4 cups/946 ml
Page 55
Reference
53
Guidelines for Dry Rice/Couscous/Pilaf
Mixes:
Amount Microwave Container Size
Individual serving package 2 cups/473 ml
4 to 5 oz (112 to 140 gm) 1½ quarts/6 cups/1420 ml
5.1 to 12 oz (142 to 336 gm) 2 quarts/8 cups/1893 ml
Guidelines for Dry Pasta Mixes:
Amount Microwave Container Size
Individual serving package 2 cups/473 ml
4 to 5 oz (113 to 142 gm) 1½ quarts/6 cups/1420 ml
5.1 to 8 oz (142 to 224 gm) 2 quarts/8 cups/1893 ml
Page 56
Microwave Oven Owner’s Manual
54
Recommended Cooking Power Level
Power
Level
Use
P 10 (high) F Boil water
F Most prepackaged microwave foods
F Sauté ground beef
F Cook fresh fruits and vegetables
F Make candy
F Cook fish, meat, and poultry
F Prepare rice
P 9 / P 8 F Heat precooked food
F Sauté onions, celery, and green peppers
P 8 / P 7 F Roast tender cuts of meat and poultry
F Cook mushrooms and shellfish
F Cook foods which contain cheese & egg
P 6 F Preparing sauces and gravies
P 5
(medium)
F Cook meat and poultry
F Cook custard
F Prepare soup
Page 57
Reference
55
Power
Level
Use
P 4 F Cook less tender cuts of meats
P 3 F Melt butter and chocolate
P 2 F Soften butter & cheese
P 1 (Low) F Soften ice cream
F Raise yeast dough
F Keep cooked foods warm for short periods of time
Page 58
Microwave Oven Owner’s Manual
56
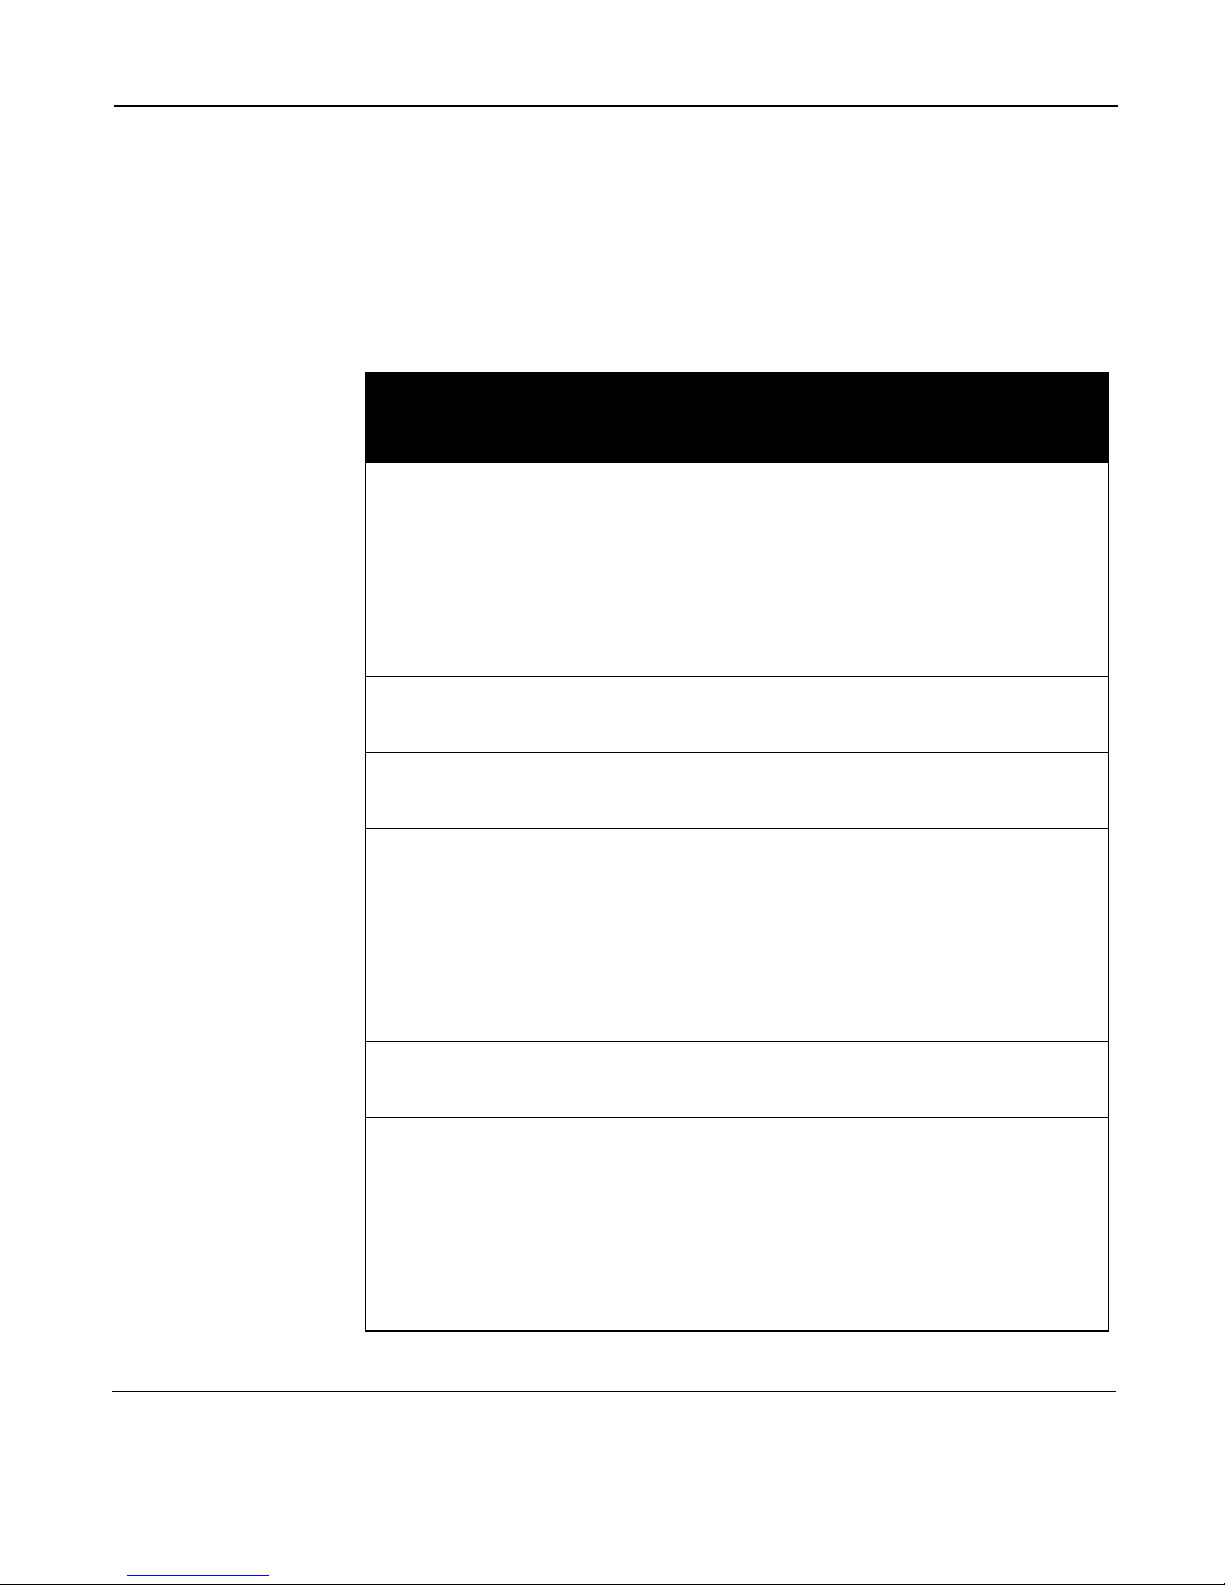
Fresh Vegetable Cooking Guide
Use microwave plastic wrap to cover vegetables
Vegetable Quantity Container / Liquid
Power
Level
Approx.
Minutes
Asparagus Cuts 3 cups, cut
into 1 to 2
inch pieces
2 quart casserole, add
¼ cup water
P 10 6 to 10
Spears 1 lb 1-1½ quart oblong
glass baking dish,
add ¼ cup water
P 7 6 to 10
Beans Green 1 lb cut in
half
1-1½ quart casserole,
add ½ cup water
P 10 12 to 17
Beets Whole 1 bunch 2 quart casserole,
add ½ cup water
P 10 15 to 20
Broccoli Spears 1 bunch
(1¼ to 1½
lbs)
2 quart oblong glass
baking dish,
add ¼ cup water
P 10
8 to 12
Cuts 1 bunch
(1¼ to 1½
lbs)
2 quart casserole,
add ½ cup water
P 10 7 to 10
Brussel
Sprouts
1 lb 1-1½ quart casserole
add ¼ cup water
P 10 7 to 10
Cabbage Whole 1 medium
head (about
2 lbs)
1-1½ or 2 quart
casserole, add
¼ cup water
P 10 8 to 11
Wedges 2 or 3 quart
casserole add
¼ cup water
P 10 7 to 10
Page 59
Reference
57
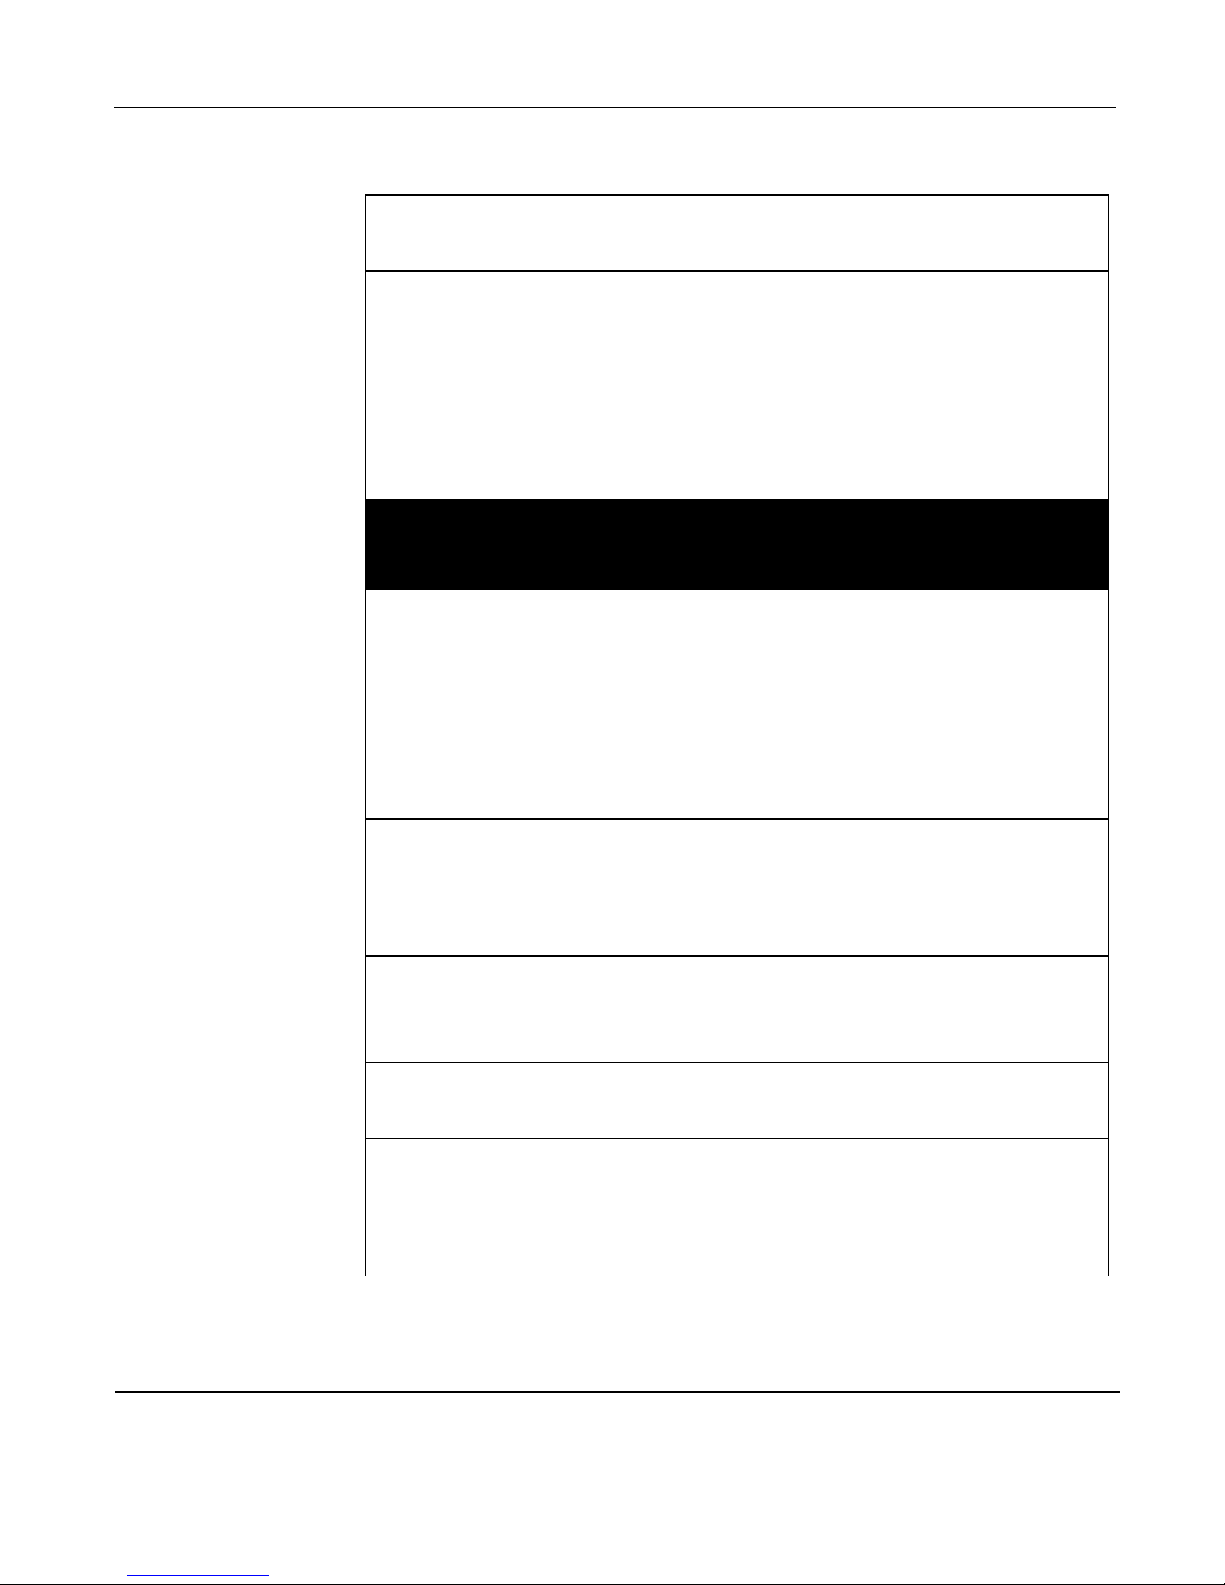
Carrots Sliced 1 lb 1-1½ quart casserole
add ¼ cup water
P 10 6 to 9
Cauliflower
Whole 1 medium
head
2 quart casserole, add
½ cup water
P 10 10 to 17
Flowerets 1 medium
head
2 quart casserole, add
½ cup water
P 10 9 to 14
Chopped 4 medium 3 quart casserole, add
1 cup water
P 10 13 to 18
Vegetable Quantity Container / Liquid
Power
Level
Approx.
Minutes
Corn on
the Cob
1 to 5 small
ears
3 quart oblong glass
baking dish. If corn is in
husk, use no water, if
husk has been removed,
add ¼ cup water.
Rearrange after half the
cooking time.
P 10 3 to 4
per ear
Eggplant 1 medium,
about 1 lb
2 quart casserole, add
3 tablespoons of water
to peeled and diced
eggplant.
P 10 5 to 8
Parsnips 1 lb 1-1½ quart casserole,
add ¼ cup water. Slice
parsnips ¼ inch thick.
P 10 7 to 10
Peas Shelled 2 lbs
unshelled
1 quart casserole, add
¼ cup water
P 10 9 to 12
Potatoes Whole
Sweet or
White
1 to 4 (6 to
8 oz each)
Pierce with fork. Place
on paper towel on
turntable 1 inch apart in
circular arrangement.
P 10 3 to 5
Page 60

Microwave Oven Owner’s Manual
58
Cubed
White
4 potatoes
(6 to 8 oz
each)
Peel, cut into 1 inch
cubes, 2 quart casserole
with 1/3 cup water. Stir
after halfway through
cooking time.
P 10 10 to 14
Spinach 10 to 16 oz 2 quart casserole, place
washed spinach.
P 10 5 to 8
Squash Summer
and
Yell ow
1 lb sliced 1-1½ quart casserole,
add ¼ cup water.
P 10 5 to 7
Winter
Acorn or
Butternut
1 to 2
squash
(about 1 lb
each)
Cut in half and remove
f i b r o u s m e m b r a n e s .
2 quart oblong glass
baking dish, place
squash cut side down.
Cover with plastic
wrap. Turn cut side up
after half time.
P 10 9 to 12
Turnips 1 lb cubed In 1-1½ quart
casserole, add 3
tablespoons water.
P 10 6 to 9
Page 61
Reference
59
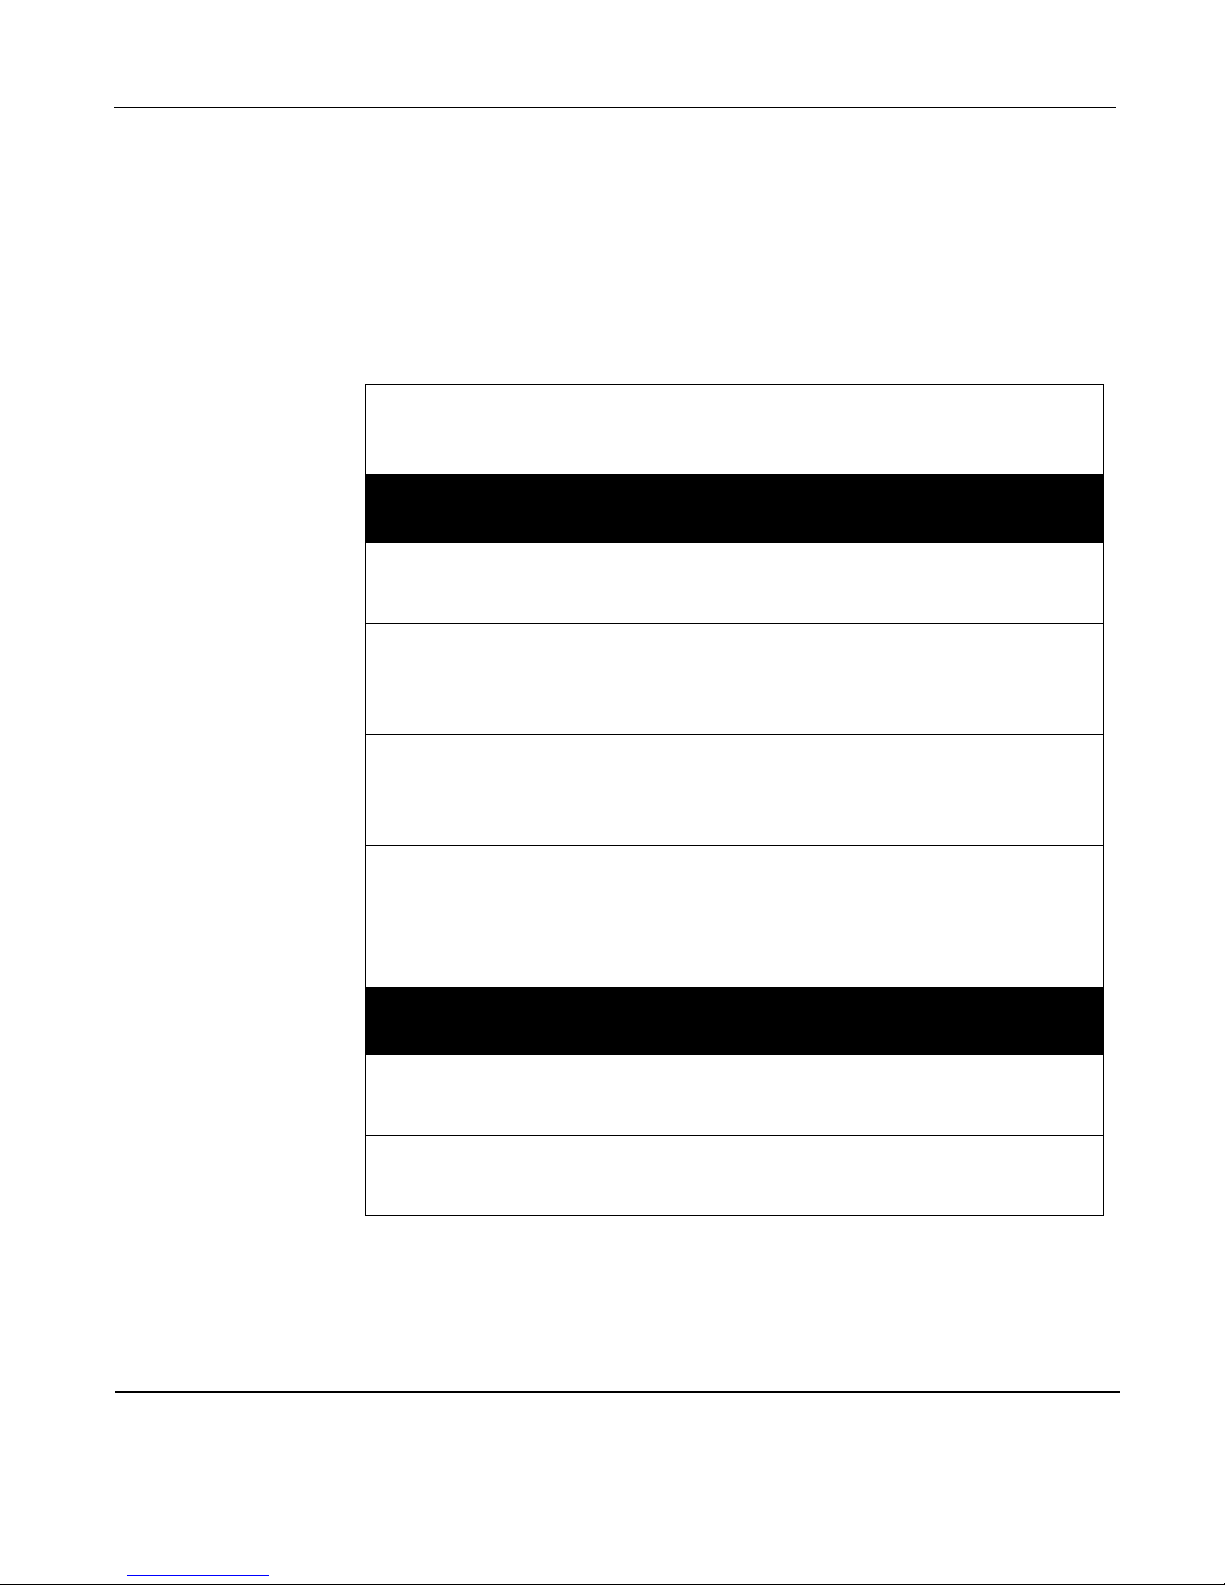
Microwave Cooking Guide
Always cook in microwave-safe containers. Paper is acceptable for some foods. DO NOT
USE METAL CONTAINERS. Cooking times and food quantities should be used as guidelines
only.
Food
Power
Level Time Comments
Appetizers
Party Mix (2½ quarts) P 10 5 to 7 minutes Stir every 2 to 3
minutes
Meatballs, small meat
or Hot Dog chunks
(24)
P 10 5 to 8 minutes Spread in single layer
in 2 quart oblong
baking dish.
Stuffed Vegetables
(12)
P 10 3 to 5 minutes Space evenly on plate
lined with paper
towels.
Toasted Nuts or Seeds
(½ to 1 cup)
P 10 3 to 5 minutes Combine nuts with
small amount of butter.
Stir every 1½ to 2
minutes.
Bakery
Round Cake P 8 3 to 5 minutes Check at minimum
time.
Fluted Tube Cake P 10 12 to 16
minutes
Let stand 10 minutes
before inverting.
Page 62
Microwave Oven Owner’s Manual
60
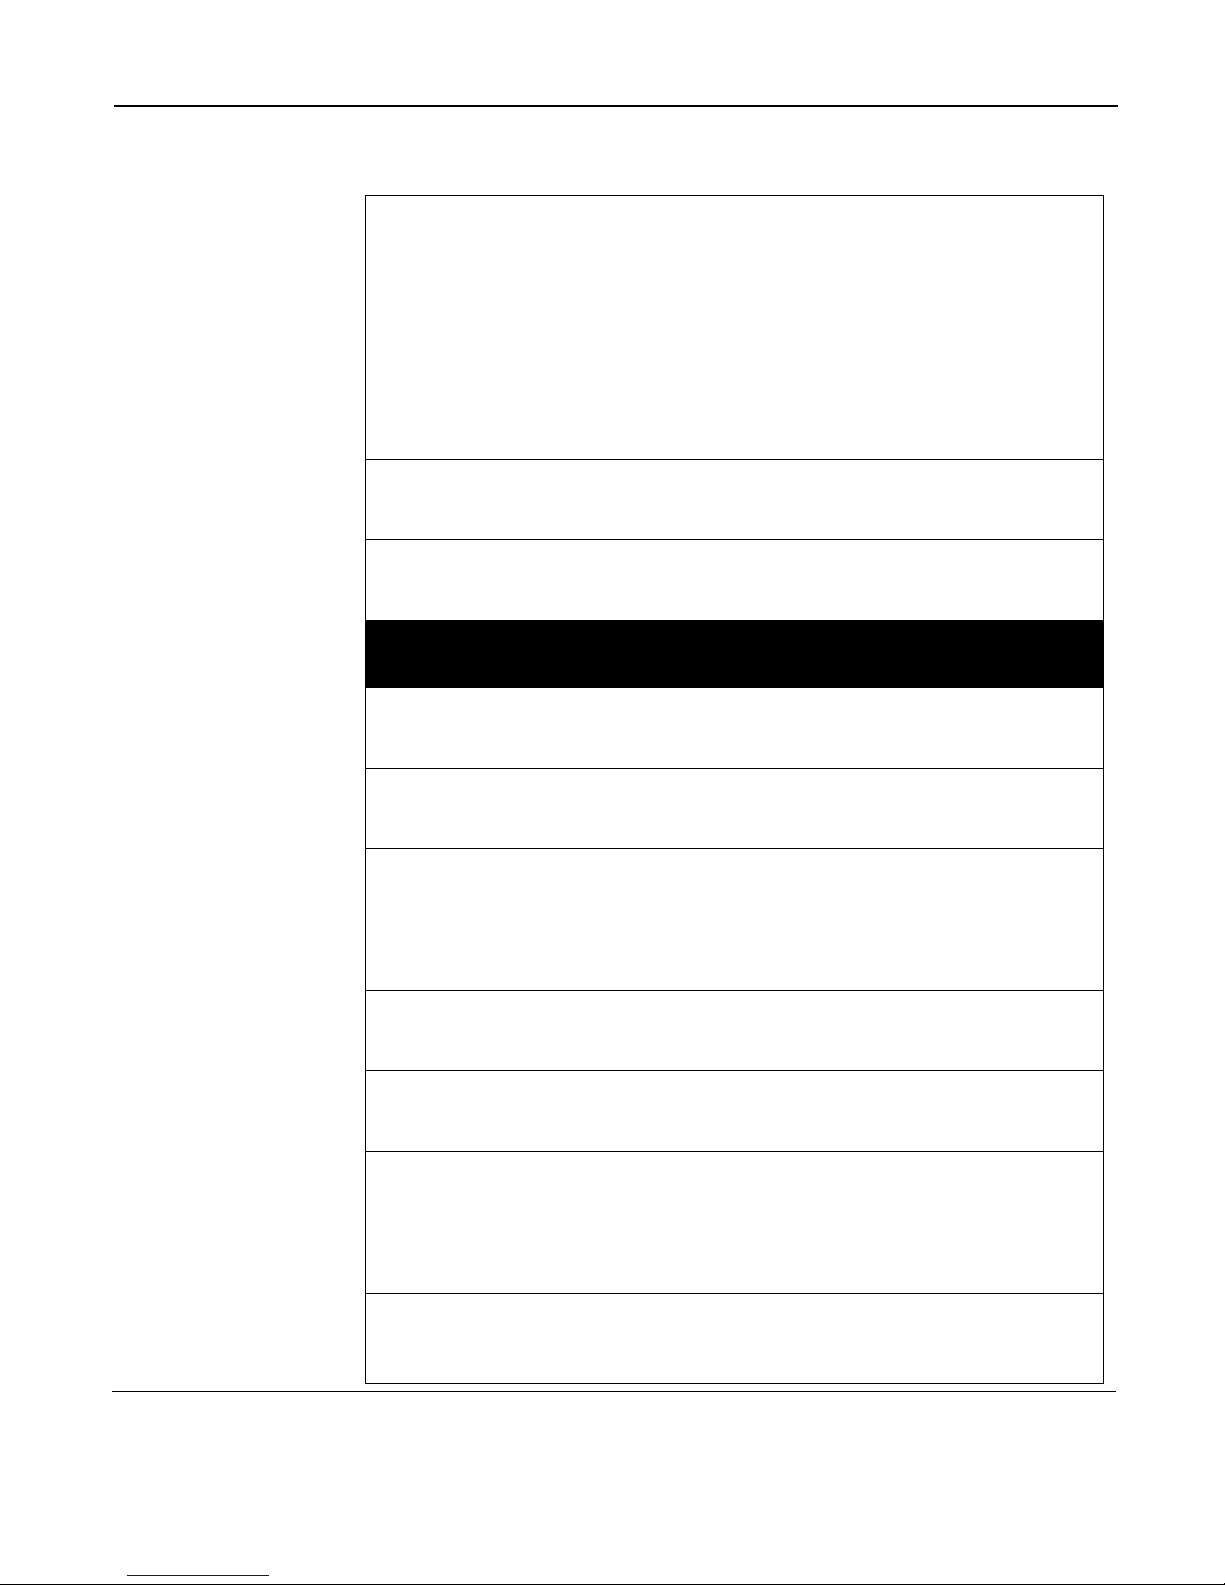
Cheesecake
(9 inch pie plate)
P 8 10 to 14
minutes
Put mixture in 2 quart
casserole dish until
thick and smooth. Stir
with wire whisk every
2 minutes. Pour into
crumb crust and place
in refrigerator until
firm.
Bar Cookies
(8 inch square dish)
P 10 5 to 7 minutes Check at minimum
time.
Muffins (6) P 8 2 to 4 minutes Check at minimum
time.
Eggs, Cheese, Dairy
Scrambled Eggs P 10 45 seconds to 1
minute per egg.
Stir during cooking.
Quiche P 7 5 to 21 minutes Pour filling into
pre-baked shell.
Thickened Sauces and
Gravies (1 cup)
P 6 3 to 5 minutes Microwave drippings,
flour, and salt for 1 to
2 minutes; blend
before adding liquid.
Scald Milk (½ cup) P 7 3 to 5 minutes Check at minimum
time.
Melt Butter (½ cup) P 10 30 seconds to 1
minute
Check at minimum
time.
Soften Cream Cheese
(8 oz)
P 7 1 to 2 minutes Remove foil wrapper,
place on
microwave-safe plate.
Stir every 30 seconds.
Food
Power
Level Time Comments
Page 63
Reference
61
Fish & Shellfish
Fillets or Steaks
(1 lb)
P 10 5 to 7 minutes Delicate fish should be
placed in or on a
microwave-safe dish.
Casserole,
precooked
(2 to 3 quart)
P 10 12 to 18
minutes
Delicate fish should be
placed in or on a
microwave-safe dish.
Scallops, Shrimp,
peeled (1 lb)
P 10 4 to 7 minutes Brush with garlic butter
before cooking.
Fruits
Baked Apples or Pears P 10 2 to 4 minutes
per piece
Pierce or peel to
prevent
bursting.
Meats and Poultry
The USDA recommends cooking meats to the following internal temperatures to be
sure any harmful bacteria has been killed. To measure the internal temperature of
meat, insert a meat thermometer into the thickest portion. Do not allow the tip of the
thermometer to come into contact with bone.
Ground Meat, 1 lb P 10 5 to 7 minutes Break up and stir
halfway through
cooking time.
Bacon (2 to 8 strips) P 10 30 seconds to 1
minute per slice
Place on paper
towel-lined plate.
Sausage Patties P 10 1 min per patty Place on paper
towel-lined plate. Turn
over half way through
cooking time.
Page 64
Microwave Oven Owner’s Manual
62
Sausage Links P 10 30 to 45
seconds per link
Place on paper
towel-lined plate. Turn
over half way through
cooking time.
Franks or Hot Dogs
(1 lb)
P 10 3 to 6 minutes Place in
microwave-safe dish
with ¾ cup water.
Rearrange half way
through cooking time.
Food
Power
Level Time Comments
Meat Casseroles with
pre-cooked Meat and
Ingredients
P 10 19 to 30
minutes
Stir halfway through
cooking time.
Meat Stews with raw
Meat and
Vegetables
P 5 70 to 80
minutes
Rearrange or stir
halfway through
cooking time.
Meat Patties
(4 per lb, or
4 oz each)
P 10 5 to 7 minutes Place on paper
towel-lined plate.
Rearrange halfway
through cooking time.
Spareribs (2 to 3 lb) P 5 80 to 90
minutes
Place in
microwave-save
casserole, cover with
liquid. Rearrange
halfway though
cooking time. 10
minutes before end of
cooking time drain
and add barbeque
sauce. Complete
cooking.
Page 65
Reference
63
Chops with Sauce P 8 30 to 40
minutes
Turn over halfway
through cooking time.
Pot Roast, 3 to 4 lb P 4 18 to 23
minutes per lb
Use microwave-safe
cooking bag. Turn
over halfway through
cooking time.
Pot Roast, tender P 5 13 to 15
minutes per lb
Use microwave-safe
cooking bag. Turn
over halfway through
cooking time.
Roast, tender beef
such as rib-eye or
rolled rib
P 7 Rare: 11 to 14
minutes per lb
Medium: 14 to
17 minutes per
lb
Well done: 17
to 20 minutes
per lb
Use microwave-safe
cooking bag. Turn
over halfway through
cooking time.
Ham Roast,
pre-cooked
P 6 14 to 17
minutes per lb
Use microwave-safe
cooking bag. Turn
over halfway through
cooking time.
Pasta and Cereals
Long pieces
(Spaghetti,
Linguini, etc.)
P 10 12 to 15
minutes
In 2 quart oblong
glass dish, add 6 cups
hot water, 1
tablespoon cooking oil
and 1 teaspoon salt.
Rearrange halfway
through cooking time.
Noodle or Rice
Casseroles (2 quarts)
P 10 8 to 15 minutes Stir halfway through
cooking time.
Page 66
Microwave Oven Owner’s Manual
64
Food
Power
Level Time Comments
Hot Cereal, regular or
instant
P 10 1½ to 3 minutes Add amount of water
specified by package
directions. Stir
halfway through
cooking time.
Rice, instant P 10 1½ to 3 minutes Add amount of water
specified by package
directions. Stir
halfway through
cooking time.
Pie Crust
Crumb Crust
(9 inch)
P 6 2 to 3 minutes Check at minimum
time.
Poultry (use microwave-safe cooking bag)
Chicken, cut up.
6 to 8 pieces
P 10 11 to 16
minutes per
piece
Turn over halfway
through cooking time.
Whole Chicken or
Cornish Hens
P 7 9 to 12 minutes
per lb.
Turn over halfway
through cooking time.
Turkey Legs or
Quarters
P 7 11 to 14
minutes per lb.
Turn over halfway
through cooking time.
Page 67
Reference
65
Turley Breast P 7 12 to 15
minutes per lb.
Place on
microwave-safe dish,
breast-side down. Turn
over halfway through
cooking time.
Eggs
Fried 1 or 2 eggs P 10 30 to 60
seconds per egg
Break egg into small
plate that has been
greased with butter.
Gently prick yolk with
fork. Cover with
plastic wrap. Place a
glass of water beside
the plate to promote
even cooking of the
white and yolk.
Scrambled, 2 eggs P 10 1 to 2 minutes Place 1 tablespoon
butter in small bowl.
Turn microwave on
high, 25 to 30
seconds or until butter
is melted. Add eggs
and 2 tablespoons
milk. Beat with fork to
scramble. Cover with
plastic wrap. Stir
halfway through
cooking time. Season,
stir, and let stand to
complete cooking.
Page 68

Microwave Oven Owner’s Manual
66
Poached P 10
then
P 8
2 minutes
3 to 5 minutes
Use a microwave-safe
container. Add water
to fill 2 inches deep.
Heat on high for 2
minutes to bring the
water to a boil. Break
eggs, one at a time,
into sauce dish; then
slip each egg into
water, holding dish
close Simmer 3 to 5
minutes on P 8
depending on degree
of doneness desired.
When done, remove
eggs with slotted
pancake turner or
spoon. Drain on paper
towels.
Page 69
Reference
67
Reheating Guide
Stir or rearrange large amount of food after half the suggested
heating time. To be thoroughly heated, food should reach a temperature of 160ºF to 165ºF. Allow foods to stand a few minutes
before serving.
Food Quantity Level
Approx
Minutes
Appetizers Saucy meatballs,
riblets,
cocktail franks, etc.
Dips: cream or process
cheese
Pastry bites: small
pizzas, egg rolls, etc.
1 to 2 servings
3 to 4 servings
½ cup
1 cup
2 to 4 servings
P 10
P 10
P 5
P 5
P 10
1 to 2
3 to 4
½ to 1
2 to 3
1 to 3
Page 70

Microwave Oven Owner’s Manual
68
Dinner
Plate
Meats &
Main
Dishes
Meat plus 2
vegetables
Saucy (1 cup serving)
chop
suey, spaghetti,
creamed
chicken, chili, stew,
macaroni
and cheese, etc.
Meats (4-oz servings)
Thinly sliced meat:
Rare minimum time
Medium rare
maximum time
Well done beef, pork,
ham,
poultry, etc.
Rare beef steak
Well done beef,
chops,
ribs etc.
Hamburger or meat
loaf
Chicken pieces
1 plate
1 to 2 servings
3 to 4 servings
1 to 10 oz can
1 to 2 servings
3 to 4 servings
1 to 2 servings
3 to 4 servings
1 to 2 servings
3 to 4 servings
1 to 2 servings
3 to 4 servings
1 to 2 servings
3 to 4 servings
1 to 2 pieces
3 to 4 pieces
P 10
P 10
P 10
P 10
P 7
P 7
P 8
P 8
P 8
P 8
P 8
P 8
P 10
P 10
P 10
P 10
2 to 4
1 to 2
2 to 3
2 to 3
1 to 3
2 to 4
1 to 3
3 to 4
1 to 2
2 to 3
1 to 2
2 to 3
1 to 1½
2 to 3
1 to 1½
2 to 3
Page 71
Reference
69
Sandwiches
& Soups
Moist filling (½ cup
serving)
Meat cheese filling
with ham
Soup (1 cup serving)
Water based
Dairy based
1 to 2 servings
3 to 4 servings
1 plate
3 to 4 servings
1 to 2 servings
3 to 4 servings
1 10 oz can
reconstituted
1 to 2 servings
3 to 4 servings
1 10 oz can
reconstituted
P 7
P 7
P 8
P 8
P 10
P 10
P 10
P 8
P 8
P 8
1 to 2
2 to 4
1 to 1½
1½ to 2½
1 to 8
3 to 4
3 to 4
2 to 3
3 to 5
6 to 8
Food Quantity
Level
Minutes
Vegetables Small (½ cup serving)
peas, beans, corn, etc.
Large or whole
asparagus
spears, corn on the
cob,etc.
Mashed potatoes,
squash,
pumpkin, etc. (½ cup
serving)
1 to 2 servings
3 to 4 servings
1 16 oz can
1 to 2 servings
3 to 4 servings
1 16 oz can
1 to 2 servings
3 to 4 servings
P 10
P 10
P 10
P 10
P 10
P 10
P 10
P 10
1 to 2
2 to 3
2 to 3
1 to 2
2 to 3
2 to 3
1 to 3
3 to 4
Page 72

Microwave Oven Owner’s Manual
70
Sauces Dessert: chocolate or
butterscotch
Chunky type giblet
gravy,
spaghetti sauce, etc.
Creamy type
½ cup
1 cup
½ cup
1 cup
1 16 oz can
½ cup
1 cup
P 10
P 10
P 10
P 10
P 10
P 10
P 10
½ to 1
1 to 2
½ to 1
1 to 2
2 to 3
½ to 1
1 to 2
Bakery
Foods
Cake, coffee cake,
doughnuts
sweet rolls, nut or fruit
bread.
Dinner rolls, muffins
Pie: fruit, nut or custard
1/8 of 9 inch pie = 1
slice
(use minimum time for
custard)
1 piece
2 pieces
9 inch cake or
12 rolls or
doughnuts
1
2 to 4
6 to 8
1 slice
2 slices
9 inch pie
P 3
P 3
P 3
P 5
P 5
P 5
P 5
P 10
P 10
P 8
½ to 1
1 to 1½
2 to 4
2 to 3
¼ to ½
½ to 1
1 to 2
½ to 1
1 to 1½
3 to 4
Page 73

Reference
71
Other Microwave Oven Uses
• Crisp stale crackers or chips by heating on high power for
45-60 seconds.
• Defrost bread, frozen stock, egg whites, and pie dough.
• Dry fresh herbs by placing between paper towels, then
heating on high power for 4 minutes or until dried. Let stand
10 minutes before storing in a covered jar.
• To extract more flavor and juice from fruits such as lemons,
oranges, limes and grapefruit, heat on high power for 15 seconds and allow to stand 3 minutes before squeezing.
• To liquefy honey that has crystallized, heat on high power
for 30-45 seconds.
Griddle
Foods
Pancakes, French toast
or waffles
Plain, no topping
With syrup & butter
With 2 sausage patties
(cooked)
2 or 3 pieces
2 or 3 pieces
2 or 3 pieces
P 10
P 10
P 10
½ to 1
1 to 2
1 to 2
Beverages Coffee, tea, cider,
other
water based
Cocoa, other dairy
based
1 to 2 cups
3 to 4 cups
1 to 2 cups
3 to 4 cups
P 7
P 10
P 7
P s7
3 to 4
4 to 6
3 to 4
6 to 8
Page 74

Microwave Oven Owner’s Manual
72
• To help loosen peels on fresh peaches or tomatoes, heat on
high power for 10 to 30 seconds, depending on the fruit and
size. Let stand for 10 minutes for peeling.
• Before grilling meat or poultry, microwave on high power
for about 3 minutes per pound. This will reduce the grilling
time and help to keep the meat or poultry from drying out
while cooking.
• When freezer packages stick to frozen foods, heat on high
power for 15 seconds. Allow the food to stand for 3 to 5 minutes before removing it from the package.
• To scald a cup of milk, heat on high power for 1 to 2
minutes.
• Soften brown sugar, butter, marshmallows, caramels, or ice
cream by heating on high power for 5 seconds to 1½ minutes,
depending on the food.
• Toast nuts or seeds by placing in a single layer on a plate
and heating on high power for up to 10 minutes per cup.
Page 75
Reference
73
English/Metric Conversions
English to Metric Metric to English
English Measure Metric Equivalent Metric
Measure
English Equivalent
1 teaspoon 5 milliliters
5 milliliters 1.01 teaspoons
1 tablespoon 15 milliliters
15 milliliters 1.01 tablespoons
1 ounce (liquid) 30 milliliters
100 milliliters 3.48 ounces
1 cup 237 milliliters
250 milliliters 1.06 cups
1 pint 473 milliliters
500 milliliters 1.06 pints
1 quart 946 milliliters
1 liter 1.05 quarts
1 gallon 3.79 liters
1 liter .26 gallons
1 ounce (dry) 28 grams
100 grams .22 pounds (3.5
ounces)
1 pound 453 grams or 45 kg
1 kilogram 2.20 pounds
Page 76
Microwave Oven Owner’s Manual
74
Technical Specifications
Note: Specifications subject to change without notice.
Power source 120V, 60 Hz
Power consumption 11.5 Amps, 1450 W
Output 850 Watts
Oven capacity 0.9 cubic feet (0.025 cubic meters)
Page 77
Troubleshooting
75
Troubleshooting
Problem Possible Cause Remedy
Oven will not turn on. The oven is not plugged in
securely.
Remove plug from outlet.
Wait 10 seconds and
reinsert.
Circuit breaker or fuse is
tripped or blown.
Reset circuit breaker or
replace fuse.
There is a problem with the
outlet.
Plug another appliance into
the outlet, to check if it is
working.
Oven will not turn on. The oven door is not closed
securely.
Make sure the door is
closed completely.
Oven diplays "LOC"
Press and hold the STOP/
CANCEL button 4 seconds
to disable control panel
safety lock.
Oven will not start cooking. The door is not closed
completely.
Close the oven door
securely.
START was not pressed
after programming.
Press START.
Another program is already
entered into the oven
Press STOP/CANCEL
twice to cancel the previous
program, enter a new
program, and press
START.
The program is not correct. Program again according
to the Basic Oven
Operating Instructions.
STOP/CANCEL has been
pressed accidentally
Program oven again.
Page 78
Microwave Oven Owner’s Manual
76
Arcing or sparking Metallic or other
inappropriate materials are
being used in food
preparation.
Remove metal objects. Use
microwave-safe utensils
only.
The oven is operated when
empty.
Do not operate the oven
when empty.
Spilled food remains inside
the oven.
Clean the interior of the
oven with a damp sponge
or paper towel.
Unevenly cooked foods
and/or undercooked foods
Metallic or other
inappropriate materials are
being used in food
preparation.
Remove metal objects. Use
microwave-safe utensils
only.
Cooking time or power
level is not suitable.
Use correct power level,
cooking time, or multistage
cooking, as appropriate.
Food is not turned or
stirred.
Turn food over, break
apart, or stir as appropriate
halfway through cooking
time.
Food was not completely
defrosted.
Defrost food completely
before cooking.
Page 79
Troubleshooting
77
Uneven, incomplete
defrosting
Metallic or other
inappropriate materials are
being used in food
preparation.
Remove metal objects. Use
microwave-safe utensils
only.
Cooking time or power
level is not suitable.
Use correct power level,
cooking time, or multistage
cooking, as appropriate.
The turntable wobbles. The turntable is not
positioned properly on the
roller ring or there is food
under the
roller ring.
Take out the turntable and
roller ring. Wipe with a
damp cloth and reinstall the
roller ring and turntable
properly
When the oven is
operating, there is noise
coming from the glass tray.
The roller ring and oven
bottom are dirty.
See Cleaning and Care on
page 44.
The word LOC appears in
the display.
The safety lock is activated. Deactivate the safety lock
by pressing and holding
STOP/CANCEL for 4
seconds.
Page 80
Microwave Oven Owner’s Manual
78
Frequently Asked Questions
Q.
I am having trouble with the scanning wand.
A.
Try moving the wand back and forth across the barcode several times. Try
scanning from corner to corner. It is easier to move the scanning wand smoothly
with a quick motion rather than a slow motion. Angle the wand so that the surface
of the lens is flat against the barcode. Scan the entire barcode from left to right or
right to left. Scan in a straight line, perpendicular to the bars. Clean the barcode
scanner lens. Make sure the barcode is not damaged or dirty.
Q.
How long does it take to download a new UPC database from a Home Hub?
A.
It takes about 20 minutes. Normally this occurs in the middle of the night.
Downloading a new database does not interfere with the normal operation
of your oven.
Q.
When the oven is plugged into a wall outlet for the first time, it does not work
properly. What’s wrong?
A.
The microcomputer used in the oven control may temporarily become scrambled
and fail to function as programmed. Unplug the oven from the wall outlet and
then plug it in again. The microcomputer will then reset for proper functioning.
Q.
Why does the turntable make noise when the oven is turned on?
A.
The noise occurs as the turntable roller rest moves around the microwave floor.
Frequent cleaning of these parts should eliminate or reduce the noise.
Q.
Why is there noise coming from the oven when using a lower power level?
Page 81
Frequently Asked Questions
79
A.
When cooking with power other than 100%, the oven automatically turns on and
off to obtain lower power output. The clicking noise can be heard when the oven
switches on and off. This is normal. The fan will continue to run during the entire
cooking cycle.
Q.
Why is there steam coming out of the vent?
A.
Steam is produced as foods heat. It is normal for the oven to vent steam during
cooking.
Q.
What is wrong when the oven light is not working?
A.
The light bulb may have burned out or START was not pressed.
Page 82

Microwave Oven Owner’s Manual
80
Limited One Year Warranty
Warranty: This Toastmaster¨ product is warranted to be free from defects in materials or
workmanship for a period of (1) year from the original purchase date. This product
warranty
covers only the original consumer purchaser of the product.
Warranty Coverage: This warranty is void if the product has been damaged by
accident in
shipment, unreasonable use, misuse, neglect, improper service, commercial use, repairs by
unauthorized personnel, normal wear and tear, improper assembly, installation or
maintenance abuse or other causes not arising out of defects in materials or workmanship.
This warranty is effective only if the product is purchased and operated in the USA, and
does not extend to any units which have been used in violation of written instructions
furnished with the product or to units which have been altered or modified or to damage to
products or parts thereof which have had the serial number removed, altered, defaced or
rendered illegible.
Implied Warranties: ANY IMPLIED WARRANTIES WHICH THE PURCHASER MAY HAVE
ARE LIMITED IN DURATION TO ONE (1) YEAR FROM THE DATE OF PURCHASE. Some states
do not allow limitations on how long an implied warranty lasts, so the above limitation may not
apply to you.
Warranty Performance: During the above one-year warranty period, a product with a
defect
will be either repaired or replaced with a reconditioned comparable model (at our option)
when the product is returned to the Repair Center, or the purchase price refunded. The
repaired or replacement product will be in warranty for the balance of the one-year
warranty period and
an additional one-month period. No charge will be made for such repair or replacement.
Service and Repair: Should the appliance malfunction, you should first call toll-free 1 (800)
947-3744 between the hours of 9:00 am and 5:00 pm Central Standard Time and ask for
CONSUMER SERVICE stating that you are a consumer with a problem. Please refer to
model number TMW1 when you call.
In-Warranty Service (USA): For an appliance covered under the warranty period, no
charge is made for service or postage. Call for return authorization (1 800 947-3744).
Out-of Warranty Service: A flat rate charge by model is made for out-of-warranty
service. Include $40.00 (U.S.) for return shipping and handling. We will notify you by mail
of the amount of the charge for service and require you to pay in advance for the repair or
replacement.
Page 83

Limited One Year Warranty
81
For Products Purchased in the USA, but Used in Canada: You may return the
product insured, packaged with sufficient protection, and postage and insurance prepaid
to the USA address listed below. Please note that all customs duty / brokerage fees, if any,
must be paid by you and we will require you to pay the cost of customs duty / brokerage
fees to us in advance of our
performing any service.
Risk During Shipment: We cannot assume responsibility for loss or damage during
incoming shipment. For your protection, carefully package the product for shipment and
insure it with the carrier. Be sure to enclose the following items with your appliance: any
accessories related to your problem, your full return address and daytime phone number, a
note describing the problem you experienced, a copy of your sales receipt or other proof
of purchase to determine warranty status. C.O.D. shipments cannot be accepted.
To return the appliance, ship to:
Attn: Repair Center
708 South Missouri Street
Macon, MO 63552
To contact us, please write to or call:
P.O. Box 6916
Columbia, MO 65205-6916
1(800) 947-3744
Email: [email protected]
Web site: www.esalton.com
Limitation of Remedies: No representative or person is authorized to assume for
Salton, Inc. any other liability in connection with the sale of our products. There shall be
no claims for defects or failure of performance or product failure under any theory of
tort, contract or commercial law including, but not limited to negligence, gross
negligence, strict liability, breach of warranty and breach of contract. Repair,
replacement or refund shall be the sole remedy of the purchaser under this warranty,
and in no event shall we be liable for any
incidental or consequential damages, losses or expenses. Some states do not allow the
exclusion or limitation of incidental or consequential damages, so the above limitation
or exclusion may not apply to you.
Legal Rights: This warranty gives you specific legal rights, and you may also have
other rights which vary from state to state.
Page 84

Microwave Oven Owner’s Manual
82
Contact Information
Contact Information
Coordonnées :
Contacte a:
Toastmaster Inc.
National Service Center
708 South Missouri Street
Macon, Mo 63552
In USA and Canada call:
Consumer Service: 1-800-947-3744
Consumer Parts: 1-800-947-3745
consumer_relations@ toastmaster.com
Hours: 8:00 A.M. - 5:30 P.M. Central Standard Time
Aux USA et au Canada, appeler les numéros suivants :
Service Consommateurs : 1-800-947-3744
Pièces Consommateurs : 1-800-947-3745
consumer_ relations@ toastmaster.com
Horaires : De 8h00 à 17h30, heure GMT - 6
En México:
Toastmaster de México, S. A. de C. V.
Cerrada de Recursos
Hidráulicos Número 6
La Loma Industrial
Tlalnepantla de Baz, C. P. 54060
Estado de México
52- 5- 397- 2848
Horario: 8:00 a.m. hasta 5:30 p.m., hora del Centro
©2004 Toastmaster Inc., A Subsidiary of Salton, Inc.
Subsidiaire de Salton, Inc.
A una Subsidiaria de Salton, Inc.
Page 85

Contact Information
83
Page 86

 Loading...