

Page 1
Page 2

Icebox, LLC and iCEBOX are registered trademarks of Icebox, LLC.
Westinghouse, (W) is a registered trademark of Westinghouse Electric Corporation and used under license by Salton,Inc.
Microsoft and Windows are registered trademarks of Microsoft Corporation.
eFast is a trademark of Young Fast Optoelectronics Co., Ltd.
Specifications subject to change without notice.
Multiple patents issued and pending.
Version 3.0 of this document
Printed in China. © Icebox, LLC, 2002–2004
Icebox, LLC
Seattle, WA
Telephone: (877) 463-7637
Telephone: (206) 448-0354
Fax: (206) 448-0359
http://www.icebox.tv
Manufactured under license from Dolby Laboratories. “Dolby” and the double-D symbol are trademarks of
Dolby Laboratories. Confidential unpublished works. © 1992–2004 Dolby Laboratories. All rights reserved.
Page 3
Table of Contents
General Warnings and Cautions ............................ 1
Protection Against Electric Shock ............................. 2
Information About Repair Service ............................4
Setting Up Your iCEBOX ....................................... 6
Installing the Batteries ............................................ 6
Connecting a TV Cable or Antenna ......................... 8
Connecting an S-Video Source ............................... 9
Connecting a Camera, VCR or Video Game. ........... 9
Connecting the FM Radio Antenna ........................ 10
Connecting to the Internet .................................... 10
Important Safety Instructions
Getting Started
Wired Broadband Connectivity ................... 10
Wireless Broadband Connectivity ................ 12
Dial-Up Connectivity .................................. 13
Networking Other Appliances ............................. 14
Coffee Maker, Bread Maker, and Microwave Oven
14
Connecting Other Devices ................................... 15
Printer ..................................................... 15
External Speakers ...................................... 15
Connecting the Power ........................................ 16
Using the iCEBOX Controls
Front Panel ....................................................... 17
LED Indicator ............................................ 18
iii
Page 4

FlipScreen Owner’s Manual
Remote and Keyboard ........................................ 19
Adjusting the Image and Sound ............................ 26
Stylus & Touch Screen ......................................... 27
Television Mode ................................................ 29
Mode and Power Buttons ........................... 20
Options Button ......................................... 21
Television Mode Buttons ............................. 21
Internet Mode Buttons ................................ 22
DVD & CD Mode Buttons ........................... 24
Using the iCEBOX Modes
Choosing the Television Signal Source .......... 29
Programming the Television Channels ........... 30
Changing Channels .................................. 31
DVD & CD Mode .............................................. 32
Playing DVD and CDs ............................... 32
Internet Mode ................................................... 34
Configuring Connection Settings .................. 35
Configuring Browser Settings ....................... 37
Browsing the Internet ................................. 38
Radio Mode ..................................................... 41
Finding Radio Stations ...............................41
Managing Radio Stations ........................... 41
Video Mode ..................................................... 43
My Kitchen Mode .............................................. 44
Monitoring Appliances in My Kitchen Mode .. 44
Appliance Status Indicators ................................. 45
Appliance Online ..................................... 45
Appliance Offline ..................................... 45
Appliance Not Present ............................... 45
Updating Appliance Recipes ................................ 45
Automatic Nightly Updates ......................... 46
iv
Page 5

Manual Recipe Updates ............................. 46
Caring for Your iCEBOX
Cleaning the iCEBOX ......................................... 47
Getting Help ..................................................... 48
Troubleshooting ................................................. 49
FAQs .............................................................. 50
Additional Information
Accessories ...................................................... 55
Privacy Policy .................................................... 55
Personal Identification Policy ....................... 55
Privacy of Children .................................... 55
Other Web Sites ...................................... 55
Security Information ................................... 56
Specifications .................................................... 57
FCC Statement .................................................. 58
Index ............................................................... 59
v
Page 6

FlipScreen Owner’s Manual
vi
Page 7
Important Safety Instructions
When using the iCEBOX™ FlipScreen, observe these basic precautions to
reduce the risk of personal injury or equipment damage.
Before using the iCEBOX
• Read and understand all iCEBOX instructions.
• Follow all warnings and cautions on the product and in these operating
instructions.
• Do not use the iCEBOX for anything other than its intended use.
Warnings and Cautions
The following examples demonstrate warning and caution statements
found within this document. Read and follow all warnings and cautions.
Important Safety Instructions
!
General
Warnings and
Cautions
Warning: Warning statements warn of hazards or unsafe practices
that could result in serious personal injury
or death.
Caution: Caution statements warn of hazards or unsafe practices
that could result in minor personal injury or damage to
the product.
The following general hazards could result in personal injury or product
damage. Specific warnings and cautions are found in relevant sections of
the operating instructions.
1. Read the instructions. All safety and operating instructions should be
read before operating the iCEBOX.
2. Retain the instructions. The safety and operating instructions should be
retained for future reference.
3. Heed warnings. All warnings on the product and in the operating
instructions should be adhered to.
4. Follow instructions. All operating instructions should be followed.
5. Cleaning. Unplug the iCEBOX from the wall before cleaning it. Do not
use liquid cleaners or aerosol cleaners. Clean the unit with a damp
cloth.
6. Attachments. Do not use attachments which are not recommended by
the manufacturer.
1
Page 8
FlipScreen Owner’s Manual
7. Do not use the unit near water. For example, near a bath tub, wash
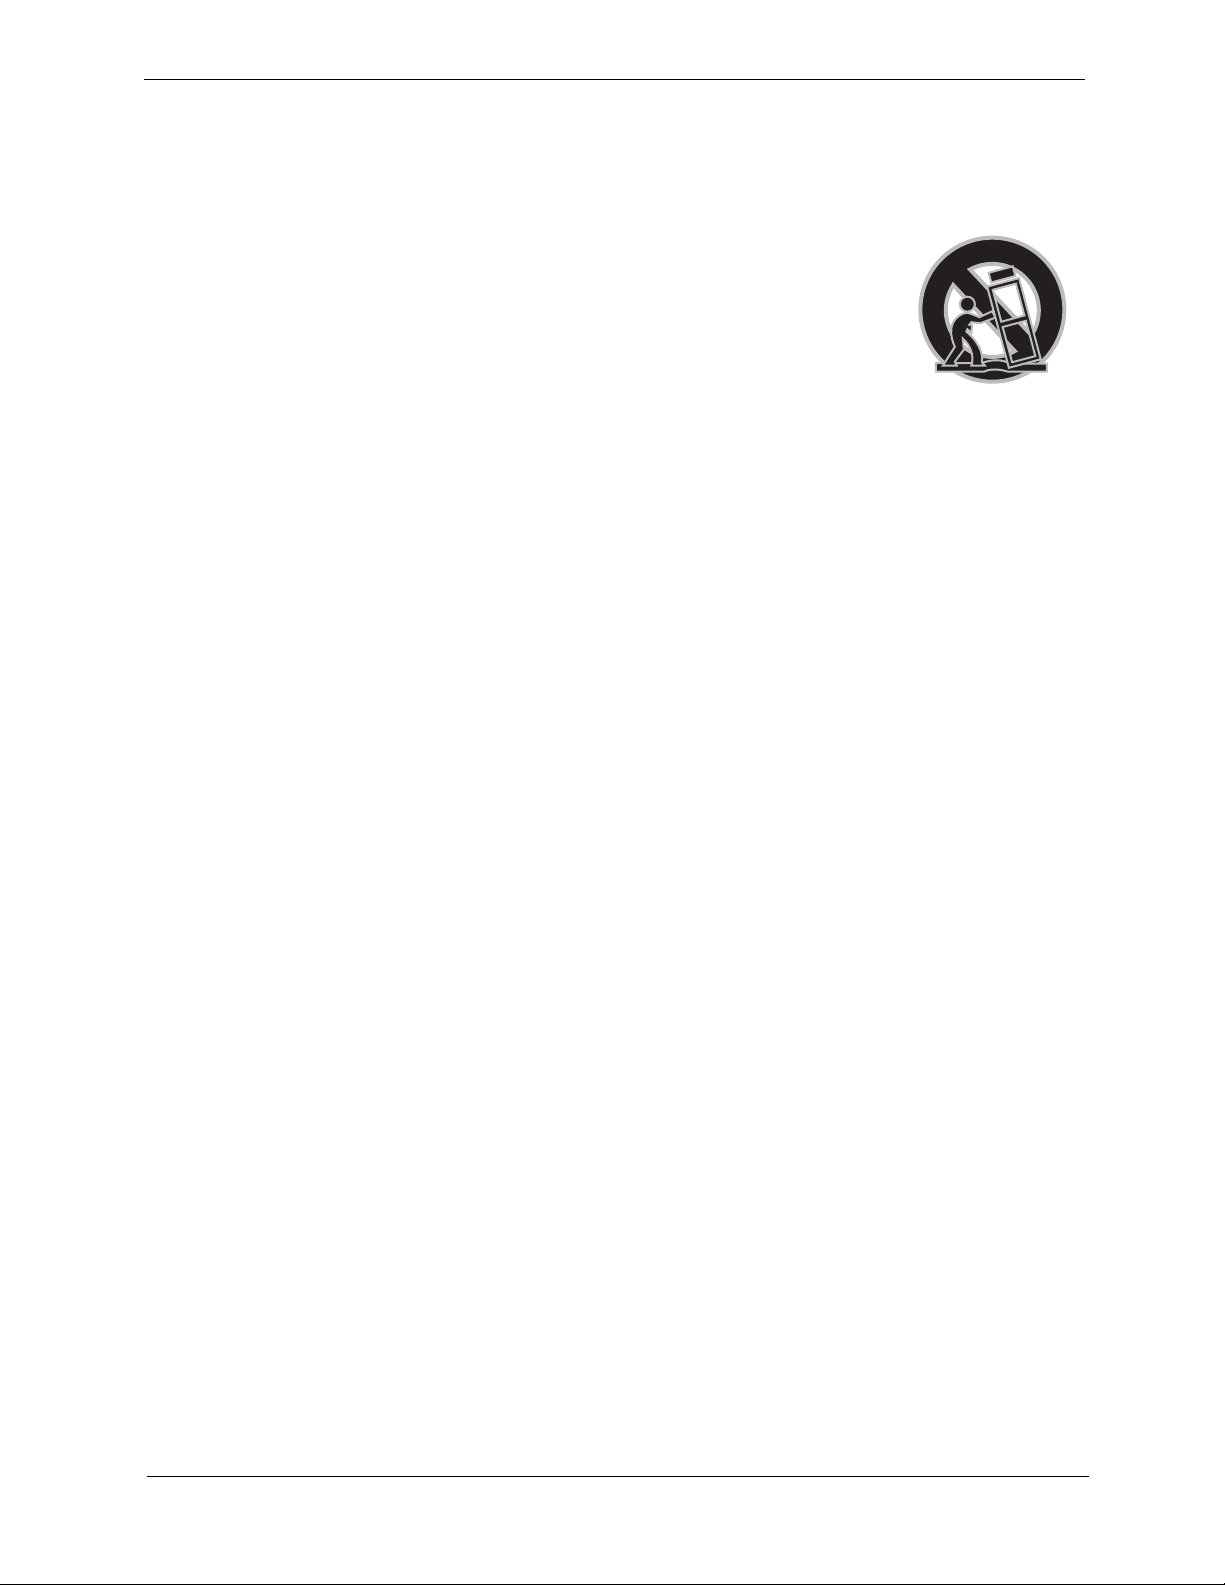
8. Carts and Stands. The iCEBOX should be placed
9. Accessories. Do not place this product on an
bowl, kitchen sink, or laundry tub; in a wet basement; or near a swimming pool; and the like.
on a cart or stand designed to securely support
the weight of the unit.
When mounted on a cart or stand, the iCEBOX
should be moved carefully. Sudden stops, excessive force, or uneven surfaces may cause the cart
to overturn.
unstable cart, stand, tripod, bracket, or table. The product may fall
causing serious injury to a child or an adult and serious damage to the
product.
Protection Against
Electric Shock
10.Power sources. This product should only be operated from the type of
power source indicated on the marking label. If you are not sure of the
power supply to your home, consult your product dealer or local power
company.
11.Grounding or polarization. This product is equipped with a three-wire
grounding-type plug, a plug having a third grounding pin. This plug
will only fit into a grounding type power outlet. This is a safety feature.
If you are unable to insert the plug into the outlet, contact your electrician to replace the obsolete outlet. Do not defeat the safety purpose of
the grounding-type plug.
12.Power-cord protection. Power-supply cords should be routed so that
they are not likely to be walked on or pinched by items placed upon or
against them, paying particular attention to cords at plugs, convenience receptacles, and the point where they exit from the product.
13.Outdoor antenna grounding. If an outside antenna or cable system is
connected to the product, be sure the antenna or cable system is
grounded so as to provide some protection against voltage surges and
built-up static charges. Article 810 of the National Electrical Code,
ANSI/NFPA 70, provides information with regard to proper grounding
2
Page 9

Important Safety Instructions
of the mast and supporting structure, grounding of the lead-in wire to
an antenna discharge unit, size of grounding conductors, location of
antenna-discharge unit, connection to grounding electrodes, and
requirements for the grounding electrode.
Antenna lead wire
Ground clamp
Antenna discharge unit
Electric service
equipment
(NEC section 810-20)
Power service grounding
electrode system
Ground clamps
(NEC ART 250 Part H)
FIGURE 1. Example of Antenna Grounding
14.Lightning. For added protection for this product during a lightning
storm, or when it is left unattended and unused for long periods of time,
unplug it from the wall outlet and disconnect the antenna or cable system. This will prevent damage to the product due to lightning and
power-line surges.
15.Power lines. An outside antenna system should not be located in the
vicinity of overhead power lines or other electric light or power circuits,
or where it can fall into such power lines or circuits. When installing an
outside antenna system extreme care should be taken to keep from
touching such power lines or circuits as contact with them might be
fatal.
16.Overloading. Do not overload wall outlets, extension cords, or integral
convenience receptacles as this can result in a risk of fire or electric
shock.
17.Object and liquid entry. Never push objects of any kind into this prod-
uct through openings as they may touch dangerous voltage points or
short-out parts that could result in a fire or electric shock. Never spill liquid of any kind on the product.
3
Page 10

FlipScreen Owner’s Manual
Information About
Repair Service
18.Servicing. Do not attempt to service this product yourself as opening or
removing covers may expose you to dangerous voltage or other hazards. Refer all servicing to qualified service personnel.
19.Damage requiring service. Unplug this product from the wall outlet and
refer servicing to qualified service personnel under the following
conditions:
a. When the power-supply cord or plug is damaged.
b. If liquid has been spilled, or objects have fallen into the product.
c. If the product has been exposed to rain or water.
d. If the product does not operate normally by following the operat-
ing instructions. Adjust only those controls that are covered by the
operating instructions as an improper adjustment of other controls
may result in damage and will often require extensive work by a
qualified technician to restore the product to its normal operation.
e. If the product has been dropped or damaged in any way.
f. When the product exhibits a distinct change in performance, this
indicates a need for service.
20.Replacement parts. When replacement parts are required, be sure the
service technician has used replacement parts specified by the manufacturer or have the same characteristics as the original part.
Unauthorized substitutions may result in fire, electric shock, or other
hazards.
21.Safety check. Upon completion of any service or repairs to this product,
ask the service technician to perform safety checks to determine that
the product is in proper operating condition.
22.Heat. The product should be situated away from heat sources such as
radiators, heat registers, stoves, or other products (including amplifiers)
that produce heat.
4
Page 11

Getting Started
Getting Started
Welcome to the iCEBOX™—the ultimate Information, Communication, and
Entertainment system designed specifically for the kitchen. With the iCE-
BOX™ FlipScreen, you can watch television, browse the Internet, play
DVDs or CDs, check your Email, and monitor other areas of your home, all
from the convenience of your kitchen.
FIGURE 2. The iCEBOX FlipScreen Installed Under Kitchen Cabinets
5
Page 12

FlipScreen Owner’s Manual
Setting Up Your iCEBOX
Before you turn on your iCEBOX, you will need to install the batteries in the
remote and keyboard and set up the connections to support the many features of the iCEBOX. These connections may include:
• Your television cable or antenna
• Any additional video sources (such as a camera and/or satellite cable)
• The included FM Radio antenna
• A PCMCIA Network card and an Ethernet cable or phone line.
• A SANI network card if you have other Beyond Appliances
The final thing you should do is plug in the power cord before turning on
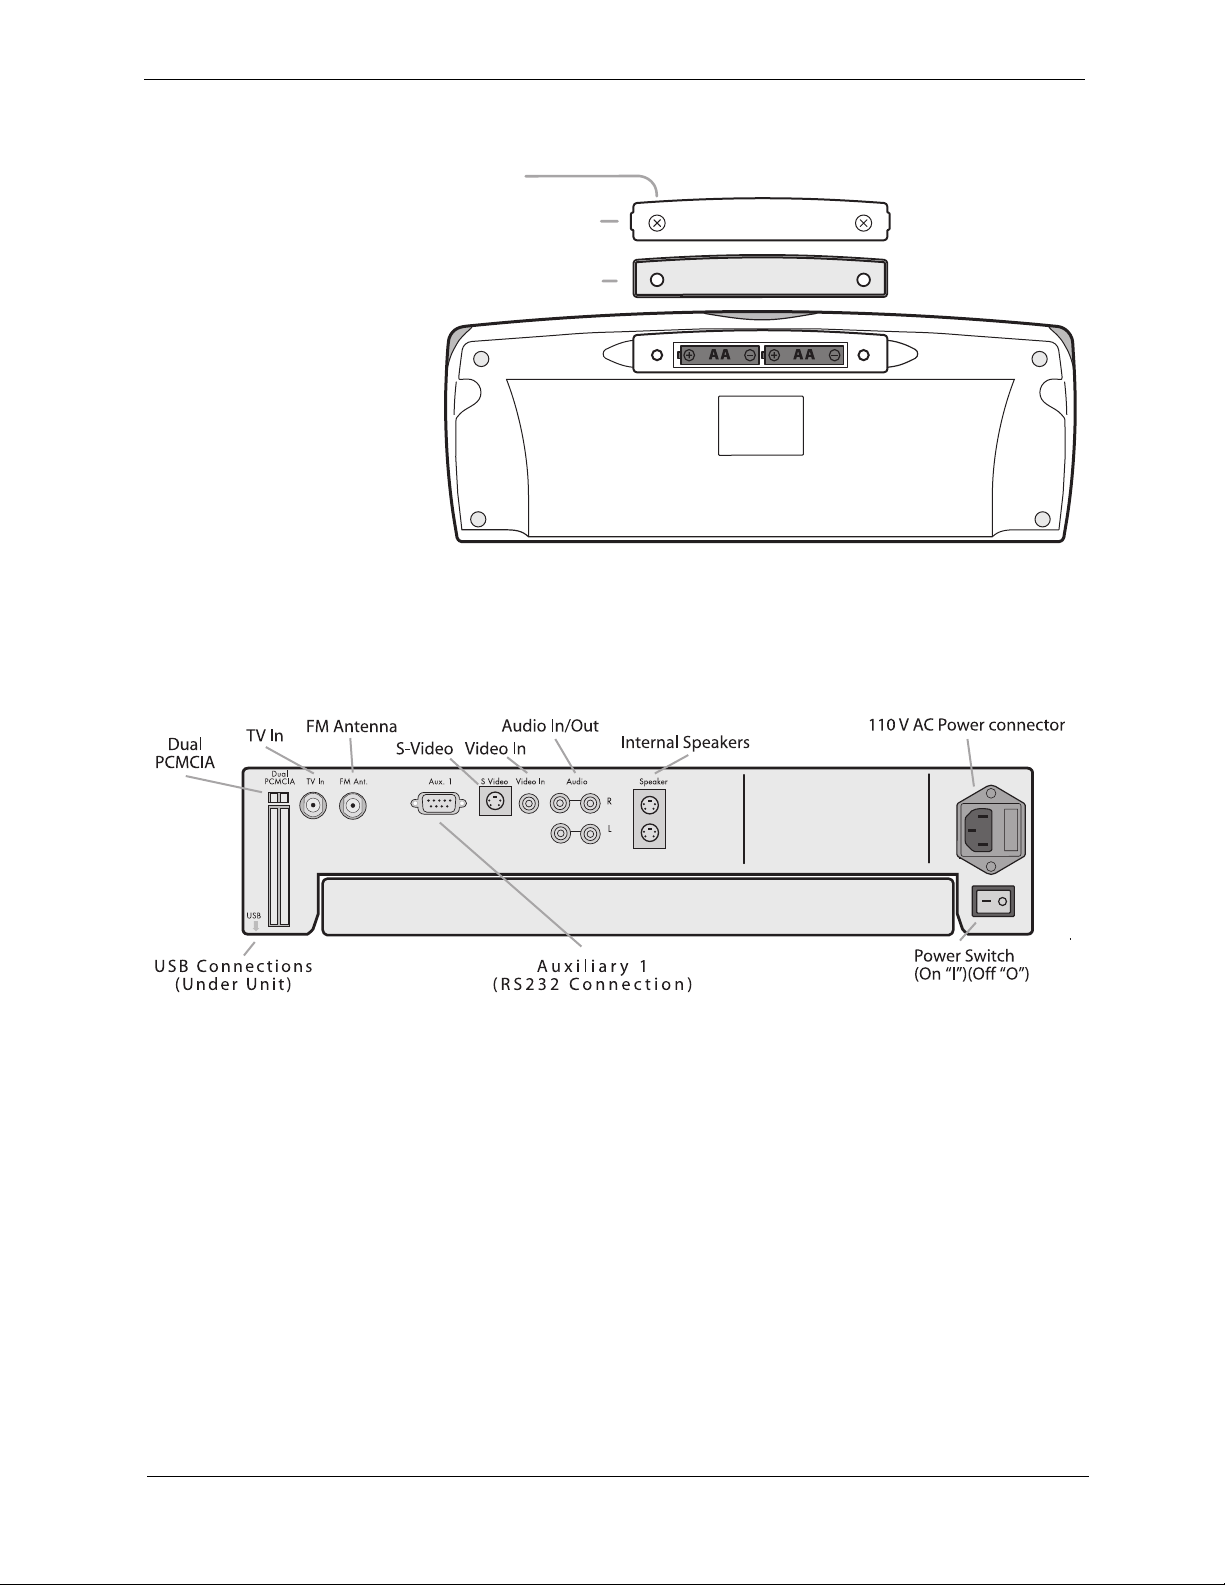
the device. Figure 5 shows the rear panel connections on the iCEBOX.
Installing the
Batteries
!
The remote requires two AAA batteries (supplied), and the keyboard
requires two AA batteries (supplied). Alkaline batteries are recommended.
To install the batteries for your remote
1. On the back of the remote, remove the battery cover by loosening the
small screw in the center of the panel ( fig. 3). Keep the attached
washer with the screw.
2. Install two AAA batteries, ensuring that the polarity (+ and –) on the
batteries matches the + and – markings in the battery compartment.
3. Reattach the battery cover, making sure that the cover is seated
properly.
4. Insert the screw, with the washer still attached, and tighten the screw
until it is snug.
Caution: Do not overtighten the screw. You may damage the
washer and the remote will no longer be washable.
6
Page 13

Getting Started
Battery Cover
Secured Screw
FIGURE 3. Remote Battery Installation
To install the batteries for your keyboard
1. On the back of the keyboard, remove the battery cover by loosening
both large screws on either end of the battery panel (fig. 4). Keep the
attached washers with each screw.
2. Remove the rubber gasket.
3. Install two AA batteries, ensuring that the polarity (+ and –) on the bat-
teries matches the + and – markings in the battery compartment.
4. Reattach the rubber gasket, ensuring that the four nubs on the under-
side of the gasket are pressed firmly into the holes in the battery
compartment. This is important to keep the keyboard washable.
5. Reattach the battery cover, ensuring that it is seated properly.
6. Insert the screws, with the washers still attached, and tighten the screws
until they are snug.
!
Note: If the screws won't tighten all the way, or the battery cover isn't
flush with the keyboard bottom, make sure the rubber gasket is
firmly inserted into the battery compartment.
Caution: Do not overtighten the screws. You may damage the
washers and the keyboard will no longer be washable.
7
Page 14
FlipScreen Owner’s Manual
Screw
Battery Cover
Rubber Gasket
FIGURE 4. Keyboard Battery Installation
Connecting a TV
Cable or Antenna
8
FIGURE 5. Rear Panel of the iCEBOX FlipScreen
The iCEBOX is a 125-channel, cable-ready, stereo television. To use your
iCEBOX as a television, you must first connect it to a TV signal source.
To connect the TV cable
• Screw the existing television cable into the TV In connection on the
back of the iCEBOX (fig. 5). If space is limited, use the supplied right
angle F-connector.
To connect a TV antenna
• Use an antenna with a connector designed to fit on to a coaxial cable
connection like the one for the TV In connection at the back of the iCEBOX (fig. 5).
Page 15

Getting Started
Satellite or Digital Cable Television Service
The iCEBOX supports satellite and digital cable television service; however, when using satellite service, the iCEBOX remote or keyboard cannot
be used to change channels. Continue to use your existing remote control
with the set-top box.
Your satellite signal may come in through the standard TV-In coxial connection. See To connect the TV cable in the previous section.
Alternately, you may wish to take advantage of the higher quality of Satellite or Digital Cable by using the S-video connection. You can connect
digital cable or a Direct Broadcast Satellite (DBS) system, such as DirectTV
or DISH, to your iCEBOX. See To connect an S-Video source in the next
section.
Note: If you use an S-Video connection from your Satellite or Digital
cable, you will need to use Video Mode to watch television. See
Video Mode on page 43. The iCEBOX remote or keyboard can-
not be used to change channels in Video Mode. Continue to use
your existing remote control with the set-top box.
Connecting an
S-Video Source
Connecting a
Camera, VCR or
Video Game.
S-Video (Super-Video) divides video information into two separate signals
for a sharper, higher-quality image. Most new video cameras, camcorders, VCRs, and game machines include an S-Video jack.
The iCEBOX can support one S-Video signal that can be viewed in Video
Mode. Press the Video mode button repeatedly to toggle between the SVideo signal and a composite signal. You can also use the S-Video jack
for Satellite or Digital Cable. For more information see Video Mode on
page 43.
To connect an S-Video source
• Plug an S-Video cable from the camera, VCR, game machine or satel-
lite/cable receiver into the S-Video connection on the back of the
iCEBOX.
• Insert audio cables from the S-Video device into the Audio In connec-
tions in the back of the iCEBOX.
Using the iCEBOX Video Mode, you can monitor another area of your
home where a video camera is installed, play a video game or view a
video tape in a VCR using a composite signal.
Since Video Mode supports both composite and S-Video sources, you can
toggle between the two signals by repeatedly pressing the Video mode
button. For more information see Video Mode on page 43.
Note: At this time, Video Mode supports only one Audio source which
will continue to play when you toggle between Video signals.
9
Page 16

FlipScreen Owner’s Manual
To connect a composite source
• Plug an RCA cable from a camera, VCR or game machine into the
• Insert audio cables from the device into the Audio In connections on the
Video In connection on the back of the iCEBOX.
back of the iCEBOX.
Connecting the
FM Radio
Antenna
Connecting to the
Internet
You can use the iCEBOX to listen to your favorite local FM radio stations in
FM Radio Mode. Enclosed with your iCEBOX FlipScreen is an FM radio
antenna.
To connect the FM Antenna
1. Make sure the FlipScreen unit is powered off by checking the LED on
the front of the unit – it should be black and unlit. The power can be
turned off using the red rocker switch on the back of the unit.
2. Remove the antenna from the iCEBOX packaging
3. Attach the antenna by screwing it onto the FM Antenna coaxial socket
(see Figure 2) on the back of the FlipScreen.
The iCEBOX supports three types of Internet connectivity using a PCMCIA
Network card. Depending upon which type of card is used, you can connect using:
• Wired (Ethernet) Broadband. Your broadband service may be pro-
vided over DSL or cable modem.
• Wireless (802.11b) Broadband. This requires a wireless network.
• Dial-Up Internet Access. The dial-up Internet services must not require
the installation of additional software.
10
Wired Broadband Connectivity
Your iCEBOX accessories box includes a PCMCIA Network card which
supports an Ethernet connection to a DSL or cable modem. Because the
iCEBOX uses the Windows CE .NET platform, we cannot ensure that an
alternate network card will work. Please contact customer support for a
current list of alternate supported cards.
The following instructions assume that your DSL/cable modem and home
network are already installed and configured. For more detailed Internet
Connection information, refer to the Installation Manual.
To connect using a Wired Broadband (DSL or cable modem)
connection
1. Insert the networking card, with the card’s label facing toward the cen-
ter of the device, into the PCMCIA slot on the back of the iCEBOX
(fig. 5).
Page 17

Getting Started
2. Insert an Ethernet cable from your home network into the Ethernet jack
on the PCMCIA card.
• In most cases, no further connection settings are required. If no
connection is established when you first go to Internet Mode, see
Configuring a Wired Broadband Connection on page 35 for
more information.
11
Page 18

FlipScreen Owner’s Manual
Wireless Broadband Connectivity
There are two ways to connect the iCEBOX to your wireless network:
• Using an approved wireless PCMCIA Network card; or,
• Using a wireless bridge connected to the ethernet PCMCIA card.
Because the iCEBOX uses the Windows CE .NET platform, we cannot
ensure the compatibility of all wireless network cards. Please contact customer support for a current list of supported wireless PCMCIA networking
cards.
To connect using a wireless PCMCIA card
1. Insert a wireless networking card, with the label facing the center of the
To connect using a wireless bridge
1. Insert the included networking card into the PCMCIA slot on the back
2. Connect the wireless bridge to your home PC and configure it follow-
3. When the wireless bridge is properly configured for your wireless net-
4. Insert one end of an Ethernet cable into the bridge, and one end into
device, into the PCMCIA slot on the back of the iCEBOX (fig. 5).
• Further configuration settings are required to connect to your wire-
less network. See Configuring a Wireless Connection on
page 35.
of the iCEBOX (fig. 5).
ing the directions provided by the manufacturer of the bridge.
work, disconnect it from your home PC.
the Ethernet jack on the PCMCIA card.
• In most cases, no further connection settings are required. If no
connection is established when you first go to Internet Mode, see
Configuring a Wired Broadband Connection on page 35 for
more information.
12
Page 19

!
Getting Started
Dial-Up Connectivity
To connect to a dial-up Internet provider, you will need to use a PCMCIA
modem card equipped with an RJ-11 phone jack.
Note: The iCEBOX does not currently support any ISPs that require
downloading or installing software. At the time of the printing of
this manual, AOL is an example of an ISP that will not work with
the iCEBOX because of their download requirements, although
you can still retrieve AOL mail using the iCEBOX Internet browser.
To connect using a Dial-Up connection
1. Insert the modem card, with the card’s label facing toward the center of
the device, into the PCMCIA slot on the back of the iCEBOX.
2. Plug the analog telephone line into RJ-11 jack on the modem card.
• Further configuration is required. See Configuring a Dial-Up Con-
nection on page 36.
Caution: Do not connect the iCEBOX to a digital phone line.
Severe damage can occur to the iCEBOX.
Digital Versus Analog Phone Lines
Two types of phone lines are commonly available: analog and digital.
Most homes are wired with analog phone lines. Digital lines are usually
found in commercial and industrial sites. However, newer homes, apartments, and condominiums may be prewired with high-speed digital phone
lines.
All modems, including that in a PCMCIA networking card, require an analog phone line. Connecting a modem to a digital line will cause
permanent damage to the modem.
To determine which type of line you have, look at the phone line connector. An analog phone connector is terminated with 2 or 4 copper wires. A
digital connector is terminated with 6 or 8 copper wires. If you cannot
determine for certain which type of phone line you have, contact your
phone service provider.
If You Have a Digital Phone Line
In commercial buildings, apartment buildings, and condominiums, digital
phone lines usually come from a telephone switch or PBX located in the
building. These telephone switches will also support analog phone lines.
The telephone system administrator may be able to arrange for an analog
phone line to be brought to your location from the local telephone switch.
13
Page 20

FlipScreen Owner’s Manual
If you live in a house wired with a digital line, you can arrange with your
phone company to have an analog line brought into your home. In addition, many digital phone manufacturers offer inexpensive adapters that
plug into the digital phone line and convert it to an analog line. These
adapters usually work best at lower modem speeds.
Networking Other
Appliances
Coffee Maker, Bread Maker, and Microwave Oven
If you purchase and install any one of the other appliances in the Beyond
Connected line, you can network those products together with your iCEBOX, and take advantage of the appliance’s smart features. For example,
by networking your Bread Maker in with your iCEBOX, new bread mix
recipes will automatically download to your Bread Maker memory through
the internet connected iCEBOX.
To network with any of the appliances, the iCEBOX FlipScreen and the
appliance must each have a SANI Cartridge installed. The SANI
Cartidges are wireless transmitting and receiving devices that operate in
the same frequency rage as a typical cordless telephone.
SANI connectivity is one of the features that make your Beyond Appliances so special.
The SANI Cartridges can be purchased wherever you purchase your
Beyond Appliances.
14
FIGURE 6. SANI Card
To install the SANI Cartridge
1. Ensure that the power switch on the iCEBOX back panel is in the off
position (“O” is depressed).
2. Remove the plastic cap from the SANI Card Slot.
3. Insert the SANI Card gently into the SANI Card Slot. The label on the
SANI Card should face up, and the connector must seat firmly in the
card socket.
4. Turn the power switch on.
5. The iCEBOX is now ready for you to bind your Connected Appliances.
Page 21

Getting Started
To Add Connected Appliances
1. On your iCEBOX, go to My Kitchen Mode by pressing the Mode X
button on the remote or keyboard.
2. Open the My Kitchen Options Menu, by pressing the Options button
on the remote or keyboard.
3. On the My Kitchen Options Menu, select Add Appliance.
4. On the appliance control panel, press the NETWORK button. The
appliance will enter Binding mode. The word BIND will display and the
word “Network” will blink on the appliance display.
If the appliance double-beeps and the word Bind disappears, there is a
SANI Card problem and you should check that the cards are properly
inserted, or if there are sources of radio interference nearby.
If the word Network was already on the appliance display, the appliance is already networked. Press and hold the NETWORK button for
five seconds to unbind the appliance, then press the NETWORK button
once to enter bind mode with the iCEBOX again.
5. When the iCEBOX detects the appliance, it will prompt you to bind.
You must choose OK to bind the appliance.
When you have accepted the appliance, the appliance will beep, the
word “Network” will remain lit and the appliance clock will synchronize to
the iCEBOX. From then on, the appliance status will be viewable on your
iCEBOX and the appliance network features will be available.
Connecting Other
Devices
To Remove a Connected Appliance
1. On your iCEBOX, go to My Kitchen Mode by pressing the Mode X
button on the remote or keyboard.
2. Open the My Kitchen Options Menu, by pressing the Options button
on the remote or keyboard.
3. On the My Kitchen Options Menu, select Remove Appliance.
4. On the Appliance Control Panel, press and hold the NETWORK but-
ton.
5. Now both the iCEBOX and the Appliance are not networked anymore.
Printer
You can print Web pages with a compatible printer. Connect a printer to
one of the USB ports on the bottom of your iCEBOX (fig. 5).
For more information on using printers with your iCEBOX, visit
support.iceboxllc.com.
External Speakers
You can route sound through a home stereo or other amplified audio system. Connect your system to the Audio Out connections on the rear panel
of the unit (fig. 5). For more information, refer to the instructions that were
provided with your audio system.
15
Page 22

FlipScreen Owner’s Manual
Connecting the
Power
The iCEBOX operates with a current of 110 V AC, 60Hz. A 110 V AC
power cord is supplied with your iCEBOX.
To connect the power
1. Ensure that the power switch on the back panel is in the off position
(“O” is depressed).
2. Plug the supplied AC power cord into the AC connector on the rear
panel of the iCEBOX.
3. Plug the other end into a 110 V AC wall socket.
4. Turn the power switch to the on position (“|” is depressed).
The LED indicator on front panel shines red.
16
Page 23
Using the iCEBOX Controls
Before turning on your iCEBOX FlipScreen for the first time, take a moment
to familiarize yourself with the controls. When you turn your iCEBOX on
for the first time, it will be in Television Mode. See Tel evis io n Mod e on
page 29 for information on programming the television channels.
Using the iCEBOX Controls
Front Panel
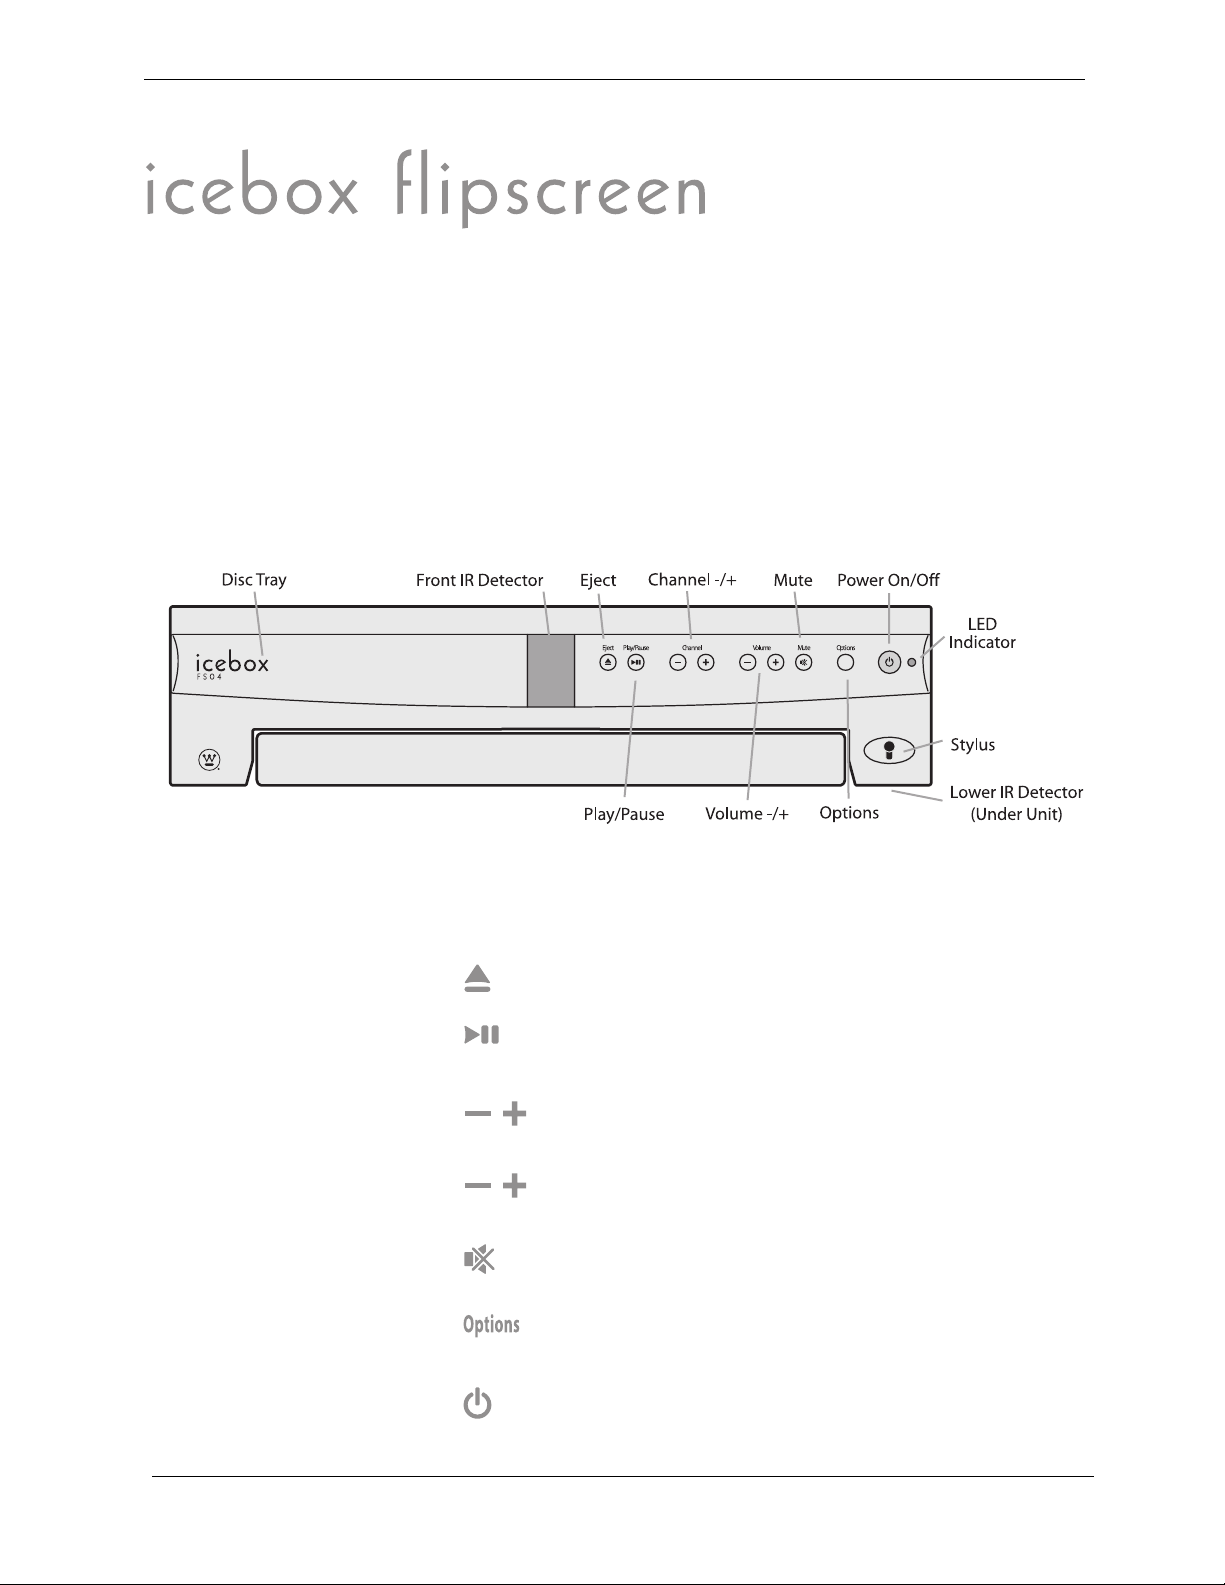
FIGURE 7. Front Panel of iCEBOX FlipScreen
The front panel of the FlipScreen has controls and indicators that are
attractively integrated into the design.
The buttons on the front panel do the following:
Eject Ejects the disc tray. Press again to retract tray.
Play/Pause Begins, pauses, or resumes the playing
of a disc.
Channel –/+ Press – to select the next lowest chan-
nel. Press
Volume –/+ Press – or + to decrease or increase the
volume.
Mute Turns off all sound from the FlipScreen. To
restore sound, press again or press
Options Displays onscreen menus for your current
mode.
Power On/Off Turns your iCEBOX on. Press again
to put iCEBOX in Sleep Mode.
+ to select the next highest channel.
Volume –/+.
17
Page 24

FlipScreen Owner’s Manual
LED Indicator
The LED indicator on the front panel of the iCEBOX tells you what the current power status is for your iCEBOX.
When the LED is... The iCEBOX is...
Unlighted Turned off at the main power switch on the
rear panel of the unit.
Red In Sleep Mode. Sleep Mode occurs when
the main power switch is on, but the iCEBOX is turned off at the remote, keyboard,
or front panel
Flashing Turning on or resetting.
Green On.
Power On/Off button.
18
Page 25
Using the iCEBOX Controls
Remote and
Keyboard
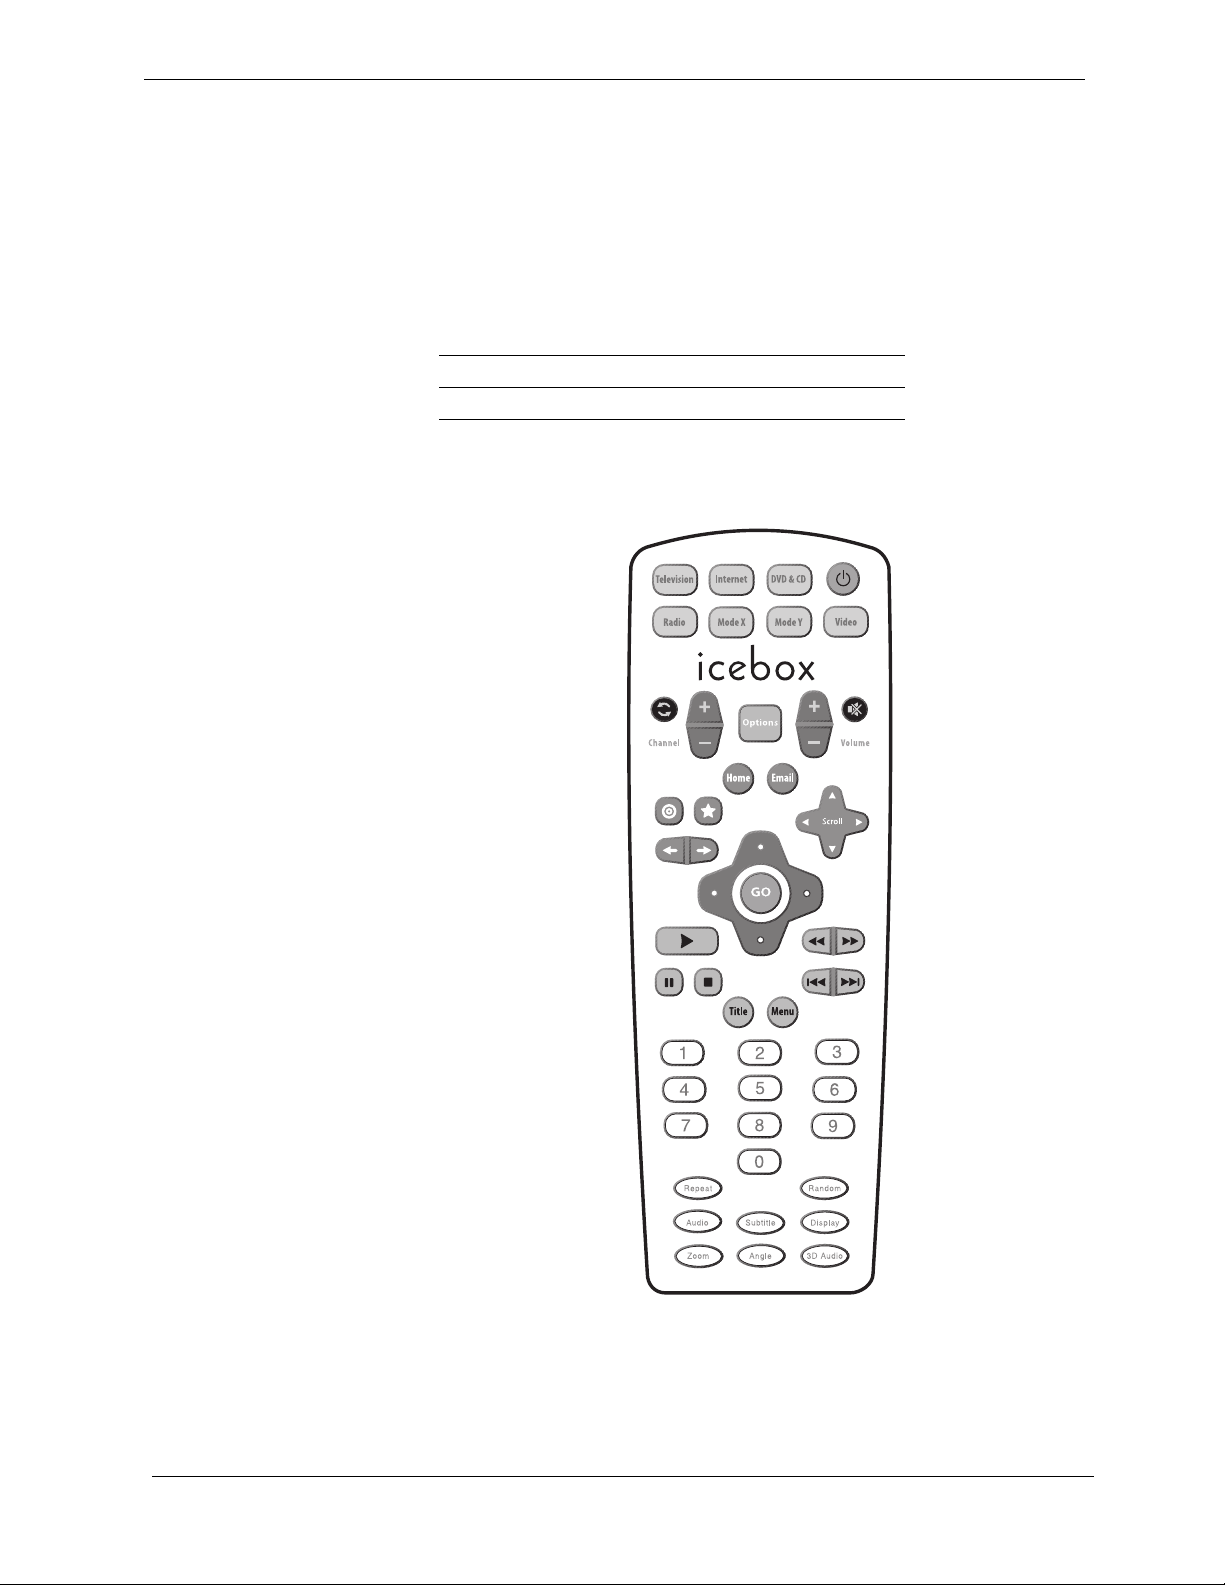
The remote and keyboard have similar controls—what works on one will
work on the other. Figure 8 shows the layout of the remote buttons. The
layout for the keyboard is similar unless otherwise noted.
The buttons on the remote and keyboard are laid out in sections and are
color coded. The following table shows which colors are associated with
the various modes.
Mode Color of Buttons
Telev isi on M ode Purple
Internet Mode Orange
DVD & CD Mode Green
FIGURE 8. The iCEBOX Remote
19
Page 26
FlipScreen Owner’s Manual
Mode and Power Buttons
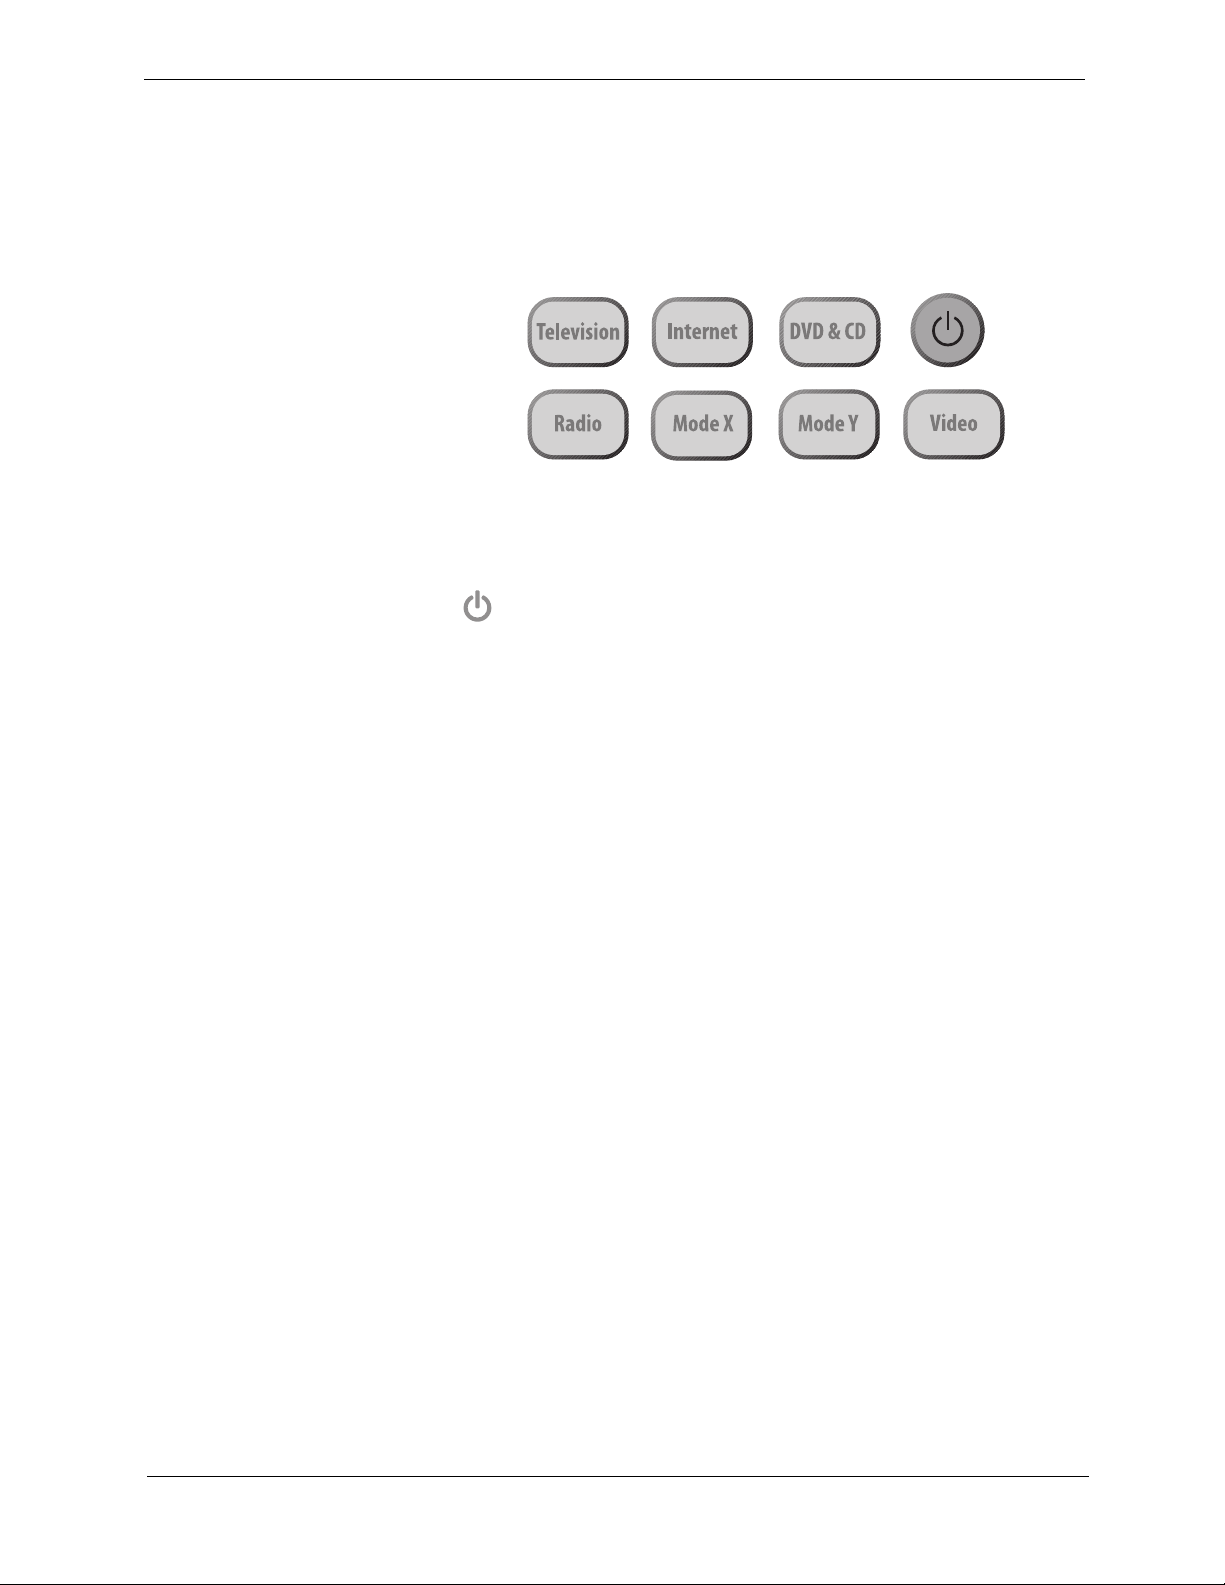
The mode buttons and power button (fig. 9) are located at the top of the
remote and along the top of the keyboard.
The mode and power buttons do the following:
FIGURE 9. Mode and Power Buttons
Power Turns the iCEBOX on. Press again to
put iCEBOX in Sleep Mode. (See LED Indicator on page 18)
Tel ev isi on
Internet
DVD & CD
Radio
Video
Mode X, and
Mode Y
Tele vi si on Mo de
Puts the iCEBOX into Television Mode so that you can watch your
favorite shows.
Internet Mode
Puts the iCEBOX into Internet
Mode so that you can connect to the Internet.
DVD & CD Mode
Puts the iCEBOX into DVD &
CD Mode so that you can watch a DVD or
play a CD.
Radio Mode
Puts the iCEBOX into Radio Mode
so that you can listen to your favorite FM
Radio stations.
Video Mode
Puts the iCEBOX into Video Mode
so that you can monitor another place in your
home or access an s-video signal. Press the
Video button repeatedly to switch between the
S-Video and composite signals.
Mode X
Puts the iCEBOX in My Kitchen Mode
where you can monitor and interact with your
other Beyond Connected Appliances.
Mode Y This key is intentionally unassigned so
that it can be available for future updates.
20
Page 27
Using the iCEBOX Controls
Options Button
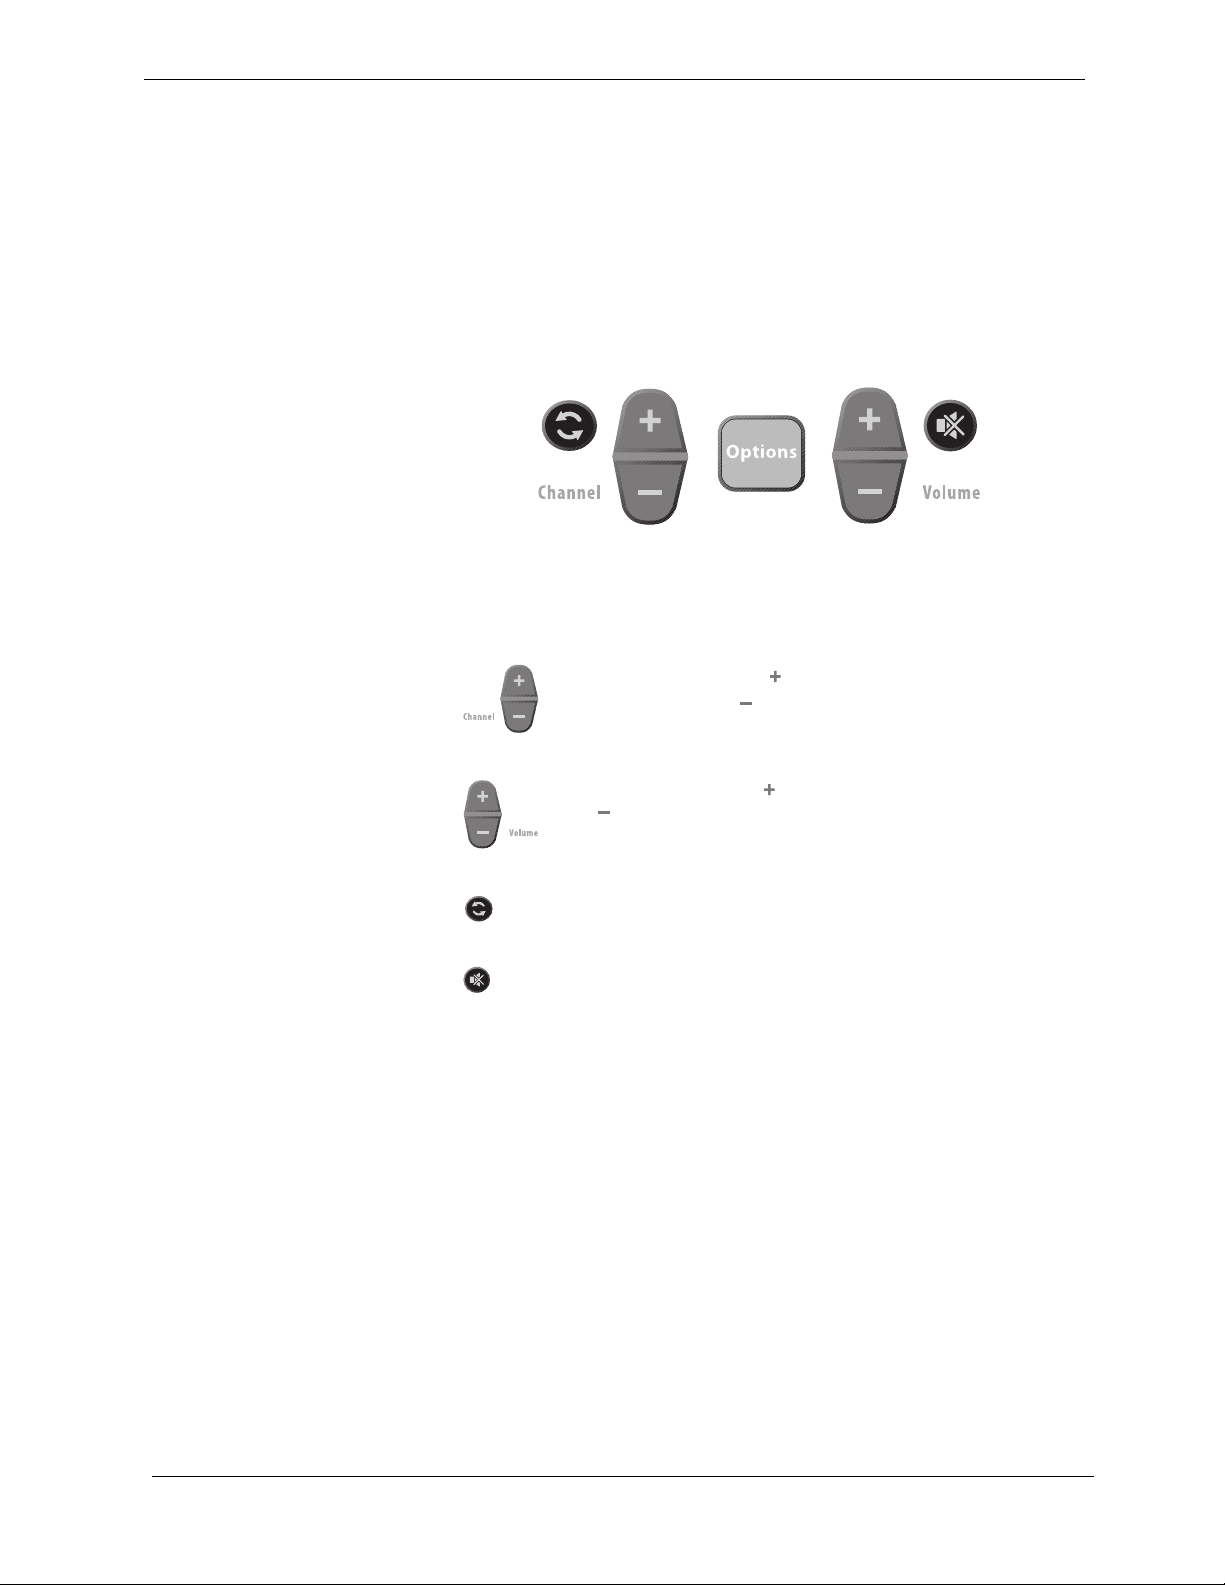
Figure 10 shows the location of the Options button. You can use the
Options button in all modes to display the Options menu for the current
mode.
Television Mode Buttons
FIGURE 10. Options, Channel, and Volume Buttons
The television and volume buttons do the following:
Channel –/+ Press to select the next highest
channel. Press to select the next lowest
channel.
Volume –/+ Press to increase the volume. Press
to decrease the volume.
Last Channel Press to jump to the last viewed
channel.
Mute Press to turn off all sound from the iCEBOX.
To resume sound, press again or press
Volume –/+.
21
Page 28
FlipScreen Owner’s Manual
Internet Mode Buttons
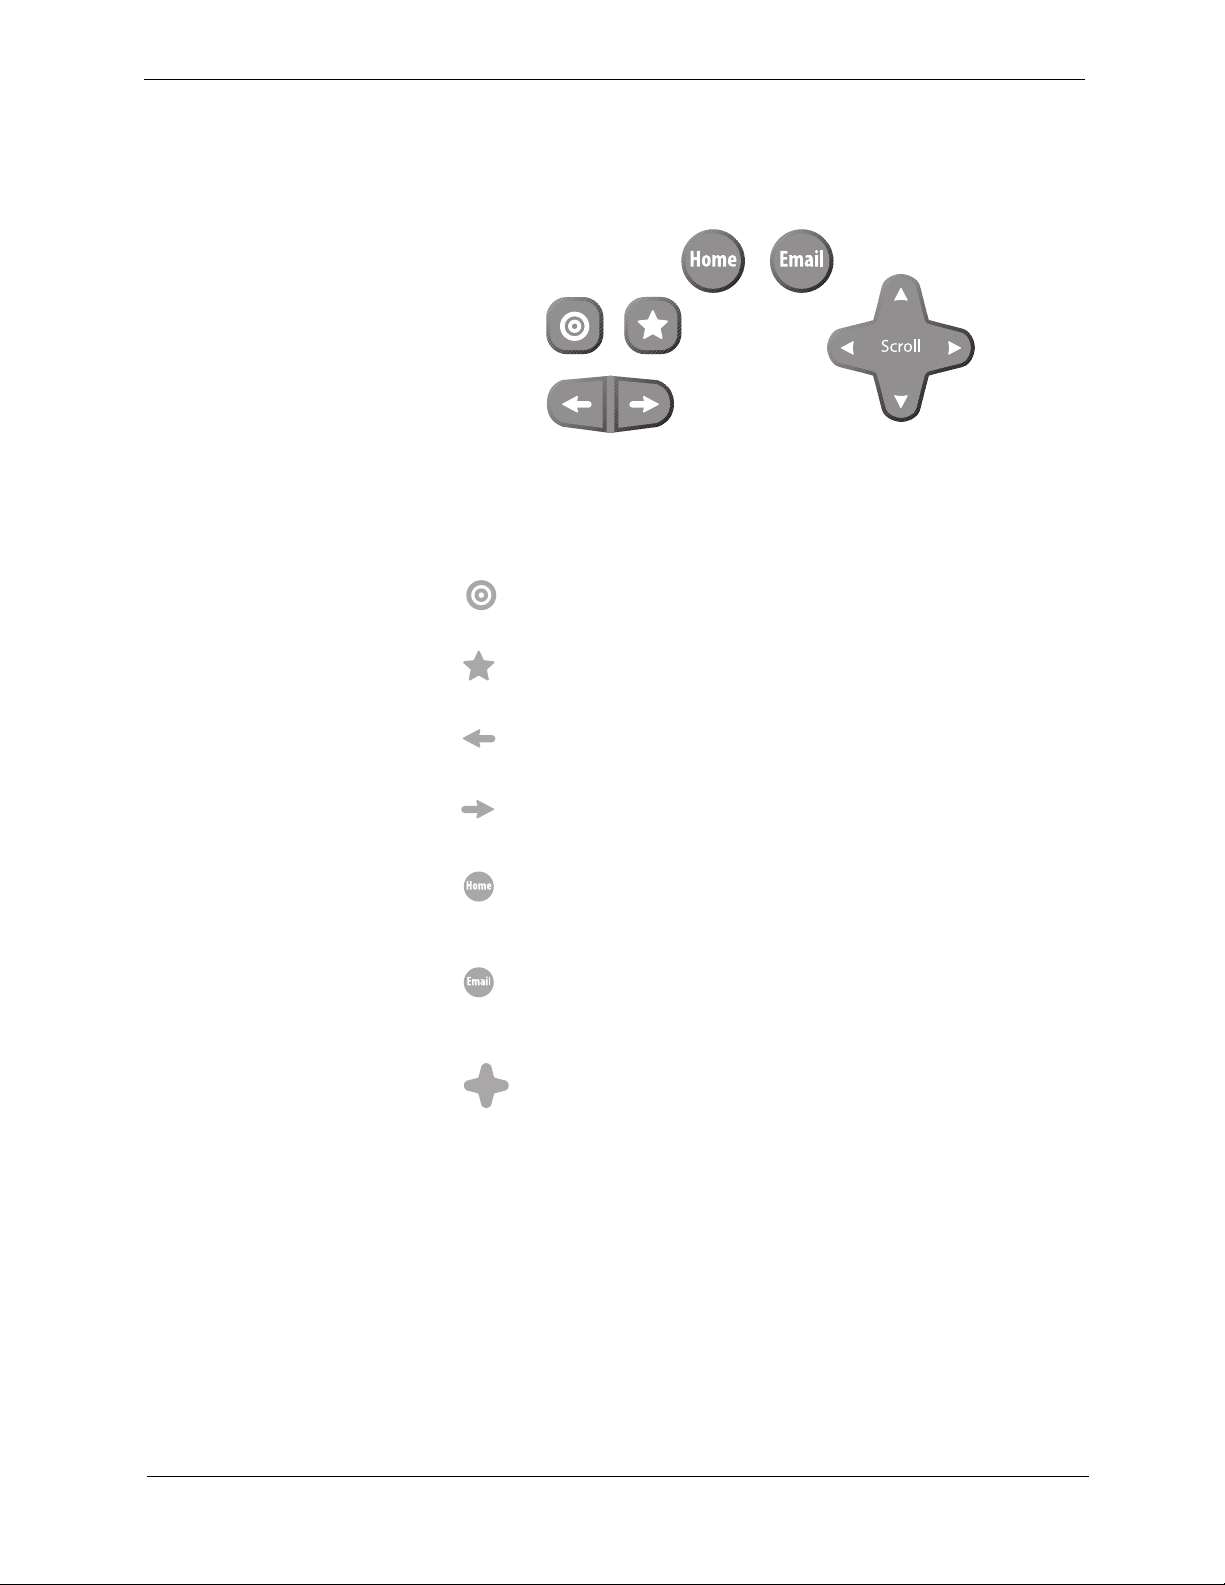
The Internet Mode buttons do the following:
FIGURE 11. Internet Mode Buttons
Jump to Target Press to move the selection indicator
to the target area and back again.
Jump to Favorites Press to display your list of favor-
ite Web sites.
Back Press to return to the previously viewed Web
page.
Next Press to advance to the next viewable Web
page.
Home Press to return to your home page from any-
where on the Internet. See Configuring Browser
Settings on page 37.
Email Press to go to your Web-based Email
account. See Configuring Browser Settings on
page 37.
Scroll Press to scroll the page up, down, left, or
right on the screen.
22
Page 29
Using the iCEBOX Controls
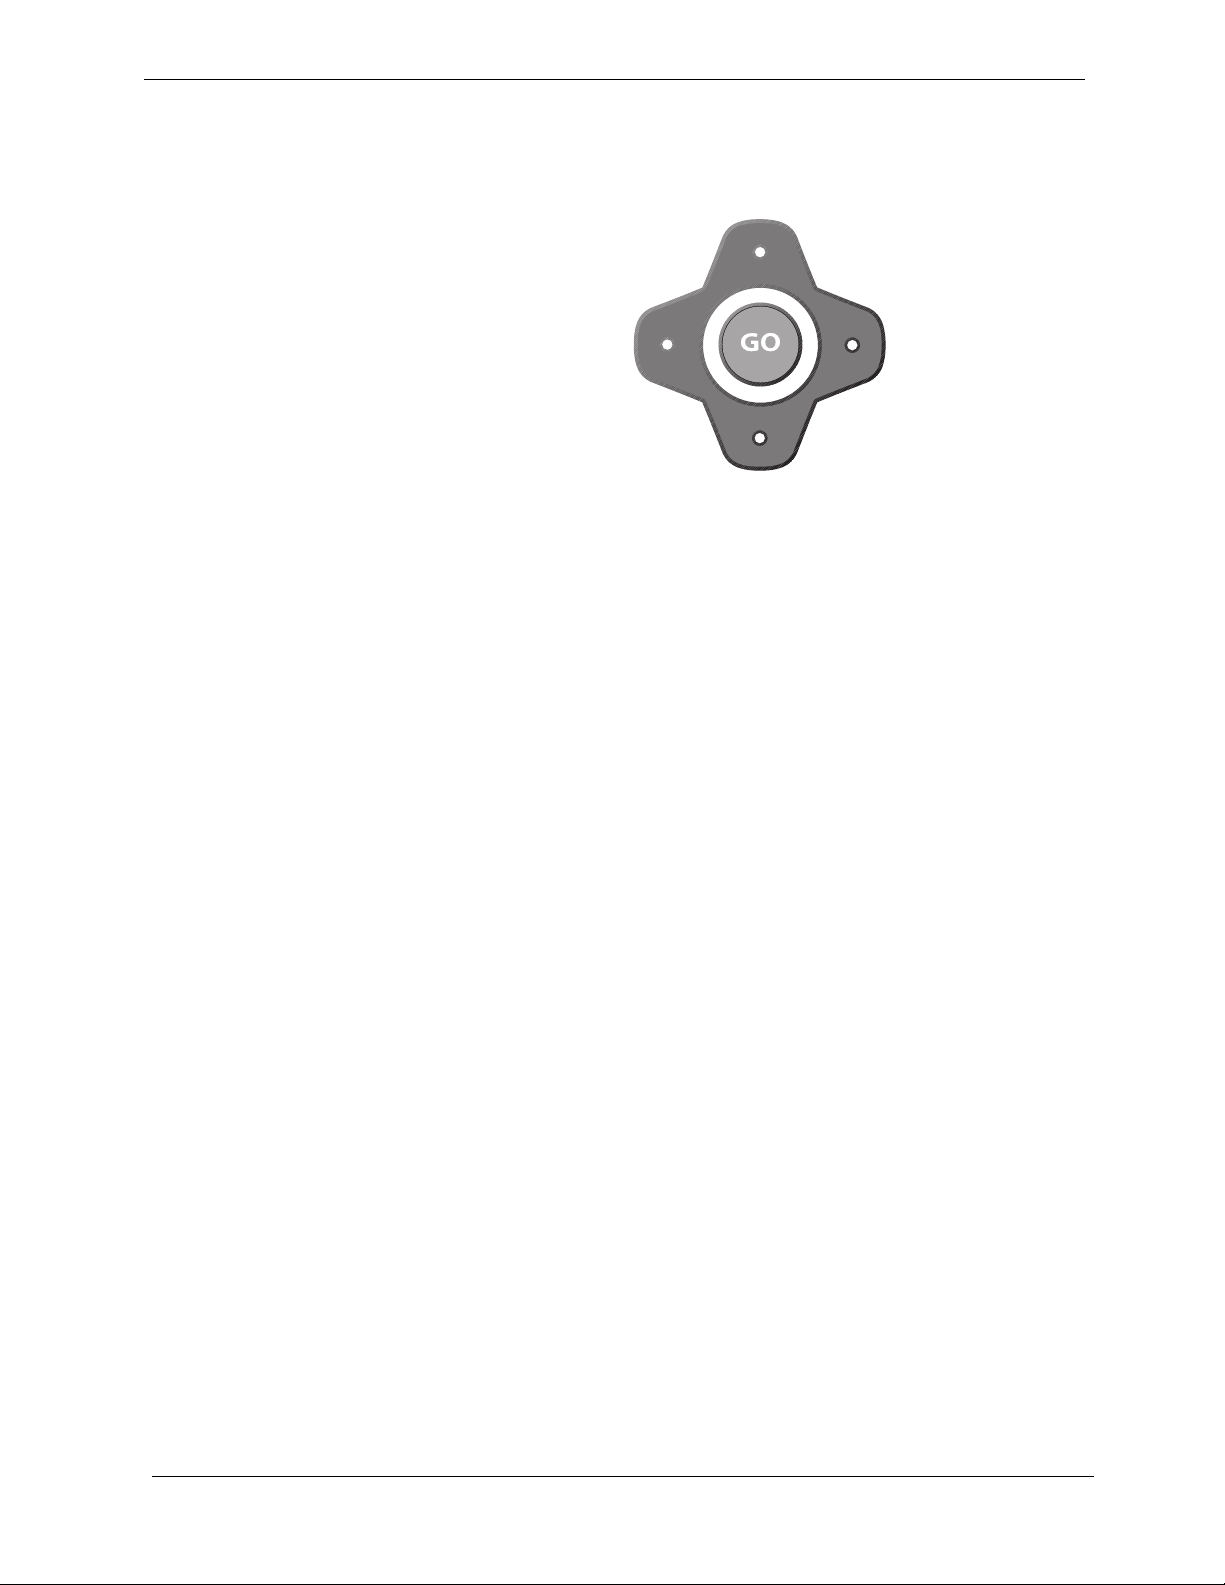
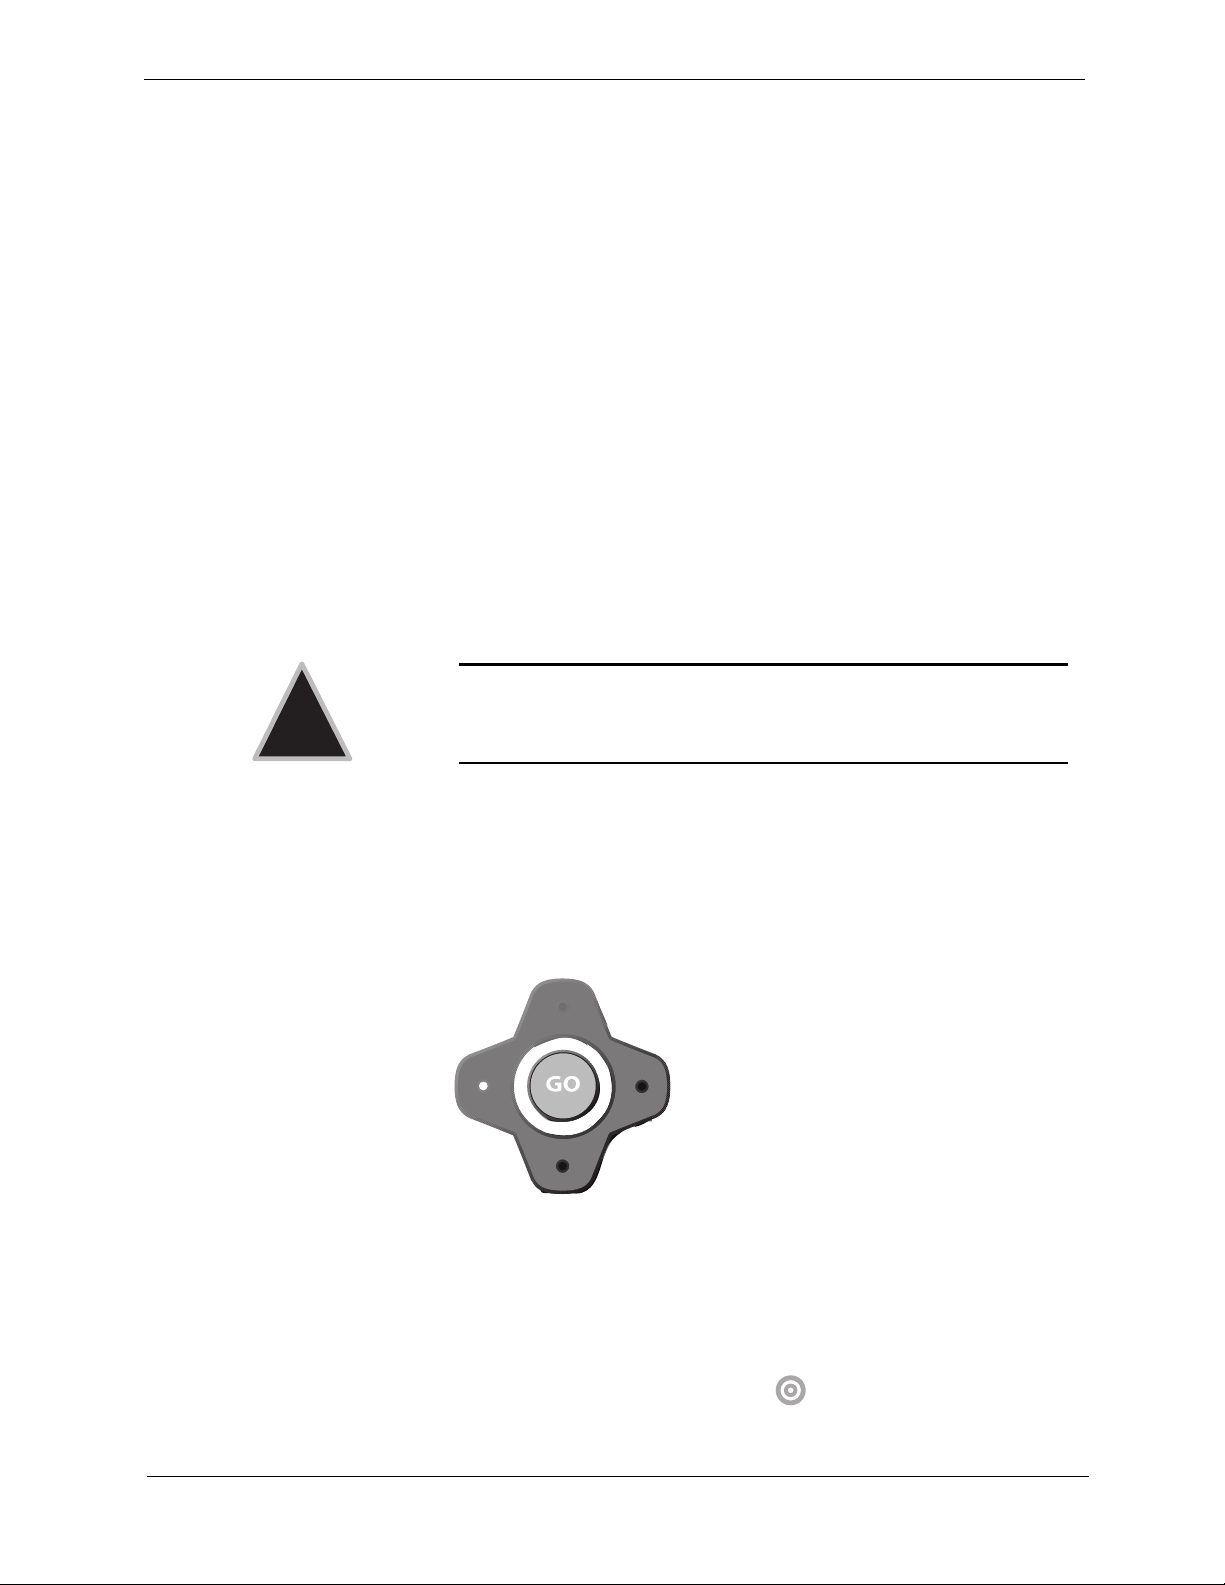
The directional buttons and the GO button are shown in figure 12.
FIGURE 12. Directional Buttons and GO Button
In Internet Mode, use the directional buttons around the GO button to
move the colored selection box around the screen to select a link. To follow the link, press GO.
In DVD & CD Mode, use the directional buttons to navigate through DVD
menus. To select a menu item, press GO.
23
Page 30
FlipScreen Owner’s Manual
DVD & CD Mode Buttons
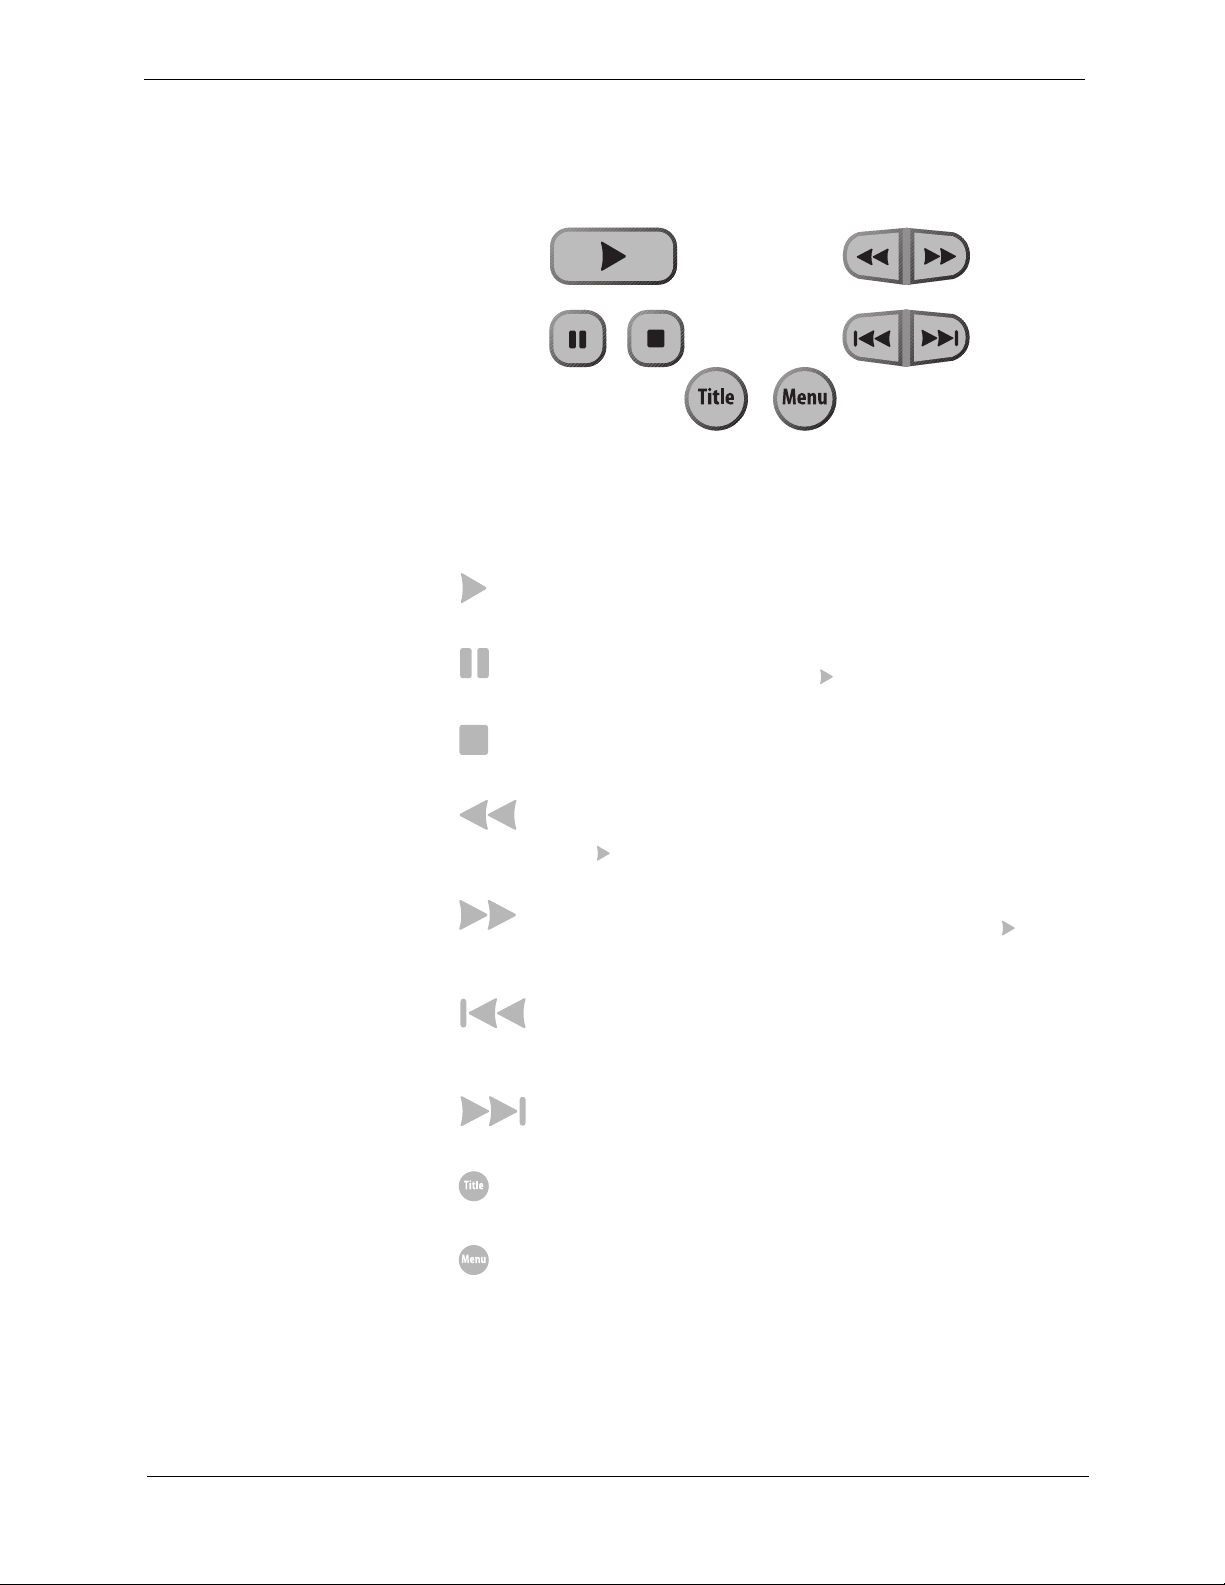
The DVD & CD Mode buttons do the following:
FIGURE 13. DVD & CD Mode Buttons
Play Press to begin or resume playing a disc.
Pause Press to pause the DVD or CD in its present
track. To resume, press .
Stop Press to stop disc play.
Reverse Press once and the disc moves in reverse.
Press multiple times to increase the speed. Press
to resume normal speed.
Forward Press once and the disc advances. Press
multiple times to increase the speed. Press to
resume normal speed.
Skip Reverse Press to return to the previous chapter
or CD track. Skips to the beginning of the current
CD track if partway though it.
Skip Forward Press to advance to the next view-
able chapter or CD track.
Title Press to view the title on DVDs (when
available).
24
Menu Press to view the menu on DVDs (when
available).
Page 31
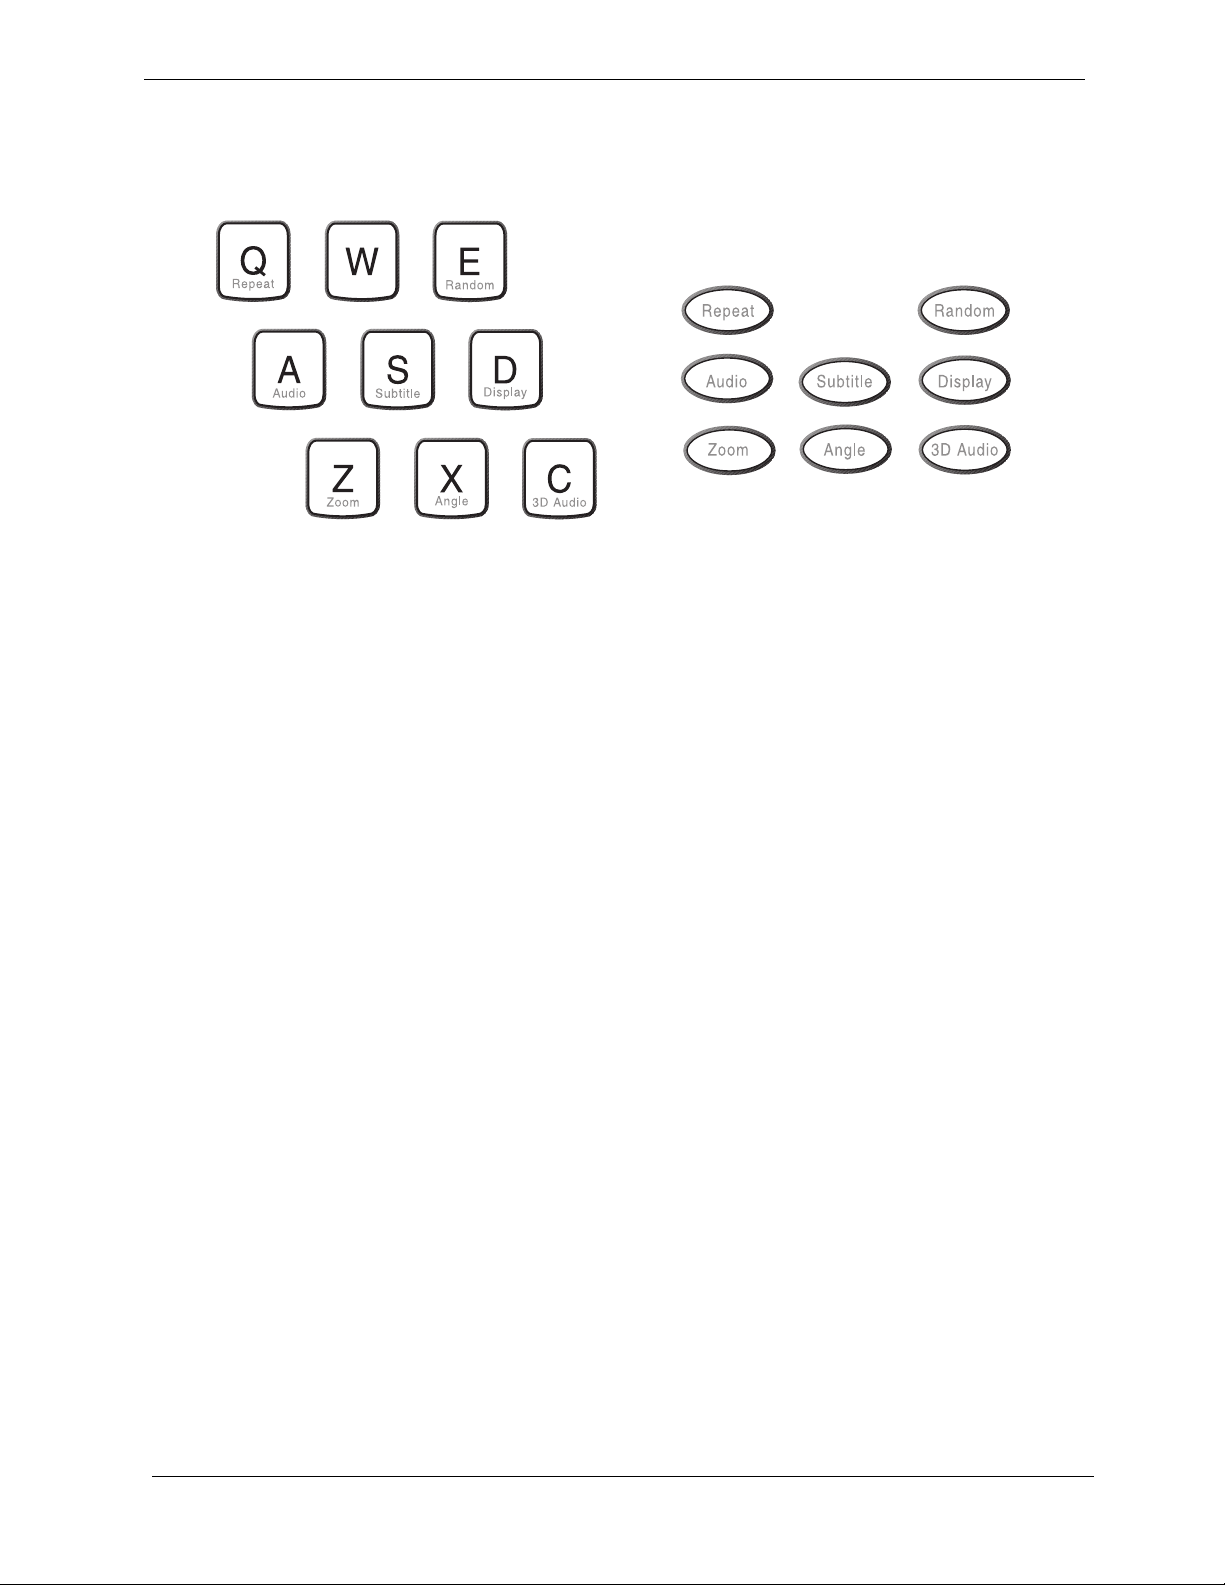
Using the iCEBOX Controls
Keyboard Keys
FIGURE 14. Additional DVD & CD Mode Buttons
These additional DVD & CD Mode buttons do the following:
Repeat
Random
Remote Buttons
Press to toggle between different repeat modes,
such as track (CD Only) or disc (CD & DVD).
Press to have chapters or tracks play in a random
order. Press again to cancel random play.
Audio
Subtitle
Display
Zoom
Angle
3D Audio
Press to toggle among available audio tracks on
DVDs, such as dubbed languages or director commentary. (Not available on all DVDs.)
Press to display subtitles on a DVD. Press again to
toggle among available subtitles and clear from
the screen. (Not available on all DVDs.)
Press to toggle between DVD information displays
such as time elapsed and time remaining. Press
repeatedly to cycle through all functions and clear
from the screen.
Press to zoom in on scenes. Press again to cancel.
Press to toggle scenes from different camera
angles. (Not available on all DVDs.)
Press to toggle an optional audio mode that can
enhance the listening quality of some DVDs and
CDs.
25
Page 32

FlipScreen Owner’s Manual
Adjusting the
Image and Sound
In any mode (see Using the iCEBOX Modes on page 29), you can adjust
aspects of the image and the sound that your iCEBOX produces. Once
made, these adjustments are in effect for all modes.
The following table shows which image adjustments are available in each
mode.
Mode Brightness Contrast Color (Saturation) Tint (Hue)
Tel ev is ion
DVD & CD
Internet
Video
To adjust the image
1. With the iCEBOX turned on, press Options.
2. Select Adjust Image.
3. Select the image adjustment that you want to make. (See the table
above to see which adjustments are available in each mode.)
4. Use the navigation buttons to move the slider, or use the stylus to tap
the desired setting.
5. Repeat for other image adjustments.
6. Choose OK.
•• • •
•• •
•
•• • •
To adjust the sound
1. With the iCEBOX turned on, press Options.
2. Select Adjust Sound.
3. Select the sound attribute that you want to adjust.
4. Use the navigation buttons to move the slider, or use the stylus to tap
the desired setting.
5. Repeat for other sound attributes.
6. Choose OK.
26
Page 33

Using the iCEBOX Controls
Stylus & Touch
Screen
While in Internet Mode, you can use the stylus to tap links, select items,
and scroll pages. Always use the stylus rather than a finger, fingernail or
other implement. The stylus is specially weighted for best results, makes it
easier to select smaller links on Web pages, and helps keep the touch
screen clean.
To navigate using the stylus
• Tap a link or button to go to that Web page.
• Tap a check box to mark or clear it.
• Tap a text box to select it.
• Tap the arrow of a drop-down list to display the options, then tap an
item in the list.
• Drag a scroll bar to scroll the Web page.
27
Page 34

FlipScreen Owner’s Manual
28
Page 35
Using the iCEBOX Modes
The iCEBOX is a television, DVD & CD player, Internet browser, home
video monitor and FM Radio—all in one device. These separate “modes”
are explained below.
Using the iCEBOX Modes
Television Mode
The iCEBOX is a 125-channel, cable-ready television. Before you view
television channels on your iCEBOX, you must select the signal source.
Also, you can program the television channels that are available in your
area.
Choosing the Television Signal Source
For your iCEBOX to work properly in Television Mode, you need to select
the signal source that is plugged into the iCEBOX.
To select the television signal source
1. If not already in Television Mode, press Te lev is ion .
2. Press Options. The Television Options menu is displayed.
Television Options
Manage Channels
Autoscan Channels
Choose Signal Source
Adjust Sound
Adjust Image
?
FIGURE 15. Television Options Menu
OK
29
Page 36

FlipScreen Owner’s Manual
3. From the Television Options menu, select Choose Signal Source.
4. Select Cable or Antenna to match the source of the TV signal that you
5. Choose OK.
Satellite Television Service
The iCEBOX supports satellite television service; however, when using satellite service, the iCEBOX remote or keyboard cannot be used to change
channels. Continue to use your existing remote control with the set-top
box.
Your satellite signal may come in through the TV In coxial connection or
the S-Video jack in the back of the iCEBOX.
To access a signal from the TV In connection
• To set a satellite signal source coming in through the TV In coaxial con-
• You may also want to remove all the iCEBOX channels except 3 or 4 (if
• Use your existing remote control with the set-top box to change
have connected to the iCEBOX.
nection, select the Cable option when choosing the Signal Source.
needed) to prevent the Channel +/- buttons from having any effect.
channels.
To access a a signal from the S-Video connection.
• To access a satellite (or Digital Cable) signal coming through the S-
Video jacks, switch to Video mode to watch television.
• Press the Video mode button repeatedly to toggle between the compos-
ite and S-Video video signals.
• Use your existing remote control with the set-top box to change
channels.
Programming the Television Channels
The Autoscan Channels feature allows you to easily configure the iCEBOX
to show only the television channels that are available in your area.
To Au toscan for Television Cha nnels
Note: Do not perform Autoscan if your iCEBOX is not connected to a
television signal source.
1. If not already in Television Mode, press Te lev is ion .
2. Press Options. The Television Options menu is displayed (fig. 15).
3. Select Autoscan Channels.
4. Choose OK.
The iCEBOX automatically scans for television channels available in
your area. This may take a few moments. When the scan is complete,
the TV tunes to the first available channel.
30
Page 37

Using the iCEBOX Modes
Changing Channels
You can change television channels on your iCEBOX using either of the following methods.
To change channels
• Using the number keys, enter the channel number that you want to
view. After a few seconds, the new channel appears.
–Or–
• Press Channel –/+ to switch to the desired channel.
Note: Program the channels before using the Channel –/+ keys to avoid
changing to channels without any content (static). See Program-
ming the Television Channels on page 30.
31
Page 38
FlipScreen Owner’s Manual
DVD & CD Mode
Playing DVD and CDs
In DVD & CD Mode, the iCEBOX can play DVDs and music CDs.
To play a DVD or CD
1. Press on the front panel of the iCEBOX to open the disc tray.
2. Place the disc with its label side up onto the tray.
3. Press to close the tray.
The disc will play automatically. DVDs will typically display a menu.
General Commands
The following table lists additional tasks and commands:
To... Do this...
Stop the disc On the remote or keyboard,
press .
Pause the disc On the remote or keyboard,
press .
Resume a paused disc On the remote or keyboard,
press .
Move forward or backwards in the disc
Automatically repeat the
disc
Play the next or previous
DVD chapter
Display DVD menu On the remote or keyboard,
Watch DVD with subtitles On the remote or keyboard,
Change angle on DVDs that
feature different camera
angles
On the remote or keyboard,
press or .
Press again to increase or
decrease the speed backwards or
forward. Press to resume playing the disc.
On the remote or keyboard,
press Repeat.
Press again to turn off repeat
function.
On the remote or keyboard,
press or .
press
Menu.
press Subtitle.
Press again to turn off subtitles.
On the remote or keyboard,
Angle.
press
Press again to see other camera
angles.
32
Page 39
Using the iCEBOX Modes
Change zoom level on
DVDs
On the remote or keyboard,
press
Zoom.
Press again to see other zoom
options.
Change DVD audio track
options
On the remote or keyboard,
press
Audio.
Press again to see other audio
track options.
Go to a specific CD track On the remote or keyboard, enter
the number of the track,
Play the next or previous
CD track
then press
On the remote or keyboard,
press or .
GO.
Randomize CD tracks On the remote or keyboard,
press
Random.
Press again to turn off random
function.
3D Audio
3D Audio is an optional audio setting that may enhance the listening quality of some DVD and CDs.
To listen with 3D Audio
1. Press 3D Audio.
2. Press again to turn 3D Audio off.
33
Page 40
FlipScreen Owner’s Manual
Internet Mode
You can browse the Internet on your iCEBOX using Internet Mode. Using
the remote, keyboard and touch screen, you can browse web sites, check
email and look up useful information in the kitchen. You can specify a
default home and email web page for quick access.
Before browsing you may need to configure your Internet connection. If
your iCEBOX was professionally installed, it is most likely already configured for Internet Mode. If it was not, you will need to contact your Internet
service provider (ISP) for information needed to configure the iCEBOX.
Note: You can find more information about configuring an Internet con-
nection in the iCEBOX Help. Press Help in Internet Mode and
select Connecting to the Internet.
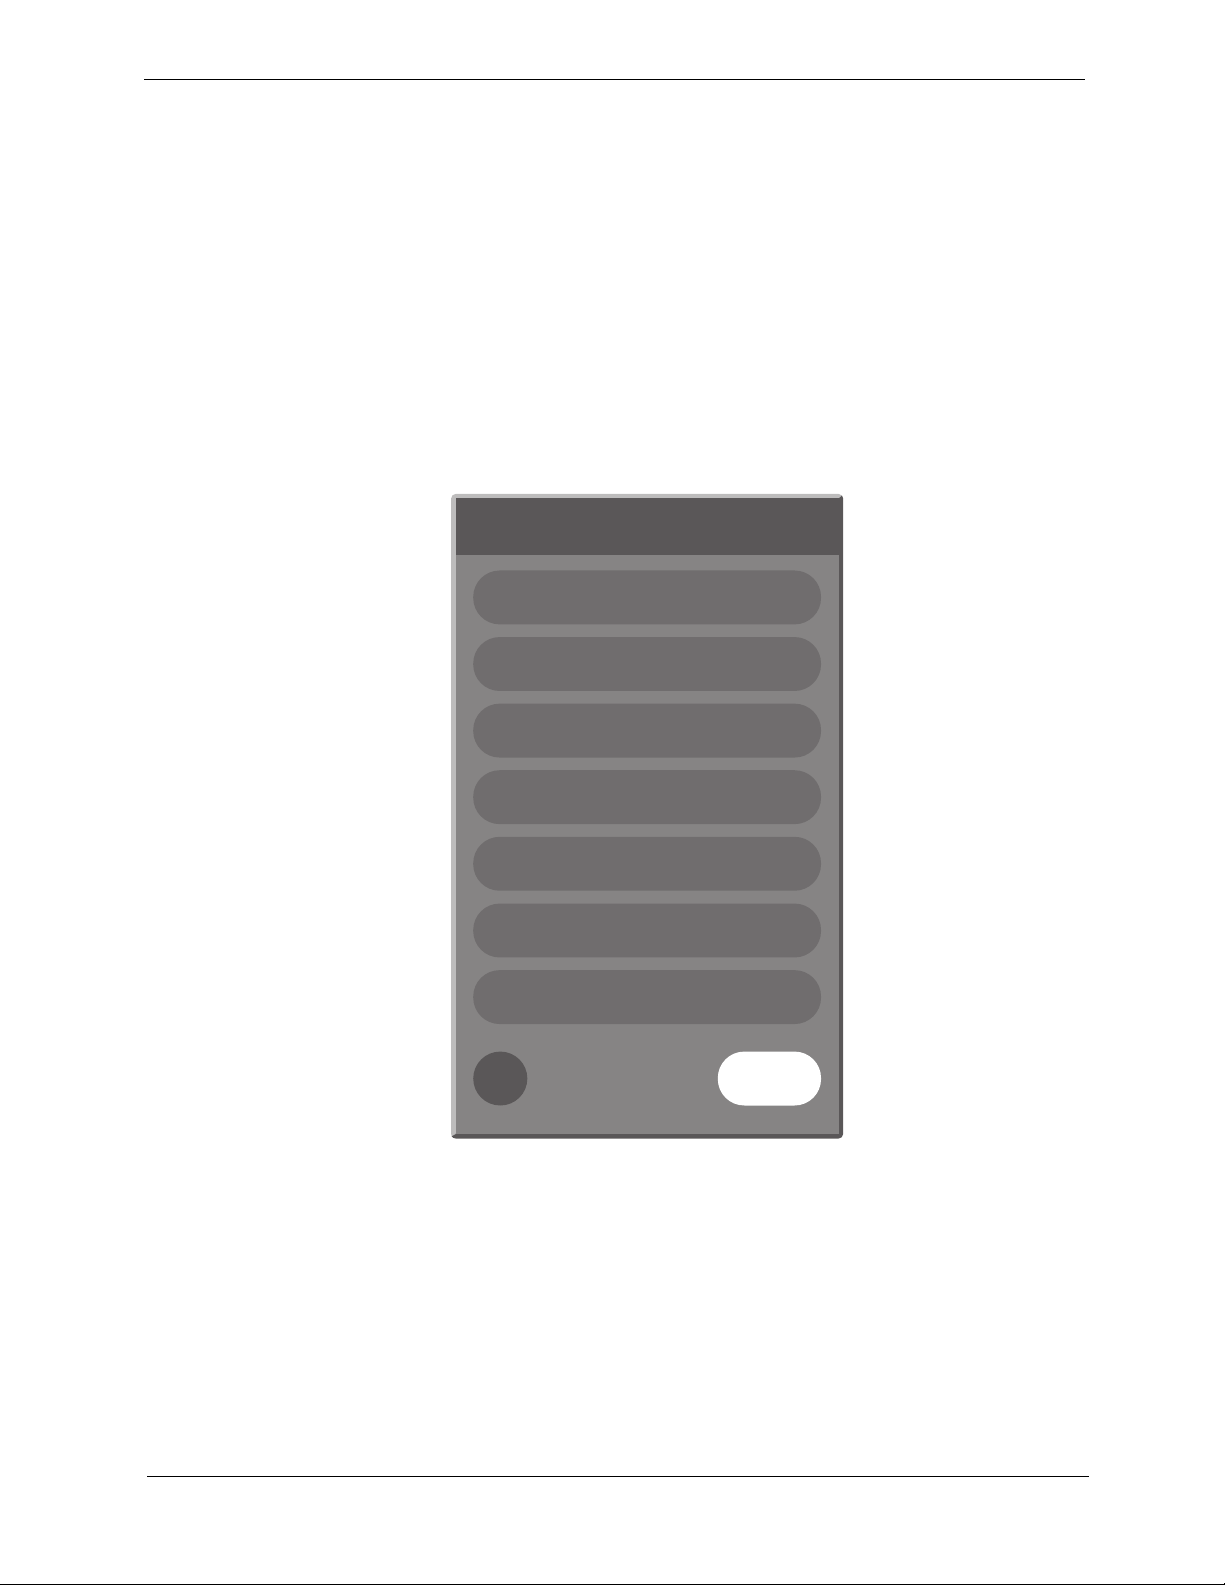
Internet Options
Refresh Connection
Print
Browser Settings
Connection Settings
Updates
Adjust Sound
Adjust Image
OK?
FIGURE 16. Internet Options Menu
34
Page 41

Using the iCEBOX Modes
Configuring Connection Settings
The iCEBOX can connect to the Internet in three different ways:
• Wired (Ethernet) Broadband
• Wireless (802.11b) Broadband
• Dial-Up
Configuring a Wired Broadband Connection
If you’ve installed the included PCMCIA Network card for a wired (ethernet) Broadband connection, further configuration may not be needed. The
iCEBOX is set by default to support DHCP (Dynamic Host Configuration
Protocol), which is suitable for most households. If your Internet Service
Provider (ISP) support DHCP, the iCEBOX should connect automatically
when you go to Internet Mode.
However, if you use a Static IP address further information is required to
connect. Your ISP will need to provide you with a static IP address, subnet
mask, gateway router and DNS servers.
To configure a Broadband connection
1. Press Internet to switch to Internet Mode, then press Options.
2. From the Internet Options menu, select Connection Settings.
3. Select the Broadband Settings button.
4. Select the Ethernet Type.
• Select the Use DHCP (Auto) if your ISP supports dynamic host con-
figuration protocol (DHCP).
• Clear the Use DHCP (Auto) checkbox if your ISP does not support
DHCP.
5. If needed, enter static IP address, subnet mask, gateway router and
DNS servers.
6. Choose OK.
Configuring a Wireless Connection
If you are using a wireless network card, you’ll need to configure the connection settings the first time you go to Internet Mode. This may include a
WEP (Wired Equivalent Privacy) key and other security settings. This may
also include additional IP information if you use a Static IP address.
To configure a Wireless connection:
1. In Internet Mode, press Options.
2. From the Internet Options menu, select Connection Settings.
3. Select the Wireless Settings button.
4. Select your home network.
35
Page 42

FlipScreen Owner’s Manual
5. If your network requires a WEP key, select the Security button, then:
6. If you use a static IP address, select the IP button, then:
7. Choose the Connect button.
Some networks are set up to allow only specific devices to connect based
on the device’s MAC (Media Access Control) address. You can quickly
find the MAC (Media Access Control) address (also known as the physical
address) of your wireless card.
a. Select the appropriate security options.
b. Enter the WEP key.
c. Choose OK.
a. Clear the Use DHCP (Auto) checkbox.
b. Enter static IP address, subnet mask, gateway router and DNS
servers.
c. Choose OK.
• If the connection is successful, the Options dialog closes.
• If the connection is not successful, the Options dialog remains
open so you can resolve the issue.
To find a card’s MAC address
1. From the Internet Options menu, select Connection Settings.
2. Select the Wireless Settings button.
3. Select the IP button.
The MAC Address of the wireless card is displayed. Write it down so
you can enter it when configuring your router for the iCEBOX.
Configuring a Dial-Up Connection
If you have inserted a modem card, you can enter the information
required to dial up to your ISP and log in.
Note: The iCEBOX does not currently support any ISPs that require
downloading or installing software. At the time of the printing of
this manual, AOL is an example of an ISP that will not work with
the iCEBOX because of their download requirements, although
you can still retrieve AOL mail using the iCEBOX Internet browser.
To configure a Dial-Up connection
1. In Internet Mode, press Options.
2. From the Internet Options menu, select the Connection Settings button.
3. Enter the appropriate information in the User Name, Password, Dialing
Prefix (if any), and ISP Phone # fields.
4. Select whether you want an audible Dialing Sound.
5. Enter a Disconnect time limit.
6. Choose OK.
36
Page 43

Using the iCEBOX Modes
Entering Proxy Settings
In rare cases, you may be using a proxy server. Proxy servers are typically
found in an office environment. If you know that you are using a proxy
server, you’ll need to enter proxy settings.
To configure proxy settings
1. In Internet Mode, press Options.
2. From the Internet Options menu, select Connection Settings.
3. Choose the Proxy Settings button.
4. Select the Ethernet Type.
Configuring Browser Settings
Browser Settings are best configured before you start using Internet Mode,
so you can use the Email and Home keys on the keyboard or remote.
You can choose what Web page that you want to have as your Home
page. You can also select a Web-based Email service, such as AOL Anywhere® or MSN Hotmail® to have as your default Email page.
You can also set the system time and choose your preferred font size.
To configure the browser settings
1. Press Internet to switch to Internet Mode.
2. Press Options.
3. From the Internet Options menu, select Browser Settings.
4. Select the Font Size that you want.
5. Select the Home Page URL field.
6. Enter the address of the Web page that you want as your home page.
For example:
7. Select the Email URL field.
8. Enter the address of the Web page you want as your Email service.
For example:
9. Set the current Date and Time.
10.Choose OK.
www.yahoo.com
www.hotmail.com
37
Page 44
FlipScreen Owner’s Manual
Browsing the Internet
Once you have configured your iCEBOX for the Internet, you can explore
the Internet.
The Selection Box
Unlike a desktop or laptop computer, the iCEBOX does not have a cursor.
Instead, a colored outline or highlight, also known as the selection box,
indicates the active element of the screen. Buttons, links to other pages,
boxes in forms, and other interactive elements on Web pages are selected
when highlighted.
When you select an element on a Web page such as a link, it can be activated by pressing GO. When a form box is selected, you can enter text
into it.
Using the Stylus
In Internet Mode, you can use the stylus to tap links, select items, and scroll
pages.
!
Caution: Only use the stylus provided with your iCEBOX to touch
the screen. Using any other object could permanently
scratch the touch screen.
Using the Remote or Keyboard
You can use either the remote or the keyboard to move the selection box
around the screen. Press the navigation buttons (fig. 17) that surround the
GO button to move the selection box in the direction of the button.
FIGURE 17. Navigation buttons
38
To go to a specific Web site
1. On the browser toolbar, tap the Web Target box with the stylus.
–Or–
On the keyboard or remote, press .
Page 45

Using the iCEBOX Modes
2. Type the address of the Web site.
It is not necessary to type “http://”. For example: To go to http://
www.icebox.tv, you can type:
3. Choose GO or press Enter.
Note: Repeatedly pressing the switches the focus between the Web
Target box and the Web page.
Saving Favorite Web Sites
You can save Web sites that you want to visit frequently in a Favorites list.
To save a Web page to your Favorites list
1. With the stylus, tap the on the touch screen.
–Or–
On the remote or keyboard, press .
2. Choose the Add button next to "Add current page to my favorites list".
The Web page is added to the favorites list.
www.icebox.tv
To change or rename a Web page in your Favorites list
1. With the stylus, tap the on the touch screen.
–Or–
On the remote or keyboard, press .
2. Select the Favorite that you want to edit.
3. Choose the Edit button.
4. Type the new name or URL.
5. Choose OK.
To delete a Web page from your Favorites list
1. With the stylus, tap the on the touch screen.
–Or–
On the remote or keyboard, press .
2. Select the Favorite that you want to delete.
3. Choose the Delete button.
4. Choose OK.
39
Page 46
FlipScreen Owner’s Manual
Other Internet Mode Commands
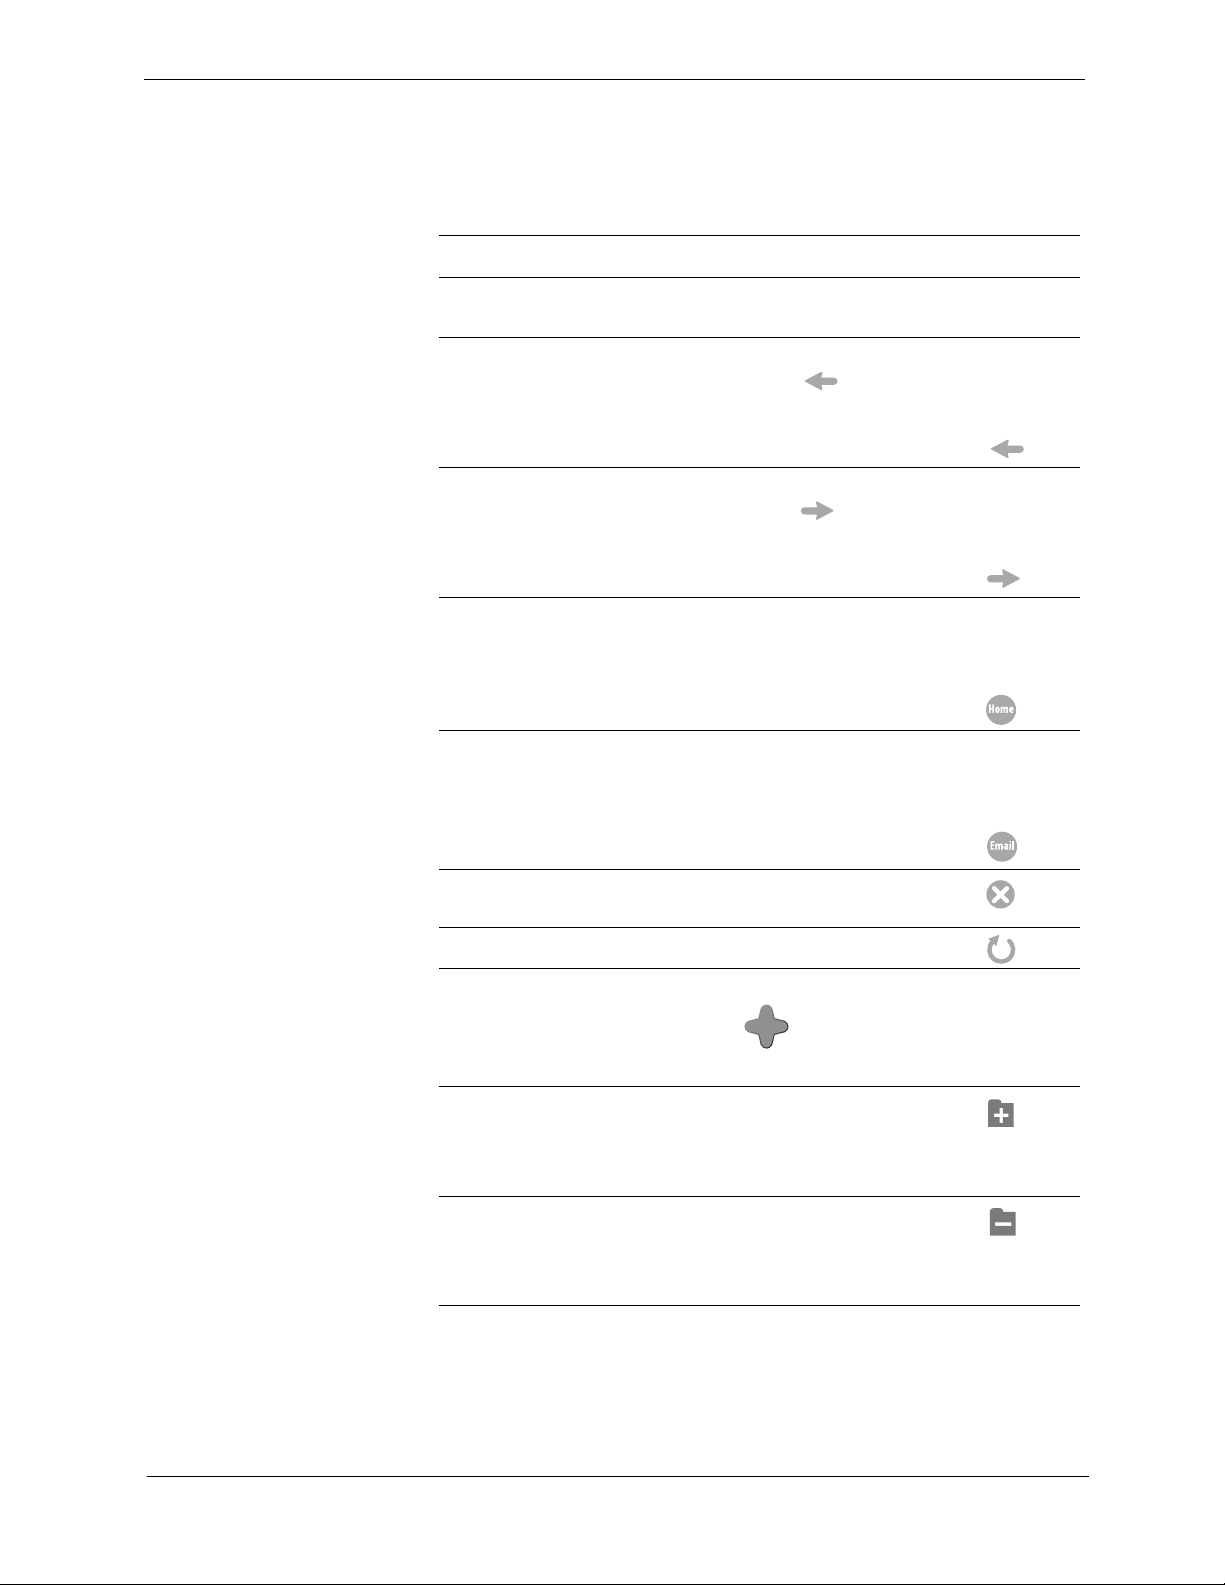
The following table lists additional tasks and commands.
To... Do This...
Disconnect a Dial-Up connection to the Internet
Go back to the previous
viewable Web page
1. Press Options.
2. Choose Disconnect.
On the remote or keyboard,
press (fig. 11).
–
Or–
On the touch screen, tap .
Go forward to the next
viewable Web page (works
after you have gone back to
On the remote or keyboard,
press (fig. 11).
Or–
–
a previous page)
On the touch screen, tap .
Go to your home page On the remote or keyboard,
Home (fig. 11).
press
Or–
–
On the touch screen, tap .
Go to your Email page On the remote or keyboard,
Email (fig. 11).
press
–
Or–
On the touch screen, tap .
Stop a Web page from
loading
Refresh a Web page
On the touch screen, tap .
On the touch screen, tap .
Scroll a Web page On the remote or keyboard, press
in the direction that you
want to scroll the page.
Open a new window
Close the current window
On the touch screen, tap
Or–
–
On the keyboard, press
On the touch screen, tap
–
Or–
On the keyboard, press
CTRL + N.
CTRL + E.
40
Page 47

Using the iCEBOX Modes
Radio Mode
With the iCEBOX, you can listen to your favorite FM Radio stations. The
iCEBOX can receive radio signals from either the included FM Antenna or
your cable service, if it is offered.
If you want to listen to your local radio stations, we recommend using the
FM Antenna.
To switch to FM Radio Mode
• On the remote or keyboard, press Radio.
Finding Radio Stations
Locating radio stations on the iCEBOX is the virtually the same as using
your car or home radio. Use the Tune buttons to manually move up or
down the spectrum to locate stations.
To stop only at stations with a strong signal, use the Seek buttons on the
screen, or the channel +/- buttons on the keyboard or remote.
To choose a saved station
• Tap its name on the touchscreen.
–Or–
• On the keyboard or remote, use the navigation controls to highlight the
station, then press GO.
–Or–
• Using the keyboard or remote, enter the channel number.
Note: Saved stations are listed in order of their Station Frequency.
Managing Radio Stations
Most people listen to a regular set of radio stations. To avoid having to
tune to your favorite stations, you can save up to 21 stations.
You can give saved stations any name you want (the default is the Station
Frequency). If you are using Cable TV to pick up FM Radio the station frequencies may not be accurate. In this circumstance, naming saved stations
can help avoid confusion.
To save a favorite station
1. Press Radio to switch to FM Radio Mode.
2. Use the Tun e or Seek buttons to locate a favorite radio station.
3. Choose Save Station
The station appears on the Radio as a Saved Station.
41
Page 48

FlipScreen Owner’s Manual
To name a saved station
1. With the iCEBOX in Radio Mode, choose Manage Stations.
2. In the Saved Stations list, select the station you want to name.
3. Select the Station Name box.
4. Type a name (up to 25 characters) for the selected station.
5. Choose the Apply button.
6. Repeat steps 2-5 to name additional stations.
7. Choose OK.
To re move stations
1. With the iCEBOX in Radio Mode, choose Manage Stations.
2. In the Favorite Stations list, select the station you want to remove.
3. Choose the << button.
4. Repeat steps 2-3 to remove additional stations.
5. Choose OK.
The new station names appear in your list of Saved Stations.
The removed stations no longer appear in your list of Saved Stations on
the FM Radio.
42
Page 49

Using the iCEBOX Modes
Video Mode
The iCEBOX can be connected to a video camera which you can use to
monitor another part of the house. For example, you can monitor the activity in a child’s room or see who is at the front door.
You can also use Video Mode to view video tapes on a VCR or play video
games on a game system.
Additionally, you may wish to take advantage of the higher quality of Satellite or Digital Cable by using the S-video connection, which can also be
viewed in Video Mode.
Note: If you send your Satellite or Digital cable to the iCEBOX using S-
Video, the iCEBOX remote or keyboard cannot be used to change
channels in Video Mode. Continue to use your existing remote
control with the set-top box.
If you’ve connected both an S-Video and composite signal, both are accessible from Video mode.
To vi e w video sources
1. Press the Video mode button.
The last viewed video signal appears.
2. Press the Video mode button again.
The alternate video signal (if any) appears.
43
Page 50
FlipScreen Owner’s Manual
My Kitchen Mode
My Kitchen
Appliances
The iCEBOX can be networked with other Beyond Connected Appliances
like the Beyond Bread Maker, the Beyond Microwave Oven, and the
Beyond Coffee Maker. Once networked, you can use my kitchen mode to
monitor and interact with those appliances, and the appliances will also
be able to receive nightly updates from the internet recipe databases.
For instructions on connecting to the appliances, see Networking Other
Appliances on page 14, or refer to the instructions that come with the
appliance.
Monitoring Appliances in My Kitchen Mode
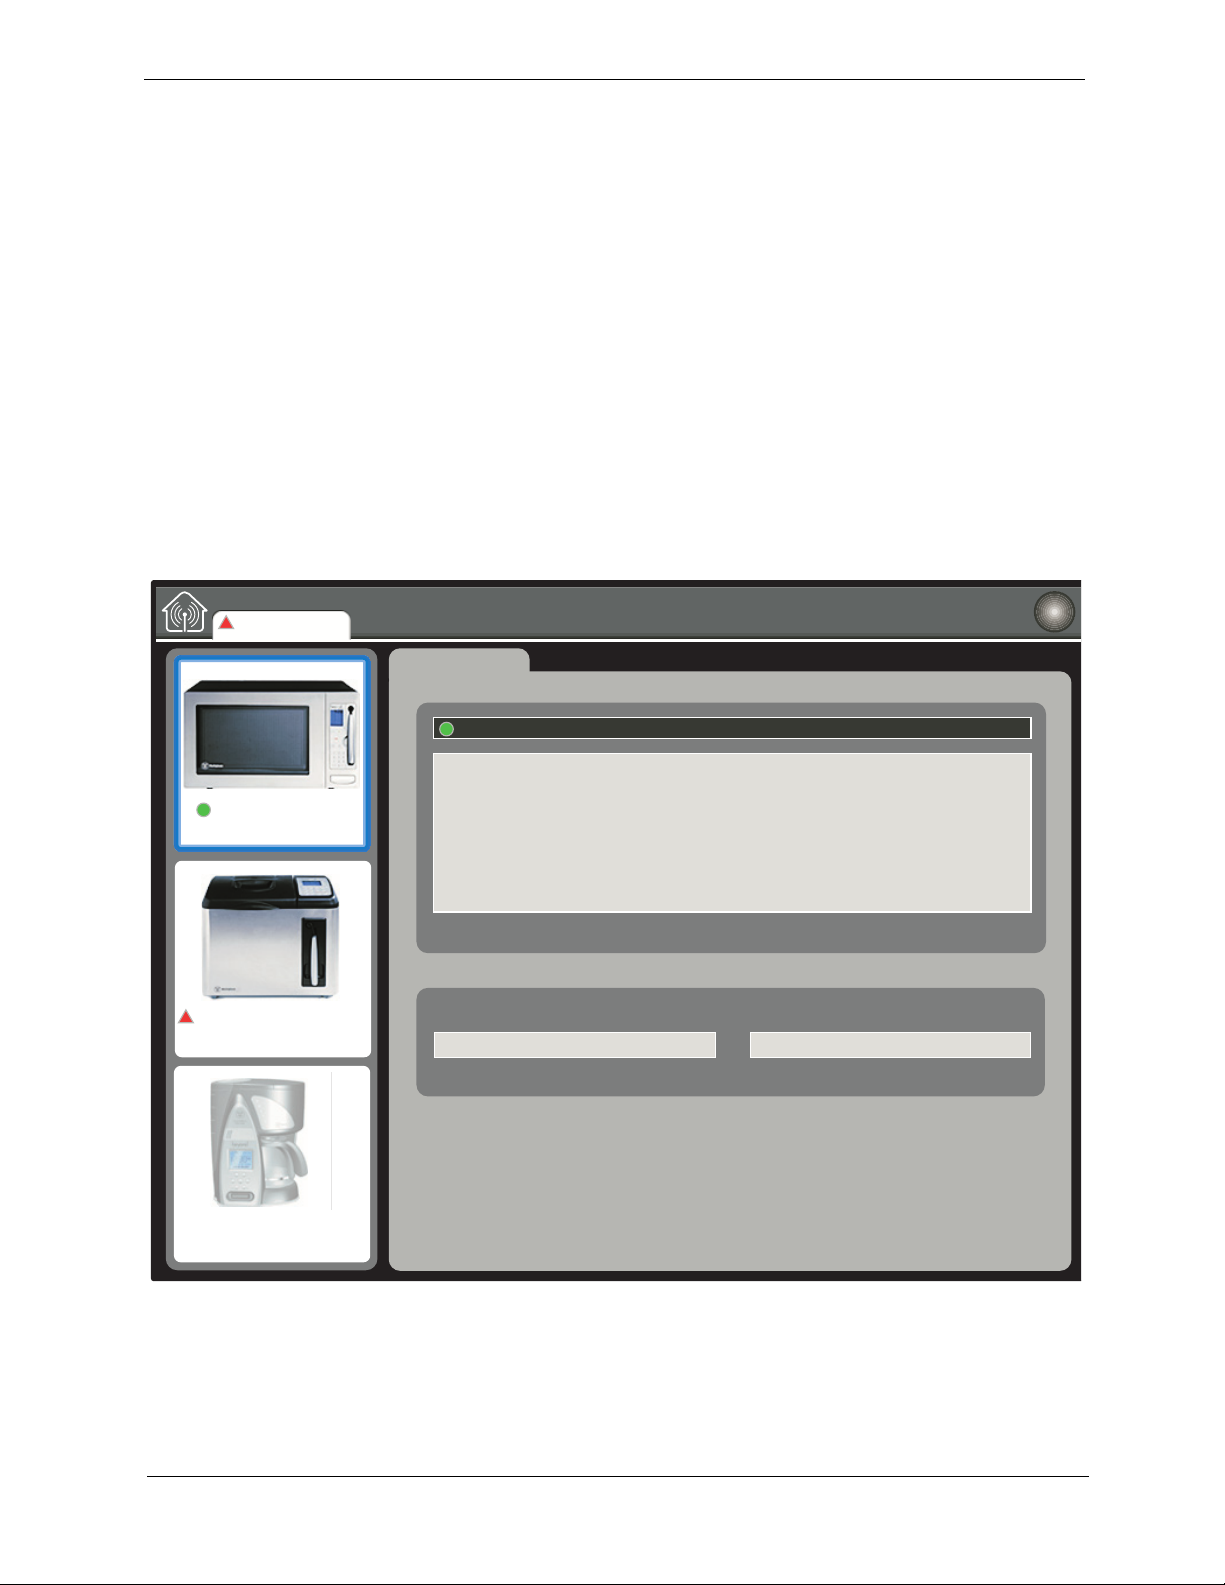
When you are in My Kitchen Mode the status of your networked appliances will display in the control window. To interpret the different
appliance status indicators, refer to the following figure.
12:34 PM
Information
Cooking, Magnetron at Power Level 9
?
Microwave
Cooking, Power Level 9
Bread Maker
Offline
Apr 16 - 12:34 PM Begin Cooking.
Apr 16 - 12:34 PM Power On.
Apr 16 - 12:34 PM Power Off.
Apr 1 - 12:34 PM Finish Cooking.
Apr 1 - 12:34 PM Finish Phase 2.
Apr 1 - 12:34 PM Begin Phase 2.
Apr 1 - 12:34 PM Stirred.
Apr 1 - 12:34 PM Stir Now!
Apr 1 - 12:34 PM Finish Phase 1.
Apr 1 - 12:34 PM Begin Phase 1.
Information
Microwave 1 Serial # MWV2-12345679
FIGURE 18. Appliances Viewable in My Kitchen Mode
44
Page 51

Using the iCEBOX Modes
Appliance Status
Indicators
There are several different indicators in the My Kitchen Control Panel. The
different indicators are displayed in Figure 18, and described in the paragraphs below.
Appliance Online
When one of your networked appliances is functioning properly and communicating with the iCEBOX, a green circle will display in the My Kitchen
Mode Control Window below the image of the appliance, and next to the
appliance name. In Figure 18, the Microwave Oven is shown with the
green circle.
In this case, the Microwave Oven is also selected, and therefore each status message from the microwave is displayed in the My Kitchen Control
Screen. Additionally, an appliance that displays the green circle will
receive a nightly update from the Beyond Recipe Database, via the
iCEBOX’s internet connection.
Appliance Offline
When one of your networked appliances stops communicating with the
iCEBOX, for example because it is unplugged or moved out of range, then
the green circle will change to a red triangle. The Bread Maker pictured in
Figure 18 is in the Offline state.
Updating
Appliance
Recipes
While an appliance is offline, status messages will not display, and as
long as the appliance remains offline, nightly internet updates will
discontinue.
Appliance Not Present
If you don’t have an appliance, or if you have it but it isn’t networked, the
appliance will display as a ghosted image in the My Kitchen Mode Control Window. The Coffee Maker in Figure 18 is ghosted, indicating that
there is no Coffee Maker in the appliance network.
The Beyond Appliances like the Microwave and Bread Maker are smart
appliances, in that they already know the right cooking times for thousands of packaged foods and bread mixes. To cook known foods and
mixes, instead of entering cooking times and power settings by hand, all
you do is scan the UPC Code (bar code) on the product package, and the
smart appliance will cook the product perfectly. It is brilliantly convenient.
Occasionally, however, you will scan items that are not in the Microwave
or Bread Maker memory. In this case, the appliance will display the “Not
In Memory” message, and then you will cook the product according to the
package instructions, just like you would with a normal appliance.
45
Page 52

FlipScreen Owner’s Manual
What you don’t see about a Beyond Appliance, is that every night your
appliance will request new recipe information from the Internet. It actually
sends a message through the iCEBOX to the Beyond Information Network
asking “Can I Please Get The Recipes I Want?”
If the recipes have been added to the Beyond Network (there are new recipes added daily) then the recipes will be sent to your appliance. If the
recipes you want are not available, Beyond will be informed that your specific product recipes have been asked for.
Over time, the recipes your appliance knows will more and more closely
reflect the foods that you like to prepare and eat. They really are smart
appliances!
Automatic Nightly Updates
As long as your Connected Appliances are networked to your iCEBOX,
your appliance recipes will be updated automatically, nightly, from the
Beyond Appliance Recipe database. You don’t have to do anything, and
you probably won’t even see that it is happening.
Manual Recipe Updates
If you would like, rather than waiting for the nightly update, or because
your internet access settings prevent the nightly update from taking place,
you can request an appliance recipe database update at any time from
the My Kitchen Options Menu.
To manually update the recipe database, select Update Recipes from the
My Kitchen Options Menu, then follow the instructions on the screen.
46
Page 53
Caring for Your iCEBOX
Cleaning the
iCEBOX
Warning: Risk of electric shock! Do not disassemble the iCEBOX
unit, remote, or keyboard - the only user serviceable
parts of the remote and keyboard are the batteries. There
are no user-serviceable components and dangerous voltages may be present. All service must be performed by
an authorized service technician. For more information,
please refer to your warranty service card.
Caring for Your iCEBOX
!
To clean the iCEBOX
1. Unplug the iCEBOX from the wall.
2. Clean the exterior of the iCEBOX using a slightly damp, lint-free cloth.
3. Gently clean the LCD screen with a slightly damp, lint-free cloth.
4. Using a soft, nonabrasive sponge and mild detergent or dish soap,
wash the remote and keyboard and rinse under the faucet in the sink.
Caution: Do not wash the remote or keyboard in the dishwasher.
Doing so can result in damage to the remote or
keyboard.
47
Page 54

FlipScreen Owner’s Manual
Getting Help
If you have questions while using the iCEBOX, access the built-in Help to
find answers. This comprehensive Help contains information that you can
use to solve most problems that you may encounter.
Note: A limited amount of information is available in Help without being
connected to the Internet. To access all available information, you
must configure your iCEBOX for access to the Internet and have
an Internet connection. See Internet Mode on page 34.
To get help
• On the keyboard, press Help.
–Or–
• On any menu, choose Help.
If you are unable to find the solution to your problem in Help, contact iCEBOX Customer Care for answers. Icebox Customer Care is available 24
hours per day, 7 days per week.
To get help from iCEBOX Customer Care
1. Have the following information and items ready when you call:
• The serial number for your iCEBOX.
• The date you purchased your unit.
• A notepad and pen.
2. Call 1-877-463-7637.
You can also send Email to [email protected]. Please include
the serial number for your iCEBOX, the date purchased, a detailed
description of the issue, and your phone number if you want to be contacted by phone.
See also Troubleshooting on page 49 and FAQ s on page 50 for more
information.
48
Page 55
Caring for Your iCEBOX
∅
Troubleshooting
S
Problem Possible causes/solutions
The screen and LED
are blank.
• The power cord is not plugged in.
• The power button on the back panel is
turned off.
• The power outlet is not working properly.
No dial tone is
present when
attempting to connect to the Internet.
Disc tray will not
open when is
pressed.
• The phone line is not connected firmly into
the Phone In connection on back of the unit.
• The phone line does not have a dial tone. To
test, connect a different phone to the line. If
there is no dial tone, contact your local telephone company.
• The power is not on and the LED is not
green.
• Try turning the power off and back on from
the back panel.
• The disc is not in the tray correctly. Contact
Customer Care for help in manually opening the disc tray. Do not try to force the disc
tray open, as damage may occur.
•
icon appears on
screen.
Disc ejects auto-
matically or will not
play.
The selected function is not supported on the
disc being played.
• The disc is damaged or dirty.
• The disc is not placed on the tray correctly,
with the label side up.
• The disc is not in a compatible format, such
as the software discs provided by AOL® or
Earthlink®.
The unit does not
respond to remote
input.
• The IR signal from the remote is reaching
neither of the IR detectors (see fig. 6) – try
standing a little farther back from the unit.
• The batteries for the remote need
replacement.
The unit does not
respond to keyboard input.
• The IR signal from the keyboard or remote is
reaching neither of the IR detectors (see fig.
6 ) – trying placing the keyboard on the
counter just in front of the unit or try stepping back from the unit.
• The batteries for the keyboard need
replacement.
Unit stops responding to remote,
keyboard, or stylus
input.
• The unit has stopped responding. Turn the
unit off at the power switch on the back
panel and unplug the unit for five seconds.
Plug the it back in and turn it on.
Note: More Troubleshooting tips are available in the iCEBOX Help.
49
Page 56

FlipScreen Owner’s Manual
FAQs
The following are frequently asked questions (FAQ) about the iCEBOX.
Note: More FAQs are available in the iCEBOX Help.
General Questions
Q: Is the iCEBOX FlipScreen a computer?
A: No. While the product has many powerful features, it was not
designed to be a computer. It does not have a hard drive and
it will not play or read CD-ROMs designed for PCs. The current version of the product does not support file transfer, file
sharing, print sharing, and other LAN/WAN functions.
Updates to enable this functionality may be available in the
future.
Q: What operating system does the iCEBOX use?
A: The iCEBOX uses the Microsoft® Windows® CE .NET oper-
ating system.
Q: How much memory is in the iCEBOX?
A: The FlipScreen has 128 MB of SDRAM.
Q: Can I add more memory to the iCEBOX?
A: No, you cannot add more memory to your iCEBOX. However,
the amount of RAM currently installed in the iCEBOX is more
than adequate to handle all of its functions.
Q: Can you print from the iCEBOX?
A: Printing is currently available with a variety of printers.
Q: Do the remote and keyboard use infrared (IR) or radio fre-
quency (RF) to communicate with the iCEBOX?
A: Infrared.
Q: Can I hook up external speakers to the FlipScreen?
A: Yes. In addition to the two speakers that come standard with
the FlipScreen, it comes equipped with audio connections on
the back panel for additional speakers. These additional
speakers would need to have their own dedicated amplifiers.
50
Page 57

Caring for Your iCEBOX
Service and Cleaning Questions
Q: Are the remote and keyboard covered by the warranty?
A: Yes .
Q: If I choose to not register my unit, will I be able to get customer
support?
A: For Icebox, LLC, to provide basic customer support, you must
provide the serial number of the unit and your contact information. If you decline to register and the problem that you are
having is related to needing iCEBOX updates, Customer Care
may be limited in terms of what they can do to assist you. To
register your iCEBOX, visit http://support.iceboxllc.com.
Q: What happens if I accidentally spill water or food on the key-
board and/or remote?
A: Both items are water resistant. They can be washed with a
mild detergent and water and then rinsed under the kitchen
faucet.
Q: How do I clean the touch screen display of my iCEBOX
FlipScreen?
A: Any household cleaner that does not contain vinegar is appro-
priate. Do not spray the cleaner directly on the screen. Spray
the cleaner on a nonabrasive cloth and rub the surface of the
display to clean it.
Television Questions
Q: Does the iCEBOX support picture in picture?
A: No, because picture in picture does not present well on a
small screen.
Q: Does the iCEBOX support video out?
A: No, the product is strictly video in and can act as a video
monitor.
51
Page 58

FlipScreen Owner’s Manual
Internet Questions
Q: What are the requirements for which Broadband carriers I can
A: At this time, any Broadband service provider’s technology
Q: What are the requirements for which Dial-Up ISPs I can use?
A: As of the publishing of this document, the iCEBOX FlipScreen
use?
should work with the iCEBOX. No additional software needs
to be installed onto the iCEBOX FlipScreen.
cannot support downloaded ISP software, such as that provided by AOL®. However, you can still access your Email at
the AOL Anywhere® or MSN Hotmail® sites. All other major
ISPs, such as Earthlink™, will work with the iCEBOX. More
information about Web-Based Email is available in the iCEBOX Help.
Q: What does it mean when the same Web site viewed on my
iCEBOX looks slightly different from how it looks on my PC?
A: If this occurs, it will occur very rarely. It is a result of very
minor differences between your iCEBOX browser and the
browser on your PC. The iCEBOX browser is built on
Microsoft Internet Explorer 5.5.
Q: Can I use Internet Connection Sharing (ICS) to connect my iCE-
BOX through my existing PC running the Windows operating
system?
A: If your existing PC is running Windows 98 Second Edition,
Windows 2000, Windows Millennium Edition (Me), or Windows XP with Internet Connection Sharing installed, your
iCEBOX, as well as other computers on your LAN, can then
gain access to the Internet through the connection on the computer that has Internet Connection Sharing installed. For more
information about ICS, visit http://www.microsoft.com
DVD and CD Questions
Q: Why don’t some DVD buttons on the remote and keyboard
work with all DVDs?
52
A: Not all DVDs are published with all of the features that the
iCEBOX is capable of supporting. In some cases, DVD manufacturers have certain features available only at specific times.
In addition, certain content will not respond to all commands.
For example, the
Stop button will not affect the “FBI Warning”
screen.
Page 59

Caring for Your iCEBOX
FM Radio Questions
Q: Why does the product have FM only (and not AM as well)?
A: Based on our research, the vast majority of our customer
demographic listens exclusively to FM radio.
Q: How many radio channels can I store with the product?
A: The product will store as many as 21 channels.
Q: Can I listen to the FM radio while in Internet mode?
A: No, the product does not have this capability at this time.
Q: Can I install my own FM antenna on the back of the
FlipScreen?
A: Yes. The antenna supplied with your unit has been tested and
will typically provide good FM radio reception. You may be
able to improve reception by using a more powerful antenna.
Q: Does touch screen work with the FM radio mode?
A: Yes. The touch screen works with all the functionality of the
Radio mode.
53
Page 60

FlipScreen Owner’s Manual
54
Page 61
Additional Information
Additional Information
Accessories
Privacy Policy
Your iCEBOX can connect to a variety of accessories. For information on
which devices and accessories are compatible with your iCEBOX, visit
http://support.iceboxllc.com.
Icebox, LLC is committed to protecting the privacy and security of iCEBOX
users. This privacy policy will advise you about how we protect your personal information and address your potential concerns over the use of this
information. We may need to change this policy from time to time to
address new issues and changes in our product. If you have any questions
or concerns about your privacy, please send Email to
[email protected].
Personal Identification Policy
Icebox, LLC will not disclose any personal identification information about
you as an individual user, such as your address, name, or telephone number. We may request personal identification information for the use of our
services. We have two exceptions to this policy:
1. We will release specific information about your account to comply with
any valid legal process, such as a search warrant, subpoena, statute,
or court order.
2. We will release specific information in special cases, such as if there is
a physical threat to you or others.
Privacy of Children
We urge all parents to participate in their children's Internet and online
experience. Please teach children about protecting their personal information while online.
Other Web Sites
If you should give out personal information online, through bulletin boards
or other Web sites, that information can be used by third parties. You disclose information in these areas at your own risk. We encourage you to
investigate and ask questions before disclosing information to third
parties.
55
Page 62

FlipScreen Owner’s Manual
Security Information
Protecting your privacy and information is a priority of Icebox, LLC. We
have taken careful measures to secure both our information and our physical premises. We exercise great care in providing secure transmissions of
your personal information from your unit to our servers. Our server software encrypts information, which is intended to ensure that all Icebox, LLC
transactions remain private (unless sent by an unsecured means, such as
Email). We also make use of firewalls and secure socket layers where
appropriate.
Please contact your own Internet Service Provider for information on their
privacy policies. Icebox, LLC is not responsible for the policies of private
Internet service providers.
Notwithstanding our use of technology to provide appropriate security, in
this time of rapidly changing technology, any responsible Internet-related
business must recognize and acknowledge that there are individuals and
businesses that may attempt to use unethical or illegal means to access
information or disrupt communications.
Therefore, we must advise you that no security system is perfect and that
your use of the iCEBOX product constitutes a waiver of any claim against
Icebox, LLC for direct, consequential, and all other damages arising from
the unauthorized access, use, or disclosure of information maintained on
our systems, unless such damages are due to our intentional wrongdoing
or gross negligence.
56
Page 63

Specifications
Additional Information
Size - with speakers 23 5/8 in x 10 13/16 in x 3 7/8 in
(600 mm x 275 mm x 97 mm)
Weight 24 lb (10.9 kg)
Power Source 110 V AC, 60 Hz
Display 800 x 600 pixels 12.1 TFT-LCD with backlight
Touch Screen E-Fast Resistive touch screen
Activation force <130 g
Speakers Speaker channel–L/R bass, midrange, and treble
Power 10 W per channel
Resistance 4 Ω
Switch Controls On/Off, Options, Mute, Volume +/–, Channel +/–,
Pause/Play, Eject
Audio and Video
inputs/outputs
Radio Input FM band coaxial connection, F-type
Other Connections Dual USB ports
Keyboard Housing Washable design, wireless IR technology, injection
Remote Housing Washable design, wireless IR technology, injection-
Keyboard Keys On/Off, Television, Internet, DVD & CD, Video,
Remote Keys On/Off, Television, Internet, DVD & CD, Video,
Disc Player Works with the following formats: DVD, CDDA (Audio
Television Channels 125 channels, cable ready
Coaxial CATV antenna in (F-type jack), stereo audio
in/out (RCA type), composite video in (CVBS), DVD,
Video CD 2.0 and S-Video In
Dual PCMCIA slots
RS-232, 9 pin connection
SANI Cartridge
molded, high-impact, ABS plastic
molded, high-impact, ABS plastic
Radio, Mode X, Mode Y, Tab, Caps Lock, Enter, Shift,
Help, Ctrl, Alt, Escape, Delete, Backspace, Full Alpha/
Numeric keyboard with punctuation, Back/Previous
Channel, +/– Channel, Options, +/– Volume, Chan-
nel direct select 1–9, Mute, Home, Email, Type in URL,
Favorites, Scroll, Next/Previous Web page, Multidi-
rectional Navigation, Play, Pause, Stop, Fast
Forward/Backward, Skip to a Scene, Go to DVD Title
page, Jump to Target, Go to Menu page, Audio,
Zoom, Subtitle, Angle, Random, Display, 3D Audio
Radio, Mode X, Mode Y, Back/Previous Channel, +/–
Channel, Options, +/– Volume, Channel direct select
1–9, Mute, Home, Email, Favorites, Scroll, Next/Pre-
vious Web page, Multidirectional Navigation, Play,
Pause, Stop, Fast Forward/Backward, Skip to a
Scene, Jump to Target, Go to DVD Title page, Go to
Menu page, Repeat, Audio, Zoom, Subtitle, Angle,
Random, Display, 3D Audio
CD), MP3
57
Page 64

FlipScreen Owner’s Manual
FCC Statement
The United States Federal Communications Commission (in 47 CFR
15.105) has specified that the following notice be brought to the attention
of users of this product:
This equipment has been tested and found to comply with the limits for a
Class B digital device, pursuant to part 15 of the FCC rules. These limits
are designed to provide reasonable protection against harmful interference in a residential installation. This equipment generates, uses, and can
radiate radio frequency energy and, if not installed and used in accordance with the instructions, may cause harmful interference to radio
communications. However, there is no guarantee that interference will not
occur in a particular installation. If this equipment does cause harmful
interference to radio or TV reception, which can be determined by turning
the equipment off and on, the user is encouraged to try to correct the interference by one of the following measures:
• Reorient or relocate the receiving antenna.
• Increase the separation between the equipment and the receiver.
• Connect the equipment into an outlet on a circuit different from that to
• Consult the dealer or an experienced radio/TV technician for help.
which the receiver is connected.
58
Page 65

FlipScreen Owner’s Manual
Index
Numerics
3D Audio 25, 33
A
accessories 2, 55
Adjust 26
adjusting image & sound 26
analog phone line 13
Angle 25, 32
antenna 30
antenna grounding 2
attachments 1
Audio 25, 33
Audio Out 15
Autoscan Channels 30
B
Back 22, 40
batteries
installing in keyboard 7
installing in remote 6
Bread Maker 14
brightness 26
Broadband
configuring connection 35
broadband
connecting 10
wireless 12
Broadband Settings 35
Browser Settings 37
button
3D Audio 25
Angle 25, 32
Audio 25, 33
Back 22, 40
Channel –/+ 17, 21
Display 25
DVD & CD 20
Eject 17, 32
Email 22, 40
Forward 24, 32, 33
GO 23, 38
Help 48
Home 22, 40
Internet 20
Jump to Favorites 22
Jump to Target 22
Last Channel 21
Menu 24, 32
Mode X 20
Mode Y 20
Mute 17, 21
Next 22
Options 17, 21
Pause 24, 32
Play 24, 32
Play/Pause 17
Power 20
Power On/Off 17
Radio 20
Random 25, 33
Repeat 25, 32
Reverse 24, 32, 33
Scroll 22
Skip Forward 24, 32
Skip Reverse 24, 32
Stop 24, 32, 40
Subtitle 25, 32
Television 20
Title 24
Volu m e –/+ 17, 21
Zoom 25, 33
buttons
directional 23
DVD & CD Mode 23, 24–25
front panel 17
Internet Mode 22–23
mode 20
remote and keyboard 19–25
Television Mode 21
C
cable 30
cable modem
connecting 10
cable TV 30
camera angles 32
Cautions and Warnings 1
CD
changing tracks 24
Forward button 24
Pause button 24
pausing 32
Play button 24
playing 32–33
Random button 25
random play 33
Repeat button 25
repeat play 32
resuming paused 32
Reverse button 24
Skip Forward button 24
Skip Reverse button 24
specific track 33
Stop button 24
stopping play 32
changing channels 31
changing favorites 39
Channel –/+ 17, 21, 31
channels
changing 31
programming 30
cleaning 1, 47
close window 40
Coffee Maker 14
Coffee Maker, Bread Maker, and
Microwave Oven 14
color 26
composite video
connecting 10
connecting
antenna 8
59
Page 66

Index
cable modem 10
camera 9
composite video 10
DSL 10
FM antenna 10
power 16
RCA cable 10
speakers 15
to the Internet 10–13
TV cable 8
VCR 9
video games 9
wired broadband 10
wireless broadband 12
connection
Broadband 35
Dial-Up 36
wireless 35
Connection Settings 35, 36, 37
contrast 26
controls 17–27
front panel 17–18
remote and keyboard 19–25
Customer Care 48
D
deleting favorites 39
dial tone 49
Dialing Prefix 36
Dialing Sound 36
Dial-Up
configuring connection 36
connecting 13
disconnecting 40
digital phone line 13
directional buttons 23, 38
disc tray 17
Disconnect 40
Display 25
display DVD menu 32
drawer, disc 17
DSL
connecting 10
DVD
audio options 33
camera angles 25, 32
Forward button 24
languages 25
menu 24, 32
Pause button 24
pausing 32
Play button 24
playing 32–33
random play 33
Repeat button 25
repeat play 32
resuming paused 32
Reverse button 24
Skip Forward button 24
Skip Reverse button 24
Stop button 24
stopping play 32
subtitles 25, 32
time remaining 25
title 24
zoom 25, 33
DVD & CD Mode 32–33
button 20
buttons 23, 24–25
DVD & CD Options 33
E
Eject 17, 32
electric shock 2
electrical grounding 2
Email 22, 40
Email URL 37
Ethernet Type 35, 37
external speakers 15
F
FAQs 50–52
fast forward 32
favorites 39
changing 39
deleting 39
jump to 22
renaming 39
saving 39
FCC statement 58
FlipScreen
front panel 17
FM Antenna
connecting 10
FM Radio
connecting the antenna 10
Font Size 37
Forward 24, 32, 33
Forward, Skip 24
front panel controls 17–18
G
getting help 48
GO 23, 33, 38
grounding, electrical 2
H
Help 48
Home 40
home page 22, 40
Home Page URL 37
hue 26
I
iCEBOX
before using 1
cleaning 1, 47
controls 17–27
modes 29–??
power status 18
servicing your 4
image, adjusting 26
indicator
LED 18
information displays 25
Internet 20
configuring connections 35
connecting to 10–13
60
Page 67

FlipScreen Owner’s Manual
Internet Mode 34–40
button 20
Email 40
home page 40
refresh page 40
scroll page 40
Stop 40
using stylus 38
Internet Mode buttons 22–23
Internet Options 35, 36, 37
ISP Phone # 36
J
Jump to Favorites 22
Jump to Target 22, 38
K
key
3D Audio 25
Angle 25
Audio 25
Display 25
Random 25
Repeat 25
Subtitle 25
Zoom 25
keyboard 19, 25
battery installation 7
buttons 19–25
cleaning 47
L
languages 25
Last Channel 21
LED indicator 18
link
selecting 23
O
open disc tray 17
open new window 40
Options 17, 21, 26, 29, 30, 37
Options button 21
P
parts 4
Password 36
Pause 24, 32
PCMCIA
finding MAC address 36
wireless 12
PCMCIA network card 10
personal identification policy 55
phone line
digital & analog 13
picture, adjust 26
Play 24
play disc 24
play next 32, 33
play previous 32, 33
play, random 25
Play/Pause 17
playing DVD/CD 32–33
Power 20
power
connecting 16
Power On/Off 17
power status 18
previous Web page 22, 40
printer
connecting 15
printer, connecting 15
privacy of children 55
privacy policy 55
programming television channels 30
M
MAC address
finding 36
Menu 24, 32
menu 48
Microwave Oven 14
mode buttons 20
Mode X 20
button 20
Mode Y 20
button 20
Modes
DVD & CD 32–33
Internet 34–40
Radio 41
Tele vi si on 29–31
Video 43
Mute 17, 21
My Kitchen Mode 44
N
navigation buttons 23, 38
Networking Other Appliances 14
new window 40
Next button 22
next Web page 22, 40
R
Radio 20
radio
connecting the antenna 10
Radio Mode 41
button 20
Radio Mode button 20
Random 25, 33
random play 33
RCA cable
connecting 10
Refresh 40
remote 19, 25
batteries 6
buttons 19–25
cleaning 47
renaming favorites 39
repair service 48
Repeat 25, 32
replacement parts 4
resume play 32
Reverse 24, 32, 33
Reverse, Skip 24
rewind 32
rubber gasket 7
61
Page 68

Index
S
safety instructions 1–4
SANI Cartridge 14
satellite 9
saturation 26
saving favorites 39
Scroll 22, 40
selecting
link 23
Selection Box 38
selection frame
moving 38
serial number 48
servicing 4, 48
signal source 29
choosing 30
Skip Forward 24, 32
Skip Reverse 24, 32
sleep mode 18
sound
adjusting 26
speakers
external 15
specifications 57
static IP 36
Stop 24, 32, 40
stop disc 24
Stylus
using 27
stylus
using 38
Subtitle 25, 32
S-Video
connecting 9
definition 9
T
tapping 38
Tele vi si on 20
television
options menu 29
satellite 9
signal source 8, 29
television channels
changing 31
programming 30
Tele v is io n Mod e 29–31
button 20
Television Mode buttons 21
Television Options 30
tint 26
Title 24
Touch Screen 27
touchscreen
cleaning 47
using 38
track, go to specific 33
troubleshooting 49
TV channels
changing 31
TV In 8
TV, cable 30
U
URL
Email 37
Home Page 37
USB ports 15
User Name 36
V
VCR 43
video games 43
Video Mode 43
Volu m e –/+ 17, 21
W
Warnings and Cautions 1
Web pa g e 40
go to 38
home page 22
scroll 22, 40
stop loading 40
view favorites 22
view next 22, 40
view previous 22, 40
Web sites
favorite 39
Web-based email 22
WEP key 36
window
close current 40
open new 40
wired broadband 10
wireless
configuring connection 35
connecting a bridge 12
networking card 12
PCMCIA 12
security 36
static IP 36
WEP key 36
Wireless Settings 35
Z
Zoom 25, 33
62
Page 69

63
Page 70

FlipScreen Owner’s Manual
64
Page 71

Icebox, LLC / Microsoft Windows CE .NET End User License Agreement
You have acquired a device ("DEVICE") that includes software licensed by Icebox, LLC from Microsoft Licensing, GP or its affiliates ("MS"). Those installed
software products of MS origin, as well as associated media, printed materials, and "online" or electronic documentation ("SOFTWARE") are protected by
international intellectual property laws and treaties. The SOFTWARE is licensed, not sold. All rights reserved.
IF YOU DO NOT AGREE TO THIS END USER LICENSE AGREEMENT ("EULA"), DO NOT USE THE DEVICE OR COPY THE SOFTWARE. INSTEAD,
PROMPTLY CONTACT Icebox LLC FOR INSTRUCTIONS ON RETURN OF THE UNUSED DEVICE(S) FOR A REFUND. ANY USE OF THE SOFTWARE, INCLUD-
ING BUT NOT LIMITED TO USE ON THE DEVICE, WILL CONSTITUTE YOUR AGREEMENT TO THIS EULA (OR RATIFICATION OF ANY PREVIOUS CONSENT).
GRANT OF SOFTWARE LICENSE. This EULA grants you the following license:
• You may use the SOFTWARE only on the DEVICE.
• NOT FAULT TOLERANT. THE SOFTWARE IS NOT FAULT TOLERANT. Icebox, LLC HAS INDEPENDENTLY DETERMINED HOW TO USE THE SOFTWARE
IN THE DEVICE, AND MS HAS RELIED UPON Icebox LLC TO CONDUCT SUFFICIENT TESTING TO DETERMINE THAT THE SOFTWARE IS SUITABLE
FOR SUCH USE.
• NO WARRANTIES FOR THE SOFTWARE. THE SOFTWARE is provided "AS IS" and with all faults. THE ENTIRE RISK AS TO SATISFACTORY QUALITY,
PERFORMANCE, ACCURACY, AND EFFORT (INCLUDING LACK OF NEGLIGENCE) IS WITH YOU. ALSO, THERE IS NO WARRANTY AGAINST
INTERFERENCE WITH YOUR ENJOYMENT OF THE SOFTWARE OR AGAINST INFRINGEMENT. IF YOU HAVE RECEIVED ANY WARRANTIES
REGARDING THE DEVICE OR THE SOFTWARE, THOSE WARRANTIES DO NOT ORIGINATE FROM, AND ARE NOT BINDING ON, MS.
• Note on Java Support. The SOFTWARE may contain support for programs written in Java. Java technology is not fault tolerant and is not designed,
manufactured, or intended for use or resale as online control equipment in hazardous environments requiring fail-safe performance, such as in the
operation of nuclear facilities, aircraft navigation or communication systems, air traffic control, direct life support machines, or weapons systems, in
which the failure of Java technology could lead directly to death, personal injury, or severe physical or environmental damage. Sun Microsystems,
Inc. has contractually obligated MS to make this disclaimer.
• No Liability for Certain Damages. EXCEPT AS PROHIBITED BY LAW, MS SHALL HAVE NO LIABILITY FOR ANY INDIRECT, SPECIAL, CONSEQUENTIAL OR
INCIDENTAL DAMAGES ARISING FROM OR IN CONNECTION WITH THE USE OR PERFORMANCE OF THE SOFTWARE. THIS LIMITATION SHALL APPLY
EVEN IF ANY REMEDY FAILS OF ITS ESSENTIAL PURPOSE. IN NO EVENT SHALL MS BE LIABLE FOR ANY AMOUNT IN EXCESS OF U.S. TWO HUNDRED
FIFTY DOLLARS (U.S.$250.00).
• Limitations on Reverse Engineering, Decompilation, and Disassembly. You may not reverse engineer, decompile, or disassemble the SOFTWARE,
except and only to the extent that such activity is expressly permitted by applicable law notwithstanding this limitation.
• SOFTWARE TRANSFER ALLOWED BUT WITH RESTRICTIONS. You may permanently transfer rights under this EULA only as part of a permanent sale or
transfer of the Device, and only if the recipient agrees to this EULA. If the SOFTWARE is an upgrade, any transfer must also include all prior versions
of the SOFTWARE.
• EXPORT RESTRICTIONS. You acknowledge that SOFTWARE is subject to U.S. export jurisdiction. You agree to comply with all applicable international
and national laws that apply to the SOFTWARE, including the U.S. Export Administration Regulations, as well as end-user, end-use and country destination restrictions issued by U.S. and other governments. For additional information see http://www.microsoft.com/exporting/.
Icebox, LLC / Macromedia End User License Agreement
• You have acquired a device (ìDEVICEî) that includes software licensed by Icebox LLC from Macromedia Inc. (ìMACROMEDIAî). Those installed software products of MACROMEDIA origin, as well as associated media, printed materials, and ìonlineî or electronic documentation (ìSOFTWAREî) are
protected by international intellectual property laws and treaties. The SOFTWARE is licensed, not sold. All rights reserved.
• IF YOU DO NOT AGREE TO THIS END USER LICENSE AGREEMENT (ìEULAî), DO NOT USE THE DEVICE OR USE THE SOFTWARE. INSTEAD,
PROMPTLY CONTACT Icebox LLC FOR INSTRUCTIONS ON RETURN OF THE UNUSED DEVICE(S) FOR A REFUND. ANY USE OF THE SOFTWARE,
INCLUDING BUT NOT LIMITED TO USE ON THE DEVICE, WILL CONSTITUTE YOUR AGREEMENT TO THIS EULA (OR RATIFICATION OF ANY PREVIOUS
CONSENT).
• GRANT OF SOFTWARE LICENSE. The license rights under this EULA are subject to the terms and conditions of this EULA. This EULA grants you the following license:
• You may use the SOFTWARE only on the DEVICE.
• You may not make or distribute copies of the SOFTWARE, or electronically transfer the Software from one computer to another or over a network.
• Your license rights under this EULA are non-exclusive.
• You agree that Icebox and/or Macromedia may audit your use of the Software fro compliance with these terms at any time, upon reasonable notice.
• NOT FAULT TOLERANT. THE SOFTWARE IS NOT FAULT TOLERANT. Icebox LLC HAS INDEPENDENTLY DETERMINED HOW TO USE THE SOFTWARE
IN THE DEVICE, AND MACROMEDIA HAS RELIED UPON Icebox LLC TO CONDUCT SUFFICIENT TESTING TO DETERMINE THAT THE SOFTWARE
IS SUITABLE FOR SUCH USE.
• NO WARRANTIES FOR THE SOFTWARE. THE SOFTWARE is provided ìAS ISî and with all faults. THE ENTIRE RISK AS TO SATISFACTORY QUALITY,
PERFORMANCE, ACCURACY, AND EFFORT (INCLUDING LACK OF NEGLIGENCE) IS WITH YOU. ALSO, THERE IS NO WARRANTY AGAINST
INTERFERENCE WITH YOUR QUIET ENJOYMENT OF THE SOFTWARE OR AGAINST INFRINGEMENT. THERE ARE NO WARRANTIES OF MERCHANTABILITY OR FITNESS FOR A PARTICULAR PURPOSE. THERE IS NO WARRANTY THAT THE SOFTWARE IS ERROR-FREE OR WILL OPERATE
WITHOUT INTERRUPTION. NO RIGHTS OR REMEDIES REFERRED TO IN ARTICLE 2A OF THE UCC WILL BE CONFERRED ON YOU UNLESS
EXPRESSLY GRANTED HEREIN. THE SOFTWARE IS NOT DESIGNED, INTENDED OR LICENSED FOR USE IN HAZARDOUS ENVIRONMENTS
REQUIRING FAIL-SAFE CONTROLS, INCLUDING WITHOUT LIMITATION, THE DESIGN, CONSTRUCTION, MAINTENANCE OR OPERATION OF
NUCLEAR FACILITIES, AIRCRAFT NAVIGATION OR COMMUNICATION SYSTEMS, AIR TRAFFIC CONTROL, AND LIFE SUPPORT OR WEAPONS
Page 72

• ATE A WARRANTY OR IN ANY WAY INCREASE THE SCOPE OF ANY WARRANTY PROVIDED HEREIN. (USA only) SOME STATES DO NOT
ALLOW THE EXCLUSION OF IMPLIED WARRANTIES, SO THE ABOVE EXCLUSION MAY NOT APPLY TO YOU. THIS WARRANTY GIVES YOU SPECIFIC LEGAL RIGHTS AND YOU MAY ALSO HAVE OTHER LEGA L RIGH TS TH AT VARY FROM STATE T O STATE.
• IF YOU HAVE RECEIVED ANY WARRANTIES REGARDING THE DEVICE OR THE SOFTWARE, THOSE WARRANTIES DO NOT ORIGINATE FROM,
AND ARE NOT BINDING ON, MACROMEDIA.
• No Liability for Certain Damages. EXCEPT AS PROHIBITED BY LAW, MACROMEDIA SHALL HAVE NO LIABILITY FOR ANY INDIRECT, SPECIAL, CONSEQUENTIAL OR INCIDENTAL DAMAGES ARISING FROM OR IN CONNECTION WITH THE USE OR PERFORMANCE OF THE SOFTWARE. THIS
LIMITATION SHALL APPLY EVEN IF ANY REMEDY FAILS OF ITS ESSENTIAL PURPOSE. IN NO EVENT SHALL MACROMEDIA BE LIABLE FOR ANY
AMOUNT IN EXCESS OF U.S. TWO HUNDRED FIFTY DOLLARS (U.S.$250.00). (USA only) SOME STATES DO NOT ALLOW THE LIMITATION OR
EXCLUSION OF LIABILITY FOR INCIDENTAL OF CONSEQUENTIAL DAMAGES, SO THE ABOVE LIMITATION OR EXCLUSION MAY NOT APPLY TO
YOU AND YOU MAY ALSO HAVE OTHER LEGAL RIGHTS THAT VARY FROM STATE TO STATE.THE FOREGOING LIMITATIONS ON LIABILITY ARE
INTENDED TO APPLY TO THE WARRANTIES AND DISCLAIMERS ABOVE AND ALL OTHER ASPECTS OF THIS EULA.
• Limitations on Reverse Engineering, Decompilation, and Disassembly. You may not reverse engineer, decompile, disassemble or otherwise reduce the
SOFTWARE to human-perceivable form, except and only to the extent that such activity is expressly permitted by applicable law notwithstanding this
limitation. You may not alter, merge, modify, adapt or translate the SOFTWARE, or create derivative works based upon the SOFTWARE.
• The foregoing license gives you limited license to use the Software. MACROMEDIA and its suppliers retain all right, title and interest, including all
copyright and intellectual property rights, in and to, the Software and all copies thereof. All rights not specifically granted in this EULA, including Federal and International Copyrights, are reserved by Licensor and its suppliers.
• SOFTWARE TRANSFER ALLOWED BUT WITH RESTRICTIONS. You may permanently transfer rights under this EULA only as part of a permanent sale or
transfer of the Device, and only if the recipient agrees to this EULA. If the SOFTWARE is an upgrade, any transfer must also include all prior versions
of the SOFTWARE. You may not retain any copies of the SOFTWARE. You may not rent, lease or sublicense the software.
• EXPORT RESTRICTIONS. You acknowledge that SOFTWARE is of US-origin. You agree to comply with all applicable international and national laws
that apply to the SOFTWARE, including the U.S. Export Administration Regulations, as well as end-user, end-use and country destination restrictions
issued by U.S. and other governments.
• In the event that you fail to comply with this EULA, Licensor may terminate the license and you must destroy all copies of the Software (with all other
rights of both parties and all other provisions of this EULA surviving any such termination).The Software and the documentation are provided with
"RESTRICTED RIGHTSî applicable to private and public licenses alike. Without limiting the foregoing, use, duplication, or disclosure by the U.S. Government is subject to restrictions as set forth in this EULA and as provided in DFARS 227.7202-1(a) and 227.7202-3(a) (1995), DFARS 252.2277013 (c)(1)(ii)(OCT 1988), FAR 12.212(a)(1995), FAR 52.227-19, or FAR 52.227-14, as applicable.
• The limitations or exclusions of warranties and liability contained in this EULA do not affect or prejudice the statutory rights of a consumer, i.e., a person acquiring goods otherwise than in the course of a business. The limitations or exclusions of warranties, remedies or liability contained in this
EULA shall apply to you only to the extent such limitations or exclusions are permitted under the laws of the jurisdiction where you are located.
• Third-party software MPEG-Layer 3 audio compression technology licensed by Fraunhofer IIS and Thomson multimedia. (http://www.iis.fhg.de/
amm/). You cannot use the MP3 compressed audio within the Software for real time or live broadcasts. If you require an MP3 decoder for real time
or live broadcasts, you are responsible for obtaining this MP3 technology license.
• This EULA with respect to the Software shall be governed by the internal laws of the State of California, without giving effect to principles of conflict of
laws.
Page 73

Page 74

Page 75

BFS04-401N-US V2US092403
 Loading...