

Page 1
WBYCM2
Page 2

Coffee Maker Owner’s Manual
2
Page 3
Definition of Terms
WARNING!
CAUTION!
Read and Save These Instructions
Risk of fire or electrical shock.
WARNING!
WARNING!
WARNING!
WARNING!
A risk of fire and electrical shock exists in all electrical appliances and may cause personal injury or death. Please follow all
safety instructions.
Risk of electrical shock.
Do not remove the bottom cover. The Coffee Maker does
not have user-serviceable components. Repairs must be performed by authorized service personnel only.
Risk of burns.
This Coffee Maker generates heat and escaping steam during
use. Use proper precautions to prevent the risk of burns, fires
or other injury to persons or damage to property.
Risk of burns / hot overflow.
During the brew cycle, to prevent injury from hot overflow,
replace the carafe within 20 seconds. Pour slowly when the
carafe is full.
1. Important Safeguards
When using electrical appliances, basic safety precautions should always be followed,
including the following:
1. Read all instructions.
2. Do not touch hot surfaces. Use handles or knobs
3. To protect against electric shock, do not place cord, plugs, or appliance in water or
other liquid.
4. Close supervision is necessary when any appliance is used by or near children.
5. Unplug from outlet when not in use and before cleaning. Allow to cool before putting on or taking off parts, and before cleaning the appliance.
6. Do not operate any appliance with a damaged cord or plug or after the appliance
malfunctions, or has been damaged in any manner. Contact Consumer Service for
examination, repair or adjustment.
7. The use of an accessory not evaluated for use with this appliance may cause injuries.
8. Do not use outdoors.
9. Do not let cord hang over edge of table or counter, or touch hot surfaces.
10. Do not place on or near a hot gas or electric burner, or in a heated oven.
Hazards or unsafe practices which could result in serious
personal injury or death.
Hazards or unsafe practices which could result in minor
personal injury or product damage.
3
Page 4

Coffee Maker Owner’s Manual
11. To disconnect, turn the appliance off, then remove plug from wall outlet.
12. Do not use appliance for other than intended use.
13. Be certain Lids are securely in place before operating appliance.
14. Scalding may occur if the lid is removed during the brewing cycles.
15. The carafe is designed for use with this appliance. It must never be used on a
16. Do not set a hot carafe on a wet or cold surface.
17. Do not use a cracked Carafe or a Carafe having a loose or weakened handle.
18. Do not clean carafe with cleansers, steel wool pads, or other abrasive material.
19. Do not operate any damaged appliance. Do not operate with a damaged cord or
20. Use accessory attachments only if recommended by manufacturer.
21. Do not use while standing in a damp area.
Save These Instructions
FOR HOUSEHOLD USE ONLY.
range top.
plug, or after the appliance malfunctions or has been dropped or damaged in any
manner. Return the appliance to the nearest authorized service center for examination, repair, electrical or mechanical adjustment.
Additional Important Safeguards:
WARNING: This appliance generates heat and escaping steam during use. Proper precautions must be taken to prevent the risk of burns, fires, or other injury to persons or
damage to property.
1. All users of this appliance must read and understand this Owner’s Manual before
operating or cleaning this appliance.
2. The cord to this appliance should be plugged into a 120V AC electrical outlet only.
3. Use water only in this appliance! Do not put any other liquids or food products in
this appliance. Do not mix or add anything to the water placed in this appliance,
except as instructed in the User Maintenance Instructions to clean the appliance.
4. DO NOT attempt to move an appliance containing hot liquids. Allow appliance to
cool completely before moving.
5. Keep appliance at least 4 inches away from walls or other objects during opera-
tion. Do not place any objects on top of appliance while it is operating. Place the
appliance on a surface that is resistant to heat.
6. If this appliance begins to malfunction during use, immediately unplug the cord.
Do not use or attempt to repair the malfunctioning appliance.
4
Page 5

7. If this appliance falls or accidentally becomes immersed in water or any other
liquid, unplug it immediately. Do not reach into the water! Do not use this
appliance after it has fallen into or has become immersed in water. Contact
Consumer Service for examination and repair.
8. Do not leave this appliance unattended during use.
9. The appliance must be left to cool down sufficiently before adding more water to
avoid splattering.
10. Always use fresh, cool water in your appliance. Warm water or other liquids, except
as listed in cleaning section, may cause damage to the appliance.
11. DO NOT put Carafe into a microwave.
12. DO NOT leave empty Carafe on Warming Plate when appliance is turned ON, as
the Carafe may crack or become otherwise damaged.
13. DO NOT lift Filter Basket Lid until brewing is complete, and all parts have cooled.
14. CAUTION: To prevent injury when utilizing Pause and Pour (drip-stop)
feature, replace Carafe within 20 seconds of removing during brewing process.
Polarized Plug
This appliance has a polarized plug, (one blade is wider than the other). To reduce the risk of
electric shock, this plug is intended to fit into a polarized outlet only one way. If the plug does
not fit fully in the outlet, reverse the plug. If it still does not fit, contact a qualified electrician.
Do not attempt to modify the plug in any way.
Short Cord Instructions
A short power-supply cord is provided to reduce the risk resulting from becoming entangled
in or tripping over a longer cord.
Do not use an extension cord with this product.
Electrical Power
If the electric circuit is overloaded with other appliances, your Coffee Maker may not operate
properly. It should be operated on a separate electric circuit from other operating appliances.
5
Page 6

Coffee Maker Owner’s Manual
2. Introduction
Thank you for purchasing the Beyond Mill & Brew Coffee Maker.
The Beyond Mill & Brew Coffee Maker integrates two products into one space-saving unit.
The built-in coffee mill grinds your whole coffee beans to the desired level of coarseness (you
can choose from seven settings, or turn the mill off to use pre-ground coffee) -- and then
proceeds directly into the brewing process, eliminating the mess of transferring grounds
and the countertop clutter of two large appliances.
Using the Coffee Maker’s control panel, you can set the system to make coffee immediately or
program a brew time up to 24 hours in advance so you have fresh-brewed coffee ready first
thing in the morning.
The mill assembly includes a permanent stainless-steel filter basket, so purchasing paper
coffee filters is unnecessary. In addition, the Coffee Maker has a 10-cup Water Window for
determining how many cups you’re making and a hidden cord storage compartment for
stowing the electrical cord.
Networking
NOTE: To use the networking features of your Coffee Maker you must also have an iCEBOX™
Kitchen Entertainment Center.
Your Beyond Coffee Maker comes ready to install a SANI™ (Smart Appliance Network
Interface) Wireless Network card. When the card is properly installed in the Coffee Maker,
your Coffee Maker is able to exchange information with an iCEBOX™. This means you never
have to set the time or date on your Coffee Maker and you can use the iCEBOX’s easy-to-use
touch-screen interface to program different brew times for each day of the week. To purchase
a Sani Wireless Network card or other Beyond products, please visit the Beyond website
www.beyondconnectedhome.com.
Coffee Maker Features:
§ Beyond Connected Appliance communication via the SANI™ Wireless
Network Interface
§ Built in Mill & Brew capability
§ Time of day and week set automatically (network mode only)
§ Contemporary stainless steel and black styling
§ 10-cup capacity
§ LCD with bright blue backlight
§ ‘Pause & Pour’ allows you to pour a cup of coffee during the brew cycle
Before using your Coffee Maker for the first time, please take a few minutes to familiarize
yourself with the information in this manual.
6
Page 7
3. Unpack Your Beyond Mill & Brew
Coffee Maker
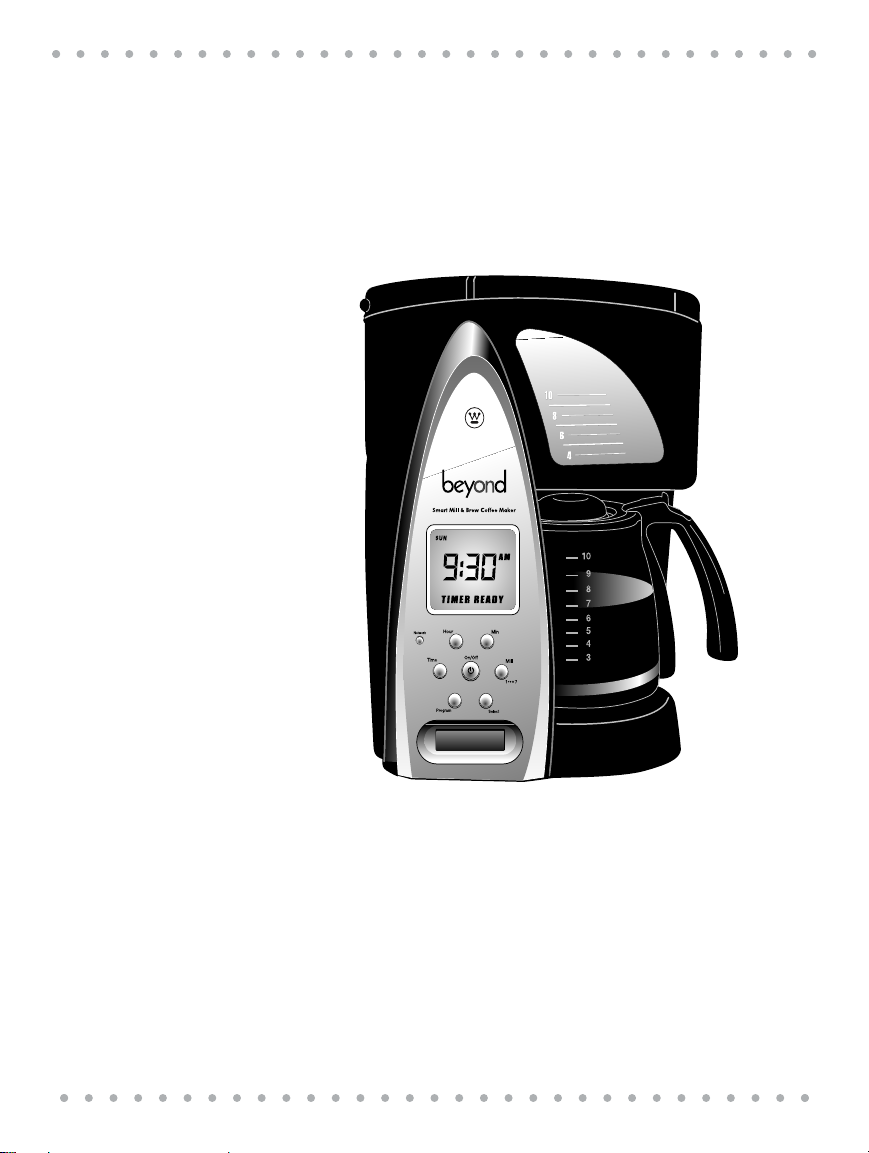
Carefully remove the Beyond Mill & Brew Coffee Maker and all other contents from the carton.
If there is any damage to the Coffee Maker, contact your Beyond retailer or contact Beyond
Customer Relations at 1-800-233-9054 (in the US) between 8 - 5:30 CST, Monday through
Friday, or by e-mail at [email protected]
7
Page 8
1
2
3
4
5
7
8
9
10
12
13
14
6
Back View
Front View
11
Coffee Maker Owner’s Manual
6
7
8
5
1
2
3
9
4
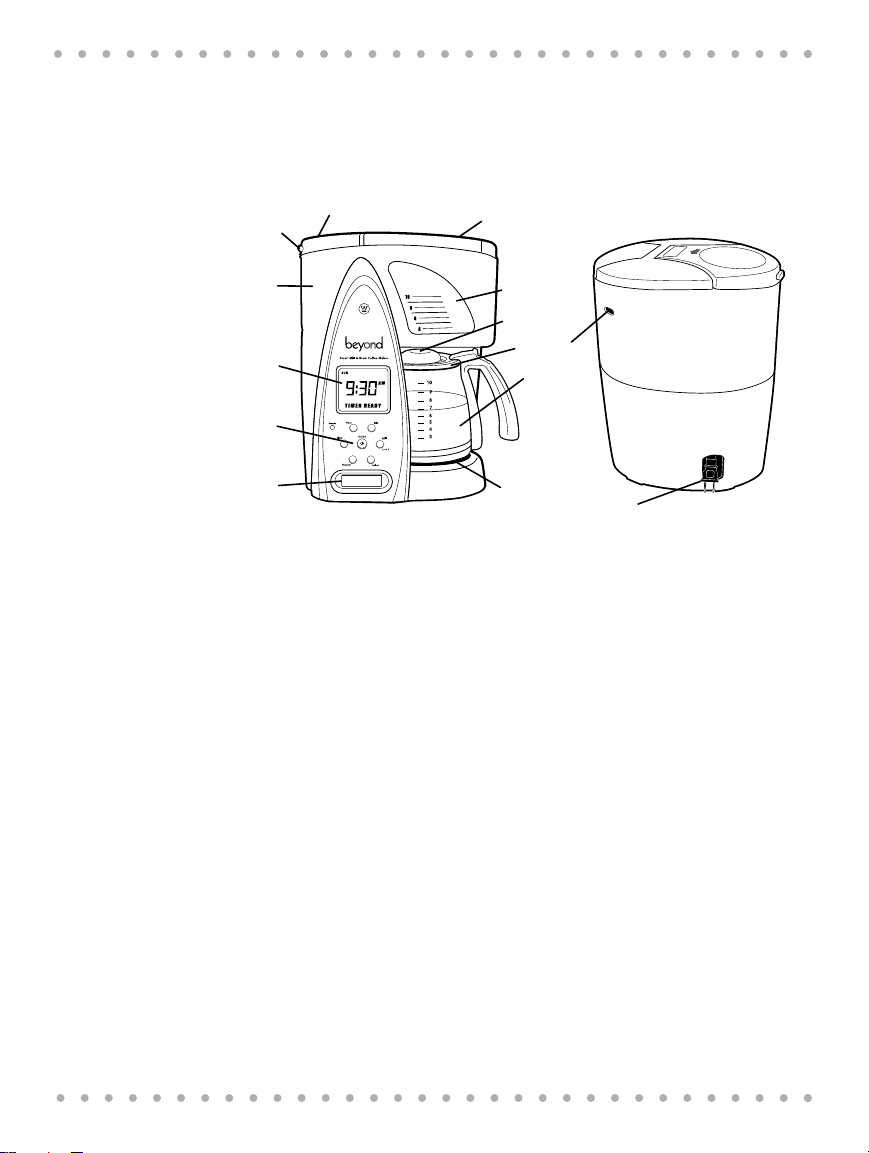
4. Coffee Maker Features and Controls
Note: Your product may vary slightly from illustration.
1. Water Reservoir Lid
Lift to pour water into the reservoir
2. Water Window
Markings indicate water needed to make corresponding cups of brewed coffee -10 cups max.
3. Pause and Pour
Stops flow of coffee from brew chamber when carafe is removed from the warming plate so
a cup can be poured in mid-brew, if desired. Since the extraction rate varies during the brew
cycle, we recommend allowing the brewing cycle to finish before pouring the finished coffee.
4. Carafe Lid (P/N 31190)
Special design minimizes oxygen flow into carafe to help preserve coffee flavor.
5. Carafe w/Lid (P/N 31191)
10 cup capacity with a sturdy, easy-grip handle.
6. Cord Storage
Unused cord may be stored inside the hidden cord storage compartment to
keep counters neat.
7. Warming Plate:
Scratch resistant with a non-stick coating to prevent carafe from sticking.
8. SANI Card Slot (Model Number WBYSM2)
When a SANI card is installed (optional, sold separately) the Beyond Coffee Maker can
exchange information with an iCEBOX™.
9. Control Panel
Allows you to manually set the clock, automatic brewing times, view/enter your
Home Code and to manually start and stop brewing.
10. LCD Display
Shows the time of day, day of the week (network mode, only) and Coffee Maker status.
8
Page 9
11. Overflow slot
6
7
8
5
1
2
3
9
4
If too much water is poured into the reservoir the excess drains through this opening
12. Coffee Mill
Includes a permanent stainless steel filter basket with integrated stainless steel blades
13. Coffee Mill Lid Latch
Press in latch to release lid
14. Coffee Mill Lid:
Press button to open
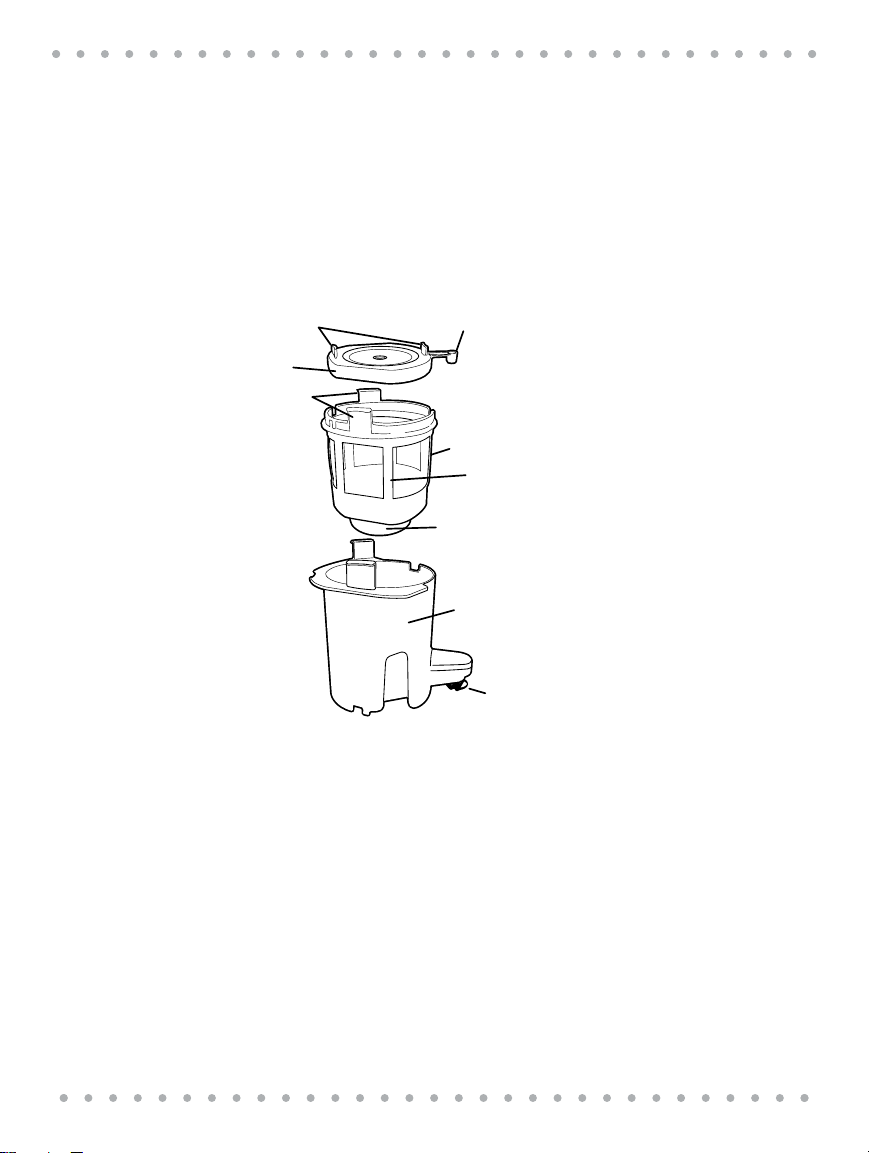
Coffee Mill Assembly
1. Filter Basket (P/N 30640)
Permanent stainless steel basket makes
paper coffee filters unnecessary
2. Maximum Fill Level
To prevent overflows, do not place more than
8 scoops (tablespoons) of coffee beans in the
filter basket
3. Blades
Stainless steel blades
4. Pause & Pour Switch
During brewing: when the carafe is seated
properly on the warming plate, the Pause &
Pour switch is depressed, allowing brewed
coffee to flow into the carafe. If the carafe is
removed from the warming plate, the Pause
& Pour switch is in the ‘out’ position preventing brewed coffee from leaving the brew
chamber.
NOTE: To prevent overflows during the brew
cycle, replace the carafe within 20 seconds.
5. Brew Chamber (P/N 31193)
Holds the filter basket and blades and funnels brewed
coffee into the carafe.
6. Filter Basket Lid Tabs
Use tabs to remove filter basket lid when hot.
7. Filter Basket Lid (P/N 30639B)
Specially designed openings distribute hot water
over coffee grinds for optimal brewing.
8. Filter Basket Tabs
Use tabs to remove filter basket when hot.
9. Safety Interlock Switch
This switch prevents coffee brewing from beginning unless the
coffee mill assembly is seated properly in the brew chamber
and the Coffee Maker lid is closed securely.
9
Page 10
Coffee Maker Owner’s Manual
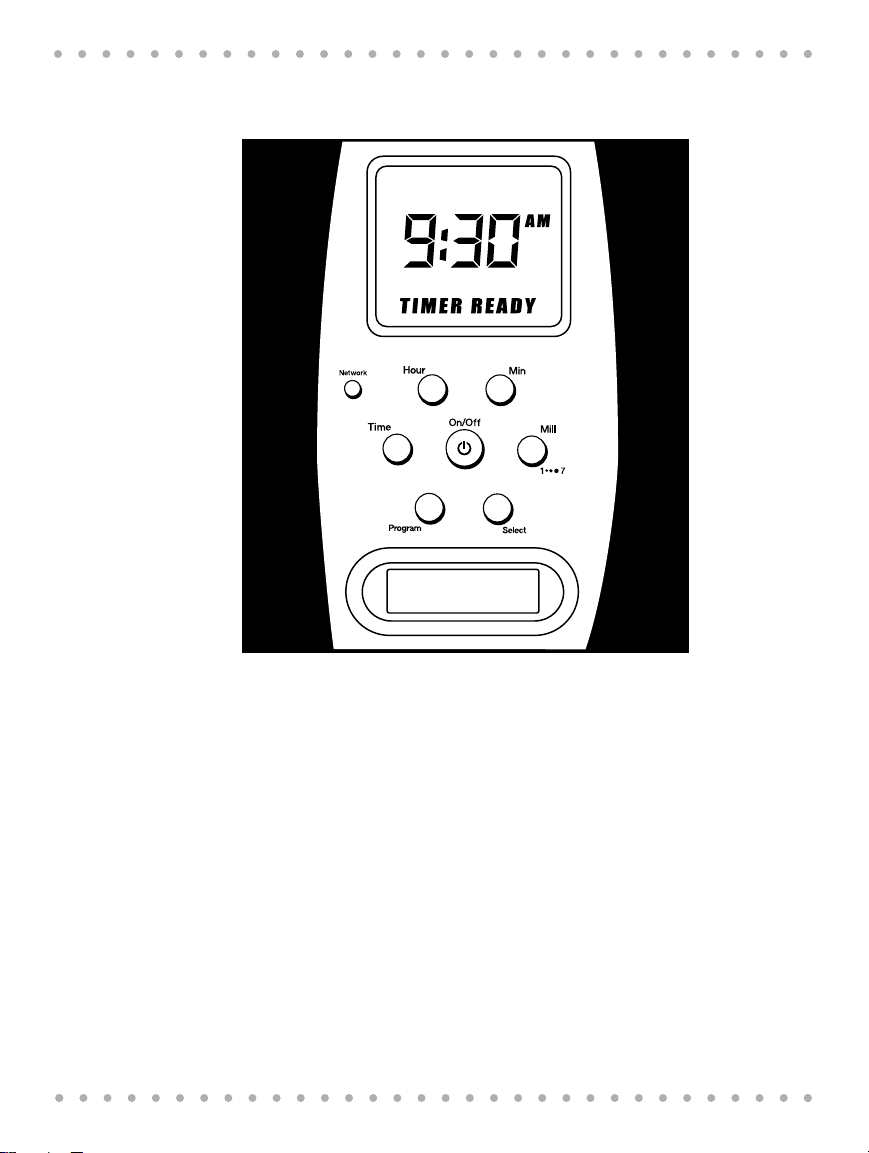
Control Panel
Use the control panel to program all of the Coffee Maker’s functions.
10
On/Off:
Press to toggle Coffee Maker on or off.
Select:
Press to select grind setting (see instructions on page 12).
Hour:
Press to set hours when setting the time manually.
Min:
Press the set minutes when setting time manually.
Time:
Press to set time of day or programmed start time.
Network:
Press to connect your Coffee Maker to an iCEBOX via a wireless network.
Please refer to instructions beginning on page 14.
LCD display:
Displays time of day, date and Coffee Maker status.
Program:
Press to enter a preset brew time.
Page 11

5. Before Using Your Mill & Brew Coffee
Maker for the First Time
Clean the Carafe and Coffee Mill Assembly
NOTE: Unplug the Coffee Maker during cleaning!
1. Clean the carafe, carafe lid, the filter basket and filter basket lid in warm soapy water.
Rinse thoroughly and dry.
2. Make sure the Coffee Maker is off. DO NOT USE COFFEE.
3. Fill the water reservoir to the 10-cup mark with cold water.
4. Insert the filter basket and filter basket lid into the Coffee Maker taking care to seat it
properly. Close the Coffee Mill lid
NOTE: The Coffee Mill lid must be closed securely in order for the brew cycle to begin.
5. Plug in the Coffee Maker, a default time setting and GRIND will appear in display.
Press On/Off and the Coffee Maker will begin to grind and ON GRIND will appear in the
display. After a few seconds, the water will begin to cycle through the Coffee Maker and
into the carafe. ON will appear in the display.
NOTE: A time will also appear in the display. To set the clock for the accurate time, follow the
procedure in Setting the Clock below.
6. When the carafe is full, HEAT ON will appear on the display.
7. Press On/Off to turn off the Coffee Maker. Discard the water in the carafe. Wait 10
minutes to allow heating elements to cool. Repeat this procedure one more time.
CAUTION: BLADES ARE SHARP. DO NOT ATTEMPT TO DISASSEMBLE COFFEE MILL ASSEMBLY.
Setting the Clock
If your Coffee Maker is NOT on a SANI network, follow these steps to set the clock manually:
NOTE: You do not have to set the clock in order to brew coffee.
1. Press and hold Time until the time display begins to flash, then release. To adjust the hour
press Hour repeatedly until the desired hour is displayed. To advance the display rapidly, press
and hold Hour. Be sure to set the correct AM or PM hour.
2. To adjust the minute: press minute repeatedly until the desired time is displayed. To advance
the display rapidly, press and hold Minute.
3. When the desired time is set the display will flash. Press Time to save your setting or the
setting will automatically be saved if you don’t press the Time button and return to a
normal display.
11
Page 12

Coffee Maker Owner’s Manual
6. Making Coffee
Coffee Yield
A 5-ounce cup is the American industry standard and is used by most coffee maker manufacturers. The Beyond Coffee Maker makes a maximum of 10 five-ounce cups as indicated by the
10 coffee cup markings on the Water Window. Your favorite mug will accommodate approximately two standard “cups” (or 10 ounces) of coffee. For best results, we do not recommend
preparing less than four cups (or 20 ounces) of coffee.
Manual Brewing
NOTE: Use this procedure for milling and brewing coffee if you are not using an iCEBOX to
interface with your Coffee Maker,:
1. Plug the Coffee Maker into 120V~60Hz outlet.
2. Fill the reservoir with cold, fresh water. The markings on the Water Window indicate level
of water required to brew the desired number of cups. Place the carafe securely onto
warming plate.
NOTE: Take care to seat the carafe squarely beneath the brew chamber. If it is even slightly off
center, the Pause & Pour feature will prevent brewed coffee from flowing into the carafe and
the coffee may overflow.
3. Remove the filter basket lid. Using the scoop provided with your Coffee Maker, measure
the desired amount of roasted whole-bean coffee into the filter basket. (We recommend
one scoop per every two cups of brewed coffee.) Replace the filter basket lid taking care
to seat it securely on the filter basket.
NOTE: You may substitute ground coffee for coffee beans. When using ground coffee PRESS
Mill and set to “0”.
4. Select the desired grind setting by pressing Mill. 4 (medium grind), the default setting,
appears in the display. To adjust the grind setting press Mill repeatedly to display the
seven different grind settings until the desired setting appears in the display. GRIND will
appear in the display. “1” is the coarsest grind, “ 7” is the finest.
5. Press On/Off. The coffee mill will begin grinding the coffee beans. ON GRIND will appear
in the display during grinding. Brewing will begin. ON will appear in the display during
brewing.
6. When brewing is complete HEAT ON will appear in the display. The warming plate will
keep your coffee at the ideal serving temperature for one hour. The Coffee Maker shuts
off automatically after one hour.
7. To turn off the Coffee Maker, press On/Off.
12
For best results:
§ To avoid overflow, do not fill the reservoir past the Max Line.
§ Do not make fewer than four cups (20 ounces).
§ To keep coffee hot, return the carafe to the warming plate after serving.
§ To avoid damage to the carafe, do not allow an empty carafe to remain
on a hot warming plate.
§ To avoid scalding and burns, do not open the filter basket lid until all liquid
has emptied into the carafe.
§ Allow Coffee Maker to cool for 10 minutes before brewing another pot.
Page 13

Pause-and-Pour
Your Coffee Maker is equipped with Pause & Pour. This feature allows you to pour a cup
of coffee before your coffee is finished brewing. At any time while your coffee is brewing,
you may remove the carafe from the warming plate and pour a cup of hot coffee. No coffee
will drip from the brew chamber. To resume brewing, simply place the carafe back on the
warming plate.
NOTE:
§ To prevent the filter basket from overflowing, do not remove the carafe for
longer than 20 seconds.
§ Strength of coffee poured mid-cycle may vary in strength from finished brew.
7. Manually Programming a Preset
Brewing Time
1. Press and hold Program for two seconds. The TIME display will flash.
2. Press Hour and Min to advance the minutes to the desired time.
3. When the desired time appears, press Program to save your automatic brewing time.
To Activate Automatic Brewing
a. Press Program to briefly display the time for preset brewing to begin.
TIMER will appear in the display.
b. To activate automatic brewing, press Select.
TIMER READY will appear in the display.
The Coffee Maker will begin brewing at the programmed time.
c. When the coffee is ready ON READY will appear in the display. The Coffee Maker will stay on
for one hour and then automatically shut itself off. You may turn the Coffee Maker off manually
at any time by pressing On/Off.
NOTE: If TIMER READY appears in the display, the Coffee Maker will attempt to brew at the
programmed time each day. If there is no water in the reservoir, the unit will automatically shut
off within one minute. To disable automatic brewing, press Select.
13
Page 14
Coffee Maker Owner’s Manual
8. Adding Your Beyond Coffee Maker to
Your iCEBOX Appliance Network
Your iCEBOX can act as a network gateway and command center for the Beyond Connected
Appliances, including the Beyond Microwave, Bread Maker and Coffee Maker. In order to network your Beyond Appliances, you must connect the SANI antenna to your iCEBOX, and also
install SANI cards in the appliances you want to network.
Once the antennas are in place, and your appliances are connected, they can be monitored
through the iCEBOX My Kitchen mode.
NOTES:
§ If you do not have an iCEBOX, skip this procedure.
§ A SANI card is available for your Coffee Maker. For more information on using the
SANI Card please refer to the instruction booklet provided with the SANI card.
§ Additional information can be found in your iCEBOX Owner’s Manual and on the
Beyond web site at www.beyondconnectedhome.com.
To add your Coffee Maker to your iCEBOX
appliance network:
§ Make sure that the SANI antenna is connected to the rear of the iCEBOX.
§ Insert a SANI card into the slot at the base of the Coffee Maker’s control panel.
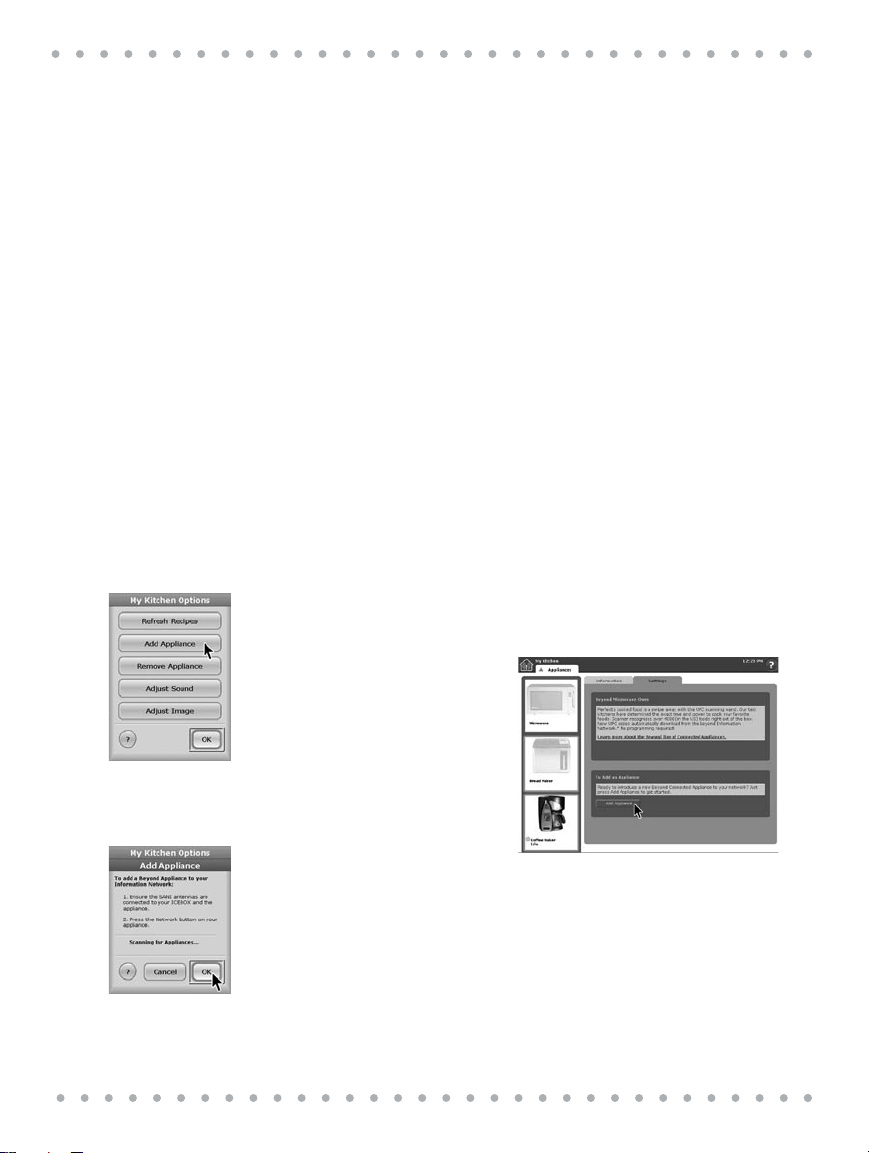
1. On your iCEBOX front panel, keyboard
or remote, press the Options button
then tap the onscreen My Kitchen
button. Select Add Appliance.
2. On the Appliances Screen, select
the Settings tab then press Add
Appliance.
3. On the Coffee Maker control panel,
press the Network button.
1
4
4. The iCEBOX and the Coffee Maker
will attempt to connect. The iCEBOX
screen will display a Scanning For
Appliances dialog. Press OK.
5. When a connection is established,
NETWORK will appear in the Coffee
Maker’s display and the Coffee Maker’s
time and date will be synchronized
with the iCEBOX’s time/date settings.
6. The iCEBOX will display a message
Coffee Maker detected. An active
Coffee Maker icon and the Coffee
Maker’s current status will appear on
the screen.
2
14
Page 15
NOTE: If your appliance fails to connect,
press and hold the Network button on the
appliance for 10 seconds, then attempt to
connect again.
You are now able to set the Coffee Maker’s
brew schedule, start or stop brewing and
check the Coffee Maker’s status from your
iCEBOX screen.
9. Using the iCEBOX to Set Your Coffee
Maker’s Brew Schedule
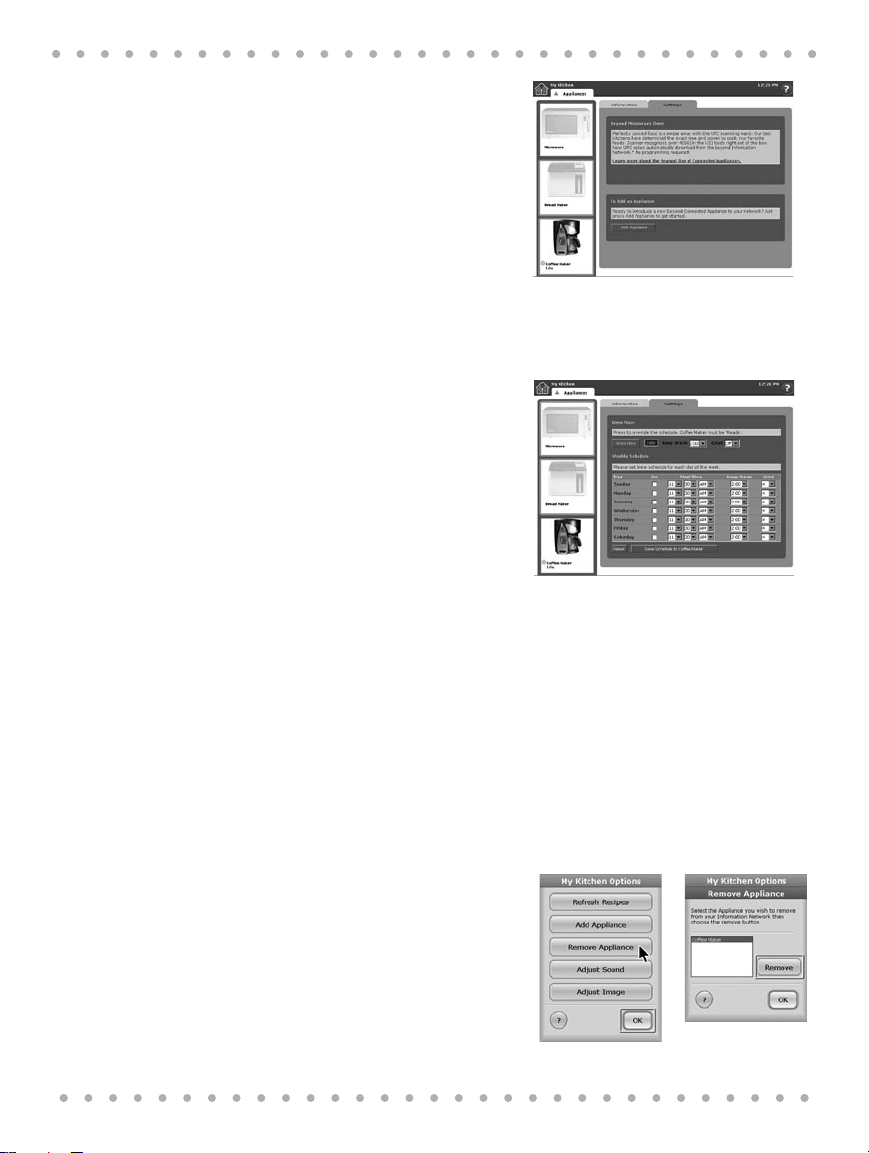
1. On the iCEBOX: In My Kitchen mode,
choose Appliances. Tap the Coffee
Maker icon to make it active then
choose Set Brew Schedule.
2. Use the drop down menus to select
start time, “keep warm” and grind
settings. Make your settings active by
clicking the On box.
3. To save your settings press Save
Schedule to Coffee Maker. To cancel
or clear your settings, press Reset.
NOTES:
§ The Coffee Maker must be armed in a ready state (READY appears in the Coffee Maker’s
display) in order for brewing to occur.
§ You may override the preset schedule at any time by selecting Brew Now on the iCEBOX
Appliance screen.
§ You can brew coffee manually at any time using the Coffee Maker’s control panel.
Programmed brew times set on the Coffee Maker’s control panel will take precedence
over the brew schedule set on the iCEBOX.
10. Removing Your Coffee Maker from
the iCEBOX Network
1. On your iCEBOX front panel, keyboard
or remote, press the Options button
then tap the onscreen My Kitchen
button. Select Remove Appliance.
2. In the Remove Appliance dialog, tap
Coffee Maker to select, then tap
Remove and OK.
3. The Coffee Maker icon will “gray
out.” On your Coffee Maker display
NETWORK will disappear.
1
2
15
Page 16

Coffee Maker Owner’s Manual
11. More About Making a Great
Cup of Coffee
There are only two ingredients that go into making a great cup of coffee: water and coffee. The
quality and freshness of both ingredients is critical to producing a delicious cup of coffee.
Water
Although a cup of coffee is 98% water, water quality is often taken for granted when brewing
coffee. Chemicals added to tap water and minerals that are naturally present in the water will
influence the taste and aroma of brewed coffee. The freshest purest water available is essential
to brewing a great cup of coffee.
Coffee
To brew a great cup of coffee you need to begin with freshly roasted, high quality coffee beans.
Ideally, you should purchase your coffee weekly or bimonthly to make sure that your coffee is
as fresh as possible. Always store your coffee an airtight container away from direct light and
heat. The airtight container preserves the volatile flavors of the coffee, maintains the coffee’s
moisture level and keeps out odors.
In an airtight container, coffee can be stored at room temperature (away from direct light and
heat) or in the refrigerator. Storing coffee in the freezer is not recommended. Freezing coagulates the coffee’s natural oils and causes ice crystals to form adversely affecting the coffee’s
flavor and aroma. Since refrigerators and freezers have automatic dehumidifiers to remove
moisture from the interior of the appliance, an airtight storage container is crucial.
Grind
The grind is critical in proper flavor extraction If the grind is too fine, over-extraction and bitterness will result. Too fine a grind may also clog your filter. If grind is too coarse, the water will
pass through too quickly and the desired flavors will not be extracted.
16
Proportion
The cups on the Beyond Coffee Maker are 5 ounces. Add approximately 1 spoon of coffee
beans per every two cups of coffee to be brewed.
NOTE: Do not place more than 8 spoons of beans in the mill.
When using ground coffee, the Specialty Coffee Association of America recommends adding 2
rounded tablespoons of coffee per 5 ounces of water, but use more or less to suit your taste.
NOTE: The maximum capacity for ground coffee is 15 tablespoons. Exceeding this amount may
cause the filter basket to overflow if the coffee is too finely ground.
Page 17

12. Cleaning and Maintenance
Coffee is naturally oily. A build up of coffee oils on the Coffee Maker will adversely affect the
taste of new pots of coffee. For best results, completely clean and dry all removable parts
after every use.
When cleaning your Coffee Maker, please observe the following precautions:
§ Make sure the Coffee Maker is off. Unplug and allow the coffee maker to
cool completely before cleaning.
§ NEVER IMMERSE THE CORD , PLUG OR COFFEE MAKER IN WATER OR OTHER LIQUID.
§ Do not use metal cleaning pads or abrasive cleaners.
Daily
Wash all removable parts in warm, soapy water. Rinse thoroughly and dry. If necessary, use
a small brush, such as a toothbrush, to clean carafe lid, the bottom of the filter basket and
around the Pause & Pour switch.
Monthly
Mineral deposits from tap water can clog the Coffee Maker or reduce its efficiency and
adversely affect the taste of the coffee. For best coffee brewing results, the Coffee Maker
should be cleaned once a month with a solution of vinegar and water.
To remove mineral deposits from the Coffee Maker:
1. Pour 1⁄2 cup of vinegar into the carafe. Add cold water up to the 4 cup mark (20 ounces).
Pour the vinegar/water mixture into the water chamber.
2. Insert the filter basket. DO NOT USE COFFEE!
3. Press On/Off to start the brew cycle.
4. When the brew cycle is finished, turn the Coffee Maker off. Carefully remove the carafe
and place on a heat resistant surface.
5. Wait 15 minutes. Pour the same vinegar/water solution back into the Coffee Maker.
6. Turn the Coffee Maker on again. Allow the vinegar/water solution to cycle through the
Coffee Maker. When the brew cycle is finished, turn the Coffee Maker off and discard the
vinegar/water solution.
7. To rinse: Allow Coffee Maker to cool for 15 minutes. Fill the carafe with cold fresh water.
Pour the water into the water chamber and press On/Off. When the brew cycle is
complete discard the water. Repeat with another carafe of fresh water. Discard the rinse
water and the paper filter.
8. Wash and dry all removable parts. Wipe the exterior of the Coffee Maker with a damp
cloth.
NOTE: Any servicing requiring disassembly other than the above cleaning must be performed
by a qualified appliance repair technician.
17
Page 18

Coffee Maker Owner’s Manual
13. Troubleshooting Guide
If the Coffee Maker lid is not closed securely brewing will not begin. If the lid is opened during
the brew cycle, brewing will stop. To restart the brewing process, make sure the Coffee Mill lid
is positioned correctly then close the Coffee Maker lid pressing down until the latch clicks into
place.
14. Contacting Consumer Service
IMPORTANT NOTICE
If any parts are missing or defective, DO NOT return this product. Please call our Consumer
Service Department for assistance.
1-800-233-9054 Monday - Friday 8:00 am - 5:30 pm CST
Thank You
15. WARRANTY
LIMITED ONE-YEAR WARRANTY
Warranty Coverage: This product is warranted to be free from defects in materials or workmanship for a period of one (1) year from the original purchase date. This product warranty is
extended only to the original consumer purchaser of the product and is not transferable. For a
period of one (1) year from the date of original purchase of the product, our Repair Center will,
at its option, either (1) repair the product or (2) replace the product with a reconditioned comparable model. These remedies are the purchaser’s exclusive remedies under this warranty.
18
Page 19

Warranty Service: To obtain warranty service, you must call our warranty service number at
1-800-233-9054 for return instructions on how to deliver the product, in either the original
packaging or packaging affording an equal degree of protection to the Repair Center specified
below. You must enclose a copy of your sales receipt or other proof of purchase to demonstrate eligibility for warranty coverage.
To return the appliance, ship to:
ATTN: Repair Center
708 South Missouri Street
Macon, MO 63552 USA
To contact us, please write to, call, or email:
Consumer Relations Department
PO Box 7366
Columbia MO 65205-7366 USA
1-800-233-9054
E-mail:
What Is Not Covered: This warranty does not cover damage resulting from misuse, accident,
commercial use, improper service or any other damage caused by anything other than defects
in material or workmanship during ordinary consumer use. This warranty is invalid if the serial
number has been altered or removed from the product. This warranty is valid only in the
United States and Canada.
LIMITATION ON DAMAGES: THERE SHALL BE NO LIABILITY FOR ANY INCIDENTAL OR
CONSEQUENTIAL DAMAGES FOR BREACH OF ANY EXPRESS OR IMPLIED WARRANTY OR
CONDITION ON THIS PRODUCT.
DURATION OF IMPLIED WARRANTIES: EXCEPT TO THE EXTENT PROHIBITED BY APPLICABLE
LAW, ALL IMPLIED WARRANTIES AND CONDITIONS, INCLUDING, WITHOUT LIMITATION, IMPLIED
WARRANTIES AND CONDITIONS OF MERCHANTABILITY AND FITNESS FOR A PARTICULAR
PURPOSE OR USE ON THIS PRODUCT ARE LIMITED IN DURATION TO THE DURATION OF THIS
WARRANTY.
Some jurisdictions do not allow the exclusion or limitation of incidental or consequential
damages, or allow limitations on how long an implied warranty lasts, so the above limitations
or exclusions may not apply to you. This warranty gives you specific legal rights and you may
have other rights under the laws of your jurisdiction.
For more information on our products, visit our website: www.maxim-toastmaster.com.
© 2004 Maxim-Toastmaster, Inc.
P/N 61644
All Rights Reserved
Printed in China
19
Page 20

 Loading...