

Page 1
WBYBM2-OM-USA-ENG-001
Page 2

Page 3

Important Safeguards ........................................................1
Additional Important Safeguards ......................................3
Short Cord Instructions ...................................................4
Electric Power ..............................................................4
Polarized Plug ..............................................................4
About Your Beyond Breadmaker ...........................................5
A Breadmaker that Connects to the Internet? ......................6
Special Features ...........................................................6
Before First Use ............................................................7
Getting Acquainted With Your Beyond Breadmaker .................9
Breadmaker Features and Controls ...................................9
Control Panel .............................................................10
Home Hub Networks ..................................................13
Manually Setting the Clock and Date ..............................15
Using Your Beyond Breadmaker Smart Features .....................16
Using the Scanning Wand ...........................................16
Using the Learn Function ...............................................19
Configure User Programs ..............................................23
Making Dough and Making Bread ......................................24
Tips and Hints for Good Results .....................................24
Guidelines for Packaged Mixes: ....................................25
Understanding the Baking Cycles ...................................26
Page 4

Crust Controls ............................................................27
Inserting and Removing the Baking Pan ...........................27
Basic Baking ..............................................................28
Using the Beyond Breadmaker’s Special Features .............29
Bake Only .................................................................30
Using the Pause Feature ...............................................31
Try This: Mediterranean-Style Bread Recipe ......................32
Customizing Pre-Programmed Baking Cycles ....................33
Programming Your Personal Recipes ...............................35
Power Loss Memory ....................................................36
Know Your Ingredients ......................................................37
Flours and Grains .......................................................37
Working with Yeast ....................................................39
Measuring Your Ingredients ..........................................42
Recipe Tips ................................................................43
Special Glazes for Yeast Breads ....................................43
Slicing and Storing Bread .............................................45
Recipes ..........................................................................46
Day Old Bread Recipes ...............................................97
Batter Bread Recipes .................................................100
Jam Cycle Instructions ................................................108
Jam Recipes .............................................................110
Dough Recipes .........................................................111
Pizza Dough Recipes .................................................139
Personal Recipes .......................................................143
Page 5

Care and Maintenance ...................................................154
Cleaning Precautions .................................................154
Cleaning the Breadmaker ...........................................155
TroubleShooting .............................................................157
One Year Limited Warranty .............................................163
Contact Information ........................................................165
Appendix .....................................................................167
Beyond Breadmaker Baking Cycles ..............................167
Page 6

Page 7
Important Safeguards
Important Safeguards
Caution: Use of controls or adjustments or performance of procedures other
than those specified may result in hazardous radiation exposure.
Caution: To reduce the risk of electiric shock, do not remove cover or back.
Caution: To reduce the risk of electric shock, do not expose this appliance to
rain or moisture.
When using electrical appliances, basic safety precautions
should always be followed including the following:
1. Read all instructions.
2. Do not touch hot surfaces. Use handles or knobs.
1
Page 8

Breadmaker Owner’s Manual
3. To protect against electric shock do not immerse cord,
plugs, or appliance in water or other liquid.
4. Close supervision is necessary when any appliance is used
by or near children.
5. Unplug from outlet when not in use and before cleaning.
Allow to cool before
putting on or taking off parts.
6. Do not operate any appliance with a damaged cord or
plug, or after the appliance malfunctions or has been damaged in any manner. Contact Consumer Service for examination, repair or electrical or mechanical adjustment.
7. The use of accessory attachments not recommended by the
appliance manufacturer may cause fire, electric shock or
injury.
8. Do not use outdoors.
9. Do not let cord hang over edge of table or counter, or touch
hot surfaces, including the stove.
10. Do not place on or near a hot gas or electric burner, or in
a heated oven.
11. Extreme caution must be used when moving an appliance
containing hot oil or other hot liquids.
12. To disconnect, press and hold the STOP/RESET button for
two seconds, remove plug from wall outlet.
13. Do not use appliance for other than intended use.
14. Avoid contacting moving parts.
2
Page 9

Important Safeguards
Additional Important Safeguards
Caution: This appliance generates heat and escaping steam during use.
Proper precautions must be taken to prevent the risk of burns, fires,
or other injury to persons or damage to property.
Caution: During use, the internal parts of the Breadmaker and the area
around the Steam Vent are HOT. Keep out of reach of children to
avoid possible injury.
1. A person who has not read and understood all operating
and safety instructions is not qualified to operate this appliance. All users of this appliance must read and understand
this Owner’s Manual before operating or cleaning this
appliance.
2. If this appliance falls or accidentally becomes immersed in
water, unplug it from the wall outlet immediately. Do not
reach into the water!
3. When using this appliance, provide adequate air space
above and on all sides for air circulation. Do not operate
this appliance while it is touching or near curtains, wall
coverings, clothing, dishtowels or other flammable materials.
4. To reduce the risk of fire, do not leave this appliance unat-
tended during use.
5. If this appliance begins to malfunction during use, immedi-
ately unplug the cord. Do not use or attempt to repair a
malfunctioning appliance!
3
Page 10

Breadmaker Owner’s Manual
6. The cord to this appliance should only be plugged into a
120V AC electrical
wall outlet.
7. Do not use this appliance in an unstable position.
Short Cord Instructions
A short power-supply cord is provided to reduce the risk resulting from becoming entangled in or tripping over a longer
cord.
Do not use an extension cord with this product.
Electric Power
If electric circuit is overloaded with other appliances, your
Breadmaker may not operate properly. The Breadmaker
should be operated on a separate electrical circuit from
other operating appliances.
Polarized Plug
This appliance has a polarized plug (one blade is wider than
the other). To reduce the risk of electric shock, this plug is
intended to fit into a polarized outlet only one way. If the plug
does not fit fully in the outlet, reverse the plug. If it still does not
fit, contact a qualified electrician.
Do not attempt to modify the plug in any way.
4
Page 11
About Your Beyond Breadmaker
About Your Beyond Breadmaker
Your Beyond Breadmaker
makes fantastic bread! It’s simple and intuitive to use. You’ll
be baking delicious fresh
bread in no time and you’ll be
inspired to try new bread
recipes.
With your Beyond Breadmaker you can start from scratch and
make your own favorite bread or you can add personal
touches to and existing recipe.
Your Beyond Breadmaker is smart, too! It’s on-board memory
contains baking programs for hundreds of packaged mixes for
breads, cakes and muffins. Simply swipe the package’s barcode with the Breadmaker’s scanning wand and the
Breadmaker programs itself to prepare the mix perfectly.
Your Beyond Breadmaker can also make non-yeast batter
breads, muffins, cakes, bagel dough, pizza dough and jams.
Dozens of recipes custom-designed for your new Breadmaker
are included in this manual and you can save five personal
baking programs in the Breadmaker’s memory so you can use
it to bake your favorite homemade breads.
Your Beyond Breadmaker makes 1 LB., 1.5 LB. and 2.0 LB.
loaves of bread. You can add extra ingredients such as nuts or
fruit. You can make dough for rolls, loaves or hand shaped
bread you’ll bake in your oven. Or you can make bread from
scratch with your own recipe or using one of the recipes
included in this manual.
5
Page 12

Breadmaker Owner’s Manual
A Breadmaker that Connects to the
Internet?
Your Beyond Breadmaker is designed to communicate with a
network of home appliances using either a Home Hub or iCEBOX as a networking center. If your Breadmaker is on a
network, you can log onto the Beyond Information Network
from your personal computer to select baking programs to be
downloaded to your Breadmaker. An easy-to-use
point-and-click interface allows you to enter baking programs
of your favorite cake or bread recipes. The more information
that’s downloaded to the Breadmaker, the smarter and more
personalized the Breadmaker becomes over time.
Special Features
• The Dough cycle does the mixing and kneading for breads
that you will shape by hand and bake in your oven
(braided bread or foccacia, for example).
• The Rapid setting allows you to complete the bread making
process in 2 - 3 hours.
• The Delay Timer lets you wake up to fresh, hot baked bread
in the morning.
• The Pause feature allows you to remove the dough for shap-
ing, filling and braiding or to score the top of your loaf for
rustic style bread or to make a decorative crust with rolled
oats, poppy seeds and more.
• The Keep Warm function prevents the bread from getting
soggy by keeping finished bread warm up to an hour after
the baking is completed.
6
Page 13

About Your Beyond Breadmaker
• The Power Loss Memory, allows the Breadmaker to resume
the cycle where it left off if there’s an interruption in electrical power during baking.
• Use the Custom Recipe Program to change the settings on
any of the pre-programmed baking cycles. The Personal
Recipe Program allows you to program the Breadmaker to
prepare your favorite bread recipes. You can store
5 personal recipes in the Breadmaker’s recipe database.
• The Bake Only cycle allows you to bake frozen dough or
dough that needs refrigeration as well as breads that need
additional baking, up to 2 hours.
Before First Use
1. Unpack the Breadmaker. Save the packing material and
carton in case of future need.
2. Place the Breadmaker on a firm, level surface. Do not place
it where it will come into contact with heat or moisture.
Make sure the vents are not blocked.
3. Plug the power cord into a polarized outlet (one blade is
wider than the other). Do not allow the cord to dangle over
the edge of the counter.
4. Wash the bread pan and the kneading paddle in warm
soapy water. Dry.
5. Once your Breadmaker is on the Home Hub network, the
time and date will be set and maintained automatically.
6. If your Breadmaker is not on a Home Hub network, set the
clock and date (For instructions on setting the clock, please
See Manually Setting the Clock and Date on page 16.)
7
Page 14

Breadmaker Owner’s Manual
Note: During first use the Breadmaker may smoke or emit an
odor. This is caused by oils used in the manufacturing process.
To burn off the oils, operate the Breadmaker empty using the
White Rapid Program.
8
Page 15
Getting Acquainted With Your Beyond Breadmaker
Getting Acquainted With Your
Beyond Breadmaker
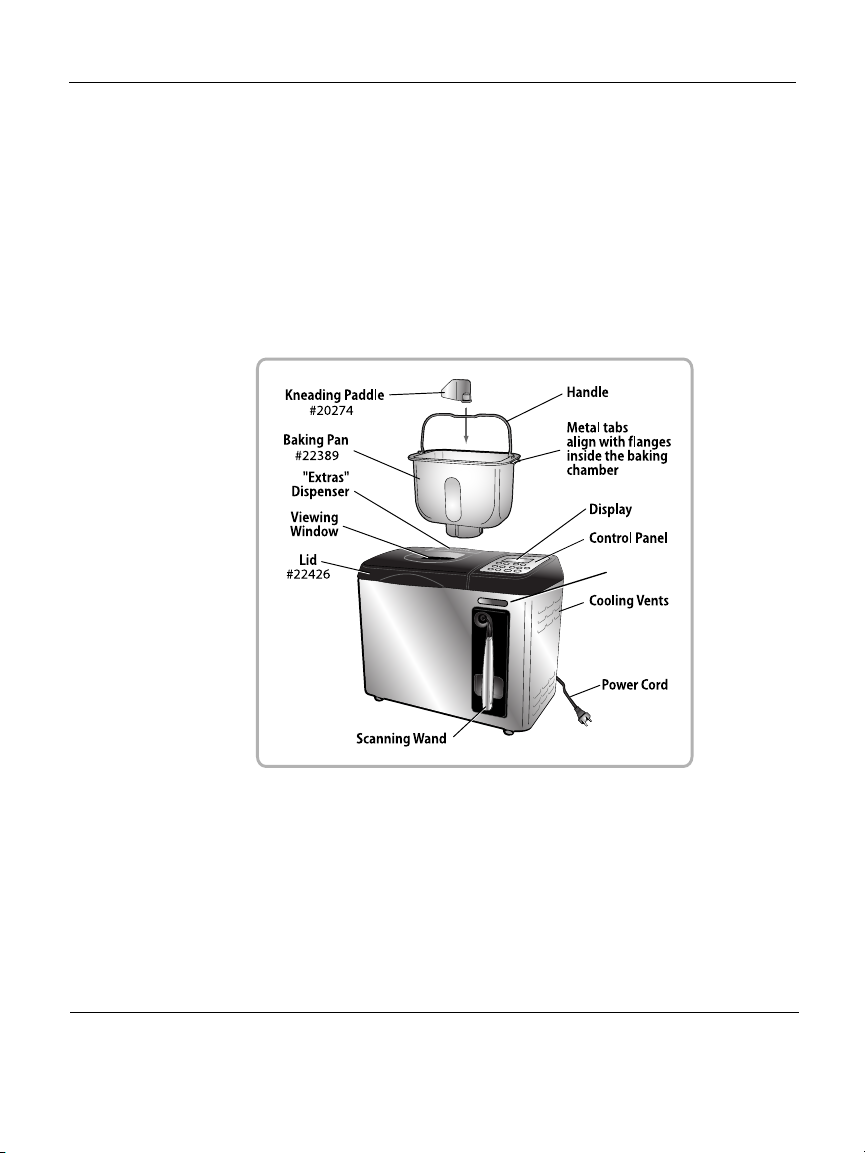
Breadmaker Features and Controls
SANI Card Slot
FIGURE 1. Beyond Breadmaker Components
9
Page 16
Breadmaker Owner’s Manual
Control Panel
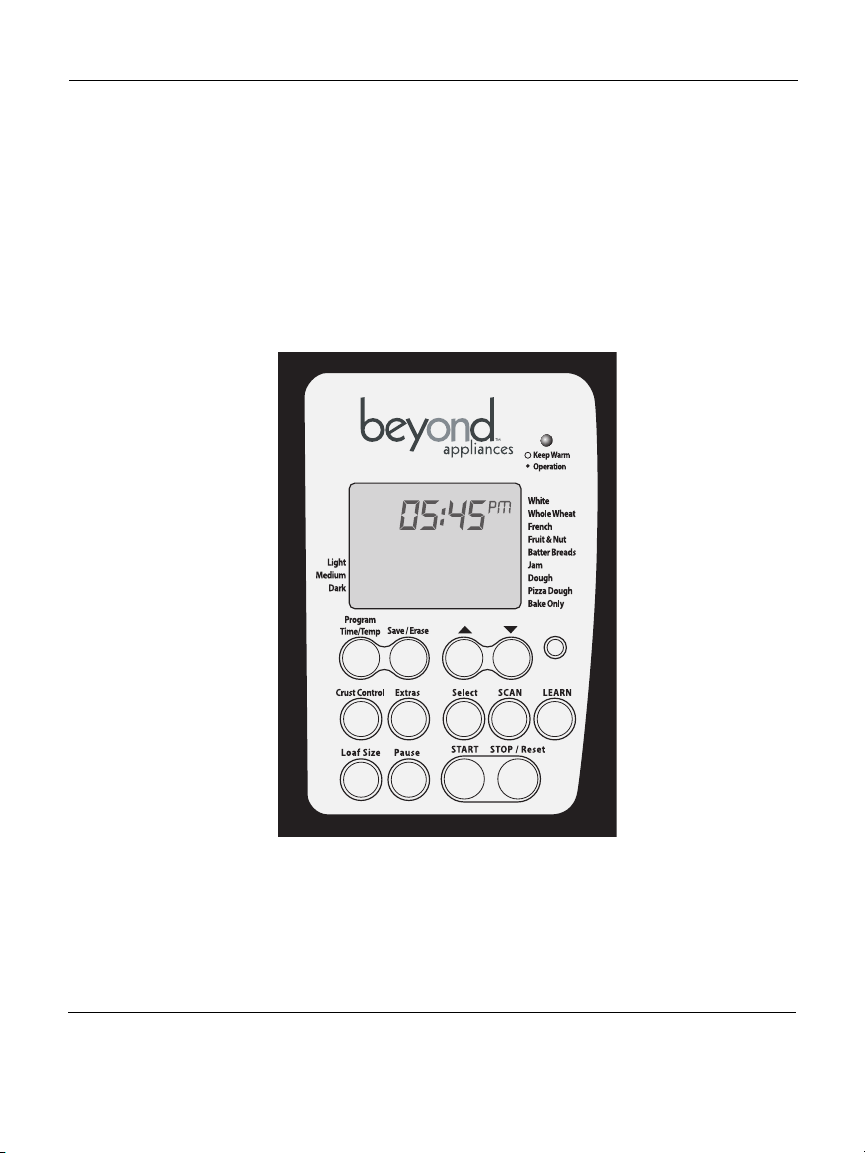
Use the control panel to program all the Breadmaker’s functions. The control panel is illustrated in Figure 2. Push button
functions are explained in Table 1.
NETWORK
FIGURE 2. Breadmaker Control Panel
10
Page 17

Getting Acquainted With Your Beyond Breadmaker
TABLE 1. Control Panel Function
Keep Warm
Operation
Display Window The display window displays the time of day, date, your
Program
Time / Temp
Save/Erase Press to save or erase changes made when using the
▲ or ▼
NETWORK
A flashing light indicates Keep Warm. Steady light indicates
a Breadmaker cycle is in progress. The Keep Warm feature
prevents bread from becoming soggy if it’s not removed
from the Breadmaker immediately when baking is complete.
The Keep Warm feature works only on the White, Whole
Wheat, French and Fruit & Nut cycles.
selections, cycle timer settings and cycle status.
Basic baking cycles are listed on the right side of the display
window. Cycle options are: White, Whole Wheat, French,
Fruit & Nut, Batter Breads, Jam, Dough, Pizza Dough, Bake
Only.
Crust options (Light, Medium, Dark) are listed on the left
side of the display window.
The Program function allows you to customize the standard
baking cycles by modifying a baking cycle’s pre-set times
for kneading, rising and so on. Please See Programming
Your Personal Recipes on page 37.
Program function.
Press to increase/decrease the amount of time. Time
increases/decreases in 10-minute increments.
Press to enter Binding mode when connecting your Bread
Maker to a Home Hub network. Please see Home
BreadmakerHub Networks on page 13.
Crust Control Press to customize the crust color and texture. The options
are Light, Medium, Dark. The default setting is Medium.
Crust options are listed on the left side of the display.
Extras Use the Extras function when programming recipes that call
for fruit, nuts, chopped garlic or similar ingredients to be
added to the bread dough during baking.
11
Page 18
Breadmaker Owner’s Manual
Select Press to select the desired Breadmaker cycle. Cycle options
SCAN Press to use the scanning wand. Your Breadmaker has
LEARN Press to use the Learn function. The Learn function is used in
Loaf Size Press to select loaf size. The options are 1 LB, 1.5 LB, 2 LB.
Pause Press to temporarily interrupt the current cycle. Please see
START Press START to begin a baking program and to start the
STOP / Reset Press for a full second to reset the baking cycle’s Delay Bake
are listed on the right side of the display window.
hundreds of baking cycles stored in its memory. If you are
baking a packaged bread, cake or muffin mix, just scan the
package barcode to have your Breadmaker program itself
for perfect results. For instructions on using the scanning
wand, please see Using the Scanning Wand on page 17
conjunction with the scan function. If you scan the bar code
on a package bread, cake or muffin mix and the message
NOT IN MEMORY appears in the display, you can “teach”
your Breadmaker to prepare the mix using the Learn
function. Please see Using the Learn Function on page 21
Using the Pause Feature on page 33
timer.
setting or to cancel the program in progress.
12
Page 19

Getting Acquainted With Your Beyond Breadmaker
Home BreadmakerHub Networks
Adding Your Beyond Breadmaker Oven to
Your Home Hub Network or iCEBOX
Appliance Network
If you do not have a Home Hub or an iCEBOX, skip this
procedure.
Note: Your Breadmaker must be equipped with a SANI card to
use the networking features. The SANI card is an optional item
you can purchase from your iCEBOX or Home Hub retailer.
For Instruction on installing the SANI Card, see the SANI Card
User Guide that comes in the SANI Card Package.
To add your Breadmaker to your Home Hub
Network
1. On your Home Hub, press MENU to open the Main Menu.
2. When the Main Menu opens, press DOWN or UP until
APPLIANCE is highlighted. Press SELECT.
3. The Appliance Menu will open.
4. Select DETECT APPL from the APPLIANCE menu.
5. On the Breadmaker control panel, press the NETWORK
button. The Breadmaker will enter Binding mode. The word
BIND will display and the word “Network” will blink on the
Breadmaker display.
If the Breadmaker double-beeps and the word Bind disappears, there is a SANI Card problem.
13
Page 20

Breadmaker Owner’s Manual
If the word Network was already on the display, the Breadmaker is already networked. Press and hold the NETWORK
button for five seconds to unbind the Breadmaker, then
press the NETWORK button once to enter bind mode
again.
6. When the Home Hub detects the Breadmaker, it will prompt
you to bind. You must press the Select button to bind the
Breadmaker.
When you have accepted the Breadmaker, the Breadmaker
will beep, the word “Network” will remain lit and the Breadmaker clock will synchronize to the Home Hub. From then on,
the Breadmaker status will be viewable on your Home Hub
and the Breadmaker network features will be available. If you
turn off the Breadmaker or the Home Hub, you do not have to
rebind. The network connection will reestablish when the the
appliances are turned back on.
To Add your Breadmaker to your iCEBOX
Appliance Network
1. On your iCEBOX, open the My Kitchen Options Menu.
2. On the My Kitchen Options Menu, select New Appliance.
3. On the Breadmaker control panel, press the NETWORK
button. The Breadmaker will enter Binding mode. The word
BIND will display and the word “Network” will blink on the
Breadmaker display.
If the Breadmaker double-beeps and the word Bind disappears, there is a SANI Card problem.
If the word Network was already on the display, the Breadmaker is already networked. Press and hold the NETWORK
14
Page 21

Getting Acquainted With Your Beyond Breadmaker
button for five seconds to unbind the Breadmaker, then
press the NETWORKNETWORK button once to enter bind
mode again.
4. When the iCEBOX detects the Breadmaker, it will prompt
you to bind. You must choose OK to bind the Breadmaker.
When you have accepted the Breadmaker, the Breadmaker
will beep, the word “Network” will remain lit and the Breadmaker clock will synchronize to the iCEBOX. From then on, the
Breadmaker status will be viewable on your iCEBOX and the
Breadmaker network features will be available.
Updating Settings From Your Beyond
Information Network Account
1. Navigate to the Home Hub’s Internet menu. Select UPDATE.
“Internet Downloading” will appear in the display.
2. When Internet downloading is complete, press OK to return
to the main display.
3. The Home Hub will display “Breadmaker User Recipes
Updated”. Press OK.
4. The Home Hub will display “Breadmaker Database Down-
load Started”. Press OK
5. Several minutes later, the Home Hub will display “Bread-
maker Database Download Finished”. Press OK
15
Page 22

Breadmaker Owner’s Manual
Manually Setting the Clock and Date
If you do not have a Home Hub follow these steps to set the
Breadmaker’s time and date manually:
1. Unplug the Breadmaker and plug it back in. The unit will
emit a long beep and “LOAD” will be displayed, flash for a
few seconds, automatically change to “CONN”, flash for a
few seconds, before displaying clock digits reading 00:00.
The clock digits will read 00:00. In a few seconds the clock
digits will flash 12:00. Press
decrease the hour until the desired hour is displayed. Press
SELECT.
2. The minute digits will flash. Press
decrease the minutes until the desired minute is displayed.
Press SELECT.
3. The month digits will flash. Press
desired month is displayed. Press SELECT.
4. The day digits will flash. Press
day is displayed. Press SELECT.
5. The year digits will flash. Press
year is displayed. Press STOP/Reset to save your settings.
▲ or ▼
▲ or ▼
▲ or ▼
▲ or ▼
▲ or ▼
to increase or
to increase or
until the
until the desired
until the desired
16
Page 23

Using Your Beyond Breadmaker Smart Features
Using Your Beyond Breadmaker
Smart Features
Note: To use some of the Beyond Breadmaker’s smart features
you must have a Home Hub or an iCEBOX and set your Breadmaker up on the Beyond Information Service.
Preparing your favorite packaged mixes for yeast breads, batter breads and cakes is easy, fast and convenient thanks to
your Beyond Breadmaker’s smart features. Your Breadmaker is
programmed to recognize the barcodes of hundreds packaged bakery mixes. With a swipe of the scanning wand your
Breadmaker will automatically program itself to perfectly prepare your packaged mix.
If your Breadmaker is on a Home Hub network, you can log
onto your Beyond Information Service from your personal computer to select baking programs to be downloaded to your
Breadmaker and you can program your favorite homemade
bread recipes.
Using the Scanning Wand
Your Beyond Breadmaker is equipped with a UPC scanning
wand that is similar to scanning equipment used in many retail
settings. The scanning wand on your Beyond Breadmaker is
like having a “magic” wand that tells your Breadmaker to
automatically program itself for the perfect baking cycle for
your packaged bakery mix.
17
Page 24
Breadmaker Owner’s Manual
To use the scanning wand:
1. Locate the barcode on the packaged mix you wish to pre-
pare. On the Breadmaker’s control panel, press SCAN. A
red light will come on in the end of the scanning wand.
Whenever you press SCAN, the Scan icon on the display
will come on. You can press Stop/Cancel to stop the
scanning.
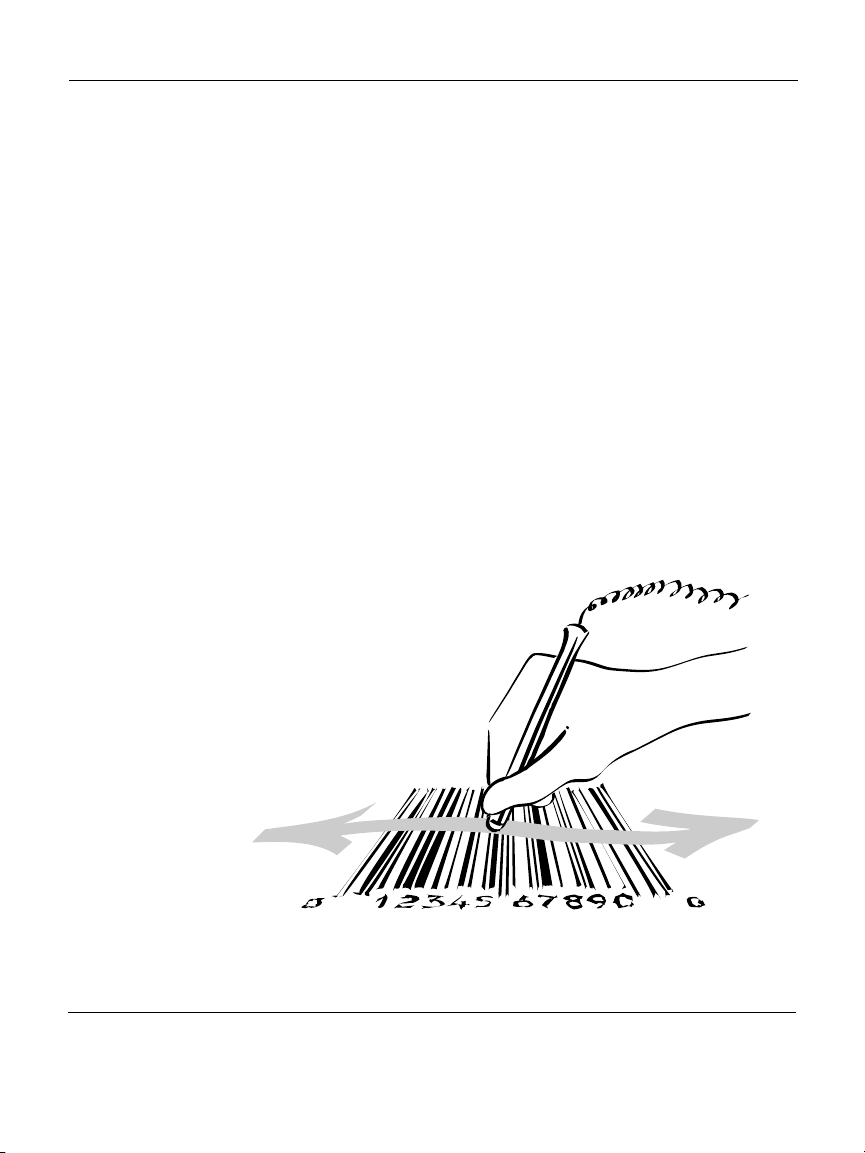
2. Hold the scanning wand as you would hold a pencil. Touch
the lighted end of the wand against the package to the left
of the barcode.
3. Using a steady sweeping motion, move the wand across
the bar code from left to right and from right to left at a
medium to fast speed. Be sure to scan the entire barcode
and to keep the wand tip touching the package. A beep
tells you that the barcode was scanned successfully.
FIGURE 3. Scan the entire from barcode beginning outside
the left edge
18
Page 25

Using Your Beyond Breadmaker Smart Features
4. Scan the entire barcode from left to right beginning outside the left edge then back across it right to left.
If you are having any trouble, review the following list:
• Try moving the wand back and forth across the barcode
several times.
• Try scanning from corner to corner. It is easier to move the
scanning wand smoothly with a quick motion rather than a
slow motion.
• Angle the wand so that the surface of the lens is flat against
the barcode.
• Scan the entire barcode from left to right or right to left.
Scan in a straight line, perpendicular to the bars.
• Clean the barcode scanner lens.
• Make sure the barcode is not damaged or dirty.
If the Breadmaker finds the barcode in its
database:
If the Breadmaker finds the barcode in its database, it will
automatically program itself for the correct baking cycle.
To complete baking:
1. Place the mix in the bread pan (the kneading paddle must
already be in the bread pan). Follow package directions
for adding other ingredients.
2. Place the bread pan in the Breadmaker. Make sure the pan
is seated properly in the baking chamber (it will snap into
place). Close the lid and press START.
3. At the end of the cooking time, the Breadmaker will beep to
let you know baking is completed.
19
Page 26

Breadmaker Owner’s Manual
4. Using oven mitts, remove the bread pan from the baking
chamber. Follow package directions for cooling and removing the baked goods from the bread pan.
If the Breadmaker does NOT find the barcode
in its database:
If the Breadmaker does not find the barcode in its database,
the Breadmaker will beep and the message NOT IN MEMORY
will appear on the display.
To modify the times/temperatures in a standard baking cycle,
please see Customizing Pre-Programmed Baking Cycles on
page 35.
Why Does NOT IN MEMORY Appear in the
Display?
Your Beyond Breadmaker comes pre-programmed with hundreds of recipes for preparing national brand bakery mixes.
However, your Breadmaker may not recognize the barcodes
for regional, private label, in-store, or distributor brands.
Your Breadmaker saves a list of all unrecognized barcodes. If
your Breadmaker is on a Home Hub network, the Home Hub
will update the Breadmaker’s database at least once each day
(depending on what type of Internet connection you have).
Your Breadmaker will now be able to recognize the barcode
and program itself with the proper cooking instructions.
20
Page 27

Using Your Beyond Breadmaker Smart Features
Using the Learn Function
When you scan a barcode that’s not already in the Breadmaker’s database, the message NOT IN MEMORY appears
on the display. If this happens, you can use the Breadmaker’s
Learn function to manually enter and save the baking program
to the Breadmaker’s database. The next time you swipe the
barcode, the Breadmaker will program itself to prepare the
mix according to the instructions you entered.
Adding a New Baking Program to the
Breadmaker’s Memory:
1. Press LEARN. The Scan icon will appear in the display and
the red light at the end of the scanning wand will illuminate. Scan the barcode on the package. (Please refer to
Figure 3 for scanning procedure.)
If you want to cancel the scan press Stop/Cancel.
2. “NOT IN MEMORY” flashes in the display.
3. Select baking cycle, loaf size and crust color for the
scanned barcode. These parameters will blink.
4. When you’re finished entering the baking program, press
LEARN again to store the program in the Breadmaker’s
memory.
The next time you scan another package of the same mix, the
Breadmaker will recognize the barcode and automatically program itself to cook the food according to the instructions that
you entered.
21
Page 28

Breadmaker Owner’s Manual
Removing a learned recipe from the
microwave memory:
1. Press Learn. The red light at the end of the scanning wand
will illuminate. The Scan icon will appear on the display.
(You can press Stop/Cancel to cancel the scan.)
2. Scan the barcode on the package.
3. Press the Learn button again to erase the program.
The next time you scan another package of the same food, the
oven will display the NOT IN MEMORY message.
Using the Learn Function to Customize
Cooking Programs
You may also use the Learn function to tailor the Breadmaker’s
pre-programmed baking cycles to your individual preferences.
Instructions that you manually enter using the Learn function
take priority over pre-programmed cooking instructions.
22
Page 29
Using Your Beyond Breadmaker Smart Features
Programming Your Breadmaker from Your
Personal Computer
Note: To use this feature you must have a Home Hub and a
Beyond Information Service.
By accessing your Beyond Information Service from any web
browser you can easily enter instructions for up to 5 custom
baking programs. You can also choose to download baking
programs for hundreds of packaged mixes.
Here’s how:
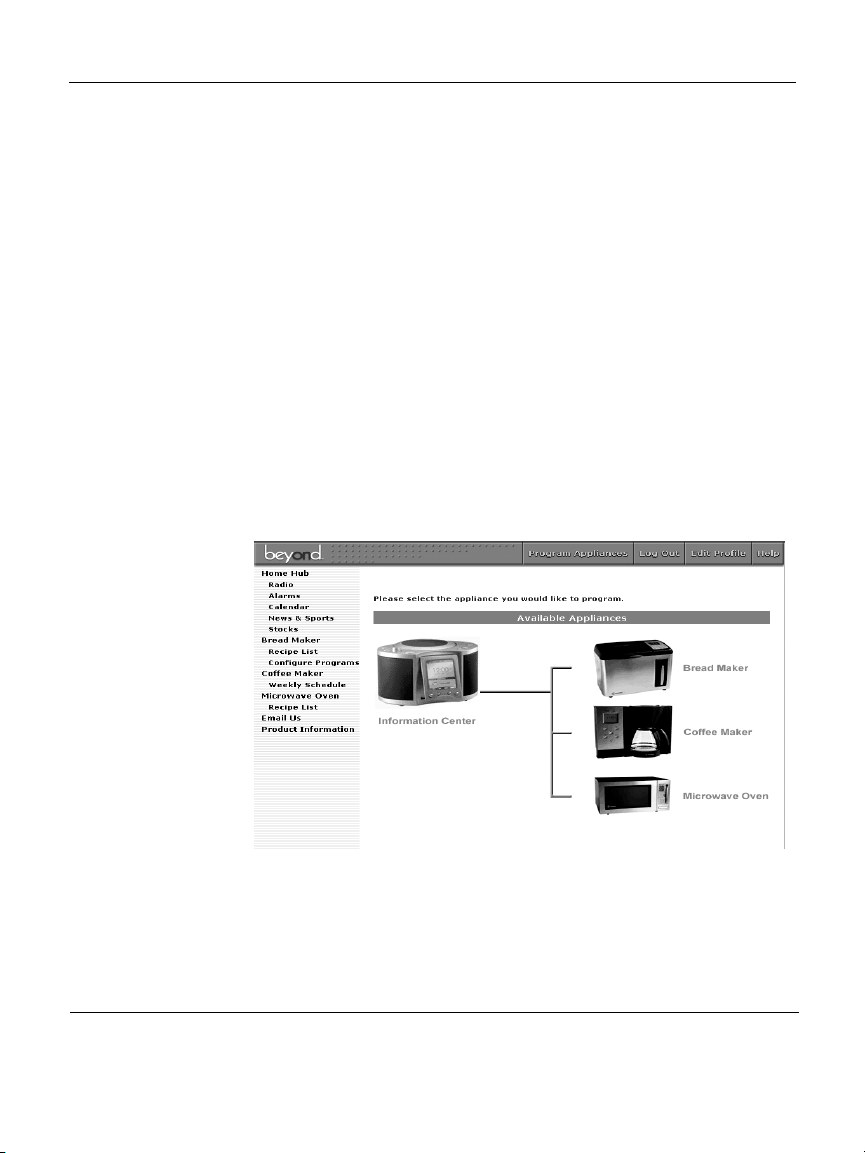
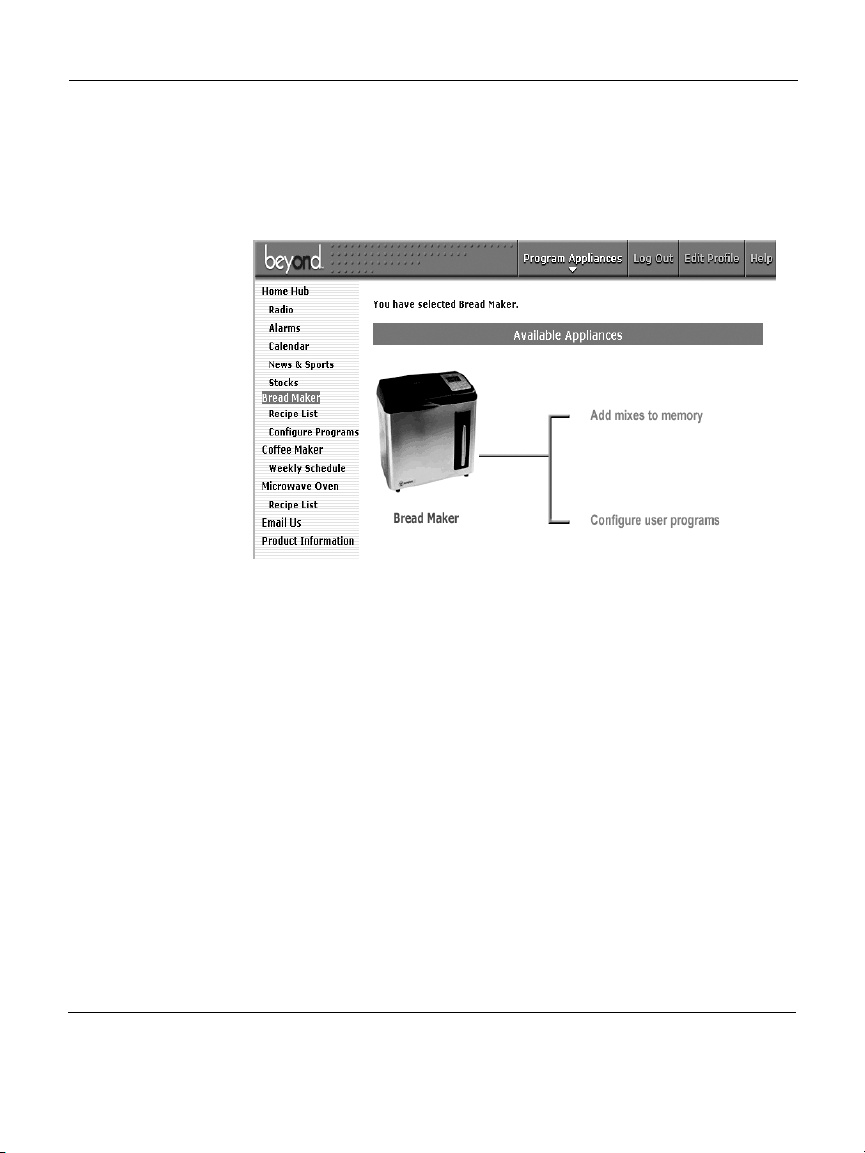
1. Log onto your Beyond Information Service. Click on the pic-
ture of the Breadmaker.
23
Page 30
Breadmaker Owner’s Manual
2. The Breadmaker screen will open. Click on either “Add
mixes to memory” or “Configure user programs”.
24
Page 31
Using Your Beyond Breadmaker Smart Features
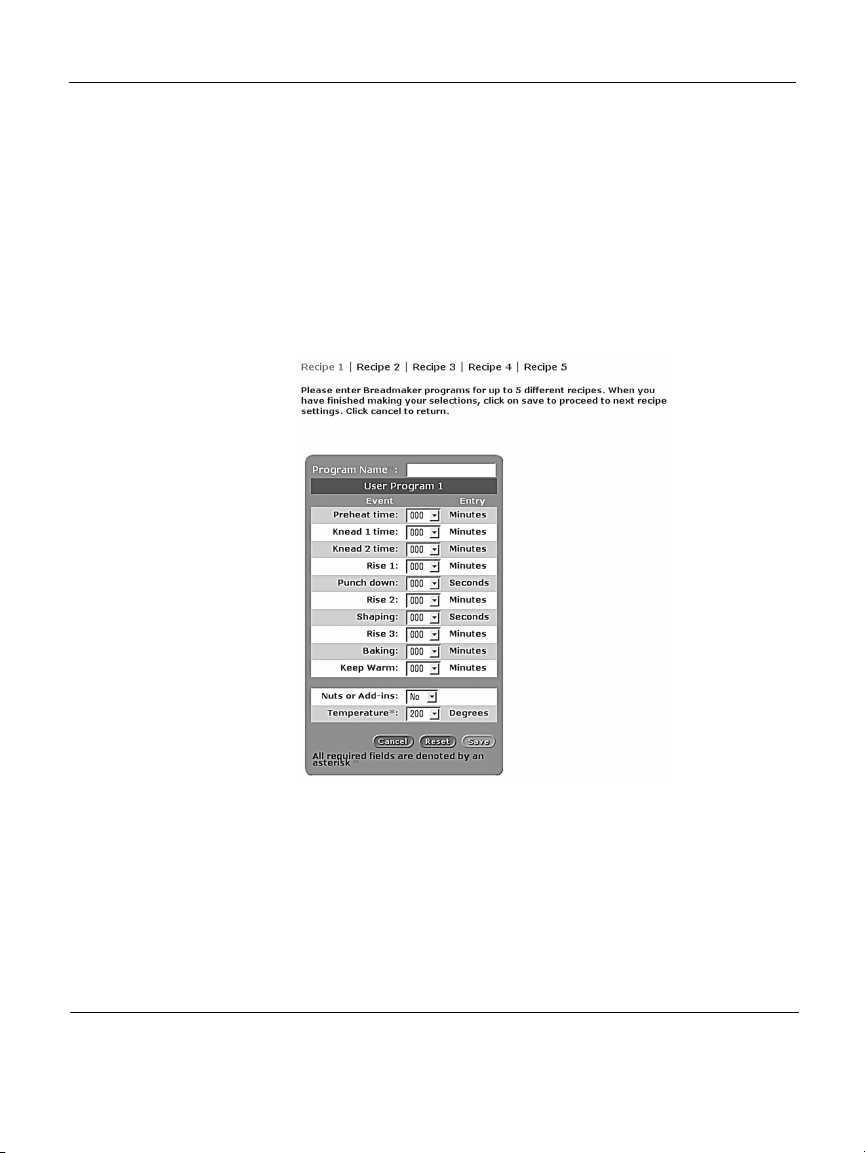
Configure User Programs
Use this feature to program up to five custom recipes.
Give your baking program a name and then use the pull-down
menus to select the desired times and temperature for your
baking program. When you’re finished entering your program, click SAVE.
Add Mixes to Memory
The Add Mixes to Memory feature allows you to choose from
hundreds of available baking programs to download to your
Breadmaker. Select Breadmaker programs by clicking a check
into the desired box. When you’re finished making your selections, click SAVE.
25
Page 32

Breadmaker Owner’s Manual
Making Dough and Making
Bread
Tips and Hints for Good Results
The most important step when using your Breadmaker is measuring your ingredients. It is very important to measure each
liquid and dry ingredient accurately. For best results, add
ingredients in the order given in each recipe.
• All ingredients should be as fresh as possible. Packaged
foods should not be past the expiration date.
• Take care to measure ingredients accurately, using a good
set of measuring cups and spoons, or a good scale. Make
sure to level all dry ingredients as you measure them. Inaccurate measuring could cause unexpected results in your
loaf of bread. In particular, be precise in measuring the
liquids.
• Add ingredients to the bread pan in the order listed in
recipe.
• Flour will deteriorate when exposed to moisture. Be sure to
store your flour in an airtight container.
• To keep your yeast active, store it in an airtight container in
your refrigerator. Do not use yeast if the date code on the
packet has expired.
• When using the Delay Bake Timer, set it for as short a time
as possible. Because ingredients are partially combined in
the bread pan, the dough may tend to deteriorate if left too
many hours, especially on a warm or humid day.
• Do not use the Delay Bake Timer if the recipe includes per-
ishable ingredients such as eggs or milk.
26
Page 33

Making Dough and Making Bread
• Ingredients, such as fruit or nuts can be added to the Fruit/
Nut Dispenser after placing ingredients in the bread pan.
• Keep the lid closed during the baking cycle. Opening it too
frequently causes uneven baking.
• If the baking cycle is complete but the bread needs more
baking, you may add more baking time using the Bake
cycle for up to 2 hours of additional baking.
• After your bread has cooled completely, store it in a plastic
bag or plastic wrap to prevent it from drying out.
Guidelines for Packaged Mixes:
• For packaged bread mixes follow package directions to
prepare a 1, 1-½, or 2-pound loaf.
• For packaged cake mixes: Use mixes 16-ounces or larger.
• For packaged muffin mixes: Use mixes 9-ounces or larger.
• For packaged quick bread (batter bread) mixes: Use mixes
13-ounce or larger
• Some brands and/or flavors do not work in the Bread-
maker, such as swirl coffee cakes.
• Follow package directions for adding correct amounts and
temperature of water, eggs, oil, and all other ingredients.
• When using the scanning wand: If a mix is not in the
Breadmaker’s database, follow package directions for the
correct cycle.
• Use the Batter Bread cycle for all cake, quick breads and
muffin mixes.
27
Page 34
Breadmaker Owner’s Manual
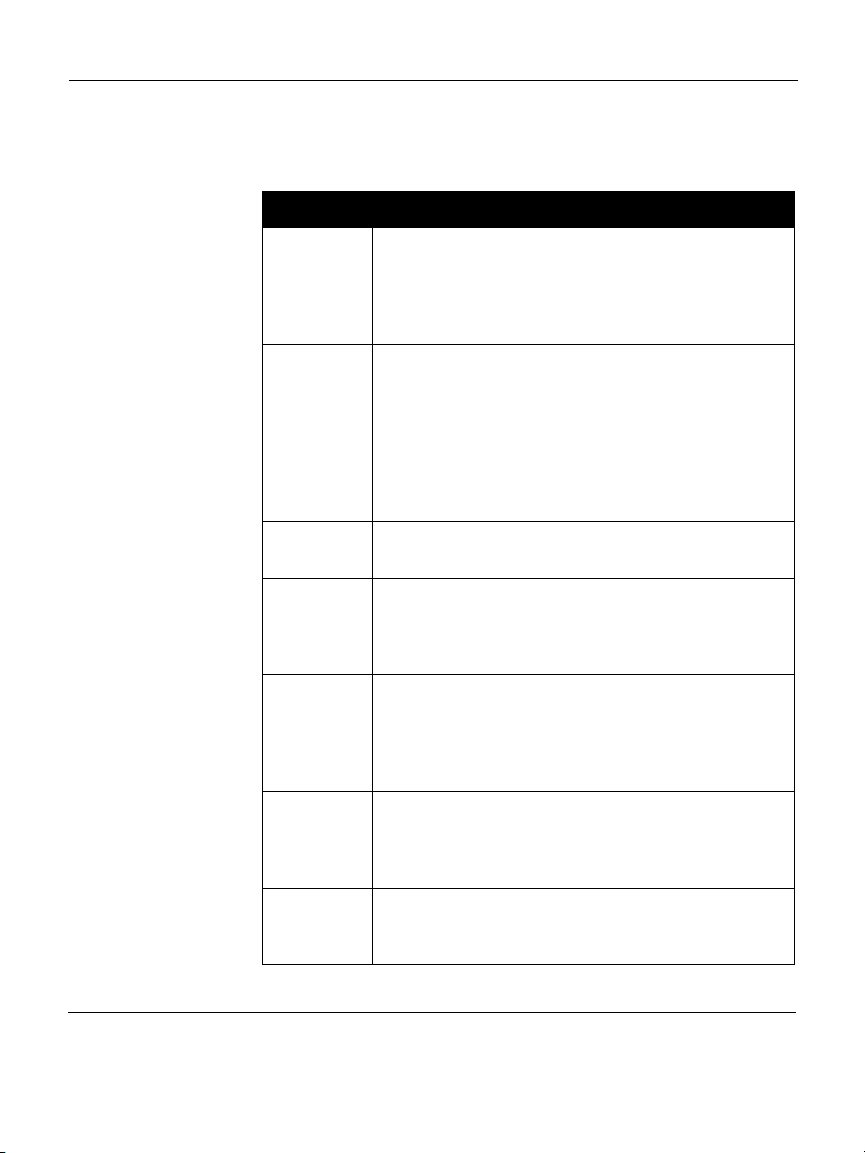
Understanding the Baking Cycles
Cycle Description
White This setting is used for breads that primarily use white flour,
although some recipes may include small amounts of whole wheat
flour. The settings has the shortest overall times until baking is
completed. Select White settings according to Loaf Size and Crust
Control.
Whole Wheat This setting is used for recipes with significant amounts of whole
wheat or rye flour, oats, or bran. It begins with a preheat or rest
period during which the flours or grains absorb the liquid
ingredients. Soaking causes the flour or grain to soften and helps
ingredients to combine well. Generally, whole wheat and
multi-grain breads are shorter and denser than White, French, or
Fruit & Nut. Select Whole Wheat and then Loaf Size and Crust
Control.
French The French cycle is for breads with crisper crusts, especially those
that are lowest in sweeteners, such as French and Italian breads.
Fruit & Nut Use this setting for recipes that use fruit juice, additional sugar or
added sweet ingredients such as coconut flakes, raisins, dried fruit
or chocolate. Baking temperature is reduced to prevent burning.
Select Fruit & Nut and then Loaf Size and Crust Control.
Batter Breads This setting is used for recipes that contain baking powder or
baking soda rather than yeast to make bread or cake rise. Cake
recipes made from scratch must be specially designed for this
setting. Use this setting to prepare pre-packaged cake and muffin
mixes.
Jam Use this setting for making jams from fresh fruits. Do not double
recipes or allow ingredients to boil over the pan into the Baking
Chamber. Should this happen, stop the Breadmaker immediately.
Allow to cool and clean thoroughly.
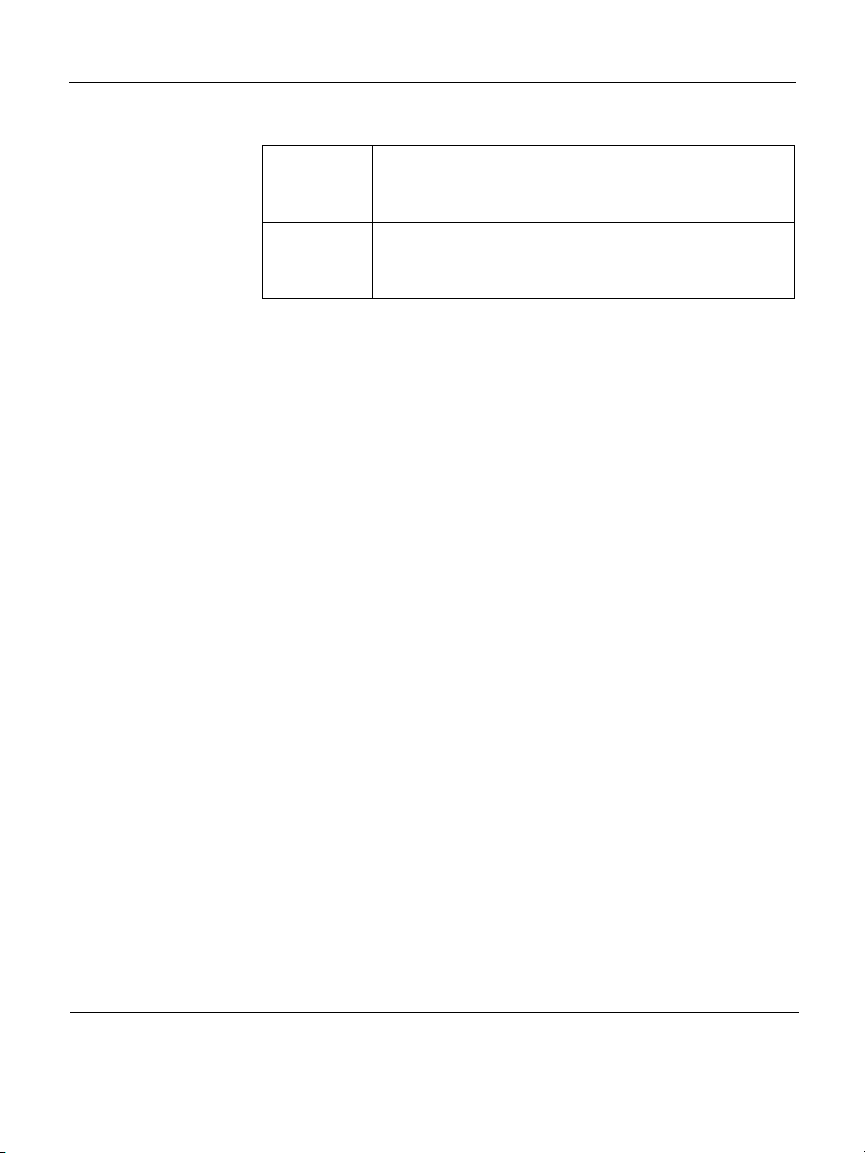
Dough This setting only makes dough and will not bake the final bread.
Remove the dough and shape it to make rolls, pretzels, and round
or braided breads. Then bake in a conventional Breadmaker.
28
Page 35
Making Dough and Making Bread
Pizza Dough This setting is a special dough setting for pizza only and will not
bake the final bread. Remove the dough and follow the recipe for
making pizza.
Bake Only This setting will bake for up to 2 hours and is especially helpful if
your bread, batter bread or cake is not quite done. Check every
few minutes.
Crust Controls
The LIGHT, MEDIUM and DARK Crust Control settings let you
choose your favorite crust color and texture for most bread
varieties, including Whole Wheat and White breads.
Inserting and Removing the Baking
Pan
Inserting the Baking Pan
1. Insert the kneading paddle onto the spindle in the center of
the baking pan. The hole in the center of the kneading paddle has one flat surface that will align with the flat side on
the spindle.
2. Gently place the baking pan into the baking chamber. The
baking pan has a pair of metal tabs on the outside of the
narrow ends. Make sure these align with the metal flanges
inside the baking chamber.
3. Press down firmly on the edges of the baking pan until it
snaps into place.
4. Gently rotate the kneading paddle by hand to make sure in
can turn freely.
29
Page 36

Breadmaker Owner’s Manual
Removing the Baking Pan
1. To remove the bread pan from the baking chamber, hold
the handle with an oven mitt and lift gently.
2. Remove the loaf by turning the bread pan upside down
and shaking gently.
3. Make certain that the kneading paddle is not stuck in the
bread. If it is, use a non-metal utensil to gently remove it,
taking care not to scratch the kneading paddle’s non-stick
surface.
Basic Baking
Baking a perfect loaf of bread with your Beyond Breadmaker
is as easy as 1, 2, 3…
1. Press SELECT to select the desired baking cycle.
2. Press CRUST CONTROL to select your crust color prefer-
ence and press LOAF SIZE to select the desired loaf size.
3. Press START to begin baking.
• When the cycle begins, a count-down baking timer
appears in the display replacing the time-of-day. The current stage of the baking cycle is displayed below the time
(for example: KNEADING, RISING or BAKING).
• When the cycle is complete a beeper will sound and the
Breadmaker will automatically go into KEEP WARM mode
(the red indicator light will be flashing) (Keep Warm does
not function for batter breads, Jam, Dough, Pizza Dough
and Bake Only cycles).
• As soon as you remove the baking pan, press STOP/
RESET.
• The time of day will be displayed when the cycle is
complete.
30
Page 37

Making Dough and Making Bread
Using the Beyond Breadmaker’s
Special Features
Delay Bake Timer
You can pre-program your Beyond Breadmaker to start baking
automatically up to 24 hours in advance. That way, fresh
bread can be waiting for you when you get home from work
or when you get up in the morning.
Note: Don’t use the Delay Bake Timer if your recipe includes
eggs, fresh milk, or other dairy products, meats, fish, etc. that
may spoil.
To set the Delay Bake Timer:
1. Add the ingredients as usual, taking care not to let the
yeast or other leavening ingredient and liquid ingredients
contact one another.
2. If your recipe contains salt, add salt with liquid ingredients,
keeping it away from the yeast.
3. Close the Breadmaker lid.
4. Select the baking cycle, loaf size and crust option you
want. The time needed for the selected baking cycle
appears in the display.
5. Press the
delay the completion of baking. (Use the
decrease time in 10-minute increments.) Once you have
pressed the UP or DOWN buttons, the time of day for the
end of the baking cycle will be displayed. To fast forward
time, press and hold the ▲ button. To fast reverse, press
and hold the
▲
button once for each 10 minutes you want to
▼
button to
▼
button.
31
Page 38

Breadmaker Owner’s Manual
Example
If it is currently 8:00 am and you want a 1.5 lb loaf of whole
wheat, medium crust bread to be ready in 5 hours, at 1:00
pm:
1. Select Whole Wheat, 1.5 lb, medium crust. The pre-pro-
grammed cycle time, 3:35 appears on the display.
2. Press the
1:00, meaning the bread will be finished in 5 hours at
1:00 pm.
Note: Actual baking times will not change.
3. Press START to begin the timer. The colon (:) in the time dis-
played begins to flash, letting you know the timer is started.
The timer will count down to 0:00, and the Breadmaker will
beep to let you know baking is complete. If you have programmed a delayed start, the display will show the current
time until the breadmaking cycle has started, then it will
show the remaining time in the breadmaking cycle.
4. If you make an error after you’ve activated the cycle and
want to start over, press and hold STOP/RESET. The timer
will clear and you can begin again.
▲
button 5 times (the time display will read
Bake Only
Bake Only allows you to select variable baking times and temperatures. This allows you to bake dough that you made by
hand, dough that needs to be chilled in the refrigerator or
dough that you purchased.
To use the Bake Only feature:
1. Select the amount of time you need to bake, up to 2 hours.
32
Page 39

Making Dough and Making Bread
2. Select the desired temperature from 200º to 375º F: Press
PROGRAM TIME/TEMP, and
3. Press START.
▲ or ▼
arrows.
Using the Pause Feature
The Beyond Breadmaker has a horizontal traditional style loaf
pan. This feature, in combination with the PAUSE button, lets
you be very creative with bread baking.
When you press and hold PAUSE for 2 seconds, the Breadmaker will interrupt the current cycle for up to 10 minutes. You
can press PAUSE at any time, during any cycle.
To activate the Pause function, press and hold PAUSE for 2 seconds. You will hear a beep when the pause begins.
To resume the cycle, press START and the Breadmaker will
resume at the point where it left off. If you forget to press
START, the machine will automatically reactivate after 10 minutes have elapsed.
Use the Pause feature to:
• Make decorative crusts
• Make pull-apart rolls
• Create rustic-style, Mediterranean-styled rolled bread
• Add crumble toppings to coffee cakes
• Make braided breads
• Make monkey breads
33
Page 40

Breadmaker Owner’s Manual
Try This: Mediterranean-Style Bread
Recipe
The recipe for this hearty, savory bread uses several of the
baking techniques described in the preceding section:
In addition to the ingredients listed for French Bread on
page 85, this recipe requires:
• Chopped garlic (to taste), ½ cup sun dried tomatoes (or to
taste) and fresh chopped rosemary and basil (to taste).
Optional ingredients:
prosciutto ham.
1. Prepare French bread according to the recipe on page 83.
2. At the end of the second SHAPE (approximately 1 hour and
35 minutes into the cycle), press PAUSE.
3. Remove the dough from the baking pan. Roll it out on a
clean, lightly floured surface into a rectangle approximately 8-½-inch x 13-inch.
4. Lightly brush with good quality, extra virgin olive oil. Sprin-
kle the oiled dough with fresh chopped garlic, basil, rosemary and sun-dried tomatoes. Top with
feta or goat cheese. If you like, you could add 2 to 3 slices
of prosciutto.
5. Roll the dough tightly jellyroll fashion, into an 8-½-inch
wide roll. Tuck the ends under and place into the bread
pan. Return the bread pan to the Breadmaker, close the lid
and press START. Be sure all added ingredients are
enclosed in the dough before baking.
6. The final Rise will begin, immediately followed by Bake.
7. As the baking begins, press PAUSE again. Score the top
crust and gently mist the loaf with cold water. Close the lid
and press START to resume baking.
1
/3 cup feta cheese, 2 or 3 slices of
1/2
cup of crumbled
34
Page 41

Making Dough and Making Bread
Note: Do not leave the lid open for extended periods of time.
ALWAYS use an oven mitt when handling the pan.
Customizing Pre-Programmed Baking
Cycles
Using the Program feature, you can alter existing settings in
the standard baking cycles. You can also use Program to
change kneading and bake times in Batter Breads, or mix,
knead and proof timings in Dough.
We recommend that for your own reference, you keep a log of
the time in the charts provided at the end of this book.
To customize a pre-programmed baking cycle:
1. Make sure the display shows the clock (time of day). If the
display shows something other than the clock, press STOP/
RESET to clear the display.
2. Press SELECT, LOAF SIZE and CRUST CONTROL to select
the pre-programmed baking cycle that is the most similar to
your personal recipe.
3. Press PROGRAM TIME/TEMP. “ C U S TO M P R OG R A M ”
appears in the upper left corner of the display.
4. Press PROGRAM TIME/TEMP to step through the program-
ming options. Use the or buttons to increase or decrease
time/temperature. Press for ADD EXTRAS. Press for NO
EXTRAS.
35
Page 42
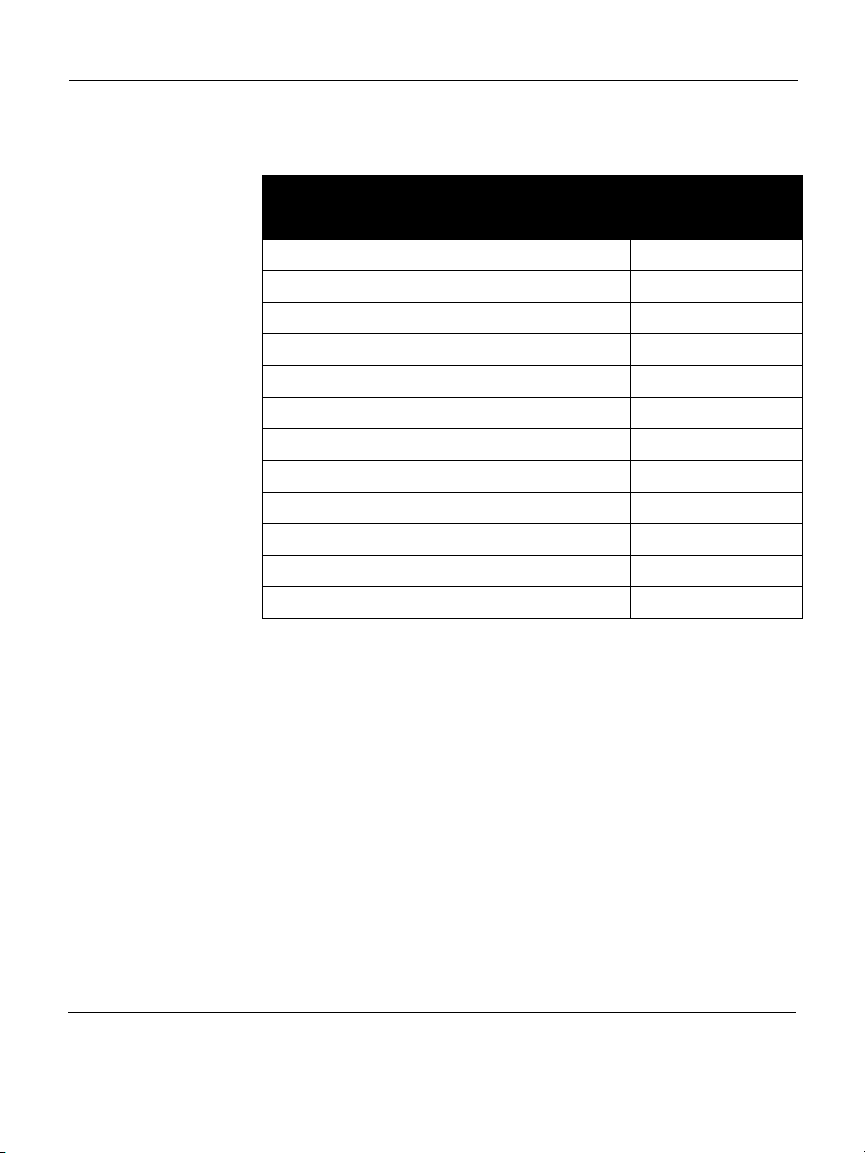
Breadmaker Owner’s Manual
Program Time/Temp Display
Sequence of programming options
1st press PREHEAT
2nd press KNEAD 1
3rd press KNEAD 2
4th press RISE 1
5th press PUNCH
6th press RISE 2
7th press SHAPE
8th press RISE 3
9th press BAKE
10th press KEEP WARM
11th press NO EXTRAS
12th press Temperature
5. When you have finished, press PROGRAM for a final time.
The word SAVE will flash. Press SAVE/ERASE to save your
personal program. To reject your program, press STOP/
RESET at any point in the programming process.
Note: You can also use pre-programmed Delay Bake in addition to the manually programmed cycles. Use the and arrows
to set the time difference after SAVE appears on the display
screen.
36
Page 43

Making Dough and Making Bread
Programming Your Personal Recipes
The Beyond Breadmaker allows you to pre-program five of
your favorite recipes. The Beyond Breadmaker’s flexible and
easy-to-use features allow you to be as creative as you like. If
you want the dough to Knead for 10 minutes, de-gas (punch
down) for 10 seconds, and rise for an hour, just program in
the numbers. If you want to skip a phase, press the or buttons
until the time reads “0”.
To program a personal recipe:
1. Make sure the display shows the clock (time of day). If the
display shows something other than the clock, press STOP/
RESET to clear the display.
2. Press SELECT repeatedly until PERSONAL RECIPE 1
appears in the display.
3. Press PROGRAM TIME/TEMP. “ C U S TO M P R OG R A M ”
appears in the upper left corner of the display.
4. To program each stage of the baking cycle follow the pro-
cedure in the preceding section, Customizing Pre-Programmed Baking Cycles.
Resetting the Program & Personal Recipe Memory
Use the Save / Erase function to restore factory setting and to
clear personal recipes and custom programs.
1. Select the personal recipe or custom program you want to
erase. Press SAVE / ERASE The display will prompt SAVE
or ERASE. Select ▲ for YES or
2. A beep will sound and the display will show “White 2 LB.
Medium.”
▼
for NO.
37
Page 44

Breadmaker Owner’s Manual
Power Loss Memory
Your Beyond Breadmaker has a 60 minute power interrupt
memory feature. If the electricity goes off, the memory will
store the cycle in process for up to 60 minutes. If the power
comes back on within this time, the cycle will resume where it
left off. If the Breadmaker loses power for more than this time
and you are using eggs, dairy products or meat in your bread,
you should discard the contents of the recipe and start again
with new fresh ingredients due to the risk of spoilage.
For non-perishable recipes you may try starting the Breadmaker
at the beginning of the cycle. However, this may not always
produce an acceptable loaf. If you are not sure when the outage occurred, remove the dough ball from the bread pan and
place it in an oven-safe baking container. Allow it to double in
size and place in a preheated 350º F/177º C oven for 30 to
45 minutes or until done. The bread will sound hollow when
tapped on top of the loaf if it is done.
If the bread has already begun to bake when the outage
occurs, you must begin with new ingredients.
When the power comes back on, you should do the following:
Press and hold down the STOP/RESET for at least 3 seconds. If
the display does not return to the time setting before the outage, unplug the Breadmaker and then plug it back in.
• If you have a Home Hub network perform an Internet
Update from your Home Hub to reset the clock and restore
saved settings.
• If you do not have a Home Hub, see Manually Setting the
Clock and Date on page 16.
38
Page 45

Know Your Ingredients
It has been said that cooking is an art that relies on the creativity of the chef. Baking bread is much more of a science, since
the process of combining flour, water and yeast results in a
chemical reaction that produces bread. You must remember
that when the ingredients combine with each other, they produce a specific result. The following information describes the
roll of each ingredient used in the bread making process.
Flours and Grains
Know Your Ingredients
All-Purpose
Flour
Bran
Bread Flour
Cornmeal and
Oatmeal
All-purpose flour is a blend of refined hard and soft wheat flours
ideally suited for making quick breads and cakes. The most
popular brands of flour have been tested for quick bread and
cakes in the Breadmaker by Beyond Test Kitchens¨ with excellent
results.
Bran (unprocessed) is the coarse outer portion of the wheat or
rye grains that is separated from flour by sifting or bolting. They
are often added to bread in small quantities for nutritional
enrichment, heartiness and flavor. They are also used to
enhance bread texture.
Bread flour is a high gluten/protein flour that typically has a
higher gluten concentration than all-purpose flour. Using bread
flour with the Breadmaker will produce loaves with better
volume and structure.
Corn meal and oatmeal come from coarsely ground white or
yellow corn and from rolled or steel-cut oats. They are used
primarily to enhance the flavor and texture of the bread.
39
Page 46

Breadmaker Owner’s Manual
Cracked
Wheat
Rye Flour
Self-Rising
Flour
Seven Grain
Cereal Blend
Vital Wheat
Gluten
Whole Wheat
Flour
Cracked wheat has a very coarse texture. It comes from wheat
kernels cut into angular fragments. It gives whole grain breads a
nutty flavor and crunchy texture.
Rye flour must always be mixed with a high proportion of bread
flour, as it does not contain enough gluten to develop the
structure for a high, even-grained loaf.
Self-rising flour contains leavening ingredients that will interfere
with bread and cake making. It is NOT RECOMMENDED for
use with your Breadmaker.
Seven grain cereal blend is a blend of cracked wheat, oats,
bran, rye, cornmeal, flax seeds and hulled millet.
Gluten manufactured from wheat flour that has been treated to
remove nearly all of the starch, which leaves a very high protein
content. (Gluten is the protein in the wheat that makes the dough
elastic.) Gluten is available at most health food stores and in the
baking aisle in many markets. It is sometimes used in small
portions with dense, low-gluten flours (such as whole wheat) to
increase volume and lighten texture.
Whole wheat flour is milled from the entire wheat kernel, which
contains the bran and germ. This high fiber flour is richer in
nutrients than all-purpose or bread flour. Breads made with this
flour are usually smaller and heavier than white loaves. Many
recipes mix whole wheat flour with bread flour or vital wheat
gluten to produce a high, light-textured bread.
Yea st
Active yeast, through a fermentation process, produces carbon
dioxide gas necessary to make bread rise. Yeast feeds on
carbohydrates in sugar and flour to produce this gas. Three
different types of yeast are available: fresh (cake), active dry
and quick-acting. Breadmaker, quick or rapid rise yeast is
quick-acting. Fresh (cake) yeast is NOT RECOMMENDED for
use with your Breadmaker.
40
Page 47

Know Your Ingredients
Note: Flours, while visibly similar, can be very different by virtue of how they were ground, milled, stored, etc. You may
have to experiment with different brands of flour to help you
make the perfect loaf.
Flour Storage
Keep flour in a secure, airtight container. Keep rye and whole
wheat flours stored in a refrigerator, freezer or a cool area to
prevent them from becoming rancid. Allow flour to come to
room temperature before using.
Working with Yeast
Ensure your yeast is fresh by checking its expiration date.
Once a package or jar of yeast is opened, it is important that
the remaining contents be immediately resealed and refrigerated or frozen for future use. Often dough that fails to rise is
due to stale yeast.
The following test can be used to determine if your yeast is
stale and inactive.
1. Place ½ cup of lukewarm (110º F to 115º F/43º C to 46º
C) water into a liquid measuring cup.
2. Stir 1 teaspoon of sugar into the water and then sprinkle 2
teaspoons of yeast over the surface.
3. Allow mixture to sit for 10 minutes undisturbed.
The mixture should foam and rise to the 1 cup mark. If this
does not occur, discard this yeast and purchase fresh yeast.
41
Page 48
Breadmaker Owner’s Manual
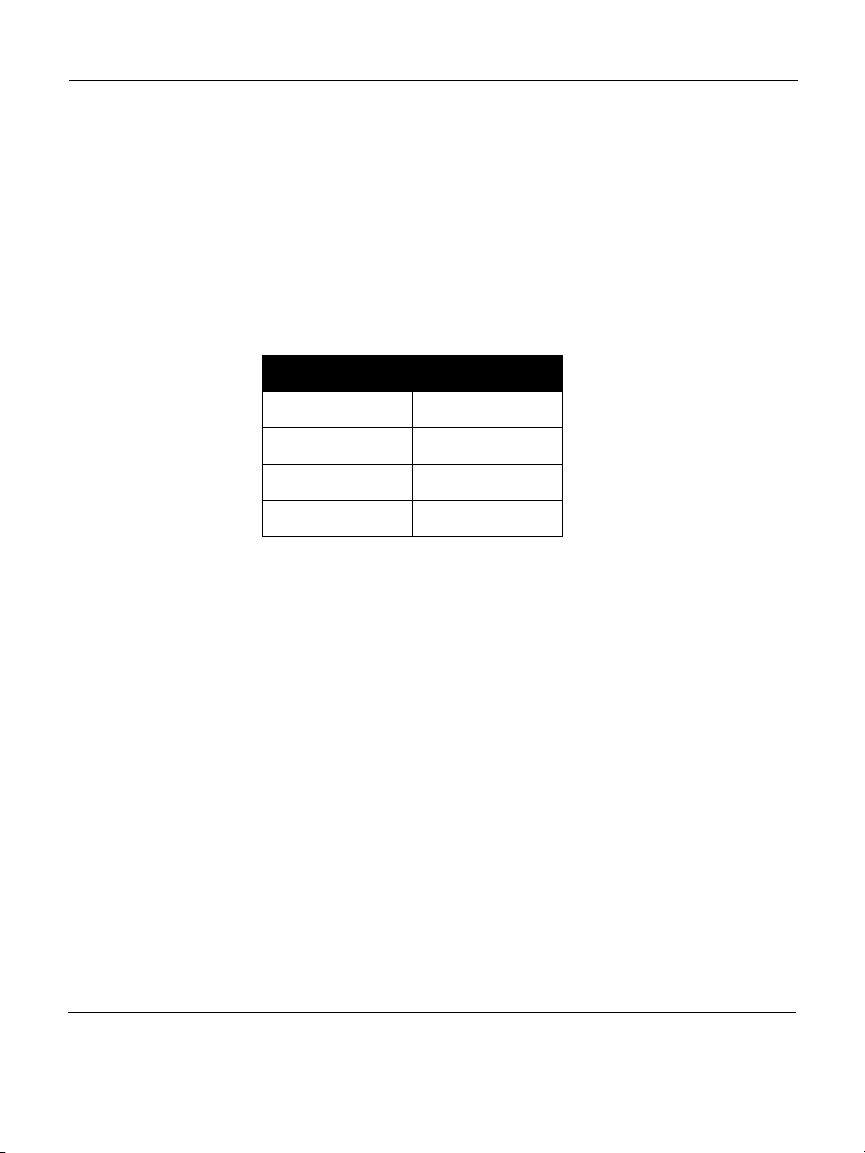
Note: The basic bread and dough recipes in this booklet
were developed using active dry yeast. You may use the chart
below to substitute any quick-acting yeast (quick rise, fast rise
or Breadmaker yeast) for the active dry yeast or vice versa.
Conversion Chart for Quick-Acting Yeast
Active Dry Yeast Quick Acting Yeast
1 teaspoon = ¾ teaspoon
1-½ teaspoons = 1 teaspoon
2-¼ teaspoons 1-½ teaspoons
1 tablespoon = 2 teaspoons
Rapid Settings Additional Yeast Amounts:
The Rapid settings for White, French, Whole Wheat and Fruit
& Nut decrease the time for making your favorite bread by
approximately an hour. Choose a recipe, then simply ADD an
additional ½ teaspoon of active dry or quick-acting yeast,
whichever one you are using, to the recipe. The bread may be
shorter and denser.
42
Page 49

Know Your Ingredients
Other Ingredients
Sugar Sugar is important for the color and flavor of breads. It also
serves as food for the yeast since it supports the fermentation
process. Recipes in this book that call for sugar require
granulated sugar. Do not substitute powdered sugar unless
indicated. In addition, artificial sweeteners cannot be used as a
substitute for sugar as the yeast will not react properly with them.
Salt Salt is necessary to balance the flavor of breads and cakes. Salt
limits the growth of yeast. Do not increase or decrease the
amount of salt shown in the recipes.
Liquids • All liquids should be warm, 80º F/27º C, for all recipes.
• Liquids, such as milk (1%, 2%, whole and skim), water or a
combination of powdered milk and water, can be used when
making bread.
• Milk will improve flavor, provide a velvety texture and soften
the crust, while water alone will produce a crispier crust.
• Vegetable or fruit juices and potato water may be used for
flavor variety.
Eggs • Eggs add richness and a velvety texture to bread dough and
cakes. When the recipe calls for egg(s): bring them to room
temperature first.
• You may substitute an egg for a portion of the liquid in a yeast
bread recipe: crack any size egg into a liquid measuring cup,
then add enough water to equal the amount listed in the
recipe.
• The Batter Bread recipes call for specific size eggs.
43
Page 50

Breadmaker Owner’s Manual
Fats • Shortening, butter and oil shorten, or tenderize, the texture of
yeast breads. Breads that call for fat stay fresh longer.
• French bread gets its unique crust and texture from the lack of
fat added.
• If butter is used directly from the refrigerator, it should be cut
into small pieces for easier blending during the kneading
cycle.
Double Acting
Baking Powder
Baking Soda Baking soda is another leavening agent, not to be confused or
Baking powder is a leavening agent used in quick breads and
cakes. This type of leavening agent does not require rising time
before baking, as the chemical reaction works when liquid
ingredients are added and again when heat is applied.
substituted for baking powder. It also does not require rising time
before baking as the chemical reaction works during baking
process.
Measuring Your Ingredients
The most important step when using your Breadmaker is measuring your ingredients. It is very important to measure each
liquid and dry ingredient accurately. For best results, add
ingredients in the order given in each recipe.
Liquid Measure
• Use transparent plastic or glass liquid measuring cups to
measure all liquid ingredients.
• Place the cup on a horizontal flat surface and view mark-
ings at eye level. The level of the liquid must be aligned to
the appropriate mark of measurement.
• Do not “guesstimate!”
44
Page 51

Know Your Ingredients
Dry Measure
• Dry ingredients must be measured using standard dry mea-
suring cups. These cups are available in various sizes.
• Gently spoon dry ingredients into the measuring cup and
level off with a knife. Do not scoop or tap measuring cup,
as this will pack the ingredients. This extra amount could
affect the balance of the recipe.
• Do not sift flour in bread making.
Recipe Tips
The recipes included in this book were developed for this
Breadmaker. Each recipe features ingredients that best compliment a particular loaf of bread and each was tested using the
Beyond Breadmaker.
• It is extremely important not to exceed the amount of flour
specified in each recipe, approximately 4-4-½ cups, or the
bread may not be satisfactory.
• When using your own yeast bread recipes, use the recipes
in this cookbook as a guide for converting portions from
your recipe to the Breadmaker.
Special Glazes for Yeast Breads
Select one of the following special glazes to enhance your
bread. After glazing, if desired, generously sprinkle with your
choice of poppy, sesame or caraway seeds.
45
Page 52
Breadmaker Owner’s Manual
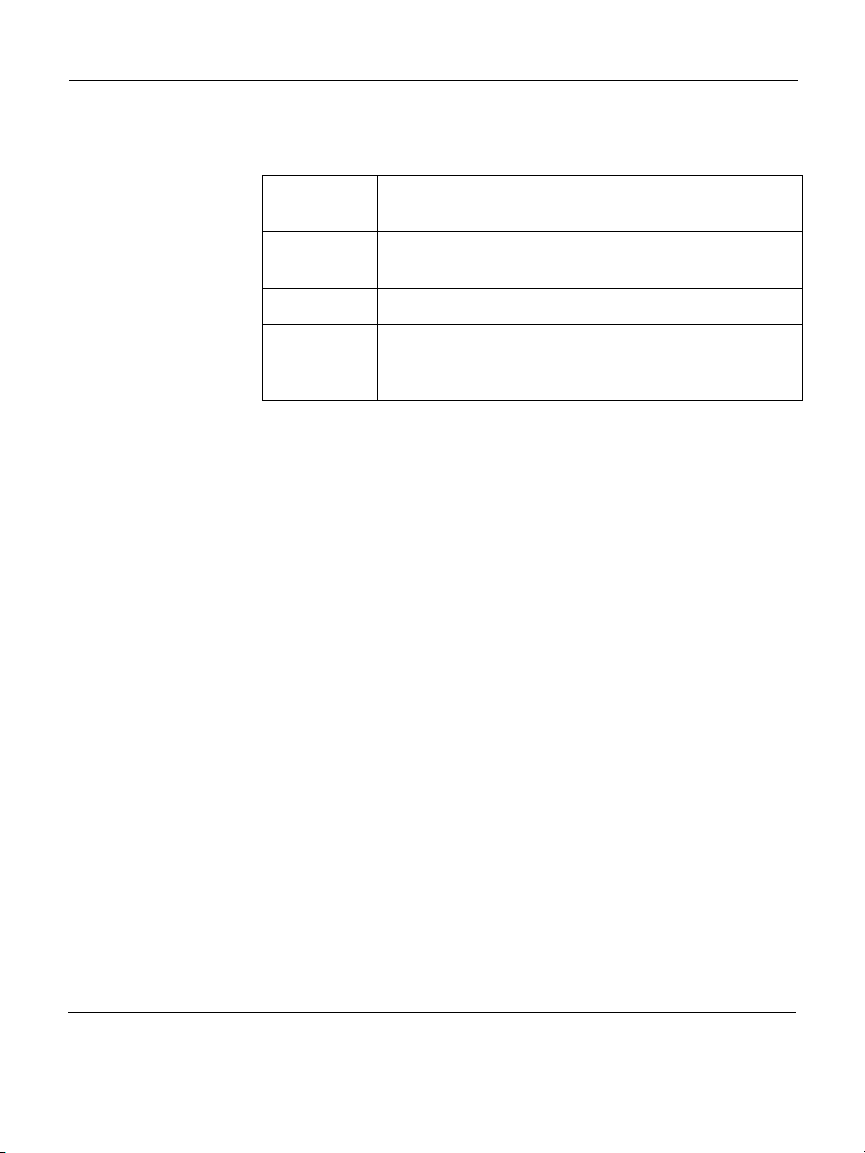
Egg Glaze Beat 1 large egg and 1 tablespoon of water together, brush
generously over dough. Note: Apply to breads just before baking.
Melted Butter Crust: Brush melted butter over just-baked bread for a softer,
tender crust.
Milk Glaze For a softer, shiny crust, brush just-baked bread with milk or cream.
Sweet Icing
Glaze
Mix 1 cup sifted icing sugar with 1 to 2 tablespoons of milk until
smooth to make a consistent glaze. Drizzle the glaze over raisin
bread or sweet breads when they are almost cool.
Bread Mixes and Other Recipe Books
You can use prepackaged bread mixes or other Breadmaker
recipes in your Breadmaker. Follow package or recipe directions for making 1.0, 1.5 or 2.0 LB. loaves. Do not exceed the
bread pan capacity.
Checking Dough Consistency
Although the Breadmaker will mix, knead, and bake bread, it
is absolutely essential that you learn to recognize the condition
of your dough. The ratio of flour to liquid is the most critical
factor in any bread recipe. After 5 to 8 minutes in the Knead
stage, open the Breadmaker to check the dough’s consistency.
The dough should be in a soft, tacky ball (feel sticky like scotch
tape). If it is too dry, add liquid ½ to 1 teaspoon at a time. If it
is too wet, add ½ - 1 tablespoon of flour at a time until the
dough has the right consistency.
46
Page 53

Know Your Ingredients
Adjusting for Climate and Altitude
In high-altitude areas, over 3,000 feet, dough tends to rise
faster, as there is less air pressure. Therefore, less yeast is necessary. For more information on High Altitude Baking contact:
Colorado Cooperative Extension Resource Center
Toll free: (877) 692-9358
E-mail: [email protected]
Website: www.ext.colostate/edu/depts/coopext
In dry climates, flour is drier and requires slightly more liquid.
In humid climates, flour is wetter and will absorb less liquid.
Therefore less liquid is required.
Slicing and Storing Bread
For best results, place freshly baked bread on a wire rack and
allow to cool 15 to 30 minutes before slicing. Use an electric
knife or a serrated knife for even slices. For rectangular slices,
place the loaf on its side and slice across.
Store unused bread tightly covered, (sealable plastic bags or
plastic containers work well) at room temperature for up to
three days. For longer storage, (up to one month) place bread
in a tightly covered container in the freezer. Since homemade
bread has no preservatives, it tends to dry out and become
stale faster than commercially-made bread.
Leftover or slightly hardened bread may be cut into ½-inch or
1-inch cubes and used in recipes to make croutons, bread pudding or stuffing.
47
Page 54
Breadmaker Owner’s Manual
Recipes
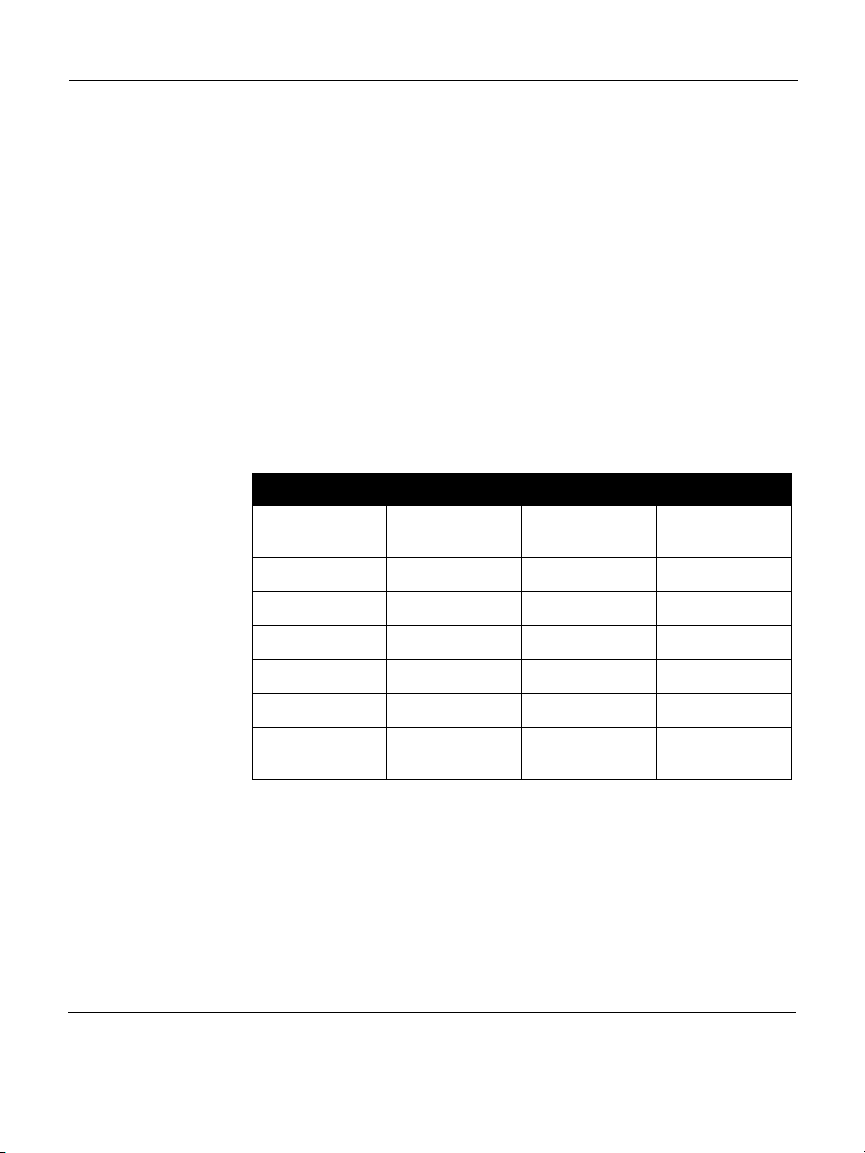
We suggest starting your bread making with this White Bread
Recipe. Follow each step carefully. These steps have been written to eliminate the most common errors in Breadmaker baking
and may be helpful for any recipe.
White Bread
Select White cycle.
WATER 80º F/27º
C
OIL 1 TBL 2 TBL 2- ½ TBL
SUGAR 1- ½ TBL 2 TBL ¼ CUP
SALT 1 TSP 1- ¼ TSP 2 TSP
DRY MILK 1 TBL 1- ½ TBL 2 TBL
BREAD FLOUR 2- ¼ CUPS 3 CUPS 4 CUPS
1 LB 1.5 LB 2 LB
¾ CUP + 1 TBL 1 CUP 1- ½ CUPS
ACTIVE DRY
YEAST
1- ¼ TSP 2 TSP 2- ¼ TSP
Method
1. Remove the bread pan from the Breadmaker. Attach the
kneading paddle onto the shaft. Make sure all ingredients,
except water, are at room temperature.
2. Use a liquid measuring cup to measure the water (80º F /
27º C) and pour into the bread pan.
48
Page 55

Recipes
3. Use a measuring spoon to measure the oil and add to the
bread pan.
4. Use a measuring spoon to measure the sugar, salt and dry
milk; level off with the straight edge of a knife and add to
the bread pan.
5. Lightly spoon bread flour into a dry measuring cup, level
off with the straight edge of a knife and add to the bread
pan.
6. Carefully measure yeast with a measuring spoon; level off
with the straight edge of a knife and add to the pan. If
using delay Timer, make sure yeast is on top of bread flour,
away from liquids. The Rapid setting for White Bread
decreases the time for making bread by approximately an
hour. Add an additional teaspoon of active dry yeast or
quick-rise yeast.
7. Place the bread pan into the Breadmaker. Close the lid.
8. Select the White cycle, Loaf Size, Crust Control and set
Timer then START for delay, or START for immediate start.
9. After the beeper sounds the Breadmaker will start a 60
minute Keep Warm cycle. The red light above “Keep
Warm” will flash.
10.Press STOP/Reset and use oven mitts to carefully remove
the pan after baking or any time during the Keep Warm
process.
CAUTION: THE PAN, KNEADING PADDLE AND BREAD
WILL BE VERY HOT. USE OVEN MITTS.
11.Turn pan upside down and shake several times to release
the bread. Do not use metal utensils inside the bread pan
or machine. Remove the kneading paddle and allow loaf to
cool standing upright on wire rack approximately 15-30
minutes before slicing.
12.When the bread has completely cooled, approximately 1
hour, store in an airtight container.
49
Page 56

Breadmaker Owner’s Manual
13.Unplug the Breadmaker before cleaning. Clean bread pan
after each use, DO NOT IMMERSE THE BREAD PAN IN
WATER. (See cleaning instructions, page 91) Clean inside
of Breadmaker after each use.
50
Page 57
Jalapeño Bread
Select White cycle.
1 LB 1.5 LB 2 LB
WATER 80º F/27º C ½ CUP ¾ CUP 1 CUP
OIL 1- ½ TBL 2- ½ TBL 3 TBL
CANNED WHOLE
KERNEL CORN, WELL
DRAINED
SLICED JALAPEÑO
PEPPERS, WELL
DRAINED
SUGAR 1 TBL 2 TBL 2- ½ TBL
SALT ½ TSP 1 TSP 1- ¾ TSP
BREAD FLOUR 2 CUPS 3 CUPS 4 CUPS
CORN MEAL
FRESH CILANTRO,
CHOPPED
½ CUP ¾ CUP 1 CUP
2 TBL 3 TBL ¼ CUP
1
/3 CUP CUP 2/3 CUP
2 TSP 3 TSP 4 TSP
Recipes
ACTIVE DRY YEAST 1- ½ TSP 2 TSP 2- ¼ TSP
51
Page 58
Breadmaker Owner’s Manual
Sourdough Starter
ACTIVE DRY YEAST 2- ¼ TSP
WATER 110º F/
43º C
BREAD FLOUR 3- ½ CUPS
SUGAR 1 TBL
2 CUPS
Method
1. In a 4 quart glass container, dissolve yeast in water 110º
F/43º C; let stand 5 minutes, add flour and sugar. Stir with
plastic or wooden spoon until blended. Mixture will be
thick; remaining lumps will dissolve during fermentation
process.
2. Cover loosely with plastic wrap and let stand in warm
place for 5 days, stirring 3 times a day. The starter will
“rise and fall’ during the fermentation period and become
thinner as it stands. A temperature of 80º F/27º is best for
the sour flavor to develop. An ideal place is on the counter
next to your range.
3. When the starter is developed, it is bubbly and may have a
yellow liquid layer on top; stir before using. It may be used
for baking or placed in the refrigerator to use later, cover
loosely.
4. To use starter, measure the amount specified in the recipe
below. After refrigeration, let container of starter come to
room temperature before measuring – about 4 hours. If
baking in the morning, leave the starter out overnight.
52
Page 59

Recipes
5. Replenish with 1 cup flour, 2/3 cup water 110º F/43º C
and 1 teaspoon sugar. Stir until blended; some lumps may
remain. Cover loosely and let stand in warm place for 10
to 12 hours or overnight. The starter will rise and become
bubbly. Stir, then place in refrigerator to store. Stir in 1 teaspoon sugar to keep active if the starter is not used every
week.
53
Page 60
Breadmaker Owner’s Manual
Sourdough Bread
Select White cycle.
*Only use starter recipe above.
WATER 80º F/27º
C
STARTER* ¾ CUP 1 CUP 1- ¼ CUPS
SUGAR 2 TSP 1 TBL 4 TSP
SALT 1 TSP 1- ½ TSP 2 TSP
BREAD FLOUR 2 CUPS 3 CUPS 4 CUPS
ACTIVE DRY
YEAST
1 LB 1.5 LB 2 LB
½ CUP + 1 TBL ¾ CUP ¾ CUP + 1 TBL
1- ½ TSP 2 TSP 2- ¼ TSP
54
Page 61
Banana Bread
Select White cycle
EGG(S) ROOM
TEMPERATURE PLUS
ENOUGH WATER
80º F/27º C TO
EQUAL
OIL 1 TBL 2 TBL 3 TBL
Recipes
1 LB 1.5 LB 2 LB
111
¾ CUP + 3 TBL 1 CUP 1- ½ CUPS
BANANA CAKE
MIX*
BREAD FLOUR 1 CUP 1- ½ CUPS 2 CUPS
GLUTEN 1- ½ TSP 2 TSP 2- ¼ TSP
ACTIVE DRY YEAST
1 CUP 1- ½ CUPS 2 CUPS
*Or any other variety of cake mix for flavor variation.
55
Page 62
Breadmaker Owner’s Manual
Corn Bread
Select White cycle.
EGG(S) ROOM
TEMPERATURE PLUS
ENOUGH WATER 80º
F/27º C TO EQUAL
OIL 2 TBL 3 TBL ¼ CUP
HONEY 2 TBL 3 TBL ¼ CUP
SALT 1 TSP 1- ½ TSP 2 TSP
DRY MILK 1 TBL 2 TBL 2- ½ TBL
BREAD FLOUR 2 CUPS 3 CUPS 4 CUPS
CORN MEAL ¼ CUP
ACTIVE DRY YEAST 1- ½ TSP 2 TSP 2- ¼ TSP
1 LB 1.5 LB 2 LB
111
¾ CUP + 2 TBL 1 CUP + 3 TBL 1-
1
/3 CUP ½ CUP
1
/3 CUPS
56
Page 63
Dill Bread
Select White cycle
1 LB 1.5 LB 2 LB
EGG(S) ROOM
TEMPERATURE PLUS
ENOUGH WATER
80º F/27º C TO
EQUAL
OIL 1 TBL 2 TBL 3 TBL
SUGAR 4 TSP 2 TBL 3 TBL
SALT 1 TSP 1- ½ TSP 2- ¼ TSP
BREAD FLOUR 2 CUPS 3 CUPS 4 CUPS
DRIED DILL WEED 1- ½ TSP 1 TBL 1- ½ TBL
1
¾ CUP + 1 TBL
1
1 CUP + 1 TBL 11 CUP + 6 TBL
Recipes
DEHYDRATED
ONION
ACTIVE DRY YEAST 1- ½ TSP 2 TSP 2- ¼ TSP
2 TSP 1 TBL 1- ½ TBL
57
Page 64
Breadmaker Owner’s Manual
Fat Free White Bread
Select White cycle.
WATER 80º F/27º
C
APPLESAUCE* 1 TBL 2 TBL 3 TBL
SUGAR 1- ½ TBL 3 TBL ¼ CUP
SALT 1 TSP 1- ¼ TSP 2 TSP
DRY MILK 1 TBL 1- ½ TBL 2 TBL
BREAD FLOUR 2- ¼ CUPS 3 CUPS 4 CUPS
ACTIVE DRY
YEAST
1 LB 1.5 LB 2 LB
¾ CUP + 1 TBL 1 CUP 1- ½ CUPS
1- ¼ TSP 2 TSP 2 - ¼ TSP
58
Page 65
Recipes
Egg Bread
Select White cycle
1 LB 1.5 LB 2 LB
EGG(S) ROOM
TEMPERATURE PLUS
ENOUGH WATER
80º F/27º C TO
EQUAL
OIL 1 TBL 1- ½ TBL 2 TBL
SUGAR 4 TSP 2 TBL 2- ½ TBL
SALT 1 TSP 1- ½ TSP 2 TSP
DRY MILK 2 TBL 3 TBL ¼ CUP
BREAD FLOUR 2 CUPS + 2 TBL 3 CUPS 4 CUPS
ACTIVE DRY YEAST 1- ½ TSP 2 TSP 2- ¼ TSP
1
¾ cup + 1 TBL
2
1 cup + 1 TBL
1-
2
1
/3 cups
59
Page 66
Breadmaker Owner’s Manual
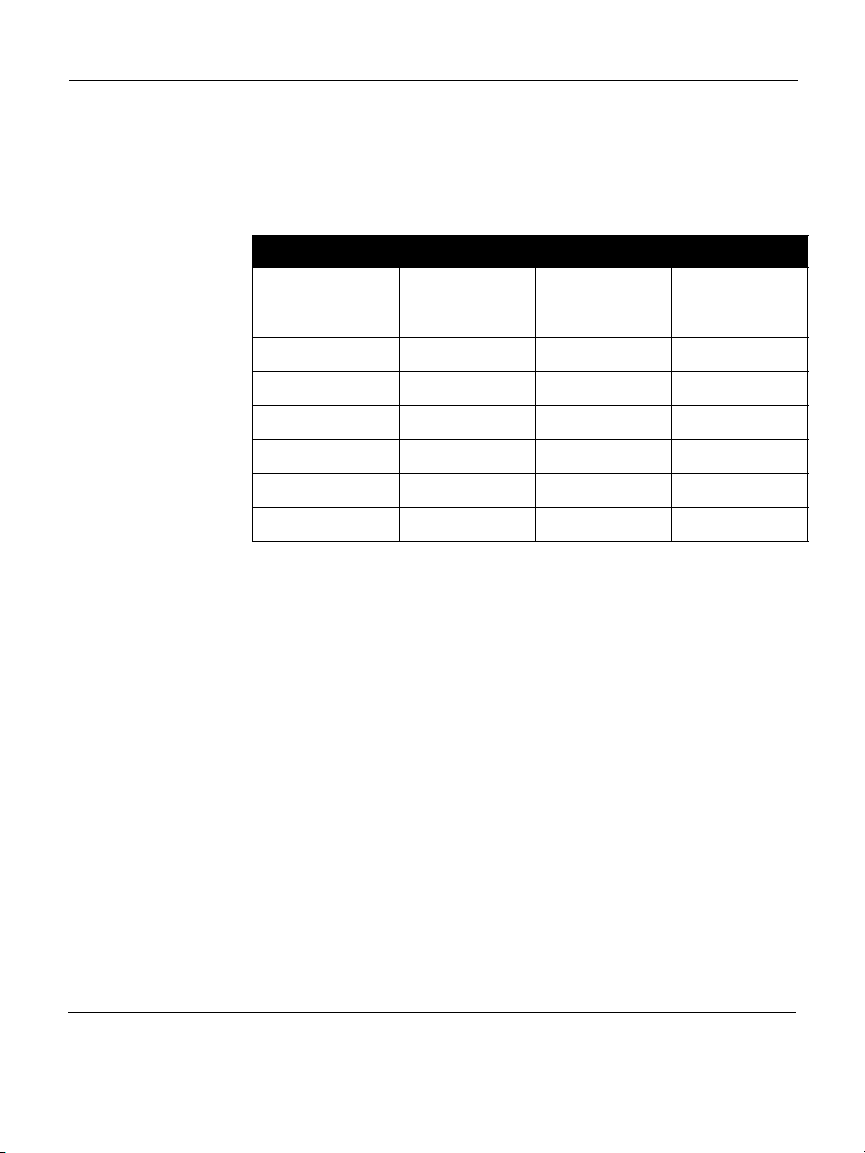
Buttermilk Bread
Select White cycle.
CULTURED
BUTTERMILK 80º F/
27º C
OIL 2 TBL 3 TBL ¼ CUP
SUGAR 2 TBL 3 TBL ¼ CUP
SALT 1 TSP 1- ½ TSP 2 TSP
BAKING SODA ¼ TSP ½ TSP ¾ TSP
BREAD FLOUR 2 CUPS 3 CUPS 4 CUPS
ACTIVE DRY YEAST 1- ½ TSP 2 TSP 2- ¼ TSP
1 LB 1.5 LB 2 LB
¾ CUP + 2 TBL 1 CUP + 2 TBL
1- ½ CUPS + 2
TBL
60
Page 67
Honey Granola Bread
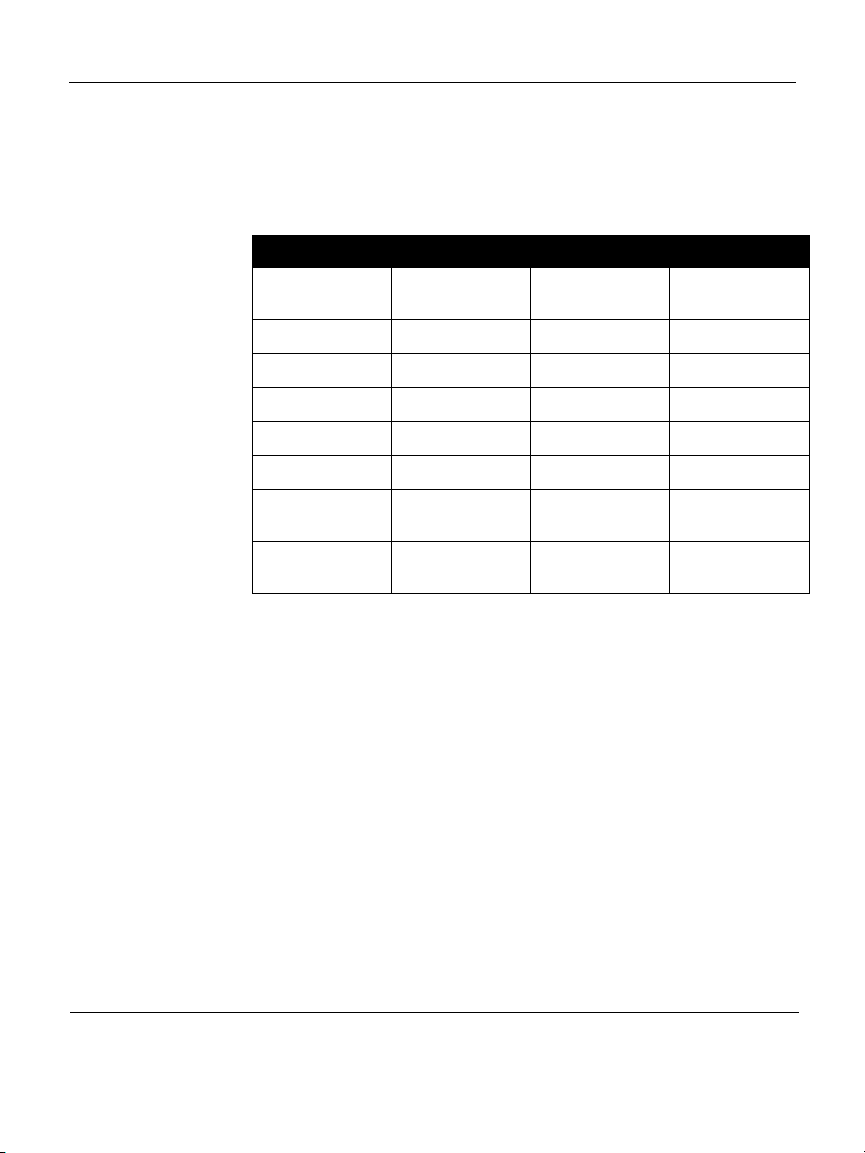
Select White cycle.
1 LB 1.5 LB 2 LB
WATER 80º F/27º
C
OIL 2 TBL 3 TBL ¼ CUP
HONEY 2 TBL 3 TBL ¼ CUP
SALT 1 TSP 1- ½ TSP 2 TSP
DRY MILK 2 TBL 2- TBL 3 TBL
BREAD FLOUR 2 CUPS 3 CUPS 4 CUPS
GRANOLA
CEREAL
¾ CUP + 3 TBL 1 CUP + 3 TBL 1- ½ CUPS
2/3 CUP ¾ CUP 1 CUP
Recipes
ACTIVE DRY
YEAST
1- ½TSP 2 TSP 2- ¼ TSP
61
Page 68
Breadmaker Owner’s Manual
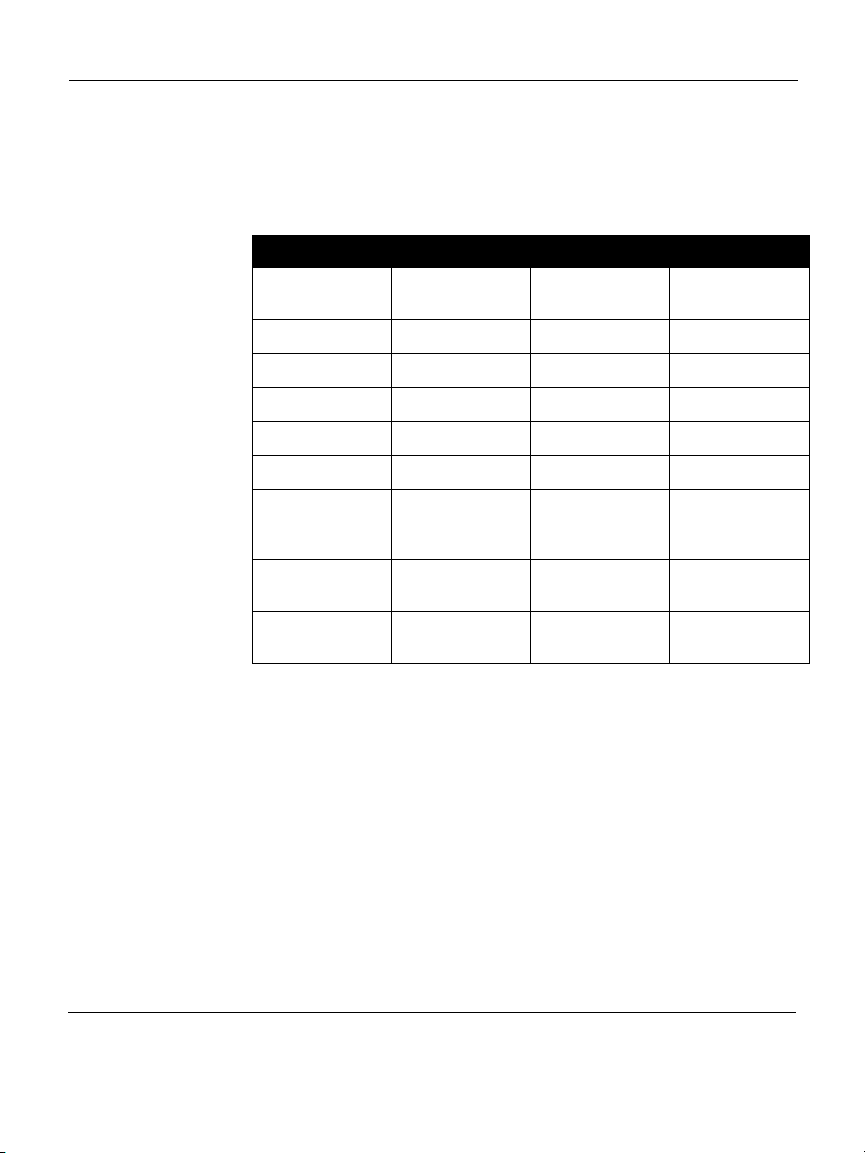
Maple Bread
Select White cycle.
WATER 80º F/27º
C
OIL 2 TBL ¼ CUP 6 TBL
MAPLE SYRUP 2 TBL CUP 6 TBL
MAPLE EXTRACT ¼ TSP ½ TSP ¾ TSP
SALT 1 TSP 1- ½ TSP 2 TSP
BREAD FLOUR 2 CUPS 3 CUPS 4 CUPS
DRY OATMEAL,
QUICK OR
REGULAR
1 LB 1.5 LB 2 LB
¾ CUP + 2 TBL 1 CUP 1-
¾ CUPS 1 CUP 1- ½ CUPS
1
/3 CUPS
WALNUTS,
CHOPPED
ACTIVE DRY
YEAST
½ CUP ¾ CUP 1 CUP
1- ½ TSP 2 TSP 2- ¼ TSP
62
Page 69
Peach Bread
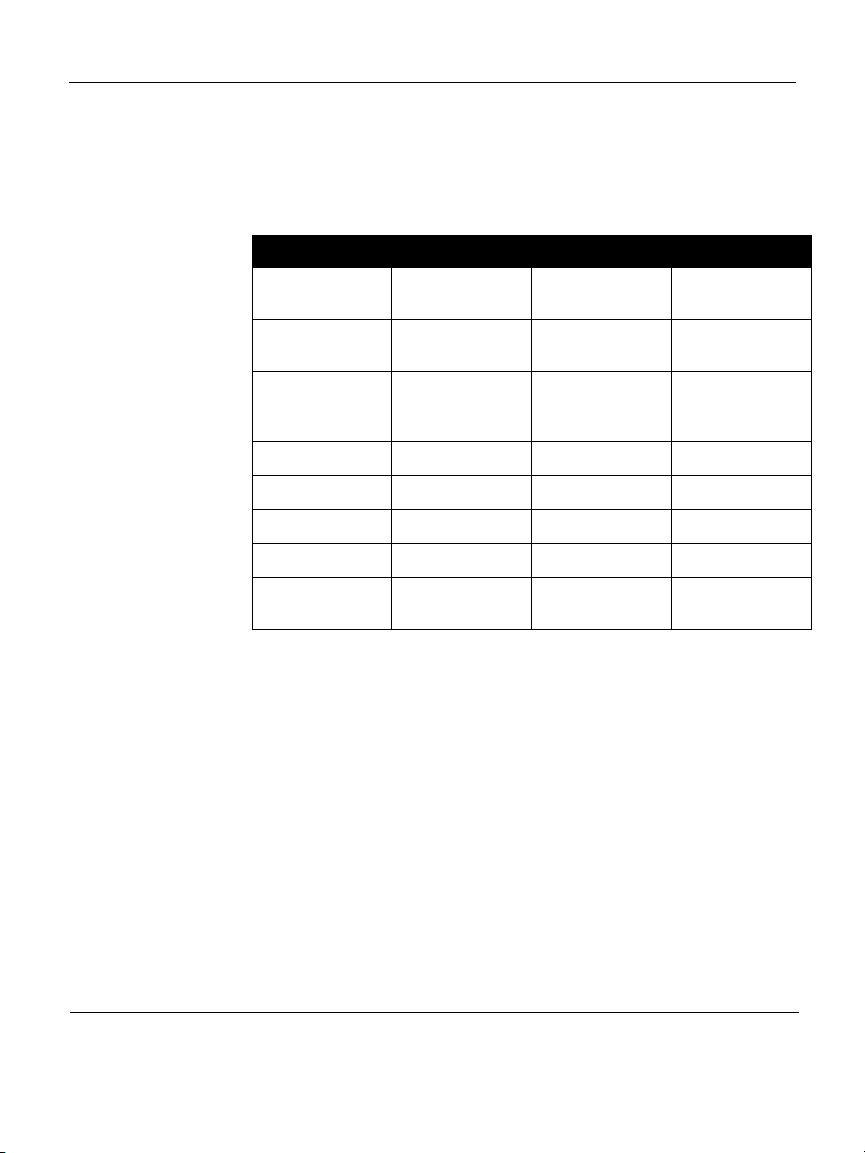
Select White cycle.
APRICOT NECTAR
80º F/27º C
Recipes
1 LB 1.5 LB 2 LB
5 TBL ¾ CUP 1 CUP
PEACH YOGURT
80º F/27º C
CARROTS,
UNCOOKED-GRA
TED
OIL 1 TBL2 TBL3 TBL
HONEY1 TBL2 TBL3 TBL
SALT 1 TSP1- ½ TSP2 TSP
BREAD FLOUR 2 CUPS 3 CUPS 4 CUPS
ACTIVE DRY
YEAST
3 TBL ¼ CUP
5 TBL ½ CUP ¾ CUP
1- ½ TSP 2 TSP 2- ¼ TSP
1
/3 CUP
63
Page 70
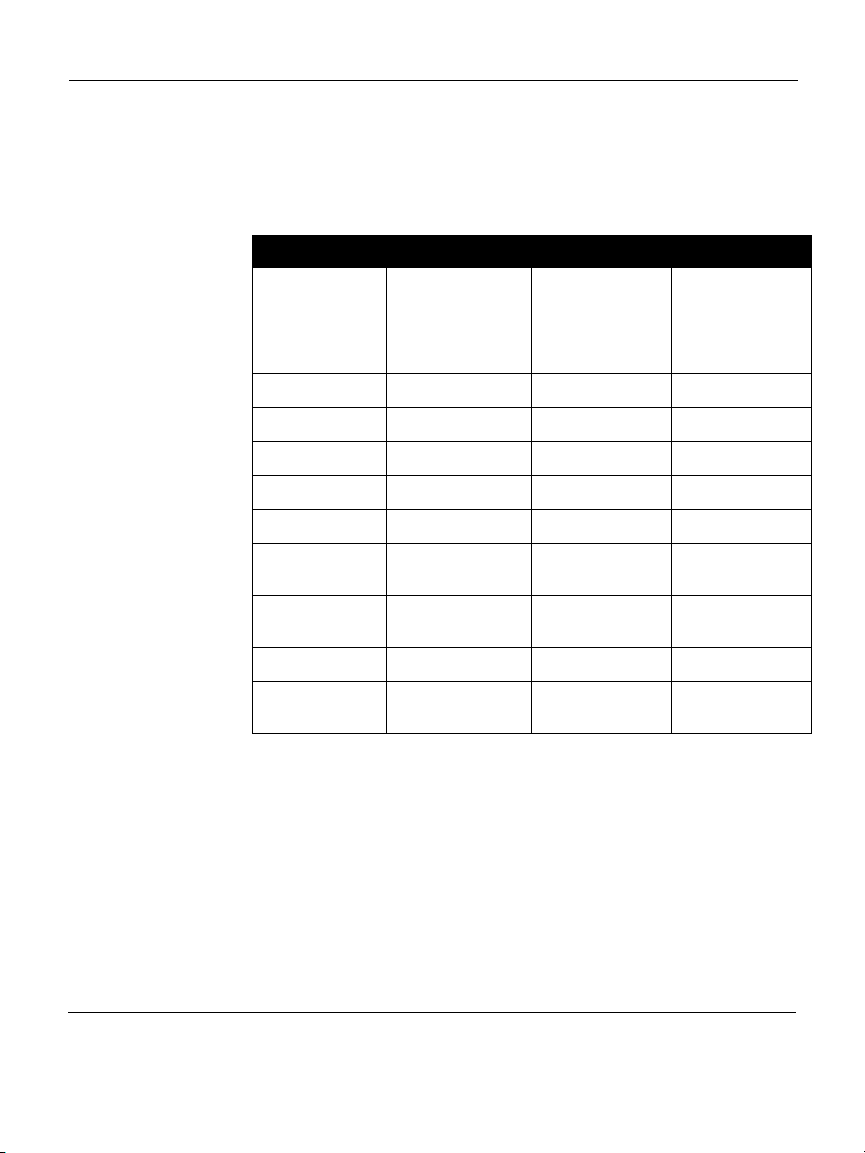
Breadmaker Owner’s Manual
Potato Bread
Select White cycle.
EGG(S) ROOM
TEMPERATURE
PLUS ENOUGH
WATER 80º F/27º
C TO EQUAL
OIL 1 TBL 2 TBL 3 TBL
SUGAR 4 TSP 2 TBL 3 TBL
SALT 1 TSP 1- ½ TSP 2 TSP
DRY MILK 2 TBL 3 TBL ¼ CUP
WHITE PEPPER 1/8 TSP ¼ TSP ¼ TSP
INSTANT
POTATO BUDS
1 LB 1.5 LB 2 LB
1
¾ cup + 2 TBL
CUP
2
1- ¼ cups
1
/3 CUP CUP
2
1- ½ CUPS
GREEN ONION
TOPS, CHOPPED
BREAD FLOUR 2 CUPS 3 CUPS 4 CUPS
ACTIVE DRY
YEAST
1 TBL 1- ½ TBL 2 TBL
1- ½ TSP 2 TSP 2- ¼ TSP
64
Page 71
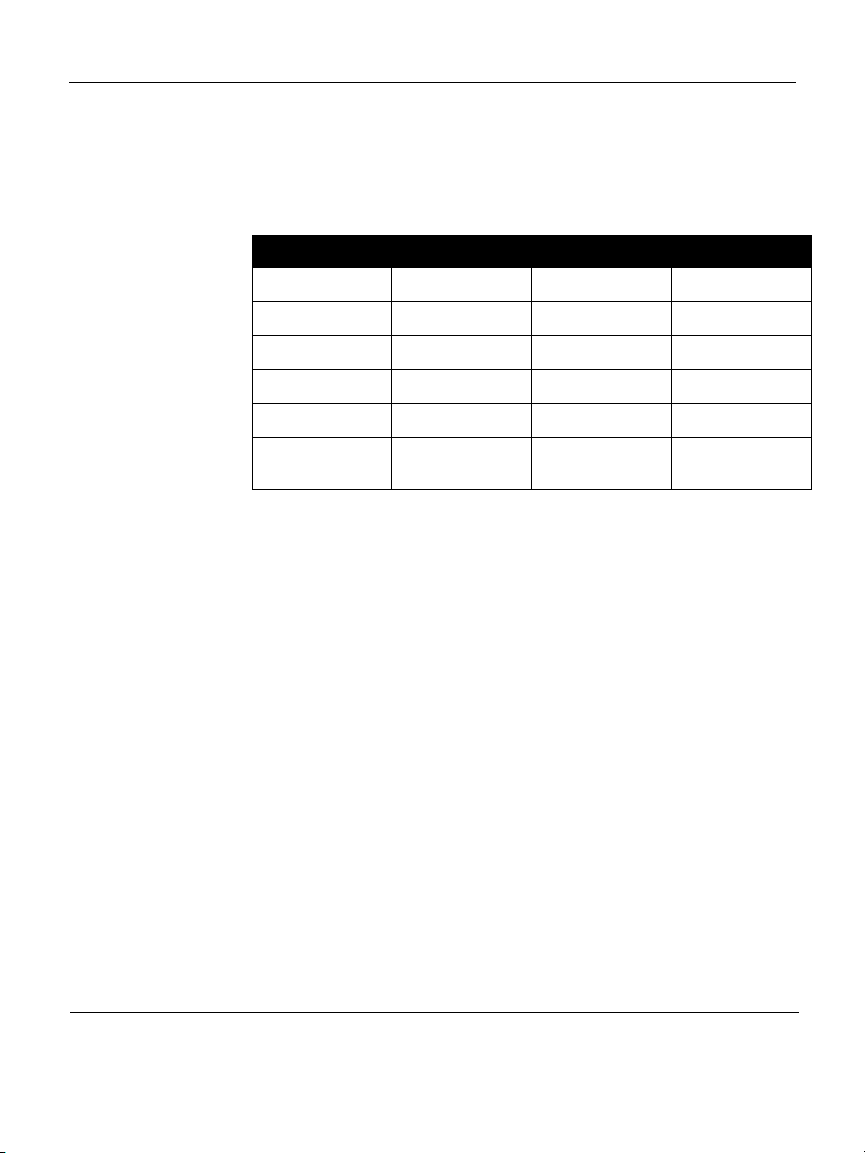
Recipes
Milk Bread
Select White cycle.
1 LB 1.5 LB 2 LB
MILK 80º F/27º C ¾ CUP 1 CUP 1- ½ CUPS
OIL 2 TBL2 TBL3 TBL
SUGAR 1 TSP1- ½ TSP2 TSP
SALT TSP 1- ½ TSP 2 TSP
BREAD FLOUR 2 CUPS 3 CUPS 4 CUPS
ACTIVE DRY
YEAST
1- ½ TSP 2 TSP 2- ¼ TSP
65
Page 72
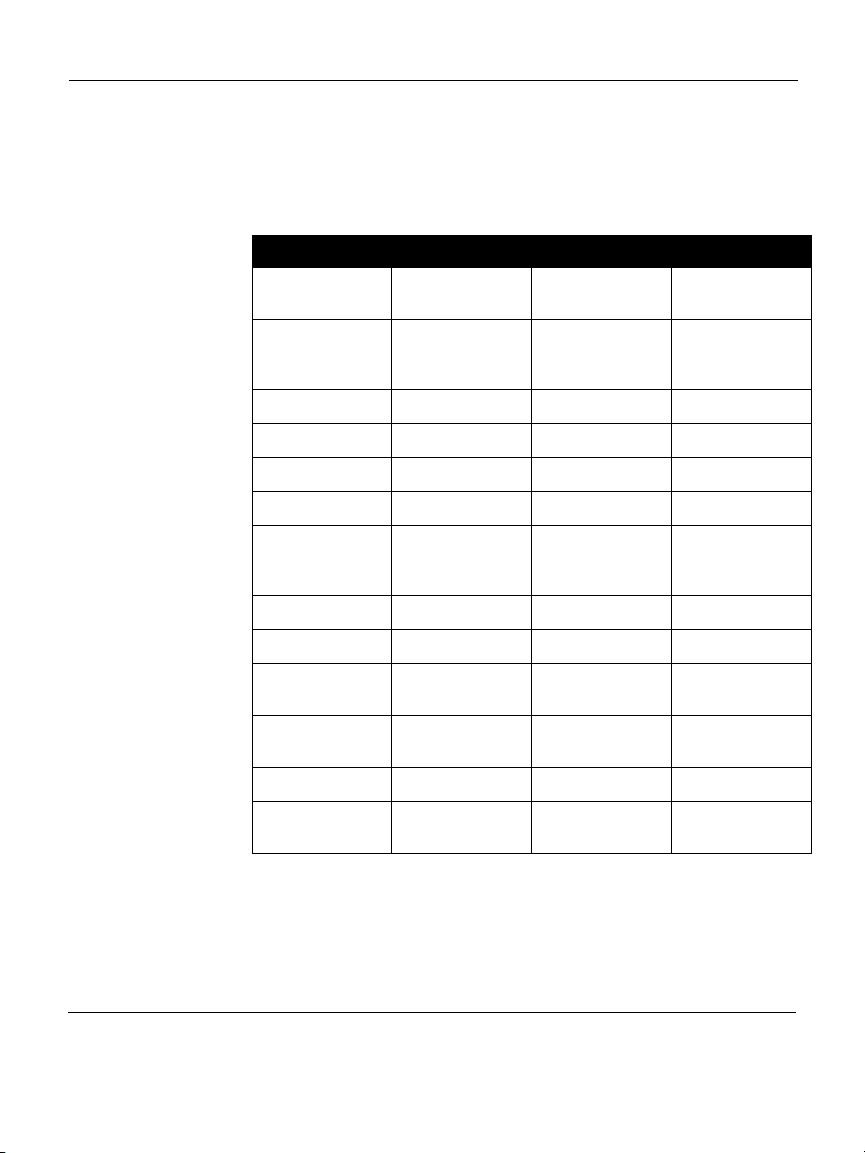
Breadmaker Owner’s Manual
Whole Grain Bread
Select White cycle.
WATER 80º F/27º
C
1 LB 1.5 LB 2 LB
1
¼ CUP
/3 CUP ½ CUP
CULTURED
BUTTERMILK 80º
F/27º C
OIL 2 TSP 1 TBL 1 TBL + 1 TSP
MOLASSES 3 TBL ¼ CUP
SALT 1- ½ TSP 2 TSP 1 TBL
BAKING SODA ¾ TSP 1 TSP 1- ½ TSP
OAT BRAN
CEREAL,
UNCOOKED
CORN MEAL 3 TBL ¼ CUP
RYE FLOUR 3 TBL ¼ CUP
BUCKWHEAT
FLOUR
WHOLE WHEAT
FLOUR
BREAD FLOUR 1-
ACTIVE DRY
YEAST
2/3 CUP 1 CUP 1-
3 TBL ¼ CUP
3 TBL ¼ CUP
1
/3 CUP ½ CUP 2/3 CUP
1
/3 CUPS 2 CUPS 3 CUPS
1- ½ TSP 2- ¼ TSP 1 TBL
1
/3 CUPS
1
/3 CUP
1
/3 CUP
1
/3 CUP
1
/3 CUP
1
/3 CUP
66
Page 73
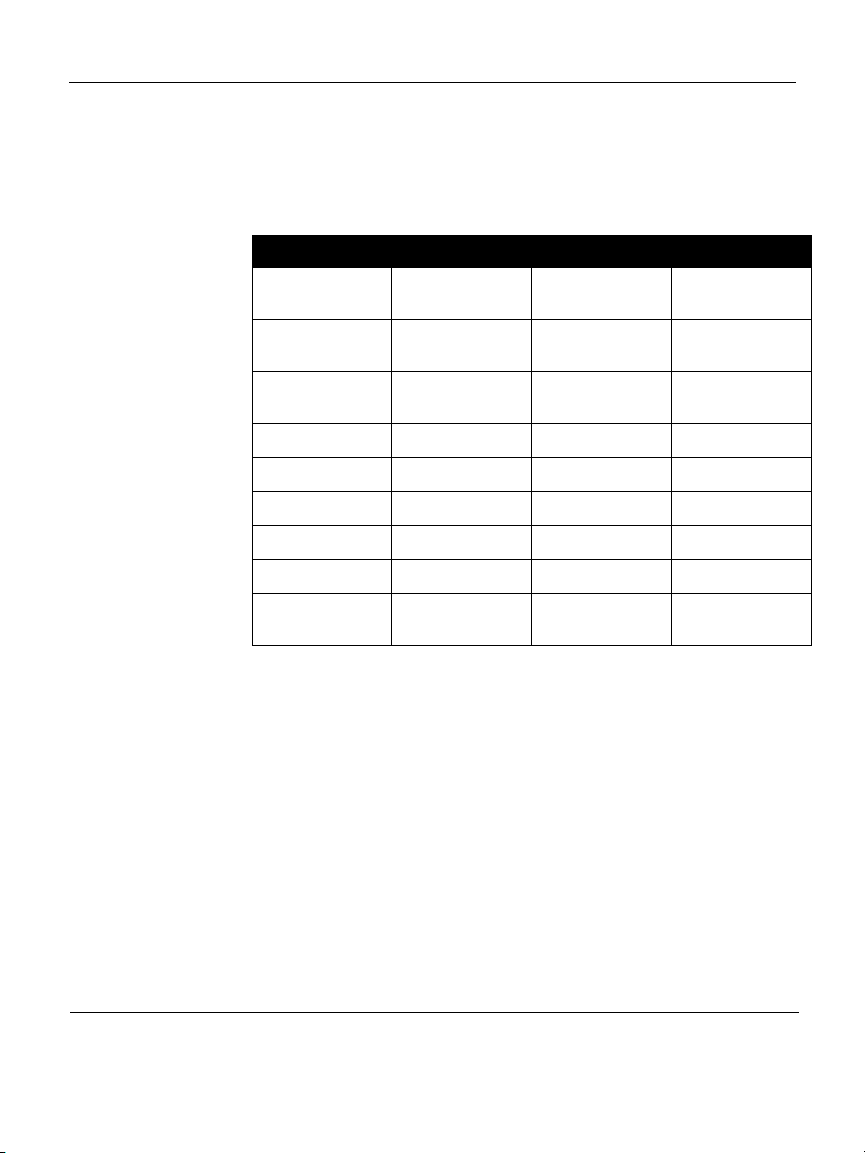
Bloody Mary Bread
Select White cycle.
1 LB 1.5 LB 2 LB
WATER 80º F/27º
C
¼ CUP¼ CUP¼ CUP
Recipes
BLOODY MARY
MIX 80º F/27º C
GREEN ONION
TOPS, CHOPPED
OIL 1 TBL2 TBL3 TBL
SUGAR1 TBL2 TBL3 TBL
SALT ½ TSP ¾ TSP 1 TSP
BREAD FLOUR 2 CUPS 3 CUPS 4 CUPS
DRIED PARSLEY 1 TBL 2 TBL 3 TBL
ACTIVE DRY
YEAST
½ CUP ¾ CUP 1 CUP
1 TBL2 TBL3 TBL
1- ½ TSP 2 TSP 2- ¼ TSP
67
Page 74
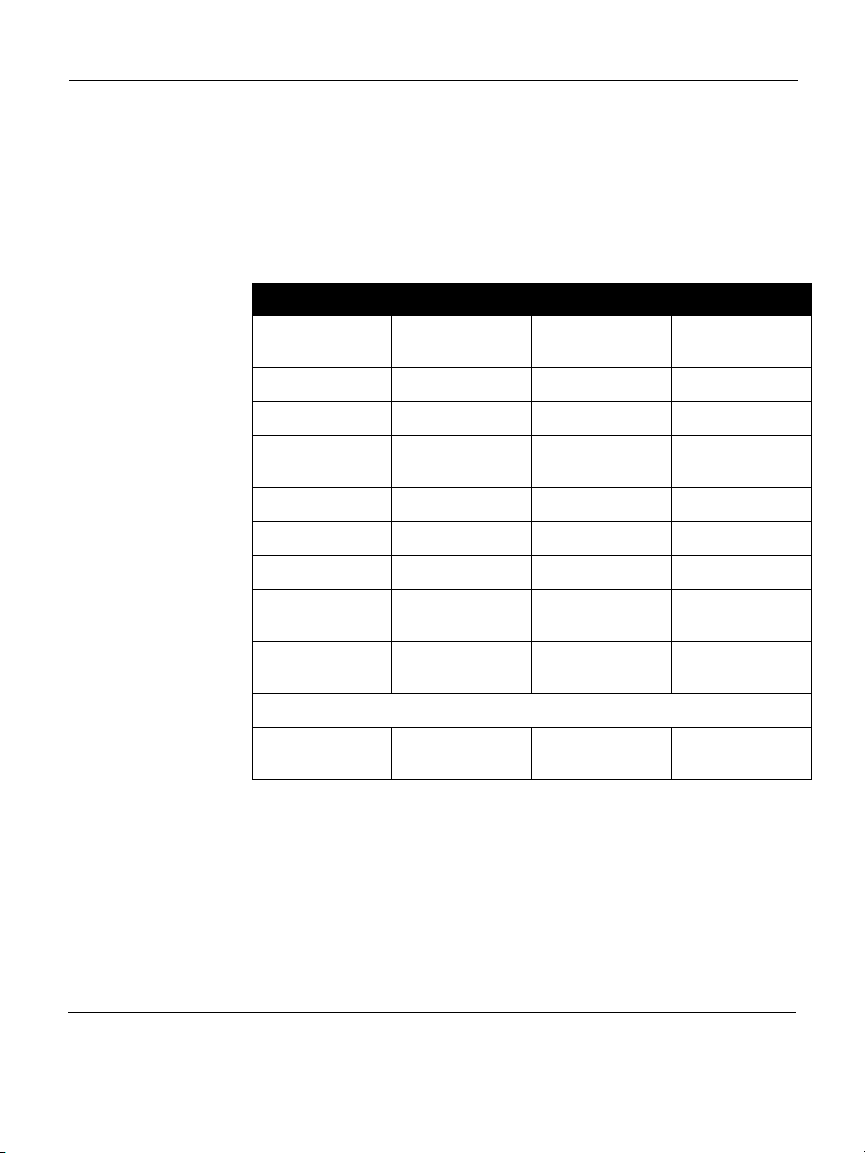
Breadmaker Owner’s Manual
Banana Granola Bread
Select White cycle.
Press EXTRAS before START
WATER 80º F/27º
C
OIL 2 TBL2- ½ TBL3 TBL
HONEY2 TBL2- ½ TBL3 TBL
BANANA
EXTRACT
SALT ½ TSP 1 TSP 1- ½ TSP
DRY MILK2 TBL2- ½ TBL3 TBL
BREAD FLOUR 2 CUPS 3 CUPS 4 CUPS
1 LB 1.5 LB 2 LB
¾ CUP 1 CUP + 2 TBL 1- ½ CUPS + 2 TBL
½ TSP ¾ TSP 1 TSP
GRANOLA
CEREAL
ACTIVE DRY
YEAST
BANANA CHIPS,
CRUSHED
2/3 CUP ¾ CUP 1 CUP
1- ½ TSP 2 TSP 2- ¼ TSP
ADD TO DISPENSER:
1
/3 CUP ½ CUP 2/3 CUP
68
Page 75
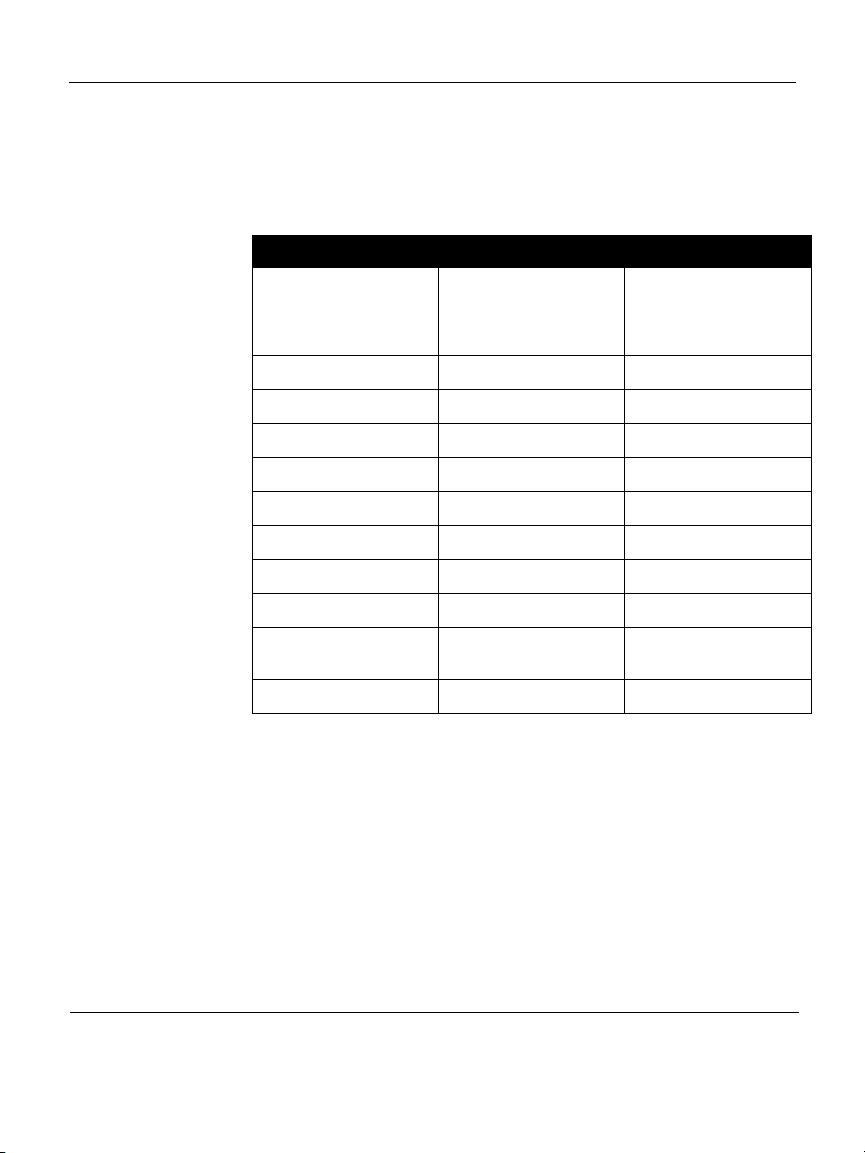
Sunflower and Sesame Seed Bread
Select Whole Wheat cycle.
1.5 LB 2 LB
EGG ROOM
TEMPERATURE PLUS
ENOUGH WATER 80º F/
27º C TO EQUAL
OIL 2 TBL 3 TBL
MOLASSES 1 TBL 2 TBL
SUGAR 1 TBL 2 TBL
SALT 1- ½ TSP 2 TSP
BREAD FLOUR 2- ½ CUPS 3 CUPS
WHOLE WHEAT FLOUR ½ CUP 1 CUP
SESAME SEEDS 2 TBL 2- ½ TBL
CUMIN SEEDS ¼ TSP ¼ TSP
SUNFLOWER SEEDS
(KERNELS)
1
1 CUP + 2 TBL
2 TBL 2- ¼ TBL
1- ¼ CUPS
Recipes
1
ACTIVE DRY YEAST 2 TSP 2- ¼ TSP
69
Page 76
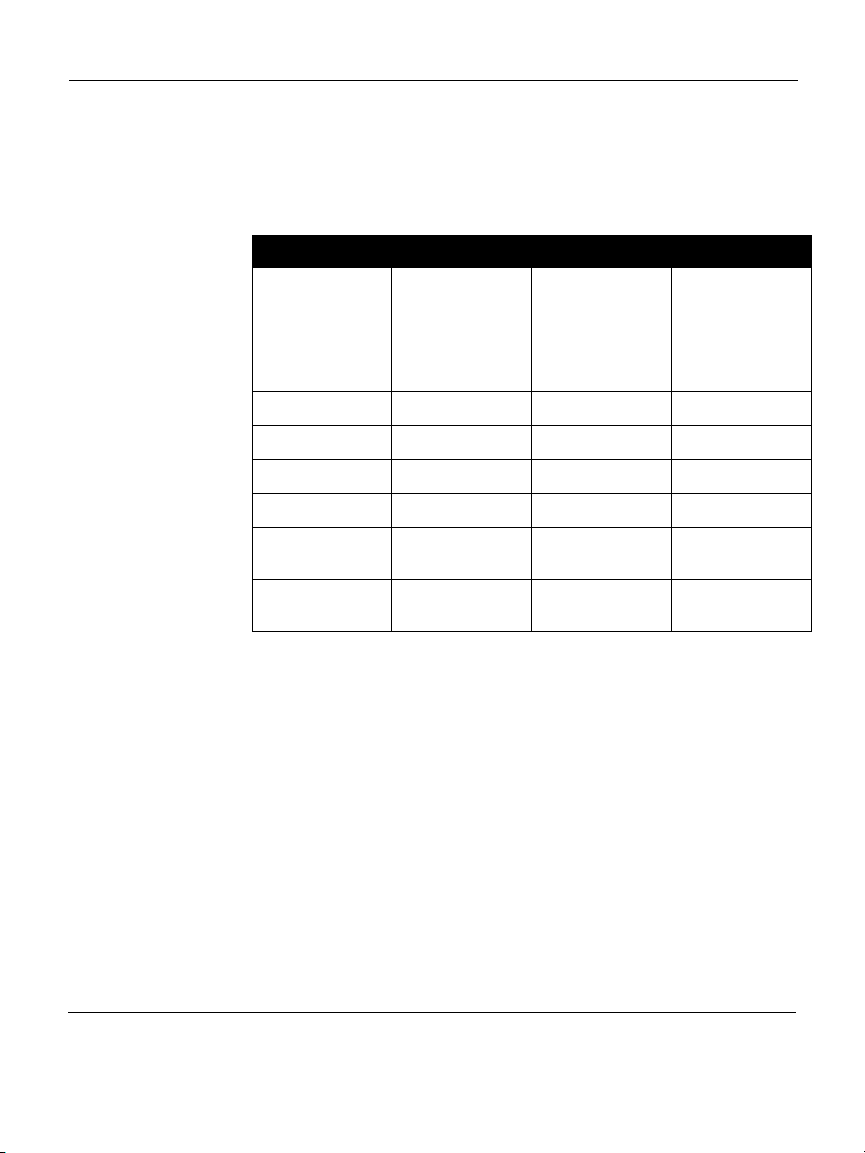
Breadmaker Owner’s Manual
Whole Wheat Bread
Select Whole Wheat cycle.
EGG WHITES
PLUSENOUGH
CULTURED
BUTTERMILK 80º
F/27º C TO
EQUAL
OIL 2 TBL 3 TBL ¼ CUP
MOLASSES 2 TBL 3 TBL ¼ CUP
SALT 1 TSP1- ½ TSP2 TSP
BAKING SODA¼ TSP½ TSP¾ TSP
WHOLE WHEAT
FLOUR
ACTIVE DRY
YEAST
1 LB 1.5 LB 2 LB
1
1 CUP
2 CUPS 3 CUPS 4 CUPS
1- ½ TSP 2 TSP 2- ¼TSP
1
1 CUP + 3 TBL
1
1- ½ CUPS
70
Page 77
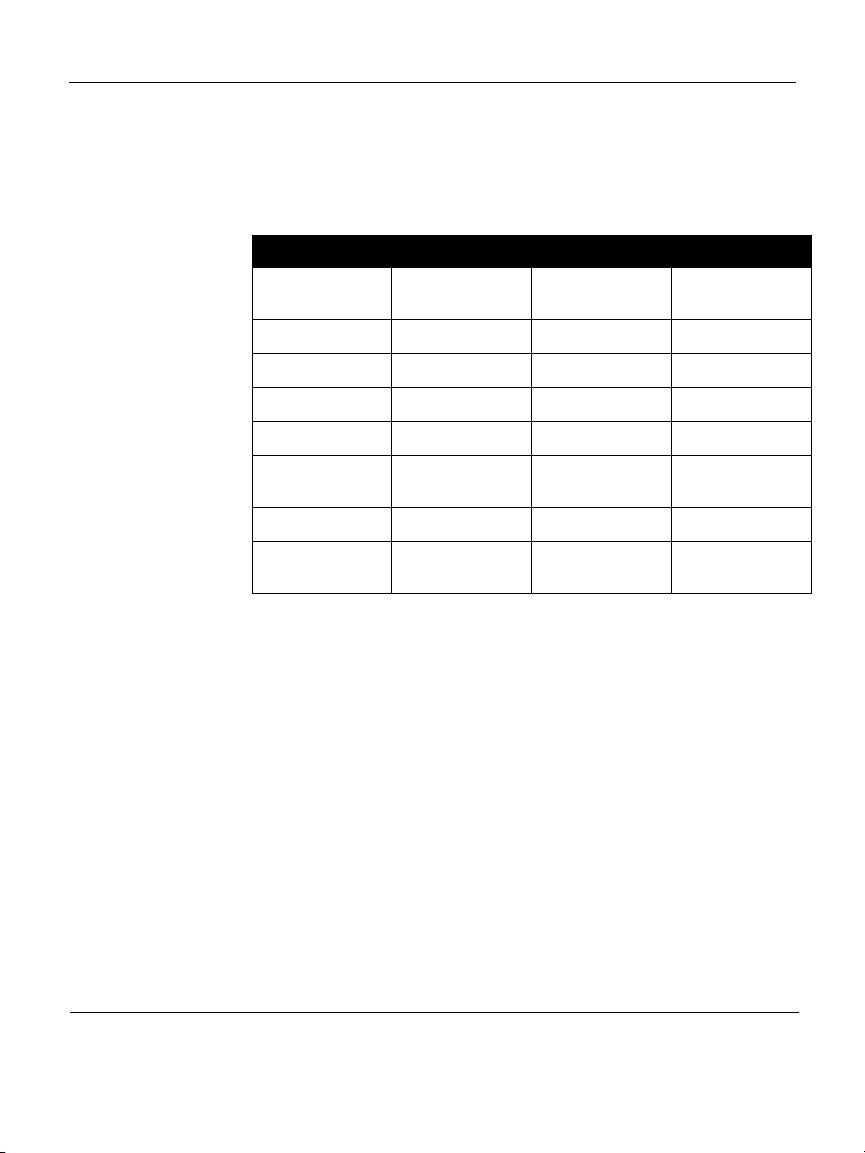
Recipes
Whole Wheat with Gluten Bread
Select Whole Wheat cycle.
1 LB 1.5 LB 2 LB
WATER 80º F/27º
C
OIL 1- ½ TBL 2- ½ TBL 3 TBL
MOLASSES2 TBL2- ½ TBL3 TBL
SALT 1 TSP1- ½ TSP2 TSP
DRY MILK 1- ½ TBL 2 TBL 3 TBL
WHOLE WHEAT
FLOUR
GLUTEN 1- ½ TBL 2- ½ TBL 3 TBL
1 CUP 1- ¼ CUPS 1- ½ CUPS
2- ½ CUPS 3- ¼ CUPS 4 CUPS
ACTIVE DRY
YEAST
1- ½ TSP 2 TSP 2- ¼ TSP
71
Page 78
Breadmaker Owner’s Manual
Whole Wheat Cinnamon Raisin Walnut
Bread
Select Whole Wheat cycle.
Press EXTRAS before START
EGG WHITE(S) ROOM
TEMPERATURE PLUS
ENOUGH WATER 80º
F/27º C TO EQUAL
OIL 2 TBL 3 TBL ¼ CUP
HONEY 2 TBL 3 TBL ¼ CUP
SALT ½ TSP 1- ½ TSP 2 TSP
CINNAMON ¾ TSP 1 TSP 1- ¼ TSP
WHOLE WHEAT FLOUR 2 CUPS 3 CUPS 4 CUPS
WALNUTS, CHOPPED
ACTIVE DRY YEAST 1- ½ TSP 2 TSP 2- ¼ TSP
ADD TO DISPENSER:
RAISINS
1 LB 1.5 LB 2 LB
1
¾ CUP
1
/3 CUP ½ CUP 2/3 CUP
1
/3 CUP ½ CUP 2/3 CUP
2
1 CUP + 2 TBL
3
1- ½ CUPS
72
Page 79
Recipes
Southern Barley Bread
Select Whole Wheat cycle.
1 LB 1.5 LB 2 LB
EGG ROOM
TEMPERATURE
PLUSENOUGH WATER
80º F/27º C TO EQUAL
OIL 1 TBL 1- ½ TBL 2 TBL
HONEY 1 TBL 2 TBL 3 TBL
SALT 1 TSP 1- ½ TSP 2 TSP
DRY MILK 2 TBL 3 TBL ¼ CUP
BARLEY, COOKED 3 TBL ¼ CUP 5 TBL
GRITS, UNCOOKED 2 TSP 1 TBL 1- ½ TBL
1
¾ CUP + 2 TBL
1
1 CUP
1
1- ¼ CUPS
OAT BRAN CEREAL,
UNCOOKED
WHOLE WHEAT FLOUR ½ CUP 1 CUP 1- ½ CUPS
BREAD FLOUR 1- ½ CUPS 2 CUPS 2- ½ CUPS
ACTIVE DRY YEAST 1- ½ TSP 2 TSP 2- ¼ TSP
¼ CUP
1
/3 CUP ½ CUP
73
Page 80
Breadmaker Owner’s Manual
Caraway Rye Bread
Select Whole Wheat cycle.
EGG(S) ROOM
TEMPERATURE
PLUSENOUGH WATER
80º F/27º C TO EQUAL
OIL 2 TBL 3 TBL ¼ CUP
HONEY 2 TBL 3 TBL ¼ CUP
DRY MILK 1 TBL 2 TBL 3 TBL
SALT 1 TSP 1- ½ TSP 2 TSP
BREAD FLOUR 1 CUP 1- ½ CUPS 2 CUPS
WHOLE WHEAT FLOUR ½ CUP ½ CUP 1 CUP
RYE FLOUR ½ CUP 2/3 CUP 1 CUP
CARAWAY SEEDS 1 TBL 2 TBL 3 TBL
1 LB 1.5 LB 2 LB
1
¾ CUP
1
1 CUP + 1 TBL
1
1-
/3 CUPS
2
ACTIVE DRY YEAST 1- ½ TSP 2 TSP 2- ½ TSP
74
Page 81
Recipes
Onion Rye Bread
Select Whole Wheat cycle.
1 LB 1.5 LB 2 LB
EGG(S) ROOM
TEMPERATURE
PLUSENOUGH WATER
80º F/27º C TO EQUAL
OIL 2 TBL 3 TBL ¼ CUP
HONEY 2 TBL 3 TBL ¼ CUP
DRY MILK 1 TBL 2 TBL 3 TBL
SALT 1 TSP 1- ½ TSP 2 TSP
BREAD FLOUR 1 CUP 1- ½ CUPS 2 CUPS
WHOLE WHEAT FLOUR ½ CUP ¾ CUP 1 CUP
RYE FLOUR ½ CUP 2/3 CUP 1 CUP
CARAWAY SEEDS 1 TBL 2 TBL 3 TBL
DEHYDRATED ONION 2 TBL 3 TBL ¼ CUP
1
¾ CUP + 2 TBL11 CUP + 3 TBL
1
/3 CUPS + 2
1-
2
TBL
ACTIVE DRY YEAST 1- ½ TSP 2 TSP 2- ¼ TSP
75
Page 82
Breadmaker Owner’s Manual
Anadama Oatmeal Bread
Method
1. Add oatmeal and cornmeal to a heat-proof bowl. Pour in
boiling water, stirring to prevent lumps.
2. Let the mixture cool for 20 minutes (to 80º F/27º C). Stir,
pour it into the bread pan, and add the rest of the ingredients in the order given.
Select Whole Wheat cycle.
BOILING WATER 1 CUP + 2 TBL 1- ½ CUPS
OATMEAL ¼ CUP
CORNMEAL 1/8 CUP 3 TBL
OIL 2 TBL 3 TBL
MOLASSES 2 TBL 3 TBL
DRY MILK ¼ CUP
SALT 1- ½ TSP 2 TSP
WHOLE WHEAT FLOUR 1 CUP 2 CUPS
1.5 LB 2.0 LB
1
/3 CUP
1
/3 CUP
BREAD FLOUR 2 CUPS 2 CUPS
GLUTEN 2 TBL 3 TBL
ACTIVE DRY YEAST 1- ½ TSP 2 TSP
76
Page 83
Recipes
Honey Banana Whole Wheat Bread
Select Whole Wheat cycle.
1 LB 1.5 LB 2 LB
EGG ROOM
TEMPERATURE PLUS
ENOUGH WATER 80º
F/27º C TO EQUAL
OIL 1 TBL 1- ½ TBL 2 TBL
HONEY 3 TBL ¼ CUP 5 TBL
VANILLA ¼ TSP ½ TSP ¾ TSP
SALT 1- ½ TSP 2 TSP 2- ½ TSP
BANANA, MASHED ¾ CUP 1 CUP 1- ¼ CUPS
WHOLE WHEAT FLOUR 1 CUP 1- ½ CUPS 2 CUPS
BREAD FLOUR 1- ¼ CUPS 1- ½ CUPS 2 CUPS
POPPY SEEDS 1- ½ TSP 2 TSP 2- ½ TSP
ACTIVE DRY YEAST 1- ½ TSP 2 TSP 2- ¼ TSP
1
¾ CUP
1
1 CUP
1- ¼ CUPS
1
77
Page 84
Breadmaker Owner’s Manual
Seven Grain Bread
Select Whole Wheat cycle.
EGG ROOM
TEMPERATURE PLUS
ENOUGH WATER 80º F/
27º C TO EQUAL
OIL 2 TBL 3 TBL
HONEY 2 TSP 1 TBL
SALT 1- ½ TSP 1 TSP
WHOLE WHEAT FLOUR 1- ½ CUPS 2 CUPS
BREAD FLOUR ½ CUP 1 CUP
BROWN RICE FLOUR ¼ CUP
SPELT FLOUR ¼ CUP
BUCKWHEAT FLOUR ¼ CUP
RYE FLOUR ¼ CUP
OATMEAL ¼ CUP
CORNMEAL 2 TBL ¼ CUP
GLUTEN 3 TBL ¼ CUP
1.5 LB 2.0 LB
1
1 CUP + 2 TBL
1- ½ CUPS
1
1
/3 CUP
1
/3 CUP
1
/3 CUP
1
/3 CUP
1
/3 CUP
ACTIVE DRY YEAST 1- ½ TSP 2- ¼ TSP
78
Page 85
Recipes
Two Cheese Bread
Select Whole Wheat cycle.
1 LB 1.5 LB 2 LB
EGG ROOM
TEMPERATURE PLUS
ENOUGH WATER 80º F/
27º C TO EQUAL
OIL 2 TSP 1 TBL 1- ½ TBL
HONEY 1 TSP 2 TSP 1 TBL
SALT 1 TSP 1- ½ TSP 2 TSP
DRY MILK 2 TBL ¼ CUP
WHOLE WHEAT FLOUR ¼ CUP ½ CUP ¾ CUP
BREAD FLOUR 1- ¾ CUP 2- ½ CUPS 3- ¼ CUPS
1
¾ CUP
1
1 CUP
1- ¼ CUPS
1
1
/3 CUP
GRATED CHEDDAR
CHEESE
GRATED PARMESAN
CHEESE
SESAME SEEDS 1 TSP 2 TSP 1 TBL
ACTIVE DRY YEAST 1- ½ TSP 2 TSP 2- ¼ TSP
2/3 CUP 1 CUP 1-
2 TBL 3 TBL ¼ CUP
1
/3 CUPS
79
Page 86
Breadmaker Owner’s Manual
Whole Wheat Zucchini Herb Bread
Select Whole Wheat cycle.
WATER 80º F/27º C ½ CUP ¾ CUP
HONEY 2 TSP 1 TBL
OIL 1 TBL 1- ½TBL
SALT 1 TSP 1 TSP
ZUCCHINI, SHREDDED 1 CUP 1- ½ CUPS
WHOLE WHEAT FLOUR ¾ CUP 1 CUP
BREAD FLOUR 2 CUPS 2- ½ CUPS
BASIL (DRIED) ½ TSP ½ TSP
OR BASIL (FRESH) 1 TSP 1 TSP
SESAME SEEDS 2 TSP 1 TBL
ACTIVE DRY YEAST 2 TSP 2- ¼ TSP
1.5 LB 2 LB
80
Page 87
Yogurt Whole Wheat Bread
Select Whole Wheat cycle.
1.5 LB 2 LB
PLAIN NONFAT YOGURT 80º F/
27º C
WATER 80º F/27º C ¼ CUP ½ CUP
OIL 1 TBL 1- ½ TBL
MAPLE SYRUP 1- ½ TBL 2 TBL
SALT 1 TSP 2 TSP
WHOLE WHEAT FLOUR 1-
BREAD FLOUR 1-2/3 CUPS 2- ½ CUPS
WHEAT GERM 1- ½ TBL 2 TBL
ACTIVE DRY YEAST 2 TSP 2- ¼ TSP
¾ CUP 1 CUP
1
/3 CUPS 1- ½ CUPS
Recipes
81
Page 88
Breadmaker Owner’s Manual
Pumpernickel Bread
Select Whole Wheat cycle.
EGG(S) ROOM
TEMPERATURE PLUS
ENOUGH WATER 80º F/
27º C TO EQUAL
OIL 2 TBL 3 TBL ¼ CUP
HONEY 2 TBL 3 TBL ¼ CUP
DRY MILK 1 TBL 2 TBL 3 TBL
SALT 1 TSP 1- ½ TSP 2 TSP
BREAD FLOUR 1 CUP 1- ½ CUPS 2 CUPS
WHOLE WHEAT FLOUR ½ CUP ¾ CUP 1 CUP
RYE FLOUR ½ CUP 2/3 CUP 1 CUP
CARAWAY SEEDS 1 TBL 2 TBL 3 TBL
INSTANT COFFEE
GRANULES
1 LB 1.5 LB 2 LB
1
¾ CUP + 1 TBL11 CUP + 2 TBL21 CUP + 6 TBL
1 TSP 2 TSP 1 TBL
COCOA POWDER 2 TBL 3 TBL ¼ CUP
ACTIVE DRY YEAST 1- ½ TSP 2 TSP 2- ¼ TSP
82
Page 89
Dairy Whole Wheat Bread
Select Whole Wheat cycle.
1 LB 1.5 LB 2 LB
WATER 80º F/27º
C
MILK 80º F/27º C
COTTAGE
CHEESE 80º F/27º
C
OIL 1- ½ TBL 2- ½ TBL ¼ CUP
HONEY 4 TSP 2 TBL ¼ CUP
SALT 1- ½ TSP 2 TSP 2- ½ TSP
WHOLE WHEAT
FLOUR
BREAD FLOUR 1-
ACTIVE DRY
YEAST
¼ CUP¼ CUP¼ CUP
1
/3 CUP ½ CUP ¾ CUP
3 TBL ¼ CUP
2/3 CUP 1 CUP 1- ¼ CUPS
1
/3 CUPS 2 CUPS 2- ¾ CUPS
1- ½ TSP 2- ¼ TSP 2- ¾ TSP
Recipes
1
/3 CUP
83
Page 90
Breadmaker Owner’s Manual
Hearty Nut Bread
Select Whole Wheat cycle.
WATER 80º F/27º
C
OIL 2 TSP 1 TBL 1- ½ TBL
MOLASSES 3 TBL ¼ CUP
SALT 1 TSP 1- ½ TSP 2 TSP
1 LB 1.5 LB 2 LB
1 CUP 1- ¼ CUPS 1 CUP + 7 TBL
1
/3 CUP
DRY OATMEAL,
QUICK OR
REGULAR
WHOLE WHEAT
FLOUR
BREAD FLOUR 1-
WALNUTS,
CHOPPED
ACTIVE DRY
YEAST
1
/3 CUP ½ CUP 2/3 CUP
2/3 CUP 1 CUP 1-
1
/3 CUPS 2 CUPS 2-2/3 CUPS
2/3 CUP ¾ CUP 1 CUP
1- ¾ TSP 2- ¼ TSP 2- ½ TSP
1
/3 CUPS
84
Page 91
French Bread
Select French cycle.
1 LB 1.5 LB 2 LB
WATER 80º F/27º
C
OIL (OPTIONAL) 1 TBL 1- ½ TBL 2 TBL
SUGAR 1 TBL 1- ½ TBL 2 TBL
SALT 1 TSP 1- ½ TSP 2 TSP
BREAD FLOUR 2- ¼ CUPS 3- ½ CUPS 4 CUPS
ACTIVE DRY
YEAST
¾ CUP + 2 TBL 1 CUP + 2 TBL 1- ½ CUPS
1- ¼ TSP 2 TSP 2- ¼ TSP
Recipes
85
Page 92
Breadmaker Owner’s Manual
Italian Herb Bread
Select French cycle.
WATER 80º F/27º C ½ CUP + 2 TBL 1 CUP + 1 TBL
OIL 1- ½ TBL 2 TBL 3 TBL
SUGAR 1 TBL 3 TBL 3 TBL
SALT 1 TSP 1- ½ TSP 2 TSP
DRY MILK 1 TBL 2 TBL 2 TBL
BREAD FLOUR 2- ¼ CUPS 3 CUPS 4 CUPS
DRIED ITALIAN
SEASONING
ACTIVE DRY YEAST 1- ½ TSP 2 TSP 2- ¼ TSP
1 LB 1.5 LB 2 LB
1- ¼ CUPS + 2
TBL
1 TSP 2 TSP 1 TBL
86
Page 93
Spiced Pumpkin Bread
Select Fruit & Nut cycle.
1 LB 1.5 LB 2 LB
EGG(S) ROOM
TEMPERATURE PLUS
ENOUGH WATER 80º F/
27º C TO EQUAL
OIL 2 TBL 3 TBL ¼ CUP
CANNED PUMPKIN 2/3 CUP 1 CUP 1- ¼ CUP
BROWN SUGAR 2 TBL 3 TBL ¼ CUP
SALT 1 TSP 1- ½ TSP 2 TSP
CLOVES, GROUND ¼ TSP ¼ TSP ¼ TSP
NUTMEG ½ TSP ¾ TSP 1 TSP
CINNAMON 1- ½ TSP 2- ¼ TSP 2- ¾ TSP
BREAD FLOUR 2 CUPS 3 CUPS 4 CUPS
ACTIVE DRY YEAST 1- ½ TSP 2 TSP 2- ¼ TSP
1
¼ CUP
2
½ CUP
Recipes
2
¾ CUP
87
Page 94
Breadmaker Owner’s Manual
Cinnamon Raisin Bread
Select Fruit & Nut cycle.
Press EXTRAS before START.
WATER 80º F/27º C ¾ CUP 1 CUP 1- ¼ CUPS + 2 TBL
OIL 1 TBL 1- ½ TBL 2 TBL
BROWN SUGAR 1- ½ TBL 2- ½ TBL 3 TBL
SALT 1 TSP 1- ½ TSP 2 TSP
DRY MILK 1 TBL 1- ½ TBL 2 TBL
CINNAMON 1 TSP 2 TSP 1 TBL
BREAD FLOUR 2- ¼ CUPS 3 CUPS 4 CUPS
1 LB 1.5 LB 2 LB
WALNUTS,
CHOPPED
ACTIVE DRY YEAST 1- ½ TSP 2 TSP 2- ¼ TSP
RAISINS
1
/3 CUP ½ CUP 2/3 CUP
ADD TO DISPENSER:
1
/3 CUP ½ CUP 2/3 CUP
88
Page 95
Recipes
Crunchy Cracked Wheat Bread
Method
1. Add cracked wheat to heat-proof bowl. Pour in boiling
water, stirring to prevent lumps.
2. Let the mixture stand for 20 minutes (to 80º F/27º C). Stir,
pour it into the bread pan, and add the rest of the ingredients in order given.
Select Fruit & Nut cycle.
1 LB 1.5 LB 2 LB
WATER, BOILING 1 CUP 1- ½ CUPS 1- ¾ CUPS
CRACKED WHEAT ½ CUP ¾ CUP 1 CUP
OIL 1- ½ TBL 2 TBL 3 TBL
SUGAR 4 TSP 2 TBL 3 TBL
SALT 1 TSP 1- ½ TSP 2- ½ TSP
BREAD FLOUR 2 CUPS 3 CUPS 4 CUPS
ACTIVE DRY
YEAST
1- ½ TSP 2 TSP 2- ¼ TSP
89
Page 96
Breadmaker Owner’s Manual
Soy Herb Bread
For best results select LIGHT crust control.
Select Fruit & Nut cycle.
WATER 80º F/27º C 1- ¼ CUPS
OIL 2 TBL
SUGAR 3 TBL
SALT 1- ½ TSP
DRY MILK 1 TBL
DRIED DILL WEED 1 TSP
GARLIC SALT ½ TSP
DRY MUSTARD ½ TSP
DRIED BASIL ¼ TSP
DRIED OREGANO ¼ TSP
1.5 LB
BREAD FLOUR 2- ¾ CUPS
SOY FLOUR ½ CUP
ACTIVE DRY YEAST 1- ½ TSP
90
Page 97
Sweet Walnut Bread
Select Fruit & Nut cycle.
Select EXTRAS before START
1 LB 1.5 LB 2 LB
WATER 80º F/27º
C
OIL 1 TBL 1- ½ TBL 2 TBL
SUGAR 1- ½ TBL 2 TBL + 1 TSP 3 TBL
SALT 1 TSP 1- ½ TSP 2 TSP
DRY MILK 1 TBL 1- ½ TBL 2 TBL
BREAD FLOUR 2 CUPS 3 CUPS 4 CUPS
ACTIVE DRY
YEAST
WALNUTS,
CHOPPED
¾ CUP 1 CUP 1- ½ CUPS
1- ½ TSP 2 TSP 2- ¼ TSP
ADD TO DISPENSER:
1
/3 CUP ½ CUP 2/3 CUP
Recipes
91
Page 98
Breadmaker Owner’s Manual
White Wheat Bread
Select Fruit & Nut cycle.
Select EXTRAS before START
WATER 80º F/27º
C
OIL 1 TBL 1- ½ TBL 2 TBL
SUGAR 2 TBL 3 TBL ¼ CUP
SALT 1 TSP 1- ½ TSP 2 TSP
DRY MILK 1 TBL 1- ½ TBL 2 TBL
BREAD FLOUR 1- ¾ CUPS 2-2/3 CUPS 3- ½ CUPS
WHOLE WHEAT
FLOUR
1 LB 1.5 LB 2 LB
¾ CUP 1 CUP + 2 TBL 1- ¼ CUPS + 2 TBL
1
¼ CUP
/3 CUP ½ CUP
ACTIVE DRY
YEAST
SUNFLOWER
SEEDS (KERNELS)
1- ½ TSP 2 TSP 2- ¼ TSP
ADD TO DISPENSER:
2 TBL 3 TBL ¼ CUP
92
Page 99
Recipes
Dried Fruit Bread
Select Fruit & Nut cycle.
Select EXTRAS before START
1 LB 1.5 LB 2 LB
WATER 80º F/27º
C
OIL 2- ½ TBL 3 TBL ¼ CUP
BROWN SUGAR 1- ½ TBL 2- ½ TBL ¼ CUP
SALT 1 TSP 1- ½ TSP 2 TSP
DRY MILK 1 TBL 1- ½ TBL 2- ½ TBL
BREAD FLOUR 2- ¼ CUPS 3 CUPS 4 CUPS
NUTMEG ½ TSP 1 TSP 1- ¼ TSP
¾ CUP 1 CUP + 1 TBL 1- ¼ CUPS
ACTIVE DRY
YEAST
DRIED FRUIT
1- ¼ TSP 2 TSP 2- ¼ TSP
ADD TO DISPENSER:
1
/3 CUP ½ CUP
2
93
/3 CUP
Page 100
Breadmaker Owner’s Manual
Trail Mix Bread
Select Fruit & Nut cycle.
Select EXTRAS before START
WATER 80º F/27º C ¾ CUP 1- ¼ CUPS 1- ½ CUPS
OIL 2 TBL 3 TBL ¼ CUP
HONEY 2 TBL 3 TBL ¼ CUP
SALT 1 TSP 1- ½ TSP 2 TSP
BREAD FLOUR 2 CUPS 3 CUPS 4 CUPS
ACTIVE DRY YEAST 1- ½ TSP 2 TSP 2- ¼ TSP
1 LB 1.5 LB 2 LB
ADD TO DISPENSER:
FRUIT AND NUT TRAIL
MIX
1
/3 CUP ½ CUP
94
2
/3 CUP
 Loading...