

Page 1
INSTRUCTION
Page 2
FOR SAFETY
Followings are the safety instructions & rules. Prior to using the safe,
please read the instructions carefully.
Cautions when placing the safe.
The safe is so heavy that it is to be handled very carefully.
Never move the safe in door open.
Place the safe on flat floor.
Cautions when using the safe.
Be careful not to close the door roughly.
Be careful not to hurt hands or fingers when closing door.
As a safe is heavy and operated with a smart digital lock, we
recommend children not to touch it.
This fire safe is for storing paper documents, not for data media.
Data media such as CDs or Diskettes are to be stored in data safes.
High value items such as cash or jewelries must be stored in certified
security safes.
Be careful not to forget the user code, and keep the instruction
outside of the safe.
2
Page 3
Overview
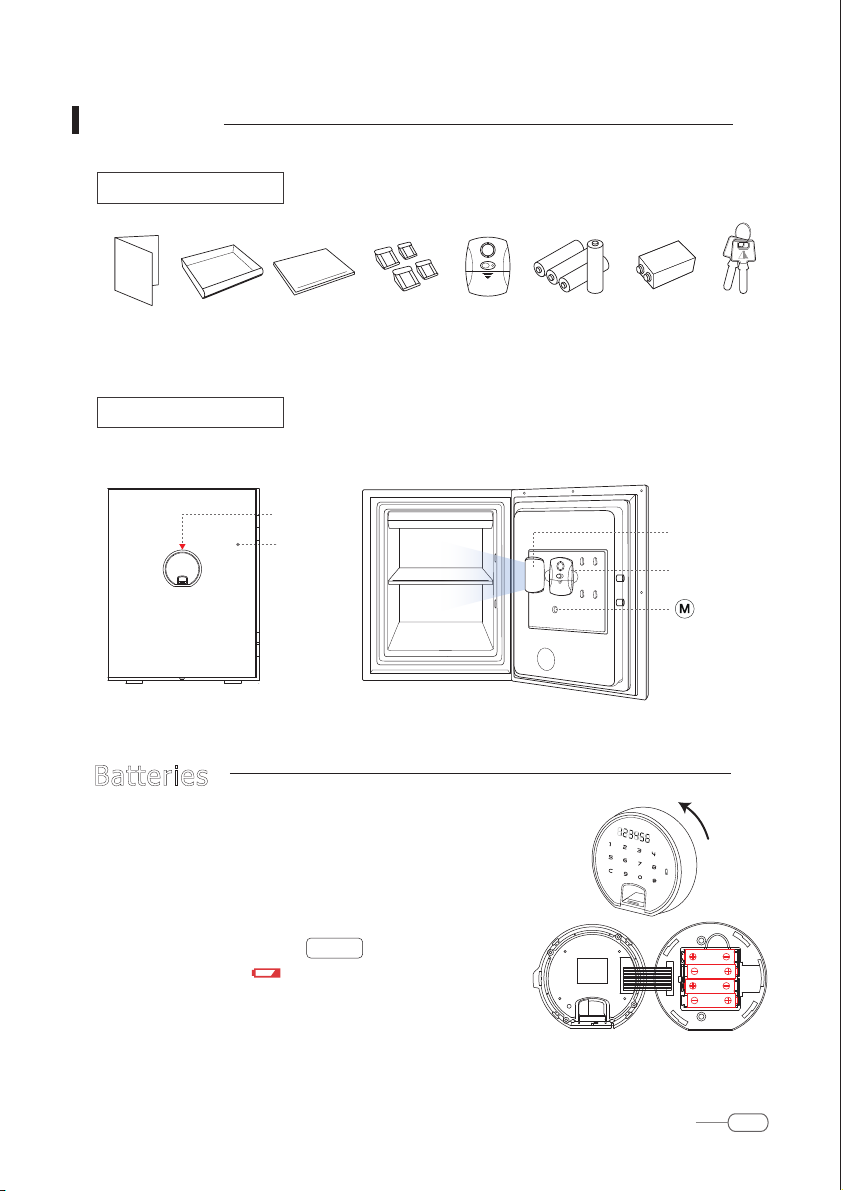
Components
Instruction
Drawer Shelf
Shelf Clips
(4pcs)
(Optional)
Nomenclature
Front Interior
Digital Lock
Door Panel
1.
Batteries
Prior to using safe,
1) Hold digital lock and turn it counter-clockwise to open.
2) Load 4pcs of AA Alkaline batteries.
(LED flickers, Bi Bi Bi sound, Melody rings 1 second)
Alarm
1.5V Alkaline
AA Batteries
(4pcs)
9V Battery
for Alarm
(Optional)
LED Light
Optional Alarm
Override
Key
(Optional)
Memory Button
In following cases, the batteries must be replaced.
1 ) When touching the pad, LobAtt appears on FND.
2) The battery icon alights on the pad.
Battery life span : 1 year (
*
Even though batteries completely exhausted,
*
the registered codes and finger-prints are not erased.
Average openings 3 times a day
)
BEYOND User Manual
3
Page 4
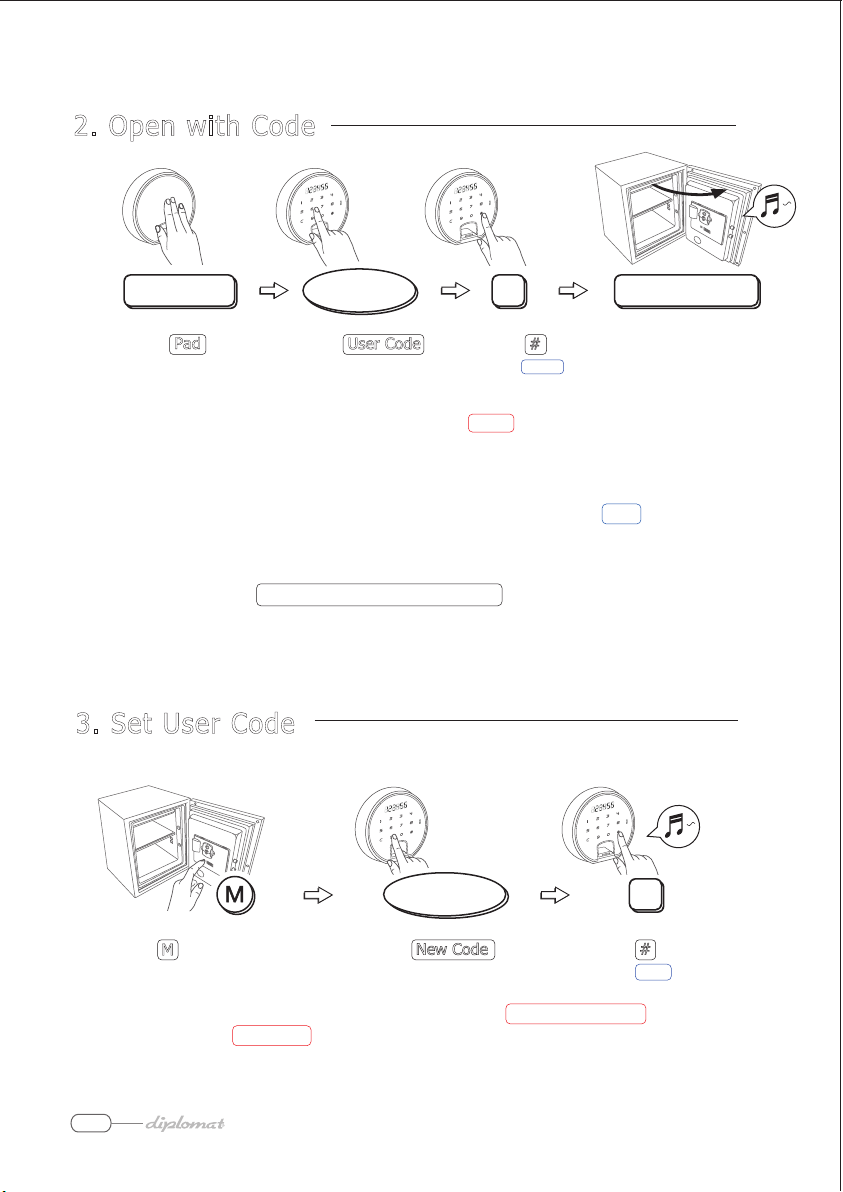
2. Open with Code
Touch Pad Open the Door
1 ) Touch Pad
(
Bi sound, Pad lighted
NOTE : If a wrong code entered, bi-ric sound and ErrOr on FND.
*
Paralysis : If wrong codes entered 5 times, the lolck gets paralyzed 5 minutes.
*
1) No response against pad touch.
2)
In case of paralysis rest time 4 minutes and 29 seconds, 4_29 indicated on FND.
3) After 5 minutes, paralysis gets released.
Scramble Numbers :
*
before and/or after the real code to avoid peeps. User code should be
touched consecutively.
)
Paralysis Rest Time is indicated on FND as Min-Sec.
(Ex) In case of user code ‘ 1 2 3 4 ’, touch ‘ xxx1234 ’, ‘ 1234xxx ’ or ‘ xxx1234xxx ’.
User Code
2 ) Touch User Code
(
)
Bi sound
(
Factory Code 1 2 3 4
When opening a safe, scramble numbers can be put
)
#
3 ) Touch # 4 ) Open the door
(
Melody, OPEnd on FND
)
32 numbers are acceptable including the real code.
3. Set User Code
Keep door open.
New Code
1 )
Press
M
Button on door back.
(
)
Bi sound
NOTE : 1) Prior to closing the door, please confirm with 2. Open with Code
*
if the New Code registered correctly.
2) It is not recommended to enter the specific user code such as telephone number,
birthday, consecutive number, and etc. for security reasons.
4
2 ) Enter New Code
(
4 ~16 digits
)
3) Touch #
#
(Melody, good on FND
)
Page 5
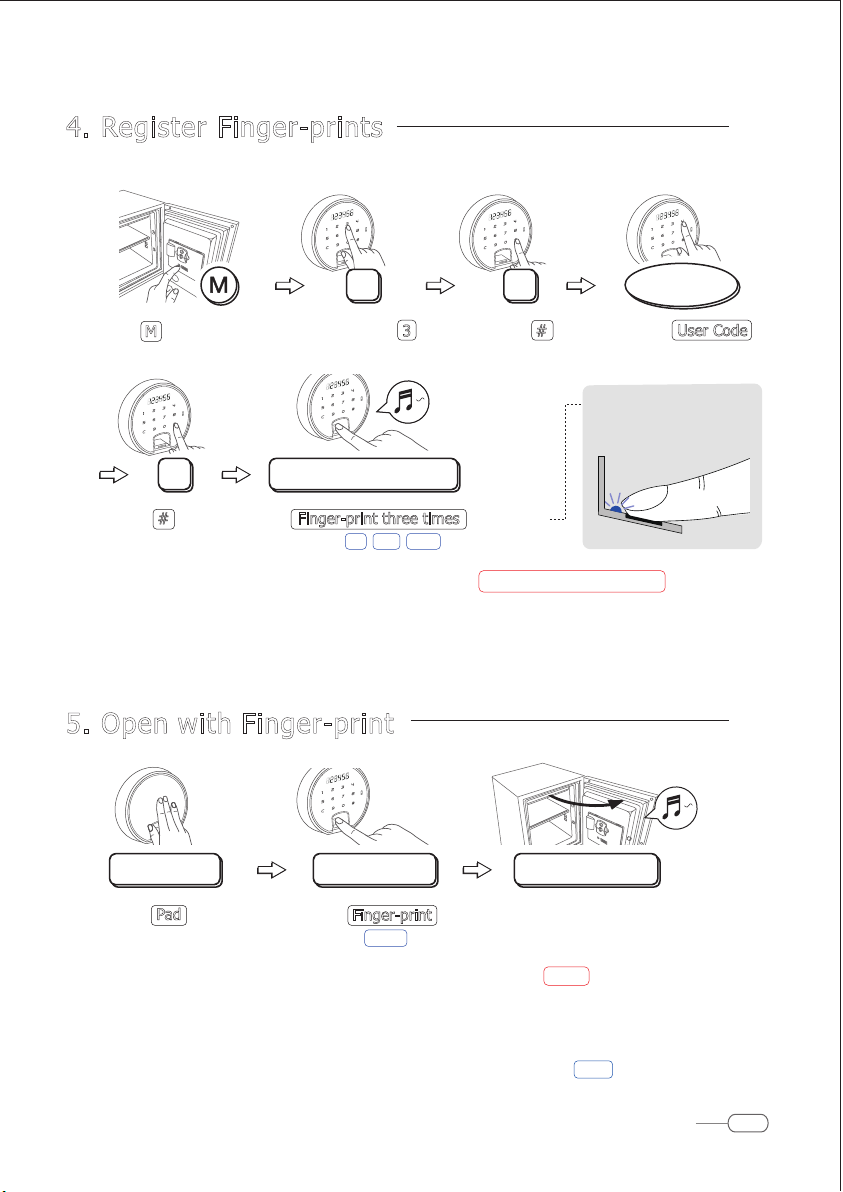
4. Register Finger-prints
Keep door open.
3
1 )
Press
M
Button on door back.
(
)
Bi sound
#
5) Touch #
(
Blue light flickers
NOTE : 1) Prior to closing the door, please confirm with 5. Open with Finger-print if the finger-print
*
correctly registered.
2) Worn-out finger-print can’t be entered.
32 finger-prints are acceptable.
*
6) Put Finger-print three times
(
)
2) Touch 3
(
)
Bi sound
Finger-print 3 times
Melody rings, 1st , 2nd , good on FND
#
3) Touch #
(
Bi sound
on sensor.
)
)
User Code
4) Touch User Code
(
)
Bi sound
Please put user’s finger
on sensor while
blue lamp flickering,
5. Open with Finger-print
Touch Pad Finger-print
1 ) Touch Pad
(
Bi sound, Blue light flickers
NOTE : If a unregistered finger-print entered, bi-bi-bi sound and ErrOr on FND.
*
Paralysis : If unregistered finger-prints entered 5 times, the lolck gets paralyzed 5 minutes.
*
1) No response against pad touch.
2)
In case of paralysis rest time 4 minutes and 29 seconds, 4_29 indicated on FND.
3) After 5 minutes, paralysis gets released.
Paralysis Rest Time is indicated on FND as Min-Sec.
2) Put Finger-print on sensor 3)
)
(
Melody, OPEnd on FND
)
Open the Door
Open the door
BEYOND User Manual
5
Page 6
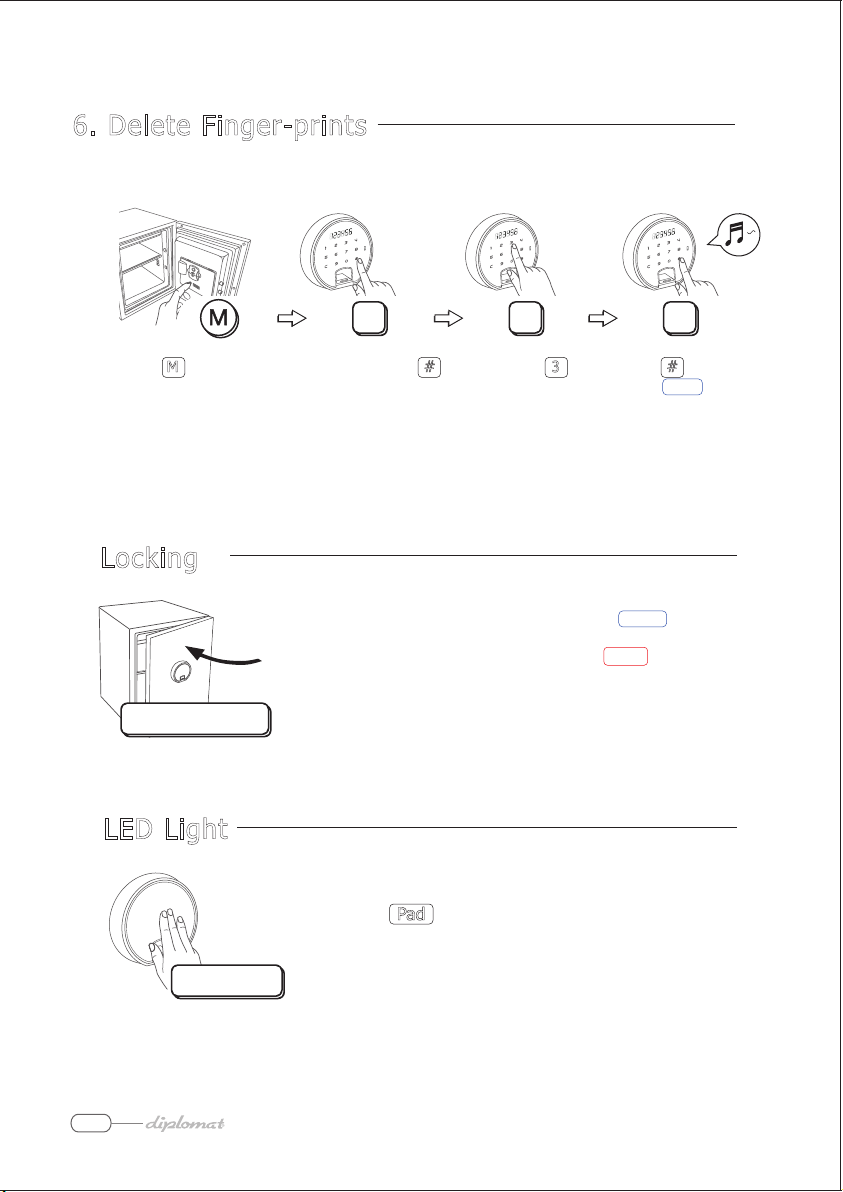
6. Delete Finger-prints
Keep door open.
# #3
1 )
Press
M
(
If one finger-print is removed, all the registered finger-prints are erased simultaneously.
*
7.
Locking
Button on door back.
)
Bi sound
2 ) Touch #
(
Bi sound
3 ) Touch
)
3
4) Touch #
(
Melody, CLEAr on FND
.
)
Close the Door
8.
LED Light
6
Touch Pad
Close the door. Door locks automatically.
If door is unlocked when closed the door, Error sign on FND
*
and sounding Bi Bi Bi Bi.
LED turns on 15 seconds.
When touch
Pad
, LED turns on 15 seconds again.
(
CLOSEd on FND
)
Page 7
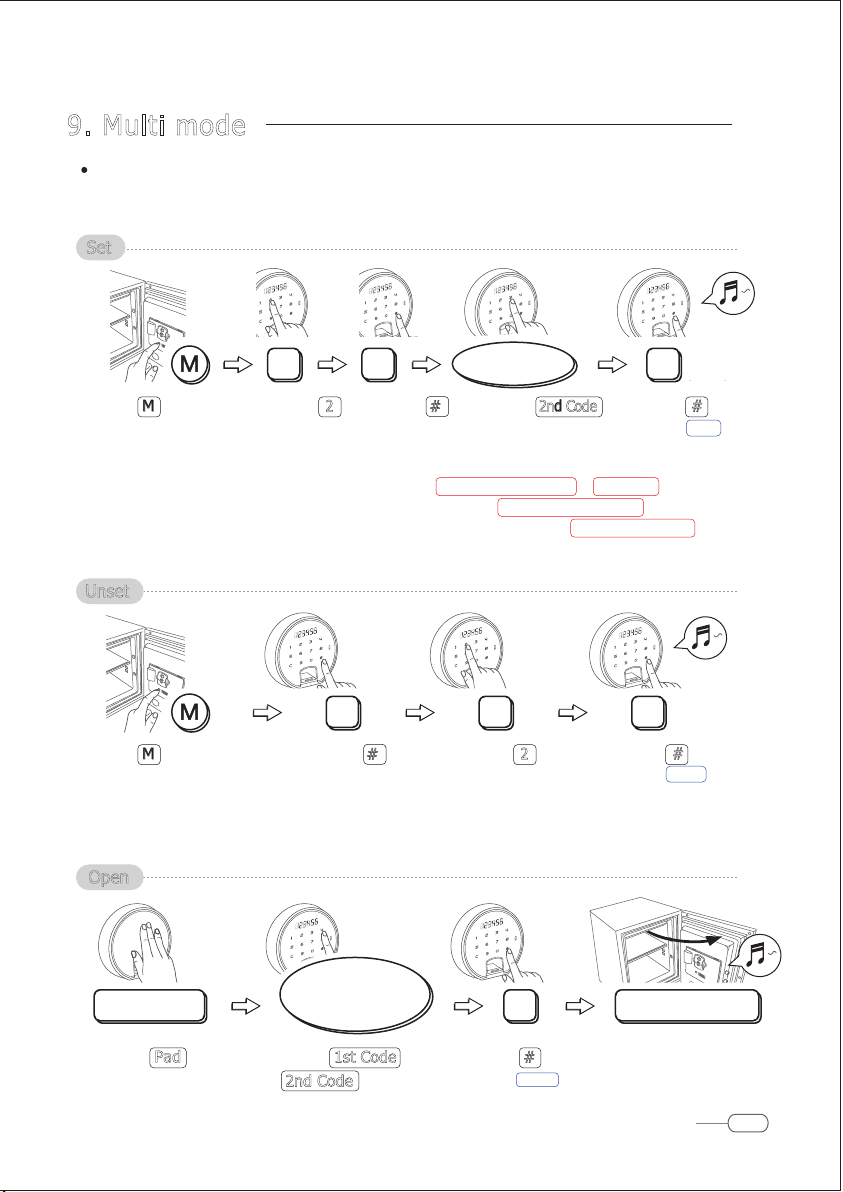
9. Multi mode
ㆍ Two users can independently open safe with each other’s own user code.
* Multi mode and dual mode can not be used simultaneously.
Set
)
2nd Code
4) Enter
2nd Code
(
4 ~16 digits
)
5) Touch #
(
Melody, good on FND
2 ##
1 )
Press
M
Button on
door back.
NOTE : 1) 2nd user code must be different from 1st code.
*
2)
3) 2nd code can be changed in the same way as 9. Multi mode ▶ Set .
4) For setting or changing 1st code, please do as shown in 3. Set User Code .
(
Bi sound
Prior to closing door, confirm as shown in 9. Multi mode▶Open if 2nd Code registered correctly.
2) Touch
) (
Bi sound
2
3 ) Touch #
) (
Bi sound
Unset
2 ##
1 )
Press
M
Button on
(
) (
door back.
NOTE : If multi mode unsets, 2nd code is removed automatically. 1st code cannot be removed.
*
Bi sound
2) Touch #
Bi sound
)
3) Touch
Bi sound
2
)(
Open
4) Touch #
(
Melody, CLEAr on FND
)
)
Touch Pad
1 ) Touch Pad
(
Bi sound, Pad lighted
1st Code
2nd Code
2 ) Touch 1st Code or
)
2nd Code
or
(
Bi sound
#
3 ) Touch # 4 ) Open the door
) (
Melody, OPEnd on FND
Open the Door
)
BEYOND User Manual
7
Page 8
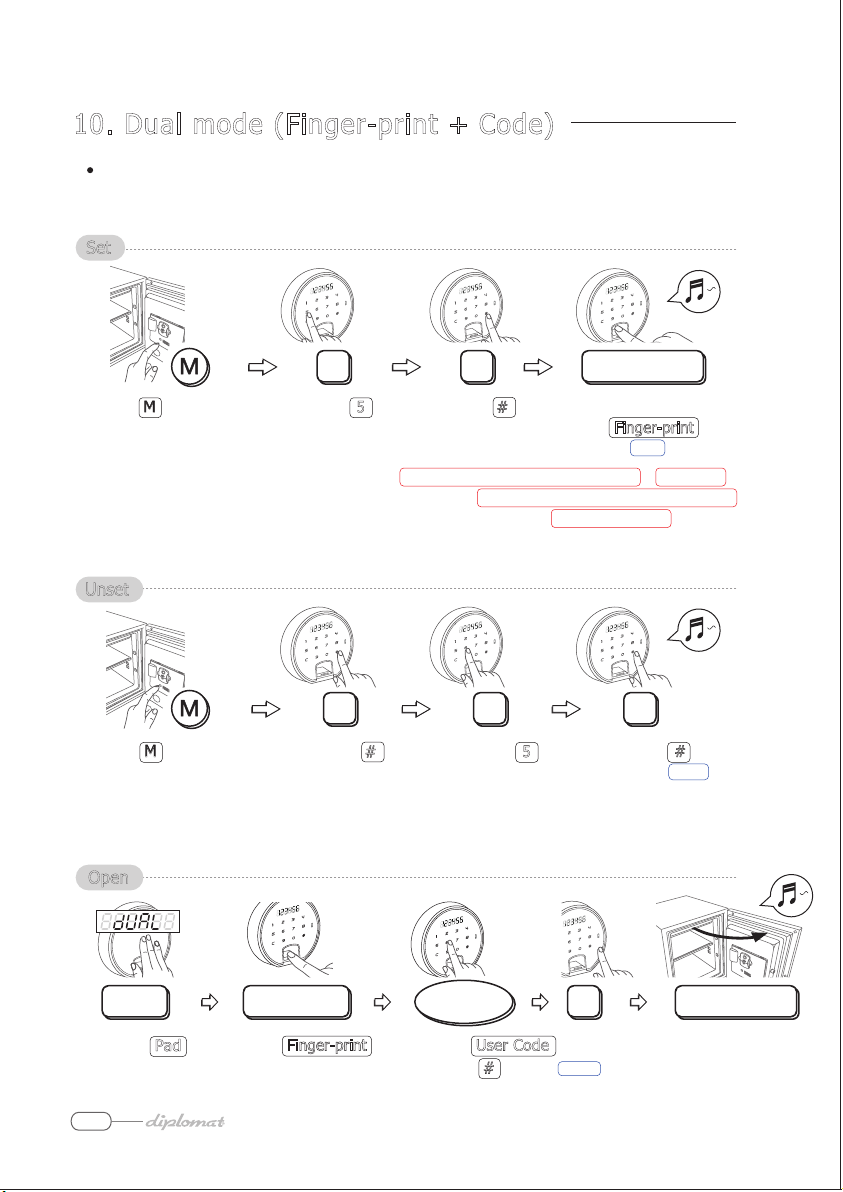
10. Dual mode (Finger-print + Code)
ㆍ Code and finger-print should be entered in a row for opening.
* Dual mode and multi mode can not be used simultaneously.
Set
1 )
Press
M
door back.
NOTE : 1)
*
2)
3)
Unset
1 )
Press
M
door back.
NOTE :
*
If dual mode unsets, registered finger-print is removed automatically. User code cannot be removed.
Open
5 #
Button on
(
Bi sound
Prior to closing door, confirm as shown in 10. Dual mode (Finger-print+ Code)▶Open if Finger-print registered correctly.
Finger-print can be changed in the same way as 10. Dual mode (Finger-print +Code)▶ Set .
For setting or changing user code, please do as shown in 3. Set User Code .
2) Touch
) (
Bi sound
5
) (
3 ) Touch #
Bi sound
)
Finger-print
4)
If there is no registered fingerprint
put
Finger-print on sensor
(
Melody, good on FND
)
5 ##
Button on
(
Bi sound
) (
2) Touch #
Bi sound
)
3) Touch
Bi sound
5
)(
4) Touch #
(
Melody, CLEAr on FND
)
Pad
1 ) Touch Pad
(
Bi sound, Pad lighted
8
Finger-print
2 )
Put Finger-print
on sensor
)
(
Melody
3 )
)
4 ) Touch #
User Code
Touch
User Code
#
(
Melody, OPEnd on FND
Open the Door
5 ) Open the door
)
Page 9
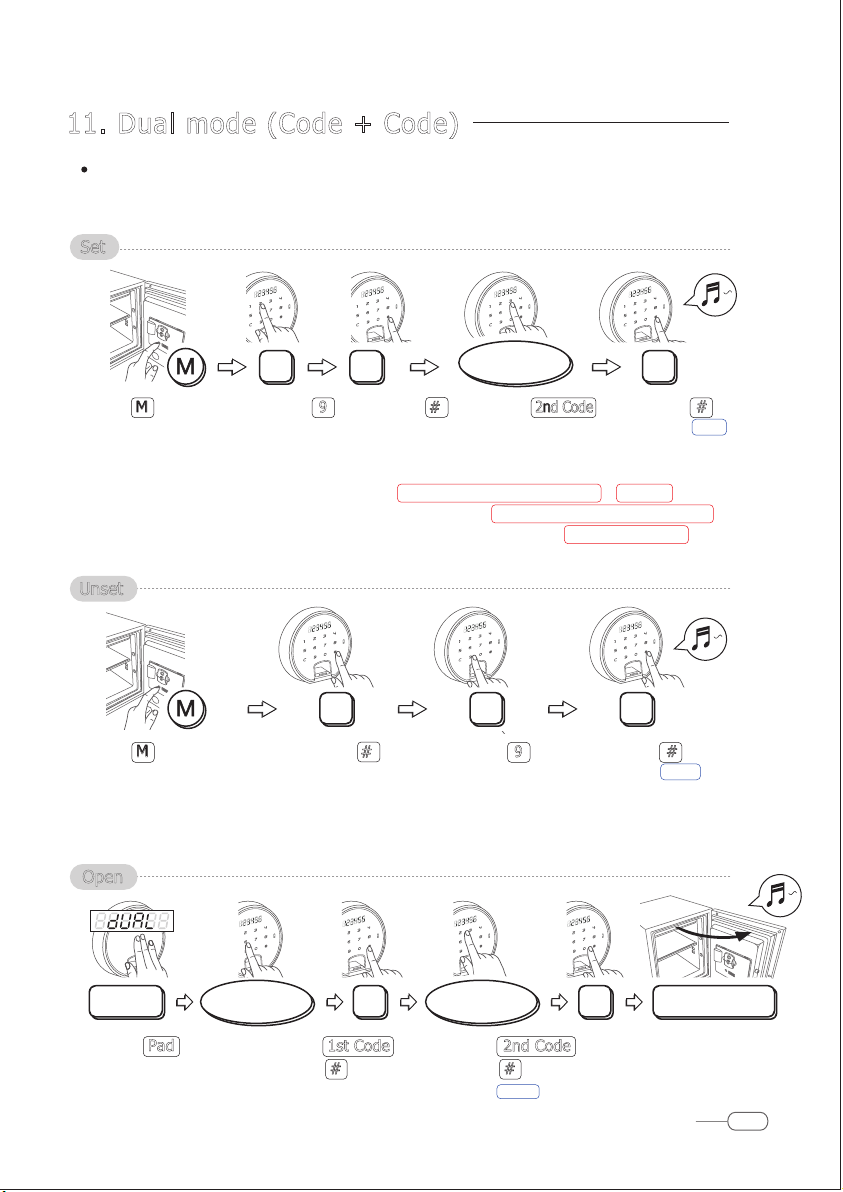
11. Dual mode (Code + Code)
ㆍ Two different codes should be entered in a row for opening.
* Dual mode and multi mode can not be used simultaneously.
Set
2nd
9 ##
1 )
Press
M
Button on
(
door back.
NOTE : 1) 2nd code must be different from 1st code.
*
2)
3) 2nd code can be changed in the same way as
4) For setting or changing 1st code, please do as shown in 3. Set User Code .
Bi sound
Prior to closing door, confirm as shown in 11. Dual mode (Code+Code)▶Open if 2nd Code registered correctly.
Unset
2) Touch
) (
Bi sound
9
3 ) Touch #
) (
Bi sound
)
Code
4) Enter
2nd Code
(
4 ~16 digits
11. Dual mode (Code+Code)▶ Set .
)
5) Touch #
(
Melody, good on FND
)
9 ##
1 )
Press
M
Button on
(
) (
door back.
NOTE : If dual mode unsets, 2nd code is removed automatically. 1st code cannot be removed.
*
Bi sound
2) Touch #
Bi sound
)
3) Touch
Bi sound
9
)(
Open
Pad
1 ) Touch Pad
(
Bi sound, Pad lighted
1st Code
2 ) Touch 1st Code
)
3 ) Touch #
2nd
Code
4 ) Touch 2nd Code
5 ) Touch #
(
Melody, OPEnd on FND
4) Touch #
(
Melody, CLEAr on FND
##
)
BEYOND User Manual
Open the Door
6 ) Open the door
)
9
Page 10
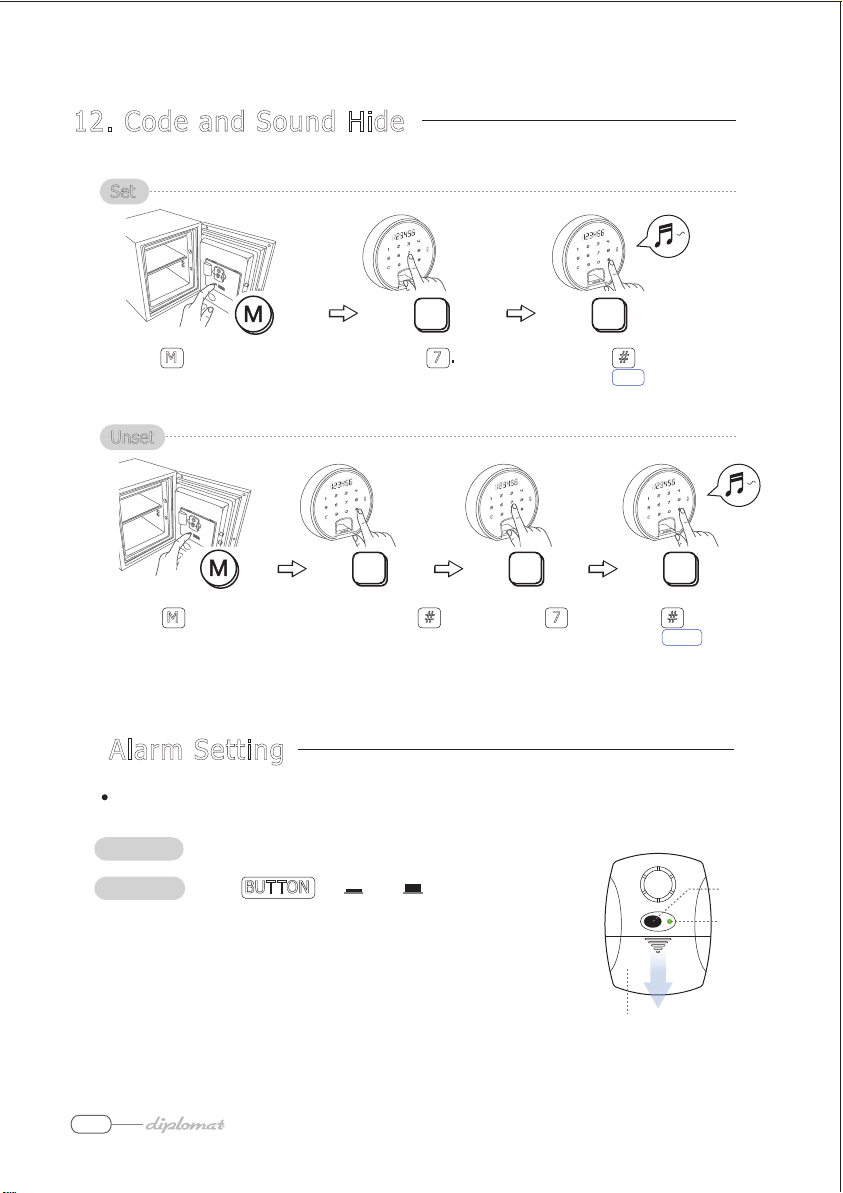
12. Code and Sound Hide
Set
7
1 )
Press
M
(
Bi sound
Button on door back.
) (
2 ) Touch
Bi sound
Unset
# #7
1 )
Press
M
(
13.
Alarm Setting
ㆍ
Once safe is shocked or tilted, alarm horns immediately.
Installing
Set / Unset
Button on door back.
)
Bi sound
Place alarm loaded with 9V battery on doorback.
Press
BUTTON
(LED turns on/off, 10 seconds required)
2 ) Touch #
(
Bi sound
(
On / Off
)
)
7 .
)
3 ) Touch
#
3 ) Touch #
(
Melody, Hide on FND
7
4) Touch #
(
Melody, CLEAr on FND
)
)
Button
LED Light
In following cases, 9V battery must be replaced.
*
- If alarm horns more than 1 hour
- When LED light is not bright enough
Battery life span : 1year (in alarm setting)
*
10
Battery Housing Cover
Push down to open.
Page 11
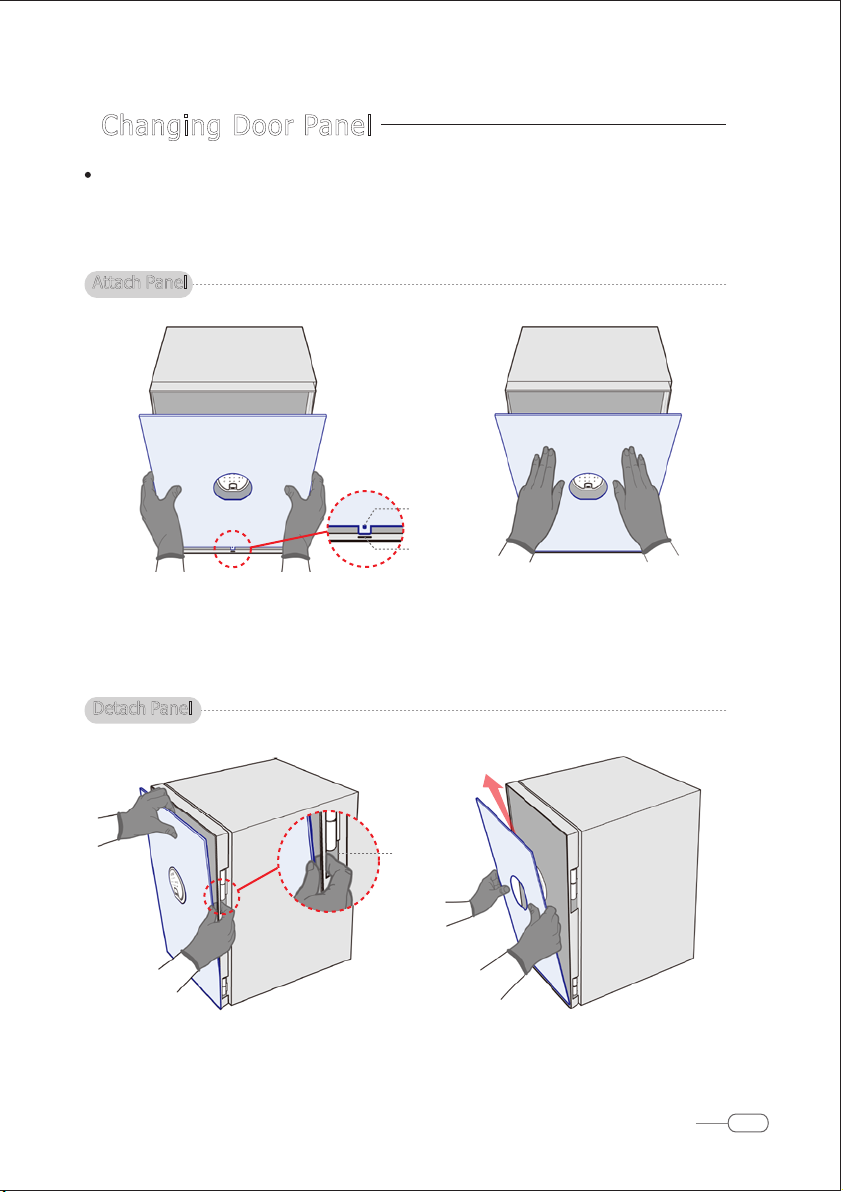
13.
Changing Door Panel
When changing panel, fingers may squeeze in between panel and door frame.
Therefore, when replacing panel with new one, please to wear gloves.
Attach Panel
Position
Guide
Fixing
Hole
1) Hold and adjust panel to let position guide
go down to fixing hole.
Detach Panel
Hinge
Hole
1) Put finger into hinge hole on upper right side of
door frame and push panel outward to detach.
2) Attach panel inside door frame.
2) Lift it up to
detach.
BEYOND User Manual
11
Page 12
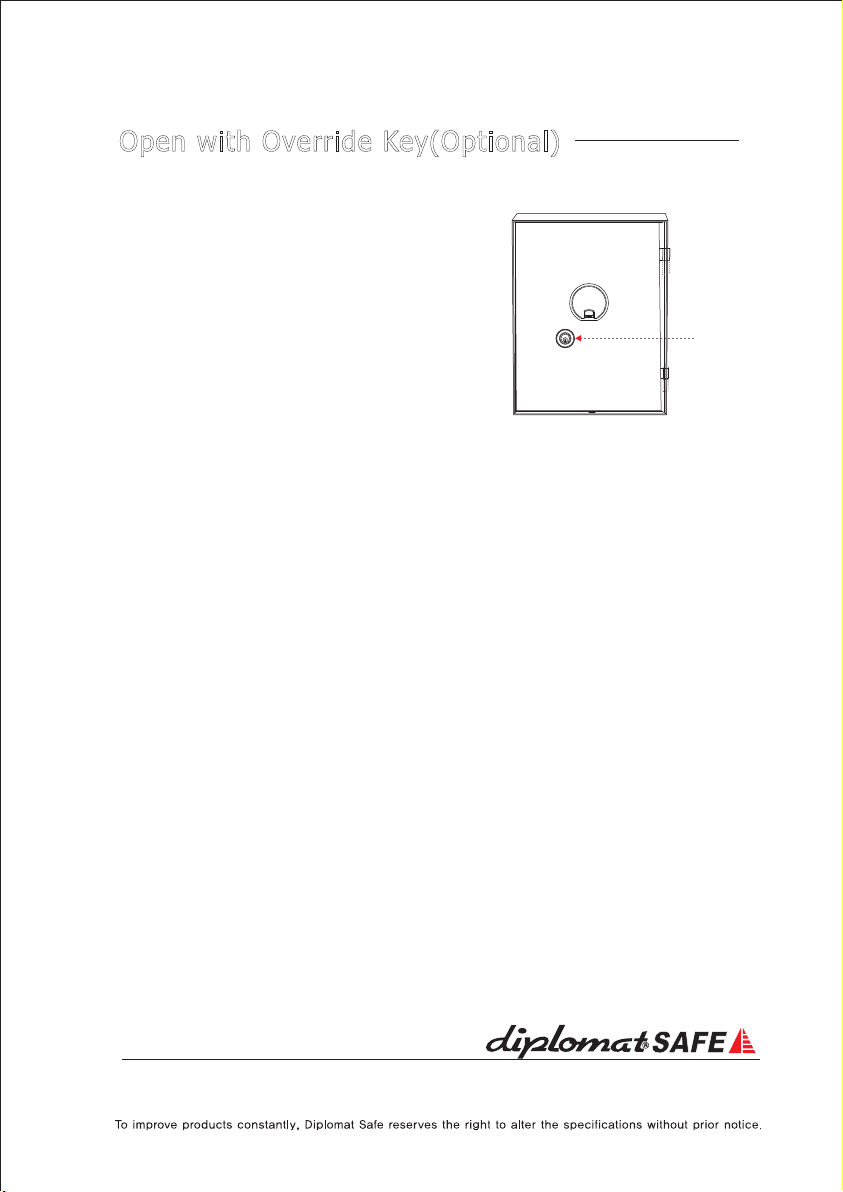
14.
Open with Override Key(Optional)
If you forget your code, you may open your safe
using override key.
1) Detach Panel. (See previous page.)
Then you can find the key hole.
2) Turn override key clockwise and open the door.
Please keep override key apart from your safe.
*
Door(without Panel)
Key Hole
19 NoksanSandan 261Ro 60Gil Gangseo-gu Busan, Korea TEL (82 51) 831- 4400 FAX (82 51) 831-4409
Printed in Korea, June 20, 2019
 Loading...